Article

Review of a Custom-Designed Optical Sensing System for Aero-Engine Applications

1
Department of Communications Engineering, University of the Basque Country UPV/EHU, Ingeniero Torres Quevedo Plaza 1, E-48013 Bilbao, Basque Country, Spain
2
AOTECH (Advanced Optical Technologies S.L.), B° Altamira 14, 5° D, E-48002 Bilbao, Basque Country, Spain
*
Author to whom correspondence should be addressed.
Int. J. Turbomach. Propuls. Power 2021, 6(1), 3; https://doi.org/10.3390/ijtpp6010003
Submission received: 18 March 2020 / Revised: 19 January 2021 / Accepted: 18 February 2021 / Published: 25 February 2021

Abstract

:
Fibre bundle-based reflective optical sensors are good candidates for parameter monitorisation in aero engines. Tip clearance is one of those parameters of great concern that is necessary to monitor. Within this optical technology, the evolution experienced by a custom-designed optical sensor is presented from its first configuration up to the fifth one. The performance of the last configuration is compared with those of other two optical sensors that are also based on a fibre bundle design. The comparison has been carried out in an experimental program in a transonic wind tunnel for aero engines. The proven high resolution and sensitivity of the last configuration of the optical sensor opens up the possibility to detect blade defects, cracks, etc. that could otherwise be hard to track.

1. Introduction

Among the various parameters of interest in gas turbines, blade tip clearance (BTC) is one of the most important as it affects their performance, safety and stability. Defined as the air gap between the most prominent part of any of the blades and the inner part of the casing, its value is related to engine efficiency and fuel consumption. High BTC values allow an amount of air to flow without generating useful work, whereas small values of it accelerate blade tip wear over time and put engine integrity at risk [1]. For noncontact clearance measurements in gas turbines, there exist several technologies such as eddy current sensors [2,3,4,5,6,7], capacity sensors [8,9,10], microwave sensors [11,12,13] and optical sensors [14,15,16]. Among the latter, fibre-based reflective optical sensors offer a trade-off between high performance and implementation simplicity. The present contribution aims to present the latest performance achievements of a fibre-based reflective optical sensor that demonstrates an upgrade from previous configurations of it [17,18]. More specifically, after presenting the general design and working principle of the optical sensor, we will show the most representative results obtained from several test programs carried out in a wind tunnel commonly used for turbine testing. We will put an emphasis on BTC, but the presented results may bring inspiration for other gas turbine applications.

2. Materials and Methods

Although sensors based on other technologies may bring higher accuracy, the fibre-based reflective optical sensor presented in this contribution has very important advantages such as simplicity, robustness, low cost and high bandwidth. More specifically, this sensor corresponds to the fifth configuration of the optical sensors that evolved from an initial basic configuration. That initial basic configuration consists of a central multimode glass fibre emitting light from a laser diode, and around it a set of multimode receiving glass fibres in a ring-like arrangement to collect part of the reflected light and convert it into a photocurrent using a single photodetector. Both emitting and receiving fibres were packed in a single fibre bundle. In this initial conceptual configuration, as the distance is correlated with the light intensity received by the sensor, any undesired power change in the light emitting source leads to an incorrect measurement of the distance to the target. To avoid this behaviour, the first configuration included a second concentric ring of receiving fibres (an outer ring or Ring 2) connected to another photodetector whose gain was set to the same value as that corresponding to the photodetector connected to the first concentric ring (the inner ring or Ring 1). Such a configuration allowed us to divide the received light intensities of both rings such that the effect of any change in the power of the light emitting source was ideally cancelled, and therefore the quotient was directly related to the distance to the target [6,19,20]. It is straightforward to prove this immunity to light fluctuations if we take the optical irradiance on each photodetector as:
I 1 = K 0 R I 0 K 1 F 1 ( d ) ,   and   I 2 = K 0 R I 0 K 2 F 2 ( d ) ,
where I0 is the light coming out of the emitting fibre, R is the reflectivity of the target, K1 and K2 stand for the fibre losses, and K0 includes the laser fluctuations. By dividing both optical irradiances, any effect of the light source will be cancelled, as well as the other common factors. Thus:
I 2 / I 1 = K 2 F 2 ( d ) / K 1 F 1 ( d )
However, there were spatial resolution problems that arose from the use of a narrowband light source combined with a relatively short length of multimode fibre bundle, preventing the equilibrium mode distribution from occurring [21]. The multiple modes propagating through the fibre interfere with each other creating at the exit of the sensor head a kind of speckle pattern [22]. The pattern is highly sensitive to several parameters such as the frequency of the laser source, mechanical deformation of the fibre and temperature, thus affecting to the overall performance of the sensor [23].
Therefore, in order to overcome the aforementioned issue related to the speckle pattern, the second configuration of the sensor included a mode scrambler that made the light power distribution uniform at the expense of decreasing the light intensity collected by the receiving fibres. Moreover, in order to maximise the sensitivity of the calibration curve, the second configuration of the sensor also used photodetectors whose gain was set to different values. With the aim of reducing the bundle cost, we built a third configuration of the sensor with characteristics similar to the first configuration of the sensor, but using plastic optical fibres instead of their glass counterparts. Some tests were performed to prove this concept, but constraints in the maximum working temperature for plastic optical fibres made this configuration inadequate for real engines and limited their use to moderate temperature conditions. Both problems, i.e. the modal noise and the power losses [24], were addressed in the following fourth and fifth configurations of the sensor by replacing the central multimode emitting fibre with a single-mode fibre [25,26]. In addition to that, in the fifth sensor configuration, the outer ring fibres were replaced by fibres of larger core diameter, and the outer ring diameter was also made larger. This geometrical and optical upgrade of the bundle design was aimed at customising the working distance of the optical probe to larger distance values. More details about this will be given later on in this section. One additional improvement of the fifth configuration of the sensor arises from having three or more rings available, a fact that makes possible the use of the sensor for different purposes at the same time. For example, we might use two rings to measure the BTC, and another spare ring to measure blade arrival times for the tip timing measurement. Furthermore, by having three or more rings at our disposal, we might use a different pair of ring combinations to measure the tip clearance for different working distances. A summary of the most relevant characteristics of the different configurations is shown in Table 1.
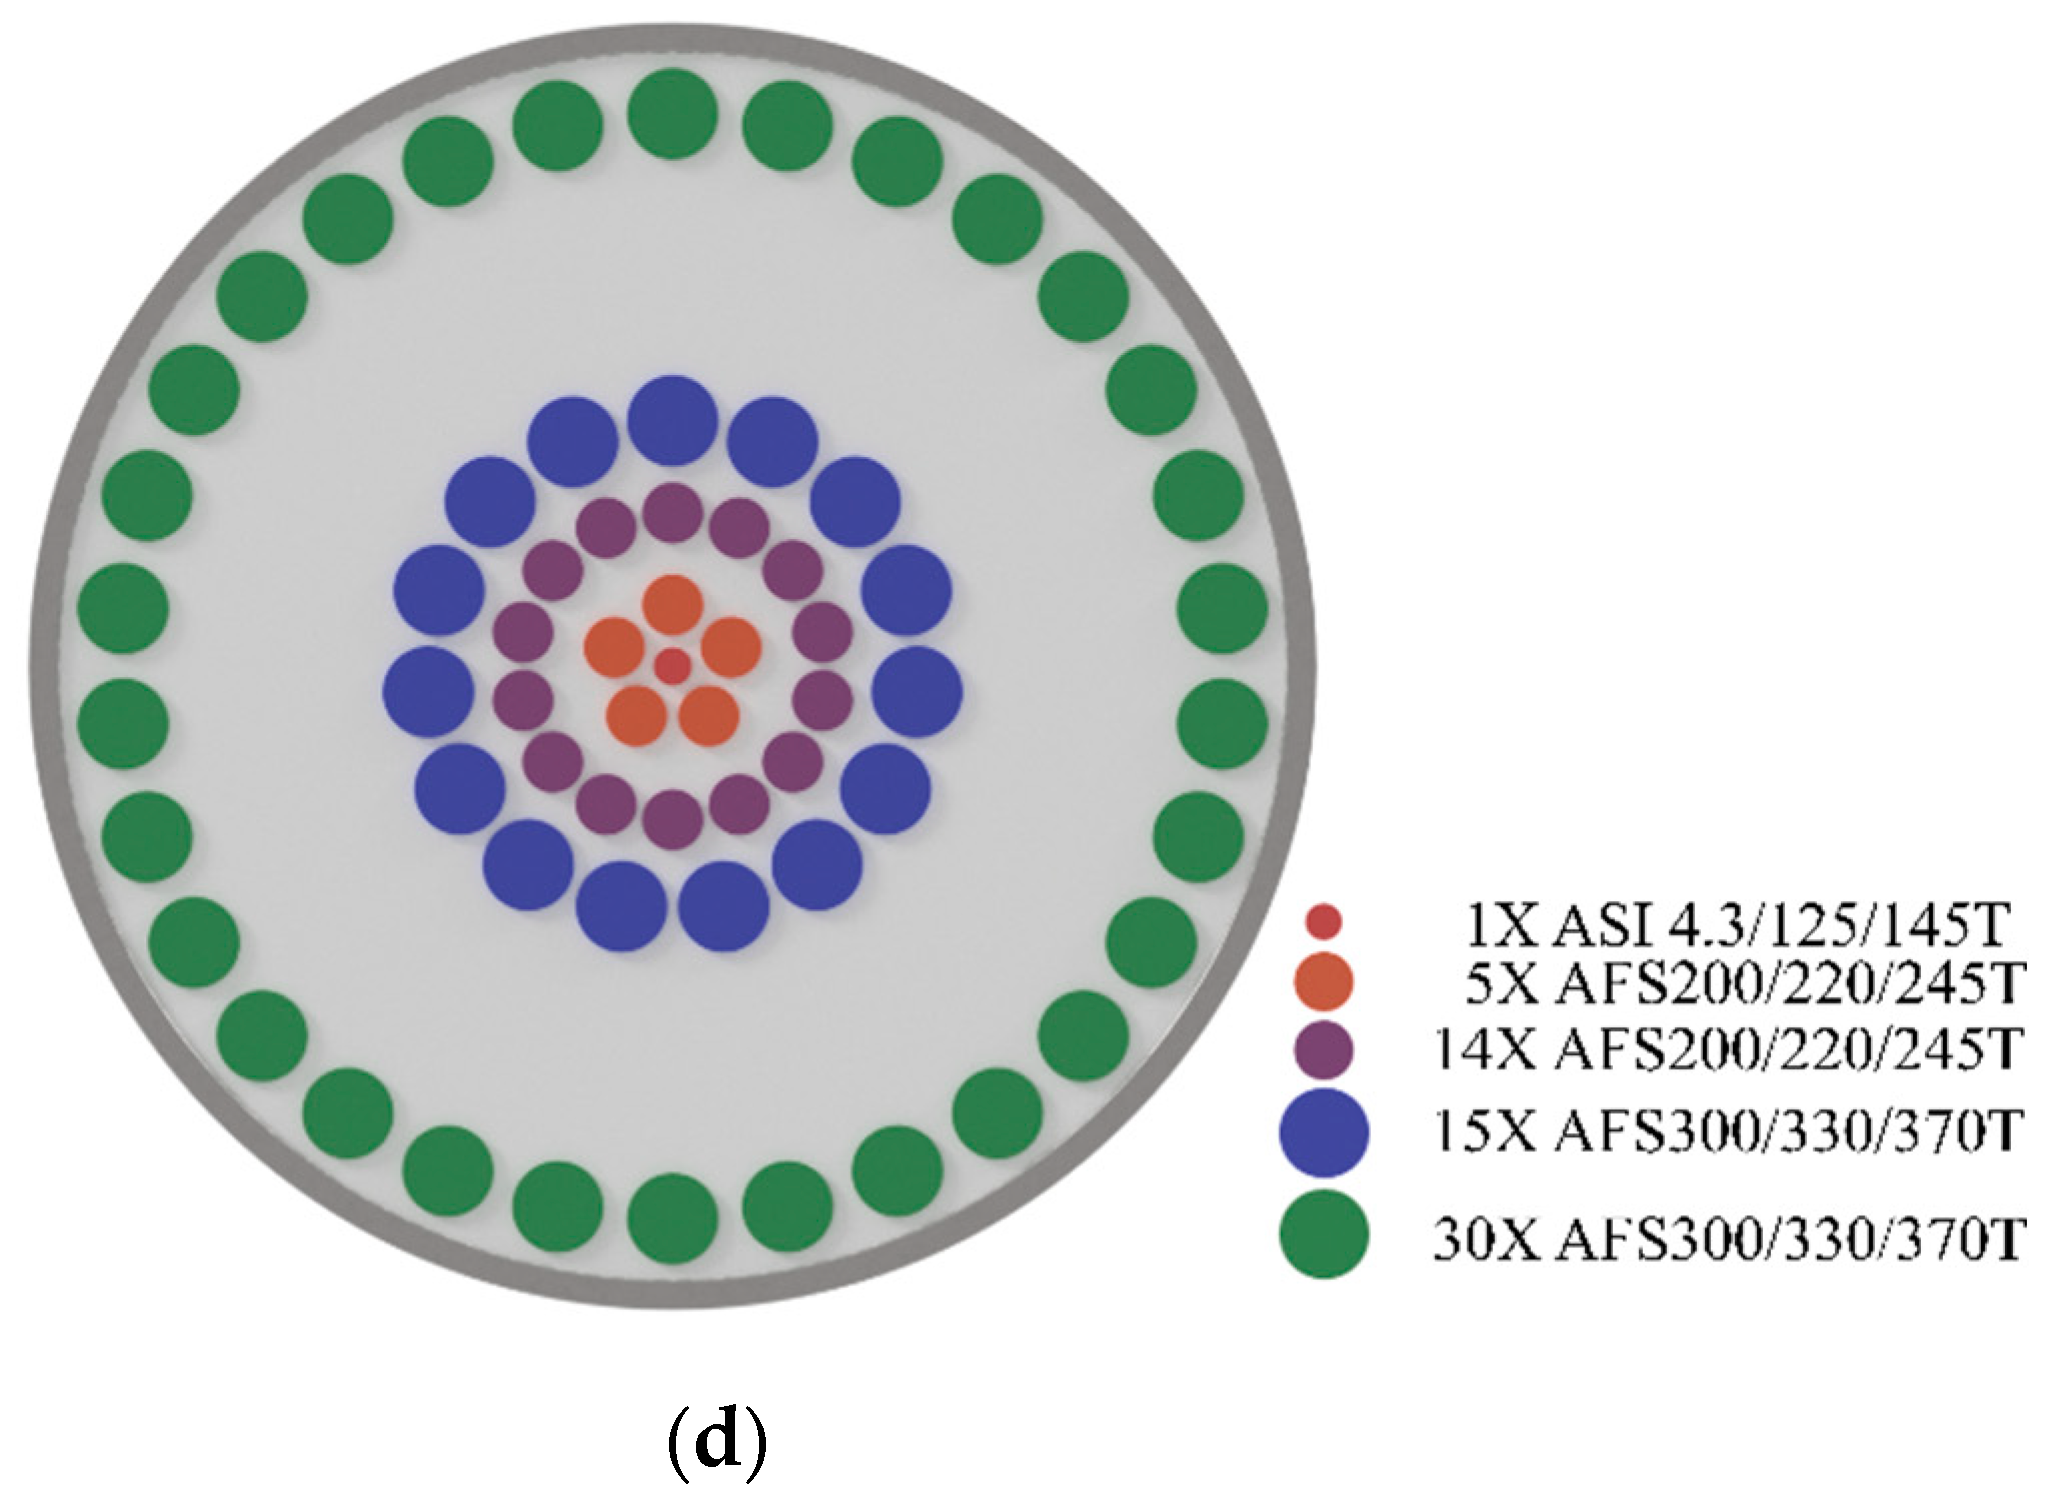
The structure of the fifth configuration of the sensor is depicted in Figure 1a: The fibre bundle manufactured by Fiberguide using our own design parameters consists of one emitting glass fibre (central fibre) and two rings of receiving glass fibres (inner and outer rings, Ring 1 and Ring 2, respectively) surrounding the central emitting fibre. As stated above, the principle of operation is quite simple: A continuous light is launched from the central emitting fibre, and after hitting the surface of interest located at a certain distance from the bundle tip, it reflects back, and finally, it is collected by both rings of receiving fibres (Figure 1b). The quotient of the light intensities collected by each of the aforementioned rings of receiving fibres will be directly related to the distance of the surface of interest. Although the sensor of the fifth generation has multiple built-in rings available, we only used the innermost and outermost rings to extend the maximum range of measurable distances (Figure 1c,d). We have connected off-the-shelf devices to the fibre bundle: The light source is a pigtailed 660 nm-wavelength laser diode from Thorlabs (S4FC660, Bergkirchen, Germany), the photodetectors are Si PIN photodiodes from Thorlabs (PDA 100A-EC), and the data acquisition system is a multifunction I/O device from National Instruments (USB-6366, Irvine, CA, USA) with a sampling rate of 2 MS/s. Finally, we control all these components using a custom-designed software in the LabVIEW (LabVIEW 2017, National Instruments, Irvine, CA, USA) environment.
For the sake of comparison, we have tested three optical sensors in several stages of a turbine test rig assembled in a transonic wind tunnel. On the one hand, the first sensor, labelled OS 1, is a commercially available sensor from Philtec (RC171, Annapolis, MD, USA). In this sensor, the transmitting and receiving fibres are separated in two independent semi-circular patterns, and they are arranged in a random fashion on the inside. Their numerical aperture (NA) is 0.22, and the diameter of the sensor head is 4.75 mm. This sensor has its own inner circuitry, which biases its laser source and converts the received optical signal into an electrical signal that is acquired by our data acquisition system. The bandwidth of OS 1 is 20 kHz. On the other hand, the fibre bundles of the second and third sensors, labelled OS 2 and OS 3, respectively, are manufactured by Fiberguide, and they are two variants of the fifth configuration of our design. The theoretical modelling behind these custom-designed sensors is based on the quasi-Gaussian emission of the transmitting fibre [27]. Taking into account such a model and the design constraints imposed by the turbine specifications (maximum allowed diameter of the fibre bundle, expected BTC working range, etc.), their theoretical characteristics have been calculated with the aid of computer simulations. This preliminary work allows the design of a sensor fulfilling the operational requirements. OS 2 and OS 3 are mostly identical, except for the radii of the outer rings for the reasons explained below. Thus, the radii of Ring 1 and Ring 2 in OS 2 are 200 and 930 µm, respectively, whereas in OS 3, they are 200 and 1800 µm, respectively. As for the central emitting fibre of both sensors, it consists of a 4.3 µm-diameter single-mode silica fibre with an NA of 0.12, whereas the receiving fibres are multimode silica fibres of 200 to 300 µm diameters (for the innermost and outermost rings, respectively) with an NA of 0.22. The diameters of the sensor head are 8 mm.
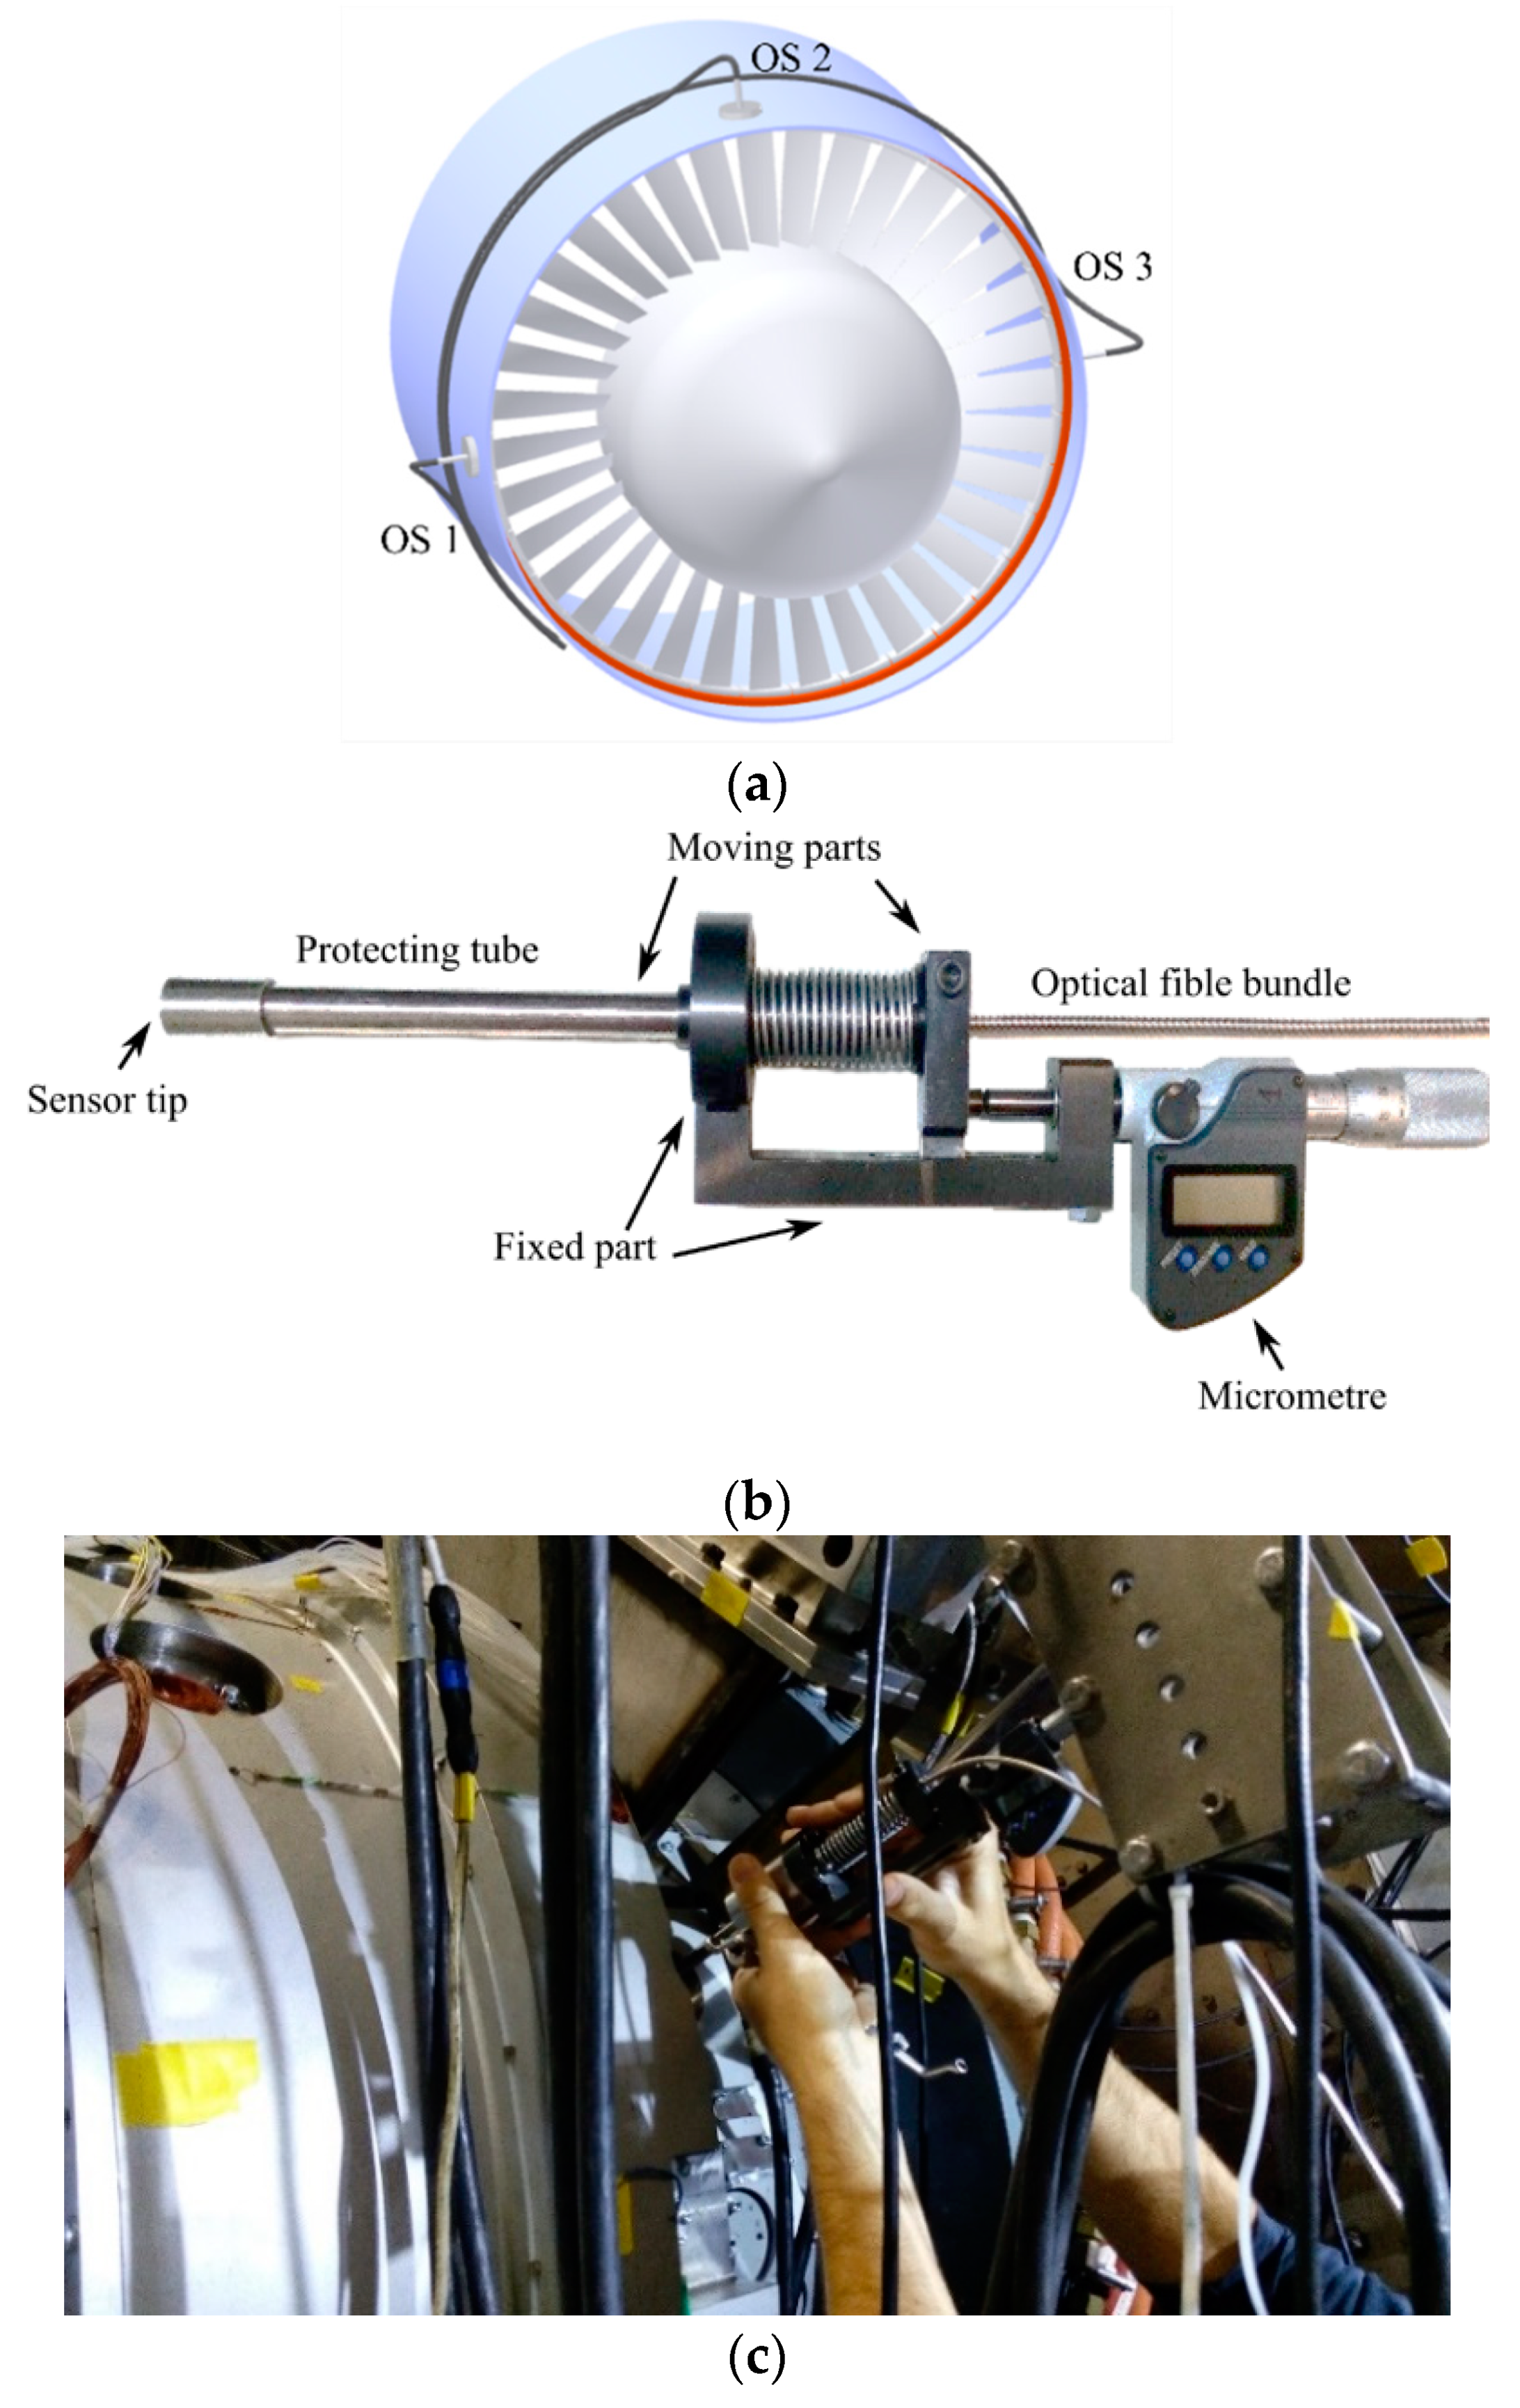
Each of these optical sensors has been inserted in three different radial holes in the casing of the turbine and shifted 90° from each other (Figure 2). The accurate positioning of the optical sensors inside the casing is crucial; therefore, we have employed ad-hoc-built micrometre-driven adapters.
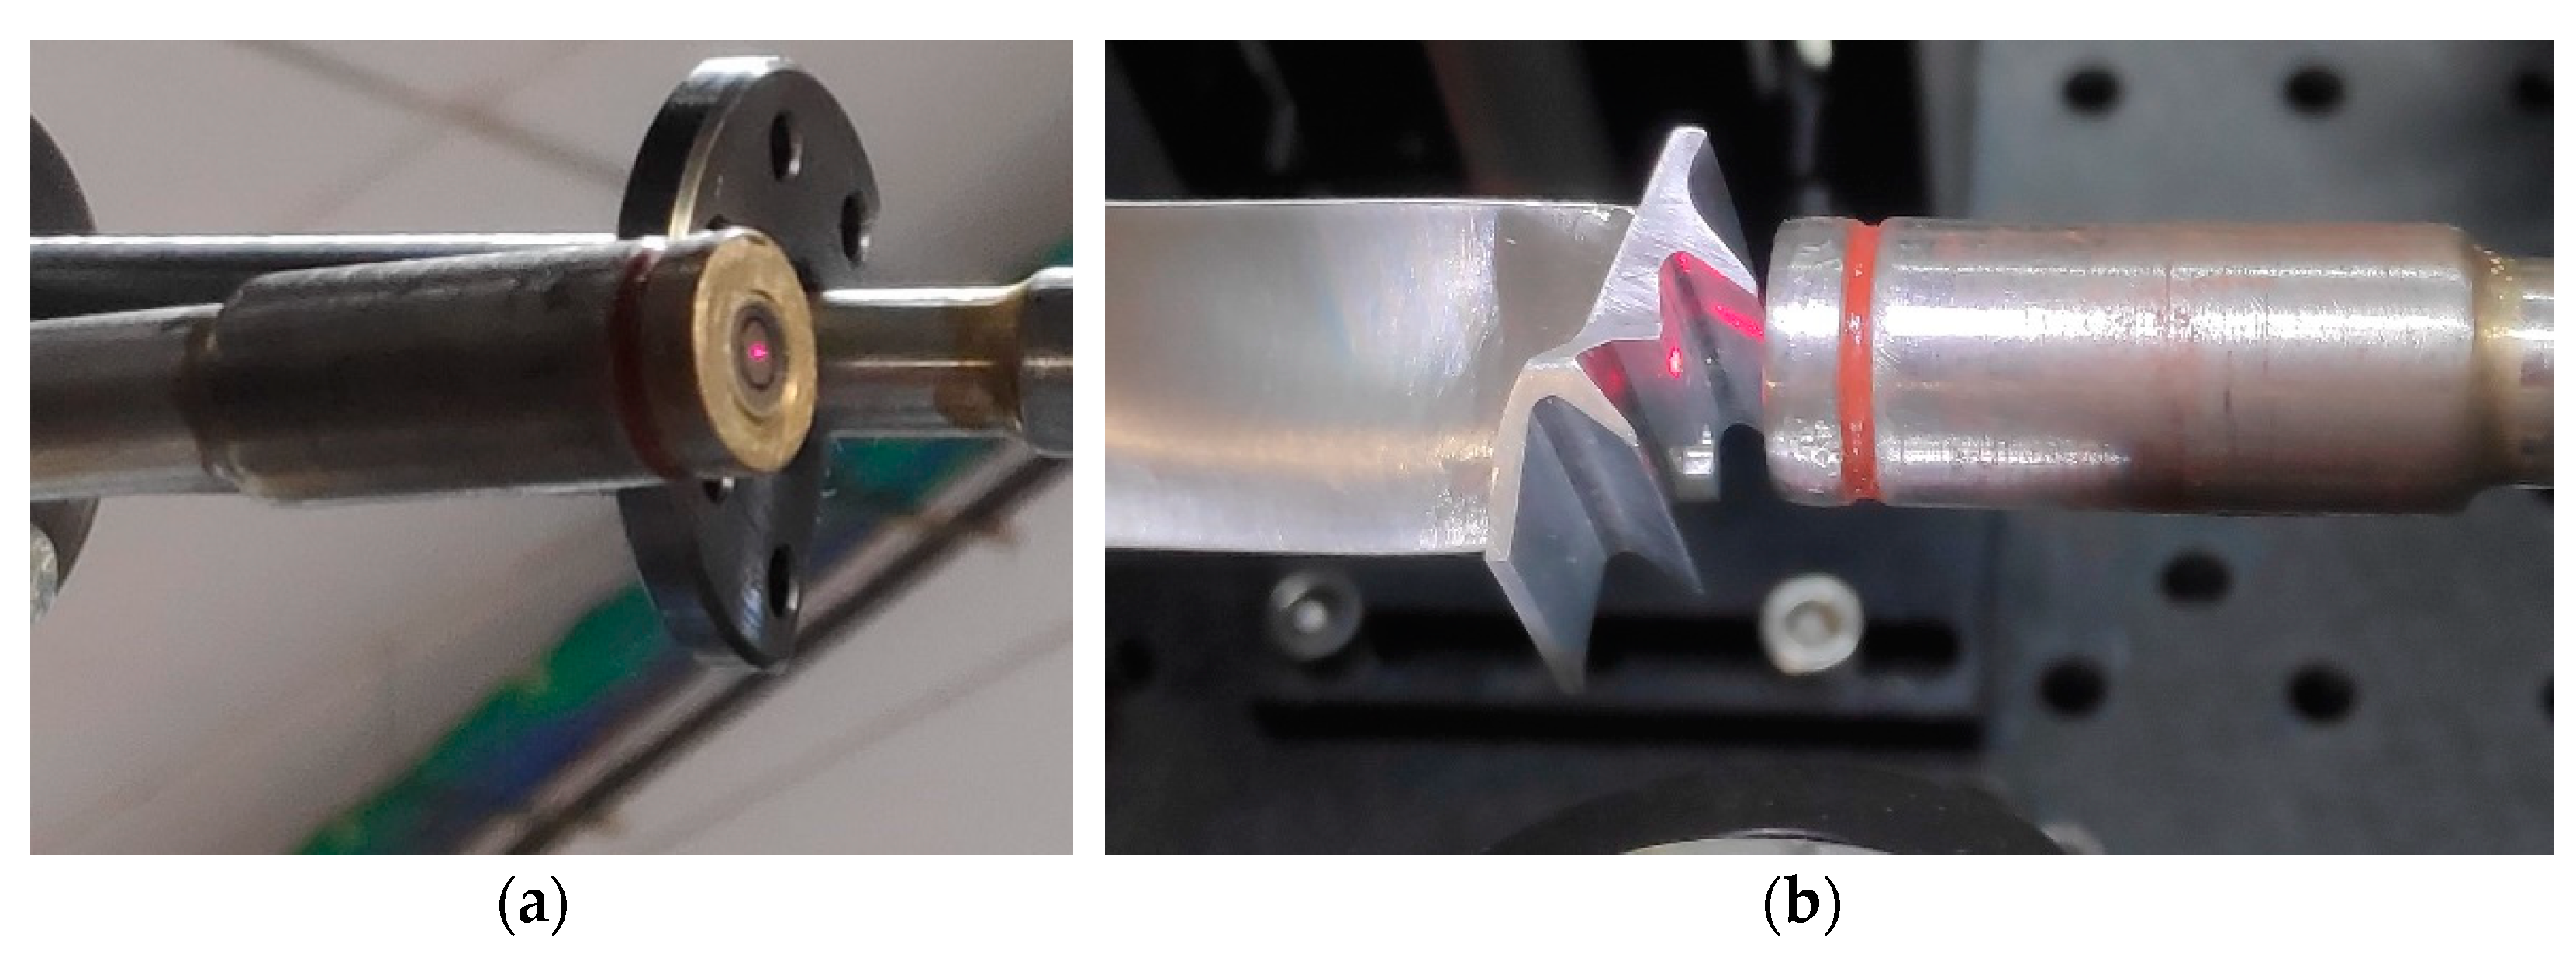
Prior to the real tests in the wind tunnel, the sensors were calibrated in laboratory conditions (Figure 3).
Figure 4 shows the response curves that relate the quotient of the collected light intensities to the distance to the target. Thus, if we increase the distance to the target, the reflected light will illuminate progressively the innermost and outermost rings (Ring 1 and Ring 2) so that the response curve (V2/V1) will increase in the first linear region (i.e. the front slope region) until a maximum is reached; for longer distances, the reflected spot will exceed the boundaries of the outermost ring so that the response curve will decrease in the second linear region (or the back slope region) [27].
We can change the sensitivity of the response curve and make it higher by decreasing the radius of the outermost ring, but at the expense of a faster transition from the first linear region to the second one. This way, it can be observed from Figure 4 that, due to the shorter radius of Ring 2, the response curve of the sensor OS 2 changes faster than in the case of the sensor OS 3. As a consequence, the working region of interest lies in the second linear region for the former, and in the first linear region for the latter.
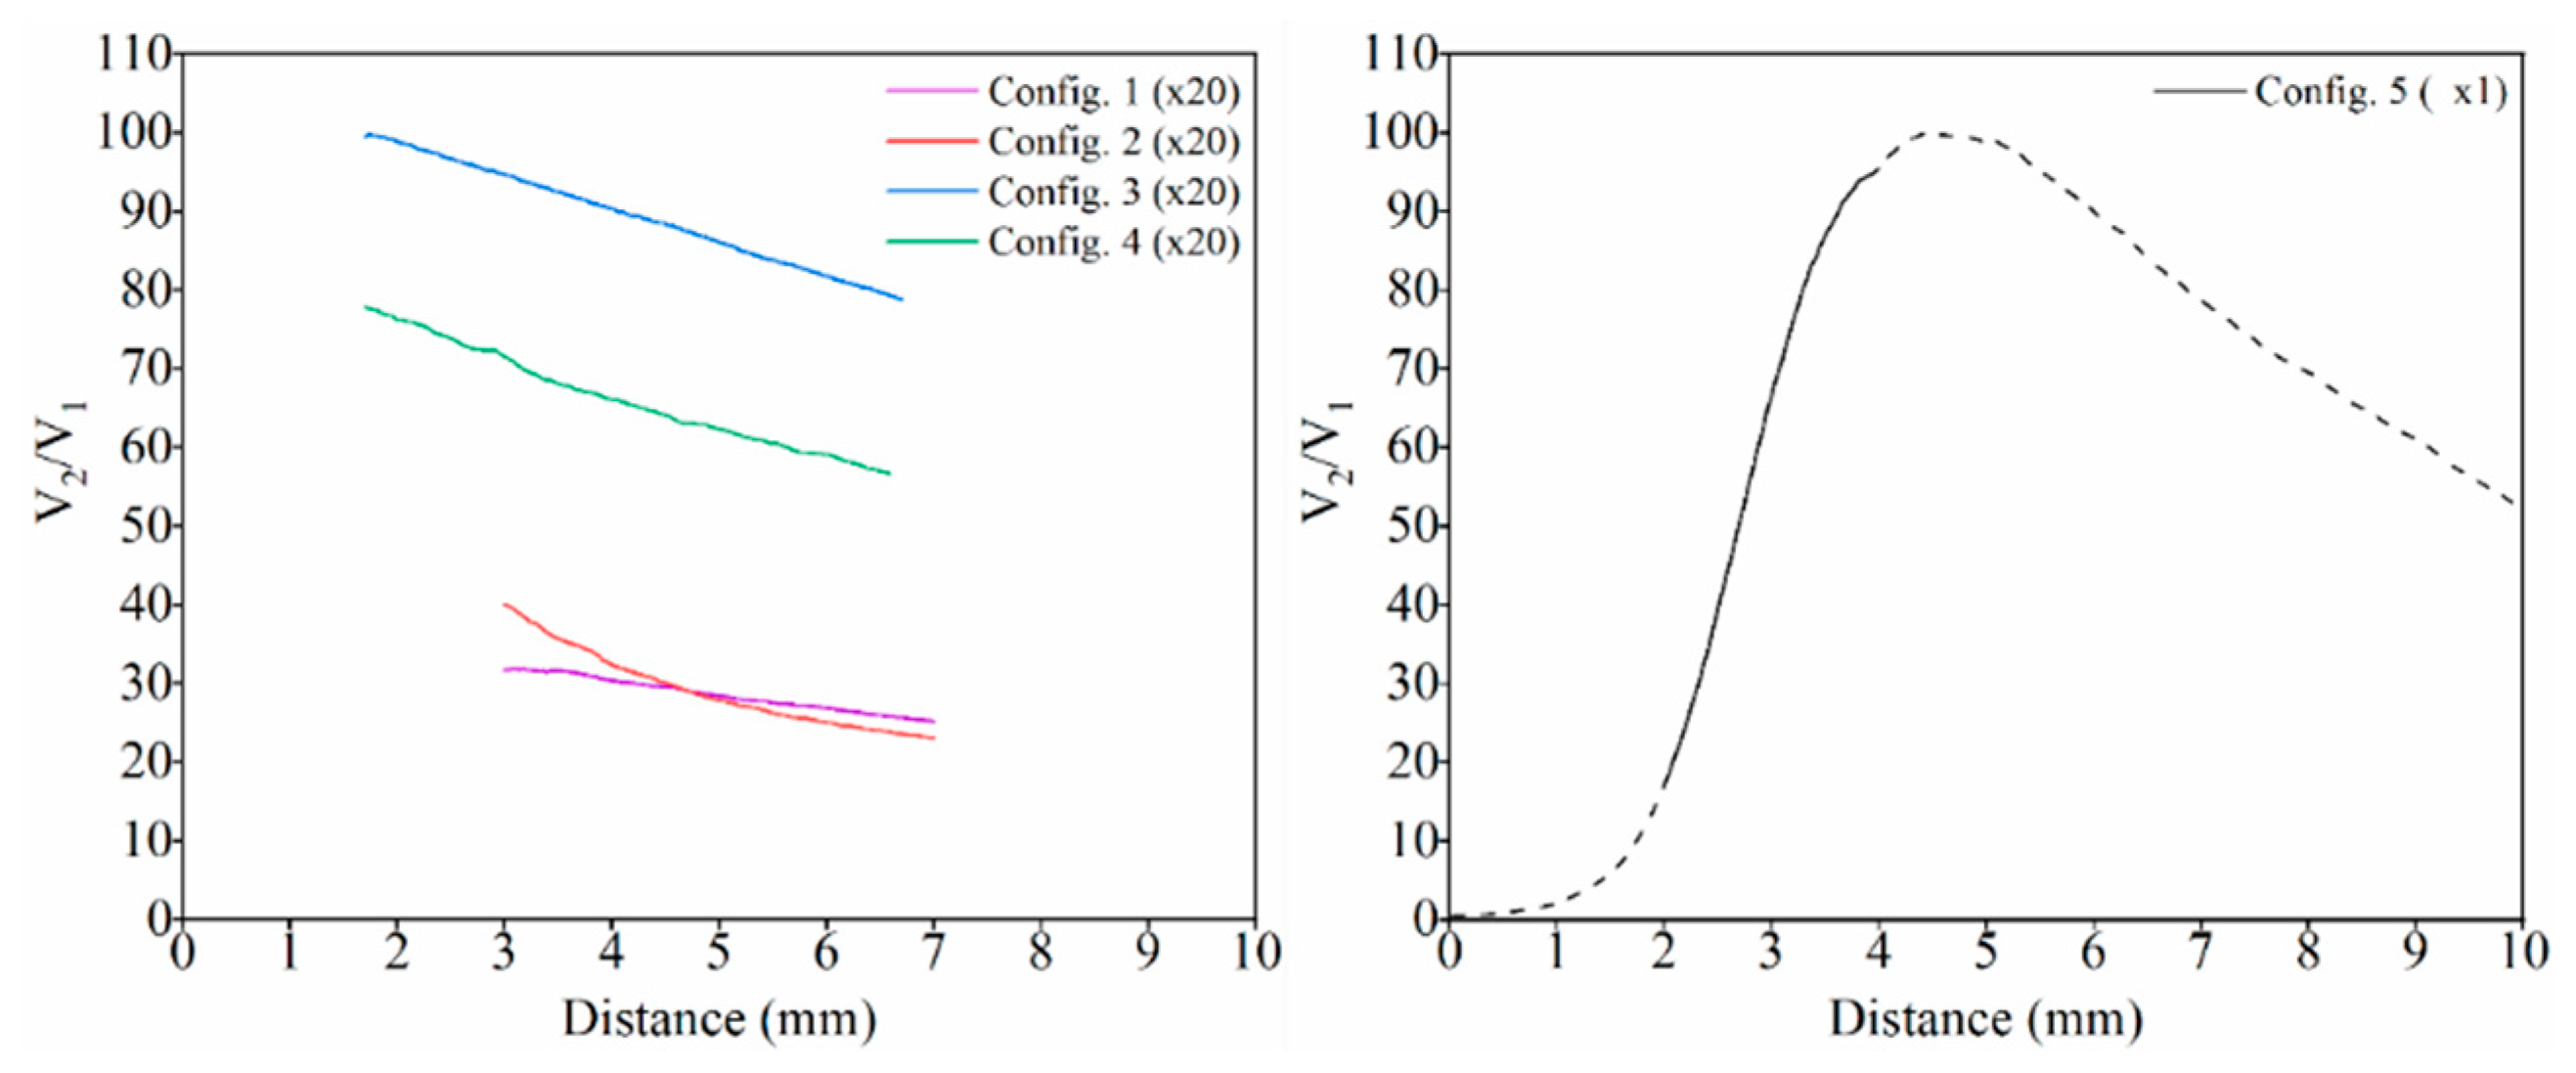
Figure 5 shows the performance of the different configurations of the sensor. From the comparison of the results, it can be observed that each configuration improves the slope sensitivity of previous configurations. Thus, the fifth configuration shows the highest sensitivity thanks in part to the optimised ring size. A suitable choice of the radii of the rings ensures that the sensor is working in the most sensitive front slope for the working region of interest. Likewise, in order to achieve the maximum sensitivity, several differential gain configurations have been tested in the search of the optimal setup (from [24], the sensitivity from the previous configurations has improved from 0.089 to 0.2).
In the final configuration of the custom-designed sensor, we can highlight the following three advantages:
  • The fluctuations in the light source and the variations in the reflectivity on the target surface are effectively cancelled by performing the quotient of the light intensities collected by the receiving fibres of each ring.
  • Its sensitivity has been improved by using an asymmetric gain configuration in the photodetectors.
  • The outer ring has been calculated so that the sensor works in the first and most steep positive slope of the response curve for these test particular conditions.

3. Results and Discussion

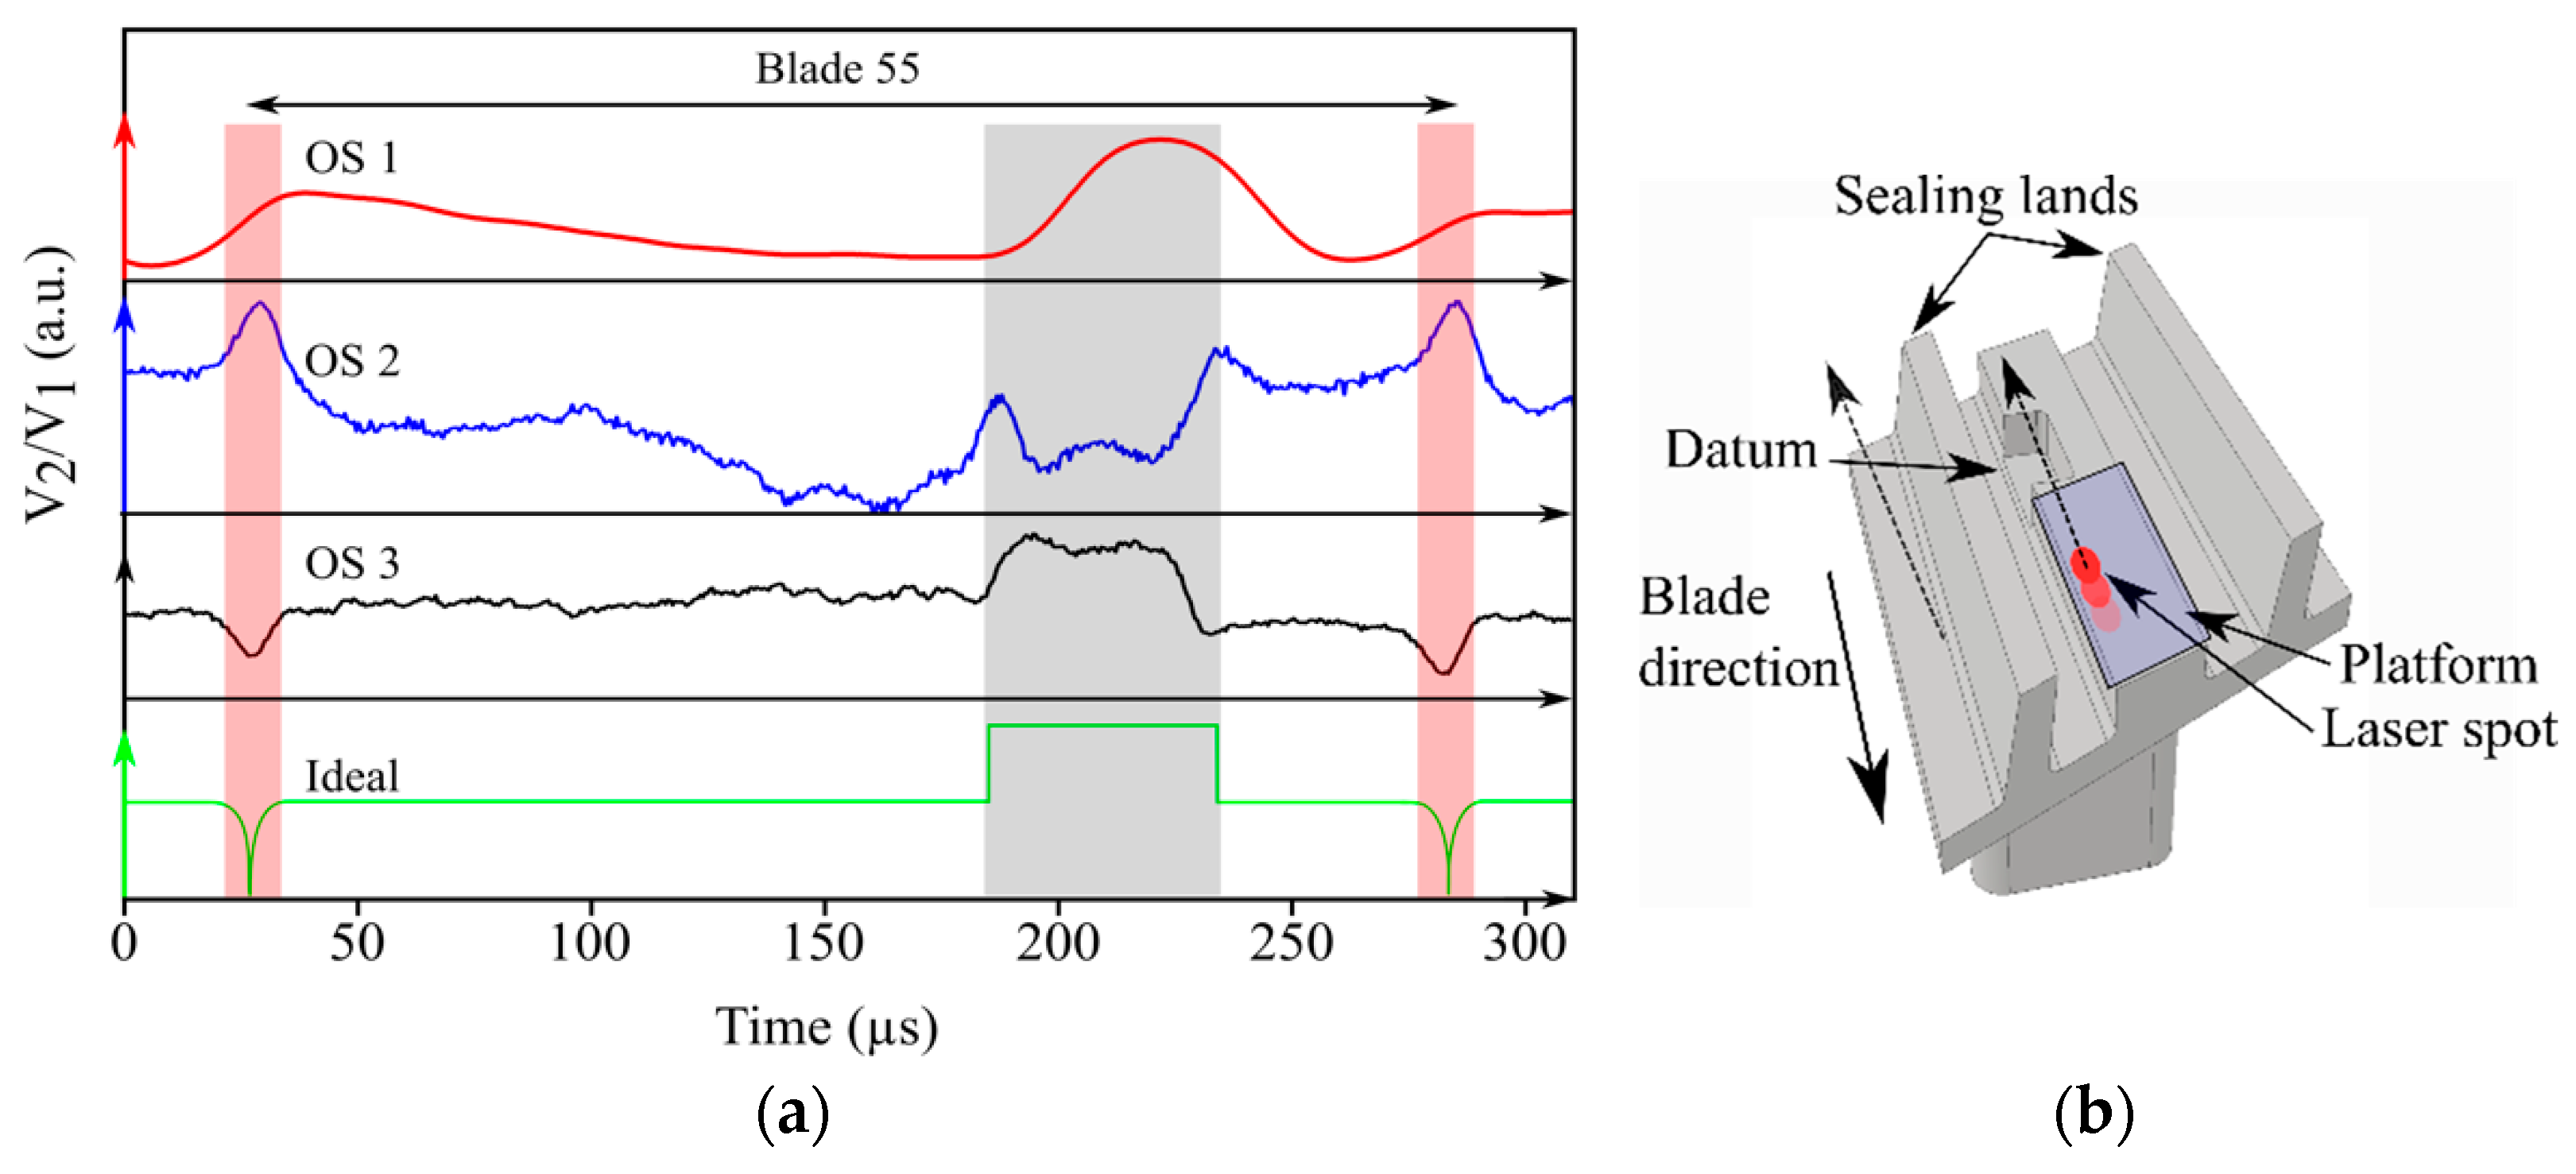
Figure 6a shows the raw signal provided by each sensor on the passing of one typical turbine blade. On the one hand, the commercial sensor OS 1 provides the smoothest signal, but it misses most of the blade profile features such as the datum (grey-shaded area) or the inter-blade spacing (red-shaded area). This is due to the bigger emitters’ spot size and their own electronic bandwidth limitations. On the other hand, the sensors OS 2 and OS 3 are able to detect specific features of the passing blade. For the sake of comparison, the lower curve in Figure 6a shows an ideal response to the passing of a typical blade. From the figure, it is clear that the high resolution and sensitivity of OS 3 are closest to the ideal response.
As for the steep rising and falling edges of the waveform of OS 3 (defined within the grey-shaded area in Figure 6a), they are closely linked to the datum boundaries (Figure 6b). This specific feature of the waveform allows us to determine the passing time of the blade with high precision, making it possible to define an instantaneous rotational speed associated with each blade within a complete turbine turn.
Once the raw data have been acquired, a very simple algorithm has been used to detect the blade arrival. A threshold value has been applied to detect patterns in the waveform. Those patterns are linked to physical parts of the blade, so the arrival has been inferred. The OS 3 sensor stands out as the most reliable sensor using this simple algorithm, as its signal is more stable in time and less prone to false detections or missing events. Missing events lead to significant errors, and for that reason, the error values in Table 2 are very high. The blade arrival can be inferred from the arriving pulse slope (blade leading edge detection) or by the exiting pulse slope (blade trailing edge detection). In our tests, using the trailing edge of the blade led to more stable results.
For the sake of brevity, in the discussion that follows, we only show the results corresponding to OS 3 and, using the trailing edge, the sensor that offers the best performance. If we define in Figure 7 the instantaneous speed as the average speed (in rpm) over one turbine turn, then the Once-Per-Revolution (OPR) signal directly offers it, whereas in the case of OS 3, all blade-to-blade instantaneous speeds must be averaged over one full turn.
We can observe that all curves follow the same trend, although the OPR signal has an edgy behaviour in contrast to the smoother behaviour of OS 3 as a consequence of the averaging process carried out over each shaft turn.
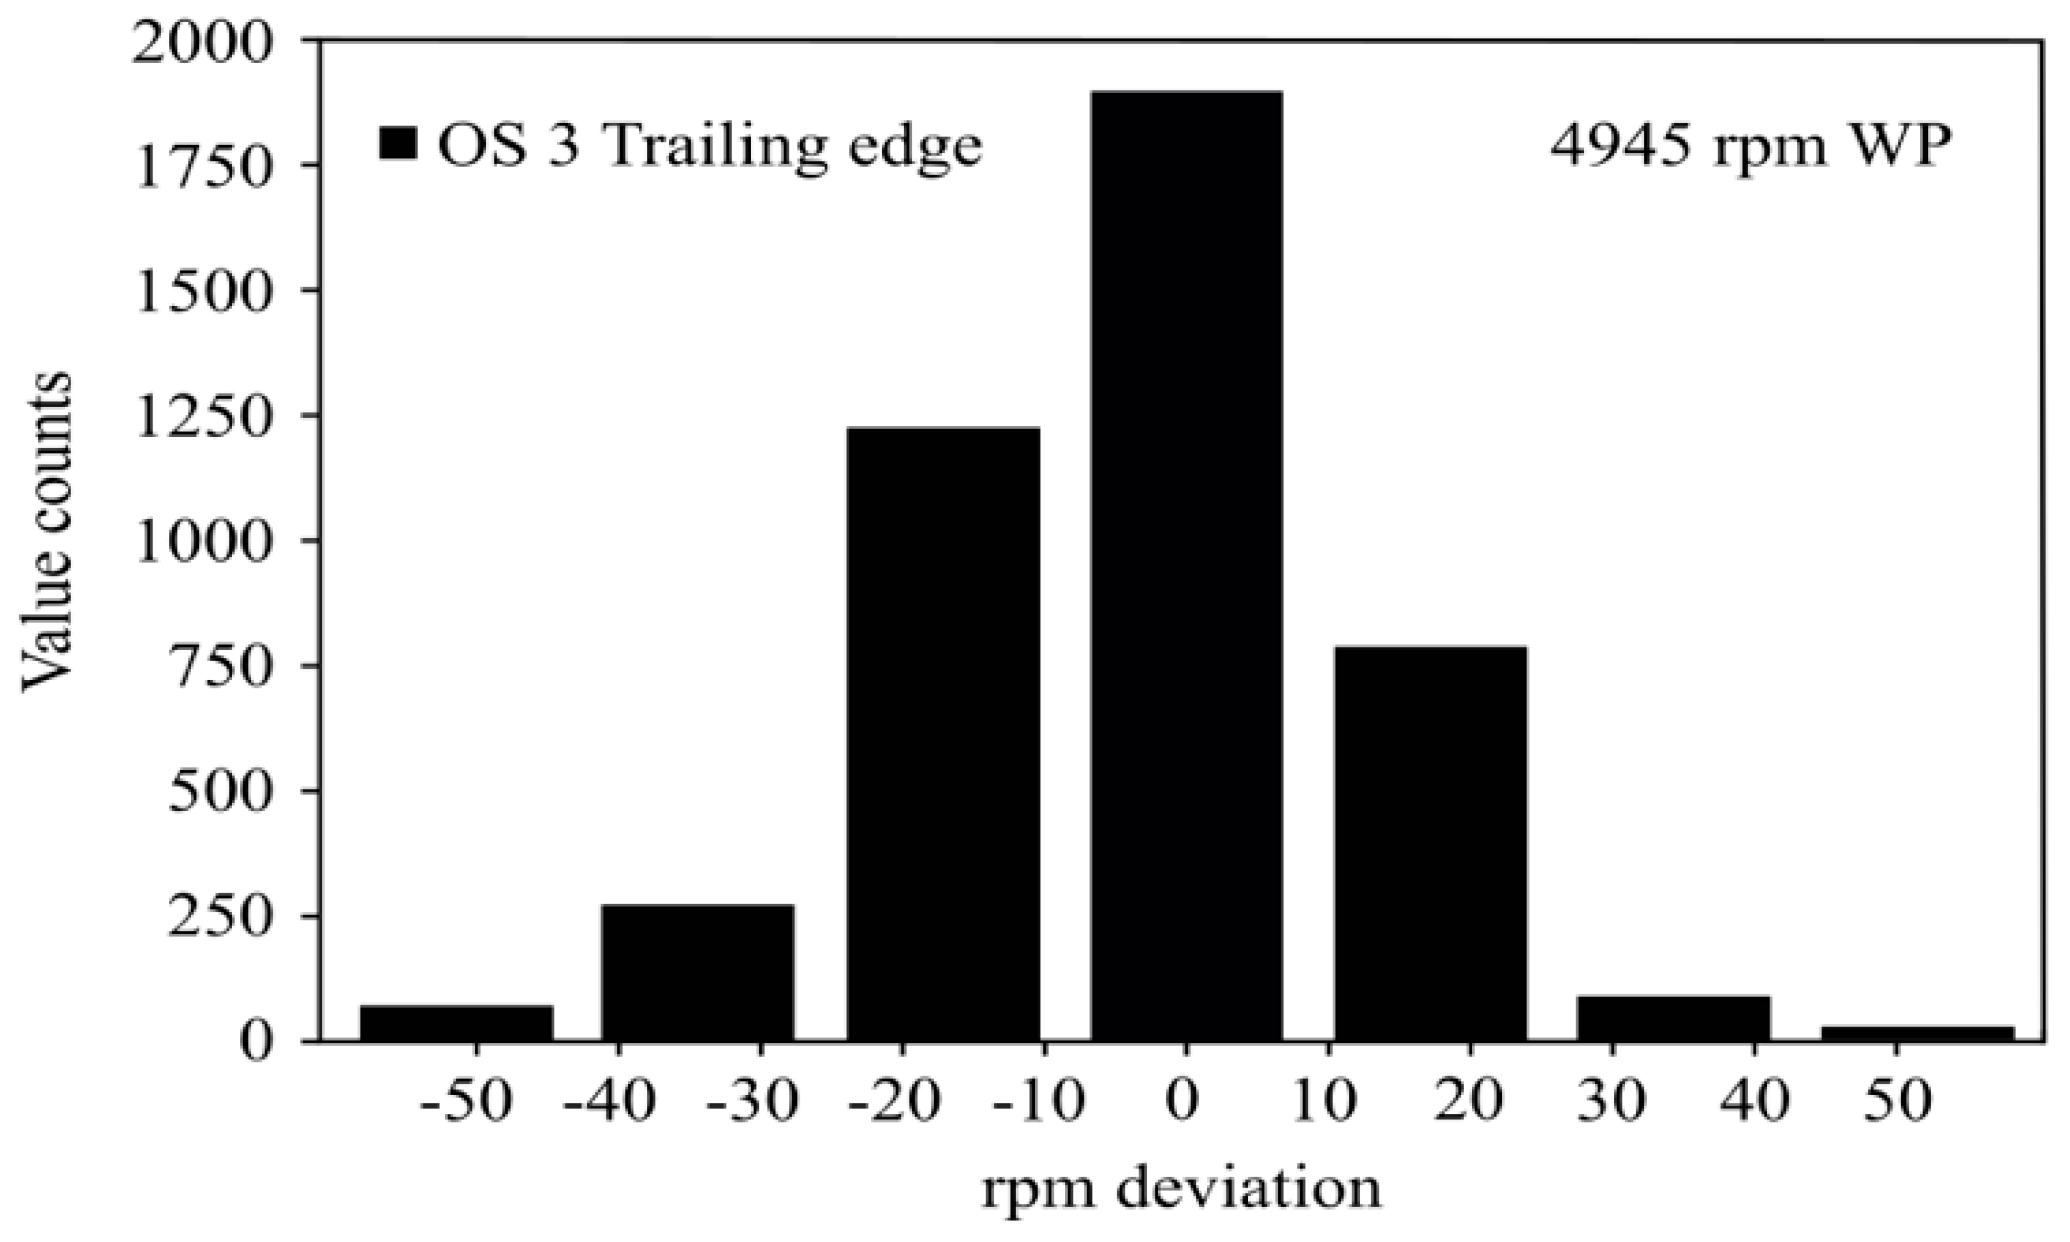
In order to appreciate further the accuracy provided by OS 3, Figure 8 shows the deviation in the instantaneous speed determined according to OS 3 with respect to the reference speed value provided by the OPR signal. In this case, the passing time of each blade was determined from the arrival time of the trailing edge of the datum. Similar results are obtained if data from the leading edge of the datum are used. Although not shown in Figure 8, the histograms corresponding to OS 1 and OS 2 contain data values that are much more spread out around the nominal value. Table 3 presents a summary of the statistical analysis in which the higher performance of OS 3 over the other two optical sensors is highlighted.
These observations are the logical consequence of the higher waveform quality of the signals gathered with OS 3.
Finally, one of those parameters of interest due to its great influence on the turbine efficiency and lifespan is the BTC. The optical sensor OS 3 once again stands out over the other two sensors and offers the possibility of taking corrective actions in the case of detecting nonstandard blades, i.e. blades with unexpected features and defects.

4. Conclusions

We report on the development of a fibre-based reflective optical sensor from its first configuration to its fifth configuration. Our sensor is capable of monitoring several parameters of interest in aero-engine applications, such as the TC or blade passing time. This sensor is designed and manufactured specifically for each application to guarantee that it will operate in the most sensitive and stable part of the response curve of the sensor (front slope), offering the highest performance.
This sensor can be easily customised to different applications requiring noncontact measurements, small dimensions and immunity to electromagnetic interference. The tests carried out certify that our sensor is a good candidate to measure small distances at high speed with high precision.

Author Contributions

G.D. contributed with the methodology, supervision and writing. I.G. contributed with the validation, writing, reviewing and sensor design. J.A. contributed with the writing, reviewing and sensor design. R.F. contributed with the software, data curation and visualization. J.Z. contributed with the resources and the reviewing. G.A. contributed with the supervision, writing and reviewing. All authors have read and agreed to the published version of the manuscript.

Funding

This work was supported in part by the European Regional Development Fund, in part by the Ministerio de Economía y Competitividad under project RTI2018-094669-B-C31, and in part by the Gobierno Vasco/Eusko Jaurlaritza under projects IT933-16, ELKARTEK (KK-2018/00078 and KK-2019/00051), EKINTZAILE 01560/2019 and HAZITEK (ZL-2020/00380). The work of J. Amorebieta is supported in part by a PhD fellowship from the University of the Basque Country (UPV/EHU), Vicerrectorado de Euskera y Formación Continua.

Institutional Review Board Statement

Not applicable.

Informed Consent Statement

Not applicable.

Data Availability Statement

No new data were created or analyzed in this study. Data sharing is not applicable to this article.

Conflicts of Interest

The authors declare no conflict of interest.

References

  1. Wiseman, M.W.; Guo, T.-H. An investigation of life extending control techniques for gas turbine engines. Proc. Am. Control Conf. 2001, 5, 3706–3707. [Google Scholar] [CrossRef]
  2. Sheard, A.G.; O’Donnell, S.G.; Stringfellow, J.F. High Temperature Proximity Measurement in Aero and Industrial Turbomachinery. J. Eng. Gas Turbines Power 1997, 121, 167–173. [Google Scholar] [CrossRef]
  3. Roeseler, C.; Flotow, A.W.; Tappert, P. Monitoring blade passage in turbomachinery through the engine case (no holes). In Proceedings of the IEEE Aerospace Conference, Big Sky, MT, USA, 9–16 March 2002; p. 6. [Google Scholar] [CrossRef]
  4. Du, L.; Zhu, X.; Zhe, J. A high sensitivity inductive sensor for blade tip clearance measurement. Smart Mater. Struct. 2014, 23. [Google Scholar] [CrossRef]
  5. Barranger, J.P.; Ford, M.J. Laser-Optical Blade Tip Clearance Measurement System. J. Eng. Power 1981, 103, 457–460. [Google Scholar] [CrossRef]
  6. Cao, S.Z.; Duan, F.J.; Zhang, Y.G. Measurement of Rotating Blade Tip Clearance with Fibre-Optic Probe. J. Phys. Conf. Ser. 2006, 48, 873–877. [Google Scholar] [CrossRef]
  7. Vakhtin, A.B.; Chen, S.-J.; Massick, S.M. Optical Probe for Monitoring Blade Tip Clearance. In Proceedings of the 47th AIAA Aerospace Sciences Meeting including The New Horizons Forum and Aerospace Exposition, Orlando, FL, USA, 5–8 January 2009. [Google Scholar] [CrossRef] [Green Version]
  8. Sheard, A.G. Blade by Blade Tip Clearance Measurement. Int. J. Rotating Mach. 2011, 2011, 516128. [Google Scholar] [CrossRef] [Green Version]
  9. Haase, W.C.; Haase, Z.S. High-Speed, capacitance-based tip clearance sensing. In Proceedings of the 2013 IEEE Aerospace Conference, Big Sky, MT, USA, 2–9 March 2013; pp. 1–8. [Google Scholar] [CrossRef]
  10. Ye, D.-C.; Duan, F.-J.; Guo, H.-T.; Li, Y.; Wang, K. Turbine blade tip clearance measurement using a skewed dual-beam fiber optic sensor. Opt. Eng. 2012, 51. [Google Scholar] [CrossRef]
  11. Schicht, A.; Schwarzer, S.; Schmidt, L.-P. Tip Clearance Measurement Technique for Stationary Gas Turbines Using an Autofocusing Millimeter-Wave Synthetic Aperture Radar. IEEE Trans. Instrum. Meas. 2012, 61, 1778–1785. [Google Scholar] [CrossRef]
  12. Violetti, M.; Skrivervik, A.K.; Xu, Q.; Hafner, M. New microwave sensing system for blade tip clearance measurement in gas turbines. In Proceedings of the 2012 IEEE Sensors, Taipei, Taiwan, 28–31 October 2012; pp. 1–4. [Google Scholar]
  13. Szczepanik, R.; Przysowa, R.; Spychała, J.; Rokicki, E.; Kazmierczak, K.; Majewski, P. Application of Blade-Tip Sensors to Blade-Vibration Monitoring in Gas Turbines. In Thermal Power Plants; Rasul, M., Ed.; IntechOpen: London, UK, 2012; ISBN 978-953-307-952-3. [Google Scholar] [CrossRef]
  14. Kempe, A.; Schlamp, S.; Rösgen, T.; Haffner, K. Spatial and Temporal High-Resolution Optical Tip-Clearance Probe for Harsh Environments. In Proceedings of the 13th International Symposium on Applications of Laser Techniques to Fluid Mechanics, Lisboa, Portugal, 26–29 June 2006. [Google Scholar]
  15. García, I.; Zubia, J.; Durana, G.; Aldabaldetreku, G.; Illarramendi, M.A.; Villatoro, J. Optical Fiber Sensors for Aircraft Structural Health Monitoring. Sensors 2015, 15, 15494–15519. [Google Scholar] [CrossRef] [PubMed] [Green Version]
  16. López-Higuera, J.M. Introduction to Fibre Optic Sensing Technology. In Handbook of Optical Fibre Sensing Technology; López-Higuera, J.M., Ed.; Wiley: Hoboken, NJ, USA, 2002. [Google Scholar]
  17. Przysowa, R.; Garcia, I.; Zubia, J. Tip-clearance measurement in a legacy turbojet with the use of an optical fiber sensor. In Proceedings of the EVI-GTI and PIWG Joint Conference on Gas Turbine Instrumentation, Berlin, Germany, 27–29 September 2016. [Google Scholar]
  18. García, I.; Przysowa, R.; Amorebieta, J.; Zubia, J. Tip-Clearance Measurement in the First Stage of the Compressor of an Aircraft Engine. Sensors 2016, 16, 1897. [Google Scholar] [CrossRef] [PubMed] [Green Version]
  19. BingHui, J.; Lei, H. An Optical Fiber Measurement System for Blade Tip Clearance of Engine. Int. J. Aerosp. Eng. 2017, 2017, 1–9. [Google Scholar] [CrossRef]
  20. Ma, Y.-Z.; Zhang, Y.-K.; Li, G.-P.; Liu, H.-G. Tip clearance optical measurement for rotating blades. MSIE 2011 2011, 1206–1208. [Google Scholar] [CrossRef]
  21. Savović, S.; Djordjevich, A. Calculation of the coupling coefficient in step index glass optical fibers. Appl. Opt. 2009, 48, 4496–4500. [Google Scholar] [CrossRef] [PubMed]
  22. Yoshimura, T. Statistical properties of dynamic speckles. J. Opt. Soc. Am. A 1986, 3, 1032–1054. [Google Scholar] [CrossRef]
  23. Daino, B.; De Marchis, G.; Piazzolla, S. Analysis and measurement of modal noise in an optical fibre. Electron. Lett. 1979, 15, 755. [Google Scholar] [CrossRef]
  24. Garcia, I.; Zubia, J.; Berganza, A.; Beloki, J.; Arrue, J.; Illarramendi, M.A.; Mateo, J.; Vazquez, C.; Vazquez, M.C. Different configurations of a reflective intensity-modulated optical sensor to avoid modal noise in tip-clearance measurements. J. Light. Technol. 2015, 33, 1. [Google Scholar] [CrossRef]
  25. Durana, G.; Amorebieta, J.; Fernandez, R.; Beloki, J.; Arrospide, E.; Garcia, I.; Zubia, J. Design, Fabrication and Testing of a High-Sensitive Fibre Sensor for Tip Clearance Measurements. Sensors 2018, 18, 2610. [Google Scholar] [CrossRef] [PubMed] [Green Version]
  26. Fernandez, R.; Amorebieta, J.; Durana, G.; Beloki, J.; Zubia, J. Perf ormance comparison among three optical fibre-based displacement sensors for Blade Tip Clearance measurements. In Proceedings of the 5th IEEE International Workshop on Metrology for AeroSpace (MetroAeroSpace), Rome, Italy, 20–22 June 2018; pp. 657–662. [Google Scholar]
  27. Cao, H.; Chen, Y.; Zhou, Z.; Zhang, G. Theoretical and experimental study on the optical fiber bundle displacement sensors. Sens. Actuators Phys. 2007, 136, 580–587. [Google Scholar] [CrossRef]
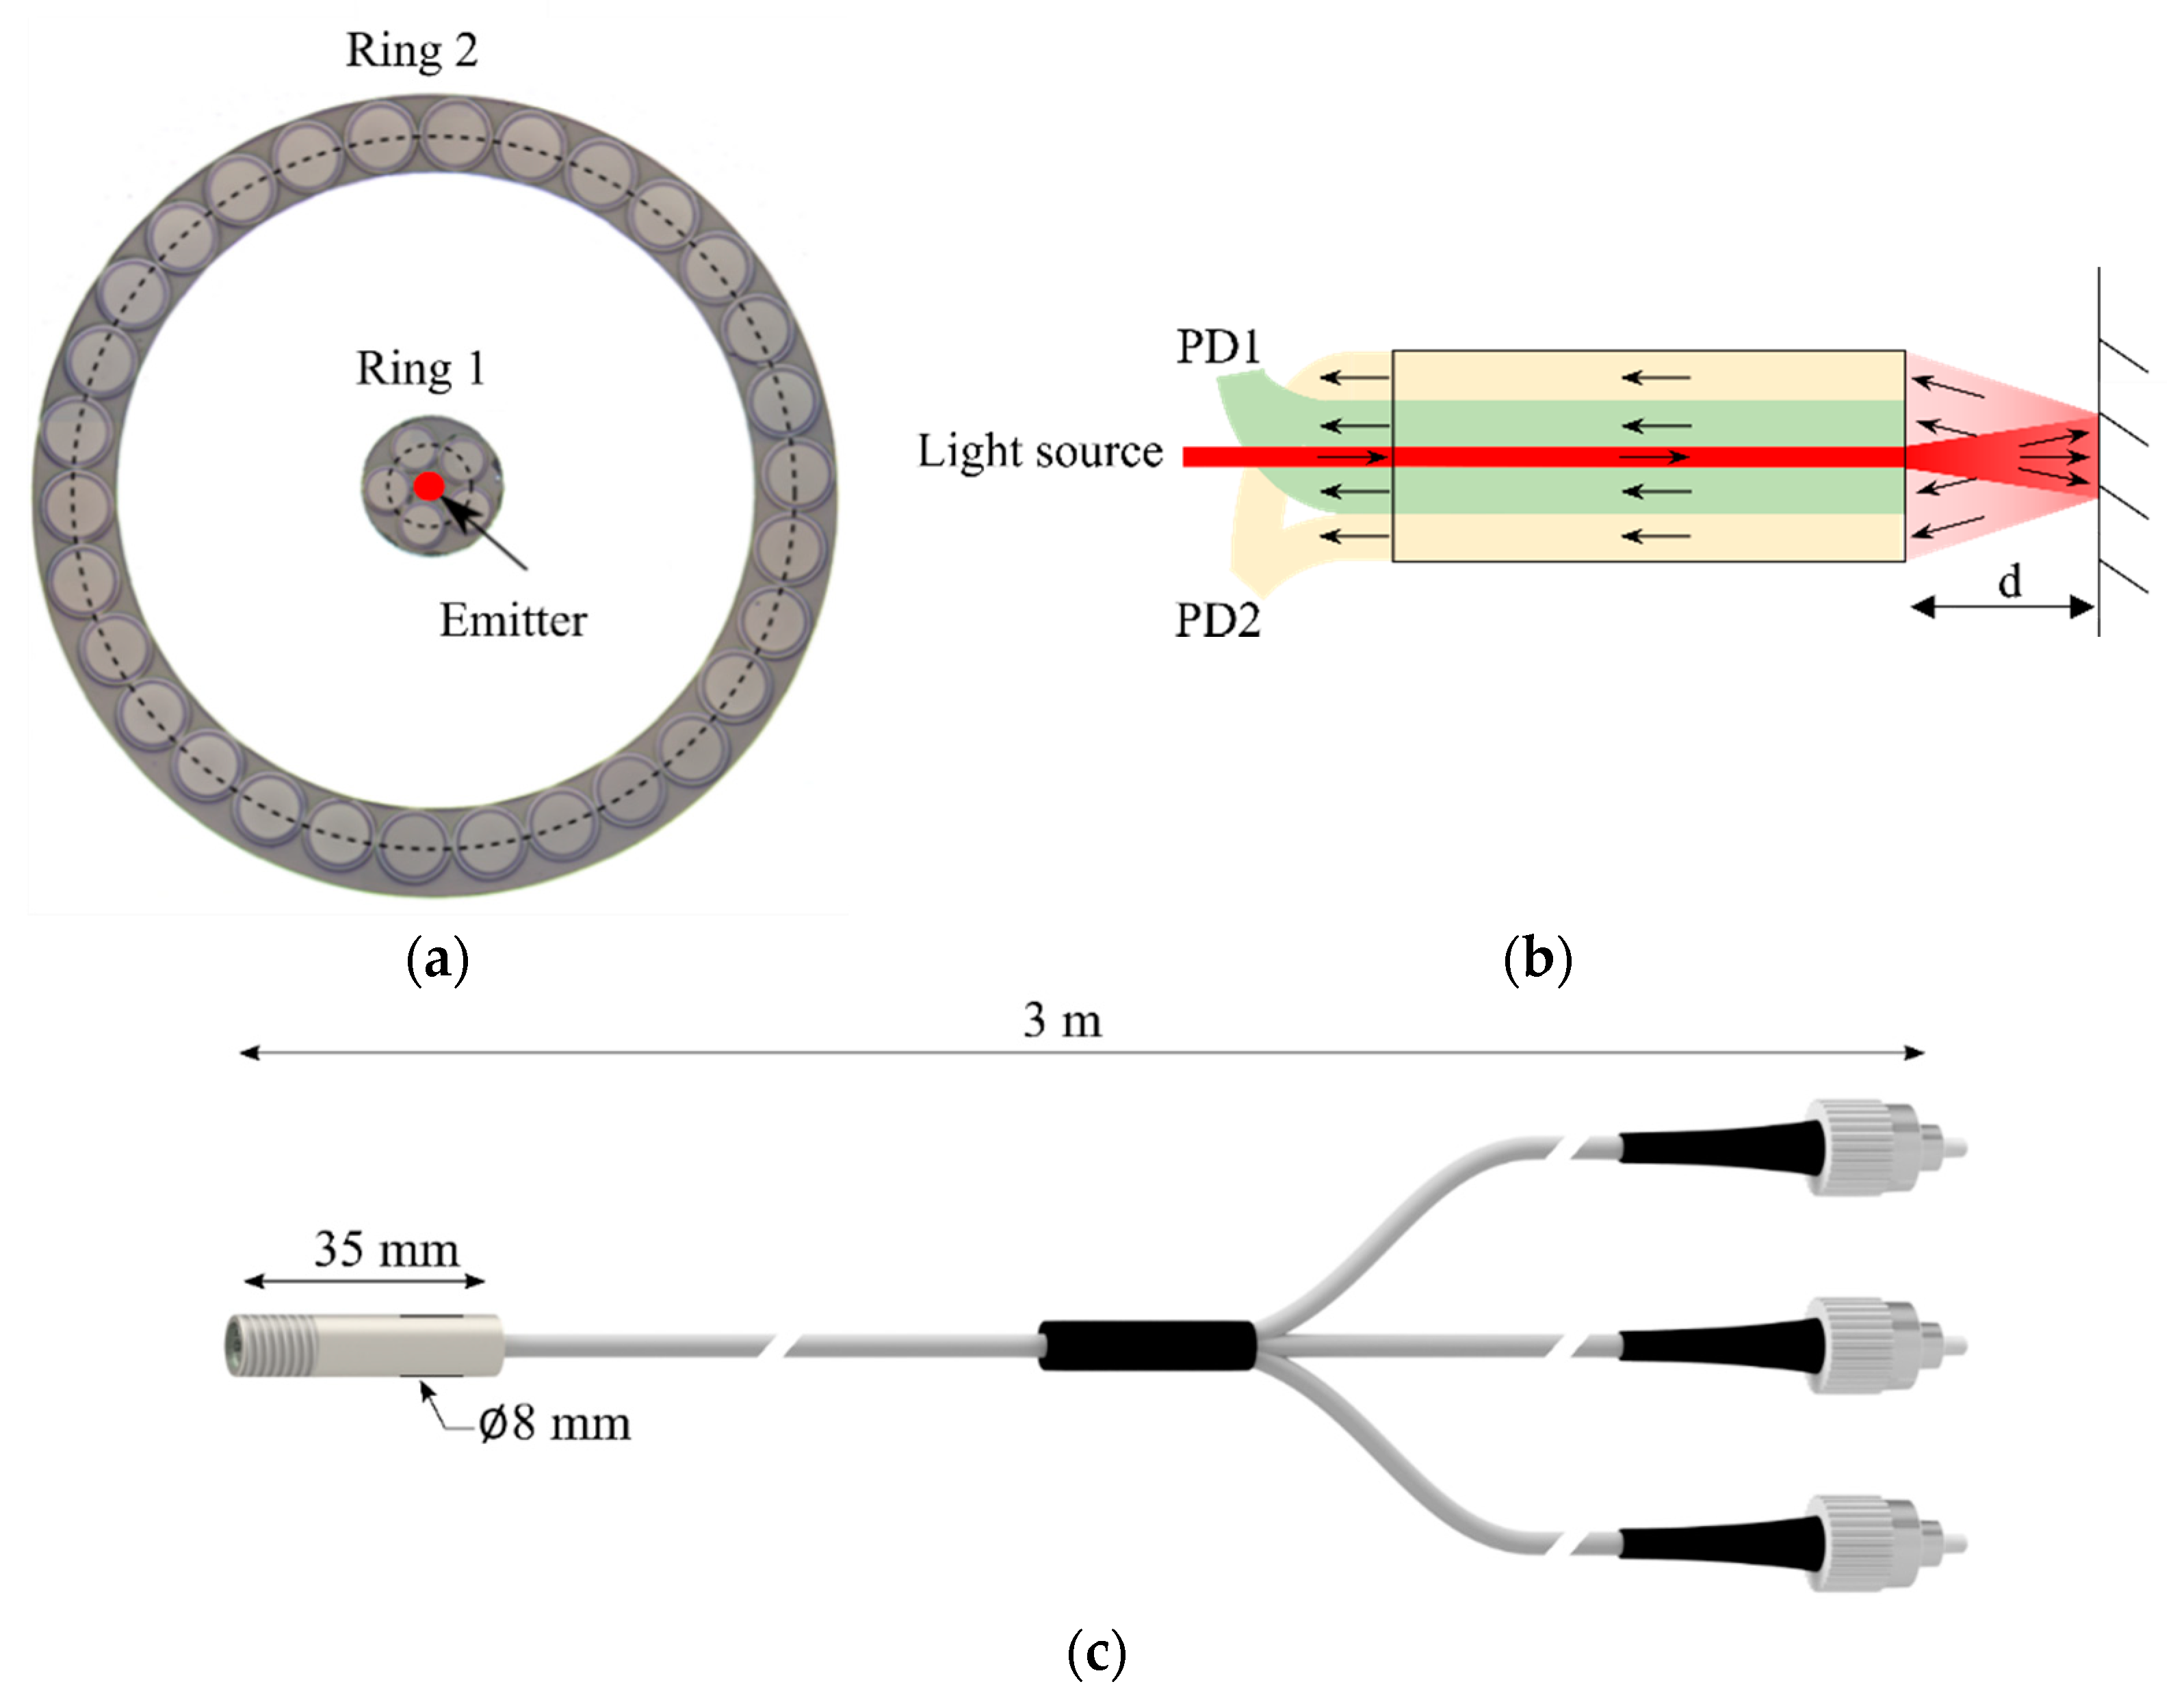
Figure 1. (a) Cross-sectional photograph of the fibre bundle (showing only the central emitting fibre, as well as the innermost and outermost rings). All configurations share the same general geometrical scheme, but the exact geometry of the bundle and the physical and optical characteristics of the fibres vary from configuration to configuration. (b) Illustration of the working principle of the optical sensor: The reflected light is collected by two independent rings of receiving fibres. (c) Detailed description of the fibre bundle in the fifth configuration. (d) Cross-section of the fibre bundle in the fifth configuration (OS 3).
Ijtpp 06 00003 g001aIjtpp 06 00003 g001b
Figure 2. (a) Illustration of the geometrical distribution of the sensors in the turbine test rig. (b) Photograph of one of the ad-hoc-built micrometre-driven adapters used to insert accurately the optical probe in the casing. (c) Assembly of one of the optical sensors in the turbine test rig.
Ijtpp 06 00003 g002
Figure 3. Detail of the optical probe (a) installed inside one of the adapters, and (b) during a laboratory calibration with a spare blade.
Ijtpp 06 00003 g003
Figure 4. Response curve of the three optical sensors OS 1, OS 2 and OS 3 as a function of the distance from the surface of interest to the tip of the sensor. The shaded region defines the working region of interest. OS 1: Commercial optical sensor from Philtec (RC171). OS 2 and OS 3: Custom-designed sensors that operate in the back and front slope regions (second and first linear regions), respectively.
Ijtpp 06 00003 g004
Figure 5. Response curves for different sensor configurations. On the left, for the fifth configuration (Config. 5), the complete calibration curve is shown as a dashed line, and the front slope is highlighted as a solid line. On the right, the back slopes of the rest of the configurations are shown magnified 20 times.
Ijtpp 06 00003 g005
Figure 6. (a) Response curve of the different three optical sensors OS 1, OS 2 and OS 3 to the passing of a blade. The datum and inter-blade spacing are highlighted as grey and red-shaded areas, respectively. (b) 3D model of the blade and travel path of the light beam emitted by the emitter fibre.
Ijtpp 06 00003 g006
Figure 7. Comparison of the instantaneous speed of the turbine over several shaft turns given by OS 3 and the Once-Per-Revolution (OPR) signal.
Ijtpp 06 00003 g007
Figure 8. Histogram that represents the deviation in the calculated instantaneous speed (OS 3) with respect to the OPR reference speed (4945 rpm).
Ijtpp 06 00003 g008
Table 1. Details of the different sensor configurations.
1st Sensor Configuration2nd Sensor Configuration3rd Sensor Configuration4th Sensor Configuration5th Sensor Configuration
Emitter fibreMultimode
NA = 0.22
fibre Ø100 µm
Scrambler + Multimode
NA = 0.22
fibre Ø100 µm
POF Multimode
NA = 0.5
fibre Ø240 µm
Single-mode
NA = 0.12
fibre Ø4.3 µm
Single-mode
NA = 0.12
fibre Ø4.3 µm
Receive fibresMultimode
NA = 0.22
fibre Ø100 µm
Multimode
NA = 0.22
fibre Ø100 µm
POF, Multimode
NA = 0.5
fibre Ø240 µm
Multimode
NA = 0.22
fibre Ø100 µm
Multimode
NA = 0.22
fibre Ø200 µm
fibre Ø300 µm
Max. operational temperature for fibres350 °C350 °C60 °C350 °C350 °C
Gain of each
photodetector
G1 = G2 = 0.75 × 10⁴ V/AG1 = 0.75 × 10⁵ V/A
G2 = 2.38 × 10⁵ V/A
G1 = 0.75 × 10⁵ V/A
G2 = 2.38 × 10⁵ V/A
G1 = 0.75 × 10⁵ V/A
G2 = 2.38 × 10⁵ V/A
G1 = 1.51 × 10³ V/A
G2 = 1.51 × 10⁵ V/A
Range of working distance3–7 mm3–7 mm0–5 mm0–5 mm2.5–4.3 mm
Calibration curveV2/V1 = −0.089d + 1.8783
R2 = 0.9945
V2/V1 = −0.2002d + 2.4578
R2 = 0.9455
V2/V1 = −0.213d + 5.0064
R2 = 0.9997
V2/V1 = −0.2167d + 3.8448
R2 = 0.9882
V2/V1 = 43.36d − 67.57
Cross-section Ijtpp 06 00003 i001 Ijtpp 06 00003 i002 Ijtpp 06 00003 i003 Ijtpp 06 00003 i004 Ijtpp 06 00003 i005
Table 2. Errors of OS 1, OS 2 and OS 3 while detecting the blade speed blade by blade.
OS 1 Leading EdgeOS 1 Trailing EdgeOS 2 Leading EdgeOS 2 Trailing EdgeOS 3 Leading EdgeOS 3 Trailing Edge
91%77%53%70%6%2%
Table 3. Summary of the statistical analysis corresponding to the data shown graphically in Figure 8. The summary shows the results corresponding to OS 1, OS 2 and OS 3. Nominal speed of the working point: 4945 rpm.
SensorMean (rpm)Standard Deviation of the Mean (rpm)
OS 1−21.37±3.06
OS 2−141.74±7.13
OS 30.09±0.40
Publisher’s Note: MDPI stays neutral with regard to jurisdictional claims in published maps and institutional affiliations.