Article

Laser Peening Analysis of Aluminum 5083: A Finite Element Study

1
Department of Mechanical Engineering, The University of Alabama, Tuscaloosa, AL 35487, USA
2
Curtiss Wright Surface Technologies, Metal Improvement Company, Livermore, CA 94551, USA
3
Department of Mechanical Engineering, George Mason University, Fairfield, VA 22030, USA
*
Author to whom correspondence should be addressed.
Quantum Beam Sci. 2021, 5(4), 34; https://doi.org/10.3390/qubs5040034
Submission received: 28 September 2021 / Revised: 25 November 2021 / Accepted: 29 November 2021 / Published: 7 December 2021
(This article belongs to the Special Issue Laser Assisted Manufacturing)

Abstract

:
In this research, a finite element (FE) technique was used to predict the residual stresses in laser-peened aluminum 5083 at different power densities. A dynamic pressure profile was used to create the pressure wave in an explicit model, and the stress results were extracted once the solution was stabilized. It is shown that as power density increases from 0.5 to 4 GW/cm2, the induced residual stresses develop monotonically deeper from 0.42 to 1.40 mm. However, with an increase in the power density, the maximum magnitude of the sub-surface stresses increases only up to a certain threshold (1 GW/cm2 for aluminum 5083). Above this threshold, a complex interaction of the elastic and plastic waves occurring at peak pressures above ≈2.5 Hugoniot Elastic Limit (HEL) results in decreased surface stresses. The FE results are corroborated with physical experiments and observations.

1. Introduction

Laser technology has been used excessively utilized in material processing and manufacturing techniques such as forming [1], peening [2], additive manufacturing [3], cladding [4], and welding [5]. Among them, laser peening (LP) is an innovative post-processing technique used in the industry to mitigate surface-related failures such as corrosion, fatigue, fretting fatigue, corrosion–fatigue, etc. This versatile technique is also used to form complex shapes and structures [6]. Compared to other similar surface engineering methods such as shot peening [7], water jet peening [8], and ultrasonic peening [9], LP is advantageous as it generates deeper residual stresses with increased thermal stability that is attributed to the lower amount of cold work [10]. However, to achieve the full potential of this technique, a precise understanding of the peening process along with the effects of different process parameters are required [11].
Many experimental studies have focused on parameter optimization of the LP process and the effects of LP on the mechanical properties and material performance [12,13,14,15]. However, far fewer attempts have been made to fundamentally understand the wave propagation and corresponding residual stress distribution [16]. This is, of course, anticipated as in situ monitoring of the residual stress distribution during peening is extremely challenging if not impossible [11]. Thus, a hybrid experimental and simulation approach enables an improved understanding of how adjusting various peening parameters affects the pressure wave as it propagates through the material as well as the final state of residual stresses.
The literature contains several studies focused on the numerical simulation of the LP process. Braisted et al. [17] used a combination of explicit and implicit dynamic analysis algorithms in ABAQUS to study the residual stresses induced by the LP process in Ti-6Al-4V as well as 35 CD4. Ding et al. [18] expanded their approach from 2D to 3D and implemented an HEL plastic model to study different LP processing conditions in different metal alloys. Peyre et al. [19] also applied a finite element method (FEM) along with the Johnson–Cook plasticity model to simulate the LP process through 2D axisymmetric FE models for martensitic stainless steel and 7075 aluminum. These studies, among others [20,21,22,23], provided improved insight into the LP process and contributed immensely to the process optimization.
In this research, the effects of power density on the magnitude and distribution of the residual stresses in the LPed Al 5083 were studied. Al 5083 is an emerging material of choice for applications in aerospace and marine industries due to its high strength-to-weight ratio as well as other outstanding attributes [24]. While this alloy is widely used in different sectors, the literature has few experimental studies on LP of Al 5083, which are mainly focused on its corrosion cracking behaviors [24,25]. However, no analytical effort has been attempted to quantitatively understand the effect of the LP process on the Al 5083 state of residual stress. This work provides the first combined experimental and numerical analysis on the LP of Al 5083, with new insights on how the laser power density affects the magnitude, depth, and distribution of the induced residual stresses in the alloy.

2. 3D Simulation of the Laser Peening Process

A 3D FE model was created using ABAQUS software to investigate the impact of a single layer LP with different power densities on Al5083 specimens. The overall dimensions of the specimen were modeled to be 12 mm × 12 mm × 7 mm, where an axisymmetric quarter of the block was only considered (Figure 1). Following the experimental conditions discussed later, the simulations were carried out with four power densities of 0.5, 1, 2, and 4 GW/cm2, which produce peak pressures (PPeak) of 0.72, 1.02, 1.44, and 2.44 GPa. Pressure loading condition was estimated based on the methodology developed by Fabbro et al. [26,27,28]. Detailed explanation of the method is provided in supplementary materials—Supplementary Information (SI), Section S1.1.
The target material was assumed to be initially stress free and considered to be elastic–plastic, homogeneous, and isotropic. It is known that in the LP process, the material becomes deformed at an extremely high strain rate (up to 107 s−1); therefore, the constitutive relations obtained from quasi-static conditions are not valid. As a result, herein, the Johnson–Cook (JC) model, being capable of predicting the material response to high strain rates and large deformations, was selected for the simulation. The JC model relates the strain hardening, the strain rate effects, and thermal effects to the flow stress in material expressed as:
σ = [ A + B ε p n ] [ 1 + C l n ε ˙ ε ˙ 0 ] [ 1 ( T T 0 T m T 0 ) m ]
where A, B, n, C, and m are the material constants; ε p represents the equivalent plastic strain; ε ˙ and ε ˙ 0 are the plastic strain rate and the reference plastic strain rate, respectively. A is defined as the yield strength; B denotes the strain-hardening modulus; n is the strain-hardening exponent; and C accounts for the strain rate-hardening effect. T is the temperature in Kelvin and   T 0 , T m , and m are the room temperature, the melting point of material, and the power of thermal softening, respectively. Since in the LP technique, the thermal effect of the process is negligible compared to the mechanical effects, the temperature term in the JC model could be eliminated. The properties of Al 5083 used here were adopted from Refs. [29,30] for the dynamic response of Al 5083 and are listed in Table 1.
To enhance the accuracy of the model as well as facilitate obtaining a converged plastic strain distribution, a finer mesh was used in and around the pulse area where elements of 0.05 mm × 0.05 mm × 0.03 mm were chosen (Figure 1). C3D8R, a continuum solid eight-node reduced integration element, was chosen as the element type. To reduce the analysis time, a coarser mesh was implemented outside of the critical region. Stress waves reflected from the back and bottom surfaces can lead to an error in the analysis; hence, to mitigate this problem, infinite elements (CIN3D8) were implemented along the back and bottom surfaces (Figure 1) so that the stress waves were able to pass through. The numbers of finite and infinite elements in the model were 873,375 and 26,925, respectively.
Each simulation included two steps. In the first step and following the experimental procedure, a square laser spot (3 mm × 3 mm) with a very high pressure was applied on the top surface of the specimen in a short time. In the second step, to assure obtaining a stabilized solution, the stress results were given sufficient time to relax. ABAQUS/Explicit was used for the analysis of both first and second steps. While previously a combination of dynamic explicit analysis and static analysis has been typically used in the literature [16,31,32,33], it has been also shown that a pure explicit model can be also utilized for both steps if the proper solution time is considered for each step [10,21,34,35]. Further information about the calculation of solution times for step one (to ensure the occurrence of all the plastic deformation in the material), and step two (to obtain the equilibrium of stresses in the material) is provided in SI (Section S1.2).

3. Experiments

3.1. LP Process

A Q-switched Nd:YLF laser was employed to do the laser peening on the AL5083 specimens. The spots had a square shape with dimensions of 3 mm × 3 mm. Specimens were moved using a robotic arm for placing laser impact spots with 100 micron accuracy. A de-ionized (15 M ohm resistance) water layer of ≈1 mm thickness acting as a plasma tamper was flowed over the specimen to be peened. The laser energy passes through the water layer, forms a plasma during the first nanosecond of the pulse, and heats the plasma approximately to 13,000 K. By controlling the distance between the specimen surface and the final imaging lens, the power density was adjusted to achieve a plasma pressure, which was confined by the tamping layer that rises in pressure to above the HEL of the material. It should be added that here, the laser spot was not focused on to the target, so there is no issue of inexact focusing. In addition, breakdown in the current system with the relay imaging was tested where water breakdown only occurred above a power density of 12 GW/cm2, which is much higher than the power density values used in this study. In this study, four power densities of 0.5, 1, 2, and 4 GW/cm2 with 18 ns laser pulse duration were selected for the experiments. It is worth noting that given the laser pulse properties and since the heat capacity of the metal is sufficiently high, only a few dozens of microns of the metal experience the heating in the LP process.

3.2. Residual Stress Measurement

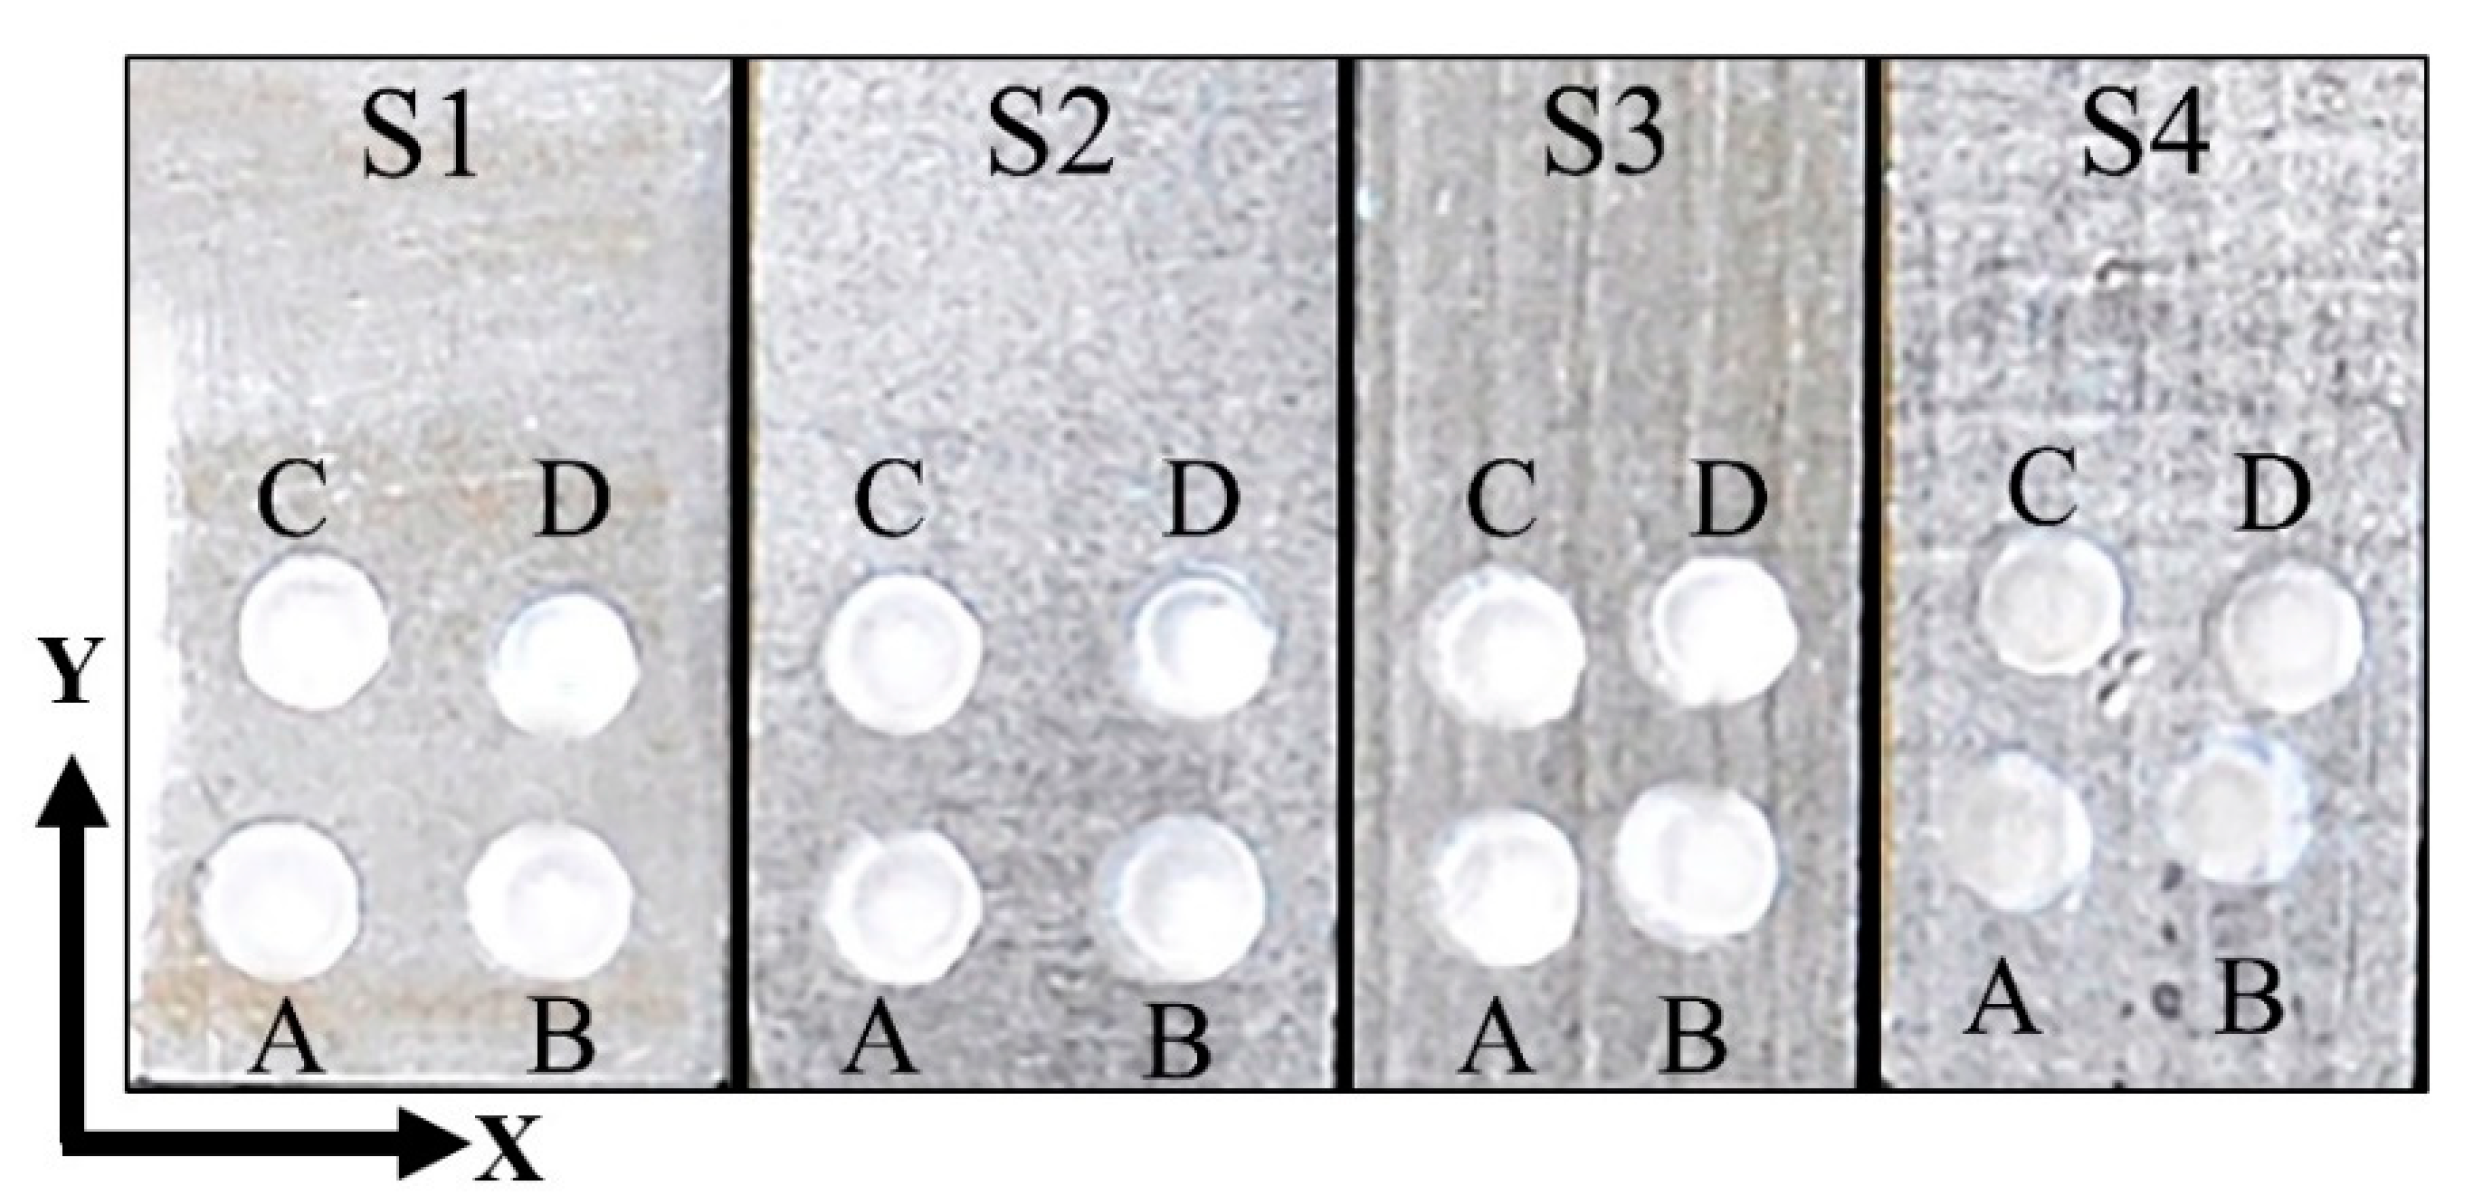
A portable X-ray diffraction (XRD) analyzer, Pulstec μ-X360 (Pulstec Industrial Co., Ltd., Hamamatsu, Japan) using the cosα method (detailed information of method are described in the SI, Section S2) was utilized to characterize the surface and in-depth residual stress. A low-intensity Cr Kα source was employed to irradiate a 2 mm diameter spot for 30 s, while an image plate was positioned normal to the incident beam at a sample-to-detector distance of ≈39 mm collecting diffracted X-rays. The X-ray incidence angle was set to 25° and the X-ray tube voltage and current were 30 kV and 1.50 mA, respectively. Since the XRD techniques are only able to measure the surface-level stress, material was removed from the surface by an electrolytic polishing machine (Proto, Proto 8818-V3, Proto Manufacturing Inc., Taylor, MI, USA) and a saline electrolyte (Proto Electrolyte A, Proto Manufacturing Inc., Taylor, MI, USA) for in-depth residual stress measurements. The material was carefully etched in four separate regions on each sample corresponding to four different depths of ≈50, 100, 150, and 200 μm, which created circular areas (5 mm diameter) suitable for XRD measurement (Section S2, Figure 2). The precise depth measurement was performed on etched regions with a stylus profilometer (Alpha-Step D-500, KLA-Tencor, Milpitas, CA, USA).

4. Results and Discussion

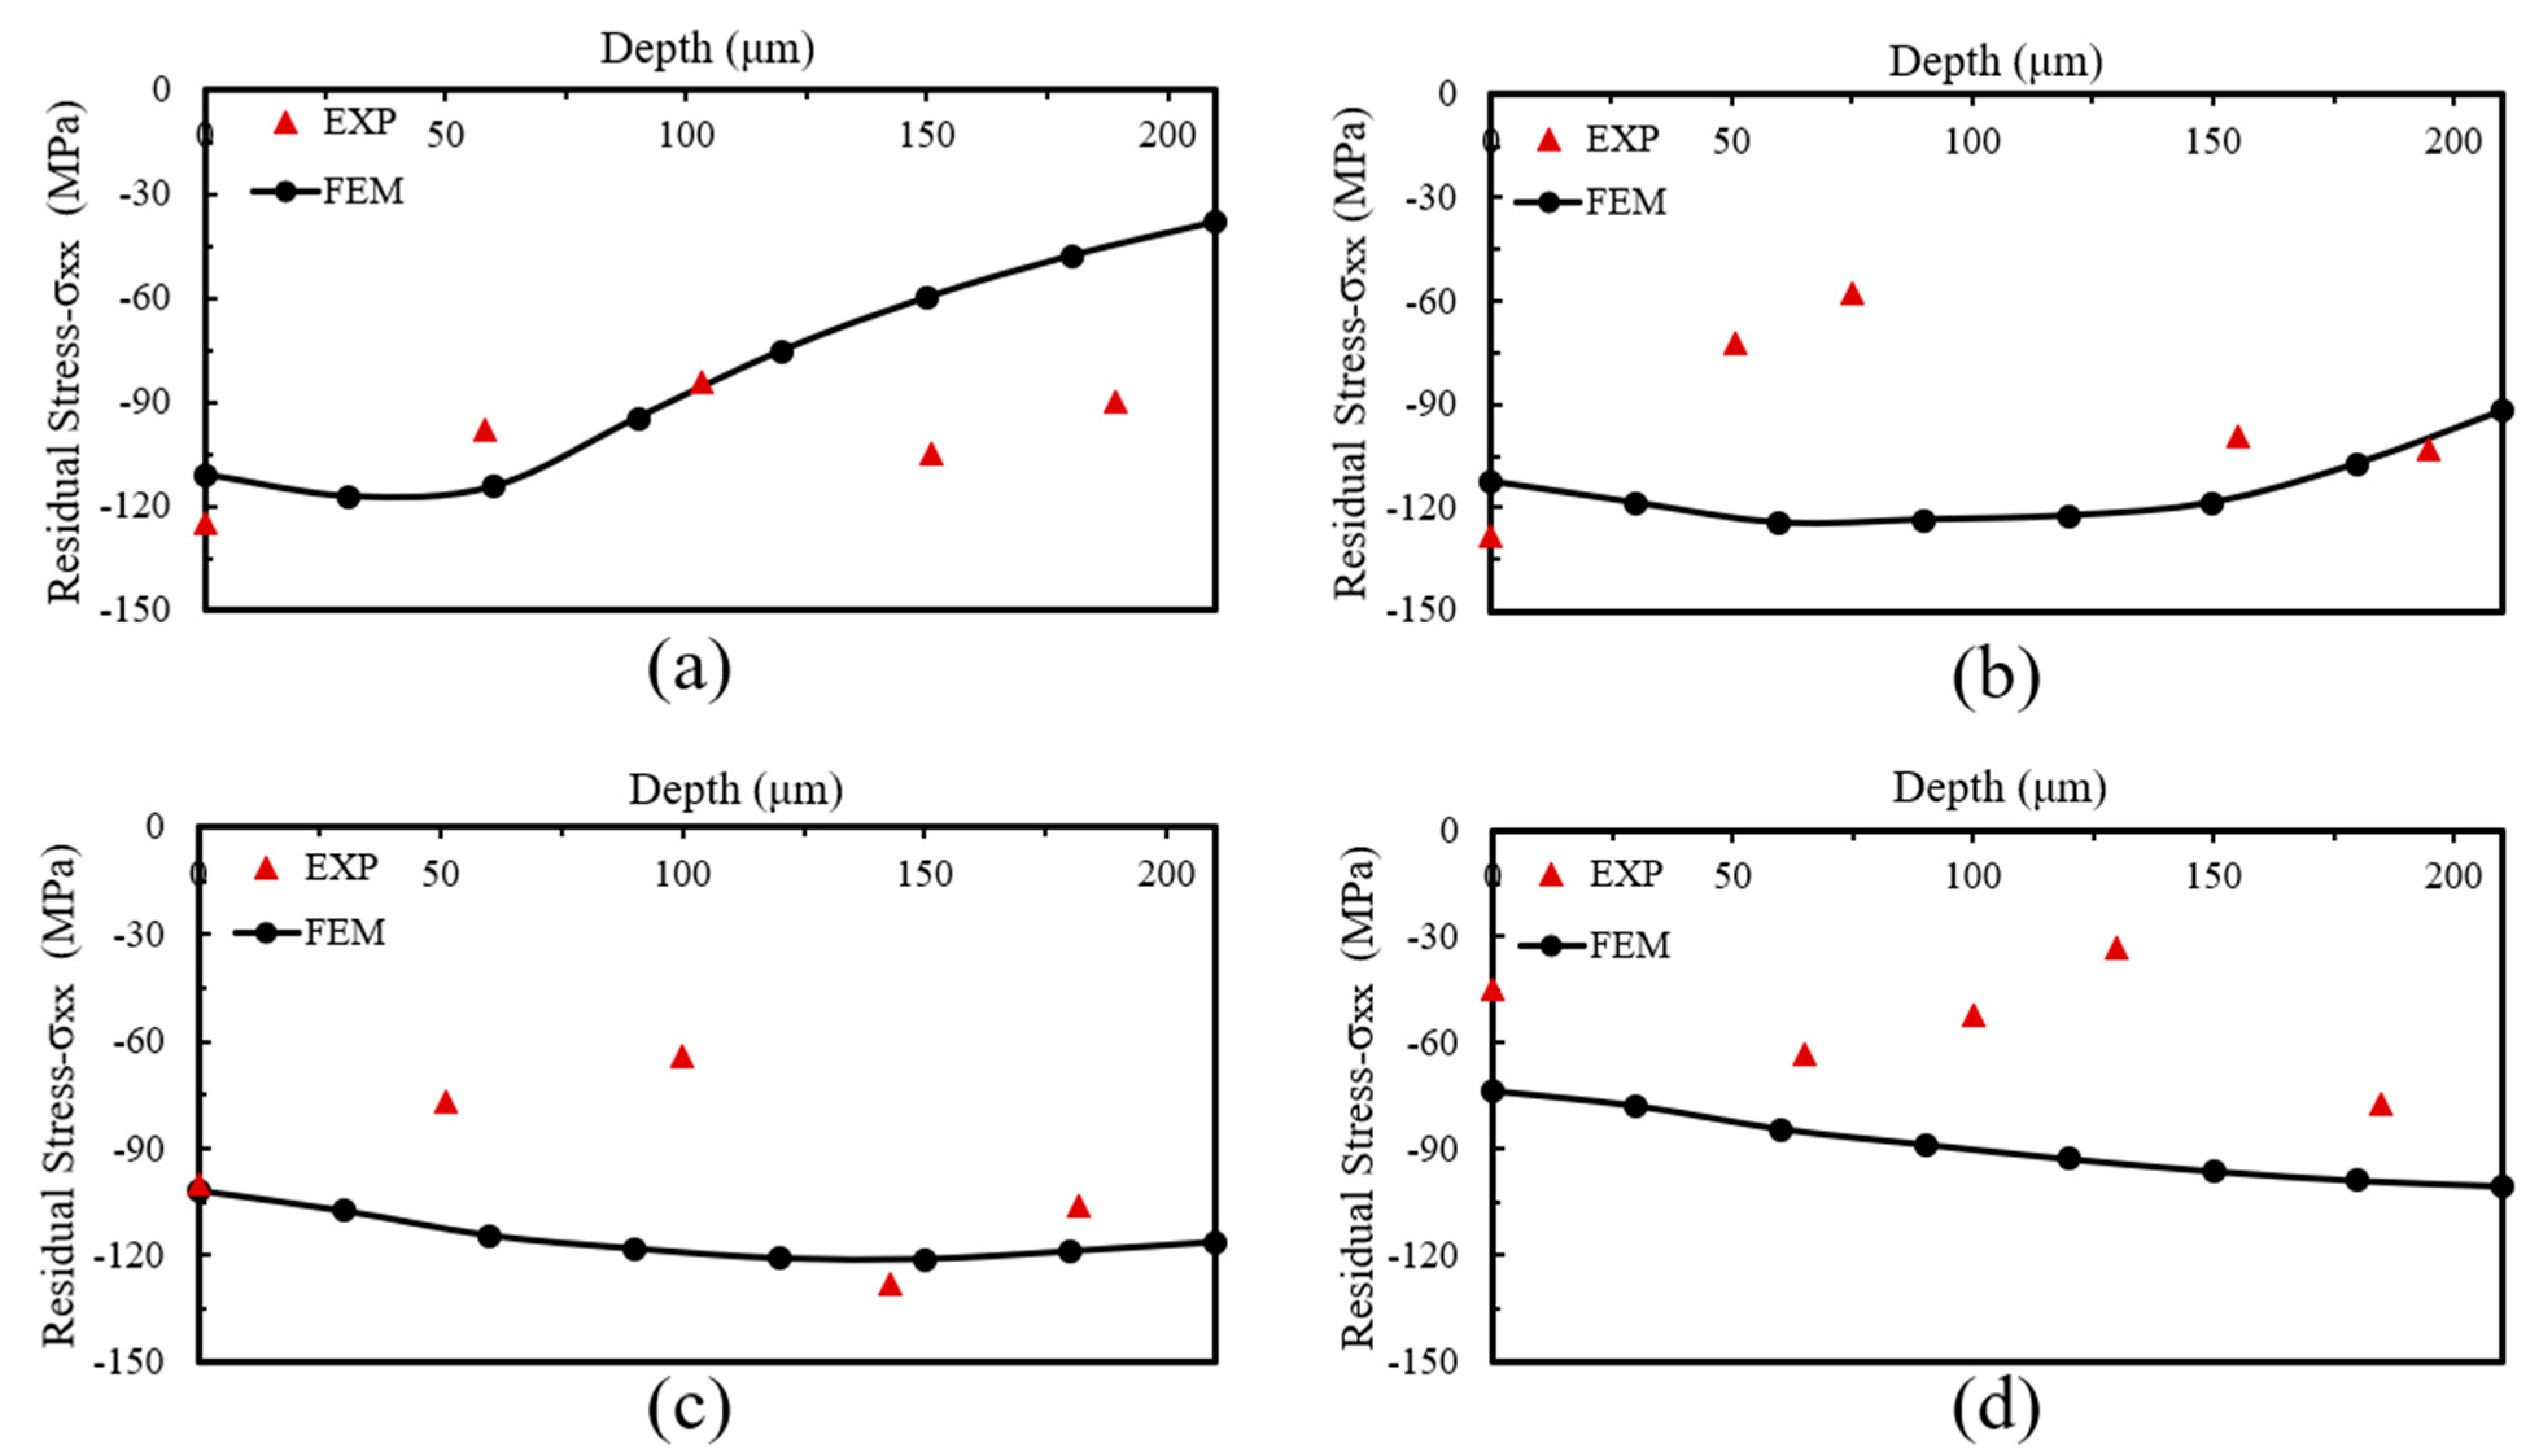
Figure 3 compares the numerical simulation results for the residual stresses along with their experimentally obtained values. The stresses were measured at different depths up to 200 µm. The experimental residual stress values for each point can be considered as the average residual stress within the measured area that is exposed to the X-ray beam. The simulation results were obtained from the average of the residual stress values of nodes along a path from the center to the edge of a peened spot.
As shown in Figure 3, only a slight difference in the compressive residual stresses is observed with an increase in power density from 0.5 to 2 GW/cm2. However, at a power density of 4 GW/cm2, a considerable decrease in the compressive residual stress values is observed for both simulation and experimental results with a majority of the points having a value less than −90 MPa. While FE analysis is able to successfully predict general experimental trends, there are differences between stress values. The differences might be attributed to couple of factors. The main factor could be that the μXRD patterns might not perfectly represent the global aluminum diffraction constants, since it was mostly obtained from regions inside grains on very small diffracting crystallites [21]. In addition, the experimental residual stress values were calculated from the whole surface of a peened spot, but the simulated residual stress values were obtained from a line (from the center to the outer edge of the spot). Additionally, for aluminum with a relatively low yield strength, XRD measurements might result in even higher errors since the magnitude of the measured stresses are generally low. Another minor contributing factor is the JC model and its sensitivity on several constants. While material properties were obtained directly from the available data in the literature for Al 5083 that was modeled here, inevitable slight differences may exist between current material constants and those of the reported in the literature that might affect the FE results [10,17].
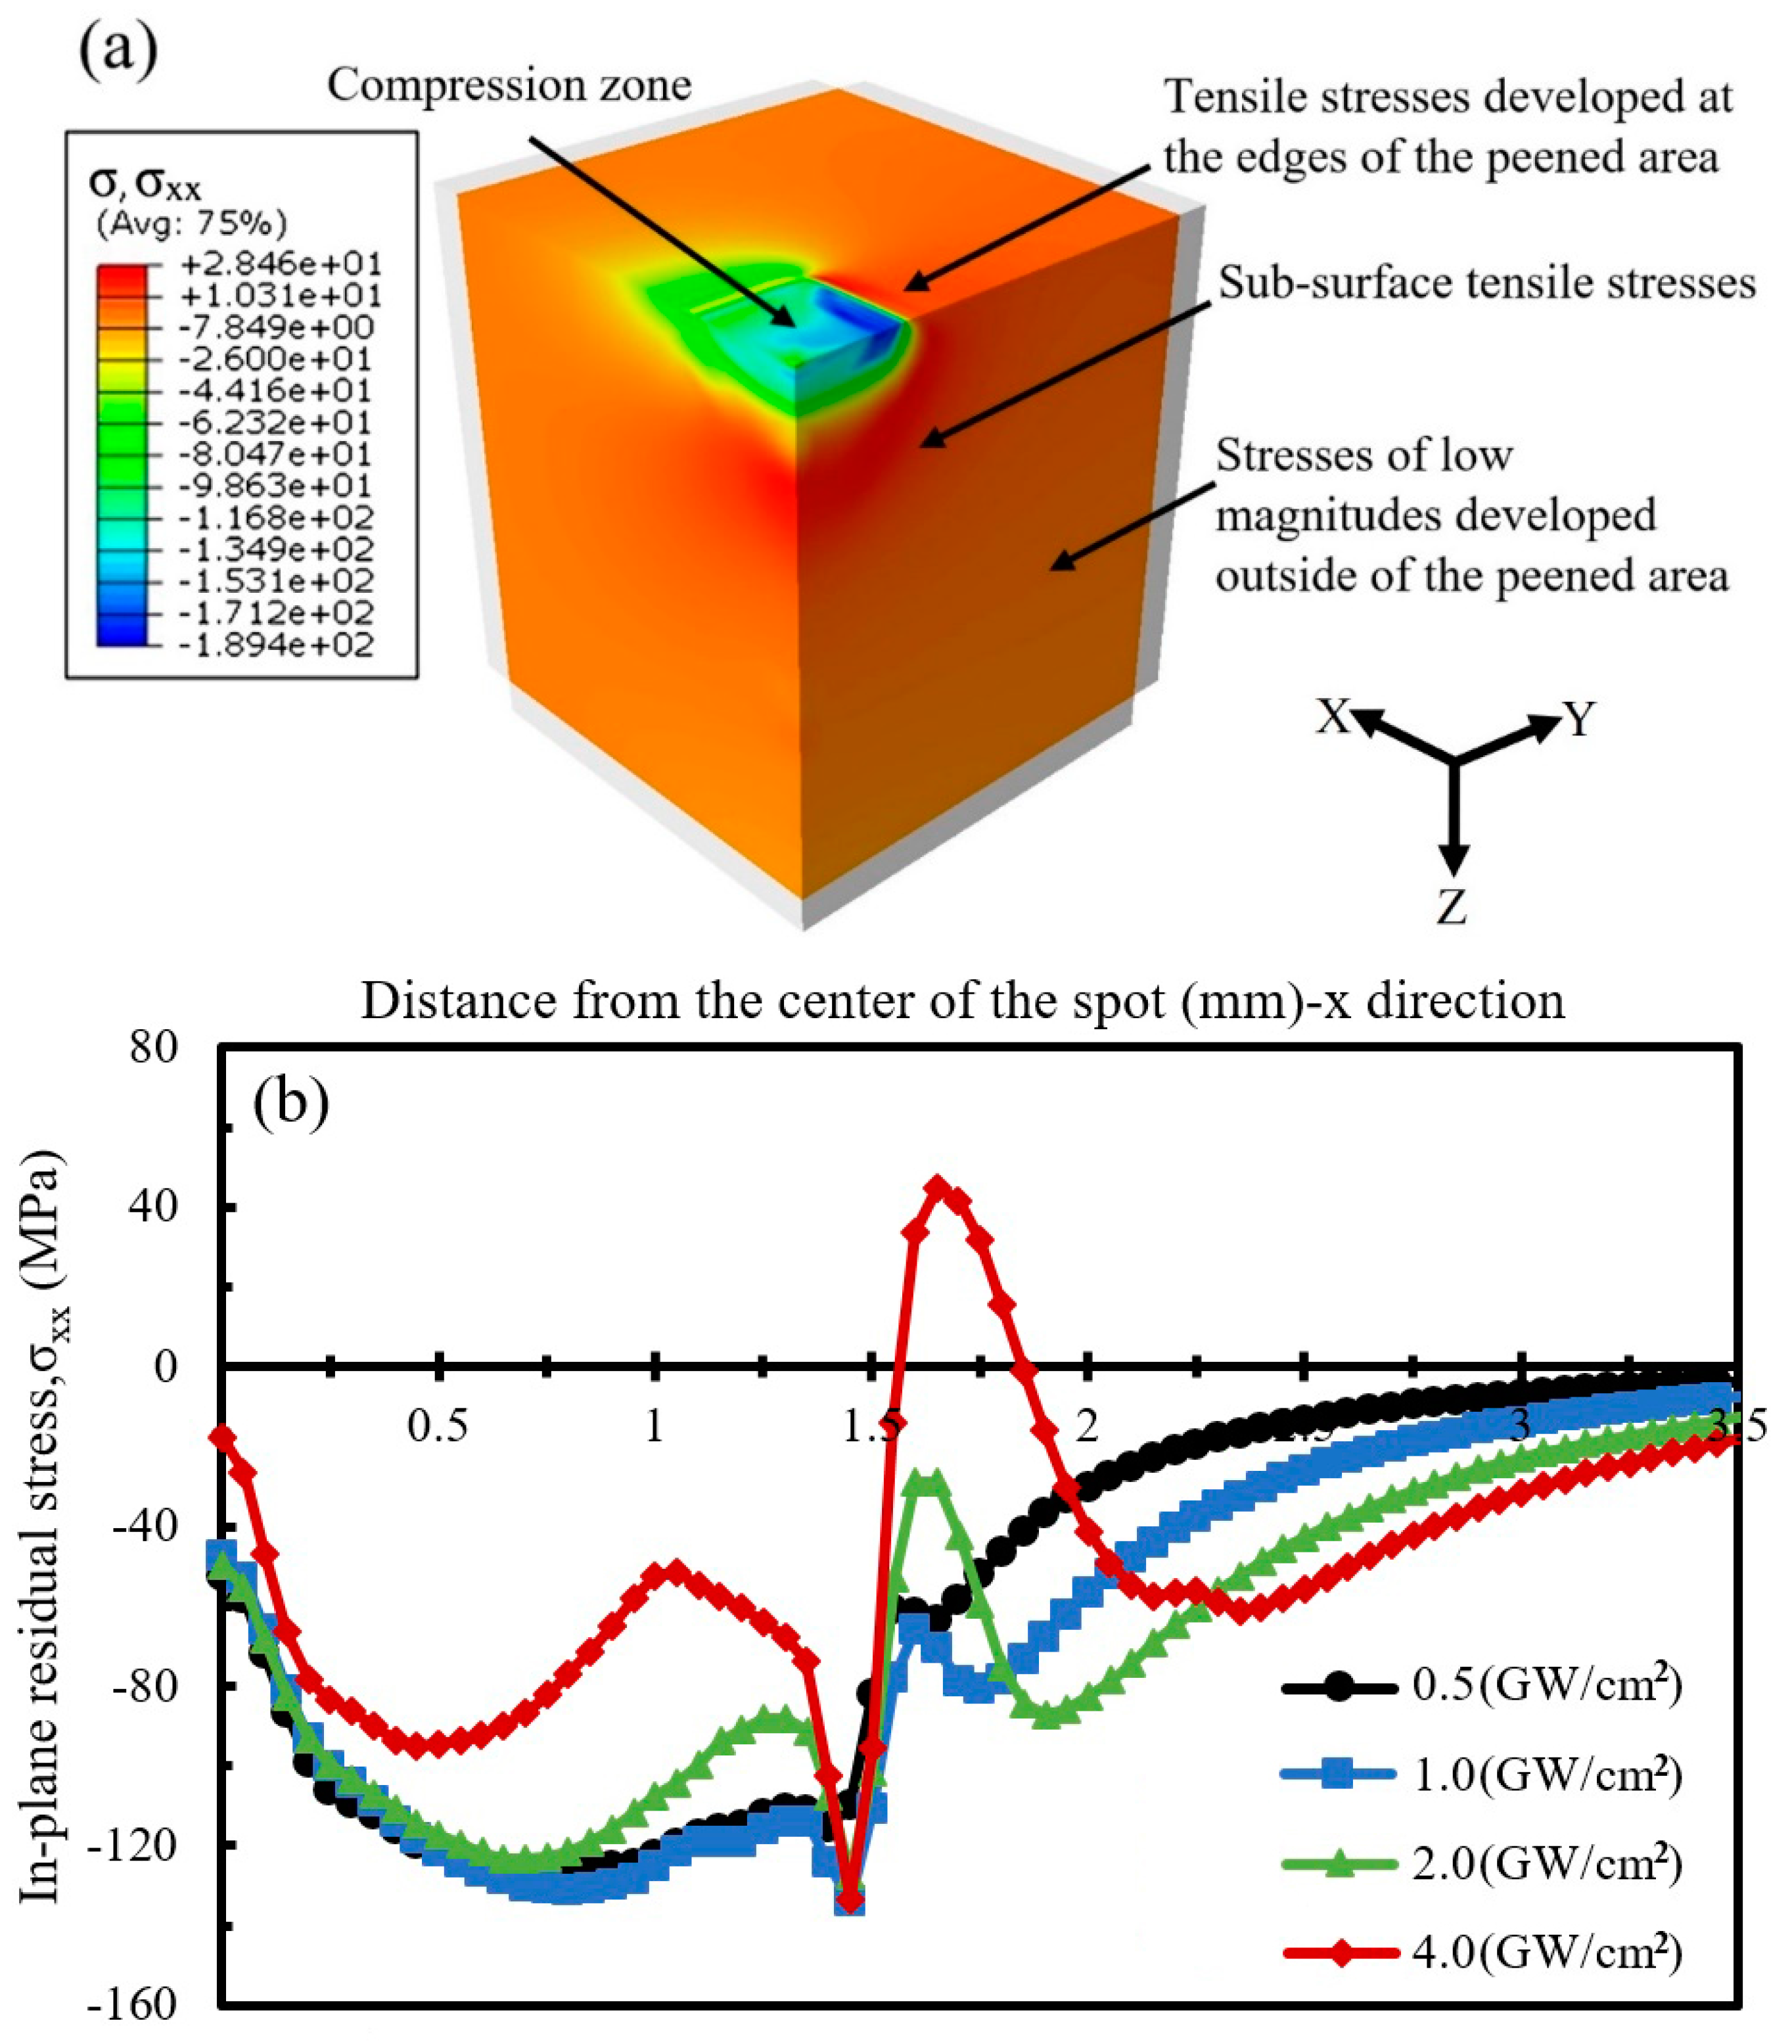
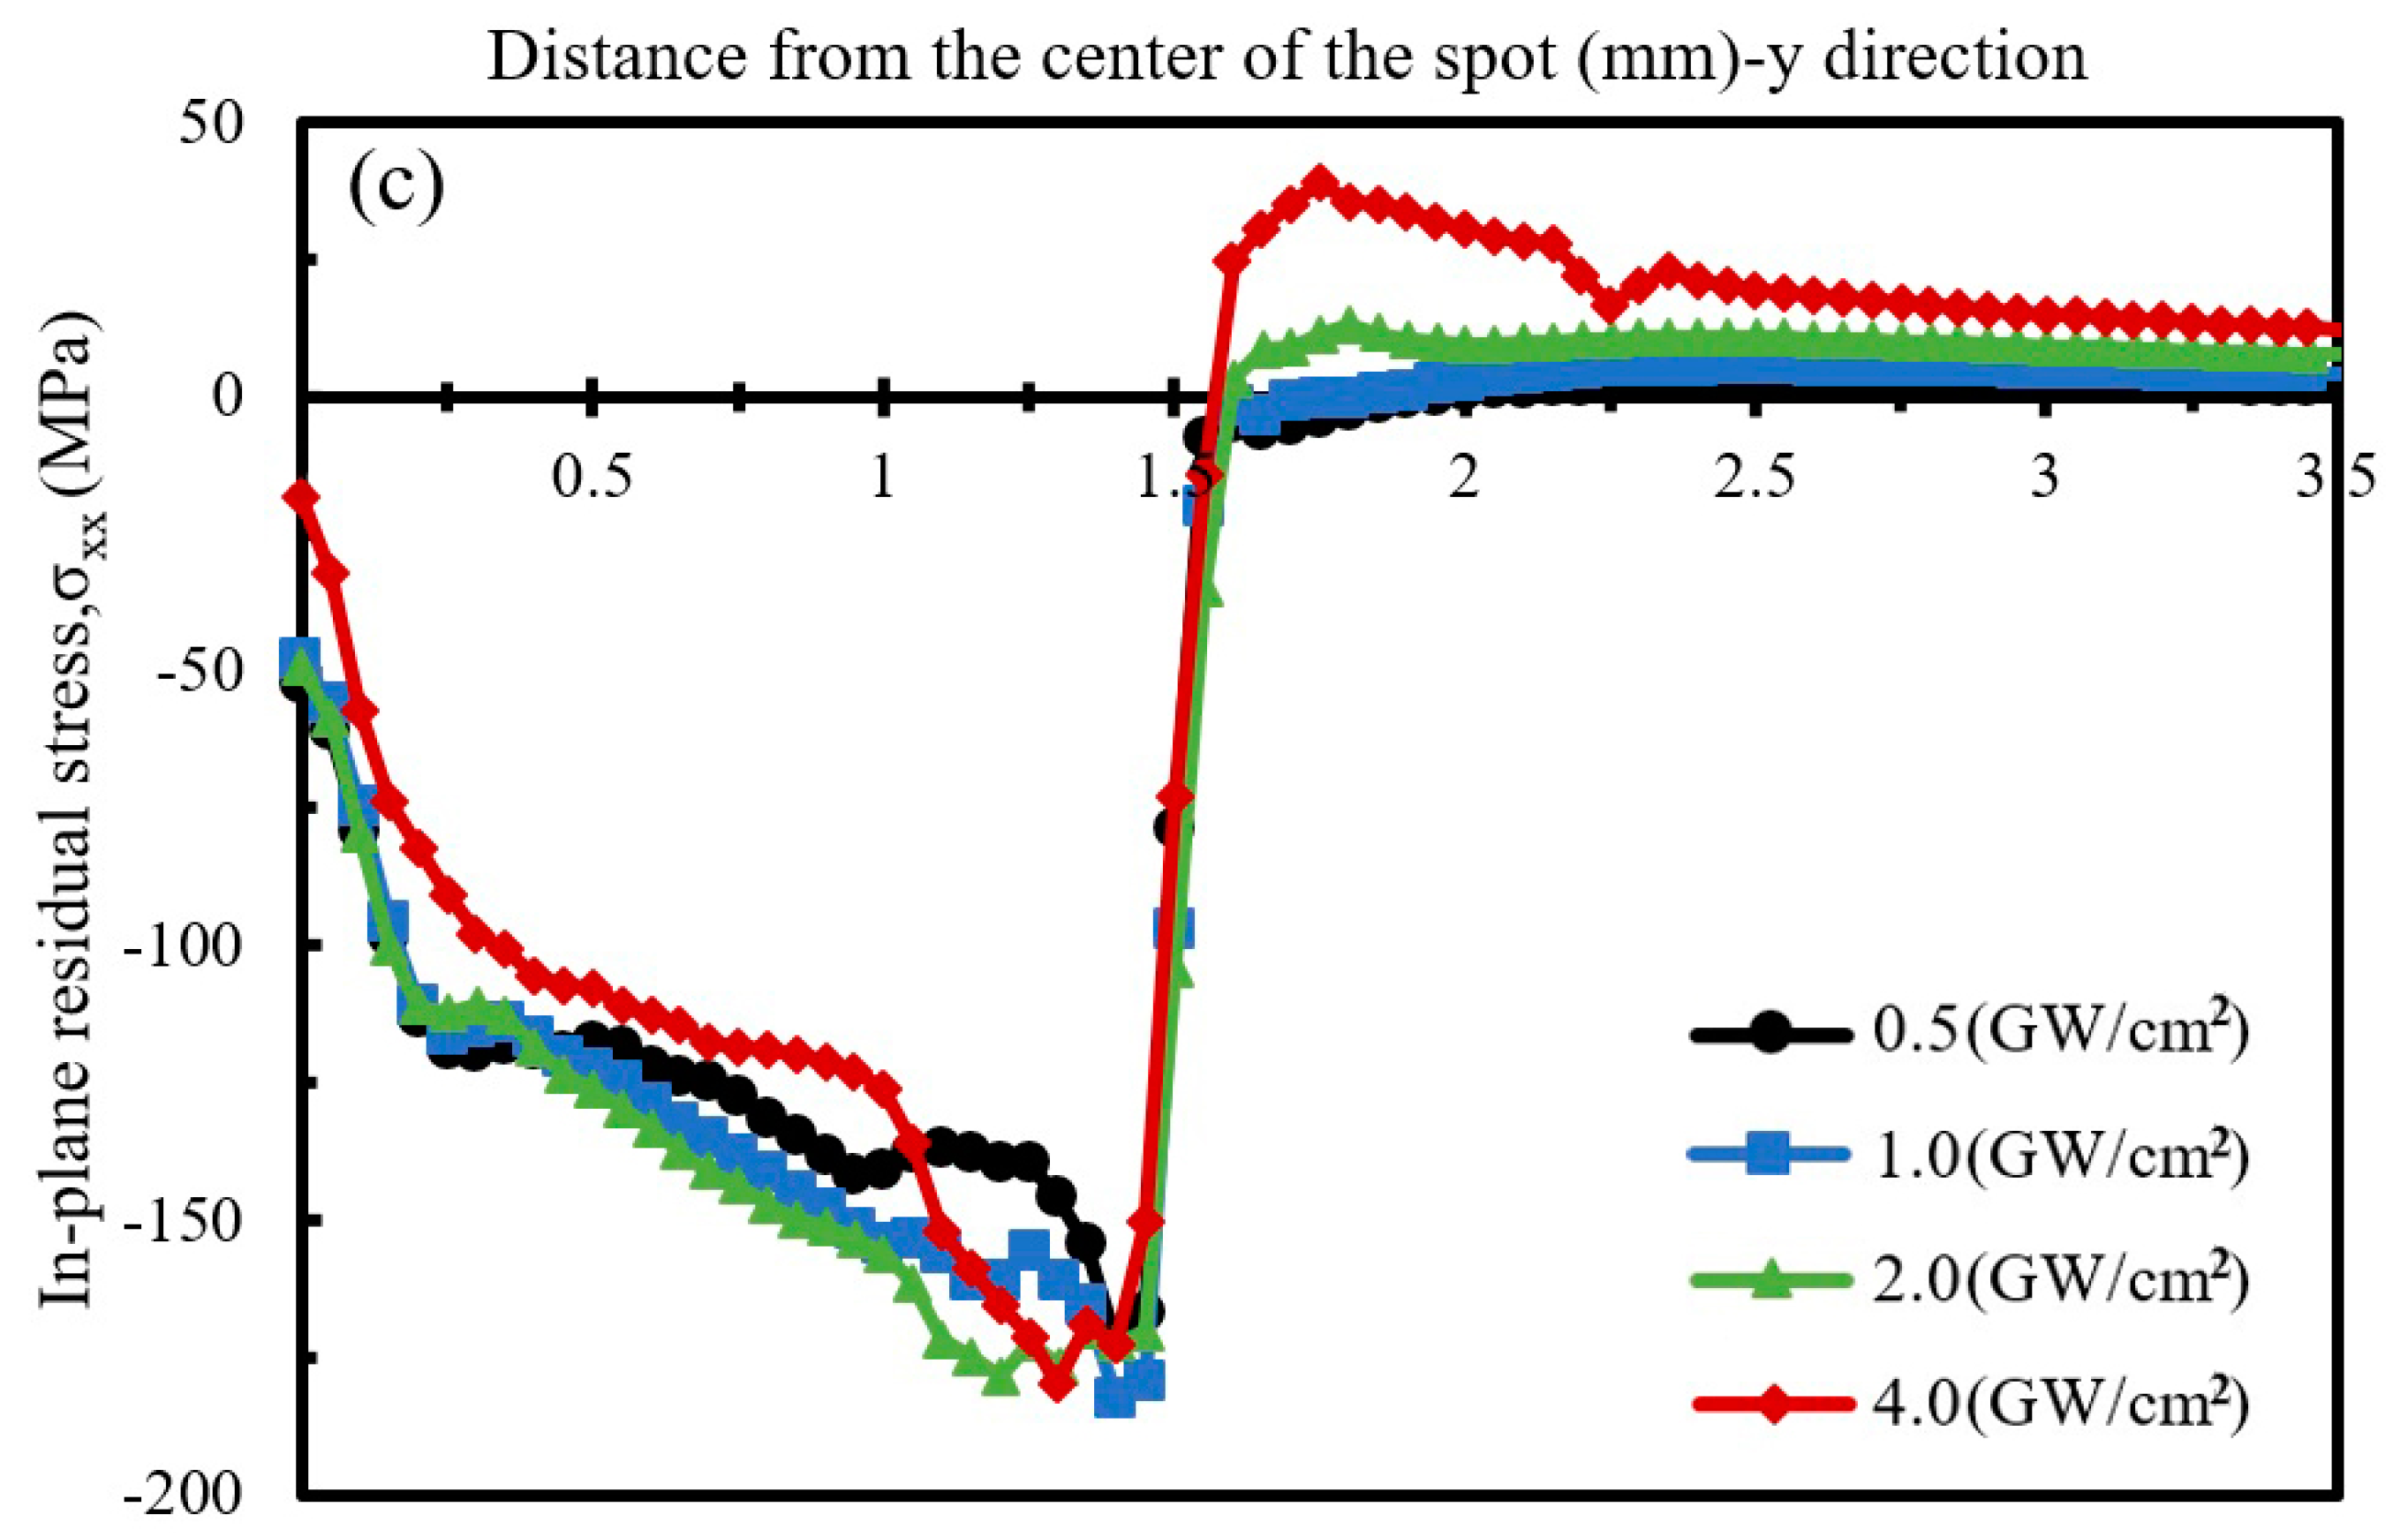
Figure 4a shows the 3D distribution of σxx residual stresses with a power density of 2 GW/cm2. It can be seen that compressive and tensile residual stresses have been developed inside and in the neighboring area of the peened spot, respectively. Figure 4b,c show the distribution of σxx on the surface with different laser power densities along the x (at y = z = 0) and y (at x = z = 0) axes, respectively. The residual stresses in the peened spot are compressive in both x and y directions. This indicates that all four power densities, 0.5 GW/cm2, 1 GW/cm2, 2 GW/cm2, and 4 GW/cm2, are able to generate peak pressures that exceed the dynamic yield strength of the material and consequently cause plastic deformation that results in the formation of compressive residual stresses [36].
Surprisingly, the maximum value of the residual stresses is not predicted to be at the center of the laser spot (Figure 4a–c). This phenomenon, called residual stress hole (or “stress empty”), was reported for both square and circular spots [37,38]. The residual stress hole may in large part be due to the concentration of the rarefaction waves that are generated by the edges of the peened area at the spot center and reverse plastic deformation. Li et al. [39] explained this phenomenon in a similar way where they attributed the formation of the stress hole to the removal of the compressive stresses at the center of the spot due to the large pulses generated from the surface waves expanding radially to the center of the spot. It was reported that there is a relationship between the magnitude of the stresses in the residual stress hole on the surface and the wave peak pressure, PPeak.
As depicted in Figure 4b, there are spatially abrupt changes in the stress values at the edge of the spot (x = ≈1.5 mm), which are more pronounced when the power density increased from 0.5 to 4 GW/cm2. It is notable that the residual stresses for the power density of 4 GW/cm2 in the x direction transition from compressive to tensile to compressive when moving from the spot center to the outside edge. Additionally, the magnitude of surface residual stresses for 4 GW/cm2 is lower than that for other power densities (Figure 4b). However, along the y direction, more uniform residual stress profiles were observed for all power densities (Figure 4c). There is an intensified peak in compressive stresses around the boundaries of the pulse area, which is followed by a rapid reduction and conversion to tensile stress outside of the spot (Figure 4c). For the power density of 4 GW/cm2 (PPeak = 2.04 GPa), the residual stress drop at the center is more pronounced in comparison to the other three power densities in both the x and y directions.
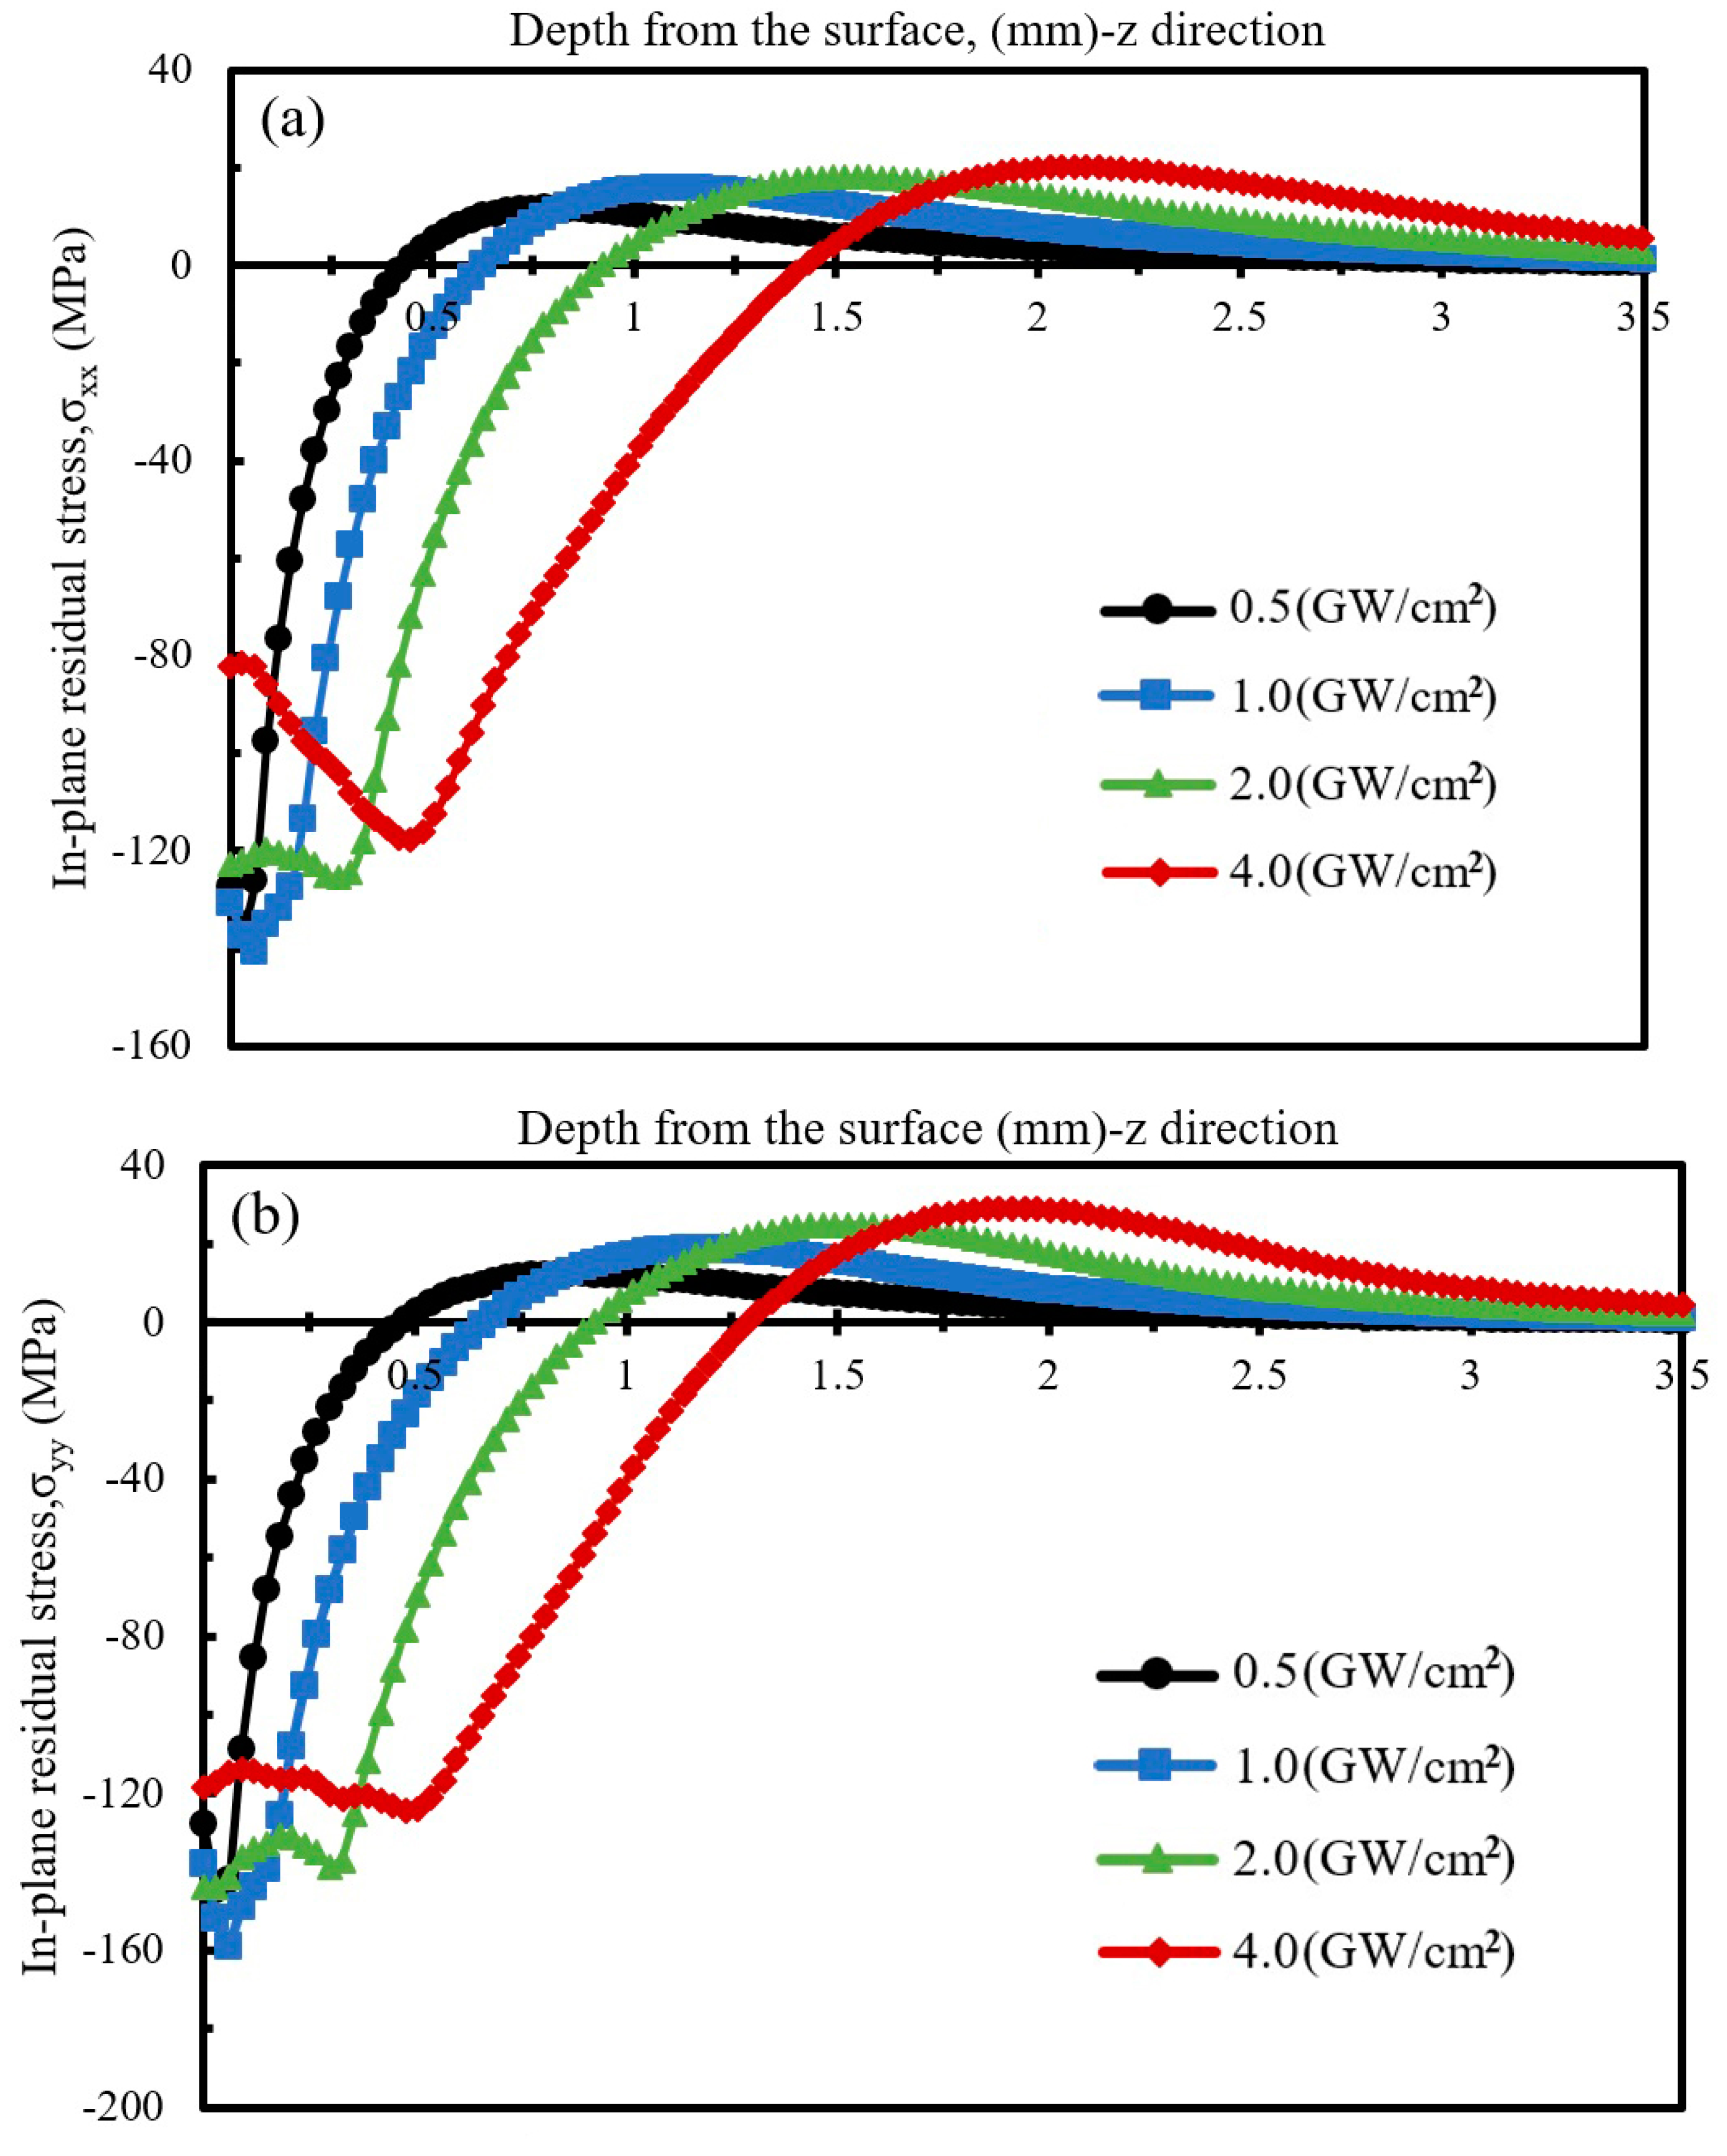
Figure 5 shows the variation of σxx and σyy with the depth. In order to avoid the effect of the residual stress hole, a position with a distance of 0.75 mm from the center of the peened spot (x = 0.75 mm, y = 0) and located on the symmetry line was selected to collect residual stress variation in depth. It should be also noted that the magnitude of the stress at other locations with close proximity to the center is checked, and a negligible difference between the residual stress values was observed. It can be seen from Figure 5a that at a power density of 0.5 GW/cm2, compressive stresses are formed up to a distance of ≈0.42 mm from the peened surface, and tensile stresses are generated beneath that (0.42 < z < 3 mm) to counter-balance the compressive stresses. With an increase in the power density from 0.5 to 4 GW/cm2, the depth of the compressive residual stresses also increases (from 0.42 for 0.5 GW/cm2 to 1.40 mm for 4 GW/cm2). This was expected, as the depth of the compressive residual stresses in an LPed specimen is closely related to the plastically deformed area [40].
The value and depth of the maximum residual stresses for the power density of 0.5 GW/cm2 are 135 MPa and ≈0.03 mm, respectively. The results show that σxx compressive residual stresses near the surface achieve magnitudes as high as 140 MPa with increasing power density to 1 GW/cm2 (PPeak = 1.02 GPa) at a depth of ≈0.06 mm (Figure 5a). With increasing the power density to 2 GW/cm2, although the values of residual stresses decrease slightly, the residual stresses are almost constant (in the range of 119.6–125.4 MPa) to the depth of 0.29 mm. Interestingly, while the compressive residual stresses are observed at a greater distance from the surface for the power density of 4 GW/cm2 compared with lower power densities, the magnitude of compressive residual stresses on the surface and sub-surface drops remarkably. Similar observations have been reported for A356-T6 alloy as well as Steel 1045 previously [38,41]. As shown in Figure 5b, similar results were observed for the σyy in-plane residual stress.
The observation here agrees well with the model developed by Peyre et al. [41] where the plastic deformation rises linearly when the peak pressure increases from 1 HEL to 2 HEL and its maximum limit is attained at around 2 to 2.5 HEL. Above that, the surface release waves focus and intensify from the edges of the impacts, and this phenomenon leads to the modification of the residual stress field. Therefore, while a power density of 4 GW/cm2 (PPeak = 2.04 GPa > 2.5 HELAl5083) generates deeper residual stresses, its magnitudes are smaller remarkably in comparison to those that the power densities of 1 and 2 GW/cm2 (PPeak = 1.02 and 1.44 G     (2 to 2.5) × HELAl5083) can generate. This is in agreement with the previously reported findings that materials can be optimally treated with PPeak in (2 to 2.5) × HEL range [37,41].

5. Conclusions

Herein, an explicit model was used to study the effects of four different power densities on the laser peening of aluminum 5083. The magnitude of the generated residual stresses up to a depth of 200 µm was compared with the experimental results. Simulations show a residual stress hole in the middle of the peened spot due to a plastic unloading wave. It was shown that with an increase in the power density from 0.5 to 4 GW/cm2, residual stresses are generated deeper into the workpiece. At a power density of 4 GW/cm2, the resulting peak pressure above 2.5 HEL reduced the near surface residual stresses.

Supplementary Materials

The following are available online at https://www.mdpi.com/article/10.3390/qubs5040034/s1, Figure S1: Temporal pressure profile, Figure S2: (a) History of the internal energy, elastically stored energy, plastically dissipated energy and artificial strain energy during the first step (b) In-plane stress profiles (σxx) versus distance from the center of spot at different calculation times during the second step (A dynamic state towards a residual state). It can be concluded that a quasi-equilibrium state is reached above 100,000 ns. Figure S3: Debye ring measurement schematic.

Author Contributions

Supervision & funding acquisition, K.D.; writing—original draft preparation, A.T.; Formal Analysis, K.D., A.T, N.H., N.B. and A.B.; Methodology, A.T. and K.D.; Review and editing, A.B., L.H., V.S. All authors have read and agreed to the published version of the manuscript.

Funding

Advanced Manufacturing program of the National Science Foundation, award CMMI-AM #2029059.

Institutional Review Board Statement

Not applicable.

Informed Consent Statement

Not applicable.

Data Availability Statement

All the raw data is available upon request.

Acknowledgments

The authors would like to thank Pulstec USA, Inc. and Toshi Suzuki (KLA) for the help with the residual stress measurements. The authors, Russell Rowe and Keivan Davami, extend gratitude to the Alabama Transportation Institute (ATI) for their support of the graduate student involved in this work. Keivan Davami acknowledges the support of the Advanced Manufacturing program of the National Science Foundation, award CMMI-AM #2029059.

Conflicts of Interest

The authors declare no conflict of interest.

References

  1. Bachmann, A.L.; Dickey, M.D.; Lazarus, N. Making Light Work of Metal Bending: Laser Forming in Rapid Prototyping. Quantum Beam Sci. 2020, 4, 44. [Google Scholar] [CrossRef]
  2. Gujba, A.K.; Medraj, M. Laser Peening Process and Its Impact on Materials Properties in Comparison with Shot Peening and Ultrasonic Impact Peening. Materials 2014, 7, 7925–7974. [Google Scholar] [CrossRef] [Green Version]
  3. Thiede, T.; Mishurova, T.; Evsevleev, S.; Serrano-Munoz, I.; Gollwitzer, C.; Bruno, G. 3D Shape Analysis of Powder for Laser Beam Melting by Synchrotron X-ray CT. Quantum Beam Sci. 2019, 3, 3. [Google Scholar] [CrossRef] [Green Version]
  4. Zhu, L.; Xue, P.; Lan, Q.; Meng, G.; Ren, Y.; Yang, Z.; Xu, P.; Liu, Z. Recent research and development status of laser cladding: A review. Opt. Laser Technol. 2021, 138, 106915. [Google Scholar] [CrossRef]
  5. Shobu, T.; Shiro, A.; Kono, F.; Muramatsu, T.; Yamada, T.; Naganuma, M.; Ozawa, T. Internal Strain Distribution of Laser Lap Joints in Steel under Loading Studied by High-Energy Synchrotron Radiation X-rays. Quantum Beam Sci. 2021, 5, 17. [Google Scholar] [CrossRef]
  6. Munther, M.; Martin, T.; Tajyar, A.; Hackel, L.; Beheshti, A.; Davami, K. Laser shock peening and its effects on microstructure and properties of additively manufactured metal alloys: A review. Eng. Res. Express 2020, 2, 022001. [Google Scholar] [CrossRef]
  7. Bagheri, S.; Guagliano, M. Review of shot peening processes to obtain nanocrystalline surfaces in metal alloys. Surf. Eng. 2009, 25, 3–14. [Google Scholar] [CrossRef]
  8. Hayashi, M.; Okido, S.; Suzuki, H. Residual Stress Distribution in Water Jet Peened Type 304 Stainless Steel. Quantum Beam Sci. 2020, 4, 18. [Google Scholar] [CrossRef] [Green Version]
  9. Malaki, M.; Ding, H. A review of ultrasonic peening treatment. Mater. Des. 2015, 87, 1072–1086. [Google Scholar] [CrossRef]
  10. Peyre, P.; Chaieb, I.; Braham, C. FEM calculation of residual stresses induced by laser shock processing in stainless steels. Model. Simul. Mater. Sci. Eng. 2007, 15, 205–221. [Google Scholar] [CrossRef]
  11. Yang, C.; Hodgson, P.D.; Liu, Q.; Ye, L. Geometrical effects on residual stresses in 7050-T7451 aluminum alloy rods subject to laser shock peening. J. Mater. Process. Technol. 2008, 201, 303–309. [Google Scholar] [CrossRef]
  12. Chupakhin, S.; Klusemann, B.; Huber, N.; Kashaev, N. Application of design of experiments for laser shock peening process optimization. Int. J. Adv. Manuf. Technol. 2019, 102, 1567–1581. [Google Scholar] [CrossRef]
  13. Palma, T.; Munther, M.; Sharma, M.; Hackel, L.; Beheshti, A.; Davami, K. Nanomechanical Characterization of Laser Peened Additively Manufactured Inconel 718 Superalloy. Adv. Eng. Mater. 2019, 21, 1900499. [Google Scholar] [CrossRef]
  14. Ren, X.; Chen, B.; Jiao, J.; Yang, Y.; Zhou, W.; Tong, Z. Fatigue behavior of double-sided laser shock peened Ti-6Al-4V thin blade subjected to foreign object damage. Opt. Laser Technol. 2020, 121, 105784. [Google Scholar] [CrossRef]
  15. Kalainathan, S.; Prabhakaran, S. Recent development and future perspectives of low energy laser shock peening. Opt. Laser Technol. 2016, 81, 137–144. [Google Scholar] [CrossRef]
  16. Hu, Y.; Yao, Z.; Hu, J. 3-D FEM simulation of laser shock processing. Surf. Coat. Technol. 2006, 201, 1426–1435. [Google Scholar] [CrossRef]
  17. Braisted, W.; Brockman, R. Finite element simulation of laser shock peening. Int. J. Fatigue 1999, 21, 719–724. [Google Scholar] [CrossRef]
  18. Ding, K.; Ye, L. FEM simulation of two sided laser shock peening of thin sections of Ti-6Al-4V alloy. Surf. Eng. 2003, 19, 127–133. [Google Scholar] [CrossRef]
  19. Peyre, P.; Sollier, A.; Chaieb, I.; Berthe, L.; Bartnicki, E.; Braham, C.; Fabbro, R. FEM simulation of residual stresses induced by laser Peening. Eur. Phys. J. Appl. Phys. 2003, 23, 83–88. [Google Scholar] [CrossRef]
  20. Xiao, Y. Effect of laser shock peening on bending fatigue performance of AISI 9310 steel spur gear. Opt. Laser Technol. 2017, 94, 15–24. [Google Scholar] [CrossRef]
  21. Hfaiedh, N.; Peyre, P.; Song, H.; Popa, I.; Ji, V.; Vignal, V. Finite element analysis of laser shock peening of 2050-T8 aluminum alloy. Int. J. Fatigue 2015, 70, 480–489. [Google Scholar] [CrossRef] [Green Version]
  22. Zhou, W.; Ren, X.; Yang, Y.; Tong, Z.; Asuako Larson, E. Finite element analysis of laser shock peening induced near-surface deformation in engineering metals. Opt. Laser Technol. 2019, 119, 105608. [Google Scholar] [CrossRef]
  23. Cao, Y.; Shin, Y.C.; Wu, B. Parametric study on single shot and overlapping laser shock peening on various metals via modeling and experiments. J. Manuf. Sci. Eng. Trans. ASME 2010, 132, 0610101–06101010. [Google Scholar] [CrossRef]
  24. Yang, Y.; Zhou, W.; Tong, Z.; Chen, L.; Yang, X.; Larson, E.A.; Ren, X. Electrochemical Corrosion Behavior of 5083 Aluminum Alloy Subjected to Laser Shock Peening. J. Mater. Eng. Perform. 2019, 28, 6081–6091. [Google Scholar] [CrossRef]
  25. Sun, S. Laser Shock Peening Process to Prevent Stress Corrosion Cracking of 5xxx Aluminum Alloys. Embargoed Master’s Thesis, University of Nebraska-Lincoln, Lincoln, NE, USA, April 2018. [Google Scholar]
  26. Ballard, P.; Fournier, J.; Fabbro, R.; Frelat, J. Residual Stresses Induced By Laser-Shocks. J. Phys. IV 1991, 1, C3-487–C3-494. [Google Scholar] [CrossRef]
  27. Fabbro, R.; Fournier, J.; Ballard, P.; Devaux, D.; Virmont, J. Physical study of laser-produced plasma in confined geometry. J. Appl. Phys. 1990, 68, 775–784. [Google Scholar] [CrossRef]
  28. Peyre, P.; Fabbro, R. Laser shock processing: A review of the physics and applications. Opt. Quantum Electron. 1995, 27, 1213–1229. [Google Scholar] [CrossRef]
  29. Elwasli, F.; Zemzemi, F.; Mkaddem, A.; Mzali, S.; Mezlini, S. A 3D multi-scratch test model for characterizing material removal regimes in 5083-Al alloy. Mater. Des. 2015, 87, 352–362. [Google Scholar] [CrossRef]
  30. Boteler, J.M.; Dandekar, D.P. Dynamic response of two strain-hardened aluminum alloys. J. Appl. Phys. 2006, 100, 054902. [Google Scholar] [CrossRef]
  31. Wei, X.L.; Ling, X. Numerical modeling of residual stress induced by laser shock processing. Appl. Surf. Sci. 2014, 301, 557–563. [Google Scholar] [CrossRef]
  32. Kim, J.H.; Kim, Y.J.; Lee, J.W.; Yoo, S.H. Study on effect of time parameters of laser shock peening on residual stresses using FE simulation. J. Mech. Sci. Technol. 2014, 28, 1803–1810. [Google Scholar] [CrossRef]
  33. Ding, K. Three-dimensional dynamic finite element analysis of multiple laser shock peening processes. Surf. Eng. 2003, 19, 351–358. [Google Scholar] [CrossRef]
  34. Bikdeloo, R.; Farrahi, G.H.; Mehmanparast, A.; Mahdavi, S.M. Multiple laser shock peening effects on residual stress distribution and fatigue crack growth behaviour of 316 L stainless steel. Theor. Appl. Fract. Mech. 2020, 105, 102429. [Google Scholar] [CrossRef]
  35. Sealy, M.P.; Guo, Y.B. Surface integrity and process mechanics of laser shock peening of novel biodegradable magnesium-calcium (Mg-Ca) alloy. J. Mech. Behav. Biomed. Mater. 2010, 3, 488–496. [Google Scholar] [CrossRef]
  36. Sun, R.; Li, L.; Zhu, Y.; Zhang, L.; Guo, W.; Peng, P.; Li, B.; Guo, C.; Liu, L.; Che, Z.; et al. Dynamic response and residual stress fields of Ti6Al4V alloy under shock wave induced by laser shock peening. Model. Simul. Mater. Sci. Eng. 2017, 25, 065016. [Google Scholar] [CrossRef]
  37. Kim, J.H.; Kim, Y.J.; Kim, J.S. Effects of simulation parameters on residual stresses for laser shock peening finite element analysis. J. Mech. Sci. Technol. 2013, 27, 2025–2034. [Google Scholar] [CrossRef]
  38. Hu, Y.; Gong, C.; Yao, Z.; Hu, J. Investigation on the non-homogeneity of residual stress field induced by laser shock peening. Surf. Coat. Technol. 2009, 203, 3503–3508. [Google Scholar] [CrossRef]
  39. Li, P.; Huang, S.; Xu, H.; Li, Y.; Hou, X.; Wang, Q.; Fu, W.; Fang, Y. Numerical simulation and experiments of titanium alloy engine blades based on laser shock processing. Aerosp. Sci. Technol. 2015, 40, 164–170. [Google Scholar] [CrossRef]
  40. Achintha, M.; Nowell, D. Eigenstrain modelling of residual stresses generated by laser shock peening. J. Mater. Process. Technol. 2011, 211, 1091–1101. [Google Scholar] [CrossRef]
  41. Peyre, P.; Fabbro, R.; Merrien, P.; Lieurade, H.P. Laser shock processing of aluminium alloys. Application to high cycle fatigue behaviour. Mater. Sci. Eng. A 1996, 210, 102–113. [Google Scholar] [CrossRef]
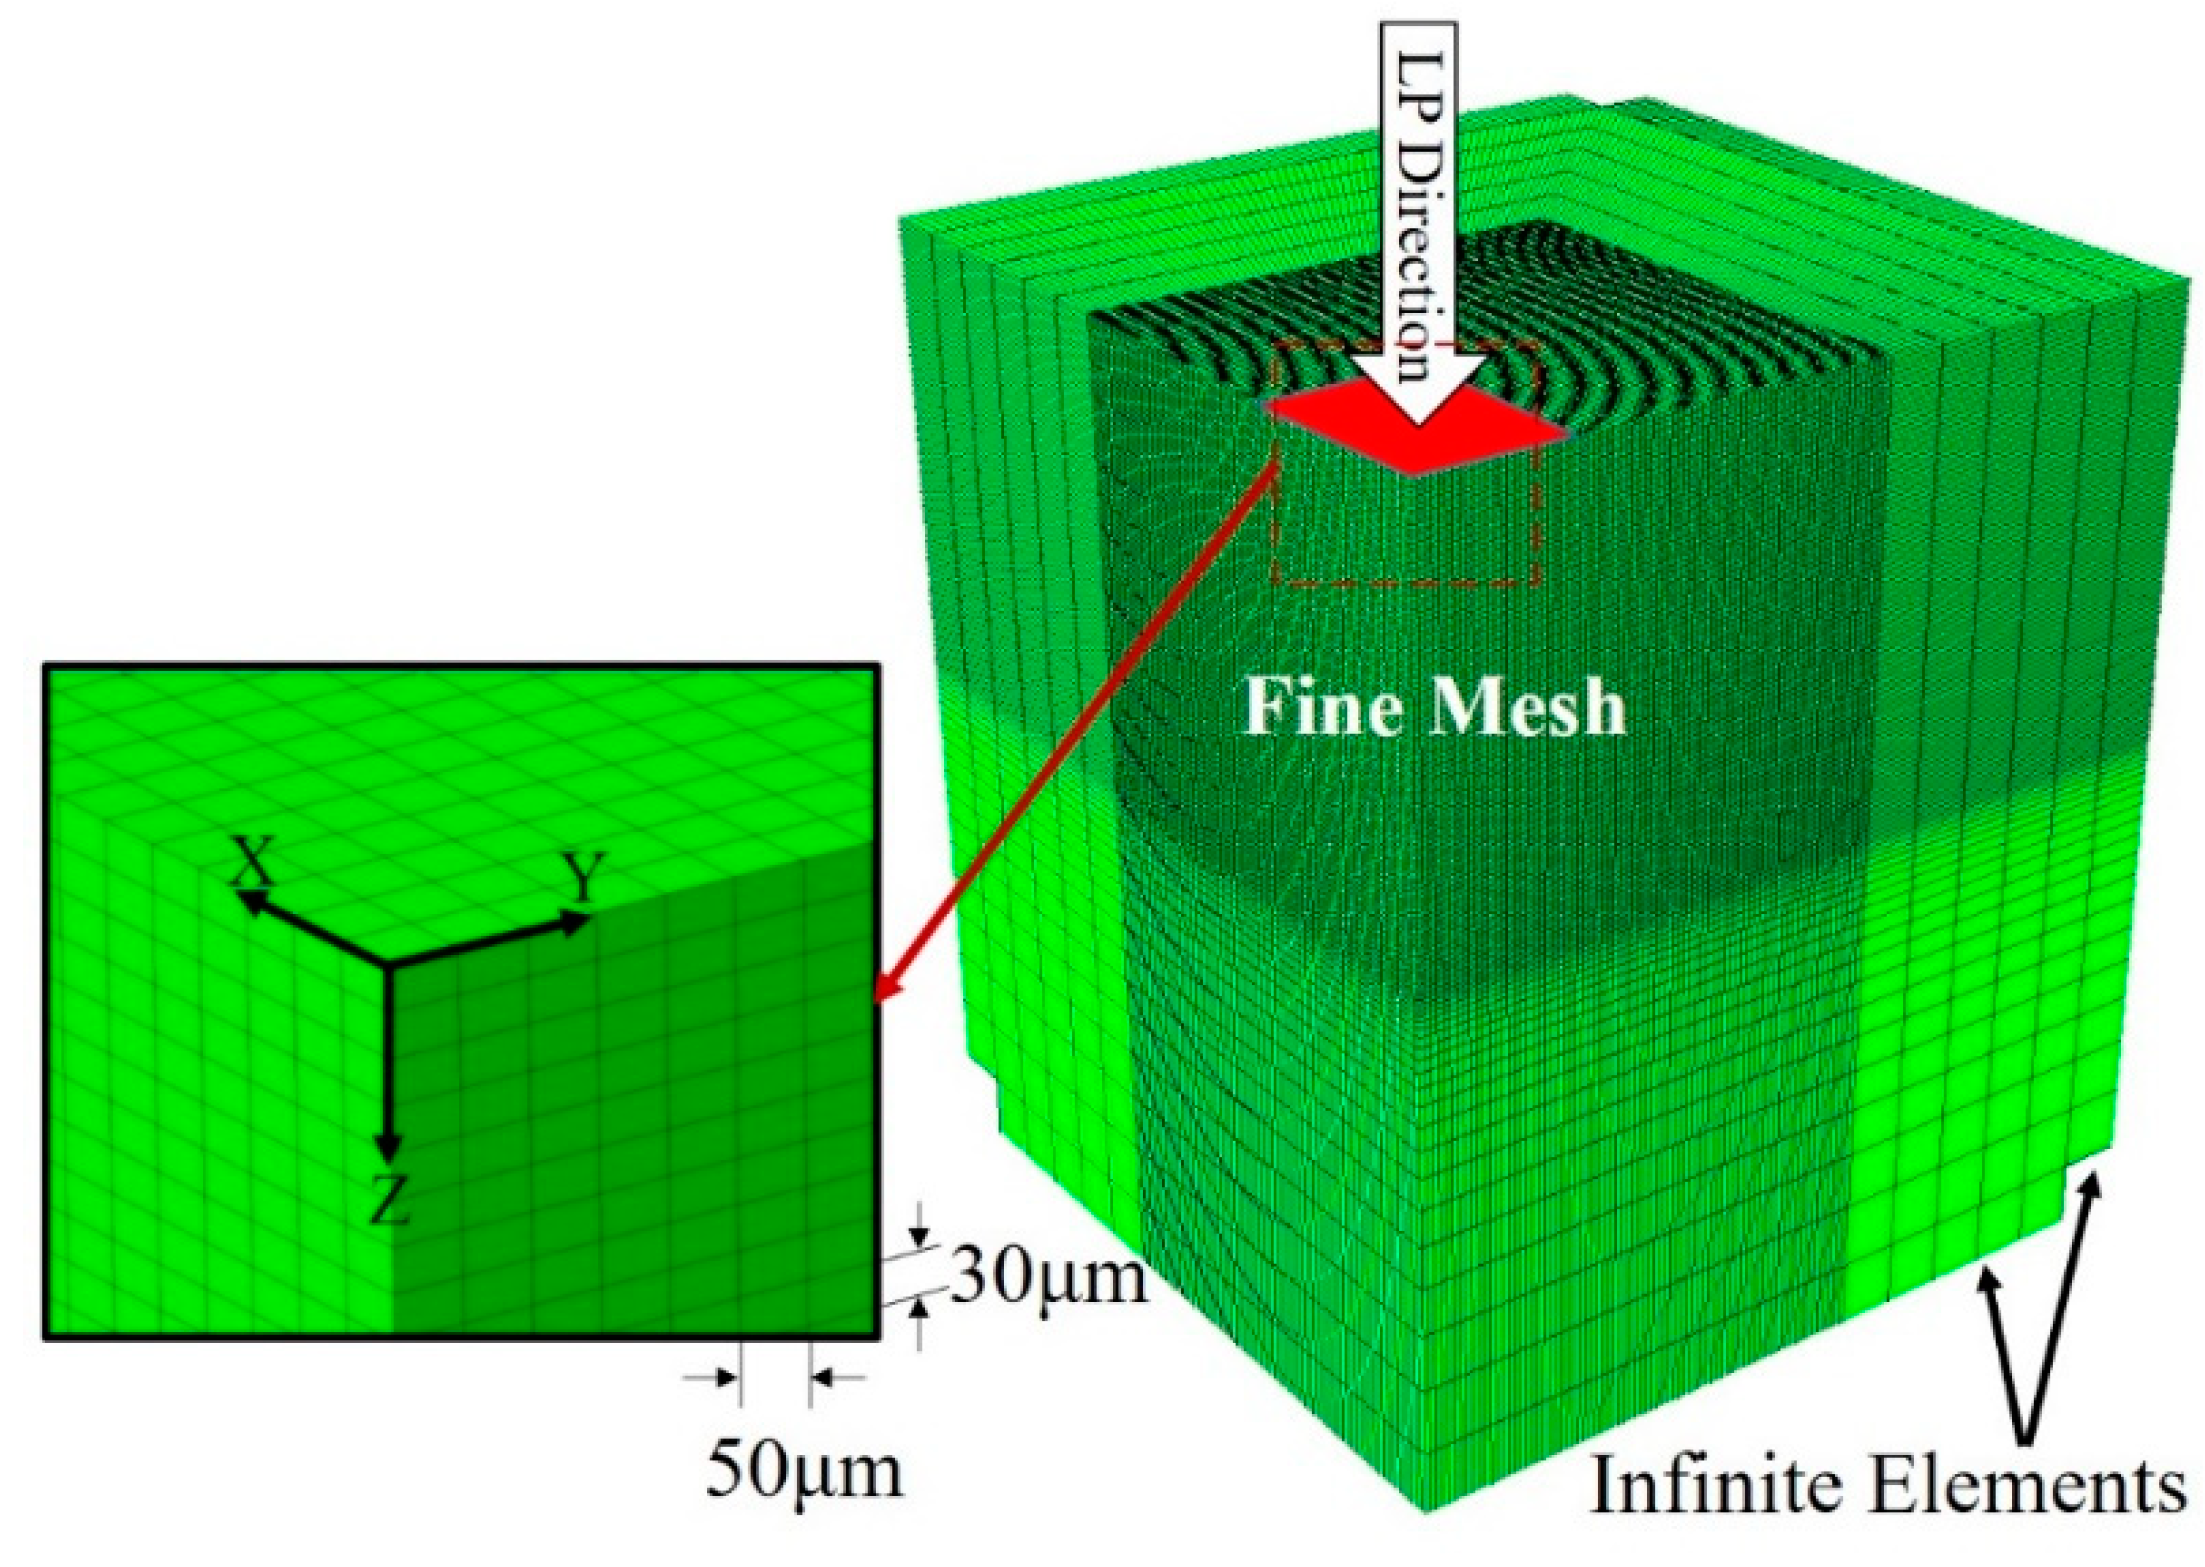
Figure 1. A three-dimensional model used in the FE simulation of the LP process.
Qubs 05 00034 g001
Figure 2. The circular etched regions (A–D) used for residual stress measurement on the four different laser-peened samples (Samples S1–S4 were laser peened with power densities of 0.5, 1, 2, and 4 GW/cm2, respectively).
Qubs 05 00034 g002
Figure 3. Comparison of residual stresses versus distance (in depth) from the LP face between simulation and experiment for different power densities: (a) 0.5 GW/cm2, (b) 1 GW/cm2, (c) 2 GW/cm2, and (d) 4 GW/cm2.
Qubs 05 00034 g003
Figure 4. (a) In-plane residual stress (σxx) distribution for specimen with a power density of 2 GW/cm2, (b,c) Distribution of σxx along the x and y axes at the surface for different power densities.
Qubs 05 00034 g004aQubs 05 00034 g004b
Figure 5. Variation of in-plane residual stress with depth (x = 0.75 mm, y = 0), (a) σxx, (b) σyy.
Qubs 05 00034 g005
Table 1. Material properties and Johnson–Cook parameters of Al 5083 [29,30].
Material Properties
Density, ρ (kg/mm3)2.7 × 10−6
Young’s modulus, E (GPa)70
Poisson’s ratio, ν0.3
Hugoniot elastic limit (HEL), (GPa)0.57
Johnson–Cook parameters
A (MPa)167
B (MPa)596
C0.001
m0.859
n0.551
ε ˙ 0 1
Publisher’s Note: MDPI stays neutral with regard to jurisdictional claims in published maps and institutional affiliations.