Article

Dimensional Accuracy in 4D-Printed PLA Objects with Holes: Experimental and Numerical Investigations

by
Alexandru-Antonio Ene
,
Tudor George Alexandru
and
Diana Popescu
*
Faculty of Industrial Engineering and Robotics, National University of Science and Technology Politehnica Bucharest, 060042 Bucharest, Romania
*
Author to whom correspondence should be addressed.
Designs 2024, 8(3), 56; https://doi.org/10.3390/designs8030056
Submission received: 1 May 2024 / Revised: 29 May 2024 / Accepted: 3 June 2024 / Published: 6 June 2024

Abstract

:
This study investigates the impact of material and process parameters—specifically, filament color, infill density, and pattern—on the dimensional accuracy of 4D-printed polylactic acid (PLA) objects featuring holes of varying diameters (6, 8, and 10 mm) that undergo a heat-induced recovery process. The objective was to understand how these factors affect shape retention and the dimensional accuracy of holes through a comparative analysis of the diameters before and after recovery. Increased variability in the hole diameters was noted after recovery, regardless of the values of the independent variables. The objects did not fully return to their original planar shape, and the holes did not completely return to their circular form, resulting in smaller diameters for each sample. No significant differences in the hole diameters could be determined. Additionally, there was no consistent trend in identifying the most influential parameter affecting the accuracy of the recovered holes. However, it was observed that higher infill densities improved shape retention. A quasi-static finite elements analysis model was developed to capture the mechanical behavior of the 4D-printed parts. This model incorporated temperature-dependent material characteristics to predict the strain occurring near the holes. Nodal displacements were defined according to the deformed shape. A correlation was established between the observed strains and the post-recovery dimensional accuracy of the specimens. The importance of this work was demonstrated through a case study involving a two-sieve filtering device for small objects.

1. Introduction

4D Printing (4DP) is an emerging technology based on the principles of 3D Printing (3DP), with time being introduced as the fourth dimension [1]. It involves the creation of objects that change their shape or properties over time in response to external stimuli such as temperature, light, moisture, etc. [2]. This approach allows for the fabrication of complex, stimuli-responsive structures with applications across various fields, including tissue and organ regeneration, smart materials, and dynamic structures [3]. The technology uses shape memory polymers and composites that can undergo programmed transformations, offering innovative solutions for customizable and adaptive objects. Shape memory materials belong to a class of materials that can return to the original shape after temporary deformation conducted in a programming phase, with the permanent shape encoded during the manufacturing phase [1,4]. This ability, known as the shape memory effect (SME), is exhibited by some metals, hydrogels, or elastomers [1] and by polymers like polylactic acid (PLA) or polycaprolactone (PCL) [5] used as feedstock in the 3DP process based on material extrusion (MEX). In this study, PLA was chosen as the material for study because it is the most commonly used in 3DP, which also has shape memory properties.
Originating in 2013 [6], 4DP is still in its early stages, and more knowledge is required for optimally tuning the 3DP process parameters and print design to achieve the required functional specifications. 4D prints can be programmed into different shapes varying from basic ones to complex ones consisting of sequences of basic deformations, which take place in time [7].
3DP brings a new level of complexity to the shape memory objects as the SME depends not only on the polymer properties, set deformation and recovery temperatures (Td—temperature applied to the material in the programming/fixation phase and Tr—temperature applied to the material in the recovery step), or applied deformation strain but also on their anisotropic macrostructure, i.e., on their printing parameters.
It is well known that 3DP is a multi-variable process. Prints can be manufactured with different layer thicknesses, infill densities, patterns, printing speeds, etc., and these process parameters influence how the SME is exhibited by the print. Kacergis et al. [8] studied the influence of bed temperature, printing speed, and number of active layers on shape memory performances of hinge-like structures made of PLA and TPU (thermoplastic polyurethane), activated in hot water (85 °C). The deformations and recoveries were assessed using an optical 3D digitizer, and the strain of the exterior surface of specimens was measured. The results showed that the first two aforementioned parameters have a significant influence on SMEs: the cooler the build platform and the faster the printing, the higher the deformation is. In their study, Wu et al. [9] investigated the impact of several parameters such as layer thickness, raster angle, Td, and Tr on the shape-recovery ratio of 3D-printed PLA. Their analysis was conducted using an orthogonal experimental design, with the outcomes showing that Tr had the most important influence on the maximum recovery rate while the layer thickness had the least effect. The results indicated that SME is dependent more on Tr than Td, parameter settings, or process parameters. Ehrmann et al. studied the recovery of 3D–printed PLA with diverse infill patterns and densities [10], as well as the influence of the applied pressure direction on shape memory properties based on quasi-static load tests [11]. Nam et al. investigated the effect of pattern, infill density, and Tr over the bending recovery and shape–recovery speed of 3DP parts [7]. The samples with 20% infill density and line pattern showed the worst recovery results, while 100% infill density samples provided the best recovery performances. Graphical tables and a bending recovery toolkit are proposed to ease the designers’ choice of process parameters to set to achieve the desired SME.
There are also studies that have investigated aspects related to the dimensional accuracy of 3D-printed objects using PLA [12,13], which can be extended to the context of 4DP due to overlapping aspects related to material behavior and 3DP technology. However, specific references addressing dimensional accuracy issues in 4D–printed PLA objects are lacking, as the literature does not explicitly address thermomechanical simulations of the 4DP process for PLA. In this study, the holes in the objects were created through direct 3D printing, not by drilling. While drilled holes tend to be more precise, drilling through the prints disrupts the top and bottom layers, as well as the infill structure. This allows the hot water, used as a trigger for the shape memory effect, to infiltrate the print unpredictably, thereby compromising the control over experimental outcomes.
Several metrics are used in the field for evaluating the 4DP recovery process: the recovery rate, recovery time, strain fixity rate, and recovery force [14]. Although these metrics are interconnected, contributing to the complexity of the process and the difficulty of developing and controlling the applications, they can be categorized as related to several factors: 3D print design–related (such as part thickness and geometrical features), material properties–related (including glass transition temperature and deformation temperature), 3DP process parameters-related (such as infills, layer thickness, printing speed, printing temperature, and bed temperature [3,7,15]), programming–related (such as applied stress/load and programmed shape, such as folding, bending, rolling, curling, etc.), and trigger/stimulus mechanisms–related (chemical, physical, and biological) [16,17].
In this research, accuracy was proposed as a new indicator for evaluating the dimensional error in 4D-printed recovered prints with holes produced using the MEX process. Recovery time was measured for each sample to evaluate the impact of process parameters on this indicator. Several other contributions can also be mentioned. The influence of filament color, infill density, and infill pattern on the dimensional accuracy of 4D-printed objects featuring holes of varying diameters after undergoing a heat-induced recovery process was systematically explored. The impact of these parameters was assessed by comparatively analyzing the diameters before and after recovery for 3D prints with open holes of 6 mm, 8 mm, and 10 mm. The results showed an increased variability in diameters post-recovery, but no significant differences among the parameters could be noted. Additionally, it was observed that higher infill densities improved shape retention. A quasi-static finite element analysis model incorporating temperature-dependent material characteristics was proposed to predict the mechanical behavior and strain near the holes, with the results aiming to be correlated with the observed dimensional accuracy. Nodal displacements were defined according to the deformed shape, and the correlation was established between the observed strains and the post-recovery dimensional accuracy of the specimens. This research relevance is for applications requiring the conservation of hole design features through the selection of material and printing settings. In this sense, a case study of a two-sieve setup was developed and discussed to show the potential for broader uses of 4D-printed PLA beyond typical origami–like structures.

Theoretical Considerations on 4DP Process

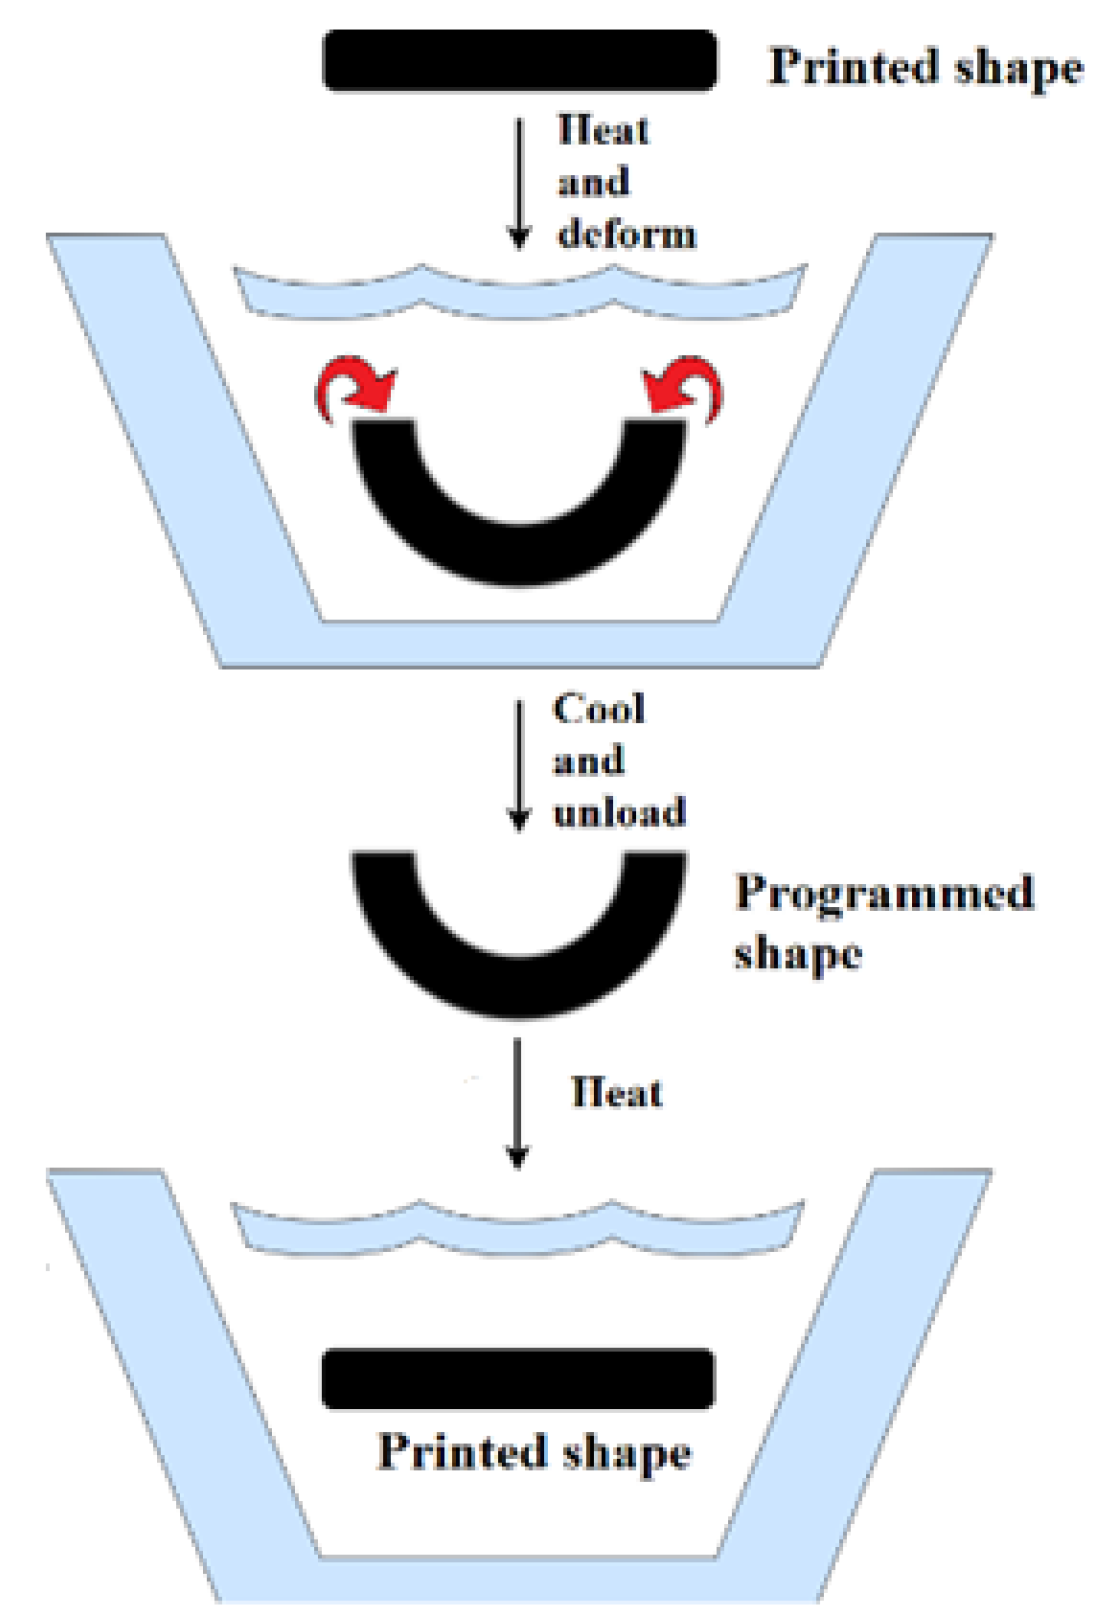
A schematic representation of a typical one–way SME using heat (hot water) as an external trigger is presented in Figure 1. The material is brought to a temperature at which the polymer chains become flexible and can withstand deformation (Td > Tg, Tg—glass transition temperature), deformed into a temporary shape under a mechanical load, and then cooled down in a temporary shape–phase known as fixation or programming. The recovery phase does not need the application of a load as the process is triggered when the 3D print is heated at Tr > Tg. Thus, two temperatures can be defined for each cycle: Td and Tr, which do not necessarily have the same value, while Tg is dependent on the material.
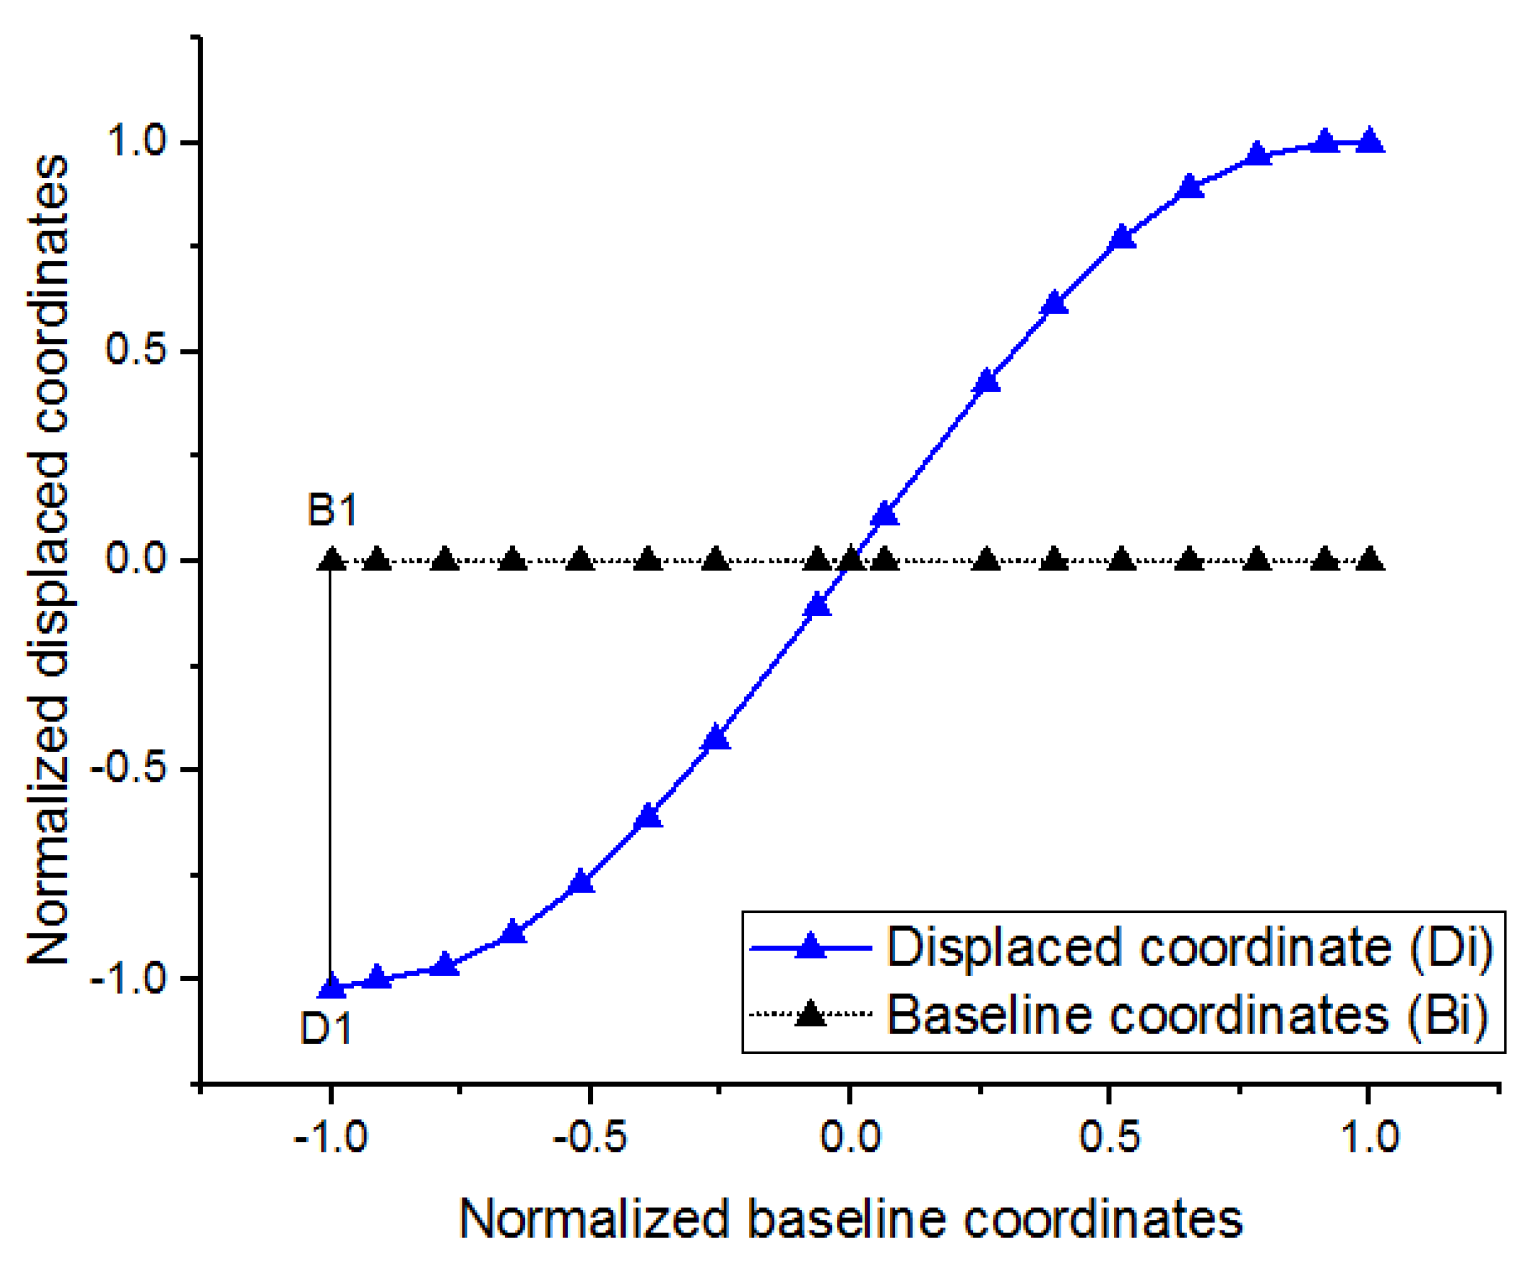
4DP involves the interaction of thermal and mechanical factors, necessitating a multiphysics simulation environment due to the time-dependent nature of the process. The thermal effects, determined by heat from external sources, lead to a temperature increase above Tg, with convection and conduction mechanisms driving heat transfer. These thermal changes influence the mechanical properties of PLA [10,16], especially Young’s modulus and the tensile yield strength. Thermal expansion induces dimensional changes, impacting mechanical stability, which is accounted for in structural analysis through temperature-dependent material properties and the coefficient of thermal expansion (CTE). The inertial effects and damping are typically negligible compared to stiffness forces due to the quasi-static loading conditions. In this context, the mapping of nodal displacement is essential for capturing specimens’ deformation, with temperature changes influencing material characteristics and thus mechanical strain. Based on the nodal displacement rule from Figure 2, each node moves from its original position to a displaced one. The resulting force reactions contribute to the overall mechanical strain of the model. This behavior can be used to capture the locations in which the maximum shape change occurs for further correlation with the experimental data.

2. Materials and Methods

2.1. The proposed Research Methodology

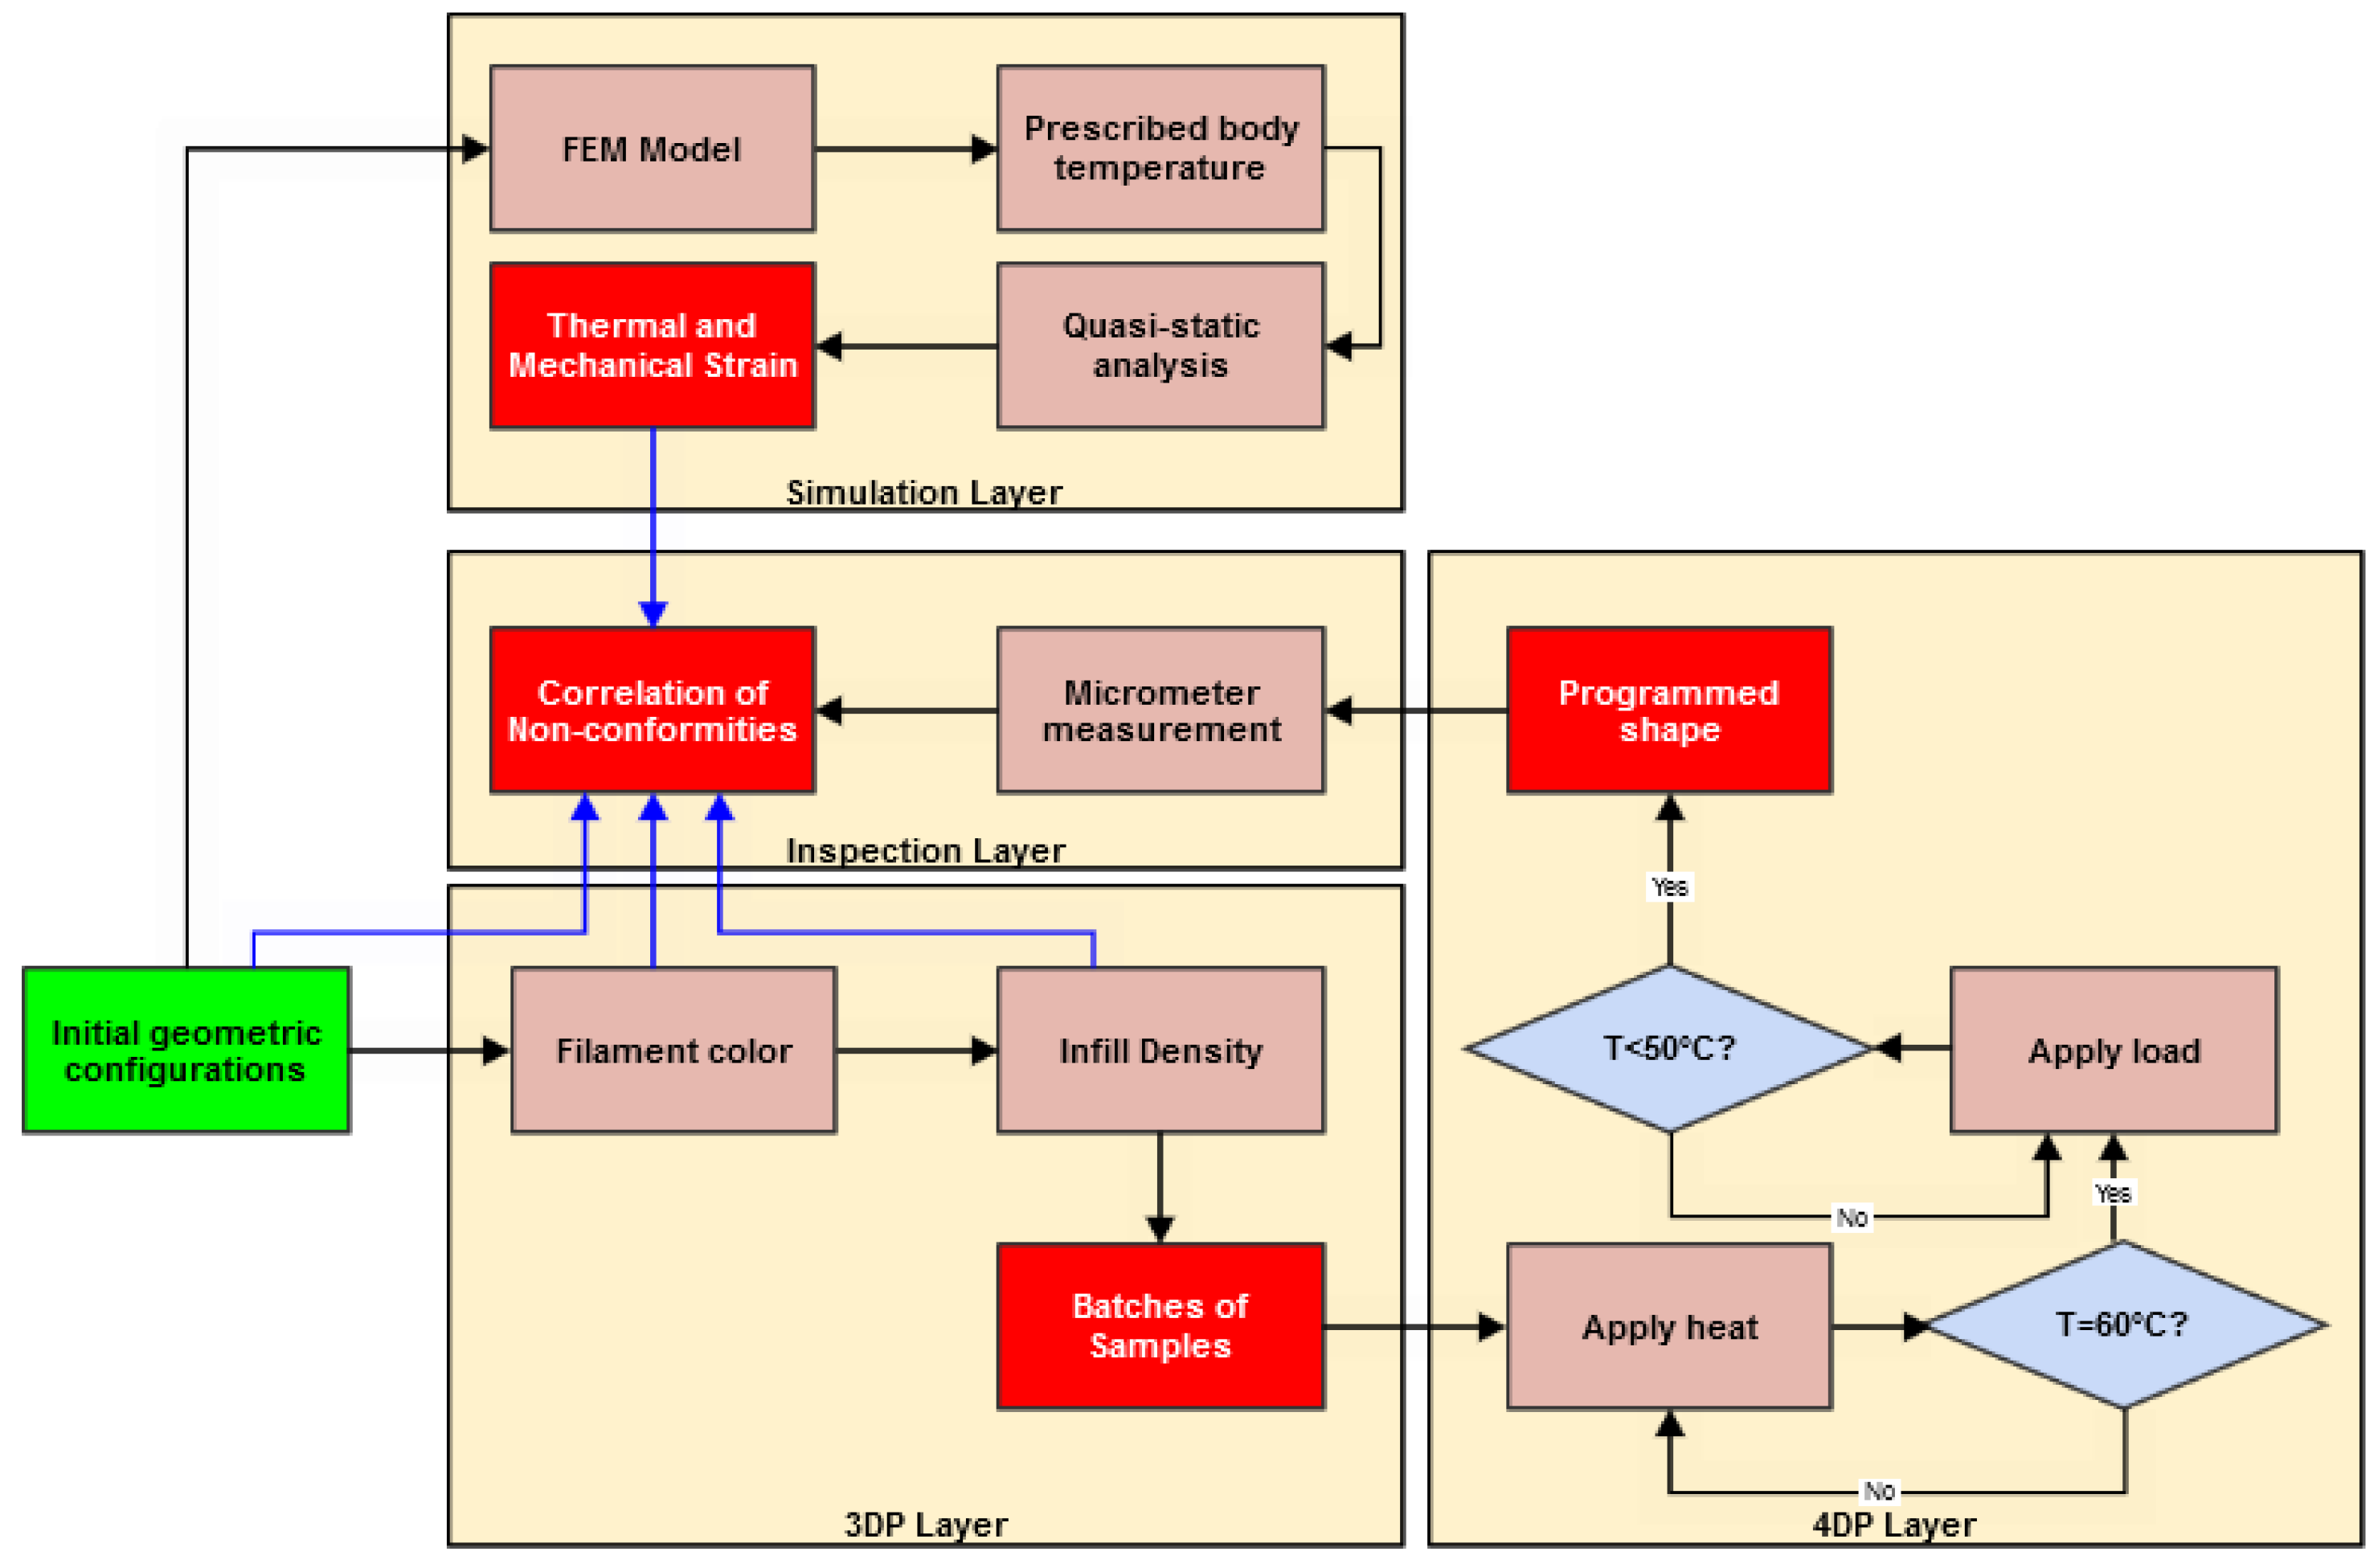
The proposed methodology involves layers of abstraction that divide the problem of 4DP dimensional accuracy into distinct experimental and simulation steps. Figure 3 depicts a schematic representation of the approach with an emphasis on the information exchange that takes place.
The abstraction layers are detailed below:
  • 3DP layer: In the initial stage, a range of geometric configurations is determined, with the samples featuring holes with varying diameters.
  • 4DP layer: The parts with holes are subjected to the 4DP process. Heat is applied by submerging the specimens in controlled−temperature water until the temperatures of the fluid and solid domains equal 60 °C. Afterward, a bending load is applied using a specially developed press for deforming the prints into the desired shape.
  • Inspection layer: Each sample’s holes are measured to evaluate the deviation from their nominal values, with the results being used further for correlation with 3D−printing parameters and numerical simulation results.
  • Simulation layer: A finite element simulation model (FEM) is developed to capture the thermomechanical behavior of the 4DP process. The temperature distribution that occurs during the cooling process is evaluated by employing transient thermal analysis. A quasi−static analysis is completed afterward to capture the effect of strain due to thermal and mechanical displacements.

2.2. The 3DP Layer

Tg is considered an important parameter along with Td and Tr, as it governs the shape memory properties [16,17,18], and it has been observed that the presence of color pigments can affect the mechanical properties and dimensional accuracy of 3D prints by altering Tg [19]. Therefore, it was of interest to investigate the impact of this factor on 4D-printed parts’ forms and dimensional properties, as no such study has been conducted so far.
Figure 4 shows the geometry of the part, as well as an image with one of the physical samples. Three sets of samples with through holes of different sizes (6 mm, 8 mm, and 10 mm) were designed. The samples had an outer diameter of 92 mm and a thickness of 2 mm. The sample geometry consisted of 25 through holes positioned concentrically with respect to the center of the print.
The position of the holes was set considering the programmed shape, which was a semi-cylindrical shape, with the deformation occurring vertically along the holes 1–13.
As the main goal of the study was to evaluate the effect of infill density, infill pattern, and filament color on the holes’ accuracy of recovered PLA samples, the levels in Table 1 were set as independent variables. The infill density values were selected at the upper and lower ends of the range, while the rectangular pattern was chosen due to its widespread use in 3DP. The gyroid pattern was selected in association with the very small infill density to ensure the sample structure and integrity during experiments. The filaments were chosen considering the effect of heat and cooling on their color (light color vs. dark color).
Thirty–six samples in total were produced from PLA (Devil Design [20]) on a Prusa i3MK3S+ 3D printer with a Revo v6 extruder 0.4 mm in diameter. The main 3DP parameters were maintained constant for all prints, while the other parameters had the default values set in the Prusa slicer (Table 2).

2.3. The 4DP Layer

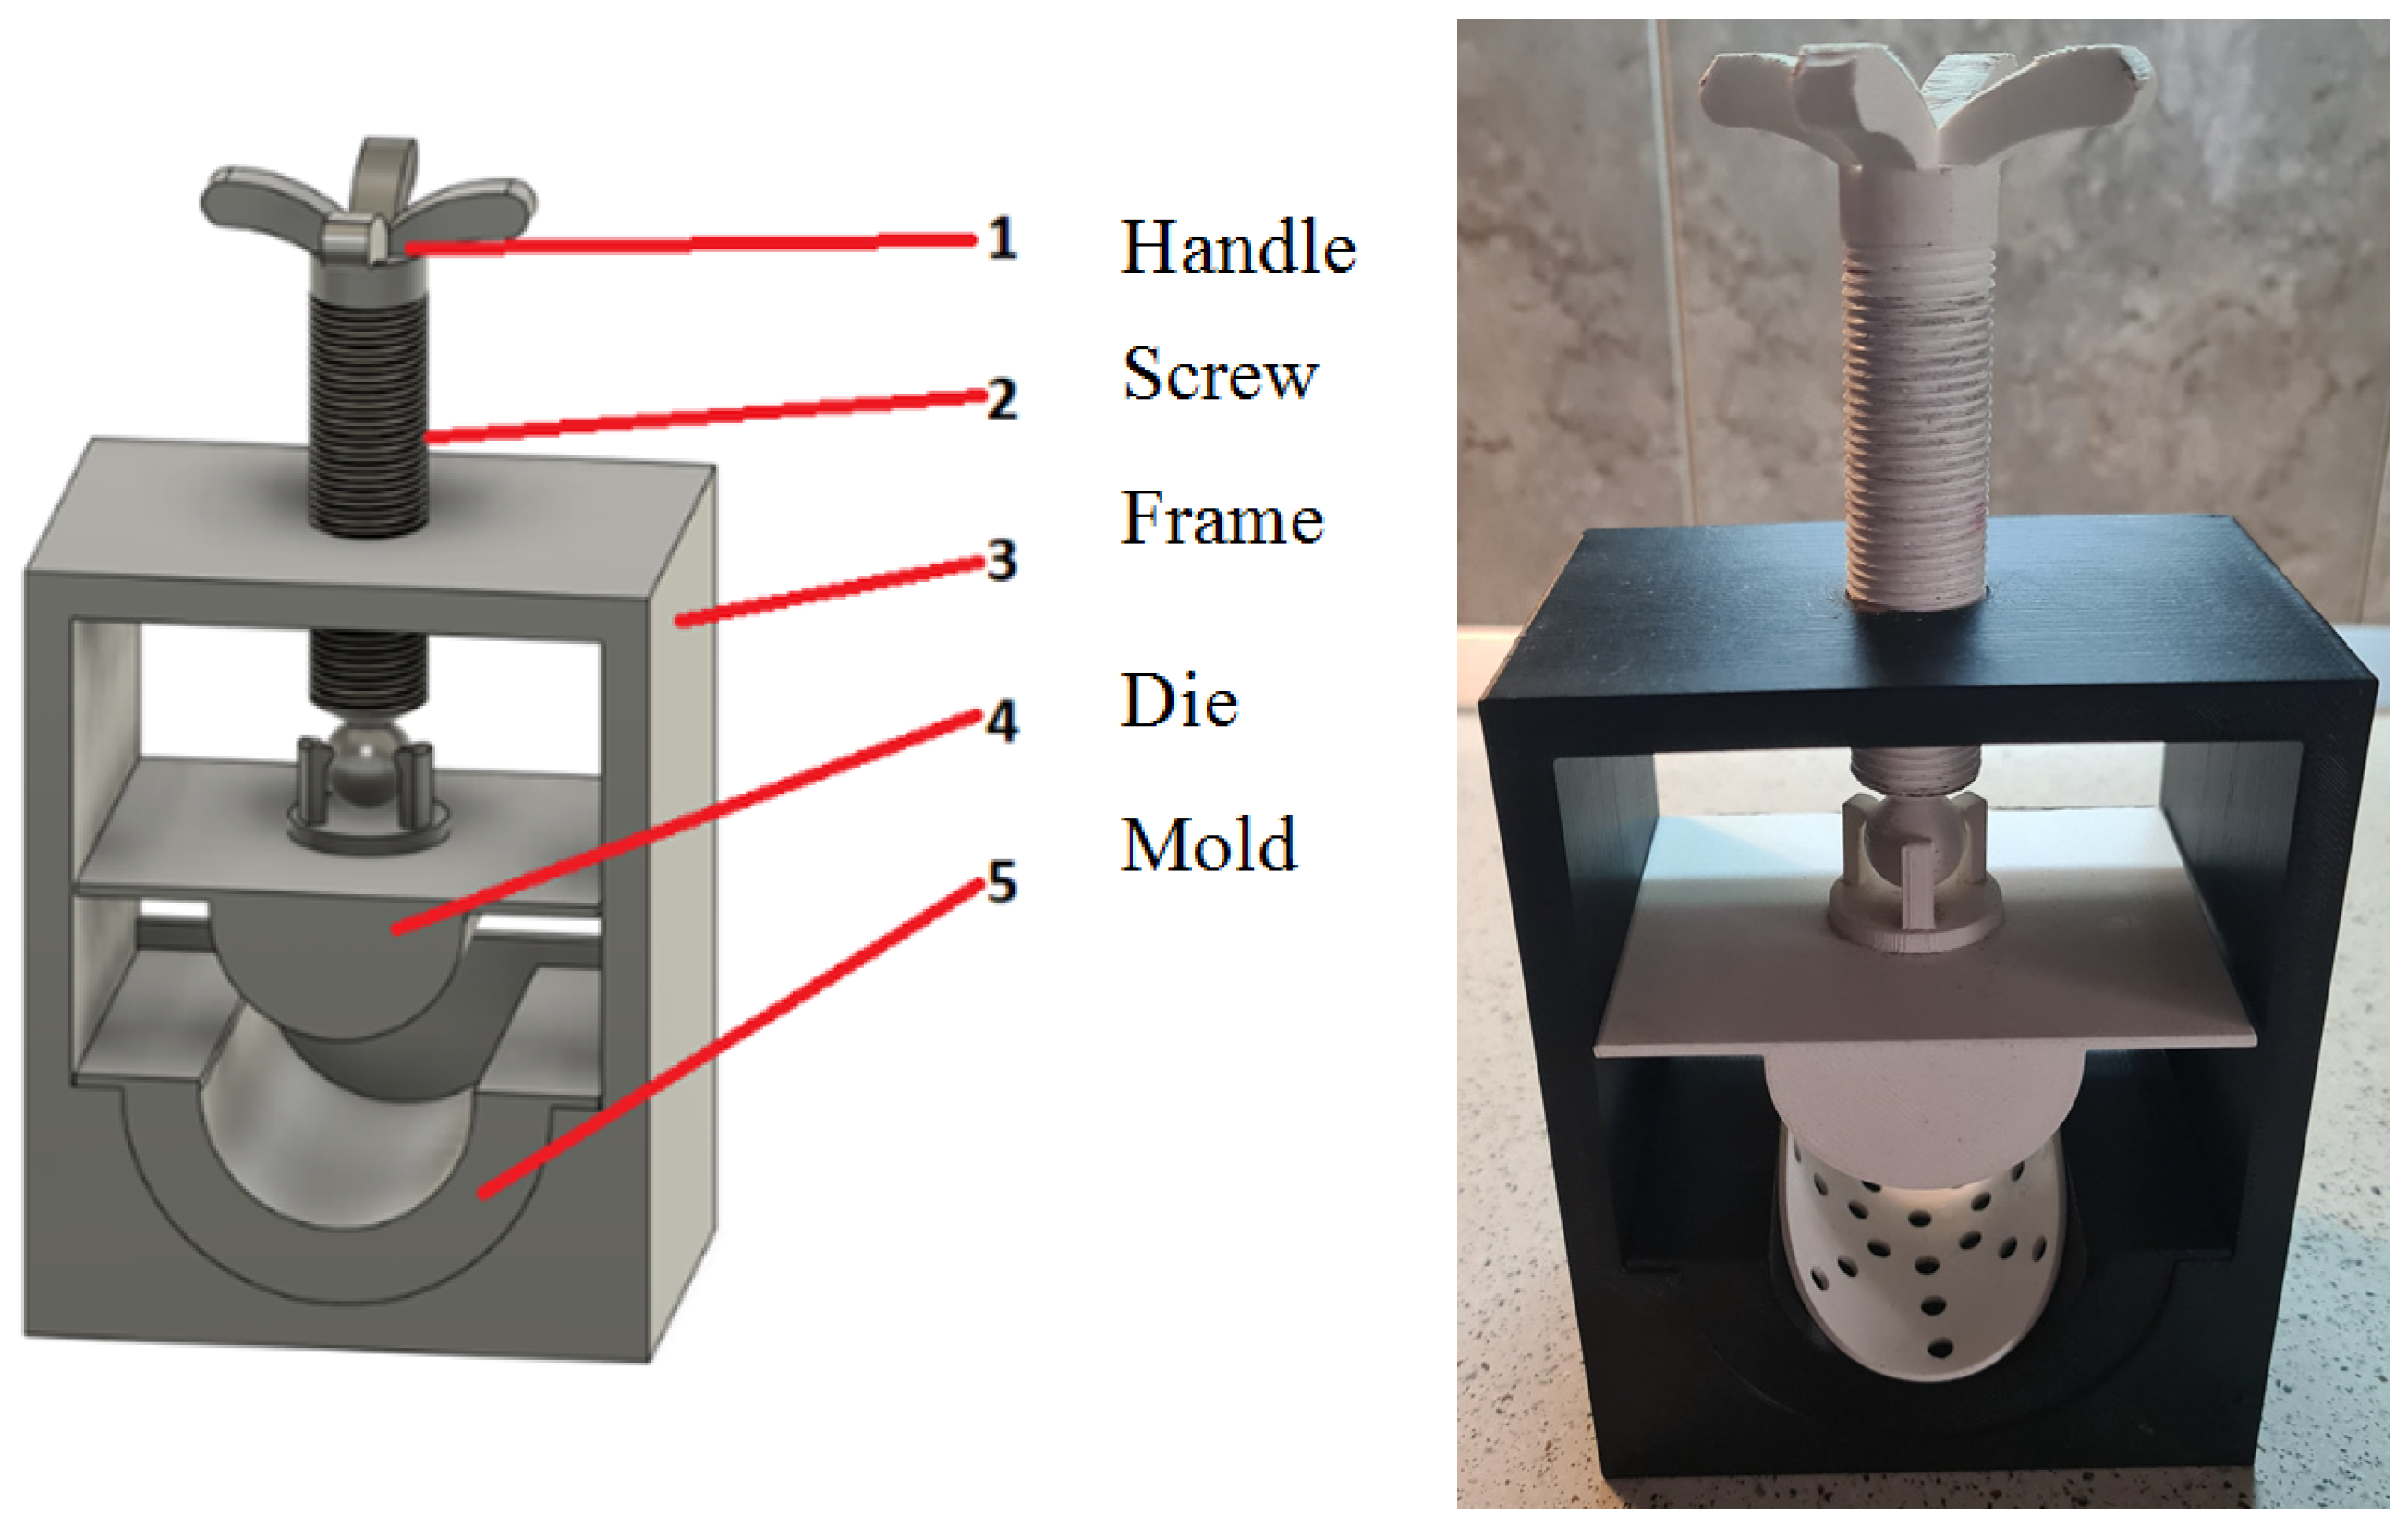
In the programming phase, the following devices were used: a sous–vide device (to maintain water temperatures at the set values for Td and Tr), a transparent polypropylene storage box, a 3D–printed manual press to achieve a similar programming shape and deformation load for all samples (Figure 5), and the 3D–printed samples.
The storage box was filled with water up to the minimum level indicated by the sous–vide. The device was set to a temperature of Td = 55 °C for PLA, and then the samples were immersed in water for 2 min to soften. Next, the samples were manually pressed into the desired semi–cylindrical shape and allowed to cool down to room temperature (23 °C) to retain their new form. To evaluate the accuracy of the SME on the holes’ diameters, the recovered samples were immersed again in hot water (Tr = Td) and cooled down (see the schematic in Figure 1) before re–measuring their diameters with the same micrometer.
Figure 6 displays four images extracted from a video that recorded the sample recovery process at different stages, from the programmed shape to the recovered shape. The recovery time was recorded for each sample; for instance, the samples with 100% rectangular infill and black filament took 27 s to return to a shape closer to the initial one.
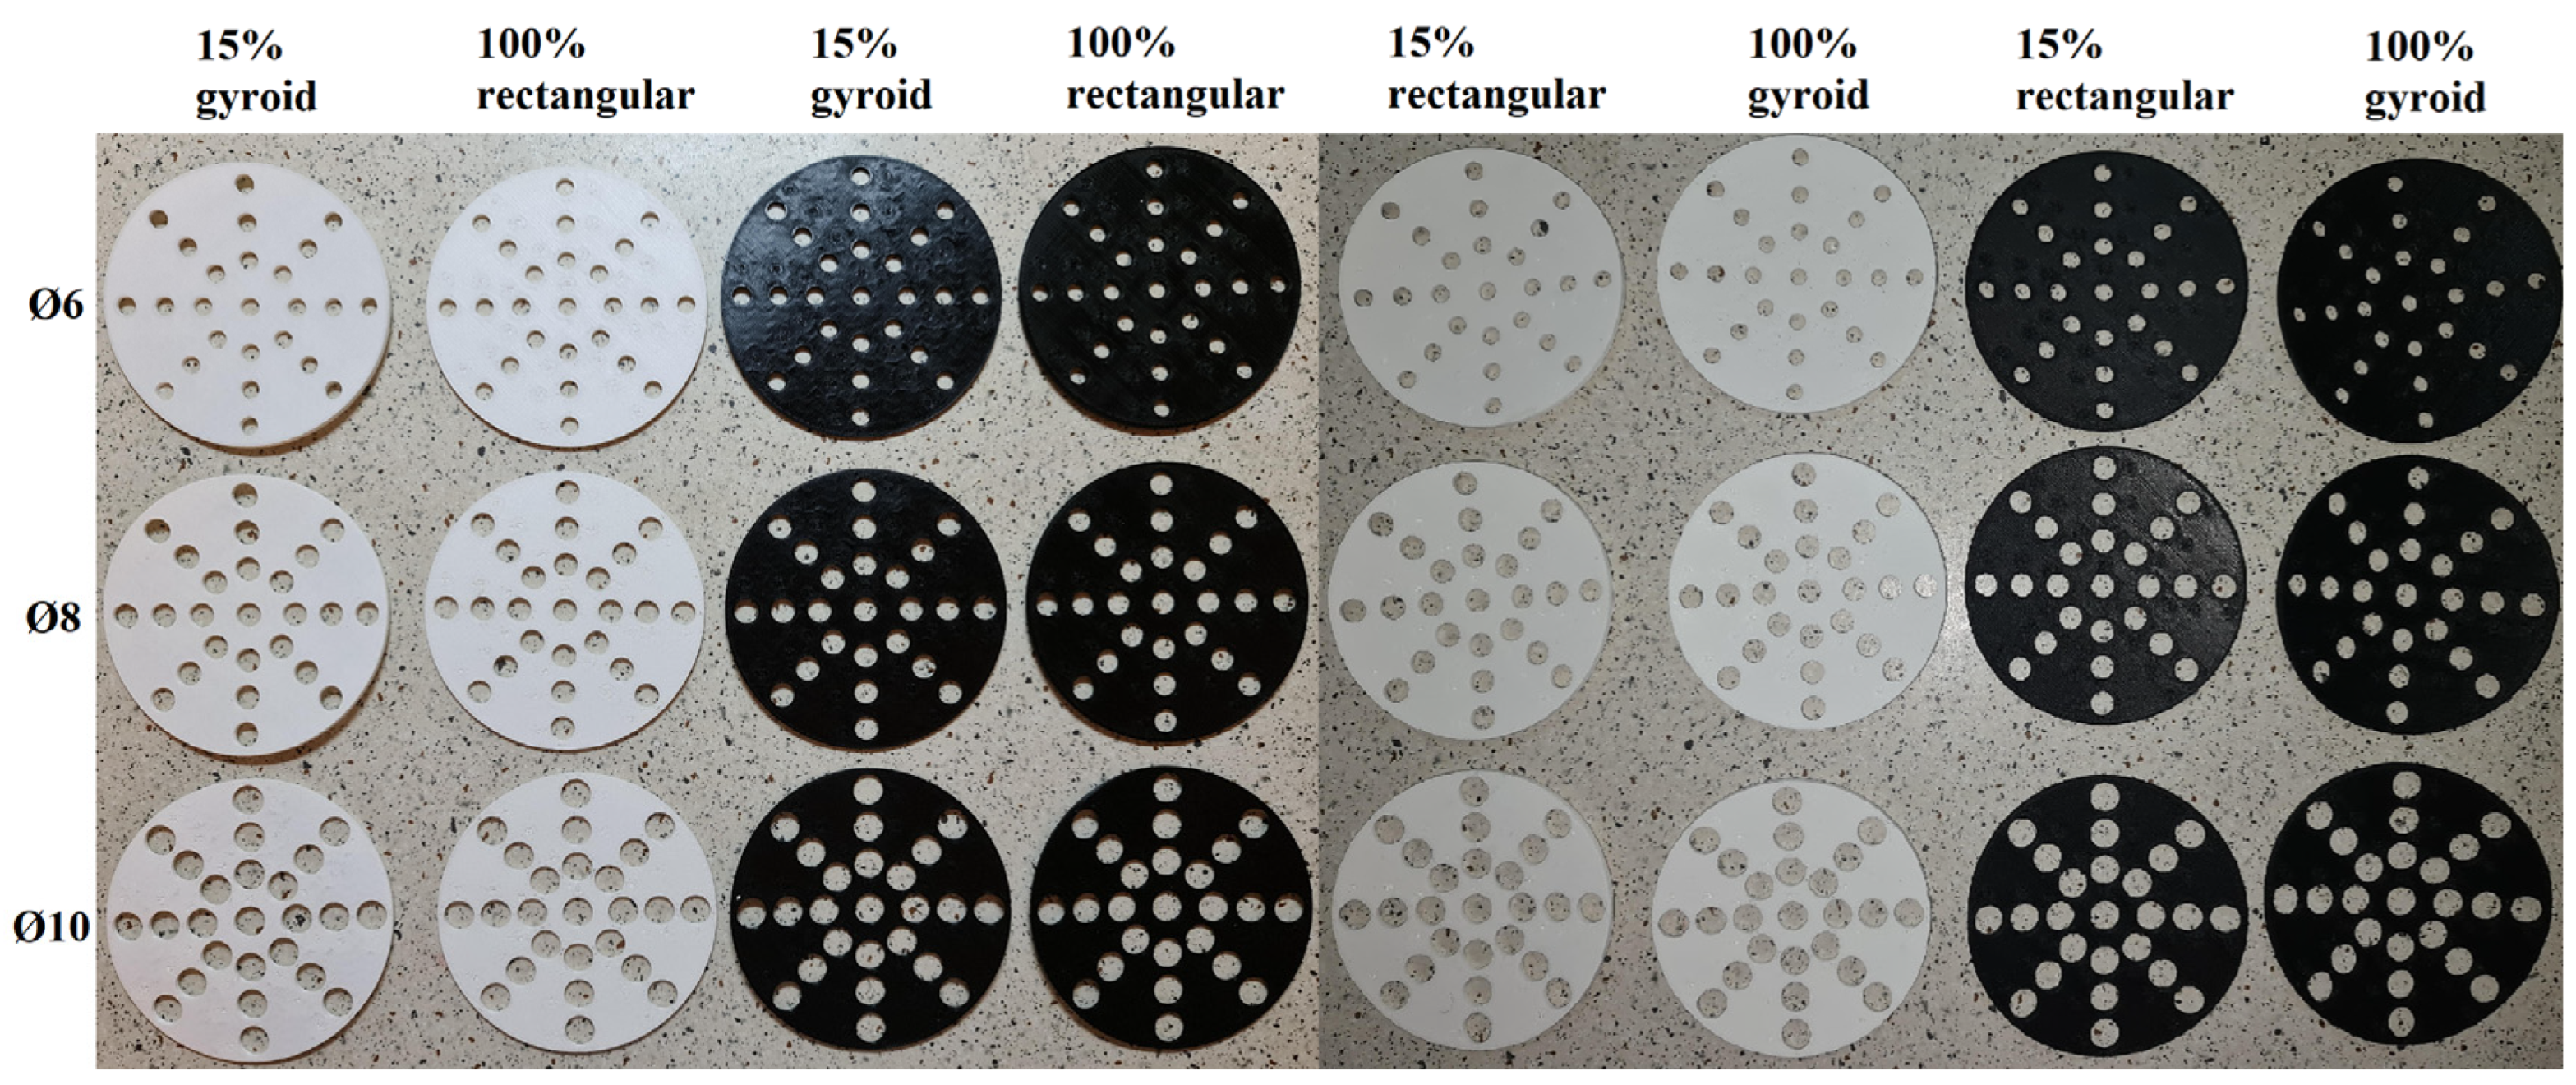
Figure 7 and Figure 8 present the recovered samples from top and side views, thus enabling a visual assessment of the degree to which they returned to a planar shape (shape recovery) and the extent to which the holes’ shapes deviated from circularity. Due to the presence of circularity error, each recovered sample’s diameter was measured eight times in different zones, and the mean values were recorded for each hole.

2.4. The Inspection Layer

Measurements of the test pieces’ through holes were conducted using a micrometer with 0.01 mm accuracy. Each hole of the initial samples was measured five times in different zones and the mean values were computed.

2.5. The Simulation Layer

2.5.1. Definition of the Analysis Types

The first stage of the FEM development process involved determining the necessary analysis types that can capture 4DP characteristics. Given the transient nature of the process, as well as the governing thermal and mechanical effects, coupled transient thermal and structural analyses are required. Nonetheless, the inertial effects of the process can be neglected, implying that the dynamic effects due to acceleration or deceleration of the mass are not significant in the context of the study. This condition is justified by the slowly occurring changes in the body’s movement. The response of the material is primarily governed by its deformation under imposed displacements. In such cases, focusing on the structural response due to thermal conditions becomes more relevant than analyzing the material’s inertial responses.
The temperature distribution throughout the material is uniform. Therefore, the need for completing a detailed thermal analysis to determine the temperature field within the object is not relevant. Instead, a uniform or prescribed temperature condition can be applied across the entire body, simplifying the analysis to how the structure responds to this boundary condition. This effect is taken into account by defining the material properties as temperature–dependent ones.
The use of prescribed displacements focused the analysis on how the structure responds to specific movements or deformations. When displacements are prescribed, the analysis is concerned with the structure’s response to these imposed conditions rather than the conditions that lead to these displacements. This approach is particularly useful in studying the effects of external forces or constraints that cause known deformations.
Given these arguments, a quasi–static analysis with prescribed body temperature was considered suitable as it directly addresses the structural response to temperature changes, considering temperature–dependent material properties. This type of analysis is efficient for examining how variations in temperature affect the material’s mechanical properties and, subsequently, its structural behavior under prescribed displacements. Furthermore, the ability to ignore the effects of thermal expansion in this context is justified by the nature of the imposed displacements. When displacements are prescribed rather than resulting from temperature changes, the analysis can focus on the direct effects of these displacements without needing to account for thermal expansion explicitly. This is because the imposed displacements already encapsulate the net effect of any expansions or contractions the material would naturally undergo due to temperature changes. Thus, the structural analysis can disregard thermal expansion as a separate factor, simplifying the model without compromising the accuracy of the results under the given conditions.

2.5.2. Definition of the Material Properties

The modulus of elasticity and Poisson’s ratio for the PLA samples were determined at an environmental temperature of 55 °C. This value was decided given the transfer (from the hot bath to the press) and holding time (the time in which the print was pressed) from Table 3.
Thus, the worst–case scenario temperature occurring after 16 s of cooling can be evaluated based on Newton’s Law of cooling:
T ( t ) = T a + ( T 0 T a ) e k t
where T(t) is the temperature of the specimens at time t, Ta is the ambient temperature, T0 is the initial temperature of the object, k is the cooling constant of the object, and t is the time since the cooling process started.
Table 4 summarizes the lowest temperatures of the specimens due to natural convection cooling. The values for k were derived experimentally by employing an infrared pyrometer.
Mechanical testing was conducted in prior research using an Instron 8872 electro–hydraulic Universal Testing Machine with a 25 kN load cell, at a loading speed of 2 mm/min. The strain was recorded at a frequency of 2 Hz using Dantec Dynamics Digital Image Correlation (DIC) equipment [21].
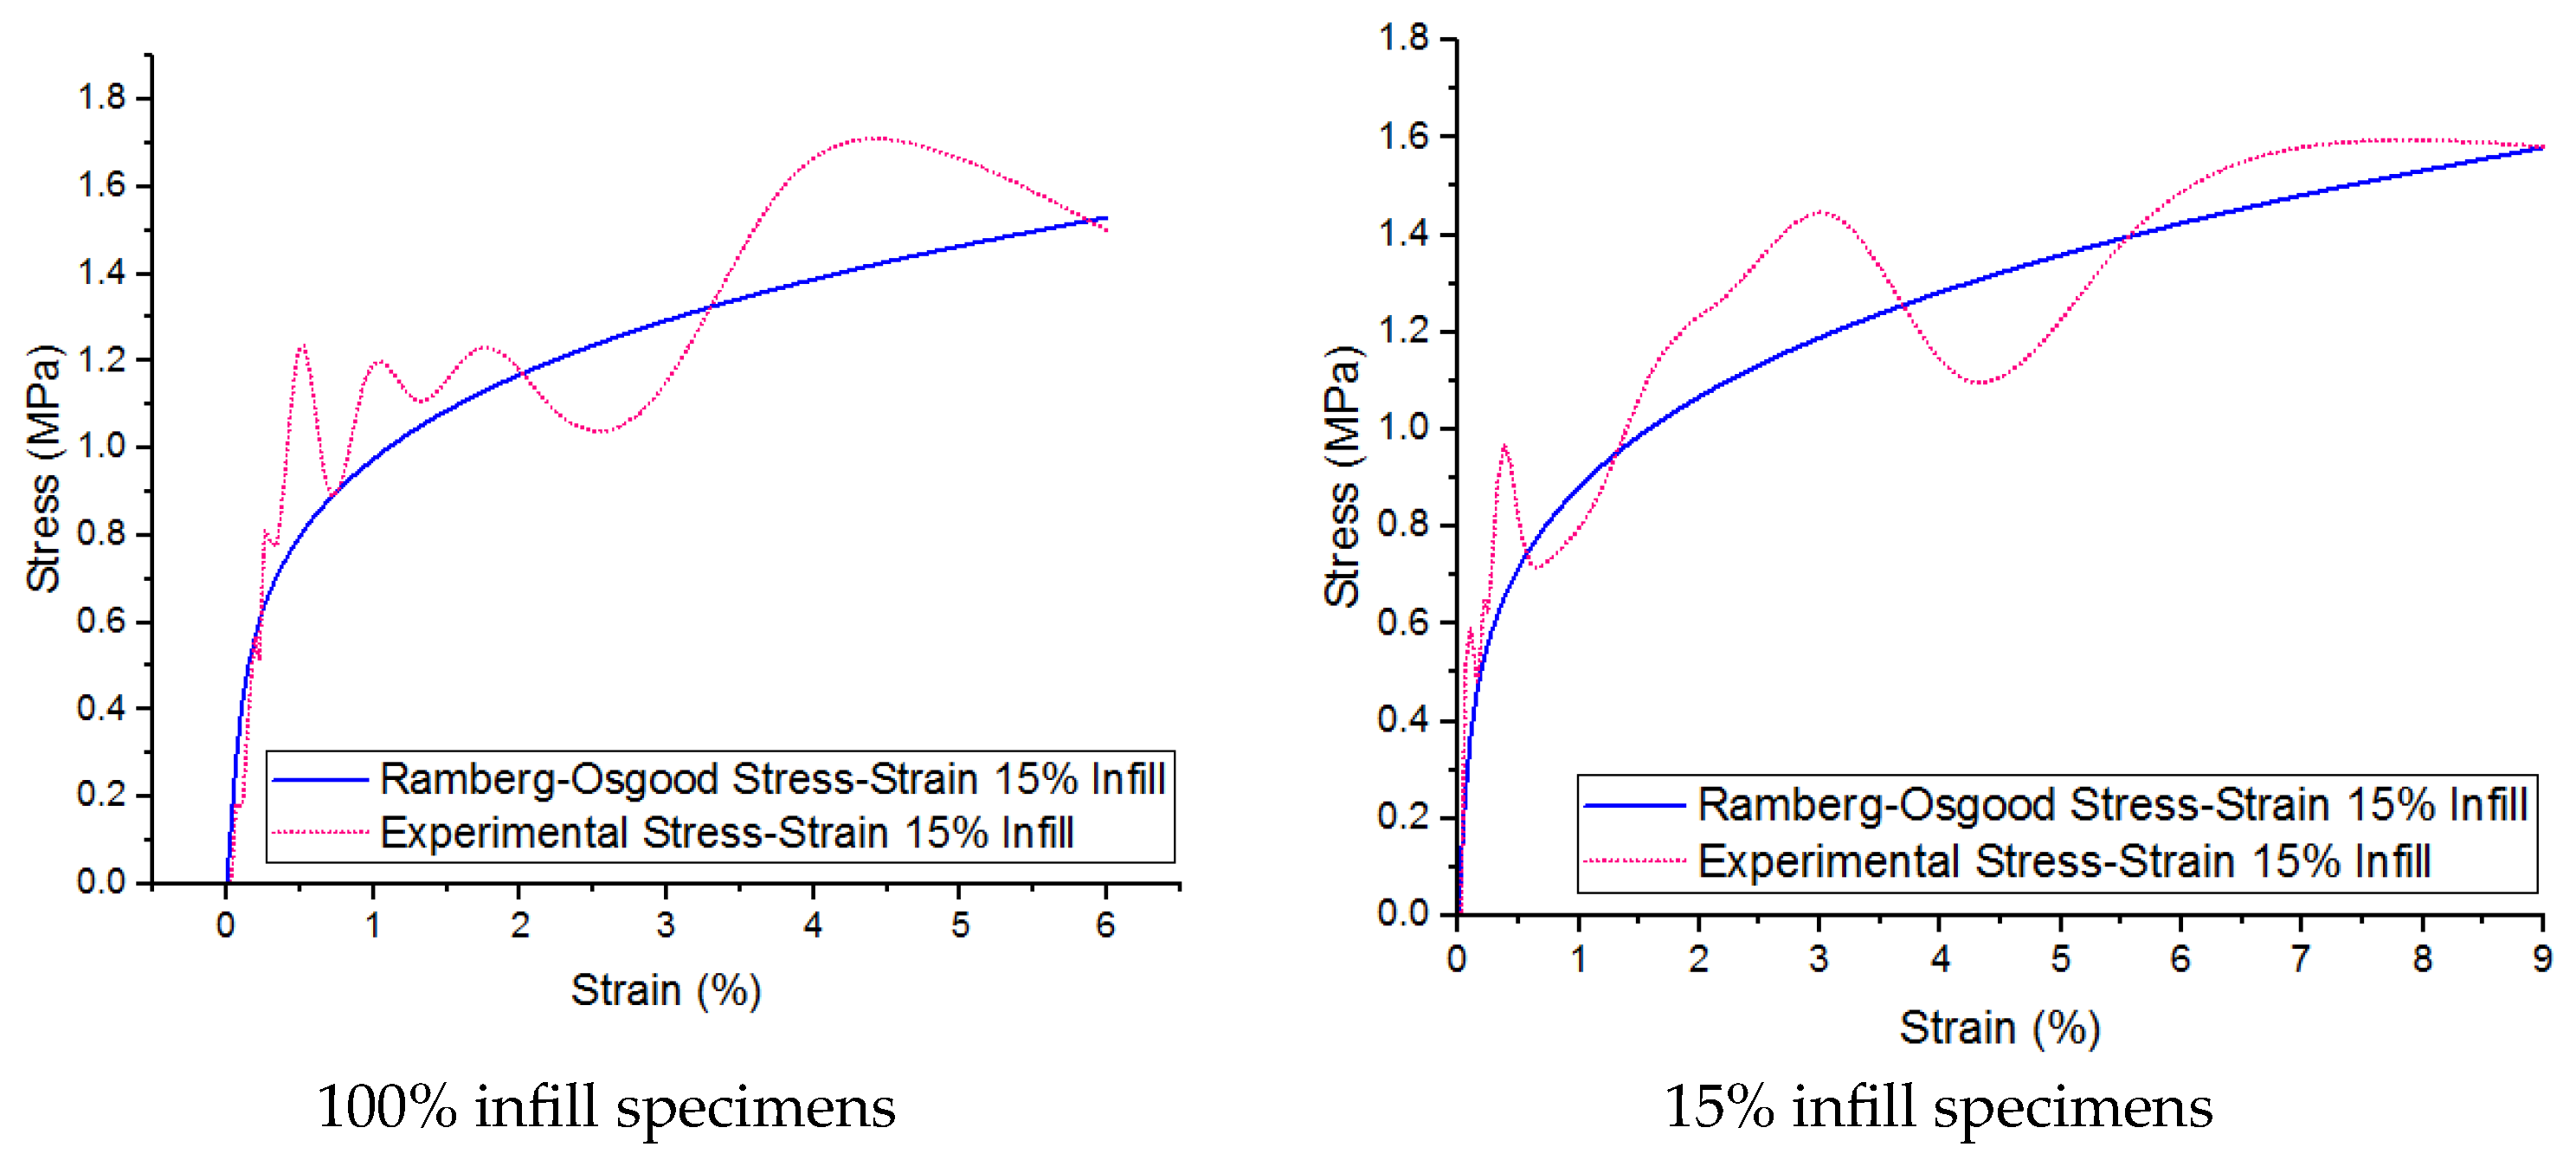
Figure 9 depicts the experimental stress–strain curves derived for the 100% and 15% infill specimens. Plasticity was included by fitting the data with an engineering stress–strain curve derived by using the Ramberg–Osgood coefficient. This behavior is defined in the simulation model with the support of a multilinear isotropic hardening model.
Table 5 presents the material properties derived, which are required for the completion of the numerical study.

2.5.3. Definition of the Mesh

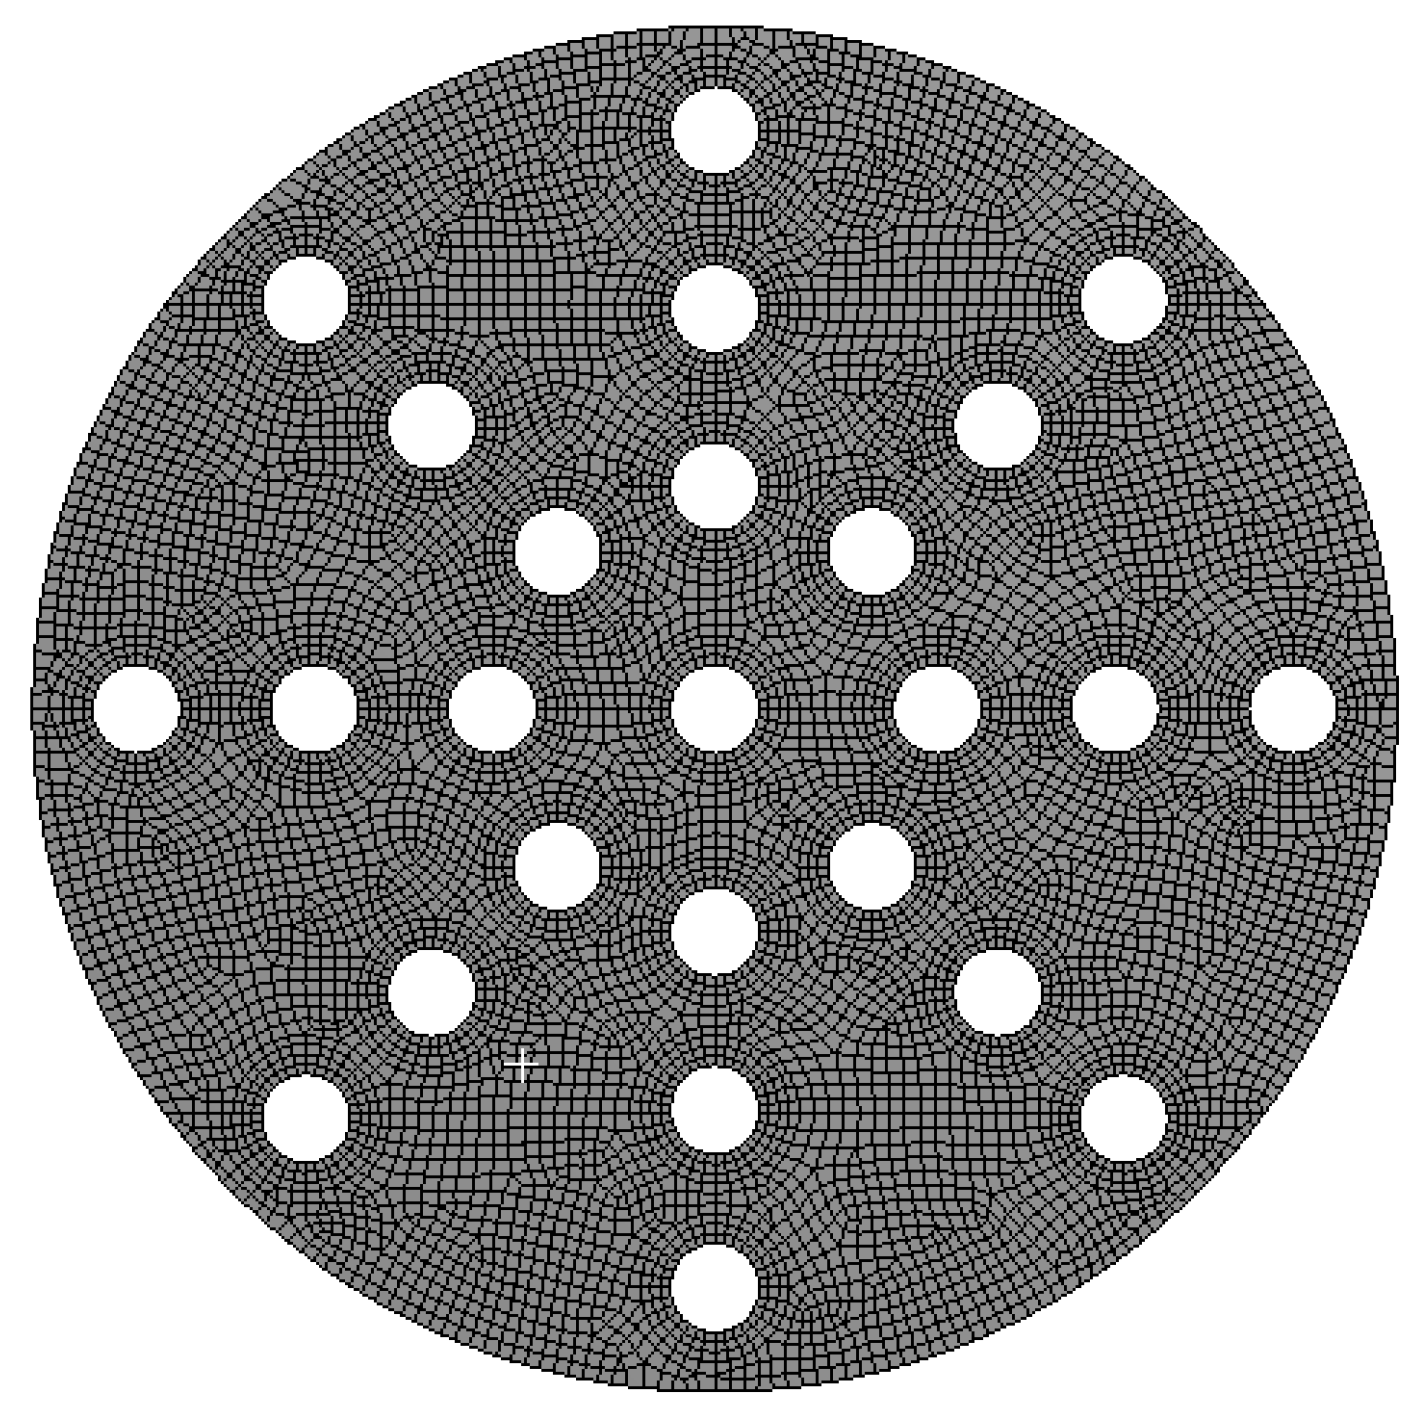
A 2D Shell representation is achieved of the working geometry. Quadrilateral and triangular elements are employed for approximating the continuous domain. A smaller element size is considered in the proximity of the holes for capturing the stress concentration effect. Figure 10 depicts the resulting meshing.

2.5.4. Definition of the Boundary Conditions

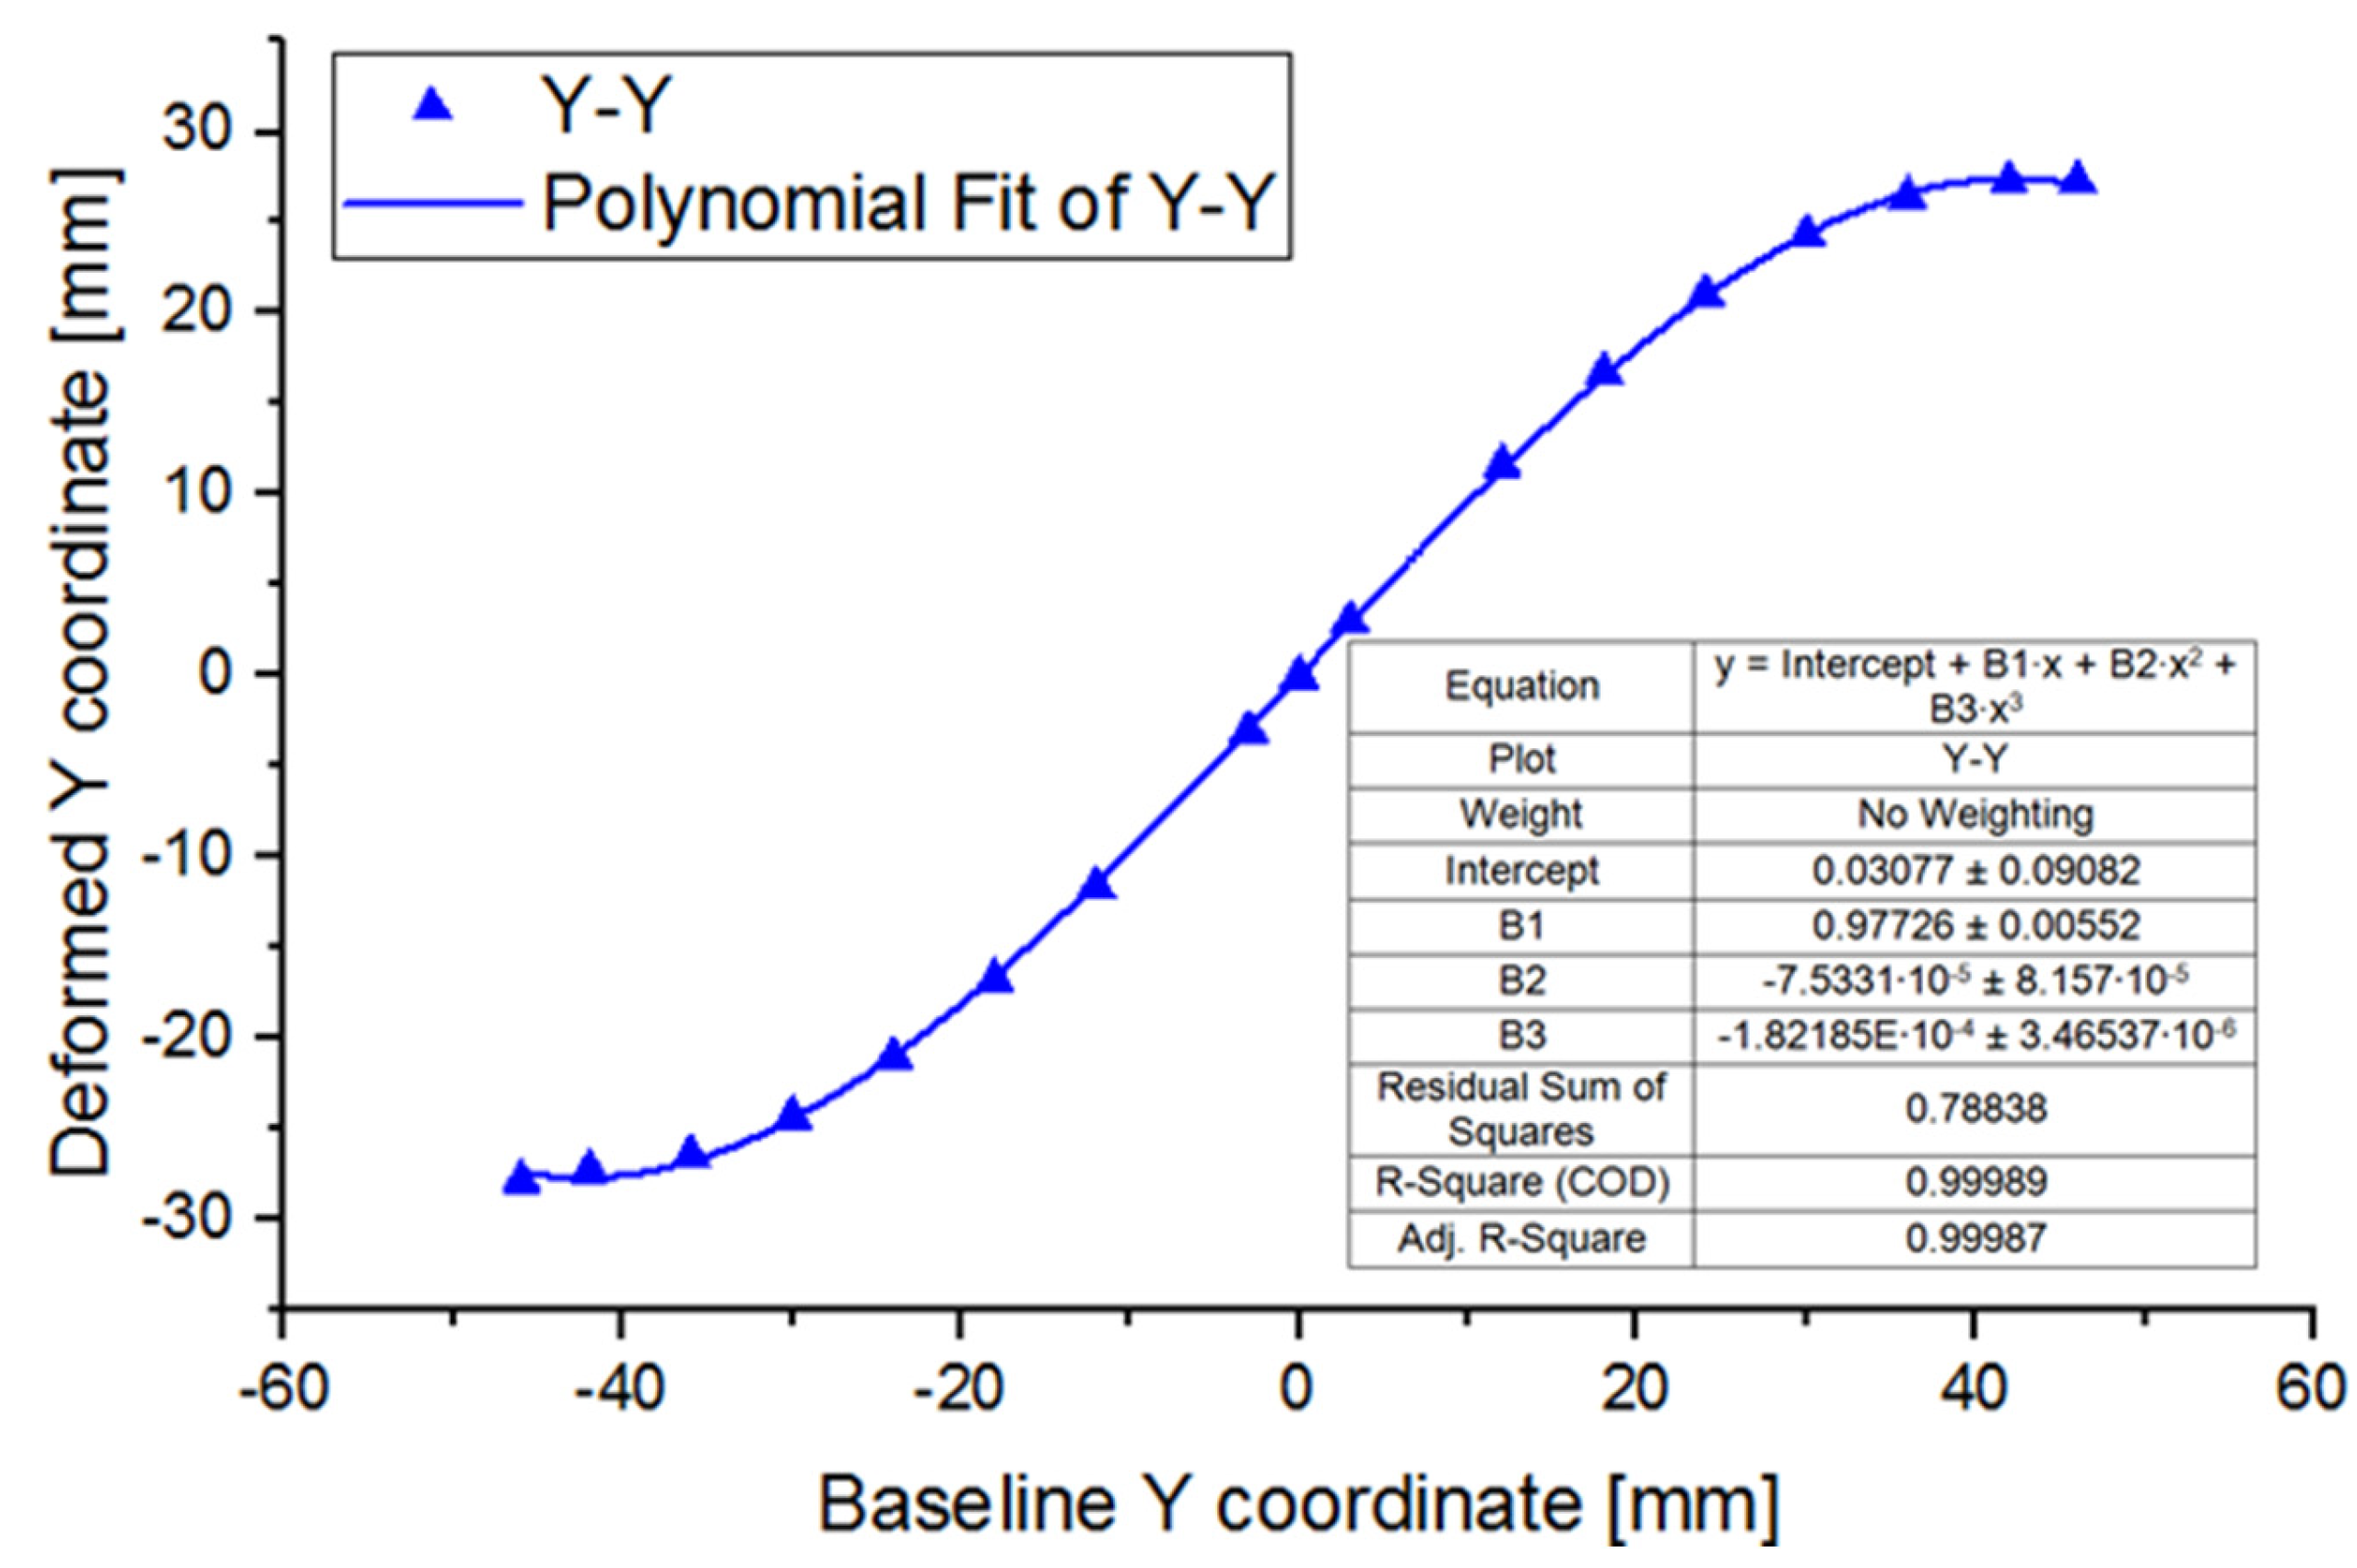
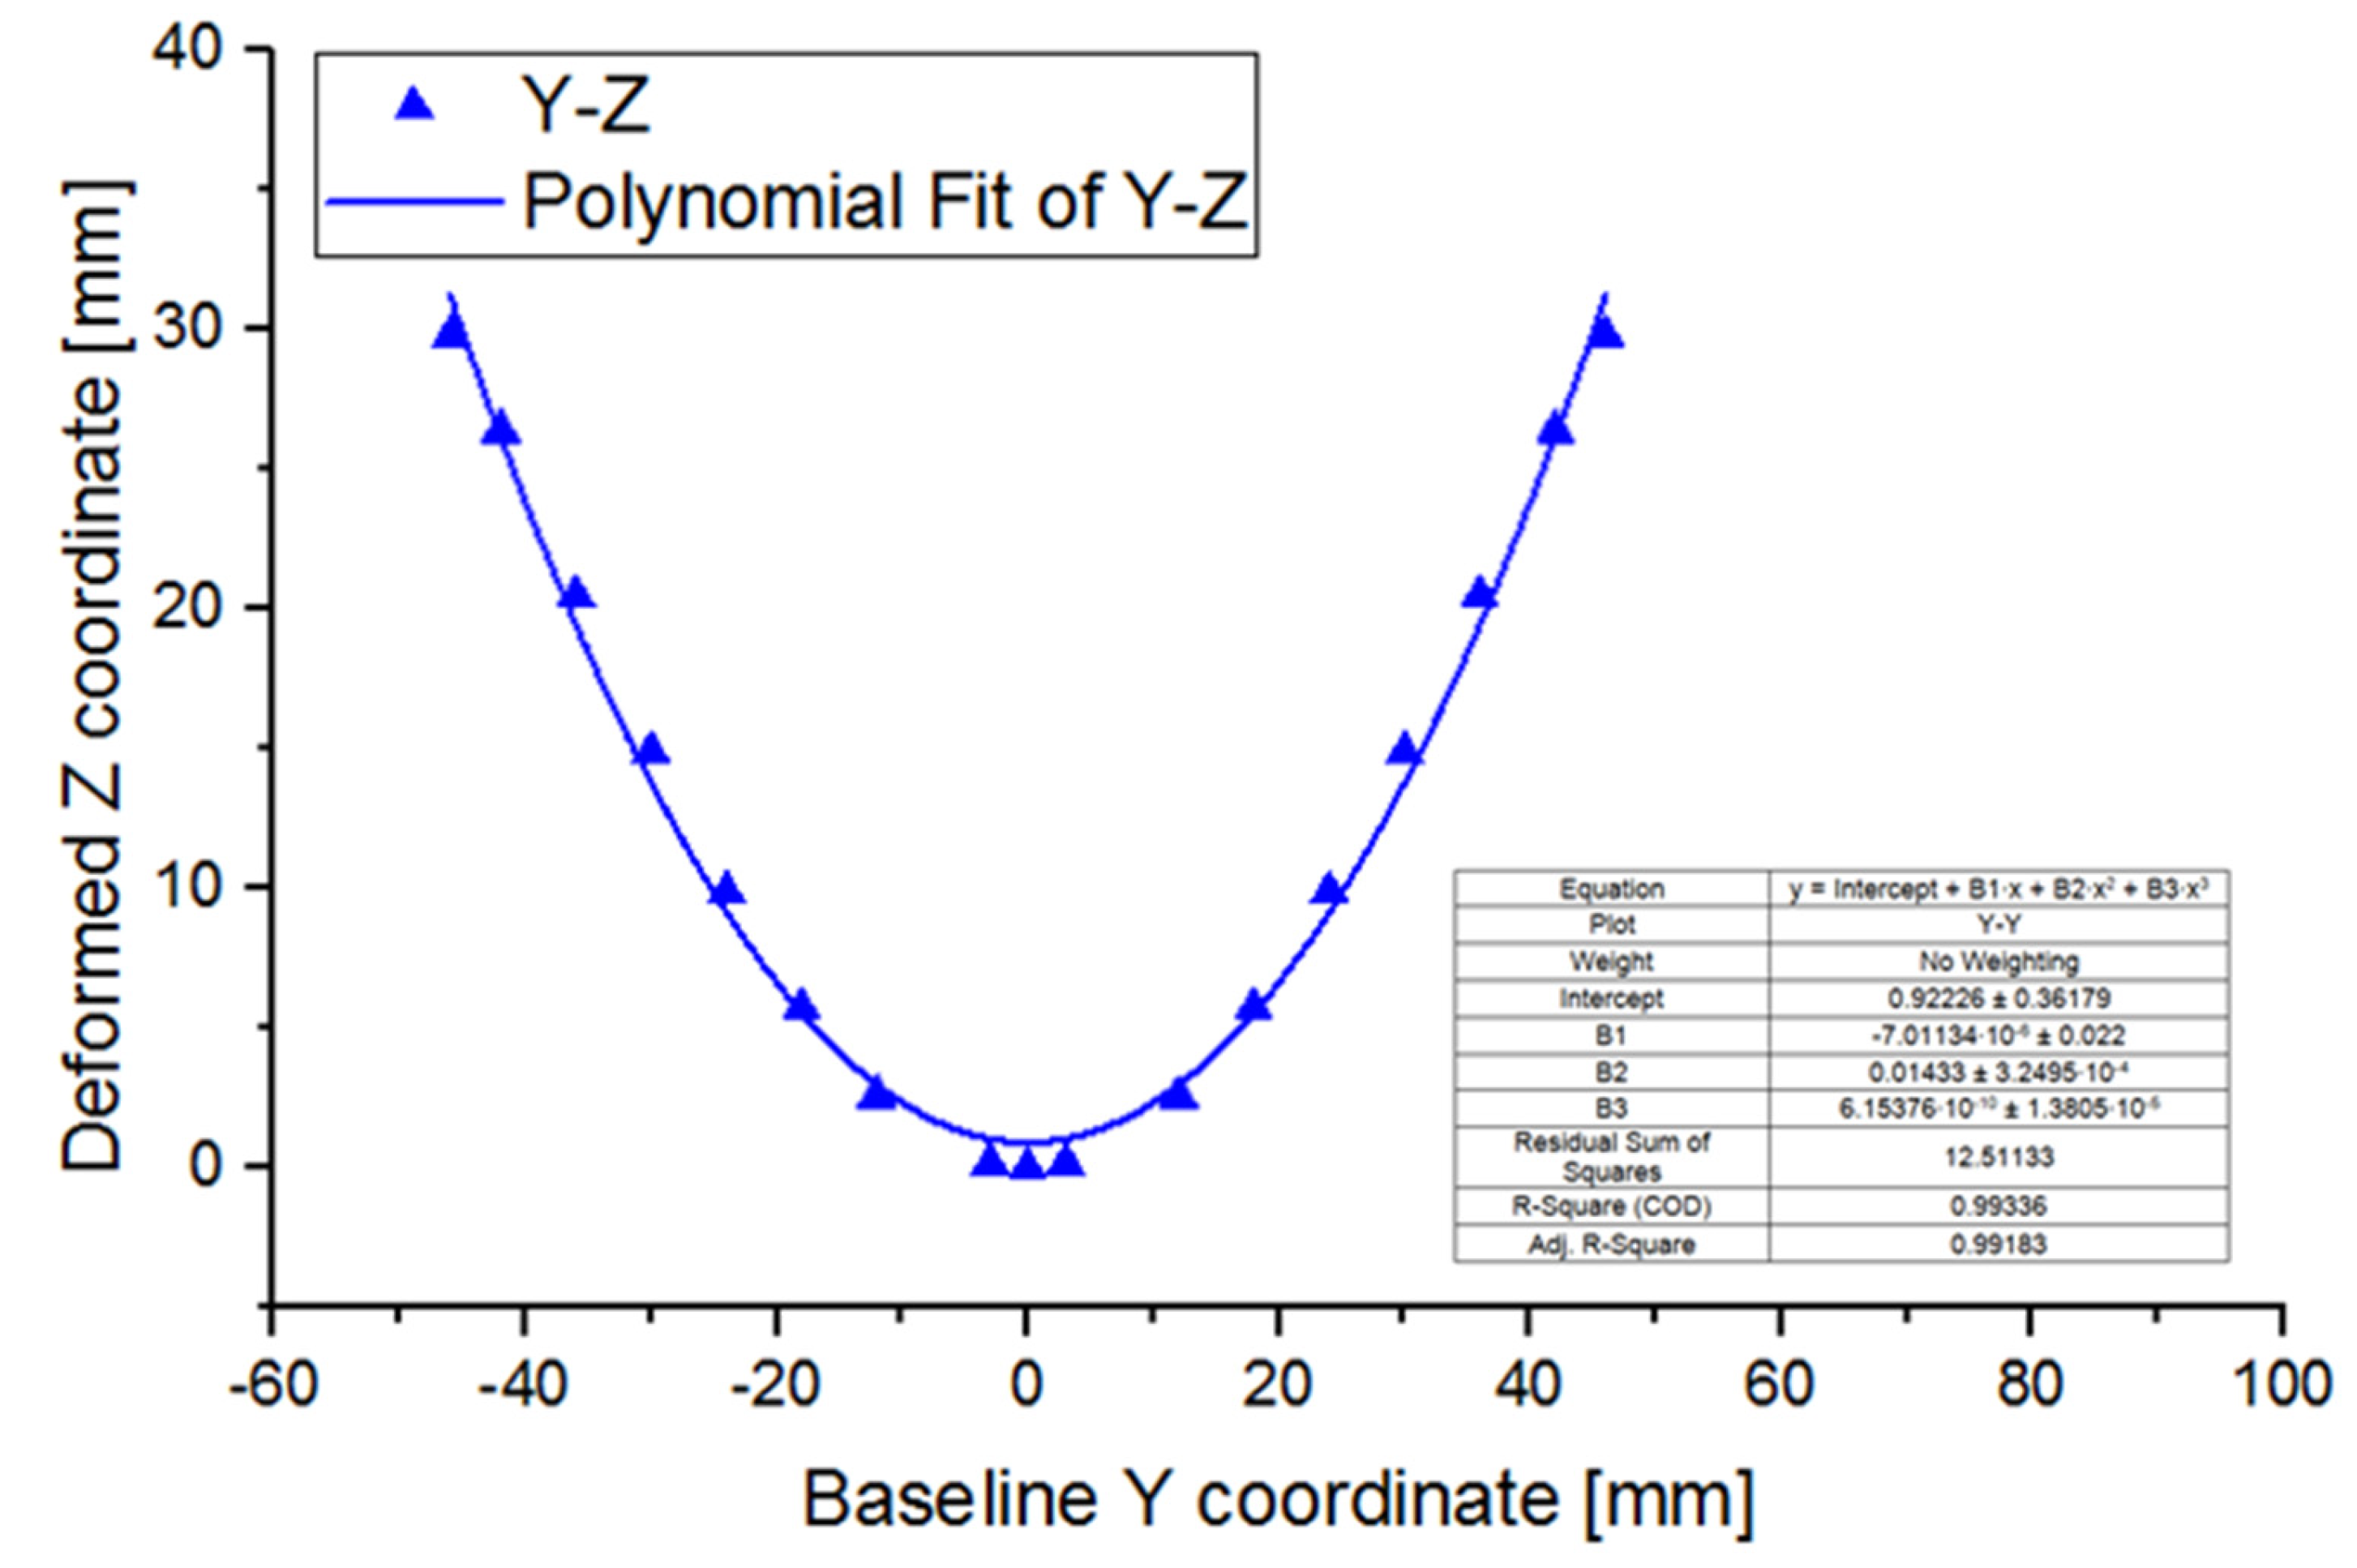
The definition of the boundary conditions required the evaluation of the deformed shape of the specimens given the geometric data of the press. Figure 11 and Figure 12 show the derived polynomial expressions between the Y–Y and Y–Z coordinates of the baseline and deformed specimens. Given that the heat is a stimulus of 4DP of PLA, a prescribed body temperature can be used, given the quasi–static behavior of the forming process. On the other hand, only axial thermal displacements can occur on the tip of the specimen as all other degrees of freedom are constrained by the press. Thus, a static structural analysis is developed by considering the material properties of PLA defined at 55 °C (Table 3).

3. Results and Discussions

3.1. Experimental Results

Table 6 presents the mean values of the measured diameters. An example of the notation is “15% G–W,” which denotes a sample with 15% infill density and a gyroid infill pattern, 3D printed from white filament.
Data were gathered by measuring the diameters of the holes both before and after the recovery process, as well as by recording the recovery time. The results analysis was conducted from multiple perspectives (research questions—RQ):
  • Examining whether there is a significant difference between holes’ diameters before and after recovery (assessing the recovery effect over holes’ accuracy).
  • Assessing the impact of 3DP process parameters and material color on the accuracy and planarity of recovered sample diameters (evaluating recovery process impact on shape).
  • Exploring the correlation between the hole diameters and the accuracy of recovered sample diameters (accuracy of hole’s diameter dependent on its diameter value).
  • Investigating whether there is a difference in hole diameter accuracy between samples produced from white and black PLA (assessing the material’s influence on accuracy).
  • Evaluating whether there is a difference in hole diameter accuracy between 3D–printed PLA samples with 15% gyroid infill versus 100% rectangular infill (examining infill’s impact on accuracy).
  • Investigating the impact of analyzed variables and hole diameter on the recovery time (evaluating the impact of the recovery process on time and shape).
  • Investigating if the holes’ positions on the sample influence their accuracy.
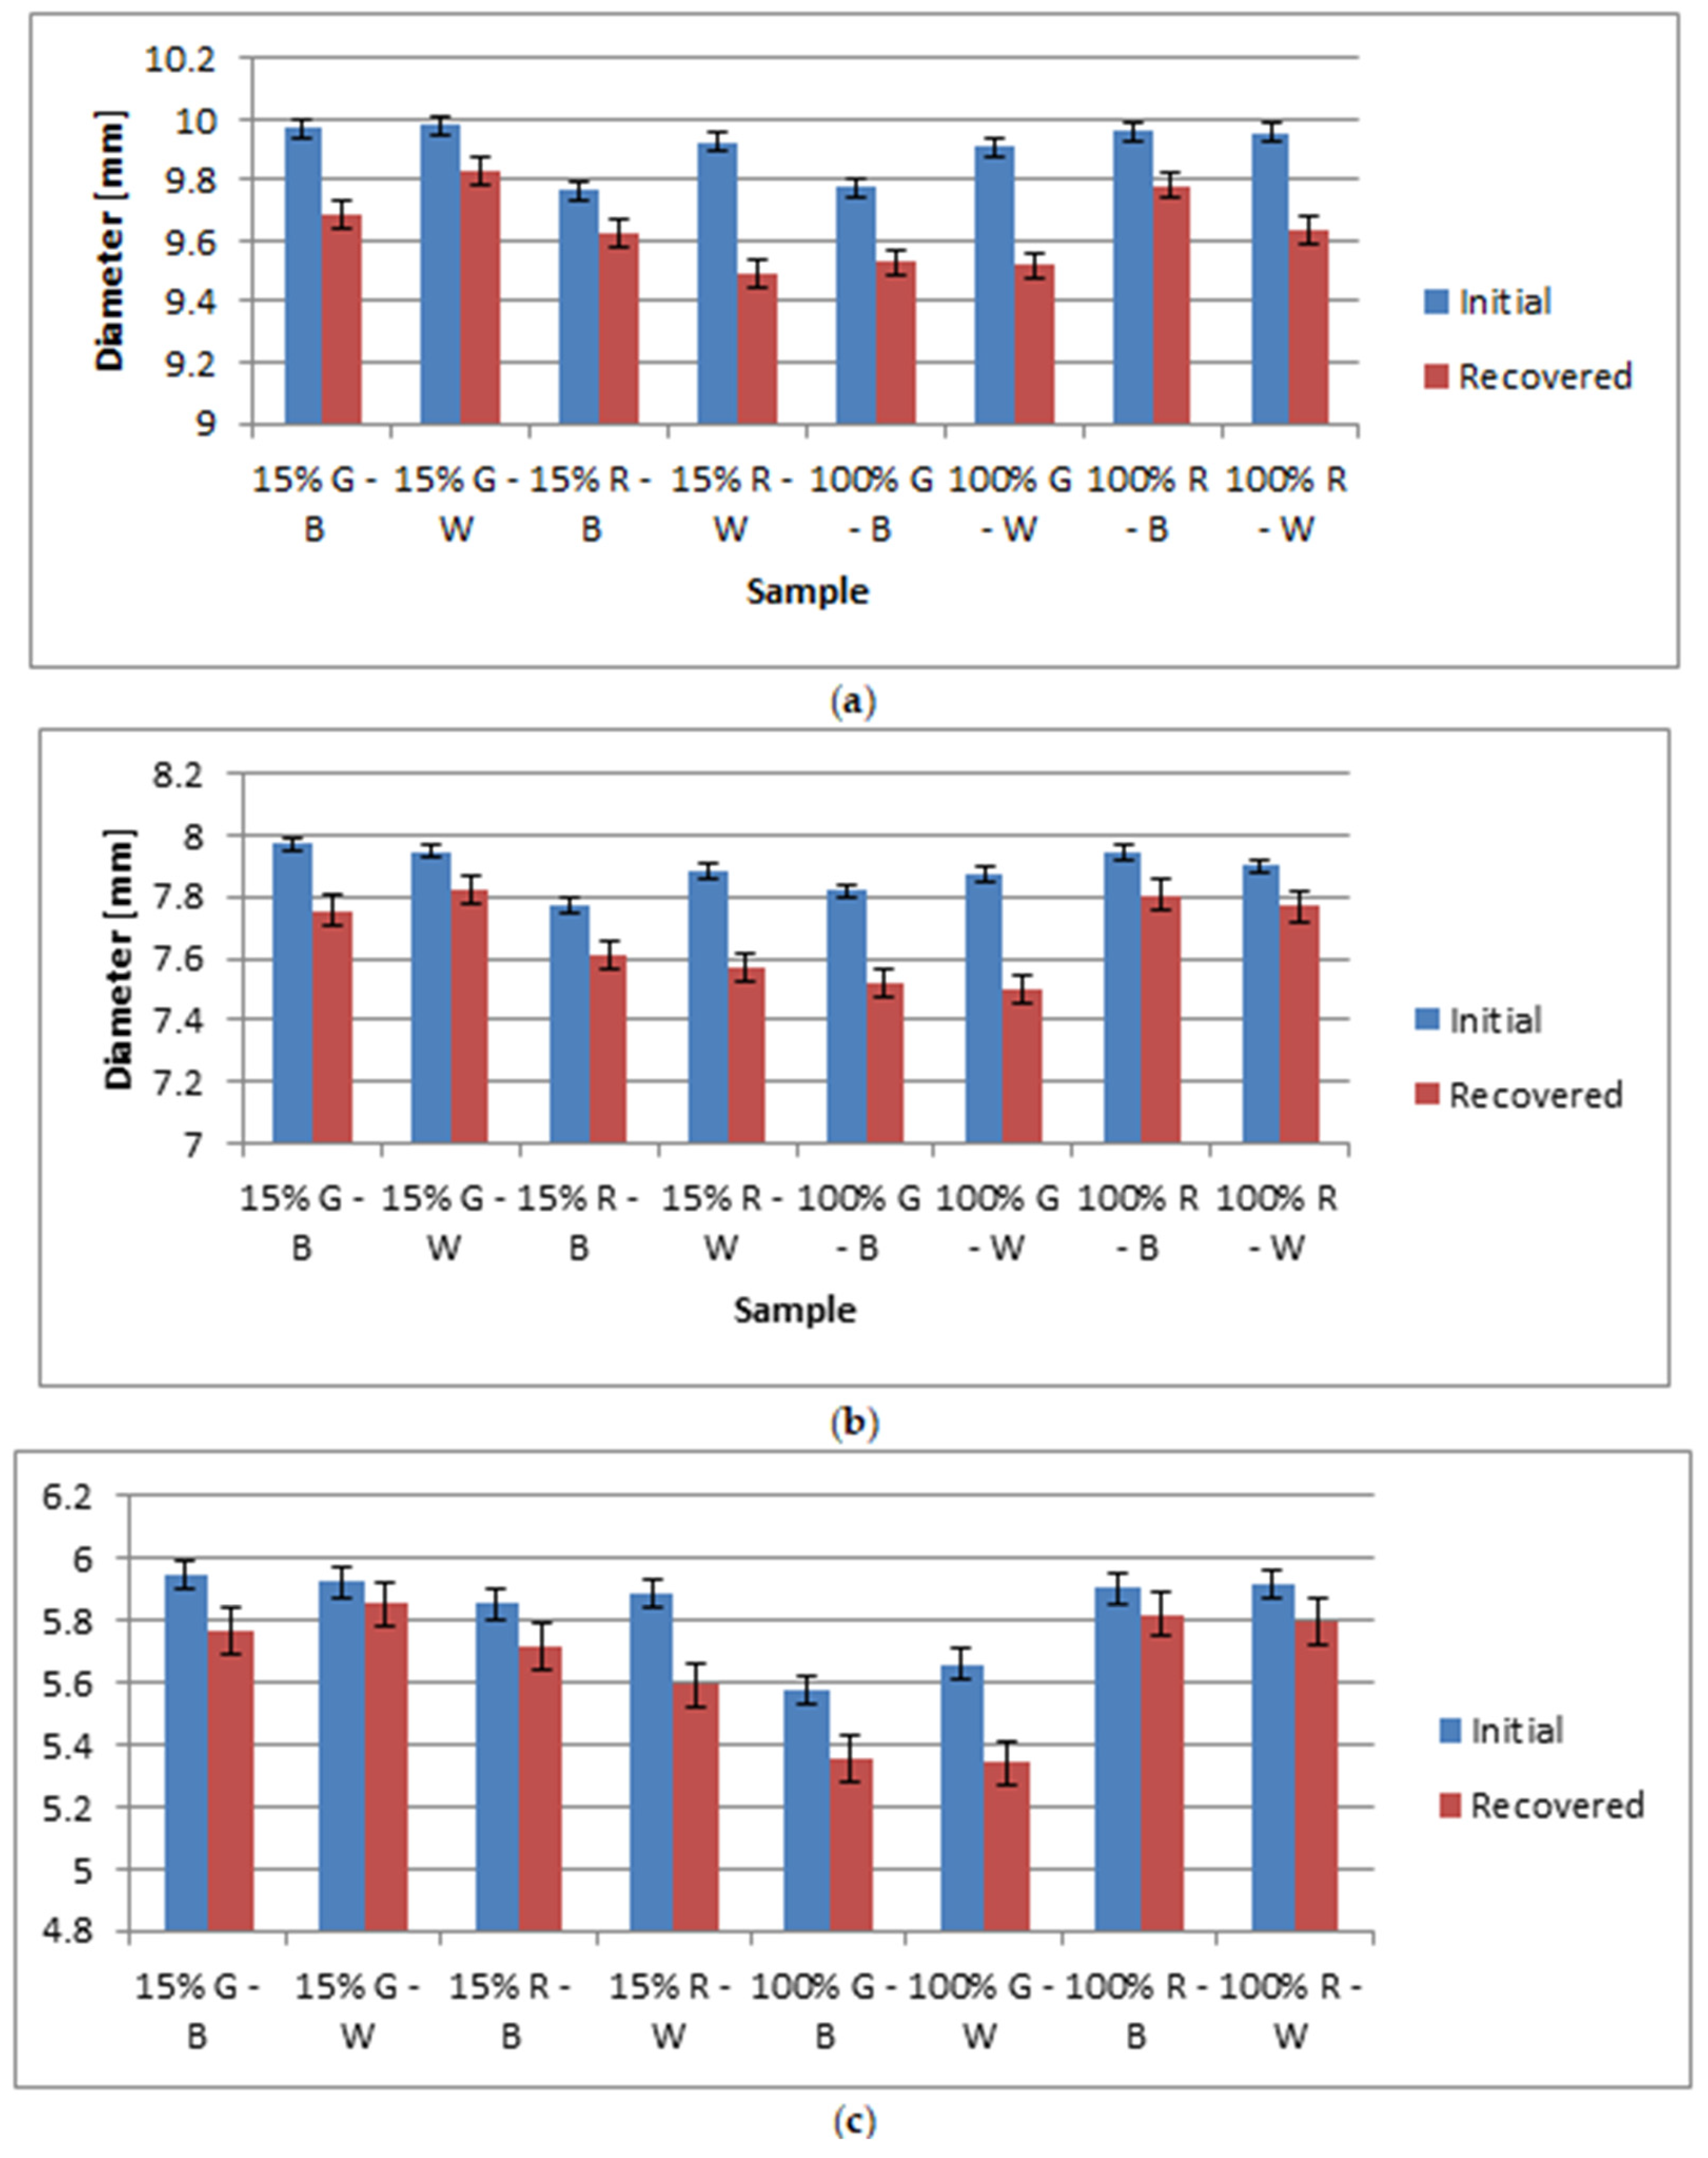
Analyzing the standard deviations in Figure 13, hole diameters after the recovery process exhibited greater variations compared to those of the initial samples. Additionally, all recovered diameters were smaller and not circular anymore, indicating that the samples in this experiment did not fully return to their initial shapes (see Figure 8). These experimental findings are supported by FEA results as can be seen in Section 3.2. Moreover, the dimensional errors were larger for the samples with 6 mm diameter holes than for the other two types of holes, regardless of the infill parameters and filament color. These results answer RQ2.
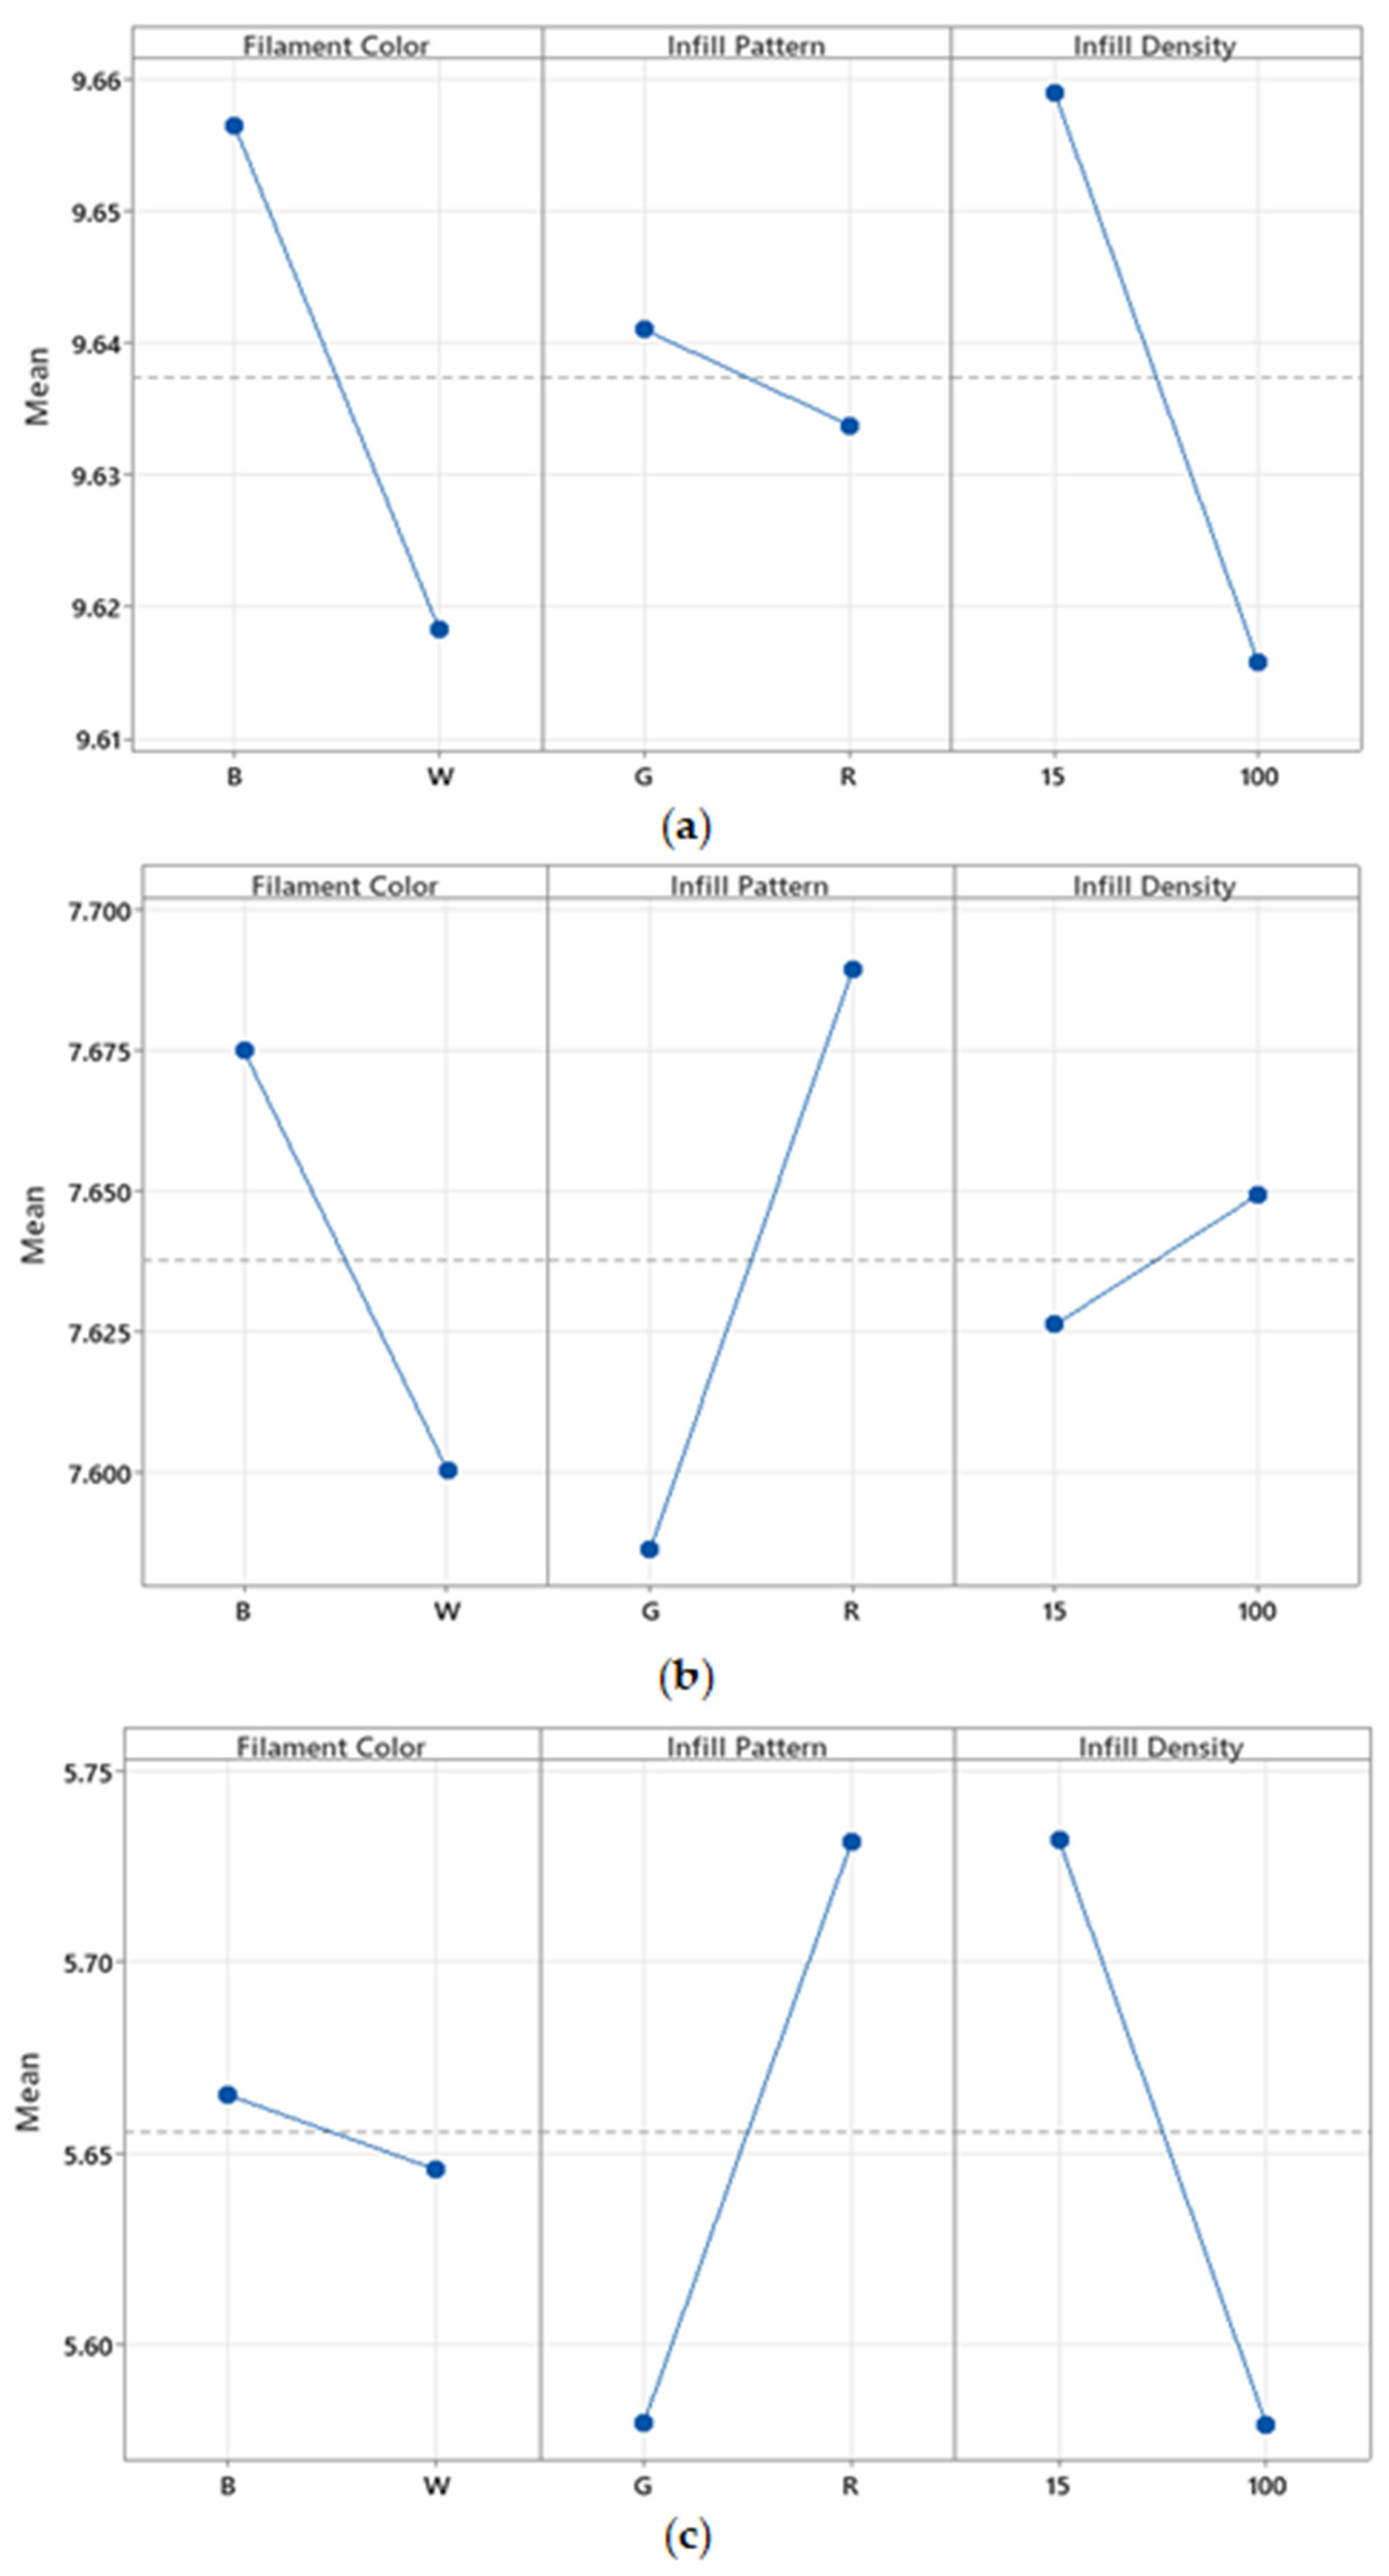
Main–effect plots were generated for the recovered samples to analyze the impact of the studied factors on the diameter values (Figure 14) to respond to RQ3–4.
It can be noted that, for the 10 mm hole sample, the influence of pattern type is less pronounced compared to the other samples, whereas color has more significance for the 10 mm and 8 mm hole samples. Samples printed with black filament exhibit lower accuracy after recovery as hypothesized because the darker color absorbs more heat and determines greater thermal expansion and subsequent contraction. Figure 14 also shows that the infill density plays a role for the 10 mm and 6 mm hole samples and less so for the 8 mm diameter samples. As no clear trend of influence for the infill–related patterns over the dimensional accuracy of the samples could be inferred from the displays of plots, further analysis was performed to evaluate the statistical significance of the effects. Higher infill densities generally improve prints’ structural integrity, and this contributes to better shape retention. On the other hand, the specific patterns may interact with the thermal and mechanical properties of the material differently, leading to varied results in dimensional accuracy. The gyroid pattern, for example, may provide a more uniform stress distribution, whereas rectilinear patterns might lead to localized stress concentrations, especially for 15% dense samples. It is also possible that the temperatures during programming and the recovery phase have a more significant impact than the infill parameters or filament color. Therefore, it is necessary to conduct further research to gain a deeper understanding of the topic.
Table 7 shows the results of a paired t–test performed using Minitab 21 Statistical Software for comparing the hole accuracy before and after recovery (degrees of freedom = 14). As all p–values are lower than the reference of 0.05, it can be said that there is no significant difference between the holes’ diameters before and after recovery. This answers RQ1.
For all diameters, the samples with 15% infill density had a shorter recovery time to room temperature than the 100% infill density counterparts (Table 8) due to their larger heat conduction, meaning that they cool down more rapidly and reach the temperature at which they become rigid faster. This explains why, for both filaments, the 100% infill density samples were closer to a planar shape when recovered (see Figure 6 and Figure 7) in comparison to the 15% density samples (response to RQ5), which confirms the results in Nam et al. [7]. However, there is no statistically significant difference between recovery times at the same infill densities regardless of hole diameters, pattern type, or filament color. This answers RQ6.
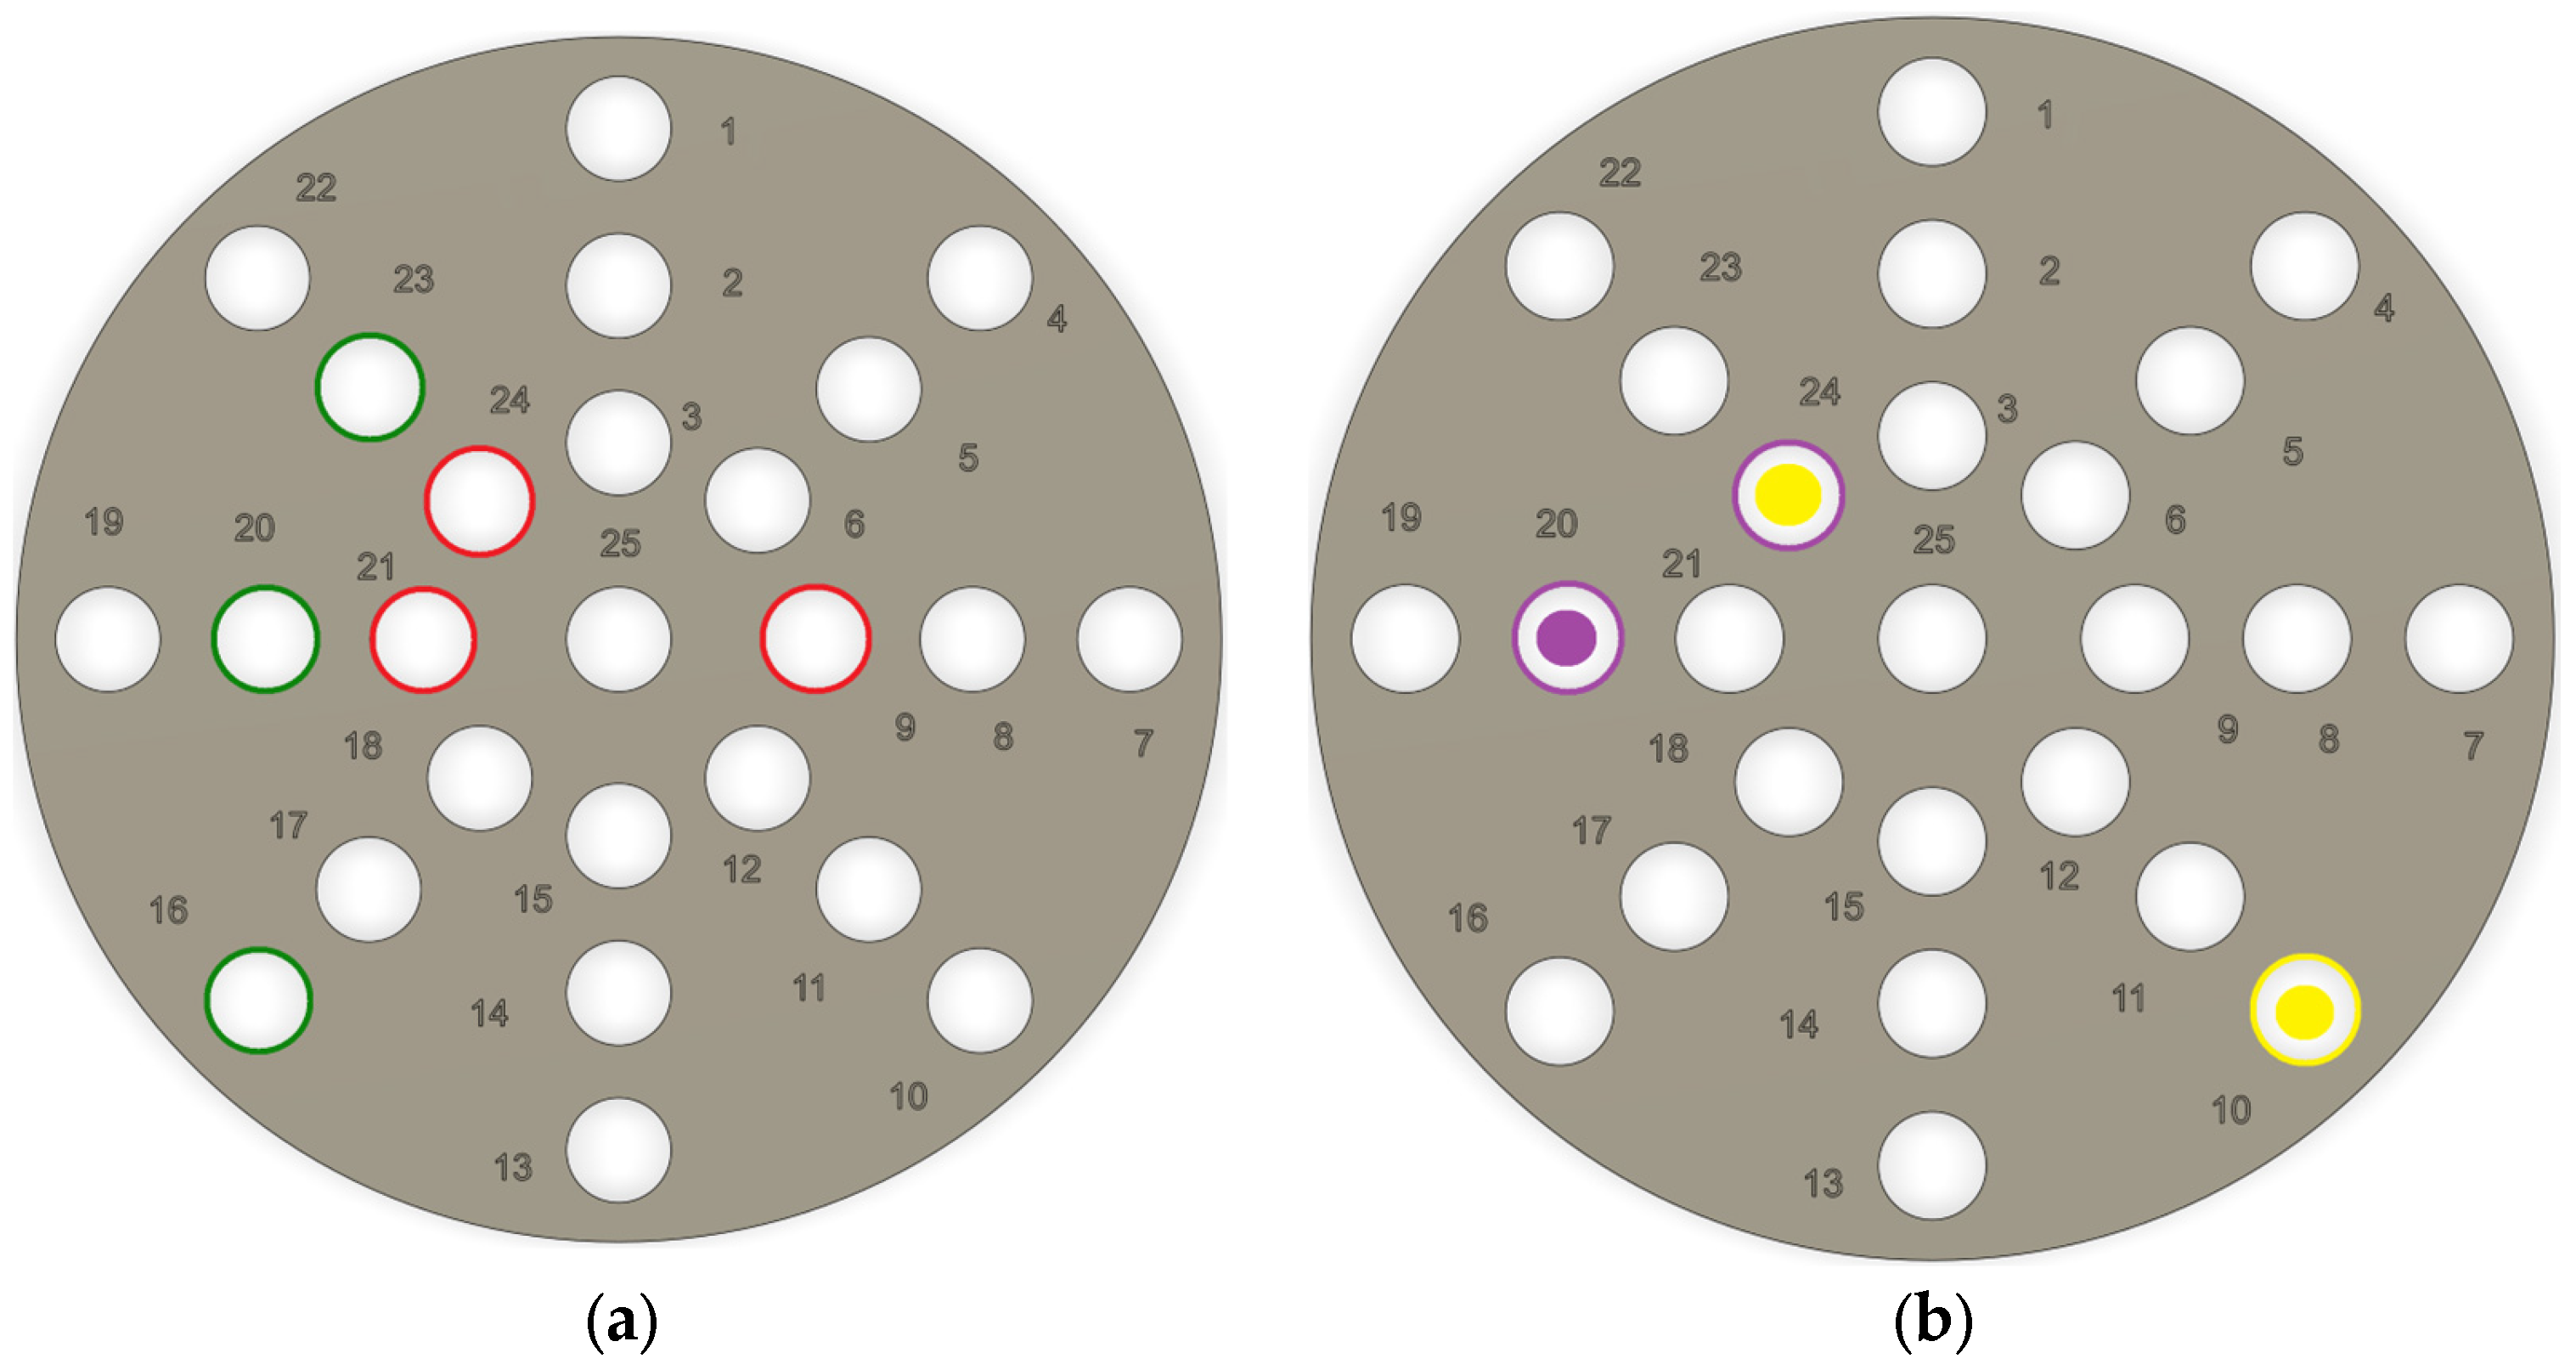
Table 9 displays the most and least accurate values for the initial diameters of the test samples, while Table 10 shows the most and least accurate values for the diameters of the recovered samples. These findings are graphically presented in Figure 15, using color–coded indicators. In Figure 15a, green denotes the most accurate values, whereas red indicates the least accurate ones. In Figure 15b, purple signifies the most accurate measurements, while yellow signifies the least accurate diameters. The reason for the superiority of holes 20 and 24 in terms of accuracy over the other holes could not be linked to their location relative to the bending direction (RQ7).
Given that the study’s results revealed no important differences in the diameters of the samples’ holes, Section 4 introduces an application involving the insertion of two sieves into a plastic container with a smaller intake relative to the sieve diameter. These sieves can be used to filter objects with spherical shapes of various diameters in multiple stages.

3.2. Numerical Simulation Results

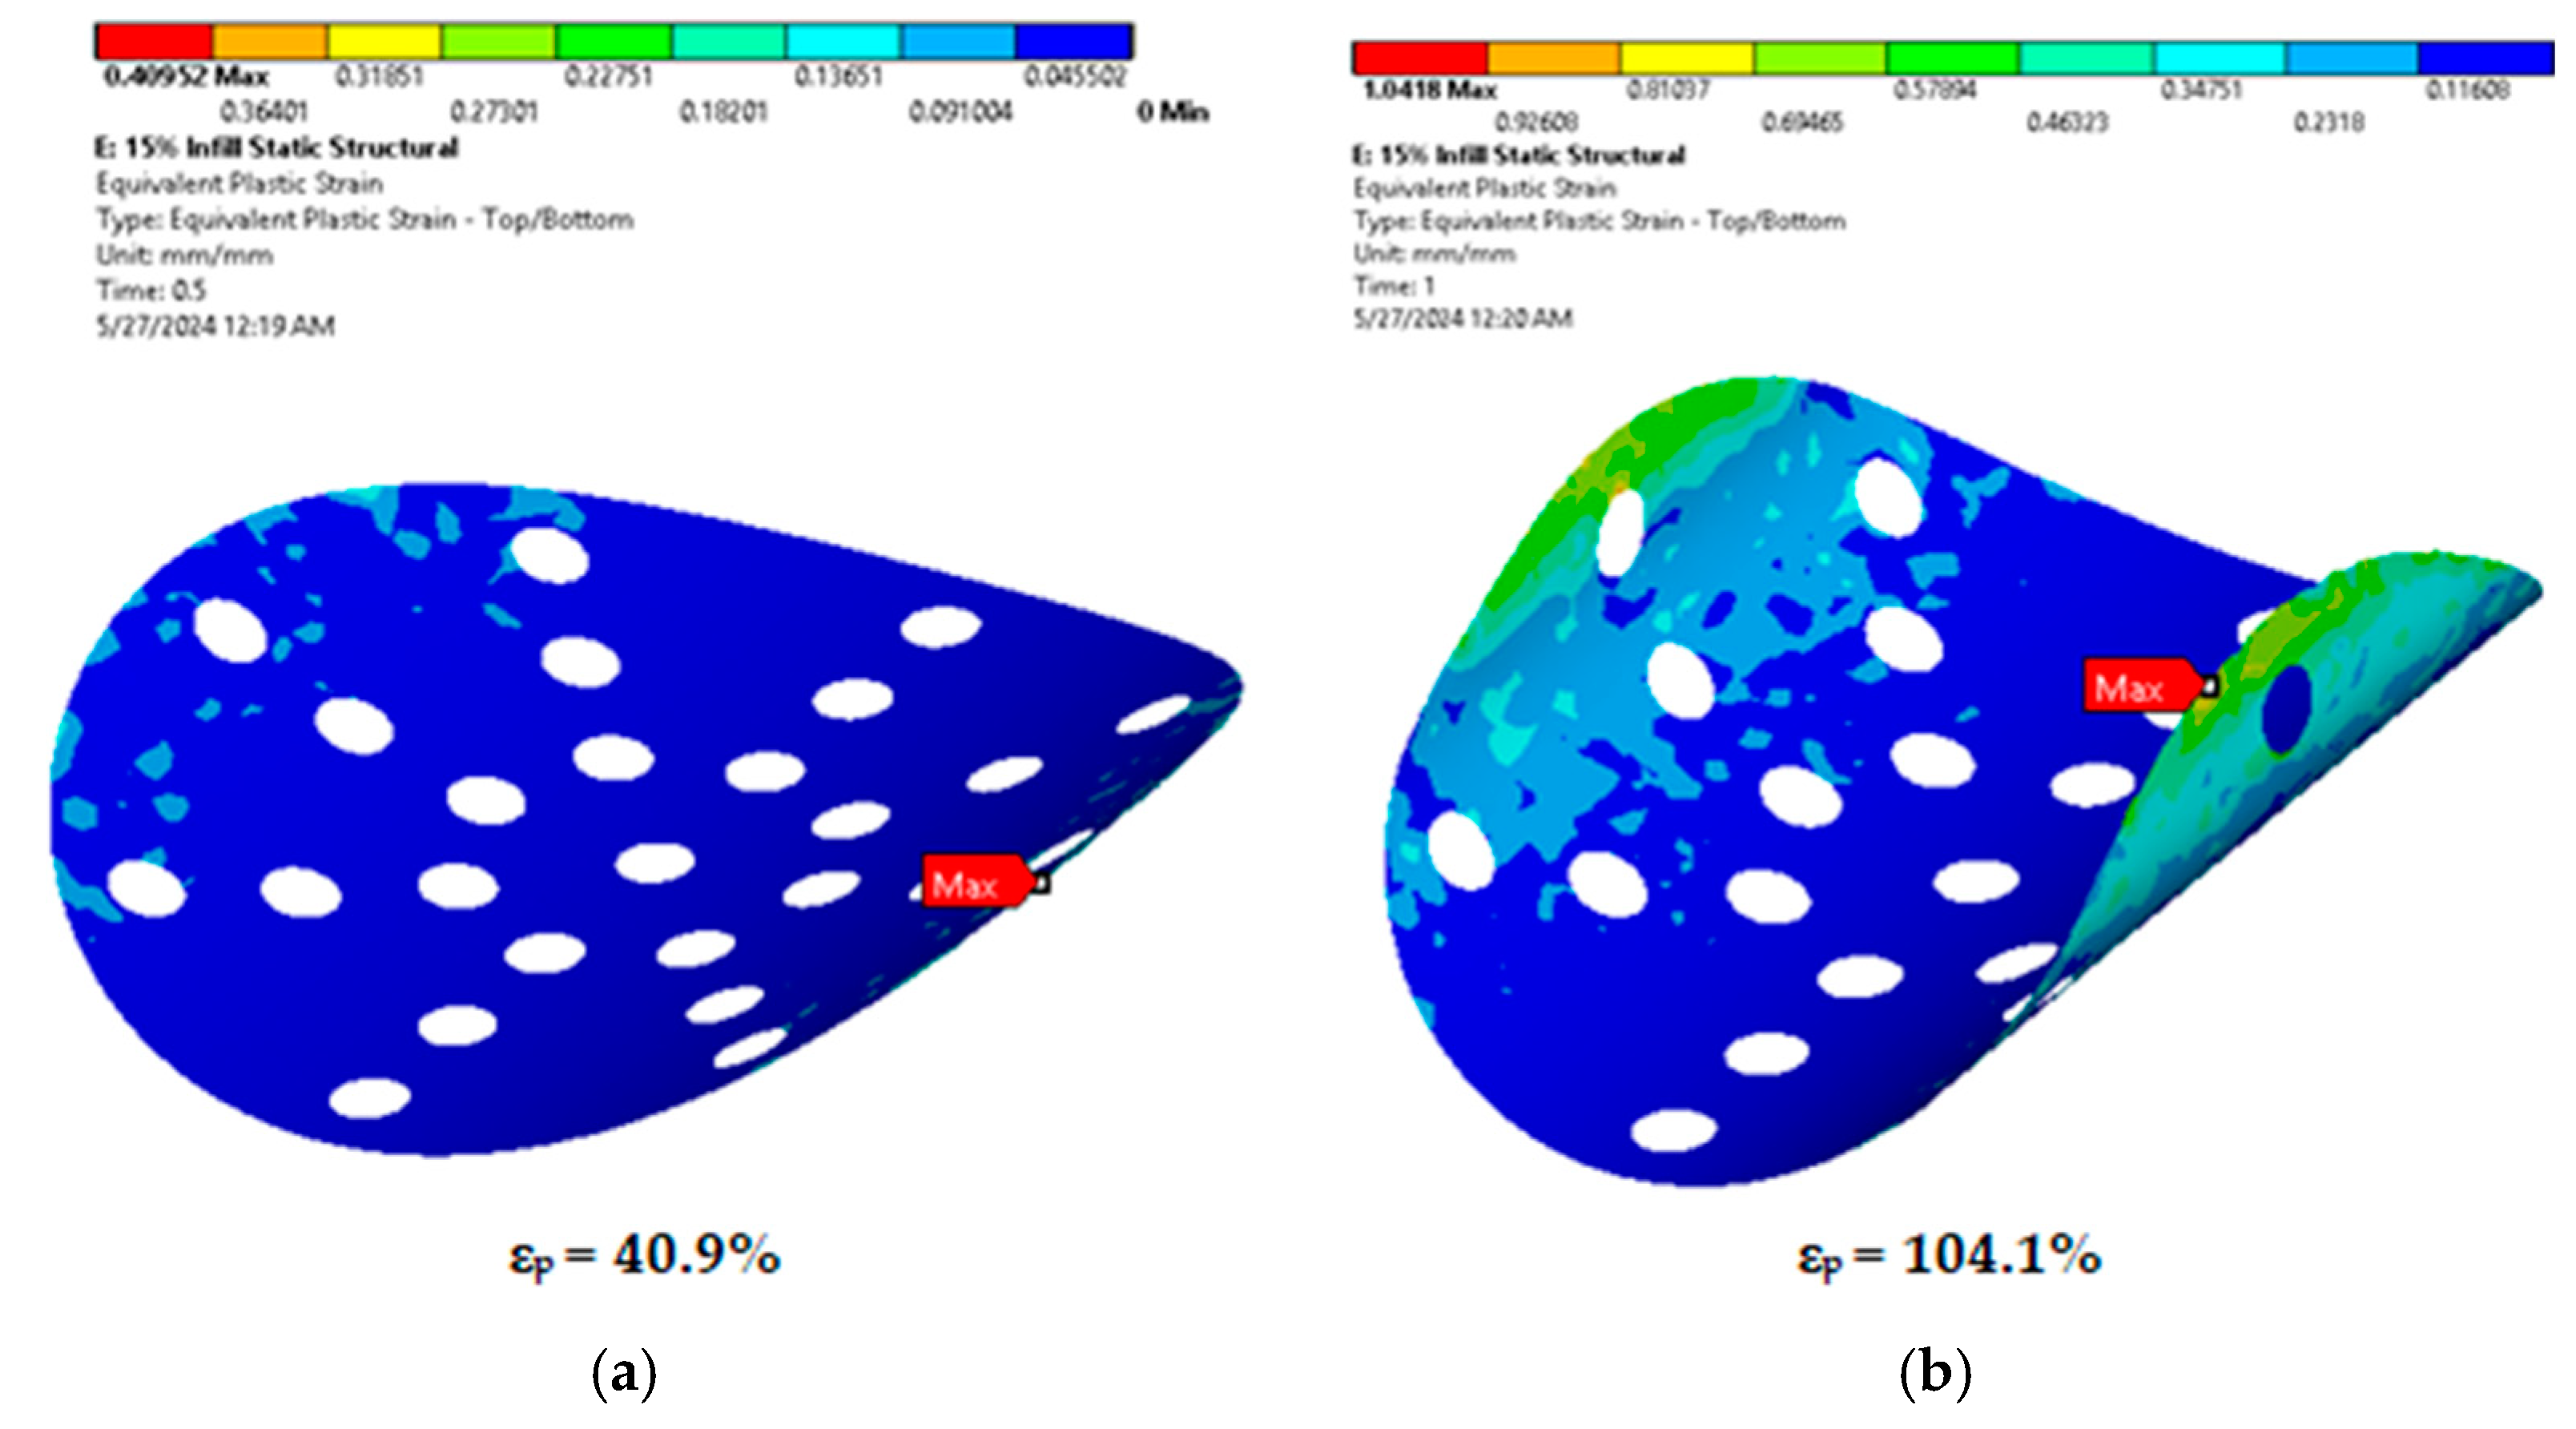
The Newton–Raphson method [22] iteratively updates the stiffness matrix and the nodal displacements to account for changes occurring due to the increasing load. From this perspective, Figure 16 presents the plastic strain of the 15% infill specimen with 6 mm hole diameters occurring at 50% and 100% of the applied load.
Permanent deformation occurs in the initial increments of the load (the maximum plastic strain–εp = 40.9%) and exceeds 100% plastic strain at the final load step (εp = 104.1%), given the low tensile yield strength of the material at the forming temperature. The values achieved are consistent with the infill density.
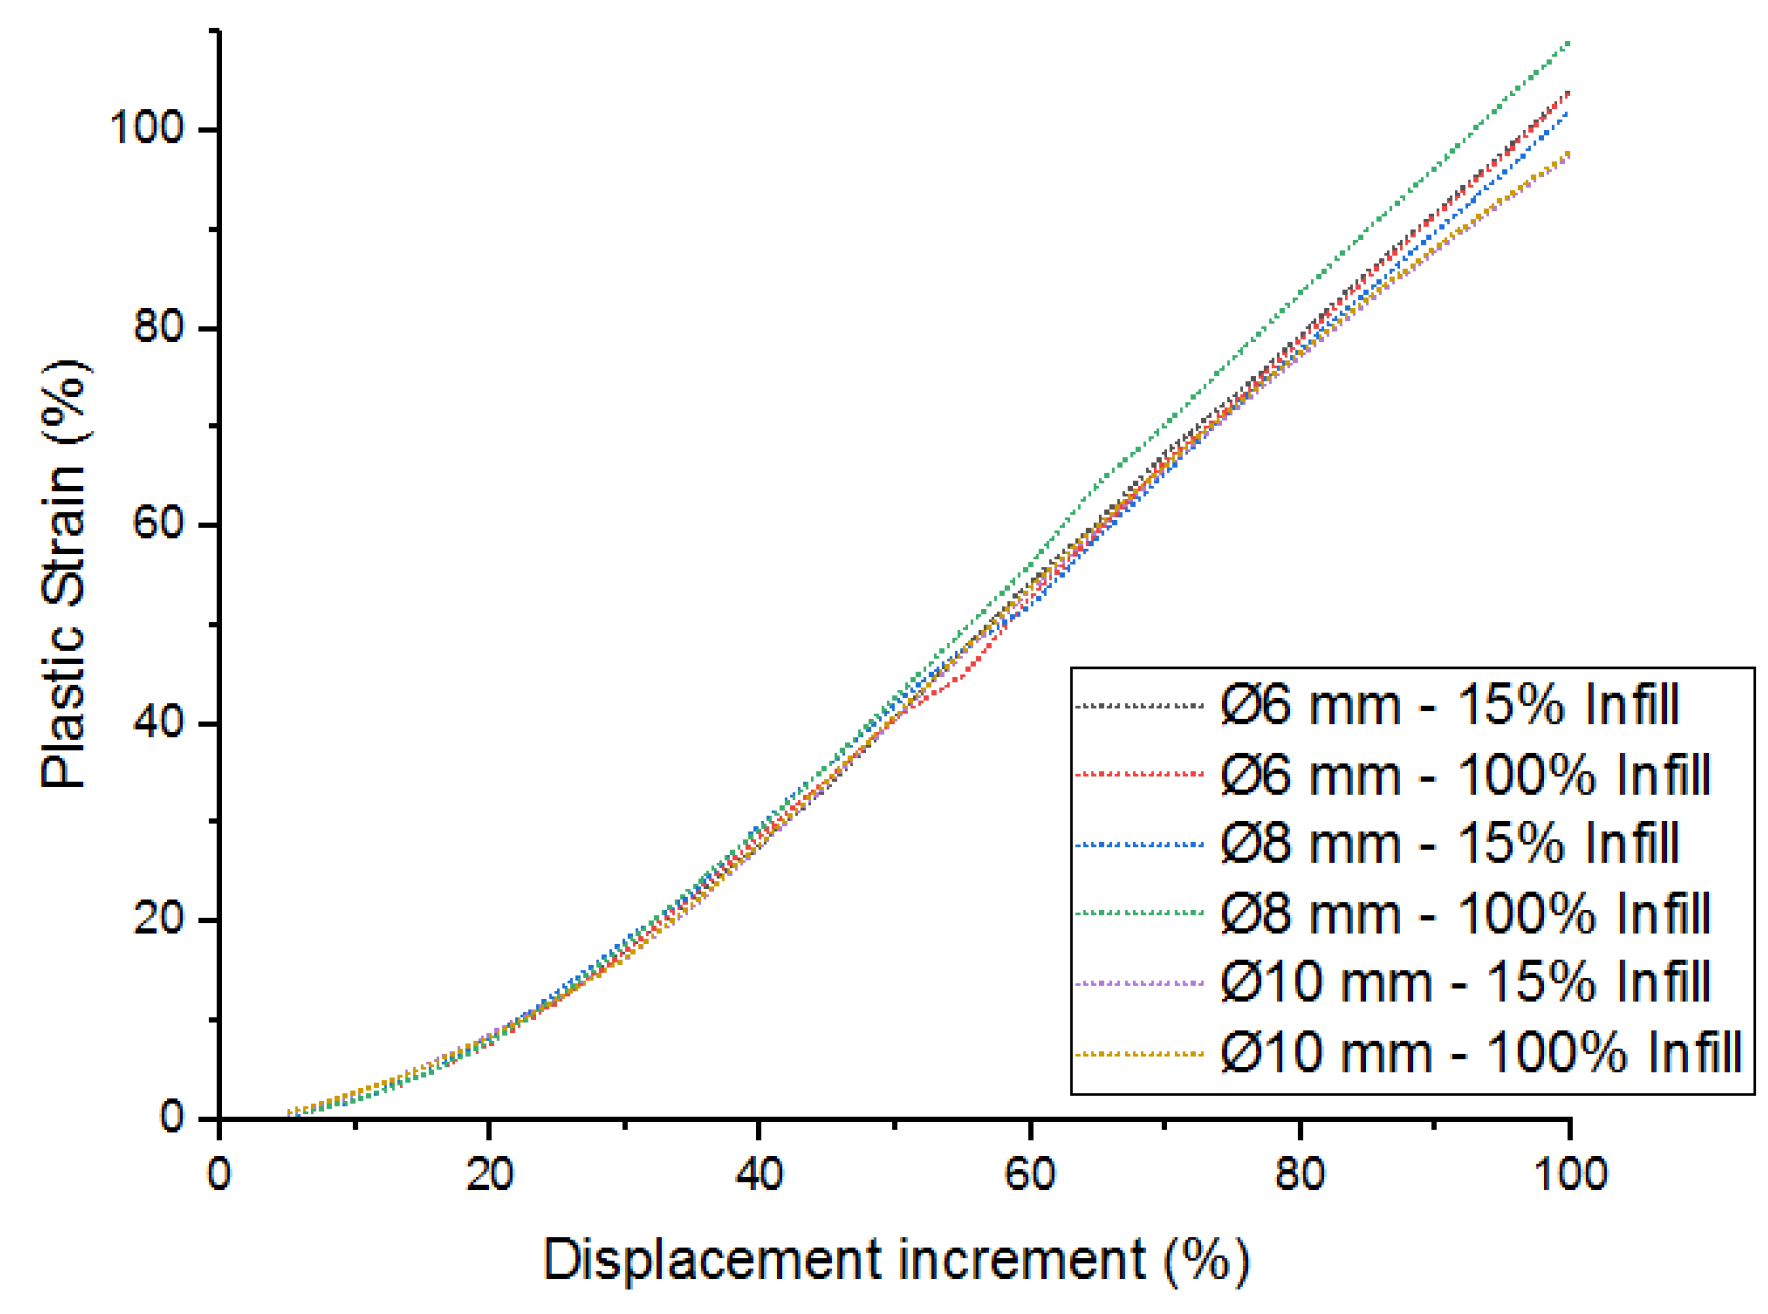
Figure 17 presents the relationship between the step loading and the maximum plastic strain. The values exceeding 100% are located at the tip of the specimen. A similar behavior can be noted for all studied configurations. However, the differences in the material properties and the diameter of the perforated holes result in different distributions of the load.
The plastic strain was processed at the exterior edges of each hole. Three strain rate ranges can be distinguished in Table 11:
  • Low strain rate: occurring between 0 and 20% plastic strain.
  • Medium strain rate: occurring between 20 and 50% plastic strain.
  • High strain rate: exceeding 50% plastic strain.
The results achieved emphasize the fact that the geometric locations that are subjected to low plastic strain values during the forming process are less prone to dimensional accuracy errors after 4DP. This is due to the fact that lower plastic strains mean the microstructural changes are minimal, leading to more predictable and stable behavior of the material during its functional life.
On the other hand, medium to high strain rates can lead to microstructural changes. Examples include grain distortion, phase transformations, or dislocation movement. Such a phenomenon can influence the material’s response to environmental stimuli in 4DP.

4. Case Study

To demonstrate the practical use of 4DP samples with open–hole features and emphasize the significance of knowing their post–recovery accuracy, a case study was conducted. A two–step filtering device for small spherical objects in the shape of a bottle was designed; in practical applications, other shapes of separation filters with multiple sieves, intakes, and outtakes could be also considered.
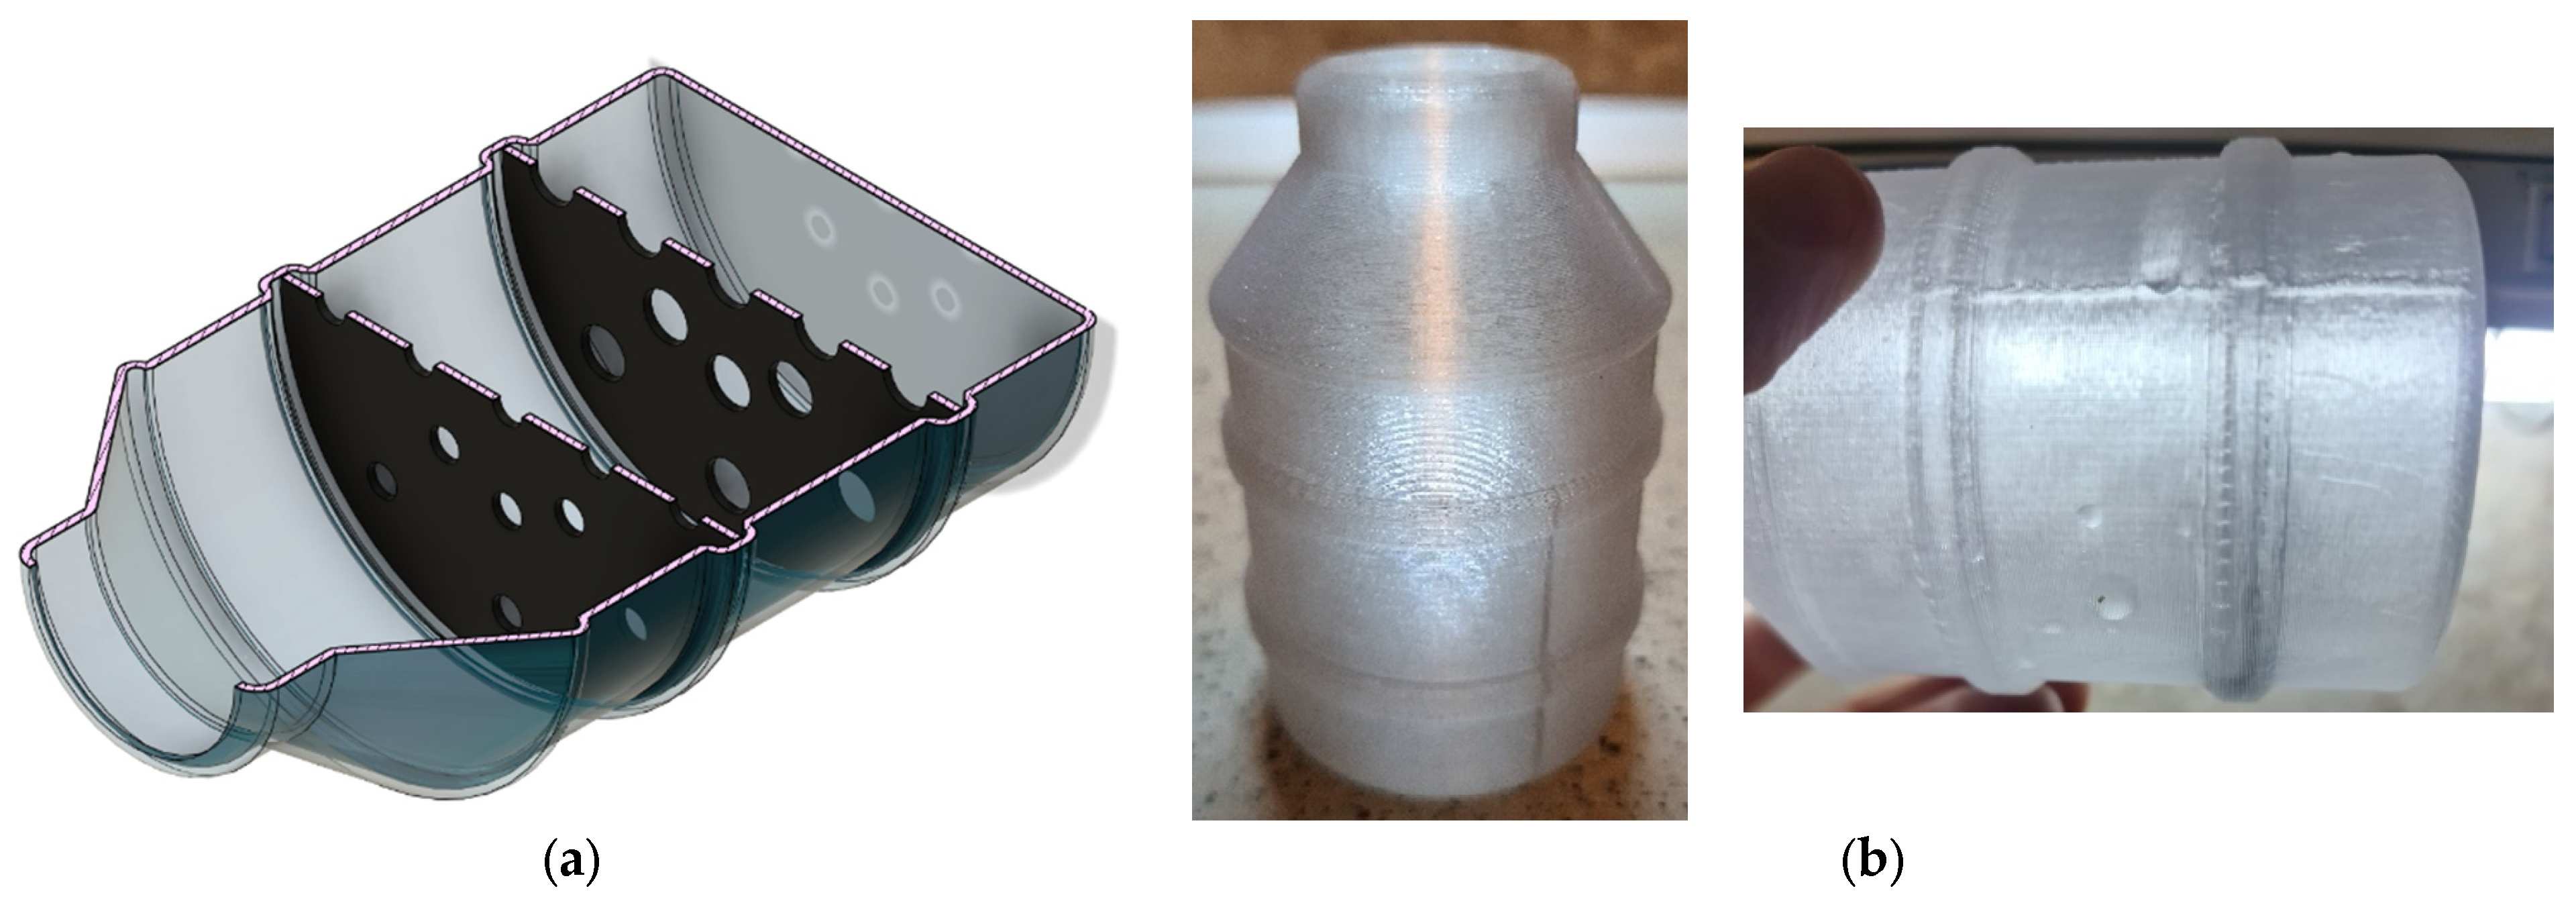
A cross–sectional view of the bottles is presented in Figure 18a, while Figure 18b shows the bottle made by 3DP using transparent PETG (polyethylene terephthalate glycol). PETG was selected because it has a higher glass–transition temperature than PLA, which ensures it is not affected by the water temperature used as a trigger. Additionally, it can be transparently 3D printed to allow visibility of the sieves’ positions.
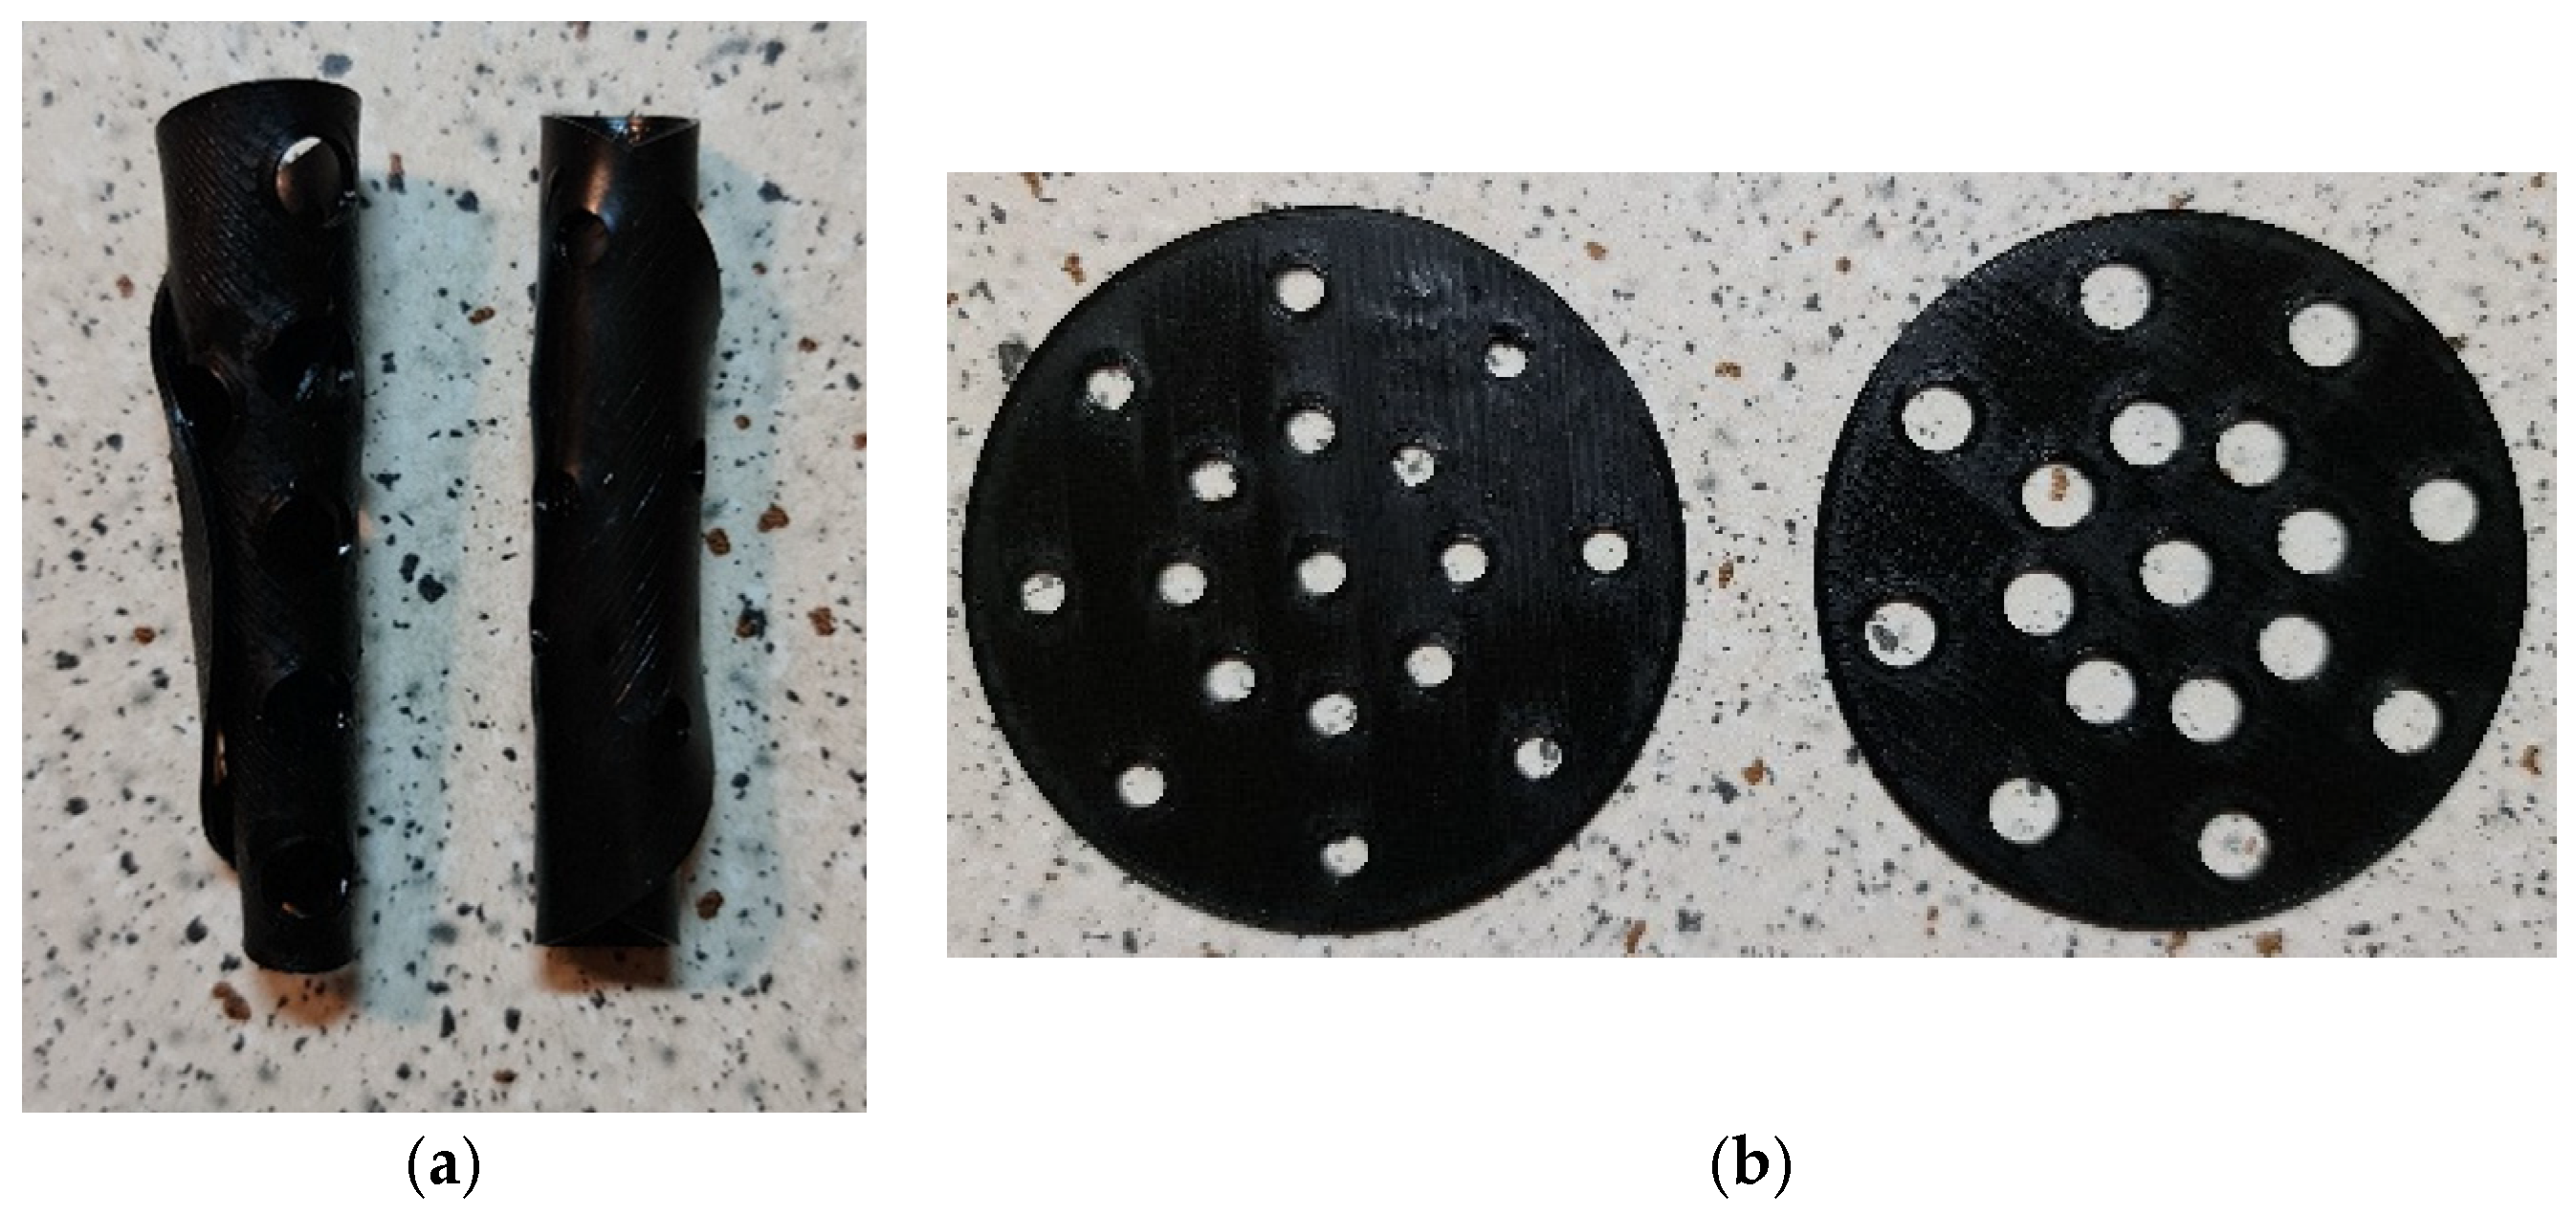
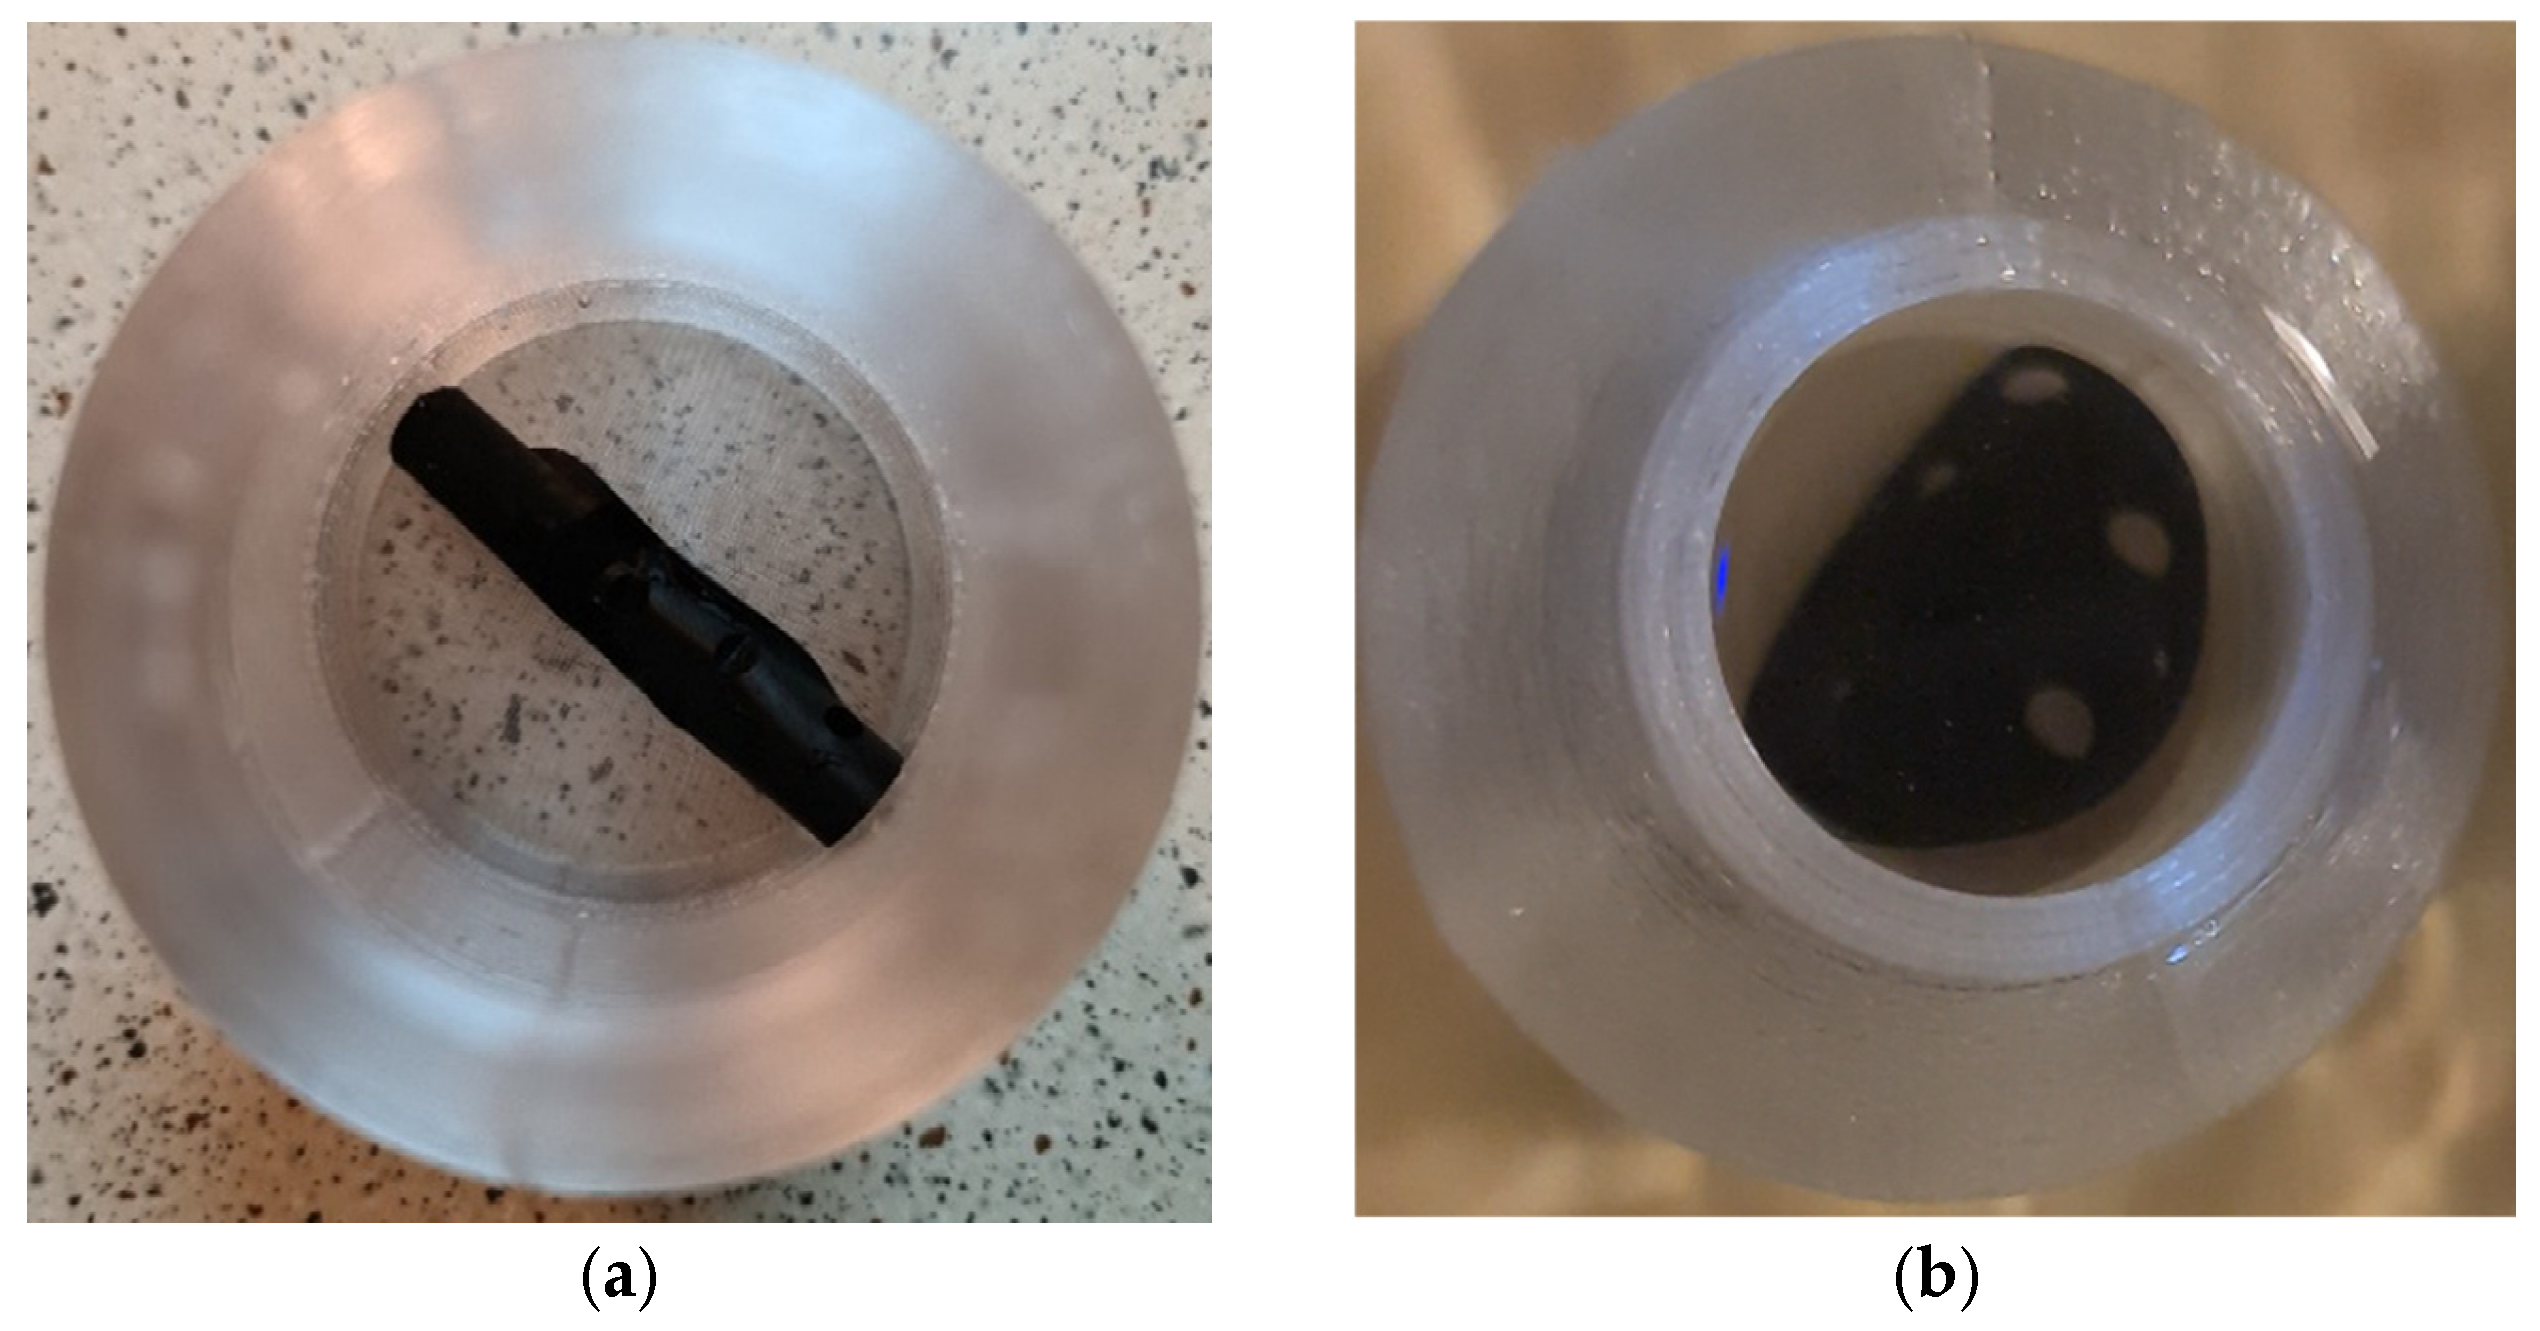
The bottle is 2 mm thick and features two circular grooves designed to accommodate the sieves, which are rolled and inserted through the small diameter intake (as shown in Figure 19a). The sieves are 1 mm thick and contain holes with diameters of 4 mm and 6 mm (as shown in Figure 19b), and were 3D printed from the black filament at 100% rectangular infill based on the research results that showed this density ensures the best recovery. The sieves are intended to filter and separate spheres with diameters of 3–3.6 mm and 5–5.5 mm. They were submerged in 60 °C hot water and rolled so that they could be placed inside the transparent bottle. Once the samples were inside the bottle, hot water was added to the bottle, determining the samples to start the recovery process and return to their disk–like shape in the zones where the grooves were located (Figure 20).

5. Conclusions and Further Research

The study evaluated the effect of filament color, infill density, and pattern on the dimensional accuracy and recovery behavior of 4D–printed PLA objects with holes by integrating experimental testing and numerical modeling. Also, another important novelty of this study was to establish a correlation between the mechanical strains and the dimensional accuracy post–recovery using numerical simulations, with existing research focusing on other factors like recovery time or shape.
The main findings of this study can be summarized as follows:
  • Infill density influences the shape retention and recovery accuracy, with 100% infill density ensuring better shape retention than the much lower density of 15%.
  • In contrast to initial hypotheses, filament color and infill pattern had no significant impact on post–recovery dimensional accuracy, meaning that the recovery characteristics are more strongly influenced by structural characteristics rather than filament color–related properties or the micro–architecture of the infill.
  • Numerical simulations using a quasi–static analysis mode and temperature–dependent material properties allowed the prediction of the mechanical behavior around the holes.
The practical application of these research results was demonstrated through a case study involving a two–sieve filtering device, using the findings on parameter influences to achieve functional requirements.
Further work will be focused on extending the range of tested parameters, particularly exploring different PLA composites and infill configurations. Additionally, the impact of recovery temperatures and heating time application will be studied to optimize the process for practical settings, alongside the long–term stability of the recovered shapes under cyclic thermal stresses.
Author Contributions

Conceptualization, D.P.; data curation, T.G.A.; formal analysis, A.-A.E., T.G.A. and D.P.; investigation, A.-A.E., T.G.A. and D.P.; methodology, A.-A.E., T.G.A. and D.P.; software, T.G.A.; visualization, A.-A.E.; writing—original draft, A.-A.E., T.G.A. and D.P.; writing—review and editing, T.G.A. and D.P. All authors have read and agreed to the published version of the manuscript.

Funding

This research received no external funding.

Data Availability Statement

No data are available.

Conflicts of Interest

The authors declare no conflicts of interest.

References

  1. Momeni, F.; Hassani, S.M.M.N.; Liu, X.; Ni, J. A review of 4D printing. Mater. Des. 2017, 122, 42–79. [Google Scholar] [CrossRef]
  2. Haleem, A.; Javaid, M.; Singh, R.P.; Suman, R. Significant roles of 4D printing using smart materials in the field of manufacturing. Adv. Ind. Eng. Polym. Res. 2021, 4, 301–311. [Google Scholar] [CrossRef]
  3. Vatanparast, S.; Boschetto, A.; Bottini, L.; Gaudenzi, P. New Trends in 4D Printing: A Critical Review. Appl. Sci. 2023, 13, 7744. [Google Scholar] [CrossRef]
  4. Tibbits, S. 4D printing: Multi–Material shape change. Archit. Des. 2014, 84, 116–121. [Google Scholar] [CrossRef]
  5. Ma, S.; Jiang, Z.; Wang, M.; Zhang, L.; Liang, Y.; Zhang, Z.; Ren, L.; Ren, L. 4D printing of PLA/PCL shape memory composites with controllable sequential deformation. Bio–Des. Manuf. 2021, 4, 867–878. [Google Scholar] [CrossRef]
  6. Tibbits, S. The Emergence of “4D Printing”|TED Talk. Available online: https://www.ted.com/talks/skylar_tibbits_the_emergence_of_4d_printing (accessed on 3 March 2023).
  7. Nam, S.; Pei, E. A taxonomy of shape–changing behavior for 4D printed parts using shape–memory polymers. Prog. Addit. Manuf. 2019, 4, 167–184. [Google Scholar] [CrossRef]
  8. Kačergis, L.; Mitkus, R.; Sinapius, M. Influence of fused deposition modeling process parameters on the transformation of 4D printed morphing structures. Smart Mater. Struct. 2019, 28, 105042. [Google Scholar] [CrossRef]
  9. Wu, W.; Ye, W.; Wu, Z.; Geng, P.; Wang, Y.; Zhao, J. Influence of Layer Thickness, Raster Angle, Deformation Temperature and Recovery Temperature on the Shape–Memory Effect of 3D–Printed Polylactic Acid Samples. Materials 2017, 10, 970. [Google Scholar] [CrossRef] [PubMed]
  10. Ehrmann, G.; Ehrmann, A. Investigation of the shape–memory properties of 3D printed PLA structures with different infills. Polymers 2021, 13, 164. [Google Scholar] [CrossRef] [PubMed]
  11. Ehrmann, G.; Ehrmann, A. Shape–Memory Properties of 3D Printed PLA Structures. Proceedings 2021, 69, 6. [Google Scholar] [CrossRef]
  12. Popescu, D.; Gheorghe Amza, C.; Marinescu, R.; Cristiana Iacob, M.; Luminiţa Căruţaşu, N. Investigations on Factors Affecting 3D–Printed Holes Dimensional Accuracy and Repeatability. Appl. Sci. 2023, 13, 41. [Google Scholar] [CrossRef]
  13. El Moumen, A.; Tarfaoui, M.; Lafdi, K. Modelling of the temperature and residual stress fields during 3D printing of polymer composites. Int. J. Adv. Manuf. Technol. 2019, 104, 1661–1676. [Google Scholar] [CrossRef]
  14. Liu, W.; Wu, N.; Pochiraju, K. Shape recovery characteristics of SiC/C/PLA composite filaments and 3D printed parts. Compos. Part A–Appl. Sci. Manuf. 2018, 108, 1–11. [Google Scholar] [CrossRef]
  15. Zeng, C.; Liu, L.; Bian, W.; Liu, Y.; Leng, J. 4D printed electro–induced continuous carbon fiber reinforced shape memory polymer composites with excellent bending resistance. Compos. Part B Eng. 2020, 194, 108034. [Google Scholar] [CrossRef]
  16. Pei, E.; Loh, G.H.; Nam, S. Concepts and Terminologies in 4D Printing. Appl. Sci. 2020, 10, 4443. [Google Scholar] [CrossRef]
  17. Rahmatabadi, D.; Soltanmohammadi, K.; Pahlavani, M.; Aberoumand, M.; Soleyman, E.; Ghasemi, I.; Baniassadi, M.; Abrinia, K.; Bodaghi, M.; Baghani, M. Shape memory performance assessment of FDM 3D printed PLA–TPU composites by Box–Behnken response surface methodology. Int. J. Adv. Manuf. Technol. 2023, 127, 935–950. [Google Scholar] [CrossRef]
  18. Mehrpouya, M.; Vahabi, H.; Janbaz, S.; Darafsheh, A.; Mazur, T.R.; Ramakrishna, S. 4D printing of shape memory polylactic acid (PLA). Polymer 2021, 230, 124080. [Google Scholar] [CrossRef]
  19. Hanon, M.M.; Zsidai, L.; Ma, Q. Accuracy investigation of 3D printed PLA with various process parameters and different colors. Mater. Today Proc. 2021, 42, 3089–3096. [Google Scholar] [CrossRef]
  20. PLA, Devil Design, Technical Specifications. Available online: https://devildesign.com/download/PLA_-_product_card.pdf (accessed on 19 December 2023).
  21. Alexandru, T.G.; Popescu, D.; Stoichioiu, C.; Baciu, F. Experimental and numerical investigations on the thermoforming of 3D printed polylactic acid parts. Rapid Prototyp. J. 2024, 30, 928–946. [Google Scholar] [CrossRef]
  22. Yang, C. Determination of the temperature dependent thermophysical properties from temperature responses measured at medium’s boundaries. Int. J. Heat Mass Transf. 2000, 43, 1261–1270. [Google Scholar] [CrossRef]
Figure 1. Schematic representation of one-way SME.
Designs 08 00056 g001
Figure 2. Normalized baseline and displaced coordinates of a thermoformed sample.
Designs 08 00056 g002
Figure 3. A schematic representation of the proposed approach.
Designs 08 00056 g003
Figure 4. Sample part: (a)—CAD model; (b)—3D–printed.
Designs 08 00056 g004
Figure 5. Manual press for deforming the samples.
Designs 08 00056 g005
Figure 6. Visualization of recovery process of one of the samples (rectangular infill pattern, 100% infill density, 8 mm diameter holes).
Designs 08 00056 g006
Figure 7. Recovered samples (top view).
Designs 08 00056 g007
Figure 8. Examples of recovered samples (side views)–15% rectangular and 100% gyroid, 8 mm diameter holes.
Designs 08 00056 g008
Figure 9. Stress–strain curves derived for the 15% and 100% infill specimens at 55 °C.
Designs 08 00056 g009
Figure 10. Samples’ mesh.
Designs 08 00056 g010
Figure 11. Baseline vs. deformed Y–Y coordinates.
Designs 08 00056 g011
Figure 12. Baseline vs. deformed Y–Z coordinates.
Designs 08 00056 g012
Figure 13. Diameter values before and after the recovery with standard deviation: (a) 10 mm holes sample; (b) 8 mm holes sample; (c) 6 mm holes sample.
Designs 08 00056 g013
Figure 14. Main–effect plots: (a) 10 mm holes sample; (b) 8 mm holes sample; (c) 6 mm holes sample.
Designs 08 00056 g014
Figure 15. Visual representation of errors: Accurate and less accurate initial values (a) and recovered values (b).
Designs 08 00056 g015
Figure 16. Plastic strain fringe for the 15% infill Ø6 mm specimens: at 50% (a) and 100% load increments (b).
Designs 08 00056 g016
Figure 17. Plastic strain fringe for the Ø6 mm specimens: at 50% and 100% load increments.
Designs 08 00056 g017
Figure 18. (a) Section view of the bottle with the samples in designated places; (b) 3D–printed bottle with circular grooves.
Designs 08 00056 g018
Figure 19. (a) Rolled samples; (b) initial samples with holes of Ø4 mm and Ø6 mm.
Designs 08 00056 g019
Figure 20. 4D–printed sieve device: (a) first rolled sieve; (b) sieve during recovery process in hot water; (c) fully recovered sieve placed inside the bottle in the corresponding groove; (d) both sieves in place.
Designs 08 00056 g020aDesigns 08 00056 g020b
Table 1. Independent variables.
Filament ColorInfill DensityInfill Pattern
white, black 15%, 100%gyroid, rectilinear
Table 2. 3D Printing parameters.
Extruder TemperatureBed TemperatureLayer ThicknessContour Deposition SpeedInfill Deposition SpeedTop/
Bottom Layers
Perimeters/
Shells
205 °C60 °C0.2 mm45 mm/s70 mm/s22
Table 3. Transfer and holding time measurement.
Scenario Transfer TimeHolding TimeTotal Time
Best case scenario3 s7 s10 s
Worst case scenario6 s10 s16 s
Table 4. Cooling parameters for different infill densities.
Infill Density (%) TaT0ktT(t)
1526 °C65 °C0.018 °C/s16 s55 °C
1000.025 °C/s50.6 °C
Table 5. Material properties of PLA at 55 °C.
InfillModulus of ElasticityPoisson’s RatioTensile Yield StrengthUltimate StrengthStrain at Rupture
100%500 MPa0.450.62 MPa1.58 MPa6%
15%488 MPa0.470.71 MPa1.53 MPa9%
Table 6. Mean diameter values initially and after the recovery process.
SampleØ 10 [mm]Ø 8 [mm]Ø 6 [mm]
InitialRecoveredInitialRecoveredInitialRecovered
15% G–B 9.979.6877.9717.7575.9475.766
15% G–W 9.9239.8317.8237.5685.9245.852
15% R–B 9.7659.6287.7757.6125.8515.592
15% R–W 9.9239.497.8877.5685.8885.592
100% G–B 9.7759.5287.827.5235.5755.357
100% G–W 9.919.5187.8757.4975.665.343
100% R–B 9.9599.7837.9427.8085.9055.821
100% R–W 9.9579.6347.9017.7695.9175.796
Table 7. t–test for hole diameters before and after recovery.
Diametert Scorep–Value
10 mm6.810.000
8 mm6.280.000
6 mm5.440.001
Table 8. Samples’ recovery times.
Sample15% G–B 15% G–W15% R–B15% R–W100% G–B100% G –W100% R–B100% R–W
1014 s18 s13 s13 s30 s27 s27 s26 s
812 s16 s13 s14 s31 s27 s26 s25 s
611 s14 s12 s13 s31 s26 s25 s25 s
Table 9. Initial samples’ hole diameter accuracy.
Nominal Value (Ø) [mm]Accuracy Status6810
Hole numberMost accurate162023
Less accurate21924
Initial/recovered measured diam. (Ø) [mm]Most accurate68.02310.035
Less accurate5.8287.8439.525
Filament colorMost accurateWWW
Less accurateBWW
Infill density (%)Most accurate1001515
Less accurate100100100
Infill patternMost accurateRGG
Less accurateRRR
Table 10. Recovered samples’ hole diameter accuracy.
Nominal Value (Ø) [mm]Accuracy Status6 810
Hole numberMost accurate242020
Less accurate101024
Recovered measurement (Ø) [mm]Most accurate5.9157.9089.89
Less accurate5.7087.6789.525
Filament colorMost accurateBBB
Less accurateWWW
Infill density (%)Most accurate151515
Less accurate1515100
Infill patternMost accurateGGG
Less accurateGGR
Table 11. Holes matching plastic strain rate ranges.
Hole
Diameter
Infill
Density
Matching Holes
Low Strain RateMedium Strain RateHigh Strain Rate
6 mm15%6–9; 12; 15; 18; 19; 20; 21; 24; 253; 5; 11; 17; 231; 2; 4; 10; 13; 14; 16; 22
100%6–9; 12; 18; 19; 20; 21; 24; 253; 5; 11; 15; 17; 231; 2; 4; 10; 13; 14; 16; 22
8 mm15%3; 6–9; 12; 15; 18; 19–21; 24; 252; 4; 5; 10; 11; 16; 17; 22; 23;14; 13; 1
100%3; 6–9; 12; 18; 19–21; 24; 252; 5; 11; 15; 17; 231; 4; 10; 13; 14; 16; 22
10 mm15%6–9; 12; 18–21; 253; 5; 11; 14; 15; 17; 23; 241; 2; 4; 10; 13; 16; 22;
100%6–9; 12; 19–21; 23; 253; 5; 11; 15; 17; 18; 22; 241; 2; 4; 10; 13; 14; 16
Disclaimer/Publisher’s Note: The statements, opinions and data contained in all publications are solely those of the individual author(s) and contributor(s) and not of MDPI and/or the editor(s). MDPI and/or the editor(s) disclaim responsibility for any injury to people or property resulting from any ideas, methods, instructions or products referred to in the content.