Abstract
This article is devoted to contemporary topics of ensuring the uniformity of Leeb hardness measurements. The analysis of the physical principles of the Leeb hardness test is carried out, and the influence of the measuring transducer parameters on the measurement results is investigated. A four-level structure of the calibration hierarchy for the Leeb hardness scales is proposed, which ensures metrological traceability of hardness scales from the calibration reference machines (CRMs) to measuring instruments. A list of requirements for the 2nd grade CRM and the 2nd grade Leeb reference test blocks are formulated in accordance with the proposed calibration hierarchy draft and their values are calculated. A prototype was developed and a model of the 2nd grade Leeb hardness CRM and a set of Leeb reference test blocks were manufactured, as well as the compliance of their metrological characteristics with the requirements of the proposed calibration hierarchy draft and international standards was confirmed. The results of this work allow us to ensure the uniformity and reliability of the Leeb hardness measurements.
1. Introduction
Hardness is one of the main characteristics of materials and is a generalized characteristic of the elasto-plastic properties of materials [1]. Hardness measurements are widespread in industry both when choosing the technology and conditions for material processing, and for assessing the technical condition of products during their manufacture and subsequent operations. In most cases, hardness is defined as the ability of a material to resist the penetration of a harder body (indenter). The indenter penetrating the tested material causes mechanical stresses in the near-surface region, which depends on the applied force, the shape of the indenter, and the parameters of the loading cycle [2]. Depending on the value of these stresses, elastic, elasto-plastic or plastic deformations occur in the surface layer of the metal. The hardness values are determined by these deformations on the surface of the piece. Hardness is related to the primary mechanical characteristics of materials, but its quantitative evaluation depends on the method of the performed tests [3].
Most of the hardness measurement methods used in the industry today are based on the procedures developed at the beginning of the 20th century, and have remained virtually unchanged to this day. At the same time, there is a progressive improvement of instruments that implement these methods. Hardness measurements using the most common static methods are accompanied by direct measurements of the indentation geometry (Brinell, Vickers, and Knoop scales), or the indenter penetration depth (Rockwell scales, Instrumented indentation). Hardness values (hardness numbers) are determined by the ratio of the applied load and the geometric parameters of the indentation [4]. The static methods used in testing the hardness of structural elements, machines and industrial equipment have significant limitations associated with the need to prepare reference blocks and the impossibility, in most cases, of measurements during operation.
An alternative to the conventional laboratory hardness testing methods is the use of portable hardness testing methods, which are the basis of the small hand-held hardness testers [5]. Technological progress has contributed to the development of new measurement instruments and procedures that make it possible to implement portable hardness testers, allowing us to create express hardness testing directly at production facilities, in the manufacturing and laboratory environment. Among them, special mention should go to the instruments that implement the method known as the “impact” or “dynamic” hardness testing method, based on the measurement of the elastic rebound of a special impact body after it impacts the test sample [6,7]. Currently, the most common dynamic hardness testers are Leeb hardness testers [8]. Dynamic hardness testers, as a replacement for Vickers, Brinell, Rockwell stationary hardness testers, are widely used in the natural resources sector. At the same time, hardness measuring is widely used to make a decision to extend the service life of high-tech equipment. That way, the use of dynamic hardness testers is approved by a number of regulatory and technical documents regulating the assessment of the technical condition of pipelines and welding joints, pressure vessels and tanks, the main oil pipelines of oil pumping stations and other equipment. There are studies using Leeb hardness testers to assess the strength of steels [9], as well as the effect of high temperatures on steel structures [10].
2. Technical Implementation of Leeb Hardness Testing
In the early 1970s, Dietmar Leeb studied various hardness measurement methods, placing emphasis on portable devices such as those based on the Baumann–Steinruck, Schmidt and Shore methods [11]. The most commonly used portable hardness testers were dynamic hardness testers, where the load was applied impulsively. The main task of the research was to increase the measurement interval without the loss of accuracy and to lift the restrictions of the devices, for example, independence from the direction of loading, while ensuring high productivity and comfort for users. The main results were the invention of a dynamic hardness testing method named after the inventor Dietmar Leeb and a device that implemented this method, the production of which was mastered by EQUOTIP in 1975 [8,12].
The method is based on measuring the velocity of the impact body during the fall and the rebound after the impact on the test piece. At the same time, the values of the maximum (impact velocity ) and the minimum (rebound velocity ) velocities are fixed (Figure 1). Leeb hardness HL is calculated based on the ratio:
where si the impact body rebound velocity and is the impact velocity.
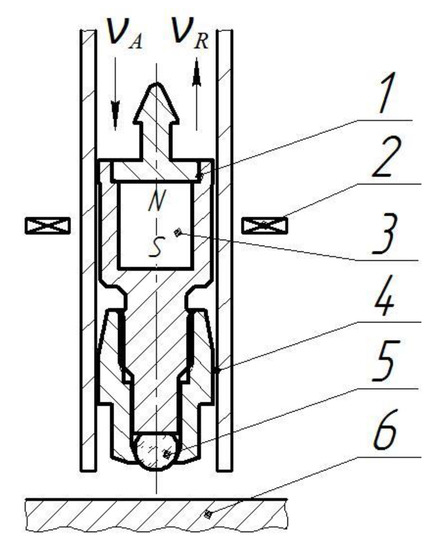
Figure 1.
Leeb hardness measuring scheme: 1—impact body; 2—inductor coil; 3—magnet; 4—guiding tube; 5—indenter; 6—test piece.
According to ISO 16859-1 [13], the hardness tester used for Leeb hardness measurements consists of a transducer and an electronic measuring unit, which analyzes the signal and calculates the hardness. The operating principle of the measuring transducer is shown in Figure 1. An impact body with a permanent magnet fixed in it flies through the inductor coil, inducing an EMF, the impulse amplitudes EA and ER of which are proportional to (Figure 2). The coil is placed on the tube in a way to ensure the distance of no more than 2 mm from the spherical tip to the test object surface at the moment of the velocity measurement.
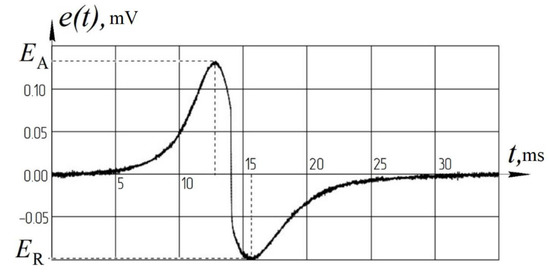
Figure 2.
Graph of EMF e(t), induced in inductor coil during measurement.
There are seven standard types of measurement transducers, that have different designs and mass-energy parameters of the impact body. The hardness is designated by a combination of the abbreviation for the Hardness Leeb method (HL) and the name of the impact body type used in the measurement. Thus, the recording of measurement results can be designated as HLD, HLC, HLDL, etc. Figure 3 shows a type D measurement transducer as an example.
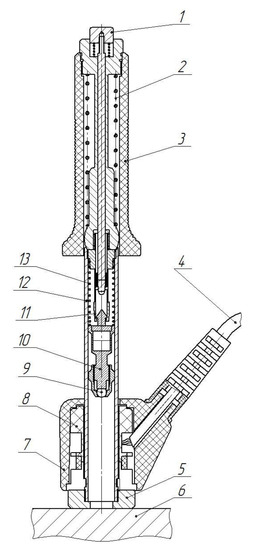
Figure 3.
Schematic image of Type D impact device: 1—release button; 2—arming spring; 3—arming tube; 4—connector cable; 5—support ring; 6—test piece; 7—inductor coil housing; 8—inductor oil; 9—indenter ball; 10—impact body; 11—collet; 12—guiding tube; 13—acceleration spring.
The practice of ensuring the uniformity of measurements for dynamic hardness testers by calibrating them using reference test blocks for the static scales of Brinell, Vickers, Rockwell is widespread [14,15].
It is known that the measurement result of the dynamic hardness testing method is significantly influenced by the elastic modulus of the material. Hence, after the calibration of dynamic hardness testers using reference test blocks for static hardness testers, further measurements on samples, which material differs from the material of hardness reference test block, will be incorrect, and the evaluated hardness quantity will differ from the true ones [5]. In addition, measuring with dynamic hardness testers requires specific restrictions on the mass and geometry of the test pieces, which differ from similar requirements for static hardness testers. Thus, the direct use of a dynamic hardness tester as a static measurement instrument can most likely lead to evaluating unreliable measurement results. This fact seems to be very dangerous, considering the amount of instruments of this type are used and the fields in which they are used, including ensuring the industrial safety of the nuclear industry, railway transport, the electric power industry, as well as in the natural resources sector.
It should be noted that most of the analyzed regulatory and technical documents regulating the use of portable hardness testers state that the measured hardness values can be used to indirectly evaluate the metal strength characteristics (ultimate strength or yield strength) by conversion using the formulas. The combination of the influence of the elastic modulus, the sample parameters and the accumulated error during the conversion between hardness scales on the measurement result makes the practice of using dynamic hardness testers to monitor the condition of products fabricated of steels and alloys potentially dangerous in terms of extending high-tech equipment service life, since inaccurate measurement results can cause equipment failure and emergencies.
The solution to this problem is the standardization and implementation of metrological support for hardness measurements with dynamic Leeb hardness testers. One of the stages of solving this problem was the approval of the international standard [13,16,17] and the approval of the national calibration reference machines [18,19,20]. There are also known examples of working calibration reference machines [21]. At the same time, the constant increase in the number of Leeb hardness testers and the expansion of the areas of application of them require the development of simple and effective technical means providing the metrological traceability of Leeb hardness scales, including 2nd grade calibration reference machines and reference test blocks.
3. Materials and Methods
In operations with dynamic hardness testers, including the ones based on the Leeb method, the informative parameter is the rebound velocity of the impact body with rated parameters that falls on the surface of the material with the given impact speed. The main parameter used to calculate the Leeb hardness value is the coefficient of restitution. The coefficient of restitution e is defined as the ratio of the rebound velocity of the impact body from the surface of the test piece and the impact velocity and is designated as:
That is, Equation (1) can be conceived of as:
The analysis of the process of interaction of the impact body with the material of the test piece, carried out on the basis of a quasi-static approach using the methods of contact mechanics, made it possible to assess the influence of transducer parameters on the measurement results. The coefficient of restitution is defined by the following analytical equation [22]:
where m and R are the impact body mass and tip radius, Yd is the dynamic yield strength of the test piece material, is the reduced elastic modulus, calculated from the ratio: , where and are the Young’s moduli and Poisson’s ratios of the test piece and tip materials, respectively.
Therefore, to ensure the uniformity of measurements, including the repeatability and reproducibility of measurement results, it is necessary to comply with the requirements for the following parameters of the impact transducers:
- Impact velocity ;
- Impact body mass m;
- Tip radius R.
To assess the influence of the specified parameters deviation and the combined relative standard measurement uncertainty of the Leeb hardness measurements, the values of the relative deviations were calculated for each parameter () at the nominal values of the specified parameters based on partial derivatives of Equation (4) in accordance with the general equation:
where is the maximum permissible deviation of the corresponding parameter.
The combined relative standard measurement uncertainty of the measurement device related to the device parameters error is calculated using the formula:
where .
Due to the widest distribution and versatility, a further analysis investigated the requirements for CRM, reference test blocks and Leeb hardness testers made for the Leeb scale D (HLD).
Table 1 shows the established values of the maximum relative deviations of the measured hardness values depending on the maximum deviations of the transducer parameters, regulated by ISO 16859-2 [16].

Table 1.
The established values of the relative deviation of the coefficient of restitution ∆e/e from the rated maximum deviations of the transducer parameters for Leeb hardness testers of the D scale.
Thus, meeting the requirements of the ISO 16859-2 standard regarding the transducer parameters allows us to provide a relative maximum deviation of the Leeb hardness measurements of no more than 2%. These metrological characteristics satisfy the industrial facilities needs to monitor hardness in the manufacturing environment, as well as the state of production facilities.
Similar calculations are provided for a CRM in accordance with the requirement of the ISO 16859-3_2015 (E) standard [17], Appendix A (Table 2).

Table 2.
The established values of the relative deviation of the coefficient of restitution ∆e/e from the rated maximum deviations of the 2nd grade CRM of the D scale parameters.
Hence, this meets the requirements of the standard result in the total relative deviation of the results of reproducing the Leeb hardness scale D by the reference machine not exceeding 0.1%.
The universal scheme for reproducing and transmitting the hardness scales, provided in ISO 16859-1_2015 (E), Appendix C1 [13], implies two methods of calibrating hardness testers and calibration reference machines: direct (elementwise), by monitoring the transducer parameters; and indirect, using certified reference test blocks. According to this approach a calibration hierarchy draft was proposed for Leeb hardness scales (Figure 4) [14], which set the requirements for the following:
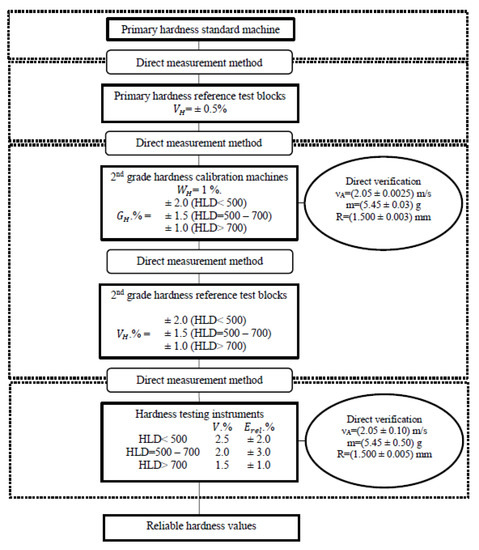
Figure 4.
Draft for calibration hierarchy for assuring metrological traceability of Leeb D hardness measuring devices, where —variation coefficient, —minimum repeatability, —limiting error, —maximum permissible deviation (, , , —metrological characteristics in accordance with ISO 16859_2015 (E)).
- Reference test block of the 1st grade;
- Calibration reference machine of the 2nd grade;
- Reference test block of the 2nd grade;
- Parameters of hardness testers.
4. Results
To implement the proposed calibration hierarchy draft it is necessary to develop a CRM of the 2nd grade and a process of manufacturing reference test blocks of the 2nd grade. In order to develop a prototype of the 2nd grade CRM, a proposition to use the gravitational method of accelerating the impact body was made [21,23]. The calculations showed that the gravitational method of the impact body acceleration makes it possible to provide the necessary spread of the values of the impact body falling velocity when the fall height is set with an accuracy of ±0.5 mm, the deviation of the position of the guide tube relative to the vertical axis is less than 0.1° and variations in the gravity acceleration g. However, in order to provide the nominal value of the impact body falling velocity, it is necessary to implement its independent measurement.
To ensure the impact body falling at the specified velocity, a system was proposed in which the impact velocity of falling from the height H1 is measured, using a design consisting of two inductor coils spaced at the distance l apart, and a permanent magnet built into the impact body (Figure 5).
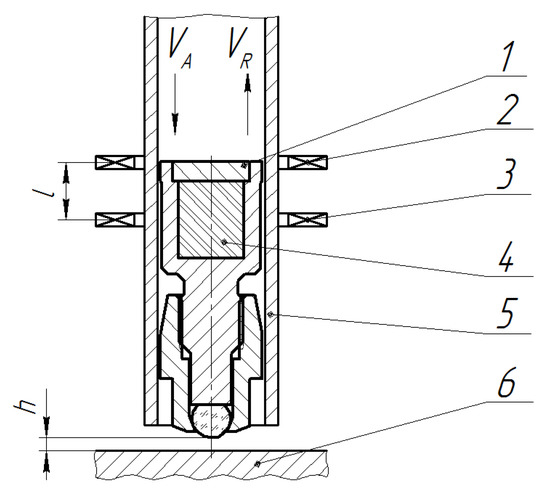
Figure 5.
Schematic of measuring system with two inductor coils: 1—impact body, 2—inductor coil L2, 3—inductor coil L1, 4—magnet, 5—guiding tube, 6—test piece.
The movement of the impact body with a magnet at the speed through the inductor coils induces an EMF in them, proportional to the speed of movement (Figure 6).
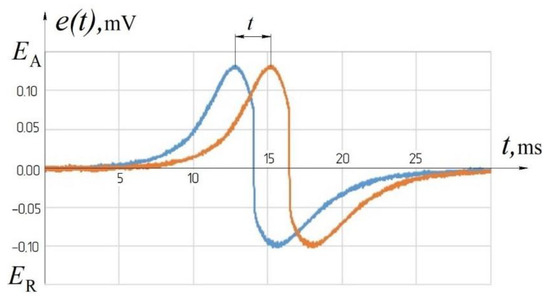
Figure 6.
Graph of the induced EMF on the inductor coils.
Having measured the time interval and taking into account that impact body moves uniformly with the acceleration of gravity, we can write the equation , then:
The measured quantity is t, the remaining arguments of this equation are constant coefficients, which must be set with the specified accuracy.
The distance l between the coils is characteristic of the design of the unit for measuring the impact body velocity. The prototype developed and tested in laboratory environment provides a maximum relative deviation of the impact body velocity of no more than 0.12% at the provided deviation of 0.0025 m/s for the nominal speed of 2.05 m/s. This value is achieved by ensuring the following values of the uncertainties of the measured values and monitored parameters:
- = ± 0.1 mm;
- ∆ = ± 3 μm;
- ∆t = ± 2 μs.
It is difficult to technologically set the distance between the centers of the inductor coils with the accuracy of ±3 μm during manufacturing; therefore, for independent calibration of the developed system, it was proposed to use optical methods for measuring the impact body velocity based on laser interferometry [19,24]. A system based on fiber optics with direct optical heterodyning of the Doppler signal was developed to achieve this [25].
Experimental studies of the prototype, using reference test blocks of the 1st grade calibrated in Physikalisch-Technische Bundesanstalt (PTB) in accordance with DIN 50156-3 using CRM HN-01-D, showed the compliance of the calculated and achieved metrological characteristics.
The final stage of the work was the development of the manufacturing process of the reference test blocks of the 2nd grade that satisfy the metrological characteristics established by the calibration hierarchy draft. As the manufacturing material of the reference hardness measures (Figure 7) 105WCr5 steel (for harder reference blocks) and 100CrMn6 steel (for soft reference blocks) were chosen in the form of sheet metal of the specified thickness, since due to the increased content of retained austenite, instrument steels are slightly deformed during heat treatment [26,27].
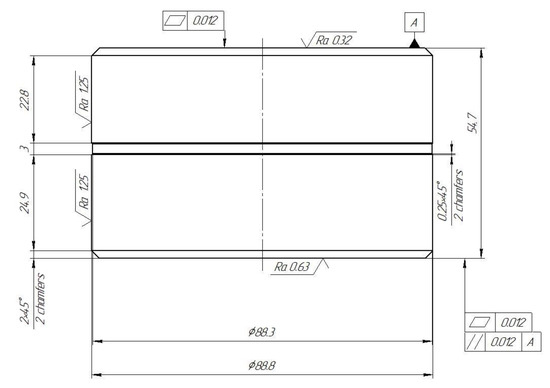
Figure 7.
Sketch of a 2nd grade reference test block.
As part of the study, it was established that the characteristics of the developed reference test blocks meet the requirements of the 2nd grade reference blocks of the proposed calibration hierarchy draft, as well as the requirements of the ISO 16859-3_2015 (E) standard [17]. The nominal reference blocks hardness values correspond to the required hardness value ranges. The values of the variation coefficient , the minimum repeatability , the limiting error and the maximum permissible deviation of the hardness tester do not exceed the established maximum permissible deviations in accordance with the developed calibration hierarchy draft.
5. Conclusions
As part of the research, the technical and methodological principles of measuring Leeb hardness were studied. The parameters of transducers affecting the measurement results were determined based on the theoretical analysis. The international standards requirements were analyzed and formed the basis for the proposed calibration hierarchy draft for reproducing and transmitting Leeb hardness units. A prototype of the 2nd grade CRM was developed, its metrological characteristics were investigated and a manufacturing process for the 2nd grade reference test blocks was developed. Part of the research was devoted to development of an inexpensive measuring complex that is capable of evaluating the velocity of the impactor body in calibration reference machines and Leeb hardness testers. Such a solution will allow manufacturers of Leeb hardness testers to calibrate and verify measuring devices during the production process, as well as expand the list of metrology laboratories that carry out the verification and calibration of hardness measuring instruments on the Leeb scale. An addition of the proposed calibration hierarchy and reference test blocks manufacturing technique will allow us to meet the industry needs in metrological support of portable Leeb hardness testers.
Author Contributions
Conceptualization, V.S.; methodology, V.S. and A.N.; validation, A.N.; investigation, A.N.; data curation, V.S. and A.N.; writing—original draft preparation, V.S. and A.N.; writing—review and editing A.N.; visualization, A.N.; supervision, V.S.; project administration, V.S. All authors have read and agreed to the published version of the manuscript.
Funding
The study was partially carried out at the expense of a subsidy for the implementation of a state task in the field of scientific activity for 2021 No. FSRW-2020-0014.
Acknowledgments
The authors express their gratitude to the staff of the Department of Metrology, Instrumentation and Quality Management of the St. Petersburg Mining University, Gogolinskii Kirill Valerievich and Umanskii Aleksandr Sergeevich for their assistance in the preparation of this article.
Conflicts of Interest
The authors declare no conflict of interest.
References
- Tabor, D. The Hardness of Metals; Oxford University Press: Oxford, UK, 2000. [Google Scholar]
- Fischer-Cripps, A.C. Introduction to Contact Mechanics, 2nd ed.; Springer: New York, NY, USA, 2007; p. 226. [Google Scholar] [CrossRef]
- Tabor, D. A simple theory of static and dynamic hardness. Proc. R. Soc. Lond. Ser. A Math. Phys. Sci. 1948, 192, 247–274. [Google Scholar] [CrossRef]
- Herrmann, K. (Ed.) Hardness Testing: Principles and Applications; ASM International: Novelty, OH, USA, 2011; p. 255. [Google Scholar]
- Gogolinskii, K.V.; Syasko, V.A.; Umanskii, A.; Nikazov, A.A.; Bobkova, T.I. Mechanical properties measurements with portable hardness testers: Advantages, limitations, prospects. J. Phys. Conf. Ser. 2019, 1384, 012012. [Google Scholar] [CrossRef]
- Kohlhöfe, W.; Penny, R. Dynamic hardness testing of metals. Int. J. Press. Vessel. Pip. 1995, 61, 65–75. [Google Scholar] [CrossRef]
- Subhash, G.; Koeppel, B.; Chandra, A. Dynamic Indentation Hardness and Rate Sensitivity in Metals. J. Eng. Mater. Technol. 1999, 121, 257–263. [Google Scholar] [CrossRef]
- Leeb, D. Dynamic hardness testing of metallic materials. NDT Int. 1979, 12, 274–278. [Google Scholar] [CrossRef]
- Formisano, A.; Chiumiento, G.; Di Lorenzo, G. Leeb hardness experimental tests on carpentry steels: Surface treatment effect and empirical correlation with strength. AIP Conf. Proc. 2018, 1978, 450004. [Google Scholar] [CrossRef]
- Liu, D.; Liu, X.; Fu, F.; Wang, W. Nondestructive Post-fire Damage Assessment of Structural Steel Members Using Leeb Harness Method. Fire Technol. 2020, 56, 1777–1799. [Google Scholar] [CrossRef] [Green Version]
- Weiler, W.W. Dynamische Hartepriifung, Héirteprufung an Metallen und Kunststoffen, 2nd ed.; Weiler, W.W., Leeb, D.H., Muller, K., Rupp, D.M., Eds.; Expert-Verlag: Ehningen bei Boblingen, Germany, 1990. [Google Scholar]
- Kompatscher, M. Equotip—Rebound hardness testing after D. LEEB. In Proceedings of the IMEKO TC5 Conference Hardness Measurement Theory and Application in Laboratories and Industries HARDMEKO, Washington, DC, USA, 11–12 November 2004; pp. 66–72. [Google Scholar]
- ISO 16859-1 Metallic Materials—Leeb Hardness Test—Part 1: Test Method; ISO: Geneva, Switzerland, 2015.
- Potapov, A.I.; Syasko, V.A.; Gogolinskiy, K.V.; Nikazov, A.A. Ensuring uniformity of hardness measurements by the dynamic method in the Russian Federation. Kontrol. Diagn. 2016, 12, 44–49. [Google Scholar] [CrossRef]
- Vaško, A.; Sovík, J.; Krynke, M. Determination of Accuracy and Reliability of Portable Hardness Testers. Qual. Prod. Improv. QPI 2019, 1, 289–295. [Google Scholar] [CrossRef]
- ISO 16859-2. Metallic Materials—Leeb Hardness Test—Part 2: Verification and Calibration of the Testing Devices; ISO: Geneve, Switzerland, 2015. [Google Scholar]
- ISO 16859-3. Metallic Materials—Leeb Hardness Test—Part 3: Calibration of Reference Test Blocks; ISO: Geneve, Switzerland, 2015. [Google Scholar]
- Herrmann, K. Reference Measuring Instrument for Calibration of Leeb-Hardness; Physikalisch-TechnischeBundesanstalt: Braunschweig, Germany, 2007. [Google Scholar]
- Shi, W.; Zeng, W.; Li, Q. Leeb hardness standard with laser measuring. In Proceedings of the 20th IMEKO World Congress Metrology for Green Growth, Busan, Korea, 9−14 September 2012; pp. 509–512. [Google Scholar]
- Aslanyan, A.E.; Aslanyan, E.G.; Gavrilkin, S.M.; Doynikov, A.S.; Shchipunov, A.N. Get 161–2019: State Primary Standard of the Hardness of Metals Based on the Shore D Scale and the Leeb Scales. Meas. Tech. 2020, 63, 81–86. [Google Scholar] [CrossRef]
- Schwenk, D. Leeb hardness-calibration-machine. In Proceedings of the IMEKO 2010 TC3, TC5 and TC22 Conferences Metrology in Modern Context, Pattaya, Chonburi, Thailand, 22−25 November 2010. [Google Scholar]
- Johnson, K.L. Dynamic effects and impact. In Contact Mechanics; Cambridge University Press: Cambridge, UK, 1985. [Google Scholar] [CrossRef]
- Syasko, V.A. On the development of a Leeb hardness calibration machine of the 2nd grade. Sci. Tech. Prod. J. Technol. Mech. Eng. 2018, 20, 33–38. [Google Scholar]
- Schwenk, D.; Bandel, M. Calibration of the impact velocity at portable hardness testing devices in accordance with Leeb. In Proceedings of the 12th IMEKO TC5 Conference on the Measurement of Hardness 2014, Held Together with TC3 and TC22 12–15, Cape Town, South Africa, 3–6 February 2014. [Google Scholar]
- Gogolinskii, K.; Syasko, V.; Umanskii, A.; Kazieva, T.; Gubskiy, K.; Kuznetsov, A.; Gluhov, R. Impactor velocity measurement system for dynamic hardness testers and calibration machines on Leeb scales. Measurement 2021, 173, 108632. [Google Scholar] [CrossRef]
- Titus, S.S.K. Hardness and Microstructure Studies of Standard Hardness Blocks. MAPAN J. Metrol. Soc. India 2005, 20, 37–41. [Google Scholar]
- Yamamoto, H.; Yamamoto, T. Development of High-accuracy Hardness Standard Blocks in Japan and Future Outlook. In Proceedings of the 10th Symposium on Recent Advancements in the Theory and Practice of Hardness Measurement 2007 (HARDMEKO 2007), Tsukuba, Japan, 19–21 November 2007; pp. 146–153. [Google Scholar]
Publisher’s Note: MDPI stays neutral with regard to jurisdictional claims in published maps and institutional affiliations. |
© 2021 by the authors. Licensee MDPI, Basel, Switzerland. This article is an open access article distributed under the terms and conditions of the Creative Commons Attribution (CC BY) license (https://creativecommons.org/licenses/by/4.0/).