
Sustainable Methodologies for Efficient Gel Electrophoresis and Streamlined Screening of Difficult Plasmids


Abstract
1. Introduction
2. Materials, Solutions, and Methods
- A.
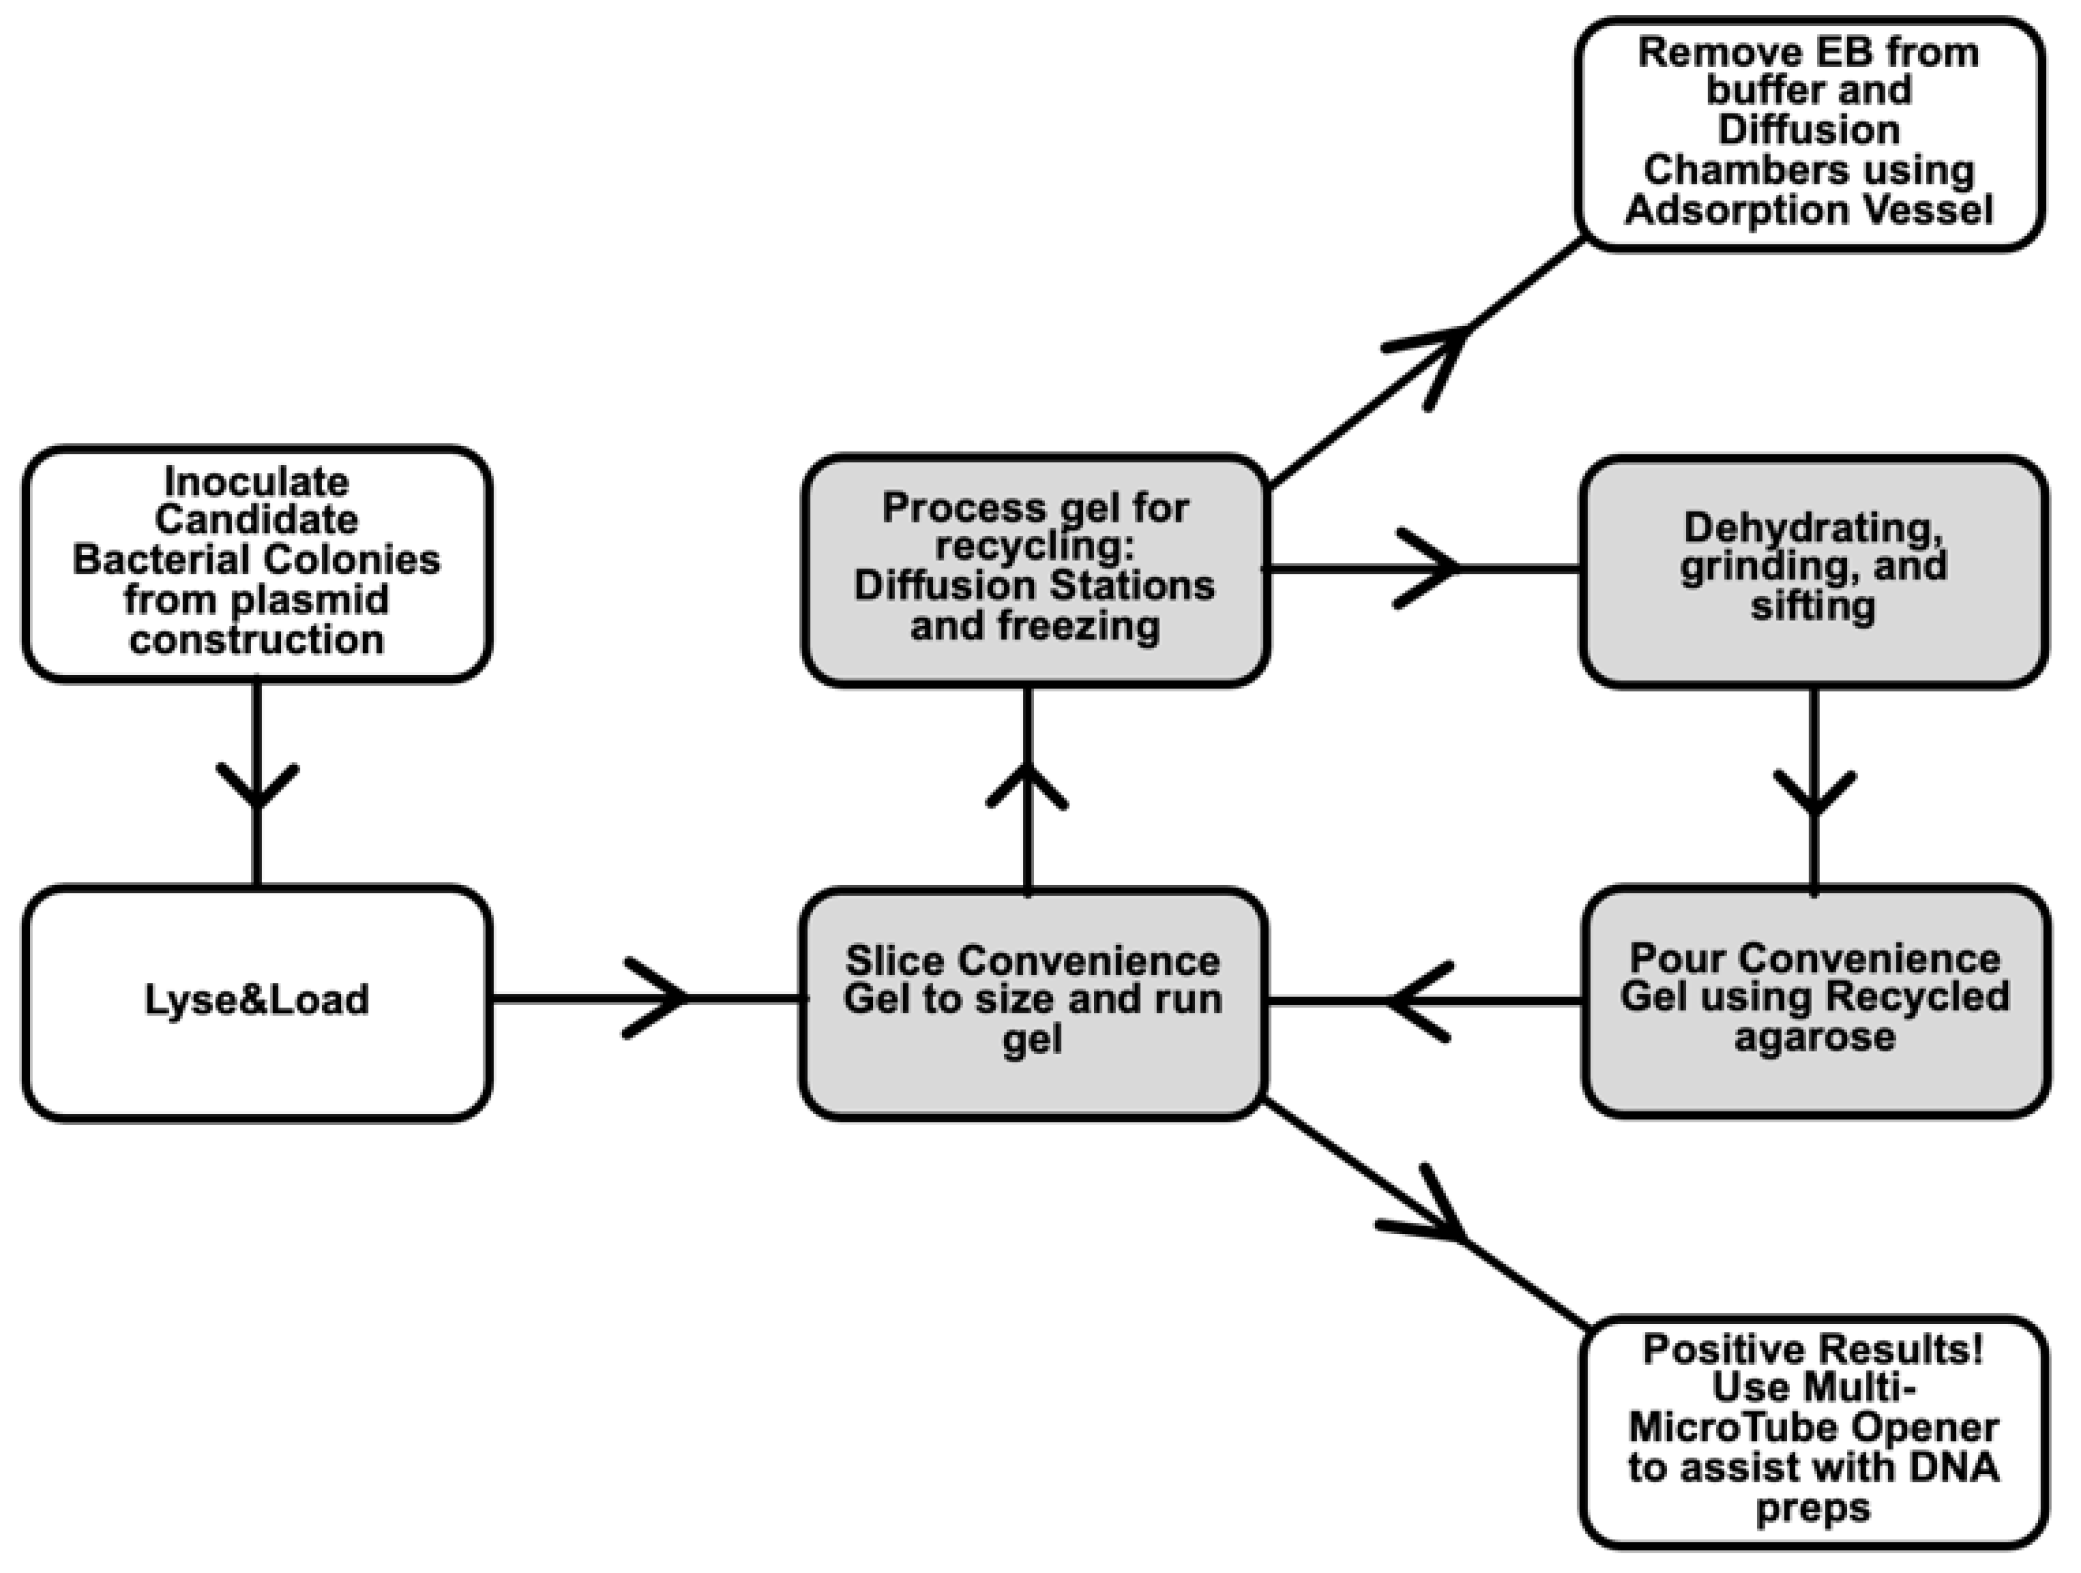
- Diffusion Stations and grinding methods for recycling agarose gels used in electrophoresis. An agarose gel can be used more than once in gel electrophoresis, saving cost and time [17]. Processing used agarose gels before reuse, by allowing ethidium bromide, DNA, and salts to diffuse from the gel, gives superior performance compared to simply remelting a used agarose gel [18,19]. We optimized the efficiency of recycling by setting up dedicated stations and materials for this purpose. The steps involve water changes, freezing gel fragments, and draining [20]. The cleaned gel pieces are baked to dryness and ground into powder. Batches of dried gel chips can be stockpiled, reducing the number of times per year that grinding is performed.
- i.
- Materials
- ▪
- House-distilled water and Ultrapure (filtered or distilled) water.
- ▪
- ▪
- Three stainless or glass baking dishes (Figure 1b,c) (The dried agarose adheres less to stainless material than glass.)
- ▪
- ▪
- A second, finer mesh is derived from a silk bolting cloth for flour milling (Figure 1g,h). Milling used in silk screening should also work. Other sources of mesh screen that can be inexpensively obtained might include nylon tulle fabric, butterfly netting material, aquarium fish netting, or some nettings used in vegetable or fruit shipments. Gauze and water-absorptive fabrics would not be suitable. It would be good to have extra material (~3 m2) on hand to replace damaged squares.
- ▪
- Rubber bands.
- ▪
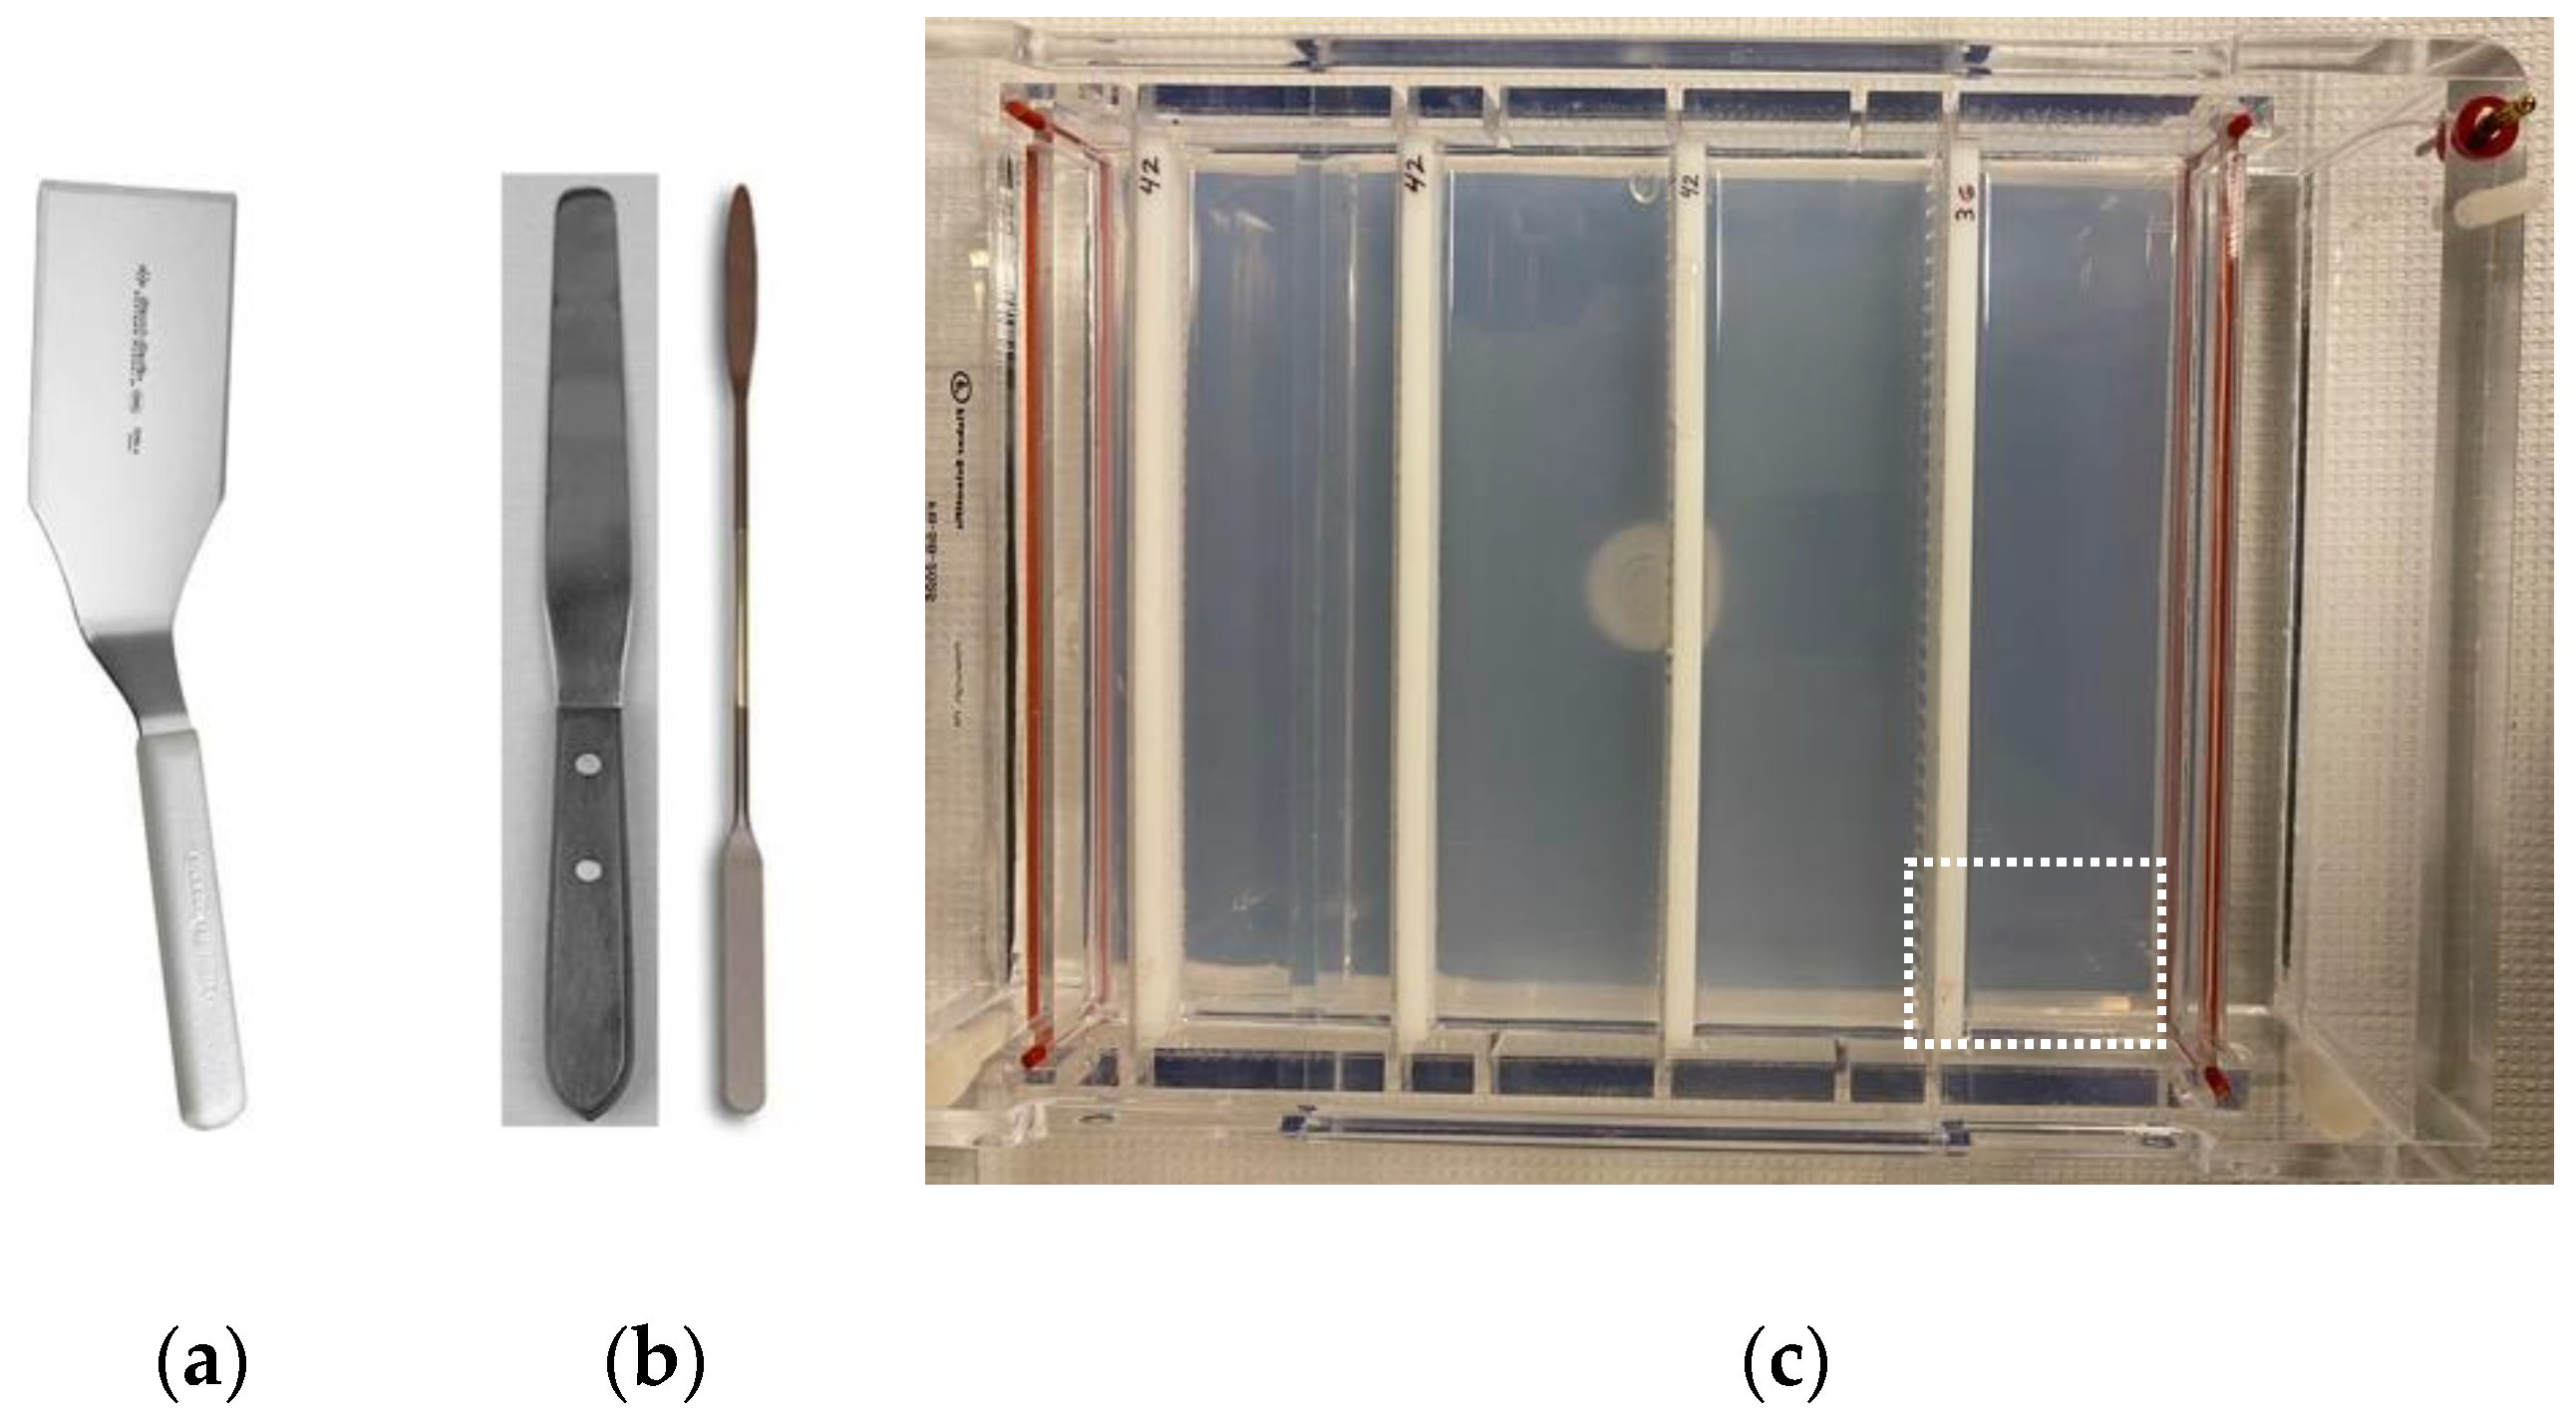
- Plastic or metal kitchen spatulas (Figure 2a).
- ▪
- Plastic box for sifting (15 cm2 and walls 10 cm high or larger), thin-walled. A hole is cut into the bottom with scissors or a safety razor, and mesh is secured with a rubber band (Figure 1h) or glued using cyanoacrylate adhesive (Superglue).
- ▪
- Large plastic bottles with wide lids that are freezer-safe. These will be used to freeze, store, and drain agarose pieces. Cut a wide hole into the lid (we used a woodworking hole saw for this purpose) and cover the hole from the underside with a section of the coarser mesh. Glue the mesh onto the lid (Figure 1f) using cyanoacrylate adhesive (Superglue).
- ▪
- Wide funnel with large opening (optional).
- ▪
- Incubator or drying oven, with fan, set at 55–60 °C.
- ▪
- Coffee/spice grinder or food blender (Figure 1e).
- ▪
- Large (6 L+) plastic pail or tub for storing dried agarose chunks.
- ▪
- Wide-mouth containers, with lid, for storing the final recycled agarose product.
- ▪
- Protective gloves and bench-protecting absorbent paper.
- ▪
- Decontamination Vessel for used buffer with ethidium (Section C).
- ii.
- Methods
- ▪
- The steps below are performed in an area restricted to ethidium bromide use while wearing gloves, and all materials are confined to the area. Gels and gel pieces are moved with spatulas reserved for this purpose and are not directly handled.
- ▪
- After photo documentation of the results from agarose gel electrophoresis, a spatula is used to break apart the gel into several narrow, rectangular strips. The gel can be fragmented on the UV transillumination box directly using a plastic spatula. The strips are placed into an Erlenmeyer flask positioned at the 1st Diffusion Station near the gel documentation system.
- ▪
- The gel pieces in the 1st Diffusion Station are covered with distilled water. The distilled water is replaced with fresh water at least once per day. The mesh is attached to the Erlenmeyer (Figure 1a) and the water is emptied into the Decontamination Vessel (Section C) for removal of ethidium bromide.
- ▪
- When the Erlenmeyer flask in the 1st Diffusion Station is full of gel fragments, it is then moved to the 2nd Diffusion Station, where it is filled with Ultrapure water (Millipore filtration system). A new Erlenmeyer is then placed at the 1st Diffusion Station; thus, two Erlenmeyers are in service at two Diffusion Stations.
- ▪
- The water from the Erlenmeyer in the 2nd Diffusion Station is replaced daily for ~3 days by emptying into the Decontamination Vessel (Section C).
- ▪
- The drained agarose is placed into a baking dish and chopped into finer pieces using a kitchen spatula, soaked in Millipore water for several hours—overnight, and then placed into a large freezer-safe plastic bottle, capped, drained, and frozen at −20 °C (Figure 1f). Frozen gel fragments can be stored for later processing.
- ▪
- The agarose is thawed, and the liquid drained by inverting the plastic bottle (Figure 1f) on a funnel in the Decontamination Vessel. Ultrapure water is added to the bottle, and the pieces drained after an overnight soak.
- ▪
- ▪
- Batches of dried agarose pieces are collected into a large plastic pail, with lid, until they can be ground into powder.
- ▪
- The grinding and sifting steps below are performed in a fume hood while wearing a disposable mask. All items are stored in a sealed box until needed.
- ▪
- The dried gel pieces can be ground using a kitchen blender, bead beater, or spice/coffee grinder (Figure 1e). A larger kitchen blender allows for hands-free grinding of larger quantities.
- ▪
- The ground gel pieces are sifted through the finer mesh fabric. The sieving fabric is secured around a plastic box with a hole cut from the bottom (Figure 1h). The sifted particles are collected in a clean baking dish. Larger particles are homogenized again or discarded. The final product is depicted in Figure 1d).
- B.
- Recycled gel preparation. Recycled agarose is used the same as fresh agarose.
- i.
- Materials and Methods
- ▪
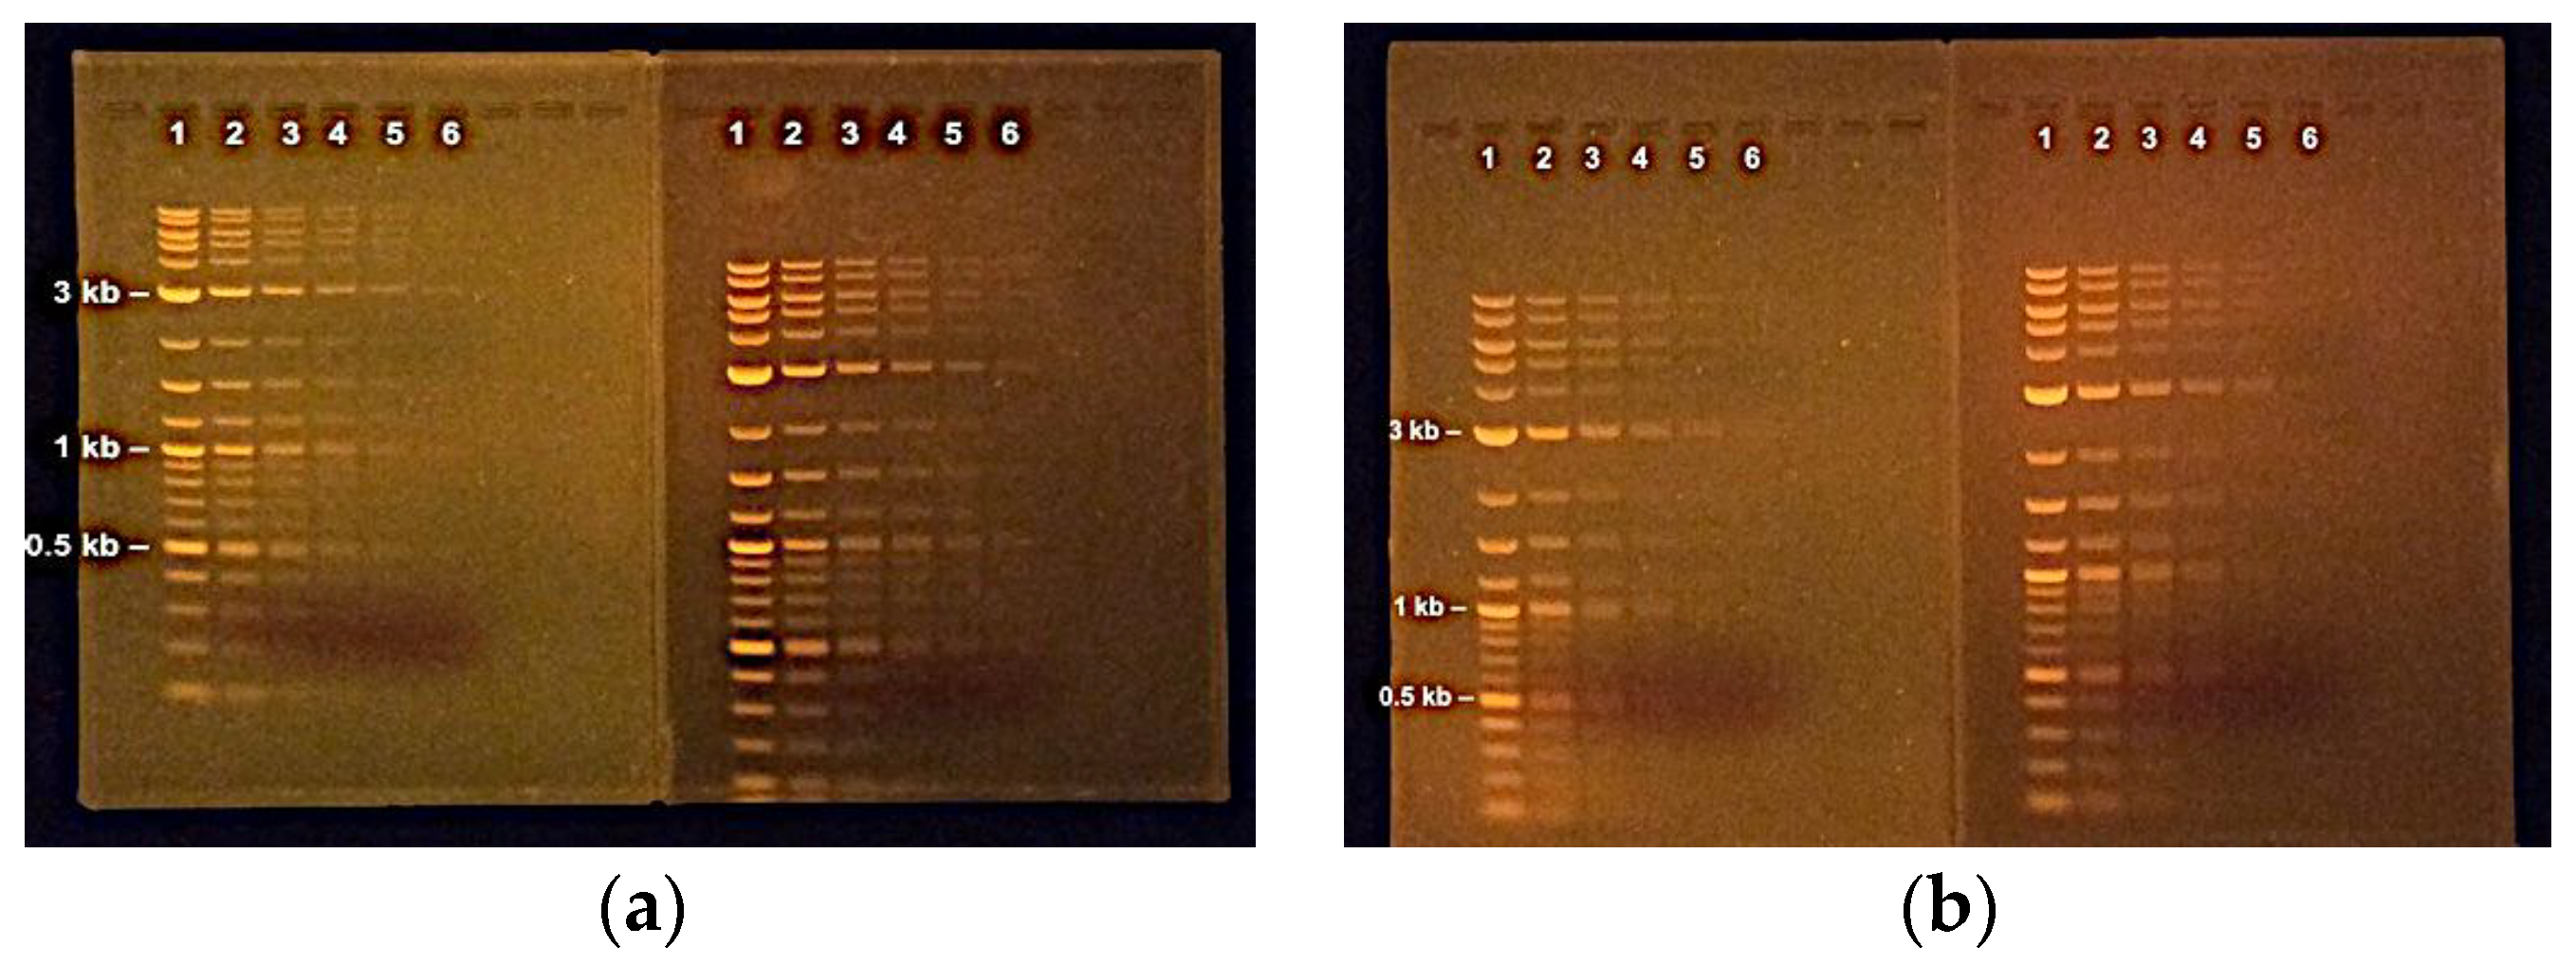
- For each 100 mL of gel required, weigh 1g of recycled agarose in a bottle, add 100 mL of 1X running buffer, add stir bar, loosely cap and slowly heat using a heated stir plate. The melting point of agarose is 91–95 °C [21], so boiling is not required. When dissolved, let cool to 55–60 °C and pour into gel box. (Cooling avoids heating of the plastic gel box, which, in the long term, could cause warping.) When ethidium bromide is used to detect DNA, it can be incorporated into the protocol at several points. Some labs add ethidium to the gel before pouring [22], some labs add ethidium to both gel and running buffer; other labs perform staining of the gel after running by placing the gel in an ethidium bath [23,24]. In all cases, measures for the safe handling of ethidium and its disposal (especially for ethidium baths) must be devised with the work area and experience level of users in mind.
- ▪
- The agarose can be recycled more than ten times. For resolution of small bands (<200 bp) that require 3–4% agarose, we use mixtures of recycled and fresh agarose, depending on the % difference in band sizes we are analyzing.
- ▪
- The end life of a batch of recycled gel can be determined by comparing the background fluorescence in a recycled gel to a fresh gel (Results and Discussion0. Agarose that is no longer recyclable can be incinerated along with spent charcoal “tea bags” (Section C).
- ▪
- By grinding large batches more infrequently and using one batch of used agarose at a time, it is easier to keep track of how many times a particular lot of used agarose has been recycled.
- C.
- Decontamination Vessel and strategy for ethidium bromide waste removal. For ethidium bromide users, proper disposal can be inconvenient, but better for the environment and required by institutes. Setting up efficient methodology, a dedicated work area, and dedicated containers is key to managing this process efficiently.
- i.
- Materials
- ▪
- Carboy with working spigot and wide opening to allow for neat pouring of water from the Erlenmeyer flasks used at Diffusion Stations for agarose recycling. The carboy is the Decontamination Vessel for the removal of ethidium bromide from agarose gel washes and from running buffer. The spigot feature of the carboy allows for quick discarding of decontaminated liquid. A plastic bottle can also be used.
- ▪
- Large funnel with wide opening.
- ▪
- Large 100 cc syringe for transferring ethidium-containing liquid or buffer to Decontamination Vessel.
- ▪
- Activated charcoal “tea bags” purchased from scientific supplier. For example: Biotium Destaining Bags/VWR (supplier #22007, catalog #89427-060) or MP Biomedicals® (SKU #112350200, CAS Number #: 7440-44-0). One bag can remove 10 mg of ethidium bromide from solutions, with 95% removed in 4 h (product MSDS data sheets). Alternatively, bags can be made from activated charcoal (from aquarium or lab suppliers) wrapped with mesh and secured with a rubber band.
- ▪
- Stir-only stir plate (no heat) and large stir bar.
- ▪
- Twine. The charcoal bag should remain in solution near, but not touching, the bottom of the Decontamination Vessel, and the twine should extend from the bag to the outside of the carboy so that the bag can be removed without users contacting the ethidium-containing solution.
- ▪
- Incinerator, for municipalities that do not incinerate trash (see your Environmental Safety or Animal Care unit).
- ii.
- Methods
- ▪
- Used electrophoresis buffer containing ethidium bromide is transferred from the gel box to a dedicated Decontamination Vessel. A small length of tubing attached to a large (100 cc) syringe, dedicated for this purpose, is a safe and convenient strategy for liquid transfer. If ethidium is incorporated into the agarose gel, but not the running buffer, the running buffer will contain ethidium at the end of a run, especially at the anode, as ethidium is positively charged.
- ▪
- The Decontamination Vessel can be placed on a stir plate (incapable of heating, for safety reasons) for more efficient adsorption of ethidium by the charcoal bags. Attaching twine to the “tea bag” would help ensure that the bag is easily retrievable.
- ▪
- It is convenient to close the Decontamination Vessel to liquid collection on a specific day (Friday evening), then empty the Vessel 24–48 h later (Monday morning). According to MSDS, a decontamination time of 4 h is sufficient for removal of 95% of ethidium bromide.
- ▪
- Keep track of how many liters of original agarose gel buffer (and therefore how many mg of ethidium bromide) have been adsorbed by the “tea bag” so that its binding capacity is not exceeded.
- ▪
- When spent (10 mg capacity), the “tea bag” can be placed in a sealed plastic bag and stored until incineration. Ethidium bromide decomposes at 262 °C, so autoclaving is not sufficient for inactivation.
- D.
- Convenience Gels for time-efficient agarose gel production. The fact that agarose gels can be prepared in advance and stored for weeks before use is not commonly appreciated. The EDTA in TAE and TBE buffers helps prevent growth of organisms. Dehydration and diffusion of ethidium bromide from gels can be prevented by keeping the gels submerged in 1X TAE (or TBE) Running Buffer with ethidium bromide added. Pre-casting “Convenience Gels” saves time, as users do not have to wait for heated agarose to dissolve, cool, and set, and more gel boxes are available for running gels as they are not being used for casting.
- i.
- Materials
- ▪
- Large agarose gel casting tray with lid (the 20 cm wide × 27 cm long casting tray from Fisher scientific in Figure 2 remains in the gel box during casting). The box is used for gel casting and storage and need not be functional.
- ▪
- Large gel combs that fit the casting tray (for example, 4 combs, with 36 or 42 wells).
- ▪
- Agarose, electrophoresis buffer, and heat source for melting.
- ▪
- Running buffer (1X TAE or 1X TBE).
- ▪
- Plastic or stainless kitchen spatula. A narrow, rectangular shape is better than flared. Squared edges work better than rounded edges (Figure 2a).
- ii.
- Methods
- ▪
- Determine the amount and percentage of agarose needed, melt agarose in running buffer, cool and pour gel into casting tray.
- ▪
- Use combs to create a 3- or 4-tiered set of mini-gels (Figure 2c).
- ▪
- When gel is set, cover the gel with running buffer to prevent the gel from drying out. If the gel contains ethidium bromide, then the equivalent concentration of ethidium bromide should be added to the running buffer to prevent diffusion of the stain from the gel. Running buffers with ethidium should be placed in the Decontamination Vessel when finished. If watertight, the gel dams can be left in place to conserve use of the running buffer. Place lid on gel box to protect from dust and insects.
- ▪
- The Convenience Gels can be stored on the bench for 2 weeks or more without loss of resolution. The gels should be always covered with running buffer.
- ▪
- When a gel is needed, a section of the Convenience Gel with the required number of intact wells is excised using a spatula (Figure 2a) and carefully transferred to a new gel box. Wells on the ends are sacrificed in the cutting because the gel cannot be sliced cleanly between wells without loss of gel integrity. When cutting in the middle of a well, the neighboring well is not usually damaged.
- E.
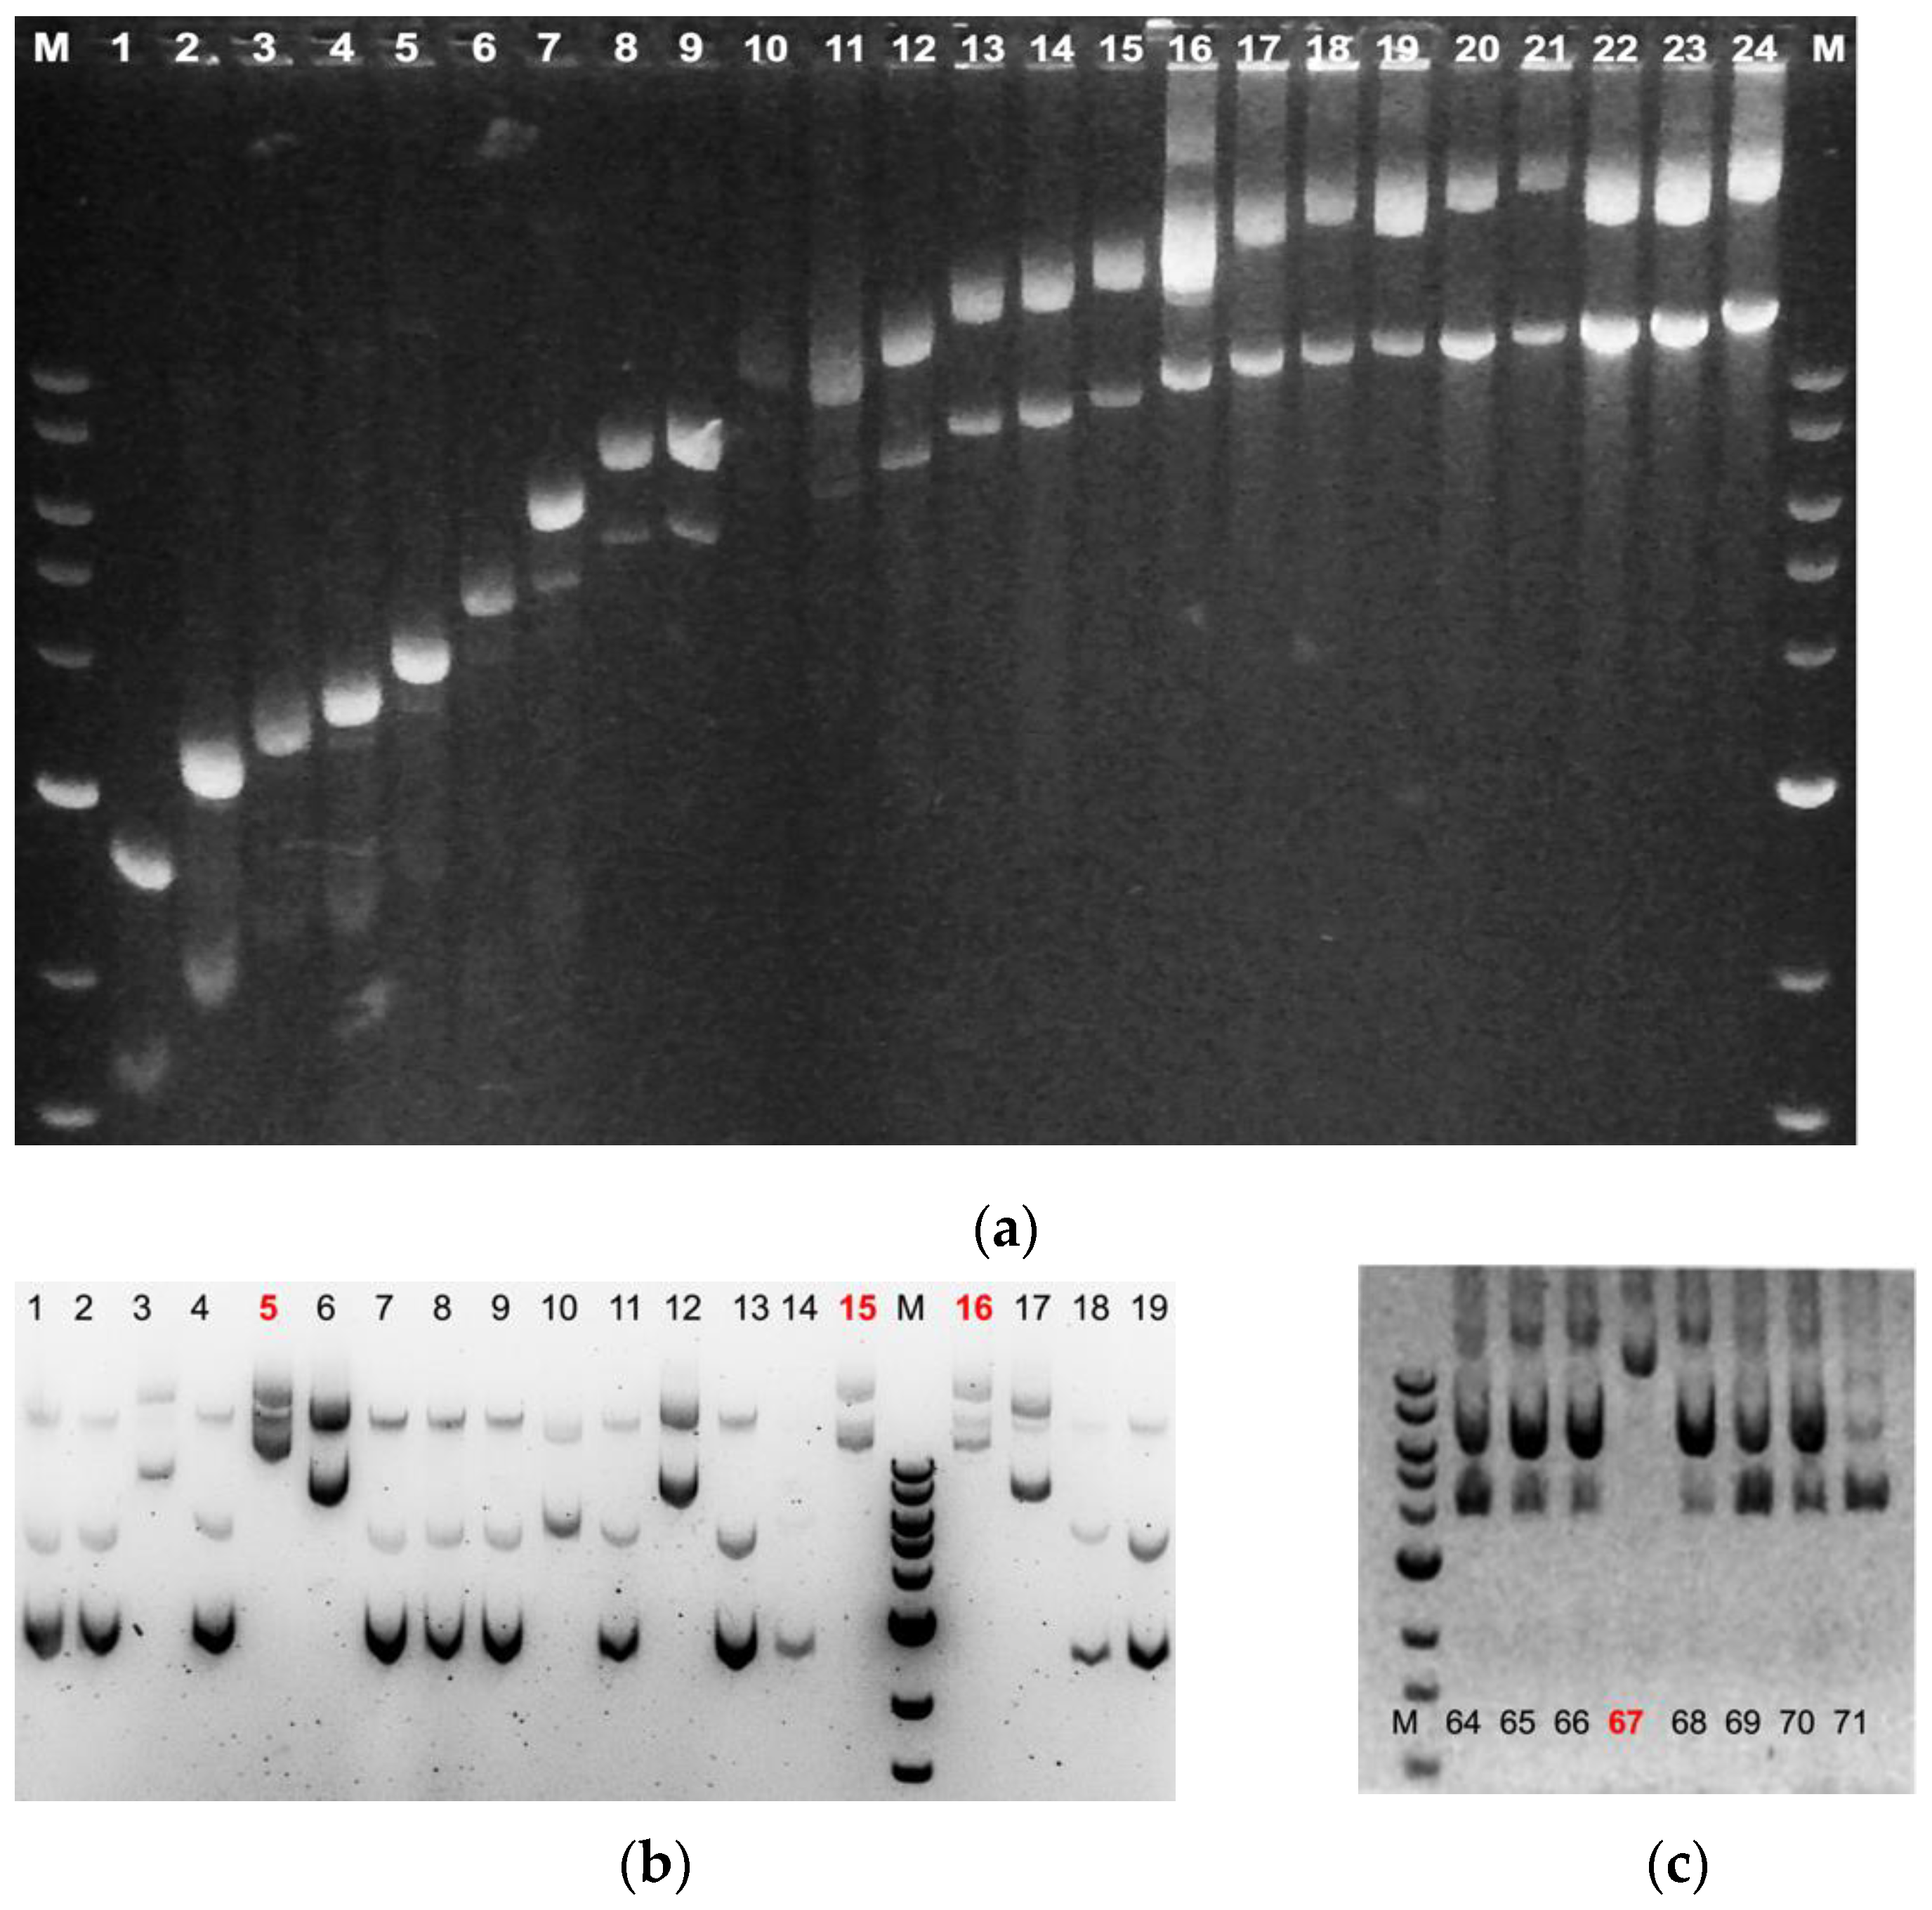
- Lyse&Load Protocol for rapid screening of plasmids based on size. When making a new plasmid, individual colonies must be screened to ensure that the desired plasmid is obtained and configured as designed. With this Lyse&Load protocol, it is possible to screen colonies, based on the relative size of the plasmid. This procedure uses solutions from the original alkaline lysis protocol [13] and is more reproducible than the single colony lysate protocol [16] through the addition of a step to scale up bacterial cell numbers. Moreover, the methodology is designed to minimize waste and hands-on time involved in screening.The goal is to take a small amount of concentrated bacterial cell suspension and quickly load the cell contents onto a gel for size analysis of uncut plasmids. If positive results are obtained for a particular culture tube, the remainder of the cell pellet is diluted with fresh growth media and cultured overnight for miniprep production the next day, analyzed by PCR, or other form of downstream analysis. Thus, DNA is isolated and further analyzed only from colonies that have a good chance of being correct. As further analysis involves use of restriction enzymes, PCR, and/or DNA sequencing, costs and effort are drastically reduced when screening at a large scale.
- i.
- Materials
- ▪
- Sterile tubes for bacterial culture and appropriate culture media. Glass culture tubes with metal caps are reusable and help minimize plastic waste.
- ▪
- Swinging bucket centrifuge that can accommodate the bacterial culture tubes (for example: Beckman Coulter Allegra X-30R or Eppendorf 5810).
- ▪
- Inoculation loop and flame.
- ▪
- Liquid aspirator.
- ▪
- Vortex Mixer.
- ▪
- Parafilm sheets.
- ▪
- Sterile pipet tips.
- ▪
- Agarose gel electrophoresis system.
- ▪
- Gel documentation system.
- ▪
- Solutions:
- ○
- 3X Alkaline Lysis Solution:
- 3% SDS,
- 0.6 M NaOH in water
- (This solution can be stored at room temperature for at least 2 months, but may need heating to ensure SDS is dissolved.)
- ○
- Loading dye (other dyes can be used; store frozen):
- 60% glycerol,
- 1X TAE (or preferred running buffer),
- 0.3% Bromophenol Blue
- ○
- Lyse&Load Solution: (make fresh)
- 9 parts 3X Alkaline Lysis Solution
- 1 part Loading Dye
- (10 μL will be needed for each sample.)
- ii.
- Materials and Methods
- ▪
- Using a sterile, flamed inoculation loop, inoculate colonies in culture tubes and incubate with shaking at 37 °C. For rapid, same-day screening, use a small volume of culture media (250–500 μL). For slow-growing colonies or low-yield plasmids, it may not be possible to obtain results in one day and an overnight culture would be required. For overnight culture, increase the volume of culture media as usual.
- ▪
- When the culture media is turbid (~OD595= 0.6–0.9), or after overnight culture, place the tubes in a swinging bucket centrifuge, balance, and obtain a cell pellet by spinning ~3000 rpm for 5–15 min (higher centrifugal forces may stress glass tubes.)
- ▪
- Most of the supernatant is removed from the cell pellet and discarded into a decontamination vessel, leaving behind ~10% of the original volume of media. The glass tubes are then vortexed in the remaining growth media to resuspend the cell pellet to generate a more concentrated suspension of cells.
- ▪
- Prepare a 1% agarose gel, or using Convenience Gels, cut out the number of lanes you will need, and fill the gel box with running buffer.
- ▪
- For quick work, a large square of parafilm is pressed onto the work surface in the gel area and the protective paper backing is removed. The parafilm will hold spots of liquid, taking the place of microfuge tubes. This reduces plastic waste and saves time.
- ▪
- Spot 10 μL of Lyse&Load Solution onto the parafilm sheet; one spot for each concentrated cell suspension you will analyze. Make sure to leave space between each dot so they will not merge when the sample is added to them.
- ▪
- Load the Molecular Weight marker on the gel. Another good control to use for sizing is uncut plasmid vector used in the construction of the plasmid.
- ▪
- Into each 10 μL spot of Lyse&Load Solution, add 20 μL of concentrated cell pellet. Carefully pipette up and down to mix, avoiding bubbles, and immediately load 20 μL of the mixture onto the gel.
- ▪
- Samples are mixed and loaded onto the gel one at a time. With delays in loading, the now-lysed bacterial contents will stick to the pipette tip, and the contents will float out of the well.
- ▪
- Depending on the loading dye used, the high pH of the Lyse&Load solution may alter the color of the dye, making it difficult to see. Wells loaded with lysed cells typically have an opaque appearance. A dark colored sheet of paper underneath the gel provides contrast and helps with keeping track of loaded wells.
- ▪
- Run gel at appropriate voltage for apparatus.
- ▪
- Compare relative sizes of plasmids (see Figure 3).
- F.
- A Multi-tube opener for speedy and ergonomic microtube (1.5–2 mL) lid opening. Tube manufactures supply plastic tube openers that can open one microtube at a time. For those with arm or hand injuries, these ergonomic devices are indispensable. We describe a device that can open an entire row of microtubes simultaneously, saving time and strain on hands. When several plasmids are screened simultaneously using Lyse&Load, handling the microtubes is easier with the Multi-tube opener. The opener reduces stress on hands and fingers and saves time.
- i.
- Materials and Methods
- ▪
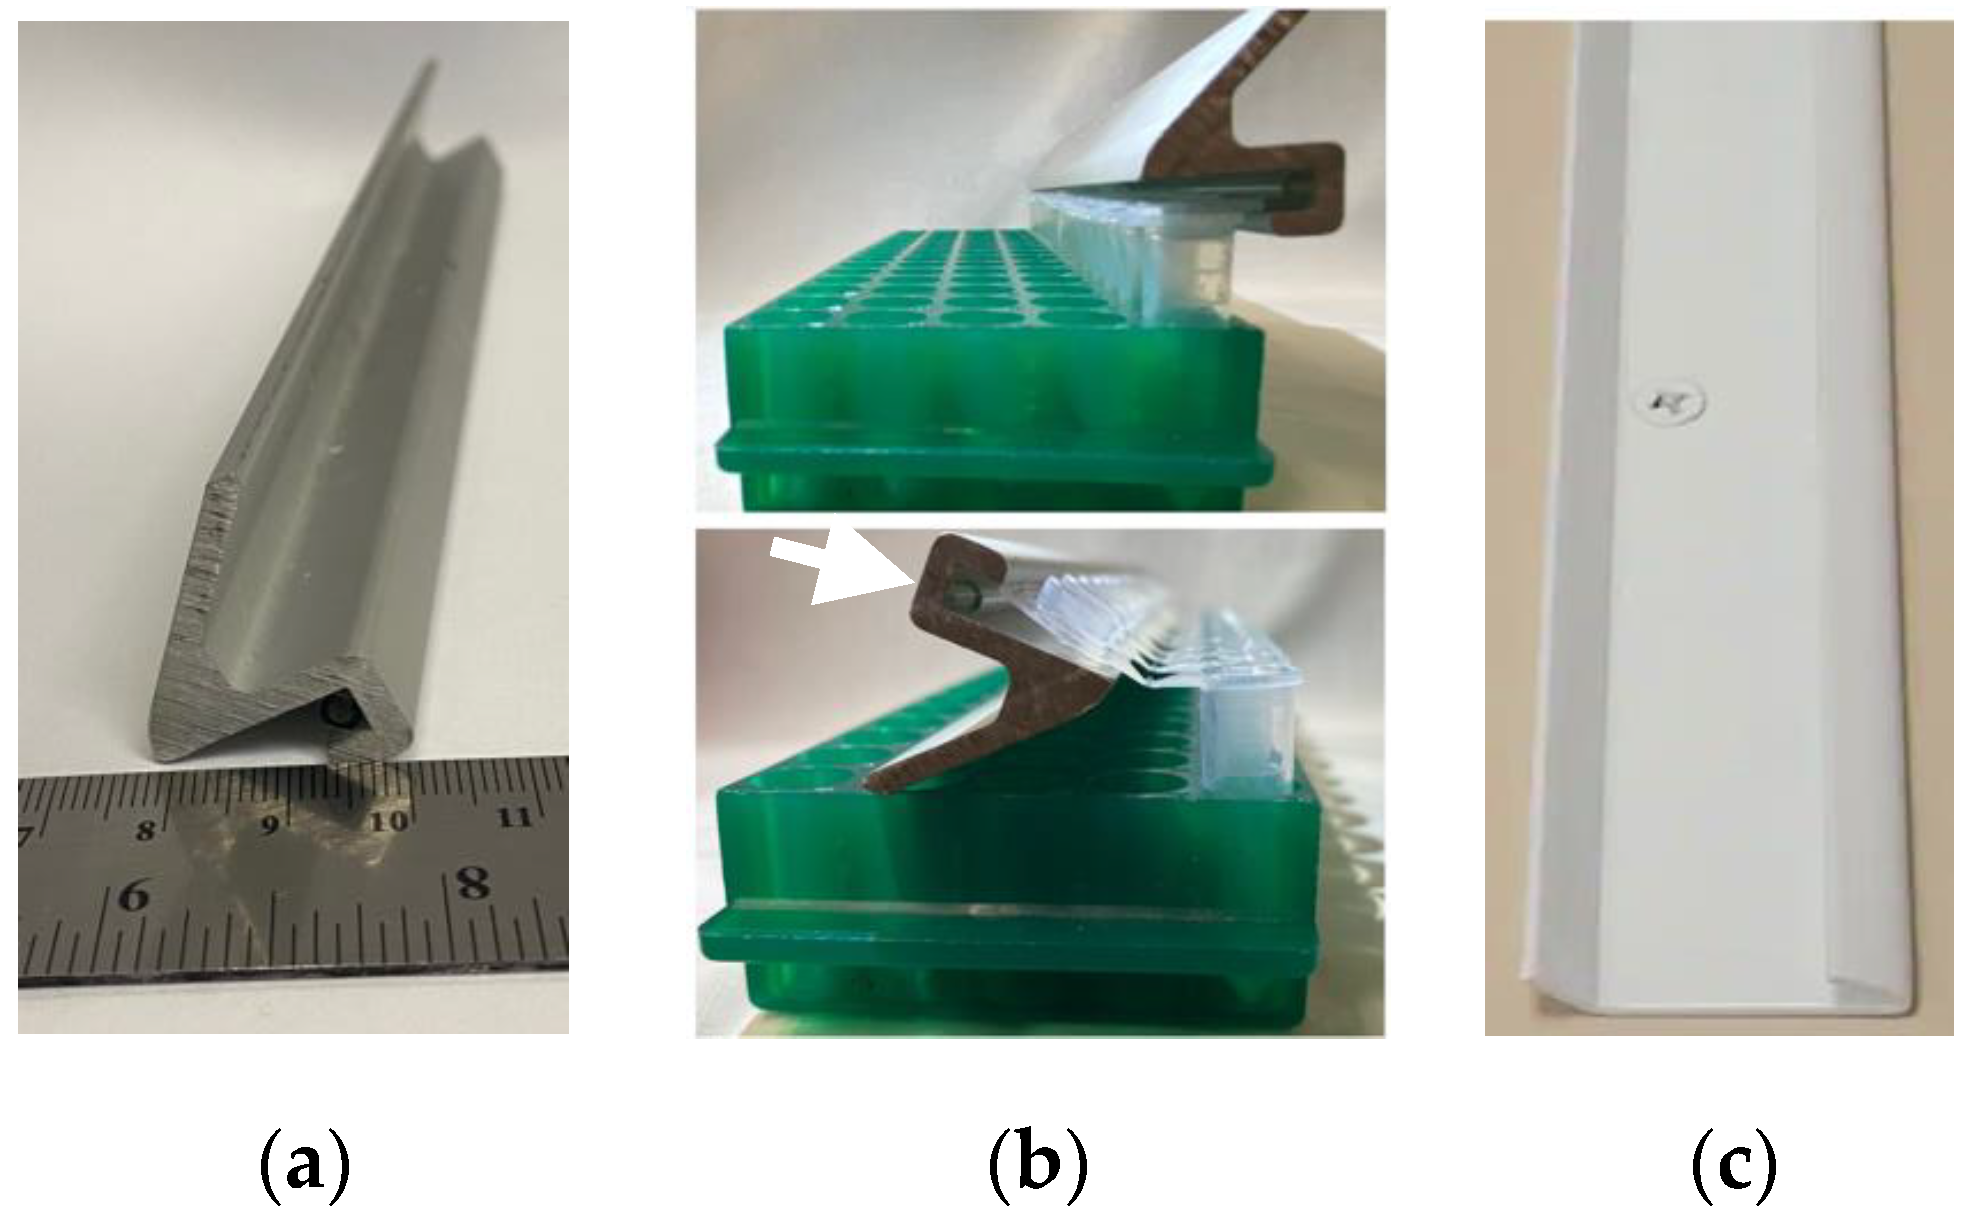
- The device we used (Figure 4a) was a lid support from broken equipment. We cut this metal piece to the length of a 16 × 5-tube rack using a bandsaw. It is an appropriately shaped and sturdy piece of metal and is a good lever for opening plastic microtubes. We investigated purchasable products that could serve the same purpose and found that hang rails/hanging tracks used in picture and shelf hanging will also work. We tested an Everbilt Super Duty Hang Track, 2in (Home Depot #1000 025 203) and found that it can also work for this purpose (Figure 4c).
- ▪
- Bandsaw for cutting to size.
- ▪
- A 1 mL plastic serological pipette. The groove in our Multi-tube Opener was too deep for the shape of the microtube lid, and this prevented efficient tube opening. We made the groove shallower by using cyanoacrylate adhesive (Superglue) to attach the pipette in the groove (Figure 4b, arrow).
- ▪
- The metal bar is used as a lever to open a row of tubes (Figure 4b).
3. Results and Discussion
Author Contributions
Funding
Institutional Review Board Statement
Informed Consent Statement
Data Availability Statement
Conflicts of Interest
References
- Santos, R.; Melo, R.A. Global shortage of technical agars: Back to basics (resource management). J. Appl. Phycol. 2018, 30, 2463–2473. [Google Scholar] [CrossRef] [PubMed]
- Callaway, E. Lab staple agar hit by seaweed shortage. Nature 2015, 528, 171–172. [Google Scholar] [CrossRef]
- Li, X.; Jin, J.; Guo, Z.; Liu, L. Evolution of plasmid-construction. Int. J. Biol. Macromol. 2022, 209, 1319–1326. [Google Scholar] [CrossRef]
- Huang, G.; Wen, Q.; Gao, Q.; Zhang, F.; Bai, Y. An efficient and rapid method for cDNA cloning from difficult templates using codon optimization and SOE-PCR: With human RANK and TIMP2 gene as examples. Biotechnol. Lett. 2011, 33, 1939–1947. [Google Scholar] [CrossRef] [PubMed]
- Sahdev, S.; Saini, S.; Tiwari, P.; Saxena, S.; Singh Saini, K. Amplification of GC-rich genes by following a combination strategy of primer design, enhancers and modified PCR cycle conditions. Mol. Cell. Probes 2007, 21, 303–307. [Google Scholar] [CrossRef]
- Matsumura, I. Why Johnny can’t clone: Common pitfalls and not so common solutions. Biotechniques 2015, 59, IV. [Google Scholar] [CrossRef]
- Godiska, R.; Mead, D.; Dhodda, V.; Wu, C.; Hochstein, R.; Karsi, A.; Usdin, K.; Entezam, A.; Ravin, N. Linear plasmid vector for cloning of repetitive or unstable sequences in Escherichia coli. Nucleic Acids Res 2010, 38, e88. [Google Scholar] [CrossRef] [PubMed]
- Ullmann, A.; Jacob, F.; Monod, J. Characterization by in vitro complementation of a peptide corresponding to an operator-proximal segment of the beta-galactosidase structural gene of Escherichia coli. J. Mol. Biol. 1967, 24, 339–343. [Google Scholar] [CrossRef] [PubMed]
- Green, M.R.; Sambrook, J. Screening Bacterial Colonies Using X-Gal and IPTG: Alpha-Complementation. Cold Spring Harb. Protoc. 2019, 2019, pdb-prot101329. [Google Scholar] [CrossRef]
- Cami, B.; Kourilsky, P. Screening of cloned recombinant DNA in bacteria by in situ colony hybridization. Nucleic Acids Res. 1978, 5, 2381–2390. [Google Scholar] [CrossRef]
- Hanahan, D.; Meselson, M. Plasmid screening at high colony density. Gene 1980, 10, 63–67. [Google Scholar] [CrossRef]
- Lu, S. Rapid screening of recombinant plasmids. Methods Mol. Biol. 2003, 235, 169–174. [Google Scholar] [CrossRef] [PubMed]
- Birnboim, H.C.; Doly, J. A rapid alkaline extraction procedure for screening recombinant plasmid DNA. Nucleic Acids Res. 1979, 7, 1513–1523. [Google Scholar] [CrossRef]
- Sandhu, G.S.; Precup, J.W.; Kline, B.C. Rapid one-step characterization of recombinant vectors by direct analysis of transformed Escherichia coli colonies. Biotechniques 1989, 7, 689–690. [Google Scholar] [PubMed]
- Kilger, C.; Krings, M.; Poinar, H.; Paabo, S. “Colony sequencing”: Direct sequencing of plasmid DNA from bacterial colonies. Biotechniques 1997, 22, 412–414. [Google Scholar] [CrossRef]
- Dale, J.W.; Greenaway, P.J. Plasmid screening using single colony lysates. Methods Mol. Biol. 1985, 2, 289–292. [Google Scholar] [CrossRef]
- Daum, H.A., 3rd; White, H.W.; Seidell, C.M.; Johnson, P.A. Cloning, restriction digestion and DNA labeling of large DNA fragments (greater than or equal to 1 kb) in the presence of remelted SeaPlaque GTG agarose gels. Biotechniques 1991, 11, 784–786, 788, 790–791. [Google Scholar] [PubMed]
- Seng, T.Y.; Singh, R.; Faridah, Q.Z.; Tan, S.G.; Alwee, S.S. Recycling of superfine resolution agarose gel. Genet. Mol. Res. 2013, 12, 2360–2367. [Google Scholar] [CrossRef]
- Palacios, G.; Gimenez, C.; De Garcia, E. Recycling Agarose. Plant Mol. Biol. Report. 2000, 18, 47–49. [Google Scholar] [CrossRef]
- Sasagawa, N. A freeze-and-thaw method to reuse agarose gels for DNA electrophoresis. Biosci. Trends 2018, 12, 627–629. [Google Scholar] [CrossRef]
- Hurtado-Oliva, M.; Manzano-Sarabia, M.; Garibay, E.; Pacheco-Ruiz, I.; Zertuche, J. Latitudinal variations of the yield and quality of agar from Gelidium robustum (Gelidiales, Rhodophyta) from the main commercial harvest beds along the western coast of the Baja California Peninsula, Mexico. J. Appl. Phycol. 2011, 23, 727–734. [Google Scholar] [CrossRef]
- Green, M.R.; Sambrook, J. Agarose Gel Electrophoresis. Cold Spring Harb. Protoc. 2019, 2019, pdb-prot100404. [Google Scholar] [CrossRef]
- Voytas, D. Agarose gel electrophoresis. Curr. Protoc. Mol. Biol. 2001, 51, 2–5. [Google Scholar] [CrossRef]
- Addgene. Agarose Gel Electrophoresis. Available online: www.addgene.org/protocols/gel-electrophoresis/ (accessed on 15 December 2022).
- Marinho-Soriano, E.; Bourret, E. Polysaccharides from the red seaweed Gracilaria dura (Gracilariales, Rhodophyta). Bioresour. Technol. 2005, 96, 379–382. [Google Scholar] [CrossRef]
- Yarish, C.; Redmond, S.; Kim, J.K. Gracilaria Culture Handbook for New England. Wrack Lines 2012, 72, 1–48. [Google Scholar]
- Kim, J.K.; Yarish, C.; Hwang, E.K.; Park, M.; Kim, Y. Seaweed aquaculture: Cultivation technologies, challenges and its ecosystem services. Algae 2017, 32, 1–13. [Google Scholar] [CrossRef]
- Scieszka, S.; Klewicka, E. Algae in food: A general review. Crit. Rev. Food Sci. Nutr. 2019, 59, 3538–3547. [Google Scholar] [CrossRef]
- Aziz, E.; Batool, R.; Khan, M.U.; Rauf, A.; Akhtar, W.; Heydari, M.; Rehman, S.; Shahzad, T.; Malik, A.; Mosavat, S.H.; et al. An overview on red algae bioactive compounds and their pharmaceutical applications. J. Complement. Integr. Med. 2020, 17, 4. [Google Scholar] [CrossRef]
- Reynolds, D.; Caminiti, J.; Edmundson, S.; Gao, S.; Wick, M.; Huesemann, M. Seaweed proteins are nutritionally valuable components in the human diet. Am. J. Clin. Nutr. 2022, 116, 855–861. [Google Scholar] [CrossRef] [PubMed]
- Maia, M.R.; Fonseca, A.J.; Oliveira, H.M.; Mendonca, C.; Cabrita, A.R. The Potential Role of Seaweeds in the Natural Manipulation of Rumen Fermentation and Methane Production. Sci. Rep. 2016, 6, 32321. [Google Scholar] [CrossRef]
- Alipour, S.; Omidvarborna, H.; Kim, D.-S. A review on synthesis of alkoxymethyl furfural, a biofuel candidate. Renew. Sustain. Energy Rev. 2017, 71, 908–926. [Google Scholar] [CrossRef]
- Alamsjah, M.A. Producing New Variety of Gracilaria Sp. Through Cross Breeding. Res. J. Fish. Hydrobiol. 2010, 5, 159–167. [Google Scholar]
- Connett, D. Seaweed Shortage Prompts Calls to Ration Use of Vital Scientific Resource. Available online: www.independent.co.uk/news/science/seaweed-shortage-prompts-calls-to-ration-use-of-vital-scientific-resource-a6794291.html (accessed on 15 December 2022).
- Pluen, A.; Netti, P.A.; Jain, R.K.; Berk, D.A. Diffusion of macromolecules in agarose gels: Comparison of linear and globular configurations. Biophys. J. 1999, 77, 542–552. [Google Scholar] [CrossRef]
- Lukacs, G.L.; Haggie, P.; Seksek, O.; Lechardeur, D.; Freedman, N.; Verkman, A.S. Size-dependent DNA mobility in cytoplasm and nucleus. J. Biol. Chem. 2000, 275, 1625–1629. [Google Scholar] [CrossRef]
- Gmeiner, W.H.; Hudalla, C.J.; Soto, A.M.; Marky, L. Binding of ethidium to DNA measured using a 2D diffusion-modulated gradient COSY NMR experiment. FEBS Lett. 2000, 465, 148–152. [Google Scholar] [CrossRef] [PubMed]
- Lowe, D. The Myth of Ethidium Bromide. Available online: www.science.org/content/blog-post/myth-ethidium-bromide (accessed on 15 December 2022).
- Aeschbacher, M.; Reinhardt, C.A.; Zbinden, G. A Rapid Cell-Membrane Permeability Test Using Fluorescent Dyes and Flow-Cytometry. Cell Biol. Toxicol. 1986, 2, 247–255. [Google Scholar] [CrossRef] [PubMed]
- Lunn, G.; Lawler, G. Safe use of hazardous chemicals. Curr. Protoc. Microbiol. 2011, 1, 1A-3. [Google Scholar] [CrossRef] [PubMed]
- Sayas, E.; Garcia-Lopez, F.; Serrano, R. Toxicity, mutagenicity and transport in Saccharomyces cerevisiae of three popular DNA intercalating fluorescent dyes. Yeast 2015, 32, 595–606. [Google Scholar] [CrossRef] [PubMed]
- Armand, R.; Channon, J.Y.; Kintner, J.; White, K.A.; Miselis, K.A.; Perez, R.P.; Lewis, L.D. The effects of ethidium bromide induced loss of mitochondrial DNA on mitochondrial phenotype and ultrastructure in a human leukemia T-cell line (MOLT-4 cells). Toxicol. Appl. Pharm. 2004, 196, 68–79. [Google Scholar] [CrossRef]
- Singh, S.; Singh, A.N. Ethidium bromide: Is a stain turning into a pollutant? A synthesis on its status, waste management, monitoring challenges and ecological risks to the environment. Int. J. Res. Anal. Rev. 2018, 4, 226–233. [Google Scholar]
- Menozzi, F.D.; Michel, A.; Pora, H.; Miller, A.O.A. Absorption Method for Rapid Decontamination of Solutions of Ethidium-Bromide and Propidium Iodide. Chromatographia 1990, 29, 167–169. [Google Scholar] [CrossRef]


| Lane | Length (bp) | Δ Length (bp) | % Difference |
|---|---|---|---|
| 1 | 2641 | ||
| 2 | 3228 | 587 | 22.2 |
| 3 | 3488 | 260 | 8.1 |
| 4 | 3630 | 142 | 4.1 |
| 5 | 3970 | 340 | 9.4 |
| 6 | 4401 | 431 | 10.9 |
| 7 | 5236 | 835 | 19.0 |
| 8 | 5774 | 538 | 10.3 |
| 9 | 6044 | 270 | 4.7 |
| 10 | 6986 | 942 | 15.6 |
| 11 | 7265 | 279 | 4.0 |
| 12 | 7767 | 502 | 6.9 |
| 13 | 8796 | 1029 | 13.2 |
| 14 | 9225 | 429 | 4.9 |
| 15 | 9749 | 524 | 5.7 |
| 16 | 11,181 | 1432 | 14.7 |
| 17 | 12,147 | 966 | 8.6 |
| 18 | 12,695 | 548 | 4.5 |
| 19 | 13,278 | 583 | 4.6 |
| 20 | 13,652 | 374 | 2.8 |
| 21 | 14,162 | 510 | 3.7 |
| 22 | 14,971 | 809 | 5.7 |
| 23 | 15,479 | 508 | 3.4 |
| 24 | 17,577 | 2098 | 13.6 |
Disclaimer/Publisher’s Note: The statements, opinions and data contained in all publications are solely those of the individual author(s) and contributor(s) and not of MDPI and/or the editor(s). MDPI and/or the editor(s) disclaim responsibility for any injury to people or property resulting from any ideas, methods, instructions or products referred to in the content. |
© 2023 by the authors. Licensee MDPI, Basel, Switzerland. This article is an open access article distributed under the terms and conditions of the Creative Commons Attribution (CC BY) license (https://creativecommons.org/licenses/by/4.0/).
Share and Cite
Asad, N.; Smith, E.; Shakya, S.; Stegman, S.; Timmons, L. Sustainable Methodologies for Efficient Gel Electrophoresis and Streamlined Screening of Difficult Plasmids. Methods Protoc. 2023, 6, 25. https://doi.org/10.3390/mps6020025
Asad N, Smith E, Shakya S, Stegman S, Timmons L. Sustainable Methodologies for Efficient Gel Electrophoresis and Streamlined Screening of Difficult Plasmids. Methods and Protocols. 2023; 6(2):25. https://doi.org/10.3390/mps6020025
Chicago/Turabian StyleAsad, Nadeem, Emily Smith, Sudeep Shakya, Sutton Stegman, and Lisa Timmons. 2023. "Sustainable Methodologies for Efficient Gel Electrophoresis and Streamlined Screening of Difficult Plasmids" Methods and Protocols 6, no. 2: 25. https://doi.org/10.3390/mps6020025
APA StyleAsad, N., Smith, E., Shakya, S., Stegman, S., & Timmons, L. (2023). Sustainable Methodologies for Efficient Gel Electrophoresis and Streamlined Screening of Difficult Plasmids. Methods and Protocols, 6(2), 25. https://doi.org/10.3390/mps6020025