Article

A Mechanical Error Correction Algorithm for Laser Human Body Scanning System

1
School of Fashion and Art Design, Xi’an Polytechnic University, Xi’an 710048, China
2
Department of Mechanical Engineering, Kunsan National University, Gunsan 54150, Republic of Korea
*
Author to whom correspondence should be addressed.
Processes 2026, 14(1), 158; https://doi.org/10.3390/pr14010158 (registering DOI)
Submission received: 25 November 2025 / Revised: 26 December 2025 / Accepted: 29 December 2025 / Published: 2 January 2026

Abstract

Human body measurement involves large-scale measurement. The acquisition of three-dimensional spatial coordinate data is a complex process. The errors which are generated in each stage of the process can potentially affect the final measurement data. Therefore, the accuracy of measurement remains one of the key technical issues that influence the development of the three-dimensional human body scanner. On the basis of analyzing the parameters to be calibrated of the entire measurement system, calibration methods for the parameters of angle a and angle β were established. After analyzing errors of the laser human body scanning system, a mechanical error correction algorithm for the system was established. Then, a mechanical error correction experiment using a standard cylinder was designed, and the overall effect was analyzed. The correctness of the mechanical error correction algorithm was verified, which made the scanner more accurate. To further verify the accuracy and reliability of the measurement result when the system used human bodies as measured objects, a comparative experiment was designed. The results of the comparative experiment demonstrated that the absolute error of the system for 3D measurement of a large-sized human body is less than 2 mm, and the relative error is less than 1%, which can meet the needs of fields such as clothing design and production.

1. Introduction

Human body data is required in numerous fields such as manned spaceflight [1,2], ergonomics [3,4,5], modern medical plastic surgery [6,7,8,9], digitalization, and preservation of cultural relics [10,11], as well as fashion design [12,13,14,15]. Human body measurement technology is a crucial scientific research direction, and it is one of the basic scientific technologies in industrialized countries.
Currently, infrared depth scanners (e.g., Kinects) are characterized by advantages of compact hardware size and portability for acquiring human body spatial coordinates [16]. Nevertheless, the practical application of infrared depth scanners is constrained by several limitations: (1) significant errors in raw depth data; (2) high susceptibility of depth images to environmental noises; (3) inconsistencies between fitted models and stitched datasets.
Furthermore, Kinects-based 3D reconstruction systems need to strike a balance between measurement accuracy and computational efficiency. Additionally, from a practical operation perspective, to obtain precise and true human body dimensions, subjects of Kinects are required to remove outer garments and wear underwear or specialized tight-fitting apparel (e.g., compression sportswear or swimwear) during measurement [17]. This type of human body scanner has limited engineering practicality.
Based on whether an auxiliary light source is required, optical measurement methods can be further divided into passive measurement methods and active measurement methods. The passive measurement method does not need an additional light source. Under natural light illumination, it acquires three-dimensional data information of a measured human body through certain technologies [18,19,20,21,22,23].
Nowadays, laser 3D human body scanners are continuously developing towards higher precision, and their application fields are also becoming increasingly extensive.
Laser triangulation is based on the principle of triangulation. A laser beam is projected onto the surface of a target object along the projection central axis, and an image acquisition device collects data on the opposite side. By calculating the geometric relationship of the system’s optical path and then deriving the position parameter (Δx) of the reflection point on the imaging device, the height information of the target object can be obtained. The laser scanning measurement range is between ±5 mm and ±250 mm. With high-precision algorithms for fine measurement of the measured object, the single-sided measurement accuracy can reach 0.02 mm [24,25]. H.Q. Technology Institute conducted an error analysis of a 3D human body scanner from Germany’s Vitronic Company, established correction models of the width and the depth directions within the world coordinate system, and applied corrections to the scanning results [26]. The American WB4 and WBX human body scanners can complete a full-body scan within 17 s, with a scanning range of 1.2 × 1.2 × 2.0 m and a model accuracy of ±3.0 mm [27]. Artec Eva [28], a commercial 3D scanner developed by Artec 3D, adopts a laser grating structured optical measurement system. It captures 3D information of the human body surface to generate a human body model, with a measurement accuracy of up to 0.1 mm. Following the acquisition of experimental data, a comparative analysis was performed between the measured dimensions and the true dimensions of the reference artifacts. Based on the derived discrepancy patterns, error correction was implemented specifically in the width and depth directions within the world coordinate system [29].
The structured light measurement method projects preset structured light (such as line laser and dot matrix laser) onto the measured object, captures the deformed fringes modulated by the object’s topography via a camera, and reconstructs the object’s three-dimensional (3D) topography using algorithms. The 3D coordinate measurement accuracy can reach the level of 0.01 mm–0.1 mm; the relative accuracy (relative to the measurement range) is usually better than 0.1%. Least squares B-spline curve fitting was performed by Zhu [30] on human body scanning lines to eliminate sampling errors and improve the measurement accuracy of the system. A tri-axial laser scanning system for human body measurements was constructed by M.H. Kim [31], utilizing a standard cylinder with a diameter of 120 mm as the experimental subject; it achieved a maximum absolute error of 1.05 mm and a maximum relative error of 1.75%. A portable human body measuring and customization system was developed by Tan X.H [32], which was based on the laser line measurement method. John W [33] carried out an overall error analysis of a laser 3D human body scanning system. In addition, a world coordinate error correction model was established, and the correction coefficients were fitted, thus improving the measurement accuracy of the system. Petra U [34] adopted three vertical mechanical guide rails, which were distributed around the human body at a certain angle to overcome occlusion. Kim Hyung [35] established a 3D body scanning measurement system associated with RF imaging, zero padding, and parallel processing. Zhou et al. carried out a high-precision multi-beam optical measurement method for a cylindrical surface profile [36].
However, the above research work is insufficient. For line laser 3D human body scanner based on the optical measurement method, its error sources and degrees of impact on the 3D reconstruction data of the system are different. The human body measurement is a large-size object measurement. The acquisition of spatial coordinates goes through processes of human body images, mechanical movements, and calibration of system parameters. Errors which are introduced in any of these processes can affect the results of 3D reconstruction data.
Therefore, we need to start from a systematic perspective. First, we need to comprehensively analyze the sources of errors. Then, we should effectively evaluate how strongly the errors in each link affected the final result. Next, we need to find ways to correct these errors. Only by finishing the above things can we improve the accuracy of the line laser 3D human body scanner based on the optical measurement method. From the perspective of engineering design, we need to conduct a comprehensive analysis of the error sources of the system. We need to establish a correction algorithm to reduce the impact of these errors. Only in this way can we design a good human body measuring instrument.
The main contributions of this paper are shown as follows:
(1)
Based on an analysis of error sources of the entire system, this paper clarified that mechanical error of the system was unavoidable and directly affected the measurement accuracy of the system.
(2)
To obtain theoretical data of several selected standard test points, and to conduct a quantitative analysis of mechanical error by comparing the theoretical data with actual data, this paper developed a simulation calculation system in accordance with the working principle and mathematical model of the scanner.
(3)
To reduce mechanical error, a mechanical error correction model and an interpolation compensation method for the system were established.
(4)
A mechanical error correction experiment using a standard cylinder was designed. The results of the correction experiment were analyzed. The experimental result verified the correctness and effectiveness of the mechanical error correction model and an interpolation compensation method of the system.
(5)
To further verify the accuracy and reliability of the measurement result when the system used human bodies as measured objects, a comparative experiment was designed. The results of the comparative experiment demonstrated that the absolute error of the system for 3D measurement of a large-sized human body is less than 2 mm, and the relative error is less than 1%, which can meet the needs of fields such as clothing design and production.

2. Related Work

2.1. Establishment of the System Model

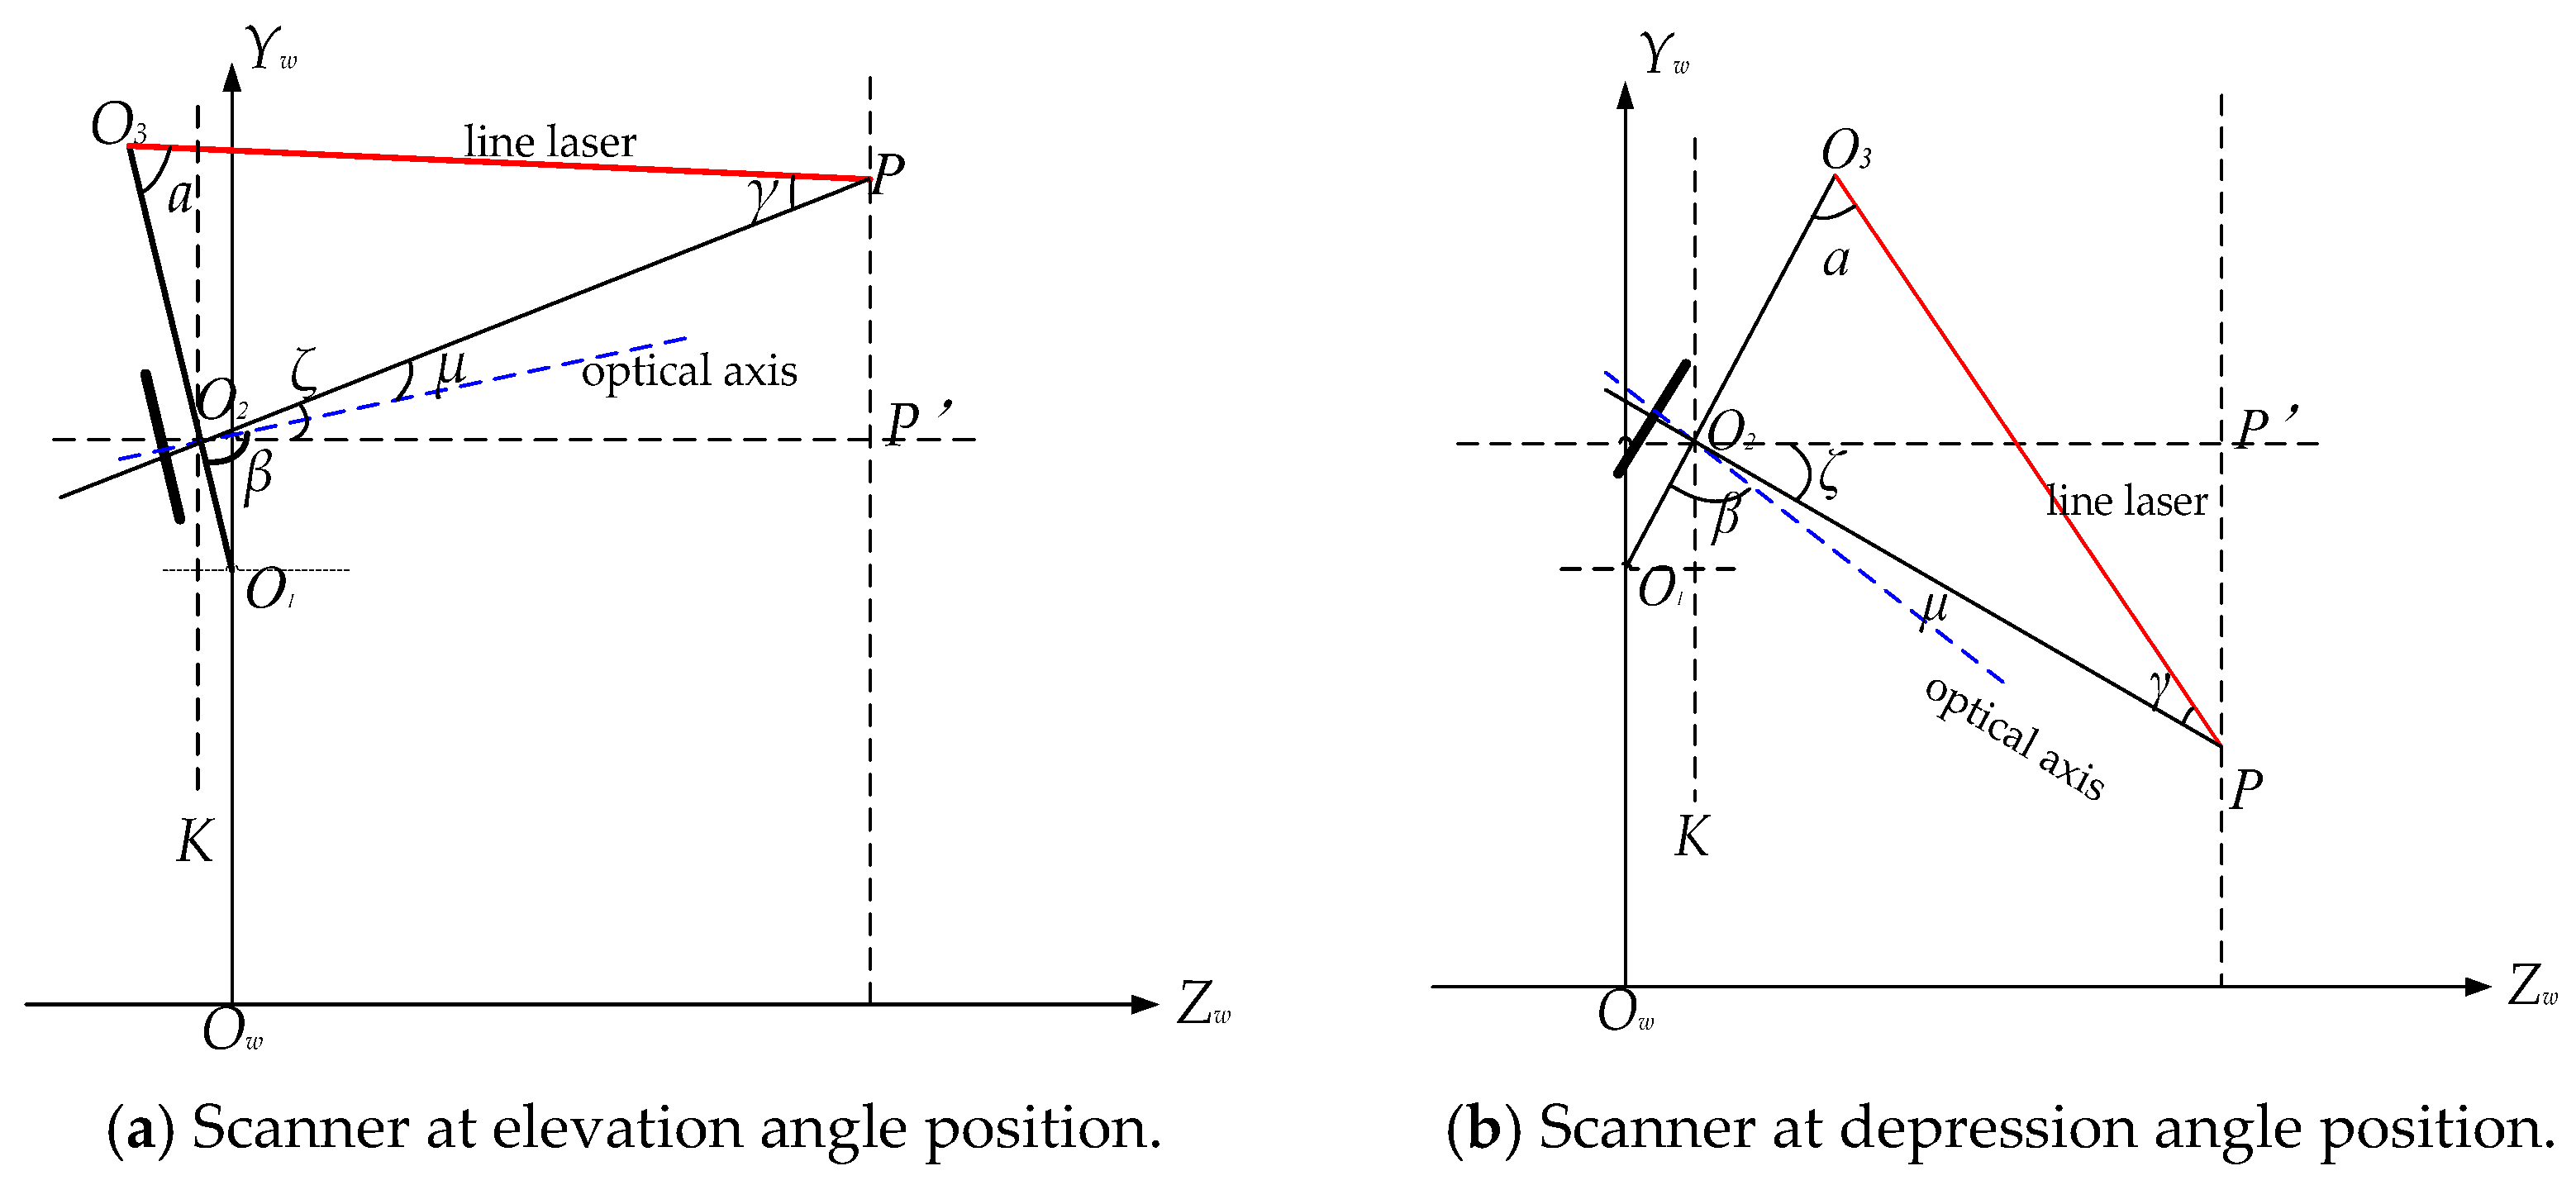
As shown in Figure 1, OW-XWYWZW was defined as the world coordinate system (in other words, the world coordinate system where the measured subject was situated). Point OW served as the origin of the world coordinate system. Specifically it was the foot of the perpendicular from the rotation center of the one-dimensional numerical control pan-tilt to the ground. The positive direction of the OWYW axis was set to be vertically upward, and the positive direction of the OWZW axis was oriented toward the human body. The positive direction of the OWXW axis was determined in accordance with the right-hand rule.
Point O1 was identified as the rotation center of one-dimensional pan-tilt. Point O2 was identified as the optical center of the industrial camera. Point O3 was identified as the line laser projector. After the light plane projected by the line laser intersected the surface of the target human body, a light strip was formed on the human body surface. Point P was designated as an arbitrary point on the center of this light strip (i.e., the target point P). Point p was defined as the projection of point P on the imaging plane of the camera, and the ideal imaging coordinate of point p was recorded as p(x,y) with the unit of mm.
The parameters of this system were specified as follows:
(1)
Hb: The vertical distance from the pan-tilt to the ground;
(2)
Hm: The distance from pan-tilt to the optical center of the industrial camera;
(3)
Ht: The distance from the optical center to the line laser;
(4)
θ: The rotation angle of the pan-tilt, which represented the angle between the rotating arm (O1O3) and the positive direction of the YW axis in the world coordinate system;
(5)
f: The effective focal length of the camera optical lens;
(6)
a: The angle between the light plane and the rotating arm;
(7)
β: The angle between the camera optical axis and the rotating arm.
In line with the camera imaging principle, it was concluded that
μ = a r c t a n y f
Since β + μ = α + γ , and angles a, β, and µ were known, it was deduced that γ = β + μ α .
In triangle O2O3P, on the basis of the sine theorem, the expression s i n a l = s i n γ H t was obtained, so
l = s i n a × H t s i n γ
A perpendicular line O2K was drawn from point O2 to the ZW axis, and a perpendicular line O2P′ was also drawn from point O2 to the YW axis.
Given that the rotation angle of the pan-tilt was θ, the following expression was derived: O 1 O 2 K = θ .
The following expression was further derived: ς = β + μ θ π 2 .
In triangle O2PP, the expression was given as follows:
O 2 P = l c o s ζ
According to Equations (1)–(3), the calculation formulas for the ZW coordinate and Yw coordinate of the target point P can be established:
Z W = H m × s i n θ + l × c o s ζ
Y W = H b + H m × c o s θ + l × s i n ζ
As shown in Figure 2, the geometric constraint relationship among the line laser, industrial camera, and target point was projected onto the XwZW plane of the world coordinate system.
In the similar triangle O2PP and triangle O2PP, O2P’ can be calculated according to Equation (3).
Since c o s μ = f O 2 p , then O 2 p = f c o s μ , O 2 o = O 2 p × c o s ζ = f c o s ζ c o s μ , o p = x .
Furthermore, since O 2 P O 2 o = P P o p , it followed that P P = o p × O 2 P O 2 o .
Through the above formulas, the calculation formula for the XW coordinate of the measured point P can be established:
X W = x l c o s μ f
As shown in Figure 3, taking the scanner directly in front of the target human body as an example, the motion law of the line laser 3D human body scanner based on the optical measurement method for rotational scanning is shown as follows:
(1)
Human body remains in a fixed position.
(2)
The industrial camera and the laser are made to work in linkage with each other via a numerical control pan-tilt head, and perform a pitching motion around the pan-tilt head.
(3)
During the motion processes, the projection position of the line laser and the field of view of the camera are changed to form a dynamic light strip. And it is ensured that the light strip is always within the camera’s field of view.
(4)
The human body is a dynamic object. Movements such as breathing or slight involuntary body sway can introduce measurement error. The longer the scanning time, the more pronounced such error caused by spontaneous body movements becomes. Therefore, rapidity is a key requirement for human body measurement.
(5)
The scanning time refers to the duration required to complete a single scan, and its length is determined by the height of the scanned object. For human body measurement, the rotation angle of pan-tilt required to complete a single human body scan varies depending on the subject’s height. For example, when scanning a human body with a height of 175 cm, the pan-tilt generally needs to rotate 235 steps (a step angle is 0.225°) to fully scan the measured subject. Given that the time required for the pan-tilt to rotate one step is 67 ms, the scanning time is approximately 15.74 s.

2.2. Calibration Method for Parameters (Angle a and Angle β)

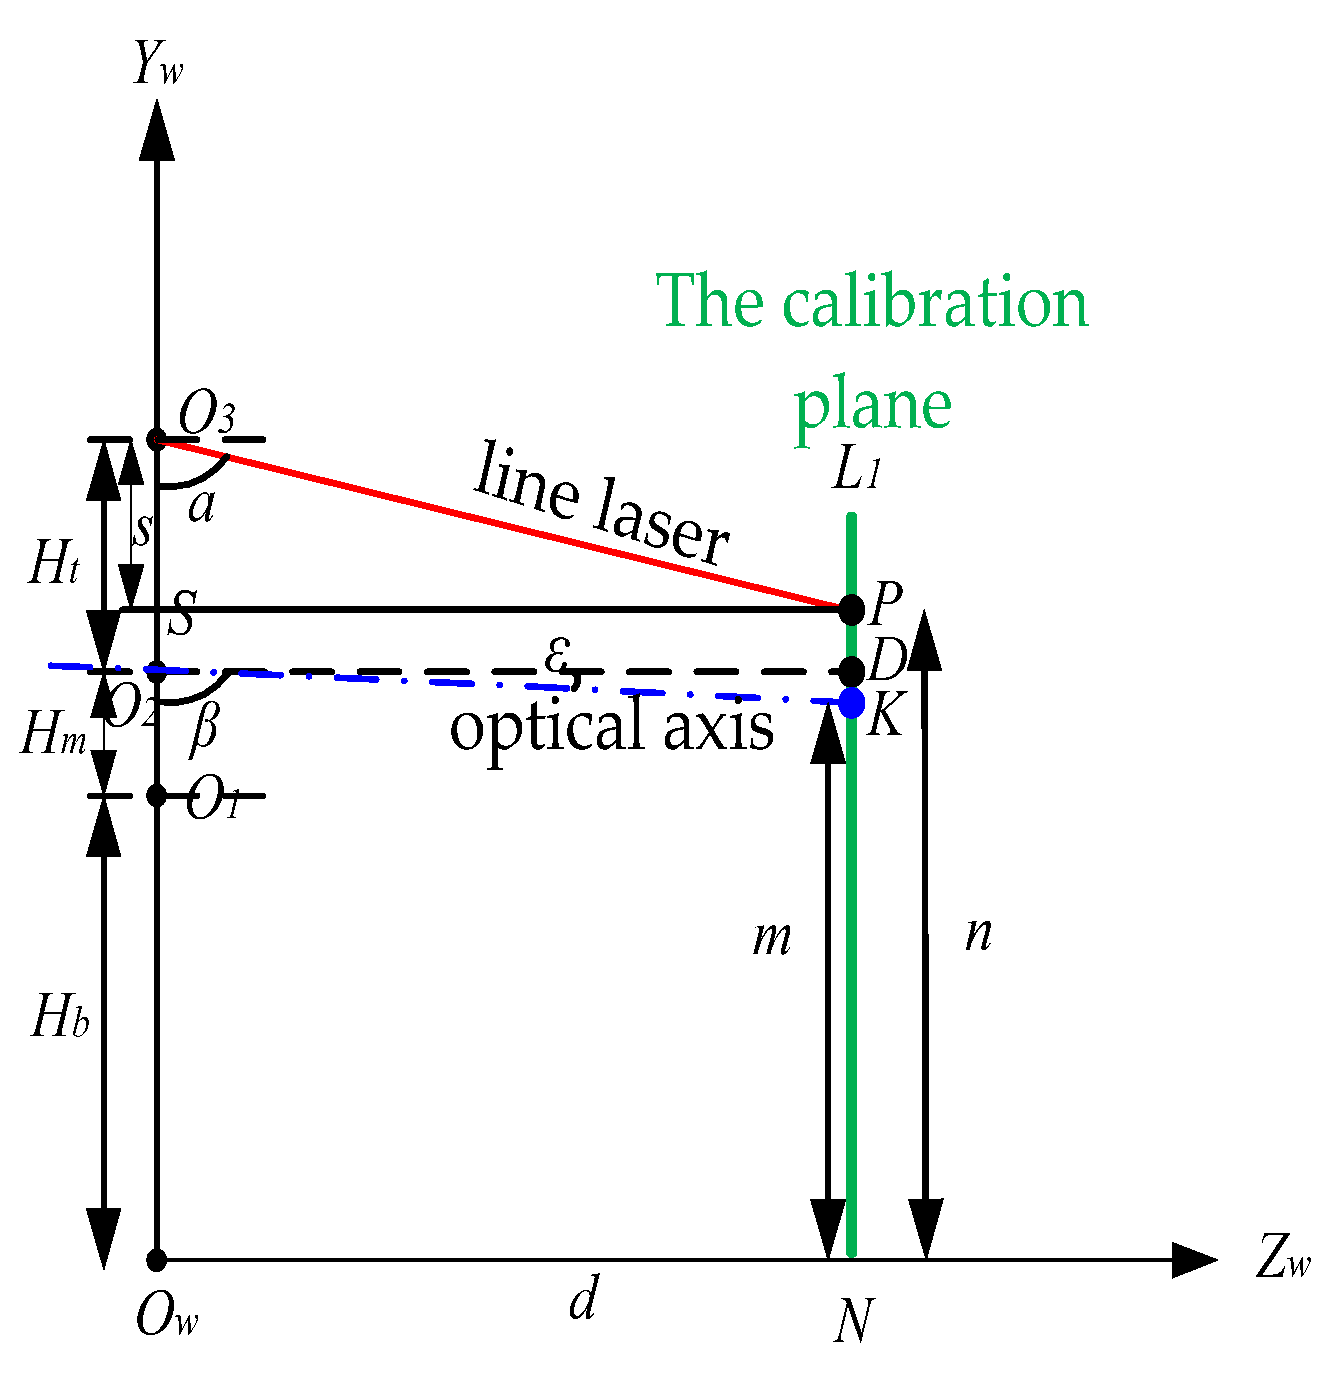
As shown in Figure 4, a horizontal line is drawn passing through point O2 (O2 is the optical center of the industrial camera) and parallel to the ZW axis, which intersects the calibration plane at point D. The light plane projected the calibration plane, then formed a light strip, and intersected at point P between the light strip and the calibration line of the calibration plane. An auxiliary line passes through point P, parallel to the ZW axis, and intersects the YW axis at point S, O 2 D = S P = d .
It is known that the parameters of the scanner, including Hb, Hm, and Ht, as well as the perpendicular distance from point P to the ZW axis, can be measured.
Assume that P N = n , then O 3 S = H b + H m + H t n = s , and thus, s could be solved for.
In triangle SO3P, t a n a = S P O 3 S = d s , then a = a r c t a n a , angle a could be solved for.
It is known that D K = D N K N .
Assume that point K is the spatial point of the world coordinate system, which corresponds to the image coordinates of the center point of the optical axis.
Since the perpendicular distance from point K to the ZW axis can be measured, then let K N = m , then D K = D N K N = H b + H m m .
In triangle DO2K, t a n ε = D K O 2 D = H b + H m m d . Then ε = arctan ε , β = π 2 a r c t a n ε . So the angle β could be solved.

2.3. Analysis of Error Sources

From the perspective of the above mathematical model, 3D reconstruction based on Equations (1)–(6), which required parameters including Hb, Hm, Ht, a, β, f, image coordinates (xi,yi) of the projected point, and θ. Therefore, the error sources of the line laser 3D human body scanner based on optical measurement were shown as follows:
(1)
The ranging errors come from direct measurements of Hb, Hm, and Ht. These errors could be mitigated by averaging multiple measurements.
(2)
The calibration errors of parameters (angles a and β). Angle a and angle β were determined by using the calibration method established in Section 2.2. The error reduction was achieved by averaging the result from multiple calibrations.
(3)
The imaging error in the optical module. Due to manufacturing and assembly tolerances inherent in the CMOS industrial camera and the optical lens used in the scanner, deviations inevitably occurred in the effective focal lengths (fx and fy) of the lens, as well as the image coordinates (u0,v0) of the camera’s optical axis center point. The magnitude of these deviations was determined by the calibration accuracy of the industrial camera. This paper adopted Zhang Zhengyou’s planar template calibration method. To mitigate the error and to ensure calibration accuracy, this paper employed an averaging approach to calibrations and conducted error analysis of the calibration results.
(4)
The extraction error of the pixel coordinates at the optical band center position. The projection point’s image coordinates (xi,yi) were calculated from the pixel coordinates (ui,vi) at the optical band center position. For this type of extraction error, by establishing a target region optimization and recognition algorithm in the image processing, such error could effectively be reduced. This paper adopted the monochrome CMOS camera with a signal-to-noise ratio of 46 dB. The camera can not only capture images with sufficient resolution, but also features high sensitivity in low-light environments and stable performance. After performing cubic Bezier spline interpolation fitting on the pixel coordinate points of each group of pixel columns in the image, the maximum points of each fitted cubic Bezier spline curve are the center position points of human body laser stripes in each corresponding column.
(5)
The mechanical motion error. During actual scanning measurements, the scanner’s one-dimensional numerical control pan-tilt inevitably introduced rotational angle deviation. Additionally, the assembly error of the mechanical arm occurred during each installation and operation process, affecting the situation of the optical plane. Mechanical errors like pan-tilt rotation angle deviation critically affected the spatial accuracy of the optical plane during scanning. The mechanical error caused a discrepancy between the theoretical and actual positions where the optical plane intersected the human body. The spatial deviation of the optical plane was transferred to target pixels, which led to extraction errors in the target pixel coordinates (ui,vi) during image processing. Consequently, it introduced amplified error in the spatial position reconstruction of the human body. Even the slightest rotational deviation in mechanical motion significantly impacted the extracted target pixel coordinates, thereby affecting the overall measurement accuracy of the system. Next, this paper focused on investigating the characteristics, causes, and correction algorithms for the error.

3. Methods

According to the reconstruction principle of the scanner, the accuracy of the pan-tilt rotation angle (θ) is directly related to the measurement precision of 3D spatial coordinates. Its error has a significant impact on the reconstruction data of the human body.
As shown in Figure 5, in the actual measurement of a spatial point P(XW,YW,ZW) on a standard cylinder, the actual pan-tilt rotation angle θ1 is inconsistent with the theoretical pan-tilt rotation angle θ2, due to the existence of mechanical error (Δθ).
If the theoretical point is defined as point P′, whose spatial coordinates are P′ (XW,YW,ZW′), it can be known that
Δ θ = θ 1 θ 2
Due to the mechanical error Δθ, there is a deviation ΔYW between the theoretical height YW′ (where the light strip falls on the standard cylinder) and the actual height YW. This vertical deviation ΔYW of the light plane is transmitted to the collected light strip image, resulting in an extraction error Δv of the target pixel v-coordinate. Consequently, a vertical offset Δy occurs on the imaging plane. Due to the offset Δy, in the 3D coordinate reconstruction model, the angle μ will have an error, which directly leads to reconstruction errors in the YW and ZW coordinates. At the same time, the error of angle μ causes a new error in the calculation of the object distance, which directly leads to a reconstruction error in the XW coordinate.
To correct the mechanical error, the core is to correct the spatial position error of the light plane. Specifically, it is to correct the vertical deviation Δy of the camera imaging coordinates (in millimeters) to the theoretical position.
Firstly, this paper calculated the value of μ″ and corrected it to the theoretical angle position. Then, this paper substituted μ″ into the formulas of XW″, YW″, and ZW″ in the mechanical error correction model.
In this way, the error correction of the measured calibration point can be realized, which is expressed as
μ = a r c t a n y Δ y f
Among them, Δy = y(θ) is the vertical offset on the imaging plane related to the pan-tilt rotation angle θ.
Since γ = β + μ α , then l = s i n a × H t s i n β + μ a , ζ = β + μ θ π 2 .
Through the above calculation, the correction algorithms for Xw″, Yw″, and Zw″ are shown as follows:
Z W = H m × s i n θ + s i n a × H t s i n β + μ a × c o s β + μ θ π 2
Y W = H b + H m × c o s θ + s i n a × H t s i n β + μ a × s i n β + μ θ π 2
X W = x × sin a × H t × cos μ f × sin β + μ a
The value of Δy can be obtained by fitting a polynomial equation using the quadratic interpolation method, which is based on the acquired target pixel deviation data. Then, the error correction coefficients are calculated to derive the expression of y(θ).
Suppose that when y(θ) is at three positions of pan-tilt rotation angles (θ1, θ2, and θ3, with θ1 < θ2 < θ3), the target pixel deviation values, respectively, are ψ1, ψ2, and ψ3, and ψ1(θ1) > ψ2(θ2) > ψ3(θ4).
Assume that y(θ) passing through the three points (θ1,ψ1), (θ2,ψ2), and (θ3,ψ3), and y θ = f 1 θ 2 + f 2 θ + f 3 , then:
y θ 1 = f 1 θ 1 2 + f 2 θ 1 + f 3 = ϕ 1 y θ 2 = f 1 θ 2 2 + f 2 θ 2 + f 3 = ϕ 2 y θ 3 = f 1 θ 3 2 + f 2 θ 3 + f 3 = ϕ 3
From Formula (12), the error correction coefficients f1, f2, and f3 can be calculated as follows:
f 1 = ϕ 1 × θ 2 θ 3 ϕ 2 × θ 1 θ 3 + ϕ 3 × θ 1 θ 2 θ 1 2 × θ 2 θ 3 θ 2 2 × θ 1 θ 3 + θ 3 2 × θ 1 θ 2 f 2 = θ 1 2 × ϕ 2 ϕ 3 θ 2 2 × ϕ 1 ϕ 3 + θ 3 2 × ϕ 1 ϕ 2 θ 1 2 × θ 2 θ 3 θ 2 2 × θ 1 θ 3 + θ 3 2 × θ 1 θ 2 f 3 = θ 1 2 × θ 2 × ϕ 3 θ 3 × ϕ 2 θ 2 2 × θ 1 × ϕ 3 θ 3 × ϕ 1 + θ 3 2 × θ 1 × ϕ 2 θ 2 × ϕ 1 θ 1 2 × θ 2 θ 3 θ 2 2 × θ 1 θ 3 + θ 3 2 × θ 1 θ 2
According to Formula (13), the complete expression of y(θ) can be obtained. Then, based on the error correction algorithms, Formulas (9)–(11), the full correction of the 3D spatial coordinates can be completed.

4. Experimental Results and Analyses

4.1. Experiment on Standard Cylinder Scanning

To quantitatively analyze the characteristics, transmission, and mechanical error that impacted on the human body reconstruction data, this paper developed a simulation system. The working principles and operation processes of the simulation system are shown as follows:
Step 1. A standard cylinder is placed at the position of the measured object. The geometric parameters and position of the standard cylinder (i.e., the horizontal distance T from the standard cylinder to scanner) are both known.
Step 2. Given the initial scanner parameters, such as Hb, Hm, Ht, a, β, and f, the ideal pixel coordinates v (vertical) and u (horizontal) corresponding to designated points on the standard cylinder can be accurately calculated on the image pixel coordinate plane for any theoretical angle θ.
Step 3. The values of v and u are then converted into the theoretical camera imaging plane coordinates x and y, expressed in millimeters.
Step 4. According to Equations (1)–(6) of the 3D spatial coordinate reconstruction algorithm of the scanner, the theoretical 3D spatial coordinate data (XW, YW, ZW) of the calibration points could be calculated.
As shown in Figure 6, by inputting initial parameters consistent with those used in the actual scanning measurement experiment of the standard cylinder, utilizing the theoretically computed θ angle, and then clicking the “Start Calculation” control, the simulation calculation system can accurately compute the required theoretical data (such as the number of target pixels in the horizontal and vertical directions of the standard cylinder marking points and the spatial position coordinates of the marking points), directly on its operation interface. The real-time display of the above theoretical data is shown in Figure 7.
Subsequently, this study devised a metrological scanning experiment utilizing a standard cylinder. The standard cylinder is characterized by a radius of 80 mm and a height of 150 mm. The standard cylinder was positioned on an 800 mm high mounting bracket, maintaining a horizontal distance (T = 1500 mm) relative to the scanner’s optical datum.
By comparing the measured height data and theoretical height data of the standard cylinder (the date is shown in the table), this paper revealed the variation law of the mechanical error as follows: when the rotation angle of the pan-tilt (θ) is zero, the error between the actual height of the target point and its theoretical height is the smallest at this height section, compared with those at other rotation angles; when the value of the pan-tilt rotation angle changes more significantly, the position error between the actual height of the calibration point and its theoretical height will also increase accordingly.
The sources of mechanical errors lie in the inherent defects of the system hardware itself, such as the vibration of the pan-tilt rotation axis, the transmission clearance of the scanning mechanism, and the geometric misalignment of sensor installation. Such errors have strong stability and repeatability. Under the same equipment operating conditions, the magnitude and direction of the mechanical errors will not easily change with the external environment.
In contrast, the scanning condition-related errors (such as room illumination, object size and color, etc.) are external interference errors with obvious randomness and volatility. For example, direct strong light can cause overexposure of laser fringes; dark-colored objects have high laser absorption rates. These factors will change with the scanning scene, resulting in poor error repeatability.
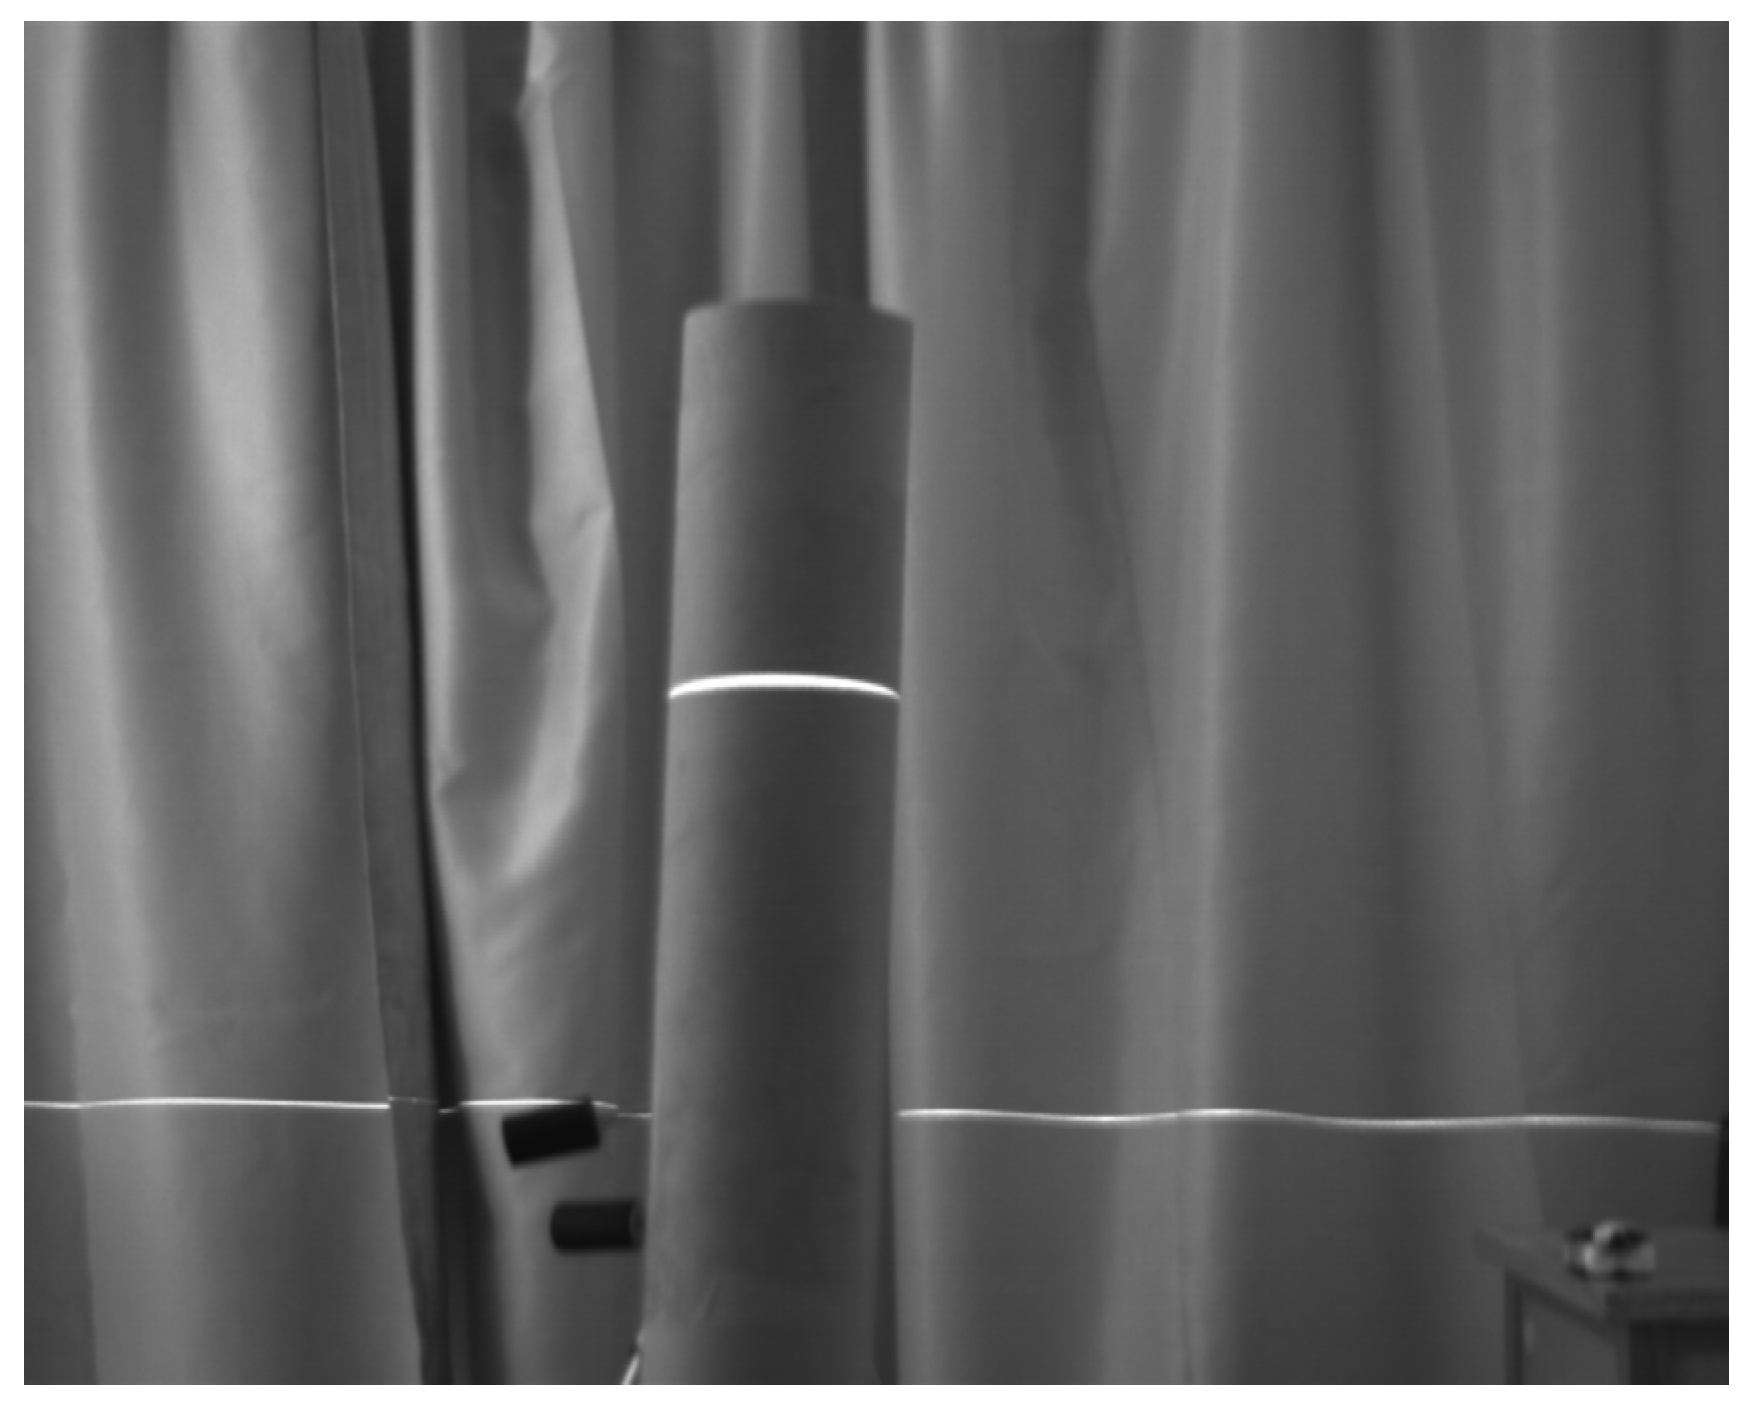
When scanning the calibration cylinder, at the position where the elevation angle of the pan-tilt is at its maximum (θ1 = 7.875°), at the zeroing position (θ2 = 0°), and at the position where the depression angle is at its minimum (θ3 = 19.125°), the experiment collected the light band images of the standard cylinder at these three rotation angles of the pan-tilt. A frame of the light band image of the standard cylinder captured by the scanner is shown in Figure 8. The grayscale distribution of the column 180 in a standard cylinder image is shown in Figure 9. As can be seen from Figure 9, the width of the light band in column 180 of the standard cylinder is eight pixels.
The system calculates the actual coordinate data YW at these three rotation angle positions. The simulation calculation system is utilized to calculate the theoretical pixel coordinates and the theoretical spatial position coordinates (YW′) in the vertical direction of the known calibration points under the above three theoretical pan-tilt rotation angles.
Due to the existence of errors in the θ angles, the YW coordinate is different from the YW′ coordinate; that is, the position error ΔYW in the spatial height direction of the light plane is not zero.
Through the simulation system, the theoretical target pixel coordinate values at these three pan-tilt rotation angles can be obtained. The actual target pixel coordinate values are acquired through image processing and the algorithm for extracting the pixel coordinates of the center position of the light band.
The calculation results of the target pixel deviation (Δv) in the vertical direction of the calibration points at the above three pan-tilt rotation angle positions are shown in Table 1.
Taking the pixel deviation value (Δv) of the calibration point as the interpolation condition, calculate the values of interpolation polynomial coefficients (f1, f2, and f3), and determine the expression of y(θ).
The algorithm process is shown as follows:
62.01 f 1 7.88 f 2 + f 3 = 122.92 f 3 = 9.54 365.77 f 1 + 19.13 f 2 + f 3 = 89.73
According to Formula (14), the error correction coefficient can be calculated, namely:
f 1 = 0.69 f 2 = 8.98 f 3 = 9.54
Given that the pixel size of the scanner’s industrial camera is 5.2 μm (h) × 5.2 μm (v), the error correction coefficient in Formula (15) can be converted to
f 1 = 0.003 f 2 = 0.047 f 3 = 0.050
Then the accurate expression of y(θ) can be obtained, with the unit of millimeters, as follows:
y θ = 0.003 θ 2 0.047 θ + 0.050
Finally, before the system processes the light stripe image of the standard cylinder and reconstructs its 3D coordinates, input the mechanical error correction coefficient values (i.e., the values of f1, f2, and f3) into this system module.
Then it is possible to correct the position errors of the XW, YW, and ZW coordinates caused by the rotation angle error of the pan-tilt. Thus, the corrected coordinates (XW″,YW″,ZW″) of the standard cylinder at any rotational angle position of the pan-tilt can be obtained.
A point cloud data map which was reconstructed by the scanner’s post-processing system is shown in Figure 10. The experimental results are shown in Table 2, Table 3 and Table 4. The measured radius values of the standard cylinder are compared with the theoretical radius values, as shown in Table 5.
From Table 2, Table 3 and Table 4, it can be seen that the errors between the corrected coordinates and the theoretical coordinates have decreased. The maximum error reduction rate is 59.1%. This shows that the 3D point cloud data after error correction is closer to the theoretical situation. The mechanical error correction method proposed in this paper can effectively reduce errors in 3D point cloud data.

4.2. Comparative Experiment

To further verify the accuracy and reliability of the measurement results when the system takes real human bodies as the measured objects, this paper also designed a comparative experiment. The comparative experiment adopted the Lectra human body measurement system from France as the reference system. The Lectra system used line laser transmitters as its light sources, and its measurement results were presented in the form of 3D coordinate data. Moreover, the typical resolution of the system can reach ±0.5 mm in three dimensions, namely the horizontal direction, the vertical direction, and the depth direction.
Due to the high complexity of human body surface morphology, to ensure the comparability of measurement data, the experiment pasted 11 marker points (with a size specification of 5 mm × 5 mm × 5 mm) on the measured human body, which were used as observation points for comparative analysis. The selection of the observation points is based on the skeletal endpoints and protruding points of the human body, which are the inherent points that do not change with time or physiological conditions.
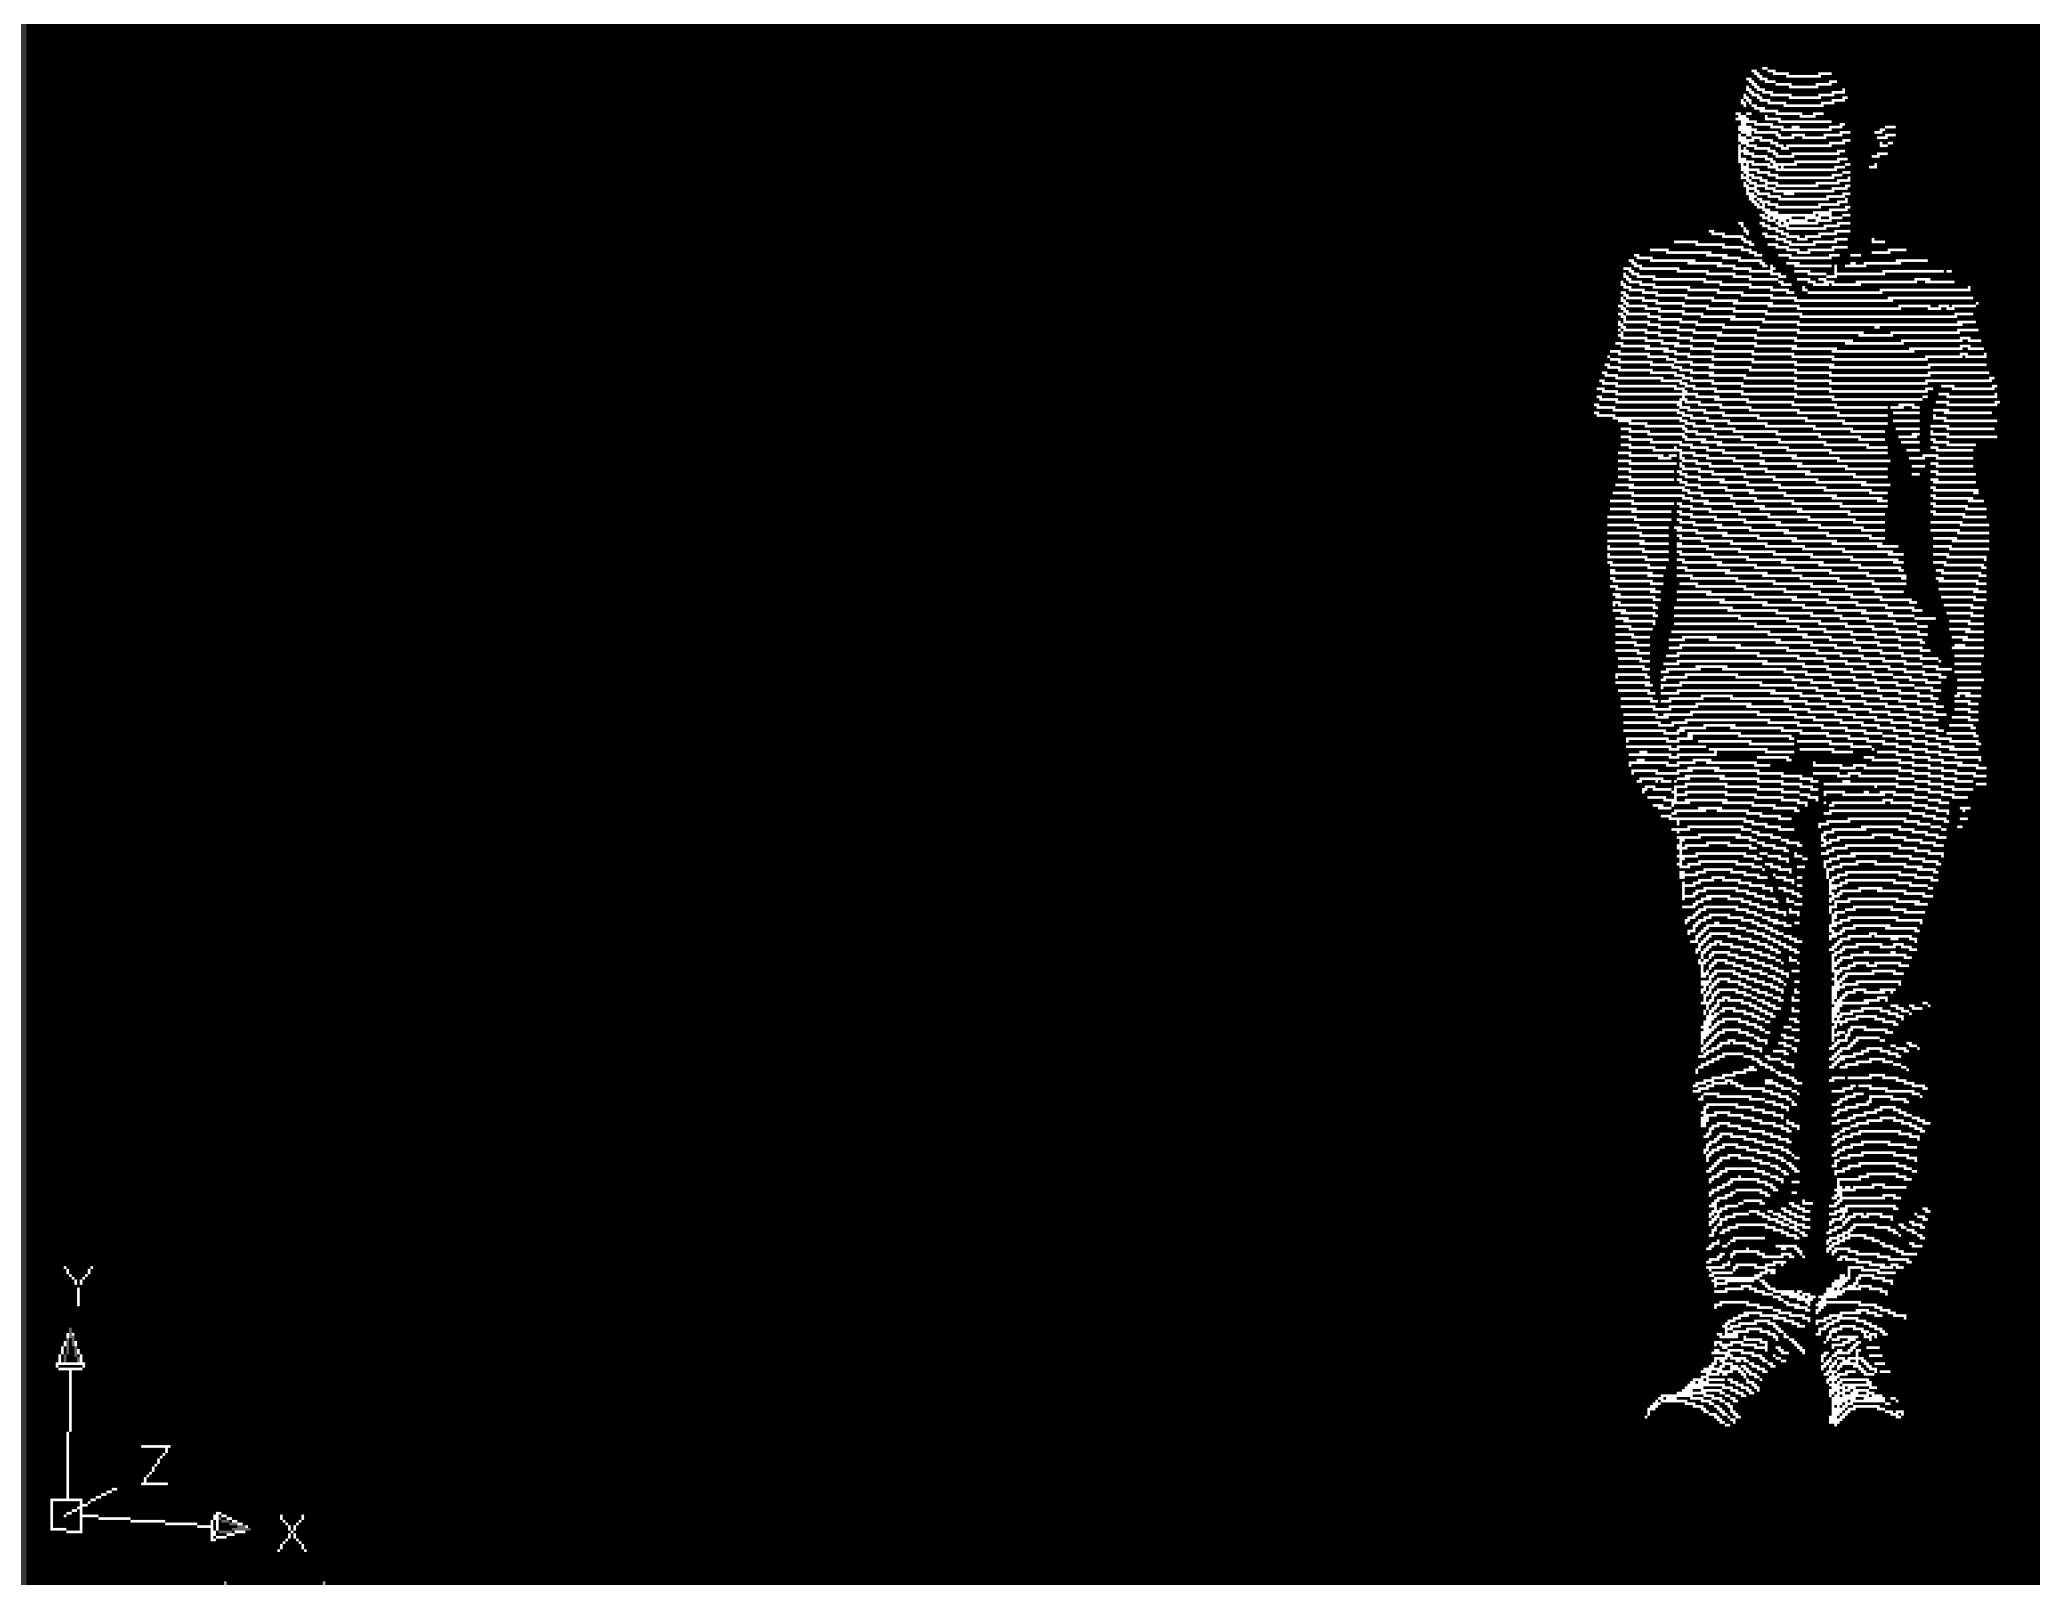
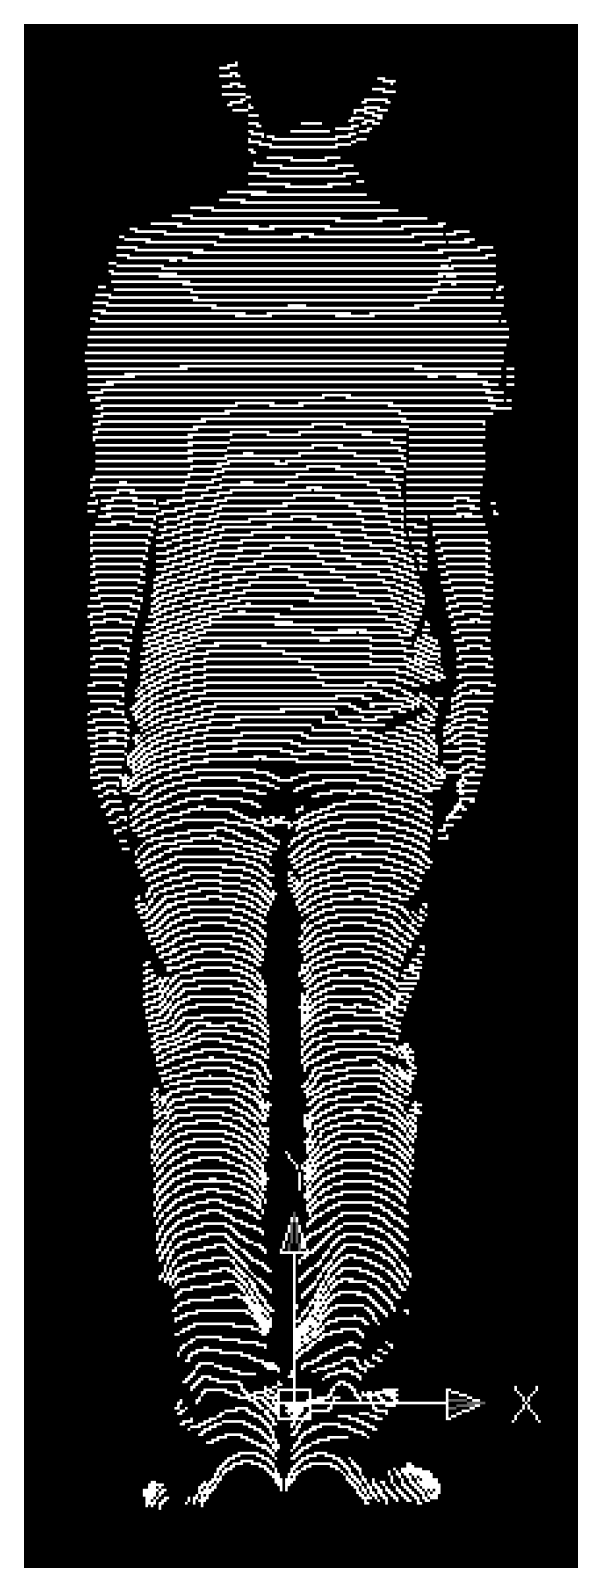
After unifying the coordinate system, a comparison was conducted on the 3D coordinate data of the marker points obtained by the two measurement systems, and the data comparison table was shown in Table 6. Figure 11 and Figure 12 showed the 3D point cloud data maps of the human body acquired by the system.
It can be seen from Table 5 that the absolute error of the XW coordinate value at the mid-knee point (right) is the largest value, reaching 0.26 cm; the absolute error of the YW coordinate value at the acromial point (left) is the largest value, at −0.19 cm; and the absolute error of the ZW coordinate value at the acromial point (left) is the largest value, at −0.18 cm.
To quantitatively analyze the measurement accuracy of the system, based on Table 5, the absolute error is 0.17 cm and the relative error is 0.21%. The absolute error of this system for 3D measurement of large-sized human bodies is less than 2 mm, and the relative error is less than 1%, which can meet the needs of fields such as clothing design and production.

4.3. Experiment on Fan Blade Measurement

The mechanical error correction algorithm and hardware construction of the system have not been specially designed for high-precision measurement. However, to verify the scalability of the system, a scanning measurement experiment was specifically conducted on the free-form surface of an industrial fan blade to measure the spatial distances between several points on it. The 3D point cloud data map of the industrial fan blade surface is shown in Figure 13.
In the experiment, the lengths of the upper and lower bases and the heights of the two sides of the blade were selected as the measured dimensions, denoted as DT, DB, HR, and HL, respectively. Their true values were measured by using a vernier caliper (with an accuracy of 0.02 mm). After the blade was scanned and measured by the system, the measured coordinate values were extracted from the output data file, and the corresponding lengths and heights were calculated accordingly. The error comparison table between the 3D measurement data of the blade and the true values is shown in Table 7.
As can be seen from the experimental results, for an object with a size of 550 mm, the absolute error of 3D measurement by the system is less than 1 mm, and the relative error is less than 1%. This system can not only meet the needs of the garment industry, but also be applied to sculpture, cultural relic protection, and some industrial measurement scenarios with low precision requirements.

5. Conclusions

With the rapid development of laser-based 3D human body measurement technology, the accuracy of 3D scanned point cloud data is particularly crucial in fields such as clothing design, ergonomics, and high-precision local detection, and it remains a key technical issue in current research. In a laser 3D human body scanning and measurement system, errors in the 3D scanned point cloud data may originate from multiple aspects, including image processing and extraction, mechanical scanning, and system parameter calibration. Therefore, it is necessary to first conduct a comprehensive analysis of the sources of system errors and propose correction methods targeting the identified errors.
Consequently, in a fully controllable environment, determining the measurement errors of the entire system through scanning and measuring standard objects, and developing error correction methods, is not only the key to improving the accuracy of 3D human body point cloud data, but also of vital importance to enhancing the overall performance of the 3D human body measurement system.
This paper established a calibration calculation method for system parameters (angle a and angle β). On the basis of a comprehensive analysis of the error sources of this system, the paper clarified that the existence of mechanical errors caused pixel deviations in the extracted target pixels, which ultimately affected the measurement accuracy of the system. Aiming at the problem that mechanical errors have a significant impact on the results of 3D point cloud data, this paper proposed a mechanical error correction model and an interpolation compensation method. Through the design of the error correction experiment, the effectiveness and accuracy of the mechanical error correction method are verified, which made the 3D point cloud data obtained by the system more accurate in terms of precision. To further verify the accuracy and reliability of the measurement result when the system used human bodies as measured objects, a comparative experiment was designed. The results of the comparative experiment demonstrated that the absolute error of the system for 3D measurement of a large-sized human body is less than 2 mm, and the relative error is less than 1%, which can meet the needs of fields such as clothing design and production.

Author Contributions

Y.W. conducted the software; F.M., Y.X., M.Y., and K.L. were in charge of the investigation; Y.W. and J.R. performed the experimental work and data analysis; Y.W. wrote the original draft; Y.W. reviewed and edited the manuscript; J.R. provided supervision. All authors have read and agreed to the published version of the manuscript.

Funding

This research was funded by the Youth Innovation Team Scientific Research Program of the Shaanxi Provincial Department of Education (Program NO. 24JP065); in part by the Key Research and Development Project of Shaanxi Provincial Department of Science and Technology (Program NO. 2024GX-YBXM-558); in part by the Planning Fund Project of Humanities and Social Sciences Research, Ministry of Education of the People’s Republic of China (Program NO. 21YJA760079); in part by the Natural Science Basic Research Program of Shaanxi Province (Program NO. 2024JC-YBMS-789).

Data Availability Statement

The original contributions presented in this study are included in this article. Further inquiries can be directed to the corresponding author.

Acknowledgments

The authors have reviewed and edited the output and take full responsibility for the content of this publication.

Conflicts of Interest

The authors declare no conflicts of interest.

References

  1. Doule, O.; Kobrick, R.L.; Crisman, K.; Skuhersky, M.; Lopac, N.; Fornito, M.J.; Covello, C.; Banner, B.C. IVA spacesuit for commercial spaceflight-upper body motion envelope analysis. Acta Astronaut. 2021, 186, 523–532. [Google Scholar] [CrossRef]
  2. Sun, Y.H.; Li, Y.Z.; Yuan, M. Joint modeling and dynamic analysis of the micro-environment and life support performance of extravehicular spacesuits. Adv. Mech. Eng. 2024, 16, 21–37. [Google Scholar] [CrossRef]
  3. He, Q.Q.; Li, L.; Li, D.; Peng, T.; Zhang, X.Y.; Cai, Y.C.; Zhang, X.J.; Tang, R.Z. From digital human modeling to human digital twin: Framework and perspectives in human factors. Chin. J. Mech. Eng. 2024, 37, 9. [Google Scholar] [CrossRef]
  4. Chen, C.; Jia, H.K.; Lu, Y.; Wu, A.A.; Zhang, X.D.; Lin, B.; Jiyan, Z.; Wang, X.Y.; Yu, L.D. Research on the application of a dynamic programming method based on geodesic distance for path planning in robot-assisted laser scanning measurement of free-form surfaces. Measurement 2024, 238, 115317. [Google Scholar] [CrossRef]
  5. Charoenpong, P.; Kongtanee, K.; Chaiprasittigul, P.; Sathapornprasath, K.; Charoenpong, T. Automatic body measurement for straight-tube mountain bike size selection using closest size classification. IEEE Access 2025, 13, 100831–100849. [Google Scholar] [CrossRef]
  6. Kovacs, L.; Eder, M.; Hollweck, R.; Zimmermann, A.; Settles, M.; Schneider, A.; Endlich, M.; Mueller, A.; Schwenzer-Zimmerer, K.; Papadopulos, N.A.; et al. Comparison between breast volume measurement using 3D surface imaging and classical techniques. Breast 2007, 16, 137–145. [Google Scholar] [CrossRef]
  7. Xie, Y.F.; He, Z.L.; Liu, C.; Liu, T.R.; Lin, Y.C.; Zhang, P.S.; Ming, W.K. Preferences for the ocular region aesthetics and elective double eyelid surgery in Chinese: A nationwide discrete choice experiment. J. Plast. Reconstr. Aesthetic Surg. 2024, 102, 28–38. [Google Scholar] [CrossRef]
  8. Wang, P.; Sun, G.F.; Hua, S.C.; Yu, W.; Meng, C.Z.; Han, Q.; Kim, J.; Guo, S.J.; Shen, G.Z.; Li, Y. Multifunctional all-nanofiber cloth integrating personal health monitoring and thermal regulation capabilities. InfoMat 2025, 7, e12629. [Google Scholar] [CrossRef]
  9. Lee, J.Y.; Kwon, K.; Kim, C.; Youm, S. Development of a non-contact sensor system for converting 2D images into 3D body data: A deep learning approach to monitor obesity and body shape in individuals in their 20s and 30s. Sensors 2024, 24, 270. [Google Scholar] [CrossRef] [PubMed]
  10. Hu, C.M.; Huang, X.P.; Xia, G.F.; Liu, X.; Ma, X.J. A high-precision automatic extraction method for shedding diseases of painted cultural relics based on three-dimensional fine color model. Herit. Sci. 2024, 12, 149–155. [Google Scholar] [CrossRef]
  11. Li, P.; Liu, Y.Q.; Zhou, K. Key technologies for the digitization of cultural relics and their application in digital museums. Humanit. Soc. Sci. Res. 2025, 7, 192–199. [Google Scholar] [CrossRef]
  12. Li, X.H.; Li, G.Q.; Li, T.C.; Lv, J.P.; Mitrouchev, P. Design of a multi-sensor information acquisition system for mannequin reconstruction and human body size measurement under clothes. Text. Res. J. 2022, 92, 3750–3765. [Google Scholar] [CrossRef]
  13. Ye, Q.W.; Huang, R.; Wang, Z.H.; Lyu, Y.R.; Liu, H.H.; Sun, Y.X. Measurements-to-body: 3D human body reshaping based on anthropocentric measurements. J. Text. Inst. 2024, 16, 455–468. [Google Scholar] [CrossRef]
  14. Li, X.H.; Li, G.Q.; Li, M.; Cheng, X.G.; Chen, F. Design of underclothing 3D human body measurement and reconstruction system for clothed individuals. Text. Res. J. 2025. [Google Scholar] [CrossRef]
  15. Ding, X.J. 3D garment human body feature point recognition and size measurement based on SURF algorithm. Inf. Resour. Manag. J. 2025, 38, 1–11. [Google Scholar] [CrossRef]
  16. Krzeszowski, T.; Dziadek, B.; França, C.; Przednowek, K.; Gouveia, E.R.; Przednowek, K. System for estimation of human anthropocentric parameters based on data from Kinect v2 depth camera. Sensors 2023, 23, 3459. [Google Scholar] [CrossRef]
  17. Yong, S.H.; Ahmad, H.; Yang, S.Y.; Michael, B.H.; David, P. Non-contact human body voltage measurement using Microsoft Kinect and field mill for ESD applications. IEEE Trans. Electromagn. Compat. 2019, 61, 842–851. [Google Scholar] [CrossRef]
  18. Zhang, Y.C. Non-contact human body dimension estimation methods based on deep learning: A critical analysis. Theor. Nat. Sci. 2024, 52, 214–221. [Google Scholar] [CrossRef]
  19. Yan, Z.; Zhou, W.Q.; Chen, G.D.; Xie, Z.X.; Zhao, Z.Y.; Zhang, C.T. Measurement of human body parameters for human postural assessment via single camera. J. Biophotonics 2023, 16, e202300041. [Google Scholar] [CrossRef]
  20. Ting, L.; Peng, X.Y.; Tian, X.H. Method of automatic measurement of human size based on depth camera. J. Chin. Comput. Syst. 2019, 4, 2202–2208. Available online: http://xwxt.sict.ac.cn/EN/abstract/abstract5150.shtml (accessed on 28 December 2025).
  21. Wu, R.; Ma, L.; Chen, Z.; Shi, Y.; Shi, Y.; Liu, S.; Chen, X.; Patil, A.; Lin, Z.; Zhang, Y.; et al. Stretchable spring-sheathed yarn sensor for 3D dynamic body reconstruction assisted by transfer learning. InfoMat 2024, 6, e12527. [Google Scholar] [CrossRef]
  22. Pasinetti, S.; Nuzzi, C.; Luchetti, A.; Zanetti, M.; Lancini, M.; Cecco, D.M. Experimental procedure for the metrological characterization of time-of-flight cameras for human body 3D measurements. Sensors 2023, 23, 538. [Google Scholar] [CrossRef]
  23. Cherdchusakulchai, R.; Thoumrungroje, S.; Tungpanjasil, T.; Pimpin, A.; Srituravanich, W.; Damrongplasit, N. Contact less body measurement system using single fixed-point RGBD camera based on pose graph reconstruction. IEEE Access 2024, 12, 84363–84373. [Google Scholar] [CrossRef]
  24. Jafari, R.; Akram, S.; Naderi, H.; Hashenmi-Nejad, N.; Choobineh, A.; Baneshi, M.R.; Feyzi, V. Technical report on the modification of 3-dimensional non-contact human body laser scanner for the measurement of anthropometric dimensions: Verification of its accuracy and precision. J. Lasers Med. Sci. 2017, 8, 22–28. [Google Scholar] [CrossRef]
  25. Tan, Z.; Lin, S.; Wang, Z. Cluster size intelligence prediction system for young women’s clothing using 3D body scan data. Mathematics 2024, 12, 497. [Google Scholar] [CrossRef]
  26. Oberhofer, K.; Knopfli, C.; Achermann, B.; Lorenzetti, S.R. Feasibility of using laser imaging detection and ranging technology for contactless 3D body scanning and anthropometric assessment of athletes. Sports 2024, 12, 92. [Google Scholar] [CrossRef] [PubMed]
  27. Yang, X.; Chen, X.B.; Zhao, G.K.; Xi, J.T. Laser speckle projection based handheld anthropometric measurement system with synchronous redundancy reduction. Appl. Opt. 2020, 59, 955–963. [Google Scholar] [CrossRef] [PubMed]
  28. Yang, X.; Xi, J.T.; Liu, J.Y.; Chen, X.B. Infrared laser speckle projection based multi sensor collaborative human body automatic scanning system. Machine 2021, 9, 299. [Google Scholar] [CrossRef]
  29. Cutti, A.G.; Santi, M.G.; Hansen, A.H.; Fatone, S. Accuracy, repeatability, and reproducibility of a hand-held structured-light 3D scanner across multi-site settings in lower limb prosthetics. Sensors 2024, 24, 2350. [Google Scholar] [CrossRef]
  30. Zhu, Z.; Li, D.H.; Guan, J.H.; Li, X.F. A 3D scanner of the whole body based on structured light. J. Hua Zhong Univ. Sci. Technol. (Nat. Sci. Ed.) 2004, 10, 7–9. [Google Scholar]
  31. Kim, M.; Nam, Y.; Cho, D.; Kang, T. Development of Three-dimensional Body Scan Method in Measuring Body Surface. Text. Res. J. 2006, 76, 9–25. [Google Scholar] [CrossRef]
  32. Tan, X.H.; Peng, X.Y.; Liu, L.W.; Xia, Q. Automatic human body feature extraction and personal size measurement. J. Vis. Lang. Comput. 2018, 47, 9–18. [Google Scholar] [CrossRef]
  33. John, W.; Sons, L. An innovative method for human height estimation combining video images and 3D laser scanning. J. Forensic Sci. 2024, 69, 301–315. [Google Scholar] [CrossRef]
  34. Petra, U.; Petr, H.B.; Mikoláš, J.A. Testing photogrammetry-based techniques for three-dimensional surface documentation in forensic pathology. Forensic Sci. Int. 2015, 250, 77–84. [Google Scholar] [CrossRef]
  35. Kim, H.T.; Kyung, C.J.; Seung, T.K.; Jongseok, K.; Seung, B.C. 3D body scanning measurement system associated with RF imaging, Zero-padding and Parallel Processing. Meas. Sci. Rev. 2016, 16, 77–86. [Google Scholar] [CrossRef]
  36. Zhou, Y.; Wu, Z.; Cai, N. A high-precision multi-beam optical measurement method for cylindrical surface profile. Micromachines 2023, 14, 1555. [Google Scholar] [CrossRef]
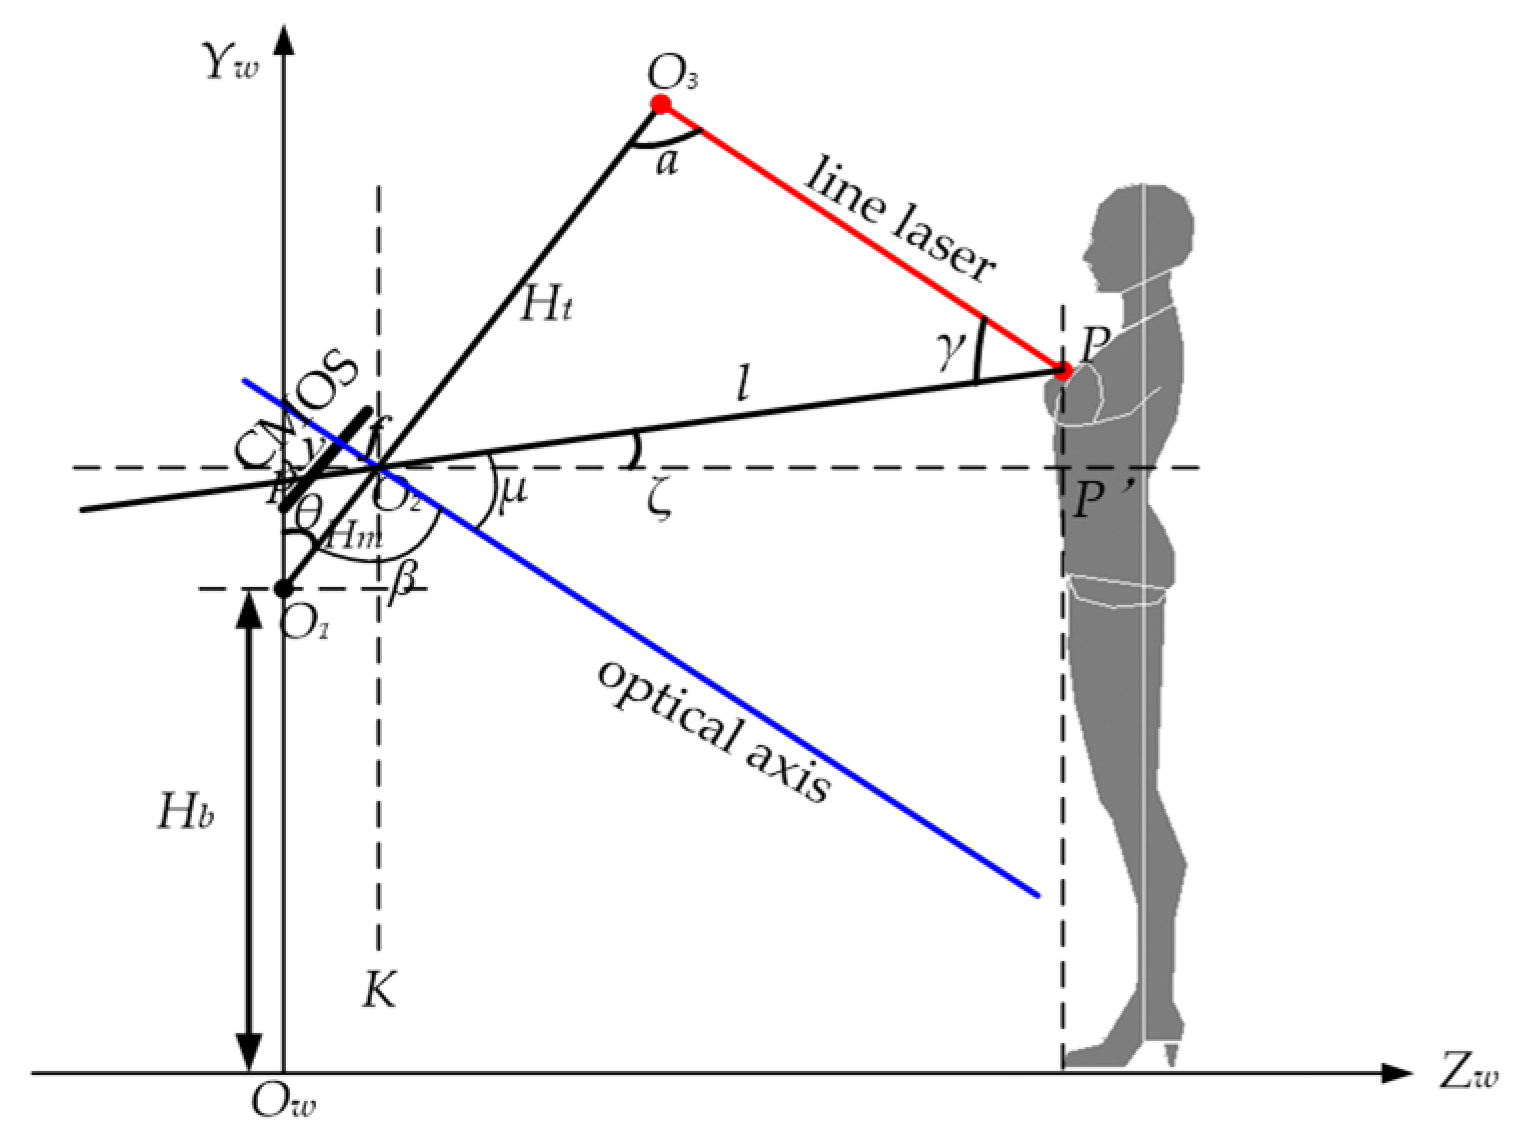
Figure 1. Triangular geometric constraint relationships projected onto the YWZW plane of the world coordinate system.
Processes 14 00158 g001
Figure 2. Triangular geometric constraint relationships projected onto the XWZW plane of the world coordinate system.
Processes 14 00158 g002
Figure 3. Scanning motion of active pitch rotation.
Processes 14 00158 g003
Figure 4. Calibration calculation of parameter angles (a and β) in the system.
Processes 14 00158 g004
Figure 5. Schematic diagram of mechanical error.
Processes 14 00158 g005
Figure 6. Setting interface of simulation calculation module.
Processes 14 00158 g006
Figure 7. Display interface for running the simulation calculation module.
Processes 14 00158 g007
Figure 8. Collected calibrated cylinder laser stripe images.
Processes 14 00158 g008
Figure 9. The grayscale distribution of the column 180 in a standard cylinder image.
Processes 14 00158 g009
Figure 10. Calibration of cylindrical 3D point cloud data graph.
Processes 14 00158 g010
Figure 11. Three-dimensional point cloud data map of the human body’s frontal region.
Processes 14 00158 g011
Figure 12. Three-dimensional point cloud data map of the human body’s posterior region.
Processes 14 00158 g012
Figure 13. Three-dimensional point cloud map of fan blade scanning measurement experiment.
Processes 14 00158 g013
Table 1. Pixel deviation data table for calibrating cylinder calibration points.
YW Actual Measured Value
(cm)
YW Theoretical Calculated Value (cm)Spatial Position Error ΔYW (mm)Target Pixel Deviation Δv
(Pixel)
−7.875135.1132135.2676−1.544
0104.6401104.6450−0.049
19.12580.776180.8743−0.982
Notes: ΔYW = YWYW′.
Table 2. Comparison table of YW data before and after correction.
Rotation Angle (Degrees)Measured Value Before Calibration
YW (cm)
Error Value
(mm)
Measured Value After Calibration
YW″ (cm)
Error Value
(mm)
Error Reduction
(mm)
Error Reduction Rate (%)
−7.875135.1132−1.544135.1916−0.6480.89658.03%
0104.6401−0.049104.6419−0.0310.01836.73%
19.12580.7761−0.98280.8342−0.4010.58159.16%
Table 3. Comparison table of ZW data before and after correction.
Rotation Angle (Degrees)Measured Value Before Calibration
ZW (cm)
Error Value
(mm)
Measured Value After Calibration
ZW″ (cm)
Error Value
(mm)
Error Reduction
(mm)
Error Reduction Rate (%)
−7.875150.25472.547150.10471.0471.50058.89%
0150.00480.048150.00310.0310.01735.41%
19.125150.16781.678150.09900.9900.68841.00%
Table 4. Comparison table of XW data before and after correction.
Rotation Angle (Degrees)Measured Value Before Calibration
XW (cm)
Error Value
(mm)
Measured Value After Calibration
XW″ (cm)
Error Value
(mm)
Error Reduction
(mm)
Error Reduction Rate (%)
−7.8758.26172.6178.10901.0901.52758.34%
08.00190.0198.00130.0130.00631.57%
19.1258.14731.4738.09470.9470.52635.70%
Table 5. Comparison table of theoretical and measured data for radius of calibration cylinder.
Rotation Angle (Degrees)Measured Value After Calibration
XW″ (cm)
Theoretical Value
XW′ (cm)
Spatial Position Error
ΔX (mm)
−1.01068.01248.00000.124
−0.70428.00938.00000.093
−0.39788.00618.00000.061
08.00198.00000.019
0.39788.00428.00000.042
0.70428.00558.00000.055
Notes: ΔX = XW″ − XW′.
Table 6. Three-dimensional spatial coordinate data of marker points of human body.
NO.Marker PointsLaser Human Body Scanning System
(cm)
Lectra Human Body Measurement System
(cm)
Comparison Error
(cm)
X1Y1Z1X2Y2Z2ΔXΔYΔZ
1Cervical vertebra point1.25148.88102.641.30148.73102.51−0.050.150.13
2Lateral cervical point (left)7.11147.57104.227.34147.41104.19−0.230.160.03
3Lateral cervical point (right)−8.63146.01104.15−8.80145.88104.110.170.130.04
4Acromial point (left)18.84142.02106.7819.01142.21106.60−0.17−0.190.18
5Acromial point (right)−19.84142.05106.52−20.07142.16106.450.23−0.110.07
6Lumbar point (left)15.29110.1093.4415.14110.2793.320.15−0.170.12
7Lumbar point (right)−14.95110.5893.21−14.90110.7693.29−0.05−0.18−0.08
8Posterior protrusion point of the hip (left)10.7590.80132.3410.9690.67132.23−0.210.130.11
9Posterior protrusion point of the hip (right)−11.0890.44133.17−11.1890.58133.20−0.10−0.14−0.03
10Mid-knee point (left)12.3040.95105.1512.4340.92105.20−0.130.03−0.05
11Mid-knee point (right)−10.9140.61105.37−11.1740.45105.220.260.160.15
Notes: ΔX = X1X2, ΔY = Y1Y2, ΔZ = Z1Z2.
Table 7. The error comparison table between the 3D measurement data of the blade and the true values.
The Measured DimensionTrue Value
(mm)
3D Measured Value
(mm)
The Absolute Error
(mm)
The Relative Error
DT98.1098.97−0.870.71%
DB131.21131.59−0.380.56%
HR500.85500.250.600.57%
HL531.93531.150.780.70%
Disclaimer/Publisher’s Note: The statements, opinions and data contained in all publications are solely those of the individual author(s) and contributor(s) and not of MDPI and/or the editor(s). MDPI and/or the editor(s) disclaim responsibility for any injury to people or property resulting from any ideas, methods, instructions or products referred to in the content.