Article

Enhancing the Surface Quality of FDM Processed Flapping Wing Micro Mechanism Assembly through RSM–TOPSIS Hybrid Approach

by
Devaraj Rajamani
1,
Esakki Balasubramanian
1,* and
Lung-Jieh Yang
2
1
Centre for Autonomous System Research, Department of Mechanical Engineering, Vel Tech Rangarajan Dr. Sagunthala R&D Institute of Science and Technology, Chennai 600062, India
2
Department of Mechanical and Electro-Mechanical Engineering, Tamkang University, New Taipei City 251301, Taiwan
*
Author to whom correspondence should be addressed.
Processes 2022, 10(11), 2457; https://doi.org/10.3390/pr10112457
Submission received: 28 October 2022 / Revised: 16 November 2022 / Accepted: 17 November 2022 / Published: 19 November 2022

Abstract

:
Improving surface quality attributes is a critical task in the production of micro-sized near-net-shaped components for end-use applications using additive manufacturing techniques. In the present study, we investigated the effect of fused deposition modeling (FDM) process parameters such as layer thickness, part orientation, raster width and raster angle on the surface quality characteristics of as-fabricated test specimens in order to develop the assembly of a flapping wing micro mechanism. Through a Box–Behnken design, a suitable experimental strategy was developed, and test specimens were manufactured. The performance of the experiments was statistically assessed using multi-response analysis of variance (ANOVA). The microstructures of the test specimens produced with various processing parameters were examined using a scanning electron microscope to identify micro surface flaws under various processing conditions. Furthermore, the optimal FDM parameters for improved surface quality attributes such as Ra, Rz and Rq were obtained using a statistical optimization technique known as Technique for Order of Preference by Similarity to Ideal Solution (TOPSIS).

1. Introduction

The fabrication of micro mechanical components imposes significant challenges in terms of dimensional accuracy, surface finish, mechanical strength characteristics and weight burden in the development of micro aerial vehicles [1,2,3]. Computer-aided design (CAD) and analysis play a significant role in the design and assembly of micro mechanical components. To prototype the parts for easy and quick realization, 3D printing is an efficient choice. Conventional methods of fabricating micro mechanism parts such as injection molding, wire cut EDM, casting and forging are time-consuming and labor-intensive, and the cost involvement is high. The modification and fabrication of various parts’ features are cumbersome and expensive with conventional subtractive manufacturing processes. Manufacturing parts from CAD data is not possible with these processes [4].
Additive manufacturing (AM) is a cost-effective process and realizes the parts’ fabrication in a swift manner. It avoids the need for jigs, fixtures, preparation of molds and other pre-processing steps in the manufacturing of micro components. The intricate features of micro mechanism parts are difficult to manufacture using conventional processes. However, AM techniques can be utilized to fabricate micro-level, complex and intricate parts with suitable dimensional accuracy. It has minimum wastage of materials in comparison to conventional manufacturing processes. The human intervention to fabricate micro parts with minimal efforts is an advantage of using AM in various applications. The polymer-based fabrication of micro components using fused deposition modeling is predominantly used in various applications such as the automotive, aerospace, medical and toy industries [5]. A variety of polymers such as polystyrene (PS), poly ether ether ketone (PEEK), polypropylene (PP), polylactic acid (PLA), polycarbonate (PC) and other polymer materials are used for various AM technologies. However, the usage of acryl butadiene styrene (ABS) material in FDM has achieved superior mechanical strength characteristics and dimensional accuracy. Many pioneering research works on FDM to assess the mechanical behavior, surface roughness and dimensional accuracy of the fabricated parts have been performed. Altan et al. [6] studied the influence of various FDM process parameters on the surface roughness and tensile strength characteristics of PLA-based parts. Camphell et al. [7] explored the surface roughness characteristics of parts made with ABS materials using FDM. There are many factors such as layer thickness, bed temperature, printing speed, slicing of layer, build orientation, raster angle, width, extrusion temperature, infill rate and other FDM process parameters affecting the part quality. Yang et al. [8] performed optimization studies on selecting the optimal process parameters of the FDM process to achieve high tensile strength and low surface finish of PLA parts. Magdum et al. [9] investigated the effect of infill density, layer thickness and shell thickness of the FDM process and examined the influence of these parameters on the mechanical properties of parts fabricated using PLA material. Vikas et al. [10] explored the influence of various process parameters such as layer thickness, printing temperature and speed on the mechanical characteristics of PLA parts made using FDM. Camargo et al. [11] studied the combination of using PLA–graphene material for evaluating the tensile strength of parts made using FDM. The infill rate and layer thickness are the major factors that affect the part quality. Vigneshwaran et al. [12] conducted various experimental investigations on the evaluation of the mechanical characteristics of the composite structures of biodegradable wood and PLA made with the FDM technique. Recently, several researchers have employed 3D printing to fabricate micro mechanical parts for achieving a high strength-to-weight ratio and improved dimensional stability. Carlo Ferro et al. [13] elaborated the significance of additive manufacturing the components of an unmanned aerial vehicle (UAV) using fused deposition modeling (FDM). Kramer explored the fabrication of flapping wing veins using 3D printing with a polylactic acid (PLA) material. Hsu et al. [14] realized micro gears and tiny linkages using Multijet 3D printing. Richter and Lipson [15] utilized polyjet 3D printing technology for fabricating the wings of micro insects. The author’s earlier works on 3D printing of various micro mechanical components of flapping wing micro aerial vehicle and unmanned aerial vehicle structures have provided further insight on realizing the linkage mechanism parts quickly. It was observed that the surface finish of 3D-printed micro mechanism parts is significantly affected by the part assembly process. The functionality of a prototype depends on the appearance of tiny parts that are essential to showcase as a product.
The extensive literature review revealed that within a decade, AM technologies became widely used for the creation of complex 3D components. Through the application of several crucial adjustments and upgrades to obtain the ideal circumstances for microfabrication, some specialized AM technologies are also capable of producing 3D micro parts and structures. Among the scalable AM technologies, FDM is found to be a suitable technique for fabricating complex geometries due to their simple working mechanism, minimized materials and low processing costs. Few reports exist on the use of FDM for the production of truly sophisticated 3D micro parts [16,17,18,19]. Most micro parts created using FDM are used in biomedical applications, and a few researchers have created micro parts for mechanical applications, particularly for flapping wing vehicles. Furthermore, the optimization of FDM parameters for enhancing the quality and performance characteristics of micro components is limited; thus, the exploration of this aspects is needed.
Therefore, the present work focuses on exploring the surface roughness characteristics of FDM-printed micro mechanical parts. The test samples were fabricated as per the Box–Behnken design of response surface methodology. The statistical analyses of performed experiments were assessed through analysis of variance, and the impacts of selected process parameters such as layer thickness, part orientation, raster width and raster angle on surface quality characteristics such as Ra, Rz and Rq were investigated through the aid of three-dimensional response surface plots. The optimal FDM parameters for improving surface quality were attained through TOPSIS optimization. Moreover, the microstructures of as-fabricated test specimens under different processing conditions were investigated through scanning electron microscopy.

2. Methodology

2.1. Response Surface Methodology

Response surface methodology (RSM) is an empirical statistical modeling technique used for optimizing complex processes [20]. It provides an easy and efficient technique to find the best range of design space for performance. RSM aims at approximating it by a suitable lower-order polynomial, especially a second-order polynomial equation. The quadratic response surface is used to correlate the relationship between independent variables (Xi) and response (Y) as follows:
Y = b 0 + i = 1 n b i X i + i = 1 n b i i X i 2 + i < j n b i j X i X j
where n is the number of design variables, and b 0 , b i , b i i and b i j represent the coefficients of constant, linear, quadratic and cross-product terms, respectively.
To obtain a proper model for the optimization of the FDM process parameters, Box–Behnken design (BBD), which is a type of RSM, was selected in this study, with four process variables at three levels. The BBD is normally used when performing non-sequential experiments, and these designs allow efficient estimation of first- and second-order coefficients with fewer design points to reduce the number of experiments. In the present study, experiments were performed according to the BBD experimental design to obtain a quadratic model consisting of twenty-nine experiments, to identify the optimum conditions and study the effect of process variables on the FDM process. Design Expert™ software version 8.0 was used to obtain the predicted values through a model fitting technique.

2.2. The Technique for Order of Preference by Similarity to Ideal Solution (TOPSIS)

To obtain the best optimal solution among available alternatives, a statistical multi-criteria decision-making approach, TOPSIS, has been widely used for solving complex real-world problems. In TOPSIS, the multi-objective problems are converted into a single objective to achieve an optimal solution. The smallest and longest distances from the optimistic and negative ideal solutions, respectively, are the most important options as determined by TOPSIS. The step-by-step procedure of TOPSIS for solving general engineering problems is given below [21]:
Step 1: The evaluation matrix is constructed for m alternatives and n criteria.
M E = x 11 x 12 x 1 n x 21 x 22 x 2 n x m 1 x m 2 x m n
where x m n denotes the performance of the mth alternative for the nth attribute.
Step 2: A normalized performance matrix for i and j is formulated through the following relation.
β i j = Y i j i = 1 m Y 2 i j
where β i j indicates the normalized value for i = 1, 2, 3, …, m and j = 1, 2, 3, …, n.
Step 3: The weight function for individual response characteristics is calculated using a compromised weighting approach. The present work utilizes the combined entropy and analytical hierarchy process for assigning the weights of individual responses. The weight for the ith criteria is calculated as follows:
w i = ϕ i × φ i i = 1 n ϕ i × φ i i = 1 , , n
φ i = 1 a i i = 1 n 1 a i
where w i indicates the weight of the ith attribute, and φ i and ϕ i denote the weight of the ith criteria obtained through the entropy method and the AHP approach. The weighted and normalized design matrix is formulated through the following relation:
η i j = β i j × w i
Step 4: The beneficial and non-beneficial responses were utilized for calculating the positive (S+) and negative (S) ideal solutions.
σ + = σ 1 + , σ 2 + , σ n + = max σ i j j K , min σ i j j K i = 1 , 2 , , n
σ = σ 1 , σ 2 , σ n = max σ i j j K , min σ i j j K i = 1 , 2 , , n
where K indicates the index set for the beneficial response and K′ indicates the index set for the non-beneficial response.
Step 5: The ideal solutions are utilized for calculating the distance for respective response characteristics as follows:
S i + = j = 1 n σ i j σ j + 2 0.5
S i = j = 1 n σ i j σ j 2 0.5
where j = 1 , 2 , , n ;   i = 1 , 2 , , m .
Step 6: The closeness coefficient (Ci) value for individual ideal experimental solutions is computed using the following relation:
C i = S i S i + S i +
A higher value of C i indicates that the rank is better.

3. FDM Experimentation and Measurements

The experiments were conducted, and test specimens were fabricated using a Fortus 250 mc commercial additive manufacturing machine with maximum part-built size capability of 254 × 254 × 305 mm3, manufactured by Stratasys Inc., Eden Prairie, MN, USA. Acrylonitrile butadiene styrene (ABS) [(C8H8·C4H6·C3H3N)n] polymer filament was used as the part material for the prototype model. The three-dimensional solid part was created by SolidWorks software™ and linked to Stratasys software for pre-processing part-built operations. The FDM cylindrical test specimens of dimensions 15 mm × 15 mm were fabricated by melting and extruding the thermoplastic material through heating of the part material deposition nozzle. The solidifying material distributed from the nozzle was deposited onto the surface of the platform to make the first layer. This procedure was repeated until the 3D physical part model was obtained. Four factors, namely layer thickness (x1), part orientation (x2), raster width (x3) and raster angle (x4), were considered as process input parameters while keeping other parameters such as contour width, air gap and part fill style at fixed levels. The parameters and their levels were selected according to the pilot experiments, existing literature and guidelines given by the manufacturer. The details of the selected FDM parameters and their corresponding levels are shown in Table 1. The surface roughness characteristics such as average roughness (Ra), average maximum height of the profile (Rz) and root mean square roughness (Rq) of the FDM specimens were measured using the non-contact optical universal 3D profilometer (Make: Rtec Instruments, Silicon Valley, CA, USA). The average surface roughness parameters were calculated by taking the observations on the top, side and bottom surfaces of the test specimens. For each specimen, the roughness values were assessed thrice, and their average values were taken into consideration to avoid measurement errors. The FDM system utilized for fabricating the test specimens, the fabricated test specimens and the measurement of roughness parameters are shown in Figure 1. The experimentally measured surface roughness characteristics values are given in Table 2.

4. Result and Discussions

To investigate the efficacy of the experimental strategy, statistical analysis of the performed experiments and the obtained response characteristics is required. The coefficient of determination, sum of squares, lack of fit, individual, interaction, quadratic effects and F-statistics were investigated using multi-parametric analysis of variance (ANOVA) for selected responses, i.e., Ra, Rz and Rq, of the fabricated test specimens in three stages. ANOVA was used in the initial stage to examine the statistical significance and the significance of a few independent variables that influence the performance and quality attributes of surface quality indices. The second stage involved creating second-order polynomial equations for each response to determine the correlations between the chosen dependent variables on the surface quality. In the third phase, the most favorable parametric combinations were determined using the TOPSIS multi-criteria decision-making approach.

4.1. Statistical Analysis of Proposed Regression Models

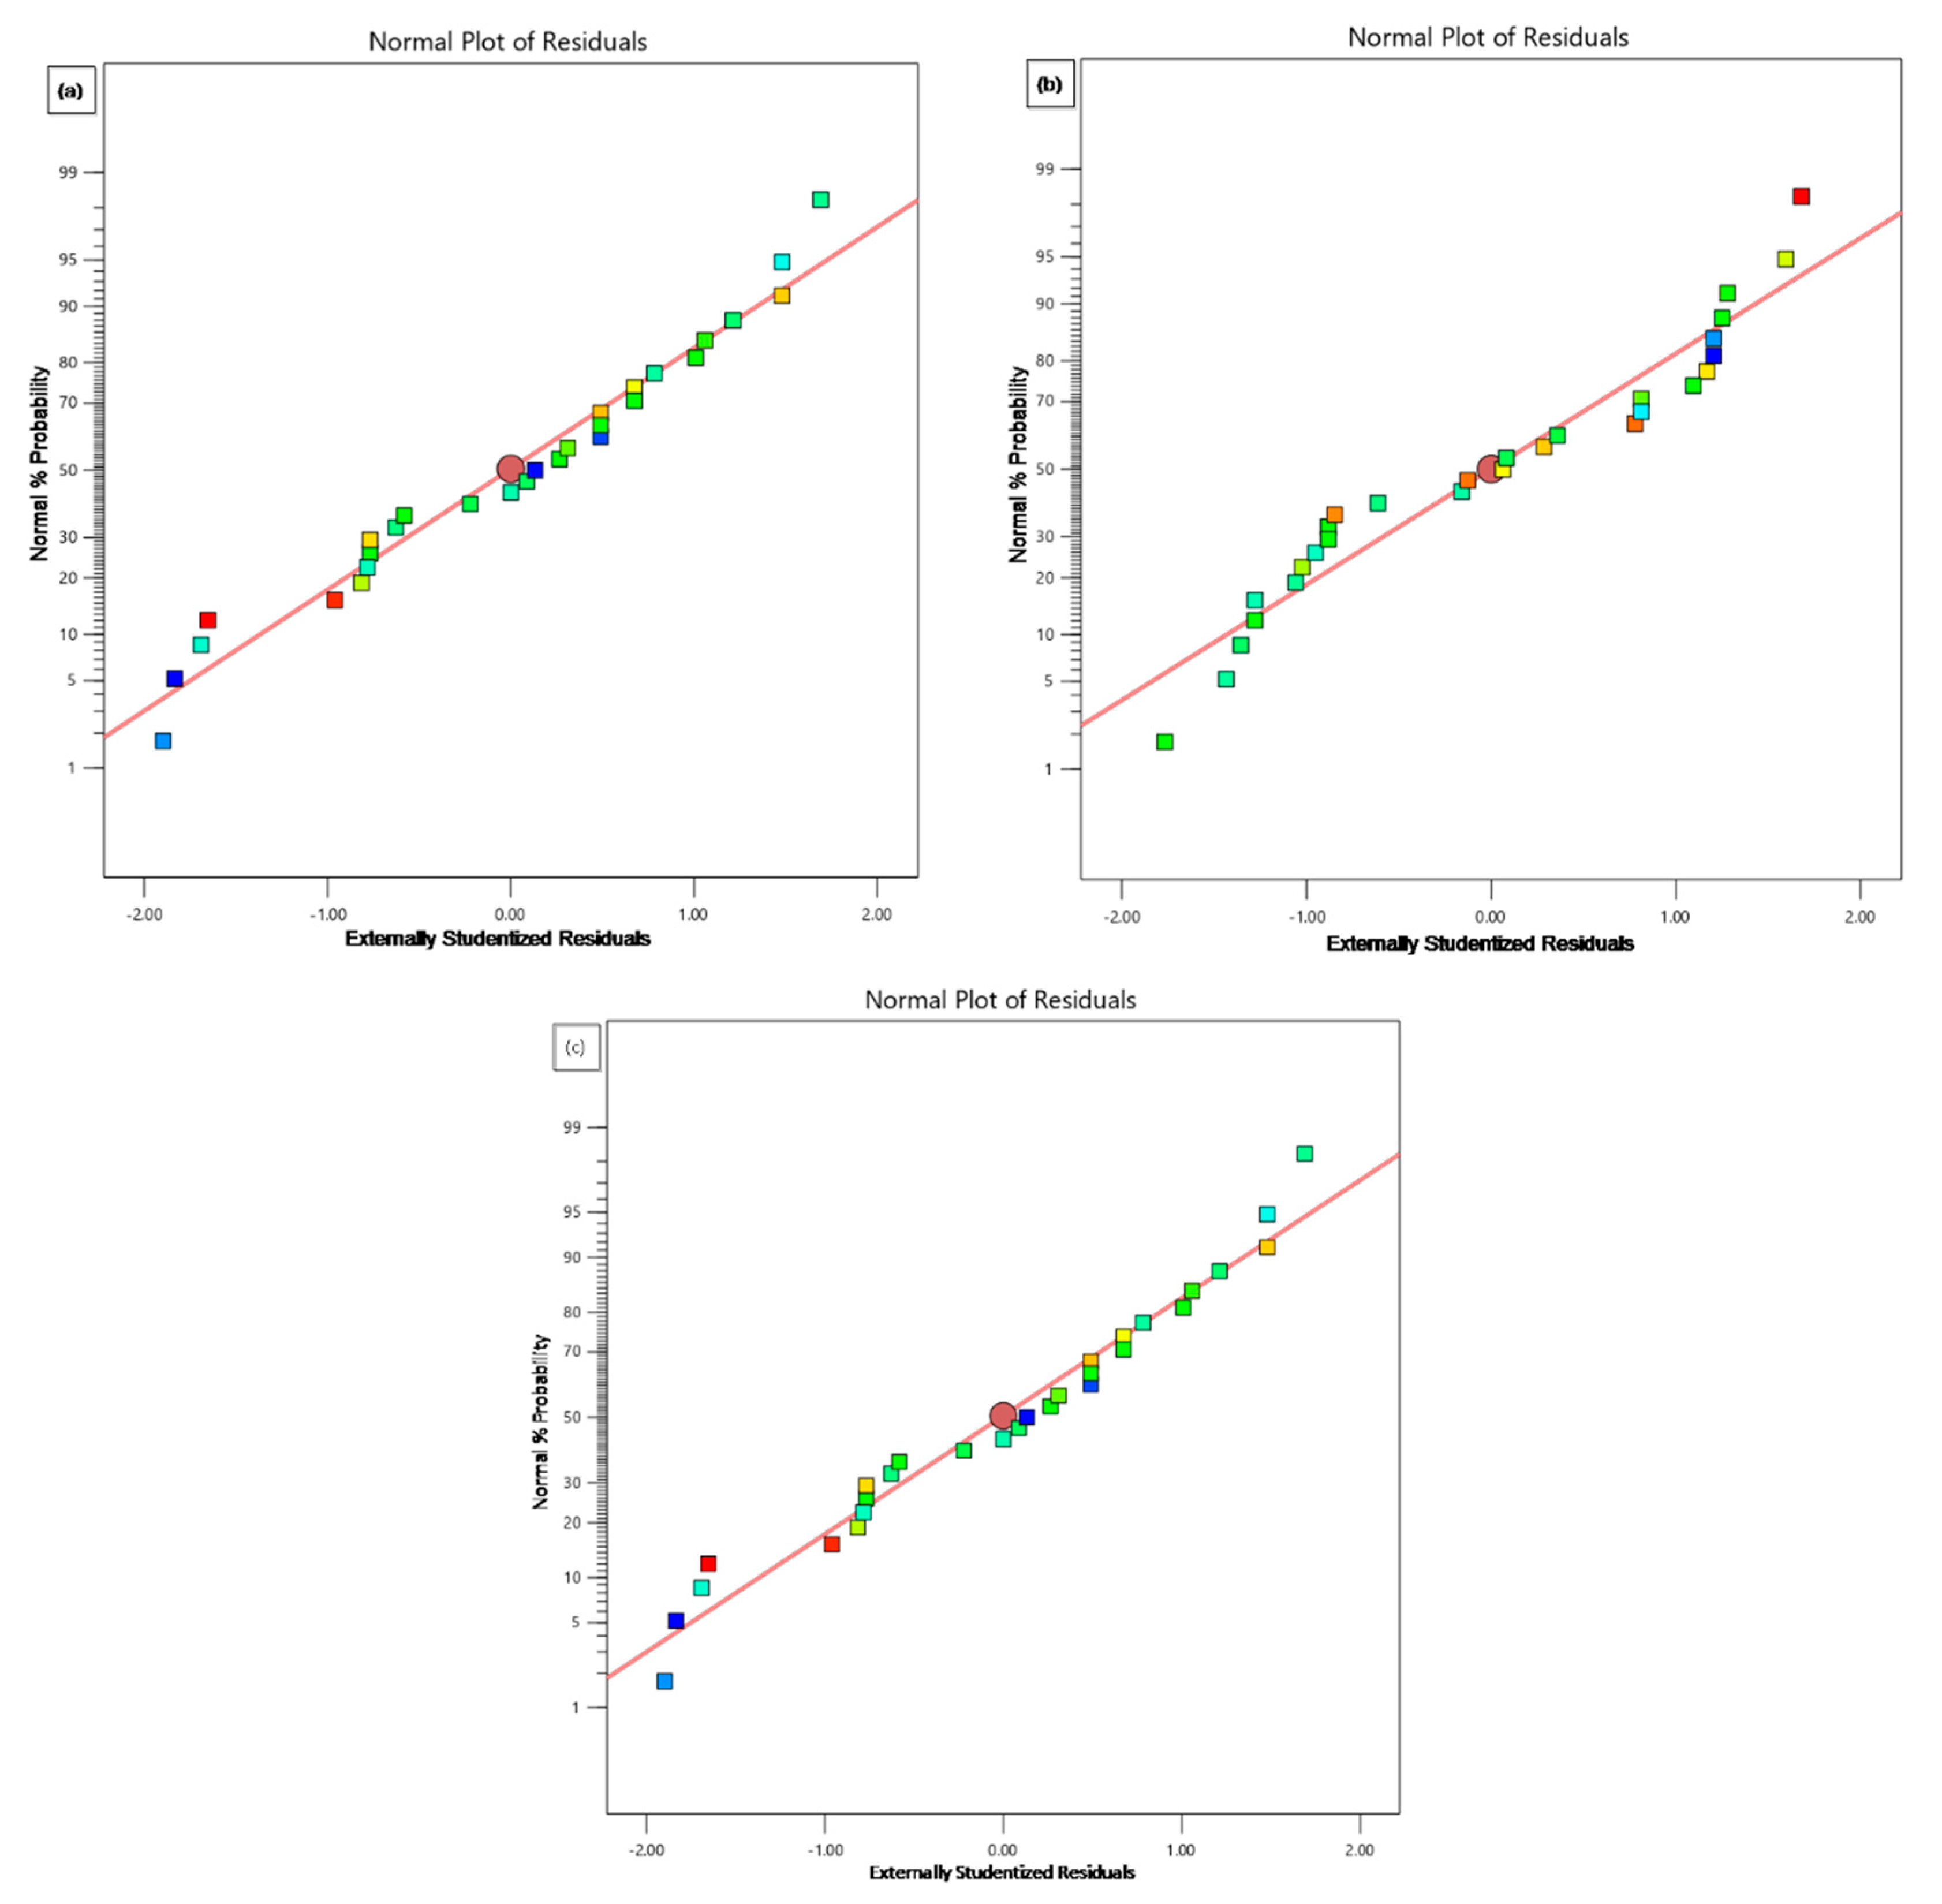
The FDM experiments were performed based on the proposed RSM-based experimental strategy, and the test specimens were fabricated. The efficiency of formulated mathematical models was statistically investigated through ANOVA. The statistical analysis results for the considered response features Ra, Rz and Rq are shown in Table 3, Table 4 and Table 5. The ANOVA was performed at a 95% confidence interval for all the response characteristics, and the insignificant parameters consisting of F-values above 0.05 were eliminated through the backward elimination technique. From the ANOVA, the selected FDM parameters were found to be statistically significant if the individual influence was considered. Furthermore, the layer thickness and raster angle were found to be the most significant parameters on Rz and Rq, whereas Ra was significantly influenced by part orientation. The co-efficient of determination (R2) and the adequate precision at selected design points for Ra, Rz and Rq were 99.57, 97.41 and 99.71 and 57.97, 24.82 and 69.67, respectively, showing the adequacy of the conceived regression models. In addition to ANOVA, the normal probability plots shown in Figure 2a–c indicate the eventual distribution of data points along the center line, proving the statistical significance of the developed models.

4.2. Influence of FDM Parameters on Surface Quality Characteristics

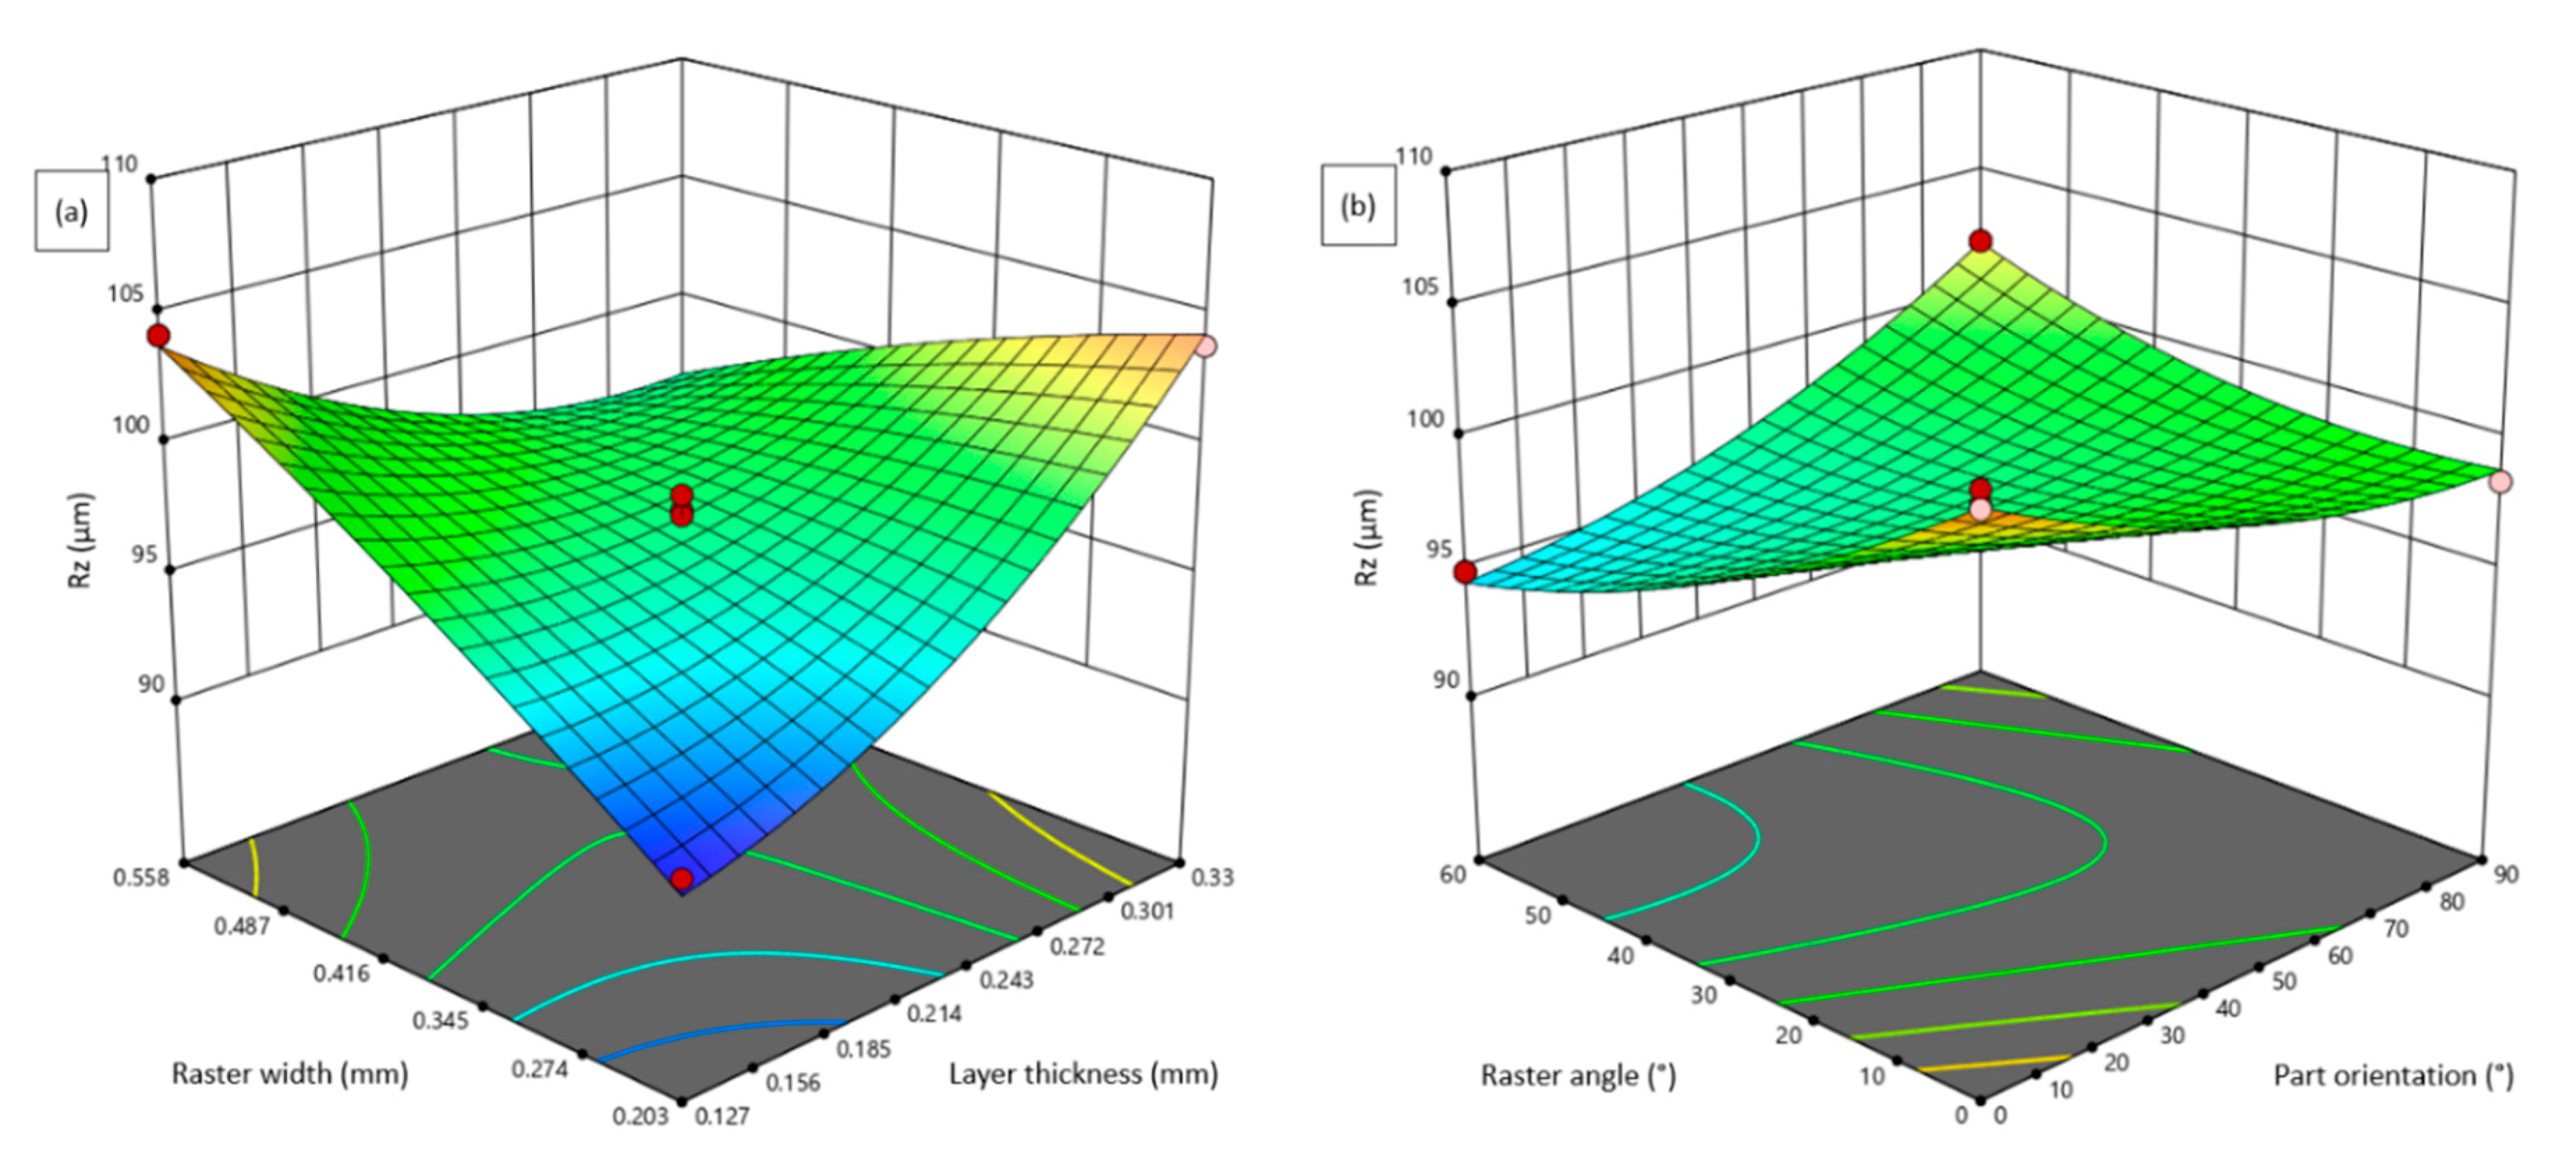
Since surface roughness affects a product’s functionality in each condition, it is crucial for engineering applications and should be minimized, especially for bearings, gears, guideways and applications that are prone to fatigue loading [22]. The statistical investigation results show that the selected FDM parameters significantly influenced the surface roughness characteristics of fabricated test specimens. During the FDM process, the presence of abundant process- and material-related parameters leads to a complex processing mechanism which results in inferior dimensional accuracy and poor surface quality due to the non-uniform heating and cooling cycles and the accumulation of internal stresses [23,24]. Therefore, it is necessary to investigate the influence of process parameters on the quality and performance characteristics and use components fabricated through fused deposition modeling. The interactive consequences of FDM parameters on the selected response features of Ra, Rz and Rq were investigated through three-dimensional response surface plots, as shown in Figure 3, Figure 4 and Figure 5.
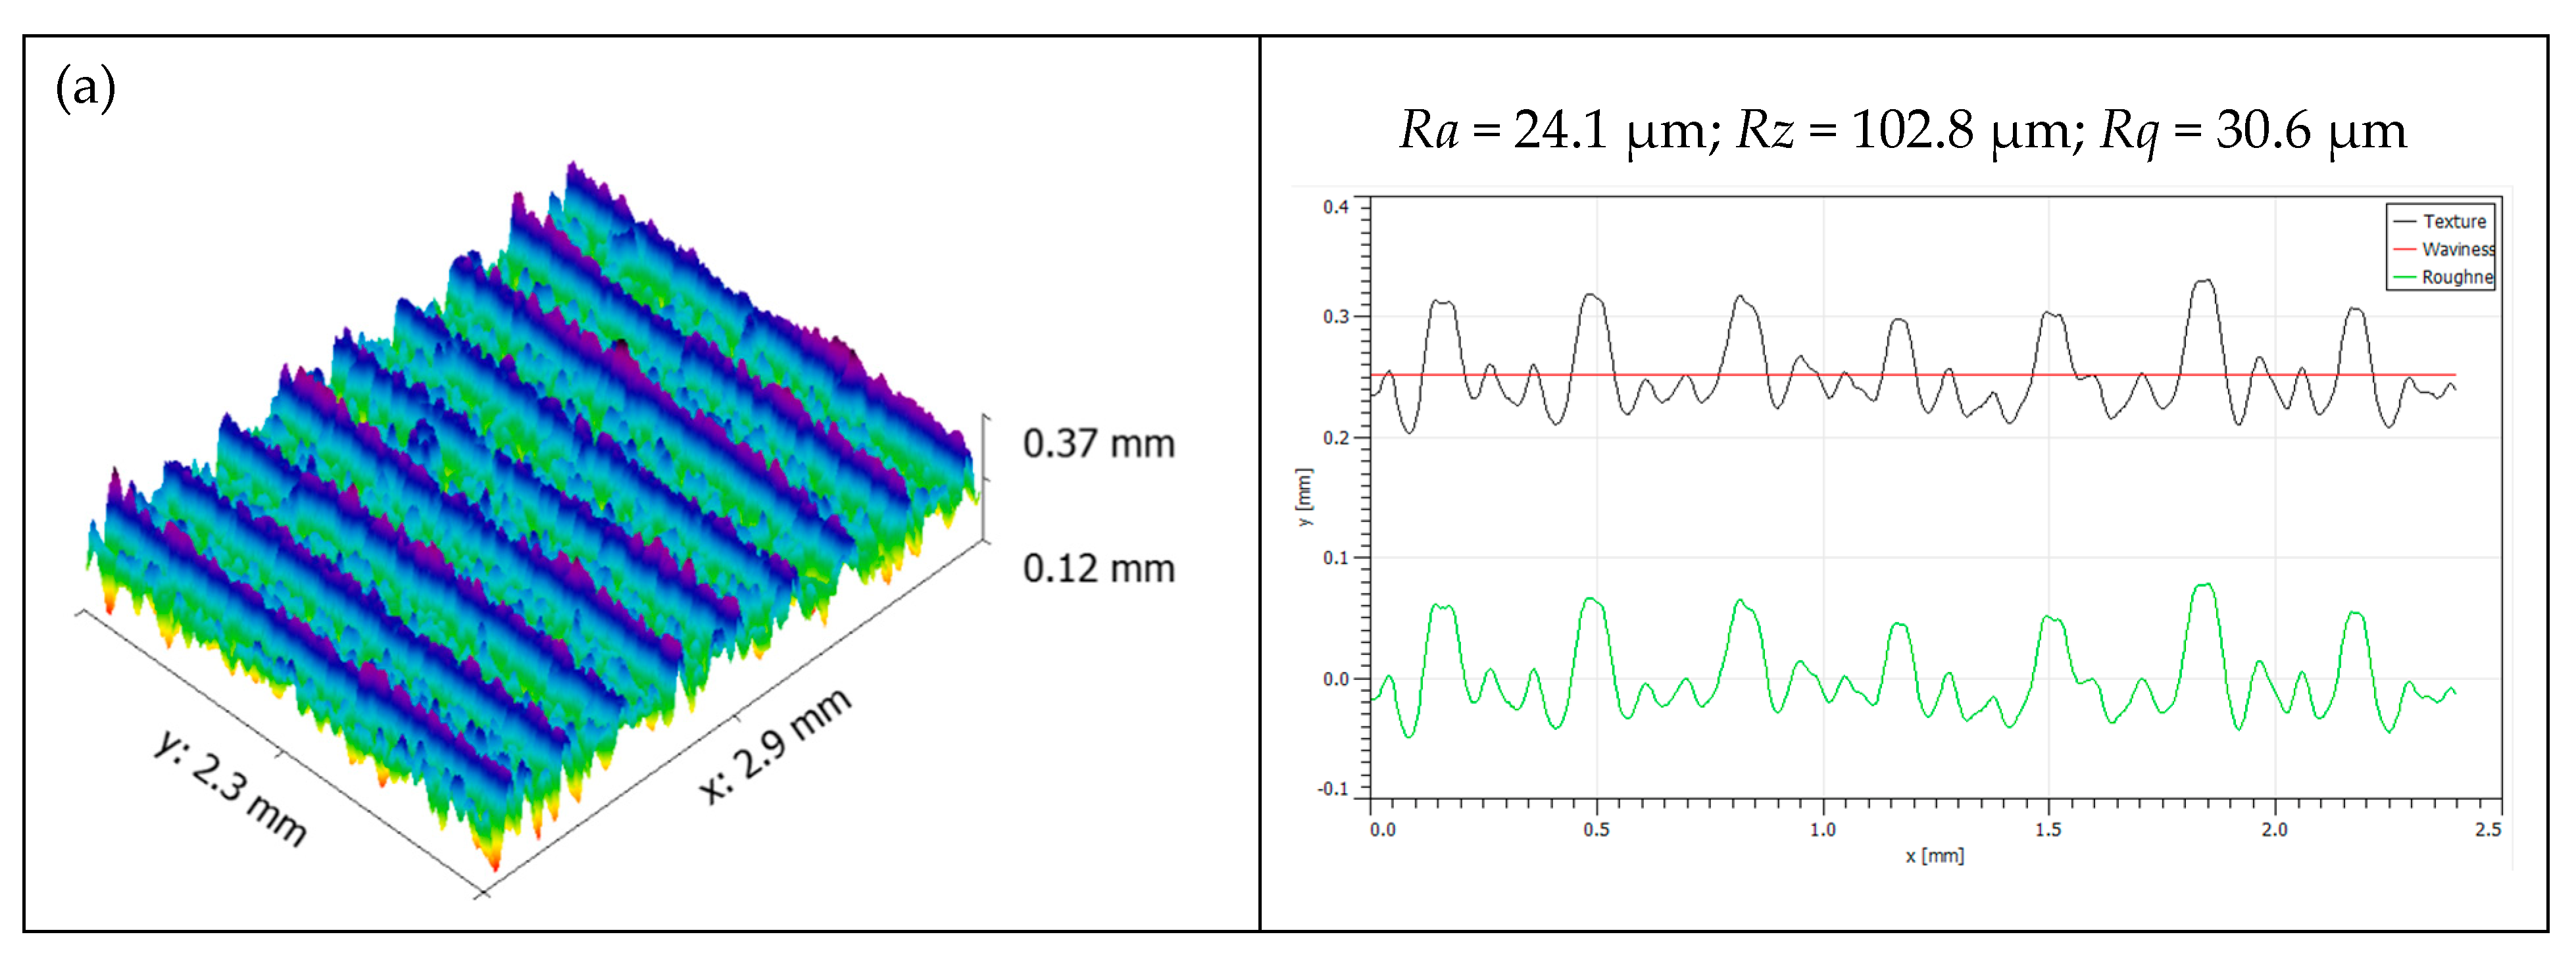
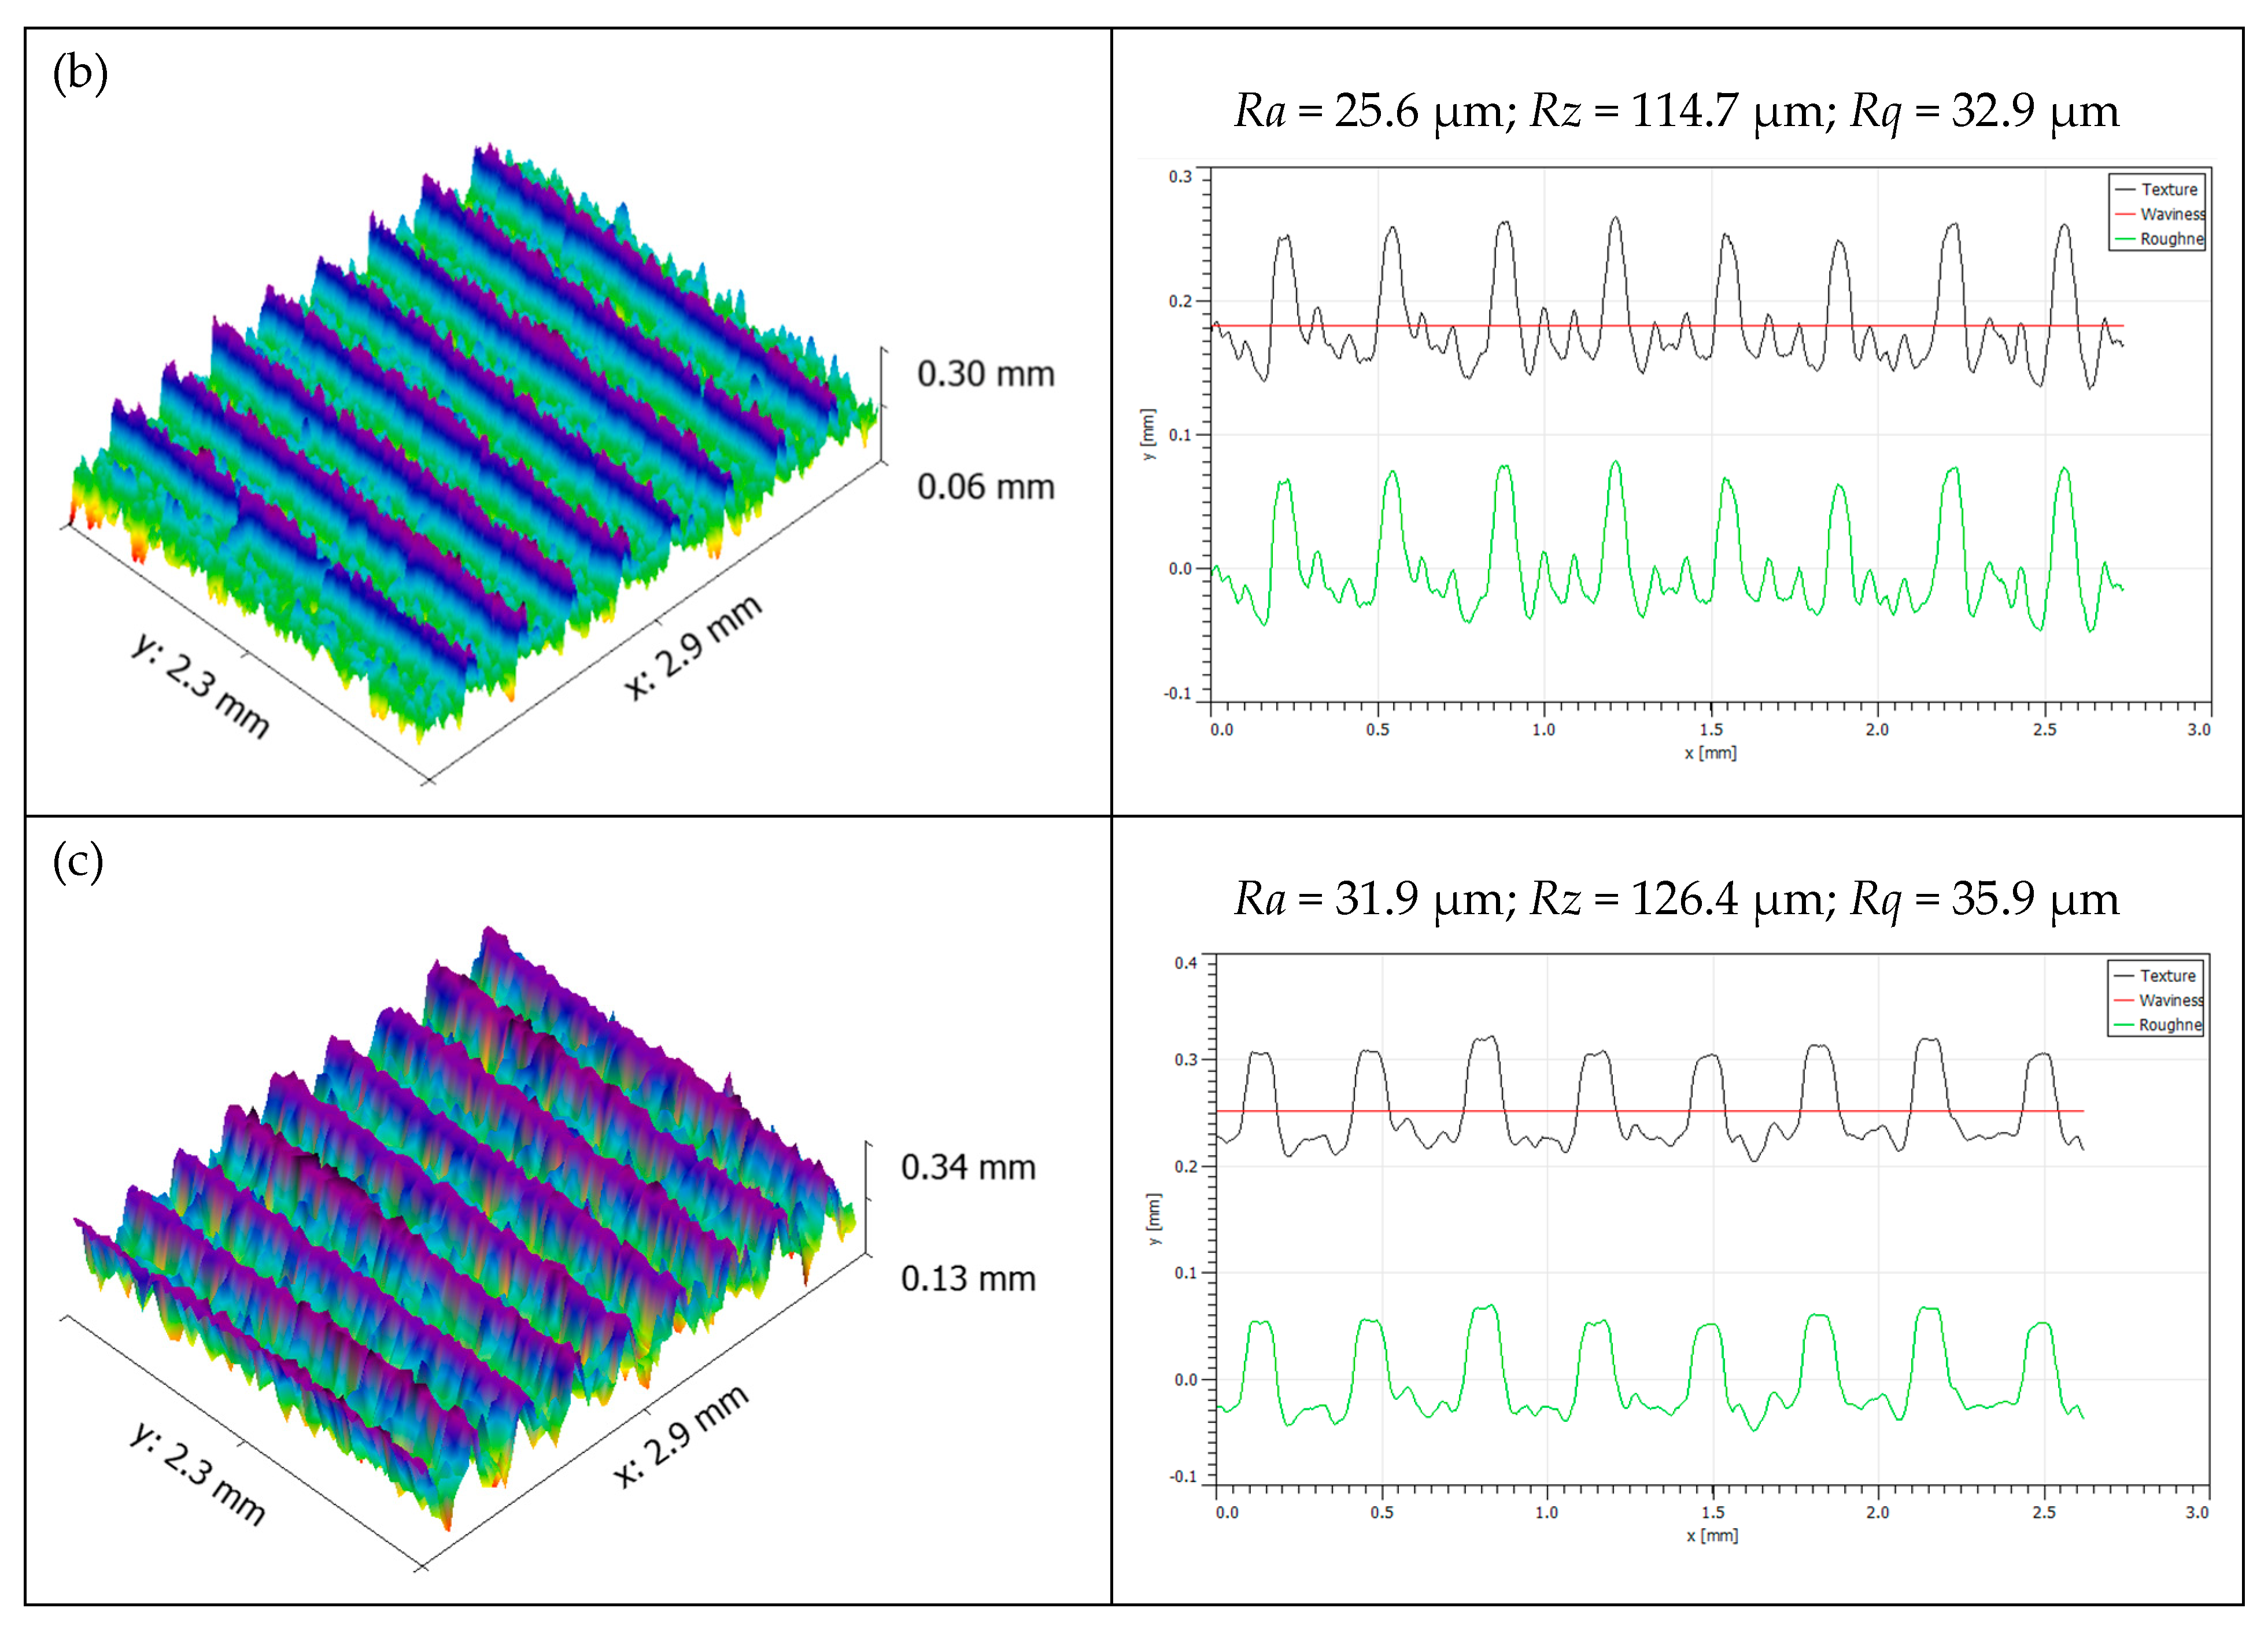
In the FDM process, the thickness of each layer deposited by the nozzle was decided based on the geometrical complexity of the part, printing time and required surface quality. From the statistical analysis, the layer thickness has a substantial influence on the selected surface roughness properties. Figure 3a, Figure 4a and Figure 5a show the influence of layer thickness on surface roughness characteristics. The response surface plots indicate that the increase in layer thickness from 0.127 mm to 0.33 mm drastically diminished the roughness characteristics. As the layer thickness increased, the stair-stepping effect significantly increased, which prominently augmented the roughness of fabricated parts in all directions; hence, the surface quality was diminished at higher layer thickness [25]. Therefore, it is necessary to maintain low layer thickness to achieve an improved surface quality. Among the selected FDM process parameters, the layer thickness was found to have a more significant impact on the surface quality. Figure 6 shows the sample three-dimensional surface roughness profiles taken on the test specimens fabricated at different layer thicknesses. The roughness parameters Ra, Rz and Rq increased linearly when the thickness of printing layers increased from 0.1 mm to 0.3 mm. In addition to response surface plots, for the investigation of micro surfaces, FDM components fabricated at different layer thicknesses are depicted in Figure 7a–c. From the microstructure observations, it is evident that the specimens fabricated at a higher layer thickness (0.33 mm) have massive defects, such as raster overlapping, abbreviated voids and pores due to the influence of staircase effects. Moreover, the surface defects between the successive layers are found to be minimal for the specimens fabricated at 0.2285 mm, whereas a defect-free dense structure is observed for the specimens fabricated with low layer thickness (0.128 mm). Therefore, it is necessary to maintain low layer thickness for the fabrication of micro components through the FDM process to achieve quality parts without the presence of defects fashioned by staircase effects [24,26,27].
The influence of part orientation on the surface quality characteristics is demonstrated in Figure 3a,c and Figure 4b. It is evident from the surface plots that the roughness values slightly increased when the parts were fabricated at 45° orientation, whereas the specimens fabricated at 0° and 90° orientation were found to be of better surface quality. When the parts were fabricated at an inclined orientation, the staircase effect increased and thus the roughness increased, whereas the specimens fabricated with horizontal and vertical orientations had significantly improved surface quality parameters despite the complex part profiles [28,29]. The consequences of varying the width of the deposited layer of pattern or raster width are depicted in response surfaces shown in Figure 3c, Figure 4a and Figure 5b. It is perceived that the increase in raster width from 0.203 mm to 0.558 mm resulted in a significant augmentation in the selected response features Ra, Rz and Rq. This could be because the gap between two successive layers deposited in the same direction increased at a higher raster width, and hence the probability of pores and voids between the printed layers increased [30]. Therefore, the roughness values at a higher raster width increased prominently.
The raster angle is a vital parameter in FDM process in which the angle of deposition of the material is varied with respect to the axis of the built table. The influence of the raster angle on Ra, Rz and Rq is demonstrated in the 3D response surface plots in Figure 3b, Figure 4b and Figure 5a,b. The roughness characteristics were found to vary non-linearly for individual response features. The response of Ra slightly increased with an increase in raster angle from 0° to 60° and the Rq slightly decreased and then increased with an increase in raster angle to a certain value, whereas the Rz decreased with an increase in raster angle. In general, an increase in raster angle leads to an increase in the number of rasters with short lengths, which leads to an increase in the number of heating and cooling cycles [31]. As a result of improper thermal deformation, an inadequate surface finish was yielded. For the specimens built with a minimum raster angle and build orientation, a better surface finish was noted. The number of heating and cooling cycles decreased by using a minimum raster angle and building orientation, which lowers non-uniform thermal stress and distortion. As a result, the road width is straighter, and the surface finish is better [25].

4.3. Multi-Response Optimization Using TOPSIS

The goal of the present investigation was to improve the surface quality characteristics of FDM-fabricated ABS specimens by minimizing roughness values such as Ra, Rz and Rq through optimizing the process parameters using the TOPSIS multi-response optimization technique. The relative weights for each response were calculated through a compromised weighting method, namely the analytical hierarchy approach. Through Equations (4) and (5), the following individual weights were obtained: Ra, 0.33919; Rz, 0.32974; and Rq, 0.33107.
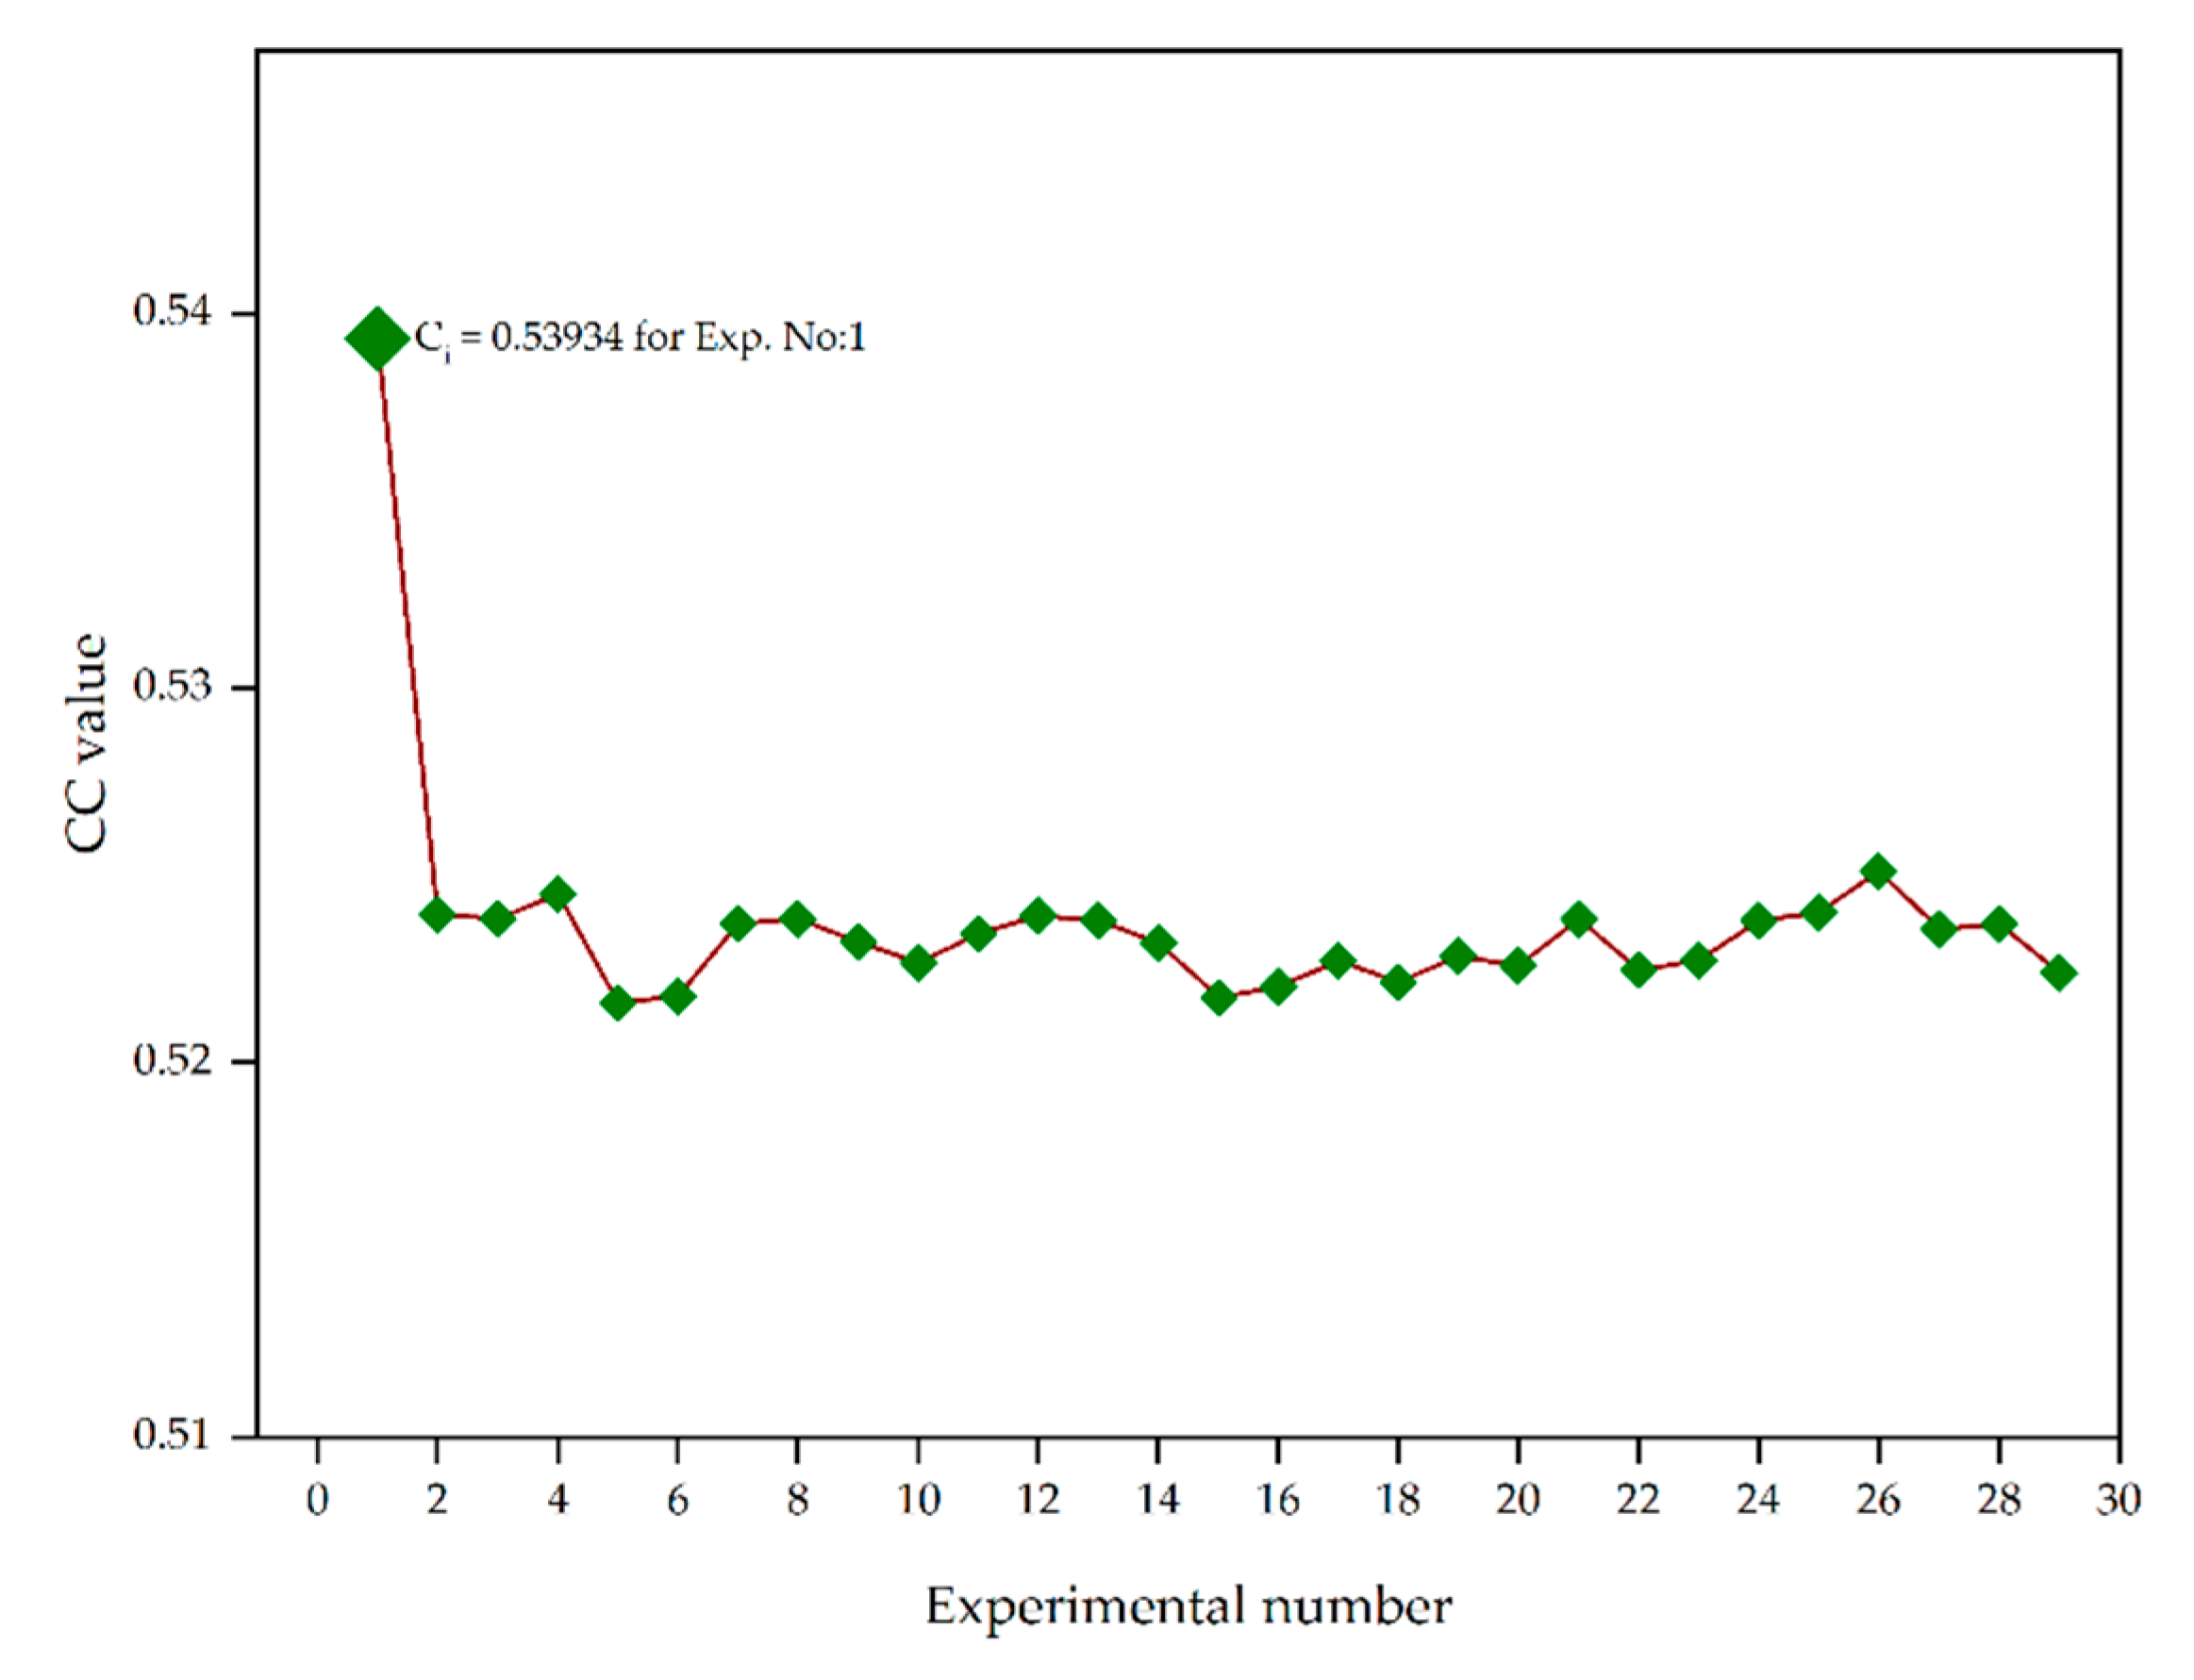
The separation measures (Si+, Si−) for the weight normalized matrix, closeness coefficient (Ci) and the rank for each alternative were calculated using Equations (7)–(11), which are mentioned in Table 6. The results are ranked by the closeness coefficient values. A higher Ci indicates that the experimentally measured response is near to an optimal solution. The Ci values for individual experimental runs are shown in Figure 8. From the results of the TOPSIS approach, it is perceived that Experiment 1 has the highest Ci value of 0.53934; therefore, the corresponding processing parameters of FDM are considered as the best parameters for improved surface quality. Furthermore, the mean closeness coefficients for each parameter level are shown in Figure 9. From the figure, it is perceived that the optimal FDM parameters for improved surface quality characteristics are 0.228 mm layer thickness, 90° part orientation, 0.558 mm raster width and 0° raster angle. From Table 7, part orientation and raster width have maximum delta values among the selected parameters; therefore, these two parameters have a substantial influence on the surface quality characteristics of FDM-processed parts.

4.4. Design and Fabrication of Flapping Wing Micro Mechanism at Optimal FDM Conditions

The optimal FDM process parameters obtained through the TOPSIS approach were further utilized for fabricating the components of a flapping wing micro mechanism. The flapping wing micro components such as mechanism base, wing connector, long, medium, linkages and short bars for connecting the parts were designed and fabricated at a tolerance limit of 100 µm through the FDM process. The assembled flapping wing mechanism, shown in Figure 10, provided a smooth operation in extreme conditions without any slippage or wear of the contact surfaces. Furthermore, the surface profile of the fabricated flapping wing part was obtained through the 3D profilometer, as shown in Figure 11. From the profile, a smooth surface with an average Ra of 20.6 µm was achieved for the assembly of a flapping wing micro mechanism through optimized FDM parameters.

5. Conclusions

The present work investigated the surface roughness characteristics of FDM-fabricated ABS specimens under different processing conditions, and optimization was carried out to identify the optimal process parameters for the improved surface quality of micro mechanical components. The following conclusions can be drawn from the performed experimental, statistical and optimization studies.
  • The ANOVA results showed that the selected FDM parameters have a substantial influence on surface roughness properties. The part orientation and raster angle have the most significant influence on Ra. Layer thickness and raster width are the most influential parameters on Rz, whereas Rq is primarily influenced by layer thickness and raster angle.
  • The optimal FDM parameters were attained through the TOPSIS optimization approach, namely layer thickness of 0.2285 mm, part orientation of 45°, raster width of 0.558 mm and raster angle of 0°, for the improved surface quality features of Ra = 25.8 µm, Rz = 98.3 µm and Rq = 49.4 µm.
  • The surface micrographs of FDM-fabricated parts with different processing parameters were investigated through SEM analysis, and we found abbreviated surface cracks, voids and overlapping layers at a higher layer thickness.
  • Finally, the components of a flapping wing micro mechanism were fabricated under optimal FDM conditions and assembled to investigate their performance. The improved surface quality of the flapping wing components provided smooth and defect-free operations; thus, the life cycle of dynamic components can be improved significantly.
  • The current study looked into the most influential FDM parameters on the surface quality of produced ABS parts. Future research could focus on the dynamic and thermomechanical properties of micro mechanical components manufactured using the FDM technique.

Author Contributions

Conceptualization, D.R. and E.B.; Methodology, D.R., L.-J.Y. and E.B.; Experimental Design, D.R.; Experimental Setup, D.R., L.-J.Y. and E.B.; Experiments, D.R. and E.B.; Measurements, D.R., L.-J.Y. and E.B.; Investigation, D.R., E.B. and L.-J.Y.; Resources, D.R., E.B. and L.-J.Y.; Visualization, D.R., E.B. and L.-J.Y.; Writing—Original Draft Preparation, D.R., E.B. and L.-J.Y.; Writing—Review and Editing, D.R., E.B. and L.-J.Y.; Supervision, E.B. and L.-J.Y.; Project Administration, D.R. and E.B.; Funding Acquisition, D.R., E.B. and L.-J.Y. All authors have read and agreed to the published version of the manuscript.

Funding

This research was funded by the Ministry of Science and Technology, Taiwan (grant numbers 109-2221-E-032-002-MY2, 109-2221-E-032-001-MY3 and 111-2923-E-032-001-MY3).

Conflicts of Interest

The authors declare no conflict of interest.

References

  1. Yang, L.-J.; Esakki, B.; Chandrasekhar, U.; Hung, K.-C.; Cheng, C.-M. Practical Flapping Mechanisms for 20 cm-span Micro Air Vehicles. Int. J. Micro Air Veh. 2015, 7, 181–202. [Google Scholar] [CrossRef] [Green Version]
  2. Esakki, B.; Mathiyazhagan, S.; Moses, M.; Rao, K.J.; Ganesan, S. Development of 3D-printed floating Quadrotor for collection of algae in remote water bodies. Comput. Electron. Agric. 2019, 164, 104891. [Google Scholar] [CrossRef]
  3. Udayagiri, C.; Kulkarni, M.; Esakki, B.; Pakiriswamy, S.; Yang, L.J. Experimental Studies on 3D Printed Parts for Rapid Prototyping of Micro Aerial Vehicles. J. Appl. Sci. Eng. 2016, 19, 17–22. [Google Scholar]
  4. Rajamani, D.; Balasubramanian, E.; Arunkumar, P.; Silambarasan, M.; Bhuvaneshwaran, G. Experimental Investigations and Parametric Optimization of Process Parameters on Shrinkage Characteristics of Selective Inhibition Sintered High Density Polyethylene Parts. Exp. Tech. 2018, 42, 631–644. [Google Scholar] [CrossRef]
  5. Esakki, B.; Rajamani, D.; Arunkumar, P. Modeling and prediction of optimal process parameters in wear behaviour of selective inhibition sintered high density polyethylene parts. Prog. Addit. Manuf. 2018, 3, 109–121. [Google Scholar] [CrossRef]
  6. Altan, M.; Eryıldız, M.; Gumus, B.; Kahraman, Y. Effects of process parameters on the quality of PLA products fabricated by fused deposition modeling (FDM): Surface roughness and tensile strength. Mater. Test. 2018, 60, 471–477. [Google Scholar] [CrossRef]
  7. Campbell, R.; Martorelli, M.; Lee, H. Surface roughness visualisation for rapid prototyping models. Comput. Des. 2002, 34, 717–725. [Google Scholar] [CrossRef]
  8. Yang, L.; Li, S.; Li, Y.; Yang, M.; Yuan, Q. Experimental Investigations for Optimizing the Extrusion Parameters on FDM PLA Printed Parts. J. Mater. Eng. Perform. 2019, 28, 169–182. [Google Scholar] [CrossRef]
  9. Yash, M.; Divyansh, P.; Akash, B.; Shantanu, H.; Vasudev, P.; Mahesh, S.K. Process Parameter Optimization for FDM 3D Printer. Int. Res. J. Eng. Technol. 2019, 6, 1–6. [Google Scholar]
  10. Boddula, V.; Manzoor, H.; Chintireddy, S.R. Optimization of 3D Printing Process Parameters of Poly Lactic Acid Materials by Fused Deposition Modeling Process. Int. J. Eng. Develop. Res. 2019, 7, 189–196. [Google Scholar]
  11. Camargo, J.C.; Machado, R.; Almeida, E.C.; Silva, E.F.M.S. Mechanical properties of PLA-graphene filament for FDM 3D printing. Int. J. Adv. Manuf. Technol. 2019, 103, 2423–2443. [Google Scholar] [CrossRef]
  12. Vigneshwaran, K.; Venkateshwaran, N. Statistical analysis of mechanical properties of wood-PLA composites prepared via additive manufacturing. Int. J. Polym. Anal. Charact. 2019, 24, 584–596. [Google Scholar] [CrossRef]
  13. Ferro, C.; Grassi, R.; Seclì, C.; Maggiore, P. Additive Manufacturing Offers New Opportunities in UAV Research. Procedia CIRP 2016, 41, 1004–1010. [Google Scholar] [CrossRef]
  14. Hsu, C.-K.; Evans, J.; Vytla, S.; Huang, P.G. Development of flapping wing micro air vehicles—Design, CFD, experiment and actual flight. In 48th AIAA Aerospace Sciences Meeting Including the New Horizons Forum and Aerospace Exposition; American Institute of Aeronautics and Astronautics: Reston, VA, USA, 2010. [Google Scholar]
  15. Richter, C.; Lipson, H. Untethered Hovering Flapping Flight of a 3D-Printed Mechanical Insect. Artif. Life 2011, 17, 73–86. [Google Scholar] [CrossRef] [PubMed]
  16. Yen, H.-J.; Tseng, C.-S.; Hsu, S.-H.; Tsai, C.-L. Evaluation of chondrocyte growth in the highly porous scaffolds made by fused deposition manufacturing (FDM) filled with type II collagen. Biomed. Microdevices 2009, 11, 615–624. [Google Scholar] [CrossRef]
  17. Kalita, S.J.; Bose, S.; Hosick, H.L.; Bandyopadhyay, A. Development of controlled porosity polymer-ceramic composite scaffolds via fused deposition modeling. Mater. Sci. Eng. C 2003, 23, 611–620. [Google Scholar] [CrossRef]
  18. Zein, I.; Hutmacher, D.W.; Tan, K.C.; Teoh, S.H. Fused deposition modeling of novel scaffold architectures for tissue engineering applications. Biomaterials 2002, 23, 1169–1185. [Google Scholar] [CrossRef]
  19. Tirella, A.; de Maria, C.; Criscenti, G.; Vozzi, G.; Ahluwalia, A. The PAM2system: A multilevel approach for fabrication of complex three-dimensional microstructures. Rapid Prototyp. J. 2012, 18, 299–307. [Google Scholar] [CrossRef]
  20. Devaraj, R.; Mahalingam, S.K.; Esakki, B.; Astarita, A.; Mirjalili, S. A hybrid GA-ANFIS and F-Race tuned harmony search algorithm for Multi-Response optimization of Non-Traditional Machining process. Expert Syst. Appl. 2022, 199, 116965. [Google Scholar] [CrossRef]
  21. Ananthakumar, K.; Rajamani, D.; Balasubramanian, E.; Davim, J.P. Measurement and optimization of multi-response characteristics in plasma arc cutting of Monel 400™ using RSM and TOPSIS. Measurement 2018, 135, 725–737. [Google Scholar] [CrossRef]
  22. Galantucci, L.; Lavecchia, F.; Percoco, G. Experimental study aiming to enhance the surface finish of fused deposition modeled parts. CIRP Ann. 2009, 58, 189–192. [Google Scholar] [CrossRef]
  23. Sachdeva, A.; Singh, S.; Sharma, V.S. Investigating surface roughness of parts produced by SLS process. Int. J. Adv. Manuf. Technol. 2013, 64, 1505–1516. [Google Scholar] [CrossRef]
  24. Sood, A.K.; Ohdar, R.K.; Mahapatra, S.S. Parametric appraisal of fused deposition modelling process using the grey Taguchi method. Proc. Inst. Mech. Eng. Part B J. Eng. Manuf. 2010, 224, 135–145. [Google Scholar] [CrossRef]
  25. Pérez, M.; Medina-Sánchez, G.; García-Collado, A.; Gupta, M.; Carou, D. Surface Quality Enhancement of Fused Deposition Modeling (FDM) Printed Samples Based on the Selection of Critical Printing Parameters. Materials 2018, 11, 1382. [Google Scholar] [CrossRef] [PubMed] [Green Version]
  26. Sood, A.K.; Chaturvedi, V.; Datta, S.; Mahapatra, S.S. Optimization of process parameters in fused deposition modeling using weighted principal component analysis. J. Adv. Manuf. Syst. 2011, 10, 241–259. [Google Scholar] [CrossRef]
  27. Sood, A.K.; Ohdar, R.; Mahapatra, S. Improving dimensional accuracy of Fused Deposition Modelling processed part using grey Taguchi method. Mater. Des. 2009, 30, 4243–4252. [Google Scholar] [CrossRef]
  28. Byun, H.-S.; Lee, K.H. Determination of the optimal build direction for different rapid prototyping processes using multi-criterion decision making. Robot. Comput. Manuf. 2006, 22, 69–80. [Google Scholar] [CrossRef]
  29. Durgun, I.; Ertan, R. Experimental investigation of FDM process for improvement of mechanical properties and production cost. Rapid Prototyp. J. 2014, 20, 228–235. [Google Scholar] [CrossRef]
  30. Fatimatuzahraa, A.; Farahaina, B.; Yusoff, W. The effect of employing different raster orientations on the mechanical properties and microstructure of Fused Deposition Modeling parts. In Proceedings of the 2011 IEEE Symposium on Business, Engineering and Industrial Applications (ISBEIA), Langkawi, Malaysia, 25–28 September 2011; IEEE: Amsterdam, The Netherlands, 2011. [Google Scholar] [CrossRef]
  31. Mohanraj, R.; Elangovan, S.M.; Arunkarthik, B.; Pratheesh Kumar, S.K.; Maaz Baig, N.B.; Shriram, A.; Muneeskumar, M. Effect of process parameters on tensile strength and surface quality of PLA-ABS part produced by fused deposition modeling. Ind. J. Eng. Mater. Sci. 2021, 28, 300–310. [Google Scholar]
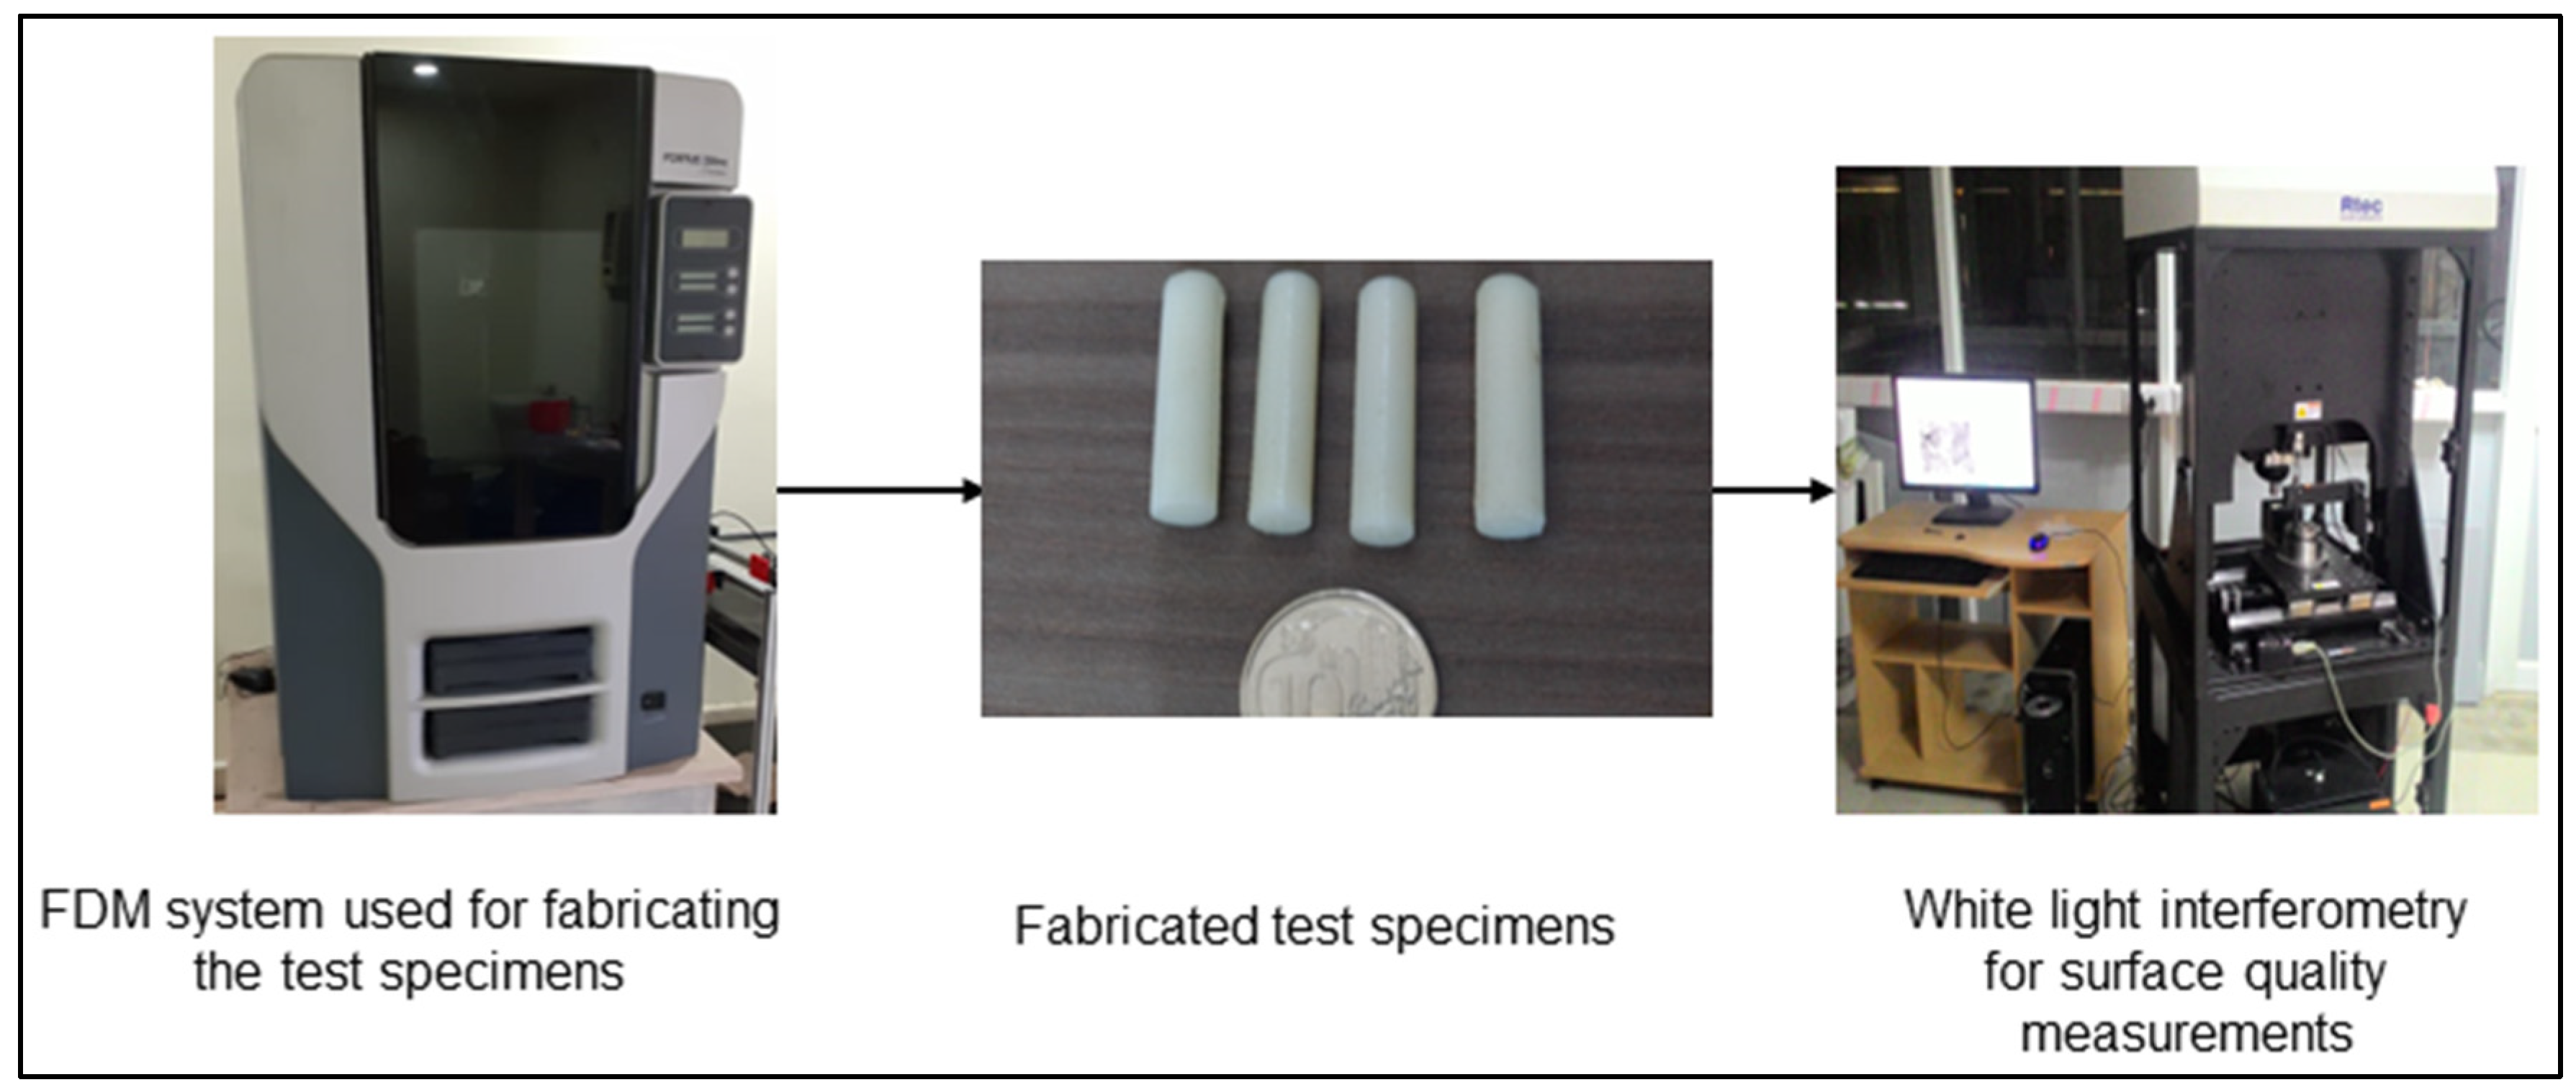
Figure 1. FDM process and surface roughness measurements.
Processes 10 02457 g001
Figure 2. Normal probability plots for (a) Ra, (b) Rz and (c) Rq.
Processes 10 02457 g002
Figure 3. Influence of FDM parameters on Ra: (a) Layer thickness vs. Part orientation; (b) Layer thickness vs. Raster angle; and (c) Part orientation vs Raster width.
Processes 10 02457 g003aProcesses 10 02457 g003b
Figure 4. Influence of FDM parameters on Rz: (a) Layer thickness vs. Raster width; and (b) Part orientation vs. Raster angle.
Processes 10 02457 g004
Figure 5. Influence of FDM parameters on Rq: (a) Layer thickness vs. Raster angle; and (b) Raster angle vs. Raster width.
Processes 10 02457 g005
Figure 6. White light interferometry 3D surface profiles for samples fabricated at different layer thicknesses of (a) 0.1 mm, (b) 0.2 mm and (c) 0.3 mm.
Processes 10 02457 g006aProcesses 10 02457 g006b
Figure 7. SEM microstructure of FDM components at different processing conditions: (a) layer thickness of 0.33 mm; (b) layer thickness of 0.2285 mm; (c) layer thickness of 0.127 mm.
Processes 10 02457 g007
Figure 8. Closeness coefficient values for each experimental specimen.
Processes 10 02457 g008
Figure 9. Mean closeness coefficients for FDM process parameters.
Processes 10 02457 g009
Figure 10. Design and fabricated flapping wing micro mechanism assembly with optimal FDM processing conditions.
Processes 10 02457 g010
Figure 11. Three-dimensional surface profile of flapping wing mechanism part fabricated with optimal FDM parameter settings.
Processes 10 02457 g011
Table 1. FDM process parameters and levels.
FactorSymbolLevelUnit
LowMediumHigh
Layer thicknessA0.1270.2280.33mm
Part orientationB04590Degree
Raster widthC0.2030.3810.558mm
Raster angleD03060Degree
Table 2. FDM experimental design and measured responses.
Exp. NoInput ParametersResponse Characteristics
Layer Thickness (mm)Part Orientation (°)Raster Width (mm)Raster Angle (°)Ra (µm)Rz (µm)Rq (µm)
10.2285450.558025.898.349.4
20.2285450.38053027.296.846.3
30.2285900.2033025.995.947
40.33450.5583027.796.144.3
50.228500.3805023.4104.148.6
60.33900.38053023.6105.744.7
70.2285450.38053027.598.146.4
80.2285450.2036026.893.650.9
90.127450.38056026.696.351.2
100.2285450.203027.3100.849.7
110.228500.5583026.798.546.8
120.228500.38056027.994.949.8
130.2285450.38053027.197.346.6
140.2285900.3805026.198.448.1
150.2285900.38056022.2102.148.8
160.127450.5583026.4104.248.7
170.33450.38056026.5101.347.8
180.127450.3805025.5102.549.1
190.2285450.5586026.999.449.9
200.2285900.5583024.1101.745.2
210.2285450.38053027.597.546.5
220.33450.2033027.6103.847.1
230.12700.38053024.599.847.5
240.228500.2033026.296.446.9
250.2285450.38053027.496.546.7
260.127450.2033028.191.547.4
270.3300.38053027.8100.444.2
280.127900.38053025.797.146.1
290.33450.3805027102.948.3
Table 3. Statistical analysis for Ra.
SourceSum of SquaresdfMean SquareF-Valuep-Value
Model61.42144.39229.32<0.0001Significant
Layer thickness0.963310.963350.35<0.0001
Part orientation6.616.6345.03<0.0001
Raster width1.5411.5480.54<0.0001
Raster angle0.2710.2714.110.0021
AB7.2917.29381.06<0.0001
AC0.8110.8142.34<0.0001
AD0.6410.6433.45<0.0001
BC1.3211.3269.13<0.0001
BD17.64117.64922.07<0.0001
CD0.6410.6433.45<0.0001
A20.128710.12876.720.0213
B219.94119.941042.3<0.0001
C20.191210.19129.990.0069
D23.813.8198.86<0.0001
Residual0.2678140.0191
Lack of fit0.1358100.01360.41160.8838Not significant
Pure error0.13240.033
Cor total61.6928
R299.57Adj. R299.13AP57.97
Table 4. Statistical analysis for Rz.
SourceSum of SquaresdfMean SquareF-Valuep-Value
Model324.031423.1537.63<0.0001Significant
Layer thickness29.45129.4547.89<0.0001
Part orientation3.8513.856.270.0253
Raster width21.87121.8735.56<0.0001
Raster angle31.36131.3651<0.0001
AB1611626.020.0002
AC104.041104.04169.16<0.0001
AD5.2915.298.60.0109
BC3.4213.425.560.0334
BD41.6141.667.64<0.0001
CD17.22117.22280.0001
A230.71130.7149.93<0.0001
B211.84111.8419.250.0006
C21.6211.622.630.1273
D210.98110.9817.850.0008
Residual8.61140.615
Lack of fit7.06100.70581.820.2962Not significant
Pure error1.5540.388
Cor total332.6428
R297.41Adj. R294.82AP24.82
Table 5. Statistical analysis for Rq.
SourceSum of SquaresdfMean SquareF-Valuep-Value
Model94.84146.77341.75<0.0001Significant
Layer thickness15.41115.41777.61<0.0001
Part orientation1.2711.2763.95<0.0001
Raster width1.8411.8492.87<0.0001
Raster angle2.2512.25113.68<0.0001
AB0.902510.902545.53<0.0001
AC4.214.2212.02<0.0001
AD1.6911.6985.26<0.0001
BC0.722510.722536.45<0.0001
BD0.062510.06253.150.0975
CD0.122510.12256.180.0262
A20.44710.44722.550.0003
B22.3412.34117.81<0.0001
C22.3412.34117.81<0.0001
D254.08154.082728.5<0.0001
Residual0.2775140.0198
Lack of fit0.1775100.01770.710.7Not significant
Pure error0.140.025
Cor total95.1128
R299.71Adj. R299.42AP69.67
Table 6. Weight normalized matrix, separation measures and rank.
Ex. NoWeight Normalized ValuesSi PLUSSi MINUSCiRank
RaRzRq
125.898.349.40.01850.02170.53931
227.296.846.30.22210.24440.52405
325.995.947.00.22060.24280.52397
427.796.144.30.21870.24120.52453
523.4104.148.60.23890.26050.521629
623.6105.744.70.23850.26020.521827
727.598.146.40.22490.24730.523712
826.893.650.90.22050.24260.52389
926.696.351.20.22620.24830.523216
1027.3100.849.70.23390.25610.522721
1126.798.546.80.22600.24820.523515
1227.994.949.80.22210.24450.52396
1327.197.346.60.22340.24570.523811
1426.198.448.10.22700.24910.523217
1522.2102.148.80.23480.25620.521828
1626.4104.248.70.23970.26180.522026
1726.5101.347.80.23280.25490.522720
1825.5102.549.10.23640.25830.522225
1926.999.449.90.23120.25330.522918
2024.1101.745.20.23060.25240.522622
2127.597.546.50.22380.24620.52388
2227.6103.847.10.23750.25990.522523
2324.599.847.50.22900.25080.522719
2426.296.446.90.22160.24380.523810
2527.496.546.70.22190.24430.52404
2628.191.547.40.21260.23510.52512
2727.8100.444.20.22760.25010.523614
2825.797.146.10.22210.24420.523713
2927.0102.948.30.23670.25890.522424
Table 7. Mean closeness coefficient for process parameters.
S. NoProcess ParametersLevel 1Level 2Level 3DeltaRank
1Layer thickness (A)0.52320.52420.52290.00134
2Part orientation (B)0.52320.52430.52580.00262
3Raster width (C)0.52360.52310.52580.00271
4Raster angle (D)0.52520.52350.52310.00213
Publisher’s Note: MDPI stays neutral with regard to jurisdictional claims in published maps and institutional affiliations.