Review

Tool Wear in Nickel-Based Superalloy Machining: An Overview

School of Mechanical and Automotive Engineering, Guangxi University of Science and Technology, Liuzhou 545006, China
*
Authors to whom correspondence should be addressed.
Processes 2022, 10(11), 2380; https://doi.org/10.3390/pr10112380
Submission received: 27 September 2022 / Revised: 25 October 2022 / Accepted: 10 November 2022 / Published: 12 November 2022

Abstract

:
Nickel-based superalloys have been widely used in the aerospace, petrochemical, and marine fields and others because of their good oxidation resistance, corrosion resistance, stability, and reliability at various temperatures. However, as a nickel-based superalloy is a kind of processed material, in the cutting process a large amount of cutting heat is generated due to the interaction between the tool and the workpiece. At the same time, the low thermal conductivity of the workpiece causes a large amount of cutting heat to accumulate at the contact point, resulting in serious tool wear, reduced tool life, frequent tool changes, and other problems, which increase the production cost of the enterprise. This paper introduces the tool wear mechanisms (abrasive wear, adhesive wear, plastic deformation, chemical wear, etc.) in the machining process of nickel-based superalloys and summarizes the research status of failure mechanisms, tool wear optimization, etc. Based on a review of the existing research, it was found that the purpose of adding tool coatings, optimizing tool materials and cutting parameters, or improving the cutting environment is to control the heat during the processing of nickel-based superalloys to improve the tool environment and prolong the service life. The development prospects of tool wear prevention measures in the field of nickel-based alloy machining are also described.

1. Introduction

Superalloys generally refer to iron-based, nickel-based, and cobalt-based superalloys; nickel-based superalloys refer to a class of alloys that work for a long time at a high temperature above 600 °C under a certain stress. Due to their excellent strength, thermal stability, thermal ductility, fatigue resistance, and corrosion resistance [1,2,3,4], they are currently widely used in aerospace, ships, vehicles, and other fields. Nickel-based superalloys are a key hot-end component material for aero engines, rocket engines, ships, and industrial-grade gas turbines. They are also high-temperature structural materials that are required for nuclear reactors and chemical equipment. Fifty percent of the weight of jet engines is Inconel 718, a Ni-Fe-Cr alloy [5]. Nickel-based superalloys are excellent materials for aviation parts. Compared with ordinary alloys, they are strengthened by the combination of different metal compounds and fine carbides. There are many metal materials for casting nickel-based superalloys. As shown in Table 1, more than ten different elements can be added to nickel alloys. The mechanical properties of nickel-based superalloys containing different elements are quite different, but they all have strong machinability. However, it is precisely because of the high strength of these high-temperature alloy parts at room temperature that their workability is much lower than that of ordinary steel, which brings great difficulties to parts machining and leads to low processing efficiency.
In addition, we still need to face many challenges in the field of nickel-based superalloy machining. Due to the low thermal conductivity inside the parts, the cutting heat generated during the cutting process cannot be transferred at an adequate rate, resulting in a sharp rise in the temperature of the cutting edge, causing crater wear and severe plastic deformation of the cutting edge. Excessive crater wear causes catastrophic damage to the tools and greatly reduces their service life. The high-hardness intermetallic compounds in the microstructures of these alloys cause severe wear on the tool tips, and the high heat generated during the machining process causes the microstructures of the alloys to change [7]. Generally, when machining nickel-based superalloys, the thermal conductivity of the tool and the workpiece is not high, and a large amount of generated heat cannot be dissipated through the chips or the workpiece, resulting in pits in the tool and plastic deformation of the blade. Therefore, when machining nickel-based superalloys, tool adhesion wear, abrasive wear, diffusion wear, oxidative wear, and debonding failure are more serious, greatly reducing tool life. Although the material level and processing level of nickel-based superalloys have been significantly improved in recent years, it still takes nearly 5 h to machine a GH4169 part with a length of nearly one meter after rough grinding and fine grinding [5], with dozens of tool-changing operations. Severe tool wear is considered to be one of the key reasons for machining inefficiency.
Although the current hard tools, ceramic tools, etc., play an important role in the improvement of the machining efficiency of nickel-based superalloys, many problems arise due to the increase in machining costs. Adding a coating on the surface of the tool can play a certain role in extending its life, but under high temperature and high pressure the elements of the coating react with the tool, forming new compounds on the surface of the tool and causing scratches on the surface of the part, affecting its surface. At the same time, the built-up tumors that are produced reduce the heat dissipation performance of the tool so that the heat generated during machining is hard to dissipate on the tool, causing more severe tool wear and resulting in a “vicious circle” [8].
Although much research has been conducted on the machinability of nickel-based superalloys [9], research on the tool wear mechanism of nickel-based superalloy machining has an important impact. This paper analyzes the failure mechanism of tool wear, describes the improvement of tool wear in nickel-based superalloy machining, and proposes the limitations of the existing research and future prospects.

2. Tool Wear Mechanism in Nickel-Based Superalloy Machining

Tool wear commonly results from mechanical (thermodynamic wear, mostly abrasion) and chemical (thermochemical wear and diffusion) interactions between the tool and the workpiece. Different tool wear mechanisms during the machining of nickel-based superalloys, such as adhesive wear, abrasive wear, diffusion wear, oxidation wear, and debonding failure, have been reported in the literature in detail [10]. A summarized representation of the reasons, mechanisms, types, and consequences of the wear is presented in Figure 1. Among the reported tool wear mechanisms, the adhesion mechanism is prominent in tool failure. The adhesion of the workpiece to the tool surfaces at high temperatures and stresses results in the adhesive wear of the tool and leads to the built-up edge (BUE) formation responsible for tool failure by the attrition phenomenon at medium cutting speeds and plastic deformation and/or tool failure by the chipping and flaking of the tool material at high cutting speeds.
To improve the study of the particularities of tool wear mechanisms in machining, we first summarize several common tool wear forms. Abrasion and adhesion are the most common tool wear forms in the machining process of nickel-based superalloys. They occur not only at high cutting temperatures but also at low cutting temperatures and are usually caused by excessive cutting forces when the tool contacts the workpiece, the different uses of lubricants in the cutting process, etc. [11]. We provide an overview of the common wear mechanisms of nickel-based superalloys.

2.1. Abrasive Wear

Research has found that the friction between the particles falling off the tool matrix and the hard carbon particles contained in the nickel-based superalloy is the main cause of abrasive wear when machining nickel-based superalloys with various tool materials. Moreover, since the workpiece material flows to both sides during machining, the hardened burrs formed on the workpiece surface also cause damage to the tool after the end of the previous machining process, resulting in abrasive wear [12,13,14]. The occurrence of abrasive wear is usually marked by the depths of the grooves on the rake face and flank face of the tool and the depth of the notch at the contact point between the tool and the workpiece.
Ezugwu et al. [15] found that when machining nickel-based superalloys with ceramic tools the hardness of the ceramic tools remained stable at high cutting temperatures, but the wear mechanism during the machining process was mainly abrasive wear. Tool wear is caused by the increase in strength due to the hardening of the material during machining and the shedding of fine particles such as carbides between the tool and the chip under high pressure. They further pointed out that the wear caused by the fine particles shed between the tool and the chip under high pressure is insignificant on SiAlON tools compared to alumina-based ceramic tools. In low-speed cutting with vc = 25 m/min and f = 0.15 mm/r, a large amount of BUE is produced, while in medium-speed cutting with vc = 55 m/min and f = 0.3 mm/r, the cutting heat generated by machining softens the BUE and reduces its height [16]. Due to the high cutting force or cutting adhesion, the cutting edge of the tool collapses, which may lead to the fracture of the cutting edge.
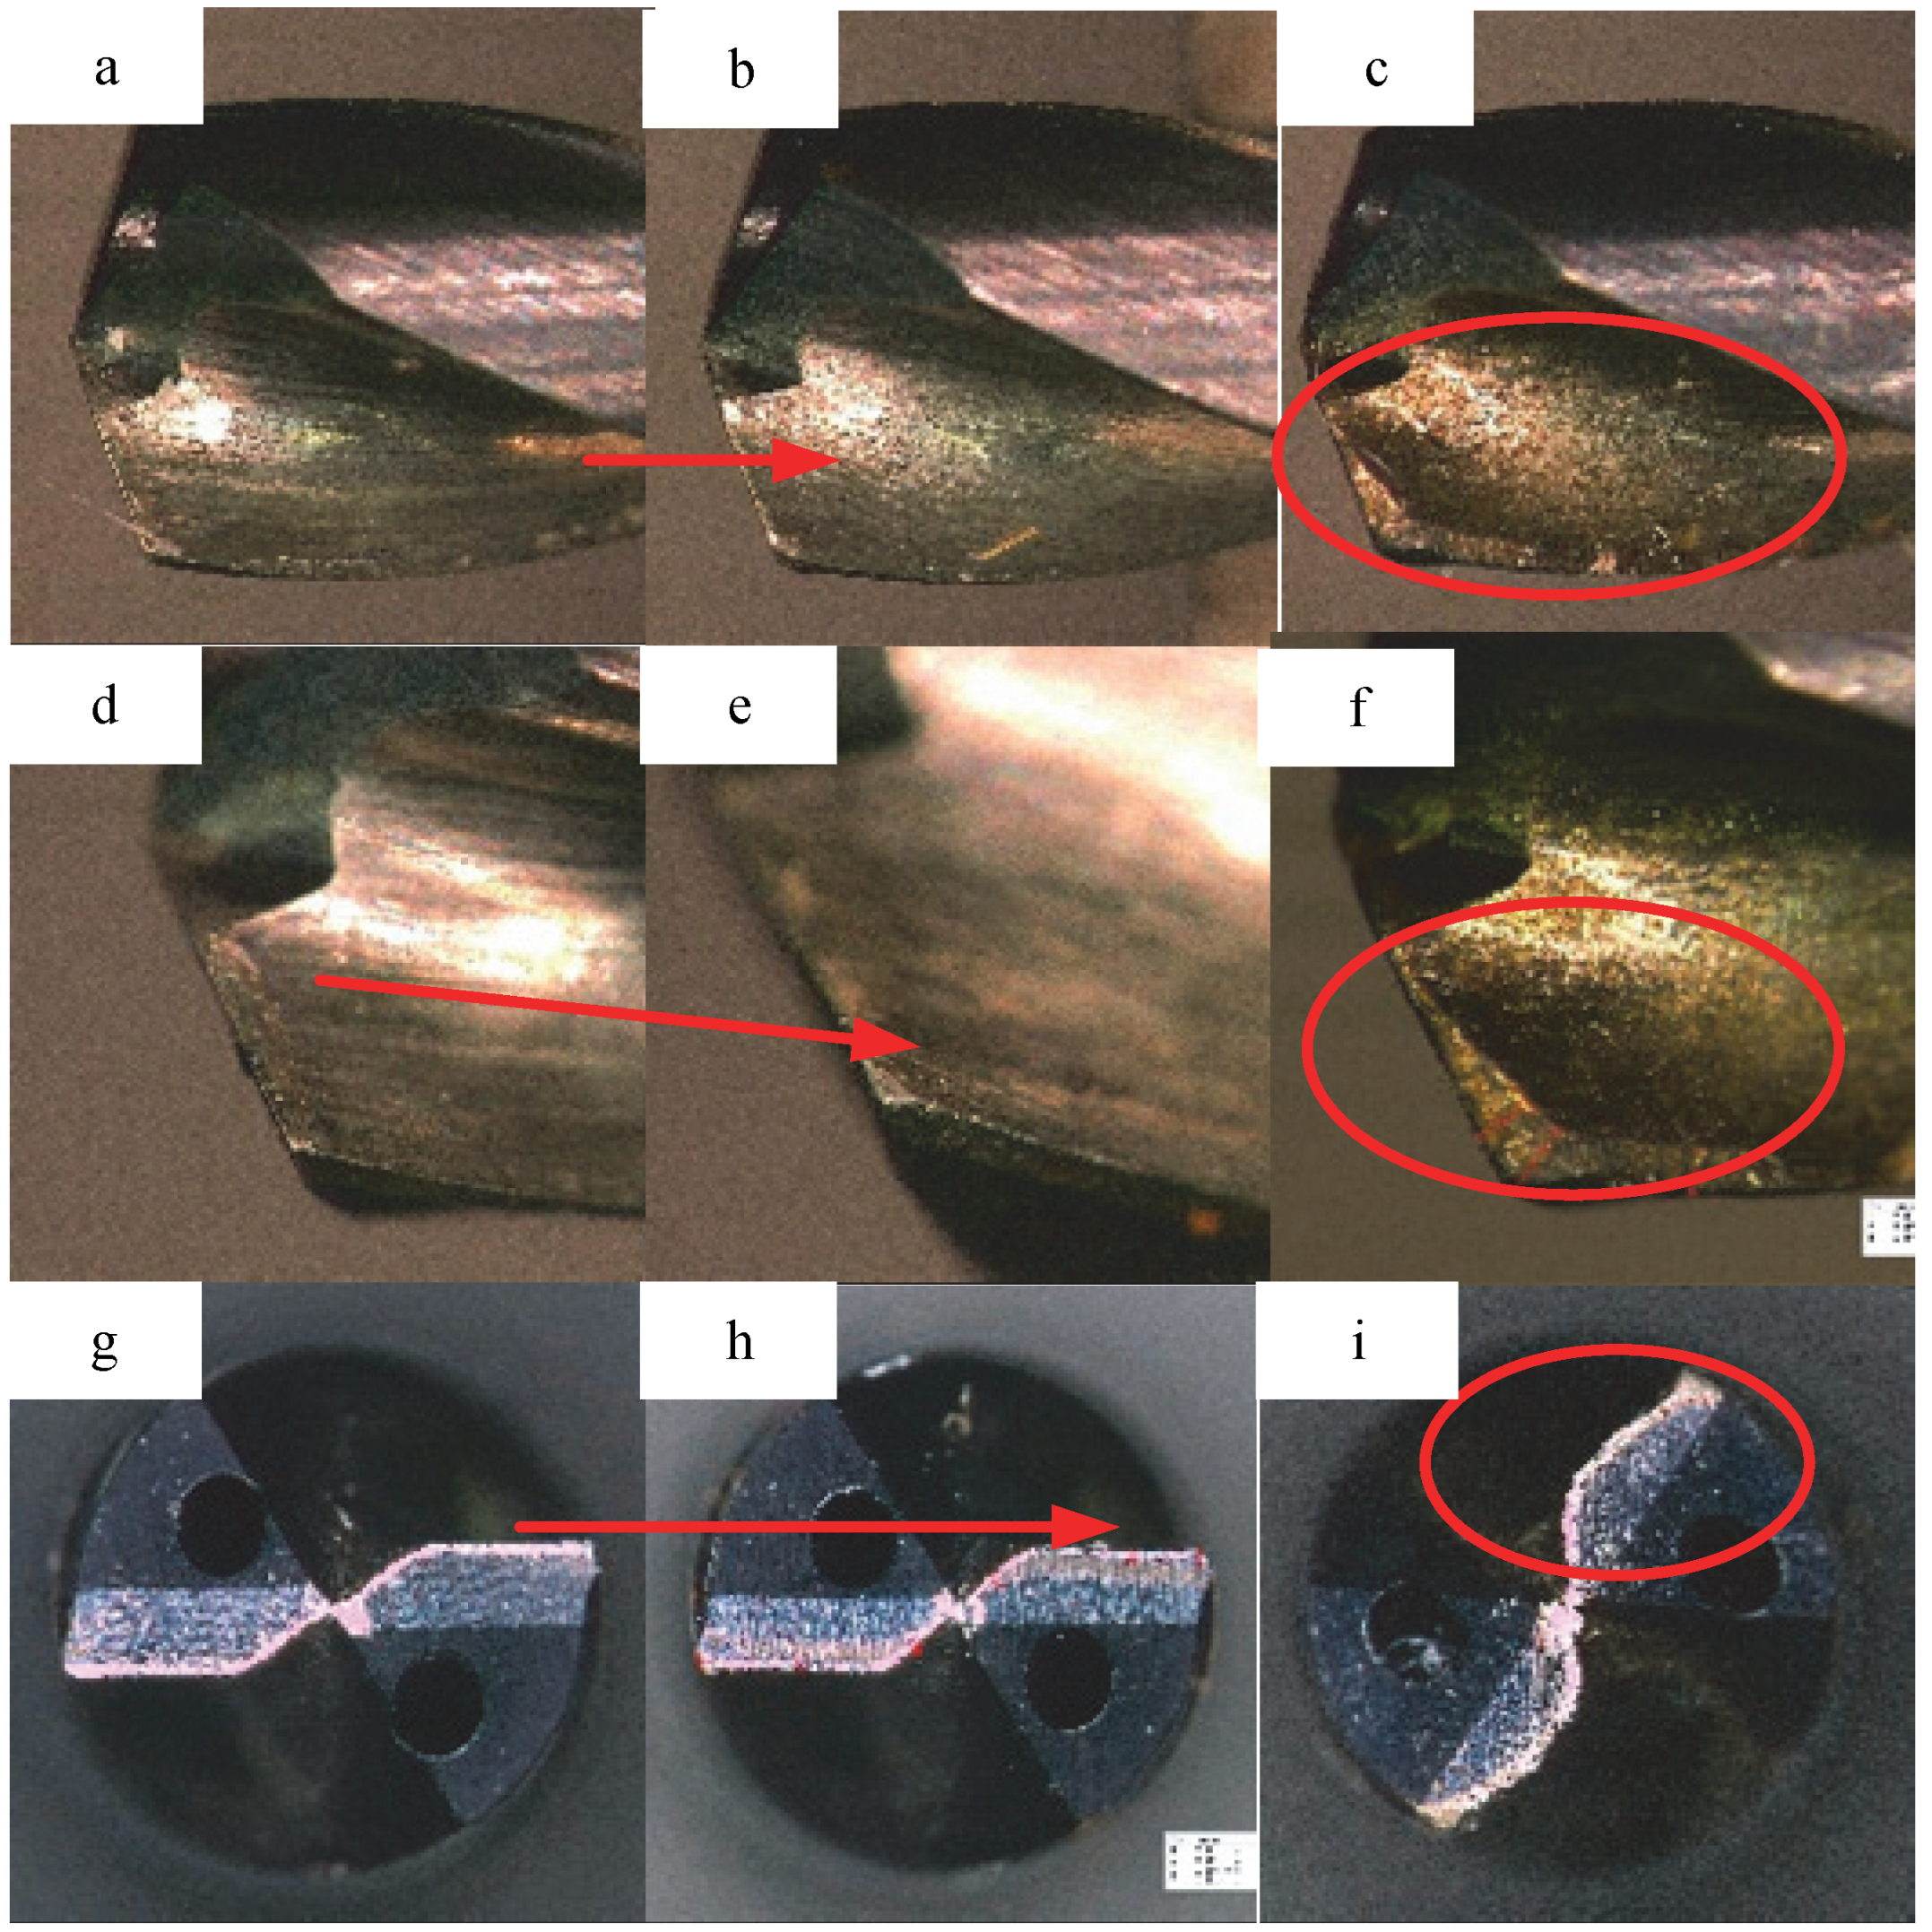
In the drilling experiment of Inconel 718, Chen et al. [17] observed that the wear mechanism on a TiAlN-coated carbide tool was mainly abrasive wear. Liu et al. [16] found that when the cutting speed was low, the tool wear mechanism was mainly abrasive wear. This was because when machining is performed at low cutting speeds, the cutting temperatures are lower, and other wear mechanisms are not significant. They also found that under low-speed cutting the rake and flank faces of the tool failed in a similar manner due to the hard particles on the machined surface and the intense friction of the tool parts. In drilling tests on Rene 65, Olufayo et al. [18] found that the tool wear was primarily flank wear due to the high abrasive forces experienced on the cutting edge of the tool. Figure 2 shows the process of rapid wear of the tool surface, which is due to the corrosion of the cutting edge of the tool due to the high temperature generated during the cutting process.
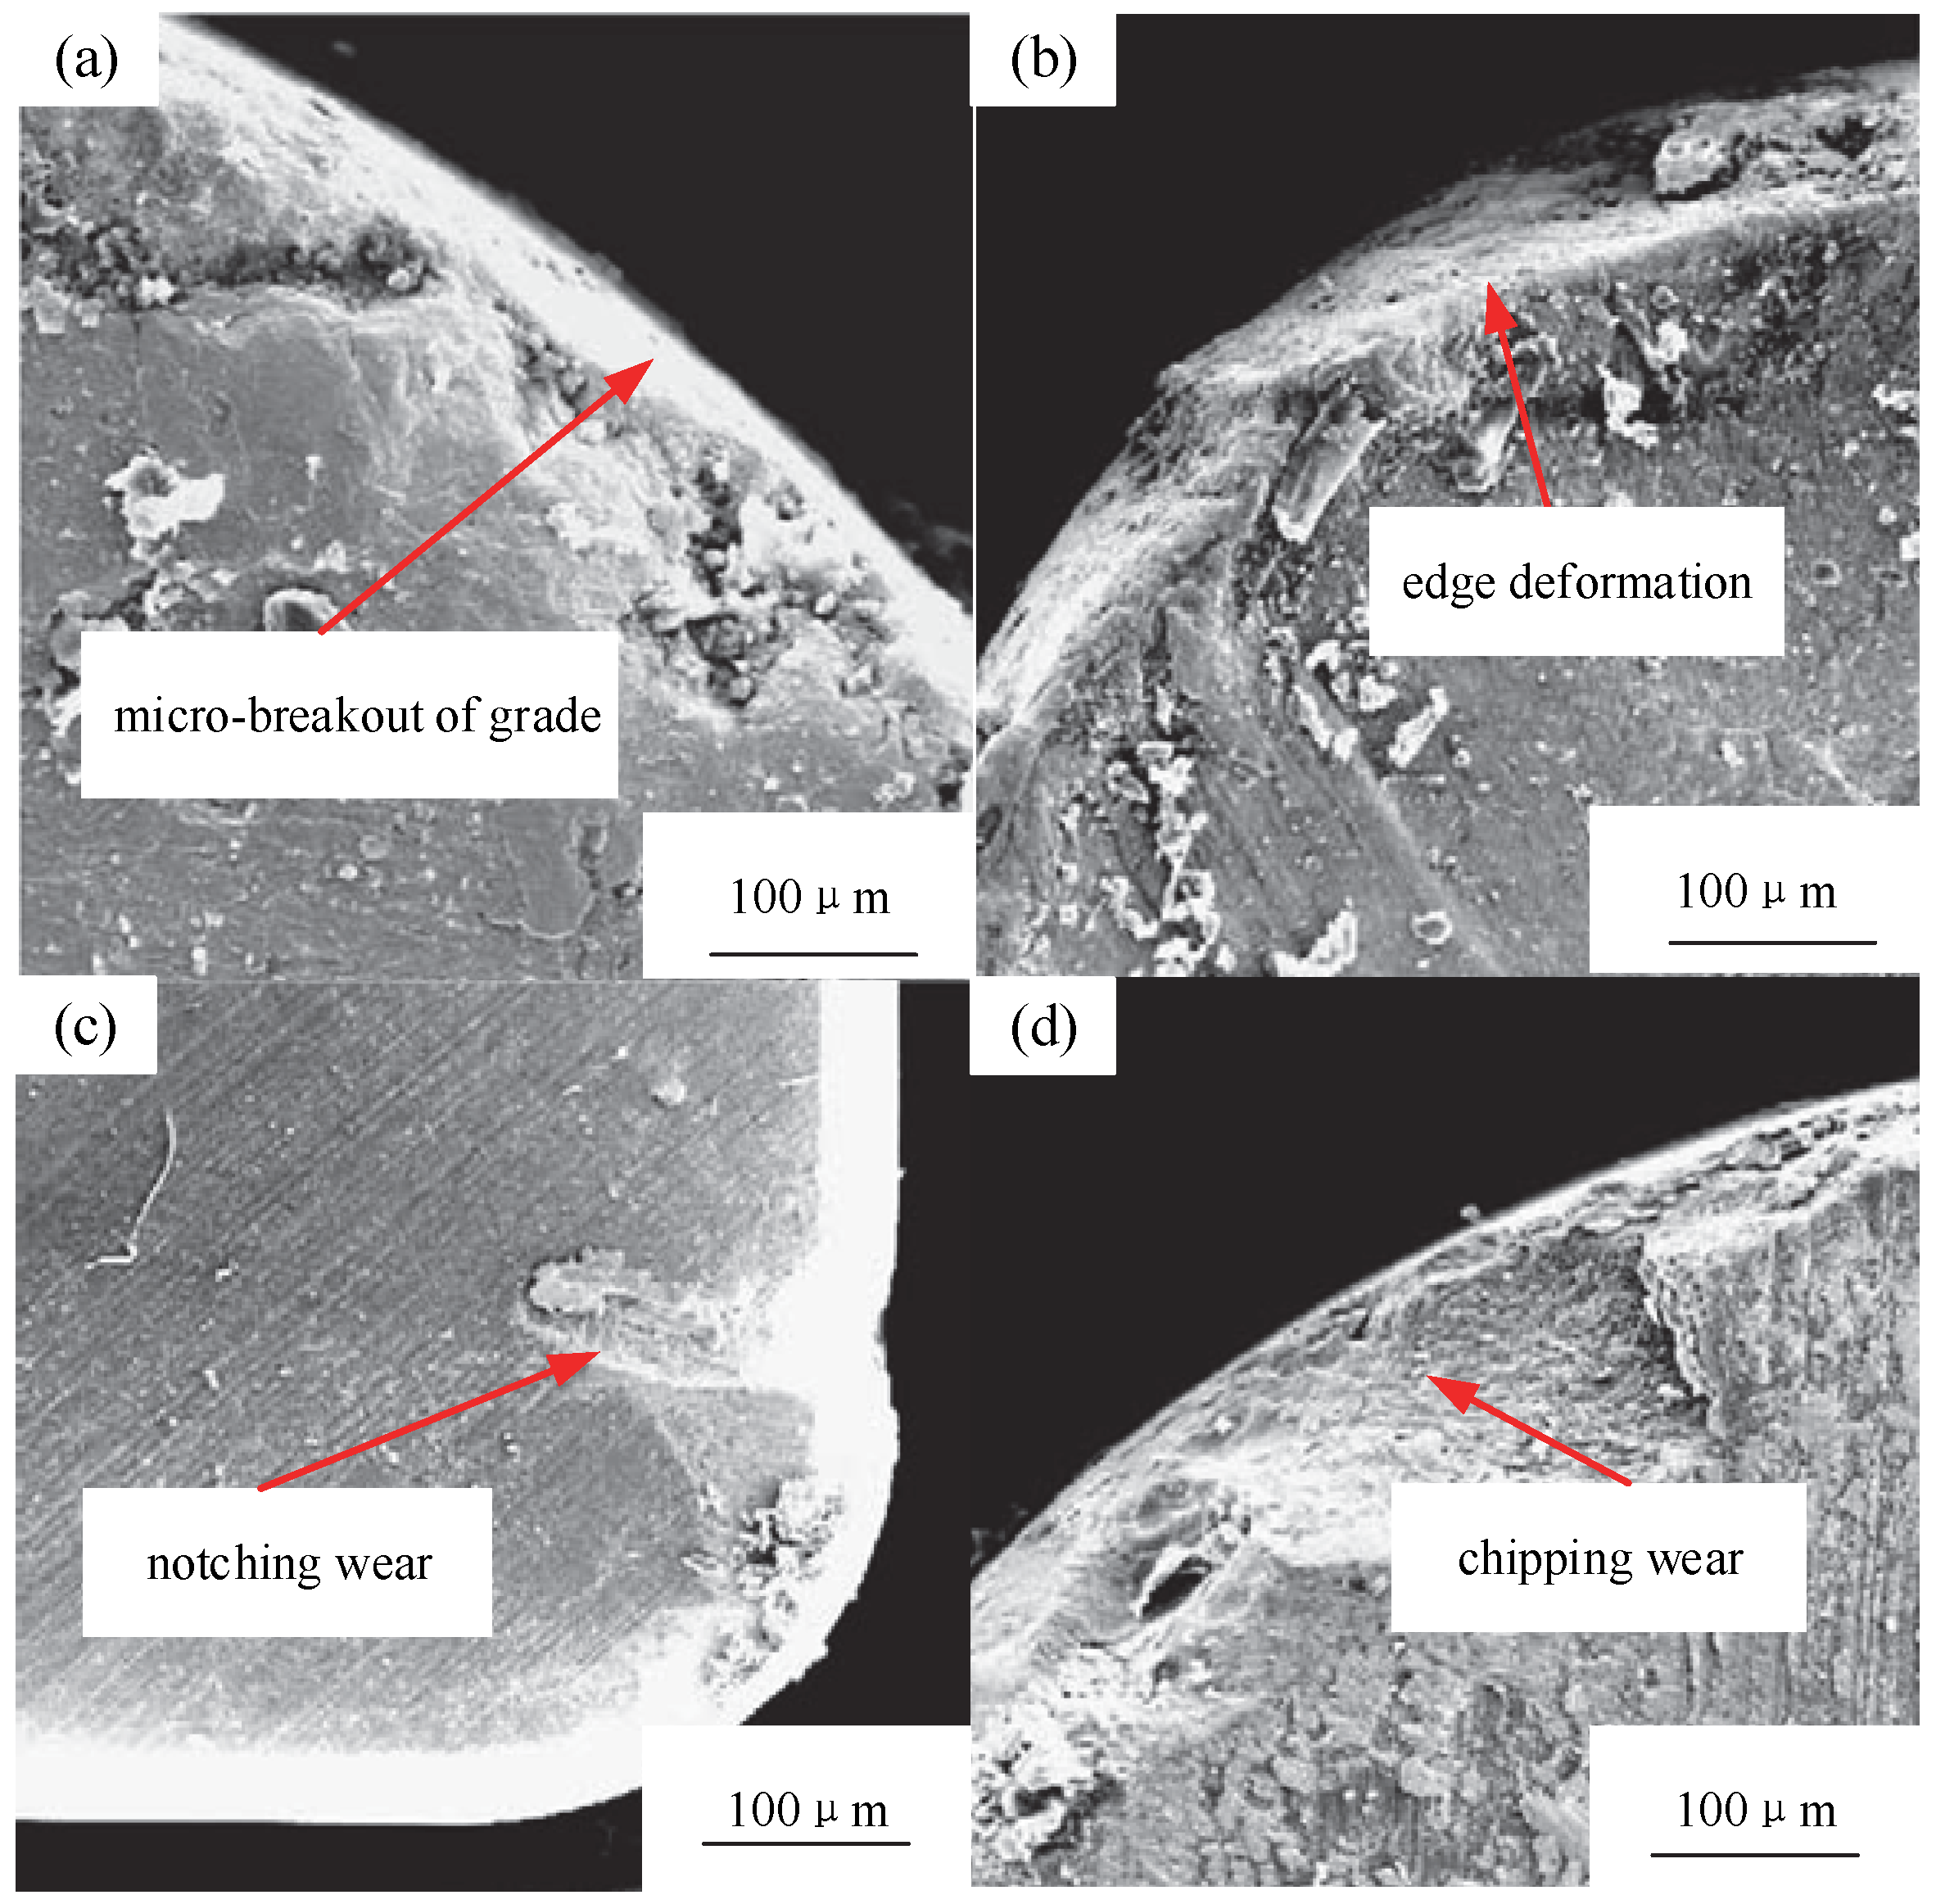
Deng et al. [19] conducted cutting experiments on Inconel 718 superalloy using Al2O3 ceramic tools reinforced with TiB2 particles and SiCw particles and found that the main wear mechanism on the tool flank was the presence of abrasive wear marked by grooves in the sliding direction of the tool and workpiece surface during machining. They believed that the friction between the tool, the hard particles in the workpiece material, and the hard debris falling off during processing is the main reason for abrasive wear. The repeated extrusion of the tool under this high-pressure environment causes crack development and more serious damage to the tool. Figure 3a shows an SEM micrograph of the tool wear profile of an ABW20 ceramic tool at a cutting speed of 80 m/min. An SEM micrograph of the crater wear trajectory at a higher magnification is shown in Figure 3b. Higher magnifications of the SEM micrographs of the flank wear trajectory are shown in Figure 3c,d. It can be seen that both the rake face and the flank face are severely worn. The adhered workpiece particles often remained attached to the tool surface. The adhesive wear of cutting tools involves a mechanism in which individual grains or their small aggregates are pulled from the tool surface and carried away on the underside of the chip or torn away by the adherent work piece. Weaker interface bonding between different ceramic phases can increase the severity of adhesion wear.
From the above studies, it can be known that the abrasive wear of the tool is the main wear mechanism on nickel-based superalloy machining in both the drilling and grinding of various types of tool materials. The hard particles in nickel-based superalloys are the main culprit of tool flank wear during machining, and the workpiece surface after work hardening is the key to deepening the depths of the worn grooves, thereby causing further wear to the tool. However, in most cases, abrasive wear is only one of the factors that cause tool damage.

2.2. Adhesive Wear

Adhesive wear occurs because under a high-pressure and high-temperature cutting environment the flow of workpiece material forms a BUE or BUL (built-up layer), which adheres to the rake face and flank face, but this BUE is unstable and will be damaged. Residual chips and workpiece material after work hardening are continuously removed. Due to adhesion to the surface of the tool, the surface of the tool is also peeled off when the BUE is removed, resulting in tool damage [13]. At low cutting speeds, the resulting cutting temperature is relatively low, and it is difficult for both the tool material and the workpiece material to undergo plastic deformation; at very high cutting speeds, the tool wear mechanism usually manifests as diffusion and chemical wear. Therefore, machining with moderate cutting speeds creates conditions such as high cutting temperatures that are conducive to the occurrence of adhesive wear.
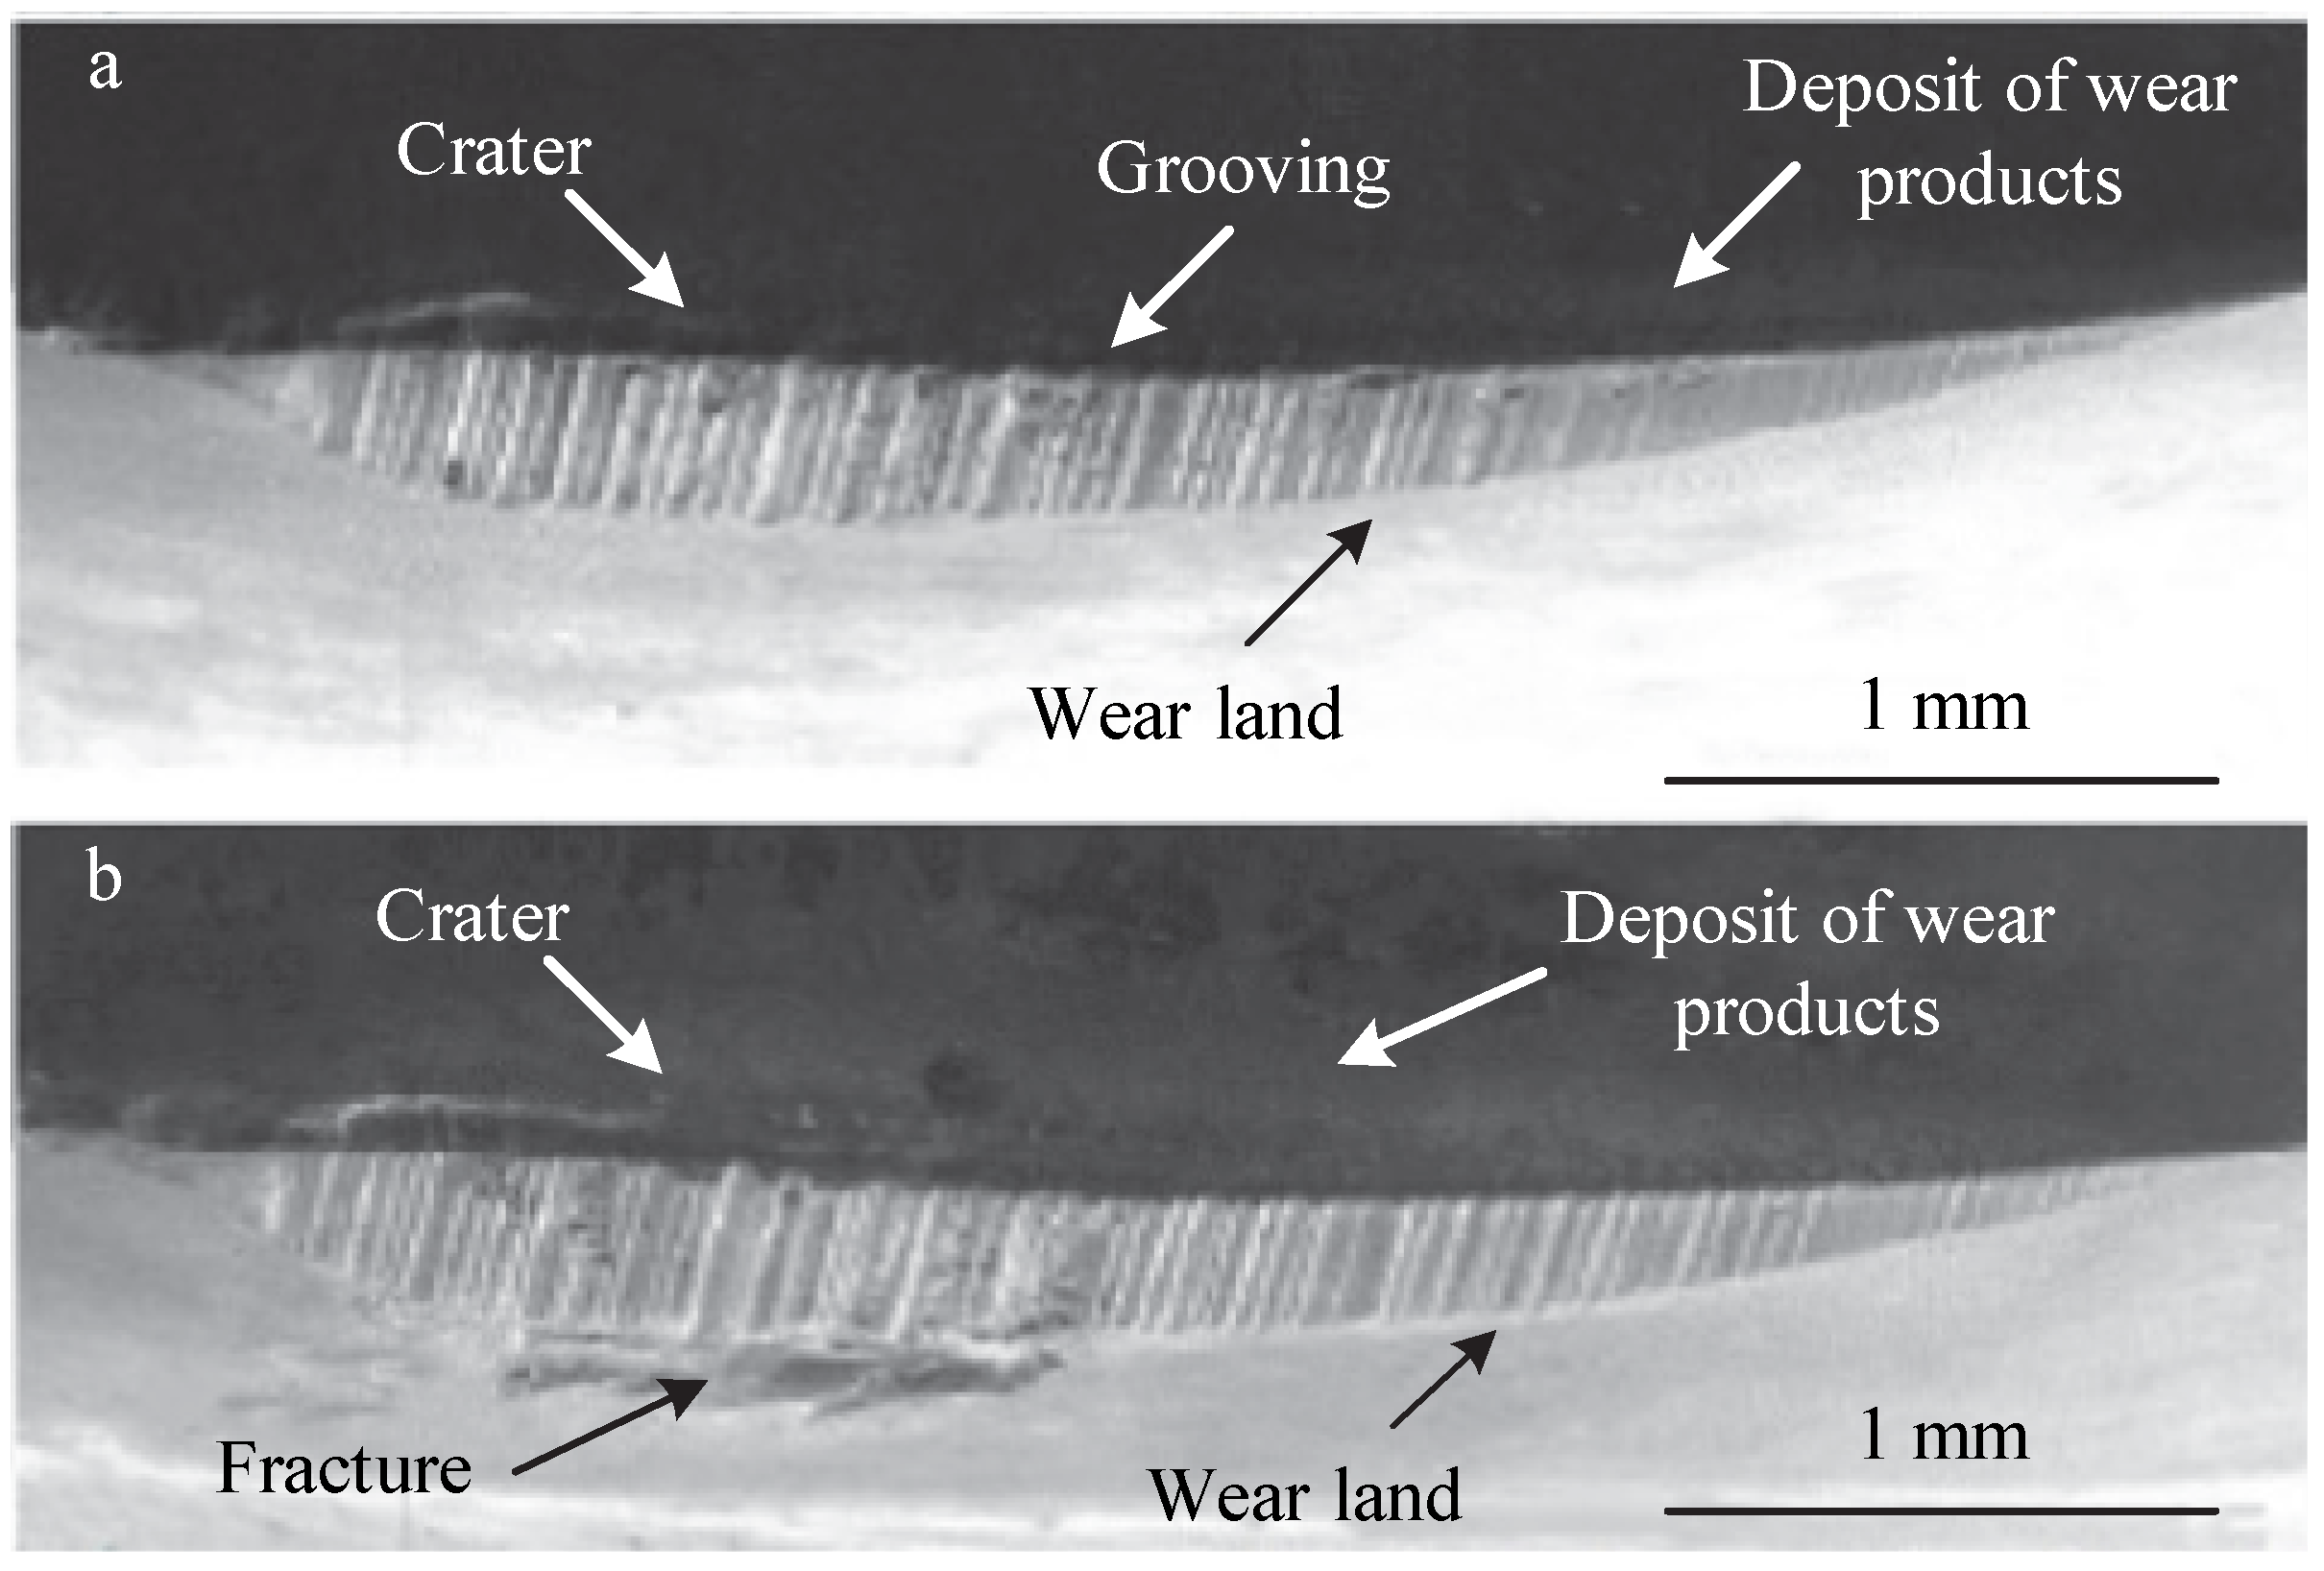
Li et al. [20] conducted cutting experiments on Inconel 718 using tools with PVD-coated and CVD-coated carbide materials, and they found a different wear mechanism than when using ceramic tools. The phenomena of adhesion, coating peeling, and edge fracture mainly occurred on the cutting edge, but the wear of the cutting edge was not serious, and no chipping phenomenon occurred. When they cut Inconel 718 with SiAlON tools, they found that the tools tended to be chipped, as shown in Figure 4. They also observed that when the cutting speed was increased (from 240 m/min to 300 m/min) the adhesion wear on the nose and flank increased, but the grooving depth decreased. Moreover, when the cutting speed and feed rate were further increased, cracks appeared on the rake face and even breakage occurred.
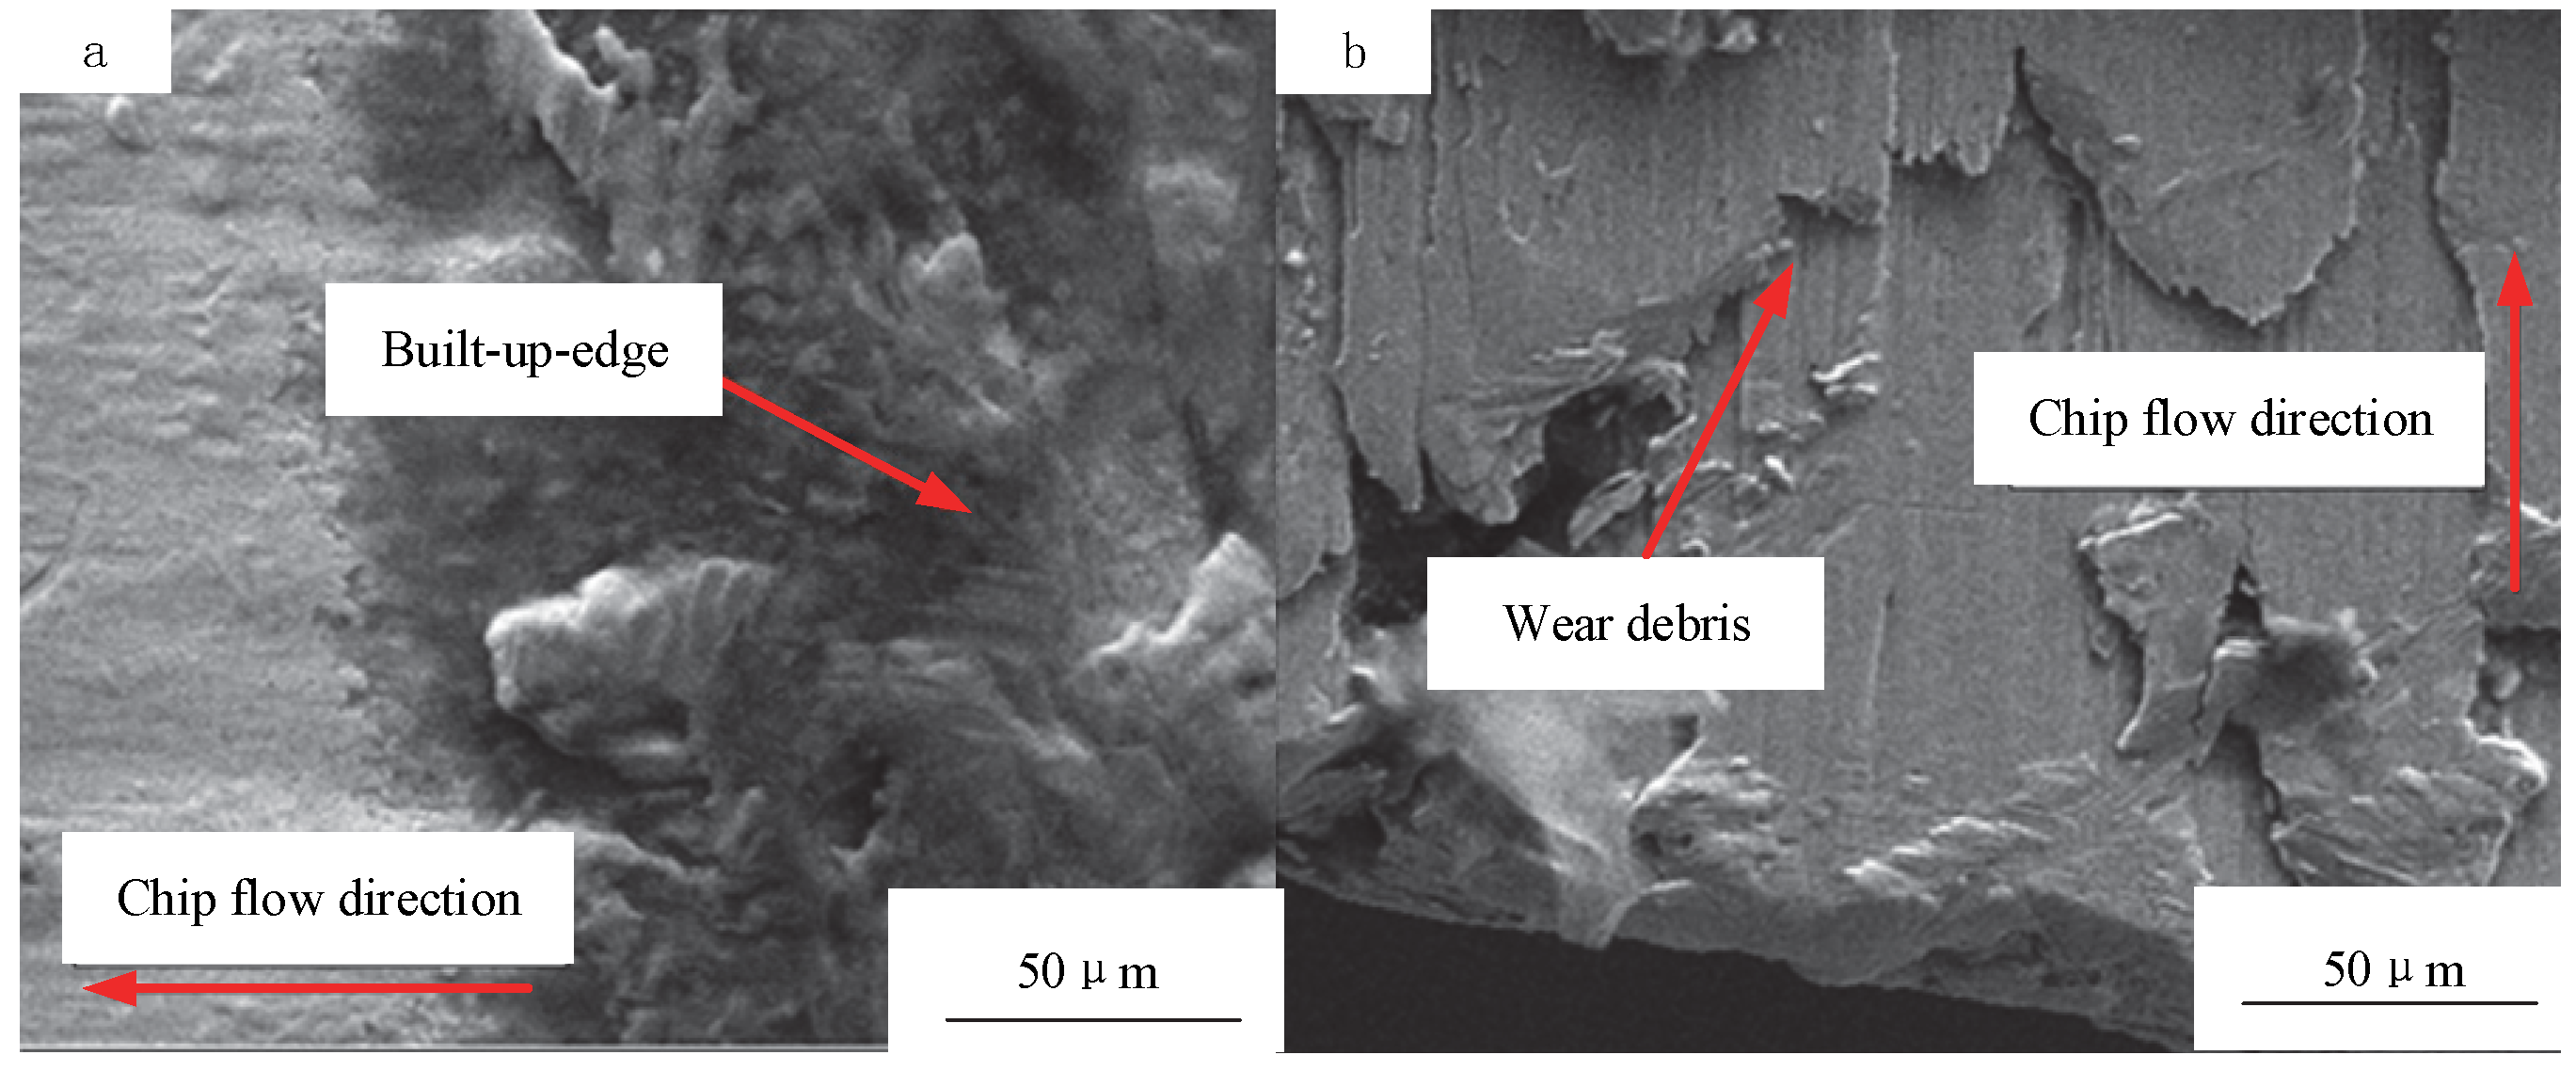
Hao et al. [21] conducted a turning test on an Inconel 718 superalloy with TiAlN-coated carbide tools and found that at a low cutting speed of 20 m/min the workpiece material accumulated and adhered to the surface of the tool in the form of a BUE (Figure 5), and the BUE formed in this case was not stable and was removed by the flowing chips as the machining progressed, resulting in the spalling and chipping of the tool material, leaving small cracks on the surface of the tool. In the machining of the Inconel 718 superalloy at high cutting speeds, the tool needs to withstand greater load shocks, resulting in a sharp rise in cutting temperature [22], and due to the poor thermal conductivity of the tool, the temperature can reach more than 1000 °C in the area of the tool tip; at this high temperature, the surface of the workpiece material is softened and quickly adheres to the tool surface, establishing and expanding the range of tool adhesion wear [23]. Under the action of a cutting force, the workpiece material and debris adhere to and insert into the tool surface, thus forming a bulge on the tool surface [24]. These adhesive materials undergo severe friction and shear in the continuous cutting process. Therefore, some adhesive materials break off, fall from the tool surface, and form microcuts on the rake face [25,26,27,28]. Liu et al. [16] found that the rake face was plastically deformed under high temperature and pressure to form a new surface, and the atoms on the surface of the tool and the workpiece adsorbed each other to form an adsorption point. In the process of machining, the adhesion point or surface is broken due to the relative movement of the tool and the workpiece, and the grain or grain group is sheared or pulled by the other side. Another study [29] also found that the use of TiAIN- or TiN-coated carbide tools can effectively reduce the phenomenon of chipping.
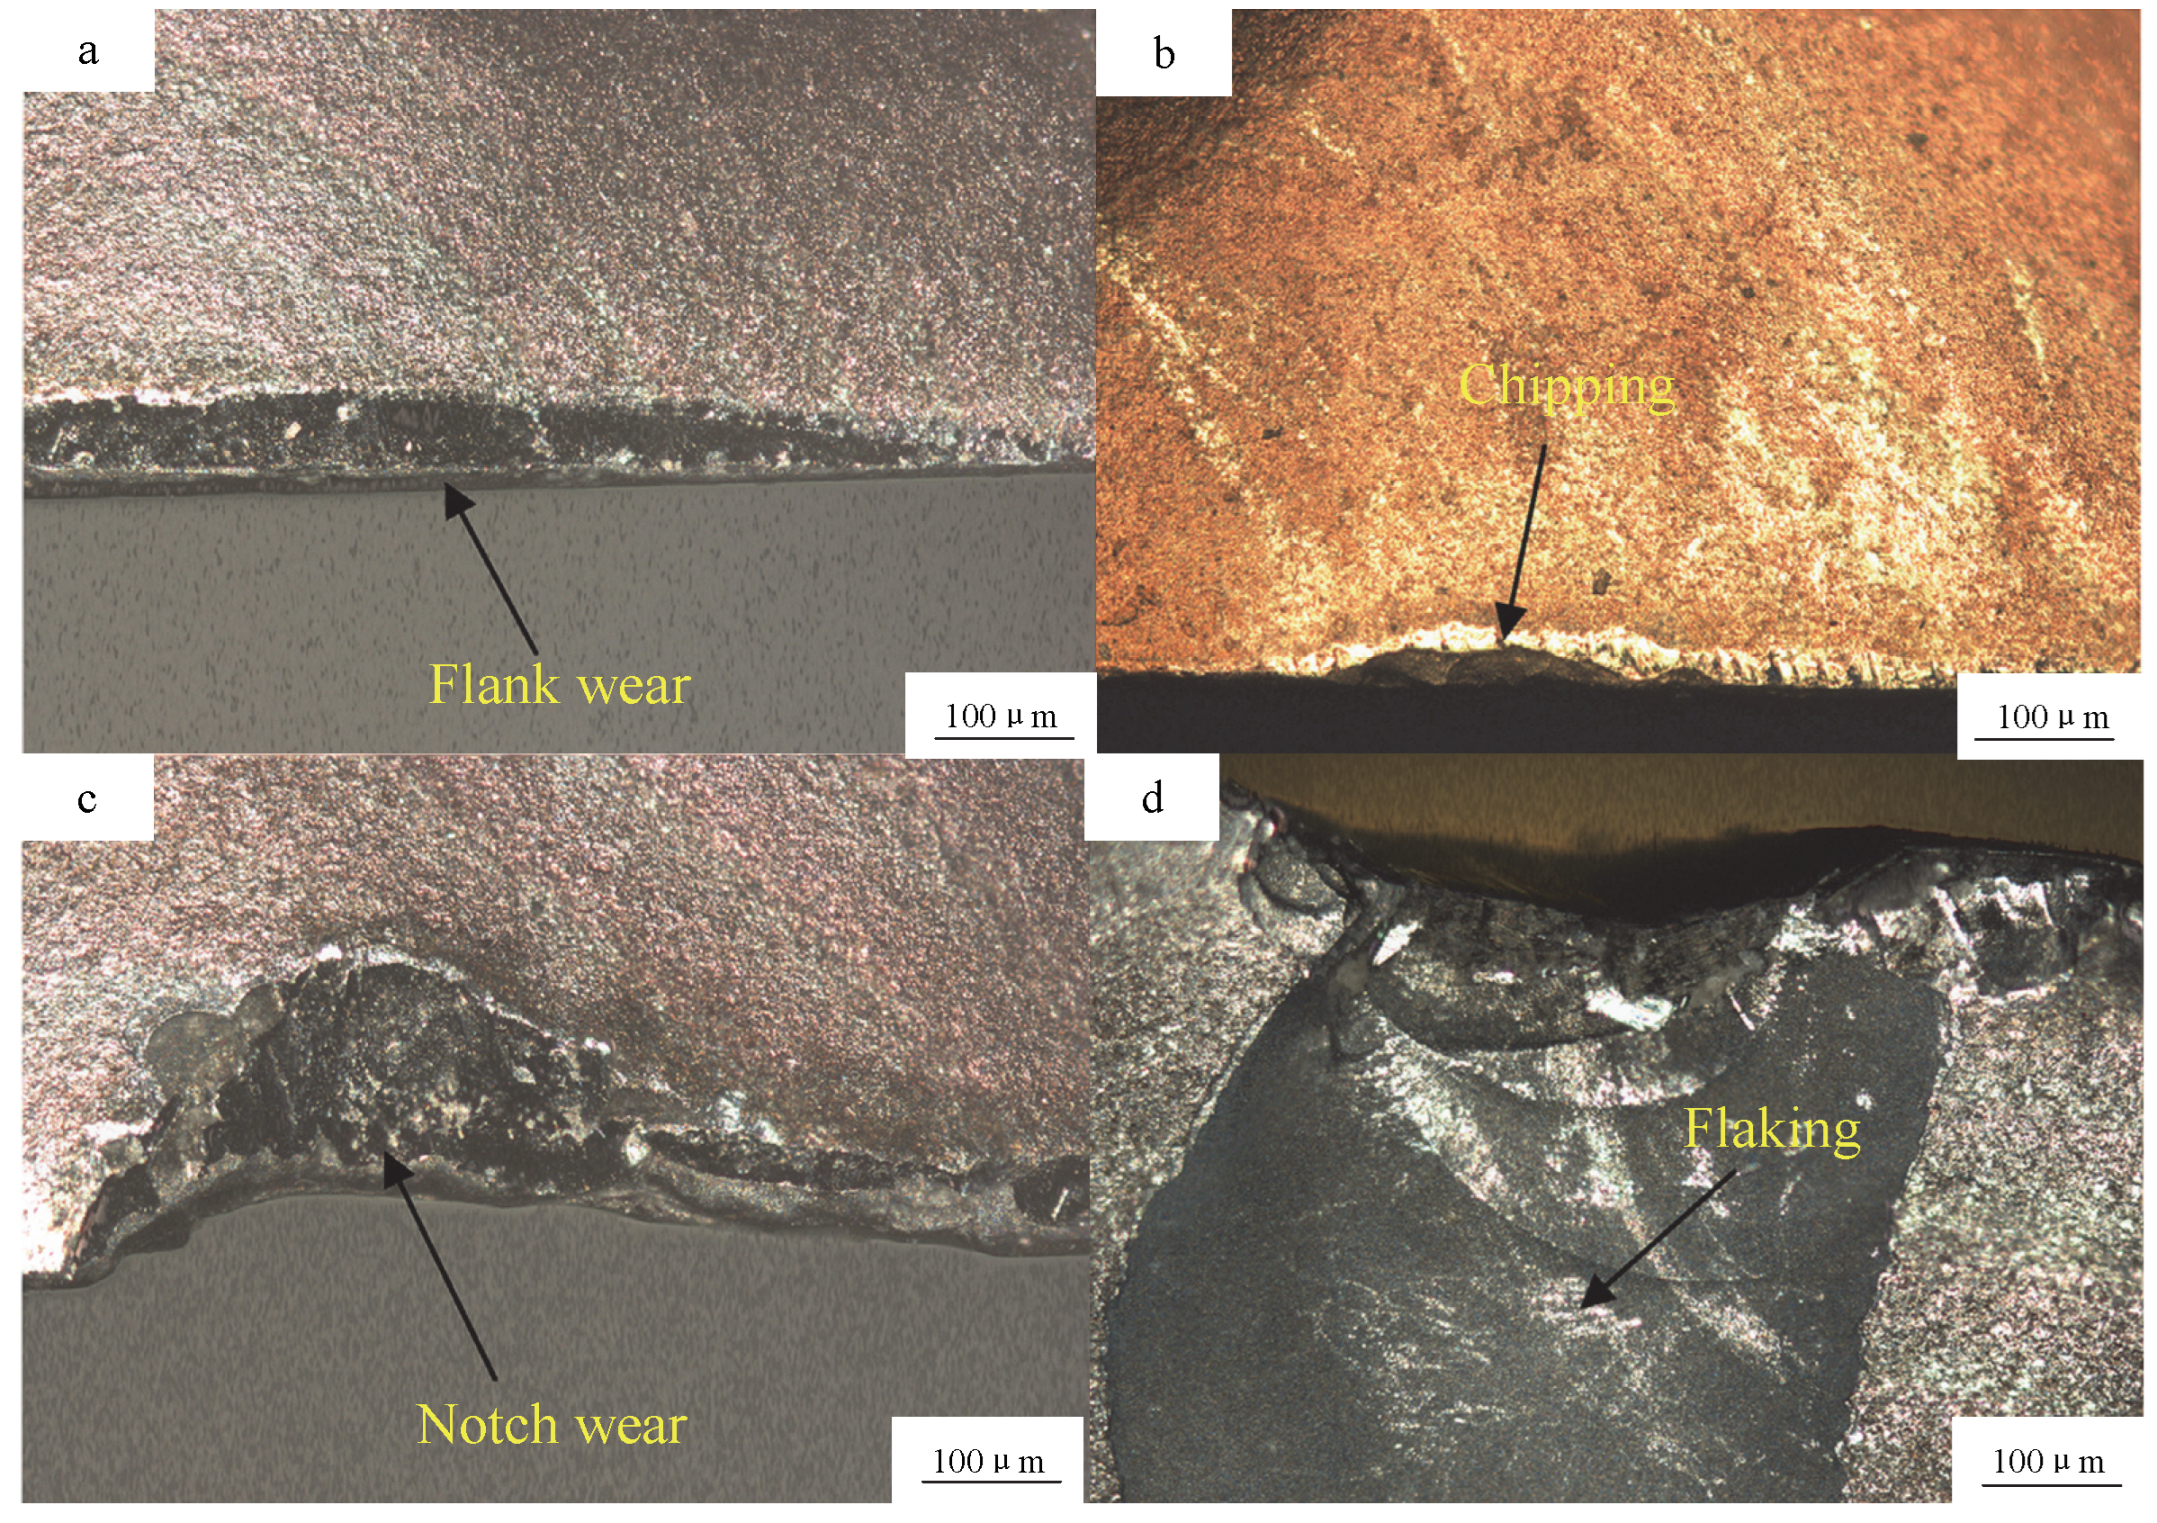
In one study [17], due to adhesion, there was a pit on the rake face, which was caused by the grain under the action of the bonding tool, which affected the strength of the cutting edge and led to edge collapse. Kasim et al. [30] milled Inconel 718 in order to analyze the wear mechanism of carbide ball end mills and predict the location of the notch. They found that, compared with abrasive wear, adhesive wear is the main wear mechanism that causes tool failure. It could be seen that the BUE on the tool surface was continuously removed, resulting in pitting corrosion on the tool surface. Under the action of high temperature and friction, the tool generated debris, which further damaged the tool (Figure 6). They further noted that the radial depth of the cut and the cutting speed were the main parameters affecting notch formation. Zhu et al. [31] reviewed the tool wear characteristics of nickel-based superalloys and found that adhesion and diffusion were the main tool failure mechanisms for CBN tools.
In the above studies, we have found that the adhesive wear mechanism is the main reason for tool failure in the machining of nickel-based superalloys with tools made from this type of material. In other words, most tool wear is established and diffused by the adhesion mechanism. Because the BUE formed by the workpiece material adheres to the surface of the rake face and flank face of the tool, the surface material is damaged and the tool is damaged, making it susceptible to abrasive wear, fatigue cracking, and other wear mechanisms. At the same time, work hardening adhesion and the build-up of workpiece material at the depth of the cut can cause severe chipping due to the plucking of adhering material. Regarding adhesive wear, uncoated damage is more serious for carbide tools. In most cases, uncoated carbide tools have limited tool lives due to severe flank wear, adhesive wear, and grooving depths, which are also observed in tools with large particle sizes. Although the wear mechanisms shown by different coating materials are different for coated carbide tools, the chipping of the tool, the peeling of the surface material, and crater wear are the most common and can also be considered adhesive-wear-dominated wear mechanisms. In some cases, deep grooves have been found on the tool, especially in milling. Compared with uncoated tools, coating can protect the tool to a certain extent and prolong its life.

2.3. Other Mechanisms

In addition to abrasive wear and adhesion wear, diffusion wear is also one of the wear mechanisms of superalloy machining tools. It is mainly at high temperatures that the elements of the tool material and the workpiece material are activated and diffuse between the two. Diffusion wear is common in high-speed cutting because in high cutting speed the cutting temperature of the tangent point between the tool and the workpiece is very high, which is conducive to the diffusion of elements on the tool, thereby causing wear to the tool [15].
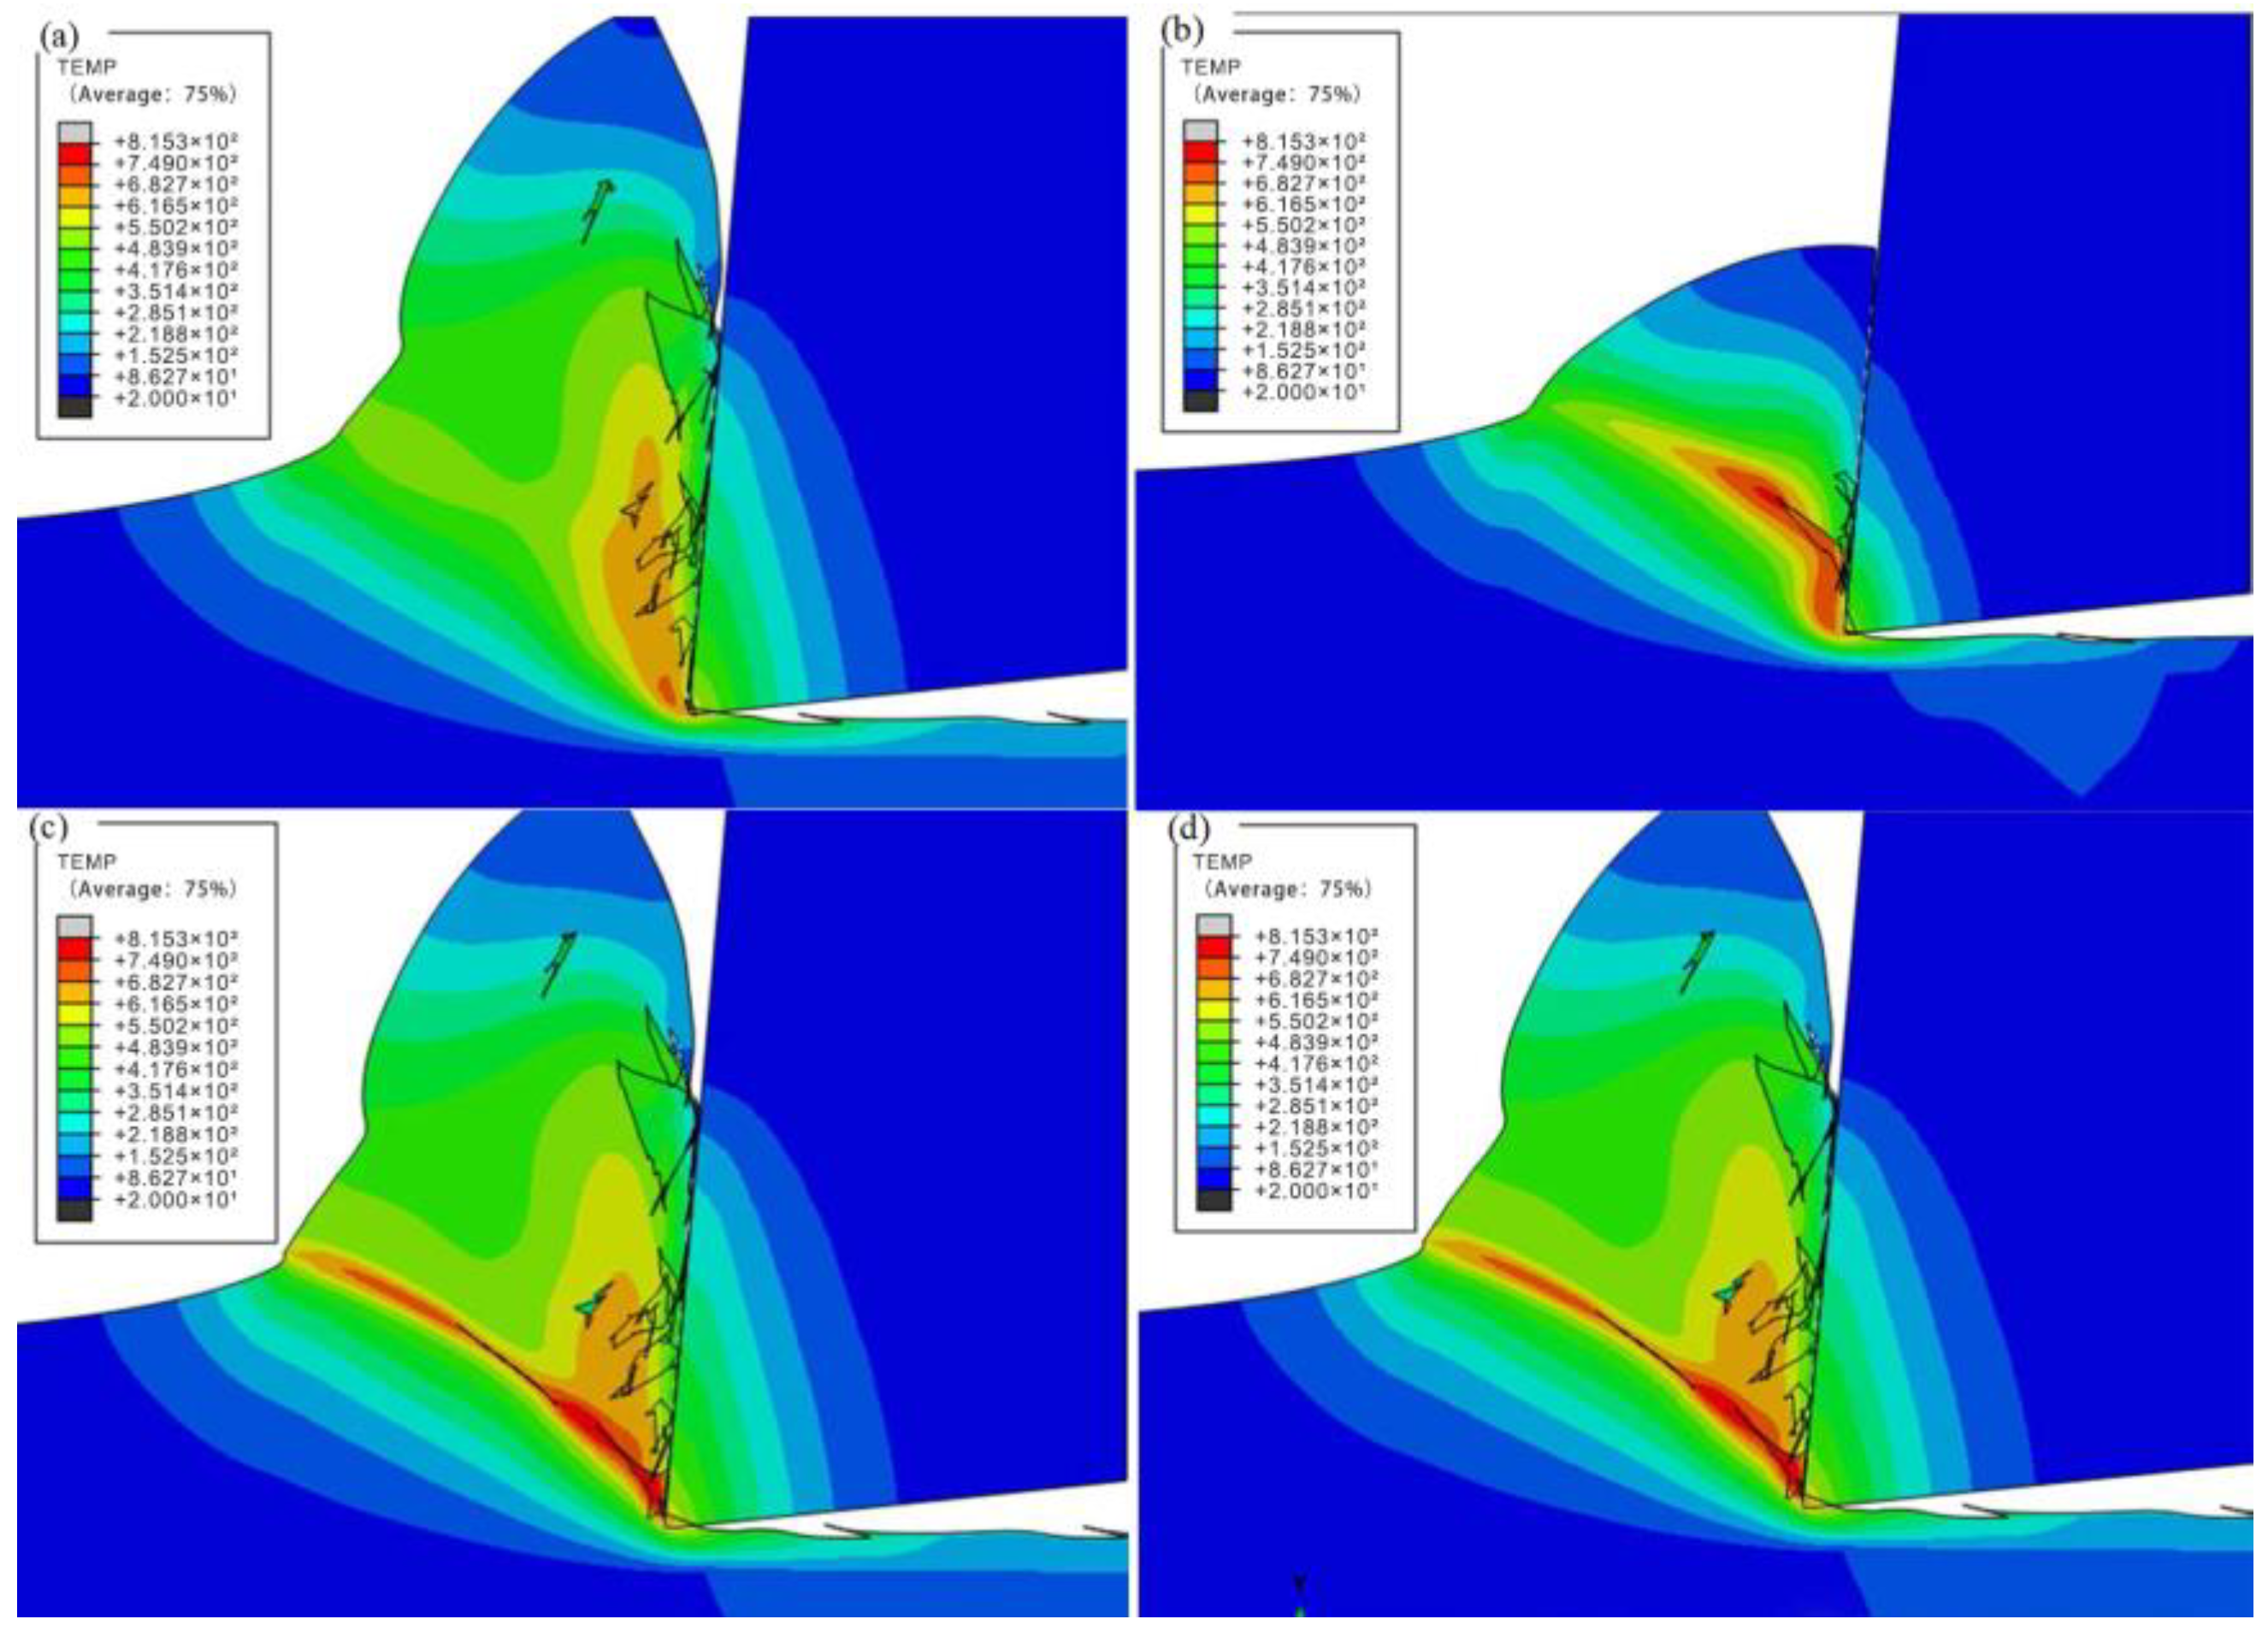
When we were cutting nickel-based superalloys, the cutting temperature was very high, and the close contact between the chip and the tool workpiece provided an ideal environment for the atoms in the tool material to diffuse outward through the chip interface. For cemented carbide tools, Co is most likely to be lost by diffusion, so the Co content of cemented carbide tools can determine the occurrence of diffusion wear [5]. In the research of Li et al. [32], cutting was simulated with a milling cutter tip as the research object. Figure 7a shows the early stage of cutting. The change in the temperature field from the initial stage of chip formation with the cutting time shows that the highest cutting temperature was at the contact point of the tool tip when the tool just contacted the workpiece, and it decreased along the shear surface to the free surface of the workpiece. Random cutting was carried out. Figure 7b shows the middle stage of cutting, when the temperature of the cutting area of the tool tip reached 439 °C. At this time, the interaction between the rake face of the tool and the high-temperature chips caused rake face wear, most of which was crescent wear. With the advancement of cutting, the temperature of the tool tip in Figure 7c,d reached 682 °C, and the wear of the tool tip was more serious.
Diffusion or solution wear has been reported to limit tool performance when using carbide tools to machine Inconel 718 [10,30]. In contrast, when the ceramic tool is replaced, the cutting speed is increased, and the cutting temperature at the contact between the tool and the workpiece is also much higher. In this high-temperature and high-pressure environment, it is very conducive to the occurrence of diffusion wear. Ezugwu et al. [33] also support this view. Diffusion wear has also been observed to result on smooth surfaces, possibly due to the fact that when cutting Inconel 718 with a ceramic tool the elements of the tool and workpiece were not only transferred on the surface but could also penetrate into the tool and cause damage to the tool. Costes et al. [34] presented an analysis of the optimal grade and wear mechanism of a ceramic binder and the low-CBN content of small grains in a finishing operation of Inconel 718. The results indicate that diffusion wear can also cause eventual tool failure.
In turning experiments on RR1000 nickel-based superalloys, Hood et al. [35] found that, when using a new tool for the first turning operation, a cutting speed of 80 m/min can effectively extend the tool life. When the tool is used for the first time on the test surface, a moderate cutting speed can prolong the service life of the tool, and the subsequent use of the tool under high-speed cutting can be prolonged with the service life of the tool. Therefore, when cutting, we cannot blindly pursue a high cutting speed but should adjust the corresponding cutting speed according to the different wear conditions of the tool to prolong it service life. Costes et al. [34] conducted cutting experiments on Inconel 718 to determine the optimal composition ratio of CBN tool materials and the optimal cutting parameters. When analyzing tool wear patterns, they found that, although the depths of cut notches were a factor, the transfer of impurities from the workpiece material into the tool was the main wear factor.
To study the tool wear mechanism, Xue et al. [36] investigated the formation of the bond layer when machining Inconel 718 superalloy under wet conditions, and the impact on PVD (TiAlN)-coated carbide tool life was investigated. They did not detect elements from the workpiece material in the tool but found elements from the tool in the workpiece material, which can also serve as evidence that tool wear occurs on the basis of an adhesive wear mechanism. Costes et al. [34] conducted cutting experiments on Inconel 718 to determine the optimal composition ratio of CBN tool materials and the optimal cutting parameters. They found that, before party adhesion wear occurred, the elements of the workpiece material diffused to the tool to speed up tool wear. When EDX (energy-dispersive X-Ray spectroscopy) was used to analyze the attachments on the rake face, the results showed that the elements of Nb, Cr, Fe, and Ni came from the workpiece material, while Al and Ti came from the tool material. The material from the tool and the workpiece could be detected on the attachment because the Cr and Ni elements and the B element on the CBN tool have better affinity. They also pointed out that when the CBN content of the tool is between 35% and 60% the service life of the tool can be extended more effectively; in addition, CBN cutters with smaller grain sizes had better performance for all wear properties. Through experiments, they found that when using a medium cutting speed (240–450 m/min) the tool can be used for a longer time.
Chemical wear generally occurs in the contact area between the tool and the workpiece. Due to the high-temperature and high-pressure environment, the tool material chemically reacts with the surrounding medium (such as air, cutting fluid, etc.), which oxidizes the surface of the tool or generates impurities that affect the looseness of the tool bond, causing irreversible damage to the tool [37]. In a low-temperature environment, the interatomic structure of the tool material is very stable and is not easily destroyed, which means that chemical wear occurs almost exclusively at high or ultra-high temperatures [15]. Chemical wear is generally a sign that the surface of the tool becomes smooth. After the tool material chemically reacts with the medium, the surface of the tool is softened, the strength and hardness of the tool decrease, and other wear mechanisms are prone to cause further damage to the tool. Pawade et al. [38] turned an Inconel 718 (HRC 45) superalloy at a high speed using two PCBN tools (TiN-coated and uncoated generic). It was observed through experiments that, in the range of cutting speeds of 250–350 m/min, although dense craters were the dominant tool failure mode, as shown in Figure 8, the main wear mechanism of the tool was the chemical wear caused by the chemical reaction on the surface of the tool due to the phenomenon of abrasive particles. Since the CBN tool has a special affinity for elements such as Fe, Ni, Nb, and Cr, when the cutting speed increases, the cutting temperature also increases, the coating of the CBN tool is damaged, and the above elements in the workpiece material react with the tool, causing damage to the tool.
From the studies above, it can be seen that chemical wear also occurs in the machining of nickel-based superalloys, although mostly in the form of incidental wear. Compared with abrasive wear and adhesive wear, whether it is diffusion wear or chemical wear, few people have conducted in-depth research on it. Some researchers have studied them together because of their similarities (they occur in high-temperature environments and smooth tool surfaces). Even if they are not common wear mechanisms, diffusion and chemical wear can cause serious tool damage if left unchecked. Therefore, it is also necessary for us to conduct in-depth research on such wear mechanisms. Preventing or delaying the occurrence of these wears is beneficial to prolong the service life of the tool and reduce the processing costs of enterprises, etc.

3. Optimization of Tool Wear

In recent years, nickel-based superalloys have been very popular in many fields, but the problems of processing efficiency and processing cost are associated with these materials, so people have carried out a lot of research on how to extend tool life in machining [39,40,41,42]. They add coating materials to the tools, select different materials to prepare tools, optimize cutting parameters, improve the cutting environment, etc., and constantly enrich and refine the protection measures for tools in machining.

3.1. Tool Coatings

Some researchers make extensive use of coated tools when machining nickel-based superalloys [43,44,45]. These coatings include TiN, TiC, TiCN, TiAlN, and Al2O3 matrices of titanium. The use of a coating reduces the friction between the tool and the workpiece to lower the processing temperature [36]. Bhatt et al. [46] conducted Inconel 718 cutting experiments with coated and uncoated tools, and they conducted an in-depth analysis of the experimental results and found that, although abrasive wear and adhesive wear were observed on both tools, the coated tools had much less damage than uncoated tools. Costes et al. [34] studied the experimental results of a CBN tool cutting Inconel 718 and found that the elements of the workpiece material detected on the surface of the tool should be due to the uncoated protection of the tool, that the elements of the workpiece material diffused to the tool, and that these elements were formed with the tool material. When the new material is removed, it will take away part of the tool material, causing tool wear. Devillez et al. [23] conducted a dry-cutting experiment on the nickel-based superalloy GH4169 with an AlTiN-coated tool. According to the experimental results, it can be concluded that the coating material on the tool can fully protect the tool, especially from tool damage due to abrasive wear.
Considering that the diffusion layer can cause thermal resistance between the coating and its substrate, Zhang et al. [8] proposed a new method to predict the cutting temperature of coated tools. In the diffusion layer of the outer layer, the coating material is continuously distributed, and the tool material is relatively dispersed. Compared with the inner diffusion layer, the tool material is continuously distributed, while the coating material is dispersed. The material dispersed in the diffusion zone of either the outer layer or the inner layer is not conducive to the conduction of the cutting temperature. Therefore, the thermal conductivity of the dispersion phase can be set to zero when considering the effect of dispersion relative to heat transfer. The results showed that the temperature calculated by the new model was closer to the experimental results. This new methodology provides new theoretical guidance for the coating design and manufacture of various tools in the future.
Tool coating can be regarded as forming a protective film on the tool surface, but the selection of coating materials is also very critical and requires good high-temperature resistance, wear resistance, and chemical stability. However, whether the addition of coating materials hinders the transmission of cutting temperature is also a subject that needs further study.

3.2. Tool Material

In the cutting of nickel-based superalloys, the machined parts often require high precision, especially in the aerospace field, and the dimensional accuracy and surface effects of the parts largely depend on the tool material. Due to the poor machinability of nickel-based alloys, cutting tool materials often experience extreme thermal and mechanical stresses close to the cutting edge during machining [30], which often lead to tool deformation or increased tool wear.
Ceramic tools can be cut at a cutting speed several times higher than that of cemented carbide tools and are generally used in high-speed machining [47]. Ceramic tools have high strength values and can cut workpiece materials with hardness values up to HRC65, and they can still maintain good chemical stability in high-temperature environments. However, the impact resistance of ceramic tools is relatively poor, and the surface of the workpiece after machining is worse than that of hard tools. At present, ceramic tools can be roughly divided into two categories: alumina-based and silicon nitride-based.
Based on glass network theory, Shi et al. [48] improved the formulation of vitrified bonds and prepared a nano-coceramic CBN grinding wheel. Compared with traditional vitrified binders, nanovitrified binders have better properties, such as their fire resistance, flexural strength, and microstructure. Through grinding experiments of nickel-based superalloys, the authors found that adding a small amount of nanomaterials in the vitrified bond as a modifier can improve the performance of the vitrified bond grinding wheel, thereby effectively reducing the grinding force and the grinding temperature and reducing the wear of the grinding wheel. Increasing the life of the grinding wheel greatly improves the grinding surface quality, reduces the surface roughness, and makes the machined surface smoother.
Compared with cemented carbide tools, CBN tools have better overall performance. CBN tools are faced with two problems in machining: high brittleness and the load impact caused by no chip breaking. Therefore, many enterprises are reluctant to choose CBN tools because of the high machining cost. At present, it seems that SiAlON tools can maintain good toughness and high strength at high cutting temperatures, and they are considered to be some of the best tools for machining materials that are difficult to machine.

3.3. Optimization of Cutting Parameters

When the material and shape of the tool are determined, selecting appropriate cutting parameters can not only improve the machining efficiency but can also play a certain role in protecting the tool, and more importantly, it can optimize the machining effect of the solid body. The influence of cutting parameters on these indicators is not consistent, and the lowest cost is usually used as the selection criterion, gaining greater efficiency to maximize profits.
The experiments by Liu et al. [16] were conducted in two stages involving specific tool materials, fixed tool shapes, and cutting parameters. In end-milling experiments with Inconel 625, it was found that changing the tool material or tool shape alone did not optimize the overall machining results, but they noticed that a combination of specific tool materials and tool shapes worked well. Figure 9 shows the tool wear caused by different cutting parameters.
Sharman et al. [49] discussed the milling of Inconel 718 using a cutting speed of 150 m/min and observed in a tool life study that a TiAlN-coated product at a cutting speed of 90 m/min resulted in the maximum tool life. Similarly, Aruna et al. [50] performed a fine turning study of Inconel 718 with ceramic tools. The cutting speed was the most important factor affecting the overall performance. The optimal cutting conditions to obtain a good surface finish were 100 m/min and 0.1 mm/rev. Tool failure occurred at 200 m/min, and the feed rate was 0.15 mm/rev. In the first turning test of Hood [29], it was found that a cutting speed of 80 m/min can more effectively prolong the life of the cutting tool than speeds of 100 m/min and 120 m/min. In the subsequent turning test, they found that since the tool was worn the use of a high cutting speed could better alleviate the tool wear. Therefore, during cutting, the cutting speed should be continuously adjusted according to the wear of the tool to extend its service life. When using cemented carbide tools to process nickel-based superalloys, it is not recommended to use excessive cutting speeds [51,52,53]. The main reason is that the local temperature of the contact area between the tool and the workpiece becomes very high, and the tool tip is prone to plastic deformation, which reduces the tool life. Astakhov et al. [54] also mentioned that the influence of the cutting temperature on tool life is a major factor restricting the improvement of the cutting speed. Therefore, we cannot choose cutting parameters without the control of the cutting temperature.
Nalbant et al. [17] obtained the following conclusions from the research experiments on the influence of cutting parameters, tool material, and shape on the tool performance when cutting nickel-based superalloys: when the cutting speed is increased, the cutting force decreases, and when the feed is increased, the cutting force decreases and the cutting temperature rises. The comprehensive experimental results showed that the cutting speed was 250 m/min, and the cutting force at that time was the minimum. In the high-speed turning of Inconel 718 with a K20 carbide tool, Thakur et al. [55] found that, in the cutting speed range of 45–55 m/min with a constant feed rate of 0.08 mm/rev, the main cutting force and feed force decreased linearly with the cutting speed.
The optimization of cutting parameters takes into account not only the influence of the three cutting elements on tool wear but also the great heat energy generated under high-speed cutting, which brings a fatal blow to tool life. Selecting more appropriate cutting parameters according to the cutting temperature and protecting the tool while ensuring the processing efficiency is also one of the ways to save processing costs.

3.4. Improving the Cutting Environment

The purpose of adding high-pressure coolant to the machining area during the cutting process is to reduce the cutting temperature generated by the contact area between the tool and the workpiece, thereby prolonging the service life of the tool. Adding cutting fluid is one of the more effective methods to improve tool wear in cutting engineering.
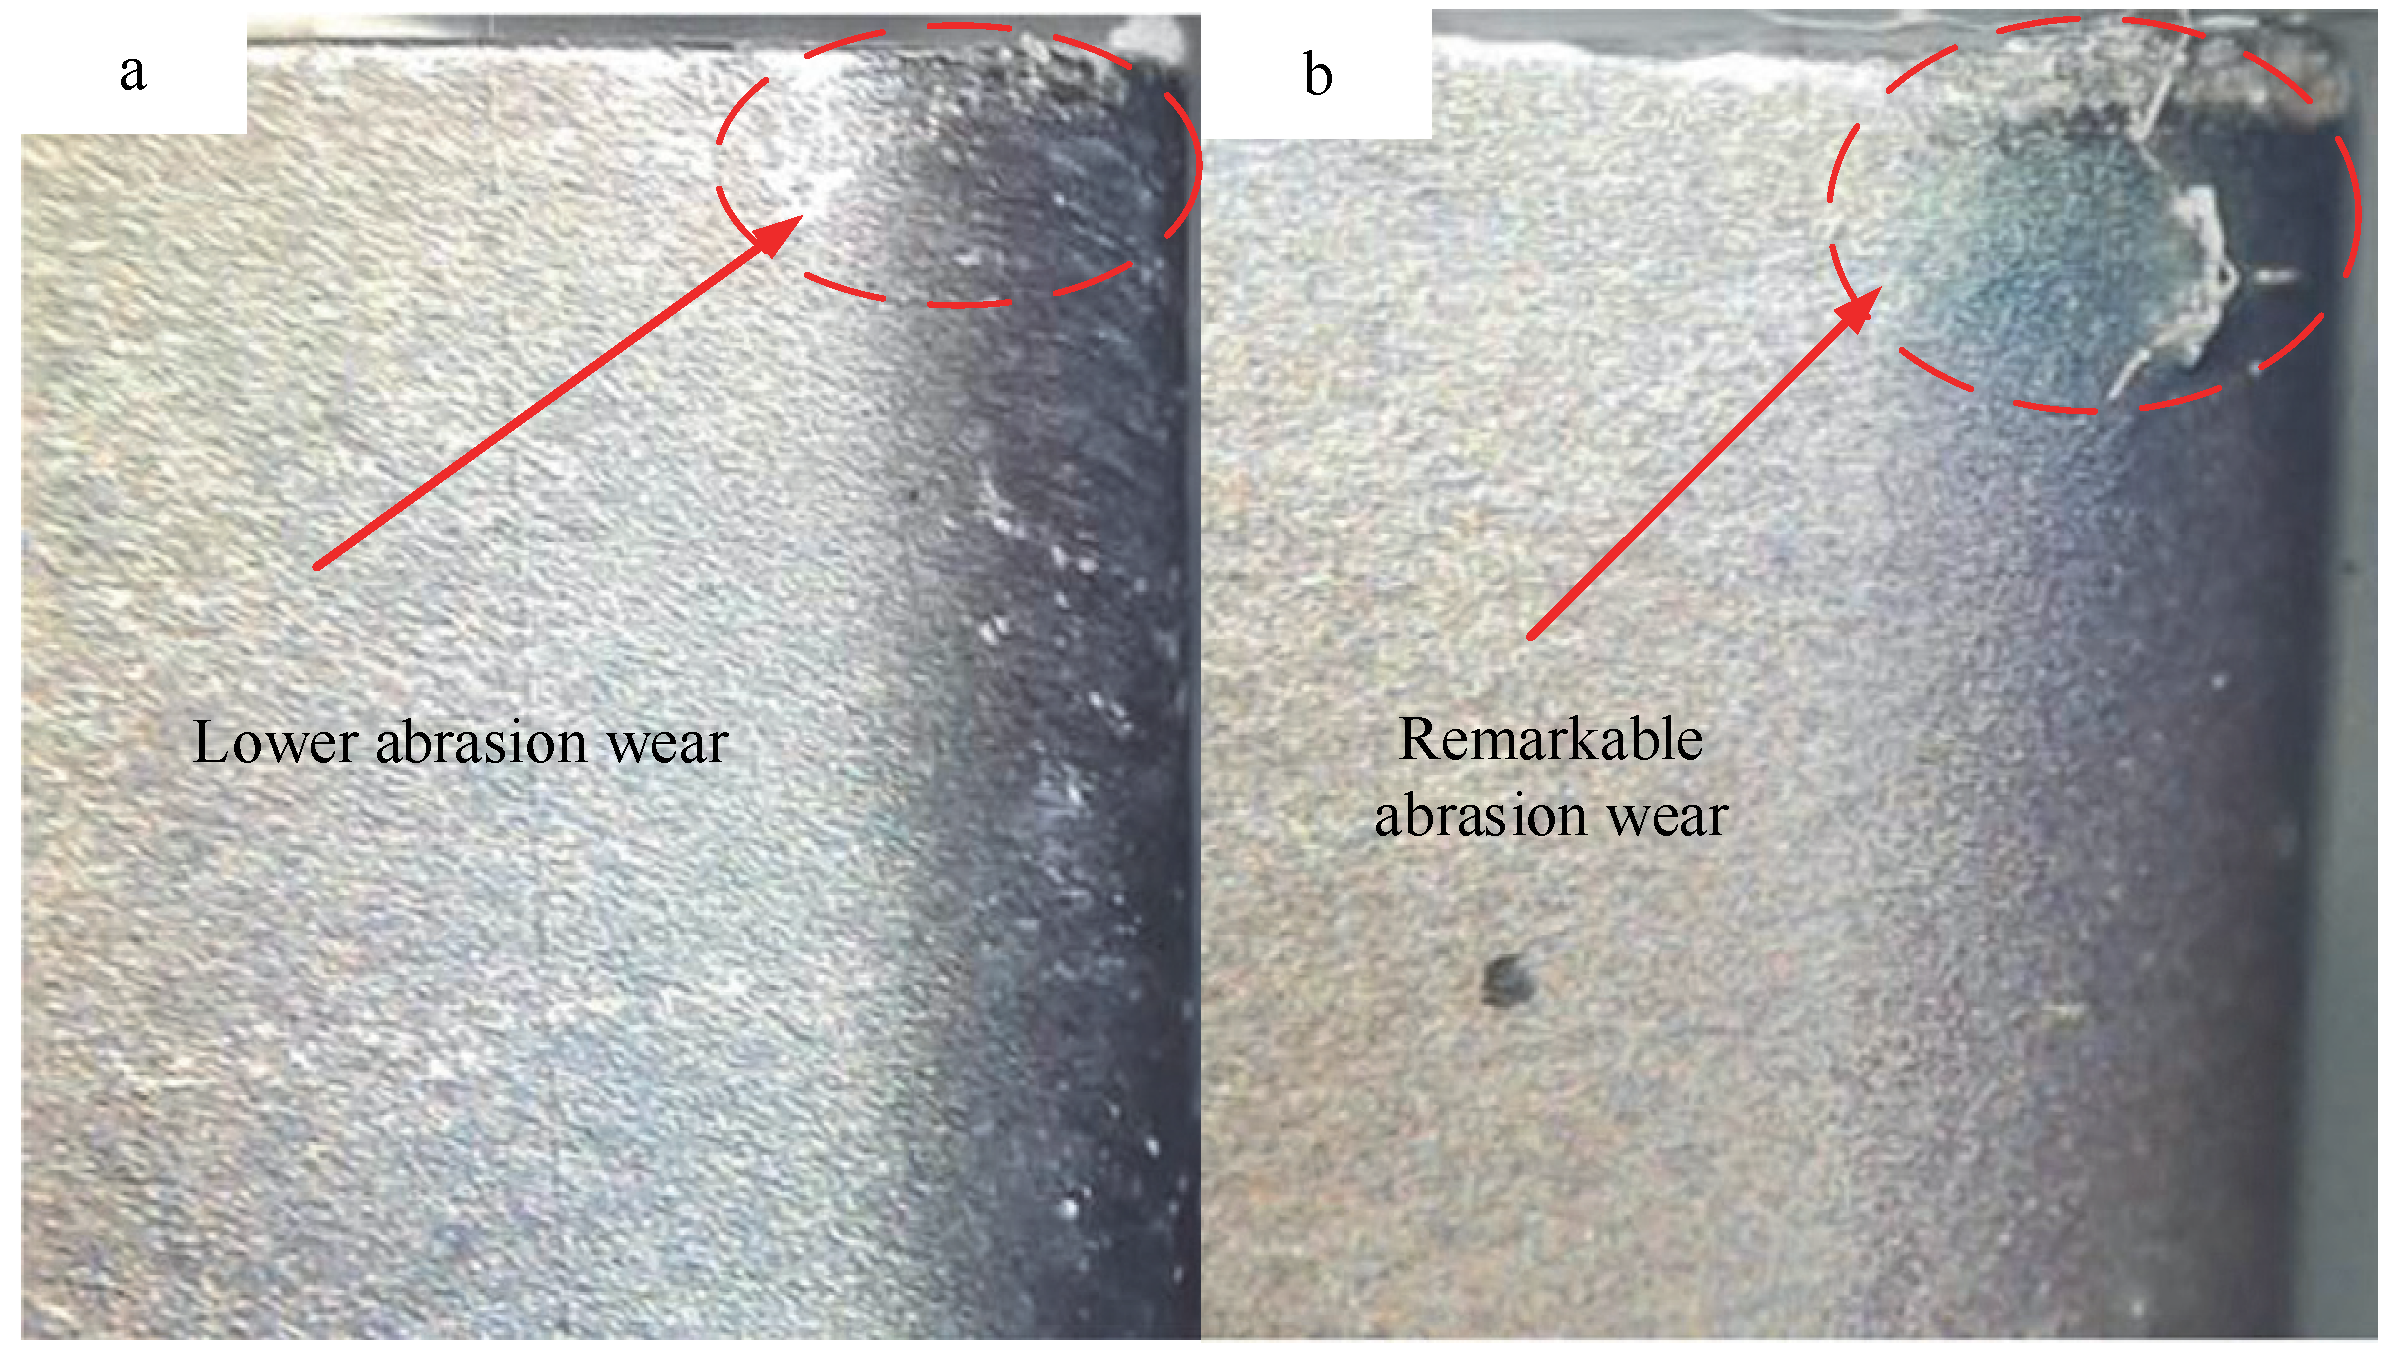
Astakhov’s book [56] on metalworking fluids mentions the use of a liquid nitrogen cryogenic coolant (LN2) in different processing methods and how to efficiently provide LN2 to ensure the smoothness of the processing line and the timely protection of the tool. Sharman et al. [57], in cutting experiments of some aerospace materials, confirmed that adding high-pressure coolant during the machining process can effectively reduce the cutting temperature and prolong the service life of the tool. Patel et al. [58] compared the machining performance of Nimonic 90 using wet machining and LCO2 as a low-temperature coolant and found that using LCO2 as a coolant for cutting results in a better surface finish. In the case of machining at low temperatures, the reduction in the temperature in the cutting zone has become a key factor in improving the flank wear. As shown in Figure 10, the LCO2 coolant can more effectively control the cutting temperature and reduce the tool wear rate. Anburaj et al. [59] used LN2 and low-temperature CO2 as lubricants when milling the face of an Inconel 625 alloy. Both low-temperature lubricants effectively delayed the wear of cutting tools at low cutting speeds. In addition, low-temperature CO2 also provided better surface morphology. Low-temperature auxiliary machining also uses the low-temperature principle to keep the process of machining nickel-based superalloys at a relatively low temperature to improve the chemical stability of the workpiece and tool and thus extend the service life of the tool [60,61,62,63].
Obikawa et al. [64] also proposed processing Inconel 718 with microliter lubrication, which shortens the coolant delivery time to the workpiece, protects the tool, and improves machining efficiency. A study by Thamizhmanii and Hasan [65] showed that when the coolant supply during processing was 37.5 mL/h the surface finish of the processed workpiece was relatively good. The results showed that the surface finish of the workpiece after machining was affected by the amount of coolant supply. Vernaza-Pena et al. [66] observed that less than 20% of the cutting heat entered the workpiece during cutting, and when the removal rate is very low, it can be assumed that about 50% of the heat is transferred to the workpiece. With a higher pressure, the cutting fluid permeates between the tool and the workpiece surface, forming a protective film between them, thereby reducing friction, the cutting temperature, and tool wear. Chen et al. [67] proposed a method combining minimum quantity lubrication (MQL) cooling and internal cooling to spray cutting fluid accurately to the cutting area of a turning nickel-based superalloy. This method can effectively reduce the use of coolant, reduce processing costs, and achieve environmental protection. In order to study the machinability of alloy 625, Yildirim et al. [68] used minimum quantity lubrication (MQL), liquid nitrogen low-temperature cooling (LN2), and hybrid CryoMQL in an experiment with turning alloy 625. As a result, hybrid CryoMQL was more effective than traditional low-temperature cooling in reducing tool wear. Mohd Khalil et al. [69] were also mentioned in relevant articles. Sirin et al. [70] found that MQL was better than LN2 cooling in terms of tool wear, surface roughness, and cutting force, and LN2 was better than MQL in terms of temperature reduction when milling Inconel X750.
It was reported that the use of thermal-assisted machining technology in the process of cutting nickel-based superalloys can effectively reduce the cutting force or cutting heat received by the tool, thereby reducing the occurrence of plastic deformation at the tool edge [71,72,73]. Chen and Liao [17] focused on the wear mechanism of the tool in the drilling experiment of Inconel 718. They found that the nanocutting fluid prepared with the mixed material could effectively reduce the friction between the tool and the workpiece, and at the same time, the tool life was three times longer. Obikawa et al. [74] proposed a new AJA (air-jet-assisted) processing method for nickel-based superalloys. When machining iron-based amorphous alloys [75], the use of traditional lubricating fluids has little effect on improving tool wear [76]. The use of liquid nitrogen [77] for auxiliary machining is obviously better than CO2 [78,79,80] and dry machining. Liquid nitrogen can reduce the temperature during machining for low-temperature machining. After machining, there is no obvious wear or BUE formation [81]. A tool life standard based on the surface roughness of the tool has also been proposed to obtain a longer tool life and improve the sustainability of the machining process [82]. In the future, it will also be possible to add liquid nitrogen and other lubricants to assist in the processing of nickel-based superalloys to reduce the high temperature generated during cutting and extend the service life of tools. It can be seen from the cutting experiment results that the conventional air jet wet-assisted machining method has a certain protective effect on the tool, which reduces the need for tool changes during machining and saves time.
From the use of traditional coolant (LN2) to the application of various auxiliary machining technologies, its main purpose is to dissipate a large amount of heat in the cutting area of the tool; reduce the plastic deformation of the tool blade; effectively reduce the friction between the tool, workpiece, and; and reduce the impact of the chip on the tool. How to make efficient use of cooling technology and prepare efficient and environment-friendly new coolant is the key content of future research.

4. Summary and Outlook

For common wear mechanisms such as abrasive wear and adhesive wear, through observation and research over the years we have obtained a better understanding of the wear mechanism, which allows preventative methods to be devised. We can reduce tool wear through tool coatings, tool materials, the optimization of cutting parameters, and the improvement of the cutting environment. At present, the research on tool coatings and tool materials is relatively mature. By selecting appropriate cutting parameters to control the cutting temperature, a variety of new machining processes, such as the combination of traditional and new coolant developments, auxiliary machining, and low-temperature strengthening machining, are increasingly favored. At present, a major problem in machining materials that are difficult to machine such as nickel-based superalloys is that a large amount of heat generated during cutting cannot be discharged at an adequate rate, causing fatal damage to tools. In order to solve the problem of cutting heat transfer, the research on tool wear can focus on developing new tool coatings and hybrid machining technologies to ensure the stability and mechanical properties of tools in efficient production.

Author Contributions

R.W.: conceptualization, methodology, resources, project administration, and writing—original draft preparation; D.Y.: software, formal analysis, writing, and editing; W.W.: software and investigation; F.W.: project administration and writing—review and editing; Y.L. (Yuwei Lu): formal analysis and project administration; Y.L. (Yuqi Li): writing—review and editing. All authors have read and agreed to the published version of the manuscript.

Funding

This work was supported by the Science and Technology Project of Guangxi, China (no. GK AD19245149), the National Natural Science Foundation of China (no. 52165055), and the Science and Technology Project of Liuzhou, China (no. 2021CBA0103).

Data Availability Statement

All data used to support the findings of this study are included within the article.

Acknowledgments

The authors would like to thank Guangxi University of Science and Technology for their full support to the writing process. The authors thank Zhang for his help in this paper.

Conflicts of Interest

The authors declare that they have no conflict of interests regarding the publication of this paper.

References

  1. Wenfeng, D.; Jiuhua, X.; Zhenzhen, C.; Honghua, S.; Yucan, F. Grindability and Surface Integrity of Cast Nickel-Based Superalloy in Creep Feed Grinding with Brazed CBN Abrasive Wheels. Chin. J. Aeronaut. 2010, 23, 501–510. [Google Scholar] [CrossRef] [Green Version]
  2. Devillez, A.; Le Coz, G.; Dominiak, S.; Dudzinski, D. Dry Machining of Inconel 718, Workpiece Surface Integrity. J. Mater. Process. Technol. 2011, 211, 1590–1598. [Google Scholar] [CrossRef]
  3. Pusavec, F.; Deshpande, A.; Yang, S.; M’Saoubi, R.; Kopac, J.; Dillon, O.; Jawahir, I. Sustainable Machining of High Temperature Nickel Alloy—Inconel 718: Part 1—Predictive Performance Models. J. Clean. Prod. 2014, 81, 255–269. [Google Scholar] [CrossRef]
  4. Li, B.; Ding, W.; Yang, C.; Li, C. Grindability of Powder Metallurgy Nickel-Base Superalloy FGH96 and Sensibility Analysis of Machined Surface Roughness. Int. J. Adv. Manuf. Technol. 2019, 101, 2259–2273. [Google Scholar] [CrossRef]
  5. Zhu, D.; Zhang, X.; Ding, H. Tool Wear Characteristics in Machining of Nickel-Based Superalloys. Int. J. Mach. Tools Manuf. 2013, 64, 60–77. [Google Scholar] [CrossRef]
  6. Nowotnik, A. Nickel-Based Superalloys. In Reference Module in Materials Science and Materials Engineering; Elsevier: Amsterdam, The Netherlands, 2016. [Google Scholar] [CrossRef]
  7. Mali, H.S.; Unune, D.R. Machinability of Nickel-Based Superalloys: An Overview. In Reference Module in Materials Science and Materials Engineering; Elsevier: Amsterdam, The Netherlands, 2017. [Google Scholar] [CrossRef]
  8. Zhang, S.; Liu, Z. A New Approach to Cutting Temperature Prediction Considering the Diffusion Layer in Coated Tools. Int. J. Mach. Tools Manuf. 2009, 49, 619–624. [Google Scholar] [CrossRef]
  9. Dudzinski, D.; Devillez, A.; Moufki, A.; Larrouquère, D.; Zerrouki, V.; Vigneau, J. A Review of Developments towards Dry and High Speed Machining of Inconel 718 Alloy. Int. J. Mach. Tools Manuf. 2004, 44, 439–456. [Google Scholar] [CrossRef]
  10. Zhang, T.; Jiang, F.; Huang, H.; Lu, J.; Wu, Y.; Jiang, Z.; Xu, X. Towards Understanding the Brittle-Ductile Transition in the Extreme Manufacturing. Int. J. Extrem. Manuf. 2021, 3, 022001. [Google Scholar] [CrossRef]
  11. Chen, X.; Li, H. Development of a Tool Wear Observer Model for Online Tool Condition Monitoring and Control in Machining Nickel-Based Alloys. Int. J. Adv. Manuf. Technol. 2009, 45, 786–800. [Google Scholar] [CrossRef]
  12. Li, B.; Ding, W.; Li, M.; Zhang, X. Tool Wear Behavior of Alumina Abrasive Wheels during Grinding FGH96 Powder Metallurgy Nickel-Based Superalloy. Procedia CIRP 2021, 101, 182–185. [Google Scholar] [CrossRef]
  13. Zimmermann, R.; Welling, D.; Venek, T.; Ganser, P.; Bergs, T. Tool Wear Progression of SiAlON Ceramic End Mills in Five-Axis High-Feed Rough Machining of an Inconel 718 BLISK. Procedia CIRP 2021, 101, 13–16. [Google Scholar] [CrossRef]
  14. Potthoff, N.; Wiederkehr, P. Fundamental Investigations on Wear Evolution of Machining Inconel 718. Procedia CIRP 2021, 99, 171–176. [Google Scholar] [CrossRef]
  15. Ezugwu, E.O.; Bonney, J.; Yamane, Y. An Overview of the Machinability of Aeroengine Alloys. J. Mater. Process. Technol. 2003, 134, 233–253. [Google Scholar] [CrossRef]
  16. Liu, E.; An, W.; Xu, Z.; Zhang, H. Experimental Study of Cutting-Parameter and Tool Life Reliability Optimization in Inconel 625 Machining Based on Wear Map Approach. J. Manuf. Process. 2020, 53, 34–42. [Google Scholar] [CrossRef]
  17. Chen, Y.C.; Liao, Y.S. Study on Wear Mechanisms in Drilling of Inconel 718 Superalloy. J. Mater. Process. Technol. 2003, 140, 269–273. [Google Scholar] [CrossRef]
  18. Olufayo, O.; Che, H.; Songmene, V.; Katsari, C.; Yue, S. Machinability of Rene 65 Superalloy. Materials 2019, 12, 2034. [Google Scholar] [CrossRef] [PubMed] [Green Version]
  19. Jianxin, D.; Lili, L.; Jianhua, L.; Jinlong, Z.; Xuefeng, Y. Failure Mechanisms of TiB2 Particle and SiC Whisker Reinforced Al2O3 Ceramic Cutting Tools When Machining Nickel-Based Alloys. Int. J. Mach. Tools Manuf. 2005, 45, 1393–1401. [Google Scholar] [CrossRef]
  20. Li, L.; He, N.; Wang, M.; Wang, Z.G. High Speed Cutting of Inconel 718 with Coated Carbide and Ceramic Inserts. J. Mater. Process. Technol. 2002, 129, 127–130. [Google Scholar] [CrossRef]
  21. Hao, Z.; Fan, Y.; Lin, J.; Ji, F.; Liu, X. New Observations on Wear Mechanism of Self-Reinforced SiAlON Ceramic Tool in Milling of Inconel 718. Arch. Civ. Mech. Eng. 2017, 17, 467–474. [Google Scholar] [CrossRef]
  22. Bushlya, V.; Lenrick, F.; Bjerke, A.; Aboulfadl, H.; Thuvander, M.; Ståhl, J.-E.; M’Saoubi, R. Tool Wear Mechanisms of PcBN in Machining Inconel 718: Analysis across Multiple Length Scale. CIRP Ann. 2021, 70, 73–78. [Google Scholar] [CrossRef]
  23. Devillez, A.; Schneider, F.; Dominiak, S.; Dudzinski, D.; Larrouquere, D. Cutting Forces and Wear in Dry Machining of Inconel 718 with Coated Carbide Tools. Wear 2007, 262, 931–942. [Google Scholar] [CrossRef]
  24. Sun, Y.; Jin, L.; Gong, Y.; Qi, Y.; Zhang, H.; Su, Z.; Sun, K. Experimental Investigation on Machinability of Aluminum Alloy during Dry Micro Cutting Process Using Helical Micro End Mills with Micro Textures. Materials 2020, 13, 4664. [Google Scholar] [CrossRef] [PubMed]
  25. Gutnichenko, O.; Nilsson, M.; Lindvall, R.; Bushlya, V.; Andersson, M. Improvement of Tool Utilization When Hard Turning with CBN Tools at Varying Process Parameters. Wear 2021, 477, 203900. [Google Scholar] [CrossRef]
  26. Nayak, M.; Sehgal, R.; Kumar, R. Investigating Machinability of AISI D6 Tool Steel Using CBN Tools during Hard Turning. Mater. Today Proc. 2021, 47, 3960–3965. [Google Scholar] [CrossRef]
  27. Fei, H.; Wu, H.; Yang, X.; Xiong, J.; Zhang, L.; Chen, Z.; Jiang, K.; Liu, J. Pulsed Magnetic Field Treatment of CBN Tools for Improved Cutting Performances. J. Manuf. Process. 2021, 69, 21–32. [Google Scholar] [CrossRef]
  28. Persson, H.; Lenrick, F.; Franca, L.; Ståhl, J.-E.; Bushlya, V. Wear Mechanisms of PcBN Tools When Machining AISI 316L. Ceram. Int. 2021, 47, 31894–31906. [Google Scholar] [CrossRef]
  29. Wang, C.; Ming, W.; Chen, M. Milling Tool’s Flank Wear Prediction by Temperature Dependent Wear Mechanism Determination When Machining Inconel 182 Overlays. Tribol. Int. 2016, 104, 140–156. [Google Scholar] [CrossRef]
  30. Kasim, M.S.; Che Haron, C.H.; Ghani, J.A.; Sulaiman, M.A.; Yazid, M.Z.A. Wear Mechanism and Notch Wear Location Prediction Model in Ball Nose End Milling of Inconel 718. Wear 2013, 302, 1171–1179. [Google Scholar] [CrossRef]
  31. Chihaoui, S.; Yallese, M.; Belhadi, S.; Belbah, A.; Safi, K.; Haddad, A. Coated CBN Cutting Tool Performance in Green Turning of Gray Cast Iron EN-GJL-250: Modeling and Optimization. Int. J. Adv. Manuf. Technol. 2021, 113, 3643–3665. [Google Scholar] [CrossRef]
  32. Li, X.; Wang, Y.; Miao, L.; Zhang, W. Deformation Analysis of Continuous Milling of Inconel718 Nickel-Based Superalloy. Micromachines 2022, 13, 683. [Google Scholar] [CrossRef]
  33. Ezugwu, E.O. Key Improvements in the Machining of Difficult-to-Cut Aerospace Superalloys. Int. J. Mach. Tools Manuf. 2005, 45, 1353–1367. [Google Scholar] [CrossRef]
  34. Costes, J.P.; Guillet, Y.; Poulachon, G.; Dessoly, M. Tool-Life and Wear Mechanisms of CBN Tools in Machining of Inconel 718. Int. J. Mach. Tools Manuf. 2007, 47, 1081–1087. [Google Scholar] [CrossRef] [Green Version]
  35. Hood, R.; Soo, S.; Aspinwall, D.; Mantle, A. Tool Life and Workpiece Surface Integrity When Turning an RR1000 Nickel-Based Superalloy. Int. J. Adv. Manuf. Technol. 2018, 98, 2461–2468. [Google Scholar] [CrossRef] [Green Version]
  36. Xue, C.; Chen, W. Adhering Layer Formation and Its Effect on the Wear of Coated Carbide Tools during Turning of a Nickel-Based Alloy. Wear 2011, 270, 895–902. [Google Scholar] [CrossRef]
  37. Wu, X.; Shen, J.; Jiang, F.; Wu, H.; Li, L. Study on the Oxidation of WC-Co Cemented Carbide under Different Conditions. Int. J. Refract. Met. Hard Mater. 2021, 94, 105381. [Google Scholar] [CrossRef]
  38. Pawade, R.S.; Joshi, S.S.; Brahmankar, P.K.; Rahman, M. An Investigation of Cutting Forces and Surface Damage in High-Speed Turning of Inconel 718. J. Mater. Process. Technol. 2007, 192–193, 139–146. [Google Scholar] [CrossRef]
  39. Abeni, A.; Loda, D.; Özel, T.; Attanasio, A. Modeling of Cutting Force in Micro-End-Milling Process with Experimental Validation on Additive Manufactured Nickel-Based Superalloy. Procedia CIRP 2021, 102, 222–227. [Google Scholar] [CrossRef]
  40. Aspinwall, D.K.; Dewes, R.C.; Ng, E.-G.; Sage, C.; Soo, S.L. The Influence of Cutter Orientation and Workpiece Angle on Machinability When High-Speed Milling Inconel 718 under Finishing Conditions. Int. J. Mach. Tools Manuf. 2007, 47, 1839–1846. [Google Scholar] [CrossRef]
  41. Nalbant, M.; Altın, A.; Gökkaya, H. The Effect of Cutting Speed and Cutting Tool Geometry on Machinability Properties of Nickel-Base Inconel 718 Super Alloys. Mater. Des. 2007, 28, 1334–1338. [Google Scholar] [CrossRef]
  42. Martinho, R.P.; Silva, F.J.G.; Baptista, A.P.M. Cutting Forces and Wear Analysis of Si3N4 Diamond Coated Tools in High Speed Machining. Vacuum 2008, 82, 1415–1420. [Google Scholar] [CrossRef] [Green Version]
  43. M’Saoubi, R.; Outeiro, J.C.; Changeux, B.; Lebrun, J.L.; Morão Dias, A. Residual Stress Analysis in Orthogonal Machining of Standard and Resulfurized AISI 316L Steels. J. Mater. Process. Technol. 1999, 96, 225–233. [Google Scholar] [CrossRef] [Green Version]
  44. Barthelmä, F.; Frank, H.; Schiffler, M.; Bartsch, A. Hard Coatings to Improve the Machining of Nickel Based Materials. Procedia CIRP 2016, 46, 294–298. [Google Scholar] [CrossRef] [Green Version]
  45. Chen, Z.; Zhou, J.M.; Peng, R.L.; M’Saoubi, R.; Gustafsson, D.; Palmert, F.; Moverare, J. Plastic Deformation and Residual Stress in High Speed Turning of AD730TM Nickel-Based Superalloy with PCBN and WC Tools. Procedia CIRP 2018, 71, 440–445. [Google Scholar] [CrossRef]
  46. Bhatt, A.; Attia, H.; Vargas, R.; Thomson, V. Wear Mechanisms of WC Coated and Uncoated Tools in Finish Turning of Inconel 718. Tribol. Int. 2010, 43, 1113–1121. [Google Scholar] [CrossRef]
  47. Altin, A.; Nalbant, M.; Taskesen, A. The Effects of Cutting Speed on Tool Wear and Tool Life When Machining Inconel 718 with Ceramic Tools. Mater. Des. 2007, 28, 2518–2522. [Google Scholar] [CrossRef]
  48. Shi, D.; Axinte, D.A.; Gindy, N.N. Development of an Online Machining Process Monitoring System: A Case Study of the Broaching Process. Int. J. Adv. Manuf. Technol. 2007, 34, 34–46. [Google Scholar] [CrossRef]
  49. Sharman, A.; Dewes, R.C.; Aspinwall, D.K. Tool Life When High Speed Ball Nose End Milling Inconel 718TM. J. Mater. Process. Technol. 2001, 118, 29–35. [Google Scholar] [CrossRef]
  50. Aruna, M.; Dhanalakshmi, V.; Mohan, S. Wear analysis of ceramic cutting tools in finish turning of Inconel 718. Int. J. Eng. Sci. Technol. 2010, 2, 4253–4262. [Google Scholar]
  51. Zhou, J.; Bushlya, V.; Peng, R.L.; Chen, Z.; Johansson, S.; Stahl, J.E. Analysis of Subsurface Microstructure and Residual Stresses in Machined Inconel 718 with PCBN and Al2O3-SiCw Tools. Procedia CIRP 2014, 13, 150–155. [Google Scholar] [CrossRef]
  52. Shalaby, M.A.; Veldhuis, S.C. Effect of Cutting Speed on Chipping and Wear of the SiAlON Ceramic Tool in Dry Finish Turning of the Precipitation Hardenable IN100 Aerospace Superalloy. J. Tribol. 2018, 141, 021604. [Google Scholar] [CrossRef]
  53. Seleznev, A.E.; Bublikov, J.I.; Batako, A.D. 14—Improved Efficiency of Ceramic Cutting Tools in Machining Hardened Steel—an Application with Nanostructured Multilayered Coatings. In Handbook of Modern Coating Technologies; Aliofkhazraei, M., Ali, N., Chipara, M., Bensaada Laidani, N., De Hosson, J.T.M., Eds.; Elsevier: Amsterdam, The Netherlands, 2021; pp. 381–433. [Google Scholar] [CrossRef]
  54. Astakhov, V.P.; Outeiro, J. Importance of Temperature in Metal Cutting and Its Proper Measurement/Modeling. In Measurement in Machining and Tribology; Springer: Berlin/Heidelberg, Germany, 2019; pp. 1–47. [Google Scholar] [CrossRef]
  55. Thakur, D.G.; Ramamoorthy, B.; Vijayaraghavan, L. Study on the Machinability Characteristics of Superalloy Inconel 718 during High Speed Turning. Mater. Des. 2009, 30, 1718–1725. [Google Scholar] [CrossRef]
  56. Astakhov, V.P.; Joksch, S.; Walther, P.; Dwuletzki, H.; Graff, M. Contributor Contact Details. In Metalworking Fluids (MWFs) for Cutting and Grinding; Astakhov, V.P., Joksch, S., Eds.; Woodhead Publishing: Cambridge, UK, 2012; pp. 57–83. [Google Scholar] [CrossRef]
  57. Sharman, A.; Hughes, J.; Ridgway, K. Surface integrity and tool life when turning Inconel 718 using ultra-high pressure and flood coolant systems. Proc. Inst. Mech. Eng. Part B J. Eng. Manuf. 2008, 222, 653–664. [Google Scholar] [CrossRef]
  58. Patel, T.; Khanna, N.; Yadav, S.; Shah, P.; Sarikaya, M.; Singh, D.; Gupta, M.; Kotkunde, N. Machinability Analysis of Nickel-Based Superalloy Nimonic 90: A Comparison between Wet and LCO2 as a Cryogenic Coolant. Int. J. Adv. Manuf. Technol. 2021, 113, 3613–3628. [Google Scholar] [CrossRef]
  59. Anburaj, R.; Kumar, M. Influences of Cryogenic CO2 and LN2 on Surface Integrity of Inconel 625 during Face Milling. Mater. Manuf. Process. 2021, 36, 1829–1839. [Google Scholar] [CrossRef]
  60. Shokrani, A.; Dhokia, V.; Munoz-Escalona, P.; Newman, S. State-of-the-Art Cryogenic Machining and Processing. Int. J. Comput. Integr. Manuf. 2013, 26, 616–648. [Google Scholar] [CrossRef] [Green Version]
  61. Zhang, Z.; Lv, J.; Xie, G.; Wang, S.; Ye, Y.; Huang, G.; Tan, D. Effect of Assisted Hydrogen on Combustion and Emission Characteristics of a Diesel Engine Fueled with Biodiesel. Energy 2022, 254, 124269. [Google Scholar] [CrossRef]
  62. Wang, F.; Li, L.; Liu, J.; Shu, Q. Research on Tool Wear of Milling Nickel-Based Superalloy in Cryogenic. Int. J. Adv. Manuf. Technol. 2017, 91, 3877–3886. [Google Scholar] [CrossRef]
  63. Tan, D.; Wu, Y.; Lv, J.; Li, J.; Ou, X.; Meng, Y.; Lan, G.; Chen, Y.; Zhang, Z. Performance Optimization of a Diesel Engine Fueled with Hydrogen/Biodiesel with Water Addition Based on the Response Surface Methodology. Energy 2023, 263, 125869. [Google Scholar] [CrossRef]
  64. Obikawa, T.; Kamata, Y.; Asano, Y.; Nakayama, K.; Otieno, A.W. Micro-Liter Lubrication Machining of Inconel 718. Int. J. Mach. Tools Manuf. 2008, 48, 1605–1612. [Google Scholar] [CrossRef]
  65. Thamizhmanii, S.; Rosli, S.H. A Study of Minimum Quantity Lubrication on Inconel 718 Steel. Arch. Mater. Sci. Eng. 2009, 39, 38–44. [Google Scholar]
  66. Vernaza-Peña, K.M.; Mason, J.J.; Li, M. Experimental Study of the Temperature Field Generated during Orthogonal Machining of an Aluminum Alloy. Exp. Mech. 2002, 42, 221–229. [Google Scholar] [CrossRef]
  67. Chen, M.; Peng, R.; Zhao, L.; Chen, R.; Luo, Y. Effects of Minimum Quantity Lubrication Strategy with Internal Cooling Tool on Machining Performance in Turning of Nickel-Based Superalloy GH4169. Int. J. Adv. Manuf. Technol. 2022, 118, 3673–3689. [Google Scholar] [CrossRef]
  68. Yildirim, C.; Kivak, T.; Sarikaya, M.; Sirin, S. Evaluation of Tool Wear, Surface Roughness/Topography and Chip Morphology When Machining of Ni-Based Alloy 625 under MQL, Cryogenic Cooling and CryoMQL. J. Mater. Res. Technol.-JMR&T 2020, 9, 2079–2092. [Google Scholar] [CrossRef]
  69. Mohd Khalil, A.N.; Azmi, A.I.; Murad, M.N.; Mahboob Ali, M.A. The Effect of Cutting Parameters on Cutting Force and Tool Wear in Machining Nickel Titanium Shape Memory Alloy ASTM F2063 under Minimum Quantity Nanolubricant. Procedia CIRP 2018, 77, 227–230. [Google Scholar] [CrossRef]
  70. Sirin, S.; Yildirim, C.; Kivak, T.; Sarikaya, M. Performance of Cryogenically Treated Carbide Inserts under Sustainable Cryo-Lubrication Assisted Milling of Inconel X750 Alloy. Sustain. Mater. Technol. 2021, 29, e00314. [Google Scholar] [CrossRef]
  71. Sun, S.; Brandt, M.; Dargusch, M. Thermally Enhanced Machining of Hard-to-Machine Materials-A Review. Int. J. Mach. Tools Manuf. 2010, 50, 663–680. [Google Scholar] [CrossRef]
  72. Unune, D.; Mali, H. Current Status and Applications of Hybrid Micro-Machining Processes: A Review. Proc. Inst. Mech. Eng. Part B J. Eng. Manuf. 2015, 229, 1681–1693. [Google Scholar] [CrossRef]
  73. Feucht, F.; Ketelaer, J.; Wolff, A.; Mori, M.; Fujishima, M. Latest Machining Technologies of Hard-to-Cut Materials by Ultrasonic Machine Tool. Procedia CIRP 2014, 14, 148–152. [Google Scholar] [CrossRef] [Green Version]
  74. Obikawa, T.; Yamaguchi, M.; Funai, K.; Kamata, Y.; Yamada, S. Air Jet Assisted Machining of Nickel-Base Superalloy. Int. J. Mach. Tools Manuf. 2012, 61, 20–26. [Google Scholar] [CrossRef]
  75. Huo, Z.; Zhang, G.; Han, J.; Wang, J.; Ma, S.; Wang, H. A Review of the Preparation, Machining Performance, and Application of Fe-Based Amorphous Alloys. Processes 2022, 10, 1203. [Google Scholar] [CrossRef]
  76. Bordin, A.; Sartori, S.; Bruschi, S.; Ghiotti, A. Experimental Investigation on the Feasibility of Dry and Cryogenic Machining as Sustainable Strategies When Turning Ti6Al4V Produced by Additive Manufacturing. J. Clean. Prod. 2017, 142, 4142–4151. [Google Scholar] [CrossRef]
  77. Khanna, N.; Agrawal, C.; Gupta, M.K.; Song, Q. Tool Wear and Hole Quality Evaluation in Cryogenic Drilling of Inconel 718 Superalloy. Tribol. Int. 2020, 143, 106084. [Google Scholar] [CrossRef]
  78. Pereira, O.; Celaya, A.; Urbikaín, G.; Rodríguez, A.; Fernández-Valdivielso, A.; de Lacalle, L.N.L. CO2 Cryogenic Milling of Inconel 718: Cutting Forces and Tool Wear. J. Mater. Res. Technol. 2020, 9, 8459–8468. [Google Scholar] [CrossRef]
  79. Tasbasi, M.; Ay, M.; Etyemez, A. Quality in Turning of Inconel X-750 Superalloy. Emerg. Mater. Res. 2020, 9, 1154–1162. [Google Scholar] [CrossRef]
  80. Zhang, Z.; Lv, J.; Li, W.; Long, J.; Wang, S.; Tan, D.; Yin, Z. Performance and Emission Evaluation of a Marine Diesel Engine Fueled with Natural Gas Ignited by Biodiesel-Diesel Blended Fuel. Energy 2022, 256, 124662. [Google Scholar] [CrossRef]
  81. Wang, H.; Li, X.; Wang, Z.; Xu, R. Influence of Electroplated CBN Wheel Wear on Grinding Surface Morphology of Powder Metallurgy Superalloy FGH96. Materials 2020, 13, 1005. [Google Scholar] [CrossRef] [PubMed] [Green Version]
  82. Iqbal, A.; Zhao, G.; Cheok, Q.; He, N.; Nauman, M.M. Sustainable Machining: Tool Life Criterion Based on Work Surface Quality. Processes 2022, 10, 1087. [Google Scholar] [CrossRef]
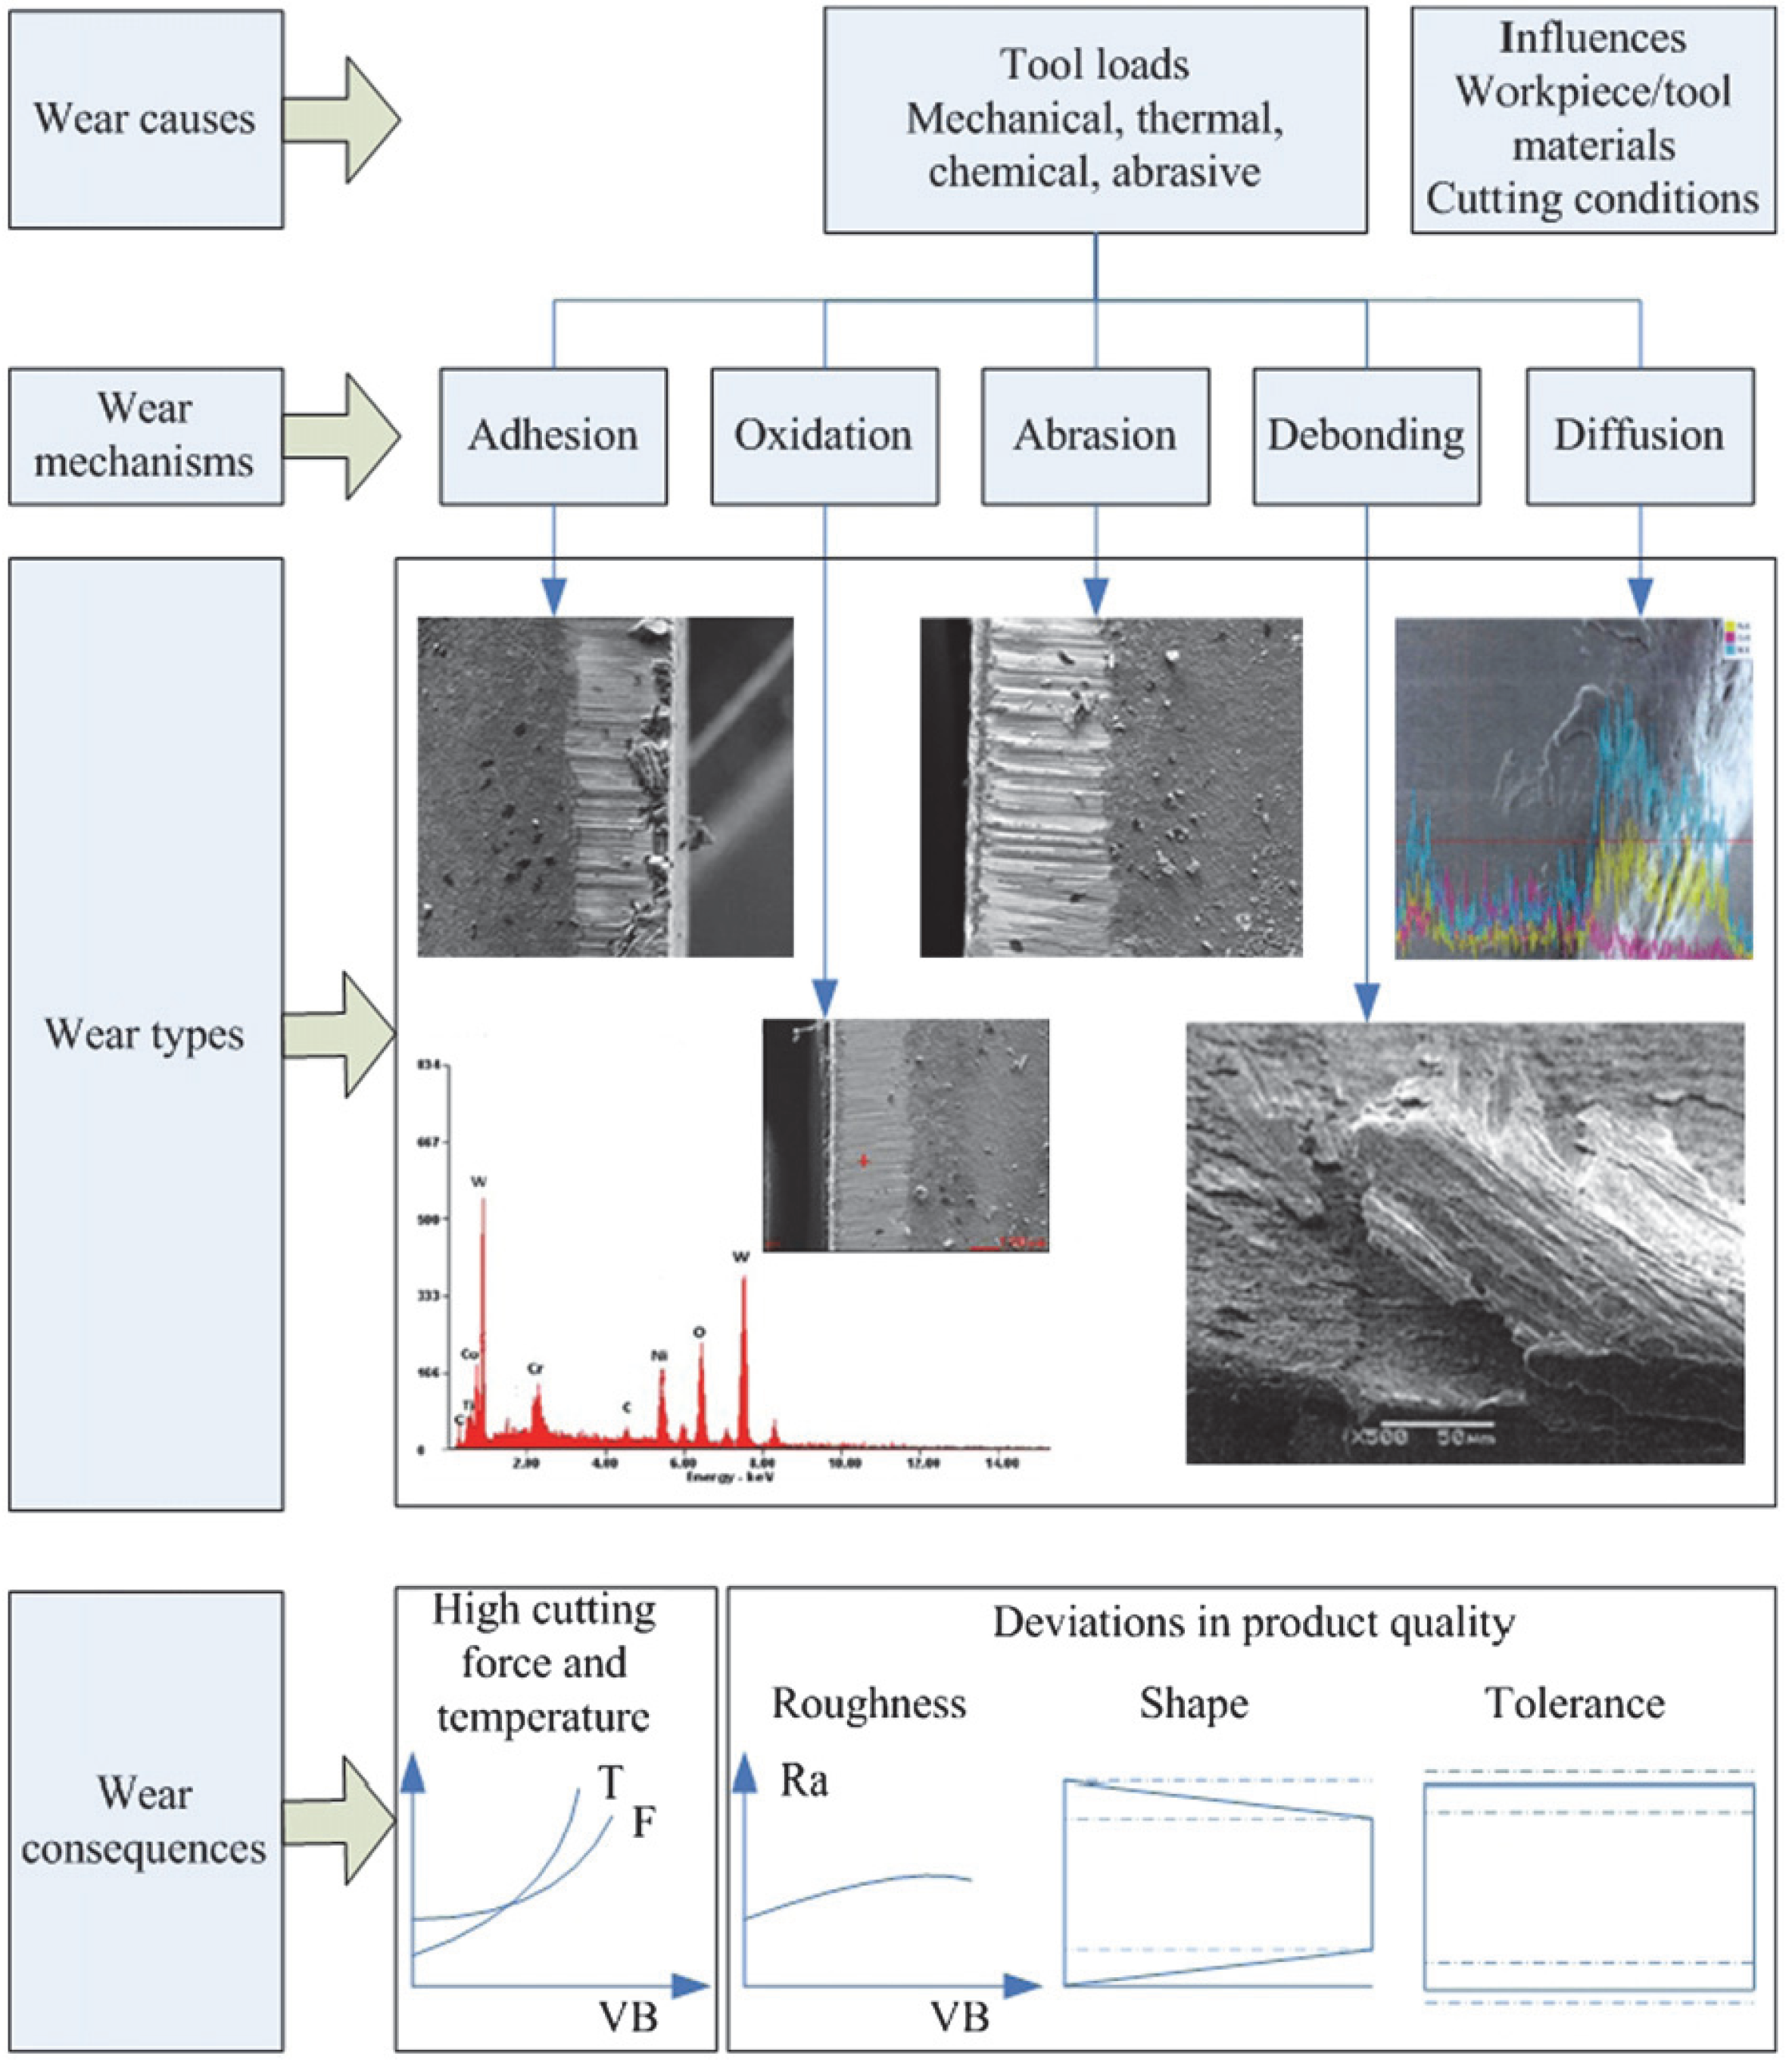
Figure 1. The wear causes, wear mechanisms, wear types, and wear consequences in the cutting of nickel-based superalloys [5].
Processes 10 02380 g001
Figure 2. The high temperature generated by the edge causes the cutting bit to change color ((a,d,g) are new tools after single drill holes; (b,e,h) are the tools after approximately 10 holes were drilled on average; and (c,f,i) are the wear conditions after drilling 30 holes) [18].
Processes 10 02380 g002
Figure 3. SEM micrographs of wear in Inconel 718 nickel-based alloys after machining with an ABW20 ceramic tool. ((b,c) are partial enlarged views of (a); (d) is a partial enlarged view of (c)) [19].
Processes 10 02380 g003
Figure 4. SEM micrographs of blade wear. Tool material: (a) KC732; (b) KC935; (c) KY210; (d) KY3000 [20].
Processes 10 02380 g004
Figure 5. SEM micrographs of tool adhesion wear at low cutting speed (vc = 20 m/min): (a) built-up-edge; (b) wear debris [21].
Processes 10 02380 g005
Figure 6. Several wear problems occurred in the milling of Inconel 718 with carbide ball nose cutters: (a) flank wear; (b) chipping; (c) notch wear; (d) flaking [30].
Processes 10 02380 g006
Figure 7. Changes in the cutting temperature field during the formation of serrated chips (°C) [32].
Processes 10 02380 g007
Figure 8. SEM micrographs of a worn CBN tool ((a) vc = 250 m/min, f = 0.1 mm/rev; (b) vc = 350 m/min, f = 0.1 mm/rev) [38].
Processes 10 02380 g008
Figure 9. Tool wear morphology with different cutting parameters. ((a,c): vc = 25 m/min, f = 0.1 mm/rev; (b): vc = 145 m/min, f = 0.05 mm/rev; (d): vc = 55 m/min, f = 0.3 mm/rev; (e): vc = 145 m/min, f = 0.1 mm/rev; (f): vc = 145 m/min, f = 0.02 mm/rev) [16].
Processes 10 02380 g009
Figure 10. Image of tool wear for (a) LCO2 as a cryogenic cutting fluid and (b) wet machining [58].
Processes 10 02380 g010
Table 1. Composition of commercial nickel-based superalloys (wt.%, bal. Ni) [6].
AlloyCrCoMoFeAlTiRuTaReHfCBWZr
Conventionally cast alloys
Rene 80149.54-35----0.170.0240.03
Mar-M2468.3100.7-5.51-3-1.50.140.02100.05
In-713LC12-4.5-5.90.6----0.050.01-0.1
Directionally solidified alloys
Rene 80 DS12.99.64-34.48---0.0740.070.0154.90.02
CM247 LC DS0.079.20.5-5.61-3-1.50.070.0159.20.015
First-generation single-crystal alloys
Rene N49.87.52-4.23.5-4.8-0.150.05-6-
PWA 1480
CMSX-2850.6-5.61-6----8-
Second-generation single-crystal alloys
Rene N577.51.5-6.2--6.530.150.05-5-
PWA 14845102-5.6--930.1--6-
CMSX-46.590.6-5.61-6.530.1--6-
Third-generation single-crystal alloys
Rene N64.212.51.4-5.8--7.25.40.150.05-6-
CMSX-10230.4-5.70.2-860.2--5-
Fourth-generation single-crystal alloys
TMS 1383.25.82.8-5.9-25.650.1--5.9-
TMS 138A3.25.82.8-5.7-3.65.65.80.1--5.6-
Fifth-generation single-crystal alloys
TMS-1622.95.83.9-5.8-65.64.90.1--5.8-
TMS-1732.85.62.8-5.6-55.66.90.1--5.6-
Wrought superalloys
Inconel 71819-318.50.50.9-----0.2--
Rene 41191110-1.53.1----0.090.005--
Nimonic 80A19.5---1.42.4----0.060.003-0.06
Waspaloy19.513.54.3-1.33----0.080.00640.03
Powder-processed superalloys
Rene 951383.5-3.52.5----0.070.0133.50.05
Rene 88DT16134-2.13.7----0.030.0154-
Inconel 10012.418.43.2-4.94.3----0.070.02-0.07
N1811.215.66.5-4.44.4---0.50.020.015-0.03
Publisher’s Note: MDPI stays neutral with regard to jurisdictional claims in published maps and institutional affiliations.