Review

Surface Quality of Metal Parts Produced by Laser Powder Bed Fusion: Ion Polishing in Gas-Discharge Plasma Proposal

by
Alexander S. Metel
,
Sergey N. Grigoriev
,
Tatiana V. Tarasova
,
Yury A. Melnik
,
Marina A. Volosova
,
Anna A. Okunkova
*,
Pavel A. Podrabinnik
and
Enver S. Mustafaev
Department of High-Efficiency Processing Technologies, Moscow State University of Technology “STANKIN”, Vadkovsky per. 1, 127055 Moscow, Russia
*
Author to whom correspondence should be addressed.
Technologies 2021, 9(2), 27; https://doi.org/10.3390/technologies9020027
Submission received: 25 February 2021 / Revised: 1 April 2021 / Accepted: 6 April 2021 / Published: 9 April 2021
(This article belongs to the Special Issue Advanced Processing Technologies of Innovative Materials)

Abstract

:
Additive manufacturing has evolved over the past decades into a technology that provides freedom of design through the ability to produce complex-shaped solid structures, reducing the operational time and material volumes in manufacturing significantly. However, the surface of parts manufactured by the additive method remains now extremely rough. The current trend of expanding the industrial application of additive manufacturing is researching surface roughness and finishing. Moreover, the limited choice of materials suitable for additive manufacturing does not satisfy the diverse design requirements, necessitating additional coatings deposition. Requirements for surface treatment and coating deposition technology depend on the intended use of the parts, their material, and technology. In most cases, they cannot be determined based on existing knowledge and experience. It determines the scientific relevance of the analytical research and development of scientific and technological principles of finishing parts obtained by laser additive manufacturing and functional coating deposition. There is a scientific novelty of analytical research that proposes gas-discharge plasma processing for finishing laser additive manufactured parts and technological principles development including three processing stages—explosive ablation, polishing with a concentrated beam of fast neutral argon atoms, and coating deposition—for the first time.

1. Introduction

Additive manufacturing allows producing complex solid structures by direct material deposition that fuses the deposed layer’s material with the substrate or previous layer [1]. Most modern research aims to unveil and improve the exploitation and mechanical properties of the steels [2], alloys [3,4], and even oxide ceramics [5,6]. One of the actual directions is related to the work with nanoscaled powders [7]. The approach of the direct growing of solids allows reducing timing on operational steps and the volume of used material during manufacturing [8].
For the continuous development of the additive approach and its application in industry, it is necessary to eliminate its main disadvantage related to the low quality of the produced surface that remains extremely rough with the presence of the unmelted powder granules. It requires finishing operation without losing the exploitation properties of the operational surfaces [9] that can negatively influence the service life of a product [10], especially regarding its responsible applications as a part of aircraft or gas-turbine engine [11].
The choice of materials suitable for additive manufacturing is limited at the technological level, and, in some cases, it does not satisfy the design and technology requirements—wear resistance [12], microstructure [13], and mechanical properties [14]. One of the additional solutions can be in coating deposition [15], which is especially actual in the case of using modern nanoscale multilayered coatings [16] and significantly improves the service life of the product [17]. The coating microhardness and wear resistance can then allow the part’s operation in extreme conditions [18].
The surface polishing and coating deposition requirements depend on the intended operational conditions, material, and manufacturing approach in the part production. In most cases, it can be determined by developing the scientific and technological principles of post-processing based the analytical and experimental research.
The authors’ previous experience showed that most of the research aims to overview residual stress [19,20], analyze the mechanical and physicochemical properties [21,22], and related microstructure evolution [23], mostly for high-entropy [24], intermetallic, titanium alloys, and steels [25,26]. The first two types of alloys were under particular interest in the context of materials development when titanium alloy, as other metal alloys and steels using in additive manufacturing, showed and proved their engineering prospects in particular applications [27]. Simultaneously, alloys based on titanium with a high strength-to-weight ratio and excellent corrosion resistance show their superior technological and exploitation properties for some critical applications, including aviation and biomechanical industries [28]. It should be noted that titanium has its particular properties among heat-resistance and anti-corrosion behavior (due to formed TiO2 thin film) that make it difficult to process by mechanical milling and lathing [29]. However, it is easily welded and melted with a laser beam in the inert atmosphere, and its final properties depend mainly on the pureness of precursors. The field of its application will only grow in the following decades.
At the same time, the questions of finishing and developing the principles of disruptive technology to improve the surface quality of parts produced by laser additive manufacturing stay unveiled.
The study presents an overview of the research domain related to the main trends in the application of the additively manufactured parts by a laser, which are used and proposed by several research groups finishing operation methods with their advantages and disadvantages in application to the complex geometry parts and simplicity of used equipment, development of the innovative approach, and their technological principals in the finishing of additively produced parts using ion polishing in gas-discharge plasma.
This analytical research’s scientific novelty is determined by an overview of surface finishing methods and their influence on the functionality and operation ability of the product responsible surfaces, which are still not fully and completely overviews, by the proposal of using ion polishing in gas-discharge plasma for the finishing and theoretical development of three stages of detailed post-processing for the first time.
The study’s scientific tasks are as follows:
  • Determining particularities in the surface quality problem (surface properties and roughness parameters) of metal parts produced by additive manufacturing methods from various metallic alloys—steels, cobalt, nickel, aluminum, and titanium alloys in the context of airspace industry application,
  • Classification existed methods to improve exploitation properties and surface quality of the parts produced by laser additive manufacturing,
  • Analyses of the last achievement in implementing finishing technologies depending on its nature—thermal, electrochemical, mechanical, and combined methods,
  • Determining finishing methods that were not covered by the experimental research for additively manufactured parts but have a potentially valuable impact on surface quality,
  • Developing the technological principles of ion polishing in gas-discharge plasma for finishing laser additively manufactured parts to improve their surface quality in the context of resistance to abrasive wear.
It should be noted that this paper aimed to review the state of science on the existing post-processing methods and last achievements in the field. The proposed idea of the ion-polishing method for additively manufactured parts is known and was never proposed before. That can be proved by the conducted overview of the research domain.

2. Problem Statement

2.1. Prospects and Surface Quality Problem

The use of laser additive manufacturing technologies has great potential for companies manufacturing products in the aerospace industry [30], especially in the production of parts with complex geometries [31]. If we look at the parts for aviation purposes, manufactured over the past decade, then complex-profile parts stand out against others’ background [32], and their use is growing every year [33]. Besides, many problems arise when these parts are manufactured using traditional processing methods [34]. One of the critical issues is the cost reduction by simplifying the production and manufacturing process. The solution of both functional and aesthetic problems can be carried out using additive manufacturing technologies (AM). Structural parts consisting of several components can be grown layer by layer as a single solid part using AM technology. It is an important issue in terms of cost and time. Fewer parts can significantly reduce assembly and other costs. It is possible to design parts that can be easily produced with AM technologies when they are extremely difficult to shape by traditional machining methods—for example, thin-walled complex-shaped parts with complex internal surfaces.
Thanks to the technological capabilities of additive manufacturing, designers can optimize the strength-to-weight ratio of a part [35] and minimize the use of consumables and provide a reduction in processing costs [36], waste disposal, material transportation costs, reduction of storage costs for raw materials, and for the direct production of final products, which reduces overall production costs [37]. There is no necessity for additive manufactured parts to buy various types of workpieces but various granulometry powder [38].
It should be noted that using a laser beam source or another concentrated energy flow for melting or sintering powders gives the advantages that are not available for other printing technologies:
  • The ability to work with metal alloys, polymers, ceramics, and metal alloys or polymers reinforced with ceramics [6,7,39,40,41],
  • The ability to produce a ready part with high operational properties and service life [4,19,20,31],
  • The ability to produce high-precision parts for the needs of medicine, jewelry, and even watch production [42].
The application of a laser beam expander or profiler allows even significantly improving the efficiency of production (up to 30%) [43,44,45] and extending the potential additive manufacturing market.
Many companies that are leaders in the aviation industry have begun production testing of various aircraft parts, taking advantage of the additive manufacturing technology. Boeing manufactured various thermoplastic parts using commercially available laser sintering technologies for the 737, 747, 777, and 787 commercial aircrafts [38,46]. Boeing was estimated to have earned an estimated $3 million in revenue for every produced 787 Dreamliner aircraft [47]. Although some of the produced parts are complex, manufacturing processes are accomplished by eliminating production constraints in a shorter timeframe, at a lower cost [48], and with the required performance [49].
GE Aviation is currently successfully manufacturing fuel injector parts for LEAP engines (“Leading Edge Aviation Propulsion” engines produced by CFM International, Cincinnati, OH, USA) using selective laser melting. Each LEAP engine is equipped with 19 fuel injectors. All engine fuel supply components have been land-tested and approved for use in civil aircraft [50].
However, with all the attractiveness of additive technologies, already available examples of their successful application and prospects, they should not be idealized. All world manufacturers of equipment for AM are currently working on many shortcomings. In particular, such disadvantages include the porosity of the formed workpiece and its increased roughness, which must be brought to the required technical level by machining operations, mainly by milling.
An illustration of it is presented in Figure 1, which presents the average values of microroughness height with a thickness of the sintered layer of 50 μm (in terms of Ra roughness parameter) for the surface of products made from various powder alloys on machines for laser powder bed fusion (LPBF) or selective laser melting (SLM) [51,52,53,54,55,56], laser cladding [57,58,59] or even cold spray [60]. It can be seen that the formed surface roughness is far from the quality parameters of the surface layer, which must be satisfied by critical engineering products. Even optimizing the melting or sintering parameters will not exclude the need for subsequent machining.
The products produced by laser additive manufacturing has particular geometry [61,62] that can be characterized as having an “edge effect” related to the used hatching strategy [63]. It mostly depends on the character of heat distribution through the layers and strongly depends on the main controlled process factors of laser power, scanning speed, powder layer thickness, and hatching parameters.
The edge defect can be identified by the roughness diagram [64] in addition to the used optical monitoring methods [65]. At the same time, the experiments showed that the used scan strategy influences its pronouncedness [66].
Another problem of the parts produced by laser additive manufacturing is an effect of aliasing [67] that can be especially pronounced for tiny objects [68] and depends on the layer thickness and granulometry of used granules [69], and thermal deformation [70]. A larger thickness of the layer increases the “aliasing effect” (build angle) when a larger diameter of the used powder granules increases the layer’s thickness.
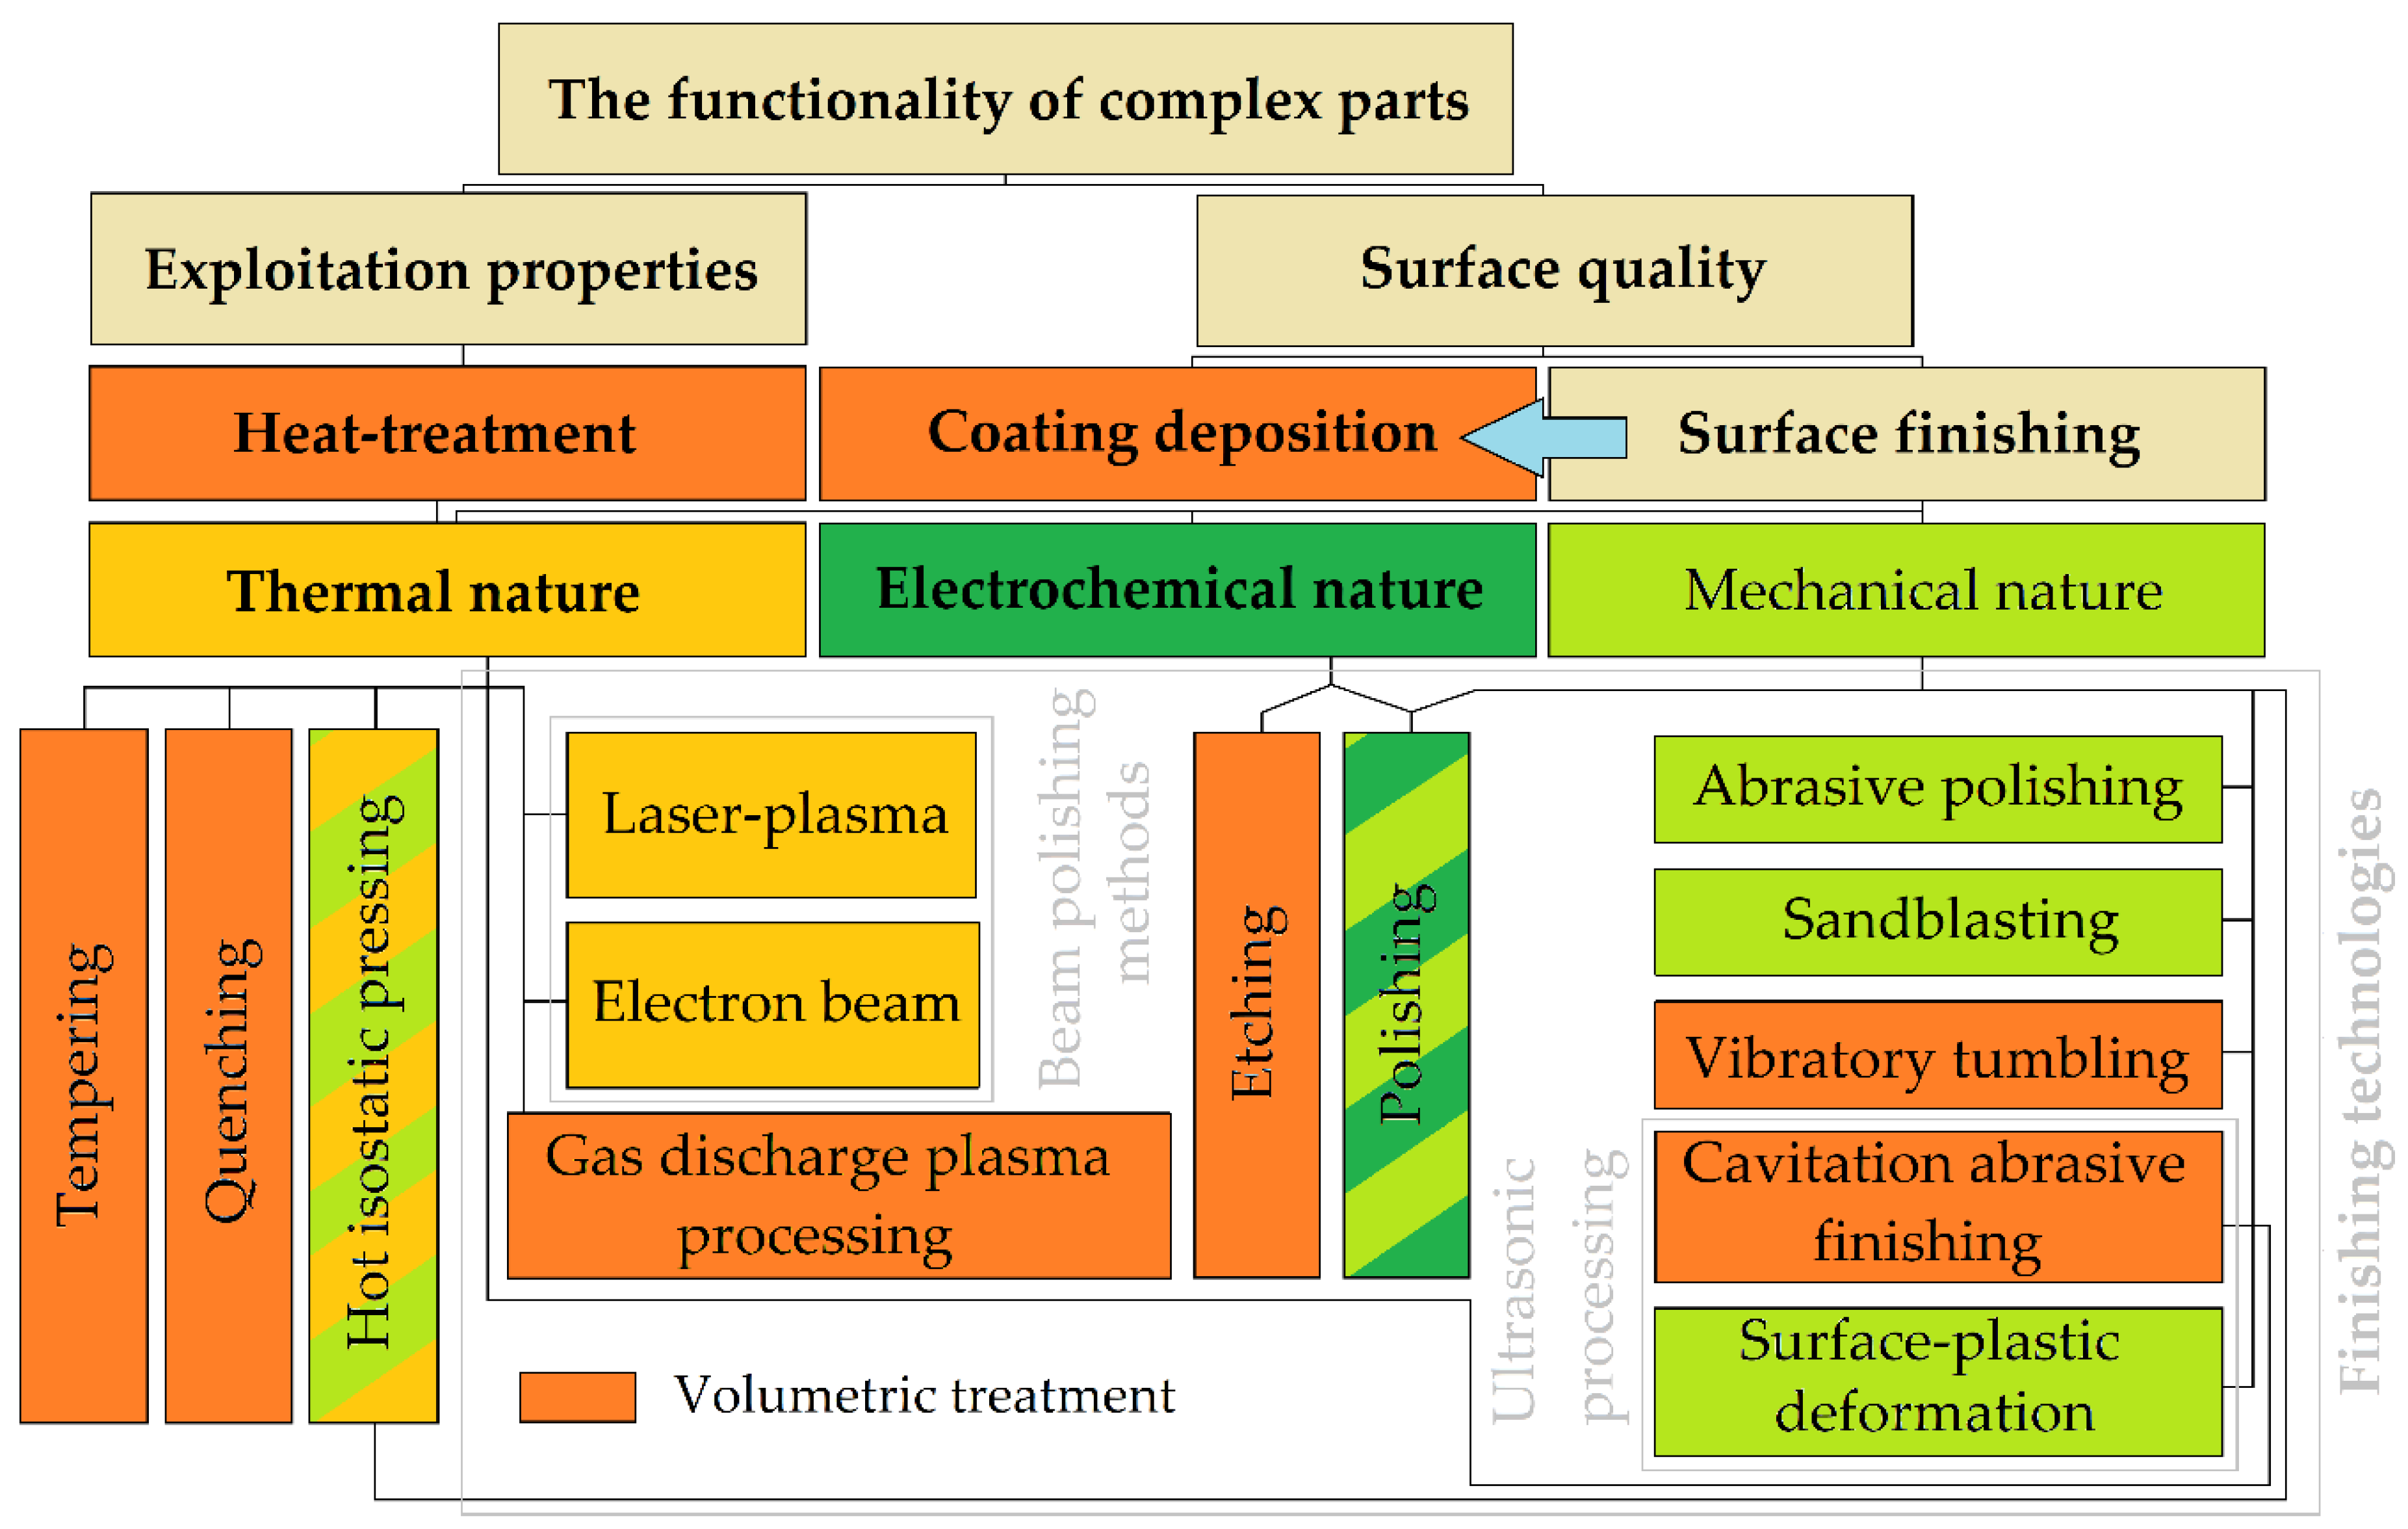
Several post-processing methods based on the varied nature of the material destruction that can be applied for the parts obtained by the laser additive manufacturing methods are presented in Figure 2.
The methods can be divided by influencing the exploitation properties and surface quality, including roughness parameters and resistance to abrasive wear. Among the methods influencing the exploitation properties of the parts produced by laser additive manufacturing, quenching and tempering allow to reduce the grain of the metal alloy and redistribute the residual stresses in the layers of the product, making the structure more monolithic than layered. However, such techniques do not always lead to an increase in the service life of their product in friction pairs and strongly depend on the material and factors of product growth. Hot isotactic pressing stays aside with its proven improvement of material ductility (by ≈20–25% for titanium alloys) but requires developing unique forms for a complex geometry product.
The use of a coating to improve the surface layer’s performance properties is a known technique and can be carried out both chemically and by plasma vapor deposition. Nevertheless, a coating that allows increasing the product’s service life several times requires preliminary cleaning of the product from unmelted granules and reducing the layer’s waviness due to the use of various techniques.
Methods for improving the product’s roughness parameters can be divided into thermal, electrochemical, and mechanical, depending on the nature of the destruction of surface irregularities. The latter group of methods is most widespread due to their relative cheapness and availability in any production.
Furthermore, the latest quantitative achievements in the field of application of these methods concerning products produced by additive manufacturing are considered, the possibility of their application for parts with complex geometry are assessed, those methods that researchers have not experimentally approbated are identified, and alternative technology principles for improving the surface properties and roughness parameters are developed.

2.2. Research Methodology

The analytical research was conducted, taking into account the basic principles of electrical and thermal physics, physics of plasma and concentrated energy fluxes, and available theoretical and practical data related to the research subject of post-processing methods for the metal parts produced by additive manufacturing methods based on a laser.
The research object is a complex geometry part produced by laser additive manufacturing from the metallic alloy powder with a powder diameter of 20–80 µm for the airspace industry. That has requirements of arithmetic mean deviation (Ra) of less than 3.2 µm for the parts with an overall size in plane less than 20 mm and less than 6.3 µm for the parts with an overall size in plane less than 200 mm for working in the conditions of abrasive wear in friction pair.

3. Analyses of Surface Finishing Methods

3.1. Mechanical Methods

Mechanical polishing and sandblasting is widely used to reduce the porosity and surface roughness of metals that allow one to obtain both the developed surface morphology of the metal and significantly reduce surface roughness depending on the used abrasive, reducing residual stress and fatigue properties. Mechanical abrasive polishing for complex geometry parts requires handling to control geometry over all the part but lapping in places. Sandblasting is a universal technique that removes all unmelted granules and unifies the geometry’s waviness in a brief period (5–10 min for each part with an overall size of less than 20 mm) without requiring a unique tool. Using any abrasives during polishing or sandblasting has several disadvantages: abrasive particles remaining on the part surface and specific geometry after processing, such as scratches in the direction of movement of the abrasive and particle impact craters (cavities).
Unevenly distributed residual stresses are one of the actual problems for laser additive manufactured parts with the maximum σ in the perpendicular direction to the solid growing direction of 205 ± 15 MPa for AlSi10Mg alloy [71]. For Inconel 718, improved roughness increased the fatigue properties at 650 °C by ≈50% [72]. A combined application of hot isotactic pressing, sandblasting, abrasive polishing, and chemical etching for Ti-6Al-4V improves the yield strength and ultimate tensile strength (UTS) by ≈2–3 times [73].
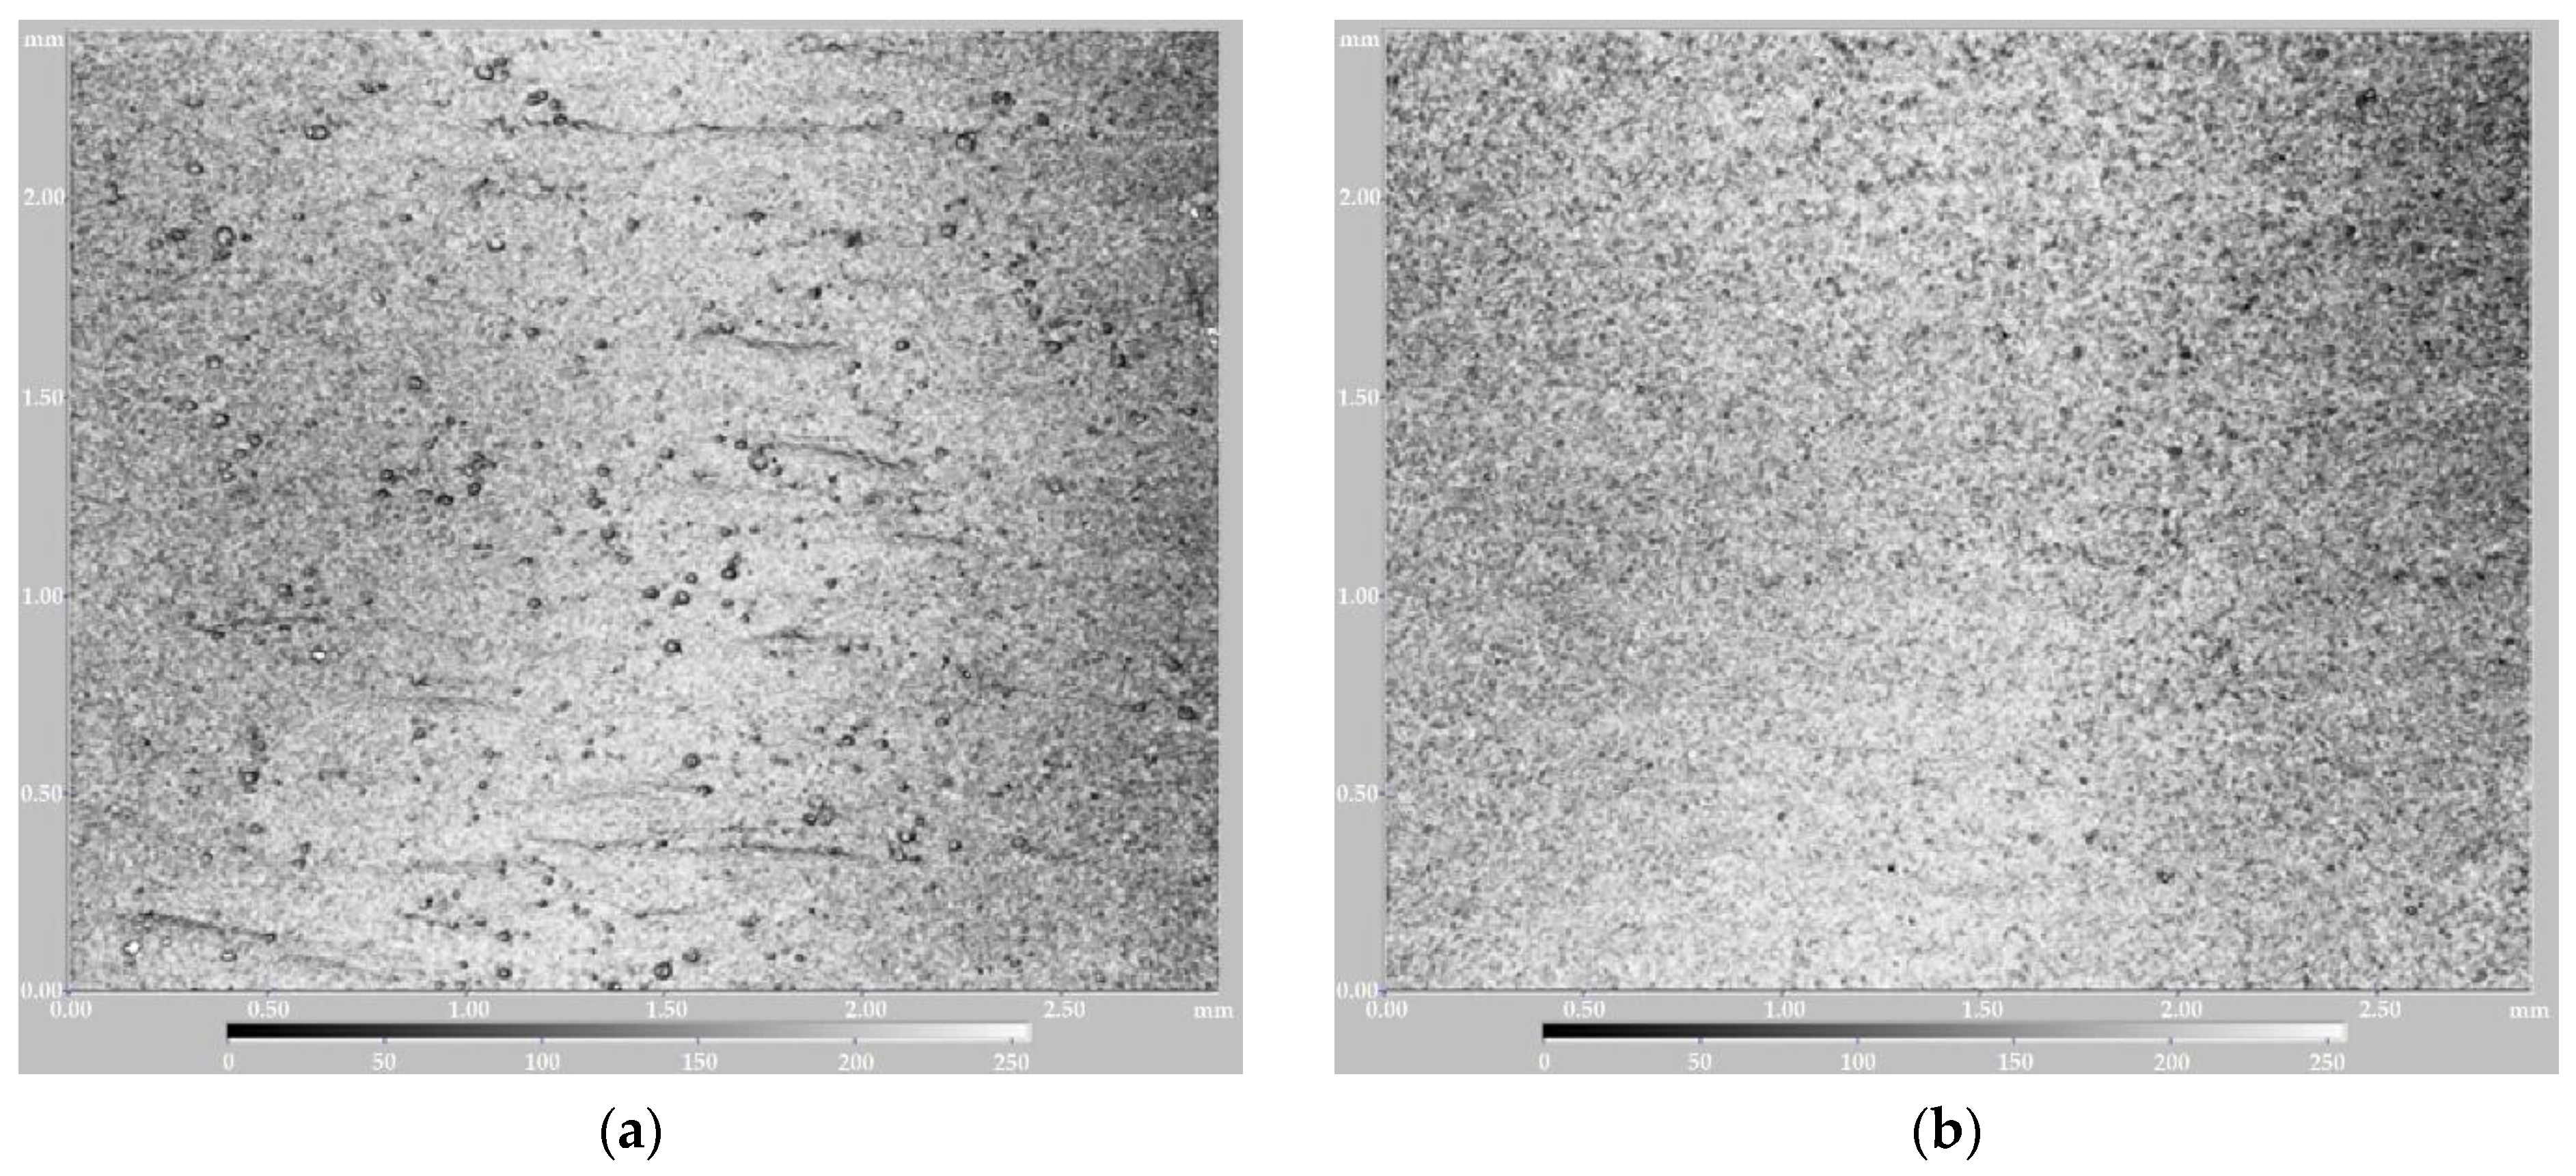
Vibration tumbling is more suitable for mass production and allows complex geometry treatment by tumbling bodies such as ceramics prisms or cork-like clean chips in water medium (for dust binding) that improve the surface roughness parameter Ra by ≈3–4 times, abrasive wear resistance by ≈18–20% for chrome–nickel anti-corrosion steels [74] (Figure 3, Figure 4 and Figure 5). For high carbon steels, the improved wear resistance is explained by the increased surface hardness caused by the stress-induced transformation of residual austenite into untempered martensite during wear, while maintaining acceptable toughness in the subsurface layers prevents brittle cracking [75]. The hardness of tumbling bodies determines the character of formed cavities and surface properties—the use of metal tumbling bodies results in the surface’s strengthening by pressure, when the most significant reduction of roughness parameters and mass loss occurs in the first minutes of processing [76]. It should be noted that dry tumbling is dangerous for the human respiratory system and is strongly not recommended for any production.
Ultrasonic cavitation abrasive finishing allows complex treatment of the part and based on the combined thermochemical and mechanical nature of mechanolysis (thermodynamic cavitation mechanism in the homogeneous liquids), sound and radiation pressure, acoustic streams, and sound capillary effect and abrasives’ action. The cavitation intensity is determined based on L. D. Landau and E. M. Lifshitz’s theory of fluctuations [77,78]. The cavitation is realized by both fluctuations of bulk and a vapor bubble with a similar probability proven by the relationship between the tensile strength of liquids and the bulk fluctuations [79]. The bubble system’s energy is emitted in the form of an acoustic wave and is dissipated by viscosity. The local energy of a transient bubble follows a step function in time, being nearly conserved for most of each cycle of oscillation but decreasing rapidly and significantly at bubble inception and the end of collapse due to the emission of steep pressure waves or shock waves [80].
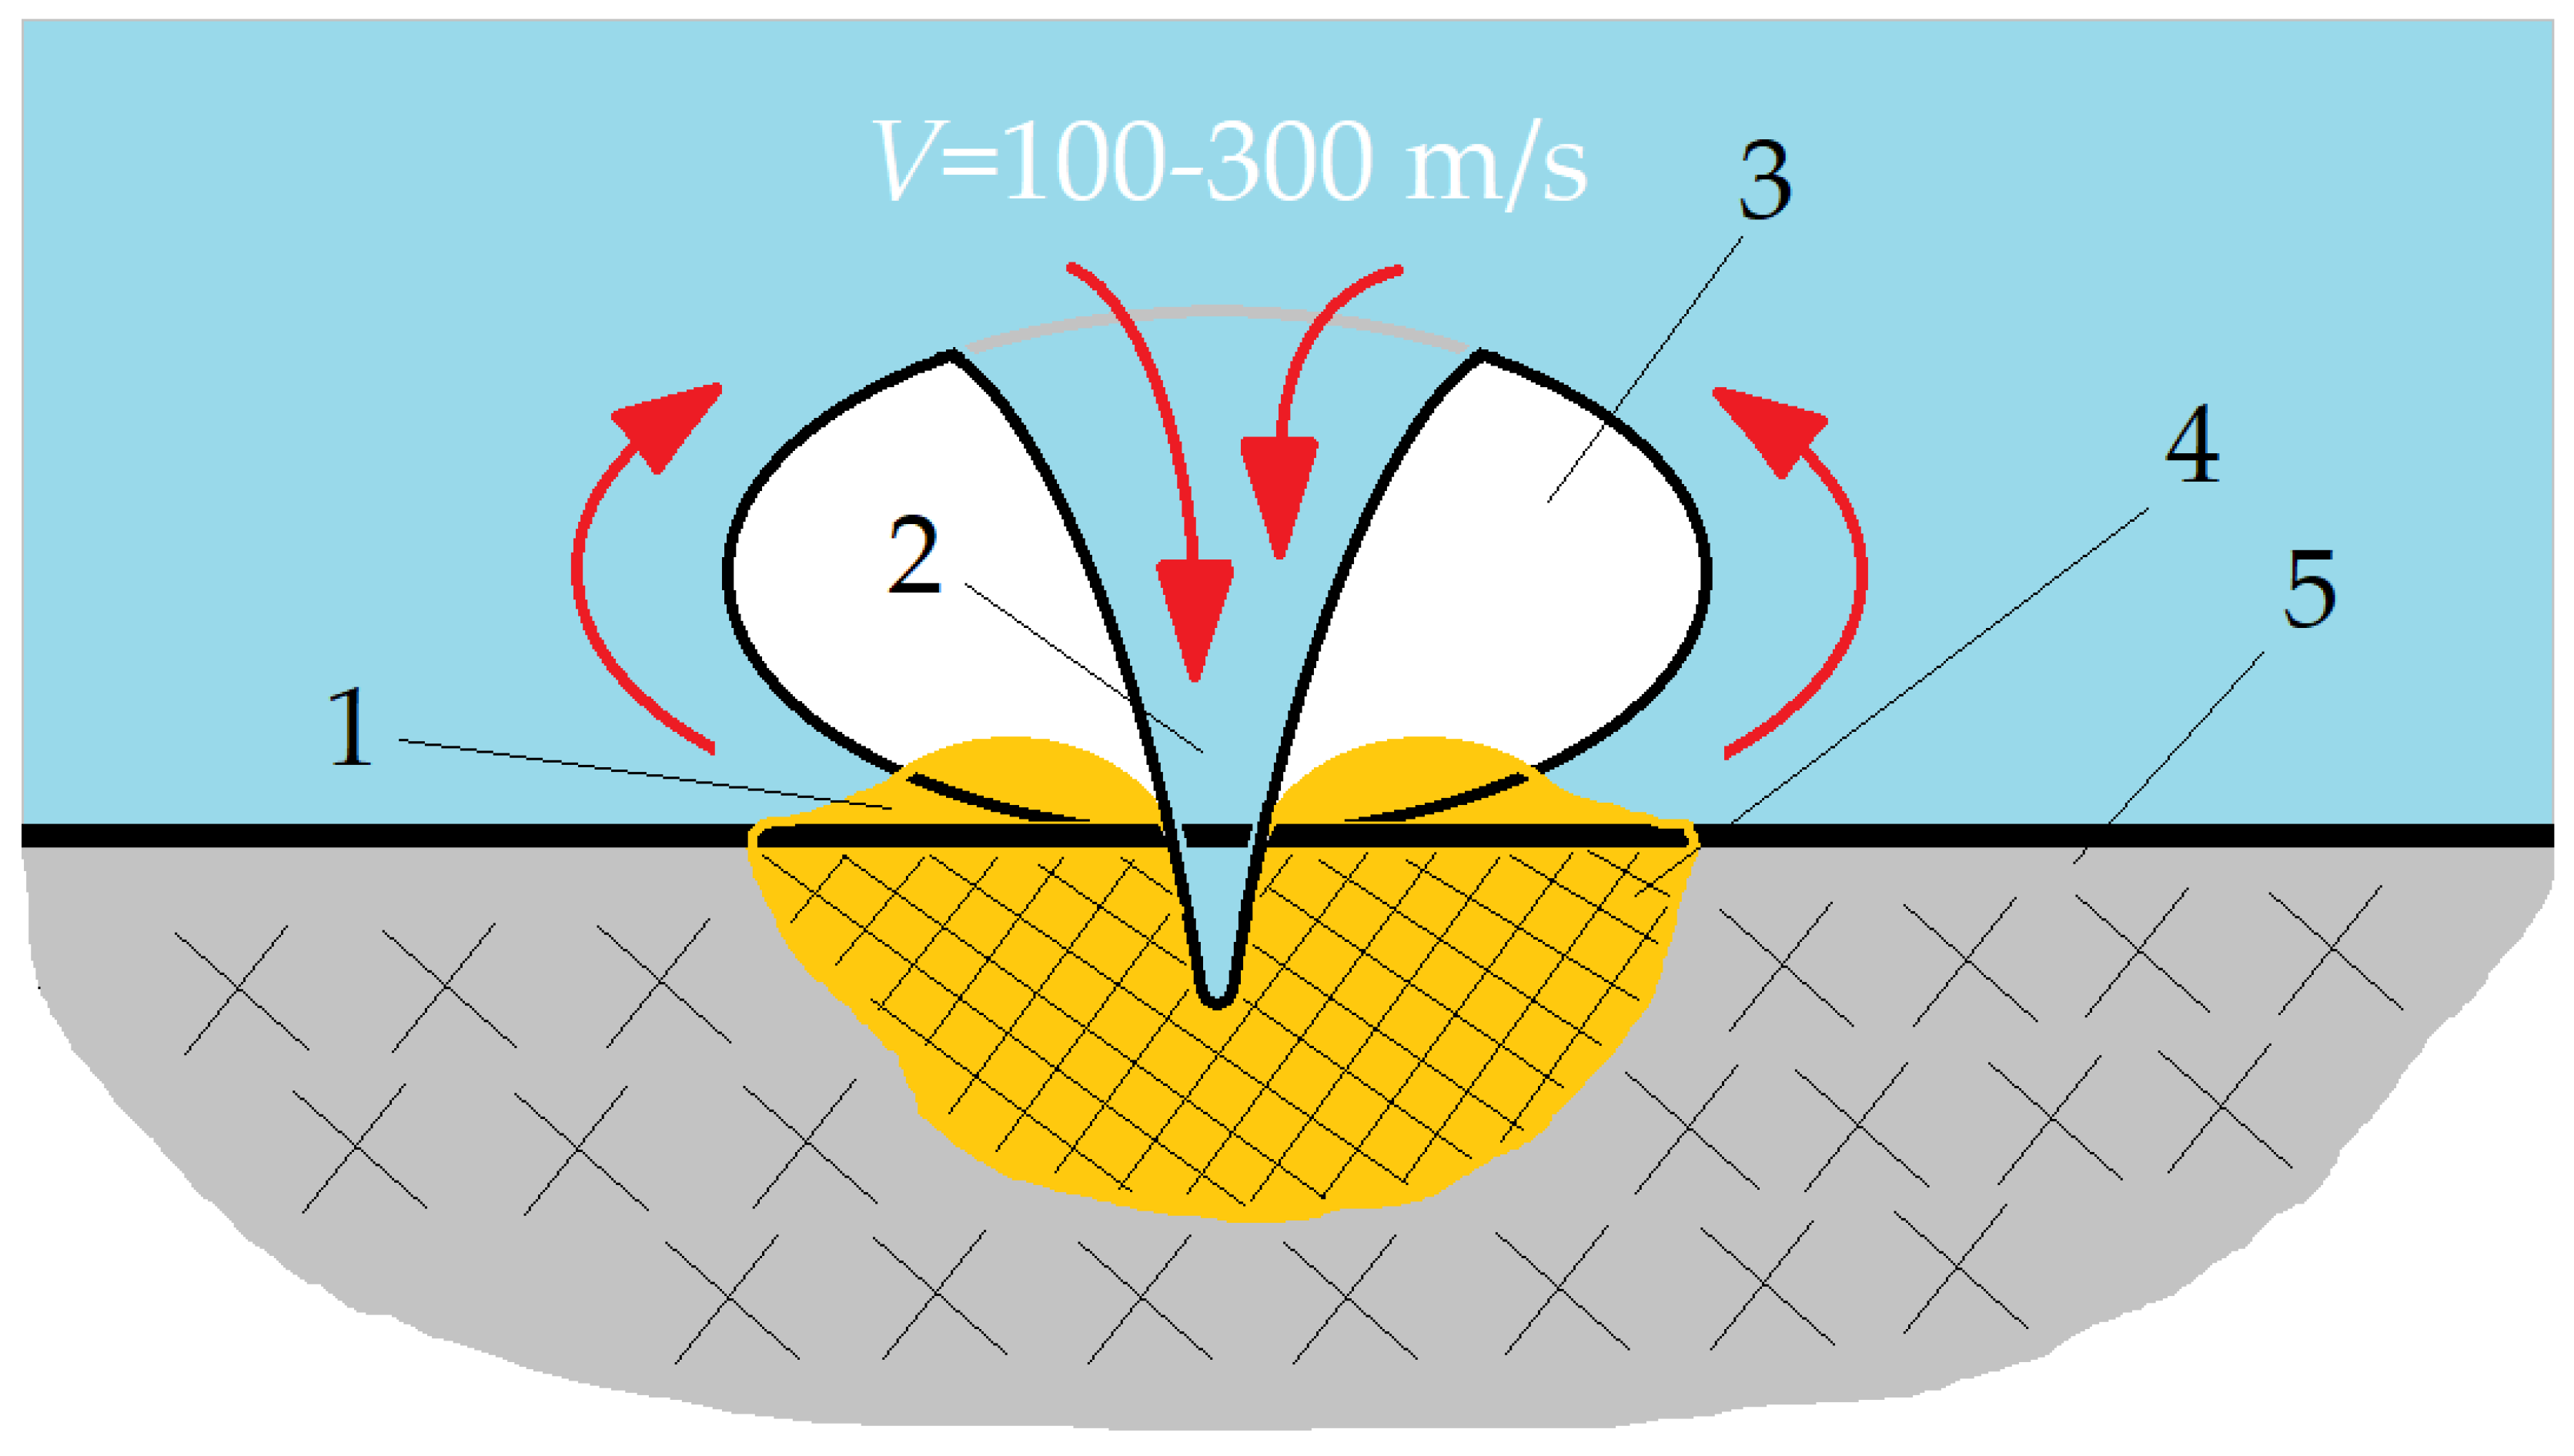
The mechanism of destruction of the structure material as a whole can be represented according to the Kornfeld–Suvorov hypothesis (the hypothesis was proposed by soviet scientists M.O. Kornfeld and L.I. Suvorov in the 1940s) as follows (Figure 6): when the cumulative microjet upon the collapse of a cavitation bubble upon collision with a solid body exhibits the behavior of a solid body and describes the laws for a solid body. When a collapsing bubble is exposed to a streamlined surface, produced by cumulative streams (the process is impulsive and non-stationary), surface deformation occurs, and because of a decrease in the fatigue strength of the material, chipping and knocking out of individual particles occurs as well. From this moment and further, the intensity of erosion increases sharply, and hydrodynamic factors that determine destruction within the framework of the shock wave theory begin to play a significant role: vibration, acoustic radiation, and in certain cases, chemical and corrosion factors, etc. At the initial stage (plastic deformation), the process is possible to describe by solving the hydrodynamic penetration problem taking into account the strength of the material.
Experiments have shown that all materials, even the strongest and hardest, are subject to cavitation destruction [81]. In this regard, the question of what characteristics of a material determine its erosion resistance has been repeatedly investigated. E.P. Georgievskaya [82] proposed an empirical formula for defining the concept of deformation energy introduced by Thiruvengadam [83,84] as a parameter characterizing the resistance of a material to erosion [85]:
S e = ( T + Y ) ε 2
where S e is a calculated value of deformation energy; T is temporary resistance; Y is the yield point; and ε is relative extension.
The energy of deformation is the power of absorption of energy per unit volume of the metal before the moment of fracture formation. The development of cavitation erosion is influenced by the conditions of flow around surfaces to a large extent: speed, pressure, pressure gradient, temperature. It was found that at a fixed value of the cavitation number, the erosion rate strongly depends on the flow rate. Activation of solid and liquid systems, leading to a change in their physical and chemical properties, reactivity, defective (impurity) structure, etc., can be carried out by various external influences: weak and strong. Such effects include, in particular, mechanical, magnetic, ultrasonic treatment, radiation exposure (for example, irradiation with gamma quanta and ion beams), as well as heat treatment. Activation methods can be subdivided into methods that destroy samples as a whole (dispersion) and do not destroy but change only the defective structure. Studies of hydromechanical treatment of water (as a sufficiently strong effect) have shown that water’s subsequent activity is manifested both at the macroscale and at the microlevels (at the molecular and submolecular level).
The essence of the hydrodynamic impact can be summarized by the action of two mechanisms: the propagation of shock waves near the collapsing cavitation microbubble and the shock action of cumulative microstructures in the case of the asymmetric collapse of cavitation microbubbles. Moreover, in this context, the method of obtaining cavitation microbubbles does not matter. These main mechanisms are accompanied by an increase in temperature and pressure near the bubble, making the local area around it a unique reactor for carrying out various reactions and processes.
The phenomenon under consideration underlies the specific properties and related phenomena occurring in water subjected to mechanical (hydrodynamic) action. The modified (or, as it is called, activated) water resulting from hydromechanical treatment can intensify many technological processes by about 30%. Here, by the term “activated” water, we mean the generally accepted concept of an active medium, that is, a substance in which the distribution of particles (atoms, molecules, ions) over energy states is not equilibrium, and at least one pair of energy levels undergoes population inversion. The activation of solid and liquid systems, leading to a change in their physical and chemical properties, reactivity, defective (impurity) structure, etc., can be carried out by various external influences: weak and strong. Such influences include, in particular, mechanical, magnetic, ultrasonic treatment, radiation exposure (for example, irradiation with gamma quanta and ion beams), as well as heat treatment. Activation methods can be subdivided into methods that destroy samples as a whole (dispersion) and do not destroy but change only the defective structure.
Studies of hydromechanical treatment of water (as a rather strong effect) have shown that water’s subsequent activity is manifested both at the macroscale and at the microlevels (at the molecular and submolecular level) (Figure 7) [86]. It indicates that the bubble’s symmetric collapse creates high-intensity fields of pressure of 5–10,000 atm. and temperatures up to 2000 °C [87], which are related to the ultrasonic waves in the working area and were even reported for finishing by a lapping tape [88]. In the case of asymmetric bubble collapse, near the surface, the collapse pattern changes significantly—the collapse occurs with the formation of a high-speed cumulative microjet, and the formation mechanism is described in sufficient detail in the literature. In the asymmetric bubble collapse far from the surface, microjets can be formed far from the surface and hit one another. It should be noted that at the moment of collapse of the bubbles’ system near the surface, the formation of streams between adjacent bubbles is equally probable.
Hydrogen bonds’ presence and development largely explain the unique properties and paradoxes of liquid water. The hydrogen bond has a cooperative nature in H2O molecules and largely determines the water structure under various external conditions. Hydrogen bonds are about ten times stronger than intermolecular interactions typical for most other liquids. In the general case, it can be said that the interactions of a large number of molecules, ensembles of molecules, the organization of a particular structure that determines the properties of water and, accordingly, its reactivity, are determined by the collective forces of Van der Waals [89]. These forces are known as dispersive, long-range forces. They cover regions above 1000 A and determine the stability of a particular structure, physical sorption, etc. The relaxation time for a number of processes in water at 20 °C, t of 10−11–10−13 s. The processes of energy transfer and recharge with the participation of water molecules, noble and active gases, and even the dissociation of water molecules become possible because the duration of the final stage of bubble collapse is about 10−9–10−8 s. Thus, under the action of hydrodynamic cavitation as a strong effect, the decomposition (mechanolysis) of water occurs. An excited water molecule can dissociate along with radiation and dissipation of excess energy into heat:
H 2 O * H + O H * ,
O H * O H + h v .
As a result of cavitation action, the concentration of O2 increases during mechanochemical reactions of the following type due to the mechanolysis of water on H and OH:
O ˙ H + O ˙ H H 2 O 2 ,
O ˙ H + H 2 O 2 H O 2 + H 2 O ,
O ˙ H + H O 2 H 2 O + O 2 .
At the same time, there is a change in the structure of water with the formation of free hydrogen bonds, which determines its increased activity and reagent ability. In the case of aqueous systems, activation and the mechanolysis of water consist of changing the degree of uniformity of distribution of impurities over the volume of the system, aggregation, and disaggregation (dispersion) of impurities, as well as in a change in their active state. The most important feature of water systems, in particular, is the heterogeneity of impurities, which can change significantly during cavitation. Under the influence of cavitation in an aqueous solution containing inert and active gases, various chemical reactions are possible.
Cavitation treatment (as opposed to, for example, magnetization, exposure to various fields of electromagnetic origin, etc.) gives stable repeated results in obtaining water modified in the process of mechanolysis, which is reproducible regardless of place and time. Along with those indicated in the cavitation cavity, transformation reactions occur with radicals with the participation of chemically active gases and radicals’ recombination in the time of 10−6–10−7 s. As a result of these processes, after the collapse of the cavitation bubble, the products of radical decomposition of H2O molecules are detected using the method of spin traps, and recombination of radicals passes into solution, which leads to the accumulation of molecular O2, H2O2, and other compounds in water. The high rate of reactions is evidence that they occur directly in the bubble collapse zone. As a result, along with microturbulent mixing and activation of the surface of aqueous semi-finished products, the process of mechanolysis of water during its hydromechanical treatment makes it possible to create and use cavitation technology to intensify various technological processes and serve as a basis for the development of new applications.
The mechanical factor is the main factor in the destruction of materials, and the known hypotheses and studies of this mechanism reflect one or another side of this complex process, complementing each other. However, the factors considered secondary (thermal effects, thermo- and hydrodynamic, chemical and electrochemical processes, etc.) and accompanying the collapse of bubbles have not been sufficiently studied. Water, simple in its chemical composition, has various anomalous properties due to its natural structural features. The main difficulty in studying the high water structure is the comparability of the potential energy of intermolecular interaction (forces of Coulomb interaction of charges, hydrogen bonds) with the kinetic energy of thermal motion.
According to the experimentally validated two-structure model [90,91], water is a mixture of ice-like and close-packed (disordered) structures. The impact of external factors on water structure is expressed in a change in the parameter characterizing the structural equilibrium shift. One of the strong physical factors affecting water is hydrodynamic cavitation, especially its bubble form, or bubble wake supercavitation. The kinetics of cavitation action is as follows. Fields of high pressures (up to 1000 MPa) and temperatures (up to 1000–2000 °C) are formed during the collapse of a cavitation microbubble in a local volume near it and inside. At the same time, rarefaction–compression waves are generated in the liquid and cumulative microjets with speeds of 100–500 m·s−1 are formed near the solid boundaries of the flow. Hydrodynamic cavitation is accompanied by the intense turbulent mixing processes, dispersion of liquid and solid components of the flow, various chemical reactions initiated by the collapse of cavitation microbubbles. Thus, the liquid region in a small neighborhood of the collapsing microbubble and the bubble itself is a kind of unique microreactor in which various chemical and technological processes are possible.
The method deserves attention since several works are devoted to researching the cavitation effect on laser additively manufactured parts from nickel alloys such as Inconel 625 [92,93,94] and corrosion-resistant chrome-nickel steels [86]. One of the most visible disadvantages of the technology is the features and traces of cavitation erosion on the part surfaces that can reduce the part’s operational life in a complex unit.
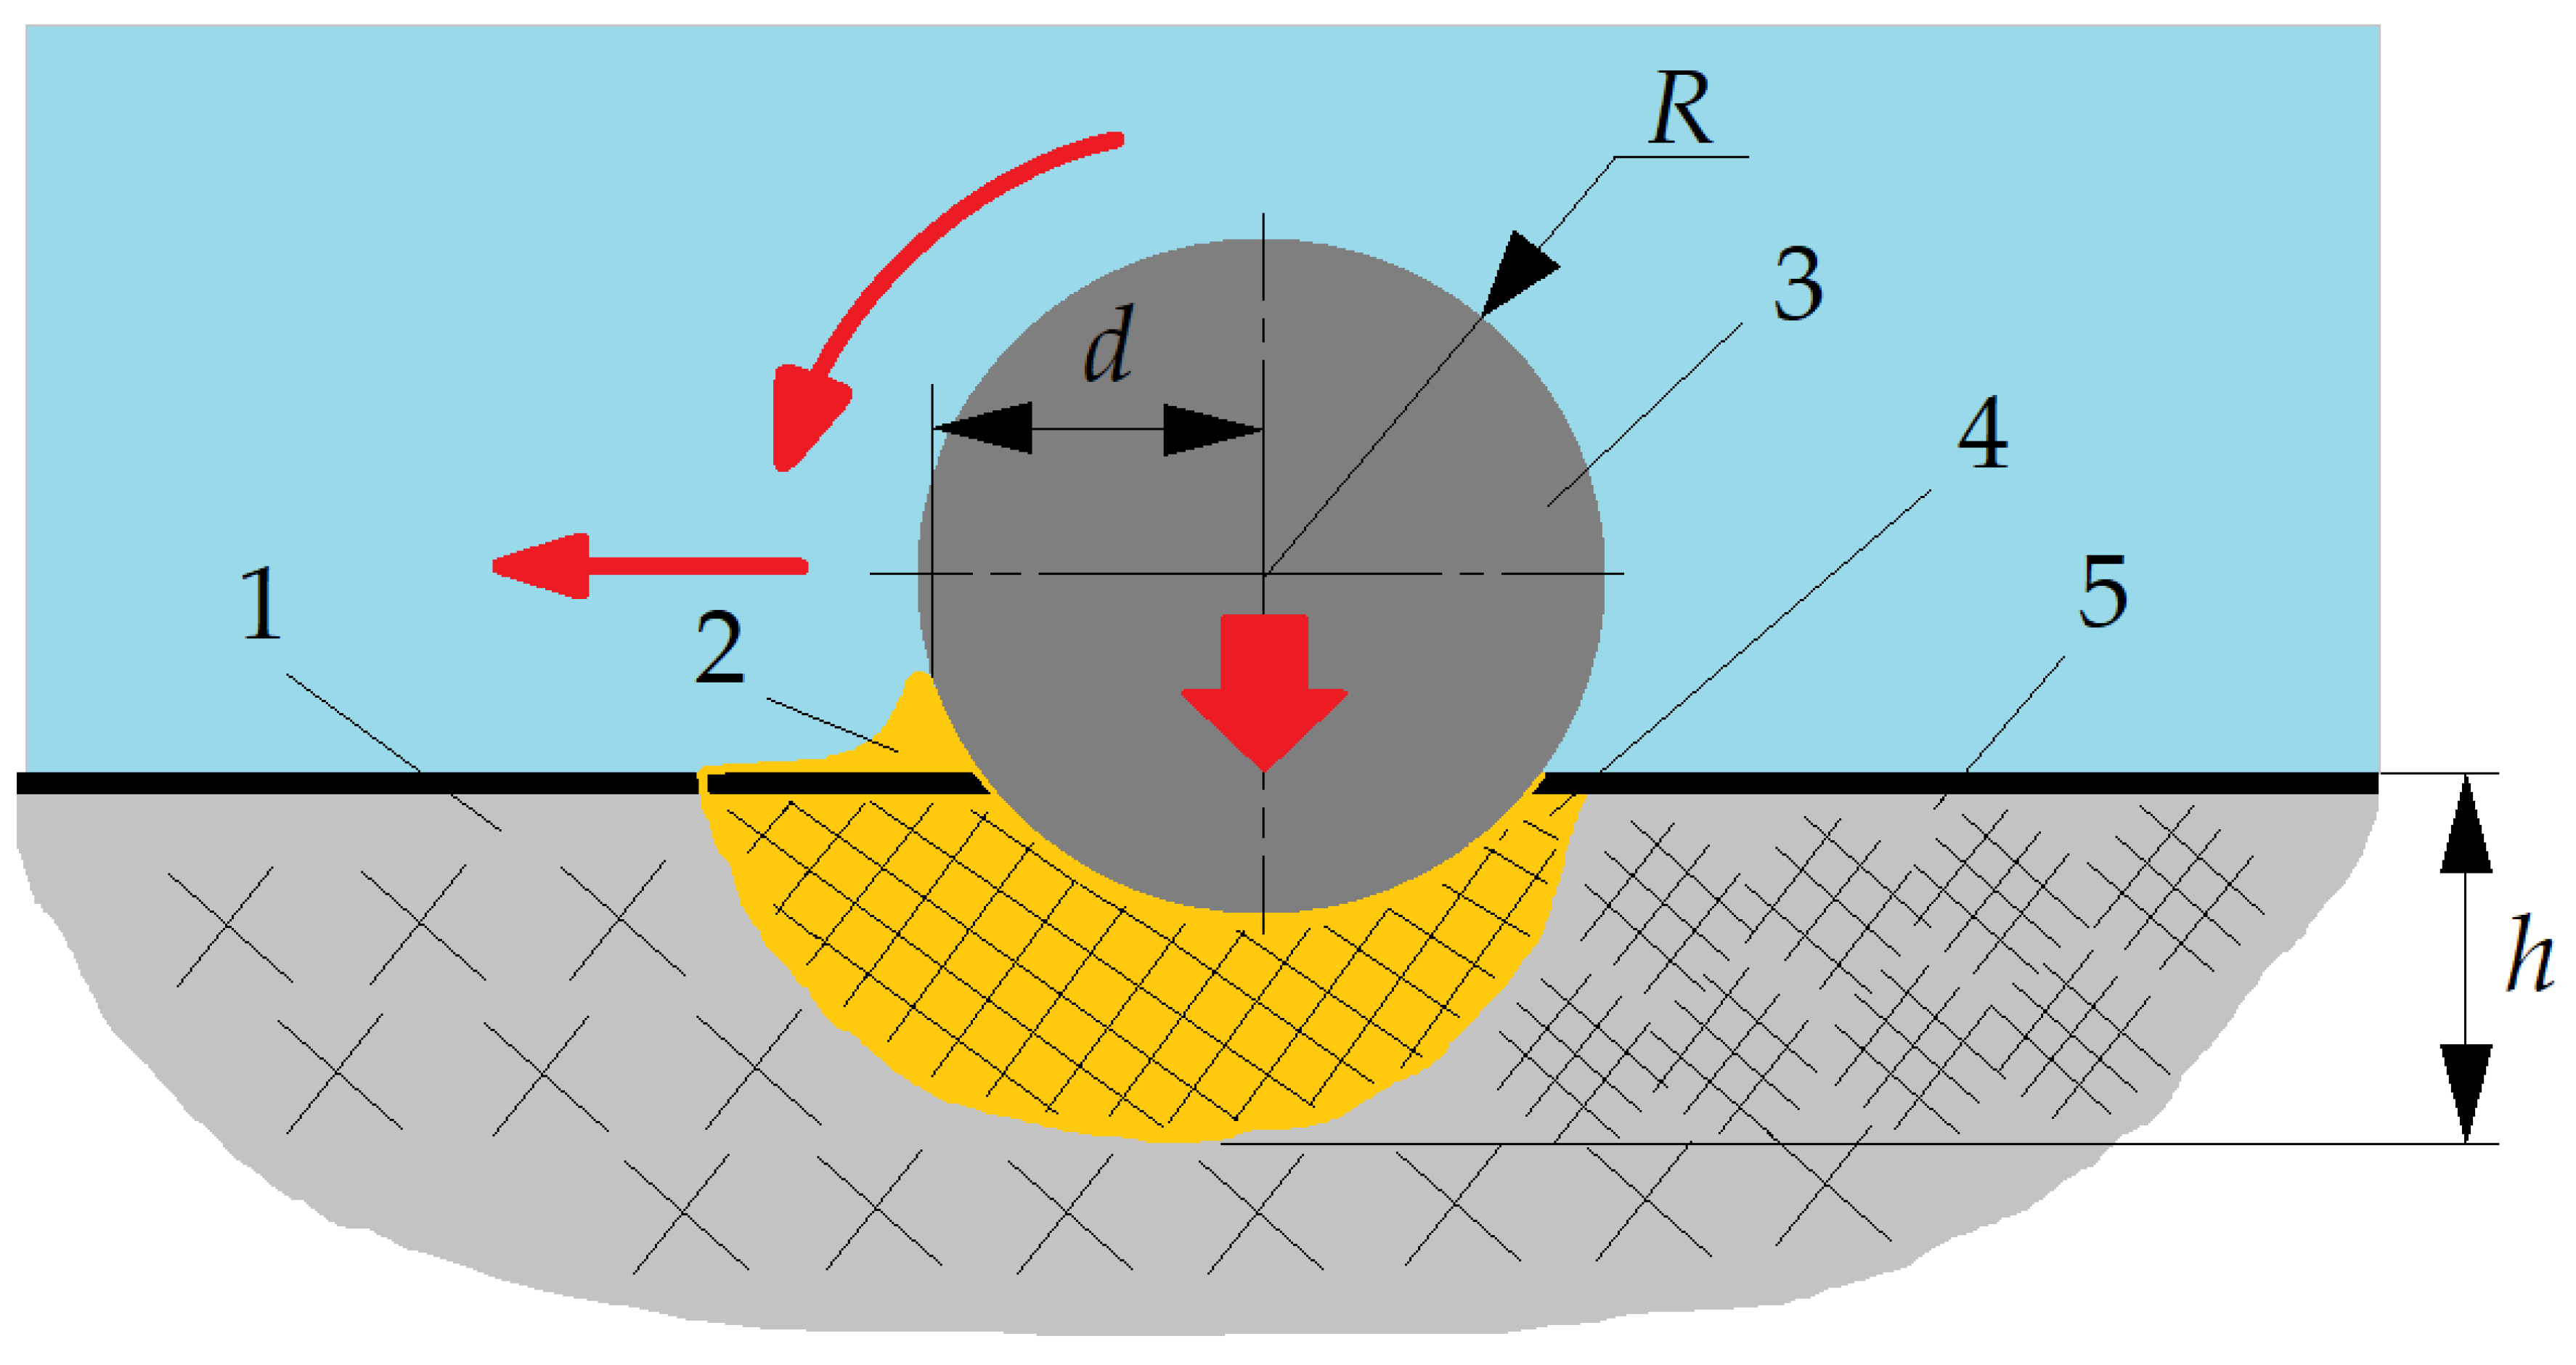
At the same time, ultrasonic plastic deformation can positively influence the properties of the surface and subsurface layer of the part produced by laser additive manufacturing. The tool passes’ geometry is determined by manually or by used equipment—turning or milling machine [15], but it can be produced as well manually for individual production [75]. The subject deserves additional research, since the effect of plastic deformation on the surfaces of laser additively manufactured parts is not covered enough but certainly has many advantages in comparison with mechanical cutting methods related to the formation of a hardened subsurface layer with increased microhardness and creating favorable residual compressive stresses (Figure 8).
When hardening titanium alloys with σB of 650–900 MPa with brushes, the microhardness of the subsurface layer increases by 15–30% with a hardened layer thickness of 0.1–0.3 mm. Studies have shown that brushing leads to a 1.2–1.4-fold decrease in the arithmetic mean deviation of the micro-profile of the ground surfaces up to mirror-like quality [95]. The surface microhardness of the investigated hardened steels increases by 10–30%. The wear of these parts is reduced by 30–40% in comparison with the ground surfaces, while the running-in time decreases by 1.5–2.2 times, which has a beneficial effect on the increase in wear resistance.

3.2. Electrochemical Methods

The chemical and electrochemical etching of metals are also used, which consist of using a specific electrolyte for each of them and direct or pulsed current allowing control of the etching speed [96] and the etched layer’s thickness to reduce the surface roughness [97]. Following the combined Faraday’s law, the volume V of the dissolved metal during electrolysis is directly proportional to the volume electrochemical equivalent Kv of this metal, the current I and the time t:
V = K v · I · t .
The volumetric electrochemical equivalent Kv of a metal depends on its valence and atomic mass and constant. In practice, the dissolved metal volume does not always correspond to the volume calculated. With a specific combination of process parameters—current density at the anode, determined by the ratio of the current to the anode area, the type of metal being processed, the composition and rate of electrolyte renewal in the interelectrode gap—the volume of the dissolved metal relative to its calculated value might decrease. In some cases, the process anodic dissolution completely stops due to the formation of poorly soluble oxide films on the anode surfaces.
If there is a sufficient amount of activating anions in the electrolyte, such as chlorine anions Cl, oxygen is displaced from the oxide film and destroyed without additional electrical energy consumption. In such processes called active, electrical energy is spent directly on the anode metal’s electrochemical dissolution. If the electrolyte lacks activating anions, additional electrical energy is spent on these films’ electrochemical anodic dissolution. In this case, the efficiency of the processes is significantly reduced and called passive.
Active anodic dissolution differs from passive dissolution in the features of the reactions taking place at the anode. The anode metal’s good solubility characterizes active dissolution since side reactions do not occur, except for the main one—anodic dissolution. For example, the active dissolution of the metal occurs during electrochemical etching. In passive dissolution, part of the electrical energy is spent on side reactions that remove hardly soluble oxide films from the anode surfaces. For example, passive dissolution of metal occurs during electrochemical abrasive polishing. Under certain conditions, an increase in the current density relative to its optimal value can lead to the formation of oxide films of a complex composition, which do not dissolve during classical electrolysis [98]. The complete passivation occurs and the transition of the surface layer of the metal from the active state to the passive state, at which point the process of anodic dissolution stops [99]. The pH of the used electrolyte in electrochemical abrasive polishing of cobalt influences the thickness of the complex oxide film: the thickness increases when the pH is varied in the range of 5.0–8.0 and decreases when the pH is 8.0–9.0, which is combined with increased wear [100].

3.3. Beam Polishing Methods

Prof. A.M. Chirkov and his colleagues proposed to solve the problematic roughness of additively manufactured parts using the laser-plasma polishing of a metal surface [101]. They are ignited in metal vapor, and a surface laser plasma is supported in a continuous optical discharge during laser-plasma polishing of a metal surface above a polished surface using a laser beam [102]. Changing the polishing mode is carried out by moving the plasma’s center relative to the polished surface. The method provides for rough polishing of the surface in the mode of deep penetration, volume vaporization, and «finish» polishing of the surface. It provides a significant simplification of process control with high productivity. The disadvantages of this method are the locality of the laser beam, the relatively small spot size (20–100 µm, in the case of using laser beam expander—up to 400 µm), the need to create a protective atmosphere that prevents the oxidation of the material during polishing, and the evaporation of the surface material.
The authors under the supervision of Prof. N.N. Koval proposed polishing the surface of metal parts obtained by additive manufacturing methods with high-current pulsed electron beams [103,104]. They irradiated the surface of metallic samples shaped as 15 × 30 × 5 mm plates produced by selective sintering in a vacuum of titanium powder VT6 (Ti-6Al-4V) with particle sizes 40–80 μm using an electron beam at the unit of the company Arcam (Sweden) [105]. The optimal for the titanium alloy VT6 (Ti-6Al-4V) mode, in which the maximum decrease in surface roughness was observed, has the pulse energy density of 45 J·cm², the pulse duration of 200 μs, the number of pulses on the same surface area of 10, and the pulse repetition rate of 0.3 Hz. Investigation of the sample surfaces showed that the roughness parameter Ra (Arithmetic Mean Deviation) was decreased from 11 to 1.1 μm, and Rz (Ten-Point Height)—from 74 to 6 μm. The porosity of the surface layer of the sample has disappeared. Scanning electron microscopy showed that the surface profile of the samples changed significantly. A homogeneous granular structure was formed in the surface layer of titanium alloy VT6 (Ti-6Al-4V), in the composition of which individual powder particles no longer existed. However, the results obtained on small flat samples seem to be difficult to repeat on the part of a complex shape manufactured by the additive method, where some of its parts block the access of the electron beam to other parts. In addition, the electron beam reduces the roughness only to Ra > 1 μm, and true polishing implies the achievement of Ra ≈ 0.04 μm, i.e., the highest 14 surface finish class.
Therefore, after processing the surface of a complex-shaped part made by the additive manufacturing method with an electron beam or a laser beam, it is necessary to continue polishing until the indicated parameters are achieved. One or another coating must be deposited on its surface, depending on its purpose. Thus, the surface treatment of the parts under consideration should include several stages and operational steps.
A group under the leadership of Prof. J. Eckert studied the surface layer’s roughness depending on the different methods of surface treatment of stainless powder steels produced by selective laser melting [106]. The scientific group performed a comparative analysis of traditional mechanical methods of treatment (grinding and sandblasting) and energy methods of treatment (electrolytic and plasma polishing) and determined their influence on the surface layer’s quality.
The international group of scientists, headed by the leading scientist Prof. J.A. Porro, also deserves attention paid to their excellent work [107]. Scientists under his supervision studied in detail two types of post-treatment of products produced by selective laser melting of powder aluminum alloy—sandblasting with ceramic particles and laser impact treatment. It is shown that not only the surface roughness should be optimized in the process of post-treatment but also the stress state of the surface. These properties significantly influence the durability of products produced by additive technologies.
A well-known group of scientists under the supervision of Prof. J.M. Flynn is engaged in developing a unified methodological approach to the selection of finishing post-treatment to improve the roughness of products produced by selective laser melting [108].

3.4. Ion Polishing Methods

Ion polishing is used to achieve a high surface finishing class [109]. It has been shown that ion polishing the surface of optical glass improves its quality [110]. Ion bombardment of polished glass surfaces with microroughness heights of 5–10 nm does not lead to a deterioration in the quality of optical surfaces when the surface layer of 20 μm thickness is removed [111].
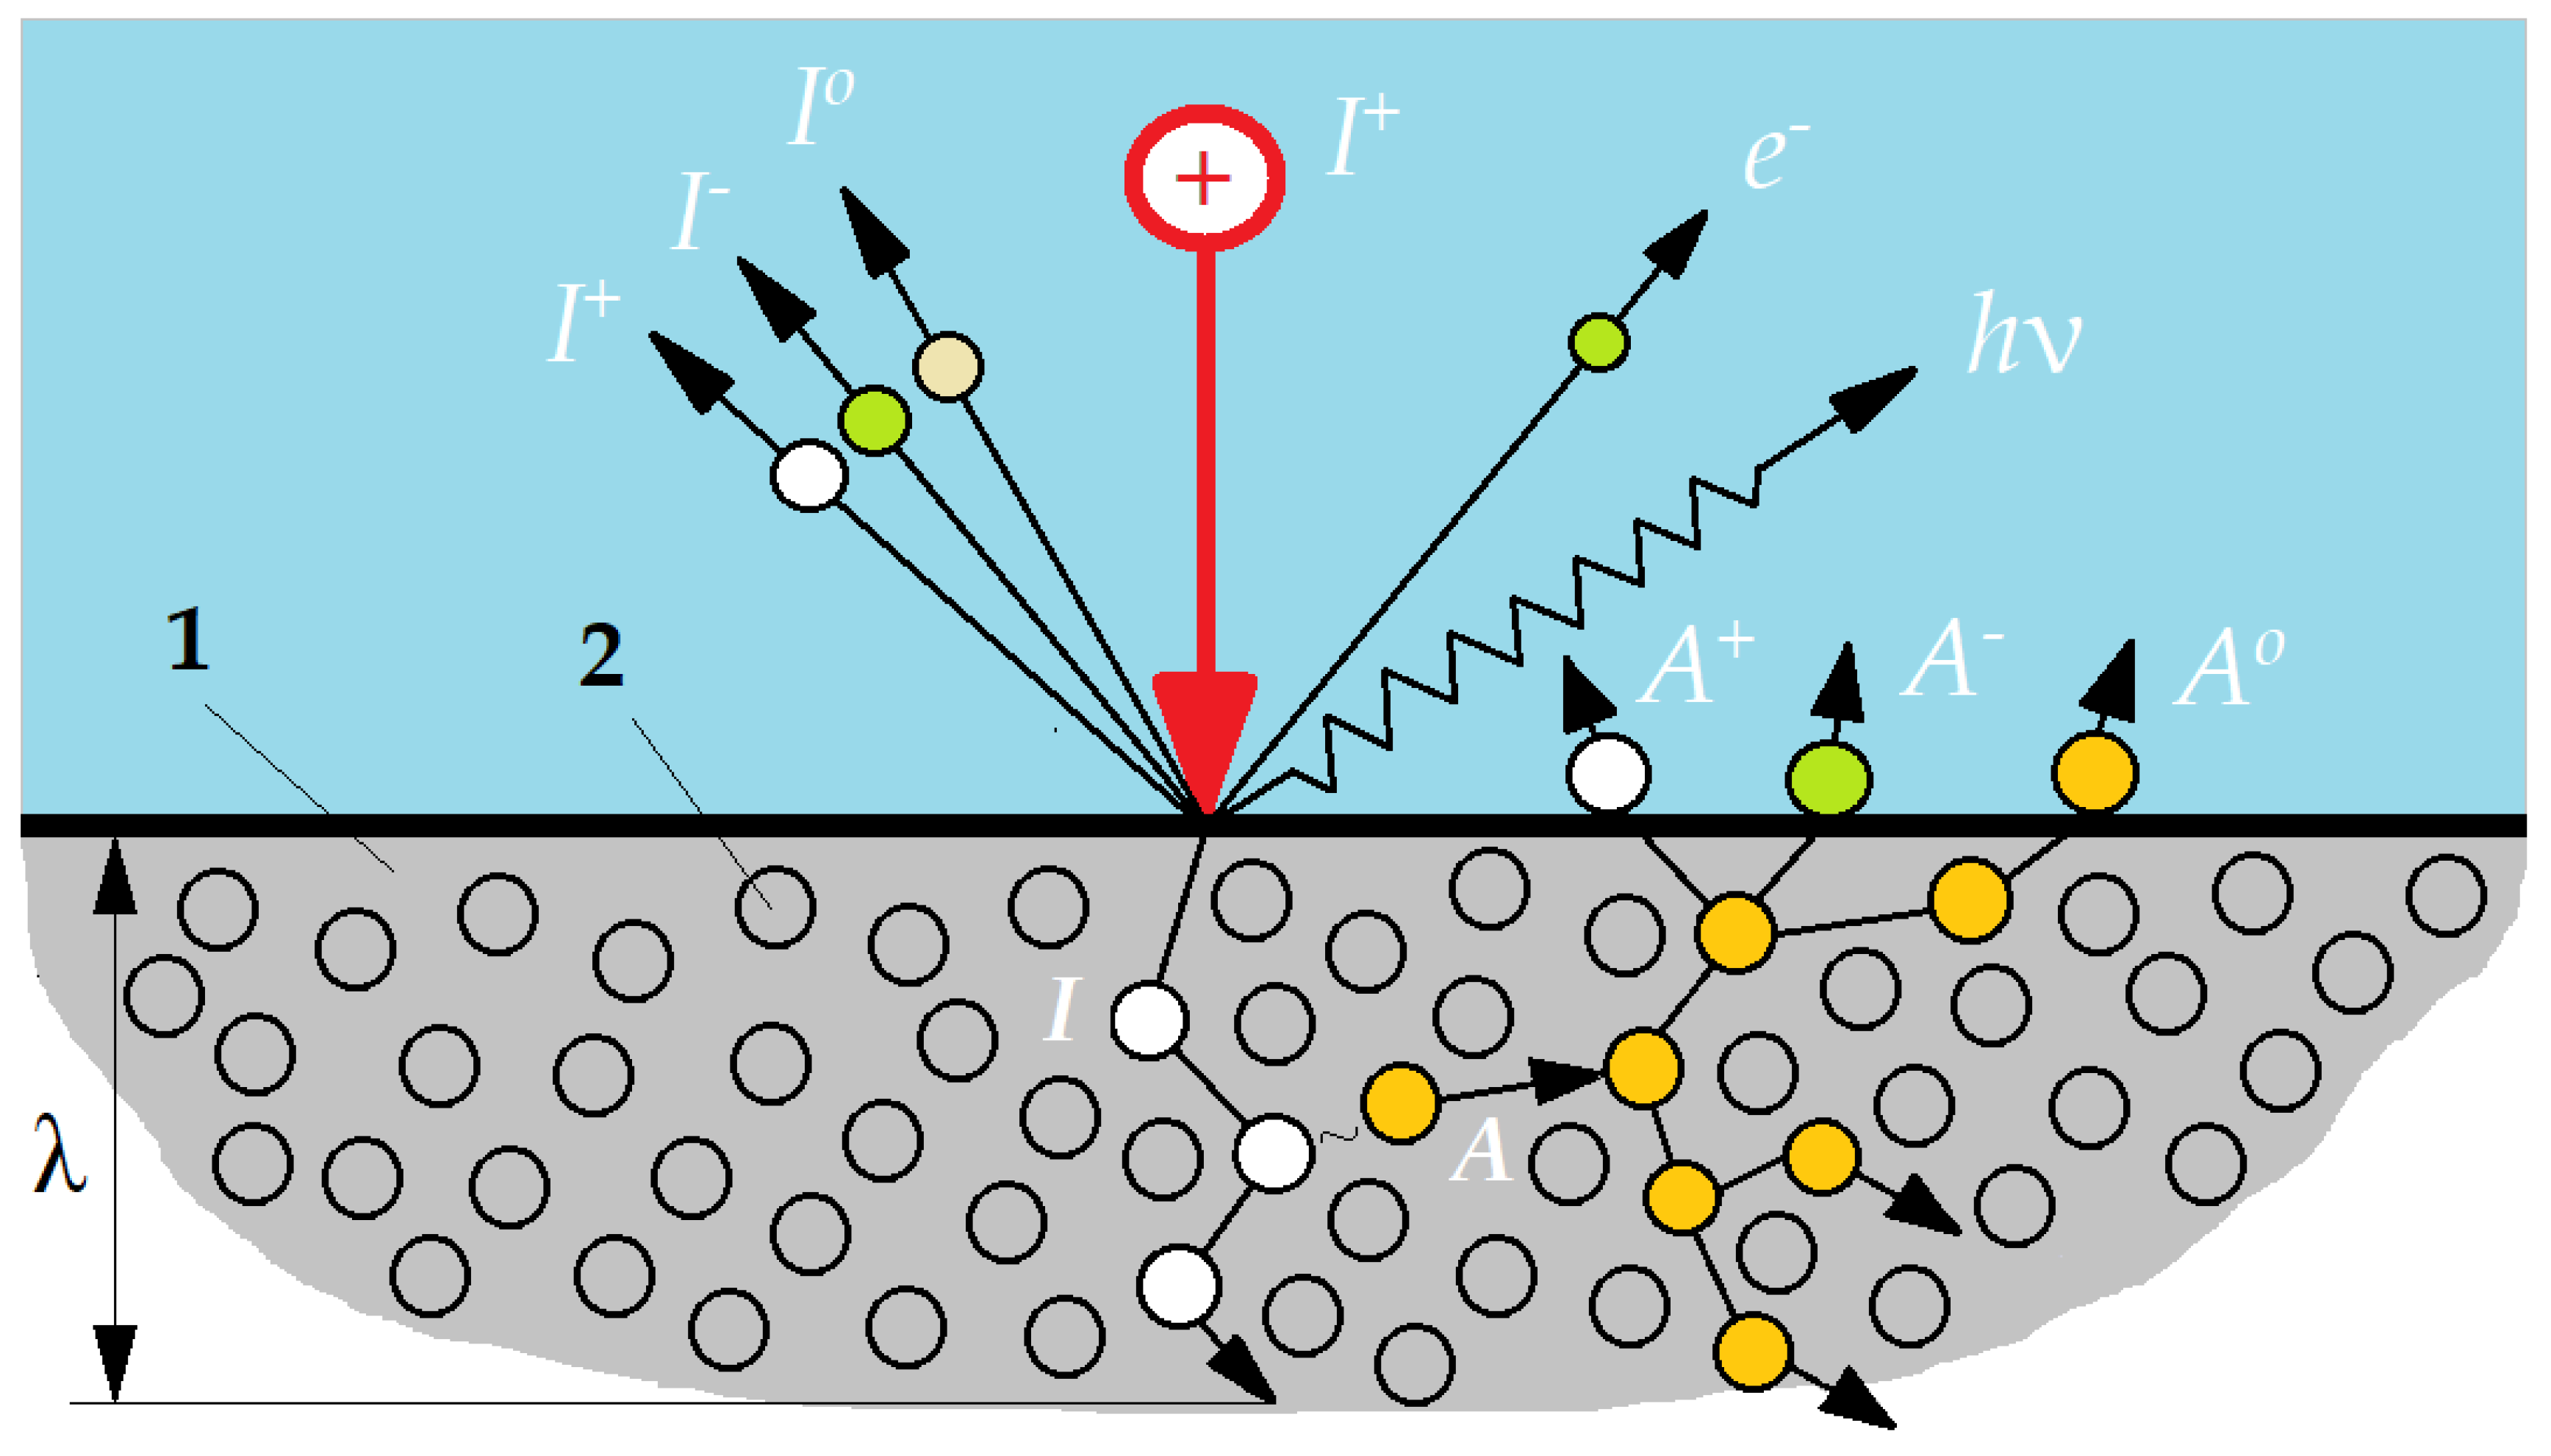
The mechanism of sizing during material removal (spraying) is based on the removal of surface atoms of the workpiece because of exposure to them preformed and accelerated to the required energies of ion beams (Figure 9).
Ions with high kinetic energy are incorporated into the material. During their motion, they experience elastic and inelastic collisions with atomic nuclei and electrons of matter. There is a displacement and excitation of atoms, which is a change in the collision zone’s material structure. Bombarding ions are partially reflected from the surface, and they can change their charge state in the process of backscattering. There is a removal from the surface (sputtering) of material atoms, which can also be in the different charge states. The interaction is accompanied by secondary electron emission and electromagnetic radiation, the spectrum of which ranges from infrared to X-ray.
Considering that the ion current density of 100 μA·cm−2 corresponds to the fall of one ion on the treated surface in 10 s, and the time of elastic interaction of an atom with an ion is comparable to this time, then because of each action, one atom will be removed. An entire monolayer of atoms from an area of 1 cm is sprayed in 1 s, and the layer is 1 μm thick in 1 h. The approximate removal rate is about 3 A·s−1, which depends on the spraying ratio of the processed material Sp:
S p = k E λ M 1 · M 2 ( M 1 + M 2 ) 2
where k is the coefficient taking into account the heat of sublimation of the material, M1 and M2 are the mass of an accelerated ion and an atom of a solid, respectively, λ is the free path of an ion in the workpiece during deceleration; and E is the energy of the ion.
With the development of ion polishing, a new direction in technology has been formed—ion processing of surfaces and coatings, which allows creating fully controlled processes to form surfaces and layers with specified characteristics [112]. For this treatment, sources of ion beams of the large cross-section are used [113].
The main disadvantage of using ion beams for processing glass and other non-conductive materials is the effect of charge accumulation on the surface and volume. It leads to a change in the electrophysical properties of materials that can be a disadvantage for some product purposes and applications. Another consequence of the effect is the appearance of strong electric fields, which leads to deviation of the ion trajectories and, consequently, to a distortion of the created profile’s geometric dimensions. The same effect also occurs on topological non-uniformities of the treated surface, which leads to an increase in its roughness [114]. In this regard, recently, sources of fast neutral atoms and molecules have been used instead of ion sources when processing both conductive and non-conductive materials [109,115]. Sixteen-μm-deep grooves were obtained in 5 h using one of these sources of fast argon atoms with an energy of 3 keV and a mask on the surface of a flat corundum substrate [116]. The etching rate of hard-to-sputter corundum was v = 3.2 μm·h−1 and was four times lower than the etching rate by the same beam of stainless steel substrate of v = 13 μm·h−1 [117]. It is possible to concentrate a broad beam on a small surface area of the part produced by the additive manufacturing method and, as a result, it increases the processing rate using a source with a concave emission grid. It is necessary to use a positioning device to move it so that all parts of the surface pass sequentially in the area of the emission grid’s geometric focus when a part is polishing. It is necessary to use sources of metal atom fluxes that do not contain metal droplets to deposit a coating on the polished surface of a part manufactured by additive manufacturing methods. First, these are planar magnetrons [118]. Powerful pulsed magnetrons have been proposed to increase the deposition rate [119]. They used expensive pulsed power supplies, but no significant increase in the deposition rate was achieved. A serious problem is a decrease in the deposition rate during the synthesis of metal compounds, such as titanium, with a reactive gas such as nitrogen. When the latter is added to argon, a nitride film is formed on the surface of the magnetron target, and the sputtering rate and the deposition rate of the coating are reduced several times.
The deposition rate can be increased by order of magnitude if an uncooled target holder is used that is made of refractory material that does not interact with the target material in the molten state [120]. At an argon pressure of 0.1–0.3 Pa, an ordinary magnetron discharge is ignited, a target made, for example, of copper melts in the holder, and the ionization of its vapors noticeably reduces the discharge voltage [121]. At this moment, the supply of argon to the chamber can be ceased, and the discharge continues in copper vapor [122,123]. In addition to high speed, deposition using a magnetron with an evaporated target is independent of chemically active gases and can be used to synthesize on the surface of a part manufactured by the methods of additive manufacturing a wear-resistant coating, for example, titanium nitride. This coating has already been synthesized by evaporation of titanium in a crucible-anode of a glow discharge [16,124].
A group of scientists led by E.V. Berlin investigated the ultra-high-speed sputtering of a magnetron working in the vapor of a liquid metal target [119], which can be considered as one of the scientific competitors of the proposed idea. Other known scientists proposed processing materials with beams of fast neutral particles [109,125]. Other competitors are a group headed by Prof. A. Anders, who proposed to solve the problem using powerful pulsed magnetrons [118] and a group of scientists led by Prof. I. Musil—they made a significant contribution to the development of coating deposition technology using magnetrons [117].

4. Development of Ion Polishing Principles

It is necessary to develop a method for filling a working vacuum chamber with a uniform plasma at a gas pressure of 0.01–1 Pa to develop explosive ablation in plasma of surface protrusions, polishing with fast atoms, and coating deposition. Thus, it is possible to use a glow discharge between the chamber, which plays the role of a hollow cathode, and the anode located inside it. With a chamber volume of about 0.1 m³ and anode surface area of 0.001 m², the electrons emitted by its surface are accelerated to hundreds of electronvolts in the cathode sheath between the chamber wall and the plasma filling it. They fly through the plasma and are reflected in the cathode sheath at the opposite chamber wall. The chamber is an electrostatic trap for electrons, and they can get to the anode only after hundreds of flights through the plasma. They spend all their energy on the gas’s excitation and ionization by their way to the anode at a pressure of 0.01–1 Pa. It allows maintaining a constant glow discharge current of 1–5 A in the indicated gas pressure range [126]. It is also necessary to provide the possibility of pulsed power supply with a short-term increase in discharge current from units to hundreds of amperes [127] for determining the optimal parameters of explosive ablation of surface protrusions when high-voltage pulses with a duration of 0.001–1 μs are applied to a part immersed in the plasma. A study of the surface of titanium, nickel, niobium, aluminum, copper, and lead cathodes showed that after a large number of pulses, the cathode microrelief is formed by the superposition of the same number of microcraters. As the pulse duration decreases, the microcrater size diminishes. The character size of a copper cathode’s surface inhomogeneities decreases to 0.1–0.2 μm with a pulse duration of fewer than 1.5 ns. This phenomenon was called the polishing effect [128].
It is necessary to determine the dependence of the amplitude of high-voltage pulses at which breakdowns occur between the surface protrusions of the part and the plasma on its density (current amplitude of glow discharge in the chamber) when studying the removal of powder particles protruding on a part surface that is responsible for the initial roughness parameter Ra up to 30 μm and surface porosity. It is also important to establish the part surface roughness’s dependence on the pulse energy that destroys large protrusions. Exceeding an optimal value of the pulse energy can increase the surface roughness instead of a decrease. The optimal parameters’ determination can be carried out on small flat samples made by sintering in a vacuum with an electron beam of VT6 (Ti-6Al-4V) grade titanium alloy powder with a particle size of 40–80 µm, which is most common for additive manufacturing. After the explosive ablation of the surface protrusions, the same samples will be used to study polishing their surface with a concentrated beam of fast argon atoms and/or ions at an angle exceeding 60° of incidence to the surface of the sample moved in a vacuum chamber using a positioning device. It is necessary to establish the sample surface roughness’s dependence on its initial value, the flux density on accelerated particles’ surface, their energy, angle of incidence, and processing time. It is necessary to modernize the previously developed source of fast neutral atoms and replace the flat emissive grid with a concave surface [114]. It will make it possible to concentrate a fast argon atoms beam in a small focal region of the grid, provide access to the narrow fast atom beam to the part cavities’ internal surfaces, and significantly increase the etching rate. After determining the optimal conditions for flat samples’ processing, a study will be made of the protrusions removal on the outer and inner surfaces of the parts shaped as a hollow cylinder obtained by the methods of additive manufacturing and subsequent polishing of all its surfaces.
It is proposed to use a set of planar magnetrons mounted at the top of the chamber and on its sidewalls to create a uniform flow of metal atoms from all sides to the sample installed in the chamber when studying the coating deposition on obtained by additive manufacturing methods flat and hollow cylindrical samples, after reducing the initial surface roughness by explosive ablation of the protrusions on their surfaces and polishing with a beam of fast argon atoms. The flux of metal atoms vaporized from the surface of the molten target of magnitude is higher than the flux of atoms sputtered by ions from the surface of a solid magnetron target by an order. Therefore, it is proposed to install at the bottom of the chamber a magnetron with a target holder made of refractory material and use it as an uncooled crucible. The magnetron discharge will be used not only to sputter a target but also mainly to heat it in the crucible to melt and vaporize its material. It will make it possible to fill the complex geometry part’s cavities with metal vapor more uniformly and in less than an hour to deposit a coating with a thickness of ≈10 μm on its surface.

5. Discussion

Additively manufactured parts by a laser have a vast potential in the aviation industry that will grow with the development of solids-growing and finishing technologies. Additive manufacturing took its place in the production industry and market. However, additive manufacturing methods further development has been exhausted until now; it does not have a principal character, and it concentrates on improving details. The development is hampered by the existing obstacles—the post-processing methods’ inability to improve the wear resistance of the complex-shaped functional surfaces.
Most of the post-operations based on mechanical abrasive principles have a few disadvantages related to the mechanical wear of the operational surface that can be critical for some applications [105,106,128,129] when plastic deformation methods stay mostly unveiled [15,75]. Simultaneously, methods based on the use of the concentrated energy flows cannot be suitable for polishing complex geometry parts [60,111]. Chemical etching requires special electrolytes and their disposal [95,96,97,130,131,132]. The microstructure of surface and subsurface layers of the metal parts after the various post-processing is presented in Figure 10, where mechanical machining and ultrasonic deformation are not available complex-shaped parts.
The conducted analytical research proposes developing the application of one of the promising approaches in finishing the laser additively manufactured parts—ion polishing in a gas discharge plasma [108,109,110,111,112]. The observation showed that this technology was never proposed before for processing parts after laser-based growing solids or for any other 3D-printing technology. It has strong advantages that improve the operational ability and service life of the responsible surfaces. In addition, it allows the processing of complex-shaped parts and requires sophisticated equipment that is usually settled for tool production.
The developed approach, including the finishing operation in three successive stages, was developed based on previously conducted research [114,125,126,127,134,135,136] that can be summarized as follows:
-
Explosive ablation of surface protrusions when voltage pulses with an amplitude up to 30 kV and a width of 0.001–1 μs are applied to a detail immersed in the plasma;
-
Polishing with a concentrated beam of fast neutral argon atoms at a large angle of incidence to the surface of the part moved in the chamber using a positioning device;
-
Coating deposition on the part surface upon sputtering with argon ions of solid magnetron targets and/or the evaporation of a liquid metal magnetron target heated by ions.
The previously observed “polishing effect” of the electron gun’s cathode, which forms high-current beams of nanosecond pulse width, consisted in reducing the size of its surface roughness to 0.1–0.2 μm with a decrease in pulse width to 1.5 ns. It cannot be considered an example of protrusion removal on the surface of a part immersed in a plasma due to explosive ablation when high-voltage pulses are applied to it, but it may testify to the feasibility of solving the problem.
Broad beams of fast atoms have already found numerous applications. However, studies of their compression to small transverse dimensions, providing access to complex-shaped parts’ internal surfaces and polishing the surfaces, have not yet been carried out.
The coating deposition features using magnetrons are well known, including a several-fold reduction in the target-sputtering rate when using a chemically active gas. The evaporation rate of liquid metal magnetron targets heated by ions is much higher than the sputtering rate of solid targets, and it does not decrease in the presence of a chemically active gas. When using them, one can expect an increase by order of magnitude of the coating deposition rate. However, studies of this method have not yet been carried out but have immense potential and prospects.
The proposed approach will allow:
  • Removal of powder particles 40–100 µm in size used in the manufacture of the part and protruding on its surface, which is responsible for the initial roughness parameter Ra (Arithmetic Mean Deviation) of 30 µm and surface porosity, by explosive ablation of surface protrusions when microsecond pulses of negative voltage up to 30 kV are applied to the part immersed in the plasma.
  • Polishing with a concentrated beam of ions and/or fast argon atoms at an angle of incidence greater than 60° of the surface of the part moved in a vacuum chamber using a positioning device.
  • Coating deposition on the surface of a part immersed in a dense metal plasma obtained by the evaporation of liquid metal magnetron targets.
The attainability of the problem solution for the first processing stage is determined by the known results of studying the surface of the explosive emission cathodes for electron guns forming high-current nanosecond beams. Based on these results, one can hope for a decrease in the roughness parameter Ra to ≈2 μm and a decrease in the surface layer’s porosity.
The attainability of the solution of the second processing stage problem is determined by the known results of polishing with ion beam products made of various materials up to 14 surface finishing class. The main problems are the forming a focused beam of fast argon atoms and developing a part positioning device that ensures successive bombardment of all its surface at an angle of incidence of more than 60°.
The attainability of the task solution for the third processing stage is based on already available experimental data on magnetron targets’ evaporation. In this case, the magnetron discharge is used not only for sputtering a target but also mainly for its heating in a crucible for melting and evaporation of its material. The flux of metal atoms vaporized from a liquid target’s surface is by an order of magnitude higher than the flux of atoms sputtered by ions from a solid target’s surface. It makes it possible to more uniformly fill with metal vapor the part’s cavities and deposit its surface coatings with a thickness of ≈10 μm in less than an hour with the complex geometry part.

6. Conclusions

All observed technologies have their disadvantages, mostly related to the nature of surface destruction that determines the increased wear of working surfaces of additively manufactured parts even at the stage of post-processing technologies, which has a complex character. Along with the positive effect of plastic deformation and recrystallization of near-surface layers, erosion processes are observed, leading to stress states. That hampers applying the complex metallic parts obtained by laser additive manufacturing for responsible mechanisms and units.
The conducted analytical research provides an innovative approach in finishing the parts produced by laser additive manufacturing based on treatment in gas-discharge plasma. The development approach includes a technology proposal for three principal stages that will allow:
  • removal granules from the surfaces of the parts with the size that primarily used in additive manufacturing of 40–100 µm and achieving roughness parameter Ra (Arithmetic Mean Deviation) of 30 µm by microsecond pulses of negative voltage up to 30 kV are applied to the part immersed in the plasma;
  • polishing the surface with concentrated ions or fast argon atoms under angle exceeds 60°;
  • coating deposition by the evaporation of liquid metal magnetron targets.
The proposed approach has no analogs in the modern industry that allow deducing laser additive manufacturing at a new principal level to reboot the industry’s current state.

Author Contributions

Conceptualization, S.N.G.; methodology, A.S.M., T.V.T.; software, E.S.M. and P.A.P.; investigation, Y.A.M.; resources, A.A.O. and P.A.P.; writing—original draft preparation, Y.A.M. and T.V.T.; writing—review and editing, M.A.V.; visualization, A.A.O. and E.S.M.; supervision, S.N.G.; project administration, M.A.V.; funding acquisition, A.S.M. All authors have read and agreed to the published version of the manuscript.

Funding

This research was funded by the Russian Science Foundation, grant number No. 20-19-00620.

Institutional Review Board Statement

Not applicable.

Informed Consent Statement

Not applicable.

Data Availability Statement

The data presented in this study are openly available in [Figures 6 and 10] at [https://doi.org/10.3390/met10111540], reference number [86].

Acknowledgments

The research was done at the Department of High-Efficiency Processing Technologies of MSTU Stankin.

Conflicts of Interest

The authors declare no conflict of interest.

References

  1. Sova, A.; Doubenskaia, M.; Grigoriev, S.; Okunkova, A.; Smurov, I. Parameters of the Gas-Powder Supersonic Jet in Cold Spraying Using a Mask. J. Therm. Spray Technol. 2013, 22, 551–556. [Google Scholar] [CrossRef]
  2. Yadroitsev, I.; Bertrand, P.; Antonenkova, G.; Grigoriev, S.; Smurov, I. Use of track/layer morphology to develop functional parts by selectivelaser melting. J. Laser Appl. 2013, 25, 052003. [Google Scholar] [CrossRef]
  3. Klein, T.; Schnall, M. Control of macro-/microstructure and mechanical properties of a wire-arc additive manufactured aluminum alloy. Int. J. Adv. Manuf. Technol. 2020, 108, 235–244. [Google Scholar] [CrossRef]
  4. Shen, C.; Liss, K.D.; Reid, M.; Pan, Z.X.; Hua, X.M.; Li, F.; Mou, G.; Huang, Y.; Dong, B.S.; Luo, D.Z. Effect of the post-production heat treatment on phase evolution in the Fe3Ni-FeNi functionally graded material: An in-situ neutron diffraction study. Intermetallics 2021, 129, 107032. [Google Scholar] [CrossRef]
  5. Khmyrov, R.S.; Protasov, C.E.; Grigoriev, S.N.; Gusarov, A.V. Crack-free selective laser melting of silica glass: Single beads and monolayers on the substrate of the same material. Int. J. Adv. Manuf. Technol. 2016, 85, 1461–1469. [Google Scholar] [CrossRef]
  6. Khmyrov, R.S.; Grigoriev, S.N.; Okunkova, A.A.; Gusarov, A.V. On the possibility of selective laser melting of quartz glass. Phys. Procedia 2014, 56, 345–356. [Google Scholar] [CrossRef] [Green Version]
  7. Grigoriev, S.; Tarasova, T.; Gusarov, A.; Khmyrov, R.; Egorov, S. Possibilities of Manufacturing Products from Cermet Compositions Using Nanoscale Powders by Additive Manufacturing Methods. Materials 2019, 12, 3425. [Google Scholar] [CrossRef] [PubMed] [Green Version]
  8. Bunnell, D.E.; Bourell, D.L.; Beaman, J.B.; Marcus, H.L. Fundamentals of liquid phase sintering during selective laser sintering. In Processing and Fabrication of Advanced Materials IV, Proceedings of the Symposium on Processing and Fabrication of Advanced Materials IV, Cleveland, OH, USA, 29 October–2 November 1995; Srivatsan, T.S., Moore, J.J., Eds.; Minerals, Metals & Materials Society: Warrendale, PA, USA, 1996; pp. 17–26. [Google Scholar]
  9. Alsulami, M.; Mortazavi, M.; Niknam, S.A.; Li, D.S. Design complexity and performance analysis in additively manufactured heat exchangers. Int. J. Adv. Manuf. Technol. 2020, 110, 865–873. [Google Scholar] [CrossRef]
  10. Wanjara, P.; Gholipour, J.; Watanabe, E.; Watanabe, K.; Sugino, T.; Patnaik, P.; Sikan, F.; Brochu, M. High Frequency Vibration Fatigue Behavior of Ti6Al4V Fabricated by Wire-Fed Electron Beam Additive Manufacturing Technology. Adv. Mater. Sci. Eng. 2020, 2020, 1902567. [Google Scholar] [CrossRef]
  11. Sotov, A.V.; Agapovichev, A.V.; Smelov, V.G.; Kokareva, V.V.; Dmitrieva, M.O.; Melnikov, A.A.; Golanov, S.P.; Anurov, Y.M. Investigation of the IN-738 superalloy microstructure and mechanical properties for the manufacturing of gas turbine engine nozzle guide vane by selective laser melting. Int. J. Adv. Manuf. Technol. 2020, 107, 2525–2535. [Google Scholar] [CrossRef]
  12. Tarasova, T.V.; Nazarov, A.P.; Shalapko, Y.I. Abrasive and fretting wear resistance of refractory cobalt alloy specimens manufactured by the method of selective laser melting. J. Frict. Wear 2014, 35, 365–373. [Google Scholar] [CrossRef] [Green Version]
  13. Tarasova, T.V.; Gusarov, A.V.; Protasov, K.E.; Filatova, A.A. Effect of Thermal Fields on the Structure of Corrosion-Resistant Steels Under Different Modes of Laser Treatment. Met. Sci. Heat Treat. 2017, 59, 433–440. [Google Scholar] [CrossRef]
  14. Nowotny, S.; Tarasova, T.V.; Filatova, A.A.; Dolzhikova, E.Y. Methods for Characterizing Properties of Corrosion-Resistant Steel Powders Used for Powder Bed Fusion Processes. Mater. Sci. Forum 2016, 876, 1–7. [Google Scholar] [CrossRef]
  15. Gavrin, V.N.; Kozlova, Y.P.; Veretenkin, E.P.; Logachev, A.V.; Logacheva, A.I.; Lednev, I.S.; Okunkova, A.A. Reactor target from metal chromium for “pure” high-intensive artificial neutrino source. Phys. Part. Nucl. Lett. 2016, 13, 267–273. [Google Scholar] [CrossRef]
  16. Volosova, M.A.; Gurin, V.D. Influence of vacuum-plasma nitride coatings on contact processes and a mechanism of wear of working surfaces of high-speed steel cutting tool at interrupted cutting. J. Frict. Wear 2013, 34, 183–189. [Google Scholar] [CrossRef]
  17. Grigoriev, S.N.; Gurin, V.D.; Volosova, M.A.; Cherkasova, N.Y. Development of residual cutting tool life prediction algorithm by processing on CNC machine tool. Materialwiss. Werkstofftech. 2013, 44, 790–796. [Google Scholar] [CrossRef]
  18. Metel, A.; Grigoriev, S.; Melnik, Y.; Panin, V.; Prudnikov, V. Cutting Tools Nitriding in Plasma Produced by a Fast Neutral Molecule Beam. Jpn. J. Appl. Phys. 2011, 50, 08JG04. [Google Scholar] [CrossRef]
  19. Fang, Z.C.; Wu, Z.L.; Huang, C.G.; Wu, C.W. Review on residual stress in selective laser melting additive manufacturing of alloy parts. Opt. Laser Technol. 2020, 129, 106283. [Google Scholar] [CrossRef]
  20. Acevedo, R.B.O.; Kantarowska, K.; Santos, E.C.; Fredel, M.C. Residual stress measurement techniques for Ti6Al4V parts fabricated using selective laser melting: State of the art review. Rapid Prototyp. J. 2020. [Google Scholar] [CrossRef]
  21. Vermilion, M.L.D.; de Oliveira, T.T.; Kreve, S.; Batalha, R.L.; de Oliveira, D.P.; Pauly, S.; Bolfarini, C.; Bachmann, L.; dos Reis, A.C. Analysis of the mechanical and physicochemical properties ofTi-6Al-4 Vdiscs obtained by selective laser melting and subtractive manufacturing method. J. Biomed. Mater. Res. Part B 2020. [Google Scholar] [CrossRef]
  22. Cardoso, R.M.; Kalinke, C.; Rocha, R.G.; dos Santos, P.L.; Rocha, D.P.; Oliveira, P.R.; Janegitz, B.C.; Bonacin, J.A.; Richter, E.M.; Munoz, R.A.A. Additive-manufactured (3D-printed) electrochemical sensors: A critical review. Anal. Chim. Acta 2020, 1118, 73–91. [Google Scholar] [CrossRef] [PubMed]
  23. Gokuldoss Prashanth, K.; Scudino, S.; Eckert, J. Tensile Properties of Al-12Si Fabricated via Selective Laser Melting (SLM) at Different Temperatures. Technologies 2016, 4, 38. [Google Scholar] [CrossRef] [Green Version]
  24. Kim, J.; Wakai, A.; Moridi, A. Materials and manufacturing renaissance: Additive manufacturing of high-entropy alloys. J. Mater. Res. 2020, 35, 19963–19983. [Google Scholar] [CrossRef]
  25. Wang, J.; Liu, S.; Fan, Y.; He, Z.R. A short review on selective laser melting of H13 steel. Int. J. Adv. Manuf. Technol. 2020, 108, 2453–2466. [Google Scholar] [CrossRef]
  26. Sing, S.L.; Yeong, W.Y. Laser powder bed fusion for metal additive manufacturing: Perspectives on recent developments. Virtual Phys. Prototyp. 2020, 15, 359–370. [Google Scholar] [CrossRef]
  27. Volosova, M.A.; Fyodorov, S.V.; Opleshin, S.; Mosyanov, M. Wear Resistance and Titanium Adhesion of Cathodic Arc Deposited Multi-Component Coatings for Carbide End Mills at the Trochoidal Milling of Titanium Alloy. Technologies 2020, 8, 38. [Google Scholar] [CrossRef]
  28. Cruz, N.; Martins, M.I.; Domingos Santos, J.; Gil Mur, J.; Tondela, J.P. Surface Comparison of Three Different Commercial Custom-Made Titanium Meshes Produced by SLM for Dental Applications. Materials 2020, 13, 2177. [Google Scholar] [CrossRef] [PubMed]
  29. Kuzin, V.V.; Grigoriev, S.N.; Fedorov, M.Y. Role of the thermal factor in the wear mechanism of ceramic tools. Part 2: Microlevel. J. Frict. Wear. 2015, 36, 40–44. [Google Scholar] [CrossRef]
  30. Khodabakhshi, F.; Gerlich, A.P. Potentials and strategies of solid-state additive friction-stir manufacturing technology: A critical review. J. Manuf. Process. 2018, 36, 77–92. [Google Scholar] [CrossRef]
  31. Kalender, M.; Kilic, S.F.; Ersoy, S.; Bozkurt, Y.; Salman, S. Additive Manufacturing and 3D Printer Technology in Aerospace Industry. In Proceedings of the 9th International Conference on Recent Advances in Space Technologies (RAST), Istanbul, Turkey, 11–14 June 2019; IEEE: New York, NY, USA, 2019; pp. 689–695. [Google Scholar]
  32. Camacho, D.D.; Clayton, P.; O’Brien, W.J.; Seepersad, C.; Juenger, M.; Ferron, R.; Salamone, S. Applications of additive manufacturing in the construction industry—A forward-looking review. Autom. Constr. 2018, 89, 110–119. [Google Scholar] [CrossRef]
  33. Chekurov, S.; Salmi, M.; Verboeket, V.; Puttonen, T.; Riipinen, T.; Vaajoki, A. Assessing industrial barriers of additively manufactured digital spare part implementation in the machine-building industry: A cross-organizational focus group interview study. J. Manuf. Technol. Manag. 2021. [Google Scholar] [CrossRef]
  34. Land, P.; Crossley, R.; Branson, D.; Ratchev, S. Technology Review of Thermal Forming Techniques for use in Composite Component Manufacture. SAE Int. J. Mater. Manuf. 2016, 9, 81–89. [Google Scholar] [CrossRef]
  35. Liu, J.; Jalalahmadi, B.; Guo, Y.B.; Sealy, M.P.; Bolander, N. A review of computational modeling in powder-based additive manufacturing for metallic part qualification. Rapid Prototyp. J. 2018, 24, 1245–1264. [Google Scholar] [CrossRef]
  36. Bambach, M.; Sizova, I.; Sydow, B.; Hemes, S.; Meiners, F. Hybrid manufacturing of components from Ti-6Al-4V by metal forming and wire-arc additive manufacturing. J. Mater. Process. Technol. 2020, 282, 116689. [Google Scholar] [CrossRef]
  37. Echsel, M.; Springer, P.; Huembert, S. Production and planned in-orbit qualification of a function-integrated, additive manufactured satellite sandwich structure with embedded automotive electronics. CEAS Space J. 2020. [Google Scholar] [CrossRef]
  38. Hafenstein, S.; Hitzler, L.; Sert, E.; Öchsner, A.; Merkel, M.; Werner, E. Hot Isostatic Pressing of Aluminum–Silicon Alloys Fabricated by Laser Powder-Bed Fusion. Technologies 2020, 8, 48. [Google Scholar] [CrossRef]
  39. Salman, O.O.; Funk, A.; Waske, A.; Eckert, J.; Scudino, S. Additive Manufacturing of a 316L Steel Matrix Composite Reinforced with CeO2 Particles: Process Optimization by Adjusting the Laser Scanning Speed. Technologies 2018, 6, 25. [Google Scholar] [CrossRef] [Green Version]
  40. Saroia, J.; Wang, Y.; Wei, Q.; Lei, M.J.; Li, X.P.; Guo, Y.; Zhang, K. A review on 3D printed matrix polymer composites: Its potential and future challenges. Int. J. Adv. Manuf. Technol. 2020, 106, 1695–1721. [Google Scholar] [CrossRef]
  41. Protasov, C.E.; Khmyrov, R.S.; Grigoriev, S.N.; Gusarov, A.V. Selective laser melting of fused silica: Interdependent heat transfer and powder consolidation. Int. J. Heat Mass Transf. 2017, 104, 665–674. [Google Scholar] [CrossRef]
  42. Hartmann, C.; Lechner, P.; Himmel, B.; Krieger, Y.; Lueth, T.C.; Volk, W. Compensation for Geometrical Deviations in Additive Manufacturing. Technologies 2019, 7, 83. [Google Scholar] [CrossRef] [Green Version]
  43. Shulunov, V.R. Several advantages of the ultra high-precision additive manufacturing technology. Int. J. Adv. Manuf. Technol. 2016, 85, 1941–1945. [Google Scholar] [CrossRef]
  44. Okunkova, A.; Peretyagin, P.; Vladimirov, Y.; Volosova, M.; Torrecillas, R.; Fedorov, S.V. Laser-beam modulation to improve efficiency of selecting laser melting for metal powders. Proc. SPIE 2014, 9135, 913524. [Google Scholar]
  45. Gusarov, A.V.; Grigoriev, S.N.; Volosova, M.A.; Melnik, Y.A.; Laskin, A.; Kotoban, D.V.; Okunkova, A.A. On productivity of laser additive manufacturing. J. Mater. Process. Technol. 2018, 261, 213–232. [Google Scholar] [CrossRef]
  46. Metel, A.S.; Stebulyanin, M.M.; Fedorov, S.V.; Okunkova, A.A. Power Density Distribution for Laser Additive Manufacturing (SLM): Potential, Fundamentals and Advanced Applications. Technologies 2019, 7, 5. [Google Scholar] [CrossRef] [Green Version]
  47. Canaday, H. Making 3D-printed parts for Boeing 787s. Aerospace Am. 2018, 56, 18–21. [Google Scholar]
  48. Jelaca, M.S.; Boljevic, A. Critical Success Factors and Negative Effects of Development—The Boeing 787 Dreamliner. Strateg. Manag. 2016, 21, 30–39. [Google Scholar]
  49. Rutkowski, M. Safety as an Element of Creating Competitive Advantage among Airlines Given the Example of The Airbus A350 XWB and The Boeing 787 Dreamliner Aircraft. Sci. J. Sil. Univ. Technol. Ser. Transp. 2020, 108, 201–212. [Google Scholar] [CrossRef]
  50. Giannis, S. Testing and Analysis Building Block Approach: Evaluation of the Performance of the Integrated Lattice Fuselage Section. SAMPE J. 2016, 52, 22–33. [Google Scholar]
  51. Kelkar, R.; Andreaco, A.; Ott, E.; Groh, J. Alloy 718: Laser Powder Bed Additive Manufacturing for Turbine Applications. In Minerals Metals & Materials Series, Proceedings of the 9th International Symposium on Superalloy 718 & Derivatives: Energy, Aerospace, And Industrial Applications, Champion, PA, USA, 17–21 September 2000; Ott, E., Liu, X., Andersson, J., Bi, Z., Bockenstedt, K., Dempster, I., Groh, J., Heck, K., Jablonski, P., Kaplan, M., et al., Eds.; Springer International Publishing AG: Cham, Switzerland, 2018; pp. 53–68. [Google Scholar]
  52. Schanz, J.; Hofele, M.; Hitzler, L.; Merkel, M.; Riegel, H. Laser Polishing of Additive Manufactured AlSi10Mg Parts with an Oscillating Laser Beam. Adv. Struct. Mater. 2016, 61, 159–169. [Google Scholar]
  53. Yang, T.; Liu, T.T.; Liao, W.H.; MacDonald, E.; Wei, H.L.; Chen, X.Y.; Jiang, L.Y. The influence of process parameters on vertical surface roughness of the AlSi10Mg parts fabricated by selective laser melting. J. Mater. Process. Technol. 2019, 266, 26–36. [Google Scholar] [CrossRef]
  54. Krawczyk, M.B.; Królikowski, M.A.; Grochała, D.; Powałka, B.; Figiel, P.; Wojciechowski, S. Evaluation of Surface Topography after Face Turning of CoCr Alloys Fabricated by Casting and Selective Laser Melting. Materials 2020, 13, 2448. [Google Scholar] [CrossRef] [PubMed]
  55. Texier, D.; Copin, E.; Flores, A.; Lee, J.; Terner, M.; Hong, H.U.; Lours, P. High temperature oxidation of NiCrAlY coated Alloy 625 manufactured by selective laser melting. Surf. Coat. Technol. 2020, 398, 126041. [Google Scholar] [CrossRef]
  56. Antanasova, M.; Kocjan, A.; Hocevar, M.; Jevnikar, P. Influence of surface airborne-particle abrasion and bonding agent application on porcelain bonding to titanium dental alloys fabricated by milling and by selective laser melting. J. Prosthet. Dent. 2020, 123, 491–499. [Google Scholar] [CrossRef]
  57. Yu, J.; Kim, D.; Ha, K.; Jeon, J.B.; Lee, W. Strong feature size dependence of tensile properties and its microstructural origin in selectively laser melted 316L stainless steel. Mater. Lett. 2020, 275, 128161. [Google Scholar] [CrossRef]
  58. Zhao, Y.Z.; Sun, J.; Guo, K.; Li, J.F. Investigation on the effect of laser remelting for laser cladding nickel based alloy. J. Laser Appl. 2019, 31, UNSP 022512. [Google Scholar] [CrossRef]
  59. Jeyaprakash, N.; Yang, C.H. Microstructure and Wear Behaviour of SS420 Micron Layers on Ti-6Al-4V Substrate Using Laser Cladding Process. Trans. Indian Inst. Met. 2020, 73, 1527–1533. [Google Scholar] [CrossRef]
  60. Kotoban, D.; Grigoriev, S.; Okunkova, A.; Sova, A. Influence of a shape of single track on deposition efficiency of 316L stainless steel powder in cold spray. Surf. Coat. Technol. 2017, 309, 951–958. [Google Scholar] [CrossRef]
  61. Smolenska, H.; Konczewicz, W.; Bazychowska, S. The Impact of Material Selection on Durability of Exhaust Valve Faces of a Ship Engine—A Case Study. Adv. Sci. Technol. Res. J. 2020, 14, 165–174. [Google Scholar]
  62. du Plessis, A.; Yadroitsev, I.; Yadroitsava, I.; Le Roux, S.G. X-Ray Microcomputed Tomography in Additive Manufacturing: A Review of the Current Technology and Applications. 3D Print. Addit. Manuf. 2018, 5, 227–247. [Google Scholar] [CrossRef] [Green Version]
  63. Matache, G.; Vladut, M.; Paraschiv, A.; Condruz, R.M. Edge and corner effects in selective laser melting of IN 625 alloy. Manuf. Rev. 2020, 7, 8. [Google Scholar] [CrossRef] [Green Version]
  64. Bashevskaya, O.S.; Bushuev, S.V.; Poduraev, Y.V.; Mel’nichenko, E.A.; Shcherbakov, M.I.; Garskov, R.V. Use of Infrared Thermography for Evaluating Linear Dimensions of Subsurface Defects. Meas. Tech. 2017, 60, 457–462. [Google Scholar] [CrossRef]
  65. Bashevskaya, O.S.; Bushuev, S.V.; Nikitin, A.A.; Romash, E.V.; Poduraev, Y.V. Assessment of Surface Roughness Using Curvature Parameters of Peaks and Valleys of the Profile. Meas. Tech. 2017, 60, 128–133. [Google Scholar] [CrossRef]
  66. Valente, E.H.; Gundlach, C.; Christiansen, T.L.; Somers, M.A.J. Effect of Scanning Strategy During Selective Laser Melting on Surface Topography, Porosity, and Microstructure of Additively Manufactured Ti-6Al-4V. Appl. Sci. 2019, 9, 5554. [Google Scholar] [CrossRef] [Green Version]
  67. Luongo, A.; Falster, V.; Doest, M.B.; Ribo, M.M.; Eiriksson, E.R.; Pedersen, D.B.; Frisvad, J.R. Microstructure Control in 3D Printing with Digital Light Processing. Comput. Graph. Forum 2020, 39, 347–359. [Google Scholar] [CrossRef]
  68. Johnson, A.R.; Procopio, A.T. Low cost additive manufacturing of microneedle masters. 3D Print. Med. 2019, 5, 2. [Google Scholar] [CrossRef]
  69. Covarrubias, E.E.; Eshraghi, M. Effect of Build Angle on Surface Properties of Nickel Superalloys Processed by Selective Laser Melting. JOM 2018, 70, 336–342. [Google Scholar] [CrossRef]
  70. Bashevskaya, O.S.; Bushuev, S.V.; Ilyukhin, Y.V.; Kovalskiy, M.G.; Mel’nichenko, E.A.; Romash, E.V.; Poduraev, Y.V. Comparative Analysis of Thermal Deformations in Structural Elements of Measurement Stands and Supports. Meas. Tech. 2015, 58, 760–765. [Google Scholar] [CrossRef]
  71. Chen, Y.; Sun, H.; Li, Z.; Wu, Y.; Xiao, Y.; Chen, Z.; Zhong, S.; Wang, H. Strategy of Residual Stress Determination on Selective Laser Melted Al Alloy Using XRD. Materials 2020, 13, 451. [Google Scholar] [CrossRef] [Green Version]
  72. Wan, H.Y.; Luo, Y.W.; Zhang, B.; Song, Z.M.; Wang, L.Y.; Zhou, Z.J.; Li, C.P.; Chen, G.F.; Zhang, G.P. Effects of surface roughness and build thickness on fatigue properties of selective laser melted Inconel 718 at 650 degrees C. Int. J. Fatigue 2020, 137, 105654. [Google Scholar] [CrossRef]
  73. Jamshidi, P.; Aristizabal, M.; Kong, W.; Villapun, V.; Cox, S.C.; Grover, L.M.; Attallah, M.M. Selective Laser Melting of Ti-6Al-4V: The Impact of Post-processing on the Tensile, Fatigue and Biological Properties for Medical Implant Applications. Materials 2020, 13, 2813. [Google Scholar] [CrossRef] [PubMed]
  74. Grigoriev, S.N.; Metel, A.S.; Tarasova, T.V.; Filatova, A.A.; Sundukov, S.K.; Volosova, M.A.; Okunkova, A.A.; Melnik, Y.A.; Podrabinnik, P.A. Effect of Cavitation Erosion Wear, Vibration Tumbling, and Heat Treatment on Additively Manufactured Surface Quality and Properties. Metals 2020, 10, 1540. [Google Scholar] [CrossRef]
  75. Gola, A.M.; Ghadamgahi, M.; Ooi, S.W. Microstructure evolution of carbide-free bainitic steels under abrasive wear conditions. Wear 2017, 376, 975–982. [Google Scholar] [CrossRef]
  76. Bankowski, D.; Spadlo, S. Vibratory Machining Effect on the Properties of the Aluminum Alloys Surface. Arch. Foundry Eng. 2017, 17, 19–24. [Google Scholar] [CrossRef] [Green Version]
  77. Niemczewski, B. A Comparison of Ultrasonic Cavitation Intensity in Liquids. Ultrasonics 1980, 18, 107–110. [Google Scholar] [CrossRef]
  78. Landau, L.D.; Lifshitz, E.M. Hydrodynamic Fluctuations. Soviet Phys. JETP-USSR 1957, 5, 512–513. [Google Scholar]
  79. Endo, H. Thermodynamic Consideration of the Cavitation Mechanism in Homogeneous Liquids. J. Acoust. Soc. Am. 1994, 95, 2409–2415. [Google Scholar] [CrossRef]
  80. Wang, Q. Local energy of a bubble system and its loss due to acoustic radiation. J. Fluid Mech. 2016, 797, 201–230. [Google Scholar] [CrossRef] [Green Version]
  81. Pelekasis, N.A.; Tsamopoulos, J.A. Bjerknes Forces between 2 Bubbles.1. Response to a Step Change in Pressure. J. Fluid Mech. 1993, 254, 467–499. [Google Scholar] [CrossRef] [Green Version]
  82. Makarov, P.V. Mathematical theory of evolution of loaded solids and media. Phys. Mesomech. 2008, 11, 213–227. [Google Scholar] [CrossRef]
  83. Gusev, A.I.; Shveikin, G.P. Energy of Elastic Lattice Deformation in Formation of Solid-Solutions of Transition-Metal Carbides and Nitrides. Inorg. Mater. 1976, 12, 1283–1286. [Google Scholar]
  84. Alekseev, A.A.; Strunin, B.M. Change of Elastic Energy of Crystal during Its Plastic-Deformation. Fizika Tverdogo Tela 1975, 17, 1457–1459. [Google Scholar]
  85. Akhmedzhanov, R.A.; Zelenskii, I.V.; Gushchin, L.A.; Nizov, V.A.; Nizov, N.A.; Sobgaida, D.A. Observation of Coherent Population Trapping in Ensembles of Diamond NV-Centers under Ground-State Level Anticrossing Conditions. Opt. Spectrosc. 2019, 127, 260–264. [Google Scholar] [CrossRef]
  86. Metel, A.S.; Grigoriev, S.N.; Tarasova, T.V.; Filatova, A.A.; Sundukov, S.K.; Volosova, M.A.; Okunkova, A.A.; Melnik, Y.A.; Podrabinnik, P.A. Influence of Postprocessing on Wear Resistance of Aerospace Steel Parts Produced by Laser Powder Bed Fusion. Technologies 2020, 8, 73. [Google Scholar] [CrossRef]
  87. Shmakov, V.A. Surface Quality of Small Components after Ultrasonic Abrasive Machining. Russ. Eng. J. 1976, 56, 33–34. [Google Scholar]
  88. Isobe, H.; Tsuji, S.; Hara, K.; Ishimatsu, J. Improvement of Removal Rate of Tape Lapping by Applying Fluid with Ultrasonic Excited Cavitation. Int. J. Autom. Technol. 2021, 15, 65–73. [Google Scholar] [CrossRef]
  89. Bolmatov, D.; Soloviov, D.; Zhernenkov, M.; Zav’yalov, D.; Mamontov, E.; Suvorov, A.; Cai, Y.Q.; Katsaras, J. Molecular Picture of the Transient Nature of Lipid Rafts. Langmuir 2020, 36, 4887–4896. [Google Scholar] [CrossRef] [PubMed]
  90. Caupin, F.; Anisimov, M.A. Thermodynamics of supercooled and stretched water: Unifying two-structure description and liquid-vapor spinodal. J. Chem. Phys. 2019, 151, 034503. [Google Scholar] [CrossRef] [PubMed]
  91. Lyashchenko, A.K.; Zasetskii, A.Y. Structural transition to electrolyte-water solvent and changes in the molecular dynamics of water and properties of solutions. J. Struct. Chem. 1998, 39, 694–703. [Google Scholar] [CrossRef]
  92. Tan, K.L.; Yeo, S.H. Surface finishing on IN625 additively manufactured surfaces by combined ultrasonic cavitation and abrasion. Addit. Manuf. 2020, 31, 100938. [Google Scholar] [CrossRef]
  93. Wang, J.; Zhu, J.; Liew, P.J. Material Removal in Ultrasonic Abrasive Polishing of Additive Manufactured Components. Appl. Sci. 2019, 9, 5359. [Google Scholar] [CrossRef] [Green Version]
  94. Tan, K.L.; Yeo, S.H. Surface modification of additive manufactured components by ultrasonic cavitation abrasive finishing. Wear 2017, 378–379, 90–95. [Google Scholar] [CrossRef]
  95. Grechnikov, F.V.; Surudin, S.V.; Erisov, Y.A.; Kuzin, A.O.; Bobrovskiy, I.N. Influence of Material Structure Crystallography on its Formability in Sheet Metal Forming Processes. IOP Conf. Ser. Mater. Sci. Eng. 2018, 286, UNSP 012021. [Google Scholar] [CrossRef]
  96. Dong, G.; Marleau-Finley, J.; Zhao, Y.F. Investigation of electrochemical post-processing procedure for Ti-6Al-4V lattice structure manufactured by direct metal laser sintering (DMLS). Int. J. Adv. Manuf. Technol. 2019, 104, 3401–3417. [Google Scholar] [CrossRef]
  97. Rotty, C.; Mandroyan, A.; Doche, M.-L.; Monney, S.; Hihn, J.Y.; Rouge, N. Electrochemical Superfinishing of Cast and ALM 316L Stainless Steels in Deep Eutectic Solvents: Surface Microroughness Evolution and Corrosion Resistance. J. Electrochem. Soc. 2019, 166, C468–C478. [Google Scholar] [CrossRef]
  98. Hryniewicz, T.; Rokosz, K.; Rokicki, R. Electrochemical and XPS studies of AISI 316L stainless steel after electropolishing in a magnetic field. Corros. Sci. 2008, 50, 2676–2681. [Google Scholar] [CrossRef]
  99. Ni, X.; Zhang, L.; Wu, W.; Song, J.; He, B.B.; Zhu, D.X. Improved Surface Properties for Nanotube Growth on Selective Laser Melted Porous Ti6Al4V Alloy via Chemical Etching. Int. J. Electrochem. Sci. 2019, 14, 5679–5689. [Google Scholar] [CrossRef]
  100. Xu, W.; Ma, L.; Chen, Y.; Liang, H. Mechano-oxidation during cobalt polishing. Wear 2018, 416, 36–43. [Google Scholar] [CrossRef]
  101. Chirkov, A.M.; Rybalko, A.P.; Rogal’skij, J.I.; Sedoj, E.A.; Merkukhin, A.V.; Borisov, N.V. Method of Laser-Plasma Polishing of Metallic Surface. RU Patent 2 381 094, 10 February 2010. [Google Scholar]
  102. Marinin, E.A.; Chirkov, A.M.; Gavrilov, G.N.; Fetisov, G.P.; Chernyshov, D.A.; Kurganova, Y.A. Experimental Evaluation of the Methods of Laser Cementation of Low-Alloy Tool Steels. Russ. Metall. 2018, 13, 1259–1263. [Google Scholar] [CrossRef]
  103. Koval, N.N.; Teresov, A.D.; Ivanov, Y.F.; Petrikova, E.A. Pulse Electron-Beam Metal Product Surface Polishing Method. RU Patent 2 619 5434, 16 May 2017. [Google Scholar]
  104. Teresov, A.D.; Ivanov, Y.F.; Petrikova, E.A.; Koval, N.N. Structure and Properties of VT6 Alloy Obtained by Layered Selective Sintering of a Powder. Russ. Phys. J. 2017, 60, 1367–1372. [Google Scholar] [CrossRef]
  105. Uglov, V.V.; Krutsilina, E.A.; Shymanski, V.I.; Kuleshov, A.K.; Koval, N.N.; Ivanov, Y.F. Heat Transfer in Surface Layer of a T15k6 Heterogeneous Hard Alloy under Pulsed High-Energy Irradiation. Russ. Phys. J. 2020, 63, 693–698. [Google Scholar] [CrossRef]
  106. Lober, L.; Flache, C.; Petters, R.; Kuhn, U.; Eckert, J. Comparison of different post processing technologies for SLM generated 3161 steel parts. Rapid Prototyp. J. 2013, 19, 173–179. [Google Scholar] [CrossRef]
  107. Gordon, E.R.; Shokrani, A.; Flynn, J.M.; Goguelin, S.; Barclay, J.; Dhokia, V.A. Surface Modification Decision Tree to Influence Design in Additive Manufacturing. In Smart Innovation Systems and Technologies, Proceedings of the 3rd International Conference on Sustainable Design and Manufacturing (SDM), Chania, Greece, 4–6 April 2016; Setchi, R., Howlett, R.J., Liu, Y., Theobald, P., Eds.; Springer: Berlin/Heidelberg, Germany, 2016; Volume 52, pp. 423–434. [Google Scholar]
  108. Gatto, A.; Bassoli, E.; Denti, L.; Sola, A.; Tognoli, E.; Comin, A.; Porro, J.A.; Cordovilla, F.; Angulo, I.; Ocana, J.L. Effect of Three Different Finishing Processes on the Surface Morphology and Fatigue Life of A357.0 Parts Produced by Laser-Based Powder Bed Fusion. Adv. Eng. Mater. 2019, 21, 1801357. [Google Scholar] [CrossRef]
  109. Kudrya, V.P.; Maishev, Y.P. Applications of the Technology of Fast Neutral Particle Beams in Micro-and Nanoelectronics. Mikroelektronika 2018, 47, 51–63. [Google Scholar] [CrossRef]
  110. Vlcak, P.; Fojt, J.; Drahokoupil, J.; Brezina, V.; Sepitka, J.; Horazdovsky, T.; Miksovsky, J.; Cerny, F.; Lebeda, M.; Haubner, M. Influence of surface pre-treatment with mechanical polishing, chemical, electrochemical and ion sputter etching on the surface properties, corrosion resistance and MG-63 cell colonization of commercially pure titanium. Mater. Sci. Eng. C 2020, 115, 111065. [Google Scholar] [CrossRef] [PubMed]
  111. Grigoriev, S.; Metel, A. Plasma-and Beam-Assisted Deposition Methods. In Nanostructured Thin Films and Nanodispersion Strengthened Coatings; NATO Science Series II: Mathematics, Physics and Chemistry; Voevodin, A.A., Shtansky, D.V., Levashov, E.A., Moore, J.J., Eds.; Springer: Dordrecht, The Netherlands, 2004; Volume 155, pp. 147–154. [Google Scholar] [CrossRef]
  112. Isakova, Y.I.; Prima, A.I.; Pushkarev, A.I. A Conical Ion Diode with Self-Magnetic Insulation of Electrons. Instrum. Exp. Tech. 2019, 62, 506–516. [Google Scholar] [CrossRef]
  113. Ghyngazov, S.A.; Zhu, X.P.; Pushkarev, A.I.; Egorova, Y.I.; Matrenin, S.V.; Kostenko, V.A.; Zhang, C.C.; Lei, M.K. Surface Modification of ZrO2-3Y(2)O(3) with Highintensity Pulsed N2+ Ion Beams. Russ. Phys. J. 2020, 63, 176–179. [Google Scholar] [CrossRef]
  114. Metel, A.; Bolbukov, V.; Volosova, M.; Grigoriev, S.; Melnik, Y. Source of metal atoms and fast gas molecules for coating deposition on complex shaped dielectric products. Surf. Coat. Technol. 2013, 225, 34–39. [Google Scholar] [CrossRef]
  115. Grigoriev, S.N.; Melnik, Y.A.; Metel, A.S.; Panin, V.V. Broad beam source of fast atoms produced as a result of charge exchange collisions of ions accelerated between two plasmas. Instrum. Exp. Tech. 2009, 52, 602–608. [Google Scholar] [CrossRef]
  116. Suhara, M.; Matsuzaka, N.; Fukumitsu, M.; Okumura, T. Characterization of argon fast atom beam source and application to mesa etching process for GaInP/GaAs triple-barrier resonant tunneling diodes. In Proceedings of the 18th International Microprocesses and Nantechnology Conference, Tokyo, Japan, 26–28 October 2005; Institute of Pure Applied Physics: Tokyo, Japan, 2006; Volume 45, pp. 5504–5508. [Google Scholar]
  117. Grigoriev, S.N.; Melnik, Y.A.; Metel, A.S.; Panin, V.V.; Prudnikov, V.V. A compact vapor source of conductive target material sputtered by 3-keV ions at 0.05-Pa pressure. Instrum. Exp. Tech. 2009, 52, 731. [Google Scholar] [CrossRef]
  118. Musil, J.; Jaroš, M. Plasma and floating potentials in magnetron discharges. J. Vac. Sci. Technol. A 2017, 35, 060605. [Google Scholar] [CrossRef]
  119. Anders, A. Tutorial: Reactive high power impulse magnetron sputtering. J. Appl. Phys. 2017, 121, 171101. [Google Scholar] [CrossRef] [Green Version]
  120. Berlin, E.V.; Grigoriev, V.Y. Features of super-high-speed deposition of copper by a magnetron operating in target vapors on dielectric substrates. In Proceedings of the 11th International conference of a “Films and Coatings—2013”, Saint Petersburg, Russia, 6–8 May 2013; pp. 104–106. [Google Scholar]
  121. Shandrikov, M.V.; Artamonov, I.D.; Bugaev, A.S.; Oks, E.M.; Oskomov, K.V.; Vizir, A.V. Deposition of Cu-films by a planar magnetron sputtering system at ultra-low operating pressure. Surf. Coat. Technol. 2020, 389, 125600. [Google Scholar] [CrossRef]
  122. Shandrikov, M.V.; Bugaev, A.S.; Oks, E.M.; Vizir, V.; Yushkov, G.Y. Ion mass-to-charge ratio in planar magnetron plasma with electron injections. J. Phys. D Appl. Phys. 2018, 51, 415201. [Google Scholar] [CrossRef]
  123. Markov, A.B.; Yakovlev, E.V.; Shepel’, D.A.; Petrov, V.I.; Bestetti, M. Liquid-Phase Surface Alloying of Copper with Stainless Steel Using Low-Energy, High-Current Electron Beam. Russ. Phys. J. 2017, 60, 1455–1460. [Google Scholar] [CrossRef]
  124. Volosova, M.A.; Grigor’ev, S.N.; Kuzin, V.V. Effect of titanium nitride coating on stress structural inhomogeneity in oxide-carbide ceramic. Part 4. Action of heat flow. Refract. Ind. Ceram. 2015, 56, 91–96. [Google Scholar] [CrossRef]
  125. Maishev, Y.P.; Shevchuk, S.L.; Kudrya, V.P. Formation of fast neutral beams and their using for selective etching. Proc. SPIE 2014, 9440, UNSP 94400K. [Google Scholar]
  126. Metel, A.S.; Grigoriev, S.N.; Melnik, Y.A.; Panin, V.V. Filling the vacuum chamber of a technological system with homogeneous plasma using a stationary glow discharge. Plasma Phys. Rep. 2009, 35, 1058–1067. [Google Scholar] [CrossRef]
  127. Metel, A.S.; Grigoriev, S.N.; Melnik, Y.A.; Bolbukov, V.P. Characteristics of a fast neutral atom source with electrons injected into the source through its emissive grid from the vacuum chamber. Instrum. Exp. Tech. 2012, 55, 288–293. [Google Scholar] [CrossRef]
  128. Mesyats, G.A.; Proskurovsky, D.I.; Yankelevich, E.B.; Tregubov, V.F. Observation of micro-tip regeneration and the cathode polishing at nanosecond pulses of explosive emission current. Rep. USSR Acad. Sci. 1976, 227, 1335–1337. [Google Scholar]
  129. Zhong, Z.W. Advanced polishing, grinding and finishing processes for various manufacturing applications: A review. Mater. Manuf. Process. 2020, 35, 1279–1303. [Google Scholar] [CrossRef]
  130. Sagbas, B. Post-Processing Effects on Surface Properties of Direct Metal Laser Sintered AlSi10Mg Parts. Met. Mater. Int. 2020, 26, 143–153. [Google Scholar] [CrossRef]
  131. Lazarenko, B.R.; Lazarenko, N.I. Electric Spark Machining of Metals in Water and Electrolytes (Elektroiskrovaya Obrabotka Metallov V Vode I Elektrolitakh). Surf. Eng. Appl. Electrochem. (Elektronnaya Obrabotka Materialov) 1980, 1, 5–8. [Google Scholar]
  132. Danilov, I.; Hackert-Oschätzchen, M.; Zinecker, M.; Meichsner, G.; Edelmann, J.; Schubert, A. Process Understanding of Plasma Electrolytic Polishing through Multiphysics Simulation and Inline Metrology. Micromachines 2019, 10, 214. [Google Scholar] [CrossRef] [PubMed] [Green Version]
  133. Afanasiev, Y.V.; Chichkov, B.N.; Demchenko, N.N.; Isakov, V.A.; Zavestovskaya, I.N. Ablation of metals by ultrashort laser pulses: Theoretical modeling and computer simulations. Proc. SPIE 2000, 3885, 266–274. [Google Scholar]
  134. Sobol’, O.V.; Andreev, A.A.; Grigoriev, S.N.; Gorban’, V.F.; Volosova, M.A.; Aleshin, S.V.; Stolbovoy, V.A. Physical characteristics, structure and stress state of vacuum-arc tin coating, deposition on the substrate when applying high-voltage pulse during the deposition. Probl. Atom. Sci. Technol. 2011, 4, 174–177. [Google Scholar]
  135. Aleshin, N.P.; Grigor’ev, M.V.; Shchipakov, N.A.; Krys’ko, N.V.; Krasnov, I.S.; Prilutskii, M.A.; Smorodinskii, Y.G. On the Possibility of Using Ultrasonic Surface and Head Waves in Nondestructive Quality Checks of Additive Manufactured Products. Russ. J. Nondestruct. 2017, 53, 830–838. [Google Scholar] [CrossRef]
  136. Metel, A.; Bolbukov, V.; Volosova, M.; Grigoriev, S.; Melnik, Y. Equipment for deposition of thin metallic films bombarded by fast argon atoms. Instrum. Exp. Tech. 2014, 57, 345–351. [Google Scholar] [CrossRef]
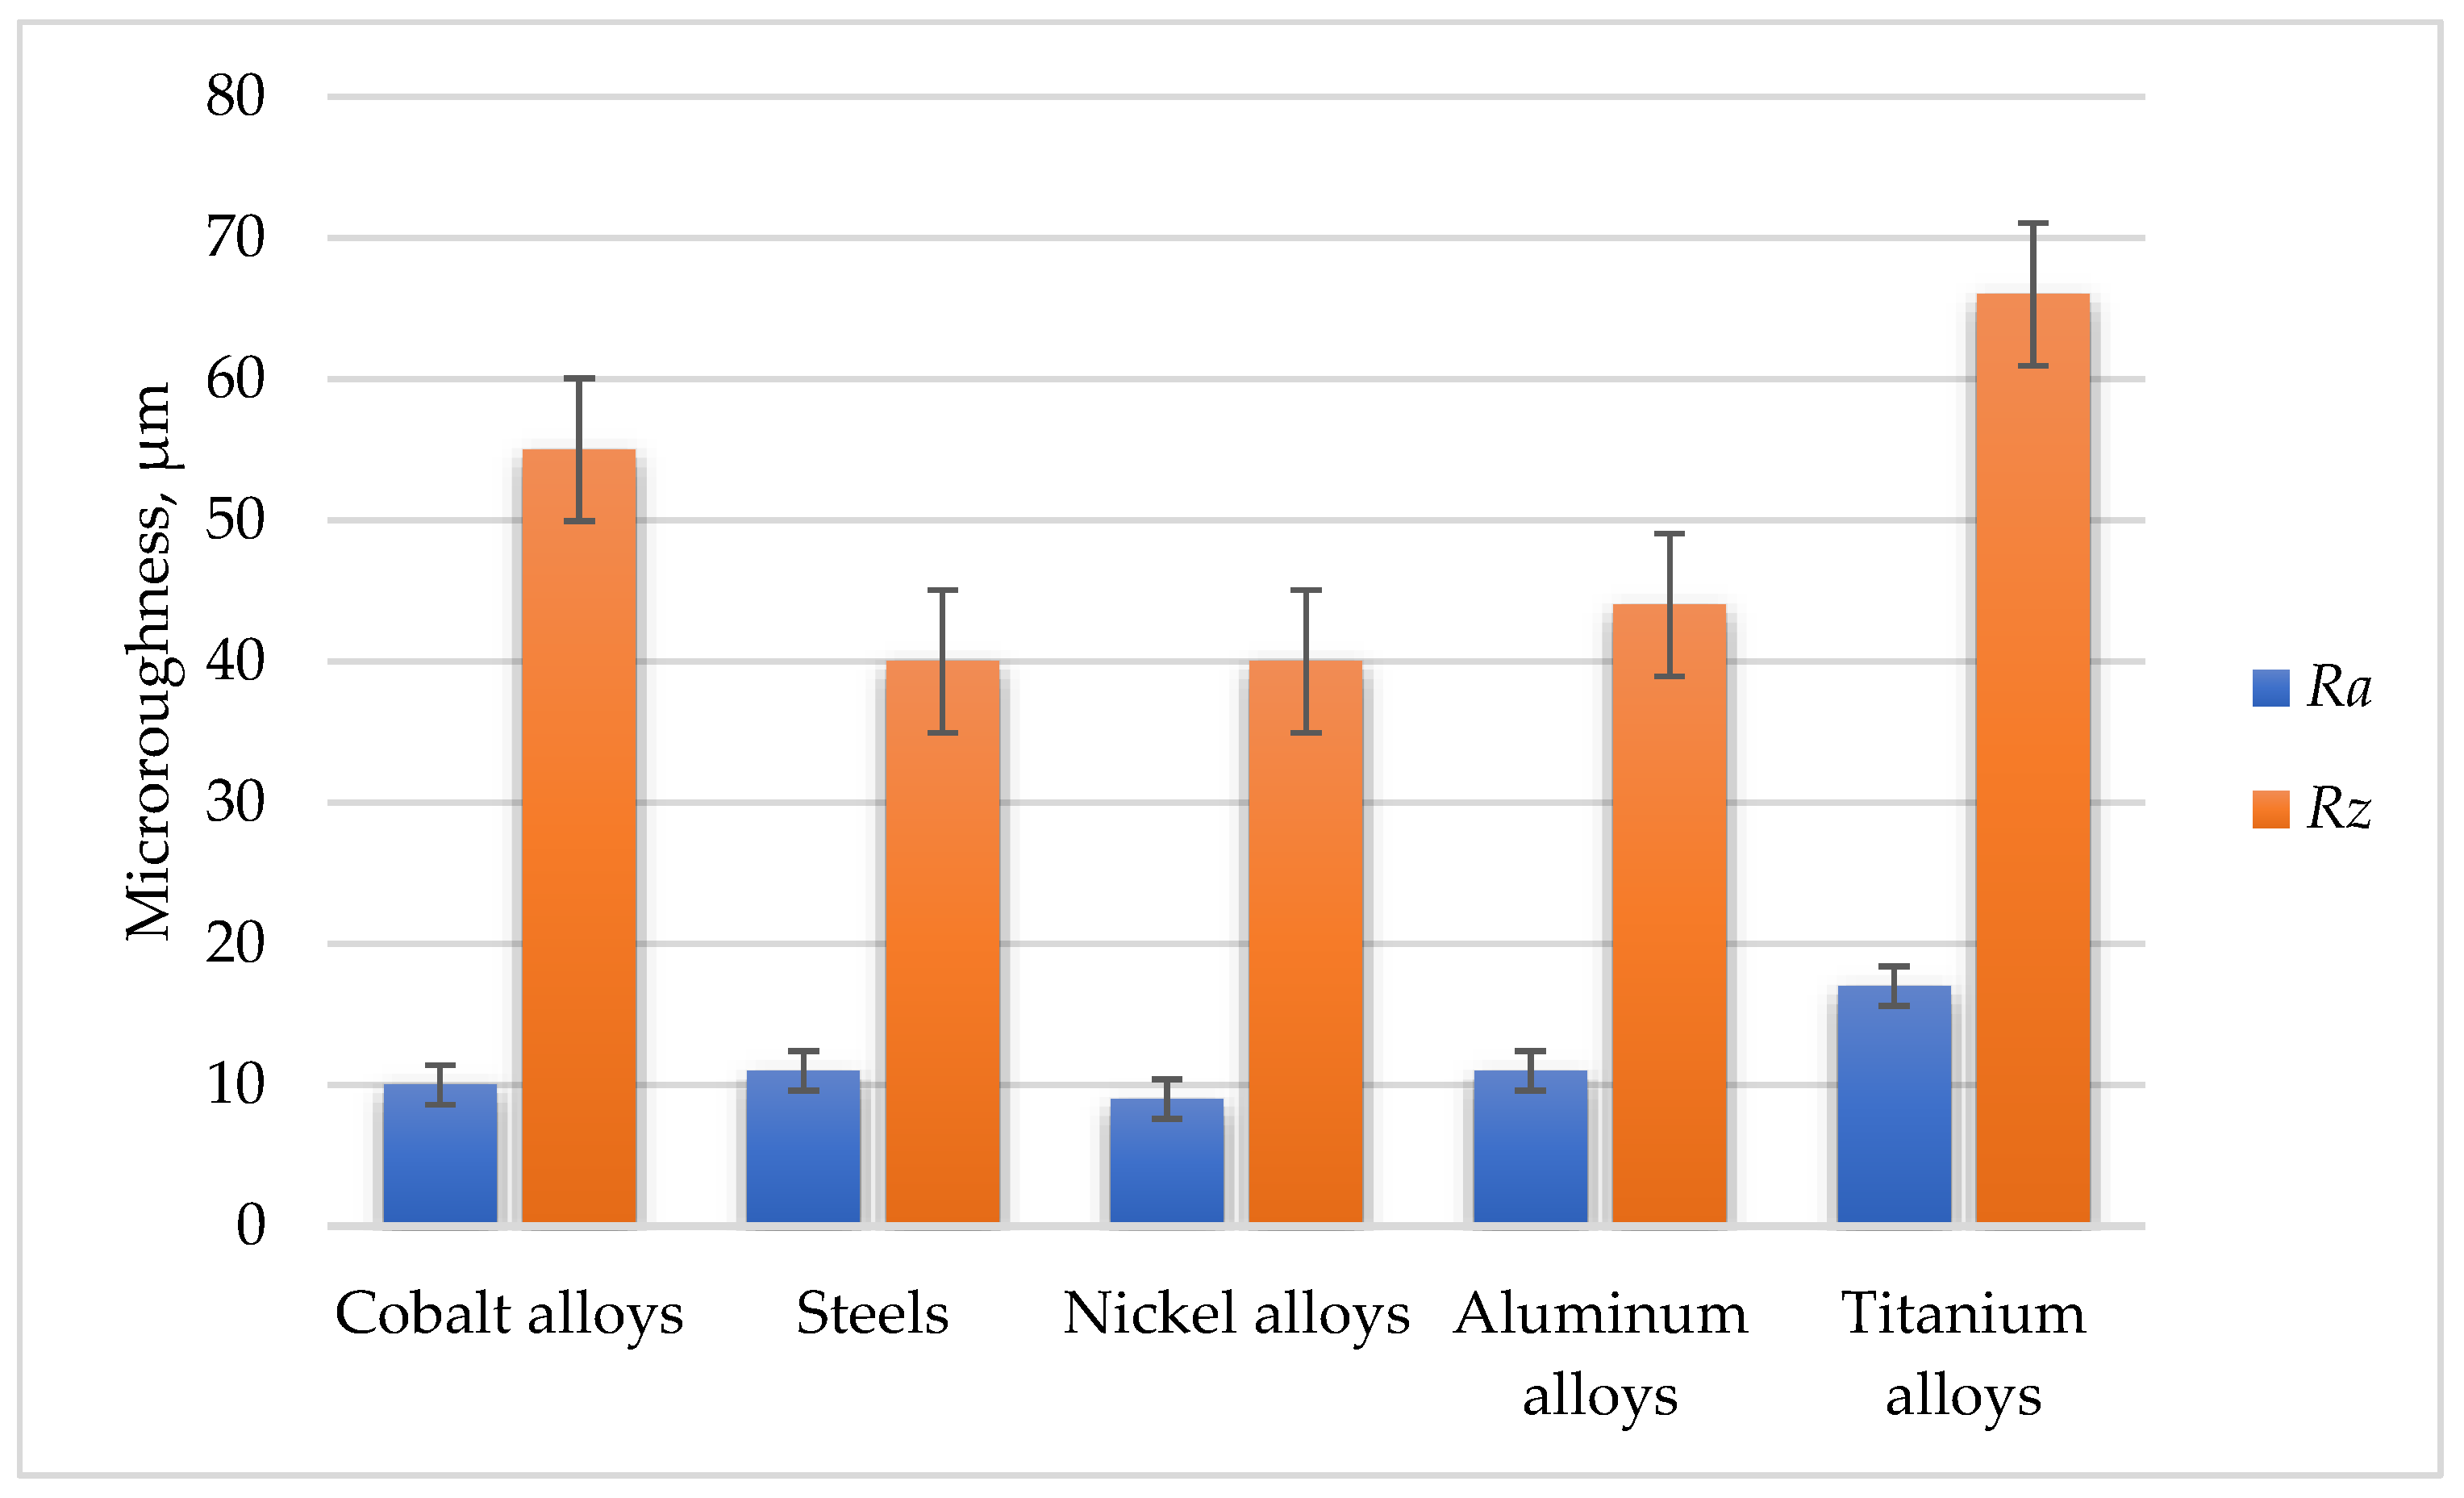
Figure 1. Arithmetic mean deviation (Ra) and ten-point height (Rz) of the product surfaces produced by laser powder bed fusion (selective laser melting) for various types of metals and alloys.
Technologies 09 00027 g001
Figure 2. Technologies’ classification improving the exploitation properties and surface quality of the complex parts produced by additive manufacturing based on its nature.
Technologies 09 00027 g002
Figure 3. Topology of the laser additively produced part surface made of 12Cr18Ni9Ti austenite chrome–nickel stainless steel (analog of AISI 321) powder with granules of ≈20 µm (by a Dektak XT stylus profilometer (Bruker Nano, Inc., Billerica, MA, USA) with a vertical accuracy of 5 Å (0.5 nm) and a tip radius of 12.5 µm): (a) after production; (b) after vibratory tumbling.
Technologies 09 00027 g003
Figure 4. Topology of the laser additively produced part surface made of 12Cr18Ni9Ti austenite chrome–nickel stainless steel (analog of AISI 321) powder with granules of ≈20 µm (by a MikroCAD-lite 3D measuring system, GFMesstechnik, Notzingen, Germany): (a) after production; (b) after vibratory tumbling.
Technologies 09 00027 g004
Figure 5. Three-dimensional (3D) presentation of the laser additively produced part surface made of 12Cr18Ni9Ti austenite chrome–nickel stainless steel (analog of AISI 321) powder with granules of ≈20 µm (by a MikroCAD-lite 3D measuring system, GFMesstechnik, Notzingen, Germany): (a) after production; (b) after vibratory tumbling.
Technologies 09 00027 g005
Figure 6. Scheme of cavitation (erosion) wear, where (1) is extruded by cumulative microjet material at the stage of plastic deformation; (2) is a cumulative microjet; (3) is a collapsing bubble; (4) is plastic deformation zone; and (5) is surface to be machined.
Technologies 09 00027 g006
Figure 7. Microphotograph of laser additively produced part surface made of 20Cr13 corrosion-resistant steel of the martensitic class (analog of AISI 420) powder with granules of ≈20 µm (optical microscopy, ×300): (a) after production; (b) after ultrasonic cavitation abrasive finishing.
Technologies 09 00027 g007
Figure 8. Scheme of surface plastic deformation, where (1) is the surface to be machined; (2) is extruded by a roller/tip material at the stage of plastic deformation; (3) is a roller/tip; (4) is plastic deformation zone; (5) is a hardened subsurface layer; R is the radius of a roller; d is feed; h is hardened sublayer depth.
Technologies 09 00027 g008
Figure 9. Scheme of a cascade of elastic collisions of atoms in a material under ion bombardment, where I+, I, and Io are the bombarding and backscattered ions in different charge states; (1) is the surface to be machined; (2) is an unexcited atom of the material; A+, A, and Ao are the sputtered atoms in different charge states; e is secondary electrons; hν is photons, λ is an ion free path that is less than the defect zone.
Technologies 09 00027 g009
Figure 10. Scheme of surface layers after various types of post-processing: (a) mechanical machining; (b) chemical etching; (c) surface plastic deformation; (d) cavitation abrasive finishing; (e) laser ablation [133]; (f) ion polishing in gas-discharge plasma, where heat-affected layer includes dislocation area, area of increased dislocation density with Cottrell zones (negatively charged acceptors).
Technologies 09 00027 g010
Publisher’s Note: MDPI stays neutral with regard to jurisdictional claims in published maps and institutional affiliations.