Article

Enhancing Multiple Properties of a Multicomponent Mg-Based Alloy Using a Sinterless Turning-Induced Deformation Technique

Department of Mechanical Engineering, National University of Singapore, 9 Engineering Drive 1, Singapore 117575, Singapore
*
Author to whom correspondence should be addressed.
Technologies 2023, 11(6), 181; https://doi.org/10.3390/technologies11060181
Submission received: 15 November 2023 / Revised: 8 December 2023 / Accepted: 11 December 2023 / Published: 13 December 2023
(This article belongs to the Section Innovations in Materials Processing)

Abstract

:
A magnesium-based multi-component alloy (MCA), Mg70Al18Zn6Ca4Y2, was successfully synthesized using the Turning-Induced Deformation (TID) method, with promising improvements in multiple properties such as damping capabilities, hardness (11% to 34% increase), and strength (5% to 15% increase) over its conventional cast and extruded equivalent which has already been established as a high-performance MCA exhibiting superior mechanical properties over other Mg-based materials while retaining acceptable ductility. This new TID-based MCA comes only at a slight compromise in the aspects of ductility, ignition resistance, and corrosion resistance, which was previously observed in other TID-based materials. In addition, the general microstructure and secondary phases of this MCA were retained even when using the TID method, with only minimal porosity (<1%) incurred during the process. Furthermore, the ignition temperature of the TID Mg70Al18Zn6Ca4Y2 remained very high at 915 °C, positioning it as a potential Mg-based material suitable for aerospace applications with a high ignition resistance. This is tantamount to a successful application of TID to yet another class of Mg-based materials and opening the door to future explorations of such materials.

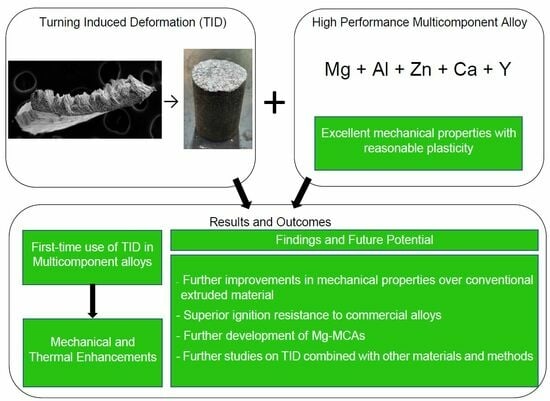
Graphical Abstract

1. Introduction

Magnesium (Mg)-based materials are attractive relative to other structural materials such as those based on iron, aluminum, and titanium due to potential weight savings, ranging from 22% to 70% on a per component basis [1]. The weight savings directly translate into lower energy costs, especially in the transportation sector. In the automotive sector, a 10% reduction in an automobile’s weight has translated into a 6–8% reduction in energy consumption [2], which in turn poses a significant prospect in the reduction of carbon emissions.
The alloying of magnesium is also widely explored, with potential benefits conferred by specific alloying elements as observed in steel [3]. For example, the addition of calcium to magnesium can be performed to reduce grain size and, at the same time, decrease corrosion rates [4], though the control of the alloying element’s quantity is important as it will affect the final properties, as seen with non-Mg-based materials as well [5].
In recent times, a more extensive alloying of Mg has been studied, while high-performance multicomponent alloys (MCAs) containing multiple alloying elements in large quantity have been developed and synthesized, ranging from those possessing excellent dynamic compression behavior [6] to those which undergo phase transformations when subject to high-dose nitrogen-ion implantation resulting in new high-entropy ceramics [7], as well as high-entropy thin-film bulk metallic glass with very high ductility (60% strain without fracture) and low electrical conductivity [8]. These new materials all offer much potential in specific properties and characteristics and showcase the potential of MCAs as materials for future development and use.
As far as Mg-based materials are concerned, an MCA of particular interest is the lightweight Mg70Al18Zn6Ca4Y2 (atomic weight%) low-entropy alloy [9,10], exhibiting reasonable ductility and overcoming previous trends of brittleness associated with Al- and Mg-based lightweight MCAs due to presence of secondary phases. This alloy is also notable for having exhibited mechanical properties (hardness, strength) far in excess of any available commercial alloy in its extruded form, which positions it as a prospect for further exploration in a class of next-generation materials suitable for use in structural applications.
The mechanical response potential within the material can be further enhanced with the Turning-Induced Deformation (TID) technique, a recent processing method inspired by severe plastic deformation (SPD). This is achieved by way of the controlled generation of machine turnings from a turning process using a lathe machine, in the process exerting deformation on the resulting chips and making them ready for further processing by compaction into billets suitable for further processing such as extrusion. Thus far, exploration with Mg-based materials synthesized in this manner has resulted in consistently enhanced material properties such as hardness and strength [11,12,13,14]. The SPD of metals developed in other contexts with varying methods has also resulted in materials with superior properties such as strength and hardness owing to a reduction in grain size [15]. This has also been demonstrated with magnesium-based materials, with the resulting materials exhibiting superplastic properties [16,17,18]. Another advantage of the TID method is the capability to directly utilize machine turnings as materials for further processing, which is an improvement over other methods of recycling magnesium compared to conventional methods such as re-melting [19] and rheo-diecasting [19] which are less energy-efficient.
Previous TID studies have found a specific combination of machining parameters [12] resulting in an optimal combination of properties. However, TID has not yet been studied or applied on MCAs, posing a conspicuous research gap considering the past explorations of pure Mg as well as conventional Mg alloys and nanocomposites. Thus, this serves as the impetus for exploration in this area not only to further enhance the properties of such alloys already under development, but also to validate the application of TID on multicomponent alloys as a whole.

2. Materials and Methods

2.1. Materials

Table 1 outlines raw materials used in this work along with their suppliers and purity levels.

2.2. Synthesis

The materials were processed into ingots using the Disintegrated Melt Deposition (DMD) [11] method with a superheating temperature of 750 °C, followed by stirring at 450 rpm for 5 min, after which turnings were generated using the TID method [13] with a 1.5 mm depth of cut and a 55 mm/min average cutting speed. The turnings were generated without the use of a cutting fluid (dry cutting), after which they were collected in such a manner as to minimize contamination from foreign debris and stored to minimize oxidation. The resulting turnings were then compacted into billets using a hydraulic press with a holding time of 60 s in a compaction die of a 35 mm diameter at a pressure of 1000 psi (6.89 MPa). As a benchmark, a billet of a 35 mm diameter and 45 mm height was also machined. Figure 1 shows the setup used for the compaction of the billet from TID-generated turnings.
The compacts were then soaked at 400 °C for 90 min before being hot-extruded at 400 °C to rods of 10 mm diameter (extrusion ratio of 12.25). Table 2 outlines the material designations of synthesized materials in this project, and Figure 2 outlines the processing pathways of DMD and TID materials in more detail.

2.3. Materials Characterization

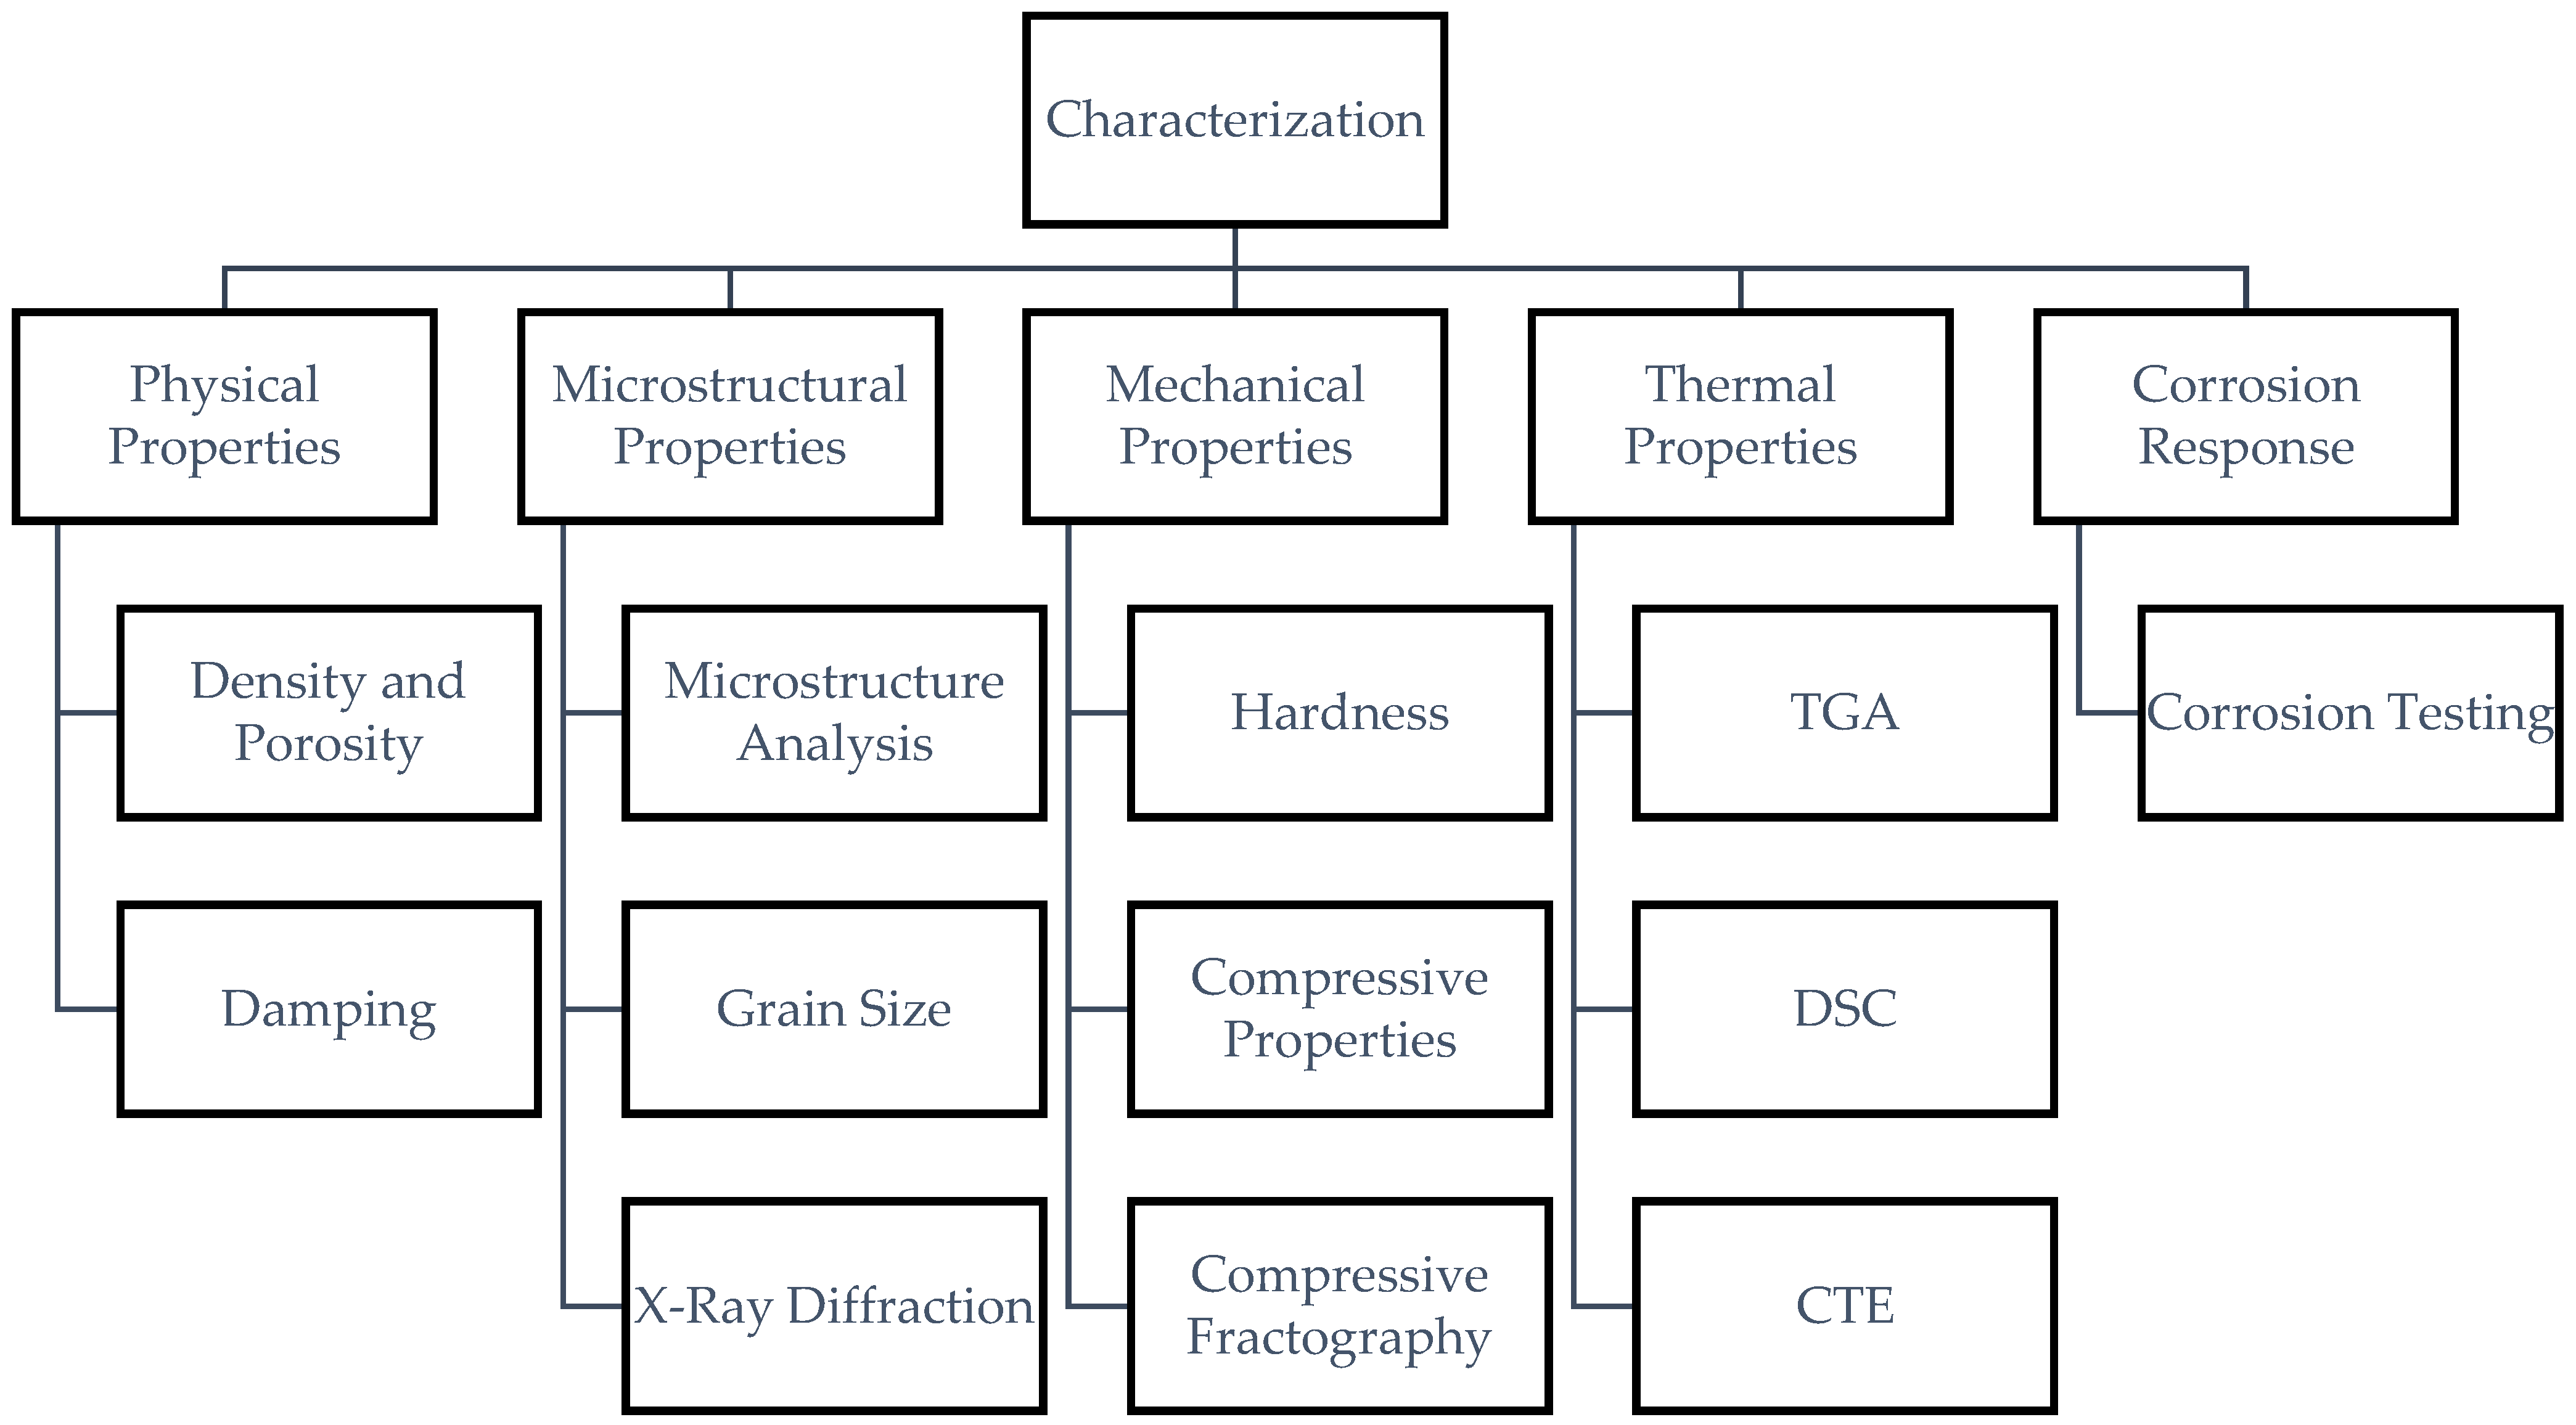
The study involves several types of characterization; Figure 3 shows the categorization of the experimental methodology and testing conducted to characterize the resulting Mg-MCA material.

2.3.1. Density and Porosity

An AD-1653 Density Determination Kit (A&D Company, Limited, Tokyo, Japan) was used in conjunction with a GH-252 electronic scale (AND Limited, Tokyo, Japan) to determine experimental density using Archimede’s principle. The experimental porosity values were then calculated by comparing the experimental density to the theoretical material density. A minimum of 5 samples each from the DMD and TID method were sampled for their measured experimental densities.
To further ascertain the experimental density of the materials, a Perkin Elmer Avio 500 Inductively Coupled Plasma-Optical Emission Spectrometer (ICP-OES) was used for the elemental analysis. The samples were digested in HNO3 and HCl, with a ratio of 1:3, on a hot plate for 2 h and topped up to 10 mL with distilled water. The resultant solution was then analyzed for the weight fraction of the alloying elements.
In addition, a JEOL JSM-6010PLUS/LV Scanning Electron Microscope (SEM) was utilized to observe the presence of pores on the surface. A MATLAB program (Version R2013b) was then used to measure the area fraction of the pores to find the approximate porosity of the materials.

2.3.2. Damping Analysis

Samples of approximately 50 mm in length and 7.9 mm in diameter were subjected to impulse excitation tests by use of a Response Frequency Damping Analyzer (RFDA) software (version 8.1.2, IMCE, Genk, Belgium). The resulting vibrations from the excited rod were recorded by the small microphone. Representative vibration signals were obtained from each material to ensure the accuracy of the test results. The vibration signals were then analyzed to obtain the attenuation coefficient, damping capacity, and elastic modulus of the material.

2.3.3. Microstructure Analysis

Samples were ground flat and fine-finished using a 4000 grit sandpaper, followed by polishing using alumina suspension to 0.05-micron size with DI water or ethanol. A Leica DM2500 optical microscope was used to obtain optical micrographs, and a JEOL JSM-6010 scanning electron microscope equipped with energy dispersive X-ray (EDX) analysis capabilities was used to obtain scanning electron micrographs as well as material composition and secondary phase analysis results. Average secondary phase sizes and phase size distribution were obtained by using MATLAB software (version R2013b). The MATLAB software was used to conduct image analysis of SEM micrographs containing the secondary phases. The resulting image analysis output average diameter as well as the surface area of the selected secondary phases.

2.3.4. X-ray Diffraction

X-ray analysis was conducted using a Shimadzu XRD-6000 X-ray diffractometer. The samples were exposed to Cu-Kα radiation (λ = 1.54056 Å) with a scanning speed of 2° per minute. The samples were scanned at angle 2θ of 10° to 70°. A graph of intensity (I) against 2θ (θ represents the Bragg angle) was obtained, and observed peaks were compared against standard values from other works and the literature.

2.3.5. Mechanical Properties

A Shimadzu HMV-2 hardness tester with a diamond indenter (phase angle = 136º) was used to perform microhardness characterization, with a test load of a 100 g force at a dwell time of 15 s in accordance with procedures outlined in ASTM E-384.
A Future-Tech FR-3 Rockwell Type Hardness Tester was used to measure the macrohardness of the materials. A load of 100 kg was applied on the surface through a 1/16 inch ball indenter with a dwell time of two seconds.
A total of 10 hardness measurements were taken across 1 surface or region of interest for each material.
Flat and parallel samples with an aspect ratio of 1 (diameter and height of approx. 8 mm) were subjected to compressive load testing using an MTS 810 compressive tester according to procedures advised in standard ASTM E9-09, with a strain rate of 8.3 × 10⁻⁵s−1 until failure. A minimum of 3 representative samples for each material and processing method combination were tested to obtain compressive properties.
Fractography was also conducted to gain insight into the fracture response of samples under compressive loading through investigation of fractured surface features.

2.3.6. Thermal Properties

Samples of approximately 2 mm × 2 mm × 2 mm were heated from 30 °C to 1400 °C at a rate of 10 °C per minute in purified air of a 50 mL per minute flow rate. The Shimadzu DTG-60H Thermogravimetric Analyzer was used to determine the ignition temperature of the materials. The ignition temperature of the materials was taken as the temperature the sample achieves prior to an immediate change in temperature recorded due to ignition of the material.
Samples of approximately 2 mm × 2 mm × 2 mm were heated from 30 °C to 600 °C at a rate of 5 °C per minute in argon gas of a 25 mL per minute flow rate to investigate microstructural variations as a function of temperature. The Shimadzu DSC-60 machine was used to measure the amount of heat absorbed or released by the sample as a function of temperature of the sample.
Lastly, a sample with a length of approximately 5 mm and diameter of 8 mm from each material was investigated for the coefficient of thermal expansion (CTE) using a TMA PT1000 Thermo-mechanical analyzer; the samples were heated to a range of 50 °C to 400 °C at a rate of 5 °C per minute in argon gas of a 0.1 L per minute flow rate.

2.3.7. Corrosion Response

Samples of an approximately 1.5 mm thickness were cut and ground for immersion in 3.5% NaCl solution for a duration of 28 days or until sample disintegration. Weight loss data were obtained in 24 h intervals by immersing the corroded samples in a solution consisting of 1.9 g AgNO3 and 20 g of CrO3 in 100 mL of distilled water to remove corrosion products, after which cleaning with distilled water was performed, and the samples were weighed. The corrosion rate was then calculated using the following formula [20] to obtain a representative average, and this characterization was conducted on 2 samples for each material:
C o r r o s i o n   r a t e m m y e a r = 87.6 × W e i g h t   l o s s   ( m g ) E x p e r i m e n t a l   D e n s i t y   ( g / c m 2 ) × S u r f a c e   A r e a   ( c m 2 ) × I m m e r s i o n   T i m e   ( h )

3. Results

3.1. Synthesis

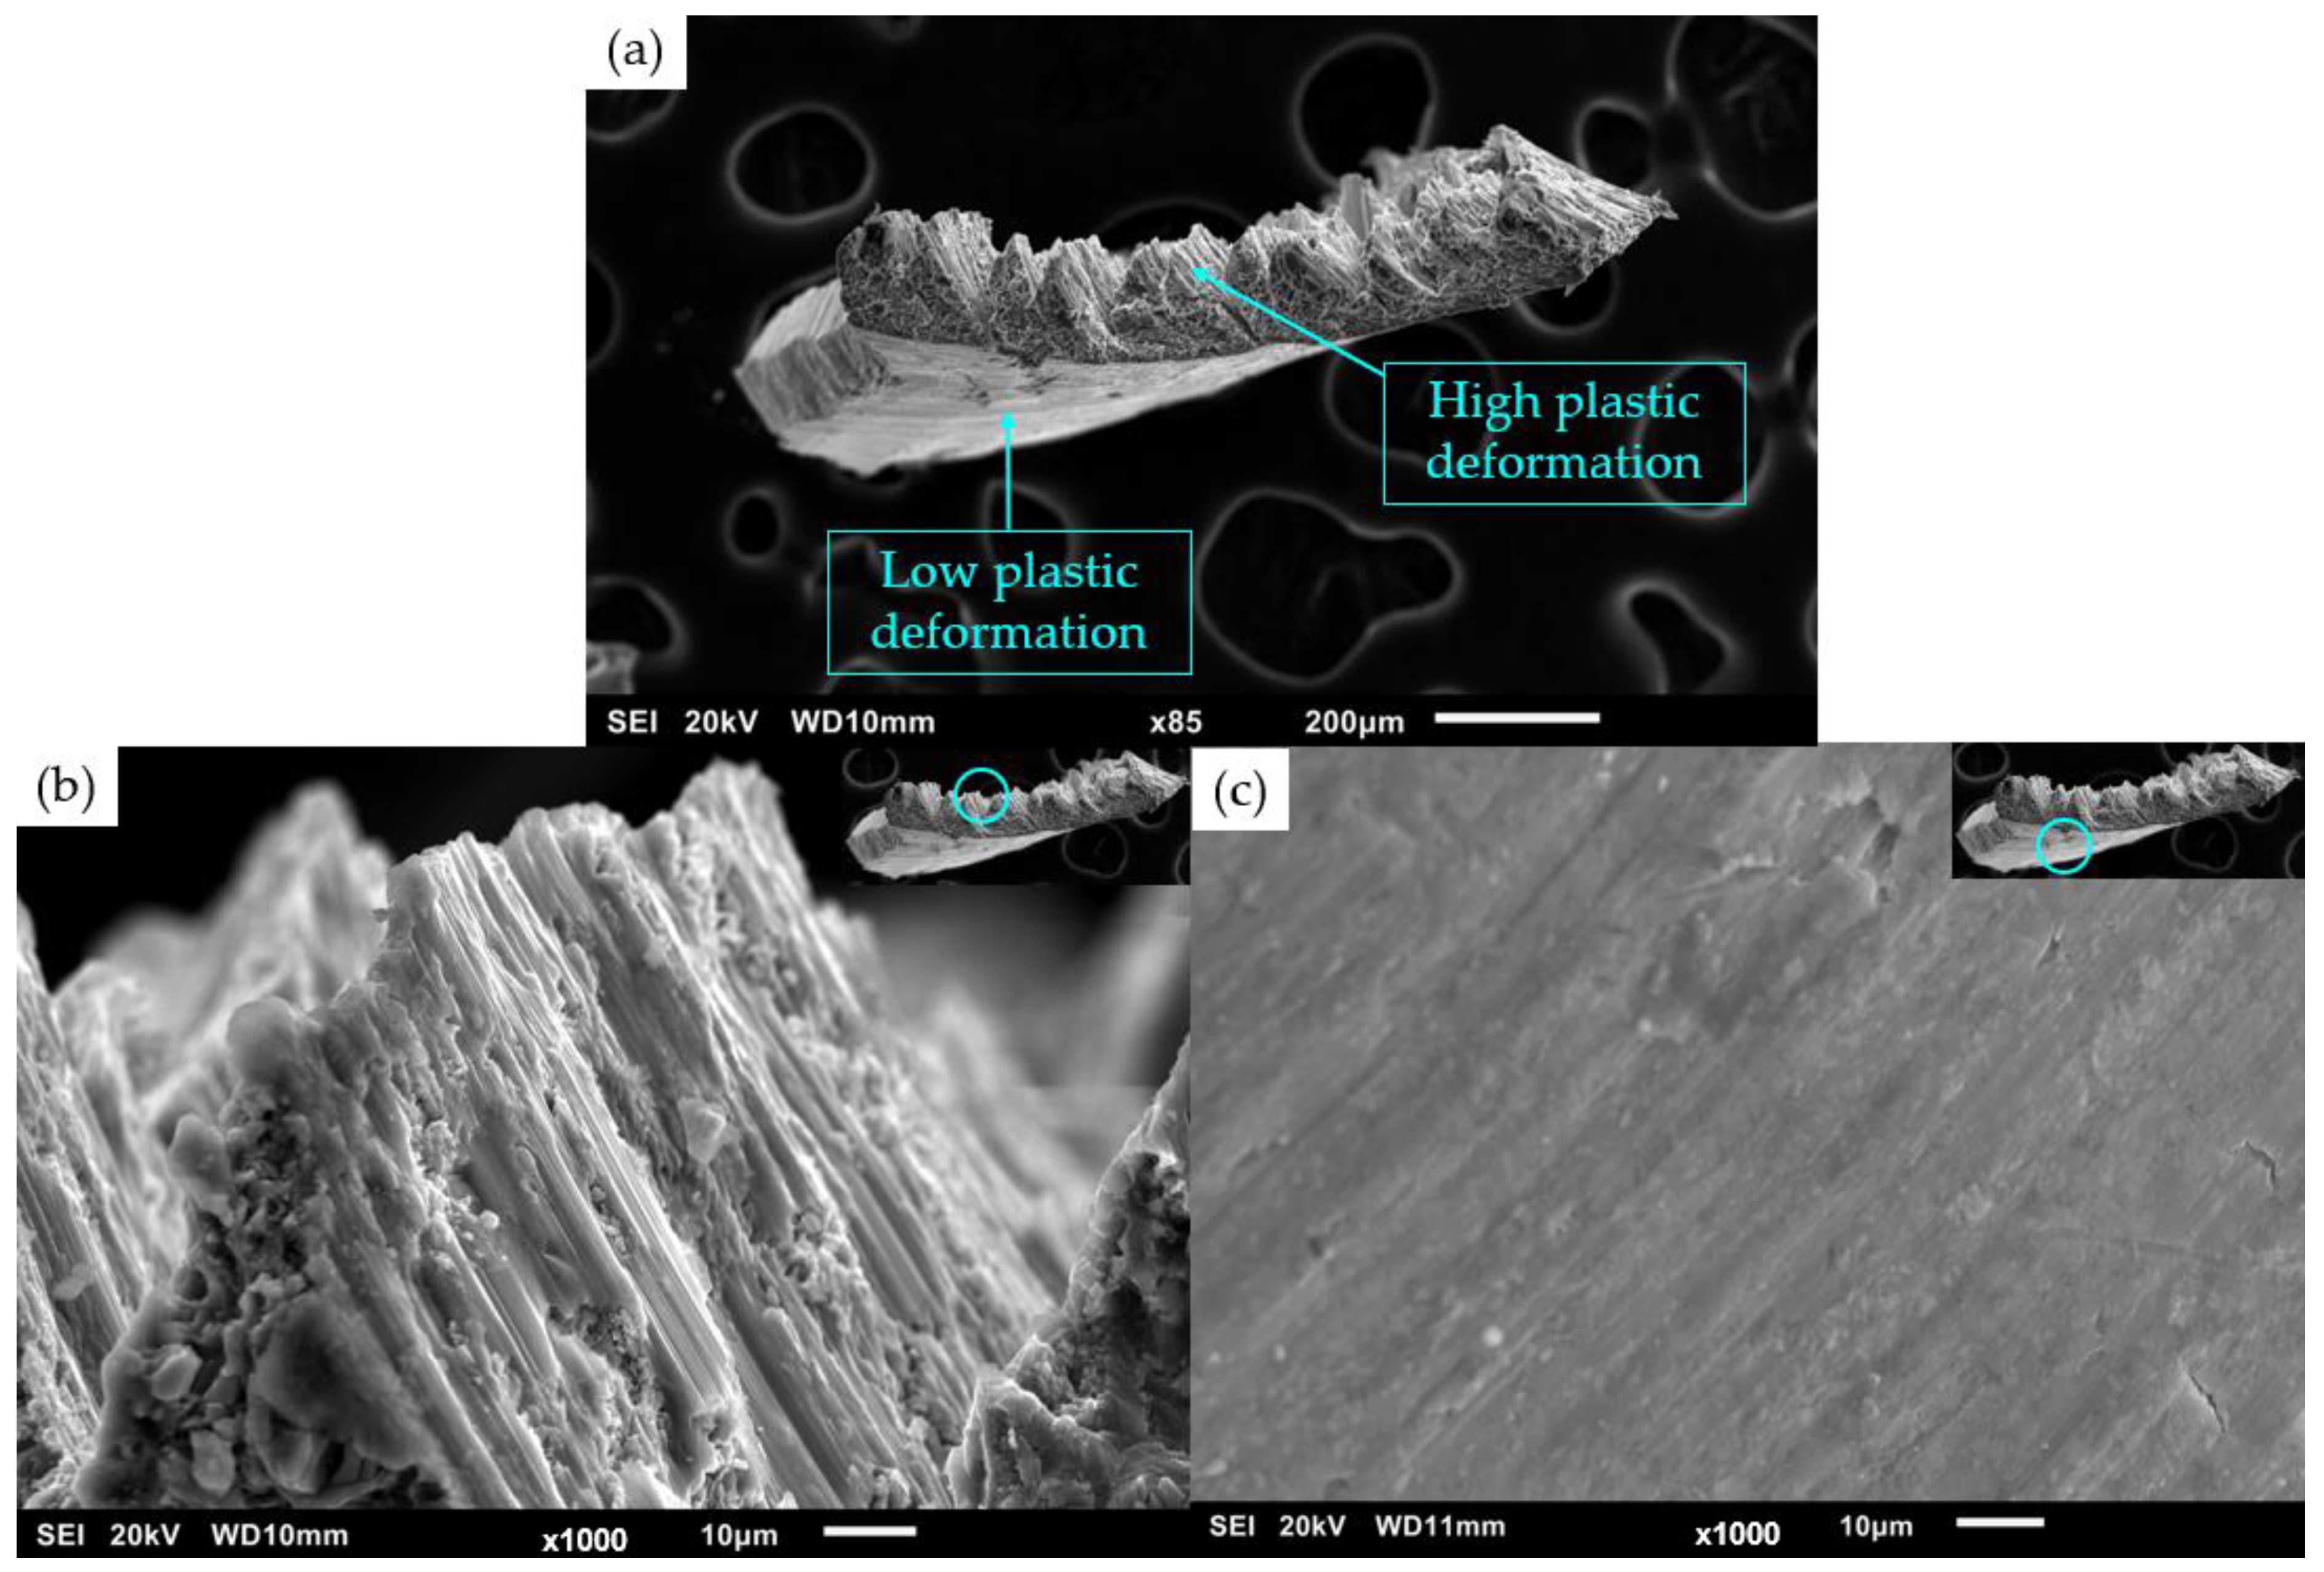
The material was cast and machined successfully, with Figure 4 showing a SEM micrograph of a Mg70Al18Zn6Ca4Y2 turning from the TID process, showing the high and low plastic deformation zones and corresponding shear bands. Following extrusion, 10 mm diameter rods were obtained. Part of the rods showed surficial cracks, and these parts were not used for characterization purposes.

3.2. Density and Porosity

Table 3 shows the measured composition of the DMD and TID samples, indicating that the measured compositions were not equal between the DMD and TID materials, with the latter having less Ca and more Y content.
With this in mind, the corrected theoretical density was calculated. Both theoretical densities remained very close to each other. Table 4 shows that the average experimental densities of the materials are higher than the theoretical densities. The area fraction of the pores in the TID material was calculated using image analysis and was found to be approximately 0.87%, corresponding to the material’s porosity.

3.3. Damping Analysis

The damping response from the damping analysis in Figure 5 can be approximated with a best-fit curve in the form of Ae−bt, where b is the attenuation coefficient. This indicates that the TID material exhibited superior attenuation as well as damping capacity as outlined in Table 5, though with a slight trade-off in its Young’s modulus.

3.4. Microstructure

Figure 6 shows the microstructure of both DMD and TID Mg70Al18Zn6Ca4Y2, showing the presence of multiple phases across both materials. Pores were also observed in the TID material as mentioned earlier.
Figure 7 and Table 6 show the morphology of the phases as well as the EDS results showing the quantities of detected elements corresponding to those individual phases, with assigned spectrum numbers to the symbols used in identifying secondary phases.
Table 7 and Table 8 show the average size and area fraction of secondary phases found in Mg70Al18Zn6Ca4Y2 materials, while Figure 8 shows the phase size distribution, indicating that TID results in smaller secondary phase sizes, but with them occupying larger area fractions of the material.

3.5. X-ray Diffraction

Figure 9 shows the X-ray diffractograms of the Mg70Al18Zn6Ca4Y2 materials studied in this work. The diffractograms were strikingly similar, showing the same phases in both DMD and TID samples.

3.6. Mechanical Properties

3.6.1. Hardness

Both microhardness and microhardness values of the materials studied in this work are shown in Table 9, showing the positive (enhancing) effect on values of TID samples when compared to DMD-processed samples, indicating the capability of TID processing to enhance resistance to localized deformation at both micro- and macroscales.

3.6.2. Compressive Properties

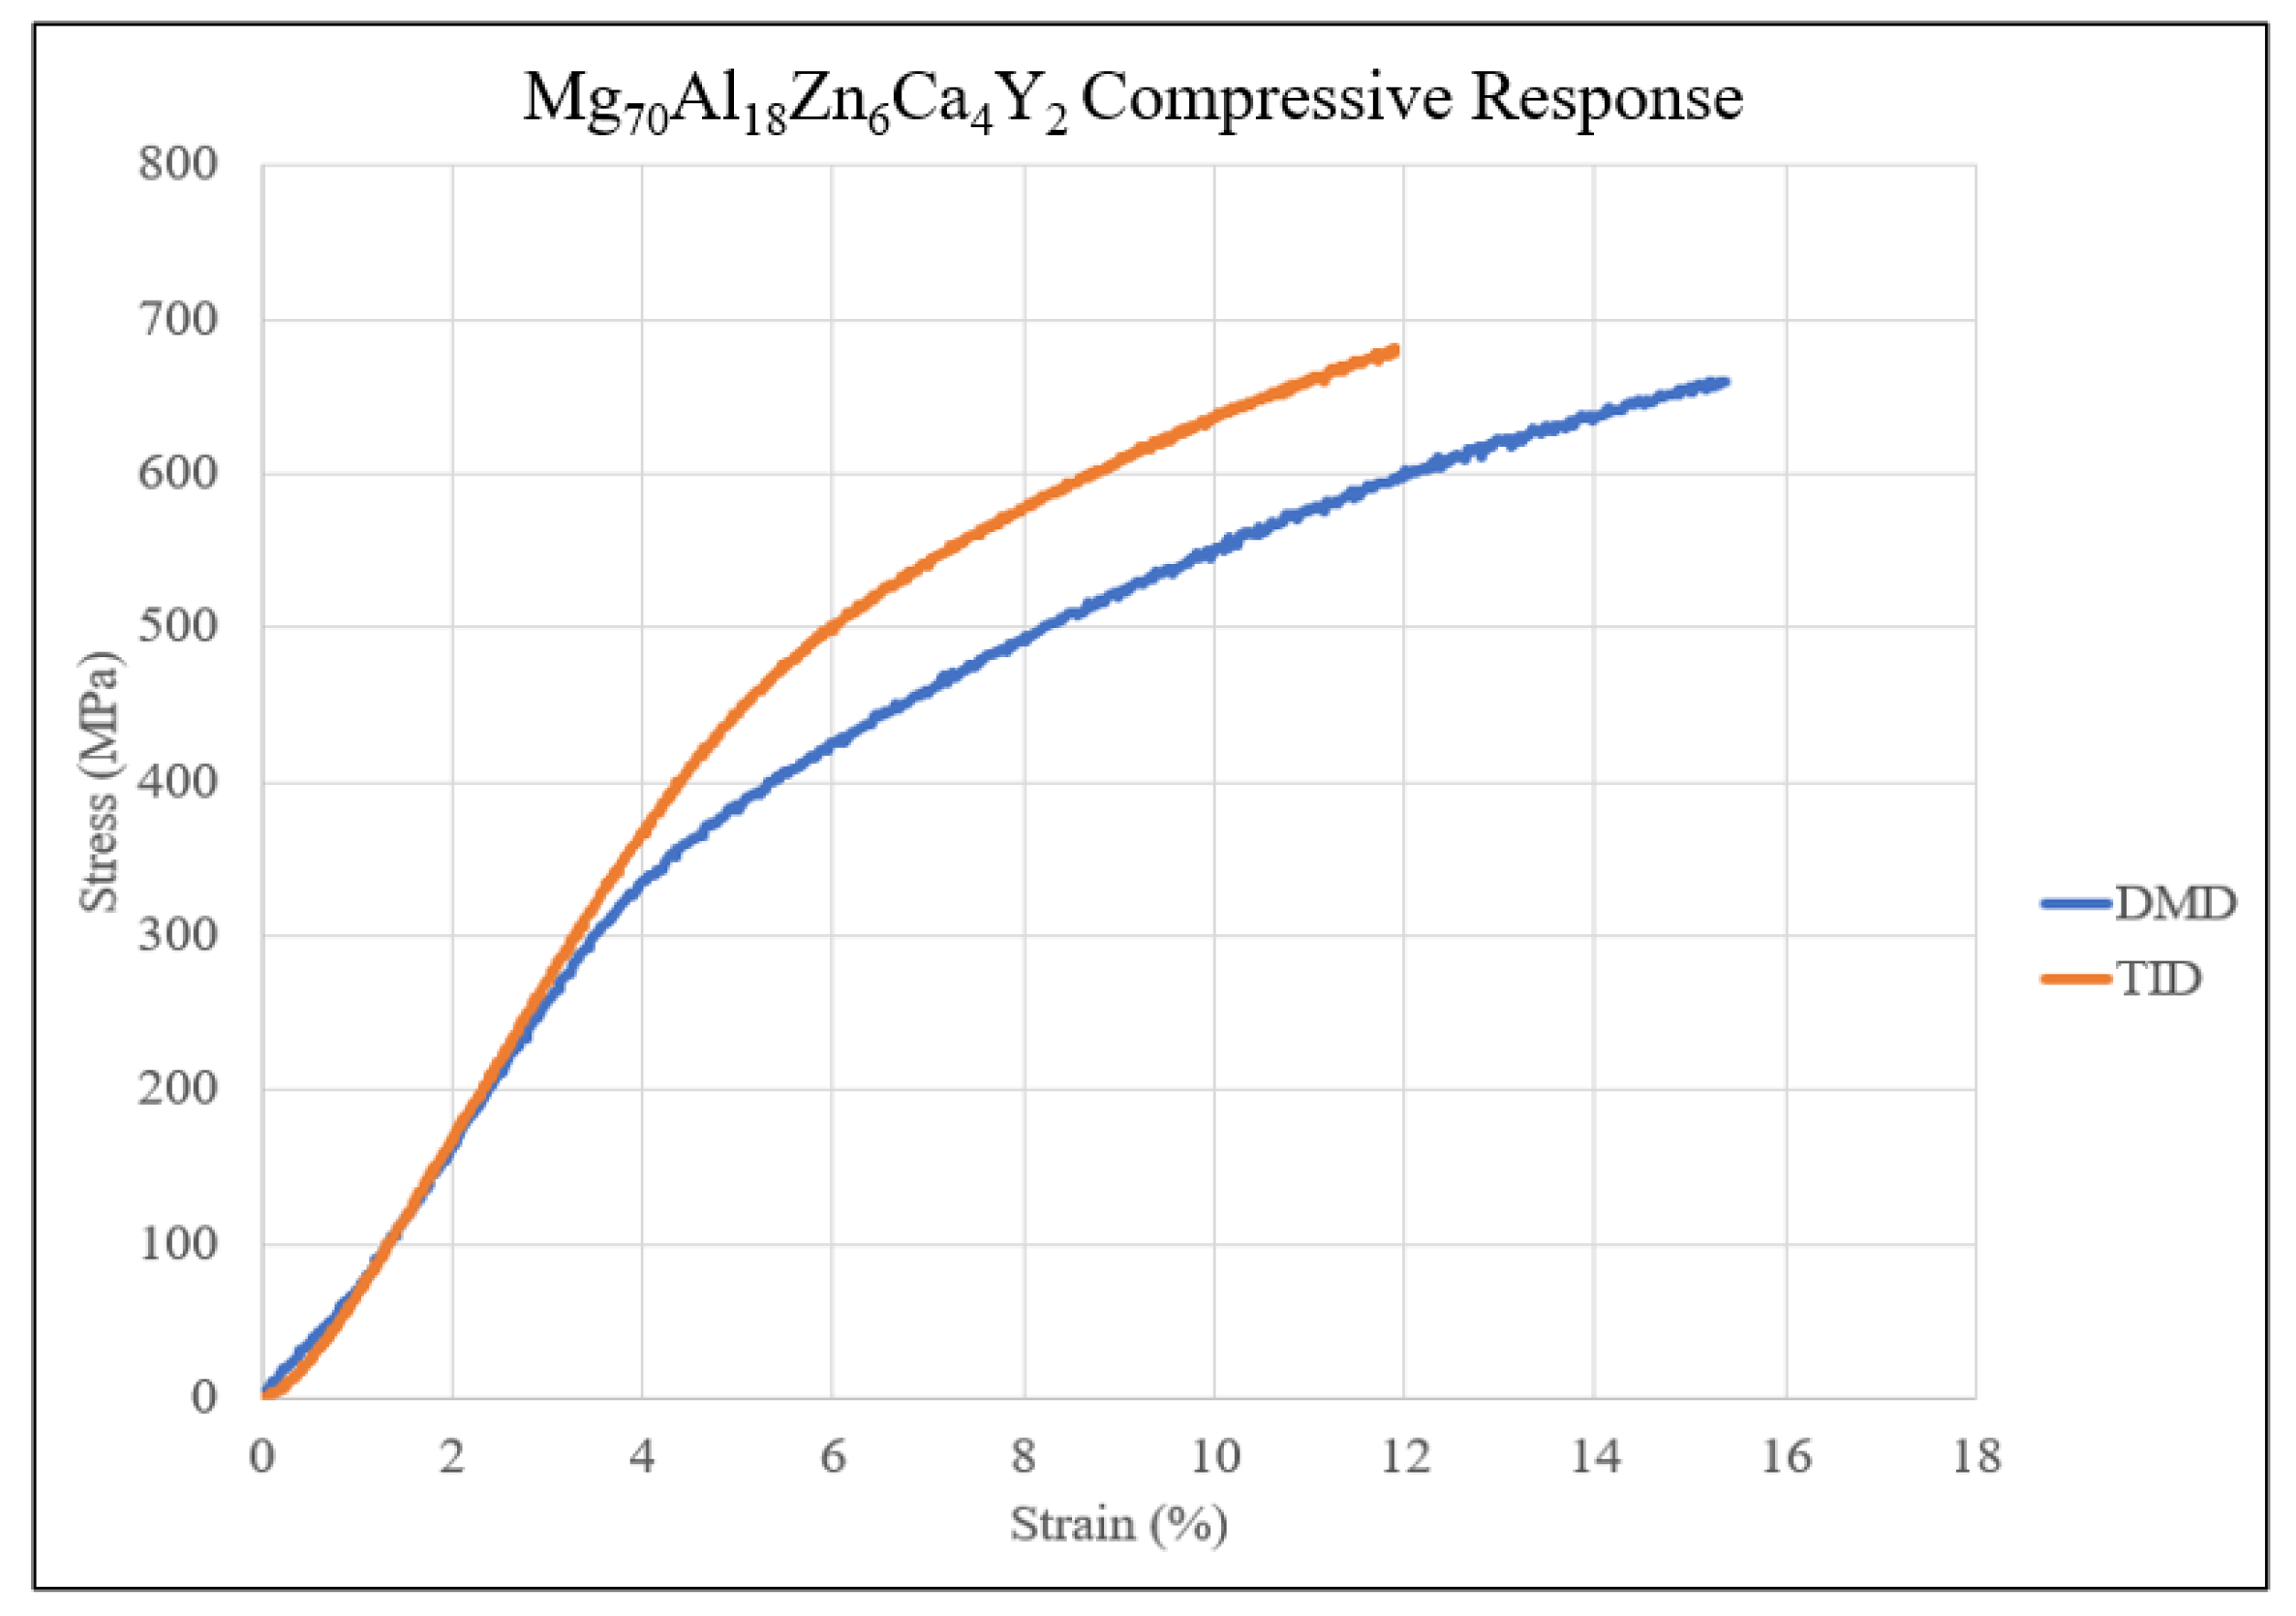
The resulting compressive properties of materials in this study are compiled in Table 10, and the compressive responses are shown in Figure 10. TID resulted in a superior yield and ultimate compressive strength at a slight cost of fracture strain and energy absorbed.
Figure 11 shows the resulting microstructure of the fractured samples, showing the 45-degree fracture angle (insets) and the resulting shear band morphology.

3.7. Thermal Properties

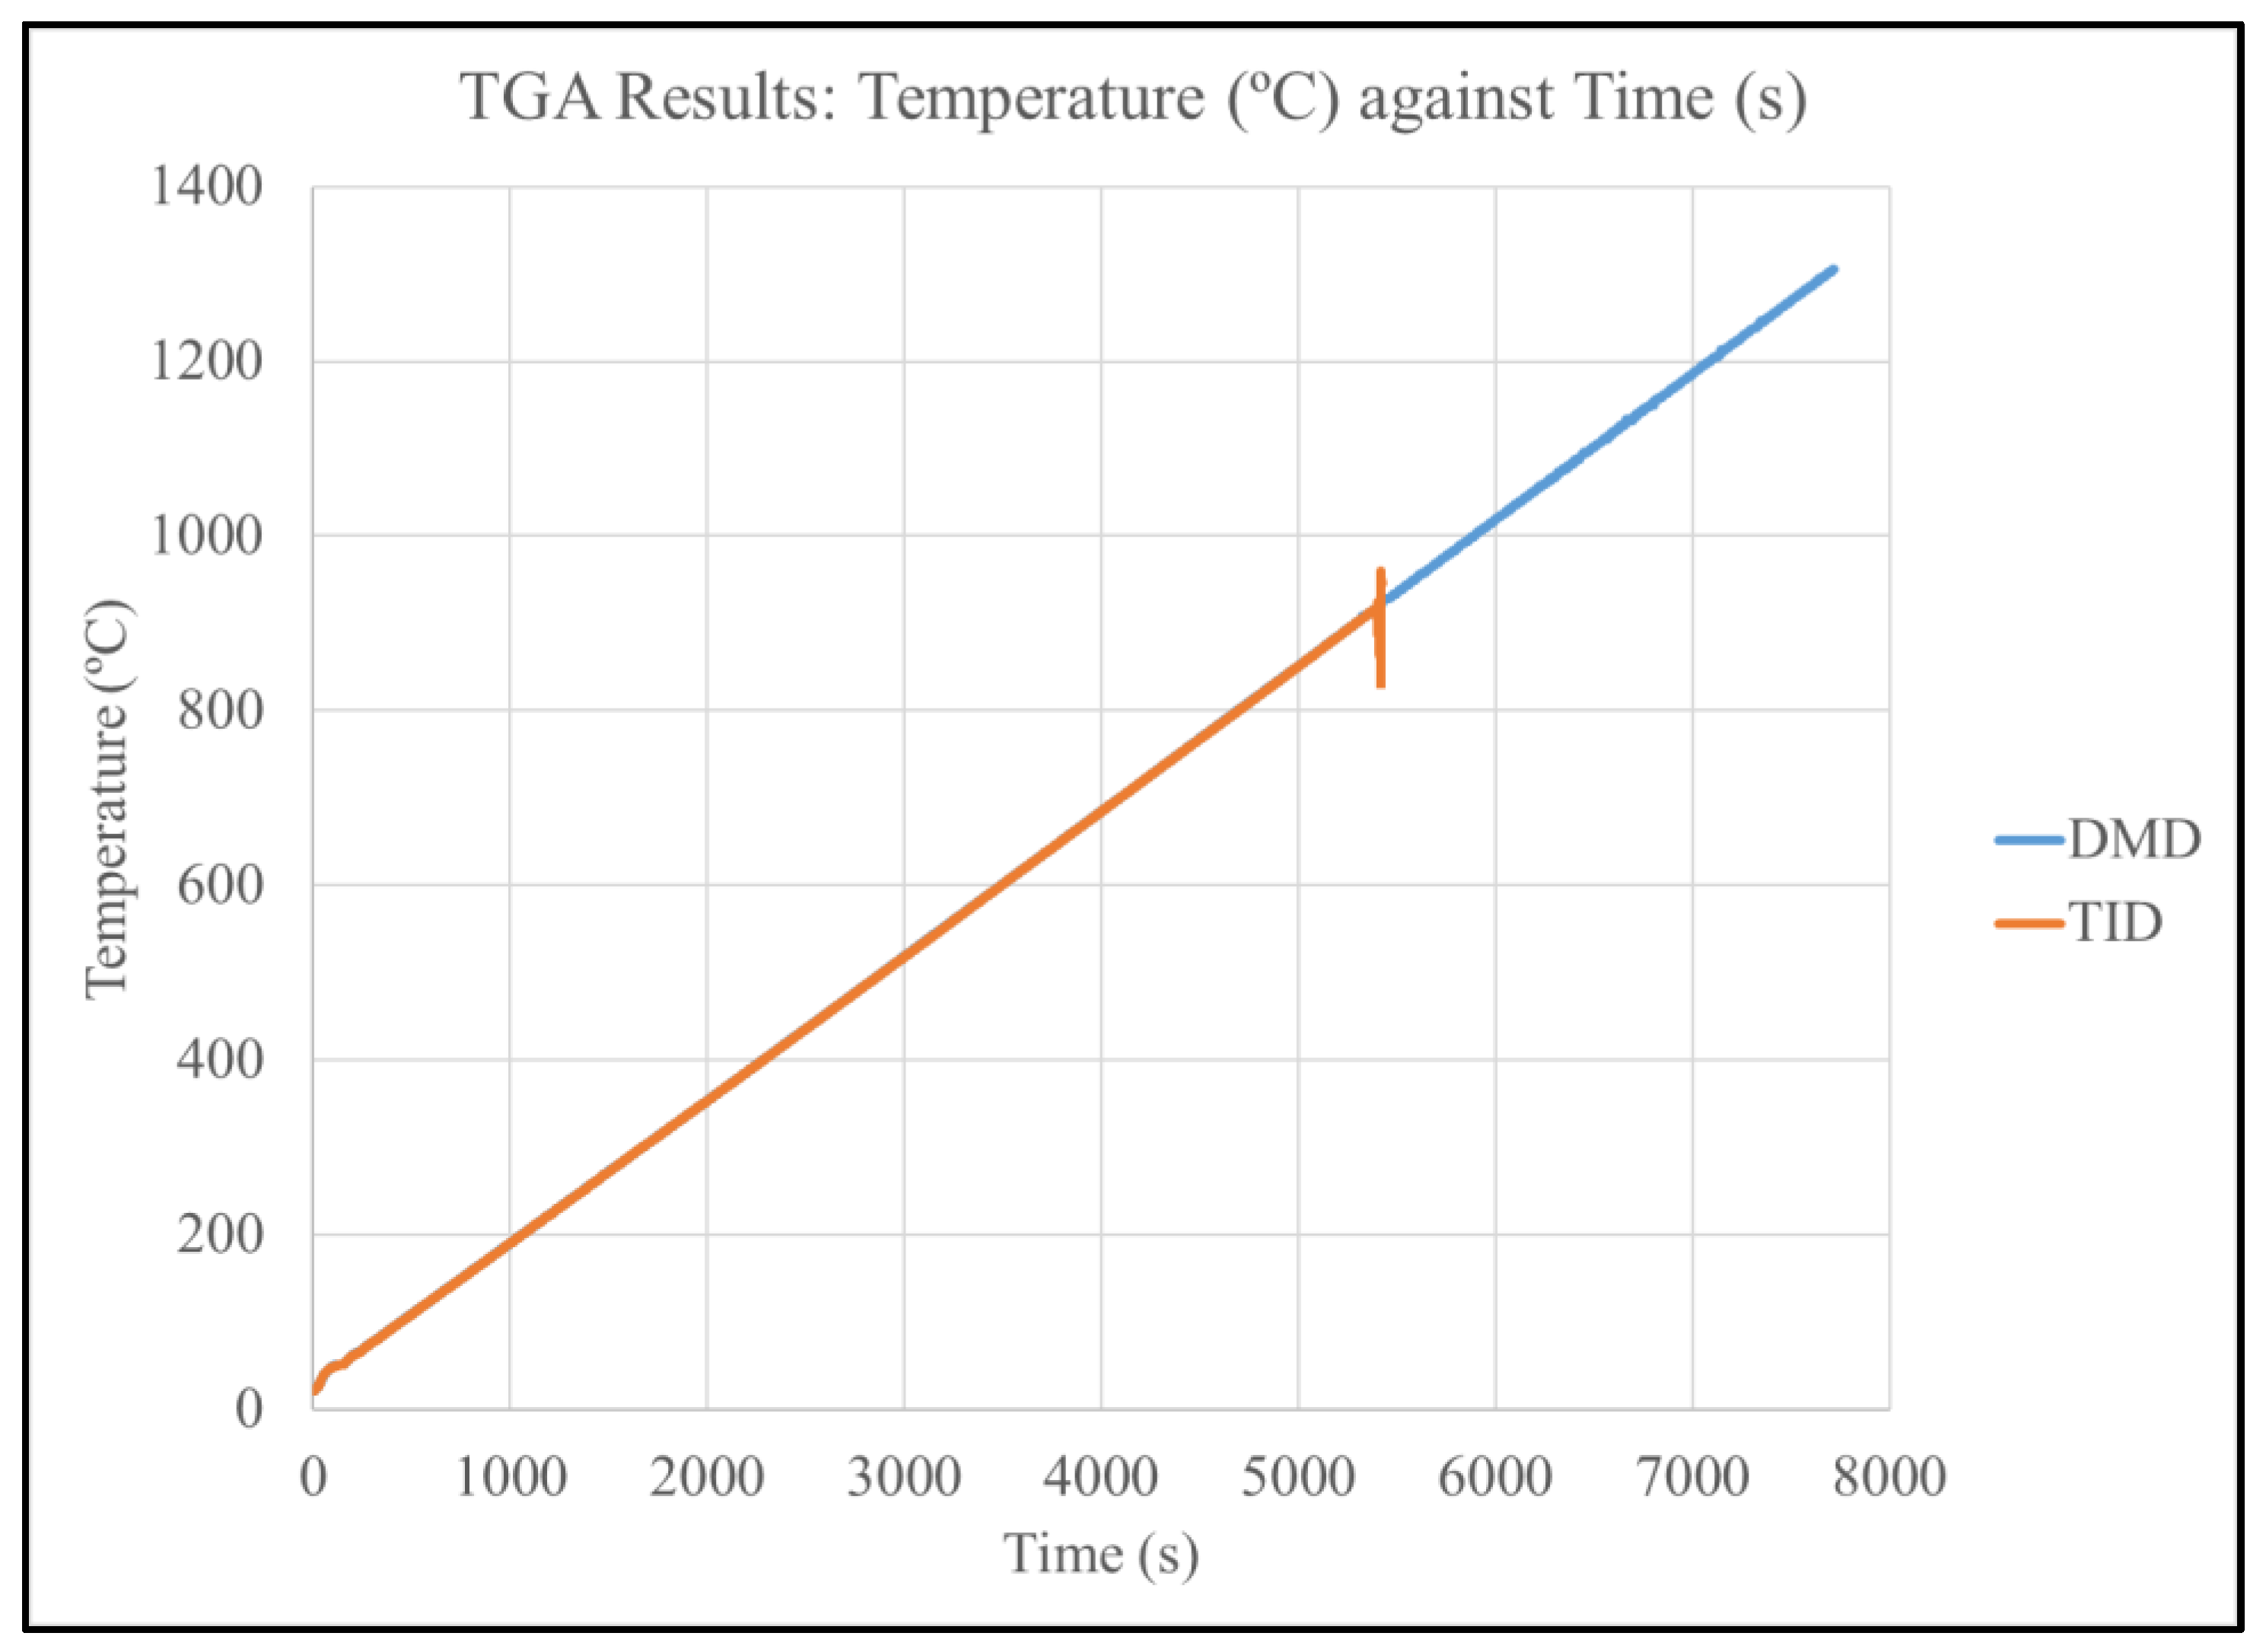
Figure 12 and Table 11 show the results of the TGA testing, showing that the auto-ignition temperature of the DMD-processed Mg70Al18Zn6Ca4Y2 was beyond 1300 °C while the TID-processed counterpart ignited at 915 °C. The results are compared with selected FAA approved commercial Mg alloys.
Figure 13 displays the DSC response curve of Mg70Al18Zn6Ca4Y2 materials, showing negative peaks at approximately 420 °C and 490 °C but, otherwise, similar behavior with temperature across both Mg70Al18Zn6Ca4Y2 materials.
Table 12 shows the resulting coefficient of thermal expansion of materials studied in this work, indicating similar coefficients of thermal expansion considering the standard deviation values.

3.8. Corrosion Response

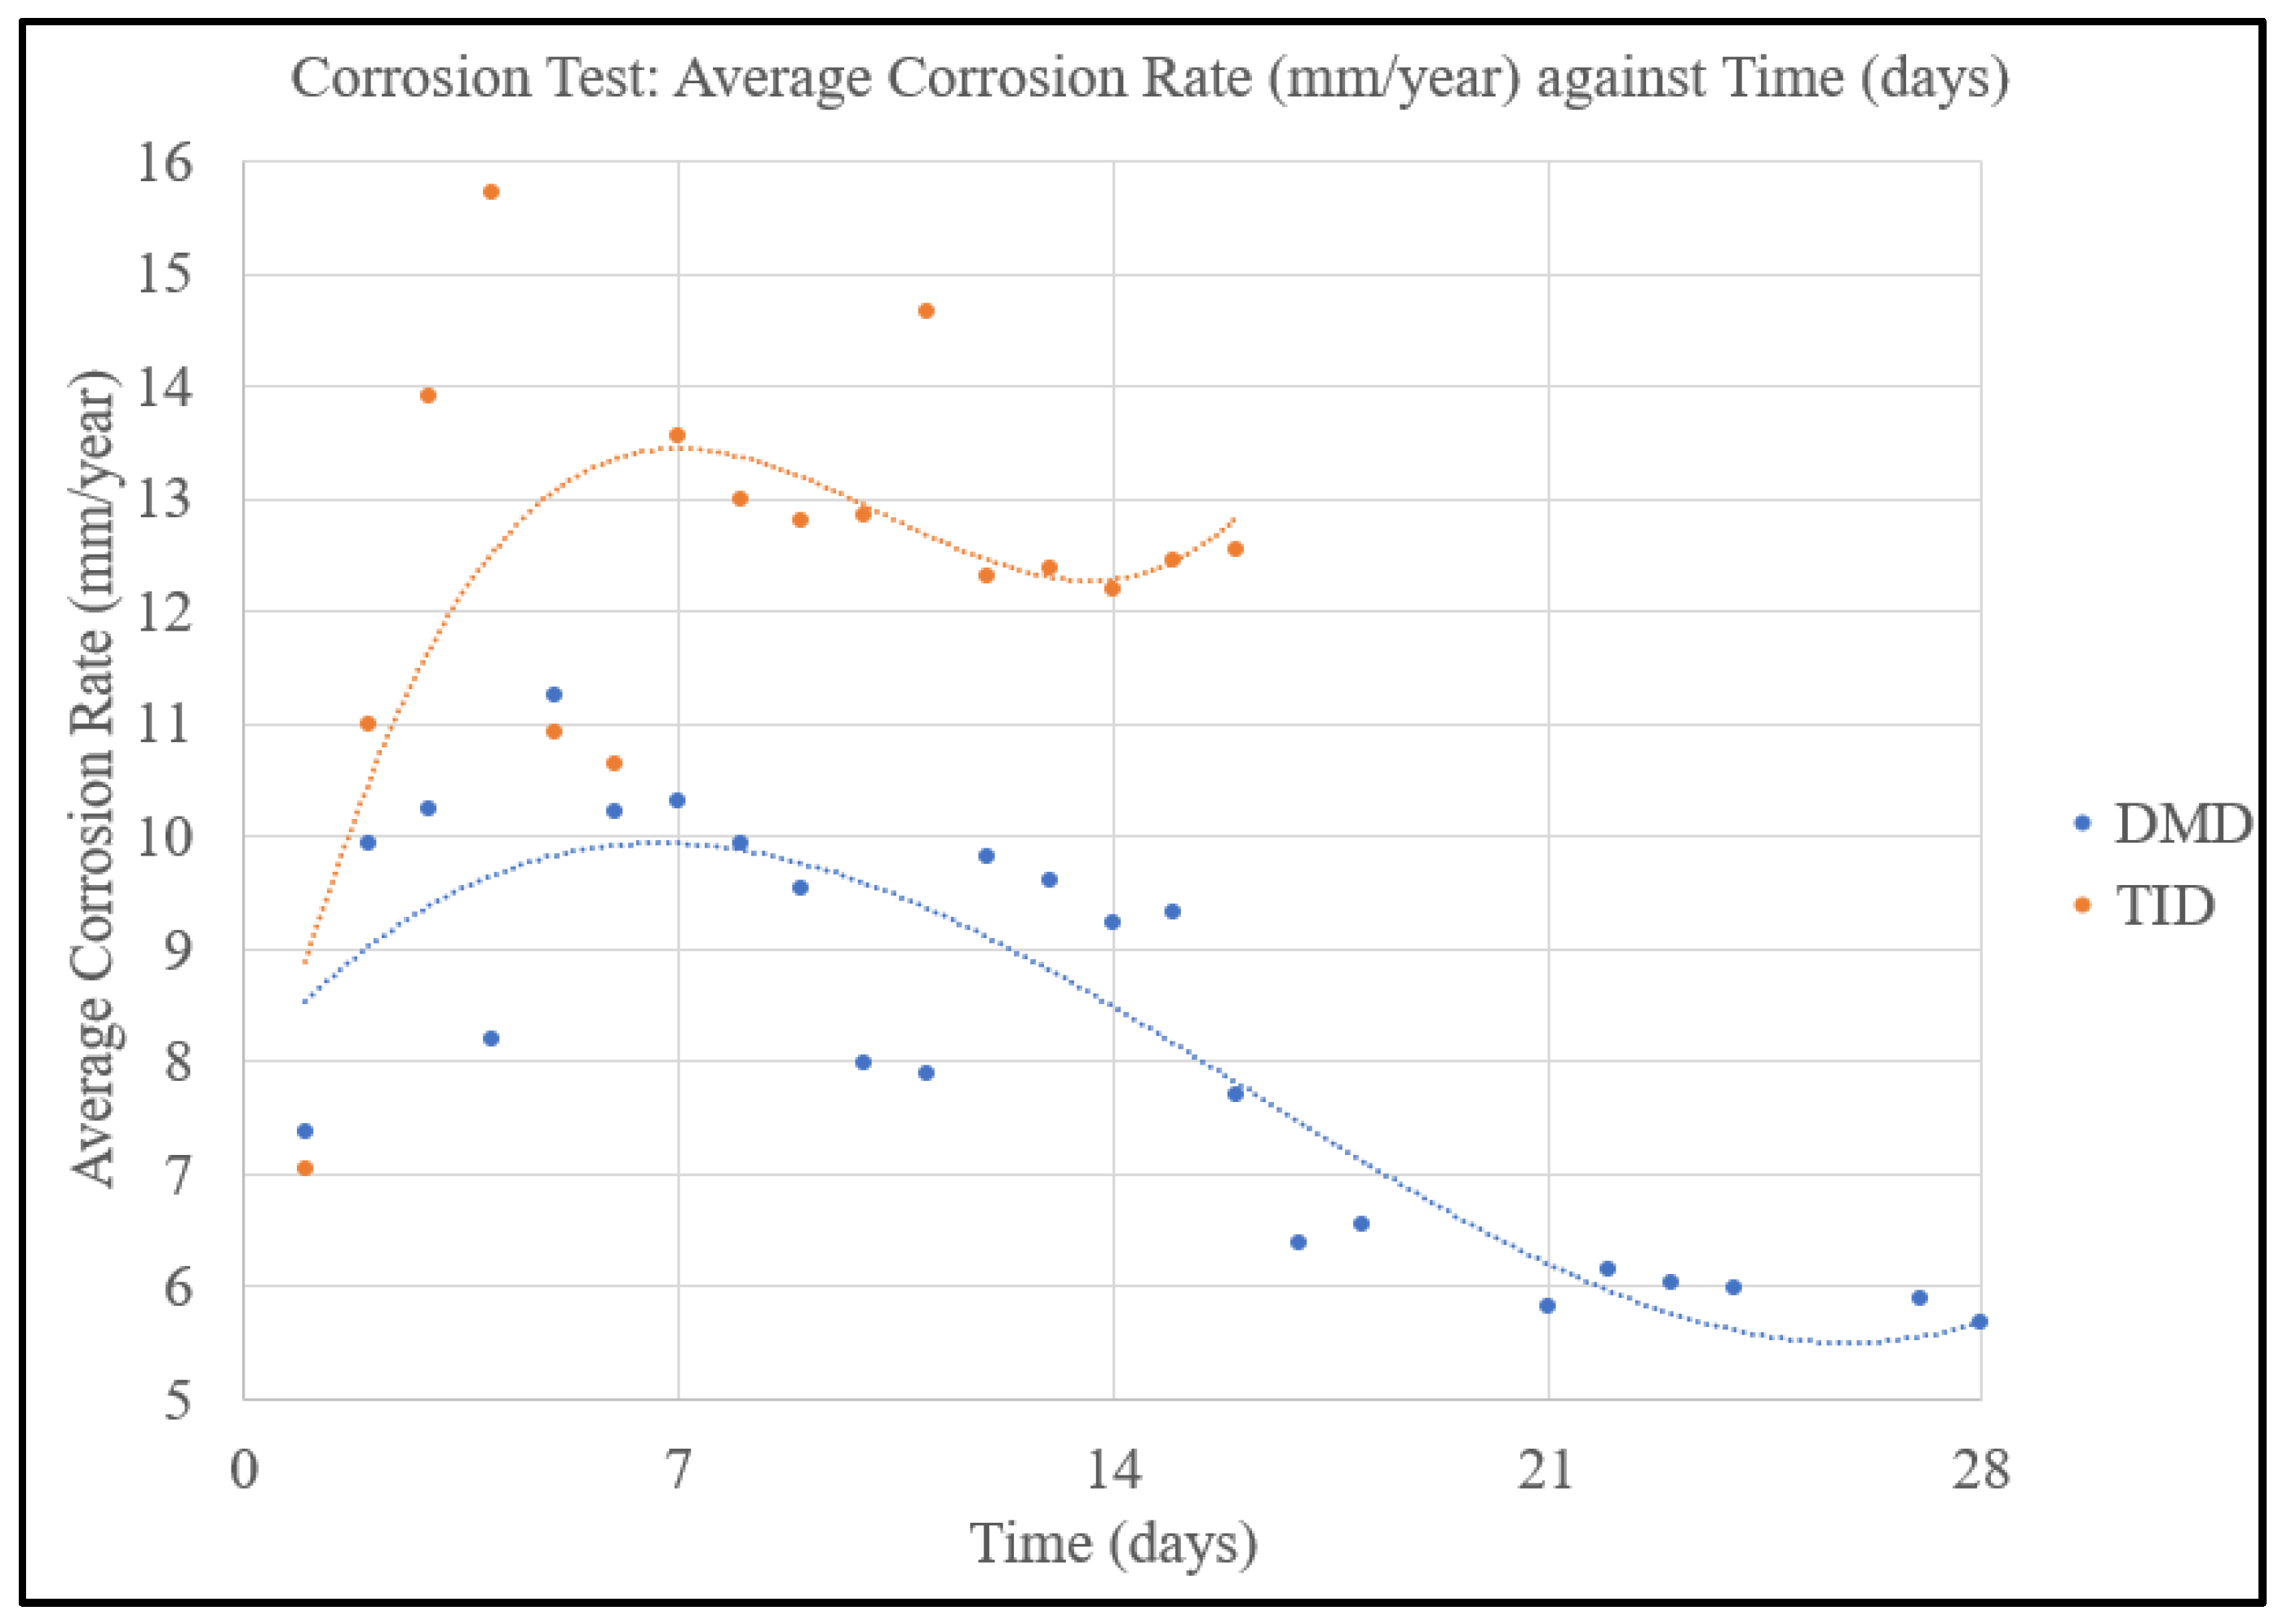
Figure 14 shows the average corrosion rates of the DMD and TID Mg70Al18Zn6Ca4Y2 materials, showing the distinct differences in corrosion rates and the latter disintegrating within 16 days as opposed to the DMD material staying intact for the entirety of the 28 days.

4. Discussion

4.1. Synthesis

While the material was synthesized using both DMD and TID methods successfully, considering the resulting challenge faced with regards to extrusion of this Mg-based MCA, it can thus be inferred that optimization of processing parameters in hot-working of MCAs is needed due to the resulting high hardness and unexceptional ductility and plasticity of the resulting material (especially TID-processed). This highlights the importance of judicious selection of parameters in synthesis of this class of material.

4.2. Density and Porosity

The experimental density was higher than the theoretical density for both the DMD and TID samples, implying the formation and presence of ordered phases [9]. The porosity results revealed the capability of the TID processing methodology adopted in this study to develop near-net-shape products (porosity < 1%).

4.3. Damping Analysis

The damping results showed that the attenuation coefficient and damping capacity increased by 23% and 19.5%, respectively, for the TID material. The positive effect of TID on the damping behavior of this multicomponent alloy is consistent with previous work on other Mg-based materials [11,14]. This effect is mainly due to the presence of pores within the TID material, which has been correlated with superior damping capabilities as demonstrated by other works on Mg and Al materials utilizing various processing methods [24,25,26]. Porous materials have superior damping capabilities because pores within the material allow for deformation and displacement to occur when an external force is exerted. The pores are able to compress and expand, allowing for kinetic energy to be converted into thermal energy which is then dissipated into the surroundings. The TID process, thus, resulted in superior damping capabilities.

4.4. Microstructure

Following the TID process, it was observed that the blocky phases of the material were smaller on average and also occupied a higher area/volume fraction of the material (more widely dispersed), as shown in Figure 9, with regard to the phase size distribution, and Table 7. This may be due to the partial dissolution of the secondary phases during the turning process and subsequent precipitation afterward while cooling down, resulting in the formation of smaller, well-distributed bulk phase sizes.
Through the investigation of the general microstructure of both materials, SEM and EDS results indicated the presence of secondary phases with largely similar compositions. Hence, it can be implied that the phases were of similar compositions for both materials.
The first feature investigated was the dark matrix of the materials (indicated as spectrum 1) which consisted mainly of magnesium with the presence of some other elements, except Yttrium as solute elements.
Bright white and large blocky phases were noticed (indicated as spectrum 2). These phases were mainly made up of aluminum and yttrium, forming Al2Y phases, with lower amounts of magnesium and zinc detected.
Darker grey blocks were also observed (indicated as spectrum 3). They can also be found within the boundaries of Al2Y blocks in the DMD material. These phases were mainly made up of aluminum and calcium, forming Al2Ca phases, based on their composition with lower amounts of magnesium and zinc. In previous studies with magnesium-based multicomponent alloys, it was observed that, in most areas where Al2Y phases were found, Al4Ca phases coexisted within that area as well [9].
Lastly, lighter grey phases were seen within the matrix of the material (indicated as spectrum 4). These phases were identified as AlxMgyZnz since they are made up of magnesium, aluminum, and zinc, with some calcium detected as well, but with compositions that deviate between the two materials.
These findings indicate that the resulting Mg matrix and phase structure/morphology of the extruded Mg70Al18Zn6Ca4Y2 materials in this work replicate those previously studied by Khin et al. [9], showing that the TID process does not result in any phase transformations.

4.5. X-ray Diffraction

These results indicate that the detected peaks of the studied materials align with those in past works involving cast and extruded (DMD) Mg70Al18Zn6Ca4Y2 [9,10], indicating that the crystalline structure and phases formed within these materials are similar to those in previous efforts. This can be corroborated by the AlMg2Zn (previously identified as AlxMgyZny), Al2Ca, and Al2Y previously detected by SEM and EDS characterization, with similar observations of Al4Ca phases coexisting with the Al2Y phases identified [9]. In addition, the results also confirm that TID does not result in the formation of new phase compositions, having the same peaks and similar diffraction pattern as the DMD counterpart. It should also be noted that due to the relatively lower area fractions of the individual secondary phases (22% at most for AlMg2Zn in the case of TID, 13% or less for others), the peak intensities of individual phases, thus, remained similar between DMD and TID.

4.6. Mechanical Properties

4.6.1. Hardness

The increase in hardness for the TID Mg70Al18Zn6Ca4Y2 can be attributed to the decrease in size and increase in the amount of the secondary phases (Table 7 and Table 8) which were also dispersed more evenly within the material, similar to other works on secondary phases [27] where dislocations were hindered to a greater extent, thus conferring a higher resistance to localized deformation under load.

4.6.2. Compressive Properties

TID resulted in a higher yield strength (~14%) as well as a higher ultimate compressive strength (~4.7%), which was also attributed to the dislocation-hindering effect of finer, higher amounts and evenly distributed secondary phases resulting in higher loading required to fracture the material [27]. However, the failure strain was lowered, indicating lower ductility. This has parallels with porous aluminum alloys where porous materials exhibited reduced ductility [28] and can also be caused by stress concentrations which occur within the pores and secondary phases [29]. It is noteworthy that ductility remained >10%, suggesting a ductile nature and good deformability of the TID samples despite showing a comparatively lower value than DMD samples.
The resulting fractographs of both the DMD and TID Mg70Al18Zn6Ca4Y2 showed similar fracture modes; a shear angle of 45° as well as the presence of shear bands are noted both visually and microscopically. This is supported by similar ductility values reported in Table 10.

4.7. Thermal Properties

The ignition temperature of Mg70Al18Zn6Ca4Y2 was observed to be beyond 1300 ºC for the DMD material and 913 °C for the TID-processed counterpart. This represents a significant leap over Mg-based materials due to the presence of multiple alloying elements within this multicomponent alloy [12,21,30]. The reduction in the ignition temperature (and, thus, resistance) of the TID material is caused by pores which allow for more oxidation to occur, consistent with previous works in this field.
Despite the lower ignition resistance of the TID Mg70Al18Zn6Ca4Y2 compared to its DMD counterpart, its ignition temperature is still significantly higher than both Elektron 21 and WE43 Mg alloys, which is significant since these latter two materials are FAA-approved for use in the aerospace industry, underscoring a potential use of Mg70Al18Zn6Ca4Y2 in a previously restricted application for Mg-based materials.
Mg70Al18Zn6Ca4Y2 exhibited a lower coefficient of thermal expansion compared to that of pure Mg. This was due to the presence of alloying elements that have lower coefficients of thermal expansion which then lowered the overall property for the material as a whole [31]. While the TID material exhibited a marginally higher coefficient of thermal expansion relative to the conventional DMD-processed counterpart, the difference can be neglected considering the standard deviation values in each case.
The DSC results confirmed that there were no significant differences in the material phase behavior/changes with temperature between the DMD- and TID-processed Mg70Al18Zn6Ca4Y2, and they also showed a negative peak (being endothermic) at 420 °C (corresponding to the melting point of zinc) [32]. Furthermore, a second, more endothermic peak was observed at 490 °C for both materials, implying a phase transformation of some type. This is significant as it serves as an indication that heat treatment or further processing of this material should take place below it to avoid further changes in material properties.

4.8. Corrosion Response

The TID process resulted in a lower corrosion resistance caused by (a) the presence of pores in the material, (b) the small size of secondary phases, and (c) larger amounts of secondary phases as seen in Table 7 and Table 8. The role of pores has been reported in other works related to Mg-based materials, including those manufactured using TID [11] as well as powder metallurgy [33]. Further, the reduced size and an increase in the amount of secondary phases such as in TID samples increase the number of micro-galvanic couples, leading to enhanced corrosion. This highlights a potential compromise of the TID method in producing components with applications in corrosion-intensive environments and further calls for a surface protection approach such as coating for a longer service life akin to zinc coating used on structural steels.

5. Conclusions

In this study, the fabrication of a Mg70Al18Zn6Ca4Y2 multicomponent alloy using the TID method was successful, and the effects of TID on this MCA were investigated. The following conclusions can be drawn from the study:
  • The TID material continued to follow previous trends in morphology, being more porous compared to the DMD counterparts, although the porosity remained at <1%.
  • The TID method imparts superior hardness (34% increase in micro-scale and 11% increase in macro-scale) and strength (14% increase in yield strength and nearly 5% increase in ultimate compressive strength) but compromises ductility and energy absorbed until fracture, with the ductility of the TID samples remaining greater than 10%.
  • The TID material has, overall, better damping capabilities than the DMD material, with a nearly 20% increase in attenuation coefficient and 24% increase in damping capacity.
  • From thermal analyses, the TID method caused the ignition temperature to decrease significantly relative to conventional DMD processing whilst the coefficient of thermal expansion increased slightly. More significantly, the ignition temperature of the TID samples, at over 900 °C, remained significantly higher than the FAA-approved WE43 and E21 alloys.
  • The average corrosion rate of the TID material was significantly higher than its DMD counterpart, with nearly double the average corrosion rate.
  • An important consideration when performing hot working of this multicomponent alloy as phase transformation was observed from the DSC results when the Mg70Al18Zn6Ca4Y2 multicomponent alloy reached 490 °C.
The TID method did not result in changes to the microstructure or phases found but reduced the size and increased the volume fraction of the secondary phases. Based on this evidence, TID has, thus, been shown to be suitable for application on Mg multicomponent alloys, especially in strength-based applications, forming a basis for further work in this field as well as potential combinations of TID with further processing such as heat or cryogenic treatments.

Author Contributions

Conceptualization, M.G.; Methodology, M.J., A.A.B.G. and M.G.; Validation, M.J.; Formal Analysis, A.A.B.G.; Investigation, A.A.B.G.; Resources, M.J. and M.G.; Data Curation, M.J. and A.A.B.G.; Writing—Original Draft Preparation, M.J. and A.A.B.G.; Writing—Review and Editing, M.J. and M.G.; Visualization, A.A.B.G.; Supervision, M.G.; Project Administration, M.J. and M.G. All authors have read and agreed to the published version of the manuscript.

Funding

This research received no funding.

Institutional Review Board Statement

Not applicable.

Informed Consent Statement

Not applicable.

Data Availability Statement

Data are contained within the article.

Acknowledgments

The authors acknowledge Juraimi Bin Madon for assistance with extrusion and Ng Hong Wei for assistance with TGA, DSC, and CTE testing.

Conflicts of Interest

The authors declare no conflict of interest.

References

  1. Viswanadhapalli, B.; Bupesh Raja, V.K. Application of Magnesium Alloys in Automotive Industry—A Review. In Emerging Trends in Computing and Expert Technology; Springer: Cham, Switzerland, 2020; pp. 519–531. [Google Scholar]
  2. Chirinda, G.; Matope, S. The Lighter the Better: Weight Reduction in the Automotive Industry and its Impact on Fuel Consumption and Climate Change. In Proceedings of the 2nd African International Conference on Industrial Engineering and Operations Management, Harare, Zimbabwe, 20–22 October 2020; pp. 520–533. [Google Scholar]
  3. Han, Y.; Liu, Z.-H.; Wu, C.-B.; Zhao, Y.; Zu, G.-Q.; Zhu, W.-W.; Ran, X. A short review on the role of alloying elements in duplex stainless steels. Tungsten 2023, 5, 419–439. [Google Scholar] [CrossRef]
  4. Waizy, H.; Seitz, J.-M.; Reifenrath, J.; Weizbauer, A.; Bach, F.-W.; Meyer-Lindenberg, A.; Denkena, B.; Windhagen, H. Biodegradable magnesium implants for orthopedic applications. J. Mater. Sci. 2013, 48, 39–50. [Google Scholar] [CrossRef]
  5. Chen, F.-H.; Xie, H.-B.; Huo, M.-S.; Wu, H.; Li, L.-J.; Jiang, Z.-Y. Effects of magnetic field and hydrostatic pressure on the antiferromagnetic–ferromagnetic transition and magneto-functional properties in Hf1−xTaxFe2 alloys. Tungsten 2023, 5, 503–511. [Google Scholar] [CrossRef]
  6. Ren, K.; Liu, H.; Ma, R.; Chen, S.; Zhang, S.; Wang, R.; Chen, R.; Tang, Y.; Li, S.; Lu, F. Dynamic compression behavior of TiZrNbV refractory high-entropy alloys upon ultrahigh strain rate loading. J. Mater. Sci. Technol. 2023, 161, 201–219. [Google Scholar] [CrossRef]
  7. Jenczyk, P.; Jarzabek, D.M.; Lu, Z.; Gadalińska, E.; Levintant-Zayonts, N.; Zhang, Y. Unexpected crystallographic structure, phase transformation, and hardening behavior in the AlCoCrFeNiTi0.2 high-entropy alloy after high-dose nitrogen ion implantation. Mater. Des. 2022, 216, 110568. [Google Scholar] [CrossRef]
  8. Alvi, S.; Milczarek, M.; Jarzabek, D.M.; Hedman, D.; Kohan, M.G.; Levintant-Zayonts, N.; Vomiero, A.; Akhtar, F. Enhanced Mechanical, Thermal and Electrical Properties of High-Entropy HfMoNbTaTiVWZr Thin Film Metallic Glass and its Nitrides. Adv. Eng. Mater. 2022, 24, 2101626. [Google Scholar] [CrossRef]
  9. Tun, S.; Nahata, A.; Vincent, S.; Gupta, M. Development of a Low Entropy, Lightweight, Multicomponent, High Performance (Hardness + Strength + Ductility) Magnesium-Based Alloy. JOM 2023, 75, 459–469. [Google Scholar] [CrossRef]
  10. Tun, K.S.; Nahata, A.; Vincent, S.; Gupta, M. Processing, microstructure and mechanical characterization of a new magnesium based multicomponent alloy. Mater. Today Proc. 2020, 28, 1044–1047. [Google Scholar] [CrossRef]
  11. Johanes, M.; Tekumalla, S.; Gupta, M. Fe3O4 Nanoparticle-Reinforced Magnesium Nanocomposites Processed via Disintegrated Melt Deposition and Turning-Induced Deformation Techniques. Metals 2019, 9, 1225. [Google Scholar] [CrossRef]
  12. Johanes, M.; Gupta, M. The Promise of Turning Induced Deformation Process for Synthesizing Magnesium Based Materials with Superior Mechanical Response. Technologies 2021, 9, 69. [Google Scholar] [CrossRef]
  13. Tekumalla, S.; Ajjarapu, M.; Gupta, M. A Novel Turning-Induced-Deformation Based Technique to Process Magnesium Alloys. Metals 2019, 9, 841. [Google Scholar] [CrossRef]
  14. Tekumalla, S.; Gupta, N.; Gupta, M. Influence of turning speed on the microstructure and properties of magnesium ZK60 alloy pre-processed via turning-induced-deformation. J. Alloys Compd. 2020, 831, 154840. [Google Scholar] [CrossRef]
  15. Azushima, A.; Kopp, R.; Korhonen, A.; Yang, D.Y.; Micari, F.; Lahoti, G.D.; Groche, P.; Yanagimoto, J.; Tsuji, N.; Rosochowski, A.; et al. Severe plastic deformation (SPD) processes for metals. CIRP Ann. 2008, 57, 716–735. [Google Scholar] [CrossRef]
  16. Yuan, Y.; Ma, A.; Jiang, J.; Lu, F.; Jian, W.; Song, D.; Zhu, Y.T. Optimizing the strength and ductility of AZ91 Mg alloy by ECAP and subsequent aging. Mater. Sci. Eng. A 2013, 588, 329–334. [Google Scholar] [CrossRef]
  17. Lapovok, R.; Estrin, Y. 4—Superplasticity in magnesium alloys by severe plastic deformation. In Advances in Wrought Magnesium Alloys; Bettles, C., Barnett, M., Eds.; Woodhead Publishing: Sawston, UK, 2012; pp. 144–185. [Google Scholar]
  18. Wu, S.; Ji, Z.; Zhang, T. Microstructure and mechanical properties of AZ31B magnesium alloy recycled by solid-state process from different size chips. J. Mater. Process. Technol. 2009, 209, 5319–5324. [Google Scholar] [CrossRef]
  19. Lapovok, R.Y.; Thomson, P.F. Production of dense rod from magnesium swarf for re-melting. Magnes. Technol. 2004, 1, 149–154. [Google Scholar]
  20. Singh, I.B.; Singh, M.; Das, S. A comparative corrosion behavior of Mg, AZ31 and AZ91 alloys in 3.5% NaCl solution. J. Magnes. Alloys 2015, 3, 142–148. [Google Scholar] [CrossRef]
  21. Ravi Kumar, N.V.; Blandin, J.J.; Suéry, M.; Grosjean, E. Effect of alloying elements on the ignition resistance of magnesium alloys. Scr. Mater. 2003, 49, 225–230. [Google Scholar] [CrossRef]
  22. Tekumalla, S.; Joo Yuan, N.; Haghshenas, M.; Gupta, M. Enhancing Properties of Aerospace Alloy Elektron 21 Using Boron Carbide Nanoparticles as Reinforcement. Appl. Sci. 2019, 9, 5470. [Google Scholar] [CrossRef]
  23. Parande, G.; Tun, K.S.; Neo, H.J.N.; Gupta, M. An Investigation into the Effect of Length Scale (Nano to Micron) of Cerium Oxide Particles on the Mechanical and Flammability Response of Magnesium. J. Mater. Eng. Perform. 2023, 32, 2710–2722. [Google Scholar] [CrossRef]
  24. Xie, Z.-K.; Tane, M.; Hyun, S.-K.; Okuda, Y.; Nakajima, H. Vibration–damping capacity of lotus-type porous magnesium. Mater. Sci. Eng. A 2006, 417, 129–133. [Google Scholar] [CrossRef]
  25. Li, Q.; Jiang, G.; Dong, J.; Hou, J.; He, G. Damping behavior and energy absorption capability of porous magnesium. J. Alloys Compd. 2016, 680, 522–530. [Google Scholar] [CrossRef]
  26. Colakoglu, M. Factors effecting internal damping in aluminum. J. Theor. Appl. Mech. 2004, 42, 95–105. [Google Scholar]
  27. Hu, B.-L.; Han, J.-Y.; Ge, S.-W.; Hua, X.-J.; Li, S.-L.; Xing, H.-R.; Wang, K.-S.; Hu, P.; Fu, J.-B.; Zhang, W.; et al. Secondary phases strengthening-toughening effects in the Mo–TiC–La2O3 alloys. Mater. Sci. Eng. A 2022, 831, 142271. [Google Scholar] [CrossRef]
  28. Mugica, G.W.; Tovio, D.O.; Cuyas, J.C.; González, A.C. Effect of porosity on the tensile properties of low ductility aluminum alloys. Mater. Res. 2004, 7, 221–229. [Google Scholar] [CrossRef]
  29. Zeleniakienė, D.; Kleveckas, T.; Liukaitis, J.; Marazas, G. The influence of porosity on stress and strain state of porous polymer materials. Mater. Sci. 2003, 9, 358–362. [Google Scholar]
  30. XingHe, T.; Chee Keat How, W.; Chan Kwok Weng, J.; Kwok Wai Onn, R.; Gupta, M. Development of high-performance quaternary LPSO Mg–Y–Zn–Al alloys by Disintegrated Melt Deposition technique. Mater. Des. 2015, 83, 443–450. [Google Scholar] [CrossRef]
  31. Stadler, F.; Antrekowitsch, H.; Fragner, W.; Kaufmann, H.; Pinatel, E.R.; Uggowitzer, P.J. The effect of main alloying elements on the physical properties of Al–Si foundry alloys. Mater. Sci. Eng. A 2013, 560, 481–491. [Google Scholar] [CrossRef]
  32. Arkansas Department of Energy and Environment. Zinc and Lead. Office of the State Geologist. Available online: https://www.geology.arkansas.gov/minerals/metallic/zinc-and-lead.html (accessed on 7 December 2023).
  33. Aghion, E.; Perez, Y. Effects of porosity on corrosion resistance of Mg alloy foam produced by powder metallurgy technology. Mater. Charact. 2014, 96, 78–83. [Google Scholar] [CrossRef]
Figure 1. Schematic of billet compaction as part of the TID process.
Technologies 11 00181 g001
Figure 2. Processing pathways of Mg70Al18Zn6Ca4Y2 materials in this study, with the DMD method (top pathway) and TID method (bottom pathway) detailed.
Technologies 11 00181 g002
Figure 3. Flowchart of characterization conducted for Mg70Al18Zn6Ca4Y2 materials in this study.
Technologies 11 00181 g003
Figure 4. Scanning electron micrograph of (a) Mg70Al18Zn6Ca4Y2 TID turning, showing (b) high plastic deformation zone and (c) low plastic deformation zone.
Technologies 11 00181 g004
Figure 5. Damping response of DMD and TID Mg70Al18Zn6Ca4Y2 with best-fit curve.
Technologies 11 00181 g005
Figure 6. Scanning electron micrographs of Mg70Al18Zn6Ca4Y2 processed with (a) DMD and (b) TID, with pores circled in yellow on the latter.
Technologies 11 00181 g006
Figure 7. Scanning electron micrographs of Mg70Al18Zn6Ca4Y2 processed with (a) DMD and (b) TID with different phases indicated with symbols.
Technologies 11 00181 g007
Figure 8. Normal distribution of secondary-phase size distribution in Mg70Al18Zn6Ca4Y2 materials studied in this work.
Technologies 11 00181 g008
Figure 9. X-ray diffractogram of Mg70Al18Zn6Ca4Y2 materials synthesized in this study.
Technologies 11 00181 g009
Figure 10. Compressive stress–strain curves for Mg70Al18Zn6Ca4Y2 materials studied in this work.
Technologies 11 00181 g010
Figure 11. Scanning electron fractographs and photographs (bottom right) of Mg70Al18Zn6Ca4Y2 materials studied in this work processed with: (a) DMD and (b) TID.
Technologies 11 00181 g011
Figure 12. Plot of temperature vs. time for TGA testing of Mg70Al18Zn6Ca4Y2 materials.
Technologies 11 00181 g012
Figure 13. Plot of heat flow vs. temperature from DSC testing of Mg70Al18Zn6Ca4Y2 materials.
Technologies 11 00181 g013
Figure 14. Corrosion rates of Mg70Al18Zn6Ca4Y2 materials in this work.
Technologies 11 00181 g014
Table 1. Raw materials used in this work.
Raw MaterialSupplierPurity
Magnesium TurningsAcros Organics, NJ, USA>99.9%
Aluminium LumpsPhoenix Scientific Industries>99.9%
Zinc ShotsAlfa Aesar>99.9%
Calcium GranulesAlfa Aesar99.5%
Mg-30Y Master Alloy IngotsSunrelier Metal Company, China99.9%
Table 2. Designations of materials synthesized in this work.
Material DesignationProcessing Method Elaboration
Mg70Al18Zn6Ca4Y2-DMDDMD + Extrusion
Mg70Al18Zn6Ca4Y2-TIDTID + Extrusion
Table 3. Elemental compositions of materials in this work.
Processing MethodElement (wt.%)
MgAlZnCaY
DMD58 ± 0.417 ± 0.715 ± 0.27 ± 0.53 ± 0.1
TID58 ± 0.417 ± 0.514 ± 0.25 ± 0.86 ± 0.3
Table 4. Theoretical and measured experimental density of materials in this work.
Processing MethodCorrected Theoretical Density (g/cm3)Experimental Density (g/cm3)Porosity (%)
DMD2.133 ± 0.0112.206 ± 0.0180 *
TID2.162 ± 0.0102.248 ± 0.0110.87 *
* Porosity calculated using image analysis; DMD samples did not have pores detected.
Table 5. Damping properties and Young’s modulus of DMD and TID Mg70Al18Zn6Ca4Y2.
Processing MethodAttenuation CoefficientRegression (R2)Damping CapacityExcitation Frequency (Hz)Young’s Modulus (GPa)
DMD13.860.9960.00034413,474.956.9
TID16.57
(↑19.5%)
0.99520.000423
(↑23.0%)
12,929.654.4
(↓4.4%)
Table 6. Tabulated EDS results of Mg70Al18Zn6Ca4Y2 and the corresponding phases.
Processing MethodSpectrumSymbolDetected Element (at.%)Phase
MgAlZnCaY
DMD191.814.563.260.36-αMg
22.2862.193.59-31.93Al2Y
37.6759.642.1628.581.95Al2Ca
444.0425.4924.805.67-AlxMgyZnz
TID197.09-2.91--αMg
25.4562.682.81-29.06Al2Y
38.7658.092.7330.41-Al2Ca
439.0633.8118.079.06-AlxMgyZnz
Table 7. Average size of secondary phases in Mg70Al18Zn6Ca4Y2 materials studied in this work.
Processing MethodAverage Size of Secondary Phase (μm)
Al2YAl2CaAlxMgyZnz
DMD8.3 ± 2.76.72 ± 1.43.4 ± 0.8
TID4.5 ± 2.6
(↓45.8%)
4.96 ± 1.9
(↓26.2%)
2.6 ± 0.7
(↓23.5%)
Table 8. Area fraction of secondary phases in Mg70Al18Zn6Ca4Y2 materials studied in this work.
Processing MethodArea Fraction of Secondary Phase
Al2YAl2CaAlxMgyZnz
DMD0.05 ± 0.0090.11 ± 0.0380.20 ± 0.07
TID0.08 ± 0.024
(↑60%)
0.13 ± 0.07
(↑18%)
0.22 ± 0.06
(↑10%)
Table 9. Average hardness values of DMD and TID Mg70Al18Zn6Ca4Y2.
Processing MethodAverage Microhardness (HV)Average Macrohardness (HRB)
DMD151 ± 8.571 ± 1.6
TID203 ± 8.9
(↑34.4%)
79 ± 1.6
(↑11.2%)
Table 10. Compressive properties of materials studied in this work.
Process0.2% Compressive Yield Strength (MPa)Ultimate Compressive Strength (MPa)Fracture Strain (%)Energy Absorbed (MJ/m3)
DMD485 ± 17653 ± 2515 ± 1.463 ± 8
TID554 ± 17
(↑14.2%)
684 ± 6
(↑4.8%)
12 ± 0.2
(↓20%)
53 ± 2
(↓15.9%)
Table 11. Ignition temperatures of Mg70Al18Zn6Ca4Y2 by processing method as well as other commercial Mg alloys.
ProcessIgnition Temperature (°C)
DMD>1300
TID915
WE43 (DMD) [21]750
Elektron 21 (E21) (DMD) [22]741
Table 12. Coefficient of thermal expansion of Mg70Al18Zn6Ca4Y2 materials.
ProcessAverage Coefficient of Thermal Expansion (×10−6/K)
DMD21 ± 5
TID22 ± 3 (↑4.8%)
Pure Mg (DMD) [23]30
Disclaimer/Publisher’s Note: The statements, opinions and data contained in all publications are solely those of the individual author(s) and contributor(s) and not of MDPI and/or the editor(s). MDPI and/or the editor(s) disclaim responsibility for any injury to people or property resulting from any ideas, methods, instructions or products referred to in the content.