Abstract
According to the discontinuous structural characteristics of a gas turbine, by considering the contact thermal resistance of the rough surface, a contact thermal resistance measurement experiment was conducted in this study. The main objectives of this work were to investigate the influence mechanism and change law of the contact thermal resistance characteristics on flange installation. Furthermore, this study conducted a theoretical analysis of contact thermal resistance and the calculation of a typical flange mounting edge based on actual operating conditions. The research results show that the contact thermal resistance of a typical flange mounting edge increases with an increase in flange clearance under different tightening torques, which is essentially proportional to the flange clearance. As the flange clearance increases, the unit contact thermal conductivity firstly decreases rapidly. Then, as the flange clearance reaches 0.4 mm, the decreasing rate of unit contact thermal conductivity tends to flatten. In addition, the contact thermal resistance of the typical flange mounting edge decreases with the increase in the tightening torque under different flange clearances. Furthermore, the contact area ratio is not related to the material, and the contact thermal resistance under actual working conditions can be calculated using the unit contact area.
1. Introduction
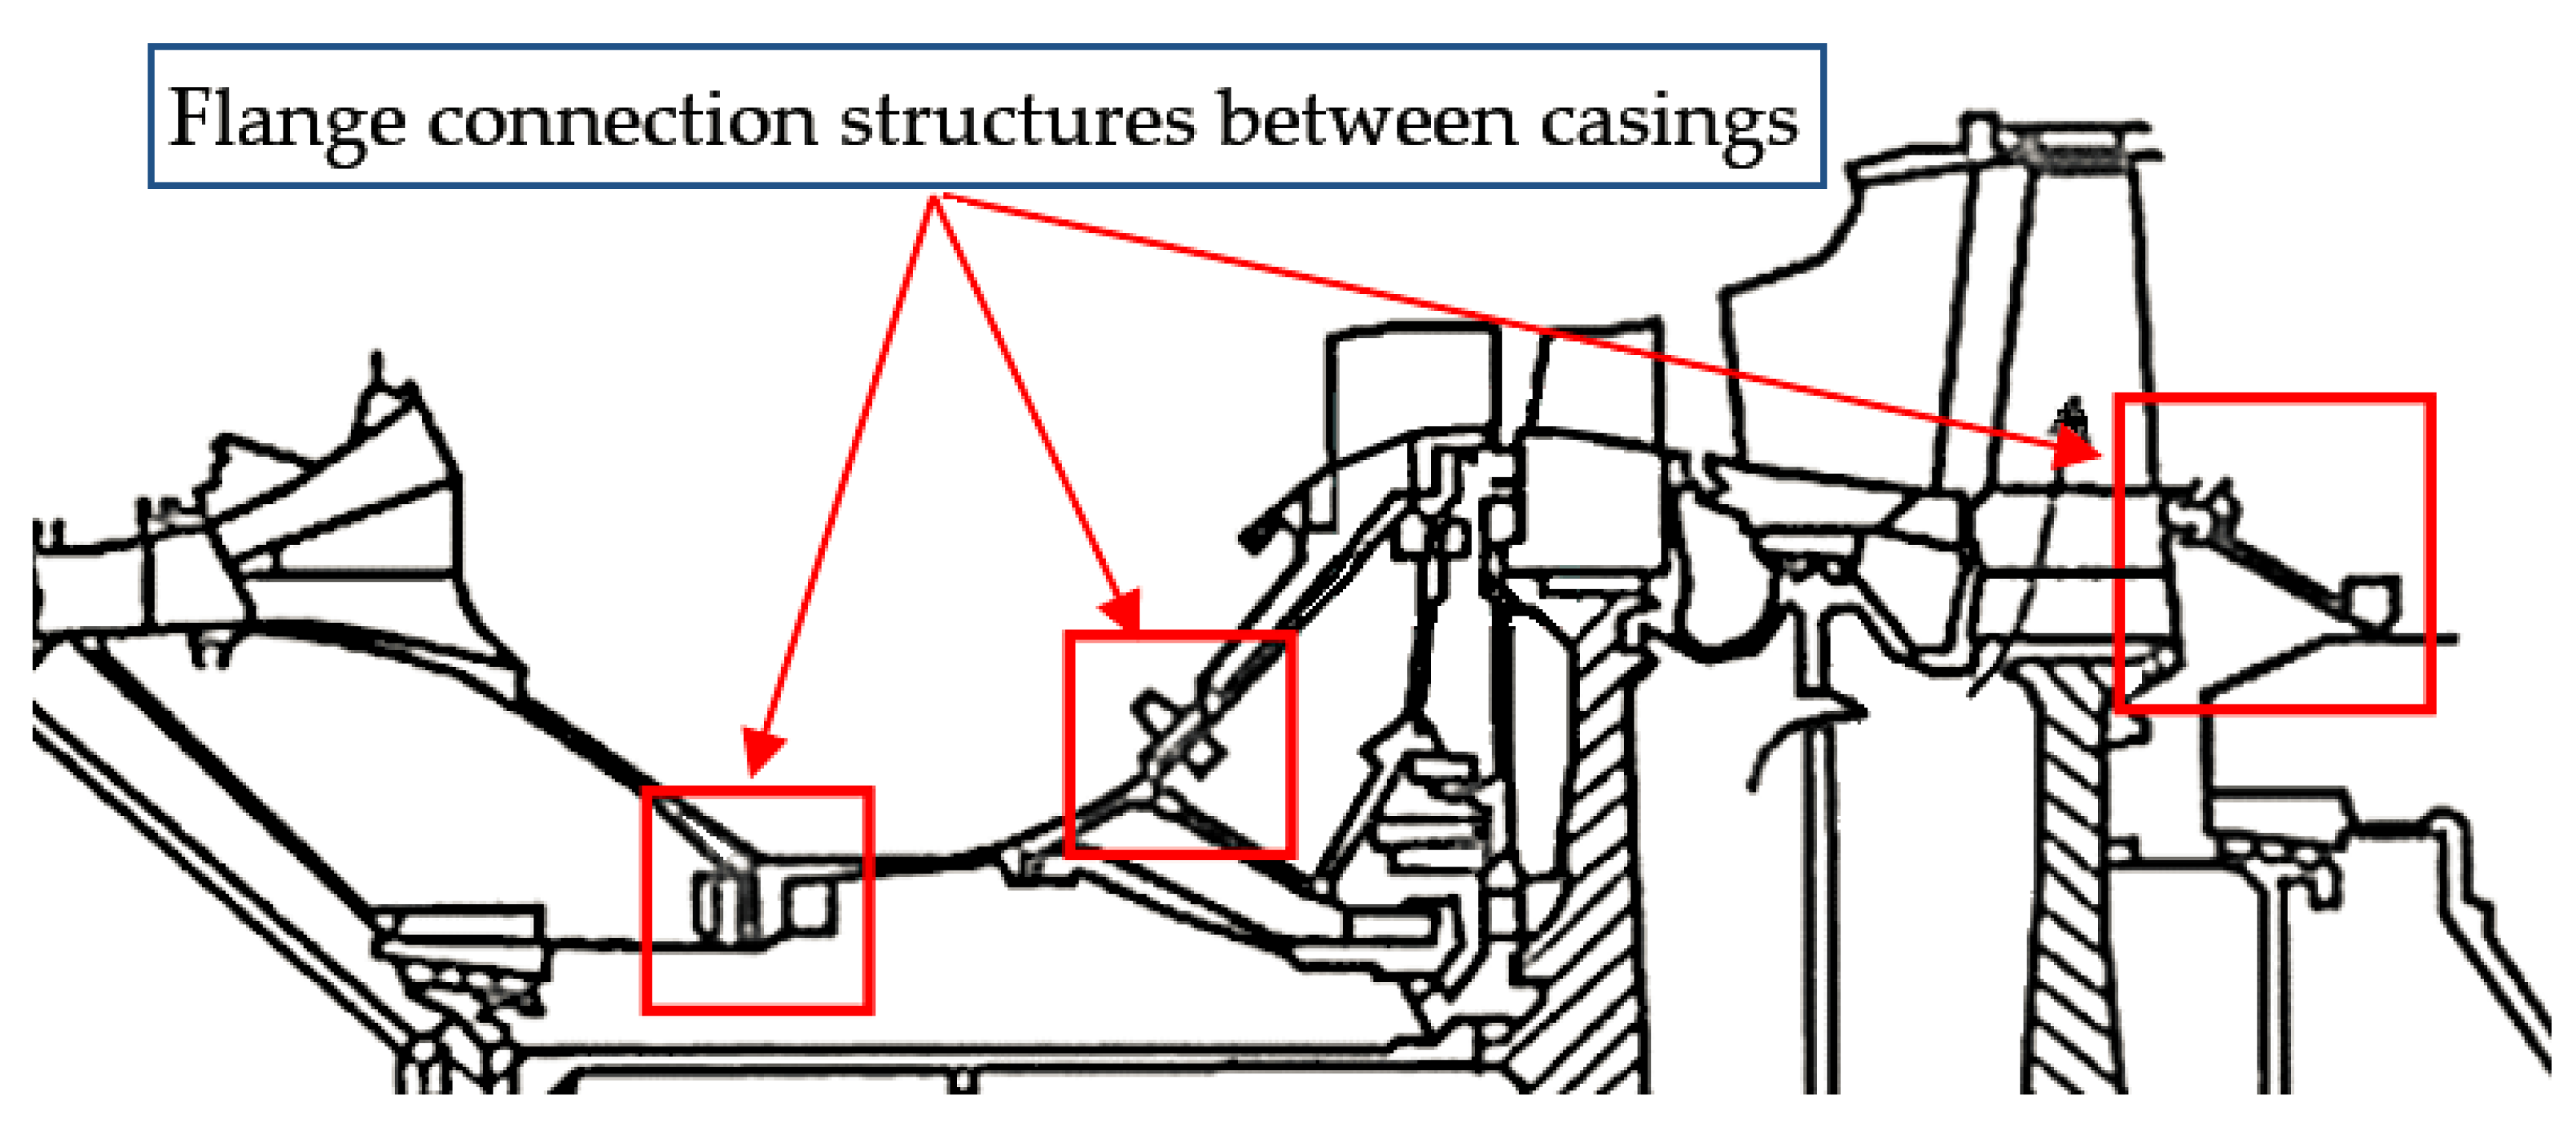
Aero-engine casing is an important component of an engine, which supports rotating parts, fixes the stator blades and their accessories, and also needs to transmit the thrust of the engine to form a gas flow channel [1]. The distribution of a typical engine casing connection structure is shown in Figure 1. Aero-engine casings are generally cylindrical shells or conical shells, and each casing is connected by flange mounting edge structures, and the connection is performed by bolt structures.
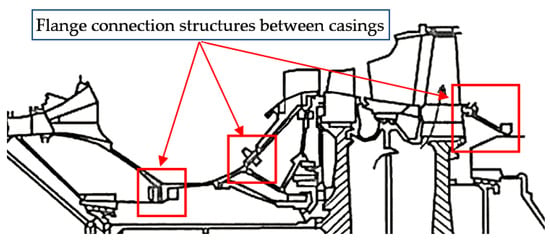
Figure 1.
Distribution of typical engine flange connection structures.
Flange casings for aero-engines are commonly connected through the flange mounting edge. The common flange mounting edge connection structure is shown in Figure 2. The casings are fastened and joined by bolted flange connections, which experience significant excitation forces [2]. These unbalanced loads lead to significant bending responses and strains (i.e., deflection) in the assembled aero-engine casings, especially at the bolted flange interface [3,4]. Moreover, as a result of the presence of contact thermal resistance on the flange mounting surfaces, the process of heat transfer is complicated [5]. Moreover, considering contact mechanics, it is apparent that there is a certain amount of surface roughness on the flange mounting contact surface between actual casings, which is essentially a contact problem between two rough surfaces. Currently, research on the contact characteristics between rough surfaces mainly focuses on heat transfer and dynamics [6]. Aerodynamic and thermodynamic performances are of importance for safe engine operation [7,8,9]. Therefore, the key to the analysis of discontinuous contact surfaces lies in the study of contact stiffness and thermal resistance on these two surfaces. Contact thermal resistance is an important characteristic of rough surfaces and has continually been the focus of research in the field of heat transfer [10]. Both the theoretical study [11] and the experimental testing [12] of the contact thermal resistance of the bolt connection structure confirmed the non-uniformity of the contact thermal resistance at the flange connection interface. The non-uniform contact thermal resistance of the connection interface has an important influence on the temperature distribution of the flange structure. In particular, the thermal problem of high temperature is always a hot topic in engine research [13,14]. Due to the high gas temperature inside the aero-engine, for the casing, the mechanical conditions of the flange mounting edge are very complicated under the action of mechanical load, thermal load, and aerodynamic load. The load of the tightening bolt changes with the pressure and temperature, and eventually, the joint surface of the bolted connection on the flange mounting side will be disengaged, resulting in a more drastic change in the temperature field of the mounting side, and the phenomenon that the pre-tightening force will gradually decrease. With the increase in the service time of the bolted structure and the decrease in the preload force to a certain level, the structure will appear to exhibit leakage, abnormal noise, shaking, and other phenomena, and in extreme cases, it will also cause catastrophic consequences such as structural disintegration. Therefore, contact thermal resistance plays a critical role in the structural design of aero-engines. For the structural design of an aero-engine, it can effectively reduce the cost of maintenance during service. Ensuring the long-life and high-reliability operation of the engine is of great significance. Therefore, there is a practical demand for research into contact thermal resistance on flange mounting surfaces.

Figure 2.
Flange mounting edge bolted connection structure of aero-engines.
Bolted flanges in aero-engine casings exhibit a nonlinear response when subjected to forced vibration [15]. Heat transfer across a pressed joint is significantly governed by contact thermal conductance, which in turn depends on the thermophysical properties of materials in contact, surface properties, contact pressure, working temperature, and interstitials present at the interface [16]. In a realistic structure, the actual contact area of a bolt joint surface only accounts for 0.01–0.1% of the nominal area. This sharp decrease in contact area causes a reduction in the heat flux, thereby generating thermal resistance on the bolt joint surfaces [17]. Contact thermal resistance is an essential contact characteristic of rough surfaces and has always been a hot topic in the field of heat transfer. Yovanovich et al. conducted a lot of theoretical and experimental research on the study of heat transfer on rough surfaces, which laid the foundation for further studies into thermal resistance [18,19,20,21,22]. Furthermore, there is a great deal of research focused on simulation calculations of contact thermal resistance. Fletcher and Madhusudana investigated single-point and multi-point contact models to calculate thermal resistance, respectively. These approaches were used to calculate thermal resistance for porous materials and synthetic materials [23]. Toshimichi et al. researched and summarized the relationship between ordinary mechanical interfaces through experiments. They found that the thermal resistance of bolt joint surfaces is related to the surface topography, the material surface hardness, and the contact pressure [14]. On the basis of multi-point contact theory, Liu et al. established the calculation model for thermal resistance at high temperatures. They investigated the influence of roughness, pressure, temperature, and the thermal conductivity of the gap material on the thermal resistance of contact surfaces [24]. The above studies provide references for studying the heat transfer process of the engine flange contact surface. However, there is not a reliable method to calculate the contact thermal resistance. This largely remains to be explored.
In this paper, in order to accurately calculate the thermal resistance, a mathematical model was established for contact thermal resistance, and a new calculation method was proposed. In addition, according to the mathematical model, an experimental model of contact thermal resistance for engine casings was designed and established. The characteristics of contact thermal resistance were obtained through experiments. Moreover, the new calculation method proposed for thermal resistance was verified, and the thermal resistance formula for the flange mounting edge was fitted.
2. The Measurement Method of Contact Thermal Resistance
2.1. Mechanics Principles of Contact Thermal Resistance
The elastic contact model is in good agreement with conditions of contact heat transfer for harder materials. In the case of repeated loading, the micro-contact surface may initially deform plastically, but eventually it will reach a fixed shape, after which, it will undergo complete elastic deformation [25,26,27]. Therefore, deformation on the contact surface can be elastic during the subsequent action. Thus, it can be considered that the deformation of the micro-convex body is elastic during contact. The heat flux passes through the contact interface, and the heat flux line only shrinks through these discrete contact points. The heat flux of the entire plane can be regarded as the composition of many parallel channels for small heat fluxes through the contact points. The following assumptions are made about these contact points:
- (a)
- The contact between the micro-convex body is elastic, i.e., the problem is the Hertz contact problem, and the radius of curvature at the contact point is the same;
- (b)
- There is no heat flux loss during the contact process; all heat flux is conducted through the contact between solids;
- (c)
- The physical parameters of the contact body remain unchanged during the contact heat transfer process;
- (d)
- The contact points are under the same interface temperature, and there is no heat exchange between them.
The contact area ratio can be defined as
The contact thermal resistance ratio can be obtained as
where Aa is the actual contact area, where the unit is m2; An is the nominal contact area, where the unit is m2; Rc is the actual total contact thermal resistance of contact, where the unit is K/W; Rn is nominal contact thermal assistance assumed by the height of the contact body in ideal condition, where the unit is K/W. Assuming that two bumps are in contact, a single-point hemispherical contact model is adopted. As a result of the parallel relationship between the contact thermal resistances, for the contact thermal resistance of the i contact point, the total contact thermal resistance is calculated as
When the size of each contact body of the contact surface is approximately equal and the height of the contact point approximately converges to the surface roughness, it can be expressed as
where c1 and c2 are the surface roughness of experimental piece 1 and experimental piece 2, respectively, where the unit is μm; λ1 and λ2 are the material thermal conductivity of experimental piece 1 and experimental piece 2, respectively, where the unit is W/K·m.
The actual total contact thermal resistance of the contact surface can be expressed as
Based on Equation (5), then, a mathematical model can be established as follows.
In Figure 3, c1 and c2 are the surface roughness of experimental piece 1 and experimental piece 2 on the contact surface, respectively.

Figure 3.
The ratio of actual contact area to the nominal contact area.
Consider that the radius of curvature and the contact radius of the two bumps are equal. According to the Hertz formulation, we have the following formulas for single-point hemispherical contact:
For the i contact point, ri is the contact radius, where the unit is m; bi is the curvature radius of convex point, where the unit is m; μ1 and μ2 are the Poisson ratio of experimental piece 1 and experimental piece 2, respectively; E1 and E2 are the elastic modulus of materials for experimental piece 1 and experimental piece 2, respectively, where the unit is MPa; σimax is the maximum contact stress of the i contact point area, where the unit is N/m2; and εi is the axial average contact strain of i contact point area, where the unit is m.
The nominal average contact stress is
The nominal average contact strain is
Because that is the only force at the contact point between the two contact surfaces, the following formulas can be obtained:
Then,
The radius of the curvature of the convex point approximately converges to the surface roughness ci on the entire contact surface, i.e., bi ≈ ci; the following formulas can be obtained:
This area ratio is the equivalent area ratio, where Aa is the actual contact area, where the unit is m2; and An is the nominal contact area, where the unit is m2.
According to the theory of material mechanics, the average contact stress and the average contact strain have the following relationship:
The average contact stress can be obtained from the average contact strain, where EAn is the equivalent elastic modulus of the contact surface:
We obtain
It can be seen that the contact thermal resistance ratio is only related to the contact stress, contact material properties (mainly elastic modulus E and Poisson’s ratio μ), and surface roughness.
Because the temperature is ultimately also reflected in the contact stress, there is no need to separately analyze the temperature as an independent variable. The average contact strain can be set at a specific position on the flange mounting edge, and the corresponding average contact strain can be calculated by measuring the displacement of these points. As long as the flange deformation measured by the measuring points set on the mounting edge is consistent with the engine condition, it can be determined that the flange is under the same contact stress condition, and the contact area ratio and thermal resistance ratio obtained from the experiment are also consistent with the engine condition.
2.2. Calculation of Contact Thermal Resistance
The materials and temperature conditions of the flange mounting edge in the experiment are different from those of the actual flange. A set of calculation methods for the actual flange mounting edge contact thermal resistance is needed to obtain the contact thermal resistance of the actual flange mounting edge. The mounting edge for the experimental flange has the same deformation and surface roughness as the actual part, through which the contact area ratio at this time can be calculated, and the contact thermal resistance ratio can be derived:
This contact thermal resistance ratio is the bridge between the experimental and the actual contact thermal resistance. The actual contact thermal resistance can be calculated using the contact thermal resistance ratio according to the thermal conductivity, surface roughness, and nominal contact area of the actual component material:
The average contact stress corresponds to the average contact strain one-to-one, and the average contact strain is determined by the preload, bolt thickness, tension, and gas parameters. However, the experiment cannot be carried out directly in the actual working environment of the engine. Therefore, it is necessary to examine the geometric similarity between the experimental and the actual conditions. Taking the same flange shape variable as the similar condition, the flange deformation is obtained under different preload, bolt consistency, tension, and gas parameters. On this basis, the same contact thermal resistance ratio can be obtained by designing the deformation of the experimental flange to be the same as the experimental condition.
2.3. Principles of Contact Thermal Resistance Measurement
The most widely used method for measuring contact thermal resistance is the static heat flux method. The basic principle is as follows: Maintain the two specimens in axial contact under a certain pressure and apply the corresponding load, insulating the surface and heating one of the experimental pieces. As a result of the outer sides of the two experimental pieces being insulated, the heat can only be transferred in the axial direction. Although the heat flux in the area near the contact interface is three-dimensional, this area is very small, so the problem can be approximately treated as a one-dimensional heat conduction problem. By measuring the temperature of the experimental piece at different positions along the axial direction, the axial heat flux and the temperature difference at the interface can be obtained, and the measured value can be obtained according to the definition of contact thermal resistance.
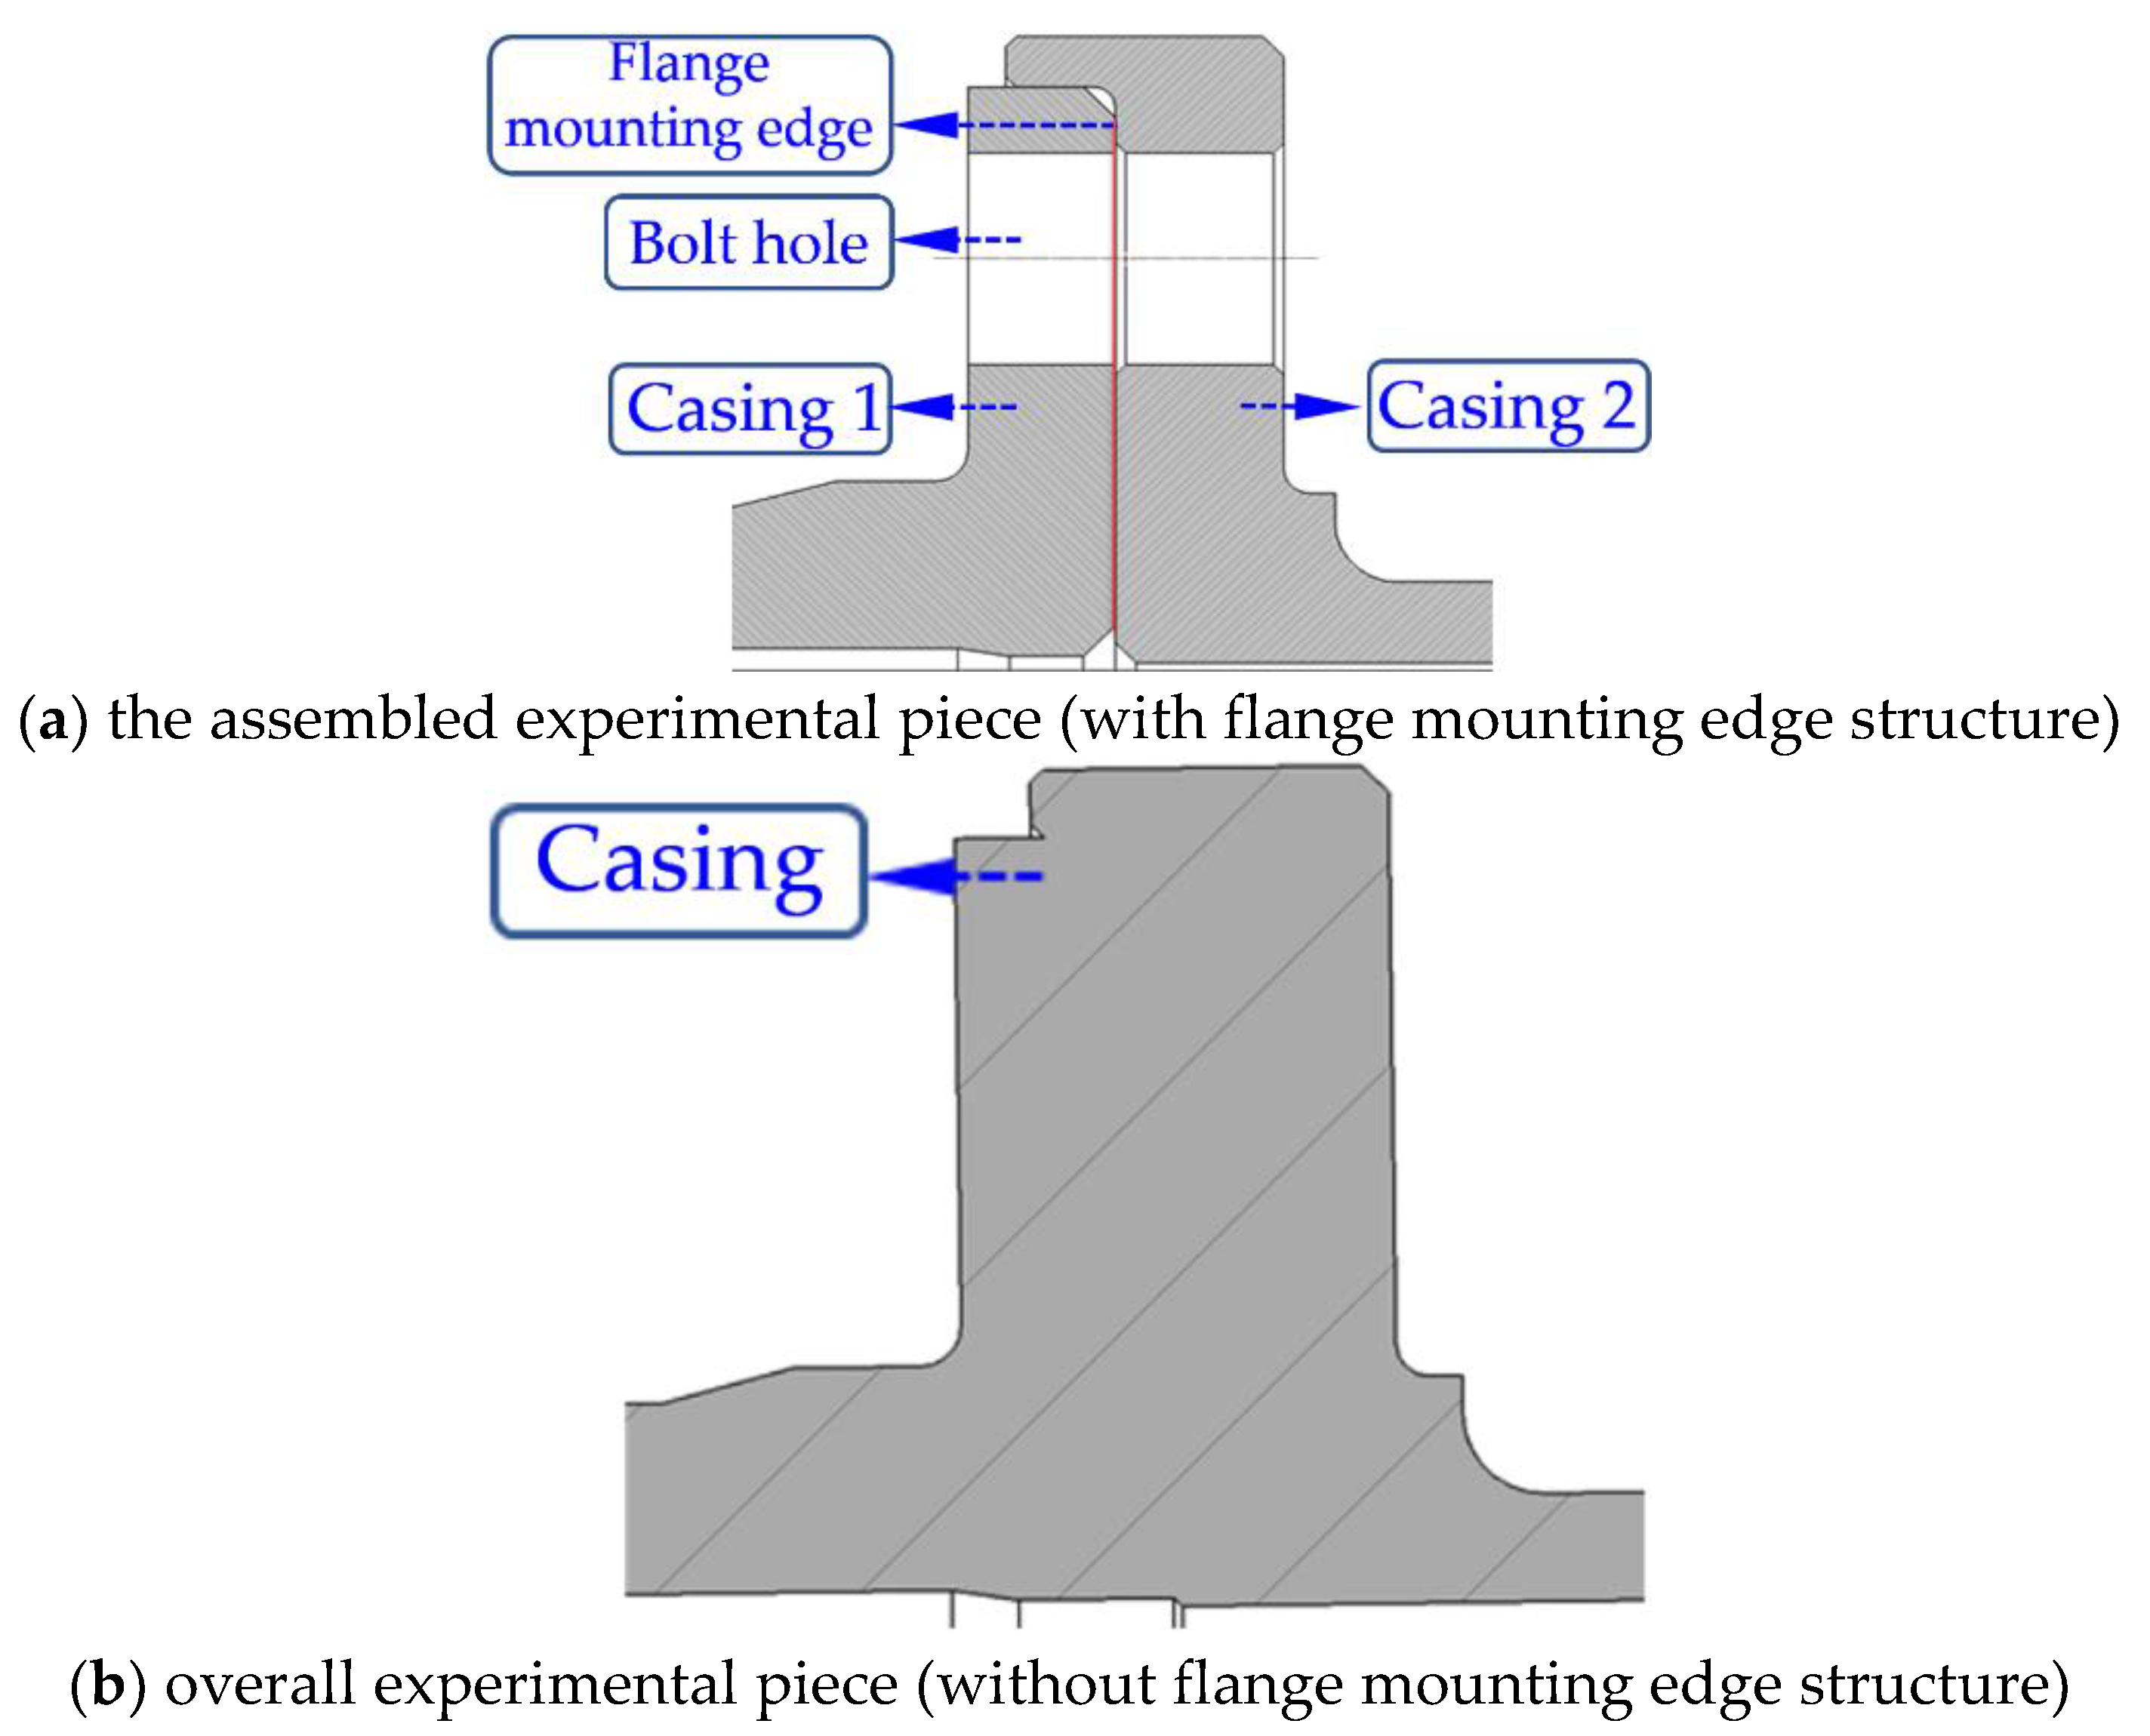
The experiment needs to measure the total thermal resistance of the two sets of experimental pieces, i.e., the assembled experimental piece with the same actual size and installation (with contact thermal resistance) and the overall experimental piece as a comparative experiment (without contact thermal resistance). Moreover, the measured thermal resistances are average values, as shown in Figure 4. During the experiment, it is necessary to accurately measure the temperature difference ΔT between the ends of the two experimental pieces at the same axial position and the actual heat flux Φa through the flange contact surface.
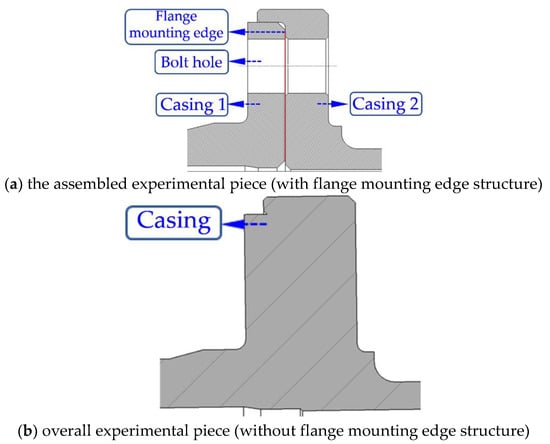
Figure 4.
Schematic diagram of the assembled experimental piece and overall experimental piece.
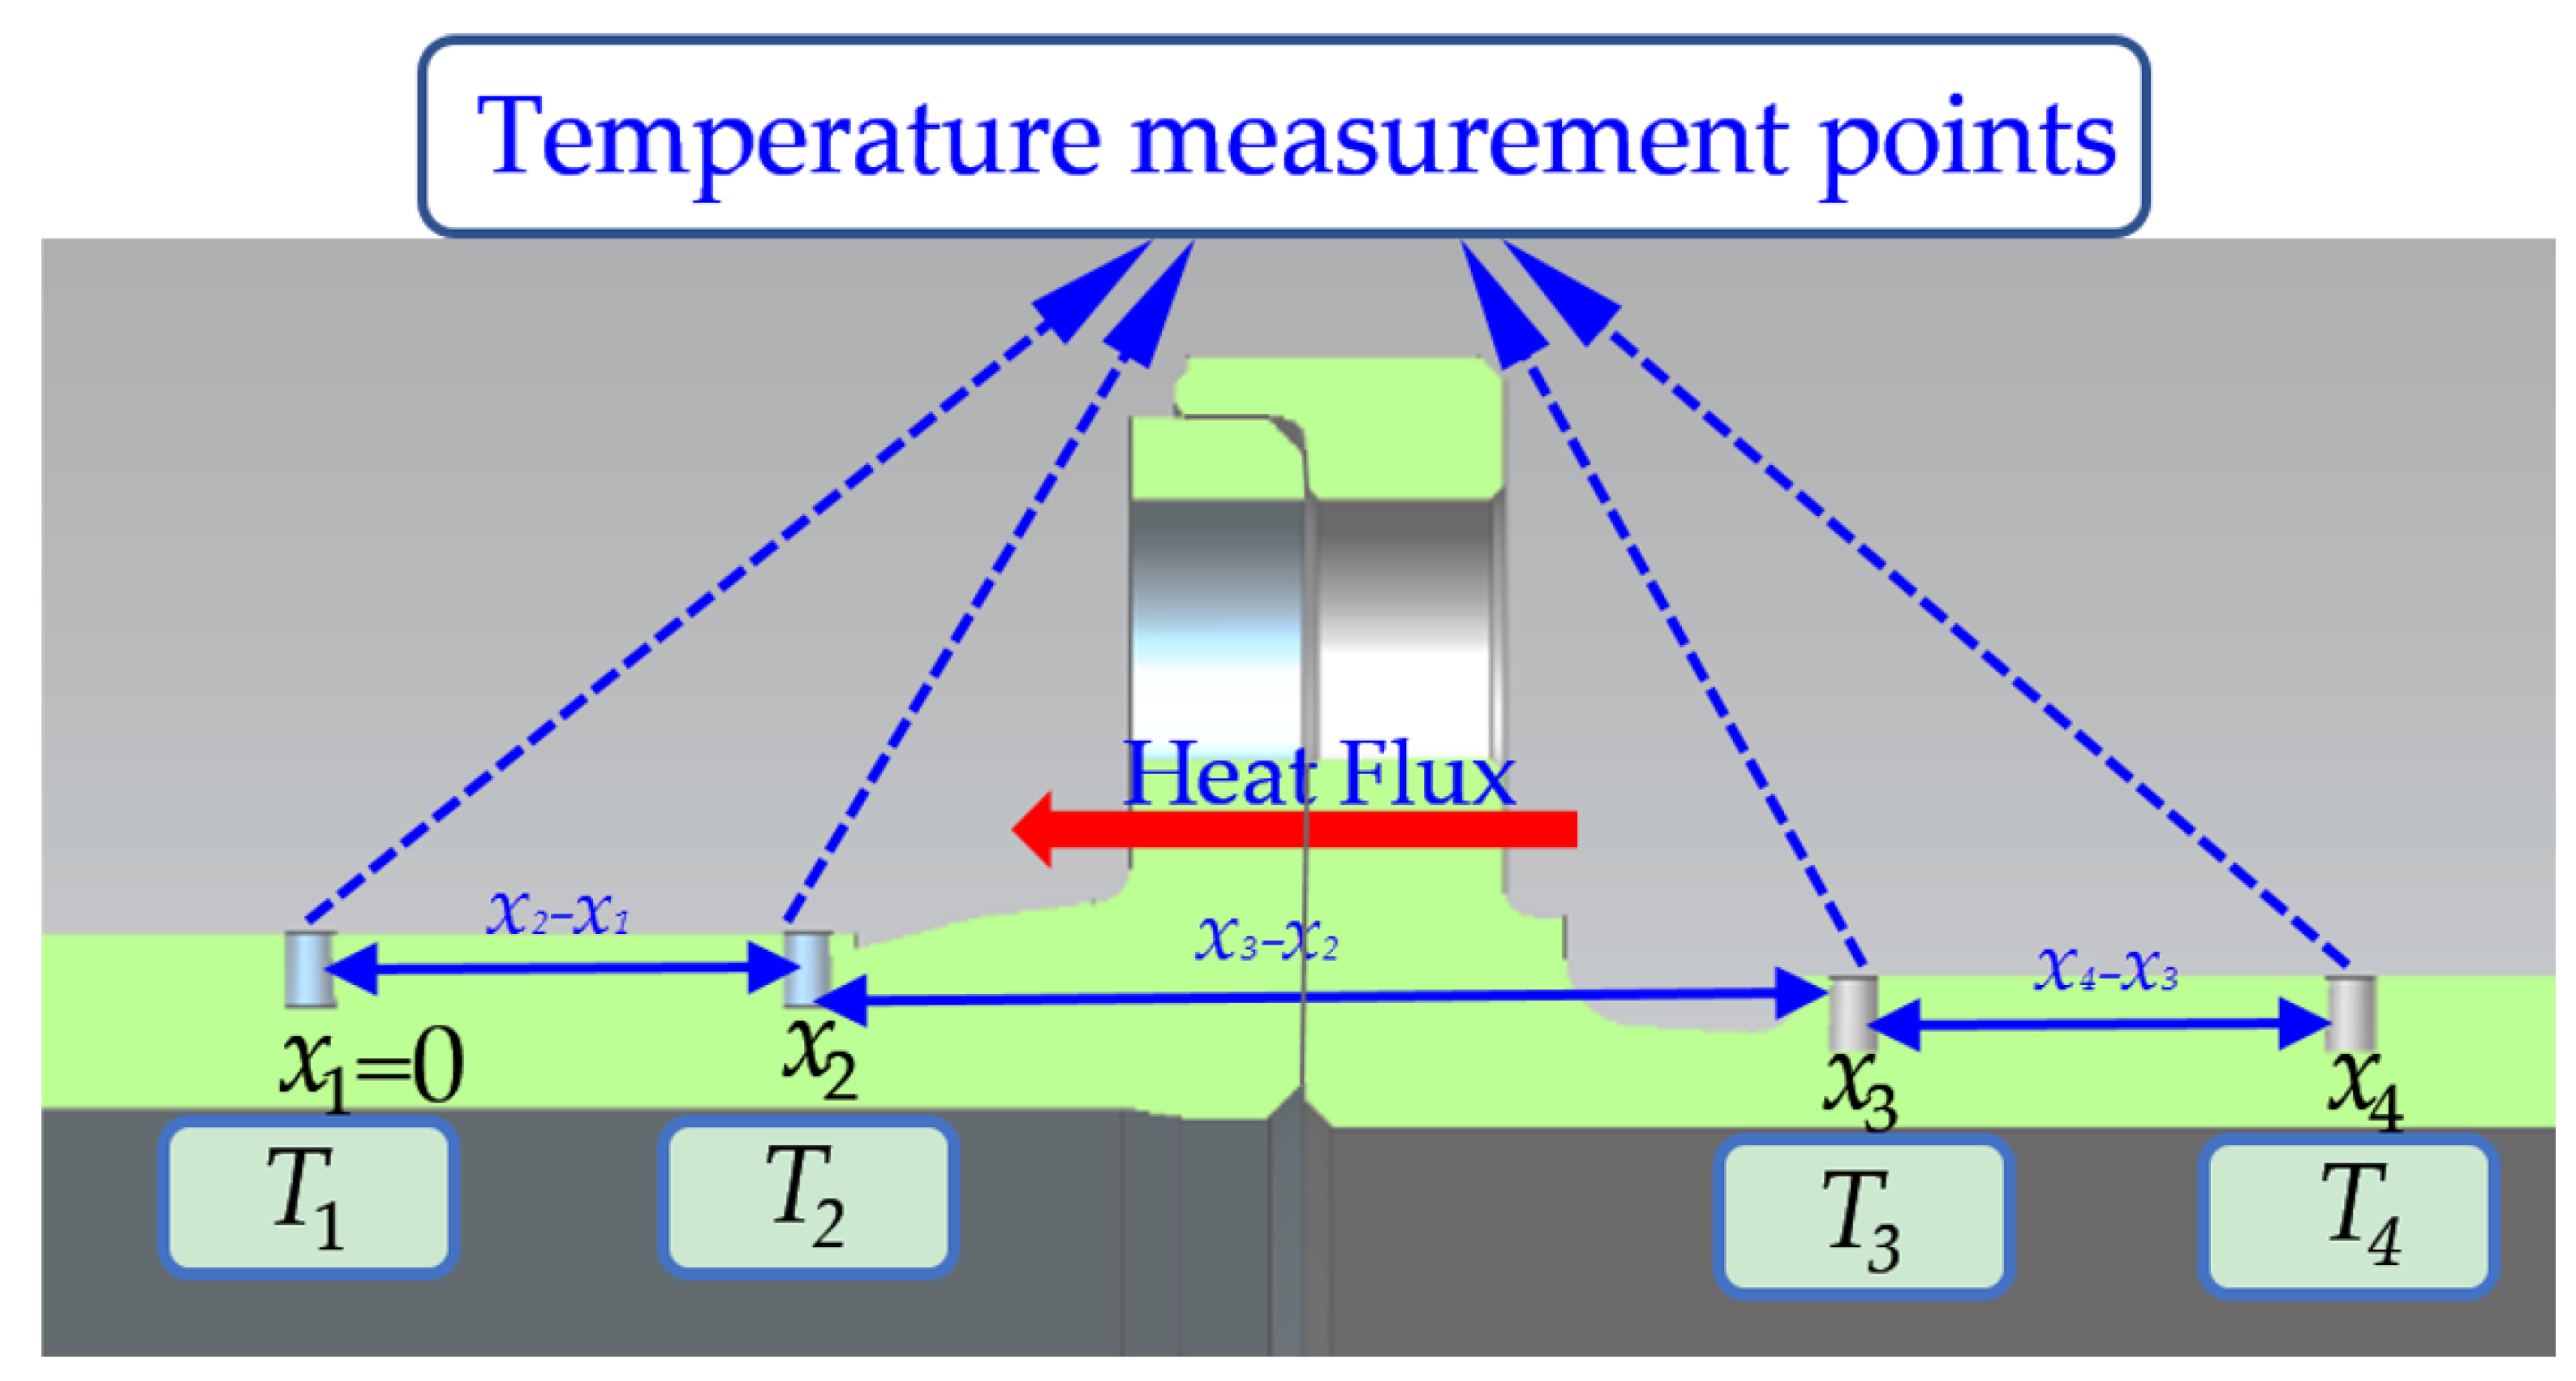
The multiple sets of measuring points are arranged correspondingly in the axial direction for the assembled experimental piece and the overall experimental piece. The locations of the temperature measurement points on the axis are shown in Figure 5. The temperature Ti (i = 2, 3,…,4) of each point can be measured in the experiment. The axial heat flux density Φij between any two measuring points can be obtained by Fourier’s law of heat conduction:
where λij (i, j = 2, 3, 4,…, 8) is the average thermal conductivity between the measuring points, where the unit is ; Aij is the heat transfer area for each measuring point position, where the unit is m2; xi is the position coordinate of each measuring point, where the unit is m. The heat flux obtained according to the temperature of two adjacent points is different due to the inevitable heat loss around the experimental piece. The arithmetic mean of the heat flux values on both sides of the interface is used as the measured value. The assembled experimental piece is taken as an example, where ΔTd is the average temperature difference between two sections, where the unit is K and Φa is the heat flux through the flange:
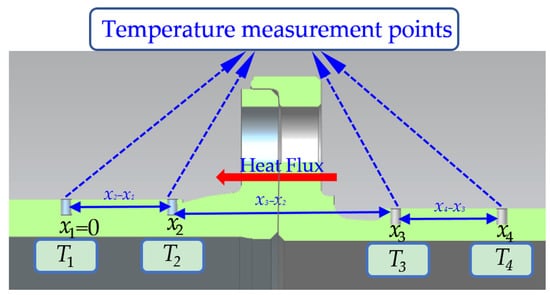
Figure 5.
Distribution of temperature measurement points in the assembled experimental section.
Then, the total thermal resistance of the assembled experimental section can be obtained through the temperature difference and the actual heat flux.
In the same way, the total thermal resistance Rh of the overall experimental section can be obtained:
Then, the contact thermal resistance is
3. Experimental Rig and Method
3.1. Research Object and Experimental System
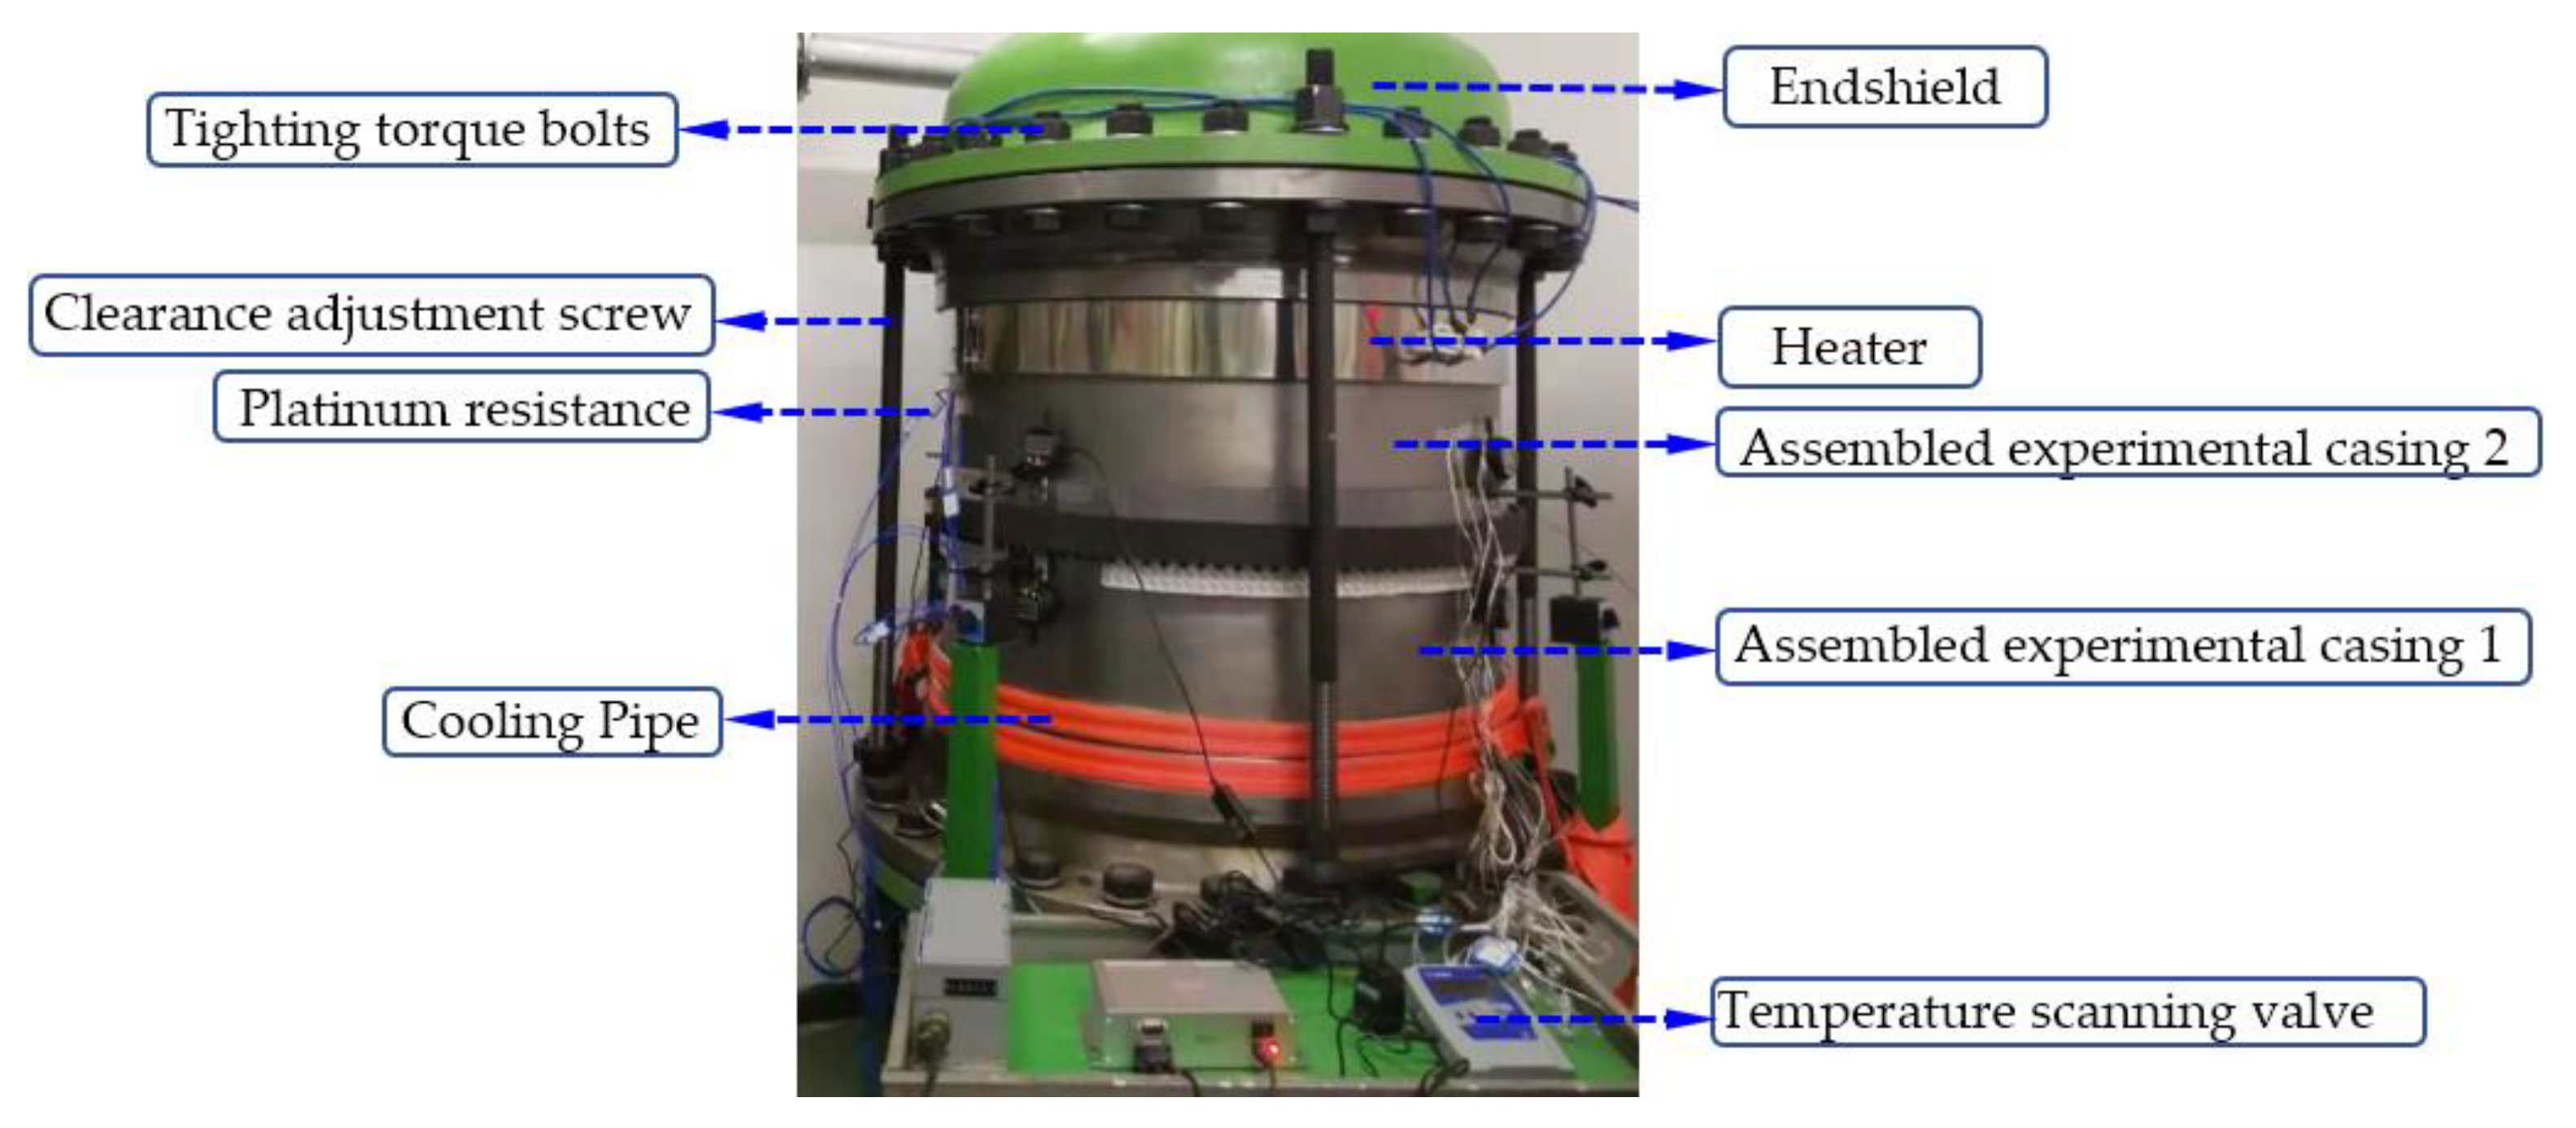
The experimental rig for flange contact thermal resistance is shown in Figure 6. Considering the conditions of clearance adjustment, bolt tightening force adjustment, etc., the different experimental conditions were achieved by replacing the experimental piece and adjusting the screw. Moreover, the experimental section was divided into an assembled experimental section and an overall experimental section for comparative experiments to obtain the contact thermal resistance.
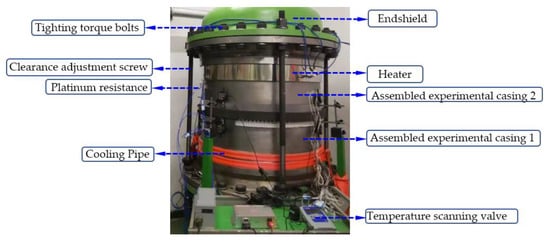
Figure 6.
Structure diagram of the experimental bench.
The main structure of the experimental piece refers to the connection flange in front of the mounting edge of the high-pressure turbine casing for the 2000AX core machine. The inner diameter of the flange was 860–870 mm, the outer diameter of the flange was 909–914 mm, and the number of bolts was 120. M10 twelve-point head bolts, M10 hexagon nuts, and gaskets with a diameter of 17 mm and a thickness of 3 mm were used. The material combinations of casing 1 and casing 2 were Q345R (cassette 1) and Q345R (cassette 2), and 304 stainless steel (cassette 1) and Q345R (cassette 2), respectively. These were used to carry out comparative experiments to verify the influence of the heat transfer coefficient on thermal resistance. The two endshields of the experimental section were fastened and connected by 28 M36 hexagonal cylindrical bolts. The composition of the integral experimental section was the same, except that the flange mounting edge structure of the integral experimental piece was manufactured integrally, and the bolt connection structure was eliminated. During the experiment, the inner and outer sides of the experimental section were covered with an EVA insulation layer with a thickness greater than 10 mm and a thermal conductivity of approximately 0.04 W/K∙m to reduce heat dissipation. The heater was mounted on experimental piece 1 through a card ring, which adopted a ceramic heating ring with a diameter of 860 mm and a power of 10 kW. The designed temperature range was from 60 to 80 °C. The water-cooled radiator was 20 hollow aluminum tubes wound at the cooling end of experimental piece 2. The maximum flow rate of the pump in the laboratory was 1 cubic meter per second. The temperature of the cold end was maintained at 15–35 °C, and the temperature difference was maintained at 25–65 °C during the experiment.
As the Figure 7 showed, the experimental section was tightly connected with the inlet and outlet pressure-holding endshields through 28 M36 hexagonal cylindrical bolts, among which four bolts were replaced by a M36 screw. Different flange clearances were generated by controlling the stroke of the nut on the screw. The assembled experimental section was matched and installed through the typical flange mounting edges of each assembled experimental piece and then connected by 120 bolts. Among them, M10 twelve-point head bolts, M10 hexagon nuts, and a gasket with a diameter of 17 mm and a thickness of 3 mm were used. The safety factor of the experimental bench reached 1.6 under the design pressure of 1.2 MPa.

Figure 7.
Physical map of the flange connection installation for the experimental bench.
3.2. Experimental Parameter Measurement
During tensile loading of the casing, the area around the bolts remained in contact, but the base of the flange was partially open, causing a local clearance to appear at the bottom of the flange mounting edge (as shown in Figure 8), which resulted in a change in stiffness and heat transfer characteristics. The tensile load included internal gas pressure and casing tension, which was generated by four clearance adjustment screws in the experiment. For the purpose of facilitating the installation of the measuring instrument, the flange clearance a was defined as in Figure 8. Four displacement measurement points were arranged around the mounting edge of a typical flange, as shown in Figure 9. Dial gauges at each measuring point on both sides of the typical flange mounting edge were installed to measure the change in relative clearance.
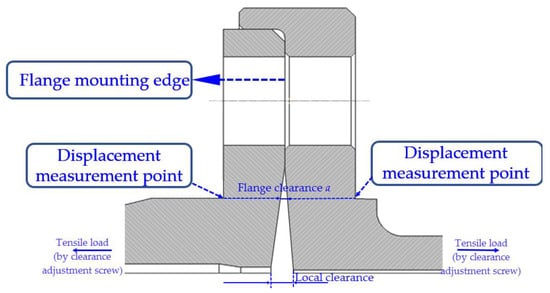
Figure 8.
Schematic diagram of the flange clearance (a).
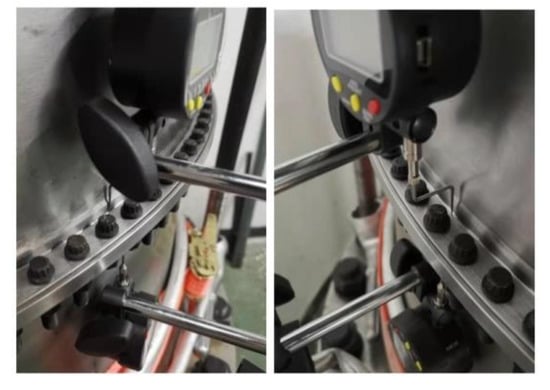
Figure 9.
A dial indicator was used to measure the clearance between the two positions.
Meanwhile, a micrometer was used to measure the deformation at the flange bolt hole. Each measuring point was measured and stored through the data acquisition program.
The temperature at the temperature measurement points on the two sets of experimental sections was measured to obtain the temperature difference on both sides of the flange mounting edge. The measuring points of pressure and temperature in the experimental bench cavity were arranged on the inlet pressure holding end cover, as shown in Figure 10.
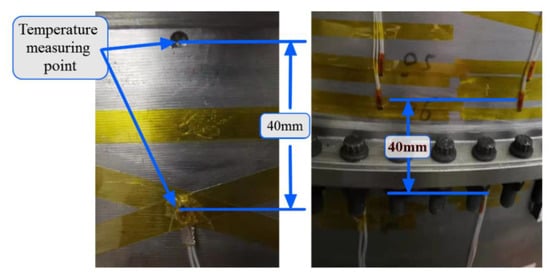
Figure 10.
Arrangement of temperature measuring points and platinum resistance in the experimental section.
A thin-film platinum resistance of 1/3B precision and the daqpro5300 temperature scanning valve with 16 measurement channels were used for temperature measurement, as shown in Figure 11. Pressure was measured using a pressure scanning valve and a pressure transmitter. These measuring points were used to measure the pressure and temperature changes in the cavity of the experimental bench for the holding pressure experiment in order to calculate the leakage of the typical flange mounting edge.
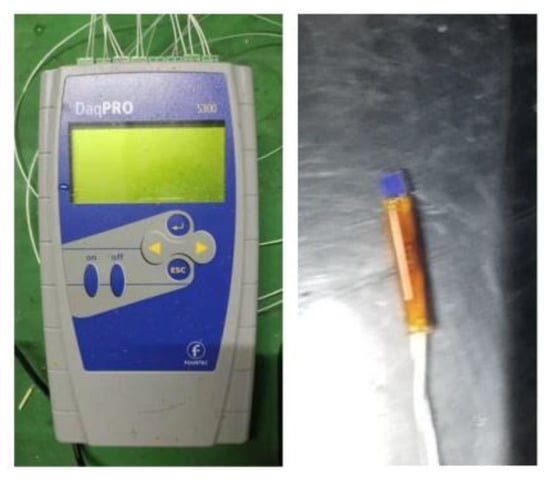
Figure 11.
Temperature scanning valve and thin-film platinum resistance.
3.3. Experimental Conditions
All experimental working conditions are summarized in Table 1. The flange mounting edge experiment was divided into assembled experimental pieces and integral experimental pieces according to the type of experimental pieces. There were two material combinations for the assembled experimental piece and a total of six sets of clearances and five sets of tightening torques. One set of contact thermal resistance experiments was performed. The whole experimental piece was subjected to one set of contact thermal resistance experiments as a control experiment. The thermal measurement method was adopted for the experiment of each group of contact thermal resistance with a total of 31 working conditions. During the experiment, the tightening force was loaded by the wrench with a preset tightening force. For the tightening force condition, a second load was performed to ensure the uniformity of the bolt tightening force for the 120 bolts after all the bolts were loaded.

Table 1.
All experimental working conditions.
3.4. Error Analysis
Heat flux measurement on the flange sides can be obtained as follows:
It can be derived by
Substituting, by , into the above formula, we obtain
It can also be obtained through
Then, the relative error of the heat flux through the flange is
The relative error of the thermal resistance measurement is
Substituting , into the above formula gives
Similarly, the relative error of contact thermal resistance can be obtained as
4. Results and Analysis
4.1. Analysis of Contact Thermal Resistance Characteristics of Q345R–Q345R Materials
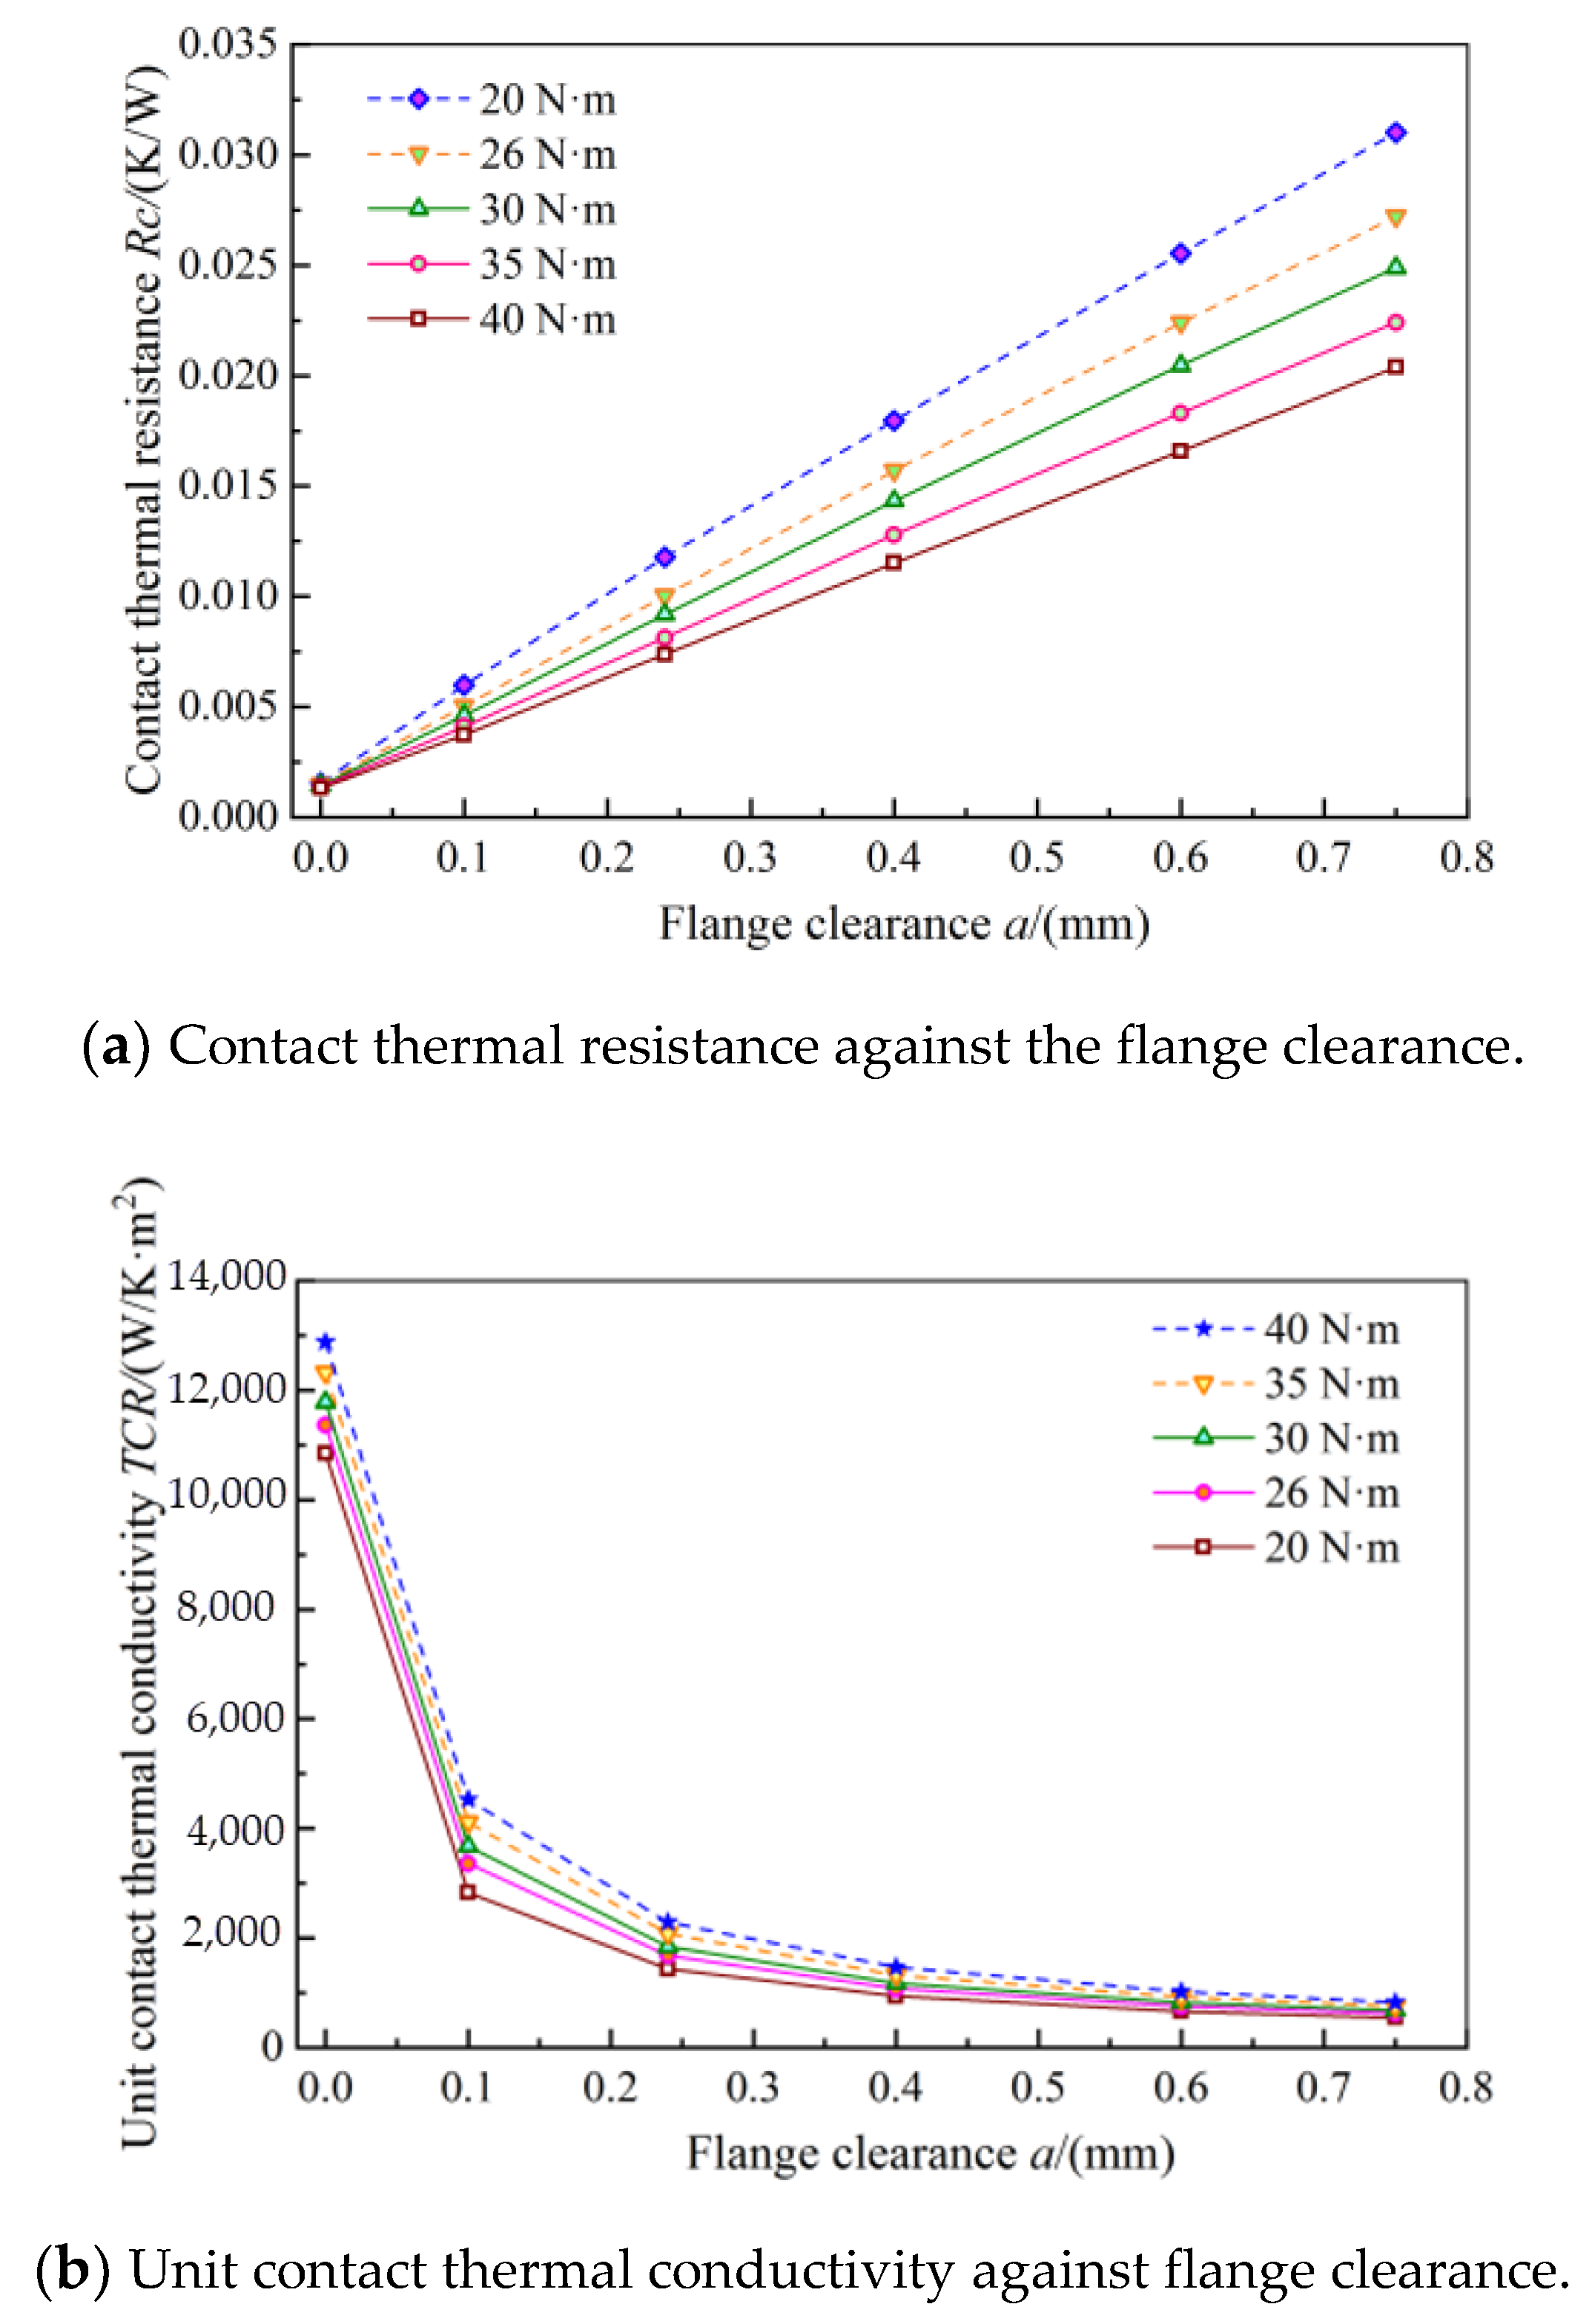
Figure 12 shows the influence of flange clearance on contact thermal resistance and unit contact thermal conductivity under different tightening torques. Figure 12a shows the curve of contact thermal resistance against the flange clearance of the Q345R–Q345R material for the assembled experimental section. It can be seen from the figure that as the flange clearance increases, the contact thermal resistance under different tightening torques also increases. The increase in thermal resistance is proportional to the flange clearance. With the tightening torque of 26 N·m, as the flange clearance increases from 0 mm to 0.75 mm, the contact thermal resistance increases by approximately 1893%. With the tightening torque of 40 N·m, the flange clearance is increased from 0 to 0.75 mm, and the contact thermal resistance only increases by approximately 1457%.
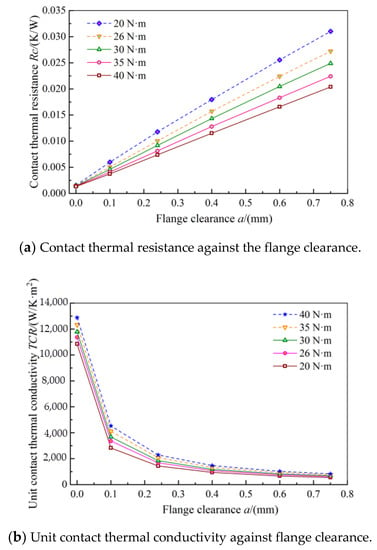
Figure 12.
Effect of flange clearances with contact thermal resistance and thermal conductivity at different tightening torques for the Q345R–Q345R material.
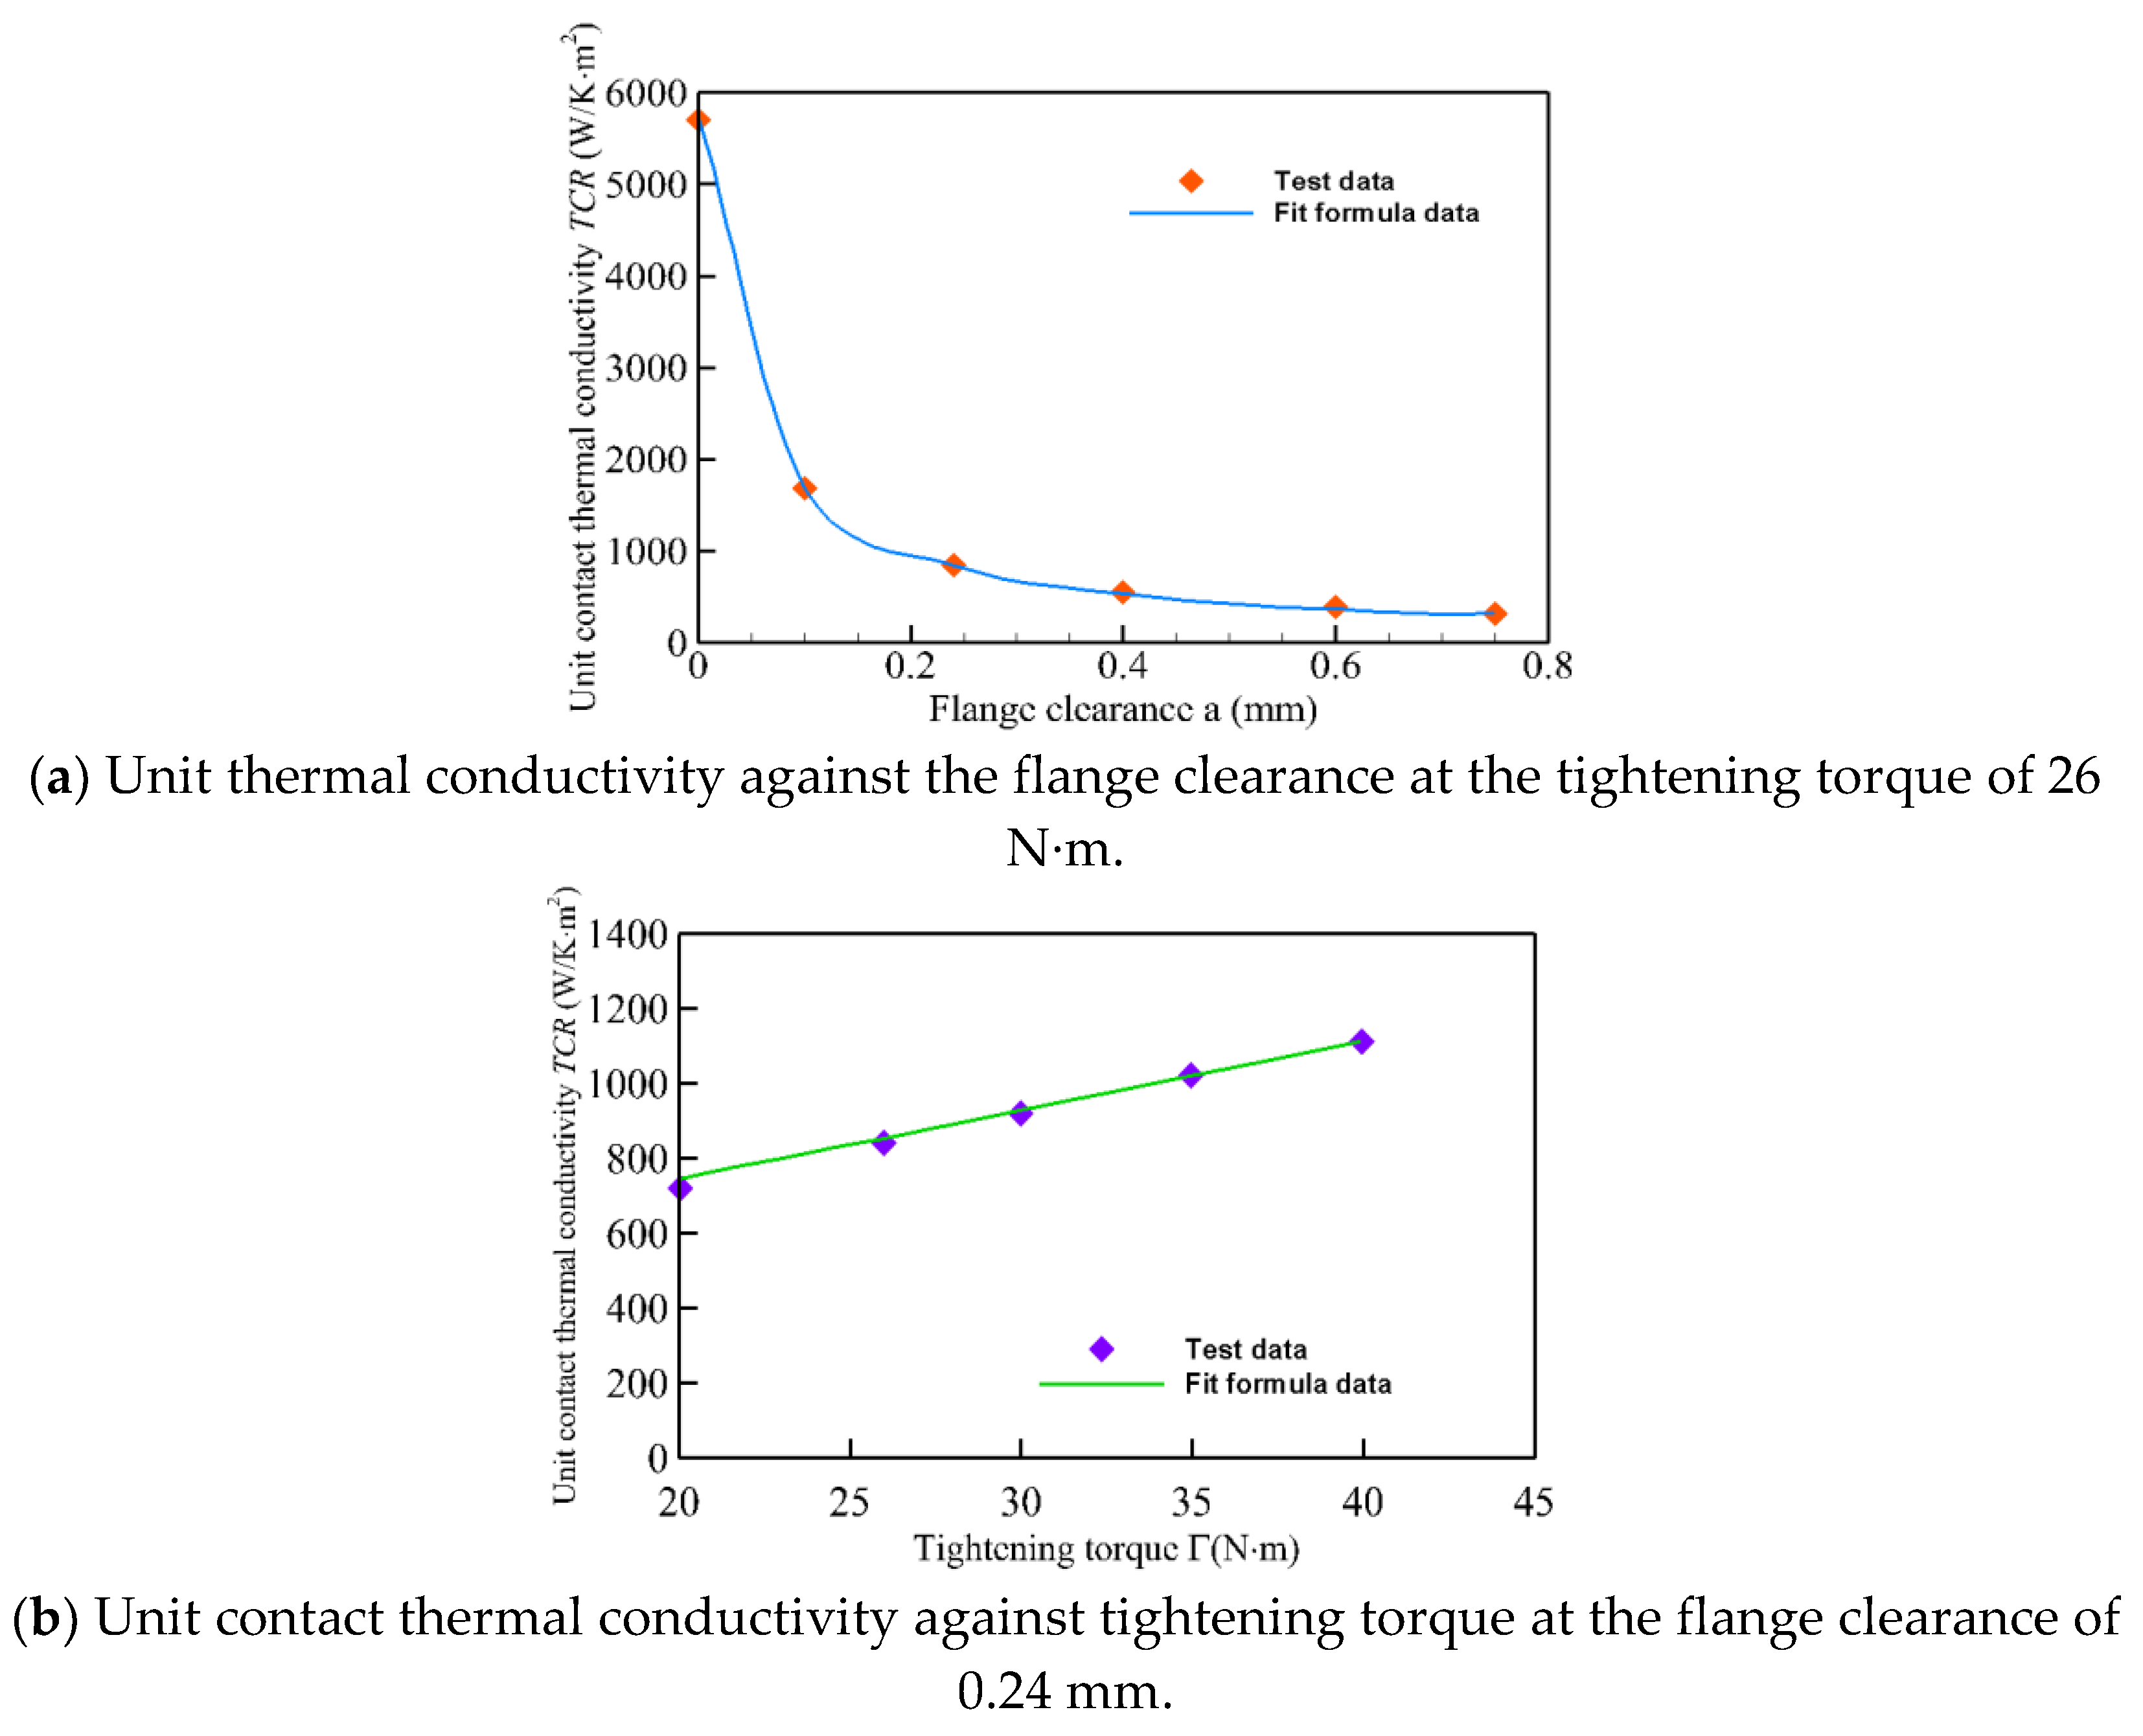
Figure 12b shows the curve of unit contact thermal conductivity against flange clearance when the assembled experimental section is made of the Q345R–Q345R material. It can be seen from the figure that the unit contact thermal conductivity first decreases rapidly as the flange clearance increases, and when the flange clearance reaches 0.4 mm, the rate of decrease in the unit contact thermal conductivity tends to flatten. When the tightening torque is 26 N·m, as the flange clearance increases from 0 to 0.24 mm, the unit contact thermal conductivity is reduced by approximately 85.2%. When the flange clearance is increased from 0.4 to 0.75 mm, the unit contact thermal conductivity is only reduced by approximately 42.3%. We speculated that the contact area drops sharply after the flange is pulled apart by axial force. After the flange is pulled apart, the heat is only transferred through the area of the bolt connection and the partial circumferential contact surface of the flange, and the influence of the flange clearance on the contact heat conduction is reduced. Thus, the decline tends to be gentle.
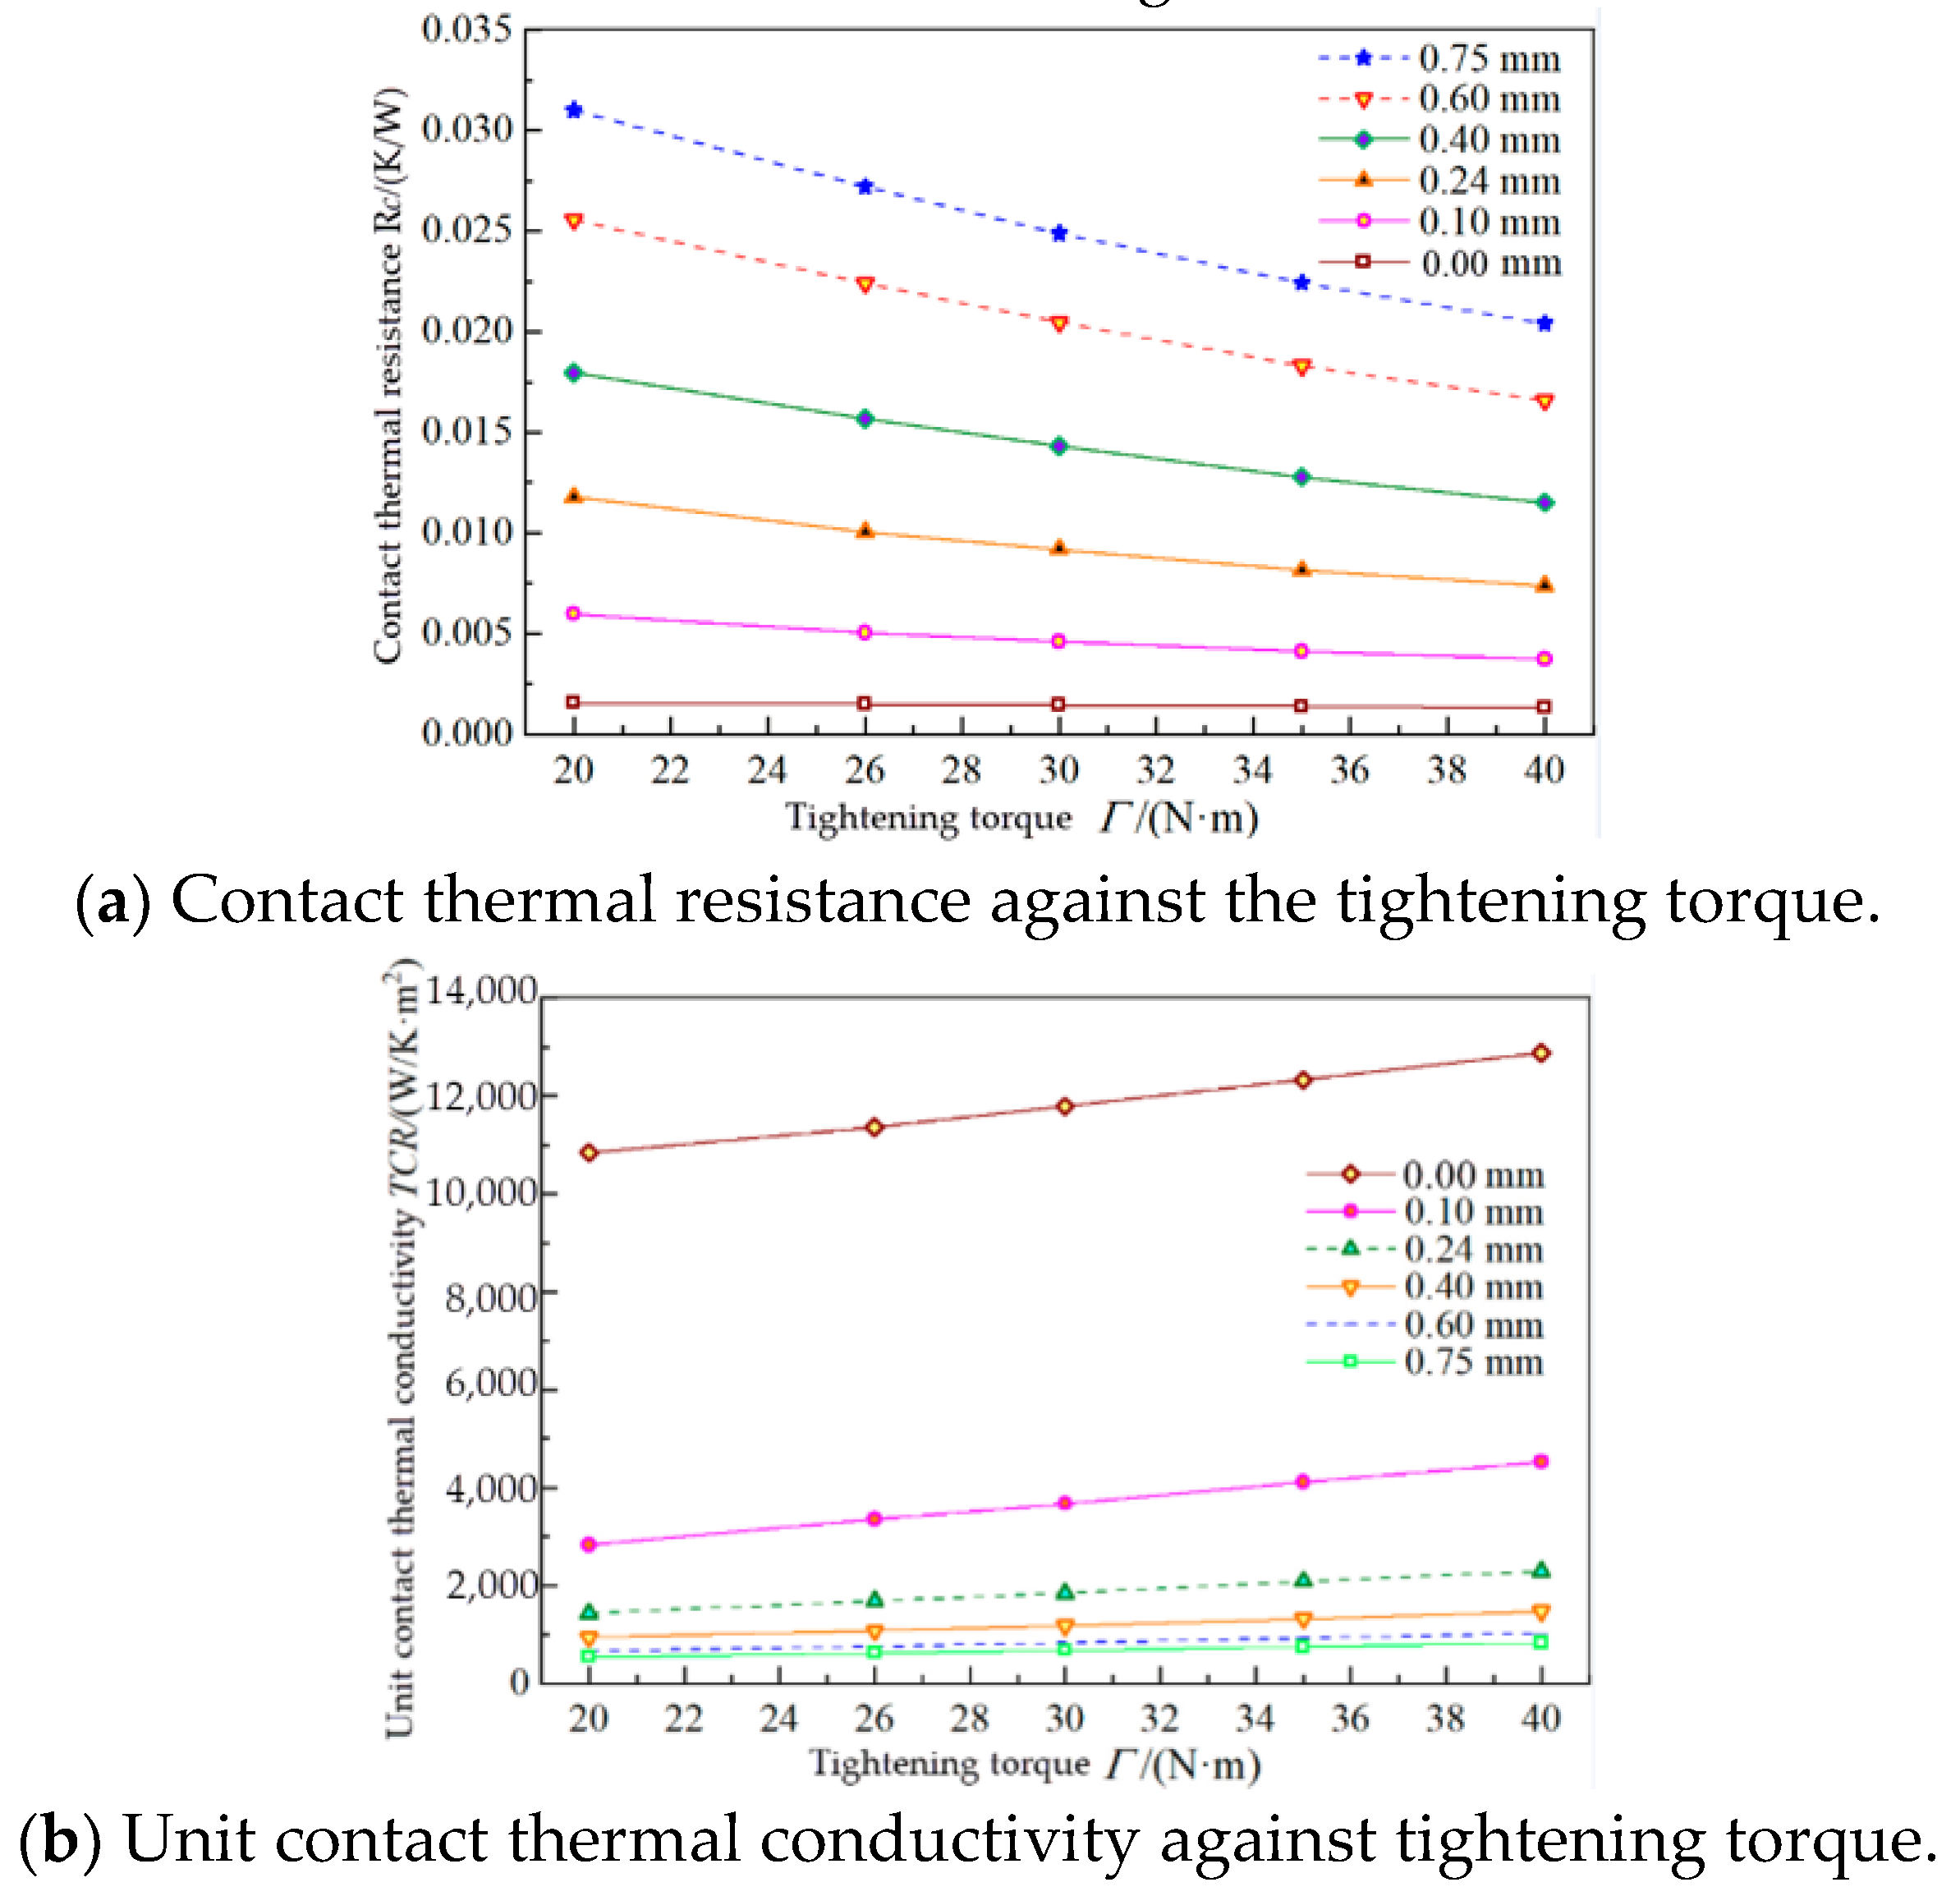
Figure 13 shows the effect of tightening torque on contact thermal resistance and unit contact thermal conductivity for different flange clearances. Figure 13a shows the curve of the change in contact thermal resistance with tightening torque when the assembled experimental section was made of the Q345R–Q345R material. It can be seen from the figure that as the tightening torque increases, the contact thermal resistance under different flange clearances decreases. As the tightening torque increases, the reduction in the tightening torque of contact thermal resistance becomes increasingly smaller. When the flange clearance is 0.24 mm, the tightening torque is increased from 20 to 30 N·m, and the contact thermal resistance is reduced by approximately 22.1%. When the tightening torque is increased from 30 to 40 N·m, the unit contact thermal conductivity is only reduced by approximately 19.6%. It can be said that as the tightening torque increases, the decrease in contact thermal resistance tends to be gentle.
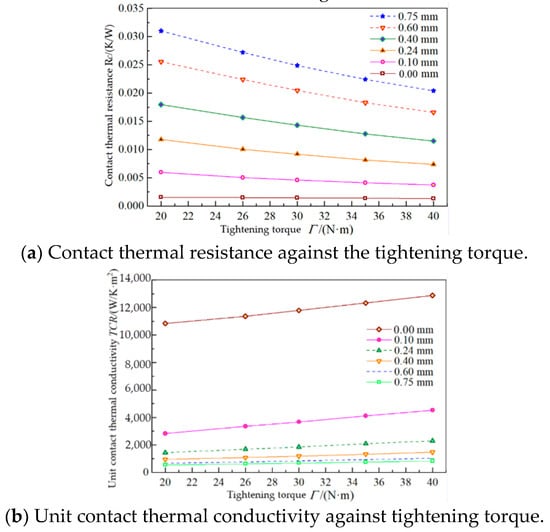
Figure 13.
Effect of tightening torques with contact thermal resistance and thermal conductivity at different flange clearances for the Q345R–Q345R material.
Figure 13b shows the curve of unit contact thermal conductance with tightening torque when the assembled experimental section is made of the Q345R–Q345R material. It can be seen from the figure that as the tightening torque increases, the unit contact heat conduction under different flange clearances also increases and is essentially proportional to the flange clearance. It can also be seen from the figure that different flange clearances have a significant impact on the unit contact thermal conductivity. When the flange clearance is 0.75 mm, as the tightening torque increases from 20 to 40 N·m, the unit contact thermal conductivity only increases by approximately 52.1%. When the flange clearance is 0.24 mm, as the tightening torque increases, the unit contact thermal conductivity increases by approximately 59.8%. We speculated that the contact area drops sharply after the flange is pulled apart by axial force. After that, only the bolt connection area and the partial circumferential contact surface of flange transfer heat, so the influence of bolt tightening torque on the contact heat conduction is reduced.
4.2. Conversion of Experimental Data and Actual Unit Contact Thermal Conductivity
To eliminate the difference caused by different materials, the actual unit contact thermal conductivity can be inversely calculated through the experimental data. First, we can obtain the contact area ratio under each working condition according to Formula (1), Formula (2), and Table 1. Then, by substituting the material thermal conductivity and roughness of the actual engine working conditions into the formula for inverse calculation, the unit contact thermal conductivity can be obtained according to Formula (32). The contact area ratio is shown in Table 2.
where TCR is the unit contact thermal conductivity of the experimental piece, where the unit is ; c is the surface roughness on the contact surface of the experimental piece, where the unit is μm; λ is the material thermal conductivity of the experimental piece, where the unit is ; ηA is the contact area ratio.

Table 2.
Experimental contact area ratio for the assembled test section made of the Q345R–Q345R material.
4.3. Characteristics Analysis of Contact Thermal Resistance for the Stainless Steel–Q345R Material
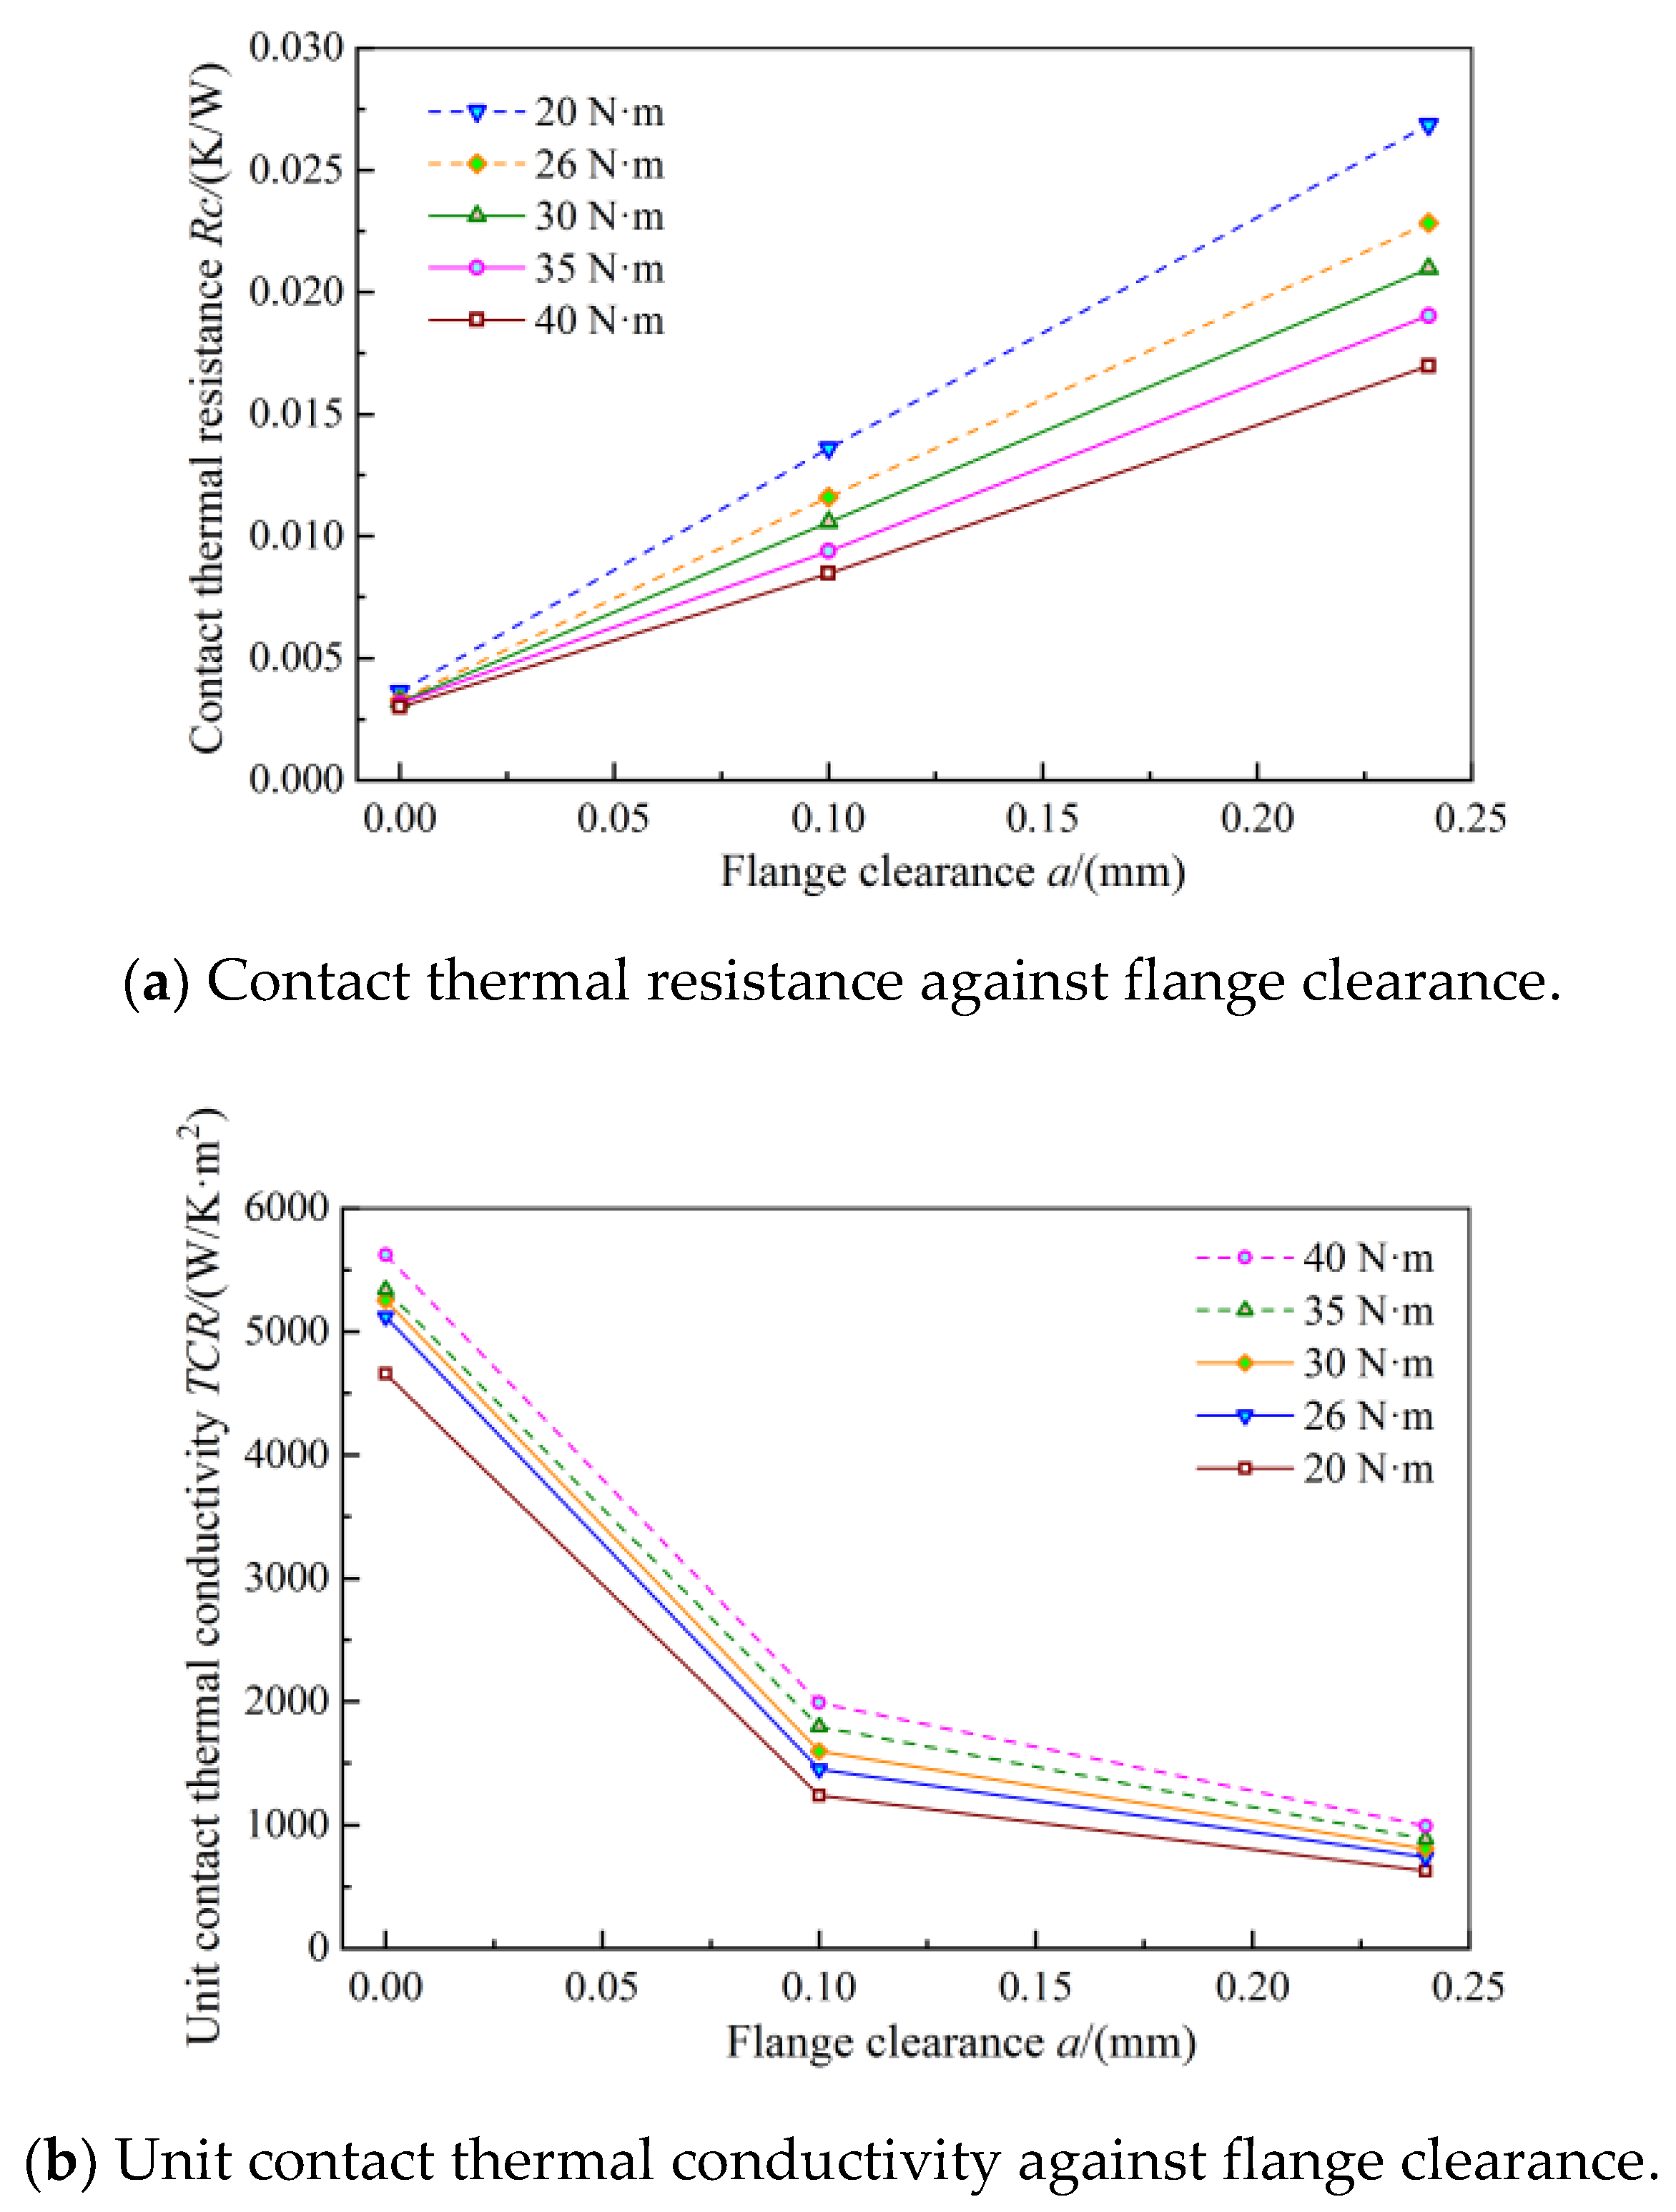
Figure 14 shows the influence of the flange clearance on contact thermal resistance and unit contact thermal conductivity under different tightening torques. Figure 14a shows the curve of change for contact thermal resistance with flange clearance when the assembled experimental section is made of the 304 stainless steel–Q345R material. It can be seen from the figure that as the flange clearance increases, the contact thermal resistance under different tightening torques increases, and it is essentially proportional to the flange clearance. When the tightening torque is 26 N·m, as the flange clearance increases from 0 mm to 0.24 mm, the contact thermal resistance increases by approximately 593%. When the tightening torque is 40 N·m, the flange clearance is increased from 0 mm to 0.24 mm, and the contact thermal resistance is increased by approximately 466%.
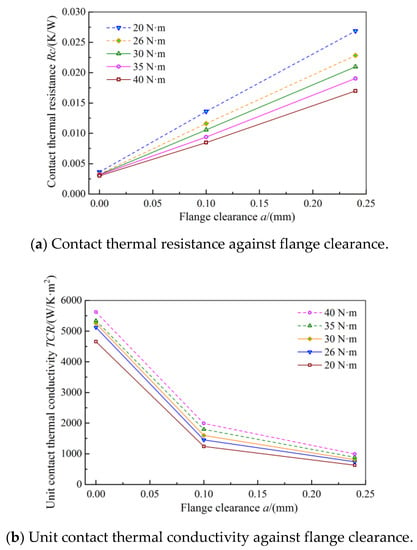
Figure 14.
Effect of flange clearances with contact thermal resistance and thermal conductivity at different tightening torques for the 304 stainless steel–Q345R material.
Figure 14b shows the curve of unit contact thermal conductivity against the flange clearance when the assembled experimental section is made of the 304 stainless steel–Q345R material. It can be seen from the figure that with the increase in the flange clearance, the unit contact thermal conductivity decreases rapidly at first, and then the rate of decrease in the unit contact thermal conductivity tends to become gentler. When the tightening torque is equal to 26 N·m, as the flange clearance increases from 0 to 0.1 mm, the unit contact thermal conductivity is reduced by approximately 71.6%. When the flange clearance is increased from 0.1 to 0.24 mm, the unit contact thermal conductivity is only reduced by approximately 49.2%. It can be speculated that after the flange is pulled apart by axial force, the contact area drops sharply. After the flange is pulled apart, only the bolt connection area and the partial circumferential contact surface of the flange transfer heat, and the influence of the flange clearance on the contact heat conduction is reduced, resulting in the trends from a decline to a flattening.
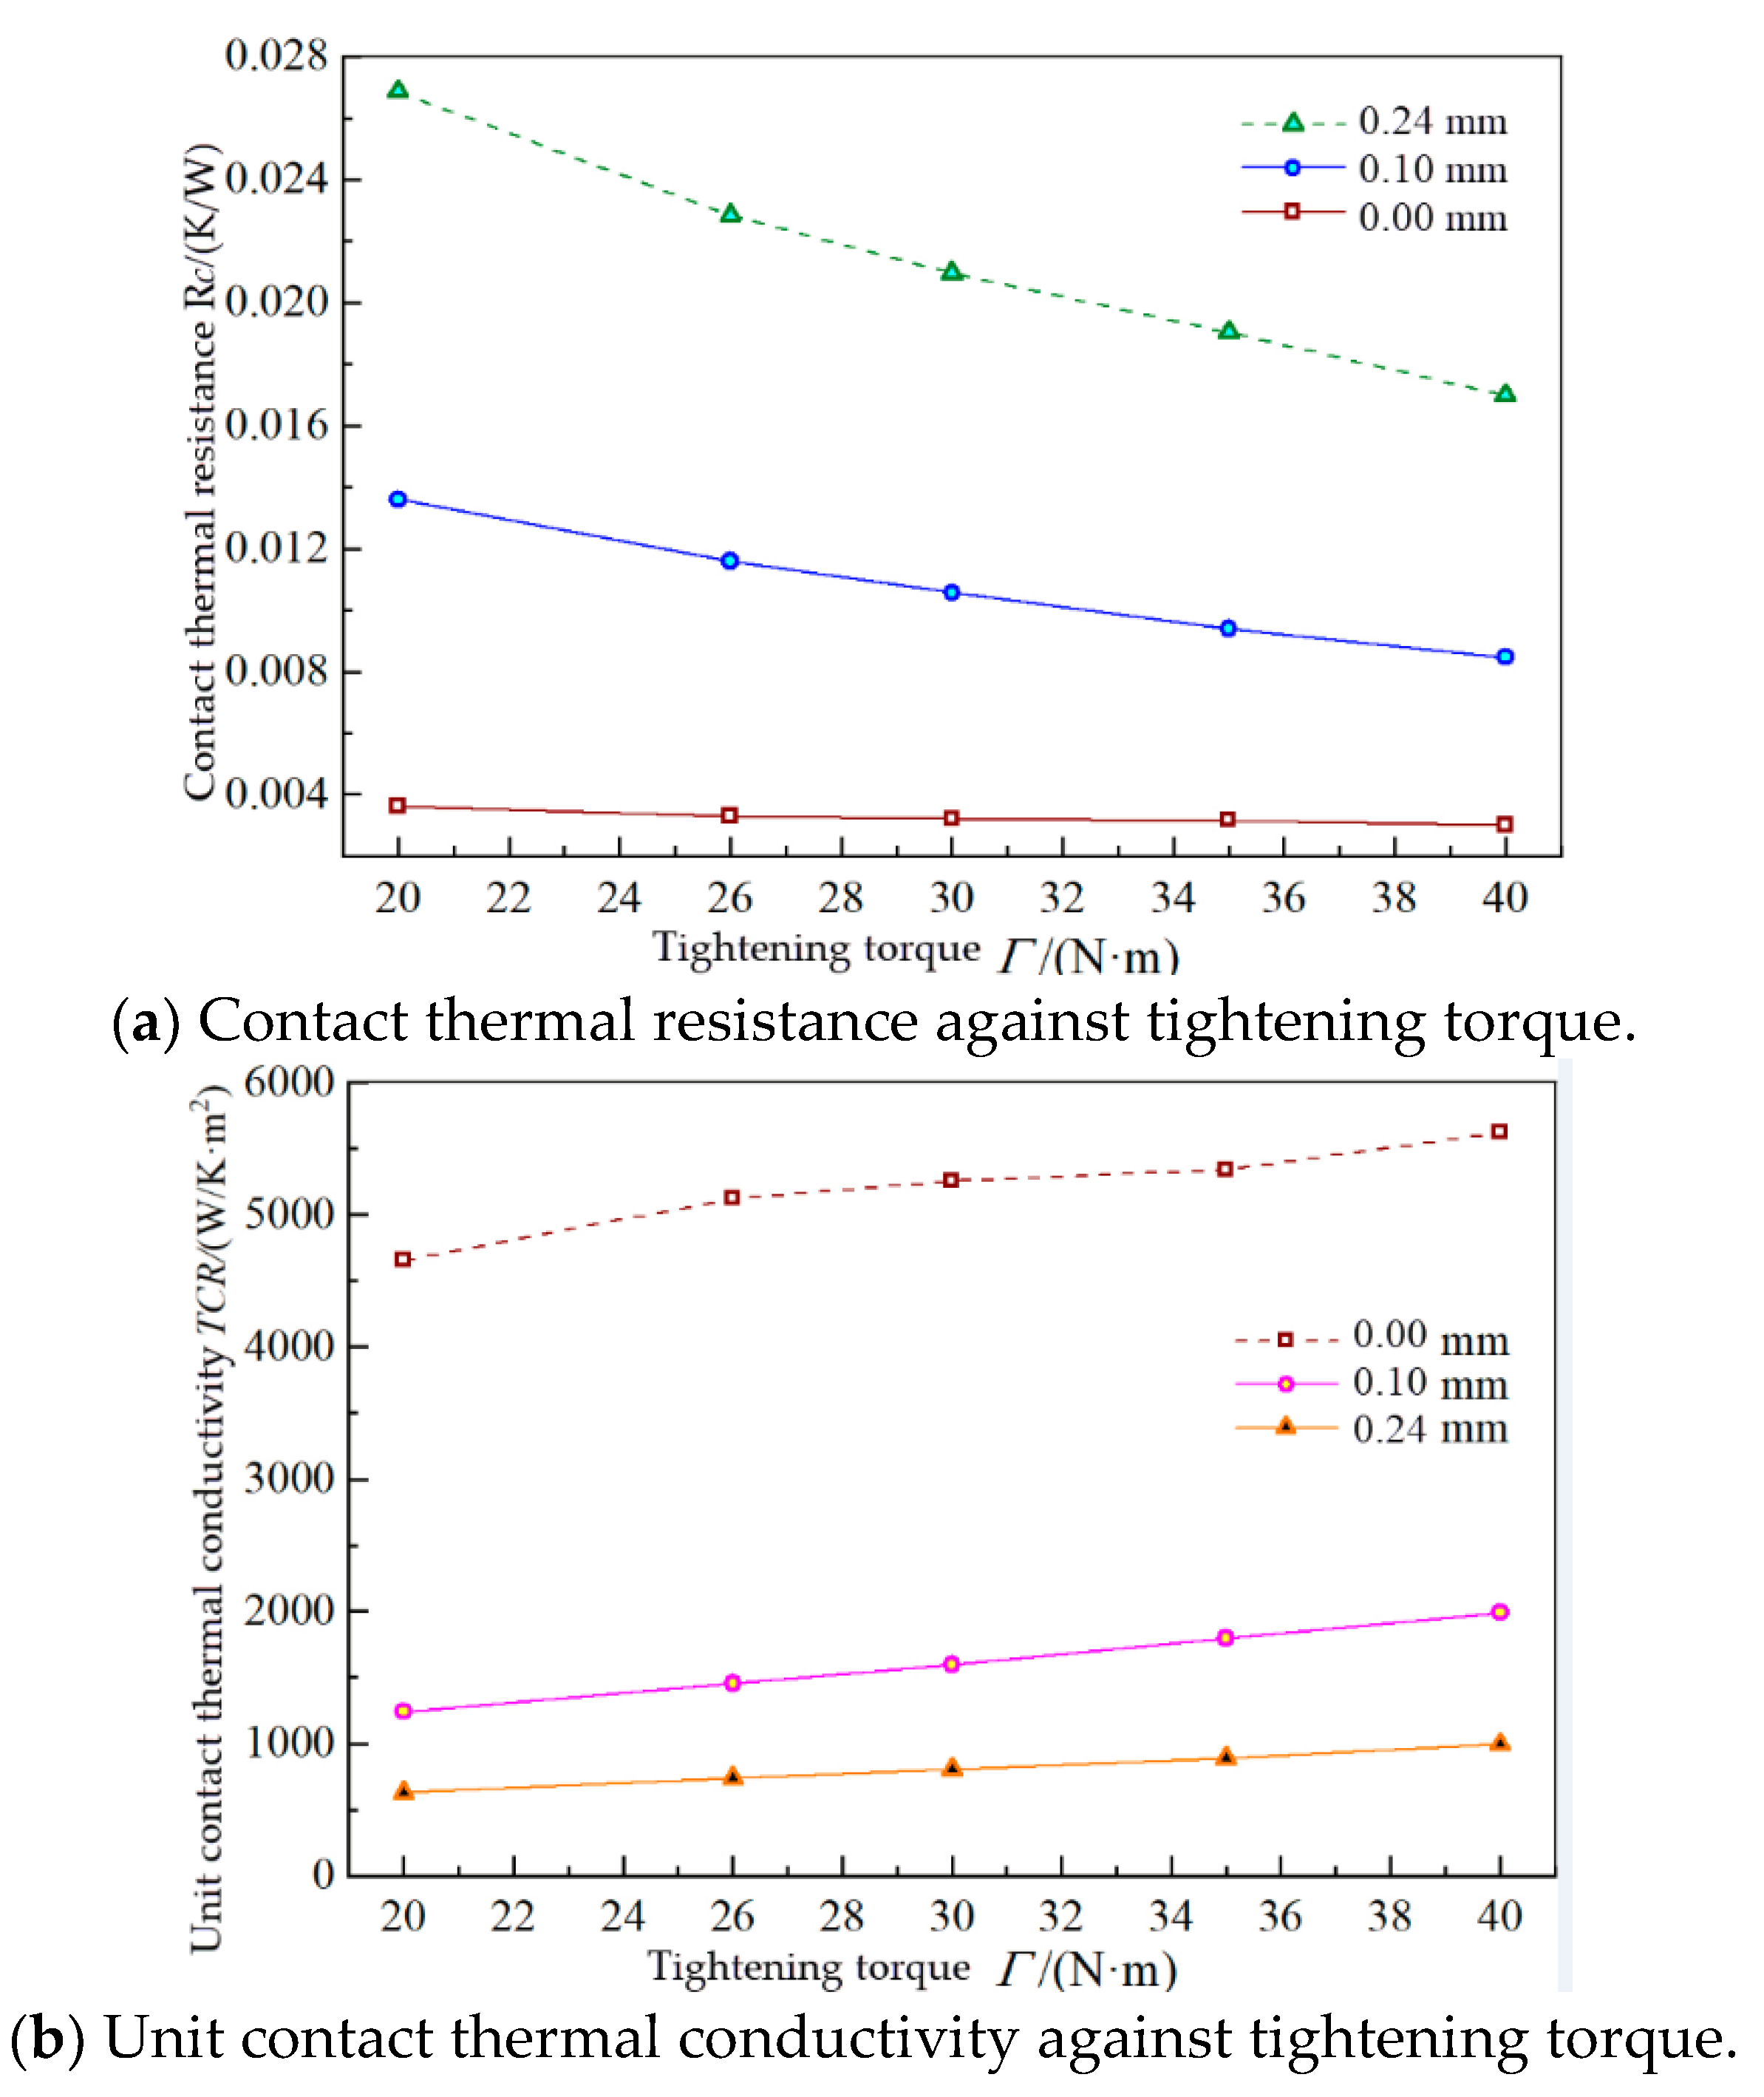
Figure 15 shows the effect of tightening torque on contact thermal resistance and unit contact thermal conduction for different flange clearances. Figure 15a shows the curve of change for contact thermal resistance against tightening torque when the assembled experimental section is made of the 304 stainless steel–Q345R material. It can be seen from the figure that as the tightening torque increases, the contact thermal resistance under different flange clearances decreases. As the tightening torque increases, the reduction in contact thermal resistance tightening torque becomes increasingly smaller. When the flange clearance is 0.24 mm, the tightening torque is increased from 20 to 30 N·m, and the contact thermal resistance is reduced by approximately 21.9%. When the tightening torque is increased from 30 to 40 N·m, the unit contact thermal conductivity is only reduced by approximately 20.6%, i.e., as the tightening torque increases, the decrease in contact thermal resistance tends to become gentler.
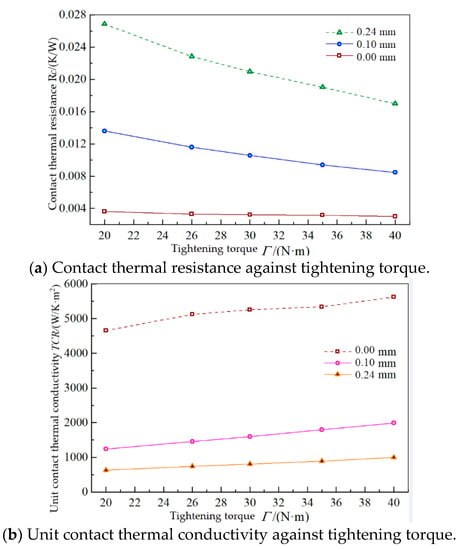
Figure 15.
Effect of tightening torques with contact thermal resistance and thermal conductivity at different flange clearances for the 304 stainless steel–Q345R material.
Figure 15b shows the curve of unit contact thermal conductance against tightening torque when the assembled experimental section is made of the 304 stainless steel–Q345R material. It can be seen from the figure that as the tightening torque increases, the unit contact heat conduction under different flange clearances also increases and is essentially proportional to the flange clearance. It can also be seen in the figure that different flange clearances have a significant impact on the unit contact thermal conductivity. When the flange clearance is 0.24 mm, as the tightening torque increases, the unit contact thermal conductivity only increases by approximately 58.1%. When the flange clearance is 0 mm, as the tightening torque increases from 20 to 40 N·m, the unit contact thermal conductivity increases by approximately 20.7%. Similarly, after the flange is pulled apart by axial force, the contact area drops sharply. After the flange is pulled apart, only the bolt connection area and the partial circumferential contact surface of the flange transfer heat, and the influence of bolt tightening torque on contact heat conduction is reduced. The experimental data of unit contact thermal conductivity for the assembled experimental section of the 304 stainless steel–Q345R material is shown in Table 3.

Table 3.
The experimental contact area ratio data for the assembled experimental section of the 304 stainless steel–Q345R material.
4.4. Verification of the Material Independence of the Experiment to the Unit Contact Thermal Conductivity
To eliminate the difference caused by materials and verify the independence of the material for actual unit contact thermal conductivity inversely calculated using experimental data, first, it was necessary to obtain the data of the contact area ratio under the same deformation, the same surface roughness, and different working conditions for 304 stainless steel and Q345R steel, and then compare these with the experimental data of the contact area ratio for the Q345R–Q345R material of the assembled experimental section. The data for the 304 stainless steel and Q345R steel materials for the assembled experimental section can be calculated according to Formulas (17) and (18), and the contact thermal resistance can be derived from the experimental contact area ratio data, as shown in Table 3.
Comparing the experimental contact area ratio data of the assembled experimental section for the 304 stainless steel–Q345R (as shown in Table 3) material with the experimental contact area ratio data of the assembled experimental section for the Q345R-Q345R material (as shown in Table 2), the deviation table of the contact area ratio for the two experiments can be obtained. Based on the data in Table 2, the relative deviation is shown in Table 4.

Table 4.
Relative deviation table of the contact area ratio for the two experiments.
Under the working conditions of a tightening torque of 35 N·m and a flange clearance of 0.24 mm, the maximum relative deviation of the two trials was 4.7%, which is small and acceptable. Therefore, the contact thermal resistance data for the typical flange mounting edge and the contact area ratio measured in the experiment can be considered credible. Using these data and substituting the material thermal conductivity and roughness of the actual engine working conditions into the formula for inverse calculation, the unit contact thermal conductivity under the actual operating conditions can be obtained.
5. Prediction of Contact Thermal Conductivity for Typical Flange Mounting Edges
Through the above analysis, it can be seen that the flange clearance and bolt tightening torque have a significant impact on the unit contact thermal conductivity of the flange mounting edge. Clearly, the unit contact thermal conductivity decreases with the increase in flange clearance, presenting a polynomial correlation. Moreover, the unit contact thermal conductivity increases as the bolt tightening torque rises, which shows a linear correlation. Then, the following relationship can be obtained.
The correlation of unit contact thermal conductivity (TCR) with flange clearance (a):
where a is the flange clearance, and α3, β3, γ3, δ3, ε3, ζ3, η3, θ3, φ3, ψ3, and ω3 are the coefficients.
The correlation of unit contact thermal conductivity (TCR) with bolt tightening torque (Γ):
where Γ is the bolt tightening torque, and φ3 and ψ3 are the coefficients.
As a result of the flange clearance, bolt tightening torque are all monotonously changing, and we use the product function form to fit the empirical formula based on Equations (33) and (34). By simplification, the TCR can be written as:
In Equation (35), α3, β3, γ3, δ3, ε3, ζ3, η3, θ3, φ3, ψ3, and ω3 are unknown parameters. Then, Equation (35) is solved by the method of nonlinear least squares and global optimization, so as to fit the correlation equations of flange clearance, and bolt tightening torque. Here, the unknown parameter values were obtained as follows:
Thus, the prediction modeling of unit contact thermal conductivity can be confirmed as follows:
Figure 16 shows a comparison of unit contact thermal conductivity between experimental data and the fitted formula line (Equation (36)). By comparison, it can be seen that the deviation between the experimental data and the fitted formula line is relatively small. Additionally, the maximum deviation between the experimental data and the fitted data under other working conditions does not exceed 10%. Therefore, a simplified prediction model of contact thermal conductivity is more suitable for engineering applications. Furthermore, the prediction modeling of contact thermal resistance is of reliability and credibility to a certain extent for the engineering reference.
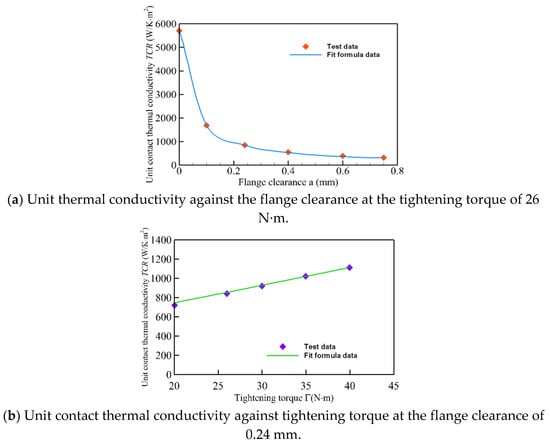
Figure 16.
Comparison of unit contact thermal conductivity between test data and prediction modeling for typical flange mounting edge.
6. Conclusions
In summary, this paper proposed a calculation method for contact thermal resistance. According to the calculation model, a detailed experimental study on the characteristics of contact thermal resistance for flange mounting surfaces was carried out. In addition, the law of the effect of the related parameters on contact thermal resistance was obtained. Furthermore, the calculation method for contact thermal resistance was verified, and the formula for the thermal resistance for the flange mounting edge was fitted.
(a) Before the experiment, the main measuring instruments, i.e., platinum resistance, temperature scanning valve, laminar flow meter, and pressure transmitter, were calibrated carefully. Thereafter, an accurate measurement method for flange clearance was investigated. As a result of careful preparation before the experiment, the measurement error result for the converted flow was controlled within 1.11%, and the measurement error result for the temperature difference was controlled within 0.2 °C.
(b) The contact thermal resistance of the flange mounting edge increases with the increase in flange clearance under different tightening torques, which is essentially proportional to the flange clearance. In addition, as the flange clearance increases, the unit contact thermal conductivity first decreases rapidly. When the flange clearance reaches 0.4 mm, the decreasing rate of unit contact thermal conductivity tends to flatten. It was presumed that the contact area drops sharply after the flange is pulled apart by the axial force. After that, only the bolt connection area and the flange circumferential contact surface transfer heat, and the influence of the flange clearance on the contact thermal conductivity is reduced. Thus, the decline tends to become gentler.
(c) The contact thermal resistance of the typical flange mounting edge decreases with the increase in the tightening torque under different flange clearances. As the tightening torque increases, the change of contact thermal resistance tends to flatten. In addition, the unit contact thermal conductivity of the typical flange mounting edge increases with the increasing tightening torque under different flange clearances, which is essentially proportional to the flange clearance. It can be speculated that the contact area drops sharply after the flange is pulled apart by axial force. After the flange is pulled apart, only the bolt connection area and the partial circumferential contact surface of the flange transfer heat, so the influence of bolt tightening torque on the contact heat conduction is reduced.
(d) Through the experimental research on the contact thermal resistance characteristics of the Q345R–Q345R material and 304 stainless steel–Q345R material for the assembled experimental section, the characteristics of contact thermal resistance and unit contact thermal conductivity for the experimental section assembled with two different materials were obtained. This was done so as to obtain the characteristics of the contact area ratio under various working conditions. By comparing the contact area ratio of the two different materials for the assembled experimental sections under the same working conditions, it was determined that the contact area ratio of the typical flange mounting edge is only related to the geometric deformation and bolt mechanical conditions, and not related to the material. In addition, substituting the material thermal conductivity and roughness of the engine under actual operating conditions into the formula, the unit contact thermal conductivity could be inversely calculated. Therefore, the feasibility of both the contact area ratio data and the method for calculating the unit contact thermal conductivity was verified.
(e) Through the experimental research on the unit contact thermal conductivity characteristics for a typical flange mounting edge, we obtained the variation law of unit contact thermal conductivity under different working conditions for a typical flange mounting edge, and we fitted the unit contact heat conduction formula for a typical flange mounting edge.
Author Contributions
Conceptualization, Y.C.; methodology, Y.C. and W.C.; software, Y.C. and L.C.; validation, Y.C.; formal analysis, Y.C. and L.C.; investigation, Y.C. and L.C.; writing—original draft preparation, Y.C., L.C., and W.C.; writing—review and editing, Y.C., L.C., and W.C.; supervision, Y.C. and W.C. All authors have read and agreed to the published version of the manuscript.
Funding
This research received no external funding.
Acknowledgments
Special thanks are given to the Laboratory of Rotating Flow and Heat Transfer at Northwestern Polytechnical University.
Conflicts of Interest
The authors declare no conflict of interest.
References
- Lai, C. Research on Sealing Characteristics of Typical Flanged Casing Structure. Master’s Thesis, Shenyang Aerospace University, Shenyang, China, 2018. [Google Scholar]
- Mir-Haidari, S.; Behdinan, K. Nonlinear effects of bolted flange connections in aeroengine casing assemblies. Mech. Syst. Signal Process. 2022, 166, 108433. [Google Scholar] [CrossRef]
- Boeswald, M.; Link, M.; Meyer, S. Experimental and analytical investigations of non-linear cylindrical casing joints using base excitation testing. In Proceedings of the 21st IMAC Conference and Exposition 2003 (IMAC XXI), Kissimmee, FL, USA, 3–6 February 2003. [Google Scholar]
- Zang, C.; Ma, S.; Friswell, M. Finite element model updating of an assembled aero-engine casing. Topics in Model Validation and Uncertainty Quantification; Springer: Berlin/Heidelberg, Germany, 2013; pp. 199–212. [Google Scholar]
- Cao, Z.; Zhang, F.; Zhang, D.; Yu, Y.; Li, L.; Guo, X. Failure mechanisms of bolted flanges in aero-engine casings subjected to impact loading. Chin. J. Aeronaut. 2021, 34, 125–144. [Google Scholar] [CrossRef]
- Peng, H.; Liu, Z.; Huang, F. Study of elastic plastic contact of statistical rough surfaces. Proc. Inst. Mech. Eng. Part J J. Eng. Tribol. 2013, 227, 1076–1089. [Google Scholar] [CrossRef]
- Lin, A.; Liu, G.; Chen, Y.; Feng, Q.; Zhang, H. Evaluation and analysis of evaporation cooling on thermodynamic and pressure characteristics of intake air in a precooled turbine engine. Int. J. Hydrog. Energy 2021, 46, 24410–24424. [Google Scholar] [CrossRef]
- Liu, G.; Lei, Z.; Lin, A.; Chen, Y.; Feng, Q. Effect of pre-swirl nozzle closure modes on unsteady flow and heat transfer characteristics in a pre-swirl system of aero-engine. Proc. Inst. Mech. Eng. Part G J. Aerosp. Eng. 2021. [Google Scholar] [CrossRef]
- Liu, G.; Wang, X.; Gong, W.; Lin, A. Prediction of the sealing flow effect on the temperature drop characteristics of a pre-swirl system in an aero-engine. Appl. Therm. Eng. 2021, 189, 116717. [Google Scholar] [CrossRef]
- Wang, A.; Zhao, J. Review of prediction for thermal contact resistance. Sci. China Technol. Sci. 2011, 41, 545–556. (In Chinese) [Google Scholar] [CrossRef]
- Fukuoka, T.; Nomura, M.; Shino, K. Analysis of heat flow around bolted joints and variations of axial bolt force. In Proceedings of theASME 2007 Pressure Vessels and Piping Conference, ASME Paper PVP2007-26383. San Antonio, TX, USA, 22–26 July 2007; ASME: New York, NY. [Google Scholar]
- Lin, A.; Liu, G.; Wang, X.; Feng, Q. Comprehensive evaluations on performance and energy consumption of pre-swirl rotor–stator system in gas turbine engines. Energy Convers. Manag. 2021, 244, 114440. [Google Scholar] [CrossRef]
- Liu, G.; Gong, W.; Wu, H.; Pang, L.; Lin, A. Theoretical and experimental evaluation of temperature drop and power consumption in a cover-plate pre-swirl system for gas turbine cooling. Case Stud. Therm. Eng. 2021, 27, 101221. [Google Scholar] [CrossRef]
- Fukuoka, T. Finite element analysis of the thermal and mechanical behaviors of a bolted joint. J. Press. Vessel Technol. 2005, 127, 402–407. [Google Scholar] [CrossRef]
- Beaudoin, M.; Behdinan, K. Analytical lump model for the nonlinear dynamic response of bolted flanges in aero-engine casings. Mech. Syst. Signal Process. 2019, 115, 14–28. [Google Scholar] [CrossRef]
- Joseph, R.; Kumar, N.; Kumar, S. Effect of interstitial compounds in controlling thermal contact conductance across pressed joints at cryogenic temperature and low contact pressure. Appl. Therm. Eng. 2021, 194, 117073. [Google Scholar] [CrossRef]
- Greenwood, J.; Williamson, J. Contact of nominally Flat Surfaces. Proc. R. Soc. Lond. Ser. A Math. Phys. Sci. 1966, 295, 300–319. [Google Scholar]
- Yovanovich, M. Four decades of research on thermal contact, clearance, and joint resistance in microelectronics. IEEE Trans. Compon. Packag. Technol. 2005, 28, 182–206. [Google Scholar] [CrossRef]
- Yovanovich, M.; Culham, J.; Teertstra, P. Calculating interface resistance. Electron. Cool. 1997, 3, 24–29. [Google Scholar]
- Yuncu, H. Thermal contact conductance of nominaly flat surface. Heat Mass Transf. 2006, 43, 1–5. [Google Scholar] [CrossRef]
- Bahrami, M.; Yovanovich, M.; Culham, J. Thermal joint resistances of conforming rough surfaces with gas filled caps. J. Thermophys. Heat Transf. 2004, 18, 318–325. [Google Scholar] [CrossRef]
- Sridhar, M.; Yovanovich, M. Review of elastic and plastic contact conductance models: Comparison with experiment. J. Thermophys. Heat Transf. 1994, 8, 633–640. [Google Scholar] [CrossRef]
- Madhusudana, C.; Fletcher, L. Contact heat transfer-The last decade. AIAA J. 1986, 34, 510–521. [Google Scholar] [CrossRef]
- Ling, D.; Wang, F.; Zeng, F. Finite element simulation method of contact thermal resistance. Eng. Mech. 2012, 9, 375–379. [Google Scholar]
- Archard, J.F. Elastic Deformation and the laws of friction. Proc. R. Soc. Lond. Ser. A Math. Phys. Sci. 1957, 243, 190–205. [Google Scholar]
- Zhang, T.; Xu, L.; Xiong, W.; Zhao, L. Comparison and analysis of theoretical models in the research of thermal contact conductance. Cryog. Supercond. 1998, 26, 58–64. [Google Scholar]
- Zhao, L.; Xu, L.; Li, Z.; Sun, H. Research on the relationship between thermal contact conductance of solid interfaces and cycling load at low Temperatures. Cryog. Supercond. 2000, 28, 5l–54. [Google Scholar]
Publisher’s Note: MDPI stays neutral with regard to jurisdictional claims in published maps and institutional affiliations. |
© 2022 by the authors. Licensee MDPI, Basel, Switzerland. This article is an open access article distributed under the terms and conditions of the Creative Commons Attribution (CC BY) license (https://creativecommons.org/licenses/by/4.0/).

