Article

Design and Evaluation of an Additively Manufactured UAV Fixed-Wing Using Gradient Thickness TPMS Structure and Various Shells and Infill Micro-Porosities

by
Georgios Moysiadis
1,
Savvas Koltsakidis
1,
Odysseas Ziogas
2,3,
Pericles Panagiotou
2,3 and
Dimitrios Tzetzis
1,*
1
Digital Manufacturing and Materials Characterization Laboratory, School of Science and Technology, International Hellenic University, 57001 Thessaloniki, Greece
2
Laboratory of Fluid Mechanics and Turbomachinery, Department of Mechanical Engineering, Aristotle University of Thessaloniki, 54124 Thessaloniki, Greece
3
UAV Integrated Research Center (UAV-iRC), Center for Interdisciplinary Research and Innovation (CIRI), Aristotle University of Thessaloniki, 57001 Thessaloniki, Greece
*
Author to whom correspondence should be addressed.
Aerospace 2026, 13(1), 50; https://doi.org/10.3390/aerospace13010050 (registering DOI)
Submission received: 1 December 2025 / Revised: 22 December 2025 / Accepted: 26 December 2025 / Published: 2 January 2026

Abstract

Unmanned Aerial Vehicles (UAVs) have become indispensable tools, playing a pivotal role in diverse applications such as rescue missions, agricultural surveying, and air defense. They significantly reduce operational costs while enhancing operator safety, enabling new strategies across multiple domains. The growing demand for UAVs calls for structural components that are not only robust and lightweight, but also cost-efficient. This research introduces a novel approach that employs a pressure distribution map on the external surface of a UAV wing to optimize its internal structure through a variable-thickness TPMS (Triply Periodic Minimal Surface) design. Beyond structural optimization, the study explores a second novel approach with the use of filaments containing chemical blowing agents printed at different temperatures for both the infill and shell, producing varying porosities. As a result, the tailoring of density and weight is achieved through two different methods, and case studies were developed by combining them. Compared to the conventionally manufactured wing, a weight reduction of up to 7% was achieved while the wing could handle the aerodynamic loads under extreme conditions. Beyond enabling lightweight structures, the process has the potential to be substantially faster and more cost-effective, eliminating the need for molds and advanced composite materials such as carbon fiber sheets.

1. Introduction

Recent advancements in Additive Manufacturing (AM) have significantly broadened its industrial applications, particularly in aerospace and UAV design [1,2]. Previously complex assemblies made up of multiple components can now be manufactured as a single, integrated part, simplifying assembly and reducing the risk of subcomponent failure [3,4].
Conventional manufacturing methods face challenges in topology optimization due to constraints imposed by mold shapes and machining limitations [5]. These restrictions prevent the creation of highly complex, weight-efficient structures that could enhance UAV performance. As a result, designers often have to compromise between manufacturability and optimal aerodynamic or structural efficiency. AM overcomes these barriers, allowing the production of intricate geometries that would be impossible or highly inefficient to manufacture with conventional methods [6,7].
Another advantage of AΜ is that it helps engineers adapt to the dynamic market demands of today. Shorter product life cycles and customizations lead to smaller production batches that align perfectly with AM production systems [8]. The increasing demand for unique customer-oriented products is shifting the focus of the design process toward the end user, made possible thanks to the adaptability of AM in the production process [9].
Depending on the mission requirements and the type of UAV some components have been conventionally constructed by composite materials or high strength alloys [10]. Respectively those parts can be produced with AM techniques using Polymers reinforced with carbon fibers [11]. Producing a UAV with CF using the conventional approach is a very time-consuming process. CF components made with molds require time to cure and specially designed autoclaves. Even after they cure, they need post-processing and assembly with multiple ribs, spars and stringers in order to form a complete structural part. In contrast, an additively manufactured UAV could be produced almost as a single part, significantly reducing overall production time [12]. While some post-processing might still be required, there would be no need to assemble ribs, spars and stringers, as they can be integrated into the printing process.
These internal structural elements can instead be realized as lattice structures [13,14]. Lattices are repeating, lightweight geometric structures composed of interconnected struts and nodes [15]. They are widely used in AM due to their high strength-to-weight ratio and material efficiency, making them highly applicable to UAVs as well [16].
Building on this, current AM research spans architected cellular metals and polymers with tailored stiffness, strength, fatigue life, and multifunctionality, as surveyed by du Plessis et al. and Benedetti et al. [17,18]. Functionally graded lattices derived from topology optimization and broader lattice design/optimization workflows allow local control of density and properties for performance targets and manufacturability [19,20]. Printable, self-supporting lattice formulations further reduce supports while preserving strength, and comparative studies clarify how TPMS vs. strut-based architectures trade off stiffness, strength, and ductility [21,22]. Beyond classic trusses, TPMS and multimorphology lattices enable multifunctional response (e.g., permeability–mechanics co-design), while plate-based lattices achieve exceptional specific stiffness and tunable energy absorption via structural gradation [23,24,25]. These advances are increasingly translated into flight structures, where AM lattices support lightweighting and part consolidation in UAV components [26].
Recent studies have also shown that TPMS-based hybrid air–solid architectures enable additional control over elastic wave propagation and load-transfer behavior through careful consideration of periodicity alignment, unit–cell orientation, and phase connectivity. In particular, functional incorporation of air–solid phases in TPMS structures has been demonstrated to influence mechanical coupling and dynamic response, highlighting the importance of lattice–shell interaction and transition smoothness in architected materials [27].
Moreover, research shows that AM can produce hierarchical porous architectures that couple macro-porosity (lattice-scale cells) with engineered micro-porosity inside the struts or walls [28,29]. This dual-scale design gives a second lever for tailoring mechanics: beyond adjusting cell topology or thickness, designers can tune internal microporosity to modify density, stiffness, strength, damping, and energy absorption [30,31].
The interplay between TPMS topology and micro-porosity introduces multiscale mechanical effects that govern the overall structural response. Previous studies have shown that micro-scale features, such as internal pores within struts or walls, can significantly influence macro-scale stiffness, strength, and energy absorption [32]. In the present design, regions with thicker TPMS walls provide macro-scale load-bearing capacity, while micro-porosity allows fine-tuning of local density and compliance. This hierarchical modulation enables tailored stress distribution and deformation behavior, offering an additional lever for performance optimization. Future work will extend this analysis using multiscale homogenization approaches to quantitatively predict effective properties, building on insights from nested FE2 methodologies.
This study aims to advance the fixed-wing UAV wing design by introducing and combining two novel elements. First, the internal architecture is optimized with a variable-thickness TPMS lattice, where regions experiencing higher stresses receive additional reinforcement. Second, a chemical blowing-agent filament is used, printed at different temperatures for the shell and the infill to produce distinct densities and mechanical properties. While hierarchical and dual-scale lattices have been explored in additive manufacturing, prior studies typically focus on either varying cell geometry at the macro-scale or introducing micro-porosity independently. In contrast, the present work uniquely integrates stress-adaptive TPMS wall-thickness grading with temperature-controlled micro-porosity tuning within the same UAV wing component. This dual-level design enables localized reinforcement in high-stress regions while simultaneously reducing density via micro-porosity, combining the benefits of topology optimization and material-level control in a single, manufacturable structure. The interplay between TPMS topology and micro-porosity introduces multiscale mechanical effects that govern the overall structural response. Regions with thicker TPMS walls provide macro-scale load-bearing capacity, while micro-porosity allows fine-tuning of local density and compliance. This hierarchical modulation enables tailored stress distribution and deformation behavior, offering an additional lever for performance optimization.

2. Methodology

Figure 1 outlines the overall methodological workflow adopted in this study. The process begins with a computational fluid dynamics (CFD) analysis of the reference wing to obtain the surface pressure distribution, which is subsequently applied as a boundary condition in a static structural analysis to compute the internal stress field. The resulting scalar stress magnitude is then used to locally modulate the lattice wall thickness, enabling increased material deposition in high-stress regions. In parallel, the temperature-dependent mechanical properties of the blowing-agent filament are experimentally characterized and independently assigned to the shell and infill regions, constituting the second proposed approach. Finally, multiple case studies combining these two strategies are evaluated through static structural analyses to assess stress distribution and deformation response.

2.1. UAV Reference Platform

The RX-1 Unmanned Aerial Vehicle (UAV) serves as the reference platform for this study (Figure 2A). This large-scale, fixed-wing UAV features a conventional tube-and-wing geometry complemented by a distinctive inverted V-tail supported by twin booms. Its design prioritizes substantial payload capacity, leading to significant physical and operational characteristics: a Gross Take-Off Weight (GTOW) of 185 kg, a wingspan of 6.4 m, a reference wing area of 4.45 m2, an operational speed of 140 km/h and a flight endurance that exceeds 10 h. The design procedure and details about the layout specifications can be found in [33].
The testing activities of such a large-scale platform are demanding both in terms of resources and infrastructure, especially following the rather strict regulations that were recently enforced in Greece (and in all European countries) by the EU. To that end, a 1:3 subscale model of the HCUAV RX-1 has been developed to support testing and research activities (Figure 2B). This scaled model, designed and constructed by the authors, features a wingspan of 2.2 m and a weight of 8.8 kg. As shown in Figure 2B, the conventionally manufactured wing is composed of ribs and spars and, together with the carbon fiber shell, has an approximate weight of 500 g. This subscale platform is used as a baseline for the computational fluid dynamics (CFD) analyses in this work, as it allows for more efficient generation of computational grids compared to the full-scale RX-1, significantly decreasing the computational cost and time required for the CFD simulation while maintaining aerodynamic fidelity. The primary purpose of this analysis is pressure mapping across the wing to obtain a detailed pressure distribution representation on the surface. Furthermore, working with a smaller, lighter model is inherently more suitable for future construction using the AM approach. This practicality establishes a path for the fabrication of a 3D-printed wing based on the optimized design, enabling a straightforward and cost-effective physical validation of the structural performance predicted by this study.

2.2. Materials

The material used in this analysis played a crucial role in optimizing the wing structure. Therefore, physical tests were conducted to determine its properties before importing them into the solver. The LW ASA filament used in this study was sourced from colorFabb B.V. (Venlo, The Netherlands). According to the manufacturer, LW ASA begins foaming at 230 °C and at 260 °C, can reduce density by up to 60% (0.4 g/cm3). The filament was printed and evaluated at 240 °C, 250 °C, and 260 °C. All specimens were printed with 100% infill, and the thread orientation was aligned parallel to the applied tensile forces. The manufacturer’s claim regarding density reduction was confirmed experimentally by measuring the weight differences of specimens with identical nominal volume across the three printing temperatures. Tensile tests of the specimens were conducted on a universal testing machine (Model M500-50AT, Testometric, Lincoln, UK) with a speed of 20 mm/min.

2.3. Computational Fluid Dynamic (CFD) Analysis

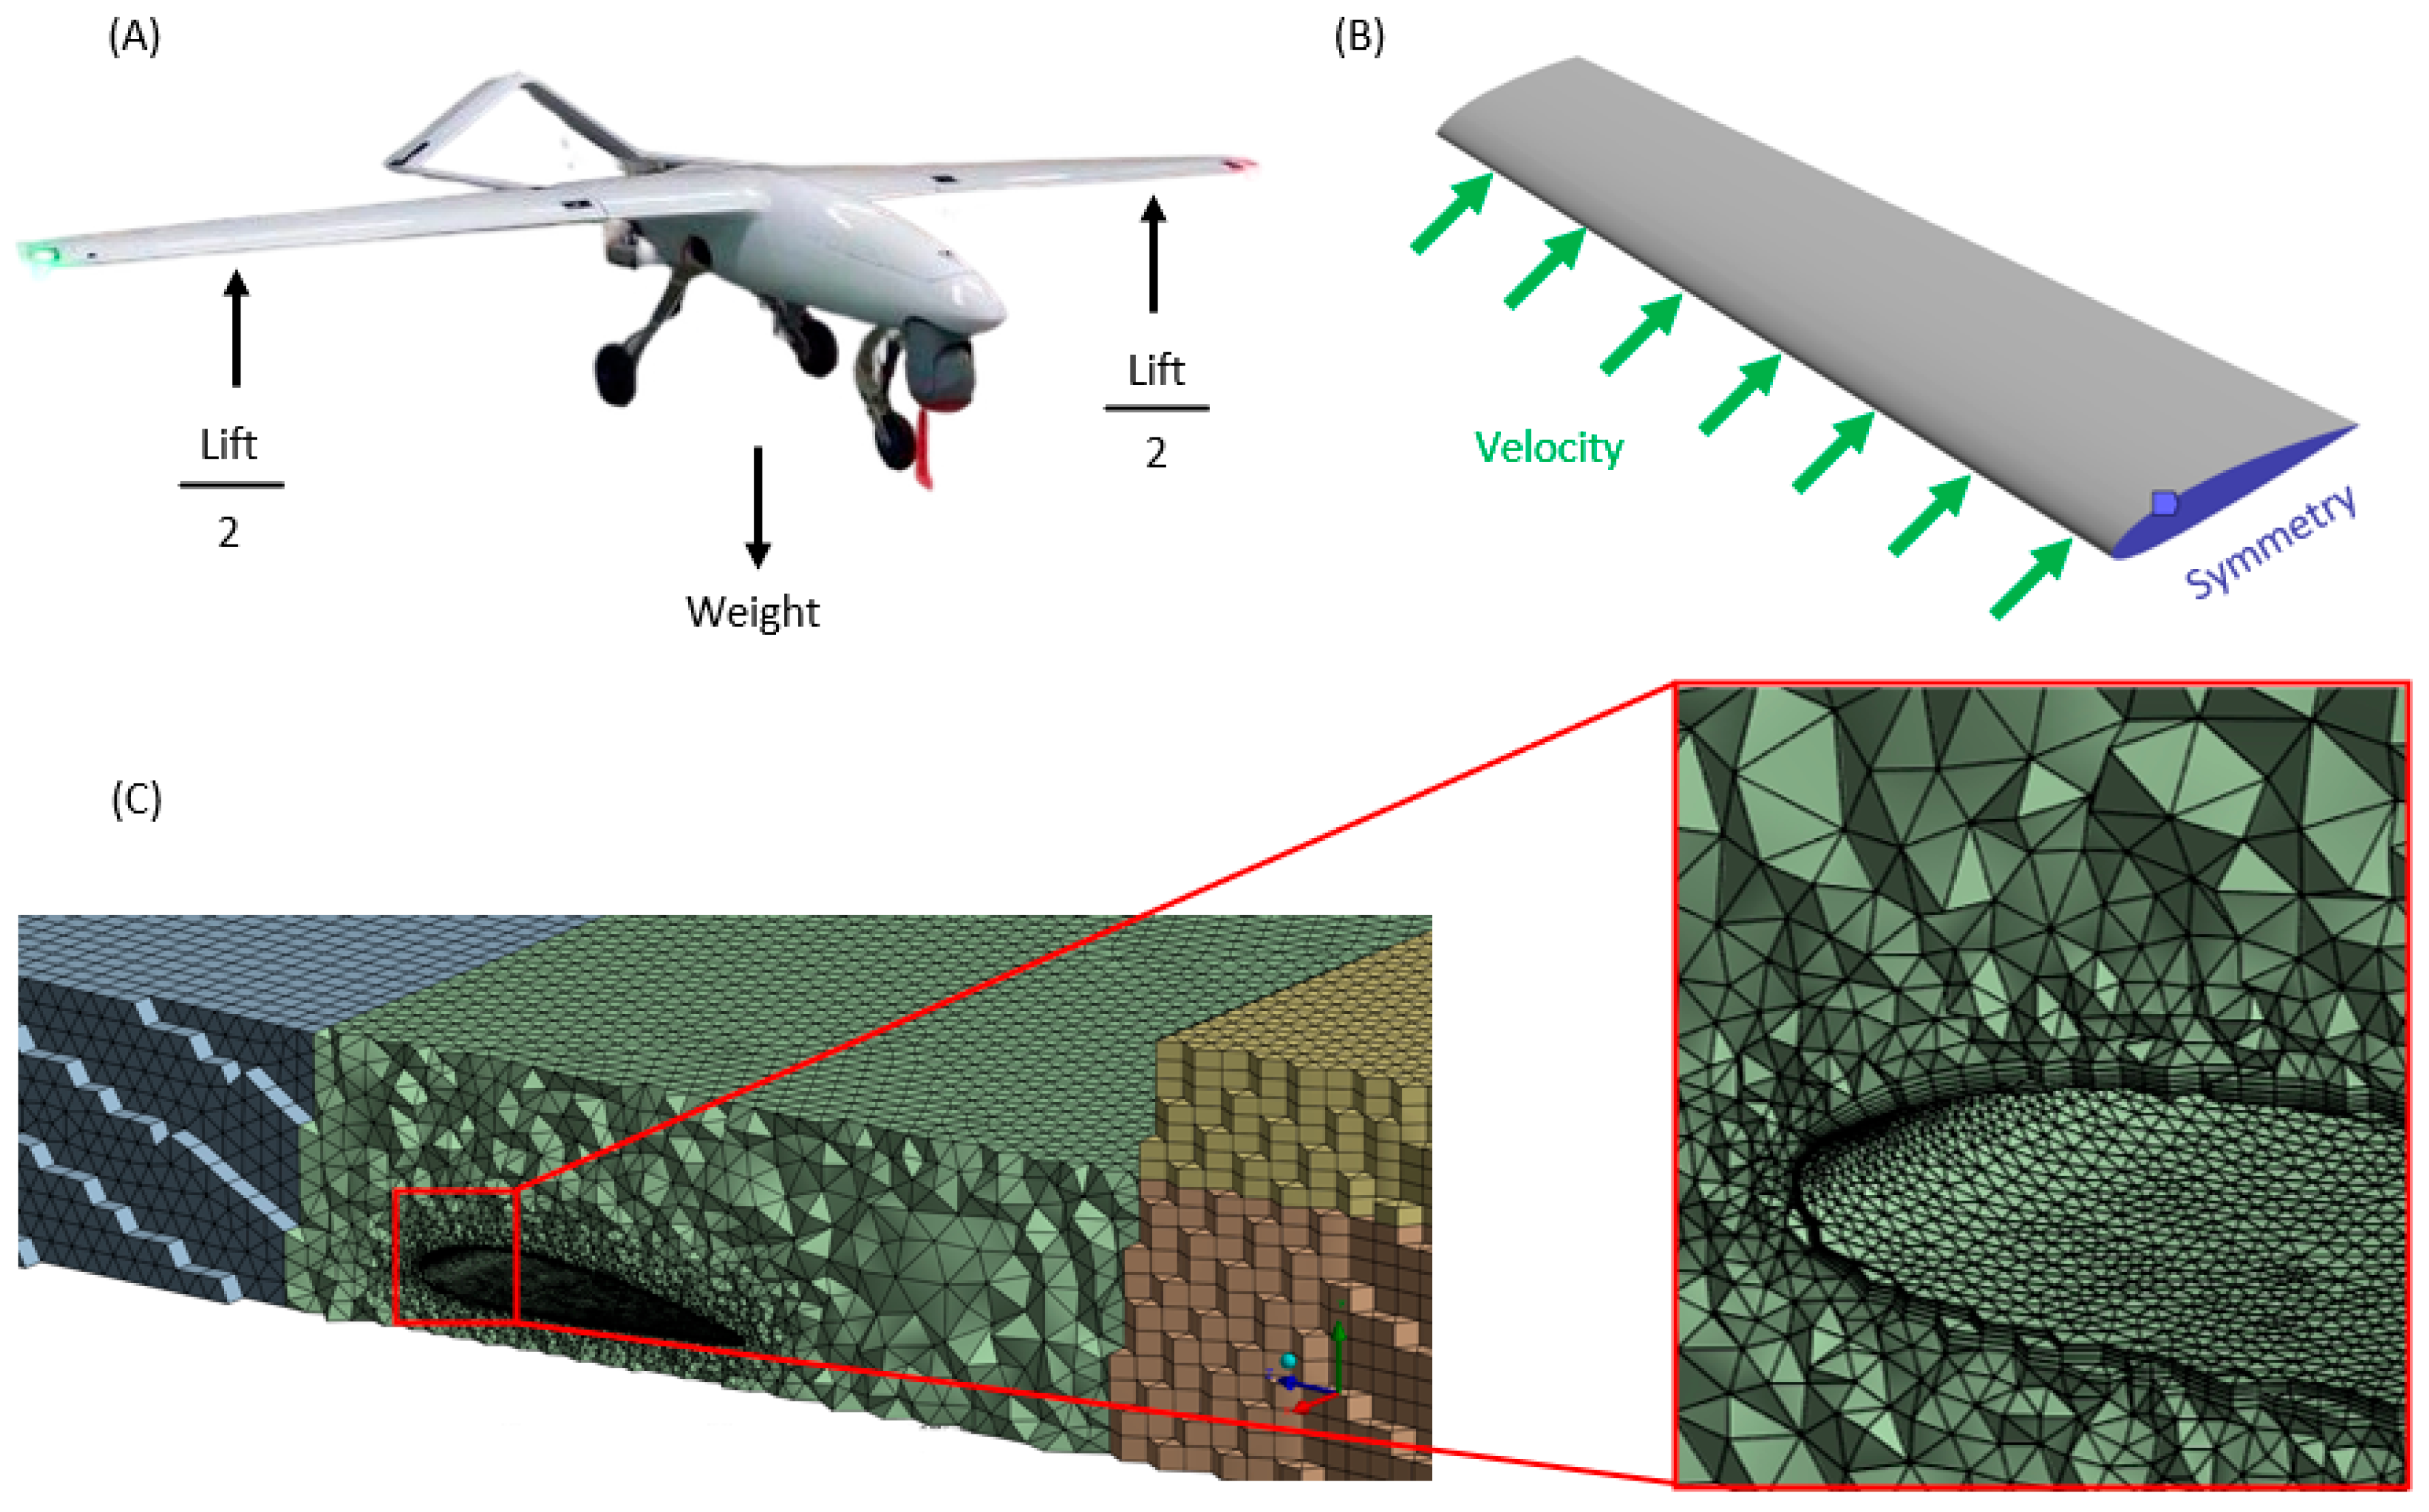
The high-fidelity CFD computations were performed on the wing of the 1:3 subscale RX-1 model, as it produces the majority of the platform’s lift (Figure 3A). The analysis was conducted in the ANSYS FLUENT software (Release 24.1), by solving the steady-state Reynolds Averaged Navier–Stokes (RANS) equations. Τhe two-equation k–ω Shear Stress Transport (SST) turbulence model developed by Menter was adopted [34]. The k–ω SST model is widely used in external aerodynamic simulations due to its improved accuracy in predicting boundary layer separation and adverse pressure gradient effects. It blends the robustness of the k–ω formulation near walls with the free-stream independence of the k–ε formulation, providing reliable results for both attached and separated flows, which is essential for accurate pressure and lift prediction [35].
Figure 3B illustrates the boundary conditions applied in the simulation, where the airflow interacts with the wing at the specified angle of attack, and the wing root serves as a symmetry plane. The computational mesh was generated using a hybrid meshing strategy, as illustrated in Figure 3C. This approach combines structured-like regions near the solid surfaces with unstructured elements in the far-field. A near-wall structured region consisting of prismatic elements was generated to accurately resolve the boundary layer, with 5 cells in the normal direction. The height of the first cell was controlled to ensure the non-dimensional wall distance (y+) was maintained below 1, thus allowing for an accurate calculation within the viscous sublayer. The remainder of the domain consisted of tetrahedral and hexahedral cells. Since the UAV wing exhibits complete geometric symmetry, only the half-wing model was solved, to reduce the computational effort of the analyses. The total number of computational cells is around 2 million and is the result of extensive grid independency studies performed during the conceptual and preliminary design phases of the reference platform.
The quality of the computational mesh was assessed using standard mesh metrics, namely skewness and orthogonal quality. The skewness values ranged from a minimum of 1.77 × 10 4 to a maximum of 0.7998, with an average value of 0.230 and a standard deviation of 0.123. These values indicate a well-shaped mesh, as the majority of the cells exhibit low skewness, remaining well below the commonly accepted upper limit of 0.85 for reliable RANS simulations.
Similarly, the orthogonal quality metric showed a minimum value of 0.200, a maximum of 0.998, and an average value of 0.769, with a standard deviation of 0.121. The high average orthogonal quality confirms that the mesh maintains good cell alignment and numerical robustness, particularly in regions of high gradients near the wing surface. Overall, the mesh quality metrics confirm that the grid is suitable for accurate and stable CFD predictions, without introducing significant numerical diffusion or convergence issues.
The structural assessment in this study is conducted under a single extreme-load condition representative of the critical design case for the wing. This approach is commonly adopted in early-stage structural studies, as maximum stress and deformation typically occur under such governing loads. While a complete flight-load envelope would include additional maneuver, gust, and asymmetric conditions, these cases are expected to produce lower stress levels relative to the extreme condition considered and are therefore not explicitly analyzed here.
The simulation was performed at an angle of attack (AoA) of 14°and an inlet velocity of 92 km/h. These conditions were specifically chosen to achieve an extreme aerodynamic load, yielding a load factor n of 3.8 (Equation (1)) which which corresponds to the regulatory limit load for the UAV category according to STANAG 4671 standards [34,36]. Ultimate load cases, incorporating an additional safety factor of 1.5, were not considered in the present preliminary study.
n = L ( N ) W ( N )
Note that L stands for the lift produced by the UAV and W for the take-off weight The latter corresponds to the weight of the subscale RX-1 platform, which equals to 8.8 kg Based on the operating conditions and standard sea-level air properties (ρ = 1.225 kg/m3 and ν = 1.46 × 10⁻⁵ m2/s) and using the Mean Aerodynamic Chord (MAC) as the characteristic length, the CFD analysis was conducted at a Reynolds number (Re) of approximately 2 × 10⁵. Regarding turbulence boundary conditions, the freestream turbulence was specified using a turbulence intensity of 1% and a turbulence viscosity ratio of 3. After the solution converged, the resulting pressure distribution was directly imported into the structural analysis as the applied load. The aerodynamic performance of the wing under these conditions yielded a lift coefficient CL = 1.29 and a drag coefficient CD = 0.0093, demonstrating a high lift-to-drag efficiency suitable for the UAV’s operational requirements.

2.4. Static Structural Analysis

Following the CFD simulation, a static structural analysis was performed on ANSYS software (Release 24.1) using the original solid wing CAD model. The primary objective of this preliminary analysis was to generate a stress gradient map to inform subsequent wing design optimization. For simplicity, the material was defined as default structural steel, as the absolute material properties have minimal effect on the stress distribution pattern and influence only the numerical range (i.e., the minimum and maximum stress values).
For the boundary conditions, the wing root was fully constrained, as shown in Figure 4B. The pressure distribution obtained from the CFD simulation was applied to the wing surface as a load, as illustrated in Figure 4A. The analysis was restricted to the evaluation of stress distribution; therefore, only the equivalent von Mises stress was computed. Displacement, safety factor, and other structural responses were not included at this stage.
Using an identical static structural analysis, the final cases, featuring different infill thicknesses and shell/infill materials, were evaluated to produce Von Mises stress maps and wing-tip displacement results.

2.5. Variable Thickness Attribution

Using the initial solid wing model and the stress distribution results, the design optimization process was carried out using nTopology (Inc., nTopology, edu license, Version 4.26, New York, NY, USA). The CAD model was first imported into nTopology and converted into an implicit model. Using the implicit representation allowed the software to efficiently handle complex geometries and generate smooth, continuous shapes, avoiding the limitations associated with traditional meshing. This provided greater flexibility in material distribution and enhanced design freedom during topological optimization.
From the implicit body, a shell geometry with a uniform thickness of 1.2 mm was created to define the external boundary of the structure. The internal volume was then extracted by subtracting the overlapping region of the shell from the original implicit body, thereby isolating the space available for lattice generation.
To populate this internal volume with a lattice, a triply periodic minimal surface (TPMS) structure was employed. A gyroid unit cell was selected due to its continuous surface and favorable mechanical performance This selection was based on studies comparing gyroid cells with other TPMS structures, such as diamond and Schwarz primitive cells [37] A walled TPMS configuration with unit cell dimensions of 80 × 80 × 80 mm was defined and repeated throughout the internal volume to generate the final lattice structure.
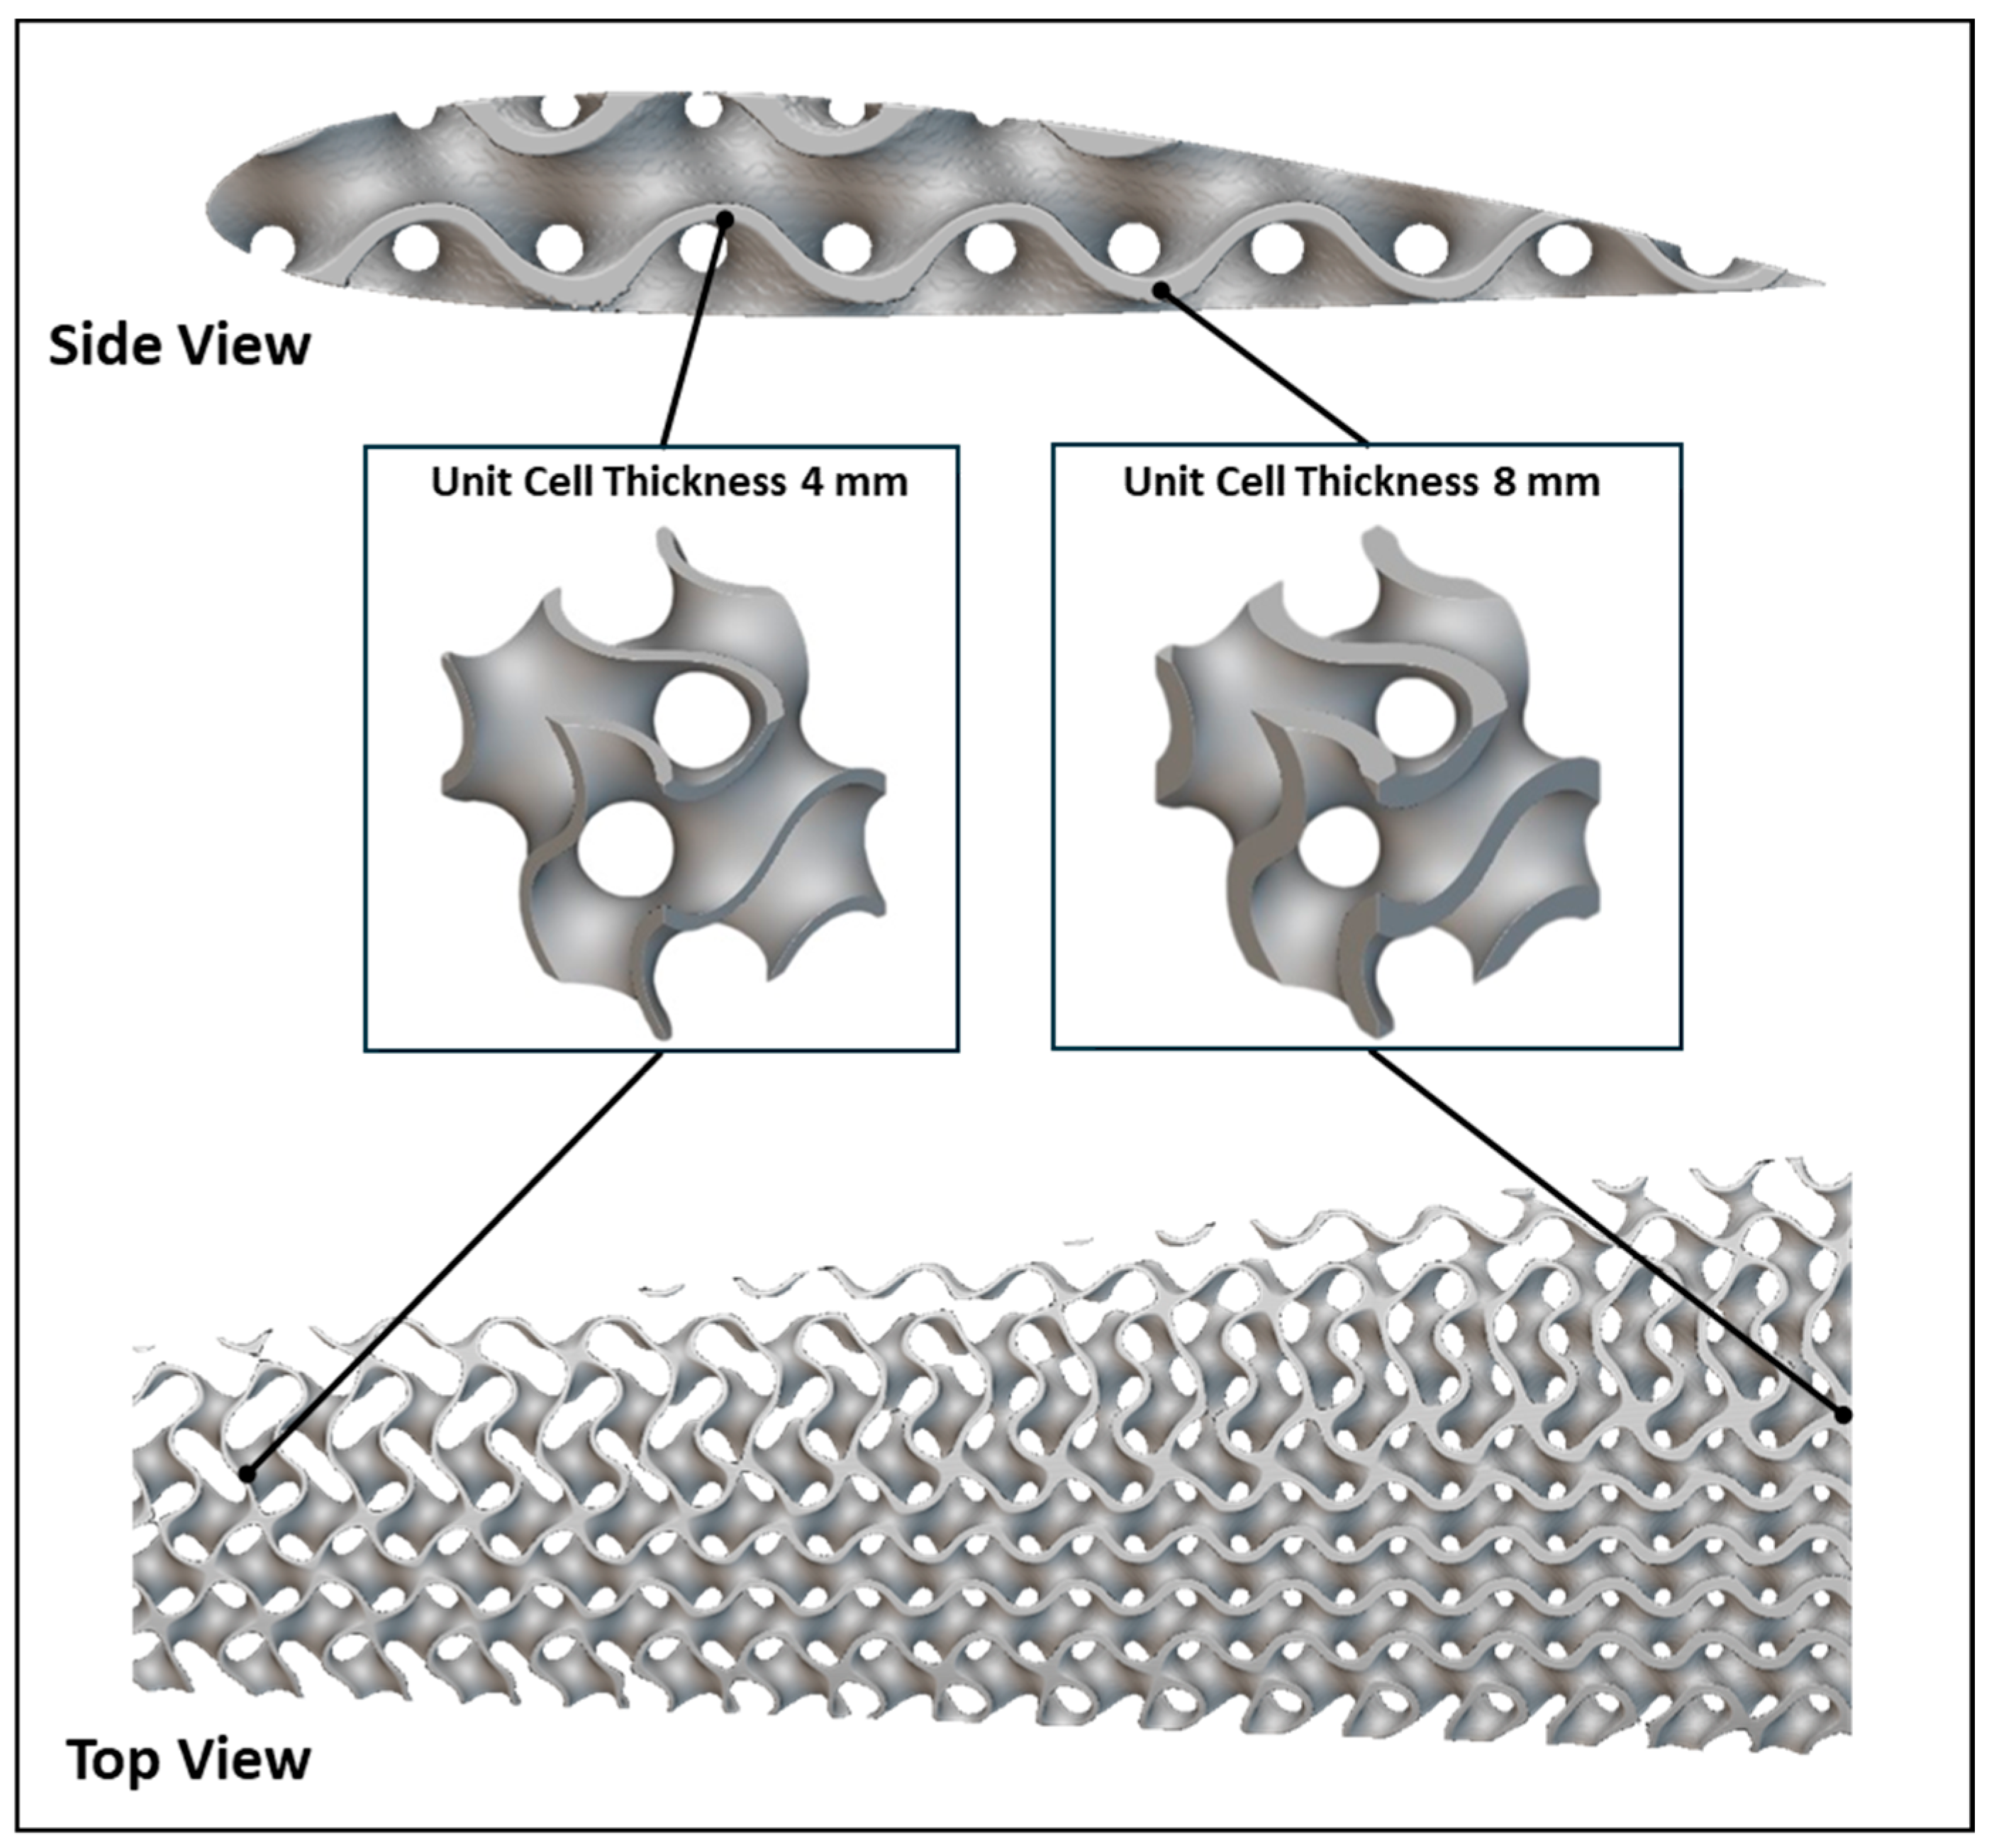
To approximate the unit cell wall thickness, a ramp function was implemented. This function defined the variable wall thickness by mapping structural performance to geometry. The ramp was generated by importing a scalar field containing stress results from the initial static structural analysis. Based on this stress field, a gradient thickness distribution was applied. Regions experiencing the lowest stress were assigned the minimum wall thickness of 4 mm, while regions with the highest stress were assigned the maximum wall thickness of 8 mm. The selected range of 4–8 mm was determined based on computational and practical constraints. Wall thicknesses below 4 mm would require a substantially finer mesh resolution to accurately capture the TPMS geometry, leading to a significant increase in computational cost and memory requirements. Conversely, thicknesses above 8 mm did not yield a noticeable improvement in structural performance during preliminary analyses. Therefore, the 4–8 mm range represents a balanced trade-off between numerical accuracy, computational efficiency, and structural response. This approach produced a variable-thickness TPMS structure, as illustrated in Figure 5.
Table 1 summarizes the four case studies considered in this work. Cases a.1 and a.2 were designed without variable wall thickness and serve as reference models for comparison. Case a.4 is the only configuration that employs LW ASA processed at 240 °C for the TPMS structure.

3. Results

3.1. Material Testing

To obtain accurate material properties, tensile tests were performed. Stress-strain curves were generated from the tensile tests to determine the Young’s modulus and yield point of the materials (Figure 6). A clear inverse relationship can be observed between the printing temperature and the resulting mechanical strength of the printed specimens. Specifically, as the printing temperature increases from 240 °C to 260 °C, there is a notable decline in yield strength and tensile performance. This trend is prominently depicted in the yield strength gradient plot Figure 7A, where the curve demonstrates a smooth, nonlinear decline in strength values. The shape of this decline closely follows a parabolic trajectory, suggesting that the reduction in mechanical strength with increasing temperature is not linear but instead accelerates at higher temperature levels.
In contrast, the density gradient Figure 7B exhibits a clear linear decrease across the same temperature range, with a steady rate of reduction. This decline occurs at a gentler slope compared to the sharper downward trend observed in the strength gradient. This indicates that while density consistently decreases with increasing temperature, the corresponding loss in mechanical strength accelerates more rapidly. This discrepancy underscores a critical design consideration: there exists a threshold temperature beyond which the marginal gain in reduced density no longer compensates for the rapid loss in strength. Therefore, identifying this inflection point is essential in ensuring that the printed structure maintains the minimum required mechanical integrity while optimizing for weight or material usage. Then, 260 °C LW ASA was considered to have significant reductions in strength, and therefore, it was not used in any case study.

3.2. CFD Results

The aerodynamic analysis of the wing yielded a lift coefficient of CL = 1.29 and a drag coefficient CD = 0.0093, resulting in a high lift-to-drag ratio consistent with the UAV’s operational requirements.
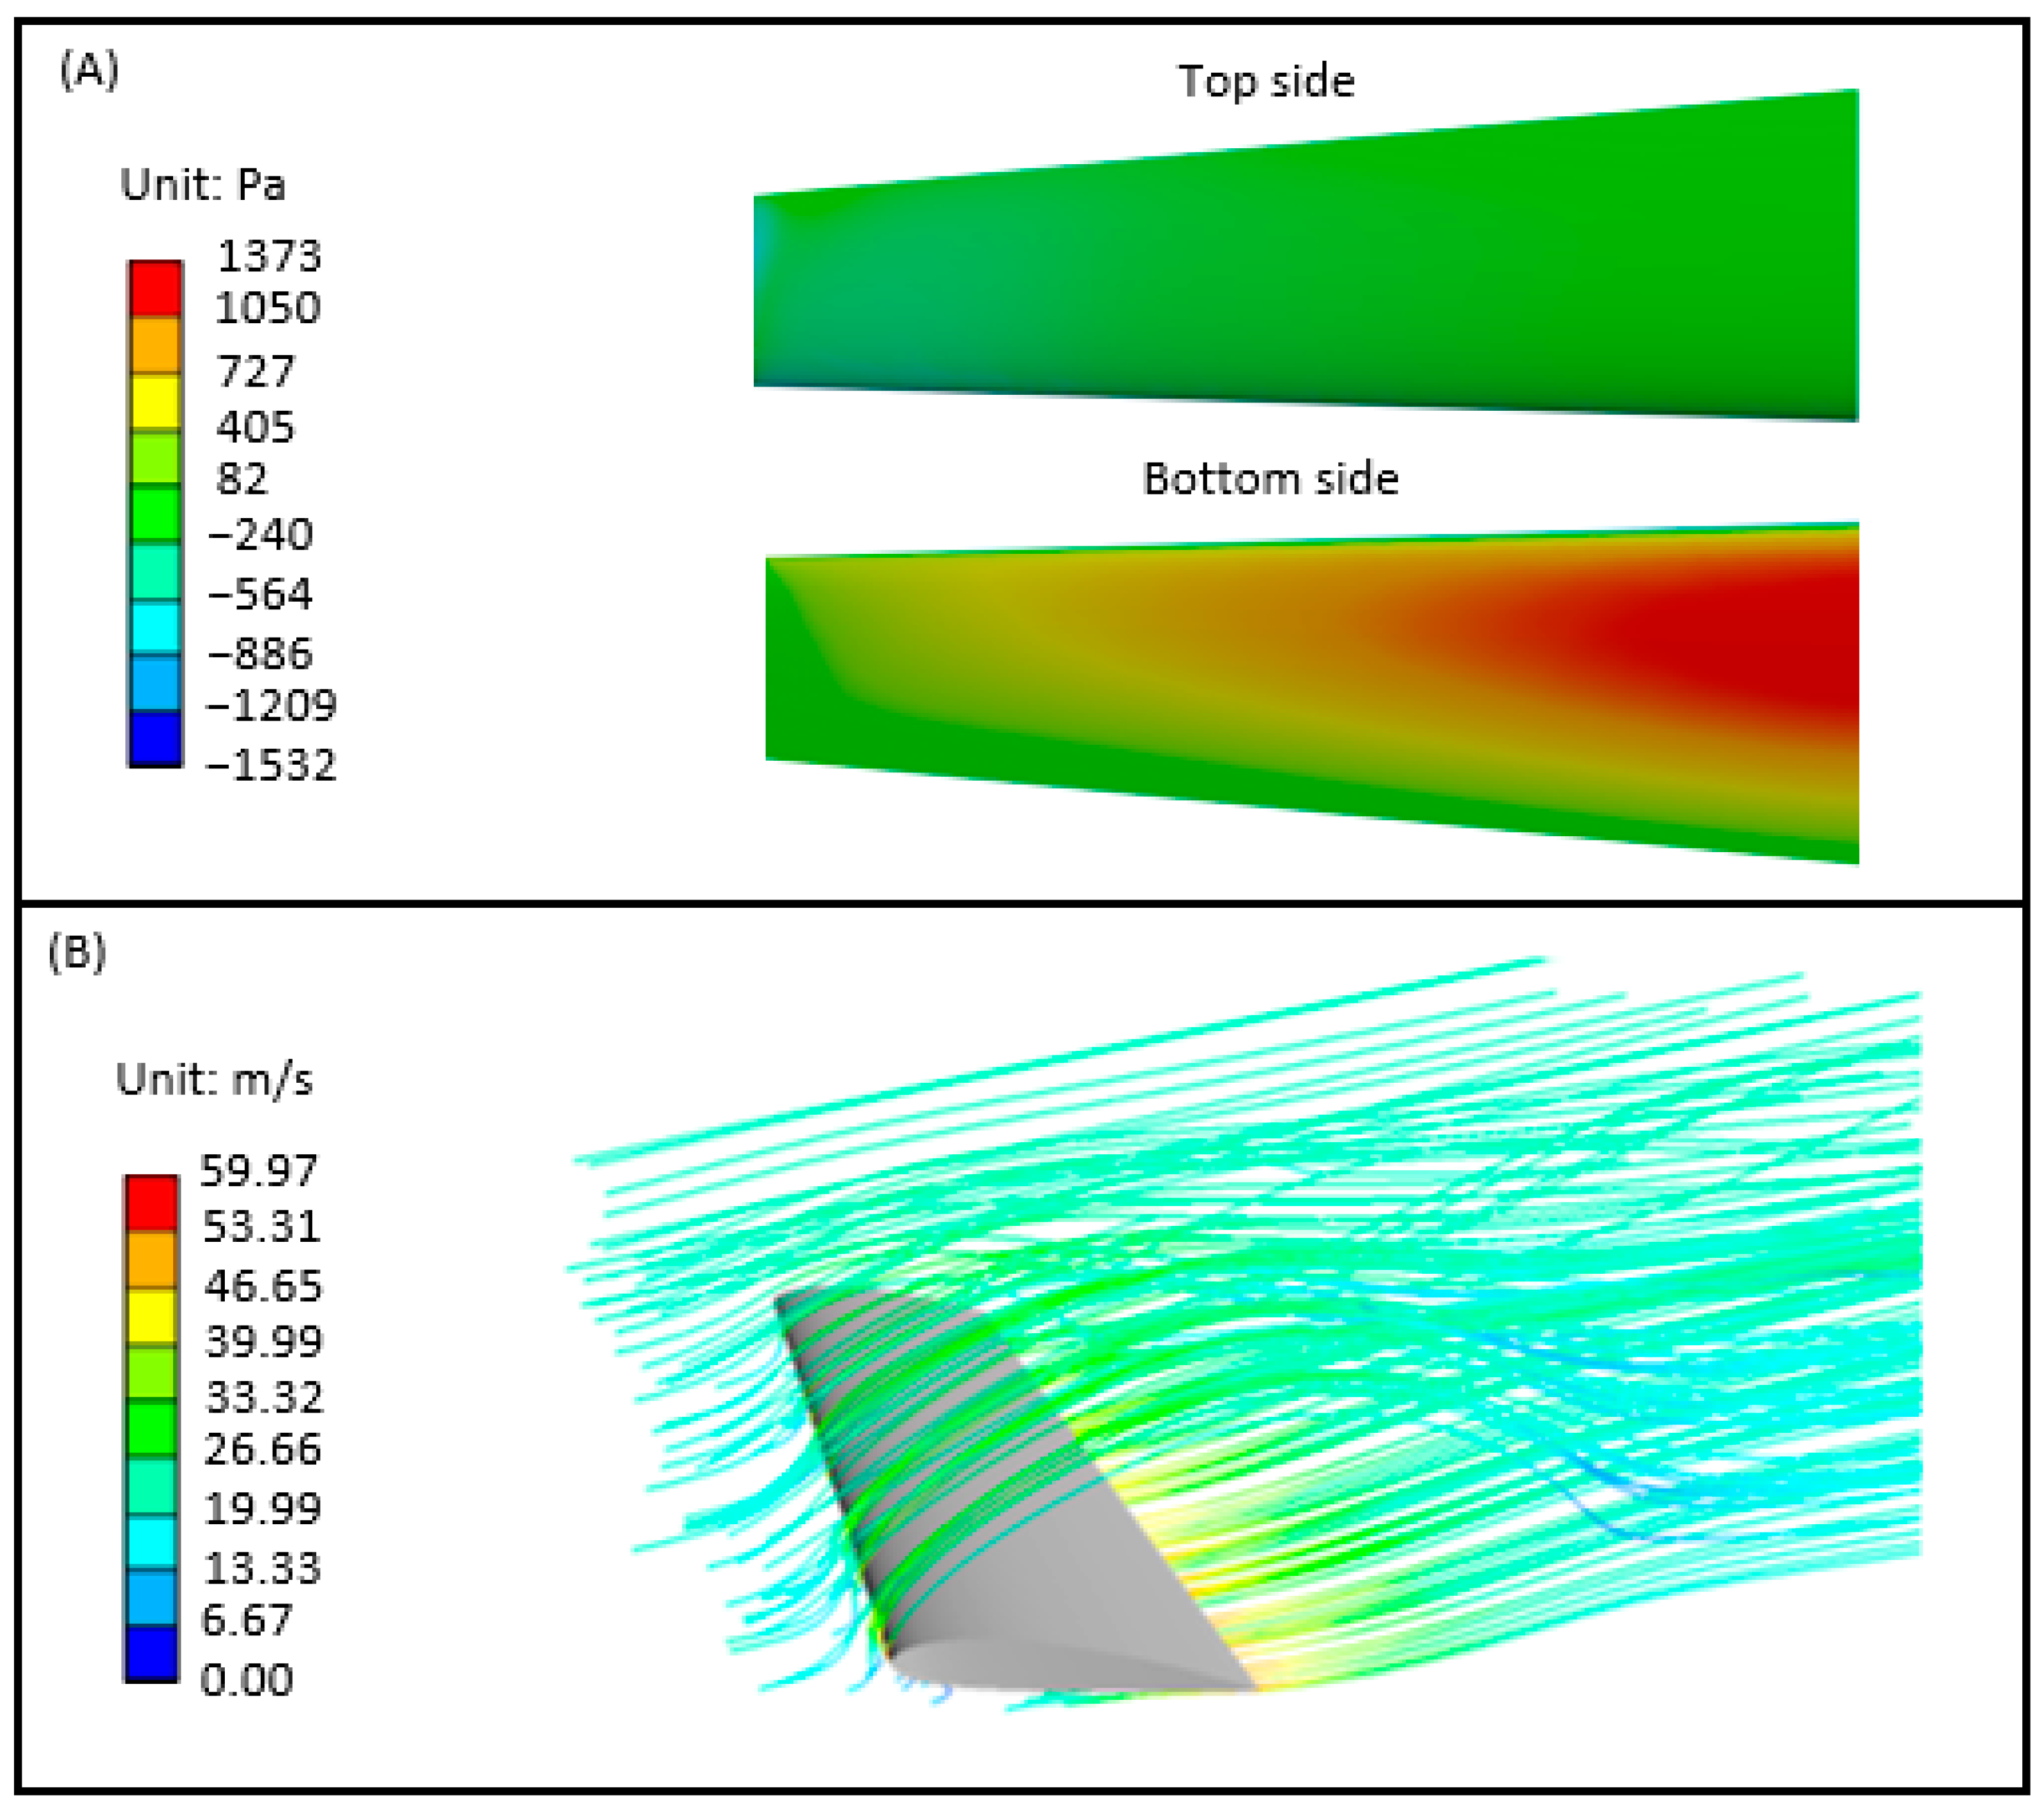
Figure 8A reveals that the highest-pressure concentrations occur along the bottom surface of the wing near the root region. This distribution aligns with expectations given the relatively high angle of attack applied in the simulation, which increases the stagnation pressure on the lower surface.
Figure 8B presents the airflow trajectory around the wing, illustrating the velocity field and streamlines at the same angle of attack. The flow pattern reveals significant acceleration of airflow over the upper surface, accompanied by a pronounced decrease in velocity on the lower side, especially near the root. This asymmetry in velocity distribution supports the differential observed in Figure 8A, where lower pressure dominates the upper surface and higher pressure accumulates on the bottom side. Additionally, signs of early flow separation can be inferred from the disturbed or divergent streamlines downstream of the trailing edge, particularly near the suction side. This behavior is typical at high angles of attack and can be associated with increased drag and the onset of stall conditions. Overall, the flow visualization confirms the aerodynamic loading characteristics expected under such conditions, highlighting a strong lift-generating regime coupled with potential instability near the upper trailing edge.

3.3. Static Structural Results

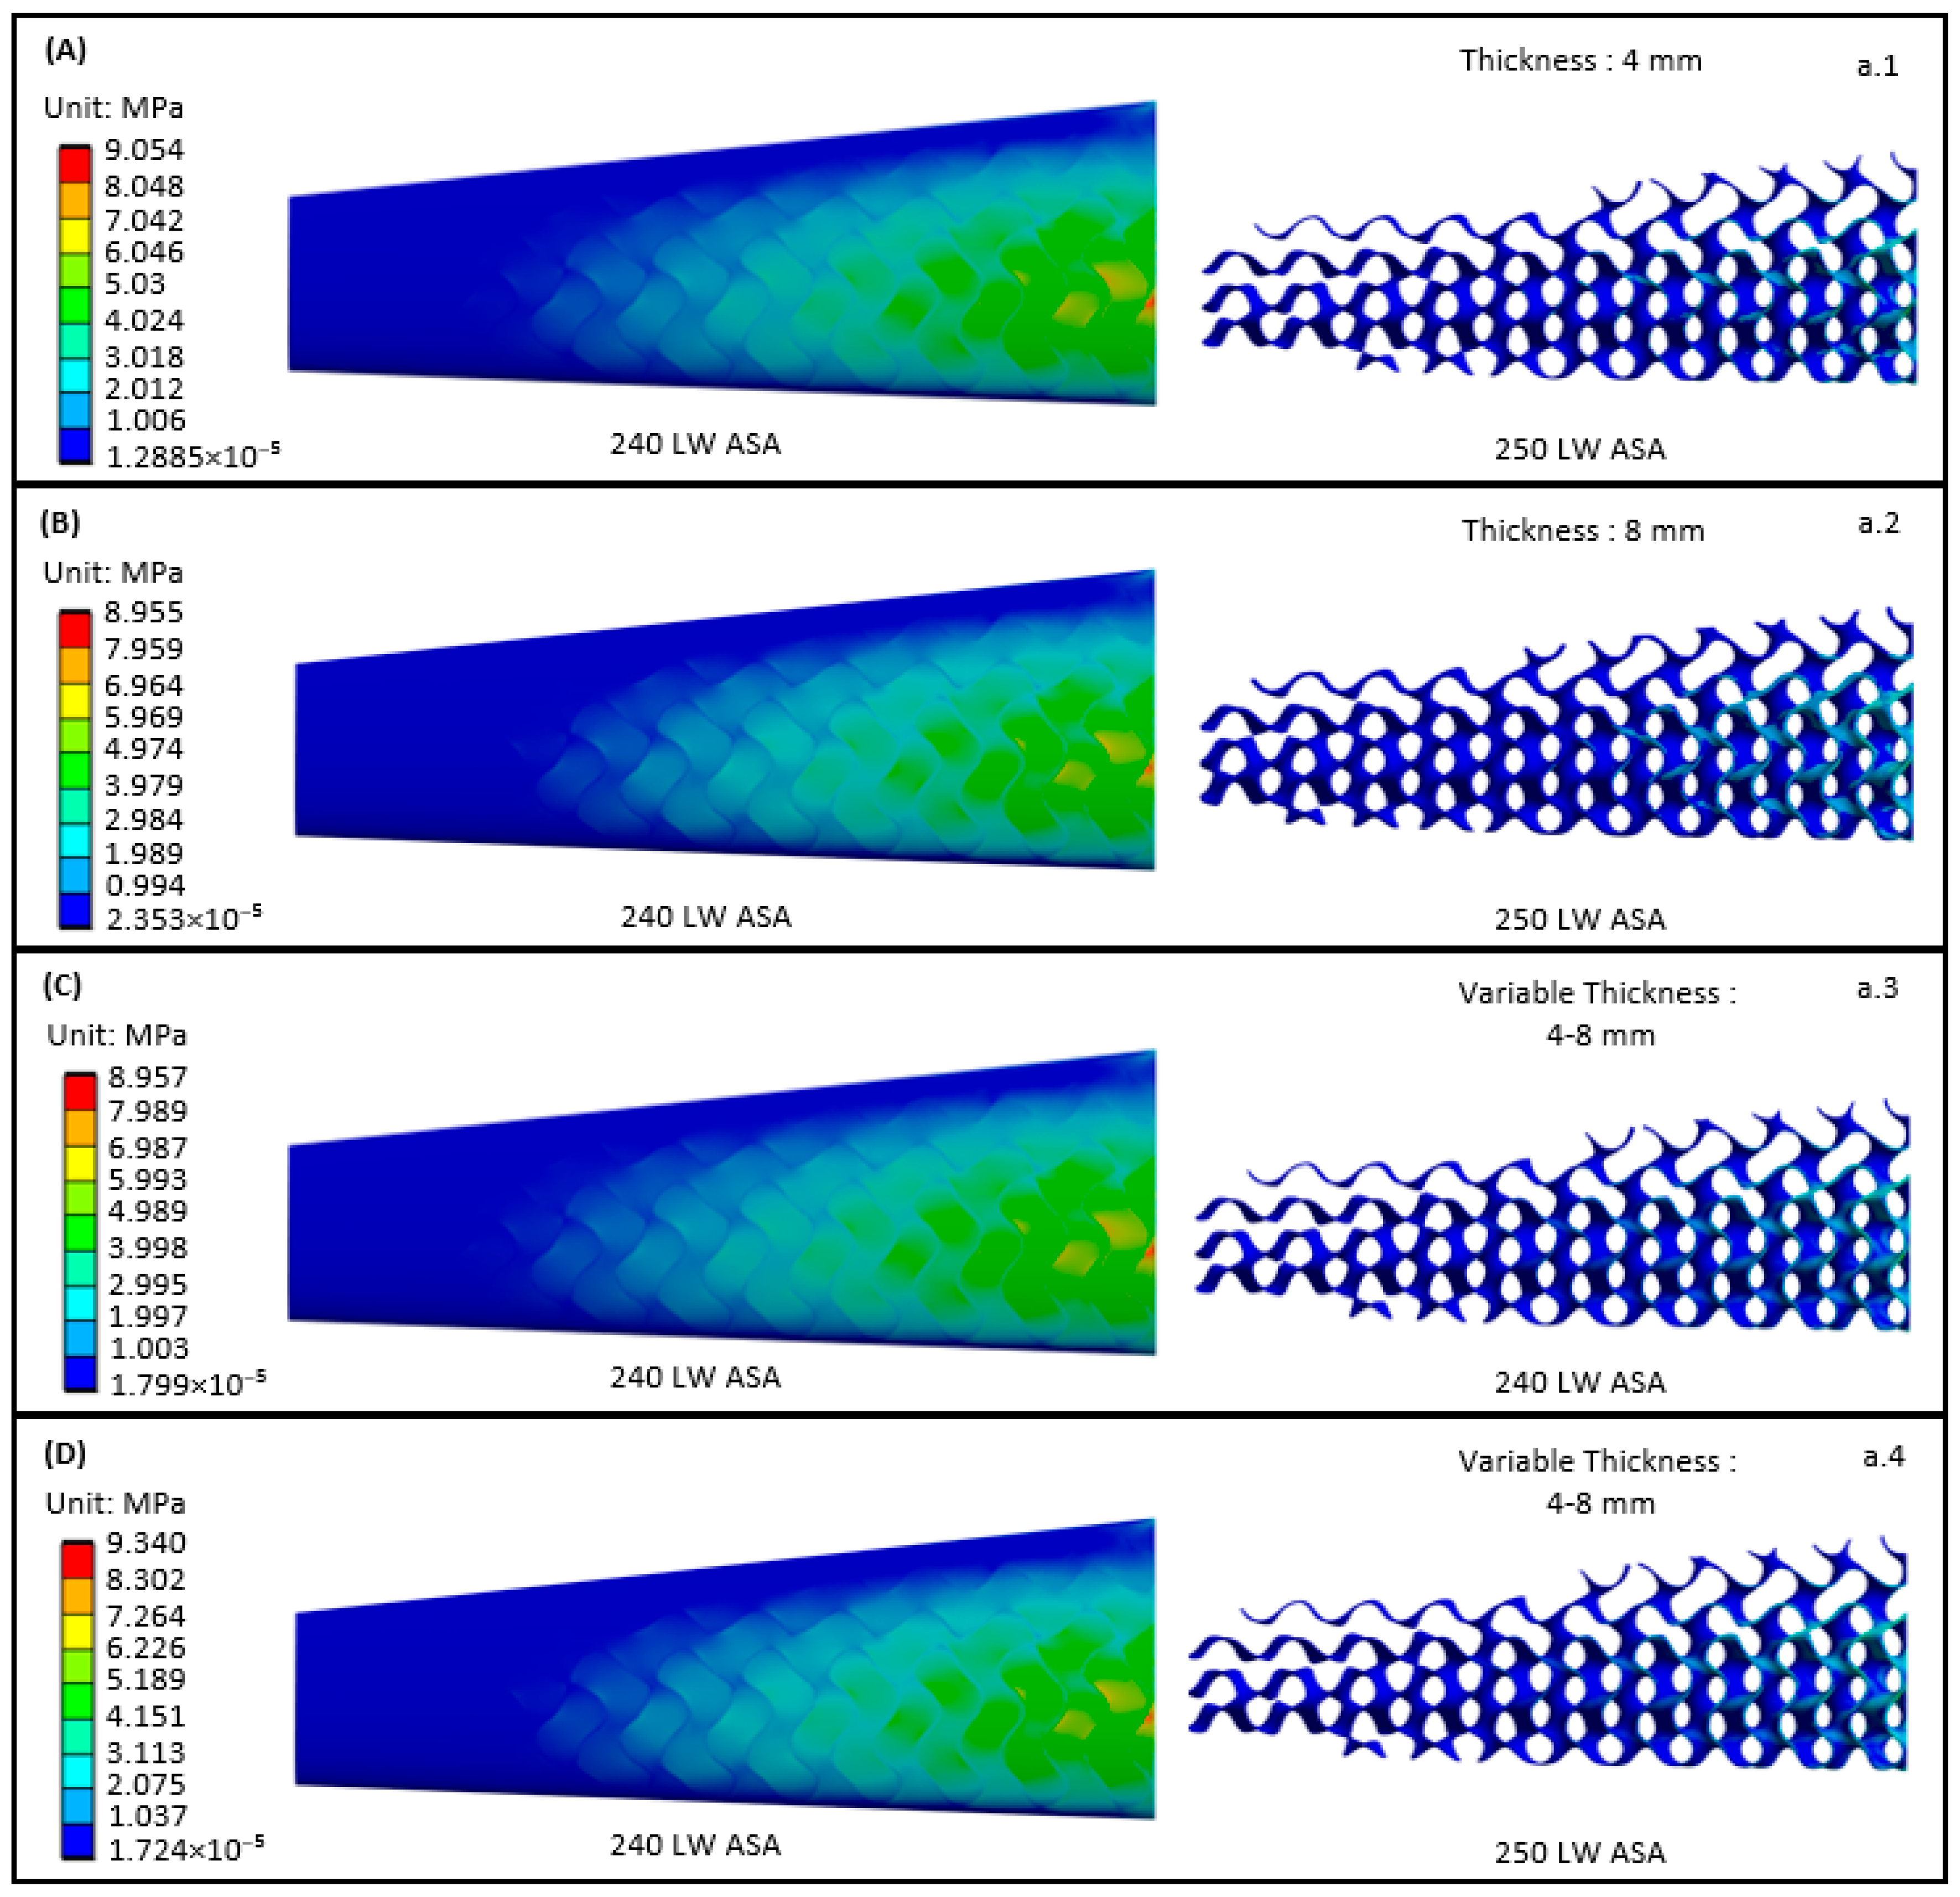
Figure 9 presents the Von Mises stress distributions on both the shell surface and the internal TPMS structures. Four case studies were developed for static structural analysis. Cases a.1 (Figure 9A) and a.2 (Figure 9B) employed fixed TPMS wall thicknesses of 4 mm and 8 mm, respectively. Cases a.3 (Figure 9C) and a.4 (Figure 9D) employ a variable TPMS thickness ranging from 4 mm to 8 mm. Across all cases, the general stress distribution patterns are similar, with the highest stresses concentrated near the loaded end of the shell. However, slight variations in maximum stress values are observed among configurations, as indicated by the color contours.
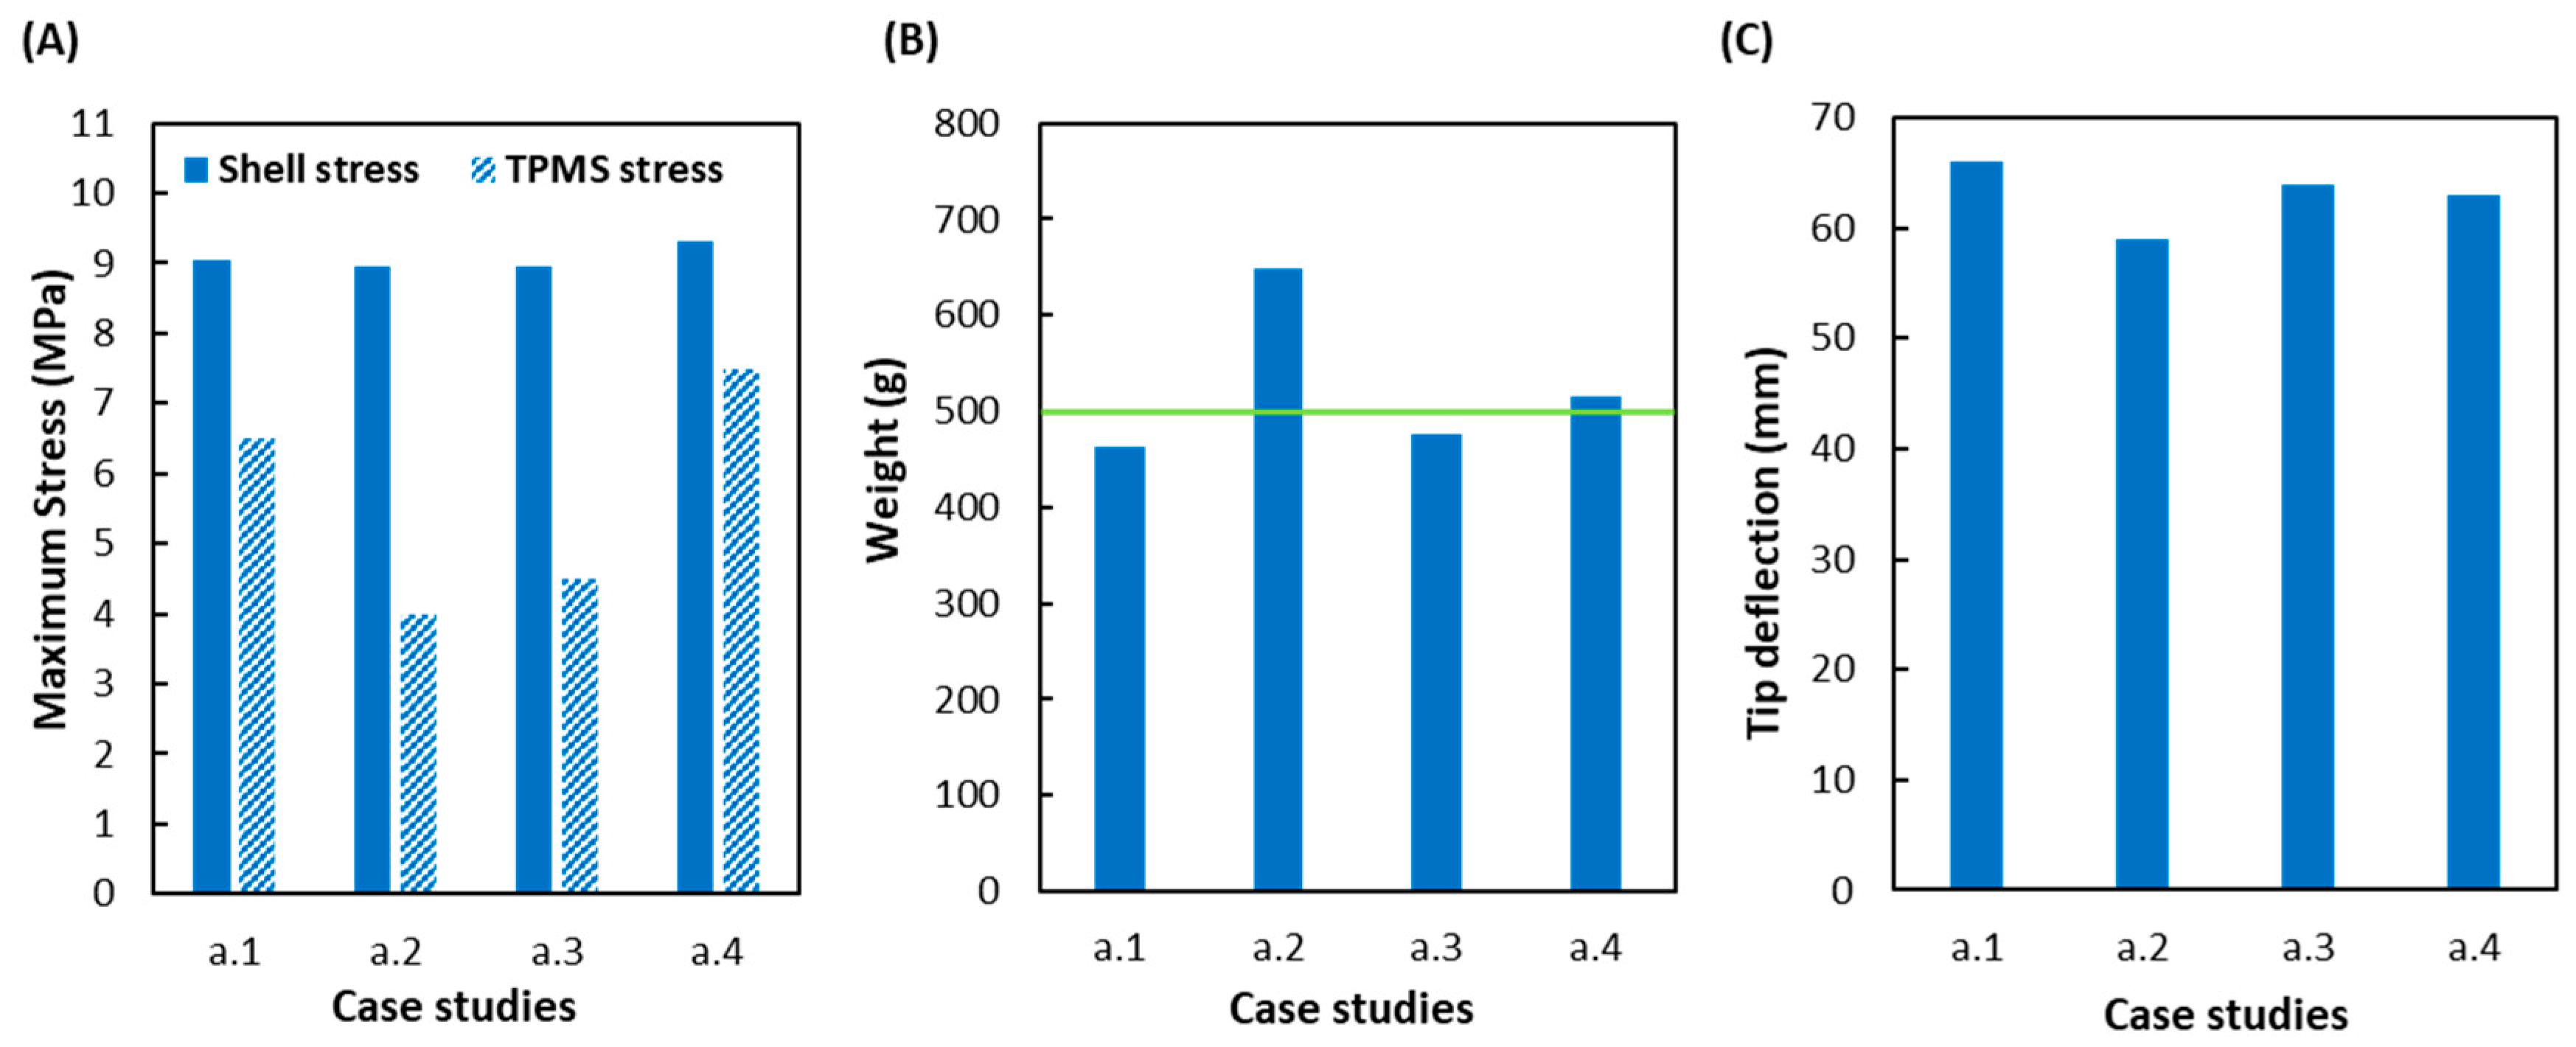
To further evaluate structural performance, Figure 10 presents the tip displacement results, followed by Figure 11, which compares maximum stress, overall weight, and tip deflection across configurations. As shown in Figure 10, the tip displacement remains close across all four loading scenarios. The maximum displacement, Figure 10A, occurs in case a.1 with 66.1 mm, followed by case a.3 with 64.2 mm Figure 10C, Figure 10D case a.4 with 63.5 mm, and case a.2, which shows the lowest displacement of 59.3 mm, Figure 10B. The difference between the largest and smallest displacements corresponds to approximately 10.4%. Such a variation is minor and can be considered insignificant in terms of UAV handling and maneuverability.
As shown in Figure 11A, case a.1 exhibits a maximum surface stress exceeding 9 MPa, approaching the yield strength limit of 9.5 MPa for the 240 °C LW ASA material. Case a.4 reaches an even higher value of approximately 9.3 MPa, despite the use of variable wall thickness in the TPMS structure. This increased stress may be attributed to the use of 240 LW ASA not only on the outer shell but also throughout the internal TPMS, resulting in a stiffer structure. Case a.2 remains slightly below 9 MPa, utilizing a uniform wall thickness of 8 mm throughout the TPMS structure. Case a.3, which incorporates variable wall thickness ranging from 4 mm to 8 mm, yields comparable maximum stress values. When comparing Figure 11B, cases a.2 and a.3, a significant weight reduction of 184 g is observed in case a.3, without compromising structural performance. Finally, Figure 11C shows the tip deflection along the Y-axis, where case a.2 exhibits the lowest deflection (59 mm), while case a.1 displays the highest deflection (66 mm).
Table 2 presents the comparative performance of the conventional composite wing and the optimized additively manufactured (AM) wing segment, clearly illustrating the benefits of the AM approach. The optimized AM wing demonstrates a noticeable mass reduction of approximately 7% while consolidating the structure into a unibody design, eliminating the need for skins, spars, and ribs assembled as separate parts. Manufacturing is transformed from a manual, tool-intensive composite process to an automated, tooling-free 3D printing workflow, significantly reducing post-processing requirements. As a result, overall production time is reduced from several weeks to less than two weeks, highlighting the AM wing’s advantages in manufacturing efficiency, reduced labor and tooling dependency, and faster development cycles.

4. Conclusions

This study presented a procedural methodology for optimizing the design of a 3D-printed UAV wing, demonstrating a workflow combining two novel approaches that can be extended to other aeronautical applications while the potential of a fully 3D-printed UAV is yet to be tested for the large scale RX1. First, the internal layout is optimized using a variable-thickness TPMS lattice, adding extra reinforcement in high-stress regions. Second, a chemical blowing-agent filament is printed at different temperatures for the shell and infills to create distinct densities and mechanical properties. The primary objective of this work was to reduce the overall mass of the wing relative to a conventionally manufactured counterpart while maintaining structural integrity. This objective was largely achieved, as most case studies resulted in comparable or slightly lower weights than the reference design. The optimal configuration (case a.1) achieved an approximate weight reduction of 7%. However, this case does not fully exploit the potential of the two proposed novelties, since a constant thickness was used. Similarly, case a.4, which achieved a 5% weight reduction, does not leverage the capability of varying microporosity, relying solely on LW-ASA printed at 240 °C for both the infill and shell. These results are derived from a preliminary study, and further investigation considering different unit cell orientations, types, and sizes is expected to fully exploit the potential of the proposed novelties. Even in cases where the additively manufactured wing matched or slightly exceeded the mass of the conventionally manufactured reference, the results demonstrate the feasibility of producing structurally functional UAV wings using additive manufacturing. With further optimization and future validation of manufacturing cost or production time reductions, such designs may represent a competitive alternative to conventional manufacturing approaches, even in scenarios involving a modest mass increase.
Even in cases where the additively manufactured wing matched or slightly exceeded the mass of the conventionally manufactured reference, the results demonstrate the feasibility of producing structurally functional UAV wings using additive manufacturing. With further optimization and future validation of manufacturing cost or production time reductions, such designs may represent a competitive alternative to conventional manufacturing approaches, even in scenarios involving a modest mass increase. In summary, this research demonstrates the feasibility of combining two novel approaches to develop lightweight 3D-printed wing structures. The proposed methodology establishes a foundation for future work on fully additively manufactured UAVs, with further optimization as computational resources and AM technologies continue to evolve.

Author Contributions

Conceptualization, G.M. and S.K.; methodology, G.M., S.K. and O.Z.; software, G.M. and O.Z.; validation, G.M., S.K., D.T. and P.P.; formal analysis, G.M. and S.K.; investigation, G.M., S.K. and O.Z.; resources, P.P. and D.T.; data curation, G.M., S.K. and O.Z.; writing—original draft preparation, G.M. and S.K.; writing—review and editing, G.M., S.K. and O.Z.; visualization, G.M., S.K and O.Z; supervision, D.T. and P.P.; project administration, D.T.; funding acquisition, D.T. and P.P. All authors have read and agreed to the published version of the manuscript.

Funding

This research received no external funding.

Data Availability Statement

Data are contained within this article.

Conflicts of Interest

The authors declare no conflict of interest.

References

  1. Getachew, M.T.; Shiferaw, M.Z.; Ayele, B.S. The current state of the art and advancements, challenges, and future of additive manufacturing in aerospace applications. Adv. Mater. Sci. Eng. 2023, 2023, 8817006. [Google Scholar] [CrossRef]
  2. Martinez, D.W.; Espino, M.T.; Cascolan, H.M.; Crisostomo, J.L.; Dizon, J.R.C. A comprehensive review on the application of 3D printing in the aerospace industry. Key Eng. Mater. 2022, 913, 27–34. [Google Scholar] [CrossRef]
  3. Sossou, G.; Demoly, F.; Gomes, S.; Montavon, G. An assembly-oriented design framework for additive manufacturing. Designs 2022, 6, 20. [Google Scholar] [CrossRef]
  4. Vaggar, G.B.; Dsouza, E.C.; Kamath, A.D. Review on additive manufacturing at the forefront: Exploring recent developments and industry applications. Mater. Res. Proc. 2025, 55, 72–78. [Google Scholar] [CrossRef]
  5. Lee, H.Y.; Zhu, M.; Guest, J.K. Topology optimization considering multi-axis machining constraints using projection methods. Comput. Methods Appl. Mech. Eng. 2022, 390, 114464. [Google Scholar] [CrossRef]
  6. Jiménez, M.; Romero, L.; Domínguez, I.A.; Espinosa, M.D.M.; Domínguez, M. Additive manufacturing technologies: An overview about 3D printing methods and future prospects. Complexity 2019, 2019, 9656938. [Google Scholar] [CrossRef]
  7. Zhou, L.; Miller, J.; Vezza, J.; Mayster, M.; Raffay, M.; Justice, Q.; Al Tamimi, Y.; Hansotte, G.; Devi Sunkara, L.; Bernat, J. Additive manufacturing: A comprehensive review. Sensors 2024, 24, 2668. [Google Scholar] [CrossRef]
  8. Turkcan, H.; Imamoglu, S.Z.; Ince, H. To be more innovative and more competitive in dynamic environments: The role of additive manufacturing. Int. J. Prod. Econ. 2022, 246, 108418. [Google Scholar] [CrossRef]
  9. Piccioni, M.; Ratti, A. Additive manufacturing in the maritime industry: Impact on production processes, workers, and end-users. Hum. Asp. Adv. Manuf. Prod. Manag. Process Control 2024, 146, 184–194. [Google Scholar]
  10. Sönmez, M.; Pelin, C.-E.; Georgescu, M.; Pelin, G.; Stelescu, M.D.; Nituica, M.; Stoian, G.; Alexandrescu, L.; Gurau, D. Unmanned Aerial Vehicles—Classification, Types of Composite Materials Used in Their Structure and Applications. In Proceedings of the 9th International Conference on Advanced Materials and Systems, Bucharest, Romania, 26–28 October 2022; pp. 77–82. [Google Scholar]
  11. Kantaros, A.; Drosos, C.; Papoutsidakis, M.; Pallis, E.; Ganetsos, T. Composite Filament Materials for 3D-Printed Drone Parts: Advancements in Mechanical Strength, Weight Optimization and Embedded Electronics. Materials 2025, 18, 2465. [Google Scholar] [CrossRef] [PubMed]
  12. Konyalıoğlu, T.; Alnıpak, S.; Şahin, H.I.; Altuğ, E. Integrating Additive Manufacturing and Composite Manufacturing Techniques to Build a General-Purpose UAV. Int. J. Aviat. Sci. Technol. 2025, 6, 91–105. [Google Scholar] [CrossRef]
  13. Patel, S.; Bhoi, A.; Maurya, V.; Wankhede, A.; Bakshi, R. Design and test 3D printed lattice structure for UAV. Int. Res. J. Eng. Technol. 2020, 7, 7169–7174. [Google Scholar]
  14. Dinovitzer, M.; Miller, C.; Hacker, A.; Wong, G.; Annen, Z.; Rajakareyar, P.; Mulvihill, J.; El Sayed, M. Structural development and multiscale design optimization of additively manufactured uav with blended wing body configuration employing lattice materials. In Proceedings of the AIAA Scitech 2019 Forum, San Diego, CA, USA, 7–11 January 2019; p. 2048. [Google Scholar]
  15. Lozanovski, B.; Downing, D.; Tino, R.; Tran, P.; Shidid, D.; Emmelmann, C.; Qian, M.; Choong, P.; Brandt, M.; Leary, M. Image-based geometrical characterization of nodes in additively manufactured lattice structures. 3D Print. Addit. Manuf. 2021, 8, 51–68. [Google Scholar] [CrossRef]
  16. Khan, N.; Riccio, A. A systematic review of design for additive manufacturing of aerospace lattice structures: Current trends and future directions. Prog. Aerosp. Sci. 2024, 149, 101021. [Google Scholar] [CrossRef]
  17. Du Plessis, A.; Razavi, N.; Benedetti, M.; Murchio, S.; Leary, M.; Watson, M.; Bhate, D.; Berto, F. Properties and applications of additively manufactured metallic cellular materials: A review. Prog. Mater. Sci. 2022, 125, 100918. [Google Scholar] [CrossRef]
  18. Benedetti, M.; Du Plessis, A.; Ritchie, R.; Dallago, M.; Razavi, N.; Berto, F. Architected cellular materials: A review on their mechanical properties towards fatigue-tolerant design and fabrication. Mater. Sci. Eng. R Rep. 2021, 144, 100606. [Google Scholar] [CrossRef]
  19. Panesar, A.; Abdi, M.; Hickman, D.; Ashcroft, I. Strategies for functionally graded lattice structures derived using topology optimisation for Additive Manufacturing. Addit. Manuf. 2018, 19, 81–94. [Google Scholar] [CrossRef]
  20. Pan, C.; Han, Y.; Lu, J. Design and optimization of lattice structures: A review. Appl. Sci. 2020, 10, 6374. [Google Scholar] [CrossRef]
  21. Wang, W.; Feng, D.; Yang, L.; Li, S.; Wang, C.C. Topology optimization of self-supporting lattice structure. Addit. Manuf. 2023, 67, 103507. [Google Scholar] [CrossRef]
  22. Sokollu, B.; Gulcan, O.; Konukseven, E.I. Mechanical properties comparison of strut-based and triply periodic minimal surface lattice structures produced by electron beam melting. Addit. Manuf. 2022, 60, 103199. [Google Scholar] [CrossRef]
  23. Al-Ketan, O.; Abu Al-Rub, R.K. Multifunctional mechanical metamaterials based on triply periodic minimal surface lattices. Adv. Eng. Mater. 2019, 21, 1900524. [Google Scholar] [CrossRef]
  24. Montazerian, H.; Davoodi, E.; Asadi-Eydivand, M.; Kadkhodapour, J.; Solati-Hashjin, M. Porous scaffold internal architecture design based on minimal surfaces: A compromise between permeability and elastic properties. Mater. Des. 2017, 126, 98–114. [Google Scholar] [CrossRef]
  25. Nam, R.; Jakubinek, M.; Niknam, H.; Rahmat, M.; Ashrafi, B.; Naguib, H.E. 3D printed octet plate-lattices for tunable energy absorption. Mater. Des. 2023, 228, 111835. [Google Scholar] [CrossRef]
  26. Battaglia, M.; Acanfora, V.; Garofano, A.; Maisto, G.; Riccio, A. An innovative approach to a UAV tails structural design for additive manufacturing. Polym. Compos. 2024, 45, 11149–11161. [Google Scholar] [CrossRef]
  27. Gao, T.; Liu, K.; Wang, X.; Shen, L.; Zhao, Y.; Wei, K.; Wang, Z. Elastic wave manipulation via functional incorporation of air-solid phases in hybrid TPMS. Compos. Commun. 2023, 44, 101745. [Google Scholar] [CrossRef]
  28. Koltsakidis, S.; Tzetzis, D. Review of the Integration of Fused Filament Fabrication with Complementary Methods for Fabricating Hierarchical Porous Polymer Structures. Appl. Sci. 2025, 15, 9703. [Google Scholar] [CrossRef]
  29. Koltsakidis, S.; Tsongas, K.; Tzetzis, D. Combining Micro and Macro Relative Density: An Experimental and Computational Study on Hierarchical Porous 3D-Printed Polylactic Acid Structures. Adv. Eng. Mater. 2024, 26, 2402012. [Google Scholar] [CrossRef]
  30. Koltsakidis, S.; Tsongas, K.; Tzetzis, D. Additive Manufacturing of Gradient Stiffness Honeycombs Using Thermoplastic Polyurethane Composite Material Variations. Adv. Eng. Mater. 2025, e202501422. [Google Scholar] [CrossRef]
  31. Koltsakidis, S.; Tsongas, K.; Tzetzis, D. Robocasting of Hierarchical Porous Al2O3 Structures: A Computational and Experimental Methodology for Porosity Estimation and its Effect. J. Mater. Eng. Perform. 2024, 34, 16284–16296. [Google Scholar] [CrossRef]
  32. Gao, T.; Liu, K.; Ma, Q.; Ding, J.; Hu, Z.; Wei, K.; Song, X.; Li, Z.; Wang, Z. Unveiling the mechanics of micro-LPBF manufactured hierarchical composites: A novel FE2-nested homogenisation approach. Virtual Phys. Prototyp. 2025, 20, e2456693. [Google Scholar] [CrossRef]
  33. Panagiotou, P.; Kaparos, P.; Salpingidou, C.; Yakinthos, K. Aerodynamic design of a MALE UAV. Aerosp. Sci. Technol. 2016, 50, 127–138. [Google Scholar] [CrossRef]
  34. Rocha, P.A.C.; Rocha, H.H.B.; Carneiro, F.O.M.; da Silva, M.E.V.; de Andrade, C.F. A case study on the calibration of the k–ω SST (shear stress transport) turbulence model for small scale wind turbines designed with cambered and symmetrical airfoils. Energy 2016, 97, 144–150. [Google Scholar] [CrossRef]
  35. Du, Y.; Yan, C.; Han, M.; Ma, M.; Jiang, Z. The improvement of adverse–pressure–gradient eddy viscosity based on the wall law. Phys. Fluids 2025, 37, 075197. [Google Scholar] [CrossRef]
  36. STANAG 4671; Unmanned Aerial Vehicles Systems Airworthiness Requirements (USAR). 1st ed. NATO: Brussels, Belgium, 2009.
  37. Sankineni, R.; Ravi Kumar, Y. Evaluation of energy absorption capabilities and mechanical properties in FDM printed PLA TPMS structures. Proc. Inst. Mech. Eng. Part C J. Mech. Eng. Sci. 2021, 236, 3558–3577. [Google Scholar] [CrossRef]
Figure 1. Flowchart of the design optimization approach followed for the wing model combining two novel approaches with variable infill thickness and different micro porosities and the shell and the infill.
Aerospace 13 00050 g001
Figure 2. (A) Flight test screenshot of the full scale RX1. (B) Detailed 3D CAD of 1:3 scale down model of RX1.
Aerospace 13 00050 g002
Figure 3. (A) Lift and weight representation of the UAV model. (B) Boundary conditions of the CFD analysis with velocity inlet and symmetry plane. (C) Hybrid mesh with prismatic elements near the wing surface and tetrahedral elements in complex flow regions.
Aerospace 13 00050 g003
Figure 4. Boundary conditions applied in the structural analysis, (A) imported pressure distribution obtained from CFD, and (B) fixed constraint applied at the wing root to simulate structural attachment.
Aerospace 13 00050 g004
Figure 5. Internal TPMS-based wing structure with variable wall thickness. The design is illustrated through side and top views, with enlarged unit cells highlighting thickness variations of 4 mm and 8 mm while maintaining the same unit cell dimensions.
Aerospace 13 00050 g005
Figure 6. Tensile tests of LW ASA specimens printed at 240 °C, 250 °C, and 260 °C.
Aerospace 13 00050 g006
Figure 7. Relationship between temperature, yield strength, and density. (A) Yield strength of printed specimens across temperature settings, (B) corresponding density across the same temperatures.
Aerospace 13 00050 g007
Figure 8. (A) Pressure distribution on the top and bottom surfaces of the wing. The upper surface exhibits regions of lower pressure compared to the underside, consistent with the generation of lift. (B) Streamlines colored by velocity magnitude illustrate airflow acceleration over the upper surface and flow deceleration beneath the wing.
Aerospace 13 00050 g008
Figure 9. Von Mises stress distributions for the shell and TPMS internal structures under different configurations. (A) In scenario a.1, TPMS is 4 mm thick and printed at 250 °C while Shell is 1.2 mm and printed at 240 °C. (B) Scenario a.2, has TPMS thickness of 8 mm, printed at 250 °C and Shell thickness of 1.2 mm printed at 240 °C. (C) Scenario a.3 has variable TPMS thickness of 4 to 8 mm, and is printed at 250 °C while Shell is 1.2 mm thick, printed at 240 °C. (D) Scenario a.4 has variable TPMS thickness of 4 to 8 mm, and is printed at 240 °C while Shell is 1.2 mm thick, printed at 240 °C.
Aerospace 13 00050 g009
Figure 10. Tip displacement of the UAV wing under four different loading conditions (a.1–a.4). The contours represent displacement in millimeters (mm). Among the four cases, (A) tip displacement for scenario a.1., where TPMS is 4 mm thick and printed at 250 °C. (B) Tip displacement for scenario a.2., where TPMS is 8 mm thick and printed at 250 °C. (C) Tip displacement for scenario a.3., where TPMS has variable thickness of 4 to 8 mm and is printed at 250 °C. (D) Tip displacement for scenario a.4., where TPMS has variable thickness of 4 to 8 mm and is printed at 240 °C.
Aerospace 13 00050 g010
Figure 11. (A) Maximum stress comparison between shell and TPMS structures for the different case studies (a.1–a.4). (B) Overall weight of each case study. The green line indicates the weight of the conventionally manufactured wing. (C) Tip deflection along the Y-axis for each case study.
Aerospace 13 00050 g011
Table 1. The four case studies considered in this work.
Case StudyTPMS Thickness (mm)TPMS Printing Temperature (°C)TPMS Weight (g)Shell Thickness (mm)Shell Printing Temperature (°C)Shell Weight (g)
a.142501851.2240278
a.282503701.2240278
a.34–82501971.2240278
a.44–82402371.2240278
Table 2. Comparison between the proposed additive manufacturing (AM) methodology and a conventional composite wing in terms of mass, structural layout, manufacturing process, tooling, and production time.
MetricConventional Composite Wing (Reference)Proposed AΜ MethodologyImprovement
Mass (g)500 g463–648 g
(Shell + TPMS)
Up to 7% Lighter
Structural LayoutSkin, Spars, Ribs (Multi-part assembly)UnibodyAssembly effort
Manufacturing MethodHand layup (CF/Fiberglass), Vacuum Bagging/Autoclave3D PrintingAutomated, Reduced Effort
Tooling RequiredMolds (CNC machined—3D printed), Vacuum pump-Tooling-free
Post-ProcessingCuring time, Trimming, Assembly gluingMinimal/Optional Post processingReduced Steps
Time 3–5 weeks6–10 daysReduced Time
Disclaimer/Publisher’s Note: The statements, opinions and data contained in all publications are solely those of the individual author(s) and contributor(s) and not of MDPI and/or the editor(s). MDPI and/or the editor(s) disclaim responsibility for any injury to people or property resulting from any ideas, methods, instructions or products referred to in the content.