Article

Damage Tolerance of a Stiffened Composite Panel with an Access Cutout under Fatigue Loading and Validation Using FEM Analysis and Digital Image Correlation

by
Pavan Hiremath
1,
Sathyamangalam Ramanarayanan Viswamurthy
2,
Manjunath Shettar
1,*,
Nithesh Naik
1 and
Suhas Kowshik
1
1
Department of Mechanical and Industrial Engineering, Manipal Institute of Technology, Manipal Academy of Higher Education, Manipal 576104, Karnataka, India
2
Advanced Composites Division, CSIR-National Aerospace Laboratories, Bangalore 560017, India
*
Author to whom correspondence should be addressed.
Fibers 2022, 10(12), 105; https://doi.org/10.3390/fib10120105
Submission received: 11 October 2022 / Revised: 3 December 2022 / Accepted: 5 December 2022 / Published: 8 December 2022
(This article belongs to the Special Issue Joining Technologies for Hybrid Polymeric Composites)

Abstract

:
Aircraft structures must be capable of performing their function throughout their design life while meeting safety objectives. Such structures may contain defects and/or damages that can occur for several reasons. Therefore, aircraft structures are inspected regularly and repaired if necessary. The concept of combining an inspection plan with knowledge of damage threats, damage growth rates, and residual strength is referred to as “damage-tolerant design” in the field of aircraft design. In the present study, we fabricated a composite panel with a cutout (which is generally found in the bottom skin of the wing) using a resin infusion process and studied the damage tolerance of a co-cured skin-stringer composite panel. The composite panel was subjected to low-velocity impact damage, and the extent of damage was studied based on non-destructive inspection techniques such as ultrasonic inspection. Fixtures were designed and fabricated to load the composite panel under static and fatigue loads. Finally, the panel was tested under tensile and fatigue loads (mini TWIST). Deformations and strains obtained from FE simulations were compared and verified against test data. Results show that the impact damages considered in this study did not alter the load path in the composite panel. Damage did not occur under the application of one block (10% life) of spectrum fatigue loads. The damage tolerance of the stiffened skin composite panel was demonstrated through test and analysis.

1. Introduction

Composite materials are used in aircraft structures to reduce the weight of aircraft and minimize assembly time, owing to their high strength-to-weight ratio and stiffness-to-weight ratio, etc. [1,2]. Figure 1 shows the composite parts that are used in Boeing 787 aircraft. The brittle nature of composite materials elicits concern about their ability to resist damage and, if damaged, their ability to carry the required load until the damage is detected [3,4,5]. The primary concerns with respect to composite laminated structures are delamination and fiber breakage resulting from impact events and environmental degradation [6,7].
Aircraft structures are designed and manufactured in such a way that they can carry out their role safely over their design life [8,9]. During assembly and operation, aircraft structures can suffer damage for several reasons, such as tool or component drops, runway debris hits, ground vehicle hits, etc. [10,11,12]. Processing defects are inevitable during the manufacturing of large aircraft structures. Environmental conditions and improper handling can also reduce the load-carrying capacity of the structure. Aircraft structures are therefore inspected periodically and repaired if required to prevent fatal accidents [13,14,15,16,17].
Most of composite structure damage is caused during maintenance, shipping, assembly, and manufacturing. A particular concern in composites is low-velocity, hard mass impacts, which can cause significant damage that may not be clearly visible [19,20,21]. Sources of such impact damage include falling tools or equipment and collision with ground-handling vehicles. Other damage is caused by low-mass collisions at high velocity, such as hail, runway debris hitting the bottom skin of the aircraft, etc. High-velocity impacts from discrete source events (e.g., bird strikes or parts of rotating machinery that fail in turbofan engines and penetrate the engine containment system, the aircraft skin, and supporting structure) can also damage airplanes [22,23,24]. The detection of such damage occurs either through inspection or malfunction. Impact damage can be classified in terms of delectability as barely visible impact damage (BVID) or visible impact damage (VID) [2,25,26].
The aircraft wing typically houses retractable landing gear in its root region. During takeoff and landing, the root region of the wing (region closer to the fuselage) is susceptible to damage from runway debris. Based on preliminary studies at NAL, a zone in the wing bottom skin was identified for this study that is both highly stressed and highly susceptible to runway debris impact. A stiffened skin panel representing this wing region was designed and fabricated as part of this work.

2. Materials and Methods

2.1. Tools and Caul Plate Fabrication

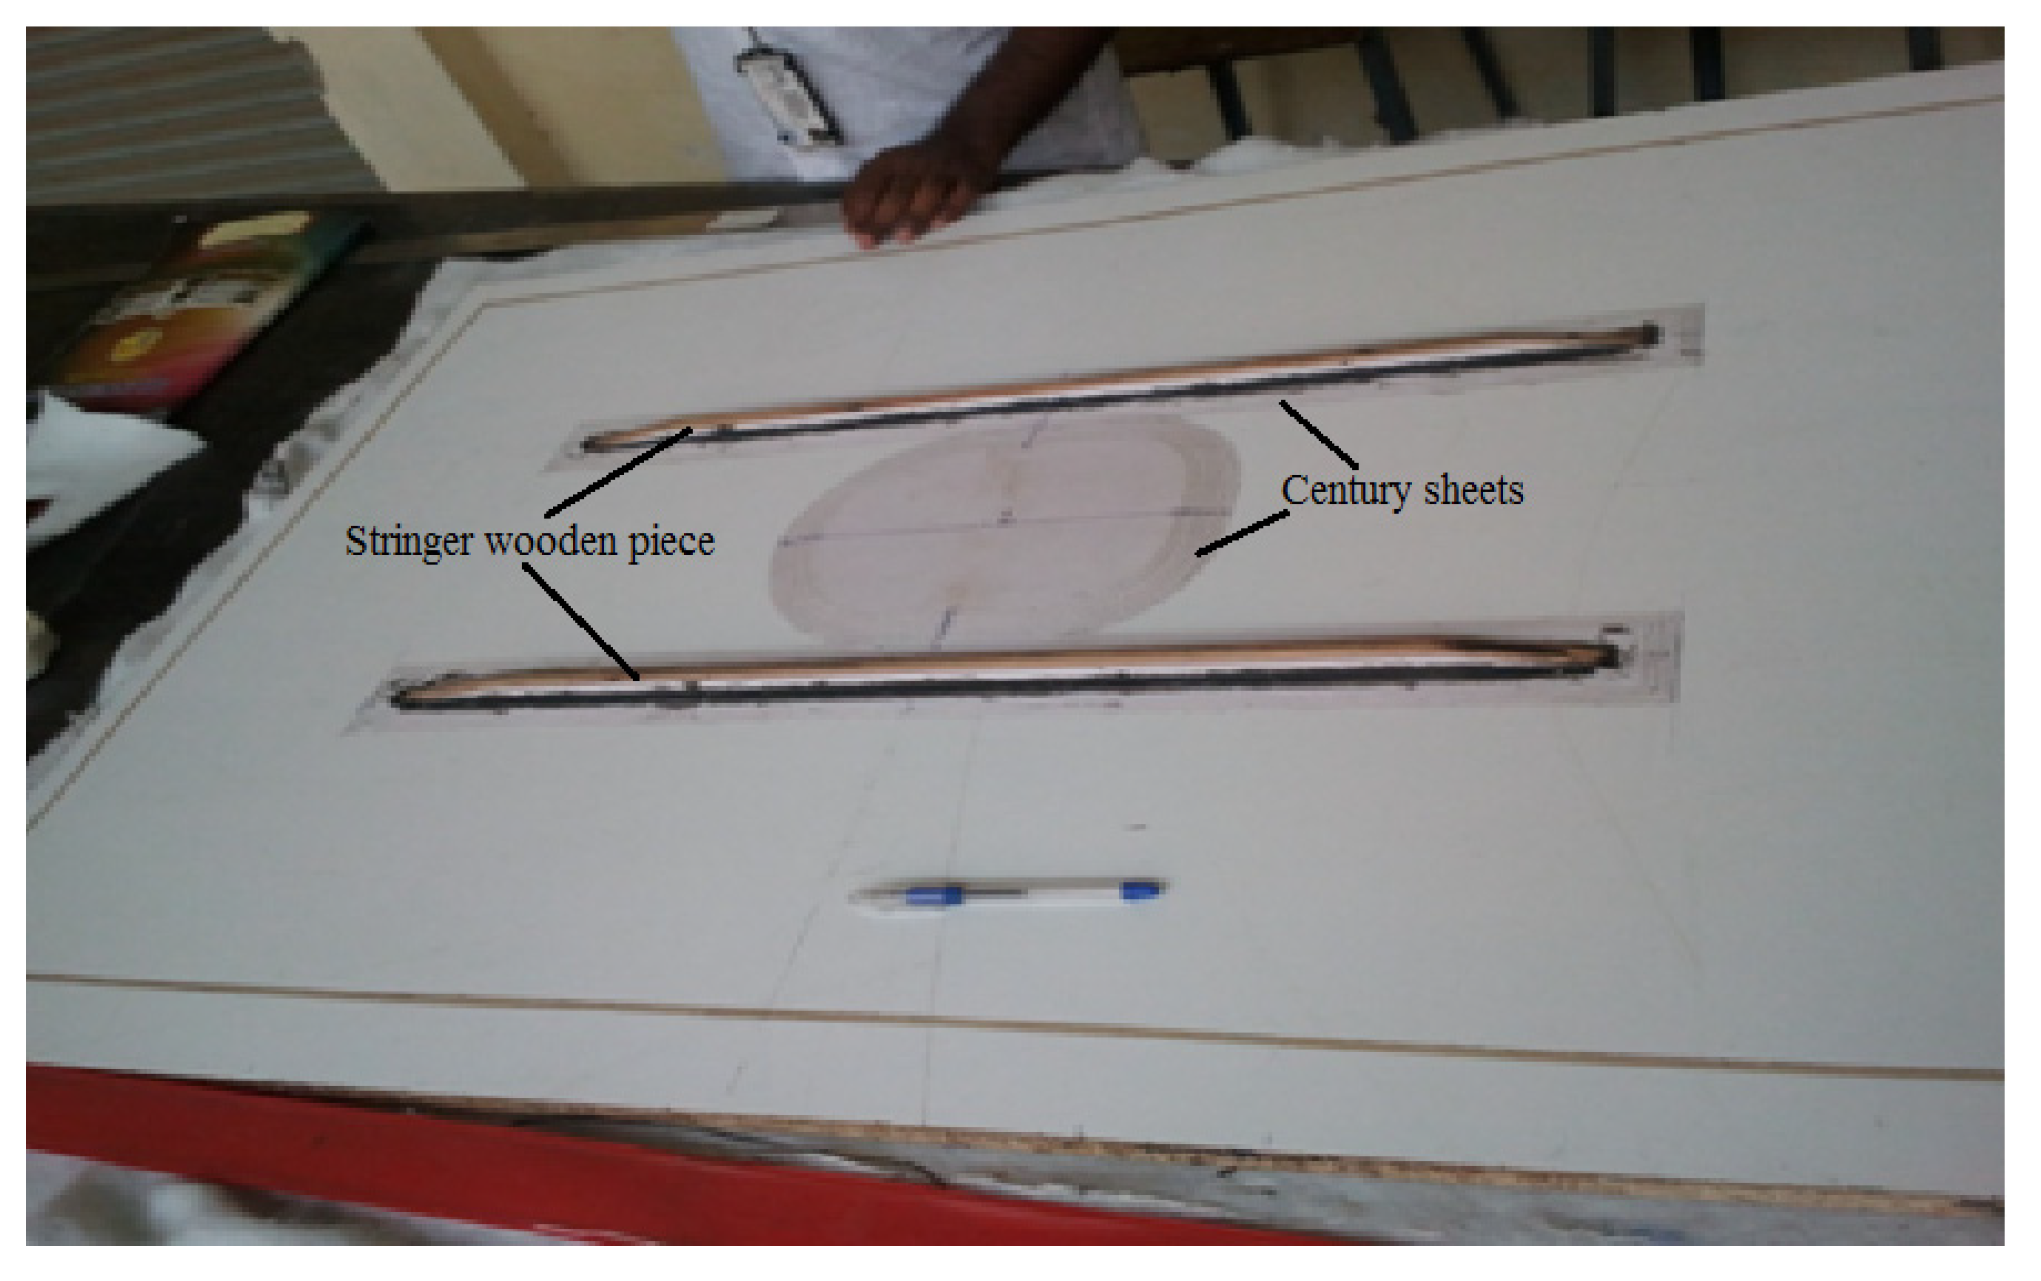
The resin infusion process requires a mold. The mold contains two halves; the upper half is called a cope, and the bottom is called a drag. In this study, the bottom surface of the panel was flat, so the drag was not made separately; instead, a flat glass plate was used. The wooden tool helps fabricate the mold’s cope part (caul plate). A tool is the negative replica of a component to be manufactured, as shown in Figure 2. Similarly, a tool for the stringer was also fabricated to obtain hat shape of the stringer.
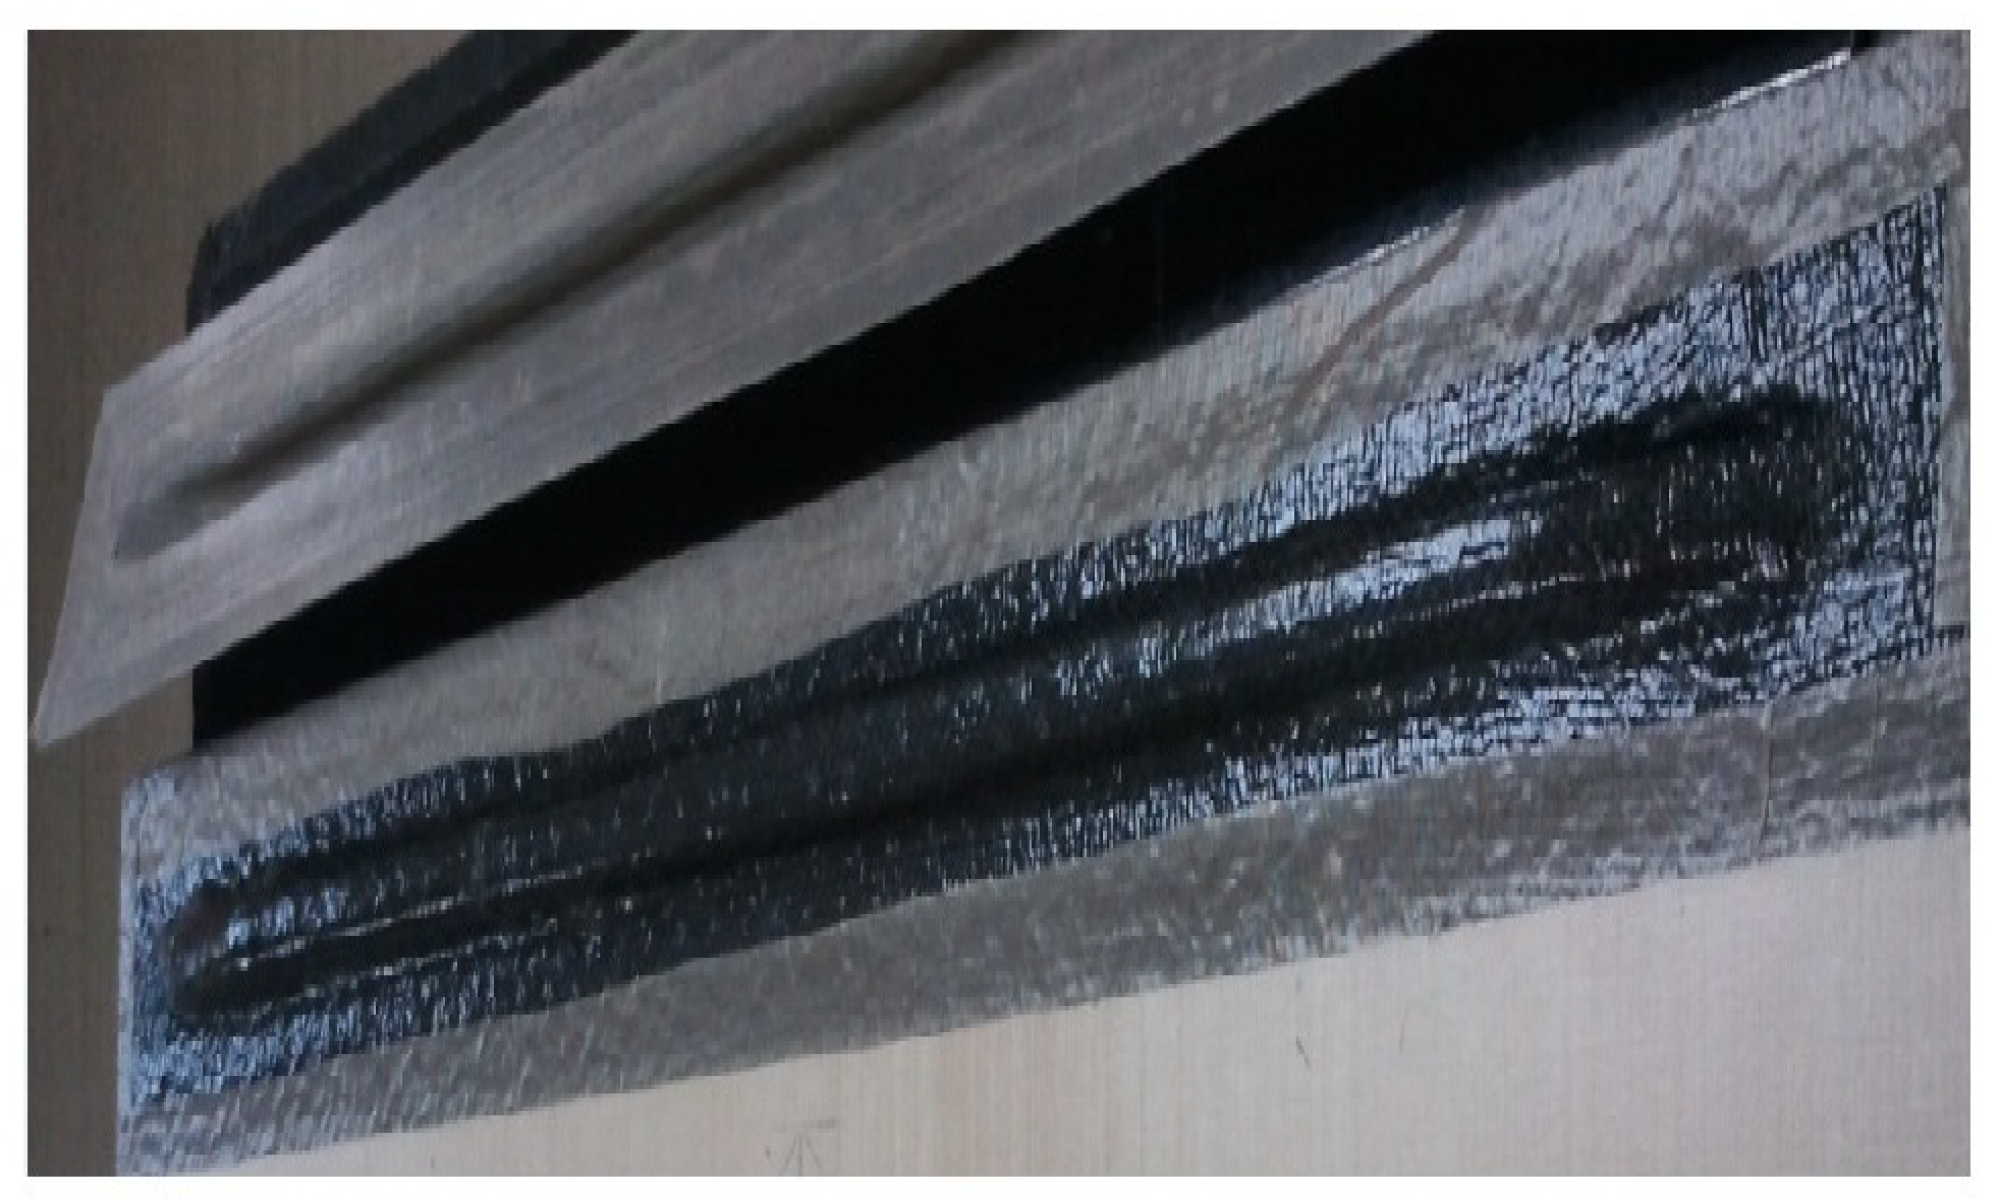
A flexible caul plate (Figure 3) was fabricated using RTV-4131-P1 Liquid Silicone Rubber and its curing agent in a ratio of 10:1 with a hand layup method followed by vacuum bagging and kept at room temperature for a day for curing. The skin and stringer preforms were fabricated separately and later co-cured in a procedure incorporated in the manufacturing the panel.
To make the stringer preform, a tool was used. The procedure was similar to the fabrication of the flexible caul plate discussed before. Here, the resin-to-hardener mixing ratio was 100:56. ARL-140(3500) resin was used with A11-419(3502) hardener. The preform tool, which was fabricated (Figure 4) using this resin, was very hard and was used to press against the stringer tool, with carbon layers are placed over it. Therefore, it should possess good stiffness to avoid deformation of the stringer during pressing.

2.2. Fabrication of Composite Panel

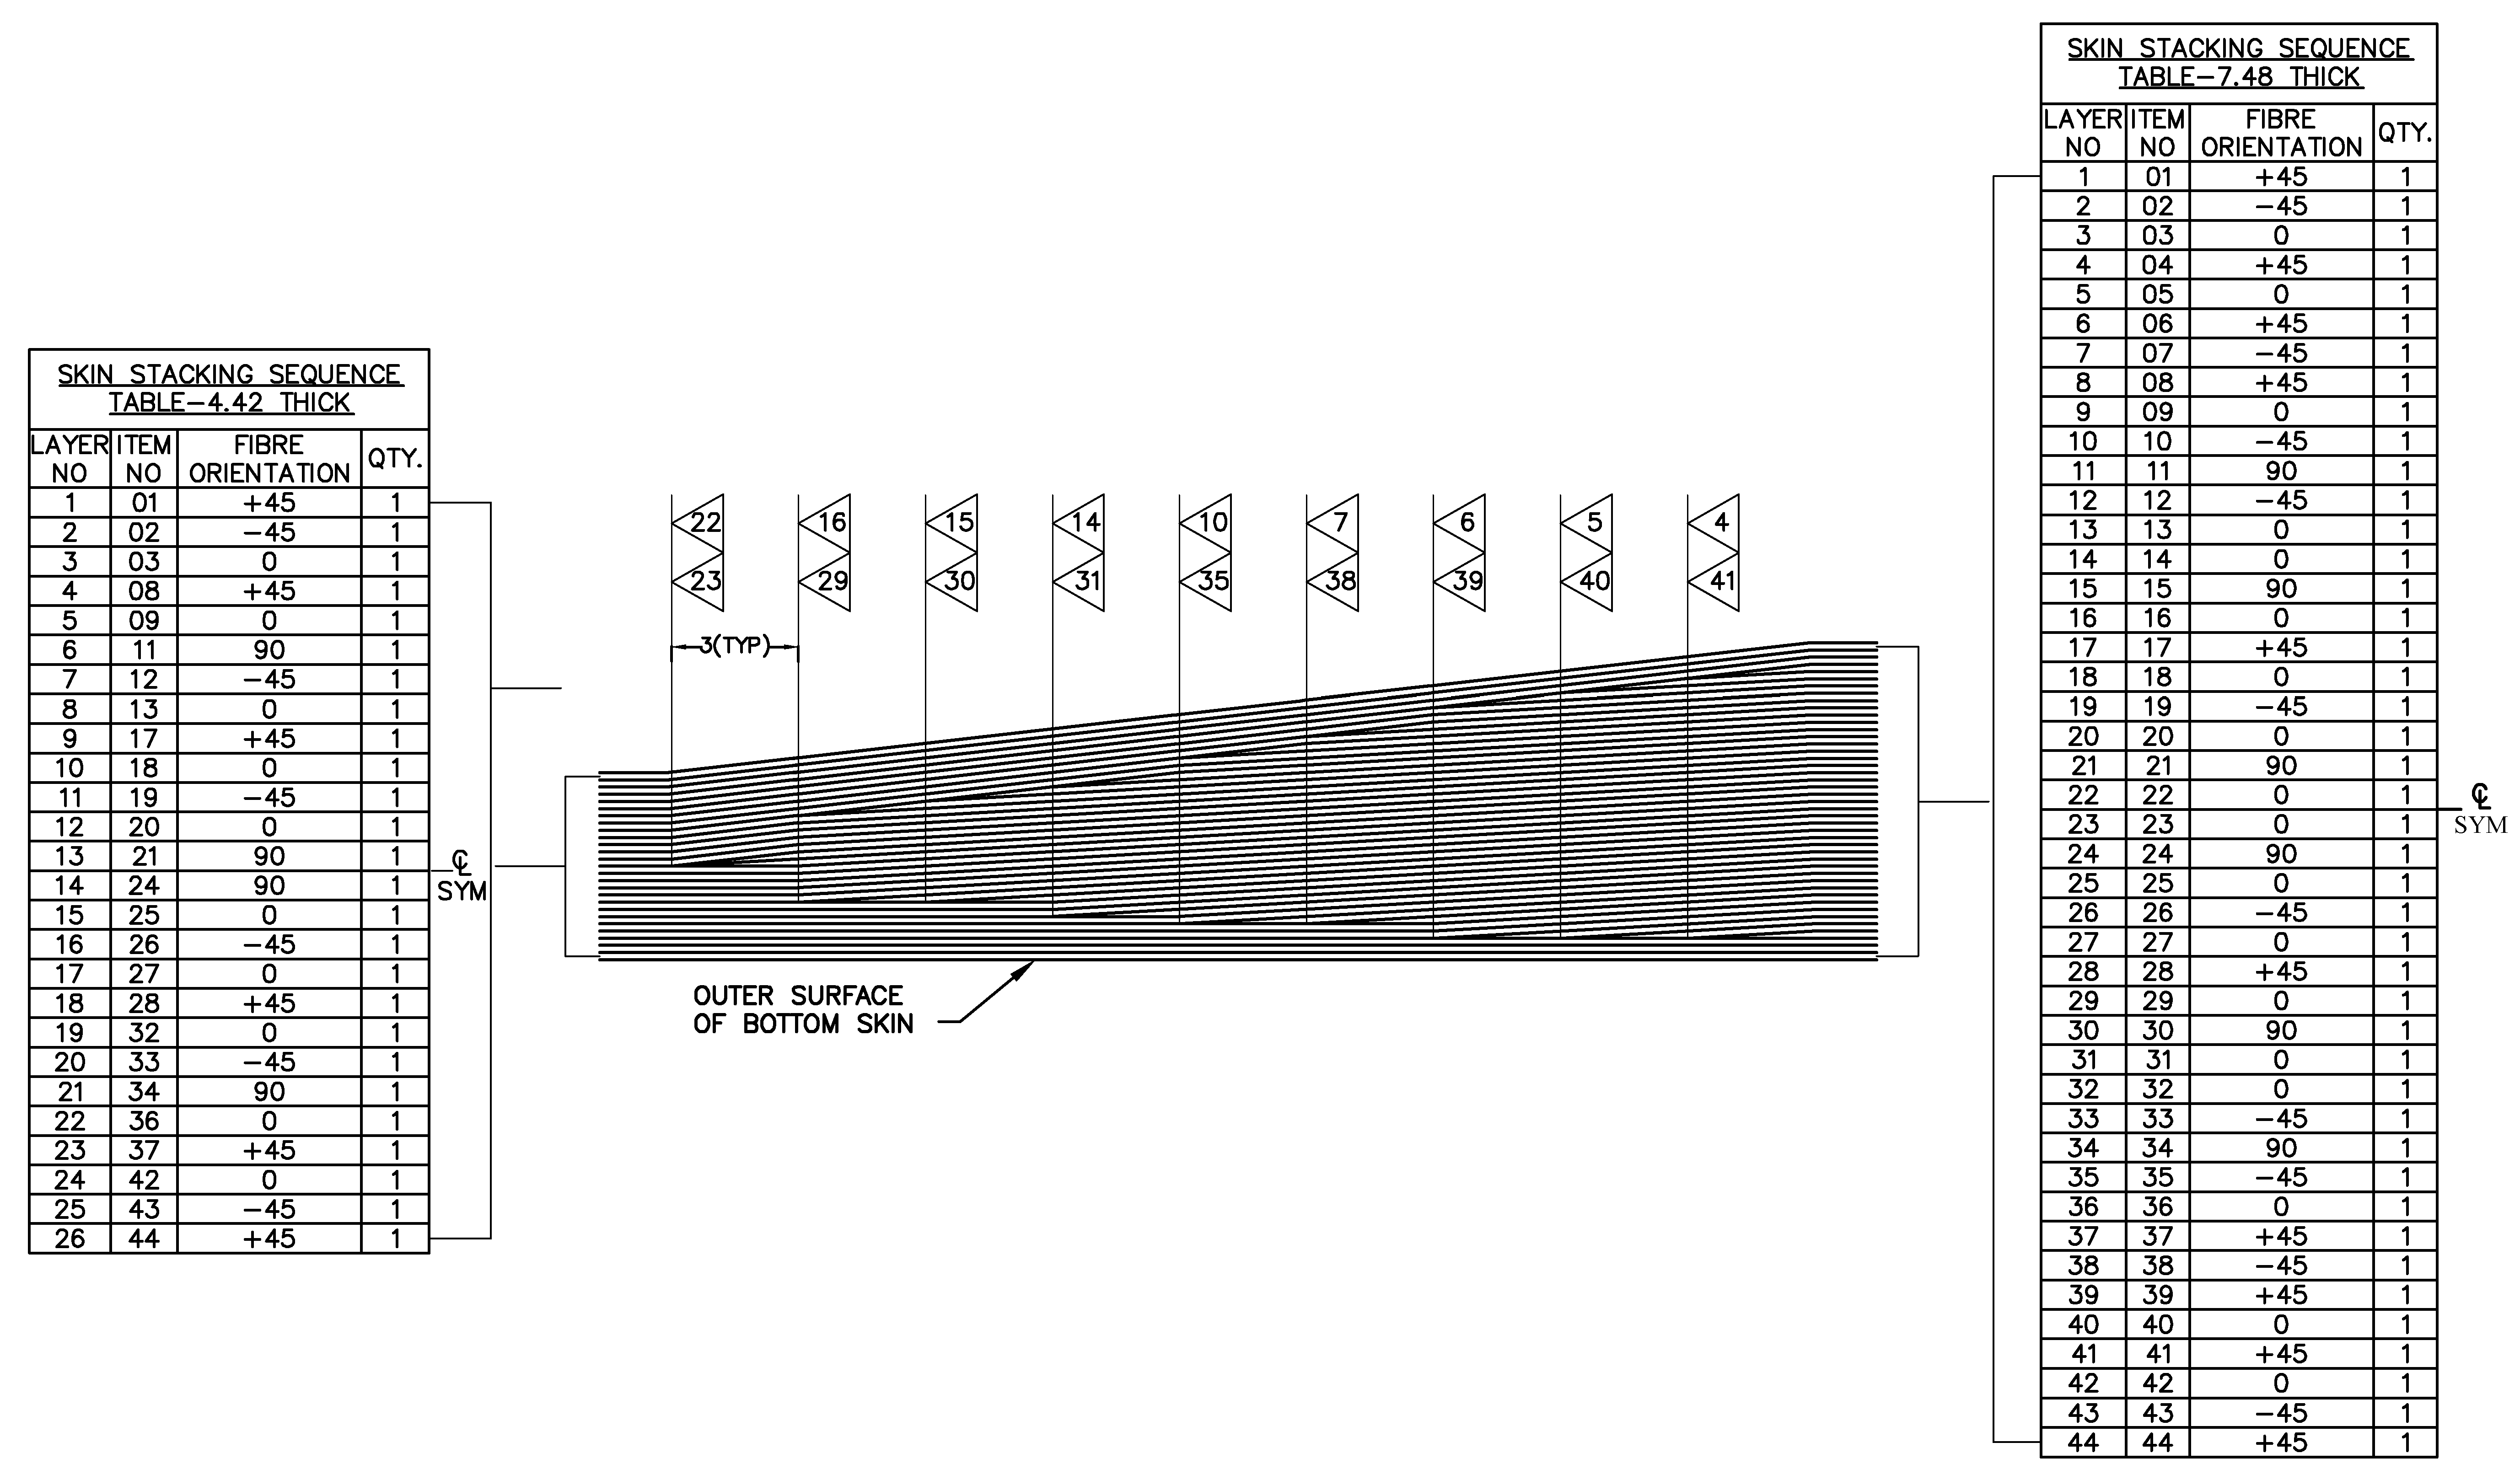
The plies were cut to the required dimension and orientation for skin layup using a fiber-cutting machine. The dry unidirectional fabric layers were arranged according to the skin layup sequence (Figure 5). The binder essentially improves the dimensional stability of the fabric and helps in preforming when required. Heat is typically applied through a clothing iron after laying each layer. Furthermore, this process helps to remove air trapped between the layers. Skin layup was carried out on a flat, toughened glass mold. The mold (drag) was adequately cleaned with acetone, and a non-porous release film was placed over it to avoid sticking of the preform to the mold. Dry carbon layers were laid on the glass mold with appropriate edge reference. Generally, a small quantity (2–3%) of binder is present on the dry fabric as supplied by the supplier, which helps in the adhesion of these fabrics during layup. During the layup, care should be taken to ensure that the binder region of one ply comes in contact with the non-binder region of the adjacent ply. The entire layup was vacuum bagged, and preforming was then carried out in an oven at 800 °C for one hour in the presence of a vacuum.
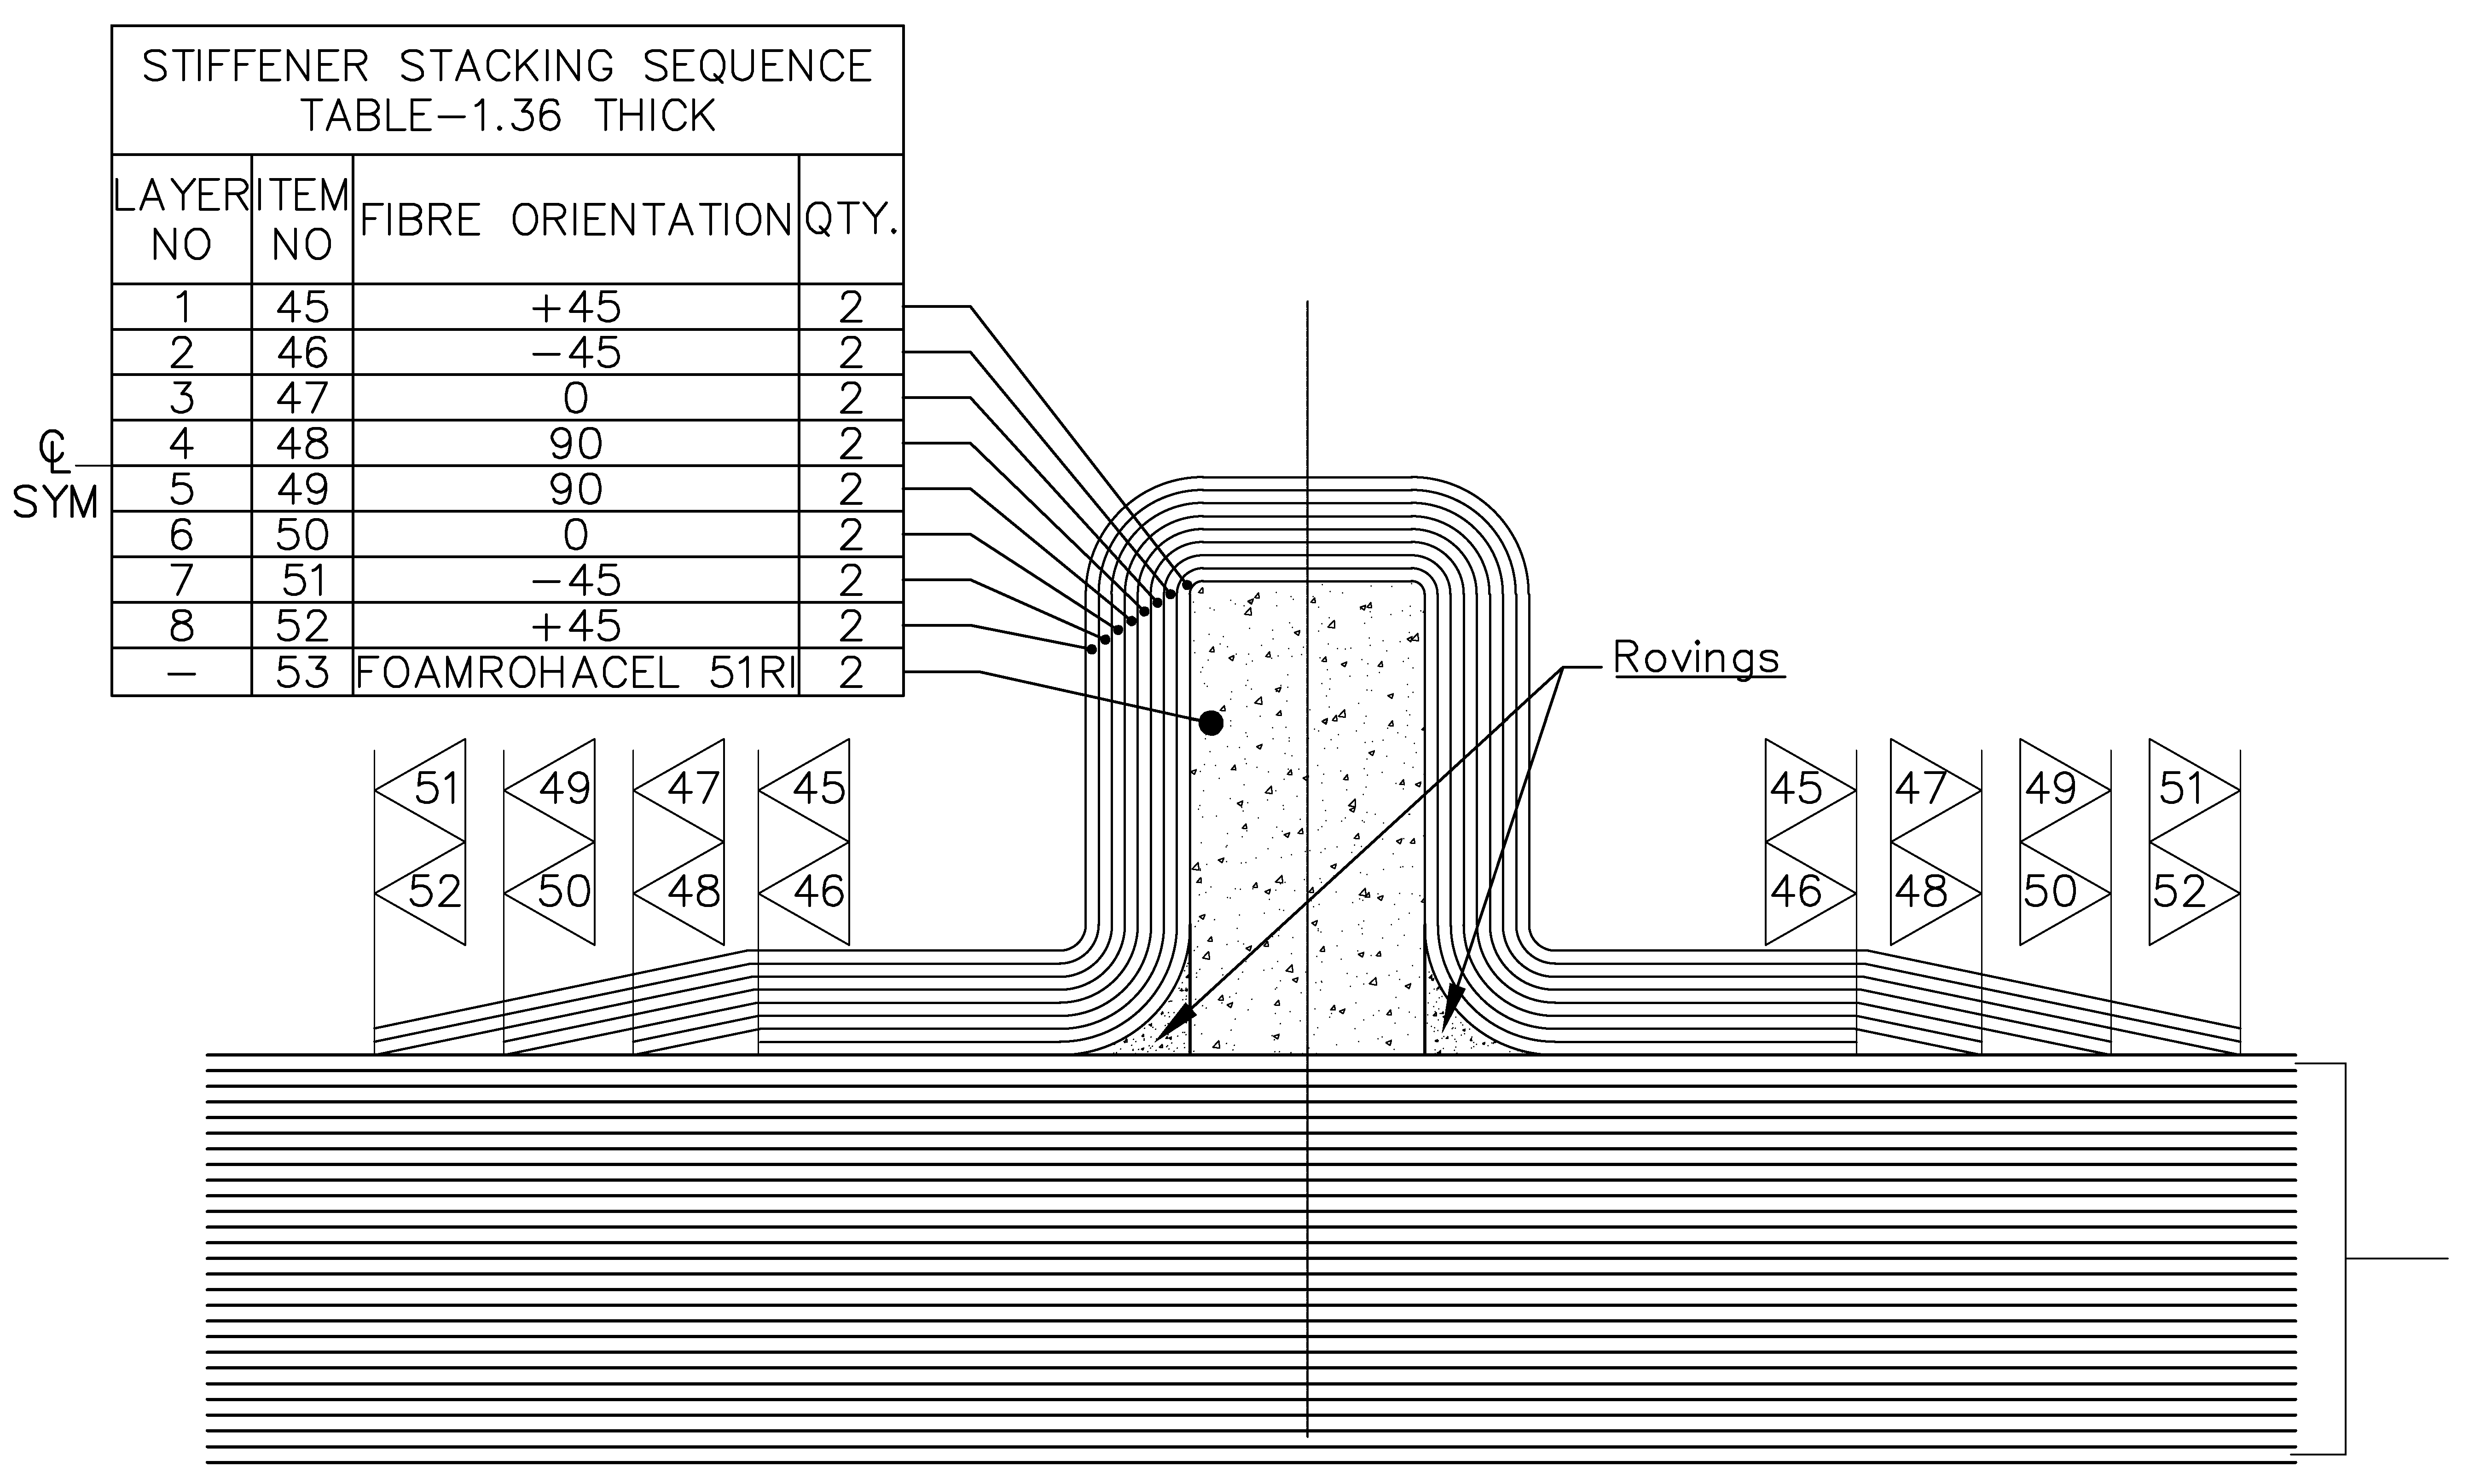
For stringer layup, the dry layers were arranged as per the sequence shown in Figure 6 and placed on the stringer tool described in the previous Section. Carbon UD fabric rovings were used along the length of the stringer between the foam and the stringer near the bottom to avoid a gap, as shown in Figure 6. Later, the stringer preform tool was pressed against the layers to obtain the hat shape of the stringer. Then the entire arrangement was placed inside a vacuum bag, followed by preforming at 800 °C for an hour. Owing to the applied pressure and temperature, the dry layers took the shape of the cavity between the preform tool and the stringer tool. Later, the preform was removed, and layer drops were cut to the required dimensions. The finished stringer was again preformed to achieve the appropriate bonding and shape. The preformed stringer contains a hollow cavity to accommodate the 51RI Rohacell foam (heat treated for 4 h at 120 °C). This foam is a porous, lightweight material with a density of 52 ± 12 kg/m3 and a compressive strength of 0.4–0.7 MPa. This foam helps maintain the stringer’s shape without adding any noticeable weight to the component. Next, the skin and stringer preforms were attached together with the help of a caul plate.
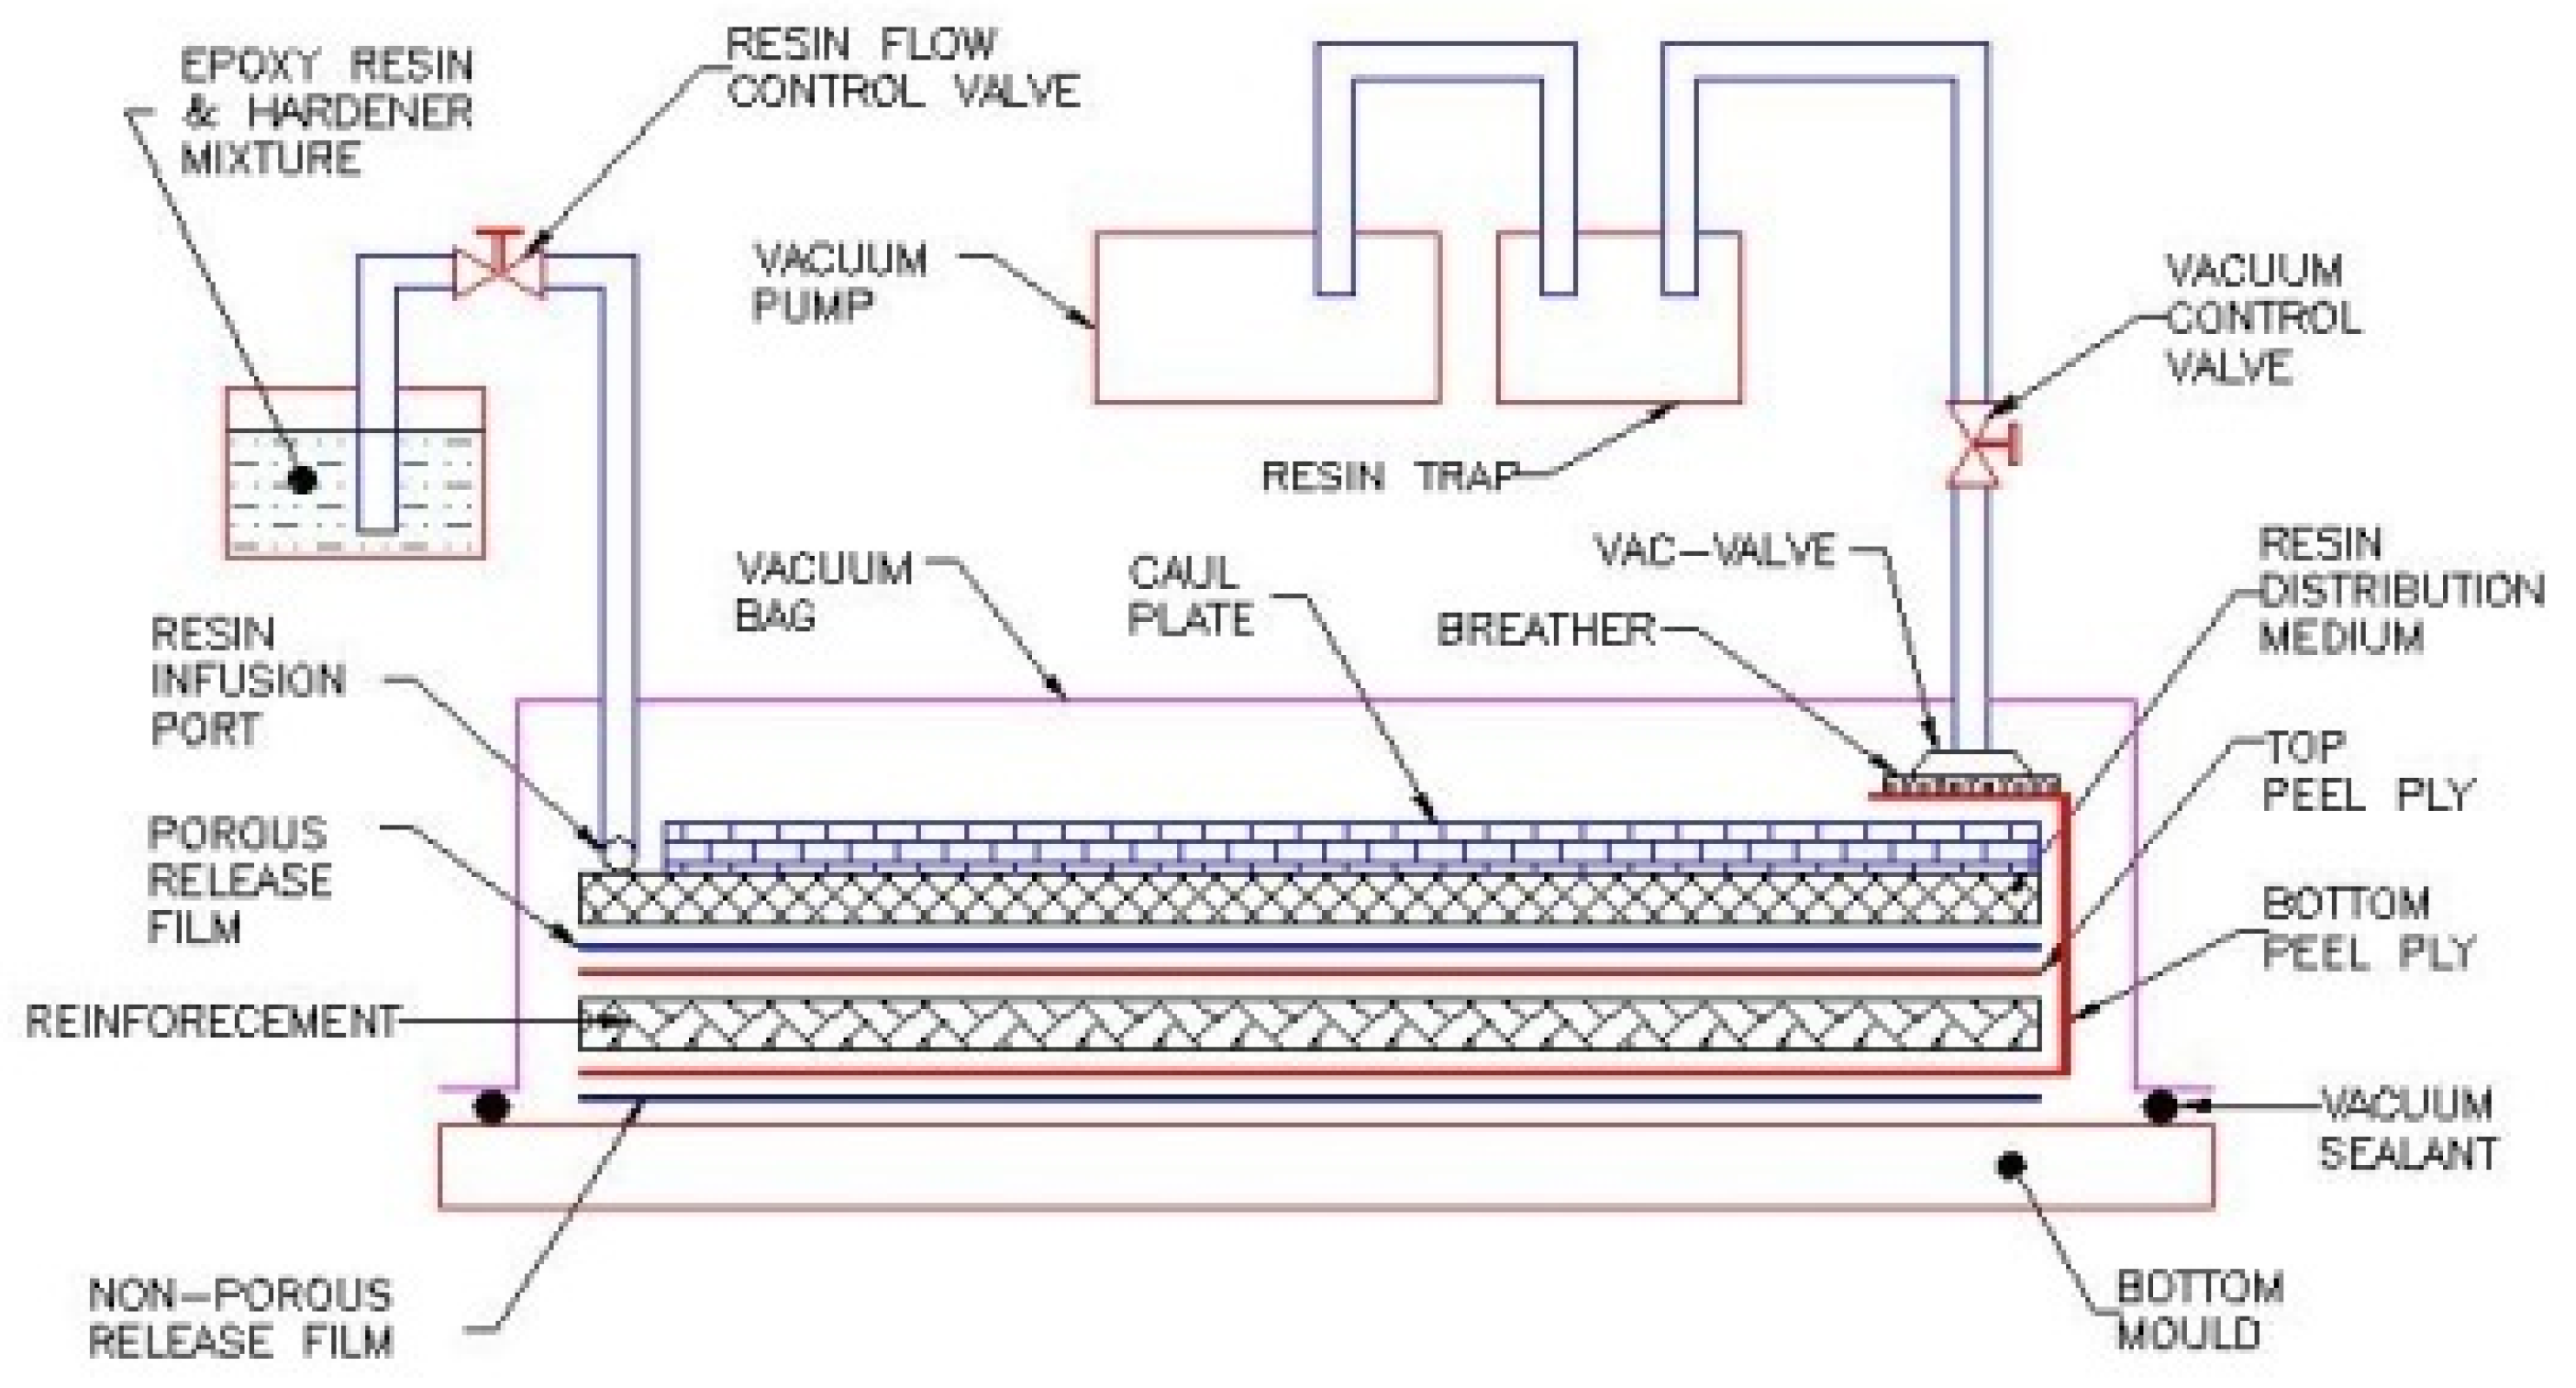
According to the resin infusion arrangements shown in Figure 7, the non-porous release film was placed on a glass mold, which facilitates easy removal of the part after curing. A peel ply is placed over the release film to impart a good surface finish in composite aircraft parts. Using peel ply on composites has many advantages; it causes the fibers to lie flat and increases the adhesion in subsequent bonding and the adhesion of primers. The dry preform was placed over the peel ply. Another layer of peel ply was placed over the preform. The porous release film was placed over this to allow the resin to flow into the preform and for easy removal of the laminate. The resin distribution medium (flow mesh) was placed over the arrangement, which helped the resin flow throughout the preform. The flexible caul plate was placed over the arrangement, which can be called the upper part of the mold and resembles the negative shape of the preform. It is helpful to apply uniform pressure all over the preform. Infusion channels and vacuum valves were sealed to the caul plate to infuse the resin and to avoid the resin flowing outside the mold. A thermocouple was placed between the layers to monitor the curing temperature. A breather was placed to absorb the excess resin and to provide proper suction. Coremat was placed on the suction side to prevent the resin from flowing into the vacuum hose. A braid was placed below the vacuum valve along the length of the preform to provide uniform suction throughout its length. Finally, the entire arrangement was bagged using a thick polythene bagging film and sealed using sealant tape. Vacuum was applied from one end, and the bag was arranged and pressed near the corners to avoid ‘Race Tracking’. The presence of high-permeability areas near the mold edges causes race tracking. These highly permeable areas are created by unraveling fiber bundles during the cutting of the preform or by improper preform placement inside the mold.
In the resin infusion process, the total volume of the composite (fiber + matrix) is assumed to be 100%. The fiber volume fraction is typically 60% for aircraft structural parts made of composites, and the remaining 40% constitutes the matrix (resin) volume. By weight fraction, reinforcement/fiber constitutes 68% of the total weight, and the matrix constitutes 32%. The resin-hardener mixture was calculated based on the requirement of dry preform weight. An additional resin mixture was prepared to account for waste. Flow mesh can hold resin four times its weight, so the required weight was multiplied by four. The total amount of matrix (resin hardener mixture) required was 2350 g. An Epolam resin hardener system was used in this study. The recommended ratio of resin to hardener is 100:107 by weight. Both the resin and hardener were mixed in the required proportion and stirred slowly and continuously for 20 min. This resin hardener mixture is hereafter referred to as ‘resin’.
The entire setup was maintained for curing (the process whereby the monomers of the matrix material convert to a polymer chain). The resin-curing process employed in this study was performed in 3 stages in an autoclave under 1 bar gauge pressure. First, the infused preform was heated to 65 °C and dwelled for 3 h to start the polymerization process. Then, the infused preform was dwelled at 80 °C for 7 h to cure the composite. Finally, the cured part was removed from the mold and post-cured for 4 h at 160 °C under an inert atmosphere (nitrogen). Post curing helps complete the resin polymerization and partially relieve thermal stresses.
After the panel was fabricated, it was qualified through non-destructive inspection (NDI) to verify its quality and consolidation and to detect any defects, such as porosity, dry/resin-starved regions, etc. The finished carbon-fiber-reinforced skin stringer panel was inspected by ultrasonic C-scan. The C-scan plot of the panel shows that the infusion was successful and that the panel is free from manufacturing defects.

2.3. Impact Test

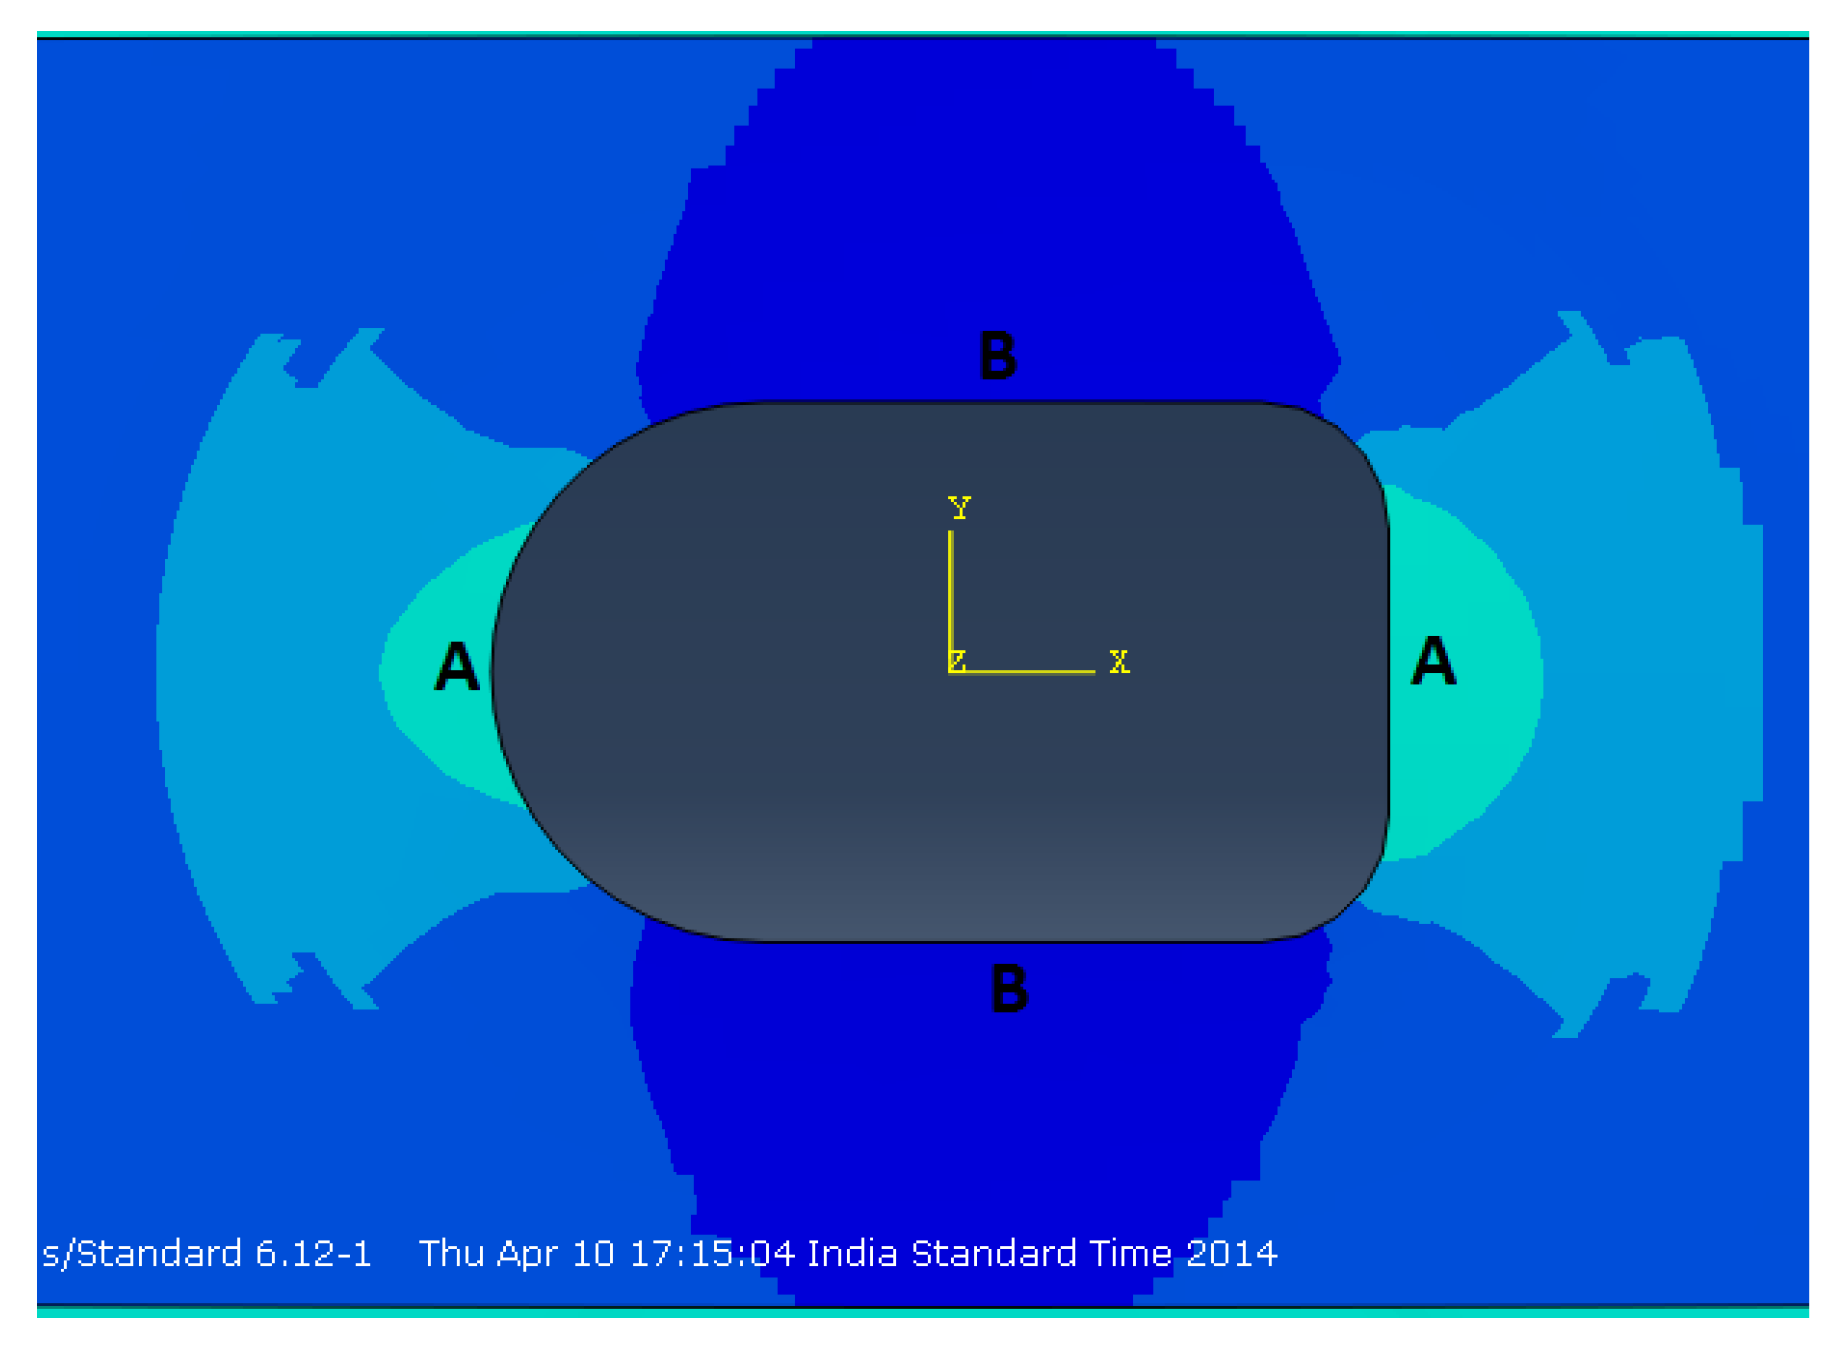
Before inflicting impact damage to the panel, impact locations needed to be identified. For this purpose, we considered which areas in the panel are highly stressed. The cutout in the panel causes stress concentration in its vicinity and is therefore a straightforward choice for impact. A finite element model of the panel with the cutout was created using the FE package Abaqus/Standard. The variation in stresses around the cutout for a tensile load is shown in Figure 8. Here, the regions with high shear stress are marked as A, and regions with high normal stress are marked as B.
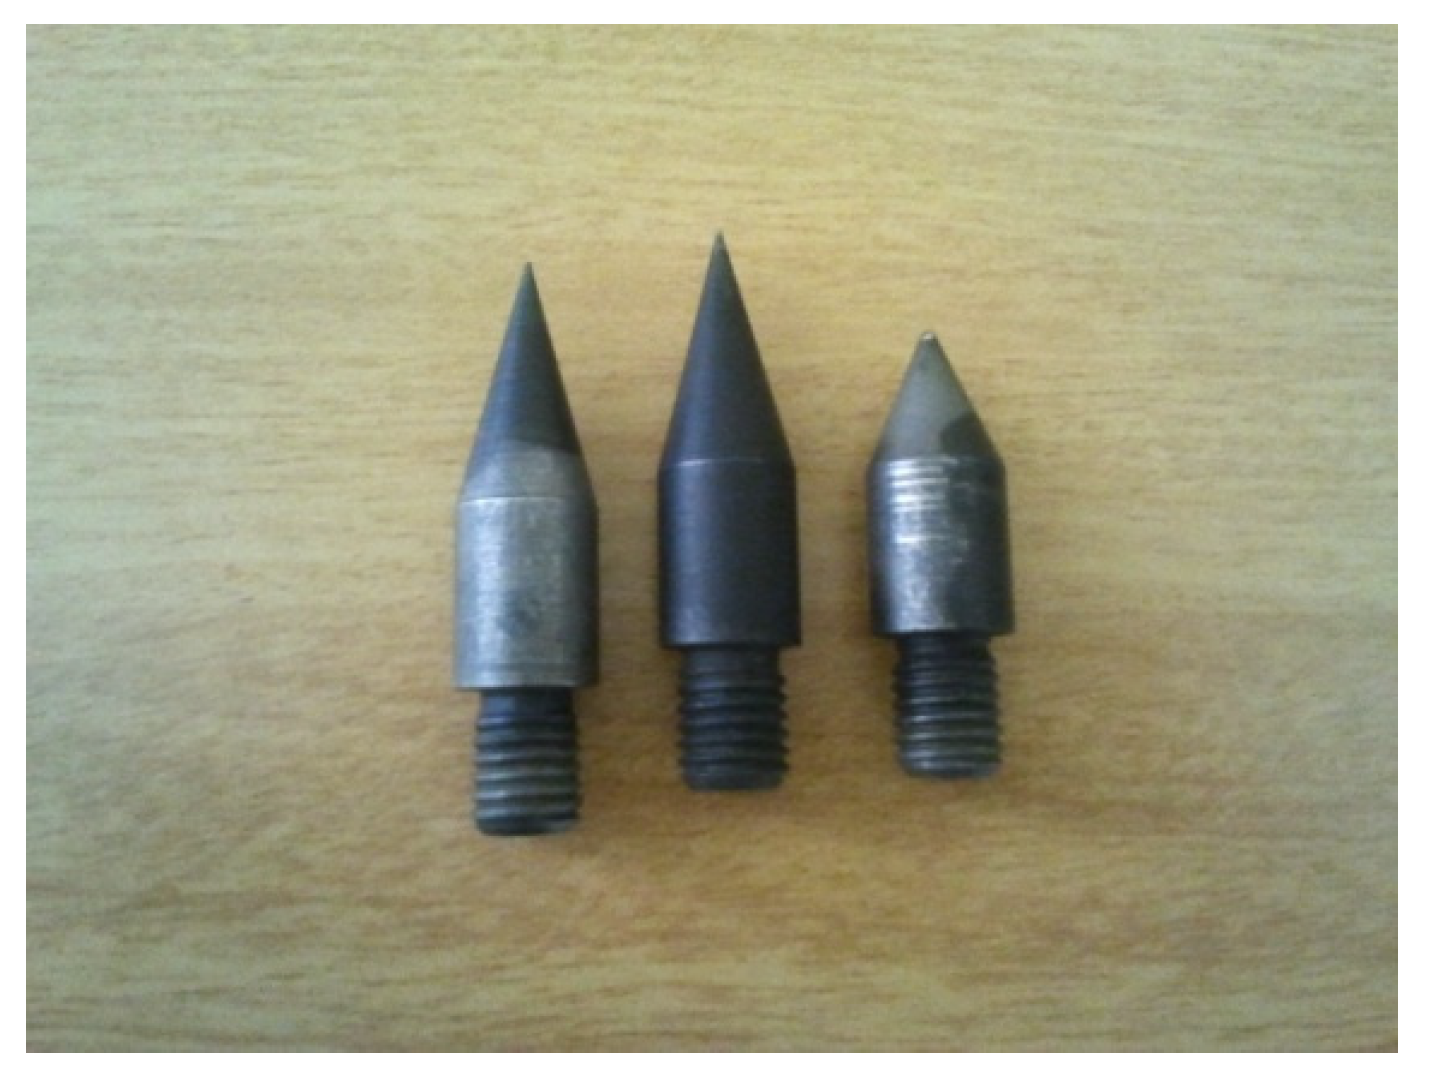
Region B was impacted with a sharp impactor (Figure 9), as it is likely to cut fibers in the panel, which are critical for carrying normal stress. Region A was impacted with a blunt hemispherical impactor, as it is likely to result in delamination in layers/plies with minimal breakage of fibers. Such a damage scenario can lead to increased shear stresses around the damaged area, representing the worst type of damage for both regions. Testing the damage tolerance of the panel in this worst-case scenario is expected to prove its tolerance of other less-critical damage.
Runway debris impact damage is usually caused by loose gravel/stones on the runway, which get into the wheels of an aircraft and are thrown toward the bottom skin. Debris hit the aircraft at high velocities, and their kinetic energy can be calculated based on their typical mass and velocity. The impact energies used in this study were selected based on a literature survey.
It is difficult to conduct impact tests with low-mass, high-velocity projectiles, which also pose additional safety issues. Hence, an alternative method was used, which involved equating the energies, increasing the mass, and reducing the impact velocity. The required impact energy was achieved by dropping a known mass from a known height. This approach has been applied by other researchers in the literature and is considered acceptable [27,28,29,30]. Figure 10 shows the drop impact testing machine used in this study.
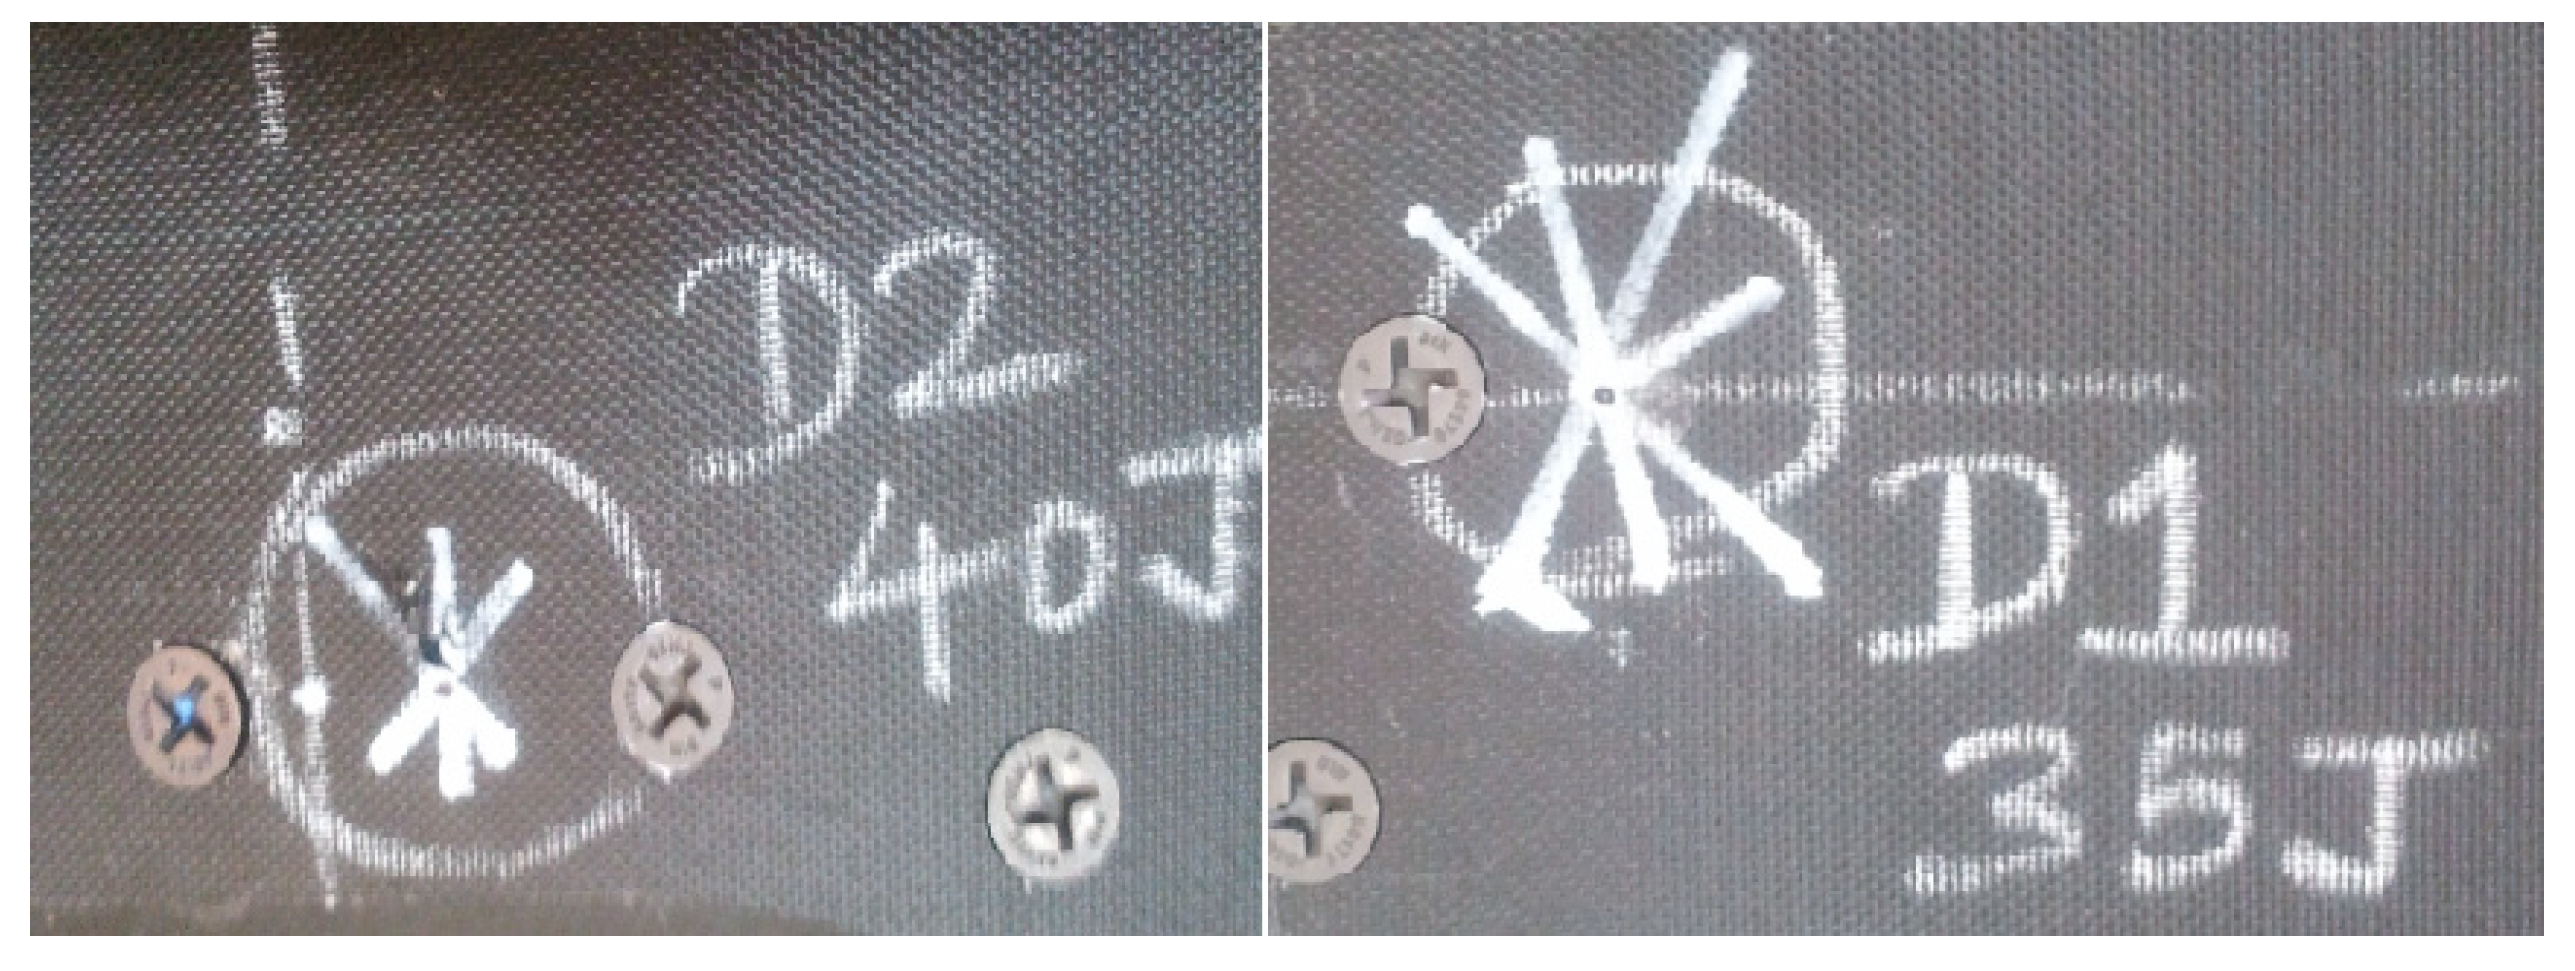
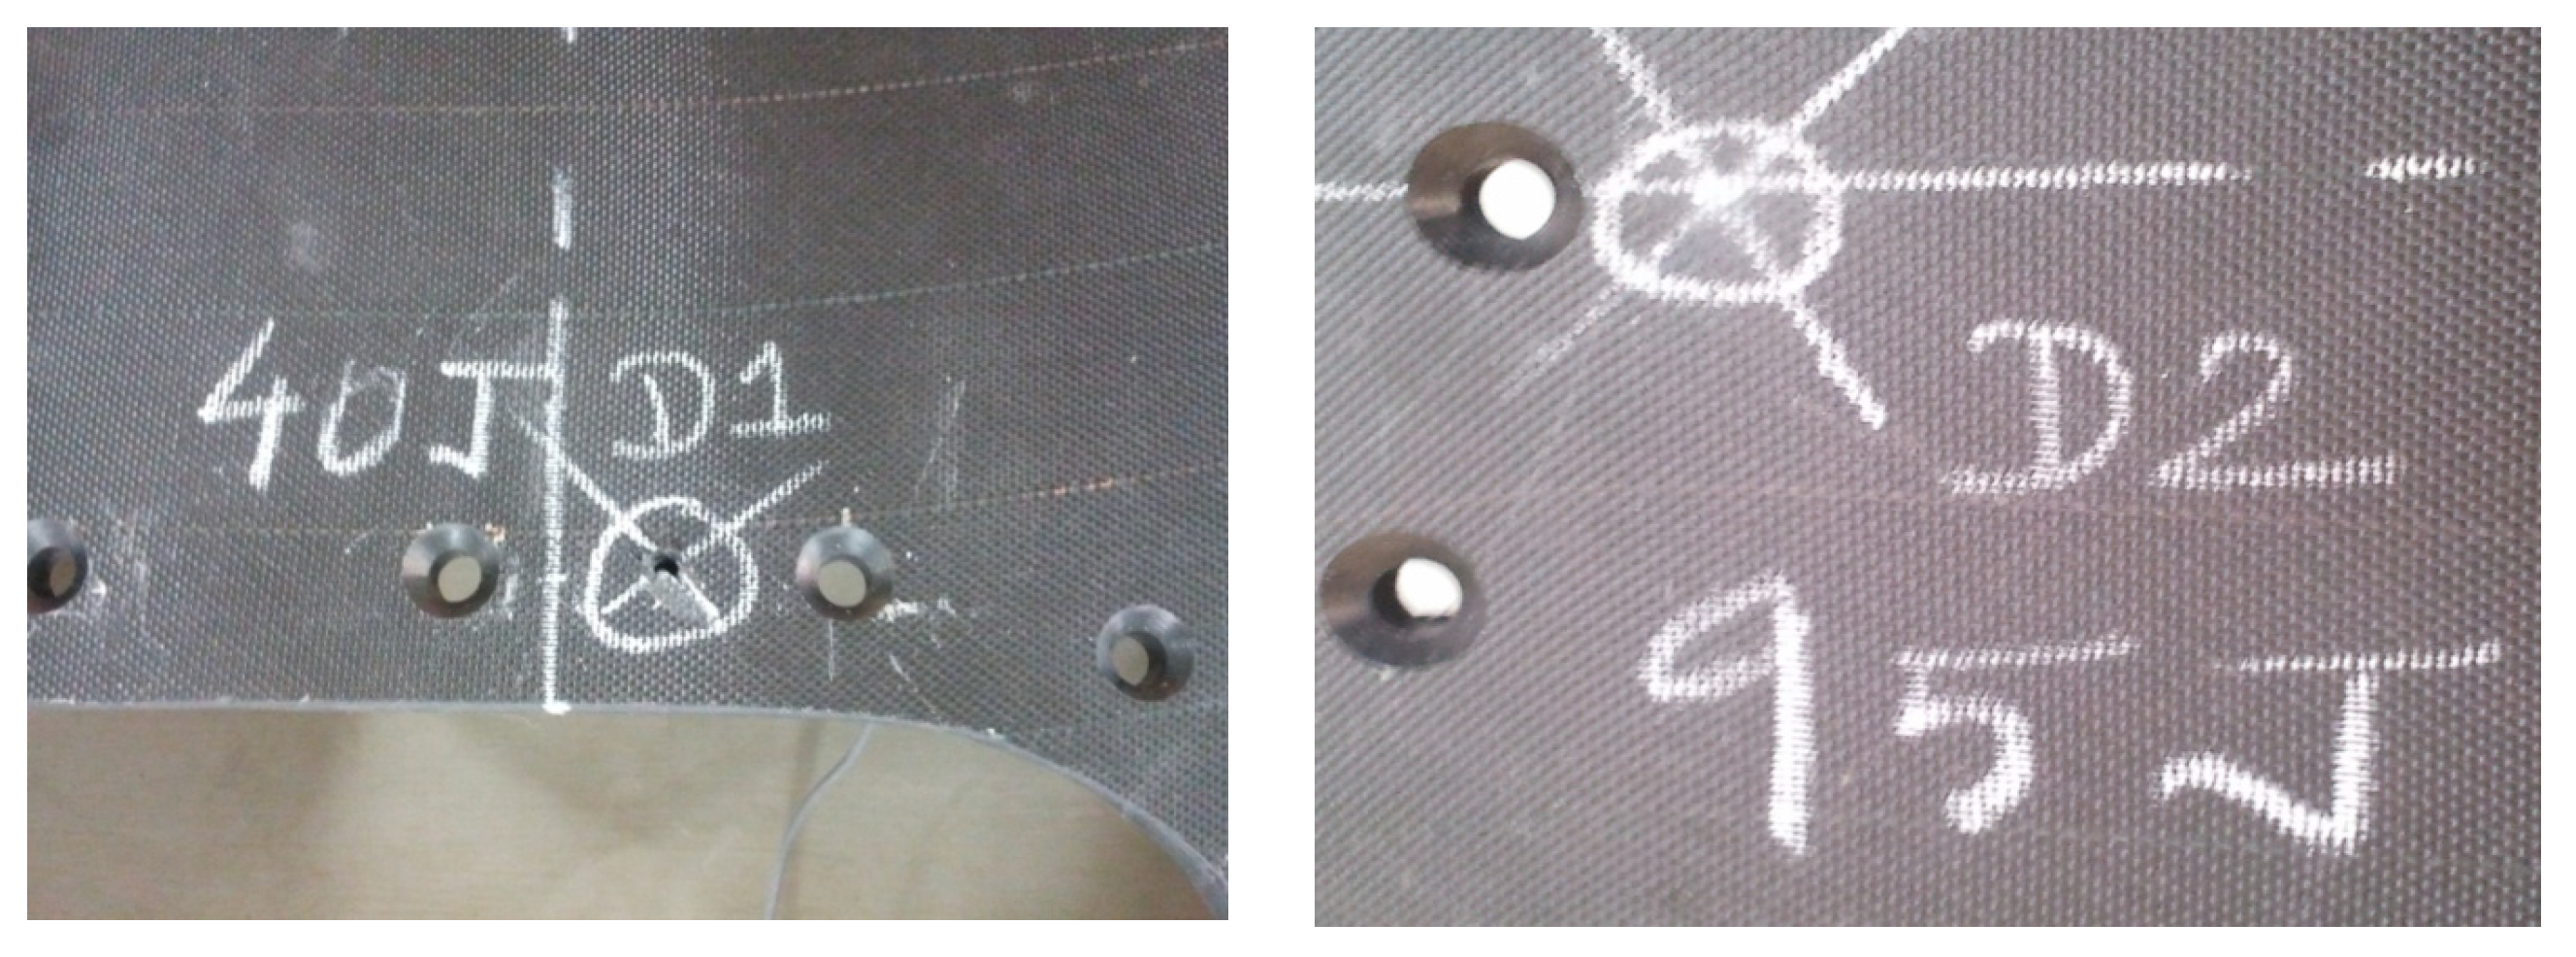
As previously mentioned, this fastening provides clamped boundary conditions on all four sides of the panel. Two instances of impact damage were imparted on panel no. 1, as shown in Figure 11. Panel 2 was also impacted at two locations, as shown in Figure 12.
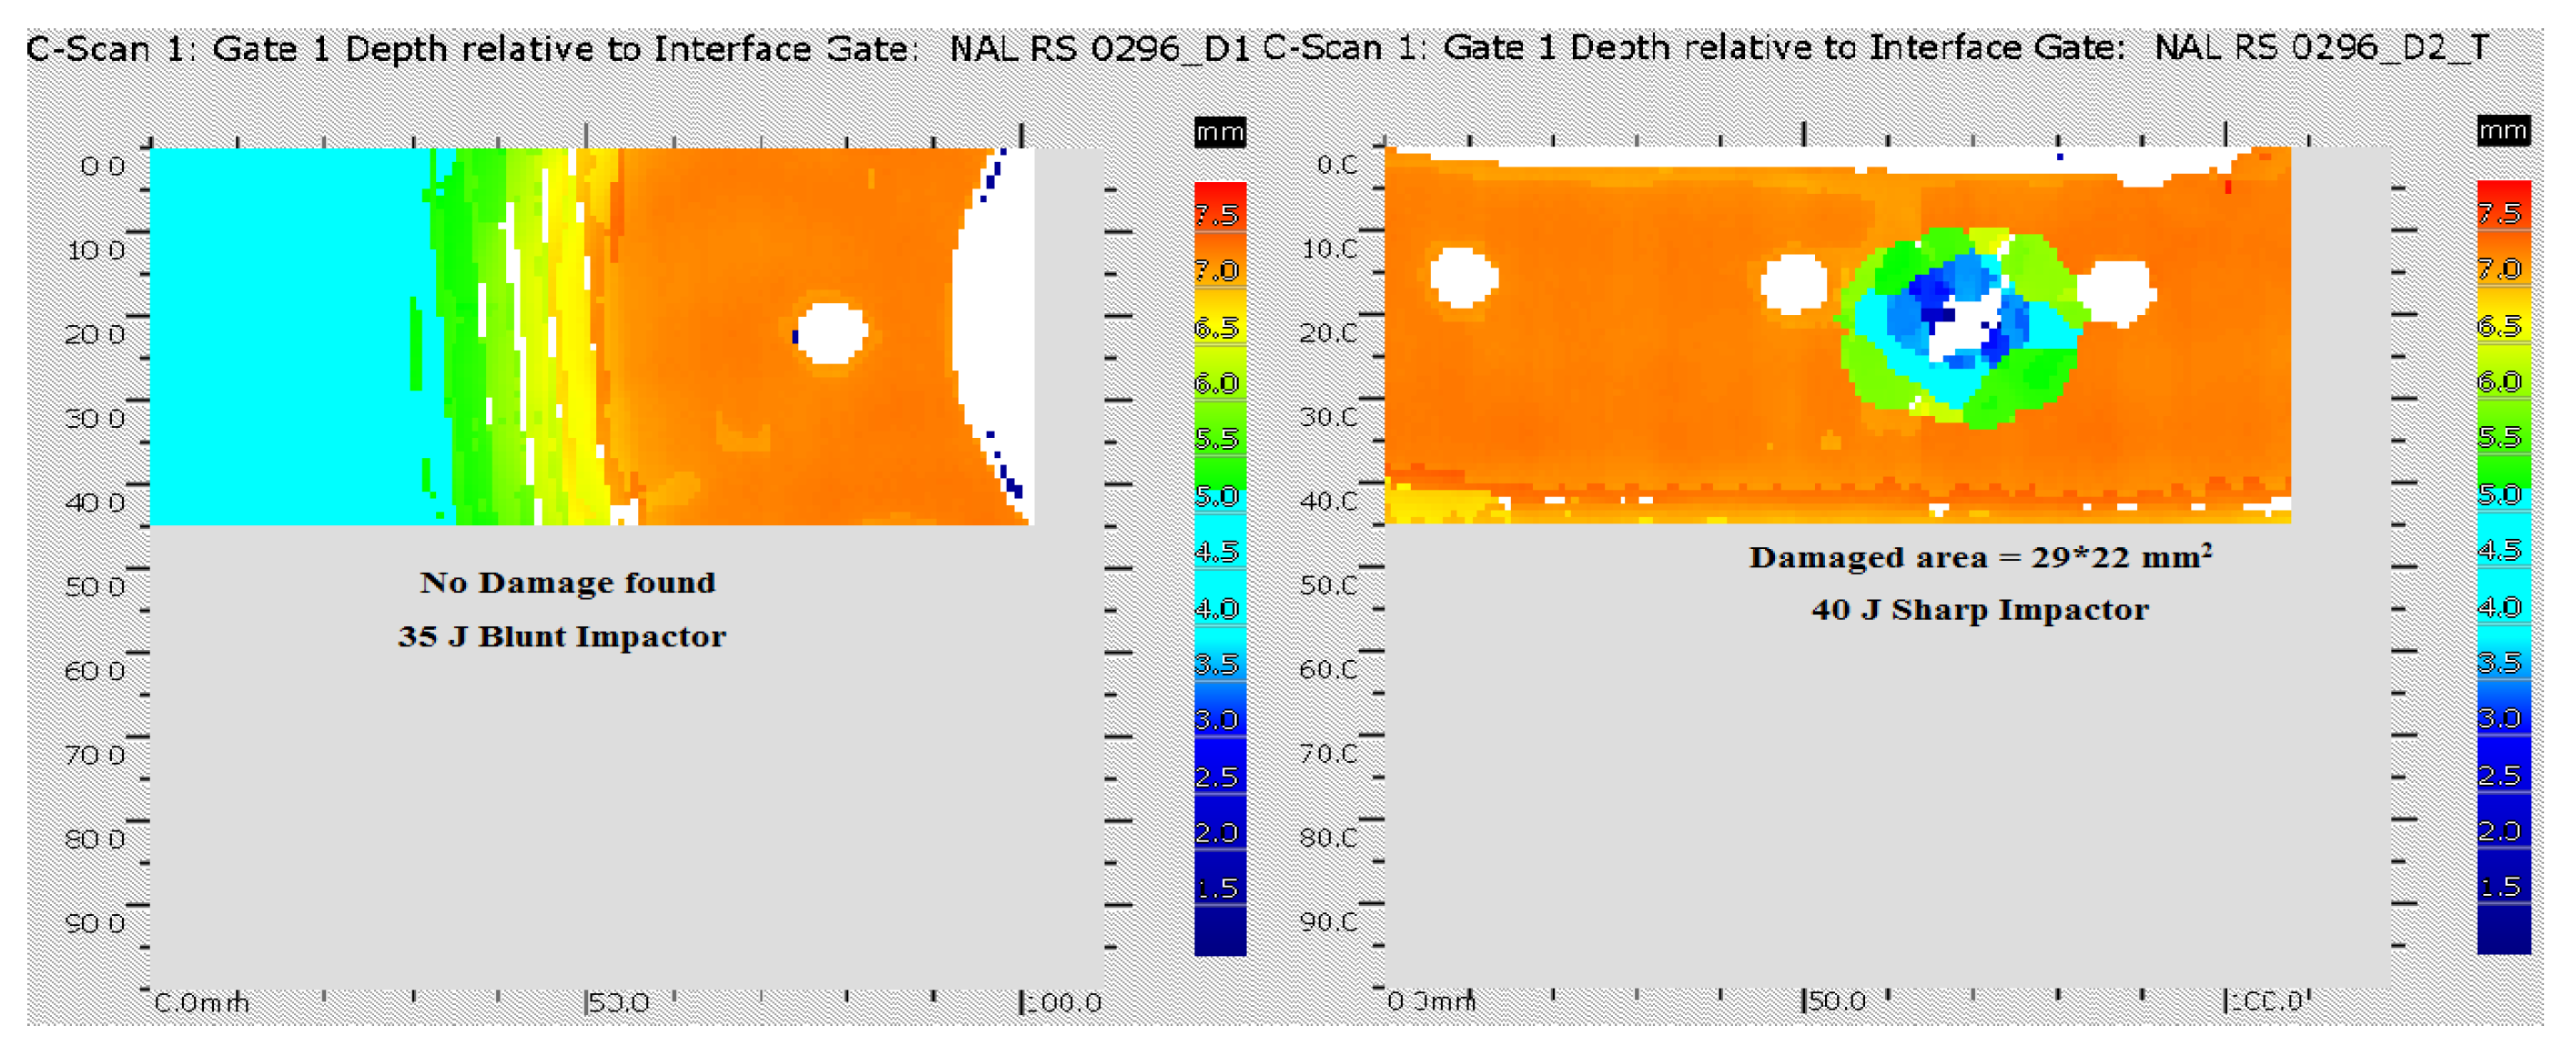
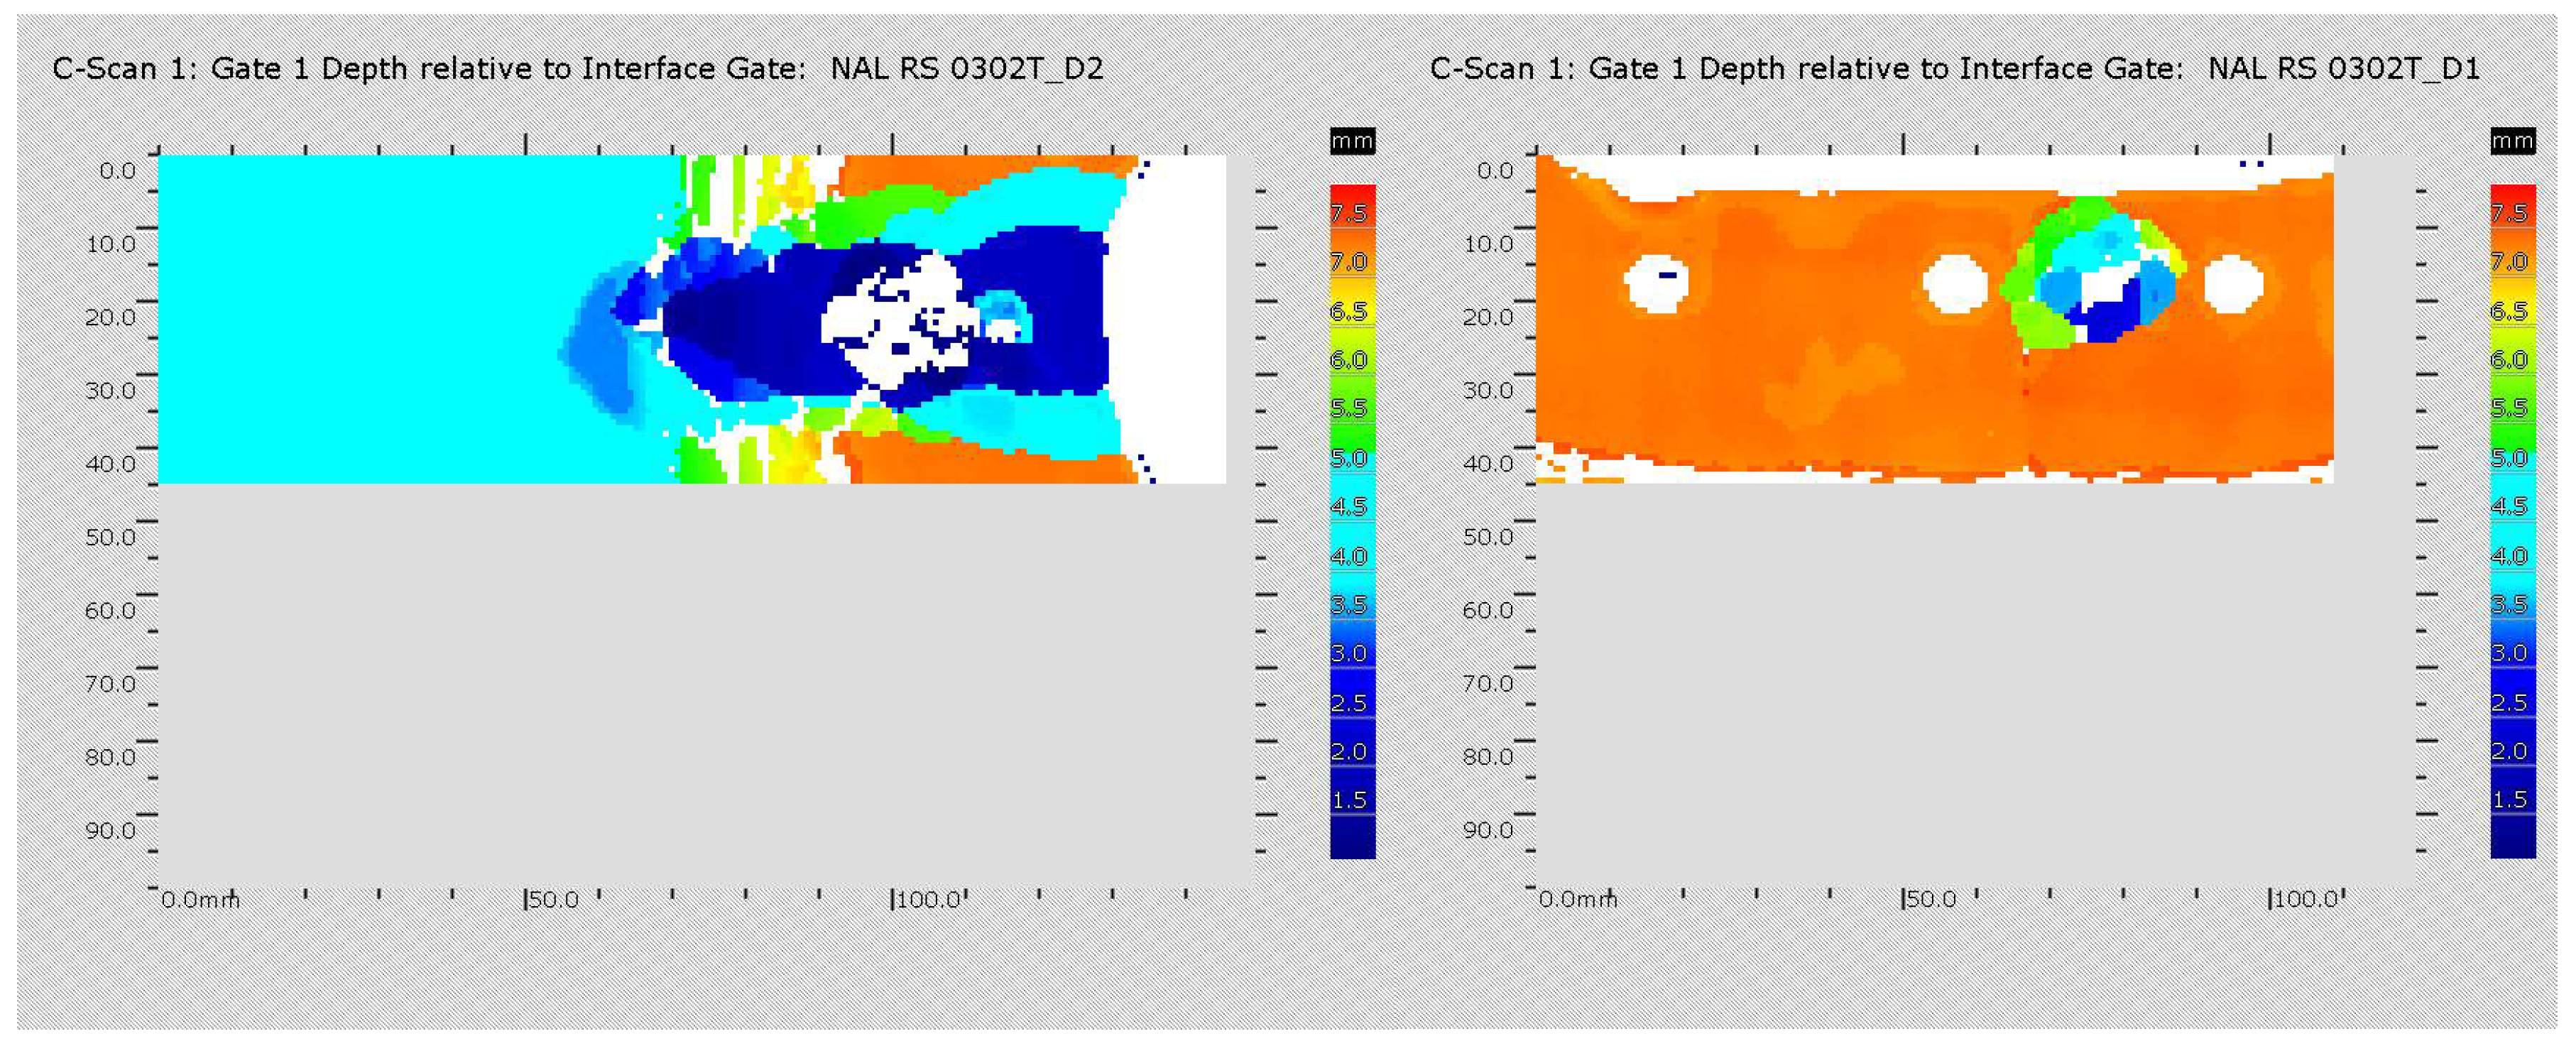
On panel 1, one impact damage was inflicted by a sharp impactor (40J), and the other inflicted by a blunt impactor (35J), with no visible damage from the 35J impact (BVID) and visible damage from the 40J impact. Panel 2 was impacted with a sharp impactor (40J) and a blunt impactor (95J). Both impacts caused visible damage to the panel. Subsequently, both panels were inspected by ultrasonic scan to determine the damaged area. The results of the ultrasonic scan are presented in Figure 13 and Figure 14.

2.4. Panel Testing under Quasi-Static Load

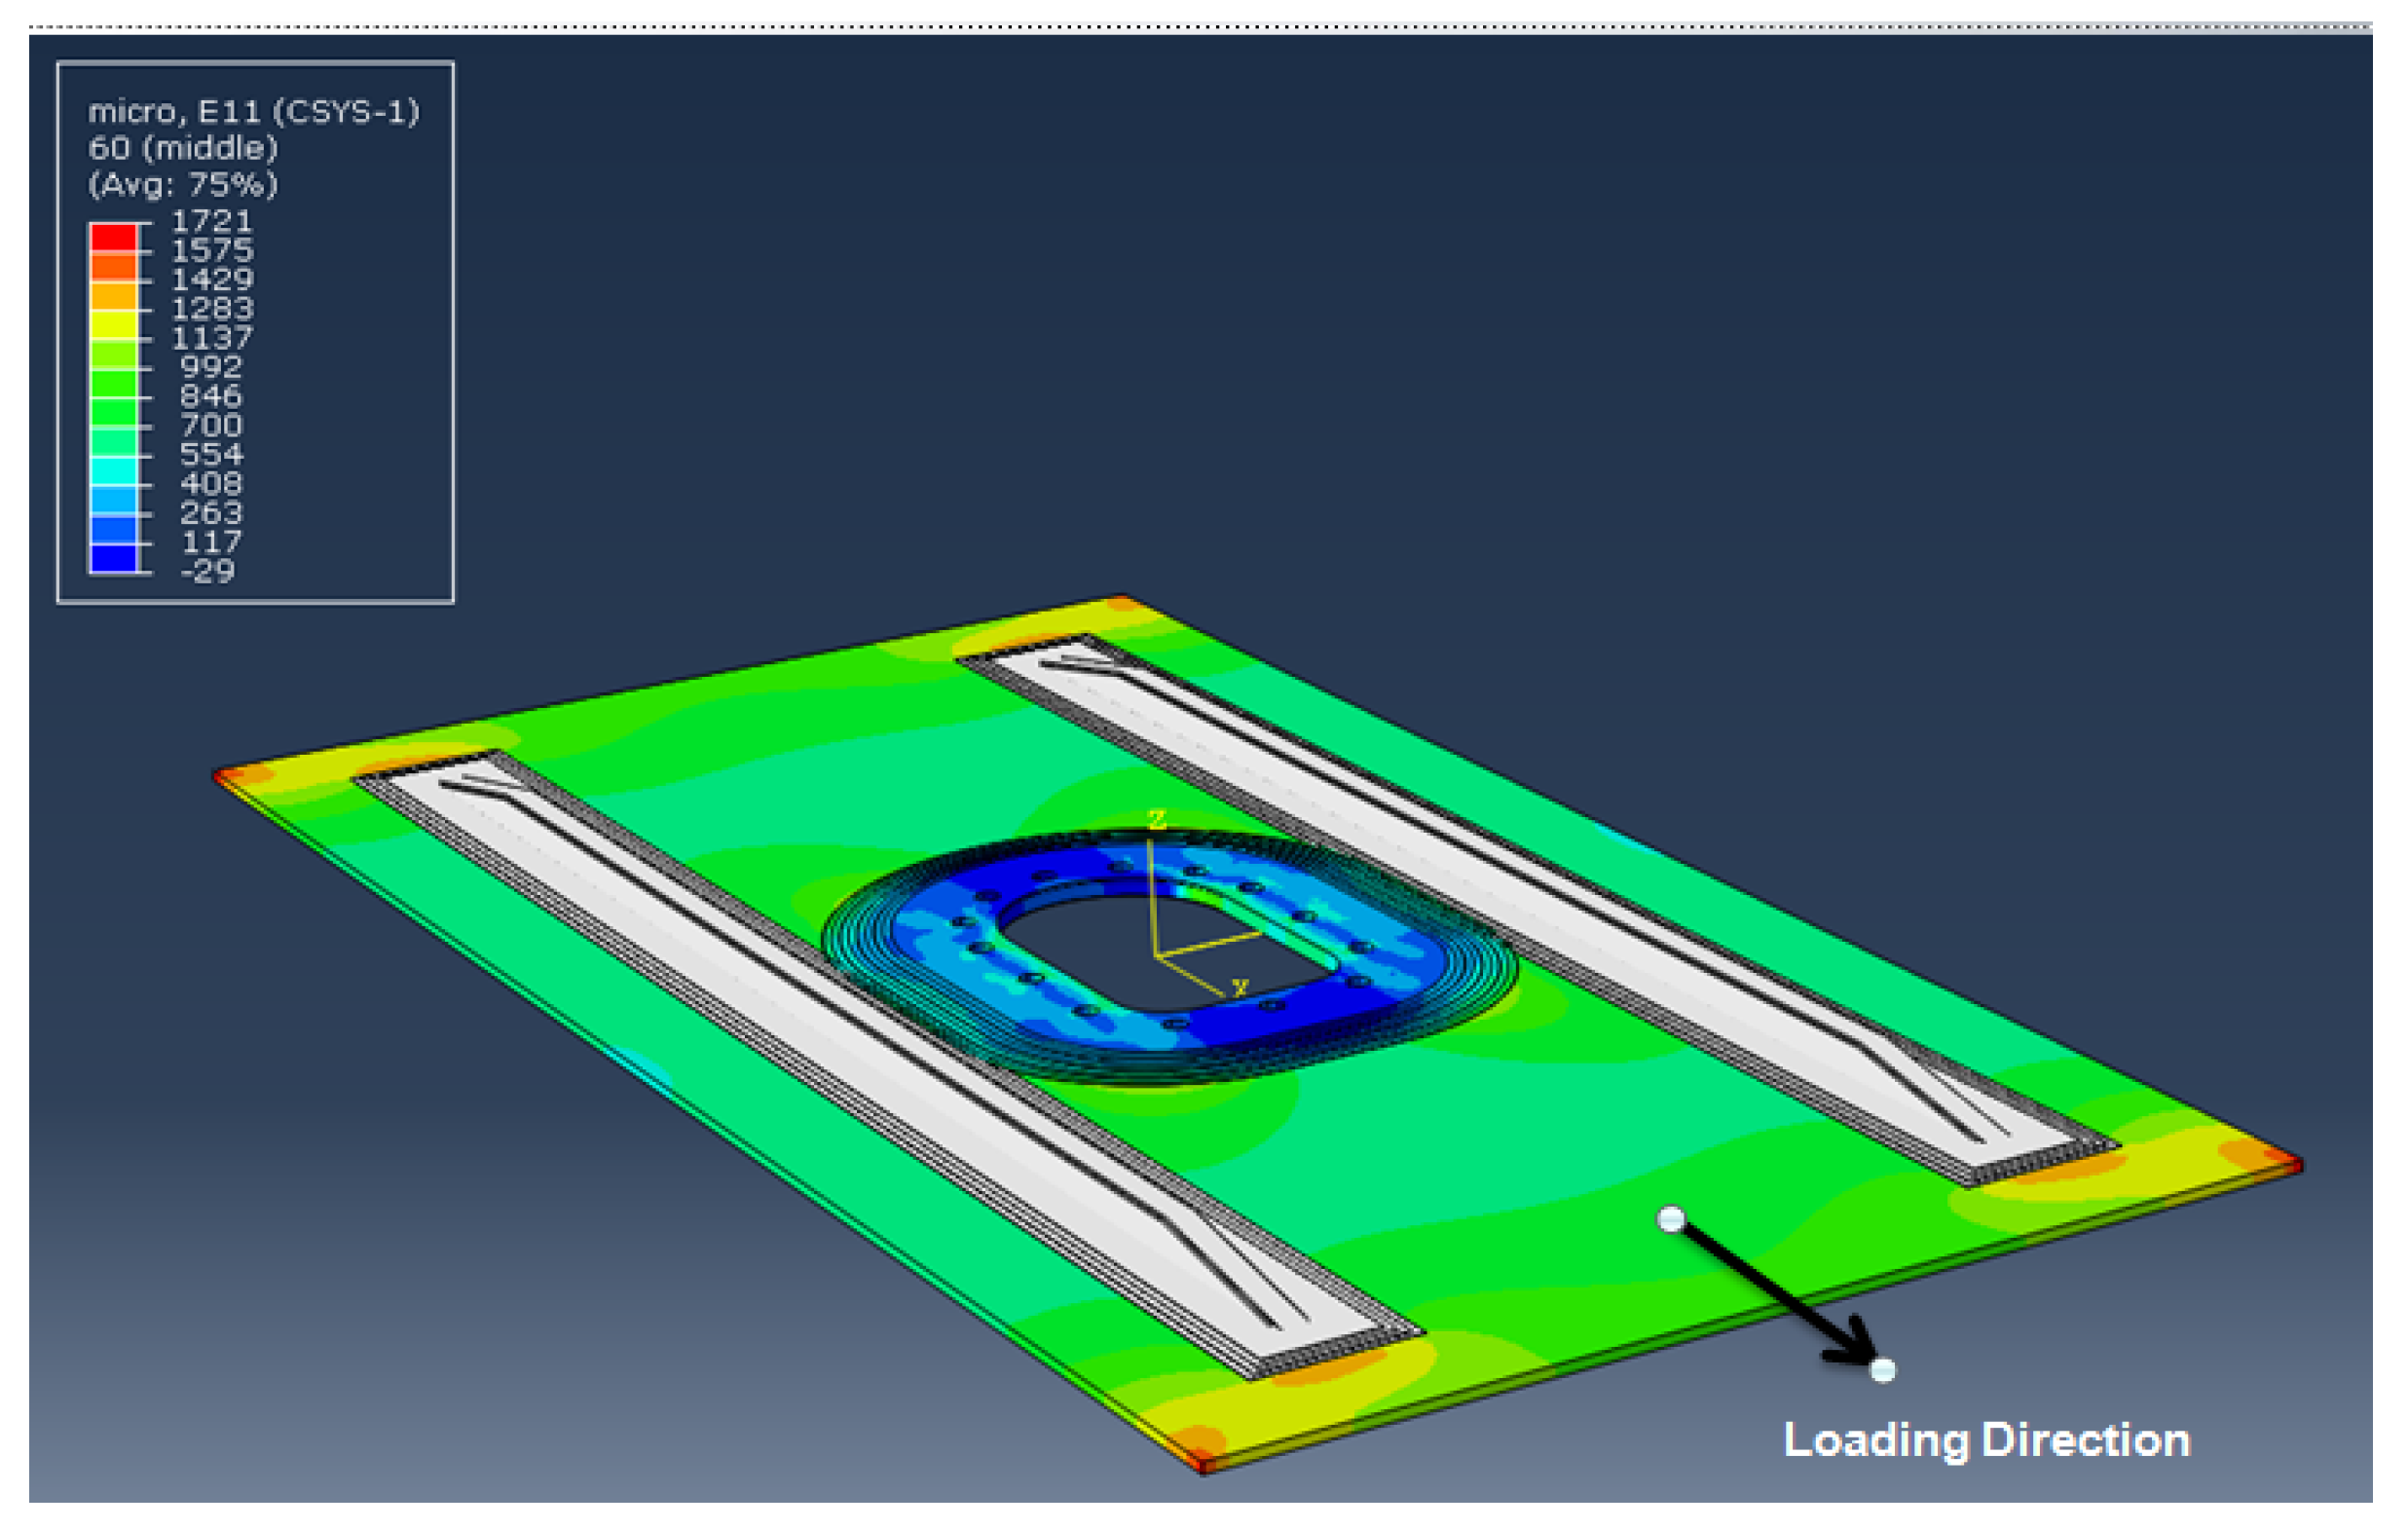
A finite element model of the panel was created using the FE package Abaqus/Standard. A static tensile load of 9000 Kgf. was applied to the model, and the strain distribution of the panel is obtained (Figure 15). The panel size after trimming off the extra edges was 950 mm × 400 mm. The thickness-related details and the orientation of fiber plies are discussed in Section 2.2. The boundary conditions were precisely designed as the fabricated panel. One end was fixed, and the other end was subjected to tension loading. The material properties, such as Poisson’s ratio (0.28) and the density of the composite (2.22 g/cc), were fed to the software for the test. The far-field strains (strains farther from the cutout, which do not have any stress-concentration effect) on the panel were approximately 846 microstrains under this load.
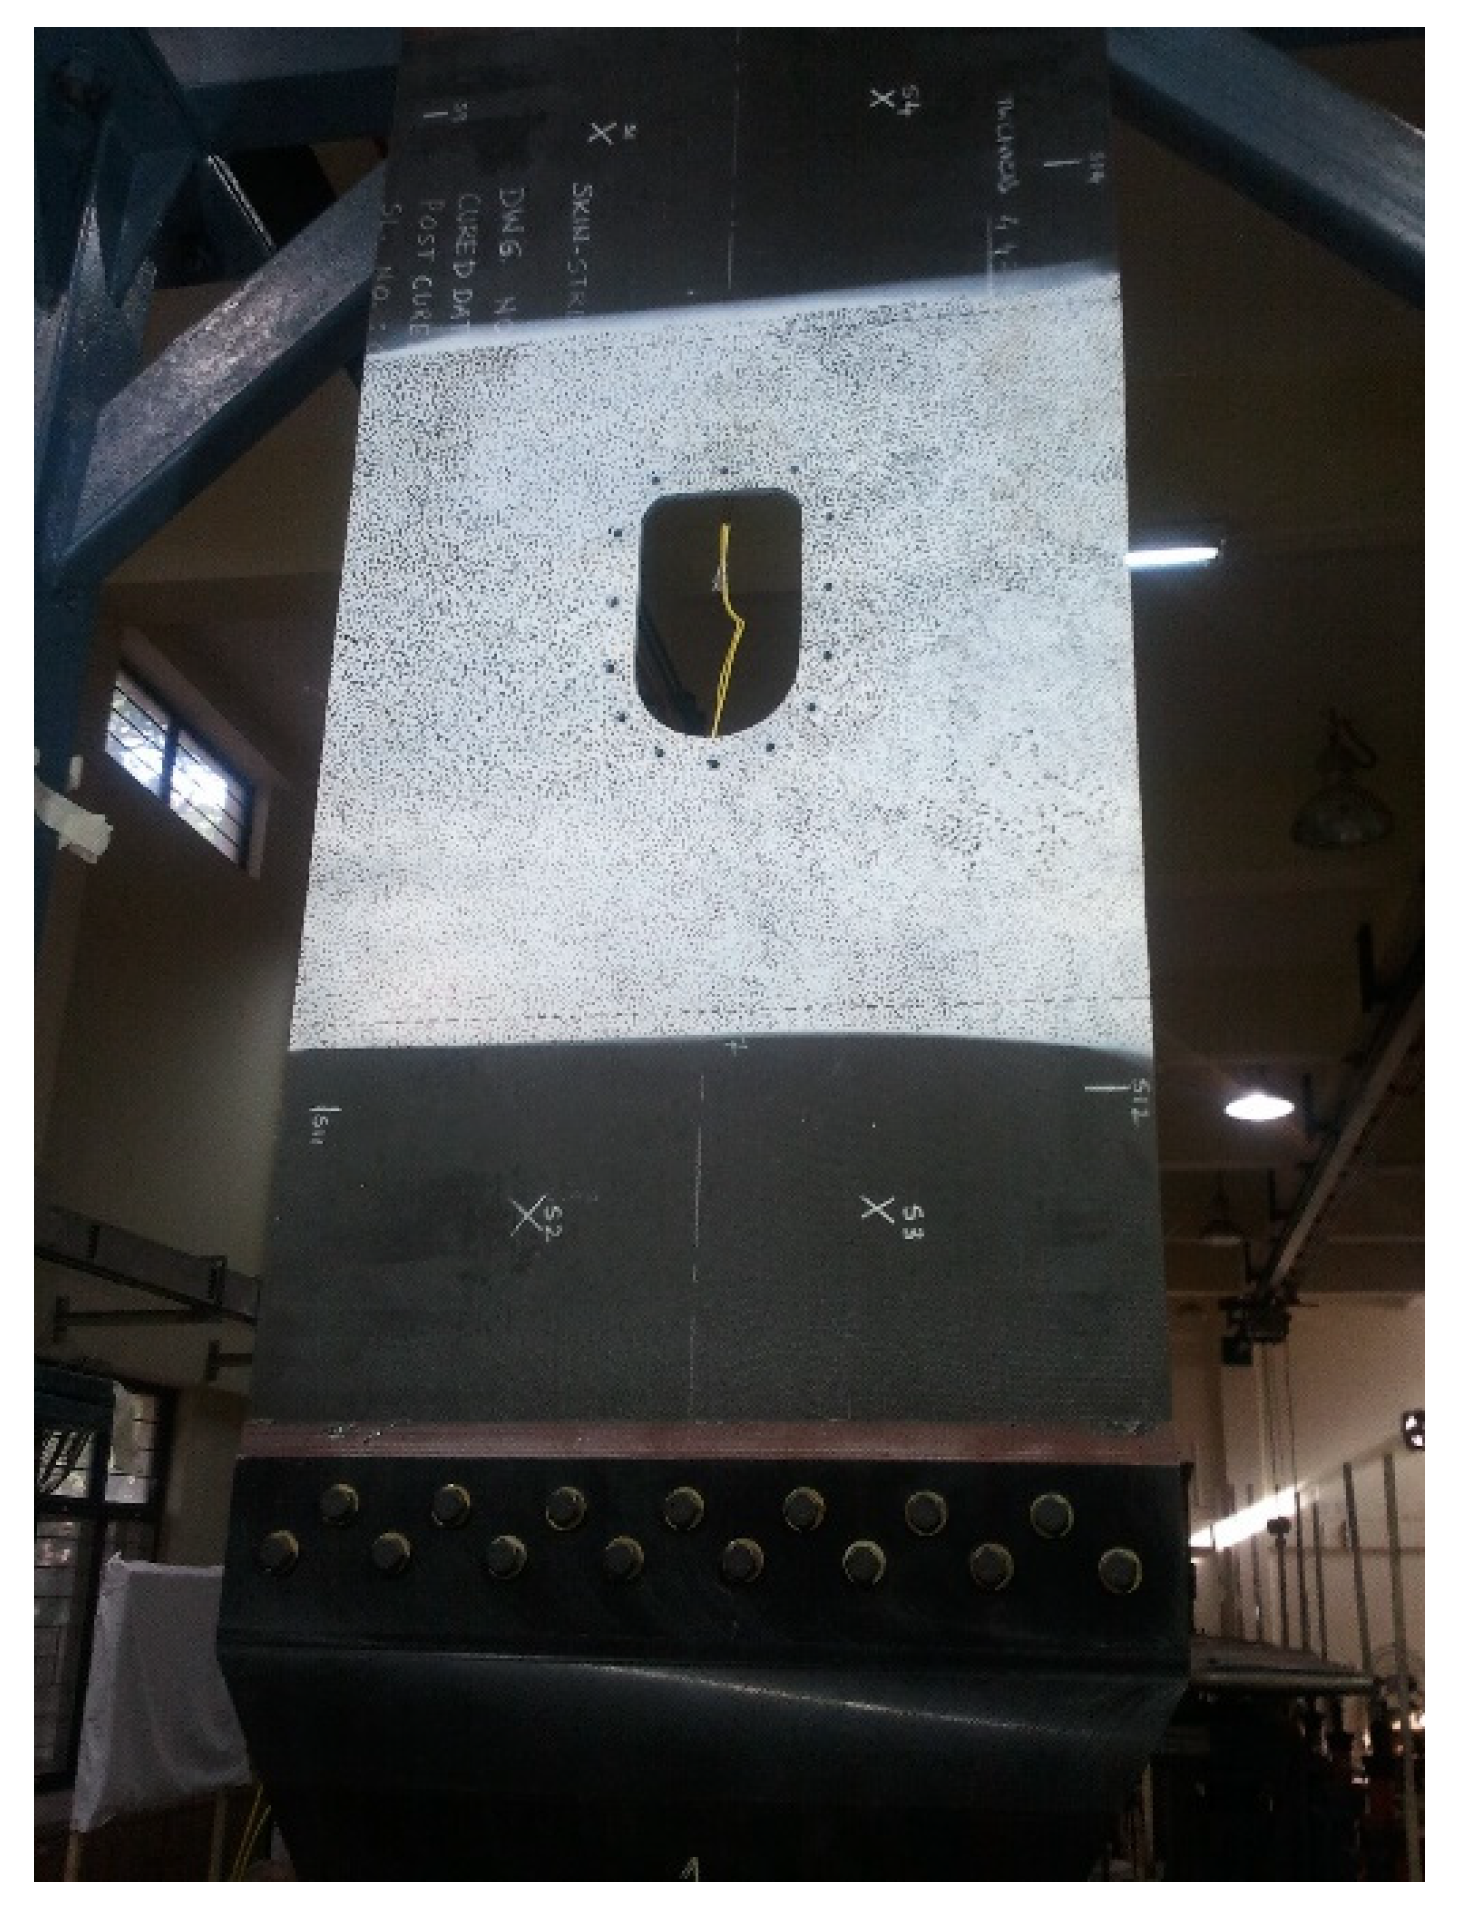
Next, the panel was painted white and speckled with black dots on the skin side for implementation of digital image correlation (DIC), as shown in Figure 16. DIC is an optical method that employs tracking and image registration techniques for accurate 2D and 3D measurements of changes in images. It is often used to measure full-field deformations and strains. The advantages of this technique are full-field and non-contact measurements [31]. Eight strain gauges were bonded on the stringer side of the panel to measure strains in the loading direction. The locations of the strain gages are shown in Figure 17.
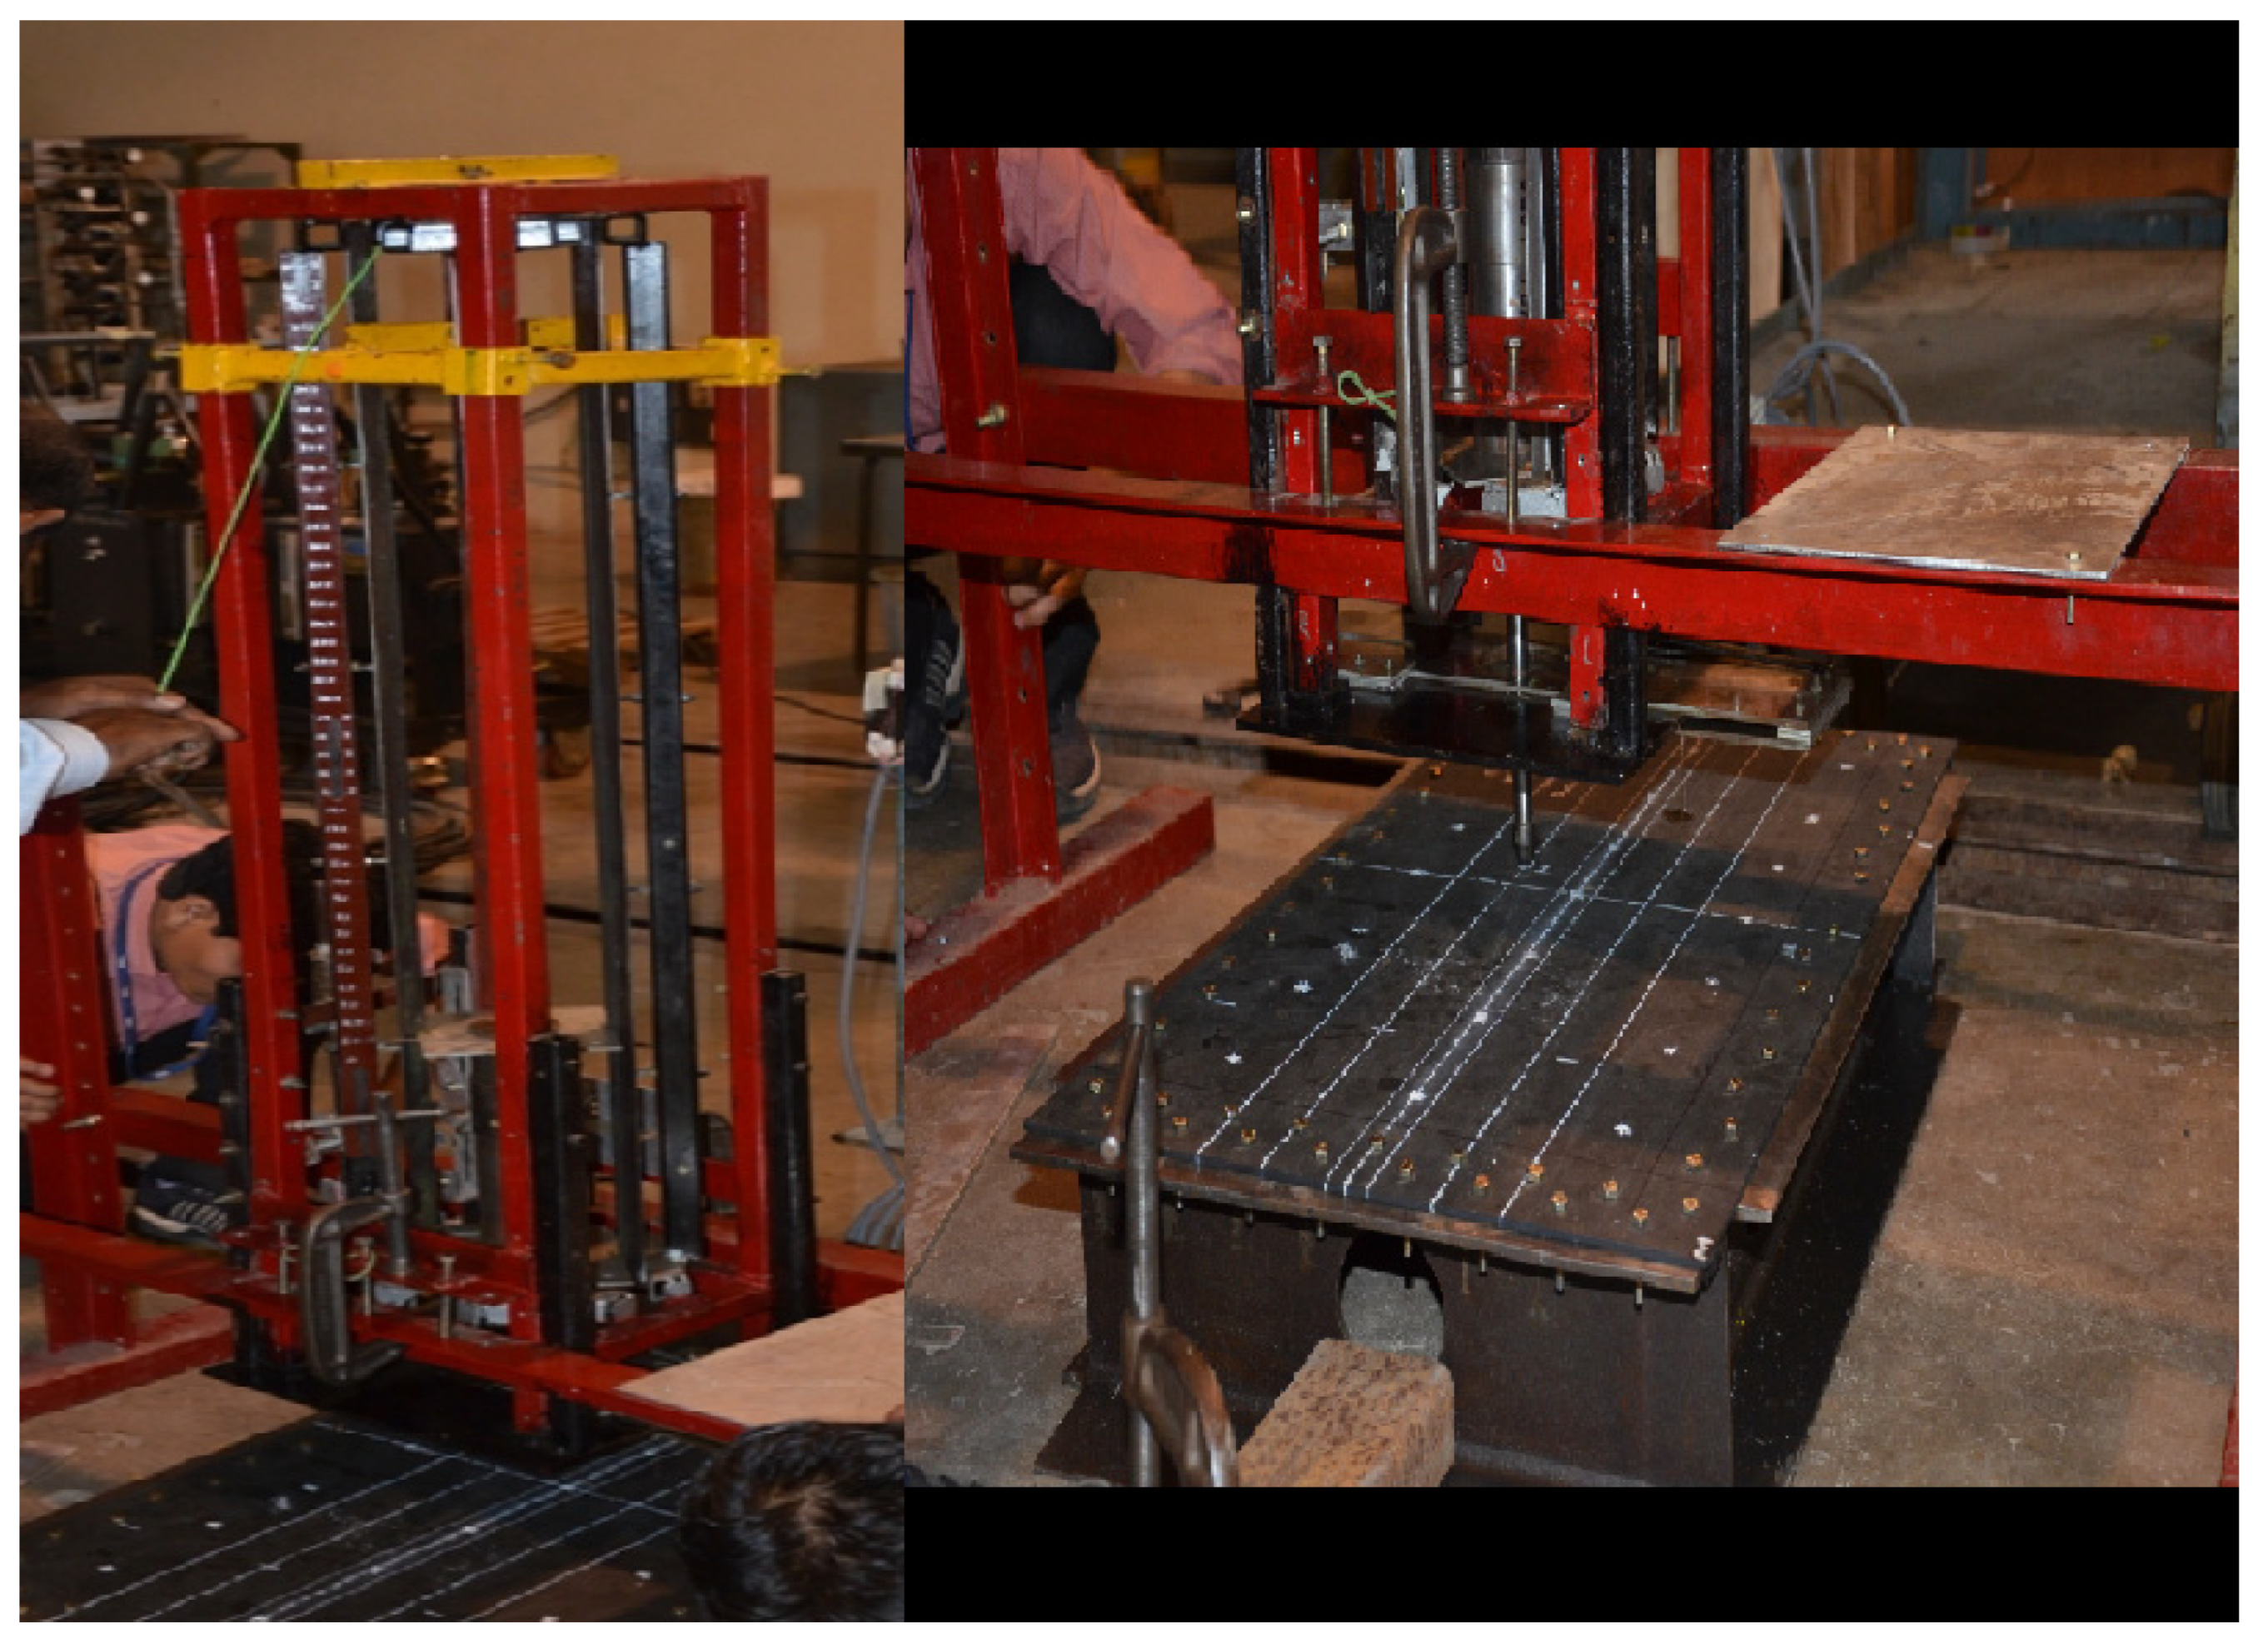
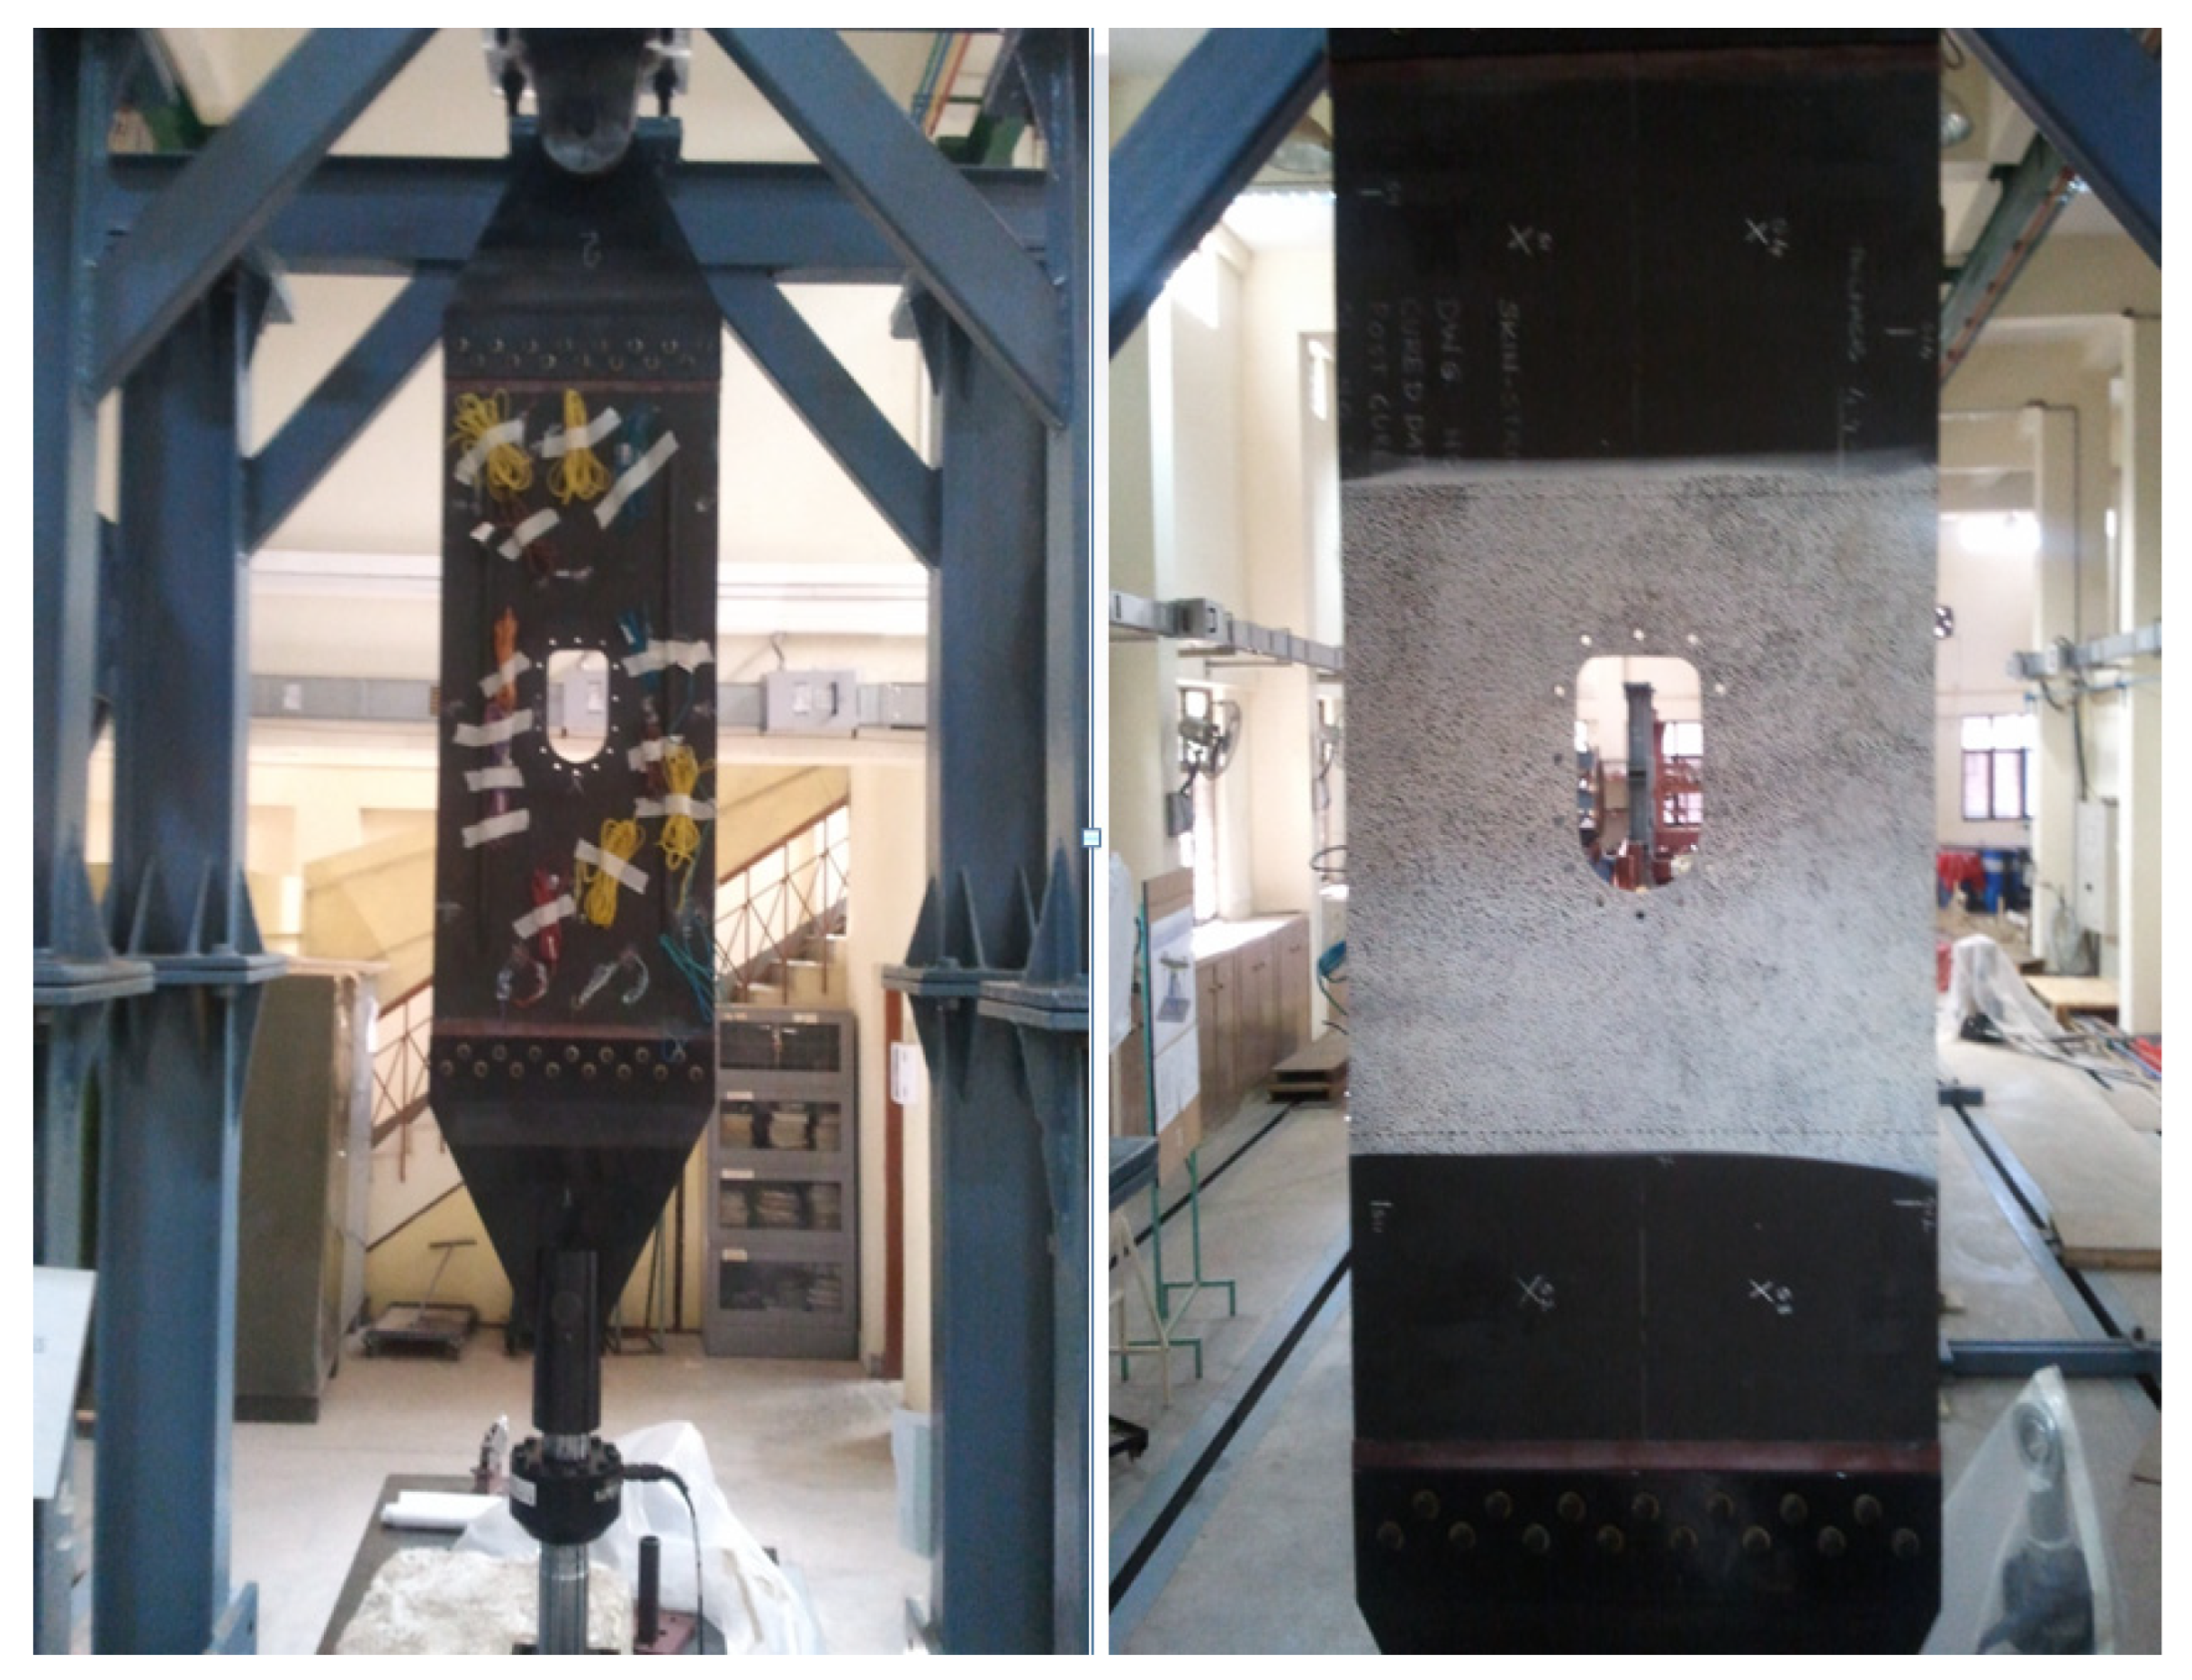
Next, the panel was subjected to quasi-static tensile loading using a servohydraulic actuator (Figure 18). The load was simultaneously measured by a load cell and strain gauge readings, and DIC images were recorded for post processing.

2.5. Derivation of Fatigue Spectrum Loads

Based on a study conducted on various aircraft, the NLR Institute, Amsterdam, and LFB, Darmstadt, established a standardized load sequence for testing the wing root section of typical transport aircraft. This non-dimensional fatigue load spectrum is well-known to aircraft structural engineers as the TWIST spectrum [32,33,34]. Testing as per the TWIST spectrum is time-consuming. Hence, the same authors developed a reduced test spectrum known as ‘mini-TWIST’ to reduce the test duration. First, the continuous spectrum is converted into the stepped function to limit the number of load amplitudes in tests. Ten load levels are considered in the TWIST spectrum. Load level 1 is the most severe, and load level 10 is the least severe. The standardized spectrum for 40,000 flights (typical life of civilian transport aircraft) is divided into ten identical flight blocks with varying load intensities. Each block is equivalent to 10% of the total life of the aircraft. Ten flight types are defined (flight type A to flight type J). The flight types are explained briefly below.
  • Type A: severe flight condition, high gust loads. Load level 1 occurs once in every block;
  • Type B: the nest most severe flight condition. Level 2 occurs once in every block;
  • Type C: load level 3 occurs only once;
  • Type D: load level 4 occurs only once;
  • Type E: load level 5 occurs only once;
  • Type F: load level 6 occurs only once;
  • Type G: load level 7 occurs only once;
  • Type H: load level 8 occurs only once;
  • Type I: load level 9 occurs only once;
  • Type J: only gust loads with the smallest amplitude.
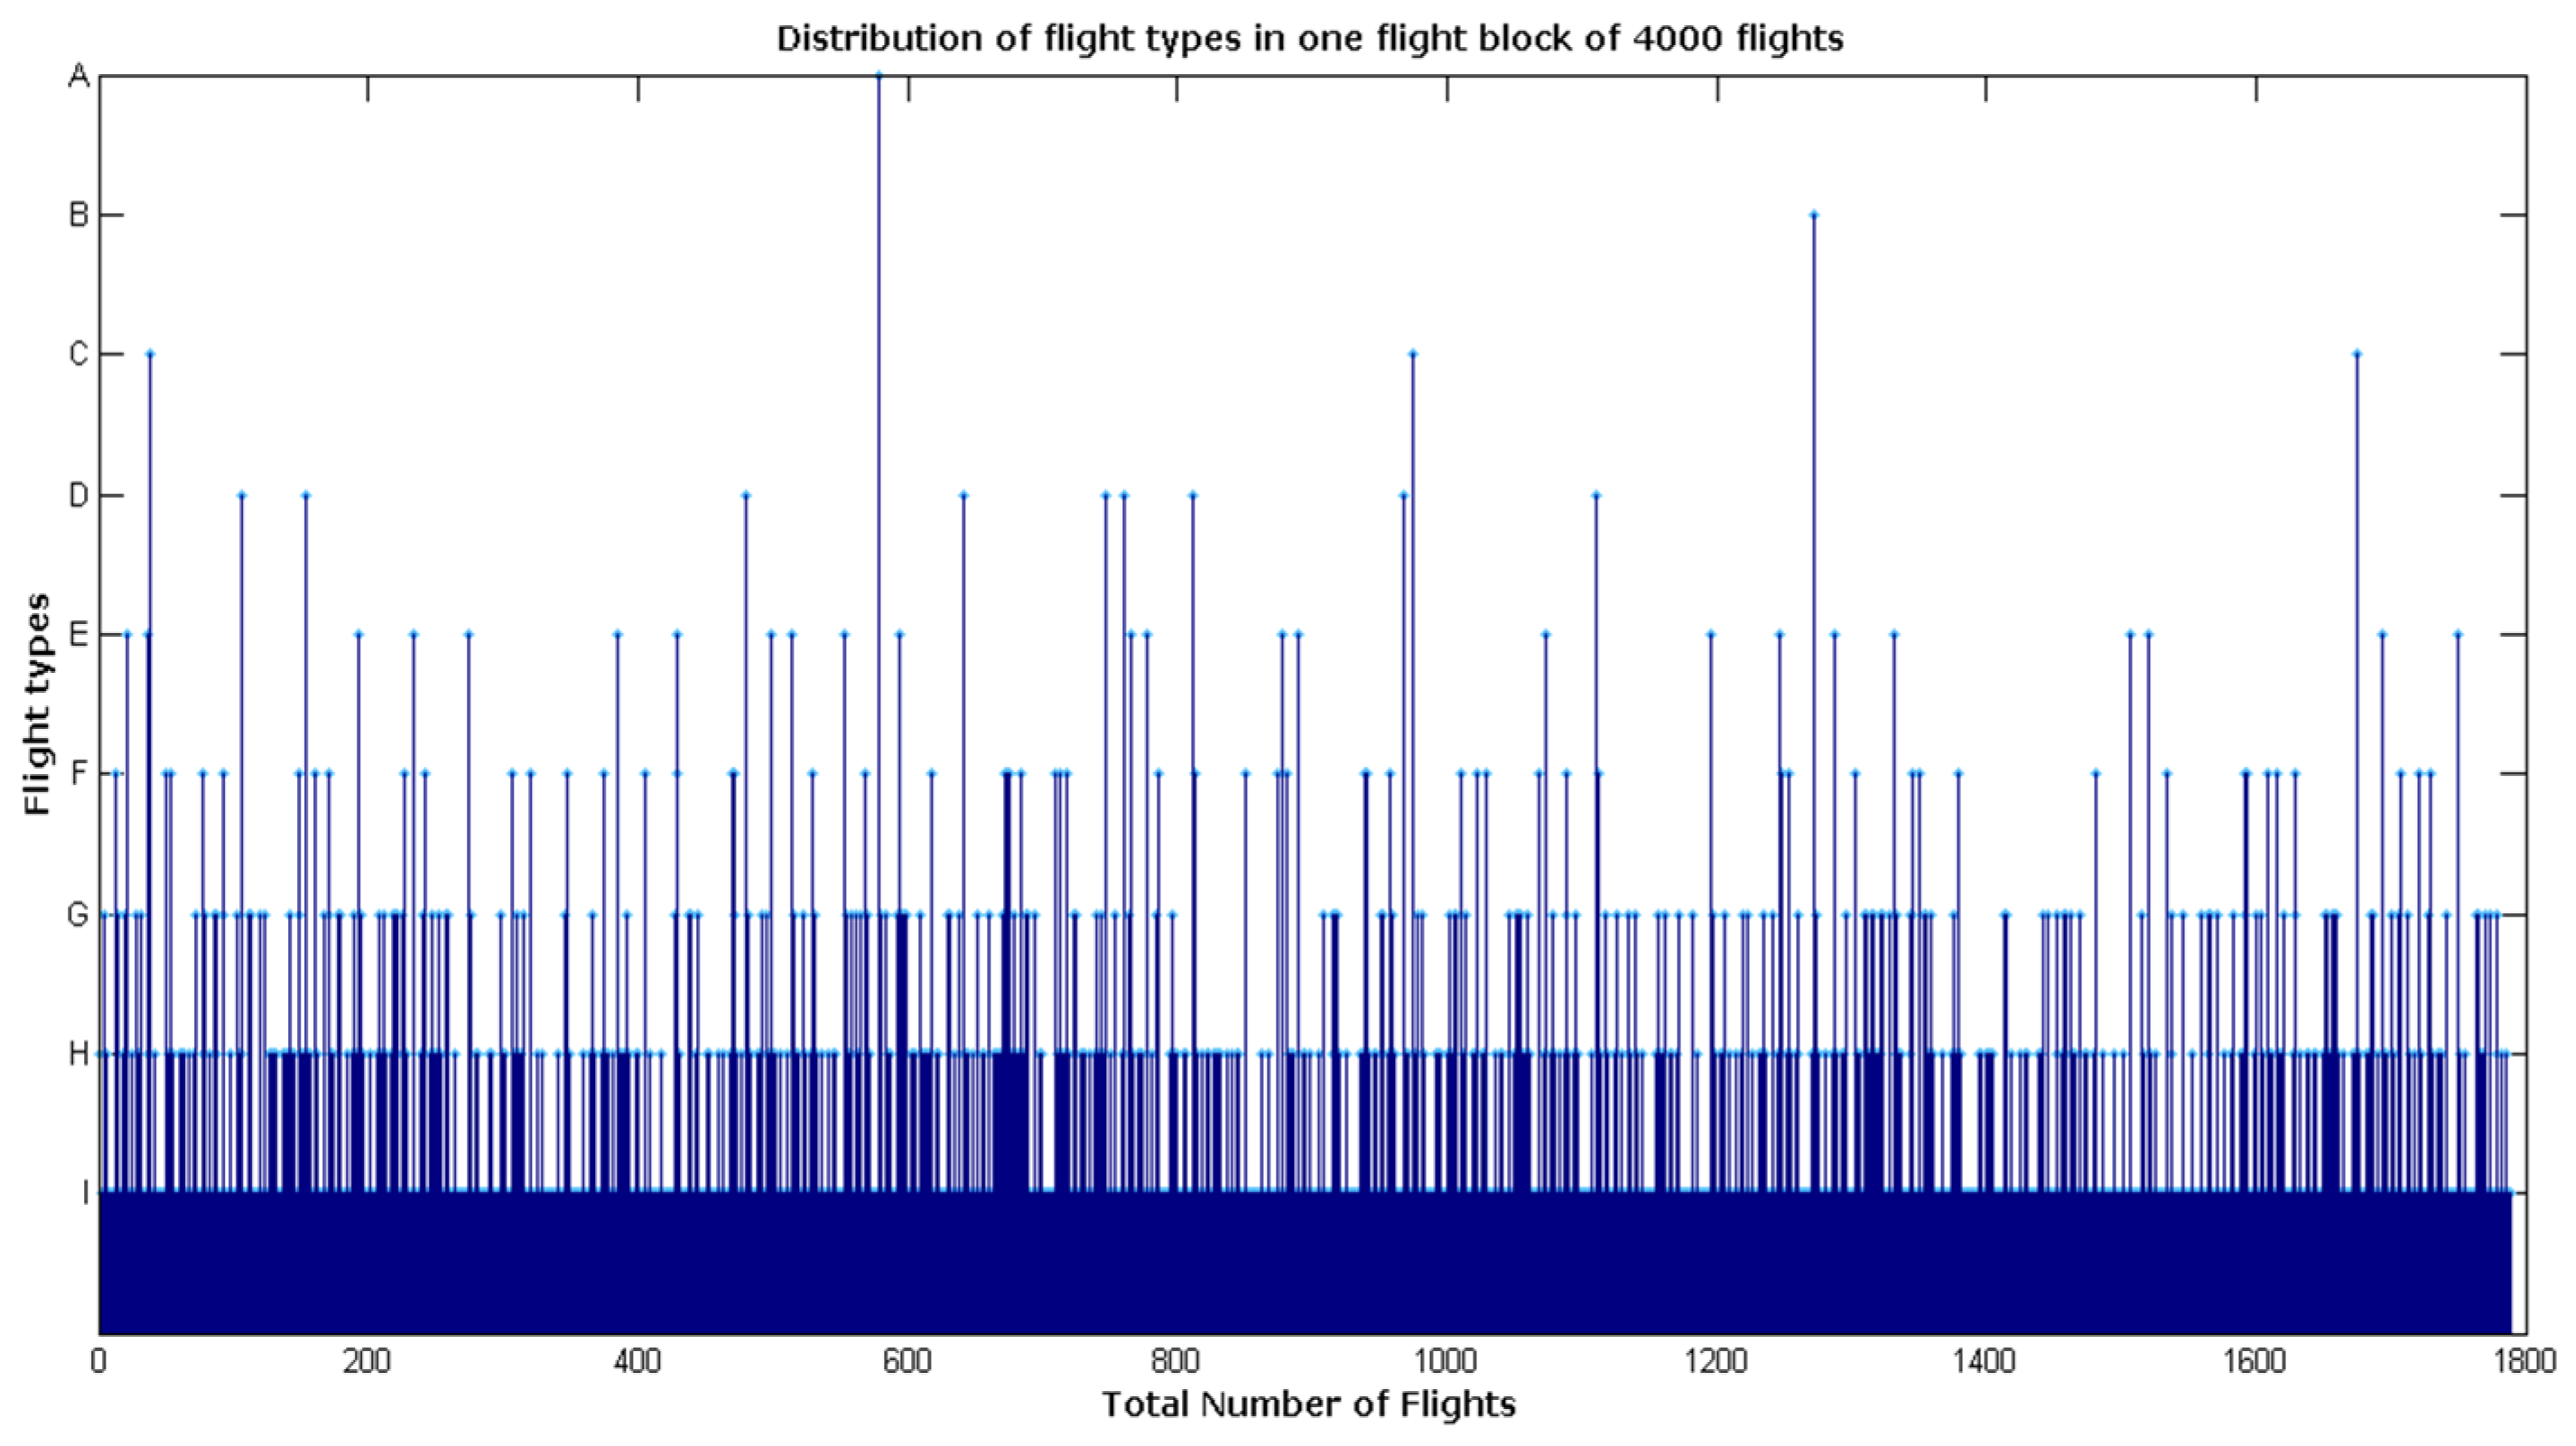
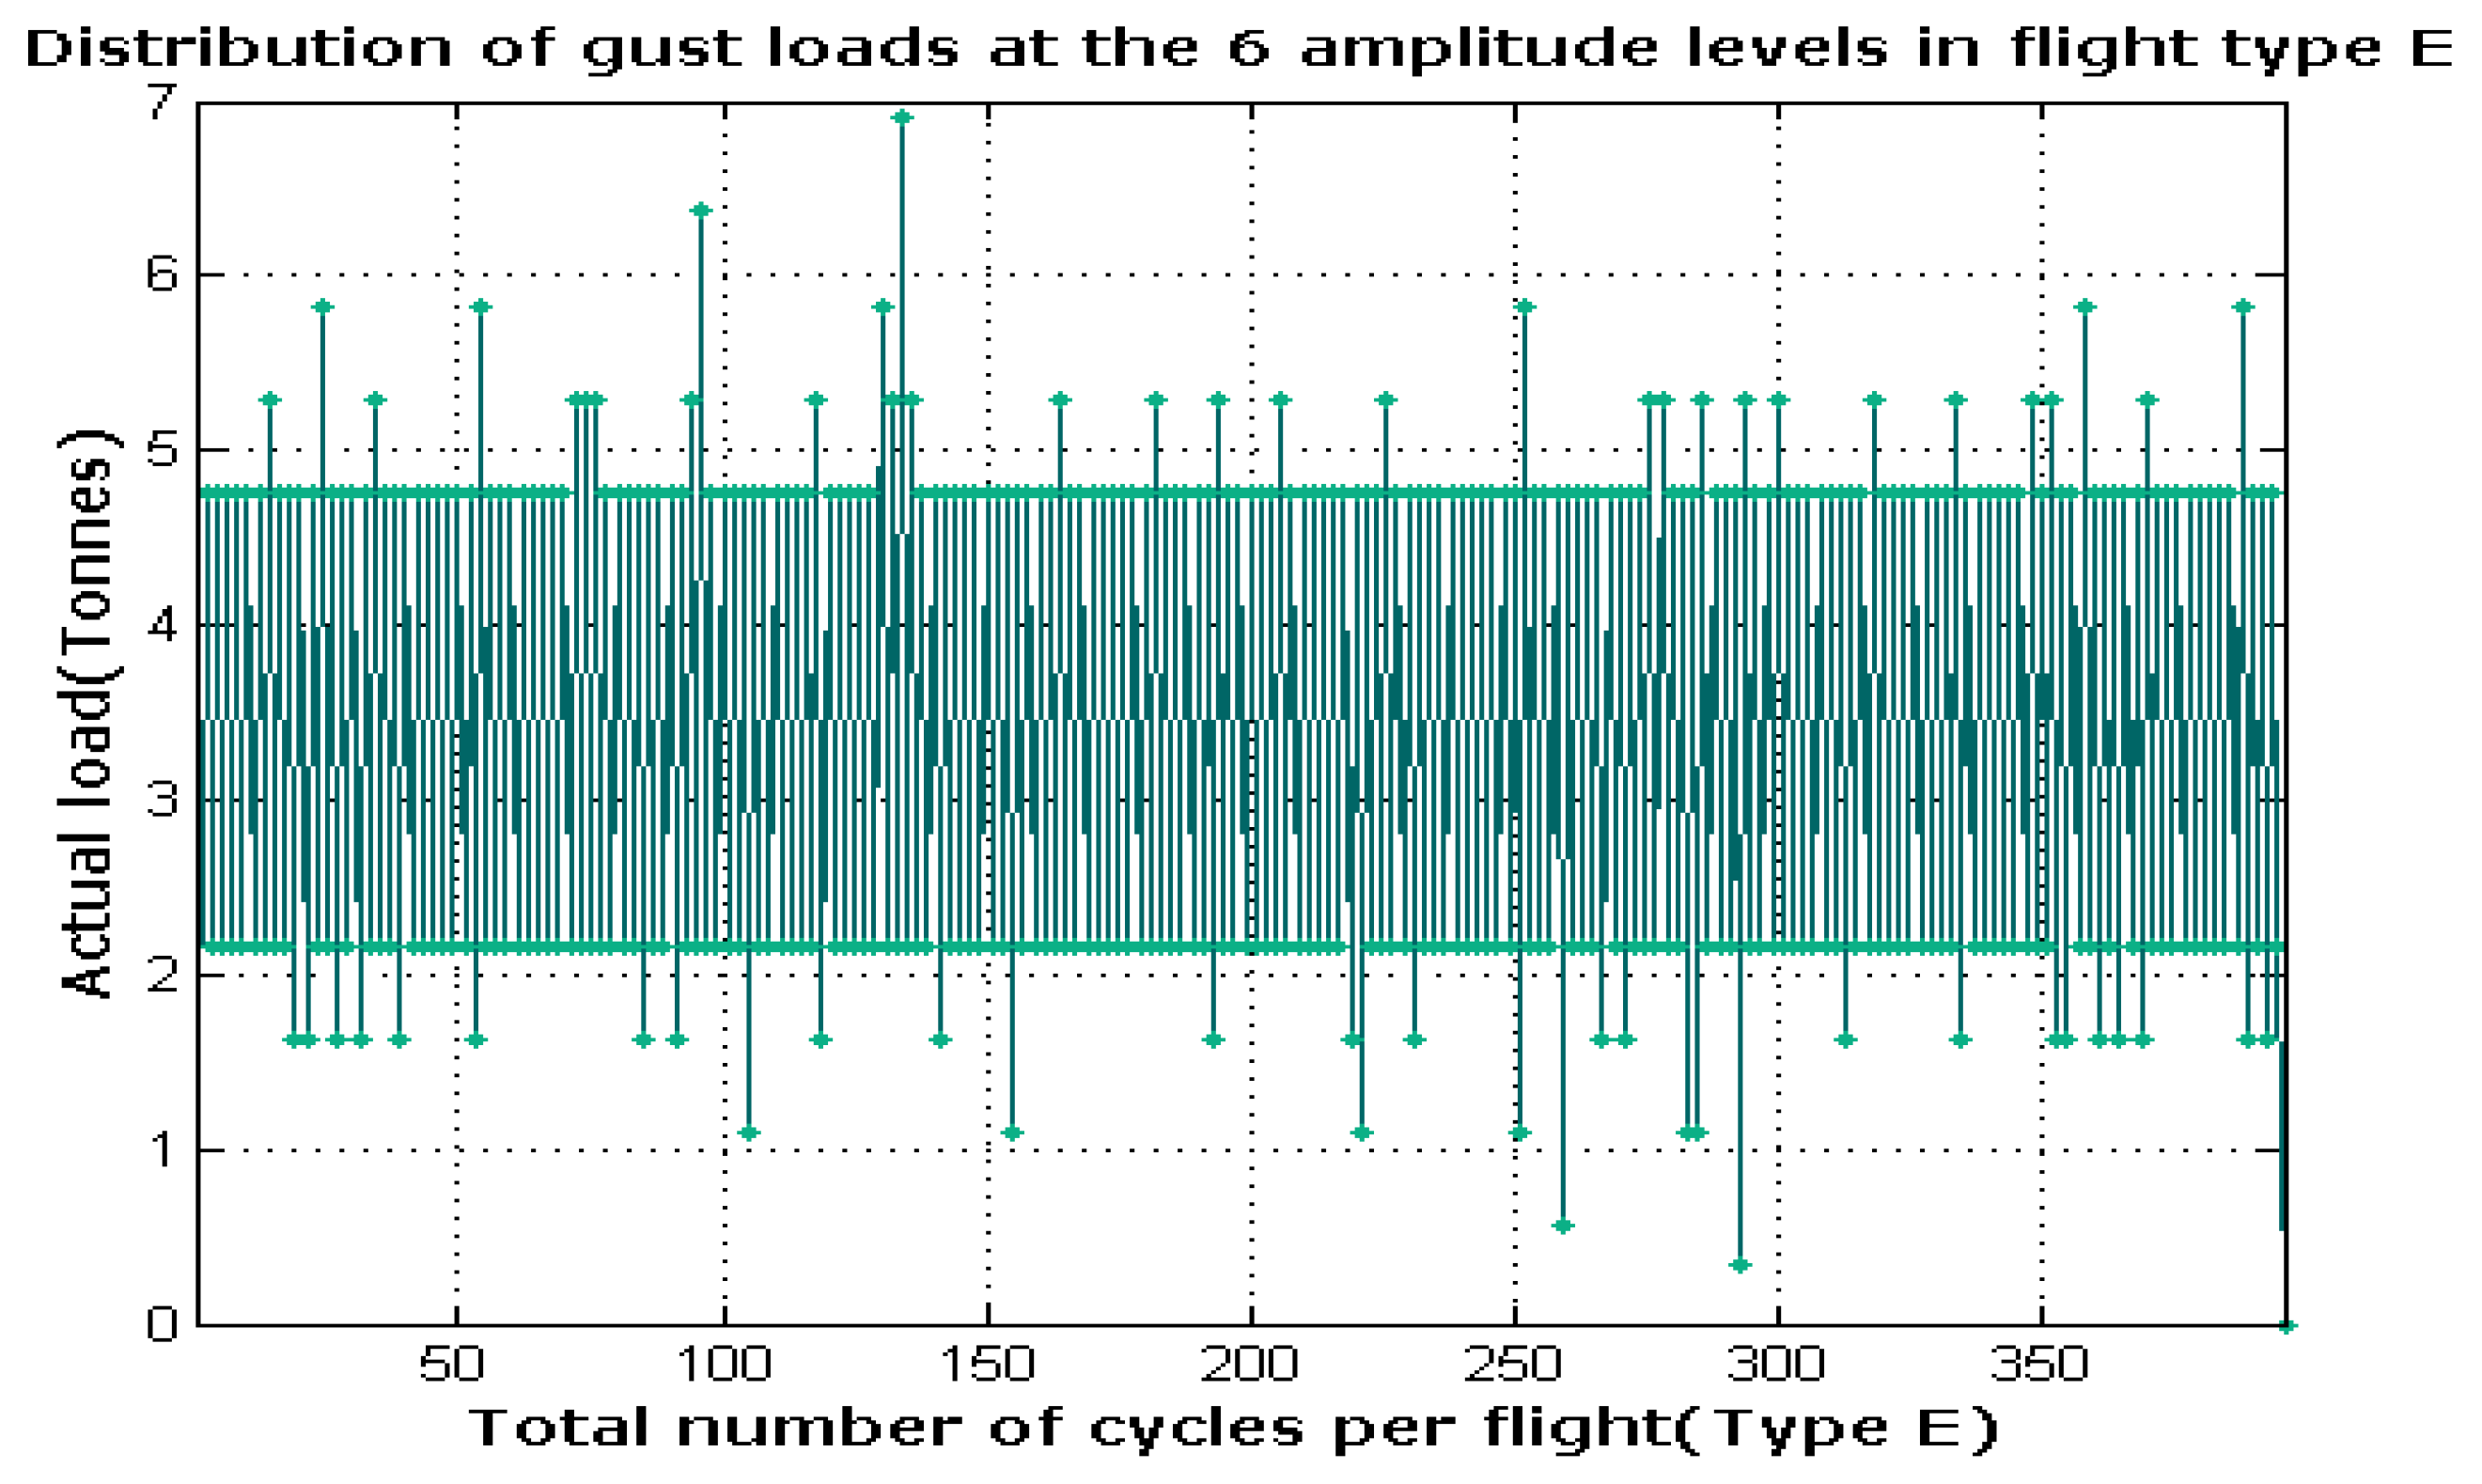
Table 1 presents the most crucial outcome/feature of the TWIST report: the frequency of each flight type and the frequency of occurrence of each load level within each flight type. A computer program was written in Matlab to randomize the sequence of flights in one block (equal to 40,000 flights). Computer programs were also written to randomize the load sequence within each flight type. Figure 19, Figure 20 and Figure 21 show the distribution of flight types and load in one block and the load sequences for one flight type, respectively. Load sequences for other flight types are not shown for brevity.
Test coupons made of composite materials are usually tested at speeds corresponding to 1–3 Hz. Testing at higher speeds usually leads to the rapid degradation of matrix properties, owing to the internal heating of the specimen. In larger test specimens, such as that considered in this study, the test speeds are even lower, given high inertia of the panel and the fixture. Assuming that each cycle takes 4 s to complete, one block of fatigue loads in the TWIST spectrum (398,665 cycles) would take approximately 443 h. One fatigue life would take approximately 4430 h, which is unacceptably long. In order to reduce the testing time, many researchers instead use the mini-TWIST spectrum. Completing one block of the mini-TWIST spectrum loading would take approximately 82 h, which is achievable. Given the time constraints, the skin-stringer panel was tested for one block of mini-TWIST fatigue spectrum loads in this study.
The maximum load (corresponding to the most severe load level in the spectrum) to be applied on the panel is taken as 9000 kgf (9 tons). Therefore, a servocontrolled hydraulic actuator with a load capacity of 10 tons was used to load the panel under fatigue. The arrangement of the panel on the hydraulic actuator is shown in Figure 18. The loading and unloading rate of the panel was kept constant at 1000 kg/s. During fatigue tests, the bolts were tightened using a torque wrench with a torque of 27 N-m at frequent intervals. The panel was subjected to one block of fatigue loads. At the end of this block, the panel was dismounted, and the loading brackets were removed from the panel. The panel was inspected using a rapid ultrasonic scan to check for growth of impact damage, if any. The details are presented in the next section.

3. Results and Discussion

Figure 22a shows the contours of strain in the loading direction according to FE analysis for the same region of the panel, which is speckled. As expected, strains adjacent to the cutout are higher (stress concentration effect) than far-field strains. Strains immediately in front of and behind the cutout are much lower than far-field strains, owing to the presence of the cutout [35]. Figure 22b shows the strain contours obtained from DIC in the same region. For the sake of comparison, the range of strains in both figures was kept the same, i.e., 0 to 2000 micro strains. Strain distribution according to FE analysis is in agreement with DIC data obtained during the test.
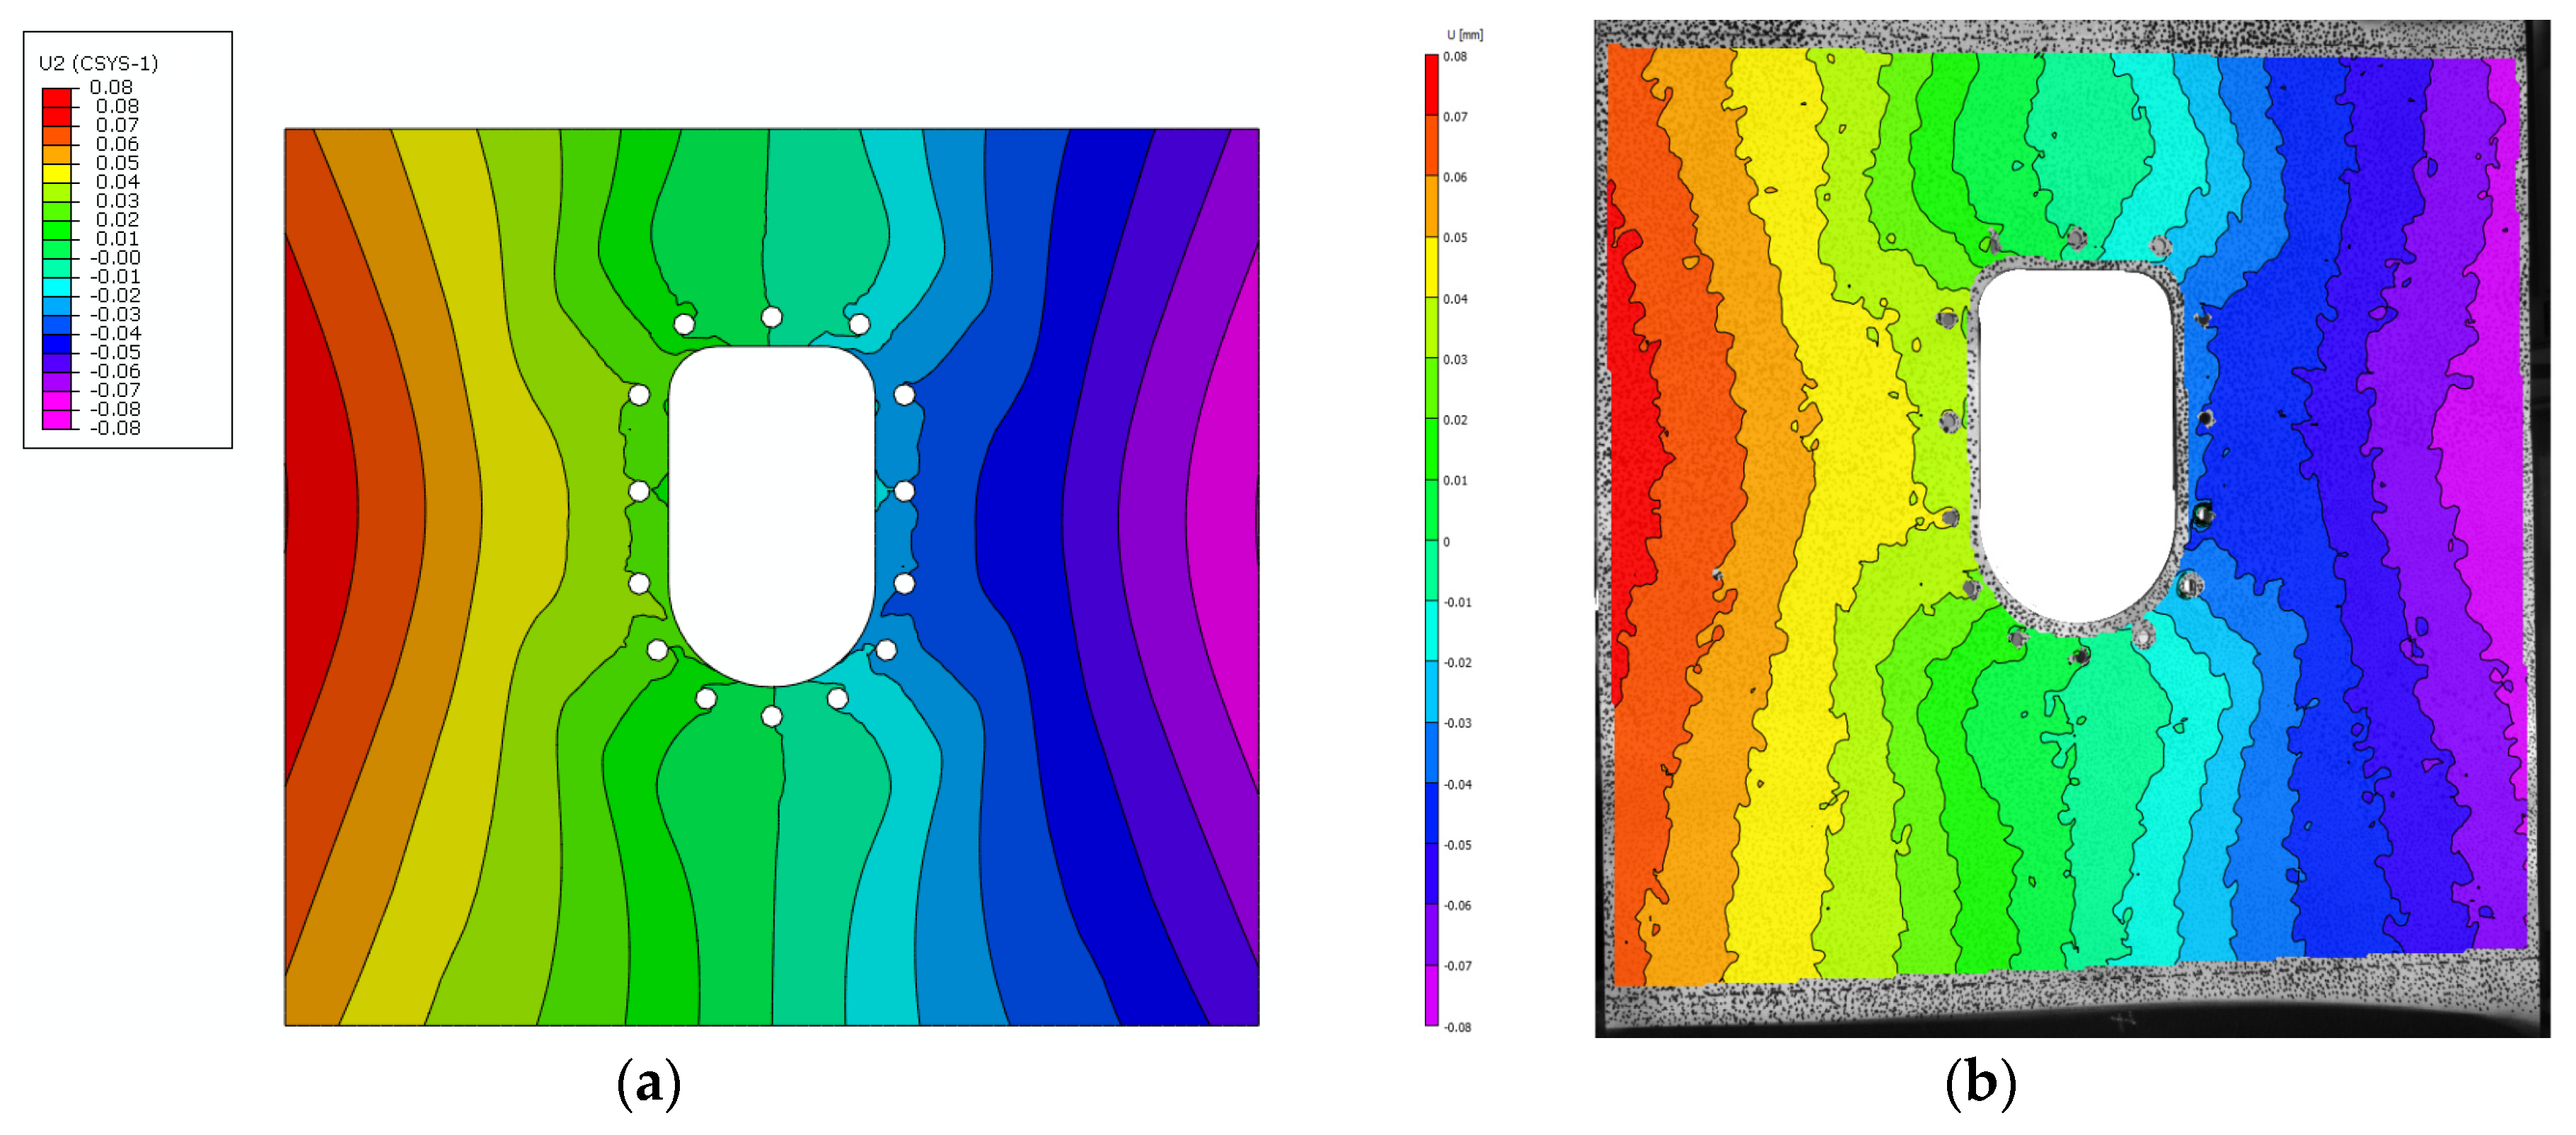
Figure 23a shows the displacement contours from according to FE analysis perpendicular to the loading direction. Figure 23b shows the displacement contour obtained by DIC in the same direction. The maximum and minimum displacements were 0.08 mm and −0.08 mm, respectively. Once again, the scales in both figures are matched for easy comparison. The results of FE analysis and DIC data are in agreement.
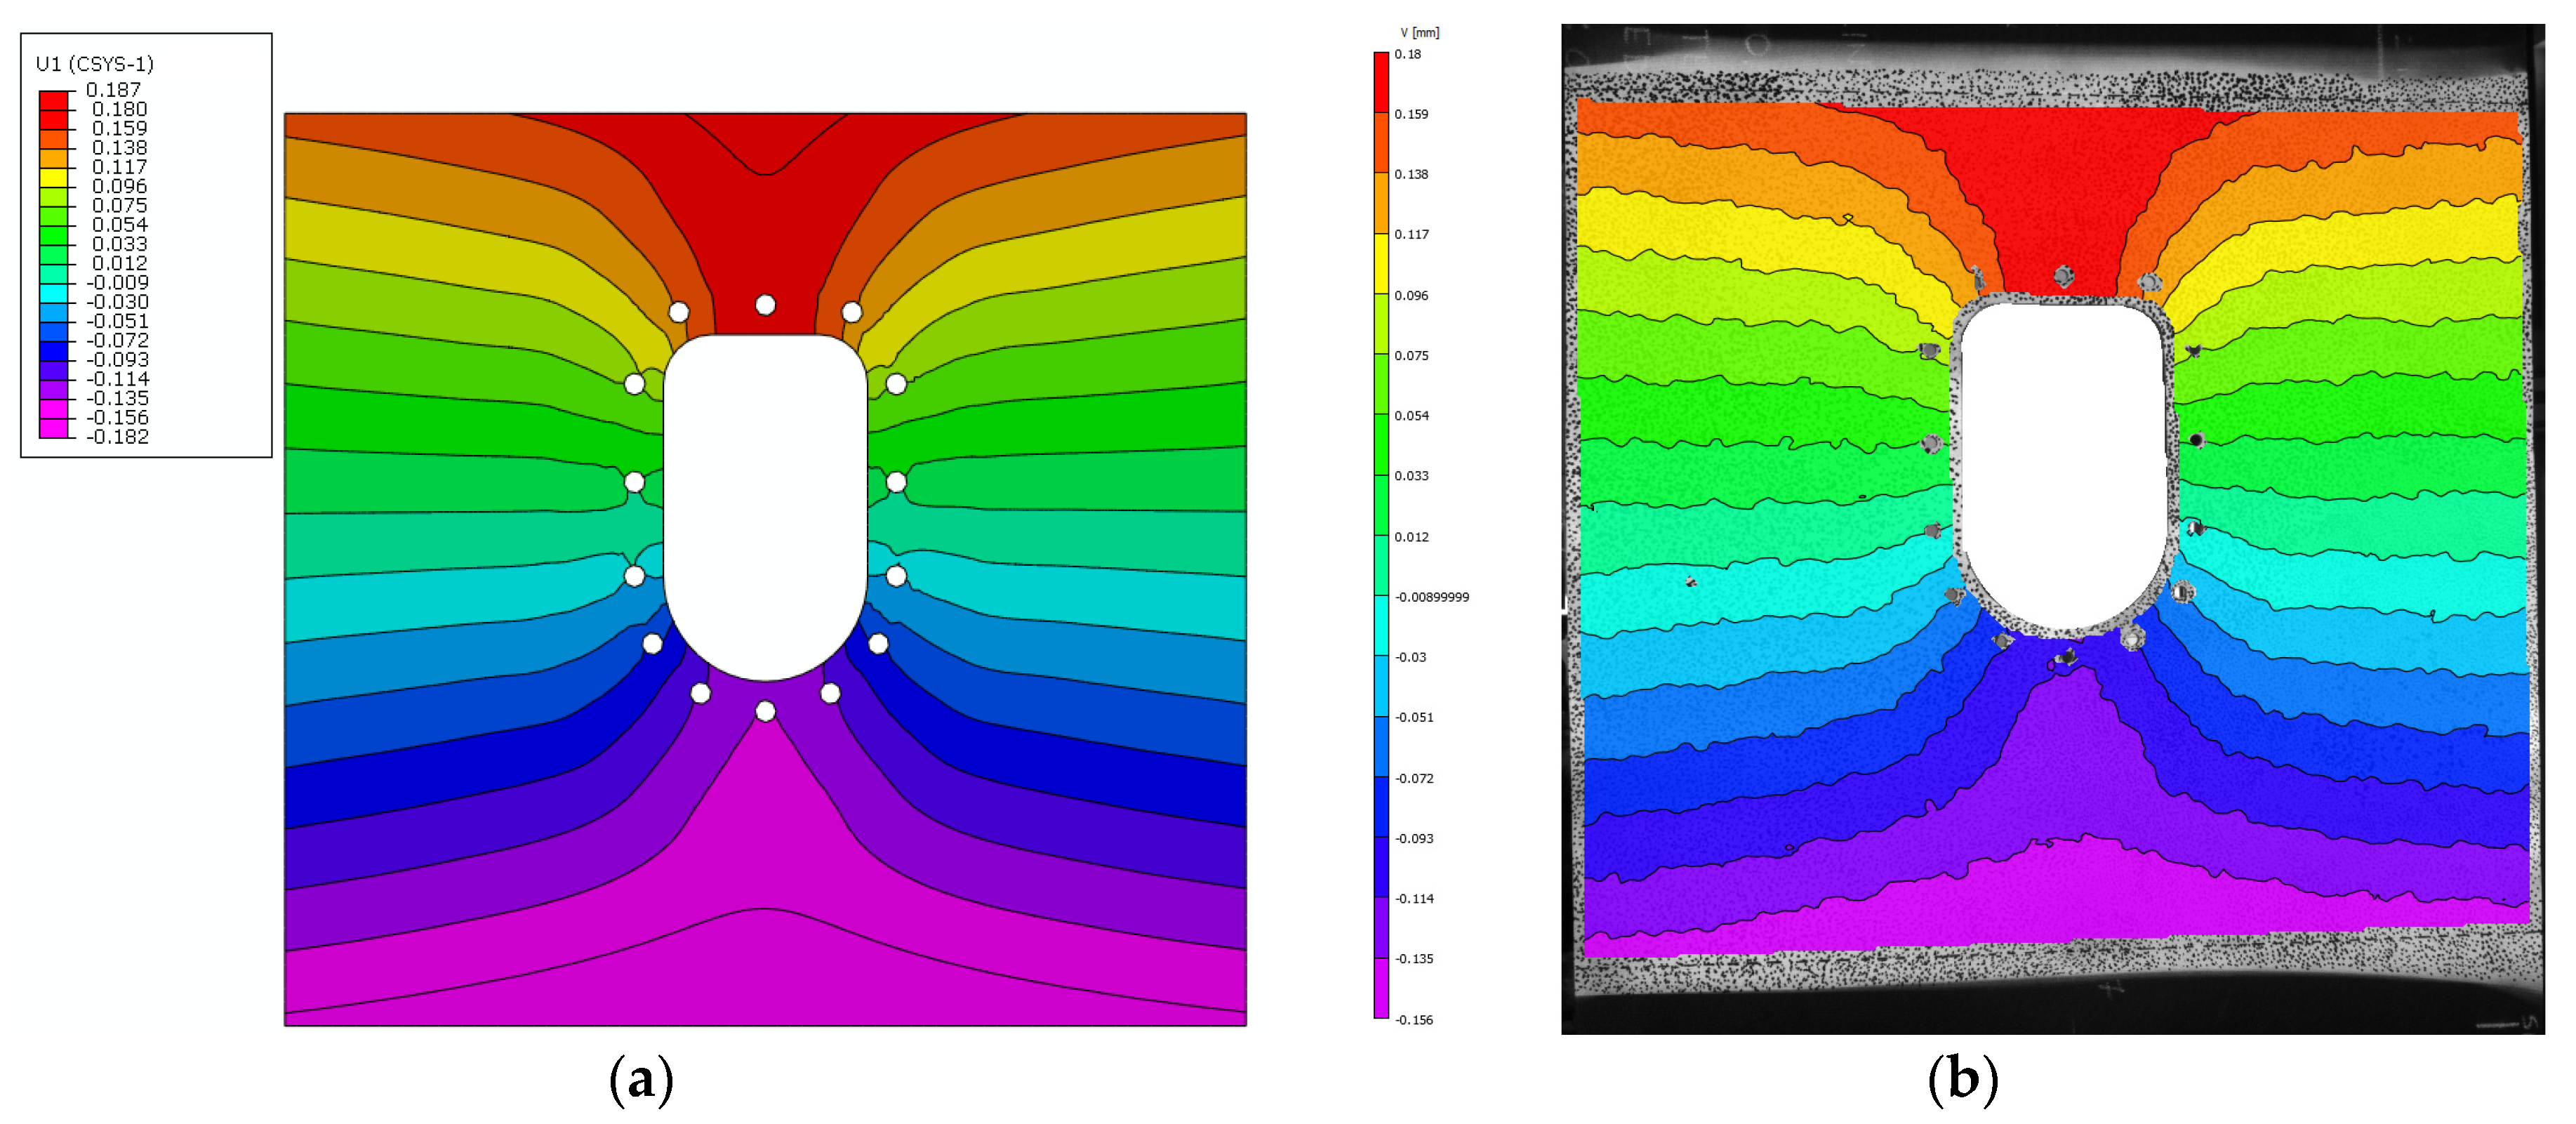
Figure 24a shows the displacement contours according to FE analysis in the loading direction. Figure 24b shows the displacement contour obtained using DIC in the loading direction. The maximum and minimum displacements were 0.187 mm and −0.182 mm, respectively. Again, analysis and test data are in agreement.
Table 2 presents the strains recorded by strain gages bonded to the panel (on the stringer side) at a load of 9000 kgf. The strains in the corresponding elements in the FE model are also given. As shown in Figure 17, the strain gauges were mounted on the panel, and the corresponding location on the FE model was compared. The strain readings are similar when compared. After the fatigue loading, the panels were analyzed for damage growth, with no change observed in the damaged regions after severe cycles of fatigue loading.

4. Conclusions

The impacted panel was also subjected to fatigue tests to study damage growth. The panel was subjected to fatigue under spectrum loads. The spectrum load sequence was derived based on a standardized load sequence published in the literature called the mini-TWIST spectrum. Within the time available, the panel was subjected to one block of fatigue testing equivalent to one-tenth of the panel’s life. At the end of one block of fatigue loading, the panel was dismounted from the loading jig, and an ultrasonic scan was conducted to check for any growth in impact damage. None of the damage grew after one block of fatigue loads, and the fabricated panel was determined to be damage-tolerant.
The modelling approach, including boundary conditions, was verified by FE analysis. The bolted joint between the loading brackets and the panel performed as per its design. The impact damage on the panel did not influence the strain distribution with an applied tensile load of up to 9000 kg. The fabricated panel with the lamination sequence discussed herein was able to handle severe impact damage. Therefore, the fabricated structure is damage-tolerant. The developed FE model was validated, and the same model can be used to predict various similar models without fabricating panels.

Author Contributions

Conceptualization, S.R.V.; methodology, S.R.V. and P.H.; software, P.H., S.K. and N.N.; validation, S.R.V., M.S. and P.H.; formal analysis, S.K. and M.S.; investigation, S.K. and M.S.; resources, S.R.V.; data curation, S.R.V. and P.H.; writing—original draft preparation, S.K. and N.N.; writing—review and editing, S.R.V. and M.S.; supervision, S.R.V.; project administration, S.R.V. All authors have read and agreed to the published version of the manuscript.

Funding

This research received no external funding.

Informed Consent Statement

Not applicable.

Data Availability Statement

The data used in the current study are available upon requires from first author.

Acknowledgments

All the researchers would like to thank the Advanced Composites Division of the Council of Scientific and Industrial Research, National Aerospace Laboratories, Advanced Composites Division, Bangalore-560017, for supporting this research.

Conflicts of Interest

The authors declare no conflict of interest.

References

  1. Bouvet, C.; Rivallant, S. Damage tolerance of composite structures under low-velocity impact. In Dynamic Deformation, Damage and Fracture in Composite Materials and Structures; Elsevier: Amsterdam, The Netherlands, 2016; pp. 7–33. [Google Scholar] [CrossRef]
  2. Talreja, R.; Phan, N. Assessment of damage tolerance approaches for composite aircraft with focus on barely visible impact damage. Compos. Struct. 2019, 219, 1–7. [Google Scholar] [CrossRef]
  3. Fernandes, P.; Pinto, R.; Correia, N. Design and optimization of self-deployable damage tolerant composite structures: A review. Compos. Part B Eng. 2021, 221, 109029. [Google Scholar] [CrossRef]
  4. Dubary, N.; Bouvet, C.; Rivallant, S.; Ratsifandrihana, L. Damage tolerance of an impacted composite laminate. Compos. Struct. 2018, 206, 261–271. [Google Scholar] [CrossRef] [Green Version]
  5. Shah, S.Z.H.; Karuppanan, S.; Megat-Yusoff, P.S.M.; Sajid, Z. Impact resistance and damage tolerance of fiber reinforced composites: A review. Compos. Struct. 2019, 217, 100–121. [Google Scholar] [CrossRef]
  6. Persico, L.; Giacalone, G.; Cristalli, B.; Tufano, C.; Saccorotti, E.; Casalone, P.; Mattiazzo, G. Recycling Process of a Basalt Fiber-Epoxy Laminate by Solvolysis: Mechanical and Optical Tests. Fibers 2022, 10, 55. [Google Scholar] [CrossRef]
  7. Manos, G.; Katakalos, K.; Soulis, V.; Melidis, L.; Bardakis, V. Experimental Investigation of the Structural Performance of Existing and RC or CFRP Jacket-Strengthened Prestressed Cylindrical Concrete Pipes (PCCP)—Part A. Fibers 2022, 10, 71. [Google Scholar] [CrossRef]
  8. Bayandor, J.; Thomson, R.S.; Scott, M.L.; Nguyen, M.Q.; Elder, D.J. Investigation of impact and damage tolerance in advanced aerospace composite structures. Int. J. Crashworthiness 2003, 8, 297–306. [Google Scholar] [CrossRef]
  9. Sebaey, T.A.; González, E.V.; Lopes, C.S.; Blanco, N.; Maimí, P.; Costa, J. Damage resistance and damage tolerance of dispersed CFRP laminates: Effect of the mismatch angle between plies. Compos. Struct. 2013, 101, 255–264. [Google Scholar] [CrossRef]
  10. Dávila, C.G.; Bisagni, C. Fatigue life and damage tolerance of postbuckled composite stiffened structures with initial delamination. Compos. Struct. 2017, 161, 73–84. [Google Scholar] [CrossRef]
  11. Goh, J.Y.; Georgiadis, S.; Orifici, A.C.; Wang, C.H. Effects of bondline flaws on the damage tolerance of composite scarf joints. Compos. Part A Appl. Sci. Manuf. 2013, 55, 110–119. [Google Scholar] [CrossRef] [Green Version]
  12. Sebaey, T.A.; González, E.V.; Lopes, C.S.; Blanco, N.; Costa, J. Damage resistance and damage tolerance of dispersed CFRP laminates: Effect of ply clustering. Compos. Struct. 2013, 106, 96–103. [Google Scholar] [CrossRef]
  13. Bogenfeld, R.; Freund, S.; Schuster, A. An analytical damage tolerance method accounting for delamination in compression-loaded composites. Eng. Fail Anal. 2020, 118, 104875. [Google Scholar] [CrossRef]
  14. Nash, N.H.; Young, T.M.; Stanley, W.F. An investigation of the damage tolerance of carbon/Benzoxazine composites with a thermoplastic toughening interlayer. Compos. Struct. 2016, 147, 25–32. [Google Scholar] [CrossRef]
  15. Dubinskii, S.; Feygenbaum, Y.; Senik, V.; Metelkin, E. A study of accidental impact scenarios for composite wing damage tolerance evaluation. Aeronaut. J. 2019, 123, 1724–1739. [Google Scholar] [CrossRef] [Green Version]
  16. Park, H. Investigation on repairable damage tolerance for structural design of aircraft composite structure. J. Compos. Mater. 2016, 002199831664357. [Google Scholar] [CrossRef]
  17. Tan, Y.; Wu, G.; Suh, S.S.; Yang, J.M.; Hahn, H.T. Damage tolerance and durability of selectively stitched stiffened composite structures. Int. J. Fatigue 2008, 30, 483–492. [Google Scholar] [CrossRef]
  18. Krzyzak, A.; Kosicka, E.; Borowiec, M.; Szczepaniak, R. Selected Tribological Properties and Vibrations in the Base Resonance Zone of the Polymer Composite Used in the Aviation Industry. Materials 2020, 13, 1364. [Google Scholar] [CrossRef] [Green Version]
  19. Richardson, M.O.W.; Wisheart, M.J. Review of low-velocity impact properties of composite materials. Compos. Part A Appl. Sci. Manuf. 1996, 27, 1123–1131. [Google Scholar] [CrossRef]
  20. Feng, D.; Aymerich, F. Finite element modelling of damage induced by low-velocity impact on composite laminates. Compos. Struct. 2014, 108, 161–171. [Google Scholar] [CrossRef]
  21. Maio, L.; Monaco, E.; Ricci, F.; Lecce, L. Simulation of low velocity impact on composite laminates with progressive failure analysis. Compos. Struct. 2013, 103, 75–85. [Google Scholar] [CrossRef]
  22. Johnson, A.F.; Holzapfel, M. Modelling soft body impact on composite structures. Compos. Struct. 2003, 61, 103–113. [Google Scholar] [CrossRef]
  23. May, M.; Arnold-Keifer, S.; Haase, T. Damage resistance of composite structures with unsymmetrical stacking sequence subjected to high velocity bird impact. Compos. Part C Open Access 2020, 1, 100002. [Google Scholar] [CrossRef]
  24. Liu, L.; Luo, G.; Chen, W.; Zhao, Z.; Huang, X. Dynamic Behavior and Damage Mechanism of 3D Braided Composite Fan Blade under Bird Impact. Int. J. Aerosp. Eng. 2018, 2018, 5906078. [Google Scholar] [CrossRef]
  25. Johnson, A.; Pickett, A.; Rozycki, P. Computational methods for predicting impact damage in composite structures. Compos. Sci. Technol. 2001, 61, 2183–2192. [Google Scholar] [CrossRef] [Green Version]
  26. Polimeno, U.; Meo, M. Detecting barely visible impact damage detection on aircraft composites structures. Compos. Struct. 2009, 91, 398–402. [Google Scholar] [CrossRef]
  27. Buonsanti, M.; Ceravolo, F.; Leonardi, G. Runway Debris Impact on Aircraft Composite Parts. Key Eng. Mater. 2017, 754, 283–286. [Google Scholar] [CrossRef]
  28. Palazotto, A.N.; Herup, E.J.; Gummadi, L.N.B. Finite element analysis of low-velocity impact on composite sandwich plates. Compos. Struct. 2000, 49, 209–227. [Google Scholar] [CrossRef]
  29. Wagih, A.; Maimí, P.; Blanco, N.; Costa, J. A quasi-static indentation test to elucidate the sequence of damage events in low velocity impacts on composite laminates. Compos. Part A Appl. Sci. Manuf. 2016, 82, 180–189. [Google Scholar] [CrossRef]
  30. Flores, M.; Mollenhauer, D.; Runatunga, V.; Beberniss, T.; Rapking, D.; Pankow, M. High-speed 3D digital image correlation of low-velocity impacts on composite plates. Compos. Part B Eng. 2017, 131, 153–164. [Google Scholar] [CrossRef]
  31. Pokkalla, D.K.; Poh, L.H.; Quek, S.T. Isogeometric shape optimization of missing rib auxetics with prescribed negative Poisson’s ratio over large strains using genetic algorithm. Int. J. Mech. Sci. 2021, 193, 106169. [Google Scholar] [CrossRef]
  32. Healey, R.; Wang, J.; Chiu, W.K.; Chowdhury, N.M.; Baker, A.; Wallbrink, C. A review on aircraft spectra simplification techniques for composite structures. Compos. Part C Open Access 2021, 5, 100131. [Google Scholar] [CrossRef]
  33. Nyman, T.; Ansell, H.; Blom, A. Effects of truncation and elimination on composite fatigue life. Compos. Struct. 2000, 48, 275–286. [Google Scholar] [CrossRef]
  34. Wan, A.-S.; Xu, Y.-G.; Xue, L.-H.; Xu, M.-R.; Xiong, J.-J. Finite element modeling and fatigue life prediction of helicopter composite tail structure under multipoint coordinated loading spectrum. Compos. Struct. 2021, 255, 112900. [Google Scholar] [CrossRef]
  35. Pokkalla, D.K.; Biswas, R.; Poh, L.H.; Wahab, M.A. Fretting fatigue stress analysis in heterogeneous material using direct numerical simulations in solid mechanics. Tribol. Int. 2017, 109, 124–132. [Google Scholar] [CrossRef]
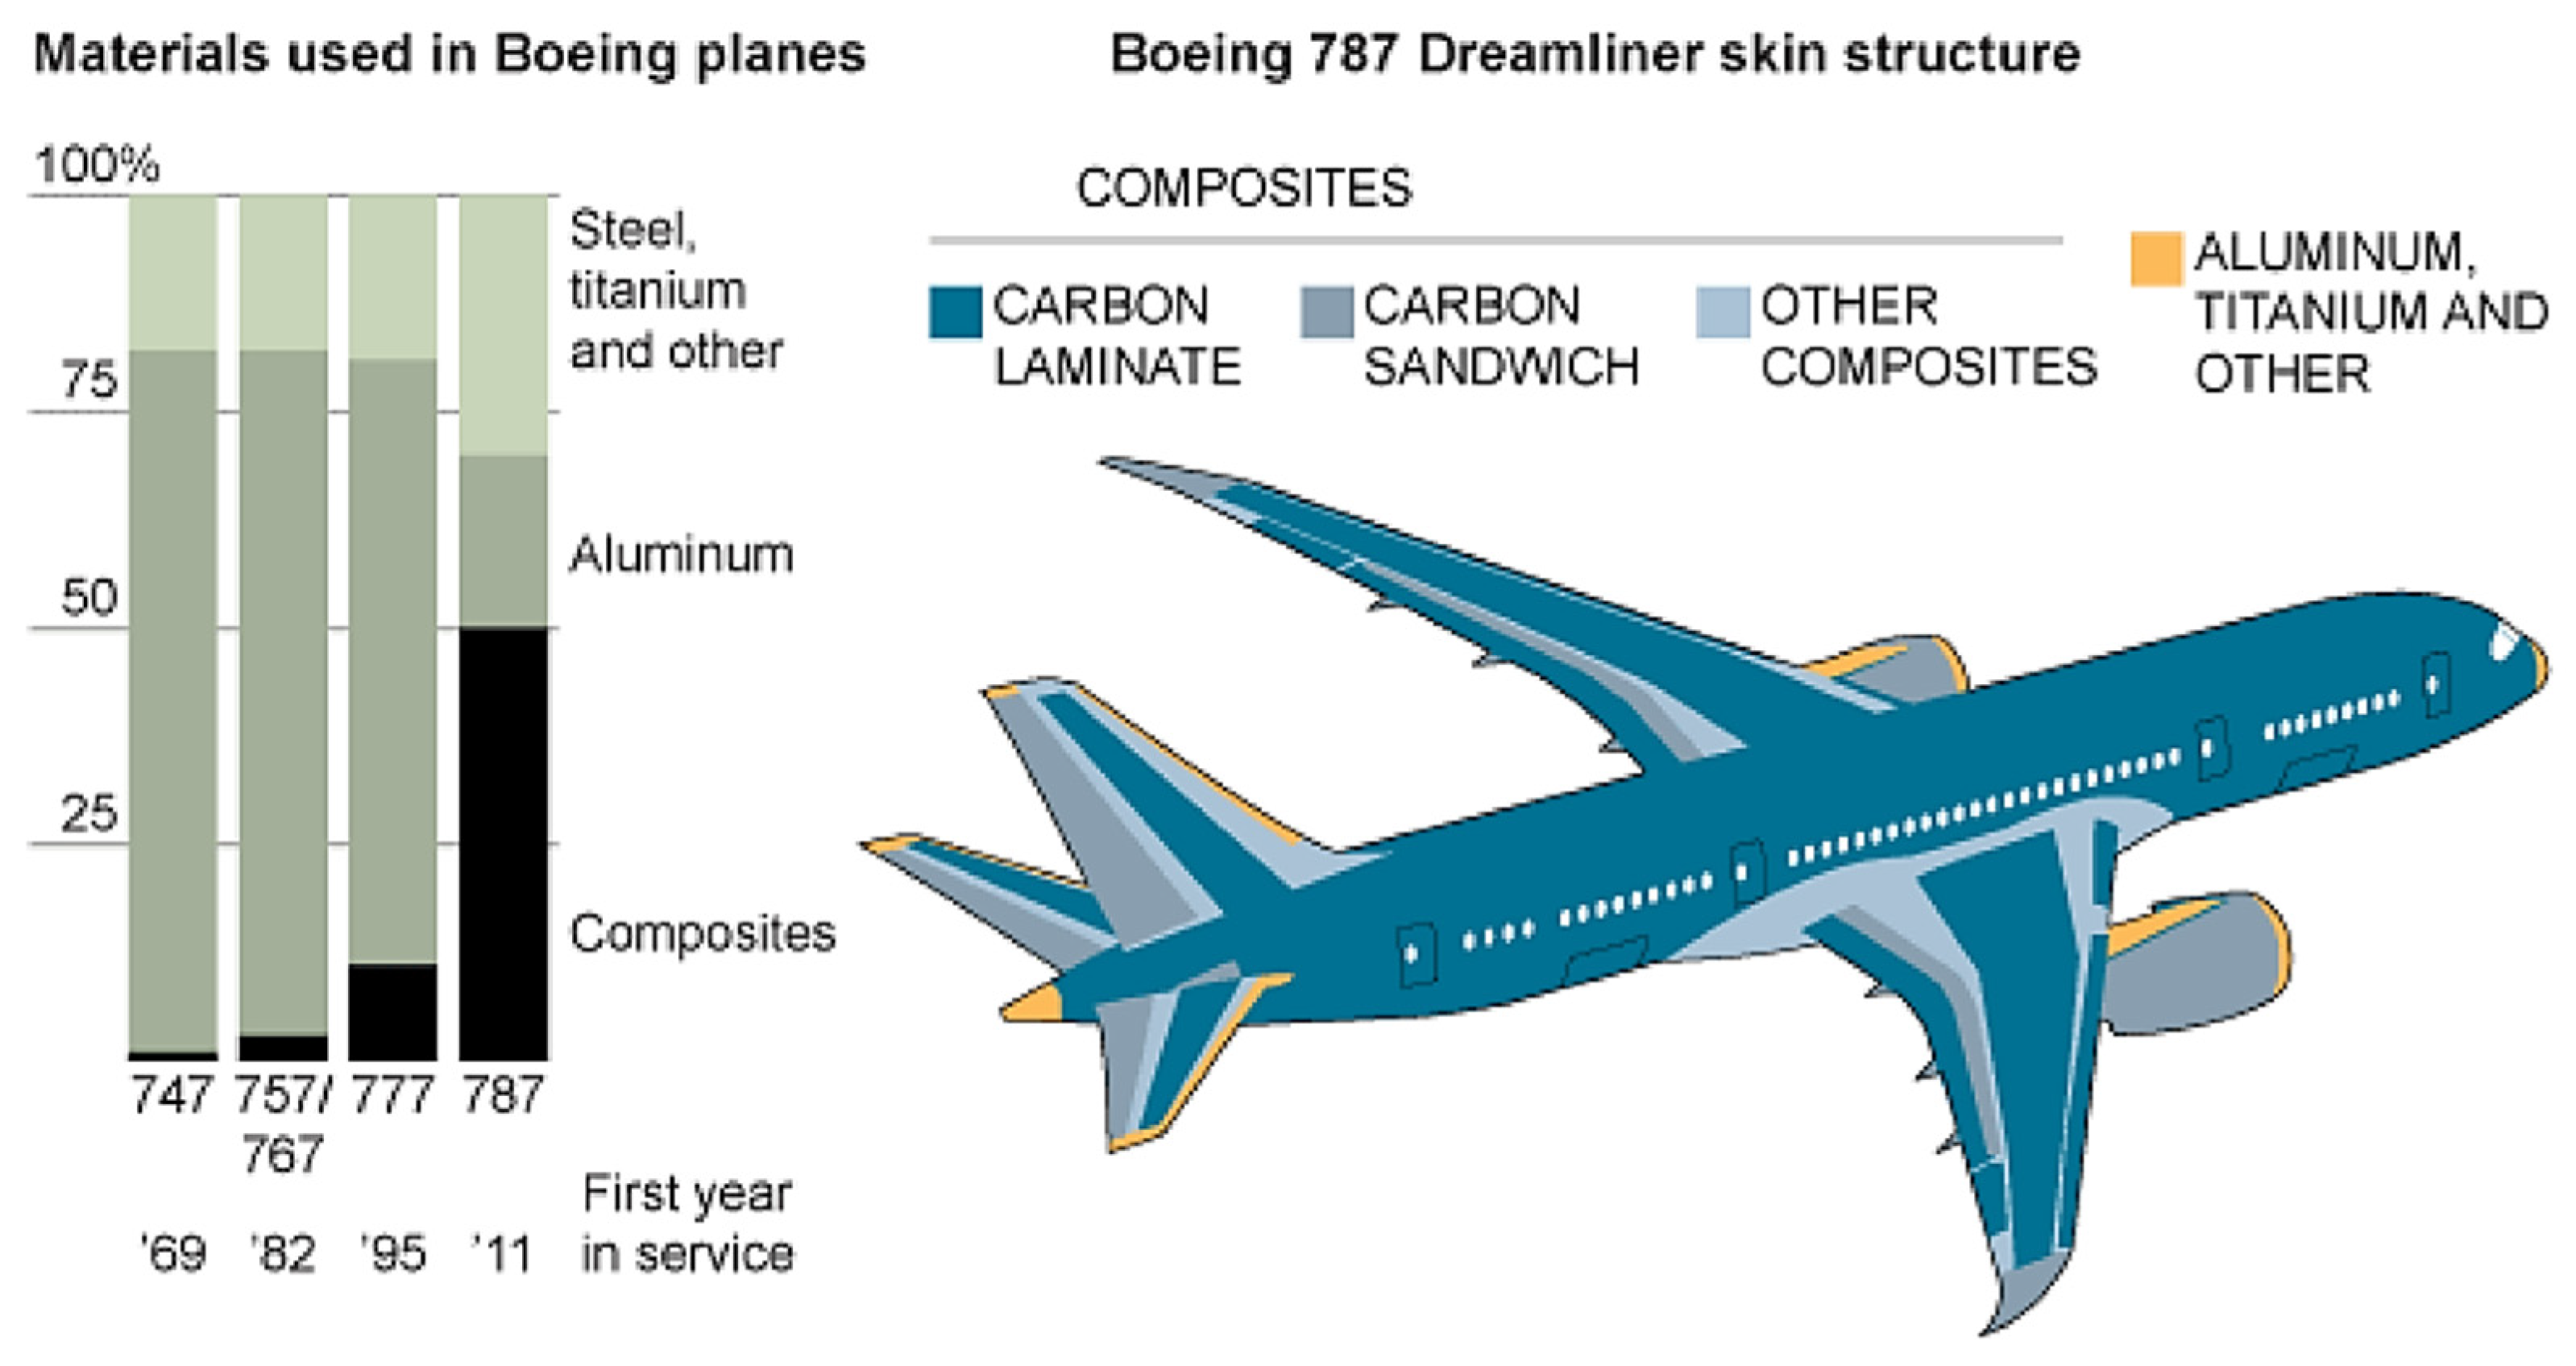
Figure 1. Various composite parts of a Boeing 787 [18].
Fibers 10 00105 g001
Figure 2. Tool for making caul plate.
Fibers 10 00105 g002
Figure 3. Caul plate after applying tool tech.
Fibers 10 00105 g003
Figure 4. Stringer preform tool.
Fibers 10 00105 g004
Figure 5. Layup sequence and thickness variation in the skin near the cutout.
Fibers 10 00105 g005
Figure 6. Layup sequence for stringer.
Fibers 10 00105 g006
Figure 7. Resin infusion arrangements.
Fibers 10 00105 g007
Figure 8. Highly stressed regions on the panel (near the cutout).
Fibers 10 00105 g008
Figure 9. Sharp impactors used in this study.
Fibers 10 00105 g009
Figure 10. Drop weight impact tower.
Fibers 10 00105 g010
Figure 11. Impact damage on panel 1.
Fibers 10 00105 g011
Figure 12. Impact damage on panel 2.
Fibers 10 00105 g012
Figure 13. Ultrasonic scan of damaged areas in panel 1.
Fibers 10 00105 g013
Figure 14. Ultrasonic scan of damaged areas in panel 2.
Fibers 10 00105 g014
Figure 15. Strain distribution in the panel skin under 9000 kgf load: numerical results from Abaqus (V. 6.13).
Fibers 10 00105 g015
Figure 16. Speckling on panel skin for DIC.
Fibers 10 00105 g016
Figure 17. Strain gauge locations on the panel (stringer side).
Fibers 10 00105 g017
Figure 18. Panel subjected to quasi-static tensile loading (front and rear sides).
Fibers 10 00105 g018
Figure 19. Distribution of flight types in one flight block of 1800 flights (mini-TWIST spectrum).
Fibers 10 00105 g019
Figure 20. Distribution of loads in one complete block.
Fibers 10 00105 g020
Figure 21. Distribution of loads in flight type E.
Fibers 10 00105 g021
Figure 22. (a) Strain contour in the loading direction according FE analysis (9000 kg) and (b) strain contour in loading direction according to DIC (9000 kg).
Fibers 10 00105 g022
Figure 23. (a) Contours of displacement perpendicular to the loading direction according to FE analysis and (b) contours of displacement perpendicular to the loading direction according to DIC.
Fibers 10 00105 g023
Figure 24. (a) Displacement contour in the loading direction according to FE analysis and (b) displacement contour in the loading direction according to DIC.
Fibers 10 00105 g024
Table 1. Definition of flight types and number of load cycles in each flight type in the TWIST spectrum.
Flight TypeNo. of Flights in One BlockNumber of Gust Loads at Ten Amplitude LevelsTotal Number of Cycles per Flight
12345678910
A11114818641123919001500
B1 11251139763668991400
C3 112722612778791250
D9 1121444208680950
E24 11624165603800
F60 1319115512650
G181 1770412490
H420 116233250
I1090 16970
J2211 2525
Total number of cycles per block1251852152800417034,800358,665
Cumulative number of cycles per block13826782301030520040,000398,665
Table 2. Comparison of strains according to FE analysis and strain gages.
Sl. No.Strain Gauge NumberElement Id in FE AnalysisFar-Field Strain Data in Micro Strains
FE AnalysisReading from Strain Gauge at 9000 kgf
1S171504684656
2S183120679757
3S811674593646
4S64537597699
5S162405598714
6S152037613738
7S206700681666
Publisher’s Note: MDPI stays neutral with regard to jurisdictional claims in published maps and institutional affiliations.