1. Introduction
Friction occurs between the surfaces of interacting components in all mechanical systems, inevitably causing wear and material damage to machine parts and devices. Wear serves as an indicator of the lifetime of systems or their components. Additionally, resistance to motion accounts for approximately 33% of losses in mechanical systems [
1]. The application of thin, hard coatings has proven to be an effective method for protecting and extending the lifespan of cutting tools, dies, and forming tools [
2,
3]. These coatings should possess high hardness, low coefficient of friction, and resistance to wear, corrosion, and oxidation. Those that meet these criteria are widely utilised on working elements subjected to high, constant, and variable loads [
2].
Hard, thin coatings are produced using PVD and CVD techniques [
2,
3,
4]. The selection of the coating deposition method depends on specific properties tailored for a particular application. Should a thick coating [
3,
5] deposited at elevated temperatures [
3] be necessary, chemical vapour deposition (CVD) is an effective technique. Such coatings are suitable for applications involving significant wear, such as turning [
3,
6] and they also resist high-temperature abrasion [
5]. When a thinner coating is required, characterised by lower residual compressive stresses [
3,
6], fine grains, a less developed surface, and an absence of cracking [
3], the physical vapour deposition (PVD) method is preferred [
3,
6]. Coatings produced via PVD are renowned for their high hardness, wear resistance, corrosion resistance, and favourable fatigue properties [
7], rendering them suitable for use on milling cutters. Multilayer coatings deposited through PVD magnetron sputtering demonstrate high oxidation resistance and exceptional hardness. Conversely, coatings fabricated using the cathodic arc plasma evaporation method are distinguished by their superior adhesive properties [
2].
Specific techniques, deposition parameters, and dopants such as Ti, Si, Al, N, and C [
2] influence the properties of coatings. Adding silicon (Si) is an effective way to enhance hardness and oxidation resistance [
8]. In turn, titanium (Ti) provides high hardness, good wear [
9,
10] and corrosion resistance [
9,
10,
11], while adding aluminium (Al) greatly improves mechanical properties and oxidation resistance [
12]. Furthermore, metal nitrides contribute to high hardness, high melting temperature, chemical stability, wear and corrosion resistance, and strong adhesion to the substrate [
13].
Recent advancements in coating technologies have facilitated the widespread implementation of dry machining, which entails machining with minimal cooling and lubrication [
14]. This development is driven by environmental concerns [
14,
15] and the reduction in production costs [
14]. The application of one or more hard metallic or non-metallic coatings, characterised by excellent anti-wear properties, to a relatively soft substrate material—such as a cutting tool—substantially improves the tool’s mechanical performance [
10,
16,
17]. The incorporation of aluminium into TiN coatings results in AlTiN coatings that are harder and exhibit enhanced resistance to wear and oxidation at elevated temperatures. The mechanical properties and crystalline structure of AlTiN coatings are dependent on the aluminium content, which, when precisely calibrated, facilitates the formation of a hard and inert film at the tool-chip interface during the machining process. This film not only inhibits further oxidation of the coating but also acts as a thermal barrier [
10,
16]. Furthermore, the AlTiN coating may be combined with other coatings to establish a multilayer system, such as the integration of the hard AlTiN layer with softer coatings. Each layer offers distinct advantages, thereby producing a composite coating with enhanced overall performance. The softer coating, often referred to as a self-lubricating coating, demonstrates exceptional lubricating properties that reduce friction between the workpiece and the tool, while also mitigating built-up edge and chip packing. As a result, the surface quality of the machined component is improved, and the lifespan of the tool is increased [
16]. The addition of aluminium (Al) to TiN results in the formation of a TiAlN coating, which exhibits improved oxidation resistance due to the formation of a protective Al
2O
3 layer at elevated temperatures [
18]. The TiSiN coating is highly regarded for its exemplary mechanical properties [
8], including high hardness [
19], a high modulus of elasticity, a low coefficient of friction [
20], and significant resistance to high-temperature oxidation, wear, erosion [
19], and corrosion [
20,
21]. Veprek et al. [
22,
23] demonstrated that the TiSiN coating exhibits resistance to crack formation and maintains integrity under oxidation at temperatures surpassing 800 °C [
6,
10].
Vattanaprateep et al. [
24] performed a comparative analysis of TiSiN, DLC, and TiSiN/DLC coatings, concluding that the TiSiN coating has the highest modulus of elasticity.
Haja Syeddu Masooth et al. [
25] evaluated the effect of coatings applied to HSS high-speed steel) drills. They compared single-layer coatings TiN and AlCrN, as well as the two-layer coating AlTiN + TiSiXN (Durana). They investigated the surface roughness of the workpiece, an AA6061 composite containing C and ZrO
2. Drilling was performed on the prepared sample using a CNC machining centre. The results showed that the AlTiN + TiSiXN coating notably improved the surface quality of the workpiece, with the lowest surface roughness, Ra, reaching 1.666 µm.
Das et al. [
26] determined the service life of a cemented carbide tool coated with DURANA (AlTiN/TiSiXN) and investigated the lubrication and cooling performance using minimum quantity lubrication based on ionic liquids. Two ionic liquids were used: 1-methyl-3-butylimidazolium tetrafluoroborate (BMIM BF4) and 1-methyl-3-butylimidazolium hexafluorophosphate (BMIM PF6). The workpiece material was biomedical-grade stainless steel. They evaluated the following parameters: cutting and thrust forces, flank and crater wear, surface assessment (roughness, morphology, residual stress, microhardness), chip morphology, and temperature. The BMIM PF6 IL-based coolant exhibited better tool wear resistance, higher viscosity, and higher thermal conductivity at a minimal contact angle compared to the BMIM BF4-based lubricant.
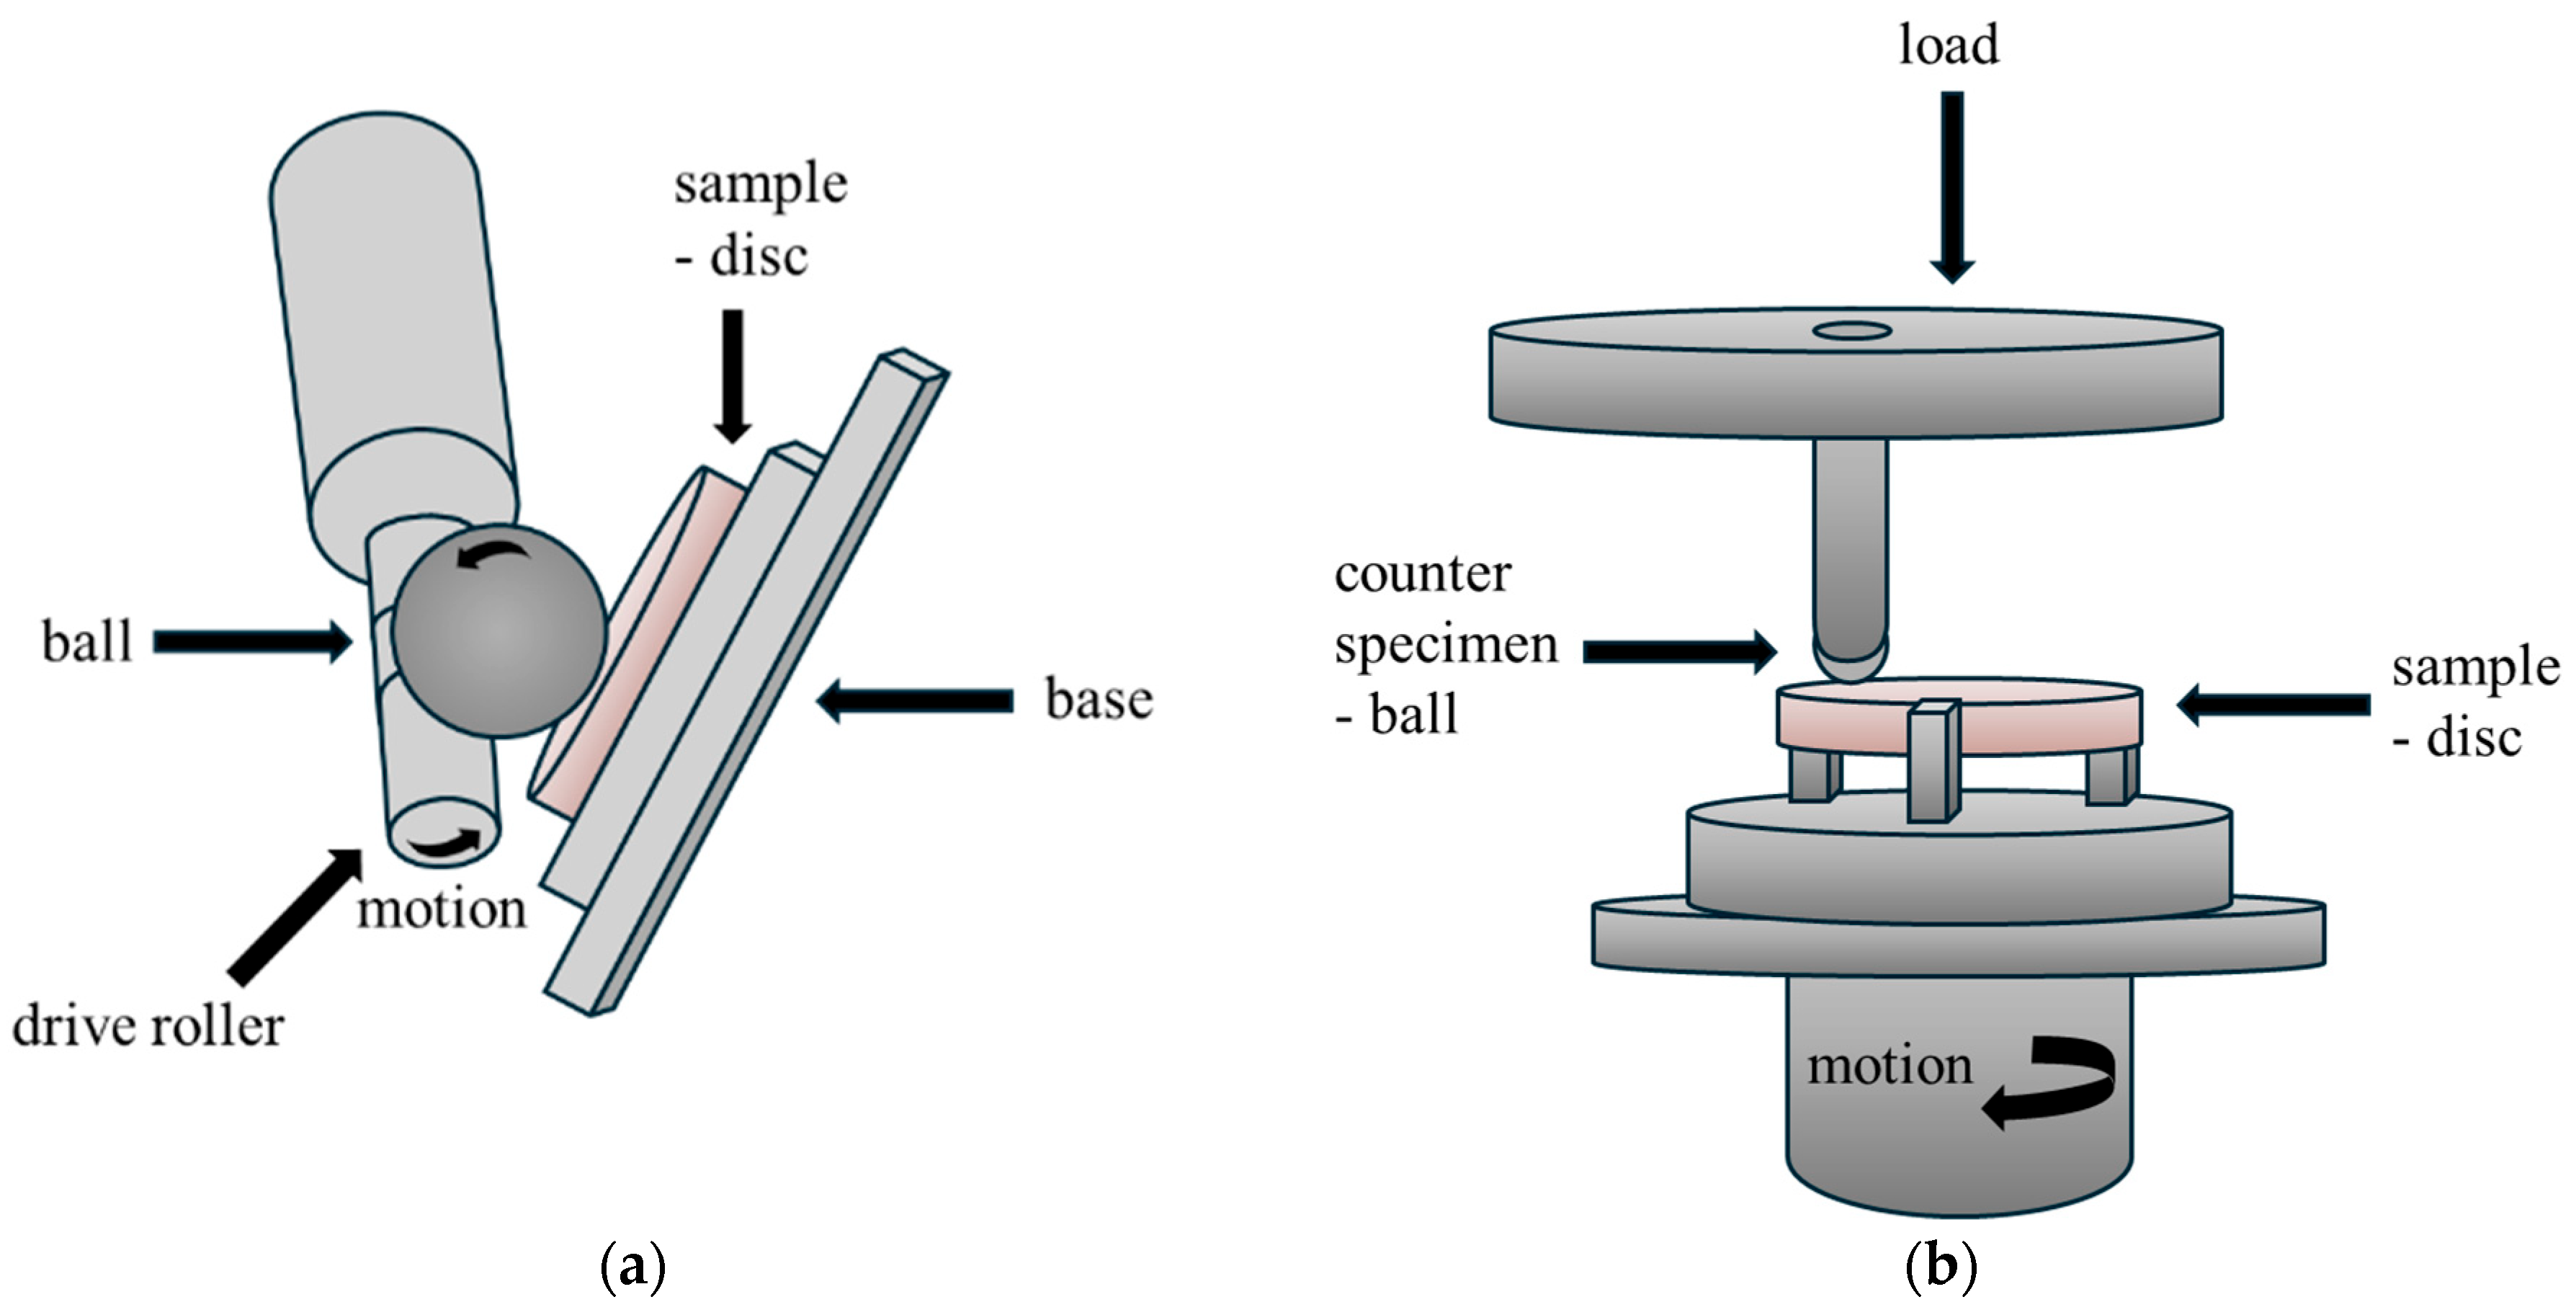
The objective of this study was to determine the tribological properties of the two-layer coating under conditions of unlubricated friction. The choice of this coating was motivated by its innovative nature and the limited number of studies focused on it. The evaluation involved measuring linear wear on a pin-on-disc tribometer during sliding friction and volumetric wear after ball-cratering testing, which could represent a new approach in studying this particular material coating.
3. Results
3.1. Surface Morphology
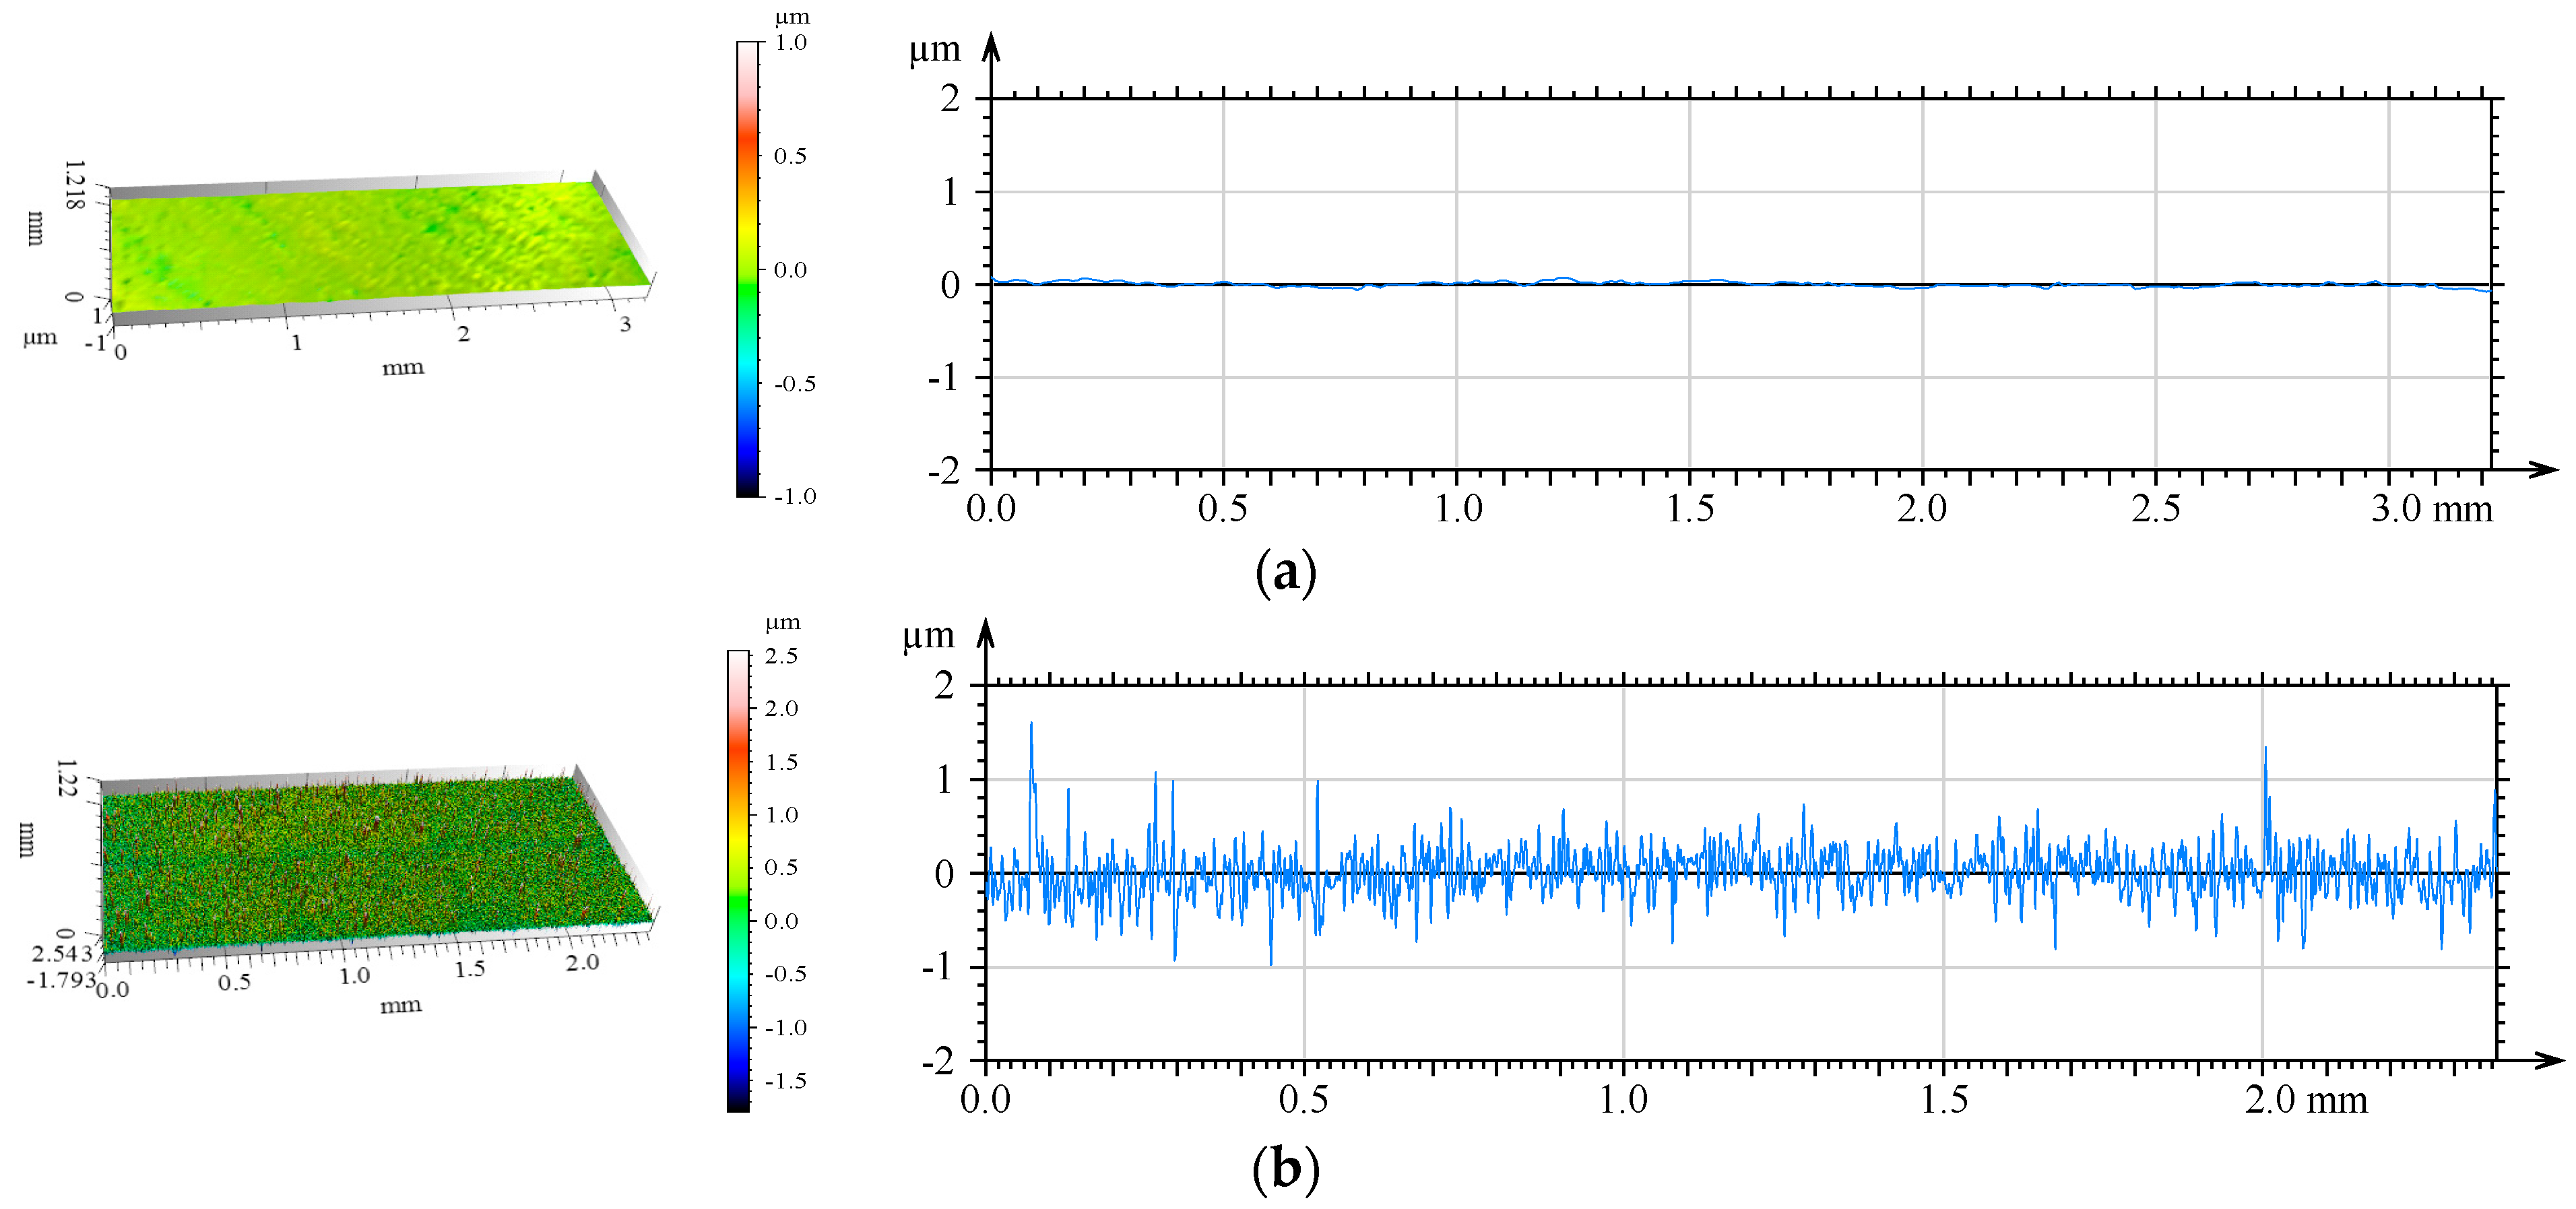
Figure 2 shows isometric images and primary profiles of the discs.
When comparing steel discs with and without coating, it was observed that the uncoated disc had a less developed surface. Elevations and depressions of approximately 0.2 µm were noted. After applying the coating, the roughness increased, with maximum elevations averaging around 0.8 µm.
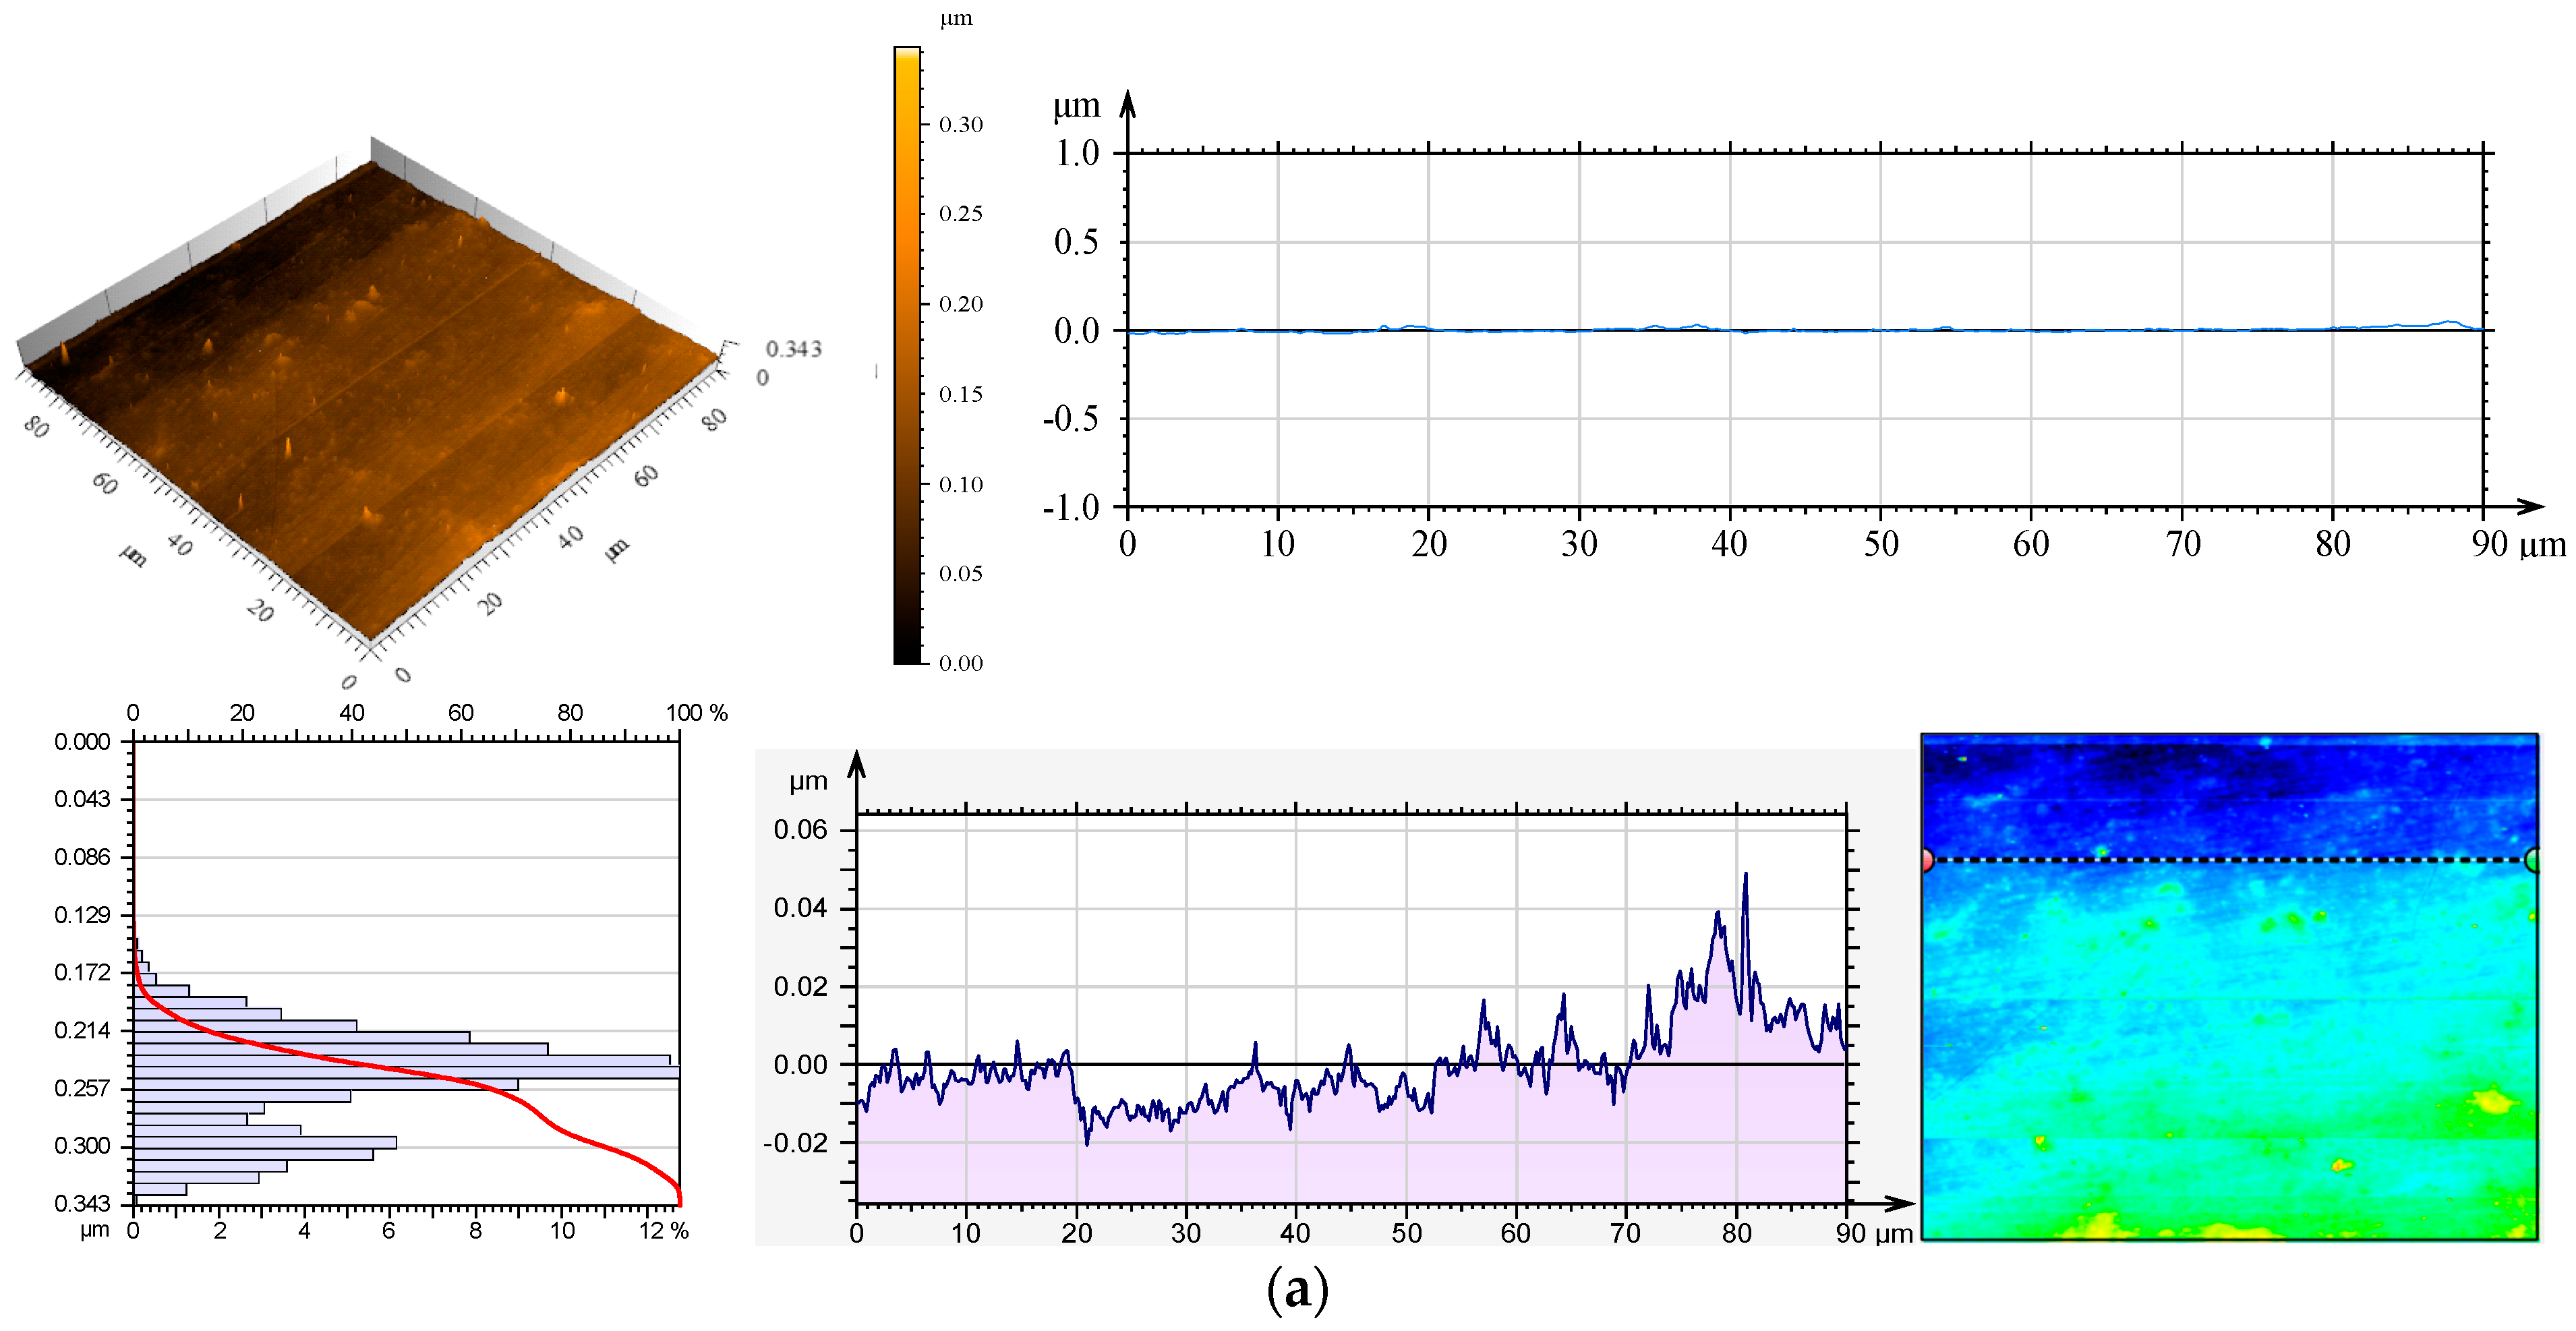
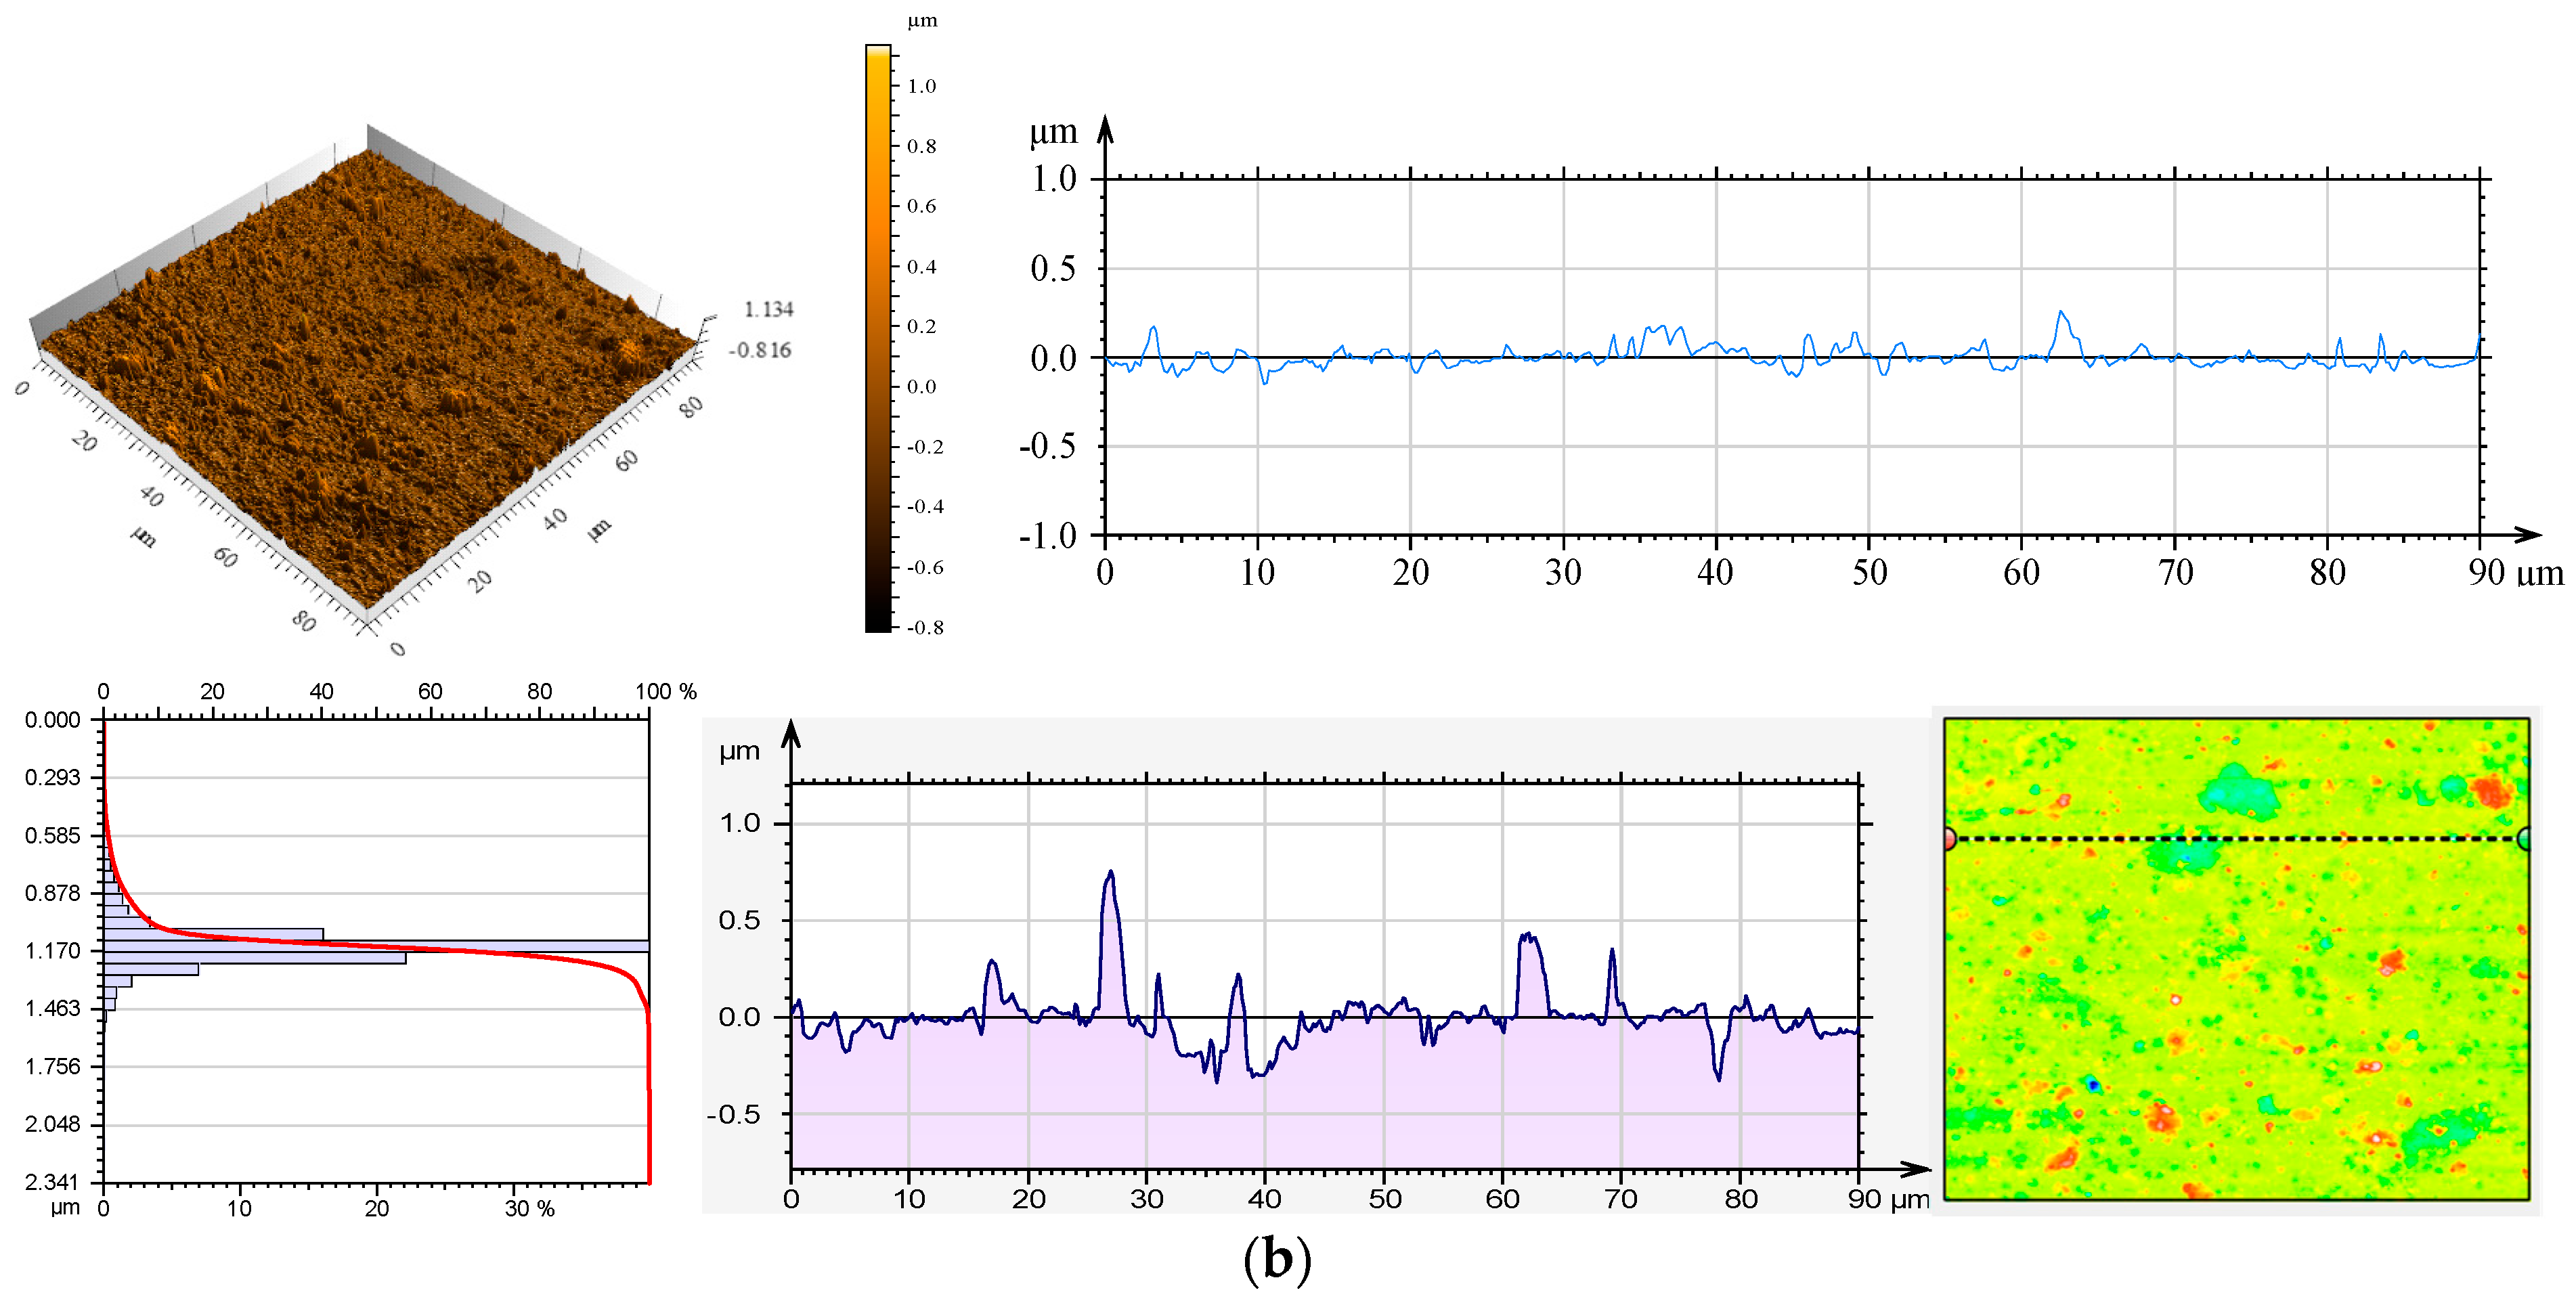
Observations of the geometric structure of the coated sample surface were also made using an atomic force microscope, and the results are presented in
Figure 3.
The images show that the uncoated sample had a surface with slight elevations and depressions of 0.05 µm and 0.02 µm, respectively. In contrast, the coated disc has higher elevations and depressions of 0.8 µm and 0.4 µm, respectively. Analysis of the Abbott-Firestone curve clearly demonstrates that the uncoated disc had a more homogeneous structure [
33]. The coated sample exhibited a more developed surface topography, as confirmed by three-dimensional topographic maps, primary profiles, material share curves (Abbott-Firestone) (
Figure 3b), and amplitude parameters of the geometric surface structure. This type of microgeometry may contribute to higher friction coefficient values in the initial phase of the tribological test. Furthermore, when comparing the height histogram and the Abbott–Firestone curve, it was observed that the surface of the coated disc contains more profound topographic valleys compared to the surface of the uncoated disc. This allows for the storage of lubricant [
34] through the formation of so-called “lubricant pockets” [
35].
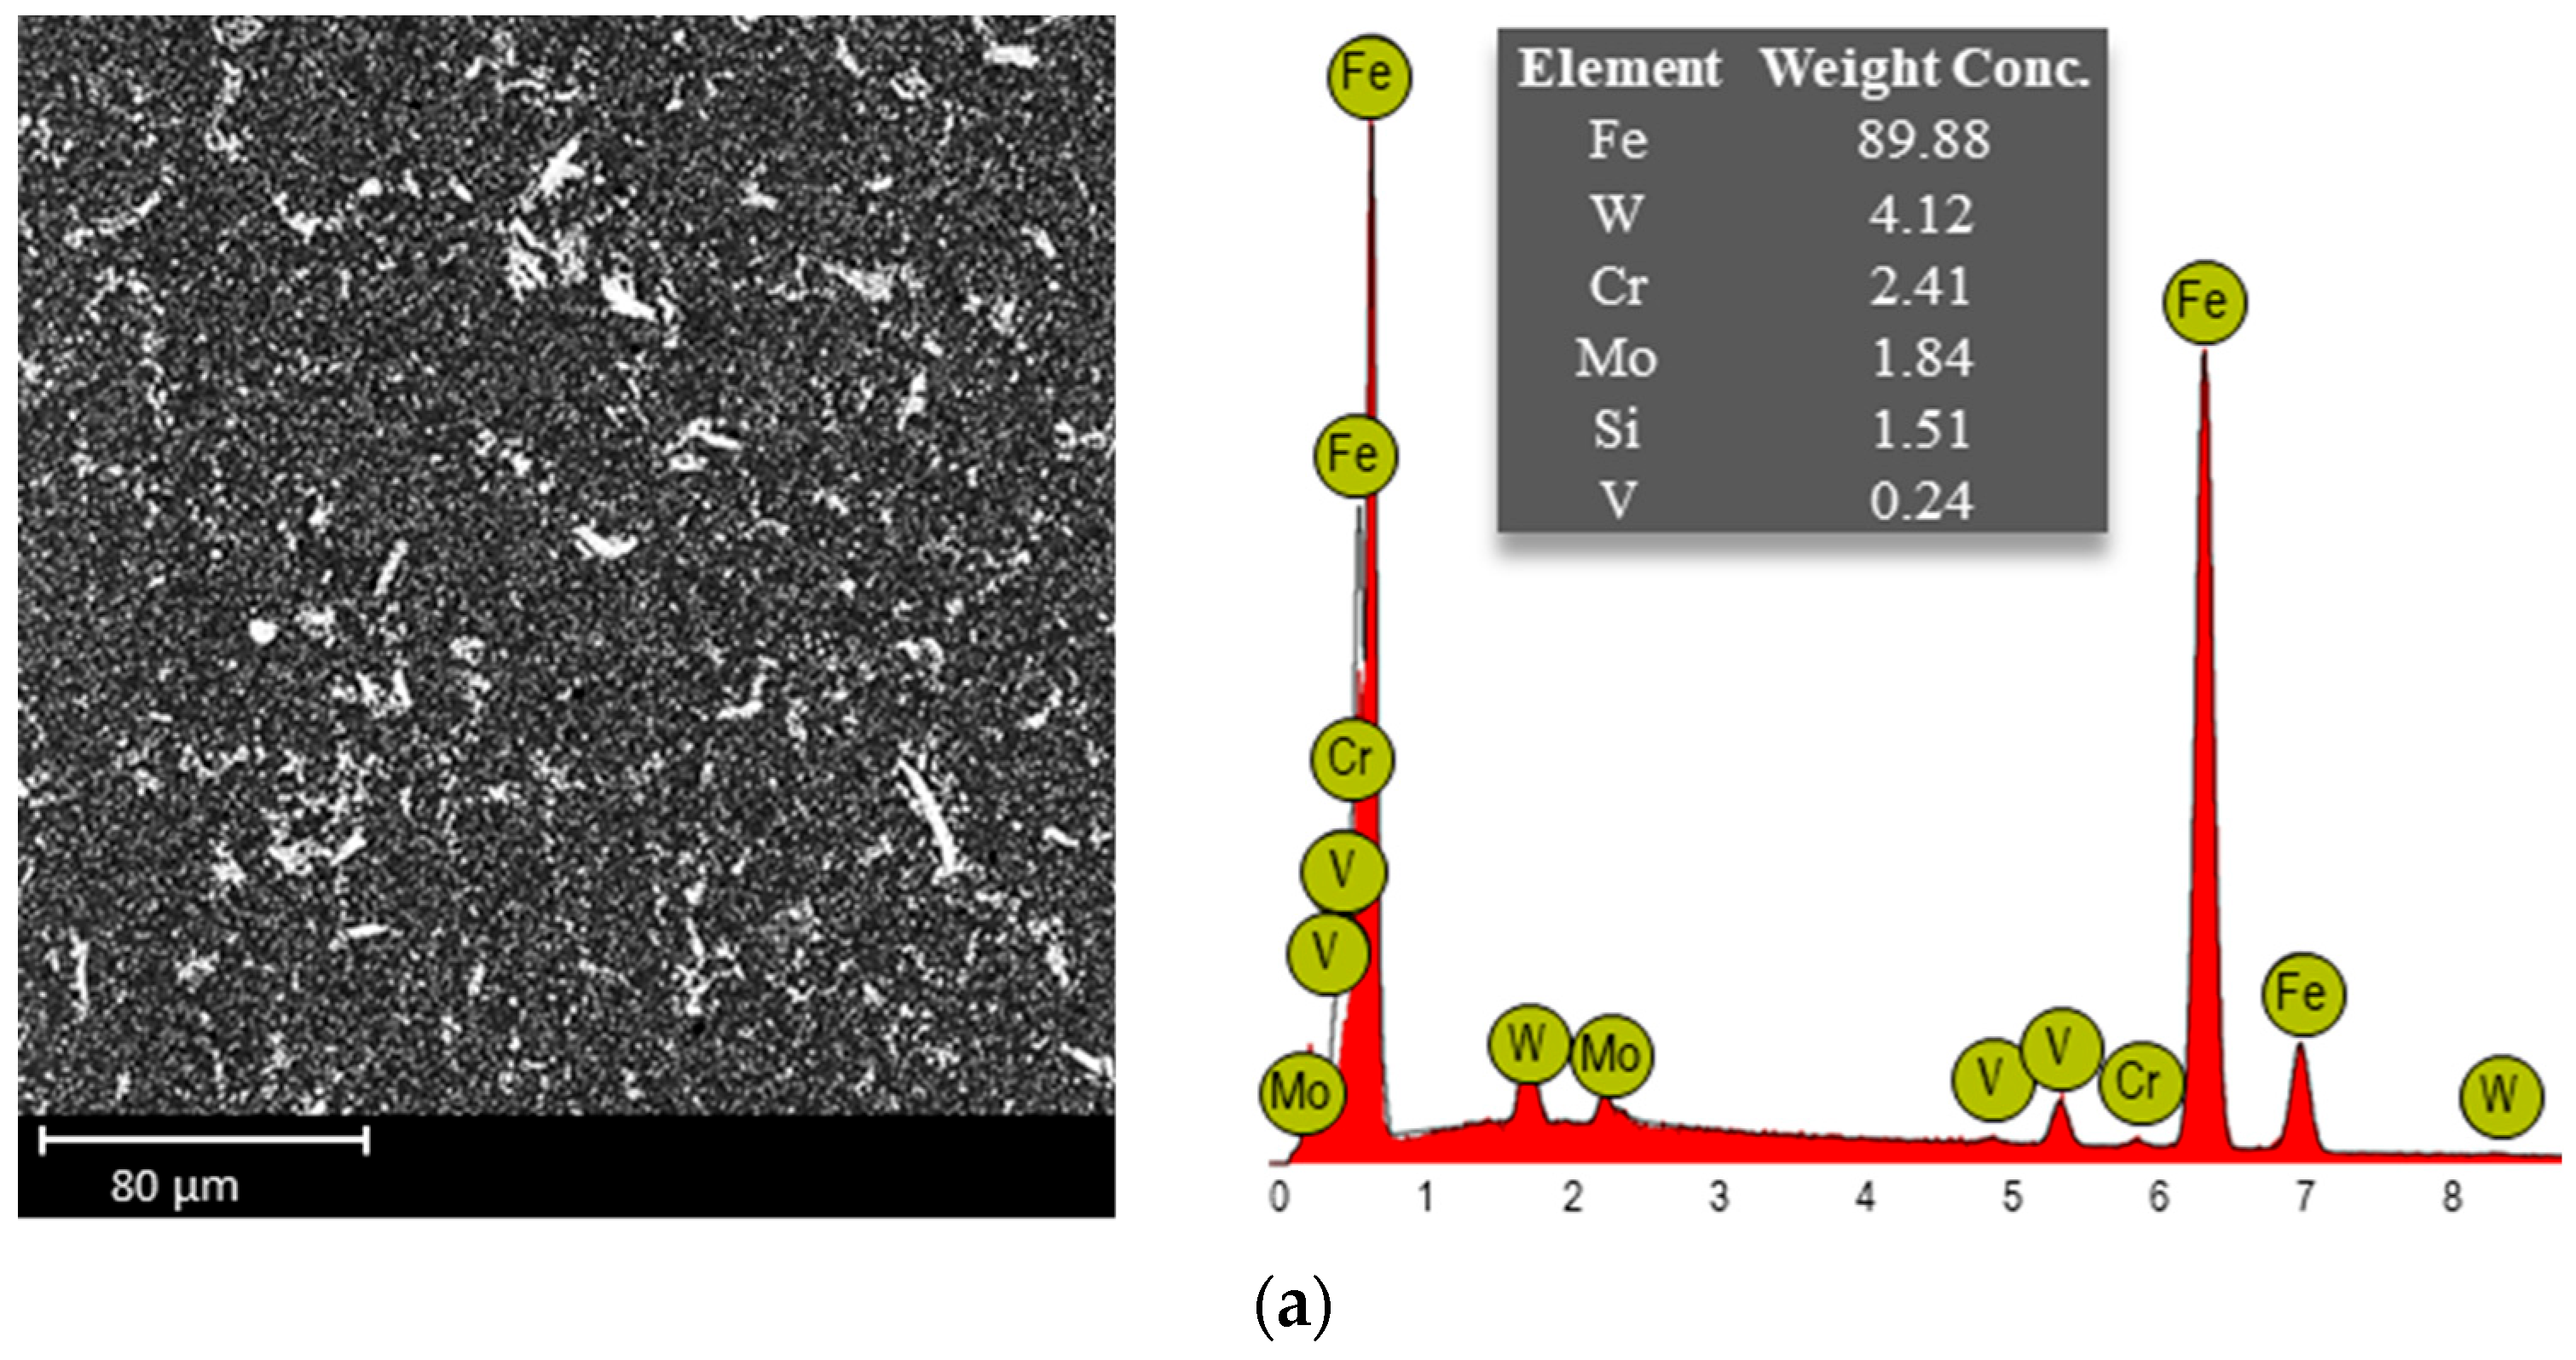
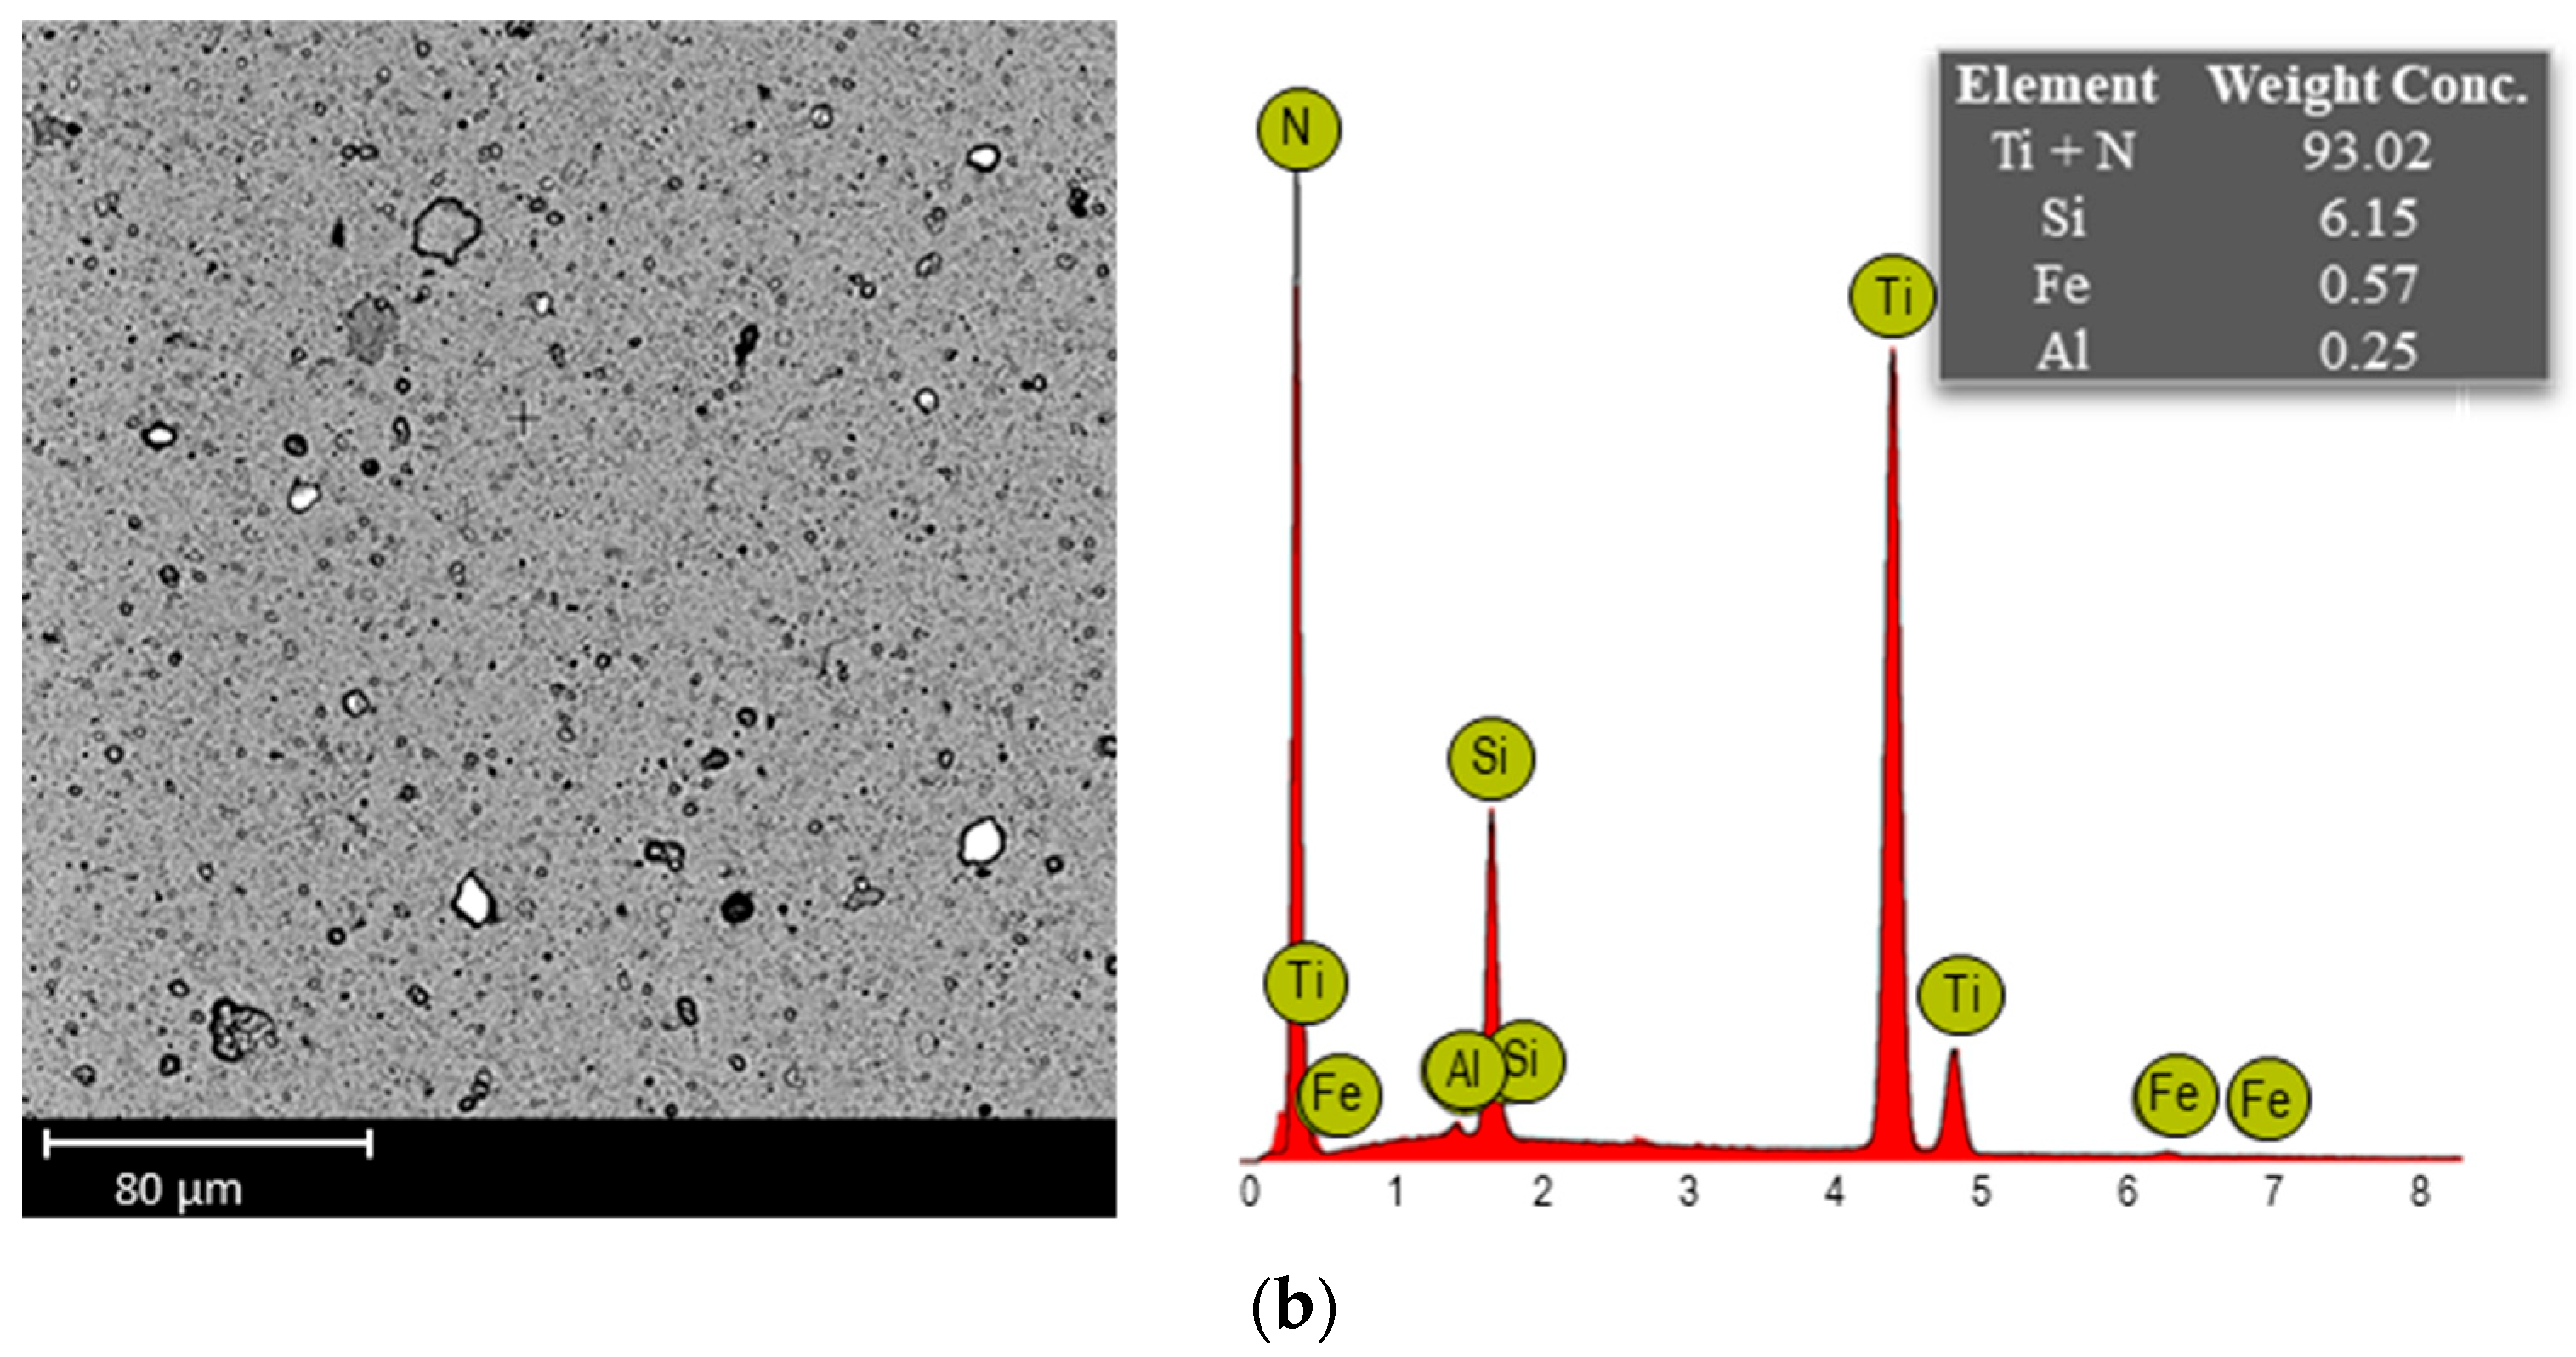
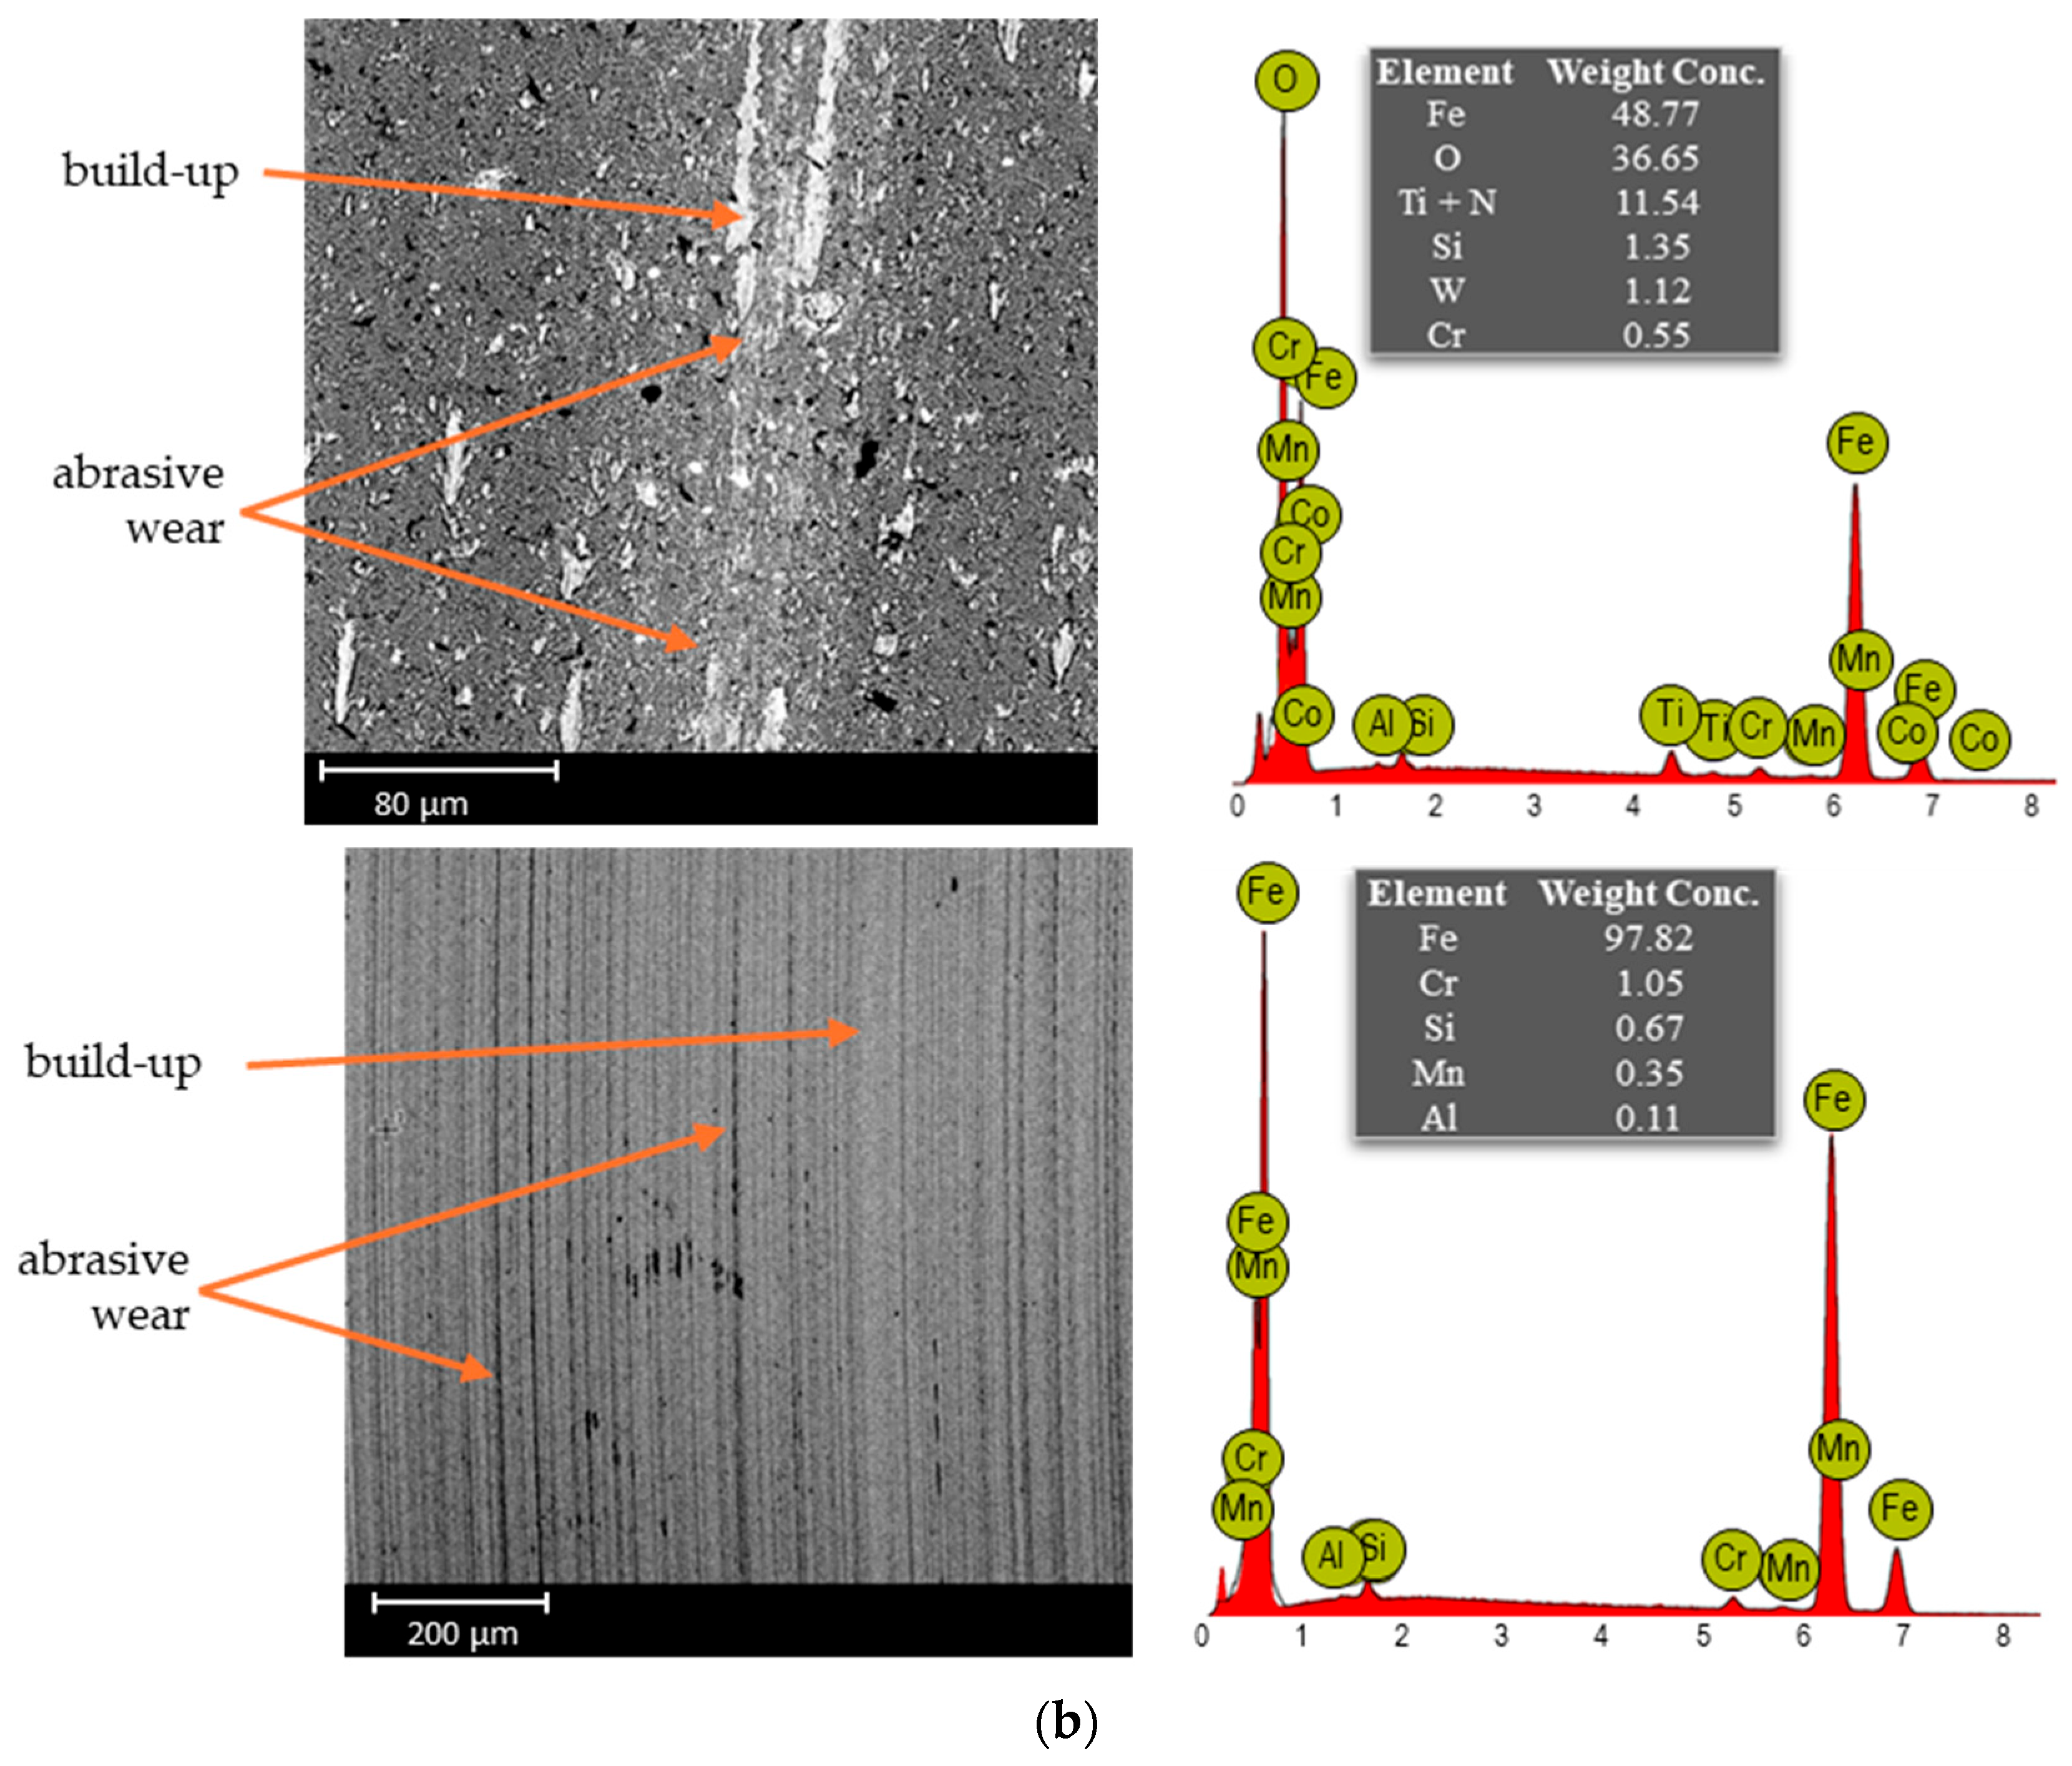
The chemical composition of the samples tested was also analysed using a scanning electron microscope with EDS (
Figure 4).
The results of tests on uncoated and coated samples showed that the chemical composition is consistent with the actual content of elements in HS6-5-2C steel and AlTiN/TiSiXN coating. In
Figure 4a, which presents the HS6-5-2C steel, distinct light and dark areas can be clearly observed. The lighter regions correspond to tungsten carbides, while the darker areas represent the matrix—tempered martensite.
Figure 4b shows the AlTiN/TiSiXN coating, where a homogeneous matrix is visible—the grey area with lighter inclusions of secondary phases (nitrides), and darker regions corresponding to titanium oxides.
3.2. Hardness
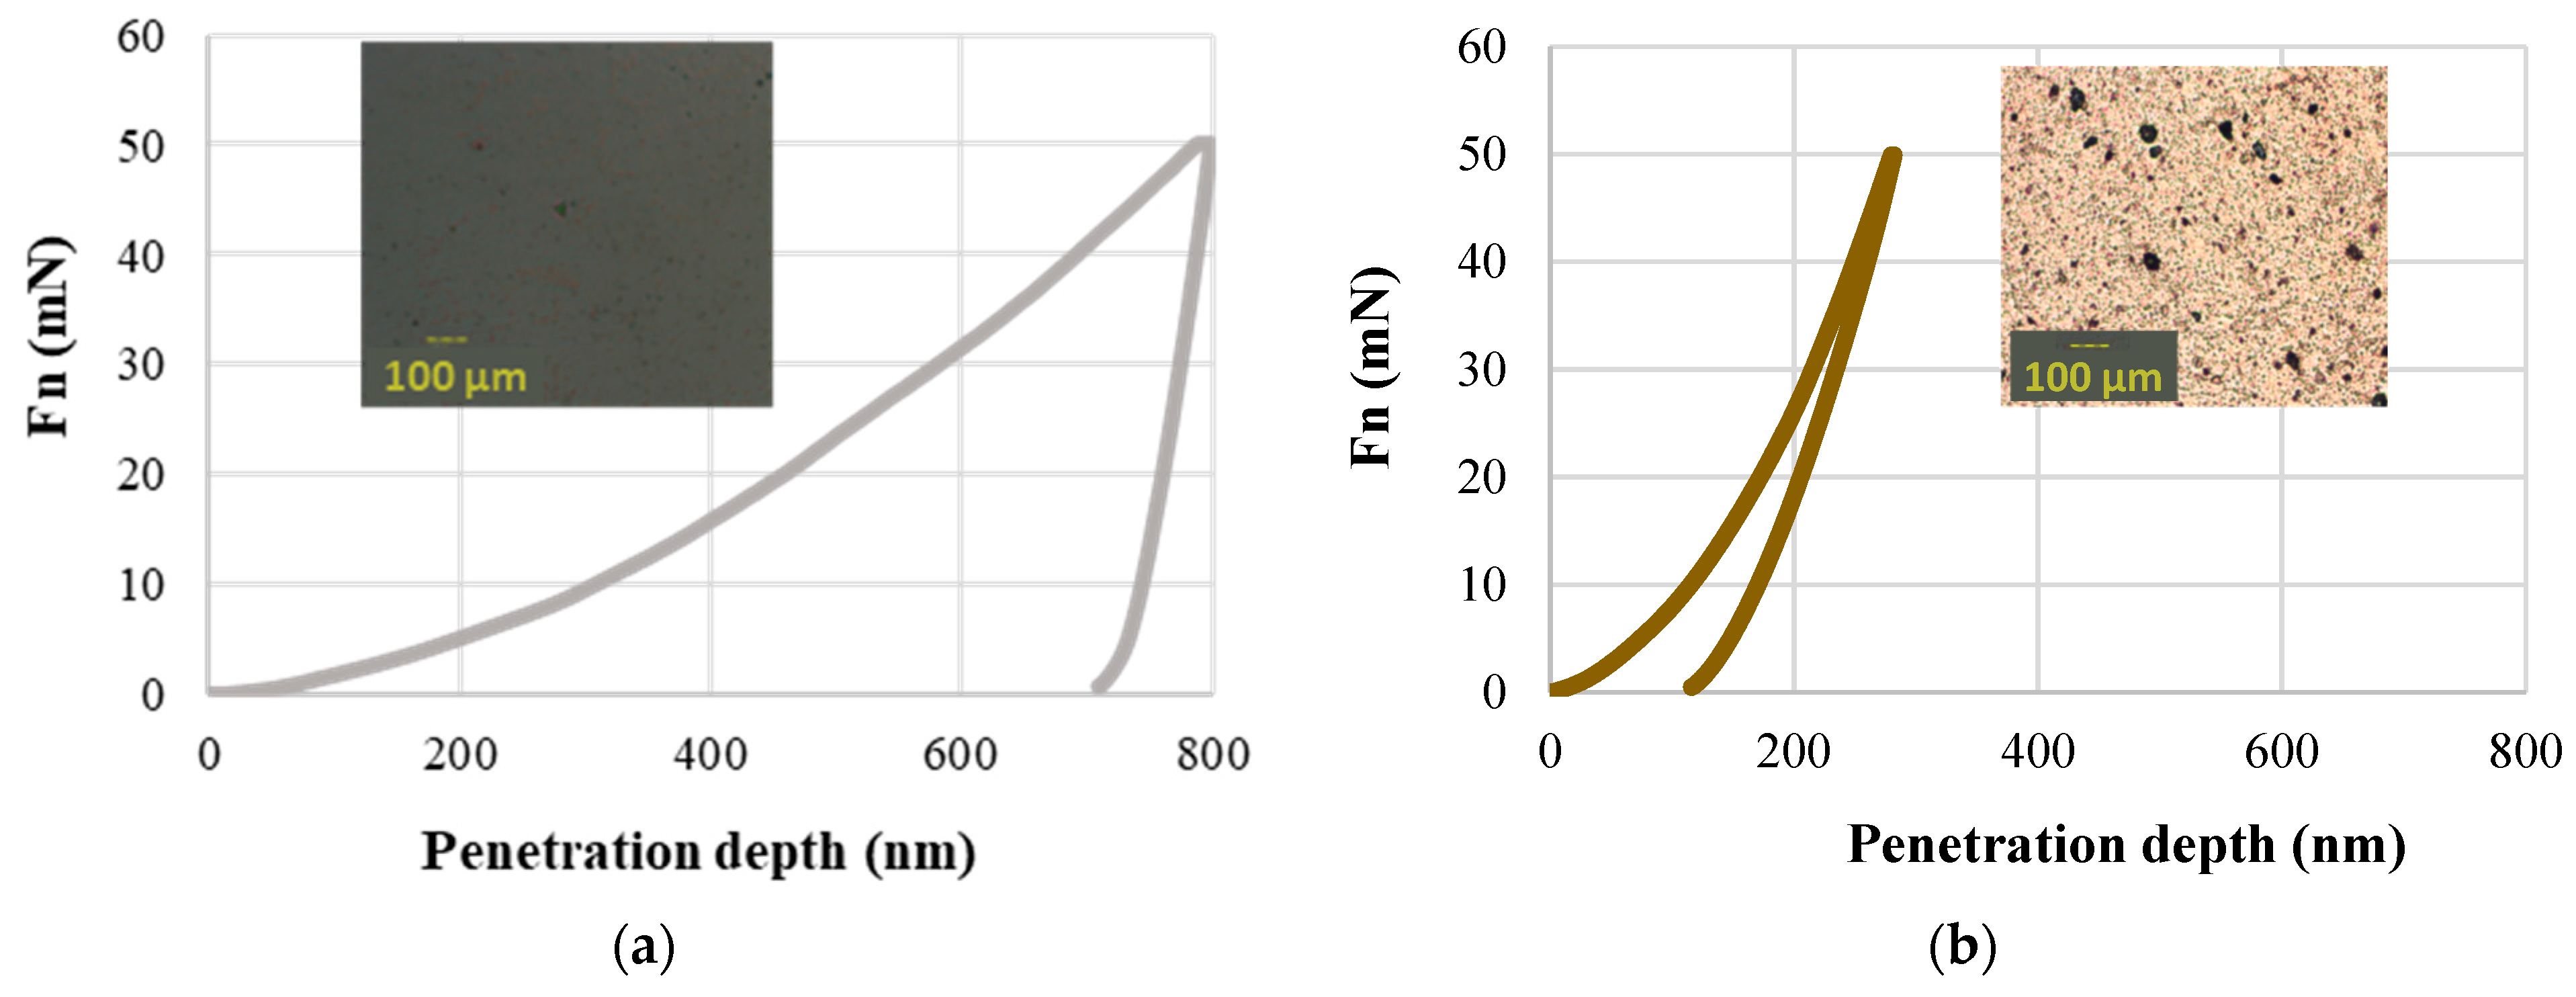
The hardness of both the coating and substrate was also measured. The results, which display the change in force with indentation depth for the substrate and coating, are shown in
Figure 5.
Table 3 summarises the nanohardness measurements for both the substrate and coating.
A comparison of the force variation graphs with penetration depth indicates that the most significant indentations occur on the uncoated disc—HS6-5-2C steel (see
Figure 5a). Furthermore, an analysis of the load-unload curve reveals that both the coating and the indentation following nanohardness testing are predominantly elastic, whereas the substrate—HS6-5-2C steel—exhibits ductile properties. This observation is corroborated by the results presented in
Table 3, which demonstrate that the AlTiN/TiAlNSiXN coating has more than 90% higher hardness and over 73% higher elasticity relative to the steel substrate. These attributes are particularly advantageous for coatings employed in tribological applications, as the energy imparted by the applied load is chiefly dissipated through elastic deformation of the coating material [
36]. The substrate displays increased ductility, as reflected by a 42% higher ductile work value.
3.3. Abrasion Wear and Tribological Tests
Table 4 lists the weights of balls with diameters of 20 mm and 30 mm, along with the calculated values of their gravitational forces.
The larger diameter balls were heavier, so their gravitational force was also greater (
Table 4).
Hertz unit pressures were calculated for balls with diameters of 6 mm, 20 mm, and 30 mm, and the results are summarised in
Table 5.
The analysis of the test results demonstrated that the highest values of pressure in the contact area (p), contact curvature radius (a), and ball indentation depth (d) were observed with a ball of 6 mm diameter, utilised during tribological testing on the TRB3 apparatus. When compared to the uncoated disc, a higher-pressure value was recorded in the steel-steel contact involving the AlTiN/TiSiXN coating. It was also noted that lower values of parameters p, a, and d were recorded for the 20 mm diameter ball in comparison to the 30 mm diameter ball.
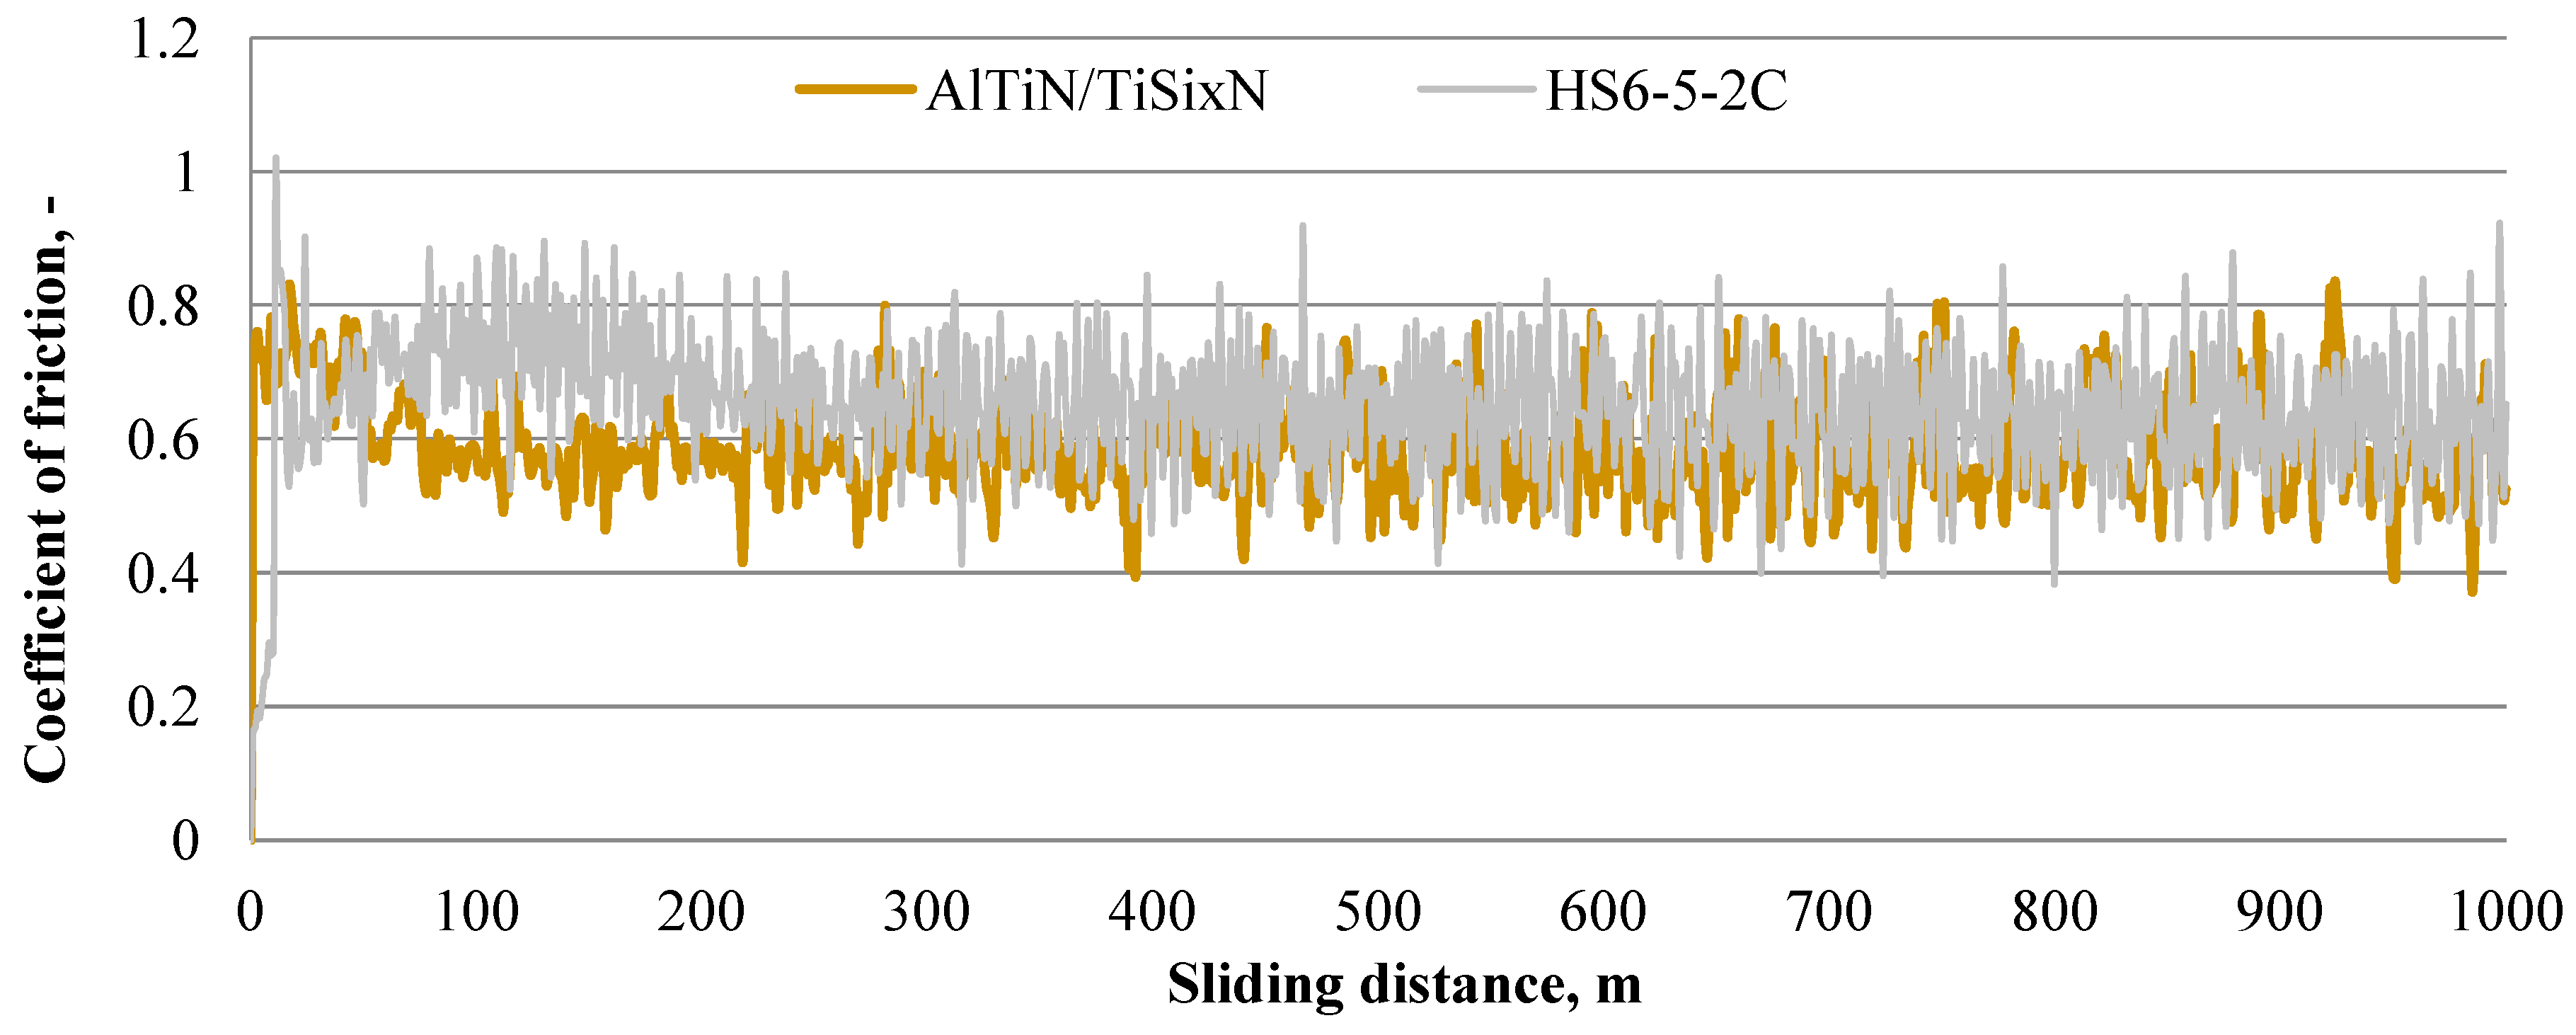
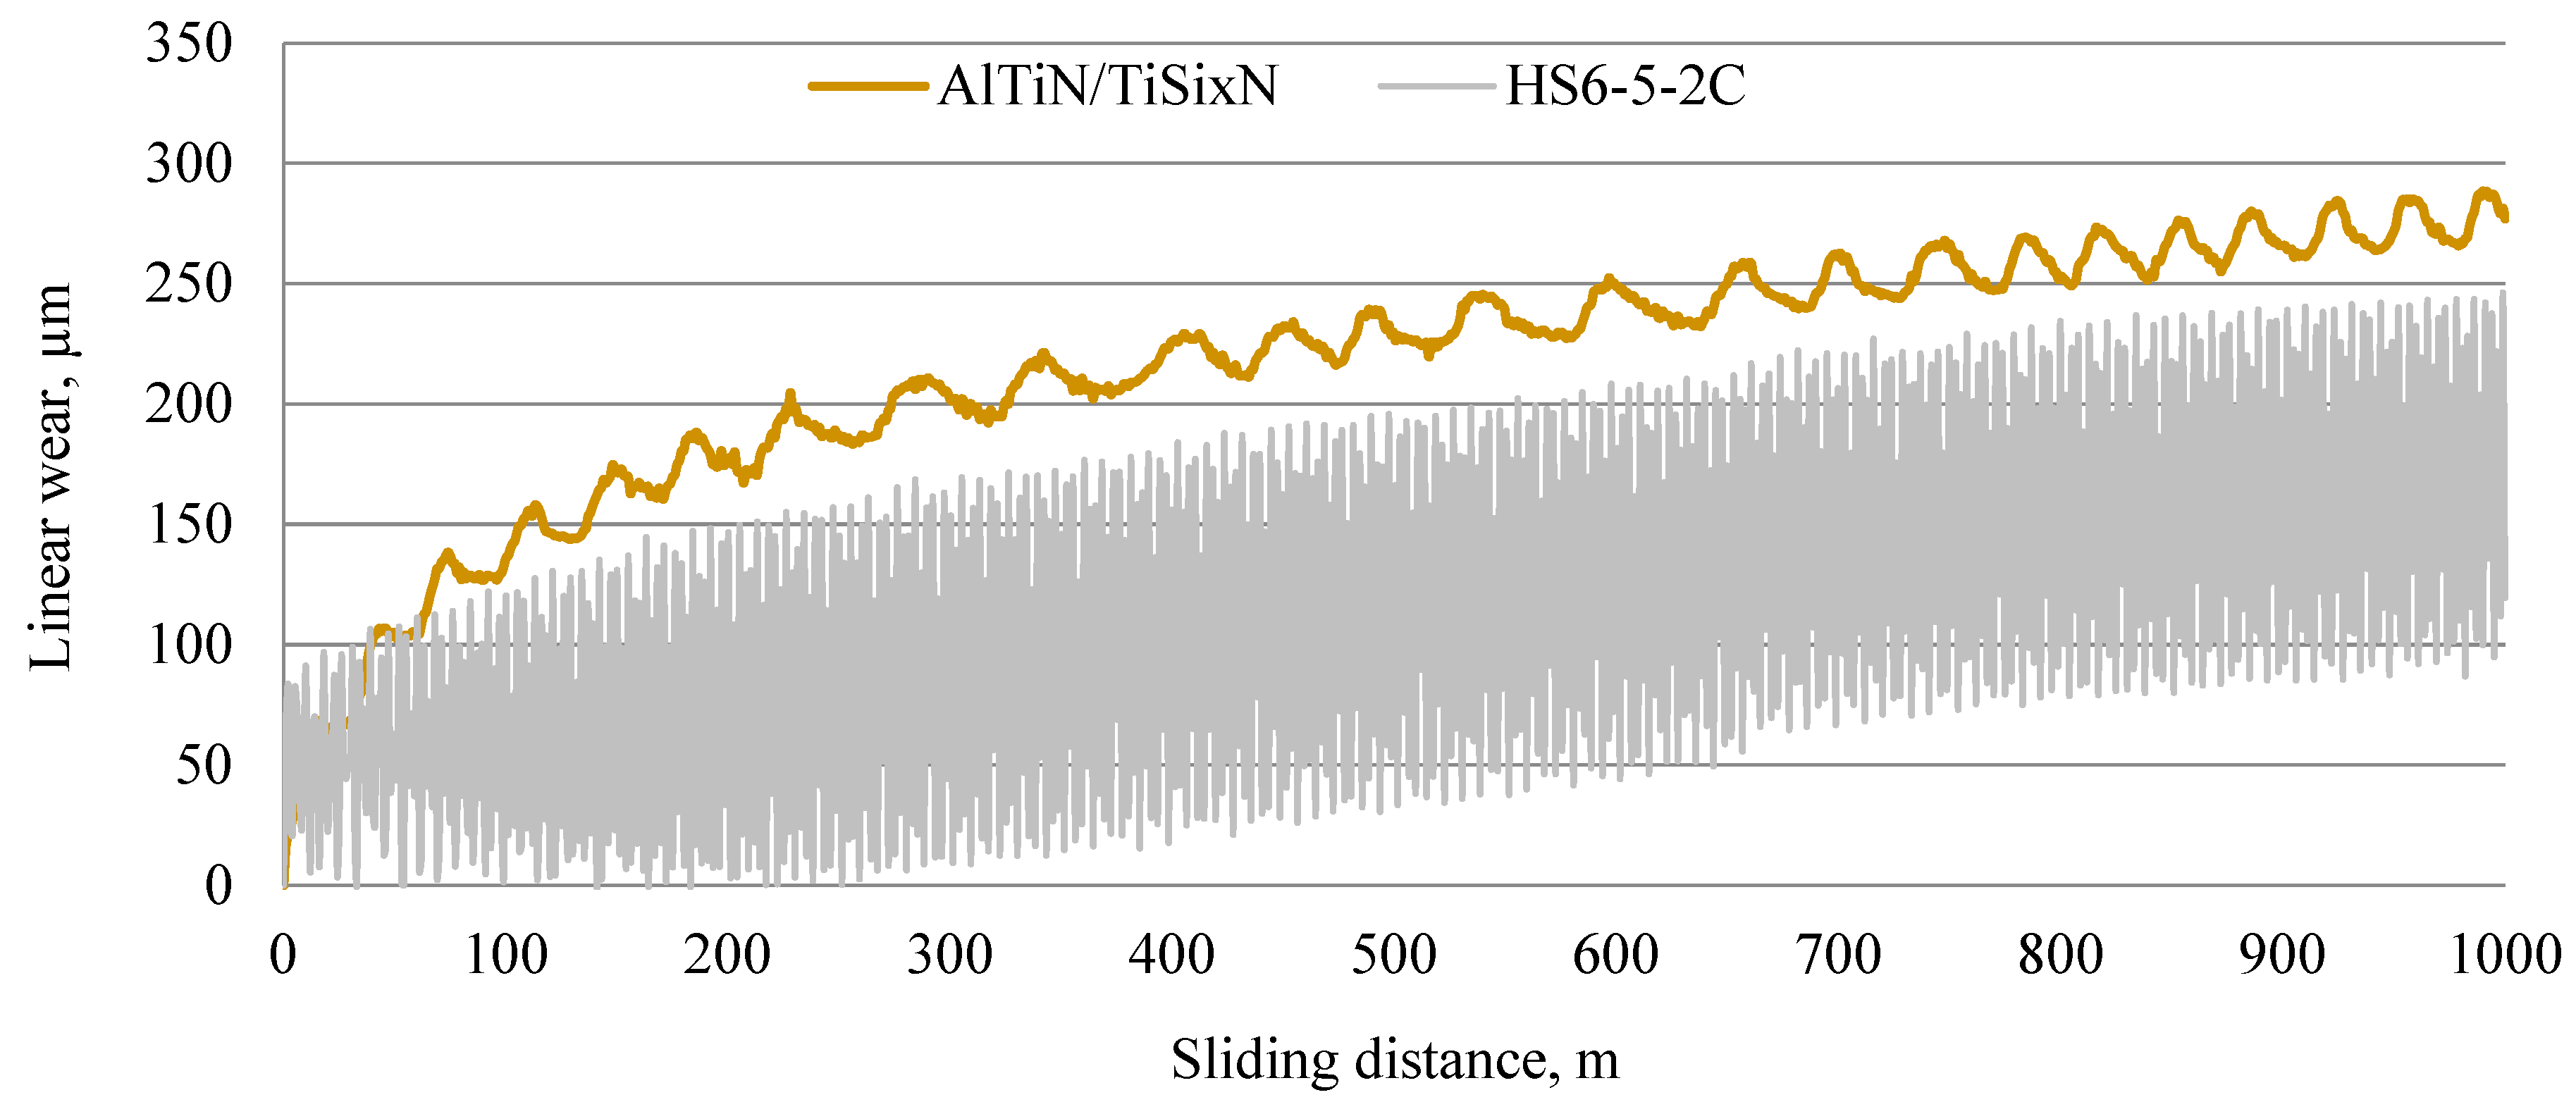
Following friction and wear testing, diagrams illustrating the relationship between the coefficient of friction and friction distance (
Figure 6) and linear wear and friction distance (
Figure 7) were generated.
In the comparison of friction coefficients (see
Figure 4), lower values were observed for the disc with the AlTiN/TiSiXN coating. Although, during the initial phase of testing, the friction coefficient was higher for the coated disc than for the uncoated disc—an outcome influenced by its more developed surface microgeometry (refer to
Figure 3b)—the analysis of linear wear (see
Figure 5) indicated a lower value for the uncoated steel disc; however, this trend was not consistently stable. Conversely, a higher value was recorded for the disc with the AlTiN/TiSiXN coating. The higher value was due to the coating being harder than the steel disc. Linear wear is the sum of the wear of the sample (disc) and the counter-sample (ball). In this case, the ball wore more than the coated disc.
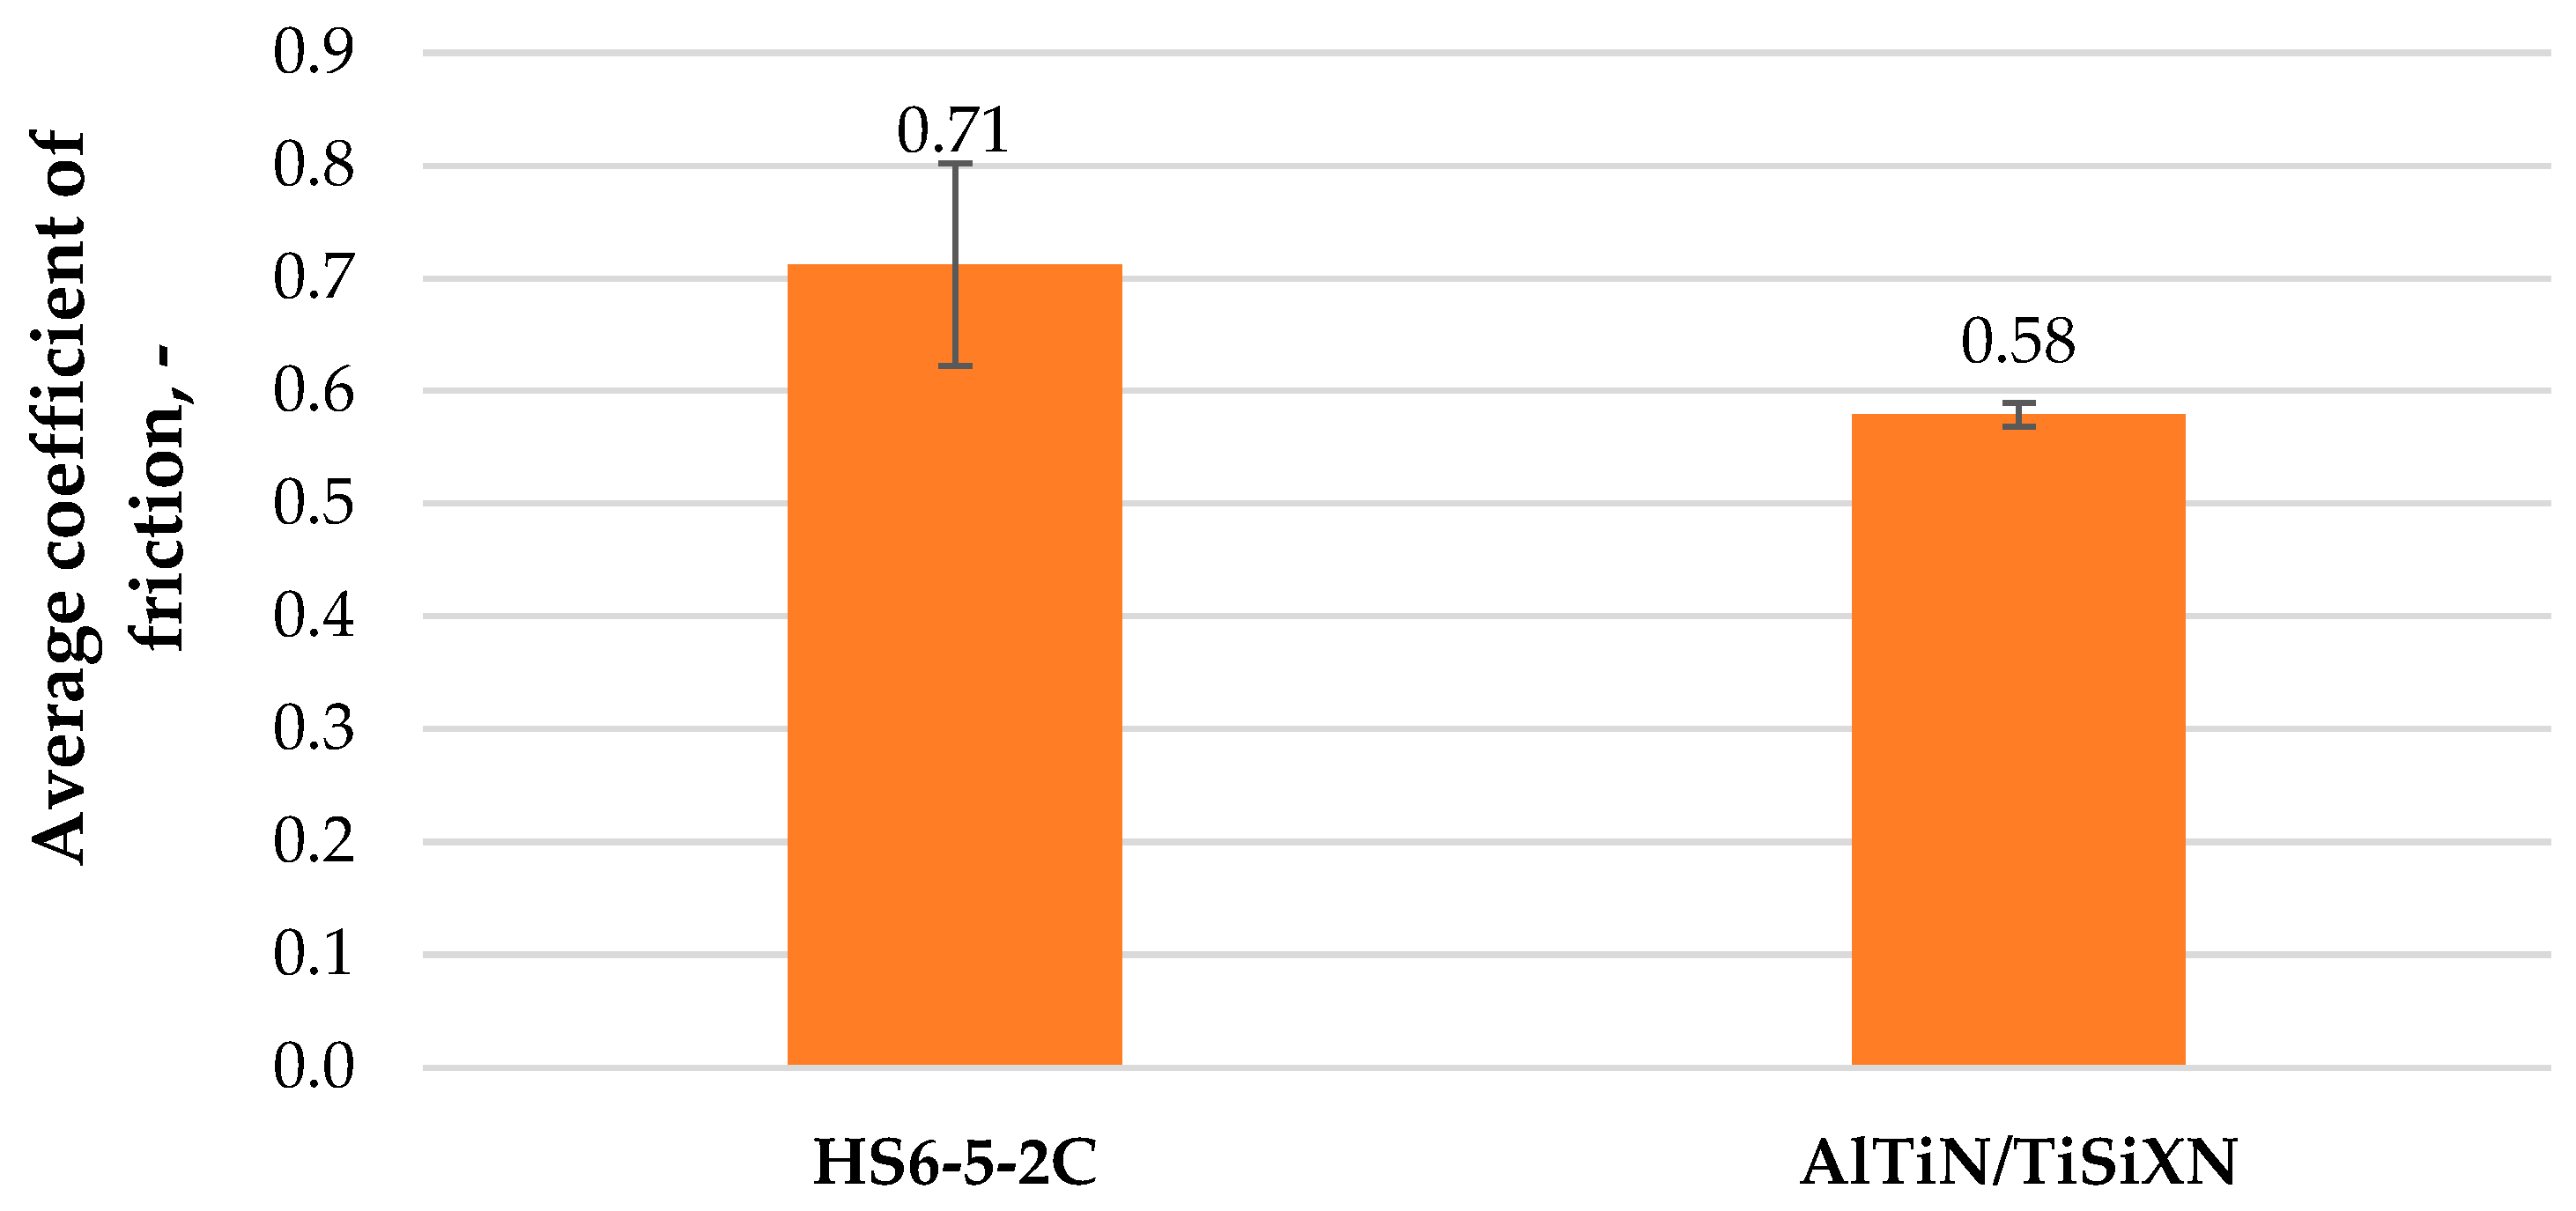
Figure 8 presents the average coefficient of friction values for the tested friction pairs.
The calculated average values of the friction coefficient were 0.58 for the coated disc and 0.71 for the uncoated steel disc. The standard deviation was 0.01 for the coated sample and 0.09 for the steel sample, respectively.
3.4. Assessment of Surface Geometric Structure of Samples After Tribological Tests
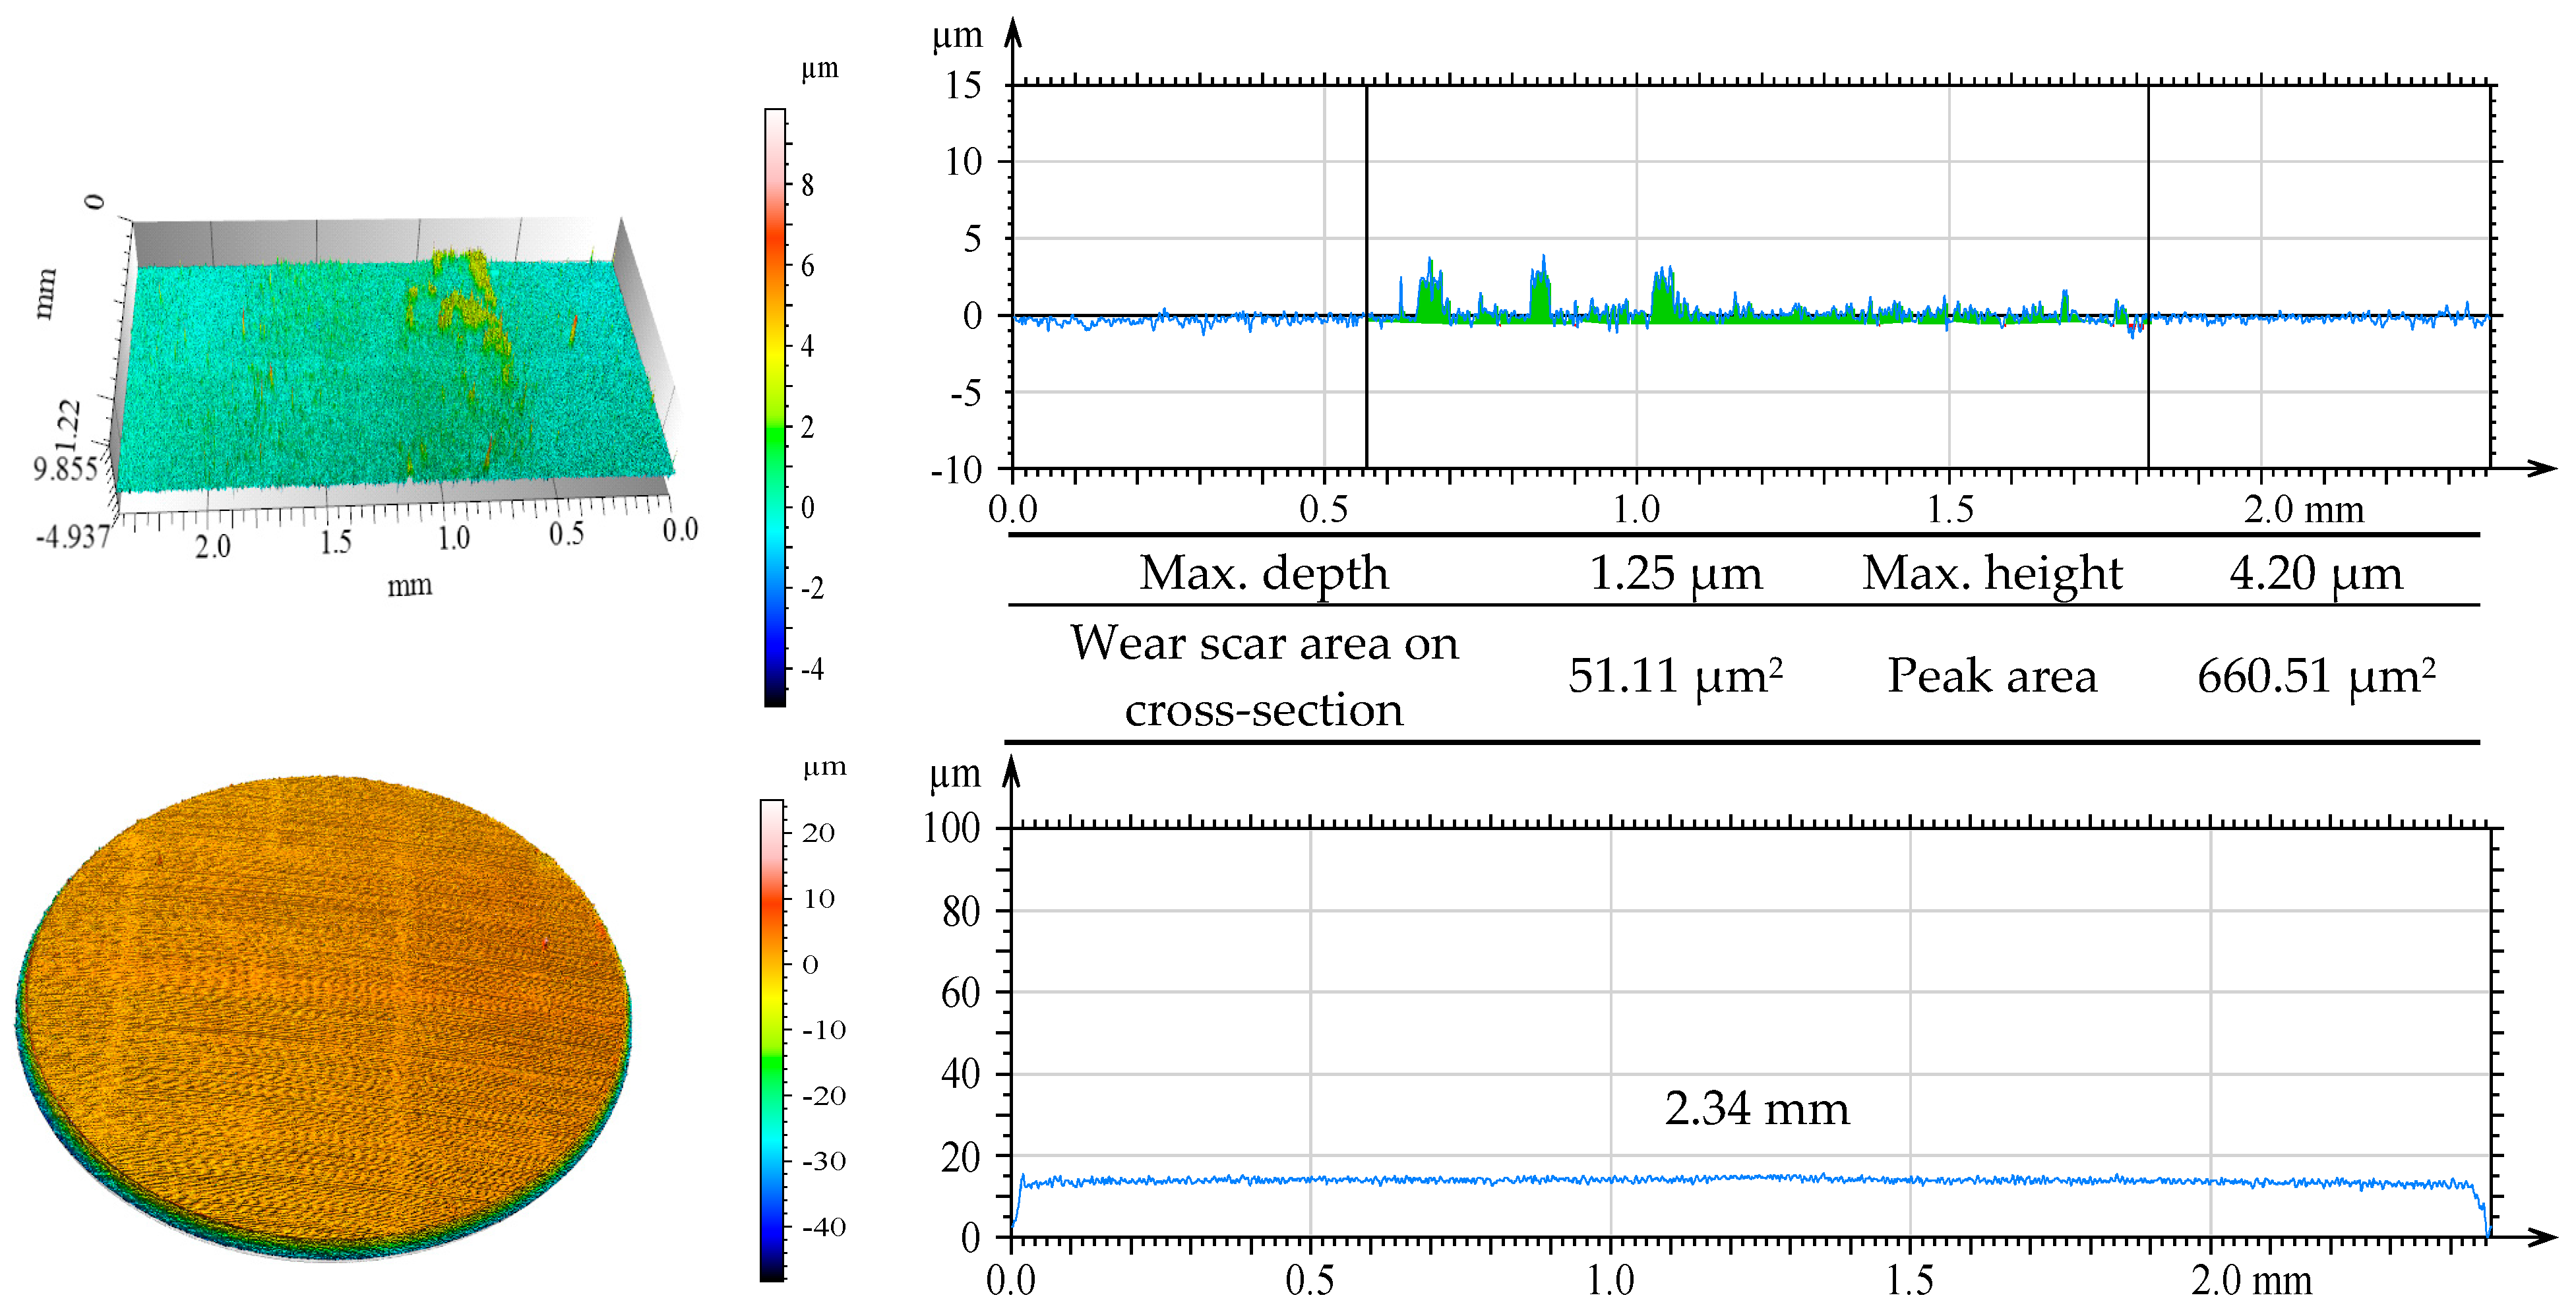
To better illustrate the individual wear of the discs and balls, a confocal microscope was used for microscopic analysis in the next stage of the research.
Figure 9 and
Figure 10 present isometric images and original profiles of uncoated (
Figure 9) and AlTiN/TiSiXN-coated steel discs (
Figure 10), as well as balls after tribological testing under dry friction conditions.
An analysis of the isomeric images and primary profiles of the wear tracks on the discs and balls indicated reduced disc wear for the coated sample. Build-ups of approximately 4 µm were observed on the coated disc (
Figure 10, build-ups shown in green). The uncoated steel disc demonstrated both build-ups of approximately 13 µm and indentations exceeding 5 µm (
Figure 9, indentations shown in red). Upon comparing the wear of the balls, a narrower wear track was observed under friction conditions with the uncoated disc, whereas it was more than 20% wider in contact with the disc coated with the AlTiN/TiSiXN layer.
Table 6 shows the ball wear values after the tribological tests.
The wear height and volume for the balls exhibited approximately 50% lower values when tested against the uncoated steel disc.
Table 7 presents the roughness parameters of the discs and balls used in the study. These parameters were measured in areas both outside and within the wear track.
In the comparison of the roughness parameters after the friction tests, the coated disc exhibited a smoother surface than the uncoated disc, with all roughness parameters showing lower values. For the ball tested in contact with the coated disc, lower values were also recorded for the following parameters compared to the ball tested against the uncoated steel disc: Sq (root mean square deviation of surface roughness), Sp (maximum peak height of the surface), and Sa (arithmetic mean deviation of surface roughness). This indicates that a surface with smaller elevations was achieved. The Sp value for the uncoated steel disc was 75% lower than for the coated disc. This result confirms the presence of numerous, larger elevations on the surface of the coated sample (
Figure 3b). Conversely, after the friction tests, the Sp value at the wear track on the coated sample was more than 60% lower compared to the uncoated steel sample. This reduction signifies the presence of only small micro-irregularities or elevations in the wear track of the coated disc (
Figure 10 (bottom)) [
37].
3.5. Evaluation of Surface Morphology After Tribological Tests
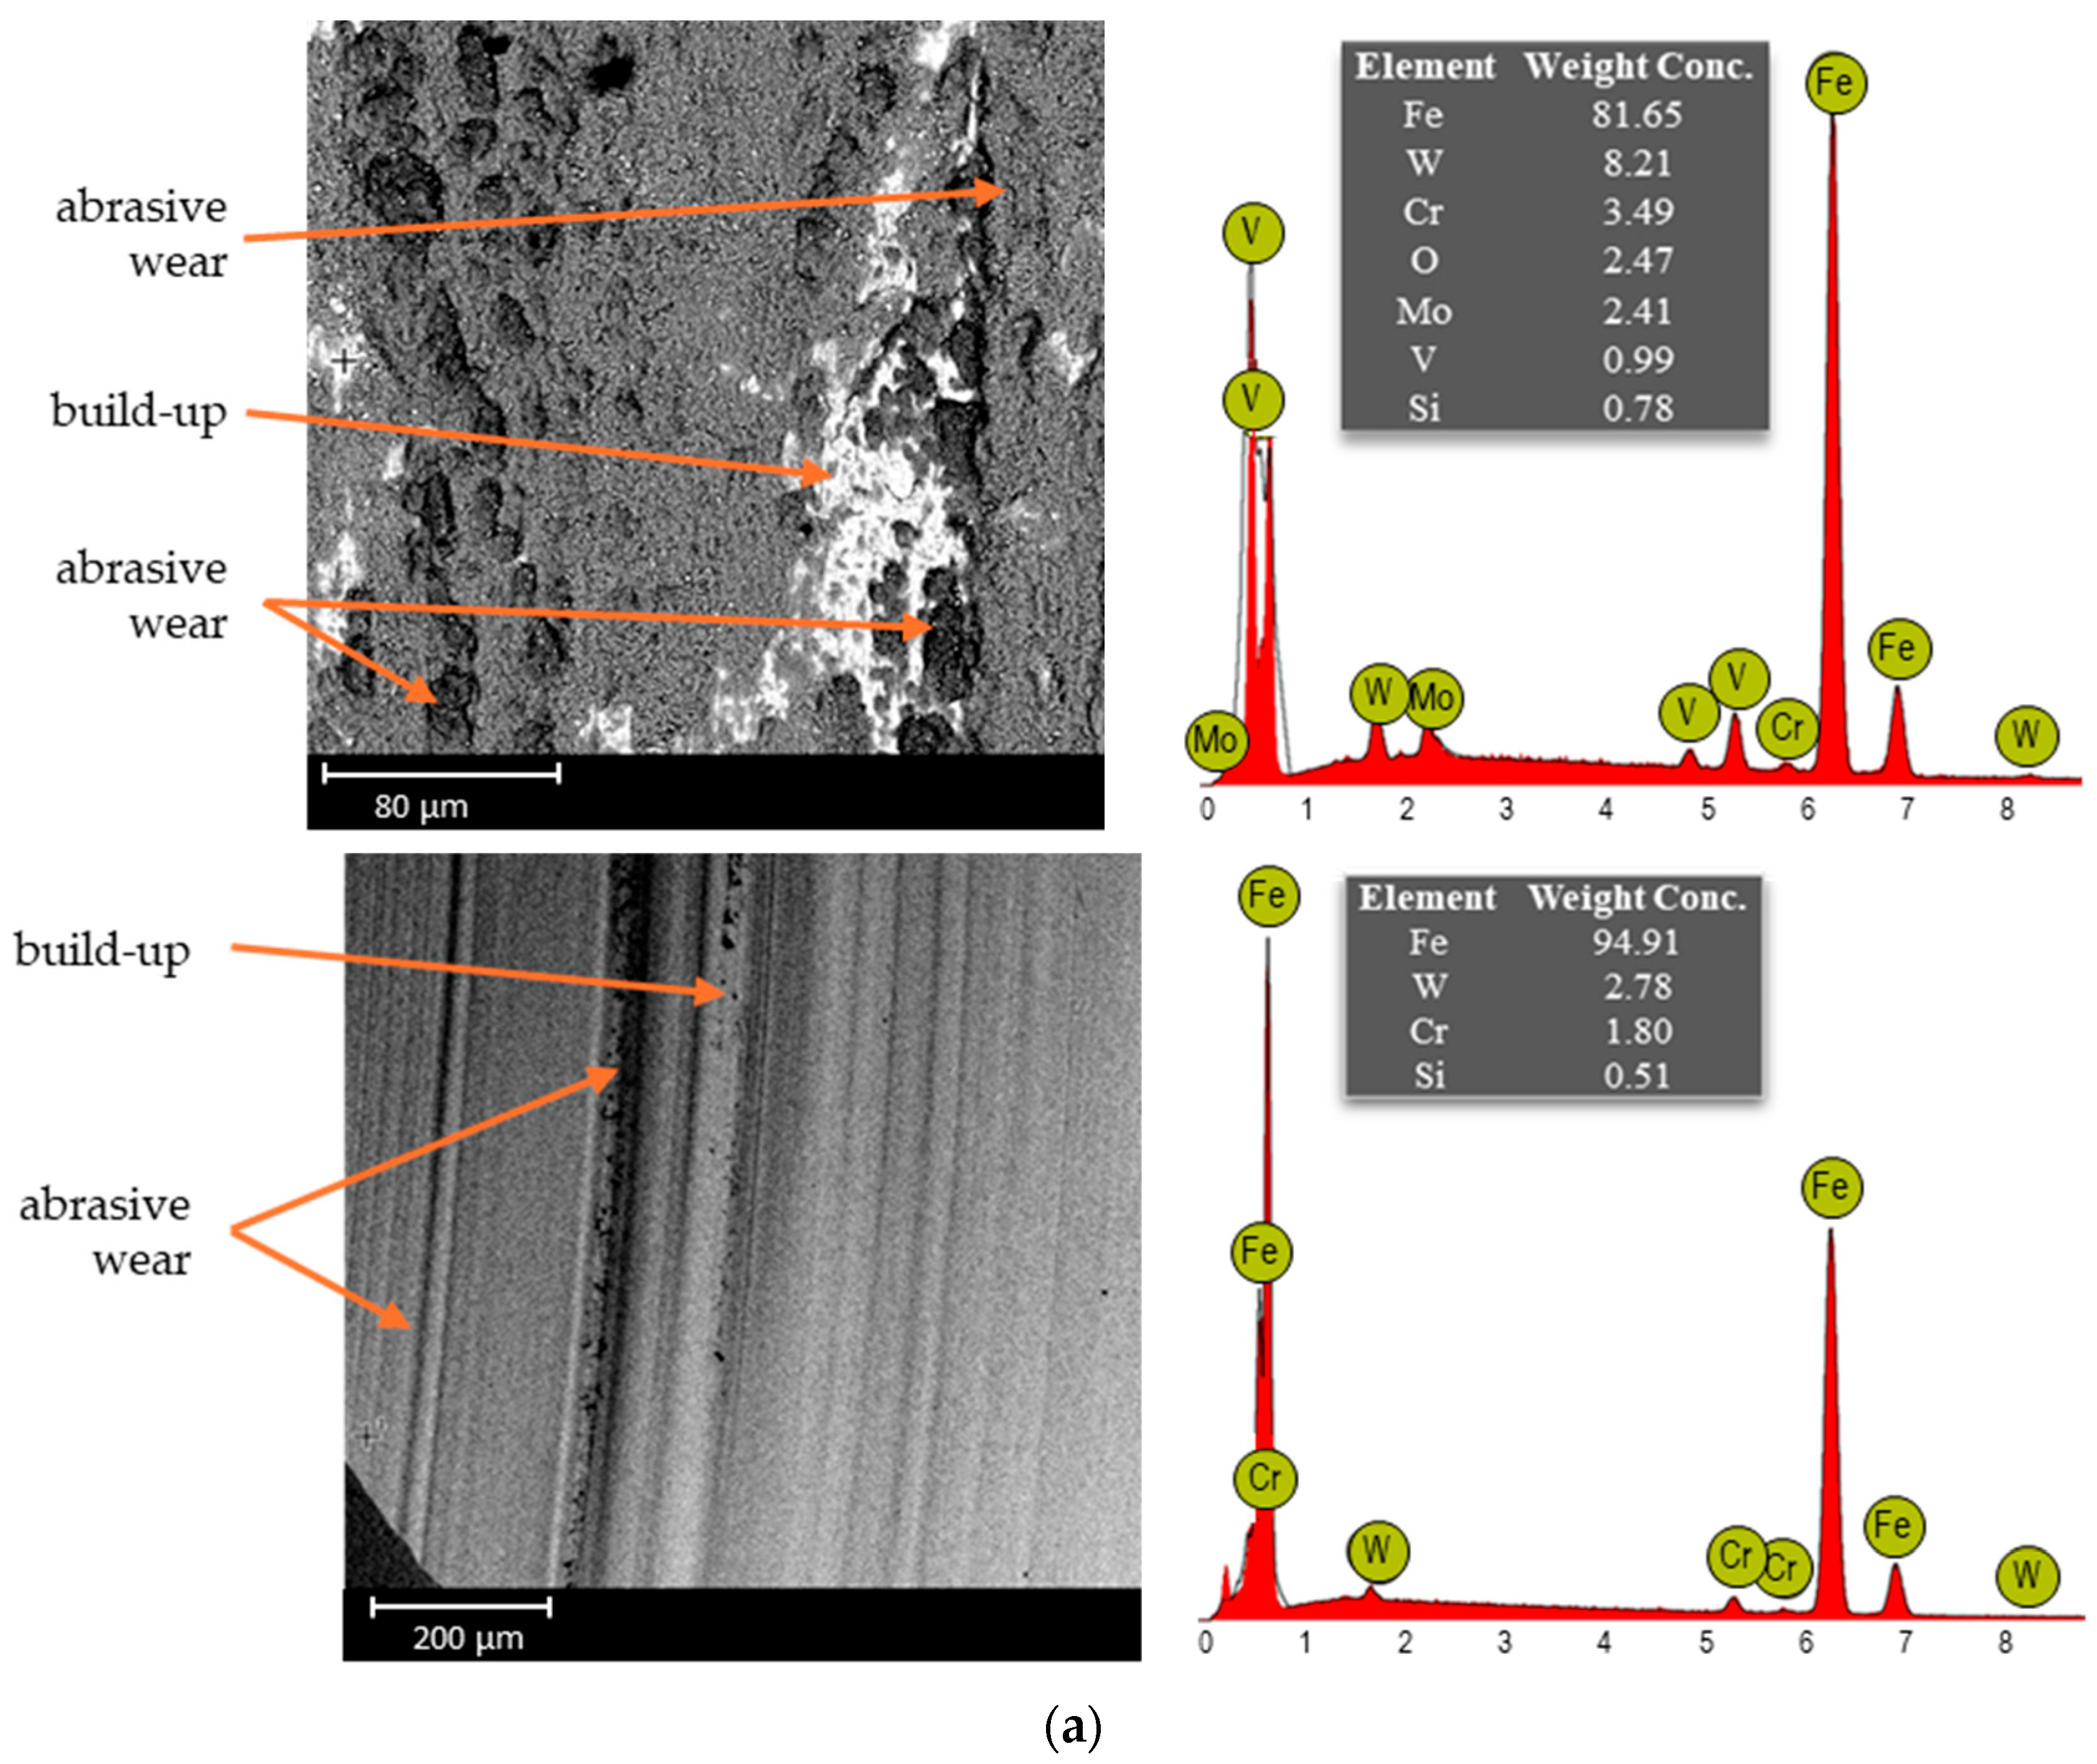
Additionally, SEM and EDS analyses were used to determine the chemical composition at the wear tracks. The results of this investigation are presented in
Figure 11.
The results from the chemical composition analysis of the discs and balls in the wear track of the steel friction pair (
Figure 11a) indicated material transfer from the disc to the ball. This transfer was evidenced by the presence of tungsten (W) on the ball, an element found only in the composition of the HS6-5-2C steel disc. Similarly, in the second friction pair (an AlTiN/TiSiXN-coated disc against a 100Cr6 steel ball,
Figure 11b), reciprocal material transfer was observed: from the ball to the disc and from the disc to the ball. This is confirmed by the presence of iron (Fe) on the surface of the coated disc and aluminium (Al) on the ball. A small amount of abrasive wear was also observed on the coated disc. Furthermore, observations of the wear on the balls in both friction pairs revealed visible grooves on the ball paired with the uncoated disc, while the disc surface showed build-ups, wear areas, and localised material pull-outs.
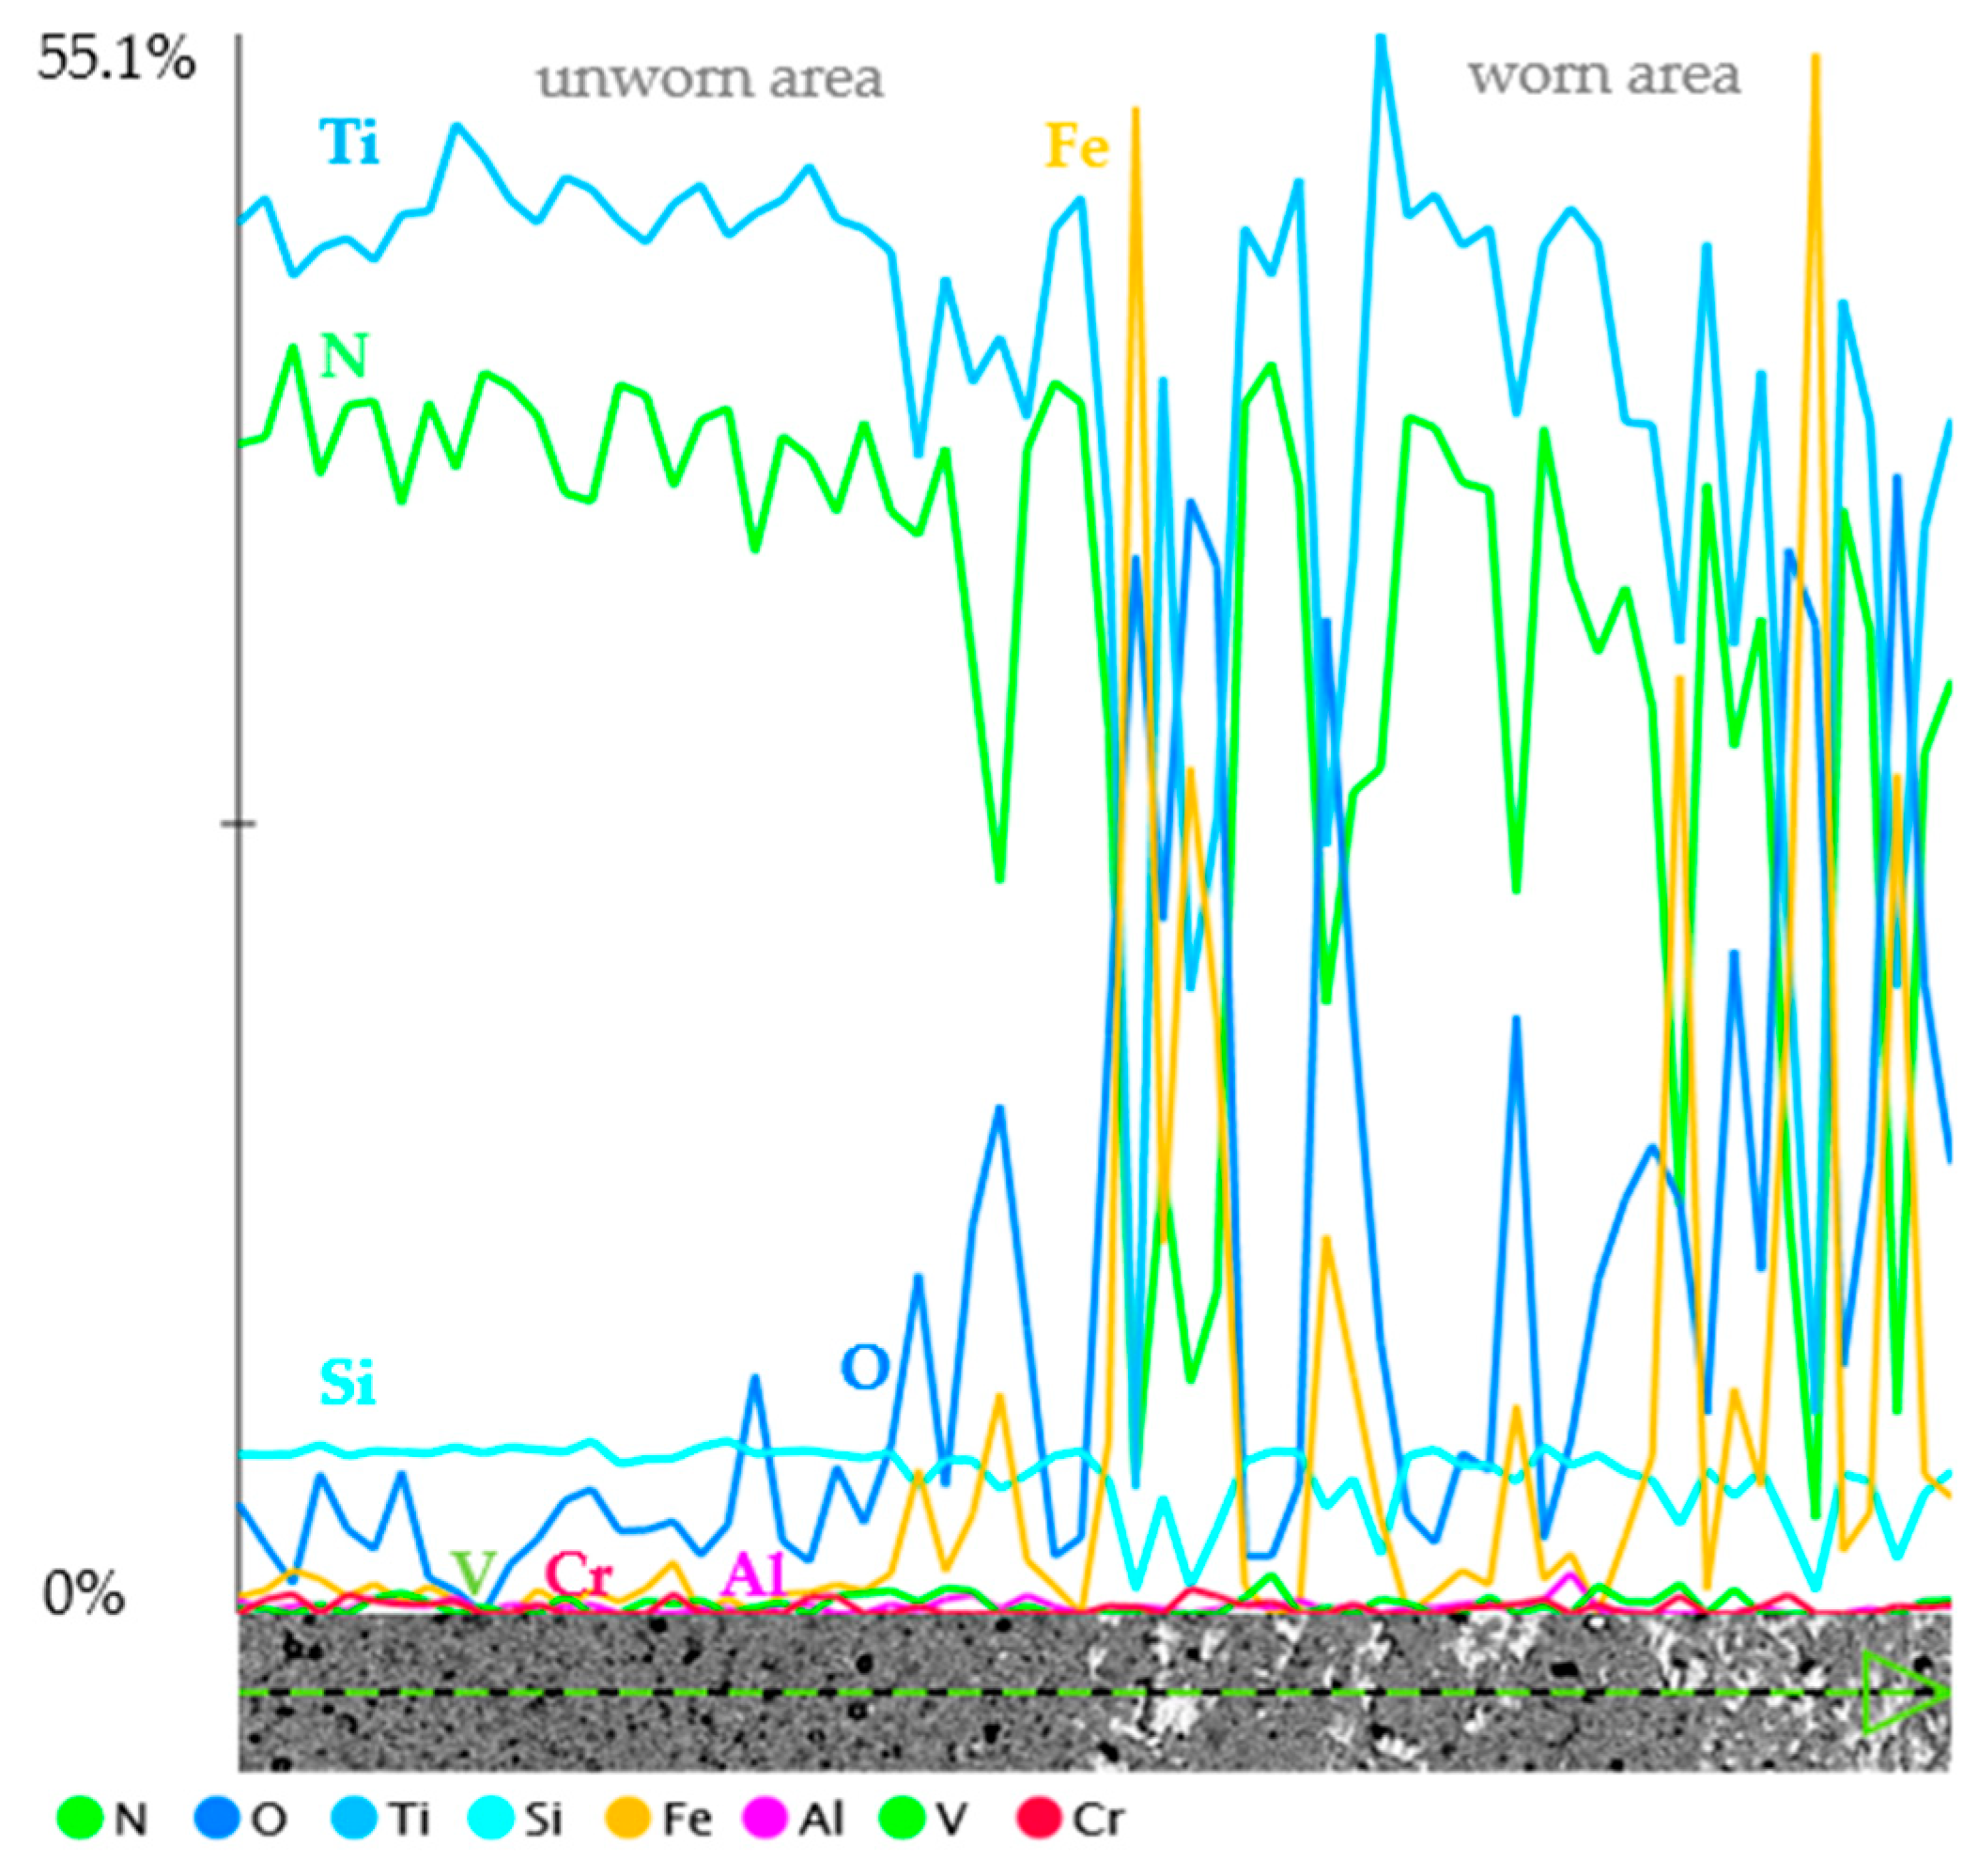
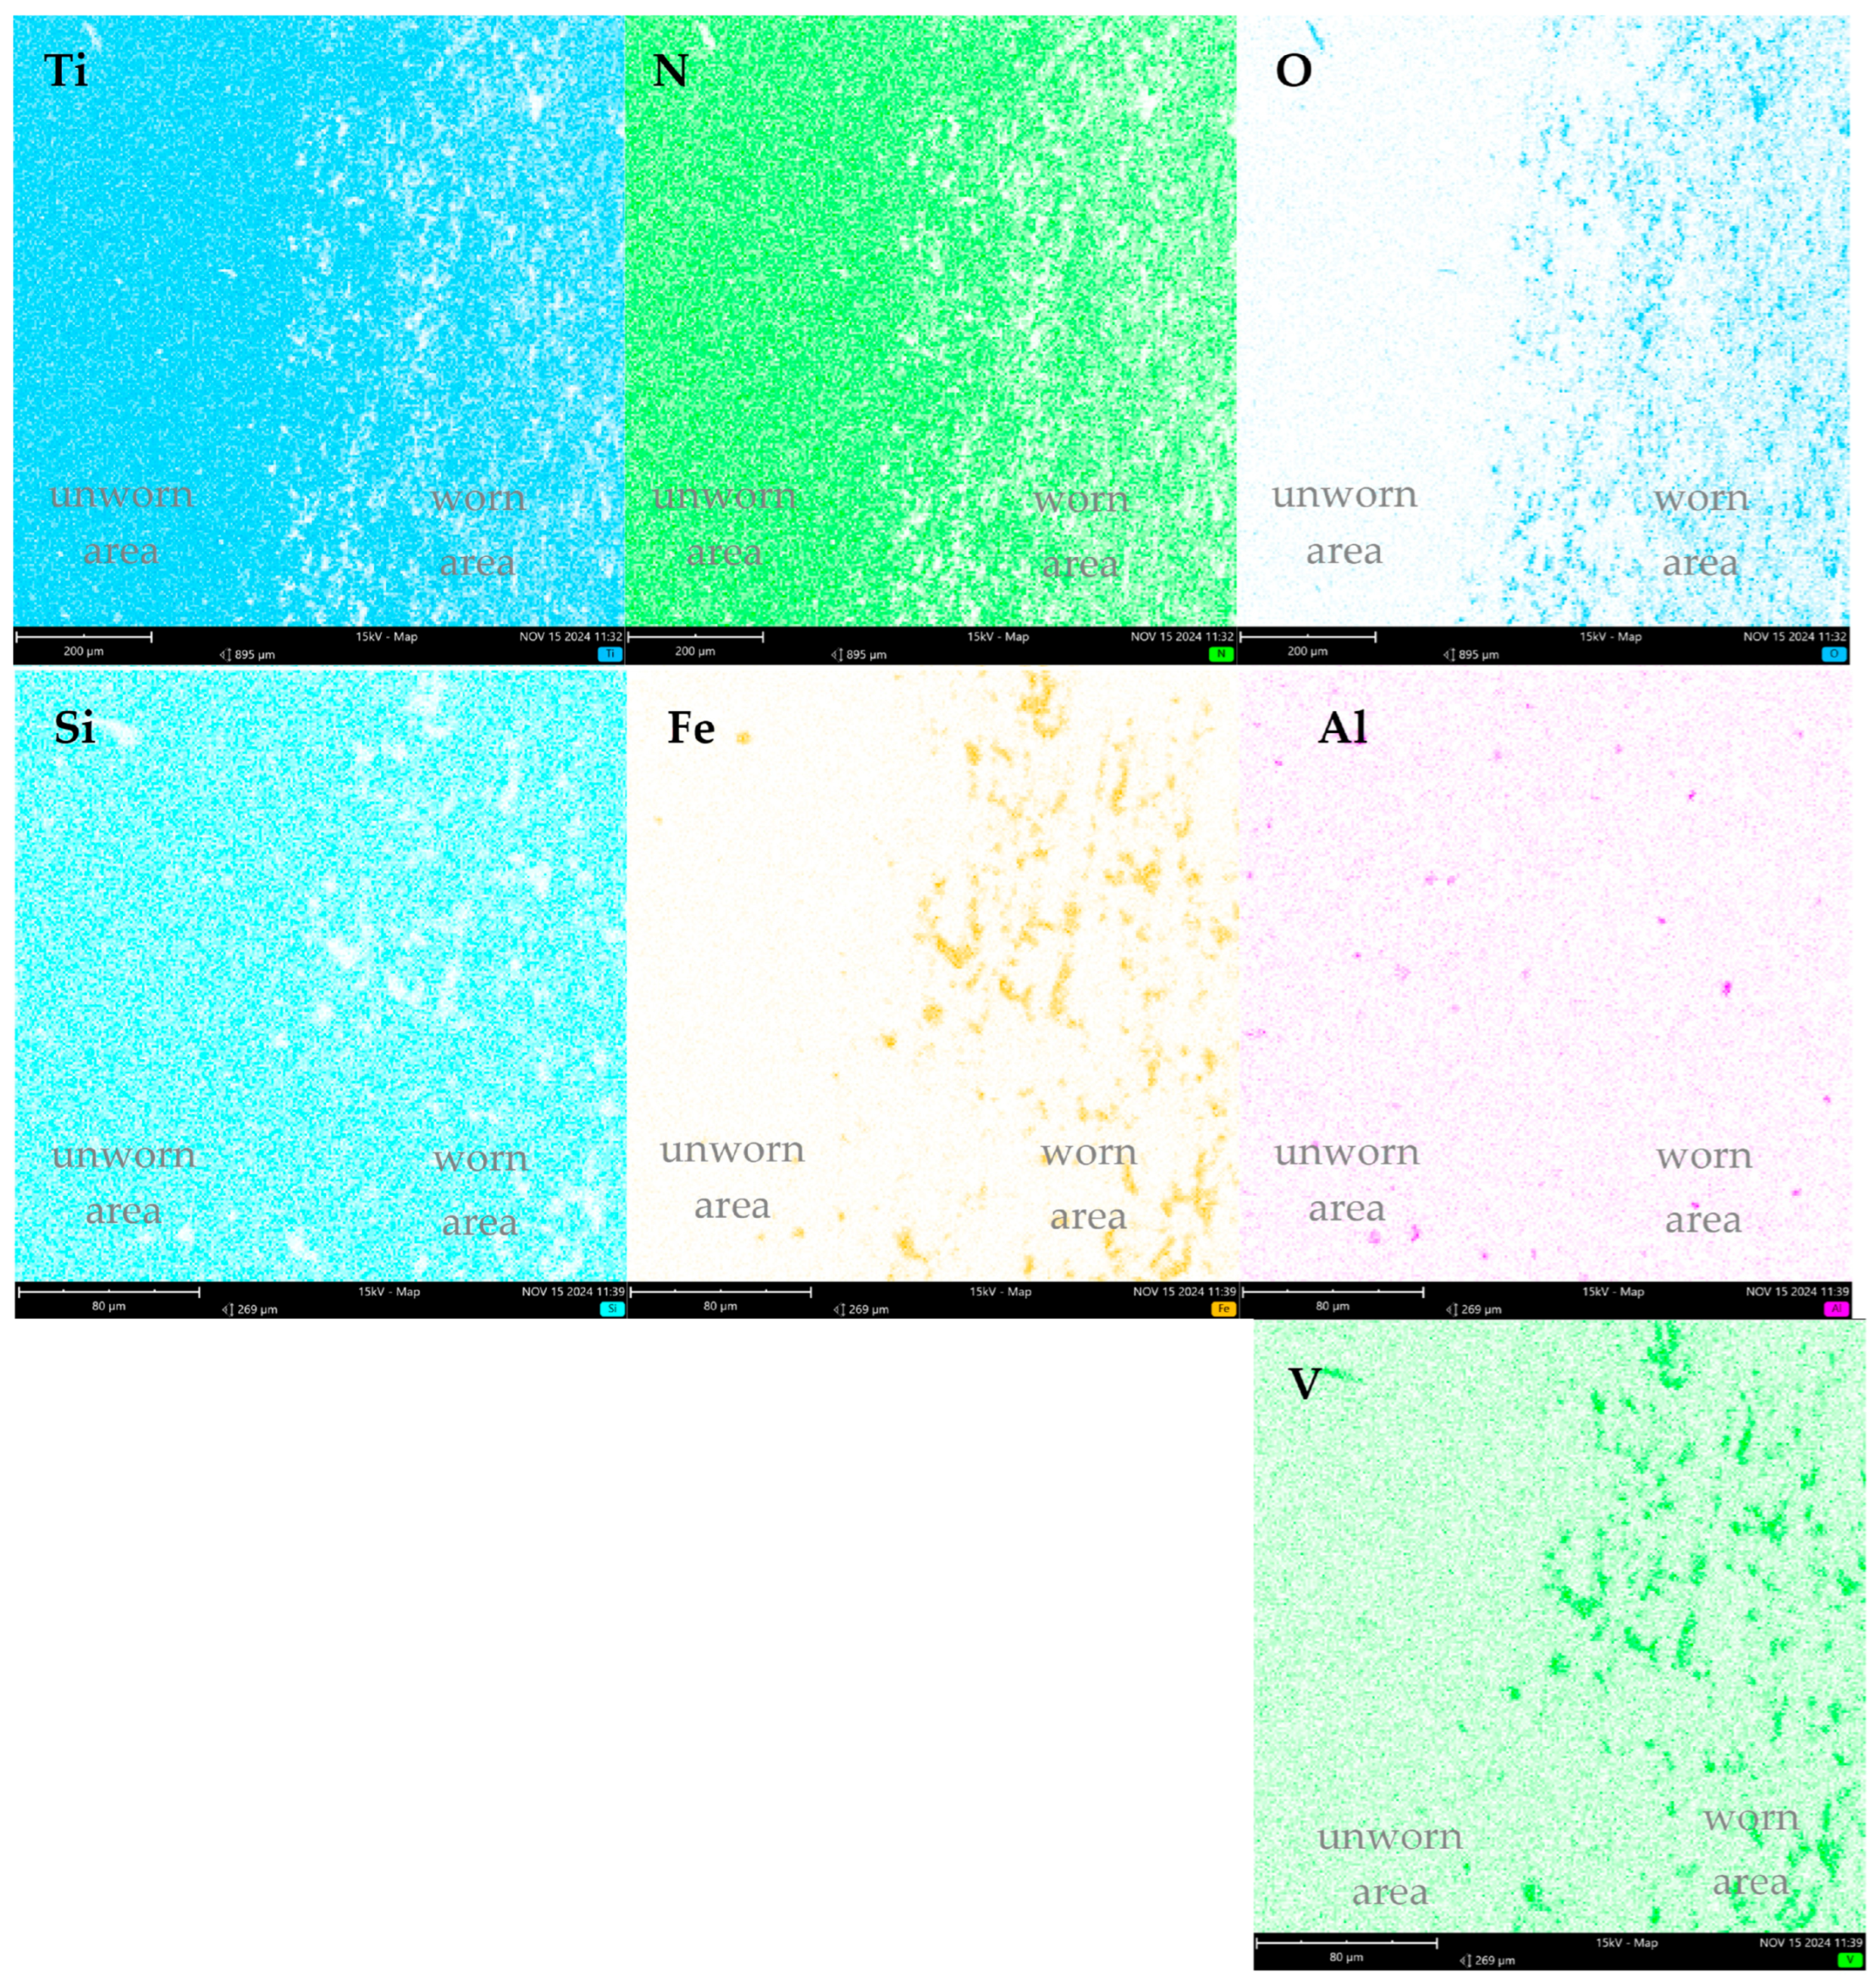
The build-ups formed on the coated disc were analysed to ascertain their chemical composition. The results of the linear analysis and distribution mapping are compiled in
Figure 12 and
Figure 13.
The linear analysis (
Figure 12) in the area without wear shows the elemental composition of the coating, mainly featuring Ti, N, and Si. In contrast, in the worn area, the content of iron and oxygen increases. Within the wear track, there is an apparent increase in iron content at the location of a build-up. This observation confirms material transfer from the counter-body (steel ball) to the sample (coated disc). This phenomenon can also be seen in the elemental mapping presented in
Figure 13.
The elemental distribution analysis revealed the presence of oxygen and iron within the wear track. Iron originates from the substrate, while oxygen comes from the formation of an oxide layer. In contrast, the unworn area of the coating showed the presence of titanium, nitrogen, and silicon—elements constituting the coating. Aluminium was detected throughout the entire investigated area, both within the wear track and in the unworn region. The formed oxide layer plays a protective role by reducing wear and providing a barrier against corrosion, thereby enhancing the durability of the coating under tribological conditions.
3.6. Assessment of Surface Geometric Structure of Samples After Abrasion Wear Tests
In addition to tribological testing, the AlTiN/TiSiXN coating was studied for wear using a calotest.
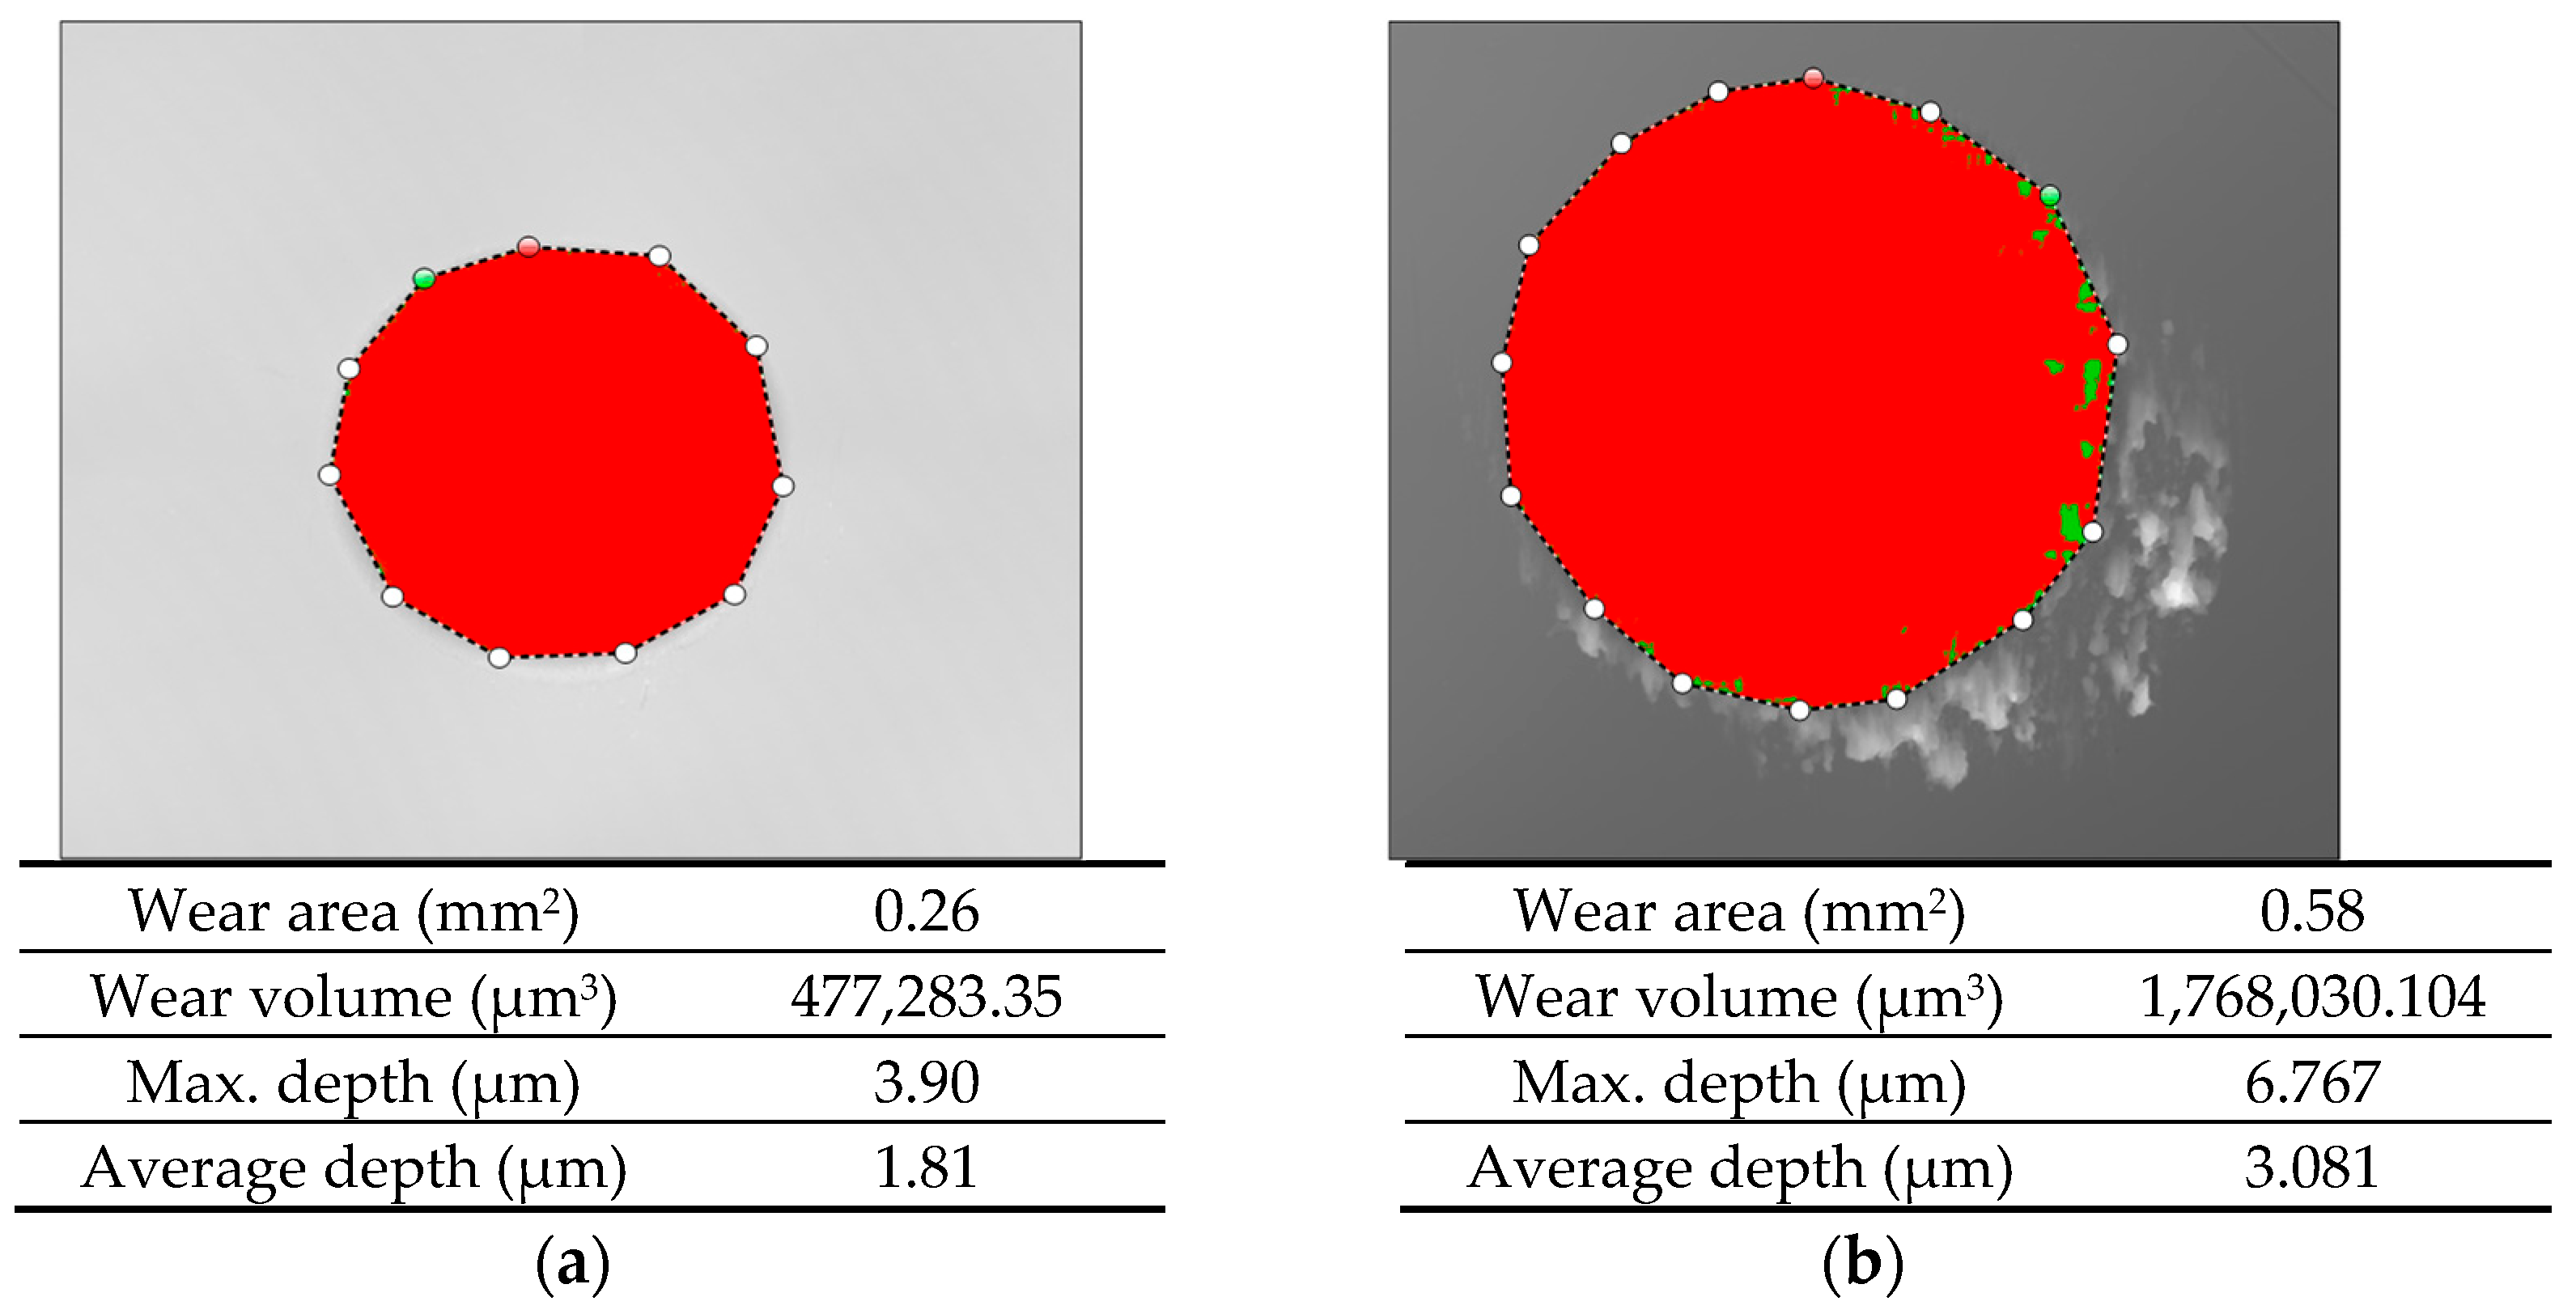
Figure 14 shows isometric images and primary profiles of the steel discs after the ball crater test.
Figure 15 shows the wear tracks on the HS6-5-2C steel disc without coating after wear tests conducted using a ball-cratering tests (calotest).
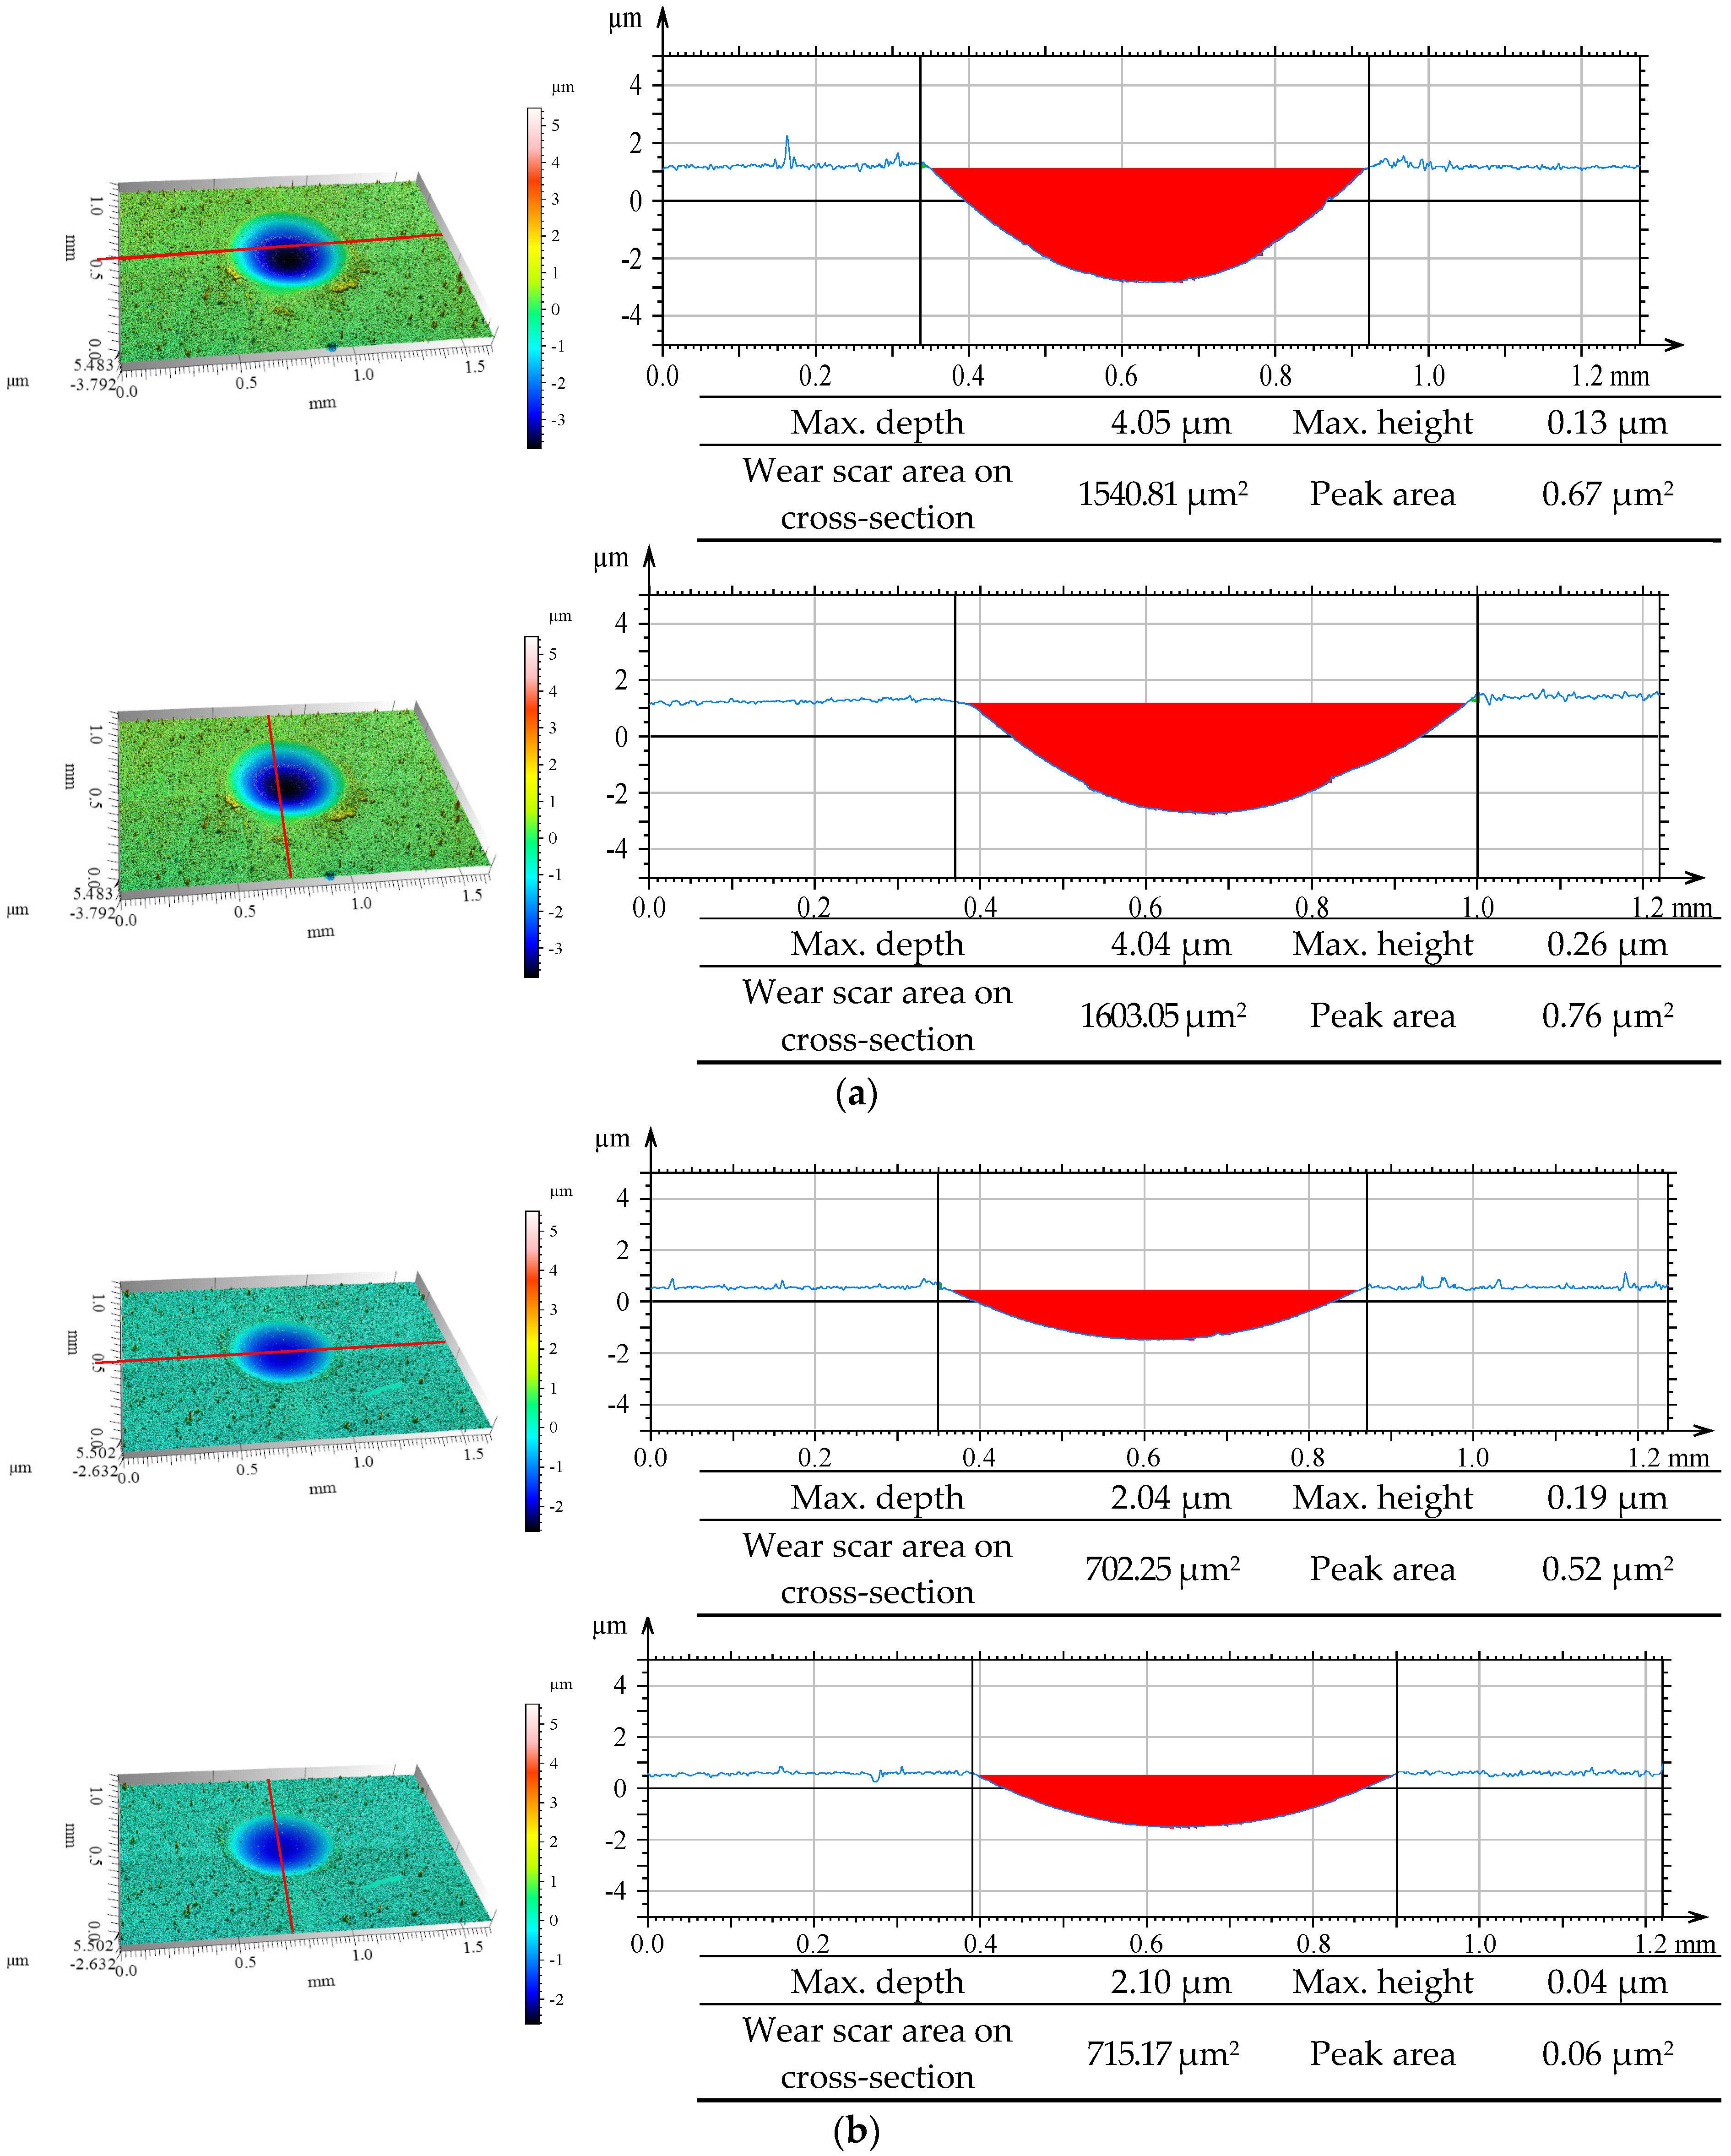
Figure 16 shows isometric images and primary profiles of the discs with AlTiN/TiSiXN coating after the ball crater test.
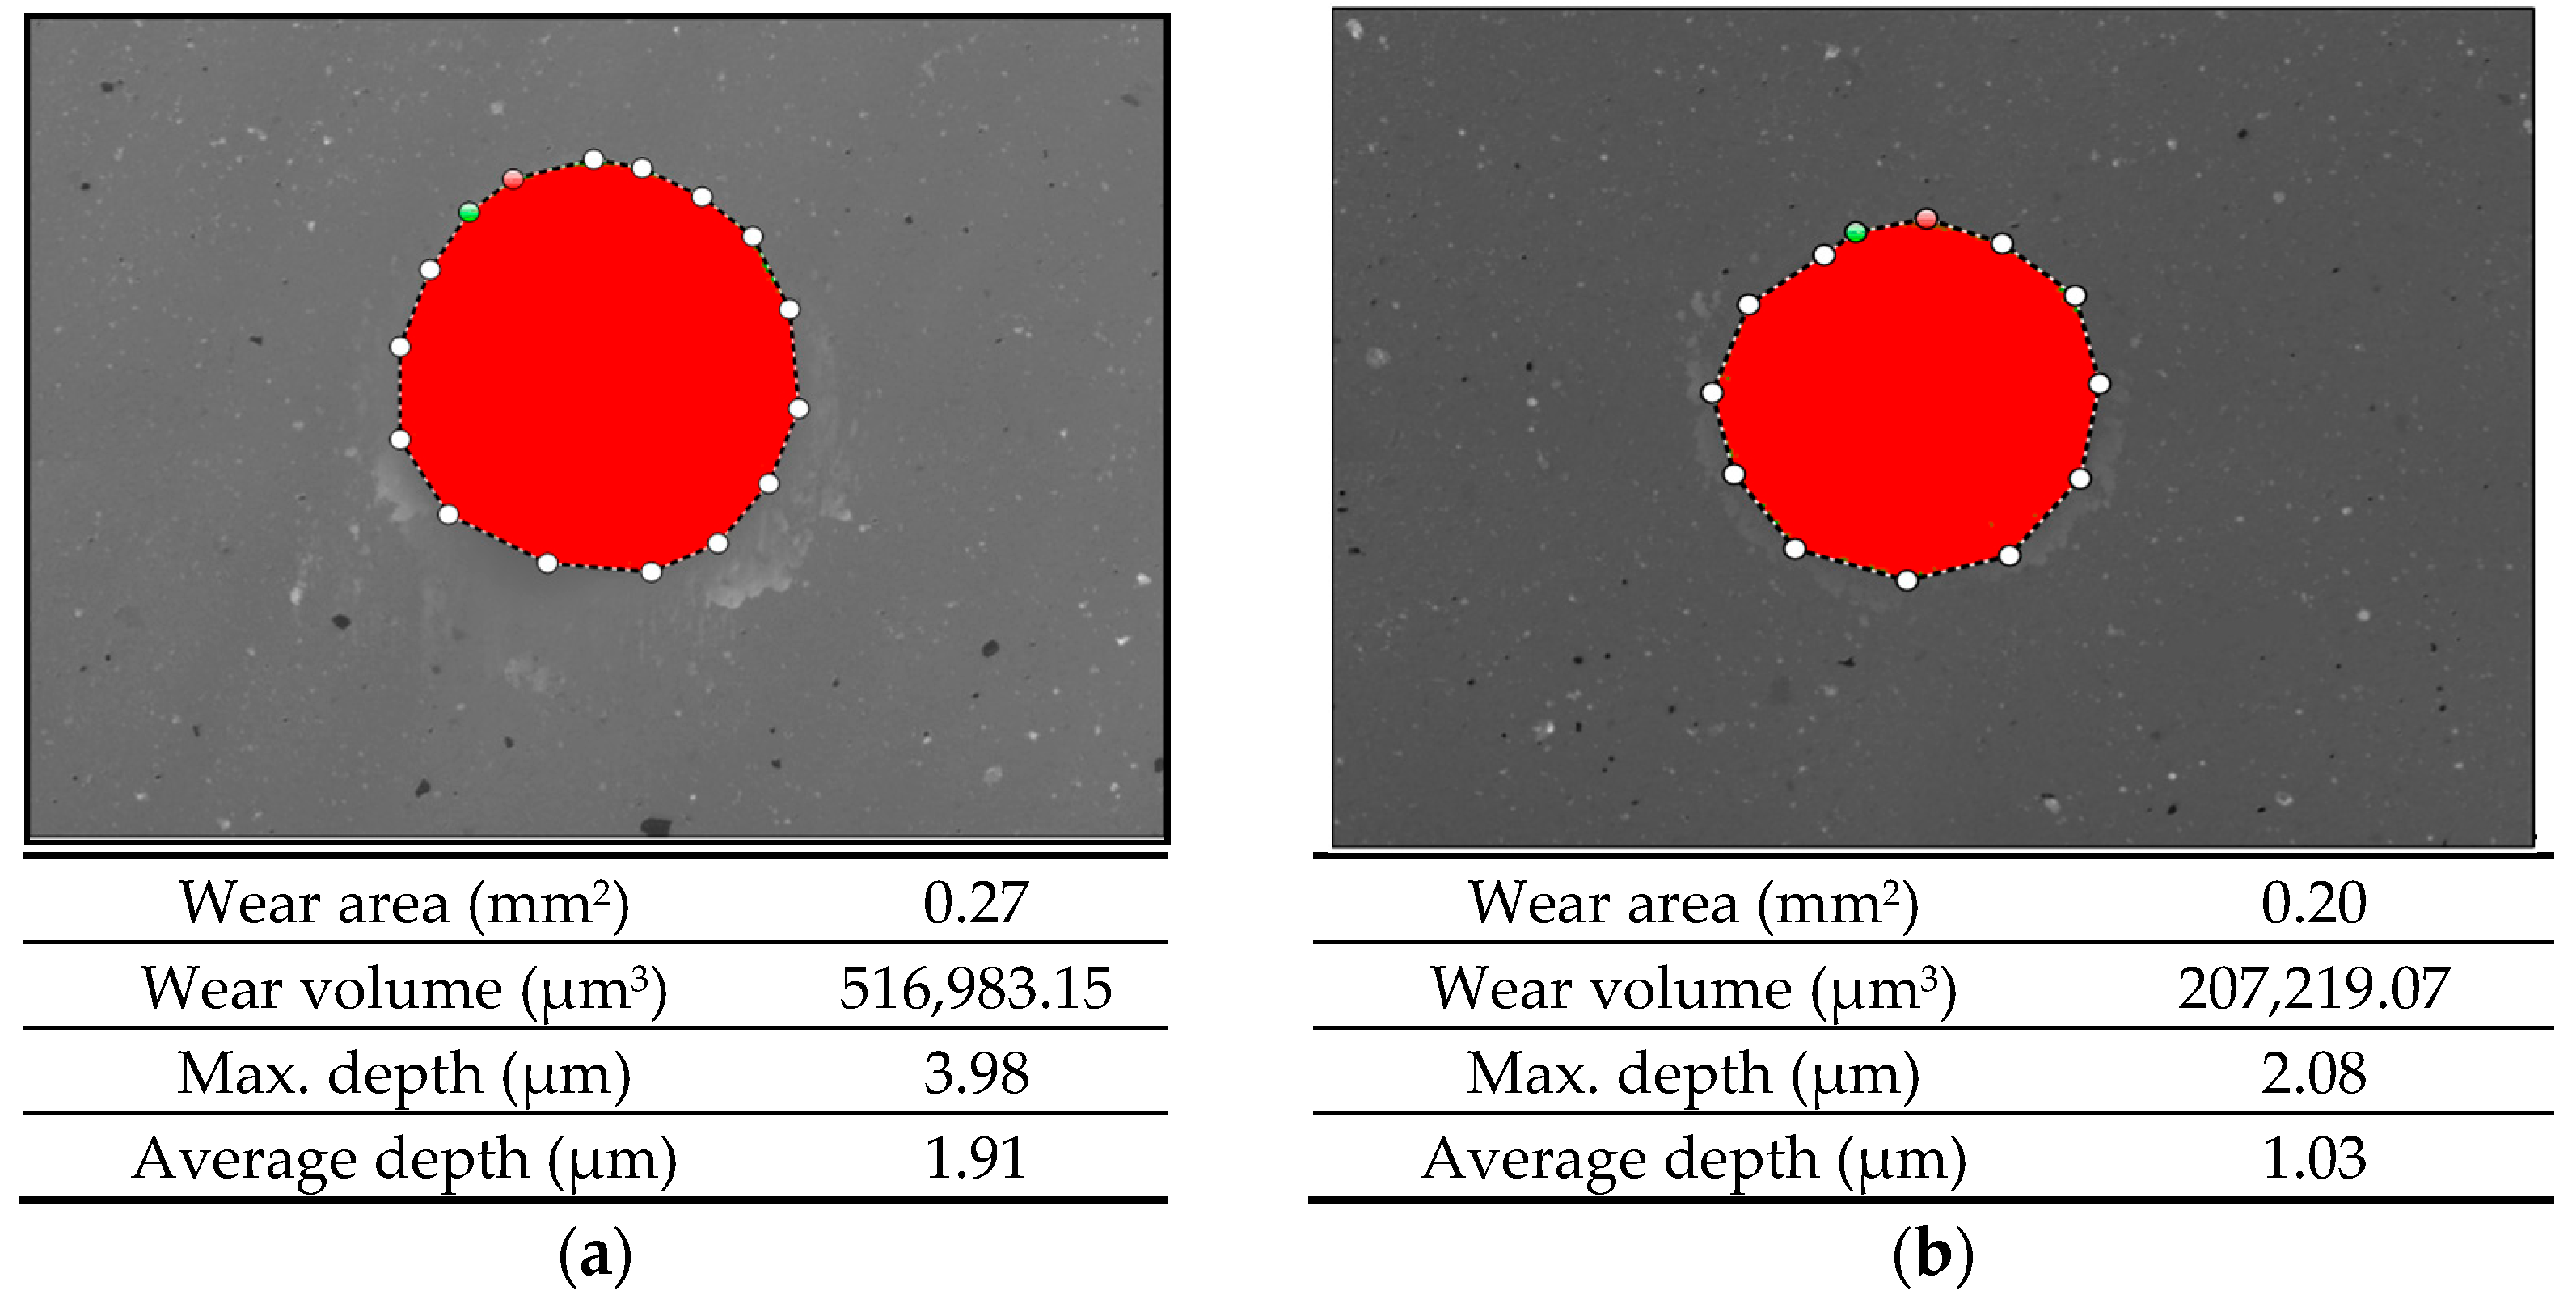
Figure 17 presents the wear tracks on the disc coated with AlTiN/TiSiXN after wear testing using a ball-on-disc tribotester.
The comparison of the wear regions following the abrasion wear test indicated a narrower, shallower region (
Figure 16b) and a reduced wear volume (
Figure 17b) when the ball with a larger diameter was employed.
Figure 18 shows the wear volumes of the uncoated and coated steel discs after the ball-cratering tests (calotest).
When comparing the wear volumes of the discs after tests conducted with the calotest, it was observed that the highest wear occurred for the steel disc in contact with a 30 mm diameter ball. Conversely, the lowest wear volume was recorded for the coated disc in contact with a 30 mm diameter ball. The comparison of the uncoated and coated discs in contact with a 20 mm and 30 mm diameter ball showed similar wear volume values.
3.7. Evaluation of Surface Morphology After Abrasion Wear Tests
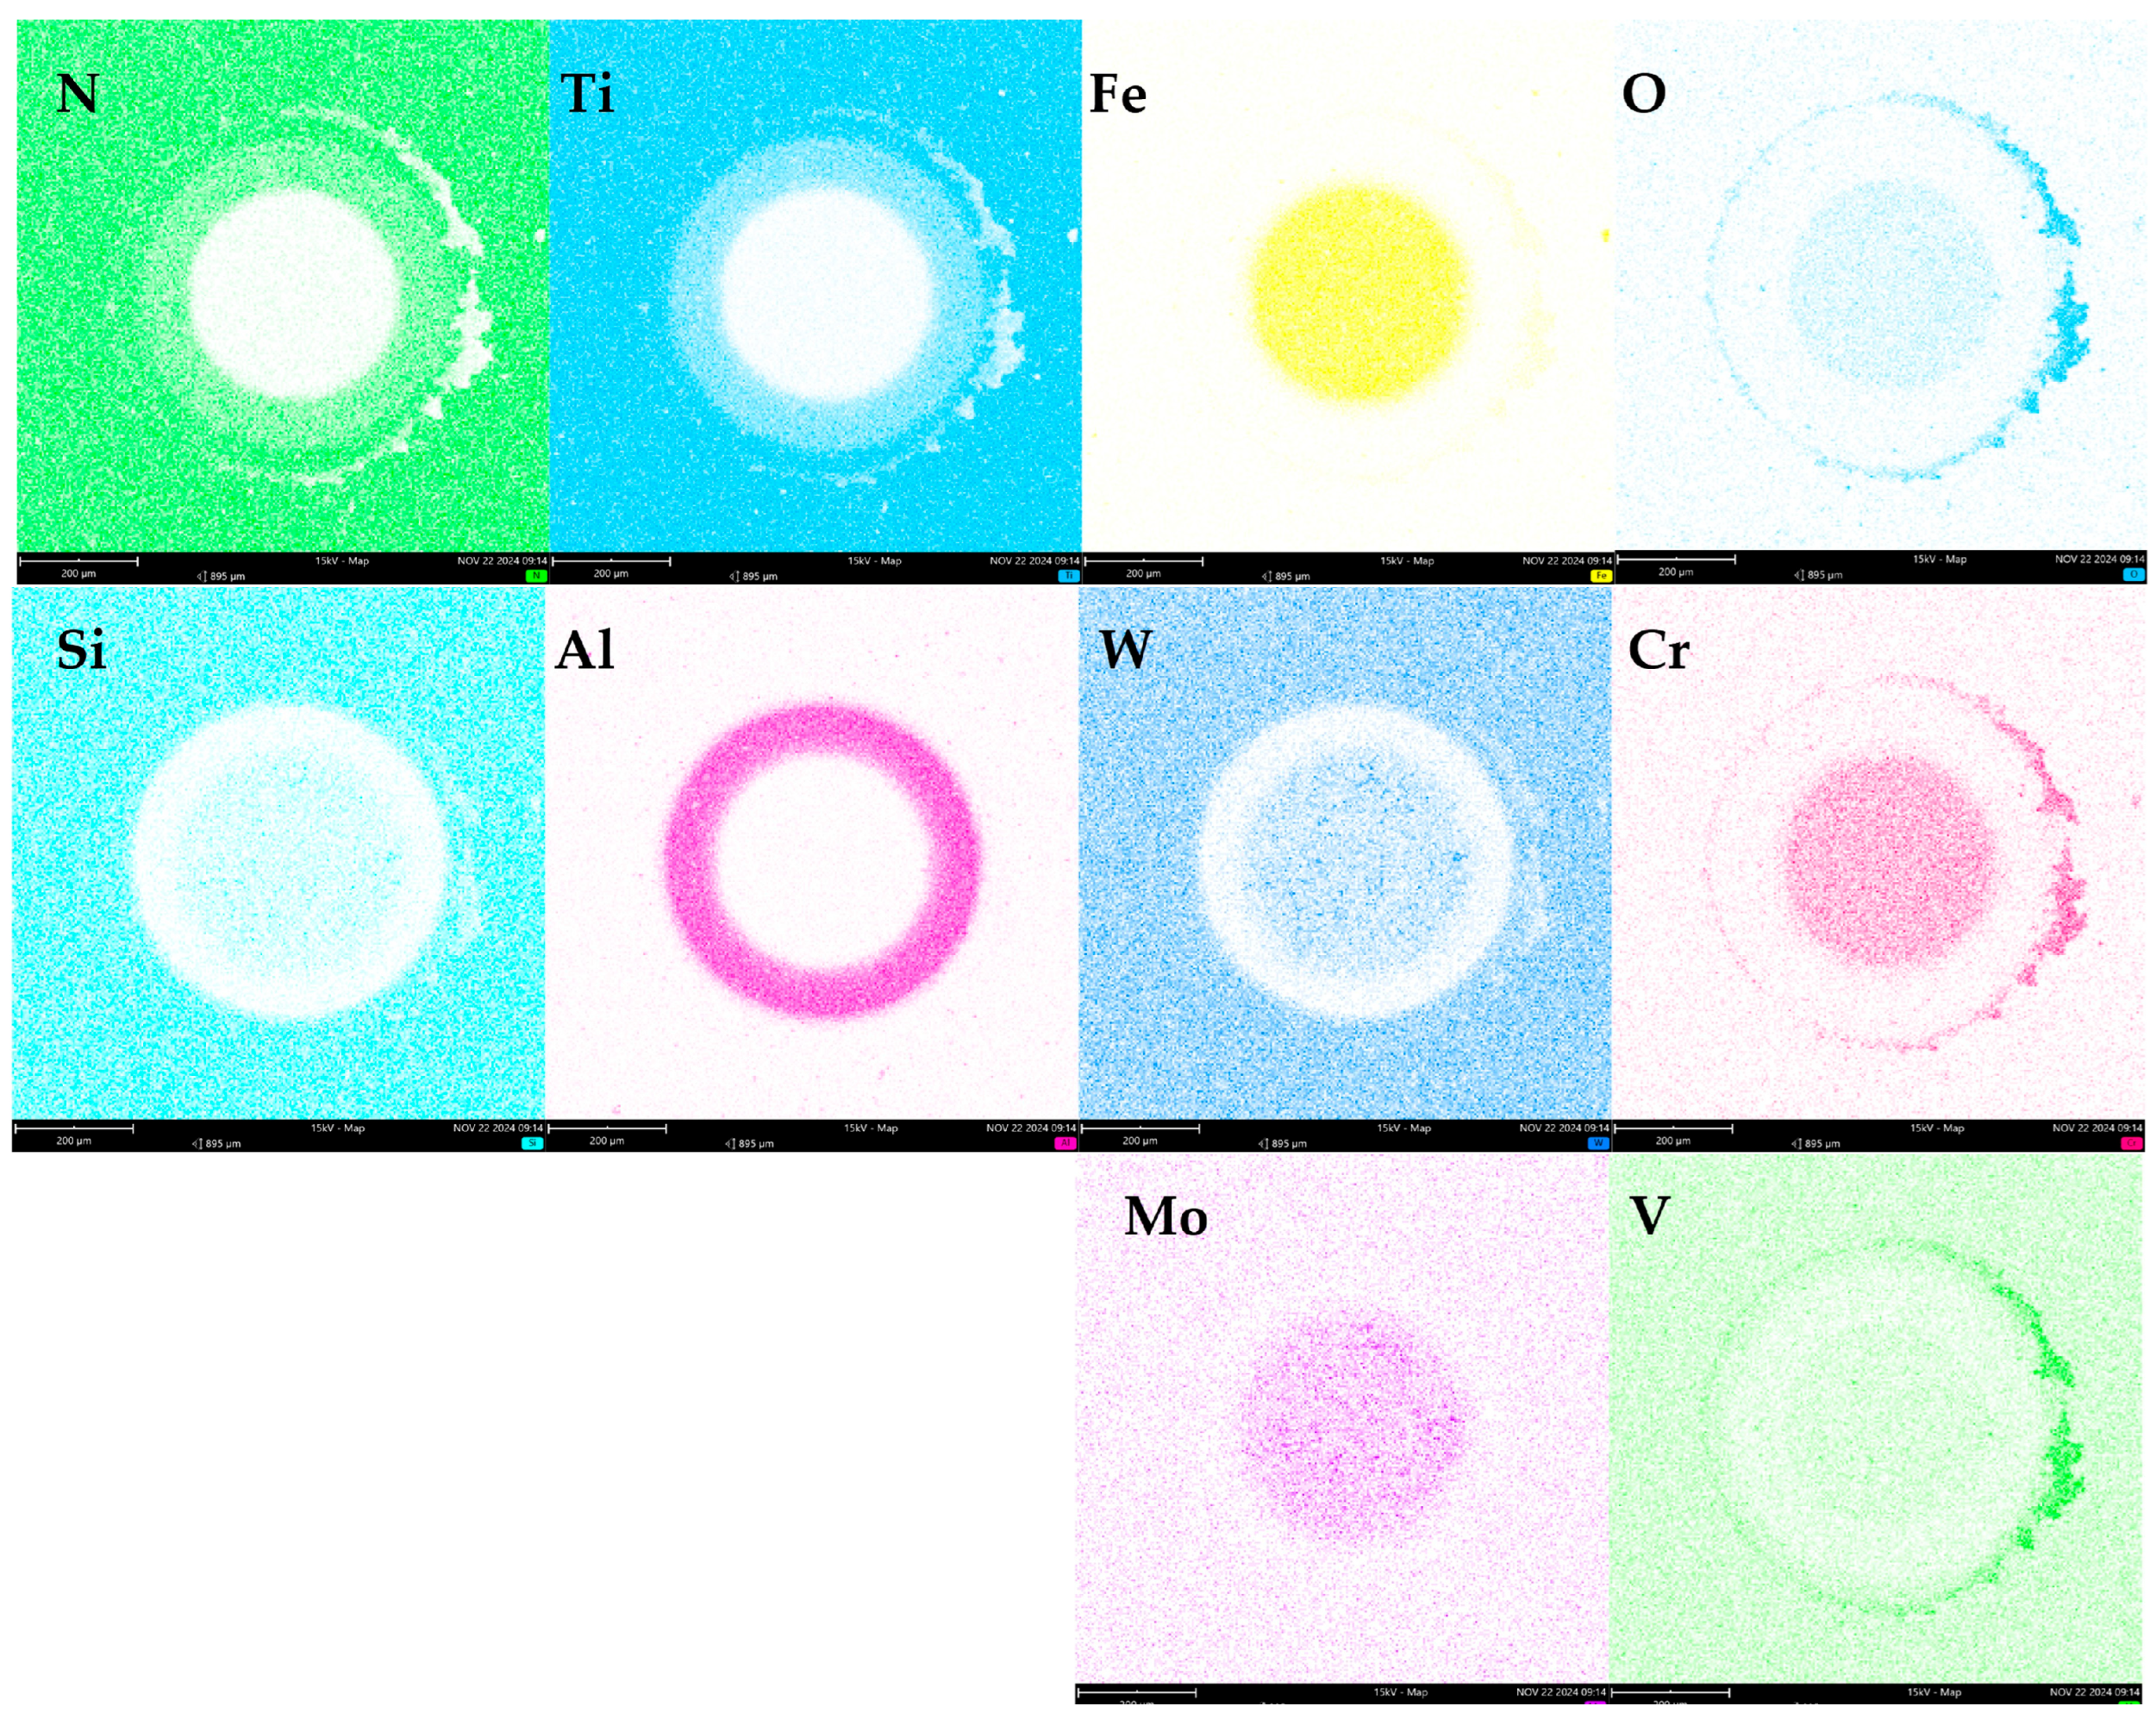
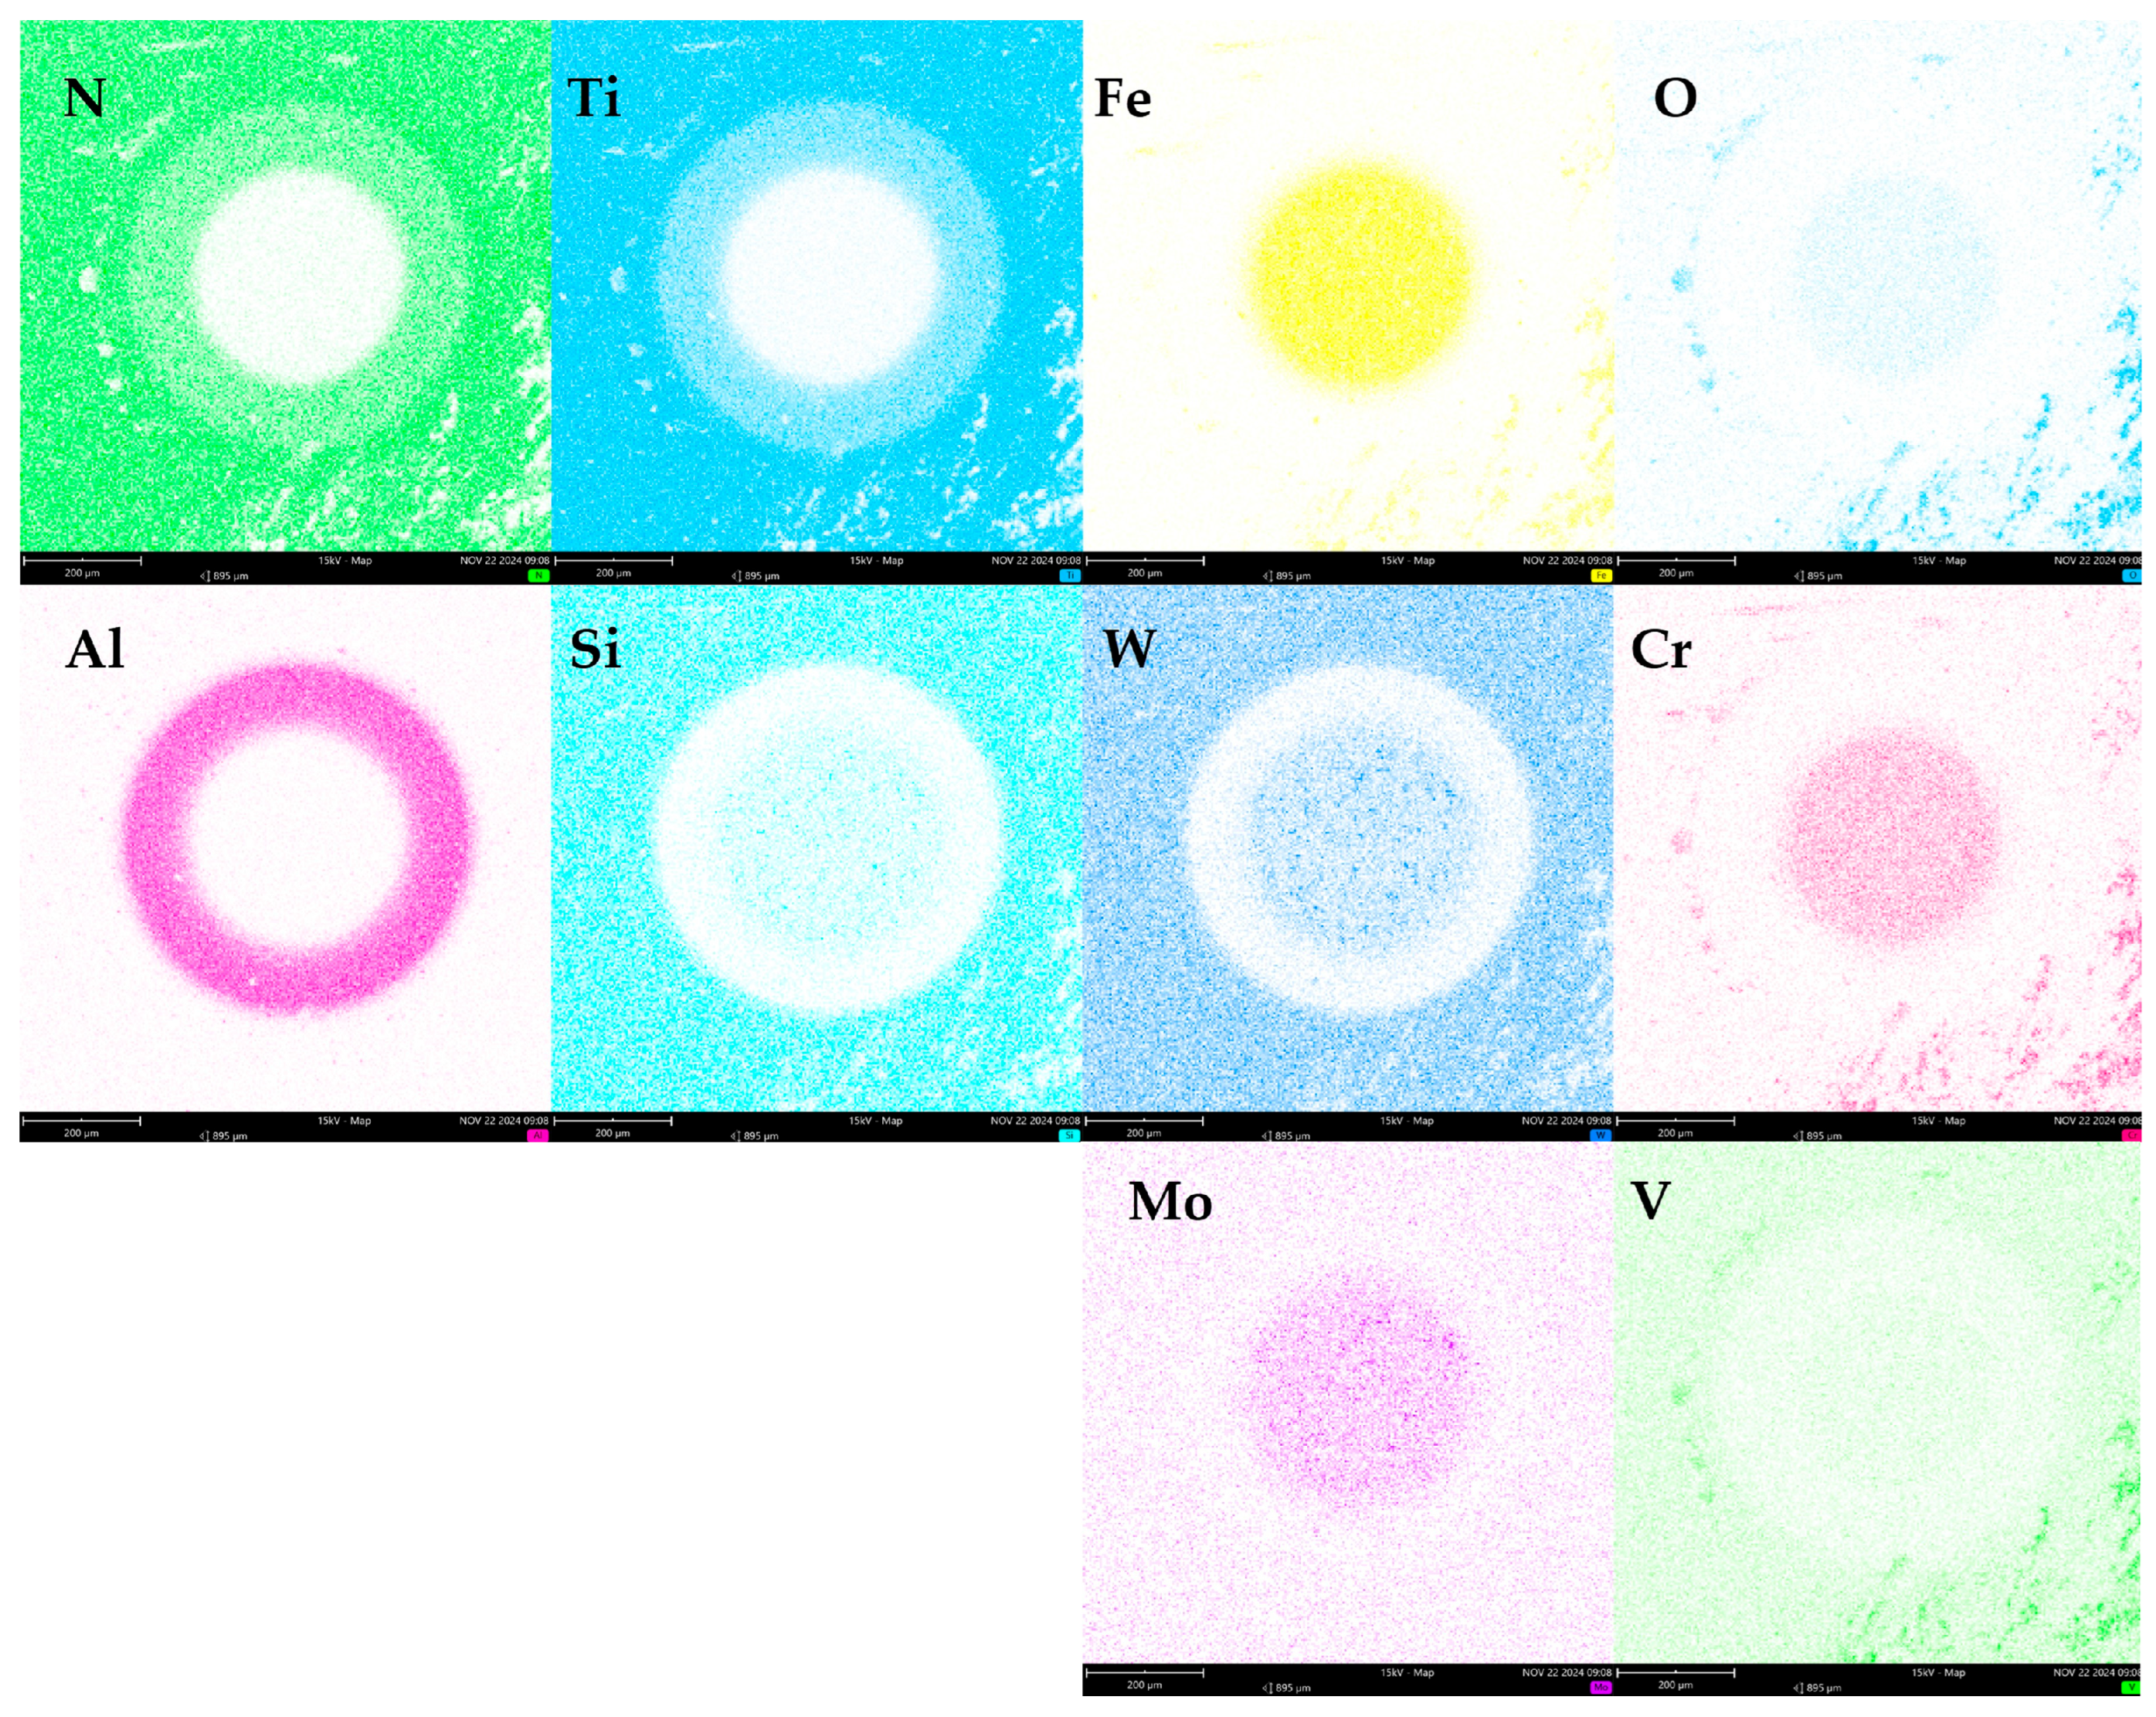
The coating thickness and chemical composition were also examined at the wear track generated after ball-cratering testing, with the results presented in
Figure 19,
Figure 20 and
Figure 21.
The wear track of the coating was measured using an optical microscope, and the thickness was determined with image analysis software. Based on three measurements, the average thickness was 3.08 µm with a standard deviation of 0.13 µm.
After the wear test on the ball-on-disc tribometer, two rings of different colours and a silver-coloured central area—corresponding to the substrate—were clearly visible on the disc (the area between the red circle). The two rings represent the successive coating layers (the first one between the red and green circles, and the second one between the green and violet circles). This indicates that the wear process occurred in stages, gradually removing the coating layers and eventually exposing the underlying substrate.
Figure 20 and
Figure 21 present the elemental mapping analysis of the coated disc after the wear test on the ball-on-disc tribometer, using balls with diameters of 20 mm and 30 mm, respectively.
The elemental distribution mapping after the ball cratering tests (20 mm and 30 mm diameter balls) showed substrate-derived elements in the wear track area: iron, chromium, molybdenum, and tungsten. The first coating layer (i.e., the ring surrounding the wear track) was composed of aluminium, titanium, and nitrogen, corresponding to the AlTiN top layer. The second coating (i.e., the area outside the wear track) had the following chemical composition: titanium, nitrogen, and silicon, corresponding to the TiSiXN layer. Additionally, substrate-derived elements were still visible: tungsten, chromium, molybdenum, iron, and vanadium.
The results of the elemental mapping made it possible to identify the sequence of the duplex coating layers: the AlTiN layer is located on the surface, while the TiSiXN layer lies beneath it, closer to the substrate.
