Article

An Estimation of Local Residual Stresses in Amorphous and Crystallized Trivalent Chromium Coatings

1
LGP, INP/ENIT, University of Toulouse, 47 Avenue d’Azereix, 65016 Tarbes, France
2
Mecaprotec Industries, 34 Boulevard de Joffrery, 31600 Muret, France
3
Centre de Micro Caractérisation Raimond Castaing (UAR 3623), 3 Rue Caroline Aigle, 31400 Toulouse, France
*
Author to whom correspondence should be addressed.
Coatings 2023, 13(1), 124; https://doi.org/10.3390/coatings13010124
Submission received: 12 December 2022 / Revised: 26 December 2022 / Accepted: 30 December 2022 / Published: 9 January 2023

Abstract

:
Hard chromium coatings have demonstrated their performance for several decades, particularly for their wear and corrosion resistance properties. However, the traditional process using chromium trioxide (CrO3) is very toxic and is intended to disappear in the European Union by 2024, thanks to the REACH regulation. This study aimed to determine the residual stress of amorphous chromium deposits elaborated from baths containing trivalent chromium ions. However, the amorphous structure of these deposits does not allow the determination of residual stresses by conventional means. In this study, we propose adapting a recent method called “FIB-DIC”, which is not limited by the material’s crystalline structure compared to the classical X-ray diffraction (XRD) analysis. The method is based on the measurement of relaxation-induced displacement fields following the ablation of material on a very local scale. The results obtained by the classical (XRD) and the FIB-DIC method on crystallized heat-treated Cr(III) deposits are 296 ± 45 and 377 ± 275 MPa. Then, the FIB-DIC technique allowed us to evaluate a residual stress level of 479 ± 359 MPa for amorphous trivalent chromium coating, which has never been performed before.

1. Introduction

Hard chromium deposits from electroplating are widely used, especially in the aerospace industry. They have good hardness, high wear, and corrosion resistance. However, the high toxicity of the electrolyte containing chromium trioxide (CrO3) has led the European Union to ban the use of this compound through the REACH directive [1]. Over the past decades, several alternatives have been investigated to replace hexavalent chromium. It can be classified into two categories: non-aqueous deposition processes, including thermal spraying and vapor deposition, and aqueous electrochemical deposition processes, such as cobalt, nickel, or trivalent chromium-based electrolytic deposition [2].
Chromium plating from trivalent chromium solutions has been used since the 1970s for decorative applications. The main components of these electrolytes and their wastes have significantly fewer adverse effects on human health. These deposits are an excellent alternative to traditional hexavalent chromium deposits, and much research is being carried out in this direction. Since the 2000s, this has led to significant improvements in the intrinsic properties of these deposits. It is now possible to obtain a thickness greater than 100 µm. The hardness [3] and wear resistance properties are similar to or better than conventional hexavalent chrome plating [4,5,6]. However, these deposits also have important disadvantages [7]. In particular, the coating is often more densely cracked, with some cracks running through the entire thickness, causing poor corrosion resistance [8]. Trivalent chromium deposits have an amorphous microstructure. They contain more interstitial solutes (oxygen, nitrogen, and hydrogen) than hexavalent deposits [9]. The presence of carbon is a strong characteristic of trivalent deposits. It will broadly impact the microstructure and mechanical properties of the coatings before and after heat treatment [10]. In particular, carbon seems to be responsible for the amorphous structure of chromium; Tsai and Wu have highlighted that the absorption of more than three wt.% of carbon systematically results in an amorphous deposit [11]. It can crystallize the deposits by applying a heat treatment above 250 °C [12,13]. Heat treatments also allow the precipitation of chromium carbides, resulting in a considerable increase in hardness [12]. This effect is not observed in hexavalent chromium deposits. This precipitation of carbides can be interesting in ensuring high hardness values at high temperatures, but it can also lead to a decrease in deposit toughness.
In this work, we focus on determining the level of residual stresses induced by the electrochemical deposition process. In the case of crystalline deposits, these stresses are usually measured by X-ray diffraction (XRD). This is the case for hexavalent deposits [14,15]. For trivalent chromium deposits, this technique is inadequate due to their nanocrystalline or amorphous microstructure [9]. For the same reasons, all diffraction-based methods assume that the material is crystalline and cannot be applied to trivalent chromium deposits. Other methods are based on the deformation of the substrate due to the stresses on the deposit. The free blade bending method or the specific “Contractometer” apparatus [ASTM B 636] are designed for such measurements. However, these methods have two main drawbacks due to the bending of the plate during chromium plating [16]. The anode/cathode distance evolves over time and the stresses are relaxed by deformation during deposition. Finally, methods are based on the relaxation induced by local material removal. These methods are mainly used on bulks, and the most common is the incremental drilling technique [17]. In recent decades, similar approaches have been adapted to the micron or submicron scale [4,18]. A particular local method, called FIB-DIC, has notably been implemented to evaluate the stresses within thin films (TiN [19], CrN/Au [20], ZrN/Zr [21], Si3N4/Ag/ZnO [22], Cu/W [23], etc.), and is compatible with amorphous structures [24,25,26,27]. This method is based on the combined use of a focused ion beam (FIB), scanning electron microscope (SEM) imaging, and digital image correlation (DIC). Estimating residual stresses are obtained from the relaxation-induced displacement fields of the analyzed area (determined by DIC) as a result of FIB milling of a given groove geometry [28]. A finite element model (FEM) can also be used to improve the understanding of the results. A critical comparison between the XRD and FIB techniques is proposed by Bemporad et al. on CrN cathodic arc physical vapor deposition (PVD) coatings [27]. The authors highlight the most critical points to consider, including (1) the difference between areas involved in the measurement process, (2) the depth of penetration relative to the thickness of the coating, (3) the presence of stress gradients or texture in the coating, and (4) the choice of elastic constants for stress calculation in the case of an anisotropic material. Romano-Brandt et al. also compared cross-correlated XRD synchrotron and FIB-DIC residual stresses measurement on Cu/W bilayers and obtained a high level of agreement [29]. More recently, Salvati et al. have focused on extending the scope of the FIB-DIC method and, particularly, have adapted it to the measurement of non-equibiaxial residual stress fields [23]. Their work has, for example, highlighted the importance of an appropriate selection of the core diameter of the machined ring. In addition, recent studies have focused on the application to the case of residual stresses in multilayer thin films [21,22]. The micro-ring core configuration appears to be the most suitable to obtain high lateral resolution and accurate information on residual stresses at different depths. Our study seems at first to be simpler than the last-mentioned works since we only study a monolayer that is relatively thick and that we can assume to be an equibiaxial stress. The main difficulty here comes from the cracking (open and internal) of the layer.
In this paper, we estimate the residual stresses generated in new chromium deposits obtained from trivalent chromium ions. The stresses in these deposits are very poorly known due to their amorphous microstructural state. Therefore, we propose to use the FIB-DIC method, which has been proven for thin film stacks, to determine the residual stresses in amorphous trivalent chromium deposits in the raw state and crystallized after heat treatment. In the first step, the FIB-DIC method will be validated on heat-treated trivalent chromium plating. A total of 300 °C treated coating residual stress is investigated by both FIB-DIC and XRD, thanks to the crystallization of these coatings above 250 °C [12,13]. This method will be applied to the as-deposited trivalent chromium coating in the second step. Finally, the influence of the subsequent heat treatment on the stress level of the trivalent deposits will also be studied by XRD.

2. Materials and Methods

2.1. Coating Deposition

The 50 µm thick coatings were performed by direct electrodeposition on a one millimeter-thick 1.0301 unalloyed steel substrate. Its composition was determined by UV spark spectrometry using the Foundry Master Xpert spectrometer from Oxford Instruments (Actemium NDT-PES, Le Plessis Paté, France) (Table 1). The trivalent chromium was electrodeposited in electrolytes containing trivalent chromium salt (CrCl3 H2O), glycine, sodium chloride (NaCl), and aluminum chlorohydrate (AlCl3 6H2O). The deposits were prepared in 85 L tanks. The pH of the solution varies between 0 and 2. All the coatings were produced at a one micrometer per minute deposition rate. After processing, all coatings were degassed at 190 °C for 3 h in order to limit hydrogen embrittlement. The post-processed trivalent chromium deposit no longer contains hydrogen but only traces of carbon [30].
The heat treatments were carried out for one hour in a conventional Nabertherm N 30/85HA forced convection chamber furnace without gaseous protection. Four temperatures were investigated on trivalent chromium: 300, 400, 500, and 700 °C.

2.2. Coating Characterization

2.2.1. XRD Method

The residual stresses were calculated using the sin2 (ψ) method from the (211) plane (corresponding to the angle ϴ = 81.72°). This plane has a high multiplicity factor (24), and the effects of elastic anisotropy on the determination of residual stresses are limited [14]. X-ray diffraction analyses were performed using a Panalytical X’Pert MRD diffractometer (PANalytical S.A.S., Limeil-Brévannes, France) with a copper radiation source (λ = 0.154056 nm, 40 kV, and 50 mA) equipped with a capillary collimator and a nickel filter. The detector is a positioning reference signal (PRS) from Philips® (PANalytical S.A.S., Limeil-Brévannes, France). The analysis conditions used to determine the residual stresses are the following:
  • θ: from 71.5° to 85.5°, by 0.02° steps (plane 211),
  • ψ: from −60° to 55°, by 5° steps,
  • φ: from 0° to 90°, by 45° steps, (0° corresponds to the longitudinal direction of the plate and 90° to the transverse direction),
  • acquisition time: 10 s by steps.
The stiffness matrix is needed to calculate the resultant stresses by XRD. Young’s modulus is obtained from nanoindentation tests, as described in a previous work [30]. Young’s modulus considered 182 ± 11 and 251 ± 15 GPa, respectively, for untreated (amorphous) and heat-treated (nanocrystalline) trivalent chromium coating. Poisson’s ratio is taken from the literature and is 0.21 [31] (pure bulk chromium).

2.2.2. FIB-DIC Method

SEM micrographs of Figure 1 allow observation of the cracking of obtained coatings. A micro-crack network is visible on the top surface (Figure 1a) and propagates through the whole thickness of the coating (Figure 1b). Cross-sections reveal many very fine cracks, oriented along the coating direction, but their lengths are far lower than the coating’s total thickness.
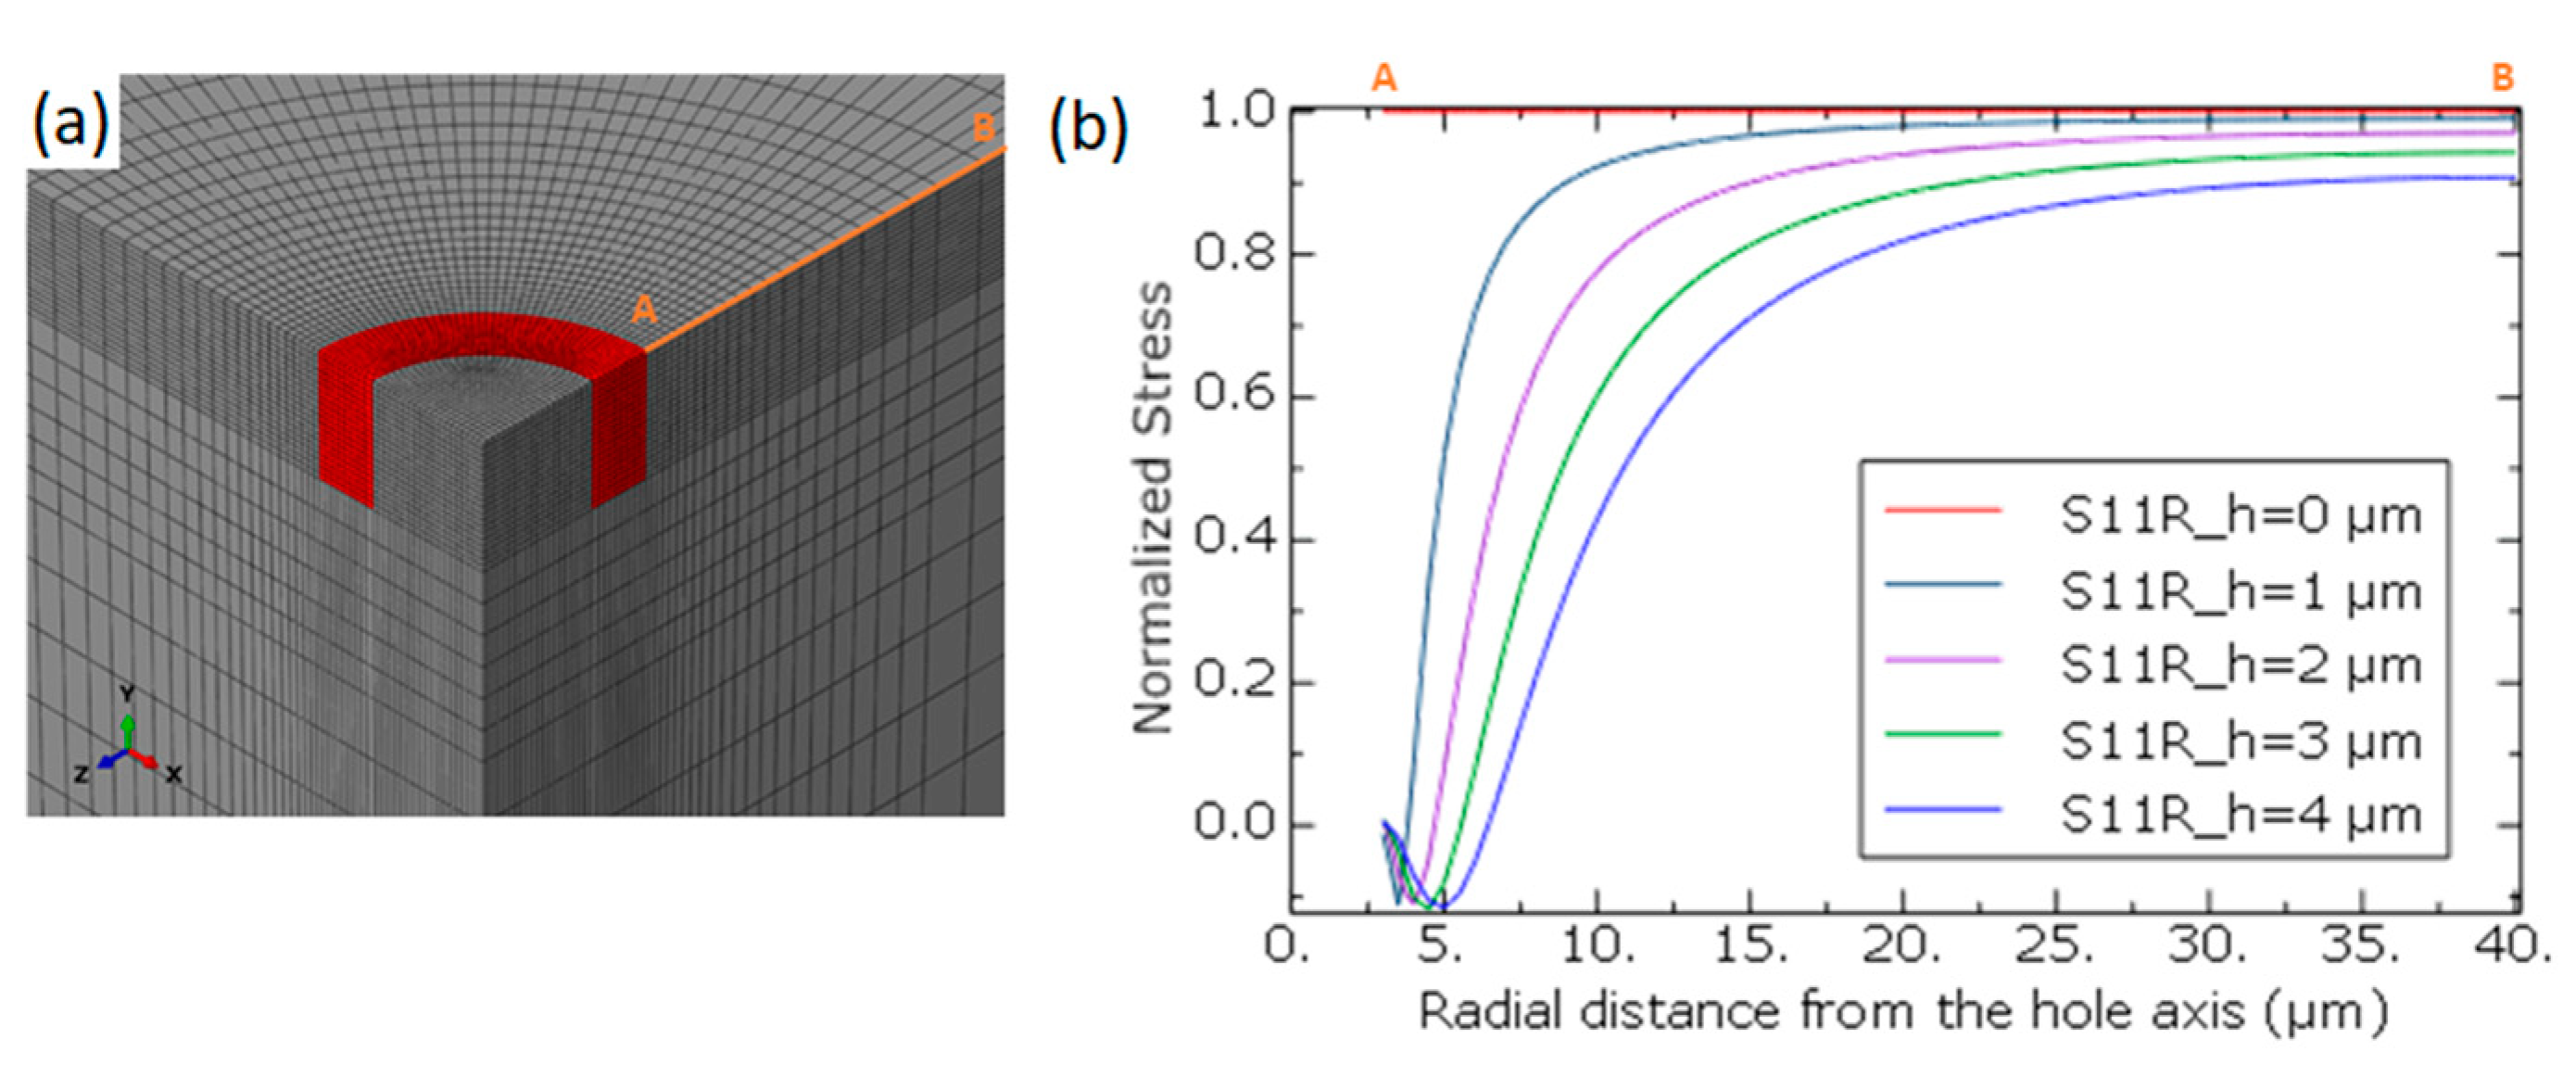
The micro-crack network of chromium deposits means that it is necessary to position the ablation test in an uncracked area to avoid any disturbance during the measurement process. The measured size of the micro-crack network cells is approximately 80 microns (Figure 1a). The finite element method was employed to simulate the FIB-DIC test using Abaqus® FEM software (Abaqus/CAE 2021). The model implementation is relatively easy in conventional studies of homogeneous thin film. In the case of these chromium layers, a difficulty appears when the size of the model must be chosen. Indeed, intrinsic through-thickness cracking results in a partial relaxation of tensile residual stresses in the layer. In order to be accurate, the model geometry must consider a representative zone of what is observed between two consecutive cracks. A micro-crack networks cell was simulated in three dimensions, using a square block of 80 µm of side length and 50 µm of depth. A quarter model with symmetric boundary conditions was used to reduce calculation time. The purely elastic behavior of the chromium was considered. Reduced integration 3D quadratic elements (C3D20R) were used. The simulation is divided into two computational steps, the first step is to introduce and balance internal stresses, and the second is to simulate the ablation of the ring. The residual stress integration step itself consists of two phases. First, an initial equibiaxial stress field is introduced into the chromium layer, and then the structure equilibrium is solved to consider the effects of the cracks. The ablation is modeled by removing the elements corresponding to the FIB-machined geometry (Figure 2a). The annular groove is milled with an inner diameter of 4 µm and an outer diameter of 5 µm. These dimensions, as well as the ablation depth, were chosen because, for larger FIB-machined annular grooves, the size of the micro-crack network cell (80 µm) became influent, and for a lower size, imaging of the FIB-ed area is more prone to noise and other disturbances. The image in Figure 2b shows, as an example, the stress relaxation for different ablation depths. Although it is advisable to use an ablation depth at least equal to the diameter of the pillar [18], the whole residual stresses of the top free surface of the pillar are relaxed for a height-to-depth ratio above 0.5. In order to reduce FIB ablation time, a ring depth of 2 µm was chosen.
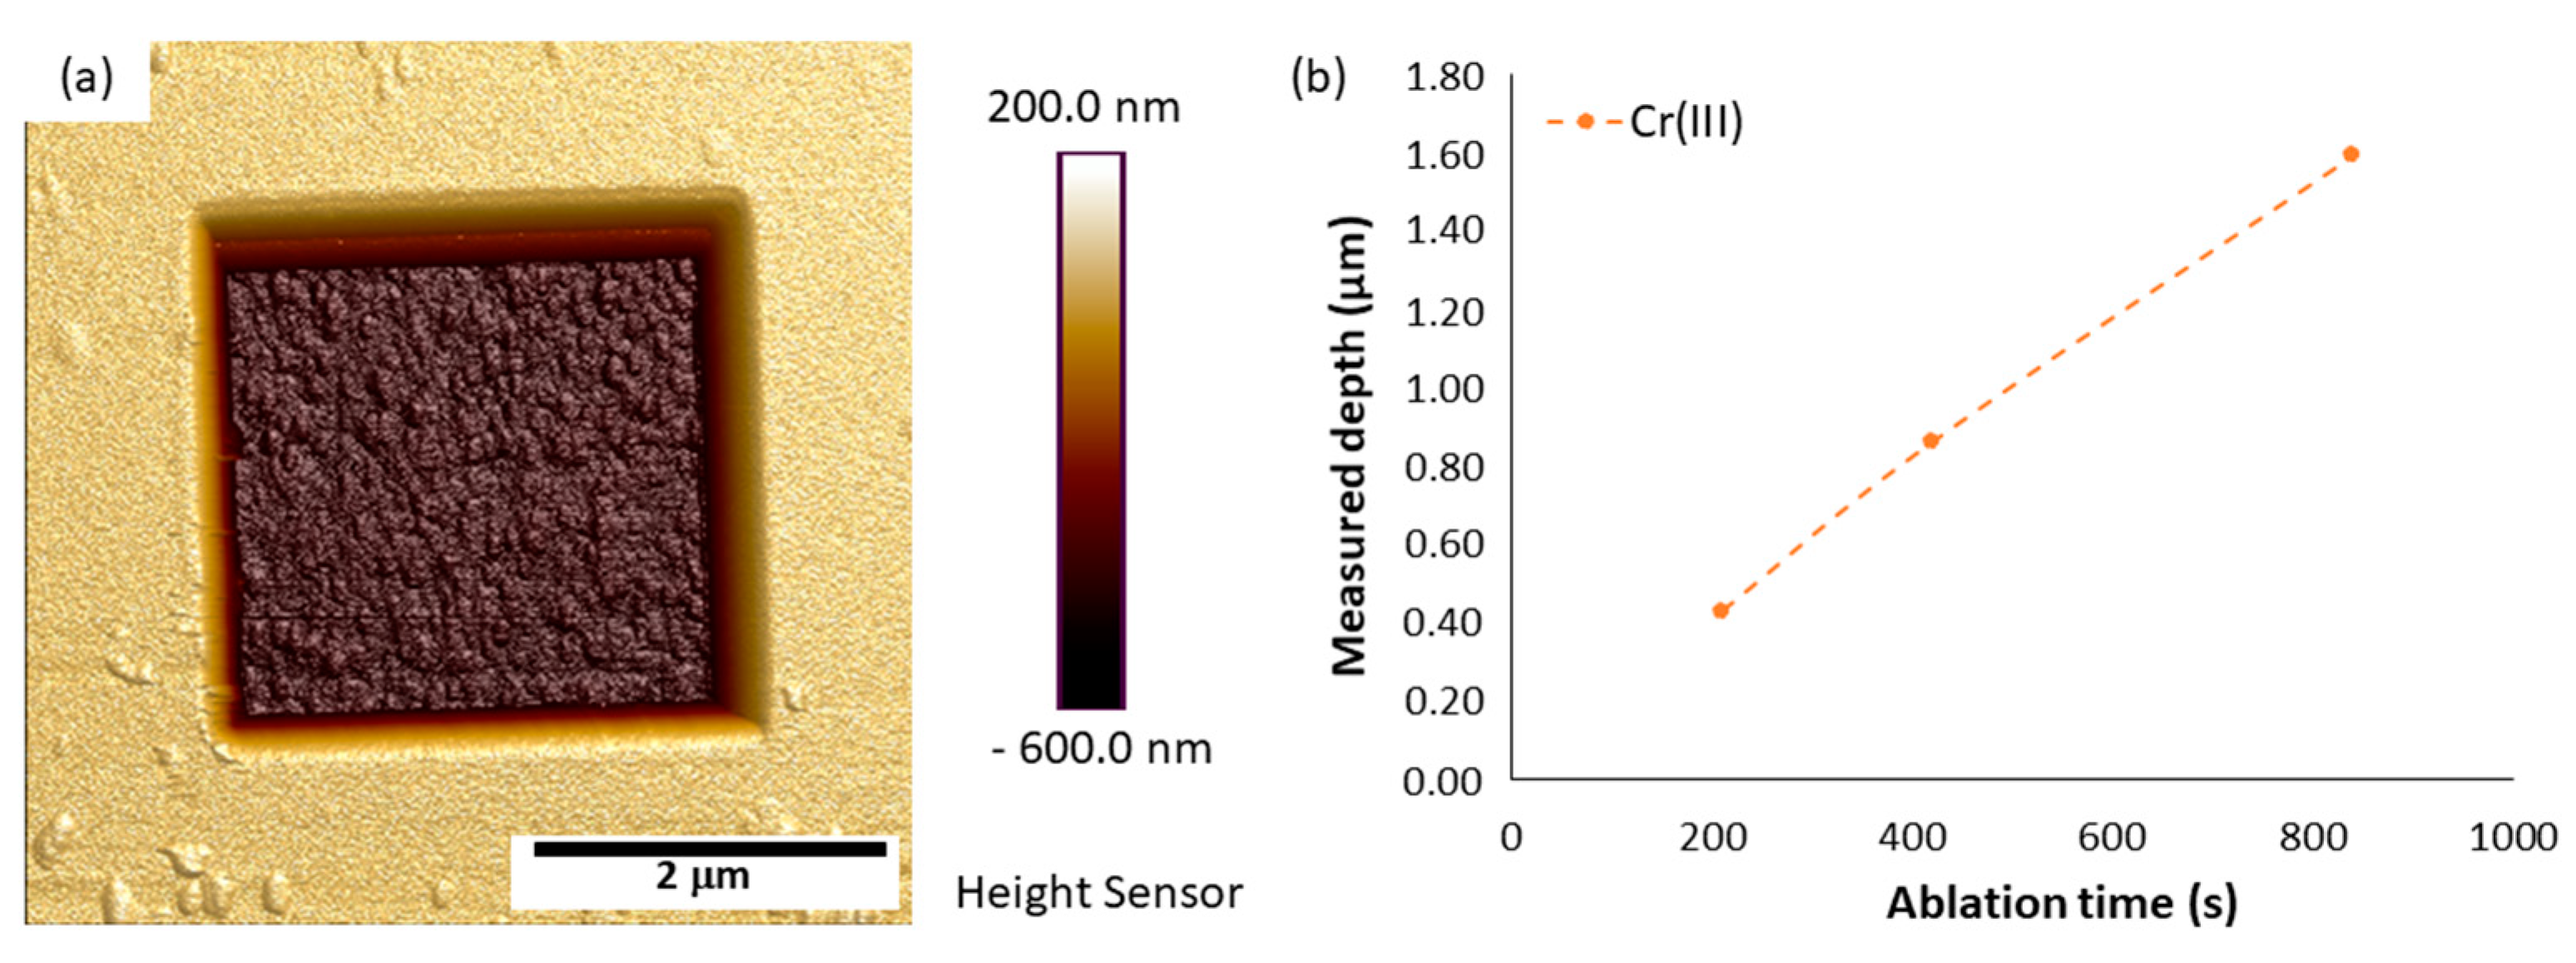
The ion beam machining was carried out using a Dual Beam SEM/FIB Helios 600i (FEI - gallium ions, Thermo Fischer, Villebon-sur-Yvette) from the Castaing micro-characterization platform. The material removal rate by ion beam machining directly depends on the beam’s and the material’s interaction. Only beam path and ablation time are adjustable to produce a given pattern with an FIB. However, determination of this ablation rate is necessary to determine the machining time corresponding to the aimed final depth. To establish a correspondence between machining time and quantity of material ablated, i.e., to determine the ablation speed, it is, therefore, necessary to carry out simple machining operations for predefined durations and measure the actual quantity of removed material. Therefore, several square pockets (3 × 3 µm2) were made, with increasing ablation times (30 kV, 80 pA). Atomic force microscopy measured the shape and depths of these pockets post-mortem. The apparatus employed here is an ICON, produced by Bruker (Brucker AXS SAS, Palaiseau, France), with a standard ScanAsyst tip (0.4 N·m−1) on tapping mode. Obtained calibration curves and AFM height measurement maps of a milled pocket are available in Figure 3.
For quantification of residual stresses in this study, the ablated area is chosen annular. The initial stress level due to the material relaxation of the pillar can be expressed using the following expression [19]:
σ r e s i d u a l   s t r e s s = Δ E   ( 1 ν )
where is the diameter of the micro-pillar, E Young’s modulus, and ν is Poisson’s ratio of chromium.
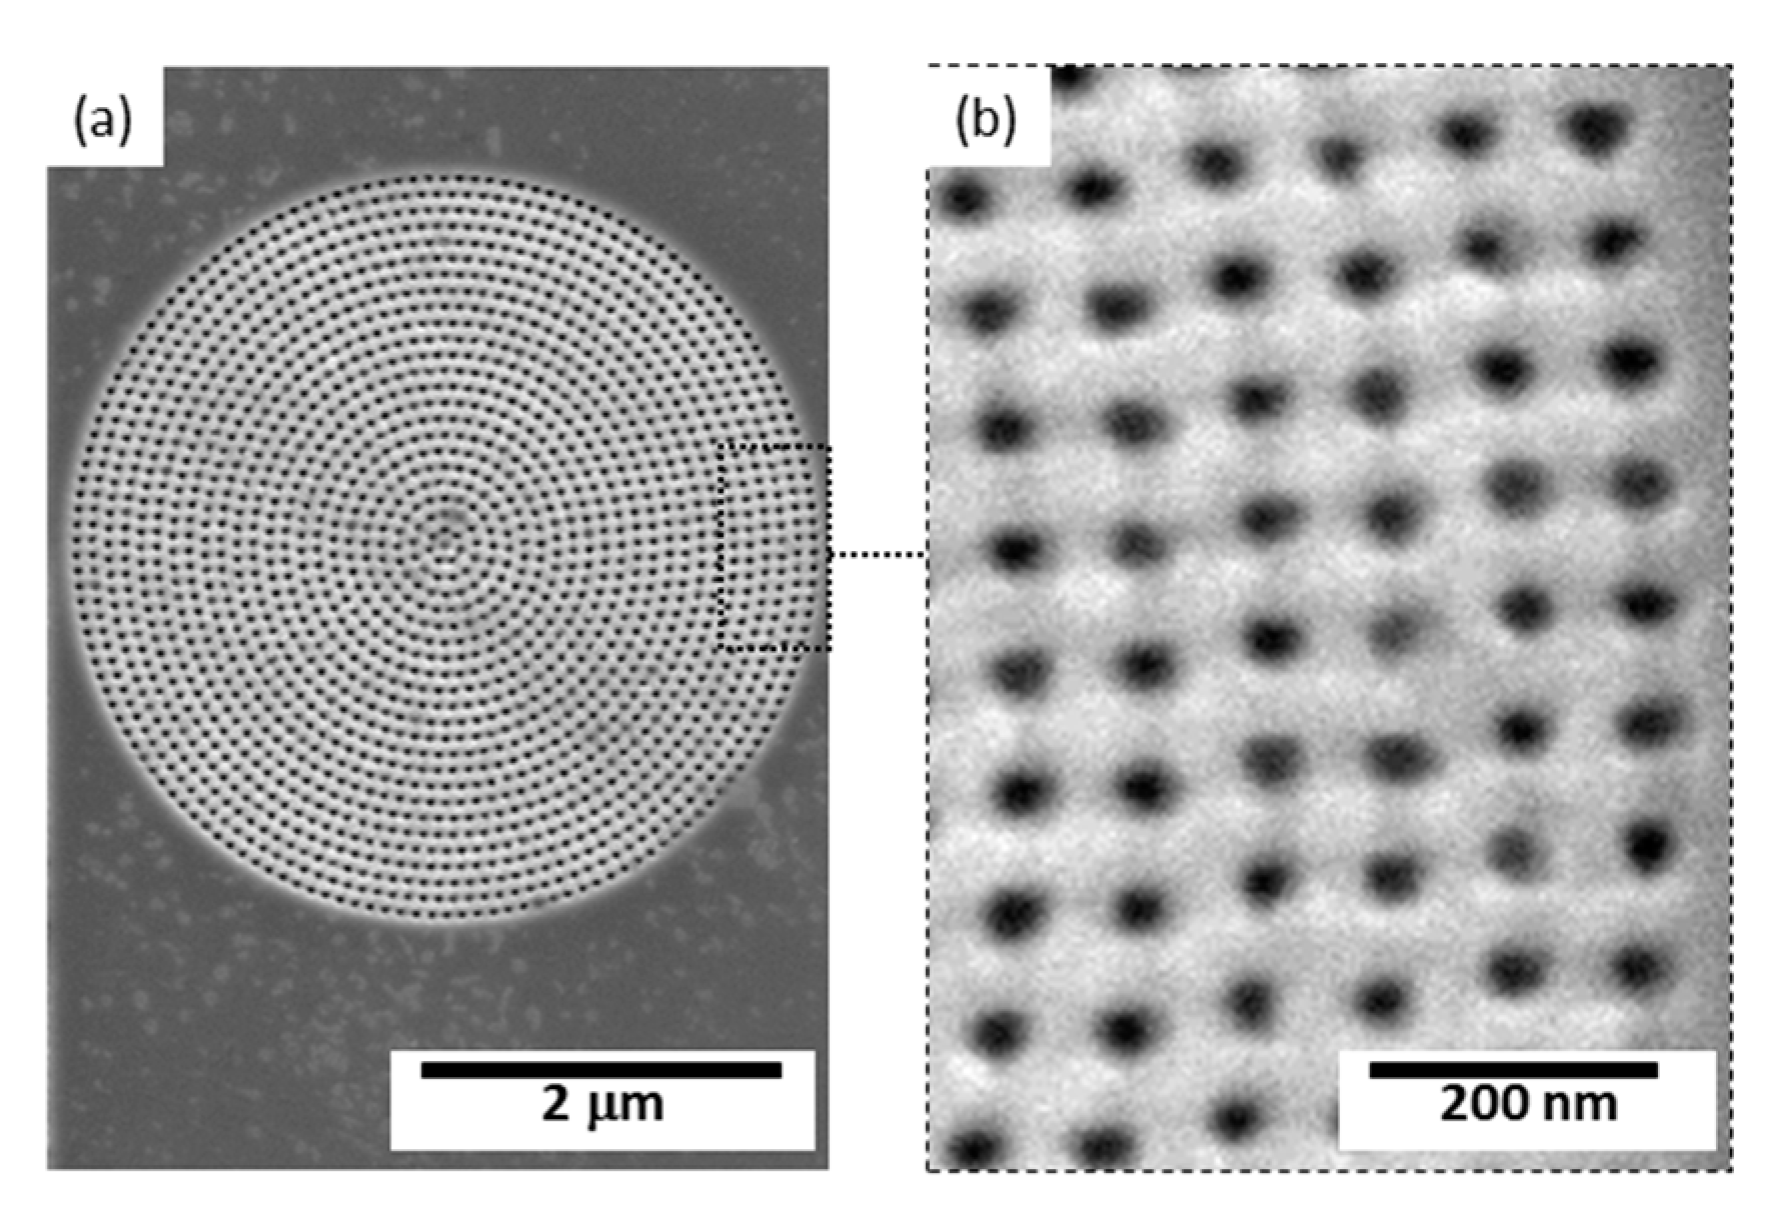
Images of the ablated area are recorded during the machining at different times (initial and after ablation), using the electron beam and secondary electron imaging (an image size of 3072 × 2207 pixels, and a resolution of 289 px·µm−1). To implement the correlation technique, a speckle was made by light ablations with the ion beam, shaping a disc pattern of a 20 nm diameter and a few nanometers in depth (Figure 4).
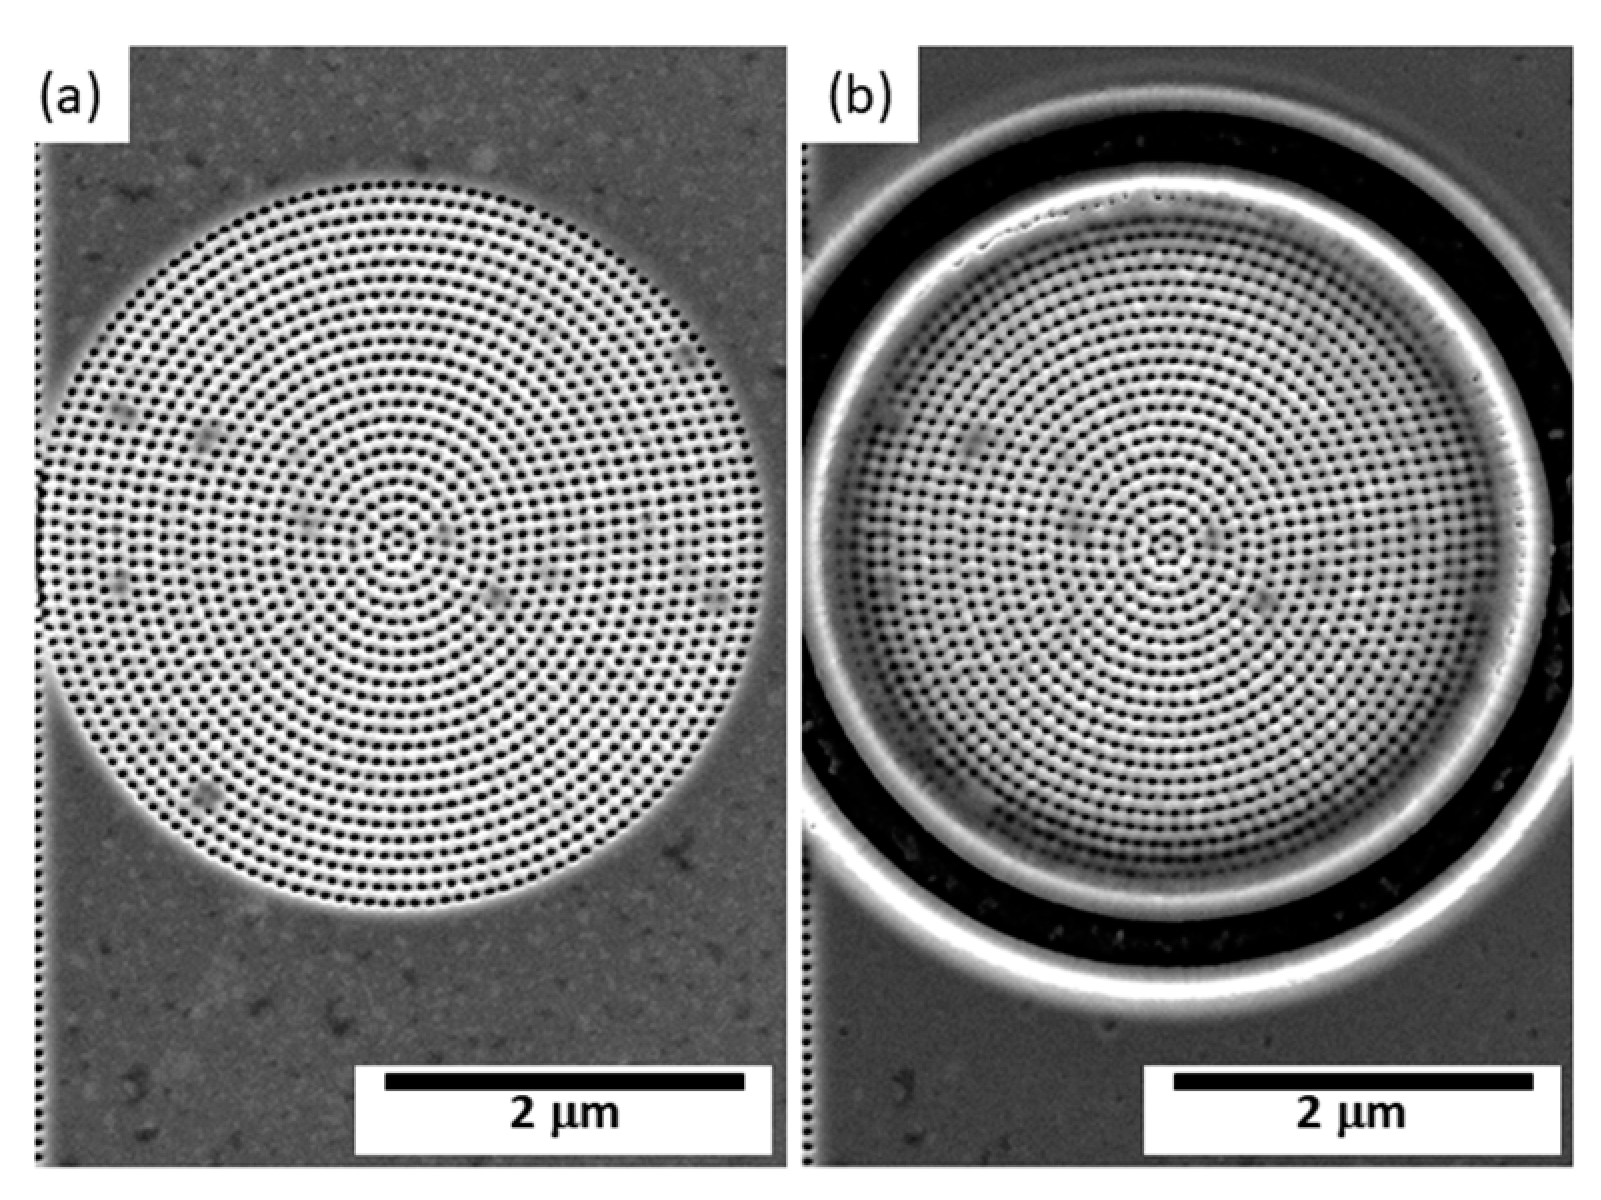
The measurement of the relaxation-induced displacement was obtained by digital image correlation with the GOM Aramis® software (2019 Hotfix 5, Rev. 123352, Build 11 December 2019). The image correlation parameters are a subset size between 60 and 80 pixels (depending on pattern quality), and a step between 10 and 20 pixels. The spatial displacement resolution (the minimum distance between the two independent measurements) is about 0.2 µm. Figure 5 shows a view of the initial and final configuration. Some of the material ablated by the FIB is redeposited on the outer side of the pillars. To limit the disturbance of the measurement due to this effect, we have chosen to evaluate only the central part of the pillar. Thus, areas farther than 1.5 µm from the center of the pillar are not analyzed.

3. Results

3.1. Determination of Residual Stresses in Heat-Treated Coatings

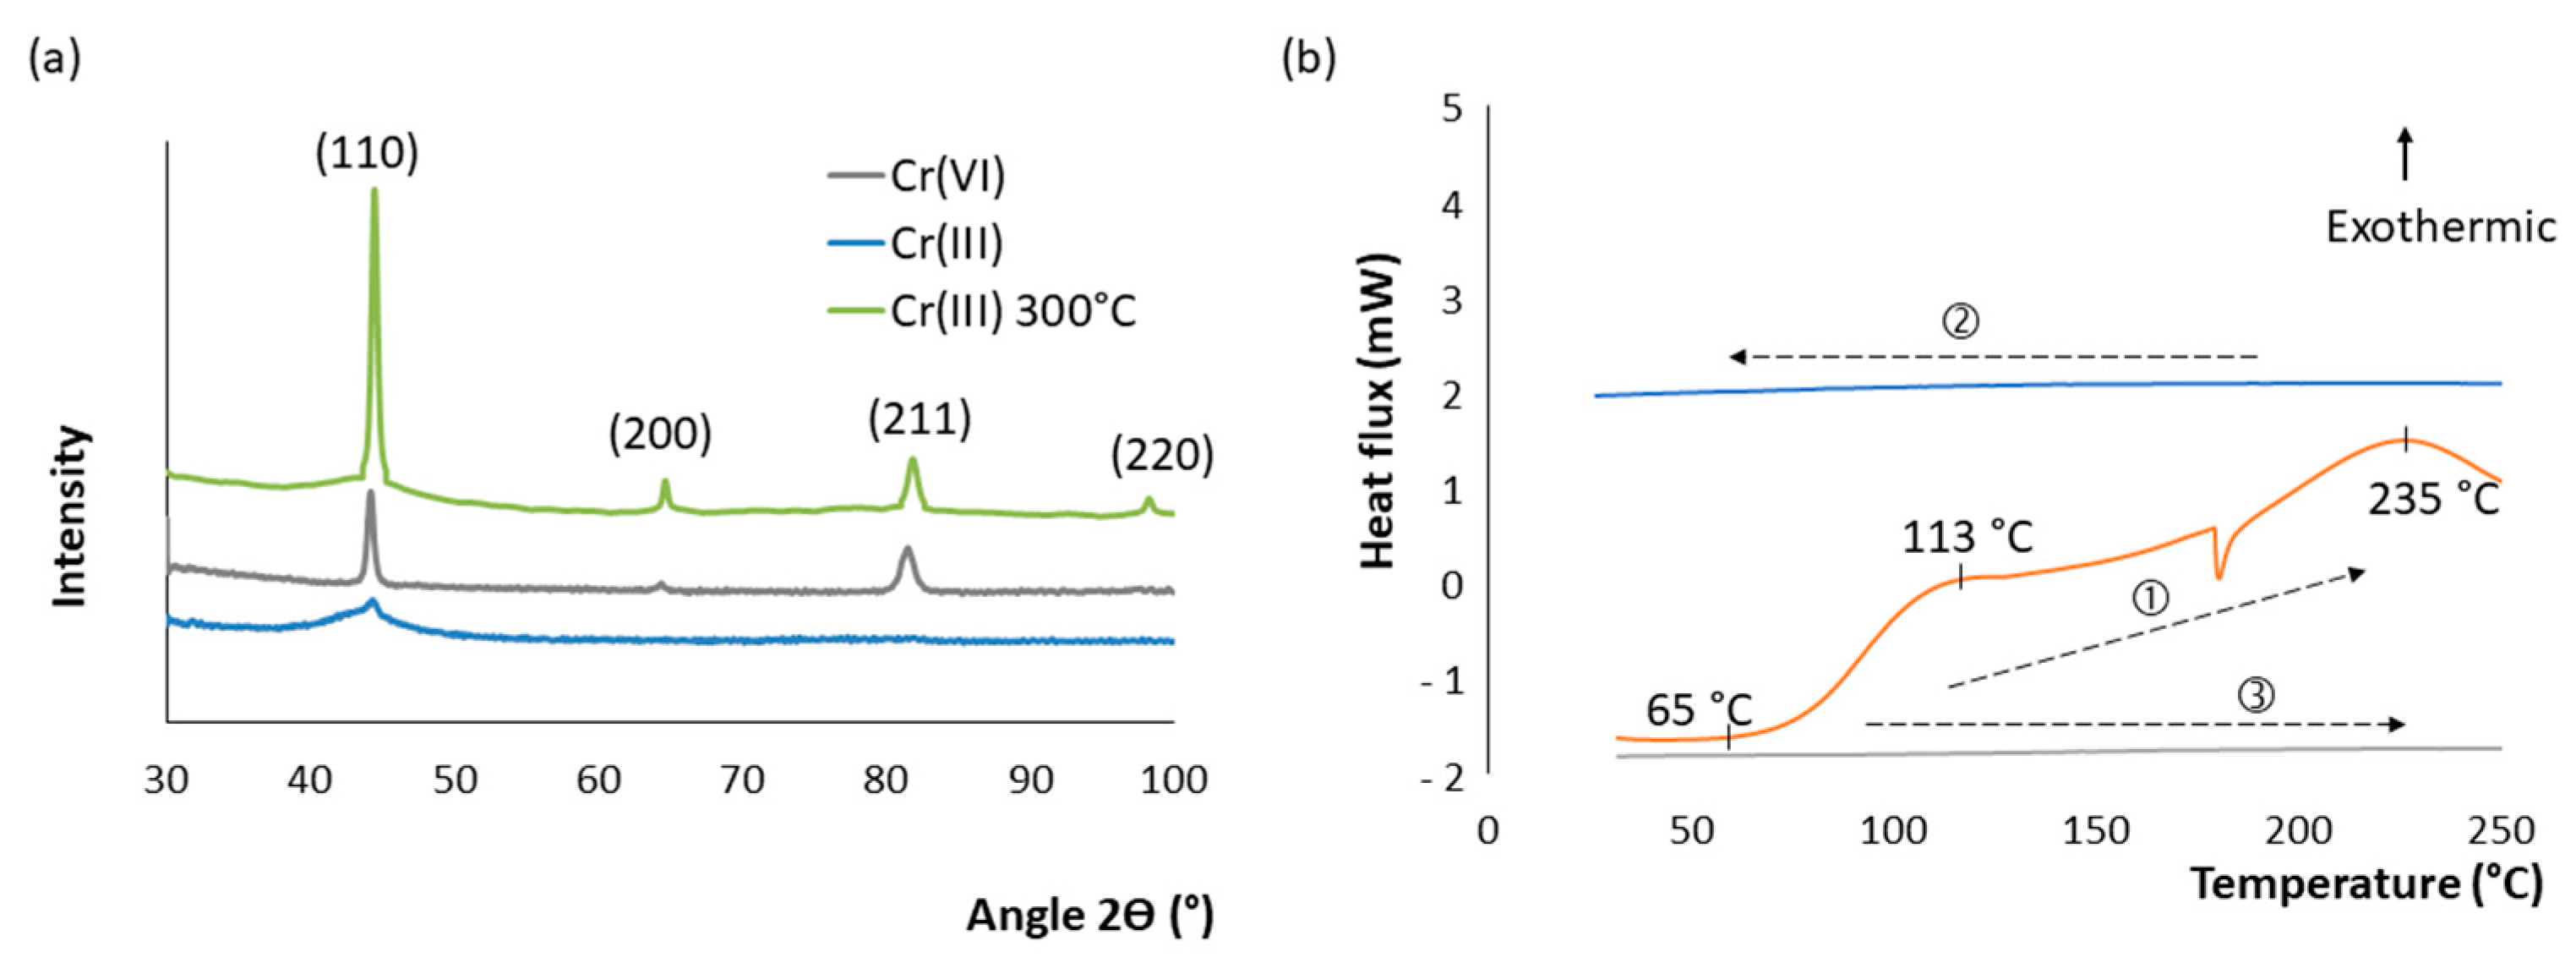
As stated in the introduction, applying a heat treatment leads to crystallizing the trivalent chromium layer at a temperature of about 250 °C. This made it possible to carry out comparative measurements between the FIB-DIC and conventional XRD methods. The structure of the trivalent chromium deposits was, therefore, studied as a function of the thermal post-treatments by differential scanning calorimeter analysis (calorimeter Q200 V24.11 Build 124 from TA Instruments, Paris, France) and by X-ray diffraction (Figure 6). During the temperature rise, two exothermic reactions are highlighted, and they correspond to the release of hydrogen (a temperature below 200 °C) and the deposit’s crystallization (a temperature between 200 and 250 °C). Diffraction analyses confirm the crystallinity of the 300 °C heat-treated deposit. As pointed out by the different authors, the deposits are amorphous or even nanocrystalline in the raw state and for post-treatments at temperatures below 300 °C.

3.1.1. XRD Method

Firstly, a sample treated at 300 °C for 1 h was tested. A θ–2θ scan allowed us to check the effectiveness of crystallization. A conventional XRD measurement of the residual stresses using the sin2 (ψ) method estimated a stress level of 296 ± 45 MPa. A notable difference is observed between the different analysis directions and a significant standard deviation (Figure 7b). This is due to the nonlinearity of the curves Δd spacing as a function of sin2 (ψ) (Figure 7a).

3.1.2. FIB-DIC Method

The residual stress level is calculated by averaging the radial displacement measured on each correlation subset divided by its radial coordinate using expression (1). Values within a 0.5 µm radius from the center of the pillar are not considered because measured displacements in these areas are too small to be reliable. Considering the statement proposed in Section 2.2.1, that the peripheral zone of micropillar analysis is disturbed by redeposition, all useful data comes from a 0.5 to 1.5 µm radius annular region.
On heat-treated trivalent chromium deposits, two pillars were milled. The results obtained are summarized in Figure 8. Therefore, the average tensile residual stress level in these deposits is estimated at 377 ± 275 MPa.
The average residual stress level determined by the two methods is similar despite a significant standard deviation. We, therefore, consider the FIB-DIC stress determination procedure to be valid. The following section is dedicated to determining these same stresses in conventional, non-heat-treated and, therefore, amorphous trivalent chromium deposits.

3.2. Determination of Residual Stresses in Untreated Trivalent Chromium Coatings

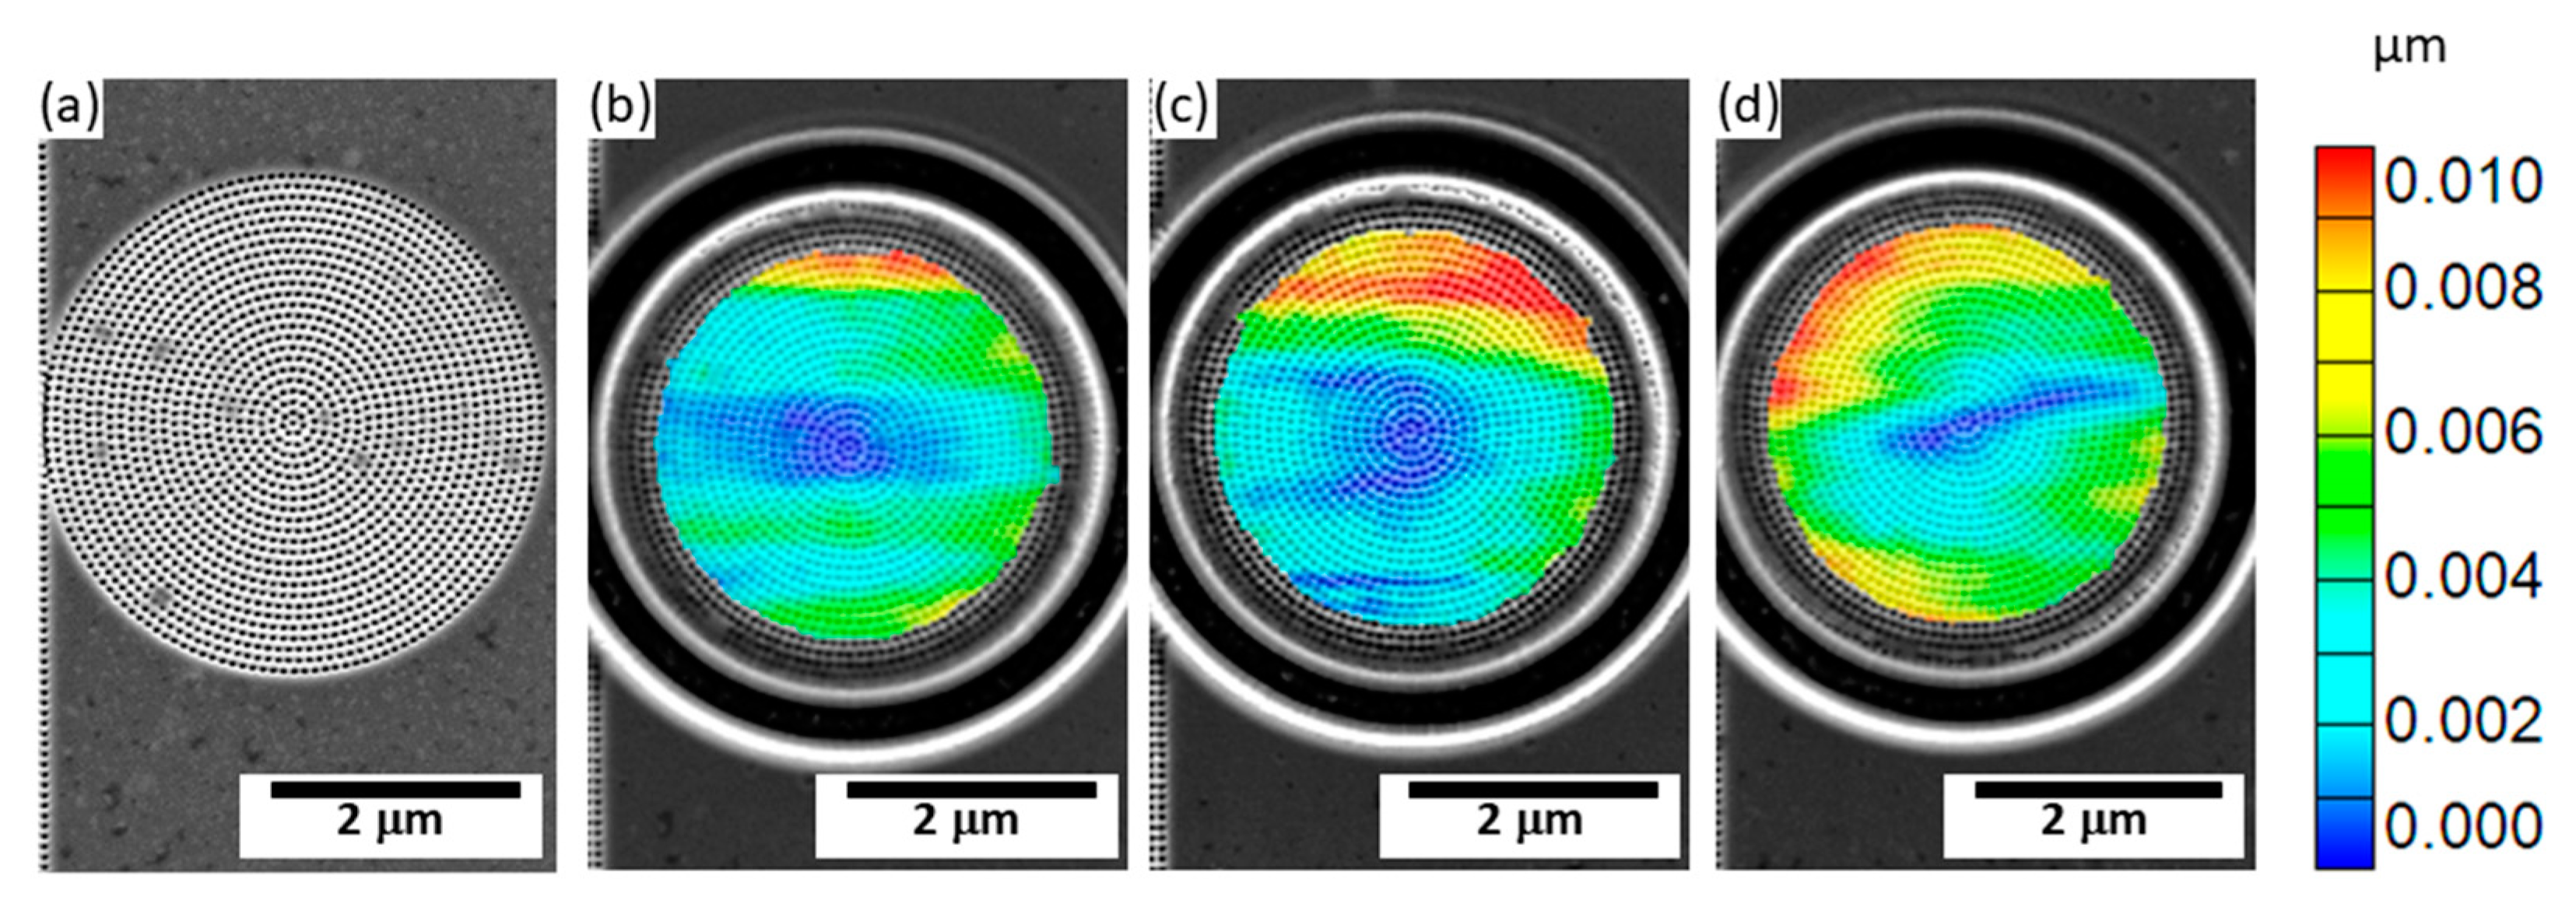
The approach is identical for these untreated (but degassed) trivalent chromium coatings. It was verified that the response to FIB ablation on this material is similar to that of the heat-treated material. Three pillars are FIB-ed. In the same way as heat-treated samples, the displacement profiles are disturbed (Figure 9).
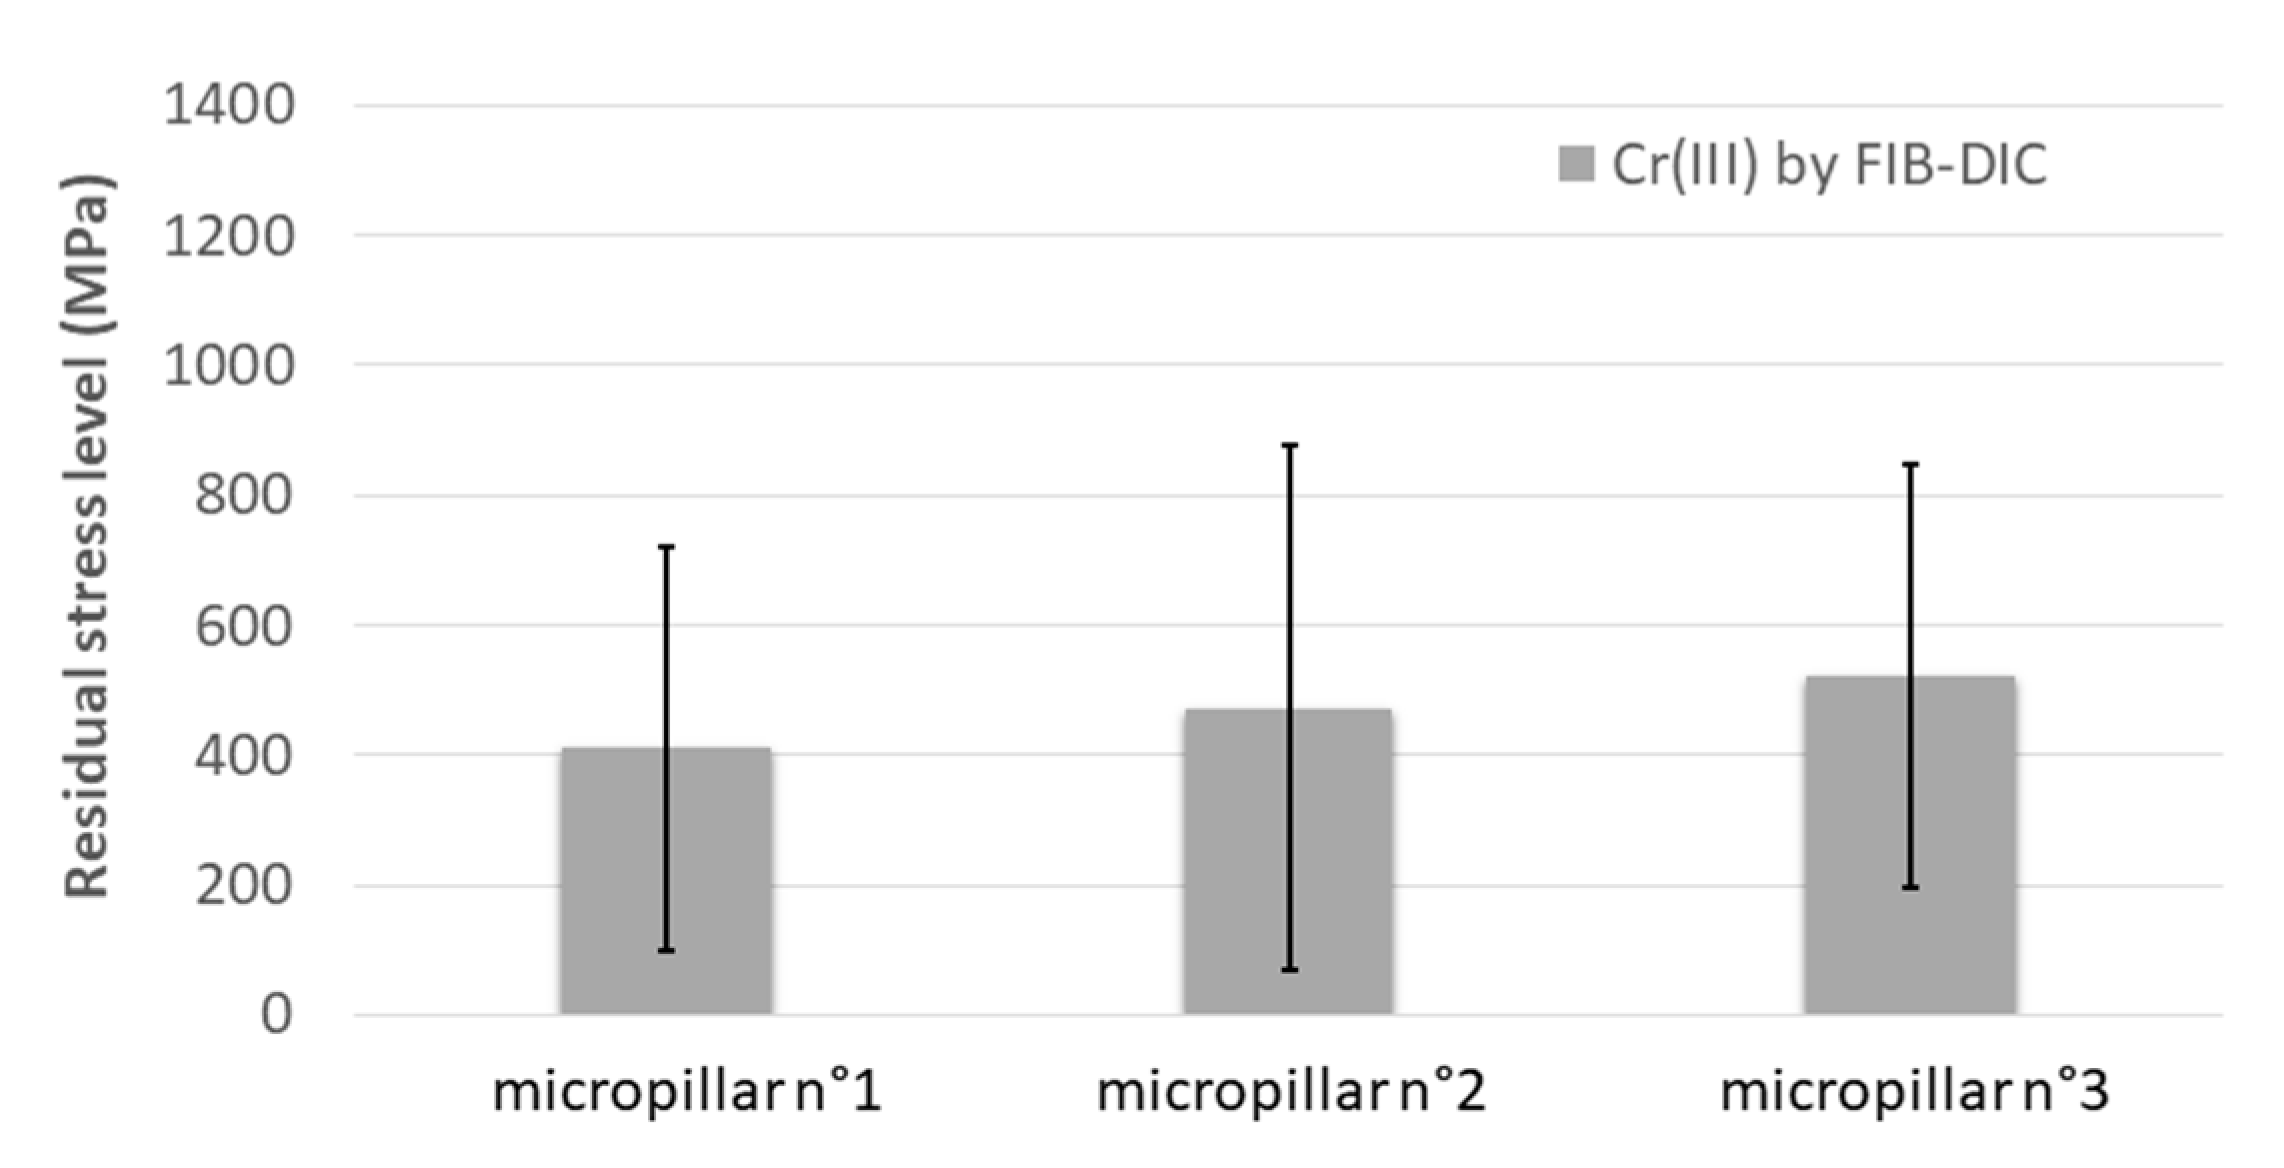
Figure 10 gives the results of determining the residual stresses carried out on three micropillars. The average stress level measured is 479 ± 359 MPa.

3.3. Determination of Residual Stresses in Annealed Coatings

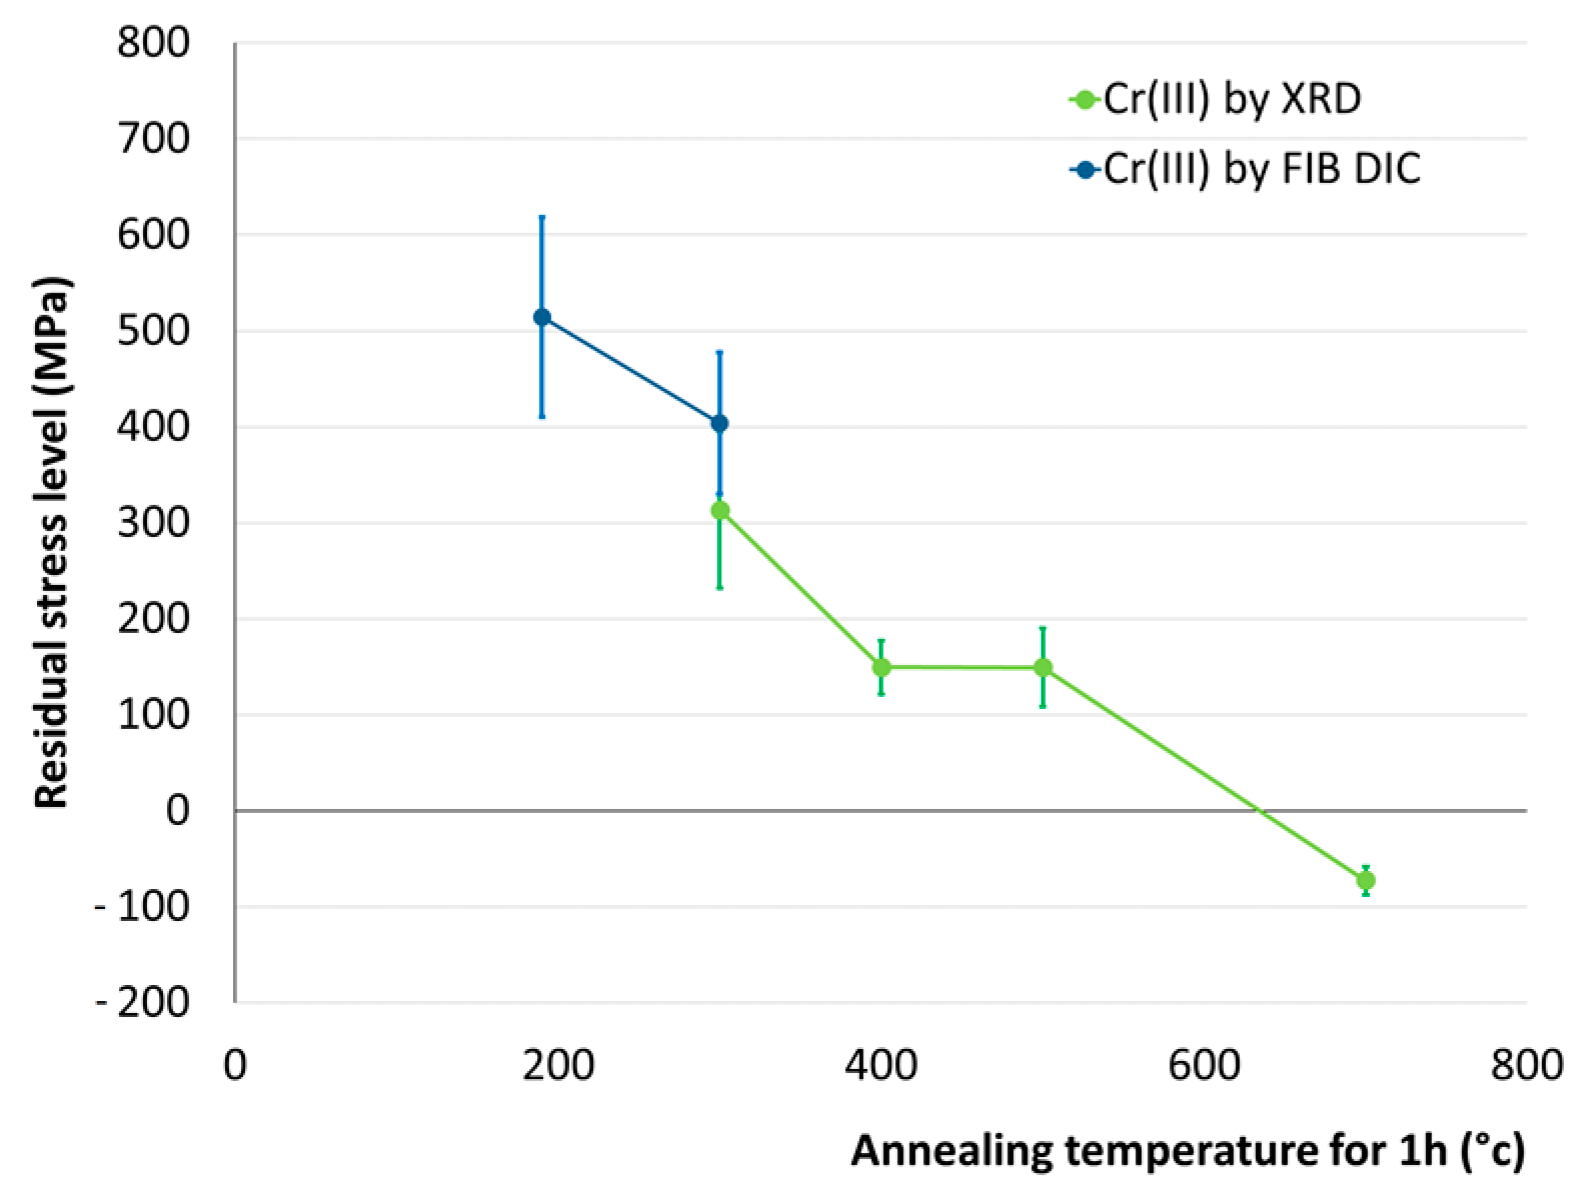
The literature review highlighted that applying heat treatment on hexavalent chromium deposits leads to a decrease in residual stresses and could revert them into a stress compression state [14]. Conventional heat treatments were used to compare the evolution of residual stress levels as a function of treatment temperature. The present trivalent chromium observed a decrease in stress level with increasing temperature. However, the impact of the heat treatment on the residual stress is less pronounced in trivalent chromium deposits than in hexavalent chromium deposits, as reported by Durut et al. [12] (Figure 11).

4. Discussion

This work adapted a residual stress characterization method to amorphous trivalent deposits. In order to validate the method, we first implemented it on heat-treated nanocrystalline chromium coatings. Conventional X-ray diffraction measurements were carried out for comparison. The average residual stress level determined by these two methods is similar despite the significant standard deviation for both techniques. These substantial variations could be due to cracks disturbing the residual stress field and then the displacement field measured on the surface of the pillars. In particular, cracks may be present within a crazing cell subsurface of the deposit. These cracks are impossible to observe by SEM during or after the test but significantly disrupt the measured displacement field. The cross-sectional observation of Cr(III) deposits allows us to distinguish a network of subsurface cracks (Figure 1b). In order to determine the influence of cracks, identical measurements were carried out on hexavalent chromium deposits (bath containing chromium trioxide (CrO3) and sulfuric acid (H2SO4) at 50 °C) which do not have through-thickness cracks. The residual stresses of these deposits, determined with the FIB-DIC method, are greater than those previously analyzed for hexavalent chromium deposits (σCr(VI) = 1748 ± 496 MPa) [32]. However, their dispersion is much less. It thus seems that the more numerous through cracks in the trivalent chromium deposits have a role in the average value of the stresses and their dispersion. Indeed, as many authors showed, contrary to the X-ray diffraction technique, the FIB-DIC method is susceptible to local variations of stresses. Thus, despite the precautions taken to correctly position the machining of the rings in relation to the macro-cracks of the deposits, the presence of numerous internal cracks close to the interface with the substrate can disturb the FIB-DIC measurement. Nevertheless, FIB-DIC measurements are repeatable. Although the standard deviation of the individual measurements is significant, the mean value determined varies slightly over the whole set of samples analyzed. Concerning XRD measurements, the hypotheses of the method consider a homogeneous, isotropic elastic material. However, these deposits are well known to be homogeneous but are densely cracked. Combined difficulties in accurately extracting the values of d-spacing on the obtained spectrum can cause the plot of Δd spacing as a function of sin2 (ψ) to be strongly affected by noise (Figure 7a). Textures measurement did not show a significant level and is not considered to influence the measured stress level. Similarly, the penetration depth of the X-rays is low (<3µm), so a possible gradient in the studied depth was neglected.
The application of heat treatment has a significant influence on the level of residual stresses. During the heat treatment, several mechanisms responsible for residual stresses build up in the deposits. Firstly, the impurity content, mainly hydrogen and oxygen, is modified. The form and quantity of these elements have yet to be well known, but their desorption leads to a decrease in the volume of the layer, causing tensile residual stress. Trivalent chromium deposits are also known to contain a significant proportion of carbon. In our case, glow discharge spectrometry measurements showed carbon’s presence [30]. With increasing the heat treatment temperature, many authors agree that carbon precipitates, modifying the microstructure of the deposit [9,10,12,33]. This phenomenon could also significantly modify residual stress states and levels. Finally, during the heating process, the differences in chromium plating and steel substrate thermal expansion lead to an increase in tensile residual stresses. However, during consecutive cooling, residual stresses become compressive. Some authors have shown that whatever the heat treatment temperature, the density of surface cracks is identical; only the width of the cracks changes with treatment temperature [34]. Durut has shown on Cr(VI) that the heat treatment time does not influence deposits’ residual stresses [14]. On the other hand, the residual tensile stresses decrease or even turn into compressive stresses (at 300 °C) when the temperature of the thermal post-treatments increases.
On trivalent chromium coatings, the residual stress level determined for heat treatment at 300 °C is similar to those recorded on hexavalent chromium. Tensile stress relief efficiency with increasing heat treatment temperature is less pronounced than hexavalent chromium. Compressive stresses are only observed after annealing at 700 °C for one hour on trivalent chromium, whereas this transition temperature is only 400 °C for the hexavalent coating.

5. Conclusions

This work aims to evaluate residual stresses in amorphous and crystallized trivalent chromium coatings.
  • Residual stress determination by FIB-DIC was successfully implemented. Comparing the results obtained from XRD measurements on the crystallized deposit show similar values, which allowed us to validate the method.
  • The estimated stress level is 479 ± 359 MPa for amorphous untreated samples. With the crystallization of the deposit, the residual stresses decrease to about 377 ± 275 MPa.
  • A relaxation of the residual stresses is observed as a function of the post-heat treatment temperature. At a heat treatment temperature of 700 °C for one hour, the stresses initially in tension are converted to compression.
  • FIB-DIC observes a significant variation in stresses within the milled pillar. We attribute this phenomenon to a subsurface microcracking in these deposits.
In order to estimate the influence of internal cracks further or closer to the areas examined by the FIB-DIC method, FIB cross-section observations will have to be made. This will allow a decision to be made on the nature of the dispersion of the measurements. Similarly, depending on the results obtained, the size of the pillars may be reviewed. Finally, additional measurements will have to be carried out to be statistical.

Author Contributions

Conceptualization, R.G., O.D., B.F. and J.A.; validation, O.D., B.F., and J.A.; investigation, R.G., C.S., C.J., Y.B. and B.F.; writing—original draft preparation, R.G. and J.A.; writing—review and editing, R.G., O.D., Y.B., B.F. and J.A.; supervision, O.D. and J.A.; project administration, J.A.; funding acquisition, J.A. All authors have read and agreed to the published version of the manuscript.

Funding

This research and the APC were funded by BPI France and the Région Occitanie Pyrénées-Méditerranée: Chromaero project grant number CP/2018-OCT/12.07.

Institutional Review Board Statement

Not applicable.

Informed Consent Statement

Not applicable.

Data Availability Statement

Not applicable.

Acknowledgments

The authors thank Lucie Bres from Collins Aerospace for the realization of the hexavalent chromium deposits, as well as Jade Pécune (LGP-ENIT) and Nathalie Aubazac (LGP-ENIT) for their support in the preparation of the samples and their SEM observations.

Conflicts of Interest

The authors declare no conflict of interest.

References

  1. Vaiopoulou, E.; Gikas, P. Regulations for Chromium Emissions to the Aquatic Environment in Europe and Elsewhere. Chemosphere 2020, 254, 126876. [Google Scholar] [CrossRef] [PubMed]
  2. Wang, S.; Ma, C.; Walsh, F.C. Alternative Tribological Coatings to Electrodeposited Hard Chromium: A Critical Review. Trans. IMF 2020, 98, 173–185. [Google Scholar] [CrossRef]
  3. Protsenko, V.S.; Danilov, F.I. Chromium Electroplating from Trivalent Chromium Baths as an Environmentally Friendly Alternative to Hazardous Hexavalent Chromium Baths: Comparative Study on Advantages and Disadvantages. Clean Technol. Environ. Policy 2014, 16, 1201–1206. [Google Scholar] [CrossRef]
  4. Liang, A.; Li, Y.; Liang, H.; Ni, L.; Zhang, J. A Favorable Chromium Coating Electrodeposited from Cr(III) Electrolyte Reveals Anti-Wear Performance Similar to Conventional Hard Chromium. Mater. Lett. 2017, 189, 221–224. [Google Scholar] [CrossRef]
  5. Mahdavi, S.; Allahkaram, S.; Heidarzadeh, A. Characteristics and Properties of Cr Coatings Electrodeposited from Cr(III) Baths. Mater. Res. Express 2019, 6, 026403. [Google Scholar] [CrossRef]
  6. Danilov, F.I.; Protsenko, V.S.; Gordiienko, V.O.; Kwon, S.C.; Lee, J.Y.; Kim, M. Nanocrystalline Hard Chromium Electrodeposition from Trivalent Chromium Bath Containing Carbamide and Formic Acid: Structure, Composition, Electrochemical Corrosion Behavior, Hardness and Wear Characteristics of Deposits. Appl. Surf. Sci. 2011, 257, 8048–8053. [Google Scholar] [CrossRef]
  7. Benaben, P. An Overview of Hard Chromium Plating Using Trivalent Chromium Solutions. Plat. Surf. Finish. 2011, 98, 7–14. [Google Scholar]
  8. Dennis, J.K.; Such, T.E. Nickel and Chromium Plating; Woodhead Publishing Series in Metals and Surface Engineering; Elsevier Science: Amsterdam, The Netherlands, 1993; ISBN 978-1-84569-863-8. [Google Scholar]
  9. Willis, D.J.; Hammond, C. Structure of Chromium Deposits from Plating Solutions Containing Trivalent and Hexavalent Chromium. Mater. Sci. Technol. 1986, 2, 630–636. [Google Scholar] [CrossRef]
  10. Ghaziof, S.; Golozar, M.A.; Raeissi, K. Characterization of As-Deposited and Annealed Cr–C Alloy Coatings Produced from a Trivalent Chromium Bath. J. Alloy. Compd. 2010, 496, 164–168. [Google Scholar] [CrossRef]
  11. Tsai, R.; Wu, S. Phase Stability of Chromium Plating from Chromic Acid Electrolyte Containing Formic Acid. J. Electrochem. Soc. 1990, 137, 3057–3060. [Google Scholar] [CrossRef]
  12. El-Sharif, M.; Chisholm, C.U. Characteristics of Electrodeposited Chromium. Trans. IMF 1997, 75, 208–212. [Google Scholar] [CrossRef]
  13. Li, J.; Li, Y.; Tian, X.; Zou, L.; Zhao, X.; Wang, S.; Wang, S. The Hardness and Corrosion Properties of Trivalent Chromium Hard Chromium. MSA 2017, 8, 1014–1026. [Google Scholar] [CrossRef] [Green Version]
  14. Durut, F. Recherche des Mécanismes Microstructuraux Qui rEgissent Les Propriétés Macroscopiques de Dépôts de Chrome: Influence des Paramètres D’élaboration. Ph.D. Thesis, Grenoble INPG, Grenoble, France, 1999. [Google Scholar]
  15. Pina, J.; Dias, A.; François, M.; Lebrun, J.L. Residual Stresses and Crystallographic Texture in Hard-Chromium Electroplated Coatings. Surf. Coat. Technol. 1997, 96, 148–162. [Google Scholar] [CrossRef]
  16. Durut, F.; Benaben, P. Détermination des contraintes résiduelles de dépôts électrolytiques de chrome réalisés à partir d’une solution de chrome hexavalent. MatÉRiaux Tech. 2000, 88, 51–59. [Google Scholar] [CrossRef]
  17. Keil, S. Experimental Determination of Residual Stresses with the Ring-Core Method and an on-Line Measuring System. Exp. Tech. 1992, 16, 17–24. [Google Scholar] [CrossRef]
  18. Abadias, G.; Chason, E.; Keckes, J.; Sebastiani, M.; Thompson, G.B.; Barthel, E.; Doll, G.L.; Murray, C.E.; Stoessel, C.H.; Martinu, L. Review Article: Stress in Thin Films and Coatings: Current Status, Challenges, and Prospects. J. Vac. Sci. Technol. A Vac. Surf. Film. 2018, 36, 020801. [Google Scholar] [CrossRef] [Green Version]
  19. Korsunsky, A.M.; Salvati, E.; Lunt, A.G.J.; Sui, T.; Mughal, M.Z.; Daniel, R.; Keckes, J.; Bemporad, E.; Sebastiani, M. Nanoscale Residual Stress Depth Profiling by Focused Ion Beam Milling and Eigenstrain Analysis. Mater. Des. 2018, 145, 55–64. [Google Scholar] [CrossRef]
  20. Sebastiani, M.; Eberl, C.; Bemporad, E.; Pharr, G.M. Depth-Resolved Residual Stress Analysis of Thin Coatings by a New FIB–DIC Method. Mater. Sci. Eng. A 2011, 528, 7901–7908. [Google Scholar] [CrossRef]
  21. Dang, N.M.; Ku, W.Y.; Wang, Z.Y.; Lin, C.H.; Chen, T.F.; Lin, M.T. Incremental FIB-DIC Ring-Core Methods for the Residual Stress Measurement of Bilayer Thin Films. Exp. Mech. 2022, 62, 1489–1499. [Google Scholar] [CrossRef]
  22. Sebastiani, M.; Rossi, E.; Zeeshan Mughal, M.; Benedetto, A.; Jacquet, P.; Salvati, E.; Korsunsky, A.M. Nano-Scale Residual Stress Profiling in Thin Multilayer Films with Non-Equibiaxial Stress State. Nanomaterials 2020, 10, 853. [Google Scholar] [CrossRef]
  23. Salvati, E.; Romano-Brandt, L.; Mughal, M.Z.; Sebastiani, M.; Korsunsky, A.M. Generalised residual stress depth profiling at the nanoscale using focused ion beam milling. J. Mech. Phys. Solids 2019, 125, 488–501. [Google Scholar] [CrossRef]
  24. Winiarski, B.; Gholinia, A.; Tian, J.; Yokoyama, Y.; Liaw, P.K.; Withers, P.J. Submicron-Scale Depth Profiling of Residual Stress in Amorphous Materials by Incremental Focused Ion Beam Slotting. Acta Mater. 2012, 60, 2337–2349. [Google Scholar] [CrossRef]
  25. Krottenthaler, M.; Schmid, C.; Schaufler, J.; Durst, K.; Göken, M. A Simple Method for Residual Stress Measurements in Thin Films by Means of Focused Ion Beam Milling and Digital Image Correlation. Surf. Coat. Technol. 2013, 215, 247–252. [Google Scholar] [CrossRef]
  26. Kang, K.J.; Yao, N.; He, M.Y.; Evans, A.G. A Method for in Situ Measurement of the Residual Stress in Thin Films by Using the Focused Ion Beam. Thin Solid Film. 2003, 443, 71–77. [Google Scholar] [CrossRef]
  27. Bemporad, E.; Brisotto, M.; Depero, L.E.; Gelfi, M.; Korsunsky, A.M.; Lunt, A.J.G.; Sebastiani, M. A Critical Comparison between XRD and FIB Residual Stress Measurement Techniques in Thin Films. Thin Solid Film. 2014, 572, 224–231. [Google Scholar] [CrossRef]
  28. Chen, T.Y.-F.; Chou, Y.-C.; Wang, Z.-Y.; Lin, W.-Y.; Lin, M.-T. Using Digital Image Correlation on SEM Images of Strain Field after Ion Beam Milling for the Residual Stress Measurement of Thin Films. Materials 2020, 13, 1291. [Google Scholar] [CrossRef] [Green Version]
  29. Romano-Brandt, L.; Salvati, E.; Le Bourhis, E.; Moxham, T.; Dolbnya, I.P.; Korsunsky, A.M. Nano-Scale Residual Stress Depth Profiling in Cu/W Nano-Multilayers as a Function of Magnetron Sputtering Pressure. Surf. Coat. Technol. 2020, 381, 125142. [Google Scholar] [CrossRef]
  30. Guillon, R.; Dalverny, O.; Fori, B.; Gazeau, C.; Alexis, J. Mechanical Behaviour of Hard Chromium Deposited from a Trivalent Chromium Bath. Coatings 2022, 12, 354. [Google Scholar] [CrossRef]
  31. Brandes, E.A.; Smithells, C.J. Metals Reference Book. Reed Elsevier plc Group: Woburn, MA, USA, 1976. [Google Scholar]
  32. Guillon, R. Amélioration de L’adhérence de Revêtements Electrolytiques de Chrome: Étude Expérimentale et Numérique. Ph.D. Thesis, Université de Toulouse, Toulouse, France, 20 June 2022. [Google Scholar]
  33. Huang, C.A.; Liu, Y.W.; Yu, C.; Yang, C.-C. Role of Carbon in the Chromium Deposit Electroplated from a Trivalent Chromium-Based Bath. Surf. Coat. Technol. 2011, 205, 3461–3466. [Google Scholar] [CrossRef]
  34. Del Pianta, D. Détermination Des Paramètres Physicochimiques Régissant L’électrodéposition D’une Couche de Chrome Métallique à Partir D’Une Solution de Chrome Trivalent. Ph.D. Thesis, University of Pau (UPPA), Pau, France, 2017. [Google Scholar]
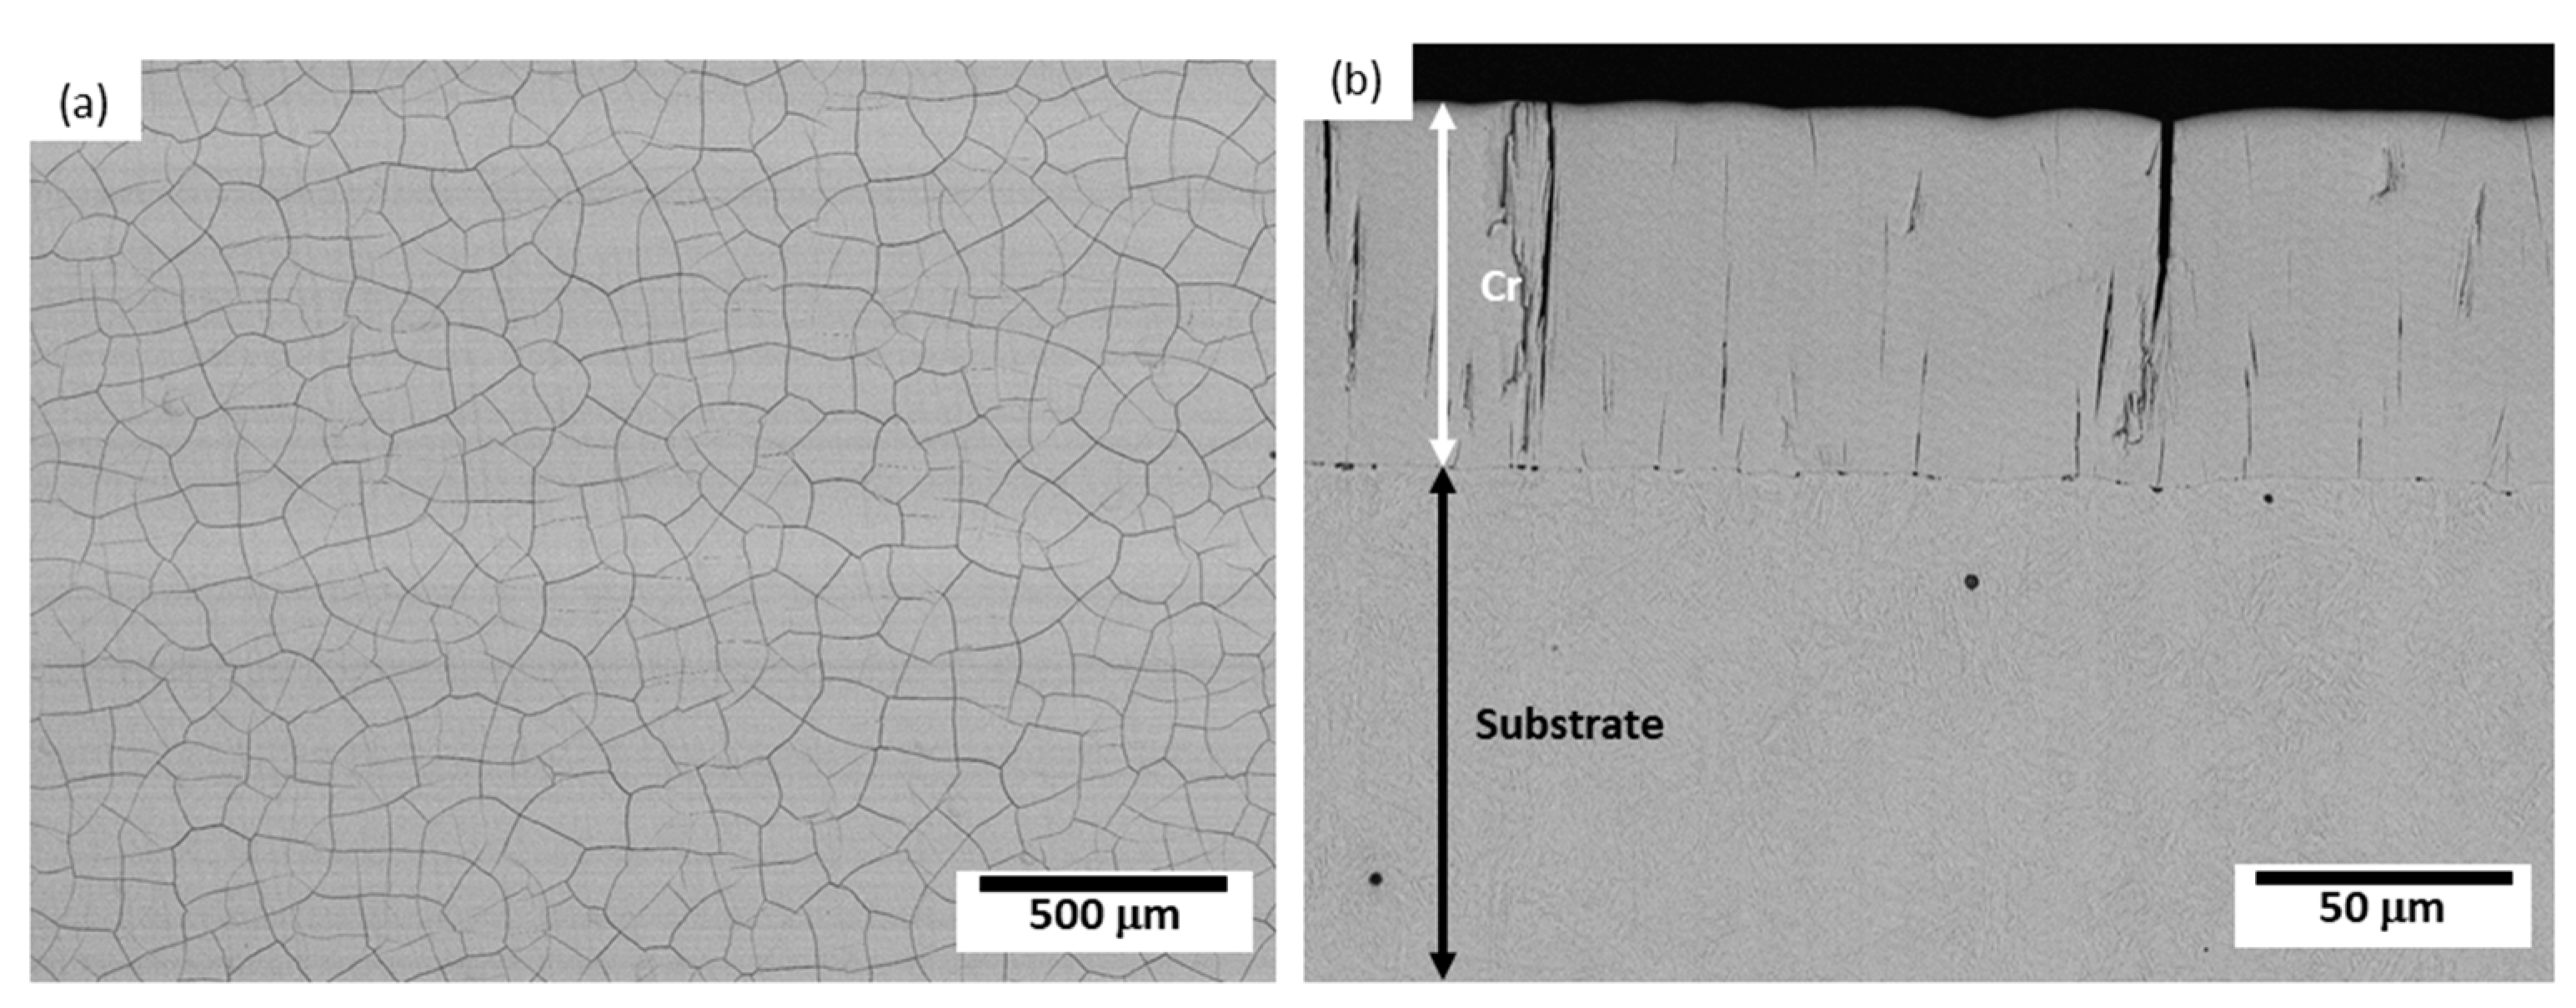
Figure 1. SEM micrographs of the Cr(III) coating. (a) A top view of the surface and (b) a cross-section.
Coatings 13 00124 g001
Figure 2. A numerical model for the sizing of the FIB-DIC test, (a) a view of the mesh in the zone of interest, red is the ablated zone, and (b) an evolution of the normalized stress along (A, B) as a function of the ablation depth.
Coatings 13 00124 g002
Figure 3. (a) Determination of the depth of FIB-machined pockets by atomic force microscopy and (b) a calibration curve of machining depth versus ablation time for trivalent chromium on 3 × 3 µm2 square pockets milling.
Coatings 13 00124 g003
Figure 4. (a) Illustration of the speckle applied before full FIB machining and (b) a detailed view of the pattern.
Coatings 13 00124 g004
Figure 5. (a) Visualization of an FIB-produced speckle on a Cr(III) coating (a) before ablation and (b) after ablation of the ring groove.
Coatings 13 00124 g005
Figure 6. (a) X-ray diffractograms of trivalent chromium deposits raw and after a post-heat treatment at 300 °C. (b) DSC analysis of a rough trivalent chromium deposit.
Coatings 13 00124 g006
Figure 7. (a) Evolution of the Δd spacing as a function of sin2 ψ for the plane (211). A total of 0°, 45°, and 90° stands for the three different values of φ. (b) Results of the XRD residual stress level measurements on crystallized trivalent chromium.
Coatings 13 00124 g007
Figure 8. (a) Amplitude of displacement field measured on micro-pillars after FIB milling. (b) Results of the FIB-DIC residual stress level measurements on crystallized trivalent chromium.
Coatings 13 00124 g008
Figure 9. FIB-DIC measurements were performed on trivalent chromium deposits. (a) Initial speckle before annular groove ablation, (bd) displacement amplitude fields obtained by DIC after completed ablation, and untreated trivalent chromium samples 1 to 3.
Coatings 13 00124 g009
Figure 10. Results of FIB-DIC residual stress level measurements on untreated trivalent chromium samples 1 to 3. Error bars correspond to one standard deviation.
Coatings 13 00124 g010
Figure 11. Evolution of stress level on the Cr(III) coating with annealing temperature, as determined by the FIB-DIC and XRD techniques.
Coatings 13 00124 g011
Table 1. Chemical composition of the 1.031 unalloyed steel substrate (wt.%).
FeCSiMnPSCrMoNi
Bal.0.0880.010.3430.0120.0060.0540.0050.009
Disclaimer/Publisher’s Note: The statements, opinions and data contained in all publications are solely those of the individual author(s) and contributor(s) and not of MDPI and/or the editor(s). MDPI and/or the editor(s) disclaim responsibility for any injury to people or property resulting from any ideas, methods, instructions or products referred to in the content.