1. Introduction
The selection of an adequate rock mining technology is a crucial aspect determining the safety and efficiency of mineral extraction. Choice of the type of mining process and the mining machines used depends on many natural and technical factors, as well as on the expected parameters such as granulation and physical properties of the mined material, to minimise the adverse impact of the mining process on the environment. Energy consumption is the factor deciding the economic efficiency of the mining process.
Lithology has an essential impact on rock cuttability. As an example, a problem of mining difficult-to-be-mined rocks of high compressive strength and complex lithology, deposited in the lignite seam Bełchatów, was analysed in ref. [
1]. Cuttability index—
fp— dependent on the rock compressive strength was analysed. An impact of different geological and mining factors on the decompression effect while mining protective layers was tested in ref. [
2], using a digital model created with the use of FLAC
3D 6.00 software. Changes in specific energy, caused by zinc and lead ore quality deterioration, were analysed in ref. [
3] using HSC Chemistry software. The impact of rocks’ lithology, subject to a beneficiation process, on their strength, deformation and porosity [
4], was tested. The problem of specific energy changes in rocks surrounding an entry working and the impact of recorded energy changes on operational stability were analysed numerically in ref. [
5].
The broad spectrum of mechanical properties of the mined rock, the complex natural and technical conditions of mining, have caused the development of numerous types of mining methods and procedures for selecting the most favourable parameters for this process. Numerous scientific papers on testing the rock mining technology from a multidisciplinary perspective have been published.
In addition to theoretical work, the laboratory tests, and in situ tests, the numerical tests have also been developed. For example, numerical modelling of the rock cutting process was used in refs. [
6,
7] to simulate a combined mining method, which involves pre-cutting the rock with a circular saw and crushing the remaining rock with conical cutters. Use of FEM to model the chip formation process was enabled by the so-called lost-element method presented in refs. [
8,
9]. In ref. [
10], numerical simulations of the rock cutting process with a pickaxe, by the Discrete Element Method (DEM) using the open-source software YADE (Yet Another Dynamic Engine), were described. The aim of the analyses presented in ref. [
11] was to formulate the basic principles of building the DEM models useful for solving the real rock engineering problems.
In addition to energy transformation, the mining process must also process information related to controlling the process of destruction of the original rock structure in such a way as to achieve the intended goal of obtaining mined material of a specific range of grain size distribution. Kinematics of the cutterhead have a significant impact on controlling the rock destruction process. The energy aspect of the process, in turn, involves the transformation of energy of a specific type and form into the internal energy of the rock, which causes its destruction by overcoming cohesive forces to obtain mined material. The tool action on the rock results in various effects: crushing the rock, chipping off fragments of various sizes, and chipping off rock ledges. The contribution of these forms of rock cohesion destruction depends on the mining method, tool geometry, operating parameters, and rock properties.
Energy consumption is the main parameter describing the efficiency of the rock mining process in the workings equipped with the mining machines. The rock mining process is very complex. This means that the strength properties of rocks defined in classical rock mechanics do not adequately describe characteristics of this process.
For example, knowledge of cutting forces and the shape and volume of removed chips—based on tool geometry and cutterhead kinematics—is crucial in designing and optimising mining machines to improve their operating parameters.
Ref. [
12] demonstrated that the product of specific energy consumption and the size of the generated particles (chips) is constant, regardless of the process used, and that this value corresponds to the specific cutting force. Using the relationship between these important parameters, specific energy consumption can be calculated based on the specific cutting force determined experimentally.
In article [
13], the tangential, lateral and normal forces acting on a disc cutting tool having three tip angles, as well as the amount of debris, were measured for several cutting spaces and cutting depths. As a result, it was observed that the specific cutting energy, i.e., ratio of the excavation power of the disc cutting tool to the amount of debris, showed a minimum ratio of cutting space to cutting depth of five, at which ratio the most efficient excavation could be attained. The article [
3] estimates the specific energy for the beneficiation process of metals, lead and zinc as case studies. This was assessed with the special software, HSC Chemistry, which determines the specific energy for the following process stages: comminution, flotation, and refining. The article [
14] identifies the impact of cutterhead rotational speed on the load applied to the cutterhead drive as well as on the efficiency and energy consumption of the cutting process. The tests were performed based on a simulation of the rock cutting process within a wide range of rock compressive strength with a roadheader transverse cutterhead equipped with 80 conical picks. Variations in the rotational speed of the cutterhead and in the factors connected with the properties of the cutterhead drive on the load condition of the cutting system and on the energy consumption of the cutting process were considered. The computer simulations indicate that a reduction in energy consumption in cutting the rocks with low workability by decreasing the cutterhead rotational speed is possible.
Currently, the attempts to increase mining efficiency are only achieved by modifying the cutting tools’ arrangements in the existing cutterhead design [
15,
16], which, however, limits the range of possible solutions. Optimisations of the arrangement of cutting tools (rotary or flat picks) on the cutterhead enable higher productivity. However, this results in the need to install an enormous total power of the shearer motor, causing significant fragmentation of the mined material and increased dust concentration in the longwall, and increased wear of the cutting tools.
In the case of the top caving method, used in coal seams of high hardness, it is essential to select a correct cutting technology. In ref. [
17], a problem of proper selection of drill hole grid, facilitating a defragmentation of the seam top layer, using, among others, numerical simulations, PFC was tested.
With these factors in mind, for many years, researchers have been searching for mining methods other than the conventional milling process, as well as for designing cutting tools other than wedge-shaped ones. Conical rotary cutting tools have become widespread [
18,
19,
20,
21,
22,
23,
24,
25]. Studies on continuous mining technology using conical cutterheads indicate the crucial importance of tool angles, which decide about load uniformity and mining efficiency with a reduction in energy consumption [
26].
A test of an innovative rock mass hydrofracturing method was discussed in ref. [
27]. Laboratory tests consisted of cyclic heating and cooling of a coal sample with the use of liquid nitrogen (LN2). Process of progressing damage to coal mechanical integrity manifested, among others, as a decrease in coal tensile strength by 63% and a decrease in resistance to fracture by 85%.
Furthermore, other effective methods for mechanically cutting the hard rocks are still being sought, including the use of disc tools [
28,
29,
30,
31]. Earlier attempts to use disc tools in the shearers, such as Twin Borer [
32] or Robbins [
33], were aimed at breaking off the remaining so-called “ribs” of rock. As the shearers of such design, equipped with disc cutting tools, did not find wider application, neither the phenomena of rock fragmentation nor the mechanics of the rock-loosening process with disc tools have been sufficiently understood, although a number of interesting relationships have been obtained through their research work. For example, it was found [
34,
35] that in the case of ledges chipping, the force required to break a square cross-section ledge is proportional to the square side to the power of 1.7. Two types of chipping were observed, i.e., so-called shallow fracture or deep fracture. For rectangular cross-sections of a ledge and
h >
b, deep fractures occurred more frequently. For
b >
h, a shallow fracture was observed more frequently. For deep fracture, two to four times greater efficiency was observed than for the shallow fracture. The highest efficiency of the chipping process was achieved with the same force as for deep fracture, but with the ledge placed on the edge of the block. For several years, attempts have also been made to use smooth and toothed disc cutting tools for equipping the cutterheads of longwall shearers. Disc rolling on the rock surface can result in local crushing and chipping, or deep cracks. It is emphasised that effective disc operation is only possible in brittle and hard rock. The plastic properties of the rock significantly reduce the cutting efficiency of such tools. When the disc passes repeatedly along the same path, the cutting efficiency from the surface decreases more significantly the more brittle the rock is. In hard and brittle rocks, repeated passes of the disc near the edge of a block or in a block of relatively small thickness, even with minimal pressure, gradually accumulate cracks and create deep cracks dividing the block.
It should be emphasised that most theories describing the process of chip separation using disc tools indicate that crushing the rock (overcoming compressive strength) is the main phenomenon. Some studies have also shown that, compared to conventional tools, these tools have incomparably low wear, but the cutting process usually has higher energy consumption and high dynamics. This is the main reason why cutting discs have not yet found wide use in longwall shearers. Only when working near the edge of the block being mined, where large fragments can be separated, is the specific cutting energy significantly lower than in conventional cutting technology.
Concepts for using the static discs, the basic idea of which is to use the disc as a chipping tool, have also appeared in ref. [
36]. This allows for using the tensile strength characteristics of rocks, which are up to several times lower than the compressive strength. The disc tool acts on the rock tangentially to the surface of the mined rock, similarly to a cutting tool. However, the difference with this method lies in the use of the disc rolling motion, which effectively eliminates sliding friction in favour of rolling friction. As a result, tool wear is significantly reduced. The principle of the presented undercutting technique is to cut the rock by cutting it towards the free surface, i.e., by attacking it with the tool tangentially to the free surface, similar to cutting with a knife. This reduces energy consumption and the pressure force, enabling the design of the mining machine with lower energy parameters and lower stability requirements than conventional crushing discs operating perpendicular to the surface of the mined rock. These advantages of this mining method made undercutting discs the only tool currently used as best for mining the seams such as platinum ore [
37]. Due to the high strength of accompanying rocks and their very high abrasiveness relative to the tools, only the method of mining with disc-equipped cutterheads allowed for effective mining of the seam.
In refs. [
38,
39], the impact of the mineralogical structure of the mined rock on the abrasion index of the cutting tool tip was demonstrated, and it was found that the abrasion properties vary widely and may depend on factors unrelated to the quantity and properties of abrasive particles. Statistically significant factors are not the same for different deposits. On average, the abrasion index for coal decreases with decreasing ash content, density, and iron content, and with increasing abrasion and oxygen content.
Refs. [
40,
41] showed that knowledge of the planned cutting direction and the direction of research work is a necessary condition for the correct interpretation of results, selection of the appropriate cutting technique, type of tools and process parameters, as well as achievement of the assumed efficiency and energy consumption.
The cutterhead used in German tests [
42] had some similarity to the design (and therefore impact on the rock) of the suggested cutterhead with milling and chipping parts. In this solution, the milling part is rigidly connected to the chipping part. In the tests, various taper angles were used for the working side of the chipping part of the cutterhead, ranging from 16° to as much as 40°. As can be seen, the side of the chipping part of the cutterhead was additionally “notched” to increase the impact of this part of the cutterhead on the rock and thus increase the ability of the cutterhead to break the rock. Thus, the chipping part of the cutterhead acts on the rock simultaneously in two directions: perpendicular to the side of the chipping part and circumferentially, tangentially to this part. The effect of this interaction was the chipping of the rock along nearly rectilinear trajectories. Until larger rock separations appeared, smaller rock masses were separated in the area of contact between the rock and the side of the chipping part of the cutterhead, and the contact area between the rock and the cutterhead gradually increased. Under equilibrium conditions, a large rock mass was separated. Paper [
43] presents another process of cutting rock with a circular saw and the mechanism of rock breakage. The effect of cutting parameters on cutting force, rock damage, and specific cutting energy was tested. It was found that the cutting force increases with advance rate and increasing cutting depth, as well as decreasing rotational speed. Tests were conducted for single and double discs. Despite a reduction in cutting force, a decrease in specific cutting energy was also observed, which decreases with increasing cutting depth and decreasing distance between the double discs.
An interesting direction in the search for new rock mining technology assumes using the lower tensile strength of rock than its compressive strength. This rock property, to a greater extent than in the case of disc tools, was used in the development of the experimental cutterhead discussed in
Section 2.1. Determining the favourable design features of this tool in terms of the mechanical properties of the mined rock and the proper selection of mining technology parameters required extensive research work and laboratory and operational tests. In light of these tests, the energy consumption of the rock mining process using the experimental cutterhead was analysed in detail. This cutterhead uses the lower tensile strength of the rock than its compressive strength.
The discussed results of rock mining tests using the experimental cutterhead will be used to develop guidelines for selecting its technical parameters.
2. Materials and Methods
2.1. Design of the Experimental Cutterhead
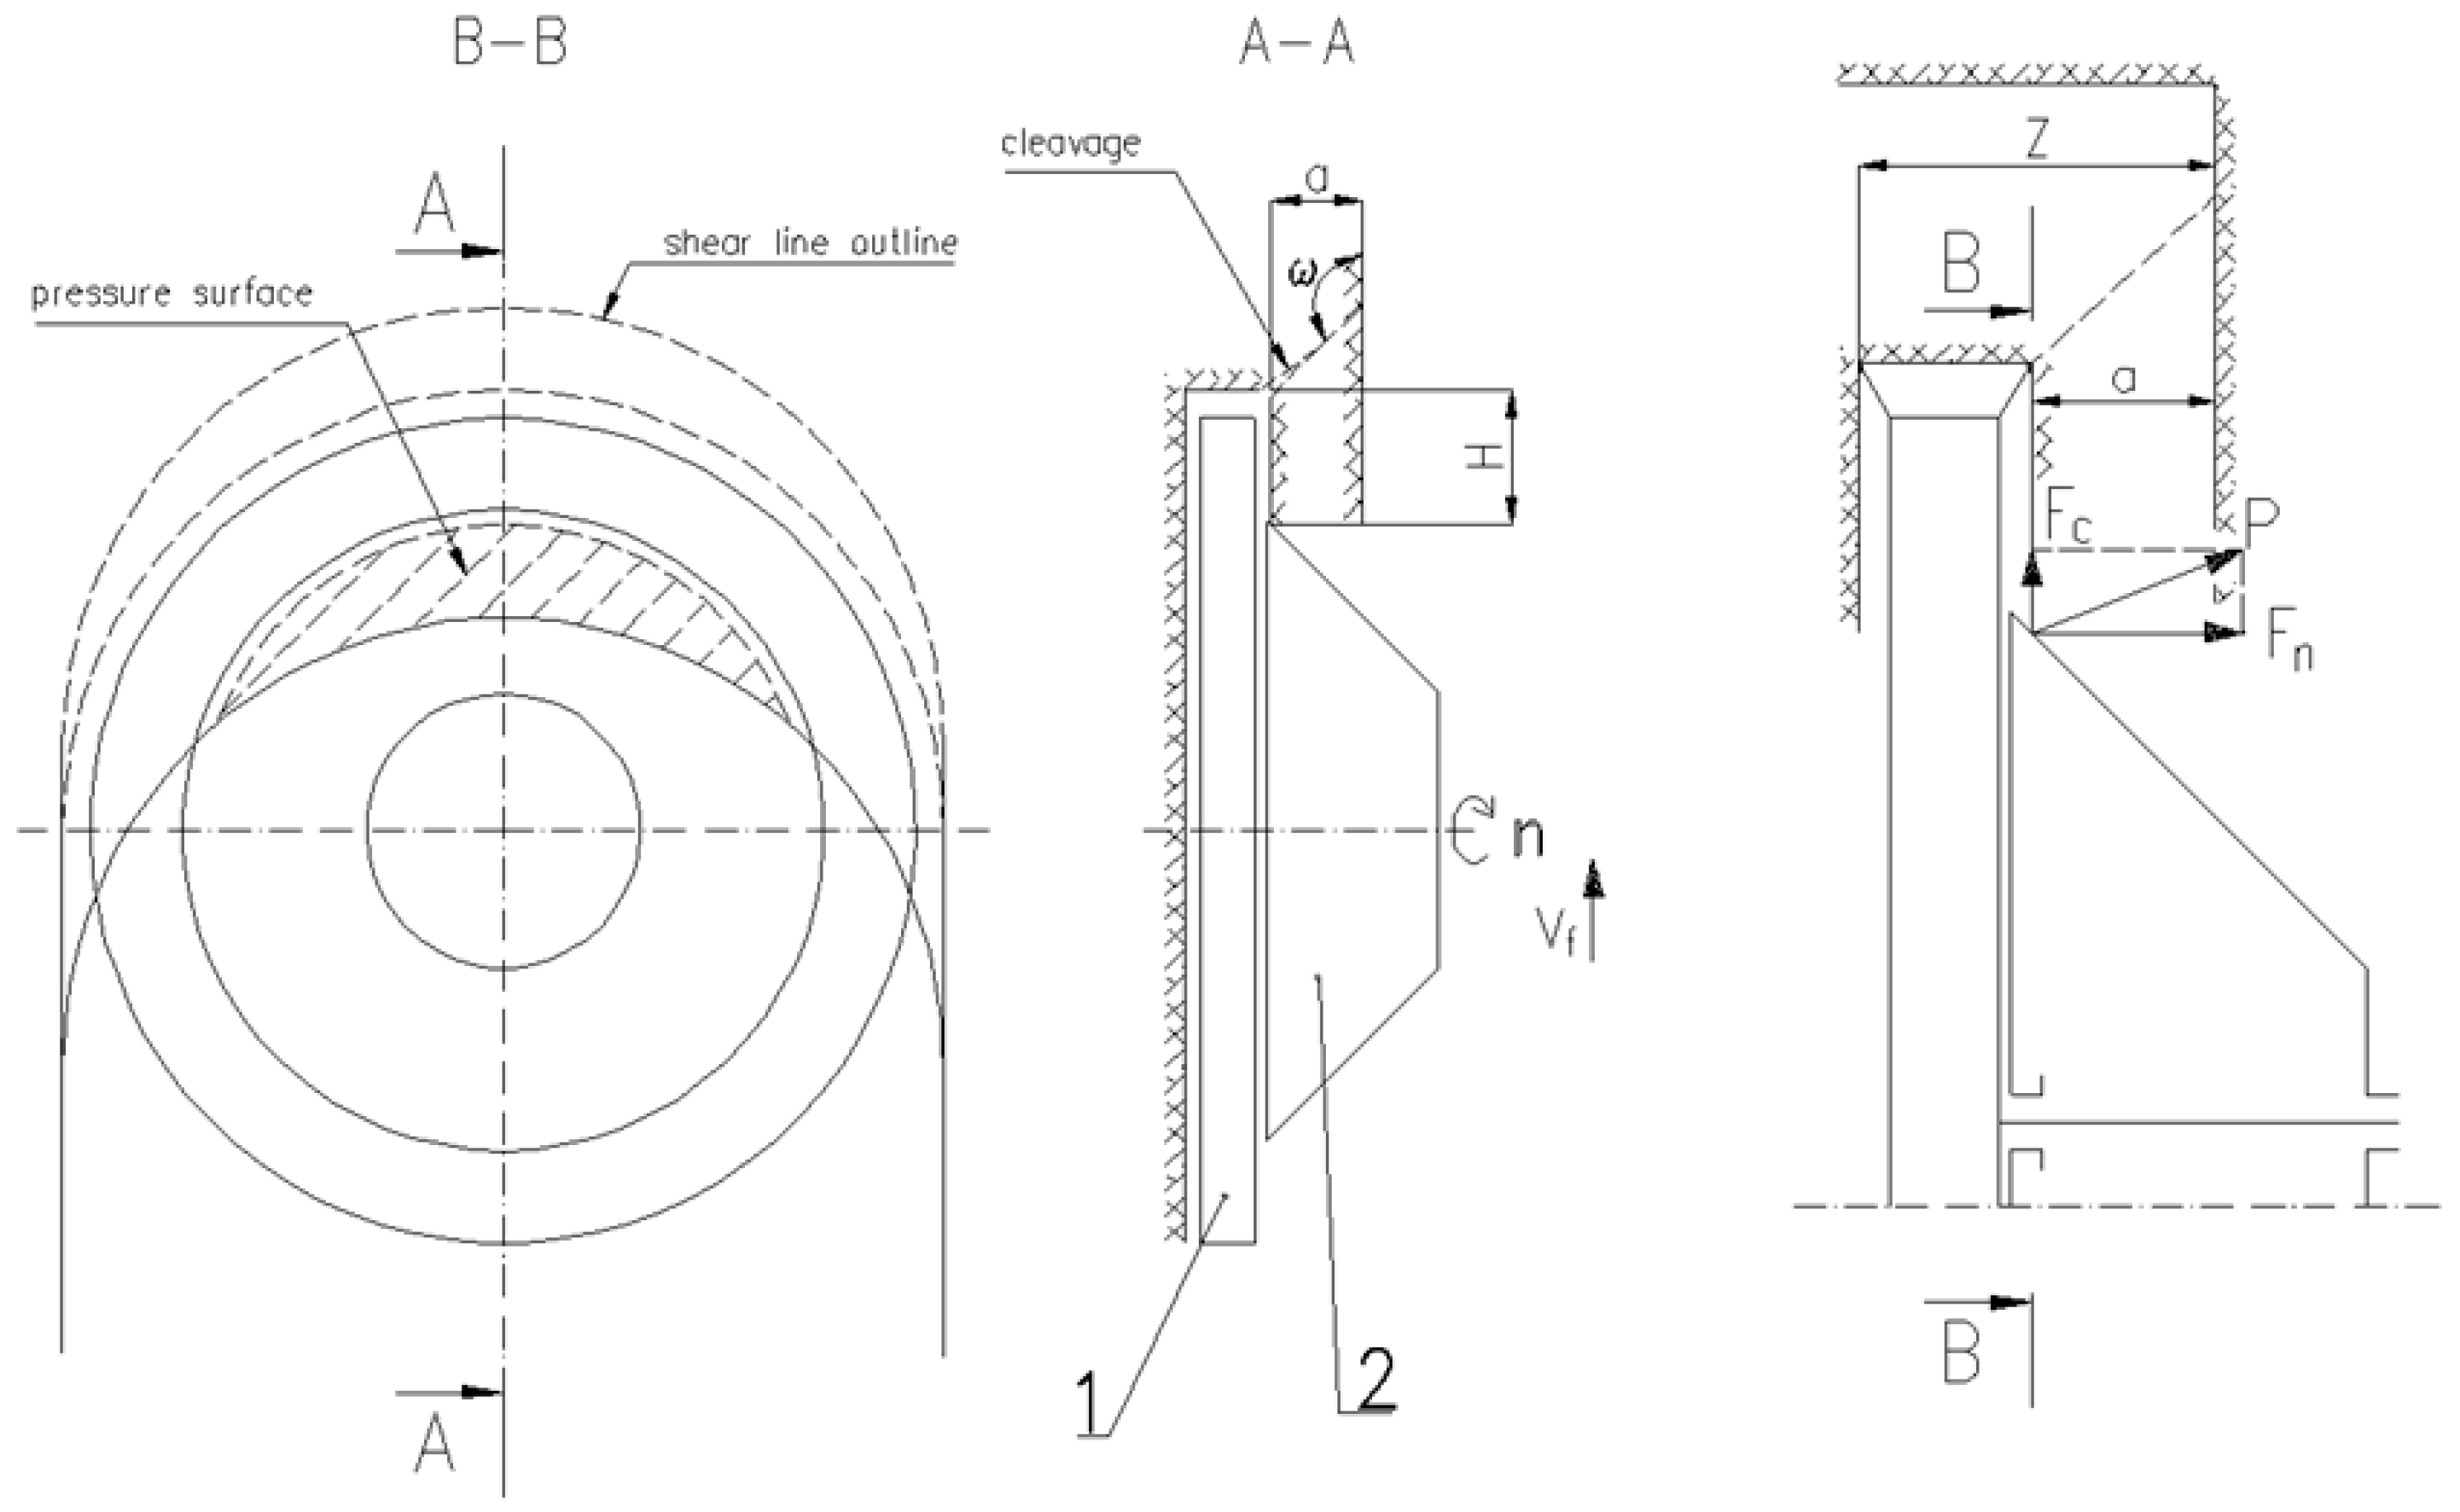
The process of rock mining with the experimental cutterhead is a combination of the classic milling process and the chipping process with a properly designed working part of the cutterhead, shown schematically in
Figure 1.
The basic components of the experimental cutterhead include a cutting disc rotating at a rotational speed
n, with welded cutterhead holders and mounted cutting tools, and a cone-shaped chipping disc. The cutterhead moves at a speed
vf along the longwall face. The task of the chipping disc is to cut through the rock mass as it rotates. As a result, for a given cutterhead mining rate
z, a rock ledge of a certain thickness
a is created in the rock mass, which is then broken off by the chipping disc. The chipping disc can rotate freely on the drive shaft (it is not coupled with the shaft). It acts solely as a disc or wedge, chipping off a fragment of rock of thickness
a. Due to its axial location and the lack of an active drive for this component (
Figure 2), the conical chipping disc is subjected to kinematic forces resulting from the cutterhead advance. This causes the cutterhead pressure on the ledge, acting in the cutterhead advance direction, to be distributed over a significantly larger area than in the case of the milling cutterhead described in refs. [
42,
44].
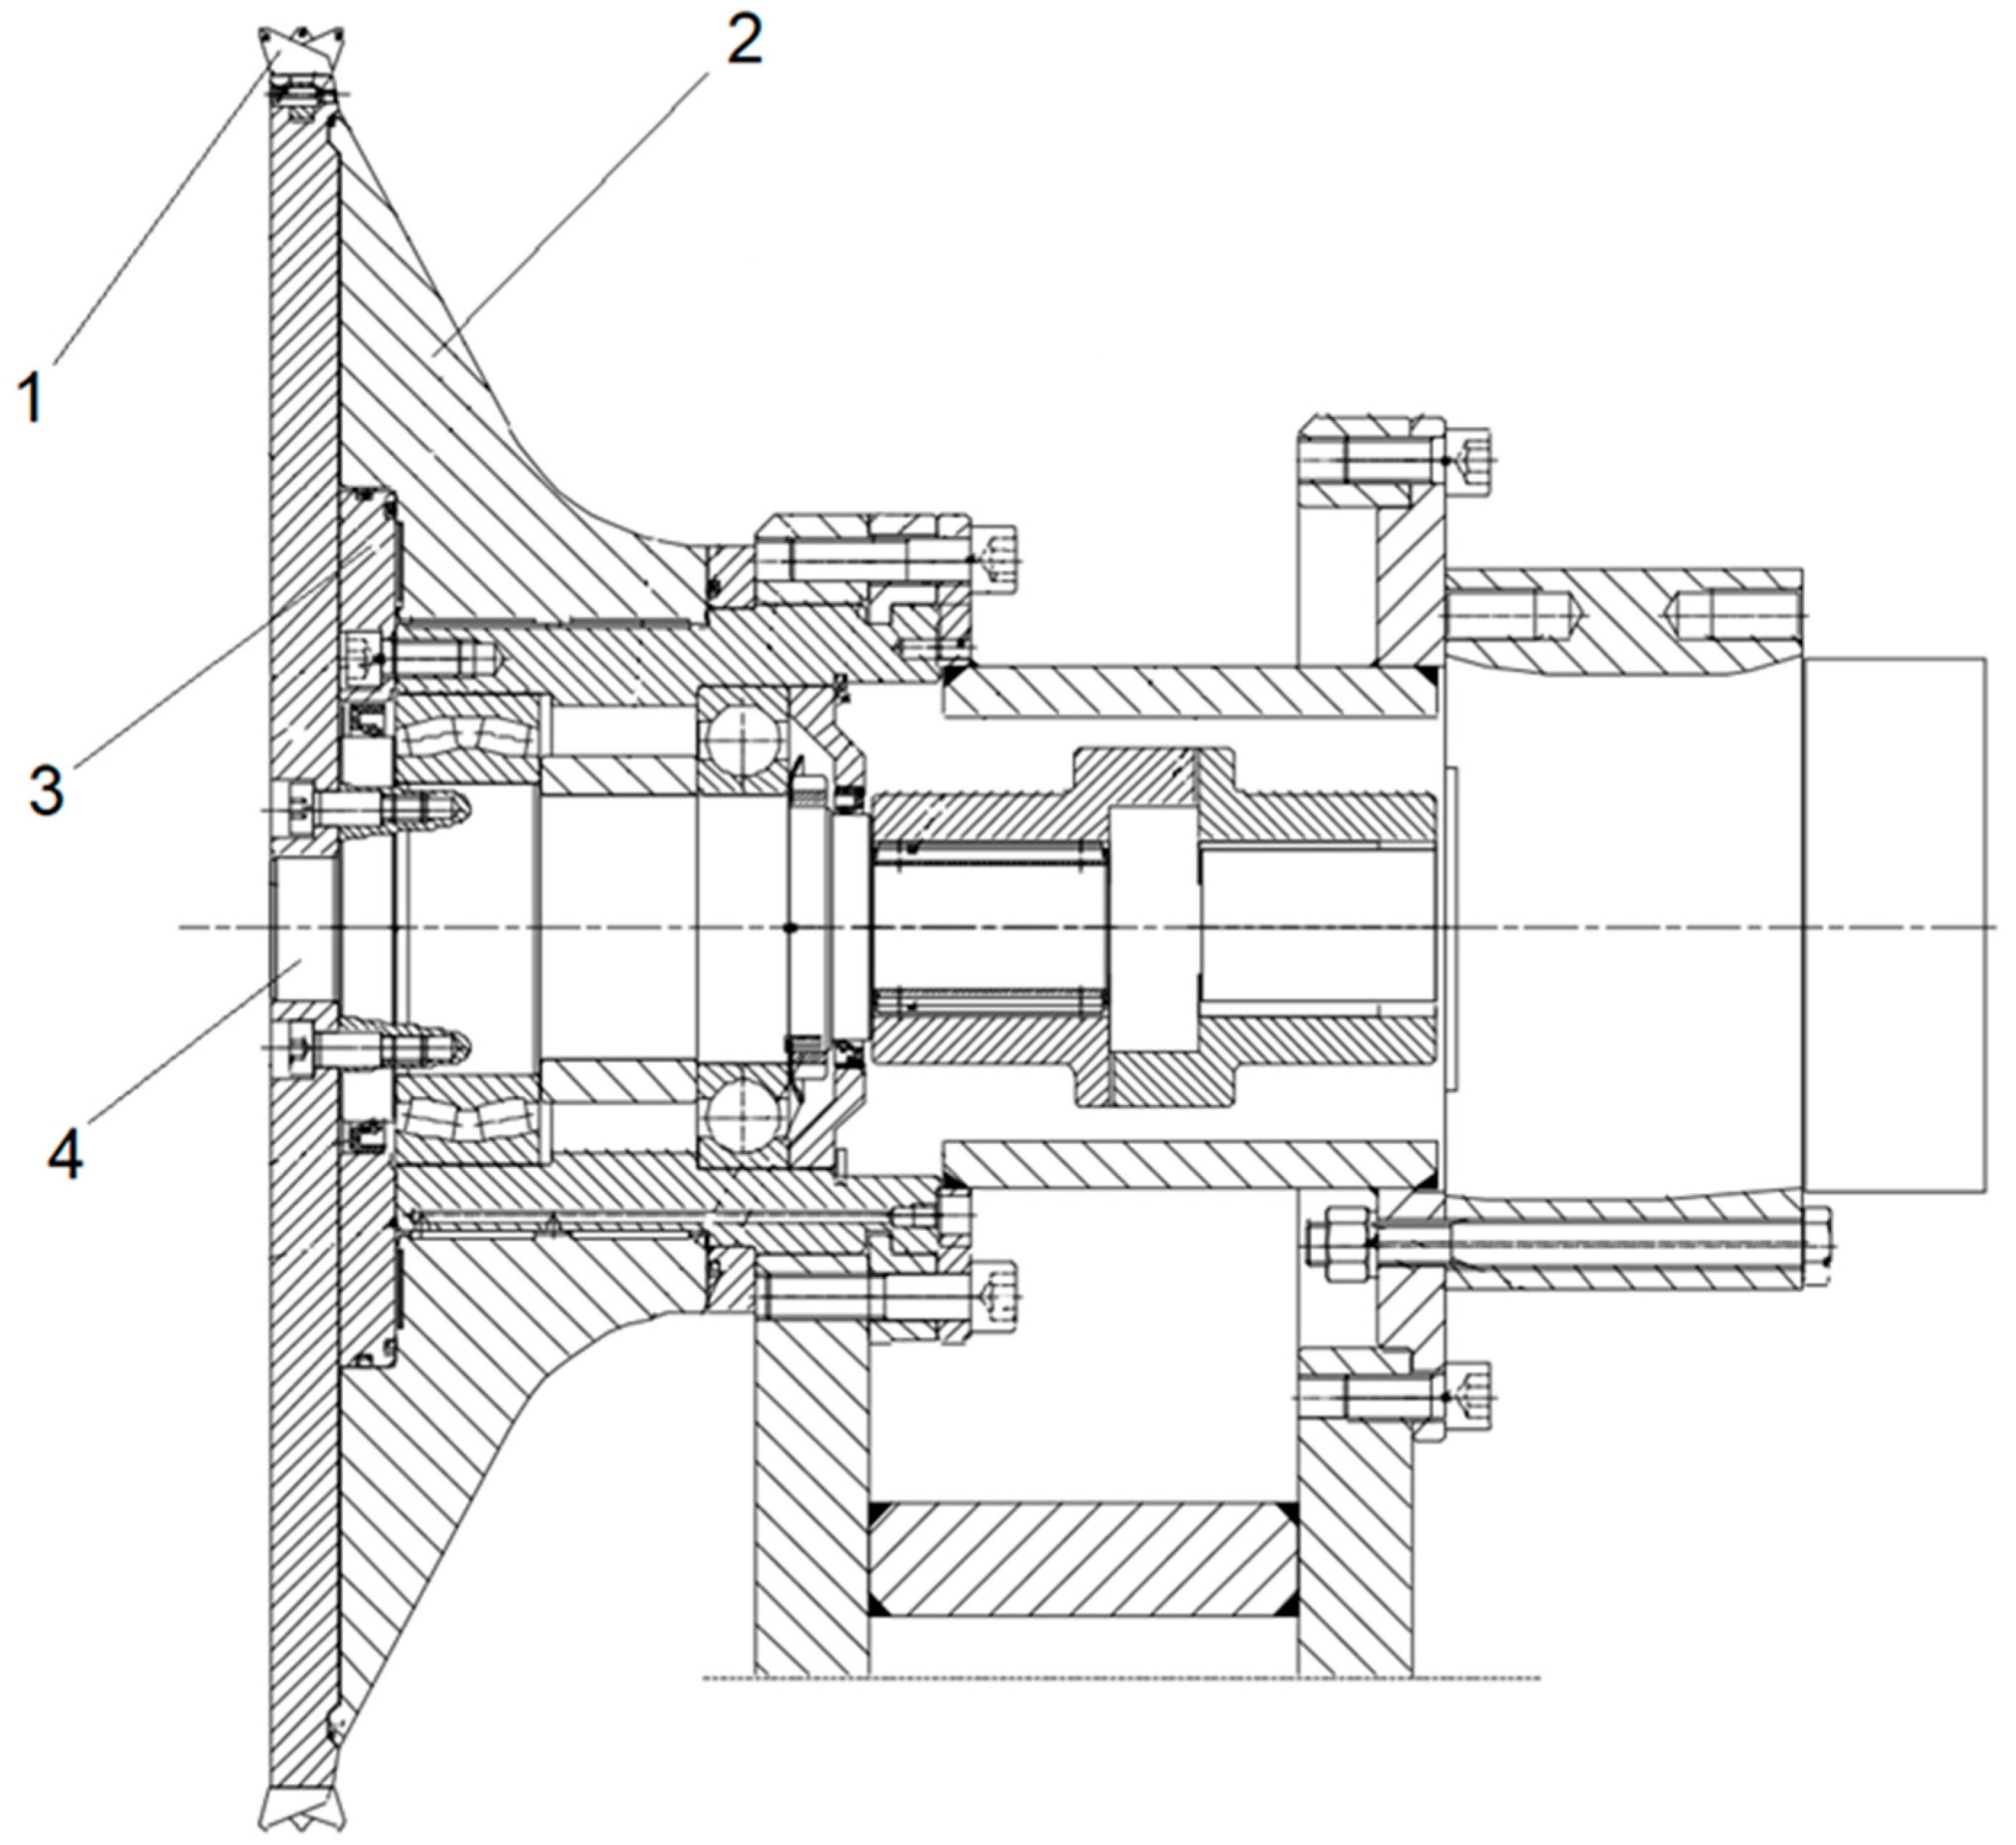
The design of the experimental cutterhead used in the stand tests is shown in
Figure 3.
The main structural components of the cutterhead are:
- -
A milling disc;
- -
A conical chipping disc;
- -
A clutch transmitting torque from the hydraulic motor;
- -
A bearing.
The cutterhead function is to separate lumps of mined material from the rock mass. For this purpose, the cutterhead is equipped with a disc with tools that creates a slot in the rock mass, on which a conical-wedge disc acts. The cone sidewall causes tensile forces in the rock mass due to the cutterhead sliding motion along the rock mass face. The cutting disc and the conical wedge disc have been mounted separately because the anticipated load on the cutterhead varies over time, both in terms of value and direction. The cutterhead is detachably connected to a shaft mounted in rolling bearings inside the body. The shaft is driven by a hydraulic motor via a clutch. The rotational speed of the milling disc can be smoothly adjusted. The disc circumference is equipped with cutting tool holders. The lateral deviation of the right and left cutting tools from the disc plane of symmetry is such that the width of the slot cut by the disc is as small as possible and simultaneously greater than the combined width of the disc and the edge of the cone side surface. This allows for smooth insertion of the chipping disc into the slot and prevents friction between the outer surface of the undercutting disc and the inside of the slot when chipping off lumps of mined material from the rock mass. The chipping disc, with a sliding bearing on the outside of the body, can remain stationary relative to the milling disc as the mined material falls off or rotate as a result of the friction forces acting on it. The supporting structure of the cutterhead allows for positioning the disc rotational plane and the cone side surface relative to the rock mass face by rotating the upper frame section around a vertical axis. The cutterhead position is selected and determined before cutting. The height of the cutterhead rotation axis relative to the floor is also adjusted.
The laboratory tests described in ref. [
45] positively verified the developed analytical and numerical methods for modelling the process of chip detachment from solid rock using the experimental cutterhead. It was demonstrated that, as a result of the cutterhead interaction with the rock material, normal (tensile) stresses dominate, generating curvilinear (arc) detachment lines of greater length and positive curvature. The range of the chipping line is significantly affected by the angle of friction between the rock and the side of the milling disc, the angle of the cutterhead axis relative to the rock mass, the angle
β of the milling disc, and the height
H of the detached rock ledge (see
Figure 1 and
Figure 2).
2.2. Design of the Test Stand
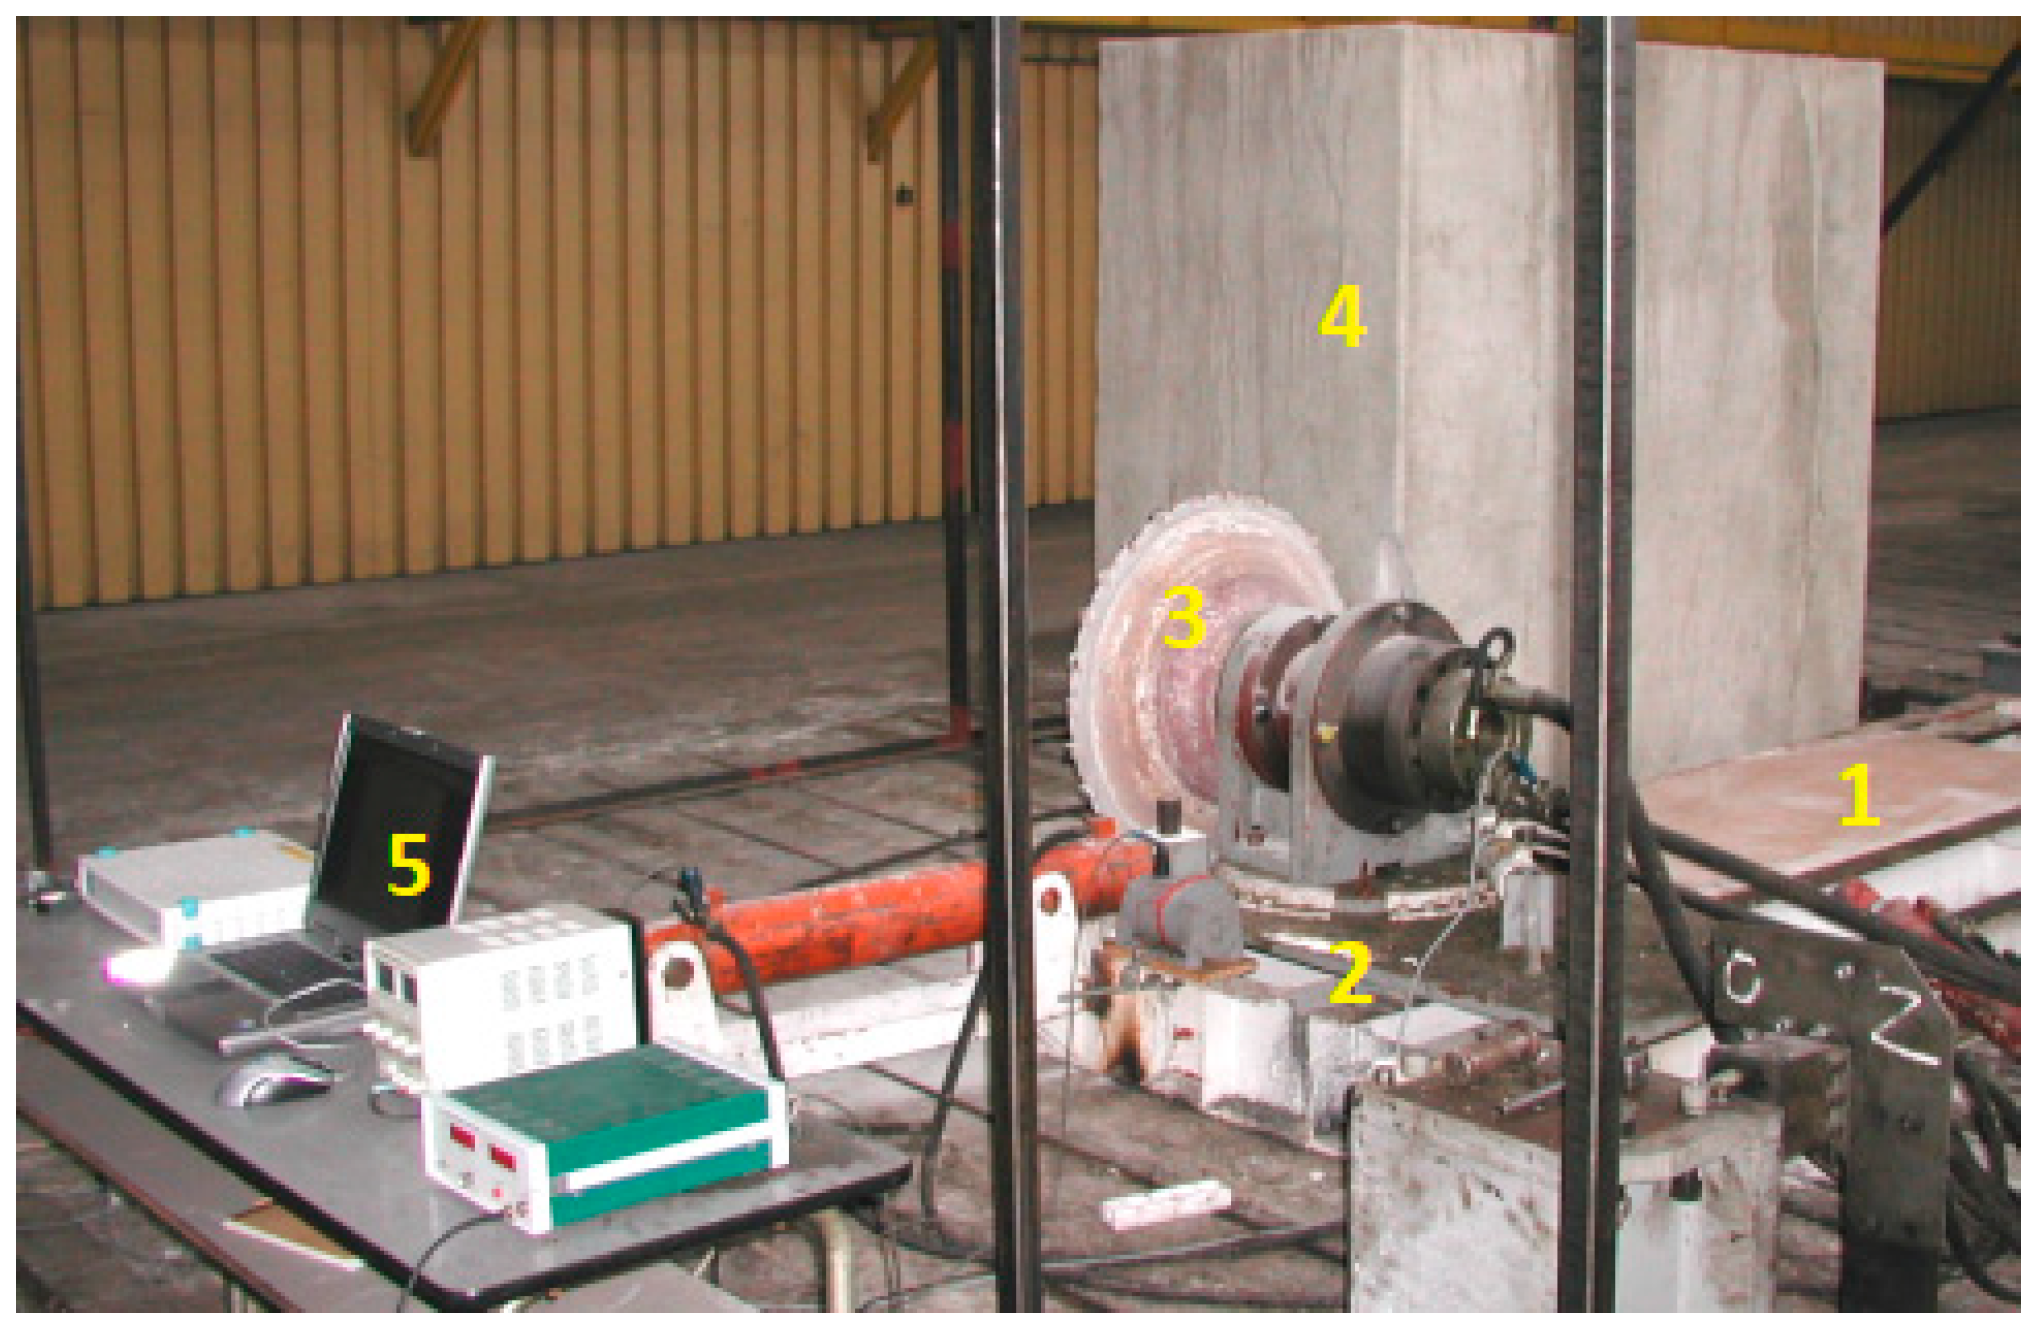
Laboratory tests aimed at determining the qualitative relationships between the energy consumption of the mining process and the design and operating parameters of the experimental cutterhead were carried out on a semi-technical scale, on a test stand at the KOMAG Institute of Mining Technology (Gliwice, Poland), and are shown in
Figure 4.
A specially designed and manufactured cutterhead (
Figure 3) with an advance drive, guidance, and control system was the testing object. The test stand design allows for the cutterhead to move in an advance motion and deflect the head axis relative to the mined rock at an angle of ±7° (
Figure 4). The support frame (1) with the guiding system of the movable longitudinal support (2), equipped with a sliding and guiding mechanism and a bracket for mounting a high-torque SOK-400K81 hydraulic motor, which drives the milling and chipping cutterhead (3) via a clutch. The hydraulic motor is powered by an A2V type pump with a variable capacity ranging from 0 to 180 dm
3/min and a pressure of 32 MPa, driven by an electric motor. For the assumed cutterhead rotational speed of
n = 100 min
−1, the required capacity is
Q = 160 dm
3/min, and the required torque is
M = 4000 Nm.
The longitudinal support is moved using a hydraulic cylinder powered by a water-oil emulsion, with a piston diameter of 80 mm and a stroke of 800 mm. The cutterhead pressure on the rock block is adjusted by controlling the pump supply pressure, while the support advance speed is set by throttling the supplying stream.
The measuring system, shown in
Figure 5, was an integral part of the test stand.
The measuring system consists of two components—the component measuring the operating parameters of the cutterhead and the component for measuring the operating parameters of the cutterhead advance system. The first component consists of sensors marked in
Figure 5 with the symbols
CP1,
UP1,
UO, and a throttle valve
ZD1, installed in the hydraulic system supplying the cutterhead rotation assembly. The throttle valve
ZD1 allows for manual adjustment of the milling disc rotation speed. Pressure in the supply system was measured using a
UP1 strain gauge pressure sensor, while volume of the medium flowing through the system was measured by the
CP1 flow sensor. Both sensors were attached to the hose supplying the working chamber of the
SH hydraulic motor. Furthermore, the disc rotational speed was recorded using a
UO rotational speed sensor. The measuring system consisted of the sensors marked
UP2 and
CP2, as well as a
ZD2 throttle valve. The
ZD2 valve, connected to the advance cylinder’s under-piston chamber, controlled the cylinder filling rate. The
UP2 strain gauge sensor measured pressure, while the
CP2 sensor measured flow rate. The linear displacement of the cutterhead along the rock block was determined using an inductive
UL displacement sensor. Measurement signals from all sensors were transmitted via an amplifier to the recording and analysis system, marked in the drawing as “Recorder.” Temperature on the cutterhead surface was measured by a contactless temperature recorder, with direct readings on the display. The measuring system enabled sampling of measurement signals at a frequency of 50 Hz. The following parameters of the hydraulic motor that gave rotary motion to the milling disc were determined: hydraulic motor supply pressure, motor displacement, and motor shaft rotational speed. In the case of the hydraulic cylinder that gives advance motion to the cutterhead, the following parameters were determined: support advance speed and the supply pressure of the advancing cylinder.
2.3. Testing Methodology
Physical quantities of the experimental cutterhead operation were analysed. Their values were determined either directly using the results of measurements taken at the test stand or indirectly using the results of the measurements.
The following parameters of the cutterhead were determined directly:
pz—hydraulic motor supply pressure [MPa].
V—hydraulic motor capacity (flow) [dm3/s].
n—hydraulic motor shaft rotational speed [min−1].
z—web depth of a head [m].
α—head tilt angle relative to the cutting direction [deg].
pzp—supply pressure in the advancing cylinder [MPa].
t—cutting duration for each stage [s].
s—cutterhead travel distance [cm].
and indirectly, using the measurement results:
v—head advance speed [m/min].
Fno—cutterhead advancing force [N].
Nskr—head drive motor power [W].
Npos—advancing cylinder power [W].
The mining process on the test stand had the following parameters:
(a) Rock parameters
Strength to the unit pressure—Rc = 10.6 MPa.
Resistance to shear—Rt = 6.7 MPa.
Coefficient of strength asymmetry—Rc/Rr = 7.6.
Rock density—r = 2.4 g/cm3.
(b) Cutterhead geometric parameters
Angle of the chipping part β = 30°.
Angle of the axis position δ = 0°, 3°, 6°.
(c) Technological parameters of the head operation
During the tests, two separate cases were considered: when the cutterhead was deepened in the rock in its entire diameter and when the cutterhead penetration was approximately half the cutterhead diameter.
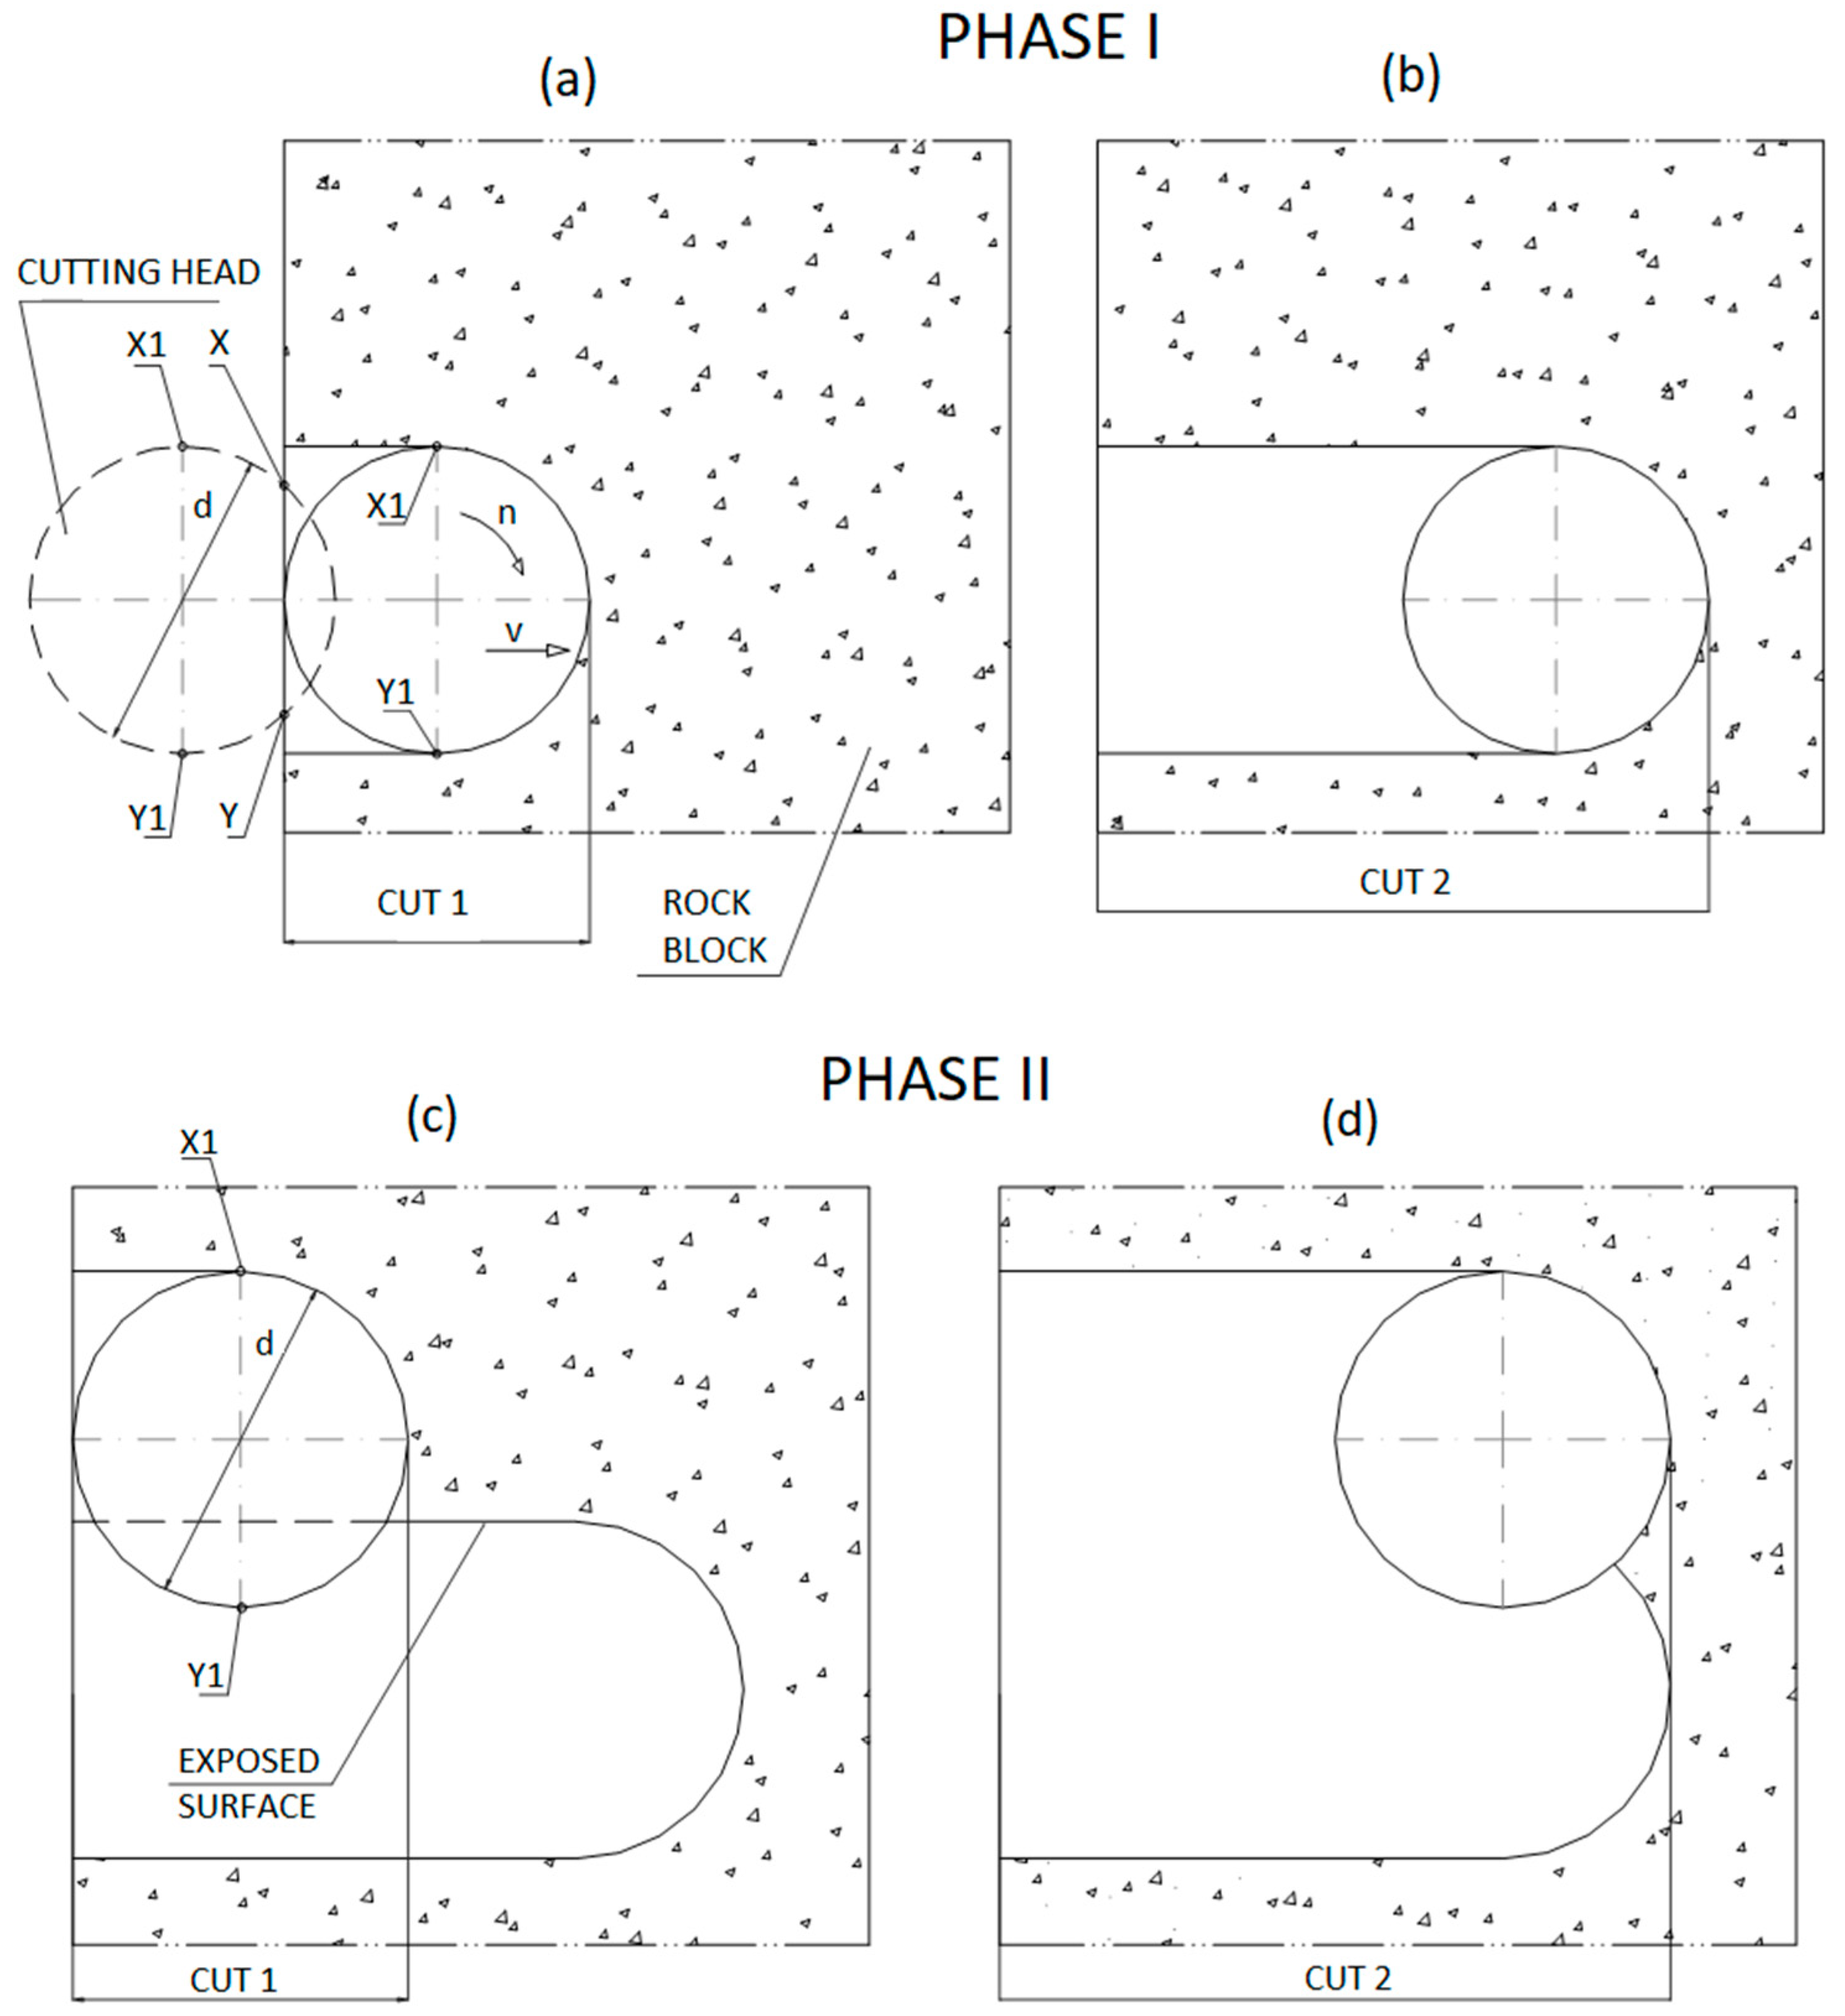
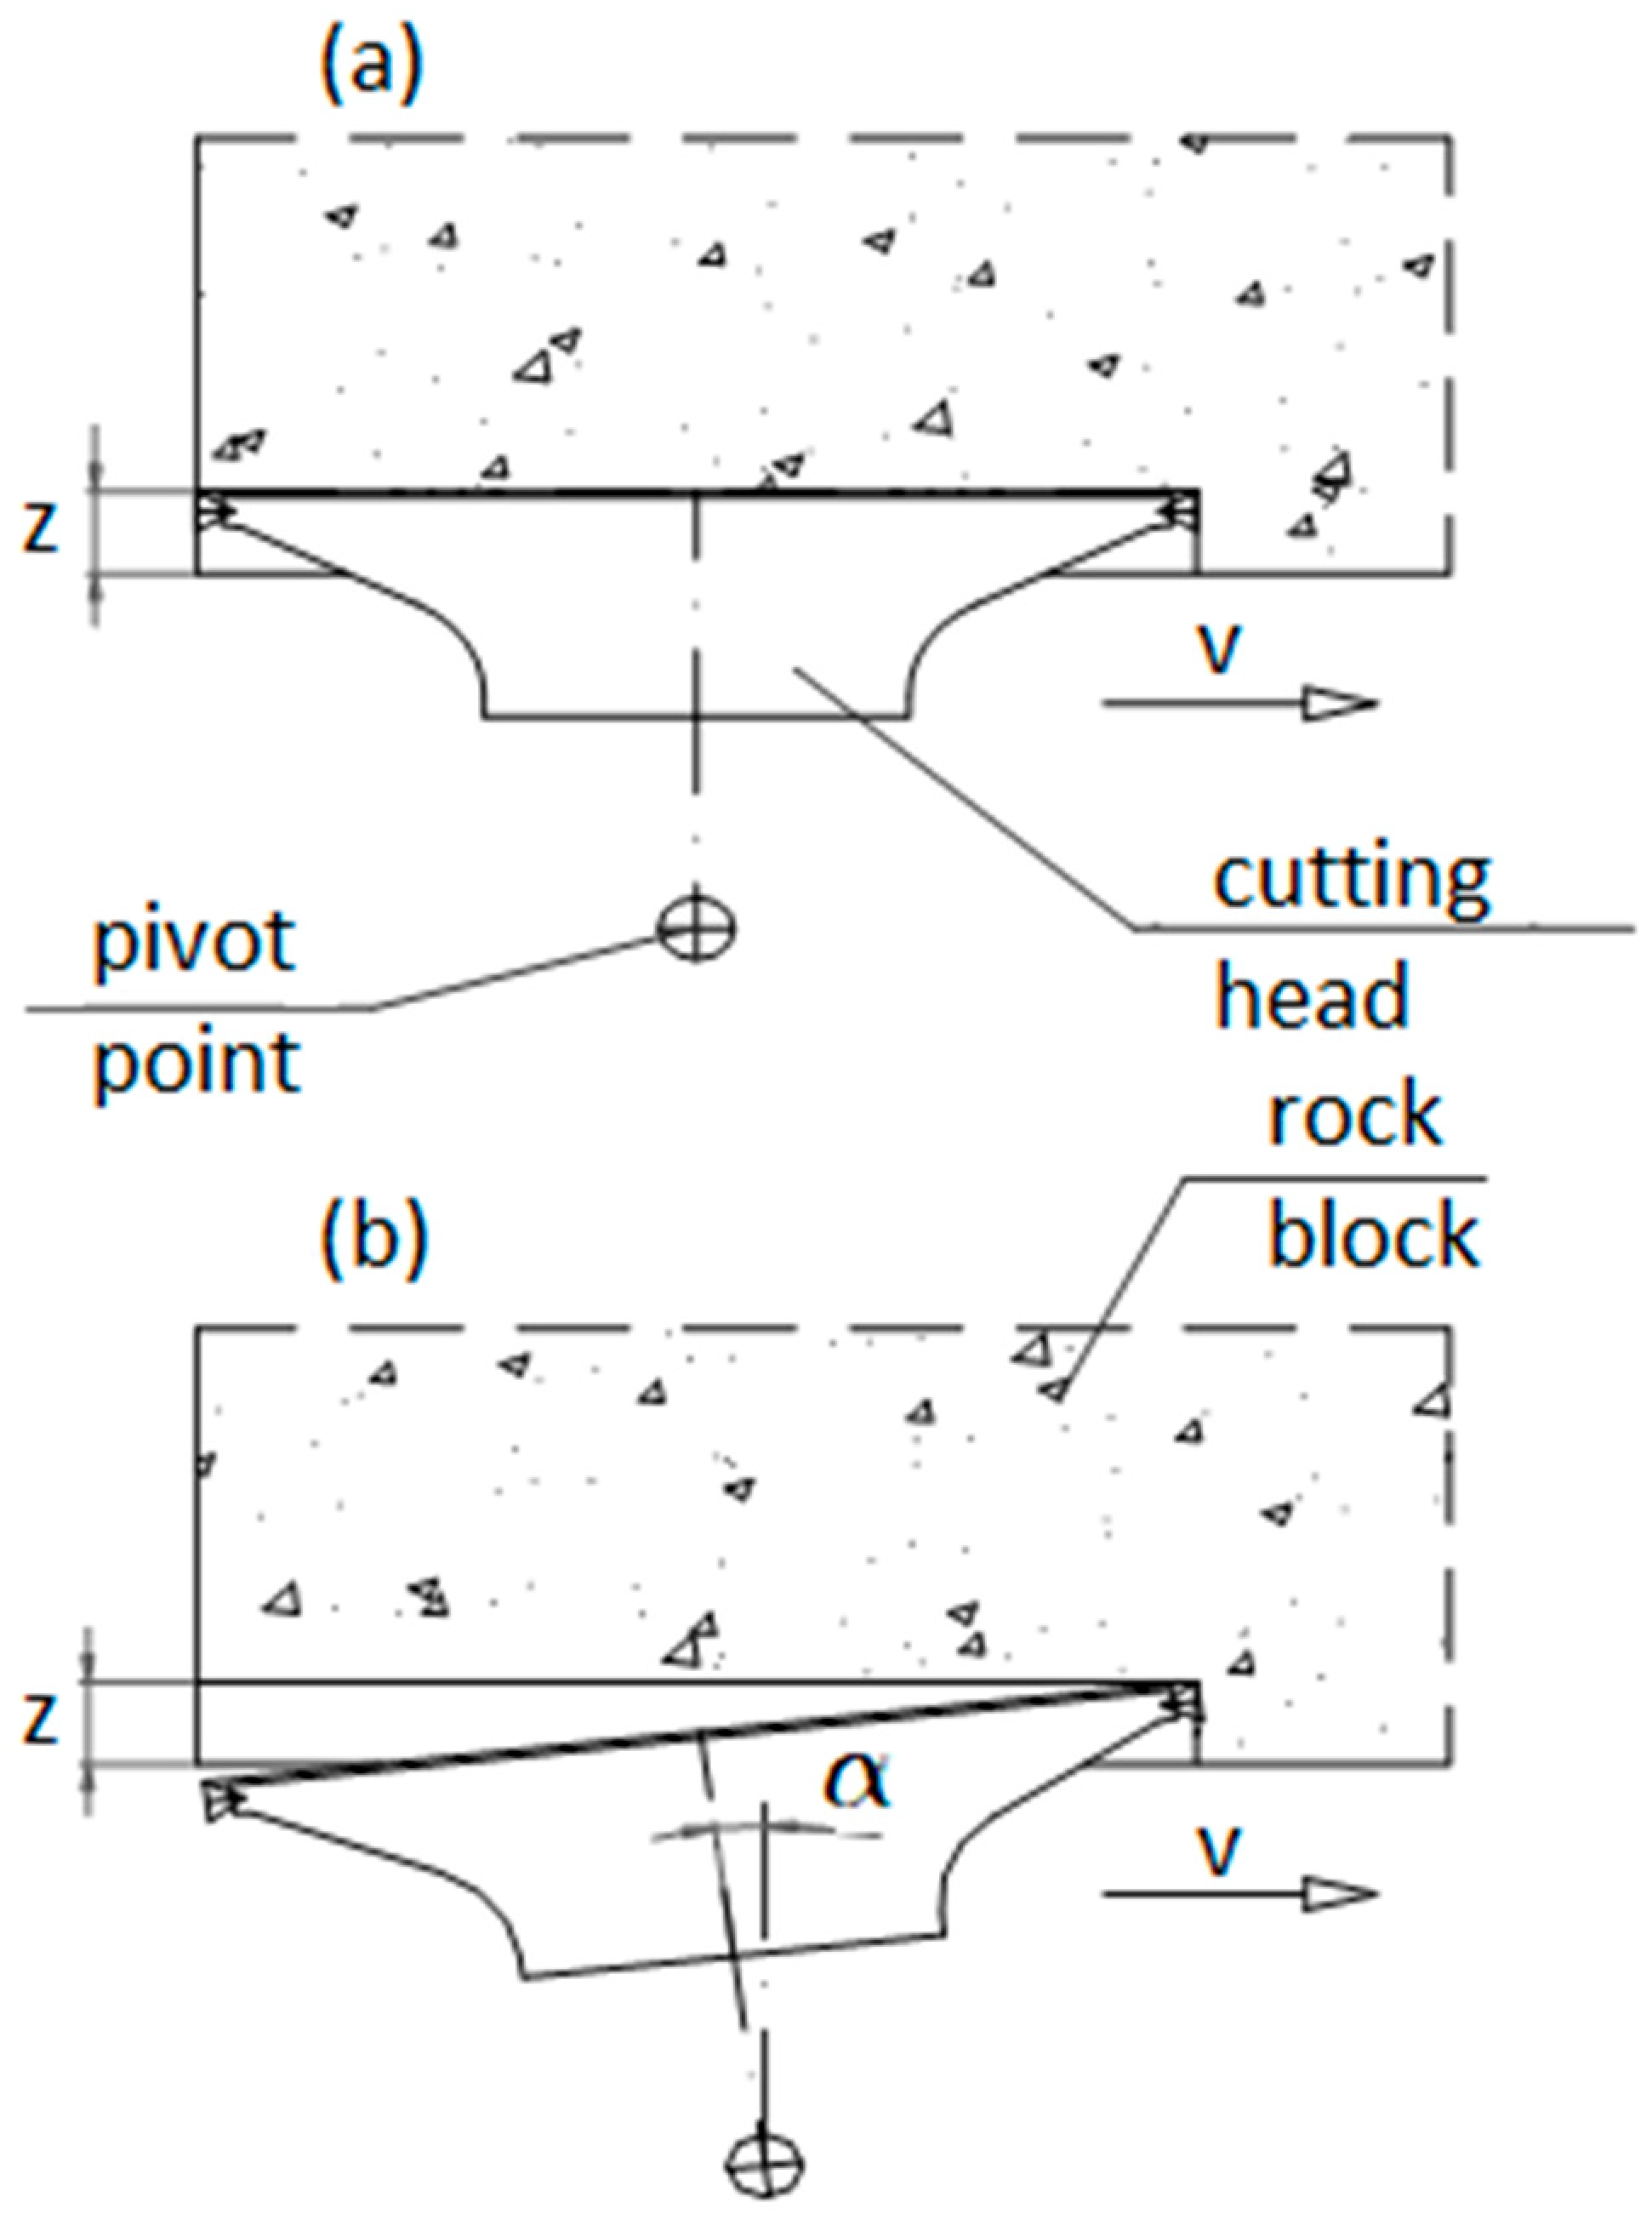
The test cycle involved cutting a specific thickness of rock block material in two phases, determined by the cutterhead position, as illustrated in
Figure 6a–d. The tests were performed with the cutterhead web depth (
z) of 50, 65, 75, and 95 mm, and with three angles of the disc rotation axis (
α) relative to the axis perpendicular to the advance direction, 0°, 3°, and 6°, set counterclockwise, as shown in
Figure 7. It should be noted that during each 800 mm long measurement cycle, the web depth (
z) and the tilt angle (
α) were constant.
Phase I consisted of two cuts, each 800 mm long, at the bottom position of the cutterhead (without a support). This cut was identified as an opening one.
Phase II, after Phase I, consisted of making two cuts, each 800 mm long, with the top position of the cutterhead (using a support). This cut was identified as a semi-open cut. In some cases, the cuts were made in reverse, i.e., the opening cut was the top cut, not the bottom cut.
Figure 6a shows the moment the cutterhead, shown as a dashed line, cuts into the rock block. At this time, the extreme contact points
X and
Y of the cutterhead with the block are below the extreme points
X1 and
Y1, which determine the head diameter
d. After giving the cutterhead rotational speed
n and an advance motion, the cutterhead begins to move at an advance rate
vp. After passing the first measuring section, marked “cut 1”, the cutterhead passes the second measuring section, “cut 2”, shown in
Figure 6b, with the full diameter of the cutterhead cut, defined by contact points
X1 and
Y1, being cut into the rock block. Then, the cutterhead is set to the top position, shown in
Figure 6c, and the cutting process begins with a partially exposed plane with which point
Y1 is not in contact. This means that the cutterhead is not fully cut in with its entire diameter
d. The cutterhead also passes the “cut 2” measurement section shown in
Figure 6d at a similar web depth.
The cutterhead, cut in a rock block to the web depth
z, is shown in
Figure 7a. The cutterhead is not deflected relative to the block and moves along it at an advance rate of
vp.
Figure 7b shows the cutterhead deflected relative to the block face by an angle
α. With this arrangement, the cutterhead moves at a speed of
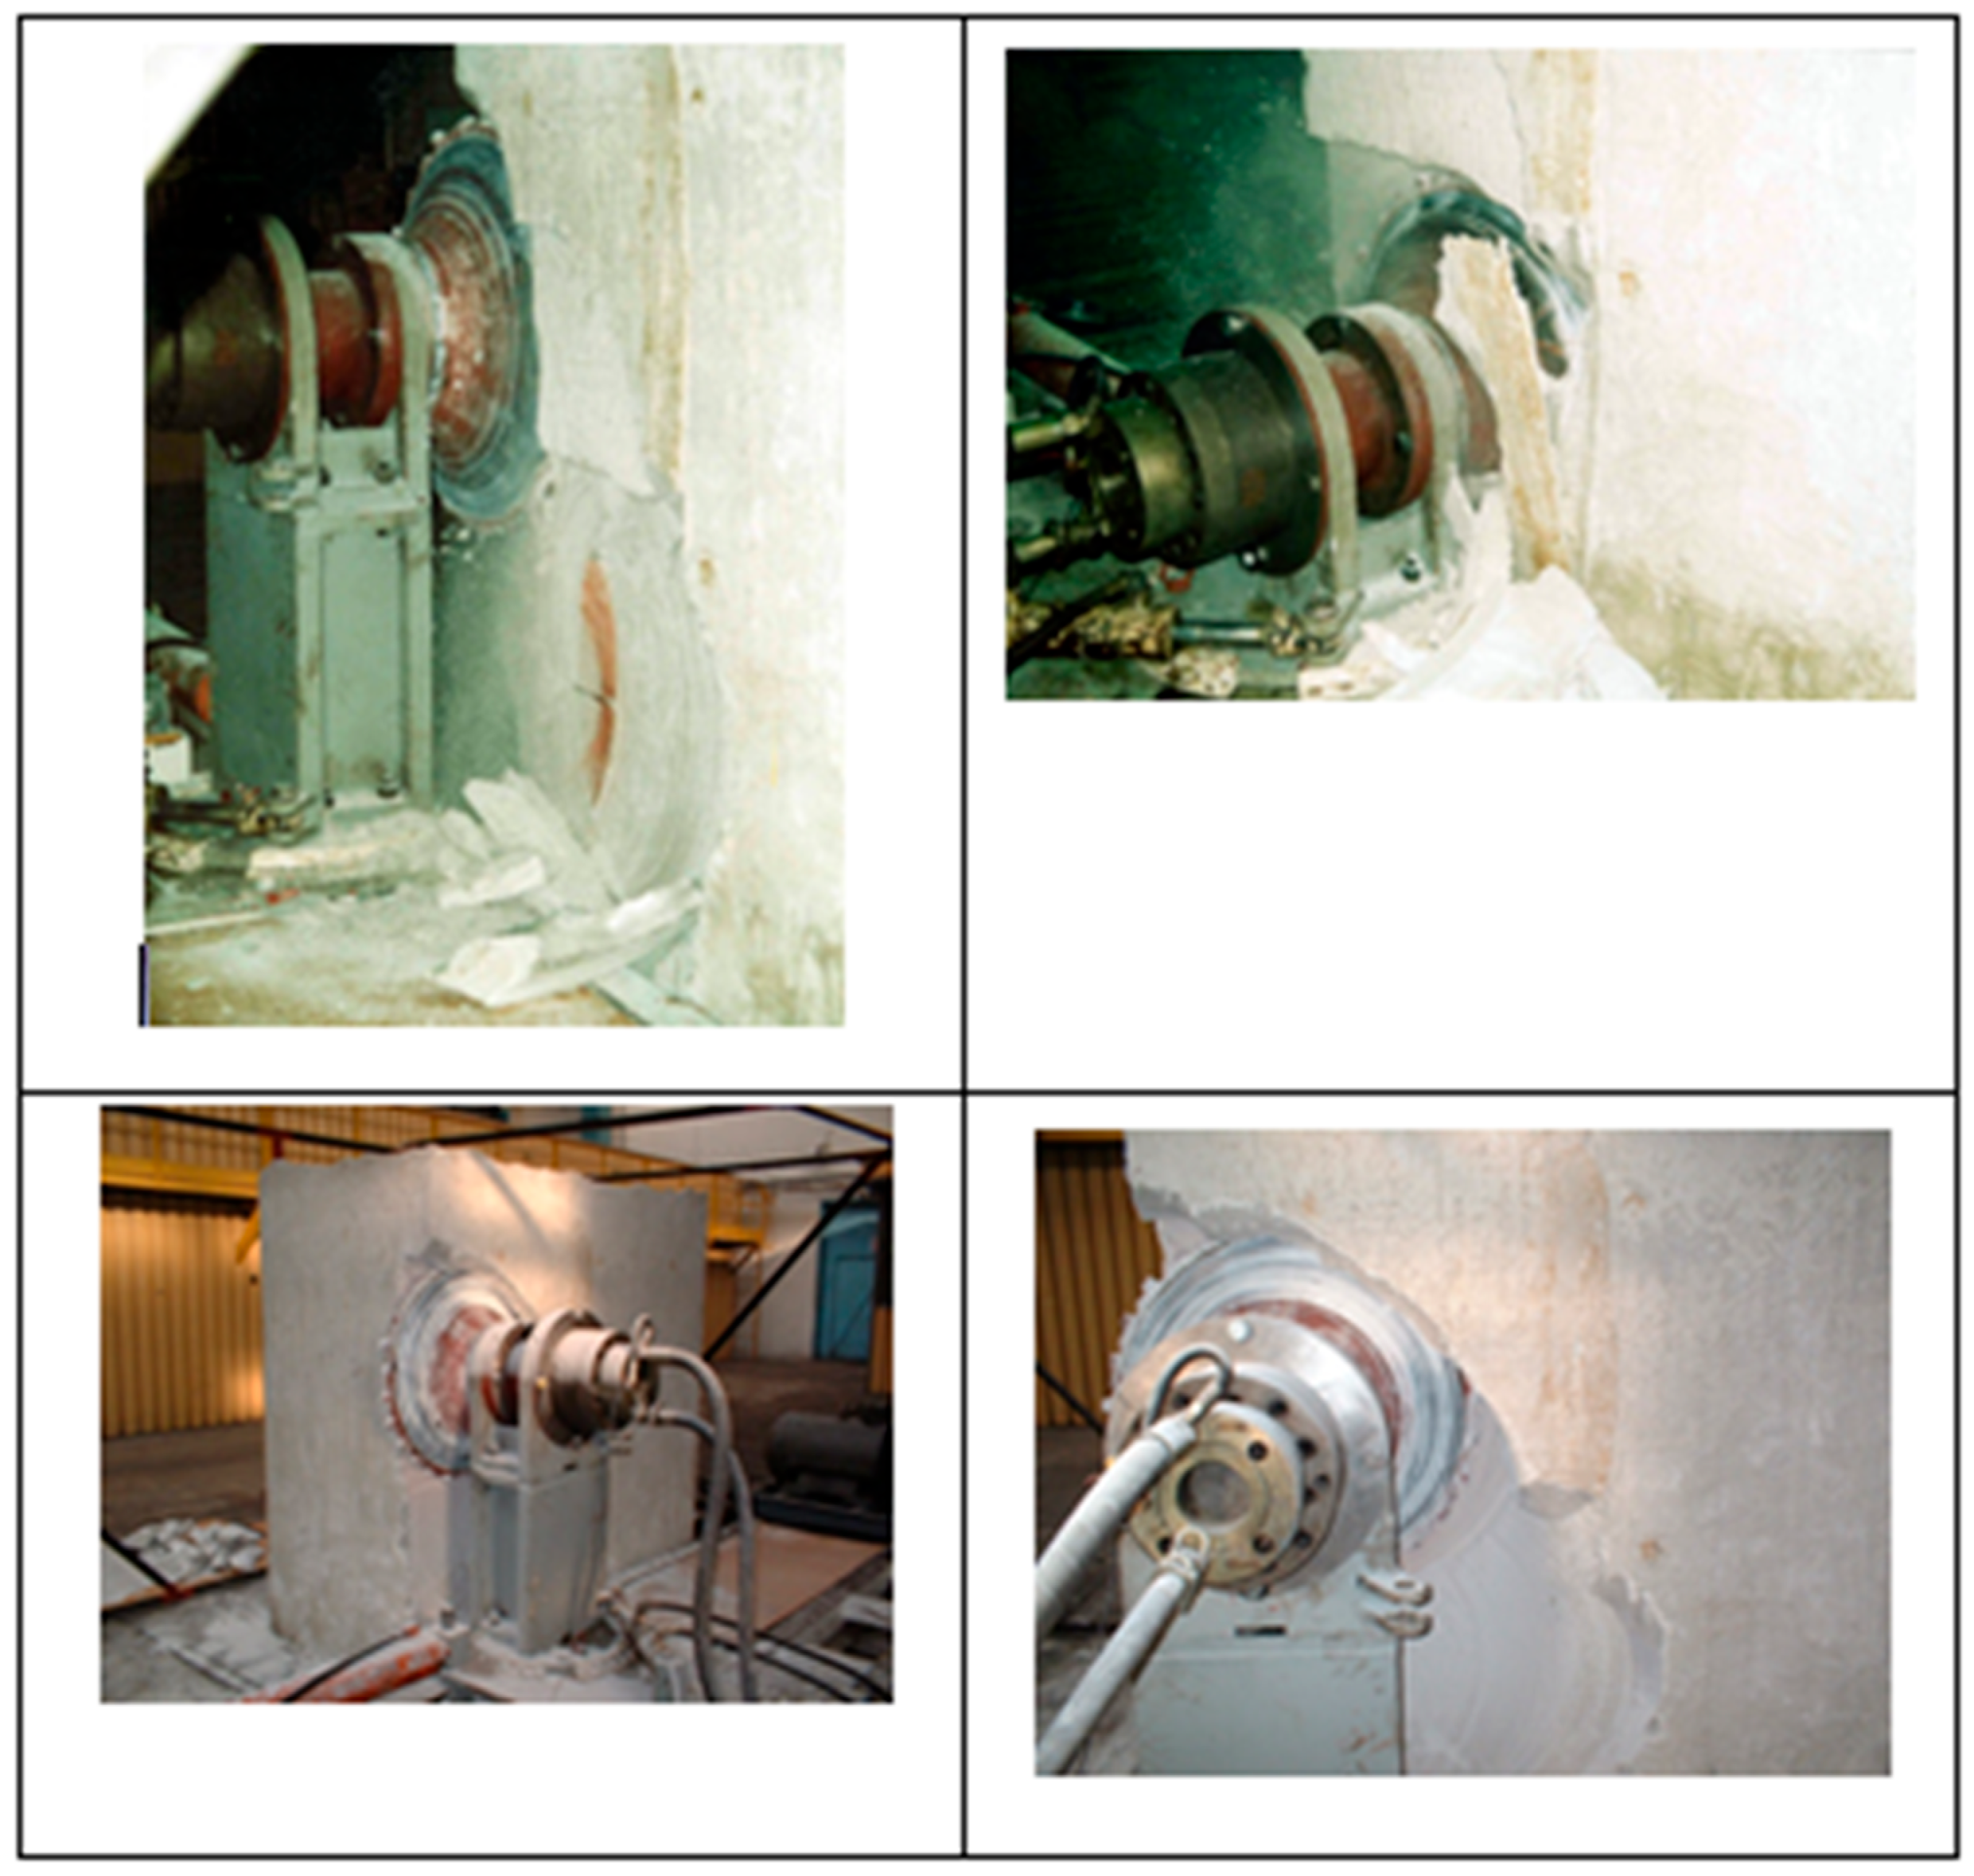
vp.Selected fragments of the discussed phases of cutting the rock block are illustrated in
Figure 8.
4. Discussion
4.1. Impact of Operating Parameters of the Cutterhead on the Specific Energy of Cutting and Grain Yield
Due to the fact that mining efficiency is primarily determined by the amount of work required to extract a given volume of coal, it was decided to use the specific mining energy
Ej when selecting the best mining parameters. This parameter describes the energy consumption of the mining process for a given rock type using the cutterhead and helps to select the most favourable mining parameters. The specific mining energy
Ej was calculated from the following Formula (1):
where
EjP—specific advance energy, [Nm/m3].
EjS—specific cutting energy, [Nm/m
3].
where
Npos—cutterhead advance power, [W].
Nskr—cutterhead cutting power, [W].
qt—specific mining volume, [m
3/h].
where
Ft—force in an advancing cylinder, [N].
v—cutterhead advancing speed, [m/s].
pz—supply pressure for a hydraulic motor, [Pa].
Q—hydraulic motor output, [m3/s].
In further analysis of the test results, the commonly used specific energy in kWh was adopted, with the conversion factor 1 kWh = 3.6 MJ.
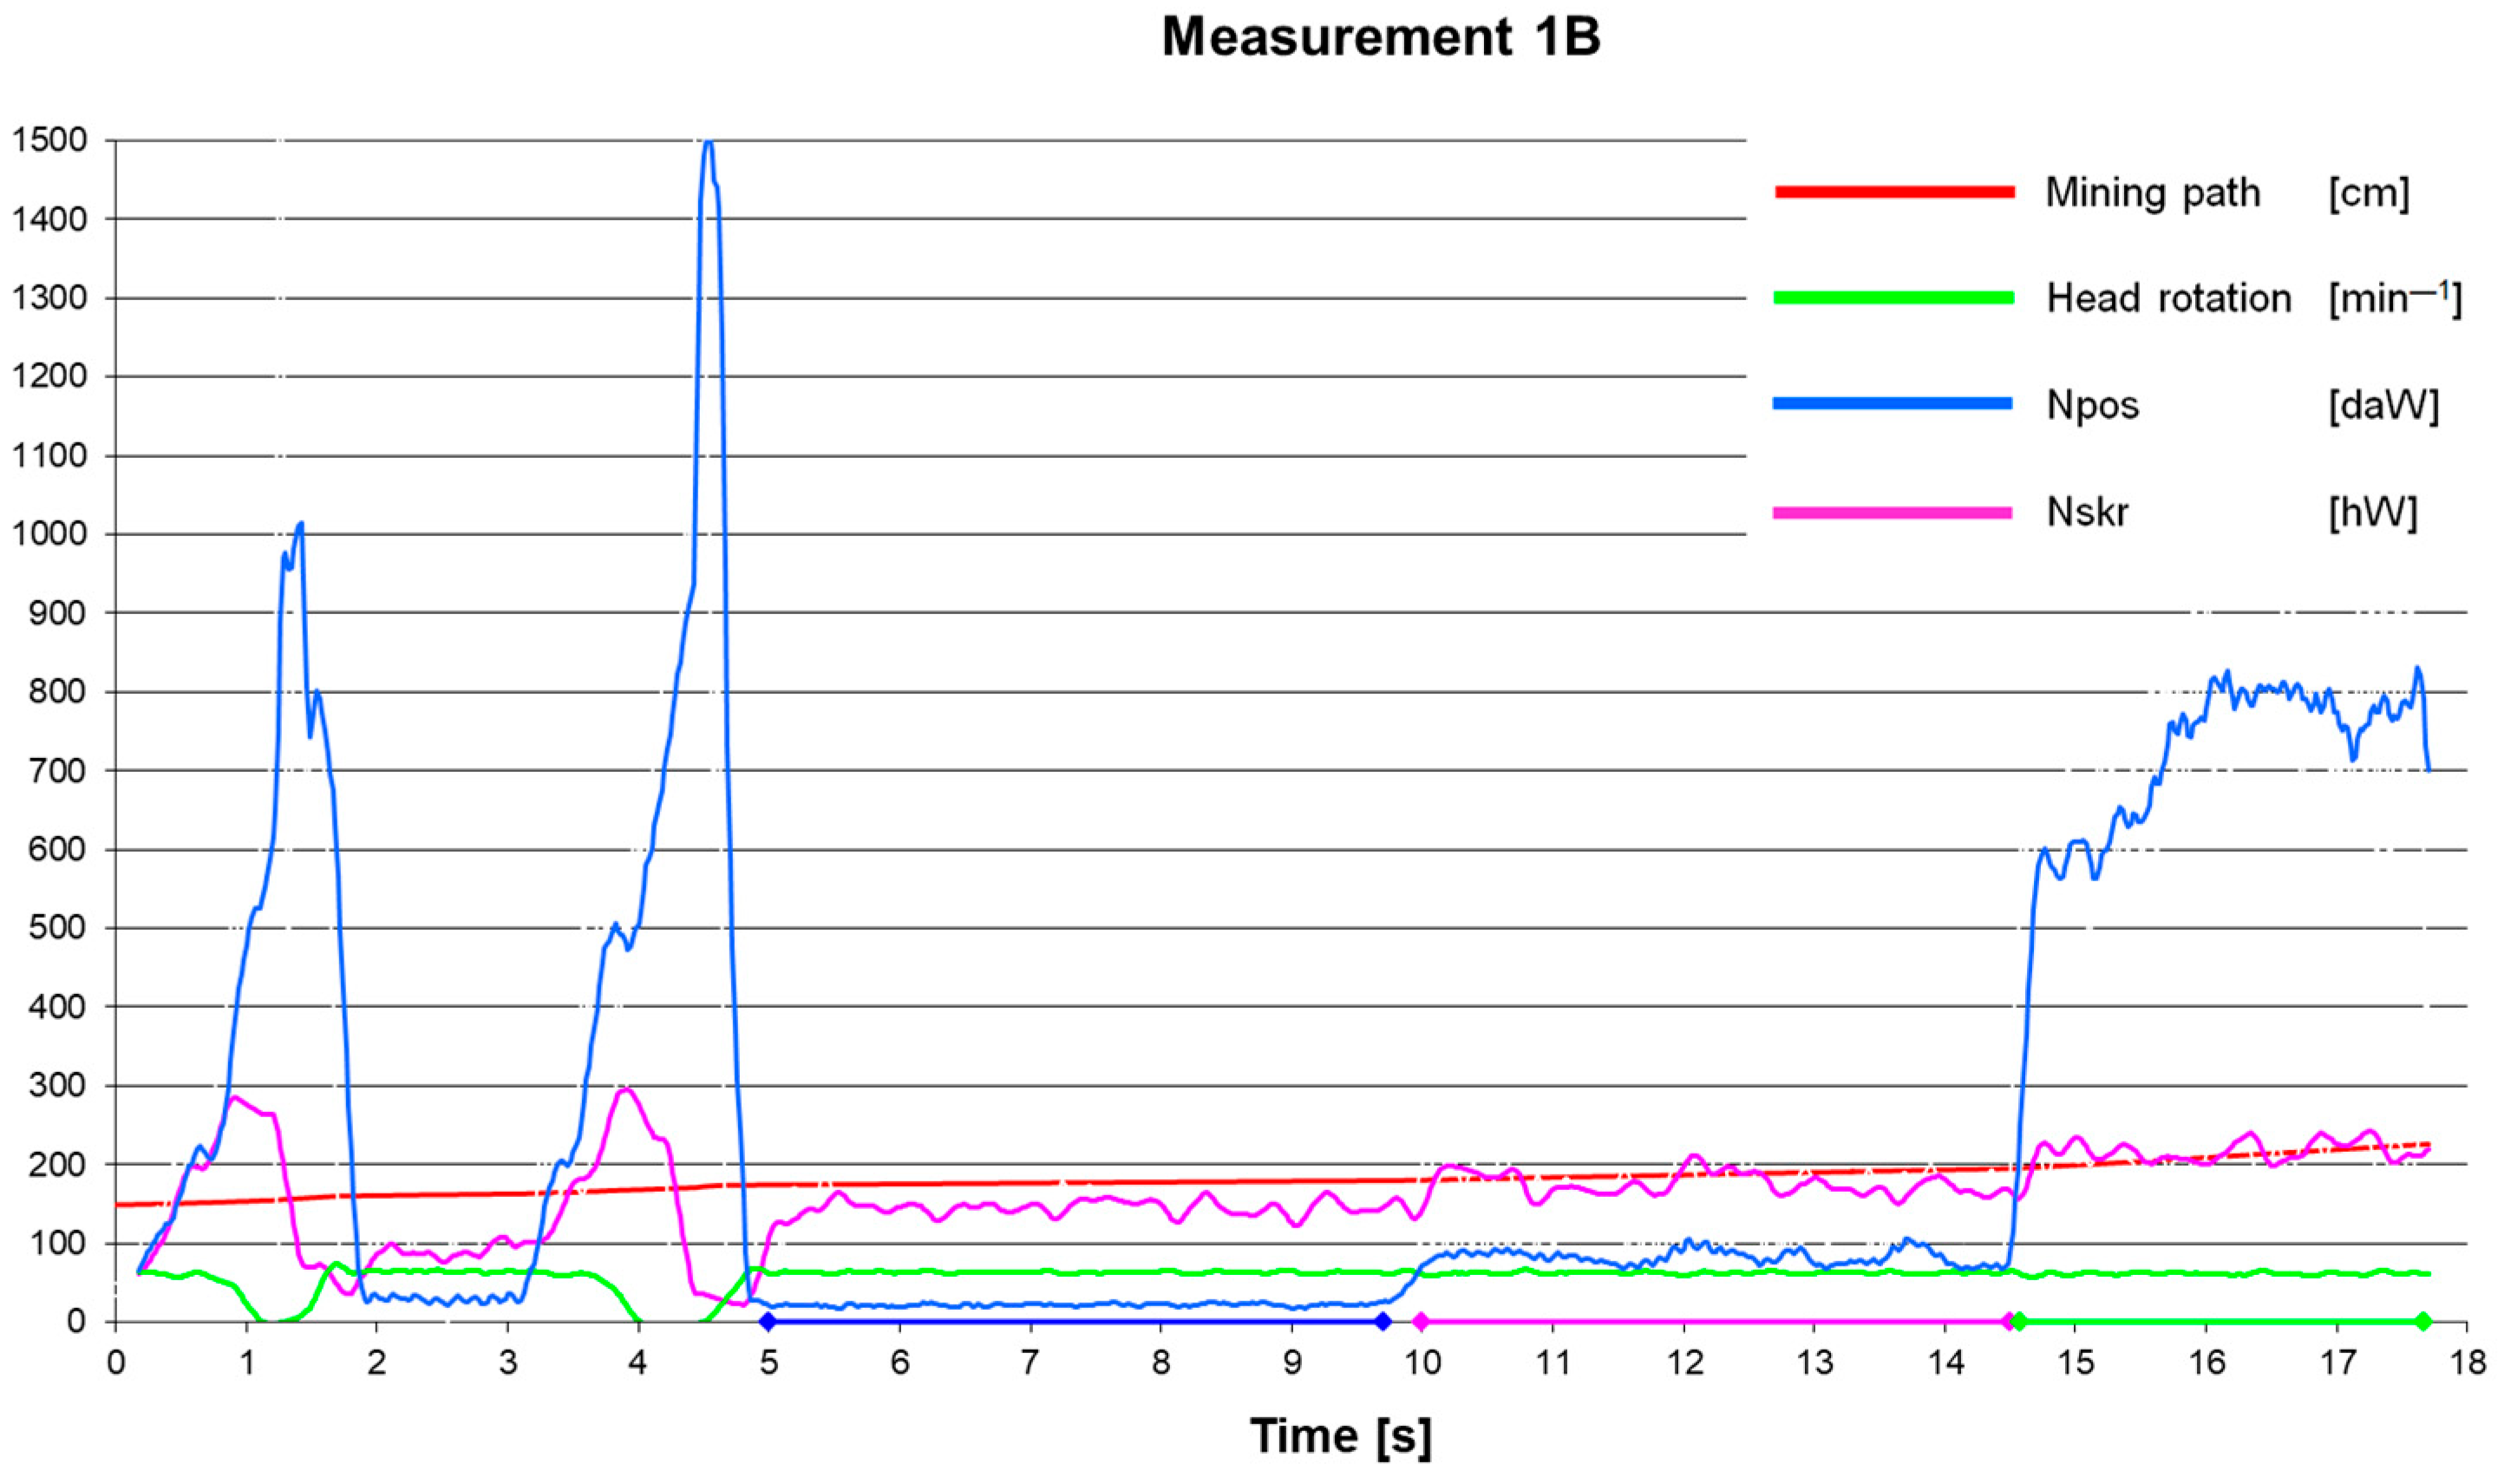
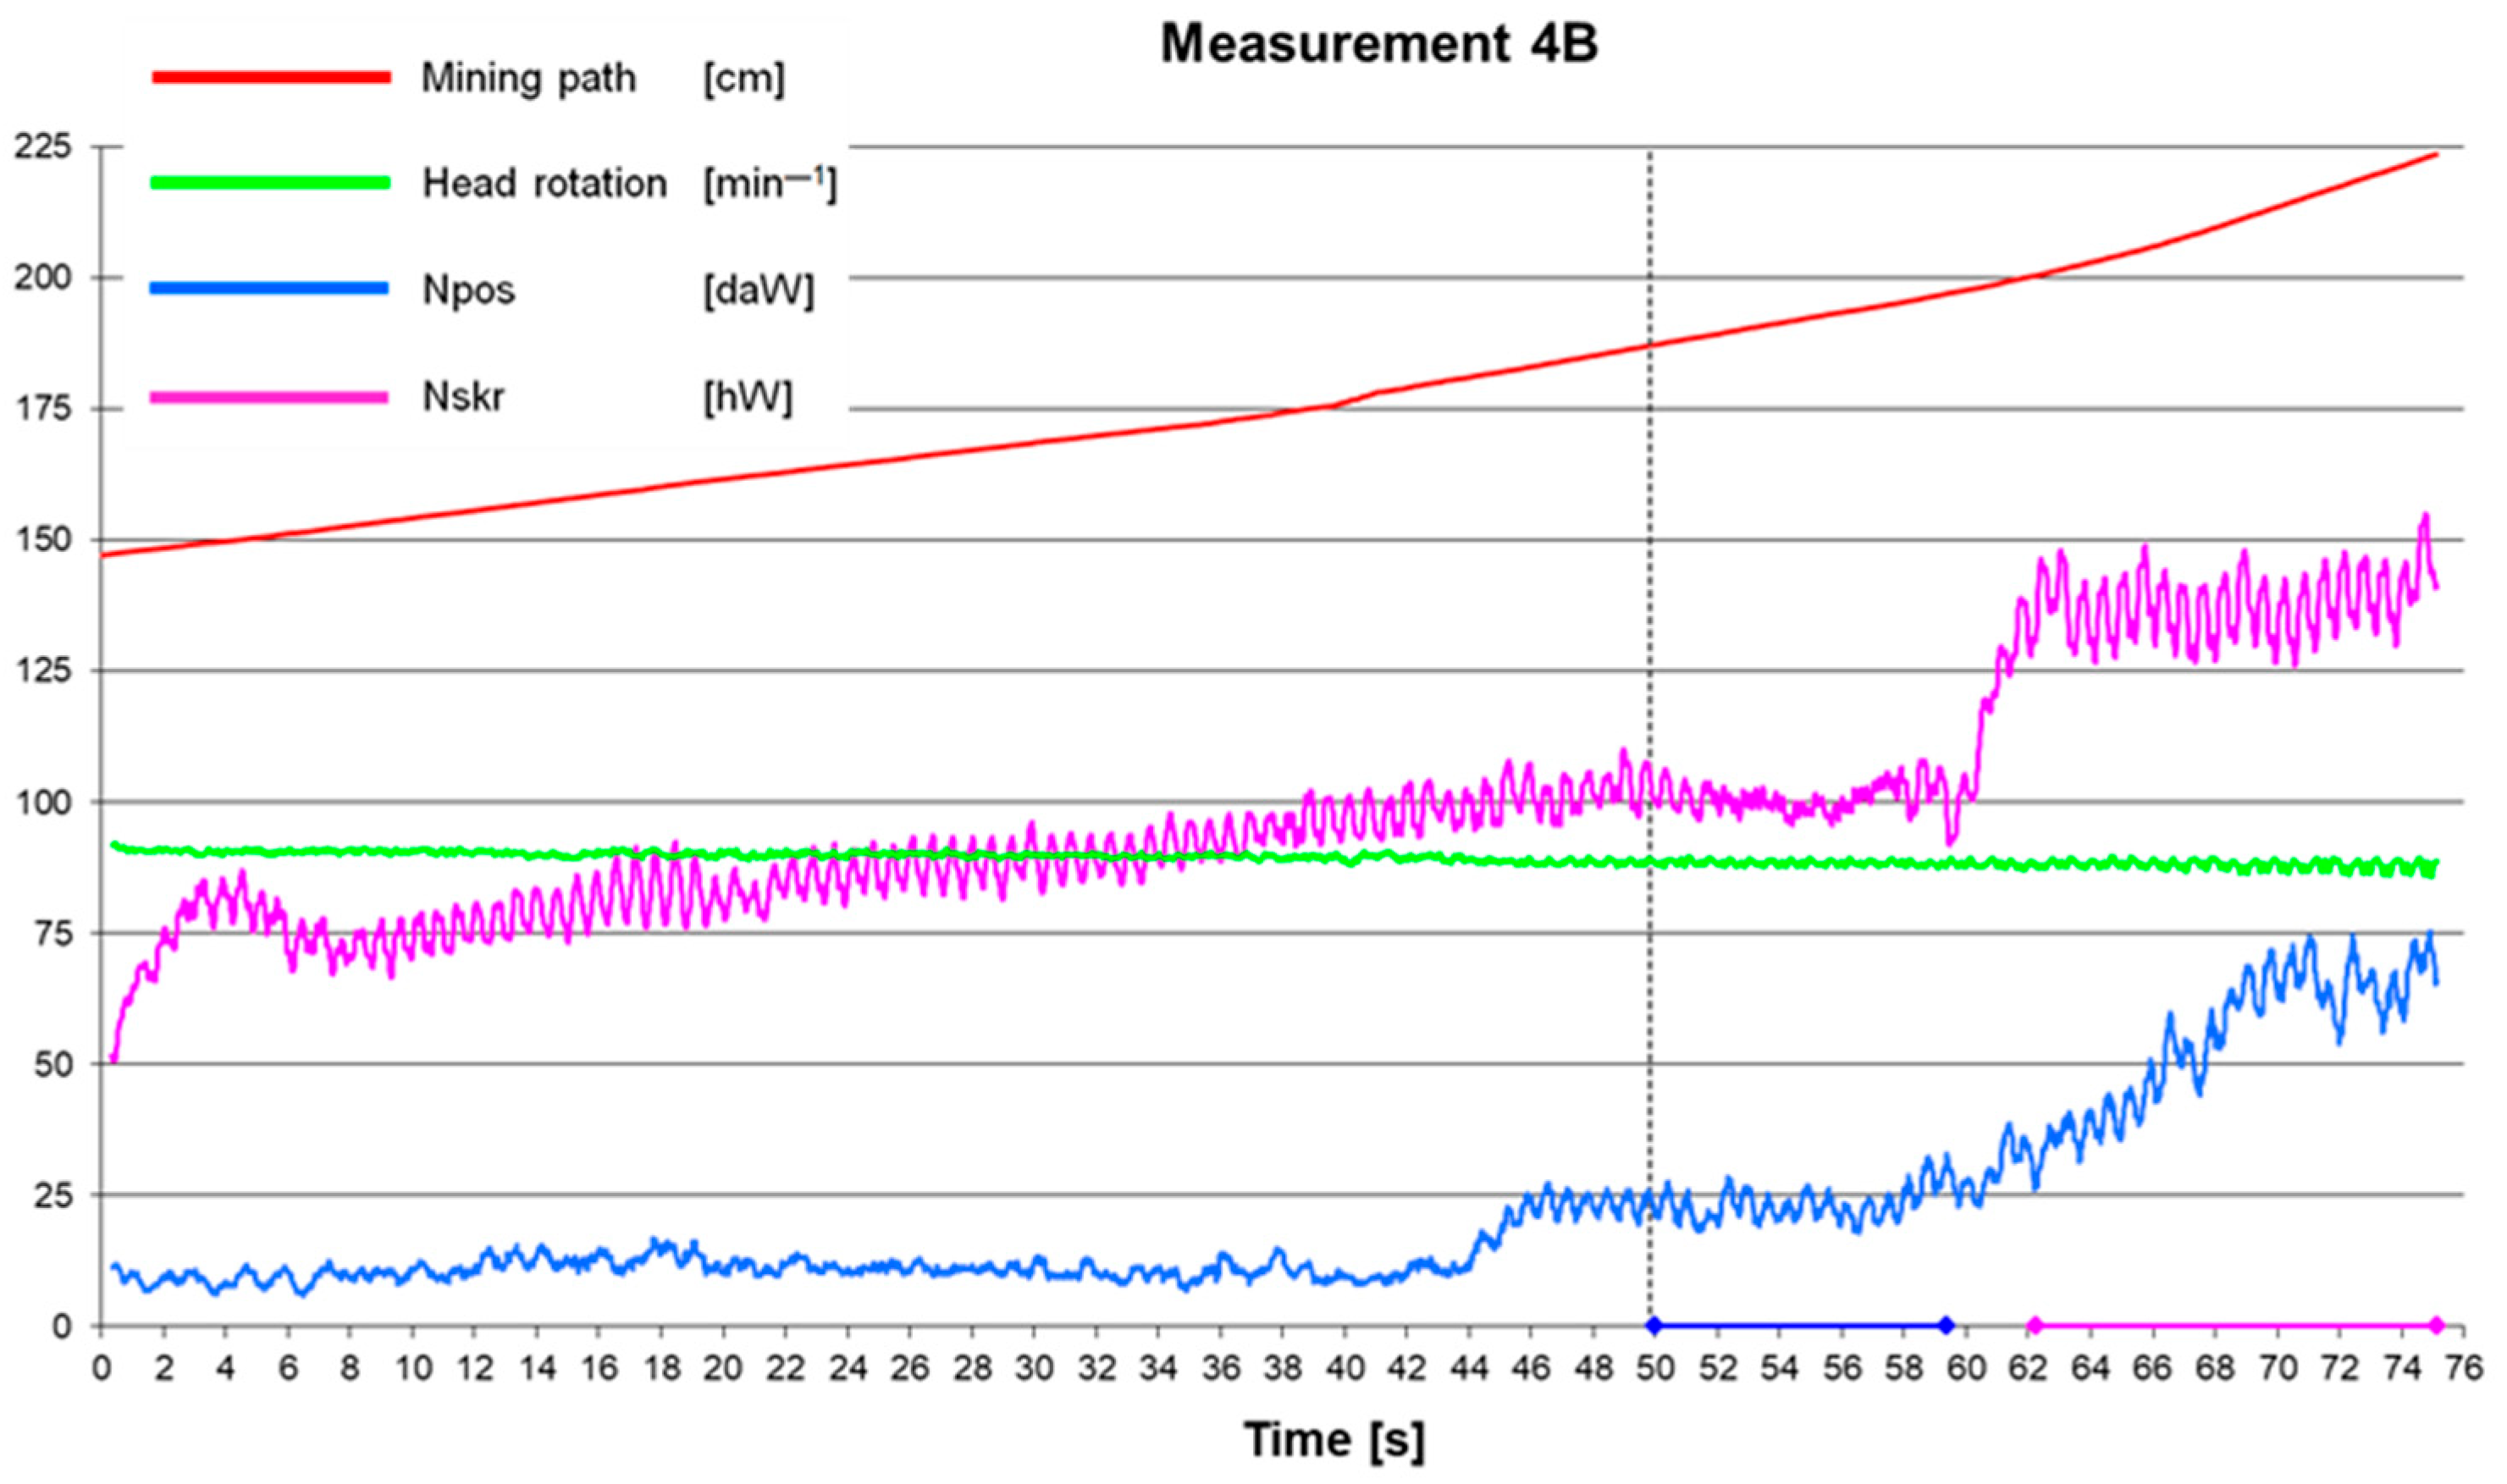
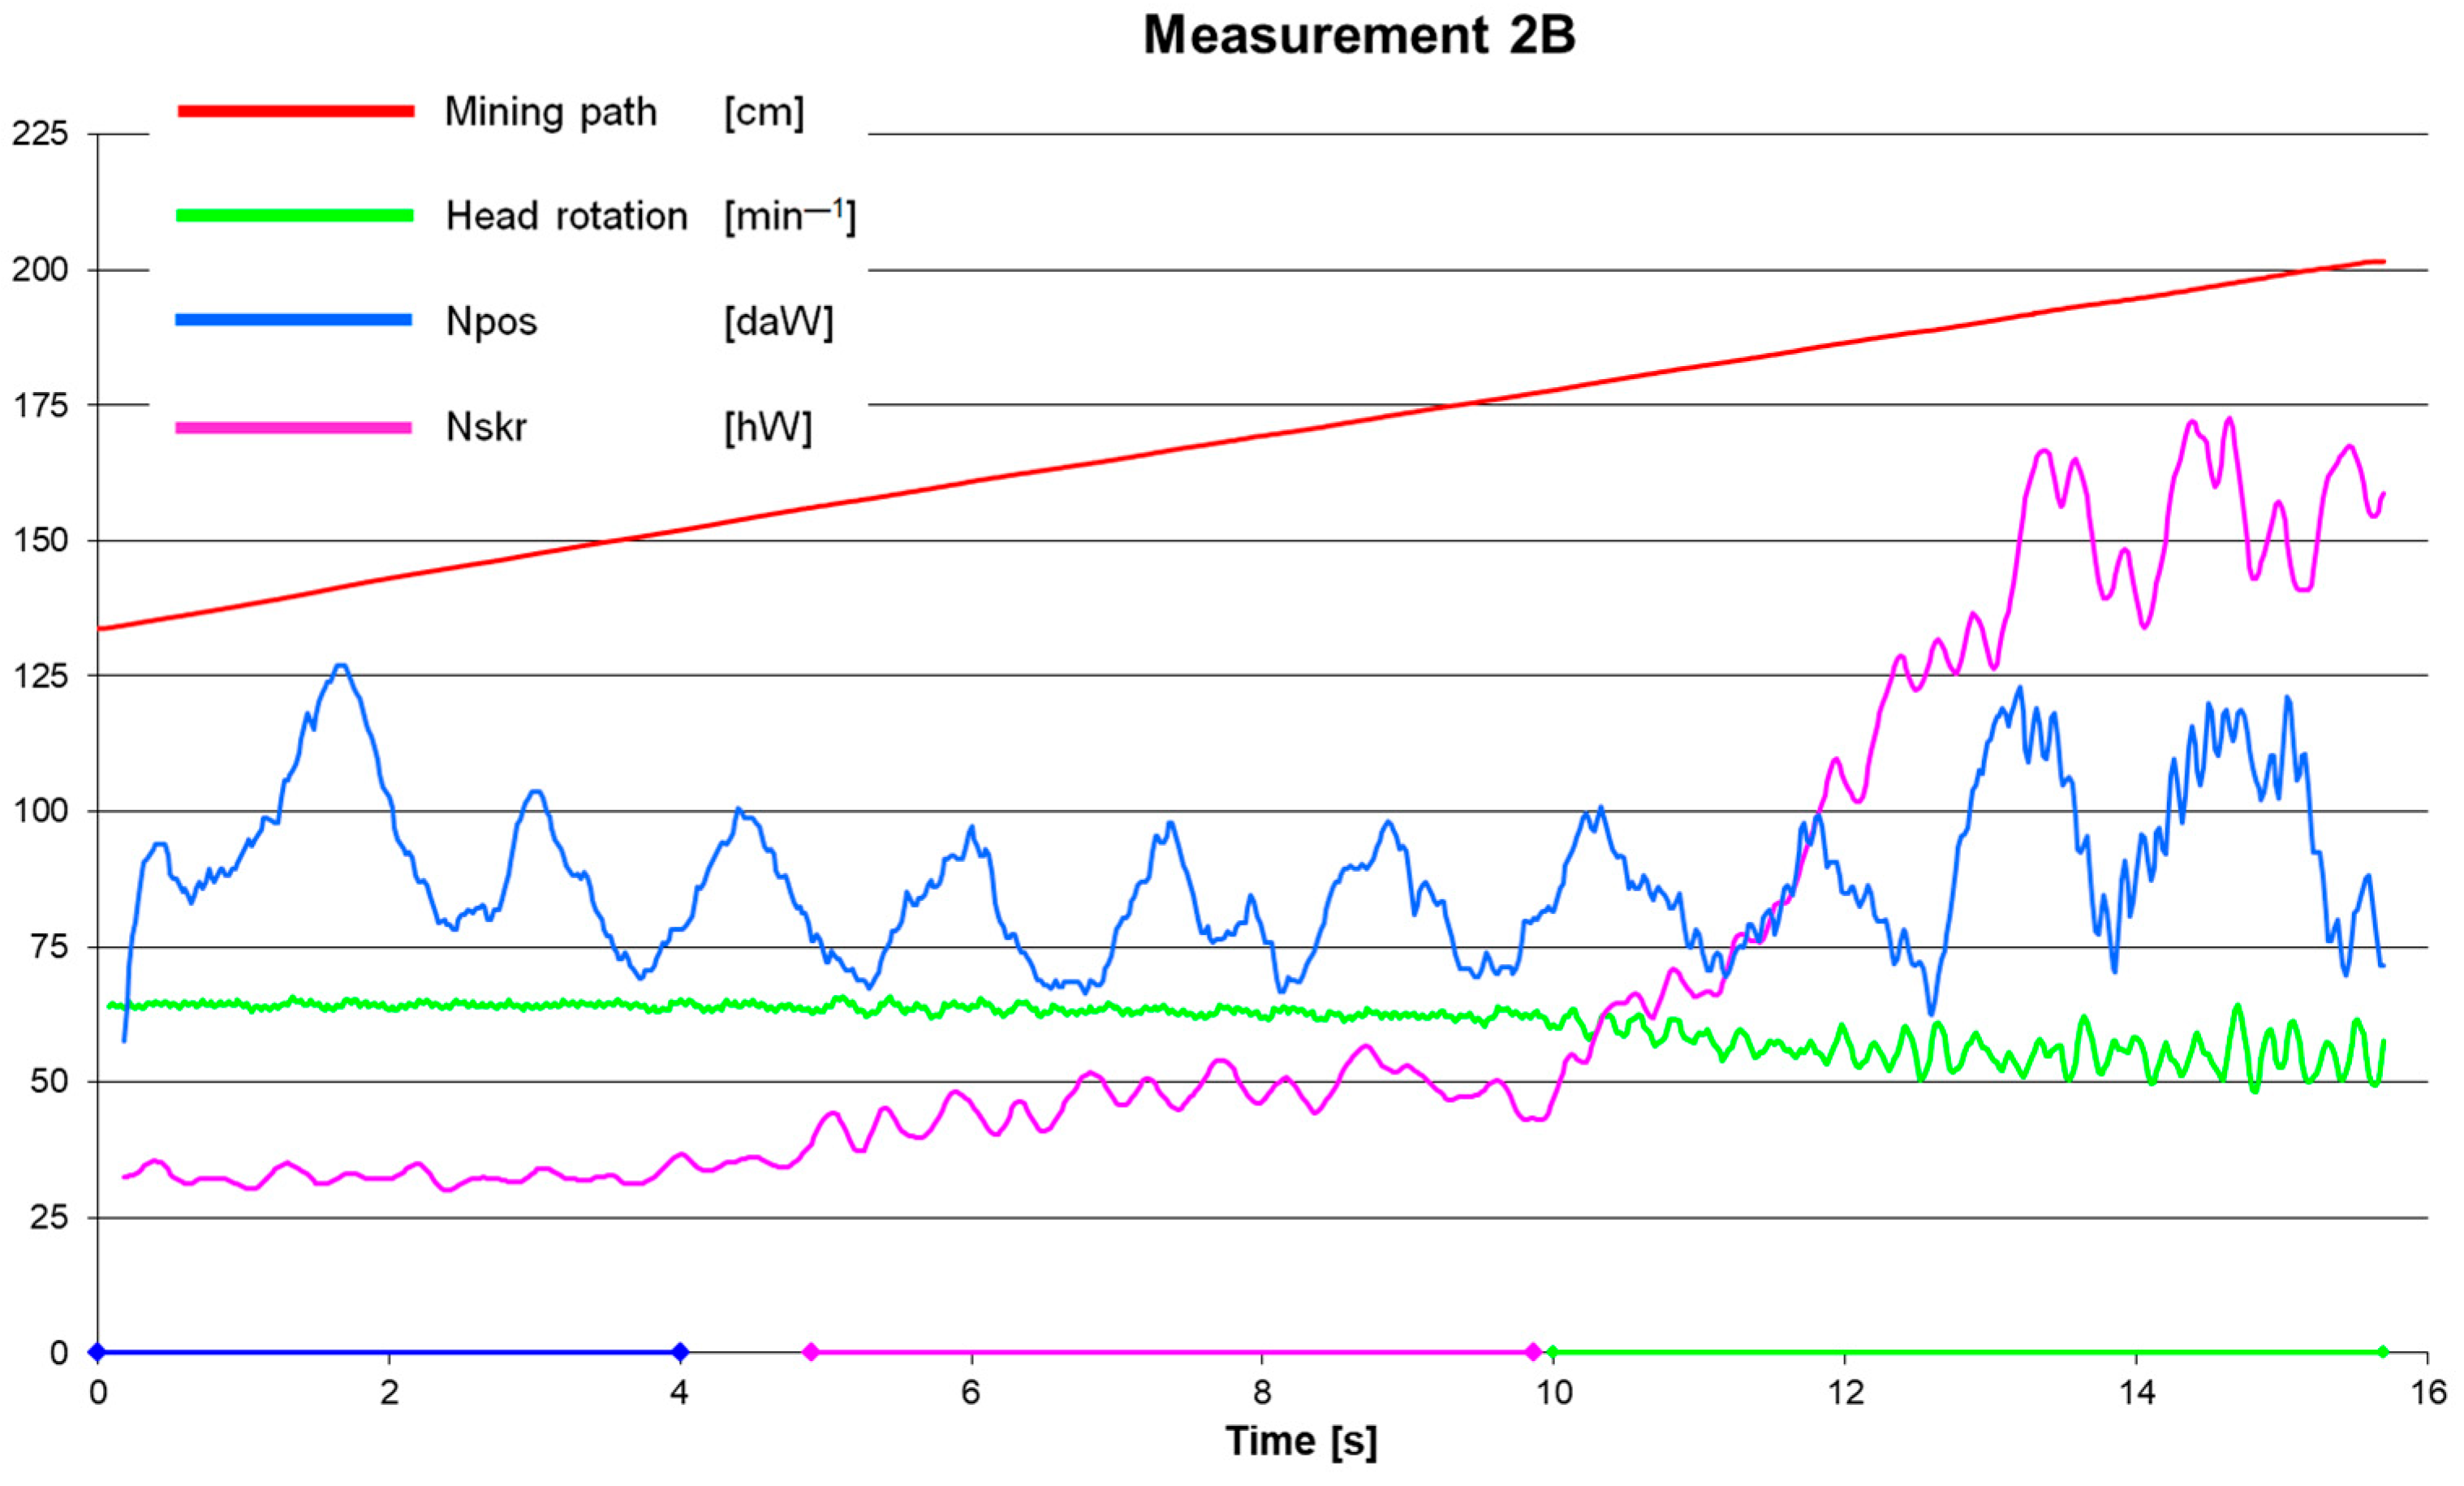
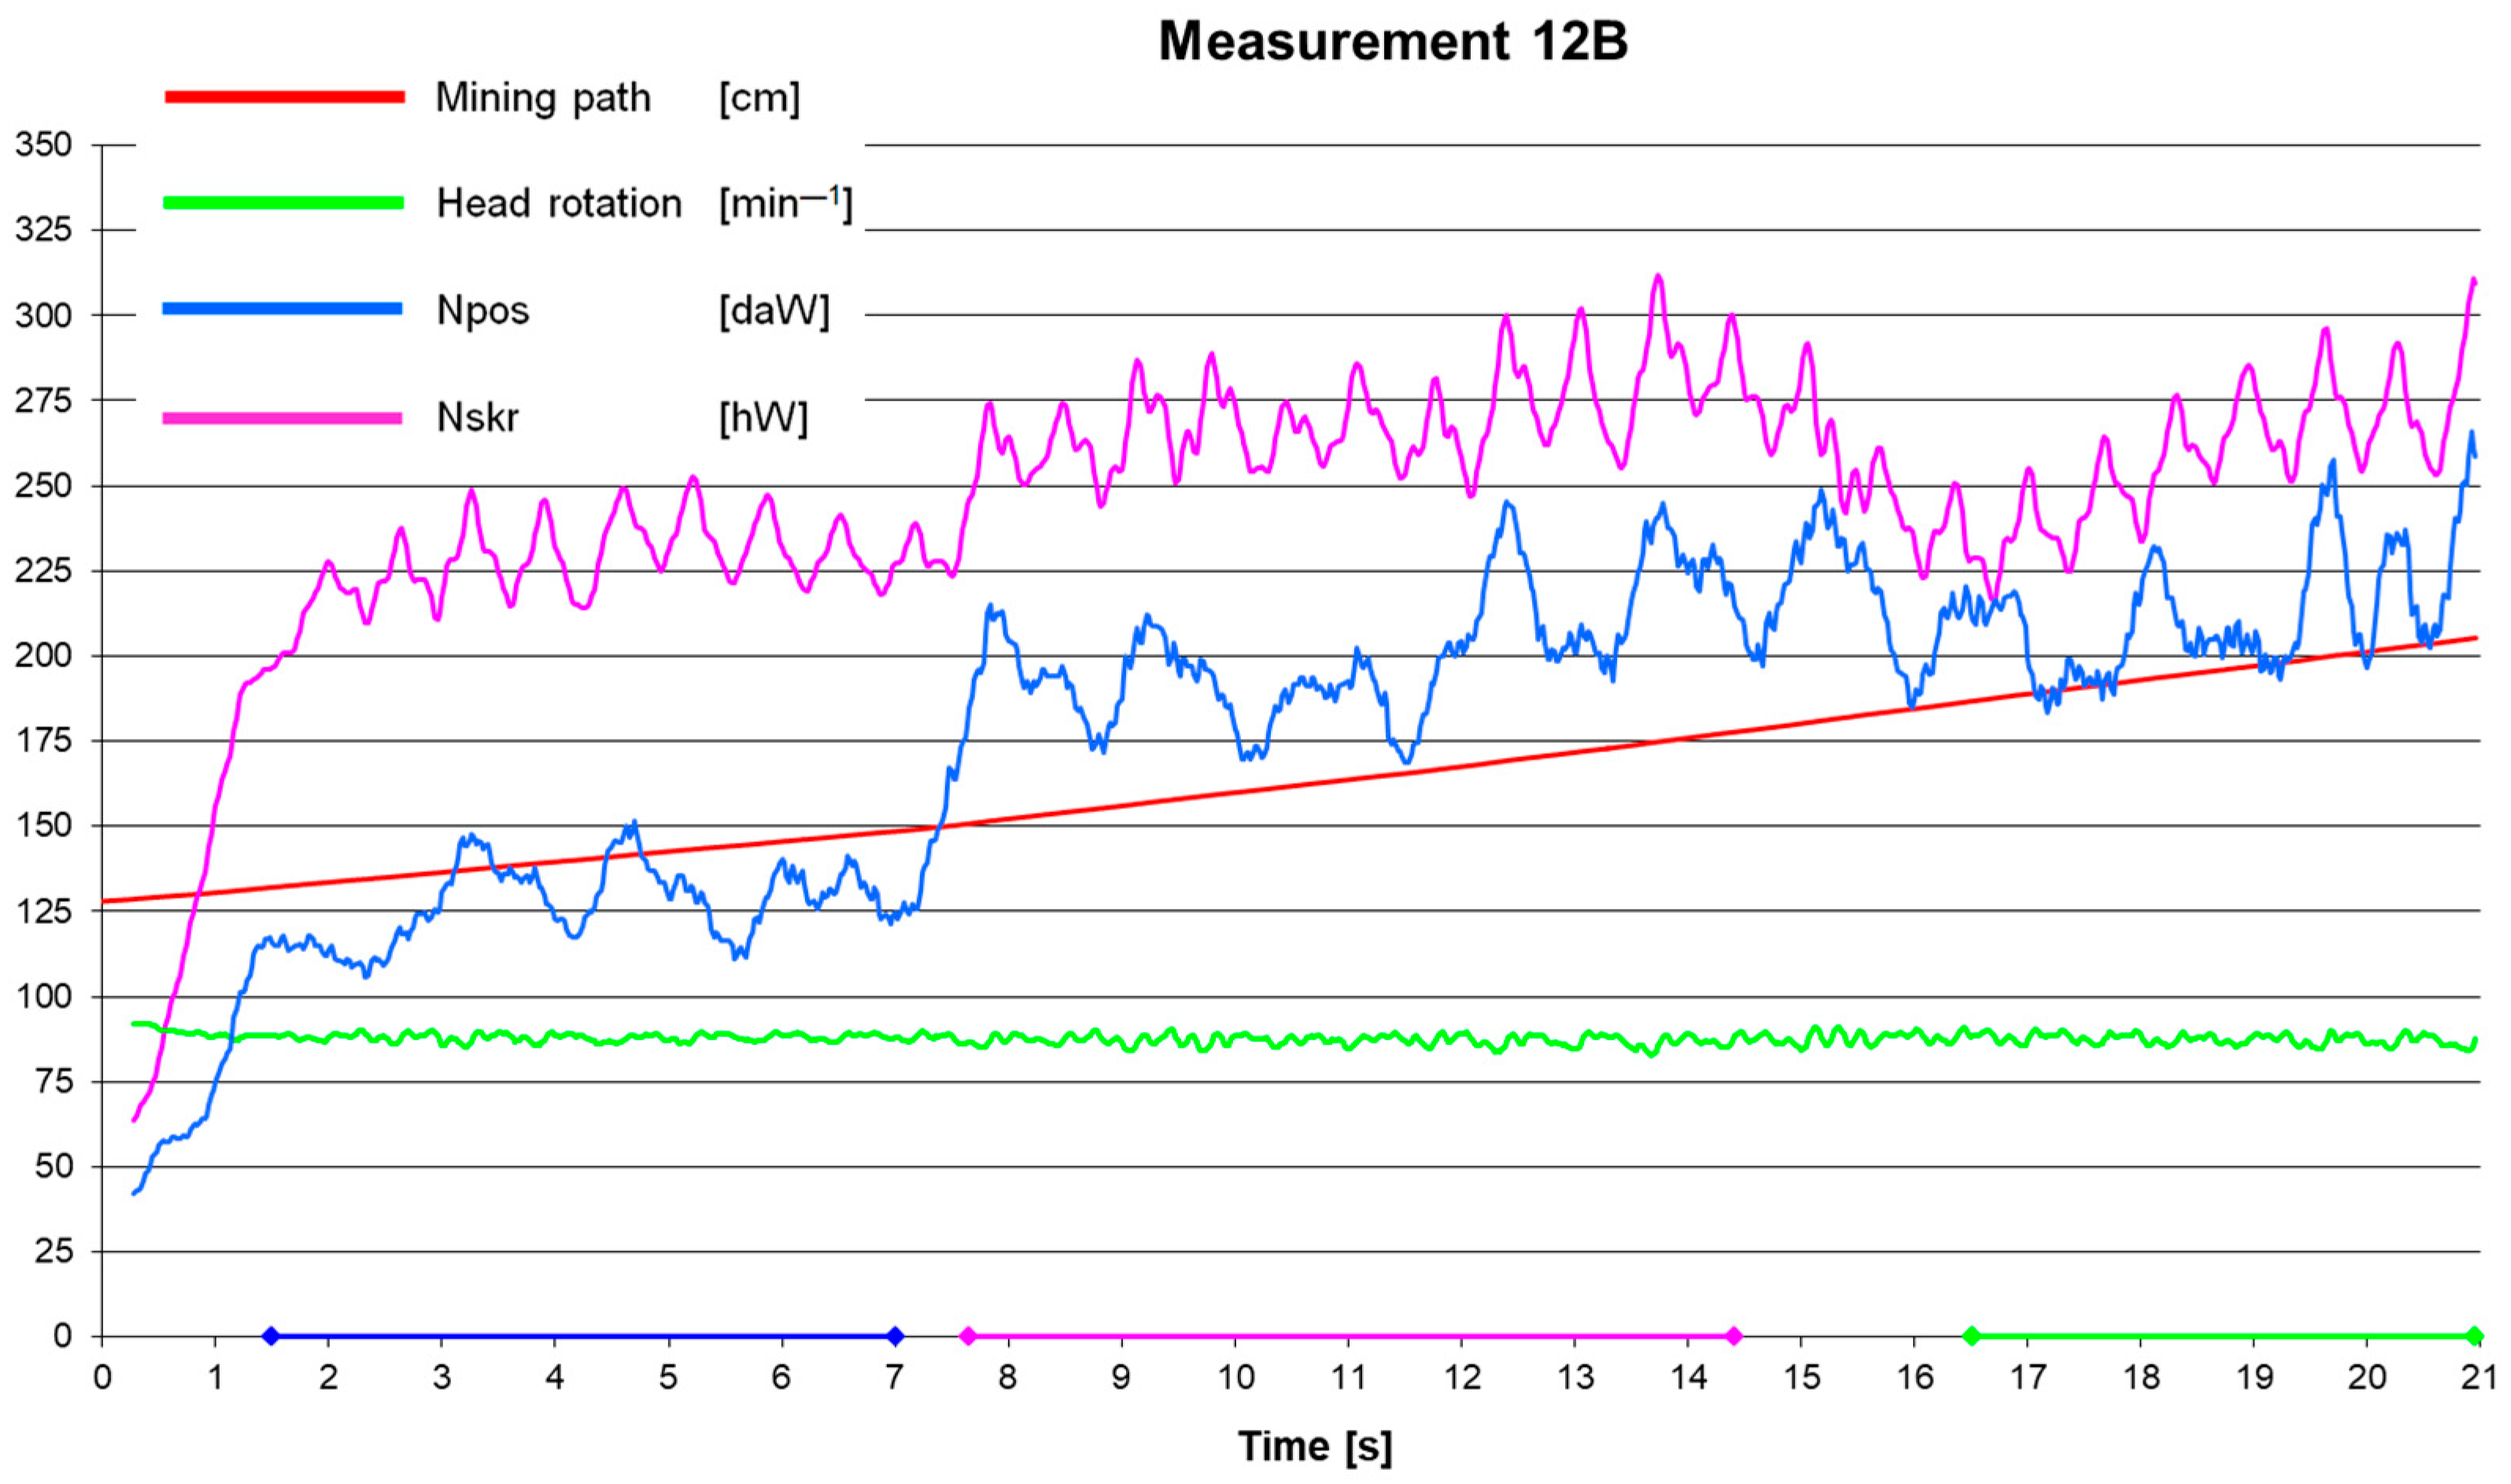
Table 2 presents sample calculation results based on the measuring data for time intervals selected for analysis.
Data from measurement 3B1 were not included in the further analysis, as they significantly deviated from the average values of the considered time interval of the given measurement series.
Table 2 shows the results after processing the measurement signals obtained during the tests. The shaded rows, marked, e.g., 1A, 1B, and 2A, give the results for the basic time curves. For these curves, the time during which the cutterhead was fully cut in the slot was the analysed period. The remaining rows, marked e.g., 1A1, 1A2, and 1B1, give the results for partial time curves, which were the components selected from the basic curves. For each curve, the considered time interval
Tc was given, and the distance
sg covered by the cutterhead during this time was determined, along with the advance rate
v at which the cutterhead covered the given measuring section. Based on the known mined volume
q, which depends on the head cutting width, and the cutting time
T, the specific hourly volume of mined minerals
qt was determined.
Furthermore, average values of the advance power Npos, cutting power Nskr, advancing cylinder force Ft, hydraulic output Q, and hydraulic motor supply pressure pz were given. Determined values of these parameters allowed calculating the specific cutting energy Ej and its components: specific advance energy EjP and specific cutting energy EjS.
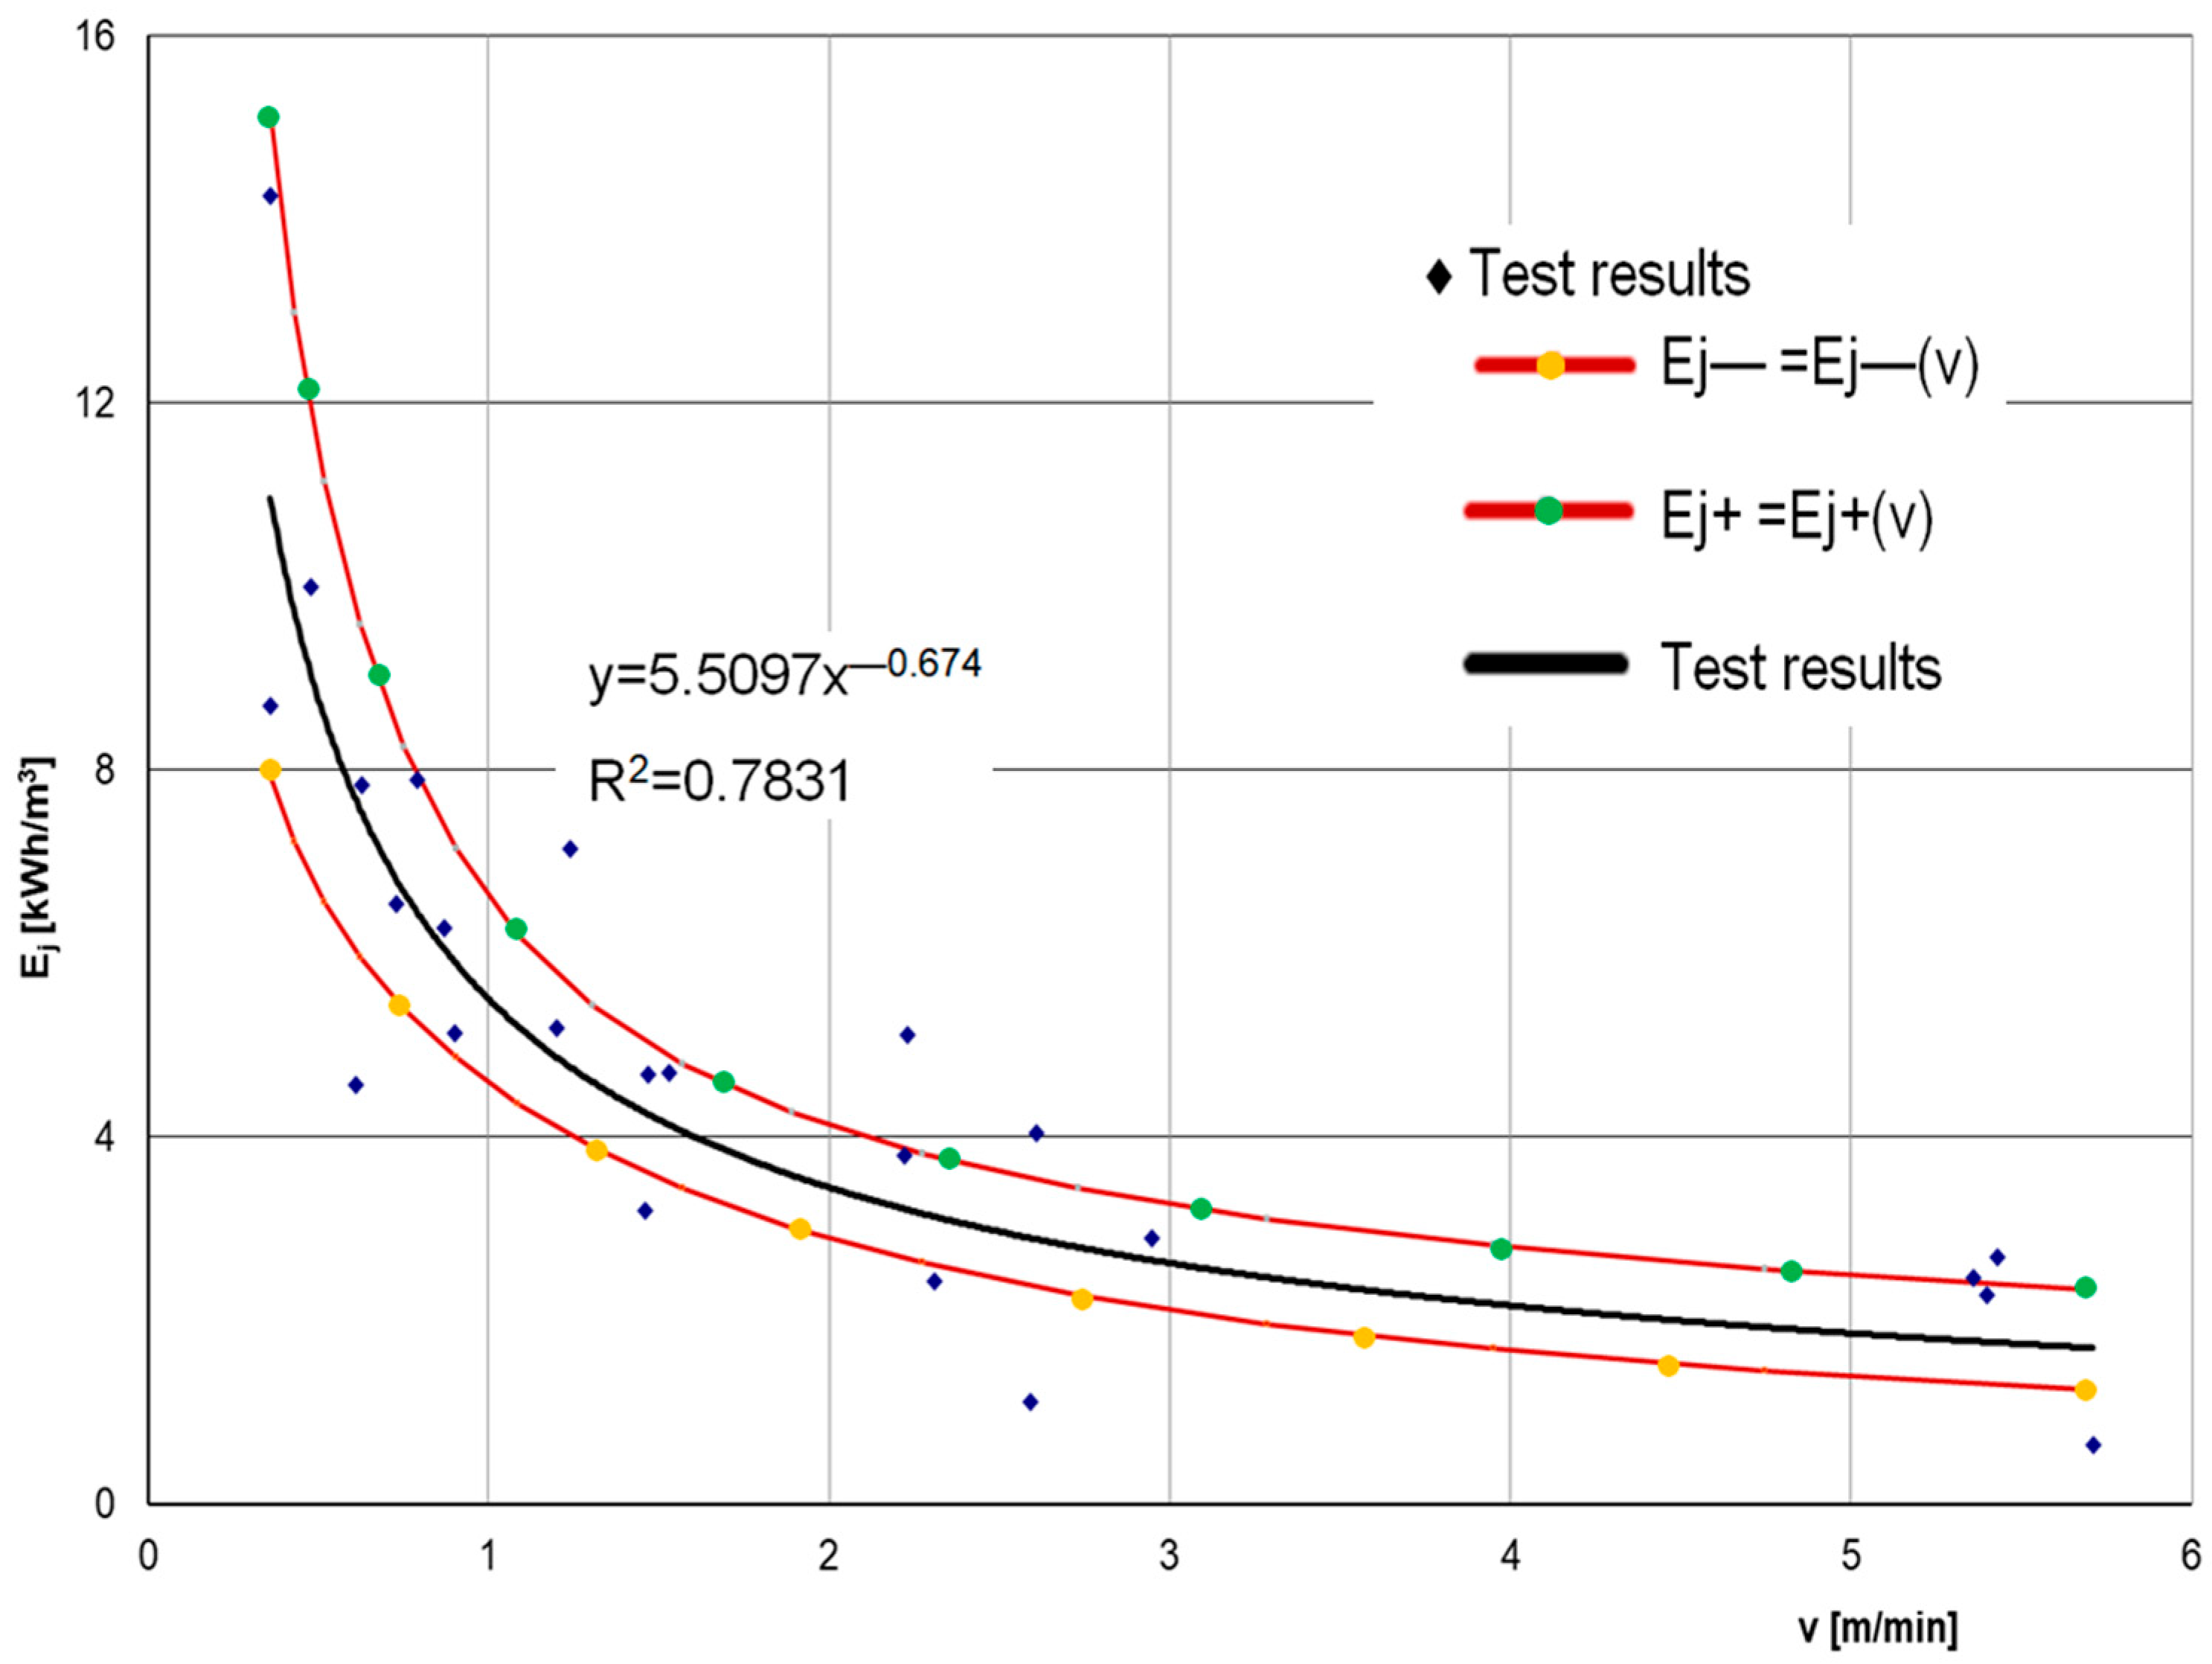
Analysis of the results for the specific energy
Ej showed that it strongly depends on the advance rate. This can be seen in the graph in
Figure 13. The measurement points are given and described by an exponential curve of better correlation.
In the transformed coordinate system
X = ln(
v) and
Y = ln(
Ej), the relationship
Ej = Ej(
v) is described by a linear correlation relationship:
The correlation between variables
X and
Y is strong; the correlation coefficient is
ρ = −0.8327. The correlation relationship
Y = Y(
X) is characterised by the sample correlation coefficient of α = 0.6736. It was found that at a confidence level of 0.95, the interval (−0.8716; −0.4755) encompasses the actual value of the regression coefficient. Therefore, with a 95% probability, the actual value of the exponent of the trend line shown in
Figure 13 falls within the interval (−0.8716; −0.4755). The confidence curves surrounding the regression line at the 95% confidence level in the
X,
Y system are presented in
Figure 13 in the form of curves
Ej+ = Ej + (
v) and
Ej− = Ej − (
v).
This curve shows that the highest specific energy occurs at low advance rates. It can be assumed that high energy Ej most likely results from the high resistance at low advance rates.
At low mining speed, the high frictional resistance of the head conical section increases energy consumption and simultaneously reduces mining efficiency. Therefore, there is an unfavourable ratio of work input to mining a given volume of rock. Too low an advance rate of the cutterhead adversely affects the total energy consumption of the mining process.
Figure 14 below shows measurement points for a partial curve, which are also described by an exponential function. The correlation coefficient is lower here than for the exponent function of the basic curve shown in
Figure 13. Therefore, the results of the basic curves will be used in further analysis.
A probable reason of a relatively large scatter of measurement results, presented in
Figure 13,
Figure 14 and
Figure 15, includes vibrations of the cutterhead drive system, vibrations of longitudinal support, and a dynamic character of the cutterhead action on the rock block under cutting, which are difficult to eliminate. An elimination of the specified vibrations will be possible after having constructed a cutting machine prototype equipped with an experimental cutterhead.
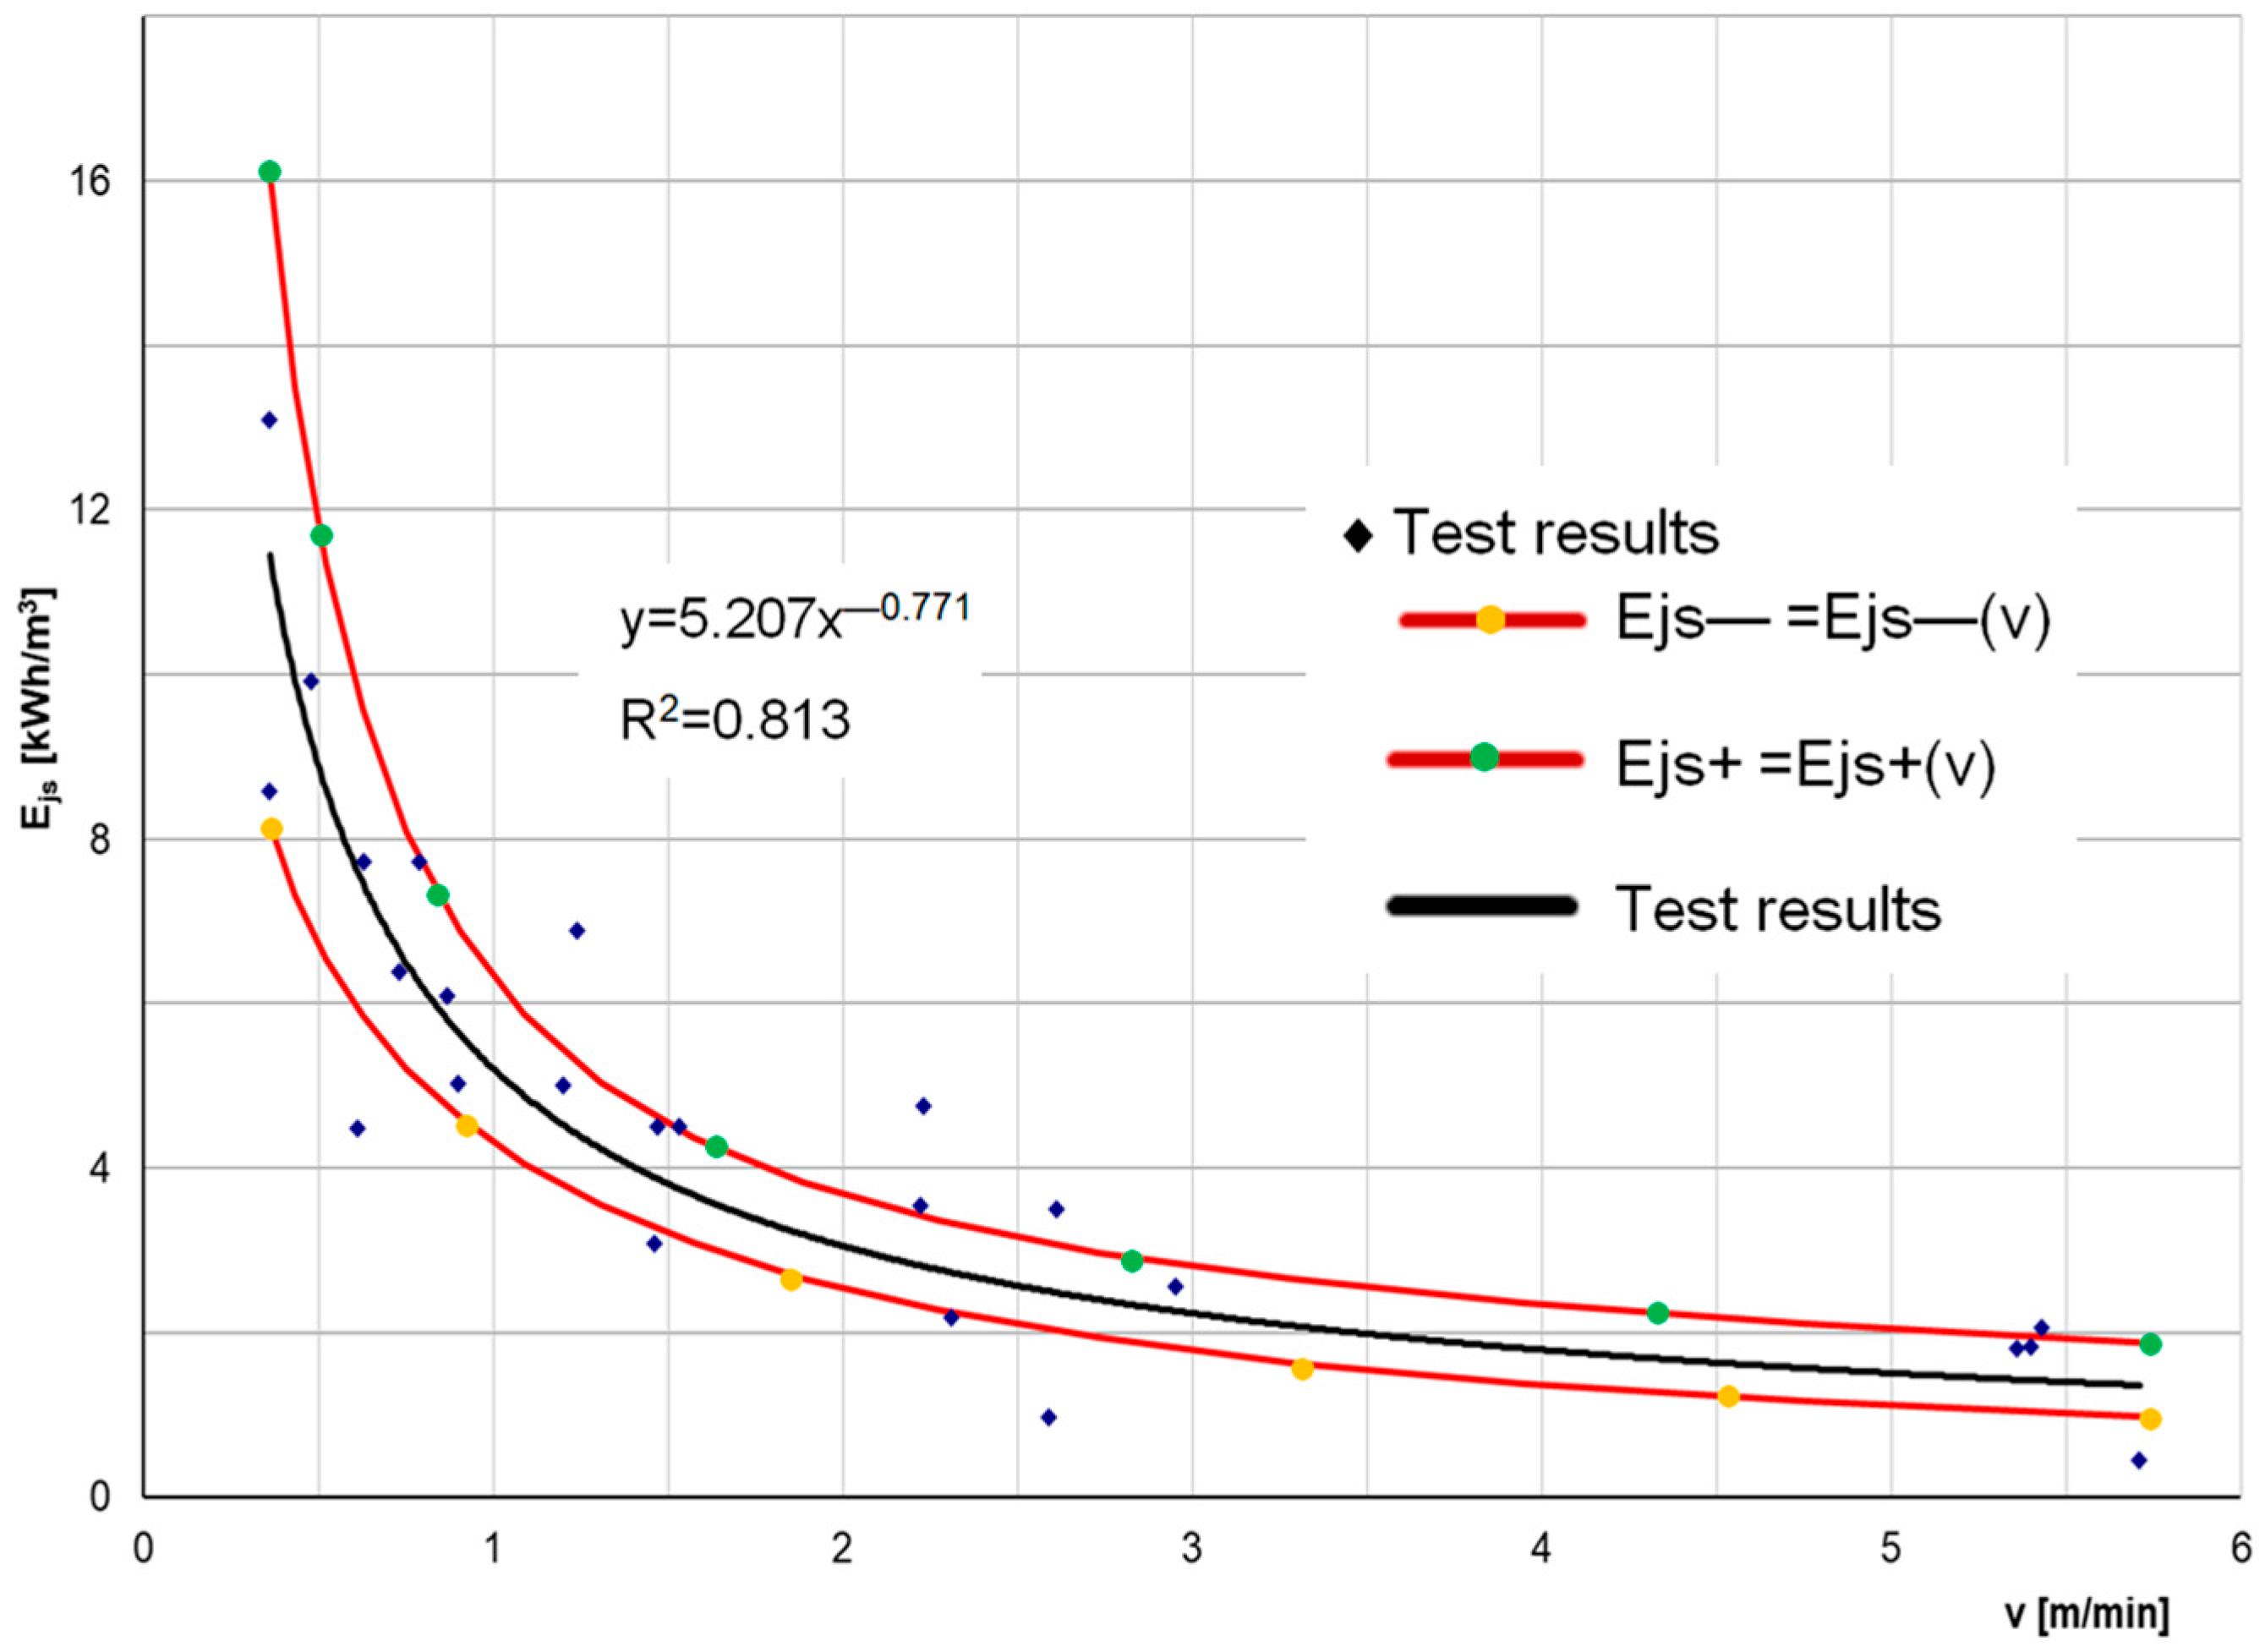
The specific cutting energy curves
Ejs =
f(
v), shown in
Figure 15, also exhibit a similar pattern as before, which is a decreasing exponential function.
Confidence curves surrounding the actual trend line with 95% confidence are also shown in
Figure 14 and
Figure 15. The standard deviation values for the feed rate
v and the energy components
Ej,
EjS, and
EjP are summarised in
Table 3.
As can be seen on the graphs in
Figure 13 and
Figure 15, with the advance rate increases, the specific energy decreases. The greatest decrease in specific energy is recorded for the speed range up to 3 m/min. Energy of approximately 2 kWh/m
3 is achieved at advance rate above 4 m/min.
As can be seen from the graphs above, the advance rate
v has the most significant impact on the total specific energy
Ej. Therefore, comparing test results with significant differences in feed rates can lead to erroneous conclusions. For such cases, we can use the method for reducing all results to one advance rate, e.g., 3 m/min, and then compare the dependencies, e.g., the disc tilt angle or the advance angle. The specific energy
Ej3 reduced to an advance rate of
v = 3 m/min was calculated based on the exponential function described by the following Formula (6):
determined for the analysed measurement results presented in
Figure 13.
Therefore, for the general dependence of the specific energy given by the following formula:
we can determine the specific energy reduced to an advance rate of 3 m/min, which is expressed by the following (8):
Based on the above method,
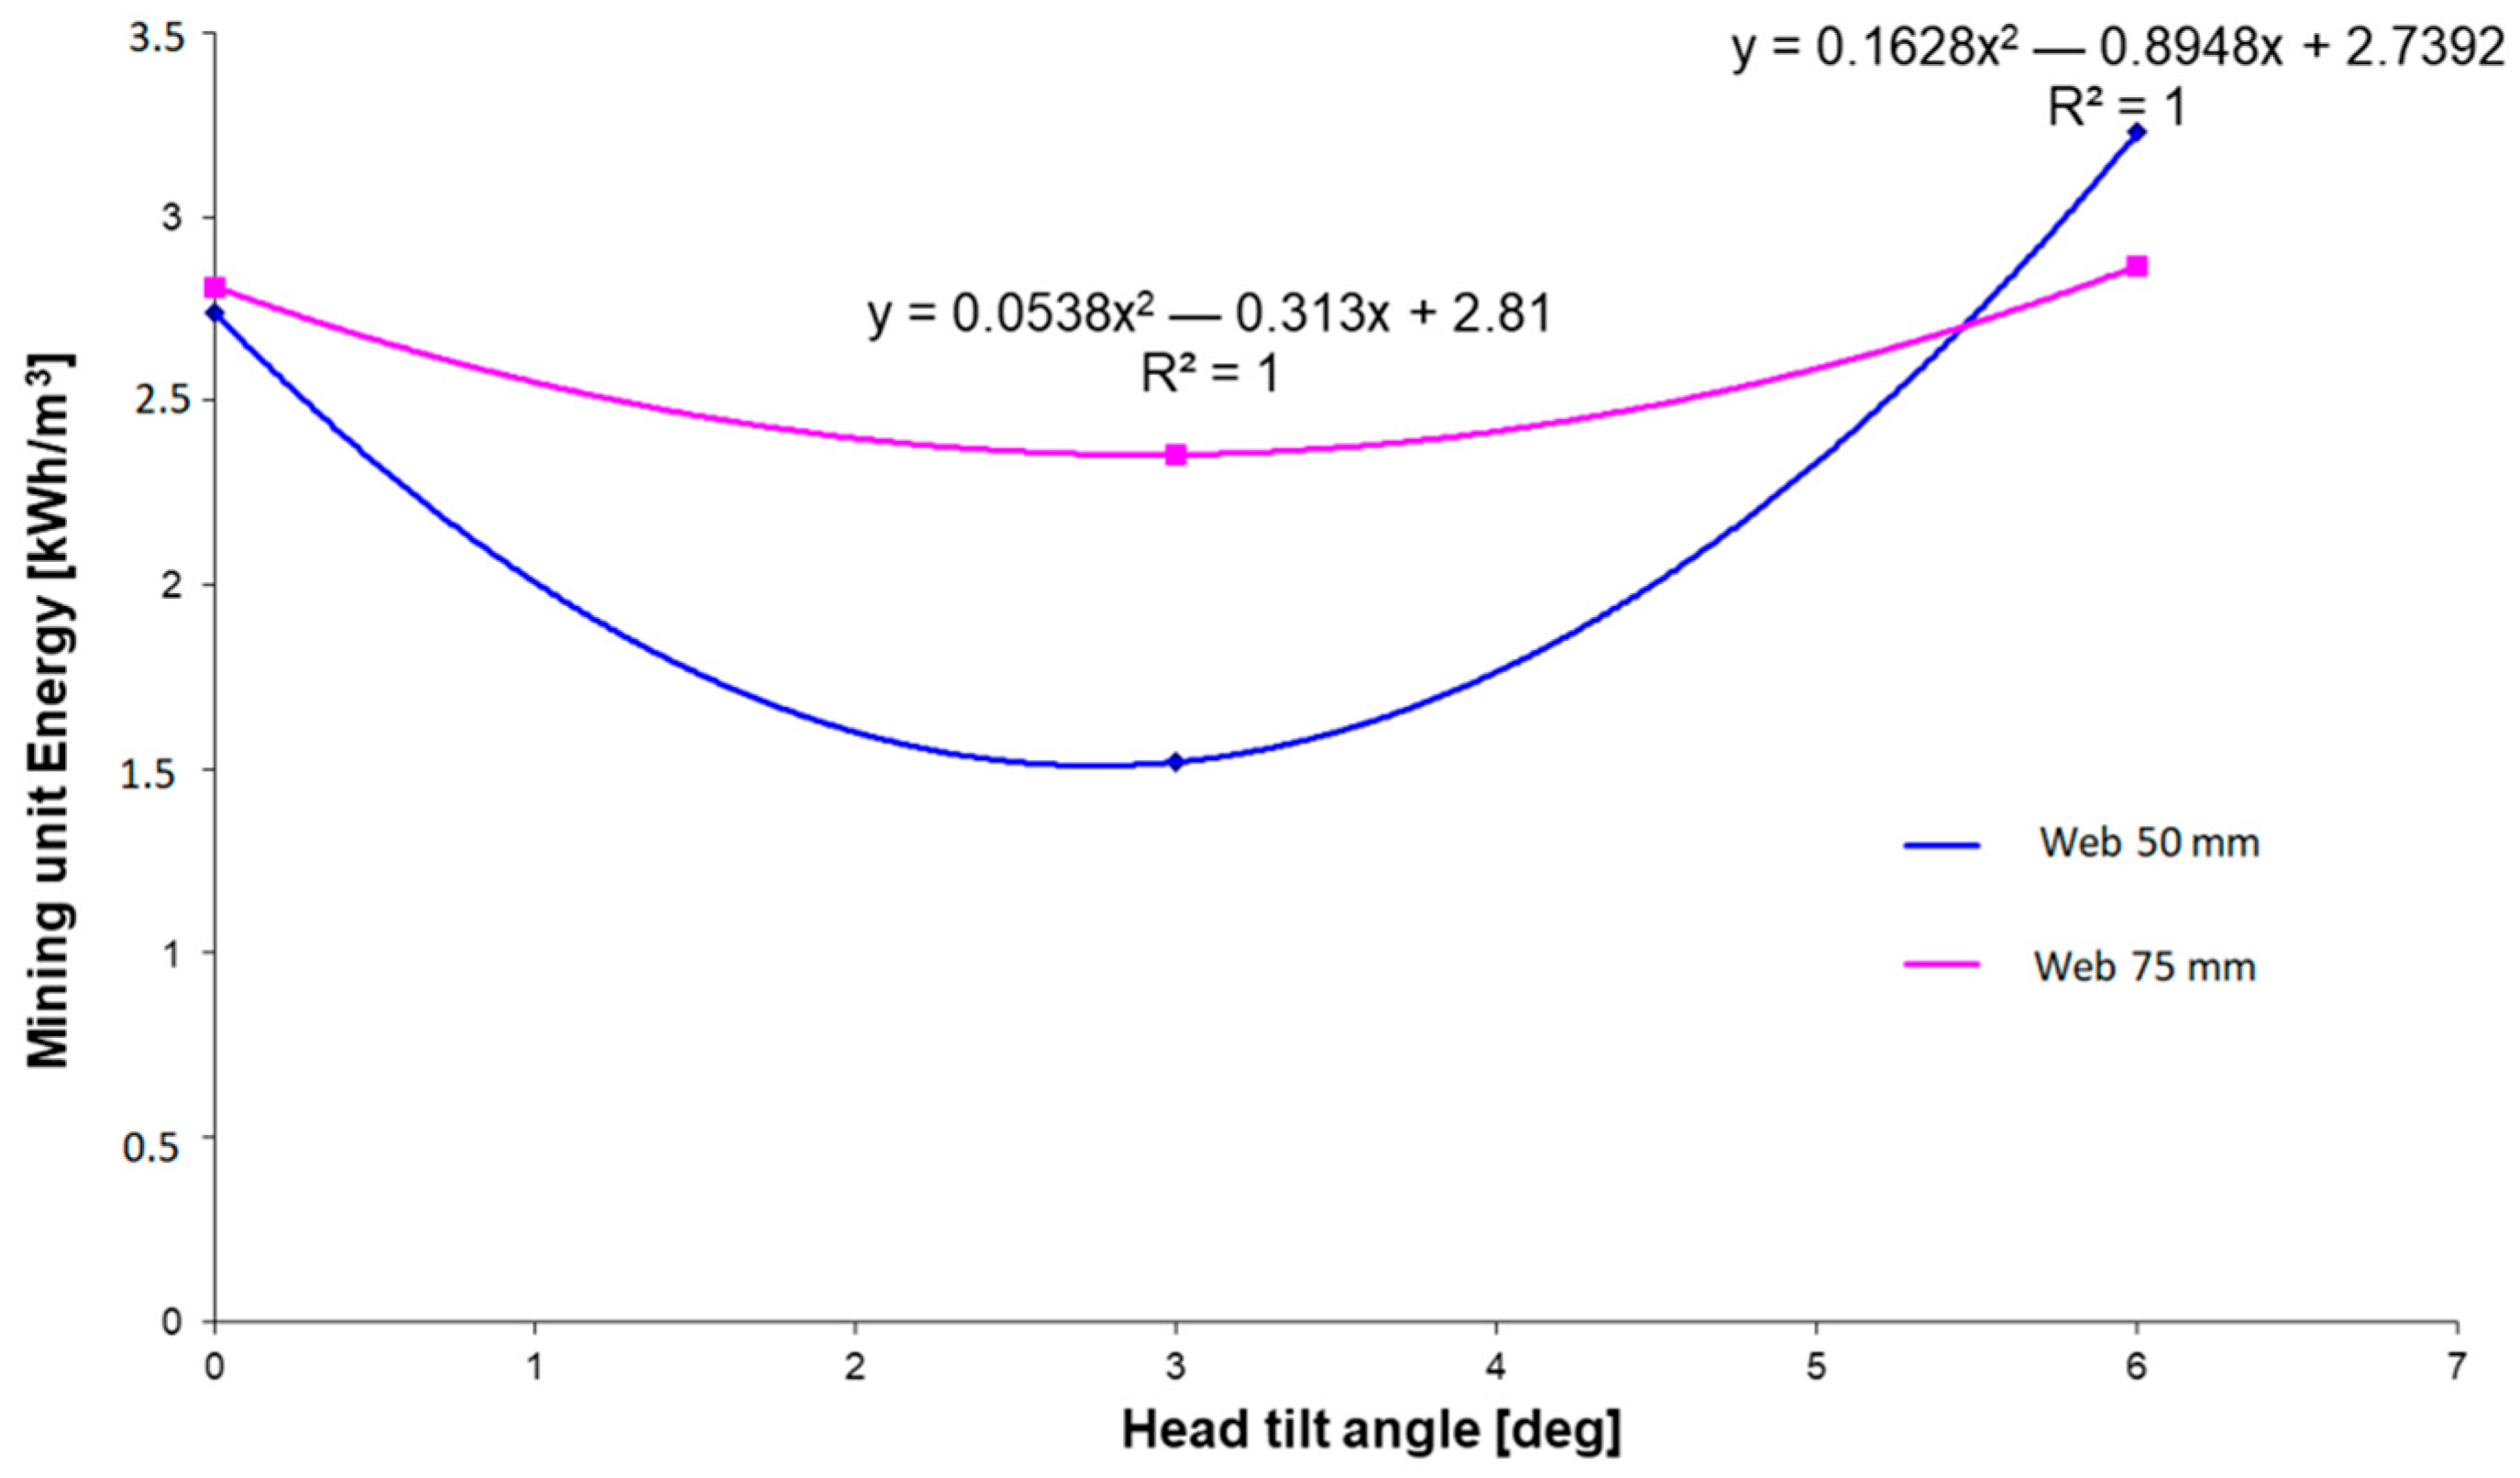
Figure 16 shows the effect of the head tilt angle on the total unit cutting energy for two web depths of a milling disc. The curves described by the second-order polynomial functions have a minimum of the function close to 3°, at which the tilt angle has the lowest specific energy.
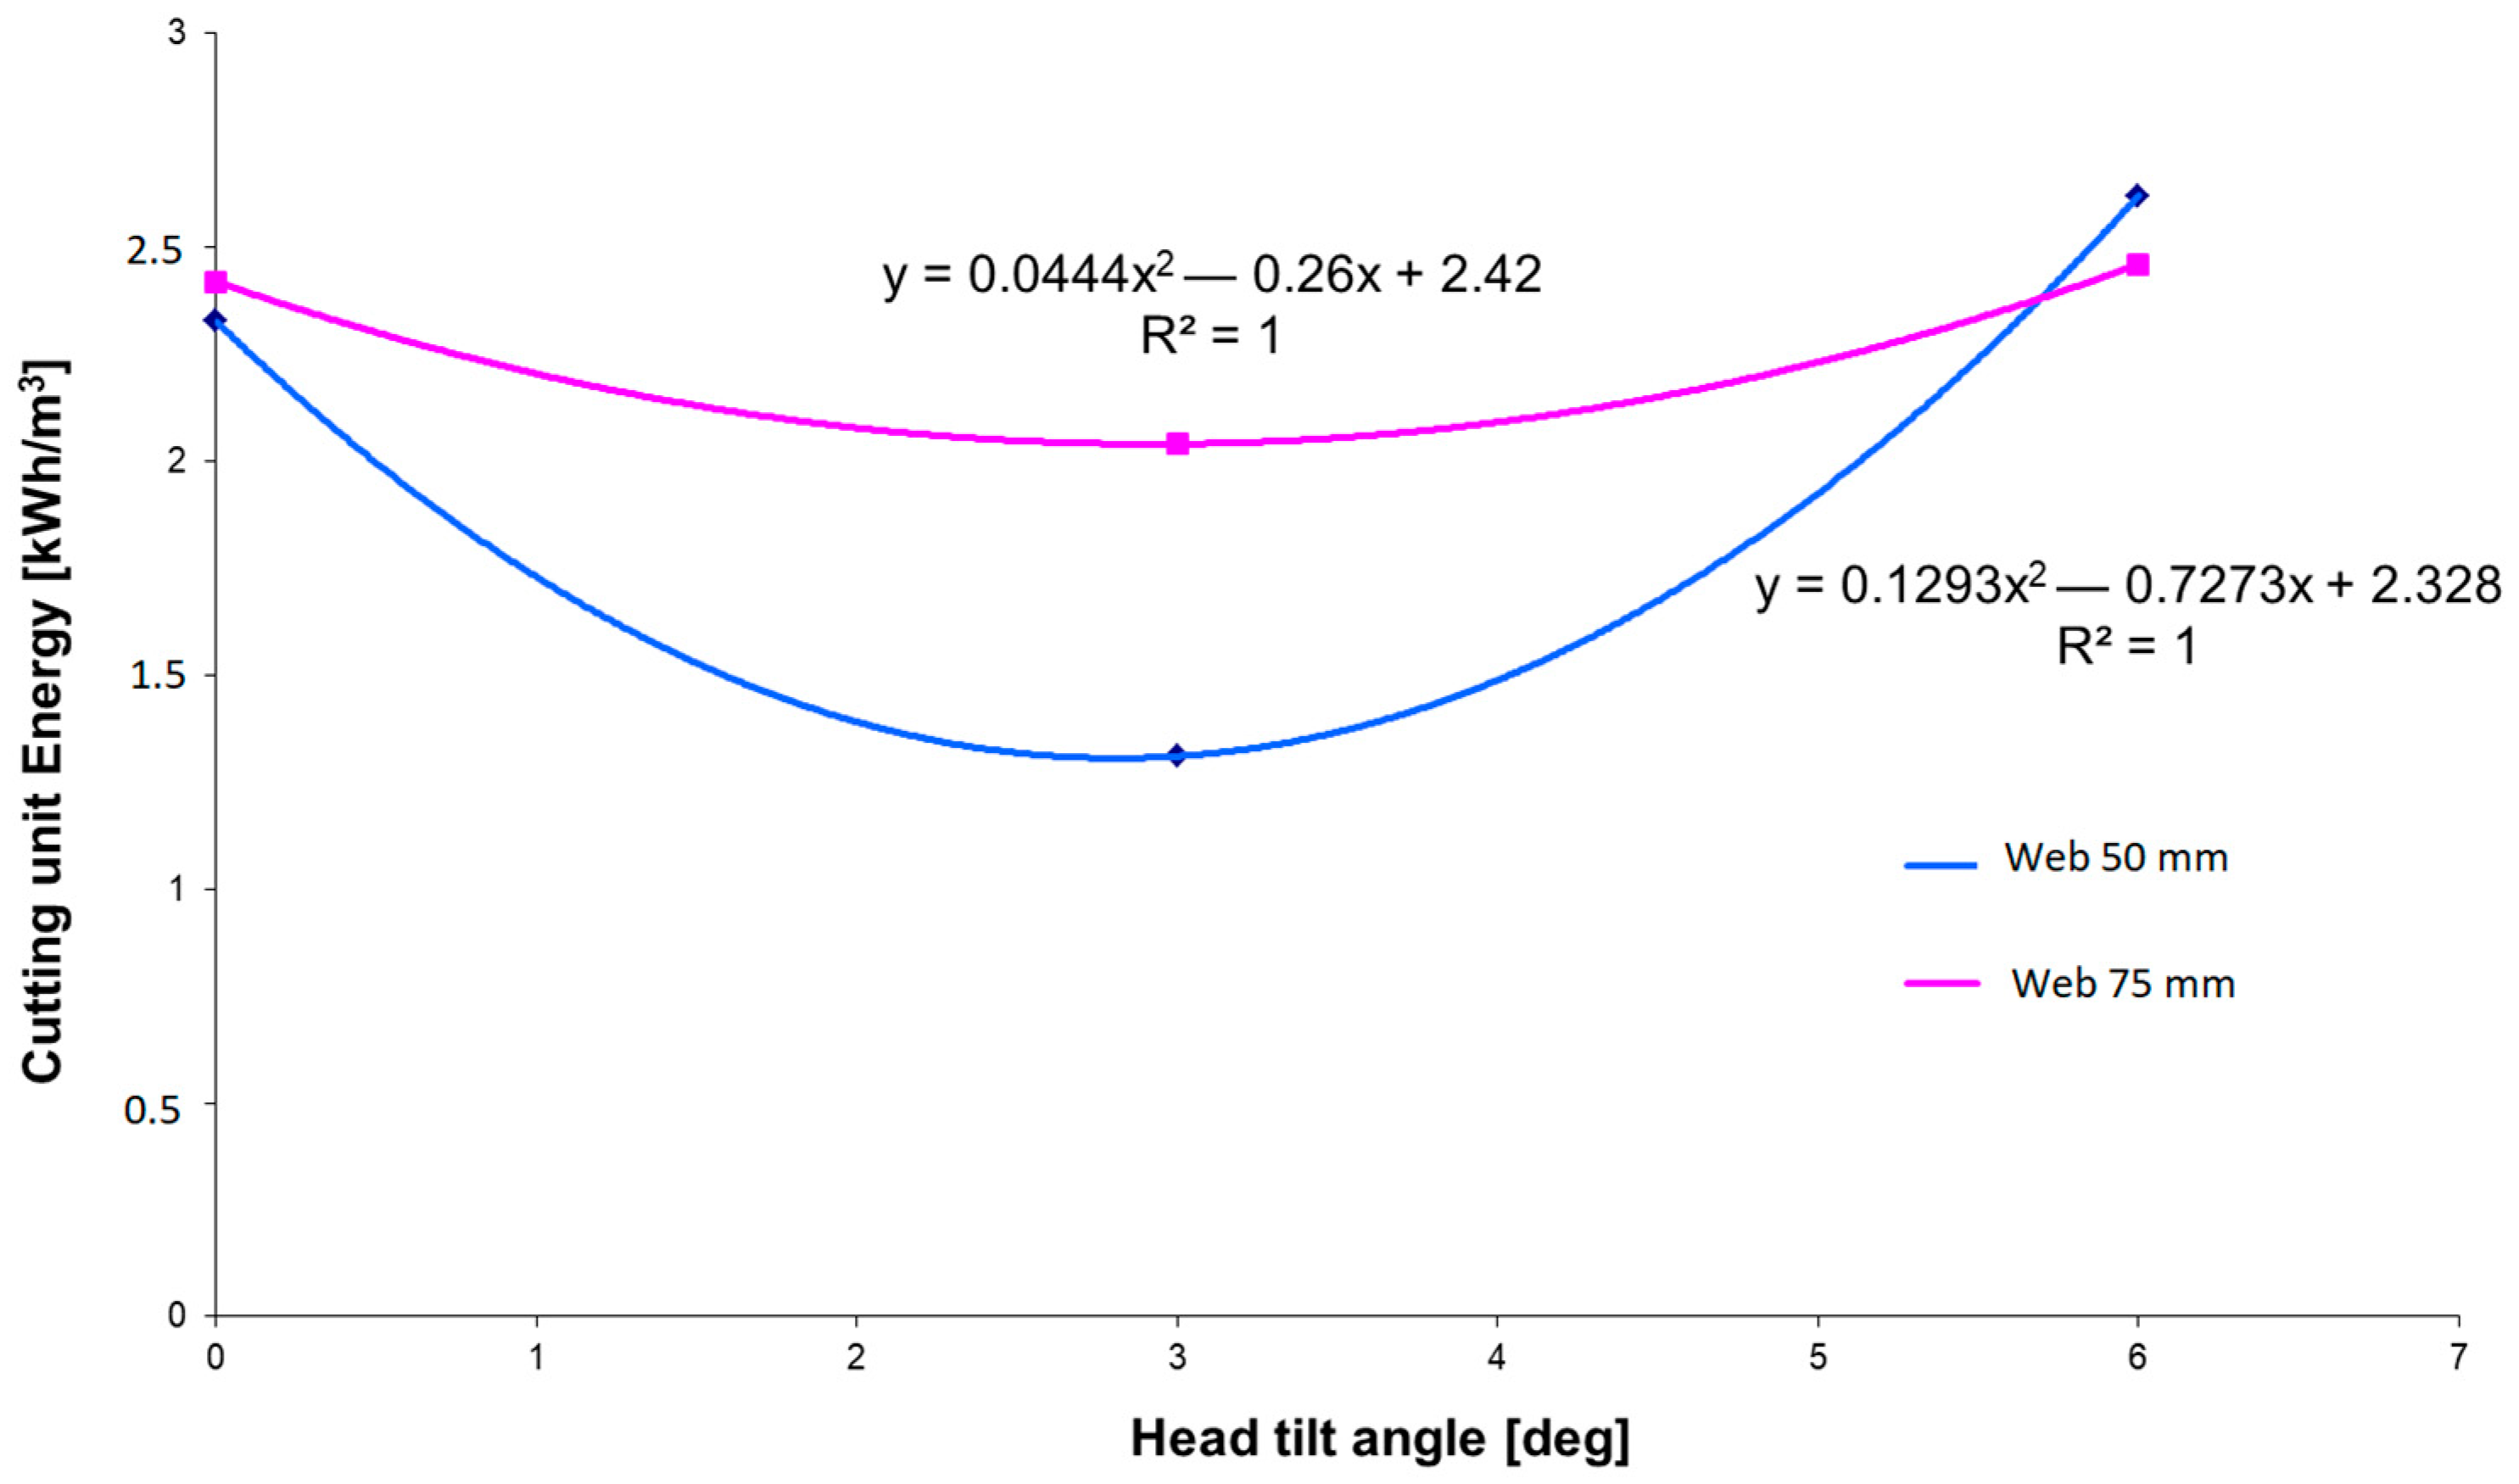
The curves of the specific cutting energy
EjS, shown in
Figure 17, are similar.
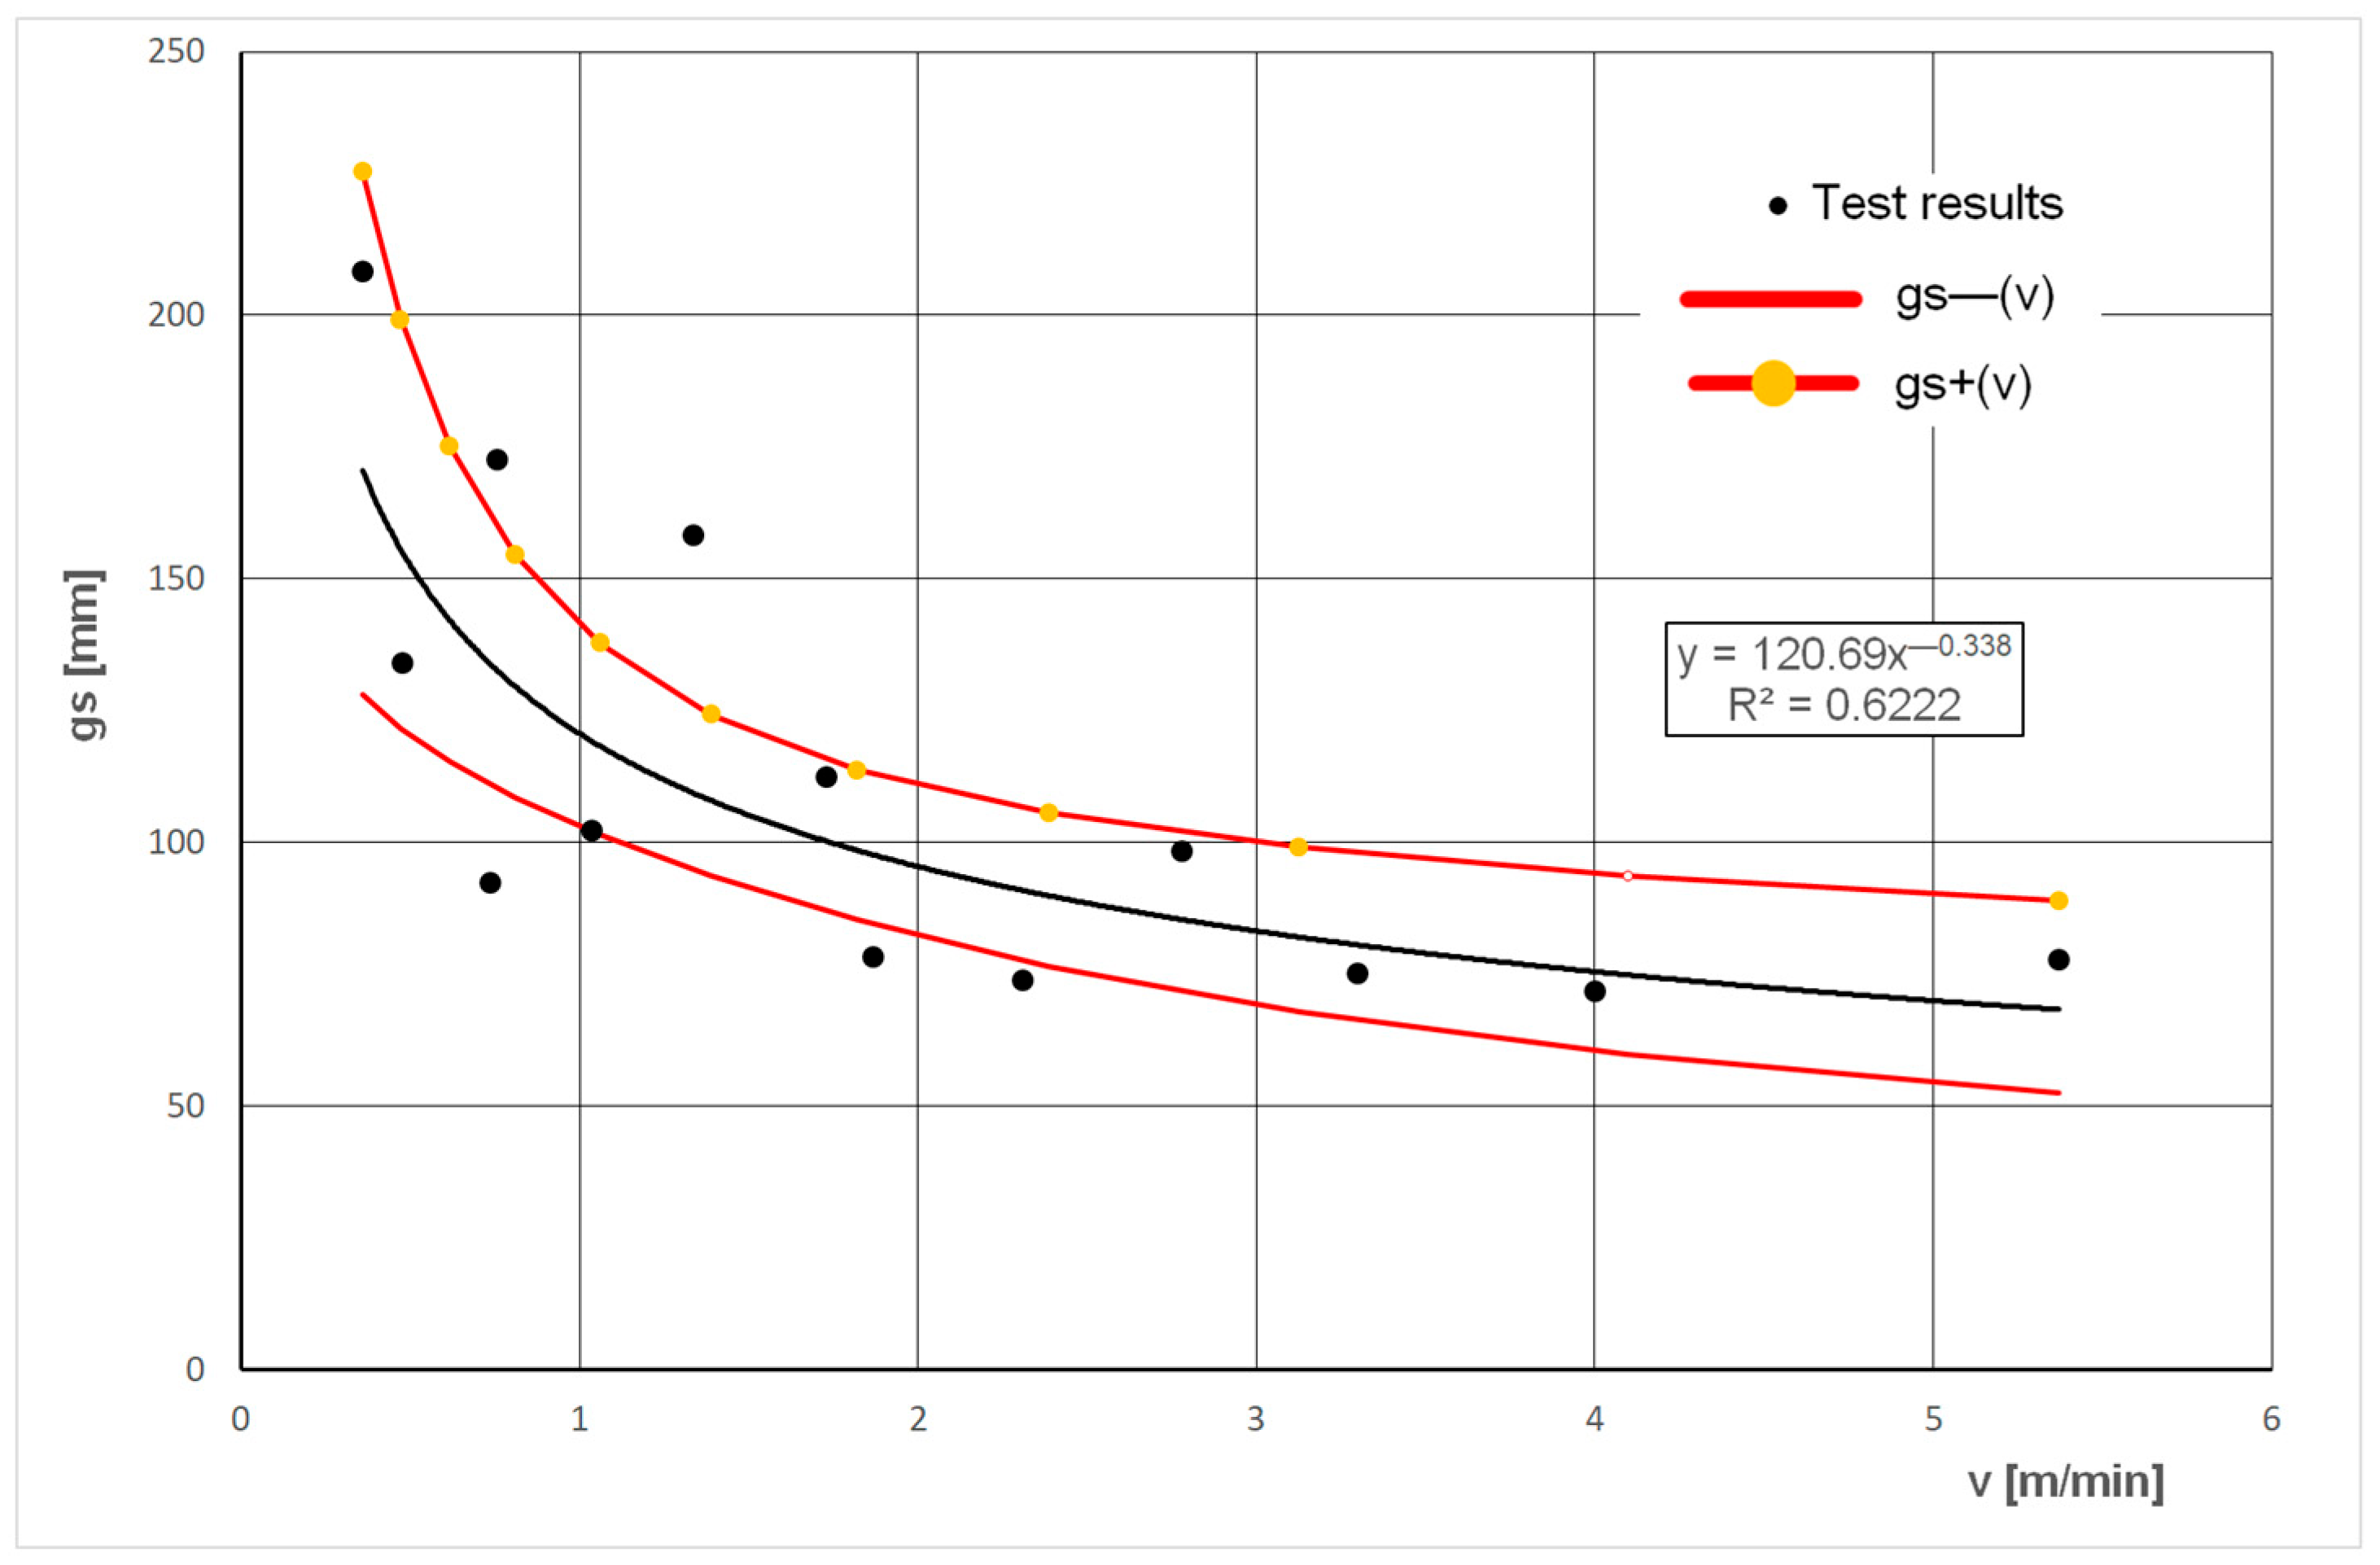
Next, the impact of mining parameters on the size of the excavated material was analysed. The percentage of grains in the highest grain size class considered—
dS > 30 mm—ranged from 13.14% to 56.73% for the individual measurement series listed in
Table 1. The relationship between the average grain size
gs in the
dS > 30 mm class and the feed rate
v was examined in detail. The average length of the sides of the cuboid described on the grain was taken as a measure of grain size. For each measurement series, the average grain size
gS is determined as the average value of the size of 19 grains obtained in the
dS > 30 mm class.
Figure 18 shows the relationship between the average grain size
gs and the feed rate
v.
The measurement results obtained are best characterised by the power trend line with the equation shown in
Figure 18. The graph also shows the confidence curves surrounding the actual trend line at a confidence level of 95%. The trend line allows us to conclude that an increase in feed speed results in a decrease in the average size of grains classified as
dS > 30 mm.
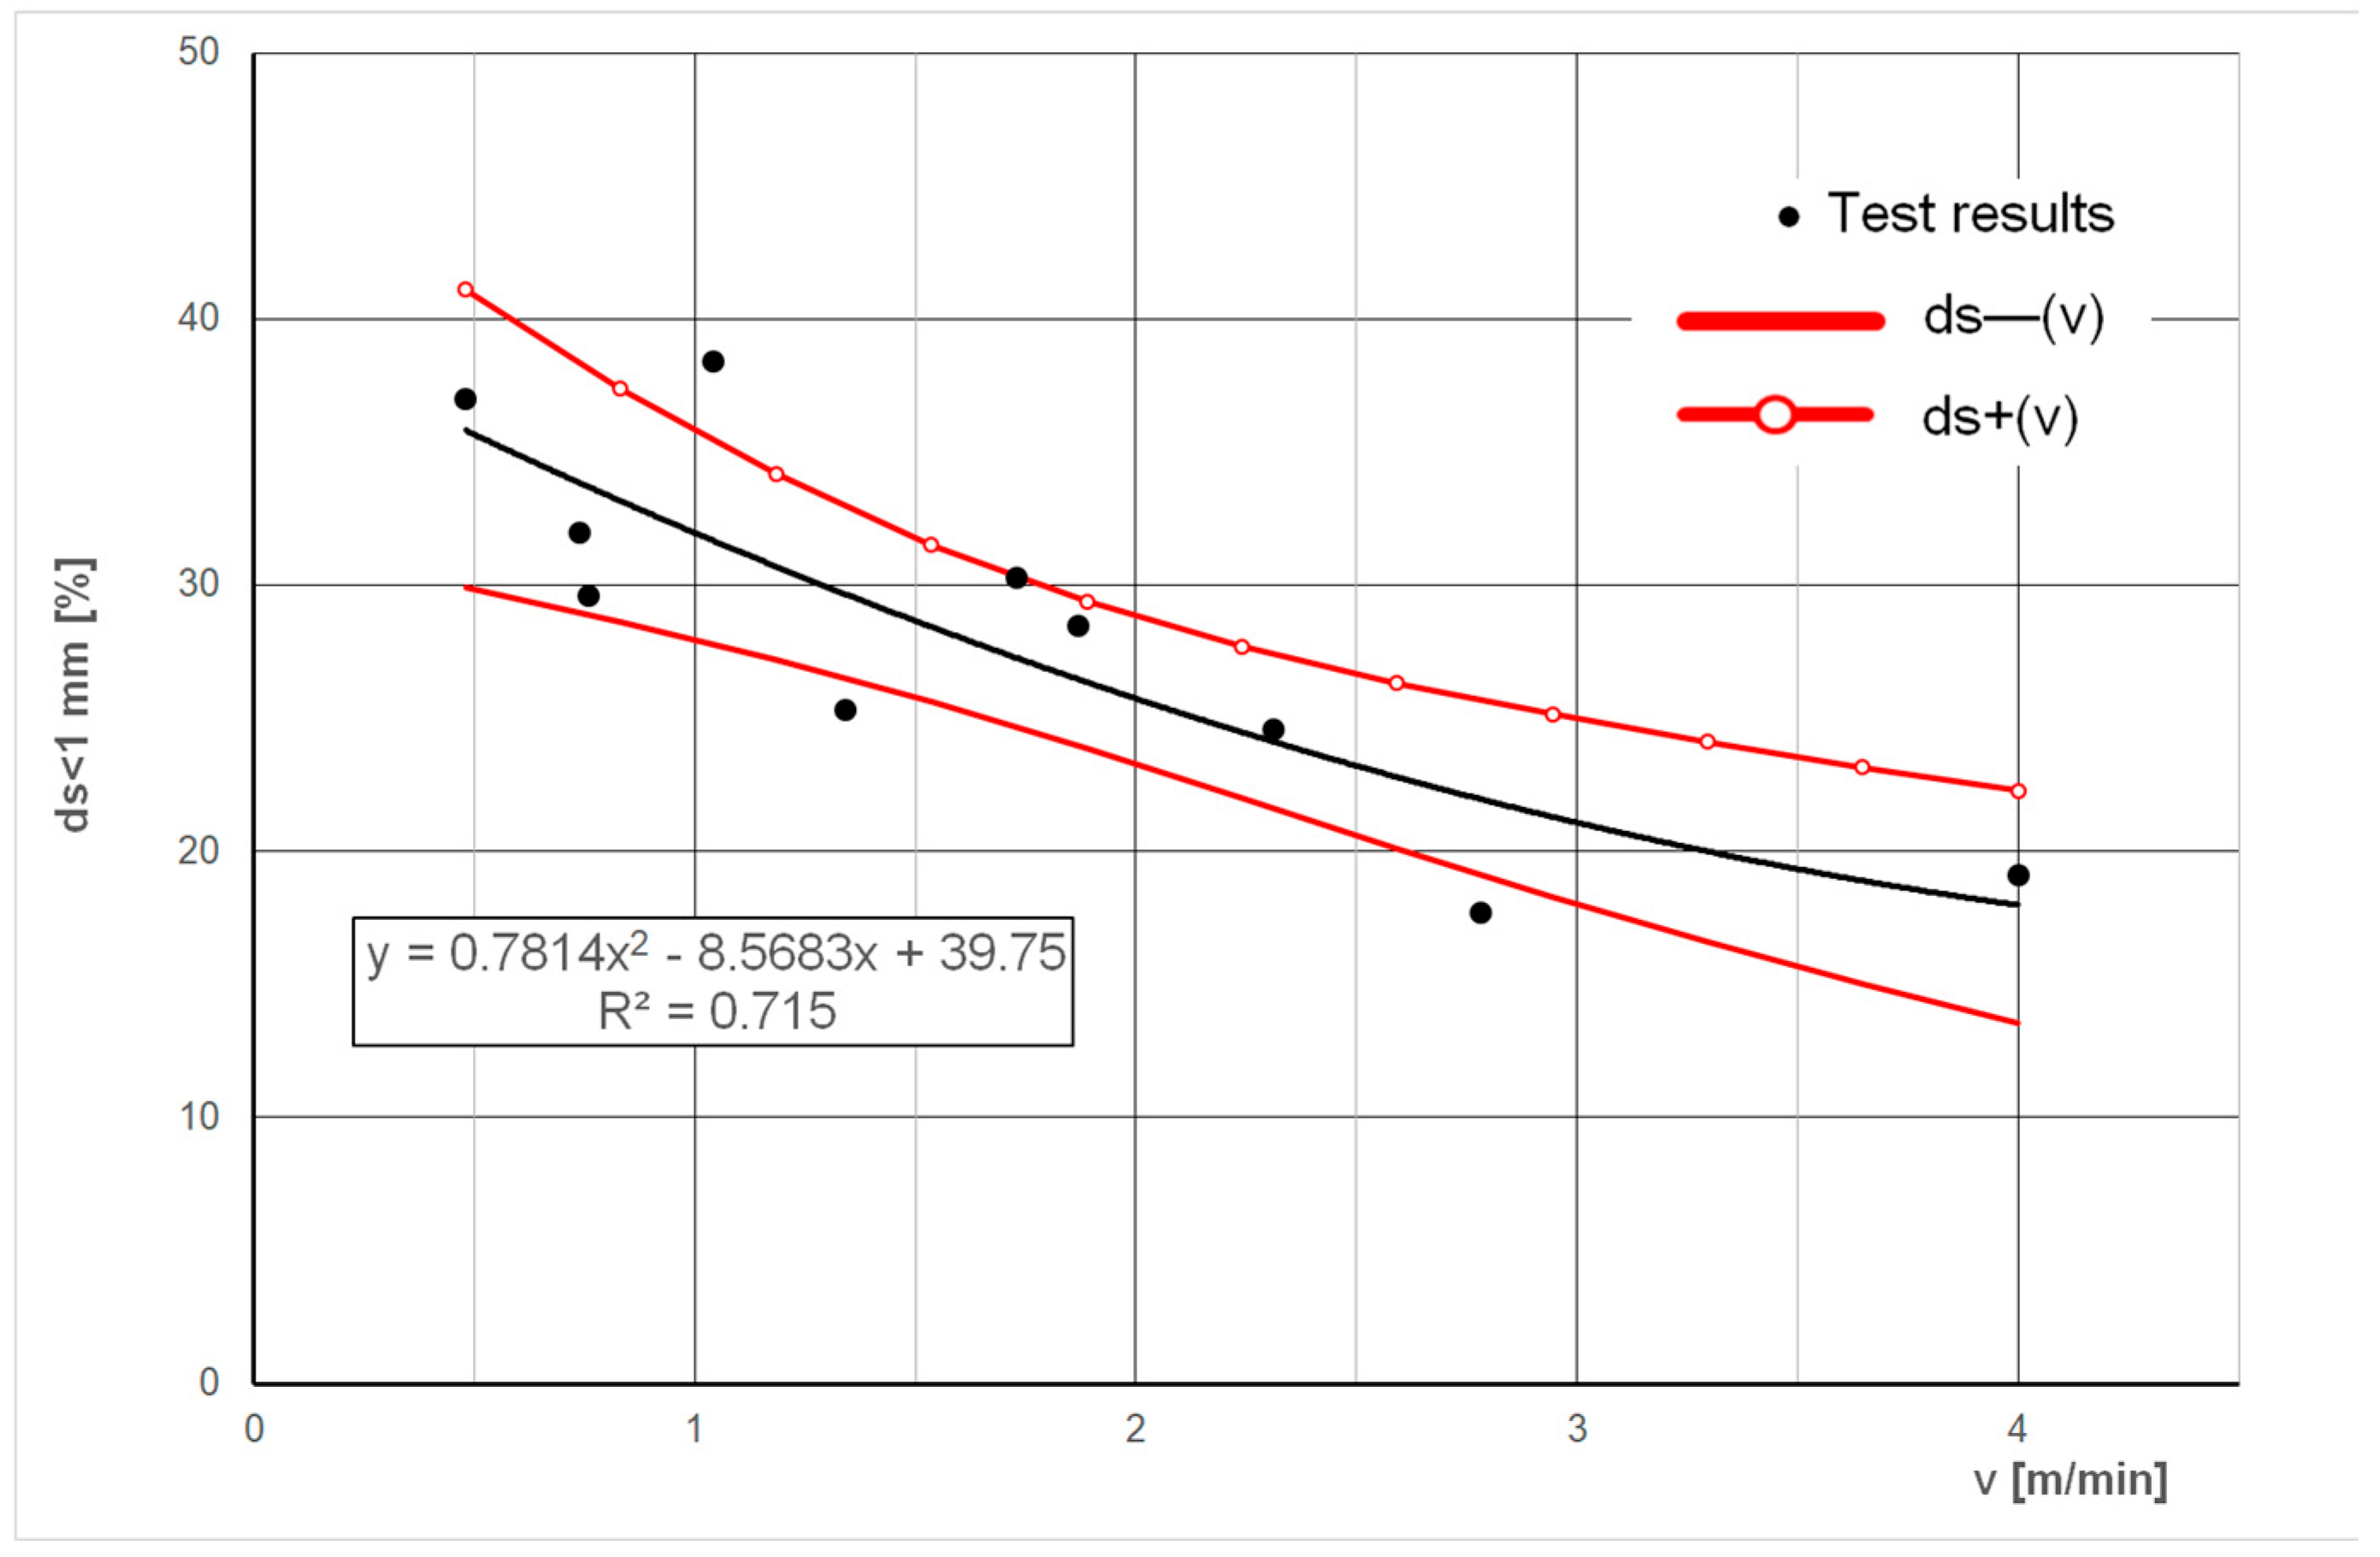
The effect of feed speed on the percentage of grains in the
dS < 1 mm class in the total mass of the excavated material was also analysed. The relationship between the percentage of the
dS < 1 mm grain fraction and the average feed speed of the cutting head is shown in
Figure 19.
The highest value of the fit coefficient was obtained for the trend line described by a second-order polynomial. Confidence curves surrounding the actual trend line at a confidence level of 95% are also presented. The shape of the trend line shown in
Figure 19 indicates that the percentage share of grains
dS < 1 mm also decreases with an increase in the average feed speed of the cutting head.
4.2. Procedure for Selecting the Most Favourable Parameters of Rock Mining Technology
When analysing the parameters, several factors, seemingly contradictory, must be taken into account. The problem of adopting specific design parameters for such a cutterhead is a complex task; each parameter will result from adopting certain basic parameters of the cutterhead, depending, for example, on the cutterhead’s intended use (rocks being cut). The remaining parameters will be subject to typical multi-criteria optimisation procedures, according to the following scheme:
- (a)
Milling Disc Rotational Speed: As for milling shearers, this must be correlated with the designed protrusion of the tool’s tip relative to the disc and the advance speed of the cutterhead, as the combination of these parameters affects the cutting depth of a single tool, sorting of the mined material in this zone, dustiness, and the energy consumption of the cutting process. Here, we can distinguish the part of the cutterhead responsible for fines formation, which has a decisive impact on the energy consumption of the cutterhead. Another issue is to correlate the rotational speed of the milling disc with the diameter of the tool’s tip (and thus the diameter of the milling disc), as this directly affects the linear velocity at the tool’s tip. This speed, in turn, is limited by the so-called critical speed, characteristic of the blade material and the rock being cut (it depends, for example, on the so-called calculated quartz content).
- (b)
Advance Speed: Its impact on the milling disc operation was discussed above. From the perspective of the chipping disc operation, this speed should be as low as possible, as its increase limits the deformation zone of the rock material under the action of the chipping disc, thus limiting the range of the gap accompanying the breakout of larger lumps of mined material. This process has also been observed, for example, in metalworking, where a significant change in the proportions of the force components on the milling disc blade is observed (for the same force on the blade, the resistive force decreases and the tangential force increases).
- (c)
Width of the Milling Disc: As the tests show, it does not significantly affect the separation of larger lumps of mined material by the cutterhead. Ratio of the height of the protrusion H to its thickness a is crucial for the formation of large lumps of the mined material. When using the typical milling tools and their holders, the minimum gap width will depend primarily on their dimensions and the lateral deflection of tools necessary to eliminate friction between the holders and the rock. Due to the previously described process of generating fine particles in the working zone of the milling disc and the impact on the energy consumption of mining, the width of the milling disc should be as small as possible, as this will reduce energy dissipation on the formation of the finest particles. The limitations that will arise here include the potentially insufficient stiffness of the milling disc and parameters of tools and tool holders, taking into account their lateral deflection, which is necessary to limit the friction of the disc and tool holders against the bottom of the cut and the wall face of the. From the perspective of minimising the energy losses in this area, it would be worth considering the possibility of using a circular saw with a special design that protects it from deformation due to intense friction. Due to the energy consumption of the cutterhead, the ratio of a cut width to the thickness of the ledge being separated should be as small as possible, as this will minimise the share of energy dissipated by the formation of fines.
- (d)
Angle of the Chipping Disc: A parabolic shape would be the best, rather than conical, which allows for deeper milling of the rock and a larger angle of the cutterhead operation, which significantly favours reducing the chipping force. From the point of the chipping energy, its limitation should result from a significant reduction in force with a limited chipping range.
- (e)
Web Depth: Due to the limited scope of tests, no limit was established for the cutterhead web depth, i.e., one that would potentially prevent chipping the undercut rock ledge.
The process can be optimised using the algorithm below to calculate the geometric parameters of a cutterhead designed for mining the given rock category.
Determine the following characteristic parameters of the rock: tensile strength ft, rock–steel friction angle ϕ = arctgμ, and rock abrasiveness (determine for the rock being mined).
Assume a diameter of the tool tips arrangement on the milling disc—D [mm].
Determine the critical cutting speed vck for the milling blade material and the abrasiveness of the cut rock (cutting with limited tool cooling). The peripheral speed of the tool should not exceed 1.5 m/s.
Determine the diameter of the milling disc, Dn, to determine the maximum extension height of the tools and tool holders relative to the disc.
For the assumed diameter Dn and vckr, determine the maximum rotational speed of the milling disc nmax.
Determine the maximum advance rate vp (advance p [mm] per one disc revolution should be less than or equal to the height of the tool tips relative to the disc—assuming one tool in the cutting line).
Select the geometric parameters of the pick blades. Determine the width of the cut h.
Determine the cutterhead web depth Z.
Determine the diameter of the base of the chipping disc D1.
Determine the rock ledge parameters: height H and thickness a = Z − h.
Determine the cutterhead axis tilt angle a (it should not exceed 3°).
Based on the optimal chipping angle for the given rock, determine the convergence angle of the conical part of the cutterhead ε.
4.3. Concept of Using the Cutterhead
The concepts for using the cutterheads are presented below. The ability to vary the distance between the base of the expansion cone and the tips of the chipping disc tools, determined for the given mining conditions, is their characteristic feature. The second variable in such cutterheads is the distance between the chipping discs, measured in the cross-sectional plane of the working, also determined for the given mining conditions.
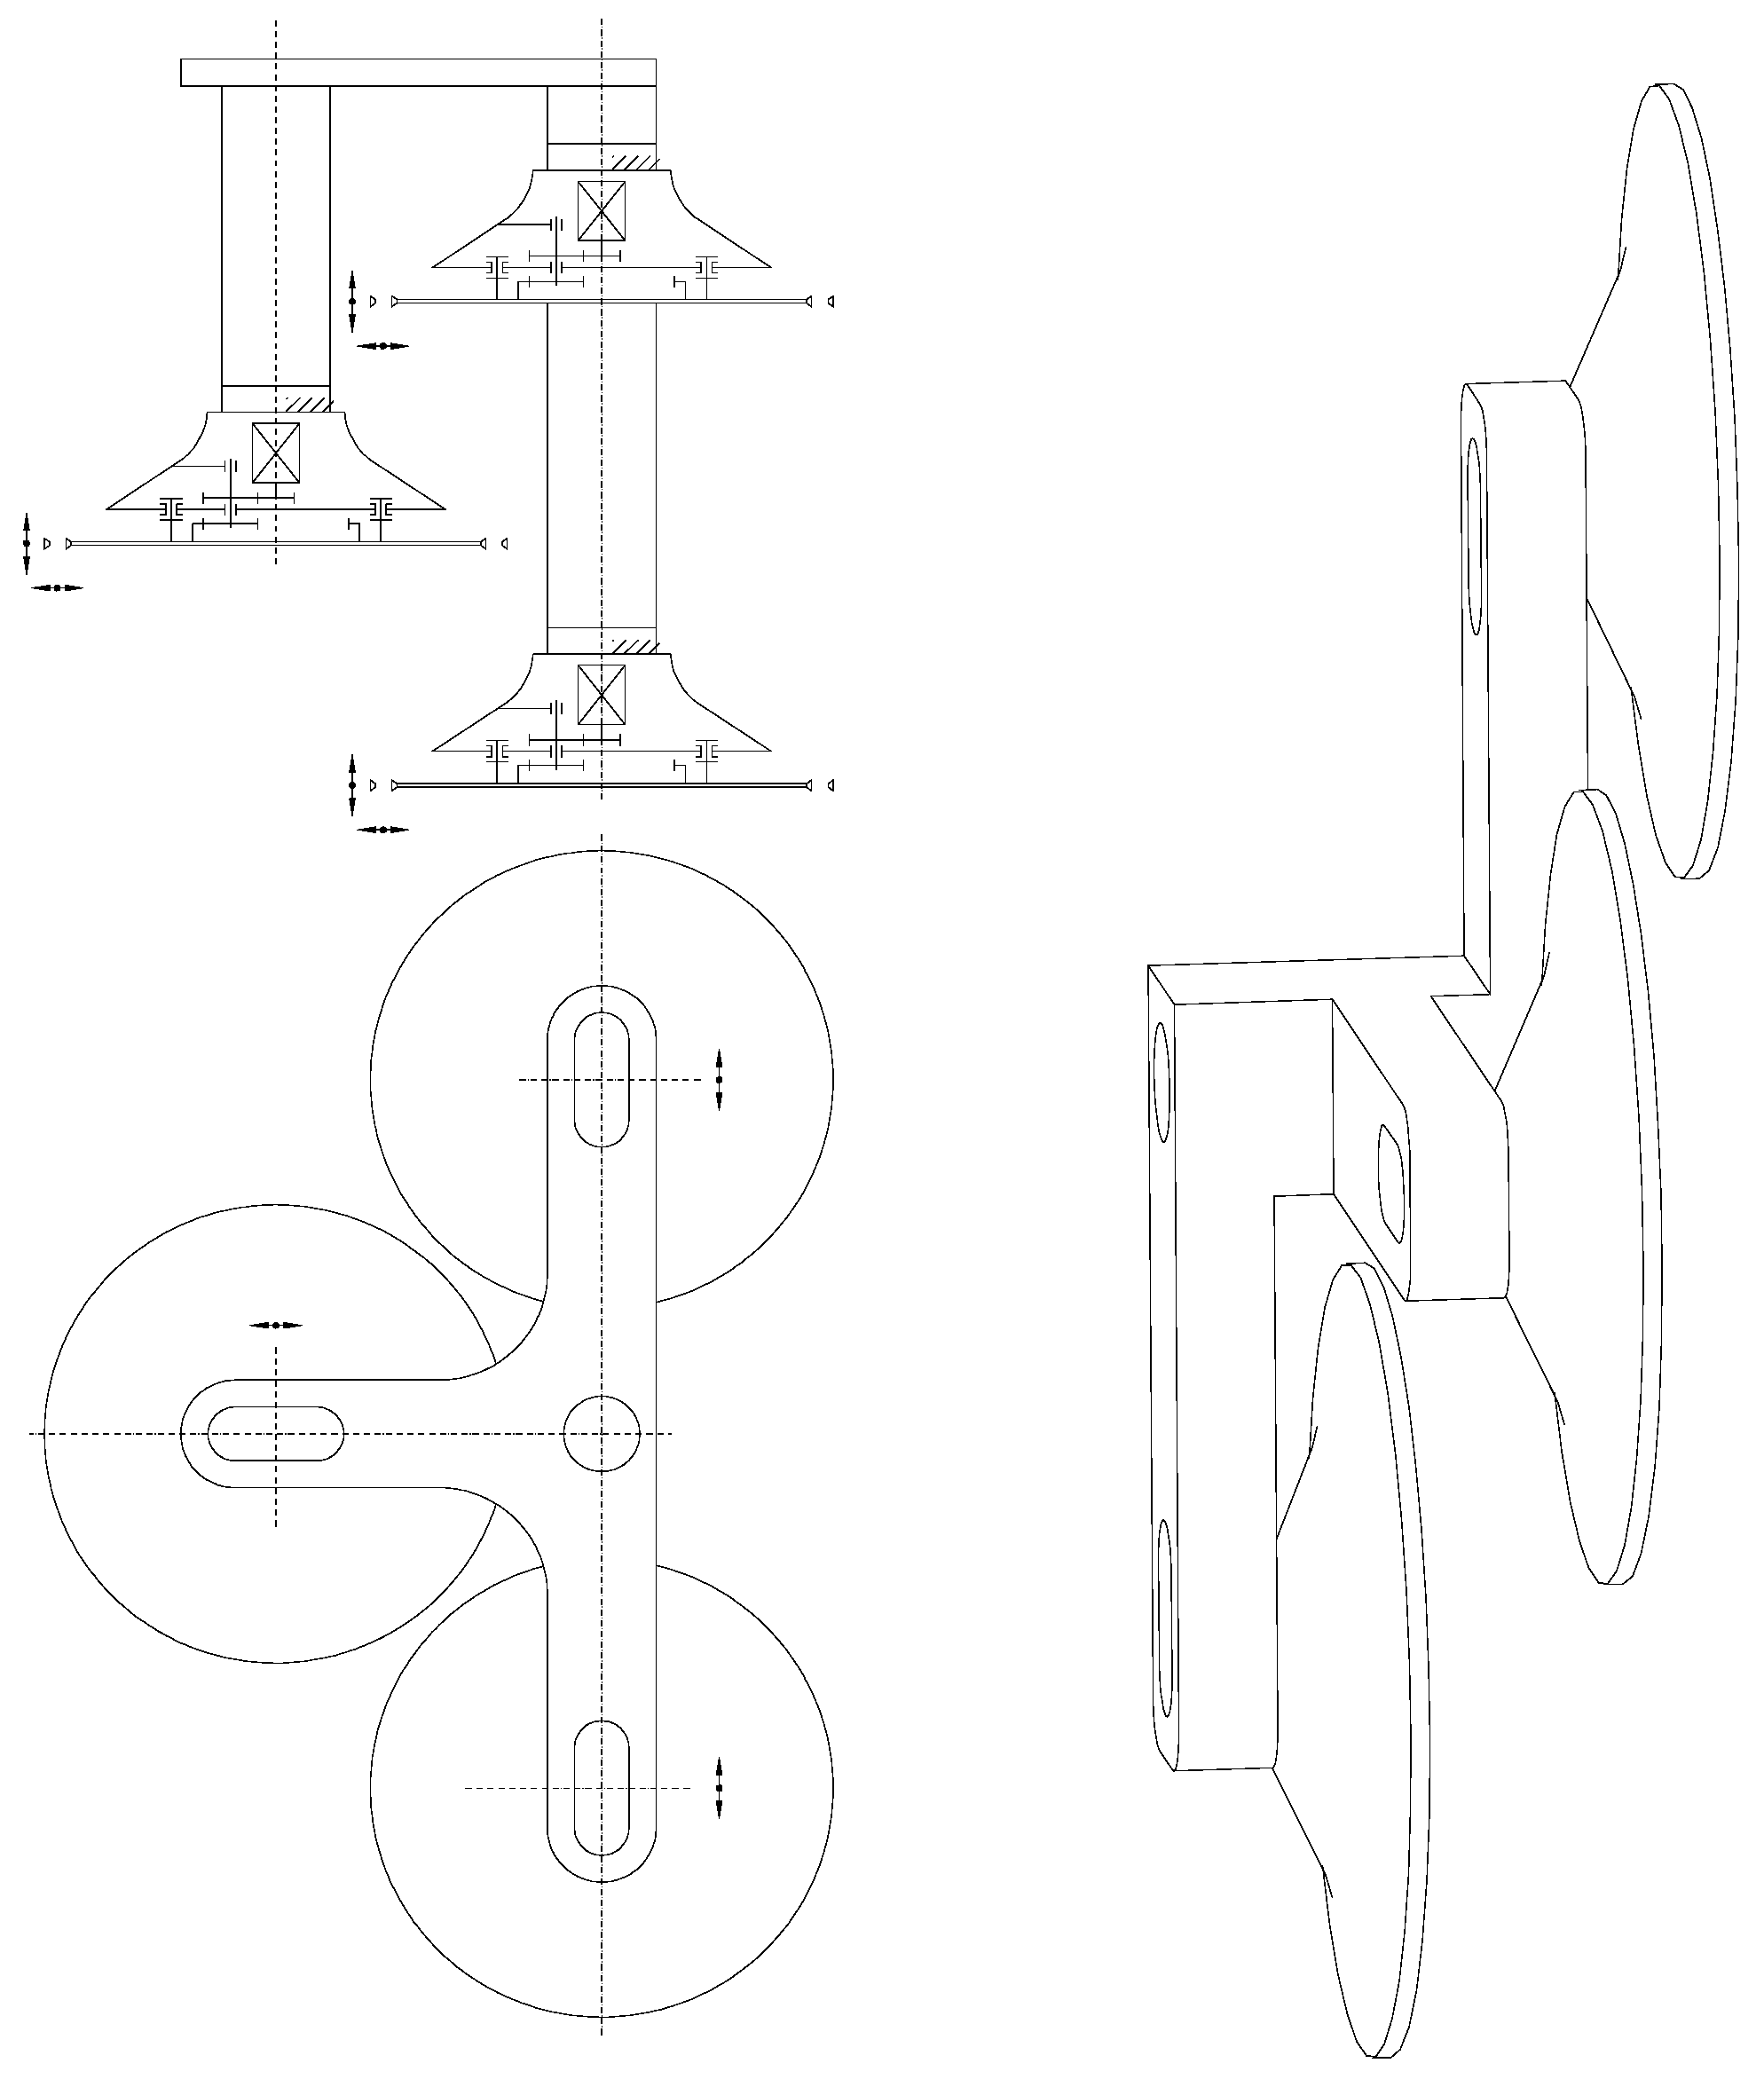
For mining the seams of a height exceeding the chipping disc diameter, the cutterhead arrangement is spatial, so that the working area of each disc overlaps within the disc diameter. The position of the disc axes relative to each other can be determined in the cutting planes, depending on the height of the workpiece, using longitudinal cutouts in the cutterhead body. If the mining machine is equipped with a single arm, the cutterhead body can rotate relative to the arm around the head support axis, allowing the cutterhead to be correctly positioned relative to the solid rock when the machine reverses. The spacing of the chipping discs is adjusted using the spacers. The structural design of each cutterhead used here is based on a stationary chipping cone, which supports the chipping disc, which rotates relative to it. A preferred variant of this solution is to place the motor driving the milling disc inside the cone, making the drive of the chipping discs independent of the cutterhead’s position. A diagram of this solution is shown in
Figure 20.
5. Conclusions
Based on the theoretical considerations and analysis of the results, the following conclusions can be drawn:
(1) The tests confirmed that the cutterhead can chip off large rock masses, improving the grain distribution of the mined material. However, there is a clear division of the material into two basic grain classes: very fine grains, formed in the cut slot, and coarse grains, formed during the process of chipping off the rock fragments with the chipping part of the cutterhead. The amount of fine rock fractions depends primarily on the working width of the milling disc, intended for undercutting the rock ledge.
(2) Among the technological parameters of mining, the following are crucial for size of chipped off rock: the cutterhead web depth, which determines the thickness a of the rock “ledge”, design parameters of the cutterhead milling disc (especially the diameter of arrangement of the cutting tools tips), and the design parameters of the cutterhead chipping part (especially the convergence angle β and its diameter in the contact zone with the cutterhead), as these parameters determine the height H of the separated rock ledge.
(3) There is a strong statistical relationship between the specific cutting energy Ej and the feed rate vp. The influence of the cutting speed v and the cutting-expanding disc angle α on the specific cutting energy Ej is characterised by power-law trend lines. As can be seen from the presented graphs, high values of the cutting energy Ej occurred at low feed rates vp.
(4) Using the considered test results, it was found that for nominal feed speed ranges with values of vp > 3 m/min, the specific cutting energy Ej reaches values of Ej < 2 kWh/m3. It can be assumed that further increases in feed speed will result in a significant reduction in the specific cutting energy Ej.
(5) Analysing the effect of advance speed on output of coarse aggregates, it was found that the average share of large grains in the grain class d > 30 mm and grains of a diameter d < 1 mm depends primarily on the advance speed vp. It was found that the higher the advance speed, the lower the share of grains of d < 1 mm.
(6) The influence of parameters such as the drive z and the angle of deflection of the cutting-expanding disc α on the specific mining energy Ej is of secondary importance compared to the influence of the mining speed v on Ej. In order to determine the influence of the disc tilt angle α on the value of the specific mining energy Ej, a method of reducing all obtained test results to a single feed speed was used.
(7) The analysis showed that optimal cutting efficiency while consuming the minimum specific cutting energy can be achieved by a proper selection of the advance rate vp, and the web depth z.
(8) The test results confirm the high consistency of the theoretical assumptions regarding the shape of the chipping line with the numerical and stand tests. However, the demonstrated power–law relationship between the specific cutting energy Ej and the advance rate vp does not have a high fit factor R2. The dynamic impact of the cutterhead on the mined rock block caused vibrations of the drive system, and the cutterhead advance system was the reason of large scatter in the measurement results. Elimination of these vibrations will be possible after constructing the prototype mining machine equipped with the experimental cutterhead.
