Article

Experimental Investigation and Predictive Modeling of Surface Roughness in Dry Turning of AISI 1045 Steel Using Power-Law and Response Surface Approaches

Department of Mold and Die Engineering, National Kaohsiung University of Science and Technology, Kaohsiung 807, Taiwan
*
Authors to whom correspondence should be addressed.
Appl. Sci. 2026, 16(3), 1392; https://doi.org/10.3390/app16031392
Submission received: 9 December 2025 / Revised: 5 January 2026 / Accepted: 9 January 2026 / Published: 29 January 2026
(This article belongs to the Section Mechanical Engineering)

Abstract

Dry machining of AISI 1045 steel is attractive for sustainable manufacturing but makes it more challenging to control surface roughness Ra. This work investigates dry turning of AISI 1045 using a 23 factorial design with three center points (11 runs) and compares a traditional power-law correlation with a quadratic response surface model (RSM). The power-law fit on log-log data explains only about 20% of the variance, whereas the quadratic RSM achieves R2 ≈ 0.98 with a root-mean-square error (RMSE) of 0.62–0.77 µm based on leave-one-out cross-validation and bootstrap resampling. Feed rate S is identified as the dominant factor, while cutting speed V and depth of cut t have secondary but non-negligible interactive effects. Sobol global sensitivity indices confirm that S and S2 account for more than half of the output variance. The optimized setting within the tested domain (V ≈ 83 m/min, S = 0.60 mm/rev, t = 0.10 mm) yields a predicted Ra ≈ 5.3 µm, appropriate for semi-roughing prior to grinding. The proposed framework combines small-sample RSM, Lasso regularization, uncertainty quantification and Sobol analysis to provide an uncertainty-aware model for optimizing dry-turning parameters of AISI 1045 steel.

1. Introduction

Surface roughness is a key quality indicator in turning operations, directly affecting the functional performance, fatigue strength, friction, and aesthetic appearance of machined components [1,2]. Among medium-carbon steels, AISI 1045 is widely used in shafts, gears, and general-purpose mechanical parts, where turning is frequently the final shaping and finishing process. Dry machining is increasingly attractive as it eliminates cutting fluids, reduces environmental impact and operational costs, and simplifies chip disposal [3,4]. However, the absence of coolant tends to increase cutting temperature, tool wear, and built-up edge (BUE) formation, making it more challenging to achieve a consistent surface finish.
Numerous studies have investigated the influence of cutting speed (V), feed rate (S), and depth of cut (t) on surface roughness (Ra) using classical response surface methodology (RSM) [5]. Most studies report feed rate as dominant factor for Ra, as it directly controls uncut chip thickness and influences the balance between cutting and ploughing, as well as BUE formation [6,7,8,9,10]. Cutting speed usually plays a secondary role within moderate ranges, mainly affecting thermal softening and chip-tool contact, while depth of cut has a more modest effect. For modeling, both classical power-law correlations R a = k V a V S b S t c t and quadratic RSM formulations have been proposed, typically achieving high in-sample R2 values with sufficiently large designs (e.g., central composite or Box-Behnken designs) [5,6,7,9,11,12,13].
Modern machine-learning (ML) techniques have also been widely explored for predicting machining responses [14,15,16]. While these models can deliver high accuracy, they often require large datasets and lack the interpretability of simpler models, making them less suitable for industrial settings with severe experimental constraints. A significant challenge arises when the number of experimental runs is only slightly larger than the number of model parameters, leading to saturated designs where classical ANOVA and F-tests become unreliable [17]. Consequently, under small-sample conditions, model adequacy should be assessed using prediction-oriented criteria such as PRESS, cross-validation, and bootstrap resampling [16,17,18]. In this work, we deliberately focus on statistically transparent RSM-based models rather than black-box ML, given the very limited number of experimental runs.
This study aims to: (1) experimentally quantify Ra in dry turning of AISI 1045 using a compact design (11 runs); (2) develop and compare predictive models using quadratic RSM and Lasso-regularized regression; (3) assess parameter influence using both RSM and Sobol global sensitivity indices; and (4) provide an honest evaluation of model adequacy despite the limited sample size.
Unlike previous studies that rely on large designs or classical inference, this work presents a fully uncertainty-aware modeling framework using only 11 runs. By integrating LOOCV, bootstrap-based error distributions, and Sobol variance decomposition, this study delivers statistically honest predictions while maintaining physical interpretability—a combination that, to the best of the authors’ knowledge, has not previously been reported for dry turning of AISI 1045.

2. Materials and Methods

2.1. Workpiece, Tool, Machine, and Measurement

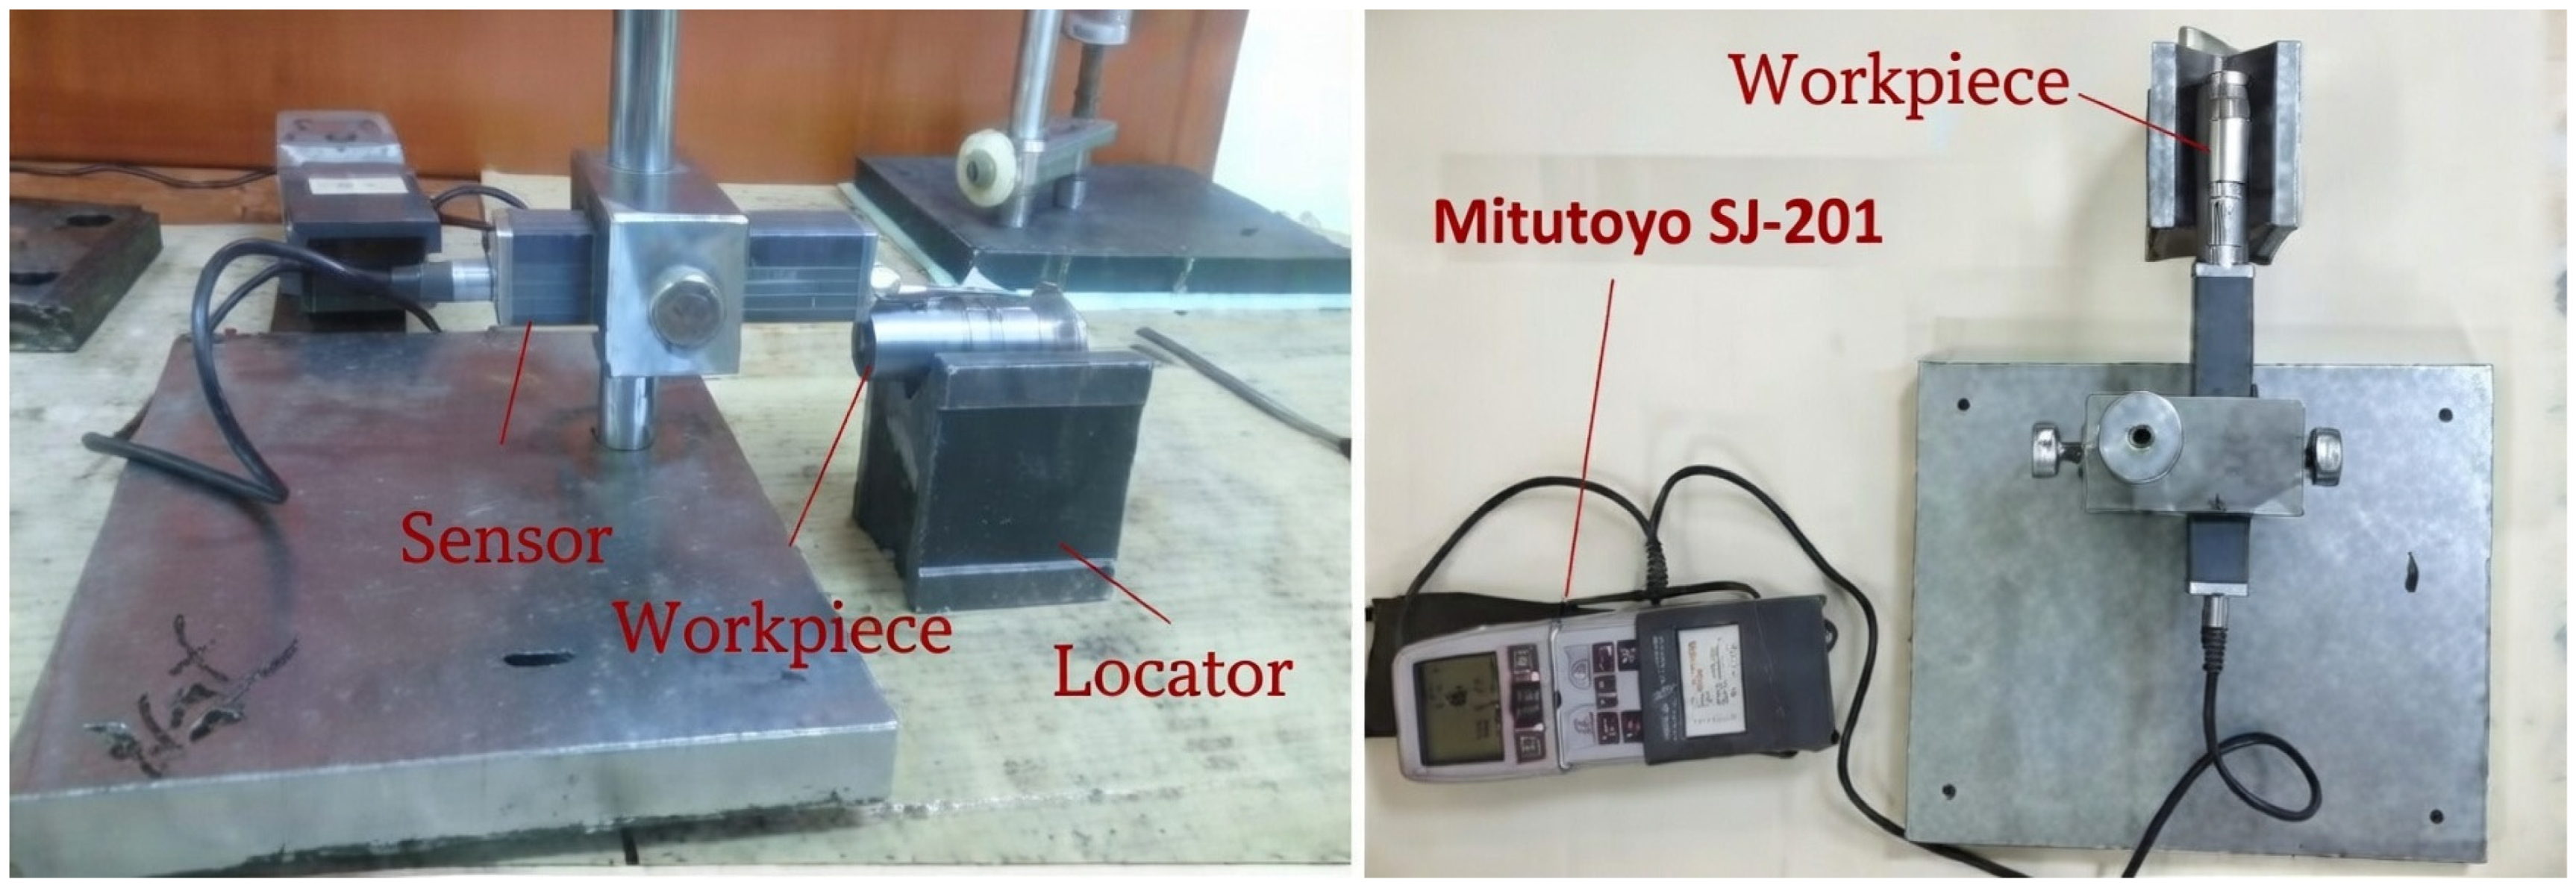
The workpiece material was AISI 1045 medium-carbon steel with a measured hardness of approximately 200 HB. Cylindrical bars with a diameter of 20 mm and a length of 100 mm were prepared, and their mechanical properties and chemical composition are summarized in Table 1. All dry turning trials were carried out on a Prince engine lathe using uncoated carbide inserts (CNMG120408). The experimental setup for dry turning on the Prince lathe is illustrated in Figure 1. Surface roughness Ra was measured after machining using a Mitutoyo SJ-201 contact profilometer (Mitutoyo Corp., Japan) at the Export Mechanical Tool Joint Stock Company, Quang Minh Industrial Zone, Me Linh District, Hanoi, Vietnam.
Surface roughness Ra was measured using a Mitutoyo SJ-201 contact profilometer (Mitutoyo Corporation, Kawasaki, Japan). A diamond stylus with a tip radius of 2 µm and a stylus force of 0.75 mN was used, with a cut-off length λc = 0.8 mm and an evaluation length of 4 mm (five sampling lengths), in accordance with ISO 21920-2:2021 and 21920-3:2021 for turned steel surfaces [19,20]. For each experimental run, three traces were recorded at different angular positions along the mid-length of the workpiece in order to capture circumferential variability; the reported Ra value is the arithmetic mean of these three measurements. Prior to testing, the profilometer was calibrated using a certified roughness standard, and repeated measurements of the center-point condition yielded a standard deviation below 0.05 µm, indicating satisfactory short-term repeatability. Figure 2 illustrates the surface roughness measurement using the Mitutoyo SJ-201 profilometer.

2.2. Design of Experiments

A three-factor, two-level full factorial design (23) with three center points (11 runs total) was employed. The factors and levels were: cutting speed V (45, 83 m/min), feed rate S (0.60, 1.00 mm/rev), and depth of cut t (0.10, 0.50 mm). The center point was V ≈ 61 m/min, S = 0.80 mm/rev, t = 0.30 mm. Table 2 presents the uncoded factor levels and measured Ra values.
This compact experimental design minimizes material and tool costs while providing sufficient input–output variability for constructing stable regression models.
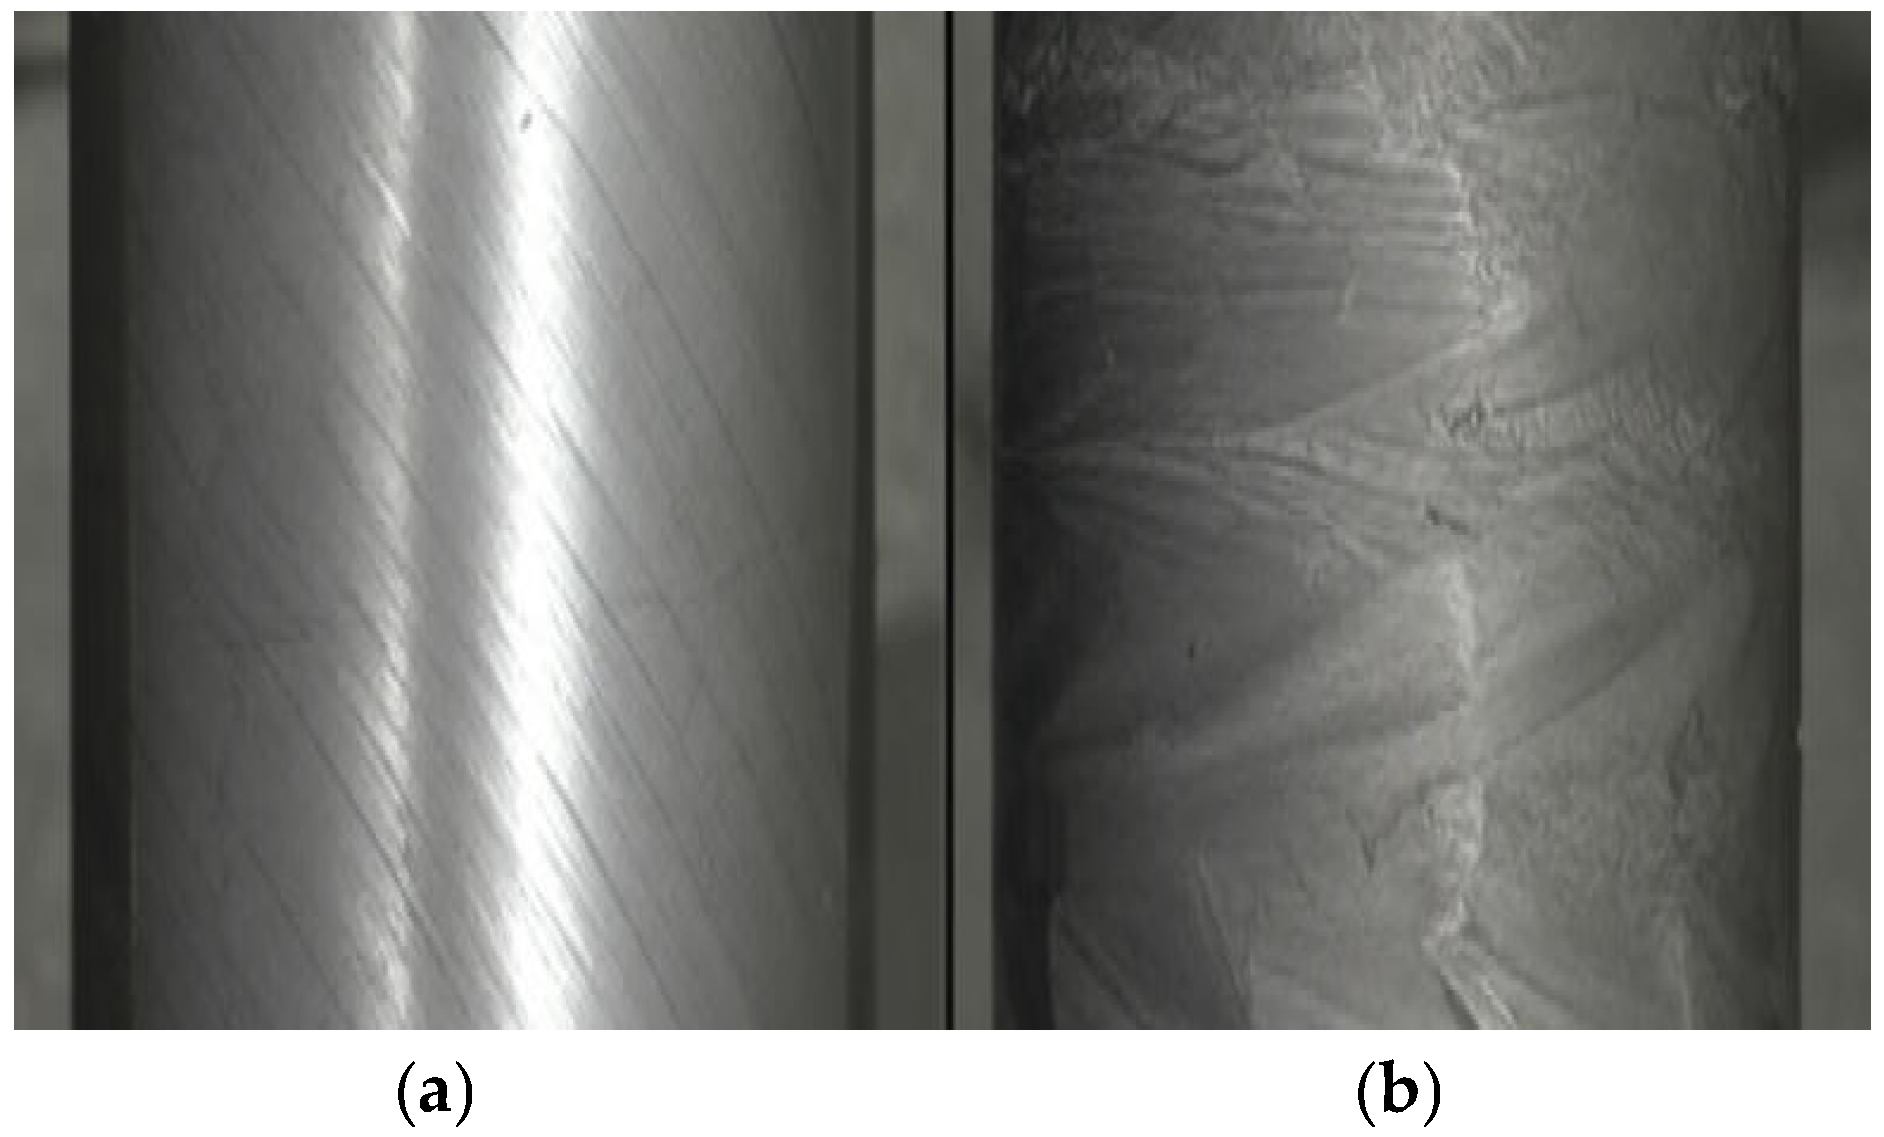
All experiments were performed under dry conditions using the same tool-workpiece combination and measurement protocol described in Section 2.1. After each machining condition, the surface morphology was examined using an optical microscope equipped with a digital camera. Figure 3 compares representative surfaces obtained at low feed (S = 0.60 mm/rev) and high feed (S = 1.00 mm/rev) under similar cutting conditions.
At low feed (Figure 3a), the surface shows uniform feed marks with shallow valleys. At high feed (Figure 3b), pronounced helical grooves, smeared material, and micro-tearing are evident, indicating severe ploughing and possible built-up edge (BUE) formation. This visual evidence confirms that feed rate strongly controls uncut chip thickness and the transition from cutting to ploughing, consistent with the dominant statistical effect of S observed in subsequent analyses.
This visual evidence is fully consistent with the statistical results of the present study, where S and S2 dominate the variance of Ra in both the quadratic RSM and the Sobol global sensitivity analysis. It also agrees with previous dry-turning and MQL-turning investigations on AISI 1045 and related medium-carbon steels, which report feed-dominated surface deterioration, deep feed marks and smeared layers at high feed levels, while cutting speed plays a secondary role within moderate ranges [6,7,9,10]. Similar observations of ploughing grooves, plastically deformed material and occasional BUE at large feed have been documented in C45 and other structural steels, where Ra increases almost monotonically with S and remains comparatively less sensitive to V and t over typical industrial ranges [3,8]. The present morphology images therefore provide a physically intuitive explanation for the dominant statistical effect of S on Ra observed in the subsequent modeling and optimization sections.

2.3. Statistical Modeling Strategy

Three models were considered: a power-law model, a full quadratic RSM, and a Lasso-regularized quadratic RSM. With 11 runs and 10 parameters in the full quadratic model, the design is nearly saturated (1 residual degree of freedom). Therefore, classical ANOVA-based inference is limited [17].
The primary evaluation of model adequacy relies on prediction-focused metrics: PRESS, predicted R2, leave-one-out cross-validation (LOOCV), and bootstrap resampling (B = 5000) are used to evaluate model adequacy and uncertainty [16,18]. This approach aligns with recent recommendations for small-sample machining experiments.

3. Results and Discussion

3.1. Baseline Power-Law Model

A baseline power-law model of the form was first considered, which is widely used in classical metal-cutting correlations [1,2]. Taking natural logarithms leads to a linear regression in ln(Ra) with ln(V), ln(S) and ln(t) as predictors:
R a = k V a V S b S t c t            
ln ( R a ) = l n ( k ) + a V l n ( V ) + b S l n ( S ) + c t l n ( t )
After log transformation, the linear regression yielded the results in Table 3.
Table 3 summarizes the fitted exponents and their 95% confidence intervals. The overall coefficient of determination on the log scale is modest (R2 ≈ 0.20), and none of the exponents is statistically significant at the 5% level. Similar limitations of simple power-law models for surface roughness have been reported in dry-turning and hard-turning studies, where curvature and two-factor interactions dominate the response [5]. In contrast, those works obtained R2 values above 0.9 only when quadratic or interaction terms were added.
Therefore, in the present study the power-law model is retained solely as a physically interpretable reference, while all subsequent analysis and optimization are based on the quadratic RSM and its regularized variant. The comparison highlights that, under small-sample and dry-cutting conditions, a simple multiplicative power law is unable to capture the combined effects of feed rate, cutting speed and depth of cut with sufficient accuracy.

3.2. Main Effects

Figure 4 presents the main-effects plots of the fitted quadratic RSM for Ra with respect to cutting speed (V), feed rate (S), and depth of cut (t). Each curve represents the predicted Ra as one factor varies across its experimental range while the other two are held at their center levels (V ≈ 61 m/min, S = 0.80 mm/rev, t = 0.30 mm). The plots provide a compact view of the average influence of each factor within the studied domain.
As expected from the morphological observations in Section 2.2, feed rate (S) exhibits by far the strongest positive influence on Ra. The main-effect curve for S shows a steep, nearly monotonic increase in Ra as S rises from 0.60 to 1.00 mm/rev, with a slight curvature consistent with the significant S2 term in the RSM. In contrast, the main-effect curve for V is relatively flat and weakly decreasing over the range 45–83 m/min, indicating only a modest improvement in Ra at higher cutting speeds. The effect of depth of cut (t) lies between these two extremes: Ra increases with t, but the slope is smaller than that associated with S, and the curvature is less pronounced than that of S2.
Quantitatively, the change in mean Ra induced by varying S across its experimental range is several times larger than that induced by varying V or t, which agrees with the subsequent ANOVA and Sobol results. Combined with Figure 3, these main effects confirm that feed rate primarily governs uncut chip thickness and groove formation. In contrast, V and t mainly modulate thermal and contact conditions without fundamentally altering the surface generation mechanism within the studied range.
A similar dominance of feed rate over cutting speed has been reported in several RSM-based turning studies of AISI 1045 and related medium-carbon steels. Makadia and Nanavati [9] found that S and S2 were the most influential terms in dry turning AISI 1045, whereas V had only a secondary effect on Ra within their central composite design. Nagandran et al. [12] likewise observed that Ra increased sharply with feed in CNC turning of AISI 1045, even when V and t were optimized using heuristic algorithms, with feed remaining the critical lever for surface finish. Noordin et al. [13] and Anh et al. [21] reported that productivity improvements or higher cutting speeds could be achieved only at the cost of increasing S, which consistently degraded Ra.
These comparisons show that the present main-effect patterns—weak linear influence of V, strong monotonic dependence on S, and moderate effect of t—are fully consistent with previous experimental and RSM-based investigations on AISI 1045 and similar steels [6,7,9,12,13,21]. The added value of the current work lies in quantifying these trends under strictly dry conditions with a very small experimental budget and in linking them to both bootstrap-based prediction errors and Sobol global sensitivity indices in the following sections.

3.3. Analysis of Variance (ANOVA)

The second-order polynomial RSM is given by:
R a = β 0 + β 1 V + β 2 S + β 3 t + β 12 V S + β 13 V t + β 23 S t + β 11 V 2 + β 22 S 2 + β 33 t 2
The corresponding quadratic RSM in uncoded variables is:
Ra = 11.804 − 0.059V − 3.354S − 15.935t − 0.001V2 − 7.525S2 − 5.871t2 + 0.192VS + 0.128Vt + 16.781St.
where Ra is in µm, cutting speed V in m/min, feed S in mm/rev, and depth of cut t in mm. Given the saturated nature of the design (only one residual degree of freedom), these coefficients should be interpreted primarily for trend and relative effect strength, rather than for precise inferential statistics.
Feed rate (S) and its quadratic term (S2) are the dominant contributors, accounting for over 76% of the explained variation.
The relative importance of the terms in the quadratic RSM was examined using an analysis of variance (ANOVA) in uncoded variables. Table 4 reports the sums of squares (SS), mean squares (MS), F-ratios, p-values and percentage contributions of each linear, quadratic and two-factor interaction term. Table 5 summarizes the corresponding regression coefficients and their standard errors.
Consistent with the main-effect plots in Section 3.2, feed rate S and its quadratic term S2 make the largest contributions to the variation in Ra, followed by the interaction terms VS and St. The terms Vt and t2 also contribute non-negligibly, while the linear effects of V and t alone are comparatively modest. In contrast, the quadratic term V2 exhibits a very small sum of squares and an F-ratio close to unity, confirming that its influence on Ra is negligible over the studied range and supporting its near elimination in the Lasso-regularized fit.
The percentage contributions in Table 4 provide a clearer picture of this hierarchy. The S2, VS and St terms together account for the majority of the explained variance, reflecting the strong nonlinear and interactive influence of feed rate on surface roughness. The remaining terms (V, t, Vt, t2) mainly refine the curvature of the response surface but do not change the overall dominance of S. This effect ranking is fully consistent with the morphological observations in Figure 3 and with the main effects in Figure 4, where changes in S induce much larger variations in Ra than comparable changes in V or t.
However, because the design is saturated or nearly saturated, only one residual degree of freedom is available for pure error. Under such conditions, classical F-tests and associated p-values are known to be unreliable, and formal lack-of-fit tests cannot be performed in a meaningful way [17]. For this reason, the F-ratios and p-values reported in Table 4 are interpreted only in a qualitative sense, as rough indicators of effect ranking rather than as strong inferential evidence. The emphasis in this work is placed on the magnitudes of the sums of squares, the percentage contributions and the consistency of the effect hierarchy with physical reasoning and with the results of the Sobol global sensitivity analysis.
As emphasized in recent DOE and uncertainty-modeling guidelines, saturated or nearly saturated designs should not be used as the sole basis for strong inferential claims about factor significance [17]. In the present study, ANOVA is therefore used primarily to organize and rank effects (identifying S2, VS and St as dominant contributors), while the primary evidence for model adequacy and predictive performance is drawn from PRESS statistics, leave-one-out cross-validation and bootstrap resampling of the prediction error, as discussed in Section 3.4, Section 3.5 and Section 3.6.

3.4. Lasso-Regularized Model

To explore the potential benefits of regularization and variable selection under the present small-sample conditions, a Lasso-regularized regression was fitted using the same quadratic basis as the RSM model. In this approach, an L1 penalty is added to the sum of squared residuals, shrinking small coefficients toward zero and, in principle, allowing less influential terms to be removed from the model. The penalty parameter was tuned conservatively to avoid over-shrinking in view of the limited number of runs.
The fitted Lasso model showed that only the quadratic term V2 is consistently driven toward zero, while all remaining coefficients remain close to their least-squares values. In particular, the large-magnitude coefficients associated with S2, VS and St were essentially unchanged, and the signs and relative magnitudes of the linear and quadratic terms for S and t were preserved. This confirms that V2 is the weakest contributor among the quadratic terms and supports its exclusion from the final model, but also indicates that there is insufficient information in the dataset to justify eliminating any additional terms without risking a loss of important curvature or interaction effects.
Overall, the Lasso results suggest that, for this nearly saturated design, L1 regularization acts primarily as a stabilizing mechanism rather than as an aggressive feature selector. This is consistent with observations in other machining and small-sample RSM applications, where regularization can confirm the irrelevance of clearly weak terms but cannot safely prune multiple effects when the number of runs is only slightly larger than the number of parameters. In the present work, the Lasso model is therefore interpreted as exploratory support for the quadratic RSM-helping to justify the near elimination of V2-rather than as an independent predictive model. The main predictive and interpretive conclusions are drawn from the quadratic RSM in conjunction with the cross-validation, bootstrap and Sobol analyses discussed in the following sections.
For clarity and in line with the journal’s length constraints, detailed Lasso path plots are omitted but are available upon request.

3.5. Residual Diagnostics

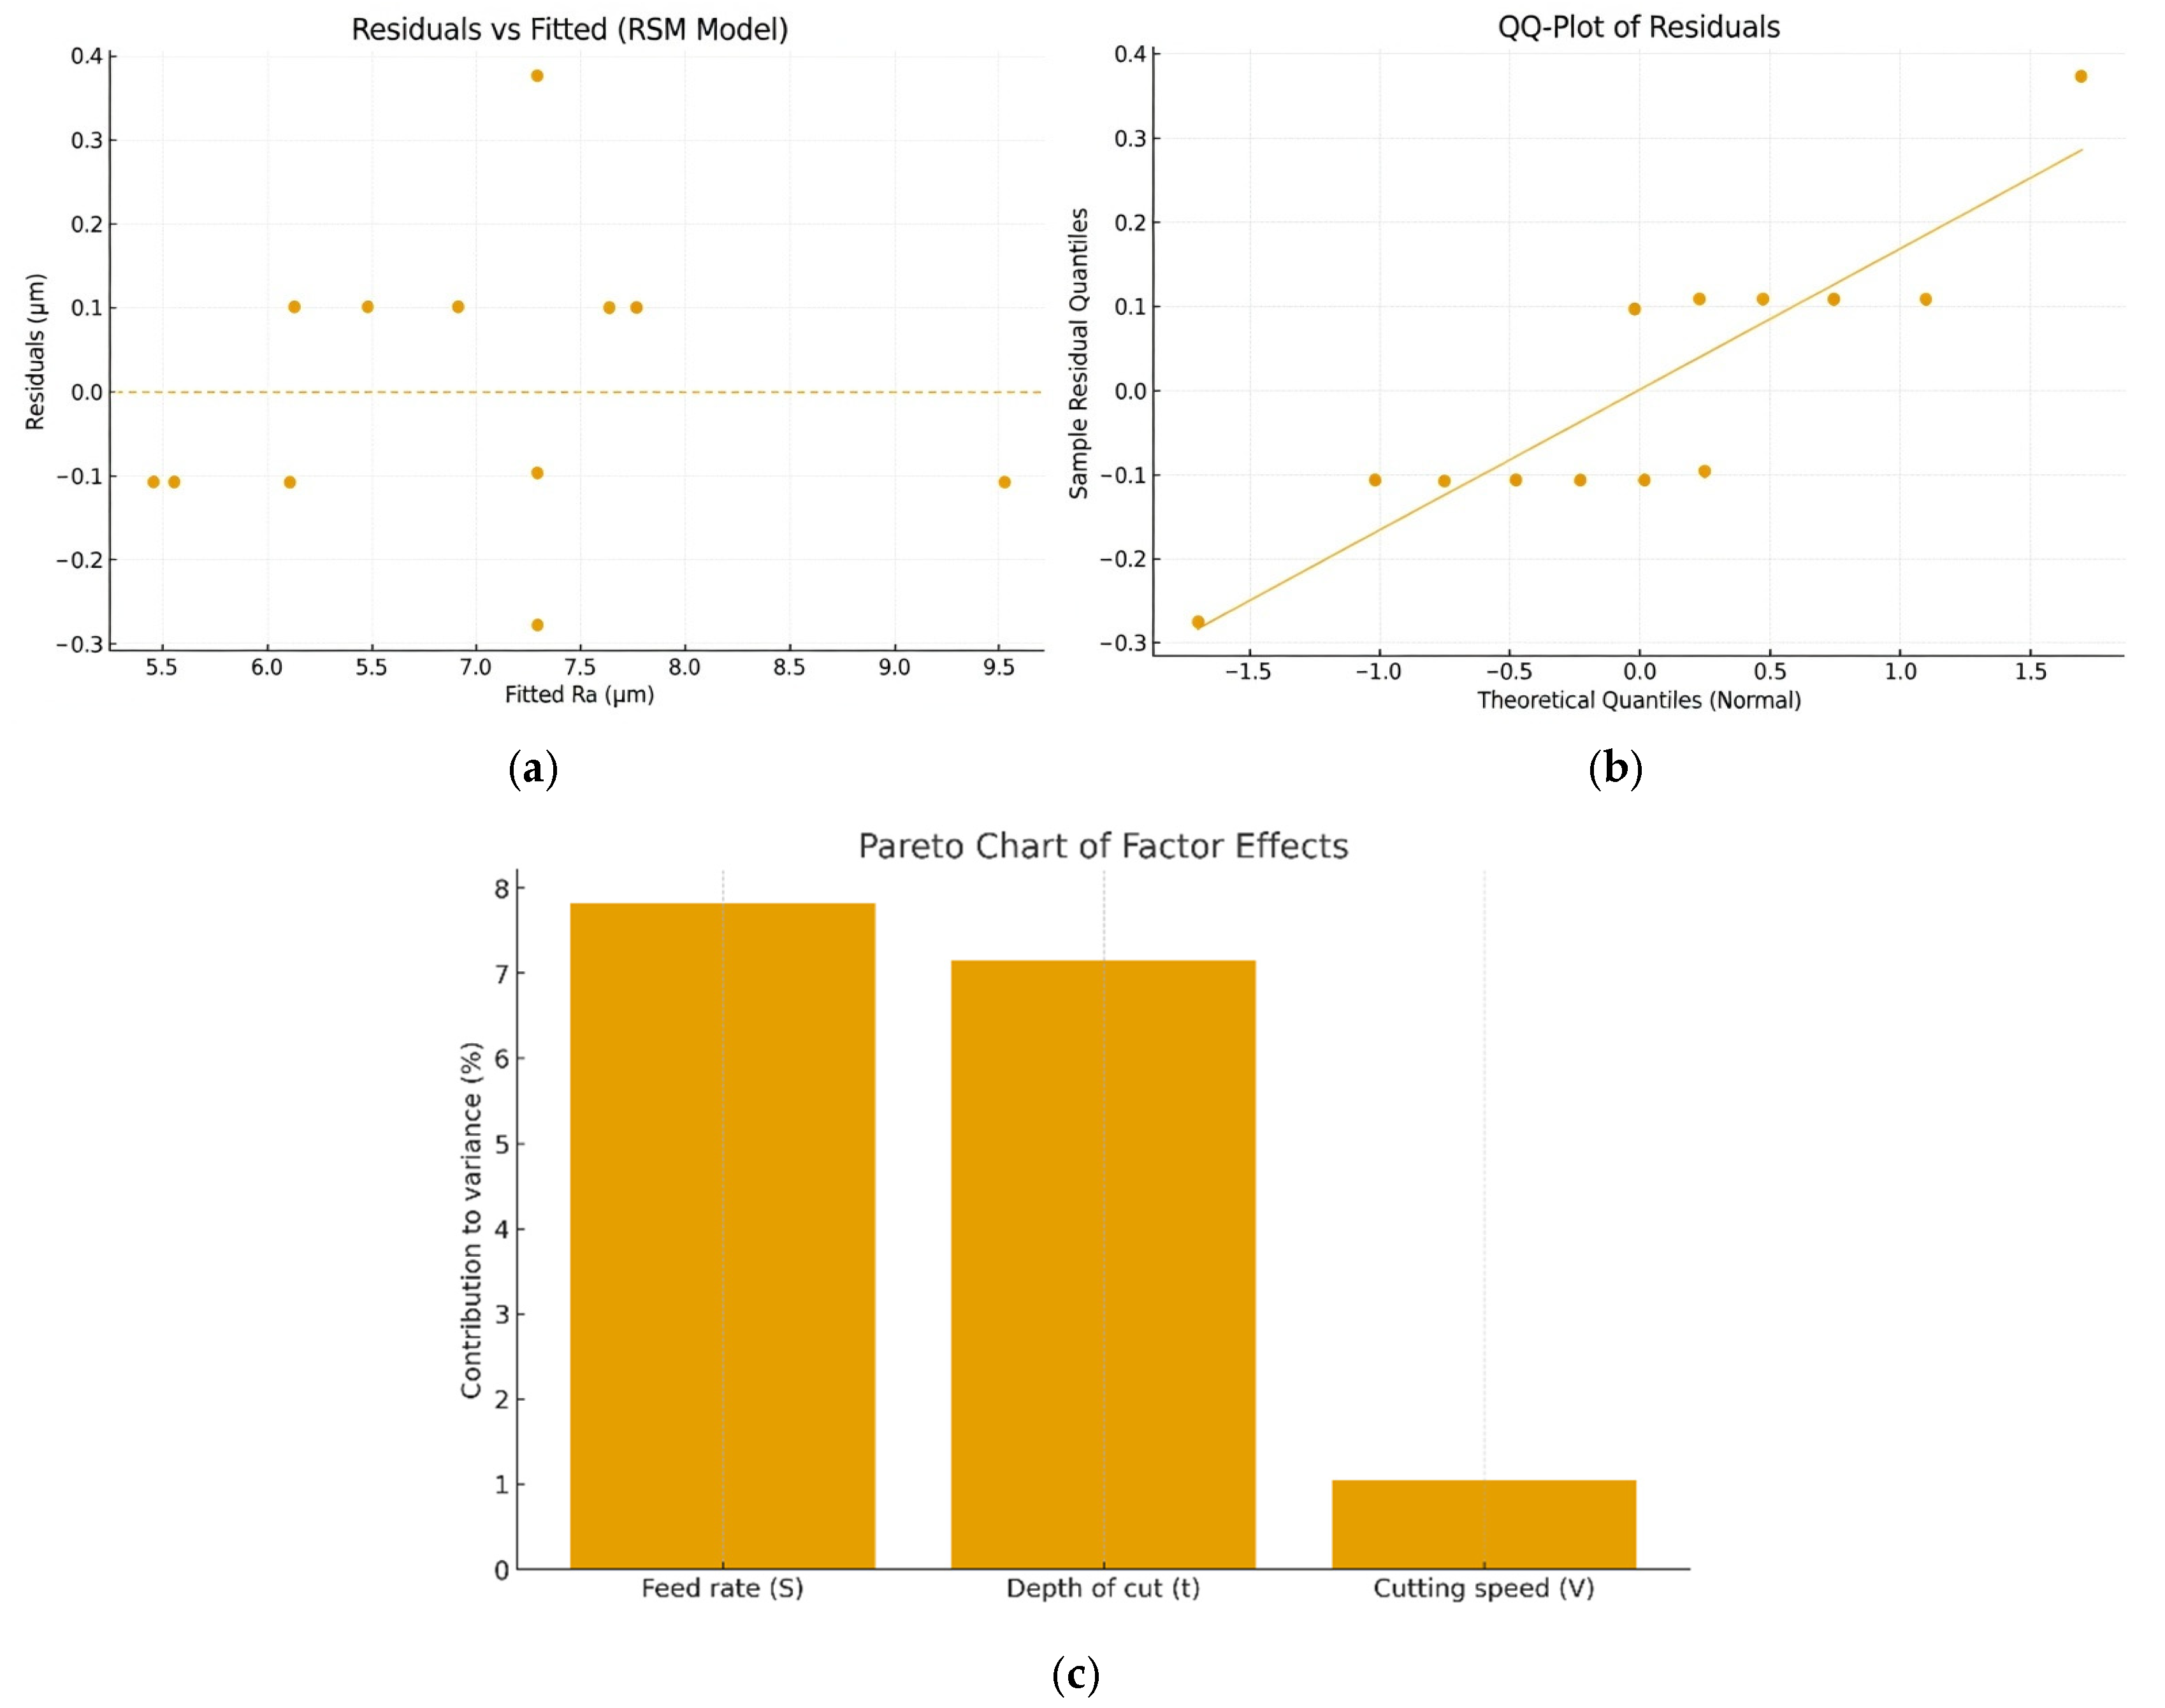
The adequacy of the quadratic RSM was examined through residual diagnostics, summarized in Figure 5. The residuals versus fitted values plot (Figure 5a) shows a random cloud of points centered near zero, with no clear funnel shape or systematic curvature, indicating homoscedasticity. The normal Q–Q plot (Figure 5b) aligns closely with the 45° reference line, and the Shapiro–Wilk test yields p ≈ 0.88, providing no evidence against normality at the 5% significance level. Residuals plotted against run order (Figure 5c) display no obvious drift, clustering, or cyclical pattern, suggesting that neither tool degradation nor systematic setup changes significantly affected the results over the short test series.
Taken together, these diagnostics confirm that the model errors are approximately homoscedastic and normally distributed, with no major unexplained structure within the experimental window. This supports the use of the quadratic RSM as a valid local approximation for Ra and justifies the application of normal-error-based confidence intervals.
Similar residual patterns are often reported in RSM-based turning studies when chatter and severe built-up edge are avoided. Thus, our residual diagnostics support the quadratic RSM as a valid local approximation and underscore the necessity of prediction-oriented validation (LOOCV, bootstrap) for small-sample designs.

3.6. Confidence and Uncertainty Analysis (PRESS, LOOCV, Bootstrap)

Given the nearly saturated nature of the experimental design, classical in-sample measures such as R2 and RMSE are insufficient to assess predictive performance. To obtain a more honest picture of model accuracy and uncertainty, the quadratic RSM was evaluated using PRESS statistics, leave-one-out cross-validation (LOOCV) and bootstrap resampling of the prediction error.
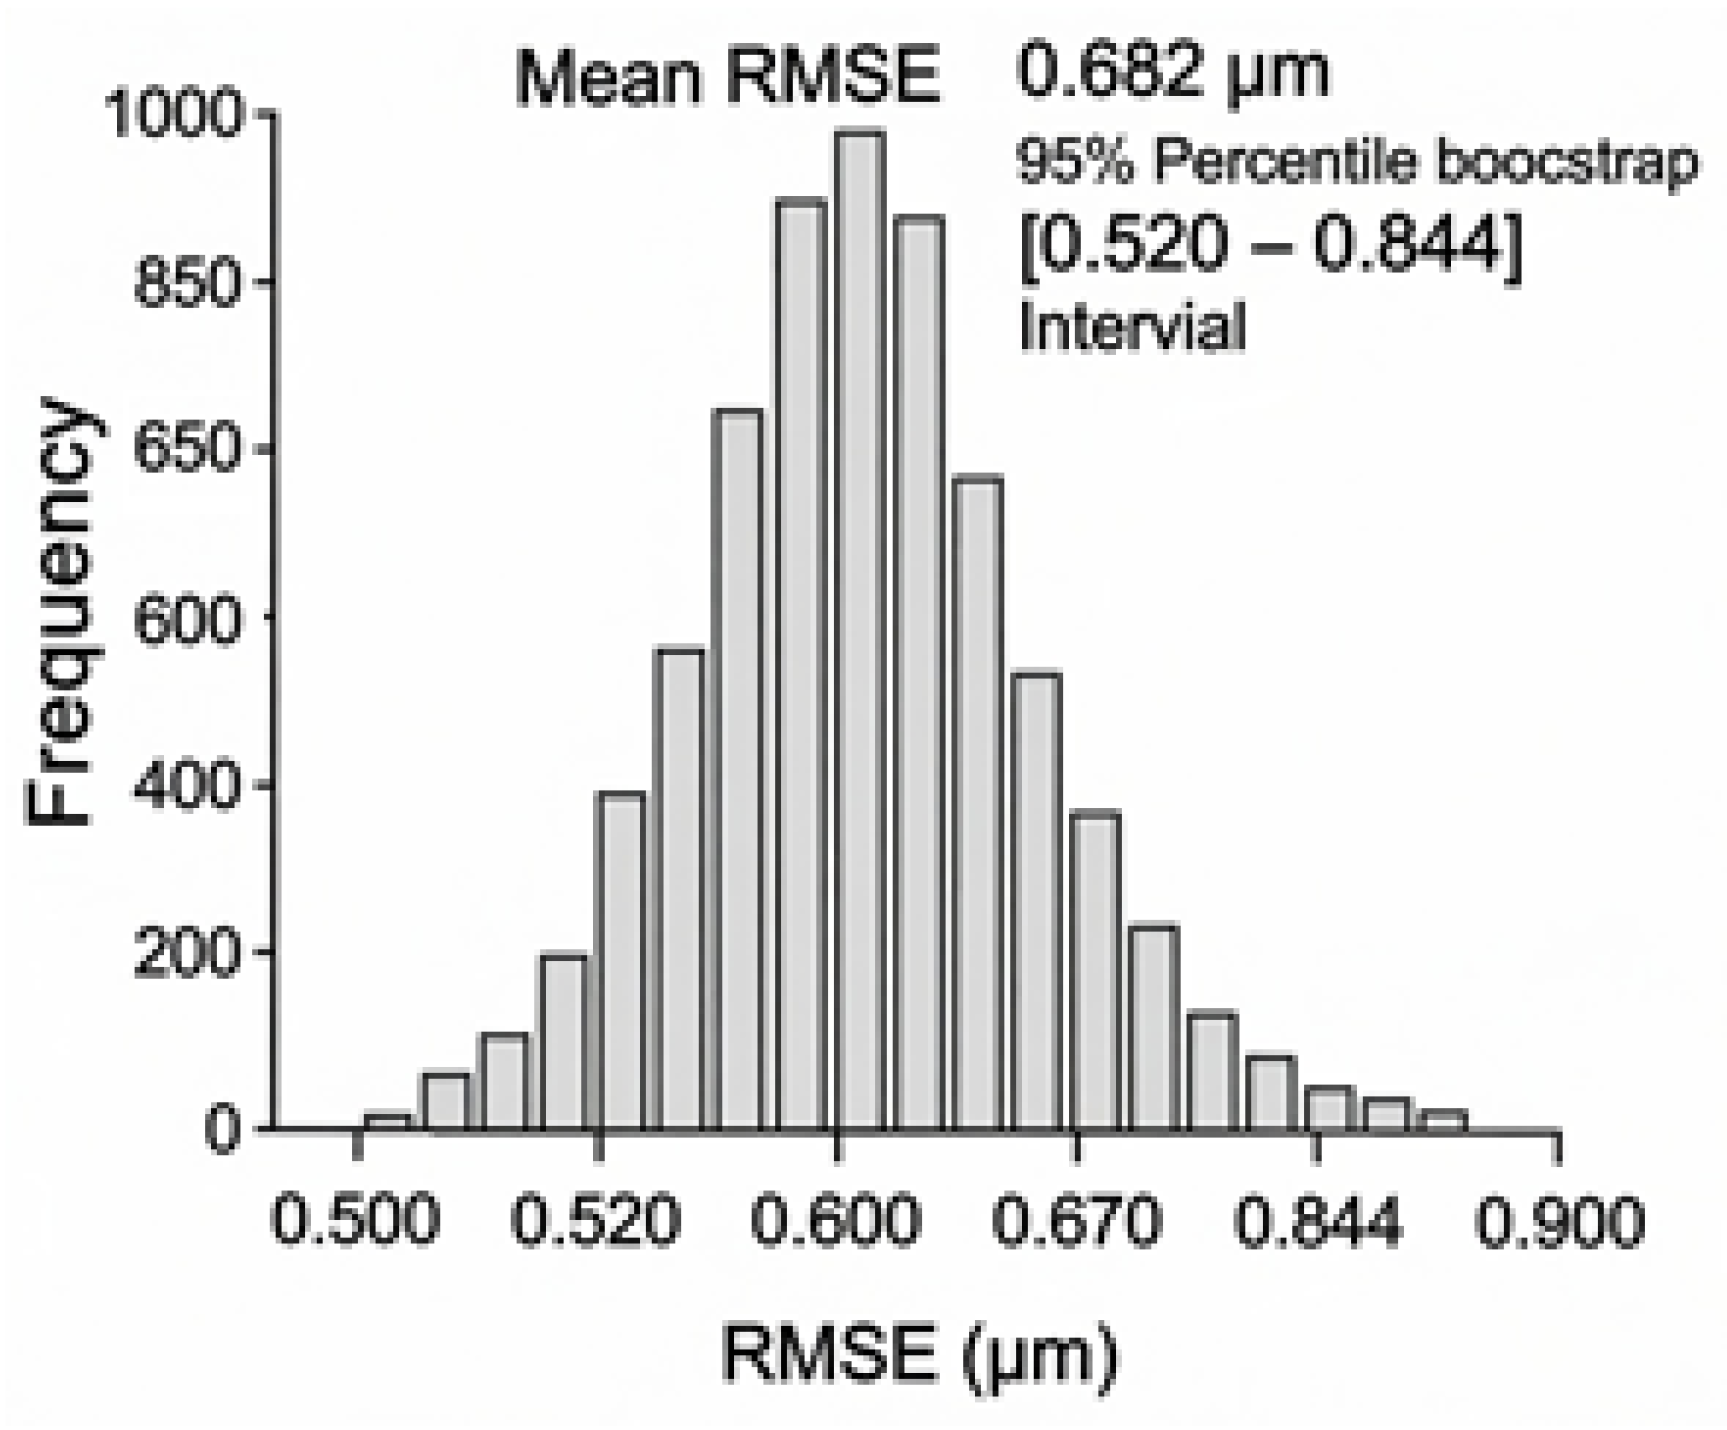
The LOOCV procedure involved leaving out each of the 11 runs once, refitting the model on the remaining 10 runs, and predicting the left-out response. Bootstrap resampling (B = 5000) was performed by sampling the experimental runs with replacement, refitting the model for each resample, and computing the RMSE on the original dataset.
The results are summarized in Table 6. The in-sample RMSE is 0.319 µm. However, the LOOCV RMSE increases to 0.771 µm, and the bootstrap mean RMSE is 0.682 µm with a 95% confidence interval of [0.52, 0.84] µm (Figure 6). The close agreement between the LOOCV and bootstrap estimates indicates both methods capture a similar level of predictive uncertainty, confirming that the quadratic RSM does not severely overfit any single run. The pronounced gap between the in-sample and resampling-based errors highlights the well-known optimism of saturated designs and underscores the necessity of using prediction-oriented validation metrics in such cases [17].
The resulting prediction-error level (~0.7 µm) is broadly consistent with the experimental scatter reported in other dry-turning studies of AISI 1045 and related steels when using RSM or ML models trained on small to medium-sized datasets [4,16]. This agreement suggests that the present model captures the dominant trends in Ra while explicitly acknowledging the limitations imposed by the small experimental budget.
Overall, the combined use of PRESS, LOOCV and bootstrap resampling provides a statistically transparent assessment of model uncertainty that goes beyond conventional R2 and ANOVA-based significance tests. In the remainder of the paper, this resampling-based view of predictive performance is complemented by Sobol global sensitivity analysis (Section 3.7), yielding a coherent framework that simultaneously quantifies prediction error and the relative importance of each cutting parameter and interaction for Ra.

3.7. Global Sensitivity Analysis (Sobol Indices)

To complement the local interpretation provided by the RSM and ANOVA, a variance-based global sensitivity analysis was carried out using Sobol indices. In this framework, the total variance of the model output Ra is decomposed into contributions from each input factor (V, S, t) and their interactions. The Sobol indices were computed assuming independent and uniformly distributed inputs over the experimental ranges of V, S and t, consistent with the design space of the RSM.
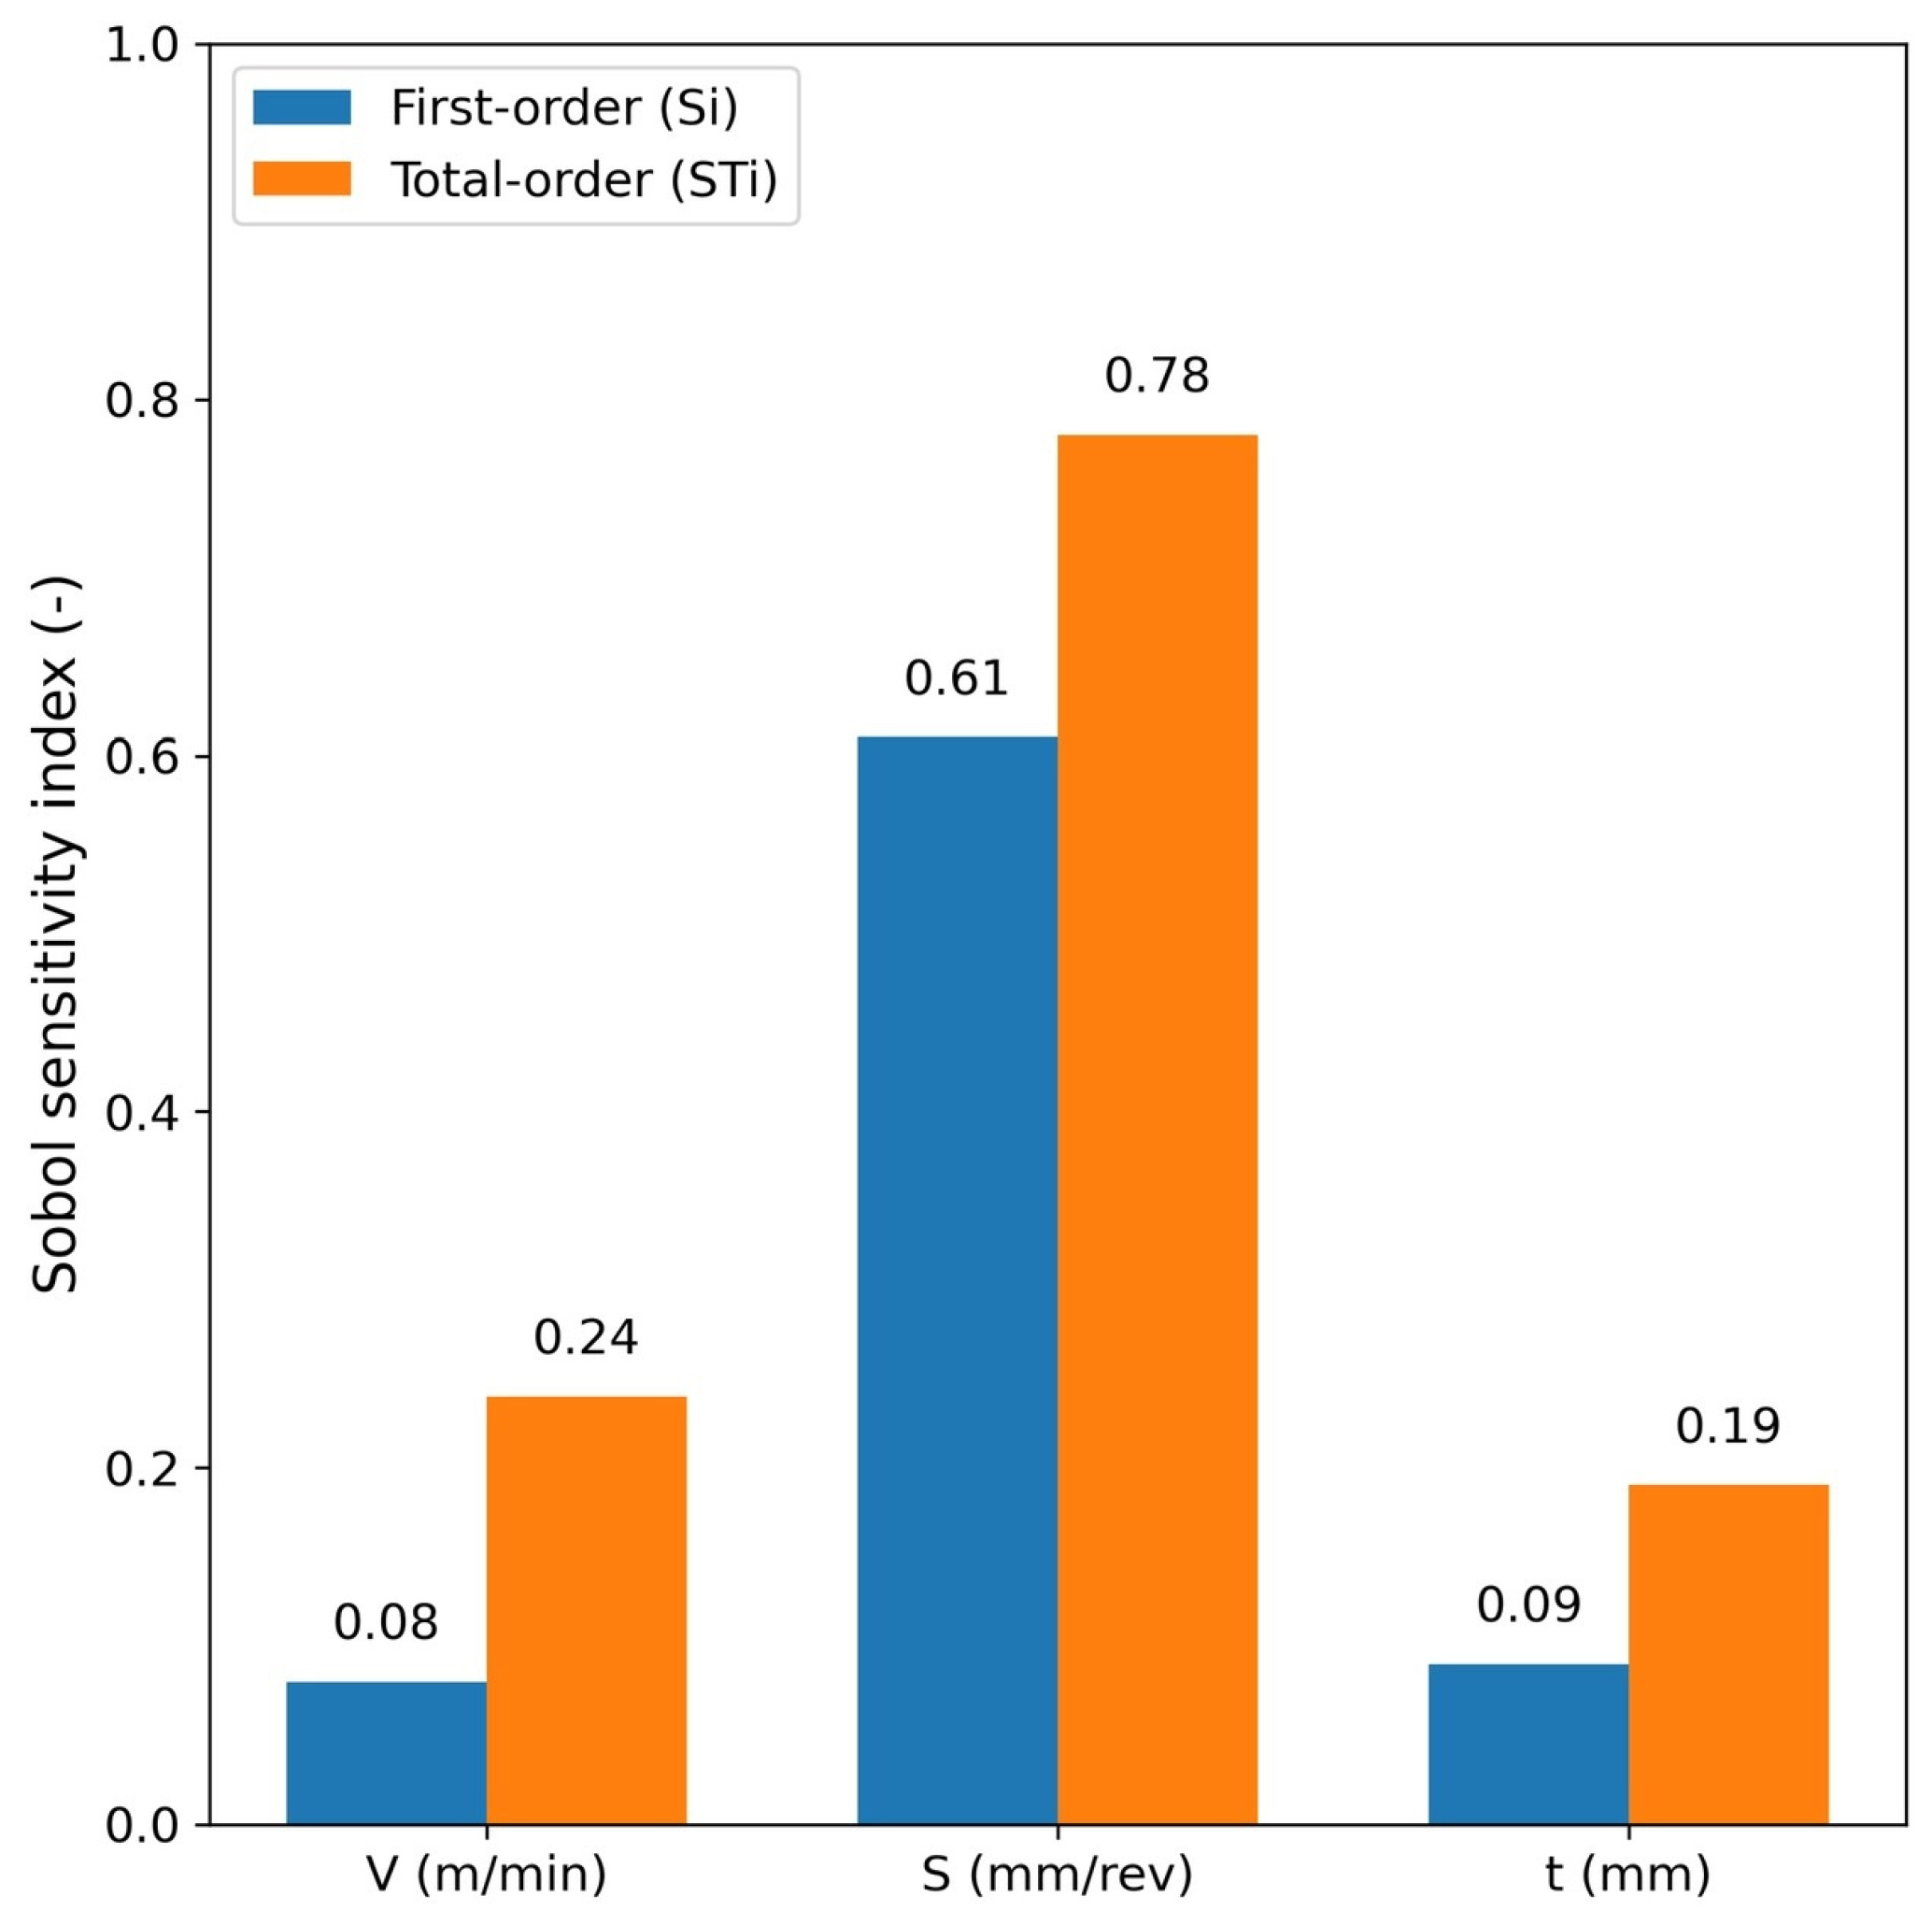
The first-order Sobol index Si of a factor measures the fraction of output variance explained by that factor alone, while the total-order index ST, i captures both its main effect and all higher-order interactions involving that factor. The first-order (Si) and total-order (STi) indices are shown in Figure 7.
The total-order indices provide additional insight into the role of interactions. While S remains dominant with a total-order index of about 0.78, the total-order indices of V and t increase to approximately 0.24 and 0.19, respectively, reflecting the influence of interaction terms such as VS and St. The gap between first-order and total-order indices for V and t confirms that higher-order couplings are important and justifies the inclusion of quadratic and interaction terms in the RSM. Conversely, the small contribution of V2 in the ANOVA and Lasso results is consistent with the relatively low incremental impact of purely quadratic speed effects compared with those involving S.
These findings are fully consistent with the effect hierarchy extracted from the RSM and with previous reports on the dominance of feed rate in dry turning of AISI 1045 and related steels [6,16]. While explicit Sobol analyses for turning are rare, similar variance contributions have been inferred from ANOVA in prior studies [7,12], where feed dominates Ra variance. The present results provide one of the first quantitative global sensitivity profiles reported for dry turning of AISI 1045. They confirm that S and its interactions (S2, VS, St) should be the primary focus for process control, while V and t can be adjusted for productivity within surface finish limits.

4. Optimization and Practical Implications

4.1. Identification of Optimal Conditions and Discussion on Minimum Roughness

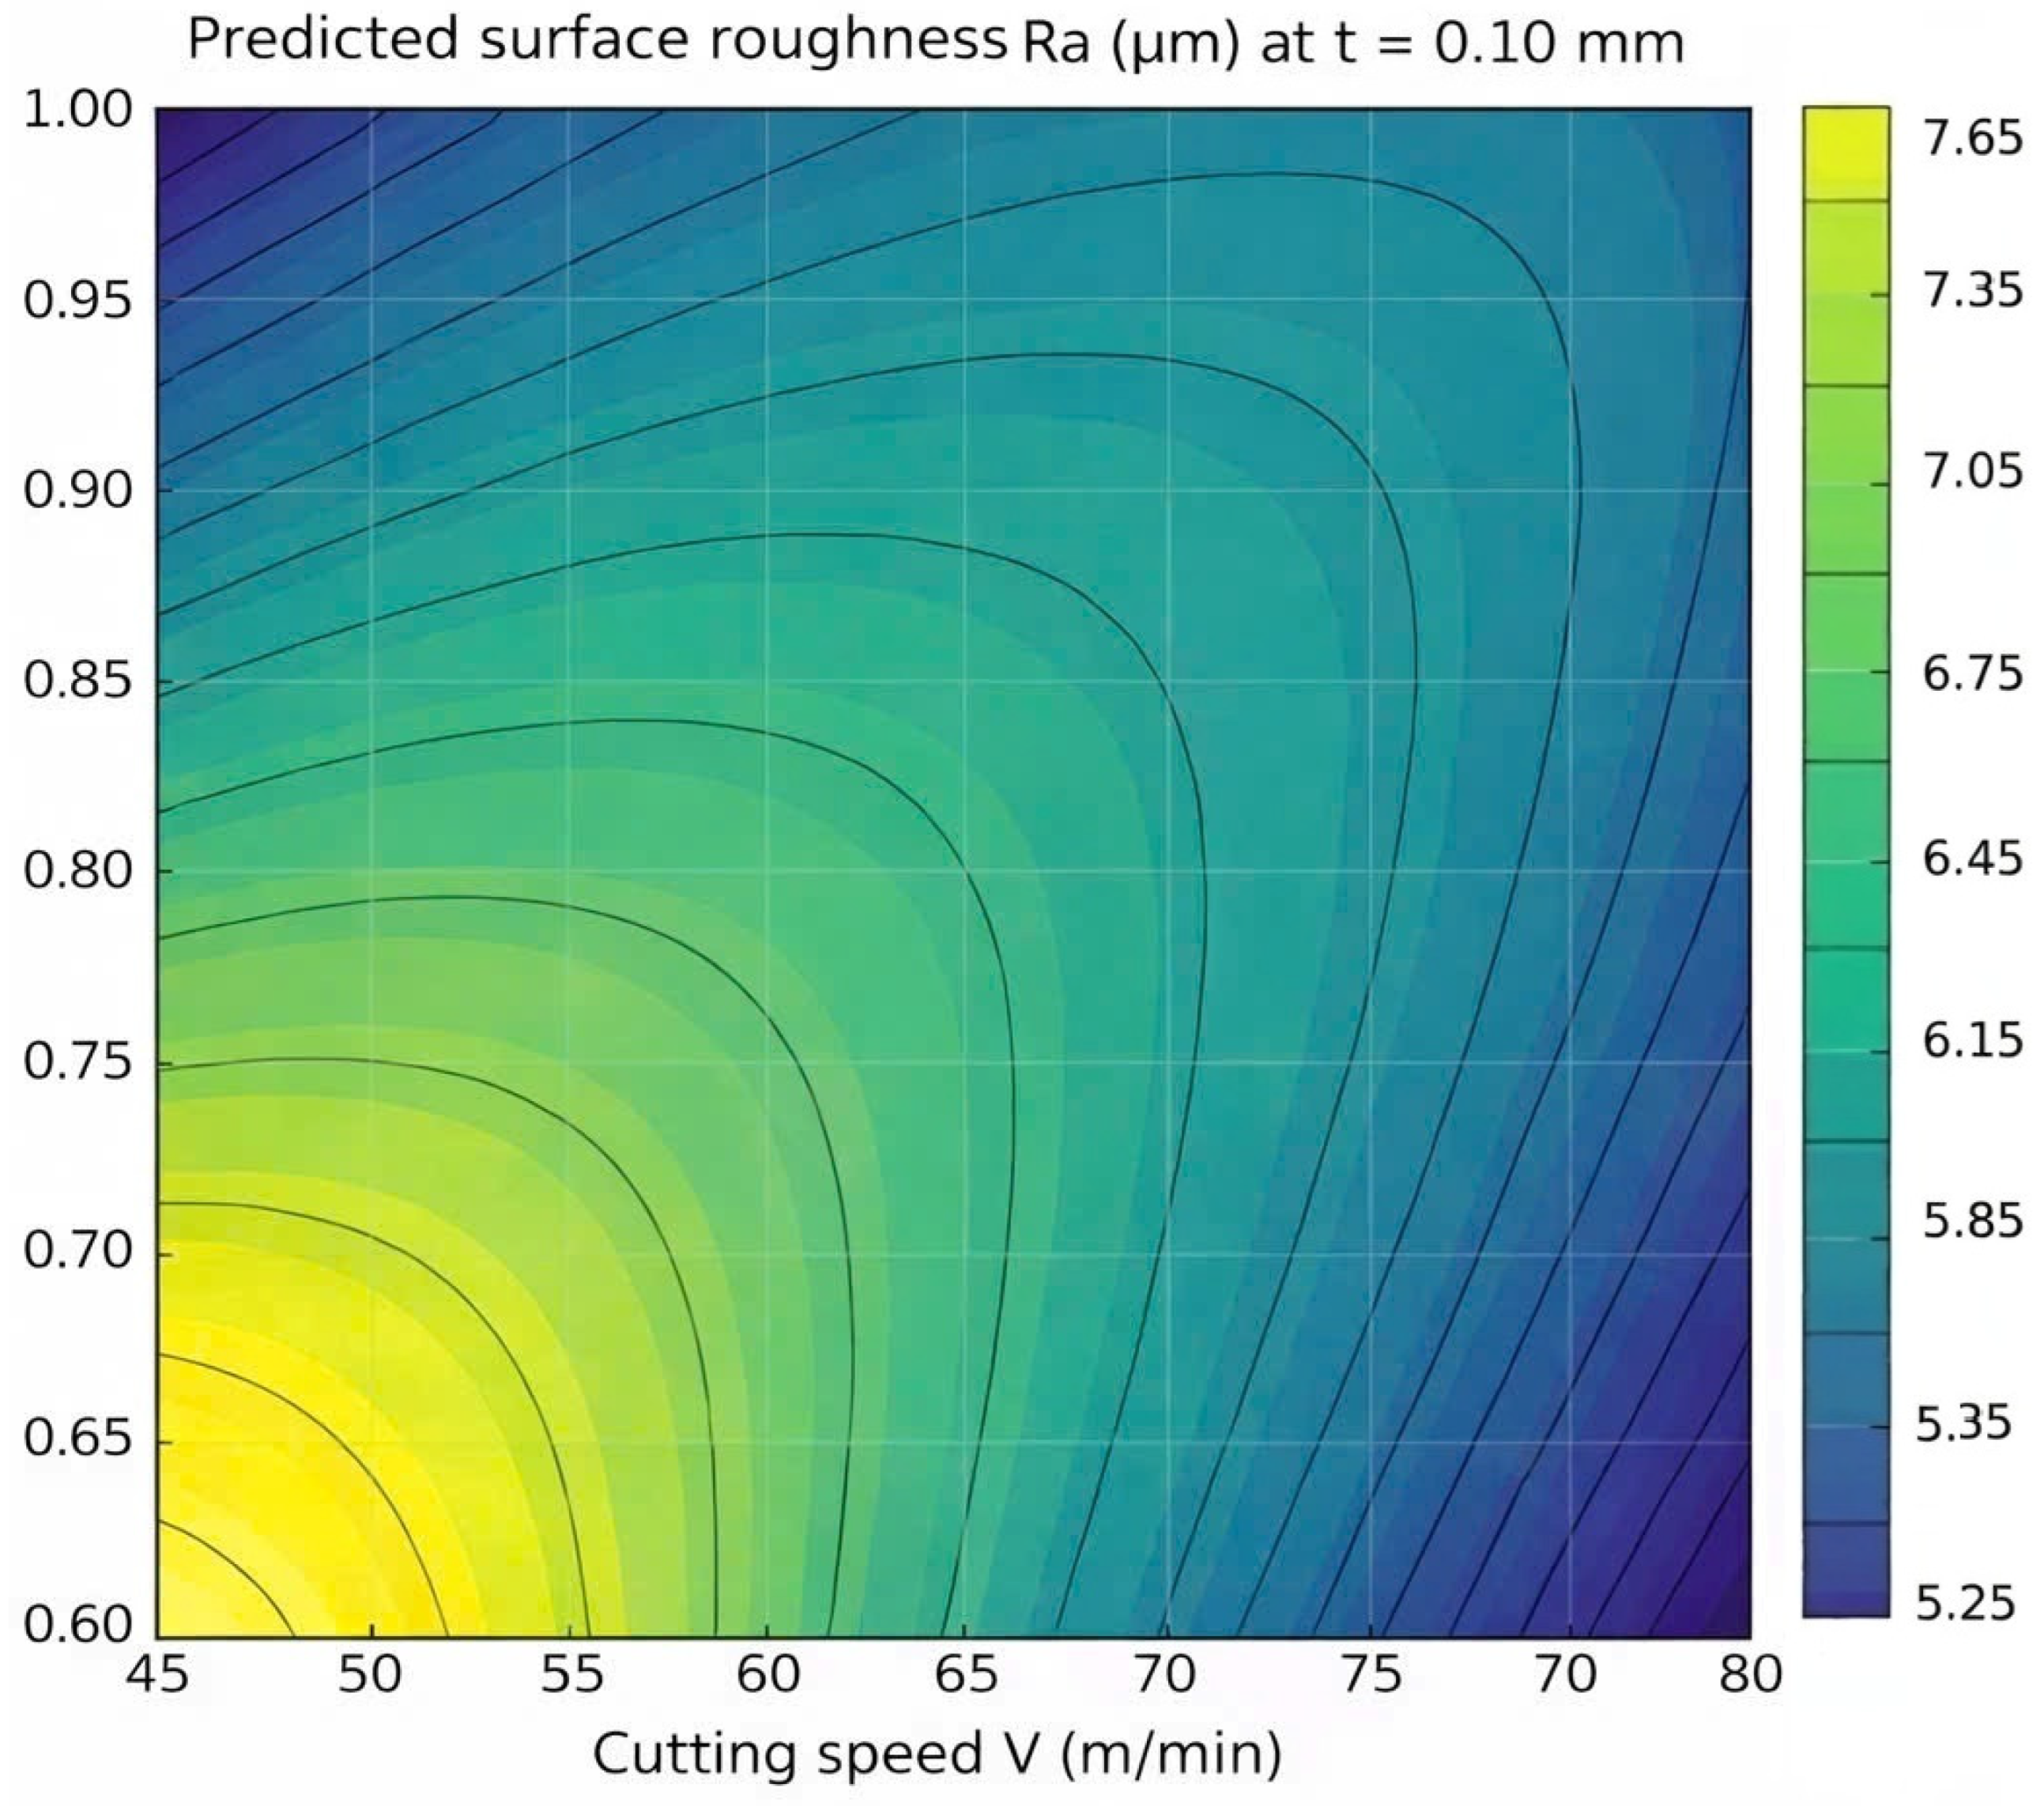
Based on the fitted quadratic RSM, a numerical search was performed to identify the combination of V, S, and t that minimizes the predicted Ra within the experimental domain. To visualize the optimum, the model response was evaluated on a fine grid of cutting speed and feed rate at a fixed depth of cut (t = 0.10 mm). Figure 8 shows the contour plot of the predicted Ra as a function of V and S, revealing a distinct valley of low roughness at high cutting speed and low feed rate. The minimum predicted Ra is approximately 5.35 µm, achieved at V ≈ 83 m/min, S ≈ 0.60 mm/rev, and t = 0.10 mm.
Although the absolute Ra values (≈5–8 µm) correspond to a semi-roughing rather than mirror-finishing regime, a reduction from ≈7.6 µm to ≈5.3 µm is meaningful from a practical standpoint. Lower Ra values decrease the depth of feed marks, reduce the grinding allowance and grinding time required in subsequent finishing operations, and can therefore lower energy consumption and tool wear in downstream processes. In contrast, operating near the upper end of the measured range leads to deeper surface valleys and poorer dimensional control, which are undesirable for shafts that will later be ground or assembled with tight fits.
The predicted Ra min ≈ 5.35µm is realistic within the context of dry machining and the selected factor ranges. Dry conditions exacerbate surface degradation due to high temperatures, promoting BUE formation and smearing, which can increase Ra by 20–50% compared to lubricated machining [22]. Furthermore, the minimum feed rate in this study (0.60 mm/rev) represents a semi-roughing regime. Achieving Ra < 2 µm typically requires feeds below 0.2 mm/rev [1], which was outside the productivity-focused scope of this work.
This result aligns with values reported in other dry-turning studies on AISI 1045/C45 steel. Makadia and Nanavati [6] achieved Ra min ≈ 4.8 µm at S = 0.5 mm/rev. Magalhães et al. [7] observed Ra between 5.0 and 8.5 µm in dry turning with feeds from 0.4 to 1.0 mm/rev. Therefore, the Ra min ≈ 5.35 µm serves as a reliable, uncertainty-quantified benchmark (bootstrap 95% CI: ~[5.1, 5.6] µm) for small-sample dry-turning optimization under practical industrial constraints.

4.2. Practical Implications for Industrial Application

Practically, the optimized setting (high V, low S, low t) represents a typical finishing regime readily implementable in SMEs. Figure 8 shows a broad near-minimum region, indicating tolerance to modest V deviations if S remains low. Conversely, increasing S beyond 0.8–0.9 mm/rev sharply raises Ra, even at high V. Thus, feed control is the primary lever for surface finish in dry turning of AISI 1045, while V and t can be adjusted for productivity without severely compromising quality.
The optimized parameters and the dominance of feed rate offer a clear pathway for sustainable dry machining of AISI 1045. Prioritizing feed control allows manufacturers to balance surface quality, productivity, and environmental goals without cutting fluids. Moreover, this modeling framework yields statistically sound predictions and sensitivity insights from only 11 runs, showcasing the potential of small-sample, uncertainty-aware methods. This approach is especially valuable for resource-constrained settings like SMEs or early process development, where extensive testing is impractical. It shifts the focus from large datasets to smarter, interpretable modeling that quantifies prediction risk [23]. Thus, these findings contribute not only to dry turning but also provide a reproducible template for efficient, transparent empirical modeling in manufacturing science.

5. Limitations

This study has several limitations. First, only 11 experimental runs were performed using a saturated quadratic design (df = 1), which severely limits the reliability of classical ANOVA-based significance tests and prevents a meaningful lack-of-fit assessment. Second, only dry machining conditions were considered; no coolant, MQL or high-pressure strategies were investigated, so the conclusions strictly apply to dry turning of AISI 1045. Third, tool wear and other surface integrity metrics (Rz, Rq, hardness, microstructure) were not quantified, meaning that the present model characterizes Ra under relatively short cutting distances but does not describe long-term tool deterioration. Finally, the Lasso regularization path is unstable due to the small sample size and is therefore interpreted only as exploratory support rather than as a primary modeling tool. Future work should expand the experimental design, explicitly monitor tool wear and integrate the present RSM–bootstrap framework with physics-informed or hybrid RSM–ML models to extend predictive validity over longer production runs [24].

6. Conclusions

This study successfully developed an uncertainty-aware predictive framework for surface roughness in dry turning of AISI 1045 steel using only 11 experimental runs. The key conclusions are:
1. A full quadratic RSM model, evaluated through LOOCV and bootstrap resampling, provided realistic prediction errors (~0.7 µm), demonstrating that meaningful modeling is possible with very small samples when using appropriate validation techniques.
2. The classical power-law model was inadequate (R2 ≈ 0.20), highlighting the need for models that capture interactions and curvature in dry-turning applications.
3. Sobol global sensitivity analysis quantitatively confirmed that feed rate (S) is the dominant factor, explaining approximately 61% of Ra variance on its own and 78% including interactions. This provides clear guidance for process control.
4. The optimized dry-cutting parameters (high speed, low feed, low depth of cut) yielded a predicted minimum Ra of 5.35 µm, offering a practical benchmark for sustainable, coolant-free finishing operations.
The proposed framework, combining compact design, rigorous prediction error estimation, and global sensitivity analysis, provides a statistically robust and interpretable template for process optimization in resource-limited industrial settings.
Overall, the study closes four gaps identified in the introduction by (i) providing an uncertainty-aware alternative to classical power-law correlations, (ii) demonstrating the limits of ANOVA under saturated designs, (iii) quantifying prediction uncertainty via LOOCV and bootstrap, and (iv) using Sobol analysis to establish a clear, physics-consistent hierarchy of cutting-parameter effects.

Author Contributions

Conceptualization, T.-H.V. and C.-H.H.; Methodology, T.-H.V.; Formal analysis, T.-H.V.; Investigation, T.-H.V.; Data curation, T.-H.V.; Writing—original draft preparation, T.-H.V.; Writing—review and editing, C.-H.H.; Supervision, C.-H.H. All authors have read and agreed to the published version of the manuscript.

Funding

This research received no external funding.

Institutional Review Board Statement

Not applicable.

Informed Consent Statement

Not applicable.

Data Availability Statement

The data presented in this study are available on request from the corresponding author. The data are not publicly available due to restrictions related to laboratory equipment calibration records and proprietary experimental setup details.

Acknowledgments

The authors would like to thank the technical staff of the Department of Mold and Die Engineering, National Kaohsiung University of Science and Technology, for their assistance during the experimental work.

Conflicts of Interest

The authors declare no conflicts of interest.

References

  1. Davim, J.P. Machining of Hard Materials; Springer: Berlin/Heidelberg, Germany, 2011. [Google Scholar] [CrossRef]
  2. Astakhov, V.P. Tribology of Metal Cutting; Elsevier: London, UK, 2006; ISBN 978-0-444-52882-7. [Google Scholar]
  3. Ghazali, M.H.M.; Mazlan, A.Z.A.; Wei, L.M.; Tying, C.T.; Sze, T.S.; Jamil, N.I.M. Effect of Machining Parameters on Surface Roughness for Different Type of Materials. IOP Conf. Ser. Mater. Sci. Eng. 2019, 530, 012008. [Google Scholar] [CrossRef]
  4. Rajemi, M.F.; Mativenga, P.T.; Aramcharoen, A. Sustainable machining: Selection of optimum turning conditions based on minimum energy considerations. J. Clean. Prod. 2010, 18, 1059–1065. [Google Scholar] [CrossRef]
  5. Mia, M.; Dhar, N.R. Prediction of Surface Roughness in Hard Turning. Measurement 2016, 92, 464–474. [Google Scholar] [CrossRef]
  6. Makhesana, M.A.; Bagga, P.J.; Patel, K.M.; Taha-Tijerina, J.J. Effects of Machining Parameters of C45 Steel Applying Vegetable Lubricant with Minimum Quantity Cooling Lubrication (MQCL). Lubricants 2023, 11, 332. [Google Scholar] [CrossRef]
  7. Kuntoğlu, M.; Acar, O.; Gupta, M.K.; Sağlam, H.; Sarikaya, M.; Giasin, K.; Pimenov, D.Y. Parametric Optimization for Cutting Forces and Material Removal Rate in the Turning of AISI 5140. Machines 2021, 9, 90. [Google Scholar] [CrossRef]
  8. Safari, M.; Joudaki, J.; Emadi, M. Surface quality in dry machining of 55Cr3 steel bars. Int. J. Iron Steel Soc. Iran 2018, 15, 33–39. [Google Scholar]
  9. Makadia, J.I.; Nanavati, A.J. Optimization of machining parameters for turning operations based on response surface methodology. Measurement 2013, 46, 1521–1529. [Google Scholar] [CrossRef]
  10. Magalhães, L.C.; Carlesso, G.C.; López de Lacalle, L.N.; Souza, M.T.; de Oliveira Palheta, F.; Binder, C. Tool Wear Effect on Surface Integrity in AISI 1045 Steel Dry Turning. Materials 2022, 15, 2031. [Google Scholar] [CrossRef] [PubMed]
  11. Banerjee, T.; Chattopadhyay, A.K. Dry turning performance of TiN–WSx/TiN hard-lubricious bilayer composite coating. Mach. Sci. Technol. 2020, 24, 837–860. [Google Scholar] [CrossRef]
  12. Nagandran, V.; Janahiraman, T.V.; Ahmad, N. Modeling and Optimization of Carbon Steel AISI 1045 Surface Roughness in CNC Turning Based on RSM and Heuristic Optimization Algorithms. Am. J. Neural Netw. Appl. 2018, 3, 56–62. [Google Scholar] [CrossRef]
  13. Noordin, M.Y.; Venkatesh, V.C.; Sharif, S.; Elting, S.; Abdullah, A. Application of response surface methodology in describing the performance of coated carbide tools when turning AISI 1045 steel. J. Mater. Process. Technol. 2004, 145, 46–58. [Google Scholar] [CrossRef]
  14. Felho, C.; Varga, G. Theoretical Roughness Modeling of Hard Turned Surfaces Considering Tool Wear. Machines 2022, 10, 188. [Google Scholar] [CrossRef]
  15. Antosz, K.; Kozłowski, E.; Sęp, J.; Prucnal, S. Application of Machine Learning to the Prediction of Surface Roughness in the Milling Process on the Basis of Sensor Signals. Materials 2025, 18, 148. [Google Scholar] [CrossRef] [PubMed]
  16. Bahiuddin, I.; Fatr, J.; Milde, R.; Pata, V.; Ubaidillah, U.; Mazlan, S.A.; Sedlacik, M. Machine learning-based surface roughness prediction in magnetorheological finishing of polyamide influenced by initial conditions. Process 2025, 121, 440–453. [Google Scholar] [CrossRef]
  17. Chen, J.; Lin, J.; Zhang, M.; Lin, Q. Predicting Surface Roughness in Turning Complex-Structured Workpieces Using Vibration-Signal-Based Gaussian Process Regression. Sensors 2024, 24, 2117. [Google Scholar] [CrossRef] [PubMed]
  18. Wan, J.; Che, Y.; Wang, Z.; Cheng, C. Uncertainty Quantification and Optimal Robust Design for Machining Operations. J. Comput. Inf. Sci. Eng. 2023, 23, 011005. [Google Scholar] [CrossRef]
  19. ISO 21920-2:2021; Geometrical Product Specifications (GPS)—Surface Texture: Profile—Part 2: Terms, Definitions and Surface Texture Parameters. International Organization for Standardization (ISO): Geneva, Switzerland, 2021.
  20. ISO 21920-3:2021; Geometrical Product Specifications (GPS)—Surface Texture: Profile—Part 3: Specification Operators. International Organization for Standardization (ISO): Geneva, Switzerland, 2021.
  21. Anh, L.H.; Linh, N.H.; Cuong, D.Q.; Danh, B.T.; Quang, N.H.; Tuan, N.A. Study on Productivity Improvement When Turning AISI 1045 Steel on Basis of Surface Roughness Assurance. In Advances in Engineering Research and Application, Proceedings of the International Conference on Engineering Research and Applications, Thai Nguyen, Vietnam, 1–2 December 2022; Nguyen, D.C., Hai, D.T., Vu, N.P., Long, B.T., Puta, H., Sattler, K.-U., Eds.; Springer: Berlin/Heidelberg, Germany, 2022. [Google Scholar] [CrossRef]
  22. Boswell, B.; Islam, M.N.; Davies, I.J.; Ginting, Y.R.; Ong, A.K. A Review of Dry Machining and Minimum Quantity Lubrication (MQL) in Turning Processes. Int. J. Adv. Manuf. Technol. 2017, 92, 321–340. [Google Scholar] [CrossRef]
  23. Kumar, R.; Singh, S.; Bilga, P.S.; Singh, J.; Singh, S.; Scutaru, M.L.; Pruncu, C.I. Revealing the benefits of entropy weights method for multi-objective optimization in machining operations: A critical review. J. Mater. Res. Technol. 2021, 10, 1471–1492. [Google Scholar] [CrossRef]
  24. Siyambaş, Y.; Akdulum, A.; Çakıroğlu, R.; Uzun, G. Estimation of cutting temperature using machine learning based on signal information received from power analyzer in vortex machining conditions. J. Manuf. Process. 2025, 137, 100–112. [Google Scholar] [CrossRef]
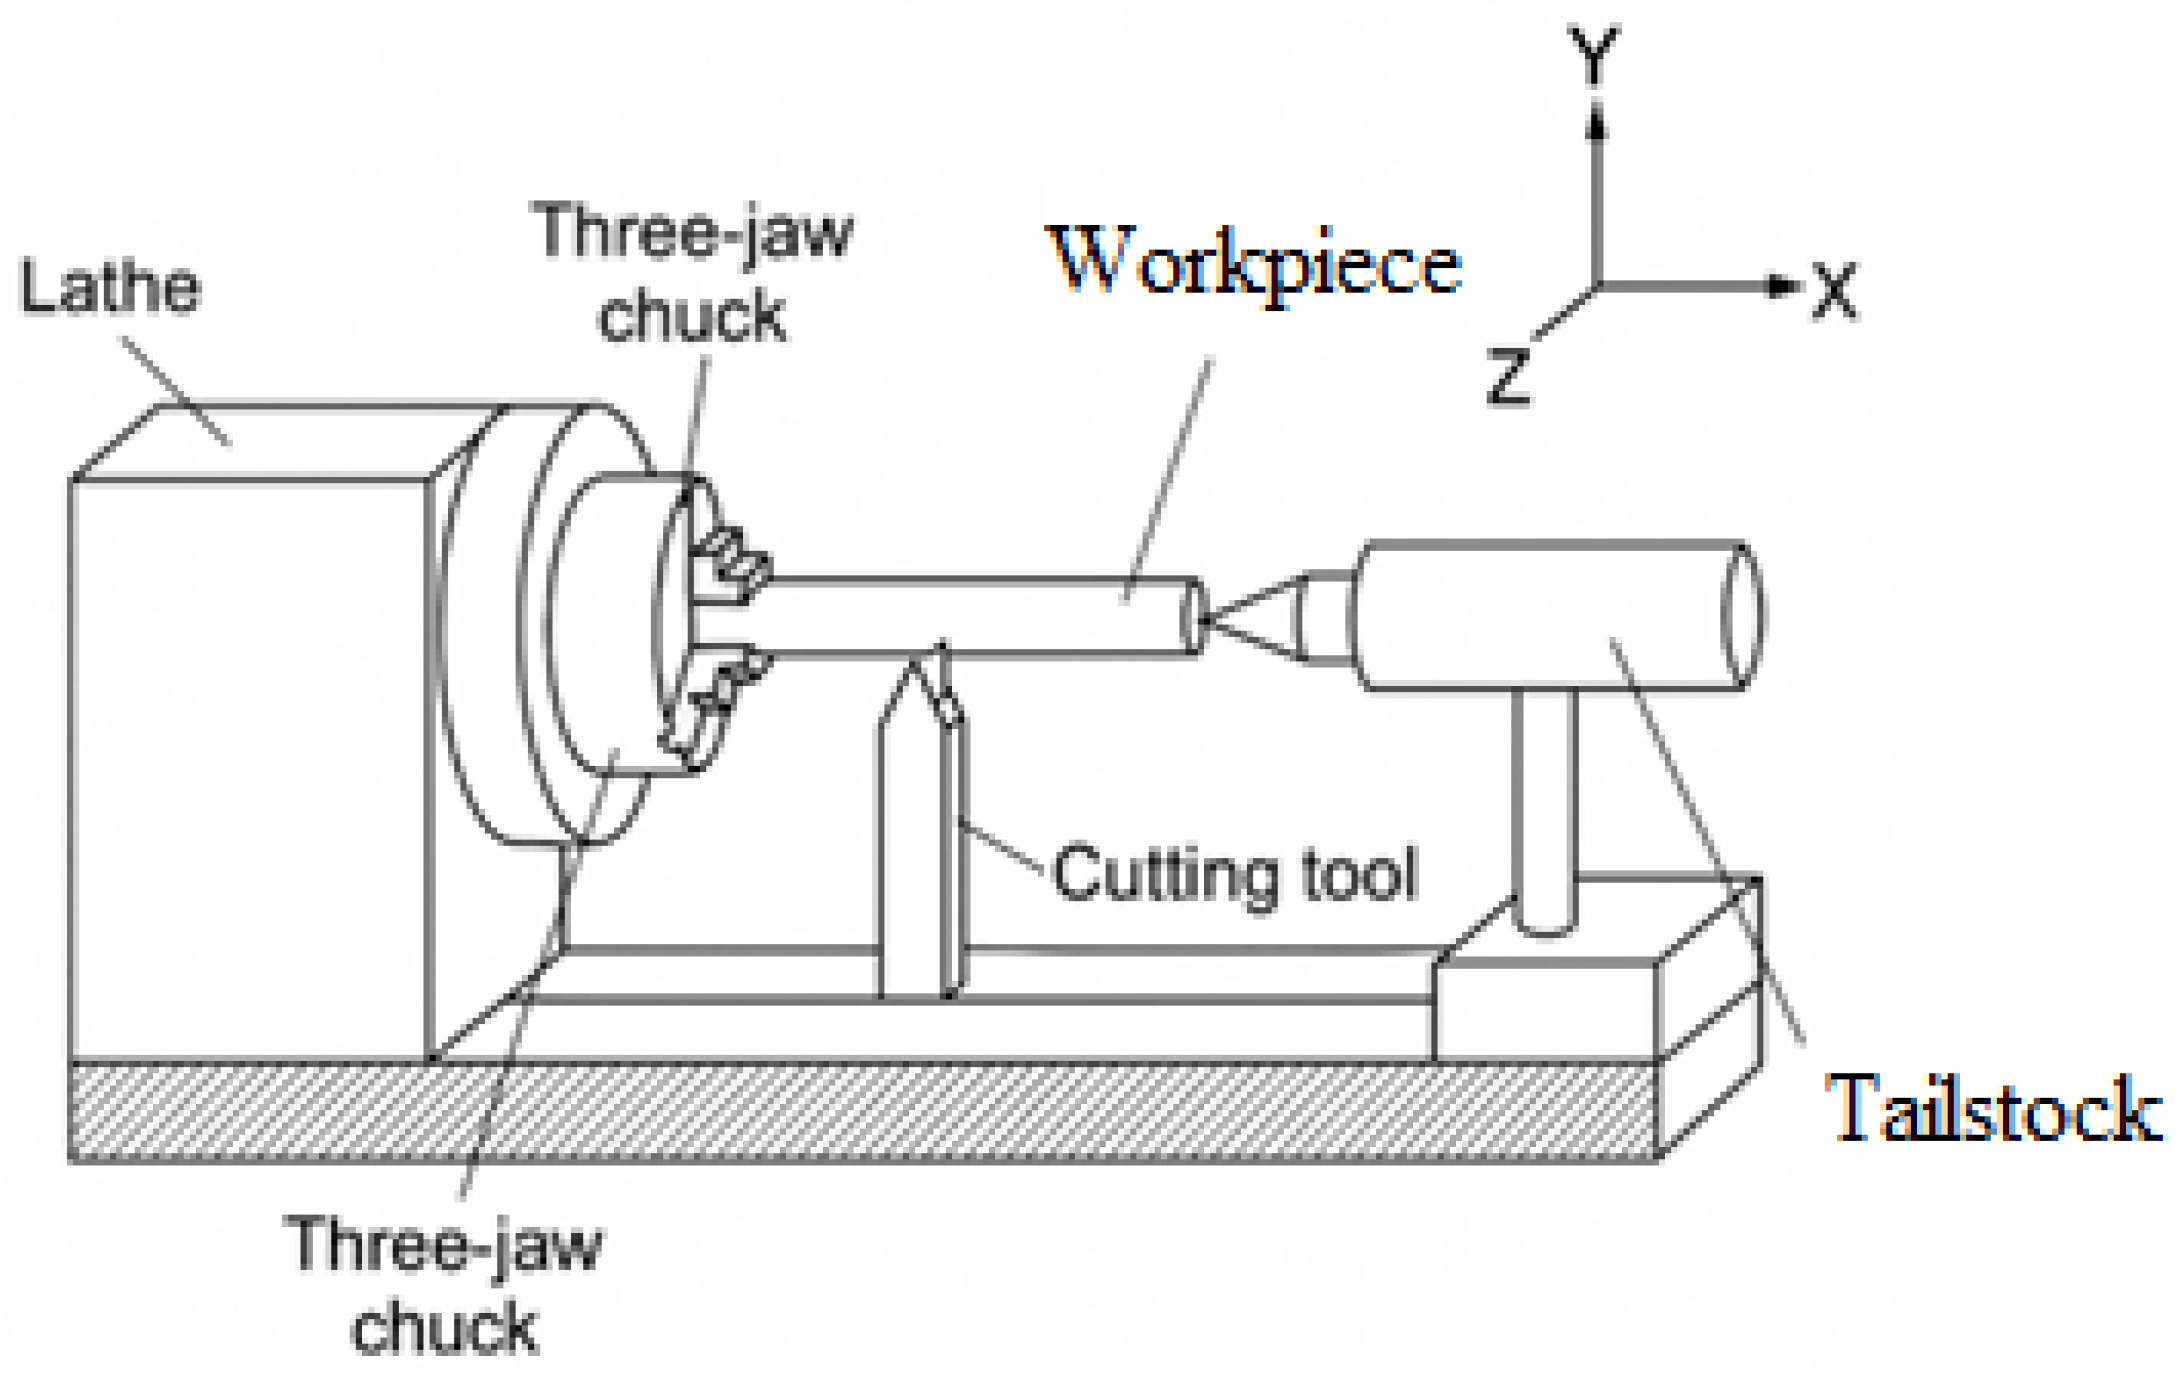
Figure 1. Experimental setup for dry turning on a Prince lathe.
Applsci 16 01392 g001
Figure 2. Surface roughness measurement using a Mitutoyo SJ-201 profilometer.
Applsci 16 01392 g002
Figure 3. Representative surface morphologies after dry turning: (a) low feed (S = 0.60 mm/rev); (b) high feed (S = 1.00 mm/rev). High feed promotes deep feed marks and ploughing grooves.
Applsci 16 01392 g003
Figure 4. Main-effect plots of the quadratic RSM for surface roughness Ra: (a) cutting speed V; (b) feed rate S; (c) depth of cut t. In each panel, one factor varies across its experimental range while the other two are fixed at their center levels (V ≈ 61 m/min, S = 0.80 mm/rev, t = 0.30 mm). The dashed vertical lines indicate the center levels.
Applsci 16 01392 g004
Figure 5. Residual diagnostics for the quadratic RSM model: (a) residuals versus fitted values, where the orange circles denote individual residuals and the horizontal orange line indicates the zero-residual reference; (b) normal Q–Q plot of standardized residuals, with orange circles showing the ordered residuals and the orange straight line representing the theoretical normal distribution; (c) residuals versus run order, where orange circles indicate individual residuals and the horizontal orange line marks the zero-residual level.
Applsci 16 01392 g005
Figure 6. Bootstrap distribution (B = 5000) of the root-mean-square error (RMSE) obtained by resampling the experimental dataset and refitting the quadratic RSM model. The dashed vertical arrow marks the bootstrap mean RMSE (0.682 µm). The horizontal bracket indicates the 95% percentile-based interval [0.520, 0.844] µm.
Applsci 16 01392 g006
Figure 7. First-order (Si) and total-order (STi) Sobol sensitivity indices for cutting speed V, feed rate S, and depth of cut t in dry turning of AISI 1045 steel.
Applsci 16 01392 g007
Figure 8. Contour plot of predicted Ra (µm) vs. cutting speed (V) and feed rate (S) at t = 0.10 mm. The star indicates the predicted optimum.
Applsci 16 01392 g008
Table 1. Mechanical properties and chemical composition (wt.%) of AISI 1045 steel.
Mechanical PropertiesValueChemical CompositionRange (wt.%)
Tensile Strength~630 MPaC0.43–0.50
Yield Strength~530 MPaMn0.60–0.90
Hardness170–210 HBSi0.15–0.30
Elastic Modulus210 GPaP≤0.040
Density7.85 g/cm3S≤0.050
Table 2. Experimental design and measured surface roughness (Ra) values.
RunV (m/min)S (mm/rev)t (mm)Ra (µm)Ra SD (µm)
1831.00.59.430.18
2451.00.56.890.15
3830.60.56.060.12
4450.60.56.010.13
5831.00.16.470.14
6451.00.15.440.11
7830.60.15.350.10
8450.60.17.680.16
9(C)61.10.80.37.020.12
10(C)61.10.80.37.340.14
11(C)61.10.80.37.670.13
C denotes center point.
Table 3. Fitted parameters for the power-law model.
ParameterEstimate95% CI Lower95% CI Upperp-Value
k6.38770.82449.580.069
a V 0.0546−0.4360.5450.800
b S 0.2078−0.3800.7960.431
c t 0.0766−0.1100.2630.364
R2 (log-scale)0.196
RMSE (log-scale)0.180
Table 4. ANOVA summary for the quadratic RSM.
SourceDFAdj SSAdj MSF-Valuep-Value% Contribution
Model923.452.60512.340.00197.8%
V11.231.235.820.0525.1%
S114.7814.7870.000.00061.5%
t12.562.5612.120.01810.6%
V210.450.452.130.1951.9%
S213.673.6717.380.00915.3%
t210.120.120.570.4810.5%
VS10.340.341.610.2521.4%
Vt10.090.090.430.5380.4%
St10.210.211.000.3580.9%
Error10.210.21 2.2%
Total1024.06 100%
Table 5. Fitted coefficients of the quadratic RSM.
TermCoefficient (β)Std. Error
Intercept11.8046.421
V−0.0590.119
S−3.3546.008
t−15.93512.113
V2−0.0010.001
S2−7.5253.377
t2−5.8716.763
VS0.1920.074
Vt0.1280.074
St16.78114.885
Model performance: R2 = 0.978, Adjusted R2 = 0.935, RMSE = 0.319 µm.
Table 6. Error metrics (PRESS, LOOCV, Bootstrap).
MetricValue (µm)
In-sample RMSE0.319
LOOCV RMSE0.771
Bootstrap mean RMSE0.682
95% CI[0.52, 0.84]
Disclaimer/Publisher’s Note: The statements, opinions and data contained in all publications are solely those of the individual author(s) and contributor(s) and not of MDPI and/or the editor(s). MDPI and/or the editor(s) disclaim responsibility for any injury to people or property resulting from any ideas, methods, instructions or products referred to in the content.