Article

Effect of Austenitizing on the Microstructure and Mechanical Properties of Gray Cast Iron

1
Department of Electrical Engineering, Shenyang University of Technology, Shenyang 110178, China
2
CCTEG Shenyang Research Institute, Fushun 110178, China
3
Fushun CCTEG Inspection Center Co., Ltd., Fushun 110178, China
4
School of Materials Science and Engineering, Shenyang University of Technology, Shenyang 110870, China
*
Author to whom correspondence should be addressed.
Appl. Sci. 2025, 15(8), 4548; https://doi.org/10.3390/app15084548
Submission received: 17 February 2025 / Revised: 20 March 2025 / Accepted: 17 April 2025 / Published: 20 April 2025

Abstract

:
This study enhanced the performance of gray cast iron through the precise control of the partial austenitizing temperature combined with an isothermal quenching process. The study investigated the effects of three austenitizing temperatures, namely 810 °C, 850 °C, and 900 °C, on the microstructure and mechanical properties of gray cast iron. With the increase in austenitizing temperature, the transformation of pearlite to ausferrite was promoted, and the ausferrite content increased from 8.0% at 810 °C to 91.2% at 900 °C. Mechanical property tests showed that the specimen treated at 850 °C had the best comprehensive performance. Its tensile strength reached 332 MPa, an increase of 78.6% compared with the as-cast state. The elongation increased by 51.8%, and the wear depth under a 20 N load decreased from 250 μm to 2 μm. Specimens with a high ausferrite content exhibited stable low-friction characteristics due to the uniform hardness and the suppression of adhesive wear. However, an excessively high austenitizing temperature of 900 °C would lead to an increase in residual stress in the casting and deformation of the graphite structure, reducing the wear resistance. Under the established austenitizing temperature conditions, this study explored the relevant mechanisms for the performance improvement of gray cast iron by means of various testing methods, providing a theoretical basis and process reference for optimizing the material performance of explosion-proof equipment under harsh mining conditions.

1. Introduction

Within the operational environment of coal mines, a significant concentration of combustible gases, dust, and other flammable or explosive substances is widely distributed. To ensure safe underground production, explosion-proof equipment is utilized. This specialized equipment is engineered to endure electric sparks, arcs, and localized high-temperature conditions, thereby preventing any potential ignition that could lead to an explosion within the external production environment [1,2,3]. Gray cast iron exhibits excellent mechanical properties, superior wear resistance, and outstanding casting characteristics. Additionally, its straightforward production process offers a significant low-cost advantage. This material is extensively utilized in complete units or components of explosion-proof electrical equipment for coal mines, including flameproof motors, explosion-proof travel switches, explosion-resistant frequency converters, integrated explosion-proof lighting protection systems, and flameproof junction boxes [4,5,6,7]. Nonetheless, in the underground operational environments of coal mines, explosion-proof equipment may encounter geological hazards such as coal seam subsidence and roof collapse. During enclosure disassembly for maintenance procedures, flameproof surfaces are susceptible to damage. This consequently stricter requirements on the strength, hardness, and wear resistance of explosion-proof equipment housings in mining applications to be imposed [8]. To meet the performance demands of explosion-proof housings and their components in underground mining environments, it is critical to further enhance the comprehensive properties of gray cast iron.
To enhance the performance of gray cast iron, scholars have conducted alloying and austempering treatments on gray cast iron castings [9,10,11]. Abdou et al. [12] added elemental Cu to gray cast iron. As a result, the content of pearlite in the gray cast iron matrix increased, and the pearlite lamellar spacing decreased significantly. This led to a slight increase in the hardness of gray cast iron and a 30% reduction in wear weight loss. Ankamma [13] incorporated elemental B into gray cast iron. When the content of added B reached 0.02%, the formation of carbides led to an elevation in both the tensile strength and hardness values of the gray cast iron. Nevertheless, once the addition amount surpassed 0.02%, type B and type D graphite would come into being. Consequently, this caused the tensile strength and hardness values to exhibit a downward-trending tendency. Ding et al. [14] investigated the influence of Mo on the properties of gray cast iron. After the addition of Mo, the eutectic structure of gray cast iron was refined, the proportion of the area of primary austenite increased, and the tensile strength was enhanced by 15%. He et al. [15] added V to gray cast iron. As the V content increased, the pearlite content increased, the inter-lamellar spacing of the pearlite decreased, and the size of the eutectic structure decreased. When the V content reached 0.77 wt%, the tensile strength reached 336 MPa, representing a 29% increase compared with the specimens without V. Weitao et al. [16] added Nb to gray cast iron. The results showed that an appropriate amount of Nb could refine the graphite and pearlite matrix and increase the friction coefficient. Hassani [17] fabricated gray cast iron containing V and Cr, which led to an 89% reduction in wear mass loss. Moreover, the hardness also increased due to the presence of chromium- and vanadium-containing carbides in the pearlite matrix. Sawy et al. [18] added Cr to gray cast iron. The formation of chromium carbide improved the wear resistance of the gray cast iron. Lian et al. [19] added Cr, Mo, Ag, and rare earth elements to gray cast iron. After alloying, the graphite morphology in the gray cast iron changed from type C to type A, and the graphite size also significantly decreased. The pearlite content decreased, and the pearlite lamellar spacing was smaller. As a result, the tensile strength increased by 17%. Vadiraj et al. [20] conducted an isothermal quenching heat treatment on gray cast iron at 360 °C for 3 h. After the heat treatment, the matrix structure consisted of acicular ferrite, high-carbon austenite, and a small amount of pearlite, and the wear weight loss was reduced by 40%. Sarkar et al. [21] investigated the performance changes in gray cast iron under different isothermal quenching temperatures (260 °C–385 °C) and a fixed time (1 h). As the isothermal quenching temperature increased, the plasticity increased. This was because at a higher isothermal quenching temperature, the austenite content in the ausferrite structure was relatively high, which led to its coarsening. Cheng et al. [22] studied the influence of isothermal quenching on the microstructure and hardness of copper-containing gray cast iron. After the cast iron was subjected to an austenitizing treatment at 900 °C for 1 h and an isothermal quenching process at 300 °C for 2 h, the ausferrite morphology was acicular, the retained austenite content was 23%, and the plane–strain fracture toughness was increased by 112% compared with that of the as-cast state. Vadiraj et al. [23] studied the performance of gray cast iron under different isothermal quenching temperatures. When the quenching temperature was 400 °C, the comprehensive performance of the specimen reached its best, with a low wear rate and a moderate hardness. Sarkar et al. [24] investigated the influence of different holding times on the mechanical properties of gray cast iron. The austenite content reached its maximum when the holding time increased to 90 min, and the tensile strength was increased by 10 MPa compared with that when the holding time was 30 min. Afterwards, Vadiraj et al. [25] conducted an isothermal quenching heat treatment on gray cast iron at 360 °C for 180 min. After the treatment, the ausferrite morphology was feather-like, the tensile strength was increased by 24%, and the friction coefficient was also increased. Research by Rundman et al. [26] showed that when the isothermal quenching temperature was 316 °C and the isothermal quenching time was 60 min, the performance of gray cast iron was the best. Compared with the as-cast state, the tensile strength was doubled.
Based on the aforementioned research, it is evident that alloying elements enhance the properties of gray cast iron to a certain extent by refining its microstructure. The austempering heat treatment process improves the mechanical properties of gray cast iron through the formation of an ausferrite structure, which consists of acicular ferrite and high-carbon austenite. This process not only enables the material to achieve higher strength and hardness but also offers broader flexibility in property regulation. Current research on austempering heat treatment primarily focuses on adjusting the austempering temperature and duration, with limited attention being paid to the austenitizing temperature. Theoretically, regulating the austenitizing temperature can modify the ausferrite content in gray cast iron, thereby affecting its strength–plasticity balance. In this study, the method of controlling the austenitizing temperature was adopted to conduct austempering treatment on gray cast iron. The influence of the austenitizing temperature on the material’s microstructure was investigated, and the correlation between microstructural evolution and wear resistance was established. Moreover, the simultaneous enhancement of wear resistance and toughness was successfully achieved.

2. Experimental

In this experiment, gray cast iron was used as the raw material, with the main chemical compositions (wt, %) as follows: 3.0 C, 2.2 Si, 1.0 Mn, P ≤ 0.1, and S ≤ 0.1. The specimens were sectioned into 10 × 10 × 10 mm metallographic samples, wear test specimens, and tensile test pieces using wire electrical discharge machining; the tensile specimens and the specimens for friction and wear tests are shown in Figure 1. This was followed by the heat treatment of the gray iron samples. The critical temperatures for heat treatment were determined according to empirical formulas [27,28]. The specimens were austenitized at 810 °C, 850 °C, and 900 °C for 1 h in a vacuum tube furnace. After heating, the gray iron parts were subjected to austempering in a molten salt solution composed of 50% KNO3 and 50% NaNO2 at 320 °C (this nitrate salt bath has good fluidity at 320 °C, which can uniformly envelop the gray iron parts; it has a low vapor pressure and weak volatility, ensuring stable maintenance of its composition; it has a high specific heat capacity, enabling efficient heat transfer and storage to guarantee a stable quenching temperature; moreover, it has a certain degree of oxidizing ability, which may cause a thin oxide film to form on the surface of the gray iron parts), before being kept at a constant temperature for 1 h. The process flow chart is shown in Figure 1. The as-cast specimen and the specimens with different austenitizing temperatures were named Ht zt, At 810, At 850, and At 900, respectively. The obtained metallographic specimens were ground, polished, and etched. The etching solution was a nitric acid–alcohol solution with a volume fraction of 4%. The content of the microstructure was measured using Image-Pro Plus software (NIH, Bethesda, MD, USA). The microstructure was observed and analyzed using a GeminiSEM 300 field emission scanning electron microscope (ZEISS, Oberkochen, Germany). Tensile tests were carried out using an E45—305 microcomputer-controlled electronic universal testing machine (MTS, Norwood, MA, USA) at room temperature with a crosshead speed of 1 mm/min. Five replicate experiments were conducted, and the average values of tensile strength, yield strength, and elongation were processed. Hardness tests were performed using a UH250 fully automatic universal hardness tester (Wilson, NC, USA) with a load of 3000 g, an indentation spacing of 2 mm, and 5 indentations. The friction performance of the AGI test pieces was tested using an MZF—1 rotary reciprocating friction and wear tester (Baohang, China). A WC ball with a hardness value of 1400 HV was selected for the friction experiment. The friction diameter was 10 mm, the reciprocating frequency was 5 Hz, the test force was 20 N, and the test time was 60 min. Each experiment was repeated five times.

3. Results and Discussion

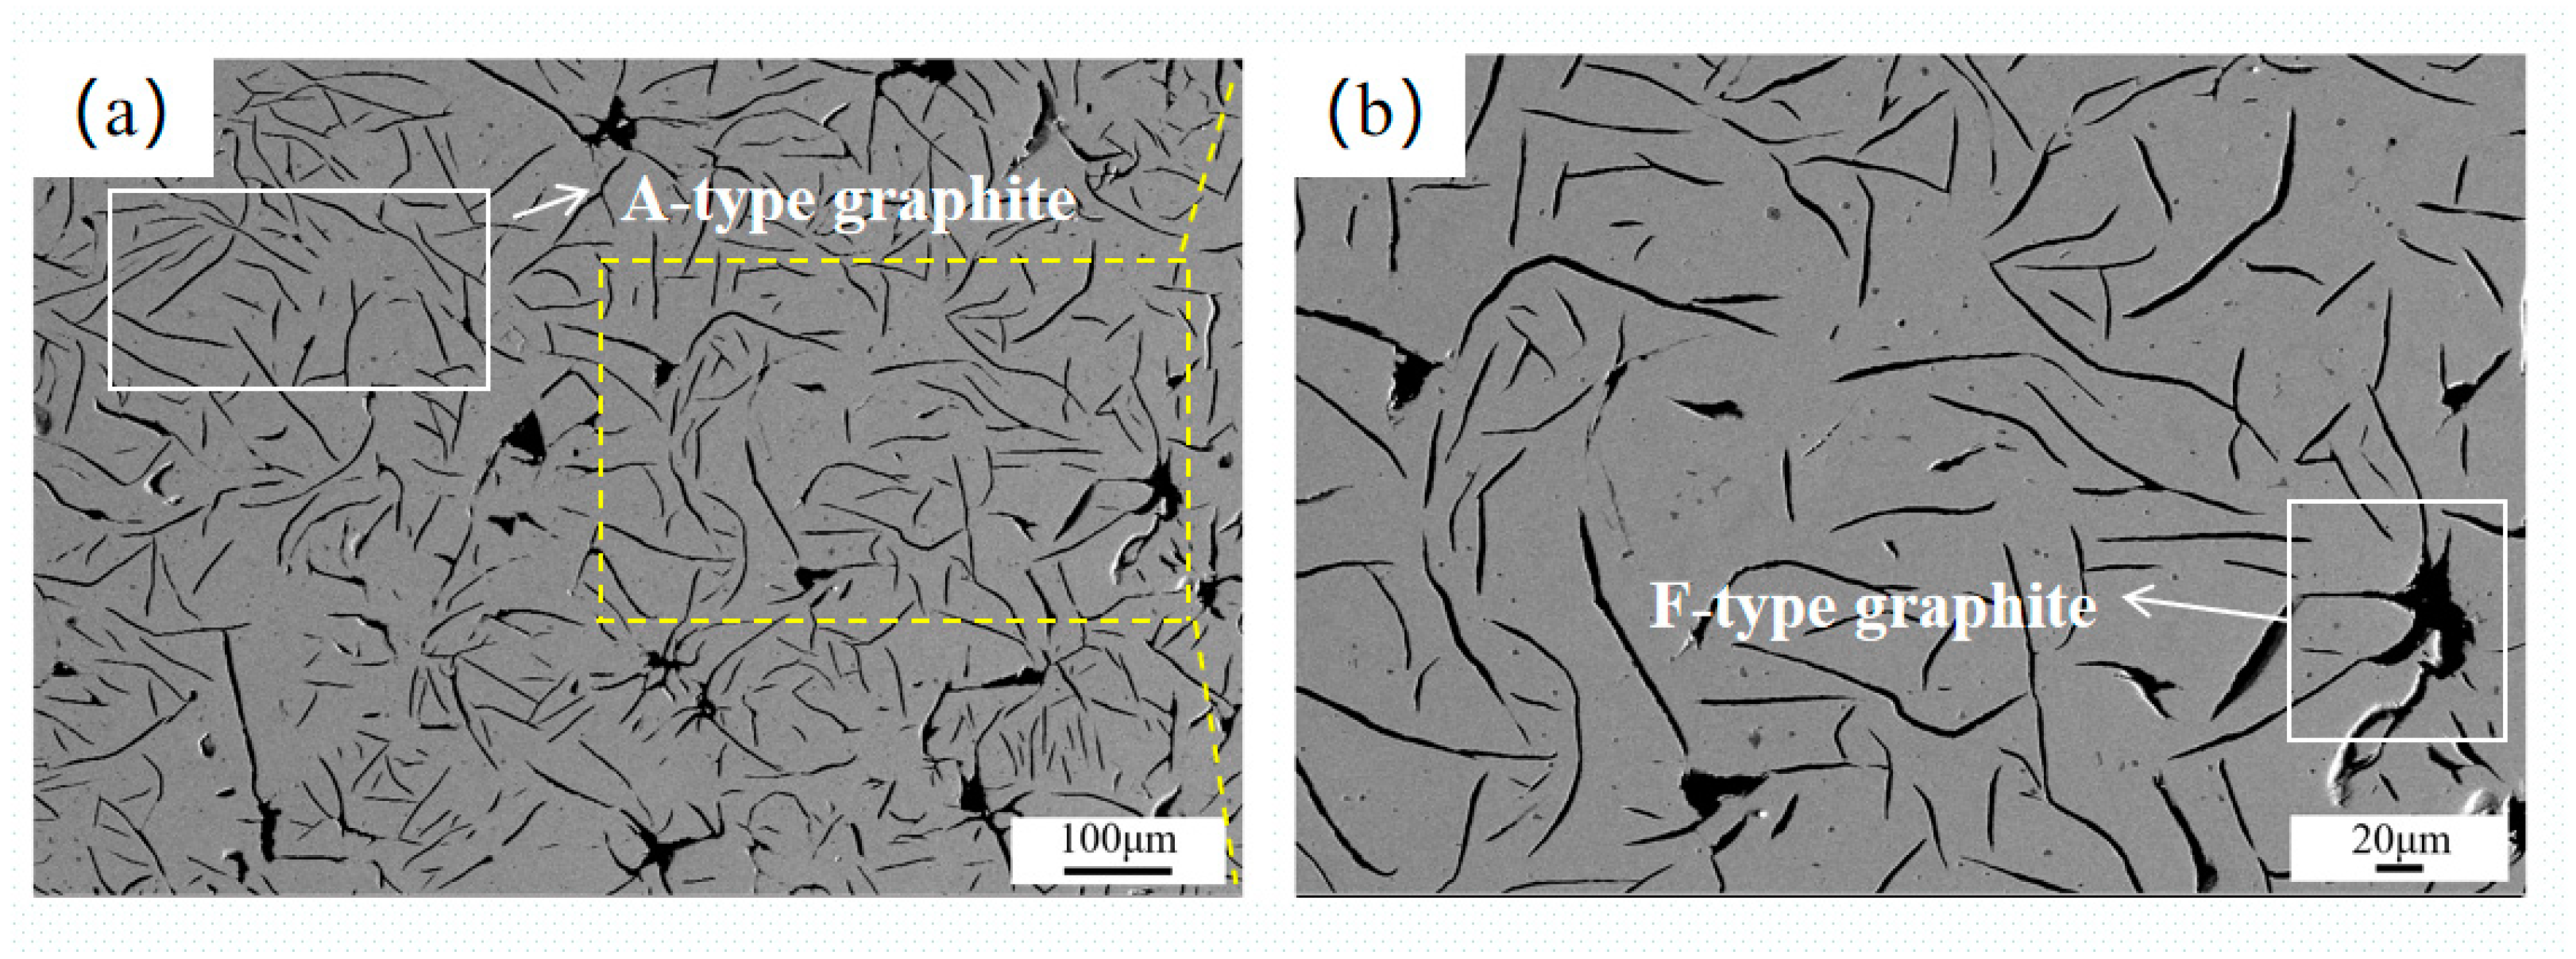
Figure 2 shows the graphite morphology of the specimen. In the figure, type A graphite (flaky graphite with a non-directional and uniform distribution) and a small amount of type F graphite (primary star-shaped or spider-shaped graphite) can be observed. The non-directional and uniformly distributed structure of type A graphite contributes to the improvement in the mechanical properties of gray cast iron. Its uniform distribution can also enhance the wear resistance. Type F graphite can effectively disperse stress, thereby improving the toughness of the specimen. This combination of graphite morphology is beneficial to the wear resistance and toughness of gray cast iron castings [29].
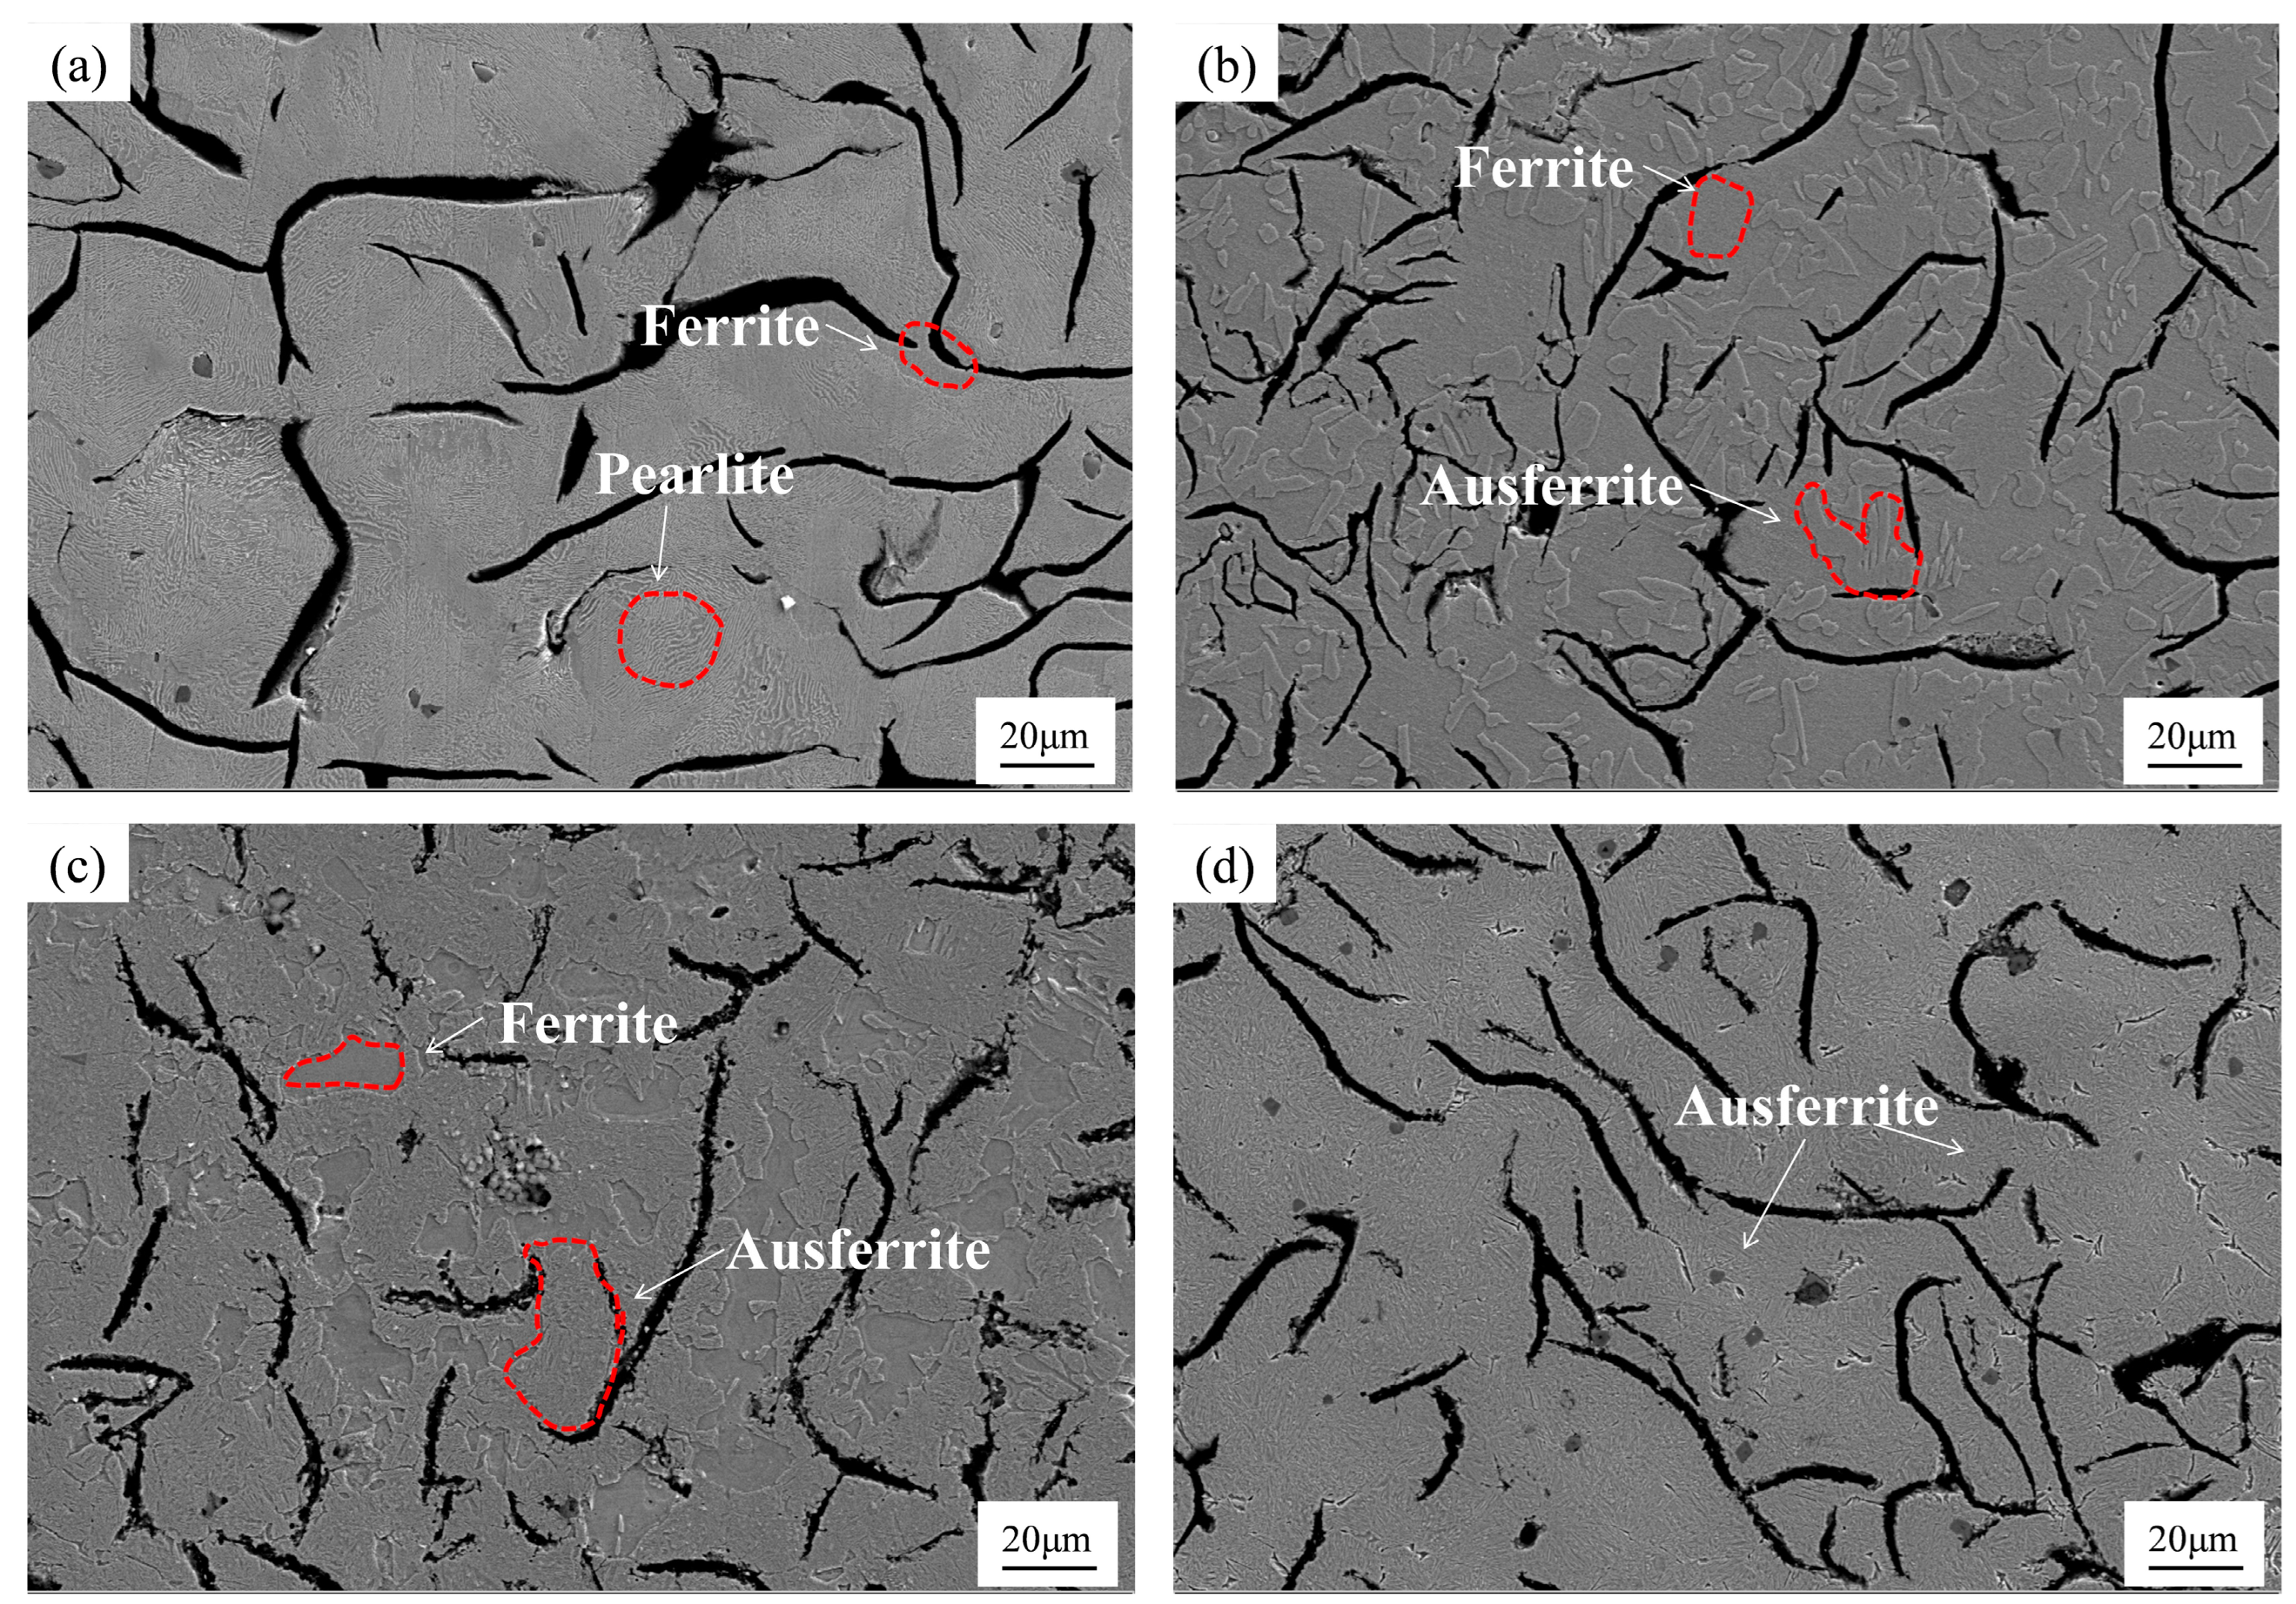
Through an analysis of the microstructure using Image-Pro Plus software (Version 6.0), it was observed that the as-cast microstructure is a typical structure with a pearlite content of 80 (the proportion of pearlite accounts for 75% to 85%). As shown in Figure 3, which displays the microstructures of different specimens, the matrix structure transitions to ferrite and ausferrite after heat treatment. With increasing heat treatment temperature, austenitization progresses more completely. Furthermore, higher austenitizing temperatures enhance the solid solubility of carbon in austenite. This occurs because the lattice interstices of austenite expand at elevated temperatures, facilitating carbon atom dissolution into the austenitic matrix, thereby increasing carbon dissolution capacity. Consequently, as temperatures rise, the proportion of ausferrite in the matrix structure progressively increases, while the content of ferrite decreases. As shown in Figure 4, the ausferrite content increases from 38.6% in At 810 to 81.2% in At 850, and finally reaches 98.1% in At 900. It can be observed that the ausferrite content first shows a linear increase, and the increasing trend is quite obvious. However, between 850 °C and 900 °C, the increasing trend of the ausferrite content slows down, which indicates that complete austenitization has occurred at 900 °C.
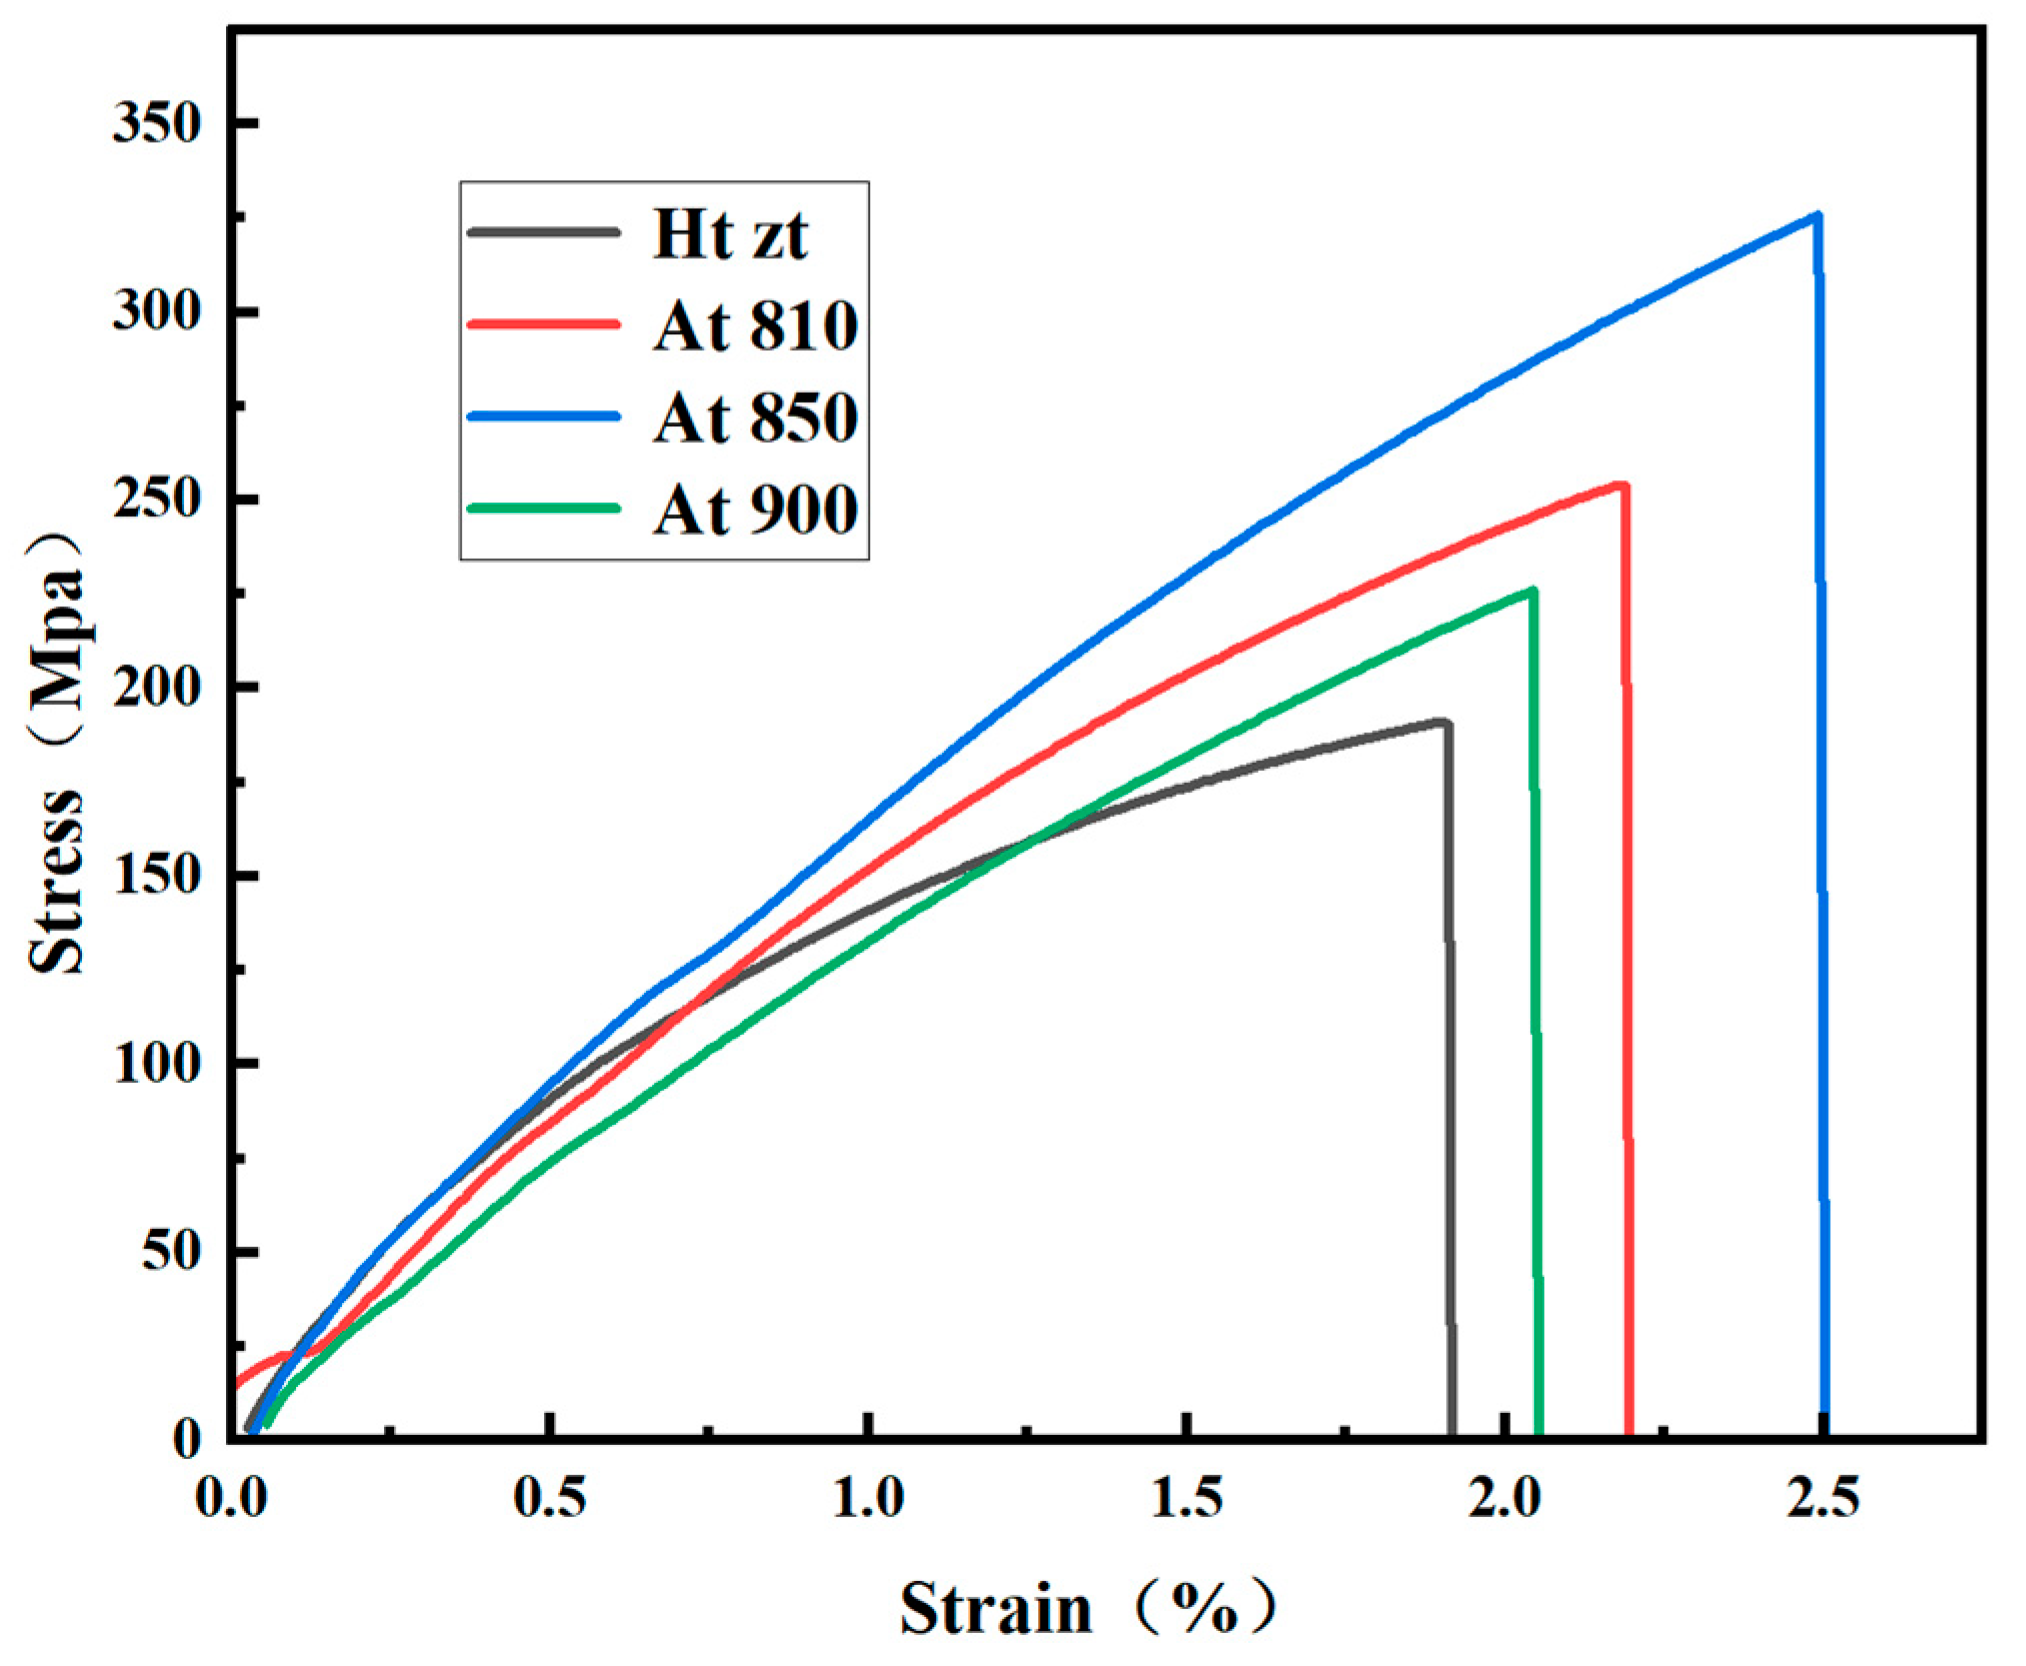
Figure 5 shows the mechanical properties of different gray cast iron specimens. The as-cast specimen exhibits a tensile strength and elongation corresponding to grade HT 150. For the heat-treated specimens, both the tensile strength and elongation first increase and then decrease. The tensile strength of At 810 is 253 MPa. With the increase in ausferrite, At 850 shows the best tensile strength, reaching 332 MPa. However, At 900 shows relatively poor tensile strength and elongation. This is because at higher temperatures, the diffusion ability of atoms is enhanced and atoms between grains can more easily cross the grain boundaries, leading to the gradual growth of grains. According to the Hall–Petch relationship [30], the smaller the grain size, the greater the number of grain boundaries, and the stronger the hindrance to dislocations. As a result, the slip of dislocations between grains is restricted, which enhances the strength of the material. However, austempering at high temperatures is more likely to cause stress concentration and the gray cast iron material has the characteristic of stress concentration. The high temperature heat treatment magnifies this characteristic. Therefore, At 900 exhibits poorer tensile properties.
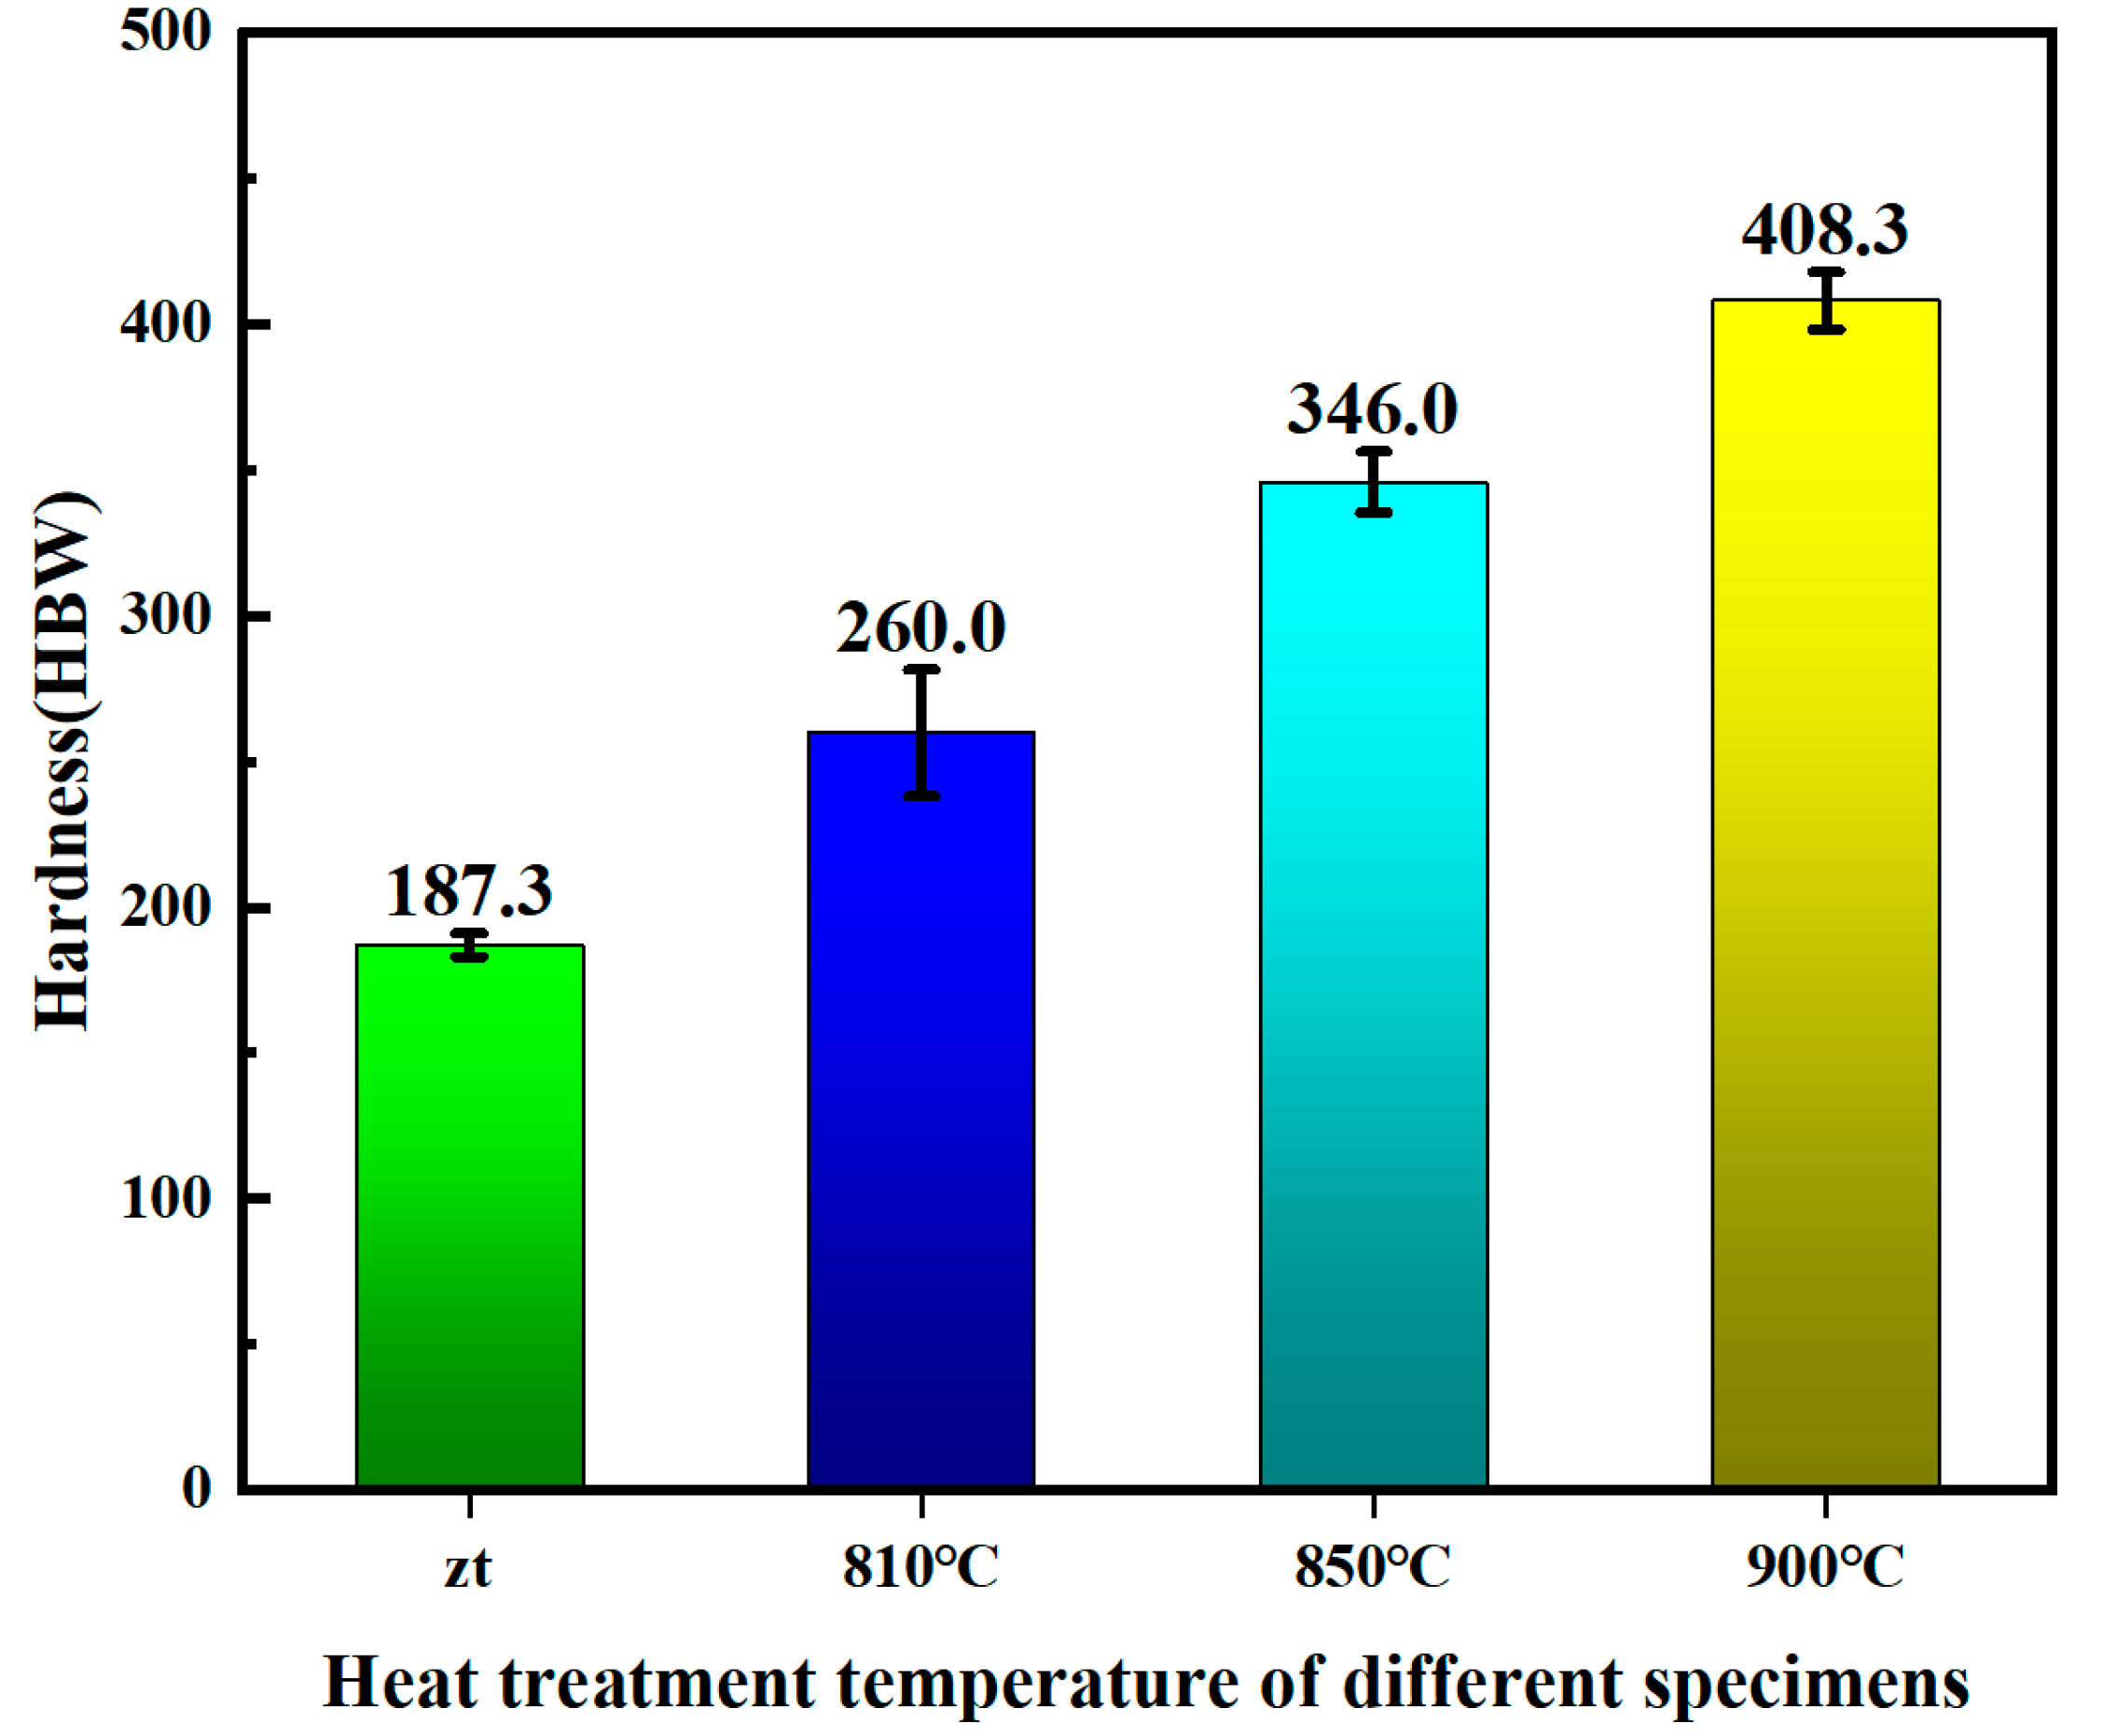
Generally, there is a positive correlation between hardness and wear resistance. As shown in Figure 6, which depicts the hardness of different gray cast iron specimens, the hardness of the specimens gradually increases with the rise in the austenitizing temperature, increasing from 187.3 HBW in the as-cast state to 408.3 HBW for At 900.
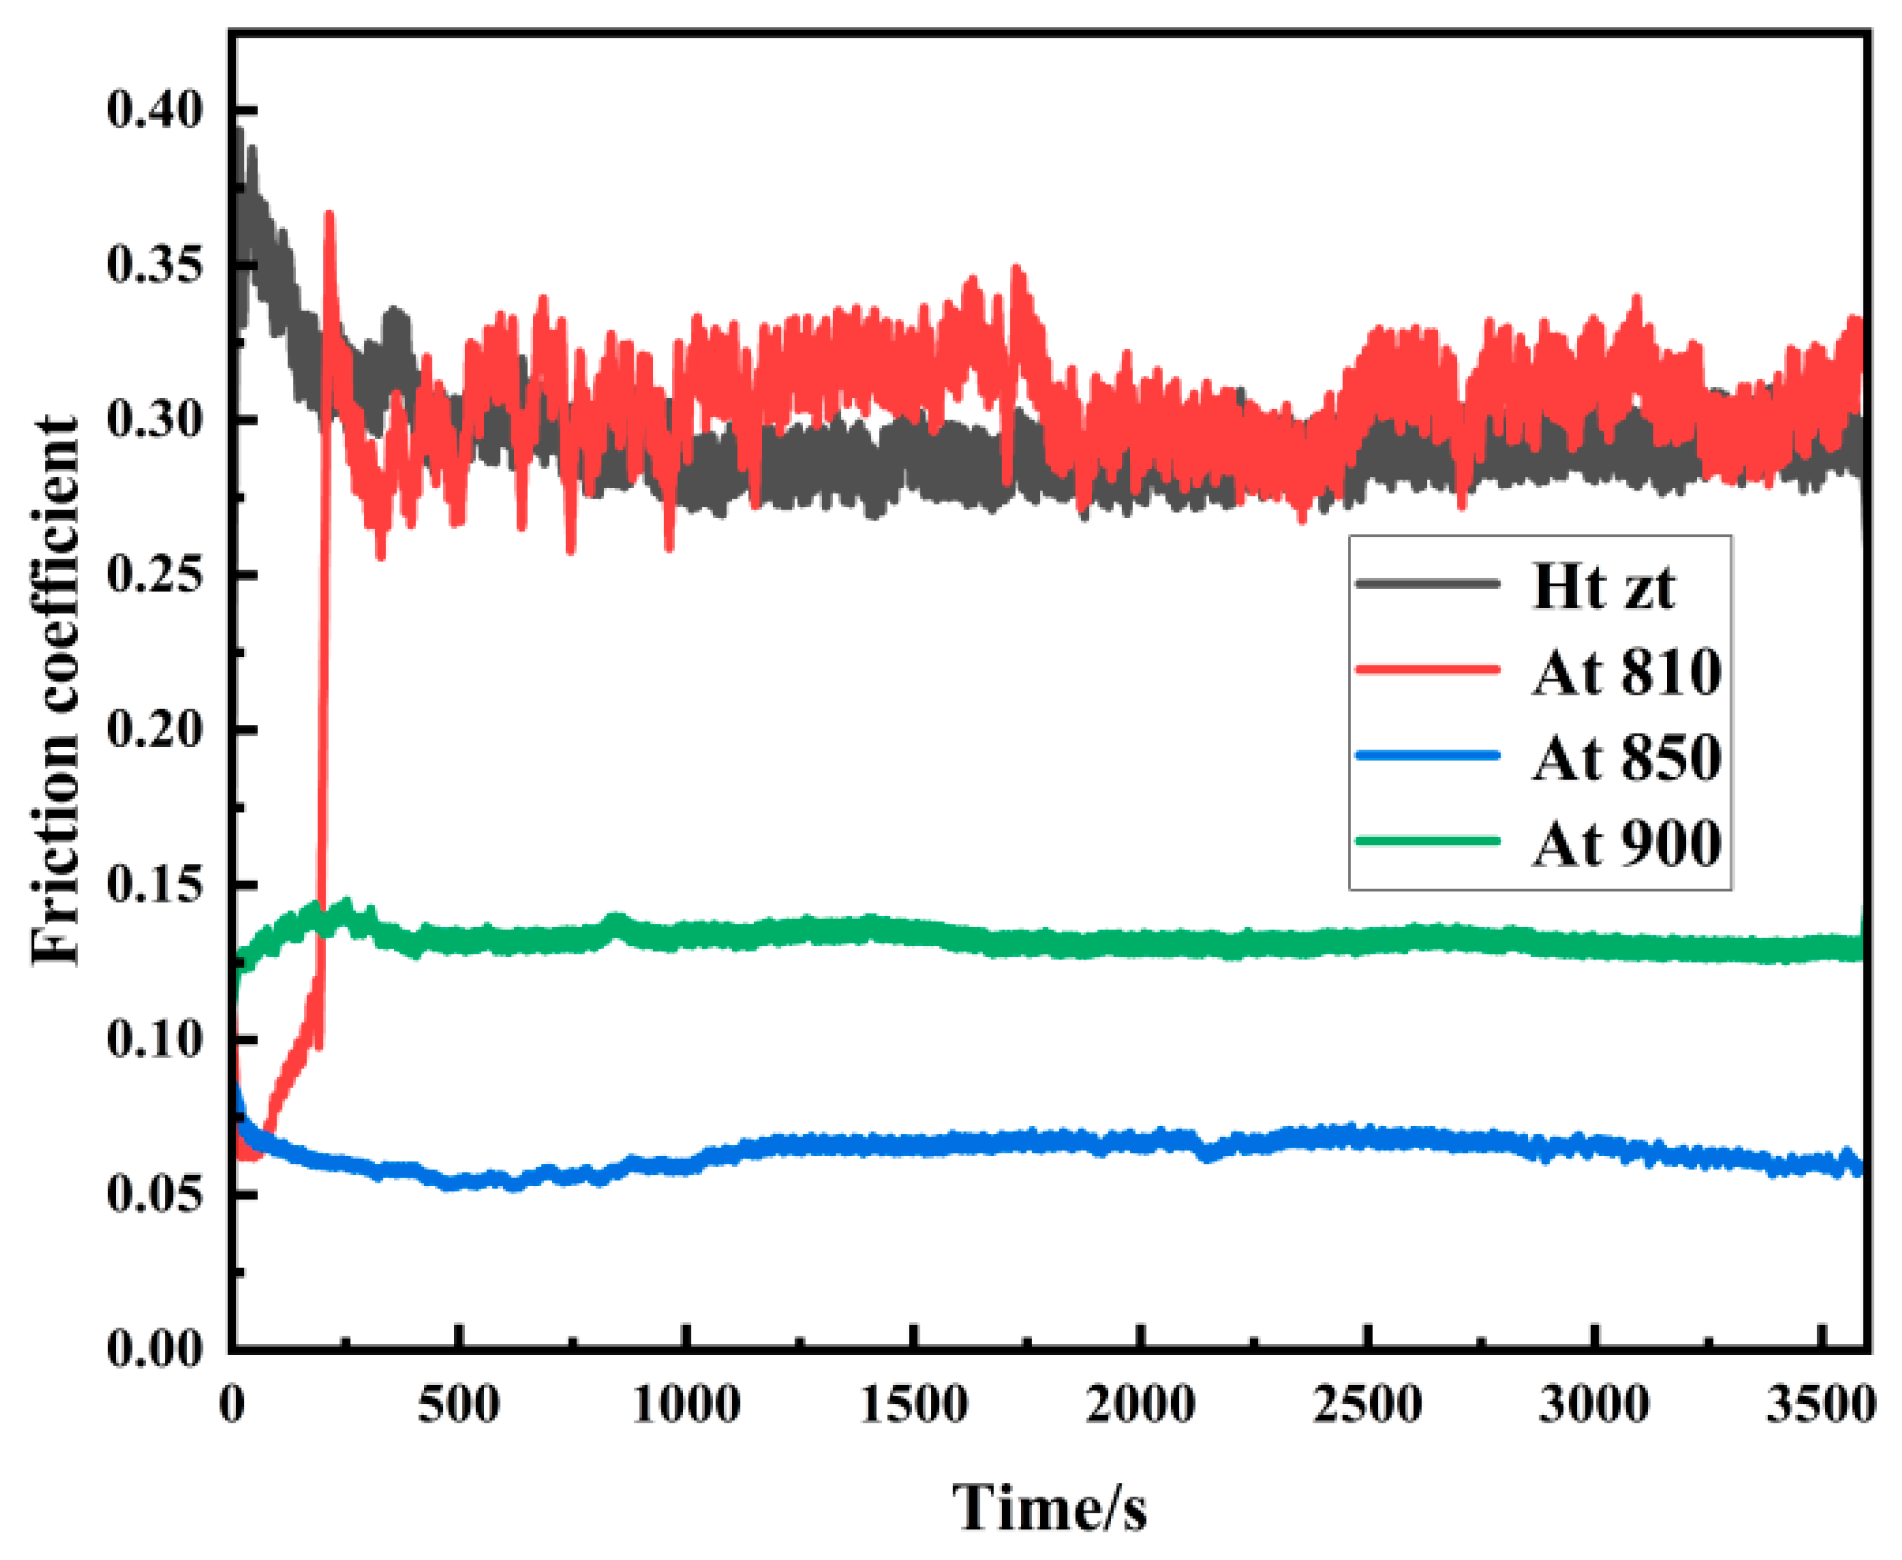
Figure 7 shows the friction coefficients of gray cast iron under different heat treatment conditions. There is little difference in the friction coefficients between the as-cast specimen and At 810, and the friction coefficient of At 850 is slightly better than that of At 900. The as-cast gray cast iron needs to enter the running-in state in the early stage of friction; therefore, the friction coefficient first decreases and then tends to be stable. For At 810, the surface is not damaged in the early stage of friction, resulting in a low friction coefficient at the beginning of the experiment. As time goes on, the friction coefficient increases rapidly. This is because the hardness difference between ferrite and ausferrite in the matrix is relatively large, causing the friction coefficient to fluctuate unstably under high-frequency friction. The matrices of At 850 and At 900 are both composed of ausferrite, which has a high and uniform hardness. Therefore, their friction coefficients are low and stable.
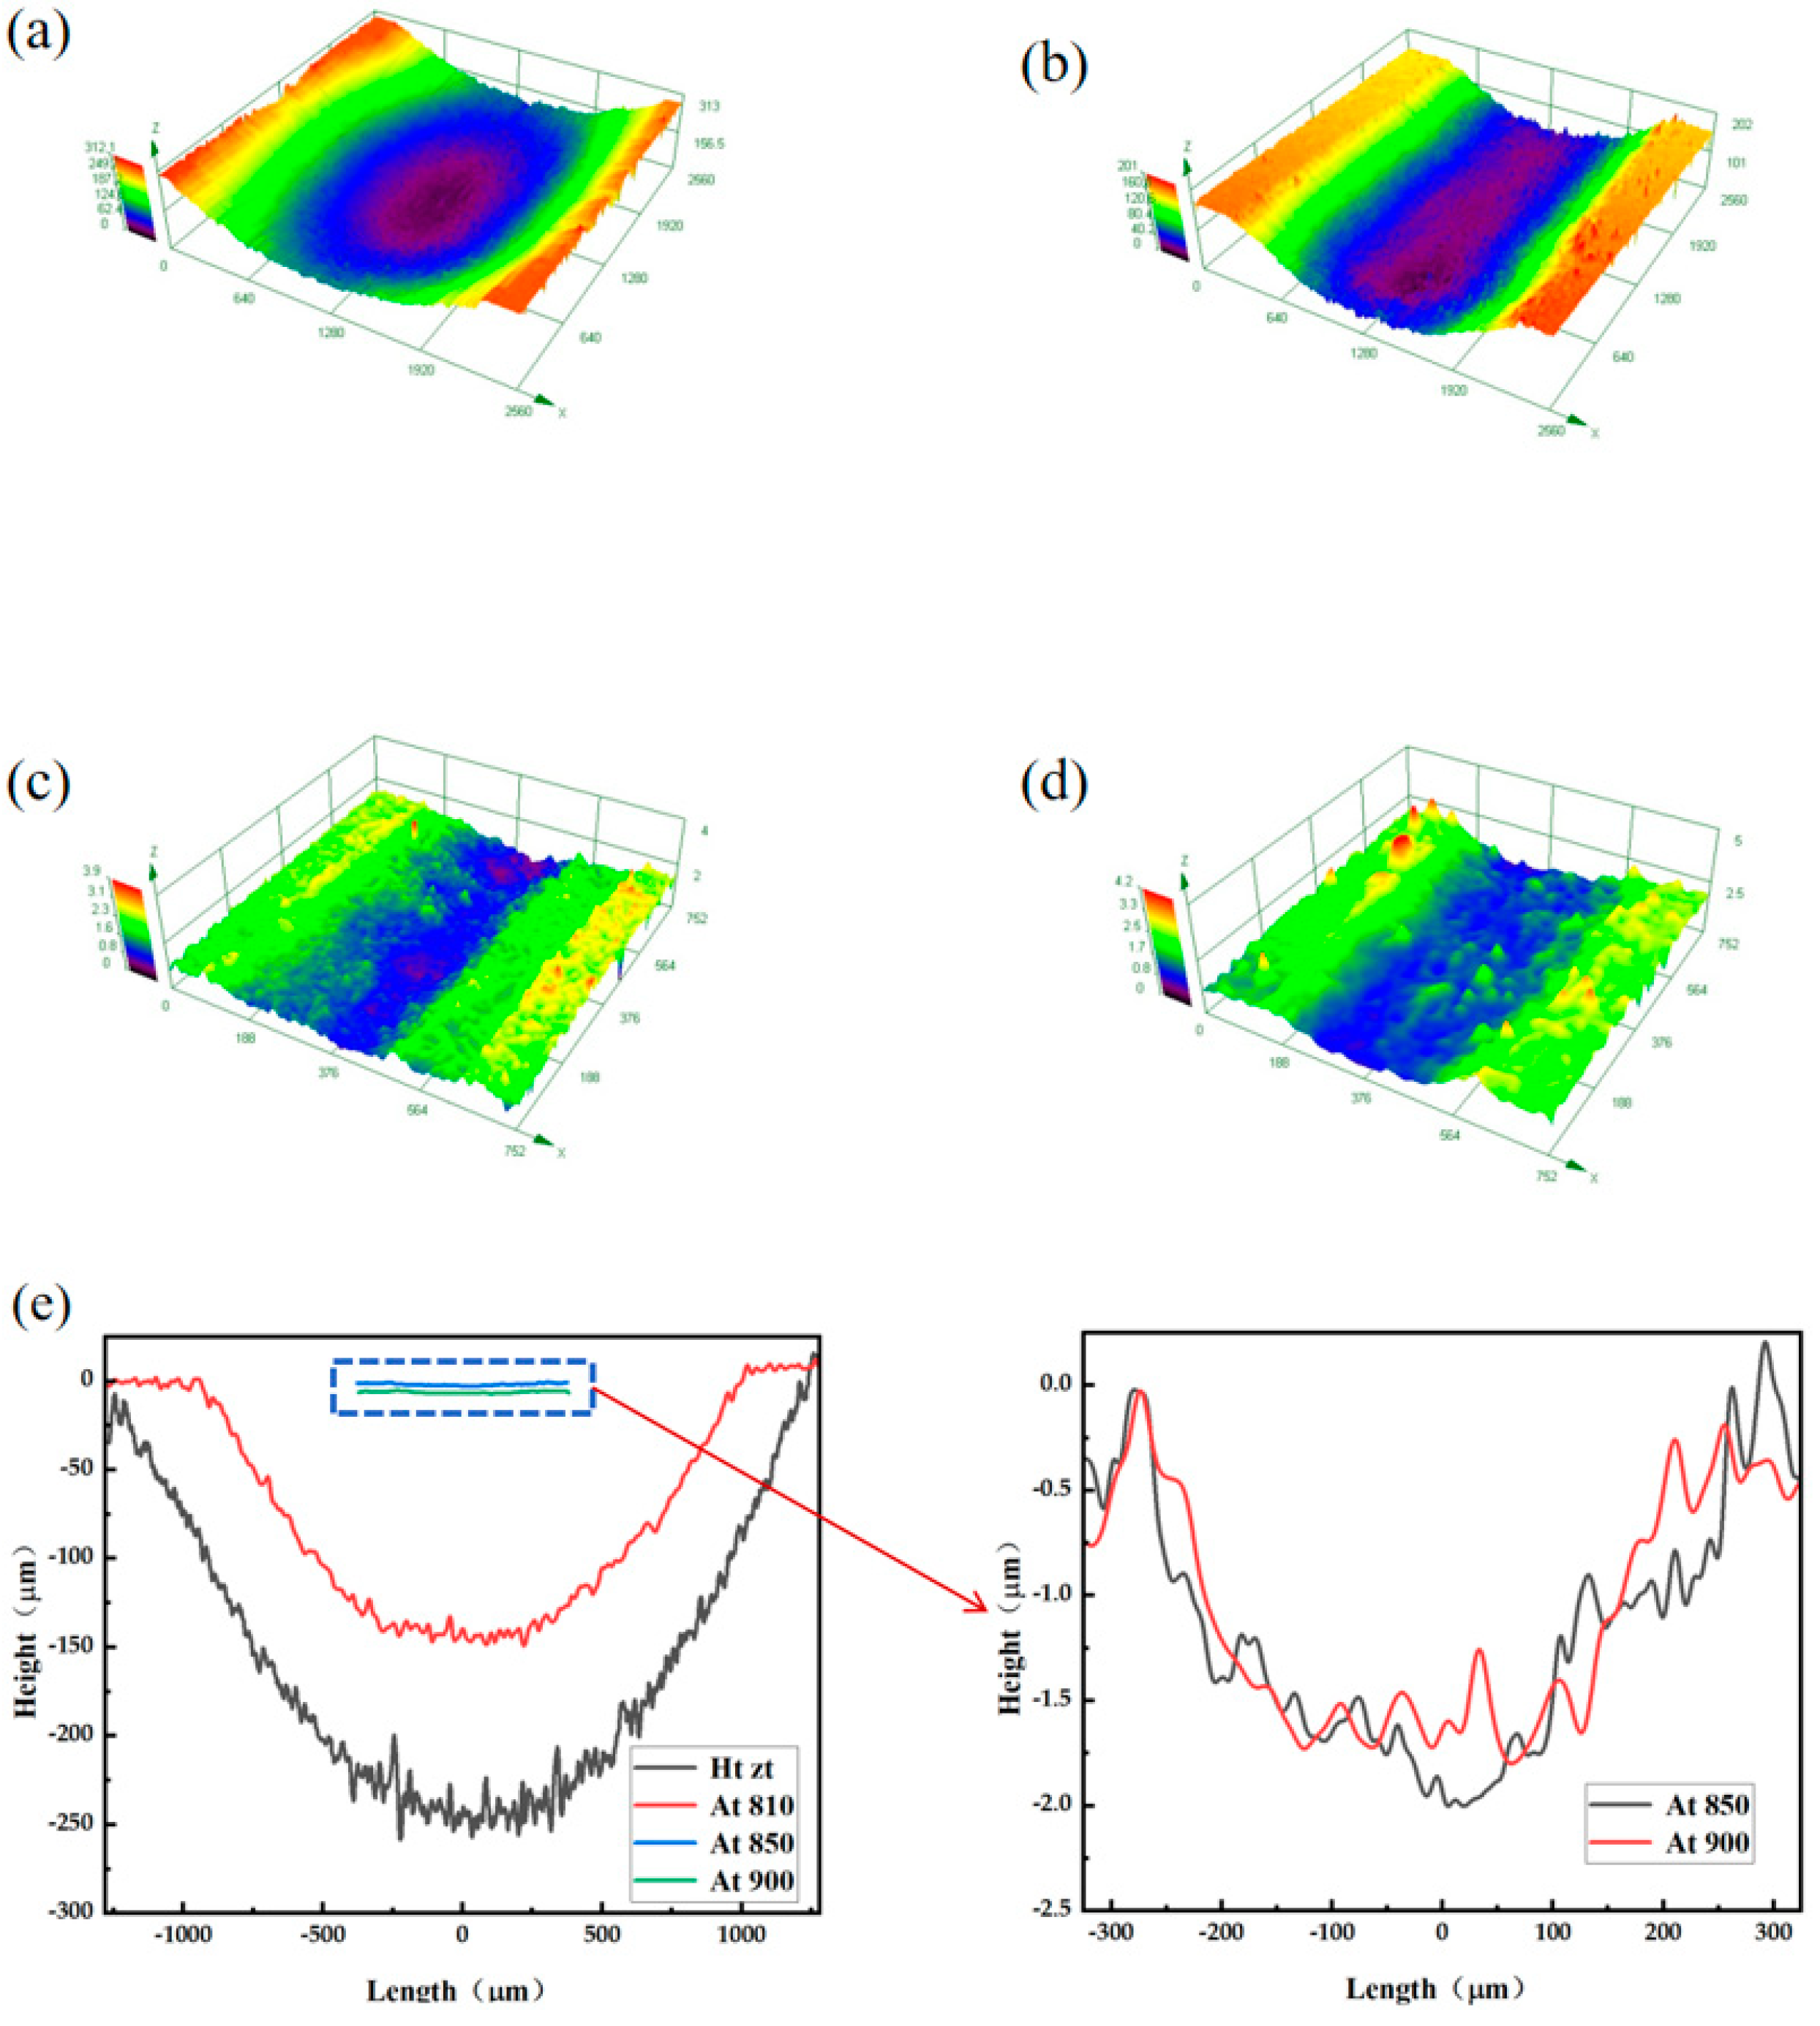
The three-dimensional morphology of the wear surface after the wear test described in the experimental method was reproduced using laser confocal microscopy, and further wear resistance analysis was conducted. As shown in the 3D topography and 2D profile in Figure 8, both the wear width and depth gradually decrease with increasing heat treatment temperature. However, specimens treated at 850 °C and 900 °C exhibit comparable wear dimensions (depth and width). Although the coefficient of friction (COF) of the as-cast specimen is similar to that of the 810 °C-treated sample, the latter demonstrates a shallower wear depth and a narrower wear width, with the as-cast specimen displaying a significantly larger wear volume. Figure 7 reveals that the 850 °C-treated specimen has a lower COF than the 900 °C-treated specimen, yet no distinct differences in wear volume are observed between them based on 3D topography and 2D cross-sectional profiles. Magnified analysis indicates that both 850 °C and 900 °C specimens exhibit wear widths of 500–550 μm and wear depths of 1.75–2.0 μm.
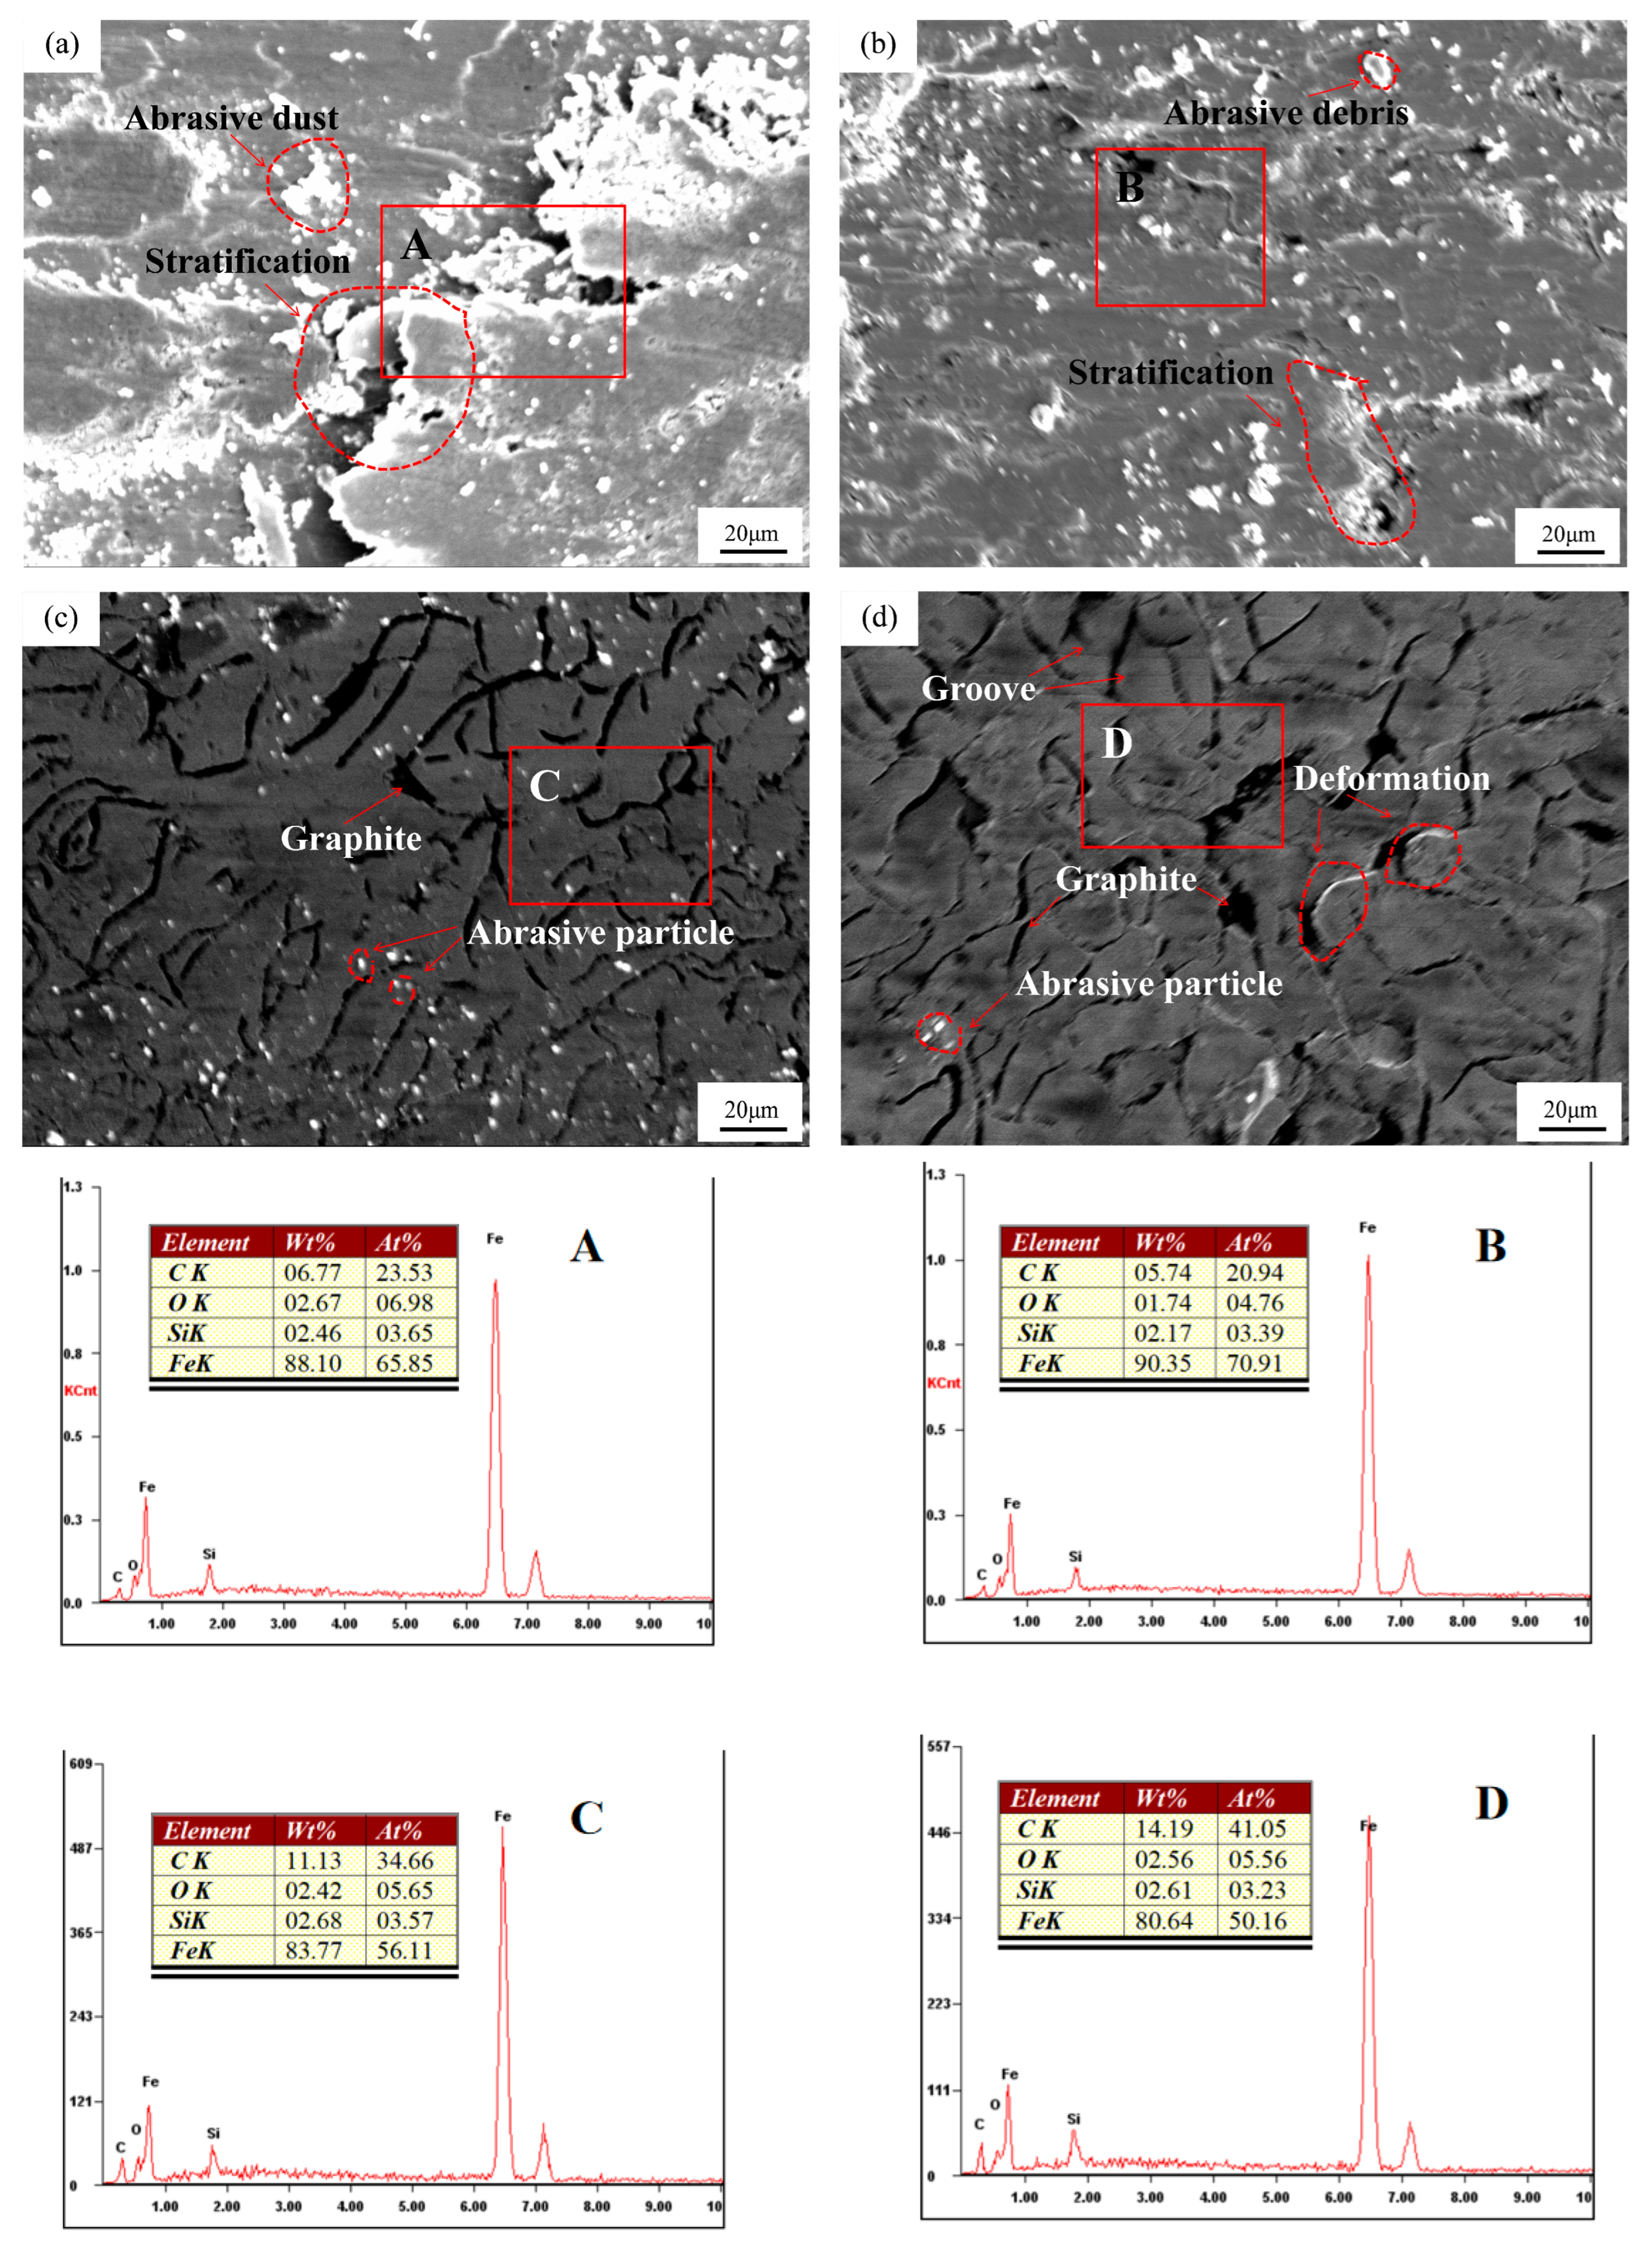
In order to conduct an in-depth comparative analysis of the wear states of gray cast iron under different heat treatment conditions, the wear surface was carefully observed, and the results are shown in Figure 9. Moreover, the wear types of different specimens were analyzed. The wear surface of the Ht zt specimen exhibits large-scale delamination and transverse cracks. The presence of oxygen elements on the surface indicates that it is atypical adhesive wear. Meanwhile, due to the surface oxidation caused by frictional heat and the easy peeling of the brittle oxide film, it is also accompanied by oxidative wear.
The delamination phenomenon on the wear surface of the At 810 specimen is reduced, and the crack size is decreased. This is attributed to the increase in the hardness of the matrix, which makes the surface less likely to be damaged. However, the wear types are still adhesive wear and oxidative wear, although the degree of oxidative wear is weakened. This is because the partial formation of ausferrite has improved the matrix’s ability to resist plastic deformation and has inhibited the peeling of the oxide film. The wear surface of the At 850 specimen is relatively smooth, with only shallow furrows and fine abrasive particles embedded. Moreover, the edges of the graphite are intact without significant deformation. As most of the structure has transformed into ausferrite, the hardness has been significantly increased, and the wear type has changed from adhesive wear to abrasive wear. Although oxygen elements are observed on the surface through energy spectrum analysis, the content is relatively low, indicating that the uniform ausferrite matrix can effectively inhibit the rupture of the oxide film. At this time, the wear type is abrasive wear combined with oxidative wear.
The surface of the At 900 specimen is similar to that of the At 850 specimen, also showing furrows, abrasive particles, and oxygen elements. However, the structure around the graphite on the surface has deformed. This is because high-temperature quenching increases the residual stress, causing stress concentration around the graphite, and the brittle matrix structure leads to the deformation of the structure. This is also the reason why the wear coefficient of At 850 is lower than that of At 900.
The distribution of oxygen elements is directly related to the wear mechanism. The high oxygen content in Ht zt and At 900 reflects significant oxidative wear, while the low oxygen content in At 850 indicates that it can effectively inhibit the rupture of the oxide film. The uniform distribution of Type A graphite in At 850 disperses stress, whereas the deformation of graphite in At 900 leads to stress concentration and accelerates the peeling of the interface.
The relatively high austenite content in At 850 provides a toughness buffer, reducing brittle spalling. In contrast, the excessive austenite content in At 900 leads to carbon supersaturation and an increase in quenching stress, weakening the comprehensive performance.
Overall, for the At 850 specimen with an ausferrite content of 81.2%, the matrix has a uniform hardness and the graphite is intact. The wear surface is mainly characterized by shallow furrows and the embedding of trace abrasive particles, with the lowest oxygen content, achieving a balance between a low friction coefficient and high wear resistance. In contrast, for the At 900 specimen, due to the deformation of graphite and the increase in residual stress, interface peeling occurs, the oxygen content rebounds, the wear mechanism becomes complex, and the comprehensive performance deteriorates.

4. Conclusions

By comparing the microstructures and mechanical properties of the as-cast specimen and the specimens treated at different austenitizing temperatures, the following conclusions are drawn.
(1) As the austenitizing temperature increases during the austempering process, the matrix of the gray cast iron used in coal mine explosion-proof equipment gradually changes from being mainly composed of pearlite to being mainly composed of ausferrite, and the proportion of ausferrite gradually increases with the rise in austenitization temperature.
(2) When the austenitizing temperature is 850 °C, the tensile strength of the gray cast iron for coal mine explosion-proof equipment treated by austempering can reach 332 MPa. Compared with the as-cast specimen, the tensile strength is increased by 78.6%, the plasticity is improved by 51.8%, and the wear depth is reduced from 250 μm to 2 μm.
(3) As the austenitization temperature increases, the wear mechanism under a 20 N load transitions from adhesive wear and oxidative wear in the as-cast state and for At 810 to abrasive wear and oxidative wear for At 850 and At 900. However, an excessively high austenitization temperature will lead to an increase in the residual stress of the casting and deformation of the graphite structure, which will affect the wear performance of the material.

Author Contributions

Investigation: Y.L., Z.J., S.Z., X.L., Y.H. and G.L.; resources: H.Z., Y.L. and S.Z.; writing—original draft: H.Z. and Y.L.; data curation: Z.J. and X.L.; formal analysis: Y.H.; writing—review and editing: H.Z.; supervision: G.L. All authors have read and agreed to the published version of the manuscript.

Funding

This work was supported by the National Key Research and Development Program of China (Grant No. 2022YFF0605300) and the Key Laboratory of Special Machine and High Voltage Apparatus (Shenyang University of Technology), Ministry of Education (Grant No. KFKT202106).

Institutional Review Board Statement

Not applicable.

Informed Consent Statement

Not applicable.

Data Availability Statement

The original contributions presented in this study are included in the article. Further inquiries can be directed to the corresponding author.

Conflicts of Interest

Authors Hongkui Zhang, Zhe Ju, and Shian Zhu were employed by the company “Fushun CCTEG Inspection Center Co., Ltd.”. The remaining authors declare that the research was conducted in the absence of any commercial or financial relationships that could be construed as potential conflicts of interest.

References

  1. Li, Q.G.; Zhang, Y.N.; Zhang, Y.N.; Liu, H.B.; Ren, H.N.; Zhong, Y.M.; Huang, X.F.; Huang, W.G. Influence of Sn and Nb additions on the microstructure and wear characteristics of a gray cast iron. Appl. Phys. A Mater. Sci. Process. 2020, 126, 8. [Google Scholar] [CrossRef]
  2. Li, Y.T.; Zhu, H. A simple optimization method for the design of a lightweight, explosion-proof housing for a coal mine rescue robot. J. Braz. Soc. Mech. Sci. Eng. 2018, 40, 10. [Google Scholar] [CrossRef]
  3. Krause, T.; Bewersdorff, J.; Markus, D. Investigations of static and dynamic stresses of flameproof enclosures. J. Loss Prev. Process Ind. 2017, 49, 775–784. [Google Scholar] [CrossRef]
  4. Scott, L.W. An overview of explosion-proof enclosure research. IEEE Trans. Ind. Appl. 1985, IA-21, 1552–1558. [Google Scholar] [CrossRef]
  5. Alvarez, L.; Luis, C.J.; Puertas, I. Analysis of the influence of chemical composition on the mechanical and metallurgical properties of engine cylinder blocks in grey cast iron. J. Mater. Process. Technol. 2004, 153, 1039–1044. [Google Scholar] [CrossRef]
  6. Labrecque, C.; Gagne, M. Ductile iron: Fifty years of continuous development. Can. Metall. Q. 1998, 37, 343–378. [Google Scholar]
  7. An, Y.; Wang, C.; Cui, H. Design of thinner and lighter explosion proof housing for coal mine flameproof electrical equipment. Colliery Mech. Electr. Technol. 2016, 1, 38–40. [Google Scholar]
  8. Băbuţ, G.B.; Moraru, R.I. An improvement on the impact resistance tests for explosion-proof electrical equipment. In Proceedings of the 17th International Multidisciplinary Scientific GeoConference: SGEM, Albena, Bulgaria, 27 June–6 July 2017; Volume 17, pp. 31–38. [Google Scholar]
  9. Habireche, M.; Bacha, N.; Haireche, S.; Djeghdjough, M.; El-hadj, A.A.; Bouterfaya, S.; Saidi, D. Effect of copper and chromium addition on the mechanical and wear resistance of tempered hypoeutectic grey cast iron used in crusher applications. Int. J. Met. 2022, 16, 1869–1884. [Google Scholar] [CrossRef]
  10. Olawale, J.; Oluwaseguun, K.; Ezemenaka, D.; Adisa, S. Production of austempered gray iron (AGI) using forced air cooling. Mater. Perform. Charact. 2014, 3, 355–370. [Google Scholar] [CrossRef]
  11. Xu, W.; Ferry, M.; Wang, Y. Influence of alloying elements on as-cast microstructure and strength of gray iron. Mater. Sci. Eng. A 2005, 390, 326–333. [Google Scholar] [CrossRef]
  12. Abdou, S.; Elkaseer, A.; Kouta, H.; Abu Qudeiri, J. Wear behaviour of grey cast iron with the presence of copper addition. Adv. Mech. Eng. 2018, 10, 8. [Google Scholar] [CrossRef]
  13. Ankamma, K. Effect of trace elements (boron and lead) on the properties of gray cast iron. J. Inst. Eng. (India) Ser. D 2014, 95, 19–26. [Google Scholar] [CrossRef]
  14. Ding, X.F.; Li, X.Z.; Huang, H.; Matthias, W.; Huang, S.Y.; Feng, Q. Effect of Mo addition on as-cast microstructures and properties of grey cast irons. Mater. Sci. Eng. A Struct. Mater. Prop. Microstruct. Process. 2018, 718, 483–491. [Google Scholar] [CrossRef]
  15. He, Y.S.; Mao, F.; Gao, A.; Pan, K.M.; Guo, A.Z.; Liu, S.H.; Wei, S.Z.; Chen, C.; Zhang, C.; Jiang, T.; et al. The influence of trace vanadium on the solidification process, microstructure, and mechanical properties of gray cast iron. J. Mater. Res. Technol. 2024, 31, 998–1007. [Google Scholar] [CrossRef]
  16. Sun, W.T.; Wang, B.; Liu, X.L.; Wang, Y.Q.; Zhang, J. Controlling the tribology performance of gray cast iron by tailoring the microstructure. Tribol. Int. 2022, 167, 10. [Google Scholar] [CrossRef]
  17. Hassani, A.; Habibollahzadeh, A.; Sadeghinejad, S. Influence of vanadium and chromium additions on the wear resistance of a gray cast iron. Int. J. Miner. Metall. Mater. 2012, 19, 602–607. [Google Scholar] [CrossRef]
  18. Elsawy, E.E.T.; El-Hebeary, M.R.; El Mahallawi, I.S.E. Effect of manganese, silicon and chromium additions on microstructure and wear characteristics of grey cast iron for sugar industries applications. Wear 2017, 390–391, 113–124. [Google Scholar] [CrossRef]
  19. Lian, X.T.; Zhu, J.N.; Dong, H.; Wang, Y.M.; Liu, J.D. Effects of micro-alloying elements on microstructure, element distribution and mechanical properties in gray irons. Int. J. Met. 2020, 14, 1025–1032. [Google Scholar] [CrossRef]
  20. Vadiraj, A.; Balachandran, G.; Kamaraj, M.; Gopalakrishna, B.; Rao, K.P. Studies on mechanical and wear properties of alloyed hypereutectic gray cast irons in the as-cast pearlitic and austempered conditions. Mater. Des. 2010, 31, 951–955. [Google Scholar] [CrossRef]
  21. Sarkar, T.; Sutradhar, G. Investigation on mechanical properties and wear behavior of Cu-alloyed austempered gray cast iron (AGI). Sadhana 2018, 43, 11. [Google Scholar] [CrossRef]
  22. Hsu, C.H.; Shy, Y.H.; Yu, Y.H.; Lee, S.C. Effect of austempering heat treatment on fracture toughness of copper alloyed gray iron. Mater. Chem. Phys. 2000, 63, 75–81. [Google Scholar] [CrossRef]
  23. Vadiraj, A.; Balachandran, G.; Kamaraj, M.; Kazuya, E. Mechanical and wear behavior of quenched and tempered alloyed hypereutectic gray cast iron. Mater. Des. 2011, 32, 2438–2443. [Google Scholar] [CrossRef]
  24. Sarkar, T.; Bose, P.K.; Sutradhar, G. Effect of the time and temperature of isothermal quenching on microstructure and mechanical properties of bainitic gray cast iron. Met. Sci. Heat Treat. 2020, 61, 552–558. [Google Scholar] [CrossRef]
  25. Vadiraj, A.; Balachandran, G.; Kamaraj, M.; Gopalakrishna, B.; Rao, K.P. Structure-property correlation in austempered alloyed hypereutectic gray cast irons. Mater. Sci. Eng. A Struct. Mater. Prop. Microstruct. Process. 2010, 527, 782–788. [Google Scholar] [CrossRef]
  26. Rundman, K.; Parolini, J.; Moore, D. Relationship between tensile properties and matrix microstructure in austempered gray iron. AFS Trans. 2005, 145, 51–55. [Google Scholar]
  27. Ribeiro, L.; Barbosa, A.; Viana, F.; Baptista, A.M.; Dias, C.; Ribeiro, C.A. Abrasion wear behaviour of alloyed and chilled cast irons. Wear 2011, 270, 535–540. [Google Scholar] [CrossRef]
  28. Gerval, V.; Lacaze, J. Critical temperature range in spheroidal graphite cast irons. ISIJ Int. 2000, 40, 386–392. [Google Scholar] [CrossRef]
  29. Nakae, H.; Shin, H. Effect of Graphite Morphology on Tensile Properties of Flake Graphite Cast Iron. Mater. Trans. 2005, 42, 1428–1434. [Google Scholar] [CrossRef]
  30. Takeda, K.; Nakada, N.; Tsuchiyama, T.; Takaki, S. Effect of interstitial elements on Hall-Petch coefficient of ferritic iron. ISIJ Int. 2008, 48, 1122–1125. [Google Scholar] [CrossRef]
Figure 1. Dimension diagrams of tensile specimens and friction and wear specimens, and a diagram of the isothermal quenching heat treatment process.
Applsci 15 04548 g001
Figure 2. Graphite morphology of the as-cast specimen (a) under 100 times magnification; (b) partial enlarged view.
Applsci 15 04548 g002
Figure 3. Microstructure diagrams of different specimens. (a) Ht zt; (b) At 810; (c) At 850; (d) At 900.
Applsci 15 04548 g003
Figure 4. Austenite content of gray cast iron specimens at different austenitizing temperatures.
Applsci 15 04548 g004
Figure 5. Mechanical property diagrams of different gray cast iron specimens.
Applsci 15 04548 g005
Figure 6. Hardness diagrams of different gray cast iron specimens.
Applsci 15 04548 g006
Figure 7. Friction coefficients of different gray cast iron specimens.
Applsci 15 04548 g007
Figure 8. Three-dimensional morphology diagrams of different gray cast iron specimens. (a) Ht zt; (b) At 810; (c) At 850; (d) At 900, and their two-dimensional profile diagrams; (e) Two dimensional contour diagram and partial enlarged view.
Applsci 15 04548 g008
Figure 9. Wear morphology diagrams of different gray cast iron specimens. (a) Ht zt, (b) At 810, (c) At 850, (d) At 900. Partial energy-dispersive spectroscopy (EDS) diagrams. (A) EDS analysis of the area within the square frame in diagram (a); (B) EDS analysis of the area within the square frame in diagram (b); (C) EDS analysis of the area within the square frame in diagram (c); and (D) EDS analysis of the area within the square frame in diagram (d).
Applsci 15 04548 g009
Disclaimer/Publisher’s Note: The statements, opinions and data contained in all publications are solely those of the individual author(s) and contributor(s) and not of MDPI and/or the editor(s). MDPI and/or the editor(s) disclaim responsibility for any injury to people or property resulting from any ideas, methods, instructions or products referred to in the content.