Article

Vision Measurement of Twisting a Double-Bimorph Piezoelectric Actuator

Faculty of Mechanical Engineering and Robotics, AGH University of Krakow, al. A. Mickiewicza 30, 30-059 Krakow, Poland
*
Author to whom correspondence should be addressed.
Appl. Sci. 2025, 15(24), 13109; https://doi.org/10.3390/app152413109
Submission received: 18 November 2025 / Revised: 8 December 2025 / Accepted: 10 December 2025 / Published: 12 December 2025
(This article belongs to the Section Mechanical Engineering)

Featured Application

The proposed vision measurement of a twist angle can be used to verify mathematical models; it is to be used in open-loop control systems of the twist angle of any actuators.

Abstract

Piezoelectric actuators are devices that convert electrical energy into mechanical energy. One of the applied structures of such actuators is a cantilever beam, which is composed of a nonpiezoelectric carrier layer and one or more piezoelectric active layers. The twisting motion of such a beam can be generated by using a double-bimorph structure, in which the beam twisting can be generated by the appropriate control of each of the two bimorphs. However, obtaining the desired twist angle requires the displacements of both bimorphs to be measured. The need to measure these displacements significantly limits the applicability of this type of actuator for generating twisting motions, because the size of the displacement sensors and their mounting components, which can significantly exceed the size of the beam actuator itself, means that a large space is needed to implement the twist angle measurement system. It is, therefore, necessary to develop techniques for controlling such an actuator based on a mathematical model. In this paper, a vision method was proposed to verify the mathematical model of a double-bimorph actuator. The results of these experiments can be used to synthesize a control system of the twist angle of the double-bimorph actuator without the need for displacement measurements of both bimorphs.

1. Introduction

A piezoelectric actuator is a device that converts electrical energy into mechanical energy. The result of this conversion is generating displacement of a selected part of this actuator. The designs of piezoelectric actuators can vary widely; the classification of actuator structures has been proposed, e.g., by Mohith [1]. One of the constructions often used in scientific research is a bimorph [2]. The piezoelectric bimorph actuator can be built in two ways [3]: (1) from two piezoelectric layers and a carrier layer without piezoelectric properties, or (2) from only two piezoelectric layers without a carrier layer. Piezoelectric materials that are used in the structure of bimorph actuators are piezoceramics, piezoelectric composites, and piezoelectric polymers. The most used ceramics are different kinds of lead zirconate titanate (PZT) [4], the most used composite is Macro-Fiber Composite (MFC) [5], and the most used polymer is polyvinylidene fluoride (PVDF) [6]. Piezoelectric materials between these three groups differ in their brittleness and energy conversion efficiency. Ceramics have poor tensile properties compared to composites and polymers, but they show the highest efficiency when it comes to energy conversion. On the other hand, polymers are the most flexible, but they have the lowest energy conversion efficiency. Currently, piezoelectric composites, especially MFC, are often used in the construction of a bimorph actuator [7]. These composites are characterized by greater flexibility compared to ceramics and greater energy conversion efficiency compared to polymers.
The most common goal of controlling a piezoelectric bimorph actuator is to achieve the required deflection of a beam tip [8]. The second purpose of the control, which is much less frequently reported in the literature, is to achieve the required twisting of a beam tip. The twisting control is implemented in two ways: (1) using a piezoelectric composite, in which the direction of the piezoceramic fibers does not coincide with the direction of the longitudinal axis of the carrier layer of actuator, or (2) the mechanical connection of two bimorph actuators. When using the first method, pure twisting occurs when the piezoelectric composite is placed in regions of high shearing strain of torsional modes in the carrier layer, and a polarization direction in this composite is about ±45°different from the longitudinal axis of the carrier layer [9]. The greatest twisting is obtained at an angle of 45° between a polarization direction and the longitudinal axis of the carrier layer [10], and no twisting deformation occurs for angles at 0° and 90° [11]. The twisting effect can also be achieved by appropriately shaping the electrodes. Interdigitated electrodes (IDEs) on the top surface of the beam should be oriented at 45° relative to the longitudinal beam axis, and the IDEs on the bottom surface should be oriented at −45° [12]. However, the piezoceramic fiber orientations may not be ±45° for best twisting control [13]. The problem of energy conversion in a twisting motion is also considered in the energy harvesting process. Applications of the commercial piezoelectric composite MFC of type F1 are reported in the literature for energy harvesting from the twisting motion of the cantilever beam [14]. MFC F1 composite is characterized by the fact that the direction of polarization of its piezoelectric fibers is different by 45° in relation to the direction of the longitudinal axis of the patch of this composite. It should be noted that the angle between the polarization direction of piezoelectric layers and the direction of the longitudinal axis of the carrier layer determines the kind of generated motion: (1) pure bending, (2) both bending and twisting, and (3) pure twisting. The angle between these directions is constant, determined during the process of joining (gluing) the piezoelectric layers and the carrier layer, so the generated motion is limited, e.g., pure bending cannot be generated for an angle other than 0°.
When using the second method, a structure called “double-bimorph” in the literature is used [15], in which four piezoelectric patches are glued symmetrically on both sides of the carrier layer: two on the upper surface and two symmetric on the bottom surface. These four piezoelectrics create two bimorphs connected to each other by the carrier layer. The polarization directions of all piezoelectrics are parallel to the direction of the longitudinal axis of the carrier layer. Pure bending of such a structure is accomplished by applying equal electrical voltages to both bimorphs. Twisting motion is accomplished by applying electrical voltages to one bimorph, for which the voltage is 180° out-of-phase relative to the voltage applied to the second bimorph [15]. This structure enables the generation of pure bending, i.e., bending with twisting and pure twisting. The double-bimorph can therefore be used to generate both bending and twisting motions, which was practically used, for example, in a fish-shaped robot [16]. The beam twisting of double-bimorph can be generated by the appropriate control of each of the bimorphs in a closed-loop control system. However, obtaining the desired beam twist angle requires the displacements of both bimorphs in such a control system to be measured [15]. The need to measure these displacements significantly limits the applicability of this type of piezoelectric actuator for generating twisting motions because the displacement sensors and their mounting components, which can significantly exceed the size of the double-bimorph actuator itself, require a large space to implement the twist angle measurement system. Therefore, there is a need to develop open-loop control systems that do not require measuring the displacements of both bimorphs in feedback. The open-loop control system of a piezoelectric actuator is usually based on a mathematical model that describes the process of converting the supplied electrical energy into desired motion. The problem in designing open-loop control is determining the values of the parameters of the mathematical model used and experimental verification of this model for a specific actuator. In the case of deflection control, a laser sensor of displacement can be used for such verification [17]. In the case of twist angle control, the two laser sensors of displacement would have to be used for such verification. However, the installation of these sensors for verification would be time-consuming, because measuring the twist angle requires determining both the displacements of both bimorphs and the center of actuator twisting.
This article proposes the use of a vision method for the experimental verification of a mathematical model that is to be ultimately used in open-loop control of the twist angle of double-bimorph. The proposed vision measurement allows for both the displacements of both bimorphs and the center of actuator twisting to be determined when mounting one camera without interfering with the mounting of the double-bimorph actuator.

2. Materials and Methods

To perform laboratory experiments, a prototype of a double-bimorph actuator was made. The mechanical element of the manufactured actuator consisted of five interconnected layers: a carrier layer and four piezoelectric layers. The carrier layer was made of a glass-reinforced epoxy laminate (FR4), which is used in the structure of piezoelectric beam actuators, e.g., by [18]. Patches of Macro-Fiber Composite (MFC) type P1, produced by Smart Material Corp. (Sarasota, FL, USA), were used as piezoelectric layers. Epoxy Adhesive DP490, produced by 3 M Company (Saint Paul, MN, USA), was used to glue the piezoelectric layers with the carrier layer. The schema of the mechanical structure of the piezoelectric actuator is shown in Figure 1, and geometric dimensions are presented in Table 1.
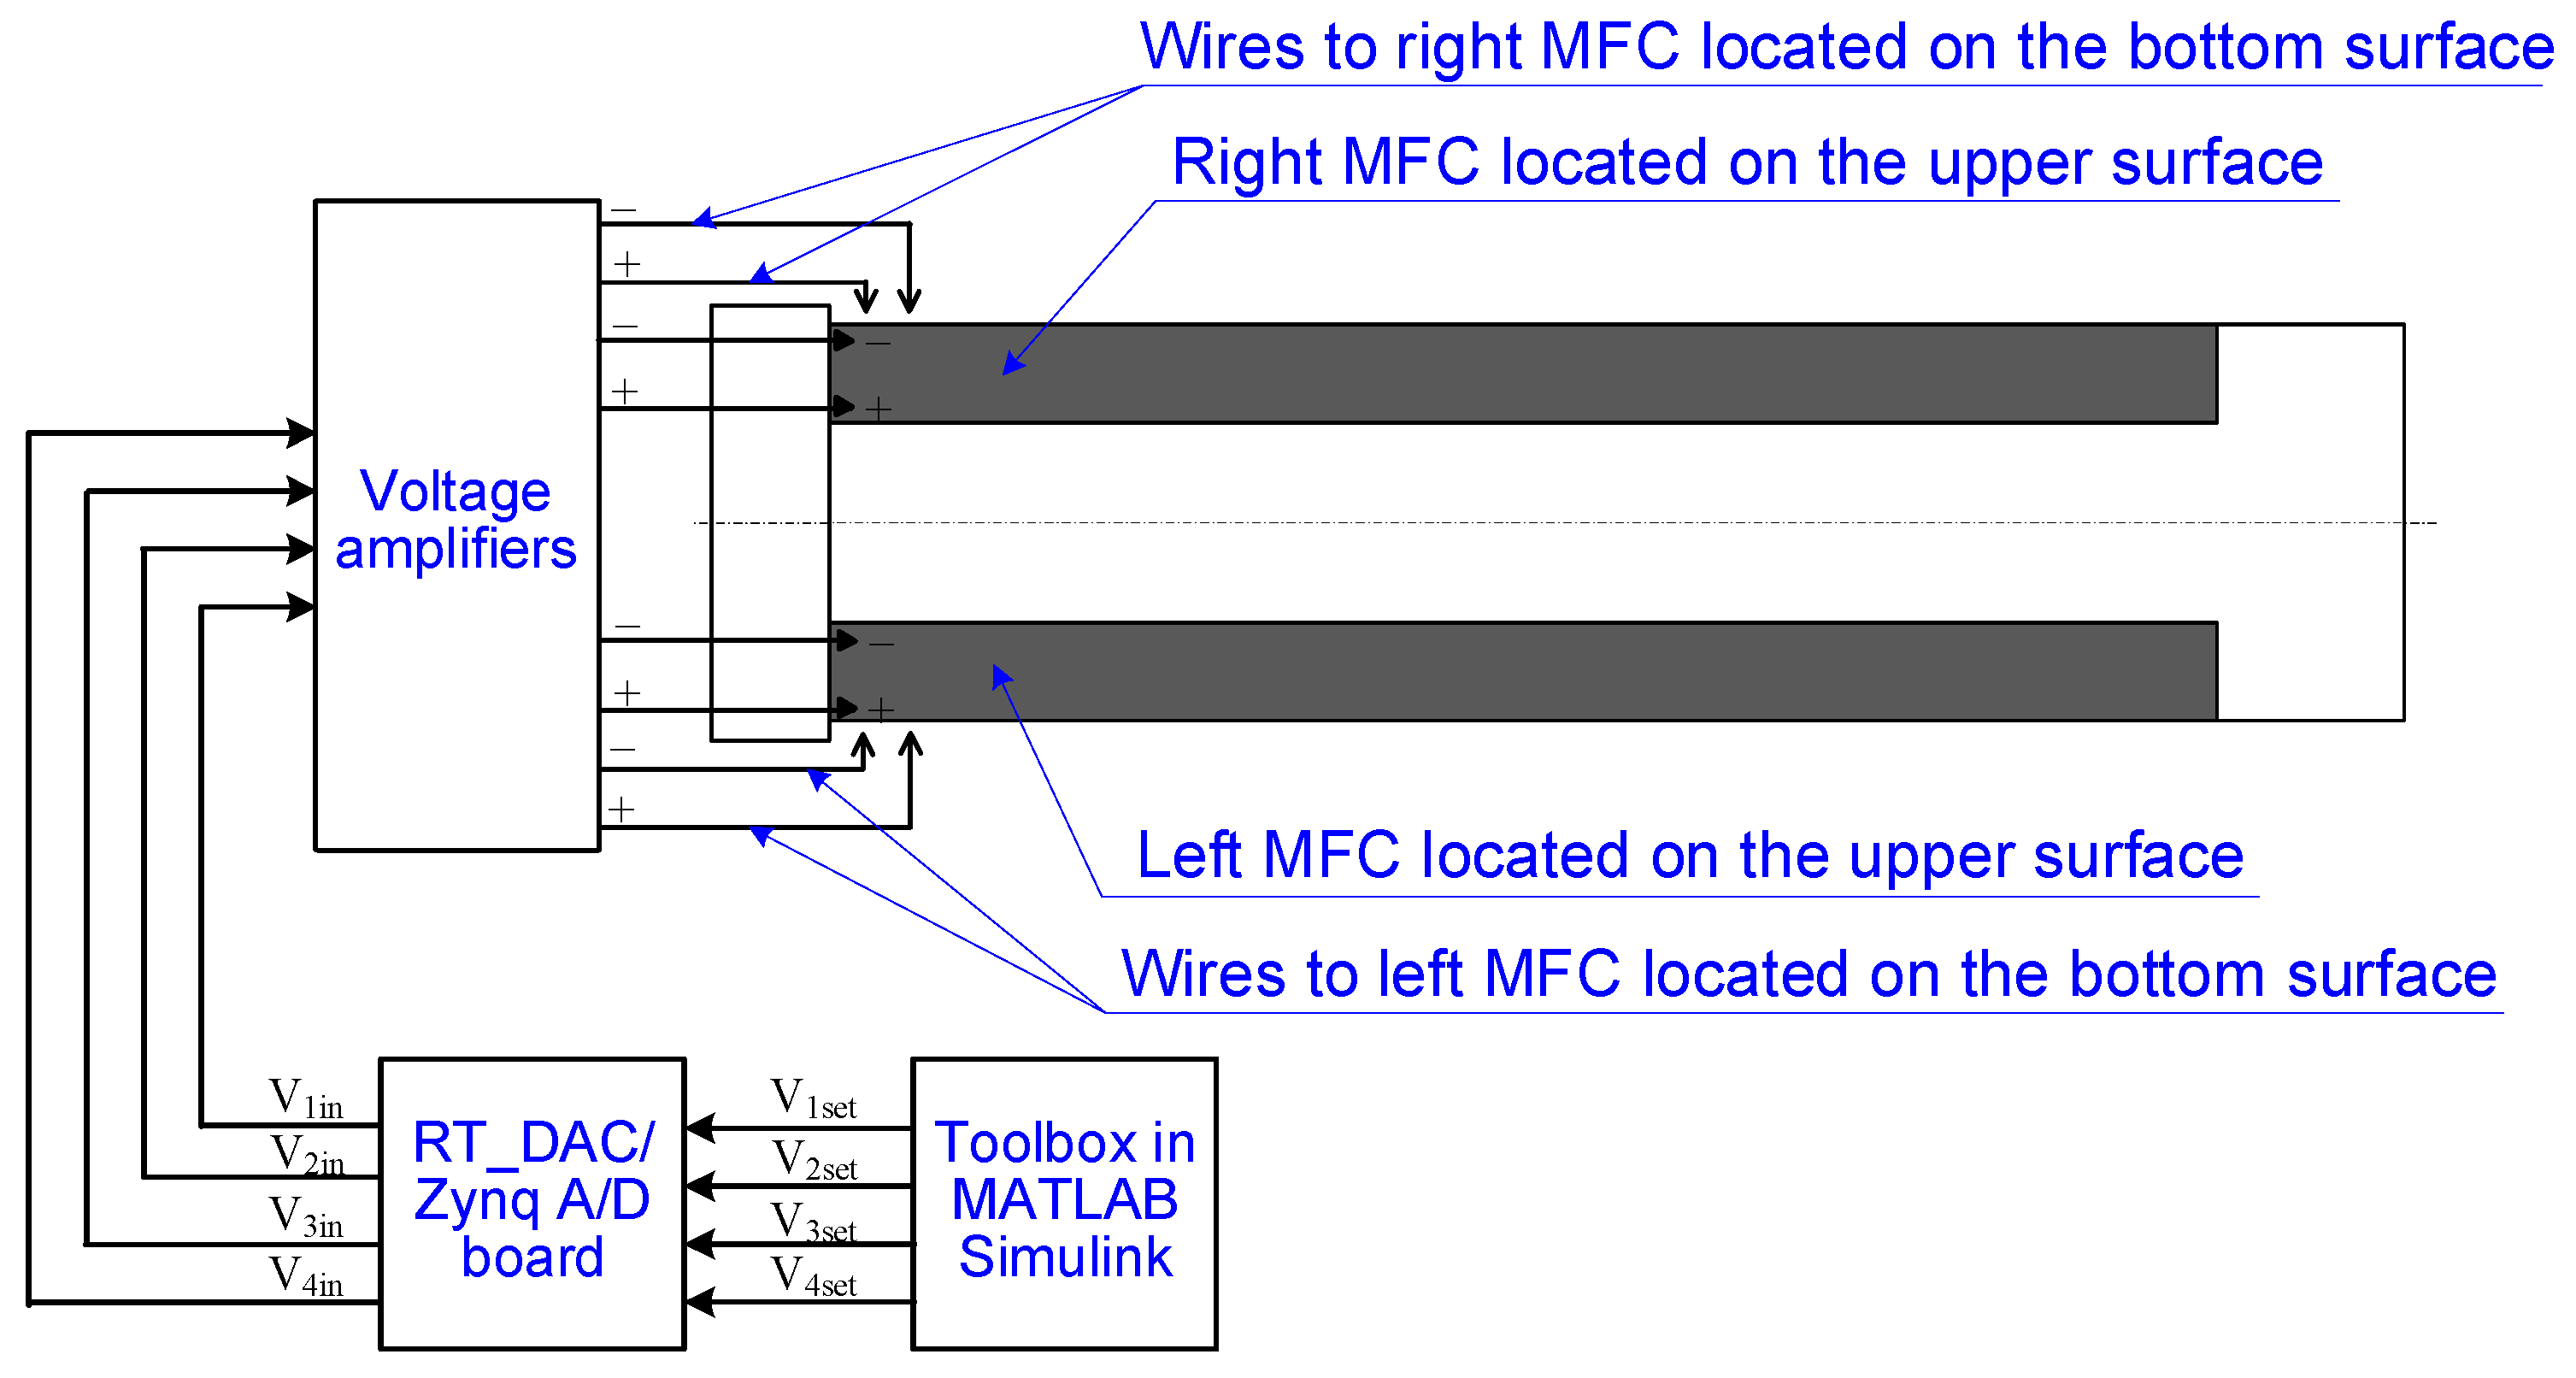
Motions of the double-bimorph actuator were forced by using a system which consists of a voltage amplifier, an A/D board, and a computer with MATLAB Simulink software [19]. Voltages V1, V2, V3, and V4, which supplied MFC no. 1, 2, 3, and 4, respectively, were generated by RT-DAC/Zynq A/D board, manufactured by INTECO company, which worked in real time. The A/D board was integrated with a dedicated toolbox in MATLAB Simulink program 2019b version. Generated in this way, four voltages (V1in, V2in, V3in, and V4in) from 0 to 10 V were the input values to two TD250-INV voltage amplifiers, which generated four voltages (V1, V2, V3, and V4), each in the range from −500 V to +500 V. TD250-INV voltage amplifiers were produced by PiezoDrive company (Newcastle, Australia). The schema of the supply system of the actuator is presented in Figure 2. Each MFC patch was connected separately to a voltage amplifier.
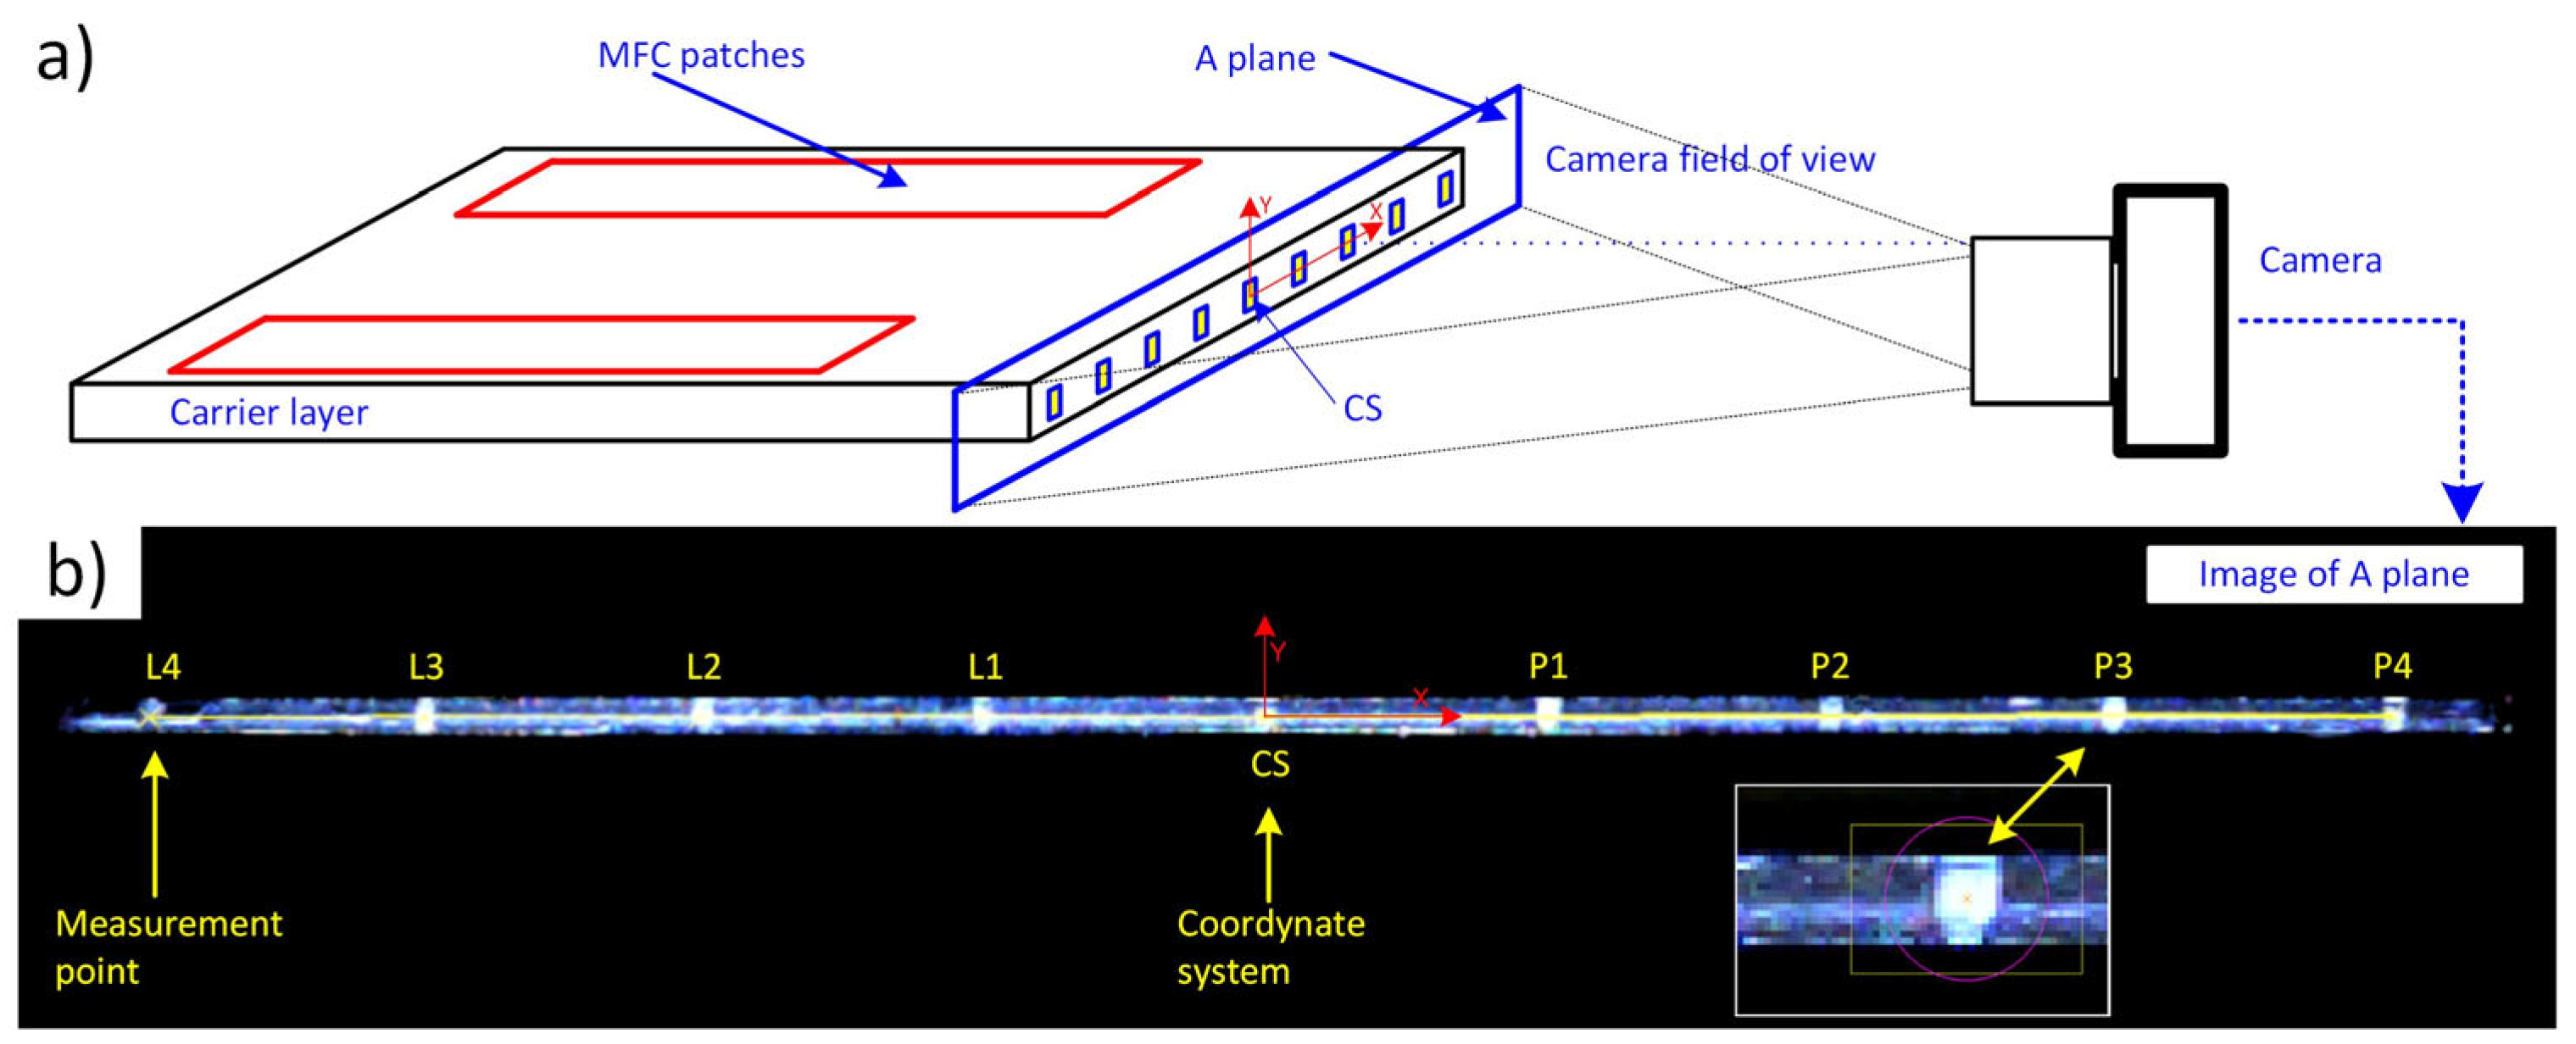
Measurements of the motion parameters resulting from the operation of the proposed actuator structure were made using the image analysis of the frontal surface of the free end of the actuator’s carrier layer, marked as plane A in Figure 3.
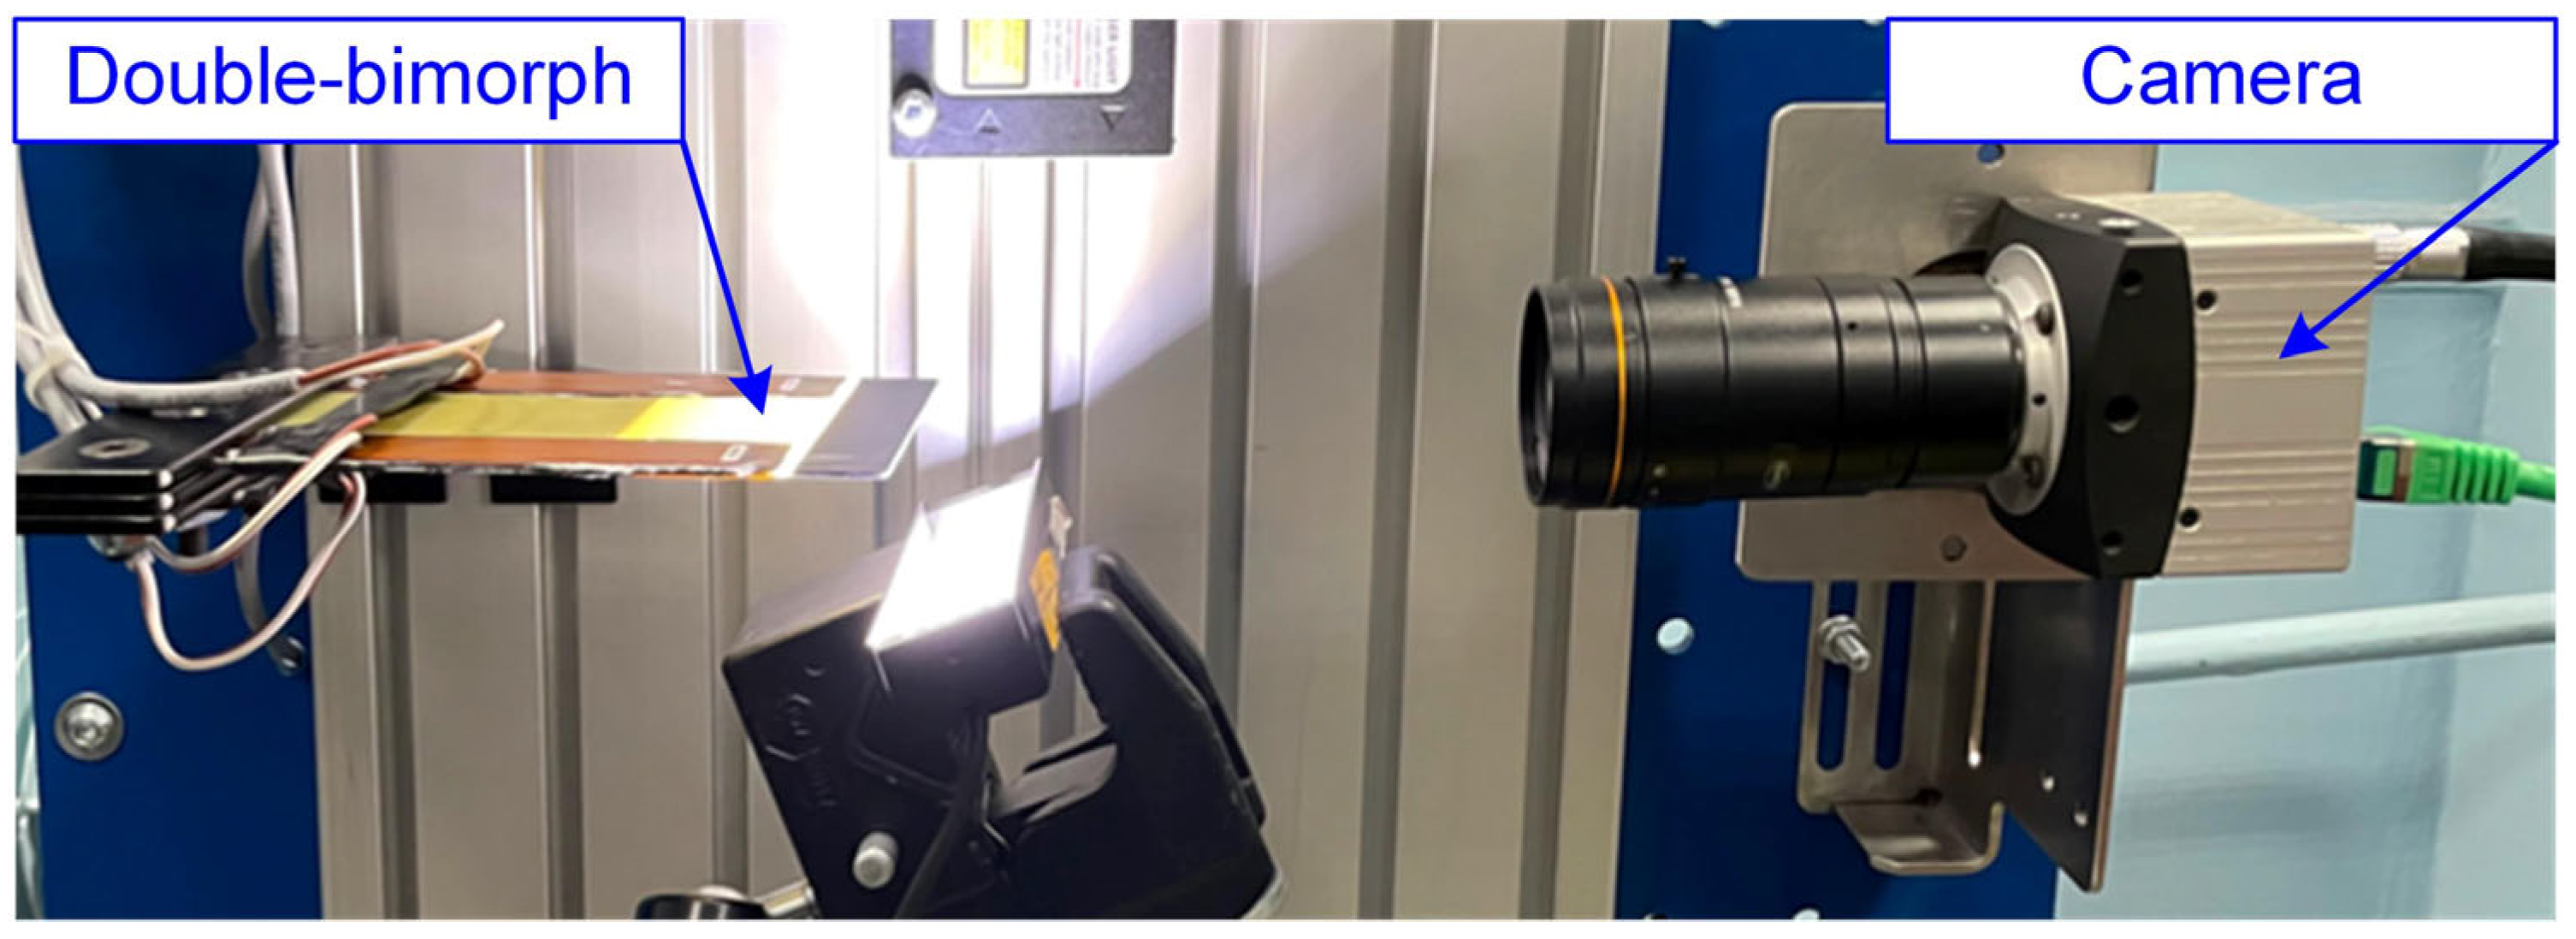
On this surface, an XY measuring plane was adopted, which is also the focal plane of the vision system recording the motion forced by the actuators. The nine measurement marks were applied to this surface. The measurement markers are described as L1 to L4 on the left side of the actuator and P1 to P4 on the right. It was used to describe the movement of the carrier layer. The markers were applied using a CNC machine tool, which allows them to be made with an accuracy of 10 microns. As part of the preparation of the markers, planning the material face, surface painting, and milling of markers are allowed. The camera uses 1280 × 1024 pixels and is equipped with a 10-bit image sensor. The camera is equipped with a lens with a focal length of f = 25 mm, which allows it to record images at 90 mm. An area of 1056 × 200 pixels has been defined on the sensor array to narrow the field of view (FoV—field of view) and thus increase the imaging frequency. These settings made it possible to record images at 1000 fps. The acquisition time for a single image was 990 microseconds. The image was calibrated based on the measurement of the distance between the markers applied on the surface corresponding to the image plane and, at the same time, to the measuring plane. The imaging resolution for the imaging field on the sensor and the field of view resulting from the construction of the test stand was 0.07975 mm/pixel. The camera captured an image of plane A with measurement markers applied. The coordinate system was defined at the CS point. In the idle state, i.e., without a power supply of MFC patches, the direction of the X axis between point CS and point P4 was determined. In the inactive state of the actuator, the OX axis passes through the centers of all the measurement marks applied to the surface to be imaged. A view of the vision measurement stand is presented in Figure 4.
The optical system used in the measurements allows for the observation of only measuring plane A with marked marks. This is due to the way the plane is illuminated and the type of illuminator. As part of the preparation of the measurement system, the quality of lighting for spotlights, ring illuminators with and without a diffuser, and linear illuminators with and without a diffuser was checked. Additionally, the settings of the illuminator in relation to the imaged surface were checked for each illuminator. For each of the illuminators, a series of measurements was recorded, and the possibility of repeatable determination of the position of the center of the markers applied on the carrier layer was evaluated. The best contrast between the marker area and the unmarked surface is achieved when a linear light source without a diffuser is positioned at a large angle to the marker surface. This configuration is shown in Figure 4. A linear LED illuminator emits white light, and the dark field lighting method was used to illuminate the front surface of the actuator. In this method, the light beam is set at an angle of 15–45° in relation to the imaged surface. Such use of the illuminator means that only the light scattered on the surface irregularities reaches the matrix of the vision system, enabling the observation of the markers made on it. On the other hand, a beam of light reflected in a mirror manner from the imaged surface is not visible. This makes it possible to observe light markers on a uniform dark background. The intensity of the markers can be further changed by adjusting the aperture in the lens and reducing the acquisition time of a single image frame. In the image preparation operations for the measurements, transformations were applied to remove point reflections visible on the surface of the material in the vicinity of the markers placed on the surface. These operations were performed using a 5 × 5 matrix and a median transformation. In the next stage of filtering, morphological operations using 3 × 3 matrices were used to homogenize the marker area. The image prepared in this way allowed for the segmentation of the marker area and the determination of the centers of their positions using the algorithm for measuring the center of gravity of the area.
Numerical experiments were carried out in the MATLAB Simulink program 2019b version. A fixed-step, equal to 0.001 s, was used in the calculations. Adopted from the literature, the material properties used in the simulation experiments are presented in Table 2.

3. Mathematical Model of Double-Bimorph Actuator

Stress in MFC patches is induced by supply voltage. Dependence between the voltage and stress in piezoelectric material is determined from the constitutive piezoelectric materials. Considering that a local polarization of piezoelectric fibers in MFC patch is along axis 3 and compressive or tensile stress is also generated along axis 3, the constitutive equations are as follows [24]:
S 3 t = s 33 E T 3 t + d 33 E 3 t D 3 t = d 33 T 3 t + ε 33 T E 3 t
where S3 is the strain along axis 3, T3 is the strain along axis 3, E3 is the electric field in-tensity along axis 3, D3 is the electric induction along axis 3, s 33 E is the compliance constant under the constant electric field, d33 is the piezoelectric constant, and ε 33 T is the permittivity under constant stress. The strain along axis 3 is blocked so the stress inducted by one MFC patch according to the direction of this axis is as follows:
T 3 i t = d 33 s 33 E E 3 i t = d 33 s 33 E 1 t mfce V i t   for   i = 1 4
where V is voltage applied to the MFC patch. A bending moment generated by one MFC patch (based on [25]) is as follows:
M bi t = 1 2 t c r 1 2 t c r + t mfca d 33 s 33 E 0.82 w mfca t mfce V i t y dy = 1 2 d 33 s 33 E w mfca t mfce t c r t mfca + t mfca 2 V i t
where tcr is the thickness of the carrier layer increased by the thickness of the inactive part in the MFC patch, tmfca is the thickness of the active part in the MFC patch, and wmfca is the width of the active part in the MFC patch. An equivalent lumped force, generated by one MFC patch in the direction of axis 3, is as follows:
F i t = 1 2 d 33 s 33 E 0.82 w mfca t mfce t c r t mfca + t mfca 2 1 l c V i t = ζ a V i t   for   i = 1 , 4
where lc is the distance between the clamping and measurement points (length of carrier layer).
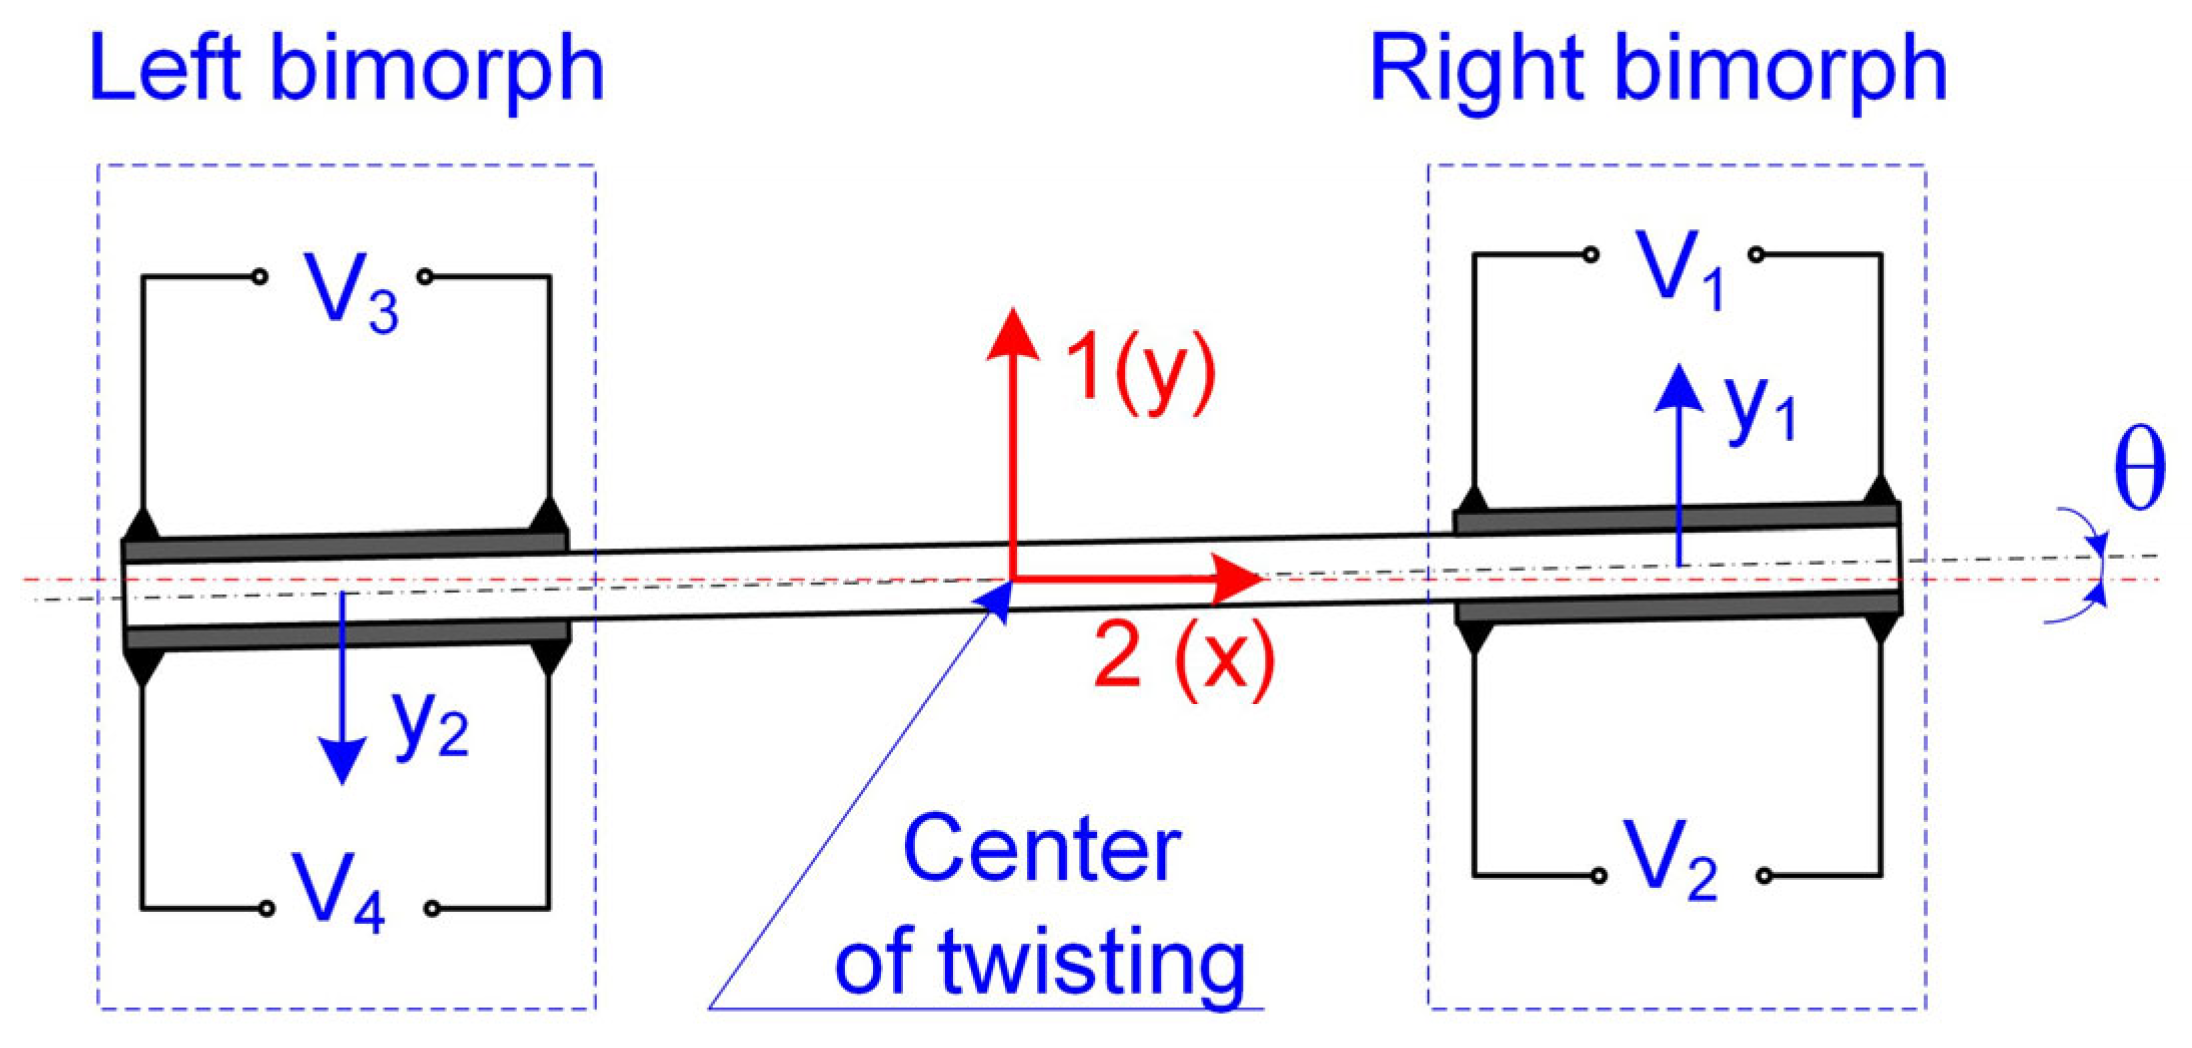
A cantilever structure is typically modeled as a single degree of freedom (SDOF) model [26]. The double-bimorph can be modeled as a 2-DOF system [27] (Figure 5):
m a y ¨ 1 t + c 11 y ˙ 1 t   +   k 11 y 1 t   +   k 21 y 1 t = ζ a V 1 t + ζ a V 2 t + k 12 y 2 t m a y ¨ 2 t + c 22 y ˙ 2 t + k 22 y 2 t   +   k 12 y 2 t = ζ a V 3 t + ζ a V 4 t + k 21 y 1 t
where y1 and y2 are the displacements of the unclamped tip of appropriately right and left bimorphs in the direction of axis 3, ma is the lumped mass of each bimorph, k11 and k22 are the stiffness coefficients of the right and left bimorphs, respectively, k21 is the stiffness coefficient representing the impact of the right bimorph on the left bimorph, k12 is the stiffness coefficient representing the impact of the left bimorph on the right bimorph, c11 and c22 are the damping coefficients of the right and left bimorphs, respectively, and V1, V2, V3, and V4 are the control voltages applied to appropriate MFC patches no. 1, 2, 3, and 4. It was assumed that the damping is proportional.
Damping coefficients were calculated according to Rayleigh dependence [28]:
c 11 = α m a + β k 11       c 22 = α m a + β k 22    
where α and β are the mass and stiffness proportionality coefficients. State space model:
x ˙ 1 t = x 2 t x ˙ 2 t = k 11 + k 21 m a x 1 t c 11 m a x 2 t + k 12 m a x 3 t ζ a m a u 1 t + ζ a m a u 2 t x ˙ 3 t = x 4 t x ˙ 4 t = k 21 m a x 1 t k 22 + k 12 m a x 3 t c 22 m a x 4 t ζ a m a u 3 t + ζ a m a u 4 t y 1 t = x 1 t y 2 t = x 3 t
where [x1, x2, x3, x4]T = [y1, y ˙ 1 , y2, y ˙ 2 ]T = x is the state vector, [u1, u2, u3, u4]T = [V1, V2, V3, V4]T = u is the control vector, and [y1, y2]T = y is the output vector. The relationship between the vectors mentioned above is described by well-known linear state equations:
x ˙ ( t ) = A x ( t ) + B u ( t ) y ( t ) = C x ( t )
where A is the state matrix, B is the control matrix, and C is the output matrix. A, B, and C were given as follows:
A = 0 1 0 0 k 11 + k 21 m a c 11 m a k 12 m a 0 0 0 0 1 k 21 m a 0 k 22 + k 12 m a c 22 m a       B = 0 0 0 0 ζ a m a ζ a m a 0 0 0 0 0 0 0 0 ζ a m a ζ a m a C = 1 0 0 0 0 0 1 0
The twist angle (in degrees) can be calculated using either the state variable x1 or x3:
θ t = 180 º π a r c t g x 1 t w
or
θ t = 180 º π a r c t g x 3 t w
where w is the distance between the twisting center and centers of the bimorphs. Expressions (10) and (11) allow for the calculation of the twist angle only if the twisting center is located exactly in the center of the beam cross-section (as in Figure 5). Considering expression (4) and the linearity of expression (9), localization of the twist center in the center of the cross-section is possible only when symmetric control voltages are applied to both bimorphs, e.g., u1 = −500 V, u2 = +500 V, u3 = +500 V, u4 = −500 V, etc.

4. Results

4.1. Measurement of a Twist Angle Using Vision Method

Nine laboratory experiments were conducted. The first eight experiments involved measuring the twist angle (θ) of the actuator at various supply voltages. The ninth experiment involved measuring the displacement and twist angle of the actuator over a long period of time to measure the changes caused by the creep phenomenon. The voltages applied to the four layers of the MFC piezoelectric composite in the double-bimorph actuator are presented in Table 3.
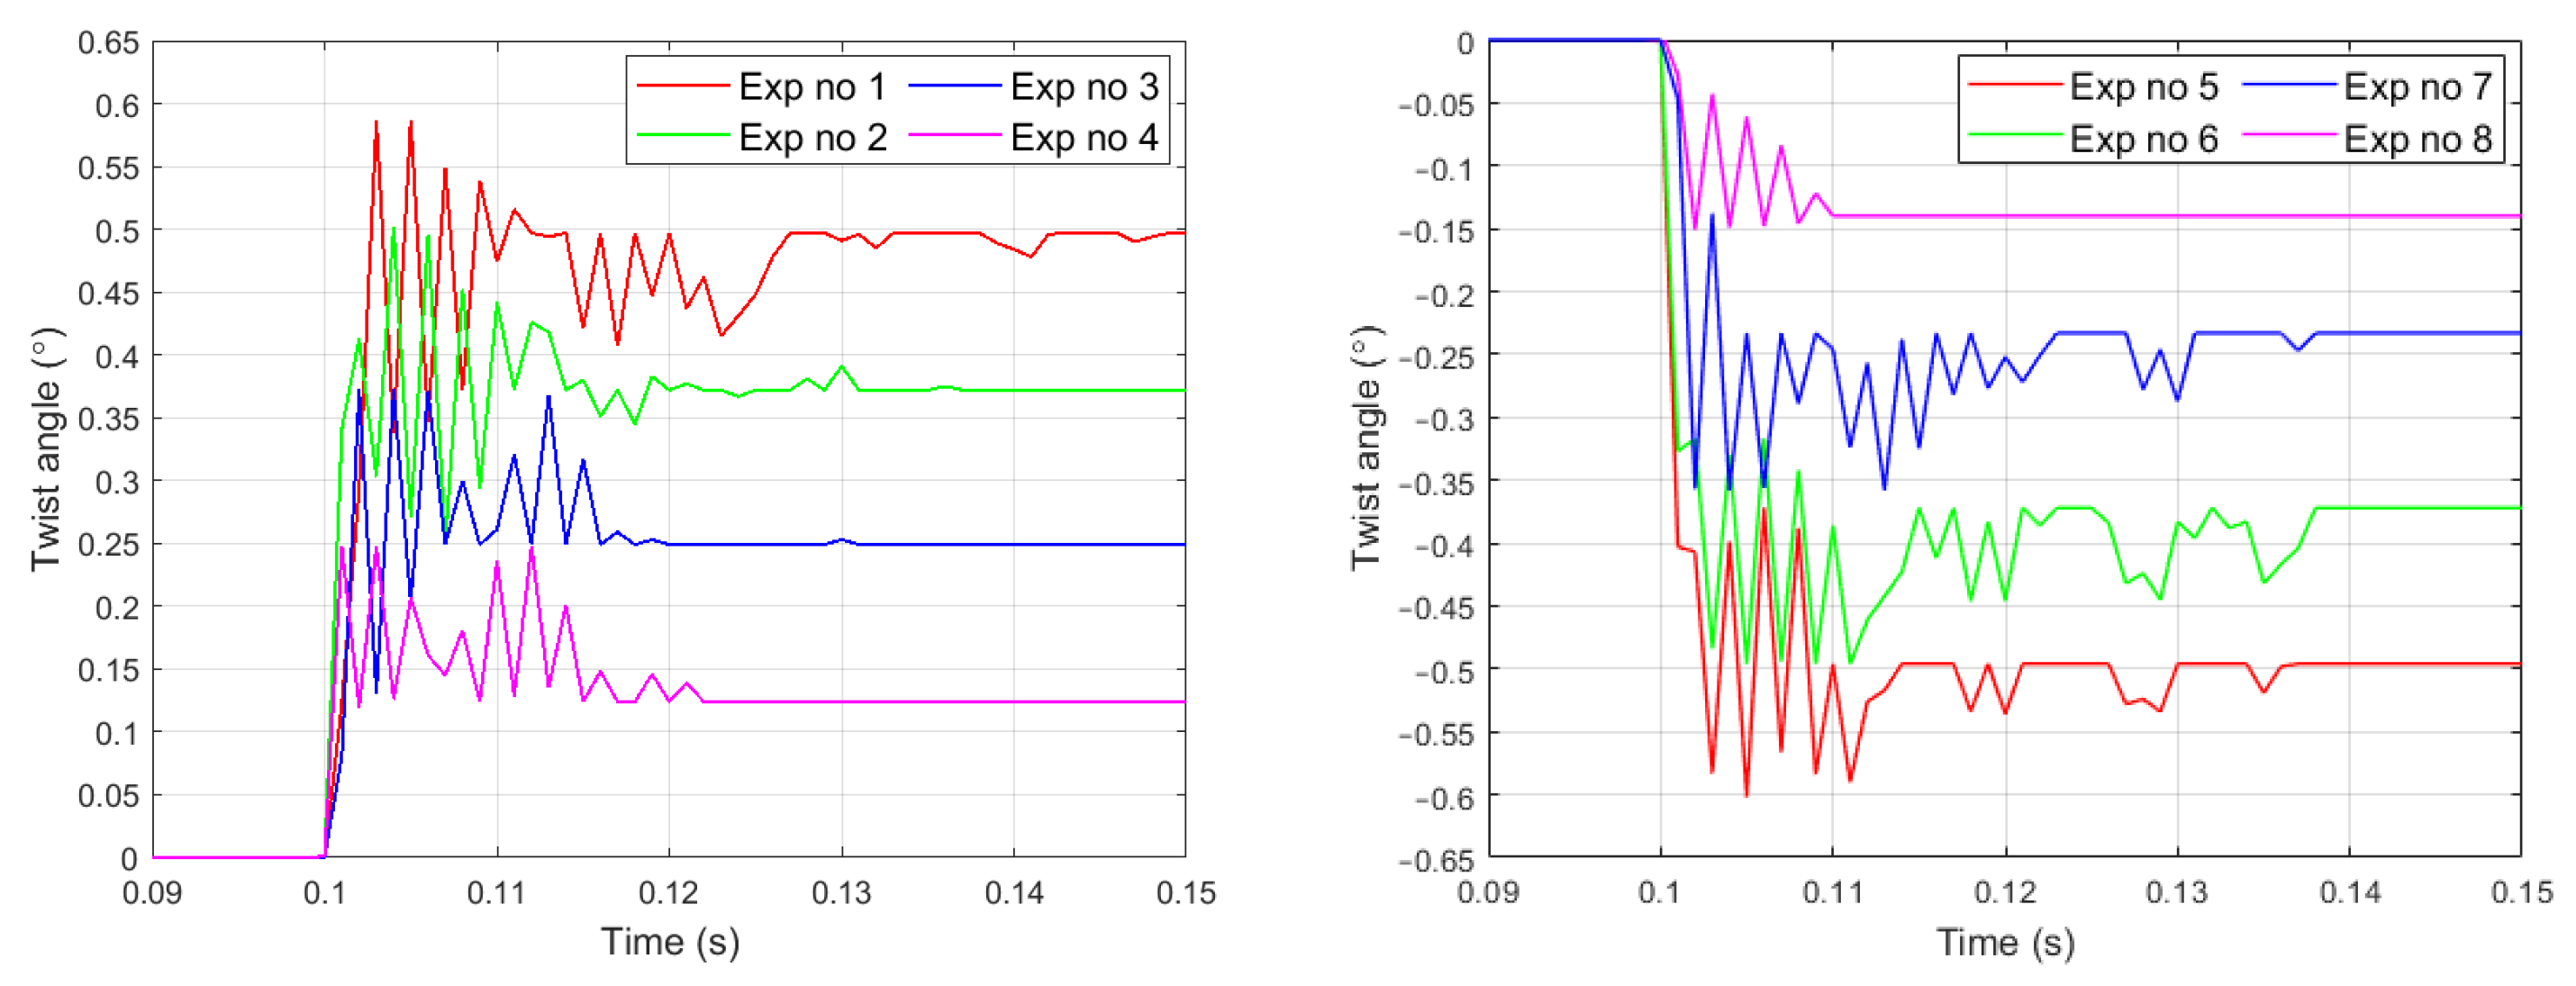
In the laboratory experiments, it was assumed that the twist angle was positive if the right bimorph moved in the direction of the 1(y) axis and the left bimorph moved opposite to the 1(y) axis. Correspondingly, the twist angle was assumed to be negative if the right bimorph moved opposite to the direction of the 1(y) axis and the left bimorph moved in the 1(y) axis direction. The diagram with the positive twist angle marked is shown in Figure 5. MFC patches 1 and 2 were part of the right bimorph and MFC patches 3 and 4 were part of the left bimorph. The courses of the angle of the twist in the first eight experiments are shown in Figure 6.
The dependence between the twist angle and the applied voltage value in all the experiments is shown in Figure 7.
The first observation was that the obtained twist angle did depend linearly on the voltages supplying the MFC patches. However, regardless of the value of the applied voltages, a certain part from each input voltage was not used to generate the twist angle. In experiments 1 to 4, this value was 100 V. In experiments 5 to 8, this value was also 100 V. In the rest of this article, this constant value of volts will be marked with the symbol γ and called the “control voltage loss coefficient”.
The second observation was that there was a lack of motion of the center of symmetry of the actuator at the symmetrical power supply of the MFC patches. A stationary coordinate system was set in the image at the center of the marker (CS point), which was in the center of symmetry of the actuator. Then, the displacement of the geometric center of the marker relative to the adopted coordinate system was checked in subsequent recorded images. Figure 8a presents the distribution of points describing the center of the marker for the actuator without power for 100 sample measurements. This figure also shows a point describing the arithmetic mean of the CS point location (red dots in Figure 8). The standard deviation for the analyzed set of points is σx = 4.9 µm in the OX axis and σy = 3.1 µm in the OY axis. An identical analysis was performed after applying power to the actuator: u1 = +500 V, u2 = −500 V, u3 = −500 V, and u4 = +500 V (Figure 8b). The standard deviation σx = 4.5 µm in the OX axis and σy = 5.4 µm in the OY axis was obtained, respectively. It can therefore be assumed that the motion of the twisting center was stationary and coincided with the symmetry center of the actuator beam.
The third observation is that there were no drifts of bimorph displacements or twist angles caused by creep. This is visible in the results of the ninth experiment, which are shown in Figure 9. No drifts of bimorph displacements or twist angles were observed during the 35 s period of the experiment.

4.2. Simulation of a Twist Angle

The main purpose of using the vision method of measurement was to prove that the twisting center is in the center of the actuator cross-section (second observation in Section 4.1). Only this observation made it possible to compare the experimental and simulation results. The simulation experiments were performed based on an extended linear mathematical model of the actuator in the state space, which were described in detail in the previous section. Based on the first observation in Section 4.1, we propose introducing the following disturbances:
d i t = s g n u i t γ   for   i = 1 , 4
where γ should be determined experimentally, as described in Section 4.1. Hence, model (8) should be extended:
x ˙ t = A x t + B u t + E d ( t ) y ( t ) = C x ( t )
where E is the disturbance matrix. E is given by the following:
E = 0 0 0 0 ζ a m a ζ a m a 0 0 0 0 0 0 0 0 ζ a m a ζ a m a
The calculated values of the parameters, which were used in the simulation experiments, are presented in Table 4. A detailed description of the determination of the values of these parameters can be found in Appendix A.
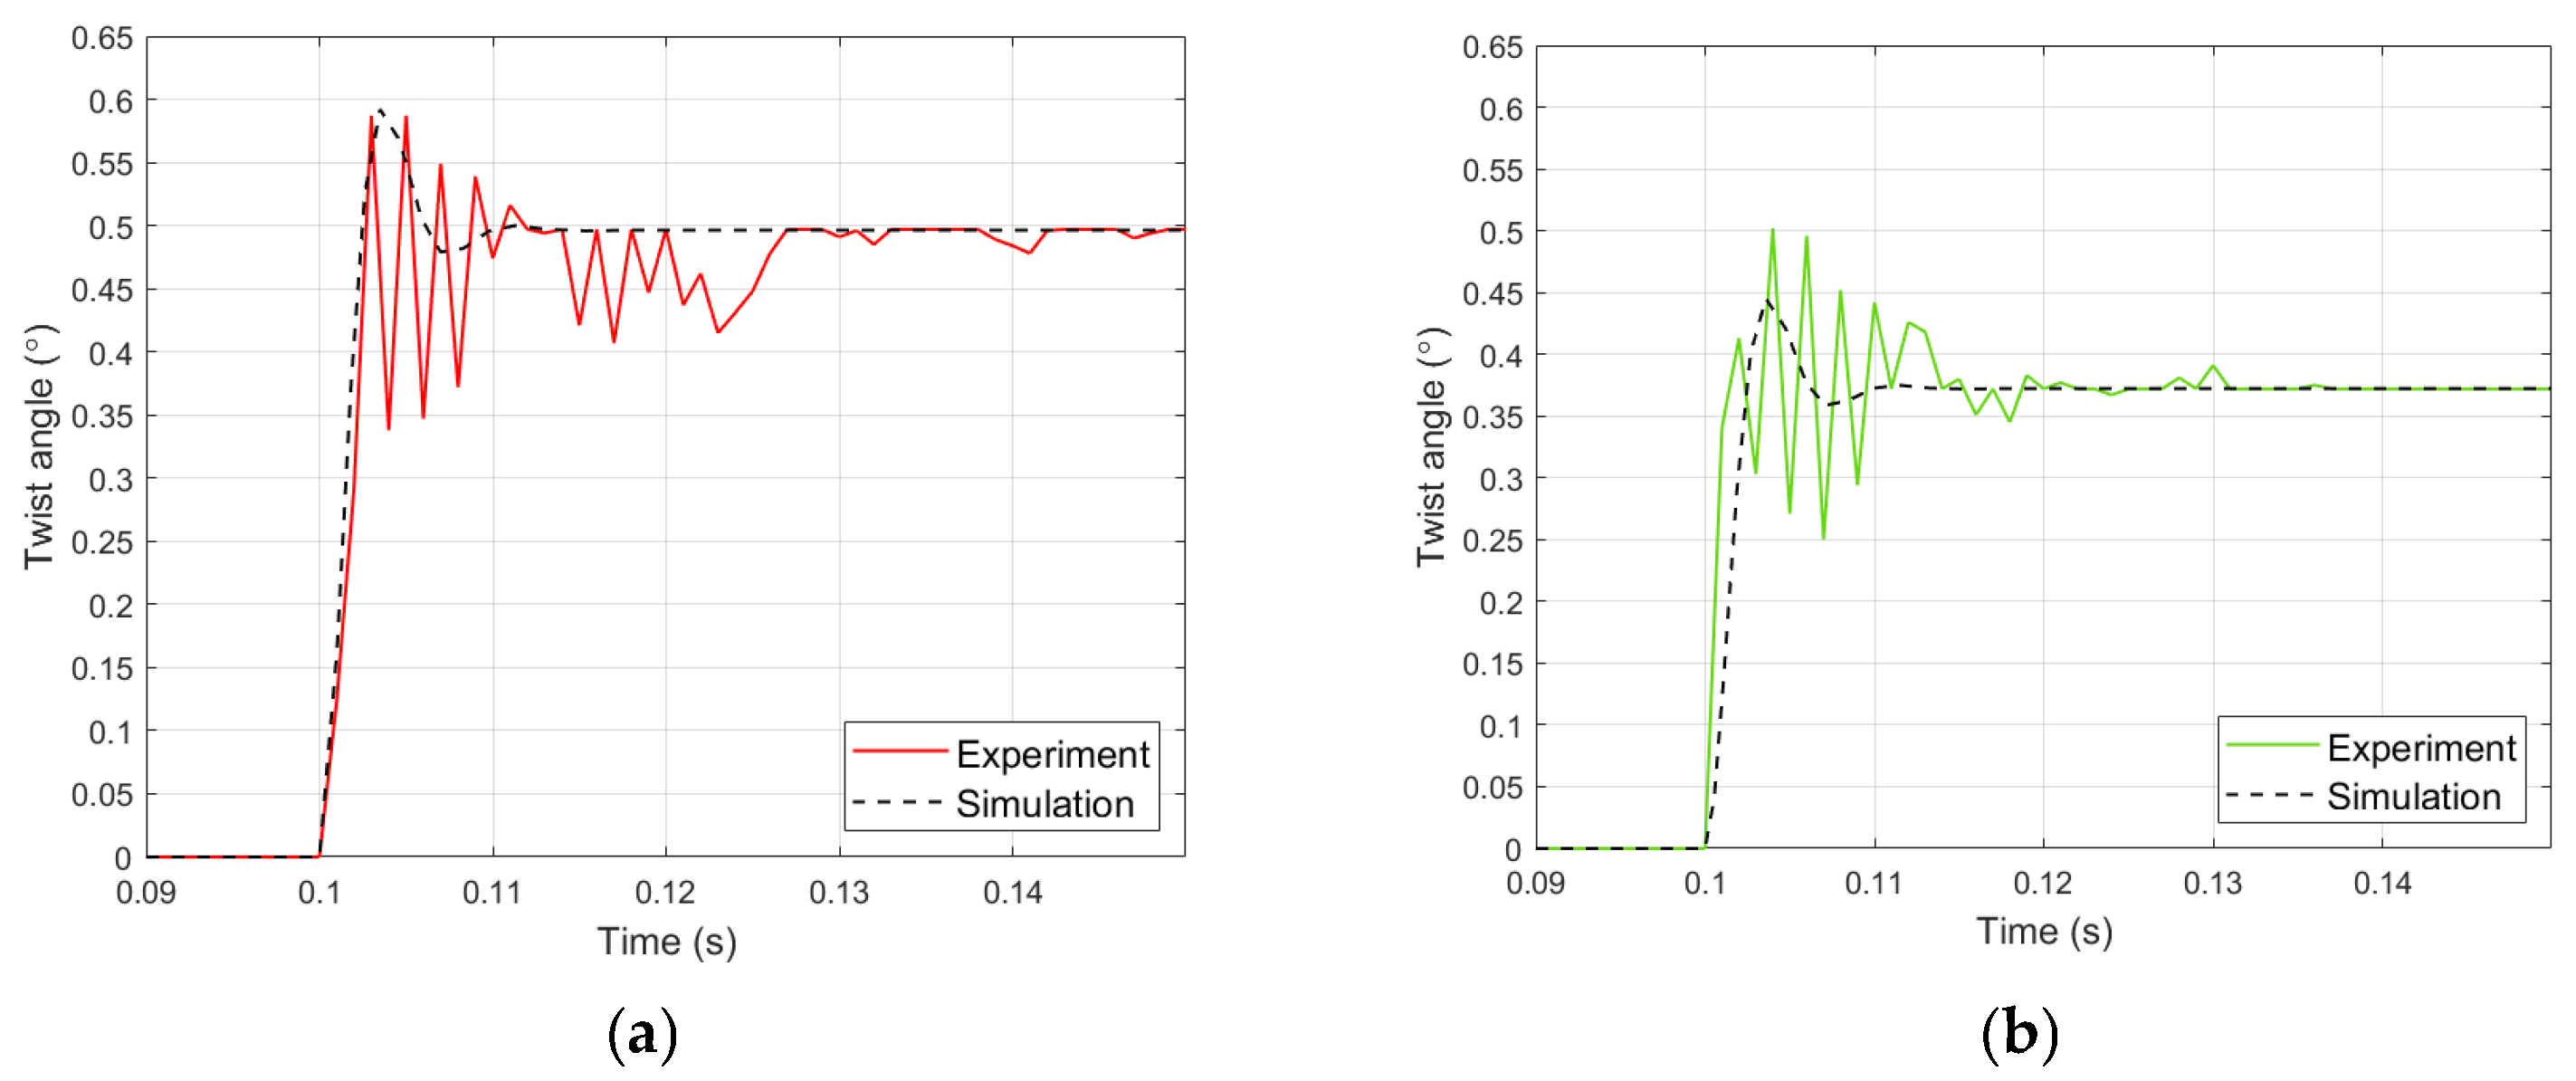
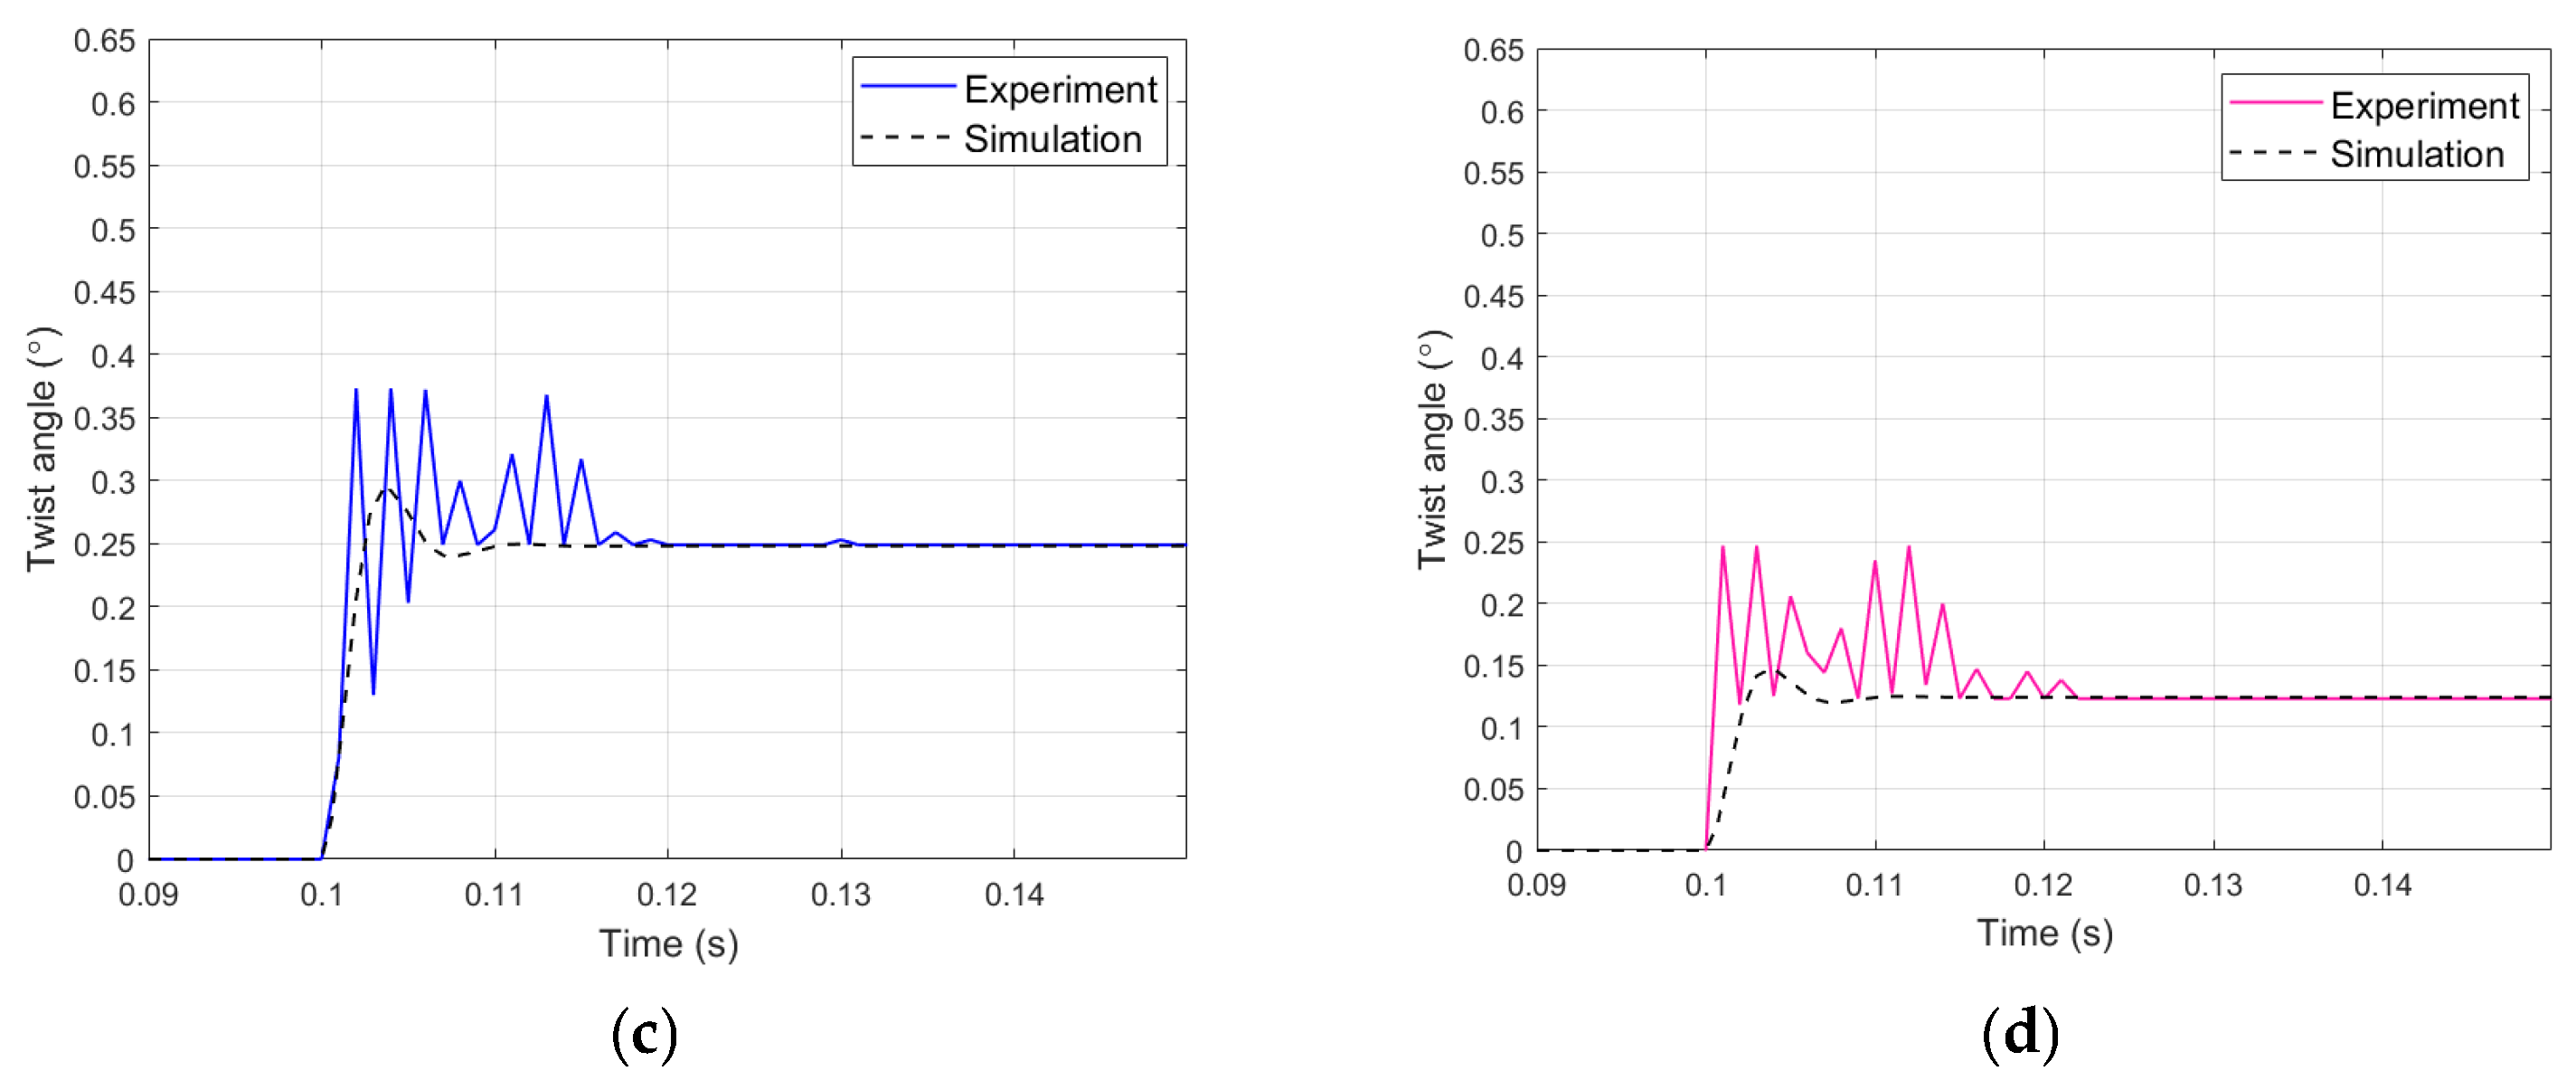
Comparisons of the experimental and simulation results in experiments 1, 2, 3, and 4 are shown in Figure 10. The simulated waveforms were determined based on Equation (10).
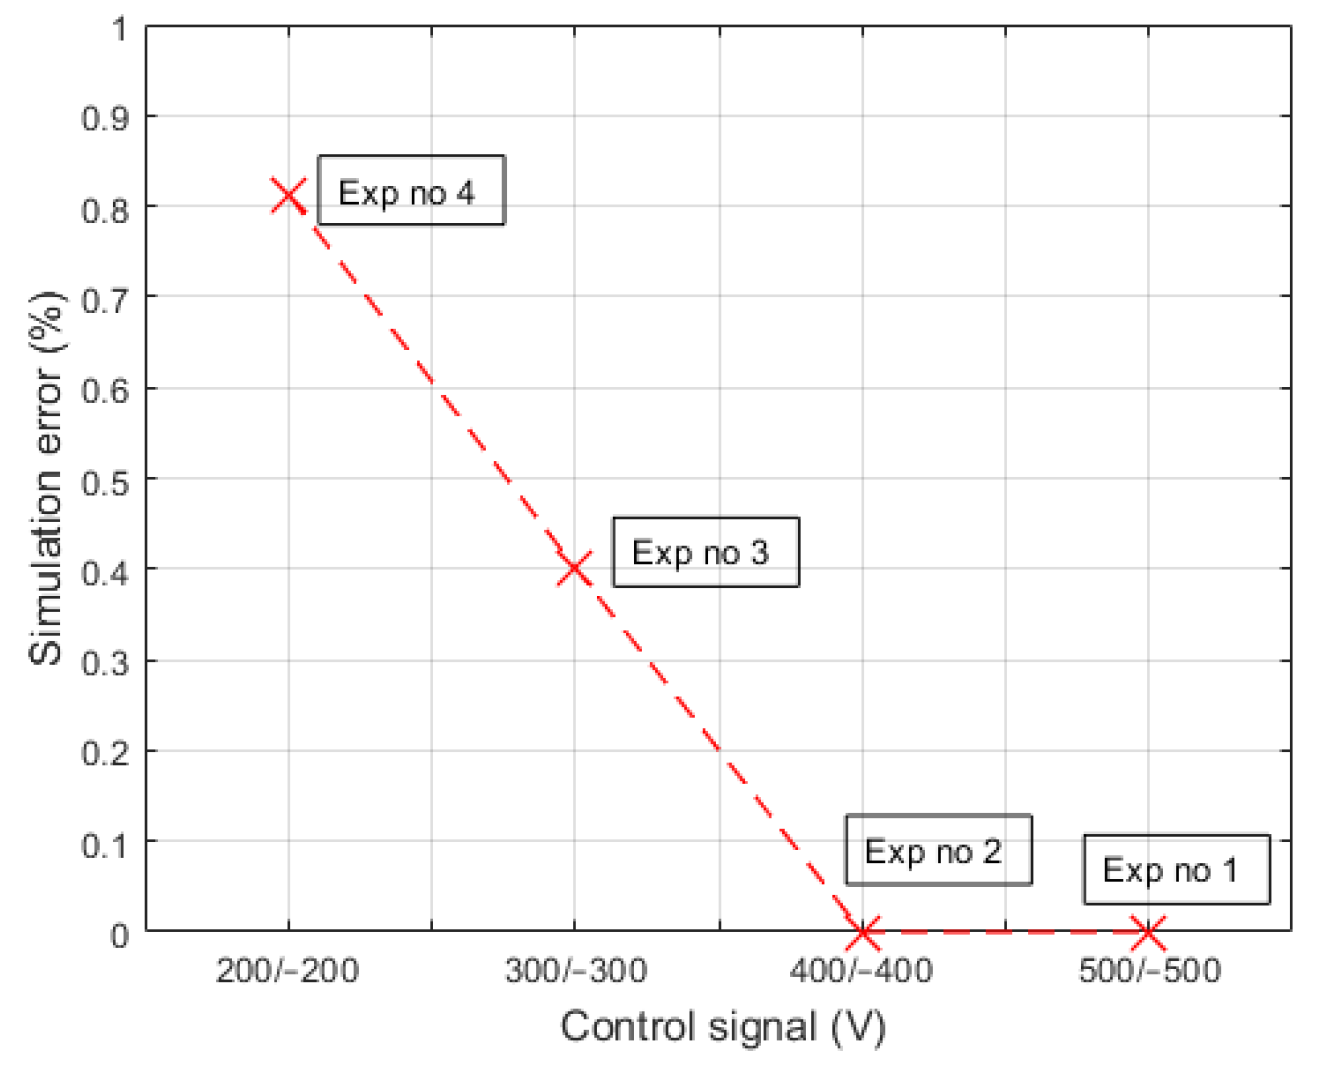
The error between the measured and simulated twisting angle in the steady state (for t = 0.15 s) is shown in Figure 11.
The error between the simulation and experimental results increased with the decrease in the control voltage values used in the experiments, but it did not exceed 1%. A different situation occurred in the time interval from 0.1 s to 0.13 s, when the simulated waveforms did not coincide with the measured waveforms. It should be noted that this is the system’s response to a step change in the control voltage. In this case, the transient portion of the response is distinguished [8]. This part should be followed by a part related to the occurrence of the creep phenomenon. In the logarithmic creep model, only the displacement after the transient portion is considered without modeling this period [29]. This approach to modeling the transient part was adopted in this article.

5. Discussion

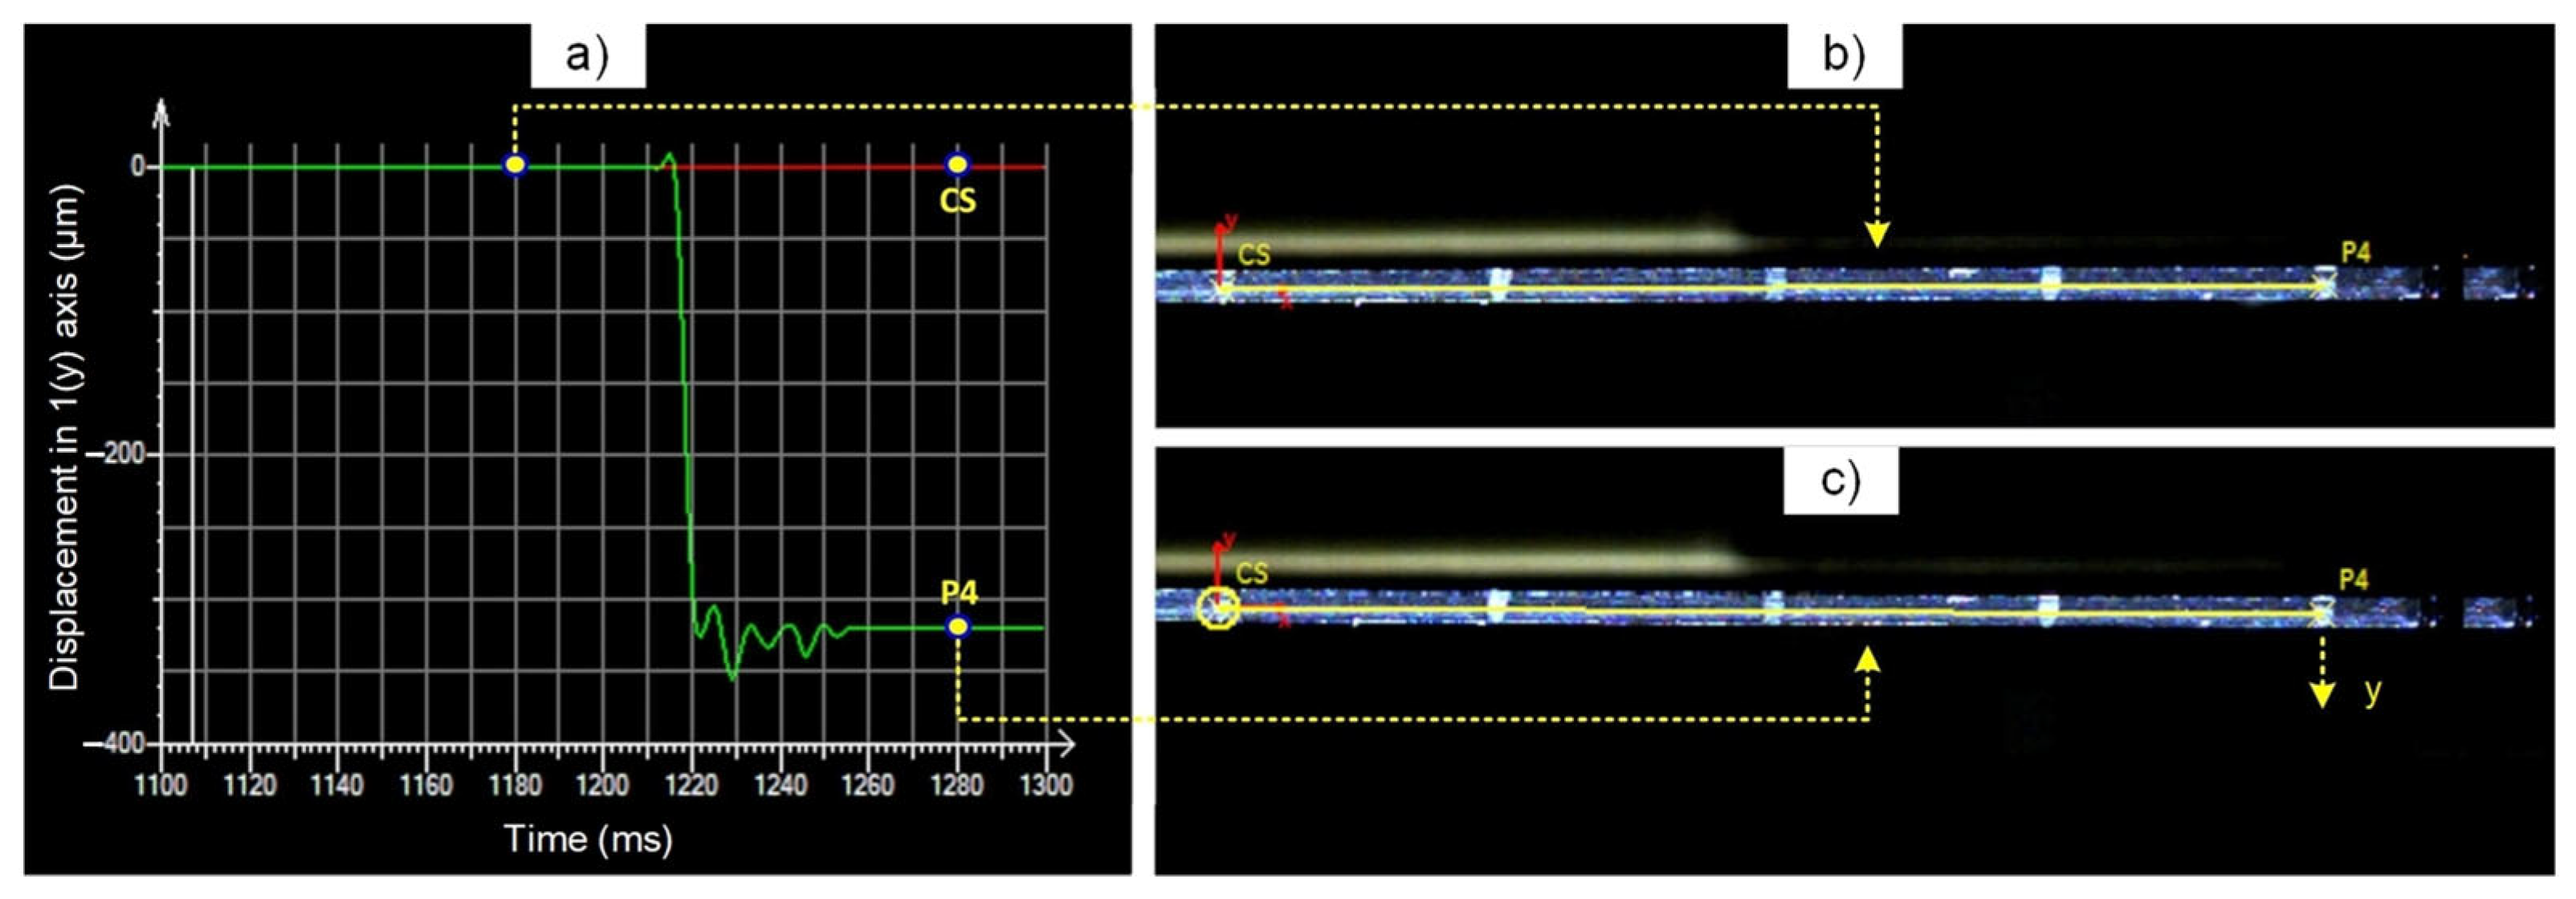
The vision method enables the measurement of the twist angle of piezoelectric actuators. Measurements of the displacement of the markers applied on the front surface of the actuator can be made based on the analysis of the image recorded at intervals of one millisecond. An ROI area corresponding to the marker must be specified for each image [30,31]. Next, the location of the center of the markers in the coordinate system adopted at the CS point should be determined. Then, in a permanently defined coordinate system, the displacements of the measurement marks should be observed, and the twist angle of the actuator should be determined after power supply to MFC patches. Each image captured by the camera should be pre-analyzed to homogenize the image of the markers and remove excessive noise visible on the surface of the material. The next step in the image analysis should be determining the irregular ROI areas assigned to each of the measurement markers in the image. As part of the image analysis, morphological transformations and an algorithm for determining the position of the center of gravity of the marker area should be used based on pixels belonging to the region [32,33,34]. The measurements showed that the CS point describing the center of the actuator does not move in the 1(y) axis relative to the adopted coordinate system (Figure 12).
On the other hand, the displacement of the P4 point in the 1(y) axis is visible, which depends on the supply voltage of the MFC patches. The position of the P4 point (described in detail in the Section 2) of the actuator is stabilized after about 40–50 ms from the date of supply. To confirm the test results and verify the displacement, the displacement of the L4 point (described in detail in the Section 2) located on the left side of the actuator was also observed. The determined values of the displacements were identical for the P4 and L4 points. Only the direction of the displacements changed. In the next measurement step, the twist angle of the actuator in relation to the stationary point CS, which is also the center of the adopted coordinate system, was determined. Figure 13 shows the twist angle in the enlarged image of the actuator half.
It should be noted that the proposed vision-based method of measuring the twist angle does not enable real-time measurements, so it cannot be used in feedback loops of control systems. However, this vision method can be used to determine the values of parameters that must be determined experimentally, including the control voltage loss coefficient γ.

6. Conclusions

Based on the laboratory numerical experimental results, it can be concluded that a vision measurement enables the following:
  • Verification of the mathematical model, which is to be used in open-loop control of the twist angle of a double-bimorph actuator. In the measured actuator, it was found that the linear mathematical model correctly describes the conversion of electrical energy into the twist angle of this actuator because the effects of the creep phenomenon were not noticeable.
  • Correction of the mathematical model of a double-bimorph actuator. In the measured actuator, it was found that the twist angle was smaller by a constant equal value regardless of the value of the applied symmetrical voltages, and such a correction was introduced into the linear mathematical model.
  • Checking the correctness of the production of a double-bimorph actuator, e.g., gluing. In the measured actuator, a pure twisting was confirmed because the center of twisting was in the center of the actuator.

Author Contributions

Conceptualization, D.G. and A.S.; methodology, D.G. and A.S.; investigation, D.G. and A.S.; writing—original draft preparation, D.G. and A.S.; writing—review and editing, D.G. and A.S. All authors have read and agreed to the published version of the manuscript.

Funding

This research was funded by AGH University of Krakow, grant number 16.16.130.942.

Institutional Review Board Statement

Not applicable.

Informed Consent Statement

Not applicable.

Data Availability Statement

The original contributions presented in this study are included in the article. Further inquiries can be directed to the corresponding author.

Conflicts of Interest

The authors declare no conflicts of interest.

Appendix A

Stiffness coefficients k11, k22, k21, and k12 were determined based on the following:
k 11 = F 1 y 11             k 22 = F 2 y 22             k 21 = F 1 y 21             k 12 = F 2 y 12
where F1 and F2 are equivalent forces generated by the right and left bimorphs, respectively, y11 is the displacement of the right bimorph caused by the force F1, y22 is the displacement of the left bimorph caused by the force F2, y21 is the displacement of the left bimorph caused by the force F1, and y12 is the displacement of the right bimorph caused by the force F2. Equivalent forces F1 and F2 were determined experimentally based on linear beam theory [35]:
F 1 = 3 y 11 Y b I l m p l 3               F 2 = 3 y 22 Y b I l m p l 3
where lmpl is the distance between the clamping and measurement point, Yb is Young’s modulus of the whole bimorph (a glass-reinforced epoxy laminate and MFC patches), and I is the moment of inertia. Young’s modulus [36] and moment of inertia were calculated based on the following dependencies:
Y b = t c Y c + 2 t m f c Y m f c t c + 2 t m f c
I = 4 w m f c t m f c 3 12 + w m f c t m f c 3 d + η w c t c 3 / 12
where d is the distance from the center of the carrier layer to the center of the MFC patch, and η is the ratio of Young’s modulus of the MFC patch and Young’s modulus of the carrier layer (η = Ymfc/Yc) [37]. Rayleigh damping coefficients α and β were calculated on the following basis [38]:
α β = 2 ω 1 ω 2 2 ω 2 2 ω 1 2 2 ω 1 2 ω 2 ω 2 2 ω 1 2 2 ω 1 ω 2 ω 2 ω 2 2 ω 1 2 2 ω 1 ω 2 ω 1 ω 2 2 ω 1 2 ξ 1 ξ 2
where ω1 and ω2 are the first and second natural modes, and ξ1 and ξ2 are dimensionless damping ratios of the first and second vibration modes. First and second natural modes were calculated for a cantilever beam [39]:
ω 1 = λ 1 2 Y b I m a l c 4                 ω 2 = λ 2 2 Y b I m a l c 4          
where λ1 and λ2 are the first two eigenvalues. Dimensionless damping ratios were calculated for a cantilever beam [40]:
ξ 1 = ξ 2 = 1 j l n y p , i y p , i + j 4 π 2 + 1 j l n y p , i y p , i + j 2              
where yp,i and yp,i+j are the measured displacement peaks at the beginning and end of the period containing number “j” of peaks. Based on the measurements, the average values of the damping ratios were calculated: ξ1 = ξ2 = 0.115. The first two eigenvalues for a cantilever beam were adopted from [35]: λ1 = 1.8751 and λ2 = 4.6941. α and β coefficients were calculated based on λ1, λ2, ξ1 and ξ2: α = 127.74 and β = 4.25 × 10⁻⁵.

References

  1. Mohith, S.; Upadhya, A.R.; Karanth, N.; Kulkarni, S.M.; Rao, M. Recent trends in piezoelectric actuators for precision motion and their applications: A review. Smart Mater. Struct. 2020, 30, 013002. [Google Scholar] [CrossRef]
  2. Giri, A.M.; Ali, S.F.; Arockiarajan, A. Piezoelectric unimorph and bimorph cantilever configurations: Design guidelines and strain assessment. Smart Mater. Struct. 2022, 31, 035003. [Google Scholar] [CrossRef]
  3. Ramegowda, P.C.; Ishihara, D.; Takata, R.; Niho, T.; Horie, T. Finite element analysis of a thin piezoelectric bimorph with a metal shim using solid direct-piezoelectric and shell inverse-piezoelectric coupling with pseudo direct-piezoelectric evaluation. Compos. Struct. 2020, 245, 112284. [Google Scholar] [CrossRef]
  4. Yang, C.; Youcef-Toumi, K. Principle, implementation, and applications of charge control for piezo-actuated nanopositioners: A comprehensive review. Mech. Syst. Signal Process. 2022, 171, 108885. [Google Scholar] [CrossRef]
  5. Tan, D.; Yavarow, P.; Erturk, A. Nonlinear elastodynamics of piezoelectric macro-fiber composites with interdigitated electrodes for resonant actuation. Compos. Struct. 2018, 187, 137–143. [Google Scholar] [CrossRef]
  6. Liu, Y.Z.; Hao, Z.W.; Yu, J.X.; Zhou, X.R.; Lee, P.S.; Sun, Y.; Mu, Z.C.; Zeng, F.L. A high-performance soft actuator based on a poly (vinylidene fluoride) piezoelectric bimorph. Smart Mater. Struct. 2019, 28, 055011. [Google Scholar] [CrossRef]
  7. Hu, K.M.; Li, H.; Wen, L.H. Experimental study of axial-compressed macro-fiber composite bimorph with multi-layer parallel actuators for large deformation actuation. J. Intell. Mater. Syst. Struct. 2020, 31, 1101–1110. [Google Scholar] [CrossRef]
  8. Schröck, J.; Meurer, T.; Kugi, A. Control of a flexible beam actuated by macro-fiber composite patches: II. Hysteresis and creep compensation, experimental results. Smart Mater. Struct. 2010, 20, 015016. [Google Scholar] [CrossRef]
  9. Wang, X.; Zhou, W.; Wu, Z.; Wu, W. Optimal unimorph and bimorph configurations of piezocomposite actuators for bending and twisting vibration control of plate structures. J. Intell. Mater. Syst. Struct. 2018, 29, 1685–1696. [Google Scholar] [CrossRef]
  10. Finio, B.M.; Wood, R.J. Optimal energy density piezoelectric twisting actuators. In Proceedings of the IEEE/RSJ International Conference on Intelligent Robots and Systems, San Francisco, CA, USA, 25–30 September 2011; IEEE: Piscataway, NJ, USA, 2011; pp. 384–389. [Google Scholar]
  11. Gohari, S.; Sharifi, S.; Vrcelj, Z. A novel explicit solution for twisting control of smart laminated cantilever composite plates/beams using inclined piezoelectric actuators. Compos. Struct. 2017, 161, 477–504. [Google Scholar] [CrossRef]
  12. Grinberg, I.H.; Maccabi, N.; Kassie, A.; Elata, D. A piezoelectric twisting beam actuator. J. Microelectromech. Syst. 2017, 26, 1279–1286. [Google Scholar] [CrossRef]
  13. Wang, X.; Zhou, W.; Wu, Z.; Zhang, X. Integrated design of laminated composite structures with piezocomposite actuators for active shape control. Compos. Struct. 2019, 215, 166–177. [Google Scholar] [CrossRef]
  14. Xie, M.; Zhang, Y.; Kraśny, M.J.; Rhead, A.; Bowen, C.; Arafa, M. Energy harvesting from coupled bending-twisting oscillations in carbon-fibre reinforced polymer laminates. Mech. Syst. Signal Process. 2018, 107, 429–438. [Google Scholar] [CrossRef]
  15. de Carvalho Dias, J.A.; de Sousa, V.C.; Erturk, A.; Junior, C.D.M. Nonlinear piezoelectric plate framework for aeroelastic energy harvesting and actuation applications. Smart Mater. Struct. 2020, 29, 105006. [Google Scholar] [CrossRef]
  16. Wang, Y.C.; Kohtanen, E.; Erturk, A. Characterization of a multifunctional bioinspired piezoelectric swimmer and energy harvester. In Proceedings of the ASME 2020 Conference on Smart Materials, Adaptive Structures and Intelligent Systems, Virtual, 14–16 September 2020; American Society of Mechanical Engineers: New York, NY, USA, 2020. [Google Scholar]
  17. Rakotondrabe, M.; Clévy, C.; Lutz, P. Complete open loop control of hysteretic, creeped, and oscillating piezoelectric cantilevers. IEEE Trans. Autom. Sci. Eng. 2009, 7, 440–450. [Google Scholar] [CrossRef]
  18. Chopra, S.; Gravish, N. Piezoelectric actuators with on-board sensing for micro-robotic applications. Smart Mater. Struct. 2019, 28, 115036. [Google Scholar] [CrossRef]
  19. Grzybek, D. Control System for Multi-Input and Simple-Output Piezoelectric Beam Actuator Based on Macro Fiber Composite. Energies 2022, 15, 2042. [Google Scholar] [CrossRef]
  20. Deraemaeker, A.; Nasser, H.; Benjeddou, A.; Preumont, A. Mixing rules for the piezoelectric properties of macro fiber composites. J. Intell. Mater. Syst. Struct. 2009, 20, 1475–1482. [Google Scholar] [CrossRef]
  21. Wang, X.; Zhou, W.; Zhang, Z.; Jiang, J.; Wu, Z. Theoretical and experimental investigations on modified LQ terminal control scheme of piezo-actuated compliant structures in finite time. J. Sound Vib. 2021, 491, 115762. [Google Scholar] [CrossRef]
  22. Macro Fiber Composite (MFC) Data Sheet. Available online: https://smart-material.com/wp-content/uploads/2025/02/MFC_V2.4-datasheet-web.pdf (accessed on 30 September 2025).
  23. Azam, S.A.; Fragoso, A. Experimental and Numerical Simulation Study of the Vibration Properties of Thin Copper Films Bonded to FR4 Composite. Appl. Sci. 2020, 10, 5197. [Google Scholar] [CrossRef]
  24. Pandey, A.; Arockiarajan, A. Actuation performance of macro-fiber composite (MFC): Modeling and experimental studies. Sens. Actuators A Phys. 2016, 248, 114–129. [Google Scholar] [CrossRef]
  25. Yabuno, H.; Saigusa, S.; Aoshima, N. Stabilization of the parametric resonance of a cantilever beam by bifurcation control with a piezoelectric actuator. Nonlinear Dyn. 2001, 26, 143–161. [Google Scholar] [CrossRef]
  26. Panayanthatta, N.; Clementi, G.; Ouhabaz, M.; Margueron, S.; Bartasyte, A.; Lallart, M.; Basrour, S.; La Rosa, R.; Bano, E.; Montes, L. Electro-Mechanical Characterization and Modeling of a Broadband Piezoelectric Microgenerator Based on Lithium Niobate. Sensors 2024, 24, 2815. [Google Scholar] [CrossRef] [PubMed]
  27. Jiang, B.; Zhu, F.; Yang, Y.; Zhu, J.; Yang, Y.; Yuan, M. A hybrid piezoelectric and electromagnetic broadband harvester with double cantilever beams. Micromachines 2023, 14, 240. [Google Scholar] [CrossRef] [PubMed]
  28. Zhang, H.; Sun, W.; Luo, H.; Zhang, R. Modeling and active control of geometrically nonlinear vibration of composite laminates with macro fiber composite. Compos. Struct. 2023, 321, 117292. [Google Scholar] [CrossRef]
  29. Sabarianand, D.V.; Karthikeyan, P.; Muthuramalingam, T. A review on control strategies for compensation of hysteresis and creep on piezoelectric actuators based micro systems. Mech. Syst. Signal Process. 2020, 140, 106634. [Google Scholar] [CrossRef]
  30. Devies, E.R. Computer and Machine Vision: Theory, Algorithms, Practicalities; Academic Press: Waltham, MA, USA, 2012. [Google Scholar]
  31. Dadhich, A. Practical Computer Vision: Extract Insightful Information from Images Using TensorFlow, Keras, and OpenCV; Packt Publishing: Birmingham, UK, 2018. [Google Scholar]
  32. Sioma, A. Vision system in product quality control systems. Appl. Sci. 2023, 13, 751. [Google Scholar] [CrossRef]
  33. Sioma, A.; Lenty, B. Focus estimation methods for use in industrial SFF imaging systems. Appl. Sci. 2024, 14, 1374. [Google Scholar] [CrossRef]
  34. Yu, Z.; Shen, G.; Zhao, Z.; Wu, Z.; Liu, Y.; Feng, J. Transverse Vibration Measurement of Beam Structure Using Based on Subpixel-Based Edge Detection and Point Tracking. IEEE Sens. J. 2024, 24, 2671–26811. [Google Scholar] [CrossRef]
  35. Carrillo, E.S. The cantilevered beam: An analytical solution for general deflections of linear-elastic materials. Eur. J. Phys. 2006, 27, 1437. [Google Scholar] [CrossRef]
  36. Wang, Q.M.; Cross, L.E. Determination of Young’s modulus of the reduced layer of a piezoelectric RAINBOW actuator. J. Appl. Phys. 1998, 83, 5358–5363. [Google Scholar] [CrossRef]
  37. Roundy, S.; Wright, P.K.; Rabaey, J.M. Energy Scavenging for Wireless Sensor Networks; Springer Science + Business Media: New York, NY, USA, 2003. [Google Scholar]
  38. Song, Z.; Su, C. Computation of Rayleigh damping coefficients for the seismic analysis of a hydro-powerhouse. Shock. Vib. 2017, 1, 2046345. [Google Scholar] [CrossRef]
  39. Meirovitch, L. Fundamentals of Vibrations; Waveland Press: Long Grove, IL, USA, 2010. [Google Scholar]
  40. Huang, H.; Zheng, C.; Ruan, X.; Zeng, J.; Zheng, L.; Chen, W.; Li, G. Elastic and electric damping effects on piezoelectric cantilever energy harvesting. Ferroelectrics 2014, 459, 1–13. [Google Scholar] [CrossRef]
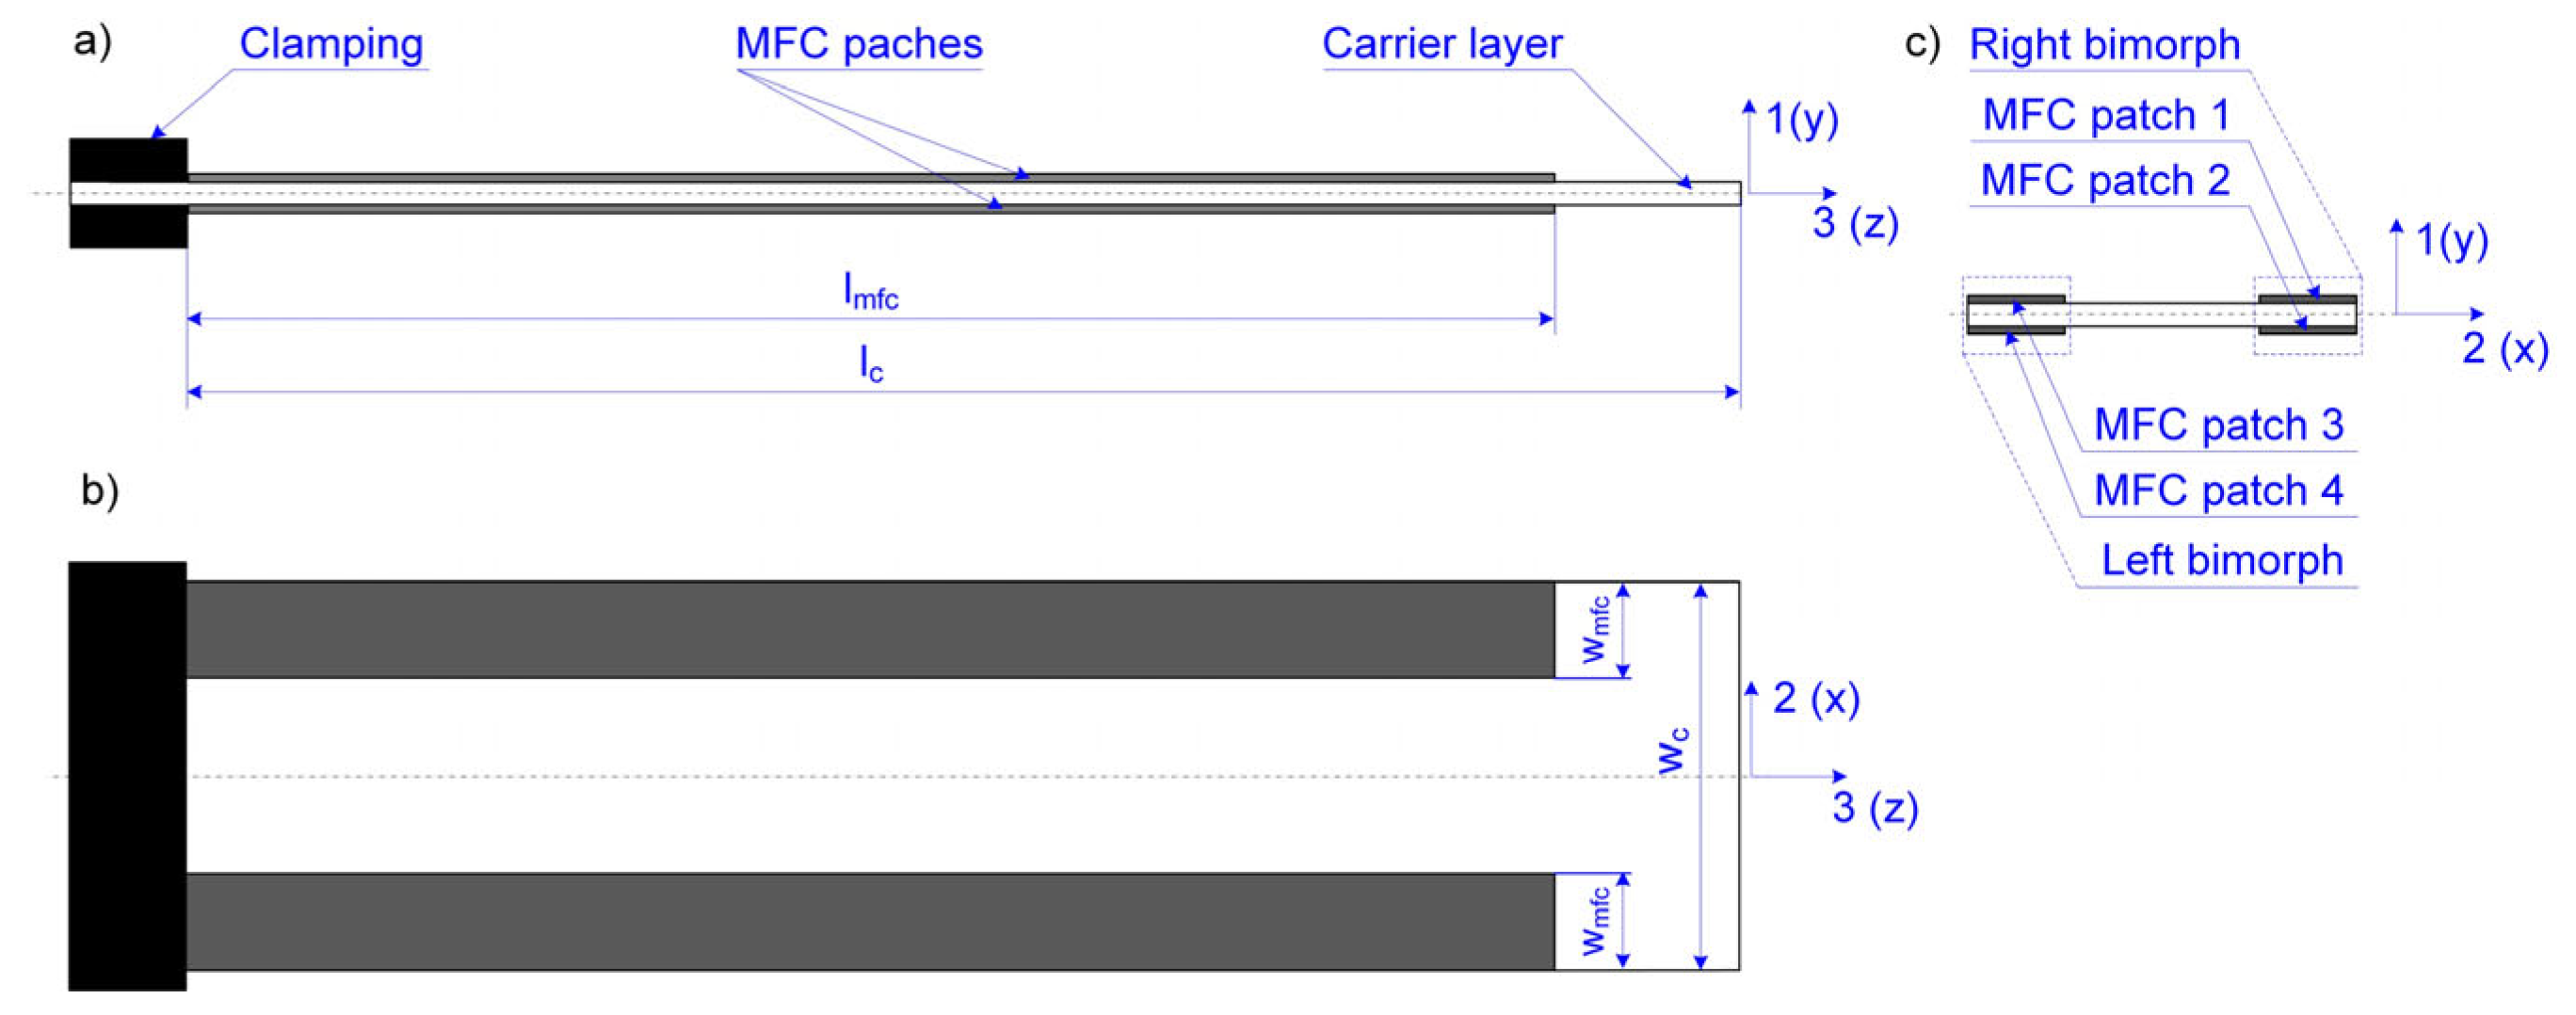
Figure 1. Schema of structure of manufactured actuator: (a) side view; (b) view from above; (c) view from the front.
Applsci 15 13109 g001
Figure 2. Schema of actuator supply system.
Applsci 15 13109 g002
Figure 3. Imaging method of the actuator: (a) schema; (b) image with markers.
Applsci 15 13109 g003
Figure 4. View of the vision measurement stand.
Applsci 15 13109 g004
Figure 5. Double-bimorph as 2-DOF system (θ is the twist angle).
Applsci 15 13109 g005
Figure 6. Determined courses of twist angle using the vision method.
Applsci 15 13109 g006
Figure 7. Twist angle versus supply voltage.
Applsci 15 13109 g007
Figure 8. Displacement of a twisting center: (a) displacement for u1 = u2 = u3 = u4 = 0; (b) displacement for u1 = −500 V, u2 = +500 V, u3 = +500 V, u4 = −500 V.
Applsci 15 13109 g008
Figure 9. Motion of actuator in experiment no. 9.
Applsci 15 13109 g009
Figure 10. Comparison measures and simulated twist angle at γ = 100 V: (a) for experiment no. 1, (b) for experiment no. 2, (c) for experiment no. 3, and (d) for experiment no. 4.
Applsci 15 13109 g010aApplsci 15 13109 g010b
Figure 11. The error between the measured and simulated twisting angle.
Applsci 15 13109 g011
Figure 12. Displacements of CS and P4 points: (a) in coordinate system (red line is CS displacement, green line is P4 displacement), (b) for actuator without power supply, and (c) for actuator with power supply.
Applsci 15 13109 g012
Figure 13. Image of twist angle of half of actuator.
Applsci 15 13109 g013
Table 1. Geometrical properties of manufactured actuator (in mm).
DimensionSymbolValueDimensionSymbolValue
Overall length of MFC patchlmfc101Distance between centers of bimorphswd70
Overall width of MFC patchwmfc20Length of an active part in MFC patchlmfca85
Overall thickness of MFC patchtmfc0.3Length of a passive part in MFC patchlmfcp7.5
Length of carrier layerlc120Width of an active area in MFC patchwmfca14
Width of carrier layerwc80Thickness of an active area in MFC patchtmfca0.18
Thickness of carrier layertc1Distance among electrodes in MFC patchtmfce0.5
Table 2. Parameter values adopted from the literature [20,21,22,23].
ParameterSymbolValueUnit
Compliance constant under constant electric field s 33 E 23.708 × 10⁻¹²m2/N
Piezoelectric constant of fibers in MFC patchd33436 × 10−12C/N
Density of MFC patchρmfc5400kg/m3
Young’s modulus of an MFC patchYmfc30.33 × 109N/m2
Density of a carrier layerρc1850kg/m3
Young’s modulus of a carrier layerYc18.6 × 109N/m2
Table 3. Conditions in experiments.
Exp 1Exp 2Exp 3Exp 4Exp 5Exp 6Exp 7Exp 8Exp 9
V1 (V)−500−400−300−200+500+400+300+200−500
V2 (V)+500+400+300+200−500−400−300−200+500
V3 (V)+500+400+300+200−500−400−300−200+500
V4 (V)−500−400−300−200+500+400+300+200−500
Duration (s)0.150.150.150.150.150.150.150.1540
Table 4. Calculated values of parameters.
ParameterSymbolValueUnit
Stiffness coefficientk11573N/m
Stiffness coefficientk22573N/m
Stiffness coefficientk12800N/m
Stiffness coefficientk21718N/m
Rayleigh damping coefficientα127.74-
Rayleigh damping coefficientβ4.25 × 10⁻⁵-
Actuator massma0.0092kg
Disclaimer/Publisher’s Note: The statements, opinions and data contained in all publications are solely those of the individual author(s) and contributor(s) and not of MDPI and/or the editor(s). MDPI and/or the editor(s) disclaim responsibility for any injury to people or property resulting from any ideas, methods, instructions or products referred to in the content.