1. Introduction
The rock mass is a complex geological structure that is non-uniform, non-continuous, anisotropic, and internally endowed with stress. Under various earth tectonic movements and surface transformations, geological surfaces or zones with particular structural extension directions and lengths and relatively small thicknesses are formed in the rock mass, including weak joint, schistosity, bedding, fault, unconformity, etc., which are called structural planes. The structural plane is the weak point inside the rock mass, and its form and scale are important factors affecting the stability of the engineering rock mass. The study of structural faces started in the 1950s, when Muller L. [
1] studied the influence of the mechanical effects of structural faces on engineering stability, and Goodman [
2] studied the mechanical properties of the structural plane. In the 1980s, Sun Guangzhong [
3] proposed the “cybernetics of rock mass structure”. In 1978, ISRM [
4] recommended 11 geometric parameters to characterize the development of structural faces, among which, the consistency of structural faces is an important research element. At present, some progress has been made in the study of the consistency of structural facies at home and abroad, and Berkowitz [
5], Bour and Davy [
6,
7], Renshaw [
8] et al. have studied the relationship between fracture network connectivity and fracture geometric properties in depth for the length and distribution of fractures; T. Meyer [
9] used a three-dimensional stochastic fracture system model to represent the fracture network of a rock mass; Yu [
10] applied a discrete fracture network (DFN) to the modeling of a fracture network to study the connectivity of fractures and the flow of fluid in it; and by studying fractal clustering, Darcel [
11] proposed a theoretical study and numerical analysis of fractal network connectivity with fractal correlation. Wang [
12], Li [
13], and Liu [
14] established fractal description models of fracture size and number based on fractal theory and topological geometry theory; Li [
15] defined connectivity based on statistical parameters of random discontinuous networks and studies its relationship with permeability; Huang [
16] proposed a multivariable regression function to predict the permeability of a three-dimensional fracture network, which can approximate the permeability of a three-dimensional fracture network by analyzing the outcrop of fractured rock mass; Huang [
17] presented an H-H connectivity estimation formula using the geometric definition of connectivity, while Fan Liuming [
18] derived a generalized probabilistic model for an H-H connectivity rate estimation on this basis; and Chen and Lu [
19,
20] used 3D network numerical simulation techniques, projection method and genetic algorithm to find the 3D connectivity rate of the structural plane of the rock mass. At the same time, only a few studies involved the extension range and connectivity of specific structural planes. Chen [
21,
22] gave a set of spatial structural face connectivity discrimination methods based on structural face coplanarity and structural face geological characteristics; Wang [
23] and Guo [
24] analyzed the structural plane connectivity of parallel vertical boreholes based on digital borehole images, which can finely describe the relationship between structural planes of rock masses.
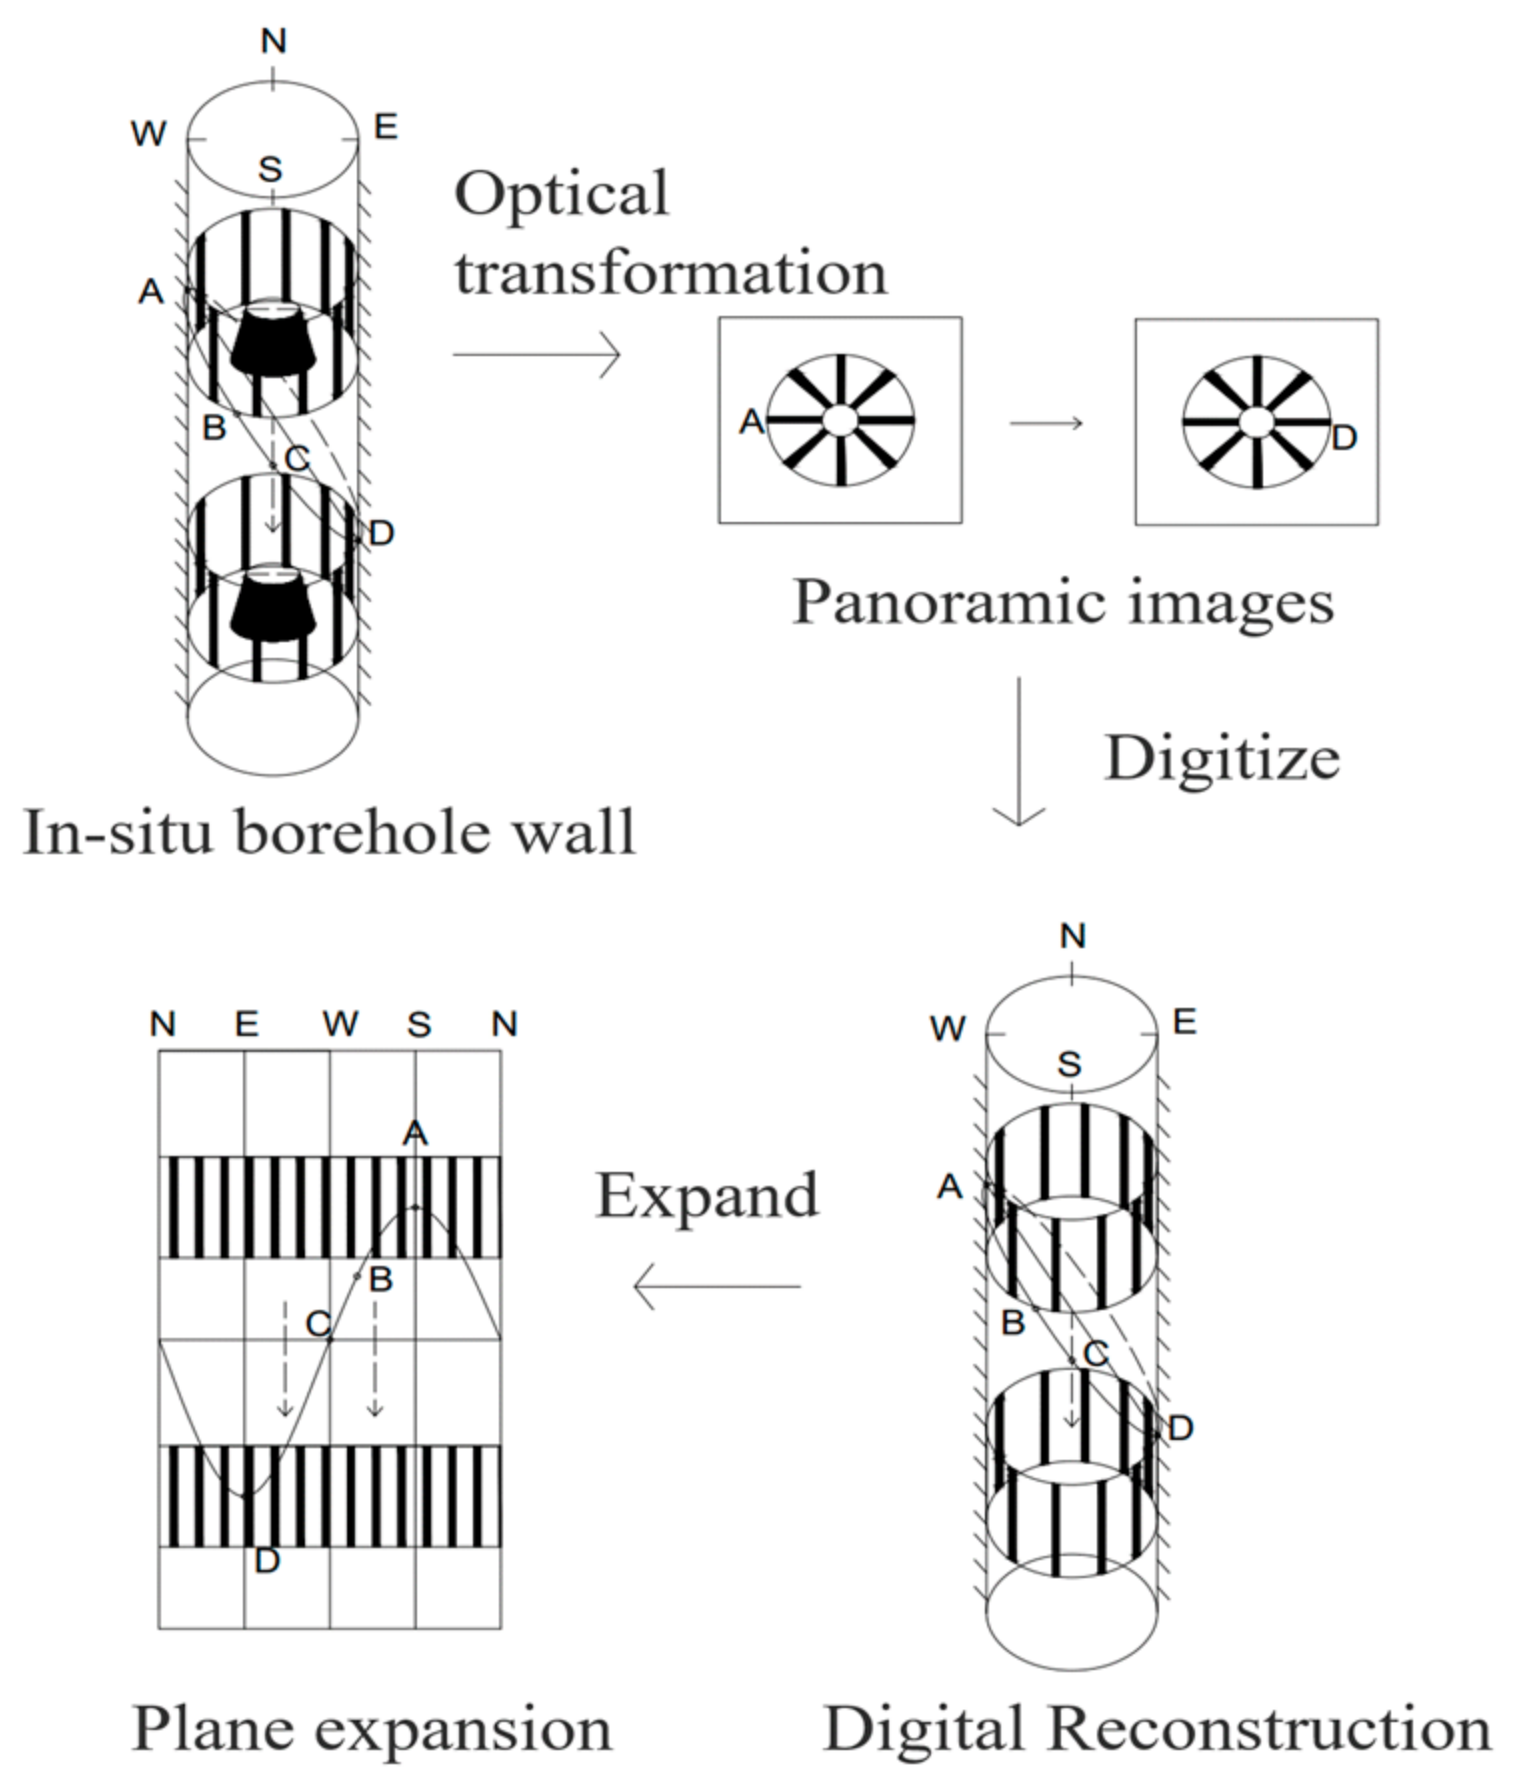
Most structural planes are distributed inside the rock mass, which is difficult to observe directly. The number of structural planes that can be directly observed through natural outcrops or artificial excavation faces is limited, which limits geologists’ research on their characteristics. The development of borehole camera technology makes it possible to take a borehole as the research object. Based on the principle of optical imaging, the technology can directly observe the interior of the rock mass through the borehole, and give a high-resolution image of the inner wall of the borehole. From it, we can collect the geological interface, such as the occurrence, width, filling information and fracture characteristics of faults, fractures, joints, interlayer, etc.
There are differences between the structural plane parameters in the borehole image and the measured parameters of the exposed structural plane. The method of using the outcrop measurement data to analyze the connectivity of the structural plane is not completely applicable to the analysis of the digital borehole image. It is difficult to describe the development range or size of a specific structural plane using the connectivity rate estimated by the fracture network established by the probability model. Therefore, it is critical to quickly and accurately determine the connectivity of some specific structural planes. In engineering applications, due to various geological factors or the influence of drilling technology and manual operation, vertical drilling is prone to tilt and shift. Currently, the method of analyzing the connectivity of structural planes by vertical drilling has great limitations. In this paper, using analytical geometry and space vector tools, a universal method for determining the connectivity of structural planes in boreholes with arbitrary angles and positions in space is derived. Combined with the indoor test, the feasibility of the discrimination method is fully verified by comparing the design of vertical drilling, inclined drilling, flat structural plane and simulated structural plane with certain roughness and undulation angle.
3. Structural Plane Consistency Analysis between Boreholes
In engineering practice, it is often necessary to conduct multiple borehole surveys when investigating the geology of an area. Since the structural plane has a special extension in space, the same structural plane can be penetrated by multiple boreholes through a reasonable arrangement of borehole locations. Collecting and analyzing the images of the inner wall of each borehole, and analyzing the consistency of the structural plane between boreholes by counting and filtering the structural plane data from the extracted images of multiple boreholes, is essential for engineering applications.
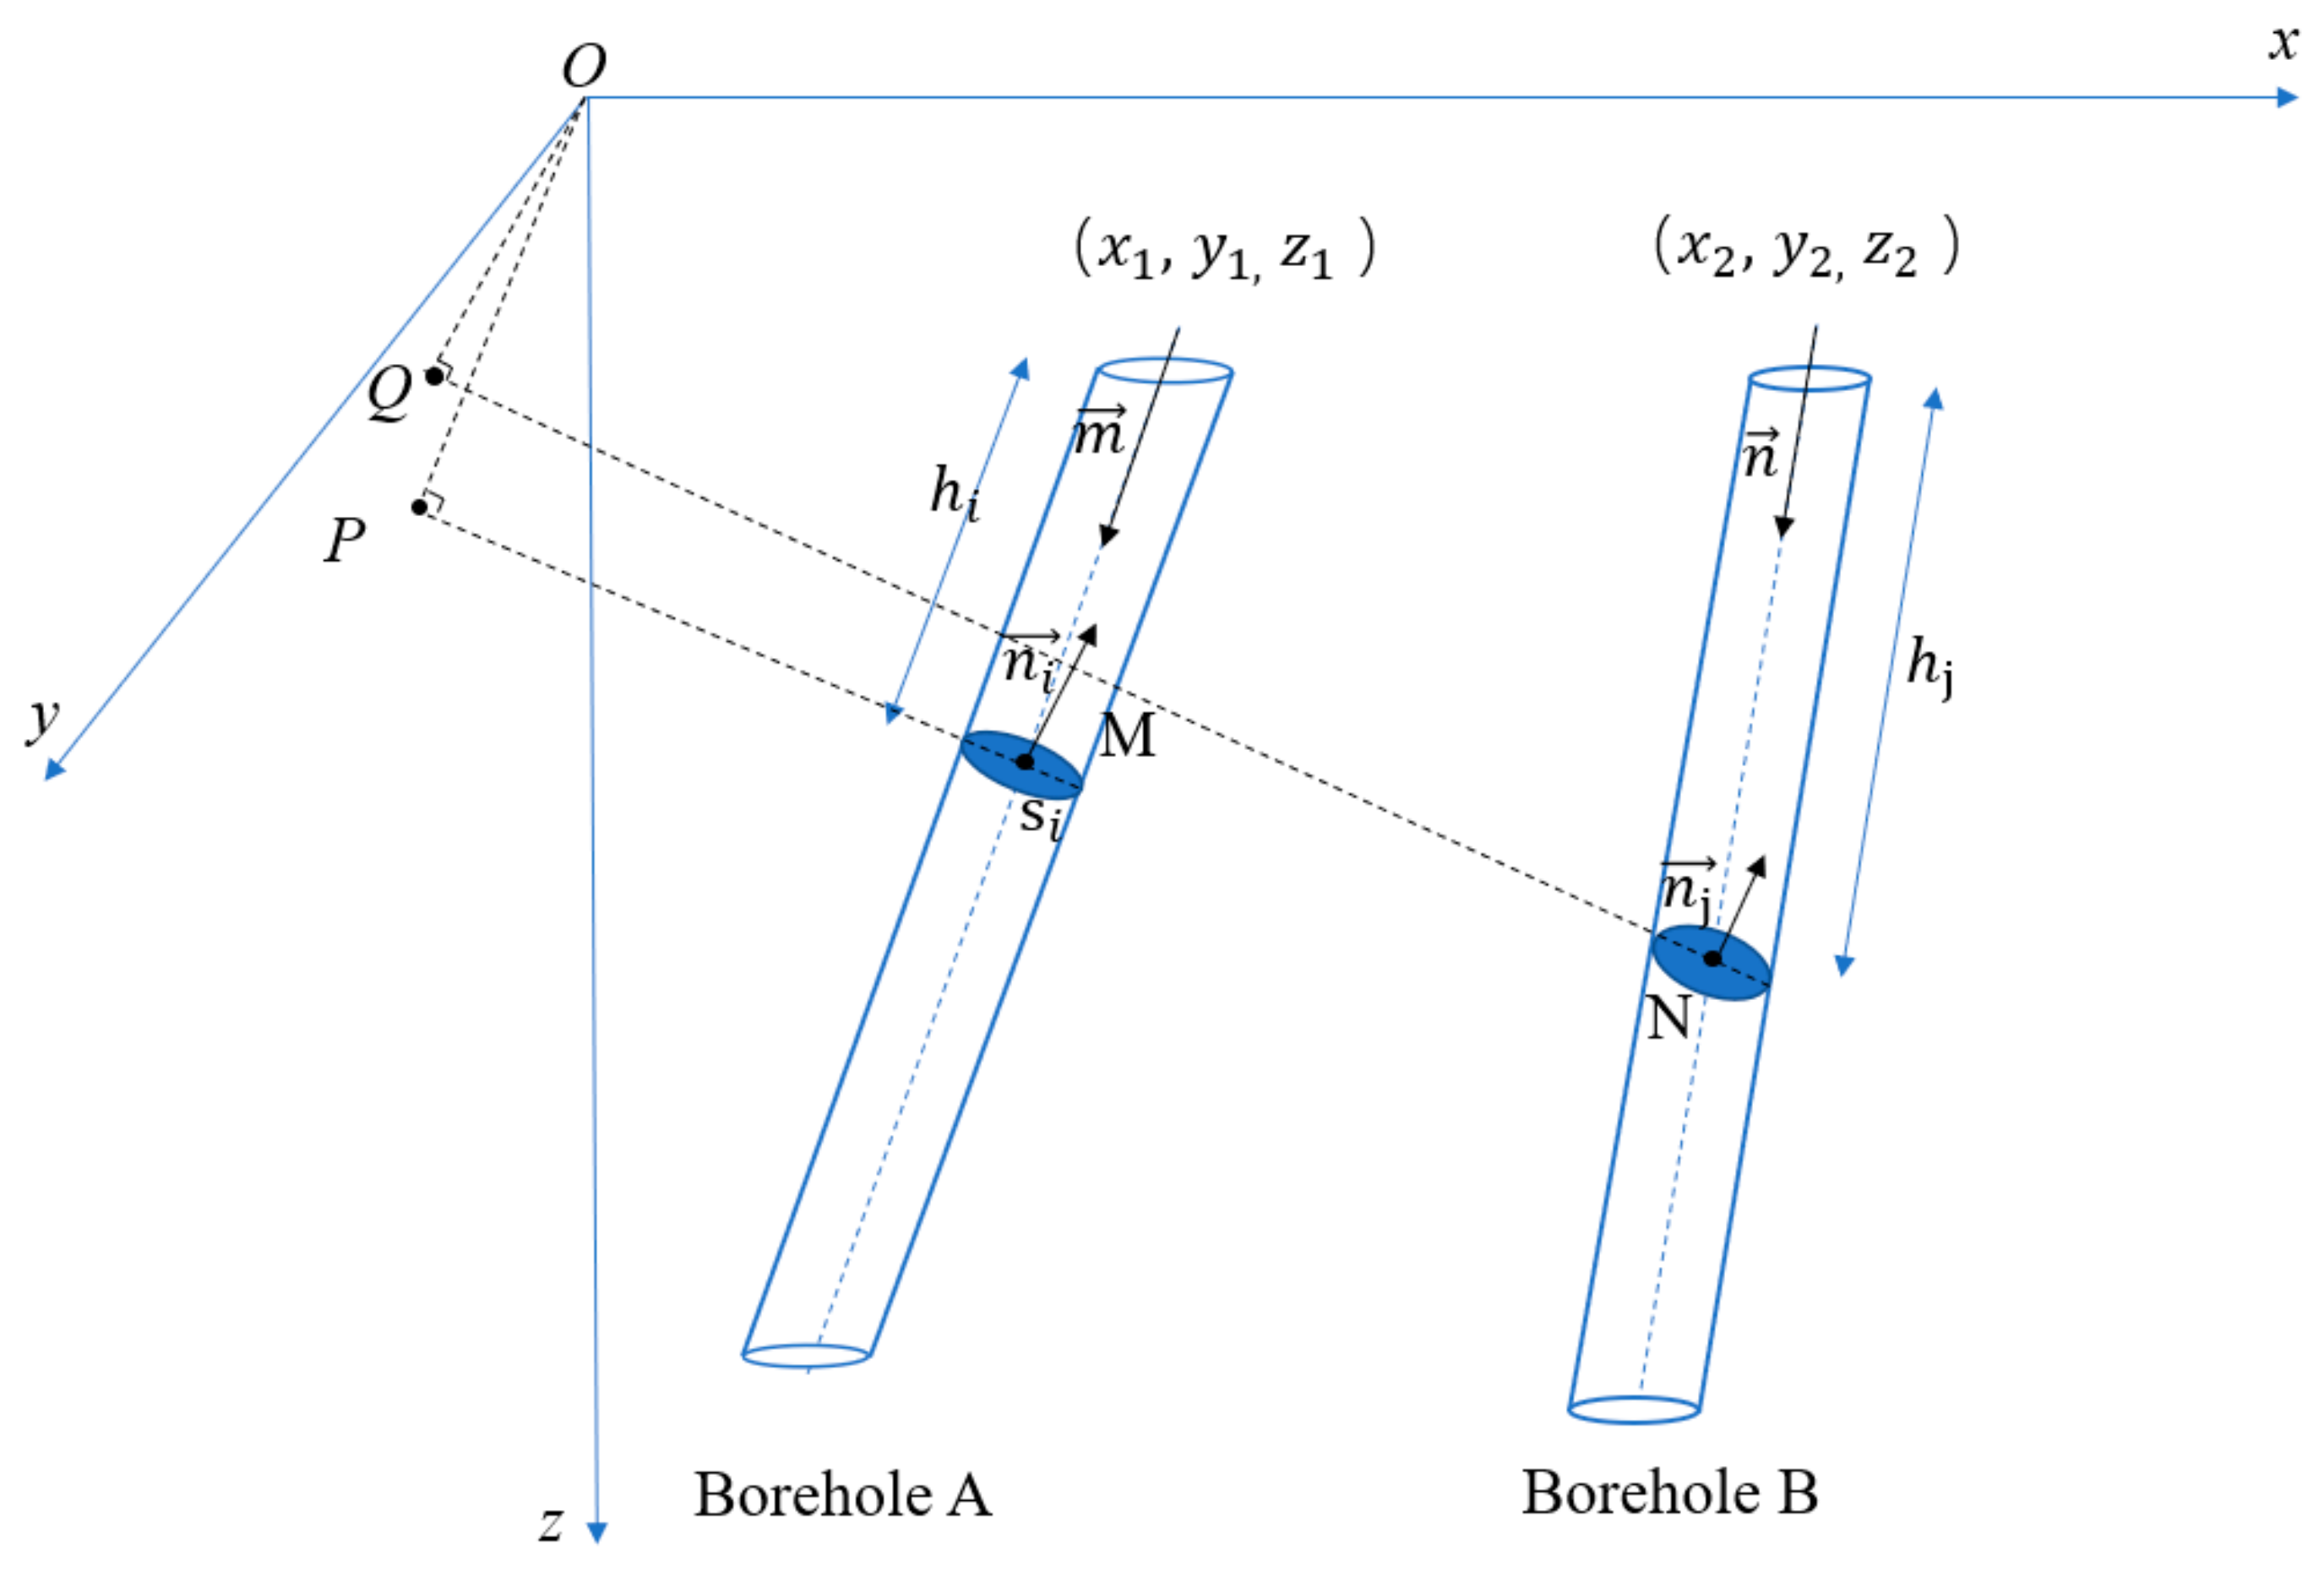
When analyzing the structural plane consistency of multiple boreholes, it is assumed that the structural plane is straight and flat. Let the
x-axis direct the due north direction, and a suitable space-rectangular coordinate system is established, as shown in
Figure 3 for two boreholes A and B in space. The coordinates of their borehole centers are
, and
.
Let vector
is the unit vector of the axis of borehole A pointing in the positive direction of
z-axis, and vector
is the unit vector of the center of borehole B pointing in the positive direction of the
z-axis. Let the angle between
and the
x-axis is
and the angle with
z-axis is
. rThe angle between
and the
x-axis is
, and the angle with the
z-axis is
. Then,
, and
. Therefore, we can write the straight-line equation of the axis of the borehole A as
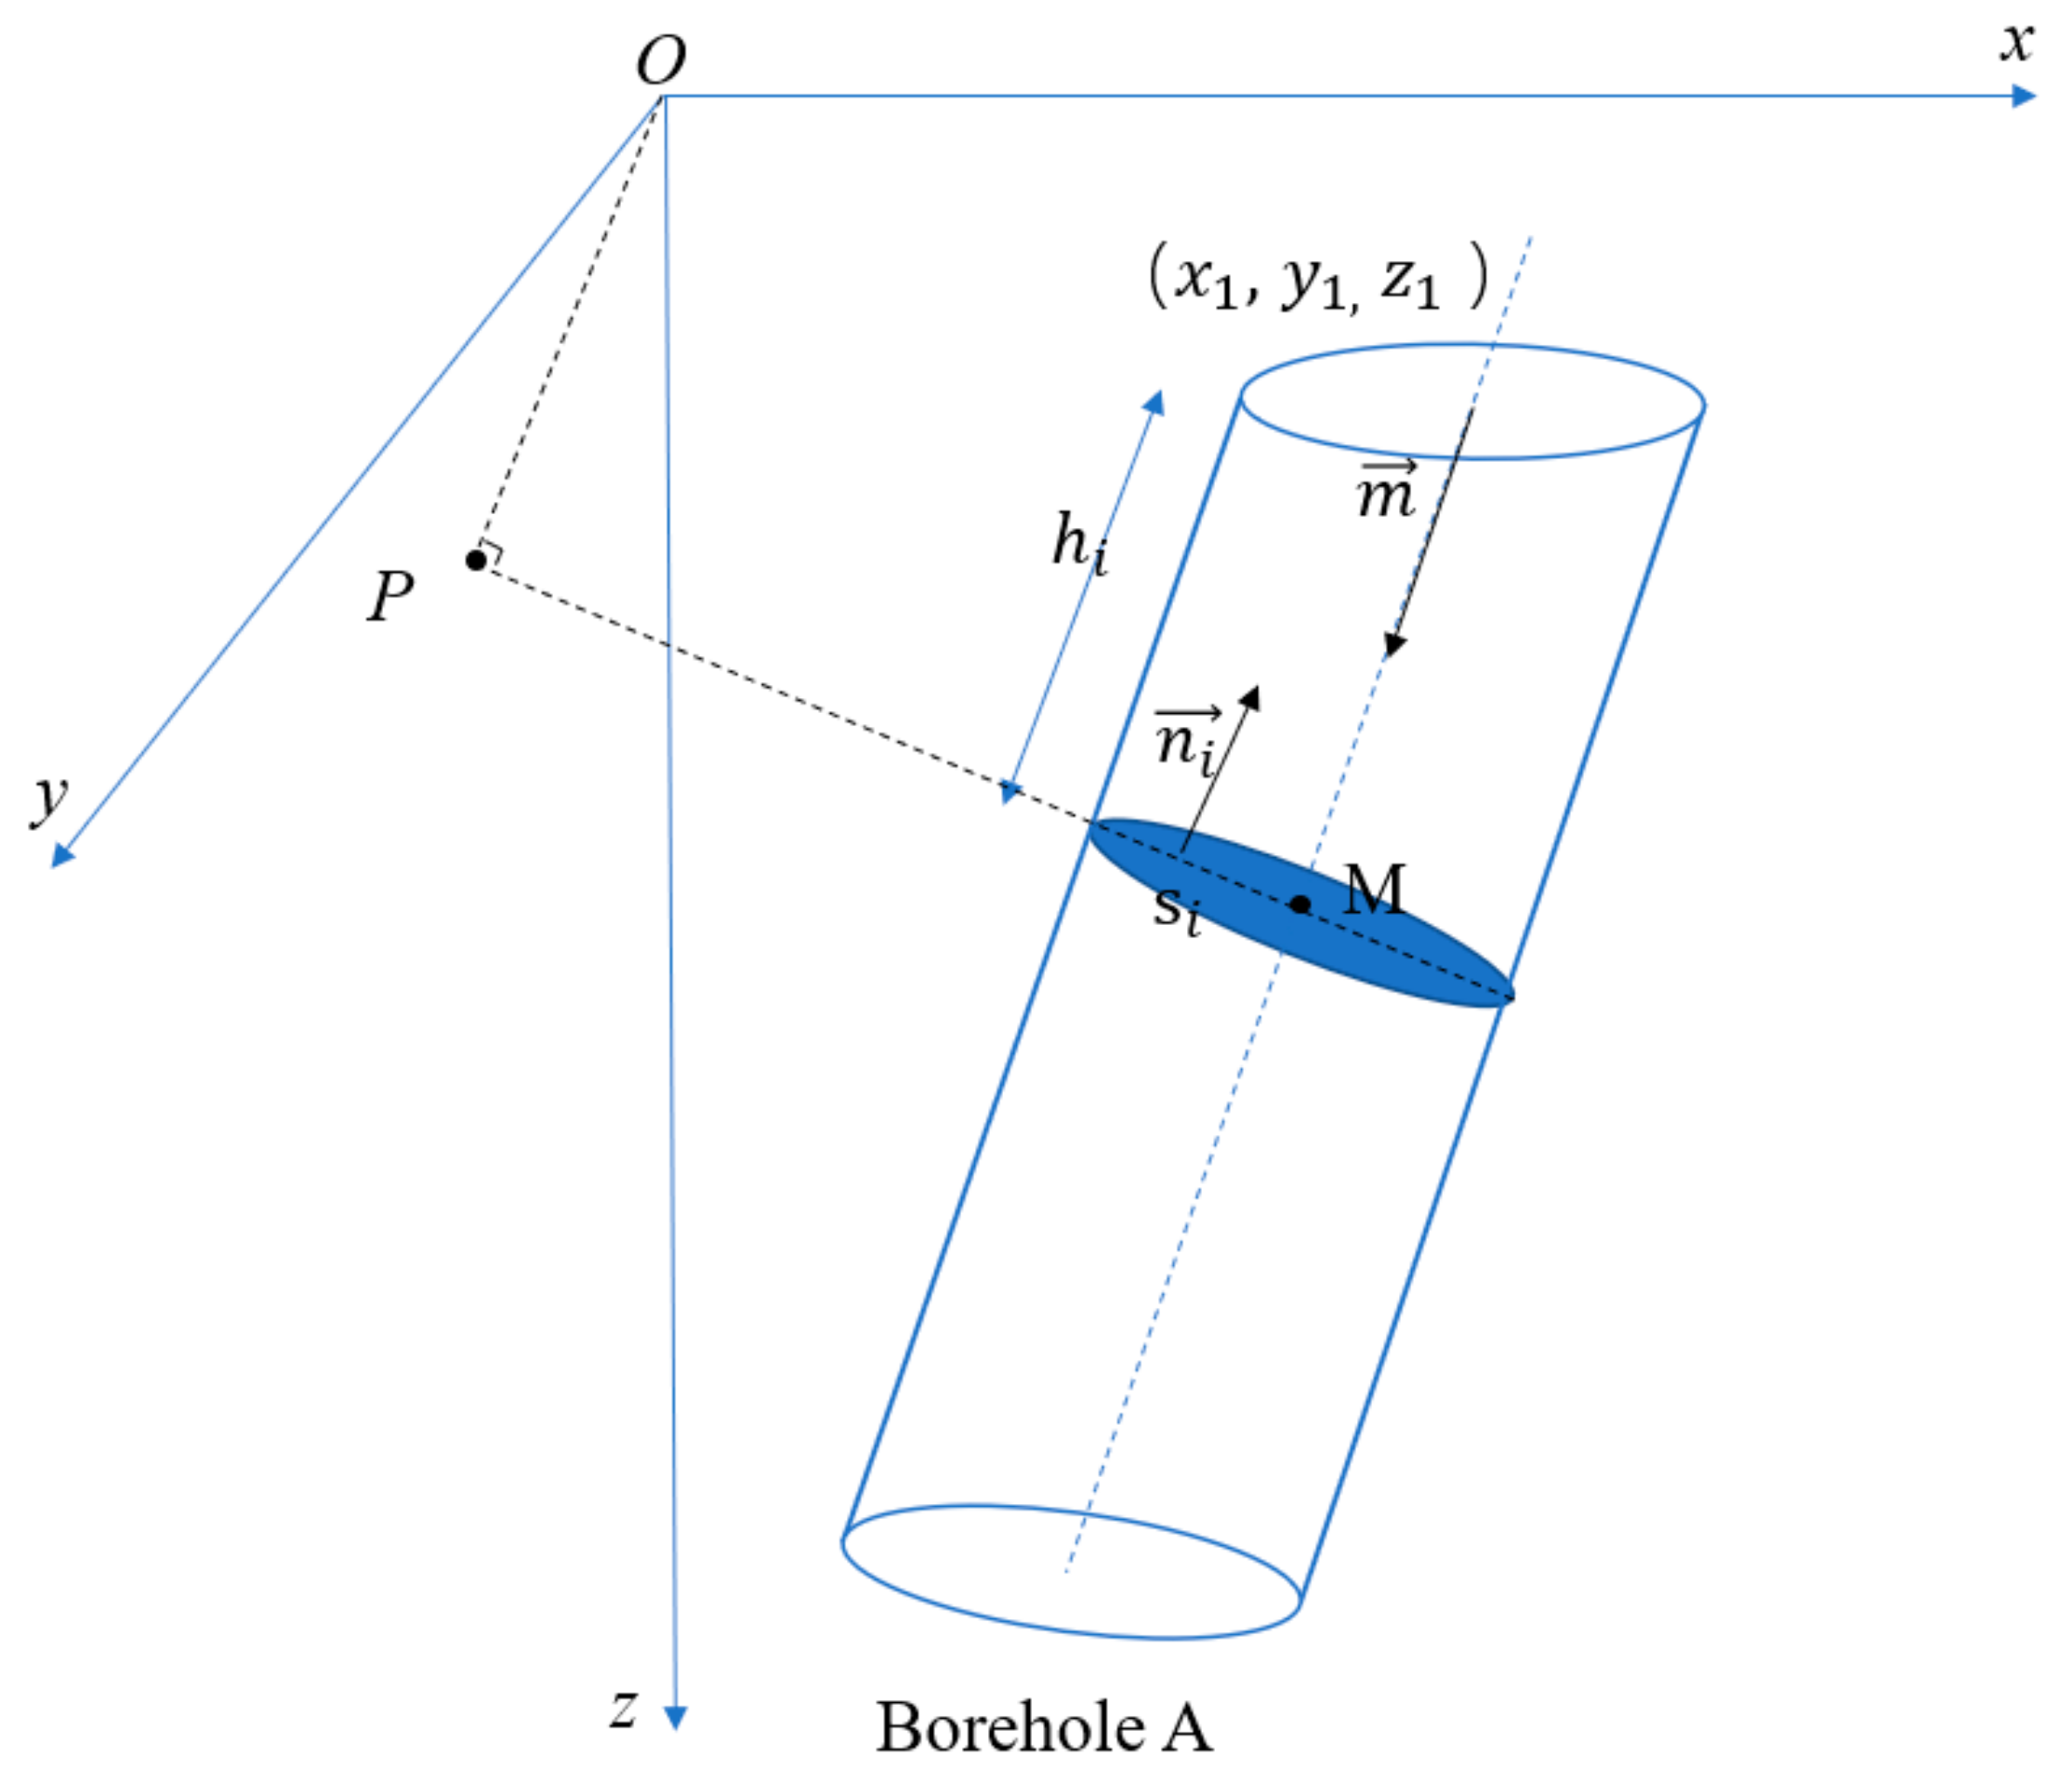
As shown in
Figure 4,the structural plane in borehole A is
. Its inclination is measured to be
, and the dip angle is
. The depth of the borehole is hi (the depth of the borehole is the distance from the structural plane to the hole opening, the same below), and the surface normal vector of the structural plane is
. We can obtain
, where
. Correspondingly, one of the structural planes in borehole B is
, its inclination is measured to be
and the dip angle is
, and the depth of the borehole is
. Set the origin to O, OP is perpendicular to the plane of structural plane
, and the vertical foot is point P. The vertical line OQ is perpendicular to the surface of structure plane
, and the perpendicular point is Q, since the depth of structural plane
in the borehole is
. The intersection of the axis of borehole A and the structural plane is M. The coordinates of M are (
,
,
), where the value of
,
and
are Equations (3)–(5).
According to the coordinates of point M and the surface normal vector
, we can determine the plane equation of the structural plane
is
Because
is parallel to the normal vector of structure plane
,
(
k is a constant and
k ≠ 0), let the coordinates of point
P be (
,
,
), and then the coordinates of point
P can be expressed as
Additionally, because the point
P is on the structural plane
, by substituting the coordinates of point P into the equation of the structural plane
, we can obtain
Solving Equation (10), we can obtain
, as shown in Equation (11):
A and
B in Equation (11) are Equation (12) and Equation (13), respectively.
By the above calculation, the coordinates of point P can be solved. Similarly, according to the information of structural plane
, the coordinates of point
Q are obtained as
The
C and
D in the coordinates of point
Q are
Calculate the distance of
PQ and obtain
Since each structural plane has a uniquely determined coordinate point within the same set of coordinates system, if two structural planes in different boreholes have consistency, then
The is related to the survey accuracy of the structural plane. Theoretically, when two structural planes in different boreholes are connected, the distance between the corresponding coordinate points of the structural plane is 0. However, the natural structural plane is not ideal. There are specific folds and undulating angles, which make a certain distance between PQ. Moreover, in engineering applications, the digital panoramic borehole camera system also has an inevitable systematic error, which can be reduced by averaging the structural plane for multiple analyses. Selecting a smaller , and you can quickly filter out some of the possible consistent structural planes. However, when the value of is too small, some corresponding surfaces may be missed during the screening. Therefore, when verifying the consistency of the structure planes, it is crucial to determine a suitable is crucial.
After the above calculation, we can initially judge the consistency of the structural plane
in Borehole A and the structural plane
in Borehole B. Further, we can determine whether the structural plane is connected based on the structural plane’s morphology and filling characteristics and geological characteristics on both sides of the structural plane, there are some common structural plane characteristics in
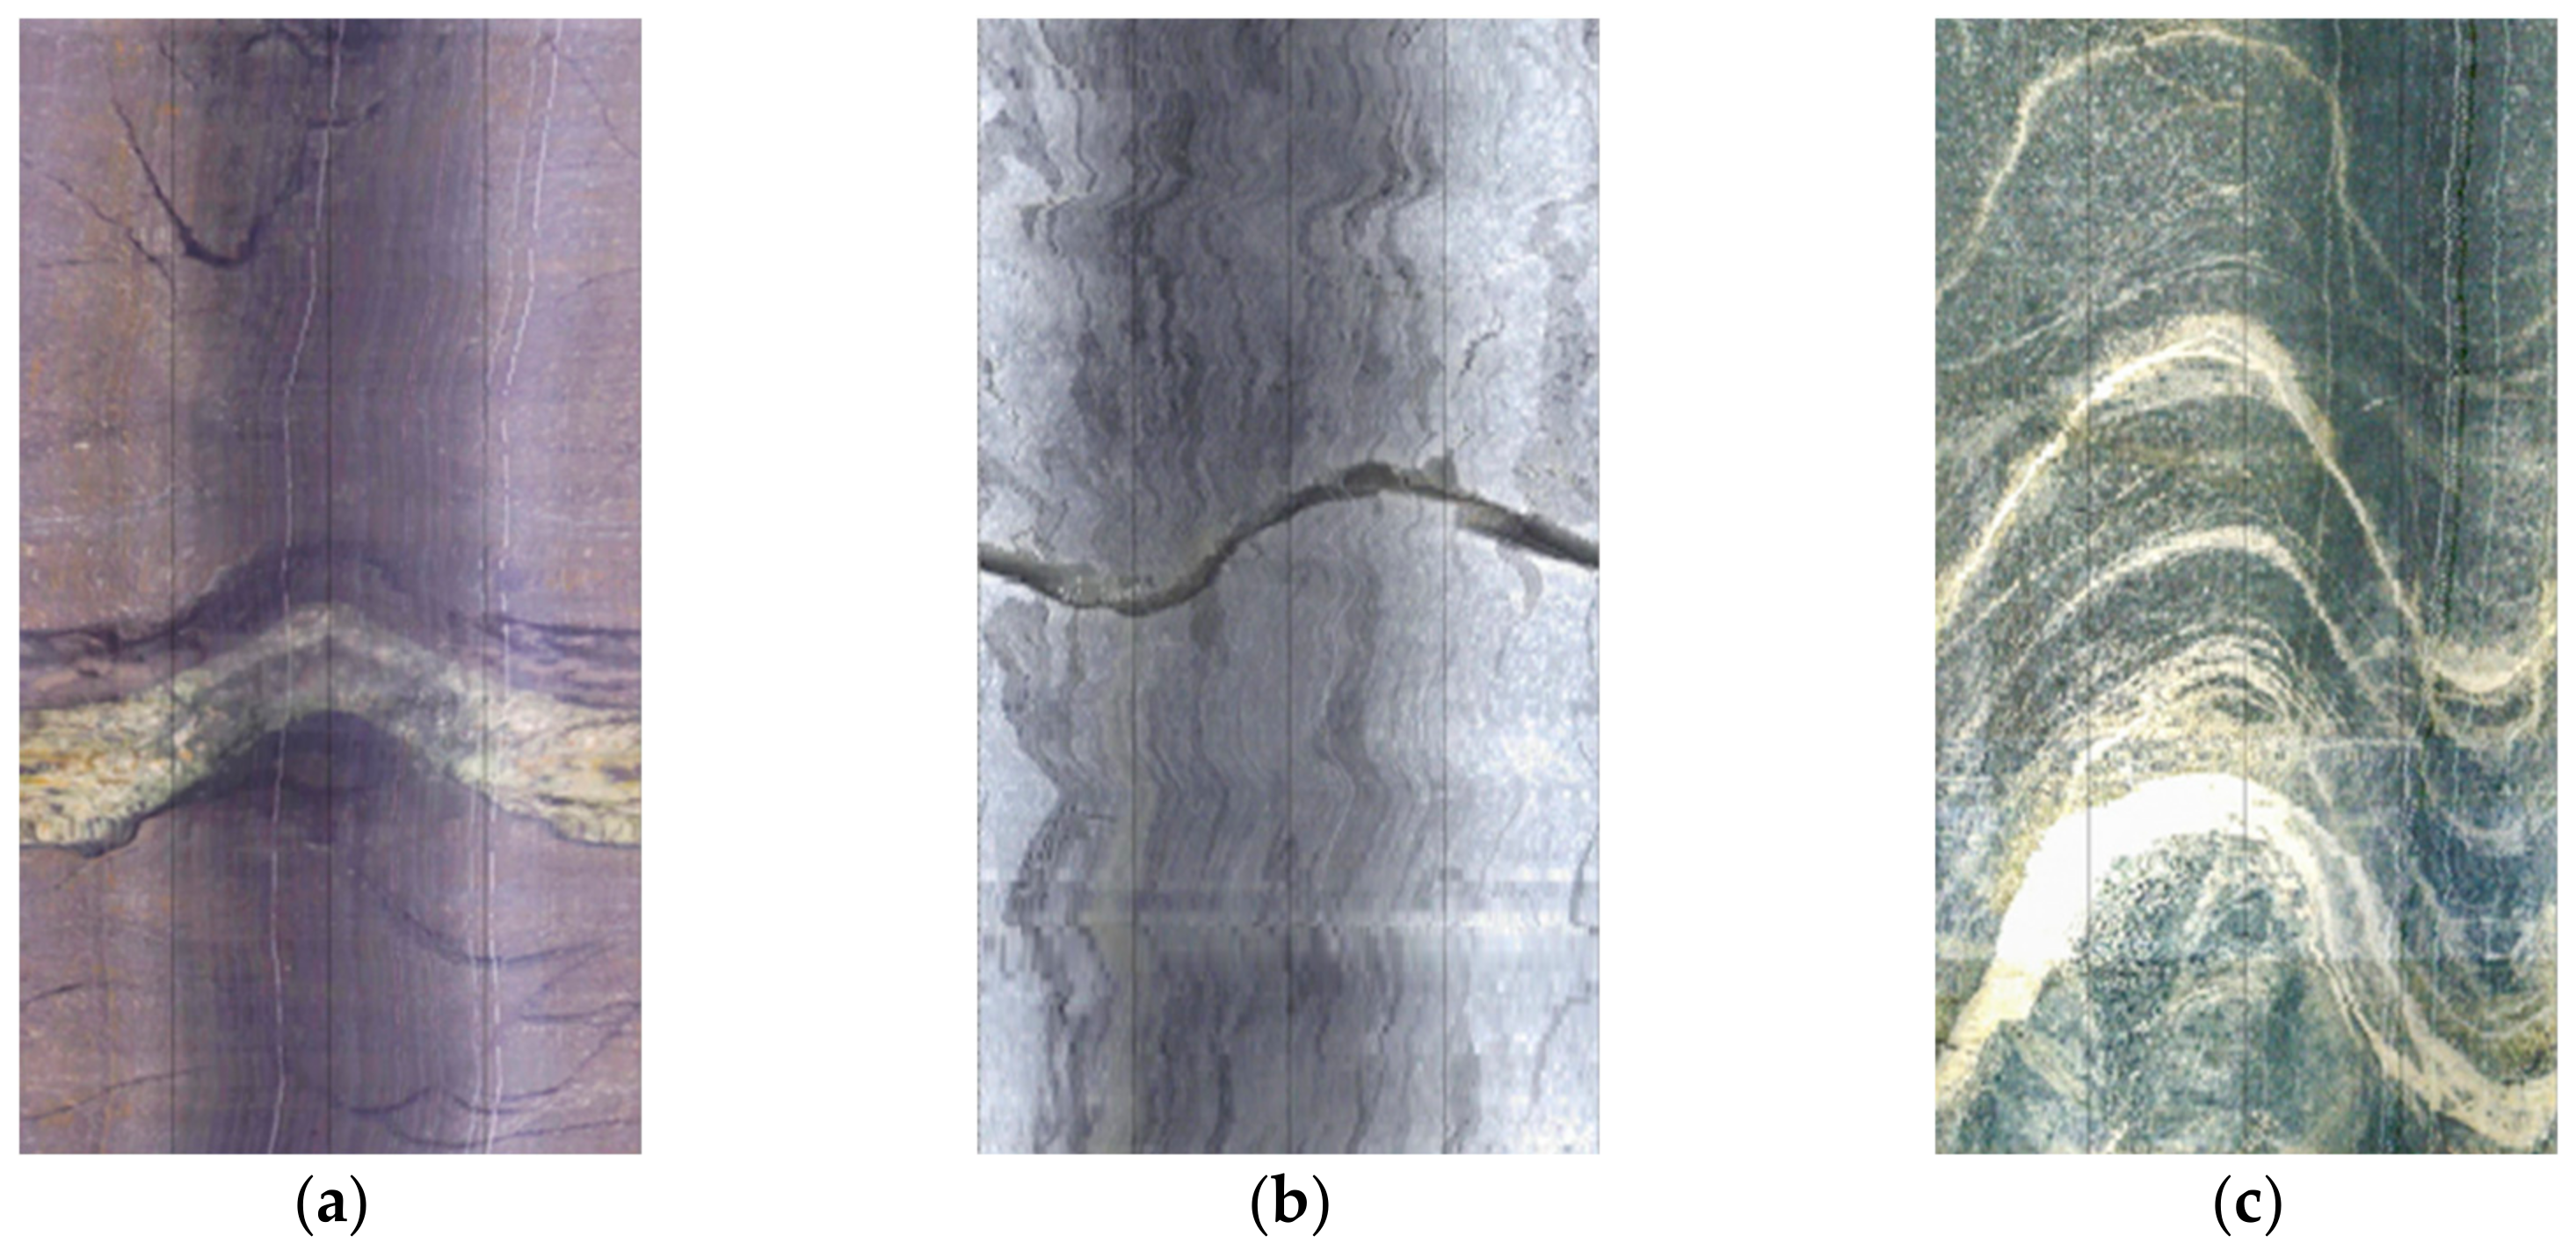
Figure 5. Usually, the same structural plane is the same type as a joint or a fault and has the same roughness and openness; the same structural plane generally has the same filling characteristics, such as the mineral composition, color, texture and filling thickness, so the filling characteristics can be an admirable aid to determine the correlation of the structural plane; the rock type and rock characteristics around the identical structural plane are similar. The rock features can be clearly identified in the borehole wall images. Based on this information, the consistency of the resultant faces can be further determined.
4. Experimental Validation and Project Examples
In this experiment, concrete material was used to simulate the rock mass, and 3D scanning and 3D printing techniques were used to obtain a structural plane of resin material highly similar to the real one [
25]. The 3DSL-600 printer was used for 3D printing, with a molding accuracy of ±0.1 mm, which can meet the accuracy requirements of the simulated structural plane. When the concrete samples were poured, the artificial structural plane was arranged from different directions to obtain the simulated structural plane with different yields. The size of the concrete sample is: L × W × H = 300 mm × 300 mm × 300 mm.
Considering the complexity of the rock structure, we generalized the rock’s geometrical dimension in this experiment according to the need of the test. In most cases, the actual structural plane is not strictly flat, but has a certain undulation angle, roughness, and randomness in extension. The experiments were carried out by 3D scanning the surface model of the original structural plane of marble collected from the field, and 3D printing was used to obtain the structural plane of the resin material with different thicknesses close to the original structural plane, respectively. The process of making the simulated structural plane is shown in
Figure 6. In order to compare with the simulated real structural plane, the resin material was used to make a flat structural plane of the same size. The size of the simulated structural plane was designed to penetrate the concrete sample. This way, the structural plane’s occurrence can be measured conveniently after the sample is formed. In order to make the sample still have some strength after the structural plane is arranged, small holes of 20 mm in diameter are arranged around the simulated structural plane, and the small holes will not affect the structural plane cutting drilling. In consideration of the experimental purpose, metamorphic quartz sand was used as the prototype material. Quartz sand, cement, and water were selected as rock-like materials, and relevant information [
26,
27,
28,
29] was consulted. After several proportioning tests, following the principle of easy experimental observation, the ratio of water:cement:altered quartz sand was determined to be 1:2:4. The mold shall be removed 48 h after the sample is poured and formed. The test shall be conducted after curing for three days under standard curing conditions.
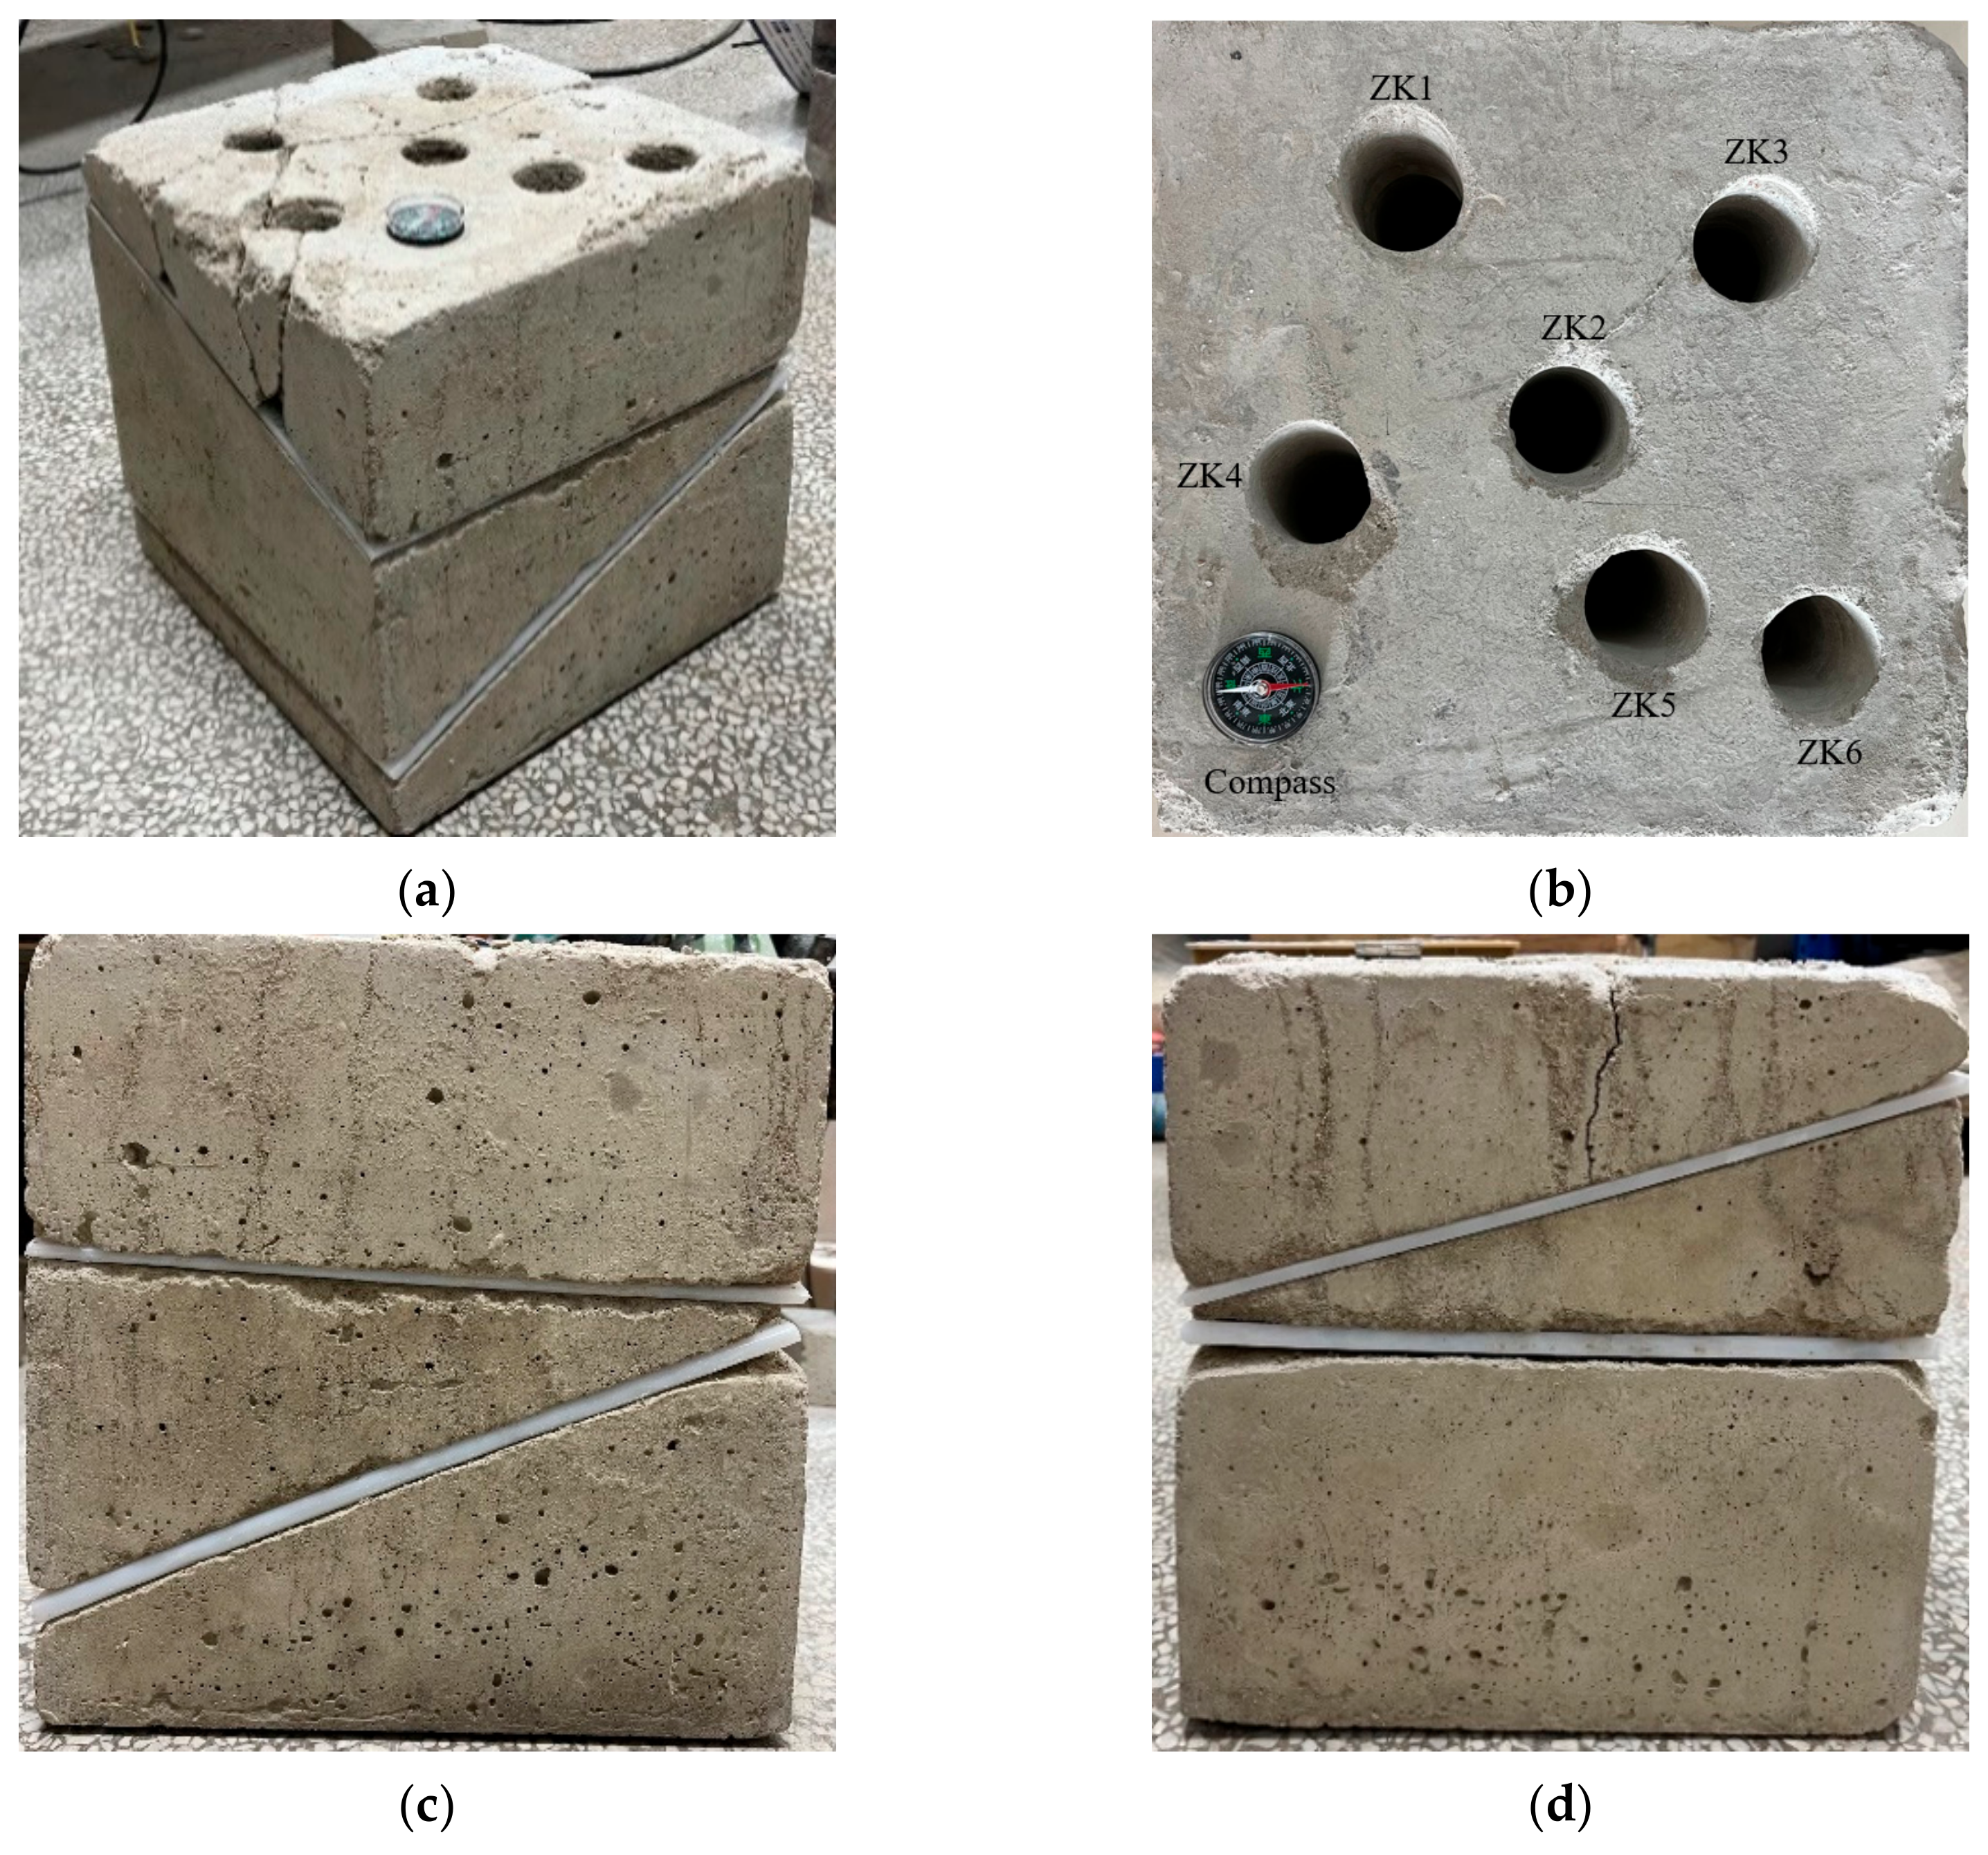
The distribution of structural planes within the rock mass is spatially complex and irregular, so two groups of structural planes with different production shapes were designed for this experiment. The two groups of structural planes were run through the concrete sample for experimental observation and contrast. Six boreholes were arranged at different locations, and the arrangement of each borehole and the structural plane is shown in
Figure 7. A small water-grinding drilling rig with a 40 mm outer diameter drill pipe was used to drill into the concrete samples to obtain boreholes of 40 mm diameter, and a 32 mm diameter probe was used for the borehole camera. In these boreholes, ZK1, ZK2 and ZK3 were vertical boreholes, and ZK4, ZK5, and ZK6 were inclined boreholes with different inclination directions. Two sets of experiments were conducted with the flat structural plane and simulated structural plane. The structural plane parameters were the same in each set of experiments, and the borehole arrangement was the same. The structural plane and borehole arrangement are shown in
Figure 7 below.
In the sample preparation process, due to the insecure fixation of the embedded structural plane and the deformation of the concrete during the forming process, the actual structural plane occurrence has some deviation from the preset value. Therefore, the practical parameters of the structural plane used for comparison are subject to the measured data after the sample removal.
Figure 8 is the sample obtained from the actual pouring, from which the actual structural plane occurrence can be measured. The actual measured structural plane parameters are shown in
Table 1.
Six boreholes with different parameters were arranged in each sample, and the parameters of the boreholes are shown in
Table 2. Let the angle between the borehole axis and the positive
x-axis be
αi, and the angle between the positive
z-axis be
βi (
i is the borehole number, numbered 1, 2, 3, 4, 5, and 6, respectively).
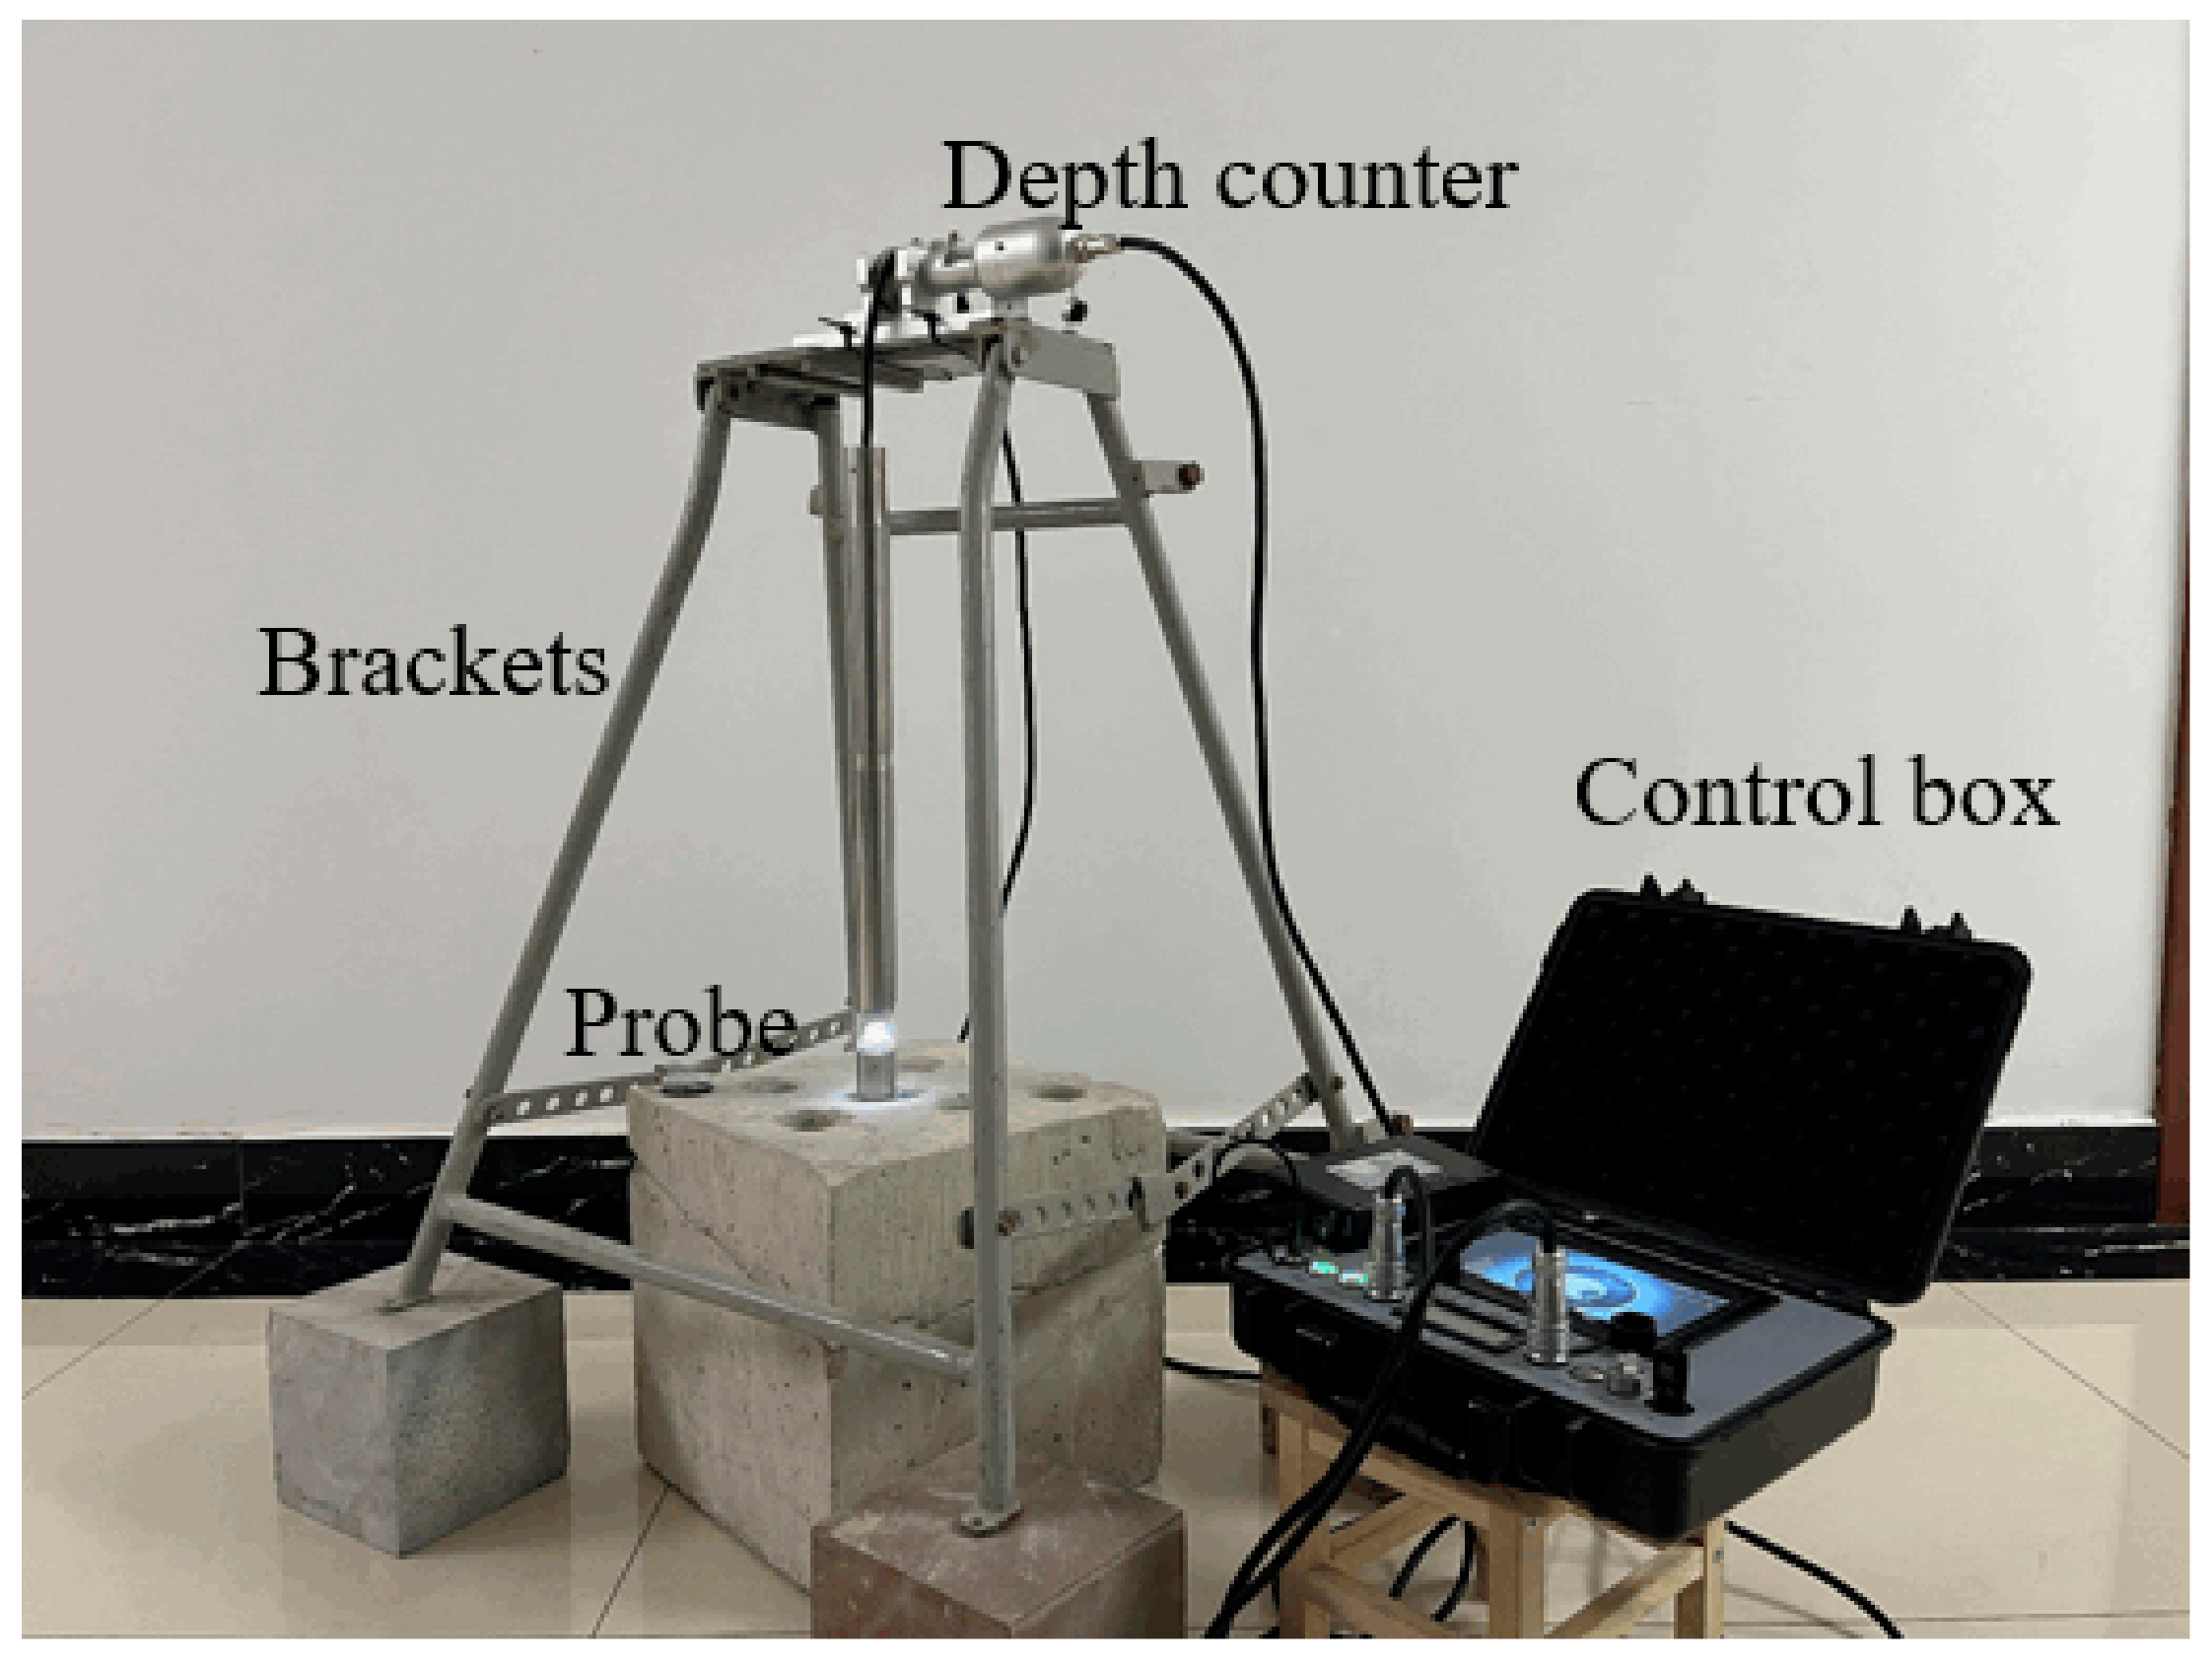
Before the beginning of the digital panoramic borehole camera, use the compass to adjust the orientation. Until the
x-axis of the sample points to the due north, we recorded the orientation. Finally, the borehole inner wall image was acquired with the borehole camera (
Figure 9).
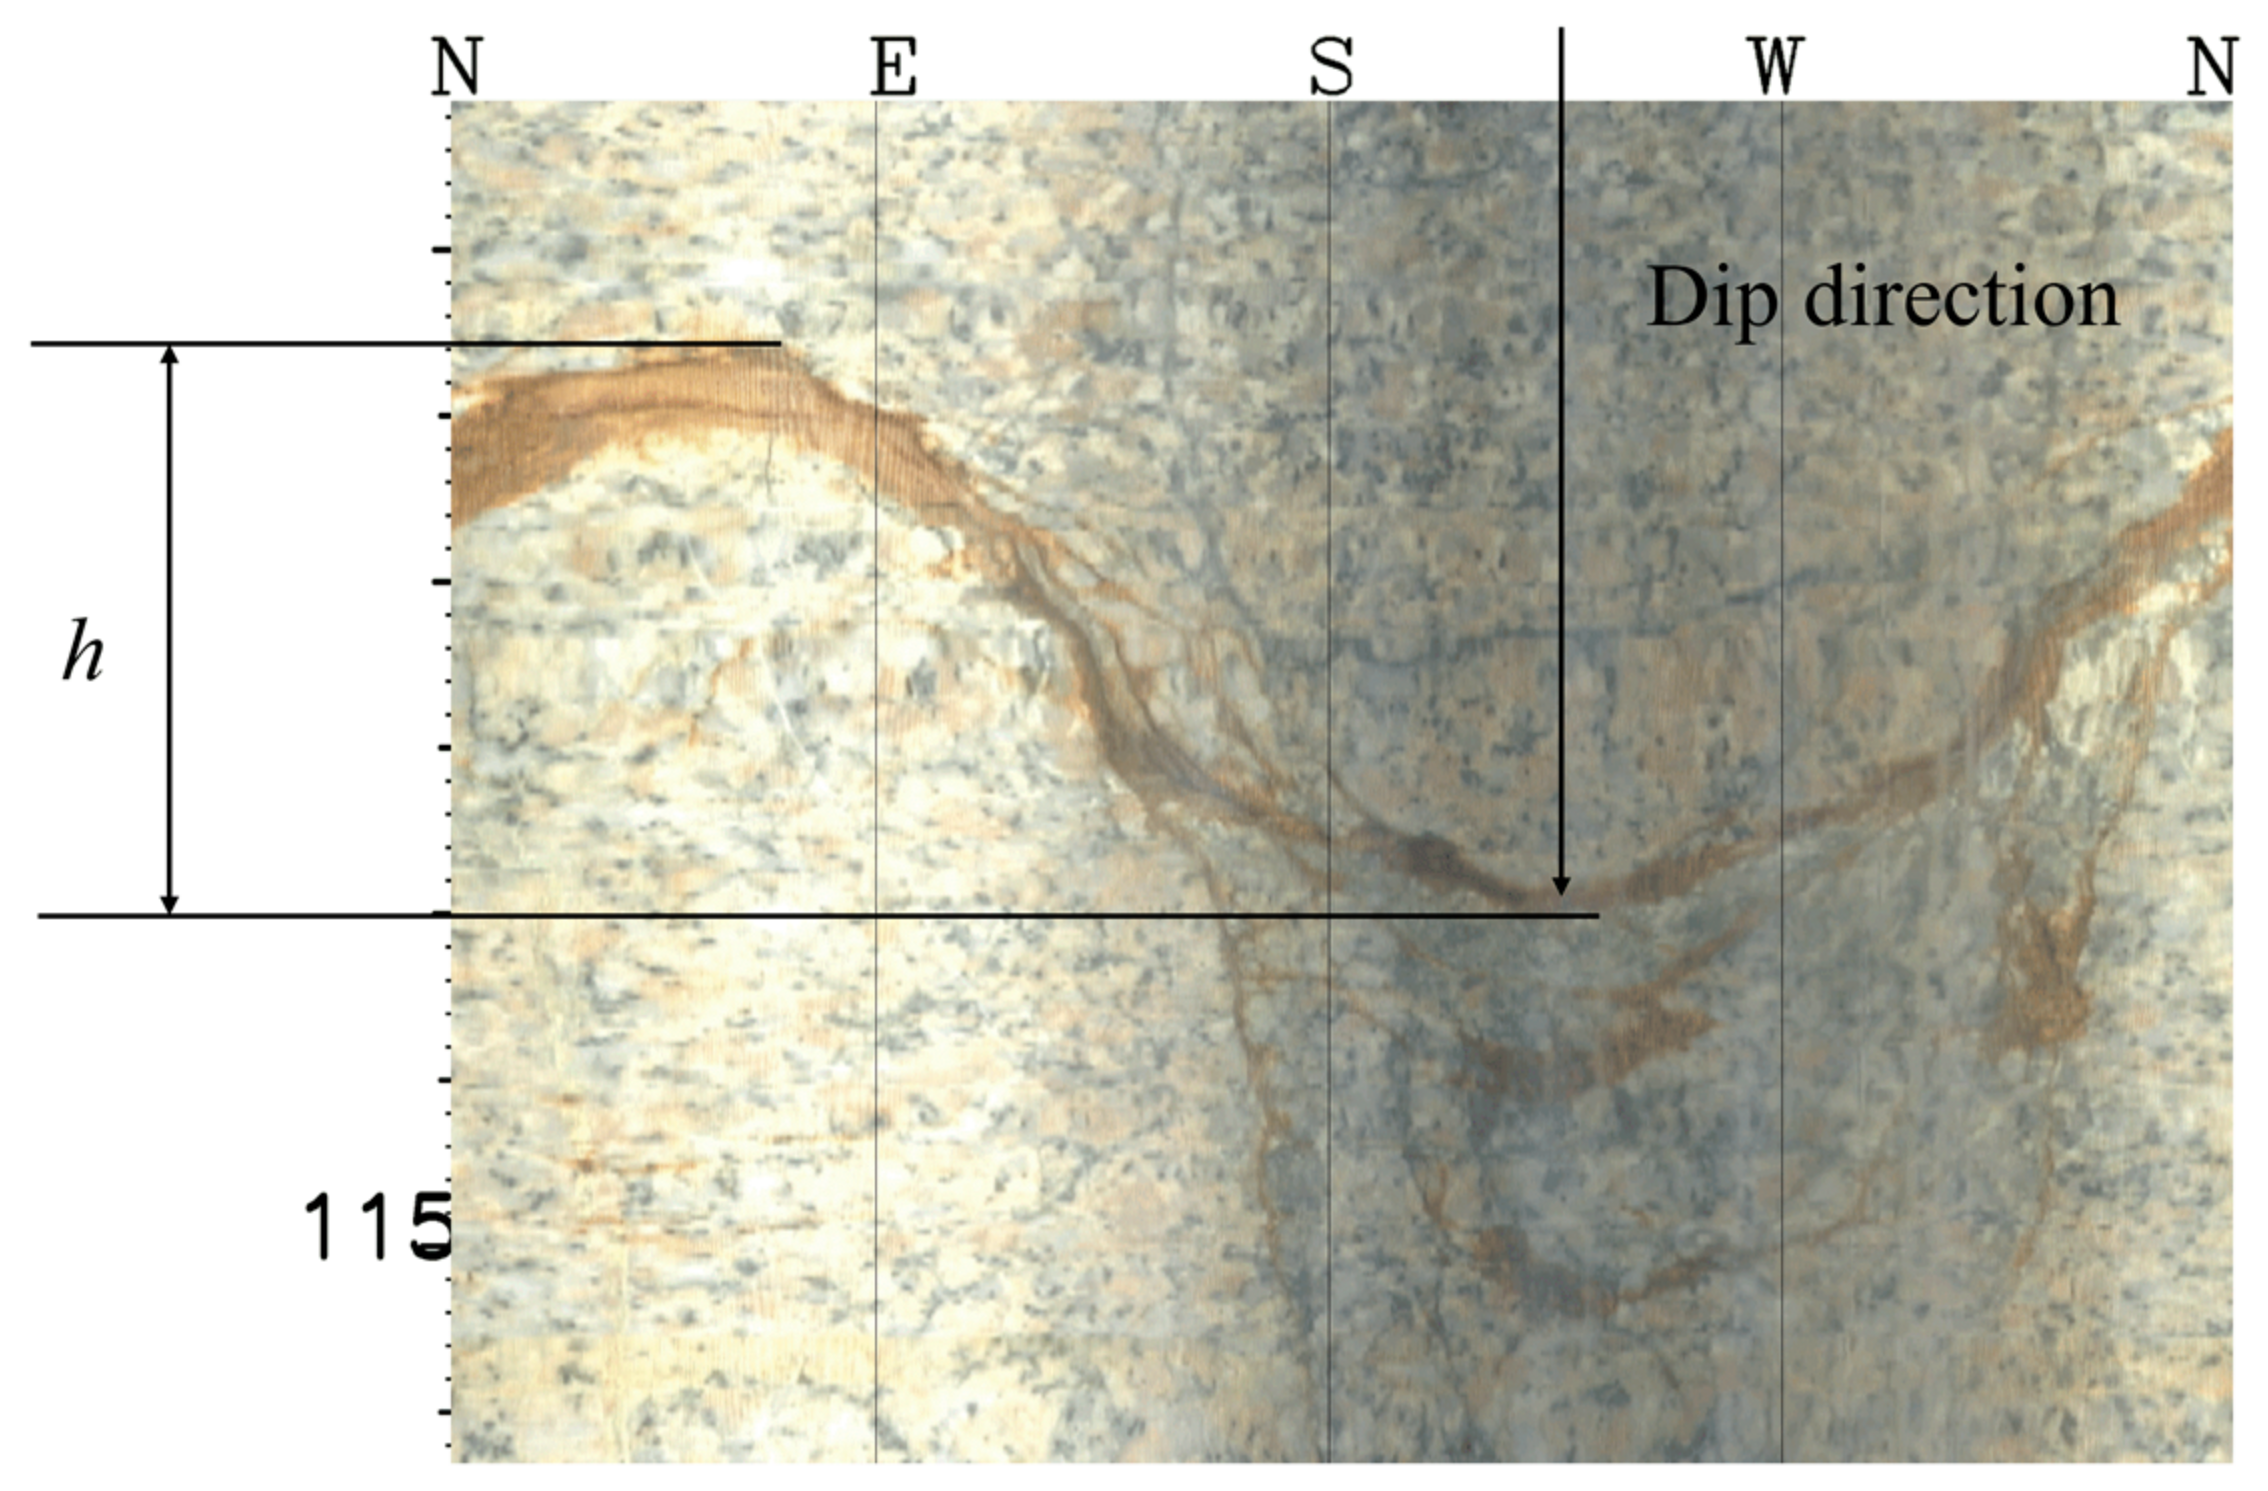
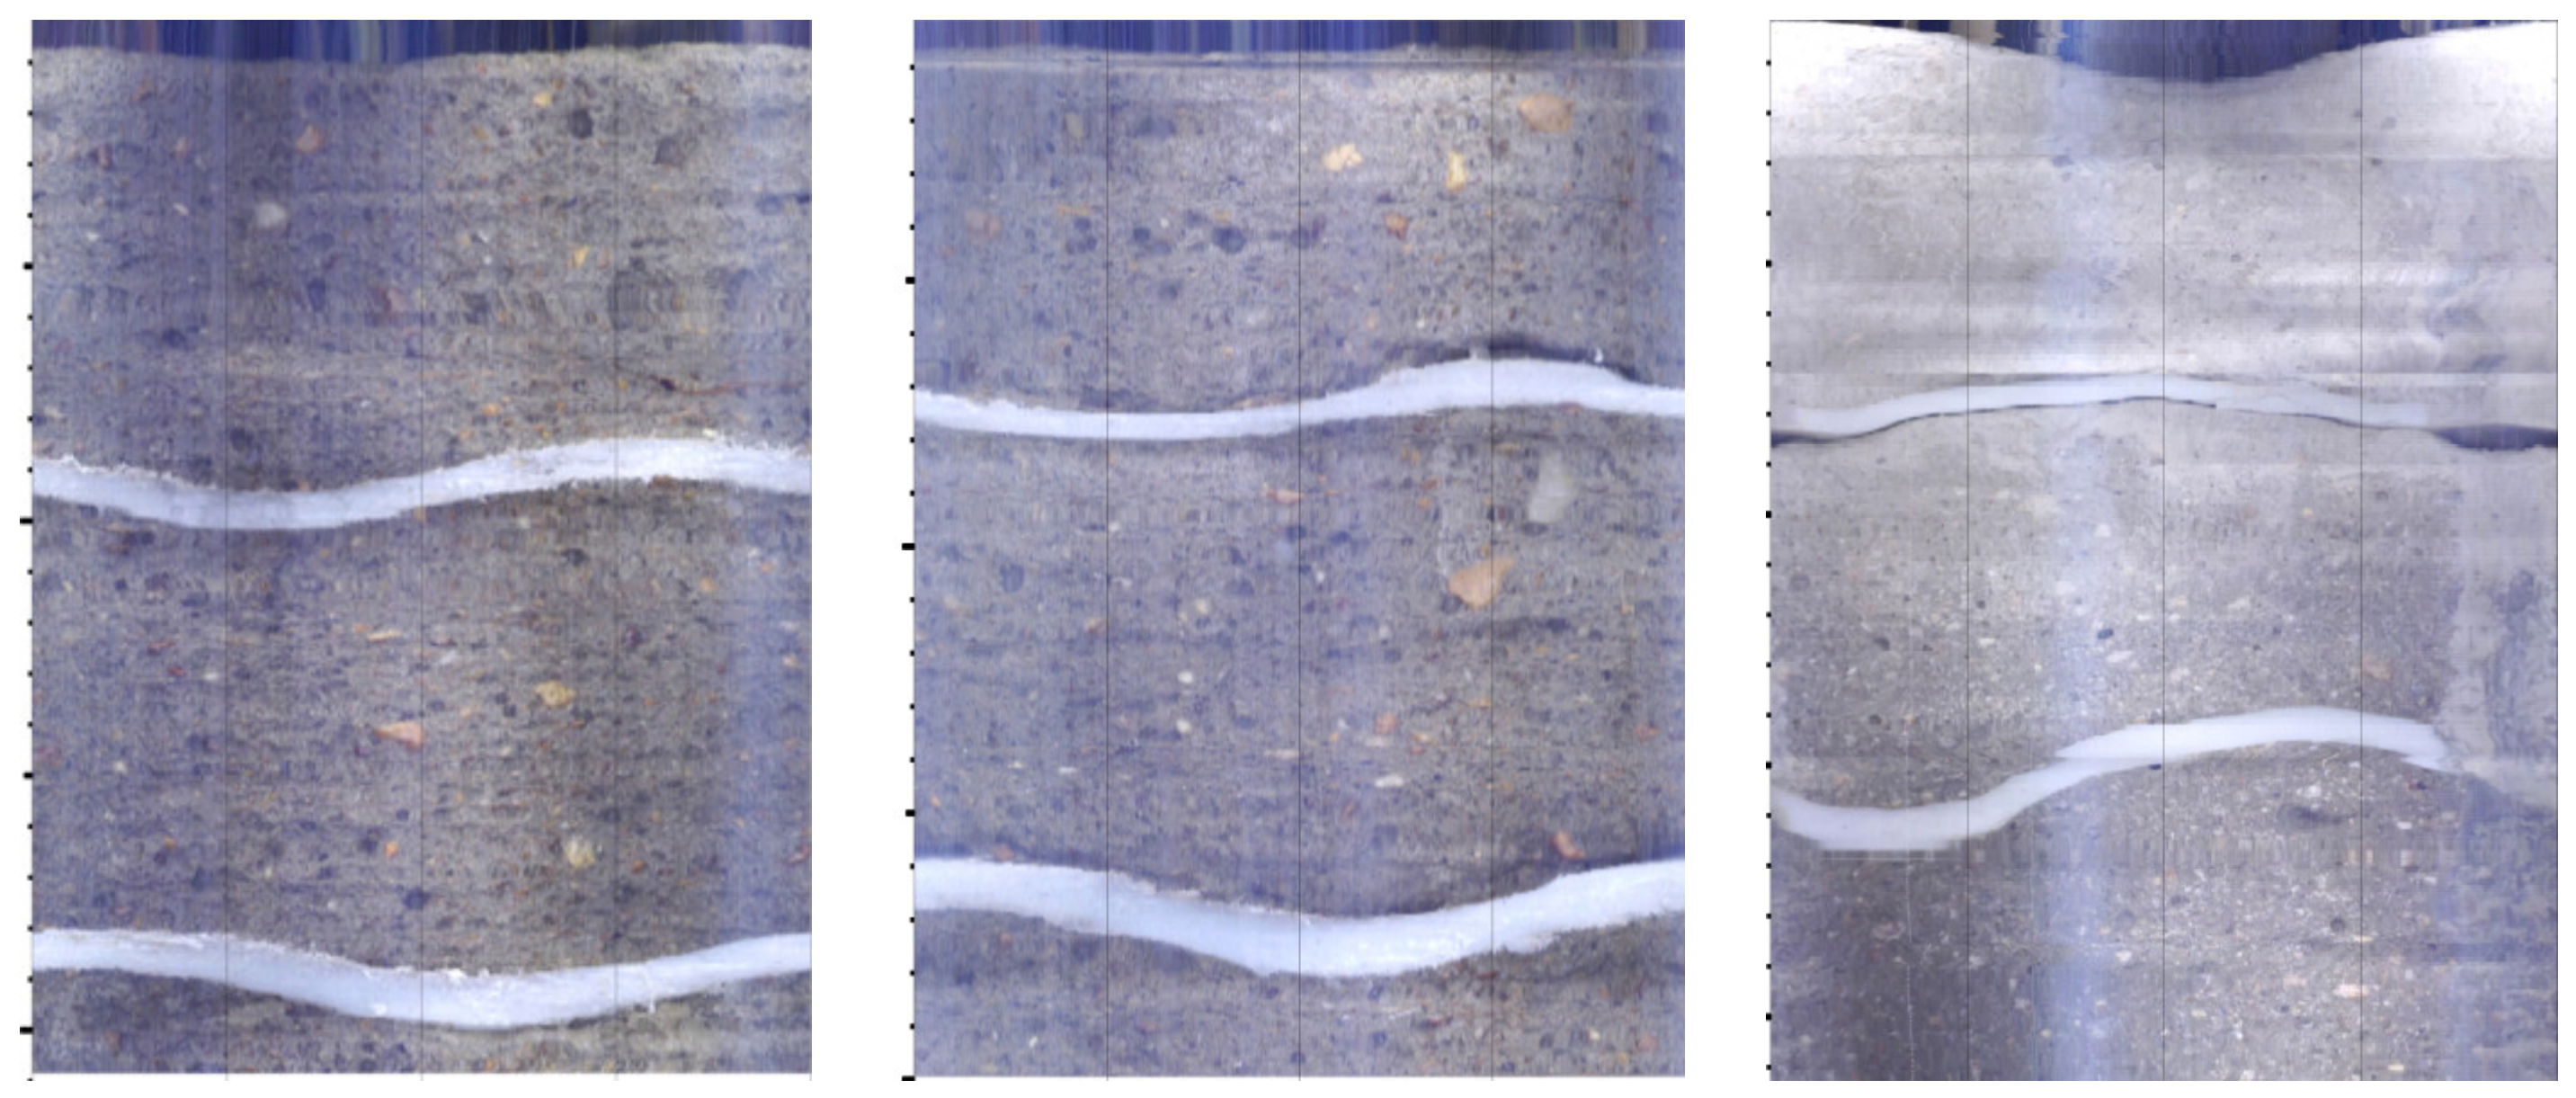
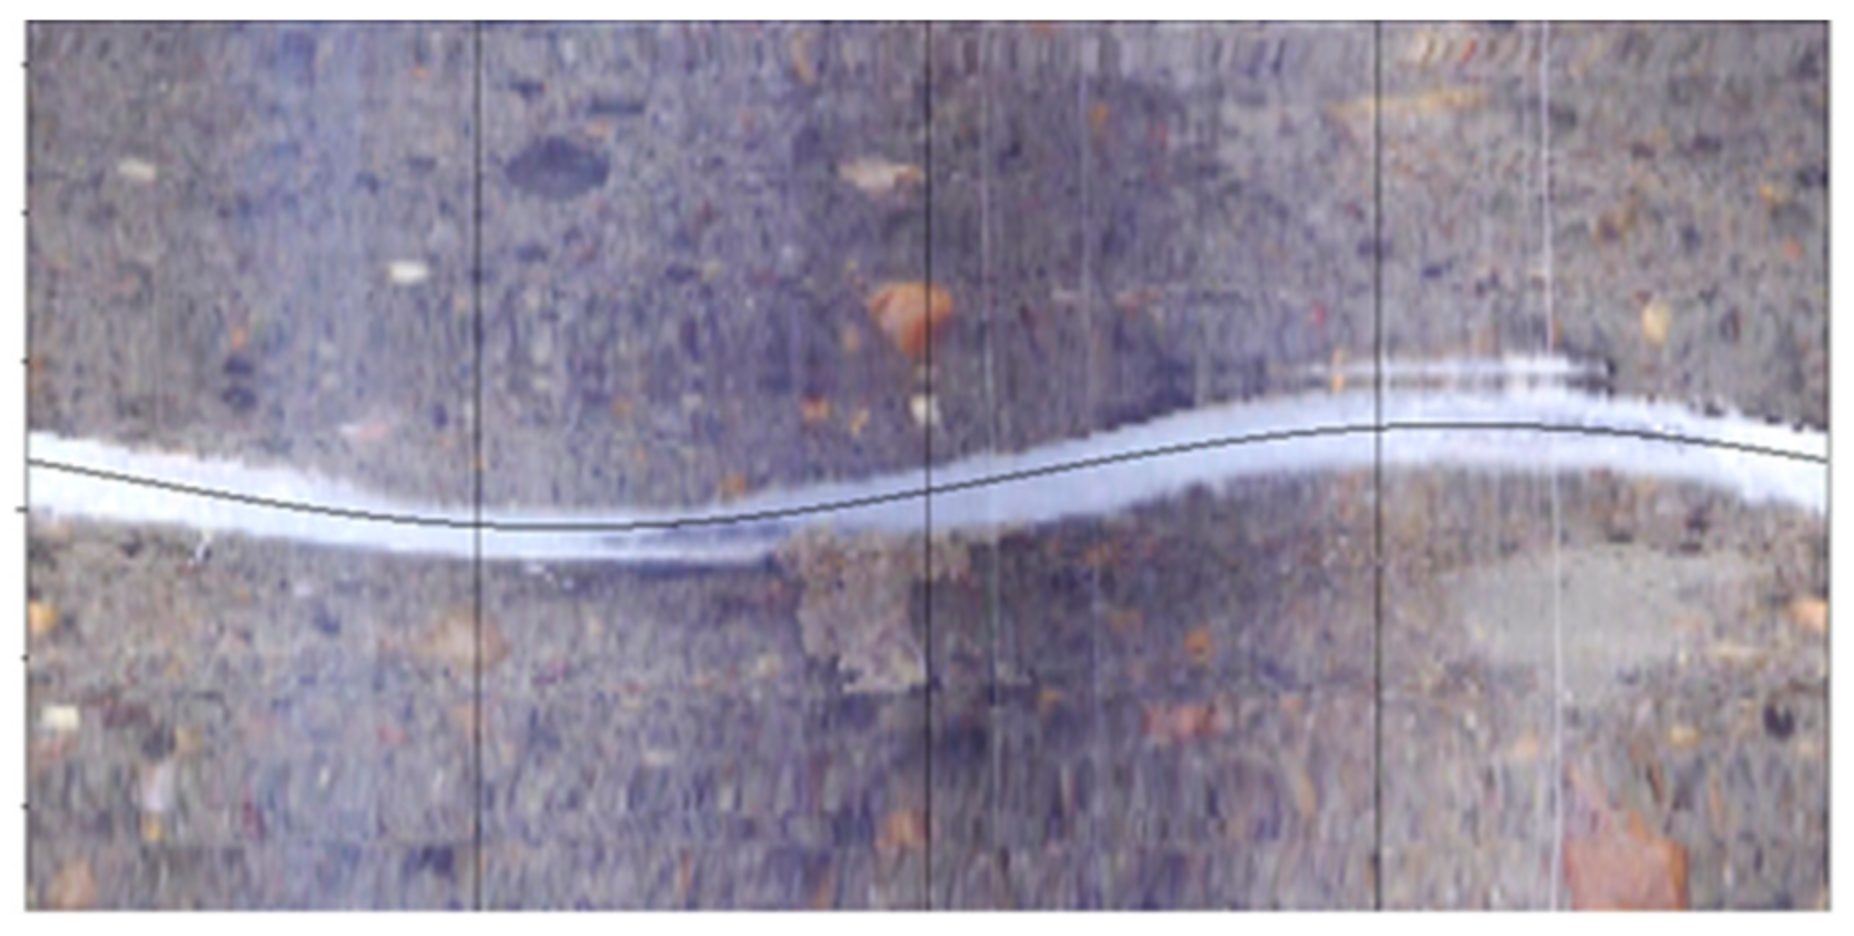
Due to the roughness and undulation angle of the structural plane, it is not absolutely in the form of a sine curve in the borehole image expansion diagram after the structural plane cuts the borehole wall (
Figure 10). In the analysis of borehole images, the sine curve is usually obtained by three-point fitting, and the yield information obtained after processing may deviate from the actual value. In addition, the three-point fitting process is intensely subjective, and the results are not conducive to subsequent analysis. Therefore, when processing the borehole images, the image processing tool is used to filter and detect the images’ edges, then extract the structural plane information from the generated borehole images. Fit them with MATLAB to obtain the sinusoidal curves, and convert them into yield information. The process is shown in
Figure 11. The results obtained in this way avoid the artificial point taking in the fitting process, and the results are more objective than before.
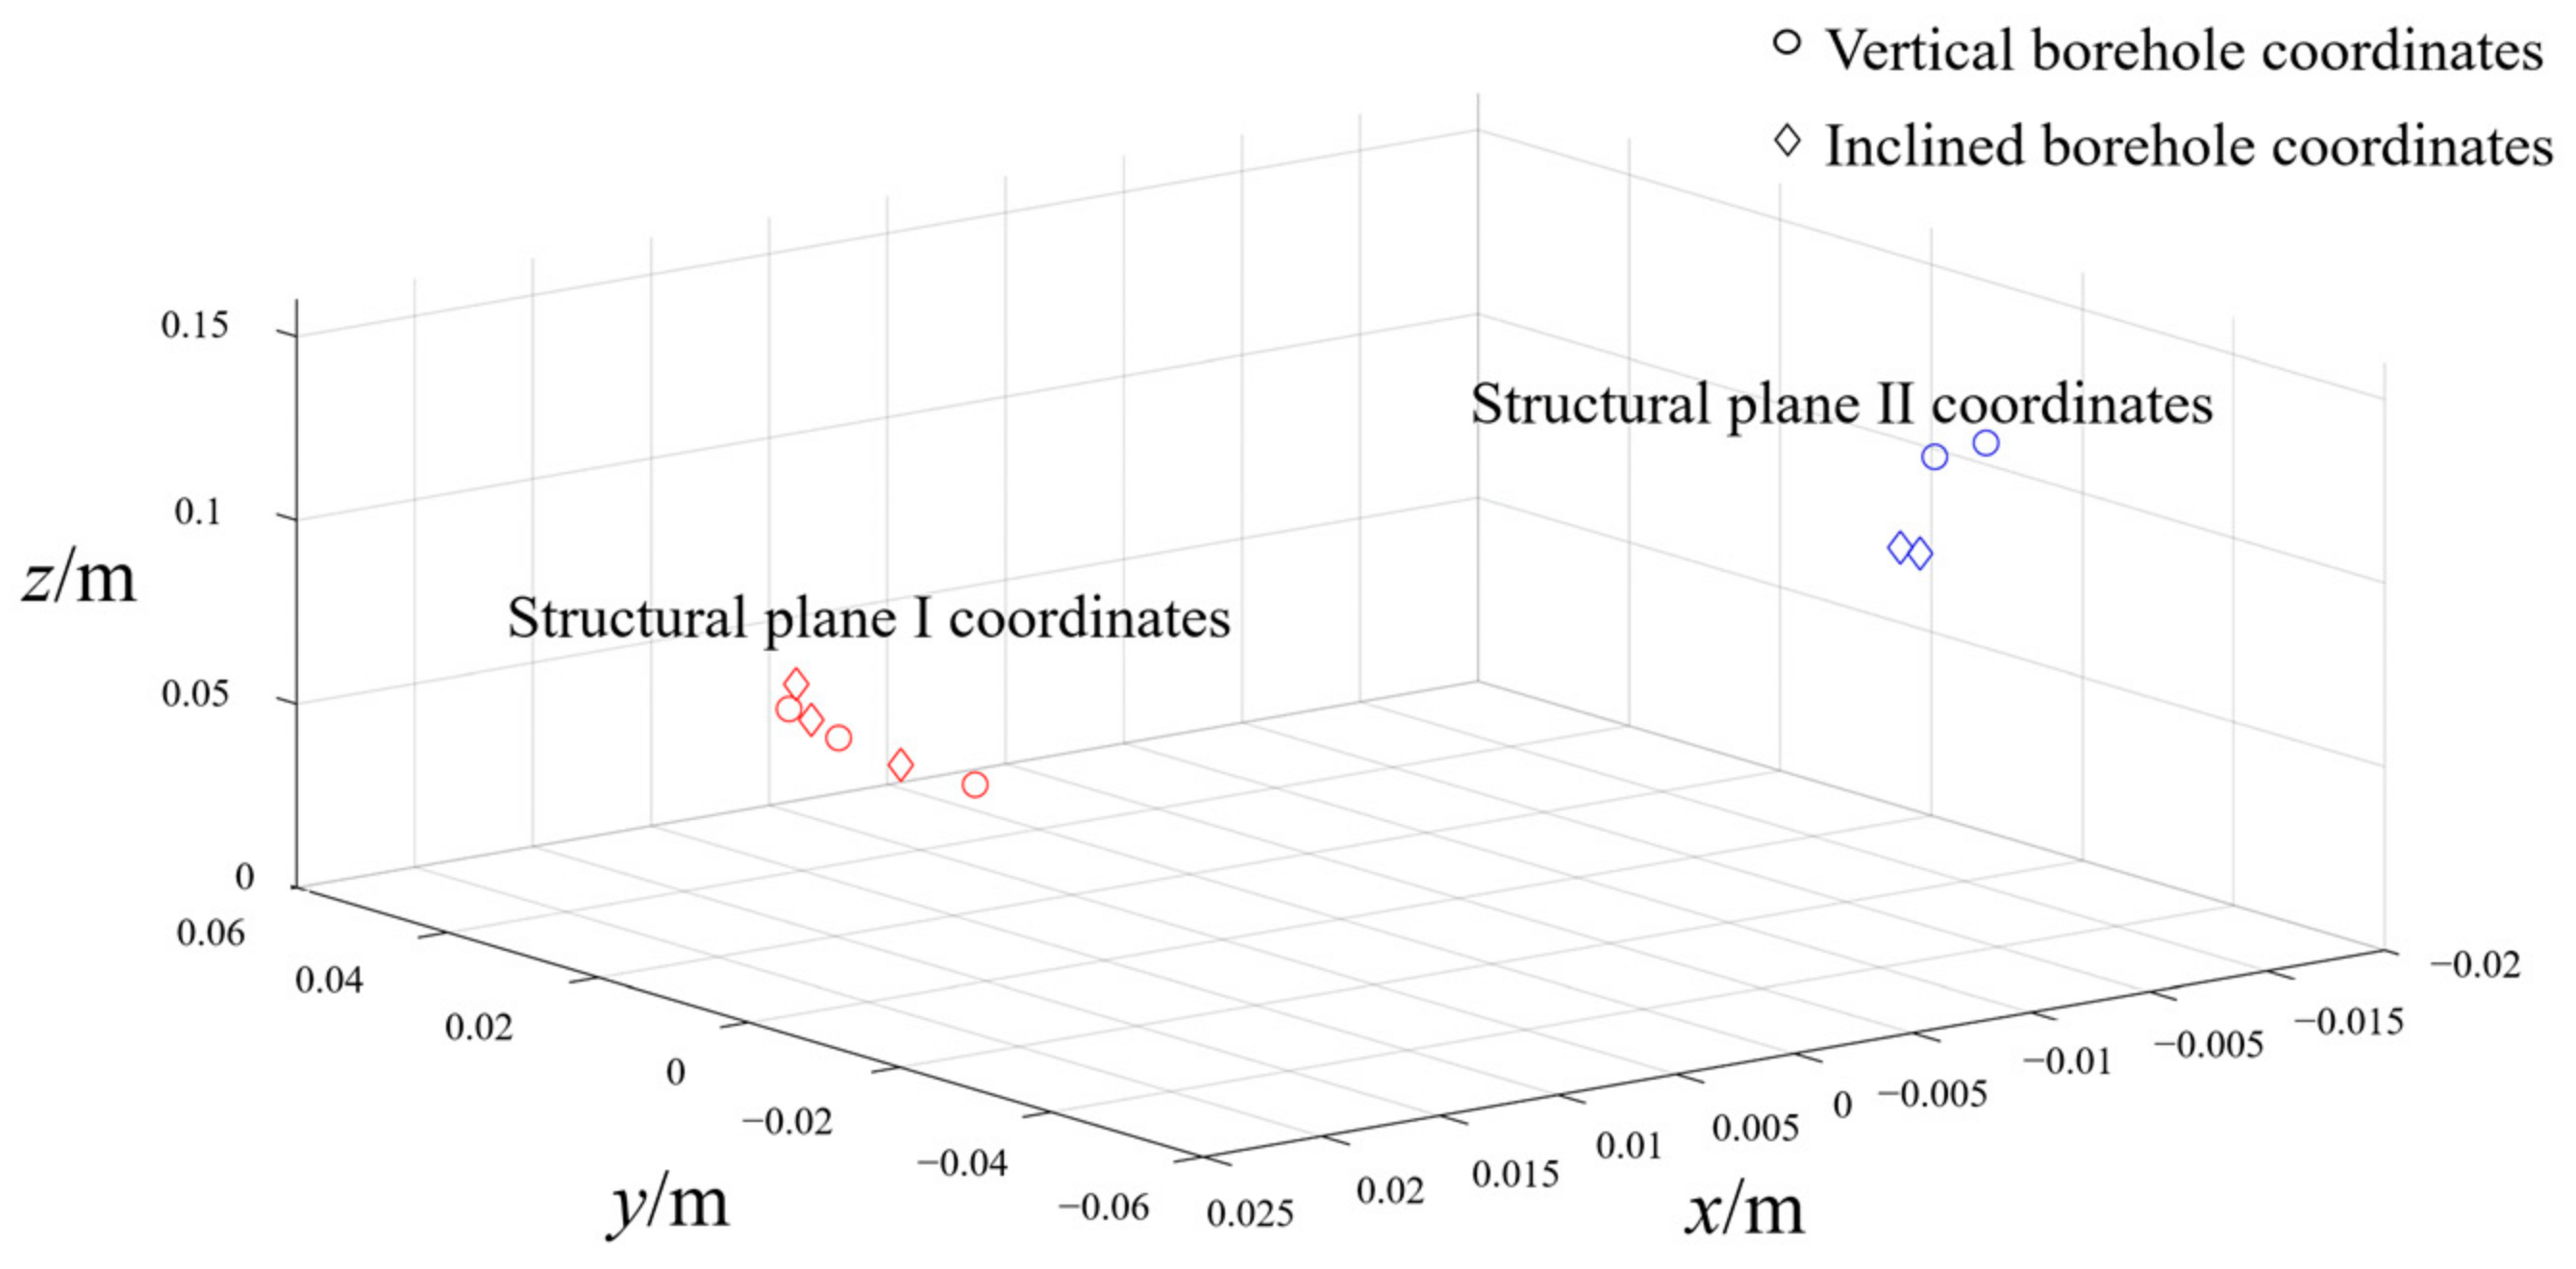
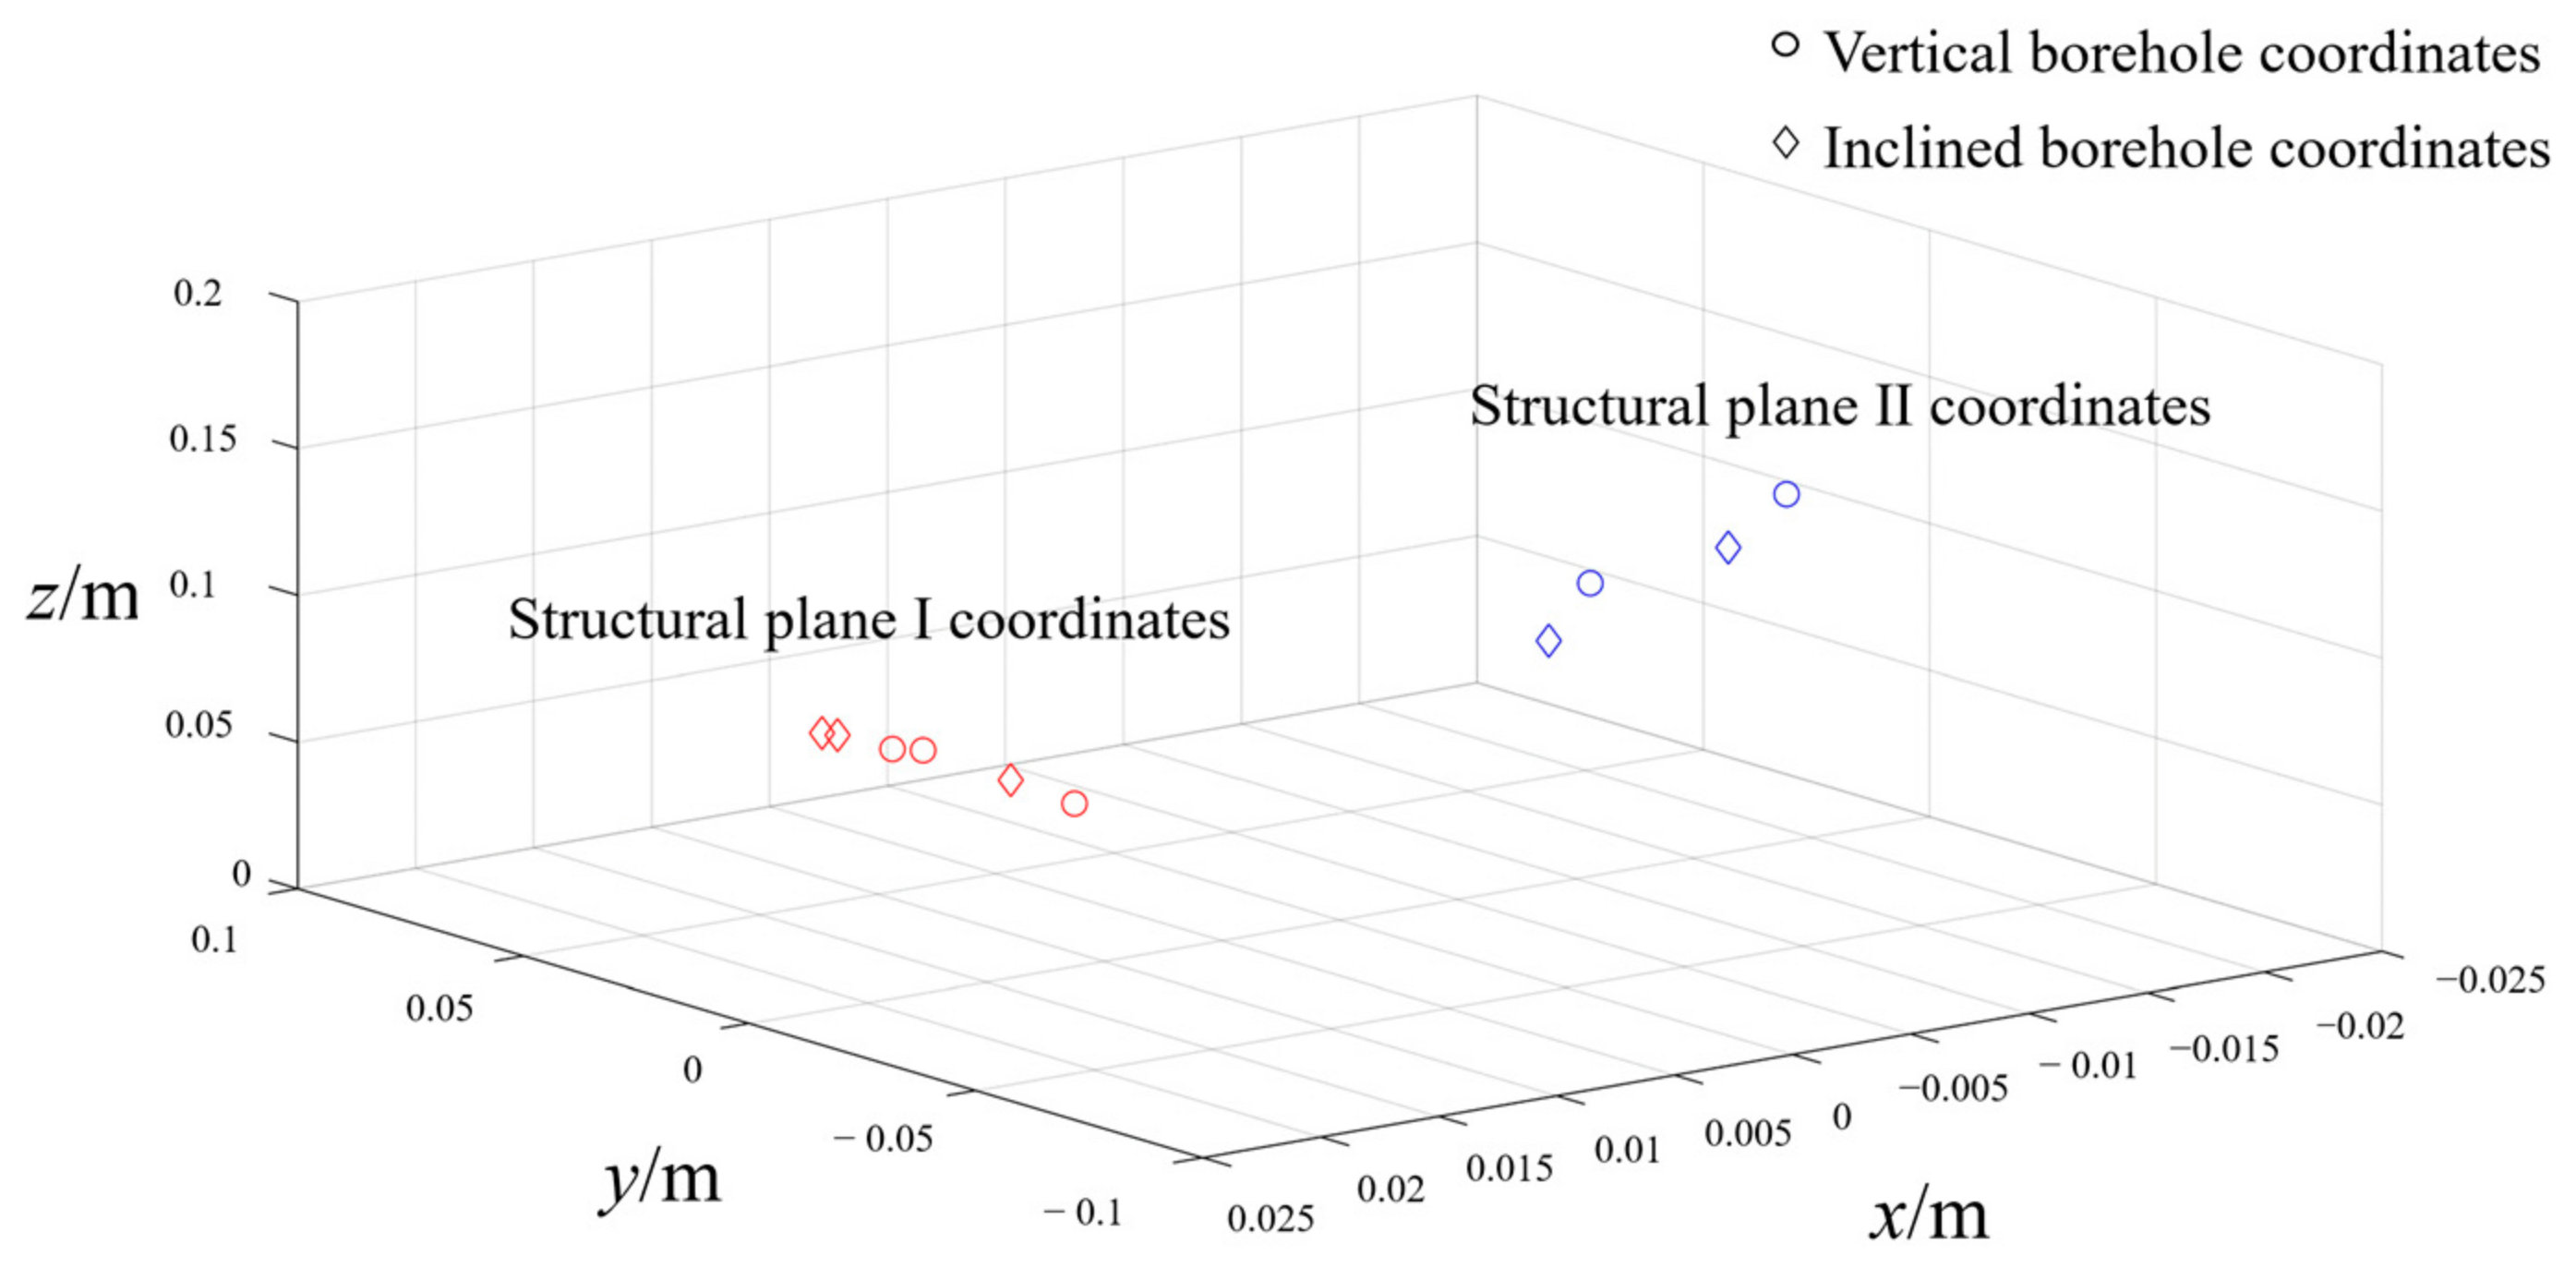
The two samples were arranged with six boreholes in the experiment, in which the structural plane Ⅰ was both penetrated by six boreholes and four boreholes penetrated the structural plane Ⅱ, so each sample corresponded to 10 coordinate points. The results of the coordinate points obtained by processing are shown in
Table 3 and
Table 4 below.
The structural plane coordinate points are plotted to the 3D coordinate system, and the results are shown in
Figure 12 and
Figure 13.
The figure shows that the coordinate points of structural plane Ⅰ and structural plane Ⅱ are separated from each other. Furthermore, the coordinate points of the same structural plane are concentrated so that the structural plane can be well distinguished by this calculation method. There is no apparent regularity for the position of coordinate points of vertical and inclined holes, so the calculation method applies to drilling at any angle in space. Comparing the coordinate point positions of sample 1 and sample 2, it can be found that the coordinate points of the structural plane with an undulating angle are more discrete than the flat structural plane. Therefore, the in the Equation (20) can be appropriately enlarged when the structural plane has some roughness and undulation angle.
Xichang Iron Mine, located in Sichuan Province, is a large open-pit iron mine. Due to the expansion of the mining scale and the increase of the mining speed, the problem of the side gang on both sides of the mine is becoming more and more prominent. The recovery of an ancient landslide was found on the south side of the mine, which caused great hidden danger to the safety production of the mine. In order to ensure the normal mining of the mine, it is necessary to further survey the side slopes on both sides of the mine. Using the digital panoramic borehole camera system to survey multiple boreholes on the side gang of the mine, we can understand the landslide’s inner structural plane, the distribution of the fracture zone, and its coherence analysis to make a targeted reinforcement strategy.
After collecting data on-site using digital panoramic borehole camera technology, the collected results were analyzed. There are three vertical boreholes on a landslide surface, hole numbers ZK1, ZK2 and ZK3, and their orifice coordinates are (12259.532, 88099.958, 1707.729), (12299.435, 88111.734, 1708.499). The survey depth of each borehole is 70m. Take the mean value of the three borehole coordinates as the coordinate origin, the due north direction as the
x-axis, and the vertically downward direction as the
z-axis to establish a suitable coordinate system. A suitable coordinate system was established to facilitate subsequent data processing and reduce errors. Furthermore, after a coordinate transformation, the orifice coordinates were converted to ZK1 (−34.452, −7.623, 0.810), ZK2 (5.451, 4.153, 1.580), and ZK3 (29.002, 3.471, −2.391), the relative position diagram of the boreholes are shown in
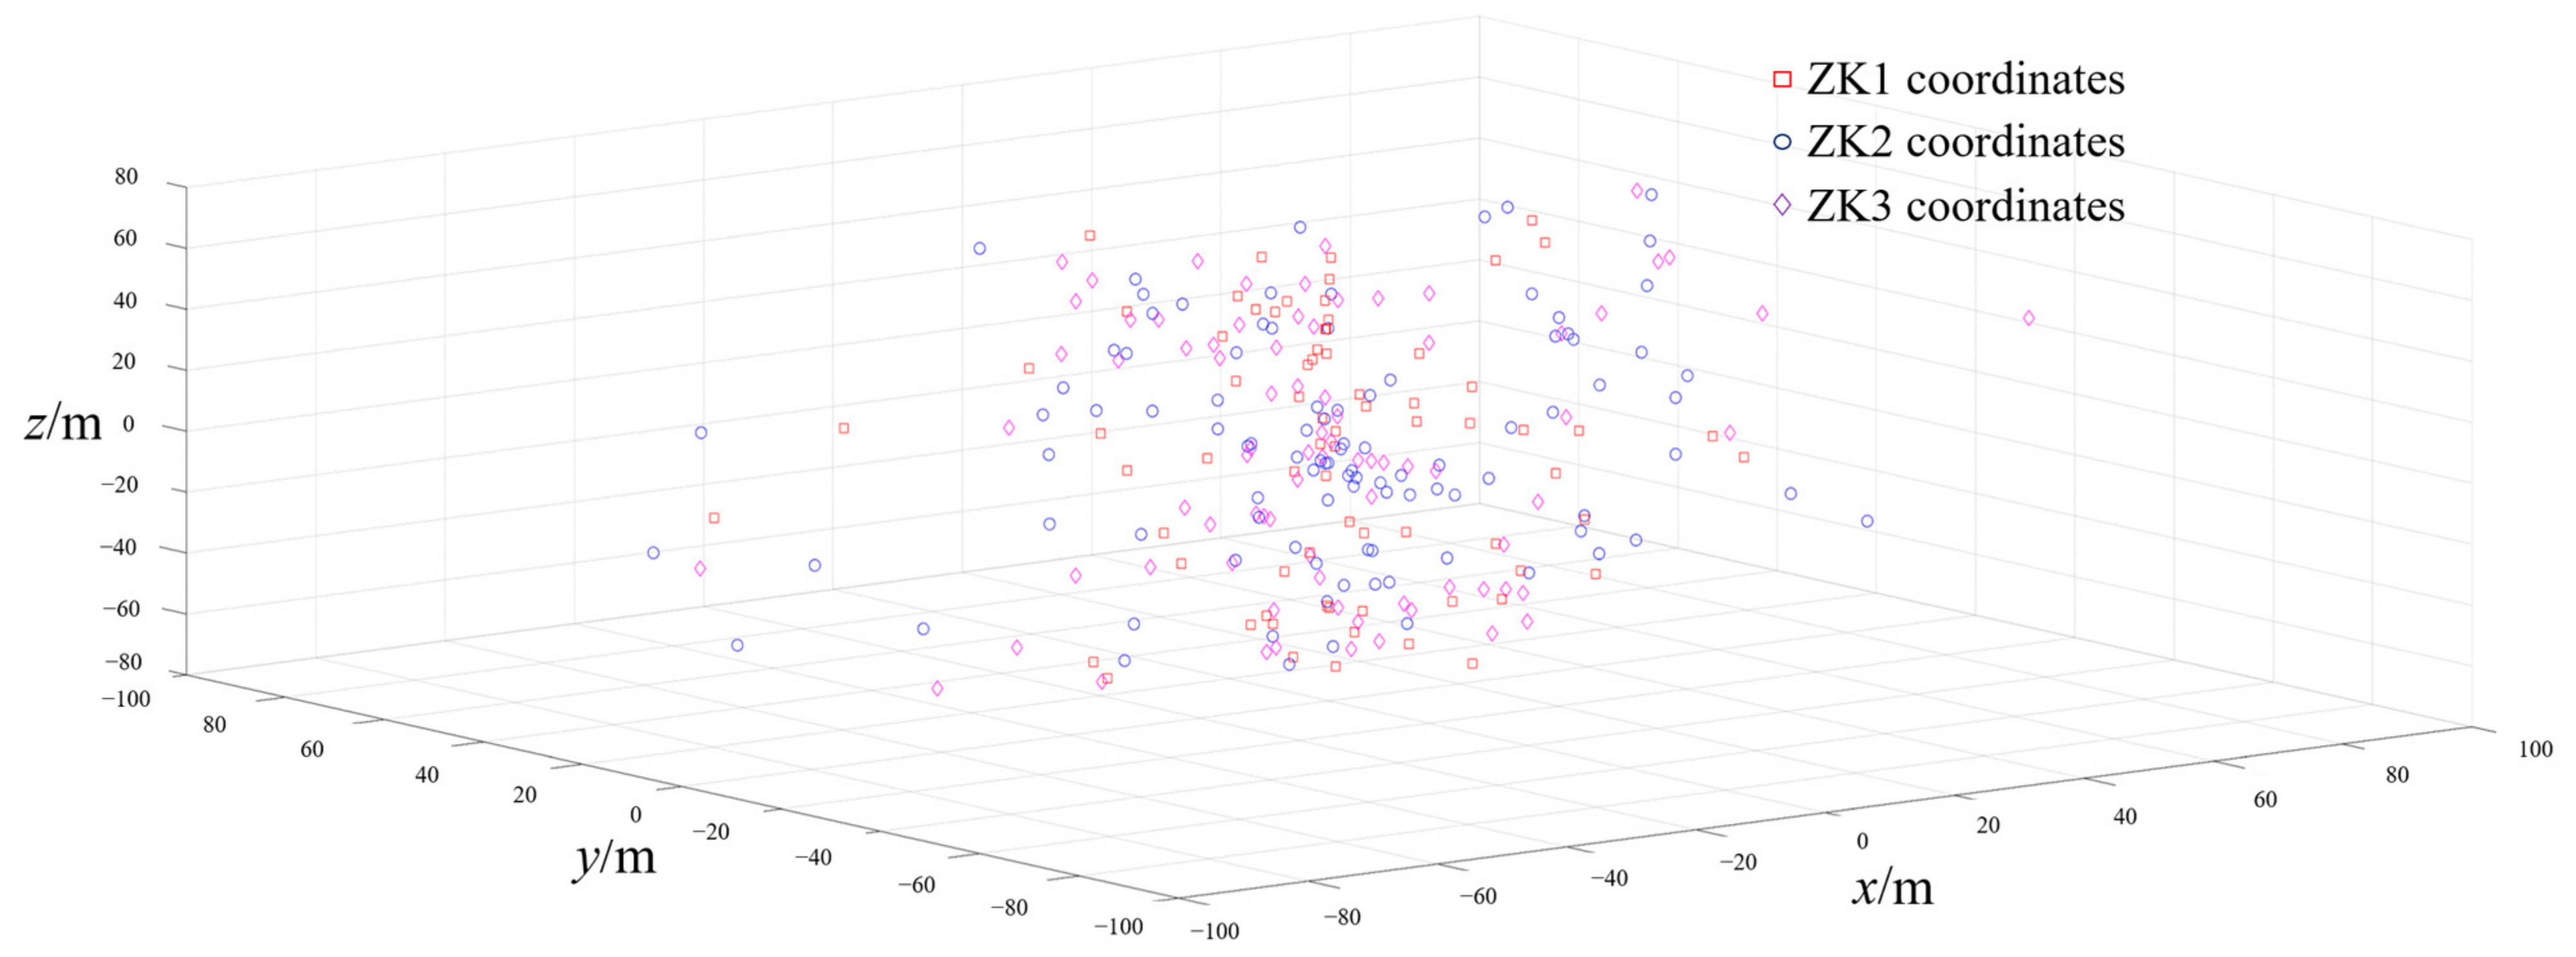
Figure 14. After processing the analyzed structural plane data, the data were plotted into the 3D coordinate system to obtain
Figure 15. From the figure, it can be found that the structural plane coordinate points are not uniformly distributed, and the dense areas of their distribution are consistent with the statistically obtained dominant production grouping of the structural plane.
According to the calculation formula, determine the appropriate
value, which is 5 here. Combined with the occurrence and depth information, we can quickly screen out some structural planes that meet the consistency from a large number of data.
Table 5 below shows the seven possible coherent structural planes screened.
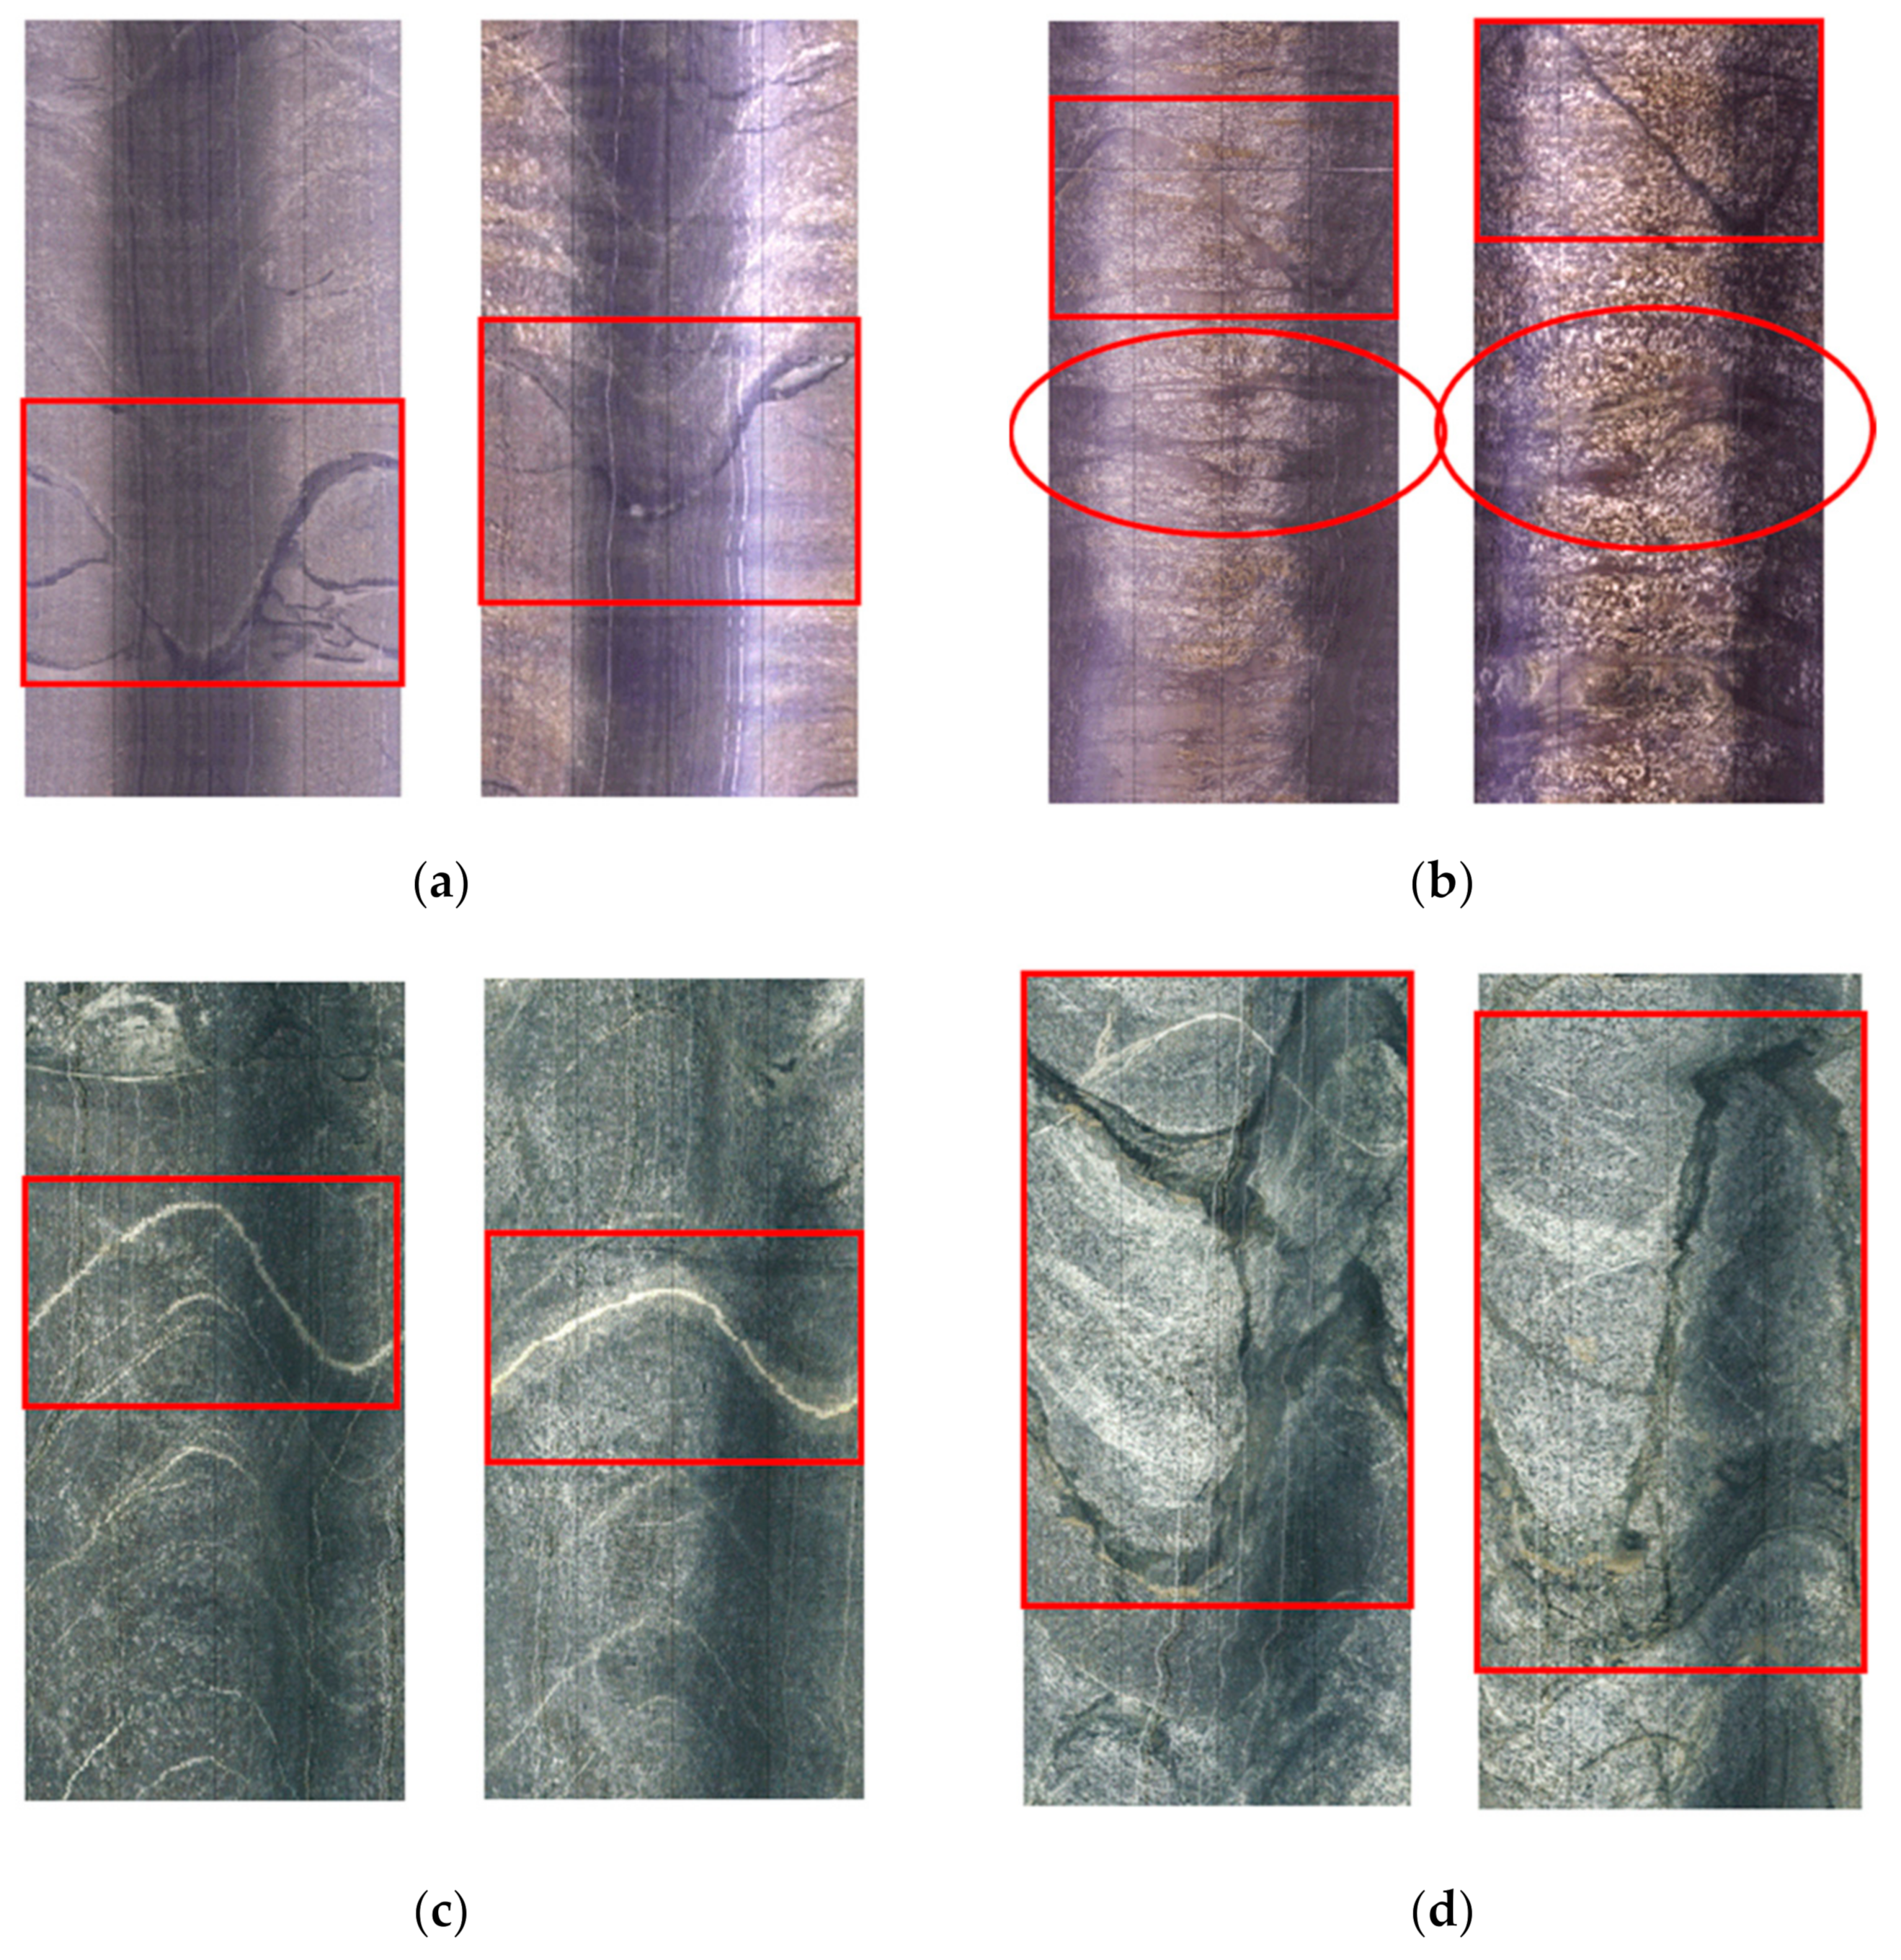
By using the structural face information and finding the corresponding borehole images, the coherence of the structural faces can be further judged. By comparing the geological characteristics of the structural faces, the following four groups of more consistent structural faces were found, as shown in
Figure 16 below, among which (a) (b) and (d) are all open fissures with the same lithology on both sides of the structural faces, the geological characteristics are consistent, and the openness of the structural faces are similar, and (c) is a group of closed structural faces with consistent structural face morphology and good coherence.
5. Conclusions
In this paper, we studied the method of discriminating the structural plane consistency of a rock based on optical borehole images. We obtained the following conclusions by designing several indoor controlled experiments and applying the discriminating method to a regional landslide survey in Xichang Iron Mine.
(1) Based on the spatial geometry and vector analysis, the discriminative method of structural plane consistency within any two boreholes in space is derived. The discriminative method can initially screen out the possible connected structural planes, significantly improving the efficiency of analyzing the structural plane consistency.
(2) By finding the corresponding high-precision hole wall images through the preliminary screened structural face information, observing the color, morphology, and type of rocks on both sides of the structural plane, comparing the textural characteristics of the rock and the geological characteristics on both sides of the structural plane, further consistency analysis of the structural plane to be selected is carried out.
(3) Comparing indoor tests and analyzing an engineering example in a mining area of the Xichang iron ore mine proves that the above discrimination method can be applied to two boreholes with arbitrary angles and positions in space. Moreover, the method can quickly and efficiently screen the structural faces that may be consistent with consistency in multiple groups of boreholes. After further identification by hand, the structural face consistency inside the rock body can be finely described.
