Article

Non-Destructive Evaluation of In-Plane Waviness in Carbon Fiber Laminates Using Eddy Current Testing

1
Department of Electrical and Computer Engineering, Baylor University, Waco, TX 76706, USA
2
Department of Mechanical Engineering, Baylor University, Waco, TX 76706, USA
*
Author to whom correspondence should be addressed.
Appl. Sci. 2023, 13(10), 6009; https://doi.org/10.3390/app13106009
Submission received: 25 April 2023 / Revised: 9 May 2023 / Accepted: 10 May 2023 / Published: 13 May 2023
(This article belongs to the Special Issue Nondestructive Testing of Composite Materials)

Abstract

:
Non-destructive detection of the in-plane waviness of carbon fiber-reinforced plastic (CFRP) laminates is of interest in a wide variety of industries, as wrinkles and other fiber alignment defects significantly impact the mechanical performance of the composites. This work demonstrates a method to detect in-plane wrinkles on a 5-ply unidirectional CFRP laminate with a customized eddy current testing (ECT) system. The results show that the ECT system is effective in detecting and quantifying in-plane waviness, and the results are compared to conventional X-ray computed tomography (CT) and ultrasonic testing (UT) methods. Using the anisotropic conductive nature of the aligned CFRP lamina, the ECT system was able to clearly detect throughout the part changes in the local fiber orientation, wave tangent angle, and wrinkle width.

1. Introduction

Carbon fiber-reinforced plastic (CFRP) is widely used in aerospace, automobile, shipping, sporting goods, and other industries due to its excellent strength to weight ratio, wear, and corrosion-resistant properties [1]. However, a defect in the manufacturing stage of CFRP composites can lead to premature failure during its service time [2]. In-plane waviness is one such defect that can significantly reduce the mechanical properties such as tensile and compressive strength and stiffness of CFRP composites [3]. In-plane waviness is difficult to observe visually during manufacturing and will be impossible to see once a surface coating is present or if the defect occurs below the surface lamina. Thus, rigorous detection and evaluation of in-plane waviness requires the use of non-destructive testing (NDT) and non-destructive evaluation (NDE) techniques.
Many NDT methods for inspecting CFRPs exist, and each has unique strengths and weaknesses for certain applications and types of defects. NDT methods that have shown success at detecting fiber orientation in CFRPs include ultrasonic testing (UT) [4], eddy current testing (ECT) [5], optical microscopy, X-ray computed tomography (CT), and microwave synthetic aperture radar (SAR) polarimetry [6]. Except for microwave polarimetry, these methods typically use high-resolution imaging and post-processing based on transforms such as the Fast Fourier Transform (FFT) or the Discrete Radon Transform (DRT) to determine the dominate fiber orientation in one or more laminae.
Previously, researchers used high resolution pulse/echo UT and the 2D FFT to detect the ply orientation within ±3° for each lamina in a 20-ply cross-weave laminate, with the exception of the top three laminae [4]. ECT imaging has also been developed by Hughes et al. to determine the fiber orientations and stacking sequence of unidirectional laminates using the FFT and DRT [7]. Because of its high precision and accuracy, CT scanning has also been applied to CFRPs as a comparison for error analyses and verification of other methods.
In-plane waviness refers to a defect within woven or unidirectional CFRPs where the fiber orientation has unwanted variations throughout the part. A common variation of this defect is an in-plane wrinkle, which can be characterized by the parameters width, amplitude, and maximum angle. The literature contains many successful approaches to detecting fiber orientation and ply layup order, whereas fewer methods have been developed for fiber waviness detection and quantification. The existing CFRP NDT methods struggle with scanning this type of defect for a variety of reasons. To detect in-plane waviness, a scanning method must identify changes in the fiber direction at multiple points in the scanning area.
Generally, the existing imaging methods have been optimized to detect a single dominant fiber orientation over the entire scan area and thus do not have the resolution to accurately determine the changing fiber’s orientation throughout an image. One counterexample is in the work of Kosukegawa et al., where edge detection techniques were used to obtain angle changes at the edges of the waviness section [8]; however, this was not applied to quantify the waviness, as datapoints were only extracted at the strongest identifiable edges, not the entire part or the waviness region.
Non-imaging methods have shown promise in efficiently and accurately determining varying fiber orientation in CFRP. These methods rely on the directionality of ECT probes and include detection [9,10], estimation [11], and visualization [12] of in-plane waviness. The consistent and reliable quantification of fiber waviness, however, is still a sought-after goal for the NDT toolbox, as most of the existing methods focus on detection or parameter estimation.
In this work, we apply rotational eddy current testing to measure the fiber angle throughout a unidirectional CFRP laminate. This approach differs from those found in the literature in several ways. The approach does not rely on imaging or image processing, which in turn, depends on the resolution of the scan. Furthermore, because of the rotational scanning pattern, we are directly measuring the fiber orientation instead of providing a calculated estimation, the accuracy of which is reflected by the presented error analysis. The presented method allows for accurate 2D visualization and quantification of the fiber’s waviness while being flexible in the spatial resolution, scan pattern, and scan region. Because the method measures relative amplitudes at individual points, it is also insensitive to lift-off. This work is an extension of the early study published by Newton et al. [13].

2. Materials and Methods

2.1. Manufacturing the CFRP Sample with in-Plane Waviness

The test sample used in this study is a 5-layer 0 ° 5 pre-impregnated unidirectional laminate. Coupons were fabricated with “prepreg” material obtained from Rockwest Composites using a Toray T700 unidirectional fiber in an epoxy resin system. The procedure to produce the in-plane waviness was performed following the same general technique as presented in other locations in the literature [14,15].
During the layup process, the five 13.5 × 18.5 cm laminae are laid on an aluminum tool over a glass rod lying perpendicular to the fiber direction, as shown in Figure 1a. Using a heat gun to soften the resin, the laminae on either side of the rod are pressed down, forming an out-of-plane wrinkle supported by the glass rod. The glass rod is then removed from the clamped fiber and the out-of-plane wrinkle is rolled flat to form the in-plane wave depicted in Figure 1b. Finally, the part is vacuum-bagged and cured according to the manufacturer’s recommended cure cycle.
While the defect itself is highly reproducible with this technique, it is difficult to control and reproduce wrinkle parameters such as maximum angle and wrinkle width. However, the part was scanned on the tool side to avoid any potential issues introduced by inconsistency in the fabrication, such as lift-off errors.

2.2. Manufacturing the Custom ECT Probe

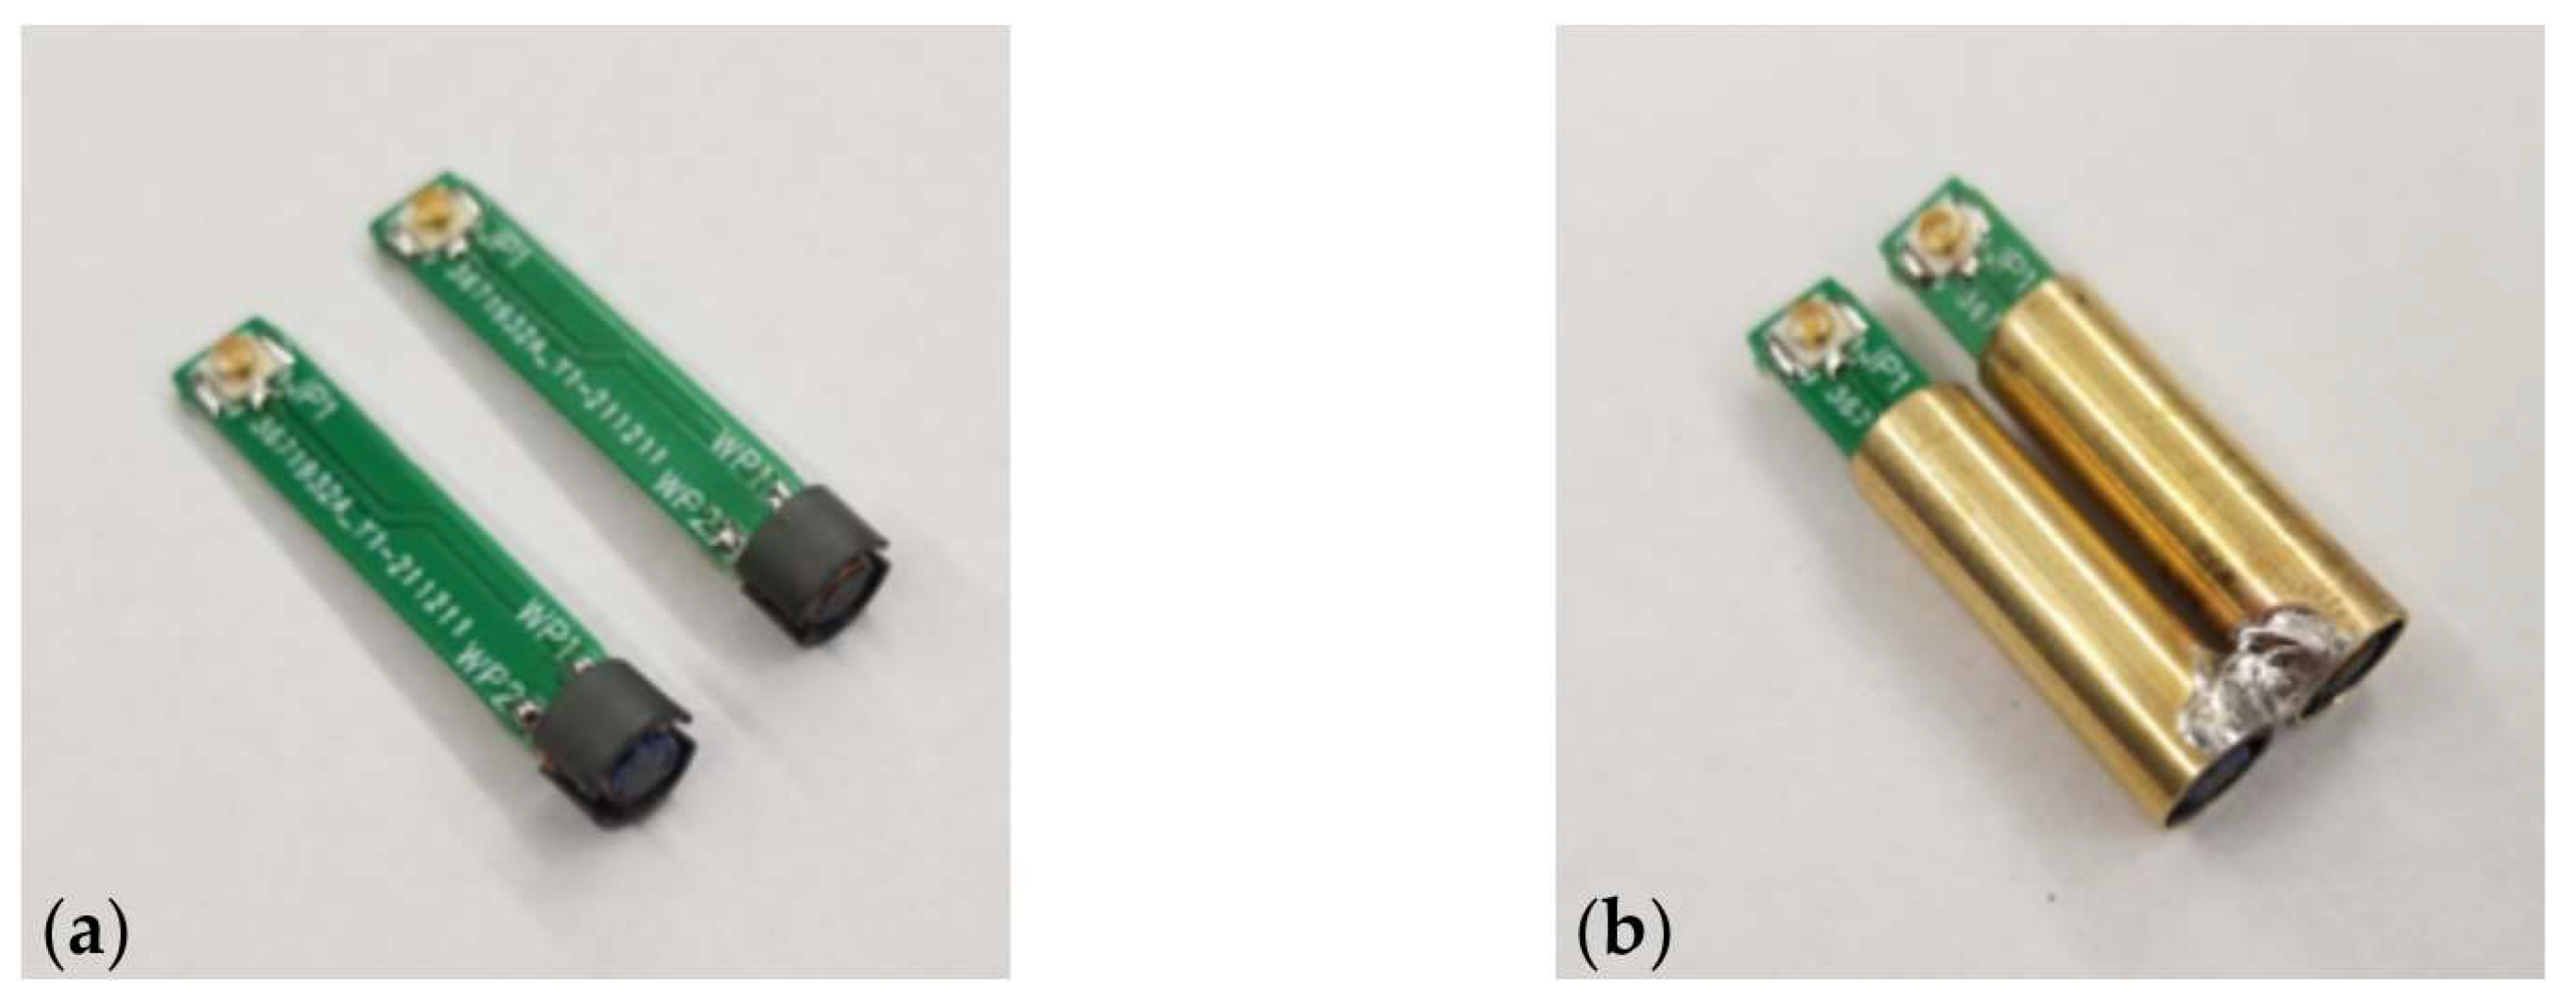
The horizontally displaced transmit-receive probe topology, shown in Figure 2, is chosen for the present study due to its inherent directionality and electronic simplicity. To implement this, two identical coils are fabricated with 10 turns of coated copper wire around a 2.5 mm diameter rod. These coils are placed in M33 pot core ferrites with a height of 3.7 mm and an outer diameter of 5.6 mm. Finally, the coil–ferrite assemblies are soldered to custom PCBs, which route solder pads to UMCC connectors and are glued inside a brass tubing housing for structural integrity, additional shielding, and rigid coil separation. UMCC to SMA cables route the coils directly to the waveform generator and IQ demodulator.

2.3. Experimental ECT System

The custom-built ECT probe assembly is mounted onto the rotary table of a motorized 4-axis stage via telescoping brass rods for automated translation and rotation. This motorized stage is controlled by two Velmex VXM-2 controllers that receive commands from a laboratory PC running custom MATLAB scripts. A coaxial cable connects the transmitter coil to a BK Precision 4064 dual channel arbitrary waveform generator to act as an AC voltage source operating at f = 15 MHz. Likewise, the receiver coil is connected to an AD8333 I/Q demodulator chip, which acts as a low-cost lock-in amplifier. In this case, the AD8333 chip is implemented using the AD8333-EVALZ evaluation board, which contains all the necessary amplification, biasing, and connections for immediate use in the system. The reference signal for the AD8333, operating at 4 × f = 60 MHz, is supplied by the second channel of the BK Precision waveform generator. Section 2.4 describes the mathematics behind the IQ demodulation and its relation to our study in more detail. Finally, the in-phase and quadrature output channels of the demodulator are sampled by the A/D inputs of an NI 6009 USB DAQ unit for processing by the computer in a MATLAB environment. Figure 3 shows the block diagram of the entire hardware system.

2.4. IQ Demodulation

Given a sinusoidal input voltage V i provided by the BK Precision 4064 into the transmit coil, a sinusoidal output voltage V o can be read on the receiver coil. In the ideal case, these voltages can be defined as
V i t = A i cos 2 π f t ,   and
V o t = A o cos 2 π f t + ϕ .
The BK 4064 also generates a reference signal
V r t = A r cos 2 π 4 f t ,
which is down-converted by the AD8333 to the quadrature pair
V r , I t = A r cos 2 π f t ,   and
V r , Q t = A r cos 2 π f t + 90 ° = A r sin 2 π f t .
Signals (4a) and (4b) are multiplied with (2), and with the use of product-to-sum trigonometric identifies, one can obtain
V o   t × V r , I t = A o A r 2 cos 4 π f t + ϕ + A o A r 2 cos ϕ ,   and
V o t × V r , I t = A o A r 2 sin 4 π f t + ϕ + A o A r 2 sin ϕ .
A low-pass filter removes the high-frequency ( 2 f ) component and thus eliminates the time dependency, providing the commonly known “I” and “Q” DC signals:
V I = A o A r 2 cos ϕ ,
V Q = A o A r 2 sin ϕ .
Finally, the complex signal response that is used in this work, r , is defined as
r = V I + j V Q .
where j = 1 is the imaginary unit. When recorded against changing angle, r n refers to the value of r at the n th angle measurement. After compensating for scaling and the reference signal amplitude A r , this signal relates the magnitude A o and phase ϕ from the physical phenomena by
A o = r = V I 2 + V Q 2 ,   and
ϕ = r = tan 1 V Q V I .

2.5. Scanning Methodology

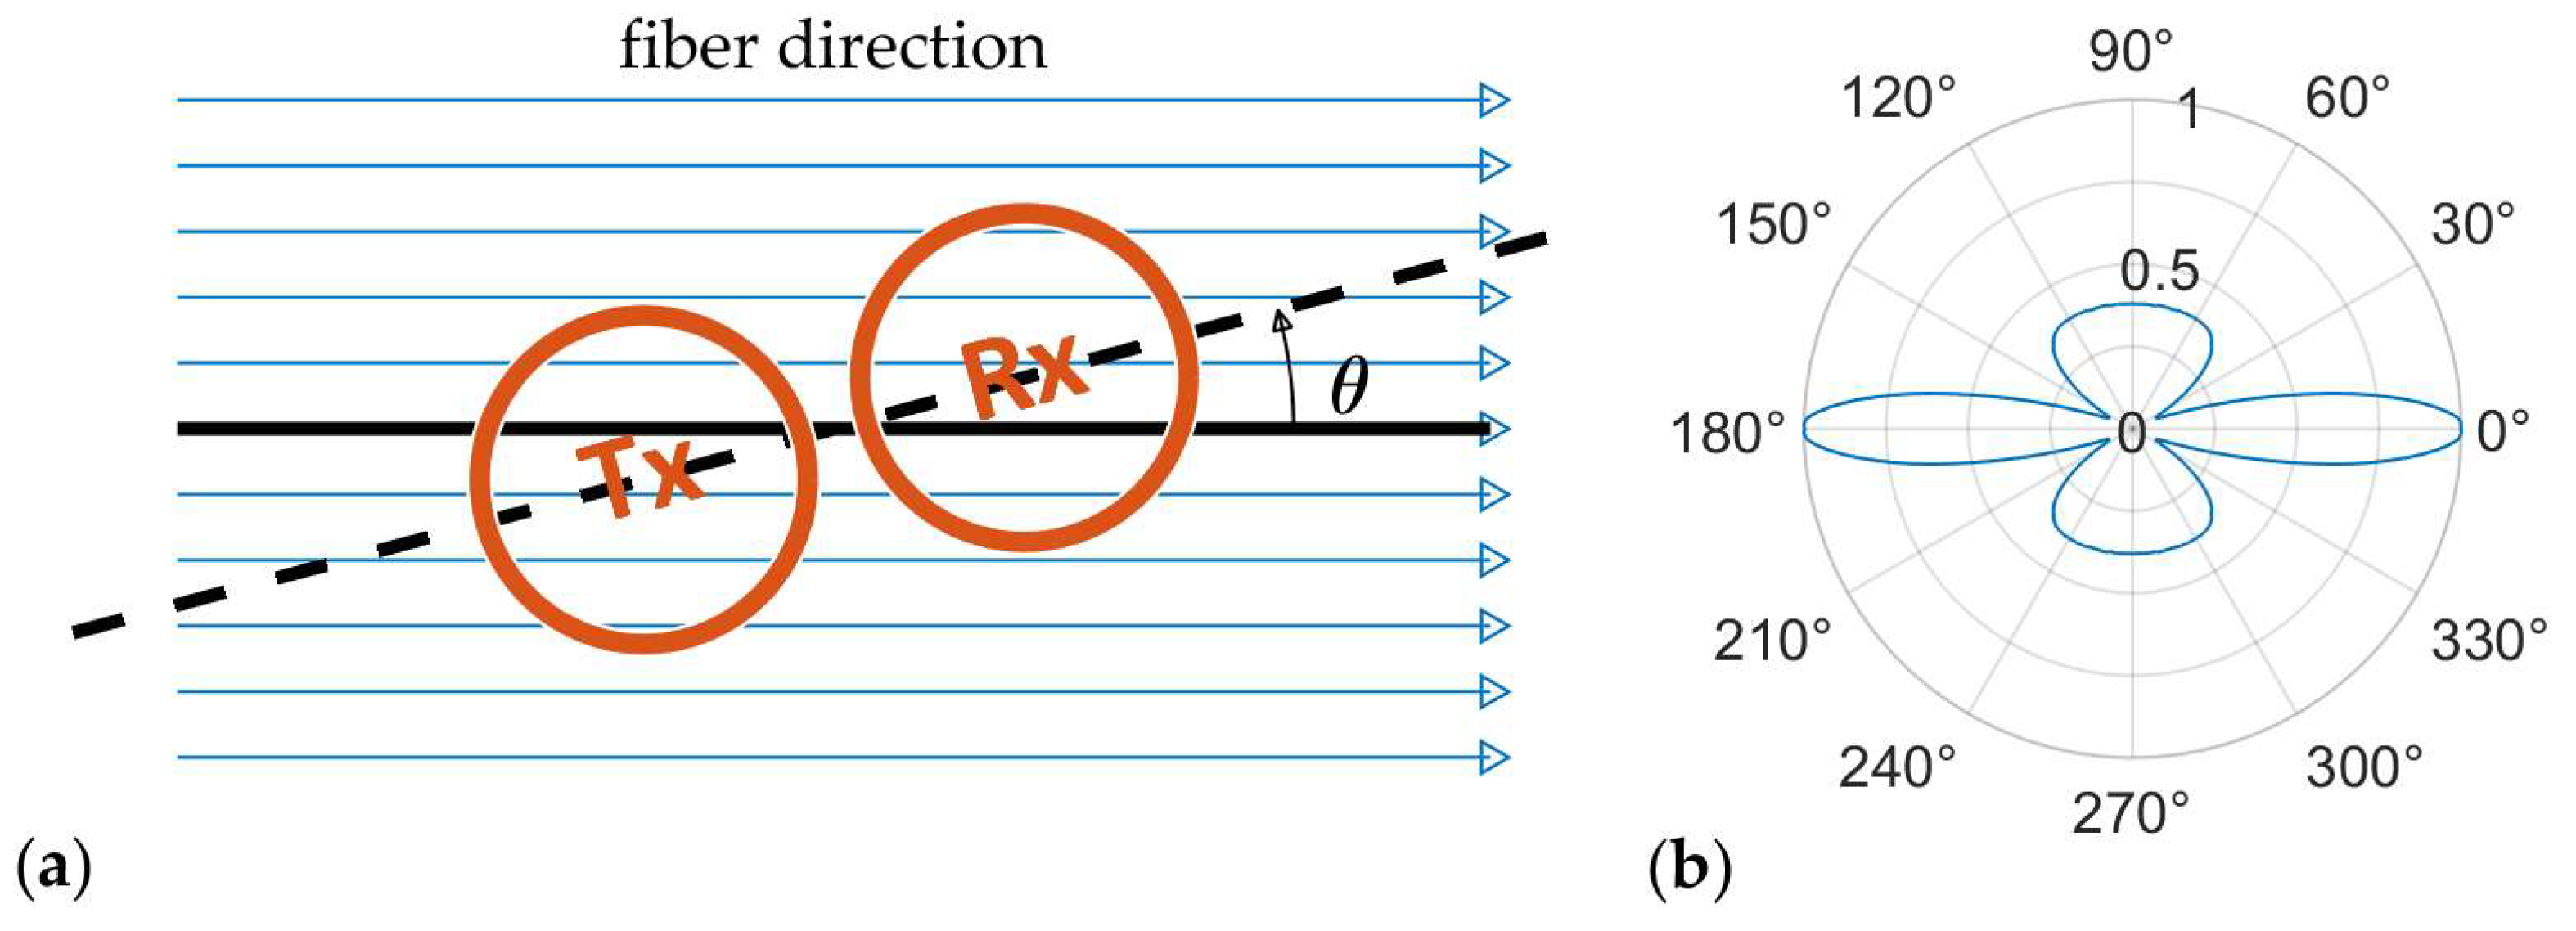
The fundamental property of CFRP that enables our method of detecting fiber directionality is its anisotropic conductivity. A unidirectional CFRP has a significantly higher conductivity in the direction of the fiber than in the transverse direction, by as much as several orders of magnitude [16]. To test and observe this basic principle, we perform an ECT rotational scan (herein referred to as an “r-scan” for brevity). An r-scan is simply a rotational sweep of the eddy current probe over the surface of the part while recording coil response as a function of angle, as depicted in Figure 4. A greater response is produced in the receiver coil when the coils are aligned with the fiber direction, i.e., when θ = 0 ° , 180 ° in Figure 4a, as compared to when the coil orientation is transverse to the fiber alignment, such as when θ = 90 ° , 270 ° for the configuration shown in Figure 4a. This observation is similar to that shown by Li in [17]. In such a configuration, it is common to plot angular data on polar axes, as shown in Figure 4b, where the radial axis is the magnitude of the complex ECT response on the receiver coil, r , normalized between 0 and 1. When the fiber direction is constant throughout the entire part, this method can be used to determine the dominant fiber orientations quickly and accurately in the laminate [5].
When the fiber direction changes throughout the part (as is the case when in-plane waviness is present), the process of rotating the probes to obtain the local alignment is performed at multiple locations. For repeatability and standardization, we create a grid over the surface of the part where angular “r-scan” data are collected at each vertex. The resulting data take the form of a 3D matrix representing the coil response in the spatial dimensions x , y and the rotation θ space. The time required to perform the scan depends on both the desired resolution in the rotational space θ and the spatial resolution of the x , y grid. These resolutions also determine the optimal scanning order of operations. For example, for high rotational resolution and low spatial resolution, it is optimal to sweep the rotational axis (i.e., “r-scan”) first, and then move to the next (x, y) point. Conversely, if low angular resolution and high spatial resolution are desired, the optimal order is to scan the entire surface of the part (i.e., “c-scan”) before incrementing the probe angle. When scanning for in-plane waviness, as is the case in this study, a high spatial resolution is desired to properly quantify the wrinkle parameters. Furthermore, we show here that it is possible to increase the effective angular resolution of the scan by signal processing against the known rotational pattern in Figure 4b.
Given a single high-resolution (e.g., 1 ° ) r-scan r h , we can calculate the angular offset of low-resolution data r l to determine the dominant fiber orientation. In the present study, a final angular resolution of ≤1° can be obtained from a rotational resolution of 15 ° . The offset calculation is accomplished using circular cross-correlation of a high-resolution zero-centered angular scan data r h n against the up-sampled low-resolution data r l , u p n with n 1 , 2 , , N according to Equation (9). The up-sampled low-resolution data r l , u p n is obtained by zero-stuffing the low-resolution data r l m where m 1 , 2 , , M and M < N . The fiber offset is simply the angle corresponding to the maximum of the cross correlation, as shown in Equation (10). A demonstration of this process is given in Figure 5, showing the original high-resolution signal with the low-resolution signal for some angular offset, their convolution, and the resulting shift calculation on the polar axes. This calculation is repeated at every point in the x , y grid, resulting in a direction field θ x , y representing the fiber direction over the surface of the part, such as that shown in Figure 6.
r h r l , u p n = m = 1 N r h m r l , u p m n
θ f i b e r = Δ θ arg max n 1 , N r h r l , u p n
Due to the non-negligible depth penetration of magnetic fields into CFRPs [18], our method detects fiber orientations not just on the surface of the part but into the part itself (as shown in [5]), differentiating our work from other methods that can only assess waviness in the top laminae of a CFRP (see, e.g., [6]). This ability could present the opportunity to look at the waviness of each layer in a lamina where the layup contains more than one nominal orientation. Furthermore, because correlation works independently of whether the signal is real or complex, this method takes advantage of the complex nature of ECT data while still remaining flexible enough to be applied to only real data.

2.6. Reference/Ground Truth Data Collection

2.6.1. X-ray Computed Tomography

In order to verify the accuracy of our method, we scanned the test specimen using a North-Star Imaging X3000 X-ray CT (computed tomography). The fabricated part shown in Figure 1 contained a small amount of warpage because of its narrow thickness; thus, the CT reconstruction data had to be shifted to account for the warpage of the part when looking at individual slices of the CT data set corresponding to a single lamina. The alignment was performed using 3D morphology to extract the part surface, which was then fit to a 2D polynomial. The depth values were then shifted according to the offset given by the fitted plane.
After this alignment in the z -direction, a grid the same size and location as the ECT grid was setup over the surface of the part, and the Radon Transform was applied to a circular window around each point in the grid, giving the dominant texture direction for that point. This was applied to each layer in the z-direction, producing a direction field for each lamina in the part. For a direct comparison with the eddy current data, we averaged the direction field for all five laminae to obtain a single direction field θ C T for error analysis. Figure 7a shows that the density field of the first five laminae averaged in the z direction. Figure 7b shows the flowlines of the averaged direction field overlayed with the raw direction data. The waviness region can be seen to be roughly located at 25   mm < x < 45   mm and was consistent between the two images.

2.6.2. Pulse/Echo Ultrasonic Testing

In order to compare against leading NDE methods, the part was scanned with pulse/echo UT. The UT system was setup using an in-house immersion system presented in previous work (see, e.g., [4,19]). Here, an Olympus Focus PX with a 100 MHz sampling frequency was connected to a 10 MHz spherical focused immersion transducer with a nominal focal length of 1.5 inches operating in the pulse/echo configuration. This transducer was mounted on a 3-axis motorized gantry system for 3D translation throughout the immersion tank. Raw a-scans were taken over a 50 × 50 mm area on the surface of the part at a spatial resolution of 0.1 mm, and the results are shown in Figure 8. These results are from the same UT dataset presented in [13].
Detection of in-plane waviness in a unidirectional CFRP is difficult for pulse/echo UT, and currently, the methods for such a defect with pulse/echo UT are very limited, if existent at all. One reason for the ineffectiveness of pulse/echo UT at characterizing in-plane waviness is that the defect is orthogonal to the acoustic waveform transmission path. Out-of-plane waviness can be effectively characterized with UT (see, e.g., [19]) for the opposite reason. In order to detect in-plane waviness using pulse/echo UT, the scan resolution would have to be small enough to enable accurate image processing on the waviness region. However, the width of the narrow region of the ultrasonic beam is a limiting factor to the effective resolution from UT scanning. For the scan shown in Figure 8, the resolution of 0.1 mm provides that the general location of the in-plane wave can be observed, but we have been unsuccessful in the development of automated algorithms for consistent quantification of the local orientation, nor were we successful in finding any in the literature. This is a path for future research in ultrasound development.

3. Results

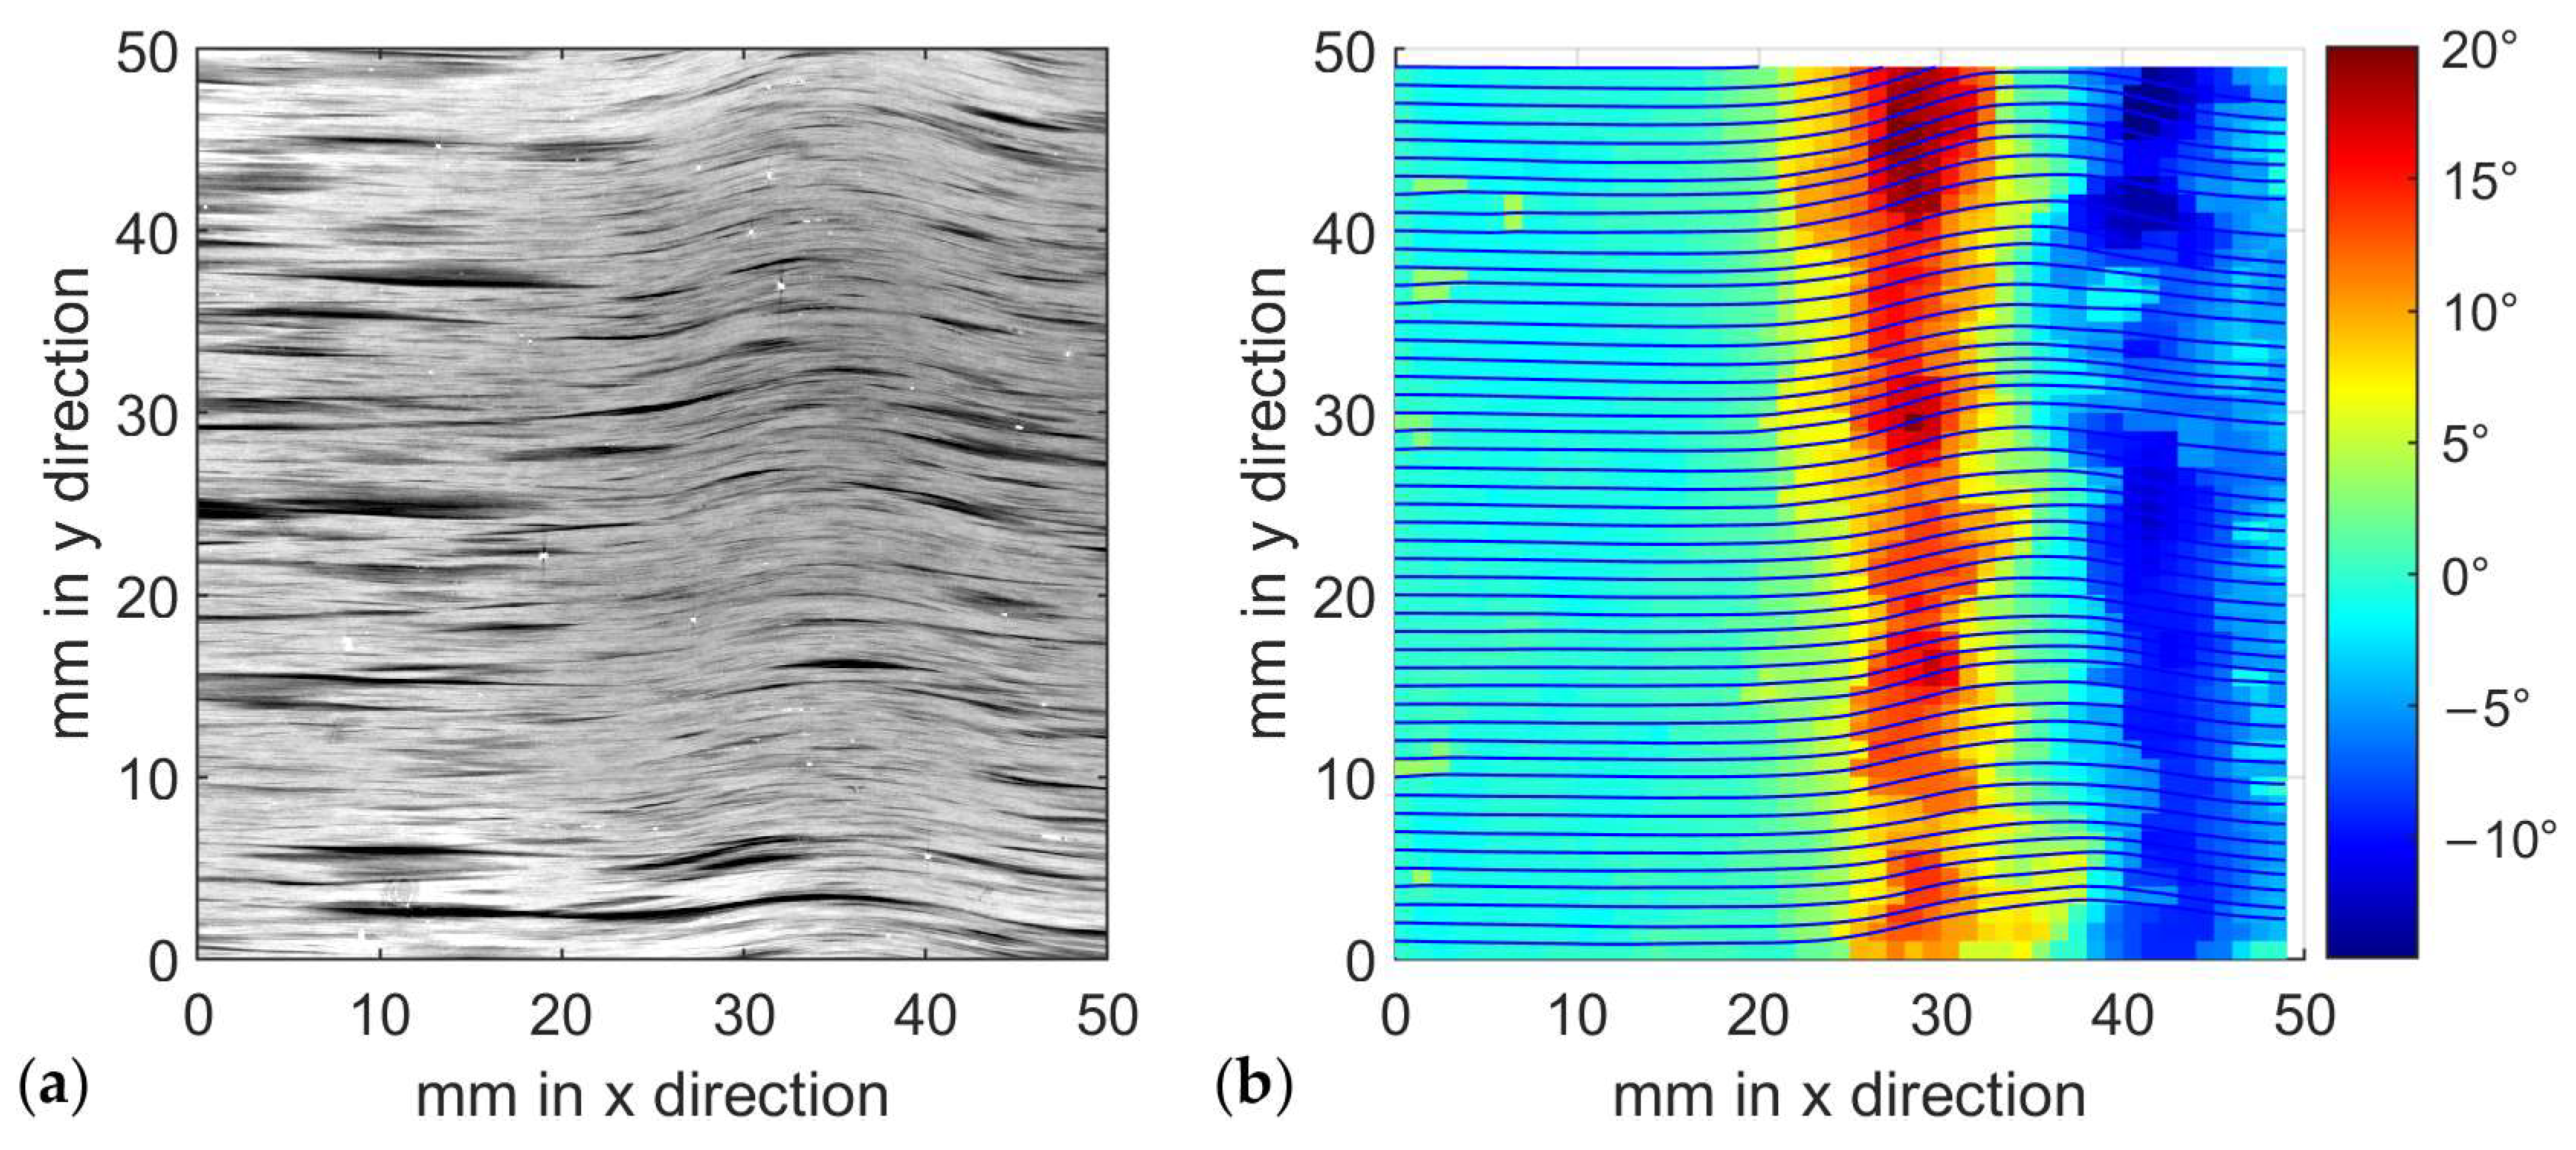
The vector field in Figure 6b shows the spatially varying fiber orientation as reconstructed by the ECT method described in this work, which we herein refer to as an “rc-scan”. A spatial resolution of 1 mm in the x direction and 1 mm in the y direction was used with an angular resolution of 15 degrees. At each location in the raster grid, the principal direction and magnitude, such as shown in Figure 6a, are generated. Upon close inspection of the quiver plot, one can see the area of waviness by the suddenly changing fiber orientation. A more intuitive method of visualizing this data uses flow lines, which we accomplish here with MATLAB’s streamline function. The resulting flow plot in Figure 9 shows the area of waviness as a representation of the fiber paths themselves.
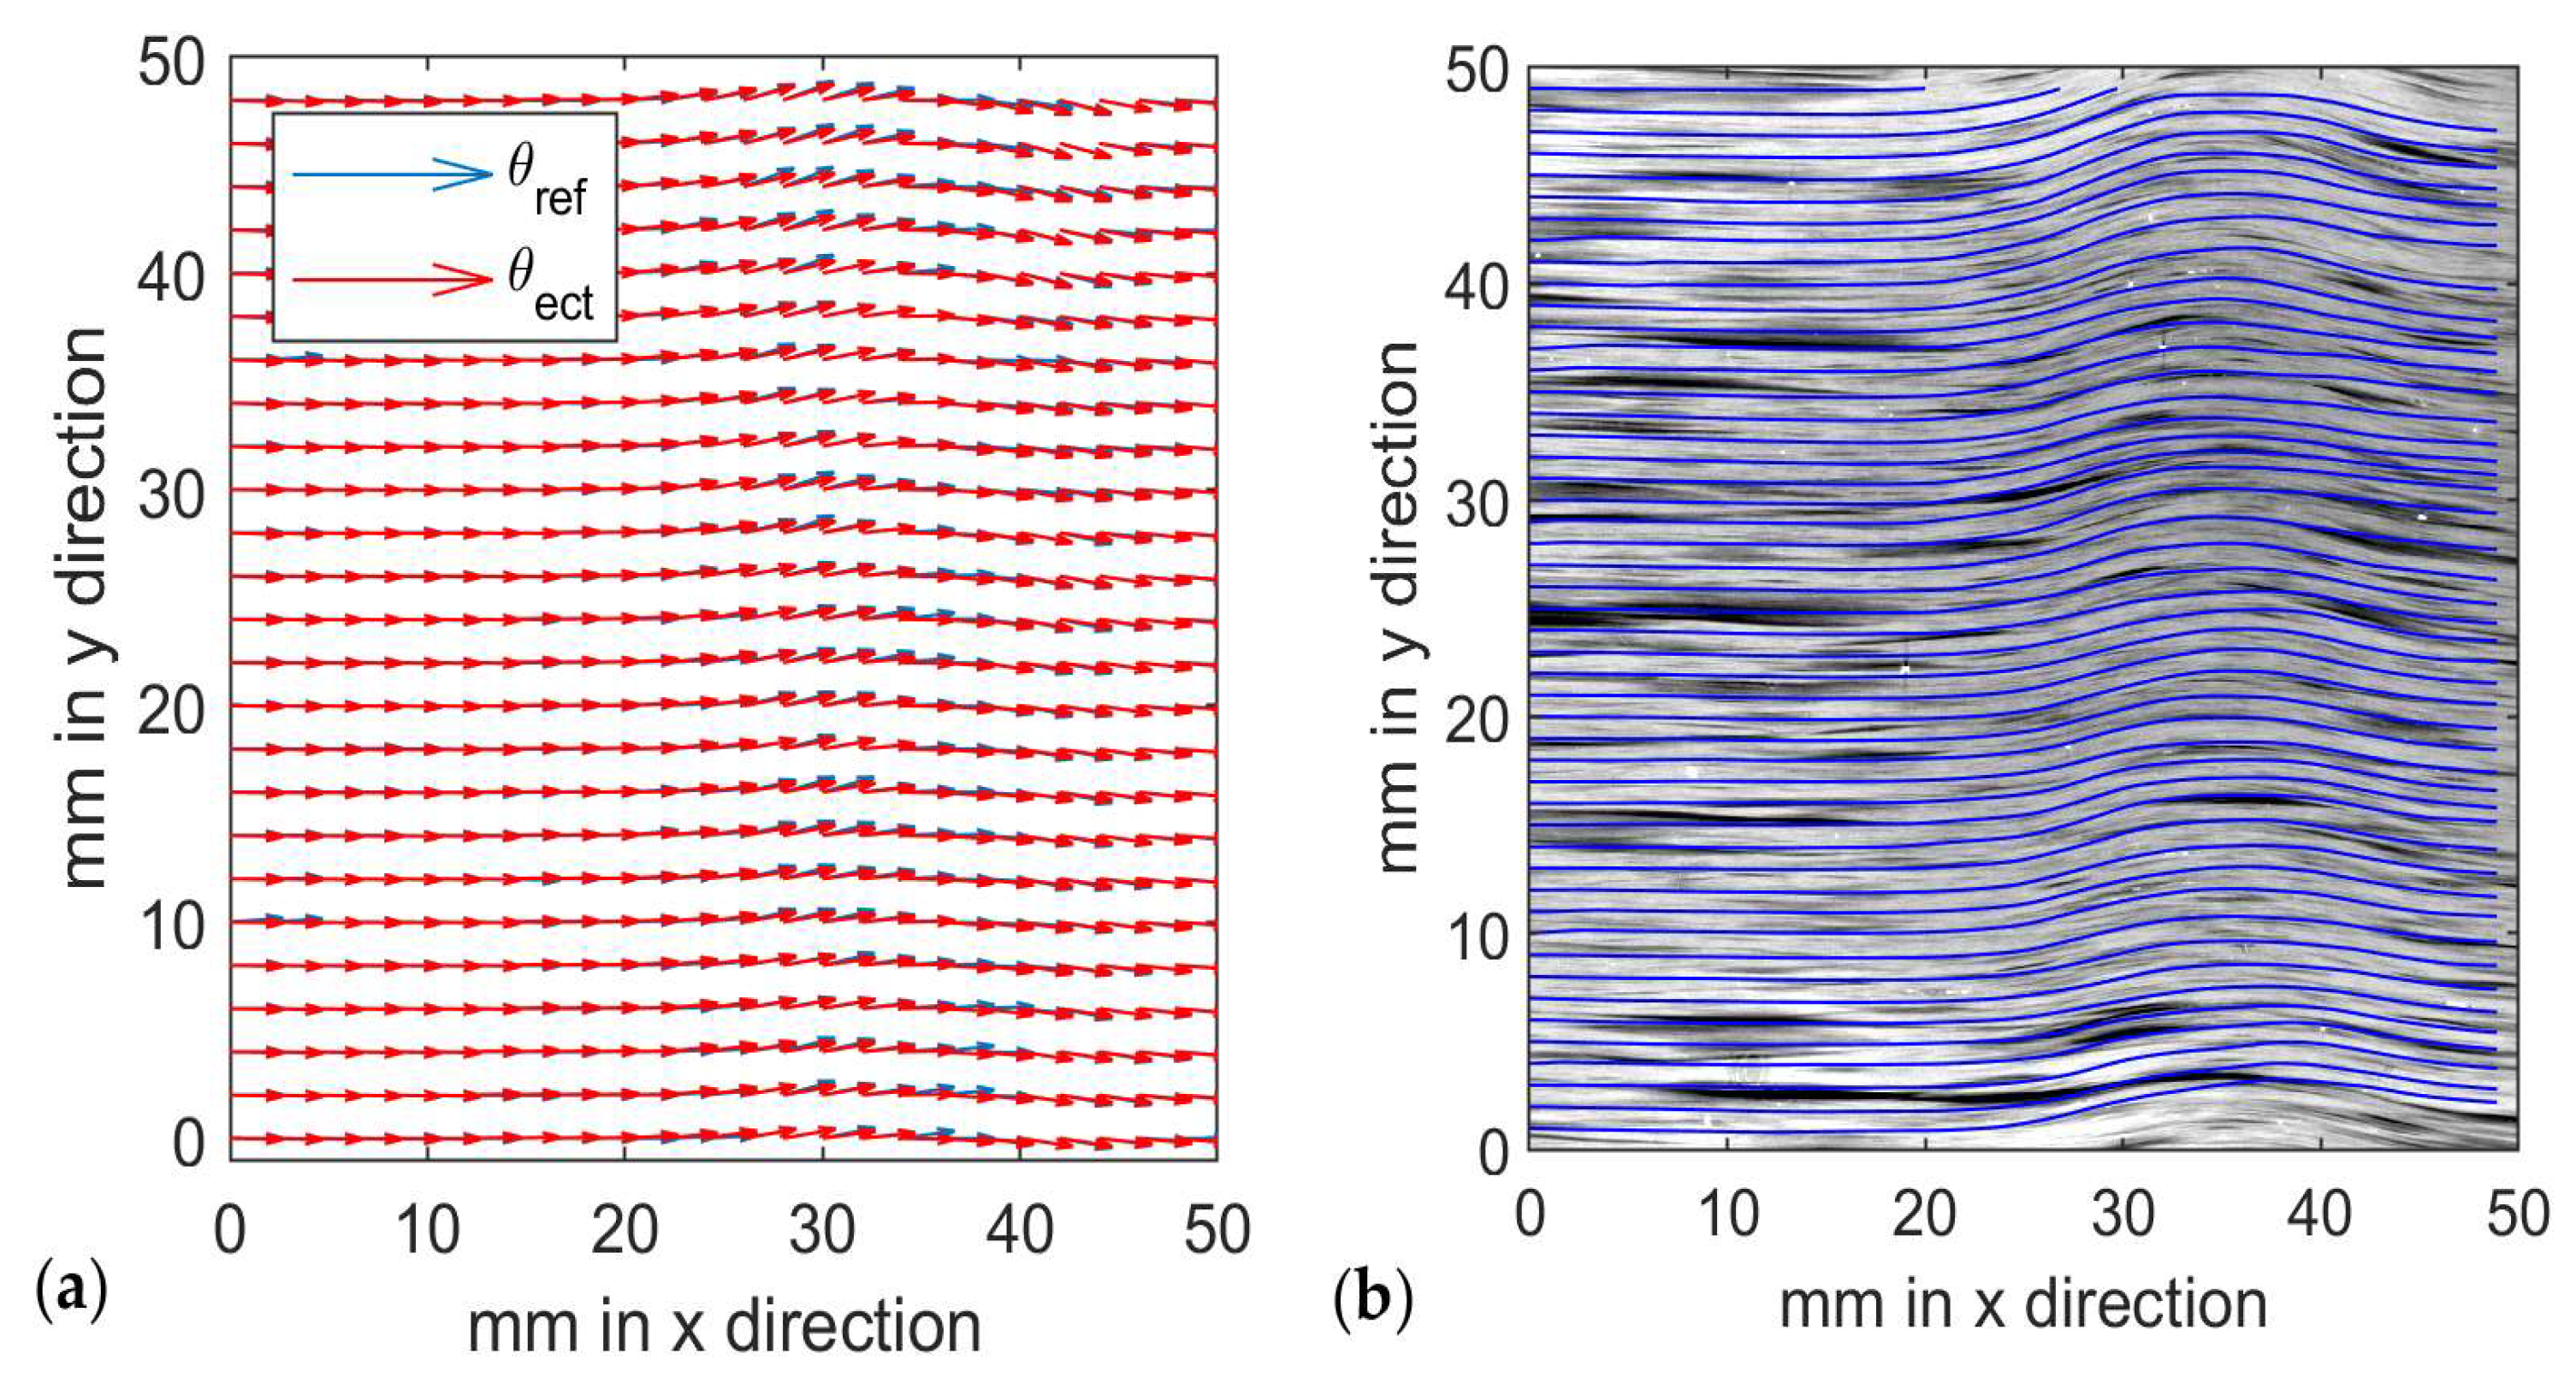
To obtain the quantitative error analysis, we compare the ECT results with the results from the CT scanning and subsequent image processing over the same region of the fabricated part. Figure 10a shows both direction fields displayed as quiver plots on the same axes. Figure 10b displays the streamlines from ECT testing overlaying the top-down mean X-ray CT data to show the alignment of the two testing methods.
It is worth noting that the regions of higher error are associated with variations in the CT reference data from the normal trend of the waviness. Furthermore, the total variation of the CT reference data is higher than the variation of the ECT data. We recognize that there are difficulties in determining the “ground truth” fiber direction; even our CT approach contains some errors due to the limitations of image processing. As such, the actual error of our method could be different than what is given in Table 1. Figure 11 illustrates the width calculation and shows the detected waviness region plotted over the CT and ECT streamlines.

4. Discussion

The presented ECT method provides some advantages over traditional imaging methods for the detection of in-plane waviness. One such advantage is the lack of reliance on spatial resolution for accurate angular measurements. This provides flexibility for defining the scan region and allows for effective measurements using larger probes. A disadvantage with our method is the extended scanning time; where an imaging technique only requires one raster (or c-scan) over the surface, we must raster over the surface (albeit at a lower resolution) once for each angular datapoint. However, this disadvantage is hardware-based, and methods are being developed in-house to mitigate this limitation. One possible solution is through the use of multiple coils on the probe to measure several directions simultaneously, thereby reducing the number of passes (and thus scan time) by a factor of the number of simultaneous measurement angles in the probe. Such a probe is proposed in [20,21]. Further refinement of the data processing algorithm could also reduce the number of necessary datapoints, specifically by further capitalizing on the complex nature of the ECT data. While outside the scope of this work, these measures could potentially reduce the scanning time to a single pass.
The second primary disadvantage of this method in its current configuration is its limitation to tracking only one dominant fiber orientation. When multiple nominal orientations are present, e.g., a [0/45/90] unidirectional laminate or a woven CFRP laminate, each nominal direction can have its own independent waviness. Thus, woven CFRP laminates could be scanned with this method only if the waviness is not independent in both nominal orientations. Methods of discerning between multiple orientations and their associated depths are under investigation [5].
Mitigating or resolving these limitations would increase the commercial potential of the proposed technique. In a commercial application, this method could be used exactly like other NDT scanning methods, such as UT, where a probe is mounted on a robotic arm or gantry system for scanning surfaces of various shapes. Instead of measuring depth data, this method would map the fiber direction across the surface of the object, thereby detecting in-plane waviness that could negatively impact the mechanical performance of the object under examination.

5. Conclusions

The contribution of this work is the development of a straightforward yet highly reliable ECT method for determining the local changes in the fiber orientation of a CFRP as it varies throughout the test specimen. This ability enables the detection and quantification of defects, such as in-plane waviness and in-plane wrinkles, in CFRP to within 3° of the local orientation quantified using a high-resolution X-ray CT. Furthermore, the developed method provides reliable evaluation for a defect type that is difficult for traditional UT, X-ray CT, and other imaging methods to quantify, thereby giving it a unique role in the NDT/NDE arsenal.
Even with the difficulty in obtaining ground truth fiber direction data, the current error analysis suggests a high level of reliability and accuracy, even when only considering the aspect ratios in wrinkles. Other methods of detecting in-plane waviness in CFRP can typically only measure the top surface, provide estimations of fiber angle, or are limited to a single cross-section of the wrinkle.
Further research will expand on and refine this method, exploring techniques for reducing the scan time via probe design and data processing. Sample fabrication with control over the defect parameters would also enable a more accurate error analysis. The application of this method to different types of CFRP composites is also of interest, as is associating waviness with specific layers when multiple orientations are present.

Author Contributions

M.N. constructed the test equipment and performed the lab experiments, as well as drafting the journal article version of the paper. T.C. drafted the conference proceedings version of this work and contributed with insight and supervision in the early stages of the work. I.G. and D.J. provided extensive research supervision, guidance, insights, revision, and support. All authors have read and agreed to the published version of the manuscript.

Funding

Funding was provided by Verifi Technologies under contract 1001059.

Institutional Review Board Statement

Not applicable.

Informed Consent Statement

Not applicable.

Data Availability Statement

Data will be provided upon request to the corresponding author.

Acknowledgments

The authors would like to thank Seamus Lowe and Navid Bin Mojahid of Baylor University for the sample fabrication. Special thanks to Irrtisum Khan for helping with UT system and optical imaging. This work was supported by Verifi Technologies, LLC.

Conflicts of Interest

The authors declare no conflict of interest.

References

  1. Jones, R. Mechanics of Composite Materials; CRC Press: Boca Raton, FL, USA, 1998. [Google Scholar]
  2. Li, Z.; Haigh, A.; Soutis, C.; Gibson, A.; Sloan, R.; Karimian, N. Detection and evaluation of damage in aircraft composites using electromagnetically coupled inductors. Compos. Struct. 2016, 140, 252–261. [Google Scholar] [CrossRef]
  3. Piggott, M.R. The effect of fibre waviness on the mechanical properties of unidirectional fibre composites: A review. Compos. Sci. Technol. 1995, 53, 201–205. [Google Scholar] [CrossRef]
  4. Blackman, N.; Jack, D. Novel Technique for the Automated Determination of the Ply Stack for a Woven Carbon Fiber Composite using High-Frequency Pulse Echo Ultrasound. Compos. Part B, 2022; under review. [Google Scholar]
  5. Newton, M.; Gravagne, I.; Jack, D. Normalization and Processing of Rotational Eddy Current Scans for Layup Characterization of CFRP Laminates. In Proceedings of the ASNT Research Symposium, Columbus, OH, USA, 26–30 June 2023. [Google Scholar]
  6. Dvorsky, M.; Munalli, D.; Al Qaseer, M.T.; Zoughi, R. Application of Microwave Polarimetry to the Characterization of Fiber Misalignment in Composites. IEEE Open J. Instrum. Meas. 2022, 1, 1–9. [Google Scholar] [CrossRef]
  7. Hughes, R.; Drinkwater, B.; Smith, R. Characterisation of carbon fibre-reinforced polymer composites through radon-transform analysis of complex eddy-current data. Compos. Part B Eng. 2018, 148, 252–259. [Google Scholar] [CrossRef]
  8. Kosukegawa, H.; Kiso, Y.; Hashimoto, M.; Uchimoto, T.; Takagi, T. Evaluation of detectability of differential type probe using directional eddy current for fibre waviness in CFRP. Philos. Trans. R. Soc. A 2020, 378, 20190587. [Google Scholar] [CrossRef] [PubMed]
  9. Mizukami, K.; Mizutani, Y.; Todoroki, A.; Suzuki, Y. Detection of in-plane and out-of-plane fiber waviness in unidirectional carbon fiber reinforced composites using eddy current testing. Compos. Part B Eng. 2016, 86, 84–94. [Google Scholar] [CrossRef]
  10. Zeng, Z.; Wang, J.; Liu, X.; Lin, J.; Dai, Y. Detection of fiber waviness in CFRP using eddy current method. Compos. Struct. 2019, 229, 111411. [Google Scholar] [CrossRef]
  11. Mizukami, K.; Mizutani, Y.; Kimura, K.; Sato, A.; Todoroki, A.; Suzuki, Y.; Nakamura, Y. Visualization and size estimation of fiber waviness in multidirectional CFRP laminates using eddy current imaging. Compos. Part A Appl. Sci. Manuf. 2016, 90, 261–270. [Google Scholar] [CrossRef]
  12. Wincheski, R.A.; Zhoa, S. Development of eddy current probe for fiber orientation assessment in carbon fiber composites. In Proceedings of the AIP Conference Proceedings, Provo, UT, USA, 5–6 July 2018. [Google Scholar]
  13. Newton, M.; Chowdhury, T.; Gravagne, I.; Jack, D. Nondestructive Detection of In-Plane Wrinkles in Carbon Fiber Laminates Using Eddy Current and Ultrasonic Testing. In Proceedings of the ASNT Research Symposium, St. Louis, MO, USA, 20–23 June 2022. [Google Scholar]
  14. Wu, C.; Gu, Y.; Luo, L.; Xu, P.; Wang, S.; Li, M.; Zhang, Z. Influences of in-plane and out-of-plane fiber waviness on mechanical properties of carbon fiber composite laminate. J. Reinf. Plast. Compos. 2018, 37, 3–891. [Google Scholar] [CrossRef]
  15. Nair, S.N.; Dasari, A.; Yue, C.Y.; Narasimalu, S. Failure Behavior of Unidirectional Composites under Compression Loading: Effect of Fiber Waviness. Materials 2017, 10, 909. [Google Scholar] [CrossRef] [PubMed]
  16. Cheng, J.; Ji, H.; Qiu, J.; Takagi, T.; Uchimoto, T.; Hu, N. Role of interlaminar interface on bulk conductivity and electrical anisotropy of CFRP laminates measured by eddy current method. Ndt E Int. 2014, 68, 1–12. [Google Scholar] [CrossRef]
  17. Li, X. Eddy Current Techniques for Non-Destructive Testing of Carbon Fibre Reinforced Plastic (CFRP); The University of Manchester: Manchester, UK, 2012. [Google Scholar]
  18. Cheng, J.; Qiu, J.; Xo, X.; Ji, H.; Takagi, T.; Uchimoto, T. Research advances in eddy current testing for maintenance of carbon fiber reinforced plastic composites. Internation J. Appl. Electromagn. Mech. 2016, 51, 261–284. [Google Scholar] [CrossRef]
  19. Minnie, W. Nontdestructive Evaluation of Out-Of-Plane Wrinkles within Woven Carbon Fiber Reinforced Plastics (CFRP) Using Ultrasonic Detection. Ph.D. Thesis, Baylor University, Waco, TX, USA, 2021. [Google Scholar]
  20. Berger, D.; Lanza, G. Development and Application of Eddy Current Sensor Arrays for Process Integrated Inspection of Carbon Fibre Preforms. Sensors 2017, 18, 4. [Google Scholar] [CrossRef] [PubMed]
  21. Naidjate, M.; Helifa, B.; Feliachi, M.; Lefkaier, I.-K.; Heuer, H.; Schulze, M. A Smart Eddy Current Sensor Dedicated to the Nondestructive Evaluation of Carbon Fibers Reinforced Polymers. Sensors 2017, 17, 1996. [Google Scholar] [CrossRef] [PubMed]
Figure 1. Manufacturing of in-plane waviness in CFRP sample (a) forming wrinkle in transverse direction and (b) wrinkle rolled flat to form in-plane wave.
Applsci 13 06009 g001
Figure 2. Construction of custom ECT probe (a) without brass shielding/support and (b) with brass shielding/support.
Applsci 13 06009 g002
Figure 3. Signal processing flow for ECT system.
Applsci 13 06009 g003
Figure 4. Illustration of ECT r-Scan, (a) rotating TR probe (orange), consisting of transmit (Tx) and receive (Rx) coils, versus fiber orientation (blue), and (b) ECT normalized response of signal amplitude r as a function of rotation angle θ .
Applsci 13 06009 g004
Figure 5. Demonstration of circular cross-correlation applied to determining the offset of normalized low-resolution angular data; (a) rectangular plot; (b) polar plot.
Applsci 13 06009 g005
Figure 6. Generating direction field from multiple r-scans; (a) angular reconstruction at a single point; (b) quiver plot generated from x-y-θ data.
Applsci 13 06009 g006
Figure 7. Ground truth using X-ray CT and the Radon Transform (a) top-down mean of CT scan for laminae 1–5 and (b) reference fiber orientation extracted from CT data.
Applsci 13 06009 g007
Figure 8. Energy of UT c-scan over waviness region.
Applsci 13 06009 g008
Figure 9. ECT rc-scan testing results for fiber orientation, streamline plots and heatmap.
Applsci 13 06009 g009
Figure 10. (a) Comparison of direction fields from CT and ECT testing; (b) ECT streamlines overlayed with CT scan to show alignment.
Applsci 13 06009 g010
Figure 11. Calculation of width and maximum angle parameters for wrinkle characterization using (a) CT reference and (b) ECT rc-scan method.
Applsci 13 06009 g011
Table 1. Error and variance results.
θ C T θ e c t θ e r r = θ C T θ E C T
Average max angle, θ m a x 12.68°10.40°-
Average width 124.22 mm26.80 mm-
Total variance4.4°
Total RMSE--
1 Width is calculated as the interval of x where θ m i n / e   θ θ m a x / e and e 2.7 .
Disclaimer/Publisher’s Note: The statements, opinions and data contained in all publications are solely those of the individual author(s) and contributor(s) and not of MDPI and/or the editor(s). MDPI and/or the editor(s) disclaim responsibility for any injury to people or property resulting from any ideas, methods, instructions or products referred to in the content.