Low-Cost Calibration of Matching Error between Lidar and Motor for a Rotating 2D Lidar
Abstract
1. Introduction
2. Problems
- (1)
- As mentioned in [1,4,5,6,7,8,9,10], the mechanical error between the 2D lidar and rotating unit can cause distortion of the 3D point cloud. Based on the idea of control variables, in order to focus on other reasons, we need to exclude this item first. By improving the manufacture and assembly accuracy of the mechanical parts of our prototype, we minimized the impact of mechanical errors on the accuracy of the 3D point cloud. We used computer numerical control (CNC) machine tools to manufacture the key parts of our prototype, with a tolerance level of IT5 (Chinese standard, GB/T1184-1996). In Appendix B, we verified that the self-reasons of our prototype (which include the mechanical error) has a much smaller impact on the accuracy of the 3D point clouds than the error of the 2D lidar itself (±40 mm). Therefore, we can exclude this item and assume that other reasons are causing the resulting observed error.
- (2)
- The acceleration and deceleration of the motor shaft will cause error. In a 3D scan of a rotating 2D lidar, we assume roughly that the shaft of the stepper motor rotates at angular velocity ω for time T, and it rotates 180° in total. However, in practice, the motion of the motor shaft is more complex. The motor shaft accelerates from standstill to angular velocity ω, and then it keeps rotating at this speed, after which it decelerates to standstill. We have ignored the acceleration and deceleration of the motor shaft, and this can lead to the shape error of the 3D point cloud, which is especially obvious at the closed position of the point cloud. The so-called closed position here refers to the area where the points collected by the 2D lidar when the motor shaft starts to rotate or stops rotating. The areas of these two types of points are adjacent, and these points are most directly affected by the acceleration and deceleration of the motor shaft.
- (3)
- The use of photoelectric switches may cause error. Since no encoder or servo motor is used, it is necessary to define the initial position of motor shaft by photoelectric switch. When finding the initial position, the motor shaft will rotate back and forth by a large margin and make the shading sheet which rotates with the motor shaft triggering the photoelectric switch. After the photoelectric switch is triggered, the controller sends a stop command to the motor to stop its shaft. The position of the motor shaft after it stops is considered to be the initial position. This process can be described in more detail, the shading sheet blocks the light beam of the photoelectric switch—the photoelectric switch is triggered—the controller sends the stop command to the stepper motor—the shaft of stepper motor decelerates until it stops. The accuracy of the initial position of the motor shaft is affected by many factors such as the response time of the photoelectric switch, the rotation direction and the speed of the motor shaft. For each 3D scan of a rotating 2D lidar, the motor shaft starts rotating from its initial position. Therefore, if the initial position of the motor shaft is not accurately defined, the attitude error of the 3D point cloud will be caused.
- (4)
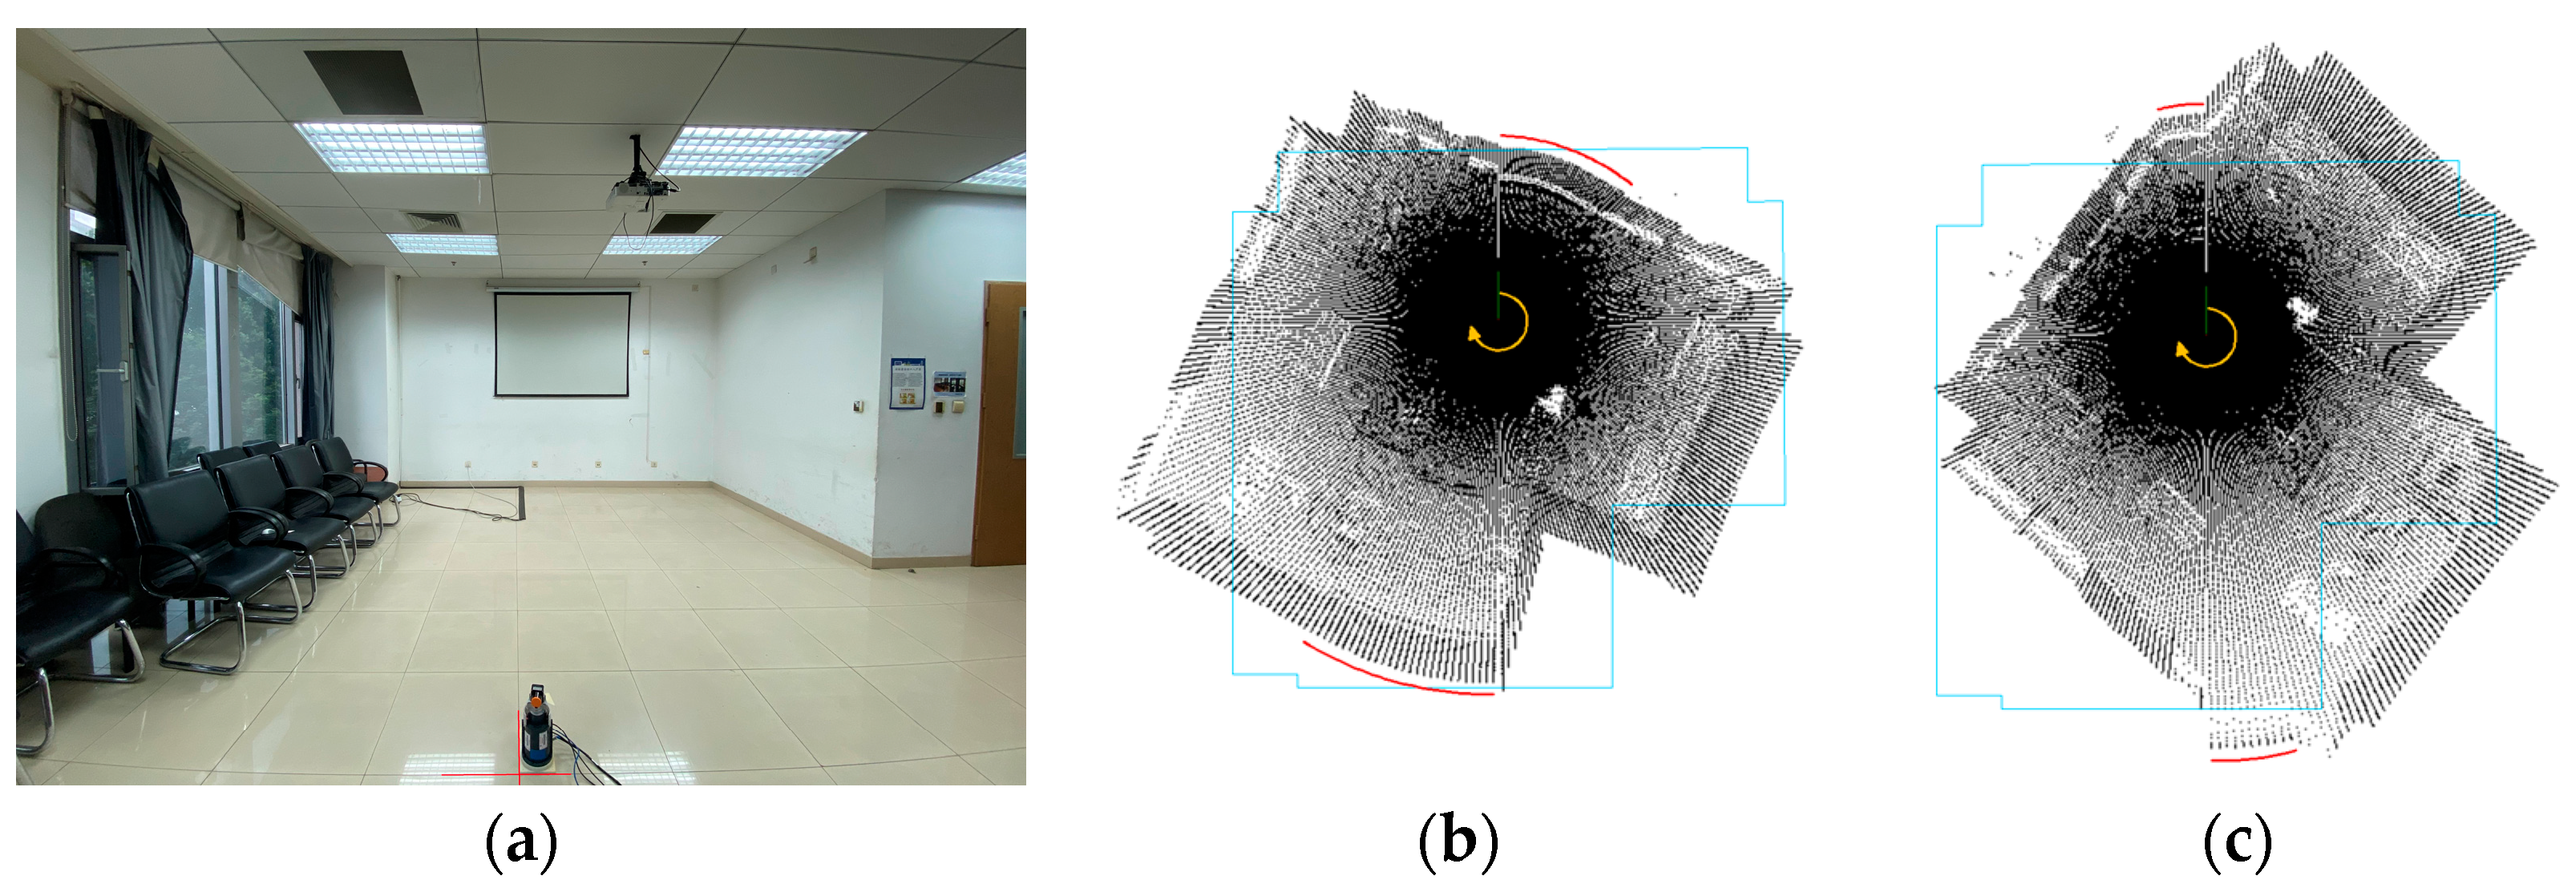
- The uncertain time deviation may cause error. In the actual engineering operation, we found that although we require the 2D lidar and the stepper motor to start to work at the same time, there is an uncertain time deviation between the starting time of the 2D lidar and the starting time of the stepper motor. The value of this time deviation is very small, but it is enough to have a significant impact on the accuracy of the 3D point cloud. The reason for the uncertain time deviation is that the response time of the 2D lidar and stepper motor to the command is inconsistent and not constant, as mentioned in [16]. Because both the transmission of the command and the response of the motor or the 2D lidar take time, there is an uncertain time deviation between the time when the controller starts to send the command to the motor and the time when the motor starts to work. Similarly, there is an uncertain time deviation between the time when the controller starts to send the command to the 2D lidar and the time when the 2D lidar starts to work. The uncertainty of the transmission time of the command and the response time of the device is a common problem which is difficult to solve. Because of this problem, we can mark the time when the controller starts to send the command to the motor or the 2D lidar in the program, we cannot know the actual working time of the motor or 2D lidar. This is the cause of the uncertain time deviation between the starting time of the 2D lidar and the starting time of stepper motor. For each 3D scan of a rotating 2D lidar, this time deviation is uncertain, so the shape and attitude error of the 3D point cloud for each scan is also uncertain (see Figure 1). The reason for the shape error of the 3D point cloud can be analyzed as follows. Due to the uncertain time deviation, there may be two situations. One is that the motor starts to rotate after the 2D lidar has started scanning continuously for a short period of time. The 3D point cloud collected in this case is shown in Figure 1b. At the position where the motor starts to rotate (the beginning of the yellow circular arrow), there is a shape error marked by red line. The other situation is that the motor starts working earlier than the 2D lidar, so that the motor has stopped rotating before the 2D lidar stops scanning. The 3D point cloud collected in this case is shown in Figure 1c. At the position where the motor stops rotating (the end of the yellow circular arrow), there is a shape error marked by red line. In either case, a shape error of the 3D point cloud will result. In addition, the attitude error can also be caused. Therefore, the uncertain time deviation between the starting time of the 2D lidar and the starting time of stepper motor is one of the reasons for the uncertain error of the 3D point cloud in shape and attitude.
3. System Modeling
3.1. Overview of Prototype
3.2. Coordinate Conversion
4. Method
4.1. Calibration of Uncertain Attitude Error of 3D Point Cloud
- (a)
- In our method, we define the middle line of the triangular plate according to the center point c. We have also tried to define the middle line by finding the point in point cloud Ctri which is farthest from the rotation axis of the motor shaft (that is, the right-angled vertex of the triangular plate), it turns out that it is less accurate. The reason is obvious, the center point c is calculated based on all the points in point cloud Ctri, while the farthest point is just one point selected from point cloud Ctri. Therefore, the former is more accurate. Moreover, the accuracy of the 2D lidar Hokuyo UST-10LX we use in our prototype is ±40mm. At this level of accuracy, it is necessary to use the average of multiple points instead of a single point to define the middle line of the triangular plate.
- (b)
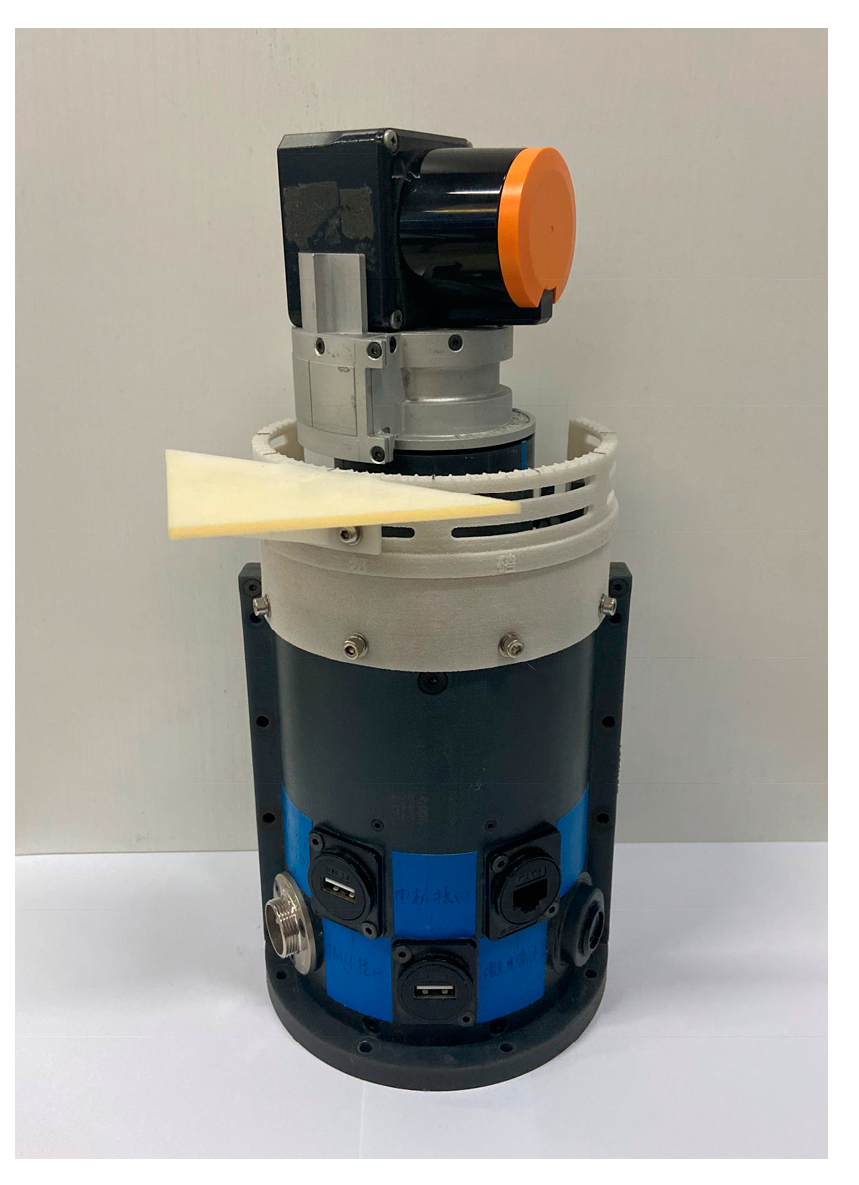
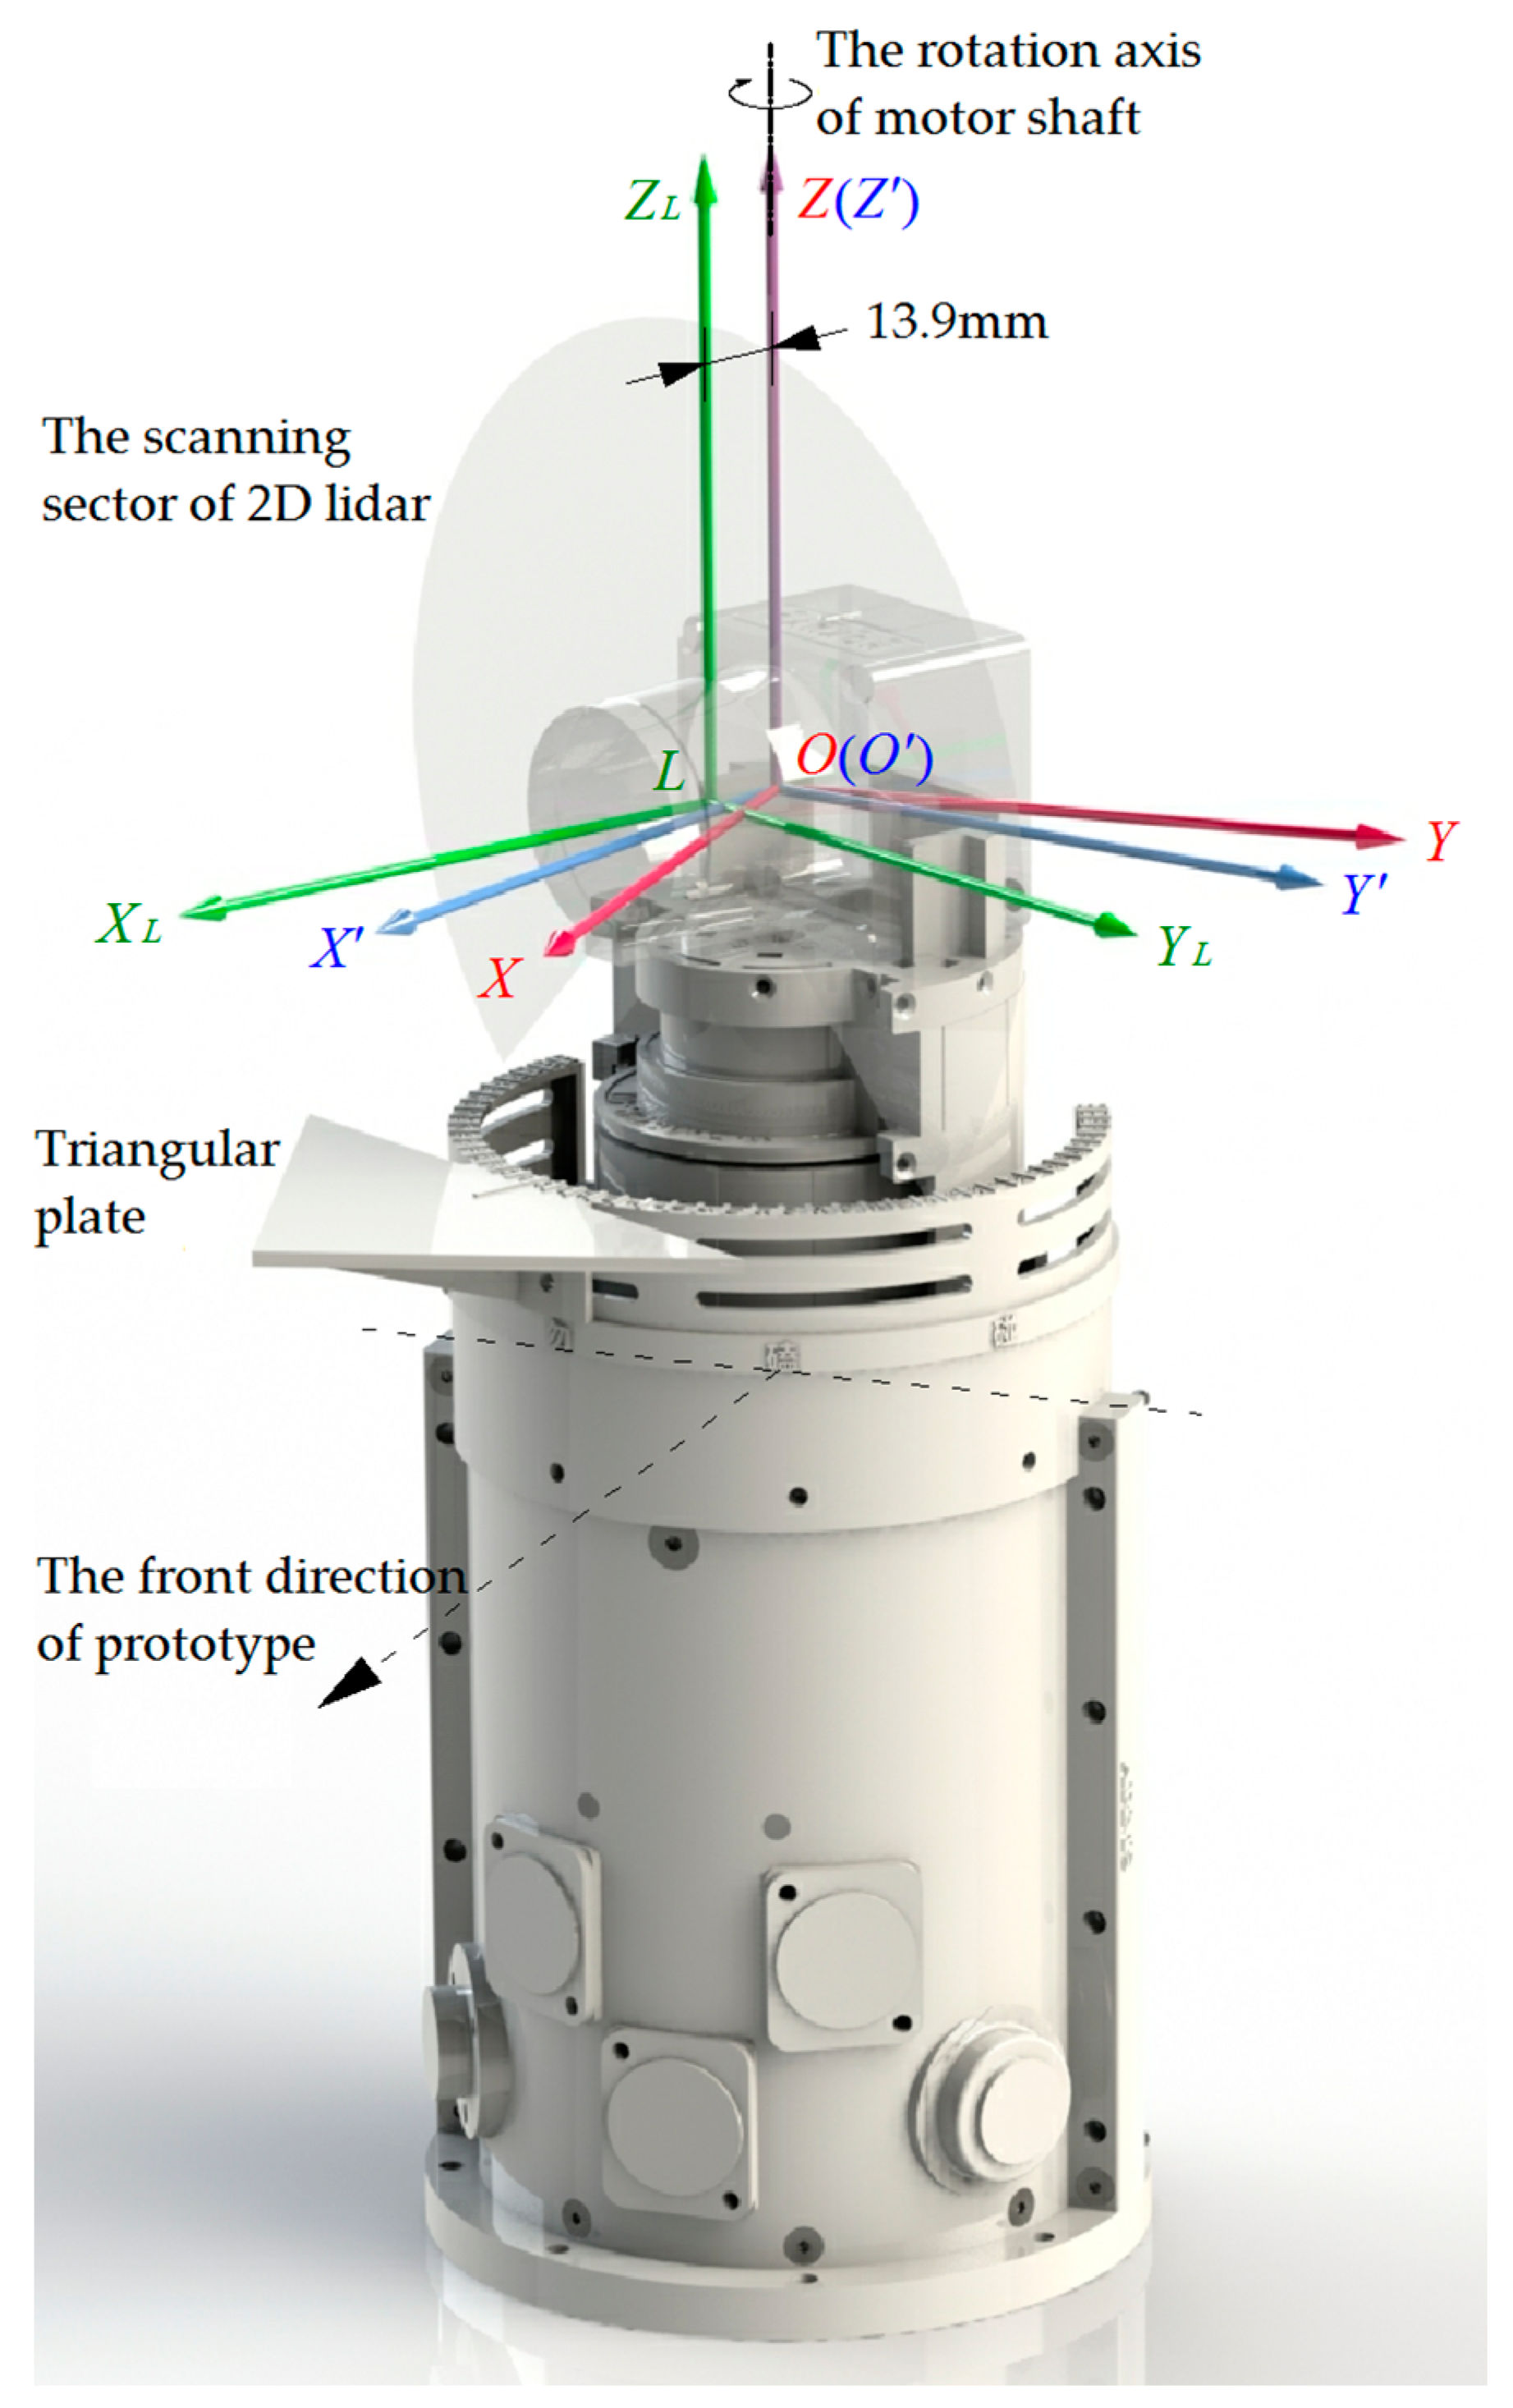
- The larger the triangular plate is, the more points are contained in the point cloud Ctri, and the calculation of the center point c is less affected by the accidental error. However, if the size of the triangular plate is too large, it will be inconvenient. The triangular plate installed on our prototype is an isosceles right triangle. The lengths of its three edges are 79.2 mm, 79.2 mm and 112 mm respectively.
- (c)
- The distance between the triangular plate and the motor shaft should be moderate. If the distance is too close, a part of the triangular plate will be in the blind area of the scanning field and cannot be scanned. If the distance is too far, the beam of 2D lidar will irradiate the triangular plate at a more inclined angle, and the number of the points contained in the point cloud Ctri will be reduced. In our prototype, the distance between the base edge of the isosceles right triangle and the rotation axis of the motor shaft is 54.75 mm.
- (d)
- Since the center point c is calculated by averaging the 3D coordinates of all the points in the point cloud Ctri, the points in point cloud Ctri should be evenly distributed on the surface of the triangular plate. Therefore, the strip blank area and strip overlap area shown in Figure 5 should be staggered with the point cloud Ctri. This should be considered when determining the installation position of the triangular plate on the prototype. The installation position determines the value of the angle α. In our prototype, α = 30°.
4.2. Calibration of Installation Error of Triangular Plate
5. Experiments
5.1. Effectiveness Test
5.1.1. Data of Experiments
5.1.2. Characteristics of Uncertain Attitude Error
5.1.3. Characteristics of Our Algorithm
5.1.4. Effectiveness of Our Algorithm
5.2. Accuracy Test and Application Evaluation
6. Conclusions
Author Contributions
Funding
Acknowledgments
Conflicts of Interest
Appendix A
| Symbol | Explanation |
|---|---|
| γ | Angular resolution of rotating 2D lidar in the direction of motor shaft. |
| n | Number of 2D lidar scans included in a 3D scan. |
| f | The scanning frequency of 2D lidar is f, which can be found in its product manual. |
| T | The time used by a 3D scanning of a rotating 2D lidar is T. |
| ω | The Angular velocity of the motor shaft in a rotating 2D lidar is ω. |
| L | The coordinate frame of 2D lidar. |
| O’ | The coordinate frame of rotating unit (before attitude correction). |
| O | The coordinate frame of rotating unit (after attitude correction). |
| r | Ranging data of 2D lidar. |
| θ | The azimuth angle in the scanning sector of the 2D lidar corresponding to the ranging data r. |
| pL | A 3D point with respect to coordinate frame L, it is calculated according to the data of 2D LIDAR. |
| Rotation matrix from coordinate frame L to coordinate frame O’ at the moment when a 3D scan of a rotating 2D lidar is started. | |
| The translation vector from coordinate frame L to coordinate frame O’ at the moment when a 3D scan of a rotating 2D lidar is started. | |
| φmotor | Rotation angle of the motor shaft corresponding to the ranging data r. |
| RM | The rotation matrix calculated according to the rotation angle φmotor of the motor shaft. |
| K | The total number of points in the 3D point cloud obtained by a 3D scan of a rotating 2D lidar. |
| k | The ordinal number of a point in all points of a 3D point cloud. |
| pO’ | A 3D point with respect to coordinate frame O’, which is converted from point pL in coordinate frame L. |
| φoffset | The deflection angle of the coordinate frame O’ relative to the coordinate frame O in the Z-axis direction. |
| The rotation matrix calculated according to φoffset. | |
| pO | A 3D point with respect to coordinate frame O, which is converted from point pO’ in coordinate frame O’. |
| CO’ | A 3D point cloud with respect to coordinate frame O’, which is collected by a rotating 2D lidar. |
| Ctri | A point cloud corresponding to the triangular plate extracted from the point cloud CO’. |
| c | The center point of the triangular plate. |
| α | The angle between the middle line of the triangular plate and the front direction of the prototype (which is also the positive direction of the axis X of coordinate frame O). |
| β | The angle between the middle line of the triangular plate and the axis X’ of the coordinate frame O’. |
| CO | A 3D point cloud with respect to coordinate frame O, which is converted from point cloud CO’ through rigid body transformation. |
| n1~n4 | The unit normal vectors of the planes corresponding to the 4 walls of the room in the point cloud CO, respectively. |
| i, j | The unit normal vectors corresponding to X-axis and Y-axis of coordinate frame O, respectively. |
| Eatti | The attitude error of point cloud CO, which is expressed as the sum of absolute values of vector inner product. |
| φerror | The attitude error of point cloud CO, which is expressed as an angle. |
| The rotation matrix calculated according to the angle φerror. | |
| A function showing the attitude error of the point cloud CO, with φerror as the independent variable. | |
| fcost(α) | A function showing the attitude error of the point cloud CO, with α as the independent variable. |
| M | The total number of 3D scans used for the calibration of the installation error of the triangular plate. |
| m | The serial number of a 3D scan while calibrating the installation error of the triangular plate. |
| The total attitude error of point cloud CO, which is expressed by least square method. | |
| N1~N4 | Data sets, formed by n1~n4 from 50 point clouds CO, respectively. |
| kitera | Parameter of Algorithm A1, the serial number of a iteration. |
| kmax | Parameter of Algorithm A1, the maximum times of iteration. |
| α0 | Parameter of Algorithm A1, the initial value of α. |
| ε1 | Parameter of Algorithm A1, the first stopping criteria of the algorithm. |
| ε2 | Parameter of Algorithm A1, the second stopping criteria of the algorithm. |
| J(α) | Parameter of Algorithm A1, Jacobian matrix. |
| A | Parameter of Algorithm A1, A = J(α)TJ(α). |
| g | Parameter of Algorithm A1, g = J(α)T Fcost(α). |
| μ | Parameter of Algorithm A1, the damping parameter. |
| τ | Parameter of Algorithm A1, a coefficient which is used to determine the initial value of μ. |
| v | Parameter of Algorithm A1, a coefficient which is used to adjust the value of μ in each iteration. |
| aii | Parameter of Algorithm A1, the element in A. |
| I | Parameter of Algorithm A1, unit matrix. |
| Δα | Parameter of Algorithm A1, the gain of α in each iteration. |
| ρ | Parameter of Algorithm A1, gain ratio. |
| d | The distance from the object to a rotating 2D lidar. |
| Emap | The error of the 3D map at distance d, the map is obtained by a rotating 2D lidar which is calibrated by our method. |
Appendix B
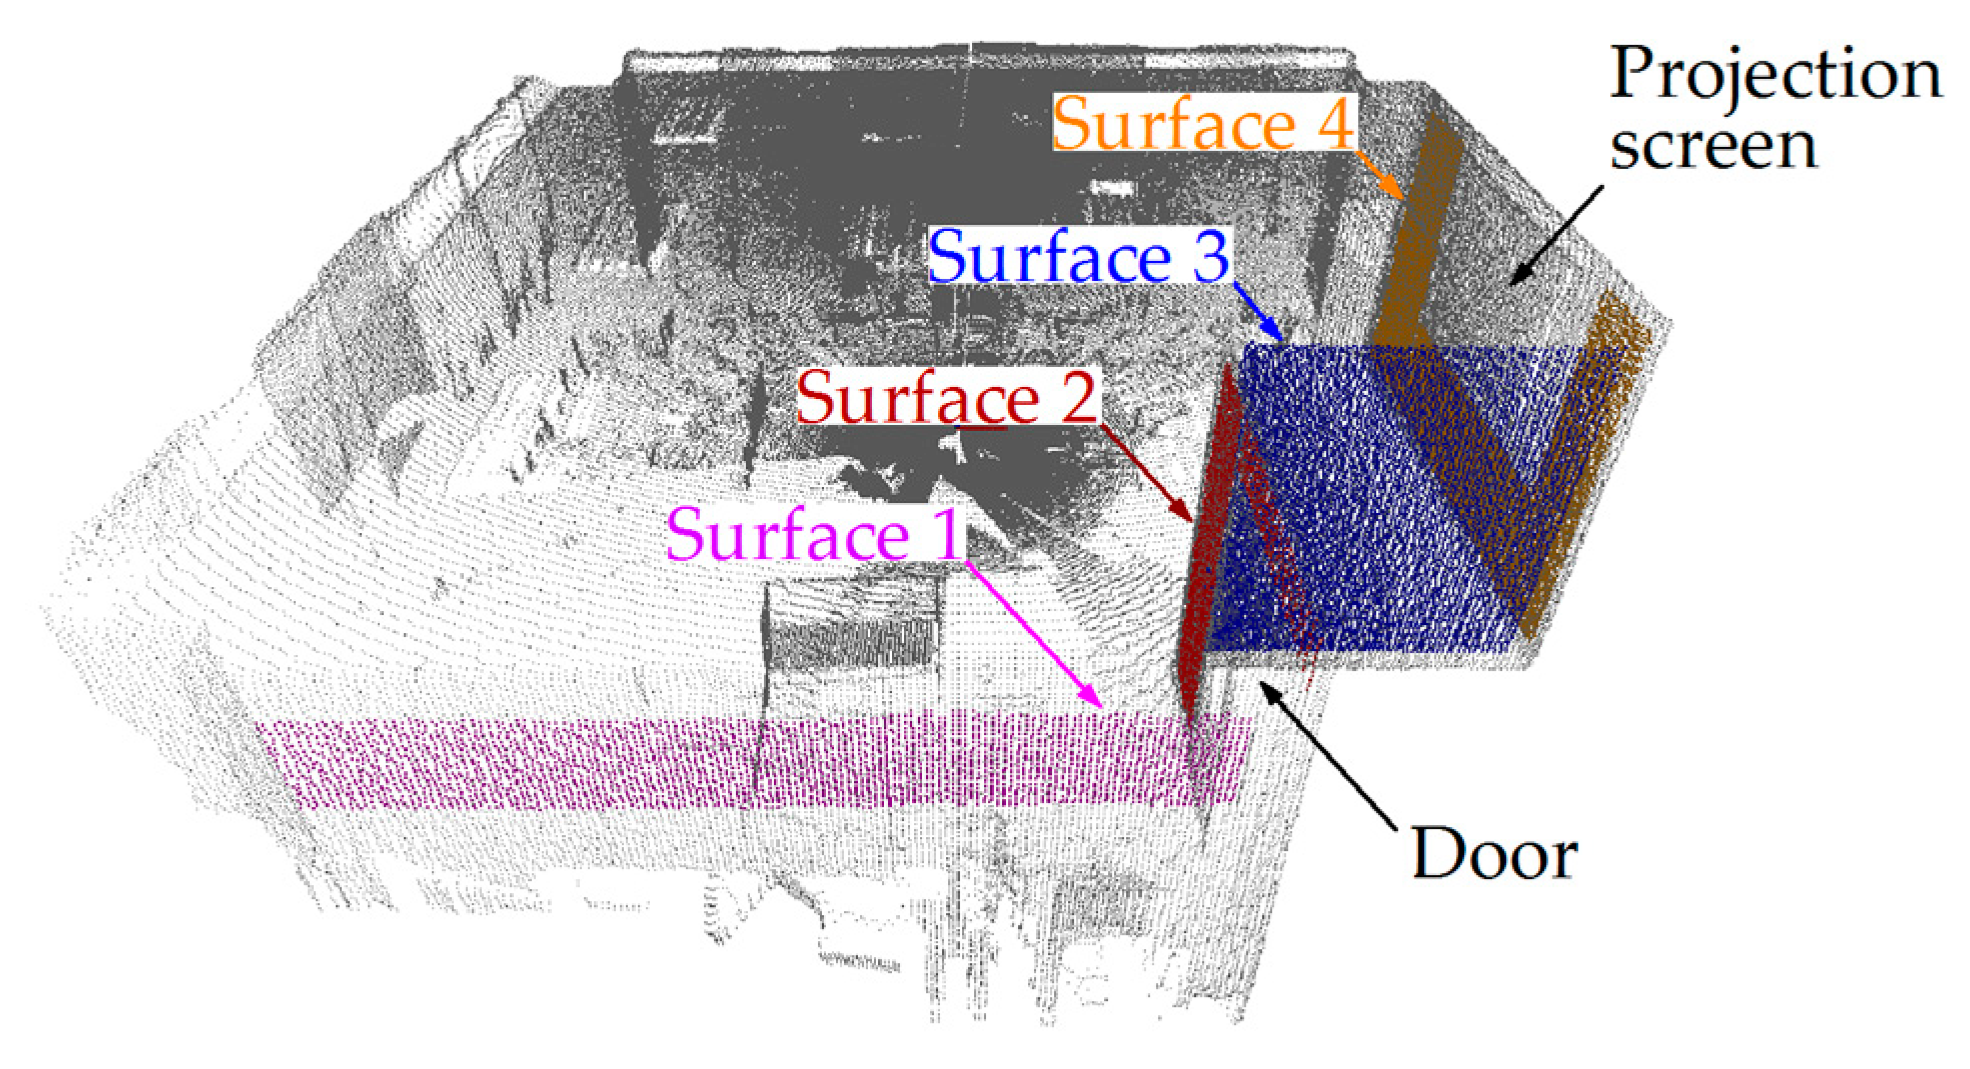

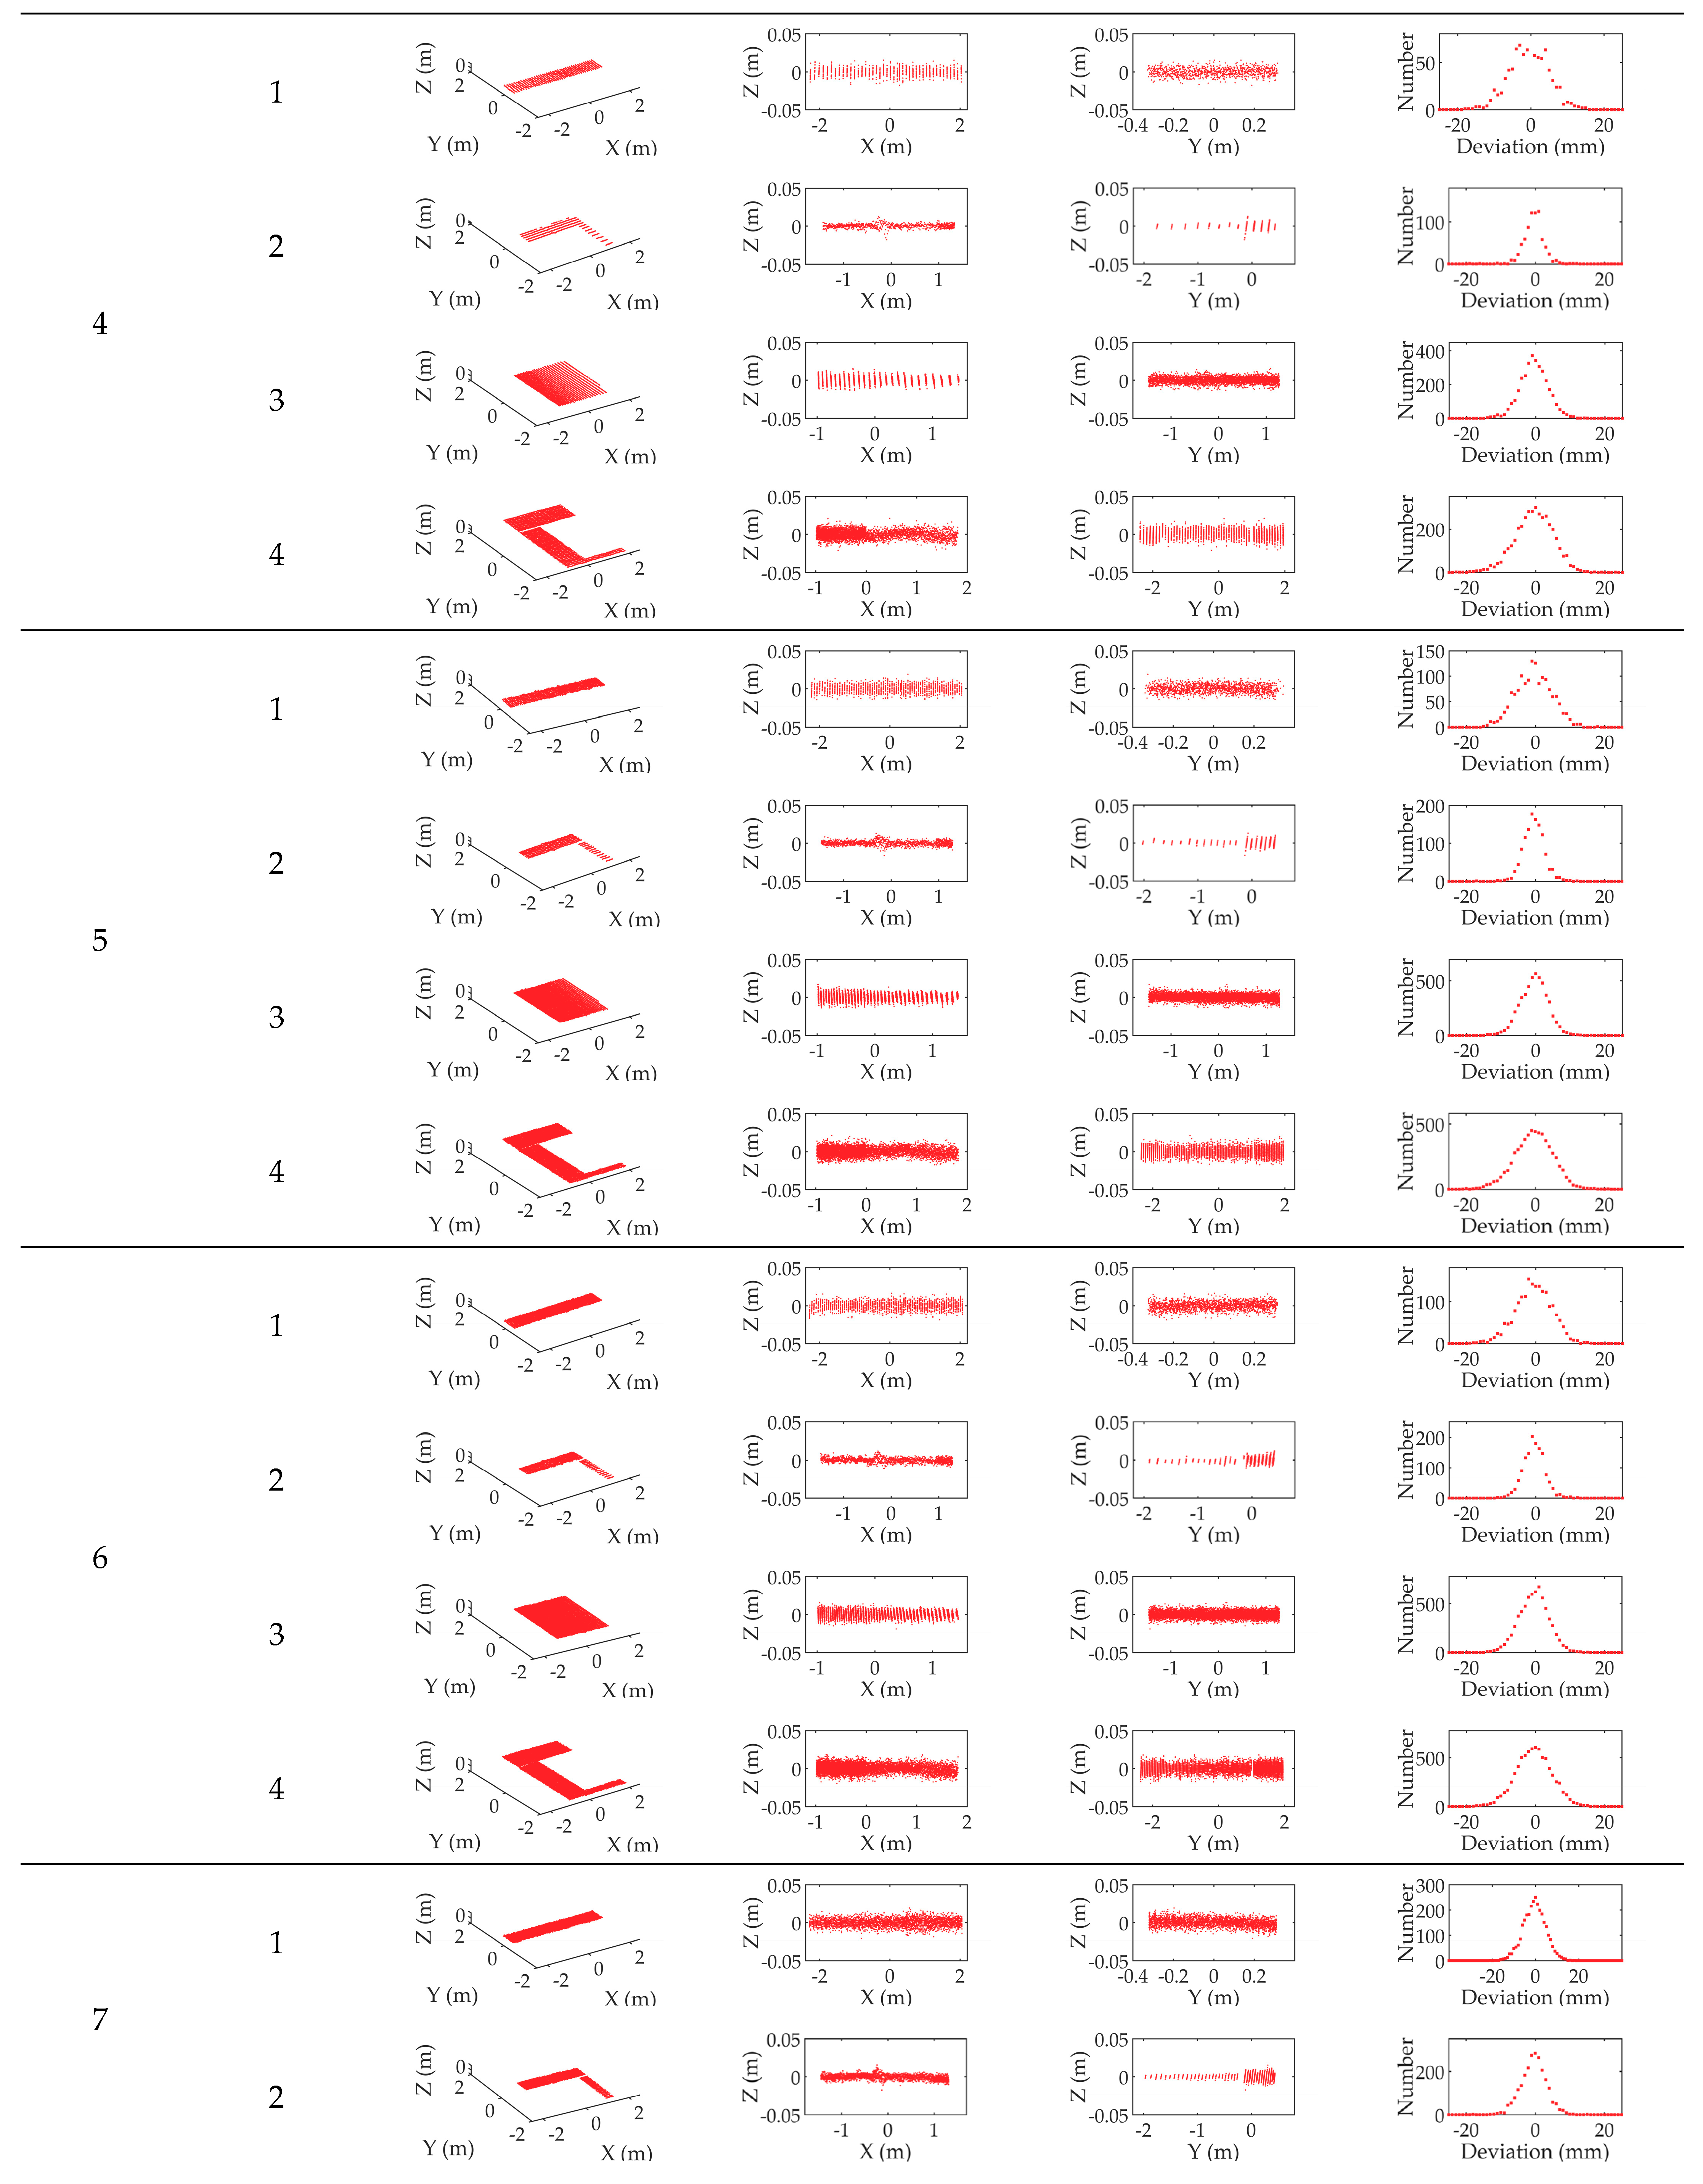

- (a)
- We can observe that the points in each surface are roughly evenly distributed on both sides of the ideal plane, which indicates that the surface and the ideal plane fit well. This shows that the shapes of these surfaces are very close to planes. Since they were obtained by scanning to the walls using our prototype, this can further indicate that the shape of the 3D point cloud collected by our prototype is correct.
- (b)
- For each surface, its X-Z view and Y-Z view show that the distribution range of the points which are distributed at both sides of the ideal plane is roughly coincident with the accuracy of the 2D lidar (which is ±40 mm) used in our prototype. There is no case where a large number of points exceed this range, which indicates that the surface is obviously distorted.
- (c)
- From the X-Z view and Y-Z view of each surface in Figure A2, we can find that very few sampling points exceed the range of ±0.04 m, which is the accuracy of the 2D lidar. So we can know that the shape error of the 3D point cloud caused by the self-reasons of our prototype (such as mechanical error, etc.) is relatively small compared to the error 2D lidar. Under the influence of the latter, the former is almost hardly noticeable.
- (d)
- From the distribution graphs of the deviations, we can find a law of normal distribution (for surfaces with more points, their normal distributions are more obvious), which indicates that the deviation values from the points to the ideal plane are approximately normally distributed. This verifies the previous conclusion, that is, the shape of the 3D point cloud collected by our prototype is correct. If the 3D point cloud is distorted, the distribution of the deviations from the points to the ideal plane will be severely affected by the shape of the distorted surface, and it will be not easy to find out a normal distribution in the distribution graphs of the deviations.
Appendix C
| Algorithm A1 The Calibration of Angle α Based on Levenberg–Marquardt Method | |
| Input: 50 point clouds CO, that is, | |
| Output: Angle α, the installation angle of triangular plate | |
| 1 | begin program FindAngleAlpha () |
| 2 | Step1: for each point cloud CO in , extract the planes corresponding to the 4 walls, and calculate the unit normal vectors n1~n4 of these 4 planes. The unit normal vectors extracted from 50 point clouds form the data sets N1~N4 |
| 3 | N1~N4←ExtractNormal() |
| 4 | Step2: calculate angle α through Levenberg–Marquardt method |
| 5 | kitera: = 0; kmax = 500; α0: = 30°; v: = 2; ε1 = 10−9; ε2 = 10−9; τ = 10−6 |
| 6 | A:= J(α)TJ(α); g:= J(α)TFcost(α) |
| 7 | found: = (||g||∞ ≤ ε1); μ:= τ * max{aii} |
| 8 | while (not found) and (kitera < kmax) |
| 9 | kitera:= kitera + 1; Solve (A + μI)Δα = −g |
| 10 | if ||Δα|| ≤ ε2(||α|| + ε2) |
| 11 | found: = true |
| 12 | else |
| 13 | |
| 14 | ifρ > 0 |
| 15 | α:= α + Δα |
| 16 | A:= J(α)TJ(α); g:= J(α)TFcost(α) |
| 17 | found: = (||g||∞ ≤ ε1) |
| 18 | μ:= μ*max{1/3, 1-(2ρ−1)3}; v: = 2 |
| 19 | else |
| 20 | μ:= μ*v; v: = 2*v |
| 21 | end if |
| 22 | end if |
| 23 | end while |
| 24 | returnα |
| 25 | end program |
References
- Morales, J.; Martinez, J.L.; Mandow, A.; Reina, A.J.; Pequenoboter, A.; Garciacerezo, A. Boresight Calibration of Construction Misalignments for 3D Scanners Built with a 2D Laser Rangefinder Rotating on Its Optical Center. Sensors 2014, 14, 20025–20040. [Google Scholar] [CrossRef] [PubMed]
- Morales, J.; Martinez, J.L.; Mandow, A.; Pequenoboter, A.; Garciacerezo, A. Design and development of a fast and precise low-cost 3D laser rangefinder. In Proceedings of the International Conference on Mechatronics, Istanbul, Turkey, 13–15 April 2011; pp. 621–626. [Google Scholar]
- Wulf, O.; Wagner, B. Fast 3d scanning methods for laser measurement systems. In International Conference on Control Systems and Computer Science; Editura Politehnica Press, 2003; Available online: https://www.researchgate.net/publication/228586709_Fast_3D_scanning_methods_for_laser_measurement_systems (accessed on 6 January 2021).
- Kang, J.; Doh, N.L. Full-DOF Calibration of a Rotating 2-D LIDAR with a Simple Plane Measurement. IEEE Trans. Robot. 2016, 32, 1245–1263. [Google Scholar] [CrossRef]
- Gao, Z.; Huang, J.; Yang, X.; An, P. Calibration of rotating 2D LIDAR based on simple plane measurement. Sens. Rev. 2019, 39, 190–198. [Google Scholar] [CrossRef]
- Alismail, H.; Browning, B. Automatic Calibration of Spinning Actuated Lidar Internal Parameters. J. Field Robot. 2015, 32, 723–747. [Google Scholar] [CrossRef]
- Zeng, Y.; Yu, H.; Dai, H.; Song, S.; Lin, M.; Sun, B.; Jiang, W.; Meng, M.Q.H. An Improved Calibration Method for a Rotating 2D LIDAR System. Sensors 2018, 18, 497. [Google Scholar] [CrossRef] [PubMed]
- Martinez, J.L.; Morales, J.; Reina, A.J.; Mandow, A.; Pequeno-Boter, A.; Garcia-Cerezo, A. Construction and Calibration of a Low-Cost 3D Laser Scanner with 360 degrees Field of View for Mobile Robots. In Proceedings of the 2015 IEEE International Conference on Industrial Technology (ICIT), Seville, Spain, 17–19 March 2015; pp. 149–154. [Google Scholar]
- Murcia, H.F.; Monroy, M.F.; Mora, L.F. 3D Scene Reconstruction Based on a 2D Moving LiDAR. In International Conference on Applied Informatics; Springer: Cham, Switzerland, 2018. [Google Scholar]
- Olivka, P.; Krumnikl, M.; Moravec, P.; Seidl, D. Calibration of Short Range 2D Laser Range Finder for 3D SLAM Usage. J. Sens. 2016, 2016. [Google Scholar] [CrossRef]
- Oberlaender, J.; Pfotzer, L.; Roennau, A.; Dillmann, R. Fast Calibration of Rotating and Swivelling 3-D Laser Scanners Exploiting Measurement Redundancies. In Proceedings of the 2015 IEEE/RSJ International Conference on Intelligent Robots and Systems, Hamburg, Germany, 28 September–2 October 2015; pp. 3038–3044. [Google Scholar]
- Kurnianggoro, L.; Hoang, V.-D.; Jo, K.-H. Calibration of Rotating 2D Laser Range Finder Using Circular Path on Plane Constraints. In New Trends in Computational Collective Intelligence; Camacho, D., Kim, S.W., Trawinski, B., Eds.; Springer: Cham, Switzerland, 2015; Volume 572, pp. 155–163. [Google Scholar]
- Kurnianggoro, L.; Hoang, V.-D.; Jo, K.-H. Calibration of a 2D Laser Scanner System and Rotating Platform using a Point-Plane Constraint. Comput. Sci. Inf. Syst. 2015, 12, 307–322. [Google Scholar] [CrossRef]
- Pfotzer, L.; Oberlaender, J.; Roennau, A.; Dillmann, R. Development and calibration of KaRoLa, a compact, high-resolution 3D laser scanner. In Proceedings of the IEEE International Symposium on Safety, Hokkaido, Japan, 27–30 October 2014. [Google Scholar]
- Lin, C.C.; Liao, Y.D.; Luo, W.J. Calibration method for extending single-layer LIDAR to multi-layer LIDAR. In Proceedings of the 2013 IEEE/SICE International Symposium on System Integration (SII), Kobe, Japan, 15–17 December 2013. [Google Scholar]
- Ueda, T.K.H.; Tomizawa, T. Mobile SOKUIKI Sensor System-Accurate Range Data Mapping System with Sensor Motion. In Proceedings of the 2006 International Conference on Autonomous Robots and Agents, Palmerston North, New Zealand, 12–14 December 2006. [Google Scholar]
- Nagatani, K.; Tokunaga, N.; Okada, Y.; Yoshida, K. Continuous Acquisition of Three-Dimensional Environment Information for Tracked Vehicles on Uneven Terrain. In Proceedings of the IEEE International Workshop on Safety, Sendai, Japan, 21–24 October 2008. [Google Scholar]
- Matsumoto, M.; Yuta, S. 3D laser range sensor module with roundly swinging mechanism for fast and wide view range image. In Proceedings of the Multisensor Fusion & Integration for Intelligent Systems, Salt Lake City, UT, USA, 5–7 September 2010. [Google Scholar]
- Walther, M.; Steinhaus, P.; Dillmann, R. A foveal 3D laser scanner integrating texture into range data. In Proceedings of the International Conference on Intelligent Autonomous Systems 9-ias, Tokyo, Japan, 7–9 March 2006. [Google Scholar]
- Raymond, S.; Nawid, J.; Waleed, K.; Claude, S. A Low-Cost, Compact, Lightweight 3D Range Sensor. In Proceedings of the Australasian Conference on Robotics and Automation; Available online: https://www.researchgate.net/publication/228338590_A_Low-Cost_Compact_Lightweight_3D_Range_Sensor (accessed on 6 January 2021).
- Dias, P.; Matos, M.; Santos, V. 3D Reconstruction of Real World Scenes Using a Low-Cost 3D Range Scanner. Comput.-Aided Civ. Infrastruct. Eng. 2006, 21, 486–497. [Google Scholar] [CrossRef]
- Nasrollahi, M.; Bolourian, N.; Zhu, Z.; Hammad, A. Designing LiDAR-equipped UAV Platform for Structural Inspection. In Proceedings of 34th International Symposium on Automation and Robotics in Construction; IAARC Publications, 2018; Available online: https://www.researchgate.net/publication/328370814_Designing_LiDAR-equipped_UAV_Platform_for_Structural_Inspection (accessed on 6 January 2021).
- Bertussi, S. Spin_Hokuyo—ROS Wiki. Available online: http://wiki.ros.org/spin_hokuyo (accessed on 13 October 2020).
- Bosse, M.C.; Zlot, R.M. Continuous 3D scan-matching with a spinning 2D laser. In Proceedings of the IEEE International Conference on Robotics & Automation, Kobe, Japan, 12–17 May 2009. [Google Scholar]
- Zheng, F.; Shibo, Z.; Shiguang, W.; Yu, Z. A Real-Time 3D Perception and Reconstruction System Based on a 2D Laser Scanner. J. Sens. 2018, 2018, 1–14. [Google Scholar] [CrossRef]
- Almqvist, H.; Magnusson, M.; Lilienthal, A.J. Improving Point Cloud Accuracy Obtained from a Moving Platform for Consistent Pile Attack Pose Estimation. J. Intell. Robot. Syst. 2014, 75, 101–128. [Google Scholar] [CrossRef]
- Zhang, J.; Singh, S. LOAM: Lidar Odometry and Mapping in Real-time. In Robotics: Science and Systems; 2014; Available online: https://www.researchgate.net/publication/311570125_LOAM_Lidar_Odometry_and_Mapping_in_real-time (accessed on 6 January 2021).
- Zhang, T.; Nakamura, Y. Moving Humans Removal for Dynamic Environment Reconstruction from Slow-Scanning LIDAR Data. In Proceedings of the 2018 15th International Conference on Ubiquitous Robots, Honolulu, HI, USA, 26–30 June 2018; pp. 449–454. [Google Scholar]
- David, Y.; Kent, W. “Sweep Diy 3d Scanner Kit” Project. Available online: https://www.servomagazine.com/magazine/article/the-multi-rotor-hobbyist-scanse-sweep-3d-scanner-review? (accessed on 16 October 2020).
- Hokuyo UST-10/20LX. Available online: https://www.hokuyo-aut.co.jp/search/single.php?serial=16 (accessed on 16 October 2020).
- Point Cloud Library. Available online: https://pointclouds.org/ (accessed on 16 October 2020).
- More, J.J. The Levenberg-Marquardt algorithm: Implementation and theory. In Lecture Notes in Mathematicsl; Springer: Berlin/Heidelberg, Germany, 1978; Volume 630. [Google Scholar]
- Madsen, K.; Nielsen, H.B.; Tingleff, O. Methods for Non-Linear Least Squares Problems, 2nd ed.; Informatics and Mathematical Modelling (IMM), Technical University of Denmark (DTU): Lyngby, Denmark, 2004. [Google Scholar]
- Ricaud, B.; Joly, C.; de La Fortelle, A. Nonurban Driver Assistance with 2D Tilting Laser Reconstruction. J. Surv. Eng. 2017, 143. [Google Scholar] [CrossRef]
- Yan, F.; Zhang, S.; Zhuang, Y.; Tan, G. Automated indoor scene reconstruction with mobile robots based on 3D laser data and monocular visual odometry. In Proceedings of the 2015 IEEE International Conference on CYBER Technology in Automation, Control, and Intelligent Systems (CYBER), Shenyang, China, 8–12 June 2015. [Google Scholar]
- Colas, F.; Mahesh, S.; Pomerleau, F.; Liu, M.; Siegwart, R. 3D path planning and execution for search and rescue ground robots. In Proceedings of the IEEE/RSJ International Conference on Intelligent Robots & Systems, Tokyo, Japan, 3–7 November 2013. [Google Scholar]




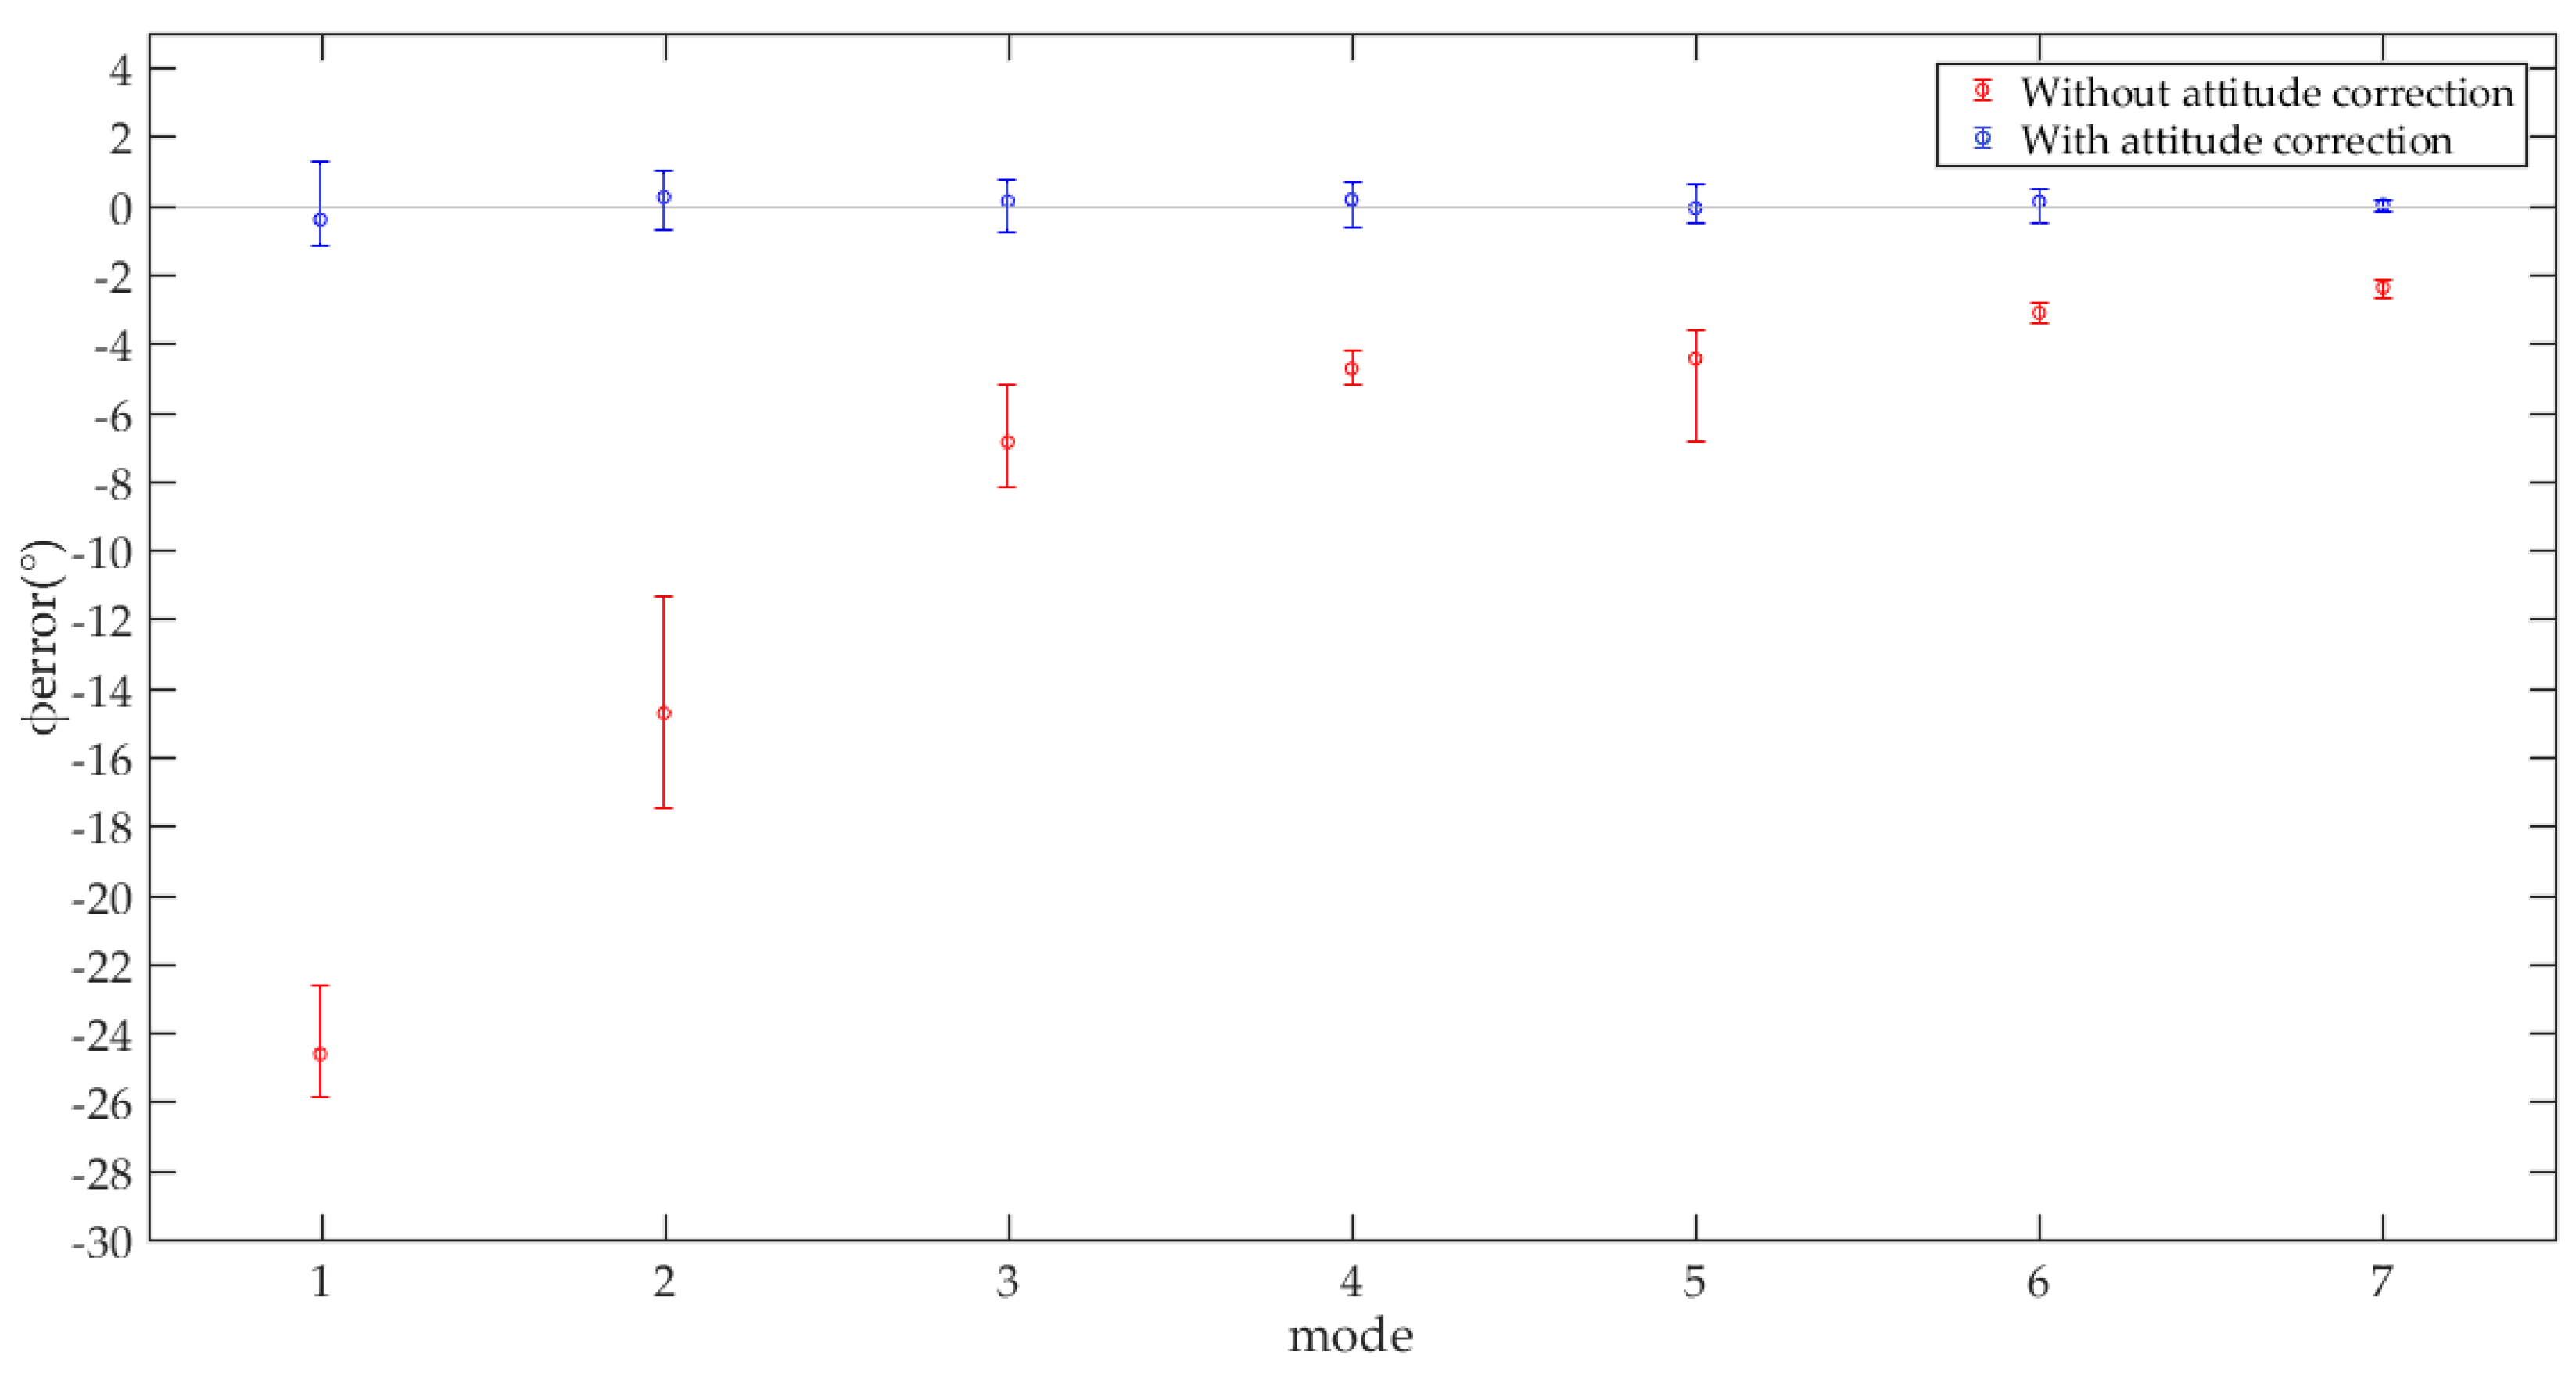
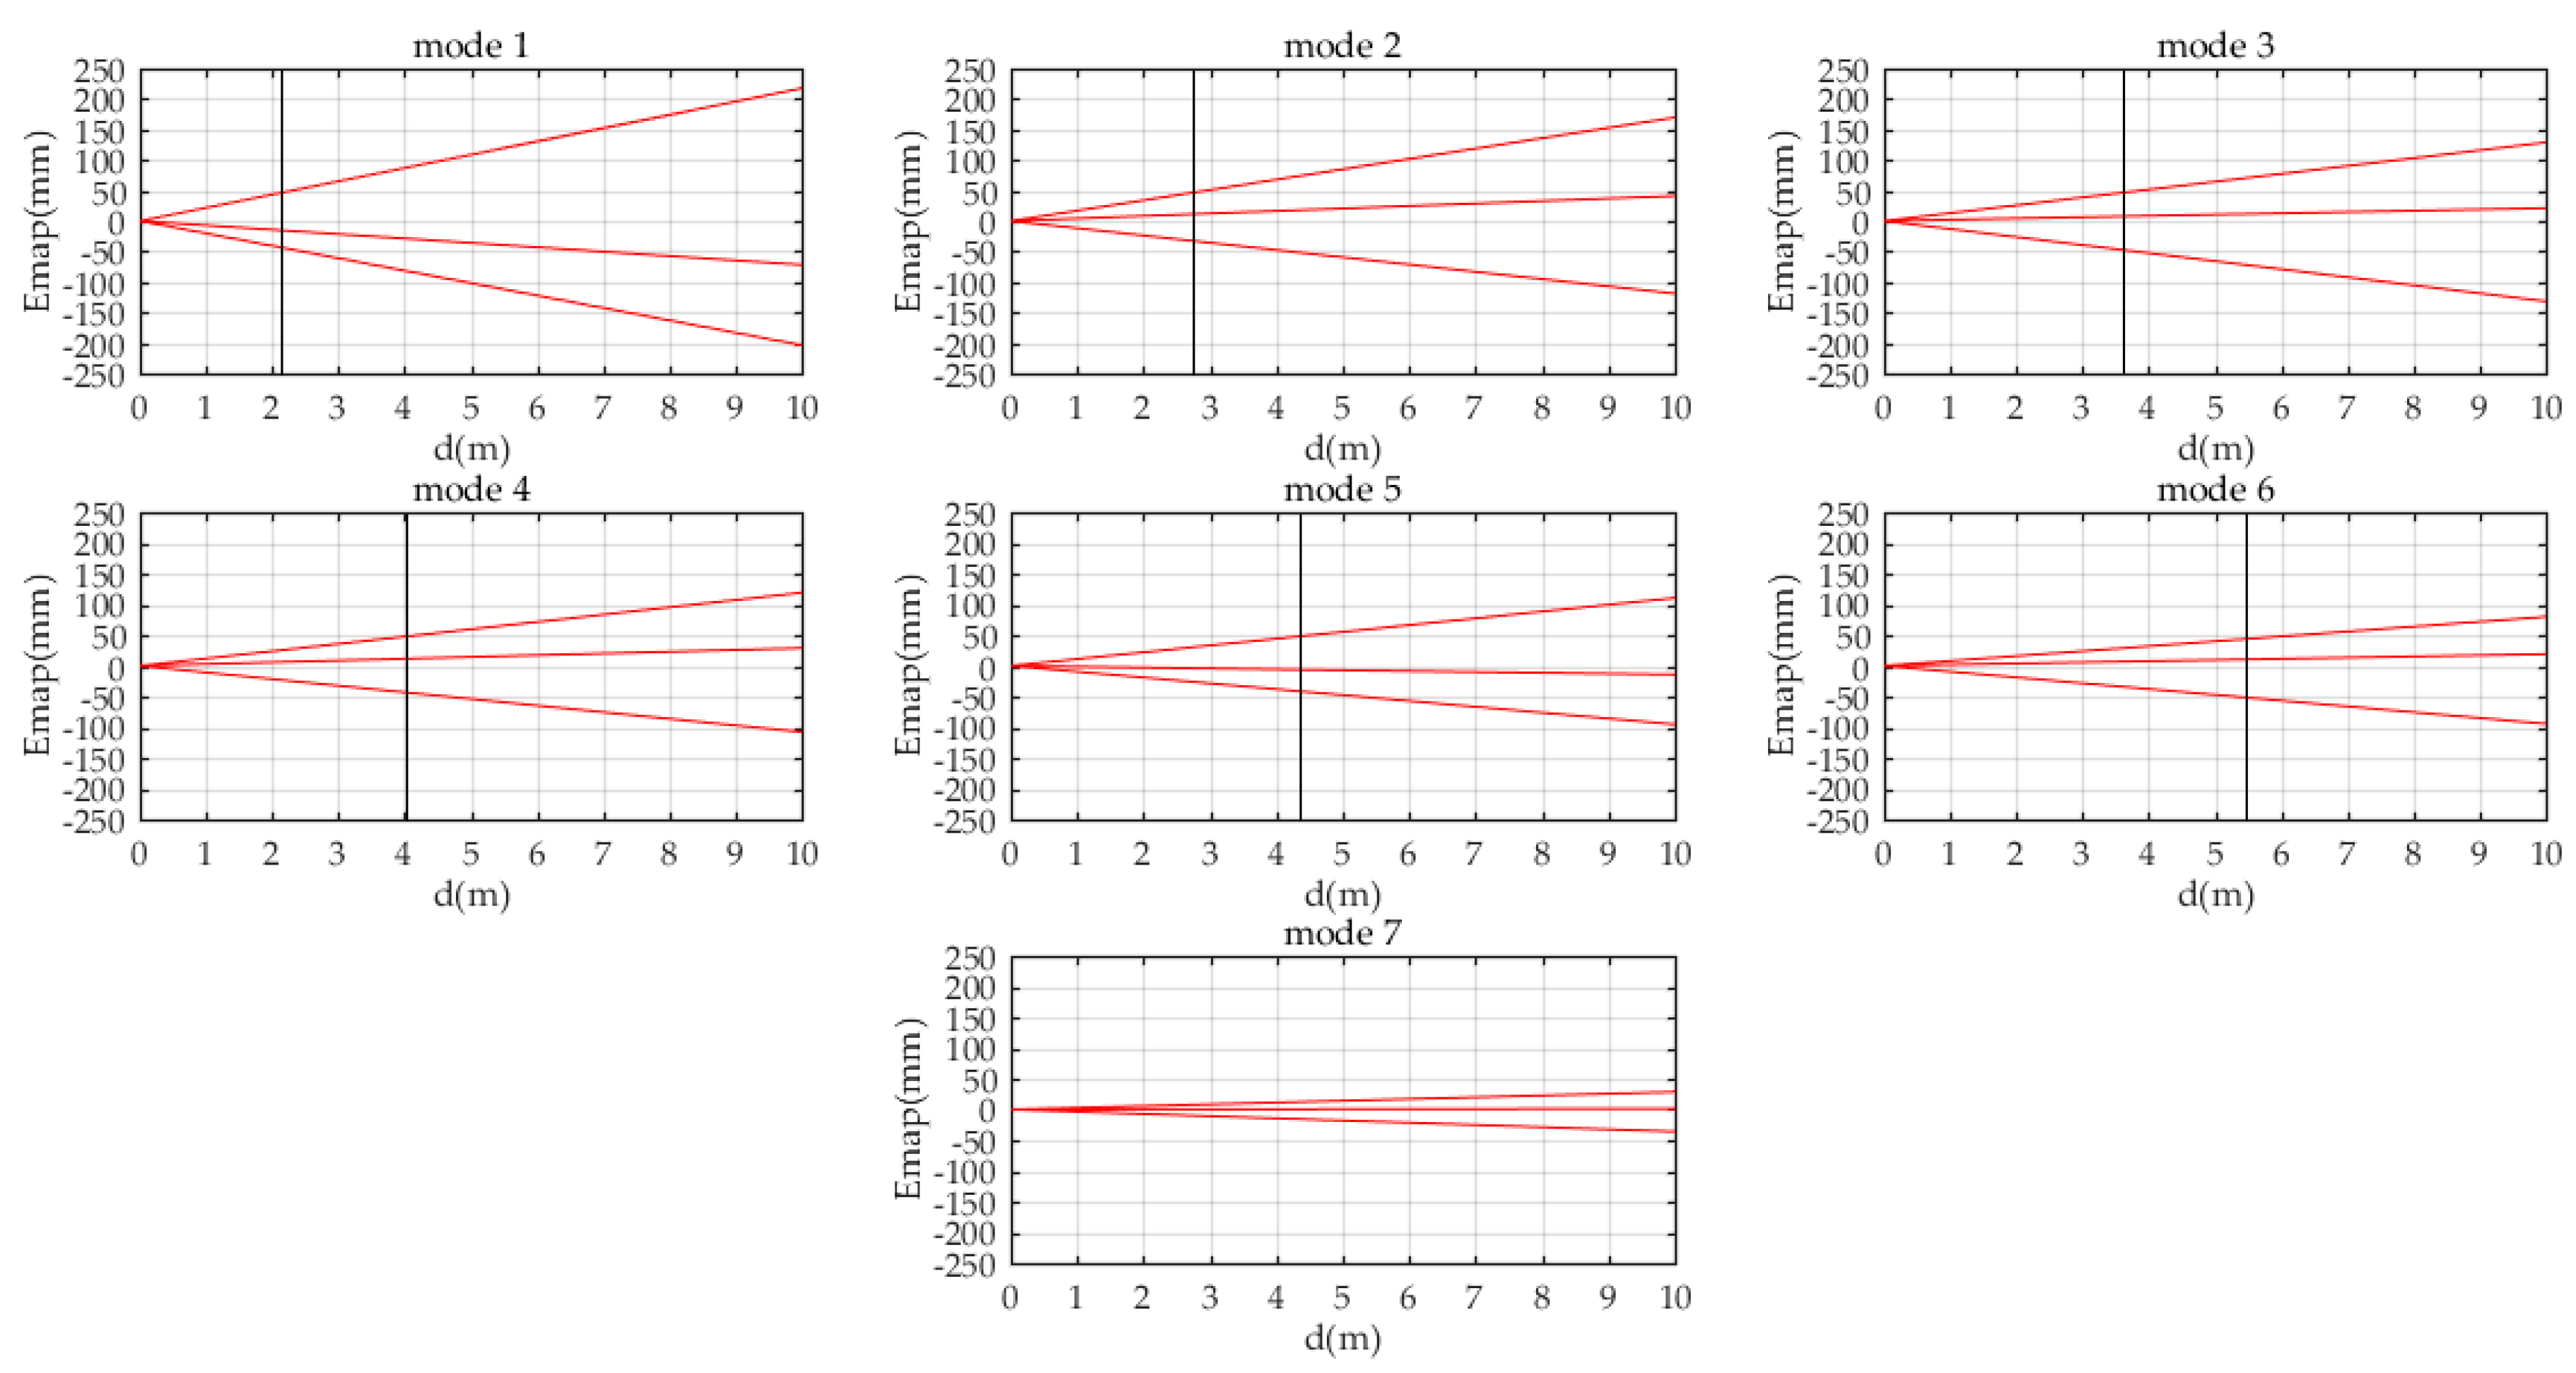
| Mode | 1 | 2 | 3 | 4 | 5 | 6 | 7 |
|---|---|---|---|---|---|---|---|
| T/s | 1 | 2 | 4 | 5 | 8 | 10 | 16 |
| γ/° | 4.5 | 2.25 | 1.125 | 0.9 | 0.5625 | 0.45 | 0.28125 |
Publisher’s Note: MDPI stays neutral with regard to jurisdictional claims in published maps and institutional affiliations. |
© 2021 by the authors. Licensee MDPI, Basel, Switzerland. This article is an open access article distributed under the terms and conditions of the Creative Commons Attribution (CC BY) license (http://creativecommons.org/licenses/by/4.0/).
Share and Cite
Yuan, C.; Bi, S.; Cheng, J.; Yang, D.; Wang, W. Low-Cost Calibration of Matching Error between Lidar and Motor for a Rotating 2D Lidar. Appl. Sci. 2021, 11, 913. https://doi.org/10.3390/app11030913
Yuan C, Bi S, Cheng J, Yang D, Wang W. Low-Cost Calibration of Matching Error between Lidar and Motor for a Rotating 2D Lidar. Applied Sciences. 2021; 11(3):913. https://doi.org/10.3390/app11030913
Chicago/Turabian StyleYuan, Chang, Shusheng Bi, Jun Cheng, Dongsheng Yang, and Wei Wang. 2021. "Low-Cost Calibration of Matching Error between Lidar and Motor for a Rotating 2D Lidar" Applied Sciences 11, no. 3: 913. https://doi.org/10.3390/app11030913
APA StyleYuan, C., Bi, S., Cheng, J., Yang, D., & Wang, W. (2021). Low-Cost Calibration of Matching Error between Lidar and Motor for a Rotating 2D Lidar. Applied Sciences, 11(3), 913. https://doi.org/10.3390/app11030913


