Review

Ultrasonic Surface Rolling Process: Properties, Characterization, and Applications

by
Merbin John
1,
Alessandro M. Ralls
1,
Scott C. Dooley
1,
Akhil Kishore Vellooridathil Thazhathidathil
2,
Ashok Kumar Perka
3,
Udaya Bhat Kuruveri
4 and
Pradeep L. Menezes
1,*
1
Department of Mechanical Engineering, University of Nevada, Reno, NV 89557, USA
2
Quest-Global Engineering Services Pvt Ltd., Bengaluru 560103, Karnataka, India
3
Metal Welding and Joining, R&D Division, Tata Steel Ltd., Jamshedpur 831007, India
4
Department of Metallurgical and Materials Engineering, National Institute of Technology, Surathkal, Mangalore 575025, Karnataka, India
*
Author to whom correspondence should be addressed.
Appl. Sci. 2021, 11(22), 10986; https://doi.org/10.3390/app112210986
Submission received: 30 October 2021 / Revised: 13 November 2021 / Accepted: 15 November 2021 / Published: 19 November 2021
(This article belongs to the Special Issue Feature Papers in Surface Sciences and Technology Section)

Abstract

:
Ultrasonic surface rolling process (USRP) is a novel surface severe plastic deformation (SPD) method that integrates ultrasonic impact peening (UIP) and deep rolling (DR) to enhance the surface integrity and surface mechanical properties of engineering materials. USRP can induce gradient nanostructured surface (GNS) layers on the substrate, providing superior mechanical properties, thus preventing premature material failure. Herein, a comprehensive overview of current-state-of-the art USRP is provided. More specifically, the effect of the USRP on a broad range of materials exclusively used for aerospace, automotive, nuclear, and chemical industries is explained. Furthermore, the effect of USRP on different mechanical properties, such as hardness, tensile, fatigue, wear resistance, residual stress, corrosion resistance, and surface roughness are summarized. In addition, the effect of USRP on grain refinement and the formation of gradient microstructure is discussed. Finally, this study elucidates the application and recent advances of the USRP process.

1. Introduction

The surface integrity of engineering material is a crucial factor that affects the service life of materials in the designated field of applications. Superior surface integrity and surface mechanical properties are essential to prevent crack initiation, crack propagation, and subsequent failures that originate from the surface. Scholars have reported that most engineering failures are originated from the component surface, and they predominantly depend on the surface microstructure. Therefore, over the past few decades, scholars haveadopted various surface strengthening methods to enhance the longevity of the engineering material. Surface strengthening by different severe plastic deformation (SPD) methods has been widely perceived to enhance surface mechanical properties [1]. Researchers have used SPD by shot peening [2,3], severe shot peening (SSP) [4,5], ultrasonic impact peening [6,7], ultrasonic shot peening (USP) [8,9], laser shock peening [10,11], direct and indirect laser shock surface patterning (LSSP) [12,13], surface mechanical attrition treatment (SMAT) [14,15], and deep cold rolling (DCR) [16]. These surface SPD techniques could induce residual compressive stress (RCS) and closure of existing microcracks and microcavities on the surface [17,18,19,20]. In addition, they generate gradient nanostructured surface (GNS) layers, which can provide improved surface mechanical properties and surface integrity. However, scholars have reported that these processes increase surface roughness, which is detrimental as they influence the corrosion and fatigue crack propagation rate [21,22]. Bulk nanocrystallization is an alternative method to develop components with superior surface integrity and bulk mechanical properties. However, bulk nanostructuring is expensive [23].
To mitigate the issues associated with the mentioned SPD techniques and provide superior surface integrity, Bozdana et al. [24] introduced a method in 2005 that integrates ultrasonic vibration into a DCR technique. The researchers named this integrated process as ultrasonic deep cold rolling (UDCR). Later in 2008, ultrasonic impact peening (UIP) and deep rolling (DR) were integrated, and the authors named the process USRP [22]. Scholars have adopted different nomenclatures for this process, such as ultrasonic surface rolling (USR) and surface ultrasonic rolling treatment (SURT). However, the most commonly used name is USRP. USRP is a novel surface SPD technique, and this combination could provide superior surface mechanical properties with reduced surface roughness. In addition, the high strain rate and SPD developed during the USRP generate GNS layers, which provide a uniform microstructure with superior surface integrity. The thickness of the affected surface layer during the USRP process is much higher than DR. This technique is an effective and economical method of SPD that can develop the GNS layer without affecting the chemistry of the substrate materials.
Researchers have revealed that many materials that are successfully processed using USRP include but are not limited to different steel grades [25,26,27,28,29,30], titanium alloys [31,32,33,34,35], aluminum alloys [36,37], and magnesium alloys [38,39,40]. Scholars have experimentally demonstrated that USRP can provide superior enhancement in fatigue strength [25,28,29,32], improved wear resistance [26,30,31], remarkable increases in hardness [25,26,27,28,31,32], increases in yield strength [28,34,39,40], enhanced corrosion resistance [41,42], a reduction in surface roughness [25,26,27,28,31,32], a significant amount of induced RCS [25,28,29] and superior grain refinement [38,39,40]. The beneficial properties of USRP compared to other methods of SPD have prompted researchers to utilize this process on various metals and alloys in diverse fields of applications in recent years, thus increasing the number of research papers. This trend has mainly been observed from the year 2018, which is illustrated in Figure 1.
There are significant reviews on various surface SPD methods to enhance surface integrity and surface mechanical properties. John et al. [10] comprehensively reviewed the three most commonly used peening techniques such as SP, UIP, and LSP for a broad range of engineering materials and elucidated the influence of various process parameters on surface mechanical properties. Their study revealed superior enhancement in surface mechanical properties and surface integrity. Zhang et al. [43] discussed the effect of LSP and advanced methods of LSP on various metals and alloys. The authors divulged that LSP could provide a significant enhancement in surface mechanical properties. Liu et al. [44] specifically studied the effect of a newly developed SPD method named ultrasonic nanocrystal surface modification (UNSM) technique on titanium and titanium alloys. The authors revealed superior surface mechanical properties, especially improvement in wear resistance after UNSM. Malaki et al. [6] reviewed the effect of UIP on various engineering materials and described the potential improvement in surface mechanical properties. Sundar et al. [45] comprehensively discussed the effect of LSP on various metals and alloys. The authors revealed enhancement in fatigue life, corrosion resistance, improvement in residual stress, and surface microhardness. However, no review articles discuss the SPD by USRP and the beneficial nature of superior surface mechanical properties without affecting the surface roughness. Therefore, this review paper aims to provide a comprehensive discussion on USRP. First, the fundamental mechanism of the USRP is discussed in Section 2. The effect of USRP on microstructural features and microstructural evolution is elucidated in Section 3. Then, Section 4 discusses the impact of the USRP process on mechanical properties, such as hardness, fatigue, tensile properties, wear resistance, residual stress, corrosion resistance, and surface roughness are summarized. Finally, the applications and recent advances of USRP are explored in Section 5.

2. Mechanism of USRP

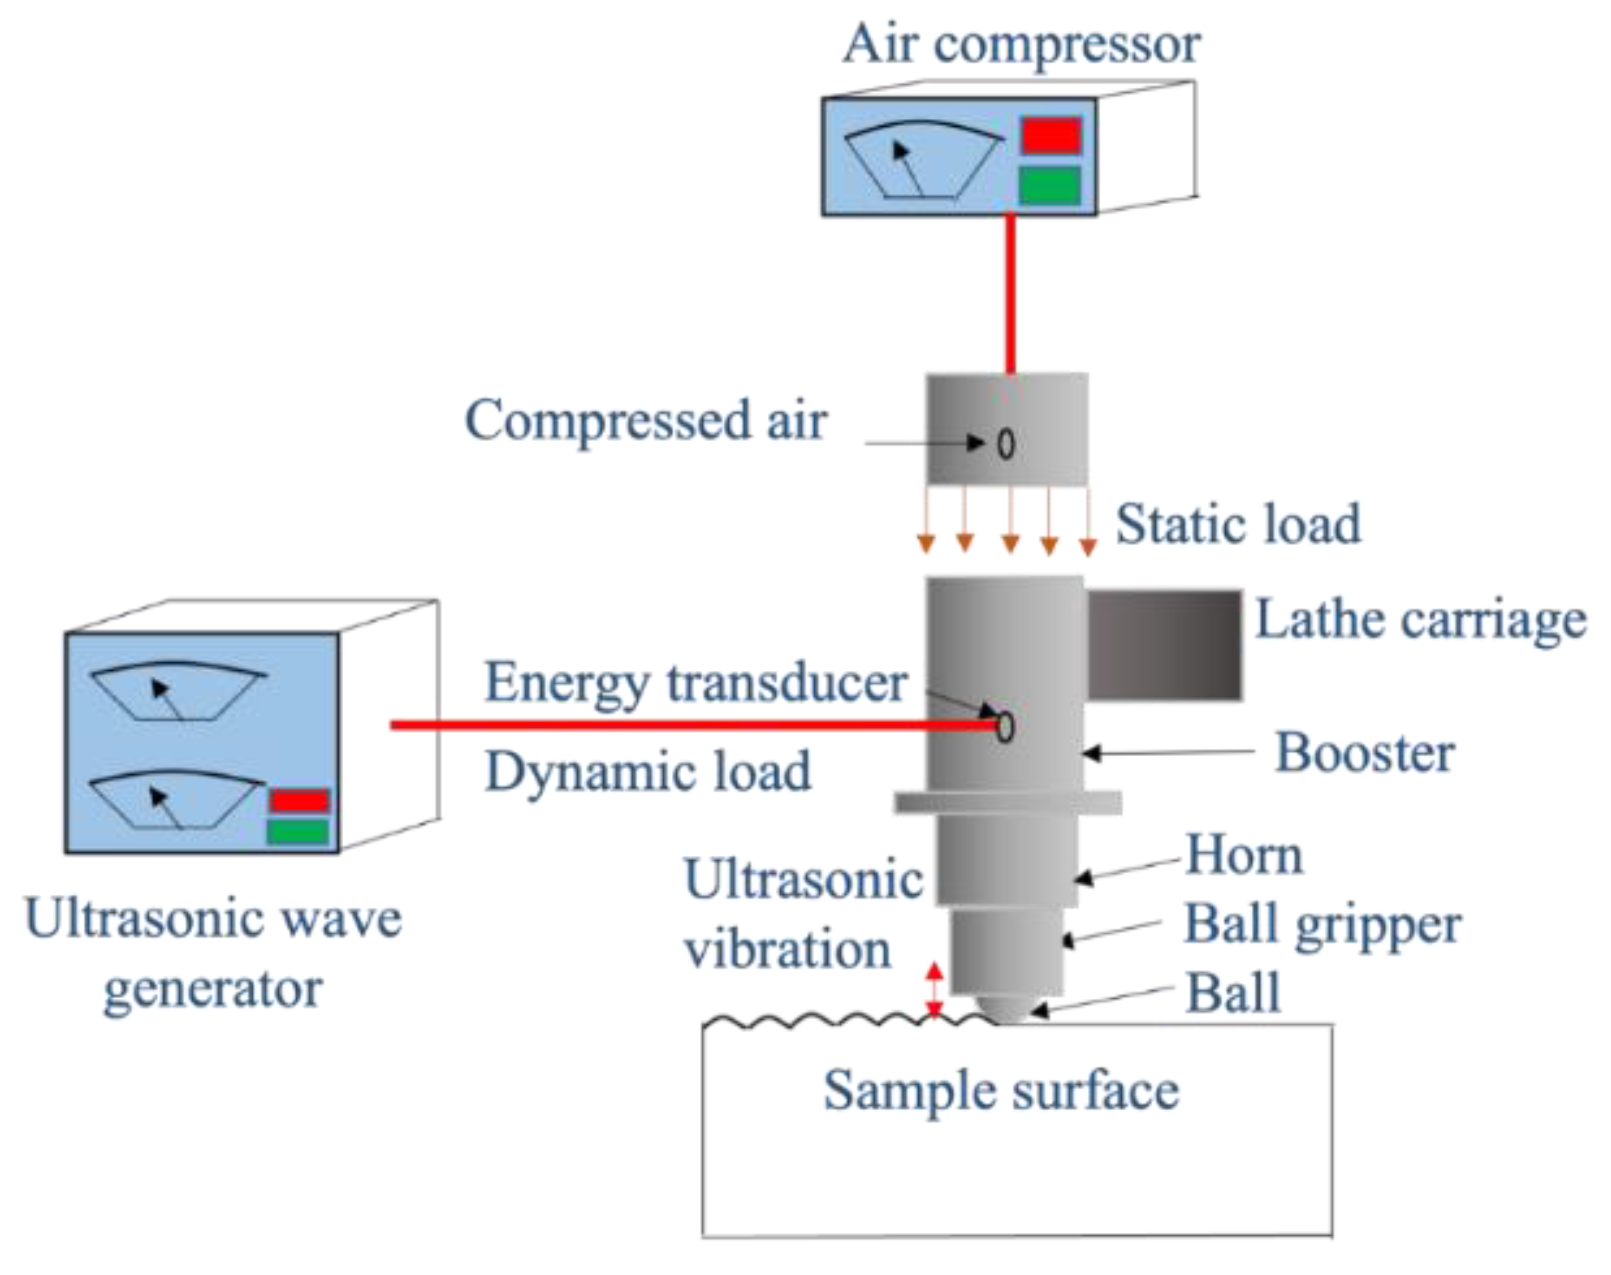
USRP is a novel surface SPD technique that is an integration of UIP and DR techniques. In USRP, the combined effect of ultrasonic vibrating motion and static force on the specimen applied through a rolling ball tip induces SPD on the specimen surface. Figure 2 demonstrates the working of USRP. A standard USRP mechanism consists of an ultrasonic wave generator, an air compressor, and a working tip usually fixed on a lathe carriage to perform the deep rolling. The high-frequency ultrasonic vibration and static force are transmitted to the roller, rotating along the substrate surface at high velocity [46]. The static force used in the USRP process is lower than the conventional DR process; hence USRP can maintain the geometrical accuracy [28]. This repeated high-frequency impact integrated with rolling produces large elastic and plastic deformation on the substrate. Once the USRP is completed, the elastic deformation recovers while the plastic deformation plays a predominant role in reducing the surface roughness. Therefore, the integration of UIP and DR can induce a significant amount of grain refinement, and eventually, it will produce a uniform microstructure and GNS layer on the substrate.
In addition, the ultrasonic vibration during the USRP process allows easy entry of the lubricant between the rolling tip and specimen surface. The purpose of providing lubrication between the working tip and processing surface is to reduce friction. The lubricant also acts as a coolant and improves the aesthetics of the surface. Simultaneously, the high-frequency impact improves the plastic deformation ability, which prevents the material from cracking and promotes the reconstruction of the material structure [47]. In this manner, USRP can provide superior surface integrity and surface mechanical properties.

3. Microstructural Development during USRP

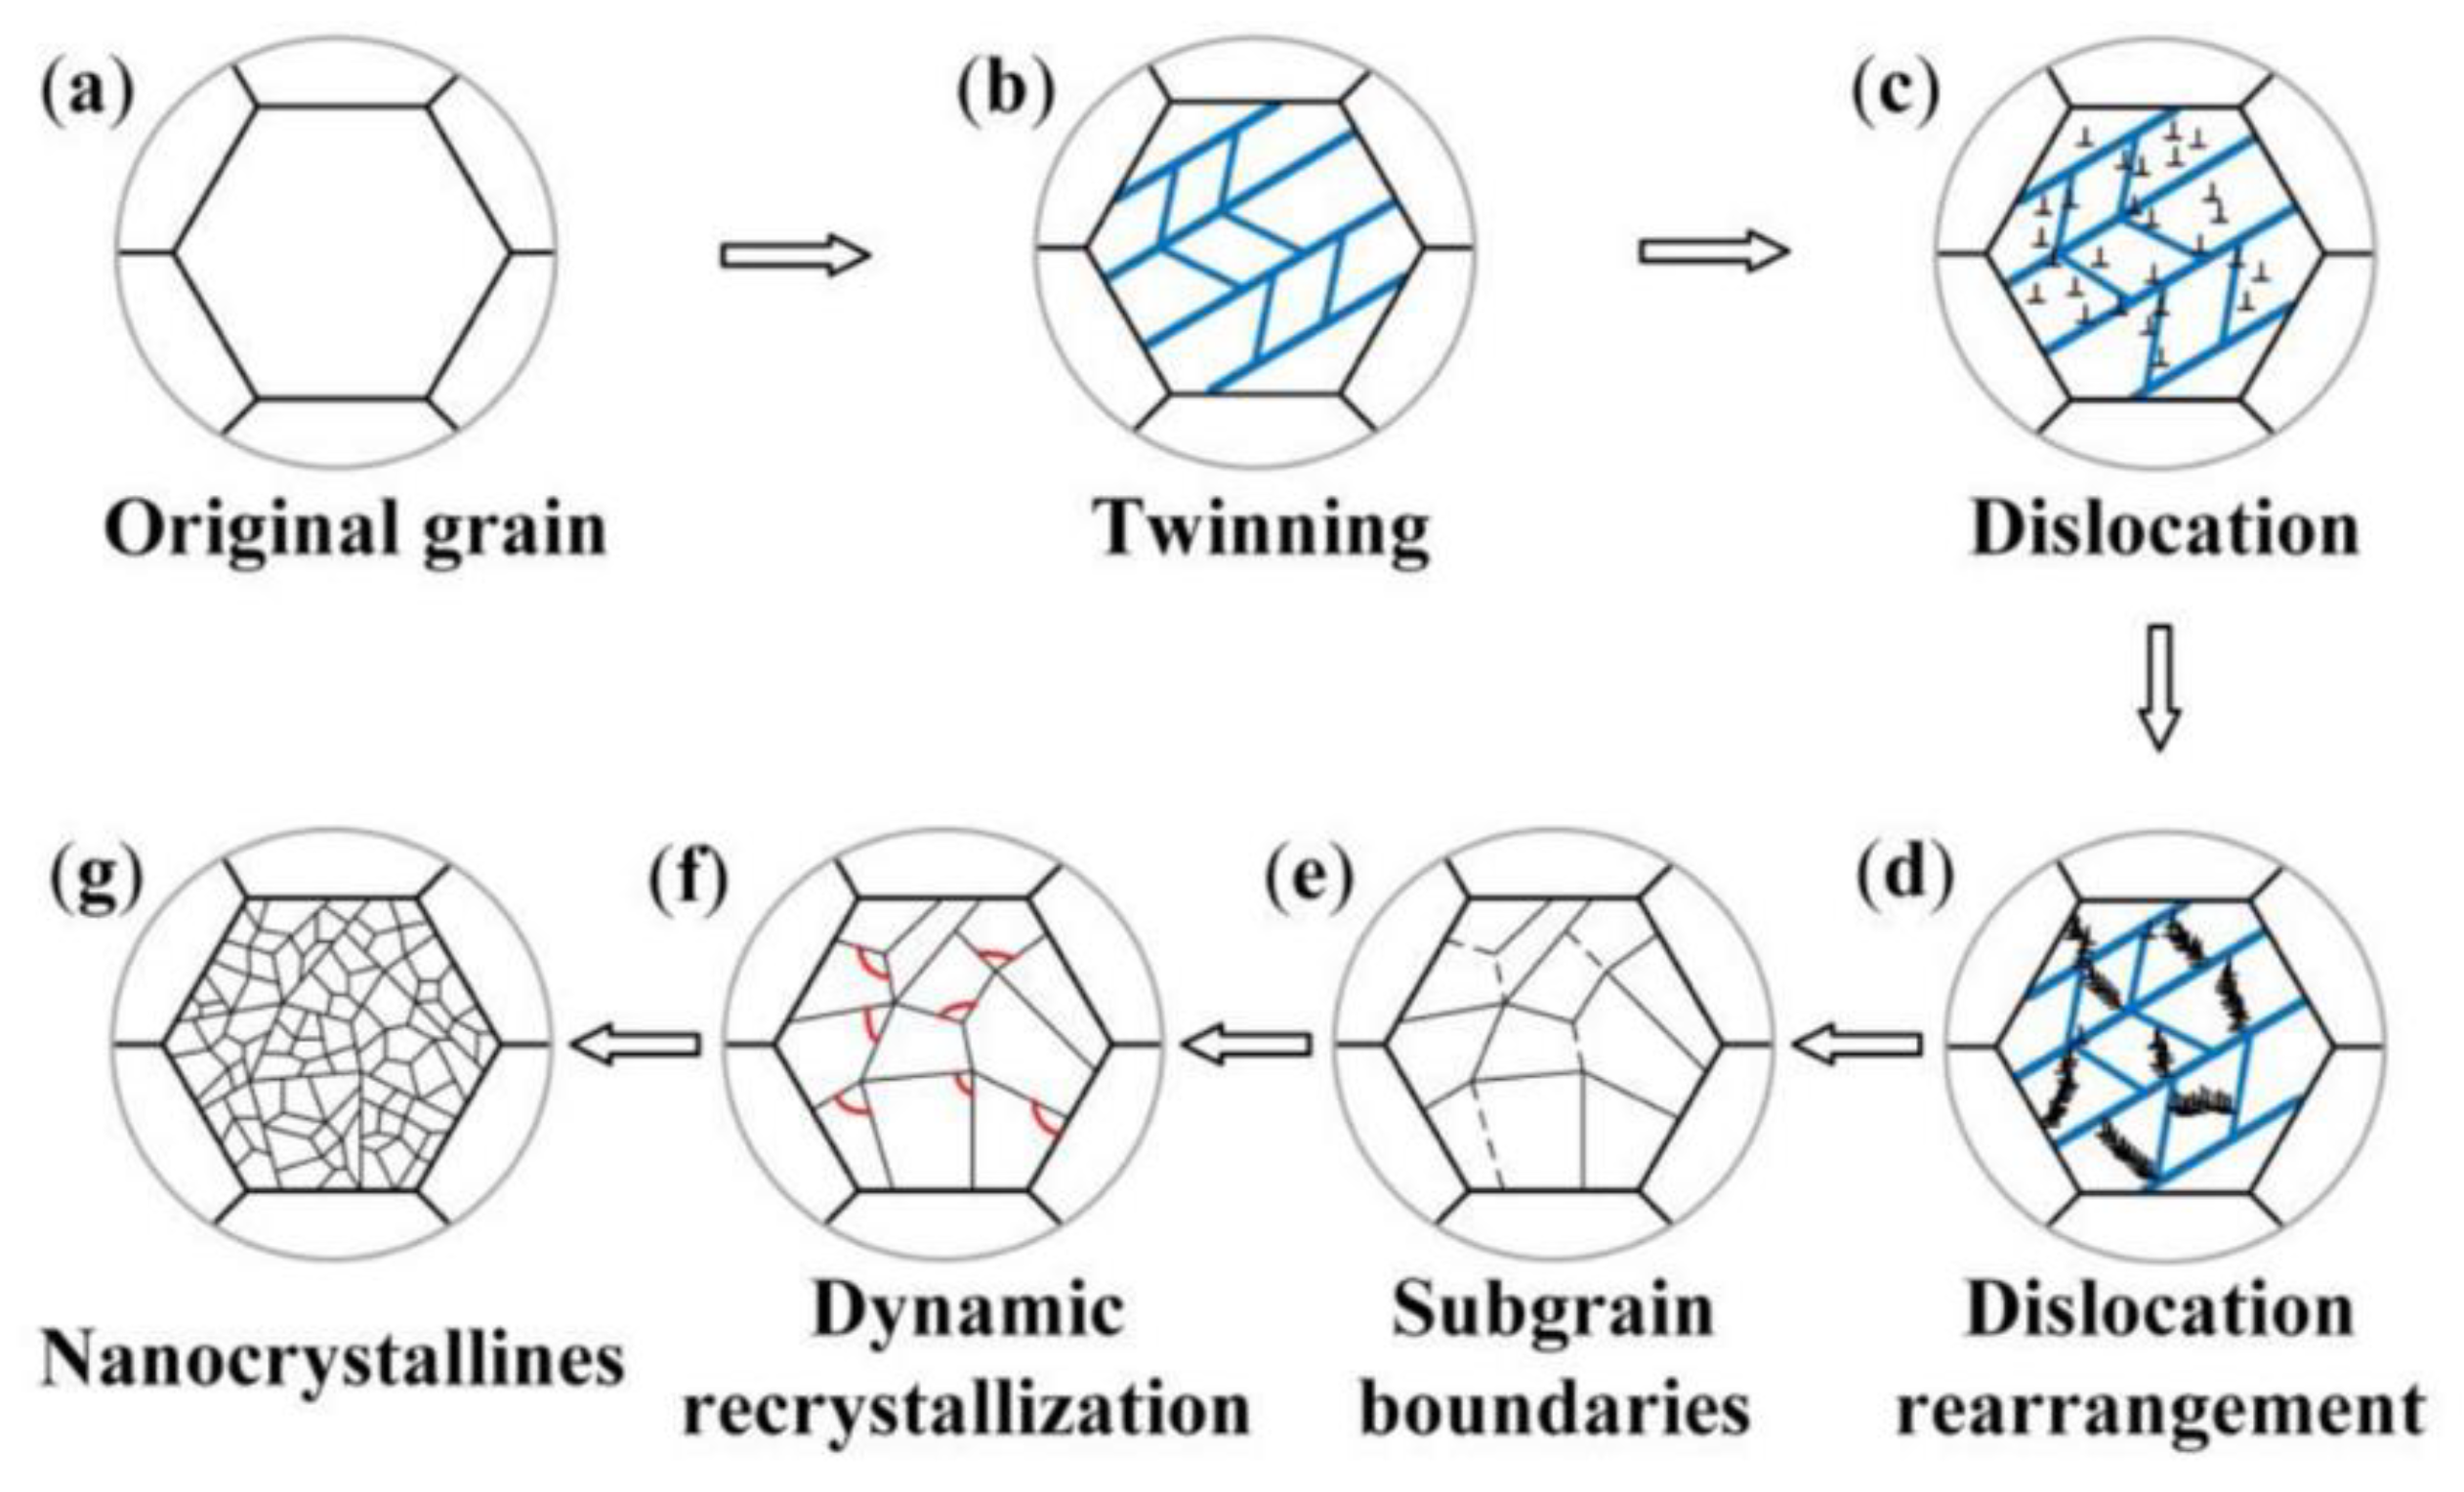
In recent years, USRP has been receiving widespread attention among scholars owing to the ability to develop a homogenous surface with precise control of the process parameters. Since USRP is a surface SPD method, it is natural to visualize the changes in the microstructure from that angle. The microstructural changes during USRP could be classified under two broad categories: microstructural changes in ferrous-based materials and non-ferrous-based materials. Both types exhibit three distinct layers. The grain refinement is extensive on the top surface, producing an ultrafine/nanocrystalline structure. Below the top layer, a second layer is present, a region of extensive deformation showing many deformation structures. Below that layer is a region that contains unaffected matrix material [40,48]. The degree of grain refinement, the extent of plastic deformation, the depth of SPD layers, etc. all depend on the initial microstructure, chemical composition, USRP processing parameters and so forth. At the top, fresh, strain-free grains can also form due to dynamic recrystallization (DRX). Microstructure details generally developed during USRP are schematically presented in Figure 3. The grain size increases towards depth direction, thus generating a GNS layer.
The following sections will provide a salient view of microstructural features developed during the USRP of ferrous-based and non-ferrous-based materials.

3.1. Microstructural Changes in Ferrous Based Materials Subjected to USRP

A wide variety of ferrous-based materials have been engineered with the USRP process with different processing parameters. Liu et al. [49] performed USRP on carbon steels (with carbon in the range of 0.5 wt.% to 0.7 wt.%). The authors observed extensive grain refinement at the top (0 μm–2 μm), wherein proeutectoid ferrite grains were refined in size and cementite platelets in pearlite were fractured. Below that (depth 2 μm–8 μm), proeutectoid ferrite grains were deformed, whereas cementite platelets in pearlite were intact. Below 8 μm depth hardly, there was any deformation. Xu et al. [50] have subjected a spring steel (with 0.5 wt.% C, 1.0 wt.% Mn and 1.12 wt.% Cr) to USRP with static load up to 862 N. They observed a gradient of microstructures up to a depth of 48 μm and within that acicular microstructure observed in the top 4 μm. Luan et al. [51] have explored microstructural change of ultra-high-strength steel (45CrNiMoVA) subjected to USRP, and they correlated the microstructural change to surface integrity. The authors observed the formation of nano-sized structures at the surface. The top surface (up to 5 μm depth) appeared to have undergone plastic flow. They also reported the development of residual stress, which is partially linked to the deformation structure. Ting et al. [22] investigated the effect of USRP on the quenched and tempered 40Cr grade shaft steel (C: 0.4 wt.%, Cr: 1.0 wt.%). USRP is performed using a sintered carbide tool of 5 mm with 400 N static force. Their work indicated a top layer of about 150 μm where the plastic flow was observed. The extent of plastic deformation was decreasing along the depth direction. The same trend was observed in the case of grain refinement. The authors observed extremely small, uniform, randomly oriented nanostructured grains of size 3 nm–7 nm at the top. Extreme grain refinement was attributed to the body center cubic (BCC) structure, which had many slip systems. During rolling, a large amount of dislocation activity took place, and as a consequence, dislocation density will increase and form a tangled network, which then rearranges to form subgrain structures. With more strain, subgrains will change into new grains with small and high-angle grain boundaries. With the generation and annihilation of dislocation reaching equilibrium, the grain size would become stable and produce extremely fine randomly oriented nanoscale grains. Wang et al. [52] explored the effect of USRP on the SCC tendency of high-strength pipeline steel. They observed a top layer having an extensive plastic flow structure. Below that layer, there was a region of transition followed by the matrix region. Extensive grain refinement was observed at the surface to produce nanostructures of 40 nm–100 nm.
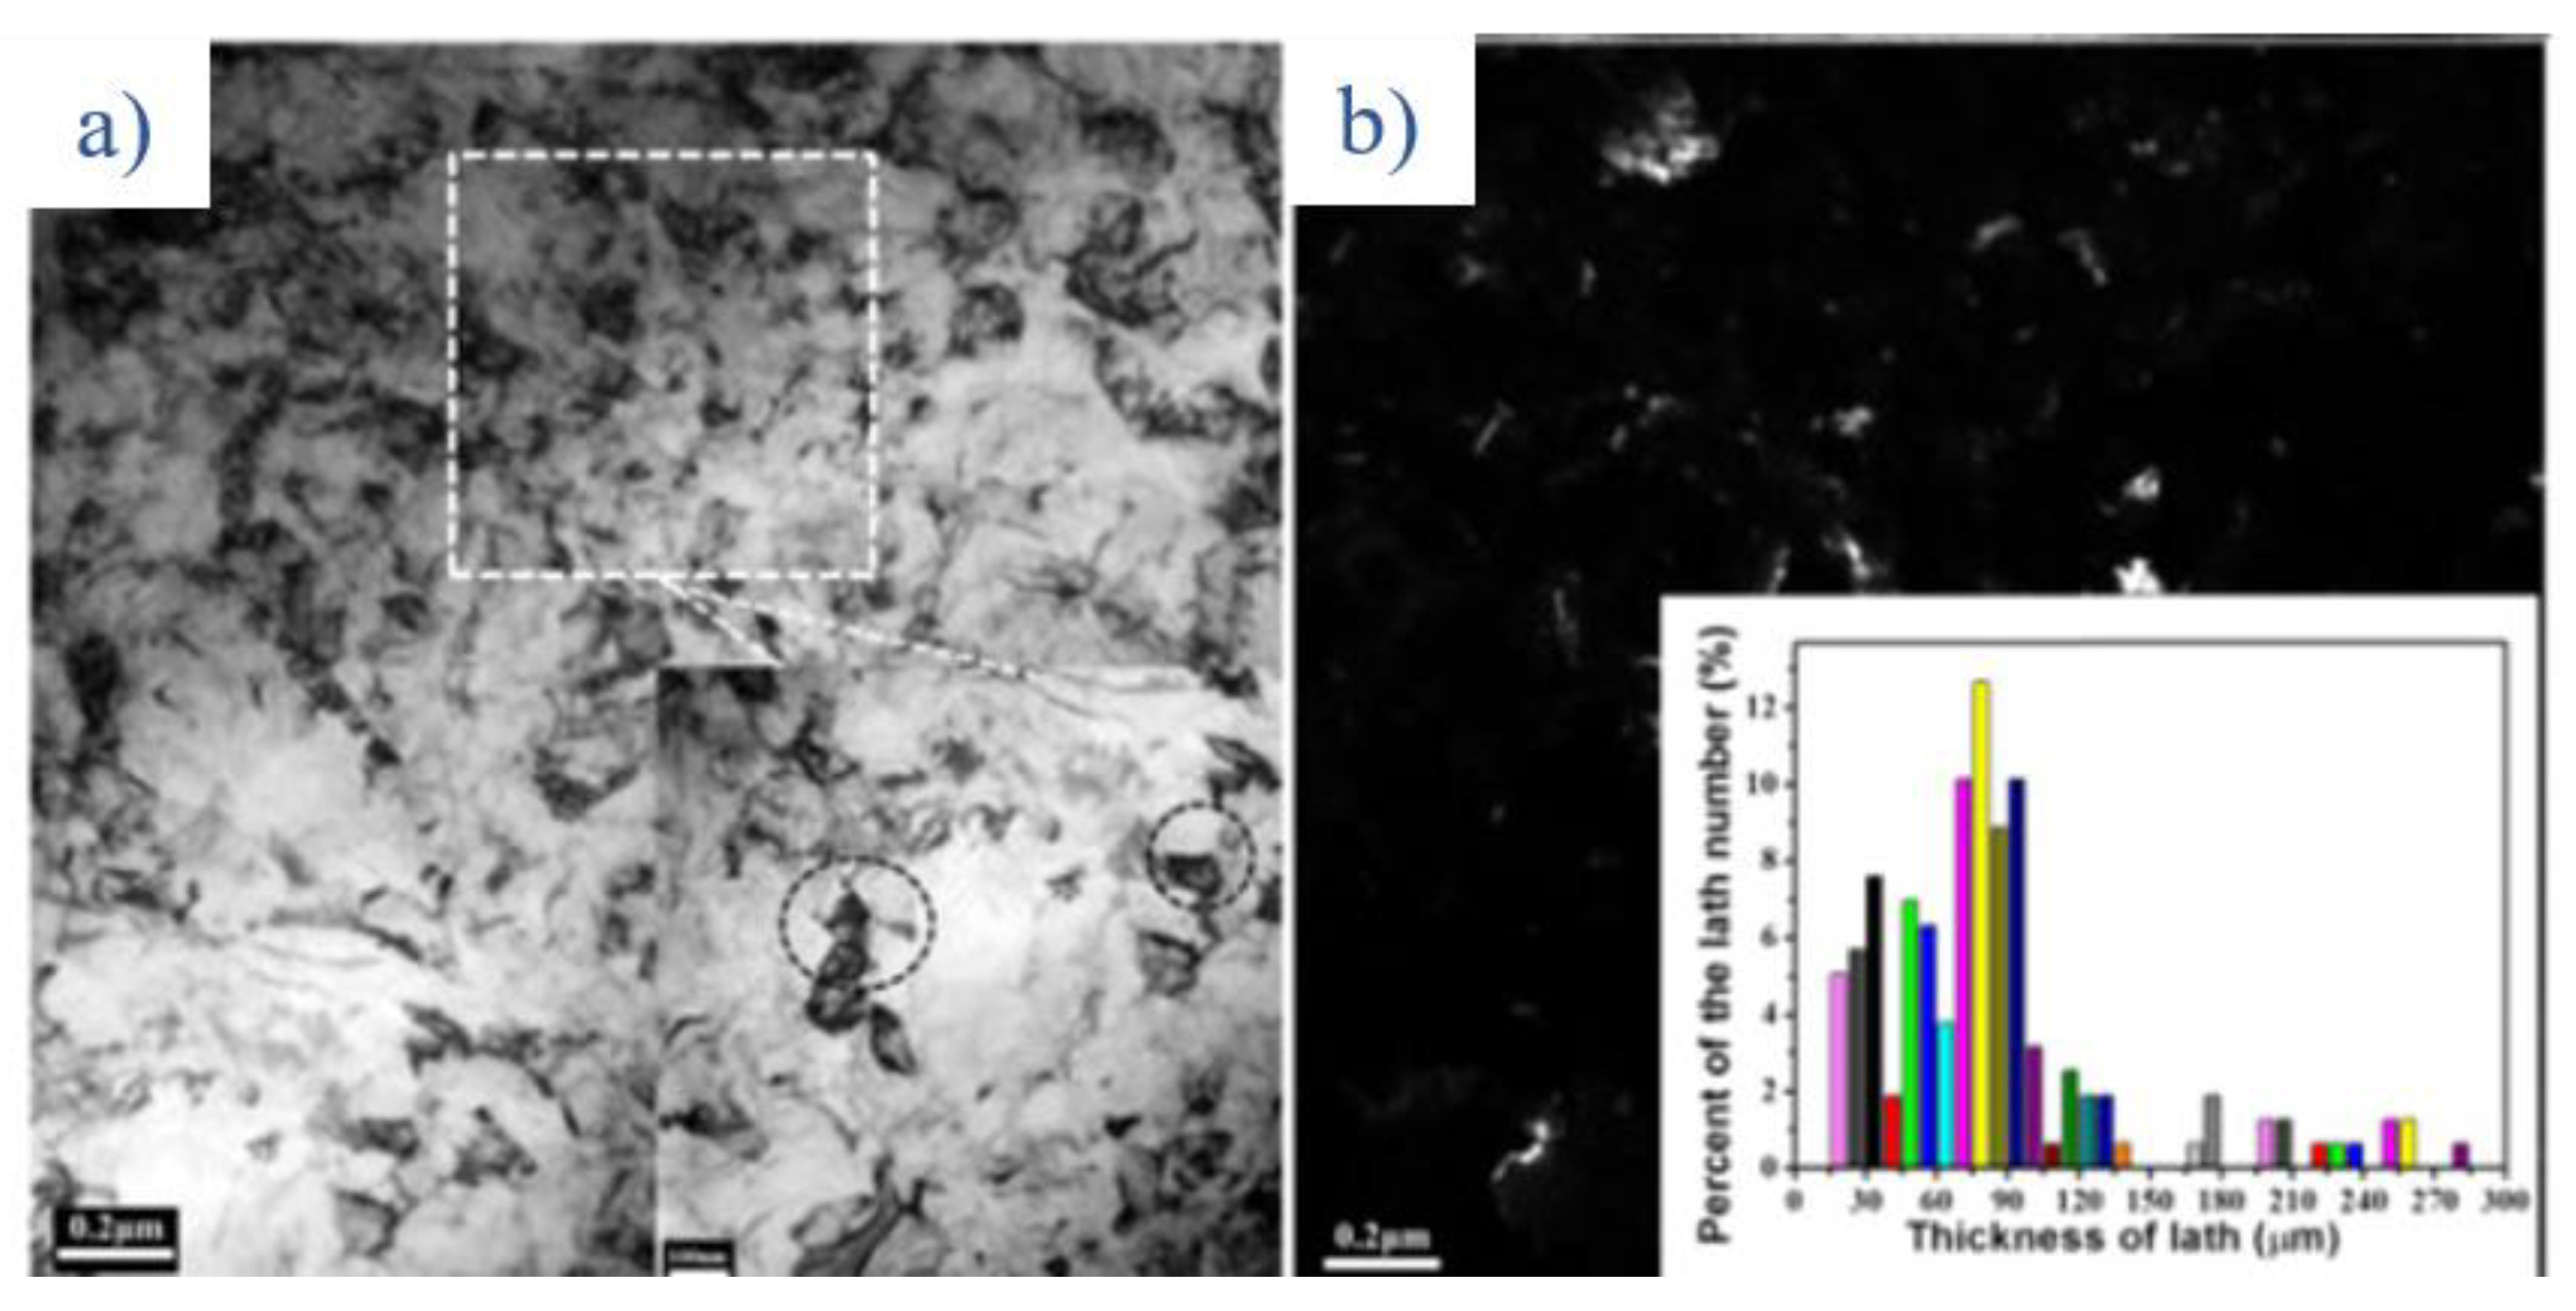
Liu et al. [21] conducted USRP on 17-4 precipitation hardened SS and studied the nanocrystallization surface. The authors revealed that the nanocrystalline structure formed after USRP had a thickness of 650 µm. During surface nanocrystallization, elongated ultrafine grains were formed first, which were subsequently refined by dislocation tangles, dislocation bands, and dislocation walls through a dislocation glide. Figure 4 represents the TEM of the USRP’ed specimen. The authors observed nano-equiaxed grains with an average short-axis measuring 84.25 nm due to the SPD during USRP.
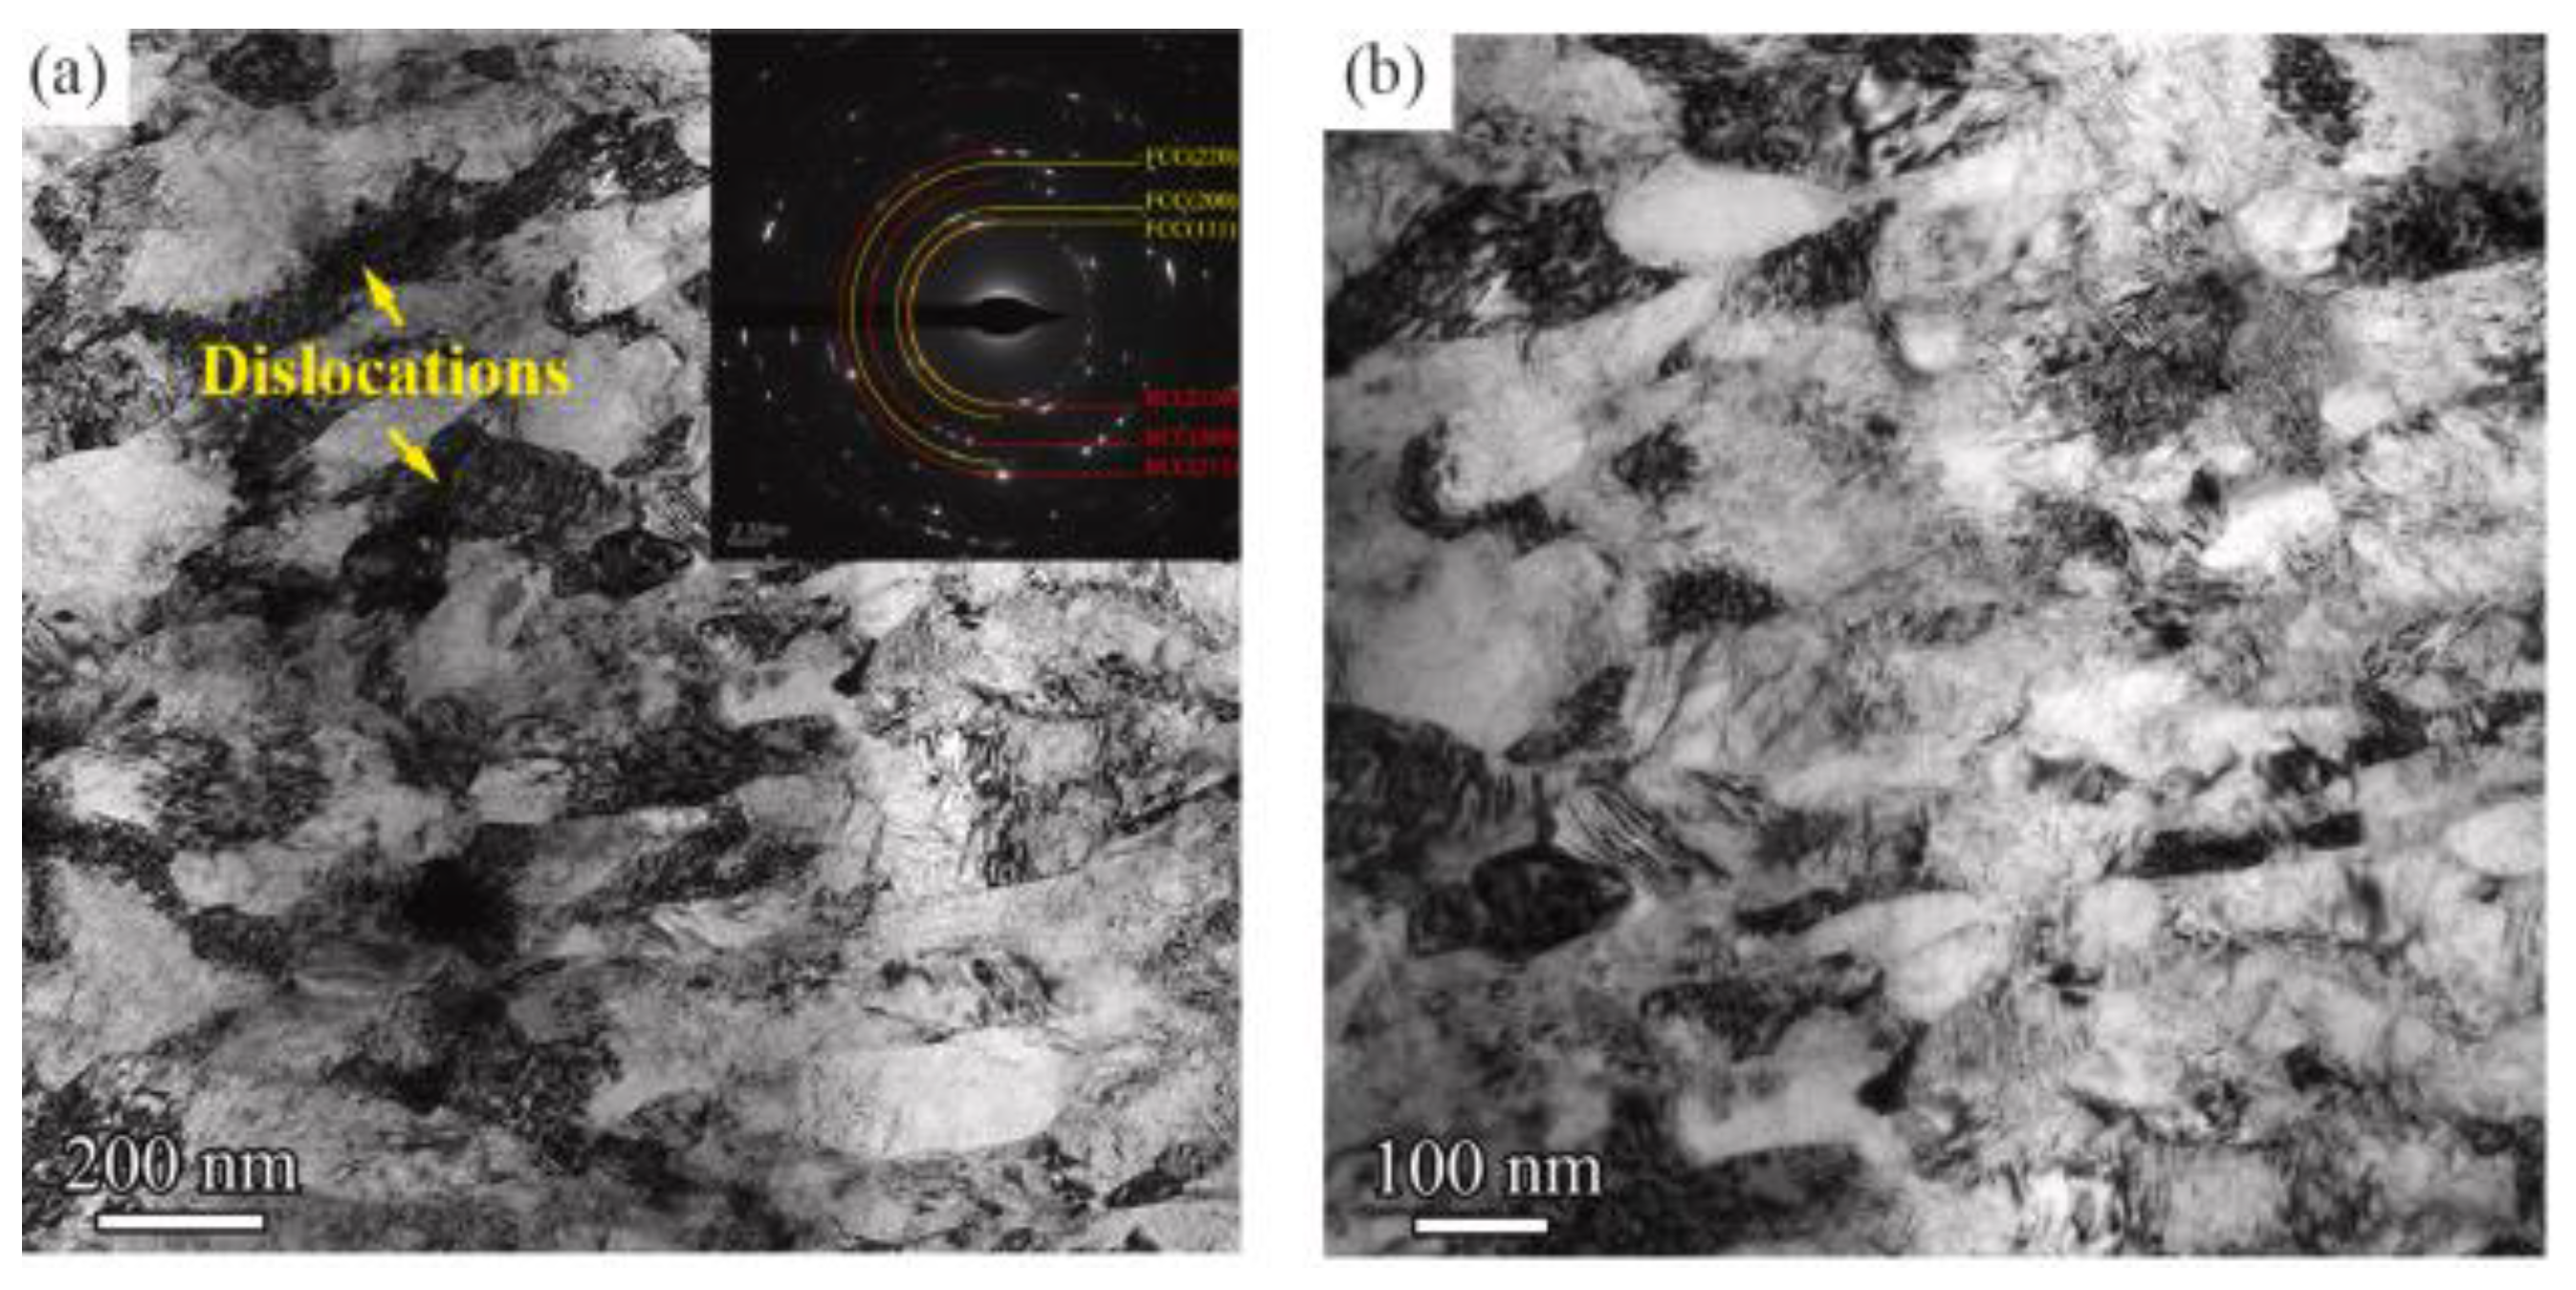
Liu et al. [53] performed ultrasonic severe surface rolling (USSR) on 316L SS and studied gradient heterogeneous microstructure and their mechanical properties. Although the authors have decided to use the nomenclature of USSR, it is essential to point out that their process is fundamentally the same as USRP. The TEM analysis of the SLM’ed specimen after USSR treatment revealed near-equiaxed nanograins on the top surface. The authors also observed lamellar grains and high dislocation density due to SPD. The average grain size measured on the top surface was 93.9 nm. Figure 5 represents the corresponding TEM micrograph of the USSR’ed specimen, indicating grain refinement and the presence of dislocations on the top surface. The SAED pattern indicates that the formed nanograins have random crystallographic orientation.
Wang et al. [46] have explored the effect of USRP on the microstructure and fatigue behavior of axle steel (C: 0.30 wt.%, Cr: 1.0 wt.%, Ni: 0.3 wt.%). They used a static load in the range of 1 to 10 kN and observed an SPD layer with refined microstructure at the top of the substrate. The direction of the plastic deformation was in line with the feeding direction of the roll. Qu et al. [27] have used USRP to engineer the surface of 25CrNi2MoV, which is used under rolling contact fatigue conditions. In this investigation, a lubricant was used between the roll and the substrate. The microstructure of the untreated material consisted of martensite and residual austenite. After USRP, deformation features were observed, and it showed a gradient along the depth direction. They reported a maximum severity in deformation at a depth of 30 μm from the surface. A significant fraction of the grains were in the scale of ultrafine grains (less than 1 μm). Lai et al. [25] have explored the USRP microstructure-fatigue and wear correlation of 23-8 engine valve steel (C: 0.33 wt.%, Mn: 2.5 wt.%, Ni: 8.0 wt.%, Cr: 23 wt.%). The microstructural study showed that the average grain diameter reduced from 6.77 μm–1.70 μm. The texture study indicated that the USRP treated material had grains oriented randomly and did not hold any preferential texture due to USRP treatment. The TEM study of the top material revealed that the microstructure consisted of nanoscale grains.
Li et al. [54] investigated the effect of USRP on stainless steel (SS) 304 material to explore the effect of changes in microstructure towards resistance to cavitation erosion damage. The authors observed that the surface undergoes phase transformation to produce martensite. The amount of martensite was maximum, and austenite was minimum at the specimen surface. The extent of the martensite formation increased along with the increase in rolling duration, attributed to the increased level of plastic deformation. After a certain rolling level, the martensite retransformed to austenite, attributed to the heating effect associated with the continued rolling deformation. Below the transformed region, there was a region of considerable grain refinement. The grain size was reduced to 5 μm–10 μm from an initial grain size of 20 μm–40 μm. The refined grains were segmented further due to the formation of twin boundaries. With continued USRP, grain refinement would not continue. Instead, the twin boundaries become blurred, and defect levels continue to increase. Sometimes defect accumulation would lead to crack formation. The total observed deformation layer depth was in the range of 100 μm–120 μm.

3.2. Microstructural Changes in Non-Ferrous Based Materials Subjected to USRP

Non-ferrous materials being investigated for the USRP processing mainly belong to Ti alloys, Ni alloys, Al alloys, and Mg alloys. Extra interest in these alloys may be due to their applications in aerospace, automobile, energy sector, etc.

3.2.1. Ti Alloys

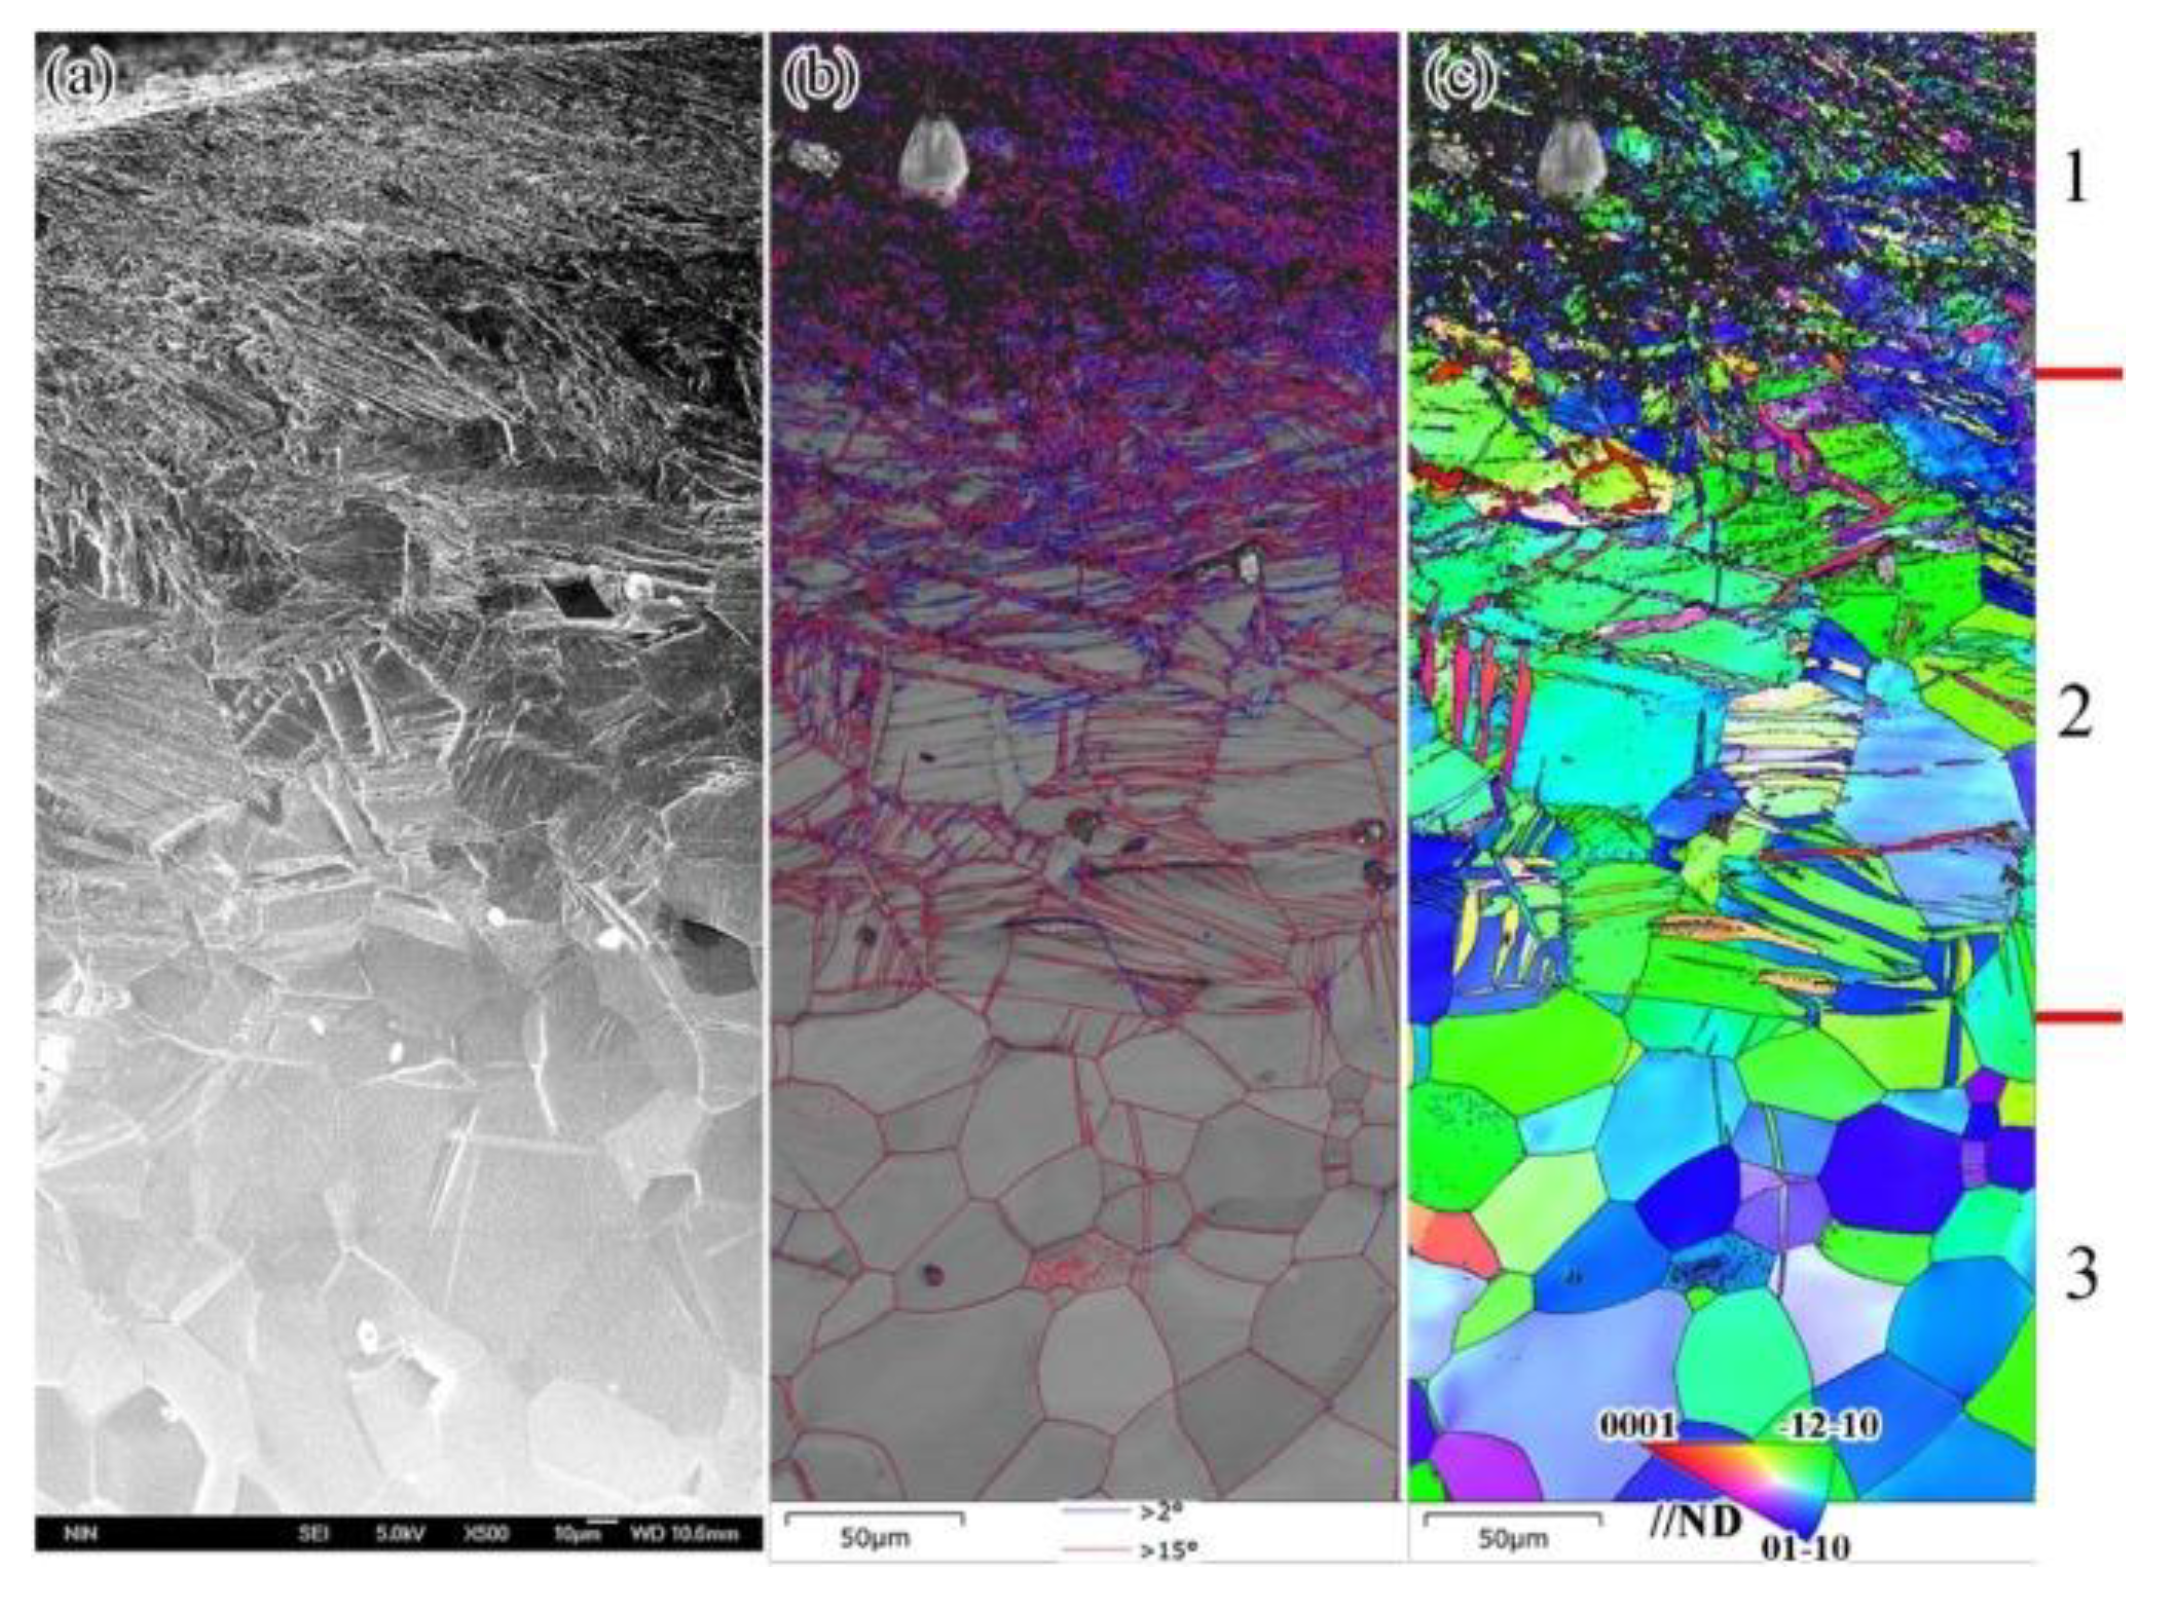
Amongst non-ferrous alloys, titanium and its alloys were explored in intense detail. She et al. [55] analyzed the effect of USRP on the pure Ti using a static load of 350 N and vibration frequency of 20 kHz. They reported extensive grain refinement and the formation of nanocrystals of 38 nm at the specimen’s top surface. Li et al. [56] explored the plastic deformation associated with multi-pass USRP on hot isostatic processed Ti6Al4V alloy. The authors observed plastic deformation in the direction of the feed. Due to plastic deformation, the shape was curved. The extent of deformation was dependent on the applied load. The total deformation layer thickness was about 35 μm. At the top surface, refined, equiaxed, and random orientated grains were observed. There was an increase in dislocations, dislocation tangles, and twins inside the grains. Some of the refined grains had subgrains within themselves. Lei et al. [34] conducted USRP experiments on pure titanium and studied the gradient nanostructure and phase transformation behavior. The gradient microstructure along the depth direction from the surface is further classified as a severe deformation layer (region 1), deformation twinning profuse layer (region 2), and low-strain coarse-grained layer (region 3). The corresponding SEM and EBSD images of these three layers are shown in Figure 6. The SEM of USRP’ed pure titanium is shown in Figure 6a. It is evident that significant grain refinement was observed in region 1. In addition, an increase in grain size is observed along the depth direction. Figure 6b shows the grain boundary orientation map. It shows many blue lines on the severe deformation layer (region 1). This represents low angle grain boundaries (misorientation less than 15°). Substructures are visible in region 1 and region 2. However, in region 3 the red lines are dominant, indicating high angle grain boundaries (misorientation more than 15°). Figure 6c represents the inverse pole figure analysis of the gradient microstructure. It indicates the formation of many lamellar/ lens structures in region 1 due to SPD during USRP. The orientation of lamellar/lens structures is different from the parent grain. This indicates that lamellar/lens structures represent deformation twinning. There is no grain refinement observed in region 3.
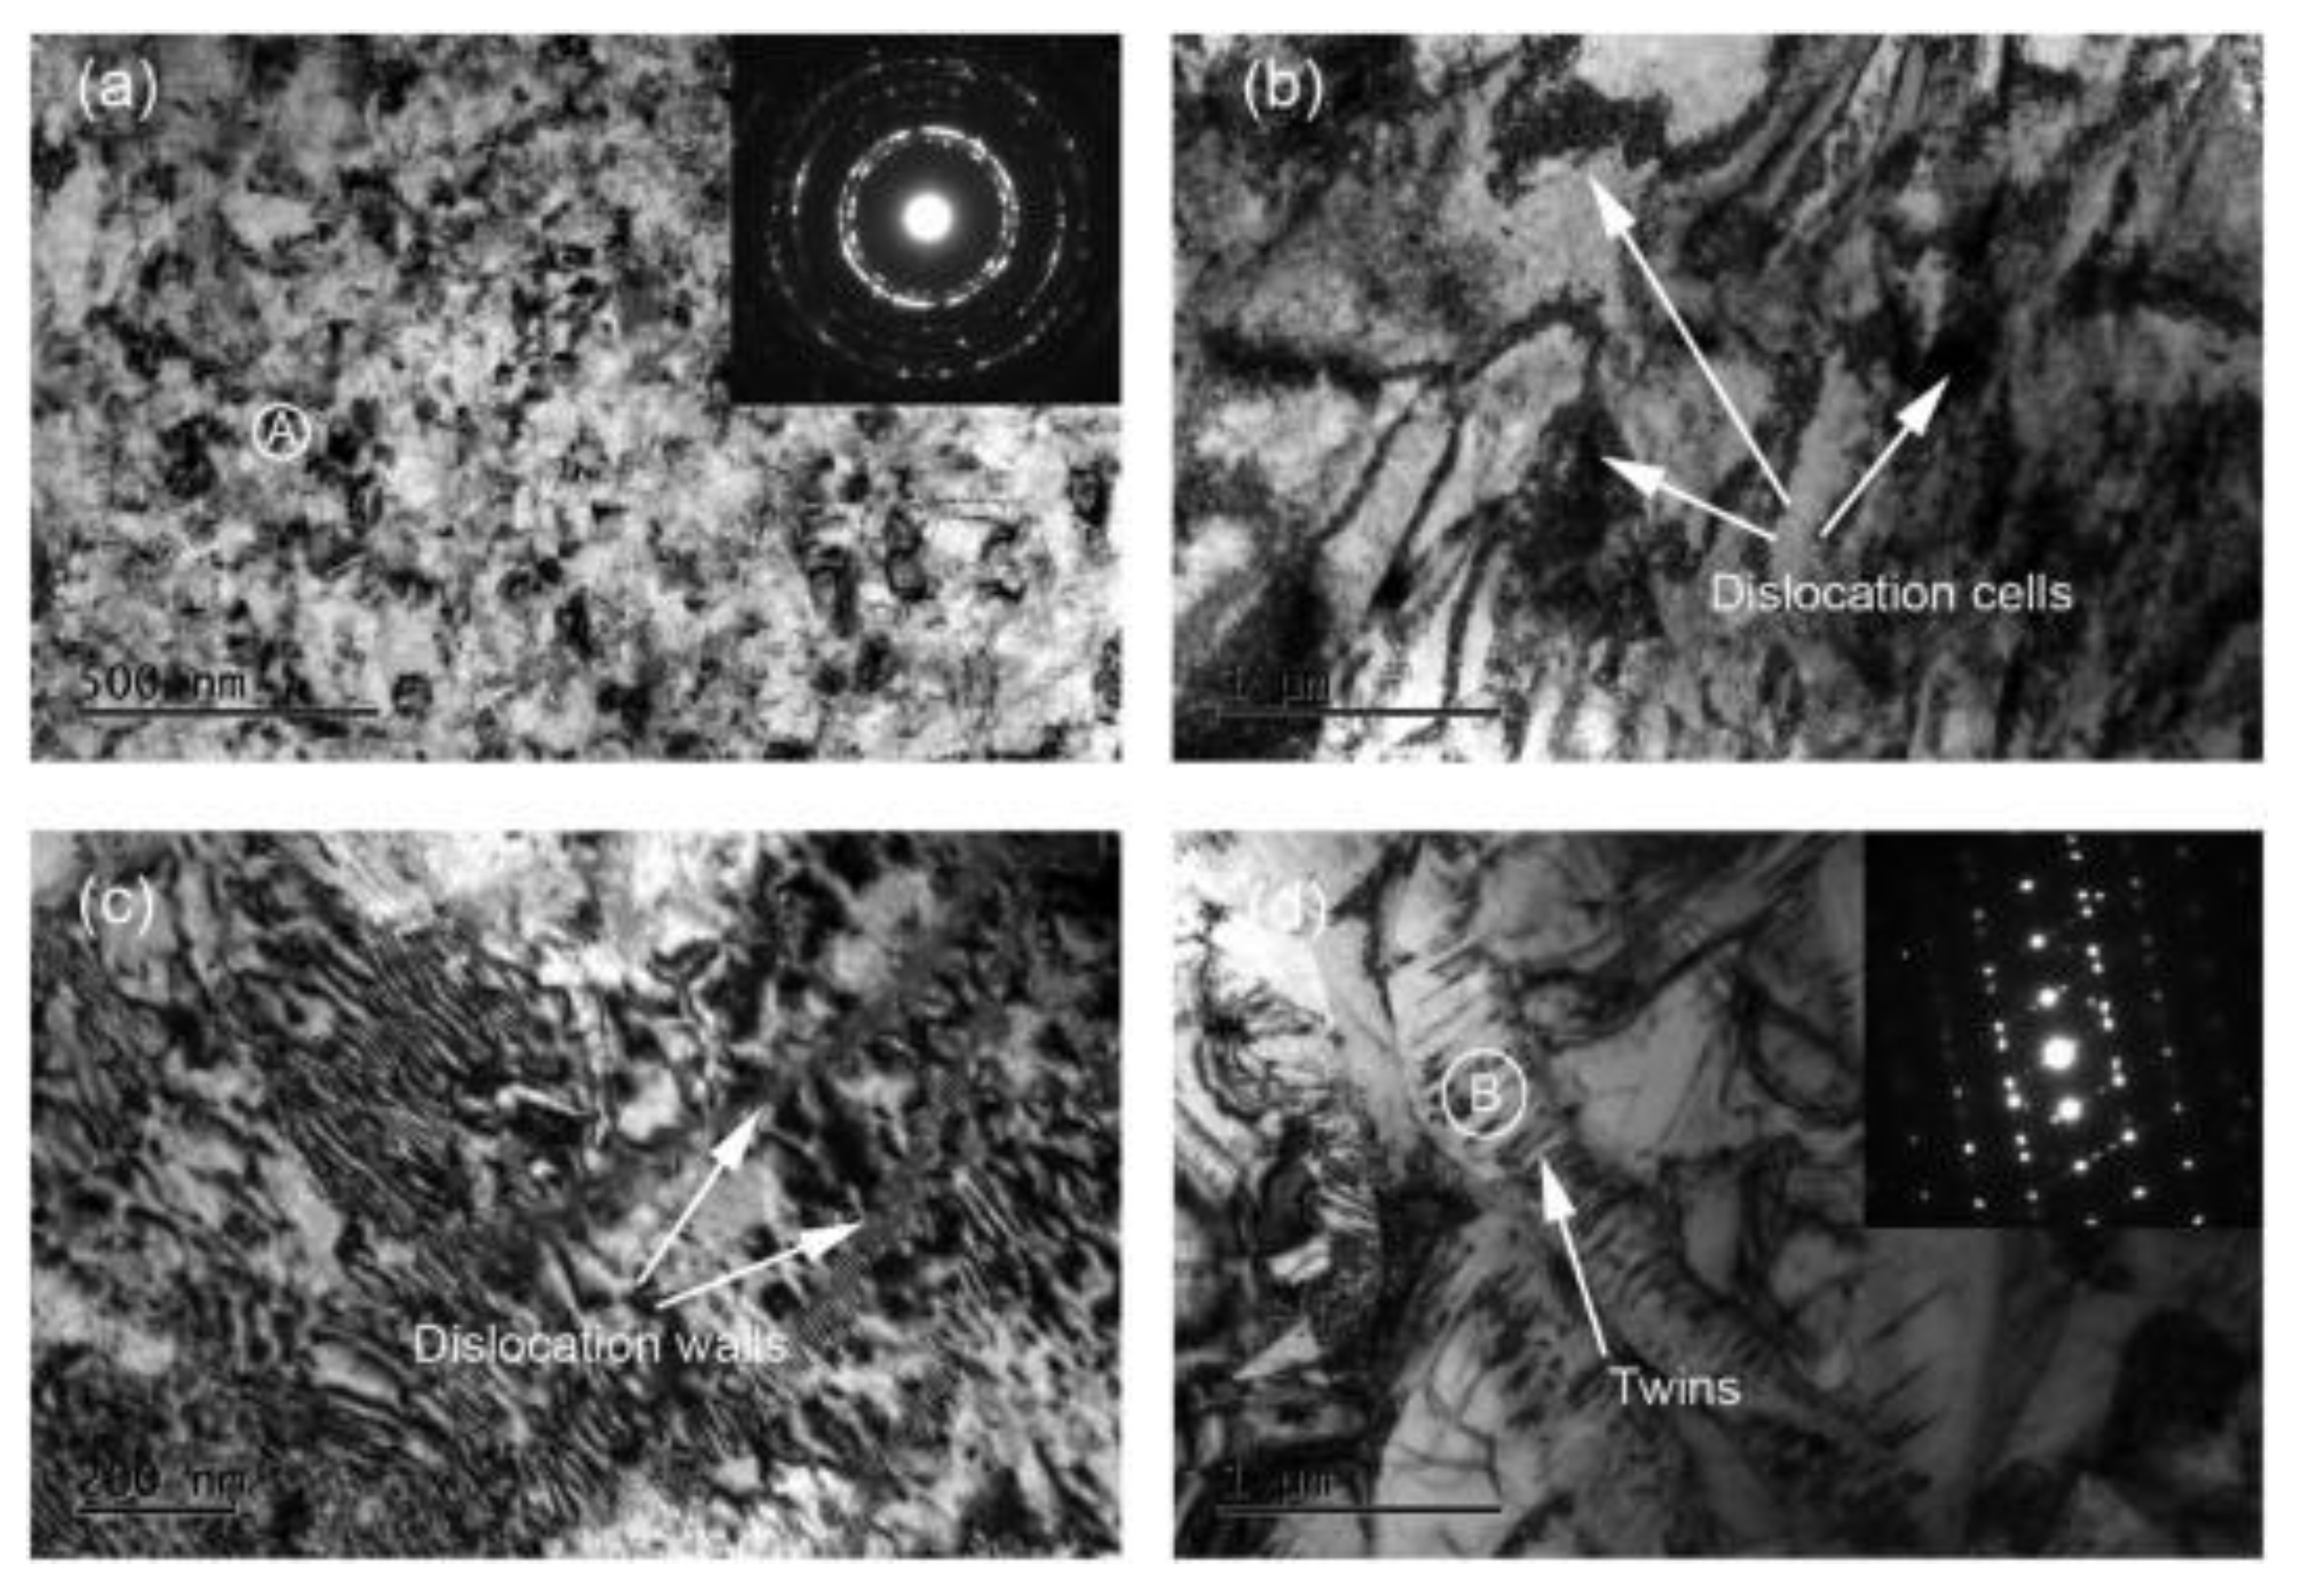
Liu et al. [57] performed USRP on Ti6Al4V using 10 mm WC-Co balls. The authors reported grain refinement up to a depth of 100 μm–110 μm. The authors observed that more than 89 % of the grains on the surface were in the size of 1.46 μm. Luo et al. [58] have explored the effect of multiple USRP processing stages on the microstructural evolution and surface integrity of Ti6Al4V alloy. The authors adopted an ultrasonic vibration frequency of 28 kHz, an amplitude of 5 μm, a static load of 800 N, and they varied processing stages as 1, 2, 4, 8, 12, and 16. They noted that the deformation layer thickness increased from 16.5 μm to 304 μm when the processing stage varied from 1 to 16. The matrix microstructure was equiaxed α and lamellar α + β mixture. On USRP, the sample showed elongated α and α + β. Both α and β phases contain a high density of dislocations due to SPD generated during USRP. Figure 7 represents the TEM images of the USRP’ed Ti6Al4V processed with 16 rolling stages. The microstructure and corresponding selected area diffraction (SAED) pattern of circle A in the inset at a depth of 5 μm from the surface is shown in Figure 7a. The microstructure indicates the presence of nanocrystals. The microstructure shown in Figure 7b contains dislocation cells and fine crystals at a depth of 20 μm. Figure 7c represents the dislocation walls at a depth of 100 μm from the surface. A large number of dislocations are visible at this depth. Dislocation walls are formed due to the interaction of dislocations with grain boundaries and other defects, thus forming dislocation tangles and further dislocation walls. The microstructure at a depth of 200 μm from the surface is shown in Figure 7d. The diffraction spots in the SAED pattern corresponds to circle B in the figure. It is evident from the figure that many deformation twins are present at this depth.
Furthermore, the phases were inclined at an angle of 30–40 degrees to the surface. Liu et al. [59] explored the effect of the umber of processing stages on the microstructure of Ti6Al4V alloy processed under lubrication conditions. They noted that increasing processing stages increases affected depth and extent of refinement. The sample with 12 processing stages showed a microstructure consisting of grains of 100 nm–400 nm. The sample with the lowest number of USRP stages had marginal microstructural refinement. Successive stages increased the severity of deformation with accelerated dislocation slip, pileup, dislocation tangles, twin deformation, and twin-slip interaction. The authors revealed the presence of randomly oriented subgrains of 200 nm–500 nm scale on the specimen surface through TEM analysis. Similarly, Wang et al. [60] have reported grain refinement in selective laser melted Ti6Al4V alloy processed using USRP. Tan et al. [61] correlated USRP parameters to microstructure and then to surface integrity of TC17, which is an α + β titanium alloy. The authors observed a gradient microstructure up to 50 μm. The microstructure consisted of a combination of deformation twinning, dislocation accumulation, and dynamic recrystallization. At the top surface, the grains were indistinguishable due to their ultrafine nature. They attributed the gradient microstructure to strain distribution. In addition, the authors reported the presence of a white layer of several micrometers at the top surface. This is attributed to the combined effect of sliding and rolling contacts. Liu et al. [32] explored the role of USRP on improving the fatigue behavior of TB8 alloy (Ti with 15 wt.% Mo, Nb 2.9 wt.%, Si 0.2 wt.%, Al 3.2 wt.%) using static stress ranging from 480 MPa to 630 MPa. They demonstrated grain refinement at the surface. They also reported defect annihilation to an extent due to the heating effect. The authors summarized the absence of texture during USRP.

3.2.2. Ni Alloys

Ni-based alloys have been subjected to modifications using USRP. Sun et al. [62] have explored the effect of USRP on the hot compression behavior of Inconel 718 superalloy. The authors observed an ultra-fine microstructure near the surface region of the specimen due to USRP. The ultrasonic strikes generated dislocations. Through striking dislocation walls in succession, dislocation entanglement was created through dislocation propagation, recombination, and annihilation. With time, this led to the creation of randomly oriented, ultra-fine grains. Liu et al. [63] generated nanograins on the top surface of the Ni alloy 690 (Ni 61 wt.%, Cr 30 wt.%, Fe 9 wt.%) using USRP. At a depth of 1 μm, randomly oriented grains of size less than 100 nm were observed. With the increase in USRP, more dislocations were activated and were blocked by the grain boundary. Yin et al. [64] investigated the effect of USRP on the microstructure change in inconel 690 alloys. They used a vibration frequency of 20 kHz and static force of 350 N. They noted that during USRP, the surface grains were deformed along the radial direction and were refined. They also observed that about 23 % of the top grains were deformed, and in about 51 % of the grains, substructures were observed. Liu et al. [65] explored microstructure changes in Inconel 690TT alloy after USRP. They used a WC-Co carbide ball of 20 mm to strike at a frequency of 28 kHz. The authors observed a GNS layer near the top surface, consisting of nanoscale lamellar grains of 47 nm and equiaxed nanocrystalline grains of a mean diameter of 40 nm. The boundaries of sub-crystals were fuzzy. They noted that USRP gradually generates dislocations that initially generate small angle grain boundaries and, later, high angle grain boundaries. Annihilation and recrystallization of grain boundaries occur continuously, generating a refined structure at the top and the extent of refinement is reduced along with the depth. Liu et al. [66] explored the effect of rolling reduction during USRP on inconel 690TT. They noted that as the amount of rolling reduction increases, the extent of deformation increases, and when rolling reduction is high, cracks even appear on the surface.

3.2.3. Al Alloys

Xu et al. [67] explored the effects of USRP on 7B85-T6 alloy (AlZnMgCuZr alloy). The authors reported grain refinement after USRP. Xu et al. [37] explored gradient layer formation in 7B50-T7751 alloy subjected to USRP with 500 N static force and vibration frequency of 28 kHz using WC-Co ball, with 12 processing stages. The authors noted a deformation layer thickness of 425 μm, including an SPD layer of 190 μm thickness. They also observed microcrack progressing to a depth of 32 μm. Lu et al. [36] studied the surface characteristics of aluminum 7050-T7451 alloy treated with USRP. They observed that under the conditions of static and dynamic pressure exerted by the ultrasonic vibration, the grains at the surface were plastically deformed due to the grain boundary being unclear at the top portion. This region also had additional energy in the form of stored energy. The depth of the affected region was about 4 μm.

3.2.4. Mg Alloys

Ye et al. [40] have explored the effect of USRP on the AZ31B magnesium alloy. The authors revealed that there was no phase transformation due to USRP. However, at the top, extremely fine grain (as small as 339 nm) followed by ultrafine grain (average 2.35 μm), then unaffected coarse grains were observed. The total affected depth was measured as 573 μm. They noted that the extent of grain refinement is a direct function of the amount of USRP. The grain refinement is attributed to extensive deformation due to USRP. USRP activated multiple deformation activities, such as a planar slip, twins, and grain boundary movement. With increased plastic deformation, more dislocation tangles, dislocation walls, and grain breakage appear, which lead to observable grain refinement. They noted that since AZ31 is a HCP structure, the number of slip systems is limited, and it is also the cause of limited plastic deformation; however, other deformation mechanisms, namely, twins, were activated, which contributed to grain refinement. Zhao et al. [68] have explored USRP on AZ91D Mg alloy to improve the wear resistance. They had used a static load of 240 N at 20 kHz. Their study indicated a deformation depth of 190 μm, and at the top region, deformation was high, and grain boundaries could not be distinguished. Like the AZ31B alloy, extensive twin deformation was observed along with the slip, and because of the limited-slip systems, only certain properly oriented grains could undergo deformation by slip, while others could deform by twin. The grain refinement mechanism is represented in Figure 8.
With continued deformation, both twin and slip were activated and were responsible for dislocation tangles and subgrain boundaries. Such observations were noticed even at a depth of 160 μm. Another essential aspect they reported is the observation of strain-free grains using a TEM at the top surface (within 10 μm). They attributed this to DRX during USRP. They also proposed that some adiabatic heating takes place during USRP, increasing the possibility of DRX.
Figure 9 represents the optical microscopic (OM) images of the AZ91D Mg alloy. It can be evident from the figure that the substrate has coarse grains. However, after USRP treatment, a gradient microstructure is observed. The SPD layer has a thickness of 190 μm. The presence of deformation twins was observed and is due to the plastic flow owing to USRP. At a higher strain rate, the stress concentration in the grain boundaries cannot be released by a slip deformation; hence, slip is hindered. This leads to an increase in twinning and thus high-density twins being formed.
Han et al. [69] studied the enhancement in mechanical properties and corrosion resistance of as-cast AZ91 Mg alloy during USRP. The authors revealed that USRP led to gradient microstructure and enhanced the yield strength and ultimate tensile strength by 51% and 50%. In addition, the authors also observed enhanced corrosion resistance, which is attributed to the reduction in surface roughness, formation of nanostructured surface, and introduction of high RCS.
Microstructural analysis of both ferrous-based and non-ferrous-based material broadly indicates some similarities in microstructure development during USRP, but there are also some noticeable distinctions in the minute details.

4. Effect of USRP on Mechanical and Tribological Properties of Engineering Materials

The SPD developed due to the synergistic influence of mechanical rolling and high-frequency static loads during USRP directly influences the degree of hardening to the surface [57]. Generally, both the longitudinal and torsional loads generate a stress field that allows for rapid dislocation multiplication [22]. Consequently, the tribological and mechanical properties of USRP’ed materials are greatly improved.
To demonstrate this, Liu et al. [53] are among many who have created a link between the mechanical hardness and tensile performance of USRP components. In this work, selective laser melted (SLM) 316L SS was subjected to a four-pass treatment of USRP using a frequency of 28 kHz, the amplitude of 5 μm, a static load of 1200 N, the scanning velocity of 0.02 ms−1, and a tip diameter of 14 mm. The variable of study in this work was the differing thicknesses of the SLM component. These thicknesses varied from 2 mm and 4 mm, which can be noted as USRP2 and USRP4. Although the authors have decided to use the nomenclature of ultrasonic severe surface rolling (USSR) in this work, it’s important to point out that their process is fundamentally the same as USRP. As expected, TEM images indicated a high-density dislocation build-up within the near-equiaxed grains of the topmost surface of the specimen. After USRP treatment, the strength of the SLM component was noticeably increased because of the combination of cellular restructuring, nanoprecipitate generation, martensite-induced transformation, and increased dislocation density. In fact, for both specimens, the mechanical hardness was increased from 243.9 HV to an astounding 412.4 HV (USRP2) and 400.4 HV (USRP4). The yield strength (YS) and ultimate tensile strength (UTS) also showed a similar trend where they were increased to a maximum value of 740.9 MPa, and 865 MPa (for USRP2) compared to the base values of 508.2 MPa and 658.4 MPa. The impediment of dislocation movement from the high-density dislocations has also contributed to this increase of YS and UTS. However, it should be noted that despite this, the ductility was slightly decreased. Although still relatively ductile, this decrease can most likely be attributed to the worsened surface conditions from processing [70]. Despite this, the strength-ductility performance was vastly improved.
Similarly, non-ferrous alloys have also demonstrated identical behaviors when subjected to USRP, as Ao et al. [71] explained in their work. Furthermore, the authors experimented with USRP on Ti6Al4V and studied their tensile behavior. The authors observed a UTS of 1046 MPa and YS of 857 MPa when they performed the uniaxial tension test. They observed that the UTS and YS values for the untreated specimen are 1018 MPa and 972.7 MPa; however, they also reported that there were no changes for the elongation and area reduction.
Li et al. [72] performed USRP on heat-treated Ti6Al4V and analyzed the tensile and fatigue properties. The authors reported an increase of 3.6% and 3% of UTS and YS, respectively. In addition to that, they reported a 43% increase in surface hardness. The authors summarized that USRP has limited influence on the tensile properties of heat-treated materials. Ye et al. [40] conducted USRP experiments on the AZ31B sheet. They used an output frequency of 30 kHz, whereas the linear velocity, amplitude, and ball radius were set to 2 m min−1, 7 μm, and 7 mm. The variable of investigation in this work pertained to the pressure applied to the sheet, varying from 0, 0.1. 0.15, 0.2, and 0.25 MPa. The pressure, in turn, was related to the amount of rolling at 0, 0.04, 0.05, 0.06, and 0.07 mm being carried out. Similar to the previous work, the microstructural morphology of the alloy was refined to nanometer size, with the minimum grain size being at 338.8 nm for a rolling displacement of 0.07 mm. The hardness was proportionally increased with the rolling distance as the plastic deformation increased the total number of dislocation walls and tangles. The highest hardness was at 128.3 HV, nearly 84% greater than the base material. The increase in hardness also translates to the tensile performance of the Mg sheet, because of which the YS increased by 24.08%. Aside from the grain-refinement and dislocation strain strengthening from USRP, the authors in this work have also related the compressive stresses to tensile performance. Particularly, the presence of these stresses can prevent the generation of early part failure via microcracks.
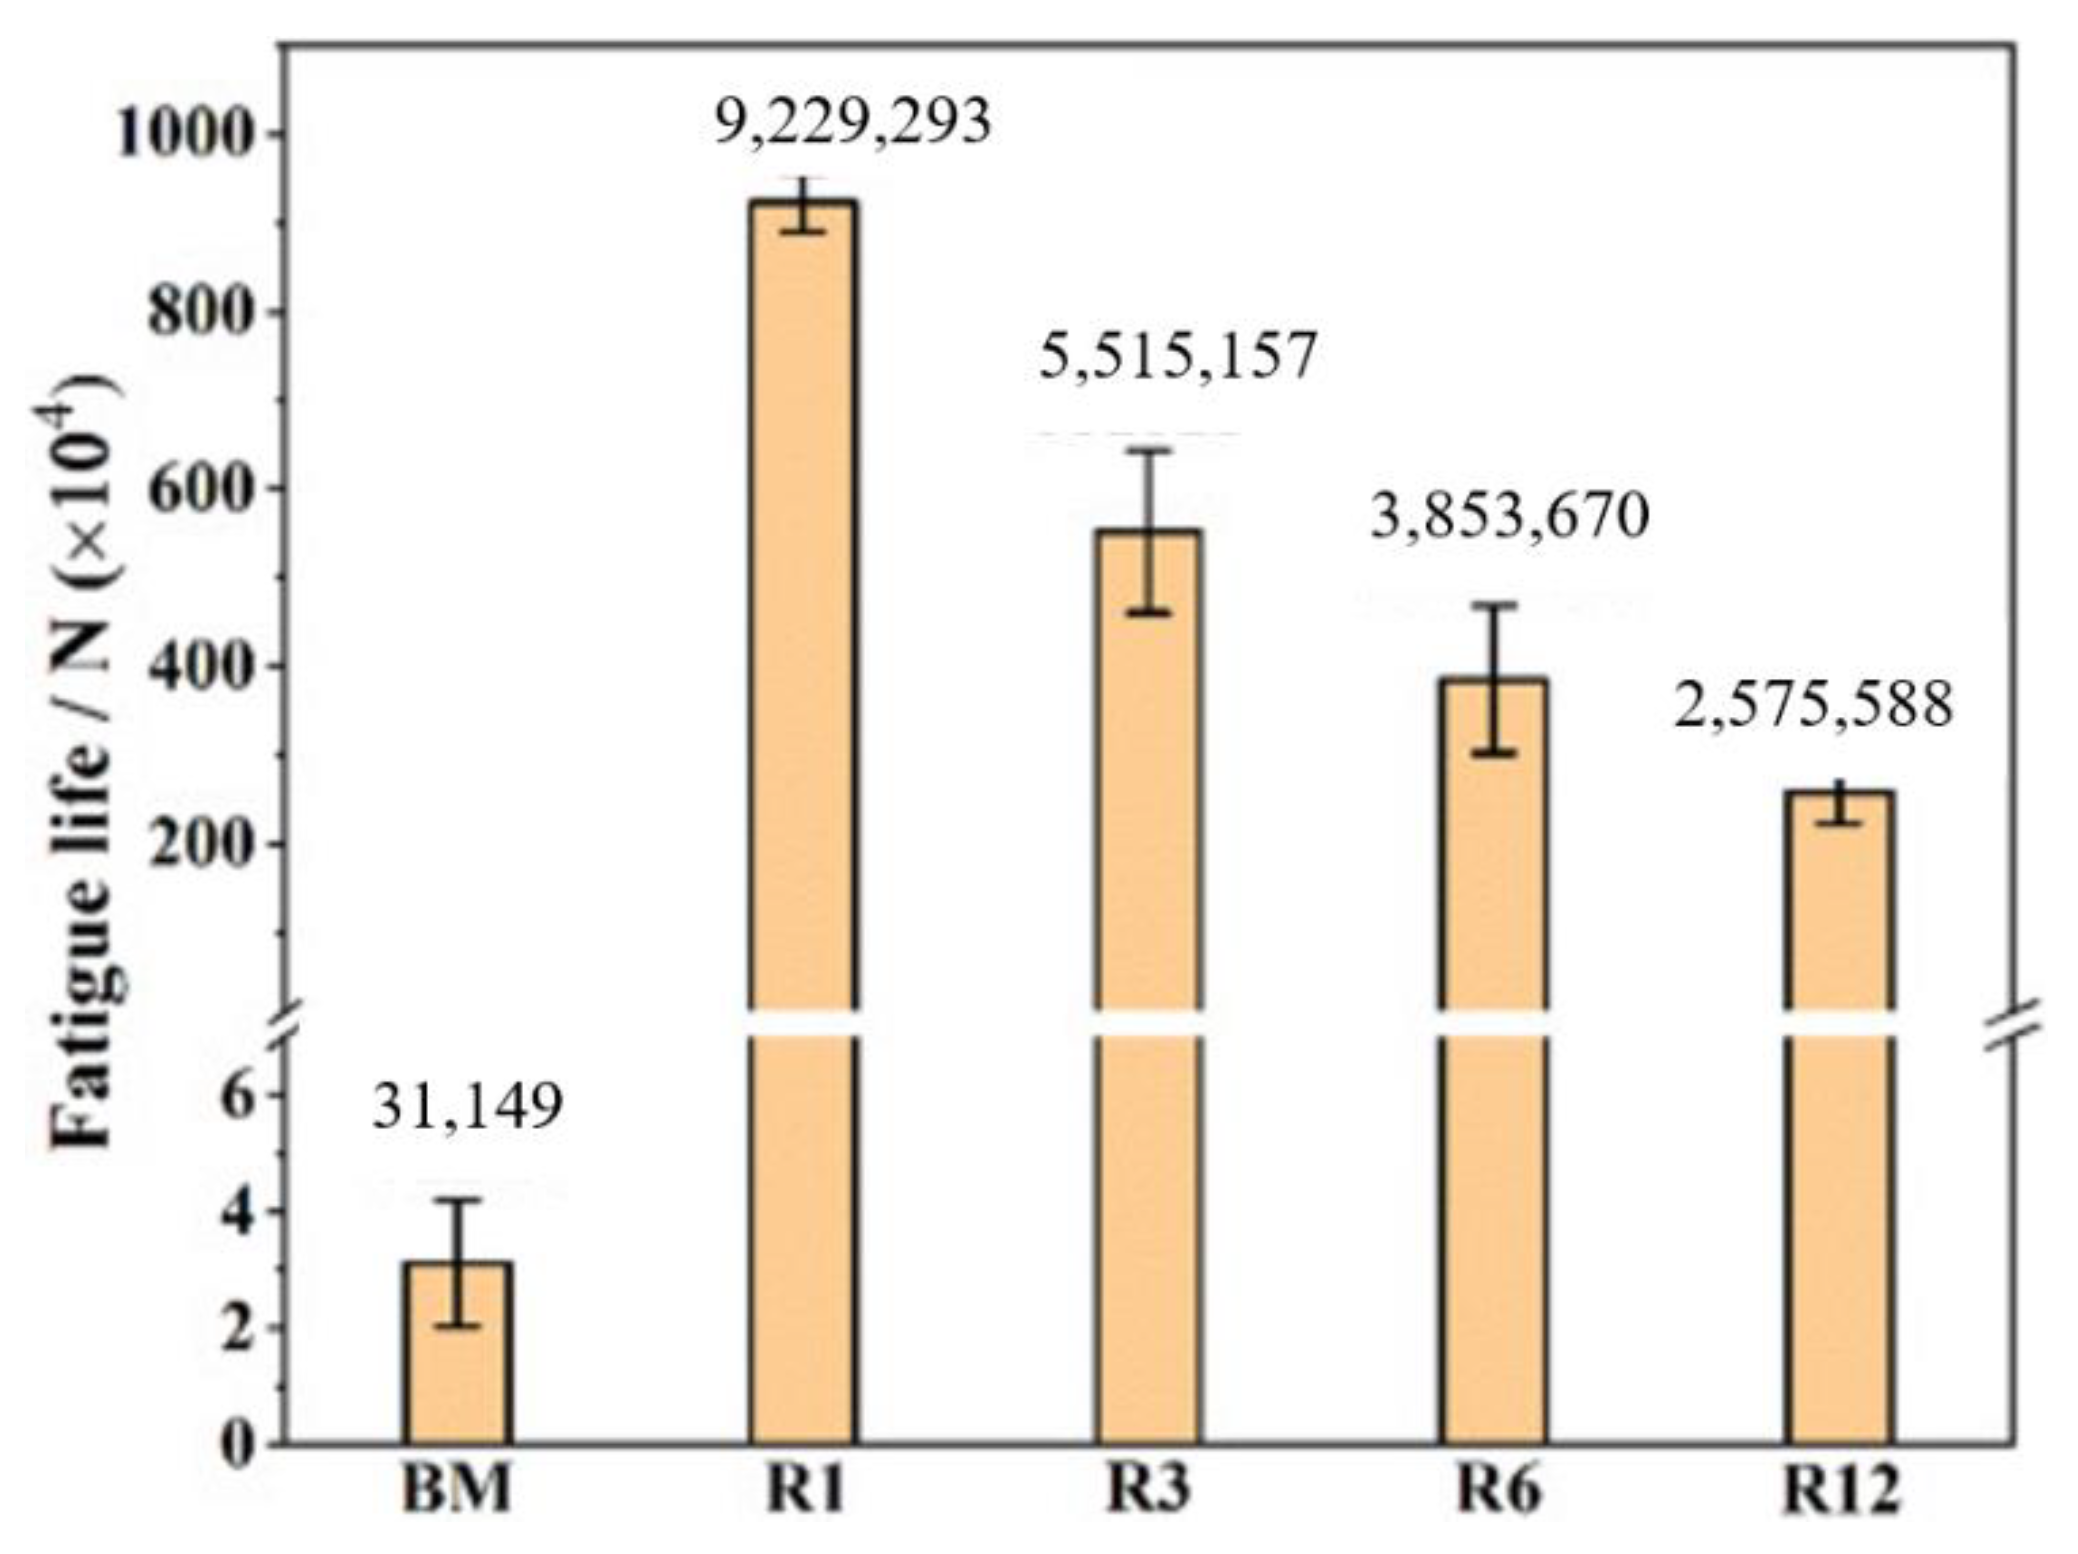
On a similar note, the fatigue properties of USRP components have also demonstrated promising results due to the combination of surface hardening, grain refinement, and improved structural integrity, which can largely prevent fatigue-induced crack initiations [73]. A recent study from Liu et al. [59] thoroughly explores the influence of USRP on the fatigue behavior of Ti6Al4V and its relation to surface integrity. This work set the static load, ultrasonic vibration frequency, and ultrasonic vibration amplitude to 600 N, 20 kHz, and 10 μm. These conditions were repeated on different sections of the alloyed bar, varying from 1, 3, 6, and 12 repetitions, also listed as R1, R3, R6, and R12. With respect to fatigue stress vs. cycles to failure, it was shown that each USRP sample had an improvement in fatigue performance, as shown in Figure 10. However, as the number of processing limits increased, its fatigue limits gradually decreased. The primary mechanisms that have enabled fatigue performance enhancement are primarily due to the work hardening, microstructural refinement, compressive stresses, and surface quality induced from USRP. In combination, the residual stresses for the high cycle fatigue (HCF) condition were shown to be lower than the low cycle fatigue (LCF) condition for all specimens. In the case of specimen R1, its superior fatigue performance can be closely linked to combination of surface quality and the amount of compressive stresses induced. Despite not containing refined grains, the superior fatigue life was explained by the ratio of refined to coarse grains. In the case of this work, coarse grains are speculated to help deflect any propagation of cracks through the grain boundaries, unlike more refined grains. This in turn can result to a reduction of crack growth rate as there is a greater likelihood of crack closure.
Other Ti alloys have also exhibited similar outcomes, as recently shown with TB8 from Liu et al. [32]. The authors also used a vibration frequency of 25 kHz, a lathe rotational speed of 75 r min−1, and a feed rate of 0.12 mm rev−1. These parameters were applied in 1, 5, and 15 passes to the base substrate, namely USRP-1, USRP-5, and USRP-15. Interestingly, USRP-1 demonstrated some slight grain growth along the surface, contradicting the expected grain refining process of USRP. These findings were correlated to a defect annihilation mechanism from the vibrational frequency of the tool piece combined with below-par thermal conductivity. As the number of passes increased, the gradient microstructure of the specimens was gradually refined with an increasing number of grain boundaries with disorientations under 15°, which were characterized as low angle grain boundaries (LAGB). In relation to the fatigue strength, all samples showed a moderate increase in fatigue life with recorded values of 335 MPa (USRP-1), 338 MPa (USRP-5), and 335 MPa (USPR-15) compared to the base sample values of 295 MPa. It can be noted that despite the refined microstructure, USRP-5 had the least likelihood of crack initiation, which was observed to occur at a higher depth compared to the rest of the specimens. Unlike the previously discussed study, the phenomenon was linked to the material’s intrinsic properties, being closer to the crystal structure. With TD8 having a higher presence of the α phase than the β phase, a smaller amount of slip systems can pin dislocations, thus having higher overall stability and resistance to crack propagation. In the case of USRP-15, the decrease in fatigue strength can be attributed to the formation of α precipitates, which can increase the localized stress of continual fatigue loads, thus resulting in early crack initiation. Liu et al. [74] conducted USRP on Ti6Al4V and revealed enhancement in fatigue performance. The authors observed a GNS layer of 10 µm which contains equiaxed grains. The average grain size at a depth of 10 µm from the top surface is 91.5 nm. The USRP experiments not only enhanced fatigue performance in the LCF region but also in the HCF region. The fatigue limit of the base material corresponds to 107 cycles is 500 MPa and 610 MPa after USRP. This corresponds to a 22% increase in fatigue performance. The enhanced fatigue performance is attributed to the combination of high RCS, GNS layer, and work hardening due to SPD.
Regarding the tribological performance of USRP’ed components, the combination of grain refinement, surface hardening, and compressive stresses largely improve the tribological properties similar to the improvement of general mechanical properties. Furthermore, understanding that a material’s wear volume is inversely proportional to its hardness, it can be implied that USRP can profoundly impact the tribological performance of various materials, as per Archard’s equation [75].
                                                  Q = K W x H                                                                          
where Q is the wear volume, K is the wear coefficient, W is the normal load, x is the sliding distance, and H is hardness. In the case of high-carbon high-chromium steel, Duan et al. [76] recently demonstrated how the dissolution of carbides from USRP can improve its wear properties. In this work, the steel disc samples were subjected to an ultrasonic vibrational frequency of 27 kHz, ultrasonic vibrational amplitude of 10 μm, static force of 700 N, and feeding speed of 1.4 mm min−1. Prior to USRP, it was noted that there were several large primary (size > 5 μm), large secondary (1 μm < size ≤ 5 μm), and small secondary (0.1 μm < size ≤ 1 μm) carbides impeded in the ferrite regions of the substrate. After applying USRP, the deformation layer of the specimen showed both increasingly refined and round carbides. When subjected to a reciprocating load of 5 N, the USRP sample showed fewer oxides to the surface and a smoother worn surface compared to the base specimen. Although each sample experienced two-body abrasive wear, there was a greater presence of deep holes along the surface of the untreated sample, which can be related to the removal of carbides, thus initiating cracking and fracturing along the wear track. Although the USRP sample demonstrated a slightly superior wear resistance to the base material, the dissolution of carbides lessened the probability of early crack propagation, which largely benefited the material’s wear resistance.
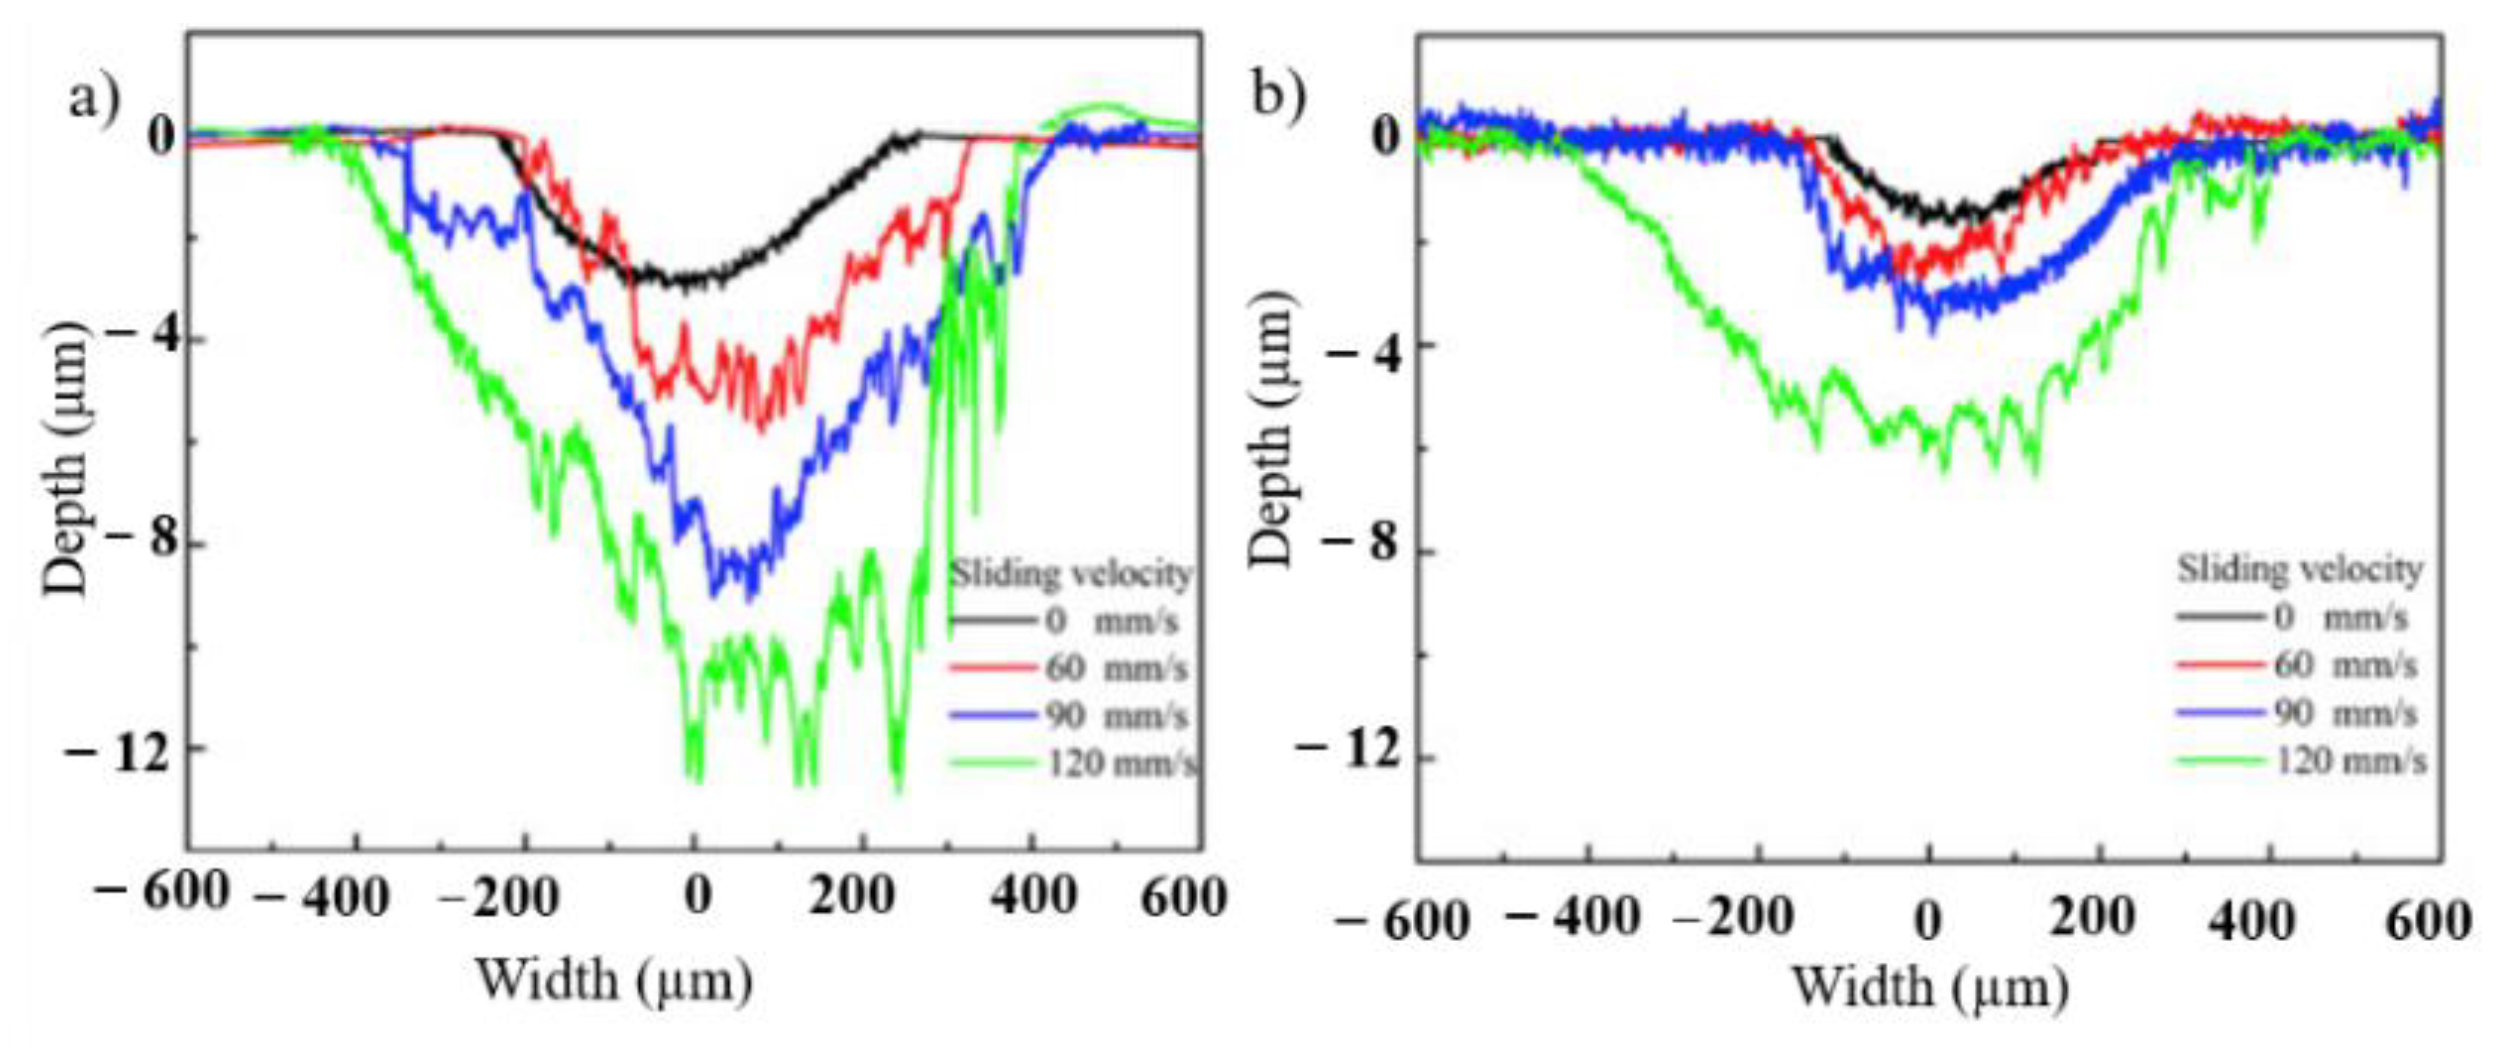
Similarly, Yin et al. [64] also found an improvement in wear resistance of Inconel 690 alloy tubes from USRP. Although many of the previously stated works do not look at the influence of USRP on tube-like materials, this work provides great insight into how this surface treatment method can be applied to materials of various geometries. During USRP testing, the spindle frequency was set to 20 kHz with a working amplitude of 30 μm and a normal static load of 350 N. It’s important to note that the tube was spun at 200 rpm with a calculated shot density of 38,500 repetitions/mm2. To study the wear behavior of the tube, a self-made impact sliding wear test apparatus was used with varying sliding velocities of 0 mm s−1, 60 mm s−1, 90 mm s−1, and 120 mm s−1. From USRP, the sheer plastic deformation from the process resulted in a greater fraction of sub-structured and surface deformed grains than the mainly recrystallized grains with the base specimen. There was a decrease in wear scar width for all sliding velocities when subjected to sliding, as shown in Figure 11. It is essential to note the more significant presence of cracking from the base material than the USRP specimen. Although each sample did exhibit some form of delamination, the accumulation of wear debris and abrasive wear for the bulk sample was substantially more than the USRP sample. This increase in wear resistance is primarily attributed to the refined grains and increased compressive stresses induced from USRP. Table 1 demonstrates the effect of USRP on a broad range of engineering materials and their corresponding enhancement in mechanical properties and influence of microstructural features.
The introduction of in-depth RCS during USRP in metals and alloys due to the SPD has been reported by scholars. Zhang et al. [30] conducted USRP experiments on 23-8 engine valve steel revealed a high RCS of 751 MPa on the surface, which became 808 MPa at 20 μm depth when the authors used a frequency of 20 kHz and static force of 900 N. When the frequency changed to 30 kHz without changing the static load the RCS on the surface became 803 MPa and 876 MPa at 20 μm depth. The authors summarized that the formation of higher grain dislocations at higher vibrating frequencies induces higher RCS quantities. Similar results were reported during USRP on Ti6Al4V [77].
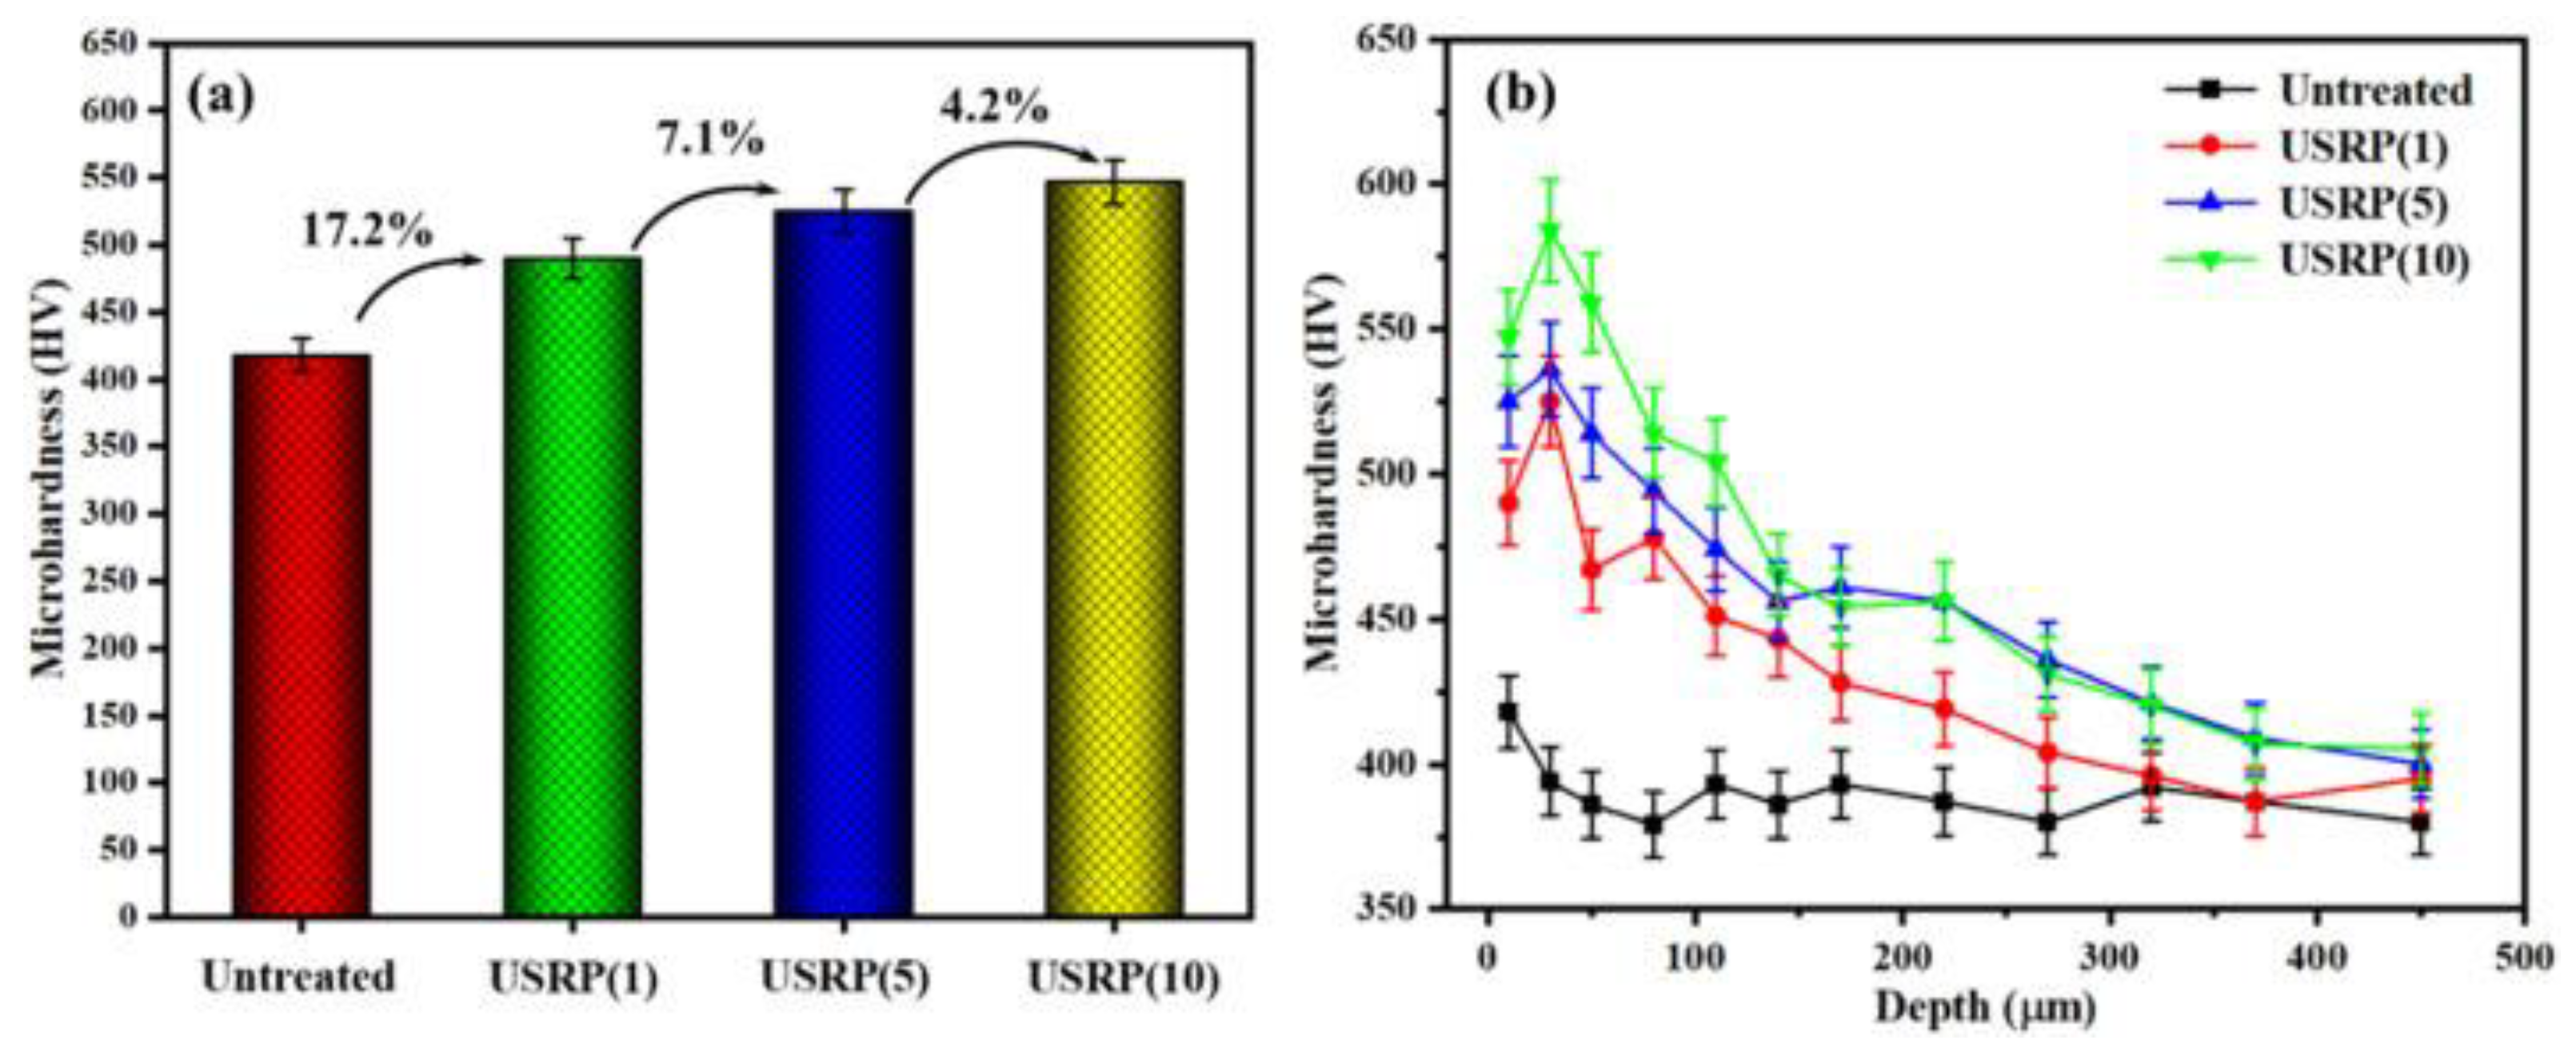
Dang et al. [28] conducted USRP experiments on 300M steel and studied the surface integrity and wear behavior. In their study, the authors used a tungsten carbide ball of 14 mm diameter with a frequency of 28 kHz and three different processing passes of 1, 5, and 10. The authors revealed superior enhancement in surface hardness with an increase in the number of processing passes compared to the untreated specimen. Figure 12 shows the surface microhardness profiles of the untreated and USRP treated 300M steel with different passes. USRP enhanced surface microhardness by 17.2%, 25.6%, and 39.2% after 1, 5, and 10, pass as represented in Figure 12a. The variation of microhardness along the depth direction is indicated in Figure 12b. It is evident that an increase in the number of passes significantly affects microhardness along the depth direction. The enhancement in microhardness due to multiple passes can be attributed to the grain refinement, work hardening, and high RCS.
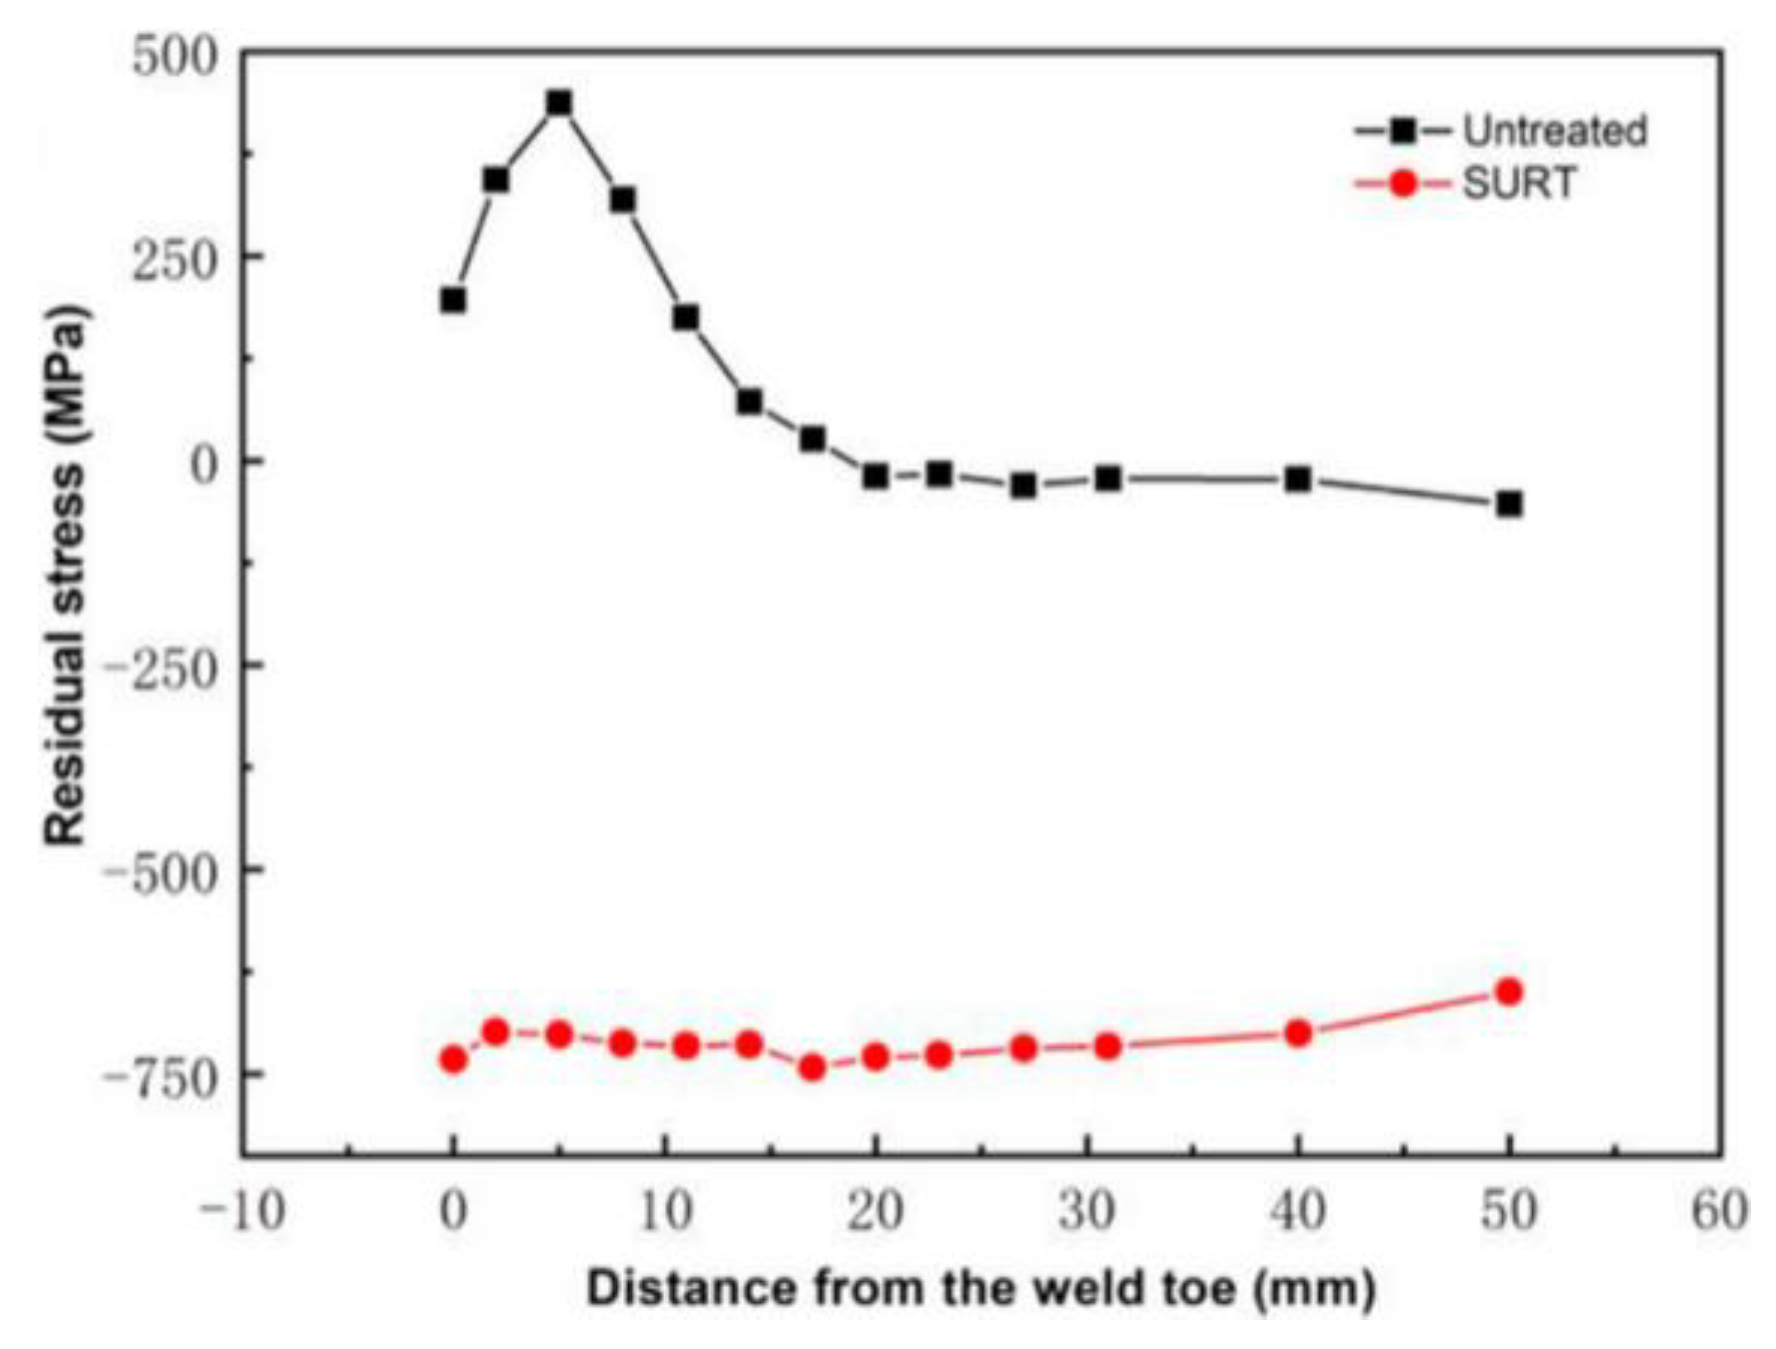
Zhang et al. [26] conducted a study of USRP on 17-4PH SS; the authors revealed they could induce RCS of 800 MPa on the surface and carry the RCS effect to a depth of 400 μm from the surface. The introduction of RCS plays a predominant role in protecting the weld joints from stress corrosion cracking (SCC). RTS is induced in the weld fusion zone, HAZ, and base material during welding, creating SCC failure when exposed to a chloride environment. After USRP treatment, RTS can be converted entirely to RCS. A high amount of RCS can be induced on the substrate material by selecting intense USRP parameters. In this manner, the severity of the USRP process can be enhanced. Liu et al. [48] studied residual stress before and after USRP treatment on T4003 ferritic SS welded joints. The authors used an X-ray diffractometer to determine the residual stress distribution at the welded junction. Figure 13 represents the residual stress distribution of the weld joint before and after USRP treatment. It is evident from the figure that the untreated weld joint possesses RTS, and after USRP treatment on the weld joint, the entire RTS is converted into RCS. The presence of RCS can close the surface fatigue cracks and can prevent the extension of cracks, thereby providing superior surface integrity.
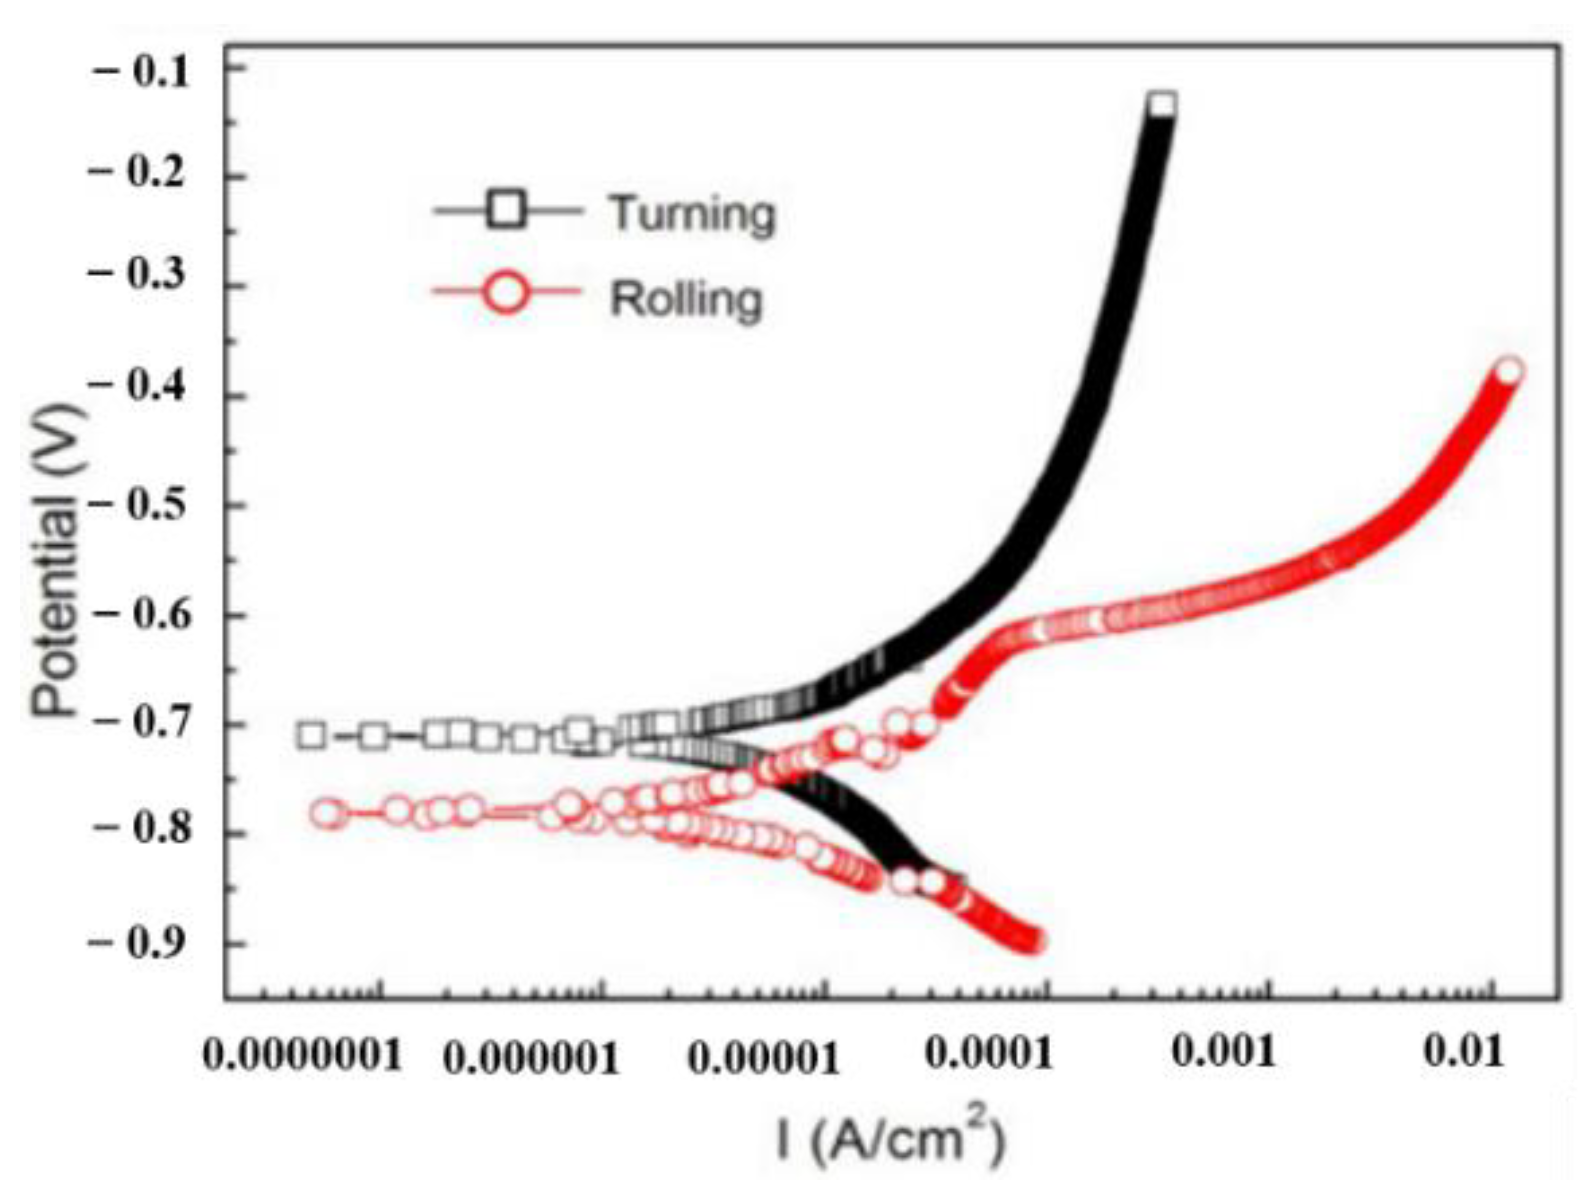
Similarly, researchers analyzed the reasons for the improvement of surface corrosion resistance after USRP treatment. The corrosion behavior of metals and alloys predominantly depends on the surface roughness; hence, the improvement of corrosion resistance can be correlated with the surface roughness. For example, Liu et al. [41] studied the effect of USRP on the corrosion properties of uranium metal. In their study, the authors compared the corrosion properties of a turned uranium metal bar of surface roughness of 1 μm with a USRP treated uranium metal bar. The electrochemical corrosion studies were conducted using 50 ppm NaCl solution. The authors revealed from the polarization curve that the USRP treated specimen’s corrosion potential is lower than the turned specimen. However, the corrosion current of both specimens remains unchanged. In addition, the authors observed pitting corrosion in the turned specimen with a size of more than 100 μm. Figure 14 represents the polarization curve of the electrochemical test on turned and USRP treated specimens.
In addition, the authors observed that the oxidation rate of uranium metal is lower after USRP. The improvement in corrosion resistance after USRP was attributed to the formation of a dense and continuous oxide layer that possesses excellent stability, which can prevent oxygen from further expanding. Xia et al. [42] conducted USRP on Cu-10 wt.% Ni alloy, commonly employed for shipbuilding and marine applications. The authors performed an electrochemical corrosion test in a 3.5 wt% NaCl solution showed enhanced corrosion resistance. The USRP treatment caused the development of the GNS layer on the surface with an average grain size of 70 nm. The authors attributed that nanostructured surface promotes passivation film, which ultimately prevents damage due to corrosion. The mechanism of enhanced corrosion resistance is the introduction of residual compressive stress and a higher number of grain boundaries on the surface. This research revealed that surface nano crystallization could improve the hardness and corrosion resistance of Cu-10 Ni alloys. Zhao et al. [78] conducted the USRP on 300M ultra high strength steel, which is predominantly used for manufacturing aircraft landing gears. The authors studied the corrosion fatigue (CF) properties before and after USRP in a 3.5 wt.% sodium chloride solution. The number of CF cycles (a representation of CF resistance) was recorded for untreated and USRP-treated samples, and experiments were performed with a maximum stress of 1100 MPa, and were repeated three times. The average number of CF cycles withstood by the untreated 300M steel specimen is 29.9 × 10³. However, the mean number of CF cycles for USRP-treated samples is 702.1 × 10³, which is 23 times higher than the untreated specimens. The authors summarized that improved surface finish, higher surface hardness, and introduction of RCS induced by USRP significantly enhanced corrosion fatigue and fretting properties. Liu et al. [48] studied the influence of USRP on microstructure and corrosion property of T4003 ferritic SS welds using electrochemical polarization curve measurement. The authors observed increased corrosion potential in the weld zone after USRP treatment compared to the untreated specimen. The reported value of corrosion potential for USRP treated weld joint is −0.41 V, whereas the untreated specimen possesses −0.61 V. The enhanced corrosion resistance after USRP is attributed to the reduction in surface roughness. The smooth surface formed after USRP reduces the exposed surface area to the corrosive medium, and the presence of RCS helps to prevent the generation and expansion of surface cracks. Liu et al. [63] studied the corrosion behavior of alloy 690 before and after USRP in a secondary side environment containing chloride. Electrochemical corrosion experiments demonstrated the positive value of open circuit potential (OCP). In addition, the passive film generated on the USRP treated specimen was denser than that formed on the untreated specimen. A higher OCP value indicates better corrosion resistance. Chen et al. [79] conducted USRP experiments on uranium metal that revealed excellent oxidation resistance. The authors concluded that the formation of nanograined microstructure and high RCS during USRP led to a stable and passive oxidation film, which enhanced the corrosion resistance. In addition to this, a strong texture in (002) direction was formed. The reason for enhanced surface integrity can be attributed to the formation of strong texture, which weakened the adsorption and diffusion of the oxidative medium. This study concludes that USRP is an effective method to prevent oxidation failures in uranium.
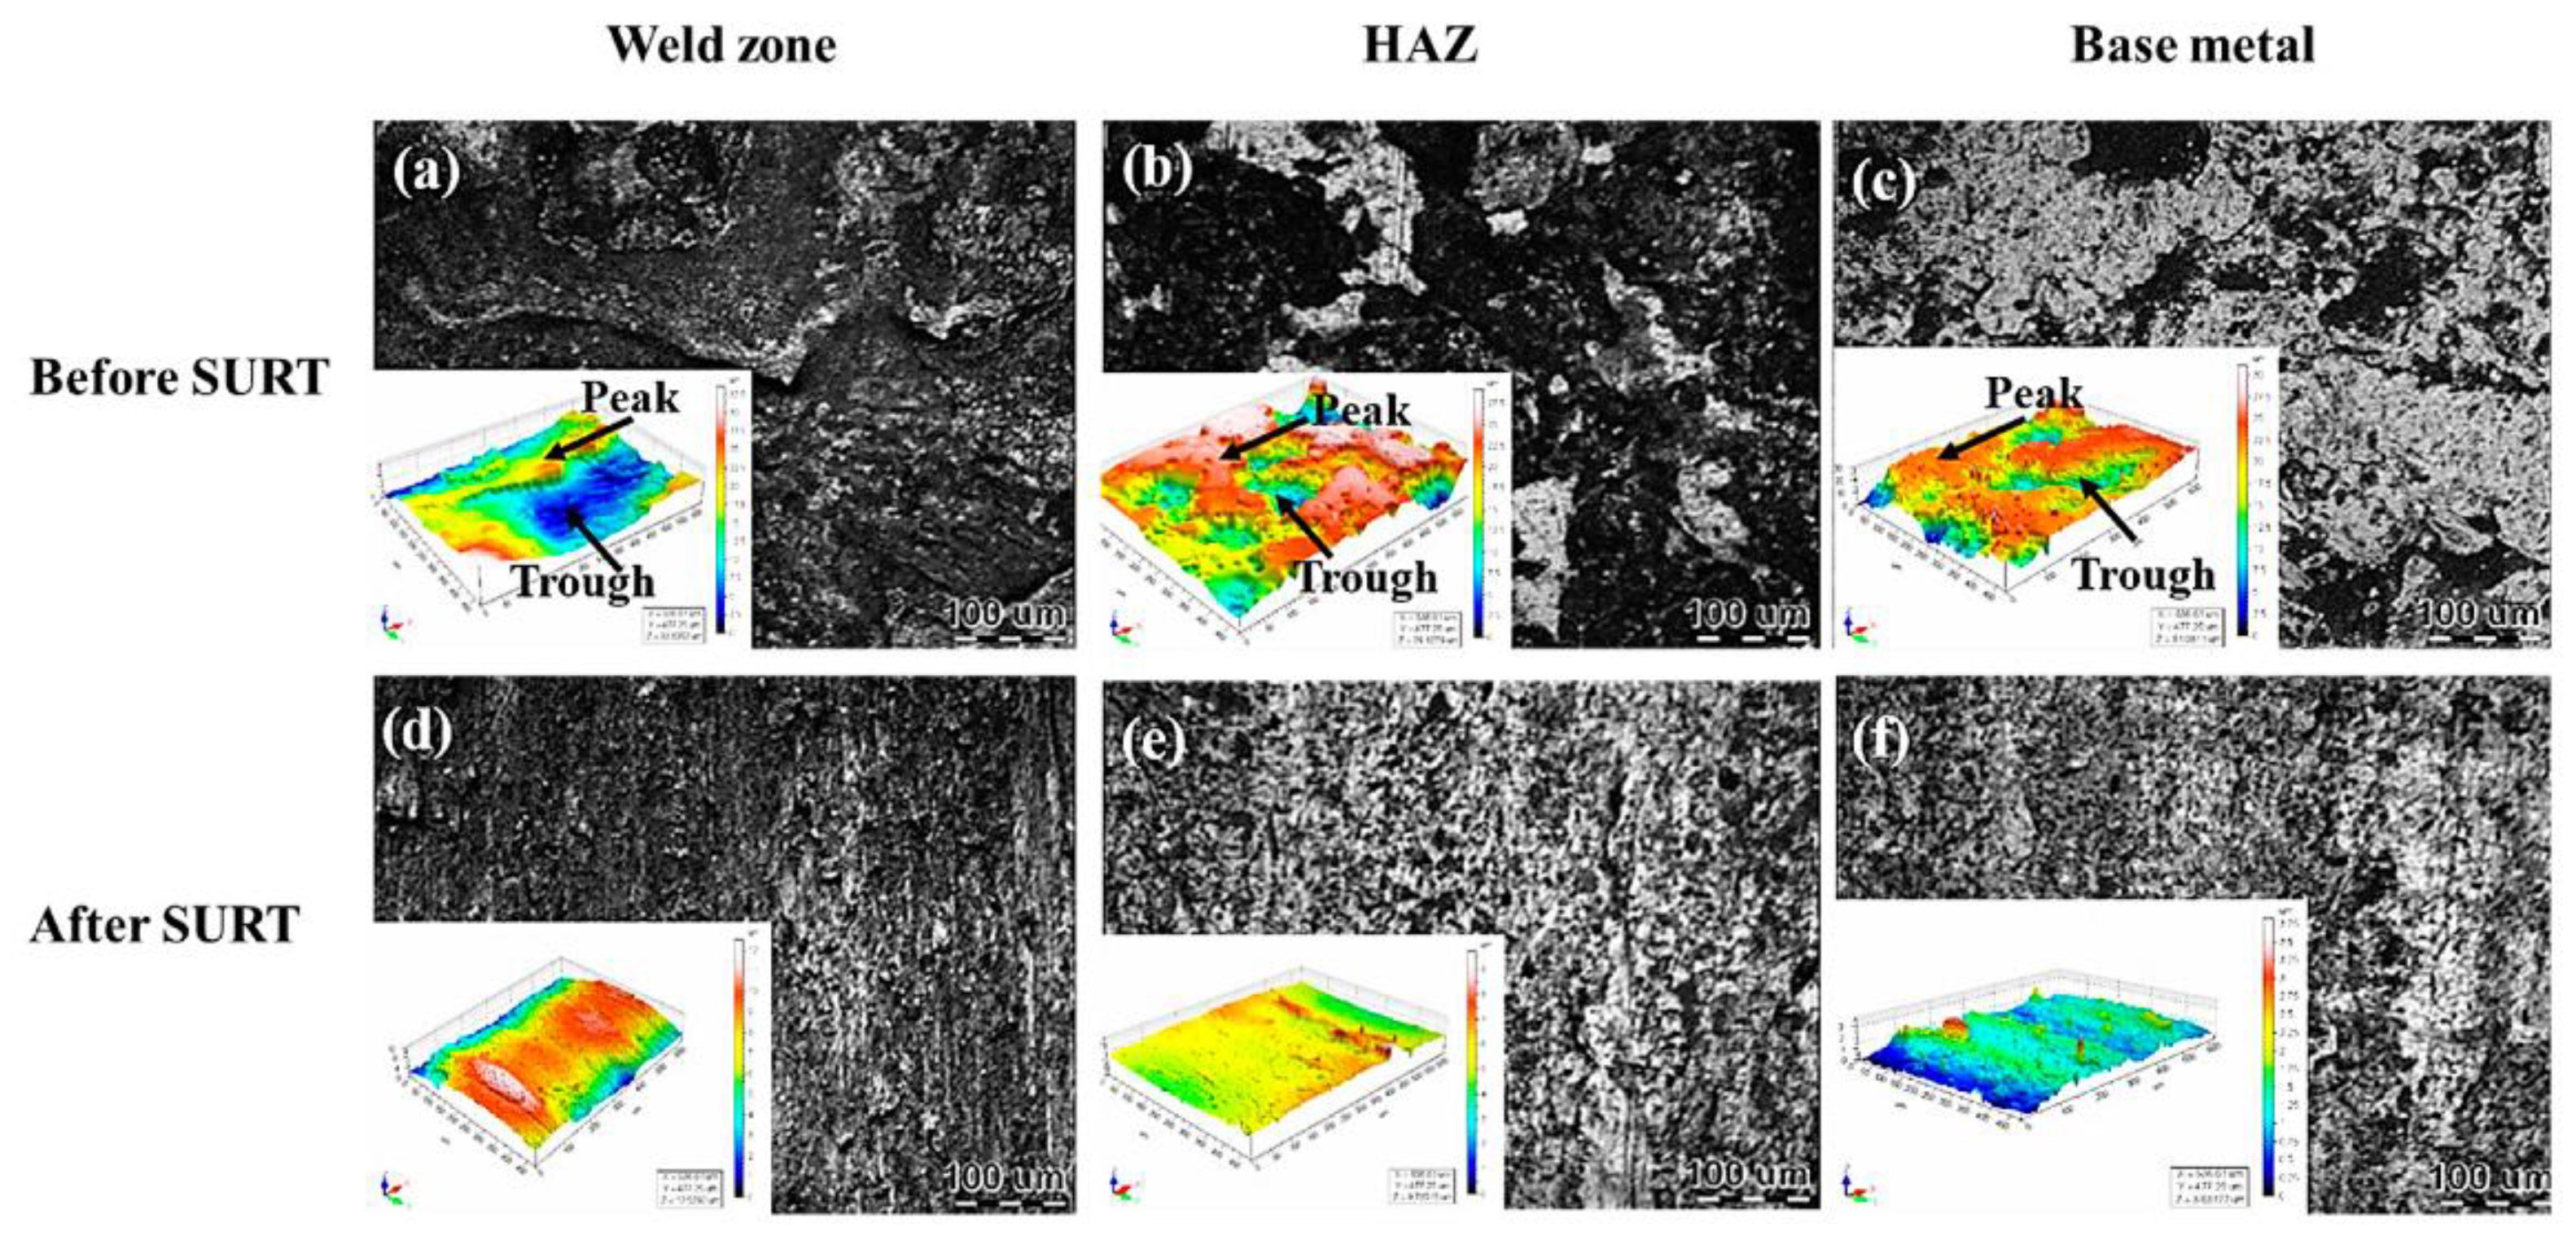
The inherent advantage of the USRP compared to other SPD techniques is the unique ability to enhance surface mechanical properties without deteriorating surface roughness. The rolling head impacts the surface of the metal parts at high speeds during the USRP process inducing intense plastic deformation on the surface and sub-surface layer of the specimen under consideration. Eventually, the valleys at the surface are filled with peaks, resulting in a reduction in surface roughness and the introduction of RCS. Finally, the formation of the GNS layer with severe plastic deformation enhances the surface mechanical properties. This attribute of USRP is extremely useful to improve the surface mechanical properties of the welded joint. The specimen is subjected to multiple weld thermal cycles during welding, resulting in the poor surface finish in the weld fusion zone and heat-affected zone. Liu et al. [48] revealed that USRP on T4003 ferritic SS weld joints reduced the surface roughness significantly and changed the surface morphology. They used another nomenclature named surface ultrasonic rolling treatment (SURT), which is similar to USRP. The average surface roughness in the weld zone, HAZ, and base material of the untreated weld joints were 1.06 μm, 2.18 μm, and 2.160 μm. However, after USRP, the average surface roughness reduced to 0.320 μm, 0.156 μm, and 0.227 μm. Figure 15 illustrates the surface morphology of T4003 ferritic SS weld joints before and after USRP. The surface morphology was quite unsmooth before USRP with peaks and troughs at the welded zone, HAZ, and base metal as shown in Figure 15a–c. It is evident that after USRP, the surface morphology became noticeably smooth with no peaks or troughs at the welded junction shown in Figure 15d–f. The authors observed that USRP induced a plastically deformed layer of 100 μm thickness and refined grains in the weldment.
In addition, scholars performed USRP on various metals and alloys and observed a significant reduction in surface roughness. Liu et al. [63] conducted USRP experiments on alloy 690, which is commonly used for heat transfer tubes and water reactor applications. The authors revealed that after USRP, surface roughness was significantly reduced. The alloy 690 has a surface roughness of 30 nm, and after USRP, the surface roughness was reduced to 1.4 nm. This reduction in surface roughness is attributed to the inflow of materials from the protrusion which is filled in the gullies on the base material. In addition, USRP produced nanograins with an average grain size of 55 nm and a GNS layer of thickness of approximately 1 μm. Dang et al. [80] performed USRP experiments on 300M steel and found that one pass of USRP can reduce the surface roughness by more than one order of magnitude (from 0.30 μm to 0.025 μm). Ye et al. [40] conducted USRP experimental studies on AZ31B Mg alloy and found the surface roughness to be decreased by 91.8% compared with the untreated specimen. Zhao et al. [78] conducted USRP experiments on 300M ultra high strength steels and reported that surface roughness reduced from 0.32 μm to 0.062 μm. Liu et al. [41] conducted USRP experiments on uranium metal and revealed that the surface roughness of uranium metal reduced to 0.38 μm after three rolling passes. The base material possesses a surface roughness of 0.90 μm, which is reduced to 0.35 μm during the first stage of USRP and reduced to 0.31 μm during the second stage of USRP.

5. Applications and Recent Advances of USRP

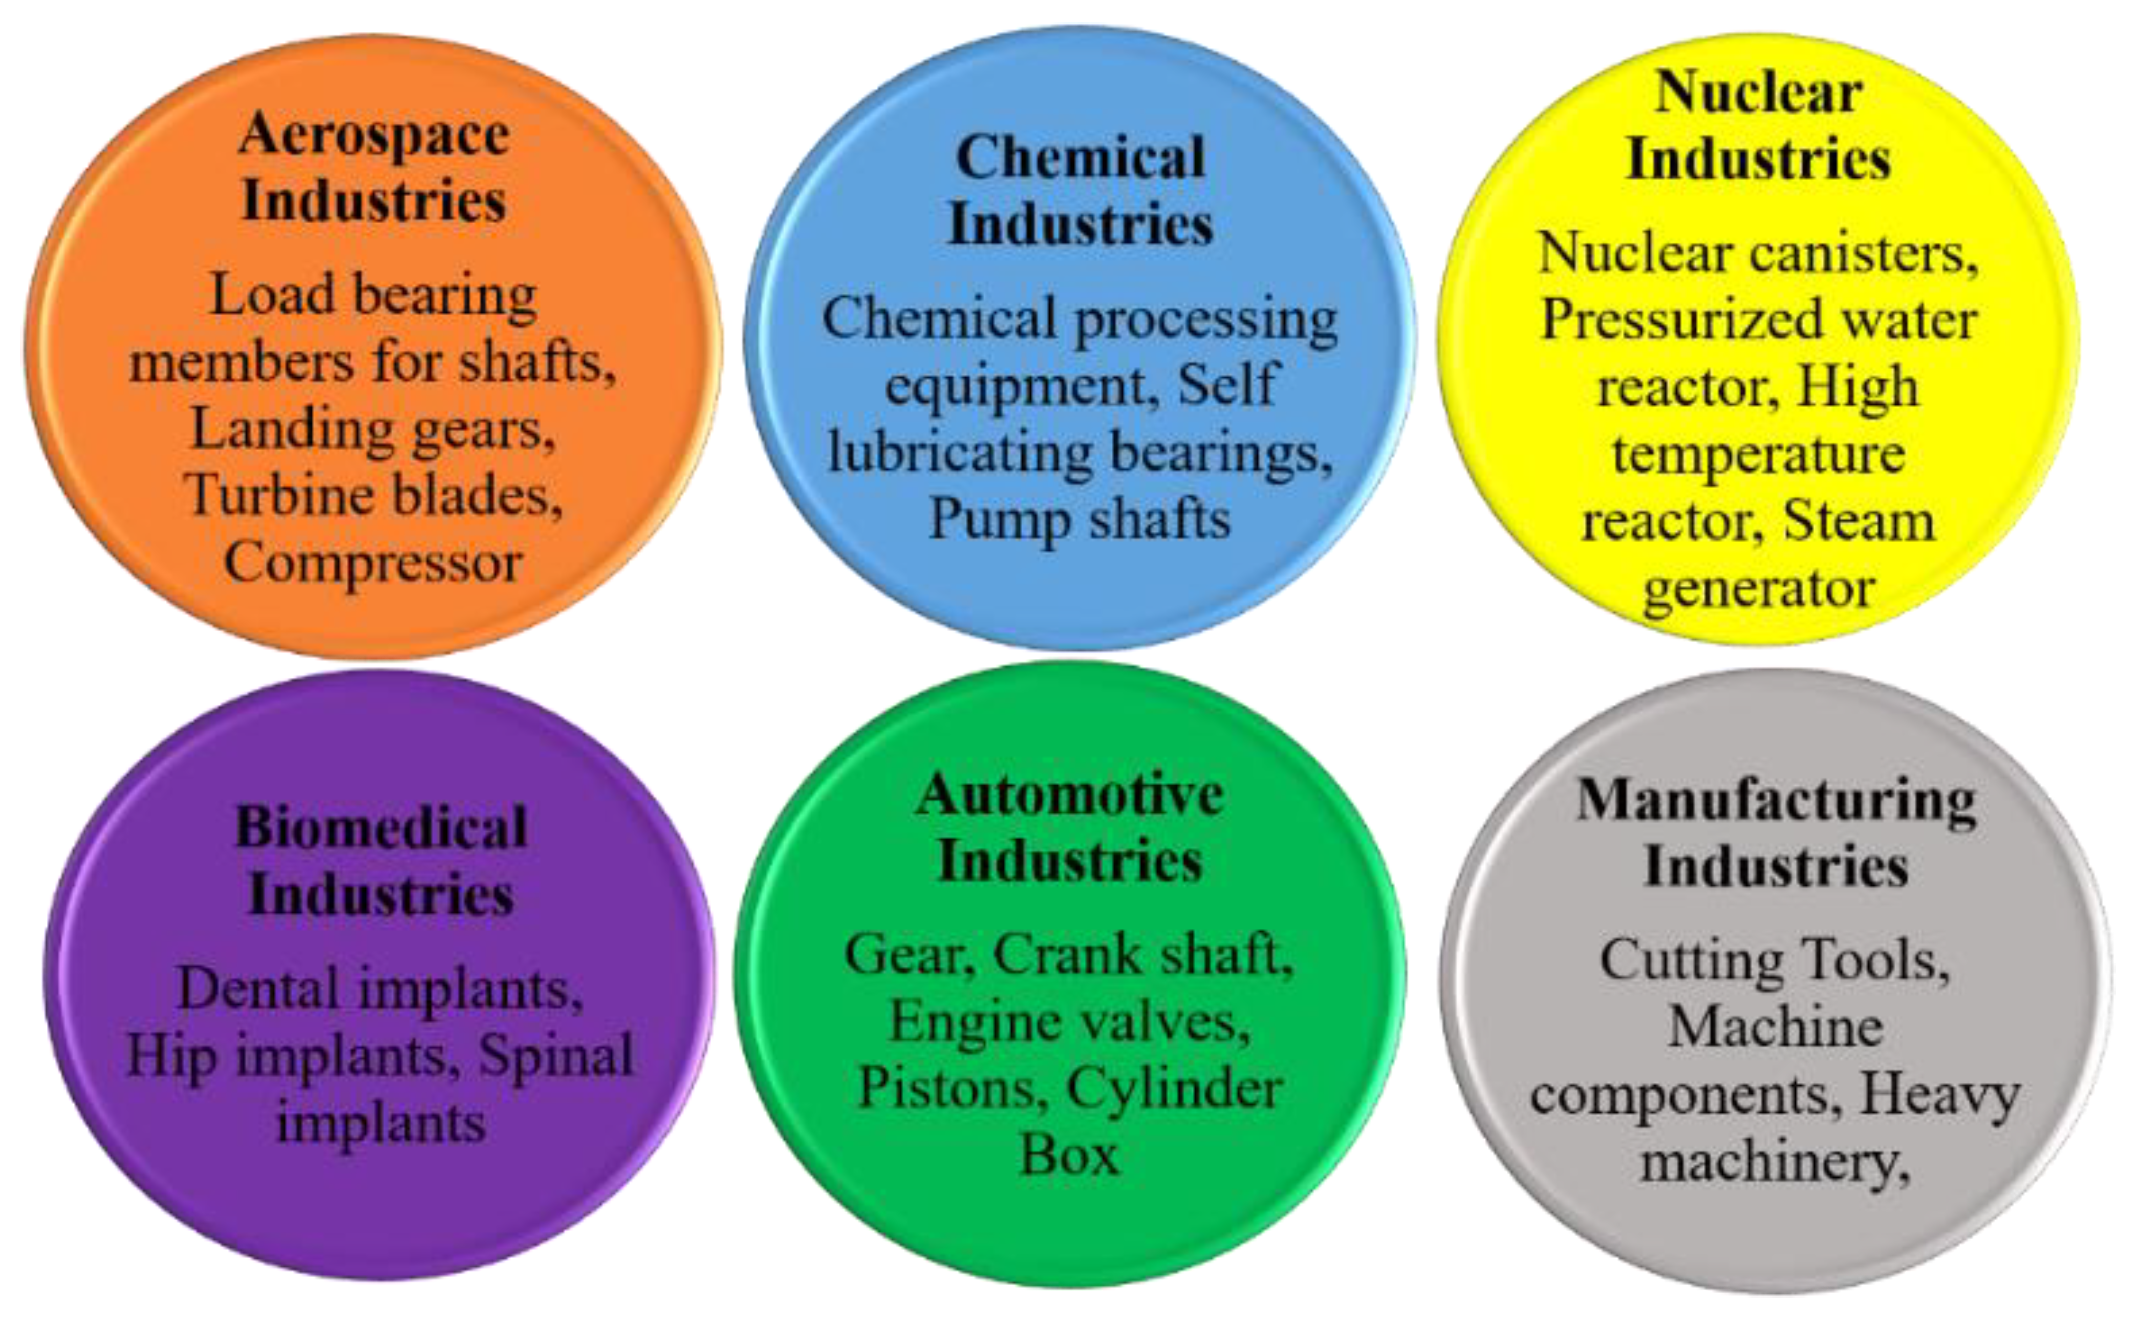
USRP is an advanced surface modification technique that provides superior surface mechanical properties and surface integrity without increasing surface roughness. These inherent advantages of USRP compared to other SPD methods led the scholars to adopt USRP in diverse fields of applications, such as, aerospace industries [81,82,83], chemical industries [26], nuclear industries [41,65], automotive industries [27,30,83], manufacturing industries [39], commercial industries [84], and biomedical industries [83,85]. Within each industry, the needs are unique. Still, USRP displays finesse in the handling of different materials for prospects of improvement.
Scholars performed USRP on Ti6Al4V, 300M steel, 7050-T7451 aluminum alloy, and GH4169 superalloy that is commonly used for various parts in aerospace applications. Liu et al. [57] conducted USRP on Ti6Al4V alloy and studied the fretting fatigue characteristics. The authors observed a GNS layer of 335 μm and a grain size of 45.8 nm on the surface of the specimen. In addition, the observed surface microhardness was 45 times higher compared to the base material, and an RCS of −861 MPa was induced on the surface. The authors reported that USRP enhanced fretting fatigue life by approximately 113% compared to the base alloy. The increase in fretting fatigue life is attributed to the combined effect of RCS, GNS layer, and work hardening. The induced RCS played the domain role to enhance the fretting fatigue life. Dang et al. [80] conducted USRP on 300M steel, commonly used as a load-bearing member for gears, shafts, and landing gears in aerospace industries, and studied the tensile and fatigue properties. The authors reported that single-pass USRP treatment improved the UTS by 3.8%. However, it reduced the YS by 5.9%. The authors observed that after USRP treatment, the LCF life was enhanced by 0.5 times, and HCF life was improved by 21 times. This is attributed to the introduction of high RCS on the top surface, which prevents the fatigue crack growth rate. Figure 16 represents the various applications of USRP in different industries.
Lu et al. [36] performed USRP on 7050-T7451 aluminum alloy, which is used as a monolithic component in aerospace applications. The authors summarized that USRP enhanced the surface microhardness by 41.3% and GNS layer of 140 μm. After USRP treatment, the surface integrity of the metal was significantly improved. The authors summarized that the grain boundary fusion and impurity phase diffusion phenomenon played a significant role in providing the internal strengthening mechanism on the USRP treated surface. Yang et al. [86] conducted USRP experiments three times on GH4169 superalloy and studied the fretting fatigue property. GH4169 superalloy is widely used for manufacturing aero-engine parts, such as turbine blades and compressors. The authors revealed that USRP increased surface microhardness, induced high RCS, and reduced surface roughness. The fretting fatigue life of the USRP’ed specimen increased from 3.6 during a single pass to 11 times after three passes of USRP. They attributed the presence of RCS to the enhancement in fretting fatigue life.
Liu et al. [41] performed USRP on uranium metal, which is widely used in nuclear industries, and studied the corrosion properties. The uranium metal demands superior surface mechanical properties; however, scholars reported that performance degradation due to friction, wear, and corrosion is a significant issue in these materials. Amongst these, degradations due to corrosion are the most common and severe problem [87,88]. The authors revealed that after USRP, the surface roughness of the uranium metal is reduced to 0.4 µm, and gradient twin microstructure is developed on the surface due to the SPD. Furthermore, the authors observed enhancement in corrosion resistance after USRP, which is attributed to the formation of a stable passive film that prevents oxidation during the electrochemical corrosion test. Zhang et al. [26] conducted USRP experiments on the 17-4PH SS, which is used for different applications, including chemical processing equipment, self-lubricating bearings, and pump shafts. The authors observed 20% improvement in surface microhardness. In addition, the wear rate and CoF were reduced by 25% and 14%. Furthermore, the authors revealed the formation of (100) and (211) strong textures after USRP, which significantly enhanced corrosion resistance. The authors accounted for the enhancement of abrasion resistance being due to the synergistic effect of improving the hardness and introducing high RCS on the specimen surface. Ye et al. [40] performed USRP experiments on AZ31B Mg alloys used in aerospace and automotive industries. Their studies revealed that USRP reduced surface roughness and corrosion rate by 91.8% and 64.15% compared to the untreated base material. In addition, the authors reported enhancement in hardness, wear-resistance, and tensile properties due to SPD during USRP.
In recent years, scholars adopted different variants of USRP. The most common amongst them is ultrasonic nanocrystal surface modification (UNSM). The SPD developed during this process is based on mechanical impacts. In this process, low amplitude, high-frequency ultrasonic vibrations are superimposed with static load [89]. Figure 17 represents the working of the UNSM process.
The mechanical impacts were applied on the specimen surface using a spherical roller tip of tungsten carbide and alumina. The repeated high-frequency impacts of the hard spherical tip on the specimen surface develop SPD, leading to surface nanocrystallization, introducing the high amount of RCS, developing high-density dislocations, and GNS layer [44]. The high-frequency ultrasonic vibrations are produced using an ultrasonic generator, which is amplified using a booster with the help of a horn and probe. The SPD developed during the UNSM process depends on the input parameters, such as static load, number of strikes, and roller diameter. Proper selection of these input parameters can control the GNS layer thickness. In the UNSM process, the primary function of the spherical roller tip is to create a mechanical impact and produce the SPD. In the case of USRP, the primary function of the spherical roller tip is to perform DR. Scholars adopted UNSM techniques on different steel grades [90,91,92,93,94], titanium alloys [95,96,97,98], aluminum alloys [99,100,101], and magnesium alloys [102,103], nickel alloys [89,104], copper alloys [105,106], shape memory alloys [107,108] high entropy alloys [109,110,111] and thus observed a significant enhancement in surface mechanical properties and surface integrity. In addition, there are advancements in USNM techniques, such as electropulsing-assisted UNSM and laser-assisted UNSM [112,113]. Scholars used combination techniques along with UNSM for superior enhancement in the surface mechanical properties [114].
Ma et al. [108] conducted UNSM on additive manufactured NiTi alloys to improve the surface roughness and wear resistance. NiTi shape memory alloys have potential application in biomedical implants because of their unique shape memory effect and superelasticity properties. In this experiment, the authors used a static load of 3 kg, a tungsten carbide tip with a diameter of 2.4 mm, and a frequency of 20 kHz. The authors reported that after UNSM, a hardened layer of 125 μm was formed, surface microhardness increased by 34.2%, surface roughness was reduced from 12.1 μm to 9 μm, reduced subsurface porosity, corrosion resistance, and wear resistance were improved. The enhancement in corrosion resistance and wear resistance were attributed to the formation of a hardened layer due to USRP. Listyawan et al. [110] conducted UNSM experiments on CoCrFeMnNi high entropy alloy and studied the effect on mechanical properties and microstructural features. The SPD, due to UNSM, led to the formation of the GNS layer with higher dislocation densities, deformation twins, and shear bands. Furthermore, the presence of high dislocation densities and deformation twins in the SPD layer improved the tensile properties of the USRP’ed specimen.
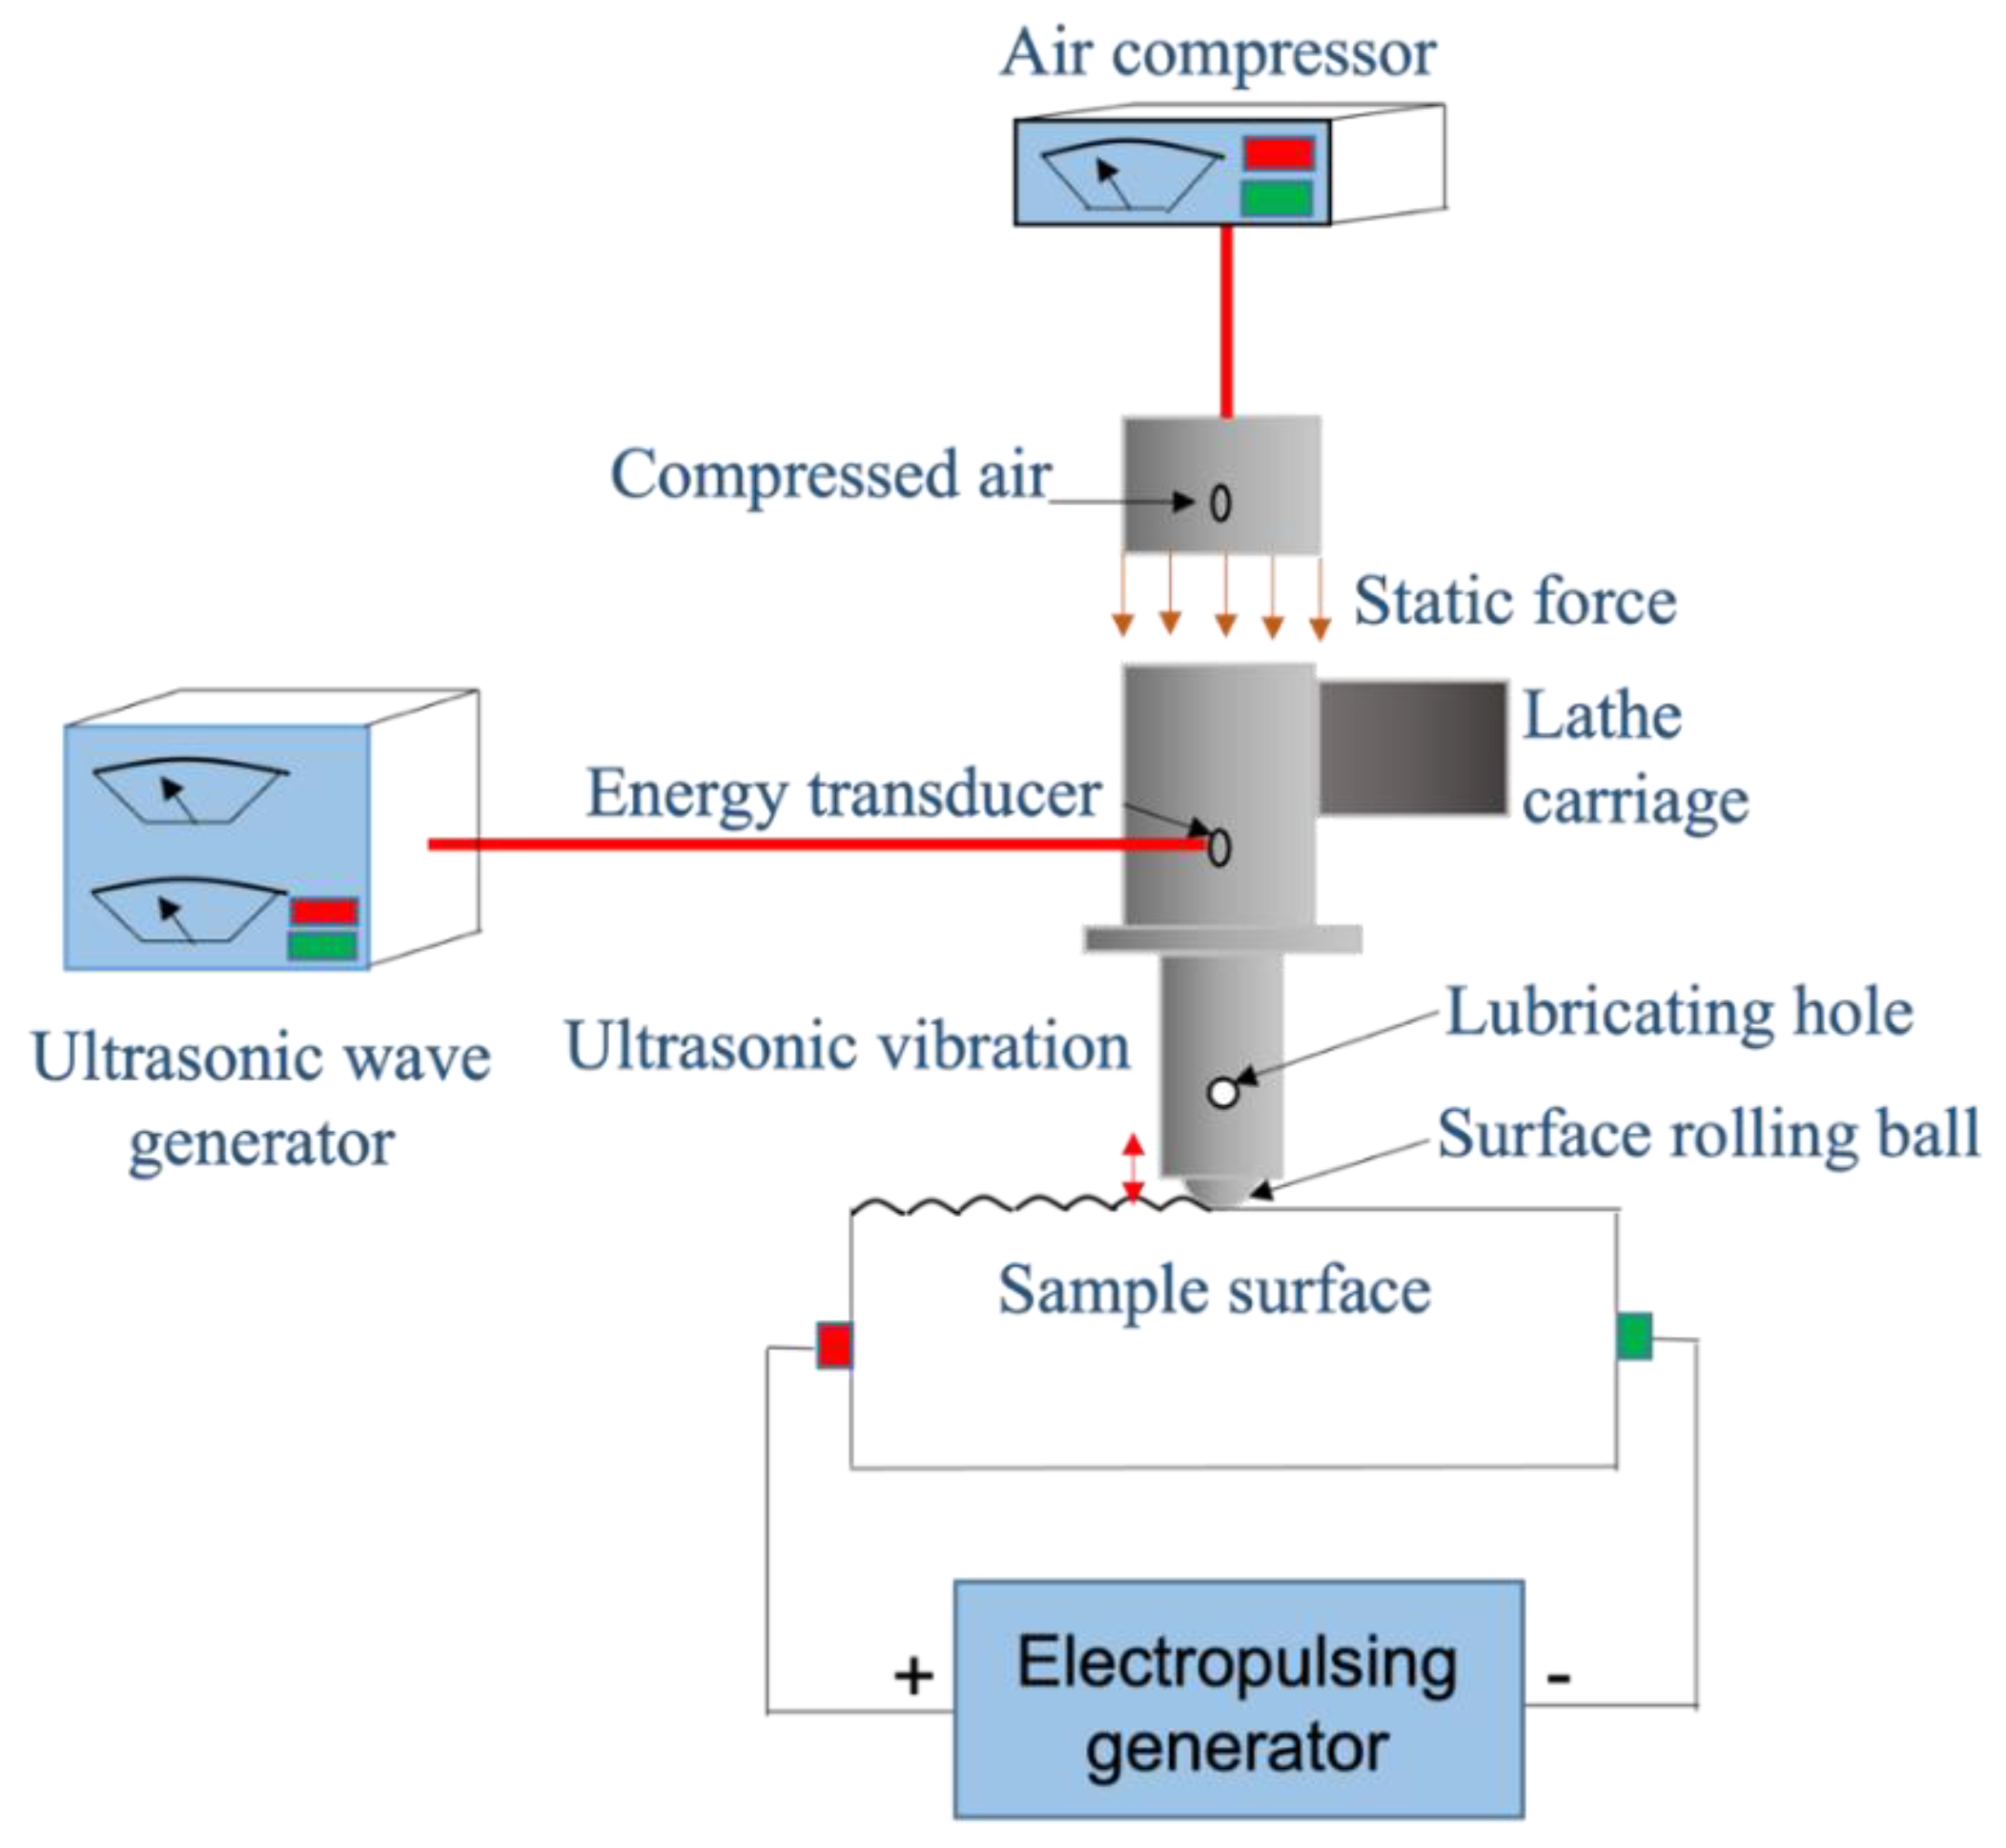
USRP can provide remarkable hardening of the surface due to SPD; however, in the subsequent stages of the USRP, the surface hardened layer prevents further improvement. On the other hand, this surface hardened layer hinders further plastic deformation. This is attributed to the presence of immobile dislocation and enhanced deformation resistance [115]. To improve the deformation ability, manipulate the microstructure, and remarkably enhance surface quality, scholars have used electropulsing techniques with USRP. The conventional method of USRP, integrated with electropulsing, led to the development of a novel electropulsing assisted ultrasonic surface rolling process (EP-USRP) [116,117]. Figure 18 represents the schematic illustration of the EP-USRP. In this process, a high electropulsing current is applied to the specimen for a short period coupled with USRP. During electropulsing, the flow stress of the material drops, and the plasticity of the specimen increases. In addition, electropulsing enhances the mobility of dislocations due to thermal and athermal effects [118,119]. The main aim of EP-USRP is to optimize the mechanical properties and microstructural features of the specimen. The electropulsing during EP-USRP causes a reduction in deformation resistance of the specimen, which improves ductility and surface quality. This is attributed to the significant reduction in work hardening and defects by promoting phase transformation, recrystallization, and crack healing [120,121,122]. Wang et al. [123] studied the effect of EP-USRP on AISI 304 SS substrate material. The authors reported that the surface undergoes extensive refinement, and the indications of deformation were observed up to the depth of 200 μm. The deformation was mainly due to the twinning activity. They attributed relatively low stacking fault energy (SFE) of the SS (16 mJ/m2) as the cause of twinning dominant deformation.
Ye et al. [124] performed EP-USRP on pure Ti and demonstrated significant improvement in mechanical properties compared to USRP. The authors observed lower surface roughness with reduced cracks on the specimen surface. The untreated specimen has a surface roughness of 0.867 µm, reduced to 0.045 µm during USRP and further reduced to 0.033 µm. After EP-USRP, authors observed smooth morphology with reduced defects on the specimen surface. In addition, the authors reported an improvement in the surface microhardness by 32.1% during EP-USRP compared to 19.5% during USRP. The enhancement in surface hardness is attributed to the thermal and athermal effect due to electropulsing, which accelerates the dislocation mobility and diffusion of atoms. Table 2 corresponds to the recent advancements of the USRP technique, which summarizes the UNSM and EP-USRP. Wang et al. [125] studied the mechanical properties and microstructural features of EP-USRP on Ti6Al4V. The authors reported a significant enhancement in surface microhardness, wear resistance, deformation layer depth, strengthened RCS in the deformation layer, and superior healing of the surface cracks. The significant enhancement in surface mechanical properties and the presence of ultra-refined grains in the deformation layer is attributed to the effect of electropulsing.
To enhance the benefits obtained from USRP, scholars used combination techniques. The commonly used combination techniques are shot peening [131], heat treatment [72,132], laser cladding [133,134], plasma nitriding [64], carburizing [135]. Table 3 summarizes the various combination techniques used with USRP to potentially improve surface integrity, and surface mechanical properties. Zhang et al. [131] used a combination of USRP and shot peening to alter the surface 17Cr2Ni2MoVNb steel to improve wear resistance and fatigue resistance. After combined treatment, the authors observed superior grain refinement and the deepest grain refinement layer. The untreated specimen surface had a grain size of 9.91 µm, which was reduced to 1.98 µm, and the depth of the SPD layer was 133.5 µm. In addition, grain refinement was correlated to intensive plastic strain and the ability of the material to absorb the deformation energy. The combination treatment specimen showed CRS of −1099 MPa and surface microhardness of 1109 HV, which was 229% and 39.5% higher than the untreated specimen. Wang et al. [135] used a combination of carburizing and USRP on 20CrMoH steel and studied the synergistic effect of these surface modification techniques on the rolling contact fatigue life. The authors reported a 100% increase in fatigue life during combined treatment compared to the carburized sample. The authors listed three methods of strengthening, such as strengthening due to carburization, strengthening due to dislocation, and stress. The combination method induced an RCS of −920 MPa and surface hardness of 900 HV.
USRP is a novel surface SPD technique capable of providing superior surface mechanical properties and surface integrity with an appreciable reduction in surface roughness [137]. It can induce in-depth CRS and GNS layers with higher intensity and deeper thickness than other SPD methods such as LSP, SP, SMAT, UIP, DR, and SMGT [86]. The primary advantage of USRP is the reduction in surface roughness of the substrate surface after SPD. Since the roller is rotating freely in lubricant, it can provide a superior reduction in surface roughness. This reduction in surface roughness can significantly hinder the failure due to corrosion, wear, and fatigue [22,138]. In comparison to SP, USRP equipment is assembled with a CNC lathe. In this way, the treating intensity during USRP can be accurately controlled. The surface roughness developed during USRP is significantly lower than UNSM. Compared to DR, the superposition of ultrasonic impact energy in USRP generate higher plastic strain on the substrate surface. It has high accuracy and repeatability for various industrial applications.
USRP can provide remarkable hardening of the surface due to SPD. However, as the number of rolling passes increases, the surface hardening developed in the previous passes limits further improvement. This surface hardened layer is hindering further plastic deformation. In addition, the SPD develops a large number of immobile dislocations, which prevents further grain refinement in subsequent passes [124]. These immobile dislocations accumulate on the top surface limits the impact depth [115]. However, these disadvantages can be overcome by EP-USRP.
In summary, USRP is a promising method of SPD that can provide superior surface mechanical properties and surface integrity with reduced surface roughness compared to other methods of SPD. This beneficial nature of USRP can be potentially used with various engineering materials to enhance surface mechanical properties and surface integrity for diverse applications.

6. Conclusions

In this review article, a comprehensive discussion on a surface SPD technique named USRP is elucidated. USRP is a promising SPD technique that integrates UIP and DR. USRP is a unique method of SPD that can provide superior surface mechanical properties with reduced surface roughness. This review focuses mainly on the state-of-the-art USRP on various engineering materials that are used explicitly for aerospace, automotive, nuclear, and chemical industries. In addition, the mechanism of USRP and the effect of USRP on microstructural features and microstructural evolution were discussed for ferrous and non-ferrous-based materials. The influence of USRP on grain refinement and the formation of the GNS layer is described. Furthermore, the effect of USRP on different mechanical properties, such as hardness, fatigue, tensile properties, wear resistance, residual stress, corrosion resistance, and surface roughness are summarized. In addition, applications and recent advances of the USRP, such as UNSM and EP-USRP, were described. The mechanisms of UNSM and EP-USRP and the effect of these processes on various engineering materials were explored. A combination of USRP with other surface modification methods has recently been adopted to obtain superior mechanical properties and surface integrity compared to USRP alone. This review paper can provide deeper insights when using USRP on different materials for diverse applications.

Author Contributions

Conceptualization, M.J.; methodology, M.J. and P.L.M.; writing—original draft preparation, M.J., A.M.R., S.C.D., A.K.V.T., A.K.P. and U.B.K.; writing—review and editing, M.J., A.M.R., S.C.D., A.K.V.T., A.K.P., U.B.K. and P.L.M.; supervision, P.L.M. All authors have read and agreed to the published version of the manuscript.

Funding

This research received no external funding.

Institutional Review Board Statement

Not applicable.

Informed Consent Statement

Not applicable.

Data Availability Statement

Not applicable.

Acknowledgments

The authors acknowledge the Department of Mechanical Engineering, University of Nevada, Reno, for providing all research facilities.

Conflicts of Interest

The authors declare no conflict of interest. The funders had no role in the design of the study; in the collection, analyses, or interpretation of data; in the writing of the manuscript, or in the decision to publish the results.

Abbreviations

BCCBody Centered Cubic
DRDeep Rolling
DCRDeep Cold Rolling
DRXDynamic Recrystallization
EP-USRPElectropulsing Assisted Ultrasonic Surface Rolling Process
GNSGradient Nanostrcutured Surface
HCFHigh Cycle Fatigue
LCFLow Cycle Fatigue
LSPLaser Shock Peening
LSSPLaser Shock Surface Patterning
RCSResidual Compressive Stress
SPShot Peening
SPDSevere Plastic Deformation
SSPSevere Shot Peeing
SSStainless Steel
SURTSurface Ultrasonic Rolling Treatment
SMATSurface Mechanical Attrition Treatment
SMGTSurface Mechanical Grinding Treatment
SAEDSelected Area Diffraction
SFEStacking Fault Energy
SCCStress Corrosion Cracking
TEMTransmission Electron Microscopy
USPUltrasonic Shot Peening
UIPUltrasonic Impact Peening
USRUltrasonic Surface Rolling
USRPUltrasonic Surface Rolling Process
USSRUltrasonic Severe Surface Rolling
UDCRUltrasonic Deep Cold Rolling
UNSMUltrasonic Nanocrystal Surface Modification

References

  1. Azhari, A.; Sulaiman, S.; Rao, A.K.P. A review on the application of peening processes for surface treatment. IOP Conf. Ser. Mater. Sci. Eng. 2016, 114, 012002. [Google Scholar] [CrossRef] [Green Version]
  2. Geng, G.S.; Xu, J.H. Surface Integrity and Fatigue Property of a High Speed Milled Titanium Alloy. Adv. Mater. Res. 2008, 53–54, 305–310. [Google Scholar]
  3. Gao, Y.-K.; Yin, Y.-F.; Yao, M. Effects of shot peening on fatigue properties of 0Cr13Ni8Mo2Al steel. Mater. Sci. Technol. 2003, 19, 372–374. [Google Scholar] [CrossRef]
  4. Chen, M.; Xing, S.; Li, J.; He, J.; Lu, Y.; Jiang, C.; Ji, V. Surface residual stress and microstructure evolutions of Hastelloy X alloy after severe shot peening. Vacuum 2021, 187, 110136. [Google Scholar] [CrossRef]
  5. Maleki, E.; Farrahi, G.H.; Kashyzadeh, K.R.; Unal, O.; Gugaliano, M.; Bagherifard, S. Effects of Conventional and Severe Shot Peening on Residual Stress and Fatigue Strength of Steel AISI 1060 and Residual Stress Relaxation Due to Fatigue Loading: Experimental and Numerical Simulation. Met. Mater. Int. 2020, 27, 2575–2591. [Google Scholar] [CrossRef]
  6. Malaki, M.; Ding, H. A review of ultrasonic peening treatment. Mater. Des. 2015, 87, 1072–1086. [Google Scholar] [CrossRef]
  7. Yin, D.; Wang, D.; Jing, H.; Huo, L. The effects of ultrasonic peening treatment on the ultralong life fatigue behavior of welded joints. Mater. Des. 2010, 31, 3299–3307. [Google Scholar] [CrossRef]
  8. Safyari, M.; Moshtaghi, M. Role of Ultrasonic Shot Peening in Environmental Hydrogen Embrittlement Behavior of 7075-T6 Alloy. Hydrogen 2021, 2, 377–385. [Google Scholar] [CrossRef]
  9. Kumar, P.; Mahobia, G.; Mandal, S.; Singh, V.; Chattopadhyay, K. Enhanced corrosion resistance of the surface modified Ti-13Nb-13Zr alloy by ultrasonic shot peening. Corros. Sci. 2021, 189, 109597. [Google Scholar] [CrossRef]
  10. John, M.; Kalvala, P.; Misra, M.; Menezes, P. Peening Techniques for Surface Modification: Processes, Properties, and Applications. Materials 2021, 14, 3841. [Google Scholar] [CrossRef]
  11. Siddaiah, A.; Mao, B.; Liao, Y.; Menezes, P.L. Effect of Laser Shock Peening on the Wear-Corrosion Synergistic Behavior of an AZ31B Magnesium Alloy. J. Tribol. 2019, 142, 1–22. [Google Scholar] [CrossRef]
  12. Zhang, X.; Mao, B.; Siddaiah, A.; Menezes, P.L.; Liao, Y. Direct laser shock surface patterning of an AZ31B magnesium alloy: Microstructure evolution and friction performance. J. Mater. Process. Technol. 2019, 275, 116333. [Google Scholar] [CrossRef]
  13. Mao, B.; Siddaiah, A.; Menezes, P.L.; Liao, Y. Surface texturing by indirect laser shock surface patterning for manipulated friction coefficient. J. Mater. Process. Technol. 2018, 257, 227–233. [Google Scholar] [CrossRef]
  14. Chen, A.; Wang, C.; Jiang, J.; Ruan, H.; Lu, J. Microstructure Evolution and Mechanical Properties of Austenite Stainless Steel with Gradient Twinned Structure by Surface Mechanical Attrition Treatment. Nanomaterials 2021, 11, 1624. [Google Scholar] [CrossRef]
  15. Ran, M.; Zhang, C.; Wen, L.; Zhou, H.; Zheng, W. Effect of surface mechanical attrition treatment on stainless steel corrosion. Surf. Eng. 2020, 37, 739–748. [Google Scholar] [CrossRef]
  16. Nagarajan, B.; Kumar, D.; Fan, Z.; Castagne, S. Effect of deep cold rolling on mechanical properties and microstructure of nickel-based superalloys. Mater. Sci. Eng. A 2018, 728, 196–207. [Google Scholar] [CrossRef]
  17. Unal, O.; Karaoglanli, A.C.; Varol, R.; Kobayashi, A. Microstructure evolution and mechanical behavior of severe shot peened commercially pure titanium. Vacuum 2014, 110, 202–206. [Google Scholar] [CrossRef]
  18. He, Z.; Shen, Y.; Tao, J.; Chen, H.; Zeng, X.; Huang, X.; El-Aty, A.A. Laser shock peening regulating aluminum alloy surface residual stresses for enhancing the mechanical properties: Roles of shock number and energy. Surf. Coat. Technol. 2021, 421, 127481. [Google Scholar] [CrossRef]
  19. Sun, Q.; Han, Q.; Wang, S.; Xu, R. Microstructure, corrosion behaviour and thermal stability of AA 7150 after ultrasonic shot peening. Surf. Coat. Technol. 2020, 398, 126127. [Google Scholar] [CrossRef]
  20. Nie, B.; Zhang, Z.; Zhao, Z.; Zhong, Q. Very high cycle fatigue behavior of shot-peened 3Cr13 high strength spring steel. Mater. Des. 2013, 50, 503–508. [Google Scholar] [CrossRef]
  21. Liu, D.; Liu, D.; Zhang, X.; Liu, C.; Ao, N. Surface nanocrystallization of 17-4 precipitation-hardening stainless steel subjected to ultrasonic surface rolling process. Mater. Sci. Eng. A 2018, 726, 69–81. [Google Scholar] [CrossRef]
  22. Ting, W.; Dongpo, W.; Gang, L.; Baoming, G.; Ningxia, S. Investigations on the nano crystallization of 40Cr using ultrasonic surface rolling processing. Appl. Surf. Sci. 2008, 255, 1824–1829. [Google Scholar] [CrossRef]
  23. Kushwaha, A.K.; John, M.; Misra, M.; Menezes, P.L. Nanocrystalline Materials: Synthesis, Characterization, Properties, and Applications. Crystals 2021, 11, 1317. [Google Scholar] [CrossRef]
  24. Bozdana, A.T.; Gindy, N.; Li, H. Deep cold rolling with ultrasonic vibrations—A new mechanical surface enhancement technique. Int. J. Mach. Tools Manuf. 2005, 45, 713–718. [Google Scholar] [CrossRef]
  25. Lai, F.; Qu, S.; Lewis, R.; Slatter, T.; Fu, W.; Li, X. The influence of ultrasonic surface rolling on the fatigue and wear properties of 23-8N engine valve steel. Int. J. Fatigue 2019, 125, 299–313. [Google Scholar] [CrossRef]
  26. Zhang, Q.; Hu, Z.; Su, W.; Zhou, H.; Liu, C.; Yang, Y.; Qi, X. Microstructure and surface properties of 17-4PH stainless steel by ultrasonic surface rolling technology. Surf. Coat. Technol. 2017, 321, 64–73. [Google Scholar] [CrossRef]
  27. Qu, S.; Hu, X.; Lu, F.; Lai, F.; Liu, H.; Zhang, Y.; Li, X. Rolling contact fatigue properties of ultrasonic surface rolling treated 25CrNi2MoV steel under different lubricant viscosities. Int. J. Fatigue 2020, 142, 105970. [Google Scholar] [CrossRef]
  28. Dang, J.; Zhang, H.; An, Q.; Lian, G.; Li, Y.; Wang, H.; Chen, M. Surface integrity and wear behavior of 300M steel subjected to ultrasonic surface rolling process. Surf. Coat. Technol. 2021, 421, 127380. [Google Scholar] [CrossRef]
  29. Zhang, Y.-L.; Lai, F.-Q.; Qu, S.-G.; Liu, H.-P.; Jia, D.-S.; Du, S.-F. Effect of ultrasonic surface rolling on microstructure and rolling contact fatigue behavior of 17Cr2Ni2MoVNb steel. Surf. Coat. Technol. 2019, 366, 321–330. [Google Scholar] [CrossRef]
  30. Zhang, Y.; Huang, L.; Lu, F.; Qu, S.; Ji, V.; Hu, X.; Liu, H. Effects of ultrasonic surface rolling on fretting wear behaviors of a novel 25CrNi2MoV steel. Mater. Lett. 2020, 284, 128955. [Google Scholar] [CrossRef]
  31. Ren, Z.; Lai, F.; Qu, S.; Zhang, Y.; Li, X.; Yang, C. Effect of ultrasonic surface rolling on surface layer properties and fretting wear properties of titanium alloy Ti5Al4Mo6V2Nb1Fe. Surf. Coat. Technol. 2020, 389, 125612. [Google Scholar] [CrossRef]
  32. Liu, D.; Liu, D.; Guagliano, M.; Xu, X.; Fan, K.; Bagherifard, S. Contribution of ultrasonic surface rolling process to the fatigue properties of TB8 alloy with body-centered cubic structure. J. Mater. Sci. Technol. 2020, 61, 63–74. [Google Scholar] [CrossRef]
  33. Liu, Z.; Gao, C.; Liu, X.; Liu, R.; Xiao, Z. Improved surface integrity of Ti6Al4V fabricated by selective electron beam melting using ultrasonic surface rolling processing. J. Mater. Process. Technol. 2021, 297, 117264. [Google Scholar] [CrossRef]
  34. Lei, L.; Zhao, Q.; Zhao, Y.; Wu, C.; Huang, S.; Jia, W.; Zeng, W. Gradient nanostructure, phase transformation, amorphization and enhanced strength-plasticity synergy of pure titanium manufactured by ultrasonic surface rolling. J. Mater. Process. Technol. 2021, 299, 117322. [Google Scholar] [CrossRef]
  35. Li, Y.; Lian, G.; Geng, J.; Song, C.; Chen, D.; Wang, H. Effects of ultrasonic rolling on the surface integrity of in-situ TiB2/2024Al composite. J. Mater. Process. Technol. 2021, 293, 117068. [Google Scholar] [CrossRef]
  36. Lu, L.X.; Sun, J.; Li, L.; Xiong, Q.C. Study on surface characteristics of 7050-T7451 aluminum alloy by ultrasonic surface rolling process. Int. J. Adv. Manuf. Technol. 2016, 87, 2533–2539. [Google Scholar] [CrossRef]
  37. Xu, X.; Liu, D.; Zhang, X.; Liu, C.; Liu, D. Mechanical and corrosion fatigue behaviors of gradient structured 7B50-T7751 aluminum alloy processed via ultrasonic surface rolling. J. Mater. Sci. Technol. 2019, 40, 88–98. [Google Scholar] [CrossRef]
  38. Geng, J.; Yan, Z.; Zhang, H.; Liu, Y.; Dong, P.; Yuan, S.; Wang, W. Microstructure and Mechanical Properties of AZ31B Magnesium Alloy via Ultrasonic Surface Rolling Process. Adv. Eng. Mater. 2021, 2100076. [Google Scholar] [CrossRef]
  39. Zhou, M.; Xu, Y.; Liu, Y.; Duan, M.; Xia, Z.; Huang, L.; Zhu, R.; Ye, H.; Peng, L.; Wu, Y.; et al. Microstructures and mechanical properties of Mg-15Gd-1Zn-0.4Zr alloys treated by ultrasonic surface rolling process. Mater. Sci. Eng. A 2021, 828, 141881. [Google Scholar] [CrossRef]
  40. Ye, H.; Sun, X.; Liu, Y.; Rao, X.-X.; Gu, Q. Effect of ultrasonic surface rolling process on mechanical properties and corrosion resistance of AZ31B Mg alloy. Surf. Coat. Technol. 2019, 372, 288–298. [Google Scholar] [CrossRef]
  41. Liu, J.; Chen, D.; Su, B.; Chen, D.; Ren, Z.; Zou, D.; Liu, K. Effects of ultrasonic surface rolling processing on the corrosion properties of uranium metal. J. Nucl. Mater. 2021, 556, 153239. [Google Scholar] [CrossRef]
  42. Xia, T.; Zeng, L.; Zhang, X.; Liu, J.; Zhang, W.; Liang, T.; Yang, B. Enhanced corrosion resistance of a Cu 10Ni alloy in a 3.5 wt% NaCl solution by means of ultrasonic surface rolling treatment. Surf. Coat. Technol. 2019, 363, 390–399. [Google Scholar] [CrossRef]
  43. Zhang, C.; Dong, Y.; Ye, C. Recent Developments and Novel Applications of Laser Shock Peening: A Review. Adv. Eng. Mater. 2021, 23, 2001216. [Google Scholar] [CrossRef]
  44. Liu, R.; Yuan, S.; Lin, N.; Zeng, Q.; Wang, Z.; Wu, Y. Application of ultrasonic nanocrystal surface modification (UNSM) technique for surface strengthening of titanium and titanium alloys: A mini review. J. Mater. Res. Technol. 2021, 11, 351–377. [Google Scholar] [CrossRef]
  45. Sundar, R.; Ganesh, P.; Gupta, R.K.; Ragvendra, G.; Pant, B.K.; Kain, V.; Ranganathan, K.; Kaul, R.; Bindra, K.S. Laser Shock Peening and its Applications: A Review. Lasers Manuf. Mater. Process. 2019, 6, 424–463. [Google Scholar]
  46. Wang, X.; Chen, L.; Liu, P.; Lin, G.; Ren, X. Enhancement of Fatigue Endurance Limit through Ultrasonic Surface Rolling Processing in EA4T Axle Steel. Metals 2020, 10, 830. [Google Scholar] [CrossRef]
  47. Liu, Y.; Wang, L.; Wang, D. Finite element modeling of ultrasonic surface rolling process. J. Mater. Process. Technol. 2011, 211, 2106–2113. [Google Scholar] [CrossRef]
  48. Liu, P.; Yu, R.; Gao, X.; Zhang, G. Influence of Surface Ultrasonic Rolling on Microstructure and Corrosion Property of T4003 Ferritic Stainless Steel Welded Joint. Metals 2020, 10, 1081. [Google Scholar] [CrossRef]
  49. Liu, P.; Lin, Z.; Liu, C.; Zhao, X.; Ren, R. Effect of Surface Ultrasonic Rolling Treatment on Rolling Contact Fatigue Life of D2 Wheel Steel. Materials 2020, 13, 5438. [Google Scholar] [CrossRef] [PubMed]
  50. Xu, C.; Liang, Y.; Yang, M.; Yu, J.; Peng, X. Effects of the Ultrasonic Assisted Surface Rolling Process on the Fatigue Crack Initiation Position Distribution and Fatigue Life of 51CrV4 Spring Steel. Materials 2021, 14, 2565. [Google Scholar] [CrossRef] [PubMed]
  51. Luan, X.; Zhao, W.; Liang, Z.; Xiao, S.; Liang, G.; Chen, Y.; Zou, S.; Wang, X. Experimental study on surface integrity of ultra-high-strength steel by ultrasonic hot rolling surface strengthening. Surf. Coat. Technol. 2020, 392, 125745. [Google Scholar] [CrossRef]
  52. Wang, B.; Yin, Y.; Gao, Z.; Hou, Z.; Jiang, W. Influence of the ultrasonic surface rolling process on stress corrosion cracking susceptibility of high strength pipeline steel in neutral pH environment. RSC Adv. 2017, 7, 36876–36885. [Google Scholar] [CrossRef] [Green Version]
  53. Liu, Y.; Sun, J.; Fu, Y.; Xu, B.; Li, B.; Xu, S.; Huang, P.; Cheng, J.; Han, Y.; Han, J.; et al. Tuning strength-ductility combination on selective laser melted 316L stainless steel through gradient heterogeneous structure. Addit. Manuf. 2021, 48, 102373. [Google Scholar] [CrossRef]
  54. Li, C.; Zhu, R.; Zhang, X.; Huang, P.; Wang, X. Impact of surface ultrasonic rolling on cavitation erosion behavior of 304 stainless steel. Surf. Coat. Technol. 2019, 383, 125280. [Google Scholar] [CrossRef]
  55. She, D.; Liu, S.; Kang, J.; Yue, W.; Zhu, L.; Wang, C.; Wang, H.; Ma, G.; Zhong, L. Abrasive Wear Resistance of Plasma-Nitrided Ti Enhanced by Ultrasonic Surface Rolling Processing Pre-Treatment. Materials 2019, 12, 3260. [Google Scholar] [CrossRef] [PubMed] [Green Version]
  56. Li, G.; Qu, S.; Xie, M.; Ren, Z.; Li, X. Effect of Multi-Pass Ultrasonic Surface Rolling on the Mechanical and Fatigue Properties of HIP Ti-6Al-4V Alloy. Materials 2017, 10, 133. [Google Scholar] [CrossRef] [PubMed] [Green Version]
  57. Liu, C.; Liu, D.; Zhang, X.; Ao, N.; Xu, X.; Liu, D.; Yang, J. Fretting fatigue characteristics of Ti-6Al-4V alloy with a gradient nanostructured surface layer induced by ultrasonic surface rolling process. Int. J. Fatigue 2019, 125, 249–260. [Google Scholar] [CrossRef]
  58. Luo, X.; Ren, X.; Jin, Q.; Qu, H.; Hou, H. Microstructural evolution and surface integrity of ultrasonic surface rolling in Ti6Al4V alloy. J. Mater. Res. Technol. 2021, 13, 1586–1598. [Google Scholar] [CrossRef]
  59. Liu, C.; Liu, D.; Zhang, X.; He, G.; Xu, X.; Ao, N.; Ma, A.; Liu, D. On the influence of ultrasonic surface rolling process on surface integrity and fatigue performance of Ti-6Al-4V alloy. Surf. Coat. Technol. 2019, 370, 24–34. [Google Scholar] [CrossRef]
  60. Wang, Z.; Liu, Z.; Gao, C.; Wong, K.; Ye, S.; Xiao, Z. Modified wear behavior of selective laser melted Ti6Al4V alloy by direct current assisted ultrasonic surface rolling process. Surf. Coat. Technol. 2019, 381, 125122. [Google Scholar] [CrossRef]
  61. Tan, L.; Zhang, D.; Yao, C.; Ren, J. Effects of Ultrasonic Surface Rolling Parameters on Surface Integrity of TC17 Alloy. J. Mater. Eng. Perform. 2019, 28, 6736–6745. [Google Scholar] [CrossRef]
  62. Sun, Z.; Ren, S.; Hu, T.; Li, B. Effect of Ultrasonic Surface Rolling Process on the Hot Compression Behavior of Inconel 718 Superalloy at 700 °C. Nanomaterials 2019, 9, 658. [Google Scholar] [CrossRef] [Green Version]
  63. Liu, J.; Liu, J.; Zhang, X.; Ahmad, T.; Liang, T.; Zeng, L.; Wang, C.; Yang, B. Effect of Ultrasonic Surface Rolling Treatment on Corrosion Behavior of Alloy 690. Metals 2020, 10, 917. [Google Scholar] [CrossRef]
  64. Yin, M.-G.; Cai, Z.-B.; Zhang, Z.-X.; Yue, W. Effect of ultrasonic surface rolling process on impact-sliding wear behavior of the 690 alloy. Tribol. Int. 2019, 147, 105600. [Google Scholar] [CrossRef]
  65. Liu, J.; Zhang, X.; Cui, Z.; Ahmad, T.; Wang, C.; Hong, N.; Liang, T.; Yang, B. Effects of ultrasonic surface rolling processing and plasma nitriding on the fretting wear behavior of Inconel 690TT. Surf. Coat. Technol. 2020, 402, 126312. [Google Scholar] [CrossRef]
  66. Liu, J.; Zhang, X.; Cui, Z.; Yu, J.; Liu, J.; Zou, Y.; Liang, T. Experimental investigation on ultrasonic surface rolling of Inconel 690TT. Mater. Manuf. Process. 2021, 1–10. [Google Scholar] [CrossRef]
  67. Xu, G.; Wang, C.; Li, Q.; Zhang, X.; Zhu, Z.; Liang, T.; Yang, B. Effects of ultrasonic rolling on surface performance of 7B85-T6 alloy. Mater. Manuf. Process. 2020, 35, 250–257. [Google Scholar] [CrossRef]
  68. Zhao, X.; Liu, K.; Xu, D.; Liu, Y.; Hu, C. Effects of Ultrasonic Surface Rolling Processing and Subsequent Recovery Treatment on the Wear Resistance of AZ91D Mg Alloy. Materials 2020, 13, 5705. [Google Scholar] [CrossRef] [PubMed]
  69. Han, J.; Wang, C.; Song, Y.M.; Liu, Z.Y.; Sun, J.P.; Zhao, J.Y. Simultaneously Improving Mechanical Properties and Corrosion Resistance of as-Cast AZ91 Mg Alloy by Ultrasonic Surface Rolling. Int. J. Miner. Met. Mater. Available online: http://ijmmm.ustb.edu.cn/article/doi/10.1007/s12613-021-2294-2 (accessed on 28 October 2021). [CrossRef]
  70. Ralls, A.M.; Kumar, P.; Menezes, P.L. Tribological Properties of Additive Manufactured Materials for Energy Applications: A Review. Processes 2020, 9, 31. [Google Scholar] [CrossRef]
  71. Ao, N.; Liu, D.; Liu, C.; Zhang, X.; Liu, D. Face-centered titanium induced by ultrasonic surface rolling process in Ti-6Al-4V alloy and its tensile behavior. Mater. Charact. 2018, 145, 527–533. [Google Scholar] [CrossRef]
  72. Li, G.; Qu, S.; Guan, S.; Wang, F. Study on the tensile and fatigue properties of the heat-treated HIP Ti-6Al-4V alloy after ultrasonic surface rolling treatment. Surf. Coat. Technol. 2019, 379, 124971. [Google Scholar] [CrossRef]
  73. Zhao, X.; Xue, G.; Liu, Y. Gradient crystalline structure induced by ultrasonic impacting and rolling and its effect on fatigue behavior of TC11 titanium alloy. Results Phys. 2017, 7, 1845–1851. [Google Scholar] [CrossRef]
  74. Liu, C.; Liu, D.; Zhang, X.; Liu, D.; Ma, A.; Ao, N.; Xu, X. Improving fatigue performance of Ti-6Al-4V alloy via ultrasonic surface rolling process. J. Mater. Sci. Technol. 2019, 35, 1555–1562. [Google Scholar] [CrossRef]
  75. Menezes, P.L.; Nosonovsky, M.; Kailas, S.V.; Lovell, M.R. Friction and Wear. In Tribology for Scientists and Engineers: From Basics to Advanced Concepts, 1st ed.; Menezes, P.L., Nosonovsky, M., Ingole, S.P., Kailas, S.V., Lovell, M.R., Eds.; Springer: New York, NY, USA, 2013. [Google Scholar]
  76. Duan, Y.; Qu, S.; Jia, S.; Li, X. Effects of ultrasonic surface rolling processing on microstructure and wear properties of high-carbon high-chromium steel. Surf. Coat. Technol. 2021, 422, 127531. [Google Scholar] [CrossRef]
  77. Li, G.; Qu, S.; Pan, Y.; Li, X. Effects of the different frequencies and loads of ultrasonic surface rolling on surface mechanical properties and fretting wear resistance of HIP Ti-6Al-4V alloy. Appl. Surf. Sci. 2016, 389, 324–334. [Google Scholar] [CrossRef]
  78. Zhao, W.; Liu, D.; Zhang, X.; Zhou, Y.; Zhang, R.; Zhang, H.; Ye, C. Improving the fretting and corrosion fatigue performance of 300M ultra-high strength steel using the ultrasonic surface rolling process. Int. J. Fatigue 2018, 121, 30–38. [Google Scholar] [CrossRef]
  79. Chen, D.; Hu, Y.; Li, H.; Li, F.; Guo, L.; Pan, Q.; Ma, C.; Chen, D.; Liu, J.; Liu, K. The oxidation behavior of uranium treated by ultrasonic surface rolling process. Corros. Sci. 2021, 194, 109917. [Google Scholar] [CrossRef]
  80. Dang, J.; An, Q.; Lian, G.; Zuo, Z.; Li, Y.; Wang, H.; Chen, M. Surface modification and its effect on the tensile and fatigue properties of 300M steel subjected to ultrasonic surface rolling process. Surf. Coat. Technol. 2021, 422, 127566. [Google Scholar] [CrossRef]
  81. Zhang, K.; Liu, Y.; Liu, S.; Zhang, X.; Qian, B.; Zhang, C.; Tu, S. Coordinated bilateral ultrasonic surface rolling process on aero-engine blades. Int. J. Adv. Manuf. Technol. 2019, 105, 4415–4428. [Google Scholar] [CrossRef]
  82. Wu, J.; Zhao, J.; Qiao, H.; Hu, X.; Yang, Y. The New Technologies Developed from Laser Shock Processing. Materials 2020, 13, 1453. [Google Scholar] [CrossRef] [PubMed] [Green Version]
  83. Wang, Z.; Xiao, Z.; Huang, C.; Weiwen, Z.; Zhang, W. Influence of Ultrasonic Surface Rolling on Microstructure and Wear Behavior of Selective Laser Melted Ti-6Al-4V Alloy. Materials 2017, 10, 1203. [Google Scholar] [CrossRef] [Green Version]
  84. Cui, Z.; Mi, Y.; Qiu, D.; Dong, P.; Qin, Z.; Gong, D.; Li, W. Microstructure and mechanical properties of additively manufactured CrMnFeCoNi high-entropy alloys after ultrasonic surface rolling process. J. Alloys Compd. 2021, 887, 161393. [Google Scholar] [CrossRef]
  85. Ren, K.; Yue, W.; Zhang, H. Surface modification of Ti6Al4V based on ultrasonic surface rolling processing and plasma nitriding for enhanced bone regeneration. Surf. Coat. Technol. 2018, 349, 602–610. [Google Scholar] [CrossRef]
  86. Yang, J.; Liu, D.; Zhang, X.; Liu, M.; Zhao, W.; Liu, C. The effect of ultrasonic surface rolling process on the fretting fatigue property of GH4169 superalloy. Int. J. Fatigue 2019, 133, 105373. [Google Scholar] [CrossRef]
  87. Sunder, S.; Miller, N.; Shoesmith, D. Corrosion of uranium dioxide in hydrogen peroxide solutions. Corros. Sci. 2004, 46, 1095–1111. [Google Scholar] [CrossRef]
  88. Handley-Sidhu, S.; Keith-Roach, M.J.; Lloyd, J.; Vaughan, D.J. A review of the environmental corrosion, fate and bioavailability of munitions grade depleted uranium. Sci. Total Environ. 2010, 408, 5690–5700. [Google Scholar] [CrossRef]
  89. Maleki, E.; Unal, O.; Guagliano, M.; Bagherifard, S. The effects of shot peening, laser shock peening and ultrasonic nanocrystal surface modification on the fatigue strength of Inconel 718. Mater. Sci. Eng. A 2021, 810, 141029. [Google Scholar] [CrossRef]
  90. Cao, X.; Pyoun, Y.; Murakami, R. Fatigue properties of a S45C steel subjected to ultrasonic nanocrystal surface modification. Appl. Surf. Sci. 2010, 256, 6297–6303. [Google Scholar] [CrossRef]
  91. Cherif, A.; Pyoun, Y.; Scholtes, B. Effects of Ultrasonic Nanocrystal Surface Modification (UNSM) on Residual Stress State and Fatigue Strength of AISI 304. J. Mater. Eng. Perform. 2009, 19, 282–286. [Google Scholar] [CrossRef]
  92. Yasuoka, M.; Wang, P.; Zhang, K.; Qiu, Z.; Kusaka, K.; Pyoun, Y.-S.; Murakami, R.I. Improvement of the fatigue strength of SUS304 austenite stainless steel using ultrasonic nanocrystal surface modification. Surf. Coat. Technol. 2013, 218, 93–98. [Google Scholar] [CrossRef]
  93. Wu, B.; Zhang, J.; Zhang, L.; Pyoun, Y.-S.; Murakami, R.-I. Effect of ultrasonic nanocrystal surface modification on surface and fatigue properties of quenching and tempering S45C steel. Appl. Surf. Sci. 2014, 321, 318–330. [Google Scholar] [CrossRef]
  94. Amanov, A.; Karimbaev, R. Improvement in frictional and fatigue performances of AISI 4150H steel by dual ultrasonic nanocrystal surface modification for ball screw applications. Tribol. Int. 2021, 161, 107092. [Google Scholar] [CrossRef]
  95. Zhang, H.; Chiang, R.; Qin, H.; Ren, Z.; Hou, X.; Lin, D.; Doll, G.L.; Vasudevan, V.K.; Dong, Y.; Ye, C. The effects of ultrasonic nanocrystal surface modification on the fatigue performance of 3D-printed Ti64. Int. J. Fatigue 2017, 103, 136–146. [Google Scholar] [CrossRef]
  96. Gujba, A.K.; Ren, Z.; Dong, Y.; Ye, C.; Medraj, M. Effect of ultrasonic nanocrystalline surface modification on the water droplet erosion performance of Ti-6Al-4V. Surf. Coat. Technol. 2016, 307, 157–170. [Google Scholar] [CrossRef]
  97. Kheradmandfard, M.; Kashani-Bozorg, S.F.; Lee, J.S.; Kim, C.-L.; Hanzaki, A.Z.; Pyun, Y.-S.; Cho, S.-W.; Amanov, A.; Kim, D.-E. Significant improvement in cell adhesion and wear resistance of biomedical β-type titanium alloy through ultrasonic nanocrystal surface modification. J. Alloys Compd. 2018, 762, 941–949. [Google Scholar] [CrossRef]
  98. Kheradmandfard, M.; Kashani-Bozorg, S.F.; Kim, C.-L.; Hanzaki, A.Z.; Pyoun, Y.-S.; Kim, J.-H.; Amanov, A.; Kim, D.-E. Nanostructured β-type titanium alloy fabricated by ultrasonic nanocrystal surface modification. Ultrason. Sonochem. 2017, 39, 698–706. [Google Scholar] [CrossRef]
  99. Efe, Y.; Karademir, I.; Husem, F.; Maleki, E.; Karimbaev, R.; Amanov, A.; Unal, O. Enhancement in microstructural and mechanical performance of AA7075 aluminum alloy via severe shot peening and ultrasonic nanocrystal surface modification. Appl. Surf. Sci. 2020, 528, 146922. [Google Scholar] [CrossRef]
  100. Oh, J.; Park, H.D.; Gwak, M.; Lee, J.; Son, S.; Amanov, A.; Kim, H.S.; Seol, J.B.; Sung, H.; Kim, J.G. Mechanical property enhancement in gradient structured aluminum alloy by ultrasonic nanocrystalline surface modification. Mater. Sci. Eng. A 2021, 812, 141101. [Google Scholar] [CrossRef]
  101. Zhang, R.; Zhao, W.; Zhang, H.; Yang, W.; Wang, G.-X.; Dong, Y.; Ye, C. Fatigue performance rejuvenation of corroded 7075-T651 aluminum alloy through ultrasonic nanocrystal surface modification. Int. J. Fatigue 2021, 153, 106463. [Google Scholar] [CrossRef]
  102. Amanov, A.; Penkov, O.; Pyun, Y.-S.; Kim, D.-E. Effects of ultrasonic nanocrystalline surface modification on the tribological properties of AZ91D magnesium alloy. Tribol. Int. 2012, 54, 106–113. [Google Scholar] [CrossRef]
  103. Hou, X.; Qin, H.; Gao, H.; Mankoci, S.; Zhang, R.; Zhou, X.; Ren, Z.; Doll, G.L.; Martini, A.; Sahai, N.; et al. A systematic study of mechanical properties, corrosion behavior and biocompatibility of AZ31B Mg alloy after ultrasonic nanocrystal surface modification. Mater. Sci. Eng. C 2017, 78, 1061–1071. [Google Scholar] [CrossRef] [PubMed]
  104. Amanov, A. Improvement in mechanical properties and fretting wear of Inconel 718 superalloy by ultrasonic nanocrystal surface modification. Wear 2020, 446–447, 203208. [Google Scholar] [CrossRef]
  105. Amanov, A.; Pyun, Y.-S.; Sasaki, S. Effects of ultrasonic nanocrystalline surface modification (UNSM) technique on the tribological behavior of sintered Cu-based alloy. Tribol. Int. 2014, 72, 187–197. [Google Scholar] [CrossRef]
  106. Maleki, A.; Teimouri, R. Optimization of ultrasonic nanocrystalline surface modification of copper and its influence on fatigue life. Int. J. Light. Mater. Manuf. 2020, 4, 156–164. [Google Scholar] [CrossRef]
  107. Biffi, C.; Bassani, P.; Nematollahi, M.; Moghaddam, N.S.; Amerinatanzi, A.; Mahtabi, M.; Elahinia, M.; Tuissi, A. Effect of Ultrasonic Nanocrystal Surface Modification on the Microstructure and Martensitic Transformation of Selective Laser Melted Nitinol. Materials 2019, 12, 3068. [Google Scholar] [CrossRef] [Green Version]
  108. Ma, C.; Andani, M.T.; Qin, H.; Moghaddam, N.S.; Ibrahim, H.; Jahadakbar, A.; Amerinatanzi, A.; Ren, Z.; Zhang, H.; Doll, G.L.; et al. Improving surface finish and wear resistance of additive manufactured nickel-titanium by ultrasonic nano-crystal surface modification. J. Mater. Process. Technol. 2017, 249, 433–440. [Google Scholar] [CrossRef]
  109. Listyawan, T.A.; Lee, H.; Park, N. A new guide for improving mechanical properties of non-equiatomic FeCoCrMnNi medium- and high-entropy alloys with ultrasonic nanocrystal surface modification process. J. Mater. Sci. Technol. 2020, 59, 37–43. [Google Scholar] [CrossRef]
  110. Listyawan, T.A.; Lee, H.; Park, N.; Lee, U. Microstructure and mechanical properties of CoCrFeMnNi high entropy alloy with ultrasonic nanocrystal surface modification process. J. Mater. Sci. Technol. 2020, 57, 123–130. [Google Scholar] [CrossRef]
  111. Bae, J.W.; Asghari-Rad, P.; Amanov, A.; Kim, H.S. Gradient-structured ferrous medium-entropy alloys with enhanced strength-ductility synergy by ultrasonic nanocrystalline surface modification. Mater. Sci. Eng. A 2021, 826, 141966. [Google Scholar] [CrossRef]
  112. Ye, Y.; Wang, H.; Tang, G.; Song, G. Effect of Electropulsing-Assisted Ultrasonic Nanocrystalline Surface Modification on the Surface Mechanical Properties and Microstructure of Ti-6Al-4V Alloy. J. Mater. Eng. Perform. 2018, 27, 2394–2403. [Google Scholar] [CrossRef]
  113. Liu, J.; Suslov, S.; Ren, Z.; Dong, Y.; Ye, C. Microstructure evolution in Ti64 subjected to laser-assisted ultrasonic nanocrystal surface modification. Int. J. Mach. Tools Manuf. 2018, 136, 19–33. [Google Scholar] [CrossRef]
  114. Amanov, A.; Karimbaev, R.; Maleki, E.; Unal, O.; Pyun, Y.-S.; Amanov, T. Effect of combined shot peening and ultrasonic nanocrystal surface modification processes on the fatigue performance of AISI 304. Surf. Coat. Technol. 2018, 358, 695–705. [Google Scholar] [CrossRef]
  115. Wang, H.; Song, G.; Tang, G. Enhanced surface properties of austenitic stainless steel by electropulsing-assisted ultrasonic surface rolling process. Surf. Coat. Technol. 2015, 282, 149–154. [Google Scholar] [CrossRef]
  116. Xu, Z.; Tang, G.; Tian, S.; Ding, F.; Tian, H. Research of electroplastic rolling of AZ31 Mg alloy strip. J. Mater. Process. Technol. 2006, 182, 128–133. [Google Scholar] [CrossRef]
  117. Tang, G.; Zhang, J.; Zheng, M.; Zhang, J.; Fang, W.; Li, Q. Experimental study of electroplastic effect on stainless steel wire 304L. Mater. Sci. Eng. A 2000, 281, 263–267. [Google Scholar] [CrossRef]
  118. Liu, T.; Li, X.; Tang, G.; Song, G. Effect of ultrasonic impact treatment assisted with high energy electropulsing on microstructure of D36 carbon steel. J. Mater. Res. 2016, 31, 3956–3967. [Google Scholar] [CrossRef]
  119. Kuang, J.; Li, X.; Zhang, R.; Ye, Y.; Luo, A.A.; Tang, G. Enhanced rollability of Mg 3Al 1Zn alloy by pulsed electric current: A comparative study. Mater. Des. 2016, 100, 204–216. [Google Scholar] [CrossRef]
  120. Zheng, Y.; Tang, G.; Kuang, J.; Zheng, X. Effect of electropulse on solid solution treatment of 6061 aluminum alloy. J. Alloys Compd. 2014, 615, 849–853. [Google Scholar] [CrossRef]
  121. Jiang, Y.; Tang, G.; Shek, C.H.; Xie, J.; Xu, Z.; Zhang, Z. Mechanism of electropulsing induced recrystallization in a cold-rolled Mg–9Al–1Zn alloy. J. Alloys Compd. 2012, 536, 94–105. [Google Scholar] [CrossRef]
  122. Zhu, R.; Liu, J.; Tang, G.; Shi, S.-Q.; Fu, M.; Tse, Z.T.H. The improved superelasticity of NiTi alloy via electropulsing treatment for minutes. J. Alloys Compd. 2014, 584, 225–231. [Google Scholar] [CrossRef]
  123. Wang, H.; Song, G.; Tang, G. Effect of electropulsing on surface mechanical properties and microstructure of AISI 304 stainless steel during ultrasonic surface rolling process. Mater. Sci. Eng. A 2016, 662, 456–467. [Google Scholar] [CrossRef]
  124. Ye, Y.; Kure-Chu, S.-Z.; Sun, Z.; Li, X.; Wang, H.; Tang, G. Nanocrystallization and enhanced surface mechanical properties of commercial pure titanium by electropulsing-assisted ultrasonic surface rolling. Mater. Des. 2018, 149, 214–227. [Google Scholar] [CrossRef]
  125. Wang, H.; Song, G.; Tang, G. Evolution of surface mechanical properties and microstructure of Ti 6Al 4V alloy induced by electropulsing-assisted ultrasonic surface rolling process. J. Alloys Compd. 2016, 681, 146–156. [Google Scholar] [CrossRef]
  126. Zhao, W.; Liu, D.; Qin, H.; Zhang, X.; Zhang, H.; Zhang, R.; Ren, Z.; Ma, C.; Amanov, A.; Pyun, Y.-S.; et al. The effect of ultrasonic nanocrystal surface modification on low temperature nitriding of ultra-high strength steel. Surf. Coat. Technol. 2019, 375, 205–214. [Google Scholar] [CrossRef]
  127. Kim, M.-S.; Oh, W.-J.; Baek, G.-Y.; Jo, Y.-K.; Lee, K.-Y.; Park, S.-H.; Shim, D.-S. Ultrasonic nanocrystal surface modification of high-speed tool steel (AISI M4) layered via direct energy deposition. J. Mater. Process. Technol. 2019, 277, 116420. [Google Scholar] [CrossRef]
  128. Xie, J.; Zhang, S.; Sun, Y.; Hao, Y.; An, B.; Li, Q.; Wang, C.-A. Microstructure and mechanical properties of high entropy CrMnFeCoNi alloy processed by electopulsing-assisted ultrasonic surface rolling. Mater. Sci. Eng. A 2020, 795, 140004. [Google Scholar] [CrossRef]
  129. Ye, Y.-D.; Li, X.-P.; Sun, Z.-Y.; Wang, H.-B.; Tang, G.-Y. Enhanced Surface Mechanical Properties and Microstructure Evolution of Commercial Pure Titanium Under Electropulsing-Assisted Ultrasonic Surface Rolling Process. Acta Met. Sin. (Engl. Lett.) 2018, 31, 1272–1280. [Google Scholar] [CrossRef] [Green Version]
  130. Sun, Z.; Ye, Y.; Xu, J.; Hu, T.; Ren, S.; Li, B. Effect of Electropulsing on Surface Mechanical Behavior and Microstructural Evolution of Inconel 718 during Ultrasonic Surface Rolling Process. J. Mater. Eng. Perform. 2019, 28, 6789–6799. [Google Scholar] [CrossRef]
  131. Zhang, Y.; Qu, S.; Lu, F.; Lai, F.; Ji, V.; Liu, H.; Li, X. Microstructures and rolling contact fatigue behaviors of 17Cr2Ni2MoVNb steel under combined ultrasonic surface rolling and shot peening. Int. J. Fatigue 2020, 141, 105867. [Google Scholar] [CrossRef]
  132. Ren, S.; Zhang, Y.; Zhao, Y.; An, Z.; Xue, F.; Yao, J.; Sun, Z.; Chang, J. Enhanced Surface Properties and Microstructure Evolution of Cr12MoV Using Ultrasonic Surface Rolling Process Combined with Deep Cryogenic Treatment. J. Mater. Eng. Perform. 2019, 28, 1132–1140. [Google Scholar] [CrossRef]
  133. Hao, J.; Hu, F.; Le, X.; Liu, H.; Yang, H.; Han, J. Microstructure and high-temperature wear behaviour of Inconel 625 multi-layer cladding prepared on H13 mould steel by a hybrid additive manufacturing method. J. Mater. Process. Technol. 2020, 291, 117036. [Google Scholar] [CrossRef]
  134. Ye, H.; Zhu, J.; Liu, Y.; Liu, W.; Wang, D. Microstructure and mechanical properties of laser cladded Cr Ni alloy by hard turning (HT) and ultrasonic surface rolling (USR). Surf. Coat. Technol. 2020, 393, 125806. [Google Scholar] [CrossRef]
  135. Wang, J.; Qu, S.; Lai, F.; Hu, X.; Deng, Y.; Li, X. Synergistic effects of a combined surface modification technology on rolling contact fatigue behaviors of 20CrMoH steel under different contact stresses. Int. J. Fatigue 2021, 153, 106487. [Google Scholar] [CrossRef]
  136. Meng, Y.; Deng, J.; Lu, Y.; Wang, S.; Wu, J.; Sun, W. Fabrication of AlTiN coatings deposited on the ultrasonic rolling textured substrates for improving coatings adhesion strength. Appl. Surf. Sci. 2021, 550, 149394. [Google Scholar] [CrossRef]
  137. Ao, N.; Liu, D.; Zhang, X.; Liu, C.; Yang, J.; Liu, D. Surface nanocrystallization of body-centered cubic beta phase in Ti–6Al–4V alloy subjected to ultrasonic surface rolling process. Surf. Coat. Technol. 2019, 361, 35–41. [Google Scholar] [CrossRef]
  138. Minglong, C.; Deyuan, Z.; Huawei, C.; Wei, Q.; Jinsheng, L. Surface nano crystallization and its effect on fatigue performance of high-strength materials treated by ultrasonic rolling process. Int. J. Adv. Manuf. Technol. 2015, 83, 123–131. [Google Scholar] [CrossRef]
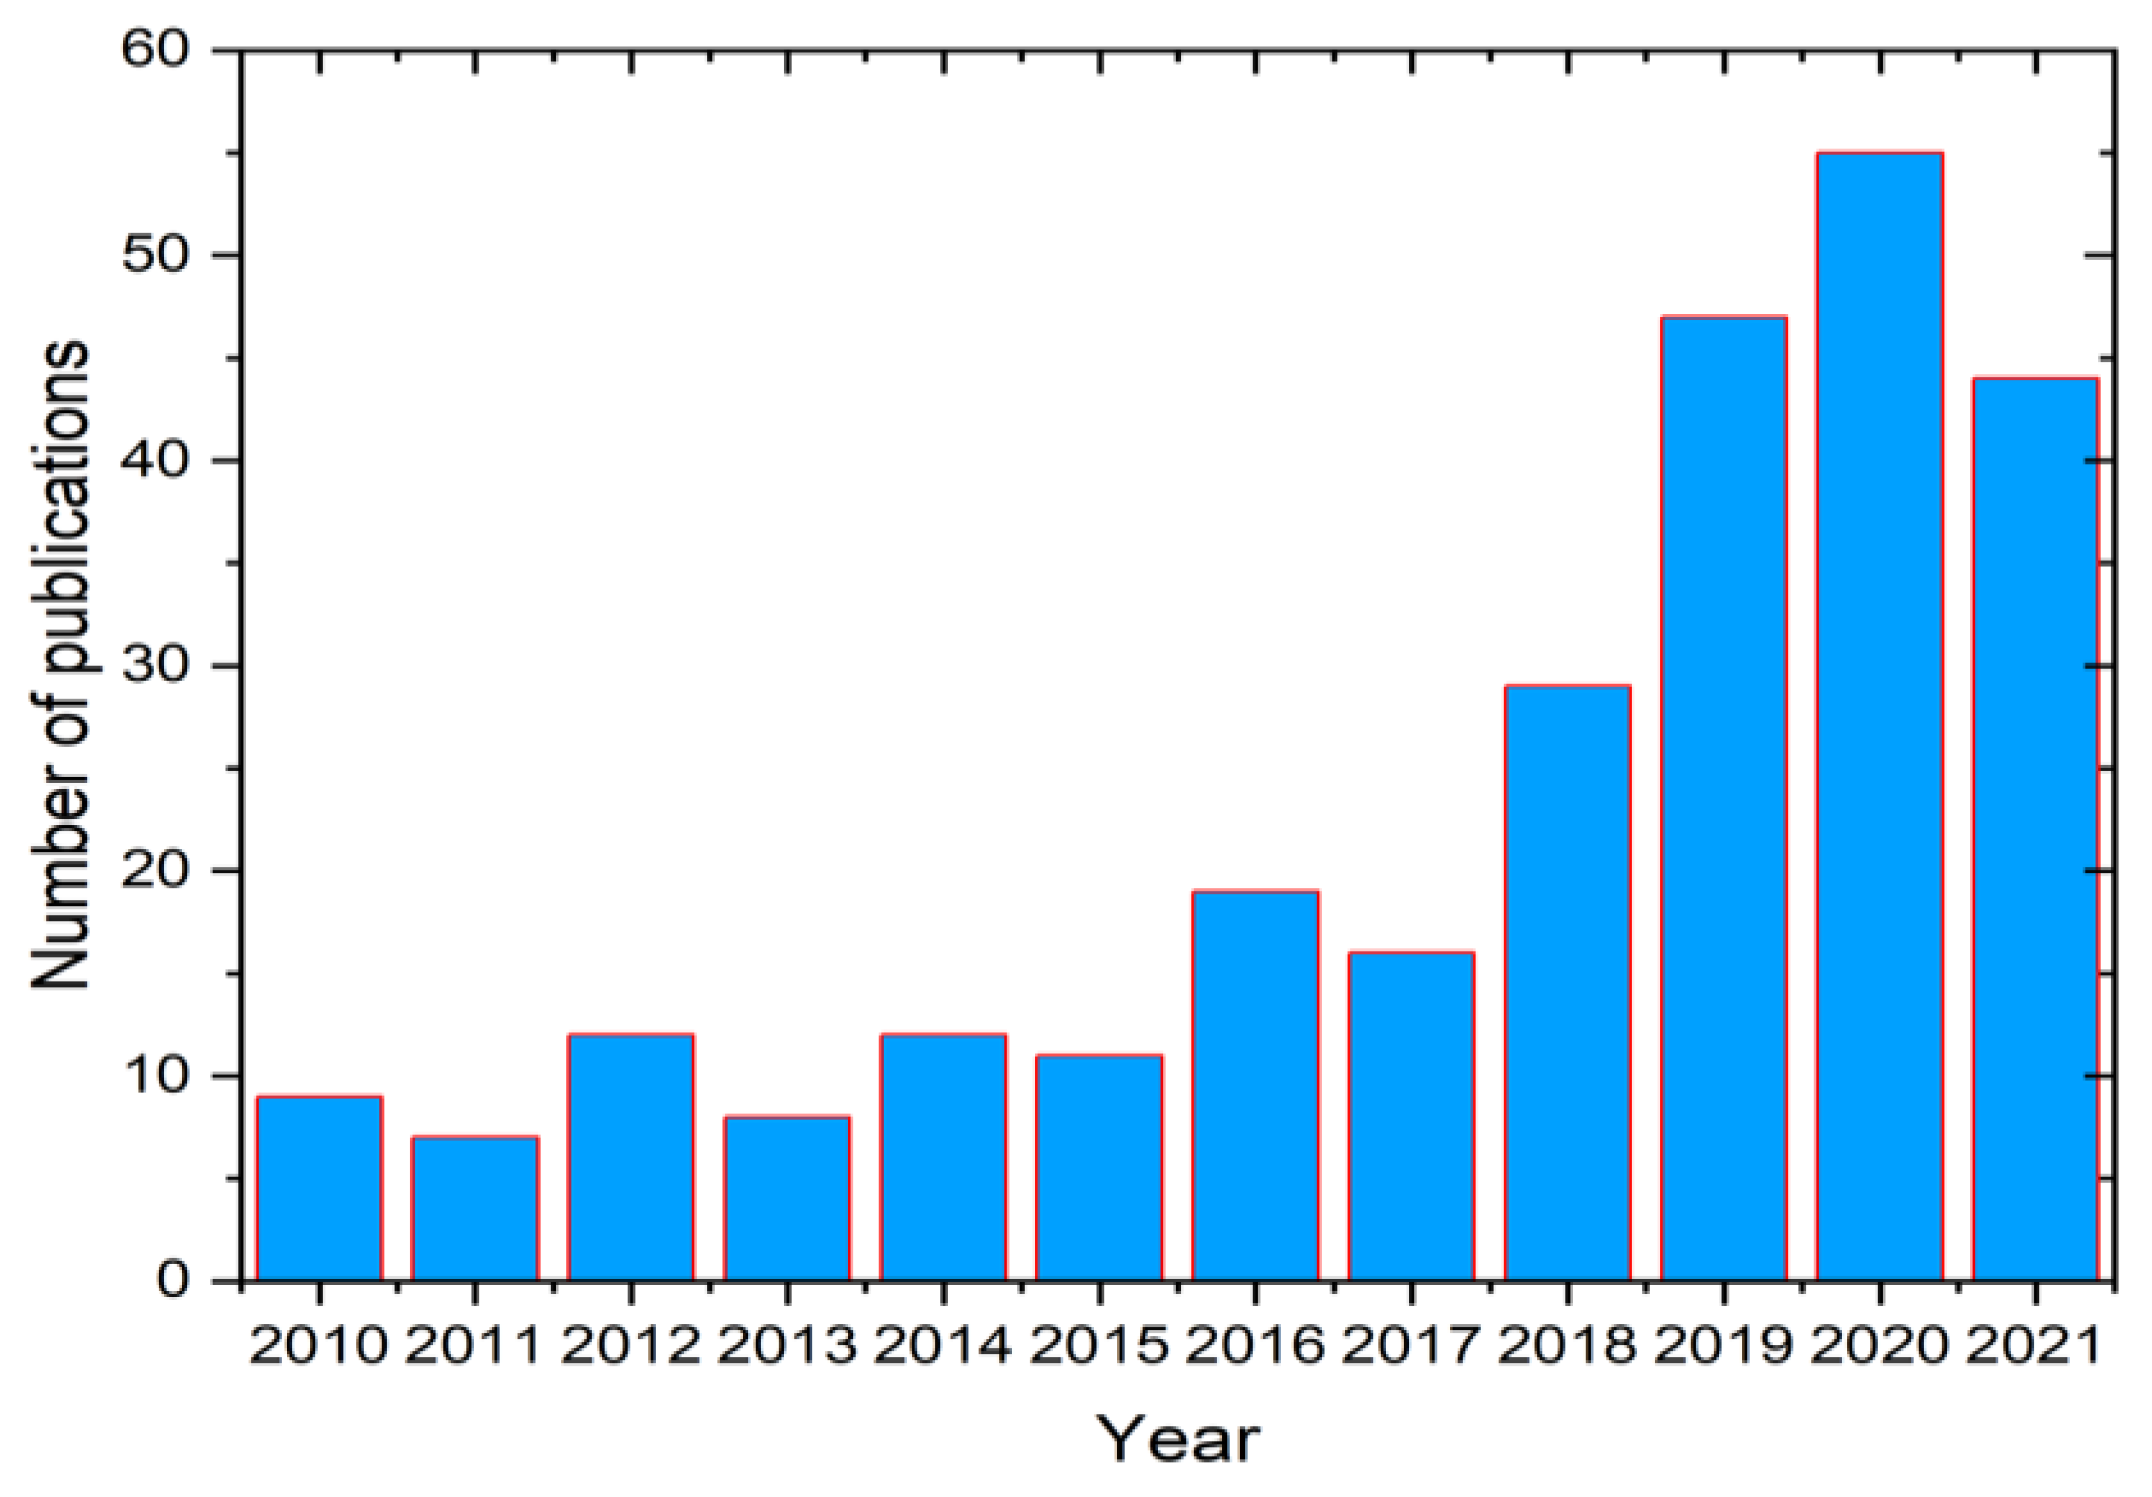
Figure 1. A bar graph shows journal articles published between 2010 and 2021 on “USRP” from the Web of Science.
Applsci 11 10986 g001
Figure 2. The fundamental working process of USRP.
Applsci 11 10986 g002
Figure 3. Schematic presentation of microstructure generated during the USRP process.
Applsci 11 10986 g003
Figure 4. TEM of 17-4 precipitation hardened SS after USRP: (a) bright-field image and (b) dark-field image and the inset shows grain size distribution. Reprinted with permission from ref. [21]. Copyright 2018 Elsevier.
Applsci 11 10986 g004
Figure 5. TEM of USSR’ed specimen: (a) low magnification image and SAED pattern, (b) high magnification image. Reprinted with permission from ref. [53]. Copyright 2021 Elsevier.
Applsci 11 10986 g005
Figure 6. Gradient microstructure after USRP on pure titanium: (a) SEM, (b) grain boundary orientation map, and (c) inverse pole figure map. Reprinted with permission from ref. [34]. Copyright 2022. Elsevier.
Applsci 11 10986 g006
Figure 7. TEM images of USRP’ed Ti6Al4V at a depth of (a) 5 μm, (b) 20 μm, (c) 100 μm, and (d) 200 μm. Reprinted with permission from ref. [58]. Copyright 2021 Elsevier.
Applsci 11 10986 g007
Figure 8. Schematic presentation of grain refinement mechanism in AZ91D subjected to USRP: (a) original grain, (b) twinning, (c) dislocation, (d) dislocation rearrangement, (e) subgrain boundaries, (f) DRX, and (g) nanocrystallines. Reprinted with permission from ref. [68]. Copyright 2020 MDPI.
Applsci 11 10986 g008
Figure 9. OM images of (a) untreated specimen, (b) USRP’ed specimen, (c) deformation layer (d) transition zone. Reprinted with permission from ref. [68]. Copyright 2020 MDPI.
Applsci 11 10986 g009
Figure 10. The fatigue of life of USRP’ed Ti6Al4V specimens under a stress value of 700 MPa. Reproduced with permission from [59]. Copyright 2019 Elsevier.
Applsci 11 10986 g010
Figure 11. 2D wear profiles of the (a) base and (b) USRP Inconel 690 alloy tubes from impact sliding wear test. Reprinted with permission from ref. [64]. Copyright 2020 Elsevier.
Applsci 11 10986 g011
Figure 12. Microhardness profiles of untreated and USRP’ed 300M steel after 1, 5, and 10 passes (a) on surface (b) along the depth. Reprinted with permission from ref. [28]. Copyright 2021 Elsevier.
Applsci 11 10986 g012
Figure 13. Variation of the residual stress of T4003 ferritic SS welded joint before and after USRP. Reprinted with permission from ref. [48]. Copyright 2020 MDPI.
Applsci 11 10986 g013
Figure 14. Polarization curve of turned and USRP treated uranium metal bar. Reprinted with permission from ref. [41]. Copyright 2021 Elsevier.
Applsci 11 10986 g014
Figure 15. Surface morphology of T4003 ferritic SS welded joint before USRP on (a) weld zone, (b) HAZ, (c) base metal and after USRP on (d) weld zone, (e) HAZ, and (f) base metal. Reprinted with permission from ref. [48]. Copyright 2020 MDPI.
Applsci 11 10986 g015
Figure 16. Applications of USRP in various industries.
Applsci 11 10986 g016
Figure 17. Schematics of the UNSM process.
Applsci 11 10986 g017
Figure 18. Schematic of the EP-USRP.
Applsci 11 10986 g018
Table 1. Effect of USRP on various engineering materials.
MaterialsStatic Force or PressureRoller Material, Hardness and DiameterFrequency and AmplitudeObservation
33Cr23Ni8Mn3
[25]
900 NCarbide; Unspecified;
15 mm
20 kHz; 30 kHz; 10 μmImproved fatigue resistance by 38.3%
Increase in residual stress by 3.6 times
Surface roughness reduced by 75%
Microhardness increases by 31.3%
17-4 PH SS
[26]
600 NWC/Co; Unspecified;
12 mm
28 kHz;
15 μm
Grain refinement by 200 nm
Surface roughness reduced by 57.69%
Microhardness increased by 20%
Yield strength increased by 24.3%
Elongation reduced by 52.6%
Elastic modulus increased by 10.93%
25CrNi2MoV Steel
[27]
900 NCarbide alloy; Unspecified; Unspecified25 kHz;
12 µm
Surface roughness reduced by 76.2%
Increase in microhardness by 11.3%
Increase in residual stress by 3.5 times
300M steel
[28]
550 NWC/Co;
80 HRC;
14 mm
28 kHz;
12 µm
Fatigue life improvement by 21 times
Yield strength Increased by 5.9%
Tensile strength increased by 3.8%
Elongation reduced by 24.3%
17Cr2Ni2MoVNb steel
[29]
600 N, 800 N, 1000 N, 1200 NUnspecified25 kHz;
6 µm
Surface roughness reduced by 67.3%
Microhardness increased by 14%
Residual stress increased by 57.8%
Fatigue resistance increased by 20.8 times
25CrNi2MoV steel
[30]
800 N, 1000 N, 1200 N,
1400 N
GCr15;
60 HRC;
40 mm
25 kHz;
10 µm
Reduction of friction coefficient by 16.7%
Reduction of wear volume by 39.5%
Ti5Al4Mo6V2Nb1Fe
Titanium Alloy
[31]
600 N, 700 N,
800 N,900 N
1000 N
Carbide;
90.5 HRA;
10 mm
30 kHz;
3 μm;
7 μm;
9 μm
Grains refined to 8 nm
Deformation layer thickness 230 μm
Surface roughness reduced by 67%
Microhardness increased by 20%
Wear rate decreased by 70%
TB8 Titanium Alloy
[32]
480 MPa,
630 MPa,
780 MPa
WC/Co; Unspecified; Unspecified25 kHz;
Unspecified
Increase in microhardness by 71%
Surface roughness reduced by 87.5%
Fatigue resistance Improved by 14%
CP Ti (grade 2)
[34]
600 NUnspecifiedUnspecified;
6 µm
Tensile strength increased by 53.4%
UTS increased by 45.1%
TiB2/2024Al
[35]
180 NWC-Co;
80 HRC;
14 mm
28 kHz;
6 µm
Microhardness increased by 50%
Elastic modulus increased by 8.8%
Yield strength increased by 12.7%
7050-T7451
Aluminum Alloy
[36]
Unspecified LoadGCr15;
Unspecified;
9 mm
5 kHz;
10 kHz;
15 kHz;
20 kHz; Unspecified
Surface roughness reduced by 84.8%
Microhardness increased by 41.3%
AZ31B Magnesium Alloy
[38]
400 NWC/Co; Unspecified Hardness;
14 mm
30 kHz;
10 μm
Grain refinement by 420 μm
Microhardness increased by 40%
Increase in elasticity
Yield strength increased by 28%
UTS increased by 8%
Mg-15Gd-1Zn-0.4Zr alloy
[39]
0.1 MPa,
0.2 MPa,
0.3 MPa,
0.4 MPa,
0.5 MPa
SS;
Unspecified Hardness; 14 mm
30 kHz;
15 μm
Grain refinement by 1.2 times
Surface roughness reduced by 93.54%
Microhardness Increased by 37.4%
Yield strength increased by 89%
AZ31B Mg alloy
[40]
0 MPa,
0.1 MPa, 0.15 MP;
0.2 MPa,
025 MPa
Carbide; Unspecified Hardness; 7 mm30 kHz;
7 μm
Grain refinement by 50%
Surface roughness reduced by 91.8%
Microhardness increased by 83.81%
Yield strength increased by 24.3 times
Uranium metal
[41]
300 N,
600N,
900 N
Unspecified Material; 80 HRC; 14 mm28 kHz;
4 µm;
6 µm;
8 µm
Surface Roughness reduced by 34.5%
Enhancement in corrosion resistance
Table 2. Recent advancement of USRP.
MaterialsProcessRoller material, Hardness and Diameter, Static Force or PressureFrequency and AmplitudeObservation
AISI 304
[114]
UNSMUnspecified; Unspecified;
2.38 mm; 40 N
20 kHz;
30 µm
Microhardness is increased by 50%
Surface roughness is reduced by 30%
RCS increased from −70 MPa to −1703 MPa
300M Steel
[126]
UNSMWC;
Unspecified Unspecified;
50 N
20 kHz;
24 µm
SPD layer of 32 µm were observed
Hardness enhancement is attributed to the refinement of lath martensite
Wear rate is reduced by 39.7%
AISI M4 high-speed tool steel
[127]
UNSMWC;
Unspecified;
2.38 mm;
10N, 30 N, 50 N
30 kHz;
30 µm
Grain refinement by 25.8%
Microhardness increased by 24.1%
Surface roughness decreased by 88.3%
Wear rate reduced by 5.85 times
AA7075 Aluminum Alloy [99]UNSMWC;
Unspecified;
2.38 mm; 30 N
20 kHz;
30 µm
Surface roughness reduced by 15.75%
RCS increased by 78 times
Microhardness increased by 26%.
Wear Rate Reduced by: 2.75 times
AZ91D Magnesium Alloy [102]UNSMWC;
Unspecified;
2.38 mm;
10 N, 20 N, 30 N
25 kHz;
30 µm
Microhardness increased by 28.3%
CoF reduced by 23%.
The wear rate is reduced by 30%.
Grain size is reduced to 39 nm.
Inconel 718
[89]
UNSMWC;
Unspecified;
2.5 mm;
10 N, 50 N
25 kHz;
40 µm
Microhardness improved by 44%
Fatigue life increased 5.25 times
Grain refined to 21.95 nm
RCS of −1100 MPa observed on the surface
Cu-alloy
[105]
UNSMWC;
Unspecified;
2.38 mm; 20 N
20 kHz;
30 µm
Surface roughness Reduces by: 62.5%
Nano hardness increased by 2.29 times.
Coefficient of friction reduced by 49.4%
Ti64
[113]
Laser-assisted UNSMWC;
Unspecified;
2.38 mm; 50 N
20 kHz;
24 µm
Microhardness improved by 75.2% compared to the as-received specimen
Nanocomposite microstructure observed with nanoscale precipitates
AISI 304 SS
[123]

EP-USRP
Unspecified;
80 HRC;
14 mm
30 kHz;
8 μm
Residual stress improved by 4.8 times
Surface roughness reduced by 20%
304 Austenitic SS
[115]
EP-USRPUnspecified;
80 HRC;
14 mm; 700 N
30 kHz;
8 μm
Improved surface hardness by 119.5% for EP-USRP, and 102.6% for USRP
Surface roughness reduced by 83.3% for EP-USRP
With the increase in current density, surface roughness slightly reduces for EP-USRP
Ti6Al4V
[125]
EP-USRPUnspecified;
80HRC;
14 mm; 1500 N
30 kHz;
8 μm
Improved surface hardness up to 28.3% for EP-USRP, and 41% for USRP
Increase in residual stress by 12.8 times in USRP and 15.6 times in EP-USRP
Surface roughness reduced by 84.6% in EP-USRP
CrMnFeCoNi High entropy alloy
[128]
EP-USRPCemented carbide; unspecified;
14 mm;
800 N
30 kHz;
6 μm
Tensile strength is improved by 3% by EP-USRP and 8.7% by USRP.
Observed 21.9% elongation in EP-USRP and 14.9% in USRP.
Commercial Pure Ti
[129]
EP-USRPUnspecified;
>90 HRA;
14 mm;
1030 N
27 Hz;
6 μm
Microhardness increased by 46.7% in EP-USRP and 26.7% in USRP.
Surface roughness decreased by 97% in EP-USRP and 95.6% in USRP.
Inconel 718
[130]
EP-USRPUnspecified;
90 HRC;12 mm;
1090 N
300 Hz, 400 Hz,
500 Hz;
6 μm
Dislocation mobility was enhanced
Increase in SFE due to thermal and athermal effect
Superior grain refinement
Increase in impact depth
Excellent thermal stability
Table 3. Combination methods with USRP.
MaterialCombination MethodStatic force, Roller Material, Hardness, Diameter, Ultrasonic Frequency, and AmplitudeResults
17Cr2Ni2MoVNb steel
[131]
USRP followed by shot peening followed by USRP600 N, 800 N, 1000 N;
Unspecified; Unspecified;
Unspecified;
25 kHz;
6 µm
Significant ultra-fine grains
Improved surface microhardness
RCS of −1099 MPa was observed on the surface.
Microhardness increased by 39.50%
Lowest surface roughness
Die Steel Cr12MoV
[132]
Deep cryogenic treatment followed by USRP1246 N;
Unspecified;
90 HRA;
12mm; 30 kHz; 6 µm
Surface roughness reduced from 0.284 µm to 0.265 µm
Microhardness increased by 6.2% HV
Improvement in wear resistance
Ti6Al4V
[72]
Heat treatment followed by USRP900 N;
Unspecified,
80 HRC; 15 mm; 30 kHz;10 µm
Microhardness increased by 43.7% HV
Fatigue strength increased by 40 MPa
Fatigue life enhanced
UTS and yield strength increased by 3.6% and 3%
AZ91D Mg Alloy
[68]
USRP followed by recovery heat treatment240 N;
Unspecified;
Unspecified;
15 mm; 20 kHz; 7.5 µm
Wear resistance of the recovery heat-treated samples I higher at 150 °C,
Recovery heat treatment affected microstructure and mechanical properties
Microhardness after recovery treatment has decreased
Inconel 625
[133]
Laser cladding followed by USRP300 N;
Unspecified;
Unspecified;
14 mm; 28 kHz; 5 µm
Surface roughness reduced from 0.335 µm to 0.12 µm.
Nanolayer formation with a depth of 20 μm
Low CoF and high wear resistance
The wear mechanism remains the same.
Dendritic grains were refined.
Cr-Ni alloy [134]Laser cladding followed by hard turning and USRP300 N;
Carbide;
Unspecified;
14 mm; 30 kHz; 7 µm
Surface roughness reduced by 89%.
Microhardness increased by 34.6%.
Elastic modulus increased by 10.8%.
Fracture toughness increased by 106%.
CrMnFeCoNi High-Entropy Alloys
[84]
Laser additive manufacturing followed by USRP300 N;
WC/Co;
Unspecified;
14 mm; 30 kHz; 20 µm
Microhardness increased
Low CoF and high wear resistance
Equiaxed crystals on the top surface replaced with NC layers
Inconel 690TT
[64]
USRP followed by plasma nitridingUnspecified;
WC/Co;
Unspecified;
20 mm; 28 Hz; 20 µm
Compared to untreated specimens, microhardness increased by 348%.
Compared to untreated specimens, wear volume decreased by 98%.
20CrMoH steel
[135]
Carburizing followed by USRP900 N,
Unspecified; Unspecified;
15 mm; 25 kHz; 10 µm
RCS of −920 MPa was observed on the surface.
Microhardness increased from 370 HV to 900 HV on the surface
AISI 1045 steel
[136]
USRP followed by physical vapor deposition0.1 MPa;
Wolfram Carbide;
14 mm; 28 kHz; 7 µm
Increased the adhesion performance
Microhardness, elastic modulus, RCS, and surface wettability were enhanced
Publisher’s Note: MDPI stays neutral with regard to jurisdictional claims in published maps and institutional affiliations.