Article

3D Printing of Objects with Continuous Spatial Paths by a Multi-Axis Robotic FFF Platform

1
Engineering Training Center, Shanghai University, 99 Road Shanda, Shanghai 200444, China
2
Shanghai Key Laboratory of Intelligent Manufacturing and Robotics, Shanghai University, 99 Road Shanda, Shanghai 200444, China
3
Department Industrial Engineering, University of Applied Sciences Technikum Wien, Höchstädtplatz 6, 1200 Vienna, Austria
*
Author to whom correspondence should be addressed.
Appl. Sci. 2021, 11(11), 4825; https://doi.org/10.3390/app11114825
Submission received: 17 April 2021 / Revised: 12 May 2021 / Accepted: 22 May 2021 / Published: 24 May 2021
(This article belongs to the Section Additive Manufacturing Technologies)

Abstract

:
Conventional Fused Filament Fabrication (FFF) equipment can only deposit materials in a single direction, limiting the strength of printed products. Robotic 3D printing provides more degrees of freedom (DOF) to control the material deposition and has become a trend in additive manufacturing. However, there is little discussion on the strength effect of multi-DOF printing. This paper presents an efficient process framework for multi-axis 3D printing based on the robot to improve the strength. A multi-DOF continuous toolpath planning method is designed to promote the printed part’s strength and surface quality. We generate curve layers along the model surfaces and fill Fermat spiral in the layers. The method makes it possible to take full advantage of the multi-axis robot arm to achieve smooth printing on surfaces with high curvature and avoid the staircase effect and collision in the process. To further improve print quality, a control strategy is provided to synchronize the material extrusion and robot arm movement. Experiments show that the tensile strength increases by 22–167% compared with the conventional flat slicing method for curved-surface parts. The surface quality is improved by eliminating the staircase effect. The continuous toolpath planning also supports continuous fiber-reinforced printing without a cutting device. Finally, we compared with other multi-DOF printing, the application scenarios, and limitations are given.

1. Introduction

Additive Manufacturing (AM), also known as 3D printing, has gained a lot of attention in recent years and has been applied in various fields such as rapid prototyping, bioengineering, and architecture [1]. Fused Deposition Modeling (FDM), or Fused Filament Fabrication (FFF), is the most popular process for 3D printing. Standard FDM equipment usually has three degrees of freedom. The nozzle of the equipment travels along the X/Y/Z axis and deposits the material in the spatial Cartesian coordinate system. Based on this platform feature, most 3D printing toolpath planning methods can be divided into specific steps: (1) obtain a digital model of the printed part, (2) slice the model equidistant using a set of parallel planes, and (3) perform toolpath planning and generate print toolpaths in each layer section. This method is easy to implement but has potential problems, such as introducing manufacturing constraints and staircase effect on the surface. During manufacturing, the FDM printer can deposit material only layer by layer, which results in significant anisotropy. The tensile strength in the build direction (vertical) is about 40% lower than that in layer direction (horizontal) [2]. Simultaneously, the sloping surface of printed parts will suffer from the staircase effect because of layering, which affects the surface quality and leads to stress concentration. These problems weaken the strength of the FDM product and limit its application scenarios, and prompted the researchers to conduct extensive exploratory work.
At present, the mainstream idea is to increase the DOF of the 3D printing system and add more flexibility to the manufacturing process to make up for the FDM deficiency. The conventional method is to add more DOF, which inevitably increases the complexity and cost of existing systems. With the continuous development of robotics, more and more multi-DOF platforms based on robotic arms are applied to 3D printing, making it an interdisciplinary subject in advanced manufacturing [3]. Compared with traditional printing equipment, robot arms are more flexible, have a broader printing range, and a more mature controlling system.
However, the toolpath planning method of multi-DOF 3D printing is more complex and less developed [4]. Most of the research on multi-DOF printing aimed to reduce or eliminate the support. There are few work studies on toolpath planning and the fabrication strategy to print parts with complex geometry and corresponding mechanical properties. Because the deposition direction of multi-DOF is different from the traditional 3D printing that deposits in a set of parallel planes, it is necessary to analyze the mechanical properties of the multi-DOF printed parts. In terms of control, there is no set of general control languages for multi-DOF printing. Different platforms usually use different scripting languages to control the hardware, increasing the difficulty of software development.
This paper presents a global spatial continuous toolpath planning method and the controlling strategy for the multi-DOF robotic 3D printing platform. The rest of this paper is organized as follows. Section 2 reviews the existing multi-DOF 3D Printing systems and corresponding toolpath planning methods. The details of the multi-DOF 3D printing pipeline are presented in Section 3. We report the experimental results in Section 4. Section 5 gives the conclusion and future works.

2. Related Work

2.1. Multi-DOF 3D Printing

Researchers have two main approaches to achieving multi-DOF printing: extending the DOF of a traditional 3D printer or using a multi-axis robotic arm as a platform. The hardware platforms of the above two methods are different. However, their essence is to introduce more DOF to extend the printing process from parallel planes to spatial trajectories.
Some research efforts are aimed at adding more freedom to traditional FDM printers. Lee et al. [5] developed a hybrid 3D printing system by adding two axes to the gantry milling machine platform. Their hybrid system can mill the part’s surface after printing to achieve higher finish quality. However, the system can only print the simple shapes on parallel planes in multiple directions, and the effect of the process on mechanical properties is not discussed in detail. Wu et al. [6] proposed a multi-DOF 3D printing system assisted by visual surveillance. Moreover, the system added two more axes of rotation to the platform to increase the printing freedom. The platform can print more complex models without any support, but it is still based on multi-directional flat plane printing. Traditional FDM printing equipment is more suitable for printing on flat surfaces but has difficulty in multi-axis cooperating. Multi-DOF printing needs the precise coordination of multiple axes, which is difficult to control and guarantee accuracy. At the same time, the complicated mechanical structure further reduces the printing space.
More research works are devoted to building a robotic arm-based 3D printing platform. Keating et al. [7] conducted a preliminary case study on the 3D printing of the robotic arm. Their platform is based on a six-axis robotic arm fitted with different end effectors for additive manufacturing, milling, and sculpture. Yuan et al. [8] took inspiration from the spider web structure and customized a four-extruder printing nozzle on the robot arm platform. The nozzle can print a self-supporting frame structure in the space. The structure is more decorative than practical. Ding et al. [9] developed a metal 3D printing system that coupled a six-axis robotic arm with a two-axis tilt and rotation positioning system. The 8-DOF system can print metal structures such as propellers without support by collaboration. Dai et al. [10] proposed a method to deposit material on curved layers using a multi-axis printing system based on a robot arm, significantly reducing the need for support structures and avoid collisions. In order to enhance the strength of the printed parts, De et al. [11] used a robotic printing platform to print continuous carbon fiber on multiple axes. However, the platform had a sophisticated end-effector to achieve multi-material extrusion. Their experiment result shows that the strength of the carbon fiber reinforced parts is about six times higher than that of the non-reinforced parts, but the specific test model and method are not given. Most of the relevant work focuses on support-free printing methods, but there is little research on evaluating the strength of multi-DOF printing.

2.2. Toolpath Planning

More studies have been done on the toolpath planning strategies for different goals in recent years. According to the implementation method, toolpath planning methods of multi-degree-of-freedom FFF can be divided into three categories:
(1) Toolpath planning of frame structure: the frame structure includes some supporting beams. Mueller et al. [12] developed the WirePrint printing system to shorten the printing time. Compared with the solid printing model, the frame structure’s processing speed is more than ten times higher than the traditional FFF printing speed. To make full use of multi-axis printing characteristics, Wu et al. [13] proposed a method for printing frame models on a five-axis printer. They used a graph structure to describe the collision problem, found a locally minimal constraint set outside the grid through global optimization, and then ordered the edge wireframes to avoid interference. Huang et al. [14] proposed a new algorithm for generating print sequences. Firstly, a sparse optimization model was constructed according to constraints, and the input shapes were decomposed into stable layers. Then, feasible print sequences were searched for each layer through local optimization methods and strategies to avoid collisions between the printed area and the manufacturing mechanism. Dorfler et al. [15] developed Mesh-Mould for large-scale building structures with higher load-bearing requirements, which collaboratively works on the building site in a distributed way and can be extended to different project scales through parallelization. Frame printing has a wide range of potential applications such as art, sculpture, architecture, and geometric manufacturing. Considering the need to use the inverse kinematics of robotic arm structure to solve the different motor rotation, to make the tool side positioning to the target position, may have a singular point in some position. Compared with conventional 3D printing, the frame model does not need intensive positioning and fill-in space, simplifying the control difficulty of multi-axis equipment.
(2) Curved surface toolpath planning: The toolpath on the curved surface directly uses the ability of multi-axis printing equipment to extend the existing plane toolpath planning to the spatial surface to reduce the ladder effect and improve the surface quality. In the work of Chakraborty et al. [16] in 2007, surface layering was the first attempt to generate surface structures of equal thickness. Yerazunis et al. [17] designed a five-axis FFF platform to print a disc-like structure with protrusion. Due to the printing toolpath’s alignment with the compressive stress tensor, the compressive strength was increased to 4.5 times that of conventional printing. Singamneni et al. [18] further investigated the effect of curved layers on structural strength. However, the toolpath planning methods designed in these works are only applicable to specific simple models. To further use the advantages of multi-axis 3D printing, an extensible toolpath generation algorithm needs to be designed according to the requirements. Some typical methods include combining plane and curved layers near the outer shell [19], introducing the anti-aliasing method in graphics to slightly adjust the change of material extrusion volume to compensate for the surface ladder effect [20], and the curve interpolation method for the bending pipe structure [21]. Etienne and Panozzo et al. [22] deformed the input model into a flat top model in the voxel domain, generated the plane slices and toolpaths in the conventional method, and then mapped the toolpath to the input parameter domain. Thus, after limiting the deformation range, a generally curved toolpath can be obtained, supporting curved surfaces printed on a three-axis printer. This kind of curved toolpath planning method can avoid the ladder effect, but the effect on anisotropy and strength and its application to multi-axis equipment are not discussed.
(3) Spatial field driving toolpath planning: spatial planning can accurately control the location and direction of material deposition according to the stress field and processing constraints and make full use of the capability of multi-axis equipment to provide customized design and manufacturing. Dai and Liu et al. [10], aiming at unsupported printing, proposed a voxel-based surface generation method to generate the current print layer according to the supportable conditions and non-collision requirements. However, the positioning in voxel space can easily cause errors. Although this method cuts the locations beyond the range through Boolean operation, the surface quality still cannot reach the level of ordinary FFF parts. Steuben et al. [23] proposed an implicit toolpath calculation algorithm based on arbitrary heuristics or level sets in the physical domain, introducing external constraints such as stresses when generating planar toolpaths. Fang and Zhang et al. [24] saved the finite element analysis results in a tetrahedral grid. They generated a spatial print toolpath aligned with the principal stress direction through stress field constraints and machining direction constraints. Experiments show that polymer printed parts’ strength under specific stress conditions can be increased to 6.35 times that of the traditional process, but the processing speed is slow and the product has a rough surface.

3. Methodology

3.1. Overview

Our approach first generates a multi-DOF continuous toolpath on curve layers to optimize the material deposit direction and improve print quality, then coordinate the robot platform’s pose and the extrusion to carry out the fabrication of the print part. In order to satisfy manufacturability requirements, it is necessary to avoid collisions in space, keep the accessibility of the processing surface, guarantee the supportability of the printed model, and synchronize the material extrusion deposited toolpath. The overview of our multi-DOF 3D printing process is illustrated in Figure 1.
Once the input model and the printing direction are given, we generate supports for the model and print it with the regular path on the 2D plane. The input model is voxelized and then deformed into a flattened shape according to the printing accessibility. Then, applying path planning on the flattened model and the continuous curve toolpath is generated. The hardware platform consists of a robotic arm with a control box and an FFF extruder with an embedded controller. The former is usually a vendor-dependent black box system, while the latter is a standard extrusion mechanism.

3.1.1. Hardware Platform

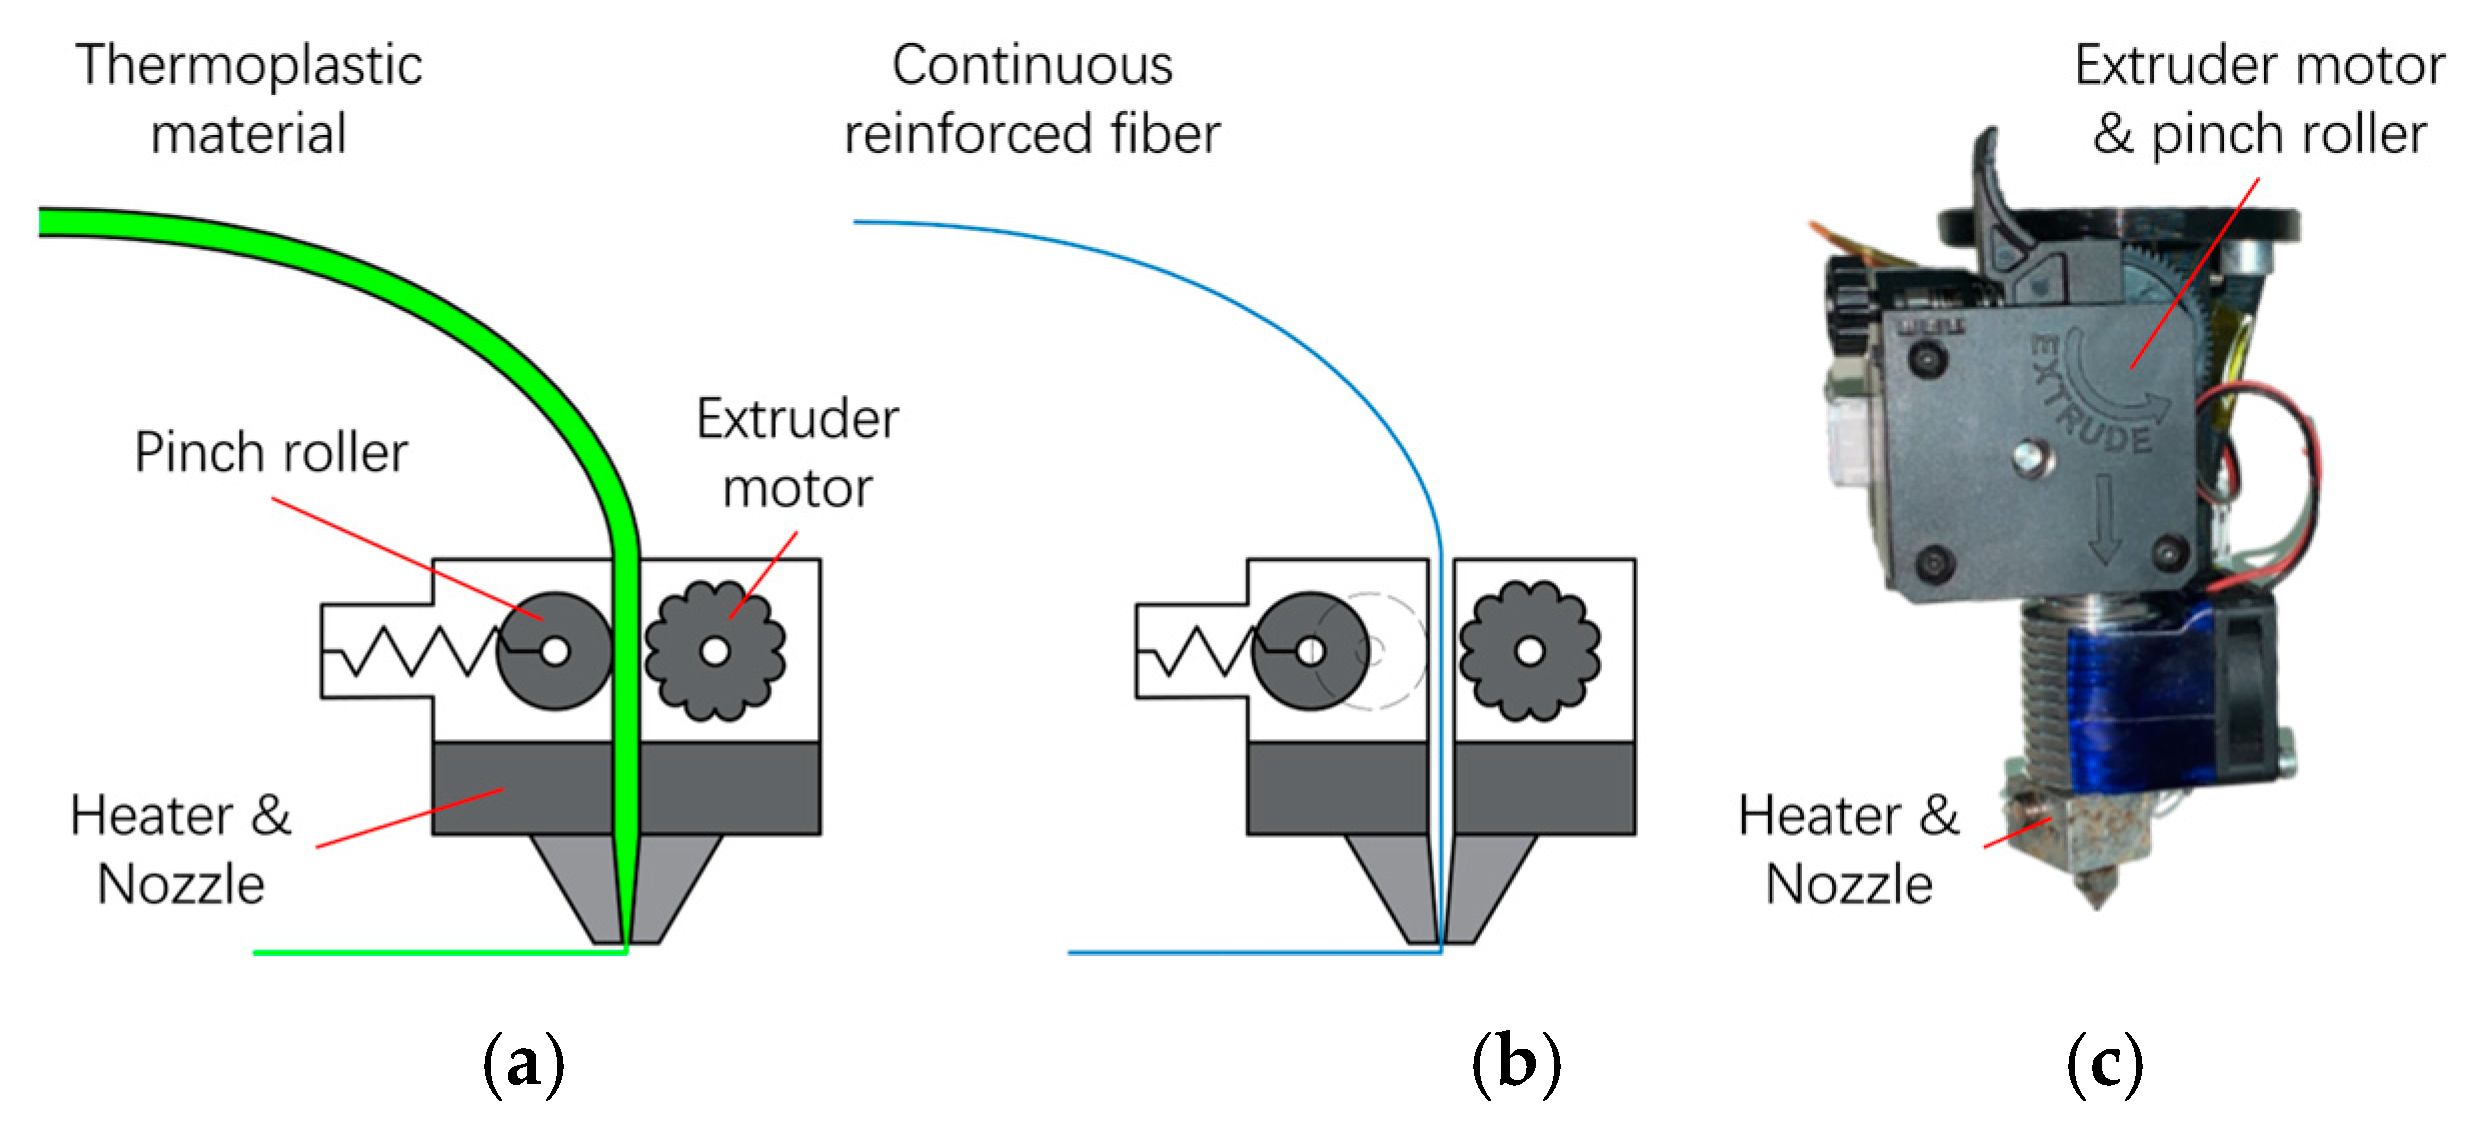
The hardware system consists of a robotic arm system, a customized extruder, a single extrusion control board and a print hotbed. The customized extruder (Figure 2) mounted on the robot arm can print ordinary thermoplastic materials or continuous reinforced fibers. Since the robotic arm and the extruder are independently controlled, this hardware setup can support different types of multi-DOF industrial robots. The former is usually a vendor-dependent black box system, while the latter is a simple extruder. Therefore, the synchronization control of both determines print quality. The hotbed is unnecessary since the robotic arm can be recalibrated on an arbitrary plane.

3.1.2. Multi-Axis Printing Toolpath Planning

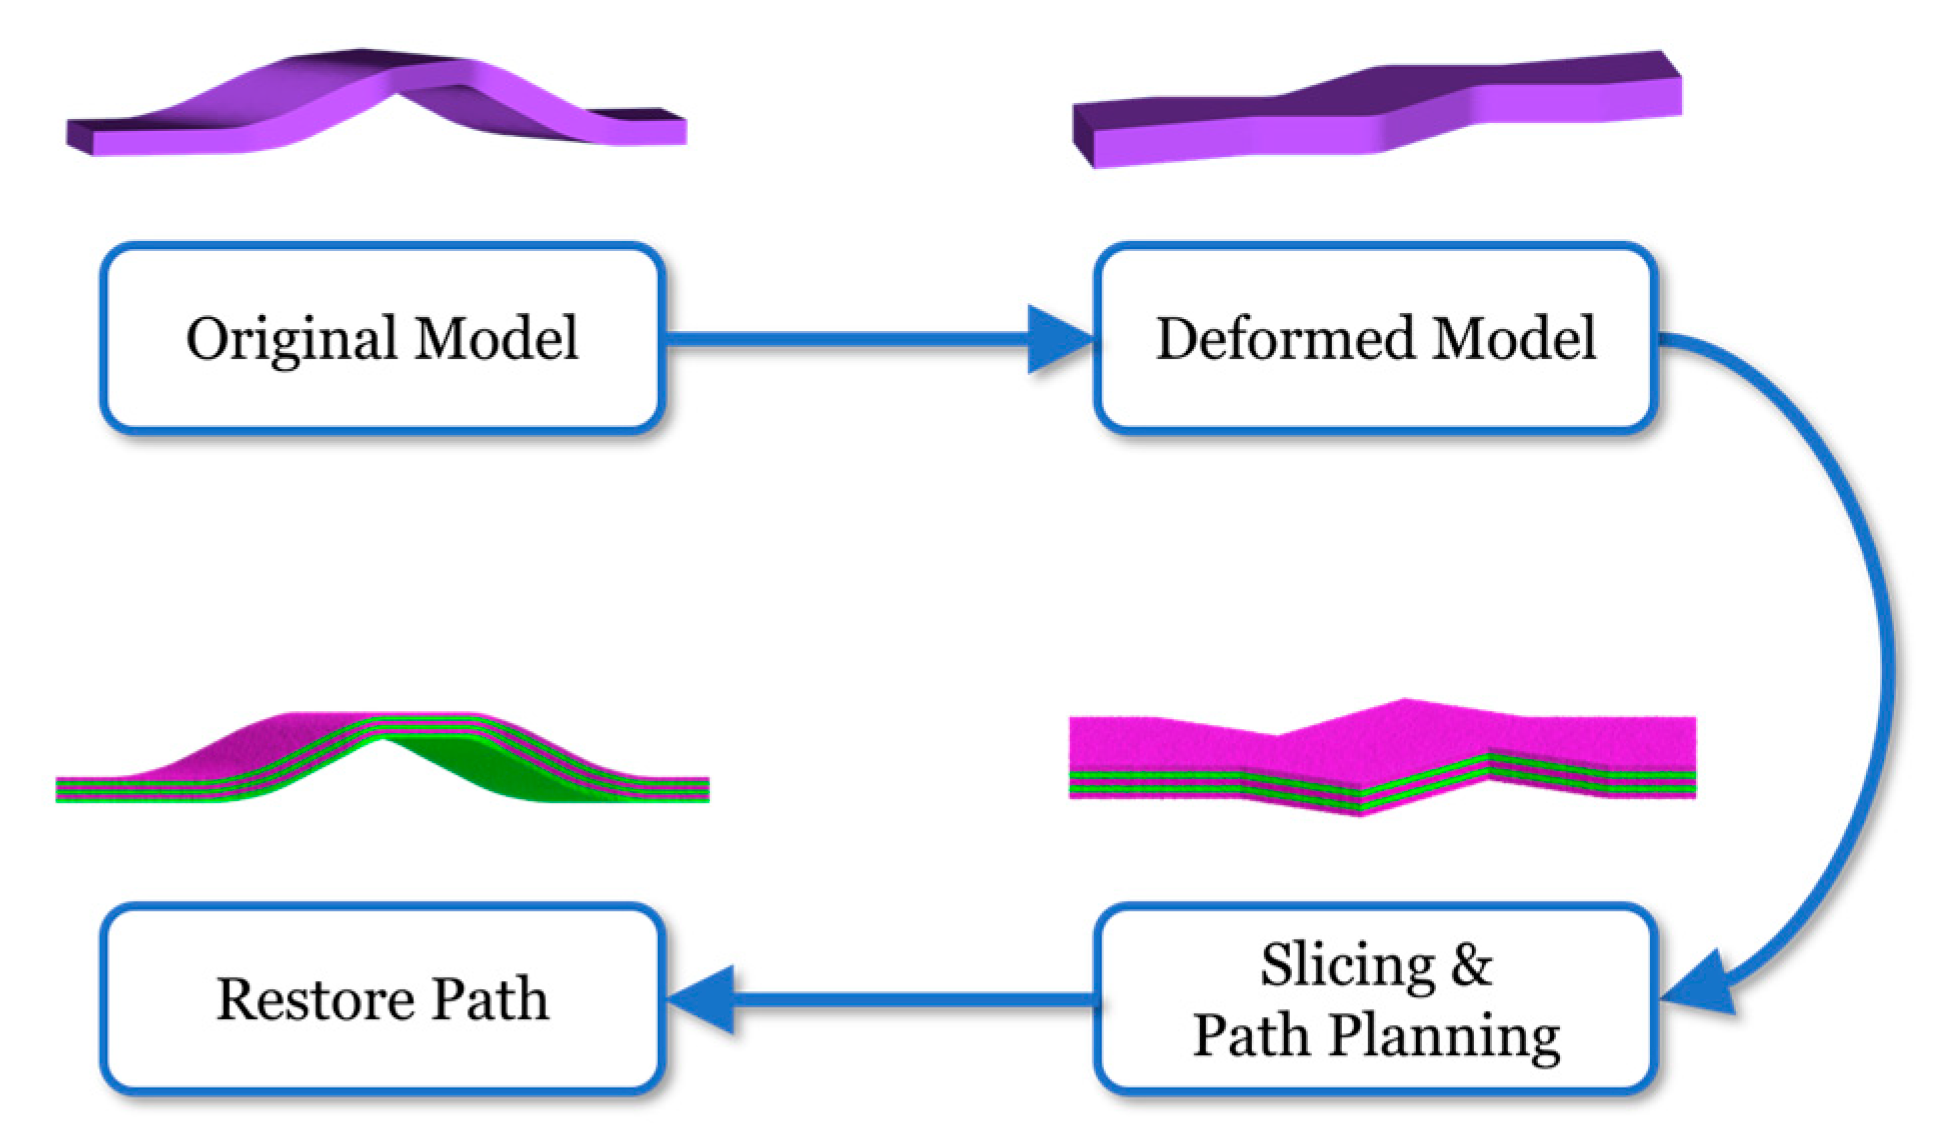
Eliminating the staircase effect on the part’s surface is an effective way to reduce the stress concentration and improve mechanical performance. Our method is to deposit thermoplastic materials on a set of curved surfaces parallel to the object’s surface depending on the multi-axis platform. First, the original model will be deformed to be flatter. The triangular surface whose angle is lower than the specified threshold is flattened into a horizontal plane. All deformation data during this process are stored to restore the deformation later. Then, the deformed model will be sliced into 2D layers by a set of parallel planes, and a continuous toolpath is generated from the connected regions on each layer. There are two main advantages to generating continuous toolpaths: avoid redundant movement and improve efficiency. Second, continuous fiber-reinforced printing can be supported without adding more cutting devices. We can restore the planar toolpath to spatial toolpath by cached deformation data. Considering that the bottom face may not be flat after deformation, the support structure needs to be generated and printed with different materials.

3.1.3. Process Controlling

Unlike traditional three-axis printing, the multi-axis printing mechanism based on the robot arm is separate from the control of the hotbed and extruder. This scheme provides much convenience for extending the platform and the print size and increases the system’s complexity. Process control requires an initial plane alignment so that printing can start on any plane. Precise synchronization is also required between toolpath motion control, material extrusive direction, and material extrusion speed control to ensure print quality. Process control provides synchronization strategies and control algorithms between robotic arm motion and material extrusion.

3.2. Multi-Axis Toolpath Planning

3.2.1. Curve Slicing

When printing on a curved surface, the multi-axis robotic arm can adjust the direction of the nozzle so that it remains perpendicular to the print surface to avoid collisions. To generate the curve plane, we use TetWild [25] to convert the STL model into a tetrahedral mesh and then use the method provided by the CurviSlicer [22] to deform the mesh. Considering the accessibility of the platform, we defined an appropriate flatten angle threshold to control the curve layer’s generation and avoid the collision. As shown in Figure 3, all the mesh surfaces within 45 degrees will be flattened, while the surface whose slope is greater than 45 degrees is inclined as vertical as possible. This type of deformation is particularly suitable for curved structures when equally thick. Each vertex’s deformation data on the tetrahedral mesh will be saved during the process. Next, parallel plane slicing and toolpath planning is performed on the deformed model. Once the toolpath is generated, it can be restored to its original model form based on the previously deformation data.

3.2.2. Global Continuous Toolpath Planning

We can use a standard way to finish toolpath planning on the 2D sliced planes. However, considering that the robotic arm moves spatially when the planes restore it to its original shape, redundant movements must be avoided as much as possible to prevent collisions or singularities. That will also reduce post-processing workload when using continuous fiber-reinforced composites as printing material. To achieve these goals, we divide the toolpath planning into two steps: (1) spatial printing sequence generation and (2) continuous toolpath planning.
After slicing, a series of plane layers L= (l1, l2, ···, ln) is generated. Each layer lk consists of one or more simply connected regions rk,i. Then, we get a collection D = {rk,i} that includes all 2D simply connected regions layer by layer. Where i is the index of the simply connected region in each layer, k represents the layer index. To improve printing efficiency and simplify control, we need to ensure that the continuous fibers are not cut during printing. Therefore, unnecessary movement during printing needs to be avoided. Our strategy is to connect the adjacent simply connected region in the upper and lower layers and then connect other simply connected regions according to the geometric interference relationship between the extruder nozzle and the workpiece. The procedure is given in Algorithm 1.
Algorithm 1 Spatial printing sequence generation
1:  Spatial Printing Sequence (D)
2:  R ← ∅
3:  rk,iD.Get End ()
4:  while D is not empty  do
5:    R.Append (rk,i)
6:    D.Remove Item (rk,i)
7:    if  Not Interfere (rk,i)  then
8:      rk,iD.Find Upper Region (rk+1,i)
9:      if  rj,k = ∅ then
10:      rj,kD.Get End ()
11:     end if
12:    else
13:     rk,iD.Get End ()
14:   end if
15:  end while
16:  return r
The output of Algorithm 1 is R = {rk,i}, which contains a sorted sequence of connected regions. The index of rk,i is the same as that in D. The algorithm contains two critical decision processes: NoInterfere and FindUpperRegion. The former is employed to check if the nozzle will collide with the printed part when printing rk,i. This process can be realized by calculating the closest distance between the contours in the same layer and comparing that with the nozzle’s preset parameters in the undeformed space. FindUpperRegion detects if it can be supported by a processed region rk−1,j in layer k − 1.
A simply connected region is a toolpath-connected domain where one can continuously shrink any simple closed curve into a point while remaining in the region. This type of region can be divided by a set of convex polygons. Each convex polygon is capable of being filled with a single continuous toolpath. As mentioned above, many space-filling curves such as the Zigzag curve [26], Hilbert curve [27], and Fermat spiral [28] can be used to generate the continuous toolpath. The collection R generated by algorithm 1 consists of an ordered sequence of simply connected regions. Therefore, our continuous toolpath planning strategy can also be decomposed into two steps: (1) fill each rk,i in R with a continuous toolpath and (2) connect each continuous toolpath by order of R.
Compared with the Zigzag and the Hilbert curve, the Fermat spiral-based 2D filling pattern presented by Zhao et al. [29] has the characteristics of definite starting and ending position and smooth transition. This pattern is more suitable for continuous fiber-reinforced printing without fiber cutting. We traverse the connected region queue R to close each connected region’s boundaries. Then, a continuous spiral is generated to fill each region with the minimum spanning tree method. To avoid the intersection of the spirals, principal component analysis and Curvature Scale Space feature are used to extract the smooth region to connect the continuous spirals between convex polygons [28]. The corresponding spatial continuous toolpaths generated for different structures are illustrated in Figure 4.
The models in Figure 4 are sliced sparsely to show the connection between different parts of a model. The corresponding parameters of nozzle size can be regulated for different printing platforms to compute a machine-oriented printing sequence. Then, the global continuous toolpath can be generated by connecting the toolpath segments in the order of the sequence provided by Algorithm 1.

3.2.3. Printing with Support

In multi-DOF printing, overhanging structures printed with curved slices need strong support. We find all the downward facets on the surface of the input model. Then, the facets are grouped and the corresponding boundary contours are extracted. The upper surface of the support and the hotbed form the initial printing surface of the printed part.
To produce a high-quality contact surface, the material of support is different from that of the printed object. Soluble materials such as PVA and HIPS or other specialized support materials are ideal choices. When the hotbed is working, the printed object and support can be attached while being easy to separate after cooling. Once the support is printed, the upper surface of the support and the hotbed form the initial printing surface of the printed part.

3.3. Process Controlling Algorithm

3.3.1. Material Extrusion Synchronization

Accurate coordination between the robot and the end-effector extruder is necessary to ensure the printing quality. Excessive extrusion can cause the printed parts to collide with the nozzle. Insufficient extrusion will reduce the strength of the printed parts, the material cannot be effectively deposited on the previous layer, or even lead to the failure of printing. Both two cases will affect the surface quality of the parts.
The print toolpath contains extrusion information. According to the extrusion information, we divide the whole printing toolpath into two sub-paths: printing toolpath and empty travel. The empty travel does not contain the extrusion information, while the printing toolpath contains both the extrusion information and the nozzle movement path.
By regulating the print toolpath’s speed and acceleration, the robotic arm will print at a constant speed during the printing toolpath to ensure a stable and accurate movement. Simultaneously, the extruder feeds printed material at a constant speed, providing a smooth extrusion.
After completing a printing toolpath, the upper computer will determine whether the next subpath is the type of empty travel. The extruder will not receive the upper computer’s extrusion command during the empty travel and will remain in a paused state until it starts to print the next printing toolpath.

3.3.2. End Effector Pose Controlling

After the toolpath planning, we generated a set of paths. The points in each path contain only the position information in the global coordinate system but not the end effectors’ pose information. The end effectors’ pose needs to be planned through path points to avoid collision during printing.
Each tool path consists of a list of sequential points p i ( x i , y i , z i ) i = 0 , 1 , , m . To prevent the collision, the angle between the end effector’s nozzle and the print path should be within a safe range. Considering the accessibility of the platform, we constraint the nozzle’s orientation within a reasonable range in the global coordinate system at the same time.
The Figure 5 shows an example for nozzle pose controlling algorithm. The specific steps of the algorithm are as follows:
(1)
For each point p i in the path, connect the next point p i + 1 to form a line segment l p i p i + 1 .
(2)
Create a vertical plane S v perpendicular to the hotbed and through the l p i p i + 1 , using the S v as a constraint.
(3)
The nozzle’s orient N i at p i should be parallel to S v and point to the negative direction of the z-axis.
(4)
N i also needs to be perpendicular to the l p i p i + 1 .
(5)
Boundary condition: If the angle between N i and the z-axis exceeds the safe range, N i will be limited within the range.
(6)
Use cubic splines to smooth the N i to ensure stable printing.
(7)
Append the N i to corresponding p i and the integrated print toolpath is P = { p i ( x i , y i , z i , R x i , R y i , R z i ) } i = 0 , 1 , , m   .
A unique pose vector corresponds to every point on the print path. We could translate this into a motion script for the robotic arm with Cartesian path planning.

4. Experiments and Discussion

As shown in Figure 6, our multi-DOF printing platform is based on a UR3 robot. UR3 is a desktop collaborative robot, including a robot manipulator and a control box. It has six rotating joints, and the repeat positioning accuracy is ±0.1 mm. Peripheral equipment includes an Arduino Mega 2560 board running Marlin firmware, a hotbed, and an end effector for printing. The end effector similar to the standard 3D printer nozzle, mounting on the robot’s flange. The upper computer is a personal computer running Ubuntu and Robot Operating System (ROS) and translates the print path into robot script and gcode. By sending gcode through the serial port to the Arduino board, the upper computer can control peripheral devices’ running state, such as extrusion length and print temperature. Although different types of robot arms use different script languages, many robot manufacturers provide ROS interfaces, making our algorithm portable.
We printed several demonstration parts and test parts through our platform. The demonstration parts showed the platform’s printing capability for continuous fibers, global path planning, and spatial curve path. Then, we carried out the tensile and flexural experiment on the test parts to compare the printing path’s influence on mechanical properties.

4.1. Model Printing

We used continuous polyester fibers prepreg with PLA to print the parts shown in Figure 7 to verify the global continuous path planning method. The parts were printed at the temperature of 210 °C, 5 mm/s speed, and 0.3 mm layer thickness. These parameters refer to the experiment of Li et al. [30]. The length, width and height of the model are 35 mm, 17 mm, and 9 mm. Compared to the conventional path planning method in Figure 7a, our proposed method has less empty travel between layers and more convenient post-processing parts (Figure 7b).
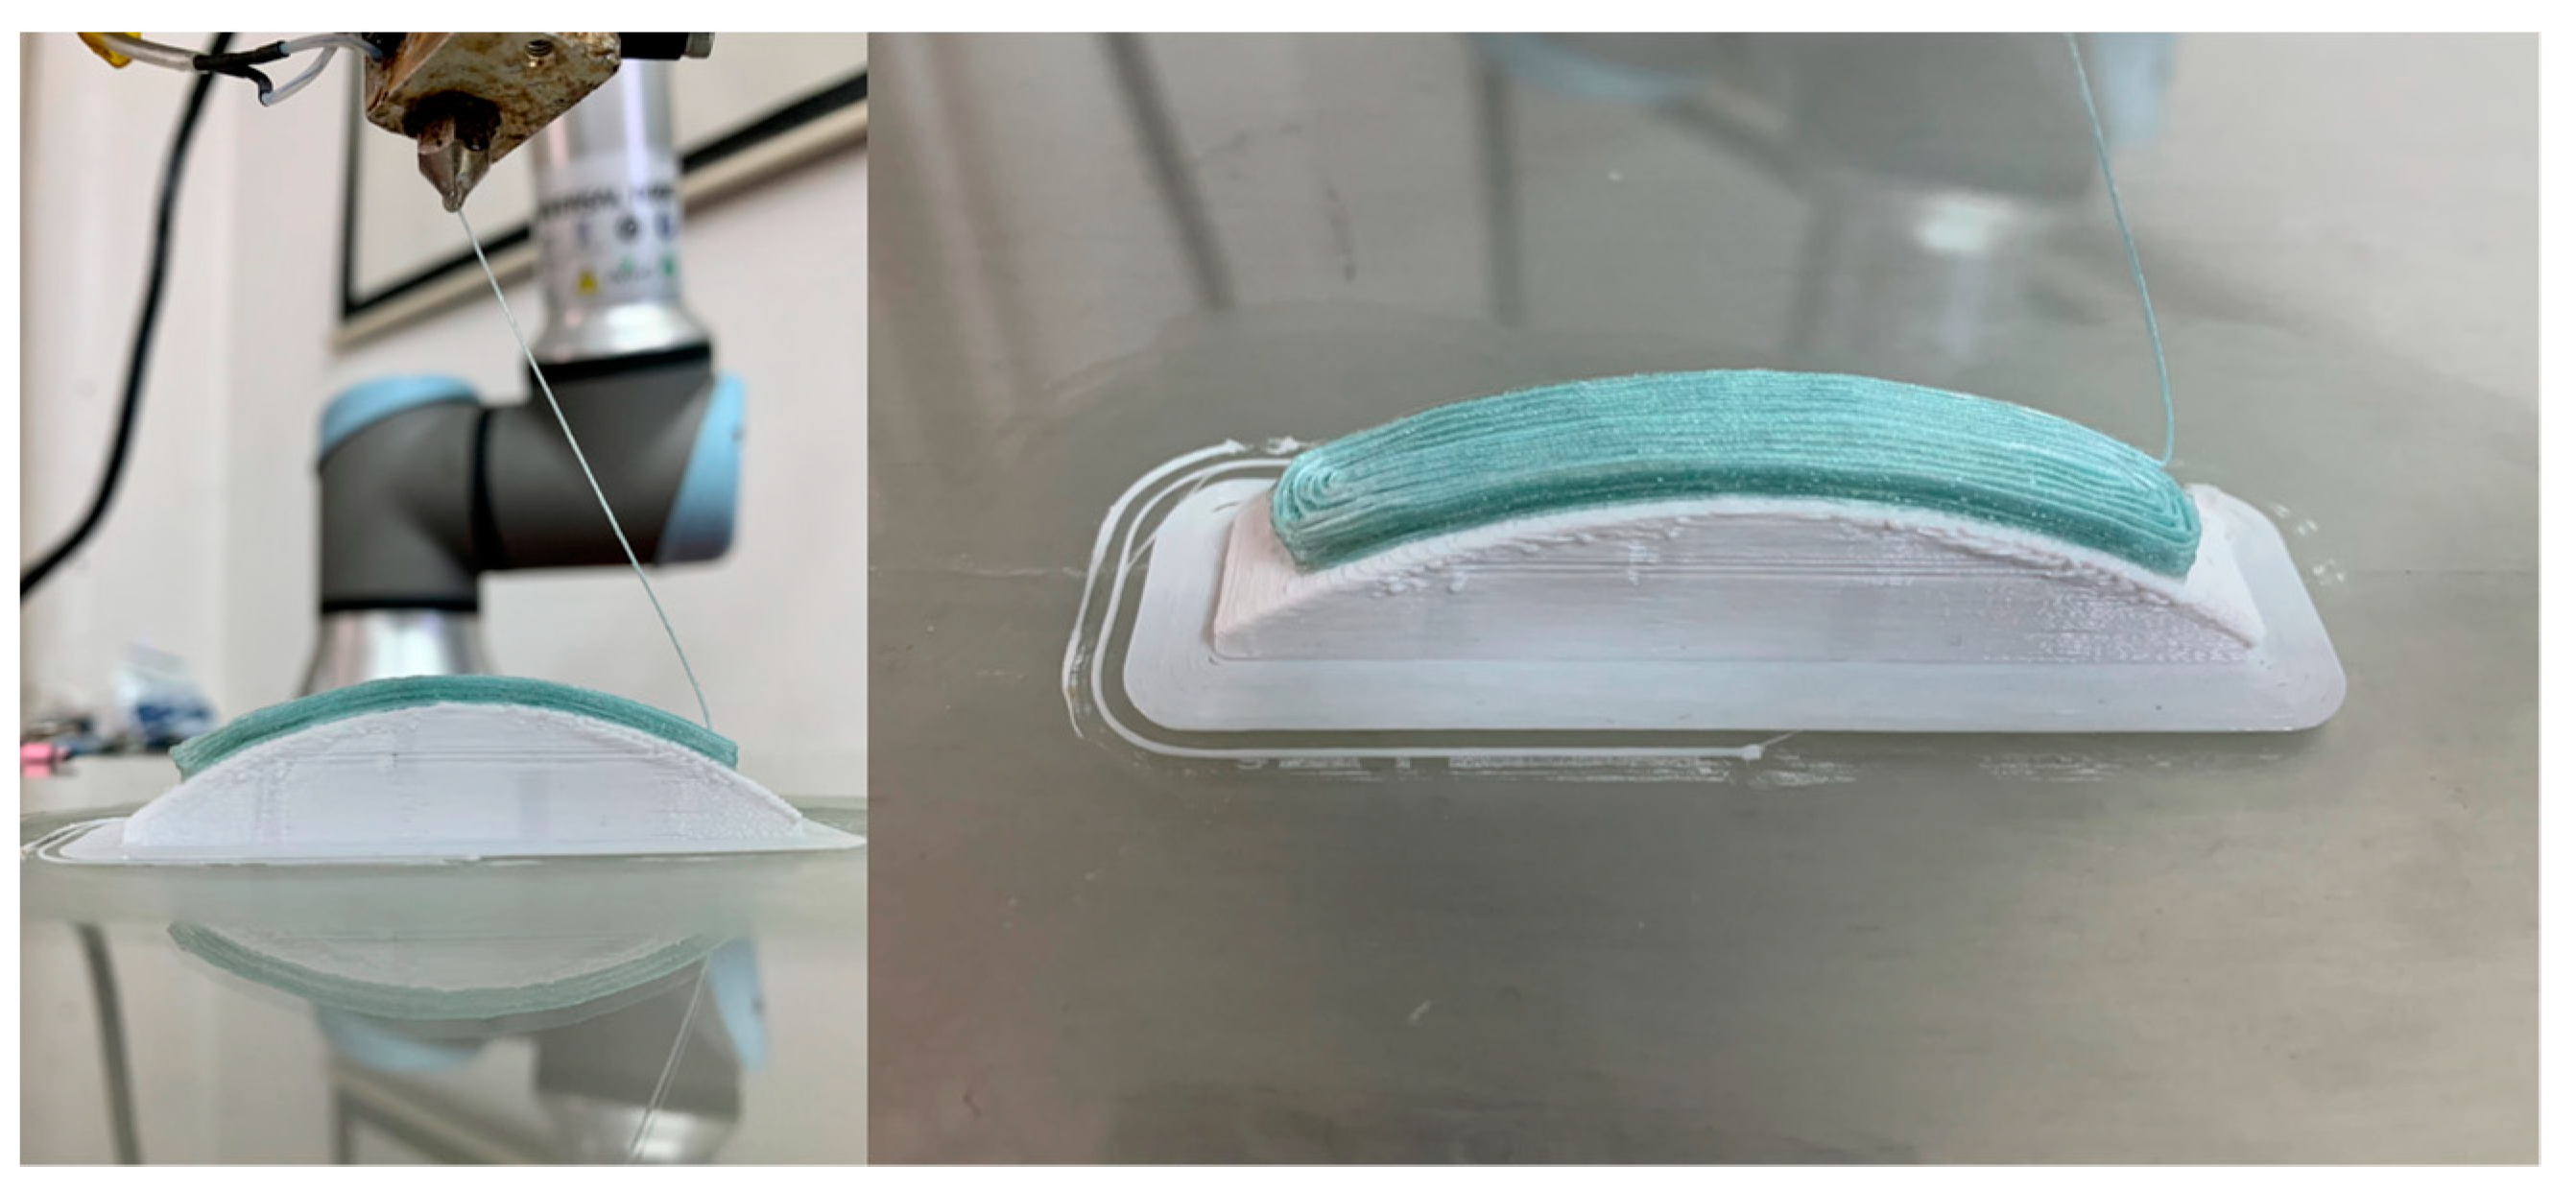
A curved part is printed on the support using the spatial Fermat spiral path (Figure 8). The length, width, and thickness of the part are 50 mm, 10 mm, and 3 mm, respectively. Compared to the planar slicing method, this method significantly improves the printed parts’ surface quality, eliminates the staircase effect, and simplifies the continuous fiber parts’ printing path on the curved surface.
As shown in Figure 9, the test part contains an arch bridge structure in the middle. The total length of the test parts is 75 mm, the width is 10 mm, and the thickness is 3 mm. This shape was chosen because standard test pieces usually have regular shapes that cannot accentuate multi-DOF printing advantages.
The test parts for mechanical test were respectively sliced and printed using a multi-DOF continuous path with Fermat spiral and conventional slicing along the X/Y/Z direction with Zigzag infill, as shown in Figure 10. We used our multi-DOF print platform to print the continuous path test parts, while a general FFF printer printed the XYZ direction sliced test parts. All test parts are printed by a 0.6 mm nozzle with polylactic acid (PLA) at 210 °C, 30 mm/s, 0.2 mm layer thickness, and 100% infill density. Figure 11 shows the printed test parts.

4.2. Mechanical Test

Tensile tests and flexural tests were designed to verify the printed part’s mechanical properties between the different slice types. We printed groups’ test parts for each of the slice types in the experiment and then obtained their average values.
Table 1 and Figure 12 show the result of the tensile test. The distance between the two clamps is 60 mm, and the test speed is 2 mm/min on the equipment shows in Figure 13.
We used the three-point flexural test to examine the test part’s maximum bending load. The test speed is 2 mm/min, the span is 60 mm, and the result is shown in Table 2 and Figure 14.

4.3. Result and Discussion

The result shows that our method avoids the strength decrease caused by anisotropy. In the tensile test, the result shows that the test part with the curve slicing path can withstand the maximum load compared to other ordinary slice types. The tensile strength of the curved sliced part is approximately 22% higher than X-direction and 167% higher than Y-direction. Parts printed in the Y and Z direction showed significant brittleness, while parts printed along curve layers showed plasticity and fractured due to bending. In the flexural test, the strength of curve slicing is second to the X direction. The result is probably due to insufficient extrusion on the surface where the parts and support contact, resulting in more pronounced stress concentration. There is little difference in the flexural strength values between different slice types, but the plasticity of parts is still obviously affected by the slice type. Compared to the work of Fang et al. [24], which aims to reinforce the strength of FFF, our method provides a similar result (maximum more 100% strength increase than traditional FFF) but with a higher surface resolution and a more feasible process.
The surface quality of our method is satisfactory: all the layers are well aligned to the surface and has no staircase effect. Compared to the robotic printing of Dai et al. [10], our method has a smaller gap between toolpaths and eliminates the staircase on convex surfaces.
Our method can be used for print parts with overhanging structures and require mechanical strength because it optimized the material deposit direction, making the toolpath along the part surface. Aerospace components, for example, usually have smooth surfaces and require high strength and lightweight, so our method can be utilized to fabricate such parts using continuous fibers. Moreover, our approach is portable and not limited to specific robot hardware or slicing software, providing a universal interface for construction. It is worth mentioning that our method does not avoid the need for support, as slice planning is based on the part surface rather than an unsupported strategy.

5. Conclusions

Multi-DOF printing gets rid of the limitation of traditional FFF that deposits materials along a single direction. Unlike conventional FFF printing, we propose a multi-axis continuous toolpath planning method and a process control strategy for the robotic arm-based 3D printing platform, making it possible to take full advantage of the multi-axis printing platform’s advantages and improve the mechanical strength and surface quality of the printed part. Our method is based on open-source architecture and can be extended to a universal solution for multi-DOF printing.
The most challenging task is to define an appropriate set of curve layers to slice the model. We flattened the model based on accessibility, then generated the toolpath with a continuous path and restored it to its original shape. The multi-axis FFF platform printed the demonstration parts and the test parts through our specially designed control architecture to verify our method. The experimental result is satisfying, showing that the continuous spatial toolpath can improve the tensile strength by 22–167% higher than that of the conventional slice type when the same printing material is used. Our method also allows the platform to print continuous reinforced fibers on the curve surfaces, further enhancing the part’s strength. In the meantime, layers generated by our method are parallel to the model’s surface, which effectively eliminates the staircase effect and improves the surface quality.
The major limitation of our approach is the generation of support when the model is complex. At present, we can not print the part with a hollow or cavity that needs internal support, as the support has to be printed entirely before the part. Another problem is that print quality is sensitive to the distance of support and the part’s initial layer. As shown in the experiment result, the improper distance may affect the deposition quality and strength. We may make further improvements to achieve more flexible printing in the future.

Author Contributions

Y.Y. presented the conception and drafted the framework of the article. Y.Z. designed the platform, tested experiments, and the drafted article. M.A. and M.L. made the modification and critical revision of the paper. All authors have read and agreed to the published version of the manuscript.

Funding

The Natural 3D: Bio-based fiber/particle reinforced thermoplastics efficiently used by additive manufacturing in the load path direction, grant number 860384, funded this research.

Conflicts of Interest

The authors declare no conflict of interest.

References

  1. Ngo, T.D.; Kashani, A.; Imbalzano, G.; Nguyen, K.T.Q.; Hui, D. Additive manufacturing (3D printing): A review of materials, methods, applications and challenges. Compos. Part B Eng. 2018, 143, 172–196. [Google Scholar] [CrossRef]
  2. Kim, G.D.; Oh, Y.T. A benchmark study on rapid prototyping processes and machines: Quantitative comparisons of mechanical properties, accuracy, roughness, speed, and material cost. Proc. Inst. Mech. Eng. Part B J. Eng. Manuf. 2008, 222, 201–215. [Google Scholar] [CrossRef]
  3. Urhal, P.; Weightman, A.; Diver, C.; Bartolo, P. Robot assisted additive manufacturing: A review. Robot. Comput. Integr. Manuf. 2019, 59, 335–345. [Google Scholar] [CrossRef]
  4. Chenming, W.; Chengkai, D.; Changling, W.; Yongjin, L. Recent Progress on Multi-DOFs 3D Printing: A Survey. Chin. J. Comput. 2019, 9, 1918–1938. [Google Scholar]
  5. Lee, W.C.; Wei, C.C.; Chung, S.C. Development of a hybrid rapid prototyping system using low-cost fused deposition modeling and five-axis machining. J. Mater. Process. Technol. 2014, 214, 2366–2374. [Google Scholar] [CrossRef]
  6. Wu, L.; Yu, M.; Gao, Y.; Yan, D.M. Multi-DOF 3D Printing with Visual Surveillance. In Proceedings of the SIGGRAPH Asia 2017, Bangkok, Thailand, 27–30 November 2017; pp. 3–4. [Google Scholar] [CrossRef]
  7. Keating, S.; Oxman, N. Compound fabrication: A multi-functional robotic platform for digital design and fabrication. Robot. Comput. Integr. Manuf. 2013, 29, 439–448. [Google Scholar] [CrossRef]
  8. Yuan, P.F.; Meng, H.; Yu, L.; Zhang, L. Robotic Fabrication in Architecture, Art and Design 2016. Robot. Multi-Dimens. Print. Based Struct. Perform. 2016. [Google Scholar] [CrossRef] [Green Version]
  9. Ding, Y.; Dwivedi, R.; Kovacevic, R. Process planning for 8-axis robotized laser-based direct metal deposition system: A case on building revolved part. Robot. Comput. Integr. Manuf. 2017, 44, 67–76. [Google Scholar] [CrossRef]
  10. Dai, C.; Wang, C.C.L.; Wu, C.; Lefebvre, S.; Fang, G.; Liu, Y.J. Support-free volume printing by multi-axis motion. ACM Trans. Graph. 2018, 37. [Google Scholar] [CrossRef] [Green Version]
  11. de Backer, W.; van Tooren, M.J.L.; Bergs, A.P. Multi-axis multi-material fused filament fabrication with continuous fiber reinforcement. In Proceedings of the 2018 AIAA/ASCE/AHS/ASC Structures, Structural Dynamics and Materials Conference, Kissimmee, FL, USA, 8–12 January 2018. [Google Scholar] [CrossRef] [Green Version]
  12. Mueller, S.; Im, S.; Gurevich, S.; Teibrich, A.; Guimbretière, F.; Baudisch, P. WirePrint: Fast 3D Printed Previews. In Proceedings of the 27th Annual ACM Symposium on User Interface Software and Technology, Honolulu, HI, USA, 5–8 October 2014; pp. 273–280. [Google Scholar]
  13. Wu, R.; Peng, H.; Guimbretière, F.; Marschner, S. Printing arbitrary meshes with a 5DOF wireframe printer. ACM Trans. Graph. 2016, 35, 1–9. [Google Scholar] [CrossRef] [Green Version]
  14. Huang, Y.; Zhang, J.; Hu, X.; Song, G.; Liu, Z.; Yu, L.; Liu, L. FrameFab: Robotic Fabrication of Frame Shapes. ACM Trans. Graph. 2016, 35, 1–11. [Google Scholar] [CrossRef]
  15. Dörfler, K.; Hack, N.; Sandy, T.; Giftthaler, M.; Lussi, M.; Walzer, A.N.; Buchli, J.; Gramazio, F.; Kohler, M. Mobile robotic fabrication beyond factory conditions: Case study Mesh Mould wall of the DFAB HOUSE. Constr. Robot. 2019, 3, 53–67. [Google Scholar] [CrossRef] [Green Version]
  16. Chakraborty, D.; Aneesh Reddy, B.; Roy Choudhury, A. Extruder path generation for Curved Layer Fused Deposition Modeling. CAD Comput. Aided Des. 2008, 40, 235–243. [Google Scholar] [CrossRef]
  17. Yerazunis, W.S.; Barnwell, J.C., III; Nikovski, D.N. Strengthening ABS, nylon, and polyester 3D printed parts by stress tensor aligned deposition paths and five-axis printing. In Proceedings of the Solid Freeform Fabrication Symposium, Austin, TX, USA, 8–10 August 2016. [Google Scholar]
  18. Singamneni, S.; Roychoudhury, A.; Diegel, O.; Huang, B. Modeling and evaluation of curved layer fused deposition. J. Mater. Process. Technol. 2012, 212, 27–35. [Google Scholar] [CrossRef]
  19. Ahlers, D.; Wasserfall, F.; Hendrich, N.; Zhang, J. 3D printing of nonplanar layers for smooth surface generation. IEEE Int. Conf. Autom. Sci. Eng. 2019, 2019, 1737–1743. [Google Scholar] [CrossRef]
  20. Song, H.C.; Ray, N.; Sokolov, D.; Lefebvre, S. Anti-aliasing for fused filament deposition. CAD Comput. Aided Des. 2017, 89, 25–34. [Google Scholar] [CrossRef] [Green Version]
  21. Ezair, B.; Fuhrmann, S.; Elber, G. Volumetric covering print-paths for additive manufacturing of 3D models. CAD Comput. Aided Des. 2018, 100, 1–13. [Google Scholar] [CrossRef]
  22. Etienne, J.; Ray, N.; Panozzo, D.; Hornus, S.; Wang, C.C.L.; Martínez, J.; McMains, S.; Alexa, M.; Wyvill, B.; Lefebvre, S. Curvislicer: Slightly curved slicing for 3-axis printers. ACM Trans. Graph. 2019, 38. [Google Scholar] [CrossRef] [Green Version]
  23. Steuben, J.C.; Iliopoulos, A.P.; Michopoulos, J.G. Implicit slicing for functionally tailored additive manufacturing. CAD Comput. Aided Des. 2016, 77, 107–119. [Google Scholar] [CrossRef]
  24. Fang, G.; Zhang, T.; Zhong, S.; Chen, X.; Zhong, Z.; Wang, C.C.L. Reinforced FDM: Multi-axis filament alignment with controlled anisotropic strength. ACM Trans. Graph. 2020, 39. [Google Scholar] [CrossRef]
  25. Hu, Y.; Zhou, Q.; Gao, X.; Jacobson, A.; Zorin, D.; Panozzo, D. Tetrahedral meshing in the wild. ACM Trans. Graph. 2018, 37. [Google Scholar] [CrossRef]
  26. McMains, S.; Smith, J.; Wang, J.; Séquin, C. Layered Manufacturing of Thin-Walled Parts. In Proceedings of the International Design Engineering Technical Conferences and Computers and Information in Engineering Conference. American Society of Mechanical Engineers, Baltimore, MD, USA, 10–13 September 2000; pp. 379–387. [Google Scholar]
  27. Griffiths, J.G. Toolpath based on Hilbert’s curve. Comput. Des. 1994, 26, 839–844. [Google Scholar] [CrossRef]
  28. Sun, S.; Yao, Y.; Jiang, Y. A 3D Continuous Path Generation Method and Evaluation for Fused Deposition Manufacturing in Tissue Engineering. J. Biomater. Tissue Eng. 2019, 9, 273–282. [Google Scholar] [CrossRef]
  29. Zhao, H.; Gu, F.; Huang, Q.-X.; Garcia, J.; Chen, Y.; Tu, C.; Benes, B.; Zhang, H.; Cohen-Or, D.; Chen, B. Connected Fermat Spirals for Layered Fabrication. ACM Trans. Graph. 2016, 35. [Google Scholar] [CrossRef]
  30. Yao, Y.; Li, M.; Lackner, M.; Herfried, L. A continuous fiber-reinforced additive manufacturing processing based on PET fiber and PLA. Materials 2020, 13, 3044. [Google Scholar] [CrossRef]
Figure 1. Process of multi-axis continuous path FFF printing. The input mesh model is fabricated after path planning and platform printing.
Applsci 11 04825 g001
Figure 2. Customized extruder. (a) Printing thermoplastic material, the pinch roller engages with the motor. (b) printing the continuous fiber, the pinch roller is relaxed to prevent crushing the fiber. (c) Extrusion device that can be mounted on a robotic arm.
Applsci 11 04825 g002
Figure 3. Curve slice: surfaces within safe range will be flattened, then apply slicing and path generating on the deformed model. Finally, restore the toolpath to its original shape.
Applsci 11 04825 g003
Figure 4. Demonstration parts for continuous toolpath planning. (a) Two-branch. (b) Split up and down. (c) Multiple parts. (d) Structure with holes. (e) Curve structure.
Applsci 11 04825 g004
Figure 5. Nozzle orientation example for the spatial path.
Applsci 11 04825 g005
Figure 6. Multi-DOF FFF printing platform for multi-axis continuous path printing.
Applsci 11 04825 g006
Figure 7. Example for spatial printing sequence generation for continuous fibers. (a) Conventional printing sequence. (b) Scheduled printing sequence.
Applsci 11 04825 g007
Figure 8. The printing process of the global continuous path.
Applsci 11 04825 g008
Figure 9. Continuous fiber part printed using spatial Fermat spiral path on curve layer.
Applsci 11 04825 g009
Figure 10. Slice types of the test parts. (a) Curve slicing. (b) Z-direction. (c) X-direction. (d) Y-direction.
Applsci 11 04825 g010
Figure 11. Printed test parts with PLA.
Applsci 11 04825 g011
Figure 12. Tensile test results of different slice types. (a) Maximum tensile load. (b) Force-deformation curve.
Applsci 11 04825 g012
Figure 13. Tensile test. (a) Equipment for tensile test and flexural test. (b) Fractured parts in the tensile test.
Applsci 11 04825 g013
Figure 14. Flexural test results of different slice types. (a) Maximum flexural load. (b) Force-deformation curve.
Applsci 11 04825 g014
Table 1. Experiment data of tensile test.
Slice TypeMax Load (N)Max Deformation (mm)
Curve slicing750.474.934
Z-direction420.663.905
X-direction614.614.594
Y-direction280.892.552
Table 2. Experiment data of three-point flexural test.
Slice TypeMax Load (N)Max Deflection (mm)
Curve slicing135.705.825
Z-direction119.706.103
X-direction140.667.172
Y-direction102.275.215
Publisher’s Note: MDPI stays neutral with regard to jurisdictional claims in published maps and institutional affiliations.