Article

EvoBot: An Open-Source, Modular, Liquid Handling Robot for Scientific Experiments

1
Robots, Evolution and Art Lab (REAL), Department of Computer Science, IT University of Copenhagen, 2300 Copenhagen, Denmark
2
Department of Mechanical and Industrial Engineering, University of Toronto, Toronto, ON M5S 1A1, Canada; His work was carried out while he was employed at ITU
*
Author to whom correspondence should be addressed.
Appl. Sci. 2020, 10(3), 814; https://doi.org/10.3390/app10030814
Submission received: 13 October 2019 / Revised: 11 January 2020 / Accepted: 17 January 2020 / Published: 23 January 2020
(This article belongs to the Section Computing and Artificial Intelligence)

Abstract

:

Featured Application

Our modular liquid handling robot can be applied to automate scientific experiments in research labs, where tasks change often, and to carry out new kinds of experiments that cannot be done manually.

Abstract

Commercial liquid handling robots are rarely appropriate when tasks change often, which is the case in the early stages of biochemical research. In order to address it, we have developed EvoBot, a liquid handling robot, which is open-source and employs a modular design. The combination of an open-source and a modular design is particularly powerful because functionality is divided into modules with simple, well-defined interfaces, hence customisation of modules is possible without detailed knowledge of the entire system. Furthermore, the modular design allows end-users to only produce and assemble the modules that are relevant for their specific application. Hence, time and money are not wasted on functionality that is not needed. Finally, modules can easily be reused. In this paper, we describe the EvoBot modular design and through scientific experiments such as basic liquid handling, nurturing of microbial fuel cells, and droplet chemotaxis experiments document how functionality is increased one module at a time with a significant amount of reuse. In addition to providing wet-labs with an extendible, open-source liquid handling robot, we also think that modularity is a key concept that is likely to be useful in other robots developed for scientific purposes.

1. Introduction

Commercial liquid handling robots are often employed in biochemical laboratories in order to automate specific, repetitive tasks. Most commercial robots use the same technology as for manual liquid handling, air displacement pipettes or syringes, while a few others use positive displacement pipettes or non-contact dispensing methods; see [1] for a useful overview and [2,3,4] for recent applications of commercial robots in biochemical laboratories. For these robots, reliability, performance, and precision are of high priority, and typically, less priority is given to their flexibility and extendibility. As a consequence, commercial liquid handling robots are rarely appropriate when tasks change often. This is unfortunate as this is the case in the early stages of biochemical research, which then lacks automation support. As an answer to this problem, there is an emerging trend in research labs to build ad hoc robots for specific experiments based on open-source 3D printing technology (e.g., [5,6,7,8,9,10]). Similarly the commercial ones, do it yourself (DIY) robots also use air displacement pipettes or syringes. However, the open-source basis reduces the cost and makes it possible to design a robot tailored to a specific experiment [11]. While the price for commercial robots starts at around $10,000, the open-source robots are at least one order of magnitude cheaper [12]. The EvoBot that we are developing (see Figure 1) is similar to these DIY liquid handling robots but with a unique focus on reusability and extendibility. Thus, EvoBot is, due to its modular design, unlikely to require a major redesign if it is to be reused for different types of experiments compared to those for which it was originally designed.
The modular design allows a non-expert user to reconfigure the robot for specific experiments. A modular approach also increases the cost-effectiveness of liquid handling robots because with relative ease they can be reconfigured for many different types of experiments during their lifetime. Some commercial liquid handling robots also have a limited form of modularity because their work spaces can be reconfigured. Our approach extends the modularity to the moveable head itself allowing us to mount self-contained pipetting modules as well as sensor, grippers, etc., inheriting a significant number of advantages from modular robots [13]. To further increase the usefulness of EvoBot, we have made it open source, which allows researchers to build on our reliable platform and extend it with new modules for their specific experiment. In this paper, we expand the description and implementation of EvoBot, which has been previously introduced in [14]. In addition to previous results, new modules and a new standalone controller are shown, and the liquid handling performance is rigorously analysed. Finally, the paper shows how, by making few changes to EvoBot, we can apply it to new tasks such as nurturing microbial fuel cells, positioning an Optical Coherence Tomography (OCT) scanner precisely, and optimizing chemotaxis of droplets.
We hypothesise that this robot will enable labs with limited resources to setup experiments that run for short periods of time, change frequently, or are interactive. Hopefully, EvoBot will accelerate exploratory research at the frontiers of chemistry and life sciences.

2. EvoBot

In order to reach a reconfigurable and extendible liquid handling robot, we have employed a modular design building on research in the field of modular robotics [13]. A modular approach allows us to encapsulate complexity while providing a simple plug and play interface for users. Furthermore, this allows non-expert users to configure the robot for a wide range of experiments. To further extend the versatility of the robot, it has two different levels of modularity: layers and modules (see Figure 2). Thus, the robot consists of one structural frame with horizontal sockets, where different kinds of layers are attached by using a cam lever mechanism. These layers can be moved up and down in a few seconds. In its basic configuration, the robot has three layers: an actuation, an experimental, and an observation layer. This default configuration can be easily changed if required by the experiment.
The actuation layer has a head, which holds modules and can be moved in the horizontal plane by using two stepper motors. The head has 17 sockets where modules can be plugged in, but only 11 sockets can be populated at the same time as all sockets overlap the adjacent ones. Most of the modules that are plugged into the head are designed to perform an action on the experiments, but it is also possible to add sensor modules including cameras or scanners.
The experimental layer supports the objects of the experiment such as Petri dishes, microscope slides, or tubes. It consists of a transparent part laser cut from an acrylic sheet, which is held in place by aluminium profiles organised in a rectangle. The acrylic part can be customised according to experiments. In fact, there usually are holes to easily dispose liquid waste into a container below the experimental surface.
The observation layer is optional, and it can be the same as the actuation layer. This layer is below the transparent experimental layer, and any modules or devices placed here cannot get in physical contact with the contents of the experiment vessels. Therefore, most modules plugged into this layer are used to sense or observe the ongoing experiments. In addition, for some experiments the sensor does not need to move, consequently the observation layer does not require actuation. As an example, we often use a statically mounted webcam instead of a fully actuated observation layer. However, the robot was designed in order to be able to use an active head in this layer. One possible application for an active observation layer is to move a microscope. Specifically, a user was interested in studying spiking droplets in a similar experiment as the one reported in Section 5.5. In this case, they wanted to track moving oil droplets in a Petri dish. As the microscope has a very short field of view, the head of the observation layer could move the microscope module to observe the oil water interface of the droplet, even if the droplet was moving.
The second level of modularity is provided by modules that can be plugged into the layers. These modules add new functionality to the system. Currently, we have implemented three different kinds of modules: syringe modules, a pump-based dispensing module, and a heavy payload module. Their designs are shown in Figure 3.
The syringe module moves liquids with precision and is usually the most used module in experiments. The module can move the syringe up and down in addition to the movement of the plunger to dispense or aspirate liquids. Four syringes with different volumes are supported (100 µL, 1 mL, 5 mL, and 20 mL), as shown in Figure 3, but other syringes can easily be employed by adapting the syringe holder and the part that connects the plunger of the syringe with the shaft of the linear stepper. Furthermore, the syringes can be easily replaced by just loosening and tightening one screw. Consequently, replacing a syringe takes less than a minute.
The dispensing module is able to pump up to four liquids and is used to wash Petri dishes or dispense pure reagents into vessels. It is the most recently developed module. Therefore most experiments were performed without it. However, it allows researchers to run longer experiments as the module can refill the vessels from an external source. This feature is critical when working with volatile liquids.
The heavy payload module is designed to move heavy loads safely. The module is usually placed in the centre of the head and occupies all the central sockets of the head. Currently, we have used the heavy payload module to hold a 3D scanner and a universal paste extruder; see Section 5 on applications.
In addition, more types of modules are under development. However, the three modules developed are enough for a wide range of experiments as shown in Section 5 on EvoBot Applications.
The cost of EvoBot is low compared to commercial products. A typical configuration (EvoBot with one actuation layer and one experimental layer) is less than $500 and each syringe module costs $100.

3. EvoBot Implementation
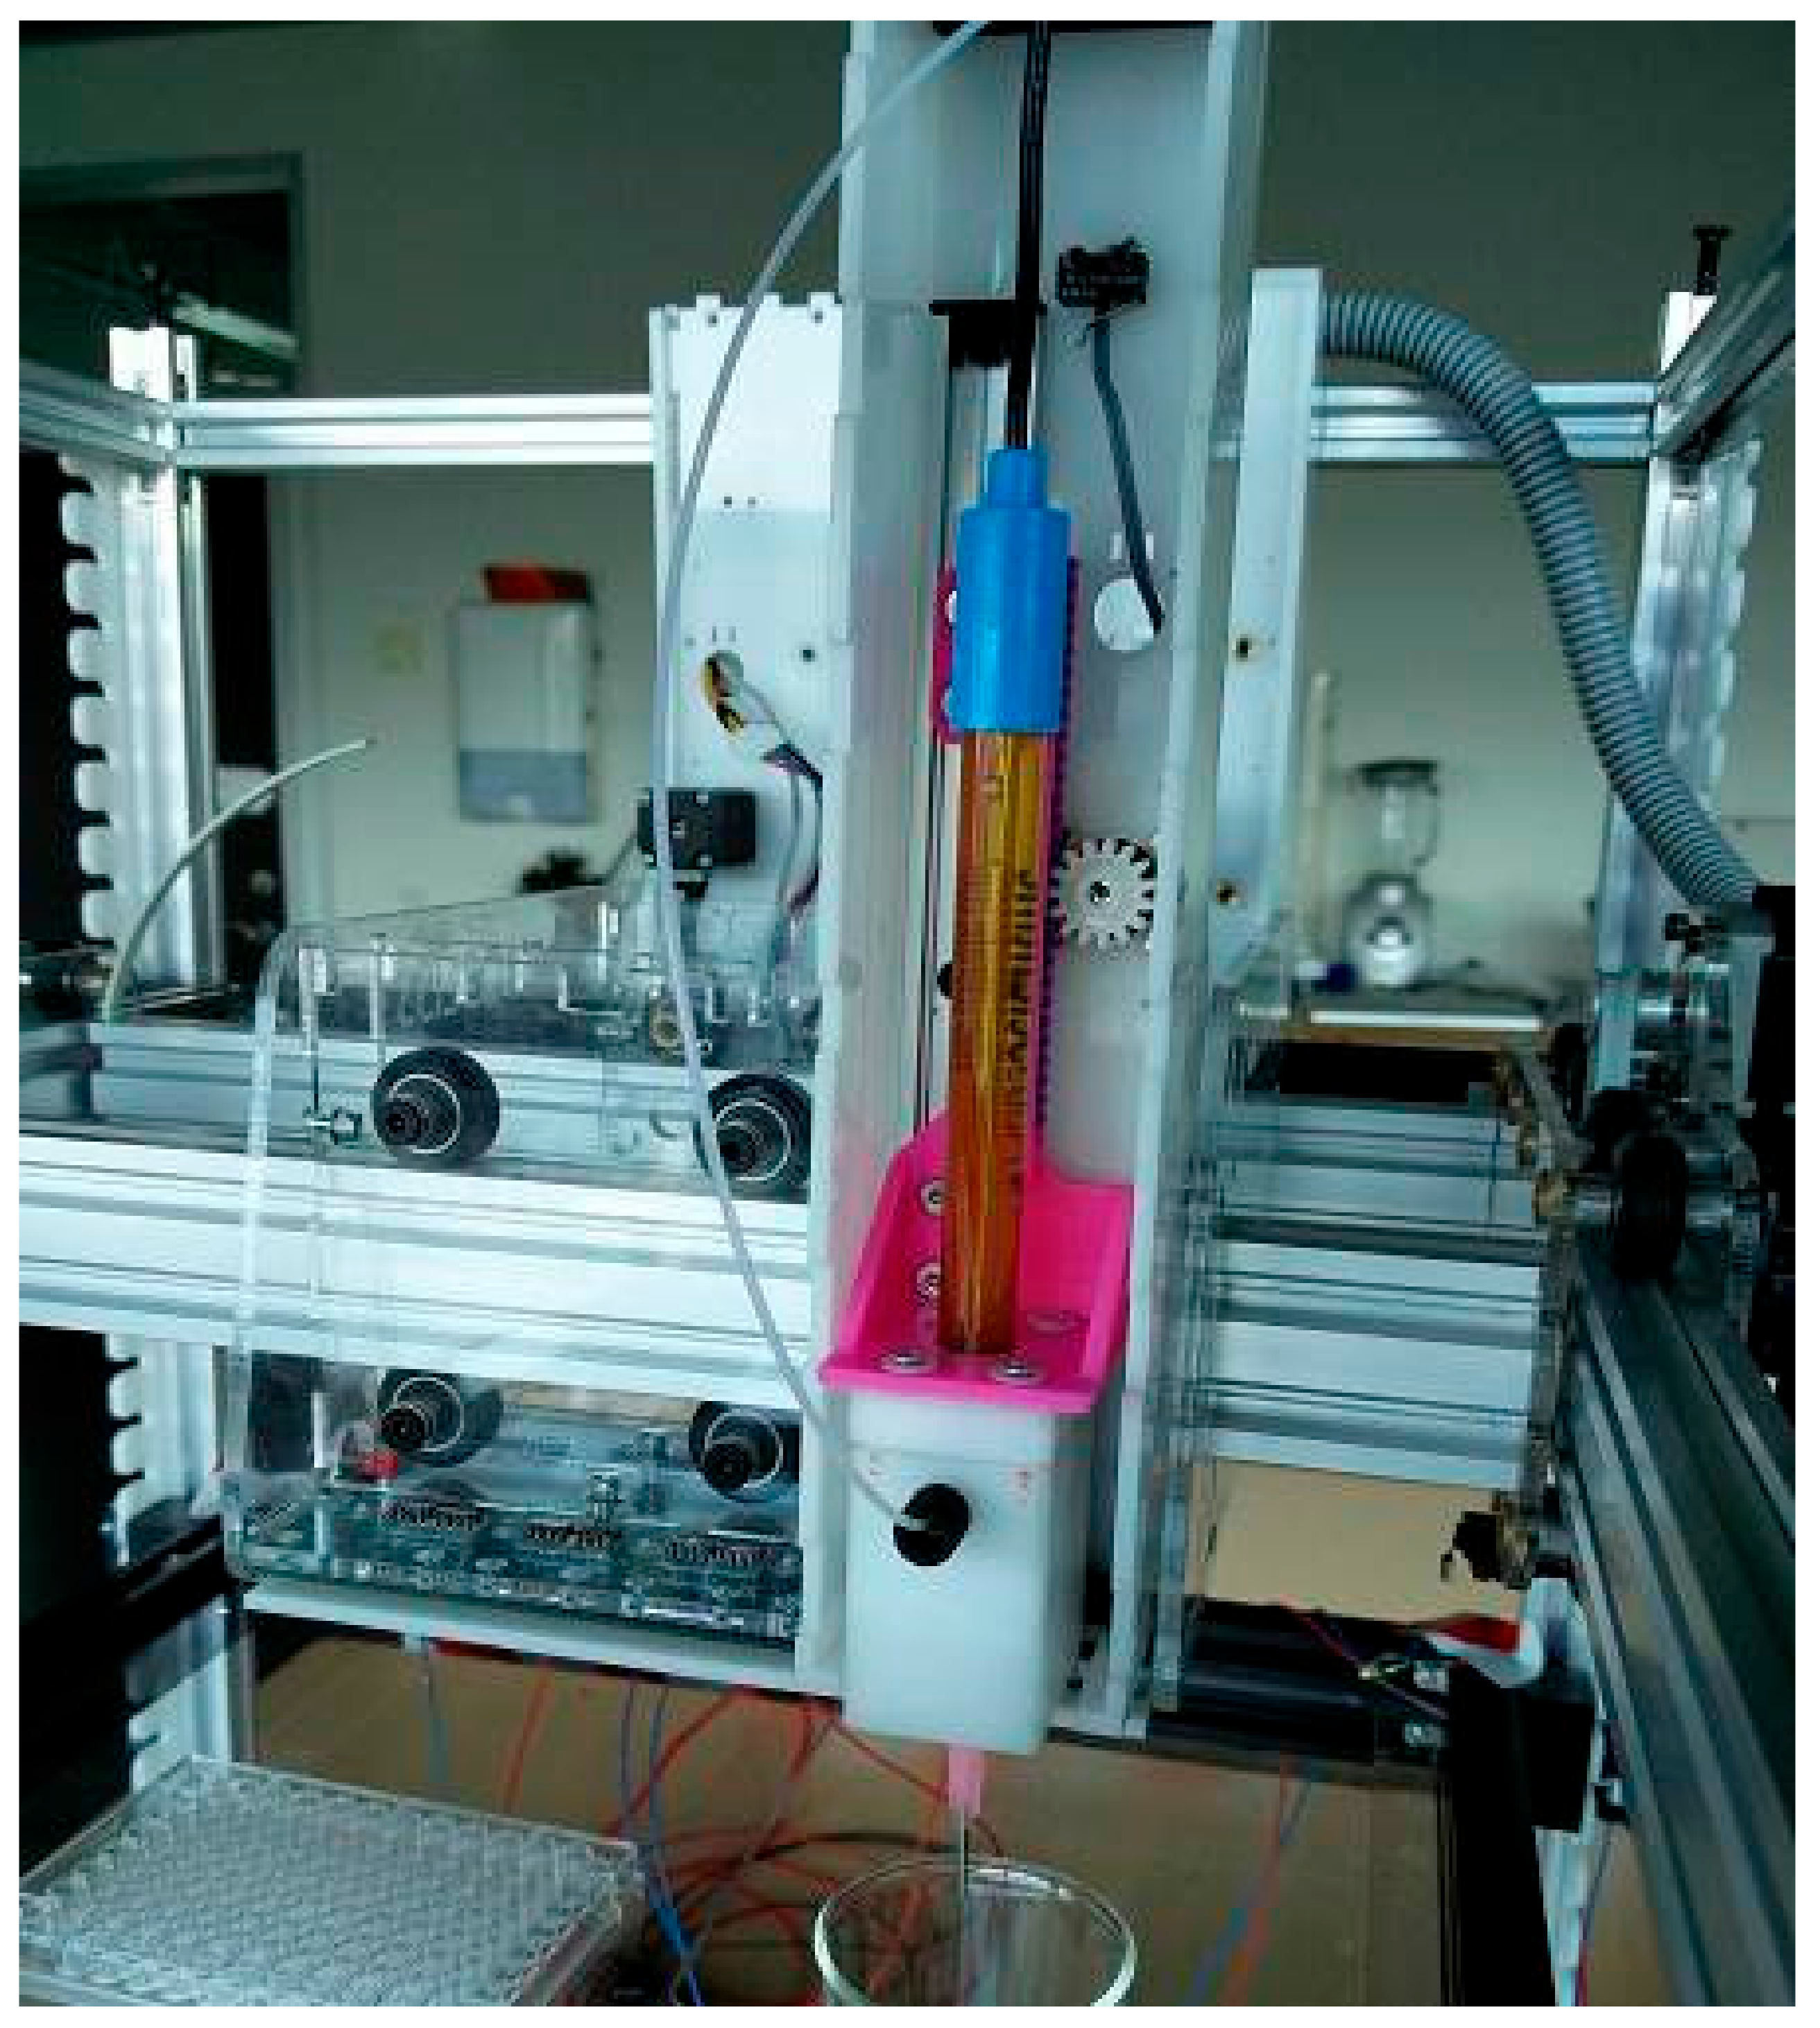
As outlined above, we are aiming for liquid handling robot technology that can be used by non-expert end-users in small laboratories to perform a wide range of experiments. To achieve this, our robotic system should have the following characteristics: to be reconfigurable, extendible, low cost and easy to build for a skilled person.
This section explains the implementation of the mechanics, electronics and software. The design files for the mechanical and electronic parts, bill of materials (BOM), and assembly instructions can be found in our repository (https://bitbucket.org/afaina/evobliss-hardware). The software repository contains the software and user guide (https://bitbucket.org/afaina/evobliss-software).

3.1. Mechanics

In order to create a high quality, low cost, and easy to build platform, we built the robot from off-the-shelf components and, where it was possible, components used by the open-source 3D printer community and therefore readily available. Another key principle was to favour parts which can be produced by laser cutting or 2D milling large sheets and 3D printed parts over 3D milling or injection moulding because these techniques are usually available in small workshops.
Another key principle was to favour laser-cut parts over 3D printing. The reasons being lower production time and high-quality of the produced parts in comparison to the elements produced through 3D-printing. However, we did use 3D printed parts outside the core mechanical structure primarily inside the syringe module (to be described later) due to geometrical flexibility afforded by 3D printers. Additionally, most parts have brass threaded inserts to avoid nuts and make the assembly easier. Few other techniques, like drilling, countersinking, or tapping, are used rarely.
The frame consists of two vertical and rectangular sides on which layers can be mounted horizontally. It measures 600 × 400 × 600 mm, but its size can be easily extended up to 1500 mm, which is the maximum length of commercially available aluminium profiles. Aluminium profiles and Polyoxymethylene (POM) laser cut parts are used to build both the frame and the layers.
To simplify the design, the aluminium profiles are used as linear guides. These profiles have a V slot where wheels with bearings can roll [15]. The carriages and the head are assembled by using laser cut sheets and off-the-shelf components. Movement is achieved by stepper motors with a pulley on the carriages and a fixed timing belt on the profiles. This adds extra weight but reduces the number of components, simplifies the design and makes it possible to have multiple carriages on the same rail.
The mechanical connection between the modules and the head is made by two grooves on the head that match with two hooks of the modules. Two countersunk holes in the head with matching screws on the module aid the insertion of a module; see Figure 4.
The syringe module has two degrees of freedom. Its main mechanical components are shown in Figure 5a. One Nema 8 stepper motor with a pinion-rack mechanism moves the syringe up and down and a linear non-captive stepper motor (25NCLA-B01) moves the plunger of the syringe. In order to save space inside the module, a linear plain bearing and a rail (Drylin N17, Igus GmbH, Köln, North Rhine-Westphalia, Germany) are used to guide the movement of the syringe. The plunger movement does not need a linear guide for the small syringes as the plunger in the syringe and the linear stepper motor provide enough guidance. In the 20 mL syringe, the friction force of the plunger combined with the longer distance between the motor and plunger can cause problems in some occasions. Therefore, a linear guide was designed with aluminium rods and plain bearings.
The dispensing module has only one degree of freedom and uses the same Nema 8 stepper motor, pinion-rack mechanism, and linear bearing as in the syringe module to move a connector up and down. Liquids are dispensed by using off-the-shelf peristaltic pumps. The pumps are placed on the side of the robot and controlled directly with the electronics of the robot; see Section 3.2, Electronics. Tubes transport the liquids from the pumps to the connector in the dispensing module, where there are four nozzles to dispense the liquids. The connector allows tubes with different properties (rigid or flexible, different sizes) to be attached using the right fittings. On the other side of the connector, Luer fittings are employed, which make it possible to attach different needles or dispensing tips.
The heavy payload module has a completely different design compared to the previous modules; see Figure 5b. The module is typically plugged into the centre of the head in order to distribute the weight of the load evenly. However, if the load is not too big, it is also possible to plug it onto the side of the head that does not have the motor. A lead screw mechanism, actuated by a Nema 17 motor or manually by a crank, prevents the load from falling in case of power failure. The V-slot rails and wheels with ball bearings, which are also employed in the actuation layer, are used as linear guides. A custom 3D printed part joins a specific payload to the module.

3.2. Electronics

Figure 6 shows a schematic view of the electronics of EvoBot and its different printed Circuit boards (PCBs). The core of the electronics is based on electronics used in the open-source 3D printer community. Specifically, we use the Arduino MEGA 2560 R3 with the shield RAMPS v1.4. This provides us with a mature and cheap electronics platform to build on, but more importantly allows us to build on existing software for open-source 3D printers.
To use the minimum number of components, each module contains a small printed circuit board (PCB) with the electronics to control the actuators and sensors of the module. Currently, the three types of modules have the same PCB, which contains up to two stepper drivers with SPI communications (L6470). In order to produce different boards for each type of module, we solder one or two stepper drivers on the PCB.
The connection between the Arduino and the electronics on each module is done through two large PCBs on the head of the robot. These PCBs contain 17 spring connectors, one per socket on the head, that automatically create an electrical connection with the module PCB when a module is inserted into the head of the robot. These connectors provide power and an SPI bus with two chip select (CS) and a reset line. In order to reduce the number of lines between the Arduino and the head boards, there are two expander ports with I2C communications on each head PCB to generate the CS and reset lines for all the sockets. Using this approach, only a power cable and an 8-way ribbon cable with the I2C and SPI buses are necessary to manage the 22 motors of the 11 syringe modules, which can be placed on the head.
Thus, the Arduino can detect if a socket is populated, the type of module, and it can control the module by sending SPI commands: If two stepper drivers are found, then the module is recognized as a syringe module. If there is only the first stepper driver, then the module is a dispensing module (or any other module built with the same vertical actuator). If only the second driver is there, then the module is a heavy payload module. It is important to note that the robot configures the drivers according to the type of module it finds. For example, the plunger drivers need a different configuration than the heavy payload module as they used different motors and mechanisms. Using the current electronics, it is not possible to recognize more than three types of modules, but we can extend the system by building new module boards with SPI communications.
Compared to the previous version of EvoBot [14], we have added a standalone controller based on a Raspbeery Pi 3. This embedded computer was chosen due to its powerful Graphical Processing Unit (GPU), and a Camera Serial Interface Type 2 (CSI-2), which can be used to process video in real time (see Performance Characteristics). The standalone controller also allows us to provide all necessary software and thus eliminate the need for users to manage and update the software. Furthermore, the dedicated controller implements a web server that makes it possible to monitor experiments remotely, which is important for long running experiments.

3.3. Software

On the robot side, the Arduino runs a modified version of the Marlin firmware, which is widely used to control 3D printers using G-code. We extended Marlin with new commands for interaction with the modules. Raspbian, a Debian-based Operating System, is installed on the Raspberry Pi, which sends the G-code commands to the robot through a USB connection. An application programming interface (API) gives users access to control the robot. This interface developed in Python is kept simple to encourage users to customize the programs that we provide for their experiments. Users can interact directly with the robot using a graphical user interface (GUI), or they can run programs directly on the Raspberry Pi, as explained in [14]. In this paper, we will focus on the new software improvements: a web interface to control the robot and a visual feedback API.
The robot can be programmed in two different ways: using the Raspberry Pi as a standard computer or using a web interface from a remote device. In the first method, we have installed the operating system Raspbian Jessie with Pixel to provide a GNOME (GNU Network Object Model Environment) for users. Therefore, Raspberry Pi can be used as a computer by connecting a touch screen and keyboard. The second approach allows users to program the robot through a web interface on an external device of their choice without installing any software. Therefore, users can run and monitor experiments remotely. In addition, using a cloud-based interface hosted on Digital Ocean, users can choose on which robot to run the experiment. Furthermore, multiple users can monitor or work on the same experiment collaboratively. In addition, users can access the latest version of the code base without pulling the repository, and saved experiments can be shared among different users and be accessed regardless of the machine running the experiment. The web interface has been implemented using modern software technologies, including Docker, MEAN stack (MongoDB, Express, AngularJS 2, NodeJS), and web sockets.
The computer vision system is designed to provide visual feedback from a camera module in the observation layer. This allows us to detect changes in the experiment and react to them. As an example, it could, in combination with a universal indicator, be used to measure the pH of a sample. Currently, the computer vision system is used for artificial chemical life experiments as described in detail in the Section 5 on EvoBot Applications. There, the webcam is used to track colour blobs in real time and, after an initial calibration, transform them from the camera coordinate system to the coordinate system of the robot. The position, size, colour, and other properties of each droplet are available through the API.

4. Performance Characteristics

In order to facilitate comparison of liquid handling robots, the main characteristics of the robot have to be evaluated in different experiments.

4.1. Mechanical Performance

Speed and positioning performance tests were already reported in [14], and their results are summarised in Table 1. In this paper, liquid handling and the standalone performance are analysed more comprehensively.

4.2. Liquid Handling Performance

Regarding the liquid handling performance, the ability to change the syringe inside the syringe module allows the robot to maintain its precision across a large range of volumes. Figure 7 shows the results of a gravimetrical test for different volumes by using 1 mL, 5 mL, and 20 mL syringe modules. These syringes are disposable plastic syringes that are available at local pharmacies. While we have built a syringe module that can carry a 100 µL syringe (80601, Hamilton), we have not performed accuracy tests with it as it is not readily available and costly.
These tests were performed through non-contact dispensing using distilled water. Thus, the tip of the needle does not touch the liquid when it is dispensing the sample in order to avoid cross contamination. In every test, a small volume of air is aspirated and dispensed with the liquid to minimize the volume of liquid that remains on the tip of the needle after dispensing, a technique which is called leading air gap. The leading air gap was fixed for each syringe size: 100 µL for the 1 mL syringe, 300 µL for the 5 mL syringe, and 2 mL for the 20 mL syringe. The tests were performed automatically using a scale with serial connection (PCB 250-3/RS, Kern and Sohn GmbH, Balingen, Baden-Württemberg, Germany) and controlling the robot through our API (moving the plunger and syringe up and down and the head of the robot). For all the aspirations and dispenses, the robot moves the plunger with a trapezoidal speed pattern with maximum speed of 8.34 mm/s and acceleration and deceleration of 3 mm/s2. Two different diameters of the needles were used (0.96 mm and 1.7 mm). Besides that, the vertical speed is constant for all the experiments; the flow rate is different as the diameter of the plunger varies for each syringe size. As the flow rate in the 20 mL syringe is too high, the smaller needle was observed to produce splashes. Therefore, only the large needle was used in the experiments with the 20 mL modules.
The results indicate that the liquid handling accuracy of the syringe modules depends on the needle used, but they fulfil the liquid handling standards defined by the ISO8655 if the right needle diameter is used. Basically, the 0.96 mm needle should be used with the syringes of 1 mL and 5 mL, and only use the 1.7 mm needle with the 20 mL syringe. This diameter depends on the size of the syringe and the volume to dispense, which can be found in Figure 7. In contrast, all the tests fulfil the ISO8655 standard if the tip of the needle is in contact with the liquid when dispensing, independent of the size of needle. Overall, the liquid handle precision is adequate for our current applications, and the robot is able to perform a large variety of experiments automatically, see EvoBot Applications.

4.3. Computational Performance

The Raspberry Pi controller can handle the liquid handling tasks without any degradation of its performance. However, the performance drops significantly when the visual feedback is used with a USB camera. To fix this, we used Pi Foundation’s native camera-module v2 connected through Camera Serial Interface, and we overclock the Raspberry Pi when the CPU usage is above 75%. Experiments show that the average frame processing rate per second (fps) is 11.3 fps for a 2.5 GHz Core-i7 MacBook Pro and 10.3 fps for the Raspberry Pi when using demanding computer vision techniques.

5. EvoBot Applications

Our claim is that EvoBot is well suited to be used for performing new scientific experiments as it is reconfigurable and extendible due to its open-source and modular design. In order to support this claim, we will go through the current applications of EvoBot. A summary of the applications of EvoBot is provided below, while the uses of modules are shown in Table 2.
The applications demonstrate the reuse of modules across applications as well as the incremental extension of EvoBot with new types of modules. The applications also differ significantly in terms of complexity and duration.

5.1. Static Liquid Handling

Liquid handling applications often involve moving liquids between vessels at specific, static positions (Video S1). Representative examples are moving liquid from a Petri dish to a well plate or placing droplets on a surface according to a specific pattern as shown in Figure 8a,b. EvoBot with syringe modules mounted on its head can easily be programmed for these types of tasks through the application programming interface by supplying relevant parameters (locations, syringes to employ, and volumes to dispense).

5.2. Static Scanning of Biofilms

The functionality of EvoBot can be extended by developing new modules that can be mounted on the head of EvoBot. This became relevant in an application where researchers at Karlsruhe’s Institute of Technology wanted to scan the growth of biofilm over a large area using an Optical Coherence Tomography (OCT) scanner (GANYMEDE, Thorlabs GmbH, Bergkirchen, Bavaria, Germany), which only covers a small area (10 × 10 × 2.14 mm3) and weighs 1.2 kg. We mount the scanner on the head using the heavy payload module as shown in Figure 8c. As the experiment needs several repetitions, the Evobot can automatically scan the biofilm at fixed time intervals, as it can be seen in Figure 8d and Video S2. In addition, this application also used the static liquid handling functionality to feed the microbes of the biofilm at set intervals. The setup is used today to periodically scan and feed several large biofilm structures growing in parallel [16].

5.3. Reactive Nurturing of Microbial Fuel Cells

Interfacing to an external voltage measurement system and building on the static liquid handling functionality described above researchers at University of West of England were able to extend EvoBot to reactively nurture microbial fuel cells (MFCs) [14,17]. MFCs are able to convert organic material into electricity and consist of two chambers: one contains the microbial community and organic material and the other water [18]. The microbes consume the organic material and use it up over time, which results in a drop in voltage output. EvoBot feeds the MFCs in response to the voltage falling below a threshold. Similar to the previous application, the MFCs are also hydrated at set intervals. A video of this application is in Video S3. EvoBot has been nurturing nine MFCs for 2 months systematically, which would not have been possible without automation.

5.4. D Printing MFC Components

With the aim of building monolithically 3D printed MFCs, UWE researchers are using EvoBot to produce 3D printed parts for an MFC (Video S4). Carbon electrodes can directly be extruded with the syringes modules as the material is fluid [19]. For cation exchange membranes, an open source paste extruder has been built to print new membrane materials like soft-clay. The extruder was placed in the heavy payload module and the 3D printing functionality of the robot was used. The main findings were that MFCs with the printable materials produce up to 50% more power than those using conventional cation exchange membranes and that printable materials can significantly reduce the overall costs [20].

5.5. Computer Vision Based Droplet Experiments

Researchers at the University of Trento study chemotactic behaviour of moving droplets. In order to automate these types of experiments, we extended the static liquid handling system described above such that it could take input from the camera module. This allows us to place the chemical attractant at fixed relative positions with respect to the moving droplet. We have shown that using EvoBot instead of manual liquid handling improves the quality of the resulting experimental data [21] and that the chemotactic droplets can be used to transport live cells under sterile conditions [22].
We have furthermore optimised the chemotactic behaviour investigated above using a combination of EvoBot and machine learning. The aim is to evolve the droplet system towards desired outcomes (chemotaxis) by running an optimization experiment, where two different continuous variables or parameters are adjusted. An evolutionary algorithm was chosen as the optimization method, the Covariance Matrix Adaptation Evolution Strategy (CMAES), which produces good results with a limited number of evaluations [23]. The DEAP library, [24], provides an implementation of the CMAES algorithm in Python, which made it straight forward to use it with our Python-based API. The parameters to optimize are the molarity and the pH of the aqueous decanoate solutions, which are represented in or algorithm as a vector of two real number {a,b} ∀ a,b ∈ [0,1] that represents the pH and the molarity of the system(pH ∈ [7,12.3]; molarity ∈ [5,20] mM). The droplet composition and volume (30 µL of 1-decanol droplet) and the salt gradient created (300 µL of 3.5 M NaCl) are fixed. In order to create the desired pH and molarity, seven vessels were placed on the experimental layer of EvoBot with solutions of 20 mM and pH ranging from 7 to 13, Figure 9a. A simple routine was developed to create a specific recipe by mixing two correlative pH solutions and water. In order to facilitate a fast setup, a custom experimental layer was developed with holes for the vessels and a template that helps to place 8 Petri dishes at specific locations. Thus, a simple routine was written, which chooses a clean Petri dish, dispenses the water and two solutions of decanoate, and mixes the liquid in order to achieve the desired concentration and pH. Then, the robot places a 1-decanol droplet and the salt, and tracks the droplet for 1 min, which can be seen in Figure 9b and Video S5. After all the Petri dishes have been used, the robot waits until a user replaces them and refills the vessels with reagents.
The robot automatically evaluates each experiment based on a fitness function, as shown in Equation (1) and Figure 9c:
f i t n e s s = i n i e n d f i N u m b e r F r a m e s + 1   ,
where f i is the movement of the droplet between 10 frames, projected on the vector d r o p l e t s a l t ; ini is the first frame where the droplets leaves the safe area (circle around the starting position of the droplet and radius = 7.9 mm) and end the number of frame when the experiment ends.
We ran preliminary tests and we found that the system is very noisy, and the droplets are affected by several factors that we did not take into account initially. To address this, we modified our setup. First, a lid module was quickly built by attaching a small servo with a lid at the end of a dispensing module. The servo was directly connected at the RAMPS board and controlled with standard M-codes provided by the Marlin firmware. This lid module covers the Petri dishes with a lid to reduce the air flows, evaporations, and spurious water movements and convective flows caused by the movement of the head (which is not needed with this module). Additionally, it provides a clear background for the images. Second, we also limited 1-decanol dissolution by first saturating the aqueous phases with 1-decanol prior to performing a chemotaxis experiment. In addition, each recipe is tested four times to reduce the noise and the fitness is the median of the four tests. The initial population was randomly generated from a normal distribution centred at (0.5, 0.5) and standard deviation of 0.15. A population of 8 recipes is tested in every generation, and then, CMAES produces a new population, which is tested again. If any of the new recipes are out of bounds (a,b ∉ [0,1]), the algorithm sets the out of bound value to the closest feasible value (0 or 1). The results are shown in Figure 9d. We can observe how that the median of the recipes increases over the generations and a recipe that causes a chemotactic movement (10 mM and pH 10) is found in generation 4. This experiment shows the potential of using robots in combination with machine learning to optimize chemical systems.

6. Discussion

6.1. Open-Source Hardware

Open-source hardware has started to revolutionise wet labs in recent years. Numerous devices have been proposed in order to reduce the costs and make tools accessible [8,9,10,11,25,26,27]. Most of these works are based on a combination of 3D printing and open-source electronics, which reduces the complexity involved in building the devices. While this is a general trend, it creates new advantages and challenges that should be taken into account.
A key advantage of open-source hardware is that users can customize their robot to fulfil specific requirements. Previous open-source liquid handling robots were designed to automate only one kind of experiment. These can still be modified by adding sensors or other devices, but this requires significant modifications [9], which in most cases will reduce their liquid handling abilities. In contrast, modifications to EvoBot are made through new modules. EvoBot has a simple software and mechatronic interface. Therefore, it does not require deep knowledge of the robot to interface a new module to it. As an example, one of our computer science students was able to develop a pH meter module just by modifying the design of the dispensing module; see Figure 10. The part that holds the different nozzles has been redesigned to hold a pH meter in a chamber with two connectors. At the bottom connector, a luer tip adapter has been installed to be able to plug a needle to aspirate and dispense liquids. The second connector allows us to connect the chamber to a peristaltic pump. Therefore, the pH can be measured by aspirating the sample through the needle until reaches the chamber with the pH meter. Once the sampled is measured, the robot can discard the sample and rinse the chamber with an electrode filling solution to keep the pH electrode moist.
Another interesting advantage of EvoBot’s design is that it makes it possible to customize the size of the robot simply by cutting the aluminium profiles to the required lengths; all the remaining parts do not change. Thus, some users built a small robot to fit inside a fume hood, while others built a robot with a large workspace.
One challenge for open source hardware is that it requires a workshop to be able to build the device. We have put effort into making it as easy as possible for end-users to produce and assemble EvoBot. We have avoided complex machining techniques, and the parts can be bought off-the-shelf, or they can be produced with simple rapid prototyping tools such as 3D printers, laser cutters, milling machines, and saws. Most university laboratories and fablabs have them, but the production could also be easily out-sourced if desired. In house production of the custom electronics of EvoBot can be more challenging, but most of the electronics are reused from the 3D printing community. Thus, only two kinds of PCBs should be fabricated. The bare PCBs can be ordered from a manufacturer, and the components can be mounted with a hot air rework station or using an open source reflow oven, built by modifying a toaster oven, as it was in our case.
In addition to the workshop, it is also necessary that the person that builds the robot has some skills. All seven EvoBots built so far were assembled at the IT University of Copenhagen by the authors and two research assistants. However, the fact that you need to build your own robot is a challenge for most people without mechatronic skills. In order to tackle this issue, we have provided good documentation in our repositories which includes, among others, a bill of materials and design files, a well-documented building manual, and a wiki with detailed tutorial and information about the robot. Additionally, we have also provided a page on Thingiverse that gives information on how to avoid the most difficult parts by externalizing them (https://www.thingiverse.com/thing:2776125). Basically, this allows a user to order the parts ready to assemble (laser cut parts, 3D printed parts and custom electronics). However, this does not solve the entire problem as there are still a few relatively complex operations for a lay person: machining some parts (countersinking), add threaded inserts, prepare electric connectors or general troubleshooting in case that something does not work. The skills and technologies required to build EvoBot are similar to the ones required to build a 3D printer. Therefore, interested persons without the necessary skills can employ a lot of resources that are available online.
Another drawback of open-source hardware is that it usually needs to be calibrated to guarantee that the performance meets the requirements of the application. Specifically, liquid handling performance can be tested, if the volumes to test are large, by using an accurate scale. For small volumes, the gravimetrical method is complex as it needs analytical scales to measure the weight with enough precision, special procedures to avoid vibrations and to take into account the evaporation. Thus, other techniques, like photometry, are more suitable for small volumes.
Finally, lack of support is another important issue in open source hardware. Commercial robots have troubleshooting guides and customer support, whereas forums provide an effective way to give support between users in large open source communities. However, support is very limited in small open source communities. EvoBot has only a small wiki addressing the most common problems, but we provided support for our partners during the Evobliss project. In our case, the main problem was that it is required to program the robot to be able to use it (we offer a simple GUI to control EvoBot manually, but it is slow compared to manual pipetting). As only few biologists and chemists can program proficiently, we provided basic templates for their experiments. Even with these templates, some of our partners struggled to adjust the parameters of the programs (like the position and height of the vessels) or to make basic modifications to these programs. Finding the coordinates for each vessel is time consuming and recalibration of the vessels’ heights is required every time that the actuation or experiment layer is moved up or down. Another issue is that they usually need to integrate specific hardware for their experiments, which was not supported by our API. For example, we had to integrate in our API voltage data loggers for the MFC experiment. In addition, the setup of experiments carried out in physical machines is time consuming. If there is an error in the middle of an experiment, the user needs to stop the robot and restart the program. Sometimes, it can be possible to continue the experiment from where it failed, but the program has to be prepared for that, or the user should be able to implement the needed changes in the code. Therefore, users often start the program from the beginning and setup the robot again (clean or replace vessels and containers, refill liquids, etc.) In the droplet experiment, the robot saved the fitness of each recipe in a text file, so we could resume the program easily. Regarding mechanical issues, the syringe modules can get stuck if the plunger pushes the bottom of the syringe. This deforms the 3D printed part that holds the plain bearings, which increases the friction force. In most of the cases, the error came from reusing the code of a 1 mL syringe with a 5 mL syringe, which has a shorter stroke for the plunger.

6.2. Cost

As we stated previously, our robot is low cost. A detailed analysis of the costs of its components can be found in the hardware repository. However, a rough estimate of a typical configuration (EvoBot with one actuation layer and one experimental layer) is less than $500 and each syringe module costs $100. Of course, this is only the cost of the components; the assembling, testing, and calibrating time should also be considered. Our robot can be built and tested in two weeks. We built ours by hiring a research assistant, which costs around $2000 in Denmark. However, this cost depends on the country were the robot is built. While the cost of commercial liquid handling robots starts at around $20,000 for the most basic platforms and rises quickly for the more advanced ones, the cost of our platform is comparable to other open hardware liquid handling robots; see [12] for a price comparison. For example, OpenTrons provides a fully assembled liquid handling robot platform for $4250 and $1500 for two pipettes. However, EvoBot is probably cheaper as it uses disposable syringes instead of pipettes, which are more expensive. Except for [6], which uses expensive commercial syringe pumps, the cost of open source liquid handling robots remains at least one order of magnitude lower than the commercial versions.

6.3. Modularity

While modularity has important advantages, it also has some disadvantages. One disadvantage is that it is more expensive and takes more time to build EvoBot compared to a fixed (non-modular) robot. For example, we have to build a case for each syringe module in order to support its components, whereas a non-modular robot could have shared the same support structure for all the syringes. Another issue is that the modules occupy more space than an integrated solution would. However, for EvoBot, the advantages outweigh the disadvantages. Firstly, users only need to build the modules required for their experiments. In addition, the most expensive parts of the modules (stepper motors and drivers) are only assembled in the module where they are used, while the parts common to all modules are cheap. Finally, the space that a modular solution needs is reduced because you only need space for the modules required for your application. This is in contrast to an integrated solution where all functionality is integrated despite not being used for all experiments.

6.4. Future Work

In the future, more modules are envisioned such as gripper, extruder for printing reaction vessels, magnetic stirrer, or thermal imaging. However, most of these functionalities could be achieved by integrating commercial systems into the robot. They provide robust and well tested systems and, at the same time, the effort to develop them is minimised.
One major issue is that most chemists or biologists do not have programming skills. We have provided a lot of examples and some templates to perform the experiments requested by our partners. Nevertheless, they are only a small subset of the possible experiments. Currently, we are working towards developing an easy to use software interface that allows users to program the robot without writing code.

Supplementary Materials

The following are available online at https://www.mdpi.com/2076-3417/10/3/814/s1. Video S1, Static liquid handling; Video S2, Static scanning of biofilms; Video S3, Reactive nurturing of Microbial Fuel Cells; Video S4, 3D printing components for MFCs; Video S5, Computer vision-based droplet experiments.

Author Contributions

Conceptualization, K.S.; methodology, A.F.; software, K.S., A.F., and B.N.; validation, A.F. and B.N.; writing—original draft preparation, K.S. and A.F.; writing—review and editing, A.F., K.S., and B.N.; supervision, K.S.; funding acquisition, K.S. All authors have read and agreed to the published version of the manuscript.

Funding

This research was funded by E.U. Future and Emergent Technologies, grant number 611640 (EVOBLISS).

Acknowledgments

The authors would like to thank the members of the EVOBLISS consortium who provided input for the application section and Carlotta Porcelli who performed the droplet experiment.

Conflicts of Interest

A.F., B.N., and K.S. are authors of patent application PCT/DK2017/050079. A.F. and K.S. are co-founders of Flow Robotics A/S. The sponsors had no role in the design of the study; in the collection, analyses, or interpretation of data; in the writing of the manuscript; or in the decision to publish the results.

References

  1. Kong, F.; Yuan, L.; Zheng, Y.F.; Chen, W. Automatic liquid handling for life science: A critical review of the current state of the art. J. Lab. Autom. 2012, 17, 169–185. [Google Scholar] [CrossRef] [PubMed]
  2. Groschl, M.; Markus, A.; Simone, L. A liquid handling robot for robust and reproducible preparation of standard and quality control samples in bioanalysis. Adv. Robot. Autom. 2017, 6, 160. [Google Scholar] [CrossRef] [Green Version]
  3. Storch, M.; Haines, M.C.; Baldwin, G.S. DNA-BOT: A low-cost, automated DNA assembly platform for synthetic biology. Unpublished. 2019. preprint available at BioRxiv: 832139. [Google Scholar]
  4. Ortiz, L.; Pavan, M.; McCarthy, L.; Timmons, J.; Densmore, D.M. Automated robotic liquid handling assembly of modular DNA devices. J. Vis. Exp. 2017, 130, e54703. [Google Scholar] [CrossRef] [PubMed]
  5. Gutierrez, J.M.P. Automatic liquid handling for artificial life research. Master’s Thesis, University of Southern Denmark, Odense, Denmark, 2012. [Google Scholar]
  6. Gutierrez, J.M.P.; Hinkley, T.; Taylor, J.W.; Yanev, K.; Cronin, L. Evolution of oil droplets in a chemorobotic platform. Nat. Commun. 2014, 5, 1–8. [Google Scholar] [CrossRef] [PubMed] [Green Version]
  7. Hanczyc, M.M.; Parrilla, J.M.; Nicholson, A.; Yanev, K.; Stoy, K. Creating and maintaining chemical artificial life by robotic symbiosis. Artif. Life. 2015, 1, 47–54. [Google Scholar] [CrossRef] [PubMed]
  8. Muller, A.; Amaldass, A.; Yanev, K.; Rasmussen, S. Do it yourself ¨(diy) liquid handling robot for evolutionary search exploration. In Proceedings of the European Conference on Artificial Life, York, UK, 20–24 July 2015. [Google Scholar]
  9. Zhang, C.; Wijnen, B.; Pearce, J.M. Open-source 3-D platform for low-cost scientific instrument ecosystem. J. Lab. Autom. 2016, 21, 514–525. [Google Scholar] [CrossRef] [PubMed] [Green Version]
  10. Barthels, F.; Barthels, U.; Schwickert, M.; Schirmeister, T. FINDUS: An Open-Source 3D Printable Liquid-Handling Workstation for Laboratory Automation in Life Sciences. SLAS Technol. Transl. Life Sci. Innov. 2019. [Google Scholar] [CrossRef] [PubMed]
  11. Pearce, J.M. Open-Source Lab: How to Build. Your Own Hardware and Reduce Research Costs; Elsevier: Amsterdam, The Netherlands, 2014. [Google Scholar]
  12. Opentrons Labworks Inc. Introducing Automation to Your Lab. Available online: https://opentrons.com/publications/ultimate-guide-to-choosing-a-pipetting-robot-for-lab-automation.pdf (accessed on 23 January 2020).
  13. Yim, M.; Shen, W.-M.; Salemi, B.; Rus, D.; Moll, M.; Lipson, H.; Klavins, E.; Chirikjian, G.S. Modular self-reconfigurable robot systems. IEEE Robot. Autom. Mag. 2007, 14, 43–52. [Google Scholar] [CrossRef]
  14. Faina, A.; Nejatimoharrami, F.; Stoy, K.; Taylor, B.; Theodosiou, P.; Ieropoulos, I. Evobot: An open-source, modular liquid handling robot for nurturing microbial fuel cells. In Proceedings of the International Conference on the Synthesis and Simulation of Living Systems (ALIFE), Cancún, Mexico, 4–8 July 2016. [Google Scholar]
  15. Openbuilds, V-slot. Available online: http://openbuildspartstore.com/ (accessed on 23 January 2020).
  16. Blauert, F.; Wagner, M.; Horn, H. Optimization of biofilm structure by means of an evolutionary platform. In Proceedings of the Workshop on Exploiting Synergies between Biology and Artificial Life Technologies: Tools, Possibilities, and Examples at ALIFE Conference, New York, NY, USA, 30 July–2 August 2014. [Google Scholar]
  17. Theodosiou, P.; Faina, A.; Nejatimoharrami, F.; Stoy, K.; Greenman, J.; Melhuish, C.; Ieropoulos, I. EvoBot: Towards a Robot-Chemostat for Culturing and Maintaining Microbial Fuel Cells (MFCs). In Proceedings of the Conference on Biomimetic and Biohybrid Systems (Living Machines), Stanford, CA, USA, 26–28 July 2017. [Google Scholar]
  18. Ieropoulos, I.; Greenman, J.; Melhuish, C. Microbial fuel cells based on carbon veil electrodes: Stack configuration and scalability. Int. J. Energy Res. 2008, 32, 1228–1240. [Google Scholar] [CrossRef]
  19. Theodosiou, P.; Greenman, J.; Ieropoulos, I. 3D-Printable Cathode Electrode for Monolithically Printed Microbial Fuel Cells (MFCs). In Proceedings of the 233rd Electrochemical Society (ECS) meeting, Seattle, WA, USA, 13–17 May 2018. [Google Scholar]
  20. Theodosiou, P.; Greenman, J.; Ieropoulos, I. Towards monolithically printed MFCs: Development of a 3D-printable membrane electrode assembly (mea). Int. J. Hydrog. Energy 2019, 44, 4450–4462. [Google Scholar] [CrossRef]
  21. Nejatimoharrami, F.; Faina, A.; Cejkova, J.; Hanczyc, M.; Stoy, K. Robotic automation to augment quality of artificial chemical life experiments. In Proceedings of the International Conference on the Synthesis and Simulation of Living Systems (ALIFE), Cancún, Mexico, 4–8 July 2016. [Google Scholar]
  22. Holler, S.; Porcelli, C.; Ieropoulos, I.A.; Hanczyc, M. Transport of live cells under sterile conditions using a chemotactic droplet. Sci. Rep. 2018, 8, 8408. [Google Scholar] [CrossRef] [PubMed]
  23. Hansen, N.; Müller, S.D.; Koumoutsakos, P. Reducing the time complexity of the derandomized evolution strategy with covariance matrix adaptation (CMA-ES). Evol. Comput. 2003, 11, 1–18. [Google Scholar] [CrossRef] [PubMed]
  24. Fortin, F.A.; Rainville, F.M.D.; Gardner, M.A.; Parizeau, M.; Gagné, C. DEAP: Evolutionary algorithms made easy. J. Mach. Learn. Res. 2012, 13, 2171–2175. [Google Scholar]
  25. Baden, T.; Chagas, A.M.; Gage, C.; Marzullo, T.; Prieto-Godino, L.L.; Euler, T. Open labware: 3-d printing your own lab equipment. PLOS Biol. 2015, 13, e1002086. [Google Scholar] [CrossRef] [PubMed]
  26. Machiraju, R. Flexible robotic platforms that allow scientists to remain scientists. BioCoder 2015, 8, 29–36. [Google Scholar]
  27. May, M. A DIY approach to automating your lab. Nature 2019, 569, 587. [Google Scholar] [CrossRef] [PubMed] [Green Version]
Figure 1. The EvoBot liquid handling robot. (a) The robot is prepared to perform experiments with Petri dishes and reagents on the experimental layer and four modules in the head; (b) A close-up of the movable head equipped with two different syringe modules (5 m and 1 mL sizes).
Applsci 10 00814 g001
Figure 2. Overview of modularity in EvoBot. Users can decide the layers that they need for their experiments and attach modules with specific functionality to the layers.
Applsci 10 00814 g002
Figure 3. Modules in EvoBot. (a) Drawings of the different modules from left to right: syringe modules from 100 µL to 20 mL, a dispensing module, and a heavy payload module with an OCT scanner; (b) The implemented modules from left to right: 1 mL syringe, a 5 mL syringe and a dispensing modules on the head of the robot; back of one syringe module; and a heavy payload module.
Applsci 10 00814 g003
Figure 4. Head of the actuation layer. (a) Mechanism to plug a module on the head, which automatically produces an electrical connection between the electronics of the module and the main controller. (b) Sockets of the head, which can have eleven modules connected at the same time.
Applsci 10 00814 g004
Figure 5. Main mechanical components of two modules: (a) Syringe module. (b) Heavy payload module.
Applsci 10 00814 g005
Figure 6. Main electronic components. The dotted lines represent the developed PCBs, and the black rectangles represent the connectors of the sockets and the module boards. Two of the stepper drivers on the RAMPS board are used to control the head; the other three are available to control other devices such as peristaltic pumps. To reduce the number of lines between the Arduino and the head boards, there are expander ports with I2C communications to generate the Chip Select and reset lines for all the sockets.
Applsci 10 00814 g006
Figure 7. Liquid handling accuracy for the syringe modules in non-contact dispensing. (a) The labels specify the syringe size and the dispensed volume for each test, which was run 30 times to find the systematic and random errors in µL. (b) Errors in µL are normalised using the maximum permissible errors defined by the ISO8655. A test fulfils this standard if the errors are between ±100%. As the standard states, the maximum permissible errors for the nominal volumes apply to every selectable volume throughout the useful volume range of the piston pipette. Therefore, the maximum systematic and the random errors allowed are ±8, ±40, and ±60 µL and 3, 15, and 30 µL for the 1 mL, 5 mL, and 20 mL syringe module, respectively. There are not maximum errors for a 20 mL pipette in the ISO8655. Thus, we have selected the maximum admissible errors for a 10 mL pipette.
Applsci 10 00814 g007aApplsci 10 00814 g007b
Figure 8. Static applications of EvoBot. (a) Filling standard 96 well plates with 2 syringe modules; (b) EvoBot is able to dispense small (5 uL) droplets on a glass surface; (c) An Optical Coherence Tomography (OCT) scanner is placed in the heavy payload module; (d) EvoBot is able to move the OCT module to scan an array of continuous flow microbial fuel cells automatically.
Applsci 10 00814 g008aApplsci 10 00814 g008b
Figure 9. Studying chemotaxis in decanol droplets. (a) The setup of the robot with 3 syringe modules, one dispensing module, 8 Petri dishes for experiments, vessels with 1-decanol (with red colour), salt and decanoate at different pH concentrations. (b) The image captured from the camera placed below the experimental layer. At some specific pH and concentrations of decanoate, the salt gradient induces a chemotactic behaviour in the 1-decanol droplet. The path of the droplet is analysed in real time and stored (blue line), and the edge of the Petri dish is detected (red circle). (c) Each experiment is scored using a fitness function. The initial position of the droplet for the fitness calculation, when it leaves the safe area (green circle), is the indicated by droplet 0. After eight frames, the droplet has moved to position 1. The vector dist 0 is projected on the axis droplet-salt, and the partial fitness, f0, is calculated. The same procedure is repeated every eight frames. The total fitness is the sum of the partial fitness divided by the number of frames. (d) The robot optimized the pH and the concentration of decanoate using an evolutionary algorithm, in order to maximize the chemotaxis of the droplet. The blue and red lines represent respectively the best individual and the median of the population for each generation.
Applsci 10 00814 g009aApplsci 10 00814 g009b
Figure 10. A pH module developed by a student. The module was designed by modifying the dispensing module.
Applsci 10 00814 g010
Table 1. Performance characteristics of the actuation layer and modules.
PropertyActuation LayerSyringe and Dispensing ModuleHeavy Payload Module
Size (mm)600 × 400 *51 × 52 × 256113 × 143 × 328
Stroke (mm)300 × 200 *Vertical axis: 78
Plunger axis: 60
100
Repeatability (mm)(X and Y axis) < 0.1Vertical axis: <0.1
Plunger axis: - †,‡
not tested
Speed (mm/s)(X and Y axis) 180Vertical axis: 235
Plunger axis: 8
8
Acceleration (mm/s2)(X and Y axis) 3000Vertical axis: 235
Plunger axis: 4
4
Payload (N)-3>15
* Default values. They can easily be changed. Only available in the syringe module. Evaluated in the liquid handling experiment.
Table 2. How the available modules are used in EvoBot applications.
Elements Used
ApplicationHeadSyringeHeavy PayloadCameraCustomisation
Static liquid handlingXX None
3D scanningX OCT Heavy payload added
Feeding MFCsXX Voltage sensing added
3D printing MFCsXXPaste extruder Heavy payload added
Droplets experimentsXX XCamera module added

