Article

Spatial Data Analysis for Deformation Monitoring of Bridge Structures

Department of Surveying, Faculty of Civil Engineering, Slovak University of Technology in Bratislava, Radlinskeho 11, 810 05 Bratislava, Slovakia
*
Author to whom correspondence should be addressed.
Appl. Sci. 2020, 10(23), 8731; https://doi.org/10.3390/app10238731
Submission received: 16 November 2020 / Revised: 30 November 2020 / Accepted: 4 December 2020 / Published: 6 December 2020
(This article belongs to the Special Issue Analyses in Geomatics: Processing Spatial Data on History and Today)

Abstract

:
Weather conditions and different operational loads often cause changes in essential parts of engineering structures, and this affects the static and dynamic behavior and reliability of these structures. Therefore, geodetic monitoring is an integral part of the diagnosis of engineering structures and provides essential information about the current state (condition) of the structure. The development of measuring instruments enables deformation analyses of engineering structures using non-conventional surveying methods. Nowadays, one of the most effective techniques for spatial data collection is terrestrial laser scanning (TLS). TLS is frequently used for data acquisition in cases where three-dimensional (3D) data with high resolution is needed. Using suitable data processing, TLS can be used for static deformation analysis of the structure being monitored. For dynamic deformation measurements (structural health monitoring) of bridge structures, ground-based radar interferometry and accelerometers are often used for vibration mode determination using spectral analysis of frequencies. This paper describes experimental deformation monitoring of structures performed using TLS and ground-based radar interferometry. The procedure of measurement, the analysis of the acquired spatial data, and the results of deformation monitoring are explained and described.

1. Introduction

Bridge structures are integral parts of the transport infrastructure in the Slovak Republic, and their number in recent decades has increased. The modernization of the transport infrastructure has caused an increase in traffic intensity, which is also reflected in the increased operating load of the bridges. This causes changes in the spatial position and the shape of the structures, which affect their static and dynamic functions and reliability. Due to these facts, taking geodetic measurements is an integral part of bridge structure diagnosis; the geometry of the structures can be measured, along with their static and dynamic responses.
Because terrestrial laser scanning (TLS) is used by the wider community of surveyors and structural and civil engineers, it is used for different surveying jobs, e.g., [1,2,3,4,5,6,7]. The benefit of TLS over the more usual surveying methods is the three-dimensional (3D) data collection’s efficiency. TLS enables non-contact measurement of the 3D coordinates of points lying on the surface of the scanned object. The state-of-the-art instruments are able to measure with a scan rate of up to 2 million p/s, which results in an expressive reduction of the time necessary for the measurements and an increases in the amount of information about the structures being measured. Using suitable spatial data analysis approaches, the resulting point cloud can be used for deformation analysis [8].
At present, knowledge of a bridge structure’s dynamics and interpretation of its complex behavior is also increasingly important. They are especially affected by weather conditions (wind, sunlight, rain) and road, railway, and pedestrian traffic. These affect the dynamic behavior of the monitored structure, which results in deformations. The dynamic behavior can be explained by the modal properties of the structure’s deformation (by vibration modes). To ensure safe and smooth operation, it is also necessary to perform dynamic monitoring of these structures [9,10,11,12]. The technique of radar interferometry is an innovative and rapidly evolving technique for the analysis of engineering structure deformation. The technology allows for the long-term deformation monitoring (dynamic and static) of structures with high precision at a level of up to 10 μm. It can be applicable to the monitoring of large engineering investments (dams, mining facilities, etc.) and landslides. Dynamic deformation analyses can be used for the deformation measurements of high-rise buildings (or any other high-rise engineering structure such as skyscrapers, towers, etc.) and bridge [13,14].
This paper describes experimental deformation monitoring of the Liberty Bridge (Bratislava, Slovak Republic) performed using terrestrial laser scanning and ground-based (G-B) radar interferometry. The basic principle of the used techniques, uses the data analysis procedures, and the results of the deformation analysis are described in the following chapters.

2. Deformation Analysis Using TLS

Laser scanning is a non-selective technique for 3D data collection; therefore, with the exception of special cases of repetition of measurements from a single position of the instrument, it is practically impossible to reproduce the identical position of measured points in point clouds from different epochs of deformation measurements. This fact makes it impossible to directly determine the displacements, therefore the allocation of identical parts of the object is performed in a separate step, which usually involves modeling parts of the point cloud [8]. The approaches for deformation analysis from terrestrial laser scanning results can be divided according to [15] into five categories:
  • Point-based approaches;
  • Point cloud-based approaches;
  • Surface-based approaches;
  • Geometry-based approaches;
  • Parameter-based approaches.
Point-based approaches are based on determination of displacements, which are based on the difference in the coordinates of repeatedly measured points in the clouds [16]. Such an approach can be used only if the scanner allows repeated measurement of points without changing the orientation of the instrument. In practice, this means that, from one position of the instrument, the surface of the monitored object is repeatedly scanned at certain time intervals using identical scanning parameters in each epoch while the stability of the instrument must be ensured during the whole monitoring process.
Point cloud-based approaches determine the displacements and deformations from the difference of two clouds. The relationship between clouds is determined by their transformation (registration) into a common coordinate system, most often using the ICP algorithm [17]. For example, according to [18], the clouds are divided into clusters after the registration process using hierarchical clustering methods, e.g., octant tree. The displacements between the clouds can then be determined in different ways. One way is to calculate the distance between the nearest neighbors. Another way is to calculate the average distance between corresponding clusters, which is calculated from the distances between identical pairs of points from both clouds, or by calculating the Hausdorff distance (the maximum distance from the set of the distances of nearest neighbors). The angles between the normal vectors of the planar surfaces approximating the points of the cloud in the corresponding clusters can also indicates deformations. A simple determination of the coordinate differences between the corresponding clusters’ centroids also belongs to this category.
The surface-based approaches are based on modeling point clouds by surfaces [19]. The displacements are determined by calculating the distances between the cloud points in the current epoch and the triangular network created in the basic epoch [8]. The second approach is to determine the distances between two surfaces in a defined regular grid of points [20].
Geometry-based approaches determine changes in the spatial position and orientation of the geometric primitives (planar surface, cylinder, sphere, etc.) modeled from point clouds. Parameter-based approaches are essentially an extension of geometry-based approaches [8]. In this case, displacements and deformations are determined by the statistical testing of changes in the characteristic parameters of geometric primitives in individual epochs [1].

2.1. Geometry-Based Approach for Deformation Analysis of Brgidge Strucutres

In most cases, the structural elements of bridge structures consist of regular geometric shapes and their combinations. This fact enables us to model the chosen part of the monitored structure by geometric primitives and therefore leads to the utilization of a geometry-based deformation analysis approach to determine the displacements of the monitored object. To improve the quality (accuracy) of the deformation analysis, the monitored parts (points) can be modelled by regression planes fitted to segmented parts of the point cloud. The advantage of regression planes is improved precision due to the reduced measurement noise, which, in the end, results in an improved deformation analysis.
In general, displacements of monitored points can be identified as coordinate differences between their coordinates in individual measurement epochs. For vertical displacements, this will be the difference between the heights (Z coordinates) of the monitored points. In the following section, an approach based on regression plane modelling is described. The heights of the monitored points are determined by modelling small planar surfaces using orthogonal regression. The monitored points are fixed in the horizontal plane (XY coordinates) in a local horizon, and only their heights are calculated (Z coordinates) (Figure 1). The segmentation of the point cloud is done by RANSAC [21] from a pre-segmented subset of points using fencing boxes. The fencing boxes are defined around the fixed position of the monitored points by their dimensions along the axis of a local coordinate system of the monitored structure. The parameters of the planes are calculated by orthogonal regression from the general equation of a plane:
a · X + b · Y + c · Z + d =   0
where a, b, and c are the normal vector’s parameters of the plane; X, Y, and Z are the coordinates of the point lying in the plane; and d is the scalar product of the normal vector of the plane and the position vector of any point of the plane.
The parameters of normal vectors are calculated using singular value decomposition (SVD) [22]:
A = U Σ V T
where the design matrix A has the dimensions nx3 where n is the number of points included in the plane’s parameter estimation. The column vectors of Unxn are normalized eigenvectors of matrix AAT. The column vectors of V3×3 are normalized eigenvectors of ATA. The matrix Σnx3 contains eigenvalues on the diagonals. Then the regression plane’s normal vector is the column vector of V, which corresponds to the smallest eigenvalue from Σ.
The design matrix has the form:
A = ( ( X 1 X 0 ) ( Y 1 Y 0 ) ( Z 1 Z 0 ) ( X 2 X 0 ) ( Y 2 Y 0 ) ( Z 2 Z 0 ) ( X n X 0 ) ( Y n Y 0 ) ( Z n Z 0 ) )
where ( X i X 0 ) , ( Y i Y 0 ) , and ( Z i Z 0 ) are the reduced coordinates (reduced to the subset’s centroid). The advantage of using SVD is that no initial parameters are needed for estimation. The above-mentioned procedure is performed by RANSAC, while the seed points are the points nearest to the defined positions of the monitored points.
The heights (Z coordinates) of the monitored points are calculated by projecting the predefined position (XY) of these points onto the estimated regression planes (Figure 1) using the formula:
Z P = a · X + b · Y + d c
The benefit of this approach is that the position of the monitored points does not change with the thermal expansion of the structure; the uncertainty caused by different scan densities (e.g., by different positions of the instrument) in the single epochs are also eliminated. Using uncertainty propagation law, the standard deviations of the results are calculated from the standard deviation of the vertical component of the registration error and the standard deviation of the regression plane. The vertical component is calculated as a quadratic mean of differences, ΔZ, between the identical reference points after the registration of point clouds into a common coordinate system. From the orthogonal distances of the subset of points from the plane, the standard deviation of the regression plane is calculated. The dispersion of the points around the plane reflects the noise of the point cloud, which is mainly affected by the rangefinder (distance measurement) of the instrument used. To minimize the effects of systematic errors, the measurements should be performed under equal conditions in each epoch (position of the scanner, temperature, etc.) if possible.
The vertical displacements of the monitored points are calculated as the Z coordinate differences of these points (calculated by (4)) in each measurement epoch. Finally, the vertical displacements can be transformed into the normal direction to the object’s surface based on the estimated normal vectors. The benefit of this procedure is that the monitored object itself defines the direction of the displacement and therefore it is not dependent on the scanner position or on the coordinate system axis orientation.

3. Structural Health Monitoring Using Ground-Based Radar

Ground-based radar interferometry is an innovative and rapidly evolving technique for the dynamic deformation analysis of engineering structures, even those of large investments such as dams and bridge structures [23,24,25]. The radar measurements use the stepped frequency continuous wave (SF-CW) approach in microwave bandwidth [26]. This approach allows determination of the monitored object’s displacements in the radar’s field of view in a radial direction (from the instrument to the object). The measurement is based on the transmission of a set of pulses created by a beam of frequency modulated electromagnetic signals (waves). To get radial resolution (range resolution), the instrument emits short pulses of beams. The relationship between the pulse duration and the radial resolution is defined by the formula:
Δ r = c · τ 2
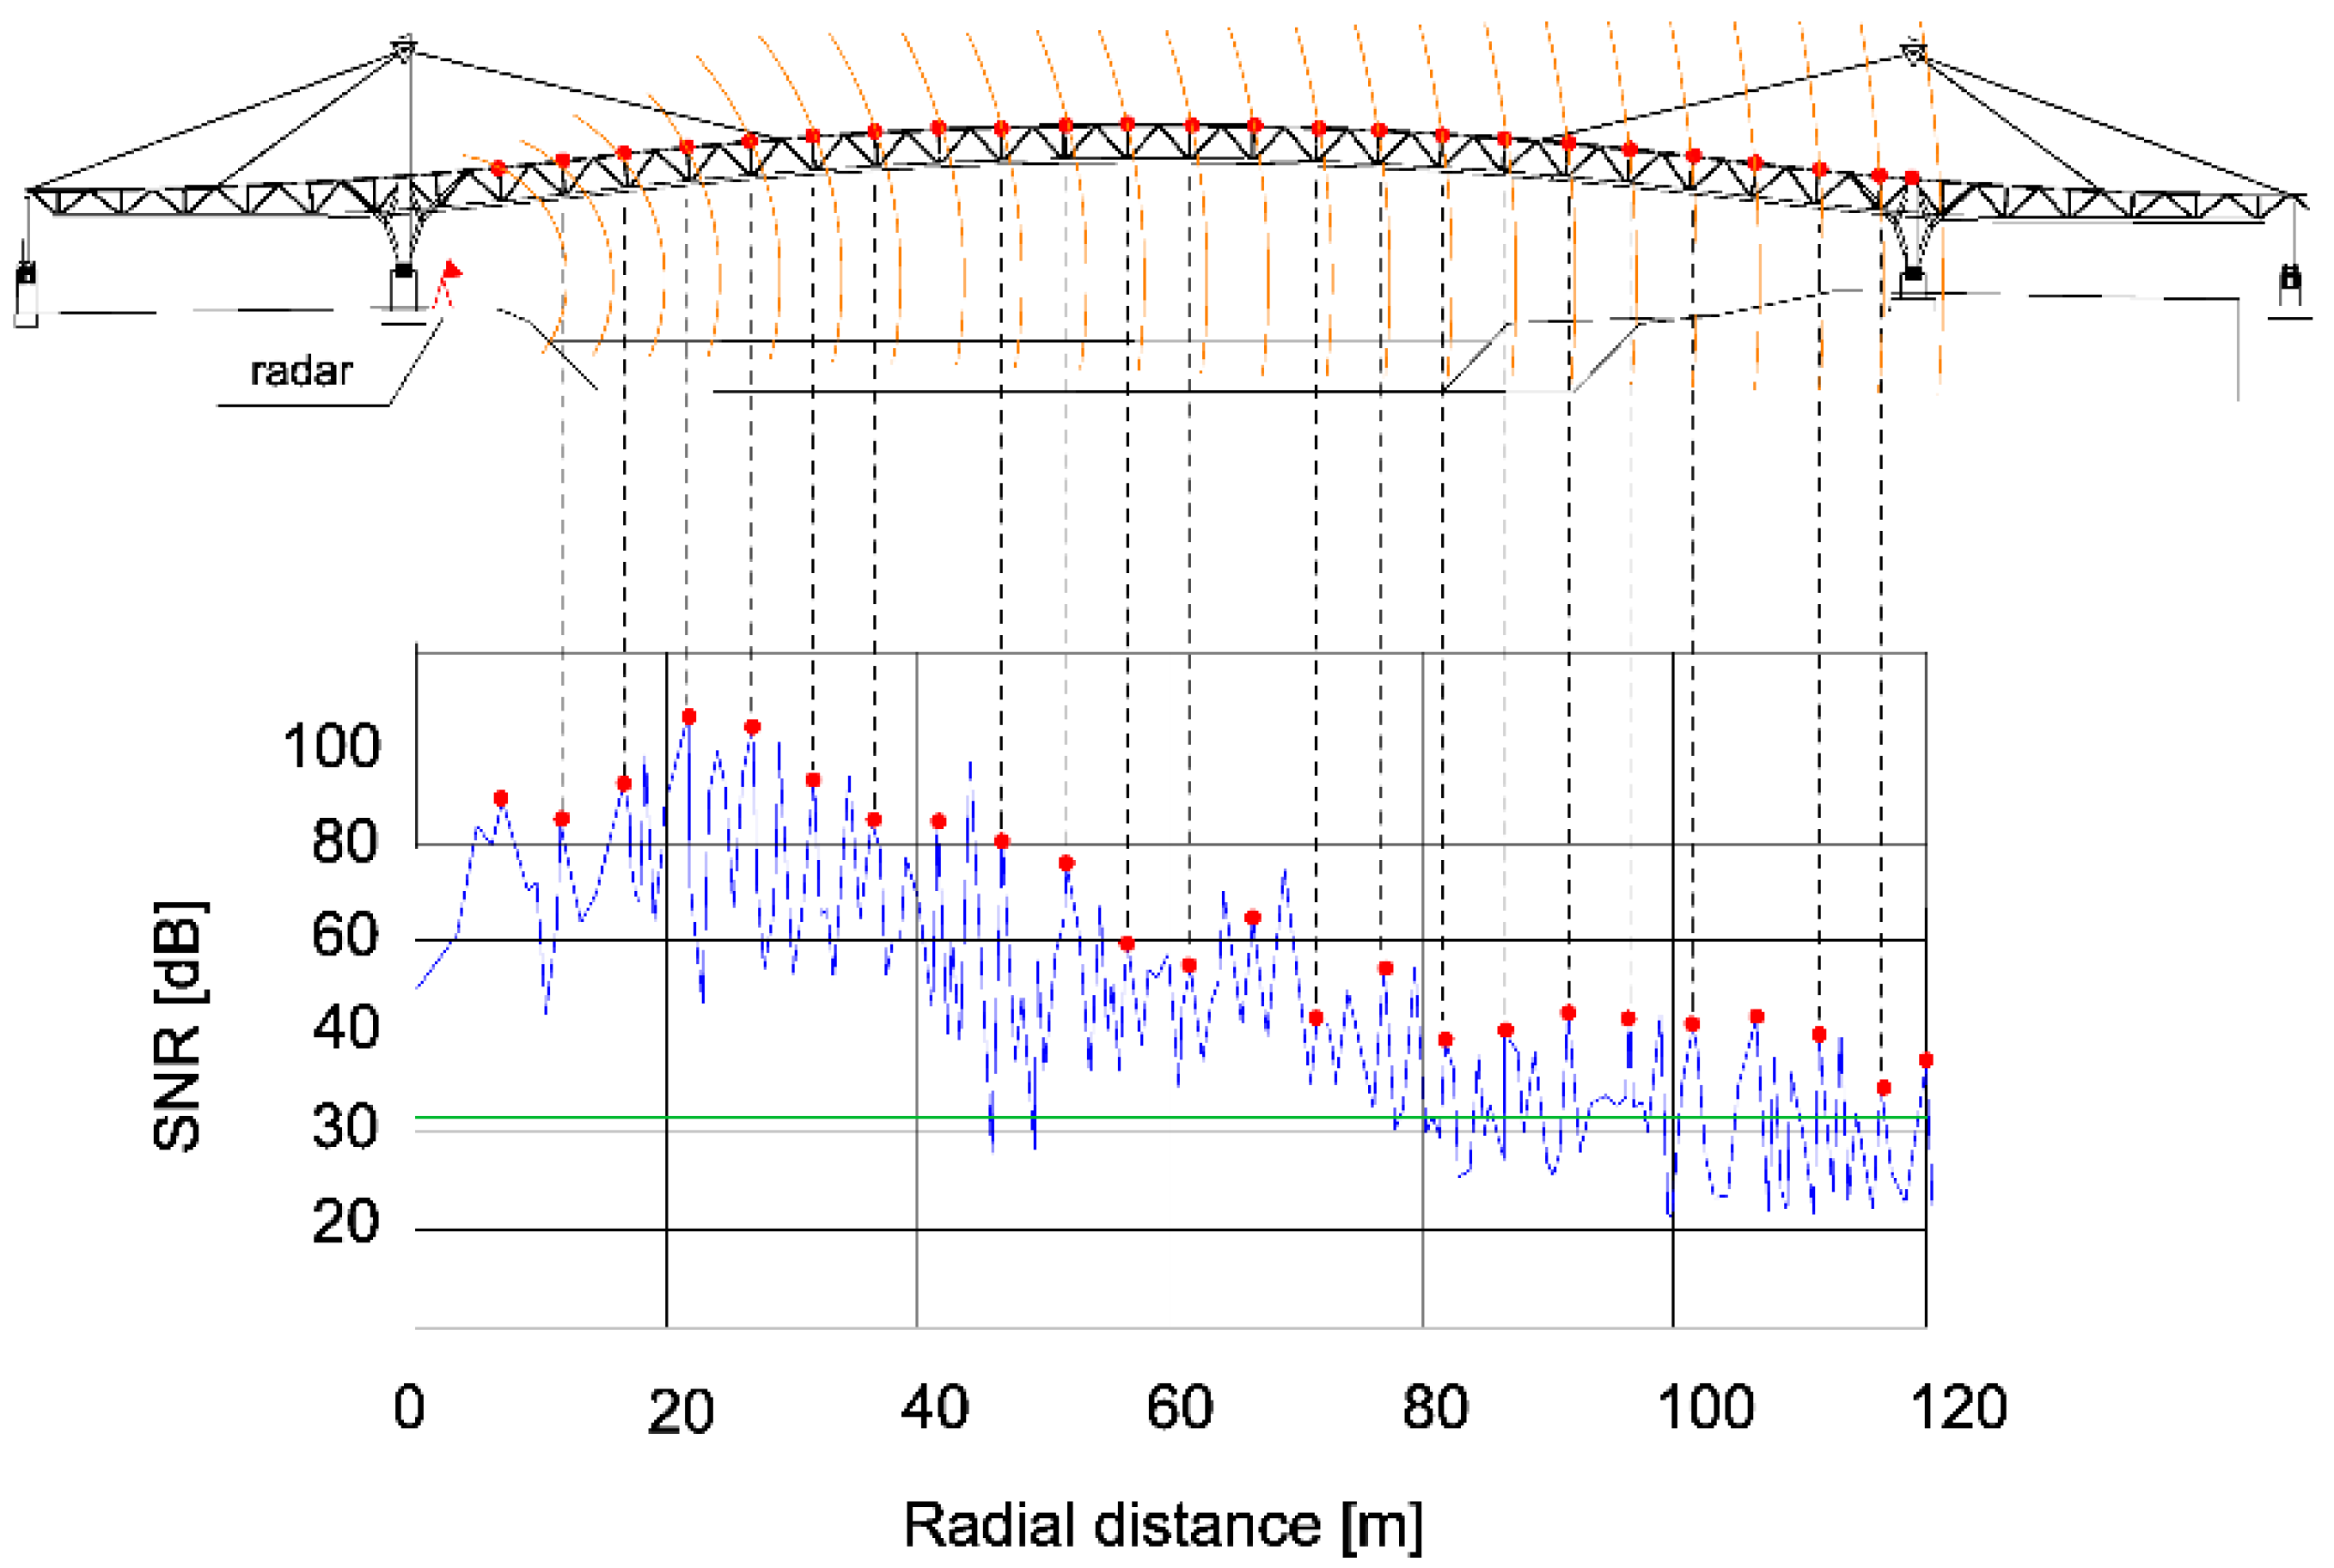
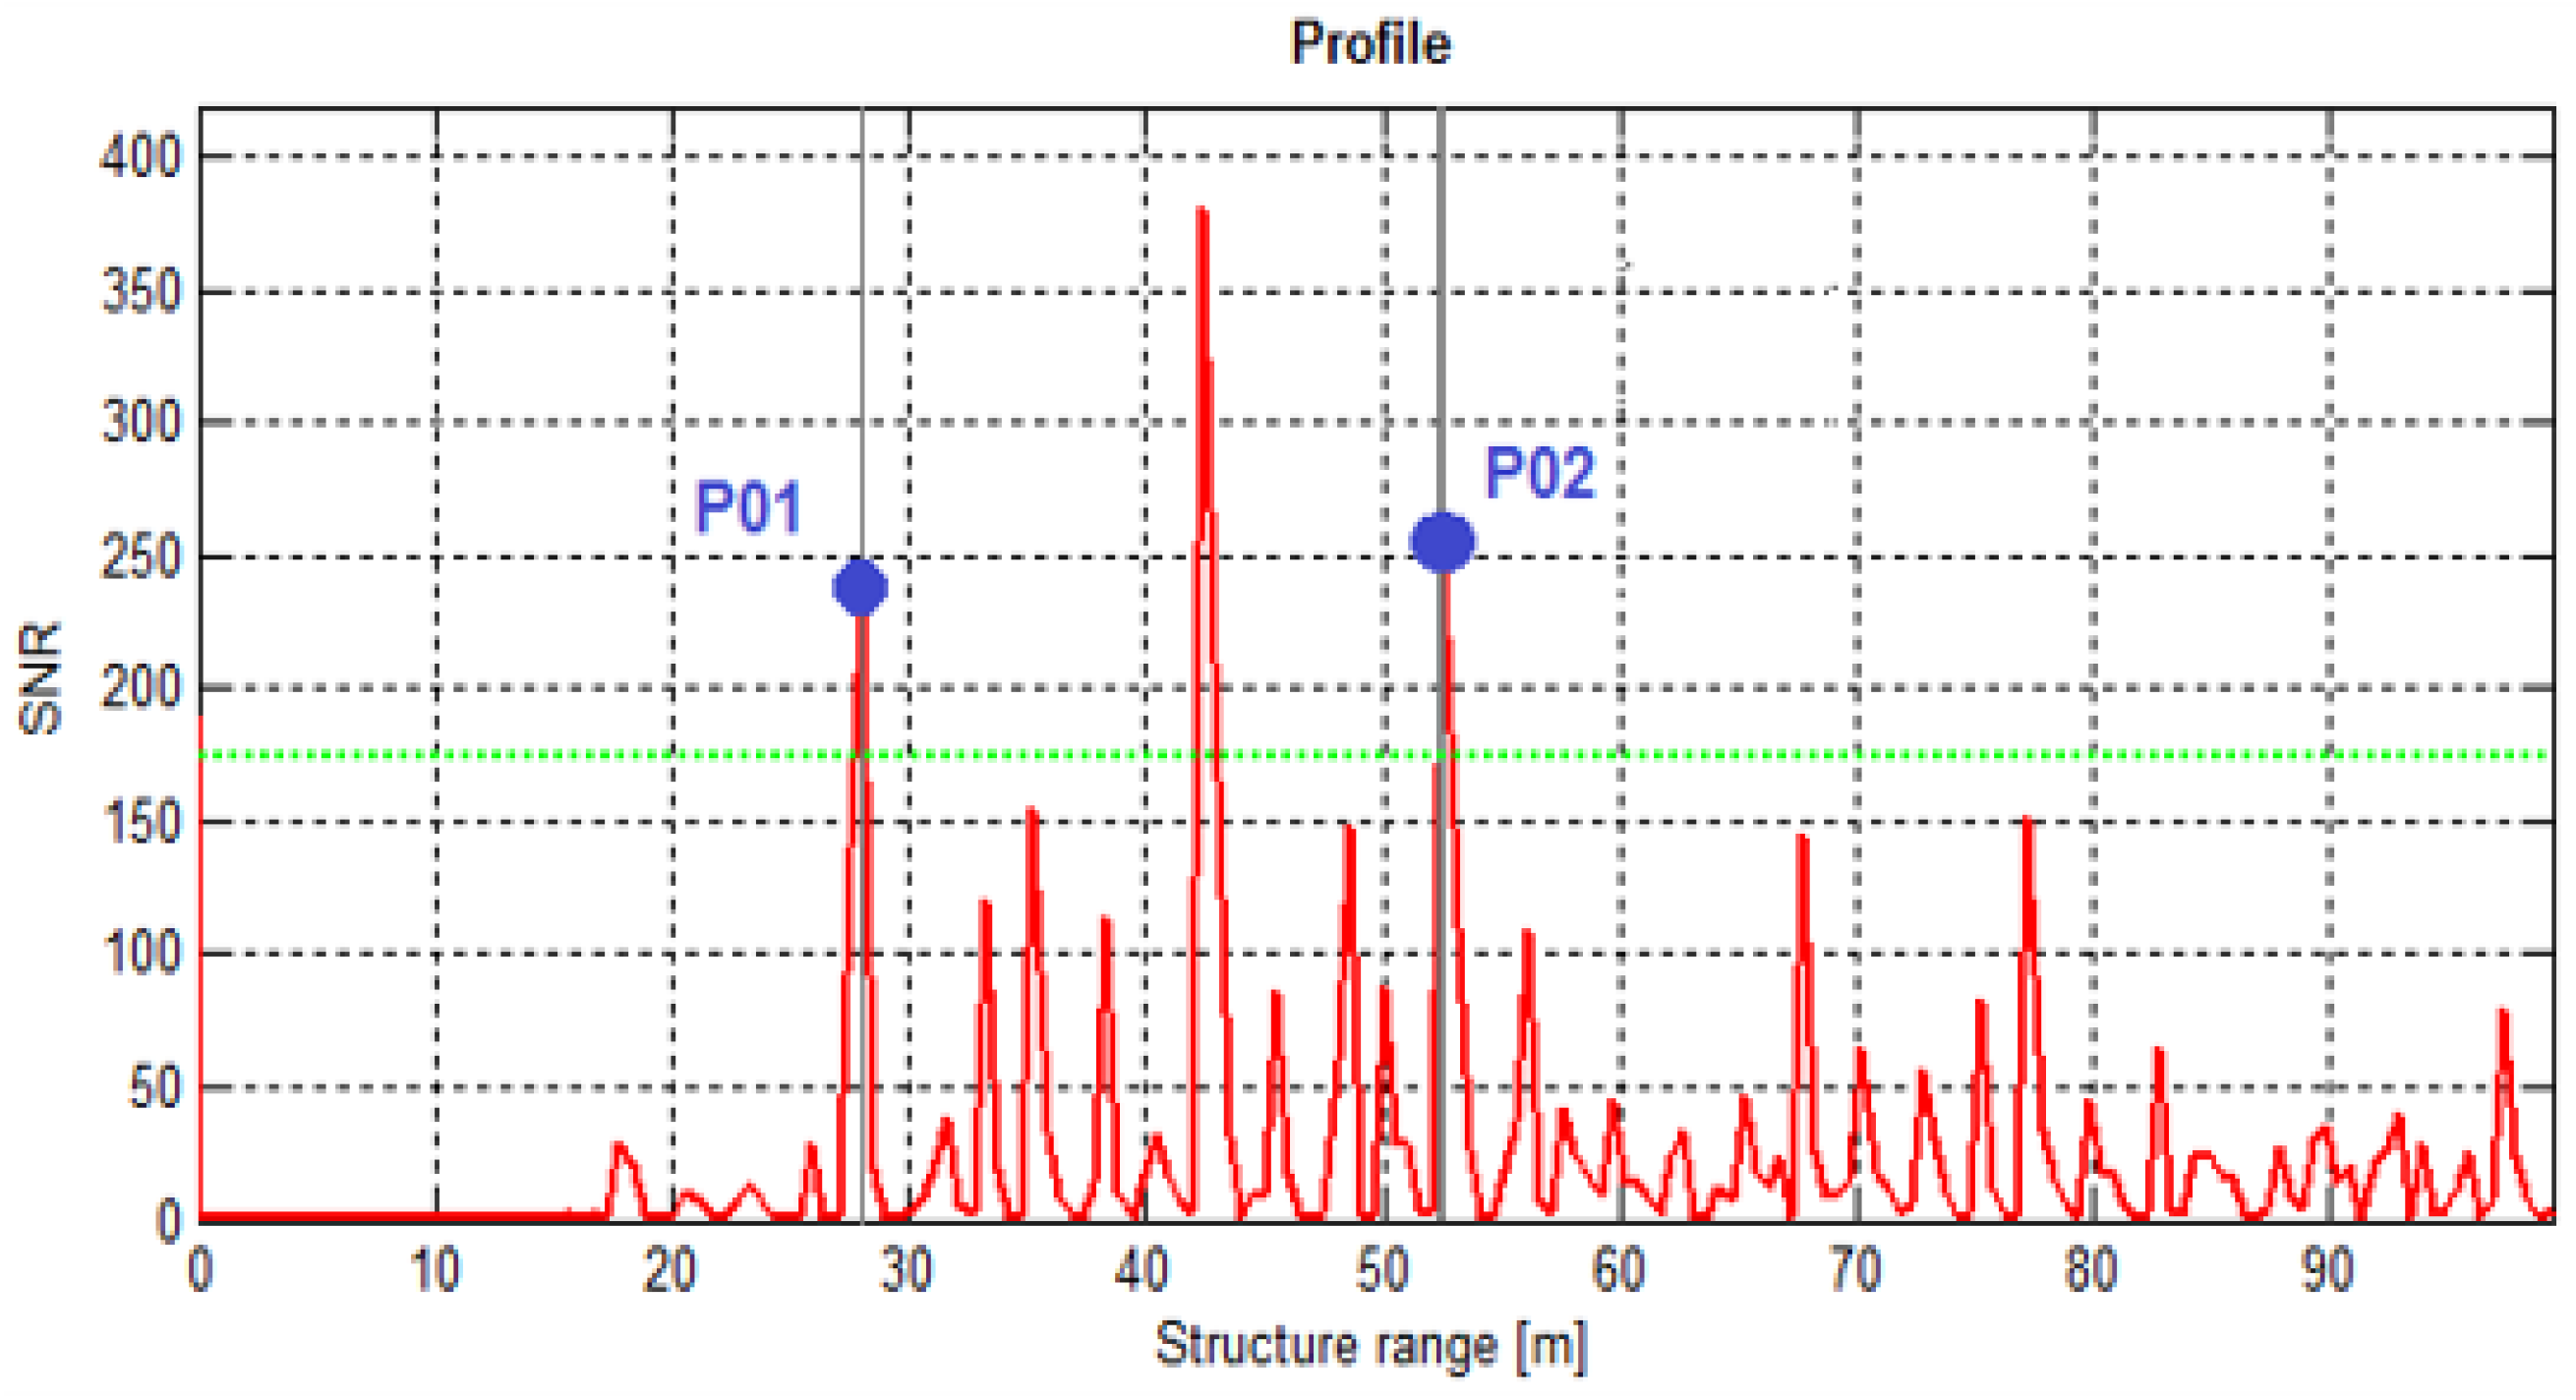
where c is the light’s speed in vacuum (empty space) and τ is the time of flight (ToF) of the measuring signal. The frequency response is then determined by comparison of the emitted and received signal. By the application of inverse Fourier transformation (IFT), this response can be transformed from the frequency domain to the time domain. After this procedure, the radar creates a so-called range bin profile, which is a one-dimensional (1D) image representing the signal to noise ratio (SNR) at individual radial distances from the instrument (Figure 2). In this range bin profile, the peaks of the reflected signal are detected. Each peak represents an average reflection from the whole range resolution area, e.g., when the range resolution is 0.5 m then the corresponding signal peak represents the average reflection from the parts of the structure monitored, which is in this 0.5 m range interval (radial resolution area).
After the range bin profile is created and the targets are identified, the changes in the position of the monitored parts are determined by differential interferometry (DI). The DI determines the radial displacements by comparison of the phase shift of the emitted and received measuring signal on the base of the formula:
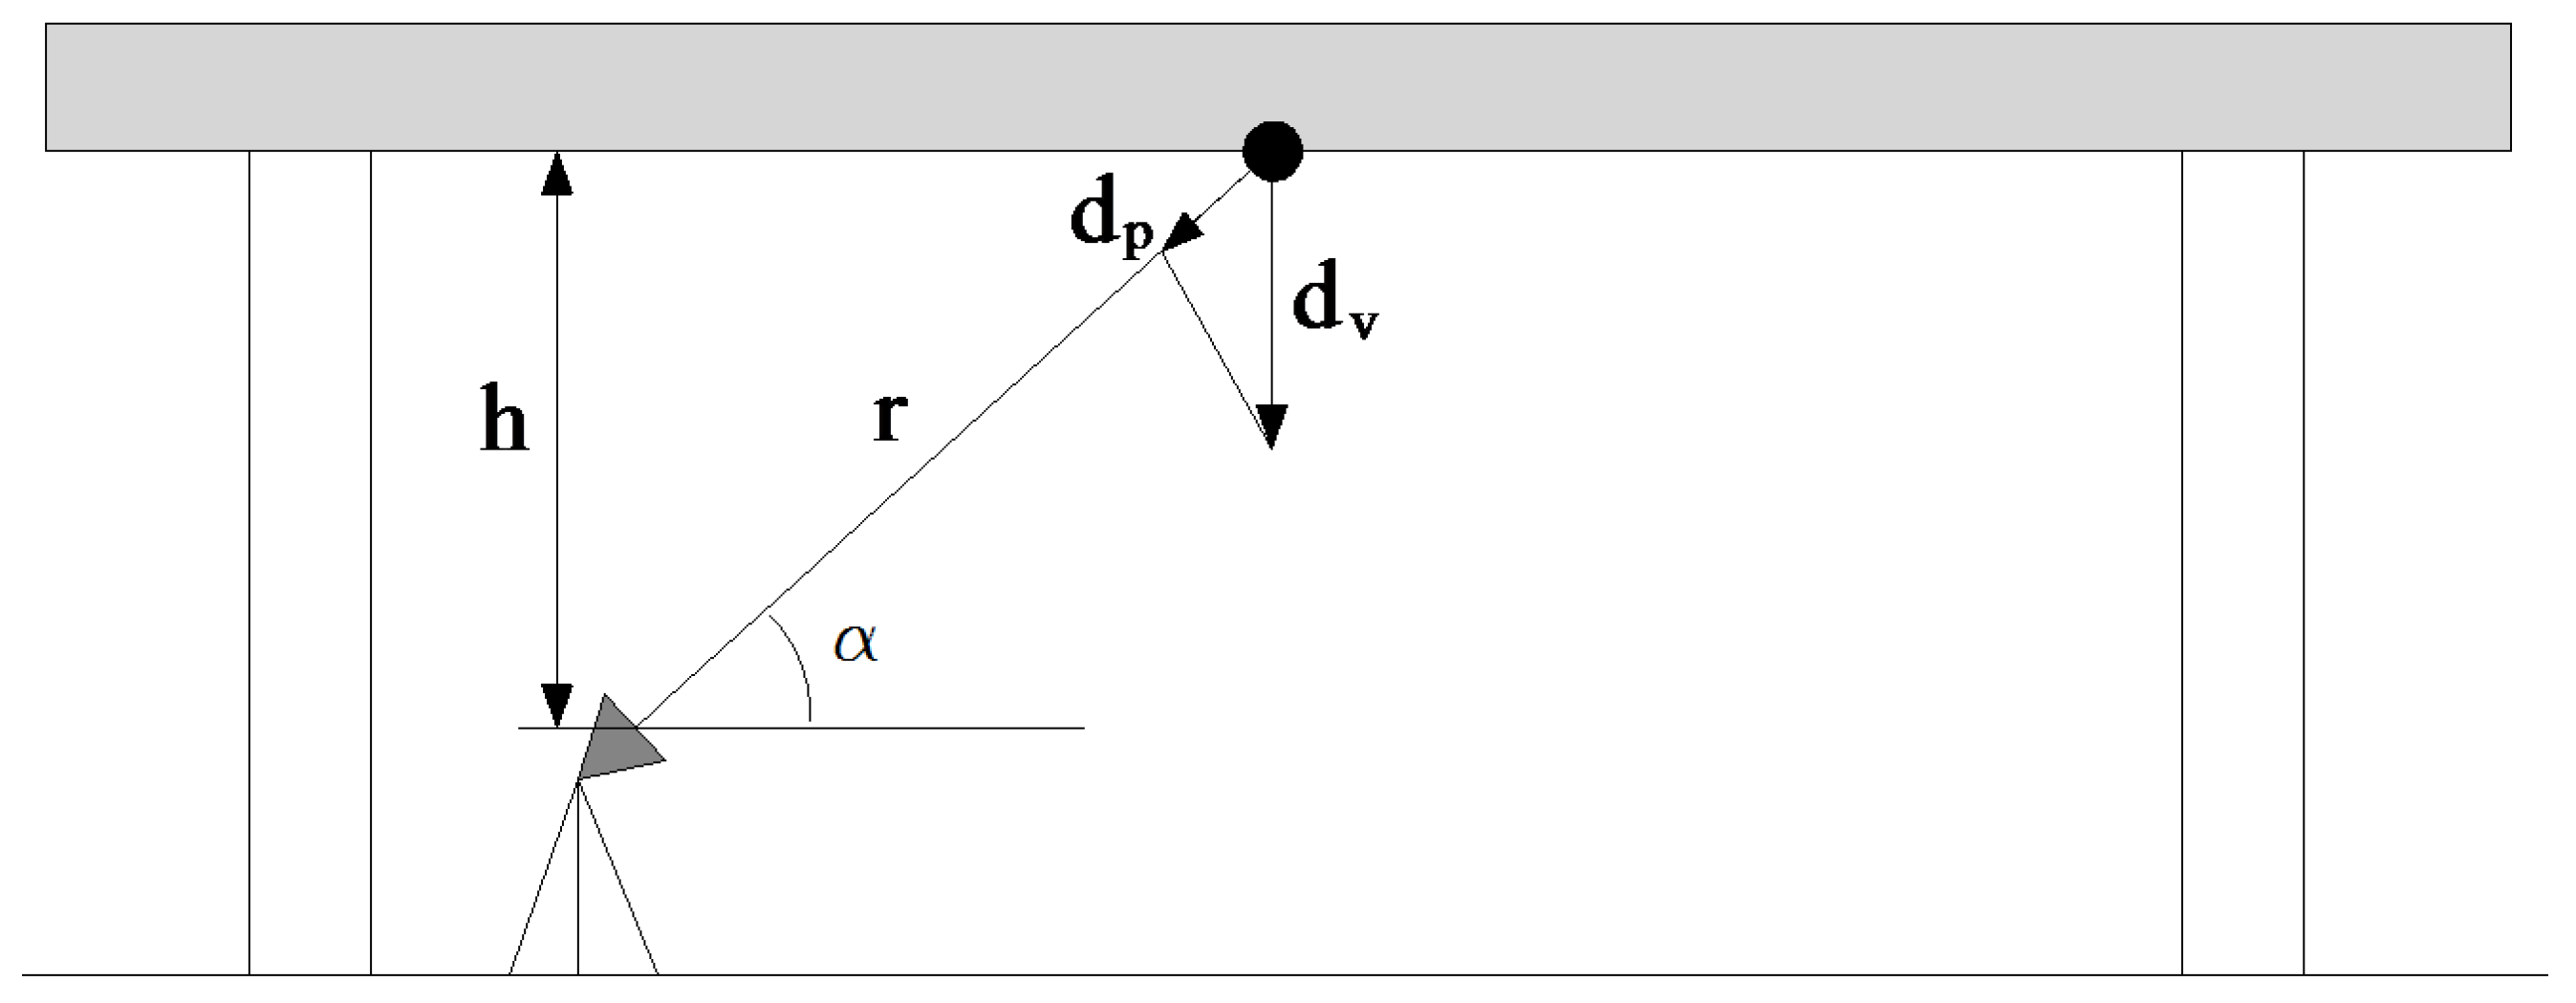
d p = λ 4 · π · ( φ 2 φ 1 )
where λ is the wavelength of the signal and φ1 and φ2 are the phase shifts of the signal in first and subsequent epoch.
As the basic principle of the radar interferometry indicates, the displacements of the monitored structure are determined in the radial direction (from the instrument to the structure being monitored). In practice, it is almost impossible to ensure the direct deformation monitoring in a required direction, e.g., vertical or horizontal. The solution can be the transformation of the displacement from the radial direction to the required one based on the known geometry of the measurements (relationship between the instrument and the object monitored); e.g., the transformation to the vertical direction is illustrated in Figure 3.

Spectral Analysis of the Data

Different methods of spectral analysis can be used when the identification of the bridge’s vibration modes is required. Fourier transform (FT) is frequently applied for this purpose. It expresses the signal in the form of time series by continuously differentiable functions. The signal can then be transformed between time and frequency domains, and it can be represented as a continuous or discrete signal.
In practice, the signal represented by a finite number of measured values is analyzed by FT, known as discrete Fourier transformation (DFT). The mathematical definition of DFT depends on the data analyzed. When the goal is the analysis of the dynamic deformations of bridge structures, the fast Fourier transformation (FFT) is used in most cases. The FFT is described by the formula:
X x ( f ) = k = 0 M γ x ( k ) w ( k ) e i 2 π f k / f s
where γx(k) represents the autocorrelation function and w(k) is the spectral window function [27]. An alternative to the approach described in the previous section is the so-called Welch method. Using the Welch method, overlapping segments of the signal are used for the determination of the spectral density. FFT is then executed using these overlapping segments. The approach ensures smoother periodograms and improved precision of the estimated frequencies, though the magnitude spectrum’s resolution is decreased [28].
The estimation of the mutual spectral density of synchronized data can be performed by their spectral analysis. By the calculation of an average value of the normalized periodograms, the average normalized spectral density (ANSPD) can be computed. The ANPSD characterizes the spectral density of every time series processed in the data analysis. It allows us to create a complex picture about the static and dynamic behavior of the structure being monitored. Time synchronized measurement of the entire structure by a G-B radar gives the possibility to calculate the average periodograms for the whole structure (Figure 4).

4. The Liberty Bridge—A Case Study

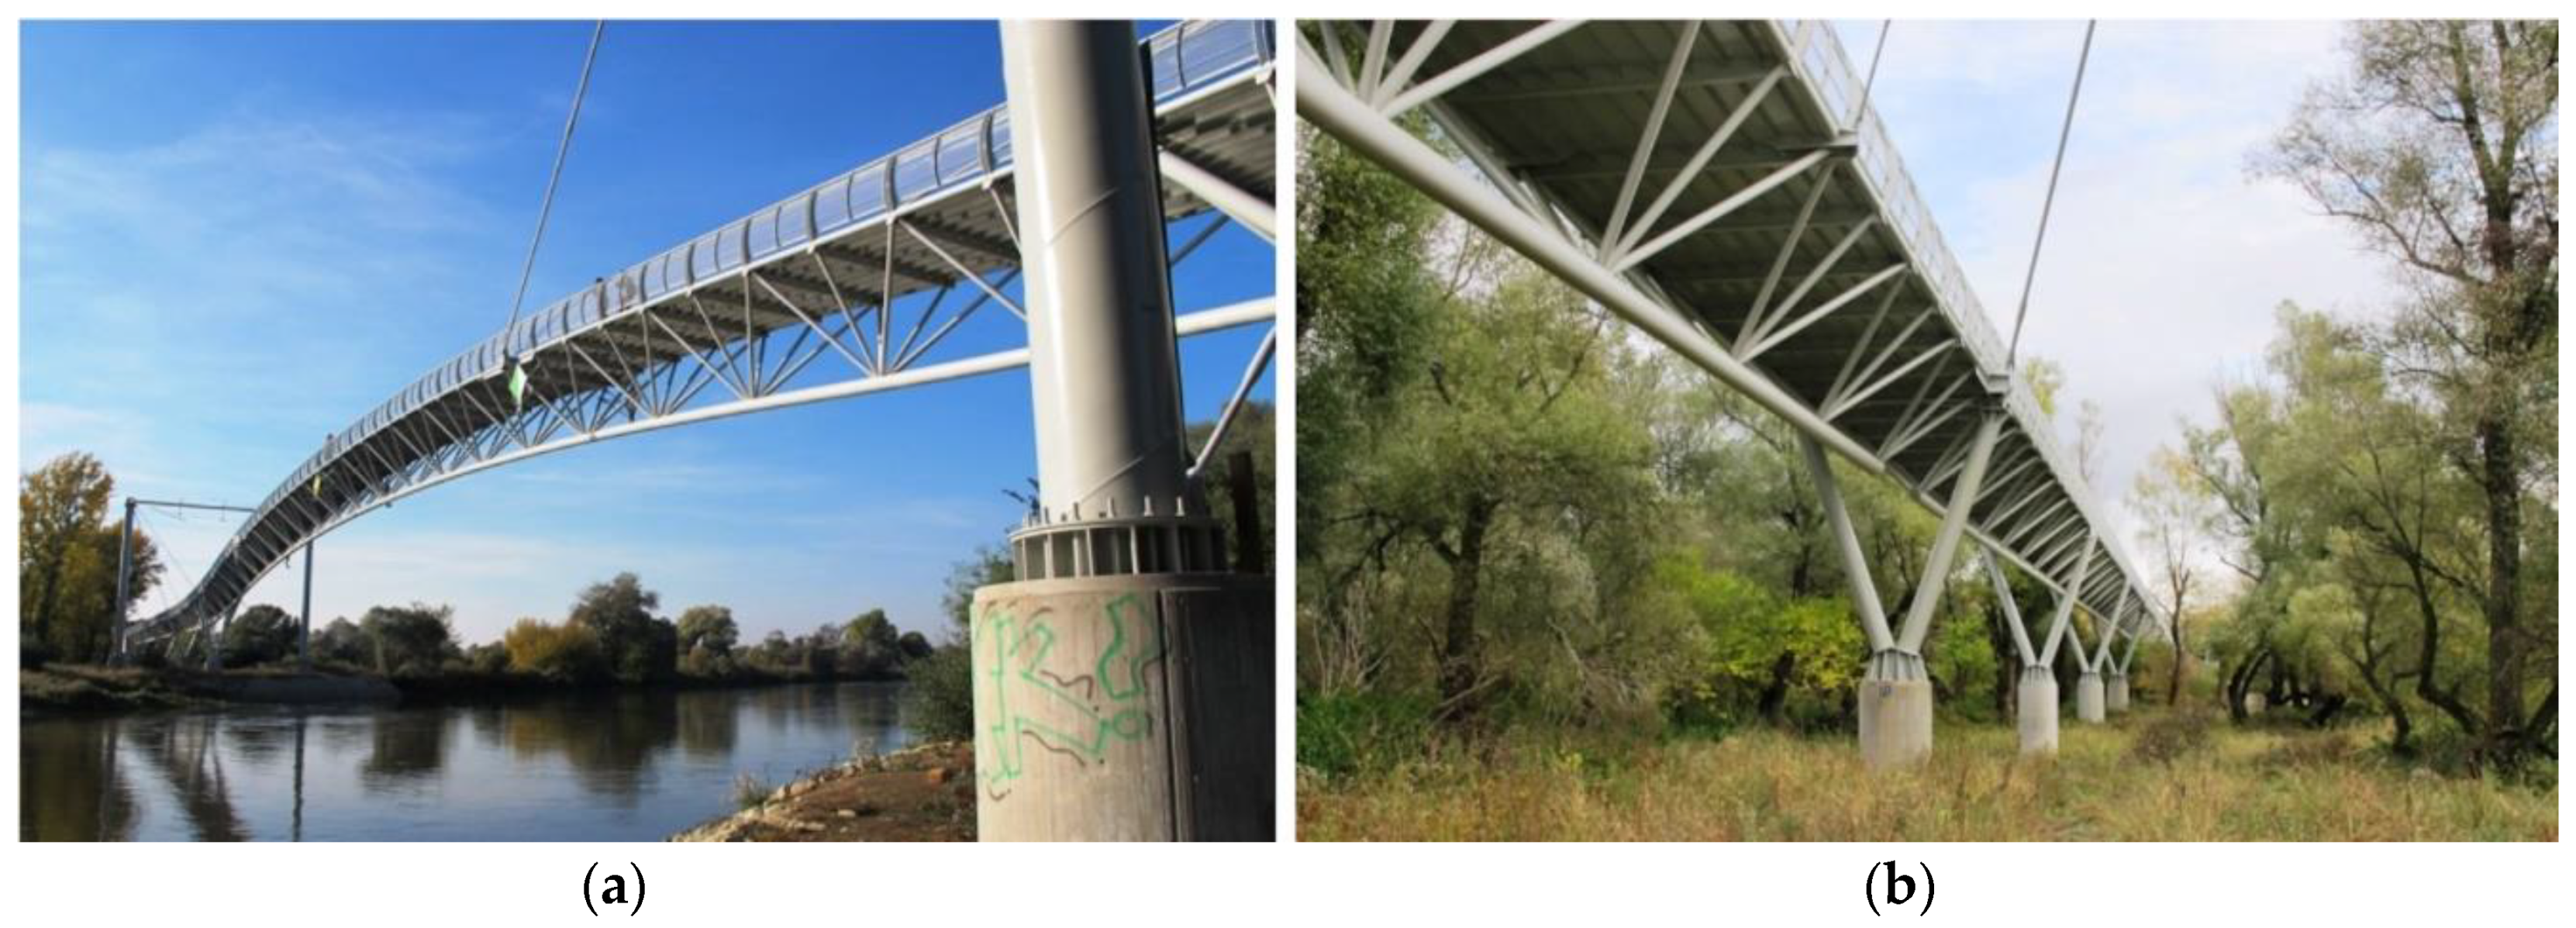
The Liberty Bridge is part of the cycling route between the Bratislava district of Devínska Nová Ves (the Slovak Republic) and Schlosshof (Austria). It spans the river Morava and a stagnant pool of associated flows with a total length of 525.0 m [29]. The bridge is located in an inundation area on both sides in a protected floodplain forest (Figure 5). The substructure consists of reinforced-concrete pillars in which the supports are anchored. The superstructure of the bridge over the river consists of three bridge sections with a total span of 180.0 m. The main part of the superstructure is a steel triangular truss beam with an orthotropic deck. The suspended bridge section has a radius of 376.35 m and is suspended on four pylons, which create dual-hinged rectangular frames. The pylons’ diameter is 0.914 m, while the height of each is 17.7 m.

4.1. Deformation Analysis Usign Terrestrial Laser Scanning

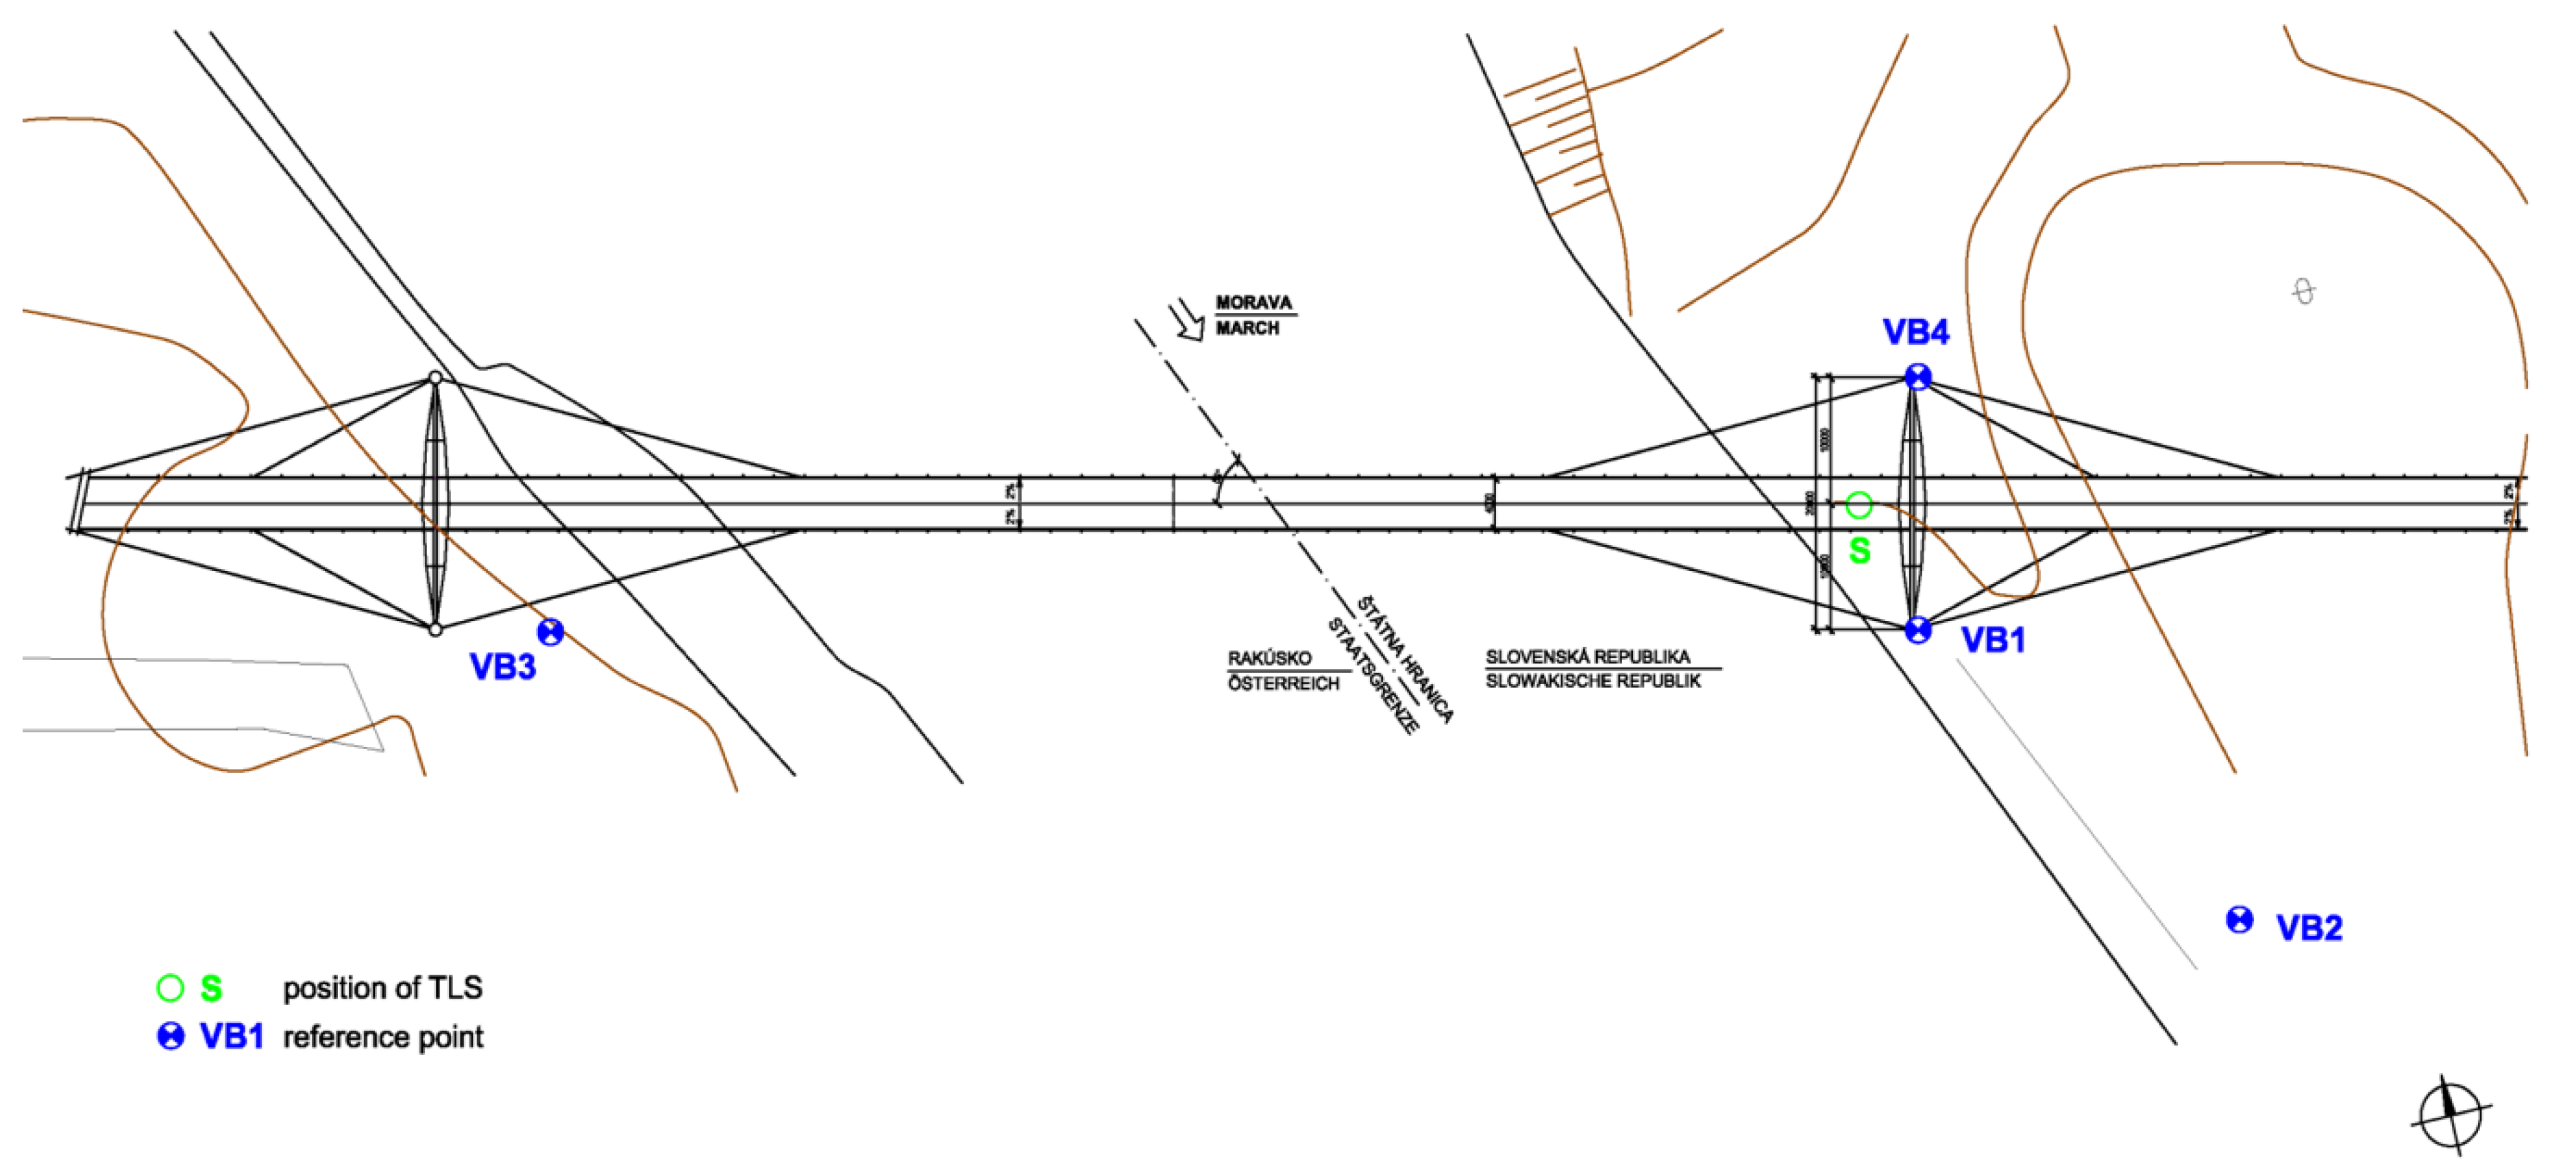
Monitoring using TLS was executed in three epochs of measurement using a Leica ScanStation2 instrument. The surface of the bottom of the main suspended bridge section was scanned from a single instrument’s position. The instrument was set up on the longitudinal axis of the structure on the Slovakian riverbank to ensure that the whole structure’s rear section could be scanned (Figure 6). The minimum density of the scanned points on the structure was 3 mm. The next two epochs of the measurements were performed using the same Leica ScanStation2 with approximately the same conditions as in the first (initial) epoch.
The reference point network consisted of four control points (VB1–VB4), realized by Leica HDS type targets. Two of the reference points were the points of the reference network established for the construction of the bridge, stabilized with concrete pillars. Due to the vegetation and the fact that the whole structure is situated in a protected area of floodplain forest, where cutting out the vegetation (for lines of sight) is not allowed, two of the reference points were stabilized by metallic fasteners on the base of the pillars.
The scanned data was transformed to a local coordinate system, which was defined for the bridge for the purpose of geodetic monitoring with a local horizon. The reference points defined the coordinate system in each measurement epoch. The aim of the data processing was the identification and quantification of the bridge’s main section in discrete points positioned on the bottom of the bridge structure. The vertical displacements were determined using the geometry-based approach of deformation analysis described in Section 2.1. During the data processing, square fences of 75 mm × 75 mm were defined around the fixed position of the monitored points (these created fencing boxes for the pre-segmentation of the points in each epoch). The monitored points were situated on the bottom of the transverse girders between the diagonal reinforcements of the supporting girders on both sides of the bridge; there were 23 points on each side (left and right), giving 46 in total.
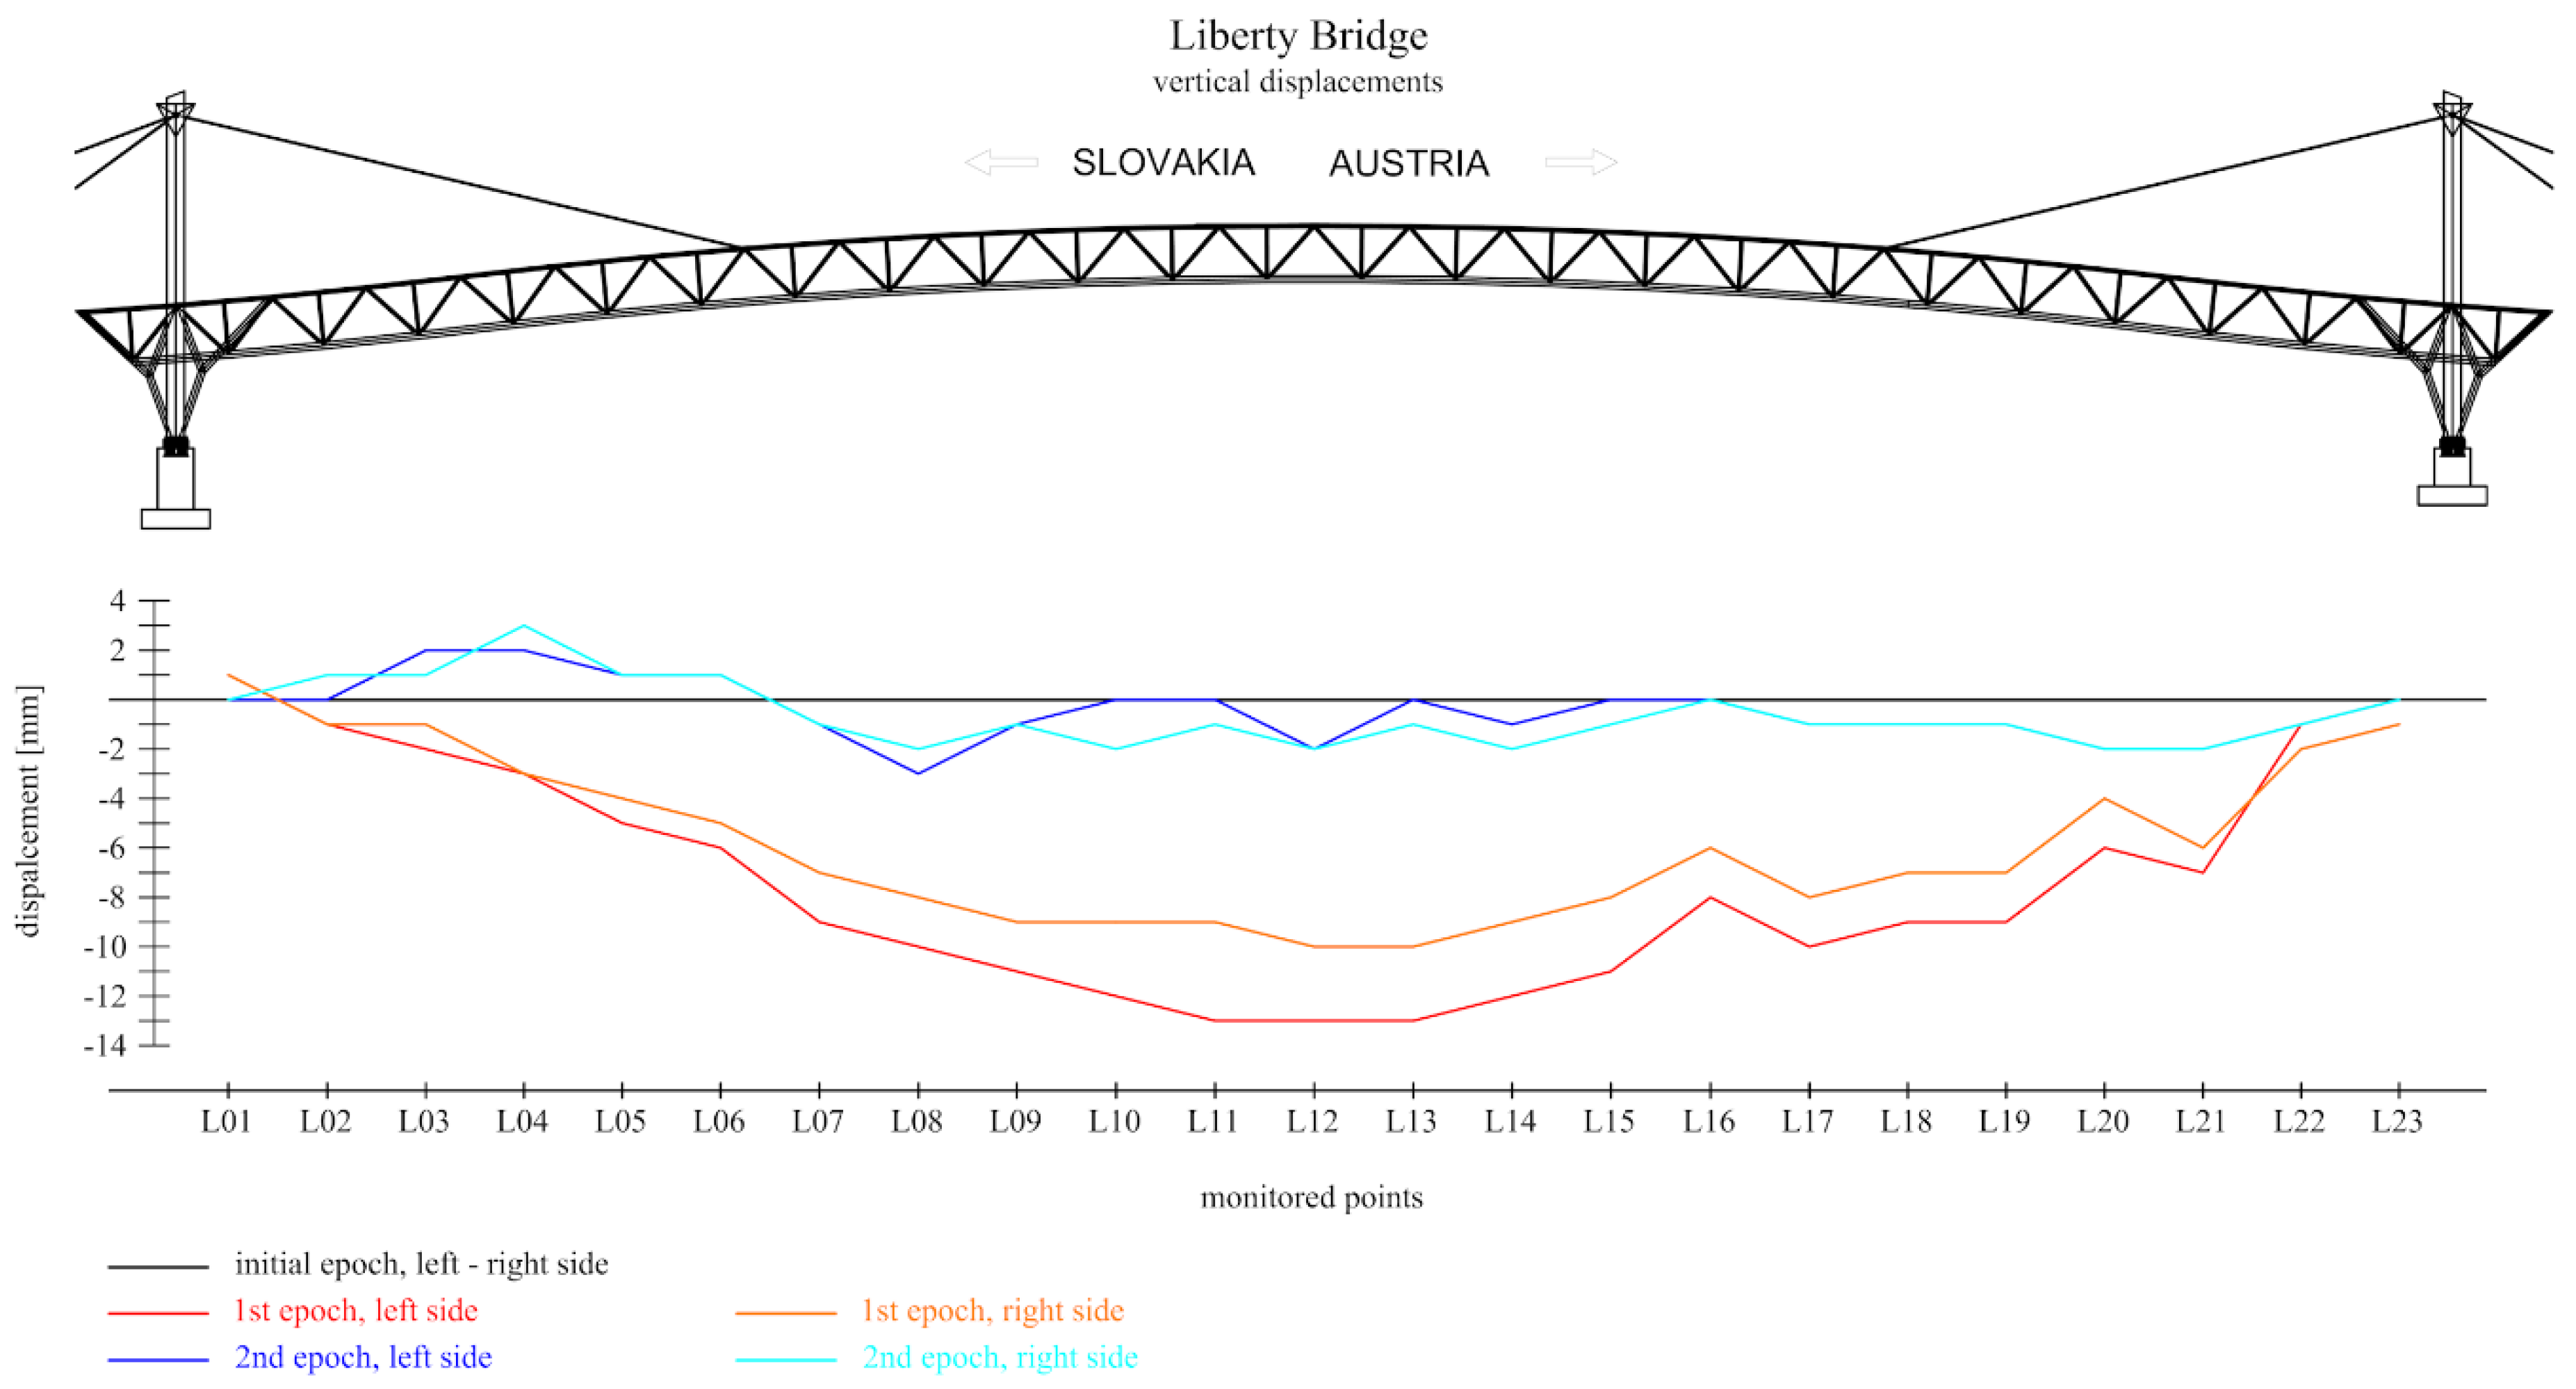
The deformation analysis shows the changed position of every monitored point, except for the points on the ends of the bridge (Figure 7). The bridge is anchored to the pillars on both ends, which means there is no displacement is these parts. The standard deviation of the displacements, calculated using the uncertainty propagation law, varied from 1.3 mm to 1.8 mm. The vertical displacements increasing from the ends to the center of the bridge where reach negative values at the level of −13 mm (left side) and −10 mm (right side). The displacements were caused by the structure’s temperature difference between the monitoring epochs and by the weight of the layer of fallen snow (approx. 100 mm).

4.2. Deformation Analysis Usign Ground-Based Radar Interferometry

The dynamic measurements were performed during different types of structural load, which were proposed based on the finite element method (FEM) model of the bridge using the structure’s technical documentation [29]. Four loading epochs were defined as follows: 1st—without loading; 2nd—one person walking; 3rd—one person running; 4th—one person jumping in the middle of the bridge’s span. Each epoch was performed in three phases. The first phase was the no load state (but the data was recorded). The second phase represented the load (4 types) and the last phase was again the no load state with the aim of determining the structure’s damping. The individual loading epochs each took approximately 60 s.
The main suspended bridge section was measured from a single position of the interferometric radar IDS IBIS-S (Figure 8). Because the FEM model of the structure assumed significant frequencies of the structure’s vibration on the level of 10 Hz, the data was registered with a frequency of 100 Hz to ensure higher relevance of the results (relative displacements), although it is sufficient to measure with a frequency that is twice as high as the accepted frequencies for their proper identification. Despite the fact that the G-B radar measurement allows monitoring of the entire structure, the measurement and data processing was focused specifically on two points of the structure. The first point was at the center of the suspended structure and the second one was positioned at the anchorage of the suspension cable.
The data analysis was realized in several steps, and its aim was the determination of the amplitude and the frequency of the vibration of the structure’s selected parts. The processing was arranged into following steps:
  • Radial displacements’ transformation to vertical;
  • Identification of the monitored parts (P01, P02);
  • Modal analysis.
The displacements were transformed from the radial to the vertical direction on the basis of the position and orientation of the radar in relation to the structure being monitored. This geometry was obtained from the laser scanning data. The second step was the identification of the peaks of the signal that corresponded to the chosen monitored parts of the structure from the range bin profile (Figure 9). The figure shows the estimated signal to ratio (SNR) of the signal’s reflection, depending on the structure’s range. The last step was the determination of the relative displacements, auto-spectral analysis of the radar data using the approaches described in the chapter 3.1, and the comparison of the results with the FEM model of the structure.
The vertical displacements are affected by a only very small extent by the pedestrian walking (Table 1). The fast movement (running) of the pedestrian has almost the same effect on the maximum vertical displacements as that of the walking pedestrian. One person jumping in the center of the span results in the maximum vertical displacement, with values of 2.55 mm (P01) and 4.63 mm (P02).
During the measurement epoch without any load on the structure, a frequency of deformation at the level of 1.53 Hz was determined (Table 2). Signals from both monitored points were of low coherence with a relatively high phase delay of around 65.0°. The dominant frequency of vibration determined during the epoch with one person walking corresponds to the structure’s 22nd vibration mode (from the FEM model). The estimated 2.01 Hz corresponds to the frequency of steps of standard walking. A phase shift of 23.0° is caused by a short delay in the structure’s response at points P01 and P02. The 3rd loading epoch shows the vibration of the structure caused by the running person to be in the range of 1.53–4.56 Hz, which corresponds to the 2nd, 23rd, and 59th vibration modes. The 4th load epoch was executed when one person was jumping synchronously at the middle of the bridge’s main span. The vibrations with a frequency of 1.82 Hz with minimum phase shift are caused purely by a person jumping. The identified frequency is close to the 22nd vibration mode defined by FEM.
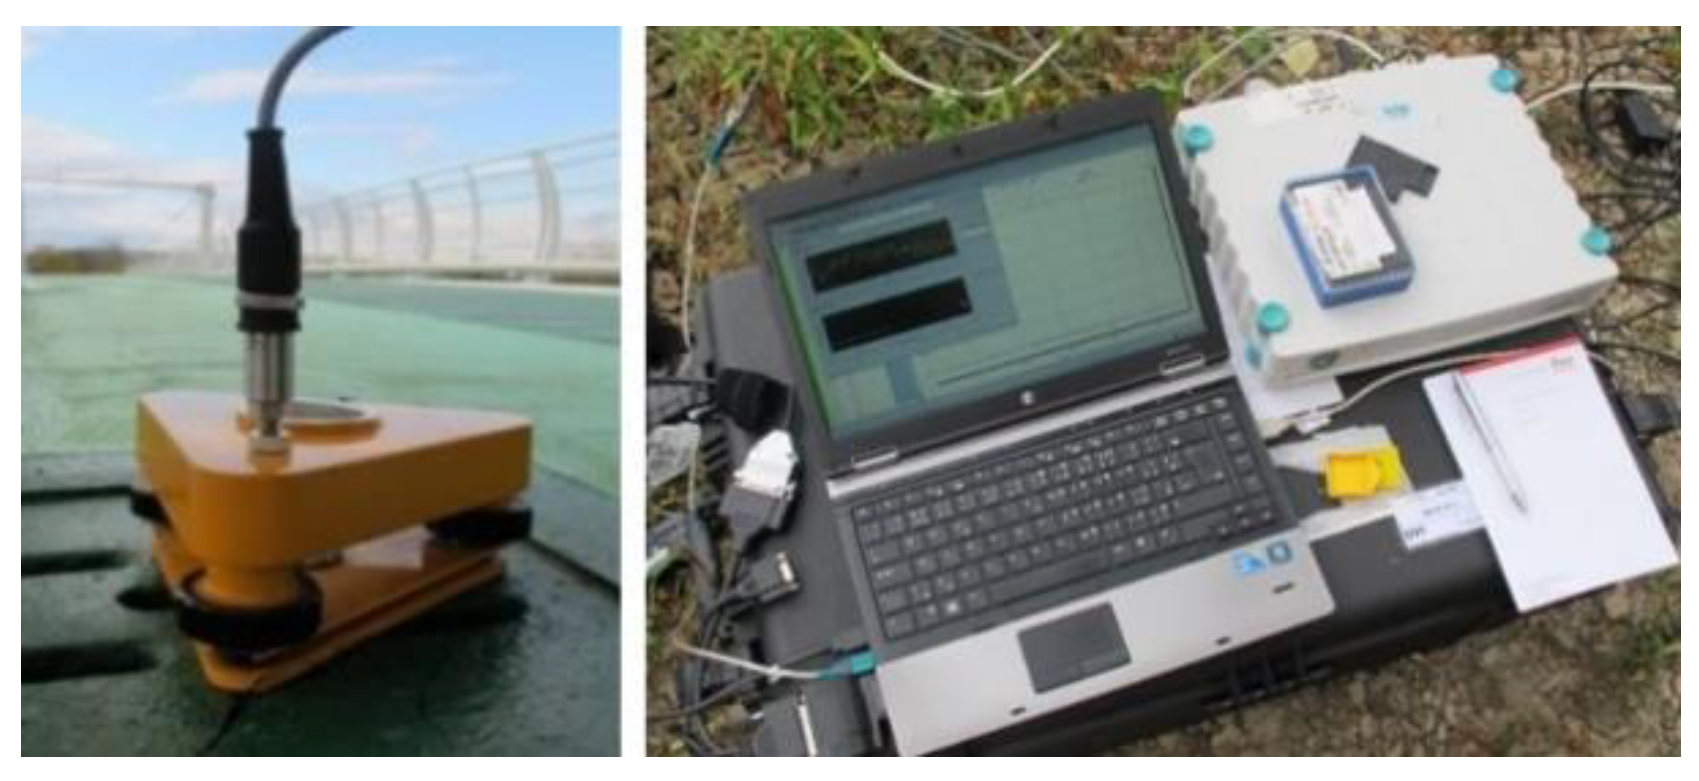
To verify the results, measurements using accelerometers were also performed. Two HBM B12/200 one-axial accelerometers were installed at the measured points, P01 and P02. The accelerometers were levelled in a vertical position using Zeiss tribraches, as shown in Figure 10, to ensure the measurement of the acceleration in the vertical direction. The accelerometers used were inductive sensors with a relative error of up to ±2%. The frequency of the data registration was 100 Hz, as in the case of G-B radar, and it was performed using a HBM Spider 8 A/D transducer and Catman Easy software.
The relative displacements from the data measured were calculated by double integration. The drift of the accelerometers and the errors caused by the integration were minimized by a Butterworth high-pass filter with a cut-off frequency of 0.5 Hz. The reduction of the spectrum’s magnitude by the filter (0.7% at 1 Hz) had no significant influence on the determined displacements. Table 3 shows the results of the measurements by the accelerometers.
The values of the vertical displacements are very close to the displacements obtained by the G-B radar measurements in all four epochs of the experiment (Table 3). The maximum vertical displacements were indicated by one person jumping at the middle of the superstructure, with values of 2.34 mm (P01) and 4.82 mm (P02).
In the 1st measurement epoch (without any load), no significant frequencies were identified from the measured data (Table 4). During the epoch with one person walking, the structure’s 22nd and 44th vibration modes with frequencies 2.05 Hz and 3.99 Hz were determined. The results of the 3rd epoch (running person), 2.90 Hz and 4.59 Hz, correspond to the 23rd and 59th vibration modes and are in accordance with the results of the G-B radar measurements.

5. Conclusions

This paper deals with the deformation monitoring of bridge structures by non-conventional surveying methods: terrestrial laser scanning and ground-based radar interferometry. The basic principles of deformation monitoring using the mentioned methods are described with a special focus on the data analysis approaches. The paper describes the experimental deformation monitoring of the Liberty Bridge (Bratislava, Slovak Republic).
The results of the case study presented in this paper show that both methods described are highly effective for the deformation analysis of engineering structures. The accuracy of 3D coordinate measurement of points by state-of the-art laser scanners is in the range of a few millimeters. The precision can be increased using the data processing approach described in the paper. In addition to the described geometry-based approach for deformation analysis, information concerning the behavior of the reflected laser beam is needed, as shown in [30].
The G-B radar interferometry is an innovative contactless technique that allows the monitoring of the entire structure’s deformation synchronously with high frequency. The accuracy of the results depends on the system configuration and on the quality of the reflected signal. The results obtained by G-B radar interferometry were verified by accelerometer measurements. Comparison of the result shows close compliance between the results of both methods. The measured deformations allow for the prediction of possible structural failure, often before an accident occurs.
The results of the measurements performed and described in the paper confirmed the assumptions about the static and dynamic responses of the structure being monitored, as defined in the technical documentation of the bridge construction project.

Author Contributions

Conceptualization, J.E. and A.K.; methodology, J.E., A.K., and P.K.; investigation, J.E., A.K., and P.K.; resources, J.E.; writing—original draft preparation, J.E.; writing—review and editing, A.K.; visualization, P.K.; project administration, J.E.; funding acquisition, A.K. All authors have read and agreed to the published version of the manuscript.

Funding

This work was supported by the Slovak Research and Development Agency under Contract no. APVV-18-0247.

Conflicts of Interest

The authors declare no conflict of interest. The funders had no role in the design of the study; in the collection, analyses, or interpretation of data; in the writing of the manuscript, or in the decision to publish the results.

References

  1. Holst, C.; Nothnagel, A.; Blome, M.; Becker, P.; Eichborn, M.; Kuhlmann, H. Improved area-based deformation analysis of a radio telescope’s main reflector based on terrestrial laser scanning. J. Appl. Geod. 2014, 9, 1862–9024. [Google Scholar] [CrossRef]
  2. Previtali, M.; Barazzetti, L.; Brumana, R.; Cuca, B.; Orieni, D.; Roncoroni, F.; Scaioni, M. Automatic façade modelling using point cloud data for energy-efficient retrofitting. Appl. Geomat. 2014, 6, 95–113. [Google Scholar] [CrossRef]
  3. Remondinno, F.; Rizzi, A. Reality-based 3D documentation of natural and cultural heritage sites—techniques, problems, and examples. Appl. Geomat. 2010, 2, 85–100. [Google Scholar] [CrossRef] [Green Version]
  4. Kovanič, Ľ.; Blistan, P.; Urban, R.; Štroner, M.; Pukanská, K.; Bartoš, K.; Palková, J. Analytical Determination of Geometric Parameters of the Rotary Kiln by Novel Approach of TLS Point Cloud Segmentation. Appl. Sci. 2020, 10, 7652. [Google Scholar] [CrossRef]
  5. Erdélyi, J.; Kyrinovič, P.; Kopáčik, A.; Honti, R. Building Information Modelling of Industrial Plants. In Contributions to International Conferences on Engineering Surveying: Springer Proceedings in Earth and Environmental Sciences; Kopáčik, A., Kyrinovič, P., Erdélyi, J., Paar, R., Marendić, A., Eds.; Springer: Cham, Switzerland, 2020; Volume 13, pp. 13–26. [Google Scholar] [CrossRef]
  6. Štroner, M.; Křemen, T.; Braun, J.; Urban, R.; Blistan, P.; Kovanič, L. Comparison of 2.5d volume calculation methods and software solutions using point clouds scanned before and after mining. Acta Montan. Slovaca 2019, 24, 296–306. [Google Scholar]
  7. Pavelka, K.; Michalík, B. Laser scanning for bim and results visualization using VR. Int. Arch. Photogramm. Remote Sens. Spat. Inf. Sci. ISPRS Arch. 2019, XLII-5/W2, 49–52. [Google Scholar] [CrossRef] [Green Version]
  8. Neuner, H.; Holst, C.; Kuhlmann, H. Overview on current modelling strategies of point clouds for deformation analysis. Avn Allg. Vermess. Nachr. 2016, 123, 328–339. [Google Scholar]
  9. Qiang, P.; Xun, G.; Zheng, Z.M. A review of health monitoring and damage detection of bridge structures. Earthq. Eng. Eng. Vib. 2003, 23, 61–67. [Google Scholar]
  10. Lipták, I.; Kopáčik, A.; Erdélyi, J.; Kyrinovič, P. Dynamic Deformation Monitoring of Bridge Structure. J. Civ. Eng. 2013, 8, 13–20. [Google Scholar] [CrossRef] [Green Version]
  11. Pieraccini, M.; Parrini, F.; Fratini, M.; Atzeni, C.; Spinelli, P.; Micheloni, M. Static and dynamic testing of bridges through microwave interferometry. NDT E Int. 2007, 40, 208–214. [Google Scholar]
  12. Cosser, E.; Roberts, G.W.; Meng, X.; Hodson, A.H. Single frequency GPS for Bridge Deflection Monitoring: Progress and Results. In Proceedings of the 1st FIG International Symposium on Engineering Surveys for Construction Works and Structural Engineering, Nottingham, UK, 28 June–1 July 2004. [Google Scholar]
  13. Owerko, T.; Ortyl, L.; Kocierz, R.; Kuras, P.; Salamak, M. Investigation of displacements of road bridges under test loads using radar interferometry-case study. In Bridge Maintenance, Safety, Management, Resilience and Sustainability, Proceedings of the Sixth International IABMAS Conference, Stresa, Lake Maggiore, Italy, 8–12 July 2012; CRC Press: Leiden, The Netherlands, 2012. [Google Scholar]
  14. Kuras, P.; Owerko, T.; Strach, M. Application of an interferometric radar to examination of engineering objects vibration. Rep. Geod. 2009, 86, 209–216. [Google Scholar]
  15. Ohlmann-lauber, J.; Schäfer, T. Ansätze zur Ableitung von Deformationen aus TLS-Daten. In 106. DVW Seminar Terrestrisches Laserscanning-TLS; Wißner-Verlag: Augsburg, Germany, 2011; pp. 161–180. [Google Scholar]
  16. Little, M.J. Slope monitoring strategy at PPRust open pit operation. In Proceedings of the International Symposium on Stability of Rock Slopes in Open Pit Mining and Civil Engineering, Cape Town, South Africa, 9 April 2016; African Institute of Mining and Metallurgy: Johannesburg, South Africa, 2006; pp. 221–230. [Google Scholar]
  17. Wunderlich, T.; Niemeier, W.; Wujanz, D.; Holst, C.; Kuhlmann, H. Areal Deformation Analysis from TLS Point Clouds—The Challenge. AVN Allg. Vermess. Nachr. 2016, 123, 340–351. [Google Scholar]
  18. Girardeau-montaut, D.; Roux, M.; Marc, R.; Thibault, G. Change detection on points cloud data acquired with a ground laser scanner. Int. Arch. Photogramm. Remote Sens. Spat. Inf. Sci. 2005, 36, 30–35. [Google Scholar]
  19. Harmening, C.; Neuner, H. A spatio-temporal deformation model for laser scanning point clouds. J. Geod. 2020, 94, 26. [Google Scholar] [CrossRef] [Green Version]
  20. Schäfer, T.; Weber, T.; Kyrinovič, P.; Zámečníková, M. Deformation Measurement Using Terrestrial Laser Scanning at the Hydropower Station of Gabčíkovo. In Proceedings of the 3rd International Conference on Engineering Surveying: FIG Regional Central and Eastern European Conference, INGEO 2004, Bratislava, Slovakia, 11–13 November 2004; International Federation of Surveyors: Bratislava, Slovakia, 2004. [Google Scholar]
  21. Fischler, M.A.; Bolles, R.C. Random sample consunsus: A paradigm for model fitting with applications to image analysis and automated cartography. Commun. ACM 1981, 24, 381–395. [Google Scholar] [CrossRef]
  22. Golub, G.; Kahan, W. Calculating the Singular Values and Pseudo-Inverse of a Matrix. J. Soc. Ind. Appl. Math. Ser. B Numer. Anal. 1965, 2, 205–224. [Google Scholar] [CrossRef]
  23. Wenzel, H. Health Monitoring of Bridges; John Wiley & Sons, Ltd.: Chichester, UK, 2009. [Google Scholar]
  24. Bernardini, G.; De Pasquale, G.; Bicci, A.; Marra, M.; Coppi, F.; Ricci, P. Microwave interferometer for ambient vibration measurements on civil engineering structures: 1. Principles of the radar technique and laboratory tests. In Experimental Vibration Analysis for Civil Engineering Structures: Proceedings of the International Conference on Experimental Vibration Analysis for Civil Engineering Structures, Porto, Portugal, 24–26 October 2007; University of Porto: Porto, Portugal, 2007. [Google Scholar]
  25. Gentile, C. Radar-based measurement of deflections on bridges and large structures: Advantages, limitations and possible applications. In Proceedings of the fourth international conference Smart Structures and Materials (SMART’09), Porto, Portugal, 13–15 July 2009. [Google Scholar]
  26. Pavelka, K.; Šedina, J.; Matoušková, E.; Hlaváčová, I.; Korth, W. Examples of different techniques for glaciers motion monitoring using InSAR and RPAS. Eur. J. Remote Sens. 2019, 52, 219–232. [Google Scholar] [CrossRef] [Green Version]
  27. Cooley, J.W.; Tukey, J.W. An algorithm for the machine calculation of complex Fourier series. Math. Comput. 1965, 19, 297–301. [Google Scholar] [CrossRef]
  28. Welch, P.D. The Use of Fast Fourier Transform for the Estimation of Power Spectra: A Method Based on Time Averaging Over Short, Modified Periodograms. IEEE Trans. Audio Electroacoust. 1967, 15, 70–73. [Google Scholar] [CrossRef] [Green Version]
  29. Agócs, Z.; Vanko, M. Devínska Nová Ves—Schloshof Cycling bridge. Cyklomost Devínska Nová Ves—Schlosshof; Technical Documentation; INGSTEEL, spol. s.r.o.: Bratislava, Slovakia, 2011; p. 29. [Google Scholar]
  30. Suchocki, C. Comparison of Time-of-Flight and Phase-Shift TLS Intensity Data for the Diagnostics Measurements of Buildings. Materials 2020, 13, 353. [Google Scholar] [CrossRef] [PubMed] [Green Version]
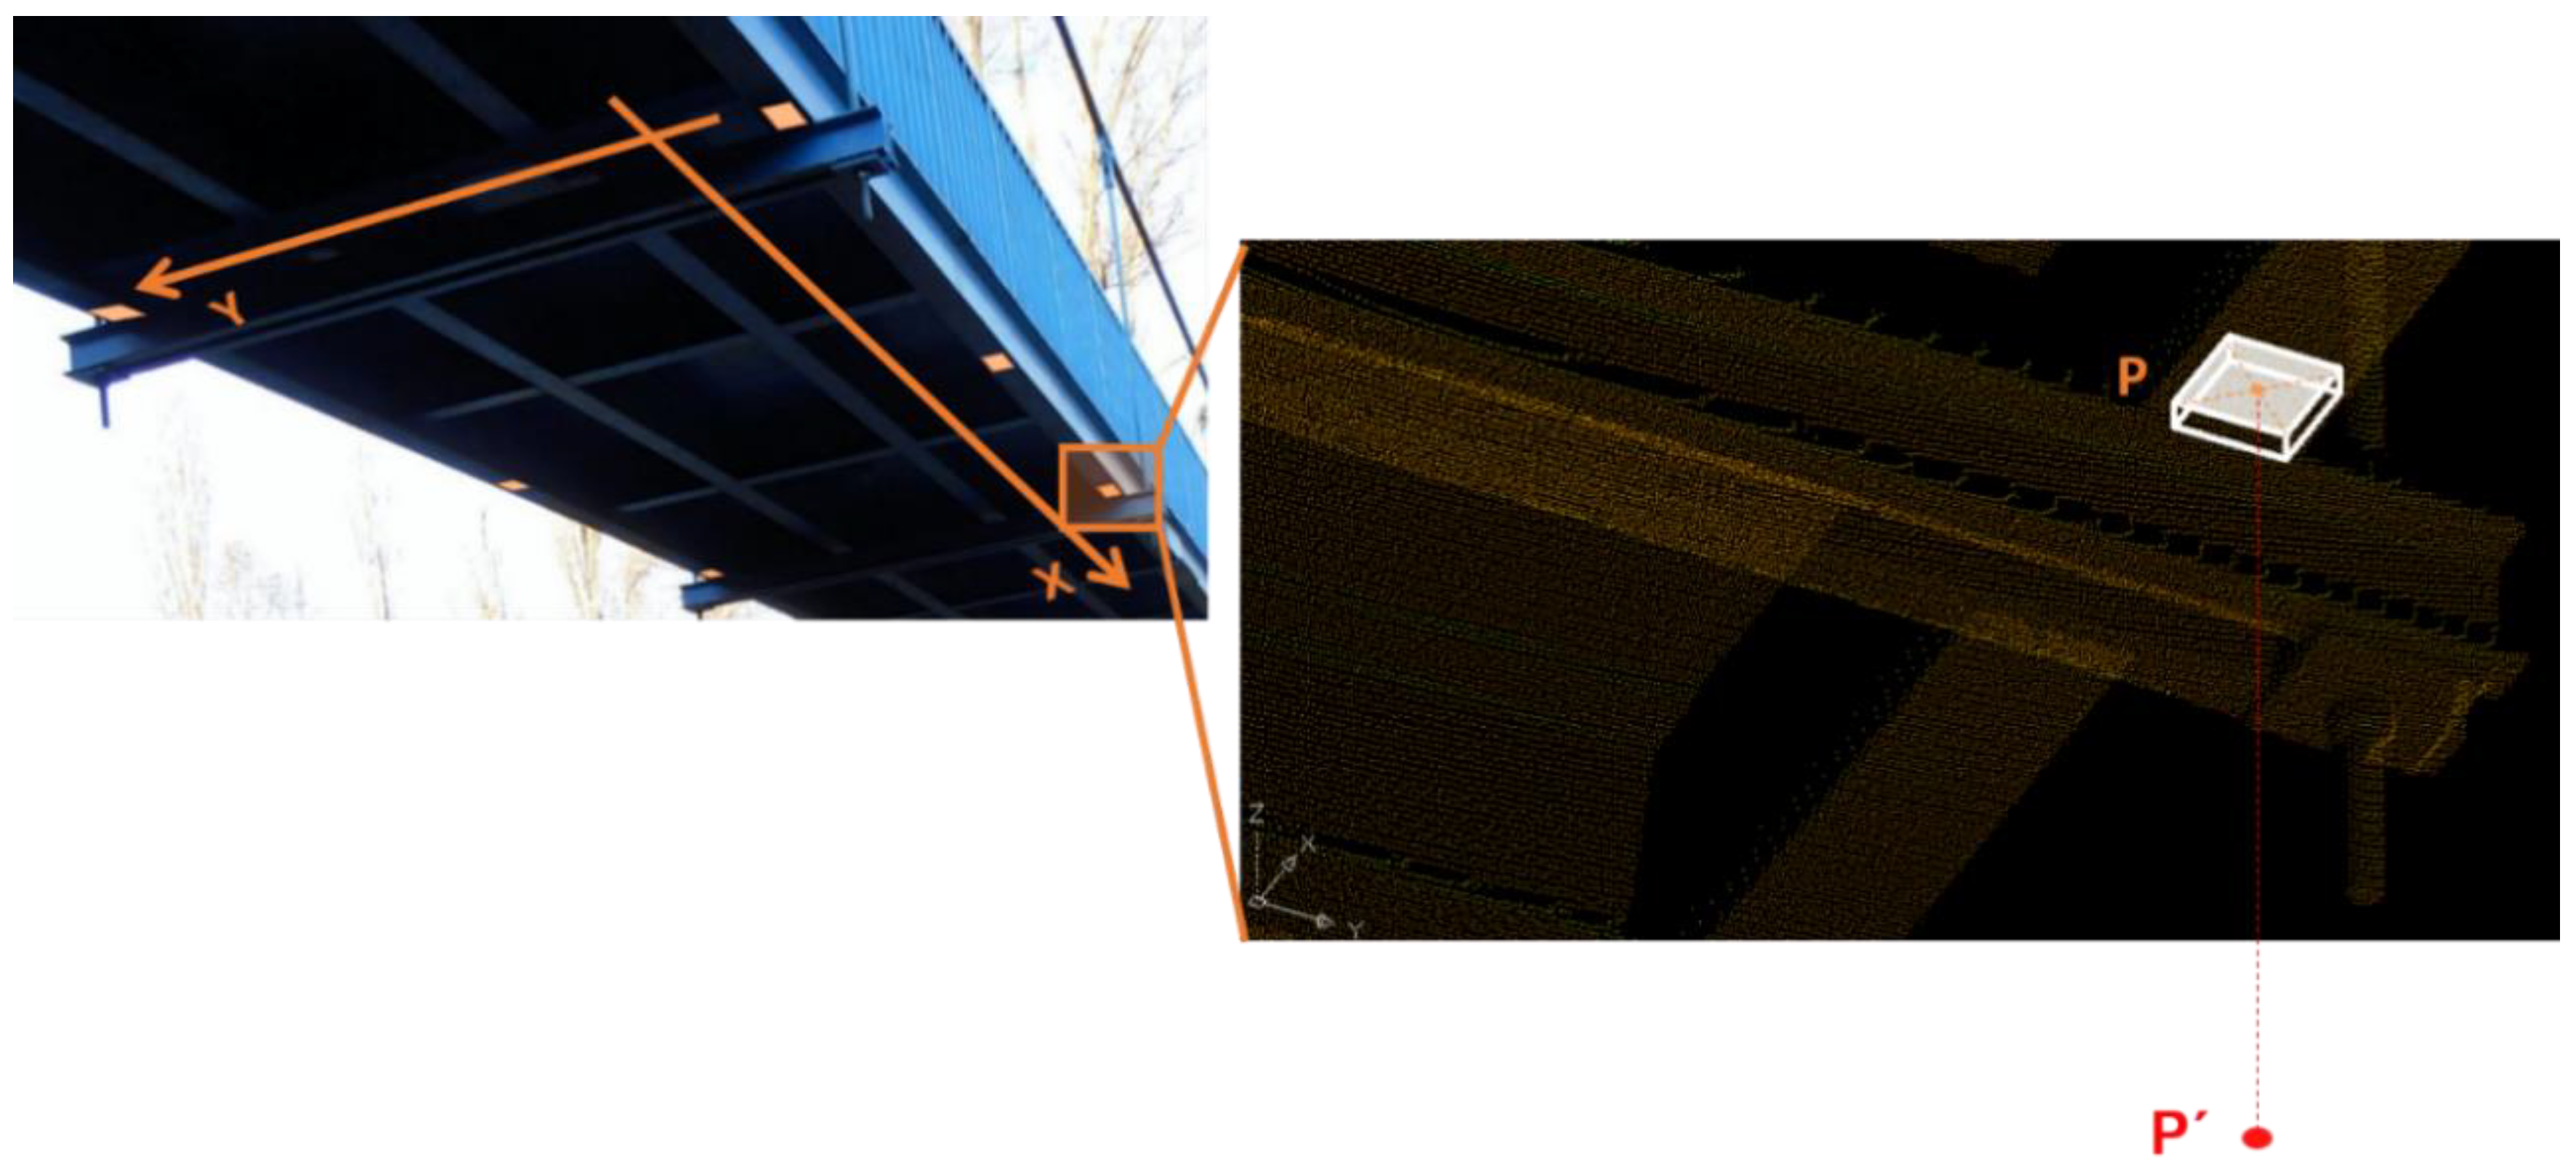
Figure 1. Modelling the height of the monitored point. Definition of a local coordinate system (left), pre-segmentation of the point cloud by fencing box and projection of the monitored point onto the modelled regression plane (right).
Applsci 10 08731 g001
Figure 2. Principle of the targets’ identification in the radial direction.
Applsci 10 08731 g002
Figure 3. Radial displacements and their transformation.
Applsci 10 08731 g003
Figure 4. Spectral analysis of data: (a) displacements of the chosen parts of the monitored structure; (b) average normalized spectral density (ANSPD) of the entire structure’s dynamics.
Applsci 10 08731 g004
Figure 5. The Liberty Bridge: (a) suspended structure; (b) inundation bridge.
Applsci 10 08731 g005
Figure 6. Position of the laser scanner and the reference points.
Applsci 10 08731 g006
Figure 7. Vertical displacement of the monitored points obtained by terrestrial laser scanning (TLS).
Applsci 10 08731 g007
Figure 8. Position of the ground-based radar.
Applsci 10 08731 g008
Figure 9. Range bin profile.
Applsci 10 08731 g009
Figure 10. HBM B12/200 accelerometer at the middle (P02) of the bridge’s main span.
Applsci 10 08731 g010
Table 1. Maximum vertical displacements obtained by G-B radar.
Monitored PointVertical Displacement [mm]
No LoadWalkingRunningJumping
P010.570.590.602.55
P020.710.740.764.63
Table 2. Dominant frequencies of structural deformation identified by GB-radar.
Vibration ModeModal Frequency [Hz]Dominant Frequencies [Hz]
No LoadWalkingRunningJumping
2nd1.631.53-1.53-
22nd2.15-2.01-1.82
23rd2.49--2.97-
44th3.76-3.71-3.51
59th4.69--4.56-
Table 3. Maximum vertical displacements obtained by accelerometers.
Monitored PointVertical Displacement [mm]
No LoadWalkingRunningJumping
P010.610.540.562.34
P020.690.730.724.82
Table 4. Dominant frequencies of structural deformation identified by accelerometers.
Vibration ModeModal Frequency [Hz]Dominant Frequencies [Hz]
No LoadWalkingRunningJumping
2nd1.63----
22nd2.15-2.05-1.80
23rd2.49--2.90-
44th3.76-3.99--
59th4.69--4.59-
Publisher’s Note: MDPI stays neutral with regard to jurisdictional claims in published maps and institutional affiliations.