Article

Intelligent Grinding System for Medium/Thick Plate Welding Seams in Construction Machinery Using 3D Laser Measurement and Deep Learning

1
School of Machinery Engineering, Tianjin University, Tianjin 300354, China
2
State Key Laboratory of Robotics, Shenyang Institute of Automation, Chinese Academy of Sciences, Shenyang 110016, China
3
The Joint Laboratory of Ocean Observing and Detection, Laoshan Laboratory, Qingdao 266237, China
4
Weichai Power Co., Ltd., Weifang 261021, China
*
Author to whom correspondence should be addressed.
Actuators 2024, 13(10), 414; https://doi.org/10.3390/act13100414
Submission received: 21 August 2024 / Revised: 2 October 2024 / Accepted: 4 October 2024 / Published: 14 October 2024
(This article belongs to the Section Actuators for Manufacturing Systems)

Abstract

:
With the rapid development of the construction machinery industry, thick plate welds are increasingly needing efficient, accurate, and intelligent processing. This study proposes an intelligent grinding system using 3D line laser measurement and deep learning algorithms to solve the problems of inefficiency and inaccuracy existing in traditional weld grinding methods. This study makes use of 3D line laser measurement technology and deep learning algorithms in tandem, which perform automated 3D measurement and analysis to extract key parameters of the weld seam, in conjunction with deep learning algorithms applied on image data of the weld seam for the automatic classification, positioning, and segmentation of the weld seam. The entire work is divided into the following: image acquisition, motion control, and image processing. Based on various weld seam detection algorithms, the selected model was MNet-based DeepLab-V3. An intelligent trimming system for welding seams based on deep learning was constructed. Experiments were conducted to verify the feasibility and accuracy of the 3D line laser measurement technology for weld seam inspections, and that the deep learning algorithm can effectively identify the type and location of the weld seam, thus predicting the trimming strategy. With an accuracy far superior to conventionally based methods in accurate detection and regrinding of weld surface defects, the system proves advantageous for improved weld regrinding productivity and quality. It was determined that the system presents significant advantages in reinforcing weld regrinding when it comes to efficiency and quality, thus initiating a paradigm of using intelligent treatments for medium/thick plate welds in the construction machinery industry.

1. Introduction

1.1. Research Background and Significance

Plate welds have become part of production processes as the construction machinery industry continues to evolve quickly [1,2]. Innovative welding techniques, such as combining Friction Stir Welding (FSW) with ball-burnishing, have enhanced the mechanical properties of aluminum alloy joints, which are critical for improving overall weld quality and efficiency in production processes. Such advancements in welding align with the need for automated post-processing methods, including intelligent grinding systems, to meet the increasing demands for precision and reliability [3,4]. While grinding welds by hand is normal and prevalent in manufacturing, the work itself can be complex and have inefficiencies that ultimately do not resolve the problems of current assembly lines, including production capacities and the related increasing demands for greater precision, efficiency, and automation [5,6,7]. Additionally, manual grinding contributes to air pollution by allowing metal particles and fume emissions, which could indirectly create metal contaminants in water, during cleaning and metal residue disposal [8,9]. To meet growing demands and mitigate the environmental footprint, an intelligent grinding system with advanced technologies could provide a great solution [10].
This research incorporates 3D line laser measurement with deep learning algorithms to establish an intelligent grinding system. The 3D laser system permits automatic weld measurement and analysis in all three dimensions, as well as extracting key parameters, such as height, width, and sag depth [11]. The deep learning algorithms permit automatic classification, locating, and segmentation of welds, using large amounts of in-process welding images, for accurate and automated grinding [12]. Furthermore, advancements in infrared thermography and machine learning models, as described for precision analysis of heat flux, indicate that a range of sensing technologies can be used in weld quality control [13,14]. Likewise, analytical models of precision property distribution in mechanical systems can be utilized in the development of a control system in our intelligent grinding system.
Integrating all of these technologies leads to an intelligent grinding system that can dramatically increase both the efficiency and accuracy of weld processing and helps with reducing labor manhours and costs. At the same time, product quality, which is essential for safety standards, is improved, addressing the increasing demands for more precision and reliability in the modern construction machinery industry [15]. In addition to improvements in labor efficiency and product quality, the intelligent grinding system illustrates applications of new technologies in welding processes that exist outside the construction machinery realm, thereby providing new capabilities and driving technical development and innovation [16,17].

1.2. Current Research Status at Home and Abroad

Three-dimensional measurement is a modeling technique that involves using 3D coordinates presented using precision instruments, electronic computers, digital control, optical detection, and other advanced technology [18,19]. This method is multi-faceted and hence provides high accuracy and stability irrespective of the target color or illumination conditions. However, it does have its downsides; scanning necessitates contact between the probe and the object, which may compromise the integrity of both parties, possibly leading to expanded constraints on application. In contrast, non-contact 3D measurement methods, and more specifically optical 3D measurement methods, are widely used and can be categorized as passive or active based on imaging by illuminating [20]. Figure 1 shows a basic class grouping of the 3D measurement techniques. The surveying details on each are covered in [21,22], and [23] mentions extra viewpoints on the efficiency and new developments in both contact and non-contact measurement methods.
Foreign research in this field is relatively nascent. In 2000, M. Levoy et al. employed the triangle principle and high-resolution color images to reconstruct Michelangelo’s main sculpture, proposing corresponding technical methods [24]. In 2006, Simon Winkelbach et al. developed an affordable desktop 3D laser scanning system; however, its application was limited to low-light environments [25].
In China, research on laser scanning three-dimensional measurement technology started relatively late but has gained significant attention from various scientific research institutions and enterprises due to its practical and theoretical value. Over the years, substantial progress has led to the development of various laser scanning measurement systems. The Research Group at Harbin Institute of Technology have proposed the camera- and ML-based detection of grind and weld. A series of high-definition cameras took pictures of the weld. The image capture was performed to extract distinct parameters that made it possible to use a machine learning classification model for the fillet weld and grinding classification. During the grinding stage, fine-tuned adjustment of grinding parameters was automatically achieved according to the model’s classification results for accurate welding grinding. In February 2009, Beijing Bowei Hengxin Technology Development Co., Ltd., developed a CP monocular three-dimensional scanner system based on the principles of structured light monocular visual triangulation. This system consists of a digital camera, structured light projector, and central controller. The projector projects multiple sets of grating stripes on the surfaces of the object while the digital camera captures the stripe patterns from different angles, which are then sent to a computer system. The computer calculates the spatial coordinates and textures very accurately for each pixel and ultimately generates a complete three-dimensional colored point cloud data of the object shape and surface characteristics [26,27].

2. Introduction to Relevant Technologies

2.1. Principles and Applications of 3D Line Laser Measurement Technology

Three-dimensional linear laser measurement is a highly precise method of laser technology for determining the proper geometric size and shape of an object by using the reflected or scattered light from the surface being analyzed. The processes of laser emission, optical path transmission, reception of light, and data processing constitute the entire procedure [28].
Using such a system, it is possible to circumvent the limitations of the traditional single-point scanning method for laser surface calibration and three-dimensional measurement accuracy will greatly increase [28]. The whole assembly contains two cameras, one laser projector, and one rotating motor (see Figure 2a). The laser stripe is projected first onto the test object in the testing process. Then, the test object is rotated and scanned by the rotating motor. During the scanning of the object, the stereo vision system captures image after image of the object at a predetermined frame rate. By leveraging epipolar constraints in stereo vision and the characteristics of laser stripes within the obtained stereo image pairs, we establish corresponding relationships between the two stereo vision systems. Finally, based on binocular stereo vision principles and preset system parameters, we acquire three-dimensional point cloud data for our target.
Based on the collection of laser point cloud data, the three-dimensional spatial coordinates of the measured object are obtained through registration, filtering, reconstruction, and other methods, and then the topographic characteristics of the measured object are accurately measured and reconstructed [29].
The application of three-dimensional laser measurement is crucial in automobile manufacturing for parts detection, aerospace engineering for structural detection, and industrial production for quality control [30,31,32]. This project aims to utilize the three-dimensional laser online detection method to achieve real-time and precise analysis of plate welding processes in large construction machinery, thereby providing essential data support for the development of an intelligent grinding system. Consequently, the immense potential of three-dimensional laser measurement technology in the construction machinery industry becomes evident.

2.2. Application of Deep Learning in Weld Inspection

Deep learning applications fit well into the sphere of interest of welding inspection. Conventional systems of weld inspection are based on human visual examination, which indeed poses various challenges, given that these are low-energy, subjective, prone to fatigue, and affected by certain nuisances in the environment [33]. Deep learning technology enables automatic feature extraction from images or videos and facilitates classification and localization through extensive data training [34], thereby achieving rapid and accurate detection and analysis of welds. Numerous works have demonstrated image processing algorithms for the detection of weld seams. For instance, Zhang Shuai et al. presented an adaptive bilateral filtering method that modifies spatial standard deviation and gray-scale standard deviation to perform better filtering on images of weld seams [35]. Wu Chaoqun et al. made similar advances by proposing a priori morphological determination to eliminate noise and improve the signal-to-noise ratio for reflective weldments [36]. Nevertheless, the novel aspect of our work surpasses anything proposed before, by uniting 3D line laser measurement with deep learning algorithms for weld seam detection and regrinding. Previous methods distributed the application of noise reduction and image enhancement in most cases, while our system uses a deep learning model (MNet-based Deeplab-V3) to extract weld seam measurements for classification, positioning, and segmentation autonomously—even though this has not been widely used in this area. This combination produces integration of real-time accuracy and detection that aids in completing the grinding process in a more efficient and precise manner, particularly for complex weld seams produced during construction-type machinery.
Firstly, deep learning is in the realm of convolutional neural networks (CNNs) which can perform quick feature extraction in weld images. Through multiple layers of convolution and pooling operations, CNNs can iteratively learn and extract key features from images, such as texture and shape [37]. This type of multi-level feature extraction enables CNNs to efficiently distinguish between weld and non-weld regions of an image, thus combining the accuracy and reliability of the inspection task. For example, for defects like welding seam inhomogeneity, fracture, and porosity, CNNs can learn many welding seam images so they can detect and extract those for features in processes.
Secondly, deep learning can also use a recurrent neural network (RNN) or a long short-term memory network (LSTM) and other models to process sequence data, and learn and predict the position, length, and other information of welds [38]. This is very important for the continuity detection and tracking of welds, especially in the welding process, where the shape and position of welds will change and need to be monitored in real time.
As one of the best tools in object detection technology, the Faster R-CNN employs deep learning capabilities to equate the positioning and identification of welds with great precision [39]. Being an immensely popular object detection technology, it pits together a region-based convolutional neural network model and a kind of deep learning model. When stipulated within the welding process, the Faster R-CNN poignantly determines the location and identification of the welding point. Typically, it consists of four main components: feature extraction network, region generation network, region of interest aggregation layer, and classification regression. Firstly, the initial features are extracted from the input image through the feature extraction network; secondly, candidate boxes are extracted by RPN using the Faster R-CNN to form candidate regions; thirdly, feature maps of different sizes are uniformly sent to the complete connectivity layer for classification and positioning purposes. The primary architecture of Faster R-CNN is depicted in Figure 2b.
In addition to the aforementioned technologies, deep learning can also integrate sensor data and other process parameters for achieving multi-modal information fusion [40], thereby enhancing the robustness and reliability of weld detection.

3. Intelligent Detection and Analysis of Welds Based on 3D Line Laser Measurement

3.1. Intelligent 3D Laser Measurement System for Enhanced Welding Quality Control

The most developed system for the online detection of welds by means of 3D laser systems is now recognized as the key for achieving welding quality control [41]. Due to the progress of welding technologies and the ever-increasing level of automation, there will be increasing demands for better welding quality standards. The credit for providing a scientific solution goes to the intelligent testing and analysis system based on 3D laser measurement technology which is proposed in this paper. The present research emphasizes image acquisition, motion control, and image processing. Figure 3 is a general block diagram of the whole testing system.
The image acquisition system is composed, as seen in Figure 3, of a linear laser projector and a CMOS camera. The CMOS camera projects a linear laser onto the surface of the object under observation, creating a contrived bright stripe against everything else. The CMOS camera will acquire striped surface repose. This system incorporates all components of a single-chip microcomputer, stepper motor, and rotating platform. The rotating base not only performs the function of carrying the laser and camera but also allows simple scanning. The single-chip microcomputer and the stepper motor are controlled by pcDuino8, receiving commands for steering angle, speed, and step angle of the rotating actuator [42].
The image processing system includes pcDuino8 and TFT LCD screen components. pcDuino8 acts as the core component of this integrated system by facilitating linear light stripe image processing, spatial coordinate transformation, and object surface point cloud reconstruction, while also sending control commands to the MCU (Microcontroller Unit). Simultaneously, the TFT LCD screen provides users with an intuitive human–machine dialogue interface that simplifies parameter configuration for seamless visualization and automation throughout.

3.2. Weld Seam Detection Algorithm Based on Deeplab-V3 Model Using MNet

3.2.1. Dataset Augmentation Methods

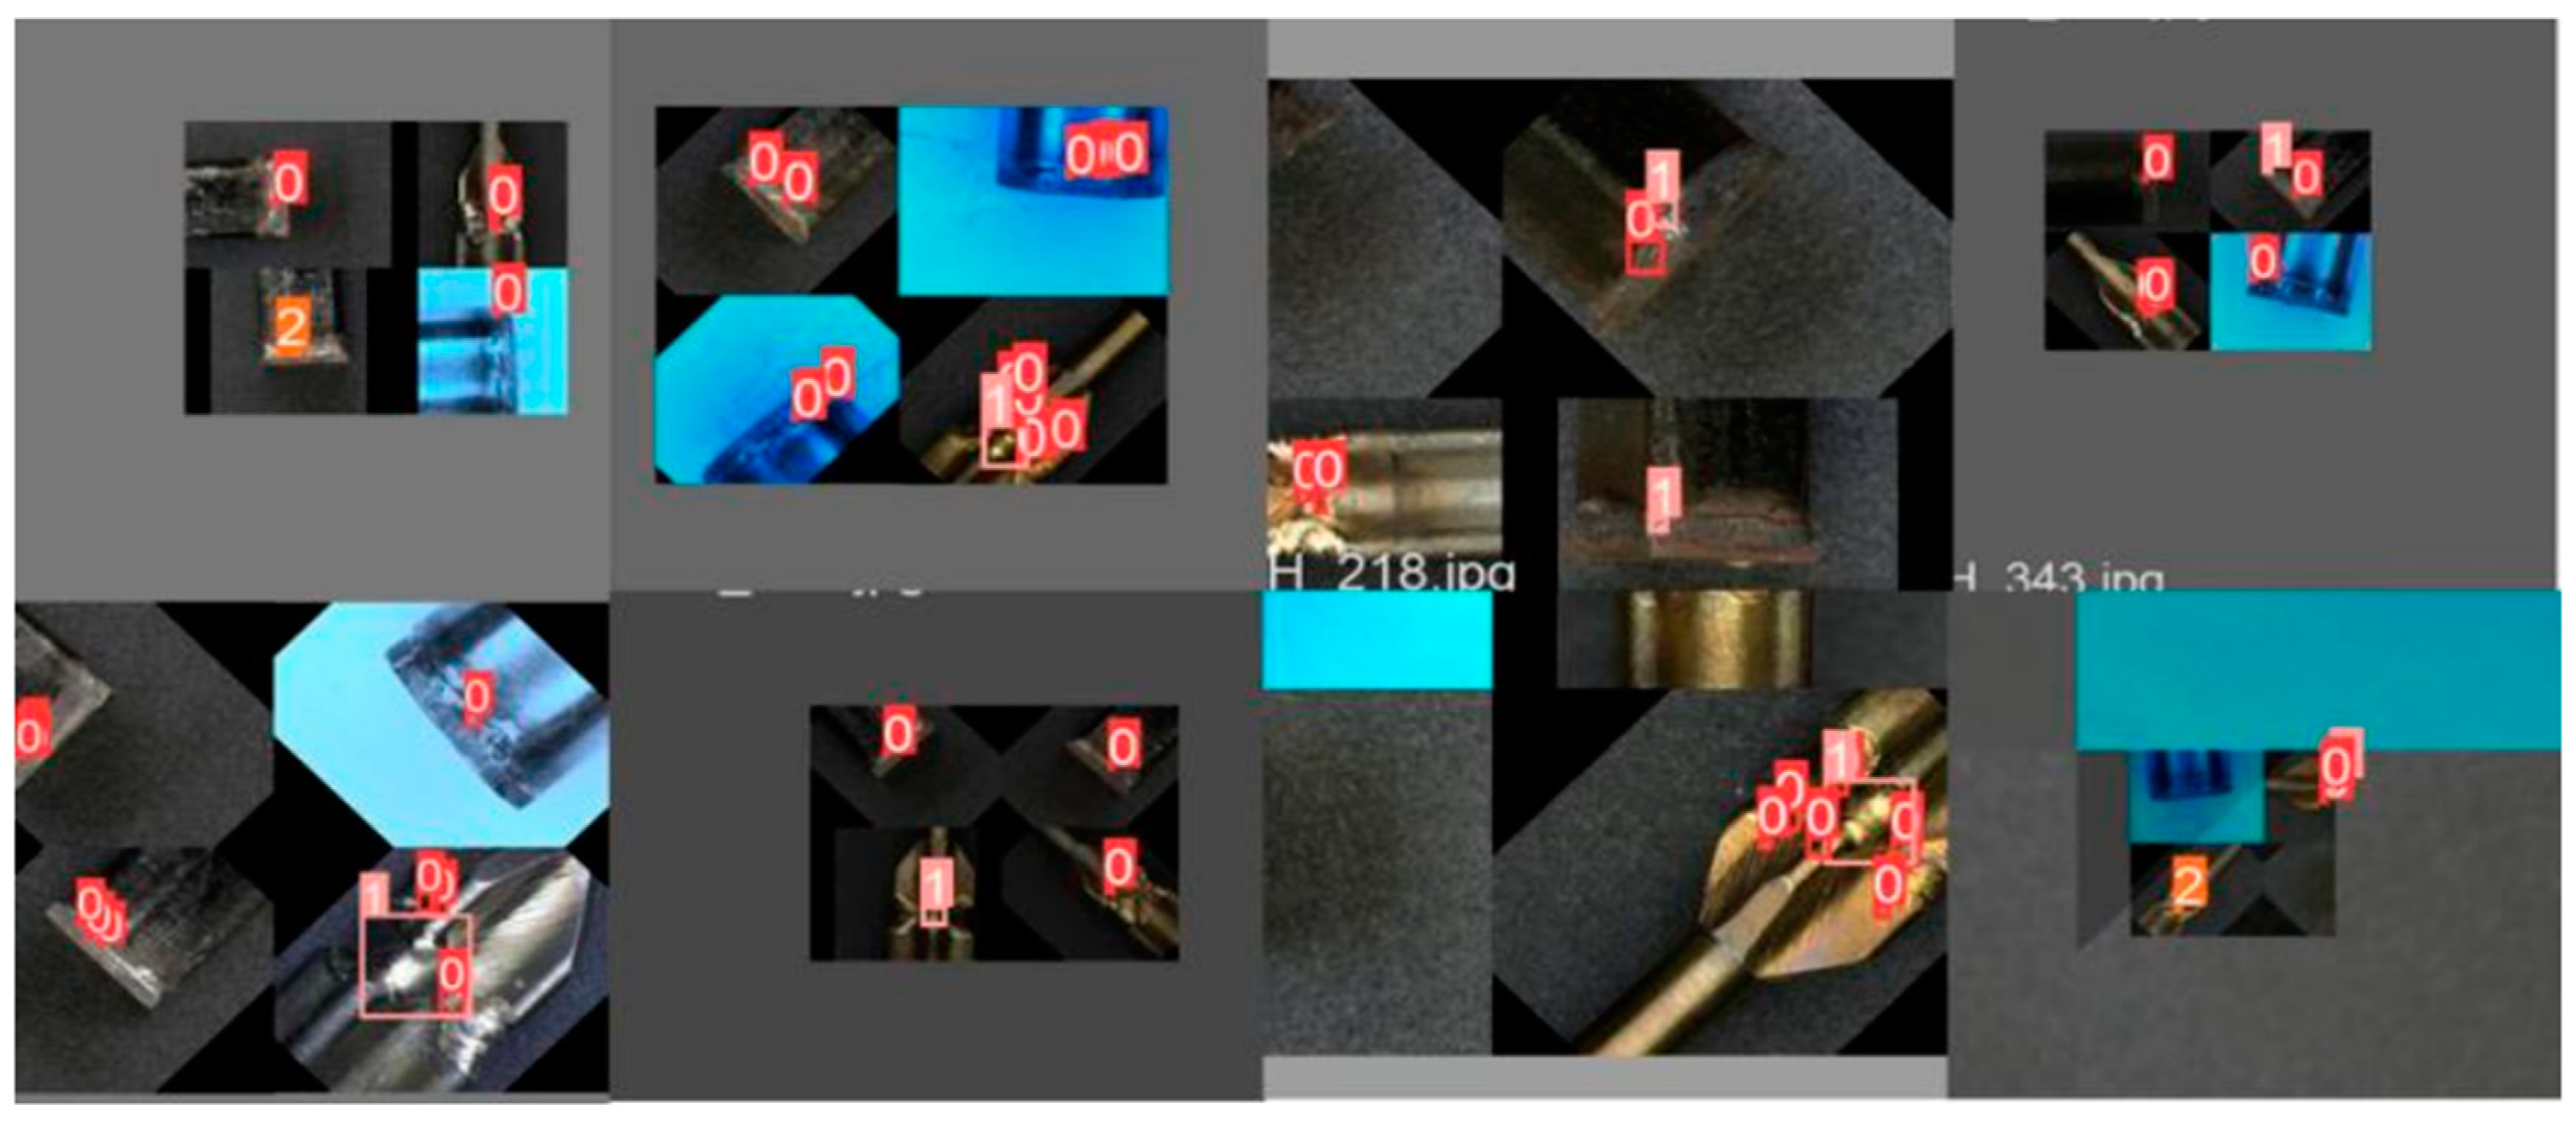
Augmentation assumes a meaningful role by means of various levels of improving generalization and model robustness at the image input stage. The datasets were subjected to color space adjustment, involving random channel adjustments and luminance alteration, as a means of creating a more appealing visual effect for the image; random-sized masks were added to the image to help the model resist noise (Cutout technique); we applied the image blend during the entire training session, and manipulated that mixed image through, say, noise addition, rotation, or resizing (Mix-up strategy); and we stitched four images together, cropped them, and reordered them in order to create modified training images from the original images (Mosaic technique). The Mosaic technique may face some issues of boundary stitching fill—for instance, when it comes to unfilled, partial, or overflow boundaries (Figure 4).

3.2.2. Dataset Creation

The data obtained for this research were exclusively collected from varying time periods and with very complex operating environments, mostly during the night, early morning, and late afternoon. The dataset in question paid special attention in its formulation to the collection of defective samples, especially with profile tubes showing complex welding techniques. This considerable increment in complexity made the completion of this fundamental step rather difficult. Having completed all these, we managed to collect 546 images of defects covering 1343 defect samples that include porosities, weld lumps, and cracks. Figure 5 displays a detailed comparison, including images of distinct defect samples such as porosity and weld nuggets, along with pictures of welding defects.
In the process of expanding the dataset, three principal data augmentation techniques that were used are as follows: (1) applied transformations that modify the location of defects in the pictures such as flipping, rotating, and panning; (2) simulated contests with adjustments made to saturation and transparency under varied lighting conditions to increase diversity in the dataset; and (3) a combination of Mosaic and Mix-up methods that can fuse different image data into new ones to further enrich the dataset. As a result of these strategies, the dataset size expanded to six times its original size, increasing the number of images to 2730 and the number of defect samples to 8058. An example of an enhanced weld defect image is shown in Figure 6.
Several important processes can be combined in the image pre-processing. A missing image can be filled using bilinear interpolation, then the noise in the image can be cleared by median filtering. Additionally, a sine function is applied for image enhancement. After these pre-processing operations are performed in raw weld images, the quality of the images is substantially improved in clarity and color contrast. The shape of the effective area and other location-specific information contained within the image is more explicit than before, so that it permits better execution of subsequent tasks. This pre-processing workflow is visualized in Figure 7.
This study, therefore, proposes using the deep learning platform PyTorch 2.0 to train the model on training, validation, and test datasets. The remaining portion of the data was used equally, with 89% for training and 11% for the validation and test datasets together. Sixteen epochs of training were performed with 4 batches. The training was carried out with the Adam optimizer and the mean squared error (MSE) as the loss function. A complete simulation system was built and optimized for 342,315 s, followed by a validation of 35,268 s. The training error was calculated with mean squared error fading out to 0.0031 and the testing error with 0.0042. These findings are reported in Table 1.
The welding point recognition method involves inputting the welding image into an 80 × 160 × 3 image and subsequently identifying the welding image based on this. The marked image is then highlighted with G color in corresponding areas [43]. In this study, the collected videos for detecting welding defects are primarily utilized during the process of defect detection. Considering the existing flaws in weld defect detection, this study aims to obtain six predicted images by averaging six consecutive predicted frames, resizing them to match the original size of the welding image, and merging them with the predicted image to indicate the specific location of welds on the original image.
The welding detection process, as illustrated in Figure 8, integrates the MNet network proposed in this study with the Deeplab-V3 network. The MNet network performs feature extraction on the welding point image using a sliding window approach, followed by constructing an edge frame for Gaussian smoothing. Finally, recognition of the welding point is achieved through non-maximum suppression operation.

3.3. Model Training and Testing

The process of constructing a weld defect image dataset based on the Deeplab-V3 network segmentation is as follows: Firstly, the defect sub-image is cropped while maintaining its aspect ratio, according to the location of the weld defect label [44]. Then, the short edge of the image is adjusted to 32 pixels in order to preserve the morphological characteristics of the weld defect. Subsequently, a window size of 32 pixels × 32 pixels with a sliding step set at 8 pixels is utilized to divide the defect sub-image into smaller blocks. Each image sub-block corresponds to a specific class label in accordance with atomic images. A total of 10,873 defect sub-blocks were obtained from cutting out 712 defect sub-images from 89 pictures. To differentiate areas without defects, non-defective parts were selected from original images and further divided into 45,924 non-defective sub-blocks using the same method. Additionally, by employing cyclic consistency generation adversarial networks and measuring samples in four directions (0°, 90°, 180°, 270°), it is possible to expand the number of cut-out defective sub-blocks. The final number of obtained defective image sub-blocks can be found in Table 2.
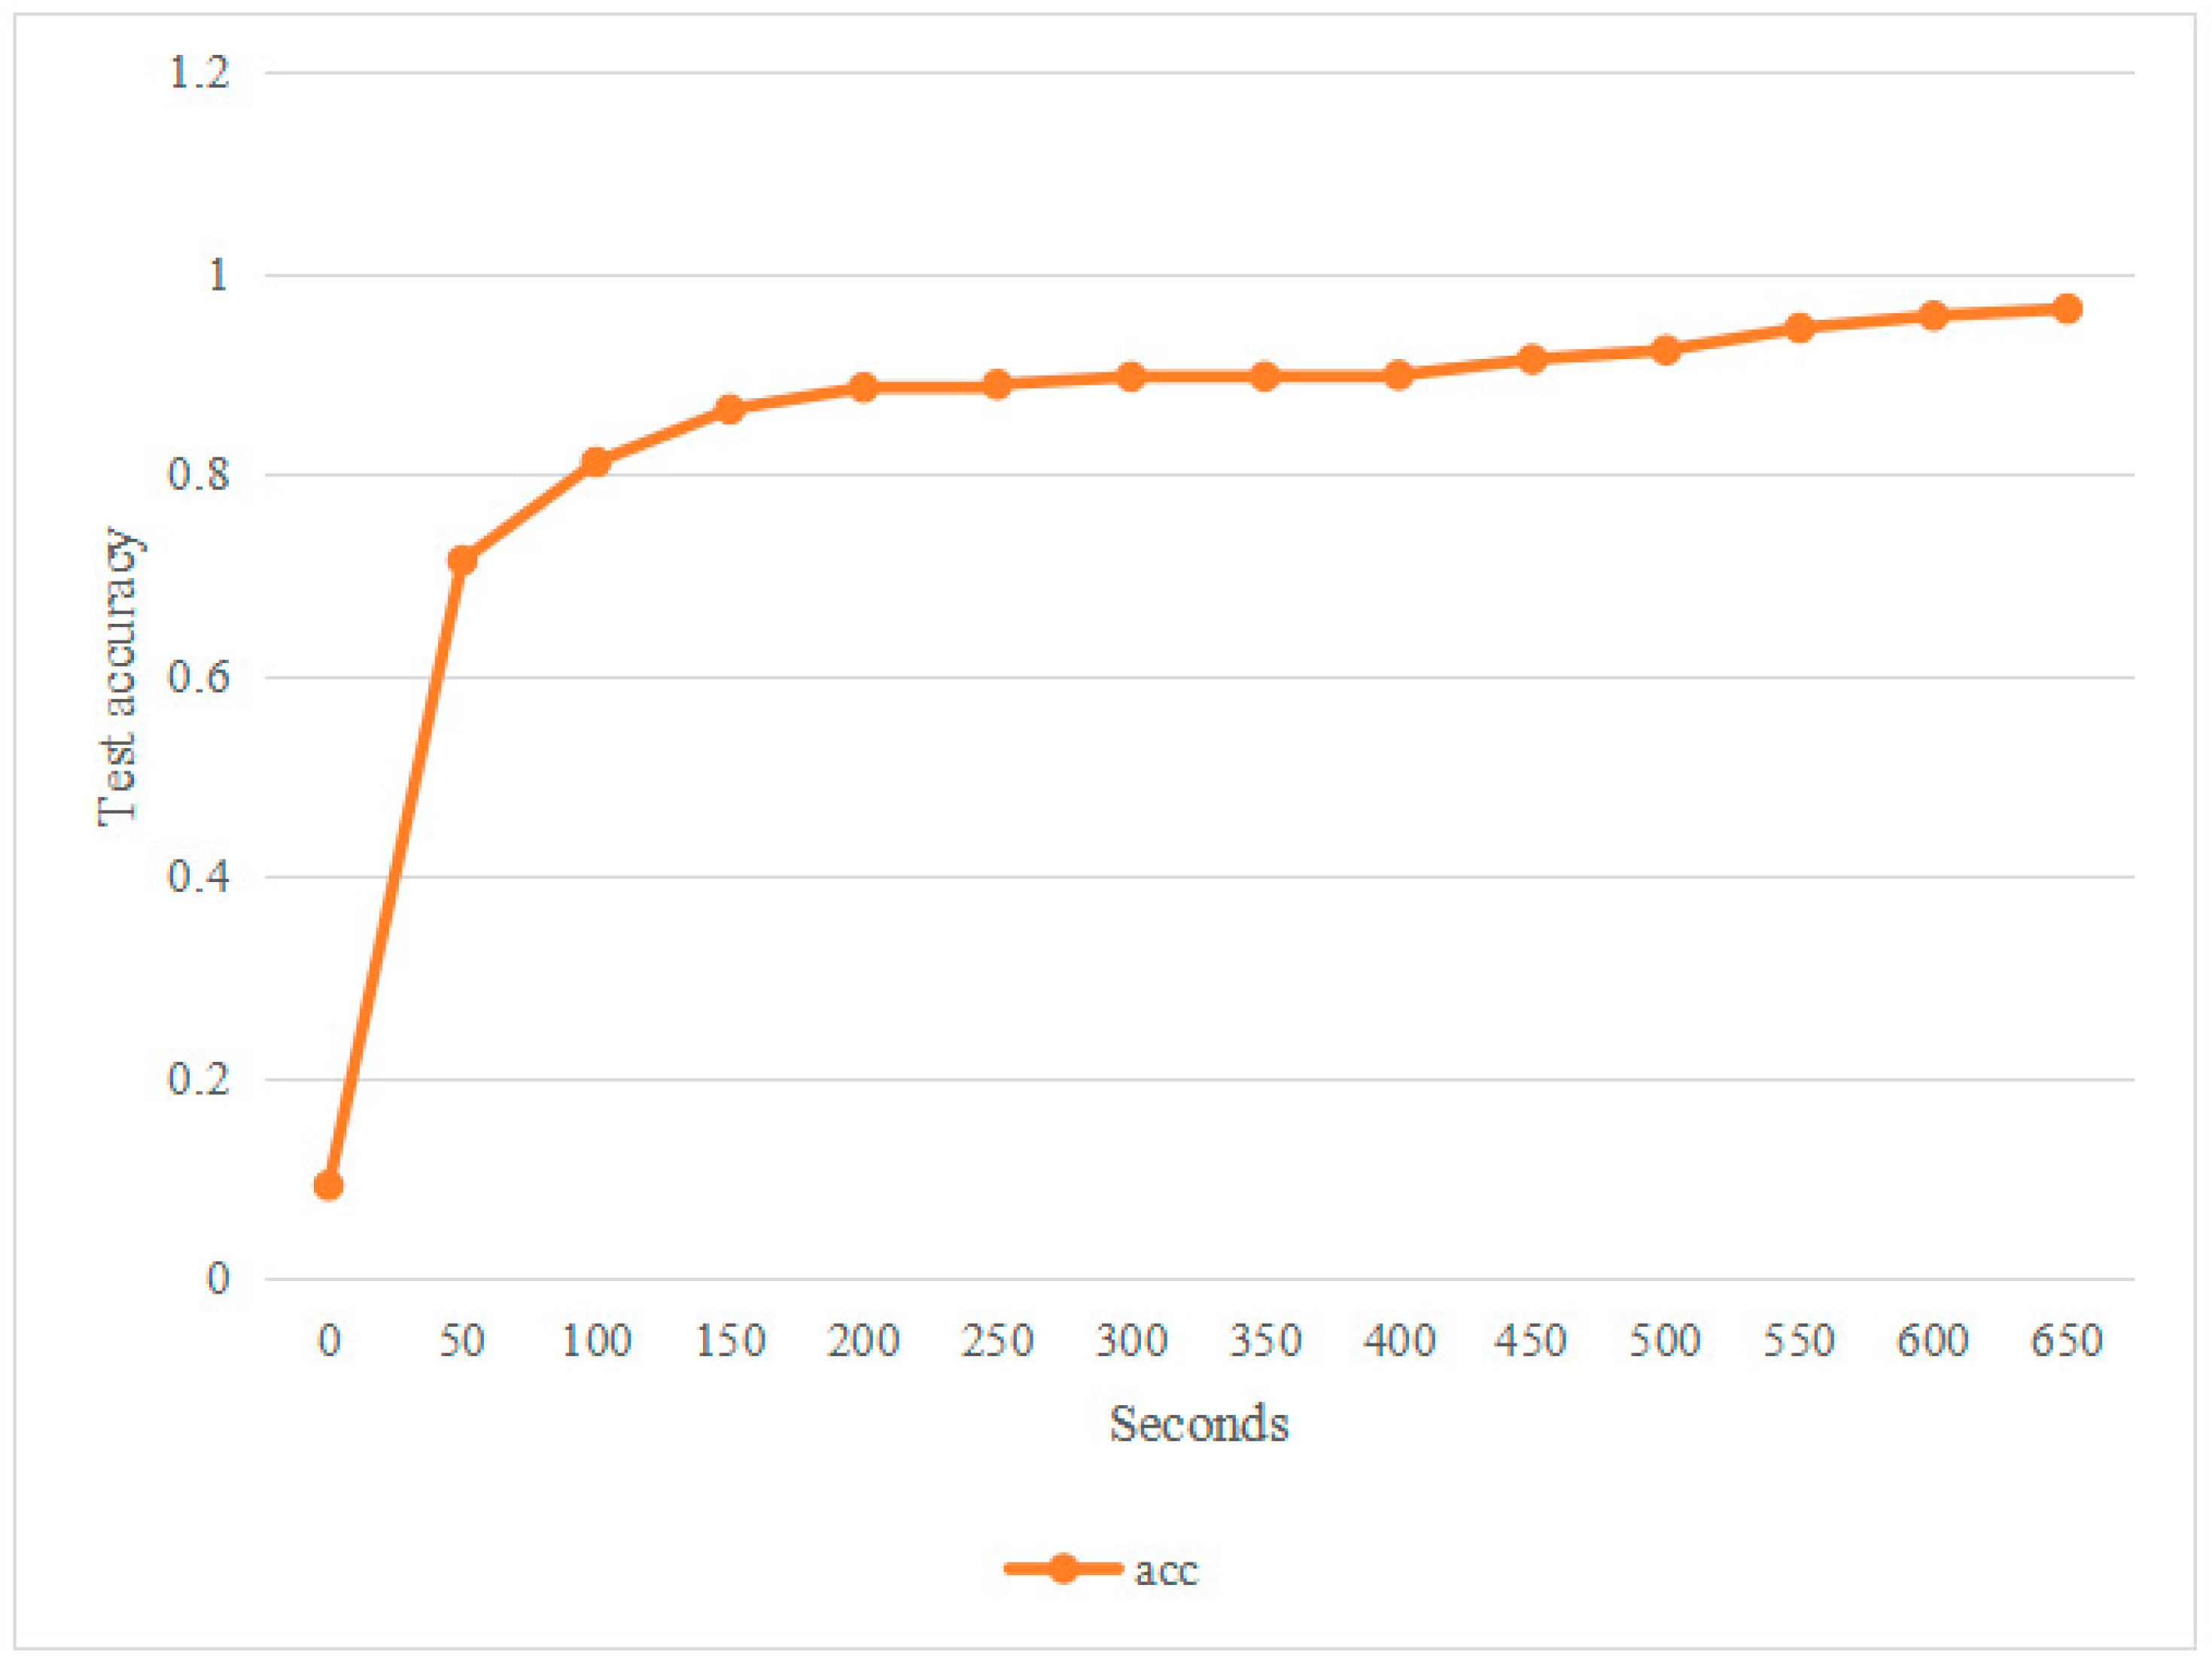
The average accuracy (segmentation) curve is the test case shown in the graph. From the graph, we infer that in the initial stage of training itself, the network exhibits a high learning rate by virtue of which the gains in accuracy are quite high. Following in the next stage are the improvements in accuracy, which are incremental in nature while there is a gradual decreasing learning rate, until such time as it reaches the maximum limit of 99.05%. Considering the aforementioned training and testing environment, it takes approximately 3 min to train one epoch. However, when using a batch size of 64 images, it takes around 10 min to complete an epoch of training. In order to represent smooth probabilities within a two-dimensional Gaussian function, a probability graph with dimensions of 32 pixels by 32 pixels is employed. Additionally, for the selection search algorithm utilized herein, a scale value of 100 is set leading to an average reduction of about 40.1% in bounding box count after minimization. See Figure 9.
The Momentum algorithm effectively uses the evolution of momentum throughout the process of gradient descent, thereby avoiding local minima better than SGD alone. Still, they are generally susceptible to the influence of the learning rate [45]. While the Momentum algorithm excels at reducing gradients with high initial learning rates, persistently adopting higher rates can lead to data loss or even failure to converge. To some extent, decreasing the learning rate might address the problem, although its usefulness depends on the number of steps taken and the decrement amount. In a complete trade-off, this is dealt with by using three optimal algorithms: Momentum, RMSProp, and Adam.
Adam is by far better than Momentum, RMSProp, and others because it requires fewer epochs yet achieves higher accuracy [46]. Also, the Adam algorithm smoothens the accuracy curve and manages to avoid major oscillation points in the convergence process, thus increasing the convergence speed. Additionally, the algorithm proves to be superior, with significant improvement in average classification accuracy, when compared to the momentum algorithm. Adam is able to increase accuracy by approximately 11% over the averages. Henceforth, it becomes obvious that proper optimization methods would reduce the time taken to train models while at the same time increasing accuracy.

4. Design of an Intelligent Welding Seam Grinding System Based on Deep Learning

4.1. System Framework Design

In general, the hardware consists of a 210 kg, 6-axis robot with a moveable 7th-axis drive shaft, a force control system, a weld grinding system, a three-dimensional laser line measurement device, and a turn-and-turn positioning mechanism. An adaptive welding grinding method with self-learning and precise welding grinding is prepared with the development of the weld identification algorithm, force control system, and weld grinding expert system.
It mainly encompasses the following technical indicators: Surface topography and calculations are performed separately for different welding organizations. A three-dimensional laser measuring instrument is utilized to conduct three-dimensional scanning of the weld and obtain a three-dimensional point cloud model. Parameters such as base metal, weld removal rate, weld retention rate, and curved surface smooth transition are calculated using the three-dimensional point cloud model.
Additionally, it involves trimming of the welded joint and inspections of the finished product size after trimming. Existing welding samples are used to calculate the grinding process path for each specific joint while dynamically adjusting it through real-time comparisons with data in the database to determine subsequent grinding paths.
The robotic cell consists of two main parts: a three-dimensional linear laser measuring instrument for presetting and comparing the robotic weld with the standard weld and a set of automatic grinding robots programmed to calculate the path of weld grinding, which is driven directly by the grinding wheel.
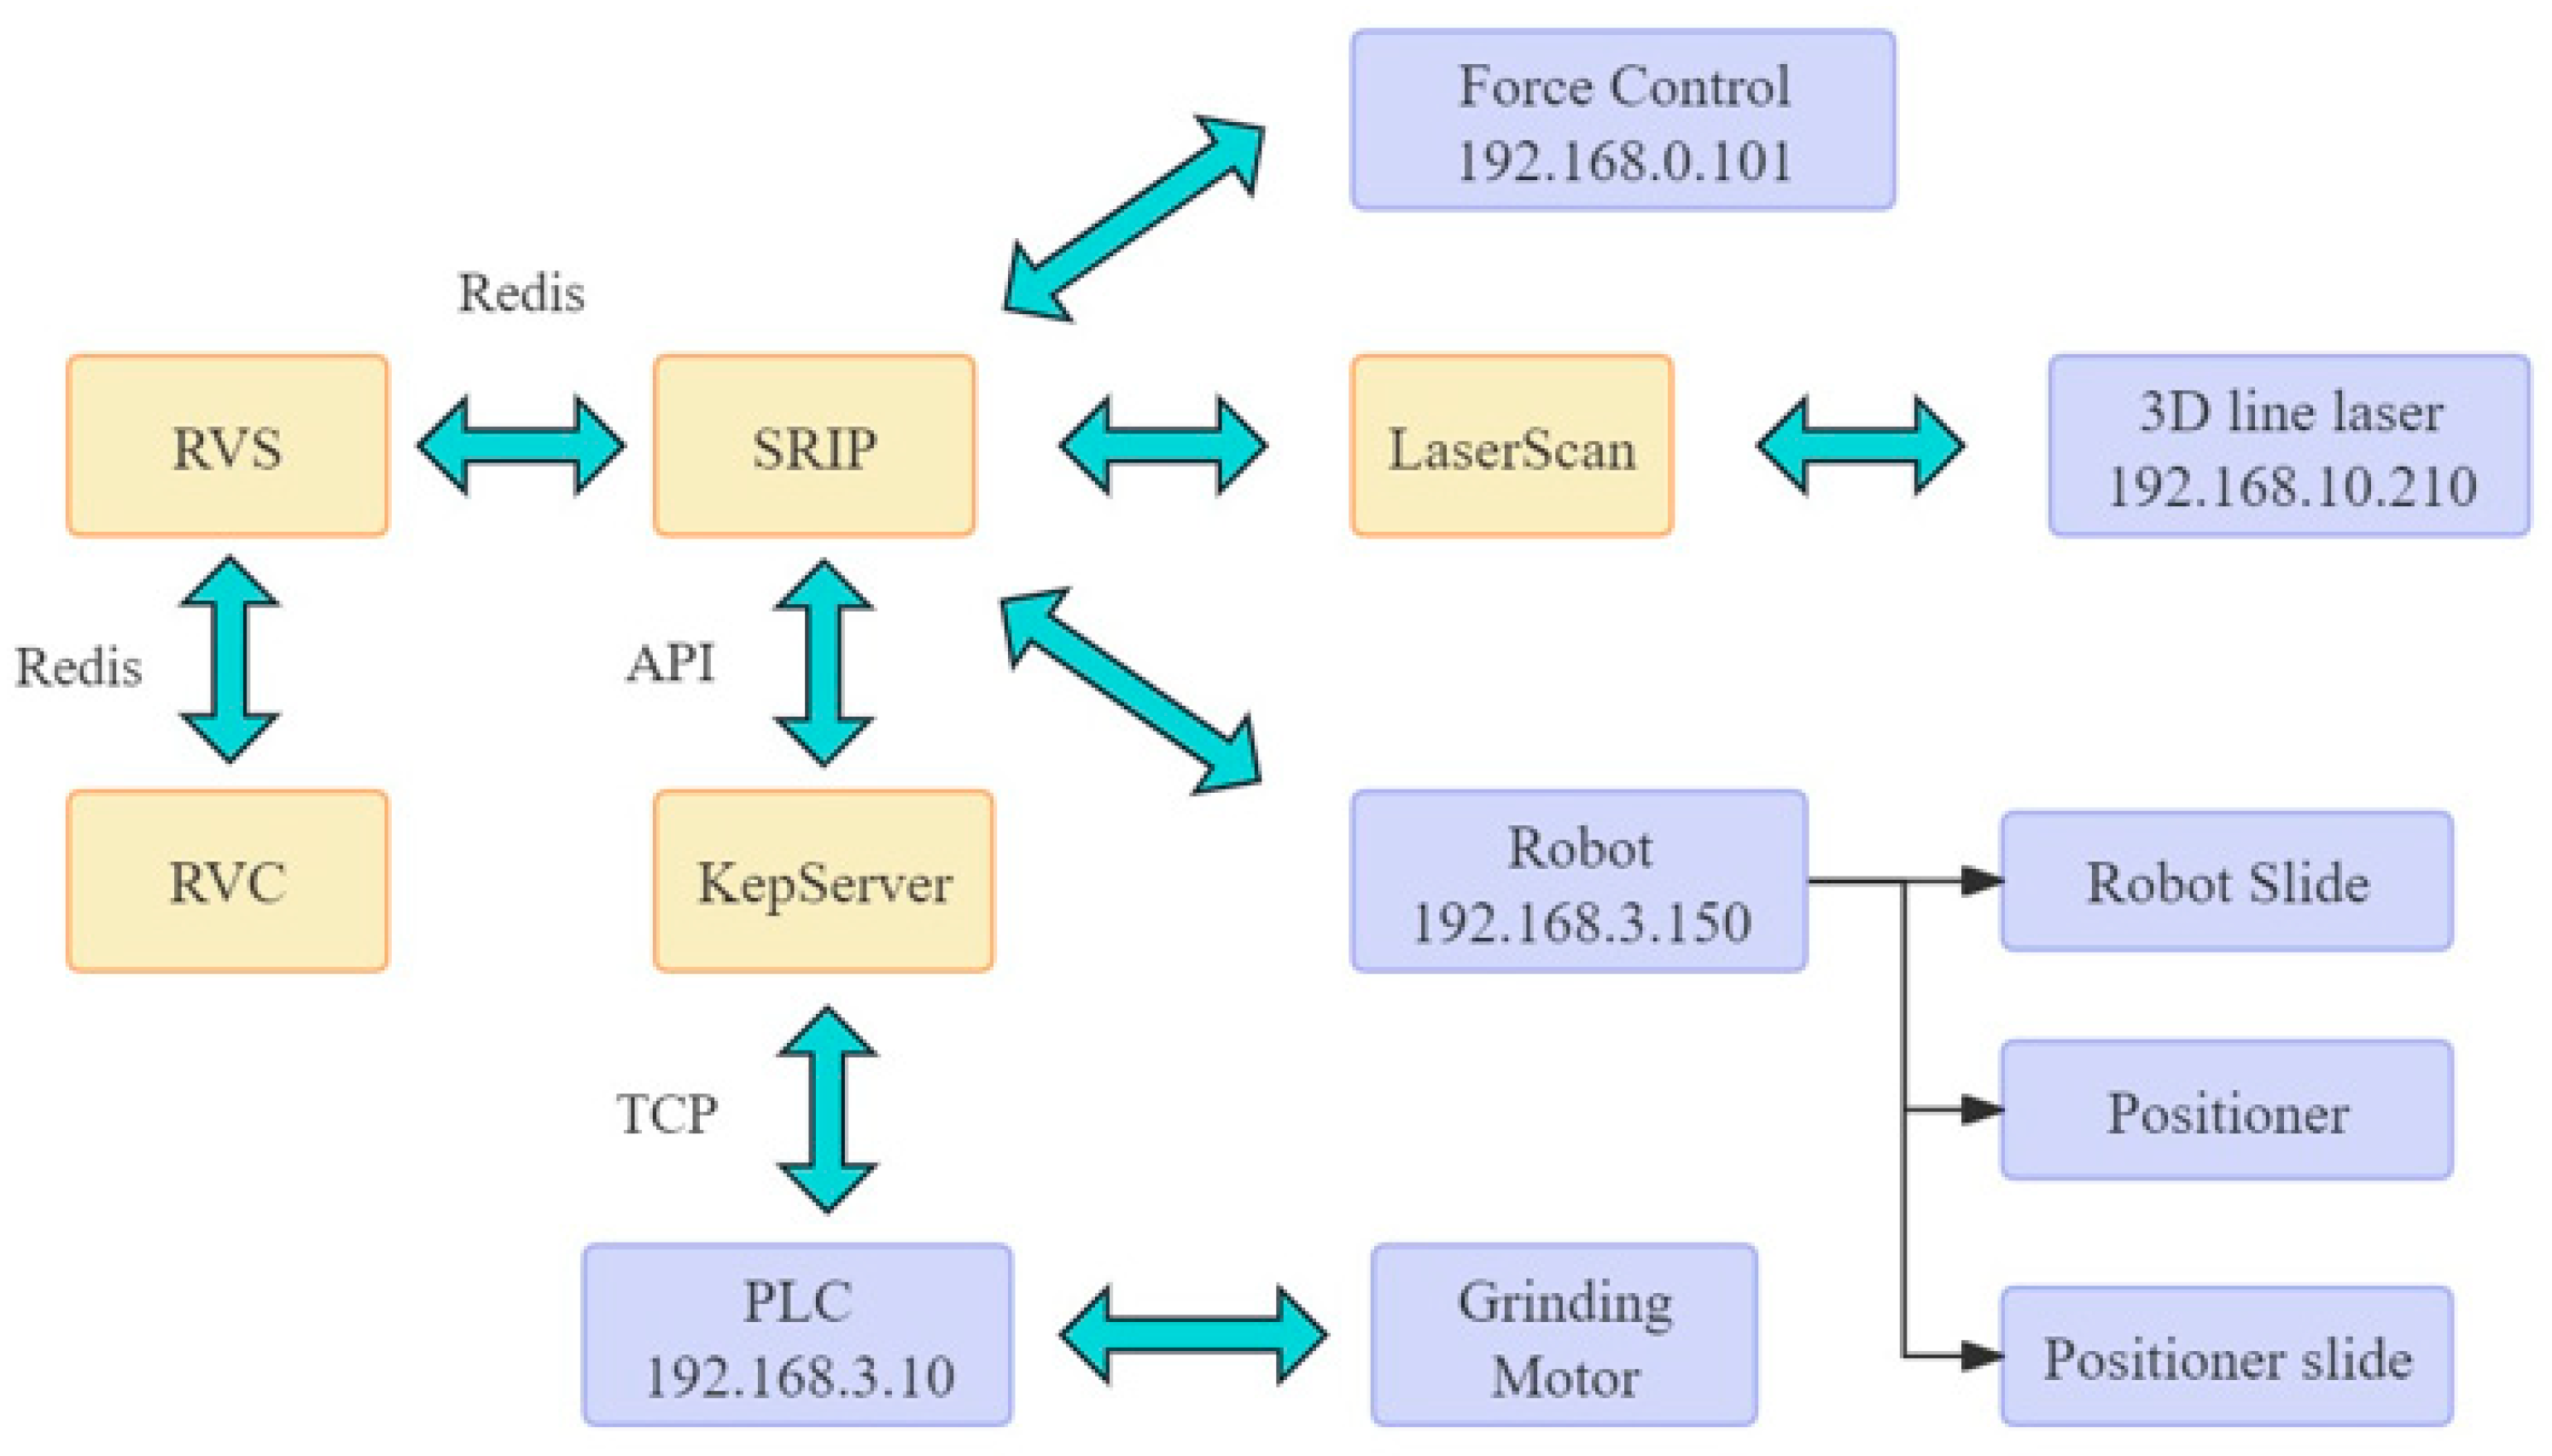
The intelligent trimming substrate for weld seams described in this paper aims to increase the quality and efficiency of welding through the complete implementation of automation technology and provides the framework for performance monitoring and data collection. The system structure is illustrated in Figure 1, where the yellow square indicates the software and the blue square identifies the hardware. Together, key hardware and the software system work to achieve accurate detection and trimming of the weld seam. Critical hardware components consist of the following:
  • Hardware:
On the hardware side, these issues touch upon several important groundwork issues: Firstly, there is the issue of the grinding task, a multiple degree of freedom robot, to cope with the variability of the weld seam. Secondly, the 3D line laser generates high-precision 3D data from the weld seam as a base for any further processing or data analysis. Thirdly, the force control system applies consistent force to the grinding process and prevents damage to the workpiece. Fourthly, the grinding head grinds the weld seam while in direct contact with it and can be outfitted with the appropriate abrasives based on the characteristics of the material. Fifthly, the positioner adjusts the position of the workpiece such that the robot grasps and successfully grinds all the weld areas. Finally, the slide provides another axis of movement, thus expanding the robot’s operational range to grind the entire weld.
2.
Software components:
SRIP: As the strategic control part of the system, the unit is supposed to coordinate the various actions of the hardware components to control the predefined grinding and machining process.
Vision Platform (RV): It recognizes the visual context of the weld seam by determining its position for the actual seam detection using certain algorithms related to image processing.
The working of the system is briefly described here. Firstly, the 3D scanning line laser measuring instrument scans the thermally affected weld area and obtains a 3D morphology of the weld. The vision platform RV analyzes the acquired image to identify the position and features of the weld seam. The total control system SRIP elaborated during the RV analysis generates a trimming path and commands a robot to put gracing touches to the weld. In the course of operation, the force control system monitors the grinding head’s applied force in real-time to guarantee the quality of the grinding. The variator and sliding table work in tandem to alter the position of the workpiece so that each part of the weld seam can be ground effectively. See Figure 10.

4.2. Neural Network Model Design

4.2.1. Convolutional Neural Networks

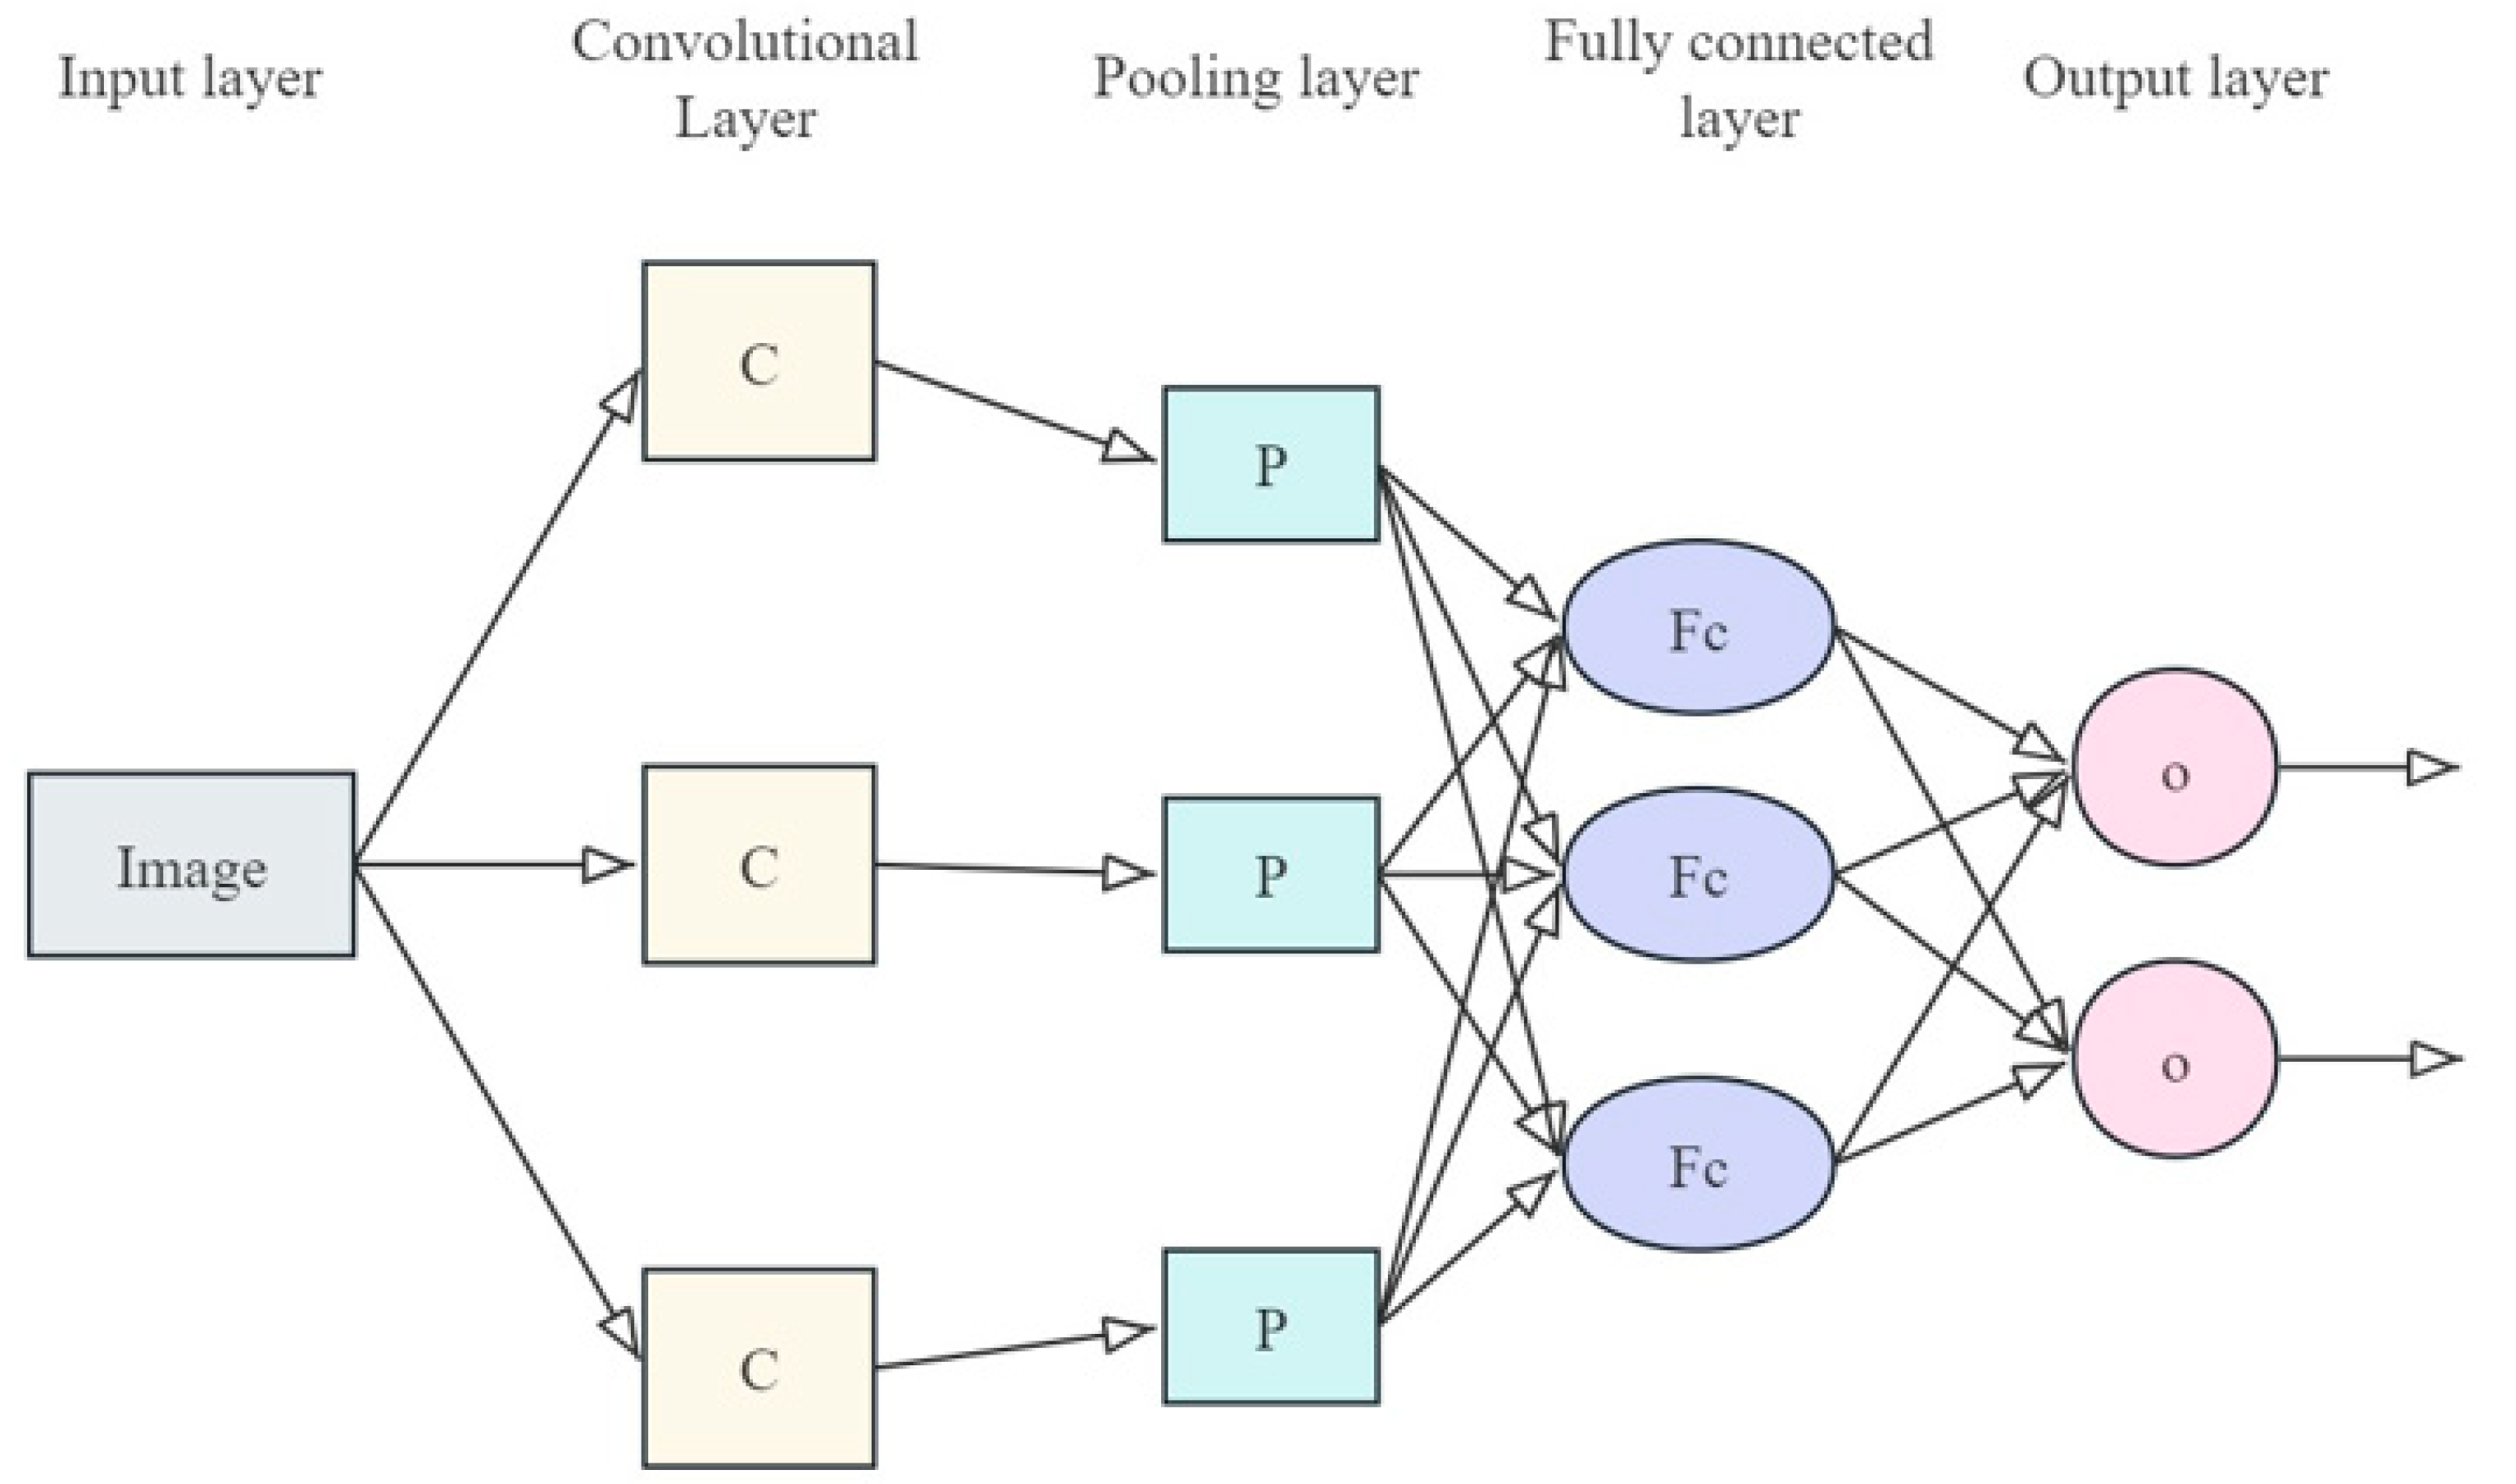
A deep learning-based Convolutional Neural Network, motivated by the fact that object features can be extracted from training samples, considers targets undergoing repeated training, and is then able to achieve target detection and recognition in various situations while maintaining robustness [47,48,49]. Deep learning considerably surpasses conventional image processing in uncovering the intrinsic relationships among feature points in an image and is equally well suited to the problem of difficult recognition due to diverse backgrounds. The underlying architecture of a convolutional neural network is shown in Figure 11.

4.2.2. Activation Function

Standard activation functions used in neural networks are the sigmoid function, hyperbolic tangent (Tanh), and rectified linear unit (ReLU) [29]. These functions introduce necessary non-linearity scaling to the model so that neural networks may learn complex, often non-linear patterns. As learning in deep neural networks follows a layered approach from output to input, computations for gradients must also be performed based on the order of execution of output to input. This makes it important to consider the expression for the sigmoid function:
f x = 1 1 + e x
The derivative range of this function is from 0 to 0.25. After multiple accumulations, the differential value tends to 0, which can easily lead to gradient loss and result in the inability to continuously update parameters. In addition, the power operation of the sigmoid function is relatively complex and takes a long time to train. The Tanh activation function is as follows:
f x = 1 e 2 x 1 + e 2 x
Although its training output is zero-mean, it still faces the risk of gradient descent and prolonged training duration.
This experiment intends to use ReLU as the activation function, and this method has faster convergence than Sigmoid and Tanh and can effectively overcome the problem that the gradient of other activation functions on the positive interval is zero. It only needs to judge the input value greater than 0, and the operation speed is faster. Its expression is as follows:
f x = max x , 0 = 0 ,   x < 0 x , x 0

4.2.3. Loss Function Optimization

The output at the i-th training sample point of the neural network is ( x i , y i , z i ), and the loss function is defined as mean squared error (MSE). Therefore,
M S E = 1 n 1 n [ x i x i 2 + y i y i 2 + ( z i z i ) 2 ]
where n represents the total number of points in the training sample; and (xi, yi, zi) is the actual 3D coordinate of the i-th sample point in the world coordinate system. In addition, to enhance the model’s generalization ability and avoid overfitting, this paper also proposes the L2 regularization method.
R w = | | w | | 2 2 = i | w i |
The present paper proposes a probability density estimation method based on probability distribution and establishes a novel probability distribution model using this approach. For regression problems, the commonly used loss functions are L1 and L2, while for classification problems, the most prevalent ones include the 0-1 loss function, Hinge loss function, and cross entropy loss function. The division of the welding area can be categorized into two parts: the welding point and the background. Assuming that P represents the probability of a pixel being welded and Q denotes the probability of a pixel being non-welded, its cross entropy can be expressed as follows:
H P , Q = P l o g Q 1 P l o g ( 1 Q )
Nonetheless, areas that are able to obtain welds in the image are much fewer; here P significantly varies from 1-P. Hence, sample unbalance is also an issue in practical applications; because of this, good results cannot often be achieved when mutual entropy is used as a loss function [50]. To address this practical issue, this project aims to construct a performance evaluation table for the two-class model (refer to Table 3) by considering the weld area as positive examples and background as negative examples. This approach maximizes the identification of all weld areas and ultimately enhances the recall rate.
Recall: The proportion of correctly predicted samples that are actually positive.
R e c a l l = T P / ( T P + F N )
Precision: The proportion of correctly predicted samples that are positive.
P r e c i s i o n = T P / ( T P + F P )
In order to enhance the recall rate in scenarios with an uneven sample distribution, a novel loss function is devised. The computation steps of this loss function are as follows: Firstly, the output values of the neural network undergo sigmoid transformation, thereby mapping each pixel’s prediction into the interval (0, 1). The coordinates of any pixel are denoted as (x,y), with x and y being their respective row and column indices. Thus, if the pixel in question is one of the welds, that is, taking its truth value as 1, loss will be given by a(1-R(x,y)); if it is part of the background, that is, taking its truth value as 0, the loss henceforth becomes bR(x,y). Herein, “a” and “b” are the weighting coefficients. Ultimately, the final loss value is obtained by averaging over all pixels.

4.3. Model Training and Data Processing

In order to effectively train the established target tracking and recognition model, a sufficient number of training samples are required to encompass the characteristics of weld images. Therefore, this project aims to focus on welding data as the research subject and utilizes a collection of over 45,000 welding images (including 21,250 noise-free images) and 25,569 welding images to train the established welding network model. The experimental results demonstrate that this method effectively handles the welding process. Specifically, noise-free welding images are obtained by instructing the robot to perform posture changes along the weld trajectory without activating the welding equipment. These images solely retain laser stripe characteristics while excluding arc flashes and splashes or any other forms of noise interference. On the other hand, noise-containing welding images are captured during actual welding processes through real-time monitoring. These images not only exhibit laser stripe features but also include arc flashes, splashes, and other types of noises which accurately reflect image characteristics obtained by visual sensors in real-world welding environments [51].
Although we can obtain a large number of weld images through the robot’s movement in the welding process, these images alone cannot be used as training samples. It is necessary to mark each image manually. However, manual marking of welding feature points on a large number of welding images is a challenging task. To address this issue, this project aims to employ an automatic marking method to overcome the lack of training samples.
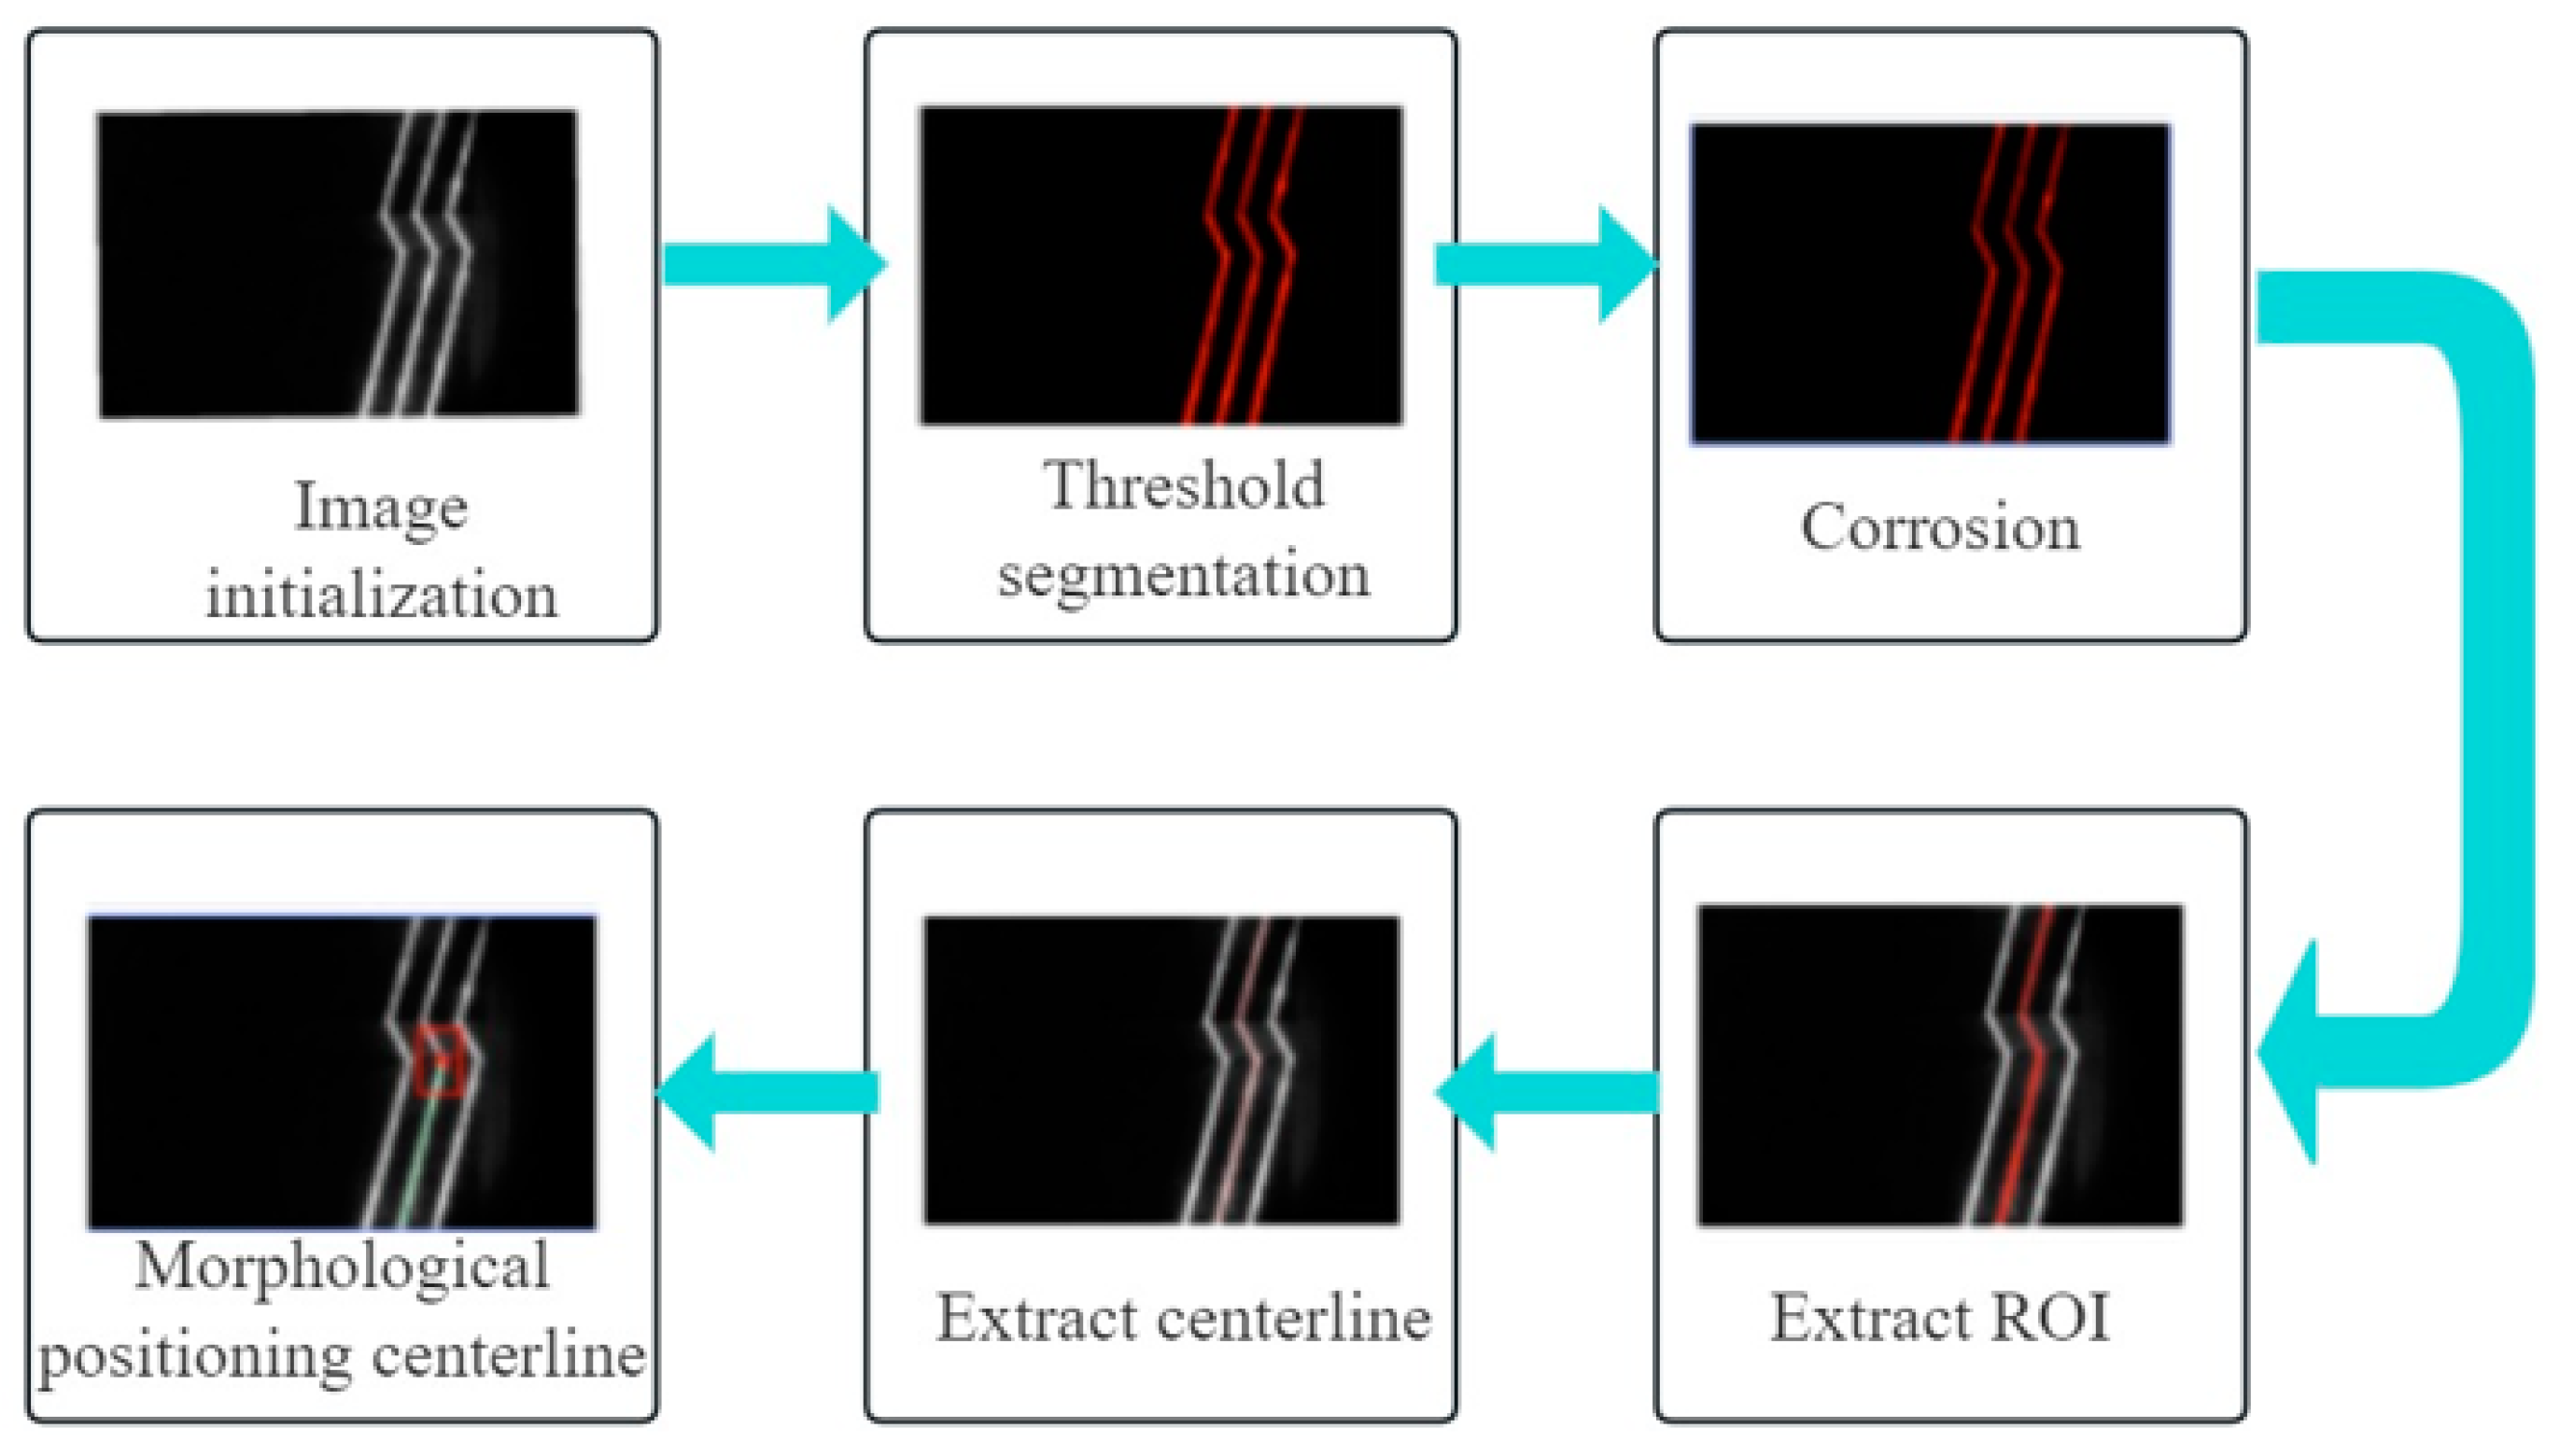
Considering the line characteristics of weld images, we can extract noise-free weld images by applying morphological techniques to locate the welding feature points. The global flow chart is presented in Figure 12. Initially, the laser stripes are binarized to eliminate reflections and other diverse factors, thus producing high-definition binary images. Subsequently, various morphological operations, including erosion and dilation of the weld image, augment its smoothness and minimize interference from burrs and holes. Subsequently, segmentation based on connected components is applied to identify the target area representing the center location of three laser stripes. Next, a continuous and smooth skeleton center is obtained using the gray center-of-gravity method. Then, the least square method is utilized for line fitting followed by extraction of key points corresponding to welds through solving linear equations.
This paper proposes an adaptive algorithm based on convLSTM to address the issue of target tracking. However, the presence of numerous interferences in noisy images hinders the time-series correlation analysis of welding images with convLSTM. To train the model, this study inputs 500 noise-free welding sequences containing 9000 welding and butt-welding images into the network. In the training mode, each video is combined with N + 1 frames, with frames 1 to N being the inputs into the convLSTM, and 2 to N + 1 being the ground truth. On the other hand, a convolutional neural network (CNN) method would fail simply because there are not enough critical features in the weld images and random sampling errors. Thus, this project aims to improve the tracking of welds, starting from the VGG-net pretraining network based on ImageNet, enabling deep convolution neural networks to achieve generalization ability.
The welding network is the one that conjugates a process with the same principle of COCO object detection for pre-processing methods, thereby reducing overfitting and improving the positioning accuracy of the welding point. We further introduce 10,010 low-noise and noise-free welding images into the network while executing a complementary round of image augmentation for added richness in feature representation. To resolve point tracking errors on the welding points, an image translation approach is said to bring the image offsets down to values less than 10 pixels.
In cyclic mode, we utilize the Adam method to train six seam sequences with a batch size of six for each sequence. The initial learning rate is set at 0.0001 and decreases by 0.96 every 1649 steps. Simultaneously, we employ the Adam method to train the detection network with a batch size of one and an initial learning rate of 0.001, which decreases by 0.98 every 5000 steps.

4.4. Grinding Control Parameters and Optimization

When conducting accurate experiments on weld seam grinding, choosing the appropriate grinding control parameters is critical to achieving a final grind of superior quality. Below is an elaborate description of the grinding control parameters and the optimizer applied.

4.4.1. Grinding Force Control

Grinding force is one of the key factors affecting grinding quality. Too high of a grinding force may lead to burns or deformation of the workpiece surface, while too low of a grinding force may not remove the material effectively. In this study, we ensure that the grinding force is kept within the optimal range by monitoring the grinding force in real time and regulating it with a closed-loop control system. The specific parameters are as follows:
Target grinding force: set at 150–200 N to accommodate the grinding of thin aluminum alloy plates.
Force feedback frequency: 1 kHz high-frequency force sensor is used for real-time monitoring.

4.4.2. Grinding Speed Control

Also, grinding speed affects grinding efficiency and surface quality. The grinding speed settings throughout the experiment were developed according to the hardness characteristics of the weld and heat-affected zone. The exact parameters included the following:
Maximum grinding speed: no more than 2000 mm/min to prevent excessive thermal damage.
Speed control mechanism: the purpose of the variation in the frequency motor is to control certain speeds accurately.

4.4.3. Control of Grinding Depth

Controlling the grinding depth is the key to ensure the flatness of the weld surface and the removal of excess material. In this study, precise control of grinding depth was achieved by means of a precision depth sensor and control system. The specific parameters were as follows:
Maximum grinding depth: controlled in the range of 0.2–0.5 mm to adapt to weld seams of different thicknesses.
Depth control accuracy: up to ±0.05 mm to ensure the surface flatness after grinding.

5. Experimental Verification and Analysis

5.1. Precision Measurement of Welds

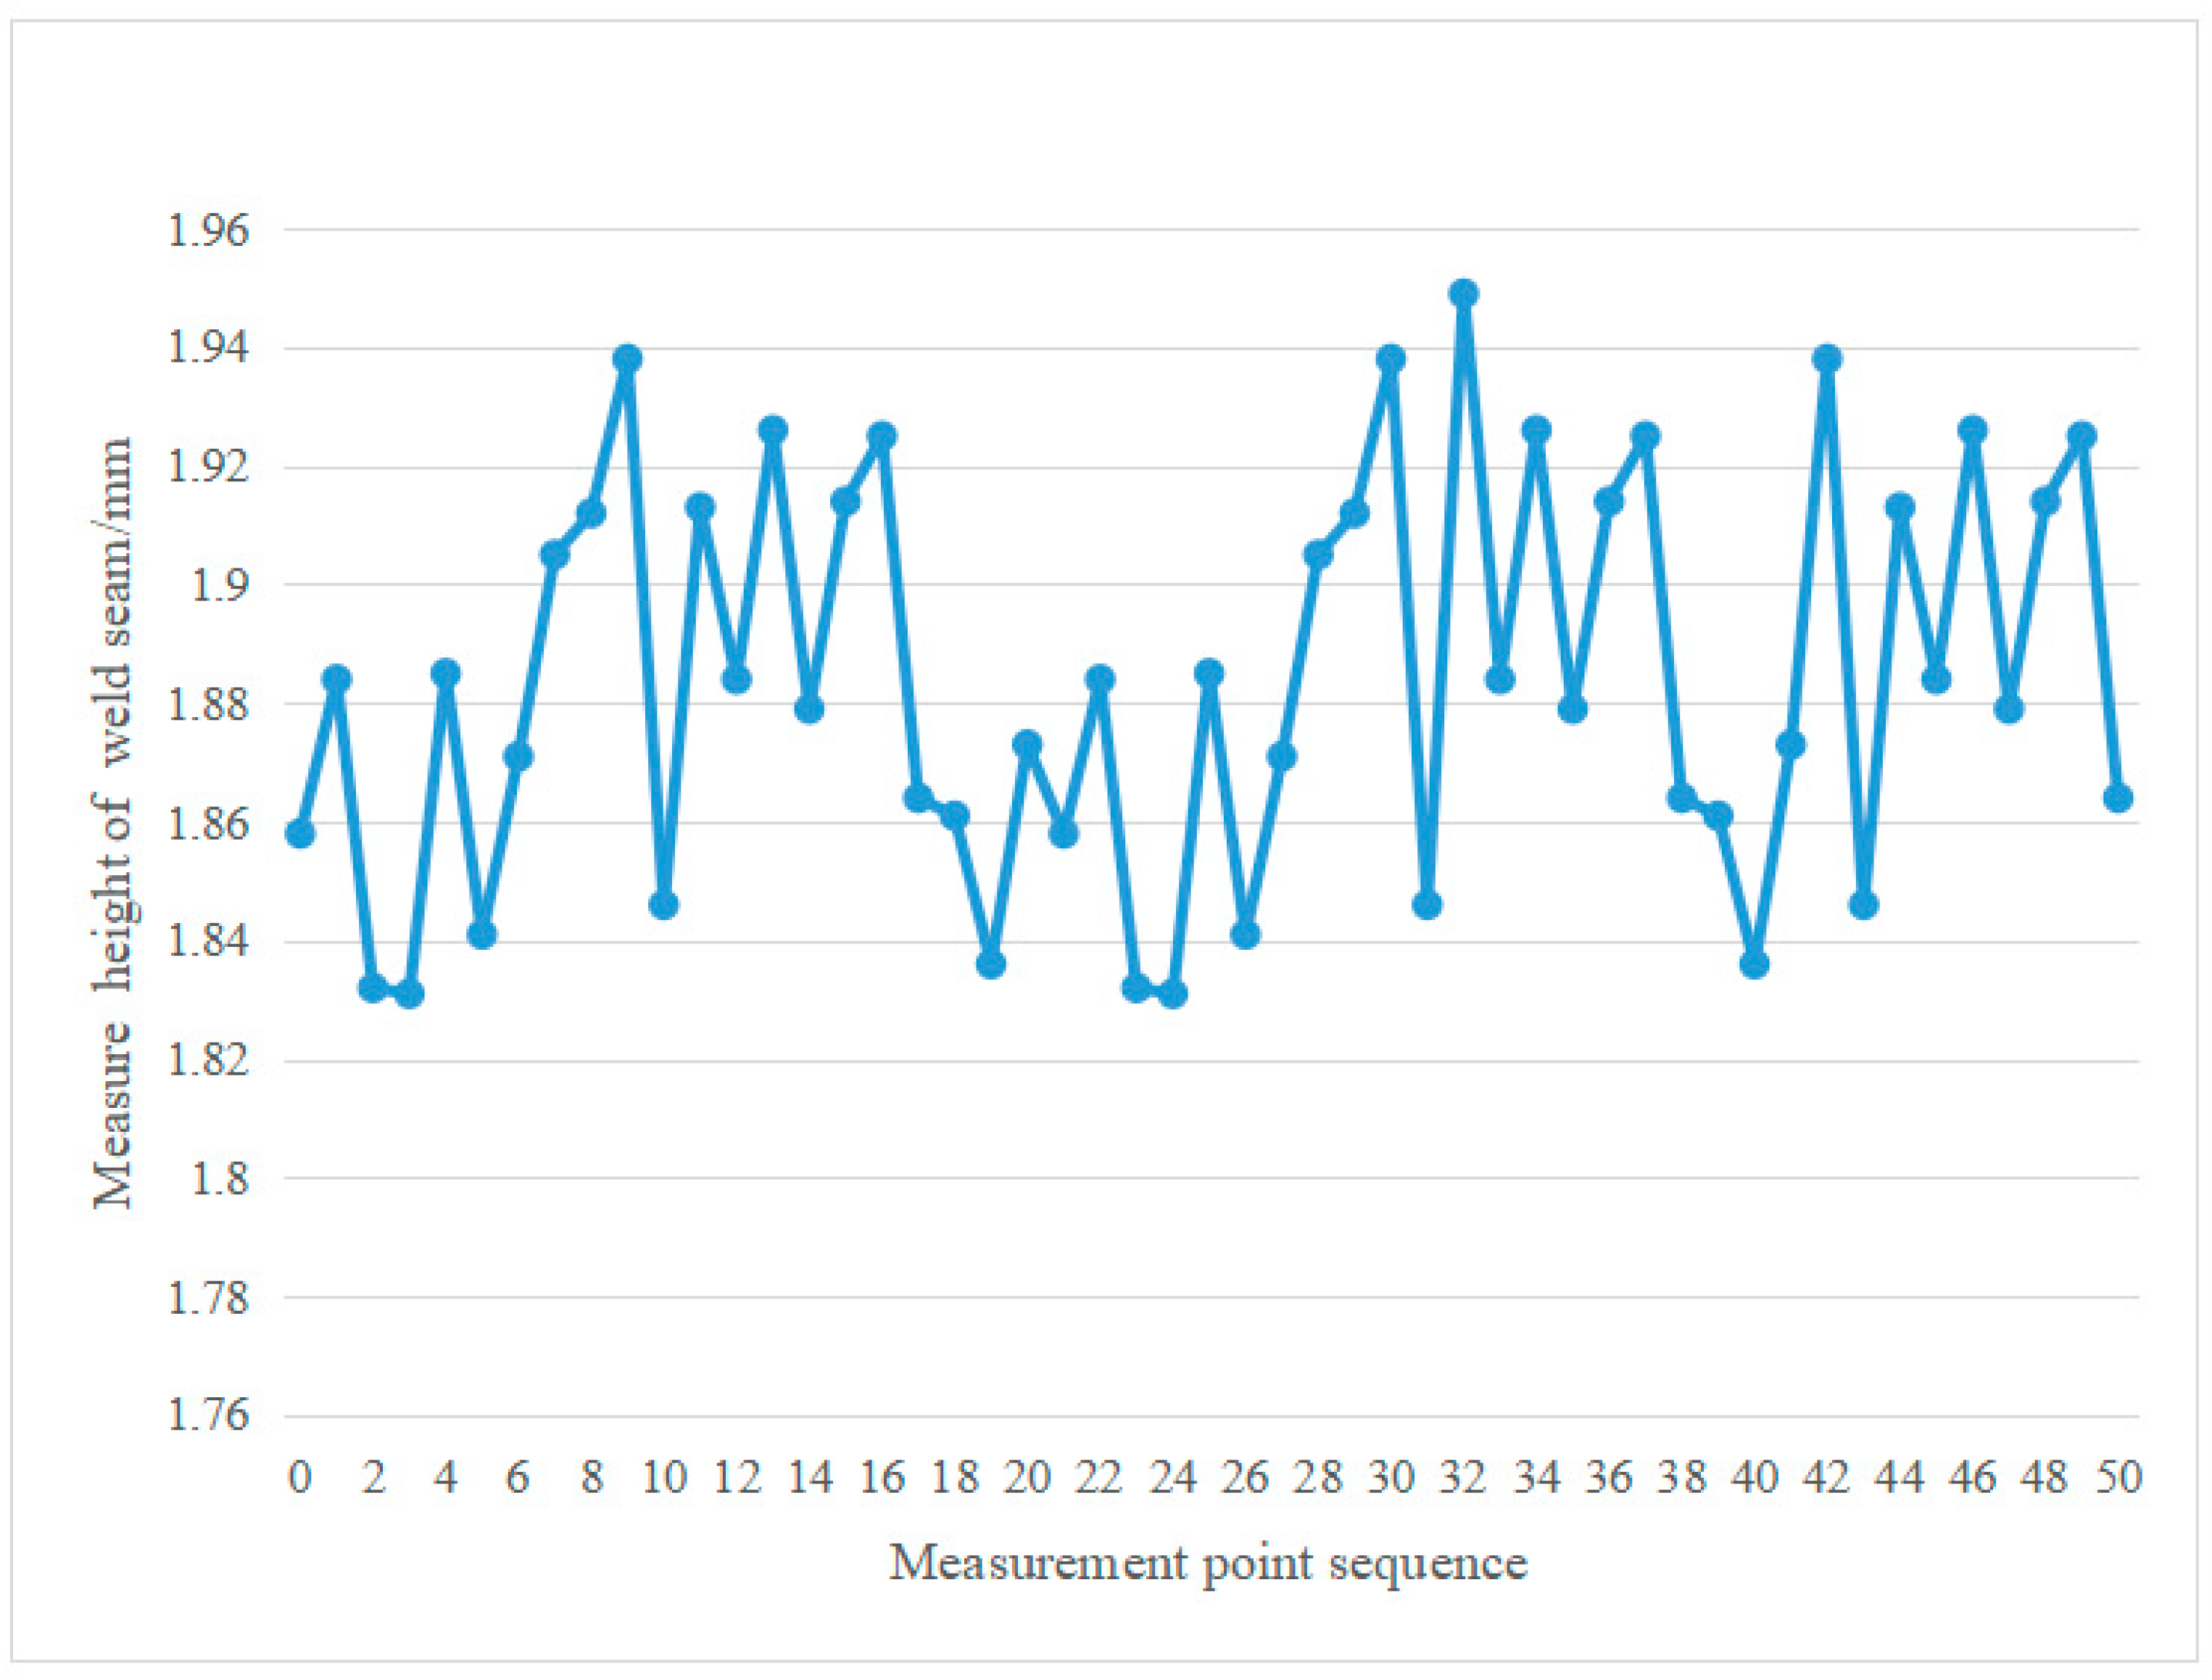
The aim of this paper was to examine the welding of thin aluminum alloy plates, with emphasis on weld point positioning tests and three-dimensional space geometry tests. The research emphasizes a repeated measurement taken one time. Accurate and steady measurement of the height of the weld is significant for the process of automatic welding, grinding, and polishing. Therefore, this project conducted multiple repeated measurements at the same position for each point. The average error among 50 welding points is 1.89 mm, with a standard deviation of 0.03 mm and a maximum–minimum difference of 0.13 mm (see Figure 9). It can be observed from Figure 13 that this method demonstrates good repeatability and relatively stable dynamic characteristics.
Three-dimensional geometry test was conducted on the welding surface using a visualization detection method, taking a weld length of 140 mm as an example, with intervals set at 2.5 mm (see Figure 14). The average welding width was found to be 0.08 mm with a maximum error of 0.14 mm, while the average welding height measured 0.06 mm with a maximum error of 0.09 mm (see Figure 10). These results indicate that the system possesses high detection accuracy and fully meets the requirements for detecting machining accuracy in welding polishing.

5.2. Image Processing Experiment

The processing speed of the weld structured light image obtained by the visual system depends not only on the algorithm itself but also on the image size, as depicted in Figure 11. In this experiment, we acquired a stitched structured light image comprising 1680 × 1230 pixels, with a selected ROT range of 320 × 165 pixels. As is shown in Figure 15, the mean frame processing time for 100 frames of weld structured light images was 9.53 milliseconds, with the shortest being 8.87 milliseconds. This shows that the vision system for the grinding and polishing robot processes images with high efficiency and very fast, suiting its operation needs for tracking and detecting welds while welding and polishing.

5.3. Precision Experiment of Weld Grinding and Polishings

Grinding test results of the weld robot combined with the computer vision system and manual welding are shown in Table 4 and Table 5. In Table 4 and Table 5, the data results indicate that the grinding robot whose computer vision was integrated exhibits better surface accuracy or higher precision than the conventional one while the weld surface processed by manual welding has poor surface accuracy, as shown in Table 4 and Table 5.

6. Conclusions

This study aimed to develop an intelligent grinding system for welds of medium- and thick-plate constructions for machinery integrating 3D line laser measurement and deep learning techniques. From precise 3D measurements, deep learning exploration, and predictive data analysis, we proceeded to intelligently grind the surface of these welds. The use of “3D lines laser measurement technology in weld inspection” was experimentally validated for efficiency and accuracy in medium- and thick-plate construction equipment fabrication and was confirmed by us to be suitable for rapid data gathering of 3D profiles of welds, defects, and blobs. We employed deep learning to treat and analyze the measured data. Neural network model training enables the correct identification of weld type and location and allows for the prediction of optimal grinding strategies. As a result, intelligent grinding of the welds becomes possible, producing greater efficiency and better quality. Further experimental results indicated that the advantages stemming from our system are noteworthy in showing greater promise over traditional grinding methods. The proposed intelligent grinding system detects surface defects on the welds and adjusts the grinding parameters based on the prediction outcomes to help ensure that the grinding operation is performed with higher precision and effectiveness. In addition, the working system can record data during grinding under conditions for further use in process optimization and quality control. From the conducted research, this intelligent welding grinder system for medium-to-thick plate construction machinery relying on 3D line laser scanning and deep learning shows great promise towards improving the efficiency and quality of weld grinding. This system can be useful not only for construction machinery industries but also for welding processes in other types of industries.
However, some limitations still exist within the system. For example, firstly, for very complex weld shapes and surface features, the accuracy and robust nature of the algorithm may need further improvement. Secondly, since the cost of the system may be quite high, some economic evaluations as well as commercial considerations may need to be explored before using it in practical applications.

Author Contributions

Investigation, Q.L., R.Z., P.L., C.L., D.M., J.W. and W.X. All authors have read and agreed to the published version of the manuscript.

Funding

This research received no external funding.

Data Availability Statement

All data generated or analyzed during this study are included in the published article.

Conflicts of Interest

The remaining authors declare that the research was conducted in the absence of any commercial or financial relationships that could be construed as a potential conflict of interest.

References

  1. Xie, J.; Chen, Y.; Wang, H.; Zhang, T.; Zheng, M.; Wang, S.; Yin, L.; Shen, J.; Oliveira, J. Phase transformation mechanisms of NiTi shape memory alloy during electromagnetic pulse welding of Al/NiTi dissimilar joints. Mater. Sci. Eng. A 2024, 893, 146119. [Google Scholar] [CrossRef]
  2. Wang, L.; Rong, Y. Review on processing stability, weld defects, finite element analysis, and field assisted welding of ultra-high-power laser (≥10 kW) welding. Int. J. Hydromech. 2022, 5, 167–190. [Google Scholar] [CrossRef]
  3. Egea, A.S.; Rodriguez, A.; Celentano, D.; Calleja, A.; De Lacalle, L.L. Joining metrics enhancement when combining FSW and ball-burnishing in a 2050 aluminium alloy. Surf. Coat. Technol. 2019, 367, 327–335. [Google Scholar] [CrossRef]
  4. González, H.; Calleja, A.; Pereira, O.; Ortega, N.; Lopez de Lacalle, L.N.; Barton, M. Super abrasive machining of integral rotary components using grinding flank tools. Metals 2018, 8, 24. [Google Scholar] [CrossRef]
  5. Chen, Y.; Sun, S.; Zhang, T.; Zhou, X.; Li, S. Effects of post-weld heat treatment on the microstructure and mechanical properties of laser-welded NiTi/304SS joint with Ni filler. Mater. Sci. Eng. A 2020, 771, 138545. [Google Scholar] [CrossRef]
  6. Yuhua, C.; Yuqing, M.; Weiwei, L.; Peng, H. Investigation of welding crack in micro laser welded NiTiNb shape memory alloy and Ti6Al4V alloy dissimilar metals joints. Opt. Laser Technol. 2017, 91, 197–202. [Google Scholar] [CrossRef]
  7. Zuo, Y.; Wang, J.; Song, J. Application of YOLO object detection network in weld surface defect detection. In Proceedings of the 2021 IEEE 11th Annual International Conference on CYBER Technology in Automation, Control, and Intelligent Systems (CYBER), Jiaxing, China, 27–31 July 2021; pp. 704–710. [Google Scholar]
  8. Mohammadi, N.; Mousazadeh, B.; Hamoule, T. Synthesis and characterization of NH 2-SiO 2@ Cu-MOF as a high-performance adsorbent for Pb ion removal from water environment. Environ. Dev. Sustain. 2021, 23, 1688–1705. [Google Scholar] [CrossRef]
  9. Adekeye, E.; Ojo, M.; Ajayi, O. Contributions of metal welding workshops to environmental pollution in Akure Metropolis, Ondo State, Nigeria. J. Environ. Issues Agric. Dev. Ctries. 2011, 3, 1–7. [Google Scholar]
  10. Shi, J.; Zhao, B.; He, J.; Lu, X. The optimization design for the journal-thrust couple bearing surface texture based on particle swarm algorithm. Tribol. Int. 2024, 198, 109874. [Google Scholar] [CrossRef]
  11. Xu, S.; Jing, X.; Zhu, P.; Jin, H.; Paik, K.-W.; He, P.; Zhang, S. Equilibrium phase diagram design and structural optimization of SAC/Sn-Pb composite structure solder joint for preferable stress distribution. Mater. Charact. 2023, 206, 113389. [Google Scholar] [CrossRef]
  12. Shi, J.; Zhao, B.; Niu, X.; Xin, Q.; Xu, H.; Lu, X. Time-varying dynamic characteristic analysis of journal–thrust coupled bearings based on the transient lubrication considering thermal-pressure coupled effect. Phys. Fluids 2024, 36, 083116. [Google Scholar] [CrossRef]
  13. Wang, H.; Hou, Y.; He, Y.; Wen, C.; Giron-Palomares, B.; Duan, Y.; Gao, B.; Vavilov, V.P.; Wang, Y. A Physical-Constrained Decomposition Method of Infrared Thermography: Pseudo Restored Heat Flux Approach Based on Ensemble Bayesian Variance Tensor Fraction. IEEE Trans. Ind. Inform. 2023, 20, 3413–3424. [Google Scholar] [CrossRef]
  14. Li, J.; Wu, X.; Wu, L. A Computationally-Efficient Analytical Model for SPM Machines Considering PM Shaping and Property Distribution. IEEE Trans. Energy Convers. 2024, 39, 1034–1046. [Google Scholar] [CrossRef]
  15. Li, M.; Liu, Y.; Wang, C.; Chu, F.; Peng, Z. Adaptive synchronous demodulation transform with application to analyzing multicomponent signals for machinery fault diagnostics. Mech. Syst. Signal Process. 2023, 191, 110208. [Google Scholar]
  16. Long, X.; Lu, C.; Su, Y.; Dai, Y. Machine learning framework for predicting the low cycle fatigue life of lead-free solders. Eng. Fail. Anal. 2023, 148, 107228. [Google Scholar] [CrossRef]
  17. Li, X.; Xie, L.; Deng, B.; Lu, H.; Zhu, Y.; Yin, M.; Yin, G.; Gao, W. Deep dynamic high-order graph convolutional network for wear fault diagnosis of hydrodynamic mechanical seal. Reliab. Eng. Syst. Saf. 2024, 247, 110117. [Google Scholar] [CrossRef]
  18. Bi, Z.; Wang, L. Advances in 3D data acquisition and processing for industrial applications. Robot. Comput.-Integr. Manuf. 2010, 26, 403–413. [Google Scholar] [CrossRef]
  19. Zhou, L.; Sun, X.; Zhang, C.; Cao, L.; Li, Y. LiDAR-Based 3D Glass Detection and Reconstruction in Indoor Environment. IEEE Trans. Instrum. Meas. 2024, 73, 8502211. [Google Scholar]
  20. Fan, J.; Deng, S.; Jing, F.; Zhou, C.; Yang, L.; Long, T.; Tan, M. An initial point alignment and seam-tracking system for narrow weld. IEEE Trans. Ind. Inform. 2019, 16, 877–886. [Google Scholar] [CrossRef]
  21. Azernikov, S.; Fischer, A. Emerging non-contact 3D measurement technologies for shape retrieval and processing. Virtual Phys. Prototyp. 2008, 3, 85–91. [Google Scholar] [CrossRef]
  22. Li, R.-J.; Fan, K.-C.; Huang, Q.-X.; Zhou, H.; Gong, E.-M.; Xiang, M. A long-stroke 3D contact scanning probe for micro/nano coordinate measuring machine. Precis. Eng. 2016, 43, 220–229. [Google Scholar] [CrossRef]
  23. Wei, Y.; Ding, Z.; Huang, H.; Yan, C.; Huang, J.; Leng, J. A non-contact measurement method of ship block using image-based 3D reconstruction technology. Ocean Eng. 2019, 178, 463–475. [Google Scholar] [CrossRef]
  24. Levoy, M.; Pulli, K.; Curless, B.; Rusinkiewicz, S.; Koller, D.; Pereira, L.; Ginzton, M.; Anderson, S.; Davis, J.; Ginsberg, J. The digital Michelangelo project: 3D scanning of large statues. In Proceedings of the 27th Annual Conference on Computer Graphics and Interactive Techniques, New Orleans, LA, USA, 23–28 July 2000; pp. 131–144. [Google Scholar]
  25. Winkelbach, S.; Molkenstruck, S.; Wahl, F.M. Low-cost laser range scanner and fast surface registration approach. In Proceedings of the Pattern Recognition: 28th DAGM Symposium, Berlin, Germany, 12–14 September 2006; Proceedings 28. pp. 718–728. [Google Scholar]
  26. Prabhu, S.R.; Shettigar, A.; Herbert, M.A.; Rao, S.S. Influence of machine variables on the microstructure and mechanical properties of AA6061/TiO2 friction stir welds. Adv. Mater. Process. Technol. 2023, 9, 441–456. [Google Scholar] [CrossRef]
  27. Song, F.; Liu, Y.; Dong, Y.; Chen, X.; Tan, J. Motion Control of Wafer Scanners in Lithography Systems: From Setpoint Generation to Multi-Stage Coordination. IEEE Trans. Instrum. Meas. 2024, 73, 7508040. [Google Scholar] [CrossRef]
  28. Wu, C.; Yang, L.; Luo, Z.; Jiang, W. Linear laser scanning measurement method tracking by a binocular vision. Sensors 2022, 22, 3572. [Google Scholar] [CrossRef]
  29. Rout, A.; Deepak, B.; Biswal, B. Advances in weld seam tracking techniques for robotic welding: A review. Robot. Comput.-Integr. Manuf. 2019, 56, 12–37. [Google Scholar] [CrossRef]
  30. Li, X.; Liu, Y.; Ge, L.; Zhang, Z. A large-stroke reluctance-actuated nanopositioner: Compliant compensator for enhanced linearity and precision motion control. IEEE/ASME Trans. Mechatron. 2024, 29, 2947–2955. [Google Scholar] [CrossRef]
  31. Long, X.; Su, T.; Lu, C.; Wang, S.; Huang, J.; Chang, C. An insight into dynamic properties of SAC305 lead-free solder under high strain rates and high temperatures. Int. J. Impact Eng. 2023, 175, 104542. [Google Scholar] [CrossRef]
  32. Zhang, H.; Liu, H.; Kuai, H. Stress intensity factor analysis for multiple cracks in orthotropic steel decks rib-to-floorbeam weld details under vehicles loading. Eng. Fail. Anal. 2024, 164, 108705. [Google Scholar] [CrossRef]
  33. Rabe, P.; Reisgen, U.; Schiebahn, A. Non-destructive evaluation of the friction stir welding process, generalizing a deep neural defect detection network to identify internal weld defects across different aluminum alloys. Weld. World 2023, 67, 549–560. [Google Scholar] [CrossRef]
  34. Isiaka, F. Performance metrics of an intrusion detection system through Window-Based Deep Learning models. J. Data Sci. Intell. Syst. 2024, 2, 174–180. [Google Scholar] [CrossRef]
  35. Deng, J.; Zhang, W. An Improved Wavelet Filtering Method for Welding Seam Images in a Complex Environment. In Proceedings of the ICMD: International Conference on Mechanical Design, Shenzhen, China, 28–31 October 2023; pp. 1393–1408. [Google Scholar]
  36. Wu, C.; Hu, J.; Lei, T.; Yang, P.; Gu, S. Research on robust laser vision feature extraction method for fillet welds with different reflective materials under uncertain interference. Opt. Laser Technol. 2023, 158, 108866. [Google Scholar] [CrossRef]
  37. Lau, S.L.; Lim, J.; Chong, E.K.; Wang, X. Single-pixel image reconstruction based on block compressive sensing and convolutional neural network. Int. J. Hydromech. 2023, 6, 258–273. [Google Scholar] [CrossRef]
  38. Hochreiter, S. Long Short-term Memory. Neural Comput. 1997, 9, 1735–1780. [Google Scholar] [CrossRef]
  39. Zhao, Z.-Q.; Zheng, P.; Xu, S.-T.; Wu, X. Object detection with deep learning: A review. IEEE Trans. Neural Netw. Learn. Syst. 2019, 30, 3212–3232. [Google Scholar] [CrossRef] [PubMed]
  40. Putri, R.K.; Athoillah, M. Detection of Facial Mask Using Deep Learning Classification Algorithm. J. Data Sci. Intell. Syst. 2024, 2, 58–63. [Google Scholar] [CrossRef]
  41. Chang, C.-L.; Chen, Y.-H. Measurements of fillet weld by 3D laser scanning system. Int. J. Adv. Manuf. Technol. 2005, 25, 466–470. [Google Scholar] [CrossRef]
  42. Jahromi, S.; Jansson, J.-P.; Kostamovaara, J. Solid-state 3D imaging using a 1nJ/100ps laser diode transmitter and a single photon receiver matrix. Opt. Express 2016, 24, 21619–21632. [Google Scholar] [CrossRef]
  43. Provencal, E.; Laperrière, L. Detection of exact and near duplicates in phased-array ultrasound weld scan. Procedia Manuf. 2021, 54, 263–268. [Google Scholar] [CrossRef]
  44. Rabe, U.; Pudovikov, S. Application of the total focusing method for quantitative nondestructive testing of anisotropic welds with ultrasound. TM-Tech. Mess. 2020, 87, 438–450. [Google Scholar] [CrossRef]
  45. Oussaid, K.; El Ouafi, A. A three-dimensional numerical model for predicting the Weld bead geometry characteristics in laser overlap welding of low carbon galvanized steel. J. Appl. Math. Phys. 2019, 7, 2169. [Google Scholar] [CrossRef]
  46. Manwiller, P.E. Three-dimensional network adjustment of laser tracker measurements for large-scale metrology applications. J. Surv. Eng. 2021, 147, 05020009. [Google Scholar] [CrossRef]
  47. Zhong, B.; Xing, X.; Love, P.; Wang, X.; Luo, H. Convolutional neural network: Deep learning-based classification of building quality problems. Adv. Eng. Inform. 2019, 40, 46–57. [Google Scholar] [CrossRef]
  48. Kumar, V.R.P.; Arulselvi, M.; Sastry, K. Comparative assessment of colon cancer classification using diverse deep learning approaches. J. Data Sci. Intell. Syst. 2023, 1, 128–135. [Google Scholar] [CrossRef]
  49. Xi, C.; Yang, J.; Liang, X.; Ramli, R.B.; Tian, S.; Feng, G.; Zhen, D. An improved gated convolutional neural network for rolling bearing fault diagnosis with imbalanced data. Int. J. Hydromech. 2023, 6, 108–132. [Google Scholar] [CrossRef]
  50. Phan, T.H.; Yamamoto, K. Resolving class imbalance in object detection with weighted cross entropy losses. arXiv 2020, arXiv:2006.01413. [Google Scholar]
  51. Xu, Y.; Fang, G.; Chen, S.; Zou, J.J.; Ye, Z. Real-time image processing for vision-based weld seam tracking in robotic GMAW. Int. J. Adv. Manuf. Technol. 2014, 73, 1413–1425. [Google Scholar] [CrossRef]
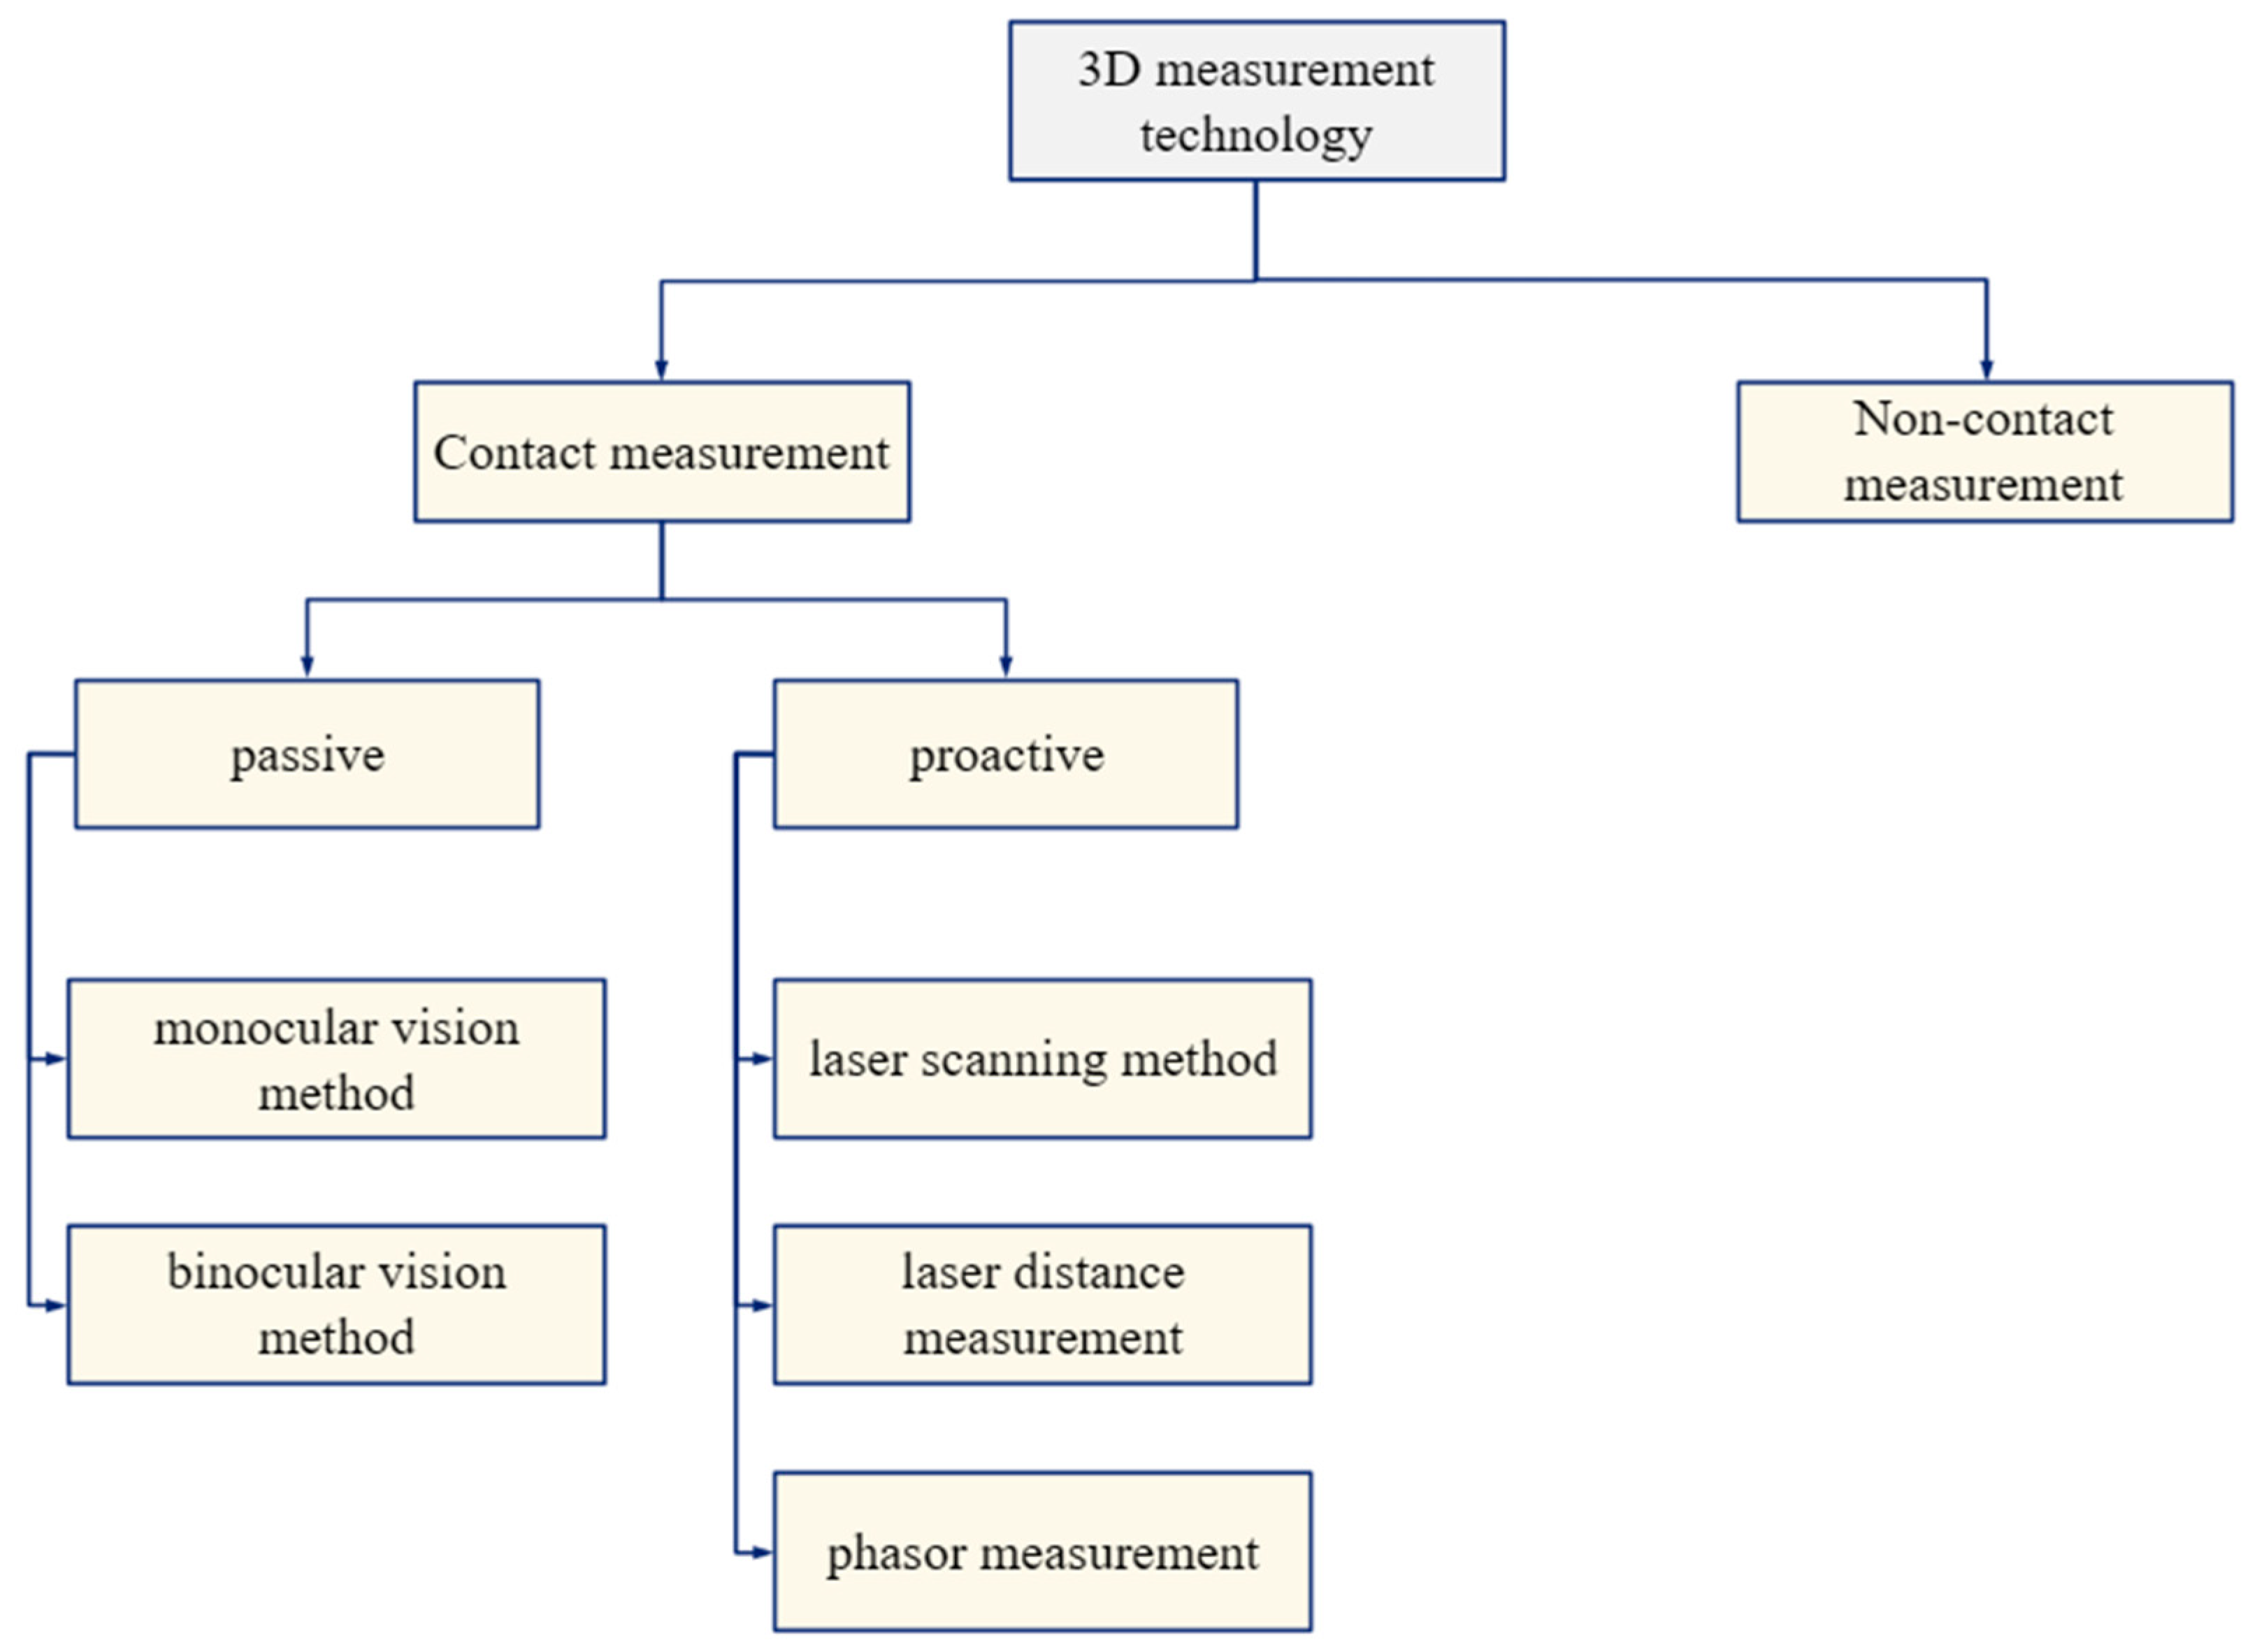
Figure 1. Classification of 3D measurement techniques.
Actuators 13 00414 g001
Figure 2. (a) Principle of binocular line laser 3D scanning technology; (b) main architecture of Faster R-CNN.
Actuators 13 00414 g002
Figure 3. Measurement system block diagram.
Actuators 13 00414 g003
Figure 4. Mosaic enhancement effect of weld defects.
Actuators 13 00414 g004
Figure 5. Sample defective image.
Actuators 13 00414 g005
Figure 6. Defective feature data enhancement.
Actuators 13 00414 g006
Figure 7. Weld seam imaging and processing.
Actuators 13 00414 g007
Figure 8. Detection process based on MNet method.
Actuators 13 00414 g008
Figure 9. Classification accuracy curve.
Actuators 13 00414 g009
Figure 10. Structural diagram of intelligent welding seam grinding system.
Actuators 13 00414 g010
Figure 11. Basic structure of convolutional neural networks.
Actuators 13 00414 g011
Figure 12. Morphology-based weld seam feature point localization.
Actuators 13 00414 g012
Figure 13. Single repeated measurement results of seam height.
Actuators 13 00414 g013
Figure 14. Measurement results of weld seam height.
Actuators 13 00414 g014
Figure 15. Image processing time.
Actuators 13 00414 g015
Table 1. Error convergence obtained from training the weld seam dataset based on the Deeplab-V3 network.
EpochEpoch1Epoch2Epoch3Epoch4Epoch5
Training set0.00980.00640.00640.00680.0046
Verification set0.00710.00790.00710.00700.0062
Test set0.00740.00810.00760.00580.0067
Table 2. Quantity of defective sub blocks.
Defect ClassificationTraining SetTest SetValidation SetTotal
No defects28,12519,14517,45664,726
Stoma26484204533521
Crack47567898426387
Hole16,5871846175920,192
Biting edge3485154613026333
Welding deviation27637457294237
Table 3. Performance evaluation table for binary classification models.
Predicted as Positive SamplePredicted as Negative Sample
Positive sampleTPFN
Negative samplesFPTN
Table 4. Experimental results of grinding and polishing robot.
Maximum Height/mmMinimum Height/mmAverage Height/mmVariance/mmRange/mm
1.541.281.420.090.28
Table 5. Results of manual grinding and polishing experiments.
Maximum Height/mmMinimum Height/mmAverage Height/mmVariance/mmRange/mm
1.711.271.490.180.43
Disclaimer/Publisher’s Note: The statements, opinions and data contained in all publications are solely those of the individual author(s) and contributor(s) and not of MDPI and/or the editor(s). MDPI and/or the editor(s) disclaim responsibility for any injury to people or property resulting from any ideas, methods, instructions or products referred to in the content.