Article

Analytical and Numerical Crack Growth Analysis of 1:3 Scaled Railway Axle Specimens

1
Chair of Mechanical Engineering, Department Product Engineering, Montanuniversität Leoben, 8700 Leoben, Austria
2
Materials Center Leoben Forschung GmbH, 8700 Leoben, Austria
3
Erich Schmid Institute of Materials Science, 8700 Leoben, Austria
*
Author to whom correspondence should be addressed.
Metals 2019, 9(2), 184; https://doi.org/10.3390/met9020184
Submission received: 28 December 2018 / Revised: 19 January 2019 / Accepted: 29 January 2019 / Published: 3 February 2019
(This article belongs to the Special Issue Fatigue and Fracture of Traditional and Advanced Structural Alloys)

Abstract

:
This paper deals with experimental fatigue crack propagation in rotating bending loaded round bar specimens as well as an analytical and numerical analysis of the residual lifetime. Constant amplitude (CA) load tests are performed with the surface crack length being evaluated using an optical measurement system. Fracture surfaces are microscopically analyzed to determine crack growth in depth as well as the crack shape. In spite of identical testing conditions, the experimental results show some scatter in residual lifetime, which is mainly caused by different residual stress states. Although X-ray residual stress measurements reveal only minor values, a superposition of the residual stress state with the load-induced stress leads to a significant impact on the residual lifetime calculations, which explains the experimental scatter. Numerical analyses are conducted to consider the residual stress state and their effect on crack propagation by different options. Considering the residual stress distribution in depth within the residual lifetime assessment, the deviation to the most conservative experiment is reduced from +48% to +2%. In conclusion, the results in this paper highlight that it is of utmost importance to consider local residual stress conditions in the course of a crack propagation analysis in order to properly assess the residual lifetime.

1. Introduction

Fatigue crack propagation is generally influenced by a multitude of different effects. With common crack propagation material parameters, determined using laboratory specimens, crack growth in full-scale components can be additionally affected by the manufacturing process and the operational loads. Load sequences, stress concentration due to notches and press fits as well as manufacturing-induced residual stress states majorly affect the crack propagation during service. Thus, the residual lifetime estimation of railway axles is still a demanding task and may also lead to a non-conservative assessment in the case of inadequate information. Gänser et al. [1] describe the issue of transferability from small-scale laboratory specimens to full-scale components. Many papers deal with fatigue crack growth behavior and assessment methods in railway axles. Numerically based stress intensity factor solutions for fatigue cracks in rotating bending loaded railway axles are given by Beretta et al. [2], Madia et al. [3,4] and Luke et al. [5,6], where various sections of a railway axle (T- and V-notches and the axle body) are analyzed as well as the influence of press fits on stress intensity factor (SIF) solutions. In [4] a comprehensive collection of different stress intensity factor solutions from several authors is presented. An overview on safe life and damage tolerance methods for railway axles, failure scenarios and causes is provided by Zerbst et al. in [7,8]. Special focus on fatigue and crack growth in railway axles under corrosion is presented in [9,10].
Contributing to the ongoing research on this topic, this paper deals with the fatigue crack propagation behavior in round bar specimens on a scale of 1:3 extracted from railway axle blanks. The investigations are performed within the framework of the international project ‘Probabilistic fracture mechanics concept for the assessment of railway wheelsets’ (Eisenbahnfahrwerke 3, EBFW3) aiming of the transferability of crack propagation parameters determined on standard laboratory specimens to full-scale test axles [11,12]. In the framework of this project, extensive fatigue crack propagation experiments in 1:1 axles, 1:3 axle specimens and single edge notch bending (SENB) specimens have been performed. This paper focuses on the comparison of 1:3 and SENB results. Special attention is denoted on the effect of residual stresses because they affect the crack propagation rate as well as the crack shape. Besides the stress intensity factor range ΔK, the crack propagation rate is mainly influenced by the stress intensity factor ratio R, see Equation (1).
R = K m i n K m a x  
As shown, the ratio R depends on the minimum and maximum stress intensity factor Kmin and Kmax respectively. In practice, local conditions may influence the local stress and strain fields. One issue is the proper determination of the local stresses and stress intensity factors. In the case of real components such as railway axles, one challenge is the fact that residual stresses and press fit induced stresses, which lead to a residual stress intensity factor Kres. This factor superimposes with the external load, thereby influencing the local minimum and maximum effective stress intensity factors Kmin,eff and Kmax,eff leading to a change of the load-dependent ratio R to an local effective ratio Reff at the crack tip, see Equation (2). Although ΔK is well known, the superposition leads to a local change of Kmin and Kmax, which may significantly affect the residual lifetime due to acceleration or delay of the crack growth rate.
R e f f = K m i n , e f f K m a x , e f f = K m i n + K r e s K m a x + K r e s
Other crucial issues are the determination of the material properties, load sequence effects as well as the crack propagation models, used for the estimation of the residual lifetime. A review of several crack propagation models under constant and variable amplitude loading is given by Beden et al. in [13]. The original Paris/Erdogan model [14] is a commonly applied method, which is comparatively easy to handle for a simple crack growth estimation; however, one disadvantage is that it does not cover the effect of the load ratio. Hence, a high deviation of the estimated residual lifetime may result. Walker [15] modified the Paris/Erdogan equation to account for the influence by the load ratio. Crack propagation models from Erdogan/Ratwani [16] or the NASGRO equation according to Forman/Mettu [17] also consider the load ratio at residual lifetime estimations and may lead to more accurate assessments. Additionally, the NASGRO equation, see Equation (3), considers crack closure mechanisms similar to Newman [18], which is included in the factor Flc additionally depending on the effective ratio Reff, see Appendix B.
d a d N = C F l c Δ K m ( 1 Δ K t h Δ K ) p ( 1 K m a x K c ) q
Maierhofer et al. [19] modified the NASGRO equation for physically short cracks according to Equation (4) considering that short cracks can grow even though the stress intensity factor range is below the long crack threshold value ΔKth,LC, see Equation B1 for ΔKth(Reff, Δa) in Appendix B. Note that in Equation Error! the transition region III of the fatigue crack curve is not considered due to neglecting the parameter q (q = 0). In the remainder of this article, the short crack model (SCM) according to Maierhofer is used for analytical residual lifetime estimation. Detailed information about crack closure mechanisms and short crack behavior is provided in [19,20,21,22].
d a d N = C F ( R e f f , Δ a ) Δ K m p ( Δ K Δ K t h ( R e f f , Δ a ) ) p
The differences between the NASGRO equation and its modification according to Maierhofer are in the determination of the crack velocity factor F and Flc respectively as well as the fatigue crack propagation threshold ΔKth. For detailed information see [19].
In general, round bars under pure rotating bending exhibit a semi elliptical crack front [3,23,24]. In Figure 1, representative fractographies of semi elliptical cracks in 1:1 railway axle specimens are illustrated.
Furthermore, in some cases deviations from typical reported fracture surfaces are noticed. Figure 2 exhibits two extreme examples of such discrepancies due to local residual stress fields. While in Figure 2a, two-thirds of the crack growth period exhibit semi elliptical crack extension (as can be seen from beach marks), the final fracture surface shows minor deviation of the semi elliptical shape. It seems that crack growth in depth is retarded compared to surface. In Figure 2b, one sided near surface crack growth over a wide range of the fracture surface is shown. The effective stress intensity factor range is not exceeding the threshold on one side of the initial notch, hence unsymmetrical and non-semi-elliptical crack propagation can be observed.
While the depicted examples of Figure 2 are curiosities, the influence of local residual stress fields on crack propagation is clearly visible. Note that the illustrated fracture surfaces in Figure 1 do not give information about the quantity of the residual stress field, but an indication of the homogeneity. In this paper, only semi-elliptical crack propagation, as illustrated in Figure 1, is considered, being the focus of this article. In the analytical approach, semi-elliptical crack growth is assumed and hence divergences of a semi-elliptical shape are not provided. Numerical methods in this case are more flexible and offer an opportunity for non-semi-elliptical crack growth estimation. In summary, this paper scientifically contributes to the following research topics:
  • Transferability of small scale SENB crack growth test results to round 1:3 scaled railway axle specimens incorporating influences of different crack front geometries and size effects focusing on varying residual stress conditions.
  • Comparison of analytical and numerical crack growth assessment methods involving both short and long crack growth regime.
  • Detailed investigation regarding the effect of different residual stress states on crack shape evolution and residual lifetime.

2. Materials and Methods

The material used for all experimental investigations is the railway axle steel EA1N, which is a normalized 0.35% carbon steel with a minimum yield stress ReH ≥ 320 MPa, see [25]. Figure 3 shows the investigated specimen geometries. Single edge notch bending specimen (SENB) tests are performed to determine crack propagation parameters at different stress ratios. These parameters are input values for the analytical and numerical fatigue crack propagation assessment in order to estimate the crack growth behavior in round bar specimens with a semi-elliptical crack front. These specimens are extracted from railway axle blanks with a scale of one-third; hence, denoted as 1:3-scale round bar specimens. The model predictions are finally compared to fatigue crack growth experiments under rotating bending. Details about manufacturing of the specimens are depicted in Appendix A.

2.1. Single Edge Notch Bending (SENB) Specimens

As introduced, experimental fatigue crack growth tests with SENB specimens have been performed to determine fatigue crack growth parameters. The specimens exhibit a thickness t = 6 mm, the width W = 50 mm, and a length L = 250 mm (see Figure 3a). All specimens are tested under four-point bending at different load ratios under laboratory conditions at room temperature. Crack growth was measured by using the direct current potential drop (DCPD) technique [26,27,28]. An initial notch with a depth of a0 = 10 mm was spark eroded and sharpened by polishing the notch root with a razor blade and a diamond paste. All specimens were fatigue pre-cracked under compression at a load ratio of R = 20 [29,30]. The stress intensity factor solution for the SENB specimen was used based on ISO 12108, see [31], and determined according to Equations (5) and (6).
K I ( a W ) = F B t W 1 / 2 g ( a W )
g ( a W ) = 3 ( 2 tan θ ) 1 2 [ 0.923 + 0.199 ( 1 sin θ ) 4 cos θ ]   w i t h θ = π a 2 W
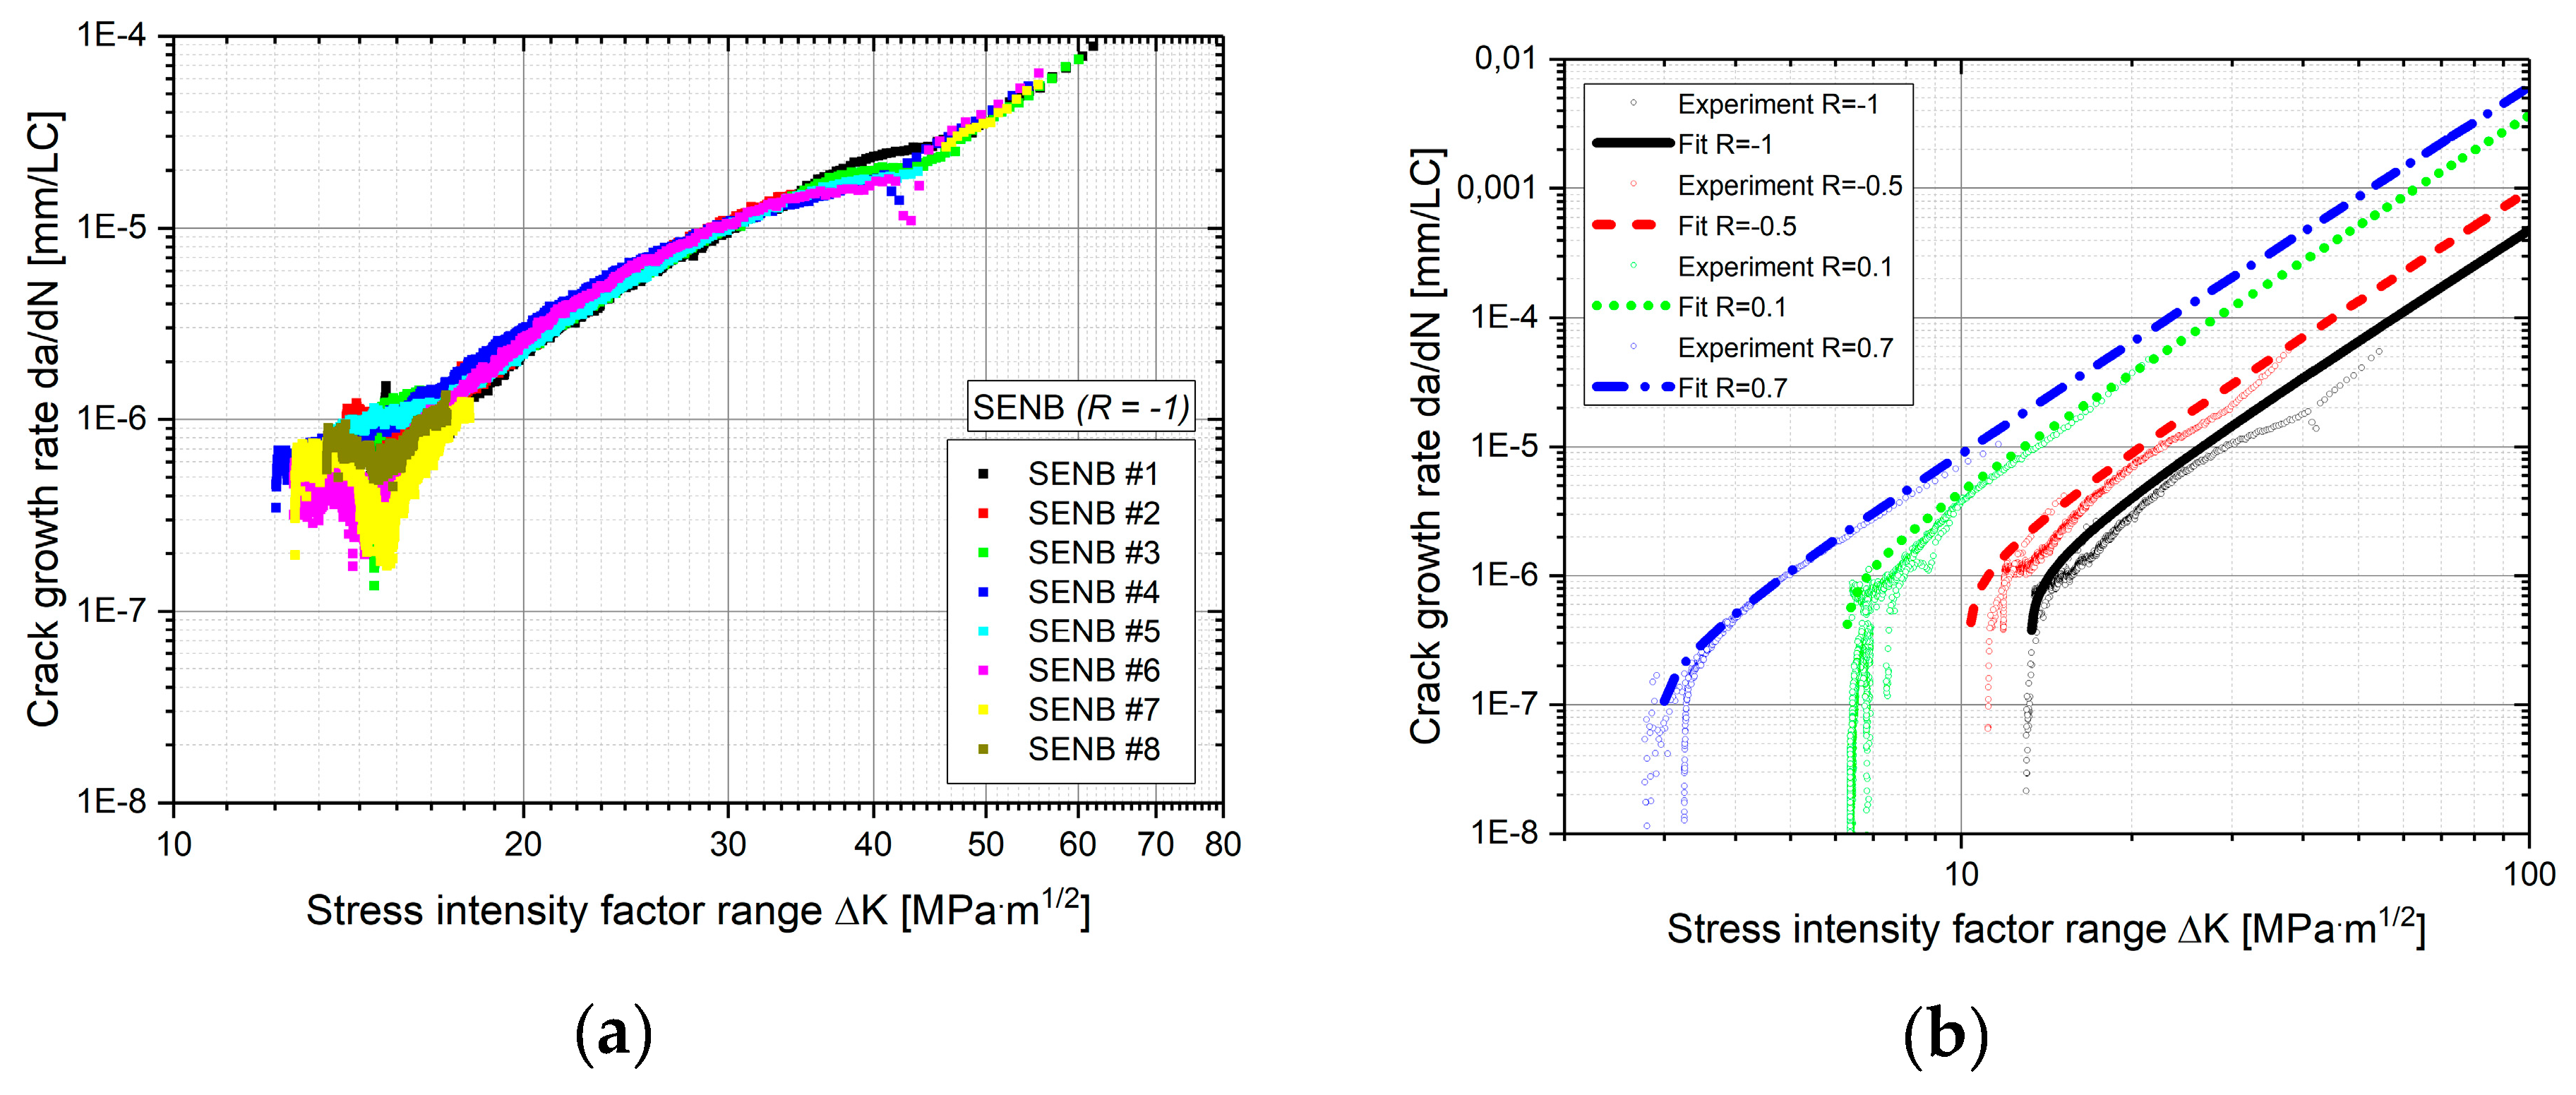
Figure 4a illustrates the results of the crack growth experiments at a load ratio R = −1, in Figure 4b results and fitted data using Equation (4) at load ratios from R = −1 to R = 0.7 are depicted. As shown in Figure 4a, the short crack effect is clearly visible at the beginning of the experiment. Further details are provided in [19].
The material crack propagation parameters of the fitted data according to Figure 4b are shown in Table 1. The Coefficients for the crack opening function f according to Newman [18] are determined with σmax/σF = 0.3 and the constraint factor α = 2.5. Detailed description about the parameters and influence on the crack growth curve are given in Appendix B.

2.2. Round Bar Specimens (1:3 Scaled Railway Axle Specimens)

Round bar specimens with a testing diameter d = 55 mm (scale of 1:3 to a real railway axle) have been tested in a rotating bending test rig. The geometry of the samples is depicted in Figure 3b and detailed information on the manufacturing procedure is given in [32]. The nomenclature of the semi-elliptical crack front is illustrated in Figure 5. The crack length on the surface of the specimen is observed by an in-situ optical measurement system. Crack propagation tests are performed starting with surface crack lengths between 2s = 4 to 5 mm up to a final value of about 2s = 18 mm, which corresponds to the limit of the optical measurement system. Detailed information about the optical crack length acquisition system and calibration is given in [33]. A geometrical recalculation of the projected surface crack length (shortest distance between S1 and S2) to the real surface arc crack length 2s is performed in order to properly evaluate the crack growth behavior.
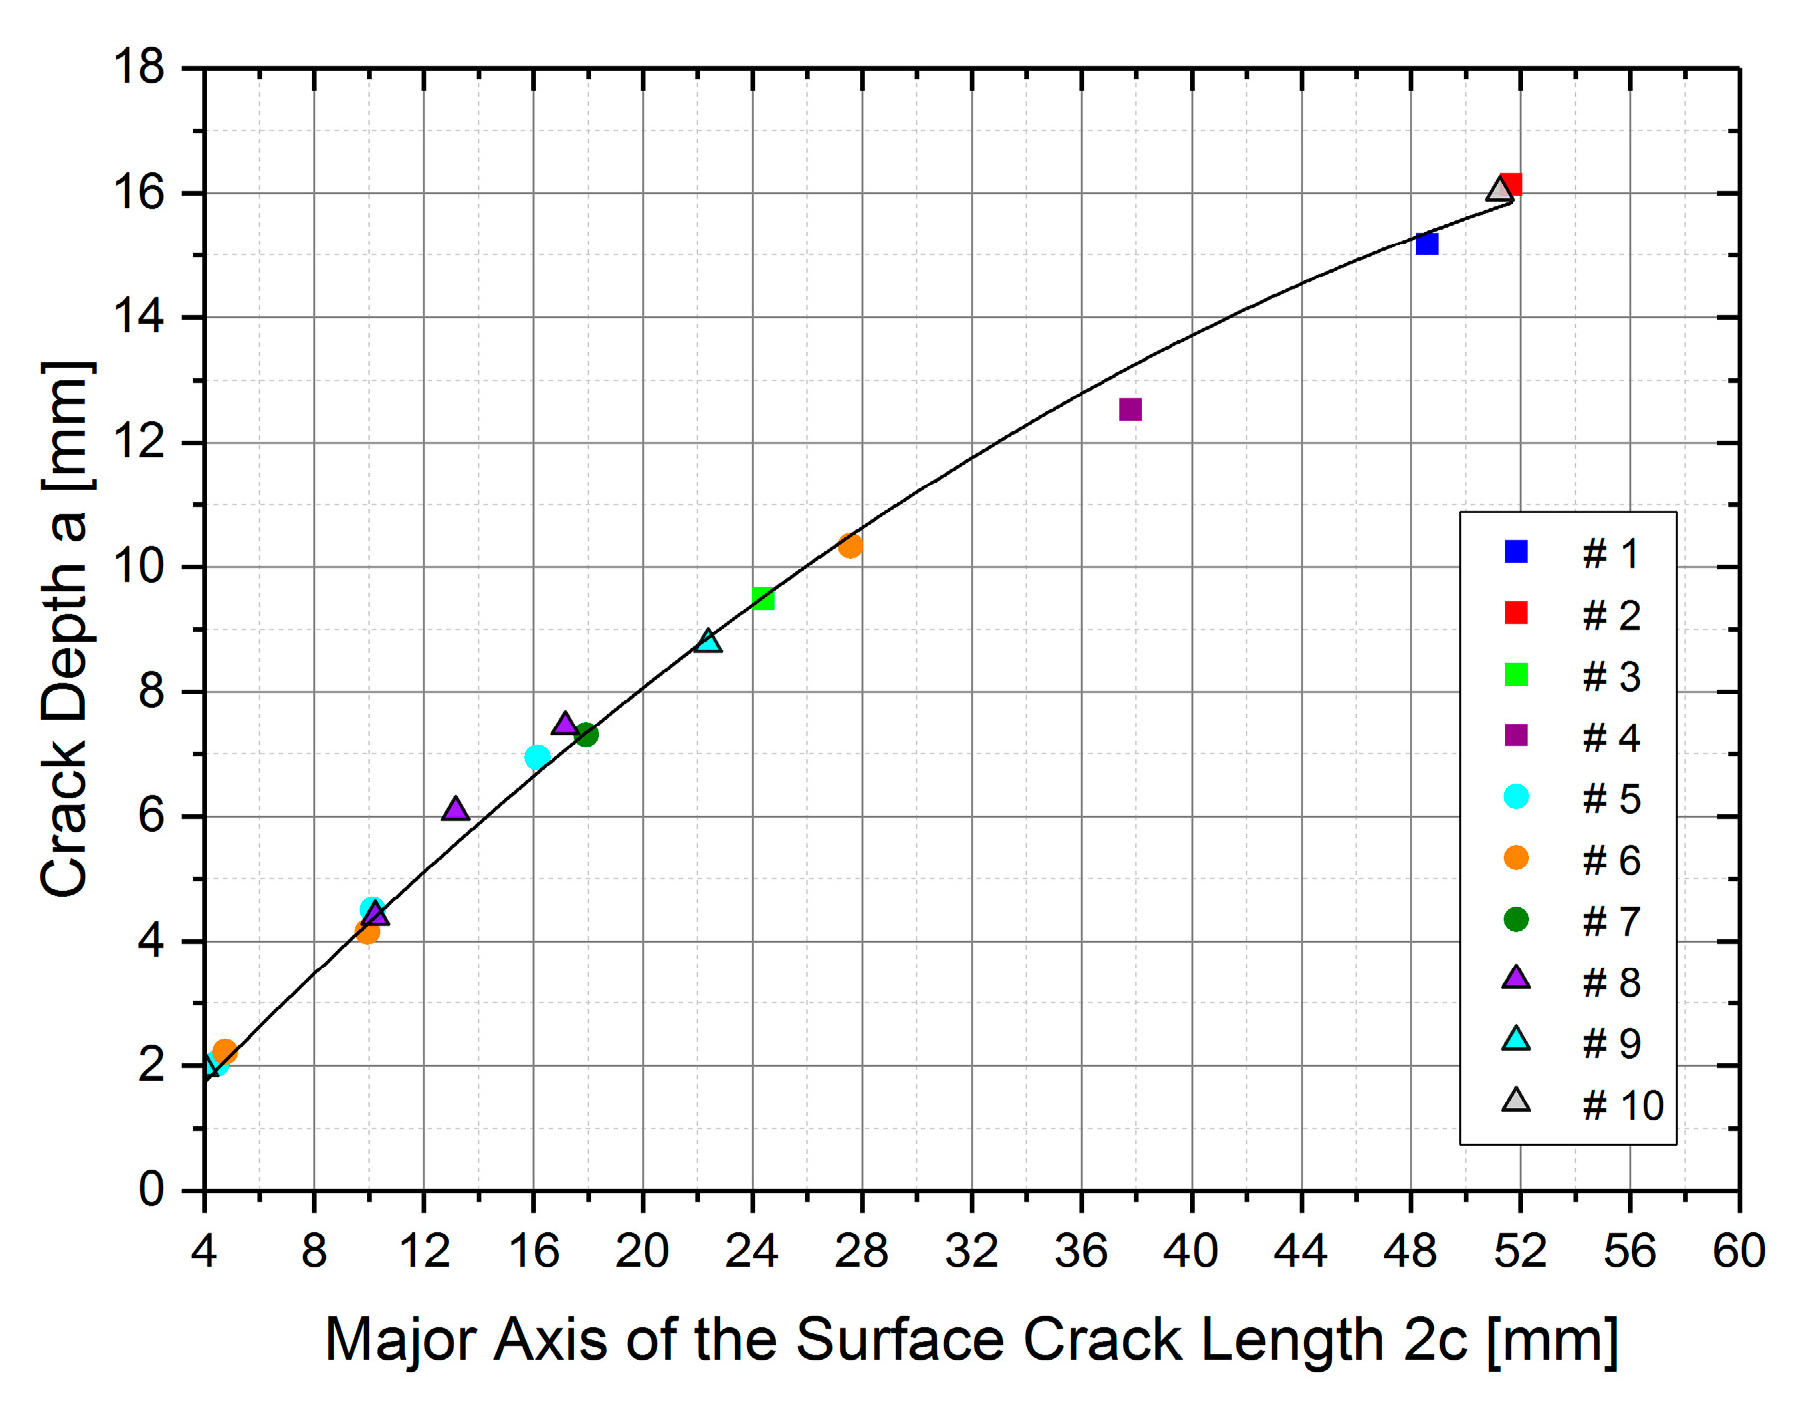
After testing, all samples are cooled down in liquid nitrogen atmosphere and fractured. Optical microscopical analyses of the fracture surfaces are conducted to evaluate the crack shape evolution of the semi-elliptical crack front. To this purpose, a self-written software code is established to measure the semi-elliptical crack front evolution at the fracture surfaces. Starting from the initial notch, beach marks and the final fracture surface are evaluated by non-linear least-squares curve fitting so that the axes of the semi-elliptical crack front can be determined. The data points of the investigated specimens provide information of crack depth evolution depending on the surface crack length (a = f(2s) and a = f(2c) respectively). In Figure 6, the evolution of the crack shape a = f(2c) for 10 tested round bar specimens is depicted. The variation of the shape between the different specimens is small, hence a single fitting function has been determined.
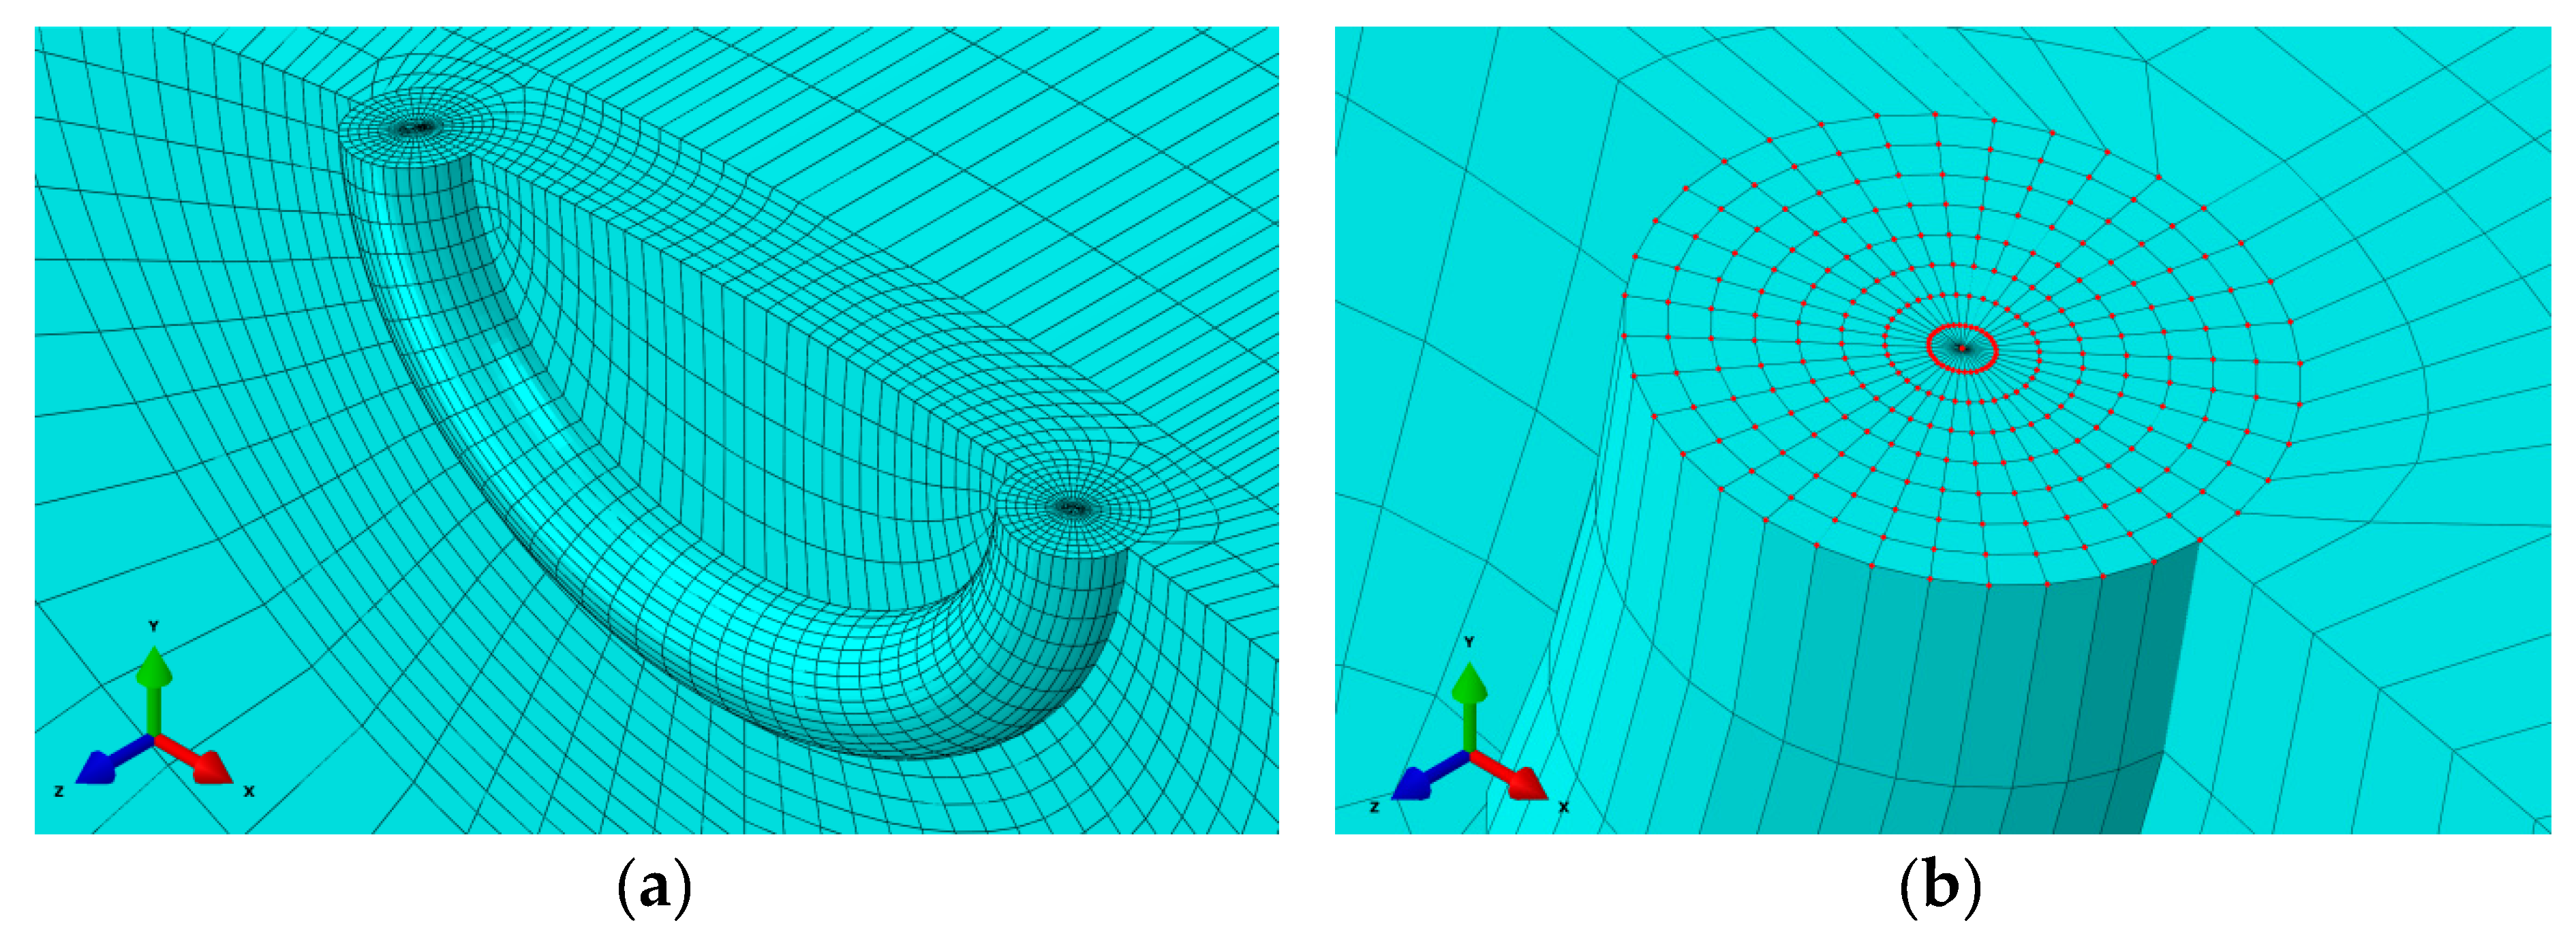
Based on the fitted crack shape evolution, three dimensional (3D) finite element (FE) models of the specimen with different crack shapes in Abaqus are built up to investigate the stress intensity factor KI along the crack front under rotating bending. Note that a fatigue crack in a shaft under rotating bending is a Mode I case and the crack grows perpendicular to the maximum principal stress. The other opening modes are negligible. In literature, many papers deal with numerical investigations of semi-elliptical surface cracks in round bars and their crack shape evolution, see [34,35,36,37,38,39,40,41]. In this study, the surface crack length was extended with an increment of Δc = 0.25 mm and the associated crack depth of the semi-elliptical crack front was adapted by the function of the fitted data points from fractography, see Figure 6. For each increment (crack length), a new numerical model is built up. In the FE model, the four-point rotating bending load was realized by an alternating bending moment. There are different numerical methods to evaluate the stress intensity factor (SIF) [42]. Courtin et al. [43] compared different numerical techniques for estimating the SIF and show the advantages of the J-Integral approach [44] using Abaqus (Version 6.14, Dassault Systemes Simulia Corp., Providence, RI, USA) [45]. The J-Integral can also be adopted for 3D crack problems. In this case, rings of elements surrounding the crack line need to be defined. Abaqus automatically identifies the contours around the crack line, whereas the first contour includes all nodes on the crack line. The first few contours are not recommended for SIF evaluation and may lead to inaccurate results [45]. Hence, a tube-shaped partition along the crack line was generated and the rings of elements have been meshed so that nine contours for evaluation were available, see Figure 7. The model is built up with hexahedral elements exhibiting reduced integration scheme and an element length of approximately 0.15 mm along the crack front. In radial direction the elements exhibit a size of 0.05 mm to ensure an accurate computation result.
The J-Integral leads to inaccurate results for contour integral evaluation on free surfaces (at the end of the crack front) due to the boundary layer effect [45,46]. This means that the 1/√r-singularity of the stress field on the surface domain is not fulfilled. To this purpose, the SIF-values from contour integrals below the surface are fitted and extrapolated to the surface in order to properly evaluate the stress intensity factor ΔKS at the surface points S1 and S2, which majorly influence the crack growth behavior. In the case of linear elastic fracture mechanics, the J-Integral is equivalent to the strain energy release rate G and the stress intensity factor KI can be determined according to Equation (7),
K I = J E '
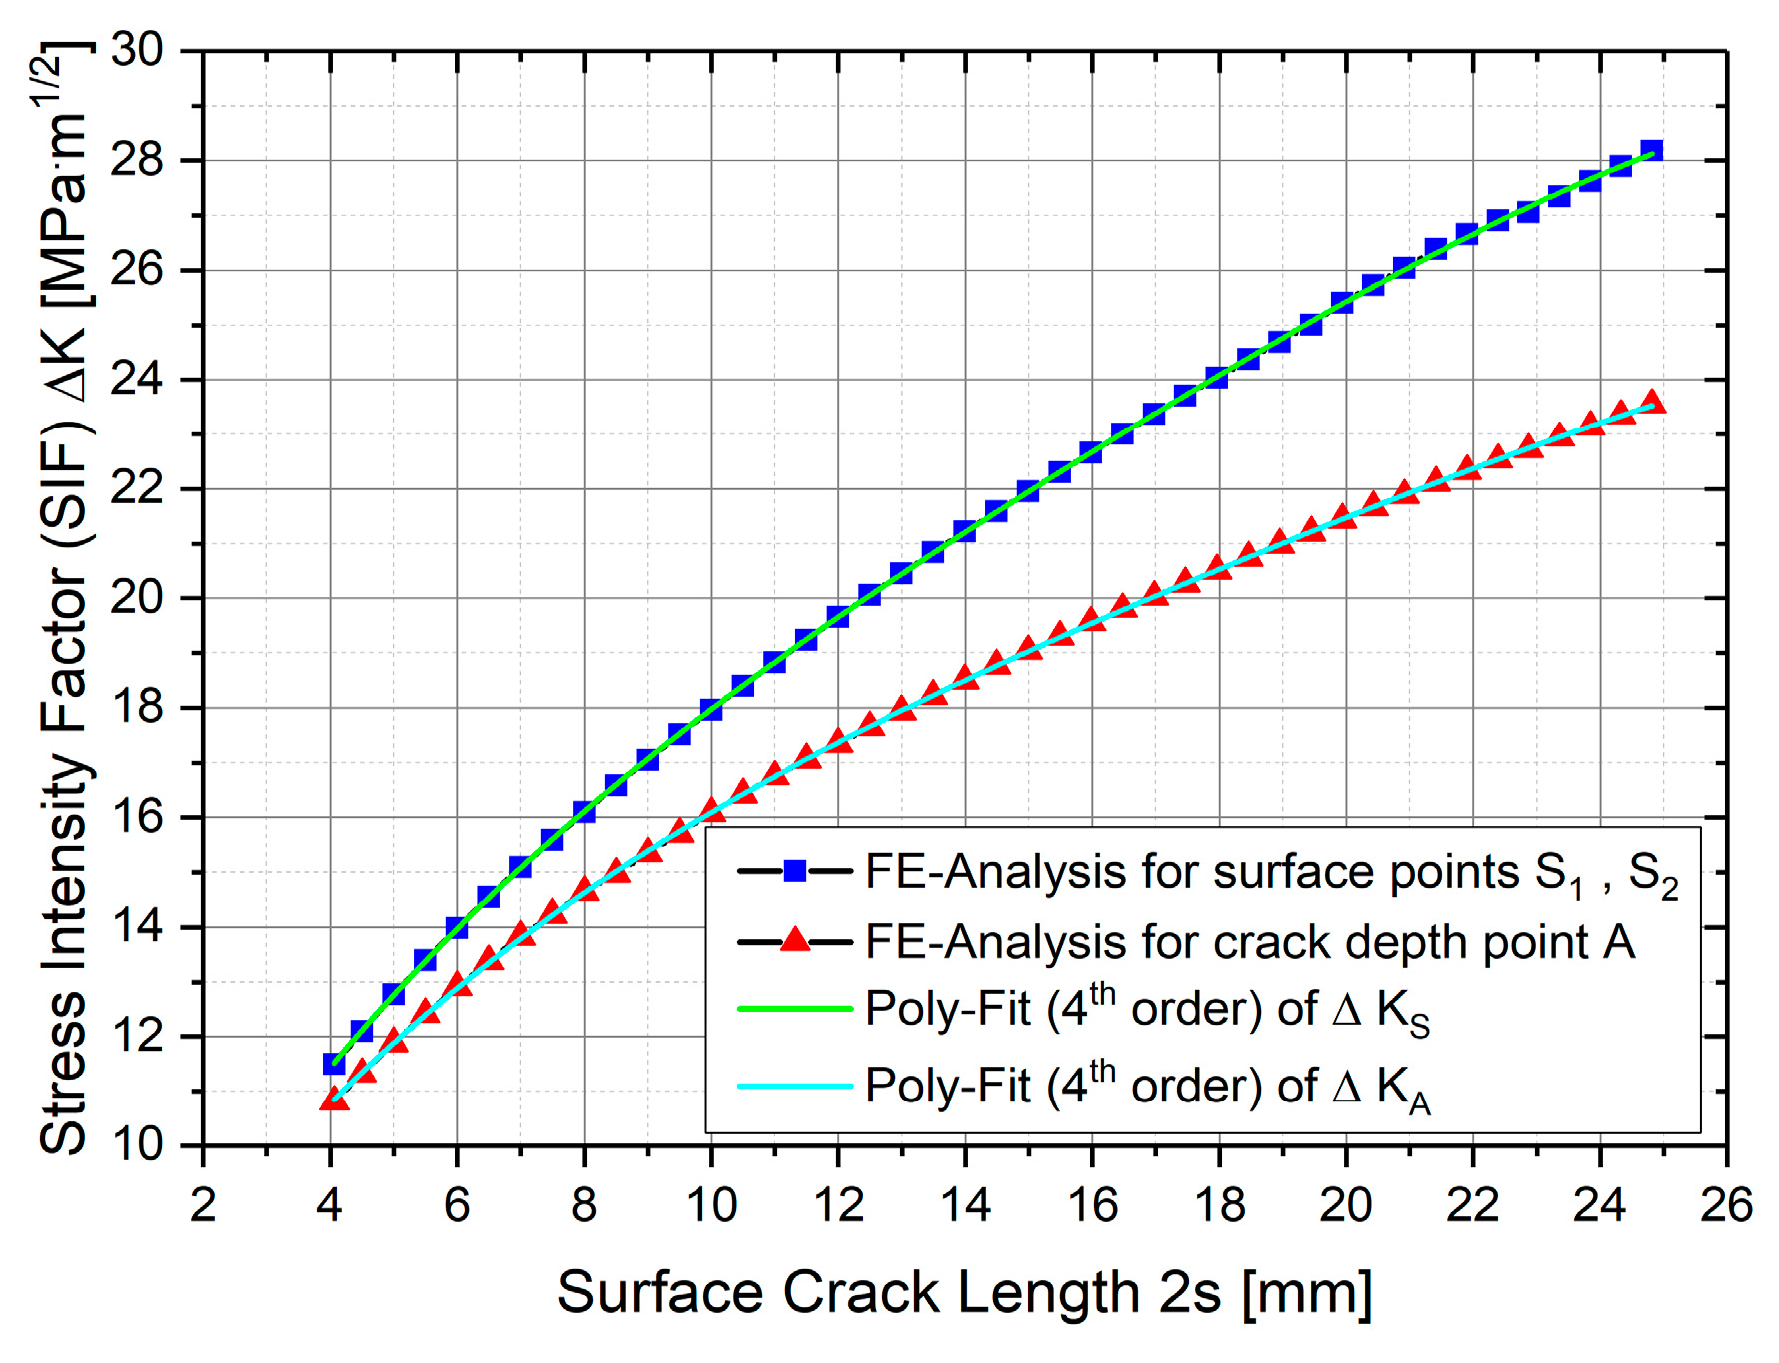
whereas E’ is the Young’s modulus and related to E’ = E at plane stress or E’ = E/(1−ν2) at plane strain condition. In Figure 8, the results of the stress intensity factor range ΔK for the surface points S1, S2 and the crack depth point A as a function of the surface crack length 2s are depicted. Based on the measured surface crack length, the SIF-range for the surface ΔKS and depth ΔKA is evaluated and used to generate ds/dNK diagrams for comparing the crack growth behavior of the different specimens.
Although all experiments show similar slopes and minor shift of the different curves in the Paris region (see Figure 9), a maximum deviation of 1.65 at residual lifetime between Experiment #3 and #4 was observed (evaluated at a surface crack length 2s = 15 mm).
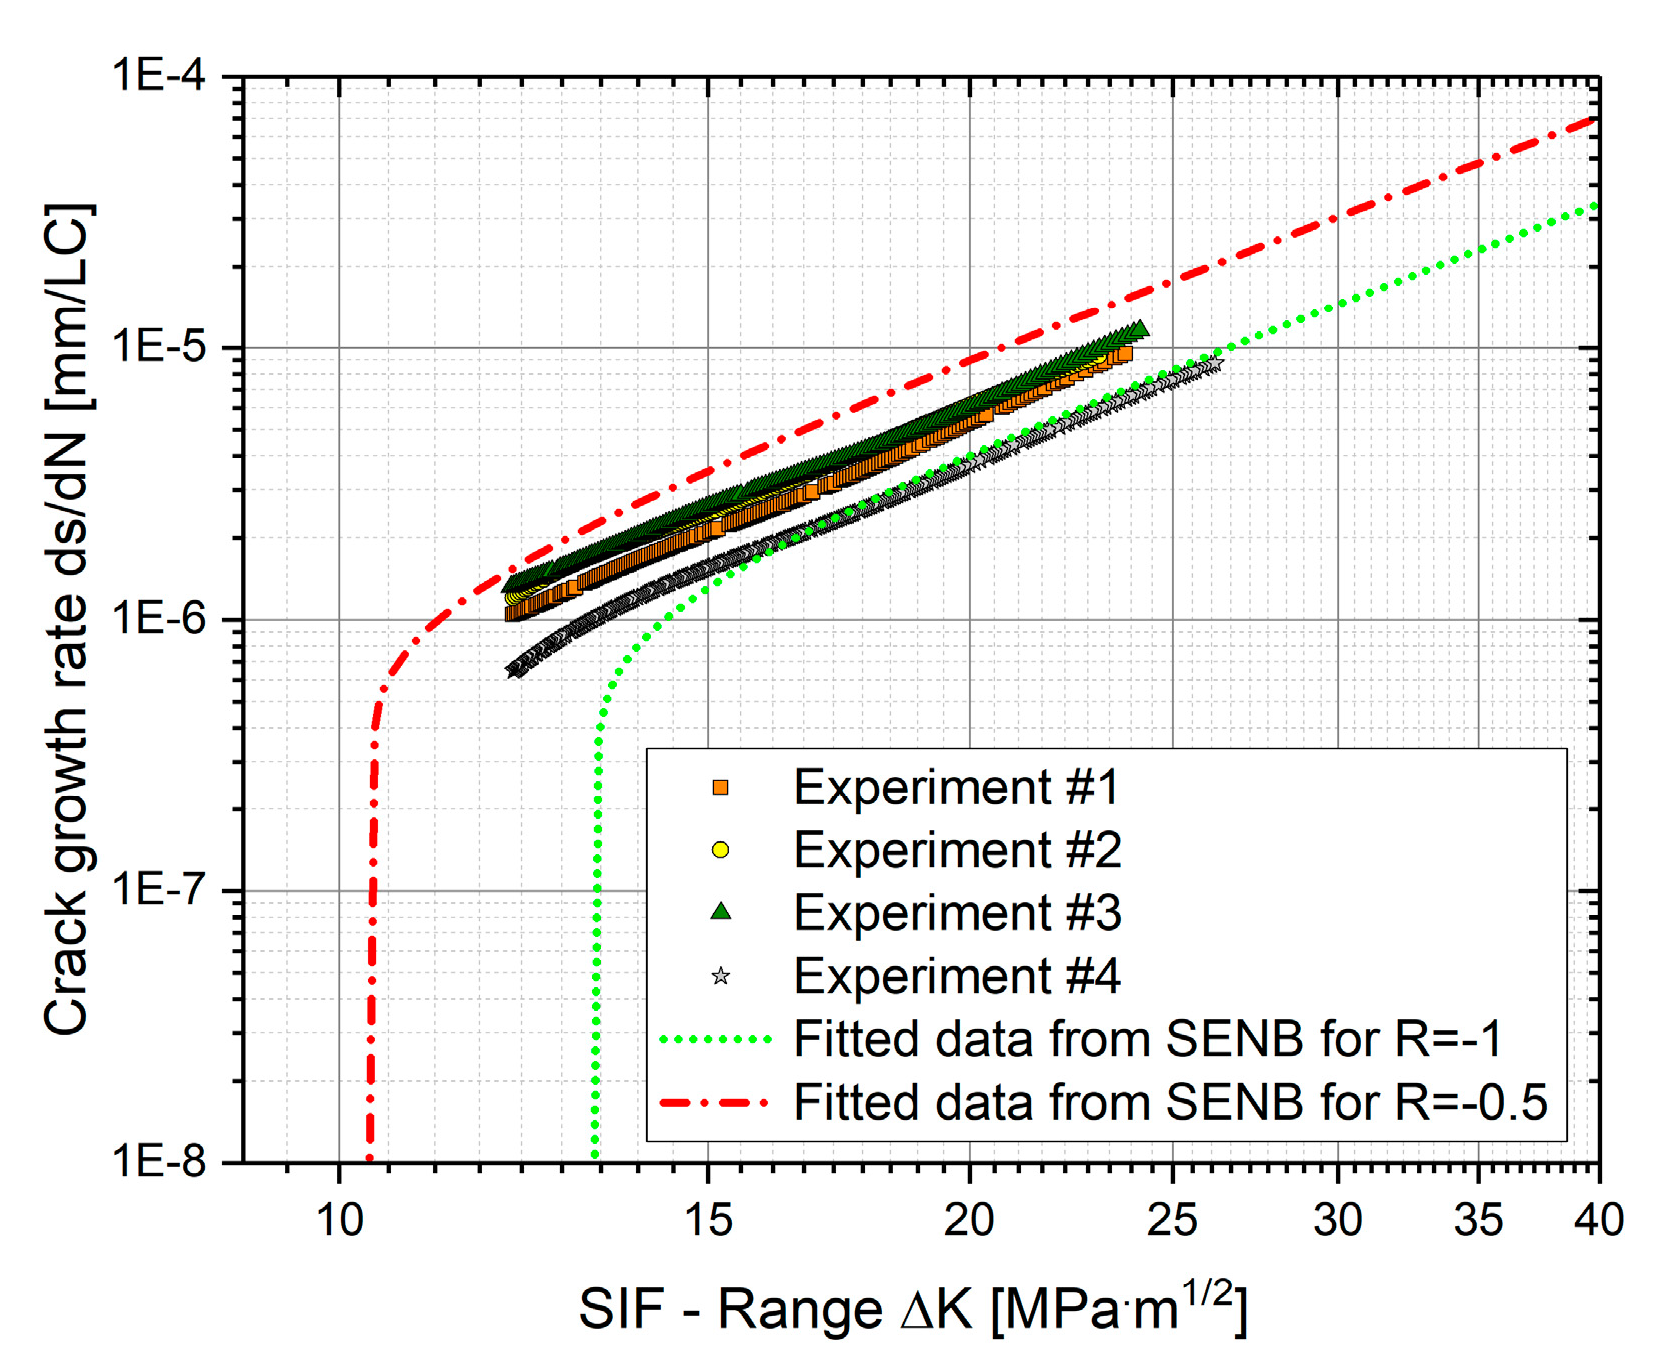
The comparison of fitted data points from SENB specimens and round bar specimens is depicted in Figure 10 and shows that the crack growth curves of the round bar samples are in the range of SENB specimens between load ratios R = −1 and R = −0.5. Although all round bar specimens are tested at R = −1, a shift of the crack growth curves can be observed.
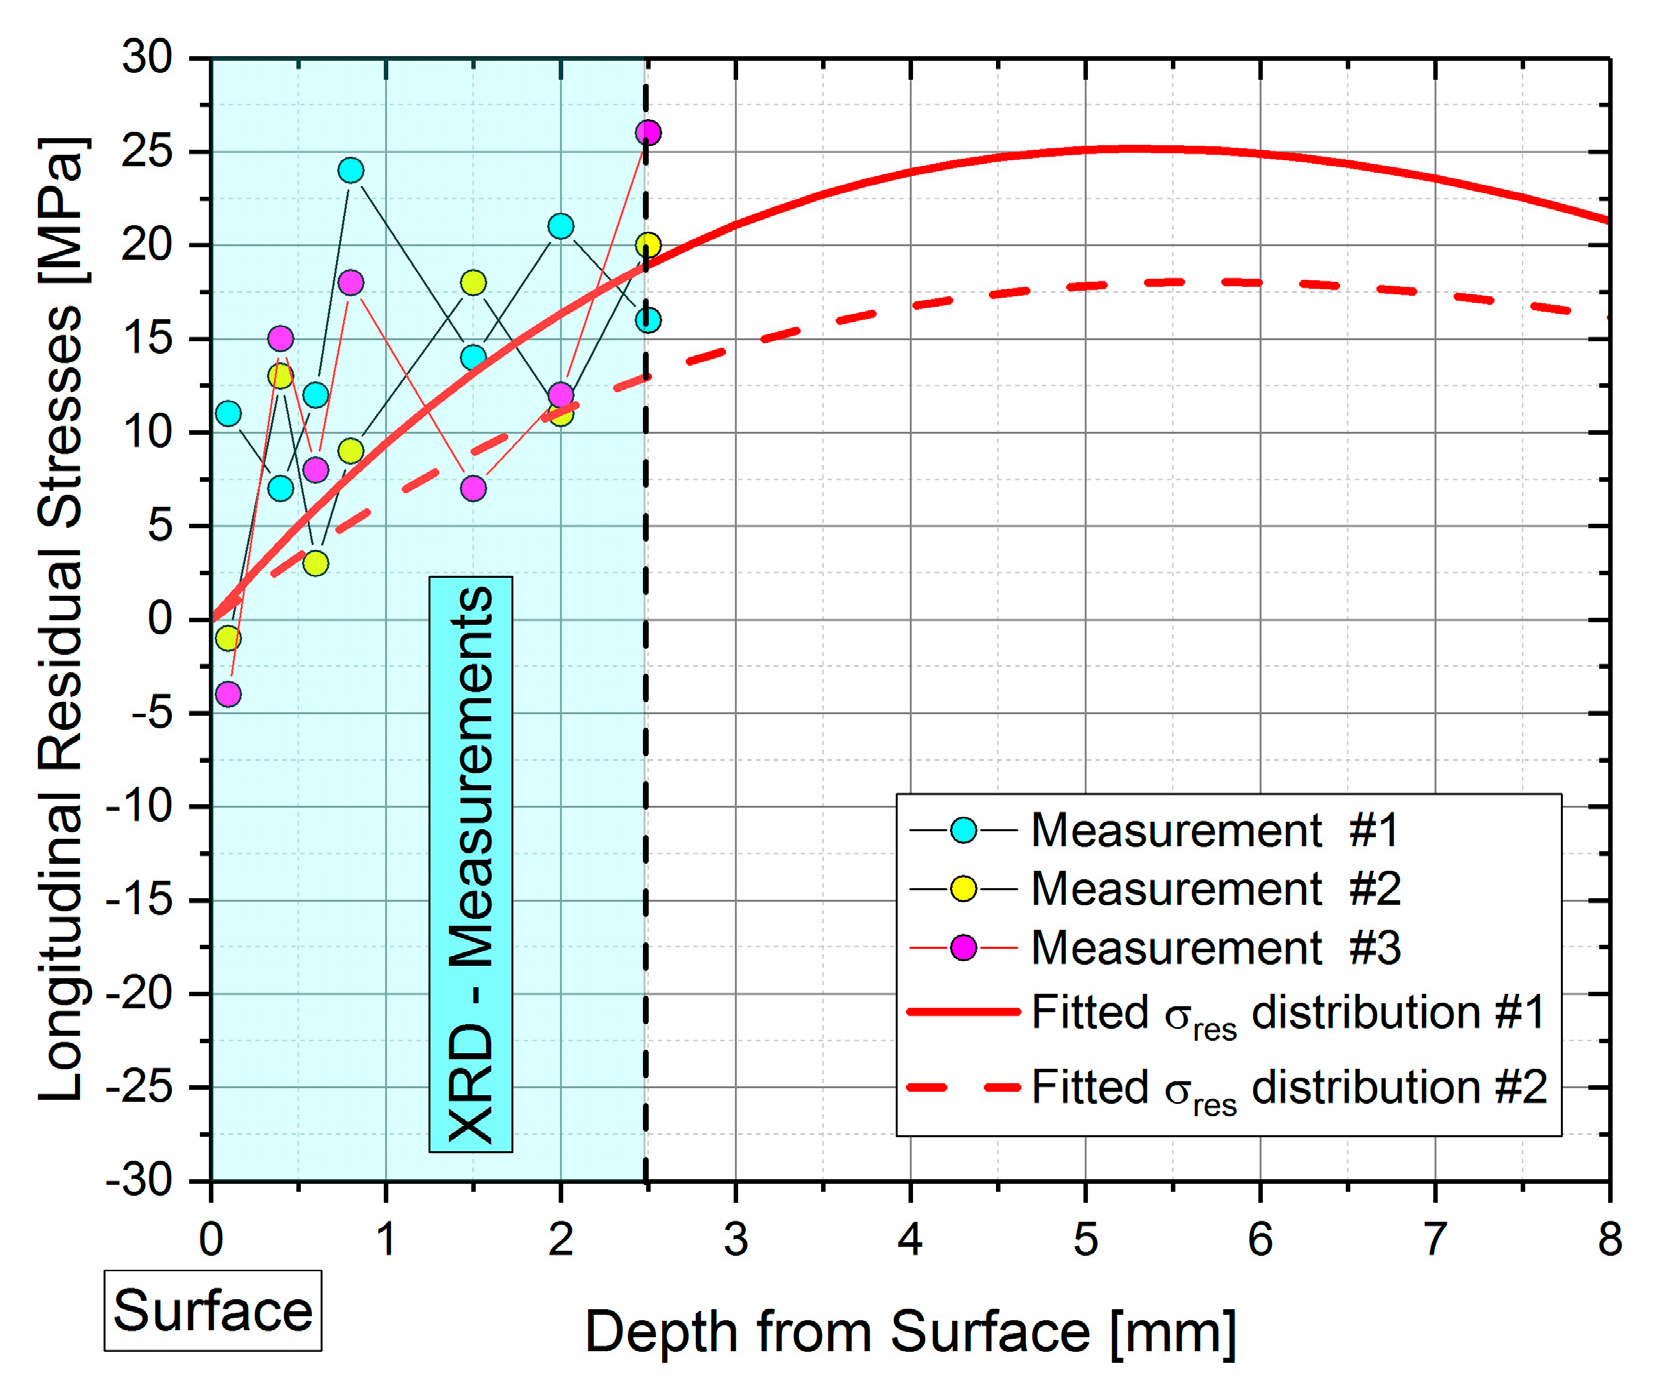
Figure 10 shows that experiments #1–#3 of the round bar samples tend to a load ratio higher than the nominal one; thus, leading to higher crack growth rates compared to SENB specimens at R = −1 and to the round bar sample of experiment #4. The shift of the load ratio can be influenced by internal or external superimposed mean stresses. Internal residual stresses act like mean stresses and thus may lead to a shift in load ratio. The samples are extracted from railway axle blanks with a diameter of 190 mm, for further details see also [32]. Whereas 1:1 railway axles usually exhibit compressive axial residual stresses 10–20 mm below the surface and minor tensile stresses below (see [1,47,48]), the residual stress distribution is significantly influenced due to cutting and machining small scale specimens out of these blanks. Hence, X-ray diffraction (XRD) residual stress measurements are performed on round bar specimens up to a maximum depth of 2.5 mm at the position of the notch. The measurements reveal high compressive residual stresses up to −250 MPa on the surface in axial direction due to machining, but almost immediately reducing to zero at a depth of approximately 100 µm. At depths below 100 µm, comparably minor axial tensile residual stresses are measured. Schindler [48] neglected the compressive residual stress peak directly on the surface in calculations due to the fact that right below the effect is not present and problems in calculating the crack growth rate occur. The averaged XRD residual stress values σres of three different measurements are depicted in Table 2. The measurements are performed from 0.1 mm to a maximum depth of 2.5 mm at three different specimens. Each measurement point exhibits some scatter, hence the minimum (best case) and maximum values (worst case) are specified additionally.
These measurement results are considered for the analytical and numerical assessment within the subsequent chapters. Additionally, performed XRD measurements of the SENB specimens showed negligible residual stresses, see [29]. Hence, the defined load ratio of the SENB results can be taken as reference without further modification of the local residual stress state.

3. Results

As shown in the previous chapters, parameters for different crack growth models are generated based on experimental fatigue crack growth tests with single edge notched bending (SENB) specimens. Analytical and numerical tools for residual lifetime estimation are used to compare calculations to experimental investigations of the round bar specimens.

3.1. Analytical Residual Lifetime Estimation

The analytical assessments are performed with INtegrity Assessment for Railway Axles (INARA) (Version 19-3-2018_13-47, Materials Center Leoben Forschungs GmbH, Leoben, Austria), a software tool to analyze semi-elliptical crack propagation in railway axles within the scope of the research project “Eisenbahnfahrwerke 3”. The crack propagation model, used for all analytical calculations, is the short crack model according to Maierhofer et al. [19] and the parameters are determined from SENB specimen results, see Section 2.1. The stress intensity factor solutions for the semi-elliptical crack front in the solid round bar is based on numerical calculations according to Varfolomeev [49] and also reported in [4,50]. The finite element software Abaqus [45] was used for stress intensity factor determination along the crack front for different crack aspect ratios, crack depths and position of the shaft. Based on these results, polynomial influence functions were generated and implemented in the software tool. According to Equation (8), the stress intensity factors are determined [4,49,50]:
K I ( a c , a R s , ϕ ) = π a m = 0 4 n = 0 4 [ D m n ( 1 ) f m n ( 1 ) ( a c , a R s , ϕ ) + D m n ( 2 ) f m n ( 2 ) ( a c , a R s , ϕ ) ] ( a R s ) m + n ( a c ) n
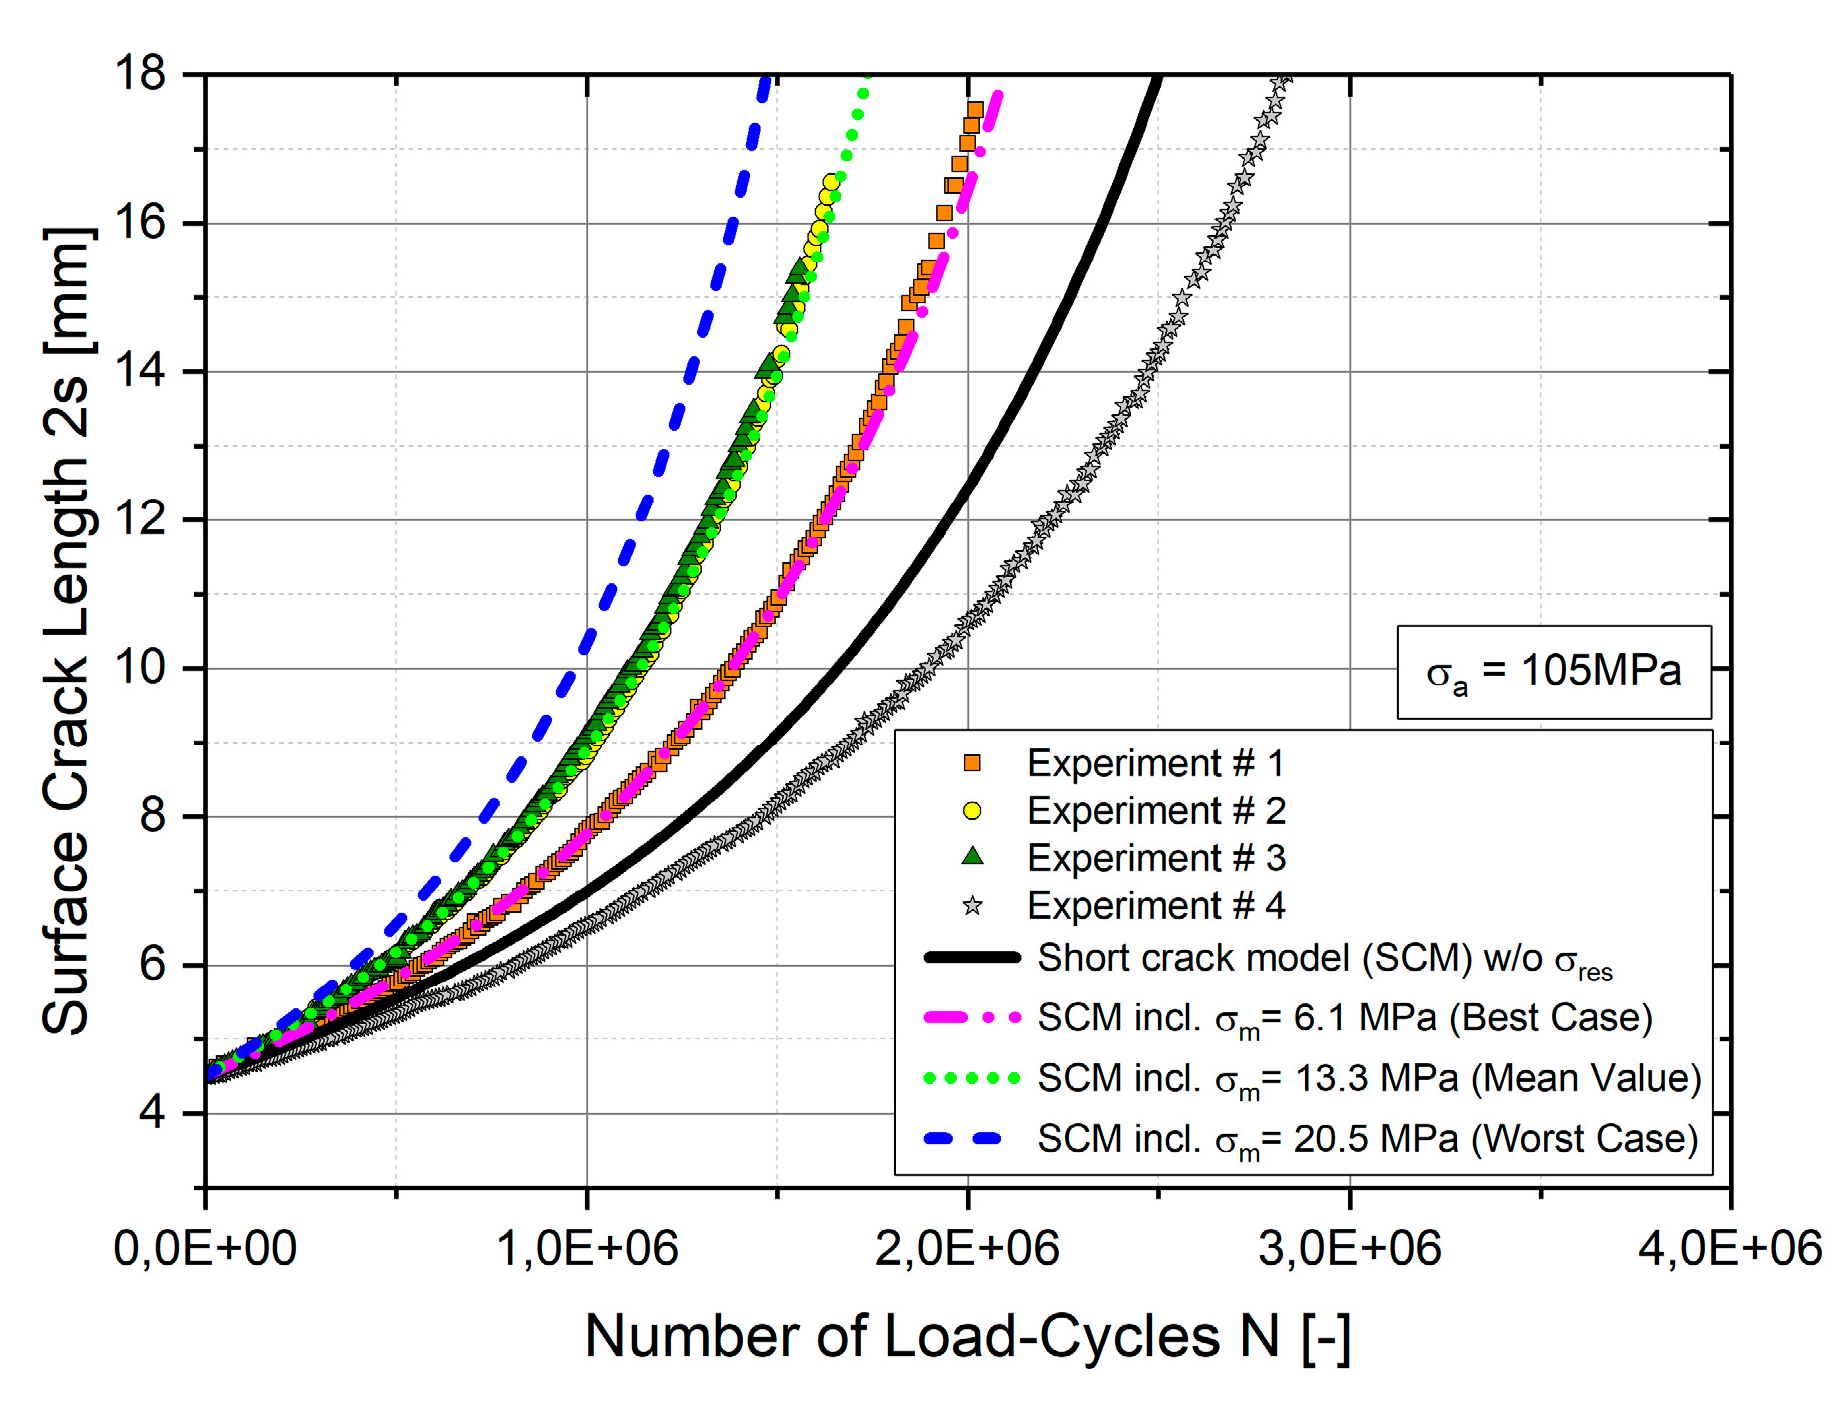
First, crack growth calculations without any consideration of residual stresses have been performed. The results highlight that the estimation is satisfying for experiment #4, but non-conservative for the results of experiments #1–#3. Consequently, the averaged results of residual stress measurement #1, see Table 2, are considered as a mean stress state in the analysis. The consideration of such mean stresses leads to a variation of the local load ratio and thus changes the crack growth rate. The results without and with consideration of residual stresses are depicted in Figure 11 in comparison to the experiments.
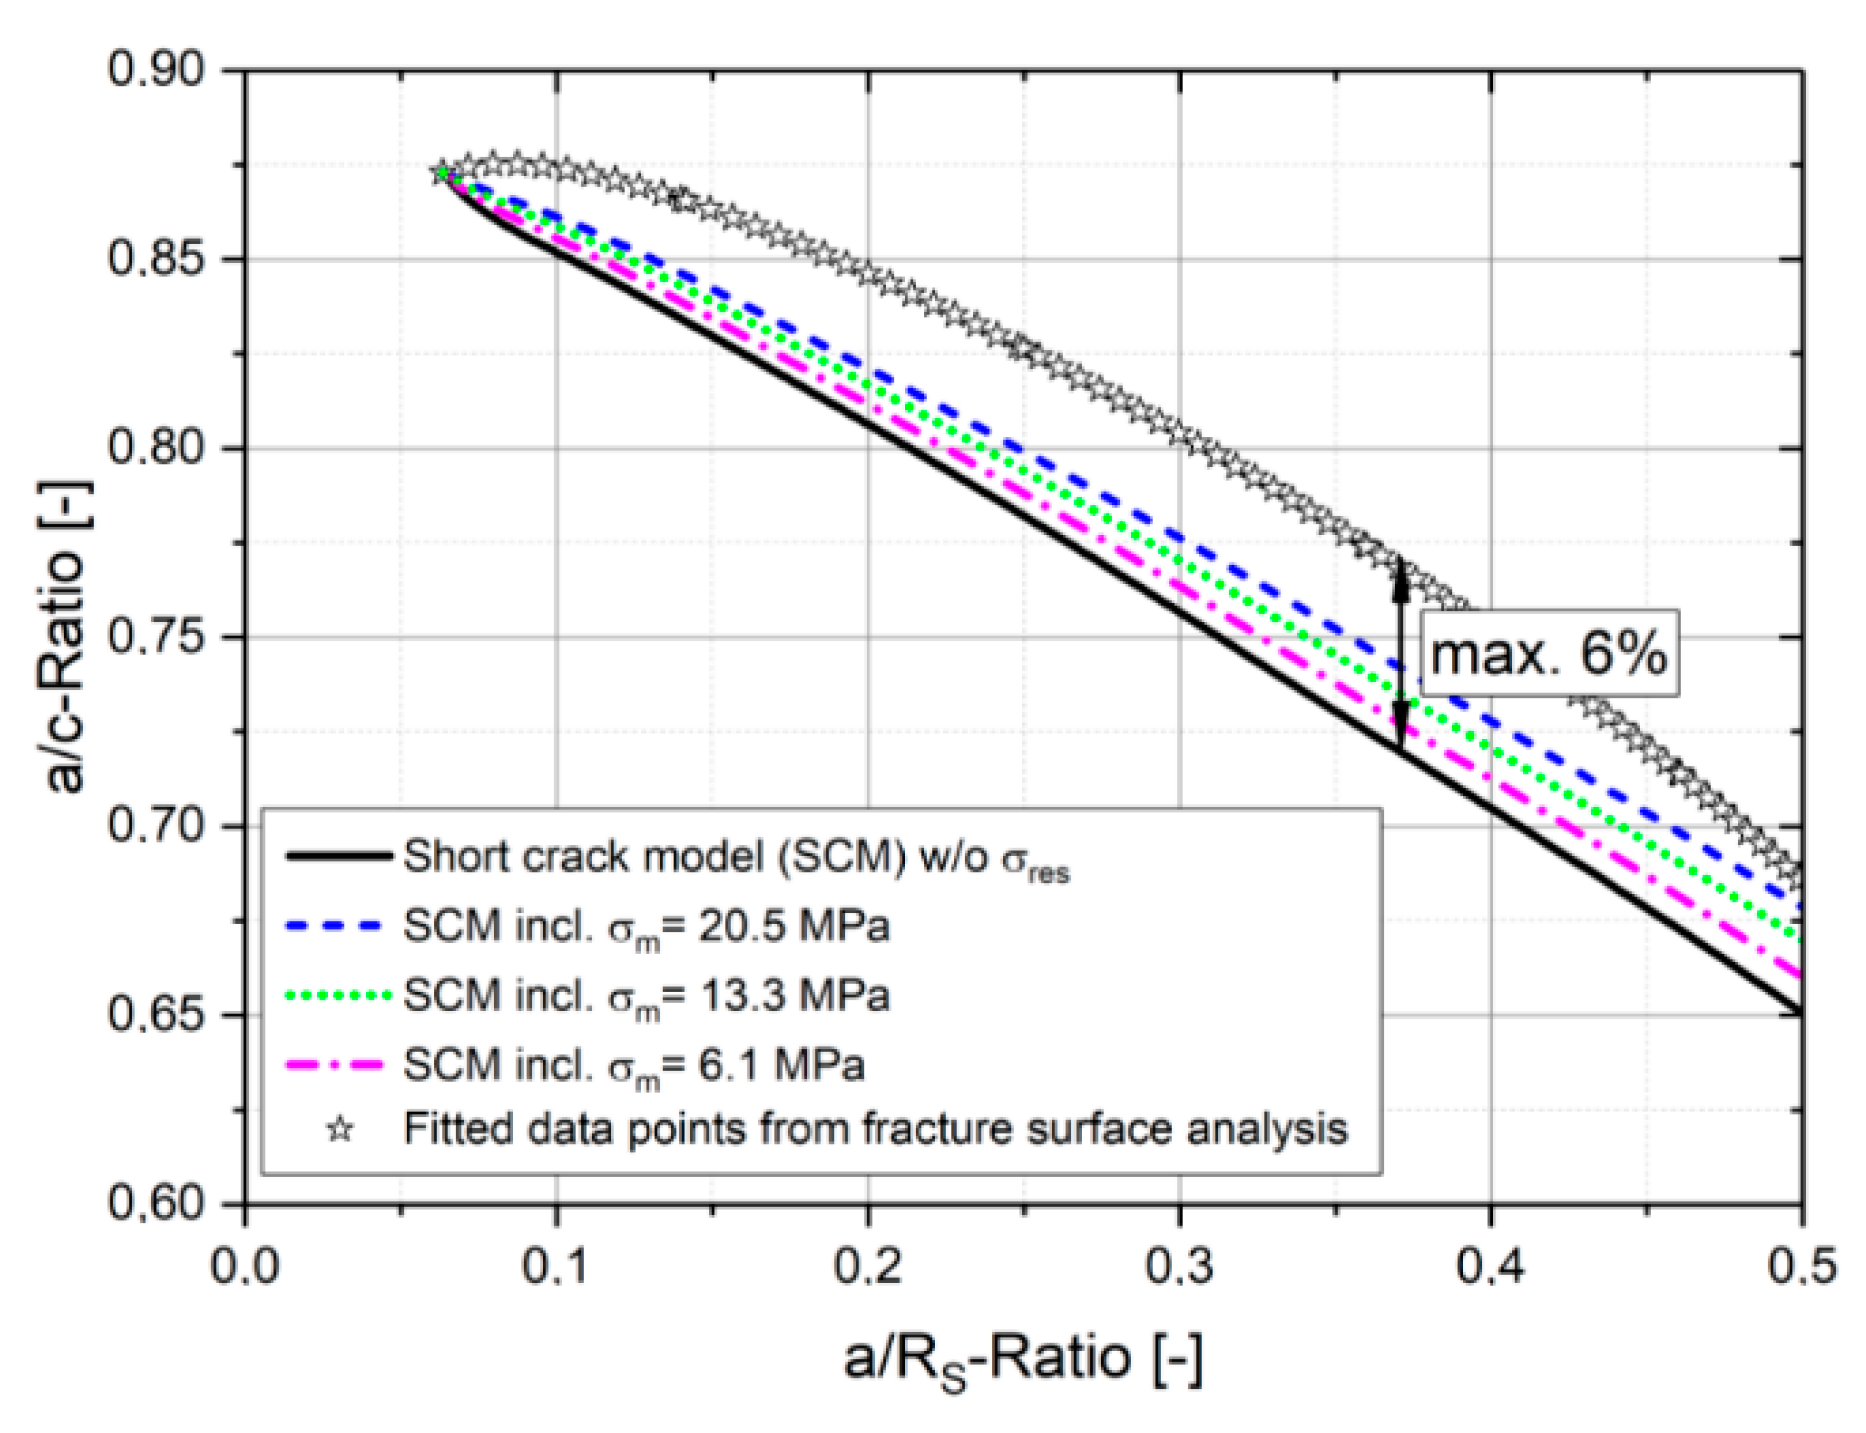
Although the residual stresses considered are quite small, the influence on the residual lifetime is shown to be significant. Here, a mean stress of σm = 6.1 MPa for the best case situation shows a reduction of 16% estimated residual lifetime at a final surface crack length of 2s = 18 mm. For comparison, in the worst case with σm = 20.5 MPa mean stress, the residual lifetime is even 41% lower. Although the assumption of average constant residual stresses as a mean stress state is an approximation, the results of the evaluated residual lifetime in Figure 11 show sound accordance with the experiments. The analytically estimated crack shape evolution of the semi-elliptical crack front compared to the fitted data points of the fracture surface analysis is depicted in Figure 12. The comparison exhibits some deviation of the crack shape evolution, whereas the experiments show a pronounced parabolic shape evolution after crack initiation, the calculations exhibit a less pronounced development. However, a maximum deviation of only 6% between the fracture surface analysis and the assessment without any residual stress consideration is observed at an a/RS-ratio of about 0.37.
Note that residual stresses are considered as constant mean stresses over the cross section for simplification, which does not describe the real residual stress distribution. Notwithstanding, satisfying results are achieved in case of the investigated round bar specimens.
As mentioned, residual stresses are measured up to a maximum depth of 2.5 mm by X-ray diffraction (XRD). For depths below, no further information is available due to measurement limitations. Based on the measured data points, residual stress distributions up to a depth of 12 mm are extrapolated to achieve an improved crack shape evolution in the course of the crack growth calculations.

3.2. Improved Analytical Assessment Based on Residual Stress Distribution

The influence of minor residual stresses considered as averaged overlapping constant mean stresses is shown in the preceding section. In this section, residual stress depth profiles are generated based on XRD measurements and their influence on the residual lifetime and crack shape evolution is analyzed. To this purpose, a multitude of different radial symmetrical stress distributions are investigated. Figure 13 illustrates two residual stress distributions up to a depth of 8 mm, which are estimated based on the measured XRD data points up to a depth of 2.5 mm. Additionally, the mean values of the data points from XRD measurements are depicted.
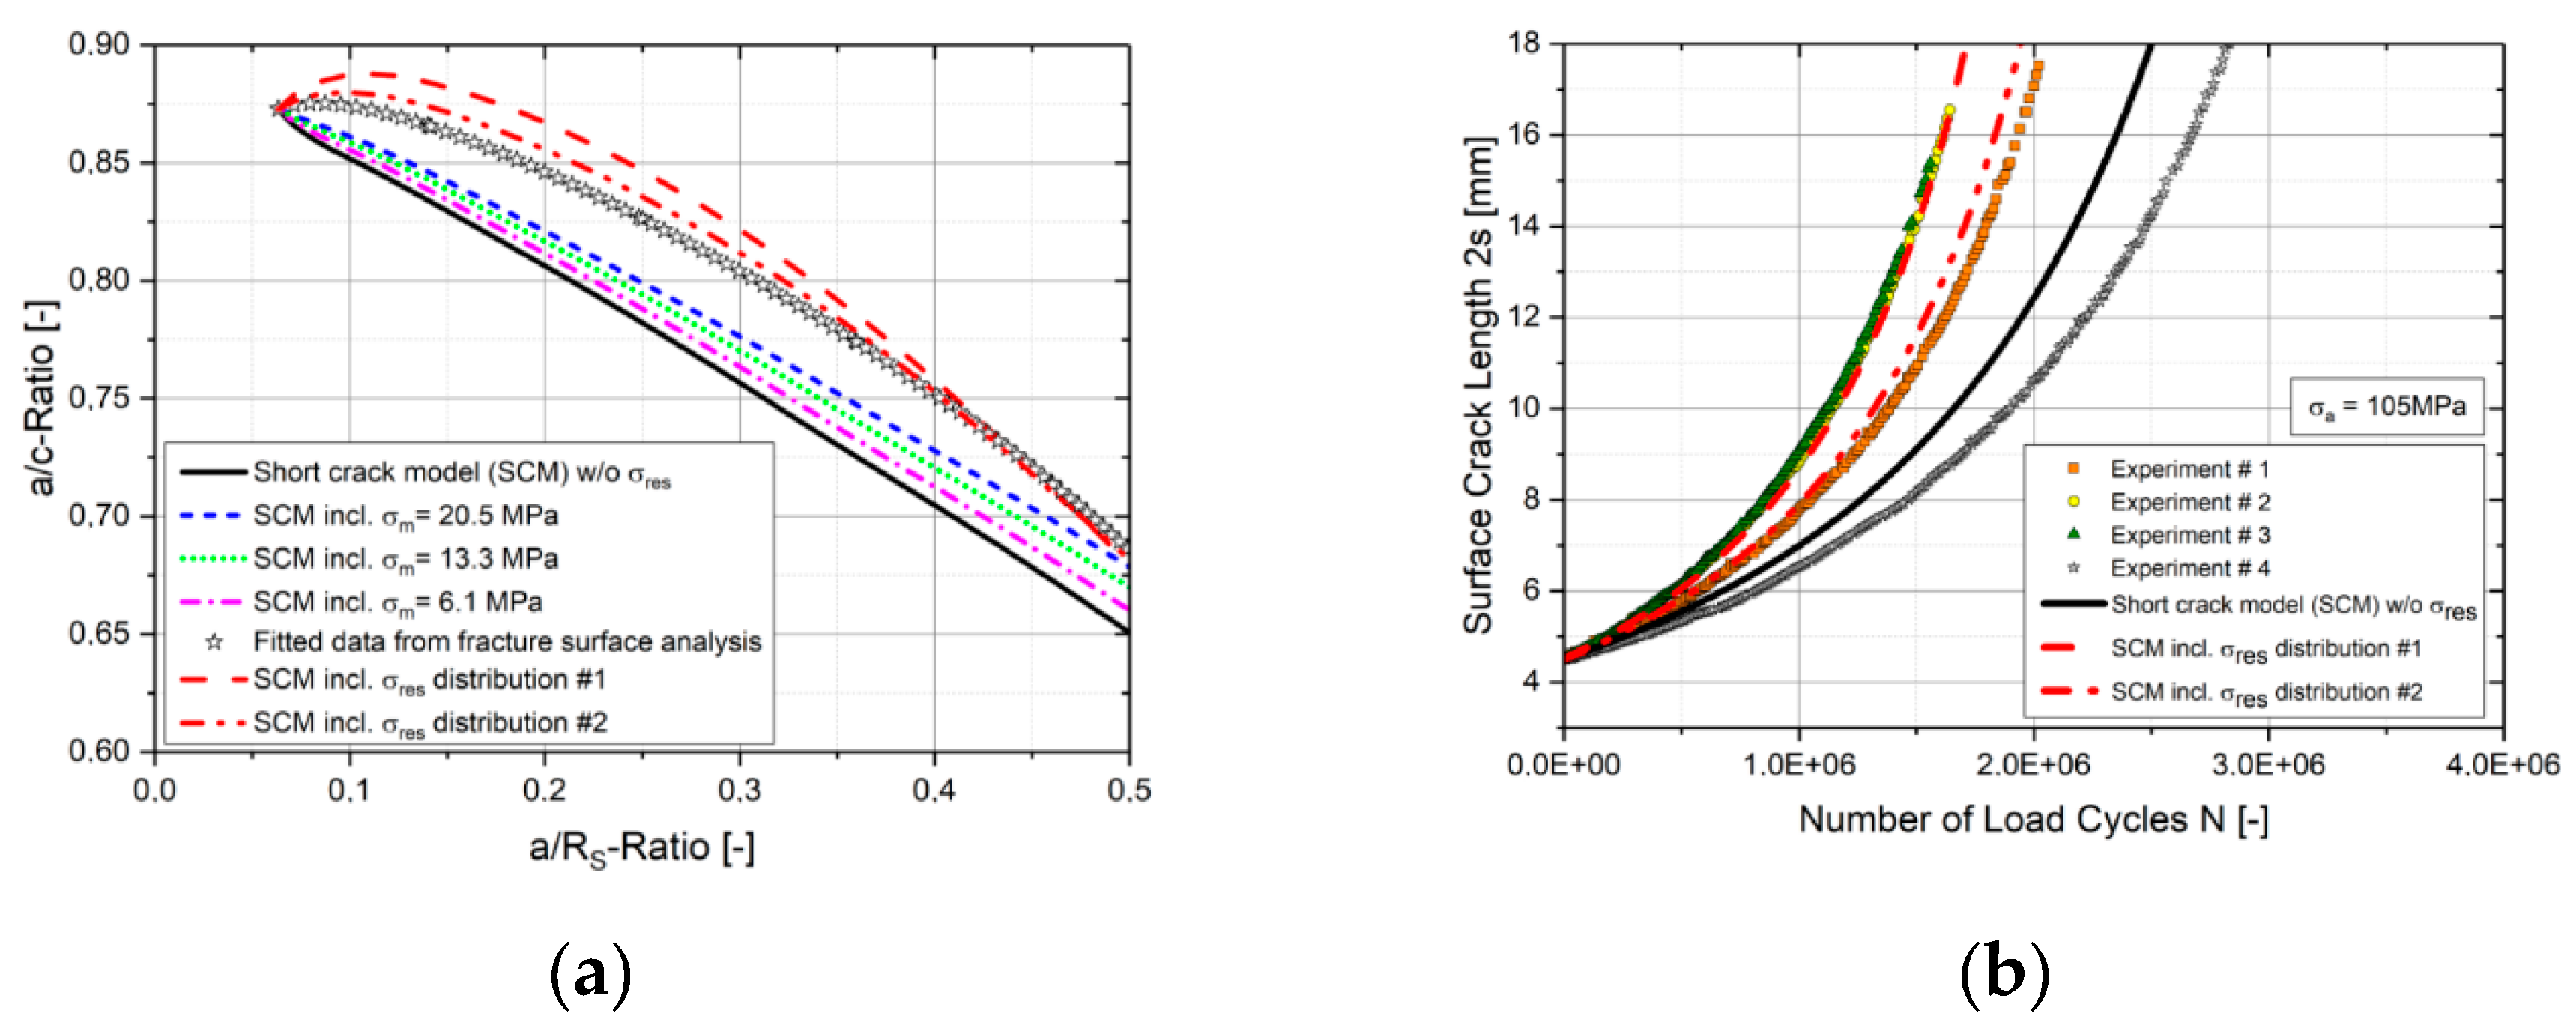
These two residual stress distributions are subsequently considered within the analytical approaches. The analysis reveals an improved crack shape evolution compared to the preceding calculations assuming a constant mean stress. Figure 14a depicts the two distributions compared to the fracture surface analysis and the calculations with constant mean stresses. The comparison highlights only a minor overestimation of the a/c-ratio using the two residual stress distributions compared to the experiments, which leads to conservative results for a crack growth assessment. A maximum deviation of 2.5% was observed at an a/RS-ratio of 0.19 for the evaluation including residual stress distribution #1.
In summary, the results of the residual lifetime assessments show sound accordance with the experimental investigations if the estimated residual stress depth profiles are included. Furthermore, it is highlighted that even comparably minor residual stresses in depth may significantly affect the crack growth rate and the residual lifetime estimation. Hence, it is of utmost importance to incorporate the exact stress conditions, such as local residual stress states, in the crack propagation analysis to ensure a proper fatigue assessment and to avoid non-conservative results.

3.3. Numerical Residual Lifetime Estimation

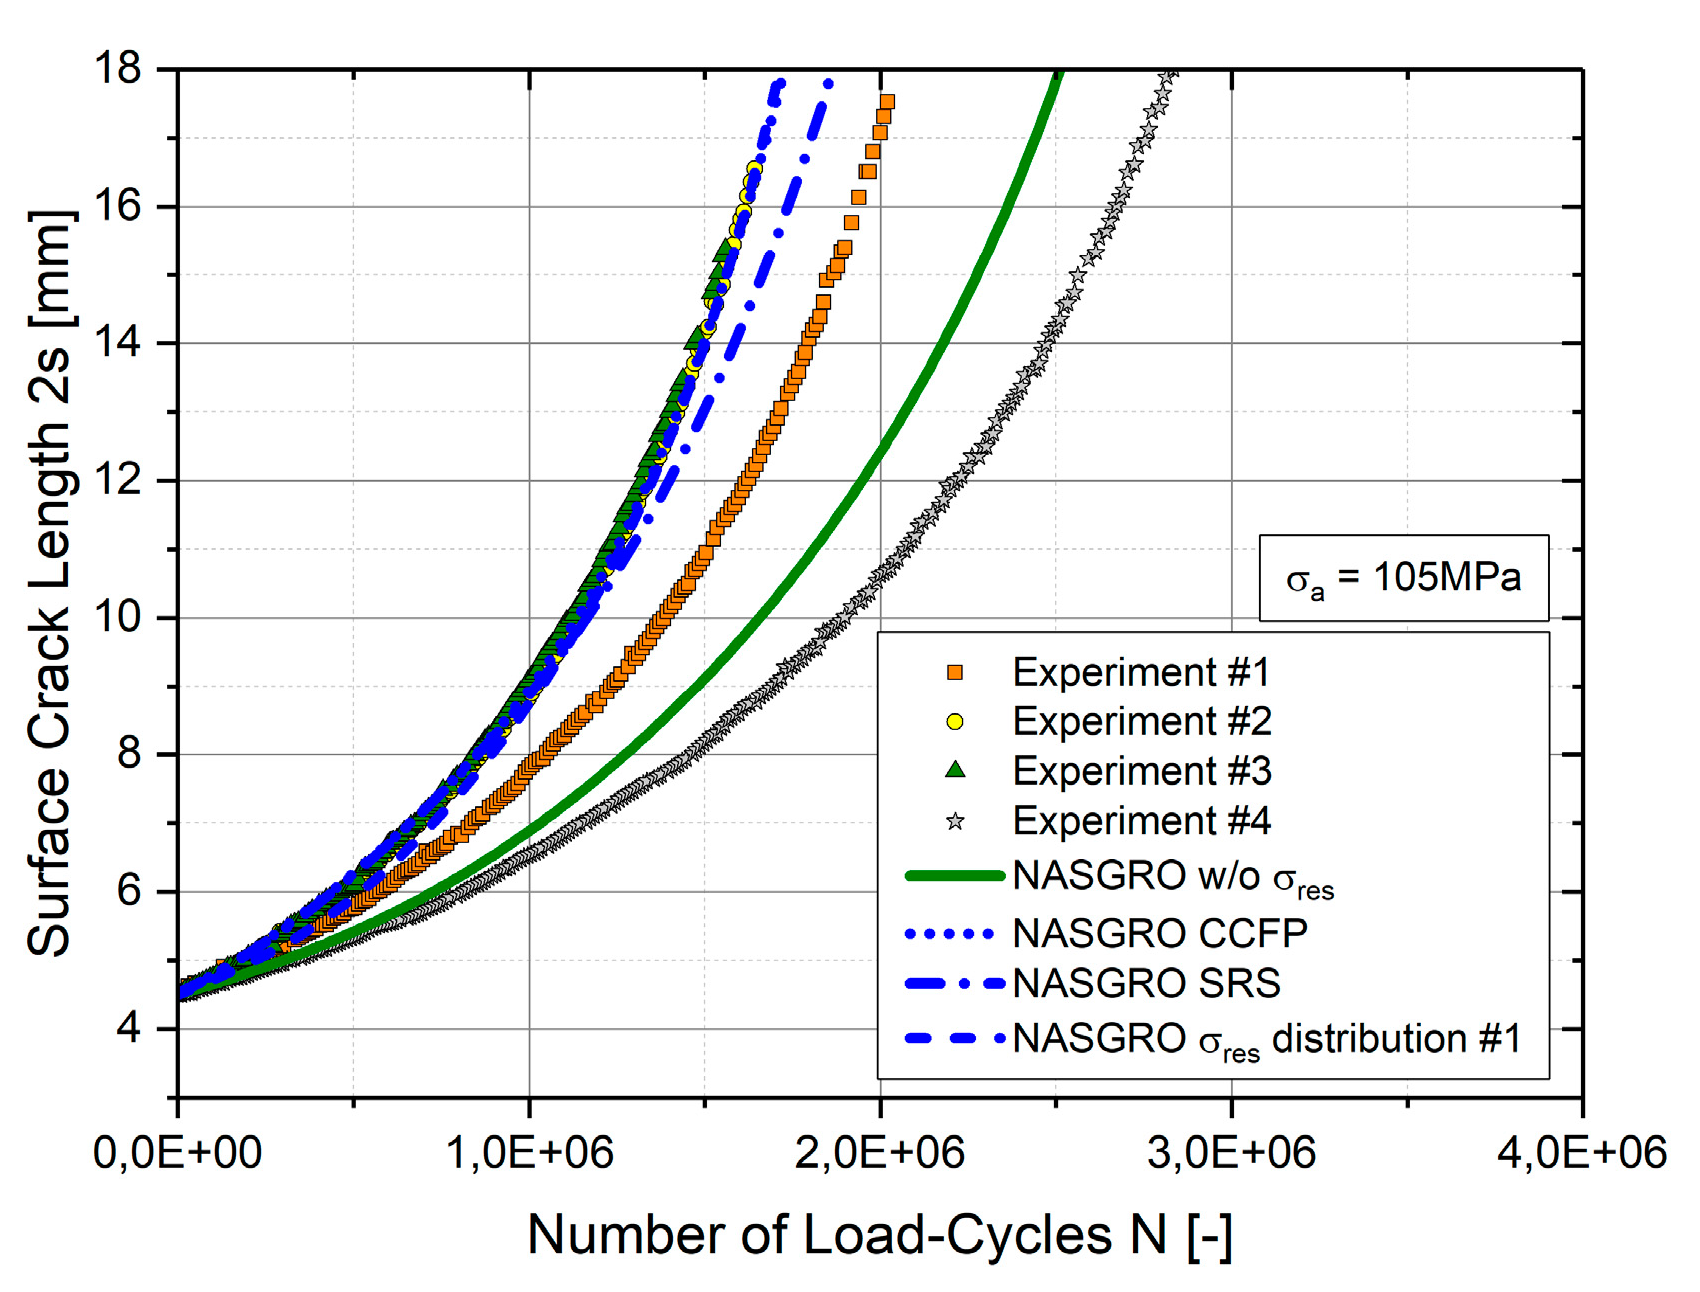
The numerical analyses are conducted with Franc3D (FRacture ANalysis Code 3D Version 7.1.0.2, Fracture Analysis Consultants, Inc., Ithaca, NY, USA), which is a 3D finite element fracture analysis software to simulate crack growth [51]. It is used in combination with a general Finite Element program, such as Abaqus in this case. The crack free model is built up and meshed in Abaqus including boundary and loading conditions. The input file is imported to Franc3D and a sub-model technique is used for the round bar specimen. A semi-elliptical crack is inserted and re-meshed automatically by Franc3D considering the singularity at the crack tip by 3D quarter point singular elements, for detailed information see [52]. Based on this model, crack growth is simulated with the stress and strain analyses conducted by Abaqus and crack extension and re-meshing being done by Franc3D. Different consideration of crack face traction and surface residual stresses and their influence on the residual lifetime are analyzed. In Franc3D, different crack growth models are deposited. In the case of the investigated round bar specimens, all analyses are based on the NASGRO model [17]. Similar to the previously described analytical calculations with INARA, the influence of the residual stress state on the residual lifetime is observed. A comparison of the numerical results based on the NASGRO model with and without consideration of the residual stress condition is provided in Figure 15. The results of the assessment for the surface crack length excluding any residual stress influence are similar to the analytical evaluation with INARA.
Franc3D provides different possibilities for considering residual stresses in crack growth simulations. In the case of the round bar specimen, three options are used for crack propagation analyses. First the mean value (σres = 13.3 MPa) from XRD measurements is considered as a constant crack face pressure (CCFP), which allows to apply a uniform pressure or tensile load on the crack face. The results show sound accordance with the experimental investigations. Another option is to respect only surface residual stresses. To this purpose, only XRD measurement points up to a depth of 2.5 mm are taken into account (NASGRO SRS). The residual lifetime at a surface crack length 2s = 18 mm was slightly non-conservative for experiment #2 and #3; however, it is shown to work well in the case of experiment #1. Finally, the residual stress distribution #1 is considered within the numerical analysis as a 1D radial symmetrical stress distribution (NASGRO σres distribution #1). This computation leads to almost the same results as for the assessments with constant crack face pressure (NASGRO SRS). Similar to the analytical assessments, minor residual stresses, considered in calculations, significantly reduce the residual lifetime.
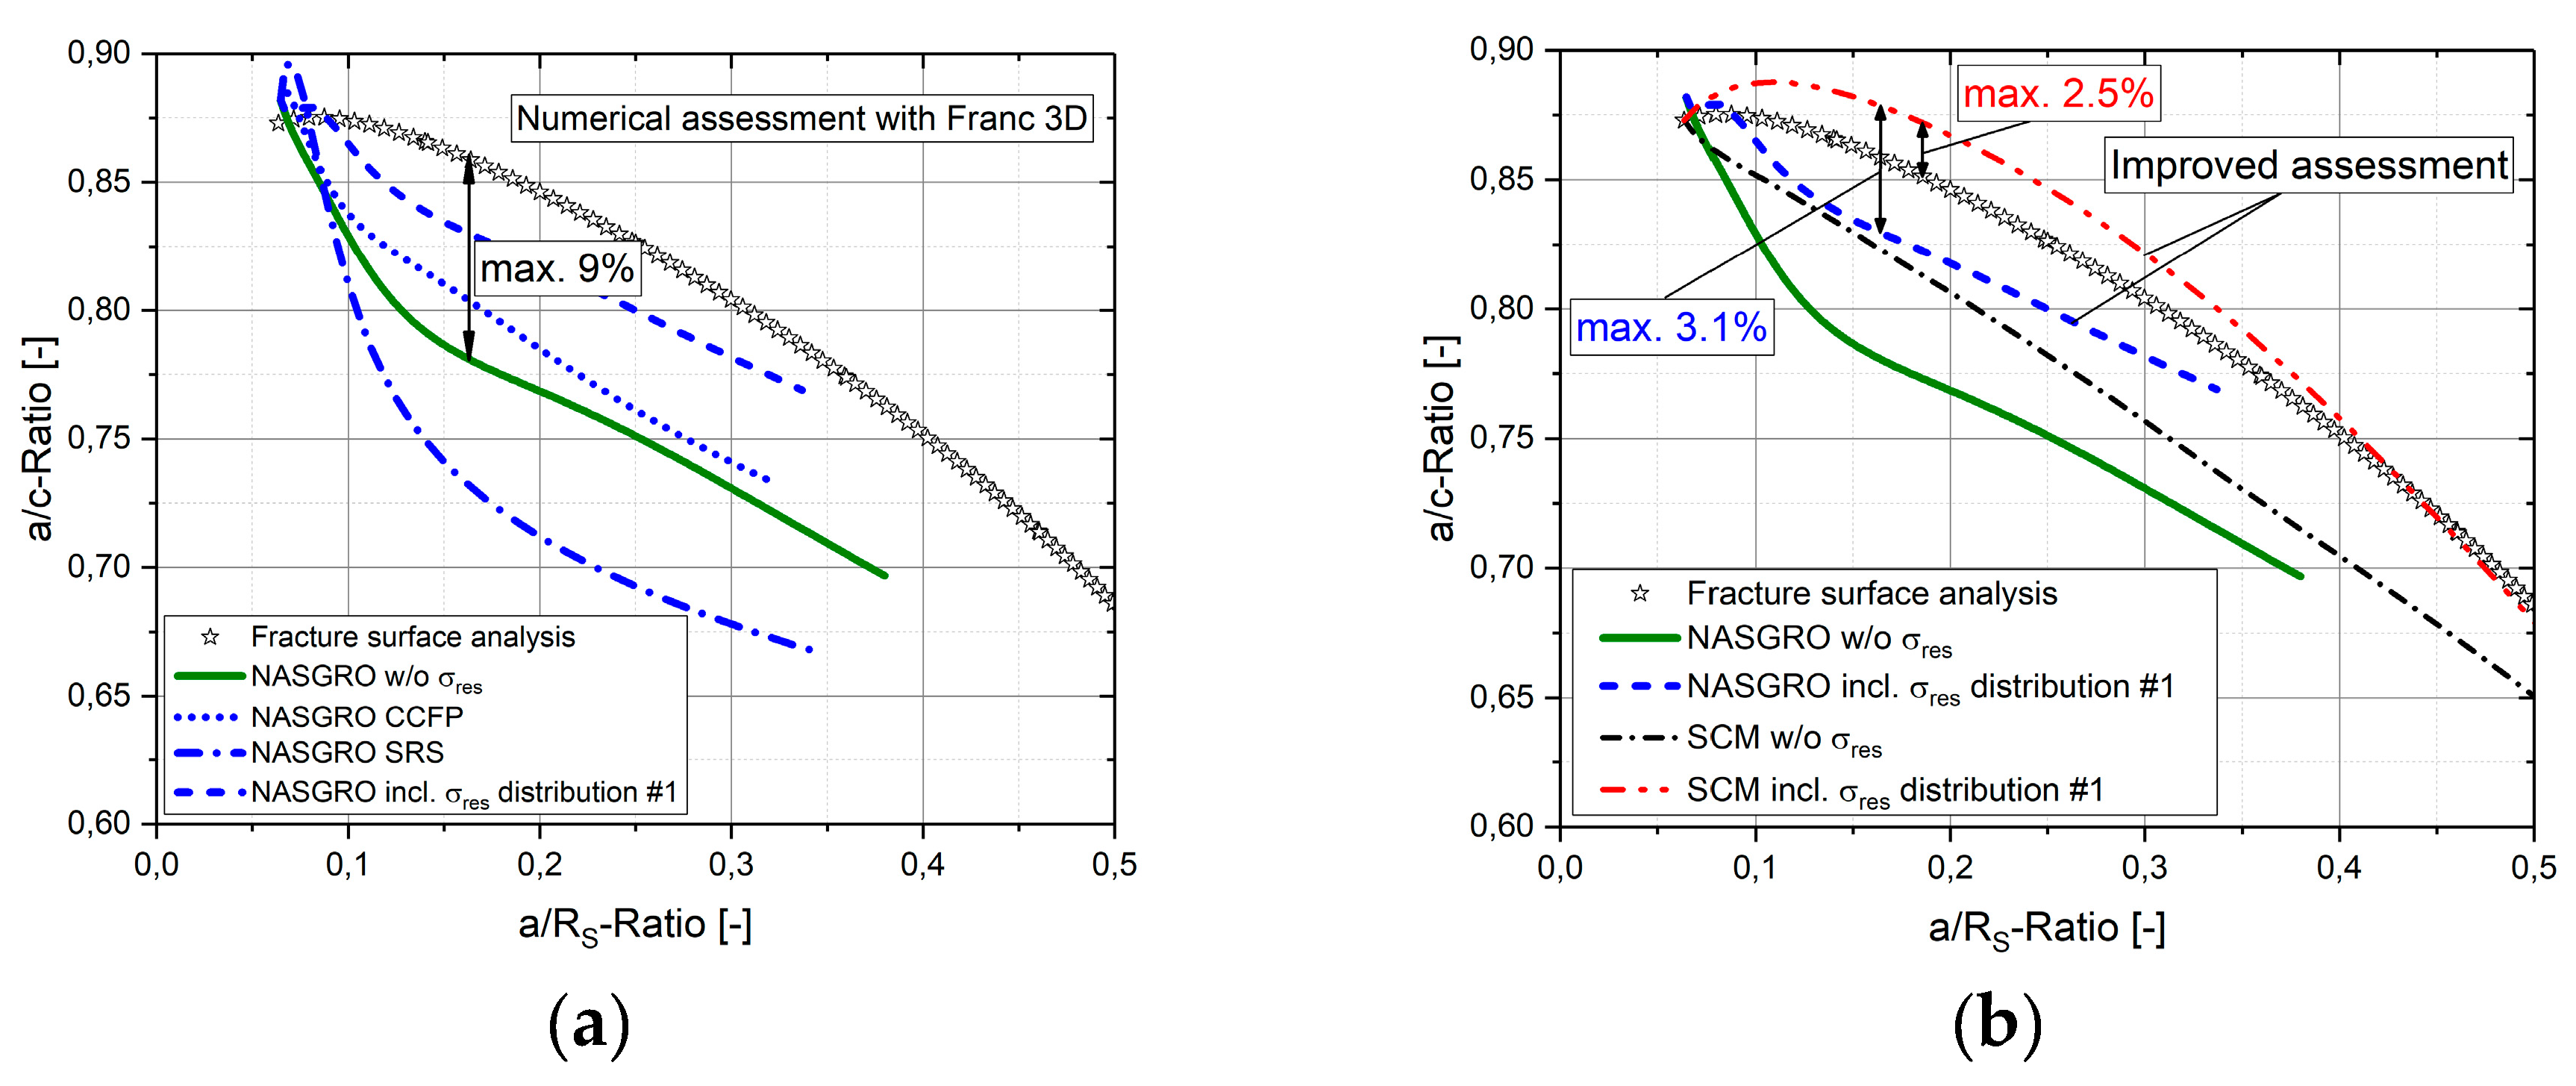
Finally, the crack shape evolution in the course of the different numerical analyses has also been investigated. The results are depicted in Figure 16a and significant different evolutions of the a/c-ratio for the different simulations are observed. The decrement of a/c-ratio is generally higher in the first crack growth steps, compared to the analytical assessments by INARA. An improved shape evolution is observed for constant crack face pressure (CCFP) as well as in the case of considering the residual stress distribution. On the contrary, the assessment including only surface residual stresses exhibits higher deviation. This seems logical due to the fact that in this case the crack propagation is only influenced at the surface, where tensile residual stresses accelerate the crack growth, whereas in depth the load ratio is basically not affected.
The deviations compared to the experimental investigations are slightly higher than the crack shape evolution according to INARA. Especially in the first few crack growth steps between a/RS = 0.06–0.18 a steep decrease can be observed. Anyway, except the assessment with surface residual stresses (SRS), a maximum deviation of 9% was noticed at a/RS ≈ 0.17 for the analysis without any residual stresses, see Figure 16a. As depicted in Figure 16b, the consideration of residual stress distribution #1 leads to a maximum deviation of 3.1%.
Figure 16b illustrates the crack shape evolutions of the analytical and numerical assessments with and without the consideration of the residual stress distribution compared to the experimental investigations. For both assessment methods, an improved estimation of the crack shape evolution is achieved.

4. Discussion

Although minor residual stresses in depth at round bar specimens are measured, the influence can be significant. Table 3 shows the results of the experimental investigated residual lifetime compared to calculated residual lifetime estimations evaluated at a surface crack length of 2s = 15 mm. For that purpose, the lifetime of the most conservative experiment and the mean lifetime value of all experiments are depicted.
A comparison of the experimental mean value shows that both calculation methods (SCM and NASGRO) with residual stress distribution #1 lead to a conservative assessment and exhibit a deviation of −17%. On the contrary, estimation without considering residual stresses results in a non-conservative assessment with a deviation of +20% compared to the mean value of the experiments.
The residual lifetime estimation considering residual stress distribution #1 is in sound accordance with the most conservative experiment with a minor difference of only +2%. Again, neglecting residual stresses within the lifetime assessment leads to a significant overestimation of +48% in residual lifetime, which proves the importance of considering local residual stress states in the crack propagation analysis.
In general, X-ray diffraction measurements are limited in depth. Other methods, such as the cut-compliance method, exhibit the potential for residual stress distribution over the total cross section. To that purpose, cut-compliance measurements are planned to determine the residual stress distributions at real railway axles. Furthermore, the applicability of the numerical crack growth approach presented in this paper will be validated for real components exhibiting varying residual stress conditions, which will lead to non-semi-elliptical crack fronts as shown Figure 2.

5. Conclusions

Analytical and numerical assessment of rotating round bar specimens was conducted and the influence of residual stresses on crack propagation was analyzed. Based on X-ray diffraction measurements, residual stresses are determined and included in calculations. The consideration showed an improved assessment of residual lifetime for the investigated specimens. Based on fracture surface analysis, the crack shape evolution of the semi-elliptical crack front was observed and compared to calculations. In addition, the consideration of residual stress distributions showed an enhanced crack shape evolution. Based on the investigated assessment and experimental analyses, the following conclusions can be drawn:
  • The transferability of material parameters evaluated on the basis of small-scale SENB specimens to real components exhibiting different geometries, crack shapes and residual stress conditions is a challenging task in residual lifetime estimations.
  • Even minor residual stress states may lead to uncertainties within the assessment and can result in a non-conservative estimation of the residual lifetime.
  • The results within this study reveal that a consideration of the residual stress distribution in depth reduces the deviation from the most conservative experiment from +48% down to +2%. This highlights the importance of including effective residual stress conditions in crack propagation analyses to properly estimate the residual lifetime.
  • Real railway axles generally exhibit compressive residual stresses up to a depth of 20 mm. Considering real residual stresses can improve the accuracy of the lifetime assessment as well as the definition of inspection intervals.
  • The influence of residual stresses on lifetime can be significant. Especially at low loading conditions, the fraction of residual stresses compared to the external load is high and thus, the influence of residual stresses on effective crack growth rate is more pronounced.

Author Contributions

Conceptualization, D.S. and M.L.; investigation, D.S.; J.M.; methodology, D.S.; software, D.S., M.L., J.M. and H.-P.G.; validation, D.S. and M.L.; data curation, D.S. and M.L.; writing—original draft preparation, D.S.; writing—review and editing, M.L., J.M., H.-P.G. and R.P.

Funding

Scientific support was given within the framework of the COMET K2-Programme, whereby the Austrian Federal Government represented by Österreichische Forschungsförderungsgesellschaft mbH and the Styrian and the Tyrolean Provincial Government, represented by Steirische Wirtschaftsförderungsgesellschaft mbH and Standortagentur Tirol, is gratefully acknowledged.

Conflicts of Interest

The authors declare no conflict of interest.

Appendix A

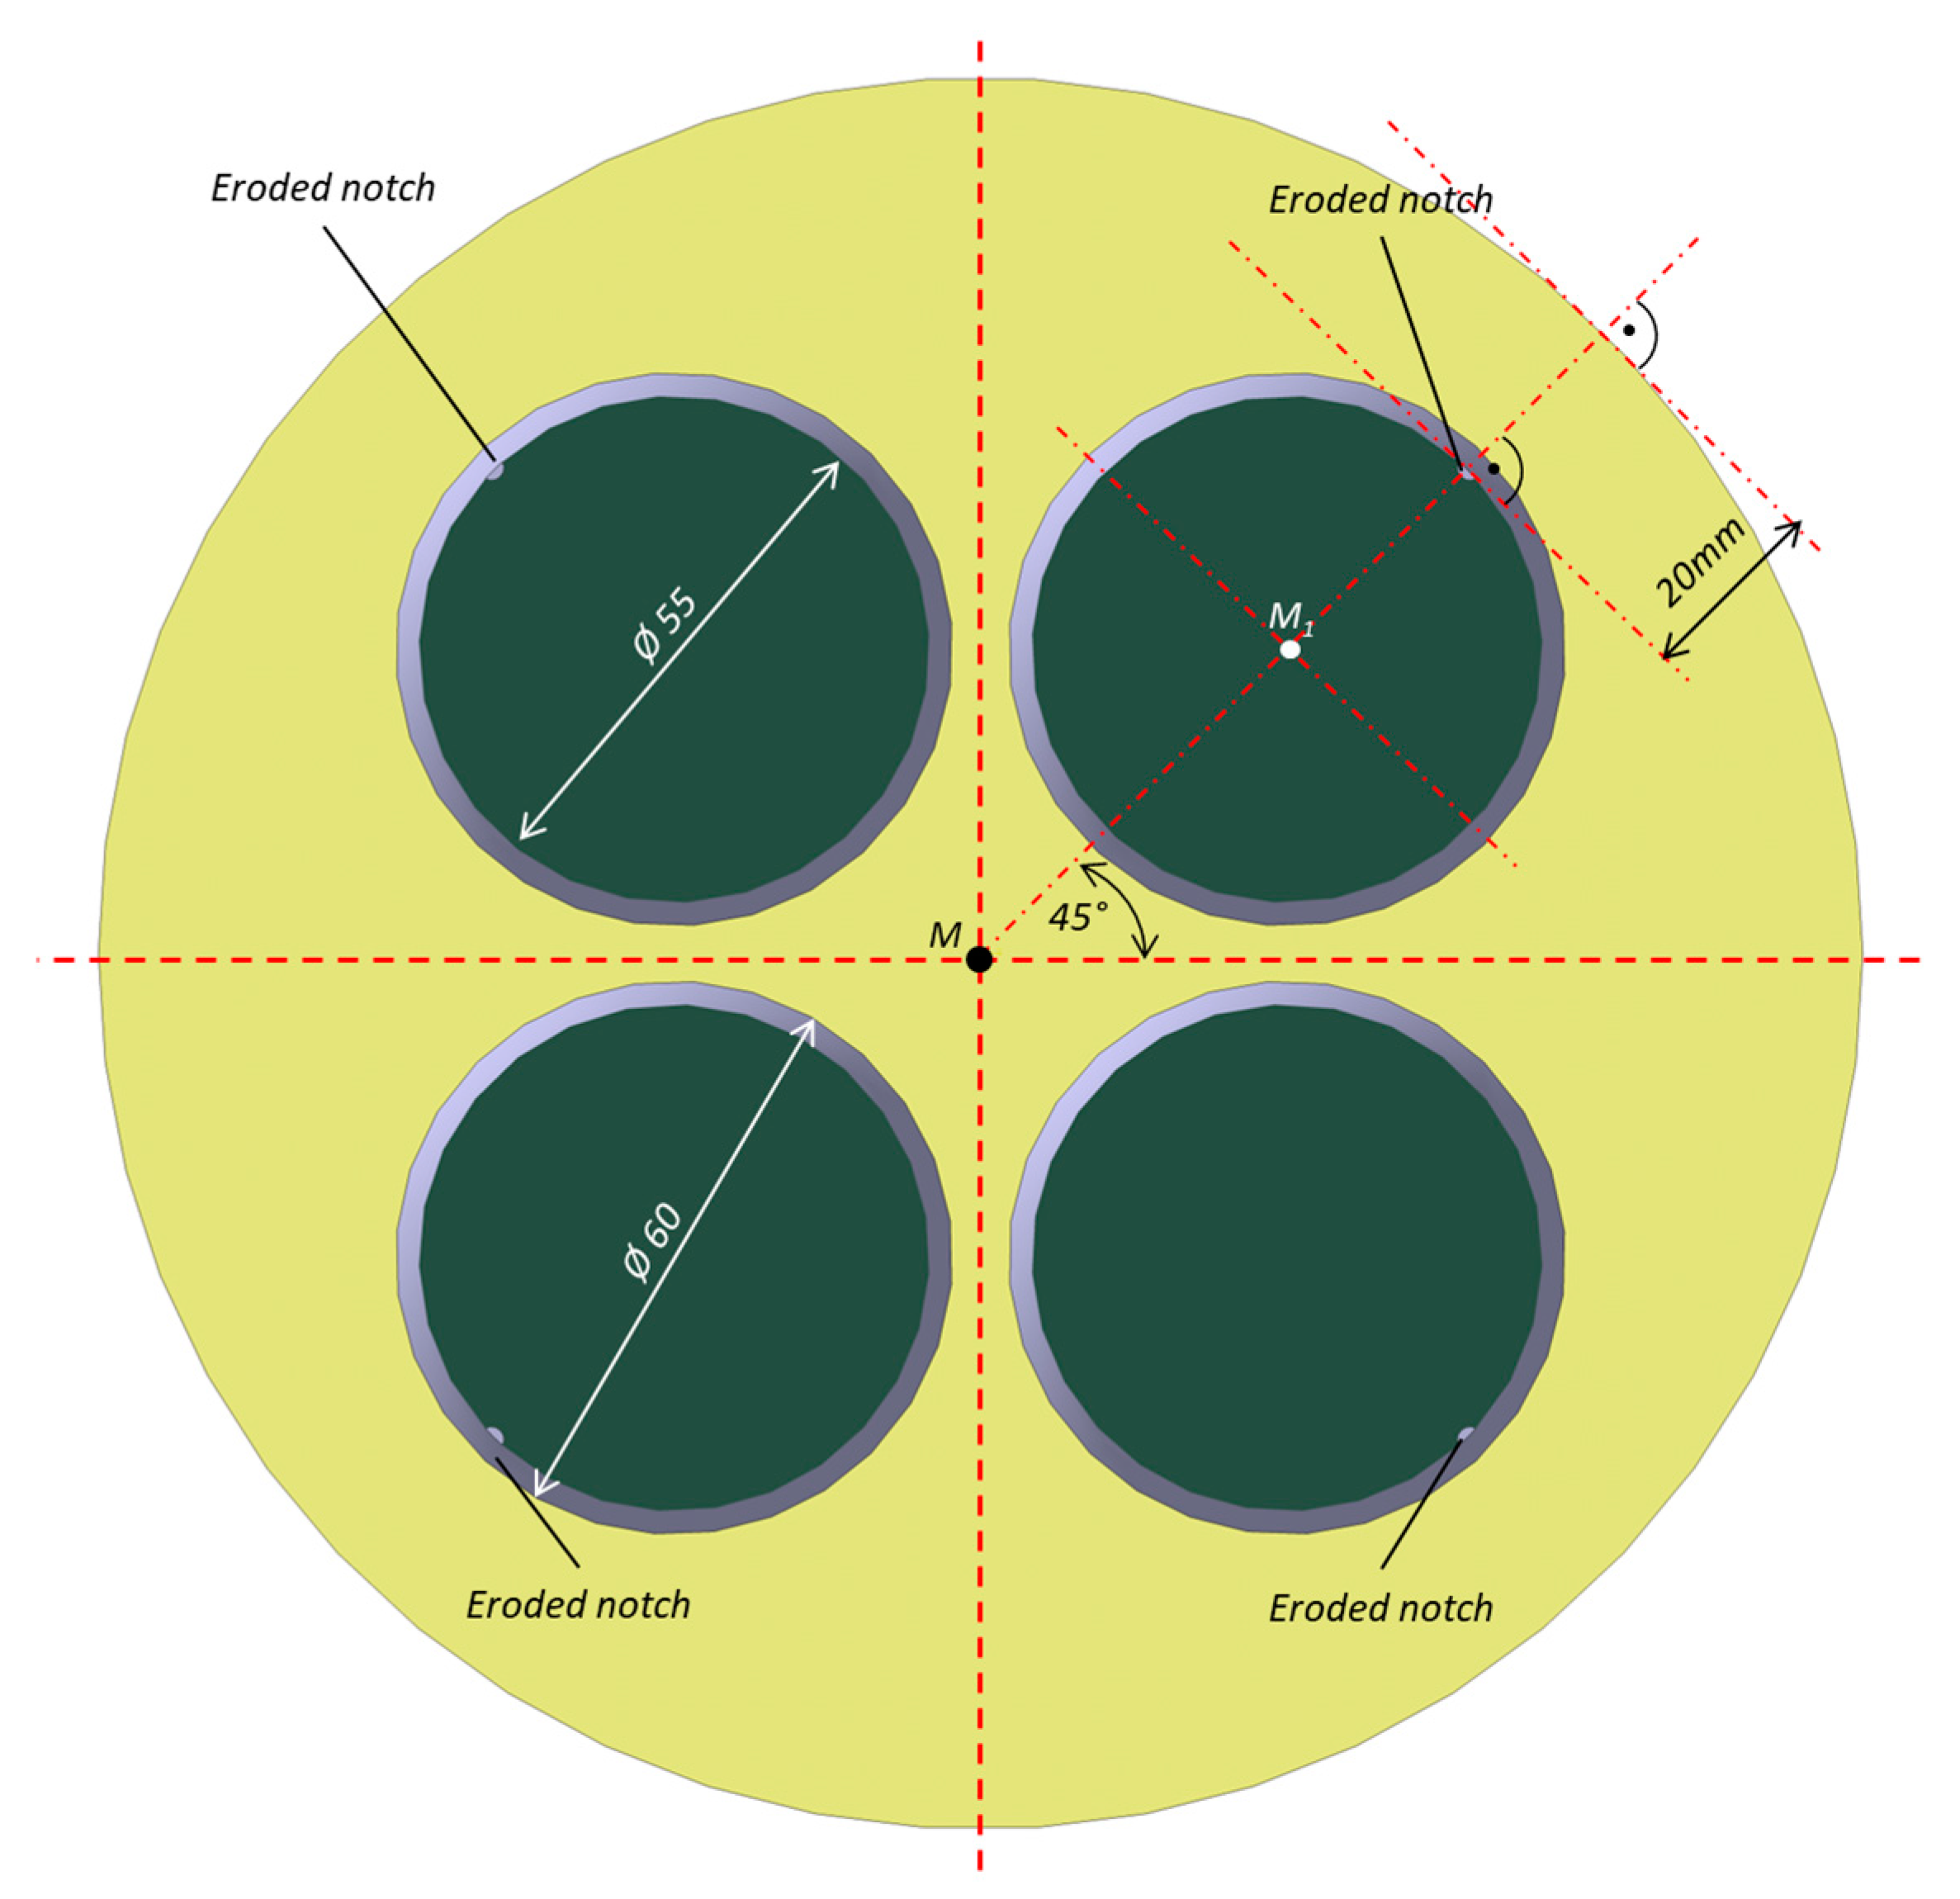
Both SENB and 1:3 scaled specimens are extracted out of railway axle blanks. The distance of the initial notch for both types of specimen to the primary surface of the blank is equal (20 mm) to guarantee similar microstructure, as schematically illustrated for 1:3 scaled specimens in Figure A1. Although the microstructure should be comparable for both SENB and 1:3 scaled specimens, the residual stress state is influenced by the truncated size of the final sample.
Figure A1. Extraction of 1:3 scaled specimens out of a railway axle blank.
Metals 09 00184 g0a1

Appendix B

The short crack behavior can be considered according Maierhofer′s modification [19] of the NASGRO-model. Based on Equation (4) in Section 1 and the crack growth material parameters of Section 2.1 (Table 1), the crack growth rate can be determined by accounting for the built-up of the crack growth threshold value in dependence of the crack extension Δa. The threshold value ΔKth can be determined according Equation (A1), which describes the transition from the effective threshold ΔKth,eff to the long crack growth threshold ΔKth,lc based on the fictitious length scales l1 and l2. The constraint factors are denoted as ν1 and ν2.
Δ K t h = Δ K t h , e f f + ( Δ K t h , l c Δ K t h , e f f ) [ 1 ( ν 1 exp ( Δ a l 1 ) + ν 2 exp ( Δ a l 2 ) ) ]
The long crack growth threshold can be determined with Equation (A2). Newman′s crack opening function f [18] and the Newman coefficient A0 are used. ΔKth,0 is the long crack growth threshold at a load ratio R = 0. The curve control coefficient Cth depends on the load ratio. In the case that the investigated material Cth for positive R-ratios is specified in Table 1, for negative R-values (R < 0) Cth = 0.
Δ K t h , l c =   Δ K t h , 0 [ 1 f ( 1 A 0 ) ( 1 R ) ] ( 1 + C t h R )
The crack velocity factor F is determined according to Equations (A3) and (A4),
F = 1 ( 1 F l c ) [ 1 ( ν 1 exp ( Δ a l 1 ) + ν 2 exp ( Δ a l 2 ) ) ]
whereas Flc describes the behavior for long cracks.
F l c = ( 1 f 1 R ) m

References

  1. Gänser, H.-P.; Maierhofer, J.; Tichy, R.; Zivkovic, I.; Pippan, R.; Luke, M.; Varfolomeev, I. Damage tolerance of railway axles—The issue of transferability revisited. Int. J. Fatigue 2016, 86, 52–57. [Google Scholar] [CrossRef]
  2. Beretta, S.; Madia, M.; Schode, M.; Zerbst, U. SIF Solutions for Cracks in Railway Axles Under Rotating Bending. Fract. Nano Eng. Mater. Struct. 2006, 263–264. [Google Scholar] [CrossRef]
  3. Madia, M.; Beretta, S.; Zerbst, U. An investigation on the influence of rotary bending and press fitting on stress intensity factors and fatigue crack growth in railway axles. Eng. Fract. Mech. 2008, 75, 1906–1920. [Google Scholar] [CrossRef] [Green Version]
  4. Madia, M.; Beretta, S.; Schödel, M.; Zerbst, U.; Luke, M.; Varfolomeev, I. Stress intensity factor solutions for cracks in railway axles. Eng. Fract. Mech. 2011, 78, 764–792. [Google Scholar] [CrossRef]
  5. Luke, M.; Varfolomeev, I.; Lütkepohl, K.; Esderts, A. Fracture mechanics assessment of railway axles: Experimental characterization and computation. Eng. Fail. Anal. 2010, 17, 617–623. [Google Scholar] [CrossRef]
  6. Luke, M.; Varfolomeev, I.; Lütkepohl, K.; Esderts, A. Fatigue crack growth in railway axles: Assessment concept and validation tests. Eng. Fract. Mech. 2011, 78, 714–730. [Google Scholar] [CrossRef]
  7. Zerbst, U.; Beretta, S.; Köhler, G.; Lawton, A.; Vormwald, M.; Beier, H.T.; Klinger, C.; Černý, I.; Rudlin, J.; Heckel, T.; et al. Safe life and damage tolerance aspects of railway axles—A review. Eng. Fract. Mech. 2013, 98, 214–271. [Google Scholar] [CrossRef]
  8. Zerbst, U.; Klinger, C.; Klingbeil, D. Structural assessment of railway axles—A critical review. Eng. Fail. Anal. 2013, 35, 54–65. [Google Scholar] [CrossRef]
  9. Beretta, S.; Carboni, M.; Fiore, G.; Lo Conte, A. Corrosion–fatigue of A1N railway axle steel exposed to rainwater. Int. J. Fatigue 2010, 32, 952–961. [Google Scholar] [CrossRef]
  10. Beretta, S.; Carboni, M.; Lo Conte, A.; Regazzi, D.; Trasatti, S.; Rizzi, M. Crack Growth Studies in Railway Axles under Corrosion Fatigue: Full-scale Experiments and Model Validation. Procedia Eng. 2011, 10, 3650–3655. [Google Scholar] [CrossRef] [Green Version]
  11. Deisl, A.; Gänser, H.-P.; Jenne, S.; Pippan, R. Eisenbahnfahrwerke 3—EBFW3 Description and Aims of the New Project. Railway Axles: Advances in Durability Analysis and Maintenance; ESIS TC24: Milano, Italy, 2014. [Google Scholar]
  12. Weber, F.-J.; Jenne, S.; Gänser, H.-P.; Kunter, K.; Maierhofer, J.; Deisl, A. Zwischenbericht Forschungsprojekt Eisenbahnfahrwerke 3; 43. Tagung “Moderne Schienenfahrzeuge”: Graz, Austria, 2016. [Google Scholar]
  13. Beden, S.M.; Abdullah, S.; Ariffin, A.K. Review of Fatigue Crack Propagation Models for Metallic Components. Eur. J. Sci. Res. 2009, 28, 364–397. [Google Scholar]
  14. Paris, P.C.; Erdogan, F. A critical analysis of crack propagation laws. J. Basic Eng. 1963, 85, 528–534. [Google Scholar] [CrossRef]
  15. Walker, K. The effect of stress ratio during crack propagation and fatigue for 2024-T3 and 7075-T6 aluminum. In Effects of Environment and Complex Load History on Fatigue Life; ASTM International: West Conshohocken, PA, USA, 1970. [Google Scholar]
  16. Erdogan, F.; Ratwani, M. Fatigue and fracture of cylindrical shells containing a circumferential crack. Int. J. Fract. 1970, 6. [Google Scholar] [CrossRef]
  17. Forman, R.G.; Mettu, S.R. Behavior of Surface and Corner Cracks Subjected to Tensile and Bending Loads in Ti-6A1-4V Alloy; NASA-TM-102165; NASA: Houston, TX, USA, 1990.
  18. Newman, J.C. A crack opening stress equation for fatigue crack growth. Int. J. Fract. 1984, 24, R131–R135. [Google Scholar] [CrossRef]
  19. Maierhofer, J.; Pippan, R.; Gänser, H.-P. Modified NASGRO equation for physically short cracks. Int. J. Fatigue 2014, 59, 200–207. [Google Scholar] [CrossRef] [Green Version]
  20. Maierhofer, J.; Kolitsch, S.; Pippan, R.; Gänser, H.-P.; Madia, M.; Zerbst, U. The cyclic R-curve—Determination, problems, limitations and application. Eng. Fract. Mech. 2018, 198, 45–64. [Google Scholar] [CrossRef]
  21. Madia, M.; Zerbst, U. Application of the cyclic R-curve method to notch fatigue analysis. Int. J. Fatigue 2016, 82, 71–79. [Google Scholar] [CrossRef]
  22. Zerbst, U.; Vormwald, M.; Pippan, R.; Gänser, H.-P.; Sarrazin-Baudoux, C.; Madia, M. About the fatigue crack propagation threshold of metals as a design criterion—A review. Eng. Fract. Mech. 2016, 153, 190–243. [Google Scholar] [CrossRef]
  23. Zerbst, U.; Vormwald, M.; Andersch, C.; Mädler, K.; Pfuff, M. The development of a damage tolerance concept for railway components and its demonstration for a railway axle. Eng. Fract. Mech. 2005, 72, 209–239. [Google Scholar] [CrossRef]
  24. Beretta, S.; Ghidini, A.; Lombardo, F. Fracture mechanics and scale effects in the fatigue of railway axles. Eng. Fract. Mech. 2005, 72, 195–208. [Google Scholar] [CrossRef]
  25. European Standard. Railway Applications—Wheelsets and Bogies—Axles—Product Requirements; European Committee for Standardization: Brussels, Belgium, 2003. [Google Scholar]
  26. Riemelmoser, F. Möglichkeiten und Grenzen der Potentialmethode zur Risslängenbestimmung. Diploma Thesis, Montanuniversität, Leoben, Austria, 1993. [Google Scholar]
  27. Lieb, K.C.; Horstman, R.; Peters, K.A.; Enright, C.F.; Meltzer, R.L.; Bruce Vieth, M.; Schwalbe, K.-H.; Hellmann, D. Application of the Electrical Potential Method to Crack Length Measurements Using Johnson’s Formula. J. Test. Eval. 1981, 9, 218. [Google Scholar] [CrossRef]
  28. Ke, Y.; Ståhle, P. Crack length measurements with a potential drop method: A finite element simulation. Int. J. Numer. Meth. Eng. 1993, 36, 3205–3220. [Google Scholar] [CrossRef]
  29. Maierhofer, J.; Gänser, H.-P.; Pippan, R. Crack closure and retardation effects—Experiments and modelling. Procedia Struct. Integr. 2017, 4, 19–26. [Google Scholar] [CrossRef]
  30. Pippan, R.; Plochl, L.; Klanner, F.; Stuwe, H.P. Use of fatigue specimens precracked in compression for measuring threshold values and crack growth. J. Test. Eval. 1994, 22, 98–103. [Google Scholar]
  31. International Organization for Standardization. Metallic Materials. Fatigue Testing: Fatigue Crack Growth Method. ISO 12108, 1st ed.; ISO: Geneva, Switzerland, 2012. [Google Scholar]
  32. Simunek, D.; Leitner, M.; Maierhofer, J.; Gänser, H.-P. Crack growth under constant amplitude loading and overload effects in 1: 3 scale specimens. Procedia Struct. Integr. 2017, 4, 27–34. [Google Scholar] [CrossRef]
  33. Simunek, D.; Leitner, M.; Grün, F. In-situ crack propagation measurement of high-strength steels including overload effects. Procedia Eng. 2018, 213, 335–345. [Google Scholar] [CrossRef]
  34. Carpinteri, A. Elliptical surface cracks in round bars. Fatigue Fract. Eng. Mater. Struct. 1992, 15, 1141–1153. [Google Scholar] [CrossRef]
  35. Carpinteri, A. Shape change of surface cracks in round bars under cyclic axial loading. Int. J. Fatigue 1993, 15, 21–26. [Google Scholar] [CrossRef]
  36. Carpinteri, A. Part-through cracks in round bars under cyclic combined axial and bending loading. Int. J. Fatigue 1996, 18, 33–39. [Google Scholar] [CrossRef]
  37. Carpinteri, A. Surface flaws in cylindrical shafts under rotary bending. Fatigue Fract. Eng. Mater. Struct. 1998, 21, 1027–1035. [Google Scholar] [CrossRef]
  38. Shin, C.S.; Cai, C.Q. Experimental and finite element analyses on stress intensity factors of an elliptical surface crack in a circular shaft under tension and bending. Int. J. Fract. 2004, 129, 239–264. [Google Scholar] [CrossRef]
  39. Shih, Y.-S.; Chen, J.-J. The stress intensity factor study of an elliptical cracked shaft. Nucl. Eng. Des. 2002, 214, 137–145. [Google Scholar] [CrossRef]
  40. Rubio, P.; Rubio, L.; Muñoz-Abella, B.; Montero, L. Determination of the Stress Intensity Factor of an elliptical breathing crack in a rotating shaft. Int. J. Fatigue 2015, 77, 216–231. [Google Scholar] [CrossRef]
  41. Shih, Y.-S.; Chen, J.-J. Analysis of fatigue crack growth on a cracked shaft. Int. J. Fatigue 1997, 19, 477–485. [Google Scholar]
  42. Kuna, M. Numerische Beanspruchungsanalsye von Rissen. Finite Elemente in der Bruchmechanik, 1st ed.; Vieweg+Teubner Verlag/GWV Fachverlage: Wiesbaden, Germany, 2008. [Google Scholar]
  43. Courtin, S.; Gardin, C.; Bézine, G.; Ben Hadj Hamouda, H. Advantages of the J-integral approach for calculating stress intensity factors when using the commercial finite element software ABAQUS. Eng. Fract. Mech. 2005, 72, 2174–2185. [Google Scholar] [CrossRef]
  44. Rice, J.R. A Path Independent Integral and the Approximate Analysis of Strain Concentration by Notches and Cracks. J. Appl. Mech. 1968, 35, 379. [Google Scholar] [CrossRef]
  45. Dassault Systemes Simulia Corp. Abaqus Analysis User’s Guide Version 6.14; Dassault Systemes Simulia Corp.: Providence, RI, USA, 2014. [Google Scholar]
  46. Lebahn, J.; Heyer, H.; Sander, M. Numerical stress intensity factor calculation in flawed round bars validated by crack propagation tests. Eng. Fract. Mech. 2013, 108, 37–49. [Google Scholar] [CrossRef]
  47. Hutař, P.; Pokorný, P.; Poduška, J.; Fajkoš, R.; Náhlík, L. Effect of residual stresses on the fatigue lifetime of railway axle. Procedia Struct. Integr. 2017, 4, 42–47. [Google Scholar] [CrossRef]
  48. Schindler, H.-J. Effect of Residual Stresses on Safe Life Prediction of Railway Axles. Procedia Struct. Integr. 2017, 4, 48–55. [Google Scholar] [CrossRef]
  49. Varfolomeev, I.; Burdack, M.; Luke, M. Fracture Mechanics as a Tool for Specifying Inspection Intervals of Railway Axles; 39. Tagung des DVM Arbeitskreises: Paderborn, Germany, 2007. [Google Scholar]
  50. Lütkepohl, K. Sicherer und Wirtschaftlicher Betrieb von Eisenbahnfahrwerken, Abschlussbericht Band I; Bundesministerium fκr Wirtschaft und Technologie: Clausthal, Germany, 2009. [Google Scholar]
  51. Fracture Analysis Consultants, Inc. FRANC3D Documentation. Available online: http://www.fracanalysis.com/software.html (accessed on 6 September 2018).
  52. Wawrzynek, P.A.; Carter, B.; Ingraffea, A. Advances in simulation of arbitrary 3D crack growth using FRANC3D/NG. J. Comput. Struct. Eng. Inst. Korea 2010, 23, 607–613. [Google Scholar]
Figure 1. Two typical fractographies of semi elliptical cracks in rotating bending loaded 1:1 railway axle specimens: (a) Moderate visibility of beach marks; (b) Improved visibility of beach marks.
Metals 09 00184 g001
Figure 2. Examples for the deviation from semi elliptical crack front in rotating bending loaded 1:1 railway axle specimens: (a) Symmetrical crack growth; (b) Unsymmetrical crack propagation.
Metals 09 00184 g002
Figure 3. (a) Illustration of the investigated single edge notch bending (SENB) specimen with straight initial notch and (b) 1:3-scaled axle specimen with semi-elliptical initial notch.
Metals 09 00184 g003
Figure 4. Experimental crack growth diagrams of SENB samples; (a) test data of eight specimens at a stress ratio R = −1; (b) Comparison of results and fit for different stress ratios from R = −1 to R = 0.7.
Metals 09 00184 g004
Figure 5. Nomenclature of the semi-elliptical crack.
Metals 09 00184 g005
Figure 6. Illustration of crack depth as a function of surface crack length 2c.
Metals 09 00184 g006
Figure 7. Mesh around crack front for contour integral evaluation; (a) Tubular mesh around crack line; (b) Detail view of contours at surface
Metals 09 00184 g007
Figure 8. Stress intensity factor of the surface points (S1 and S2) and the depth (point A) as a function of the surface crack length 2s.
Metals 09 00184 g008
Figure 9. Results of rotating bending experiments: (a) Surface crack length in dependence of load-cycles and (b) Crack growth rate vs. ΔKS.
Metals 09 00184 g009
Figure 10. Comparison da/dN vs. ΔKS of round bar specimens to SENB.
Metals 09 00184 g010
Figure 11. Comparison of analytical assessments and rotating bending experiments #1–#4.
Metals 09 00184 g011
Figure 12. Crack shape evolution compared to fracture surface analysis.
Metals 09 00184 g012
Figure 13. Illustration of measured and fitted residual stress distributions for assessments.
Metals 09 00184 g013
Figure 14. (a) Influence of residual stress distributions on crack shape evolution; (b) and residual lifetime.
Metals 09 00184 g014
Figure 15. Results of numerical assessments compared to experiments.
Metals 09 00184 g015
Figure 16. (a) Crack shape evolution of numerical computations with Franc3D; (b) Comparison of SCM model (analytically by INARA) and NASGRO model (numerically by Franc3D) to the experimental fit.
Metals 09 00184 g016
Table 1. Crack growth material parameters of fitted SENB experiments.
C
[mm/MPa√m]
m
[-]
p
[-]
v1
[-]
v2
[-]
l1
[mm]
l2
[mm]
ΔKth,eff
[MPa√m]
ΔKth,0
[MPa√m]
Cth+
[-]
1.72 × 10−82.80.210.430.572.09 × 10−31.272.07.123.09
Table 2. Averaged residual stresses from XRD measurements in three different specimens.
Averaged σres [MPa]Best CaseMean ValueWorst Case
Measurement #16.113.320.5
Measurement #2−1.86.013.8
Measurement #38.015.422.7
Table 3. Comparison of residual lifetime for calculations and experiments at 2s = 15 mm.
Residual Stress ConditionSCM
(INARA)
NASGRO
(Franc3D)
Experiments
(Mean of All Tests)
Experiments
(Most Conservative Test)
W/o σres2.26 × 1062.28 × 1061.88 × 1061.53 × 106
σres distribution #11.56 × 1061.56 × 106