Article

Strain Behavior of Nickel Alloy 200 during Multiaxial Forging through Finite Element Modeling

1
Mechanical Engineering Department, Prince Mohammed Bin Fahd University, Al Khobar 31952, Saudi Arabia
2
Mechanical Engineering Department, Imperial Collage, London SW7, UK
3
Mechanical Engineering Department, Engineering College, Qassim University, Buraidah 51452, Saudi Arabia
4
Production Engineering Department, Beni-Suef University, Beni-Suef 62764, Egypt
*
Author to whom correspondence should be addressed.
Metals 2019, 9(2), 132; https://doi.org/10.3390/met9020132
Submission received: 22 December 2018 / Revised: 17 January 2019 / Accepted: 19 January 2019 / Published: 26 January 2019

Abstract

:
Multiaxial forging (MAF) is one of the appealing methods of severe plastic deformation (SPD) techniques to fabricate ultrafine-grained (UFG) materials. In this study; the influence of process parameters such as strain rate; friction; and initial temperature has been assessed through finite element simulation of Nickel 200 alloy. The Johnson–Cook equation was applied in simulating the MAF process. The homogeneous microstructure of a material processed by MAF is an important requirement to obtain uniform mechanical and other properties. The uniformity in properties was evaluated by the investigation of the hardness measurements; effective strain (ES), and inhomogeneous factor (IF) or coefficient of standard deviation. The results showed that the inhomogeneous factor decreases with an increase in strain rate and decrease in temperature. It was found that a more homogeneous structure is observed with an increasing number of MAF cycles and the strain rate strain. Furthermore; the average grain size reduced from 850 nm to 220 nm after three cycles of MAF. Finally; experimental work was performed to validate the results.

1. Introduction

The average grain size of the materials has a significant influence on mechanical and physical properties. Therefore, mechanical properties such as strength, toughness, hardness, and wear properties can be improved by refining the material [1,2,3]. Sever plastic deformation (SPD) is considered a common modern technique to refine the grain size of several materials by imposing large deformation. Using SPD, an ultrafine grain structure (UFG) and even nanograin structure (NS) microstructure with grain sizes of less than 1000 nm can be obtained. Any large deformation, especially at relatively low temperatures, will tend to generate defects and non-uniformity of grain size [1,2,3]. The main advantage of SPD is the volume constancy; hence, by repeating the operation several times, the anticipated grain size can be achieved [4,5]. Many SPD techniques can be applied, such as equal channel angular pressing (ECAP), high pressure torsion (HPT), and multiaxial forging (MAF).
Multiaxial forging (MAF) is one of the attractive methods of SPD to fabricate UFG materials for bulk materials. An illustration of the MAF process is shown in Figure 1.
In the MAF process, a cubical specimen is pressed through a constrained die. After one pass, the specimen is rotated 90 degrees, reinserted in the die, and repressed to the same strain. Hence, it is forged in three orthogonal directions, thereby giving a product of MAF of one cycle. Various materials, such as copper, magnesium, aluminum, steel alloys, and titanium alloys, have been processed successfully by MAF. However, some of the properties, like fatigue, magnetic, thermal, superplastic, corrosion, creep, and wear behavior, have not been studied yet [6,7,8,9,10,11,12]. Pure Nickel and low alloying of Nickel-based material are used in structural components, manufacture of micro-electromechanical systems (MEMS), and the chemical and electrochemical industry [13,14,15]. Nickel 200 and 201 are approved for construction of pressure vessels and components under ASME Boiler and Pressure Vessel Code Section VIII, Division 1. Nickel 200 is approved for service up to 600 °F (315 °C), while Nickel 201 is approved for service up to 1250 °F (677 °C). Further, the mechanical properties of Nickel-based material can be improved by the grain refinement process, which would further enhance corrosive resistance [13,14,15].
Finite element analyses and experiments have shown that the deformation of SPD-processed materials is nonhomogeneous. Some portions of the samples are more strained compared to others. Various process parameters of each SPD technique influence the strain distribution. It has been reported that external conditions, such as die geometries, processing, and friction, as well as internal conditions, such as work hardening and the strain rate sensitivity of the material, may contribute to inhomogeneity of the processed material [16,17,18,19,20,21]. For example, Ebrahimi et al. [21] studied the influence of punch and die geometry on strain distribution of the aluminum alloy processed by ECAP. Inhomogeneity in structure can be assessed by a factor known as the inhomogeneous factor (IF) or coefficient of standard deviation and can be expressed by the following equation [21]:
IF = 1 n 1 i = 1 n ( ε i ε ave ) 2 ε ave
where εave is the average strain, εi is the strain in each element, and n is the number of data. A lower value for IF means a better strain distribution uniformity for the MAF-processed sample. This factor is calculated and compared for the various MAF-modeled types in this research.
However, the conventional analysis methods based on certain assumptions cannot reveal the behavior of the material accurately, while the experimental methods are costly in terms of equipment, materials, tools, and time consumption. Finite element (FE) simulation is considered an effective and realistic method for analysis. Through finite element method (FEM), it is possible to understand the deformation behavior and optimize the main process parameters, with time saved and low cost [22]. FEM is also a useful tool to simulate engineering systems to solve complex problems that would be difficult to solve otherwise. The choice of FEM modeling approaches should consider the anticipated changes in the material behavior under different loading conditions [23]. Furthermore, identifying the best design scenario to avoid inhomogeneous strain distribution requires complex calculations and expensive advanced computational analysis. In order to simplify this complex process, attempts have been made to combine the Artificial Neural Network (ANN) and FEM simulation for process [24,25,26,27].
In the case of MAF, the stresses in the tools and/or die can be numerically computed. The strain distribution can be monitored and, hence, a more homogeneous structure is possible by controlling the process variables, such as tool shape, temperature, ram speed, and lubrication. Kwapisz et al. [28] analyzed the effect of tool shape on the stress distribution in the alternate extrusion and multiaxial compression processes. Strain rate is considered one of the main variables that can be controlled to get uniform strain distribution for a specific material. At different strain rates, the response of materials is different in terms of mechanical properties, microstructural refinement, and properties variation [29]. Dissimilar to quasistatic processes, the material response may vary due to thermal and inertial forces. Moreover, lubricating conditions may influence the strain distribution [21]. For example, the brittle materials require high temperature for forging. Therefore, it is imperative to investigate the effect of temperature, strain rate, and friction on mechanical properties distribution of multiaxially forged samples.
In this work, the influence of MAF process parameters such as strain rate, friction, and temperature were investigated through finite element modeling for Ni 200 alloy. Since one cycle of MAF consists of three passes which are identical in terms of process parameters, such as strain rate, friction, and temperature, one-third of the MAF process has been simulated through FEM to minimize computational time and cost.

2. Experimental Work

The Ni 200 alloy samples with dimensions of 15 mm × 15 mm × 30 mm used for this study was purchased from Baoding Yuankun Machinery Manufacturing Co. Ltd, Baoding, China. The chemical composition of Ni 200 alloy taken for the present investigation is shown in Table 1. The samples were annealed at 750 °C for 1 h under nitrogen atmosphere and furnace-cooled.
A closed MAF die was employed to conduct the MAF process at room temperature. The initial height of the undeformed sample was 30 mm. After MAF, the width of the sample remained constant and 50% normal strain was imposed during each pass. A hydraulic press of 160-ton capacity was used to process the pure nickel up to four cycles. The setup of the process and samples before and after MAF are shown in Figure 2. More details of the experimental procedure were discussed in Reference [6].

2.1. TEM Microscopy Examination

Transmission electron microscopy (TEM, JEOL JEM 2100) was employed to validate the reduction of the samples’ grain size before and after the MAF process. Prior to TEM investigations, multiaxially forged samples were cut into small thin pieces and mechanically polished slowly until the thickness reached around 500 nm as thin foils. Ion milling was done on the thin foils up to around 100 nm, and then perforation was made on the thin foils. Based on several microstructural images of each sample, the grain size was measured by applying the standard image analyzing technique via software (Image J). At least 400 grains in each sample were counted, and the average was considered for investigation. The observed readings were evaluated statistically by the calculations of the mean, standard deviation, and standard error. Based on these calculations, error analysis was done and it was ensured that all the error values were in the range of ±5%.
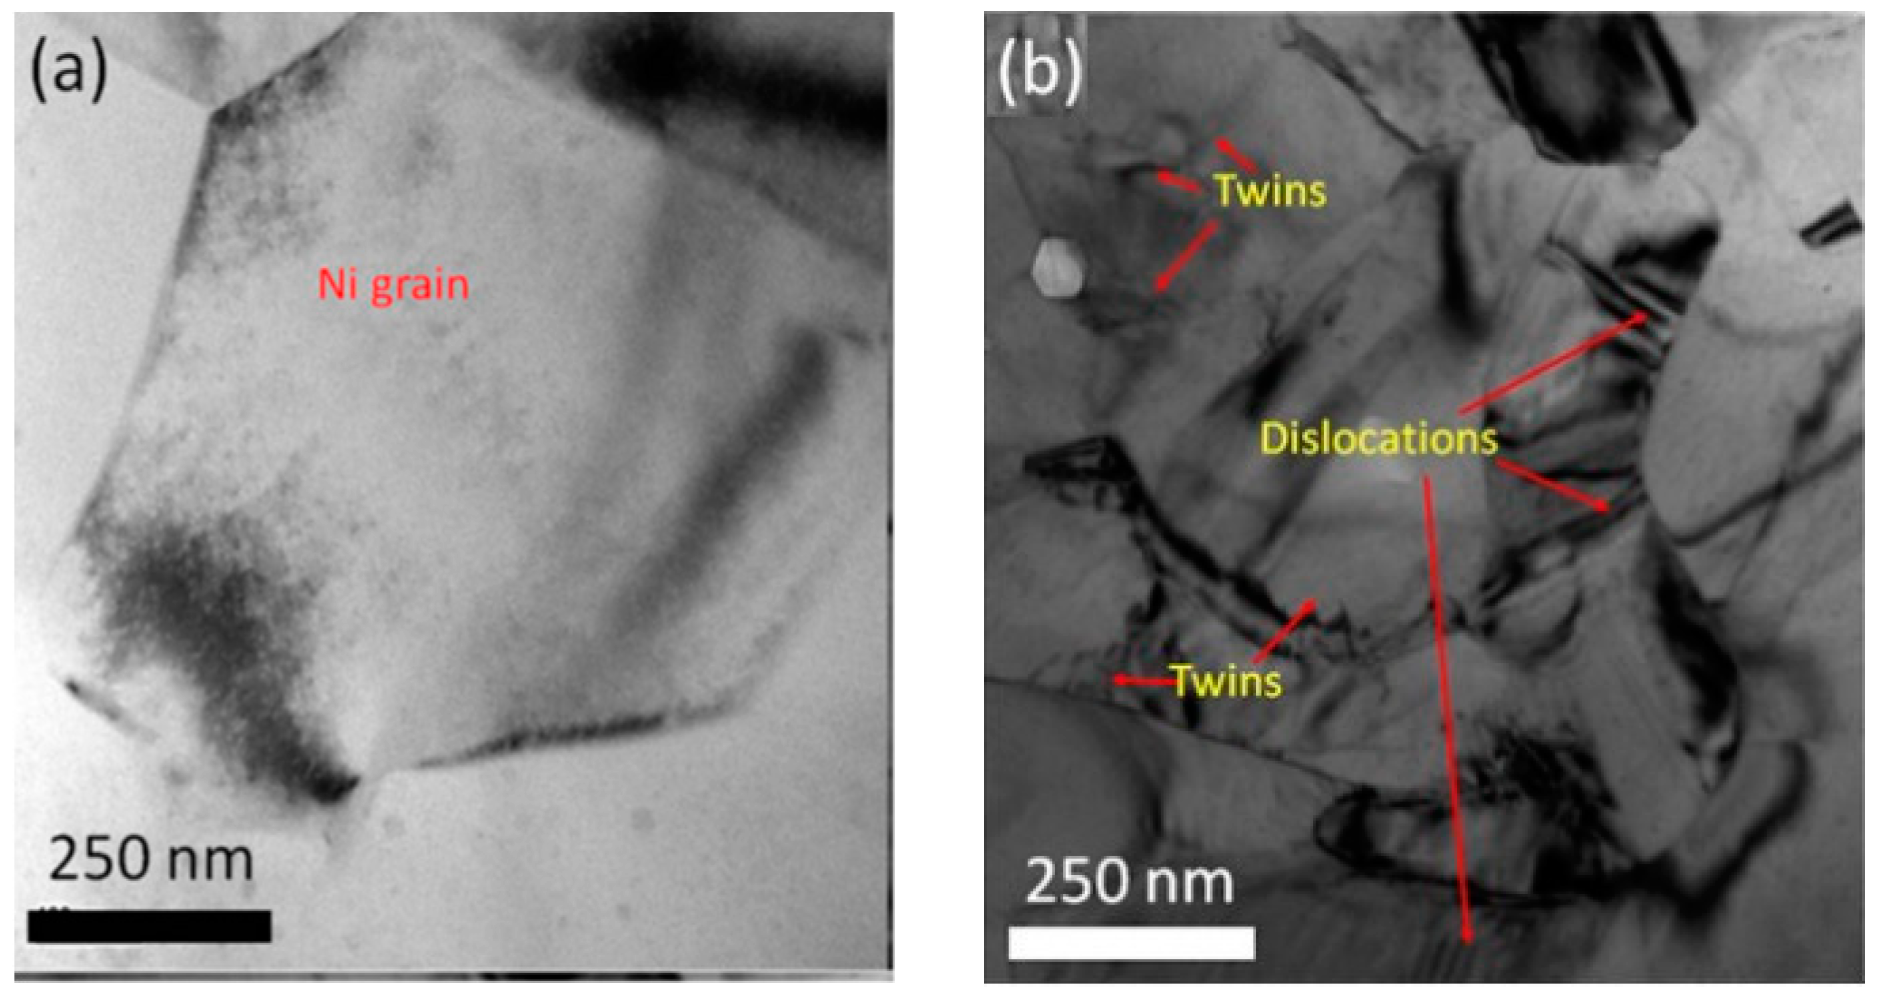
Measurements showed that the average grain size was reduced from 805 ± 22 nm at the annealed condition to the 220 ± 16 nm after three cycles of the MAF process [6]. The TEM microstructure of Ni samples is shown in Figure 3.

2.2. Hardness Uniformity

Considering that higher hardness is expected at the point where a higher strain is accumulated due to the work-hardening effect, the Vickers hardness (Zwick/ZHU 250 universal harness machine) test was employed to examine the strain uniformity of the samples. Ten measurements were taken on different locations along the three orthogonal directions to assess the IF. Lower values of IF indicate a better strain distribution and, hence, more material homogeneity. As can be seen from Table 2, the value of IF decreases as the number of cycles of MAF increases. Therefore, material homogeneity improved with the increasing number of MAF cycles. Inhomogeneity might exist for the as-received metals/alloys due to the manufacturing processes, which can induce residual stresses and other defects. This may result in more hardness variation. However, this can be reduced by the annealing process. A similar result of IF was observed for the as-received and annealed Ti-6Al-4V alloy [30].

2.3. Finite Element Modeling

The simulation of the MAF process was carried using ABAQUS/CAE 6.14-5 software. In this model, the Johnson–Cook relation shown below [31,32] was employed to describe the plastic behavior of the material:
Y f = ( A + B ε n ) [ 1 + C ln ( ε ˙ ε o ˙ ) ] [ 1 ( T T r T m T r ) m ]
where A is initial yield strength, B is the strength coefficient, ε is the strain, ε ˙ is the strain rate, n is the strain-hardening exponent, m is the thermal softening exponent, T is temperature, Tm is melting temperature, and C is strain sensitivity. The properties and parameters of annealed at 750 °C nickel 200 alloy are summarized in Table 3.
The constitutive model given by the Johnson–Cook equation can handle material under high strain rates, wide ranges of temperatures, and plastic deformation [31,32,33]. Other elastic and thermal properties are represented in Table 4.
In the modeling process, the die and plunger were assumed rigid objects. The plunger speed and step time were varied to compress the material to a desired strain level. Plane symmetric conditions were applied to save computation time and cost. The size of the Ni 200 alloy sample taken for analysis was 7.5 mm × 15 mm × 30 mm. In order to determine the optimum mesh size, a mesh sensitivity diagram was plotted to investigate the convergence of results and to choose the proper mesh element size. The optimum mesh number was chosen as 27,000 elements. The mesh type was tetrahedral and finer internal mesh was used. In addition, during large plastic deformation, if an object satisfies any of its remeshing criteria, a new mesh is generated, and the solution data are interpolated to the new mesh from the old one. For this case, automatic remeshing was applied to accommodate large deformation during the simulations using global remeshing with an interference of 0.4 mm (absolute). Furthermore, the magnitudes of effective strain (ES) were obtained by averaging the value of strain (27,000 elements) in each simulation. The effective strain (ES) and coefficient of standard deviation or inhomogeneous factor (IF) were calculated for various combinations of temperature, strain rate, and friction provided. There are three input values for each variable, which are listed in Table 5.
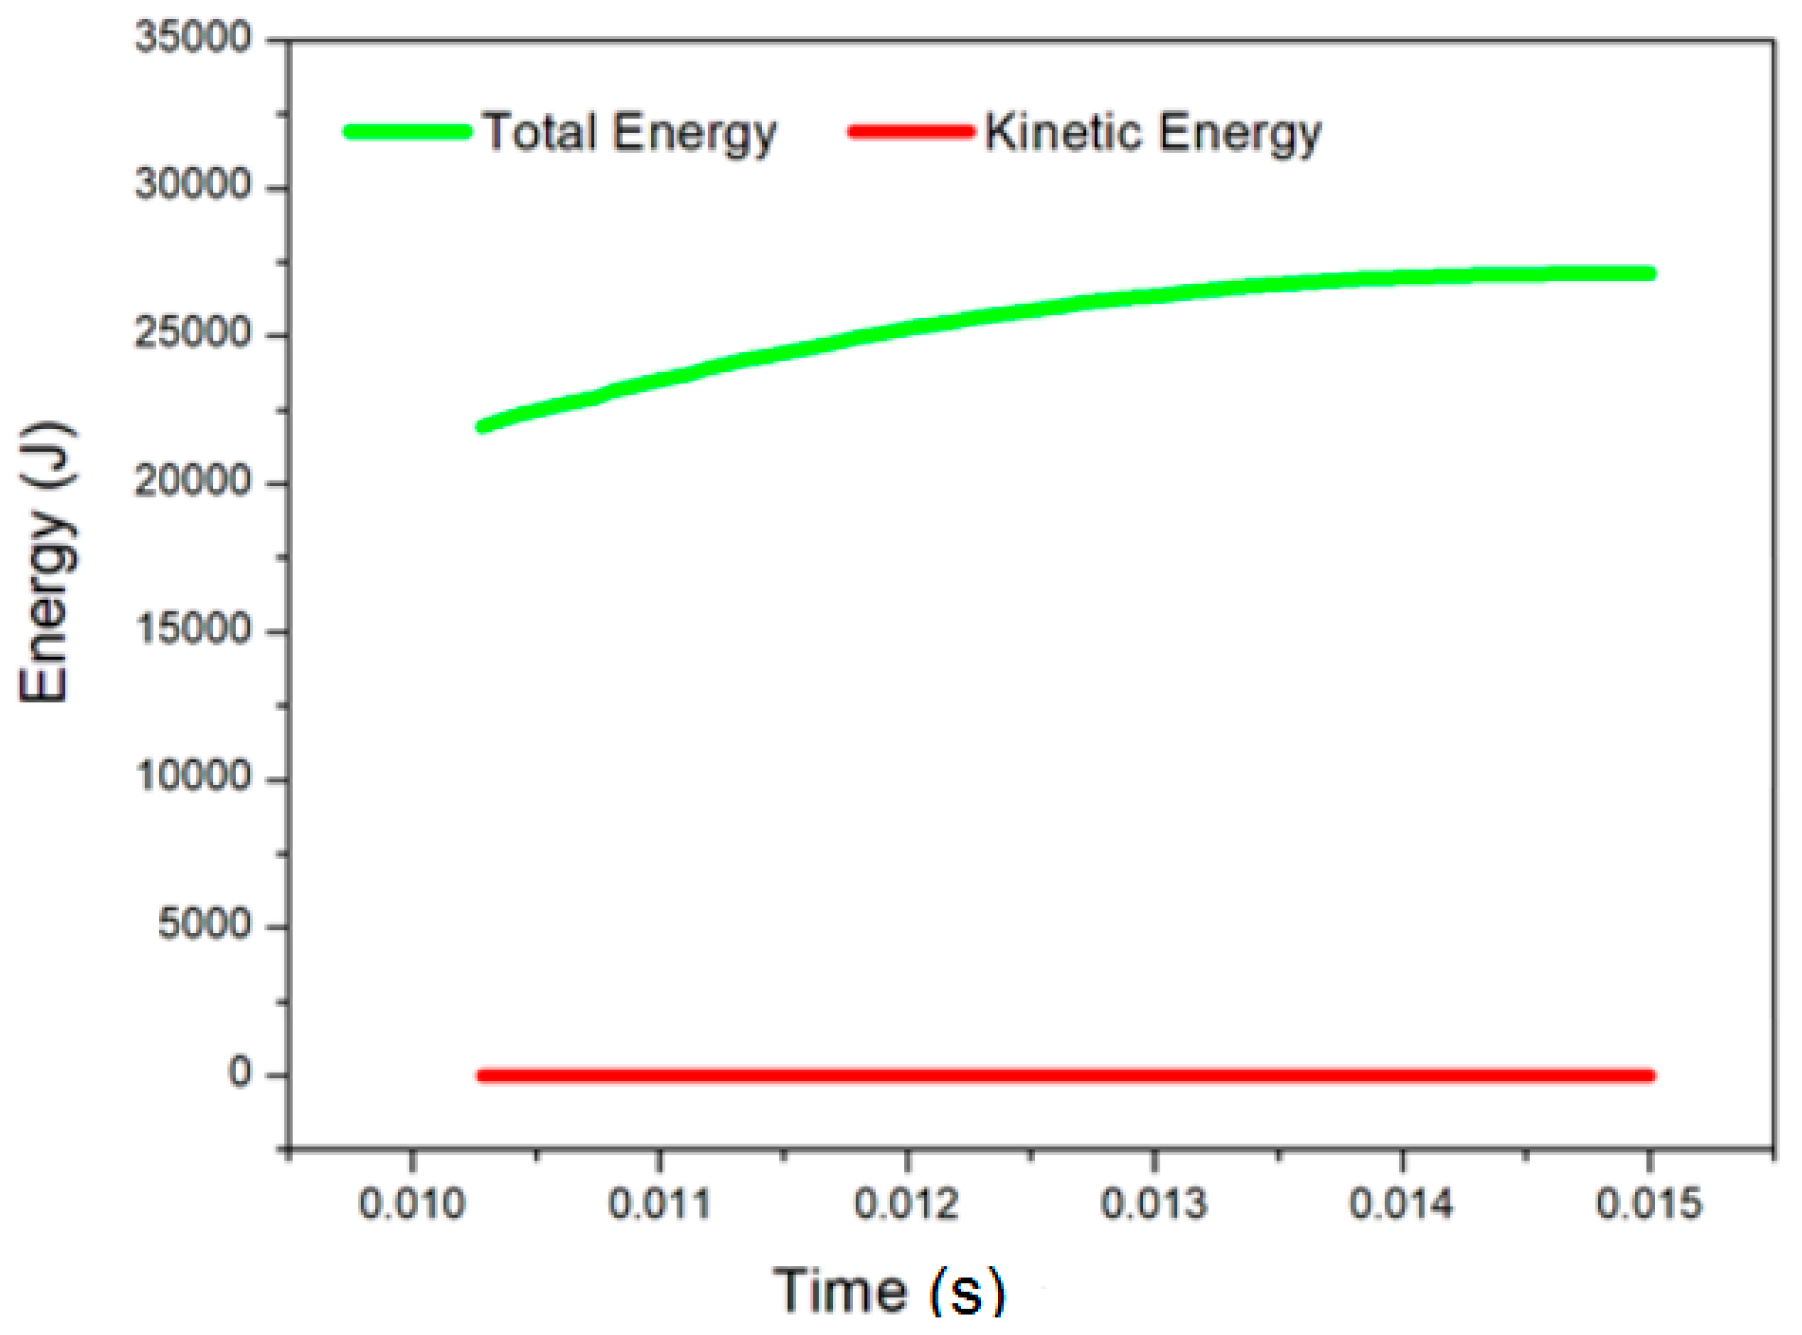
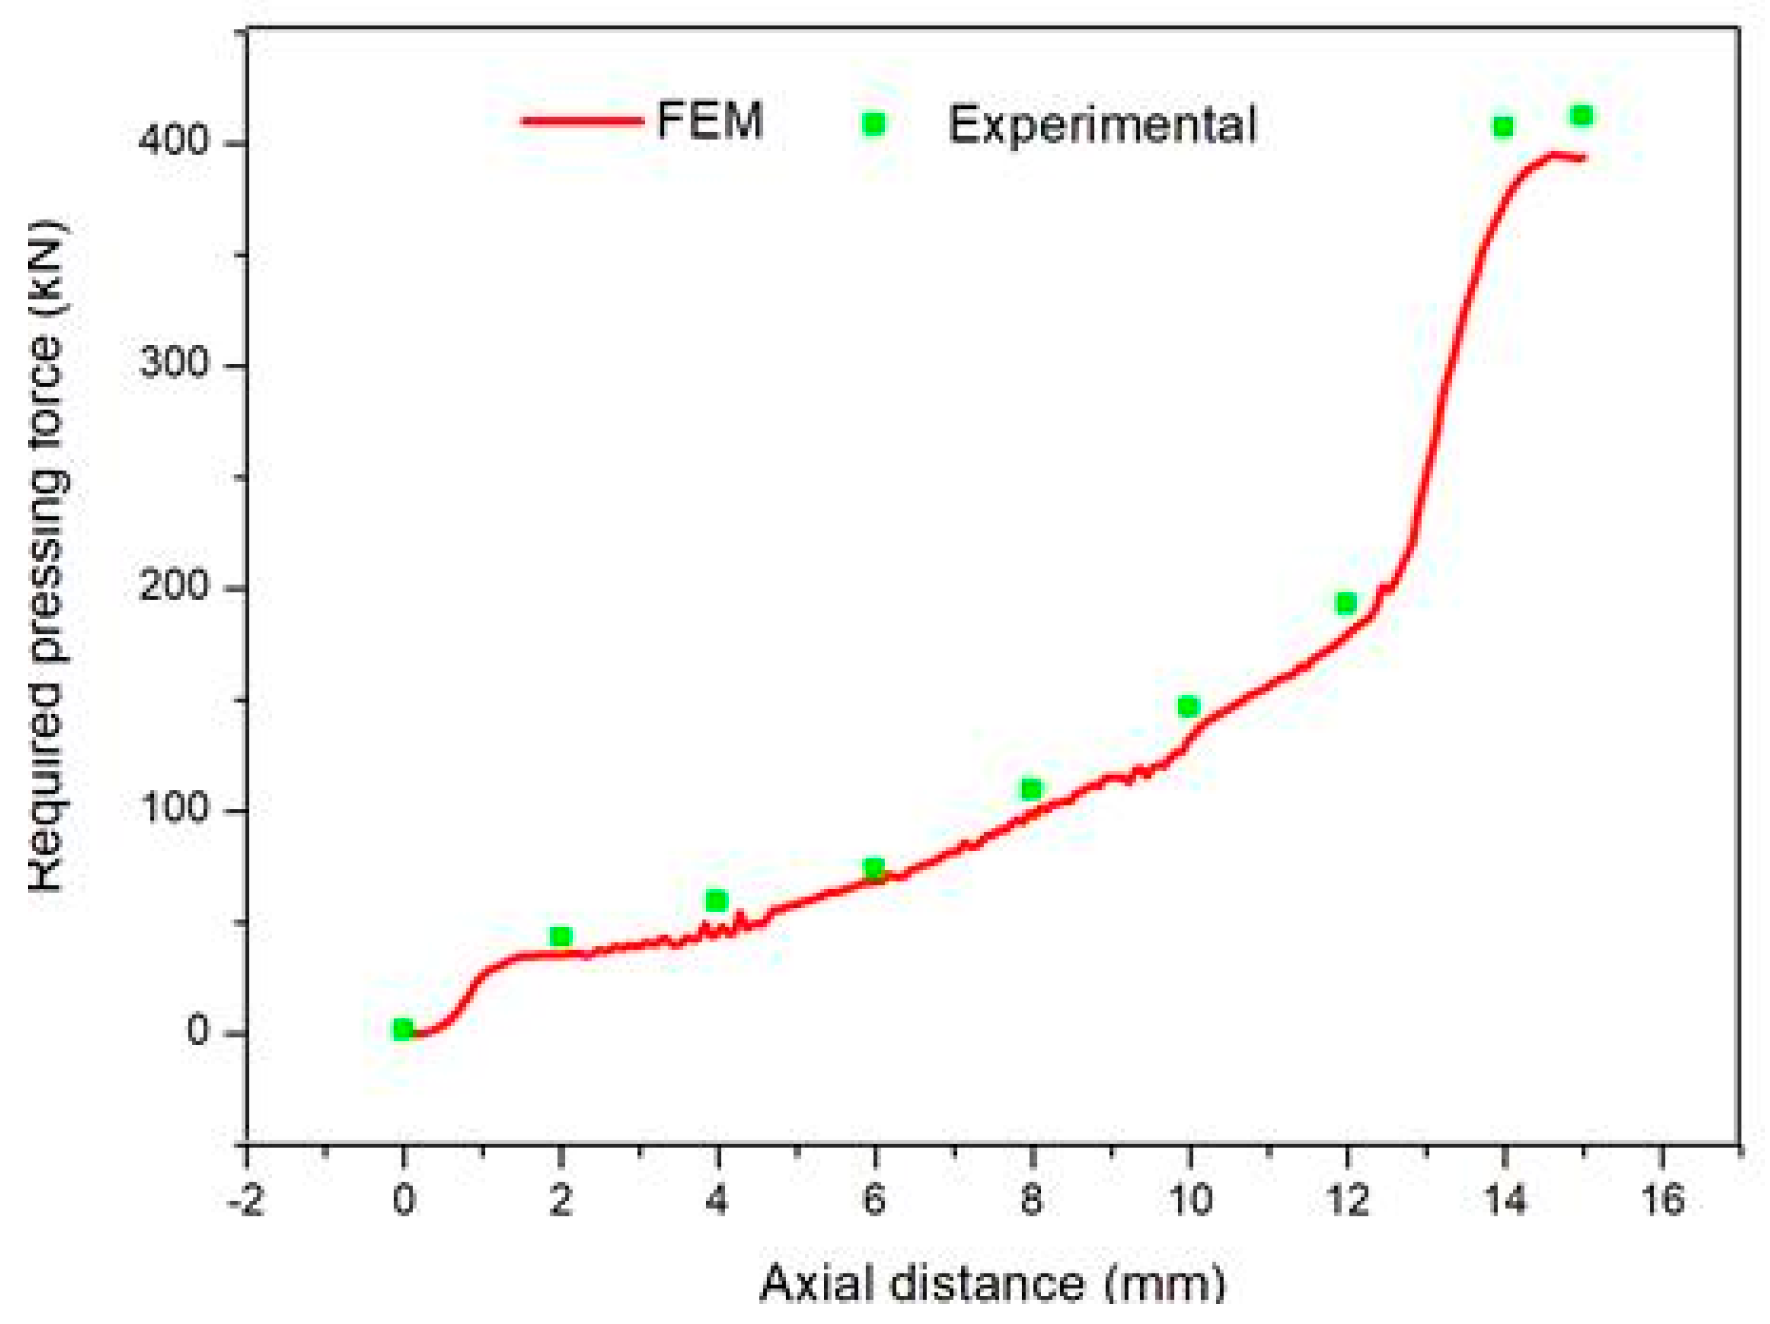
For the strain rate of 66.7 s−1, the velocity of the plunger was kept 1000 mm/s, and step time was fixed to 0.015 s so that the plunger would traverse down 15 mm. Thus, the sample would fill the space in die such that the initial height of 30 mm was reduced to 15 mm and the initial width of 15 mm duplicated. All other strain rates were imposed in this manner. While applying the loading conditions, the initial temperature was set to one of the values given in Table 5. Friction between the sliding surfaces was defined while setting the contact properties. It is well known that quasistatic conditions would exist in explicit dynamics analysis if the kinetic energy of the system was less than 5% of the total energy. Inertial effects can be ignored, and the process can be reasonably assumed as quasistatic (very slow dynamic load). Kinetic energy versus total energy plot (shown in Figure 4) taken in the case of the process when the strain rate was 66.7 s−1 indicated that kinetic energy is less than 5% of total energy of the system for each increment. Therefore, at such a strain rate, the process can be reasonably considered as quasistatic at room temperature. The Johnson–Cook model was used to describe the material response in each combination of input parameters (quasistatic, high strain rate, and high temperature), since the mathematical model includes the thermal softening coefficient (m), strain rate ( ε ˙ ), and strain sensitivity (C). The process was validated by experiments. Nickel samples of size 15 mm × 15 mm × 30 mm were pressed under the same conditions. As a validation, the required pressing force calculated through FEM can be compared with the experiments. During the experiment, a quasistatic load was applied, so comparison was made for the process where the strain rate was 66.7 s−1 (Quasi-static loading). If the pressing force in both cases is constant for the same plunger/ram position while other processing conditions are similar, it can be assumed that the FEM system is correctly modeled. Figure 5 shows that the experimental data match with the simulation data. In addition, the average load was calculated analytically (µ = 0.15, a = 7.5 mm, h = 15 mm, B = 650 MPa). The average load required to press material to the desired strain level was 110 kN. FEM also gave approximately the same value for the average load (125 kN) for pressing to the same strain level. The discrepancy was only 13%, which is acceptable. Only the temperature and strain rate were varied, and other settings were kept the same for other processes. The Johnson–Cook constitutive model was used to account for these changes and, hence, the finite element model was validated.

3. Results and Discussion

3.1. Effect of Strain Rate

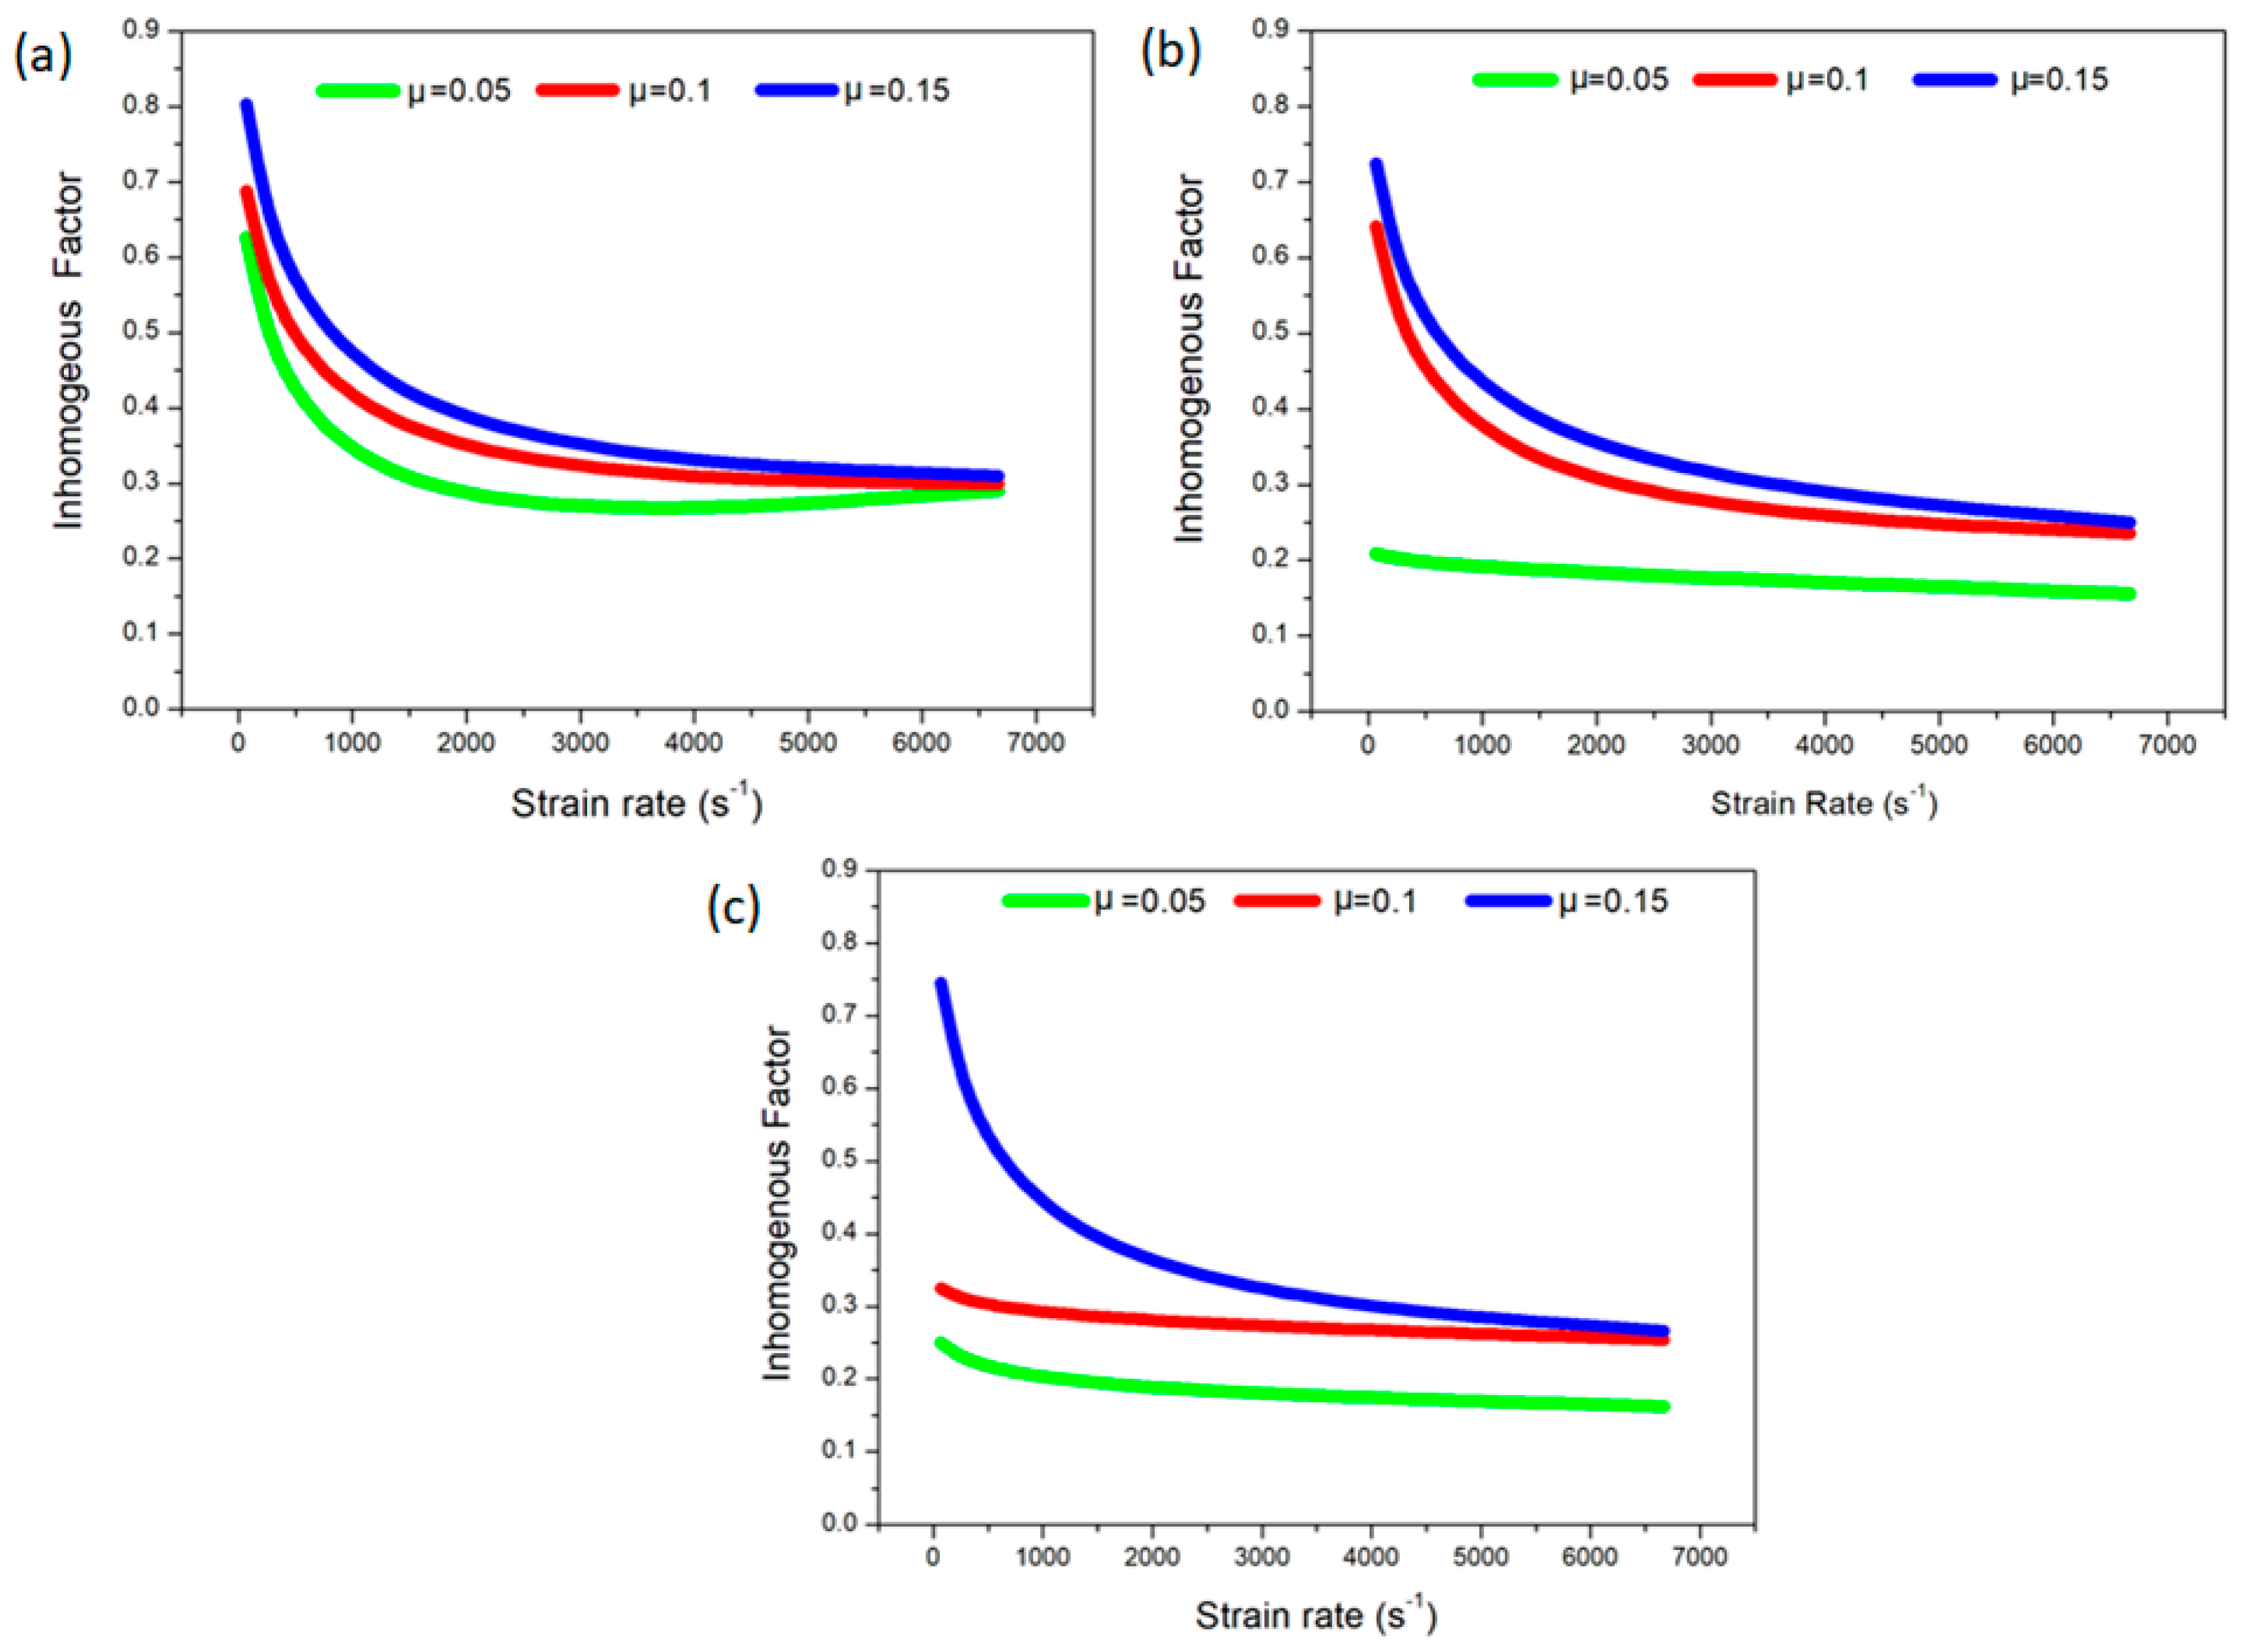
In ABAQUS software, the plunger speed was varied to apply different strain rates. It was observed that as the strain rate increased, the inhomogeneous factor (IF) decreased and, thus, the structure became more homogeneous, as shown in Figure 6. In the case of lubricating and high temperature conditions, IF reduced sharply in the beginning and leveled off with the passage of time (Figure 6a). At room temperature, for a given friction coefficient values, say 0.05, IF was 62% for a strain rate of 66.67 s−1 (quasistatic) and reduced to 50% at 666.67 s−1 under the same conditions. The same trend can be noticed for other friction and temperature conditions, as presented in Figure 6b,c.
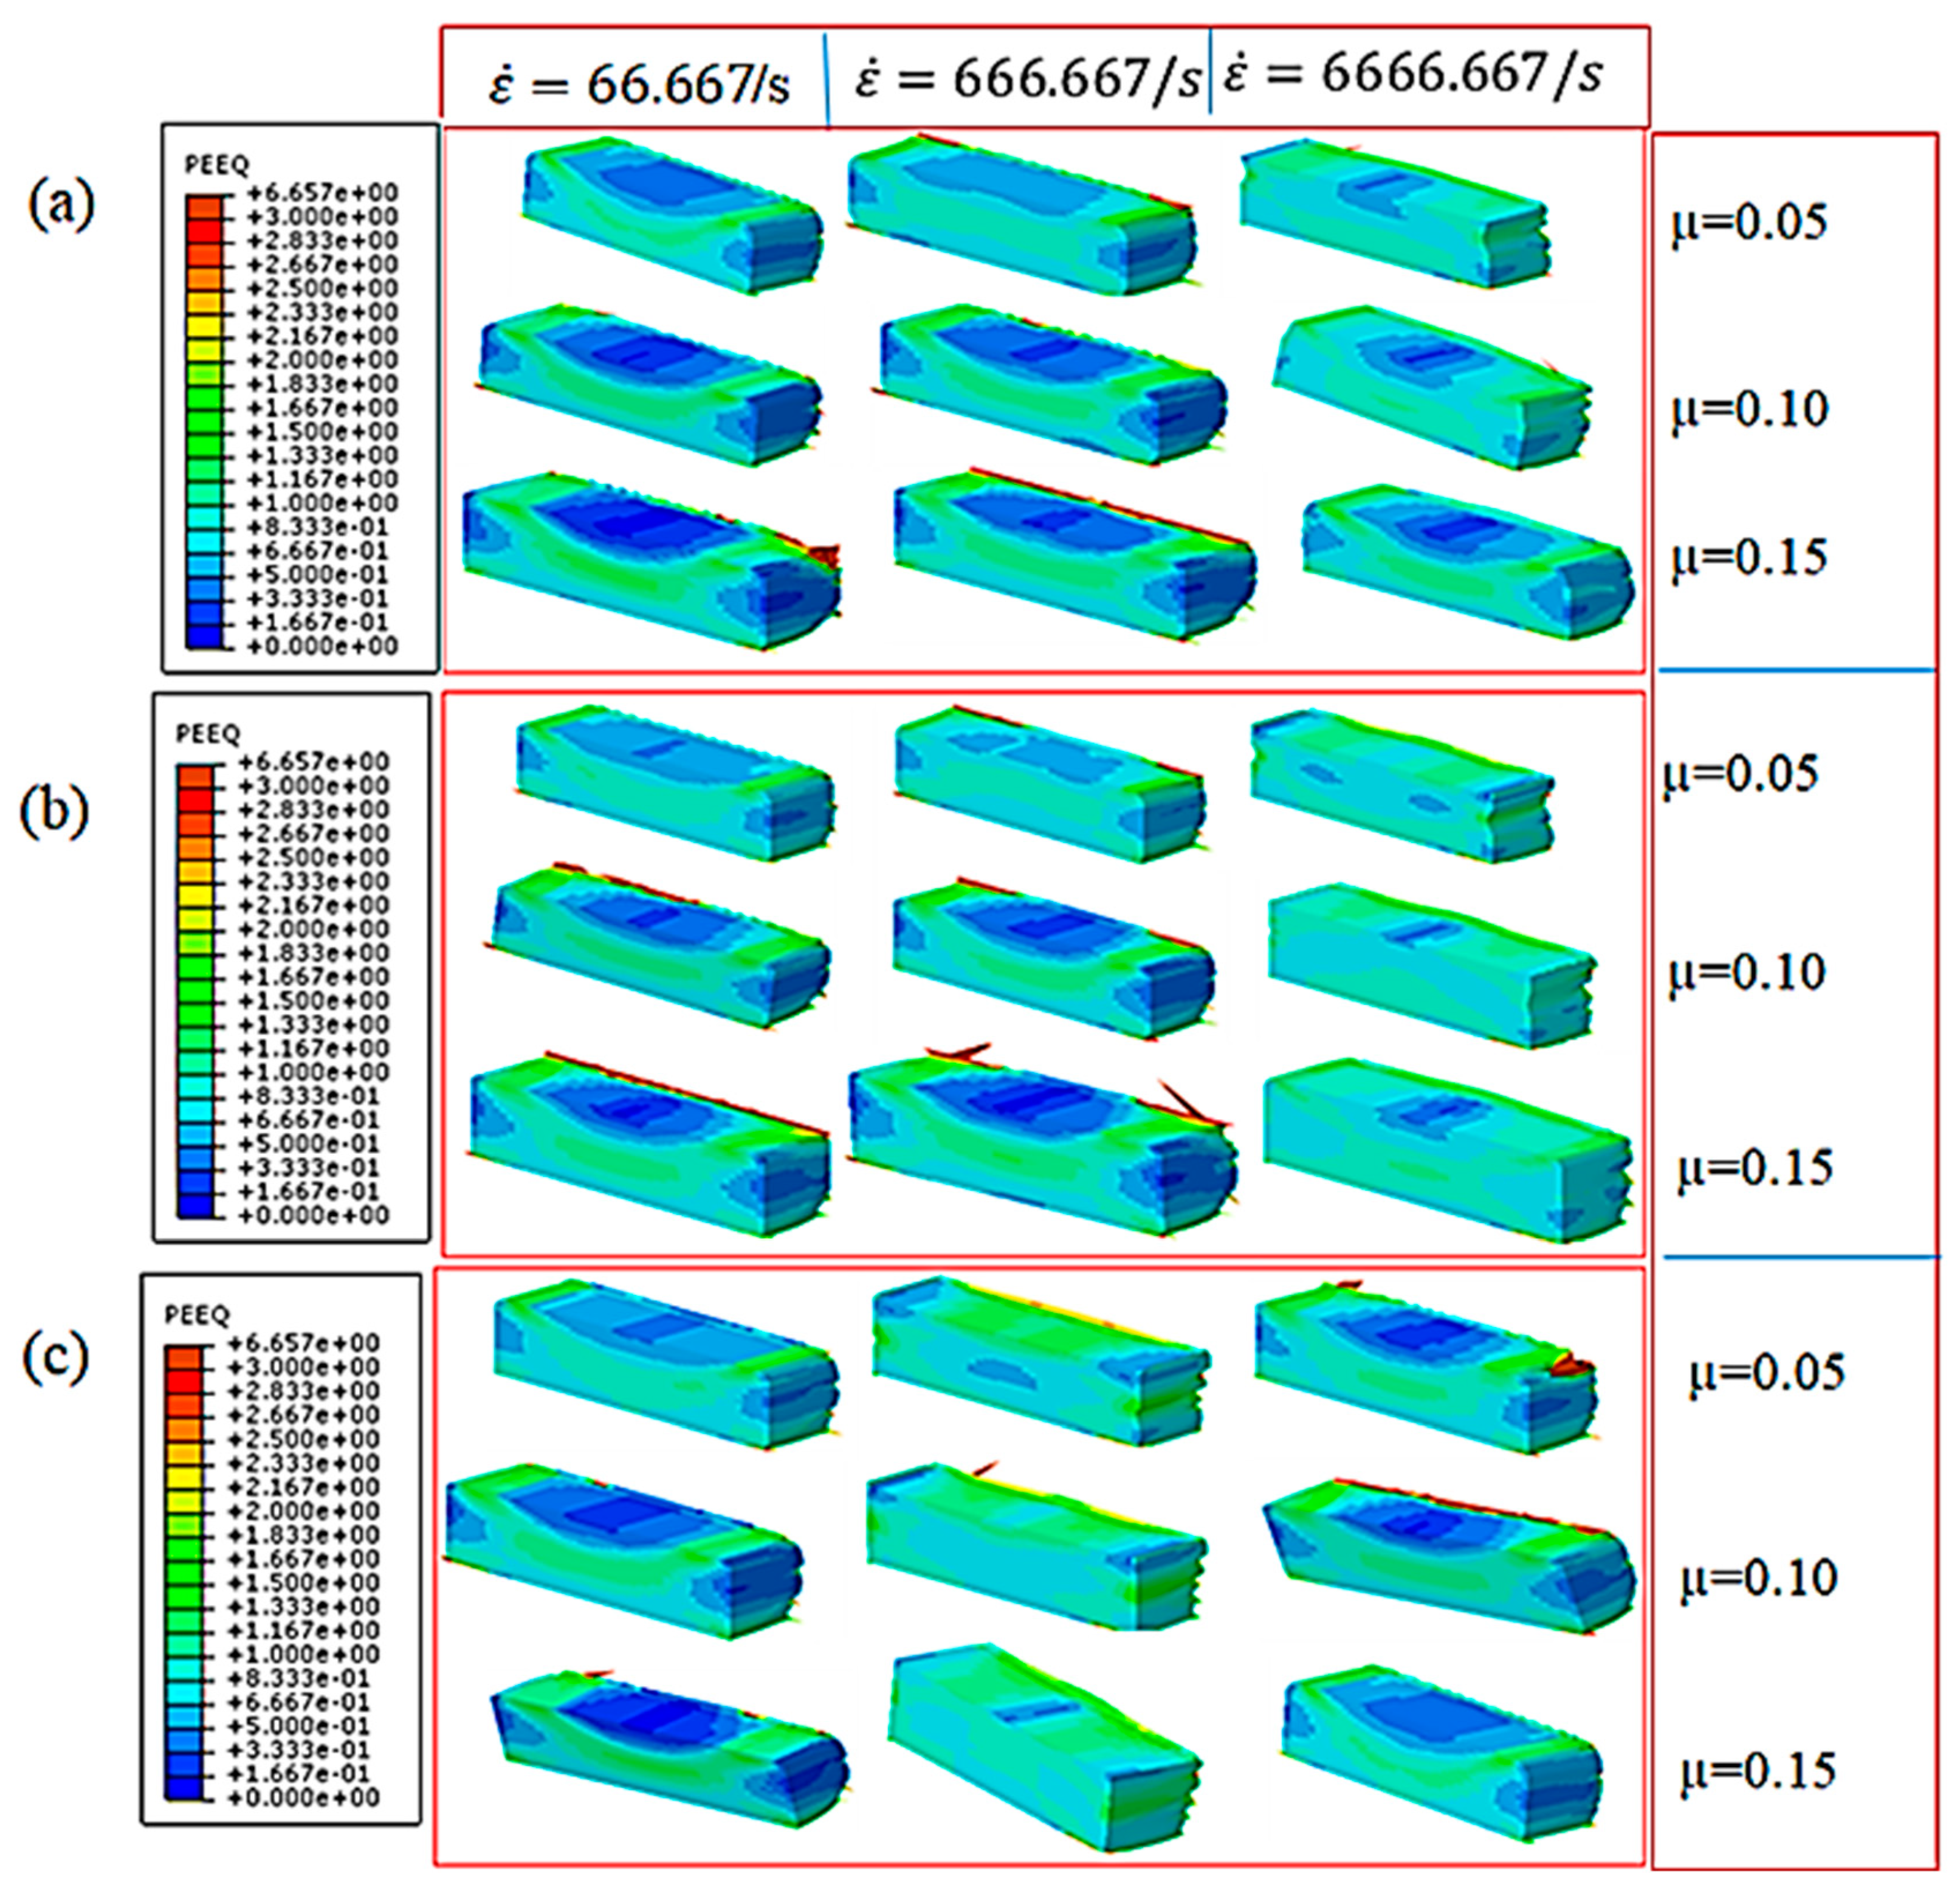
This behavior of the material can be verified by exploration of the strain distribution contours shown in Figure 7. From left to right, the strain rate increases and the distribution of strain within the specimen is uniform.
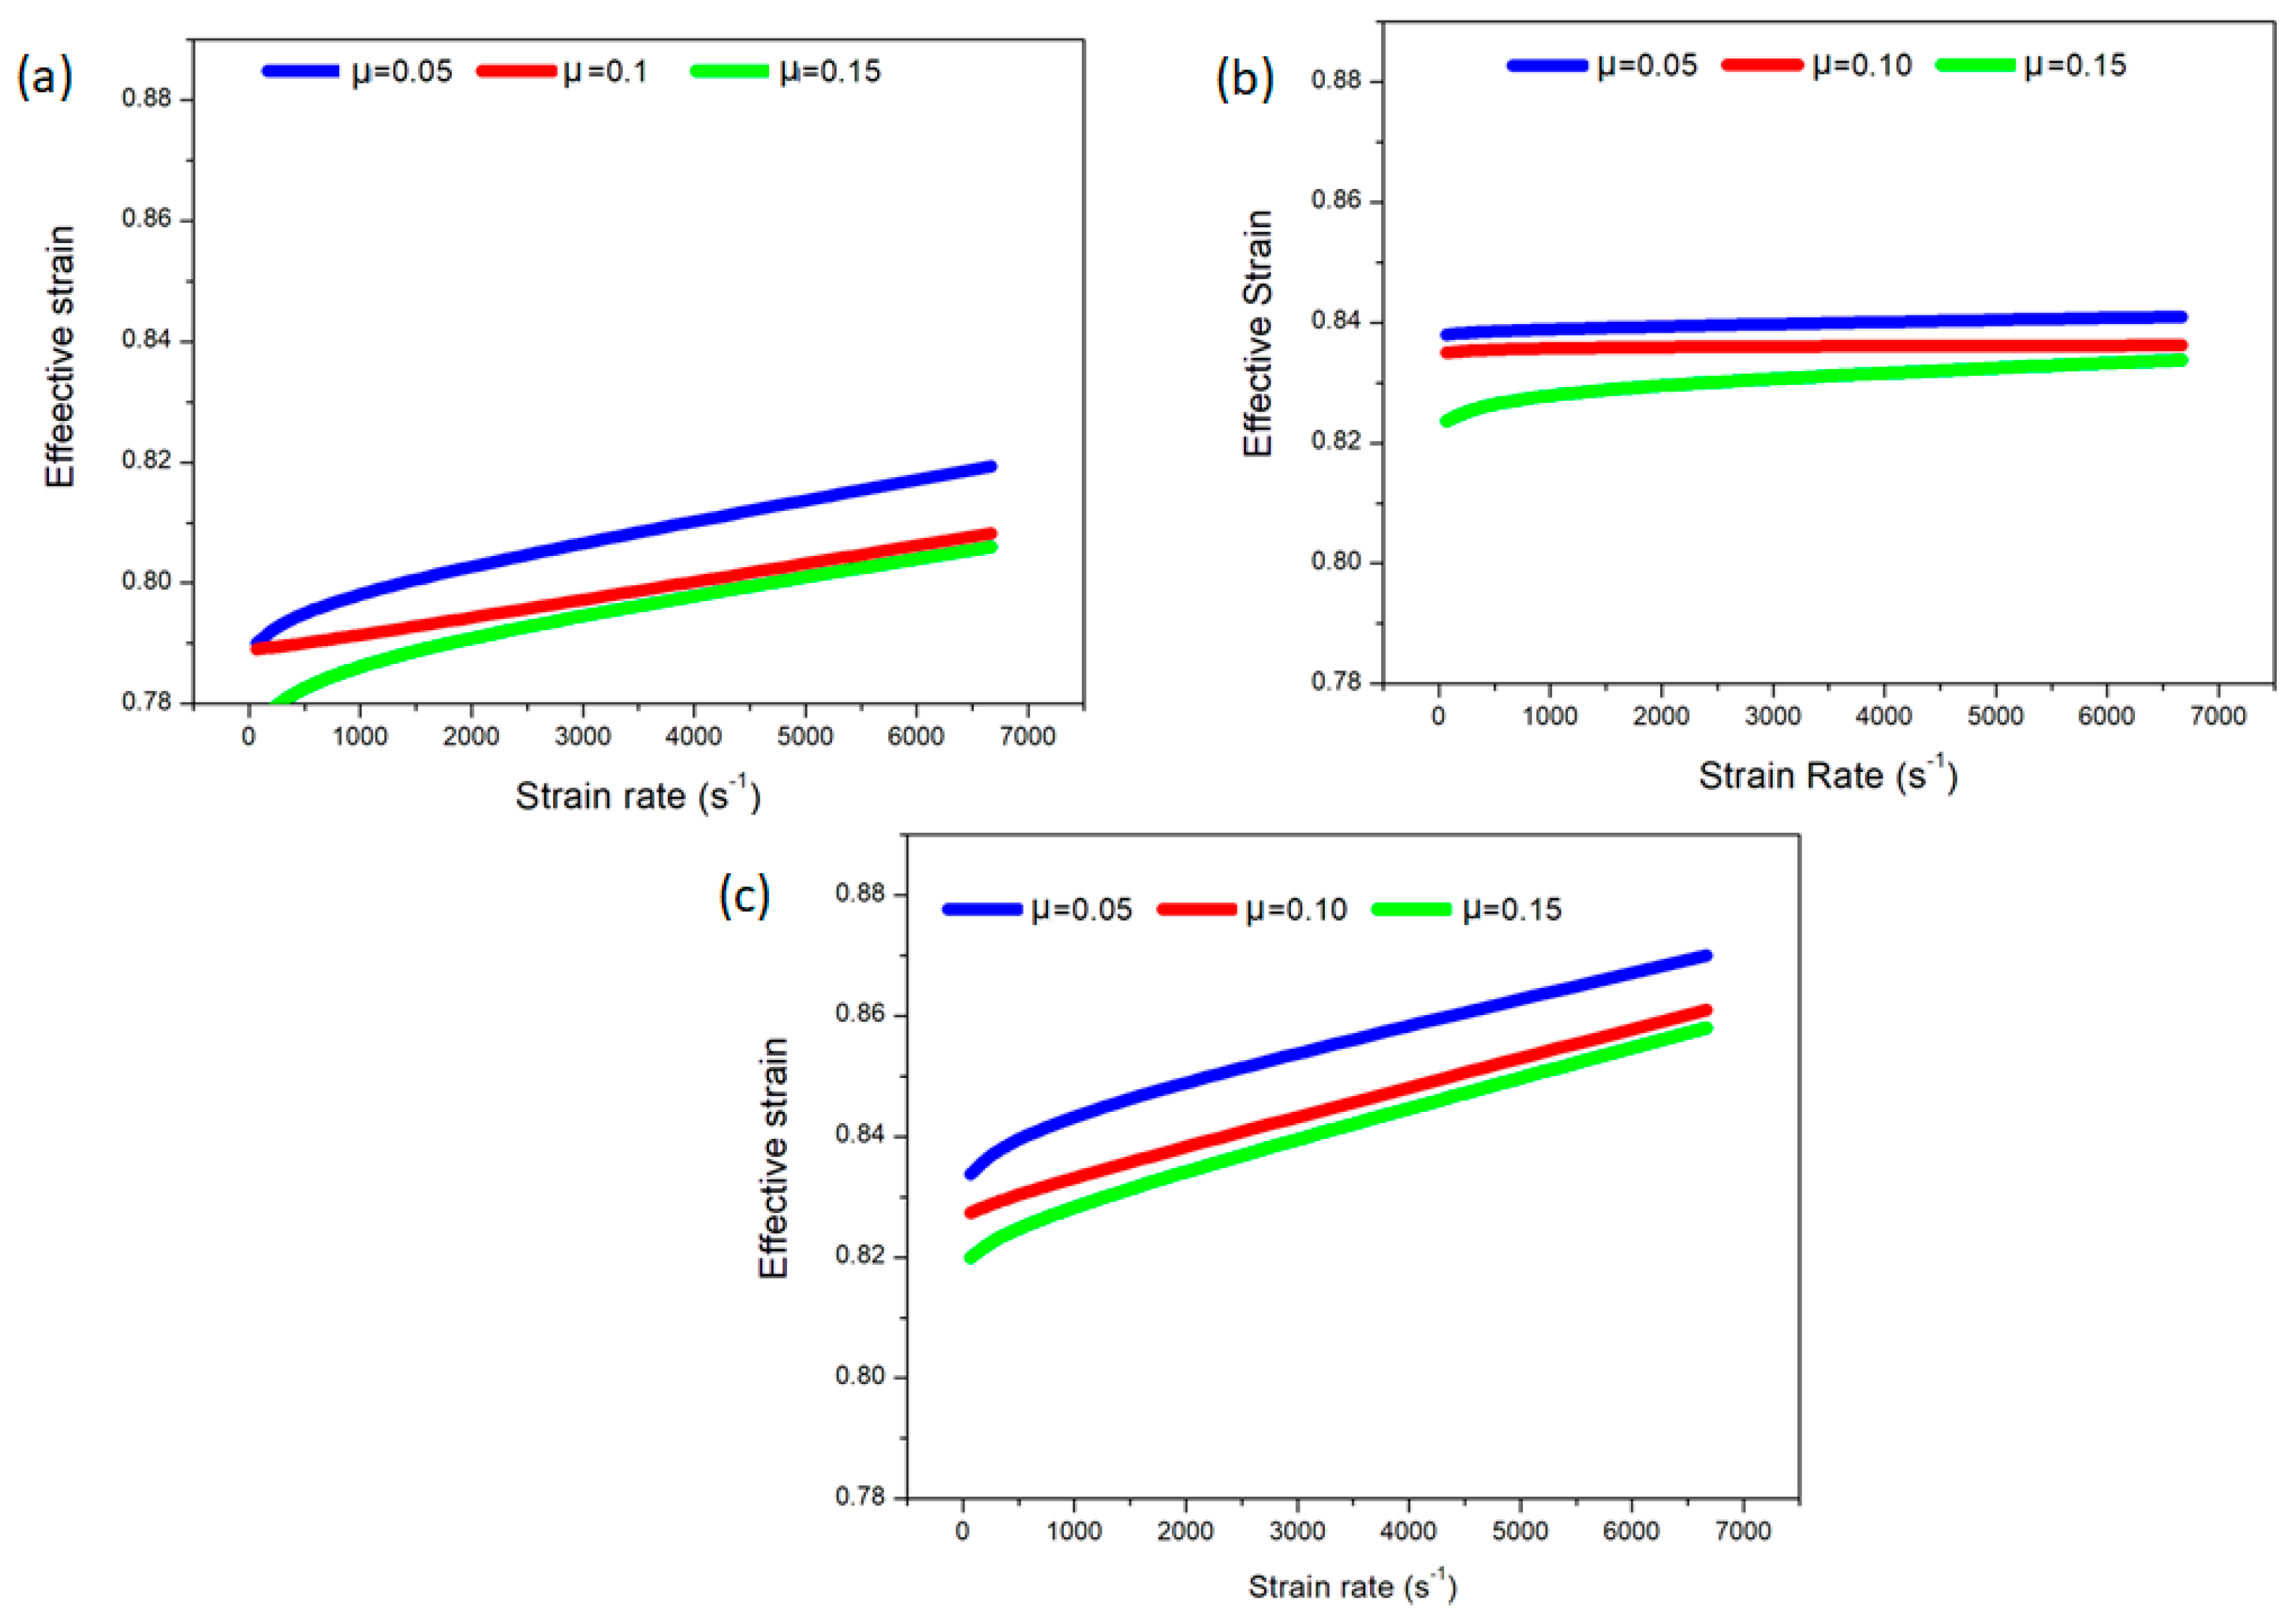
Moreover, the effective strain as a function of the strain rate was determined and is shown in Figure 8. It was observed that by increasing the strain rate, the effective strain increased accordingly. For a friction coefficient of 0.05 at high temperature of 500 °C, the effective strain increased from 83.2% to 87.2% when the strain rate increased from 66.67 s−1 to 666.67 s−1, respectively, as depicted in Figure 8c. The relationship of the effective strain and strain rate at various temperatures and friction coefficients is shown in Figure 8a,b.

3.2. Effect of Temperature

As described above, the applied temperatures were 25 °C, 250 °C, and 500 °C. The maximum temperature was below one-third of melting temperature, which is a favorable condition for MAF. It was observed that for a given coefficient of friction and at a certain strain rate, the structure was more homogeneous at a high temperature compared to a low temperature. Figure 6 reveals the inverse relation between the inhomogeneous factor and temperature. For instance, at a temperature of 500 °C in Figure 6c, the inhomogeneous factor was 32% when the strain rate and friction coefficient were kept at 66.7 s−1 and 0.1, respectively. By decreasing the temperature to 250 °C, under the same conditions, the inhomogeneous factor increased to be 65%, which is almost double of the previous value. When the temperature was reduced to ambient temperature (25 °C), the inhomogeneous factor reached 73% under the same conditions, as shown in Figure 6c. The contour plot in Figure 7 shows a similar behavior and trend. In the set of contours in Figure 8a, the temperature is 25 °C; in Figure 8b, the initial temperature is 250 °C, and it is 500 °C in the contours of Figure 7c. A larger variation in the distribution of strain is obvious at low temperatures. It is to be concluded that the effective strain has a direct relation with the temperature. The maximum effective strain of 87.2% occurred at a strain rate of 6666.67 s−1, friction coefficient of 0.05, and temperature of 500 °C, as shown in Figure 8c. The strain rate is a linear fit with effective strain for all cases. Furthermore, the slope of the curves was similar at room temperature and a high temperature at 500 °C, which is in a positive value, while the medium temperature at 250 °C represents curves with an approximately zero slope. This means that the increase of temperature is linearly fitting with the slope of the strain rate versus effective strain. In other word, the increase of strain rate is independent from the true strain at the medium temperature, while it fits on positive linear proportionality.

3.3. Effect of Friction

The higher the friction is, the greater the inhomogeneous factor (IF). This is clear in Figure 6. As an example, consider Figure 6a, where for each value of strain rate, IF is smaller when friction is larger. Strain distribution plots (Figure 8) show the same results. In Figure 7, the friction increases downward, as indicated for each set of contours. An increase in variation can be observed as one moves in a downward direction. The opposite is true for the effective strain, indicating an inverse relation with the friction coefficient. In Figure 8a, the effective strain was 79% when the friction coefficient was 0.05 at strain rate and a temperature of 66.67 s−1 and 25 °C, respectively. It reduced to 77% when the friction coefficient increased to 0.15 while other parameters remained constant. A similar trend can be seen in Figure 8b,c. It is shown that, at a low strain rate, the friction has a big effect on the process. Furthermore, the effects of friction on true stress are almost independent from strain rate variation.

4. Conclusions

The influence of MAF process parameters, such as strain rate, friction, and temperature, were assessed through finite element modeling for Ni 200 alloy. It can be concluded from the present study that:
  • The average crystallite size was reduced from 805 ± 22 nm at the annealed condition to the 220 ± 16 nm after three cycles of the MAF process.
  • The results of hardness measurement showed an increase of 175% after three cycles of the MAF process. The inhomogeneity factor (IF) calculated on the basis of hardness measurement decreased by 40% with the three cycles of MAF.
  • The inhomogeneous factor (IF) decreased with increasing the strain rate. It can be said that a more homogeneous structure and, hence, more uniform mechanical properties are possible by imposing severe strain at a high rate.
  • When the initial temperature increased, inhomogeneity in the structure decreased.
  • The deformation process is expected to induce local strain inhomogeneity and to increase the intergranular stresses. Further, single crystals anisotropy could upturn local inhomogeneity.
  • Inhomogeneity decreased with an increase of strain rate sensitivity and was enhanced by an increase of the density of material and a larger rate of elongation.
  • The increase of temperature is linearly fit with the slope of the strain rate versus effective strain. In addition, the increase of the strain rate is independent from the true strain at a medium temperature, while it fits on positive linear proportionality.
  • At a low strain rate, the friction affected MAF significantly. Then, the effect of friction reduced intensely with the increase of the strain rate. However, the effect of friction on true stress was almost independent from strain rate variation.

Author Contributions

For research articles with several authors, a short paragraph specifying their individual contributions must be provided. The following statements should be used “conceptualization, F.D.; methodology, Z.H. and O.M.I.; formal analysis, Z.H., F.D., O.M.I. and F.A.-M.; investigation, Z.H. and O.M.I.; resources, F.A.-M.; project administration, F.A.-M.; Writing—original draft, Z.H.; Writing—review & editing, F.D. and O.M.I.

Funding

This research received no external funding.

Conflicts of Interest

The authors declare no conflict of interest.

References

  1. Valiev, R.Z.; Langdon, T.G. Principles of equal-channel angular pressing as a processing tool for grain refinement. Prog. Mater. Sci. 2006, 51, 881–981. [Google Scholar] [CrossRef]
  2. Langdon, T.G. Twenty-five years of ultrafine-grained materials: Achieving exceptional properties through grain refinement. Acta Mater. 2013, 61, 7035–7059. [Google Scholar] [CrossRef]
  3. Ebrahimi, M.; Attarilar, S.; Djavanroodi, F.; Gode, C.; Kim, H.S. Wear properties of brass samples subjected to constrained groove pressing process. Mater. Des. 2014, 63, 531–537. [Google Scholar] [CrossRef]
  4. Sakai, T.; Belyakov, A.; Kaibyshev, R.; Miura, H.; Jonas, J.J. Dynamic and post-dynamic recrystallization under hot, cold and severe plastic deformation conditions. Prog. Mater. Sci. 2014, 60, 130–207. [Google Scholar] [CrossRef] [Green Version]
  5. Ebrahimi, M.; Djavanroodi, F.; Tiji, S.A.N.; Gholipour, H.; Gode, C. Experimental Investigation of the Equal Channel Forward Extrusion Process. Metals 2015, 5, 471–483. [Google Scholar] [CrossRef] [Green Version]
  6. Hussain, Z.; Al-Mufadi, F.A.; Subbarayan, S.; Irfan, O.M. Microstructure and mechanical properties investigation on nanostructured Nickel 200 alloy using multi-axial forging. Mater. Sci. Eng. A 2018, 712, 772–779. [Google Scholar] [CrossRef]
  7. Chen, Q.; Shu, D.; Hu, C.; Zhao, Z.; Yuan, B. Grain refinement in an as-cast AZ61 magnesium alloy processed by multi-axial forging under the multi temperature processing procedure. Mater. Sci. Eng. A 2012, 541, 98–104. [Google Scholar] [CrossRef]
  8. Kapoor, R.; Sarkar, A.; Yogi, R.; Shekhawat, S.K.; Samajdar, I.; Chakravartty, J.K. Softening of Al during multi-axial forging in a channel die. Mater. Sci. Eng. A 2013, 560, 404–412. [Google Scholar] [CrossRef]
  9. Hussain, M.; Rao, P.N.; Singh, D.; Jayaganthan, R.; Singh, S. Comparative study of Microstructure and Mechanical properties of Al 6063 alloy Processed by Multi axial forging at 77K and Cryorolling. Procedia Eng. 2014, 75, 129–133. [Google Scholar] [CrossRef]
  10. Milind, P.P.; Date, T.R. Analytical and finite element modeling of strain generated in equal channel angular extrusion. Int. J. Mech. Sci. 2012, 56, 26–34. [Google Scholar] [CrossRef]
  11. Valiev, R.Z.; Estrin, Y.; Horita, Z.; Langdon, T.G.; Zehetbauer, M.J.; Zhu, Y.T. Producing bulk ultrafine-grained materials by severe plastic deformation. JOM 2006, 58, 33–39. [Google Scholar] [CrossRef] [Green Version]
  12. Kundu, A.; Kapoor, R.; Tewari, R.; Chakravartty, J.K. Severe plastic deformation of copper using multiple compression in a channel die. Scr. Mater. 2008, 58, 235–238. [Google Scholar] [CrossRef]
  13. Monzon, M.D.; Marrero, M.D.; Benitez, A.N.; Hernandez, P.M.; Cardenes, J.F. A technical note on the characterization of electroformed nickel shells for their application to injection molds. J. Mater. Process. Technol. 2006, 176, 273–277. [Google Scholar] [CrossRef]
  14. Zhao, Y.; Topping, T.; Bingert, J.F.; Thornton, J.J.; Dangelewicz, A.M.; Li, Y.; Liu, W.; Zhu, Y.; Zhou, Y.; Lavernia, E.J. High tensile ductility and strength in bulk nanostructured nickel. Adv. Mater. 2008, 20, 3028–3033. [Google Scholar] [CrossRef]
  15. Du, T.; Vijayakumar, A.; Sundaram, K.B.; Desai, V. Chemical mechanical polishing of nickel for applications in MEMS devices. Mater. Lett. 2004, 58, 2306–2309. [Google Scholar] [CrossRef]
  16. Kumar, S.S.S.; Priyasudha, K.; Rao, M.S.; Raghu, T. Deformation homogeneity, mechanical behaviour and strain hardening characteristics of titanium severe plastically deformed by cyclic channel die compression method. Mater. Des. 2016, 101, 117–129. [Google Scholar] [CrossRef]
  17. Shaeri, M.H.; Djavanroodi, F.; Sedighi, M.; Ahmadi, S.; Salehi, M.T.; Seyyedein, S.H. Effect of copper tube casing on strain distribution and mechanical properties of Al-7075 alloy processed by equal channel angular pressing. J. Strain Anal. 2013, 48, 512–521. [Google Scholar] [CrossRef]
  18. Djavanroodi, F.; Daneshtalab, M.; Ebrahimi, M. A novel technique to increase strain distribution homogeneity for ECAPed. Mater. Sci. Eng. A 2012, 535, 115–121. [Google Scholar] [CrossRef]
  19. Djavanroodi, F.; Ebrahimi, M. Effect of die parameters and material properties in ECAP with parallel channels. Mater. Sci. Eng. A Struct. 2010, 527, 7593–7599. [Google Scholar] [CrossRef]
  20. Yoon, S.C.; Quang, P.; Hong, S.I.; Kim, H.S. Die design for homogeneous plastic deformation during equal channel angular pressing. J. Mater. Process. Technol. 2007, 187–188, 46–50. [Google Scholar] [CrossRef]
  21. Ebrahimi, M.; Rajabifar, B.; Djavanroodi, F. New approaches to optimize strain behavior of Al6082 during equal channel angular pressing. J. Strain Anal. 2013, 48, 395–404. [Google Scholar] [CrossRef]
  22. Wang, S.; Liang, W.; Wang, Y.; Bian, L.; Chen, K. A modified die for equal channel angular pressing. J. Mater. Process. Technol. 2009, 209, 3182–3186. [Google Scholar] [CrossRef]
  23. Qian, D.; Pan, Y. 3D coupled macro–microscopic finite element modelling and simulation for combined blank-forging and rolling process of alloy steel large ring. Comput. Mater. Sci. 2013, 70, 24–36. [Google Scholar] [CrossRef]
  24. Han, Y.; Yan, S.; Sun, Y.; Chen, H. Modeling the Constitutive Relationship of Al–0.62Mg–0.73Si Alloy Based on Artificial Neural Network. Metals 2017, 7, 114. [Google Scholar] [CrossRef]
  25. Casalino, G.; Facchini, F.; Mortello, M.; Mummolo, G. ANN modelling to optimize manufacturing processes: The case of laser welding. IFAC Proc. 2016, 49, 378–383. [Google Scholar] [CrossRef]
  26. Casalino, G.; Losacco, A.M.; Arnesano, A.; Facchini, F.; Pierangeli, M.; Bonserio, C. Statistical Analysis and Modelling of an Yb: KGW Femtosecond Laser Micro-drilling Process. Procedia CIRP 2017, 62, 275–280. [Google Scholar] [CrossRef]
  27. Djavanroodi, F.; Omranpour, B.; Sedighi, M. Artificial Neural Network Modeling of ECAP Process. Mater. Manuf. Process. 2013, 28, 276–281. [Google Scholar] [CrossRef]
  28. Kwapisz, M.; Knapinski, M.; Dyja, H.; Laber, K. Analysis of the Effect of the Tool Shape on the Stress and Strain Distribution in the Alternate Extrusion and Multiaxial Compression Process. Arch. Metall. Mater. 2011, 56, 487–493. [Google Scholar] [CrossRef]
  29. Suo, T.; Li, Y.; Deng, Q. Optimal pressing route for continued equal channel angular pressing by finite element analysis. Mater. Sci. Eng. A Struct. 2007, 466, 166–171. [Google Scholar] [CrossRef]
  30. Ghanbari, B.F.; Arabi, H.; Abbasi, S.M.; Boutorabi, S.M.A. Manufacturing of nanostructured Ti-6Al-4V alloy via closed-die isothermal multi-axial-temperature forging: Microstructure and mechanical properties. Int. J. Adv. Manuf. Technol. 2016, 87, 755–763. [Google Scholar] [CrossRef]
  31. Banerjee, A.; Dhar, S.; Acharyya, S.; Datta, D.; Nayak, N. Determination of Johnson cook material and failure model constants and numerical modelling of Charpy impact test of armour steel. Mater. Sci. Eng. A 2015, 640, 200–209. [Google Scholar] [CrossRef]
  32. Zhang, Y.-B.; Yao, S.; Hong, X.; Wang, Z.-G. A modified Johnson–Cook model for 7N01 aluminum alloy under dynamic condition. J. Cent. South Univ. 2017, 24, 2550–2555. [Google Scholar] [CrossRef]
  33. Rajendran, A.; Grove, D.J.; Dietenberger, M.; Cook, W.H. A Dynamic Failure Model for Ductile Materials; Air Force Systems Command: Florida, USA, 1991. [Google Scholar]
  34. Nickel-Properties, Fabrication and Applications of Commercially Pure Nickel. Available online: https://www.azom.com/properties.aspx?ArticleID=2193 (accessed on 15 August 2018).
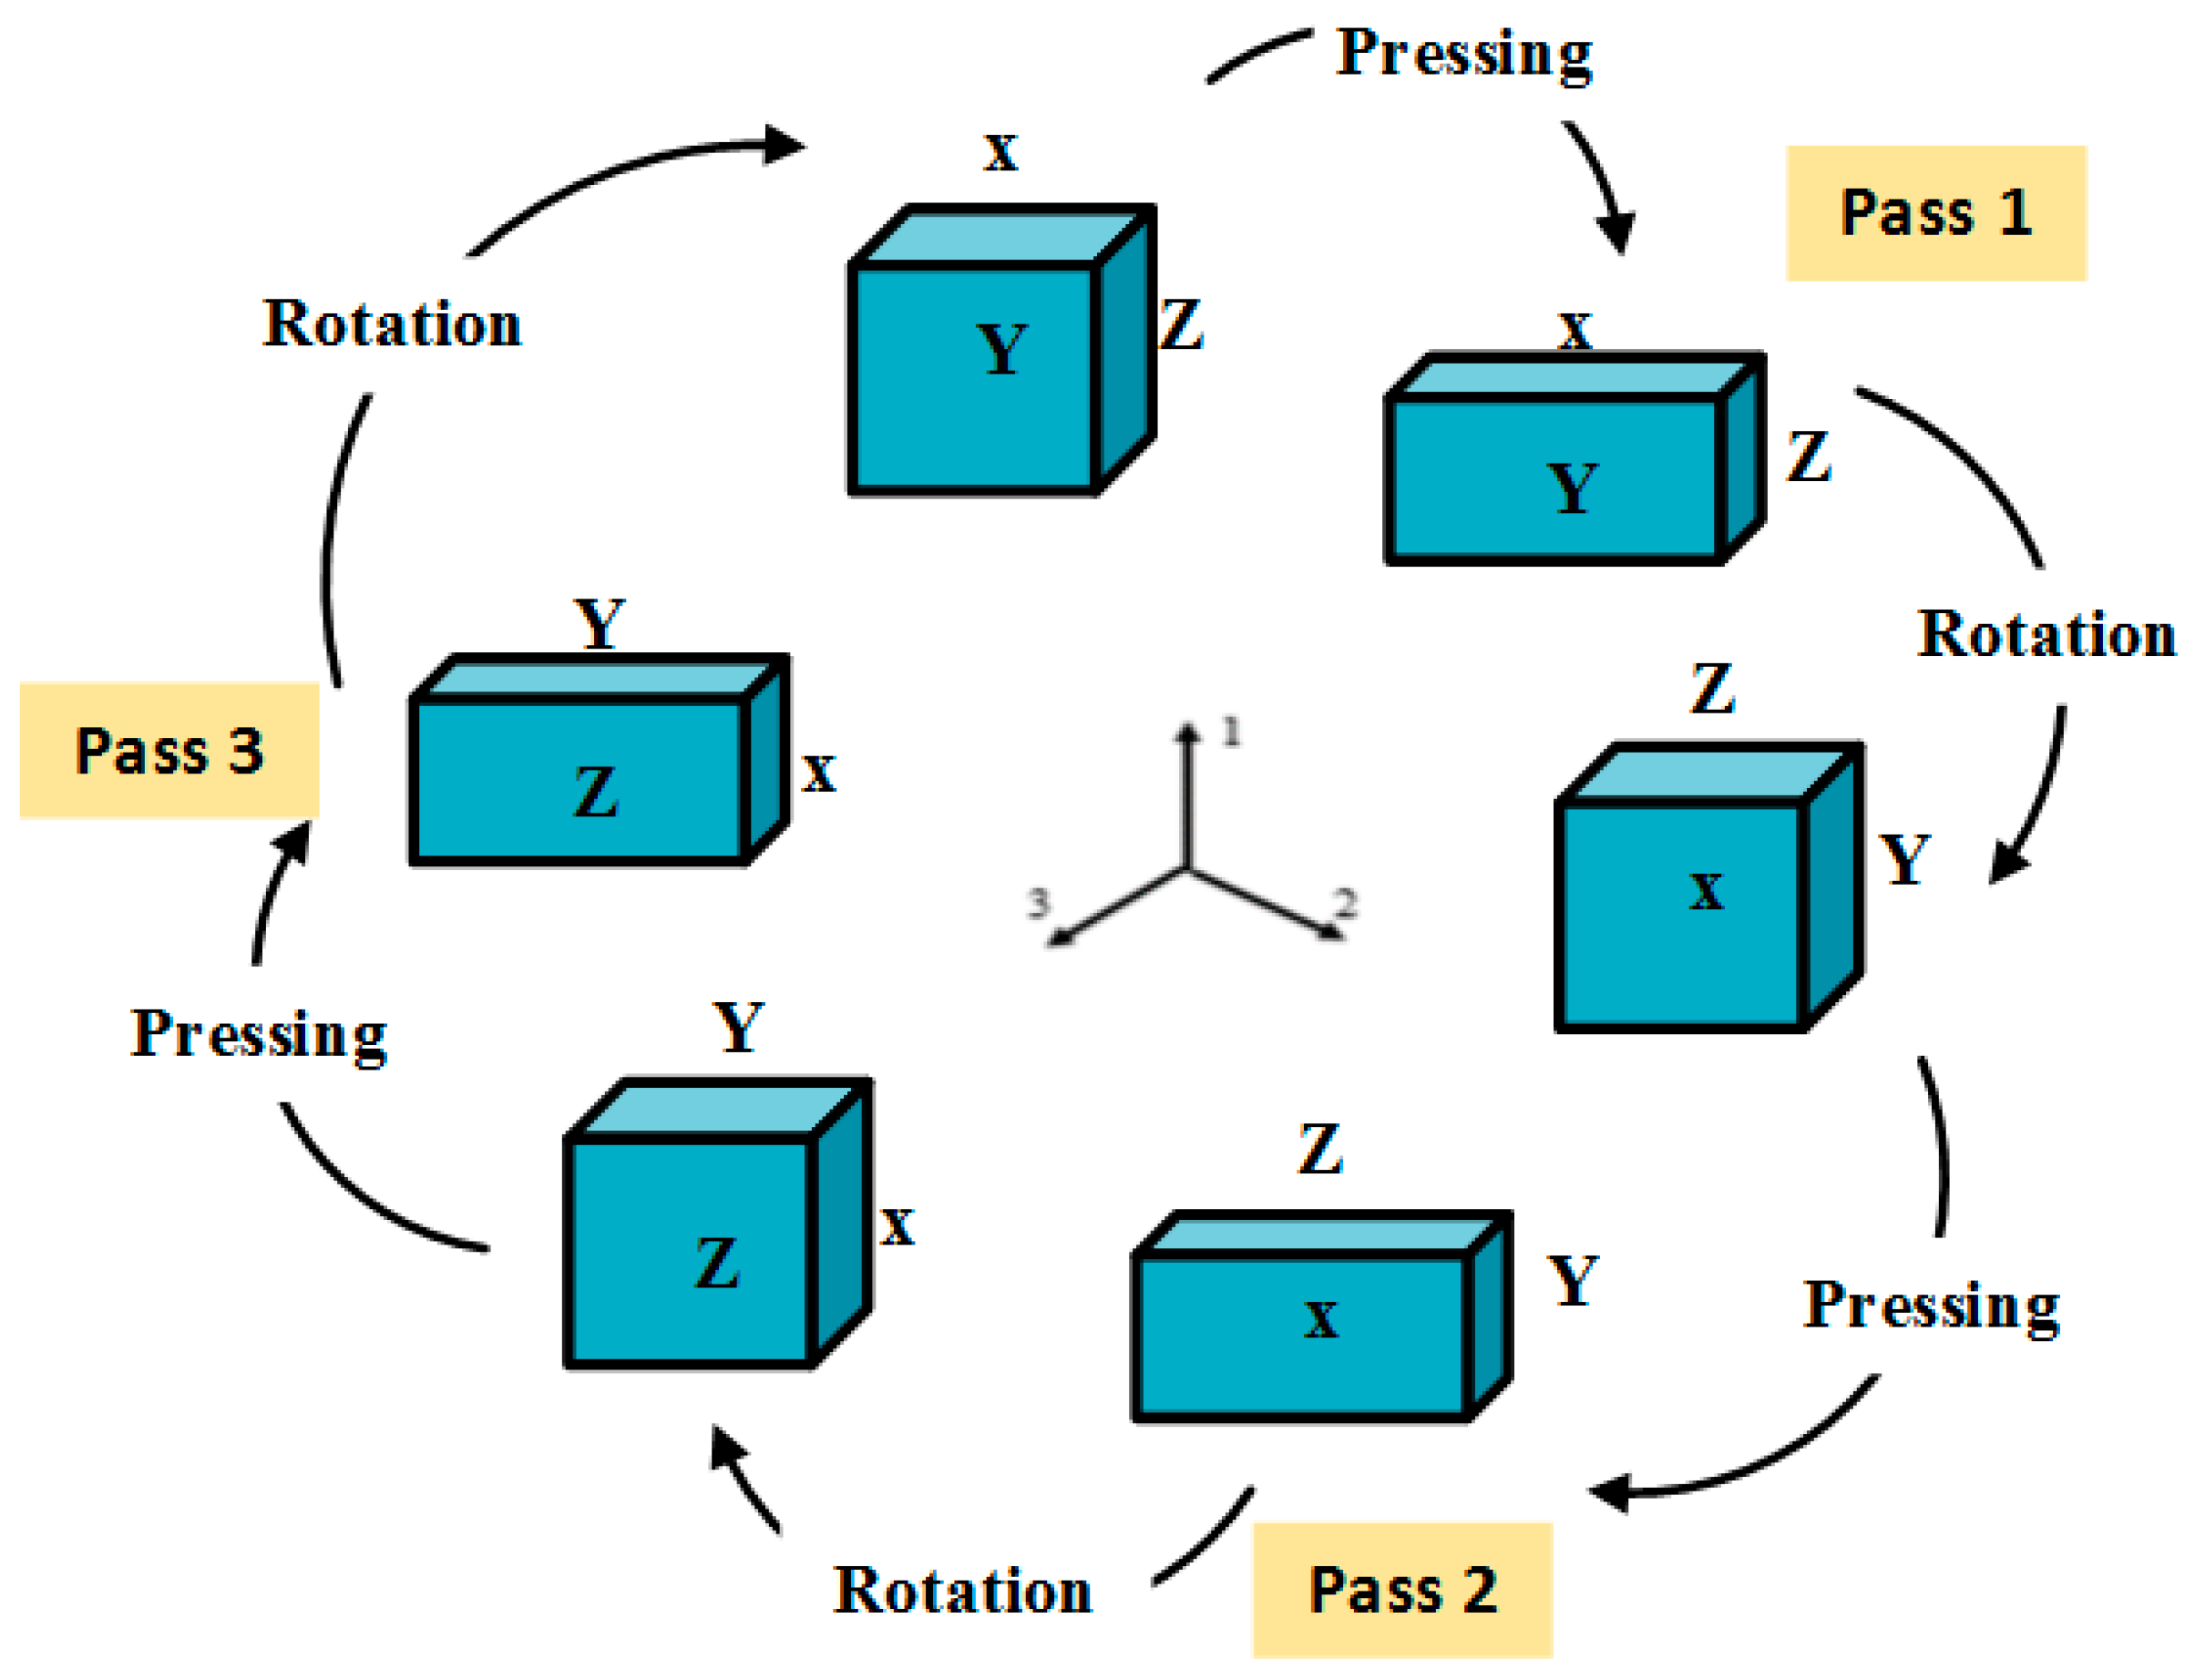
Figure 1. Schematic illustration of one cycle of the multiaxial forging (MAF) process.
Metals 09 00132 g001
Figure 2. Comparison of experimental and simulative MAF process of Ni 200 alloy. (a) Experimental set up, (b) actual sample, and (c) simulative sample through finite element (FE).
Metals 09 00132 g002
Figure 3. TEM of Ni 200 alloy: (a) Before MAF; (b) after three cycles of MAF [6]. (Reproduced with permission from Elsevier, 2018.).
Metals 09 00132 g003
Figure 4. Comparison between kinetic energy and total energy indication.
Metals 09 00132 g004
Figure 5. Finite Element Method validation graph.
Metals 09 00132 g005
Figure 6. Inhomogeneous factor at (a) 25 °C; (b) 250 °C; (c) 500 °C.
Metals 09 00132 g006
Figure 7. Strain distribution contour plot (a) at 25 °C; (b) at 250 °C; (c) 500 °C.
Metals 09 00132 g007
Figure 8. Effective strain at (a) 25 °C; (b) 250 °C; (c) 500 °C.
Metals 09 00132 g008
Table 1. Chemical composition of Ni.
ElementNiCuMnSiCMgSFePb
Weight (%)99.50.010.0020.010.01<0.005<0.0020.02<0.002
Table 2. Inhomogeneity factor (IF) of Ni 200 alloy at different MAF cycles.
Test SamplesVicker’s Hardness (Hv)IF (%)
0 cycle of MAF121.2 ± 1763.9
1 cycle of MAF260.6 ± 1448.7
2 cycle of MAF305.9 ± 1635.8
3 cycle of MAF330.7 ± 1321.7
Table 3. Material properties of Ni 200 alloy [33].
ABCnmMelting Temperature
163.4 MPa648.10 MPa0.0060.331.441465 °C
Table 4. Mechanical and physical properties of Ni-200 Alloy [34].
Elastic ModulusPoisson’s RatioDensitySpecific Heat
210 GPa0.38.908 g/cm3456 J/kg·K
Table 5. Input and output parameters considered in this research.
Independent Parameters (Inputs)ValuesOutputs
Strain Rate66.7 s−1 (Quasi-static)Effective Strain (ES)
666.67 s−1
6666.67 s−1
Temperature25 °C
250 °C
500 °C
Coefficient of friction0.05Inhomogeneous Factor (IF) Via strain distribution
0.1
0.15