Article

Suppressing the Use of Critical Raw Materials in Joining of AISI 304 Stainless Steel Using Activated Tungsten Inert Gas Welding

1
Faculty of Technical Sciences, University of Novi Sad, Trg Dositeja Obradovica 6, 21000 Novi Sad, Serbia
2
Faculty of Special Technology, Alexander Dubček University of Trenčín, Študentská 2, 911 50 Trenčín, Slovakia
3
Faculty of Technology, University of Novi Sad, Bulevar Cara Lazara 1, 21000 Novi Sad, Serbia
4
School of Aerospace, Transport and Manufacturing, Cranfield University, Bedfordshire MK43 0AL, UK
5
Łukasiewicz Research Network-Institute of Advanced Manufacturing Technology, Wroclawska 37a, 30-011 Krakow, Poland
*
Author to whom correspondence should be addressed.
Metals 2019, 9(11), 1187; https://doi.org/10.3390/met9111187
Submission received: 23 September 2019 / Revised: 19 October 2019 / Accepted: 21 October 2019 / Published: 4 November 2019
(This article belongs to the Special Issue Metal Oxides)

Abstract

:
The aim of this study was to study the influence of TiO2 coating for its efficacy during the activated-tungsten inert gas (TIG) welding and to suppress the use of consumables that are rich in critical raw materials. Post-welding penetration depth, particle size distribution, microstructure, and microhardness of welded samples were assessed. Based on these results, it was found that there is no direct correlation between the weld metal surface area and the coating. The particle size in the coating, although, seemed to have played an important role, e.g., nanoparticles resulted in an increased penetration depth and depth/width (D/W) ratio as opposed to the submicron-sized particles. The most optimal welding condition resulted when a mixture of submicron-sized and nanometric-sized particles were used. It was demonstrated by the Zeta analyser results that the micron particles rub the nanoparticles due to mechanical friction resulting in smaller oxide particle formation in the coating. Finally, the presence of Marangoni convection in TIG and reversed Marangoni convection in the activated TIG (A-TIG) process were proven by means of the microstructure analysis and measurement, which were found to be positively correlated.

1. Introduction

Tungsten inert gas (TIG), alternatively called gas tungsten arc welding (GTAW), is a well-established welding process that can produce high-quality welds on different materials, including stainless steels and a wide variety of non-ferrous alloys. However, as opposed to gas metal arc welding (GMAW), the process suffers from a relatively low yield so the application of TIG is traditionally limited to relatively thin sections in different welding positions [1,2].
To address the problem of yield, activated TIG (A-TIG), which uses a coating or a flux to act as a catalyser during the welding process (catalyzed TIG welding), was developed. The application of coating before TIG welding was proposed for the first time by the Paton Welding Institute of the National Academy of Sciences, Ukraine, back in the 1960s [3]. During A-TIG, a coating is sprayed or applied by a brush over the previously cleaned and prepared surface to be welded. Coatings are usually fabricated by mixing metallic oxide powders with solvents, most frequently acetone and ethanol [4,5,6,7,8].
The A-TIG process offers increased penetration depth, offering the possibility to weld significantly higher thicknesses, without common V-preparation and without consumable materials, as well as a significantly lower energy consumption, having a significant impact on cost and time savings during production. The secondary benefits are lower distortion, lower residual stresses, fewer micro-inclusions and improved creep-rupture properties [9,10,11,12,13,14,15,16,17]. Since the 1960s, the A-TIG process was successfully applied to weld a number of different materials: Titanium alloys, austenitic, ferritic, duplex stainless steels, high strength alloyed and unalloyed steels, nickel-based alloys, etc., as summarised in [18], as well as to weld dissimilar alloys [10,19].
There are several effects that might have a significant influence on the increase in penetration, which is accompanied by the narrowing of the weld. Welds in A-TIG change from wide shallow type (with a relatively low depth-to-width ratio) to a deep, narrow weld (with several times higher depth-to-width ratio) [20,21]. The two major factors responsible for an improved penetration depth appear to be the reversal of Marangoni convection and arc constriction [18]. Marangoni convection is a surface-tension-driven convection depending on the surface tension gradient in the fluid. As fluid flows from areas where surface tension is lower towards areas where it is higher, the reversal of surface tension influences the flow of the molten metal and at the same time can influence the shape of the weld metal. In TIG welding, the flow is from the center of the weld pool towards the fusion boundary, influencing the occurrence of the wider and less deep weld. By reversing the position of these areas, the molten metal can also be reversed, flowing from the fusion boundary towards the center, resulting in a narrower and deeper weld [22,23].
The increase in penetration can be achieved in molten metals containing small amounts of impurities such as sulphur, but obviously the alternative in the form of oxygen might be more attractive [24]. Zou et al. [24] applied a double flow plasma torch with oxygen gas added to the outer flow, to achieve a depth-to-width ratio of up to 0.8. Another approach is to use coatings, based on SiO2, TiO2, MoO3, Cr2O3, NiO, and CuO powder in a solvent, usually ethanol or acetone. This approach also influences arc constriction effect, which is achieved by the electronegativity of the coating, especially by the presence of Si and Ti [25,26]. Using this approach, even higher depth-to-width bead ratios can be achieved.
Tseng et al. [2] reported a depth-to-width ratio of 1.08 using SiO2 nanoparticle-based coating applied to UNS S31603 stainless steel. In the work by Vora and Badheka [21] on reduced-activation ferritic/martensitic steel, a range of coatings was tested, based on Al2O3, Co3O4, CuO, HgO, MoO3, and NiO, of which the most effective were Co3O4 and CuO, due to the identified reversed Marangoni effect and arc constriction effect. Also, considerable work was done on studying complex coatings, containing different types of powders. Venkatesan et al. [27] studied the effect of three different types of powders, SiO2, TiO2, and Cr2O3, in different ratios. They found that the mixtures of powders have a more pronounced effect on penetration depth, more specifically, the mixture of SiO2 and TiO2 having the highest effectiveness in welding of AISI 409 ferritic stainless steel. The influence of particle size was also studied [2], where 75 µm and 40 nm SiO2 and 95 µm and 50 nm Al2O3 micro and nanoparticles were used as key constituents in powders. It was shown that the influence of particle size of Al2O3 did not have a crucial influence on increase in penetration, unlike SiO2.
In this study, the influence of metallic oxide nano- and submicron particles in different ratios on the performance of A-TIG welding of austenitic stainless steels was analysed. The results were correlated to true particle size results. Also, molten metal flow model was developed based on microstructural analysis. The A-TIG process was compared to TIG with consumable material applied, to evaluate the possibility to avoid the application of consumable wire. Special attention was paid to the problem of critical raw materials (CRMs) for the European Union. Namely, the consumables used in the welding of austenitic stainless steels contain critical raw materials (CRM) or nearly CRMs and relatively expensive materials such as chromium, nickel, and silicon metal [28,29], the use of which can be suppressed by using the proposed approach and it became the motivation for this work.

2. Materials and Methods

The base metal used was AISI 304 (X5CrNi18-10) stainless steel in the form of 10-mm thick plates. The chemical composition of this material was <0.03% C, 0.5% Si, 1.3% Mn, <0.008% Si, 18.03% Cr, 0.003% P, 0.01% Al, 0.41% Cu, 9.51% Ni, 0.012% Sn, 0.07% V, and the remaining Fe. The two types of coatings used during the A-TIG welding were based on TiO2 oxides of 20-nm nanoparticles and 0.3-µm submicron particles (Figure 1). As part of this investigation, six different mixtures (by weight percentages) were prepared, containing 5 wt. % of particles in acetone ((CH3)2CO) and were referenced to the control sample without the coating and consumable material (specimen 0).
(1)
All-submicron particles (5M);
(2)
20% nano and 80% submicron particles (4M1N);
(3)
40% nano and 60% submicron particles (3M2N);
(4)
60% nano and 40% submicron particles (2M3N);
(5)
80% nano and 20% submicron particles (1M4N);
(6)
All-nanoparticles (designated as 5N).
Weighing was done on a Tehtnica Type 2615 analytic balance (Zelezniki, Slovenia), while mixing of the oxide particles into the carrier solvent was done with a Tehtnica MM530 magnetic stirrer (Zelezniki, Slovenia), for 600 s. The size of the particles in the liquid component was determined by the application of a Zetasizer Nano ZS device (Malvern Instruments, Malvern, UK).
The coating was manually applied over the base material with a 10-mm brush, in a layer having a width of approximately 20 mm. The welding-remelting was done on EWM Tetrix 230AC/DC device (Mündersbach-Westerwald, Germany), with 200 A DCEN current and by using a nozzle diameter of 12.7 mm. The gap from the electrode tip to the base metal surface was kept as 2 mm. The process was done with 2.4-mm tungsten electrode containing 2% thorium (with red color mark). To study the electrode tip geometry, three different shapes were used: Conical 90° sharp tip (designated as S), conical 90° with 0.5-mm frustum (F) at the tip, and blunt tip (B). Argon gas flow rate was set at 12 L/min, while the welding speed was maintained at 100 mm/min, along with the center of 50-mm width of the stainless-steel strip. Welding extension was 6 mm. Specimen 0 was prepared by machining a 2-mm-deep square V-groove. This was done to facilitate the application of 0.8-mm coil wire made of AISI 308 austenitic stainless steel with the following nominal chemical composition: ≤0.08% C, ≤2% Mn, ≤0.045% P, ≤0.03% S, ≤1% Si, 19–21% Cr, and 10–12% Ni. Other specimens (1–6) were welded without the consumables.
Post-weld characterisation was done in terms of macro- and microstructure examination, and microhardness. Macro- and microstructure examinations were done by cutting, grinding (abrasive papers), and polishing (diamond suspensions 6–¼ µm), followed by aqua regia etching. Weld width and depths were measured, while depth-to-width ratios were calculated. Also, microstructures in various typical places such as the weld bead (WB), heat-affected zone (HAZ), and base metal (BM) were examined on a Leitz Orthoplan light microscope (Oberkochen, Germany). The light microscope was also used for accurate measurement of WB width and penetration.
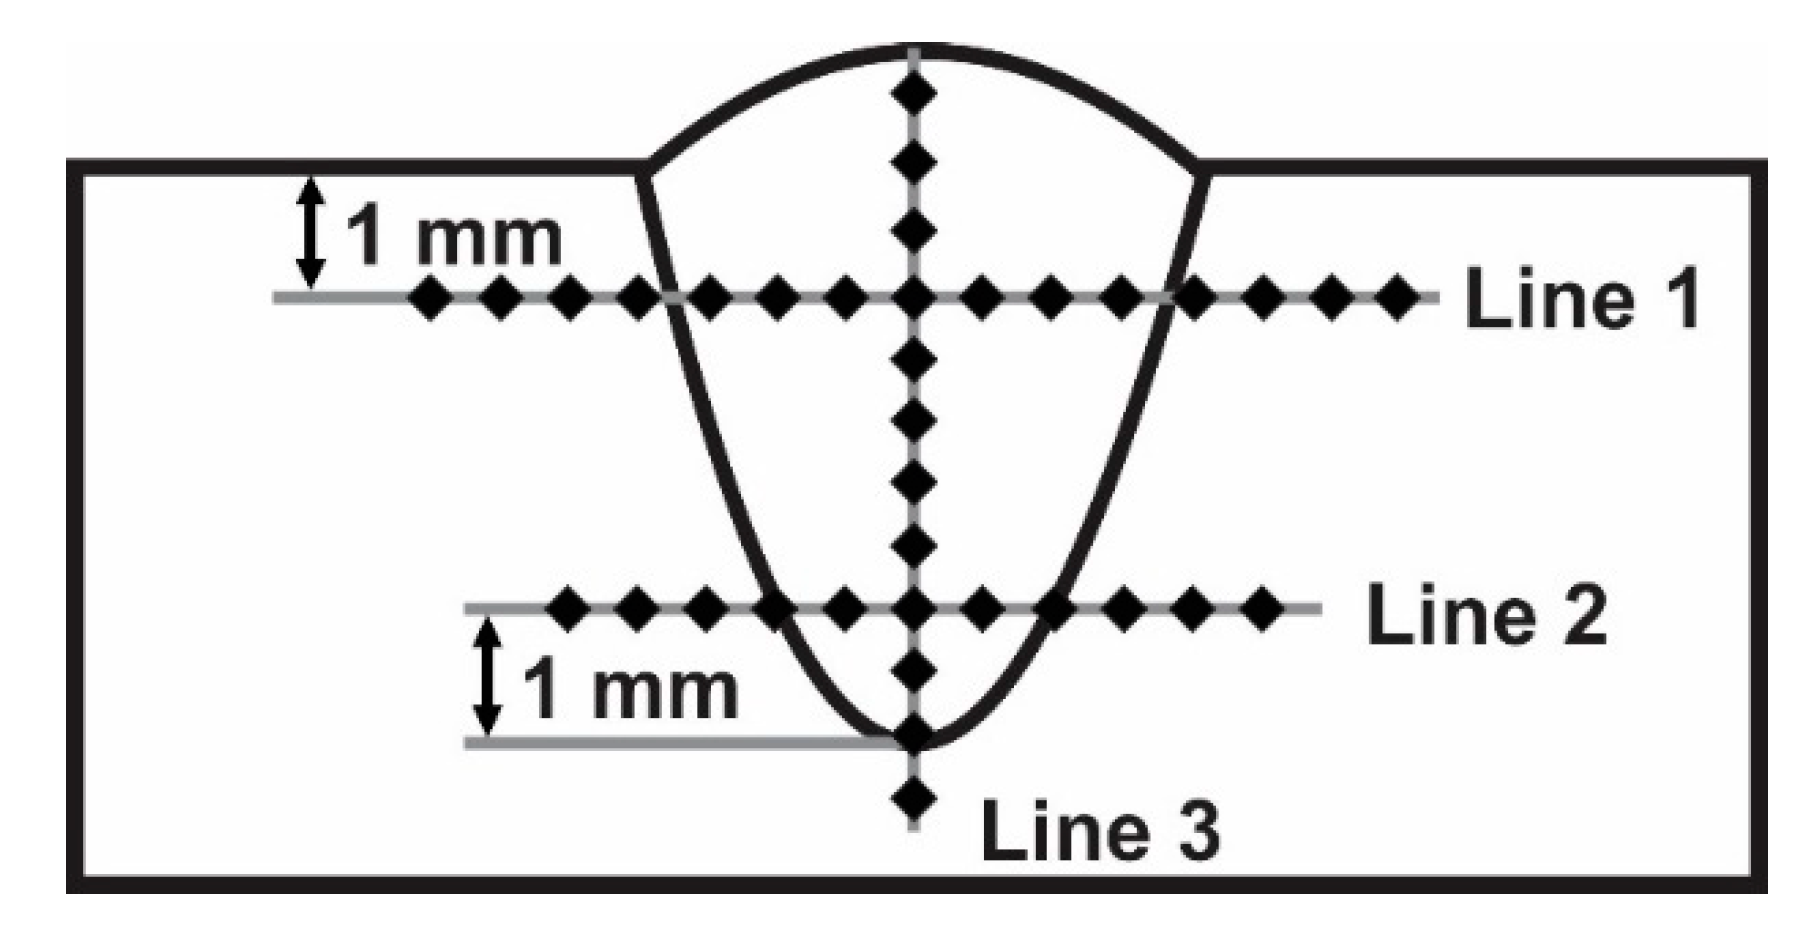
Vickers microhardness was done along line 1, 1 mm under the surface; along line 2, 1 mm above the bottom of the WB through BM, HAZ, WB, HAZ, and WB; and finally, through the center of the WB, perpendicular to lines 1 and 2, starting at 1 mm under the surface, to the bottom of the WB, HAZ, and BM, Figure 2. The distance between the indentations was 0.5 mm. Indentation loading was 0.981 N (100 gf) on Wilson Tukon 1102 (Uzwil, Switzerland) device.

3. Results

3.1. Particle Size Distribution in the Coating

Particle size distribution in the coating is shown in Figure 3. Despite the use of nominally nano- and submicron-sized particles, all specimens showed significant agglomeration. The smallest detected particles were 0.25 µm, while the largest were in the range of 15–16 µm. Particles of size up to 1 µm were seen more commonly in all the specimens. There was a significant difference between the specimen containing only submicron particles (5M) and other specimens, containing also nanoparticles. In specimens 4M1N and 3M2N, the smallest particles detected were of 0.25 µm, and in specimens 2M3N, 1M4N, and 5N the smallest detected particles were of 0.29-µm size, while in all-submicron-particle mixture 0.95-µm particles were the smallest. Although nano-based mixture (5N) showed it to be more effective in the sense of containing smaller-sized particles than the specimen containing submicron-sized particles (5M), the highest amount of the smallest particles were found in mixtures, containing both submicron and nanoparticles (3M2N, 2M3N, and 1M4N).

3.2. Macro and Weld Bead Dimensions

Macro images of welds obtained without and with coating, different electrode tip profiles, with indicated depths, widths, and depth-to-width ratios and weld surfaces are shown in Figure 4. It is difficult to establish a direct correlation between the application of coating type and surface areas of weld metals. Several weld metal shape types obtained by A-TIG can be identified. Without the coating (specimens 0), the shape of the weld was flat, semi-elliptical in shape, and could be attributed also to coatings containing submicron particles (specimens 5M) and predominantly submicron particles (specimen 4M1N) regardless of the electrode tip used. Some isolated examples also exist, relating to sharp tip (S) electrode, containing the majority or all nanoparticles in the coating (specimens 1M4N-S and 5N-S). Specimens containing a balanced amount of submicron and nanoparticles in the coating regardless of the electrode tip geometry as well as predominant-nano and all-nanoparticle coating with frustum and blunt tips (designated as F and B) exhibited pronounced change in the shape of the weld, starting from the least pronounced, nearly semicircular in specimen 2M3N-F, to an almost hour-glass shape in 3M2N-F and 1M4N-F. These three specimens obtained with frustum-shaped tip, on the other hand, indicated that relatively small variations in submicron and nanoparticle content may induce large differences both in weld shape and dimensions.
Depths of penetration of A-TIG specimens were higher than those of the control TIG specimens. Also, there were differences between specimens welded with different types of electrodes. Maximum values of penetration depths were higher in specimens welded with S and F electrodes than with the B electrode. Coatings containing only nanoparticles (5N) influenced the lower depth of penetration compared to other mixtures, including submicron particles. The highest penetration was obtained with the combination of submicron and nanoparticles in the mixture, such as 1M4N, 2M3N, and 3M2N, regardless of the electrode tip geometry used. An increase in the penetration depth caused narrowing of the weld width. The same can be established by measurement of the depth-to-width ratios, also given in Figure 3, reaching almost the value of 1 in specimen 4M1N-F.

3.3. Microstructure

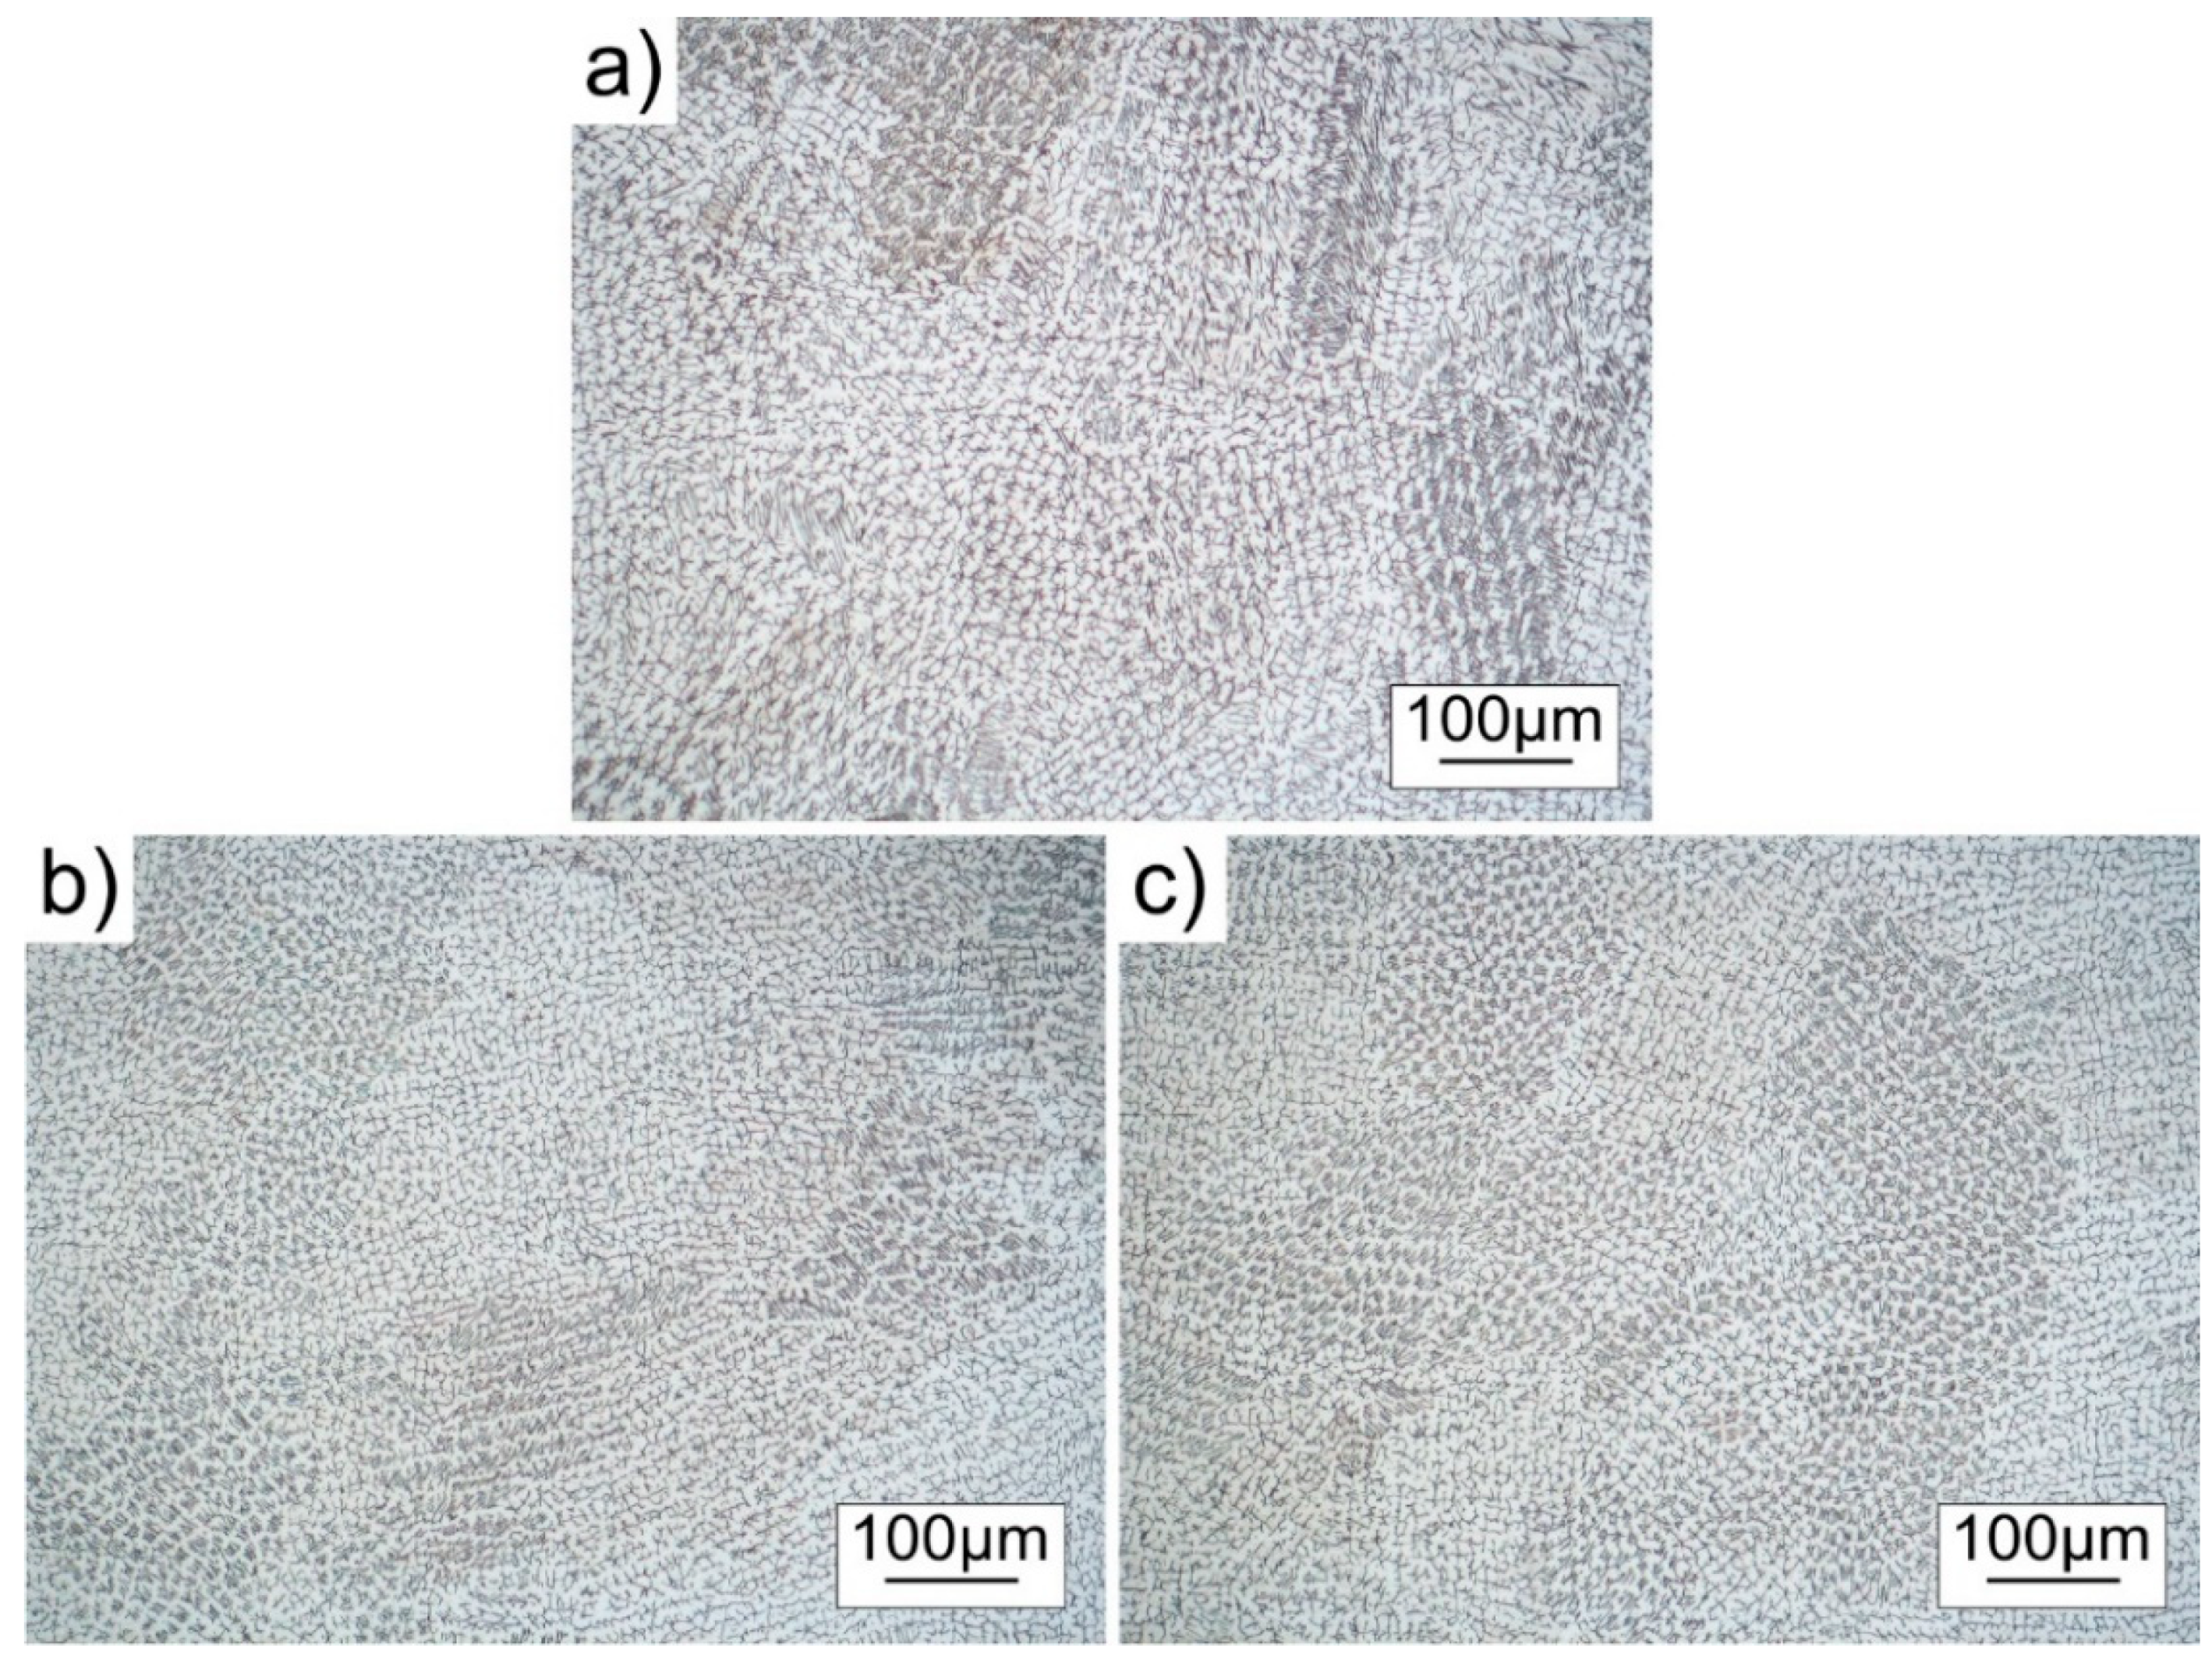
Microstructures of specimens obtained from light microscope 0-F, 5M-F, 1M4N-F, and 5N-F are presented in Figure 5, Figure 6 and Figure 7. In Figure 5, weld metal microstructures of 0-F, 1M4N-F, and 5N-F are shown. All microstructures corresponded to the typical dendritic morphology found in weld metal in stainless steels.
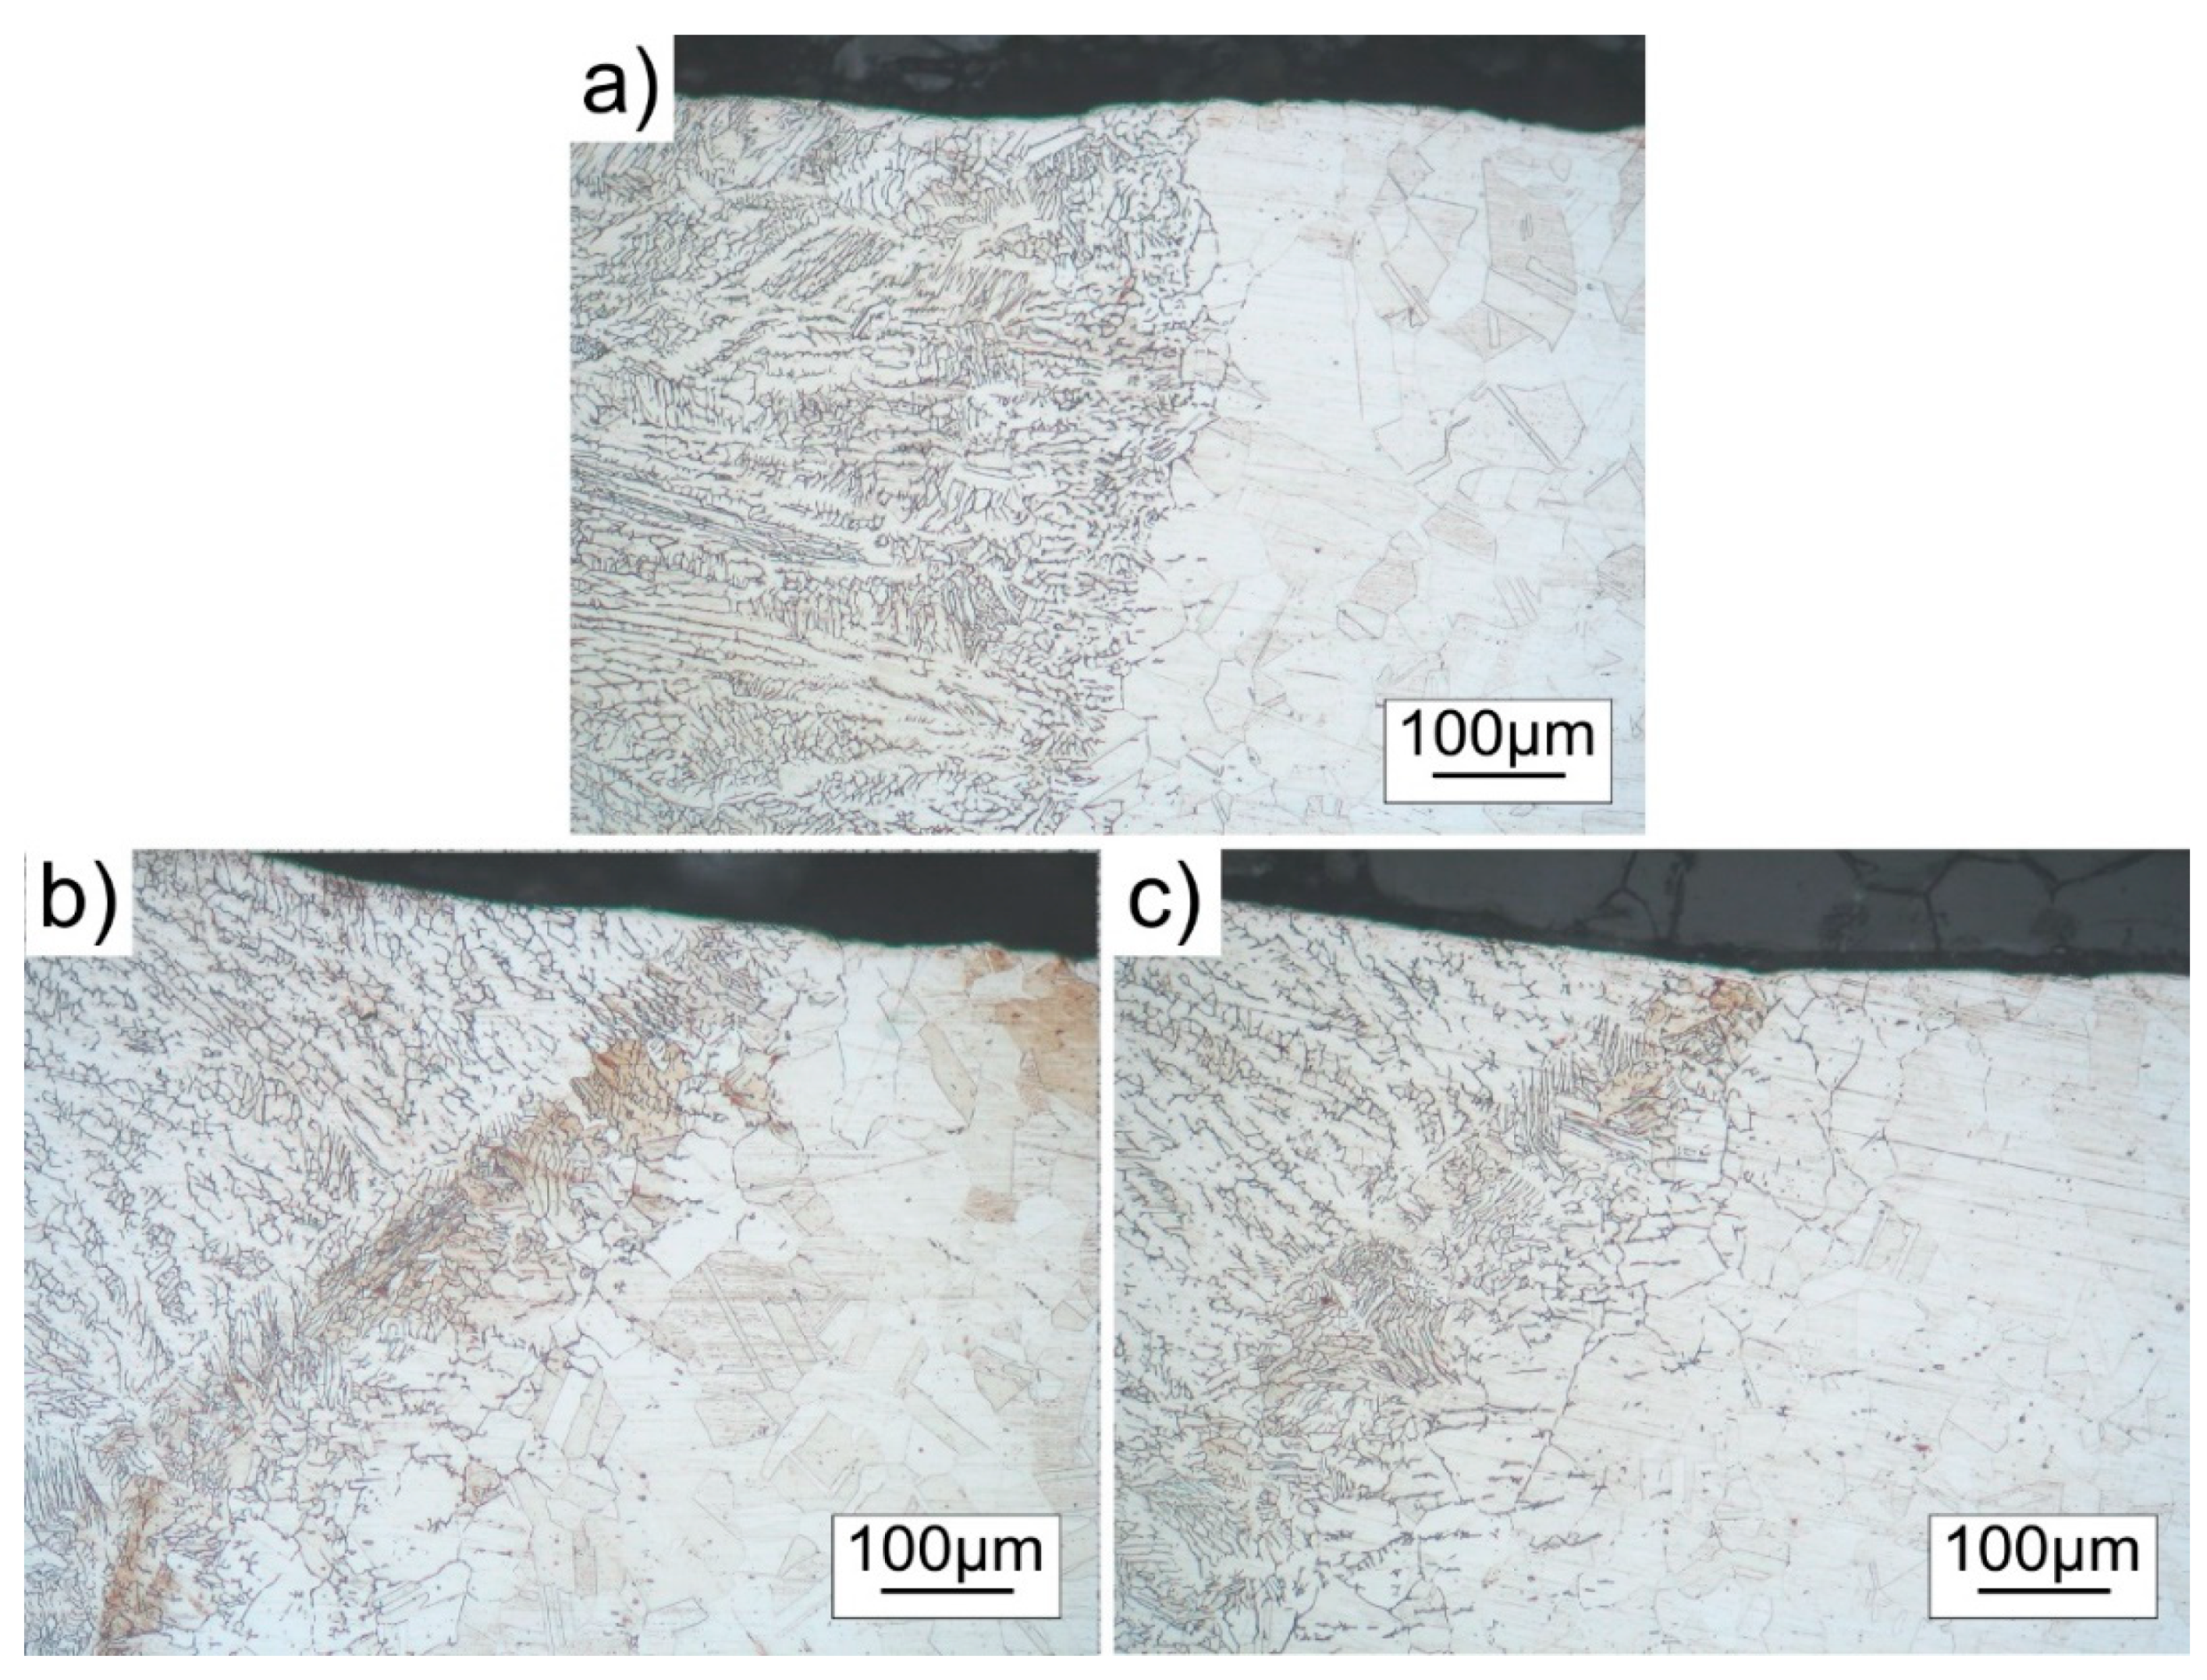
In Figure 6, the microstructure near the fusion line at the surface is shown, while in Figure 7, the fusion line at the bottom of the weld is depicted. There was a considerable difference between specimens obtained without the coating (0-F) and specimens obtained with the coating (1M4N-F and 5N-F). In specimen 0-F, austenitic grain coarsening was noticeable near the surface, while in specimens 1M4N-F and 5N-F in the bottom, under the weld line, in the base metal.

3.4. Vickers Microhardness

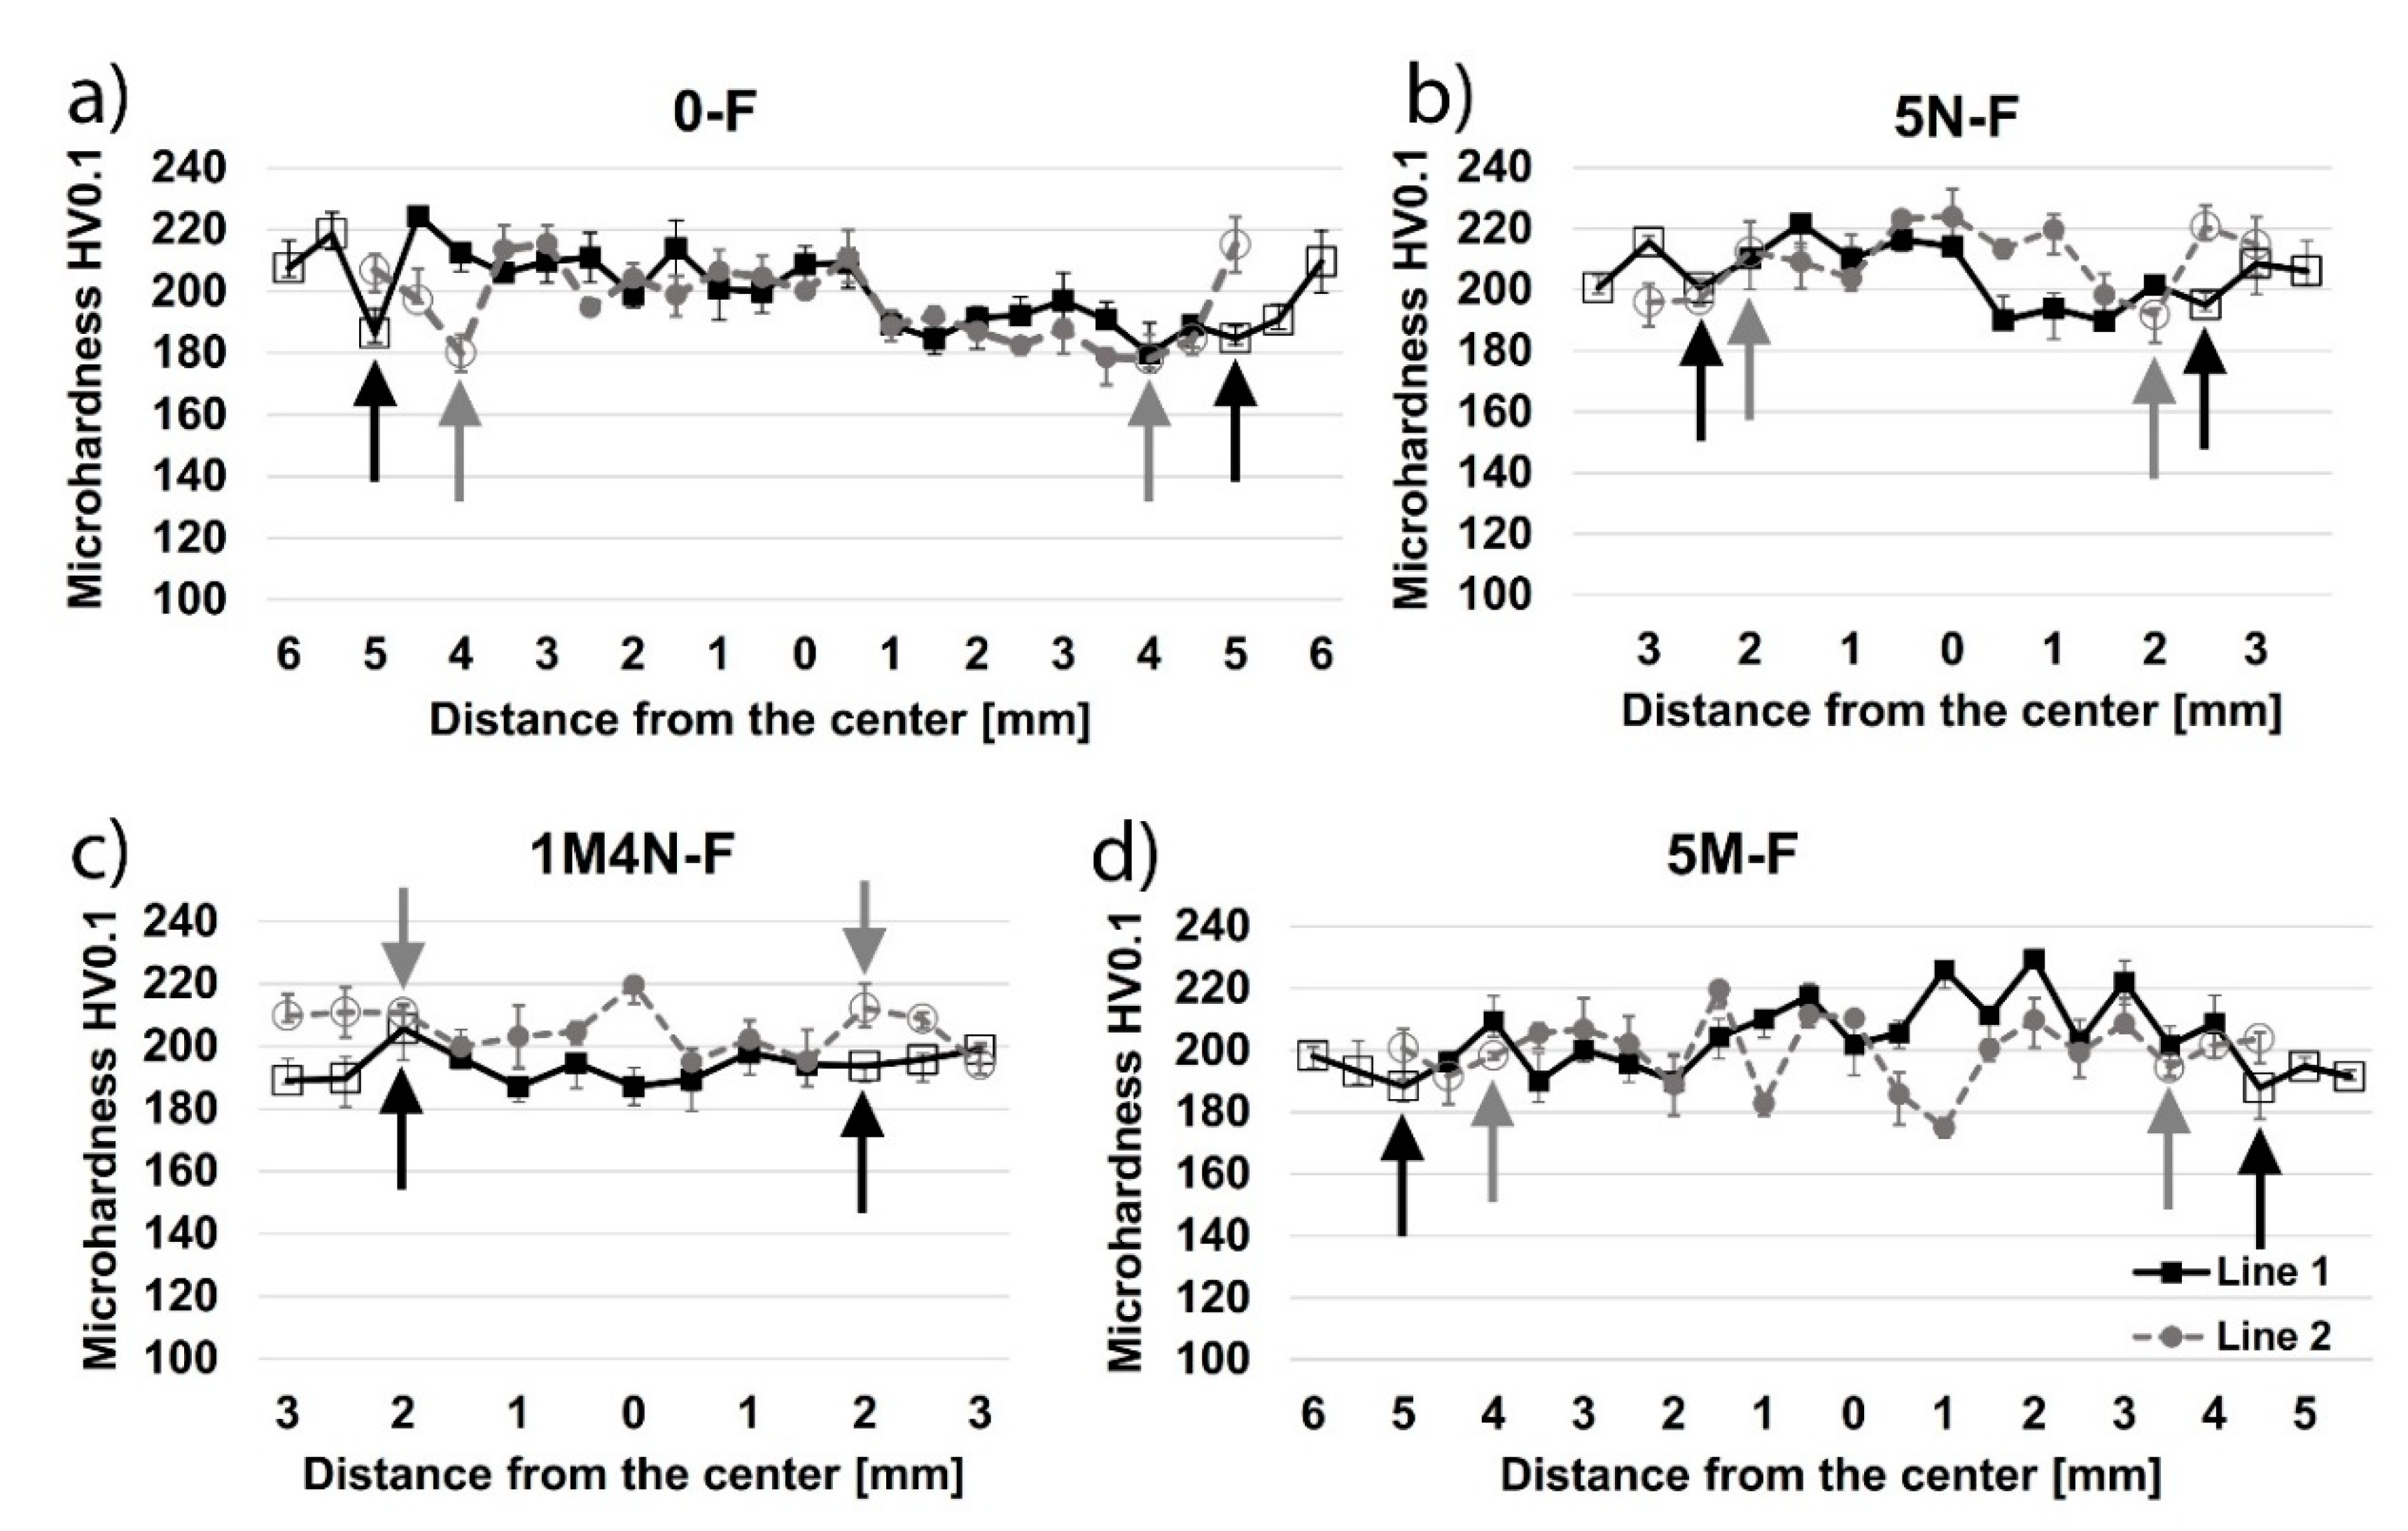
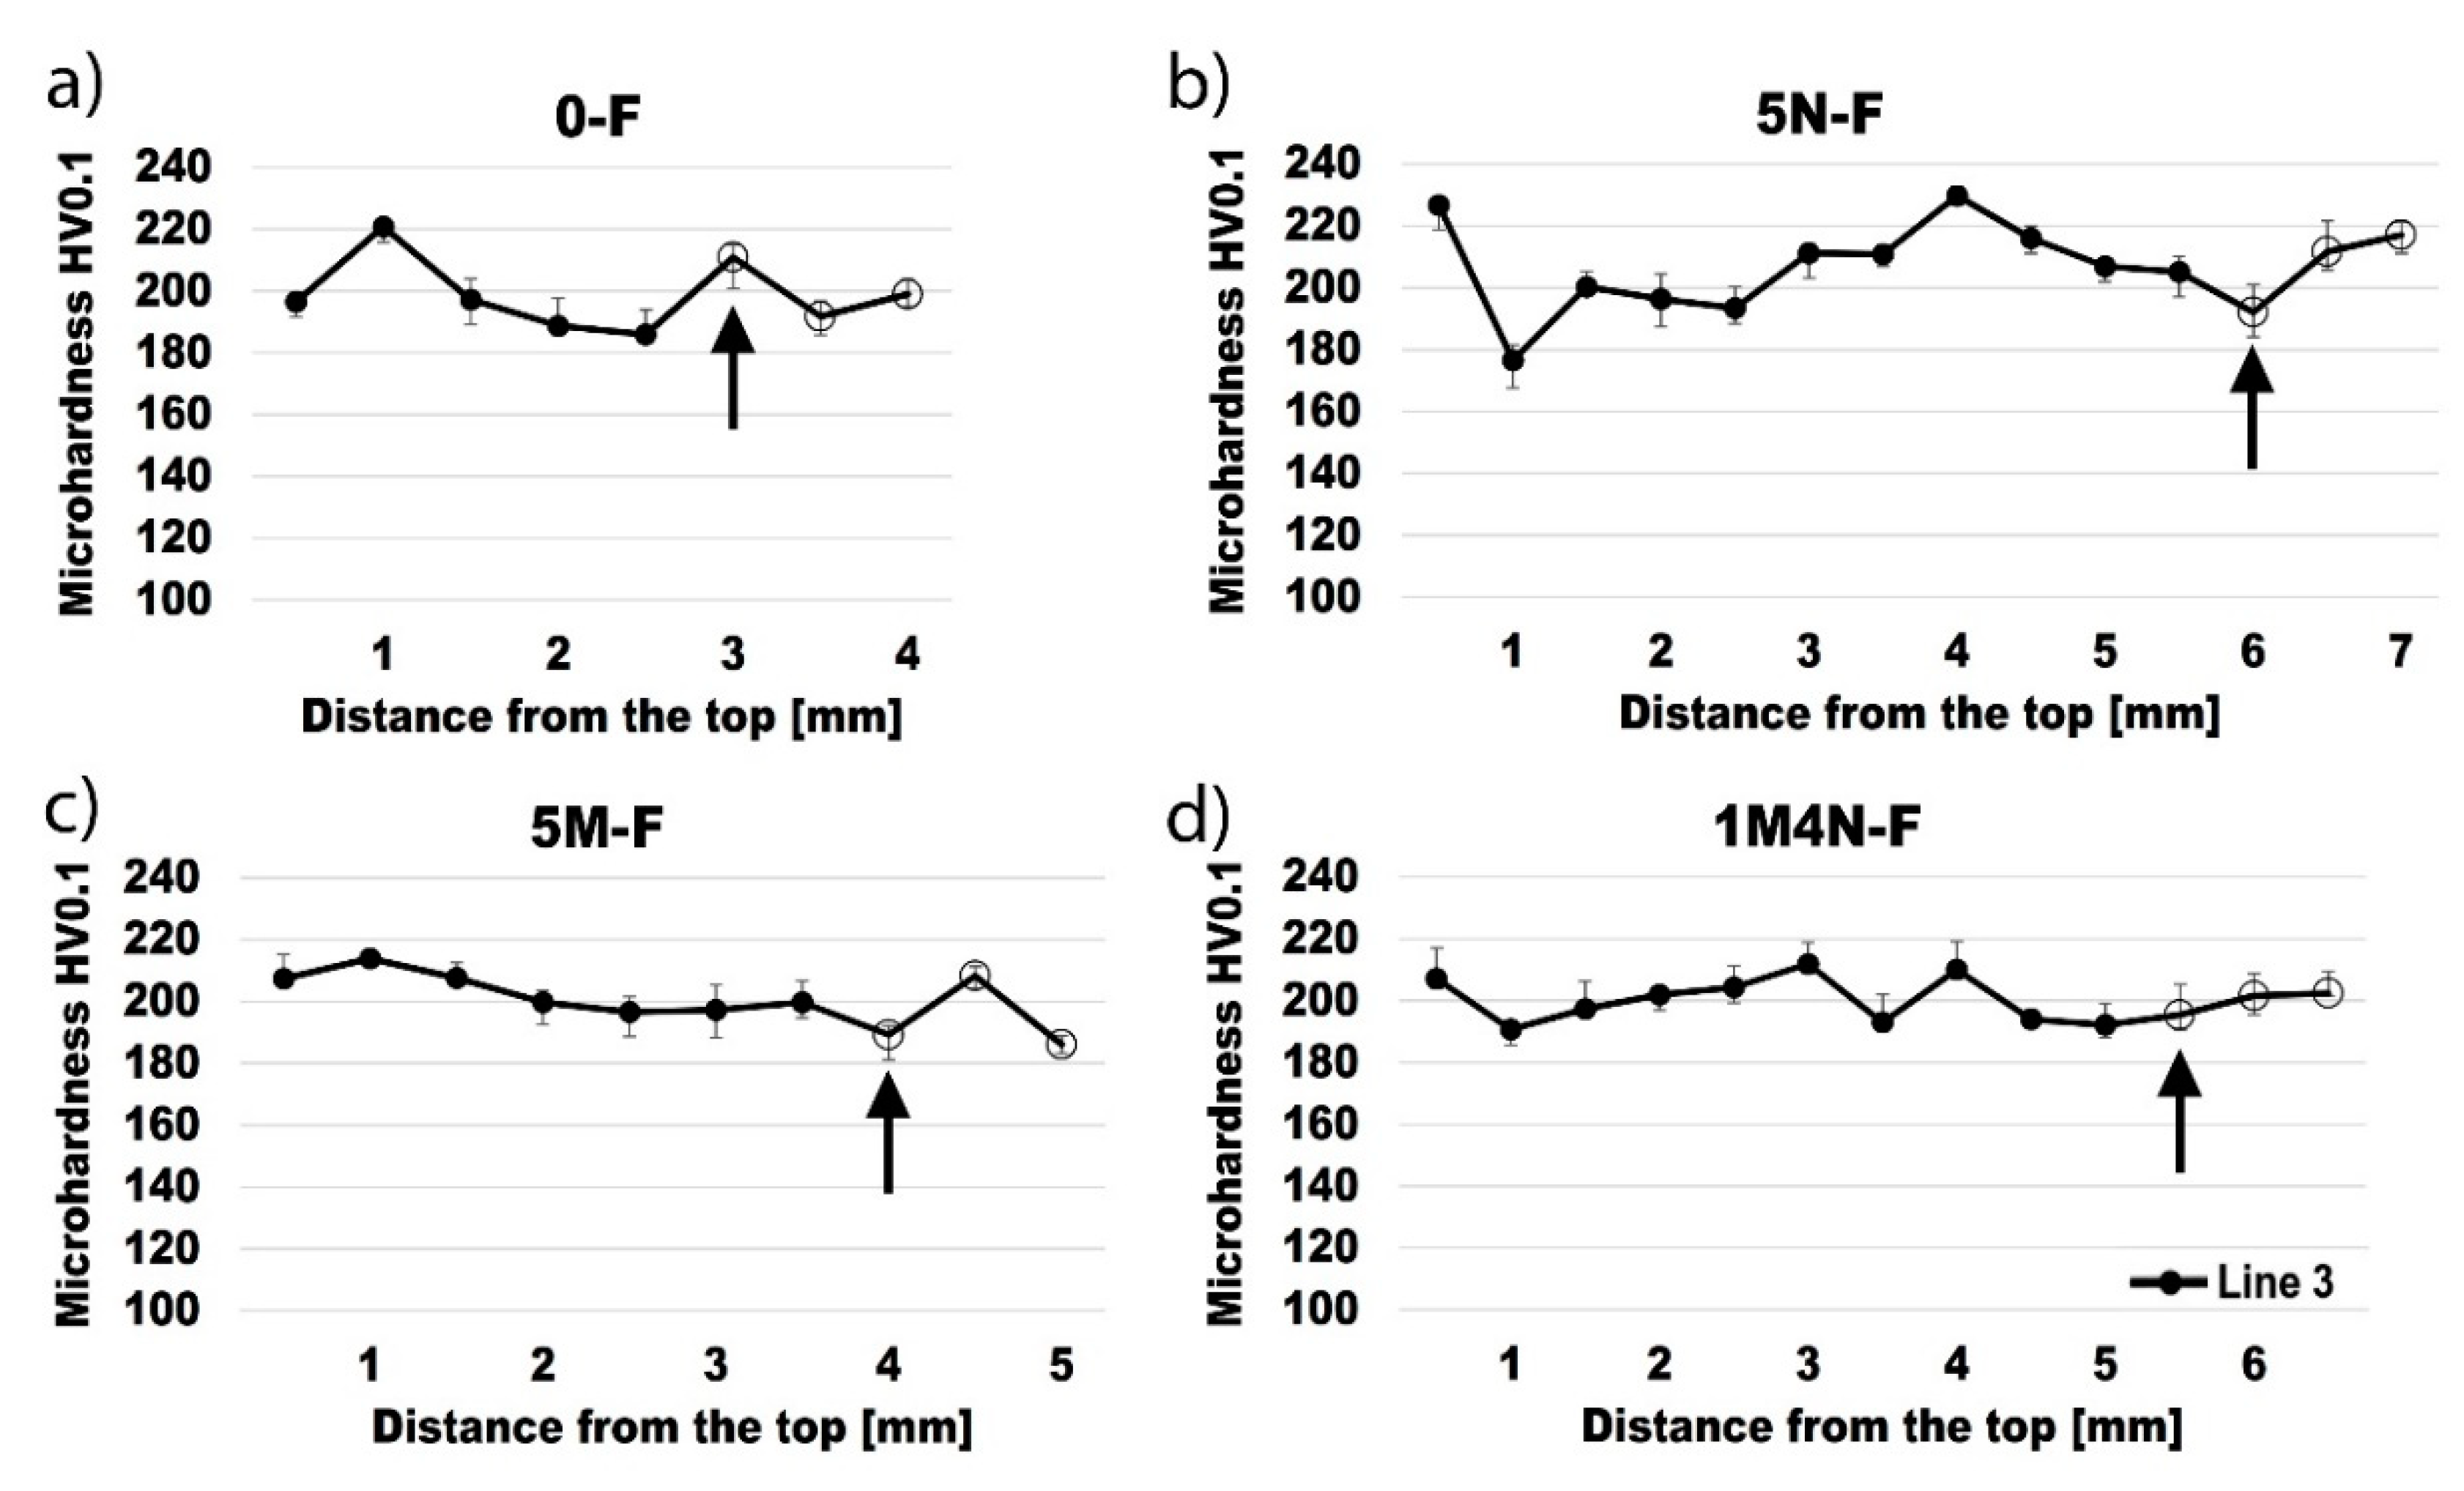
Vickers microhardness testing was done on the same specimens selected for microstructure testing: 0-F, 5M-F, 1M4N-F, and 5N-F. Microhardness values were measured in three lines, as explained in the Experimental part and graphically presented earlier in Figure 2. In Figure 8, values measured along lines 1 and 2, while in Figure 9, values along line 3 are shown. In specimen 0-F, minimal values occur near the fusion line (hollow marks, indicated by arrows), at the position just under the specimen surface (measurement line 1). On the other hand, in specimens 5M-F, 1M4N-F, and 5N-F, minimal values are obtained under the weld (hollow marks, indicated by arrows). These values closely corresponded to the occurrence of coarsened austenitic grains shown in the preceding section.

4. Discussion

In this paper, different TiO2 submicron and nanoparticle ratios were interspersed to produce A-TIG coatings, used for welding by 2% thoriated tungsten electrodes with various electrode tip profiles. The existence of coating did not influence the weld metal surface area. This was in contrast to the work of Tseng and Lin [2], who obtained significantly increased weld metal surface areas with the coating and larger surface areas with the coating based on SiO2 and Al2O3 nanoparticles compared to the ones using microparticles.
The highest depth of penetration was obtained with frustum-type electrode, in specimen 3M2N-F, closely followed by the specimen 5N-F and 2M3N-S, obtained with frustum and sharp electrodes, respectively. TiO2 nanoparticles proved to be more effective than submicron particles, but the mix of the two proved to be the most effective. A similar trend was noticed in D/W ratios. Nanoparticles proved to be more effective than submicron particles in the coating, especially with frustum electrodes used. This result is in agreement with the results reported by Tseng and Lin [2], who demonstrated that the SiO2 nanoparticles were more effective in achieving an increase in penetration depth than the microparticles of the same type. However, in [2], no significant gain in penetration was achieved by using Al2O3 nanoparticles versus microparticles. The advantage of nanoparticles versus larger submicron- or micron-sized particles could be attributed to a higher effectiveness of smaller coating particles. In arc heating, the thermal dissociation and decomposition of smaller particles occurred much more readily than in larger particles, due to their higher specific surface area. However, the nominal size of the particles used for the coating did not reflect their performance ideally, due to agglomeration. Therefore, a much more accurate indicator of particle effectiveness can be obtained by Zeta sizer true particle size results.
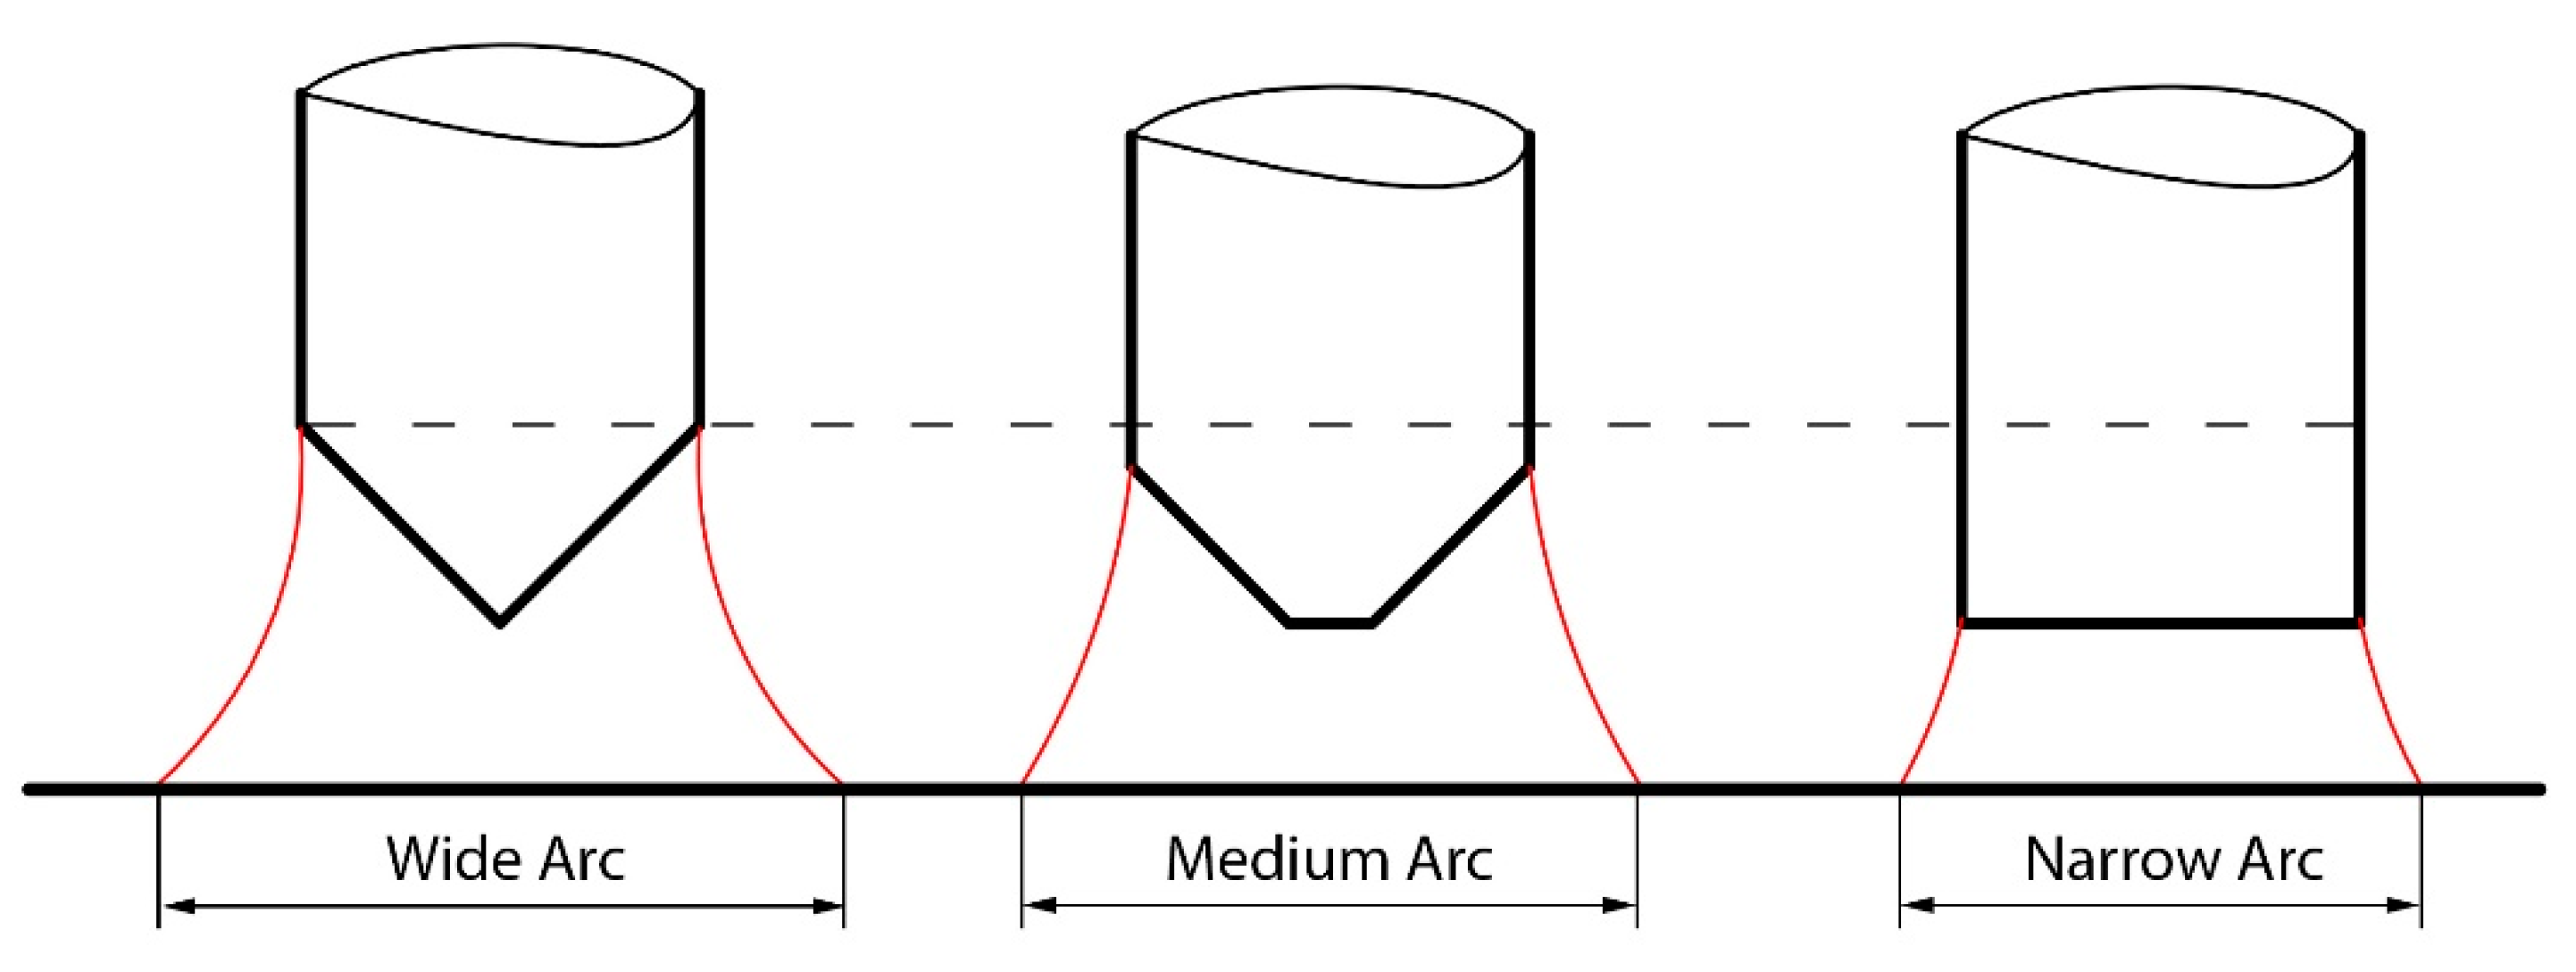
Blunt electrodes generally proved the least effective. The results showed an inferior performance in terms of weld depth which may be explained by the width of the electric arc and the corresponding width of the coating that is heated, evaporated, and thermally dissociated. Blunt electrodes offer a relatively narrow and deep weld when the welding is done without the coating, Figure 4. This is in agreement with other reports [31,32], where blunt electrodes offered higher penetration, versus sharpened electrode, which was reported to offer wider and shallower welds. The main reason is a wider electric arc, with the energy spread over a larger area. However, in A-TIG, with coating applied, a wider electric arc also influences heating and vaporization of the coating applied to the surface. That means a blunt electrode, in spite of the fact that it theoretically offers the highest penetration (in conventional TIG), when used with the coating, its effect on penetration was inferior to that of the conical and frustum electrodes. The main reason in obtaining a lower penetration compared to other electrode geometries lies in a lower width covered by the arc (Figure 10), and subsequently, a lower amount of oxides that were vaporized, dissociated, and decomposed.
Frustum-type electrode tip results in a combined concentrated-spread arc, offering a combination of a higher penetration due to the flattened tip and the vaporization, dissociation, and decomposition of the oxides. This is particularly obvious in the penetration depth of the specimen containing nano particles, 5N-F.
Of all tested coatings, the most effective were mixtures of nano and submicron TiO2 particles (specimens 3M2N, 2M3N, 1M4N), containing between 40% and 80% of nanoparticles and 20–60% of submicron particles. This may be due to the existence of submicron and nanoparticle agglomerates. Agglomerates have a relatively low cohesive strength, due to the presence of relatively weak secondary bonds between particles, usually Van der Waals forces, hydrogen or capillary [33,34,35]. By mixing nano and submicron particles, their agglomerates suffer random collisions, as reported by Dongguang et al. [36], causing a grinding effect, leading to the obtaining of smaller particles in the coating mixture, as revealed by Zeta sizer, Figure 3. A stochastic nature of these collisions may influence variable performance of the coatings used for welding specimens 2M3N and 1M4N with different types of electrodes. Also, a variable performance of all-nano coatings (5N) can also be the result of variable agglomeration between nanoparticles.
The material flow model proposed in accordance with the results obtained in this work is summarised in Figure 11. In specimens obtained without the coating, the hardness near the fusion line at the surface had a marked drop compared to the specimens obtained with the coating applied. This was in good agreement with microstructures in these zones, with a decreased hardness closely corresponding to the coarser austenite grains in respective zones. This indicates that the hot fluid flows from the surface (in specimens obtained without the coating), towards the fusion boundary of the melt pool, transferring the heat into the base metal. This heat caused the austenite grains to grow, resulting in coarser grains near the fusion line, under the surface. The austenite grains under the weld remained unchanged. On the other hand, a reversed Marangoni convection in specimens obtained with the coating caused a hot melt to flow inwards and push into the base material. This caused a higher penetration, but, as a side effect, a heat transfer towards the area under the weld metal, transferring heat to this area. As a result, coarsened austenitic grains occurred under the weld. In contrast, austenitic grains near the fusion line just under the surface remained unchanged, since the melt reaching this area already transferred part of its heat. These results are similar to ones presented in [30,37], where SiO2 and TiO2 nanoparticles were used as a basis for the coating. In A-TIG welding, where full penetration is achieved, grain coarsening under the weld metal is not possible, since in case of full penetration, there is no base metal. However, in such an arrangement, it would be necessary to use backing plates to prevent or limit over-penetration.
Therefore, microstructures and microhardnesses indicated that the reversal of Marangoni convection theory had a significant impact on an increased penetration, D/W ratio, and generally the shape of the weld, as suggested in [18,26,38,39].

5. Conclusions

According to the results presented in this work, the following conclusions can be drawn:
  • The correlation between the coating composition and weld metal surface areas could not be determined, although weld metal areas were larger with frustum and conical tips compared to blunt tip.
  • Nanoparticles were more effective than submicron particles in increasing the penetration, but a mixture of nano- and micron-sized particles helped achieve the best weld. The main reason of this appears to be the collisions that occurred between agglomerates and submicron particles, resulting in a lower size of particles in the lowest range of sizes that were most effective in increasing the weld penetration.
  • Frustum and sharp electrodes proved to be more consistent in producing high penetration compared to blunt electrodes, due to a narrower arc that affected a narrower width of the coating applied to the base metal surface.
  • Specimens welded without the coating showed an increased grain size near the fusion line in the base metal under the surface, resulting in a decreased hardness in this zone. Contrarily, specimens welded with the coating showed an increased grain size near the fusion line in the base metal under the weld metal, resulting in a decreased hardness in this zone.
  • The main cause of a reduced hardness and increased grain size under the surface and under the weld metal may be attributed to high-temperature material flowing near these zones and heat transfer towards base metal.
  • Material flow direction in the weld pool was the result of Marangoni convection in TIG and reversed Marangoni convection in A-TIG. In TIG, the flow was towards the fusion boundary and along the fusion line, while in A-TIG, the flow towards the center of the weld and to the bottom of the weld was more pronounced resulting in an increase in the weld penetration depth.

Author Contributions

S.B. designed the experiment and wrote the paper; M.D. and P.J. performed the experiments; I.Z. provided the resources (devices, materials); B.P. interpreted the data, S.G. and M.S. reviewed and edited the manuscript.

Acknowledgments

This article is based on the work from COST Action “Solutions for Critical Raw Materials under Extreme Conditions”, supported by COST Action 15102 under the auspices of H2020. Saurav Goel sincerely acknowledges the financial support obtained from various funders including the RCUK (Grant No. EP/S013652/1 and EP/S036180/1), H2020 (EURAMET EMPIR A185 (2018)), Royal Academy of Engineering (Grant No. IAPP18-19\295), and Newton Fellowship award from the Royal Society (NIF\R1\191571) that has sustained his research laboratory and its group members.

Conflicts of Interest

The authors declare no conflict of interest.

References

  1. Tseng, K.-H.; Hsu, C.-Y. Performance of activated TIG process in austenitic stainless steel welds. J. Mater. Process. Technol. 2011, 211, 503–512. [Google Scholar] [CrossRef]
  2. Tseng, K.-H.; Lin, P.-Y. UNS S31603 Stainless Steel Tungsten Inert Gas Welds Made with Microparticle and Nanoparticle Oxides. Materials 2014, 7, 4755–4772. [Google Scholar] [CrossRef] [PubMed] [Green Version]
  3. Gurevich, S.M.; Zamkov, V.N.; Kushnirenko, N.A. Improving the penetration of titanium alloys when they are welded by argon tungsten arc process. Avtom. Svarka. 1965, 18, 1–5. [Google Scholar]
  4. Huang, H.Y. Argon–hydrogen shielding gas mixtures for activating coating-assisted gas tungsten arc welding. Metall. Mater. Trans. A 2010, 41, 2829–2835. [Google Scholar] [CrossRef]
  5. Huang, H.Y. Effects of shielding gas composition and activating coating on GTAW weldments. Mater. Des. 2009, 30, 2404–2409. [Google Scholar] [CrossRef]
  6. Paskell, T.D. Gas Tungsten Arc Welding Coating. U.S. Patent 5,804,792A, 9 August 1998. [Google Scholar]
  7. Tseng, K.H.; Wang, N.S. Welding Activated Coating for Structural Alloy Steels. U.S. Patent 20,160,167,178A1, 16 June 2016. [Google Scholar]
  8. Muthukumaran, V.; Bhaduri, A.K.; Raj, B. Penetration Enhancing Coating Formulation for Tungsten Inert Gas (TIG) Welding of Austenitic Stainless Steel and Its Application. U.S. Patent 8,097,826, 17 January 2012. [Google Scholar]
  9. Dhandha, K.H.; Badheka, V.J. Effect of activating coatings on weld bead morphologyof P91 steel bead-on-plate welds by coating assisted tungsten inert gas welding process. Mater. Manuf. Process. 2015, 17, 48–57. [Google Scholar] [CrossRef]
  10. Nayee, S.G.; Badheka, V.J. Effect of oxide-based coatings on mechanical and metallur-gical properties of Dissimilar activting coating assisted-tungsten inert gas welds. Mater. Manuf. Process. 2014, 16, 137–143. [Google Scholar] [CrossRef]
  11. Modenesi, P.J.; Apolinário, E.R.; Pereira, I.M. TIG welding with single-component coatings. J. Mater. Process. Technol. 2000, 99, 260–265. [Google Scholar] [CrossRef]
  12. Lin, H.L.; Wu, T.M. Effects of activating coating on weld bead geometry of Inconel718 alloy TIG welds. Mater. Manuf. Process. 2012, 27, 1457–1461. [Google Scholar] [CrossRef]
  13. Kou, S. Welding Metallurgy, 2nd ed.; Wiley—Interscience Publishers: Hoboken, NJ, USA, 2003; pp. 116–117. [Google Scholar]
  14. Vasudevan, M.; Bhaduri, A.K.; Raj, B.; Prasad, R.K. Genetic algorithm based com-putational model for optimizing the process parameters in A-TIG welding of 304LN and 316LN stainless steels. Mater. Manuf. Process. 2007, 22, 641–649. [Google Scholar] [CrossRef]
  15. Chandrasekhar, N.; Vasudevan, M. Intelligent modeling for optimization of A-TIG welding process. Mater. Manuf. Process. 2010, 25, 1341–1550. [Google Scholar] [CrossRef]
  16. Maduraimuthu, V.; Vasudevan, M.; Muthupandi, V.; Bhaduri, A.K.; Jayakumar, T. Study of the effect of activated coating on the microstructure and mechanical properties of mod. 9Cr-1Mo steel. Metall. Mater. Trans. 2012, 43, 123–132. [Google Scholar] [CrossRef]
  17. Sakthivel, T.; Vasudevan, M.; Laha, K.; Parameswaran, P.; Chandravathi, K.S.; Paneer-Selvi, S.; Maduraimuthu, V.; Mathew, M.D. Creep-rupture behavior of 9Cr-1.8W-0.5Mo-VNb P92 ferritic steel weld joint. Mater. Sci. Eng. 2014, 591, 111–120. [Google Scholar] [CrossRef]
  18. Vidyarthy, R.S.; Dwivedi, D.K. Activating coating tungsten inert gas welding for enhanced weld penetration. J. Manuf. Process. 2016, 22, 211–228. [Google Scholar] [CrossRef]
  19. Kuo, C.H.; Tseng, K.H.; Chou, C.P. Effect of activated TIG coating on performance of dissimilar welds between mild steel and stainless steel. Key Eng. Mater. 2011, 479, 74–80. [Google Scholar] [CrossRef]
  20. Vora, J.J.; Badheka, V.J. Improved Penetration with the Use of Oxide Coatings in Activated TIG Welding of Low Activation Ferritic/Martensitic Steel. Trans. Indian Inst. Met. 2016, 69, 1755–1764. [Google Scholar] [CrossRef]
  21. Vora, J.J.; Badheka, V.J. Experimental investigation on mechanism and weld morphology of activated TIG welded bead-on-plate weldments of reduced activation ferritic/martensitic steel using oxide coatings. J. Manuf. Process. 2015, 20, 224–233. [Google Scholar] [CrossRef]
  22. Takeuchi, Y.; Takagi, R.; Shinoda, T. Effect of bismuth on weld joint penetration in austenitic stainless steel. Weld. Res. Suppl. 1992, 71, 283–290. [Google Scholar]
  23. Mills, K.C.; Keene, B.J.; Brooks, R.F.; Shirali, A. Marangoni effects in welding. Philos. Trans. R. Soc. Lond. Ser. A 1998, 356, 911–925. [Google Scholar] [CrossRef]
  24. Zou, Y.; Ueji, R.; Fujii, H. Effect of oxygen on weld shape and crystallographic orientation of duplex stainless steel weld using advanced A-TIG (AA-TIG) welding method. Mater. Charact. 2014, 91, 42–49. [Google Scholar] [CrossRef]
  25. Skvortsov, E.A. Role of electronegative elements in contraction of thearc discharge. Weld. Int. 1998, 12, 471–475. [Google Scholar] [CrossRef]
  26. Tanaka, M.; Shimizu, T.; Terasaki, T.; Ushio, M.; Koshiishi, F.; Yang, C.-L. Effects of activating coating on arc phenomena in gas tungstenarc welding. Sci. Technol. Weld Join. 2000, 5, 397–402. [Google Scholar] [CrossRef]
  27. Venkatesan, G.; Goeuge, J.; Sowmyasri, M.; Muthapandi, V. Effet of ternarz coatings on depth of penetration in A-TIG welding of AISI 409 ferritic stainless steel. Proc. Mater. Sci. 2014, 5, 2402–2410. [Google Scholar] [CrossRef]
  28. Report on Critical Raw Materials for EU, Report of the Ad-Hoc Working Group on Defining Critical Raw Materials for EU. May 2014. Available online: http://mima.geus.dk/report-on-critical-raw-materials en.pdf (accessed on 28 August 2019).
  29. Luisa Grilli, M.; Bellezze, T.; Gamsjäger, E.; Rinaldi, A.; Novak, P.; Balos, S.; Piticescu, R.; Letizia Ruello, M. Solutions for Critical Raw Materials under Extreme Conditions: A Review. Materials 2017, 10, 285. [Google Scholar] [CrossRef] [PubMed]
  30. Balos, S.; Dramicanin, M.; Janjatovic, P.; Zabunov, I.; Klobcar, D.; Busic, M.; Luisa Grilli, M. Metal oxide nanoparticle-based coating as a catalyzer for A-TIG welding: Critical raw material perspective. Metals 2019, 9, 567. [Google Scholar] [CrossRef]
  31. Key, J.F. Anode/Cathode Geometry and Shielding Gas Interrelationships in GTAW Electrode tip geometry and groove geometry must be compatible to ensure arc stability. In Proceedings of the 61st AWS Annual Meeting, Los Angeles, CA, USA, 13–18 April 1980; pp. 364–370. [Google Scholar]
  32. Mannion, B.; Heizman, J., III. Setting up and Determining Parameters for Orbital Tube Welding. Available online: http://www.pro-fusiononline.com/feedback/fab-may99.htm (accessed on 15 June 2019).
  33. Balos, S.; Pilic, B.; Markovic, D.; Pavlicevic, J.; Luzanin, O. Poly(Methyl-Methacrylate) Nanocomposites with Low Silica Addition. J. Prosthet. Dent. 2014, 111, 327–334. [Google Scholar] [CrossRef] [PubMed]
  34. Balos, S.; Pilic, B.; Petrovic, D.; Petronijevic, B.; Sarcev, I. Flexural strength and modulus of autopolimerized poly(methyl methacrylate) with nanosilica. Vojnosaniteski Pregled. 2018, 75, 564–569. [Google Scholar] [CrossRef]
  35. Elshereksi, N.W.; Mohamed, S.H.; Arifin, A.; Mohd Ishak, Z.A. Effect of filler incorporation on the fracture toughness properties of denture base poly(methyl methacrylate). J. Phys. Sci. 2009, 20, 1–12. [Google Scholar]
  36. Dongguang, W.; Rajesh, D.; Robert, P. Mixing and characterization of nanosized powders: An assessment of different techniques. J. Nanopart. Res. 2002, 4, 21–41. [Google Scholar]
  37. Dramicanin, M.; Balos, S.; Janjatovic, P.; Zabunov, I.; Grabulov, V. Activated Flux TIG Welding of Stainless Steel Pipes. Chem. Ind. Chem. Eng. Q. 2019. [Google Scholar] [CrossRef]
  38. Roper, J.R.; Olson, D.L. Capillarity effects in the GTA weld penetration of 21-6-9 stainless steel. Weld J. 1978, 57, 103s–107s. [Google Scholar]
  39. Dong, C.; Zhu, Y.; Chai, G. Preliminary study on the mechanism of arc welding with the activating coating. Aeronaut. Manuf. Technol. Suppl. 2004, 6, 271–278. [Google Scholar]
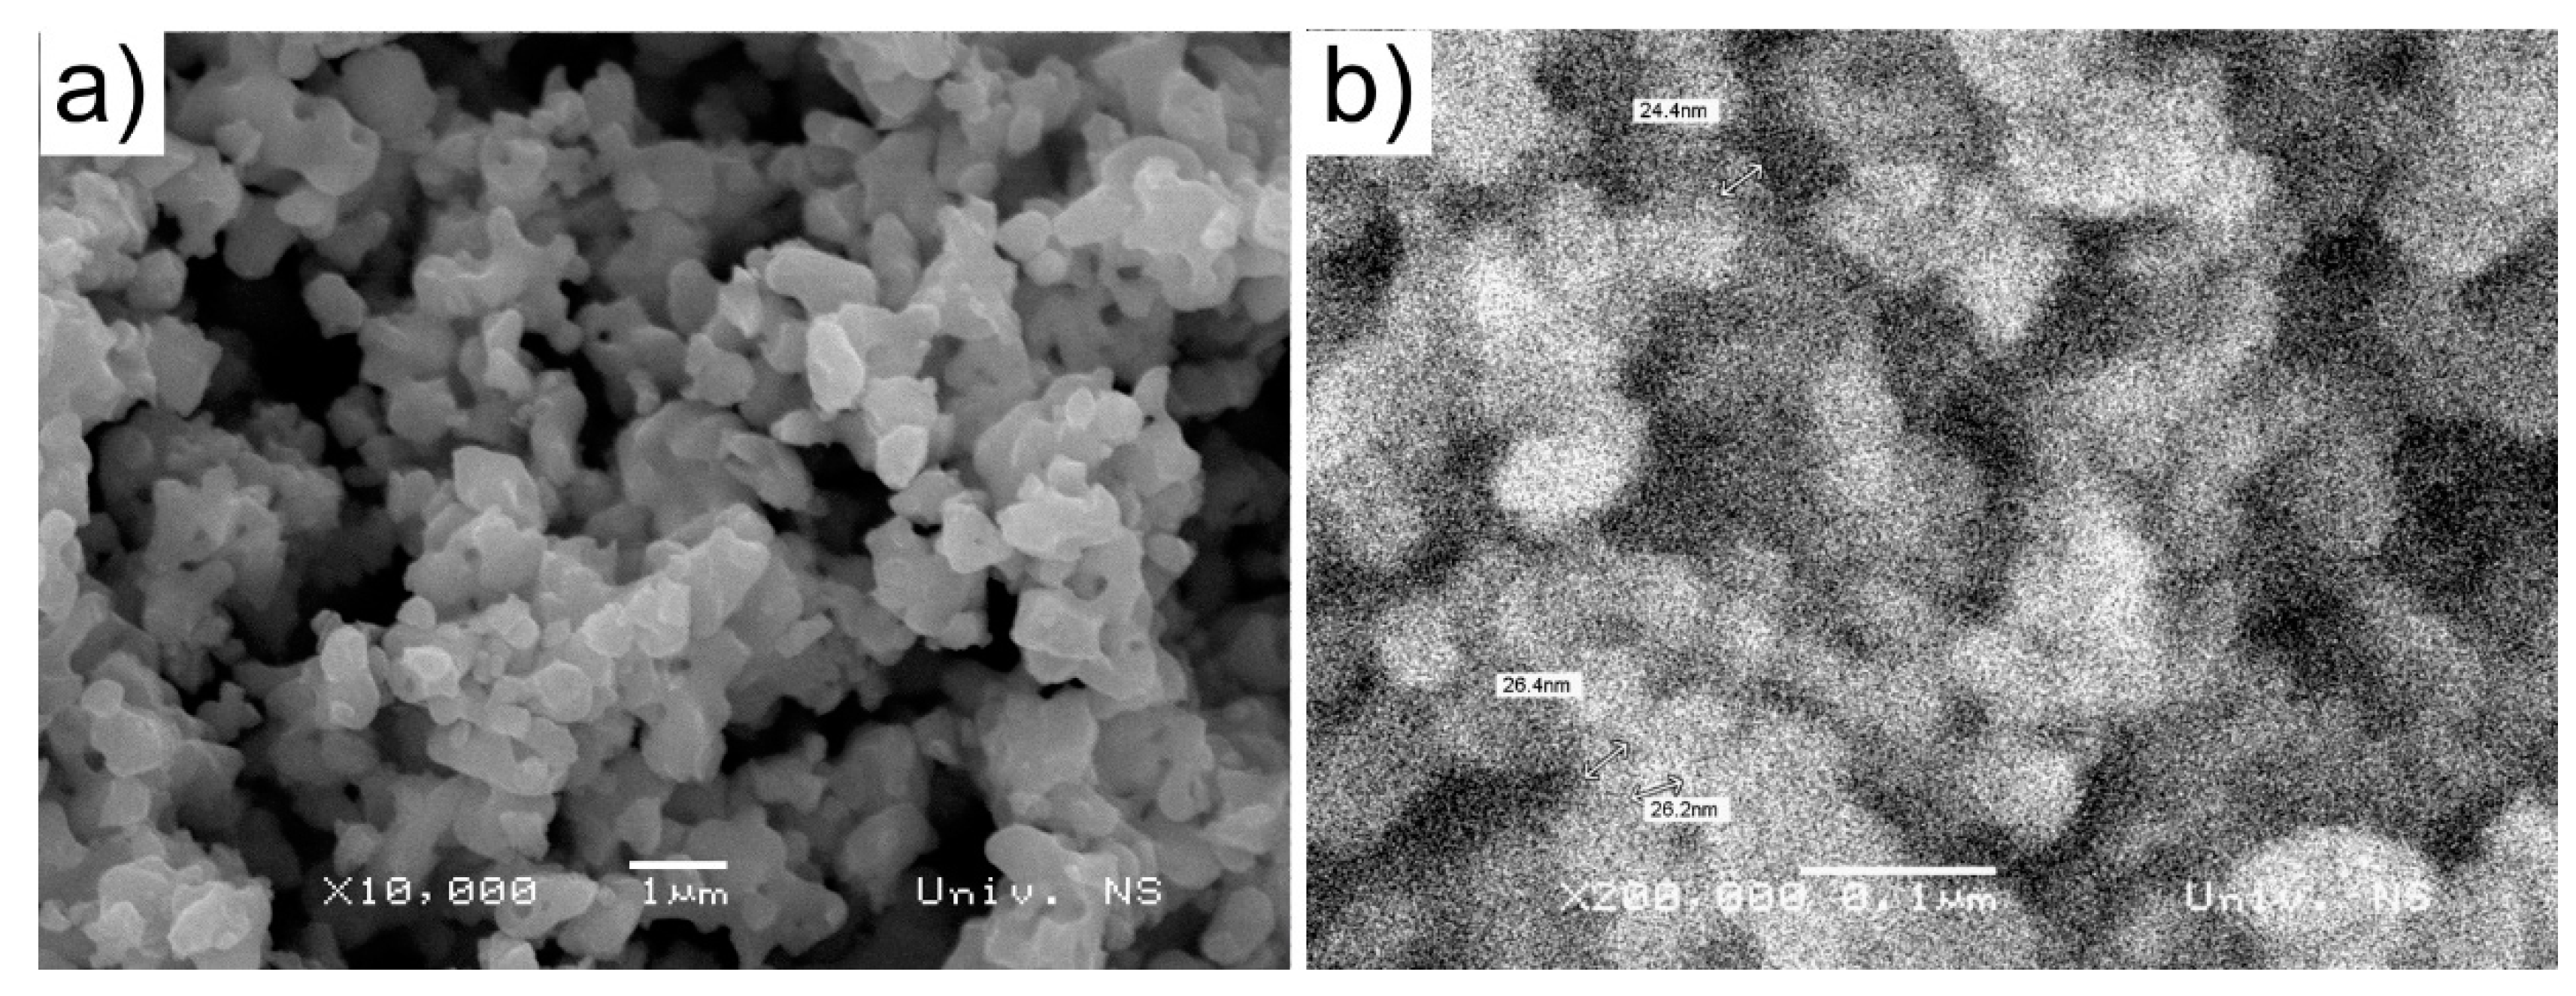
Figure 1. Basic components used: (a) 0.3-µm Submicron particles used in the coating, (b) nanoparticles used in the coating.
Metals 09 01187 g001
Figure 2. Microhardness measurement scheme [30].
Metals 09 01187 g002
Figure 3. Particle size distribution in the solvent.
Metals 09 01187 g003
Figure 4. Macrostructure of specimens welded without and with coating, with indicated depths, widths, depth-to-width ratios and weld surfaces.
Metals 09 01187 g004
Figure 5. Weld metal microstructure of tested specimens: (a) 0-F, (b) 1M4N-F, (c) 5N-F.
Metals 09 01187 g005
Figure 6. Microstructures near fusion line under the specimen surface: (a) 0-F, (b) 1M4N-F, (c) 5N-F.
Metals 09 01187 g006
Figure 7. Microstructure of the specimens near fusion line at the bottom of the weld: (a) 0-F, (b) 1M4N-F, (c) 5N-F.
Metals 09 01187 g007
Figure 8. Microhardness distribution for specimens welded with frustum-tipped electrode, along lines 1 and 2: (a) 0-F, (b) 5M-F, (c) 1M4N-F, (d) 5N-F.
Metals 09 01187 g008
Figure 9. Microhardness distribution for specimens welded with frustum-tipped electrode, along line 3: (a) 0-F, (b) 5N-F, (c) 5M-F, (d) 1M4N-F.
Metals 09 01187 g009
Figure 10. Arc width in relation to electrode geometry: Sharp electrode offers the widest arc, followed by frustum and blunt electrode.
Metals 09 01187 g010
Figure 11. TIG and A-TIG metal flows: (a) Without the coating, (b) with the coating.
Metals 09 01187 g011