Article

Comprehensive Failure Mechanisms of Industrial Mo–W Hot-Work Steel Dies in Hot Stamping: Microstructural Degradation, Reaction-Layer Evolution, and Synergistic Wear Behavior

1
School of Mechatronic Engineering, China University of Mining and Technology, Xuzhou 100083, China
2
School of Electromechanical and Energy Engineering, NingboTech University, Ningbo 315104, China
3
Beilong Precision Technology Co., Ltd., Yuyao 315499, China
*
Author to whom correspondence should be addressed.
Metals 2026, 16(1), 47; https://doi.org/10.3390/met16010047 (registering DOI)
Submission received: 1 December 2025 / Revised: 26 December 2025 / Accepted: 27 December 2025 / Published: 30 December 2025
(This article belongs to the Special Issue Advances in the Fatigue and Fracture Behaviour of Metallic Materials)

Abstract

Hot stamping dies fabricated from Mo–W hot-work steels are exposed to severe thermo-mechanical fatigue (TMF), high-temperature oxidation, and complex tribological loading, which collectively accelerate die degradation and reduce production stability. Although individual failure modes have been reported, an integrated understanding linking microstructural evolution, interfacial reactions, and wear mechanisms remains limited. A failed Mo–W hot-work steel die removed from an industrial B-pillar hot stamping line was examined using Rockwell hardness mapping, optical microscopy, scanning electron microscopy (SEM), energy-dispersive X-ray spectroscopy (EDS), and X-ray diffraction (XRD) with Williamson–Hall (W–H) microstrain analysis. Surface (0–2 mm) and subsurface (~8 mm) regions of 10 × 10 × 10 mm samples were compared. Pits, cracks, reaction layers, and debris were quantified from calibrated SEM images. A 17% hardness reduction from surface (46.2 HRC) to subsurface (37.6 HRC) revealed pronounced TMF-induced softening. W–H analysis indicated microstrain of ~0.0021 and crystallite sizes of 50–80 nm in the surface region, reflecting high dislocation density. SEM/EDS showed pit diameters of 150–600 μm, reaction-layer thicknesses of 15–40 μm, and crack lengths of 40–150 μm. Fe–O oxides, Fe–Al intermetallics, and FeSiAl4 reaction phases were identified as major constituents of brittle surface layers and debris. Wear morphology confirmed a mixed mode of adhesive galling and oxide-assisted abrasive plowing.

1. Introduction

Hot stamping has become a key manufacturing technology for producing ultra-high-strength structural components, especially in the automotive industry, where the demand for vehicle lightweighting and crashworthiness continues to intensify [1]. During the process, Al–Si-coated 22MnB5 boron steel sheets are heated to approximately 900–930 °C, rapidly transferred into the die, and then simultaneously formed and quenched. This thermo-mechanical sequence imposes extreme conditions on hot-work steel dies, including steep thermal gradients, repetitive contact stresses, frictional shear, high-temperature oxidation, and chemical reactions between the die and the Al–Si coating. As a result, die surface degradation remains a major factor limiting production stability and dimensional accuracy in industrial hot stamping [2].
Mo–W alloyed hot-work steels are widely employed in hot stamping dies due to their excellent temper resistance, good thermal conductivity, and high hot-hardness retention [3]. Nevertheless, despite these favorable properties, such steels experience complex degradation during extended industrial service. Reported failure modes include thermo-mechanical fatigue (TMF)-induced softening [4], oxidation-assisted embrittlement [5], adhesive wear (galling) [2], abrasive wear [6], and the formation of brittle Fe–Al and Fe–Al–Si intermetallic layers driven by die–sheet chemical interactions [3]. These mechanisms are considerably more severe in hot stamping than in conventional forming operations because of the much higher temperatures and contact stresses involved.
Although numerous studies have evaluated hot-work steel behavior under controlled laboratory conditions, most investigations have focused on isolated mechanisms—such as TMF softening [4], high-temperature oxidation [3], or adhesive transfer of Al–Si coatings from 22MnB5 sheets [7]. However, industrial die failures typically arise from the convolution of multiple coupled mechanisms rather than from a single dominant mode. Recent tribological and materials degradation studies highlight the need for integrated evaluation of wear, oxidation, reaction-layer evolution, and microstructural changes, yet comprehensive post-mortem analyses of Mo–W hot-work dies removed directly from production lines remain limited.
Adhesive wear, commonly referred to as galling, is widely recognized as one of the major degradation mechanisms in hot stamping dies. Under elevated temperatures and pressures, welded junctions form readily at the die/sheet interface, and their subsequent fracture during sliding removes die material and generates pits and delaminated regions [7]. The severity of adhesive wear increases when the Al–Si coating on 22MnB5 dissolves into molten films during forming, promoting chemical bonding and material transfer [8]. Simultaneously, brittle Fe–Al and Fe–Al–Si intermetallic compounds form at the interface, further facilitating crack initiation and surface spallation [3,8,9].
In addition to adhesion, abrasive wear plays a significant role in die deterioration. Detached oxides, fragmented intermetallic particles, and spalled debris act as hard third-body abrasives that plow the die surface and accelerate material removal [10,11]. The abrasive component tends to become increasingly dominant as surface roughness grows and debris accumulates during long-term service [7,11].
Thermo-mechanical fatigue also contributes significantly to die degradation. Each forming cycle exposes the die surface to high temperatures while cooling channels rapidly extract heat, generating steep thermal gradients that cause cyclic expansion and contraction [3]. These cycles induce dislocation multiplication, substructure evolution, martensite tempering, and, ultimately, surface softening [5]. Although TMF behavior in hot-work steels has been documented [4], the relationship between microstrain evolution, reaction-layer formation, and subsequent wear has not been fully clarified.
Chemical interactions between the die surface and the Al–Si coating additionally influence degradation pathways. At forming temperatures near 900 °C, aluminum diffuses into the die surface and forms Fe–Al intermetallic compounds such as FeAl and Fe2Al5, as well as ternary Fe–Al–Si phases including FeSiAl4. These brittle phases weaken the interfacial region and facilitate crack formation and propagation [3,6,7]. Meanwhile, high-temperature oxidation produces Fe–O scales, which can spall and generate additional abrasive debris [3]. The coexistence of intermetallics and oxides results in a dynamic and unstable reaction layer whose repeated formation and fracture accelerate die surface deterioration. Recent advances in die materials and surface engineering have demonstrated that ceramic-based coatings, such as AlCrN-, TiAlN-, and multilayer nitride systems, as well as duplex treatments combining nitriding and physical vapor deposition, can effectively suppress Al diffusion, oxidation, and adhesive wear in hot stamping environments. These developments provide important context for interpreting the degradation mechanisms observed in the present industrial die.
Although many of the above mechanisms have been individually reported, industrial hot stamping dies operate under far more complex conditions. In actual production environments, a die experiences tens of thousands of severe thermo-mechanical cycles, and the resulting degradation represents the cumulative effect of interacting wear, oxidation, chemical reactions, and microstructural evolution [8]. The lack of holistic, mechanism-coupled post-mortem analyses limits the development of predictive die-life models and effective countermeasures [2].
Given these gaps, the present work performs a comprehensive failure analysis of a Mo–W hot-work steel die removed from a commercial B-pillar hot stamping tool after extensive service. Through hardness mapping, optical microscopy, SEM/EDS, and XRD (including Williamson–Hall analysis), this study identifies the key microstructural, chemical, and tribological contributors to die degradation. Particular emphasis is placed on characterizing pit and crack morphology, reaction-layer composition, microstrain evolution, and the synergistic contributions of adhesive and abrasive wear.
This study aims to: (1) quantify mechanical softening and microstrain accumulation in service-exposed Mo–W steel; (2) characterize the composition, thickness, and morphology of reaction layers, pits, and cracks; (3) differentiate adhesive galling from oxide-assisted abrasive plowing; (4) establish a coherent degradation pathway linking TMF, oxidation, adhesion, abrasion, and brittle fracture; and (5) provide practical recommendations for improving hot stamping die life through material design, coating strategies, and process optimization.
Despite extensive studies on wear and damage mechanisms of hot forging and hot stamping tools, most existing investigations are based on laboratory-scale simulations or focus primarily on surface damage features. As a result, the subsurface degradation behavior of tooling materials under real industrial service conditions remains insufficiently understood.
In particular, the interaction between surface wear, thermal fatigue, and subsurface microstructural softening during long-term industrial operation has not been systematically clarified. This lack of integrated surface–subsurface analysis limits the accurate interpretation of tool failure mechanisms and the development of effective life-prediction strategies.
The present study addresses these gaps by investigating a Mo–W alloyed hot-work steel die extracted directly from an industrial hot stamping production line after extended service. The novelty of this work lies in: (i) the analysis of a real industrially serviced tool rather than a laboratory-tested specimen; (ii) the combined characterization of surface damage features, hardness evolution as a function of depth, and subsurface microstructural changes; and (iii) the establishment of a mechanistic framework linking surface wear to subsurface degradation under cyclic thermo-mechanical loading conditions. These results provide new insights into the degradation behavior of hot stamping dies and contribute to a more comprehensive understanding of tool failure mechanisms in industrial environments.

2. Materials and Methods

2.1. Material and Sampling Procedure

The failed die investigated in this study was manufactured from Mo–W alloyed hot-work steel (Table 1) and was used for hot stamping of automotive B-pillar components under mass-production conditions. According to production records provided by the industrial partner, the die experienced approximately (3–5) × 104 forming cycles prior to removal from service. During operation, the die surface was cyclically heated by contact with Al–Si-coated 22MnB5 sheets (austenitization temperature ~900–930 °C), resulting in an estimated die surface temperature of approximately 600–700 °C, followed by rapid cooling through internal water channels.
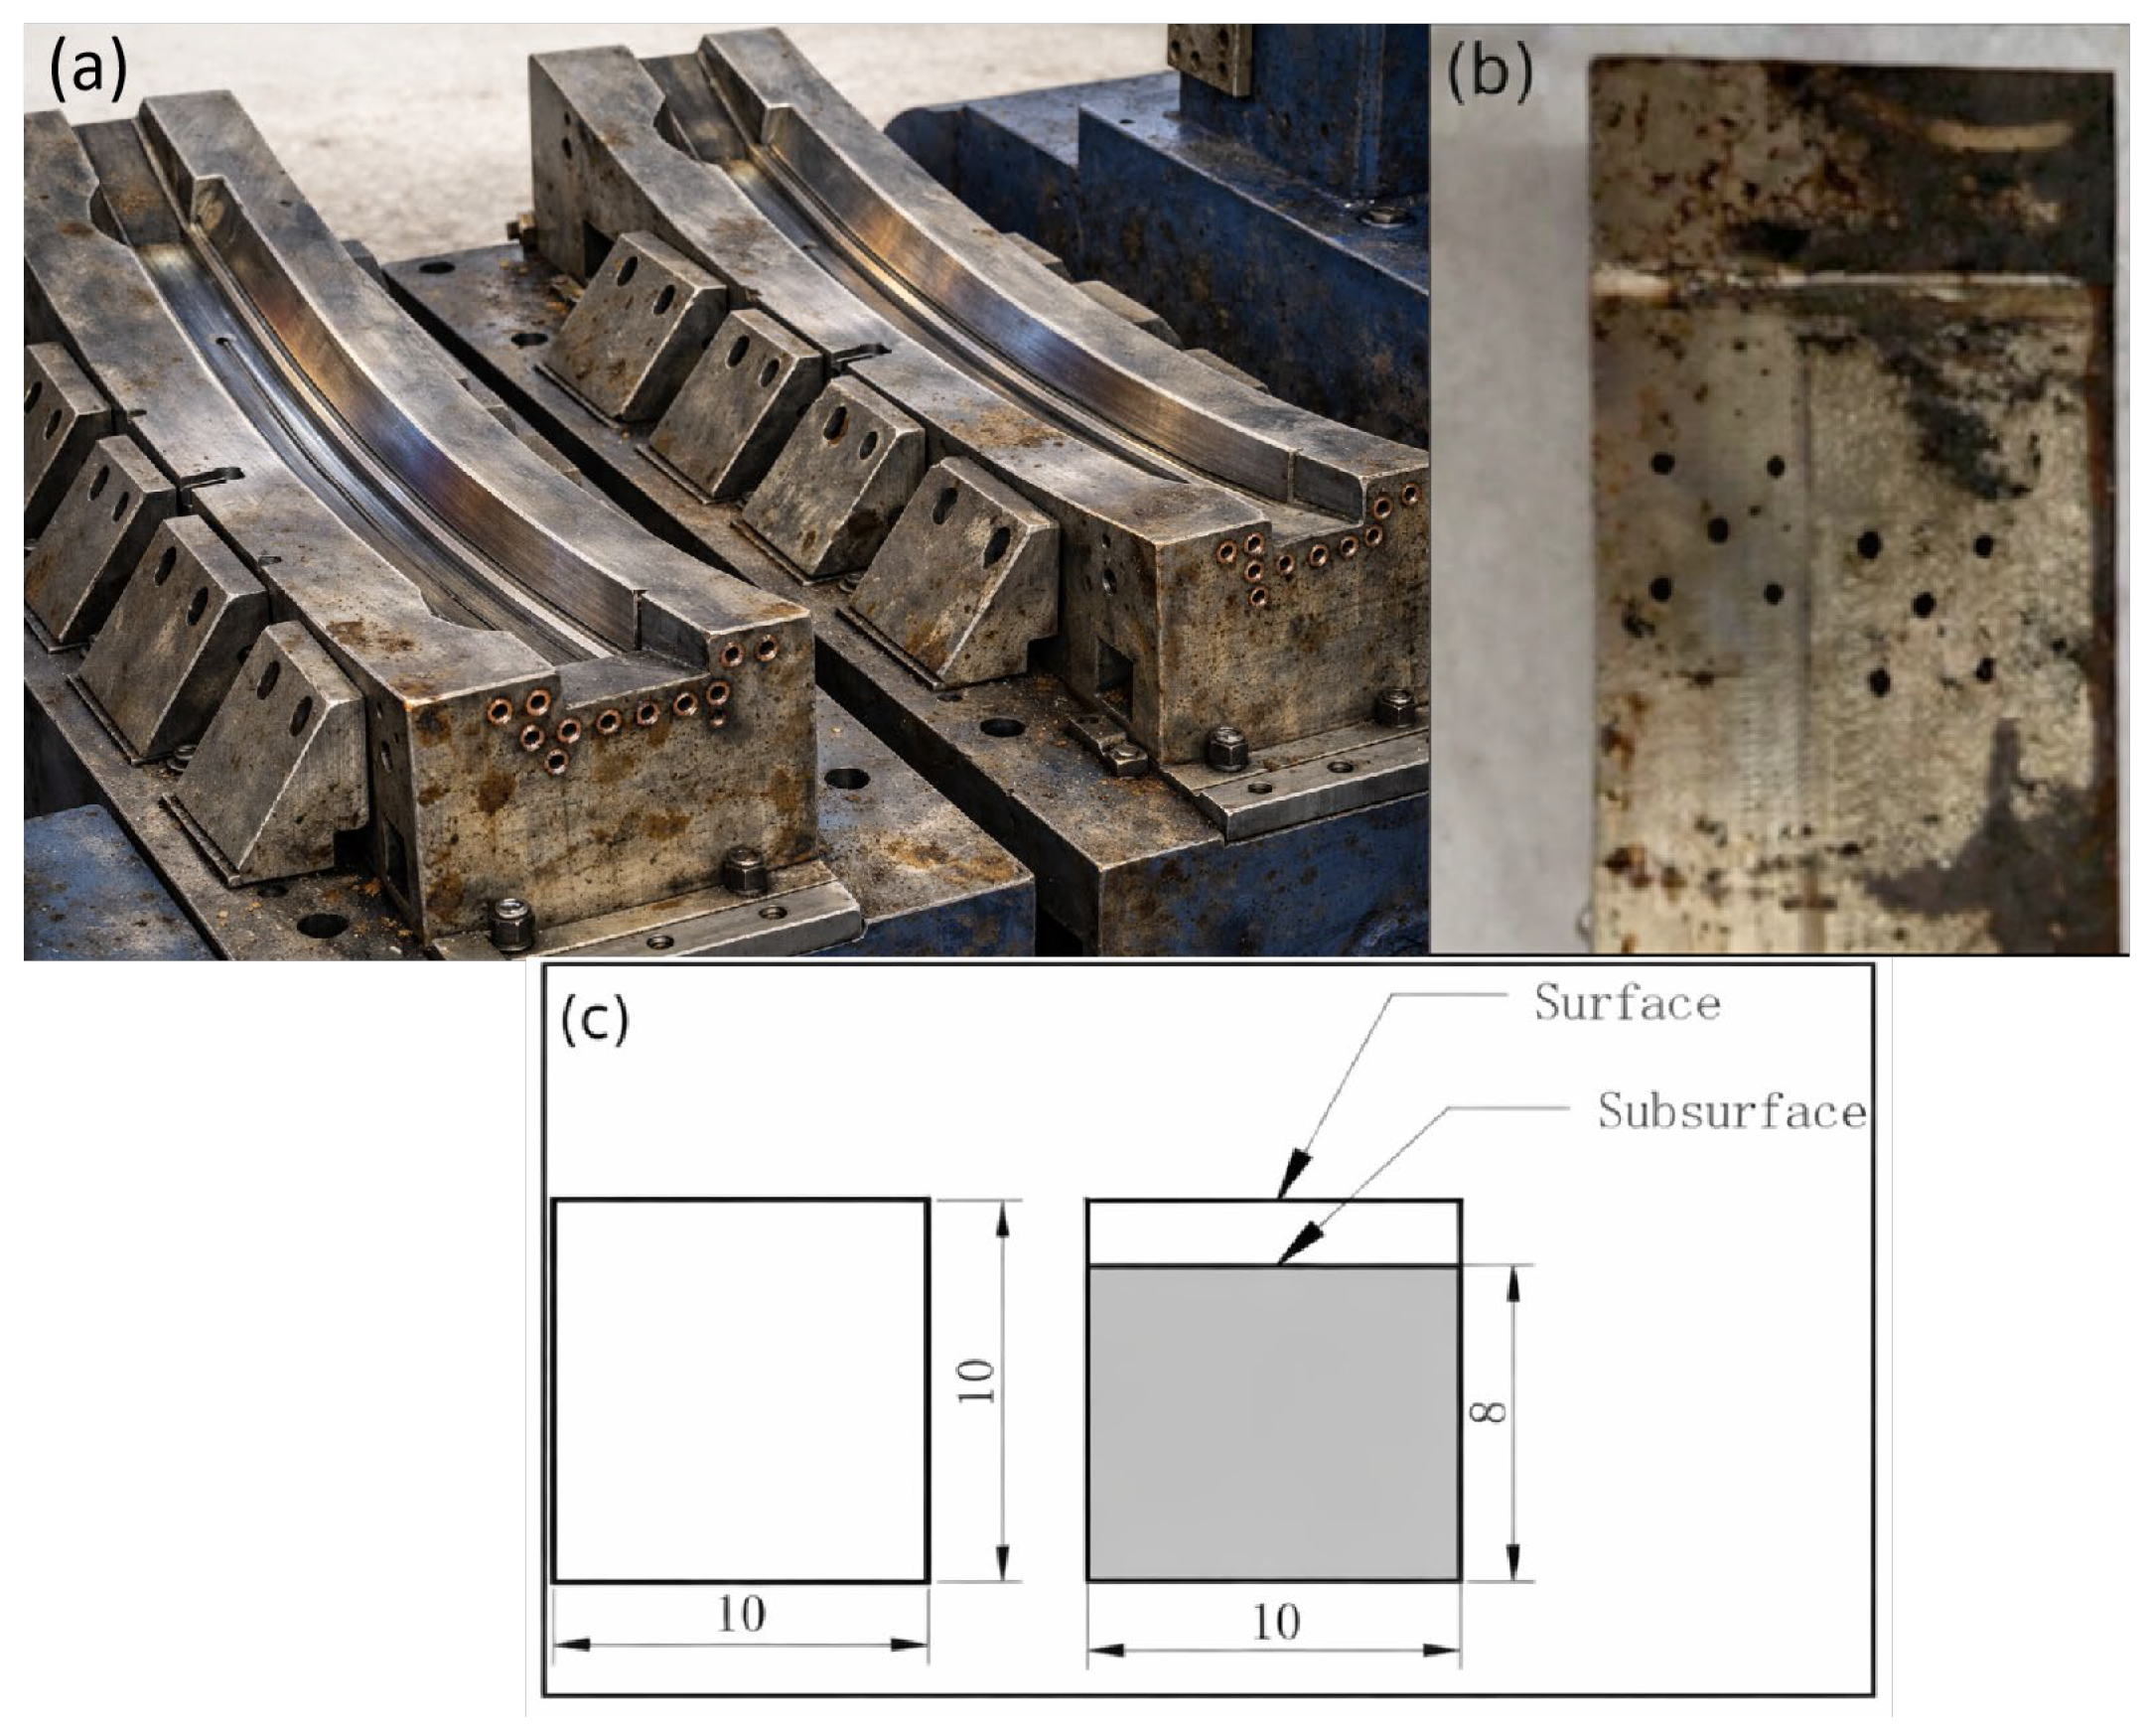
Figure 1a presents a photograph of the actual industrial hot stamping die after long-term service, showing the die assembly, forming cavities, and cooling system. After removal from the production line, pronounced macroscopic damage features were observed on the die surface, including pits, adhered layers, and surface cracks, particularly near the die radius regions in direct contact with the sheet.
Based on these visible wear characteristics, representative sampling locations were selected. Sample blocks with dimensions of 10 × 10 × 10 mm were extracted from severely worn regions using wire electrical discharge machining (wire-EDM), as shown in Figure 1b. The extracted blocks represent the real industrial degradation state of the die surface.
Each sample block was sectioned perpendicular to the worn surface to allow direct observation of the reaction layer, microcracks, and subsurface microstructural degradation beneath the damaged surface. Both surface (0–2 mm) and subsurface (>8 mm) regions were analyzed, as schematically illustrated in Figure 1c. Due to industrial safety regulations and confidentiality constraints, in situ photographing of the cutting operation was not permitted; however, the sampling strategy is explicitly documented through the photographs of the actual die and extracted samples together with the detailed description provided here.
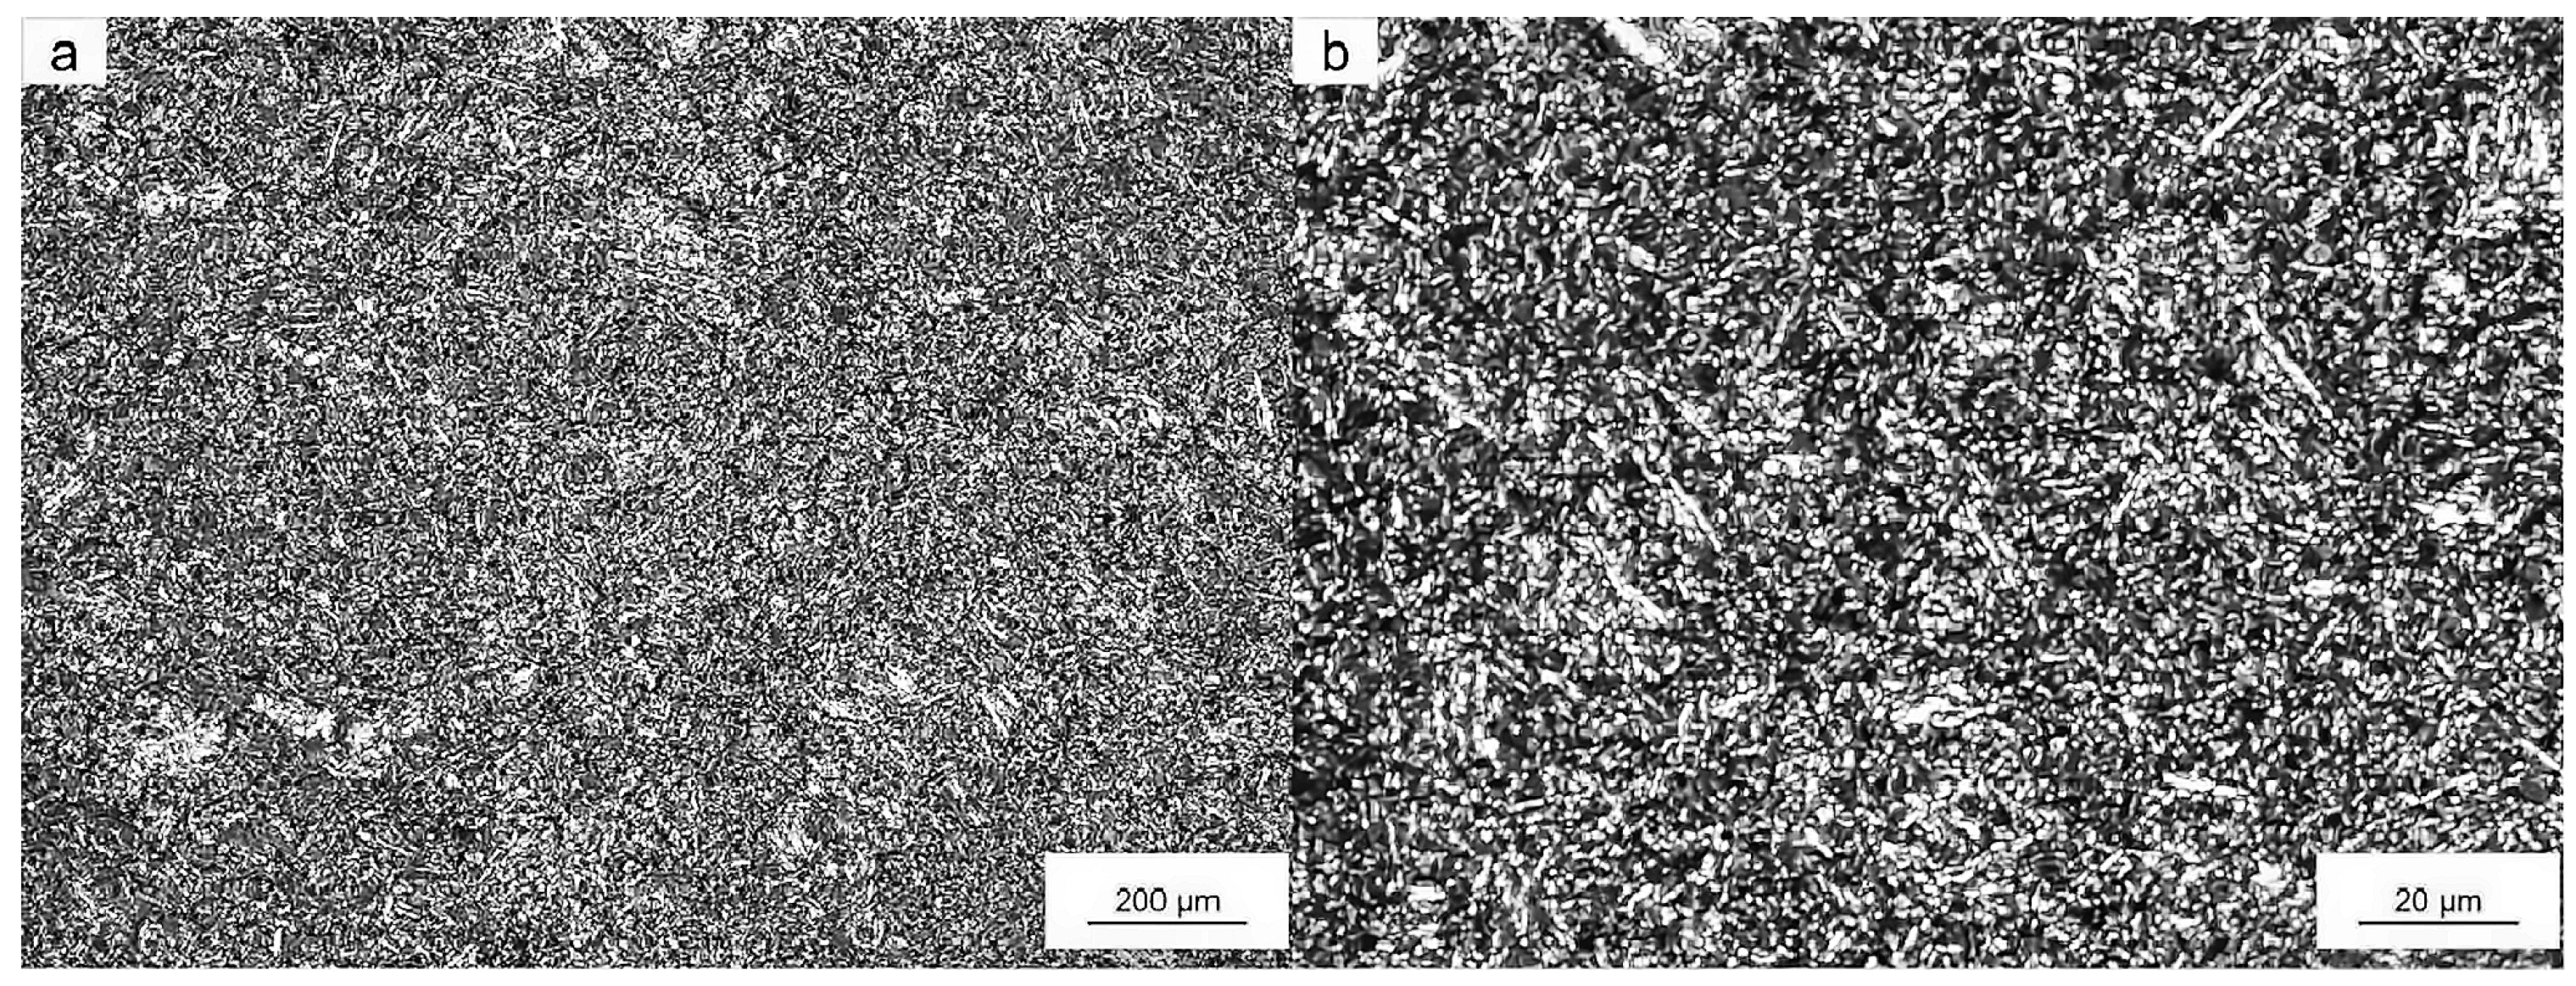
All samples were ultrasonically cleaned in ethanol prior to microstructural and mechanical characterization. The bulk microstructure of the Mo–W hot-work steel is shown in Figure 2, revealing a tempered martensitic matrix at different magnifications.

2.2. Experimental Methods

2.2.1. Hardness Measurement

Hardness measurements were performed along cross-sections perpendicular to the worn surface using a Rockwell hardness tester (TH301, Beijing Times Instrument Co., Ltd., Beijing, China). A series of indentations was placed from the surface toward the subsurface region with a fixed spacing of 1 mm, allowing hardness profiles as a function of depth to be obtained. Data scatter was controlled within ±0.5 HRC. The hardness gradient obtained (surface vs. subsurface) reflects the degree of cyclic softening associated with thermo-mechanical fatigue. For each region, at least five independent hardness measurements were performed.

2.2.2. Optical Microscopy

Optical microscopy (OM, Leica DM2700 M microscope, Leica Microsystems, Wetzlar, Germany) was employed to characterize the general microstructure and evaluate tempered martensite evolution. Surfaces were ground with SiC papers (240–2000 grit) and polished with 1.0 μm diamond suspension. Final polishing used colloidal silica. Samples were etched in 4% nital to reveal microstructural features. OM was used to compare tempered martensitic morphology between surface and subsurface regions.

2.2.3. SEM Observation and Surface Morphology Analysis

A ZEISS EVO-18 scanning electron microscope (Carl Zeiss AG, Jena, Germany) was used to examine surface wear features, pit morphology, crack initiation sites, spallation zones, and debris. Representative measurements taken from calibrated SEM images showed pit diameters of 150–600 μm, crack lengths of 40–150 μm, and reaction-layer thicknesses of 15–40 μm. High-magnification imaging identified welded junctions, transferred layers, and debris responsible for abrasive plowing.

2.2.4. EDS Elemental Analysis and Mapping

Energy-dispersive X-ray spectroscopy (Carl Zeiss AG, Jena, Germany) attached to the SEM characterized the chemical composition of reaction layers, oxides, and transferred fragments. Elemental maps were acquired with a 15 kV accelerating voltage. Key elements included Fe, O, Al, Si, Cr, and Mo. The presence of Fe–O oxides, Fe–Al intermetallics, and FeSiAl4 phases was confirmed and correlated with pit expansion and debris-assisted abrasion.

2.2.5. XRD Analysis and Williamson–Hall Microstrain Evaluation

The testing equipment selected was a Shimadzu (Kyoto, Japan) X-ray diffractometer (model XRD-6100) from Japan. The test was performed using Cu Kα radiation (λ = 0.1541 nm) over 2θ = 30–90° with a step size of 0.02°. Peak position shifts and FWHM broadening were analyzed using the Williamson–Hall method to estimate crystallite size and microstrain. For the surface region, microstrain was ~0.0021, and crystallite size was 50–80 nm, indicating significant lattice distortion and high dislocation density.
Williamson–Hall analysis was conducted using the main α-Fe diffraction peaks ((110), (200), and (211)). Linear regression of βcosθ versus 4sinθ was applied to estimate crystallite size and microstrain. The subsurface material was used as an internal reference approximating the as-received condition. Although transmission electron microscopy was not performed, the microstrain results are interpreted in conjunction with hardness degradation and microstructural observations.

2.3. Correlation with Industrial Hot Stamping Conditions

The die surface was cyclically heated to ~600–700 °C by contact with ~900–930 °C sheets and then cooled via internal water channels. These thermal cycles, combined with high contact pressure and sliding, provided the basis for linking microstructural degradation with the observed wear and reaction-layer formation.
Although direct in situ temperature measurements or thermo-mechanical simulations were not available, the estimated surface temperature range is supported by production data, the previous literature on hot stamping of Al–Si-coated 22MnB5 steels, and the observed Fe–Al–Si intermetallic phases.

3. Results

3.1. Hardness Profiles as a Function of Depth

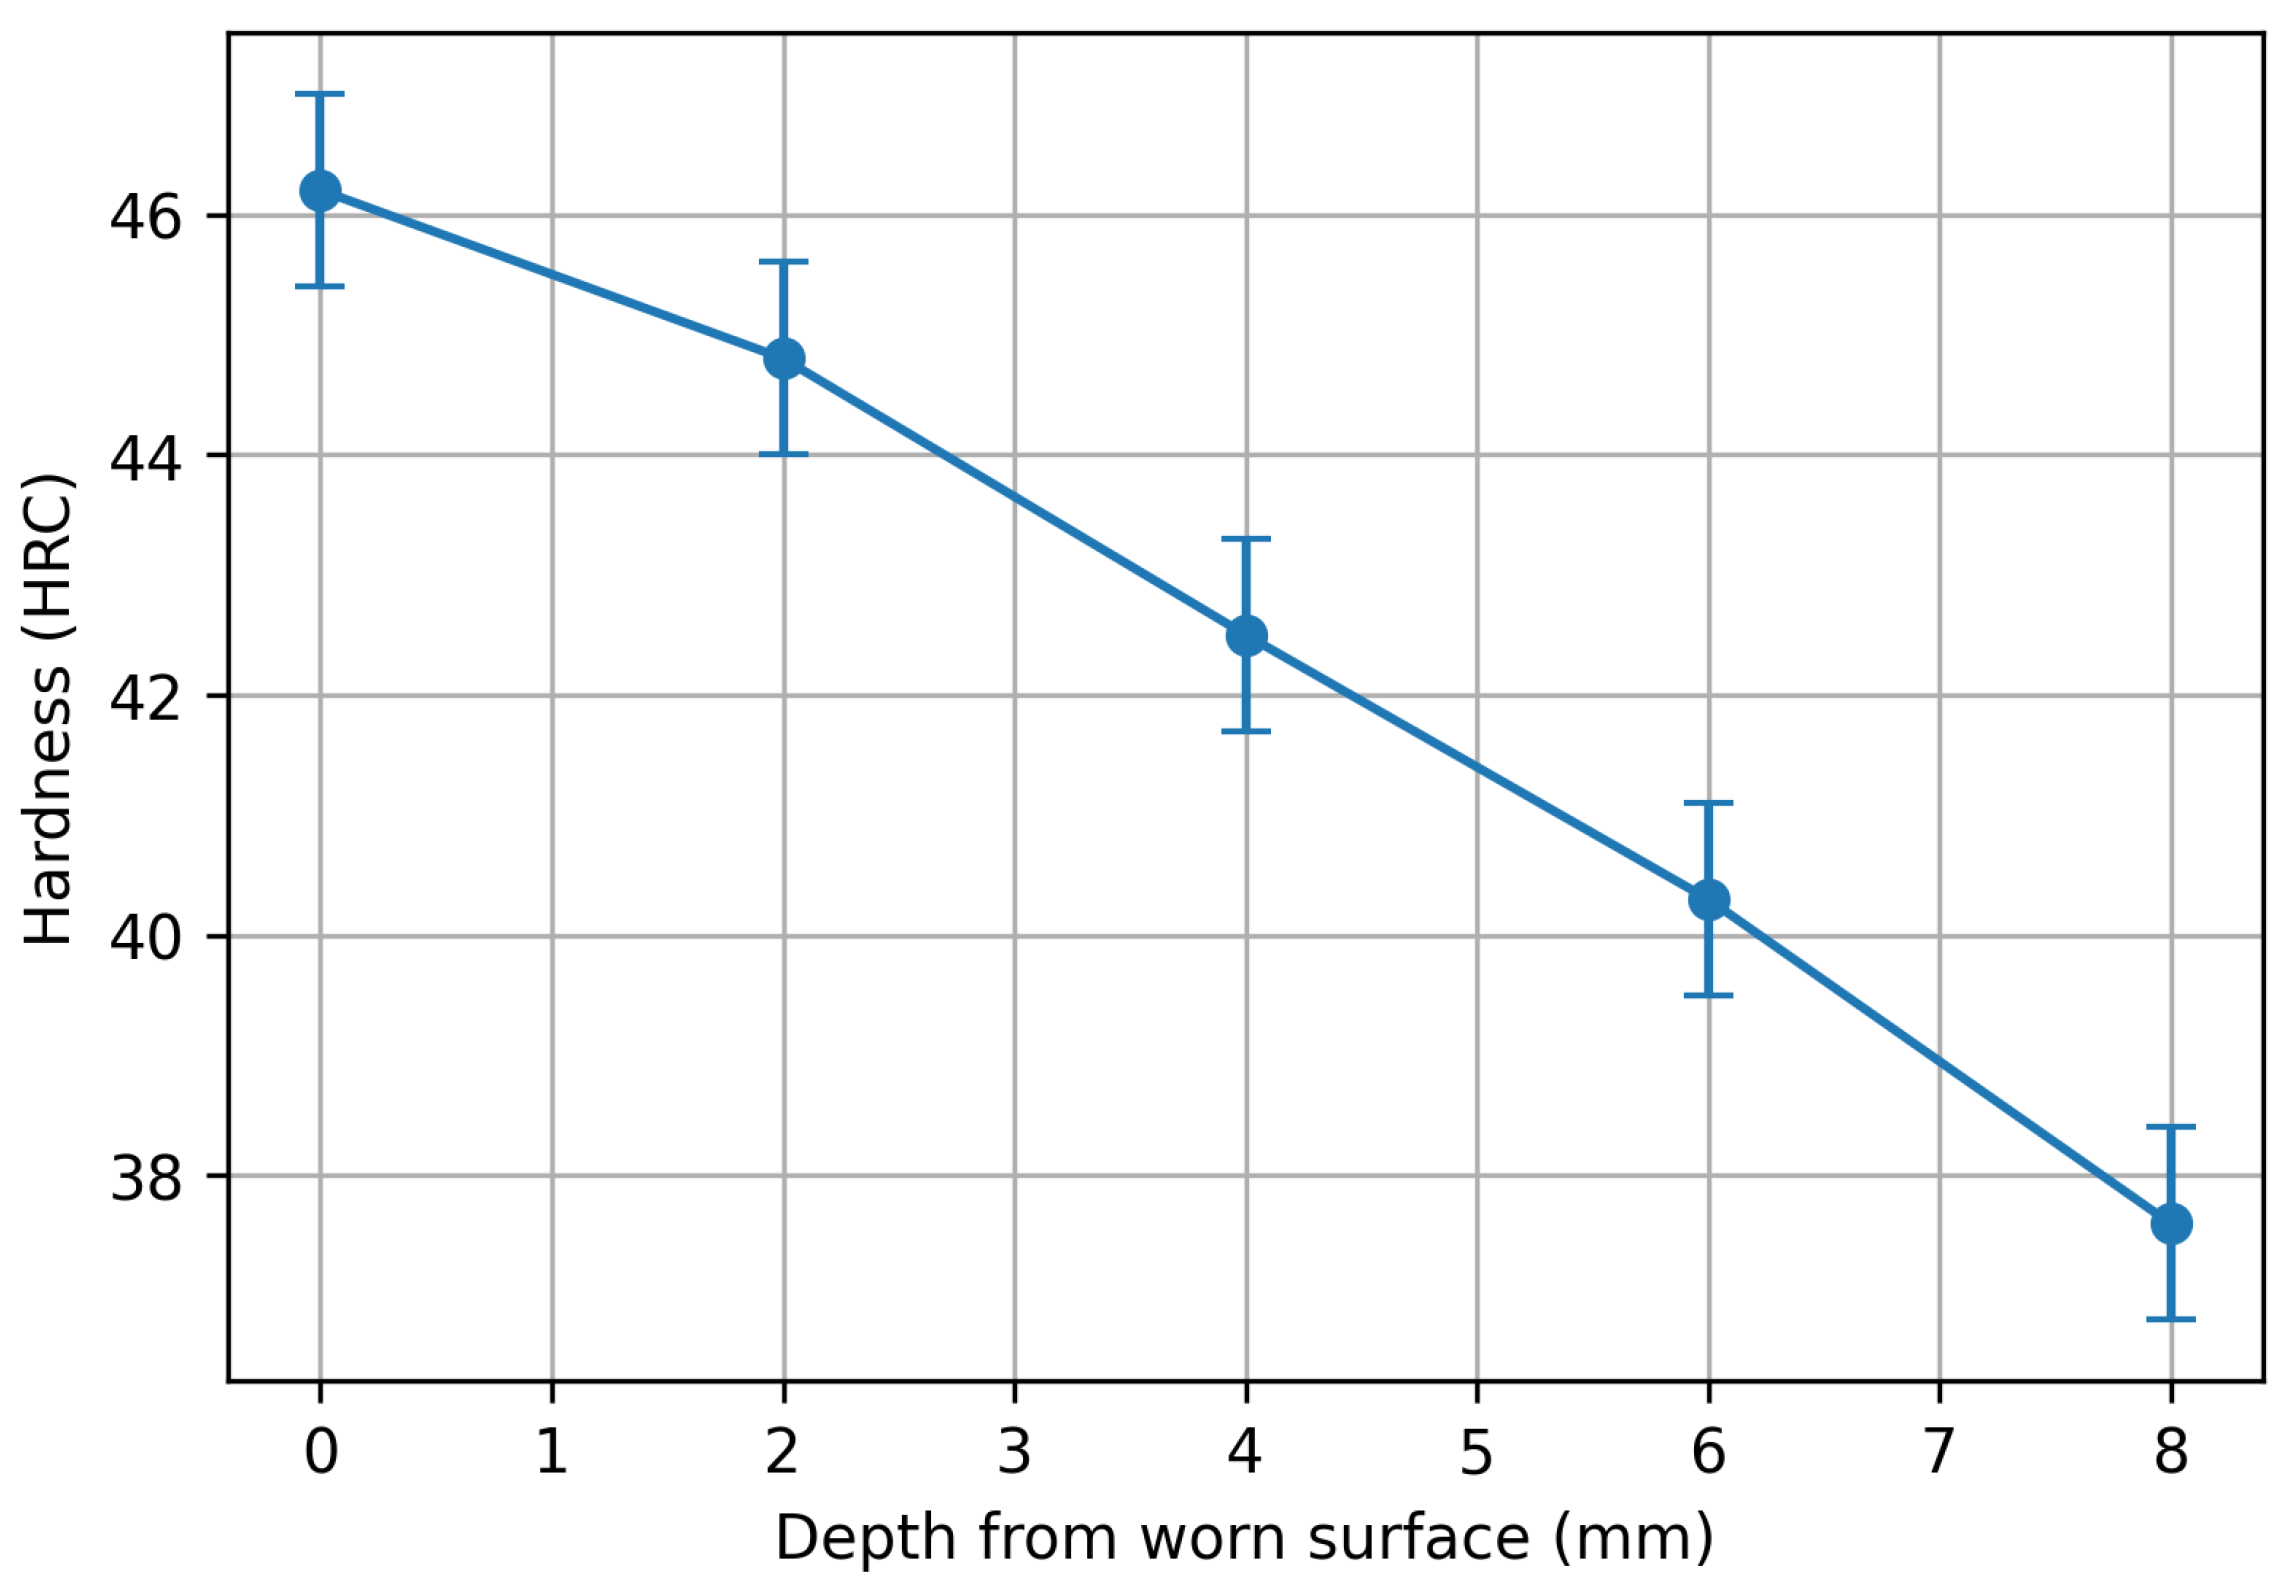
Figure 3 shows the hardness profiles measured as a function of depth from the worn surface toward the subsurface region. A pronounced decrease in hardness with increasing depth is observed, indicating thermo-mechanical fatigue-induced softening extending beneath the surface layer.
The average hardness in the near-surface region (0–2 mm) is approximately 46.2 HRC, while the subsurface region at depths greater than ~8 mm exhibits an average hardness of about 37.6 HRC, corresponding to an overall reduction of approximately 17%. This continuous hardness gradient provides clear evidence of thermo-mechanical fatigue-induced softening extending beneath the damaged surface.

3.2. Optical Microstructure Evolution

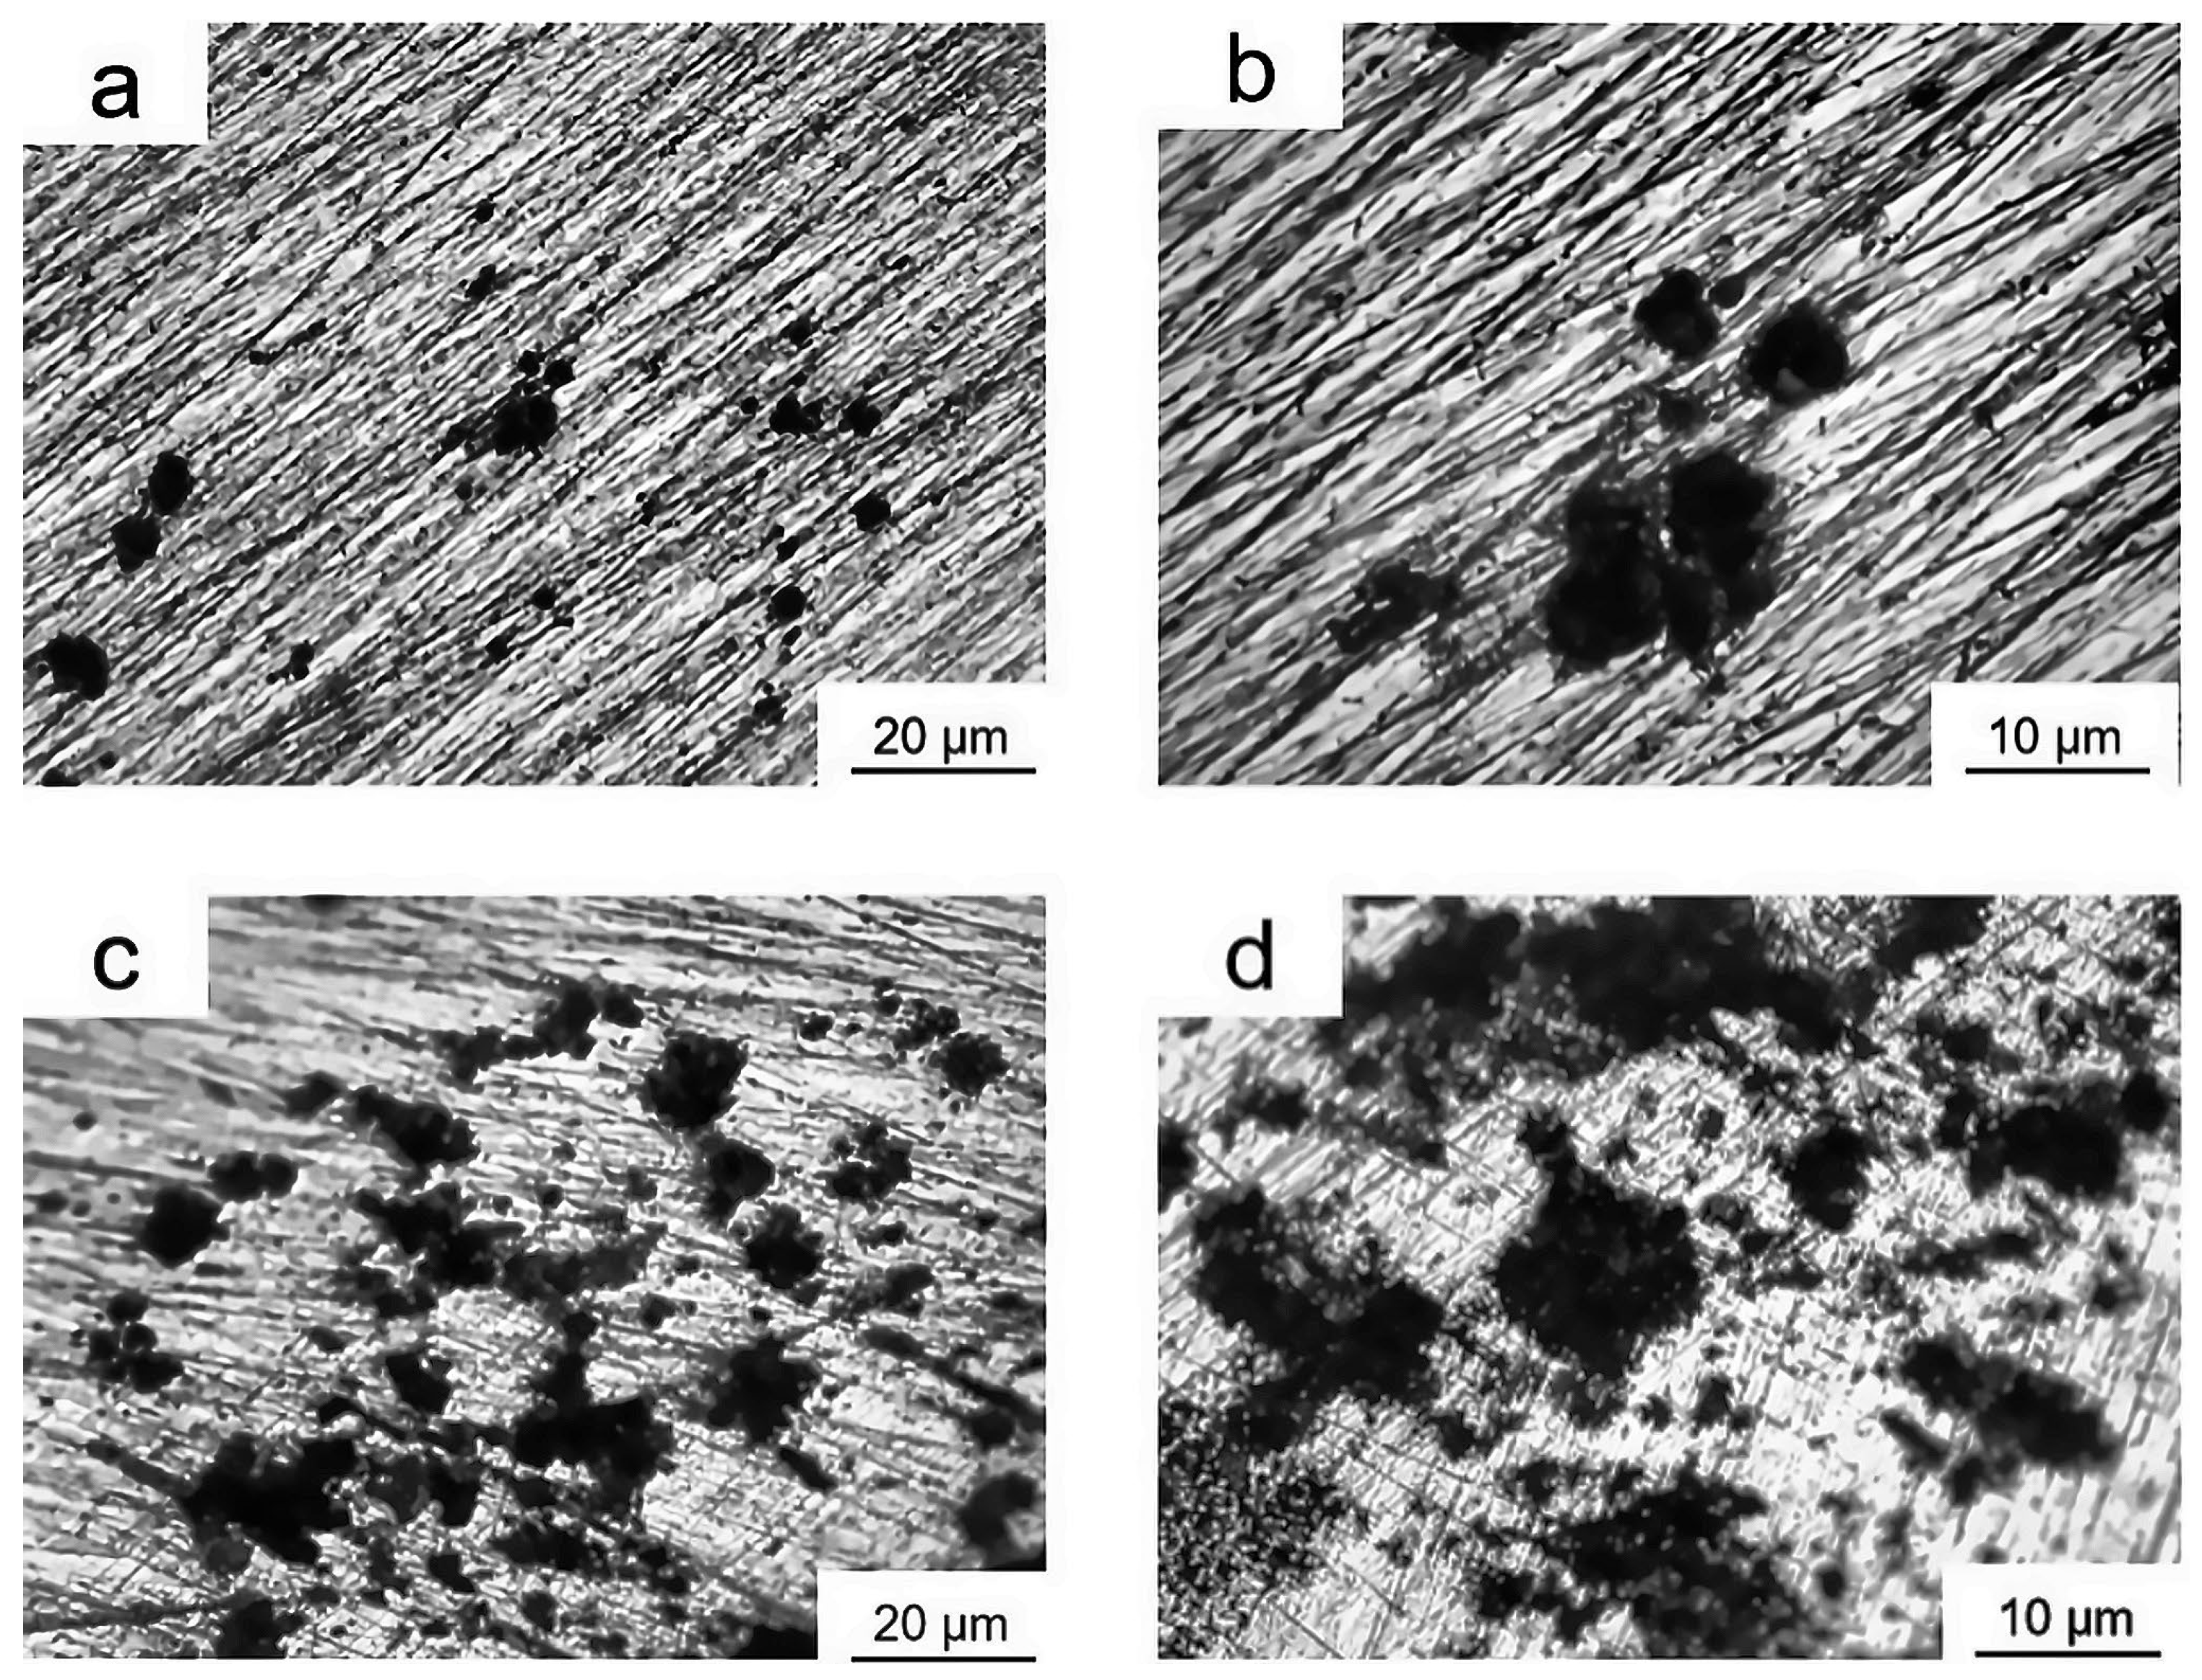
Optical microscopy (Figure 4) revealed coarsened tempered martensite and carbide redistribution in the surface region, whereas the subsurface maintained a finer tempered martensitic morphology. Carbide coarsening and martensite tempering support the hardness reduction and W–H microstrain findings and indicate that TMF-driven microstructural evolution was localized near the surface.

3.3. XRD Peak Shifts and Williamson–Hall Analysis

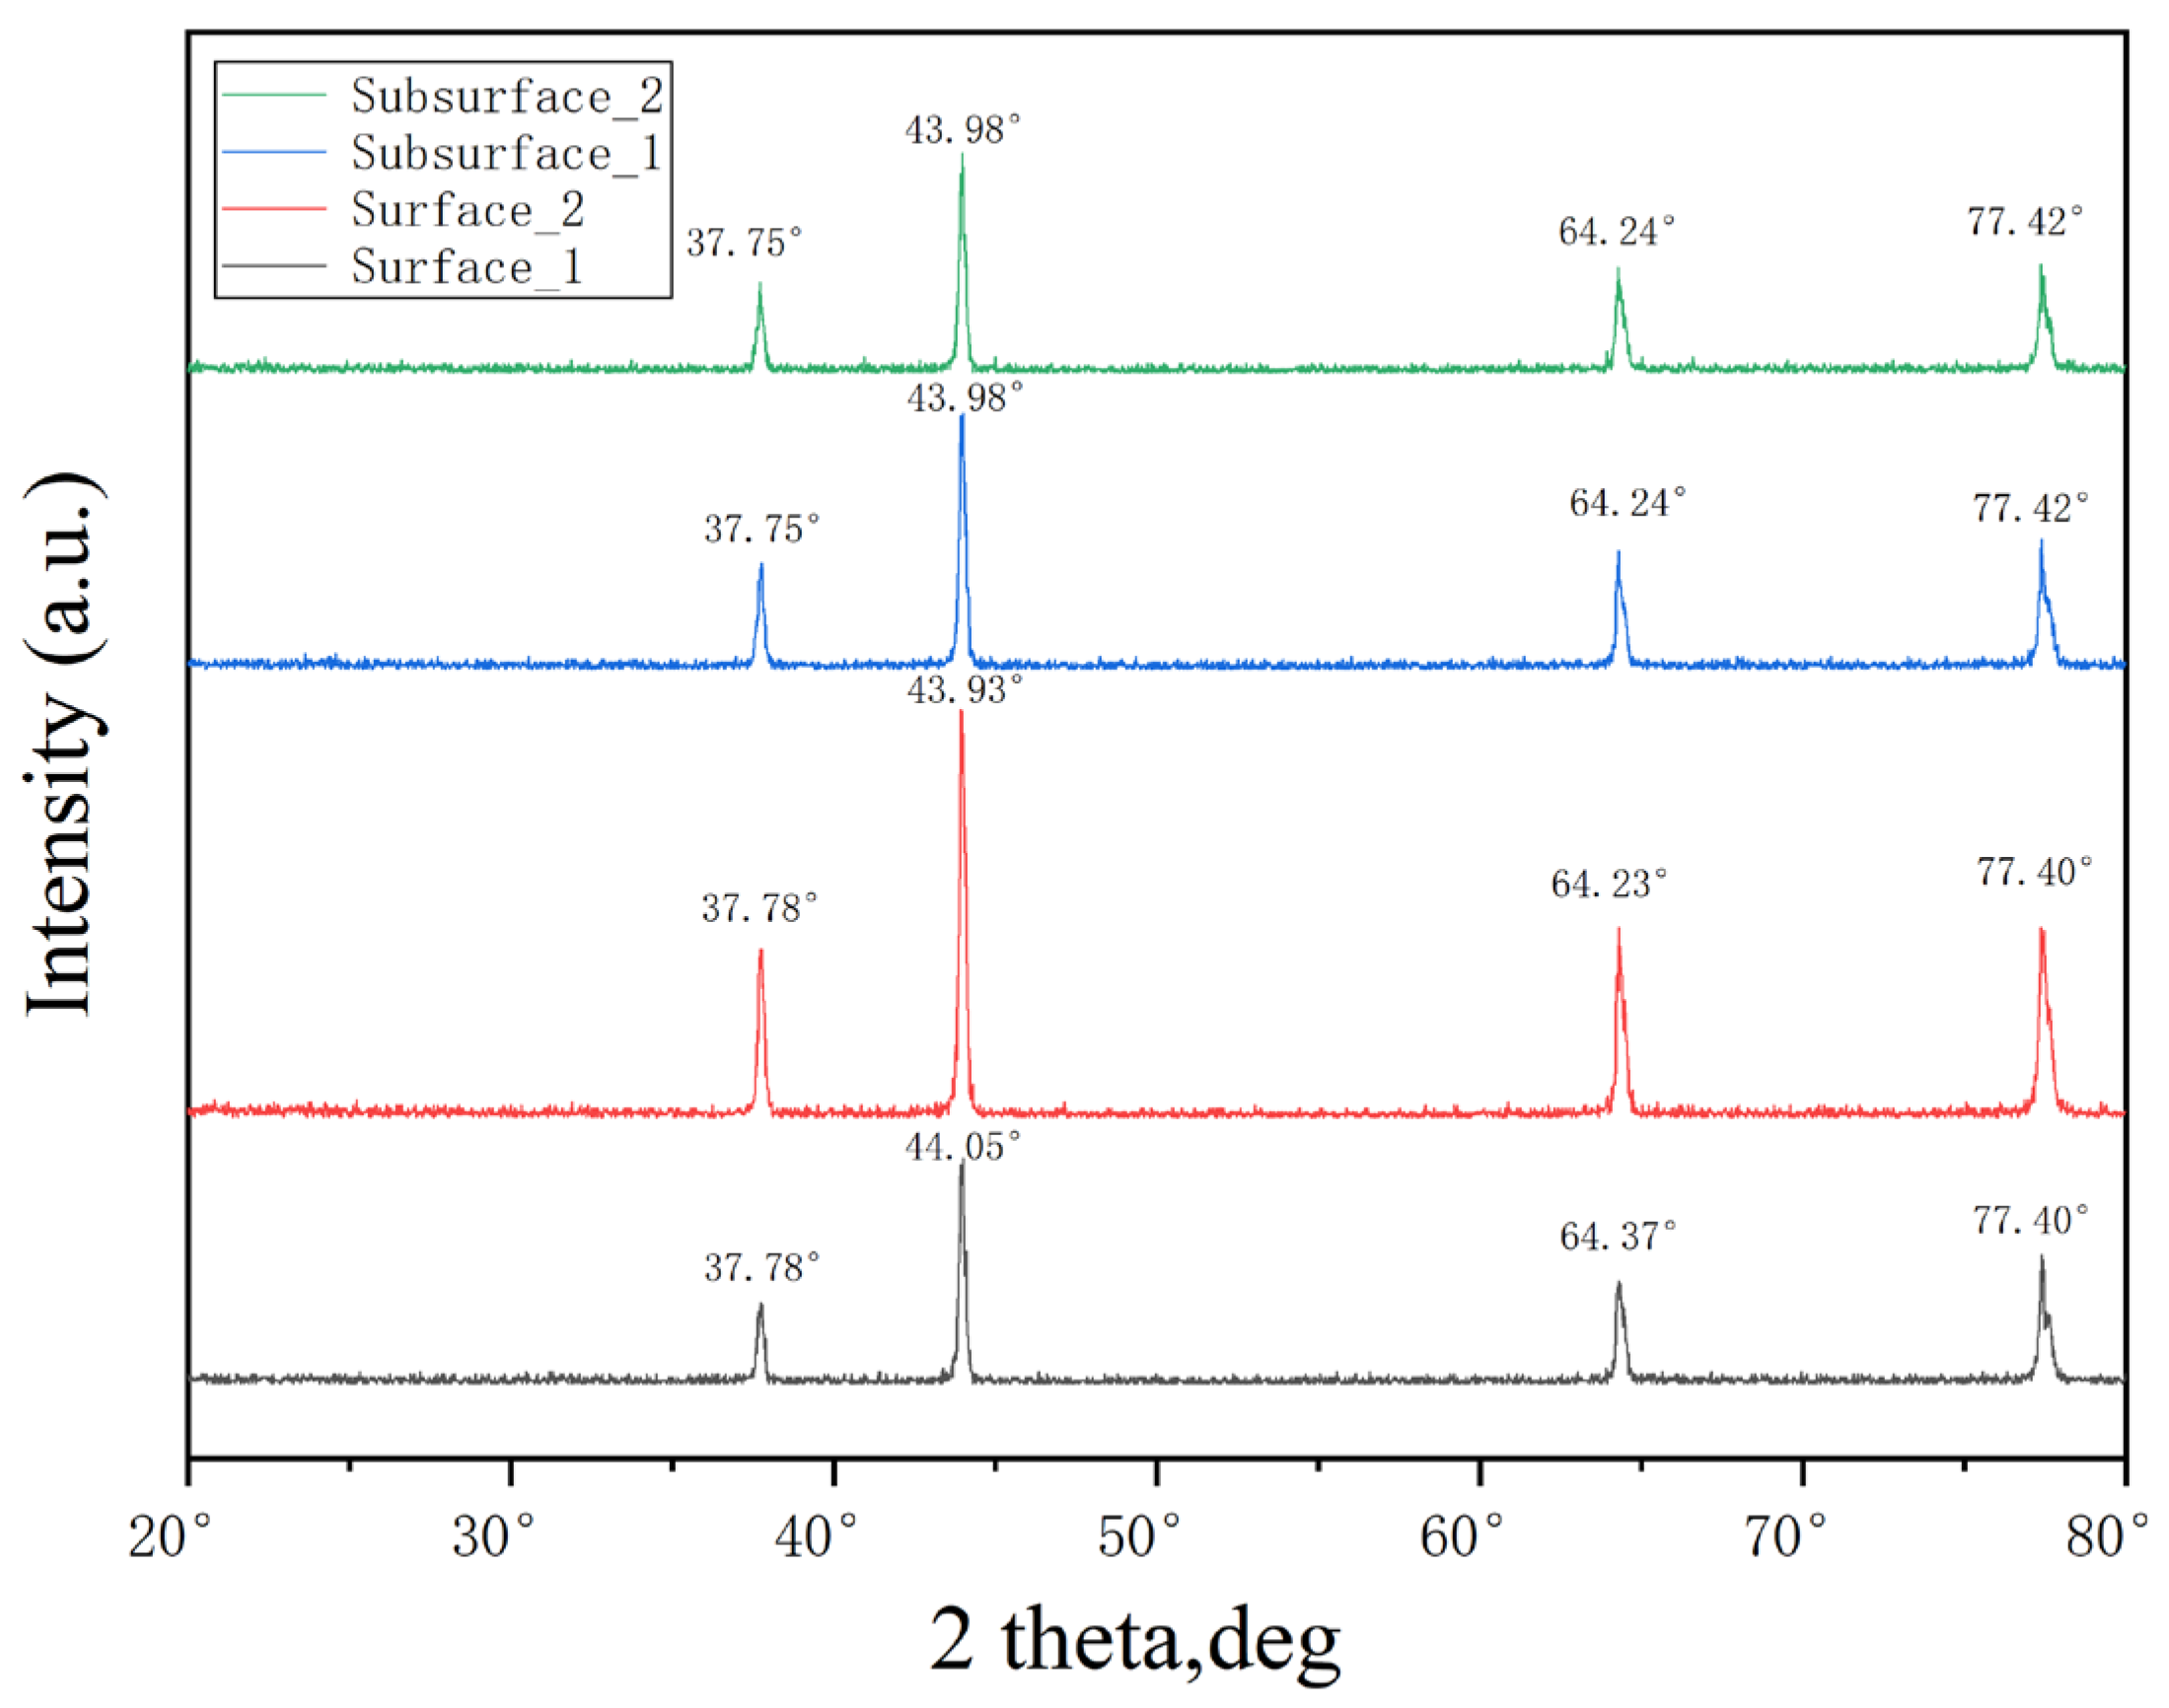
XRD patterns (Figure 5) showed peak shifts toward lower 2θ values and broadening for the surface material, indicating lattice expansion and increased microstrain. Williamson–Hall analysis yielded a microstrain of ~0.0021 and crystallite sizes of 50–80 nm. These values confirm dislocation accumulation and substructure refinement typical of TMF damage in hot-work steels.

3.4. Surface Wear Morphology and Pit Characteristics

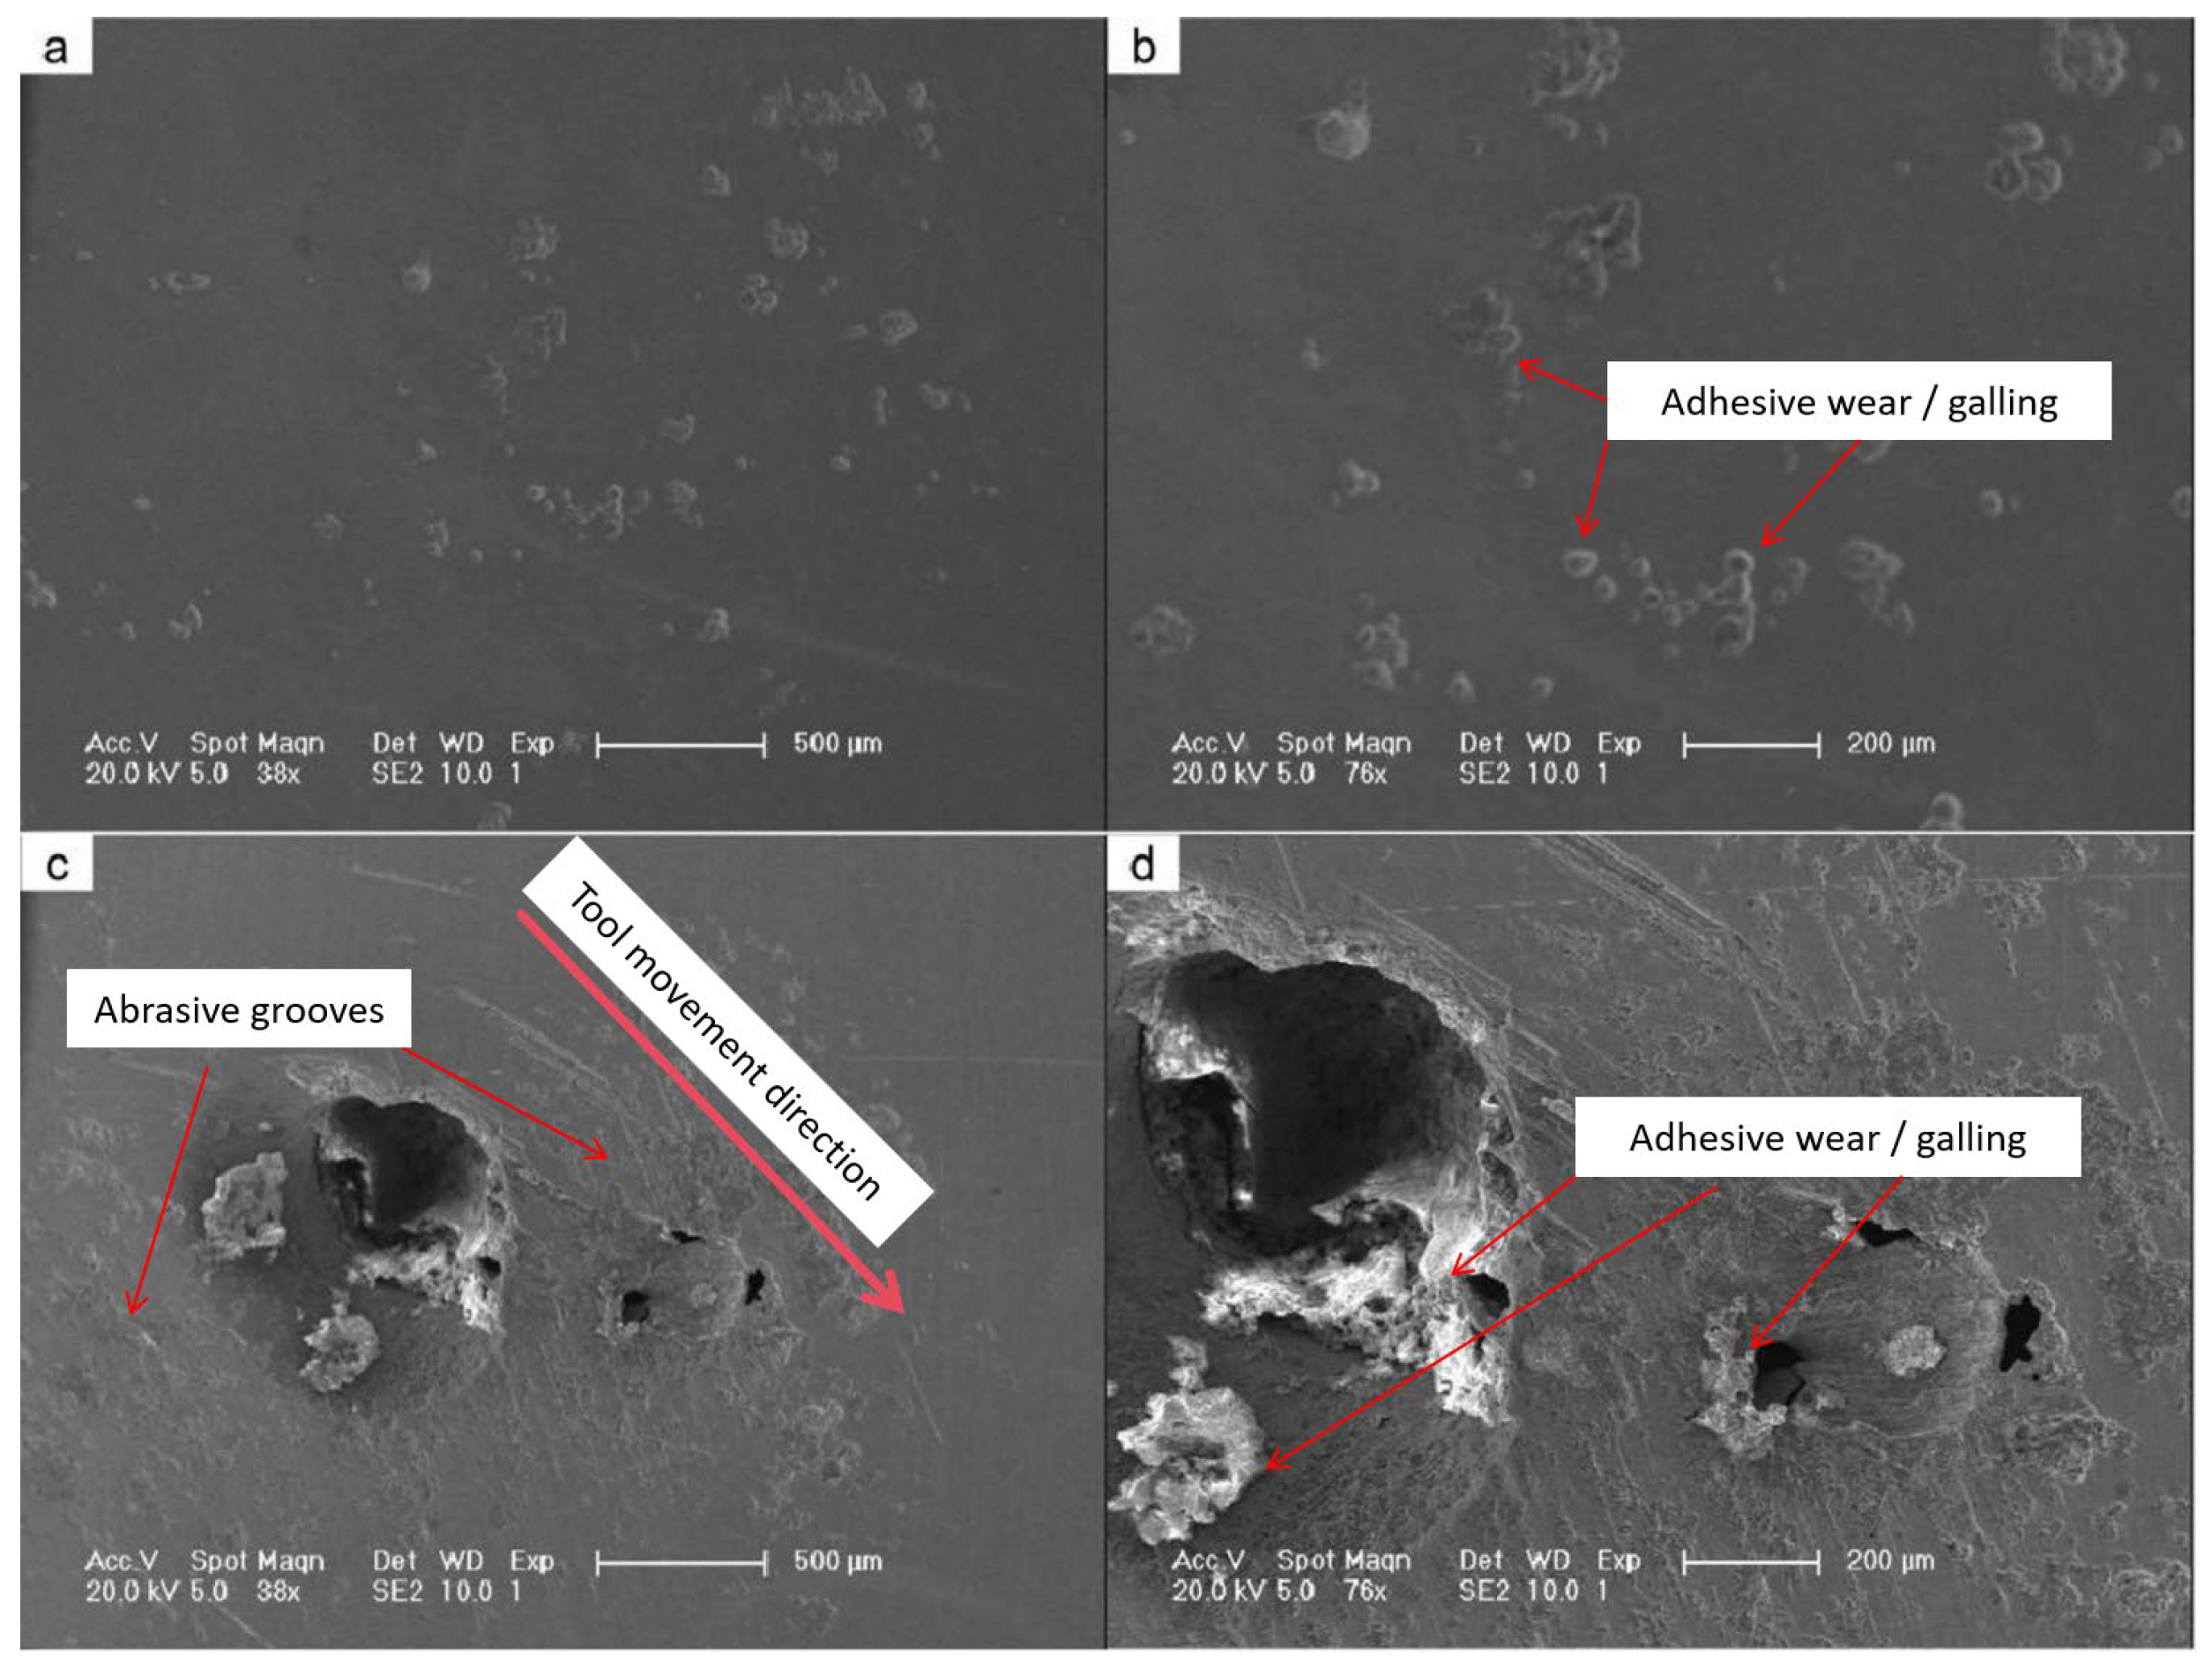
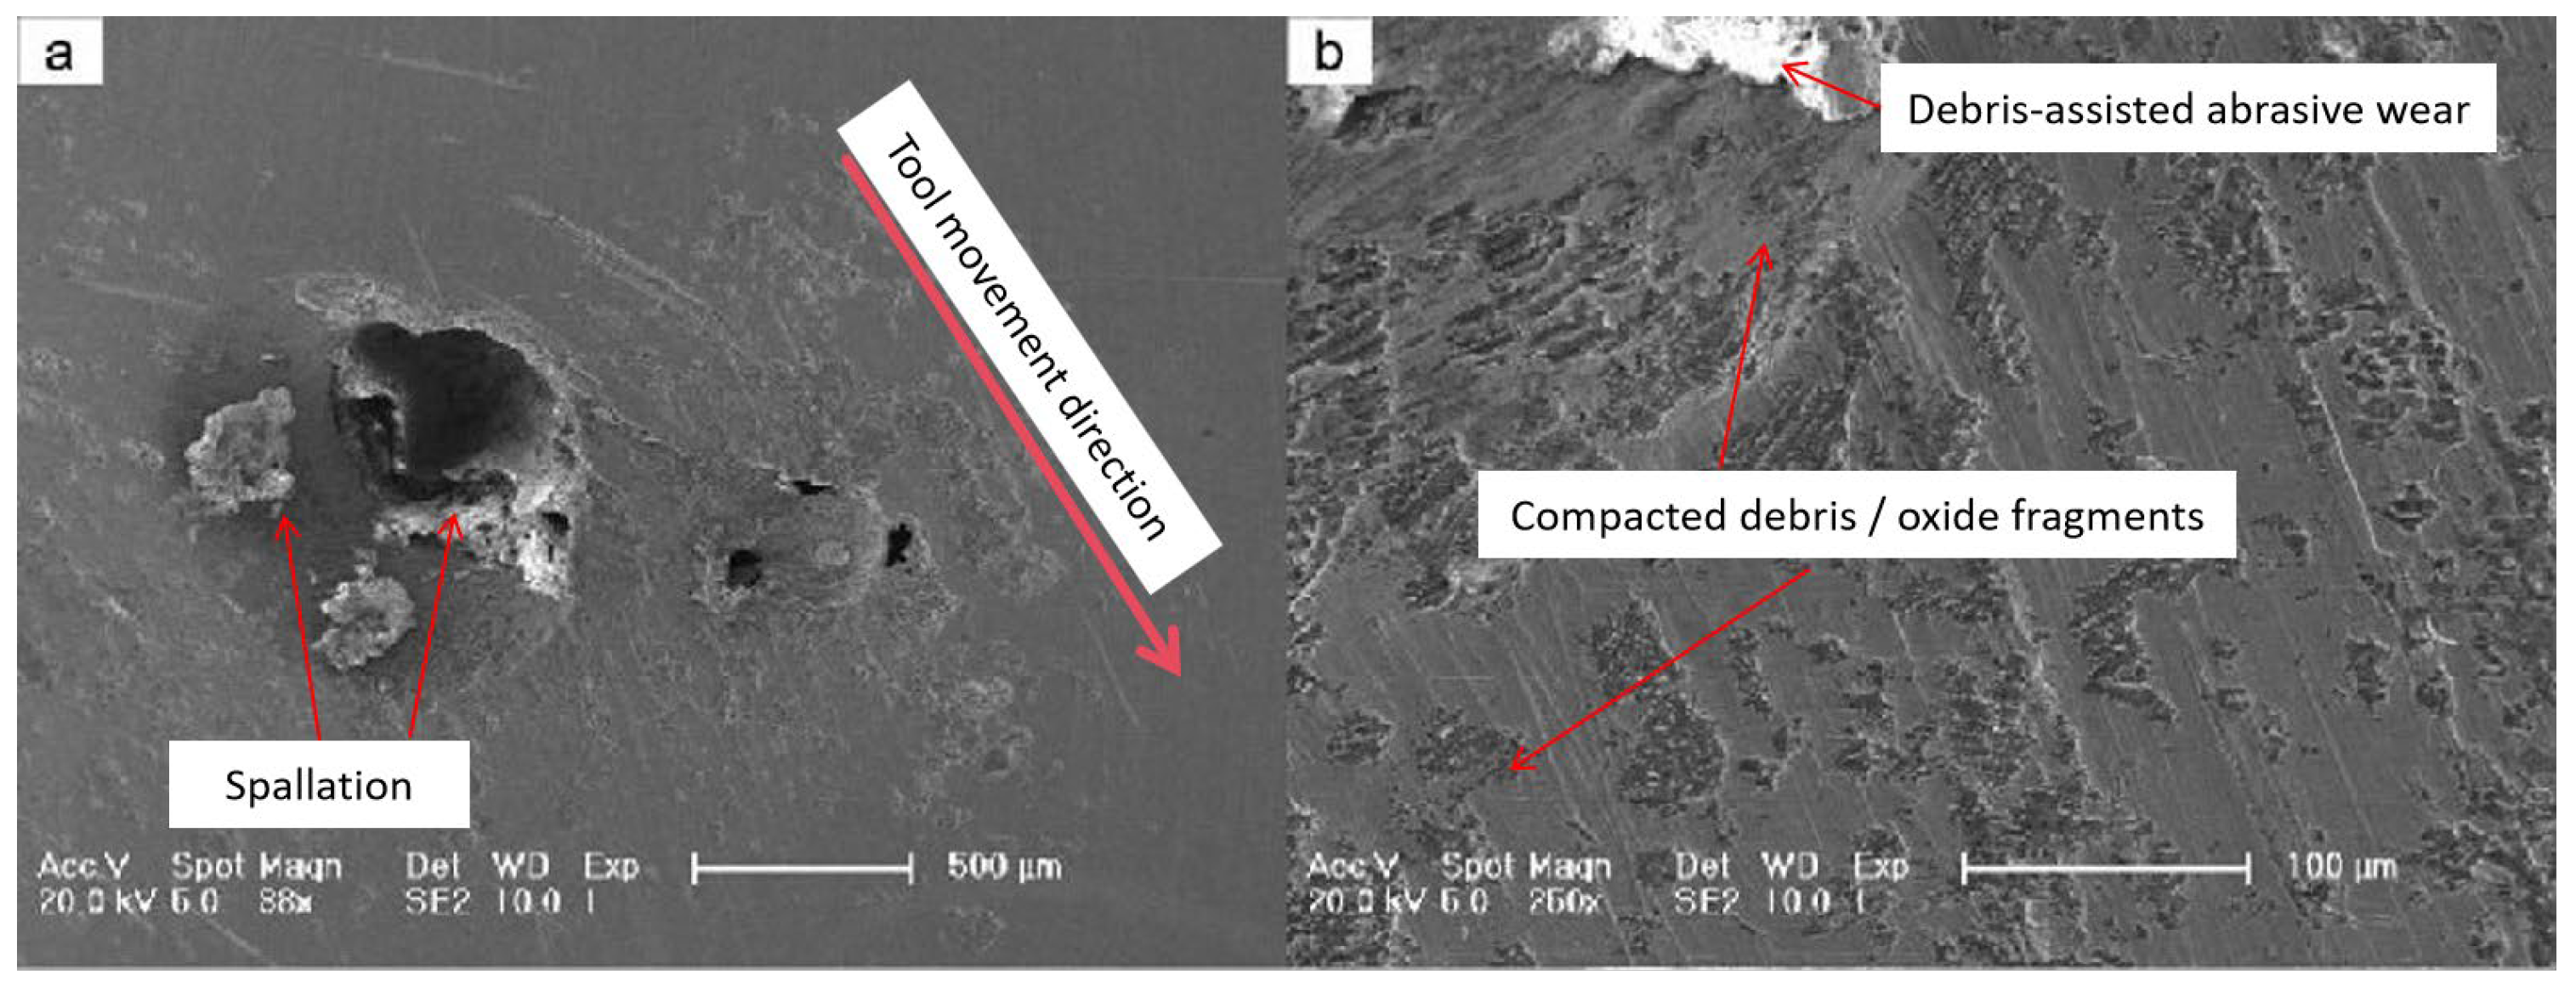
SEM images (Figure 6) revealed pits, grooves, delaminated regions, and debris-filled cavities on the worn surface. The direction of tool movement is indicated in Figure 6 to clarify the relationship between the sliding direction and the observed wear morphologies. A similar indication of tool movement is also provided in Figure 9 for comparison. Pit diameters typically ranged from 150 to 600 μm, while crack lengths were 40–150 μm. Larger pits contained embedded oxide and intermetallic debris, indicating progressive enlargement through repeated adhesion–fracture cycles and abrasive deepening. Pit edges were jagged and showed evidence of local plastic deformation, consistent with material tearing from welded junctions.

3.5. Adhesive Wear and Galling Behavior

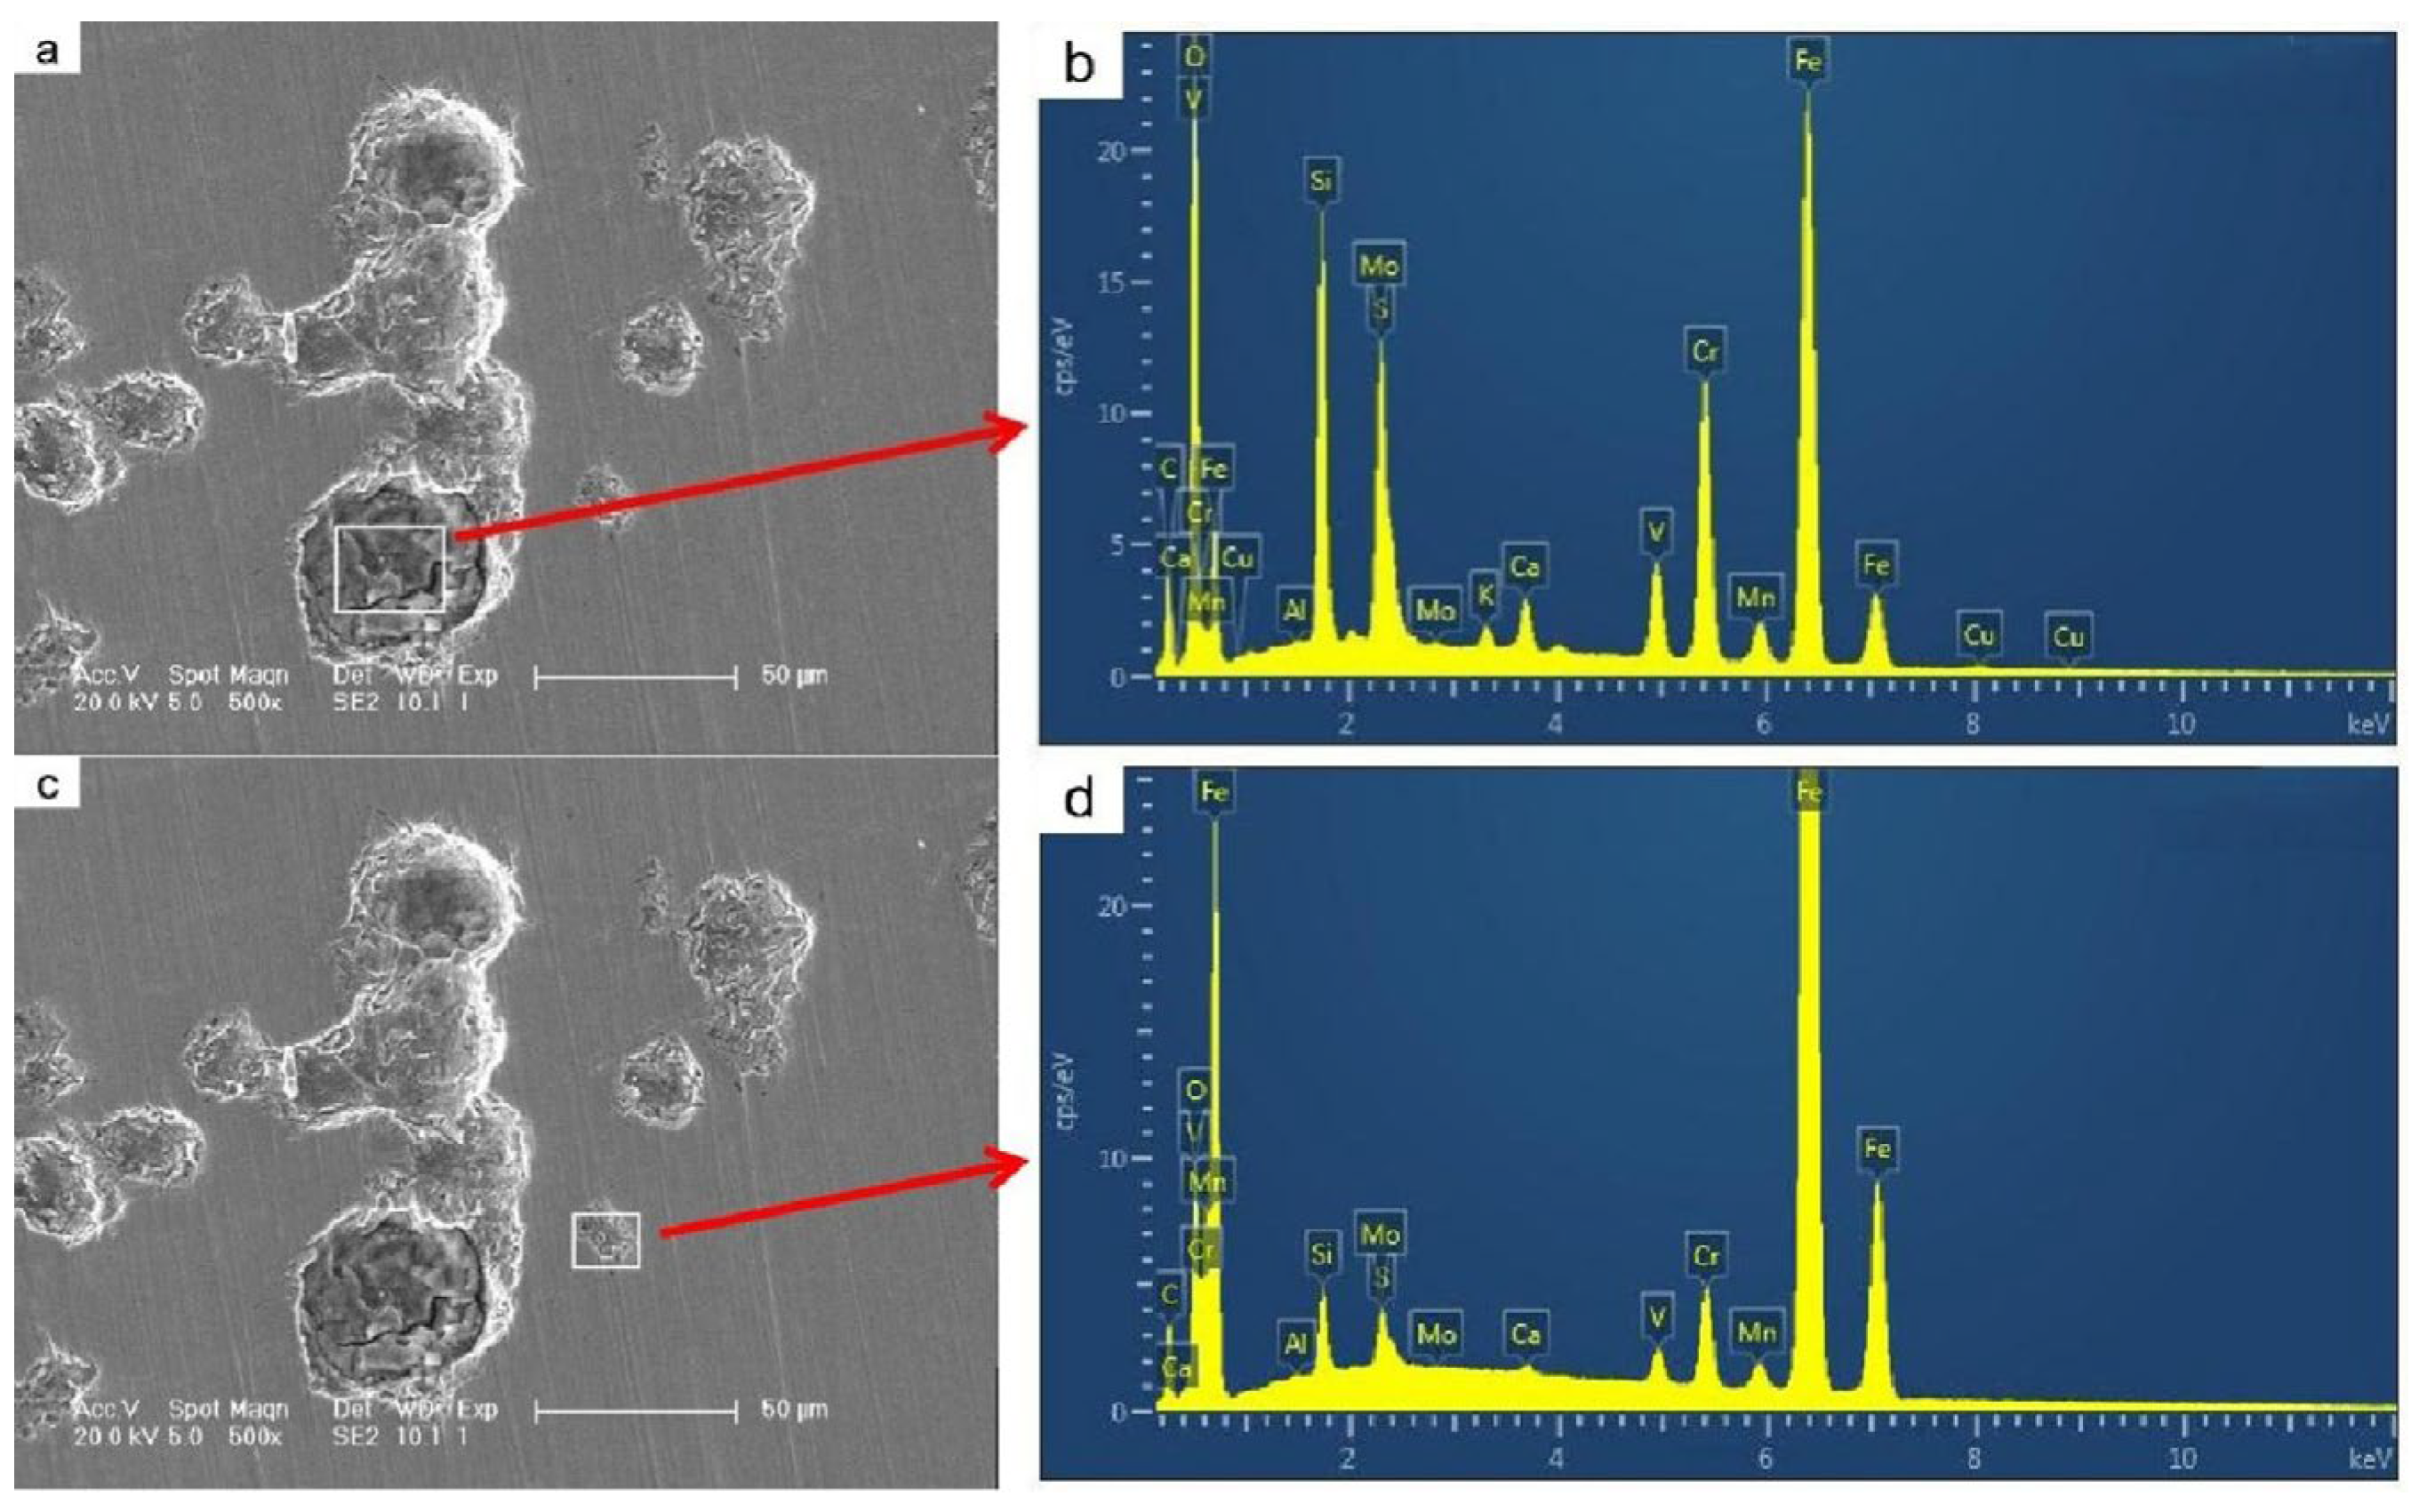
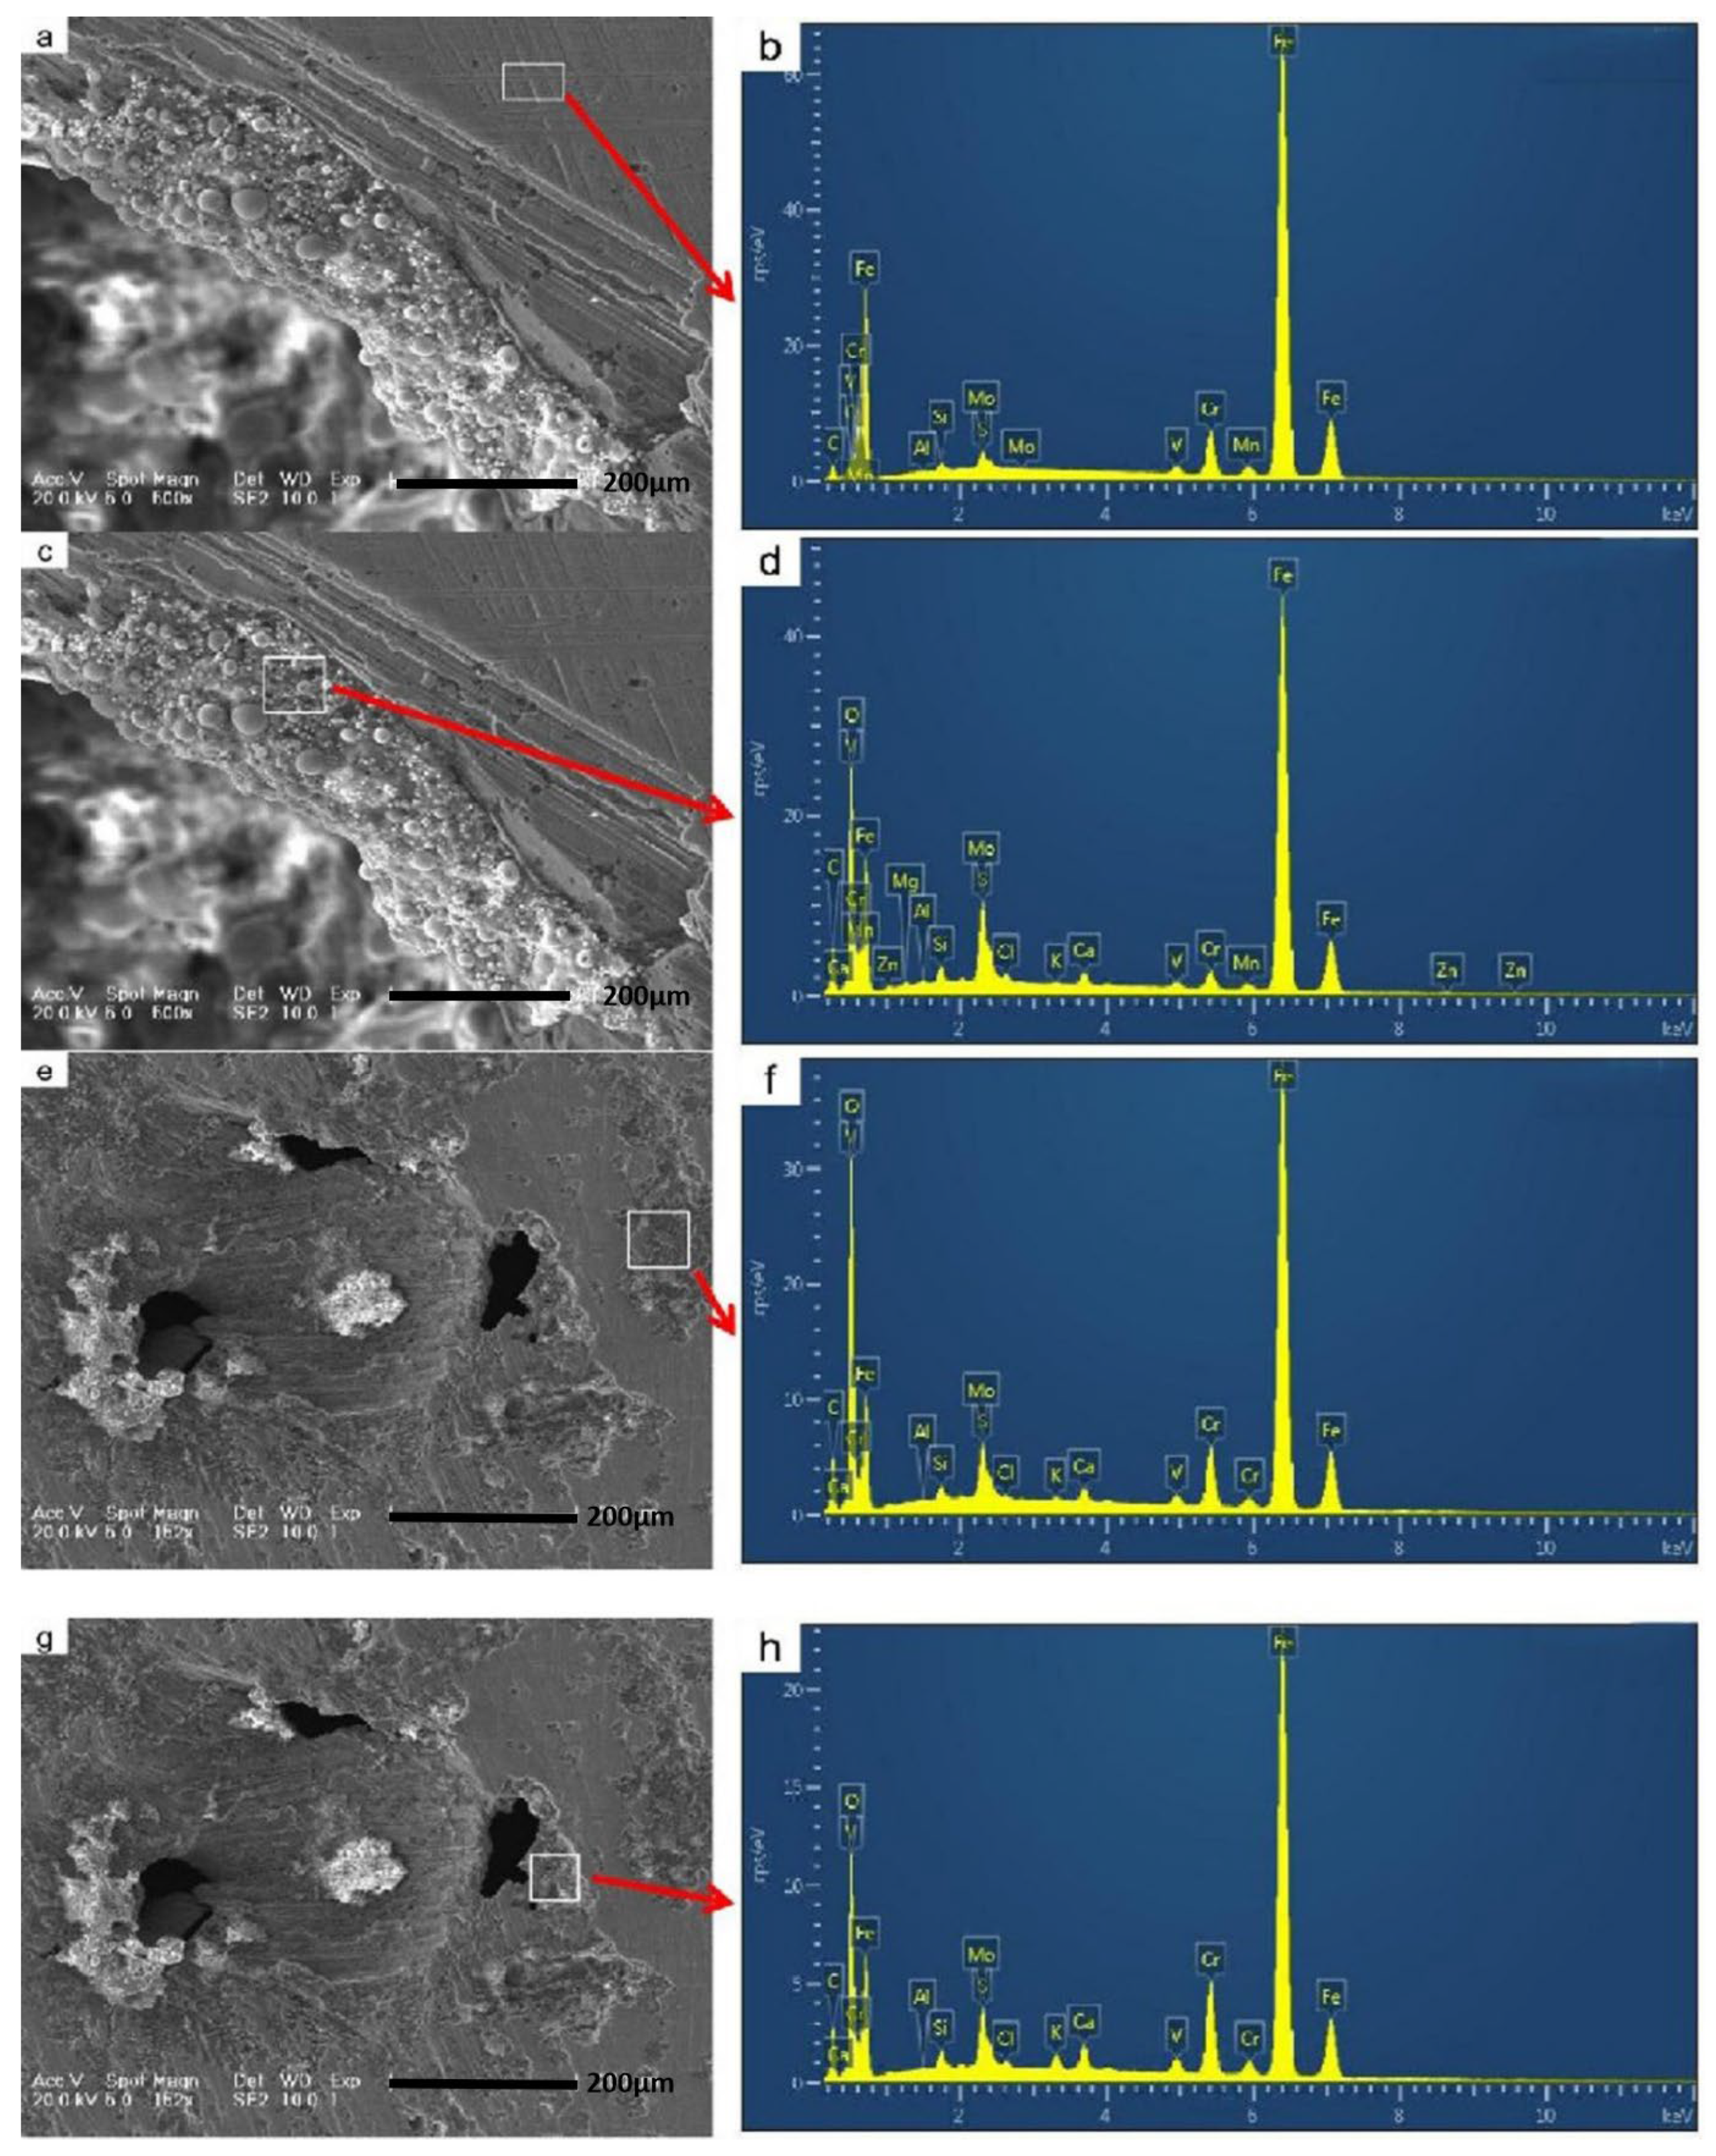
EDS point analysis and mapping (Figure 7 and Figure 8) showed high concentrations of Fe, O, Al, and Si within the reaction layer. Fe–O oxides, Fe–Al intermetallics, and FeSiAl4 phases were identified as major constituents. Reaction-layer thicknesses ranged from 15 to 40 μm. These brittle phases frequently fractured and spalled, generating debris that contributed to third-body abrasion.
Reaction-layer thicknesses were measured from calibrated cross-sectional SEM images. At least 20 measurements were performed for each sample. The thickness ranged from 15 to 40 μm, with an average value of approximately 25 ± 6 μm. The reaction-layer boundary was defined based on Al- and/or O-enriched regions confirmed by EDS line scans and elemental mapping.

3.6. Oxide-Assisted Abrasive Wear

A semi-quantitative analysis of wear evolution was performed based on pit size distribution, relative pit area fraction, and crack density. Adhesive wear was evidenced by Al-rich transferred layers and torn-out scars (Figure 8). Welded junctions formed under high temperature and pressure, aided by molten or semi-molten Al–Si coating. When sliding continued, these junctions fractured, tearing fragments out of the die surface and initiating pits. The presence of Al-rich residues in many pits confirms a strong adhesive component to the wear process.

3.7. Abrasive Wear by Hard Debris

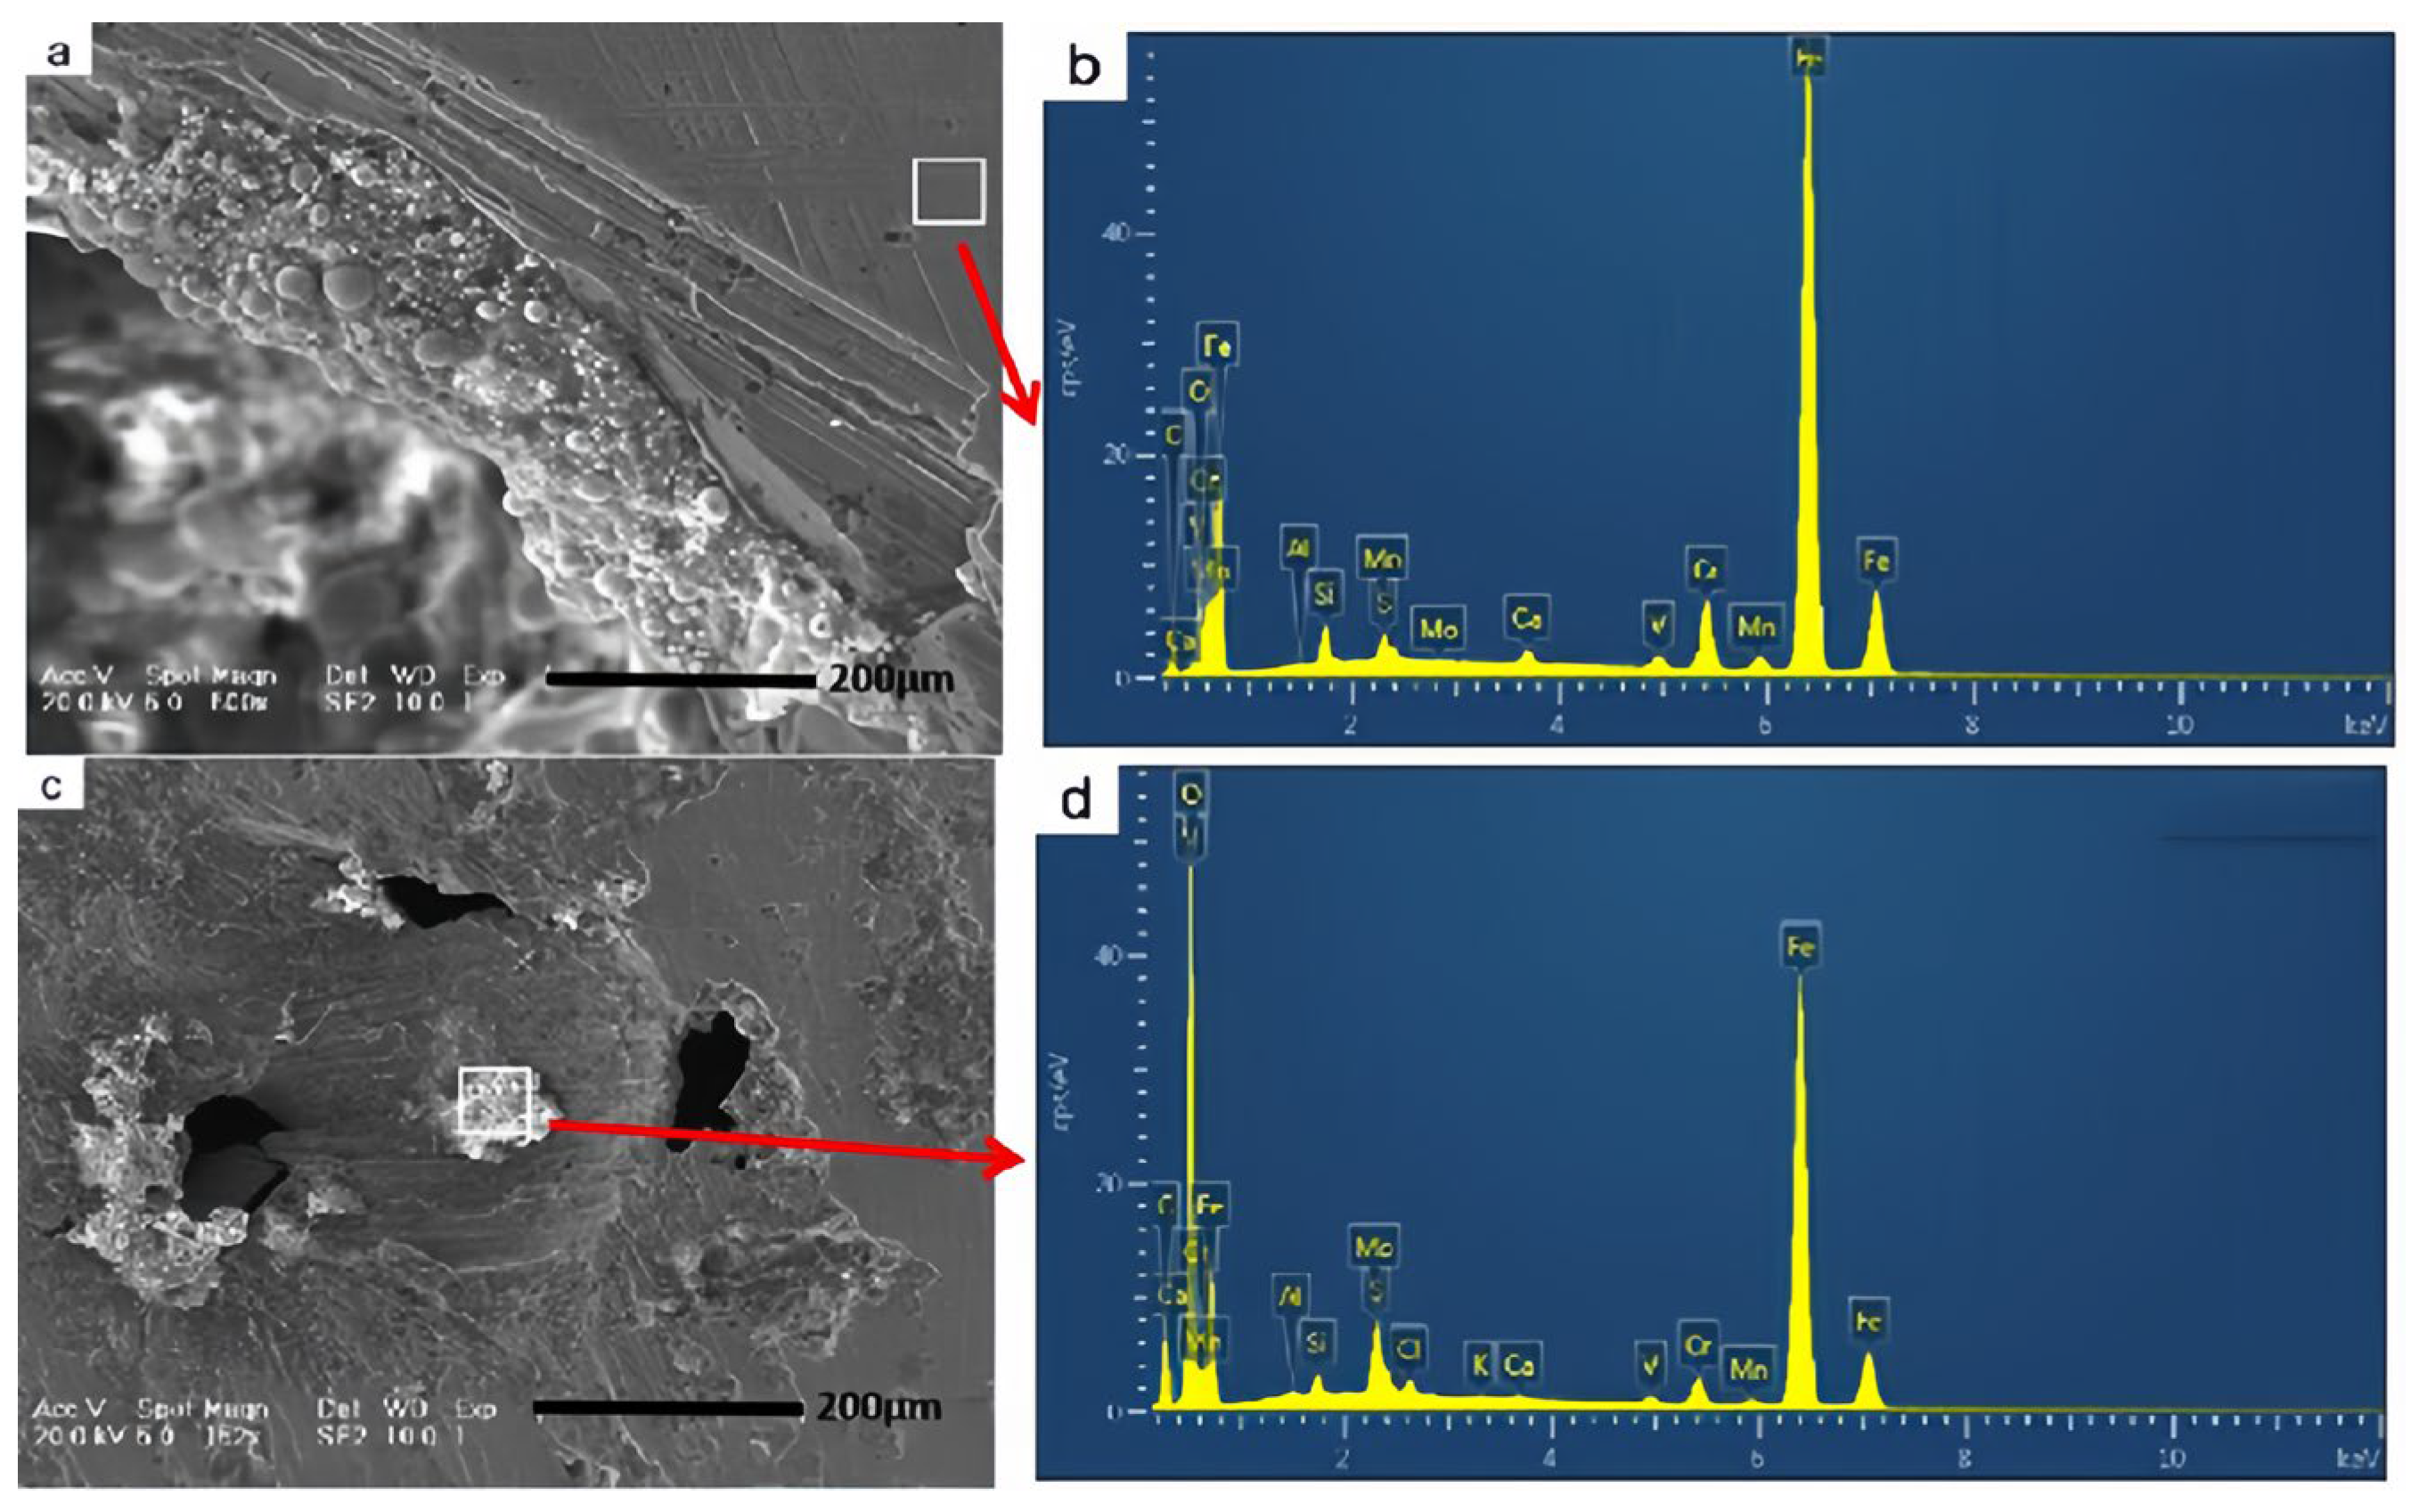
As oxides and intermetallic particles accumulated, abrasive wear became increasingly important. Angular debris particles plowed the softened die surface, producing grooves and deepening existing pits (Figure 9 and Figure 10). This transition from adhesion-dominated to debris-assisted abrasion explains the large pit sizes and severe surface roughness observed in service-exposed regions.
SEM observations revealed pit diameters ranging from approximately 150 to 600 μm and crack lengths of 40–150 μm. Based on image analysis, the relative pit area fraction and crack density were significantly higher in severely worn regions than in mildly worn areas, indicating a transition from adhesion-dominated wear at early stages to debris-assisted abrasive wear during prolonged service.

3.8. Integrated View of Morphology, Chemistry, and Microstructure

The combined hardness, microstructure, XRD, SEM/EDS, and morphological observations indicate that TMF softening, oxidation and intermetallic formation, adhesive junction formation, and abrasive debris all acted together. The degradation process is thus best described as a coupled, multi-mechanism failure rather than a single dominant wear mode. Such coupled degradation behavior has also been suggested for hot-work steels exposed to high-temperature cyclic loading and severe tribological conditions [5,8].

3.9. Subsurface Microstructural Degradation Beneath the Damaged Surface

Metallographic cross-sections prepared perpendicular to the worn surface reveal a distinct subsurface degradation zone beneath the damaged surface of the Mo–W hot-work steel die. As shown in Figure 4, the surface region exhibits pronounced microstructural changes compared with the subsurface material, indicating a strong gradient in thermal and mechanical exposure during industrial service.
In the surface region (0–2 mm), the tempered martensitic structure appears significantly coarsened, accompanied by carbide redistribution and partial loss of the original fine lath morphology. By contrast, the subsurface region located at depths greater than approximately 8 mm retains a comparatively finer tempered martensitic structure, suggesting substantially lower cumulative thermal exposure.
This microstructural gradient is consistent with the measured hardness distribution (Figure 3), which shows a pronounced reduction in hardness toward the surface. The coarsening of tempered martensite and redistribution of carbides in the near-surface region provide direct metallographic evidence of thermo-mechanical fatigue-induced softening extending beneath the visibly damaged surface.
In addition to microstructural coarsening, localized microcracks and microstructural discontinuities are observed near the surface–subsurface transition zone. These features are preferentially aligned parallel to the worn surface and are frequently associated with regions exhibiting severe surface damage, such as pits and reaction-layer spallation. The presence of these subsurface features indicates that damage accumulation during long-term industrial hot stamping service is not confined to the surface layer but involves progressive degradation within the underlying material.
Overall, the metallographic cross-sectional observations demonstrate that the degradation of the investigated die involves both surface damage and subsurface microstructural evolution, forming a coupled damage system under cyclic thermo-mechanical loading conditions.

4. Discussion

The degradation of the Mo–W hot-work steel die investigated in this study is governed by a strong coupling between thermo-mechanical fatigue (TMF)-induced softening, high-temperature oxidation, interfacial chemical reactions, adhesive galling, and debris-assisted abrasive wear. Rather than acting independently, these mechanisms interact synergistically and evolve progressively during long-term industrial hot stamping service, ultimately leading to accelerated surface failure.
TMF-induced softening constitutes the fundamental driving force underlying the observed degradation behavior. Repeated thermal cycling between approximately 600 and 700 °C at the die surface and rapid cooling through internal water channels produces severe thermal gradients and cyclic stresses. The pronounced hardness reduction (~17%) from the surface to the subsurface region, together with the coarsening of tempered martensite, confirms significant cyclic tempering and microstructural degradation. Williamson–Hall analysis further reveals elevated microstrain (~0.0021) and refined crystallite sizes (50–80 nm) in the surface region, indicating high dislocation density and lattice distortion. Similar TMF-driven softening and microstrain accumulation have been widely reported for hot-work tool steels subjected to cyclic thermal loading and high-temperature forming conditions [3,4,5,12].
In addition to individual hardness values, the hardness profiles measured as a function of depth provide further insight into the degradation behavior of the die. The observed hardness gradient from the worn surface toward the subsurface region indicates that thermo-mechanical fatigue-induced softening extends beneath the surface layer rather than being confined to the immediate contact zone. This depth-dependent softening contributes to a progressive reduction in load-bearing capacity near the surface, thereby facilitating adhesive wear, crack initiation, and subsequent debris-assisted abrasion during service.
In parallel with TMF damage, high-temperature oxidation and chemical interactions with the Al–Si coating on 22MnB5 sheets promote the formation of complex reaction layers. SEM/EDS analyses confirm the presence of Fe–O oxides, Fe–Al intermetallics, and ternary Fe–Al–Si phases such as FeSiAl4. These brittle reaction products form discontinuous layers with thicknesses of 15–40 μm, which are highly susceptible to cracking and spallation under combined thermal and mechanical loading. Previous studies have demonstrated that such reaction layers significantly weaken the die surface and serve as preferential sites for crack initiation [3,6,7,9,10,11]. The repeated formation and fracture of these layers thus represent a critical source of hard debris during service.
Adhesive wear (galling) is identified as the dominant wear mechanism during the early stages of die degradation. At elevated temperatures and contact pressures, welded junctions readily form between the softened die surface and the Al-rich coating, particularly when molten or semi-molten Al–Si films are present. The subsequent fracture of these junctions during sliding removes die material and generates pits and torn-out scars, as evidenced by Al-rich transferred layers observed in SEM/EDS analyses. Similar galling behavior has been extensively reported for hot-work tool steels in contact with Al–Si-coated boron steels under high-temperature sliding conditions.
As service proceeds, the wear mechanism progressively transitions from adhesion-dominated galling to a mixed adhesive–abrasive regime. This transition is closely associated with the accumulation of hard debris derived from fractured oxides and intermetallic compounds. These debris particles act as third-body abrasives that plow and cut the softened die surface, leading to pit deepening, groove formation, and accelerated material removal. The observed pit diameters of 150–600 μm and crack lengths of 40–150 μm are consistent with debris-assisted abrasive wear becoming increasingly dominant during prolonged service.
This transition from adhesive wear to debris-assisted abrasive wear is in strong agreement with recent tribological studies on tool steels. Notably, Krbata et al. demonstrated that powdered metallurgy tool steels M390 and M398 exhibit a clear evolution from adhesive galling to mixed adhesive–abrasive wear when hard debris particles are present in the contact interface. Their work highlights the critical roles of microstructure, hardness, and third-body particles in governing wear transitions. The present results closely mirror these findings, as the fractured Fe–Al–Si intermetallics and oxide debris observed here function analogously to hard third bodies, significantly accelerating abrasive plowing once adhesive tearing has occurred. This agreement reinforces the conclusion that debris-assisted abrasion represents a secondary but increasingly dominant wear mode in industrial hot stamping dies.
The concept of third-body-controlled wear provides a unifying framework for interpreting the synergistic interaction between adhesion and abrasion observed in this study. Once adhesive junctions fracture, detached fragments remain trapped within the contact zone and actively participate in subsequent wear processes. Reduced surface hardness due to TMF-induced softening further enhances the effectiveness of third-body abrasion by allowing deeper penetration of hard debris particles. This establishes a positive feedback loop in which TMF degradation promotes adhesive tearing, debris generation, and abrasive plowing, which in turn increases surface roughness, friction, and stress concentration. Similar synergistic wear–oxidation and adhesion–abrasion interactions have been reported for hot-work tool steels under high-temperature sliding and forming conditions [9,11,12,13,14].
From an industrial perspective, the coupled degradation pathway identified in this study can be summarized as: TMF-induced softening → oxidation and intermetallic formation → adhesive junction formation and fracture → debris generation → debris-assisted abrasive wear → crack propagation and pit enlargement → final surface failure. This sequence emphasizes that long-term die performance is controlled by mixed-mode wear mechanisms rather than by isolated adhesion or abrasion alone. Consequently, effective mitigation strategies must address multiple degradation pathways simultaneously.
Potential approaches to extending die service life include alloy design strategies aimed at stabilizing carbides and improving resistance to TMF-induced softening, as well as surface engineering solutions such as AlCrN-based and multilayer nitride coatings that suppress Al diffusion, oxidation, and adhesive galling. In addition, process optimization measures, including improved cooling-channel design and controlled lubrication, can reduce thermal gradients and adhesion severity. Monitoring indicators such as hardness gradients, reaction-layer thickness, and pit size evolution may further support predictive maintenance and life management of hot stamping dies under industrial conditions.
5. Conclusions

A comprehensive failure analysis of a Mo–W hot-work steel die used in industrial hot stamping was conducted. The main conclusions are:
(1)
A significant TMF-induced hardness gradient was observed, with a 17% reduction from surface to subsurface regions, supported by microstructural evidence of martensite tempering and carbide coarsening.
(2)
XRD–Williamson–Hall analysis revealed elevated microstrain (~0.0021) and refined crystallite sizes (50–80 nm) in the surface region, indicating high dislocation density and lattice distortion.
(3)
SEM/EDS identified Fe–O oxides, Fe–Al intermetallics, and FeSiAl4 reaction phases as key contributors to brittle reaction layers and debris, with reaction-layer thicknesses of 15–40 μm and pit diameters of 150–600 μm.
(4)
The dominant wear mechanisms were mixed-mode adhesive galling and oxide-assisted abrasive wear, which interacted with TMF-induced softening and chemical degradation to accelerate pit growth and surface roughening.
(5)
The established degradation sequence—TMF softening → oxidation/intermetallic formation → adhesion → debris generation → abrasion → cracking—provides a mechanistic framework for designing improved die materials, coatings, and process conditions to extend tool life. These findings are consistent with previously reported wear–oxidation and adhesion–abrasion synergies in hot-work tool steels under high-temperature service conditions [10,12,13].

Author Contributions

Methodology, X.L. and H.W. (Hubiao Wang); Software, X.L.; Validation, H.W. (Hongyu Wang) and H.W. (Hubiao Wang); Formal Analysis, J.D.; Investigation, J.D.; Resources, X.Z.; Data Curation, J.D. and H.W. (Hubiao Wang); Writing—Original Draft Preparation, H.W. (Hubiao Wang); Writing—Review and Editing, X.Z., X.L. and H.W. (Hongyu Wang); Project Administration, H.W. (Hubiao Wang); Funding Acquisition, X.Z. All authors have read and agreed to the published version of the manuscript.

Funding

This study was supported by Key R&D Projects of the Jilin Province Science and Technology Development Plan [No. 20210202021NC], Jilin Provincial Department of Education “13th Five-Year” Science and Technology Project [No. JJKH20201008KJ], Science and Technology Innovation Major Project of Ningbo (Nos. 2022Z044, 2023Z031, 2022Z046, 2024QL023 and 2023Z022), Ningbo Enterprise Innovation Consortium Project (Nos. 2022H005 and 2022H001) and Key R&D Program Project of Yuyao City (No. 2023JH03010002).

Data Availability Statement

The original contributions presented in this study are included in the article. Further inquiries can be directed to the corresponding author.

Acknowledgments

The authors extend their thanks to Hang Xiao for his contribution to this research. Specifically, we acknowledge his help in using drawing software.

Conflicts of Interest

The author Hubiao Wang was employed by the company Beilong Precision Technology Co., Ltd. The remaining authors declare that the research was conducted in the absence of any commercial or financial relationships that could be construed as a potential conflict of interest. The funders had no role in the design of the study; in the collection, analyses, or interpretation of data; in the writing of the manuscript; or in the decision to publish the results.

Abbreviations

The following abbreviations are used in this manuscript:
TMFThermo-mechanical fatigue
SEMScanning electron microscopy
EDSEnergy-dispersive X-ray spectroscopy
XRDX-ray diffraction
W-HWilliamson–Hall

References

  1. Mori, K.I.; Bariani, P.F.; Behrens, B.A.; Brosius, A.; Bruschi, S.; Maeno, T.; Merklein, J.; Yanagimoto, J.J. Hot stamping of ultra-high strength steel parts. CIRP Ann.-Manuf. Technol. 2017, 66, 755–777. [Google Scholar] [CrossRef]
  2. Schwingenschlögl, P.; Niederhofer, P.; Merklein, M. Investigation on basic friction and wear mechanisms within hot stamping considering the influence of tool steel and hardness. Wear 2019, 426, 378–389. [Google Scholar] [CrossRef]
  3. Neu, R.W.; Sehitoglu, H. Thermomechanical fatigue, oxidation, and creep: Part I. Damage mechanisms. Metall. Mater. Trans. A 1989, 20, 1755–1767. [Google Scholar] [CrossRef]
  4. Boher, C.; Le Roux, S.; Penazzi, L.; Dessain, C. Experimental investigation of the tribological behavior and wear mechanisms of tool steel grades in hot stamping of a high-strength boron steel. Wear 2012, 294–295, 286–295. [Google Scholar] [CrossRef]
  5. Persson, A.; Hogmark, S.; Bergström, J. Simulation and evaluation of thermal fatigue cracking of hot work tool steels. Int. J. Fatigue 2004, 26, 1095–1107. [Google Scholar] [CrossRef]
  6. Zhang, Y.; Zhao, C.; Miyamoto, G.; Furuhara, T. Resistance to temper softening of low-carbon martensitic steels by microalloying of V, Nb and Ti. ISIJ Int. 2021, 61, 1641–1649. [Google Scholar] [CrossRef]
  7. Windmann, M.; Röttger, A.; Theisen, W. Formation of intermetallic phases in Al-coated hot-stamped 22MnB5 sheets in terms of coating thickness and Si content. Surf. Coat. Technol. 2014, 246, 17–25. [Google Scholar] [CrossRef]
  8. Hardell, J.; Kassfeldt, E.; Prakash, B. Friction and wear behaviour of high strength boron steel at elevated temperatures of up to 800 °C. Wear 2008, 264, 788–799. [Google Scholar] [CrossRef]
  9. Hernandez, S.; Hardell, J.; Winkelmann, H.; Ripoll, M.R.; Prakash, B. Influence of temperature on abrasive wear of boron steel and hot forming tool steels. Wear 2015, 338–339, 27–35. [Google Scholar] [CrossRef]
  10. Shin, D.; Lee, J.-Y.; Heo, H.; Kang, C.-Y. TEM Microstructural Evolution and Formation Mechanism of Reaction Layer for 22MnB5 Steel Hot-Dipped in Al–10% Si. Coatings 2018, 8, 467. [Google Scholar] [CrossRef]
  11. Venema, J.; Matthews, D.T.A.; Hazrati, J.; Wörmann, J.; van den Boogaard, A.H. Friction and wear mechanisms during hot stamping of AlSi coated press hardening steel. Wear 2017, 380–381, 137–145. [Google Scholar] [CrossRef]
  12. Stott, F.H. High-temperature sliding wear of metals. Tribol. Int. 2002, 35, 489–495. [Google Scholar] [CrossRef]
  13. Soranansri, P.; Dubois, A.; Moreau, P.; Funazuka, T.; Dohda, K.; Dubar, L. Tribological performance of AlCrN, TiAlN and DLC coatings in hot forming of aluminum alloy. Lubricants 2025, 13, 430. [Google Scholar] [CrossRef]
  14. Studeny, Z.; Krbata, M.; Dobrocky, D.; Eckert, M.; Ciger, R.; Kohutiar, M.; Mikus, P. Analysis of Tribological Properties of Powdered Tool Steels M390 and M398 in Contact with Al2O3. Materials 2022, 15, 7562. [Google Scholar] [CrossRef] [PubMed]
Figure 1. (a) Photograph of the actual industrial hot stamping die manufactured from Mo–W alloyed hot-work steel and used for forming automotive B-pillar components after long-term mass-production service. (b) Representative sample block (10 mm × 10 mm × 10 mm) extracted by wire-EDM from a severely worn region exhibiting pits, adhered layers, and cracks. (c) Schematic illustration of the sectioning orientation of the extracted block, indicating the analyzed surface (0–2 mm) and subsurface (>8 mm) regions.
Metals 16 00047 g001
Figure 2. Optical microstructure of the Mo–W steel die: (a) coarsened tempered martensite in the surface region; (b) finer tempered martensite in the subsurface region, reflecting differential thermal exposure.
Metals 16 00047 g002
Figure 3. Hardness profiles measured as a function of depth from the worn surface toward the subsurface region of the Mo–W hot-work steel die. Error bars represent a deviation of ±0.8 HRC.
Metals 16 00047 g003
Figure 4. Representative optical micrographs showing the evolution of tempered martensite in the Mo–W hot-work steel after long-term service: (a) surface region (0–2 mm) exhibiting severe microstructural degradation and reaction layer formation; (b) subsurface region (~2–5 mm) showing partially degraded tempered martensite; (c) deep subsurface region (>8 mm) retaining the original tempered martensitic structure. (d) severely degraded surface layer characterized by extensive material transfer, agglomerated adhered layers, and the near-complete disappearance of the original tempered martensitic features, indicative of advanced adhesive wear and tribo-oxidation.
Metals 16 00047 g004
Figure 5. XRD patterns of surface and subsurface materials, highlighting peak shifts, FWHM broadening, and lattice expansion consistent with increased microstrain and refined crystallite size.
Metals 16 00047 g005
Figure 6. SEM images of the worn die surface after long-term service: (a) low-magnification overview of the worn surface; (b) magnified view showing localized adhesive wear (galling); (c) representative pit accompanied by abrasive grooves, with the arrow indicating the tool movement direction; (d) severe adhesive wear (galling) and material delamination around the pit. The arrows in the images indicate typical wear features (adhesive wear/galling, abrasive grooves) and the tool movement direction.
Metals 16 00047 g006
Figure 7. SEM images and corresponding EDS point analyses of aluminum-rich transferred layers and torn-out scars on the worn die surface after high-temperature sliding: (a) SEM image showing an aluminum-rich transferred layer with torn-out morphology, with the boxed area indicating the EDS analysis location; (b) EDS spectrum acquired from the region marked in (a), revealing enrichment of Al and O together with Fe, indicating adhesive transfer and oxidation; (c) SEM image of a nearby worn region with a torn-out scar, with the boxed area selected for EDS analysis; (d) corresponding EDS spectrum from the region indicated in (c). The combined SEM–EDS results indicate severe adhesive wear (galling) accompanied by aluminum transfer and oxidation under high-temperature sliding conditions.
Metals 16 00047 g007
Figure 8. SEM images and corresponding EDS spectra of the reaction layer and wear debris formed on the die surface after long-term service: (a,c) SEM images showing the morphology of the reaction layer with adhered particles and reaction products; the white boxes indicate the regions selected for EDS analysis; (b,d) EDS spectra acquired from the boxed regions in (a,c), showing enrichment of Fe, O, Al, and Si; (e,g) SEM images of pits and surrounding reaction products on the worn surface, with the boxed areas indicating the EDS sampling locations; (f,h) corresponding EDS spectra of the regions marked in (e,g). The combined SEM–EDS results confirm the presence of Fe–O oxides, Fe–Al intermetallics, and ternary FeSiAl4 phases within the reaction layer and debris.
Metals 16 00047 g008
Figure 9. High-magnification SEM images showing localized damage features on the worn die surface after long-term service: (a) surface spallation and pit formation, with the arrow indicating the tool movement direction; (b) debris-assisted abrasive wear characterized by compacted wear debris and oxide fragments aligned along the sliding direction. Representative wear mechanisms, including surface spallation, debris-assisted abrasion, and debris compaction, are highlighted.
Metals 16 00047 g009
Figure 10. SEM images and corresponding EDS point analyses of the worn die surface after long-term service: (a) SEM image showing Al-rich and O-rich reaction products accumulated on the worn surface, with the boxed area indicating the EDS analysis location; (b) EDS spectrum acquired from the region marked in (a), revealing enrichment of Fe, O, Al, and Si; (c) SEM image of a pit and surrounding reaction layer on the worn surface, with the boxed area selected for EDS analysis; (d) corresponding EDS spectrum from the region indicated in (c). The SEM–EDS results indicate the formation of Fe–O oxides, Fe–Al intermetallics, and Fe–Al–Si compounds at the die–sheet interface.
Metals 16 00047 g010
Table 1. Measured composition (wt.%) of the Mo–W hot-work steel, as provided by the steel supplier. Direct chemical analysis of the serviced die was not feasible due to material limitations.
MaterialCMoWVSiMnSFe
Mo-W0.4–0.54.01.5–2.00.90.20.1<0.030Balance
Disclaimer/Publisher’s Note: The statements, opinions and data contained in all publications are solely those of the individual author(s) and contributor(s) and not of MDPI and/or the editor(s). MDPI and/or the editor(s) disclaim responsibility for any injury to people or property resulting from any ideas, methods, instructions or products referred to in the content.