Article

Effect of Hot Rolling on the Microstructure and Properties of Dispersion-Strengthened W-La Alloy

1
School of Chemical and Environmental Engineering, Jiaozuo University, Jiaozuo 454000, China
2
School of Mechanical and Power Engineering, Henan Polytechnic University, Jiaozuo 454000, China
*
Author to whom correspondence should be addressed.
Metals 2025, 15(10), 1157; https://doi.org/10.3390/met15101157
Submission received: 22 September 2025 / Revised: 14 October 2025 / Accepted: 16 October 2025 / Published: 20 October 2025

Abstract

The effects of different deformation processing routes (rolling and rotary forging) and temperature conditions on the microstructure and mechanical properties of W-1%La2O3 alloy wire were investigated. The results indicate that with increasing cumulative deformation (from ø22 mm to ø5.2 mm), the grain refinement efficiency of the “rolling + rotary forging” sequence is significantly superior to that of the “rotary forging + rotary forging” process. For the as-deformed ø5.2 mm W-La alloy bars, the material processed by “rolling + rotary forging” exhibited a higher Vickers hardness of 544.9 HV compared to that processed solely by rotary forging. Following annealing treatment, the hardness values of ø9.0 mm and ø5.2 mm bars produced via the “rolling + rotary forging” route were 467.2 HV and 460.4 HV, respectively. These values are notably higher than those obtained from the “rotary forging + rotary forging” process, which measured 446.1 HV and 433.5 HV for the corresponding diameters. In summary, this study systematically compares the effects of rolling and rotary forging processes on the microstructure and properties of W-La alloy, providing a valuable foundation for the future development of high-strength tungsten alloy wires.

1. Introduction

Tungsten (W) is a refractory metal known for its exceptional physical and mechanical properties, including high density (19.3 g/cm3), an extremely high melting point (3422 °C), high tensile strength (3GPa), superior hardness, excellent thermal conductivity, outstanding wear resistance, and strong corrosion resistance. These characteristics make it an irreplaceable material in critical applications across defense, aerospace, and general industry [1,2,3]. Due to its favorable properties, such as low hydrogen solubility, high sputtering threshold energy, high elastic modulus, and strong electron emission capability, tungsten is considered a promising candidate material for plasma-facing components and divertors in future nuclear fusion reactors, as well as for wire saws used in photovoltaic silicon wafer cutting [4,5,6]. Nevertheless, the broader application of pure tungsten is limited by several inherent shortcomings, including low-temperature brittleness, recrystallization embrittlement, limited thermal shock resistance, and irradiation-induced hydrogen retention. Addressing these challenges requires technological innovation to fully exploit tungsten’s potential in advanced engineering applications [7].
Pure tungsten is characterized by a high ductile-to-brittle transition temperature (DBTT), typically exceeding 300 °C [8], which results in brittle behavior at room temperature. During mechanical testing, pure tungsten often develops extensive network cracking and may experience complete fracture. Research indicates that the fracture behavior of tungsten depends not only on alloy composition but also critically on manufacturing parameters (such as strain rate and surface finish) and microstructural features (including intragranular impurities, dislocation density, grain morphology, and texture) [9,10,11]. The primary factor contributing to tungsten’s low-temperature brittleness is its inherent lack of closely packed slip planes. As a typical body-centered cubic (BCC) metal, tungsten’s plastic deformation mechanism relies heavily on the mobility of non-planar 1/2 <111> screw dislocations. The complex core structure and diffusion-mediated movement of these dislocations hinder their ability to glide efficiently along preferred slip systems in the BCC lattice [12,13]. Another crucial factor limiting the ductility of tungsten alloys is their weak grain boundary (GB) cohesion, which is strongly influenced by the presence of inherent solute elements such as O, C, P, and N [14,15]. These impurities tend to segregate at grain boundaries, where the combined effects of intrinsic crystalline disorder and elemental segregation (particularly O and N) significantly degrade GB strength. This degradation becomes a critical factor in promoting brittle fracture and deteriorating mechanical properties [16]. Consequently, strategies aimed at modifying impurity distribution and enhancing grain boundary cohesion can effectively improve both strength and ductility. Based on the Peierls–Nabarro stress model and modified Hall–Petch and Cottrell–Petch relationships, approaches that increase dislocation mobility (through enhanced dislocation core spreading) and implement grain refinement have been shown to improve slip capability and reduce DBTT [17]. Recent advances in metals and ceramics research have promoted the application of nanocrystalline and ultrafine-grained structures to improve the ductility of tungsten. Key grain refinement techniques primarily include solid solution strengthening and second-phase dispersion [18,19]. These approaches leverage effects such as solute drag, Orowan stress, and pinning to effectively retard grain and grain boundary migration, thereby enhancing material properties. From a materials design perspective, the adoption of second-phase strengthening has proven to be an effective strategy for improving the performance of tungsten alloys [20]. In recent studies, processing routes have focused on achieving uniform dispersion of oxide nanoparticles within the tungsten matrix to produce high-performance nanostructured tungsten materials. Oxide dispersion strengthening (ODS) techniques, particularly those employing rare-earth oxides, have gained significant attention due to their exceptional thermal stability, ability to refine grains, enhanced sintering behavior, and improved mechanical properties. Moreover, the dispersed oxide particles effectively suppress grain boundary sliding and inhibit grain growth, leading to increased strength, toughness, and recrystallization resistance in tungsten alloys [21,22].
Lanthanum, as one of the most reactive rare-earth metals, imparts several critical advantages to tungsten-lanthanum (W-La) alloys, making it a preferred strengthening phase. These include excellent high-temperature performance, relatively high electrical and thermal conductivity, and enhanced mechanical strength. Combined with its favorable physical and chemical properties as well as cost-effectiveness, lanthanum has become a primary choice for strengthening tungsten-based alloys. Furthermore, due to the unique electron configuration of rare-earth elements, which enables strong coordination with oxygen atoms, the dispersed La2O3 phases exhibit a high melting point. These oxide particles remain thermally stable and uniformly distributed within the matrix, even at elevated temperatures. However, conventional dispersion-strengthened tungsten sintered materials often suffer from intergranular fracture, low density, insufficient strength, and poor ductility, which limit their widespread industrial adoption. Studies have shown that deformation strengthening techniques can effectively control defect population, distribution, and microstructural evolution in tungsten alloys, leading to significant improvements in overall performance. Thermomechanical processing methods, such as rolling [23,24,25], die forging [26], open-die forging [27], and equal channel angular pressing (ECAP) [28,29], have been identified as highly effective approaches to enhance ductility and reduce the ductile-to-brittle transition temperature (DBTT) of tungsten [30]. This study incorporates two-time annealing during thermomechanical processing to adjust the grain structure within tungsten alloy materials and enhance machinability, thereby reducing cracking during machining operations. Wei et al. [31] concluded that grain refinement through thermomechanical processing promotes redistribution of impurities, thereby improving the ductility of tungsten. Similarly, Reiser et al. [17] demonstrated that cold rolling below the recrystallization temperature enhances resistance to cleavage fracture, resulting in a reduction of the DBTT from above 650 °C to below 200 °C. They also attributed this improvement to an increased density of dislocation sources, such as low-angle grain boundaries, which alter cleavage resistance and lower the DBTT.
Most studies on thermomechanically processed tungsten have shown that the microstructure developed through rolling exhibits a strong crystallographic texture, with a laminated structural morphology being particularly prevalent. Furthermore, thermomechanical processing can enhance grain boundary strength in tungsten by minimizing impurity segregation at the boundaries. Therefore, the key advantages contributing to the improved ductility of rolled tungsten can be attributed to four inter-related microstructural factors: optimization of crystallographic texture, strengthening of grain boundaries, formation of a laminated microstructure, and the combined effects of high dislocation density and enhanced dislocation mobility.

2. Tests and Methods

2.1. Material Preparation

2.1.1. Billet Preparation

In this study, ammonium paratungstate (APT) was first used as the raw material to produce blue tungsten oxide via a reduction reaction. Subsequently, the mixture was placed in a 15-tube reduction furnace to prepare tungsten powder, with the successfully produced tungsten powder exhibiting a particle size range of 2.0–2.5 μm. Then, 1% lanthanum oxide powder was added and uniformly mixed using a blending device. The blended powder was then isostatically pressed at 180 MPa, following the process outlined in Table 1. The pressed tungsten-lanthanum alloy green compacts were placed in a medium-frequency high-temperature sintering furnace, ultimately yielding tungsten-lanthanum alloy green bars with a diameter of ø22 mm.

2.1.2. Rolling Processing

The experiment selected ø22 mm tungsten-lanthanum alloy billets as the starting material. These were placed in a medium-frequency furnace set to 1750 °C and heated for 40 min to ensure uniform heating of the billets and achieve an internal microstructure suitable for subsequent processing. The tungsten billets were then rolled to a specification of ø9 mm.

2.1.3. Rotary Forging and Annealing Treatment

Following multi-pass rolling, the tungsten-lanthanum (W-La) alloy bars exhibited significant work hardening. An intermediate annealing treatment was subsequently performed using a medium-frequency induction furnace in a hydrogen atmosphere. The annealing process was conducted at temperatures ranging from 2000 °C to 2300 °C with a controlled processing rate of 0.3 m/min. After annealing, the ø9.0 mm W-La alloy bars were subjected to three consecutive rotary forging sequences. During the first sequence, consisting of three passes, the bar diameter was progressively reduced from ø9.0 mm to ø6.4 mm. The second sequence, involving two passes, further decreased the diameter from ø6.4 mm to ø5.2 mm. The material then underwent a second annealing treatment. Finally, in the third sequence comprising four passes, the diameter was further reduced from ø5.2 mm to ø3.7 mm.

2.2. Test Scheme

2.2.1. Rolling Test

The initial ø22 mm tungsten-lanthanum (W-La) alloy billets were homogenized at 1750 °C using a medium-frequency induction furnace to achieve uniform temperature distribution and microstructural consistency. The billets were then processed through a three-roll Y-type 10-stand rolling mill system for multi-pass compressive deformation. The rolling process utilized a specialized pass design system consisting of “flat-triangle ⟶ arc-triangle ⟶ round groove” sequences to progressively reduce the billet diameter to ø9 mm through controlled multi-pass deformation.
Samples were extracted after the 4th, 8th, and 10th rolling passes, corresponding to bar diameters of ø12 mm, ø10.5 mm, and ø9.0 mm, respectively. Additionally, samples were collected after subsequent secondary rotary forging sequences, where the diameter was further reduced to ø6.4 mm and ø5.2 mm, including stages where intermediate annealing treatments were applied. The microstructural evolution of these samples was examined using metallographic microscopy, while mechanical properties were evaluated through standardized testing methods. This comprehensive approach systematically investigated the effects of temperature, compression ratio, and annealing parameters on work hardening, defect elimination, and microstructural homogenization in the tungsten alloy. Detailed rolling experimental parameters are summarized in Table 2. Test equipment is shown in Figure 1.

2.2.2. Rotary Forging Test

Through conventional rotary forging, starting from a tungsten-lanthanum alloy billet with an initial diameter of ø14 mm, five tungsten-lanthanum alloy billets with diameters of ø12 mm, ø10.5 mm, ø9.0 mm, ø6.4 mm, and ø5.2 mm were made. Annealing treatment was applied to the ø9.0 mm and ø5.2 mm specimens to restore the internal microstructure. The rotary forging test scheme is detailed in Table 3.

2.2.3. Annealing Test

This study selected tungsten-lanthanum alloy bars with diameters of ø9.0 mm and ø5.2 mm as critical-dimension samples. A medium-frequency induction annealing furnace was employed to subject the bars—rolled and rotary-forged to target dimensions—to short-duration high-temperature annealing treatment. The annealing process parameters were as follows: annealing temperature of 2000–2300 °C, with the tungsten-lanthanum alloy bar passing through a 16 cm-long induction coil at a speed of 0.3 m/min, and an annealing duration of approximately 32 s. This short-duration, high-temperature annealing achieved rapid recrystallization, effectively eliminating work hardening and residual stresses. The experimental scheme is detailed in Table 4.

2.3. Test Method

The HF320M CNC wire-cut EDM machine (Hangzhou huafang numerical control machine tool co., ltd, Hangzhou, China) was employed to cut tungsten-lanthanum alloy specimens, which were then prepared into metallographic specimens using epoxy resin. Following mechanical polishing, the specimens were etched using a solution comprising hydrogen peroxide and ammonia water in a 3:1 volume ratio. The hydrogen peroxide exhibited a mass percentage concentration of 30–40%, while the ammonia water had a mass percentage concentration of 25–28%. Surface observations were conducted using a metallographic microscope and a scanning electron microscope. The Vickers hardness (HV, MPa) of tungsten alloy rods was measured with a TH702 digital microhardness tester (Beijing TIME High Technology Ltd., Beijing, China) under a test load of 1000 gf and a dwell time of 10 s. The density was measured three times using the displacement method, with the results averaged.

3. Results and Discussion

Figure 2a presents the microstructure of a sintered tungsten alloy billet, primarily composed of tungsten particles and a lanthanum-based binder phase (La2O3). The tungsten particles exhibit a polygonal arrangement with well-defined boundaries, indicating effective particle bonding during sintering without significant abnormal agglomeration. The lanthanum-based binder phase predominantly occupies the interstitial spaces between tungsten particles, serving to reinforce the structure and enhance toughness. Simultaneously, it forms barriers at grain boundaries, inhibiting grain growth. The regions indicated by yellow arrows reveal pores or localized anomalous phase zones present during sintering, reflecting insufficient particle bonding in certain areas and inadequate sintering density in localized regions. These phenomena also appeared in our previous research [32].
Figure 2b clearly distinguishes the distribution of tungsten particles and the binder phase through binarization. The morphology of tungsten particles is generally uniform, though in a specific region, large black areas indicate minor particle agglomeration, potentially arising from uneven particle flow during pressing. If the lanthanum-based phase distribution is non-uniform, it may induce localized ‘liquid phase segregation’, leading to overheating and coarse grain formation. Figure 3 displays the grain size distribution of a ø22 mm tungsten alloy bar, with an average grain size of 36.82 μm. The histogram exhibits a skewed distribution characteristic, attributable to the presence of numerous large-sized grains. This phenomenon may arise from incomplete disaggregation of agglomerated particles during powder preparation, forming ‘large particle nuclei’ during compaction that subsequently grow into coarse grains during sintering. Alternatively, temperature gradients may induce rapid grain growth in a specific region, resulting in anomalously large grains. Nevertheless, the majority of grain sizes are concentrated within a narrow range, indicating good overall material homogeneity.

3.1. Effect of Rotary Forging on Microstructure and Morphology of W-La Alloy Cross-Section

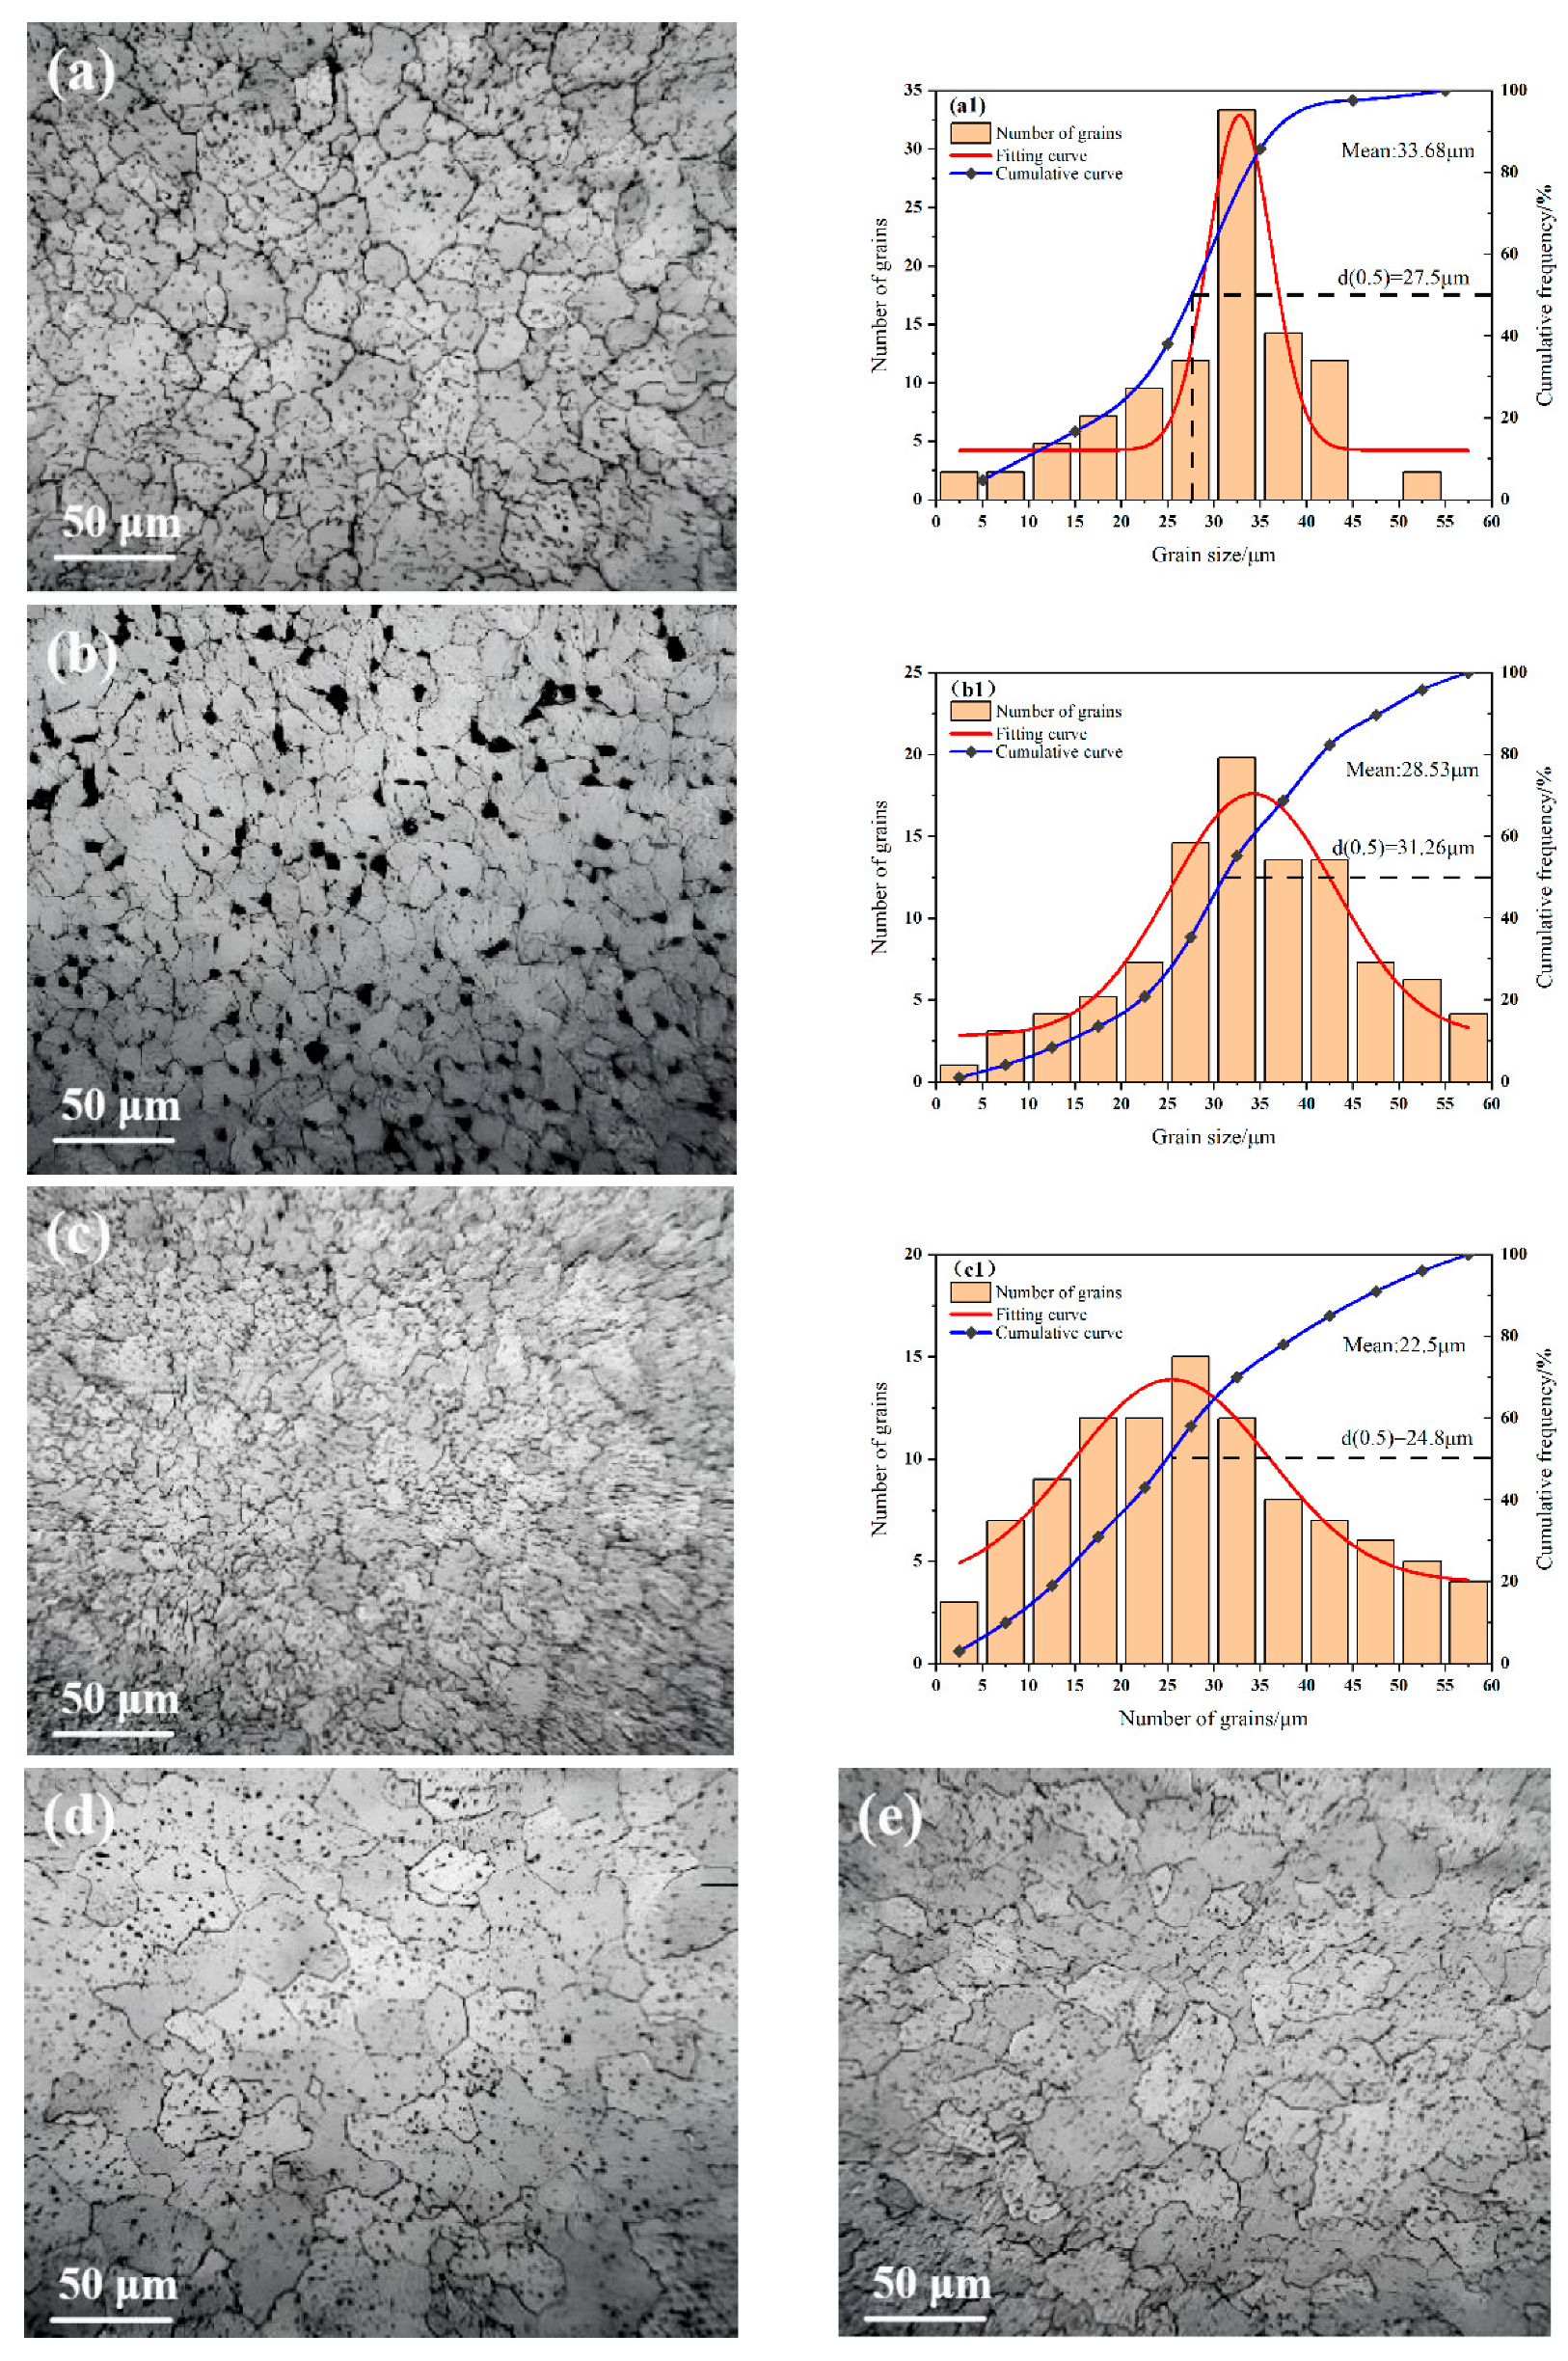
Figure 4 shows the microstructure of a cross-section from a ø12 mm tungsten-lanthanum alloy rotary forged to ø5.2 mm. Figure 4a depicts the microstructure of the ø12 mm bar after rotary forging at 1500 °C with 26.5% deformation. The grains exhibit an equiaxed morphology with well-defined grain boundaries, averaging 33.68 μm in size. During rotary forging, dislocation motion and grain boundary slip occurred, reducing grain size. However, the grain size distribution (Figure 4(a1)) exhibited a typical unimodal normal distribution, with increased microstructural inhomogeneity and grain sizes predominantly concentrated within the 25–35 μm range [33]. Significant grain refinement is evident in Figure 4b, with the average grain size decreasing to 28.53 μm, as shown in Figure 4(b1). At 1400 °C and 26.5% deformation, the average grain size further decreased to 22.5 μm, as depicted in Figure 4(c1). Figure 4d presents the microstructure of the 9 mm bar after annealing, where the annealing process induced partial recrystallization and significant grain growth. Figure 4e,f display the microstructures of the annealed bar after hot rolling at 1350 °C with 49.4% deformation and at 1300 °C with 33.9% deformation, respectively, revealing substantial microstructural refinement at this stage. Figure 4g illustrates the microstructure of the hot-rolled bar at 1350 °C with 49.4% deformation, where the material exhibits a distinct microstructural refinement. With 49.4% strain at 1350 °C and 33.9% strain at 1300 °C, the microstructure of the rotary forging bar exhibits significant refinement. Figure 4g displays the microstructure of the ø5.2 mm bar after annealing. The annealing-induced recrystallization and grain growth are clearly visible, with a marked expansion of the fine-grained regions and the presence of numerous large grains [34].

3.2. Effect of Rolling on Microstructure and Morphology of W-La Alloy Cross-Section

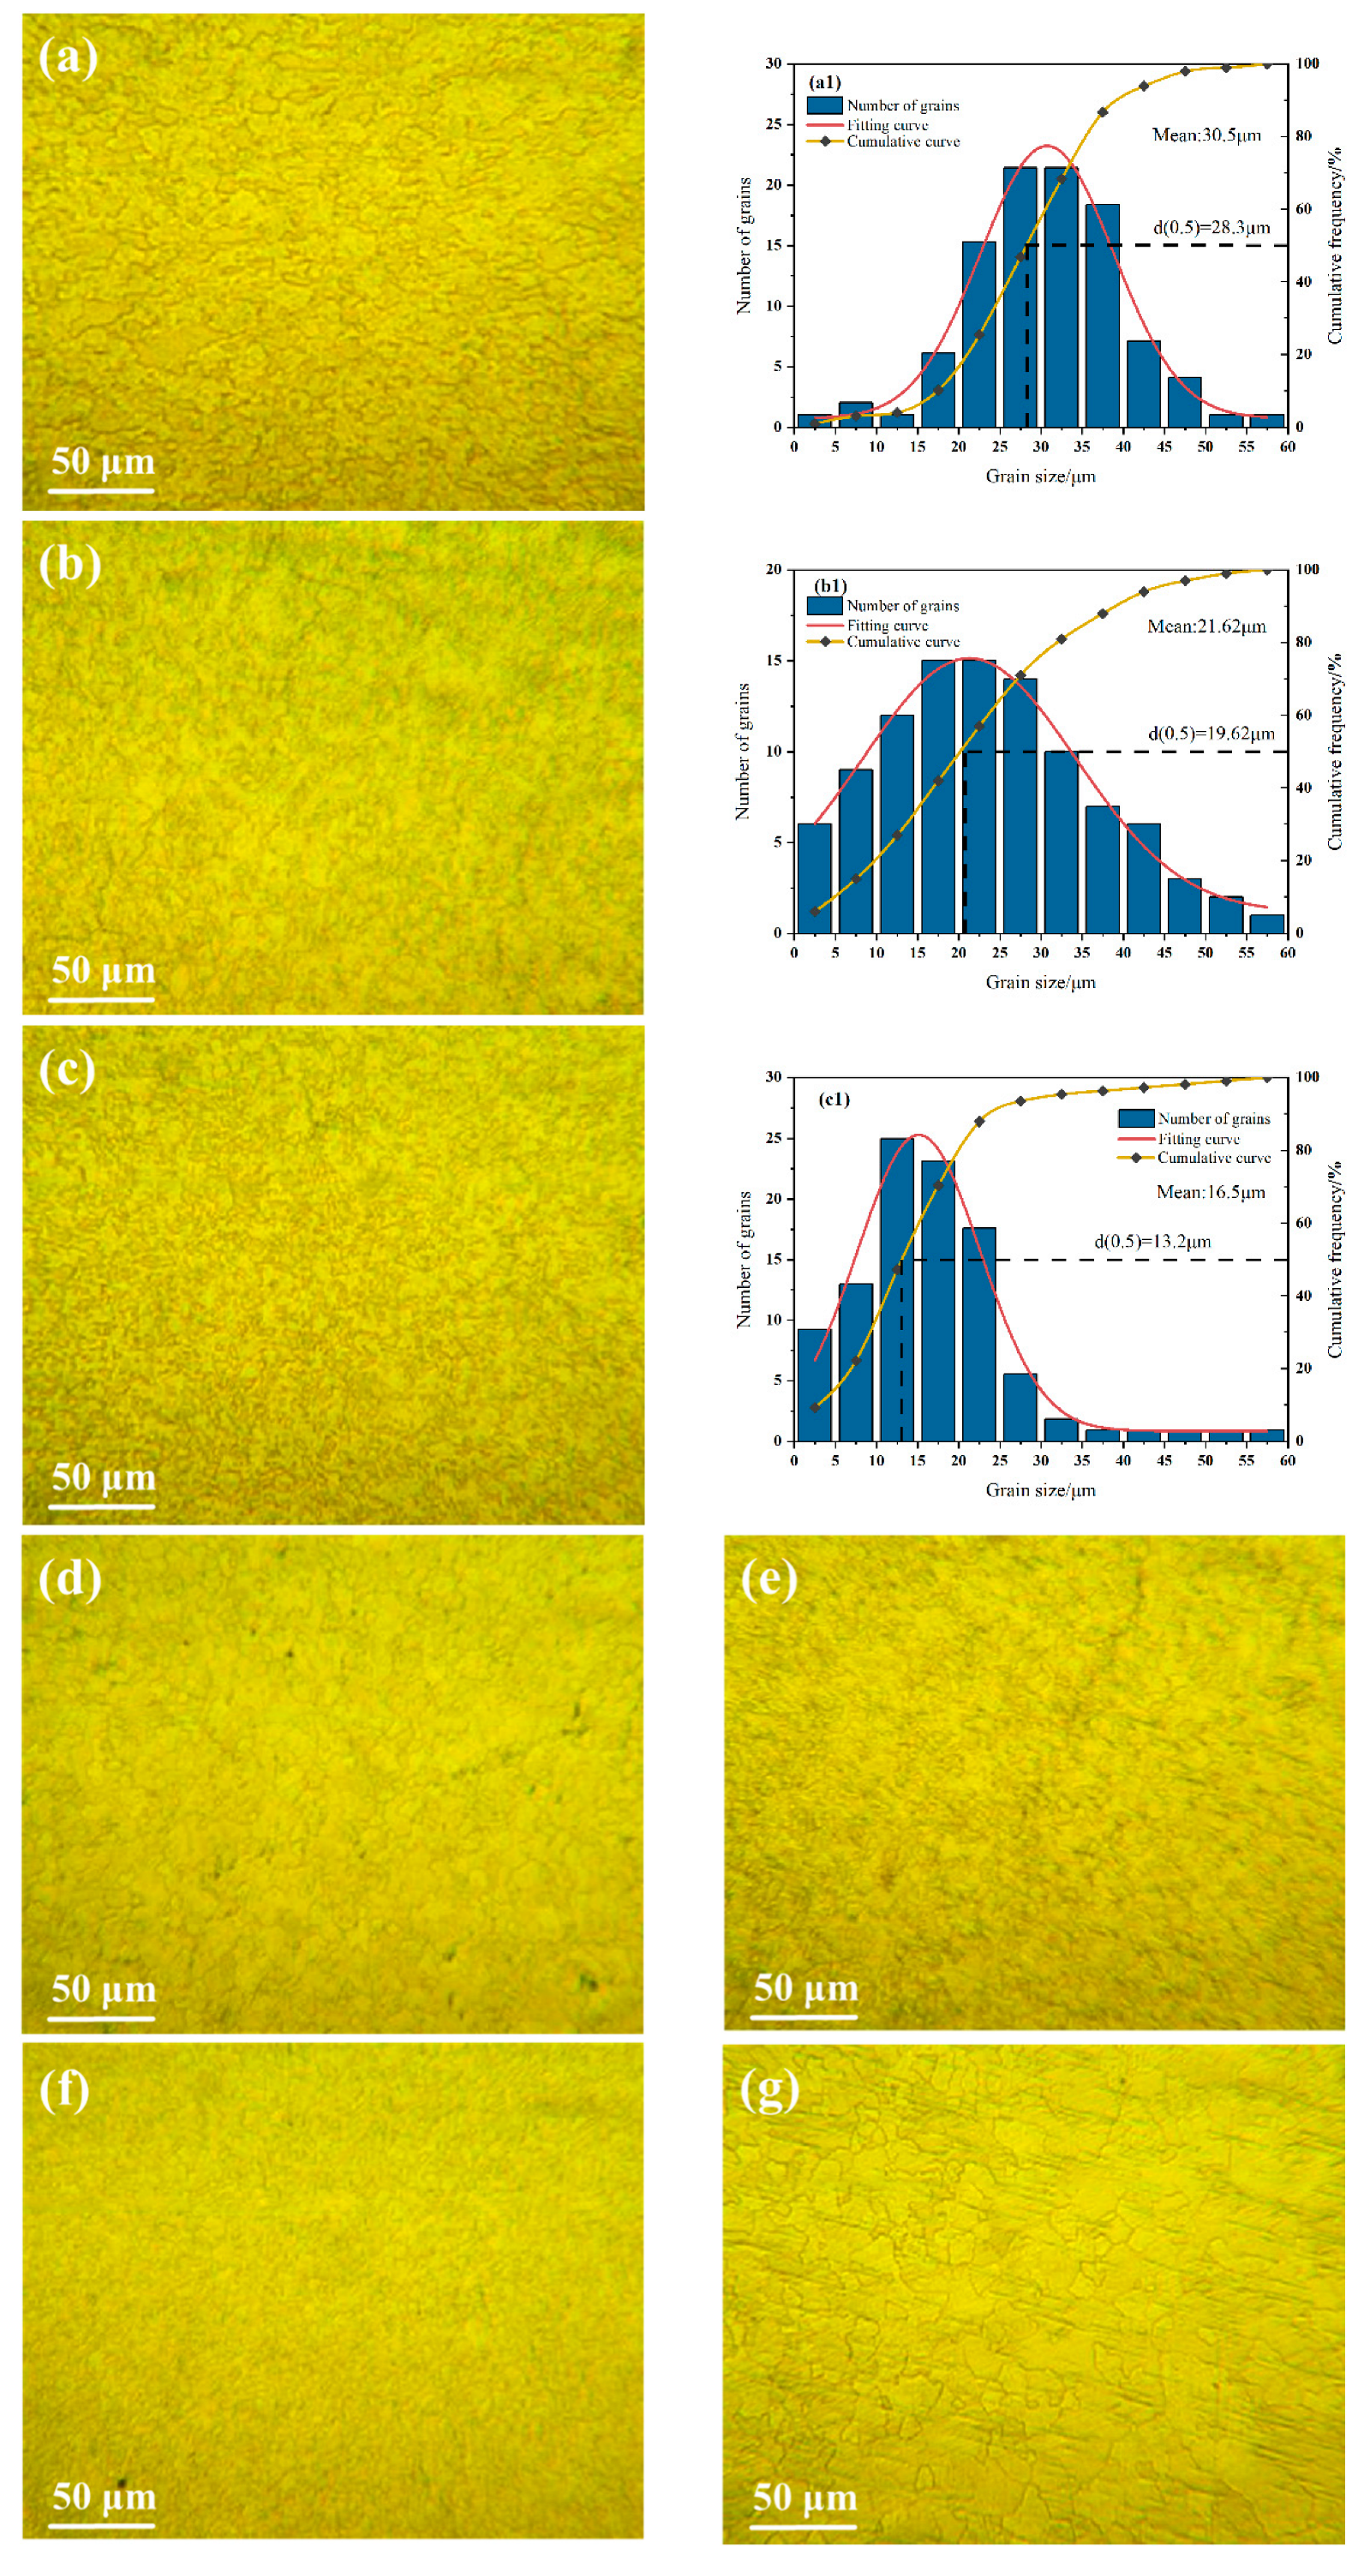
Figure 5a–c,e,f display microstructural cross-sectional images of tungsten-lanthanum alloy rods at 70.2%, 23.4%, 26.5%, 49.4%, and 33.9% cumulative strain, respectively. Under 70.2% cumulative large deformation processing at ø12 mm, the material underwent significant plastic deformation, with gradual grain fragmentation and refinement. The high-temperature zone at 1650 °C accelerated grain boundary migration and atomic diffusion, resulting in an average grain size of 30.5 μm. Severe grain boundary segregation led to a coarse and non-uniform microstructure overall. During the intermediate deformation stage from ø10.5 mm to 9 mm, further plastic deformation induced by rolling intensified dislocation motion. This aligns with the ‘dynamic recrystallization nucleation theory’, wherein dislocation aggregation in high-strain regions promotes preferential nucleation growth [35]. In certain regions, dislocation depletion and rearrangement occurred, forming subgrains. The intermediate temperature zone (1620–1590 °C) achieved ideal recrystallization refinement, with grains progressively refining into a uniform equiaxed state, yielding significant strengthening effects. The average grain size decreased from 21.62 μm at a rod diameter of ø10.5 mm to 16.5 μm, while the median size d (0.5) is concentrated from 19.62 μm to 13.2 μm. This marked grain refinement resulted in a stable, fine-grained network structure. According to the “work hardening theory” in rolling, dislocation density is proportional to deformation. The proliferation of dislocations increases material strength but reduces plasticity. To facilitate subsequent processing, annealing was performed at 9.0 and 5.2 mm, as shown in Figure 5d,g. The figure reveals a distinct equiaxed grain structure following annealing. During subsequent rotary forging, dislocation motion concurrently completes dynamic recrystallization, replacing the original microstructure with newly formed equiaxed fine grains. This results in a uniformly refined, ideal fine-grained microstructure. In conjunction with the Hall–Petch strengthening mechanism, the reduction in grain size effectively enhances both yield strength and toughness, achieving optimal material performance [36].
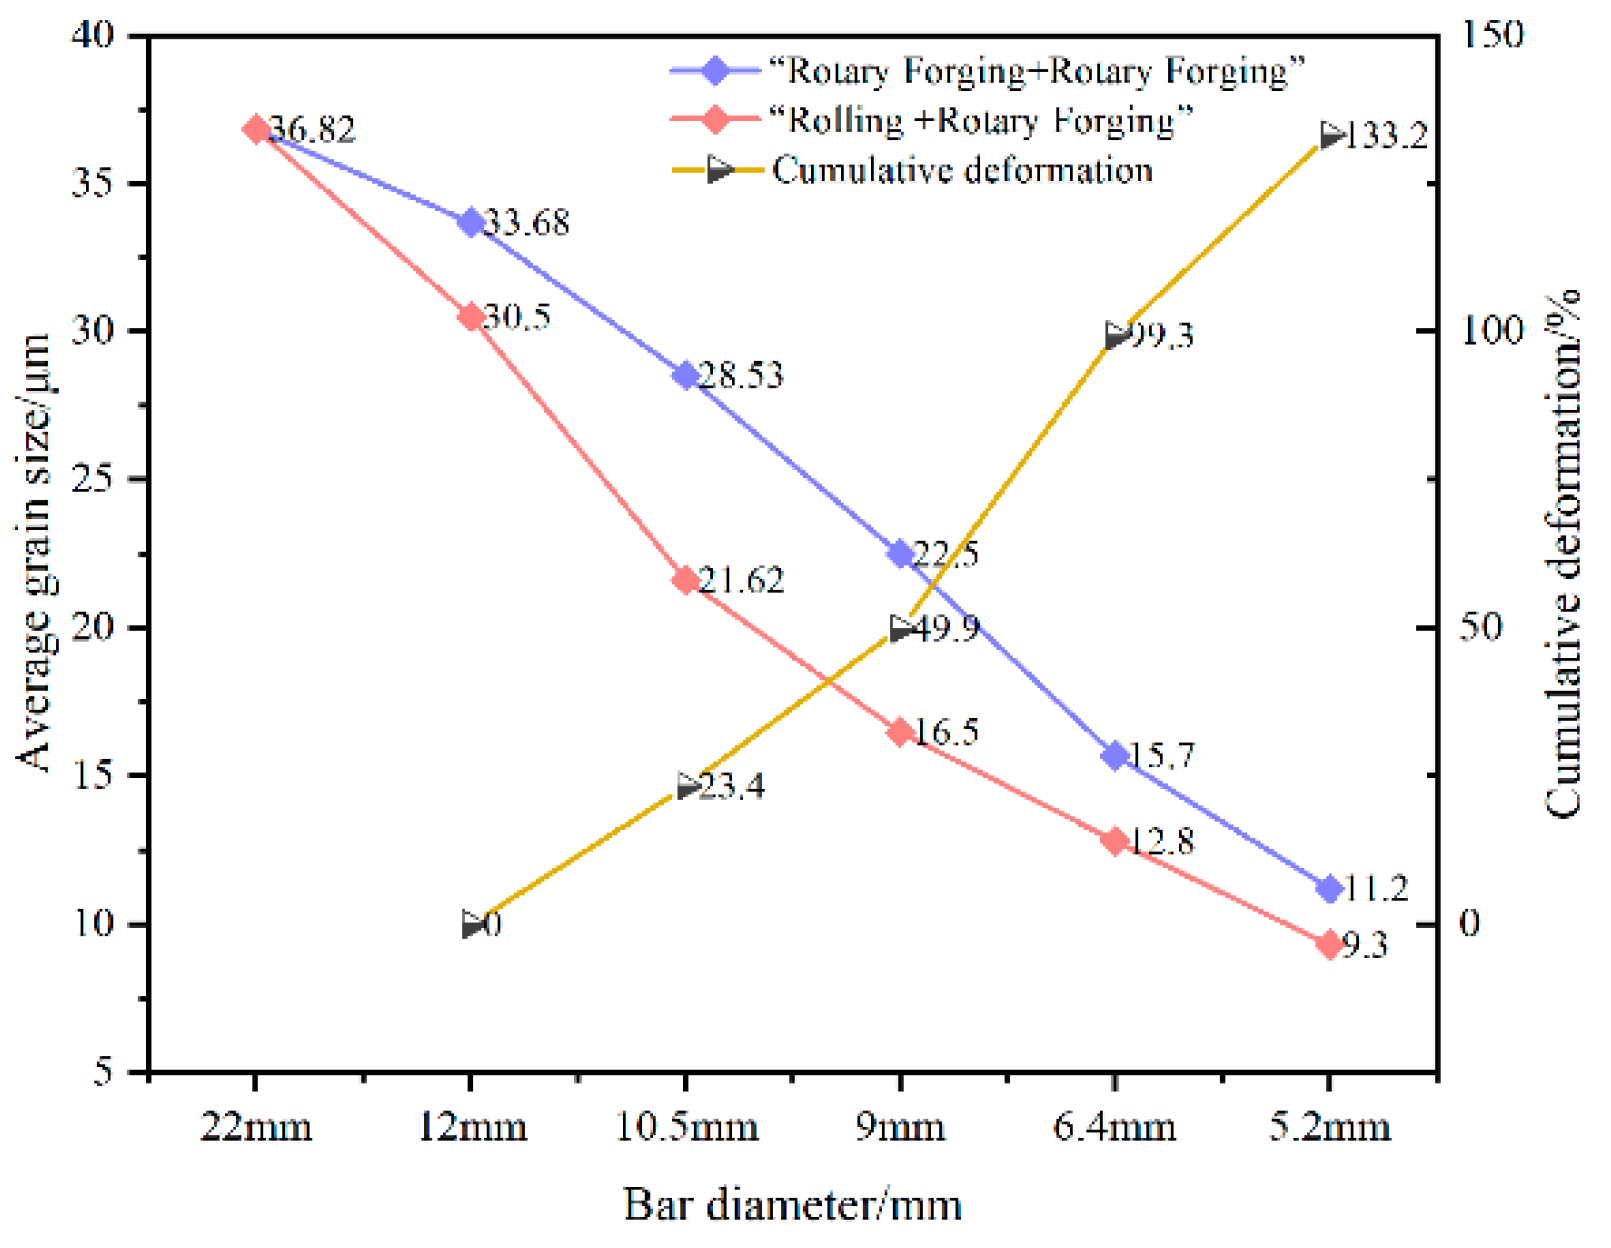
Figure 6 presents the distribution of average grain sizes for tungsten-lanthanum alloy bars produced via rotary forging and rolling at different deformation levels. The figure systematically illustrates the variation in average grain size of tungsten alloy bars with diameter under the ‘rotary forging + rotary forging’ and ‘rolling + rotary forging’ processes. With increasing cumulative deformation, the average grain size of bars from both processing methods progressively decreased. During the diameter reduction from ø22 mm to ø10.5 mm, the grain size in the bar “rolling + rotary forging” process decreased from 36.82 μm to 21.62 μm, representing a refinement rate of 41.3%. Concurrently, the “rotary forging + rotary forging” process only decreased from 36.82 μm to 28.53 μm, representing a refinement rate of 22.5%. This demonstrates that the “rolling + rotary forging” process exhibits significantly higher grain refinement efficiency during the initial stage. During the large-diameter stage (ø22 mm ⟶ ø10.5 mm), the ‘rolling + rotary forging’ process accelerated dislocation proliferation and the formation of dislocation cell structures. These cell walls subsequently evolved into subgrains, hastening the fragmentation of primary grains. For the ø10.5 mm diameter, the ‘rolling + rotary forging’ process achieved full recrystallization, refining the grain size to 21.62 μm. In contrast, the ‘rotary forging + rotary forging’ process exhibited insufficient deformation energy storage and weak recrystallization driving force, resulting in a grain size that remained at 28.53 μm. Prior to annealing at ø5.2 mm, the average grain sizes achieved by rotary forging and rolling were 11.2 μm and 9.3 μm, respectively. According to the Hall–Page formula, when grain size was refined to 11.2 μm via rotary forging, yield strength increased by 80.5 Mpa, whereas refining to 9.3 μm via rolling yielded an increase of 97.9 Mpa. This demonstrates the technical advantage of rolling in regulating dislocation kinetics and enhancing recrystallization driving forces.

3.3. Hardness Distribution of W-La Alloy Under Rotary Forging and Rolling Processing

In actual production processes, hardness is commonly used as a rapid, approximate measure of a material’s strength. The relationship between the hardness of tungsten alloys and their grain size can be expressed by the following formula [37]:
H = H 0 + K H · d 1 2
In the formula, H —hardness of tungsten, MPa, H 0 —constant, K H —constant, and d —average grain diameter/μm.
From the above formula, it can be observed that material hardness progressively increases as grain size decreases. The dispersion-strengthened tungsten-lanthanum alloy, formed by adding lanthanum to pure tungsten to achieve a uniformly dispersed oxide distribution, exhibits a smaller average grain size and higher hardness than pure tungsten. Hardness tests were conducted on bars of various diameters subjected to rotary forging and rolling processes. Each bar was tested three times, with the final average value taken as the hardness test result.
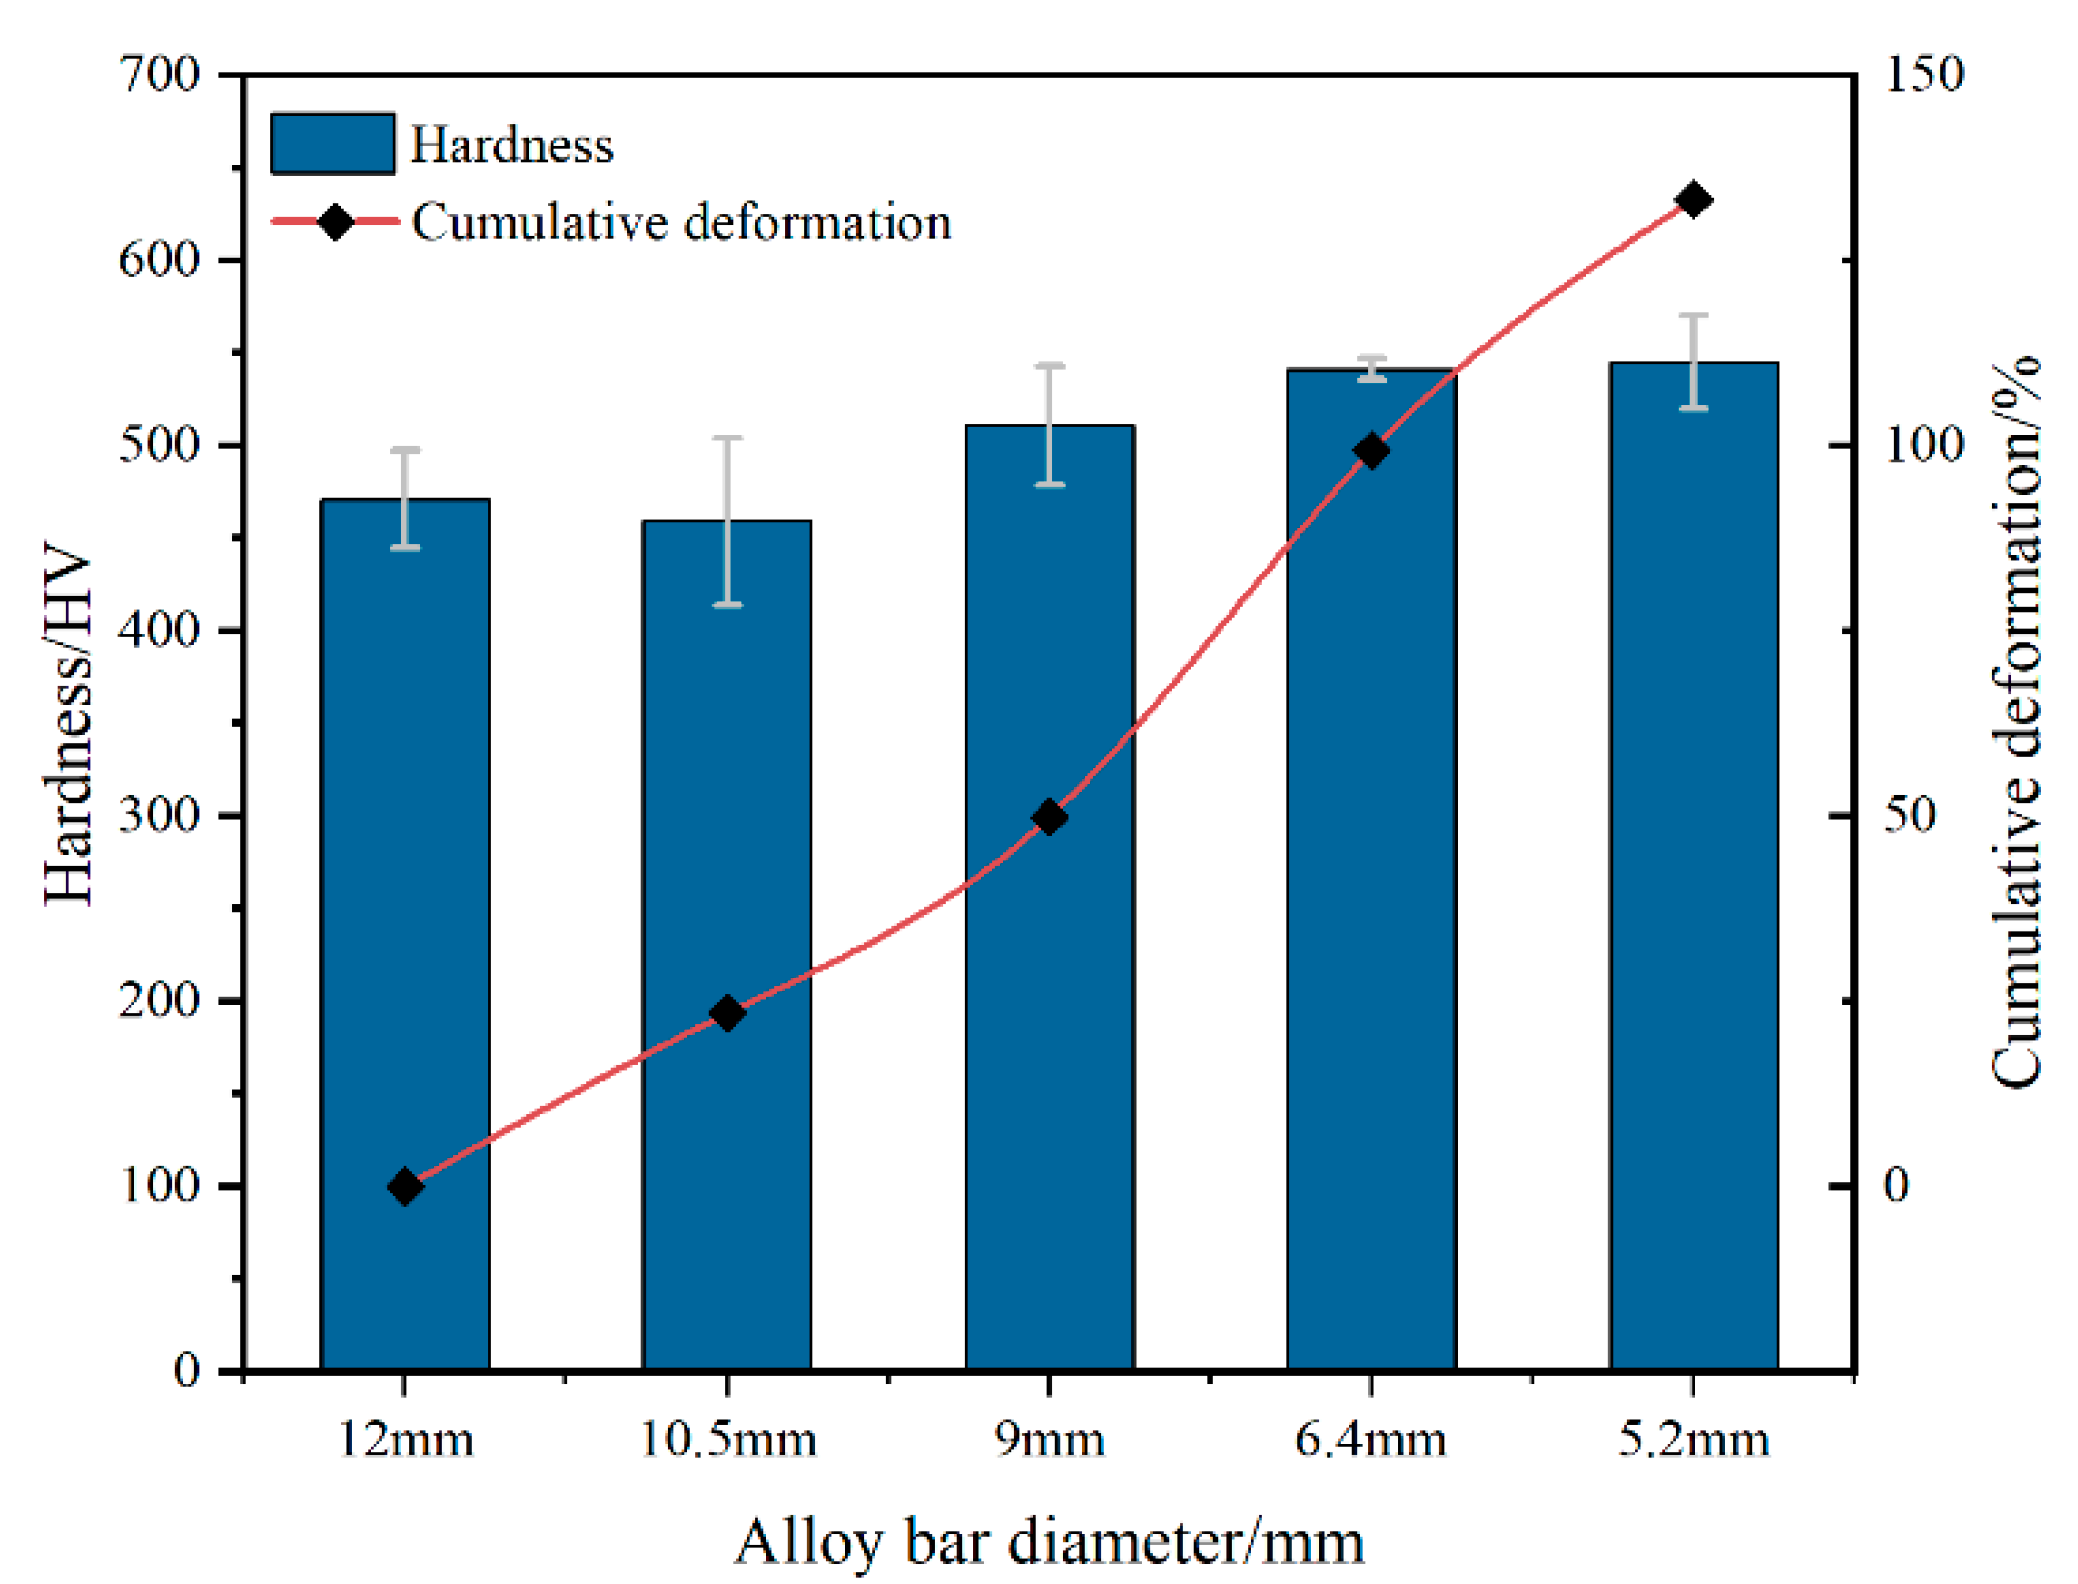
Table 5 presents the microhardness and compression ratio data of tungsten-lanthanum (W–La) alloy bars with varying diameters processed via the “rotary forging + rotary forging” method. Figure 7 visually illustrates the variation in hardness of rotary-forged tungsten-lanthanum alloy bars with respect to bar diameter. It is evident that as the bar diameter decreases (with increased cumulative deformation), the hardness initially fluctuates slightly before rising significantly. When the bar diameter is ø10.5 mm (compression ratio 23.4%), the hardness decreases slightly. In the unannealed samples, when the rod diameter decreased from ø12 mm to ø10.5 mm (23.4% compression ratio), the hardness decreased from 471.0 HV to 459.1 HV. Due to the low initial compression ratio, insufficient coordination of dislocation motion and deformation inhomogeneity led to a local decrease in hardness. As the rod diameter further decreased to ø9.0 mm (26.5% compression ratio), ø6.4 mm (49.4% compression ratio), and ø5.2 mm (33.9% compression ratio), the hardness increased to 510.8 HV, 541.3 HV, and 544.9 HV, respectively. The increased compression ratio promoted cumulative deformation, triggering extensive dislocation multiplication and entanglement to form dislocation cell structures. This significantly enhanced the work-hardening effect, impeding dislocation motion and thereby elevating material hardness. For annealed specimens, the hardness of the annealed ø9.0 mm and annealed ø5.2 mm bars decreased to 446.1 HV and 433.5 HV, respectively. After annealing, the work hardening caused by deformation is eliminated, and the hardness of the material is reduced [38].
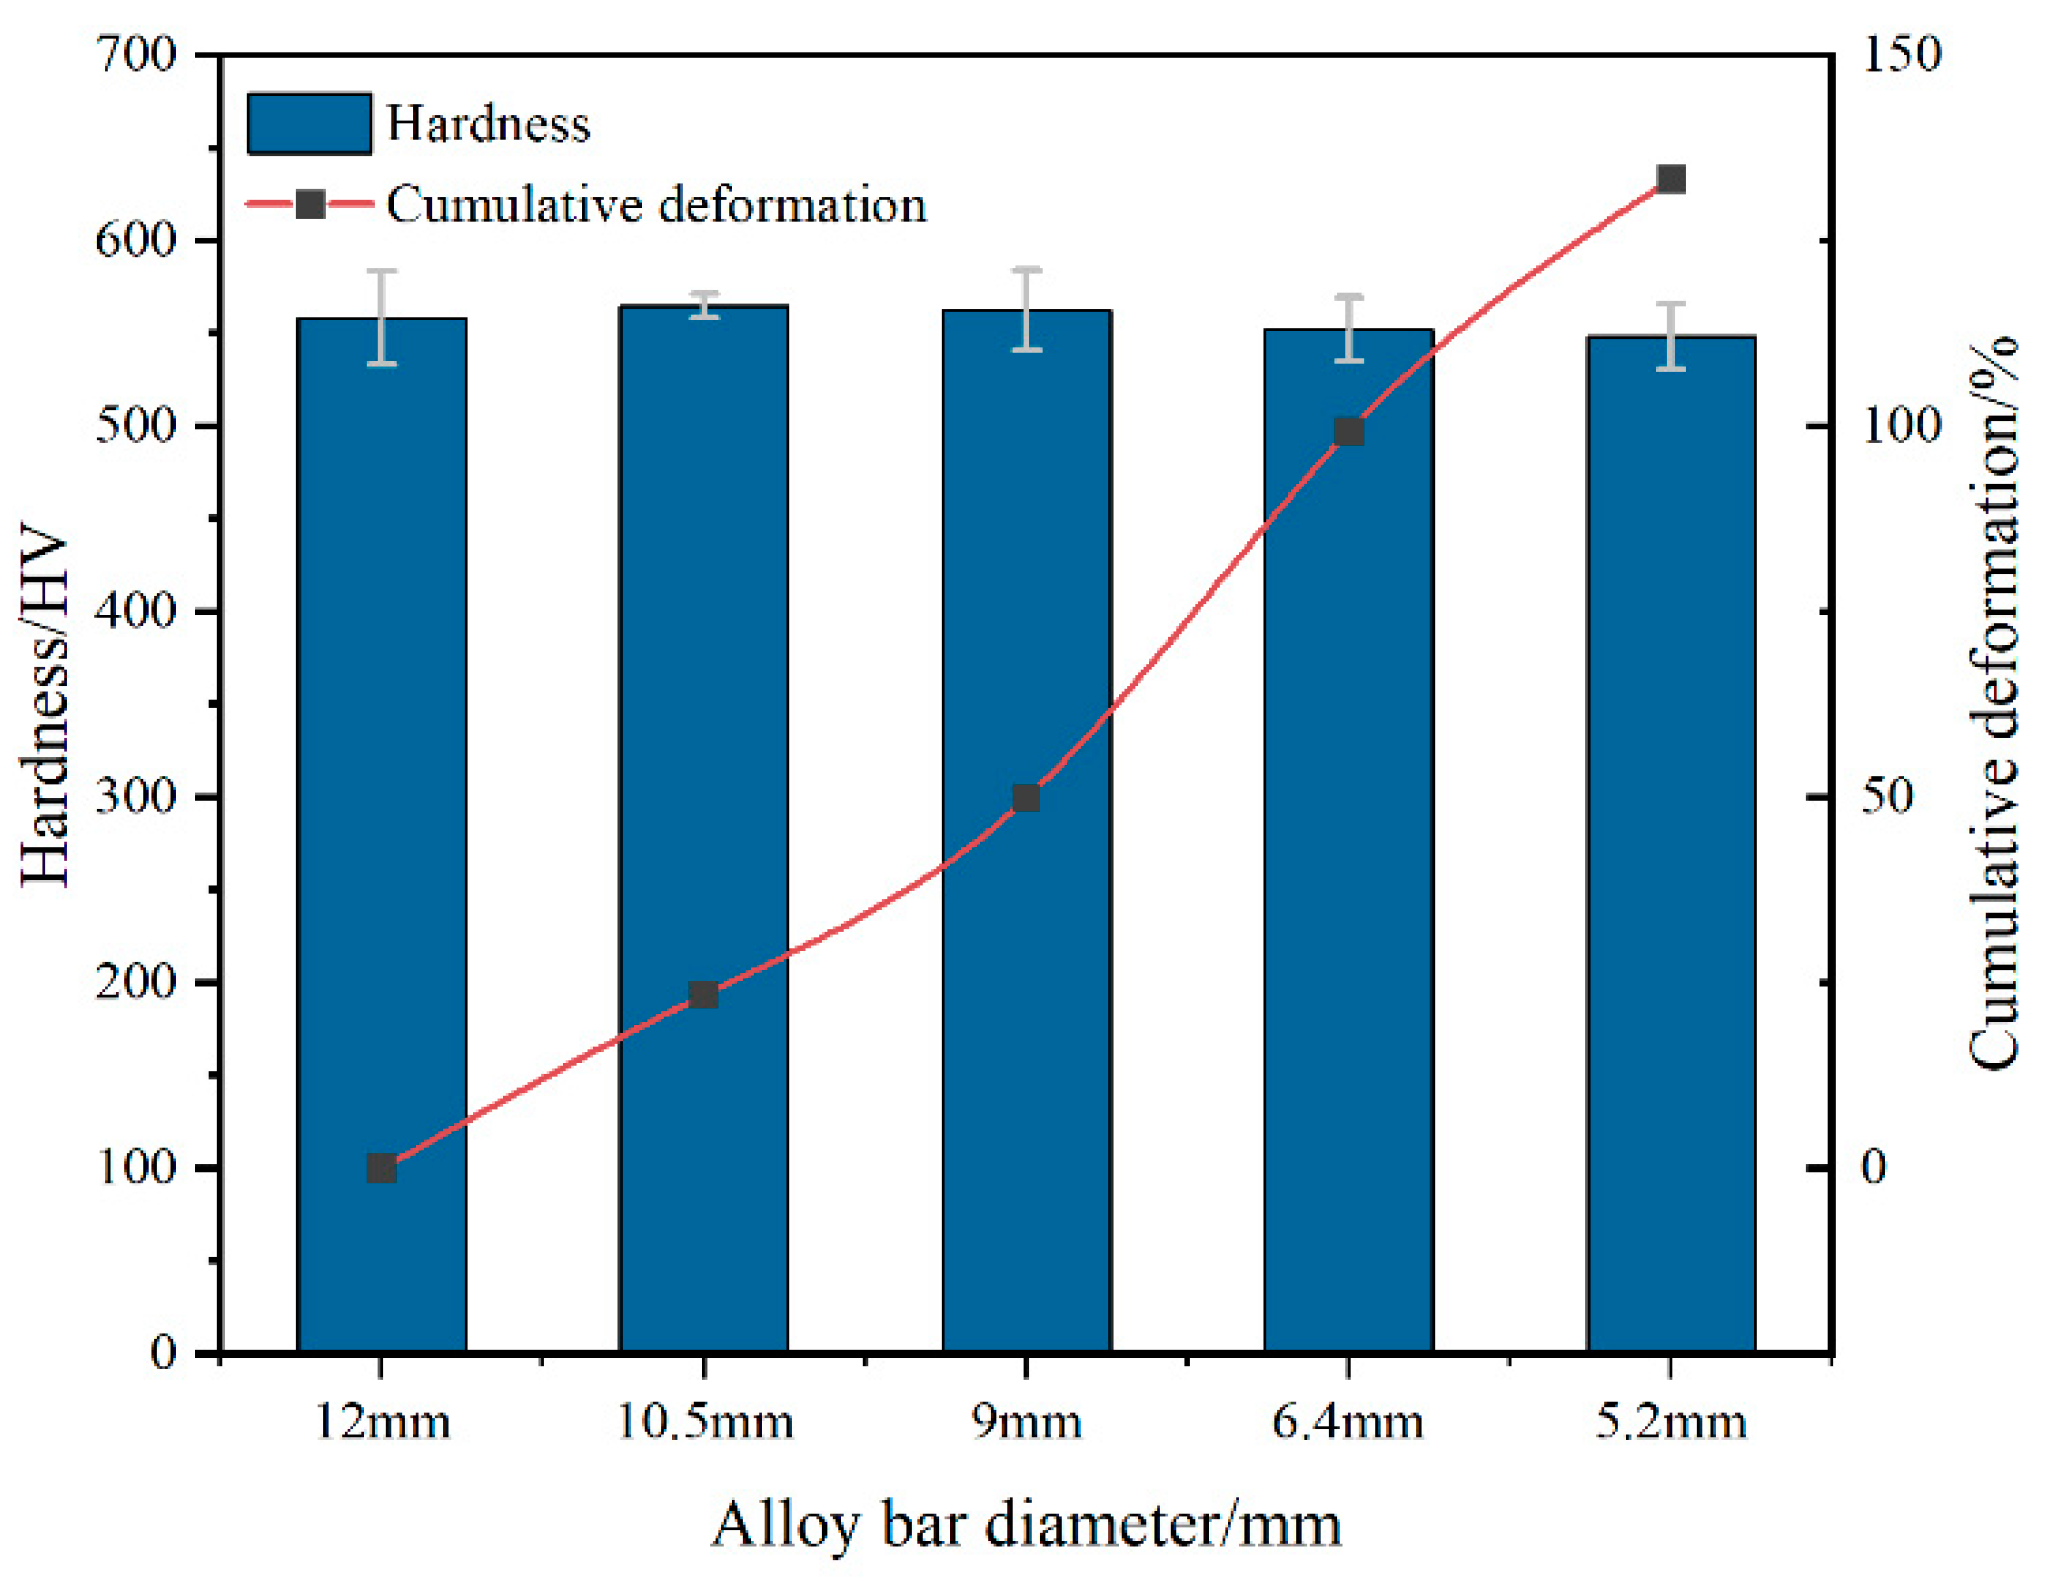
Table 6 presents the microhardness data for tungsten-lanthanum alloy bars processed via the ‘rolling + rotary forging’ method. Figure 8 visually illustrates the variation in hardness of rolled tungsten-lanthanum alloy bars with respect to bar diameter (reflecting cumulative deformation). The overall trend indicates that as the bar diameter decreases (indicating increased cumulative deformation), the hardness initially remains relatively stable before rising significantly with further deformation. During the rolling stage: At the fourth rolling pass with a bar diameter of ø12 mm, the hardness value was 558.3 HV. By the eighth rolling pass with a bar diameter of ø10.5 mm (reduction ratio 23.4%), hardness increased to 565.0 HV. This rise resulted from the high reduction ratio promoting extensive dislocation multiplication and intensifying the work-hardening effect. During the tenth rolling pass at ø9.0 mm (26.5% reduction), hardness slightly decreased to 562.7 HV. As the bar diameter reduced from ø12 mm to ø10.5 mm and then to ø9.0 mm, hardness remained at a relatively high level with minimal fluctuation. This indicates good deformation uniformity during the initial rolling stage, where dislocation multiplication and motion were in dynamic equilibrium. During the rotary forging stage, hardness was 552.2 HV at the first rotary forging pass with a bar diameter of ø6.4 mm (49.4% reduction in area); at the second rotary forging pass with a bar diameter of ø5.2 mm (33.9% reduction in area), hardness was 548.4 HV. Despite the higher reduction in area, hardness did not continue to increase due to the synergistic effect of the deformation mechanisms in rotary forging and rolling. Annealed samples (rolling annealed and rotary annealed) exhibited reduced hardness values of 467.2 HV and 460.4 HV, respectively. This reduction stemmed from recovery and recrystallization during annealing, which eliminated dislocation accumulations induced by work hardening, restructured the grain microstructure, and consequently diminished hardness.
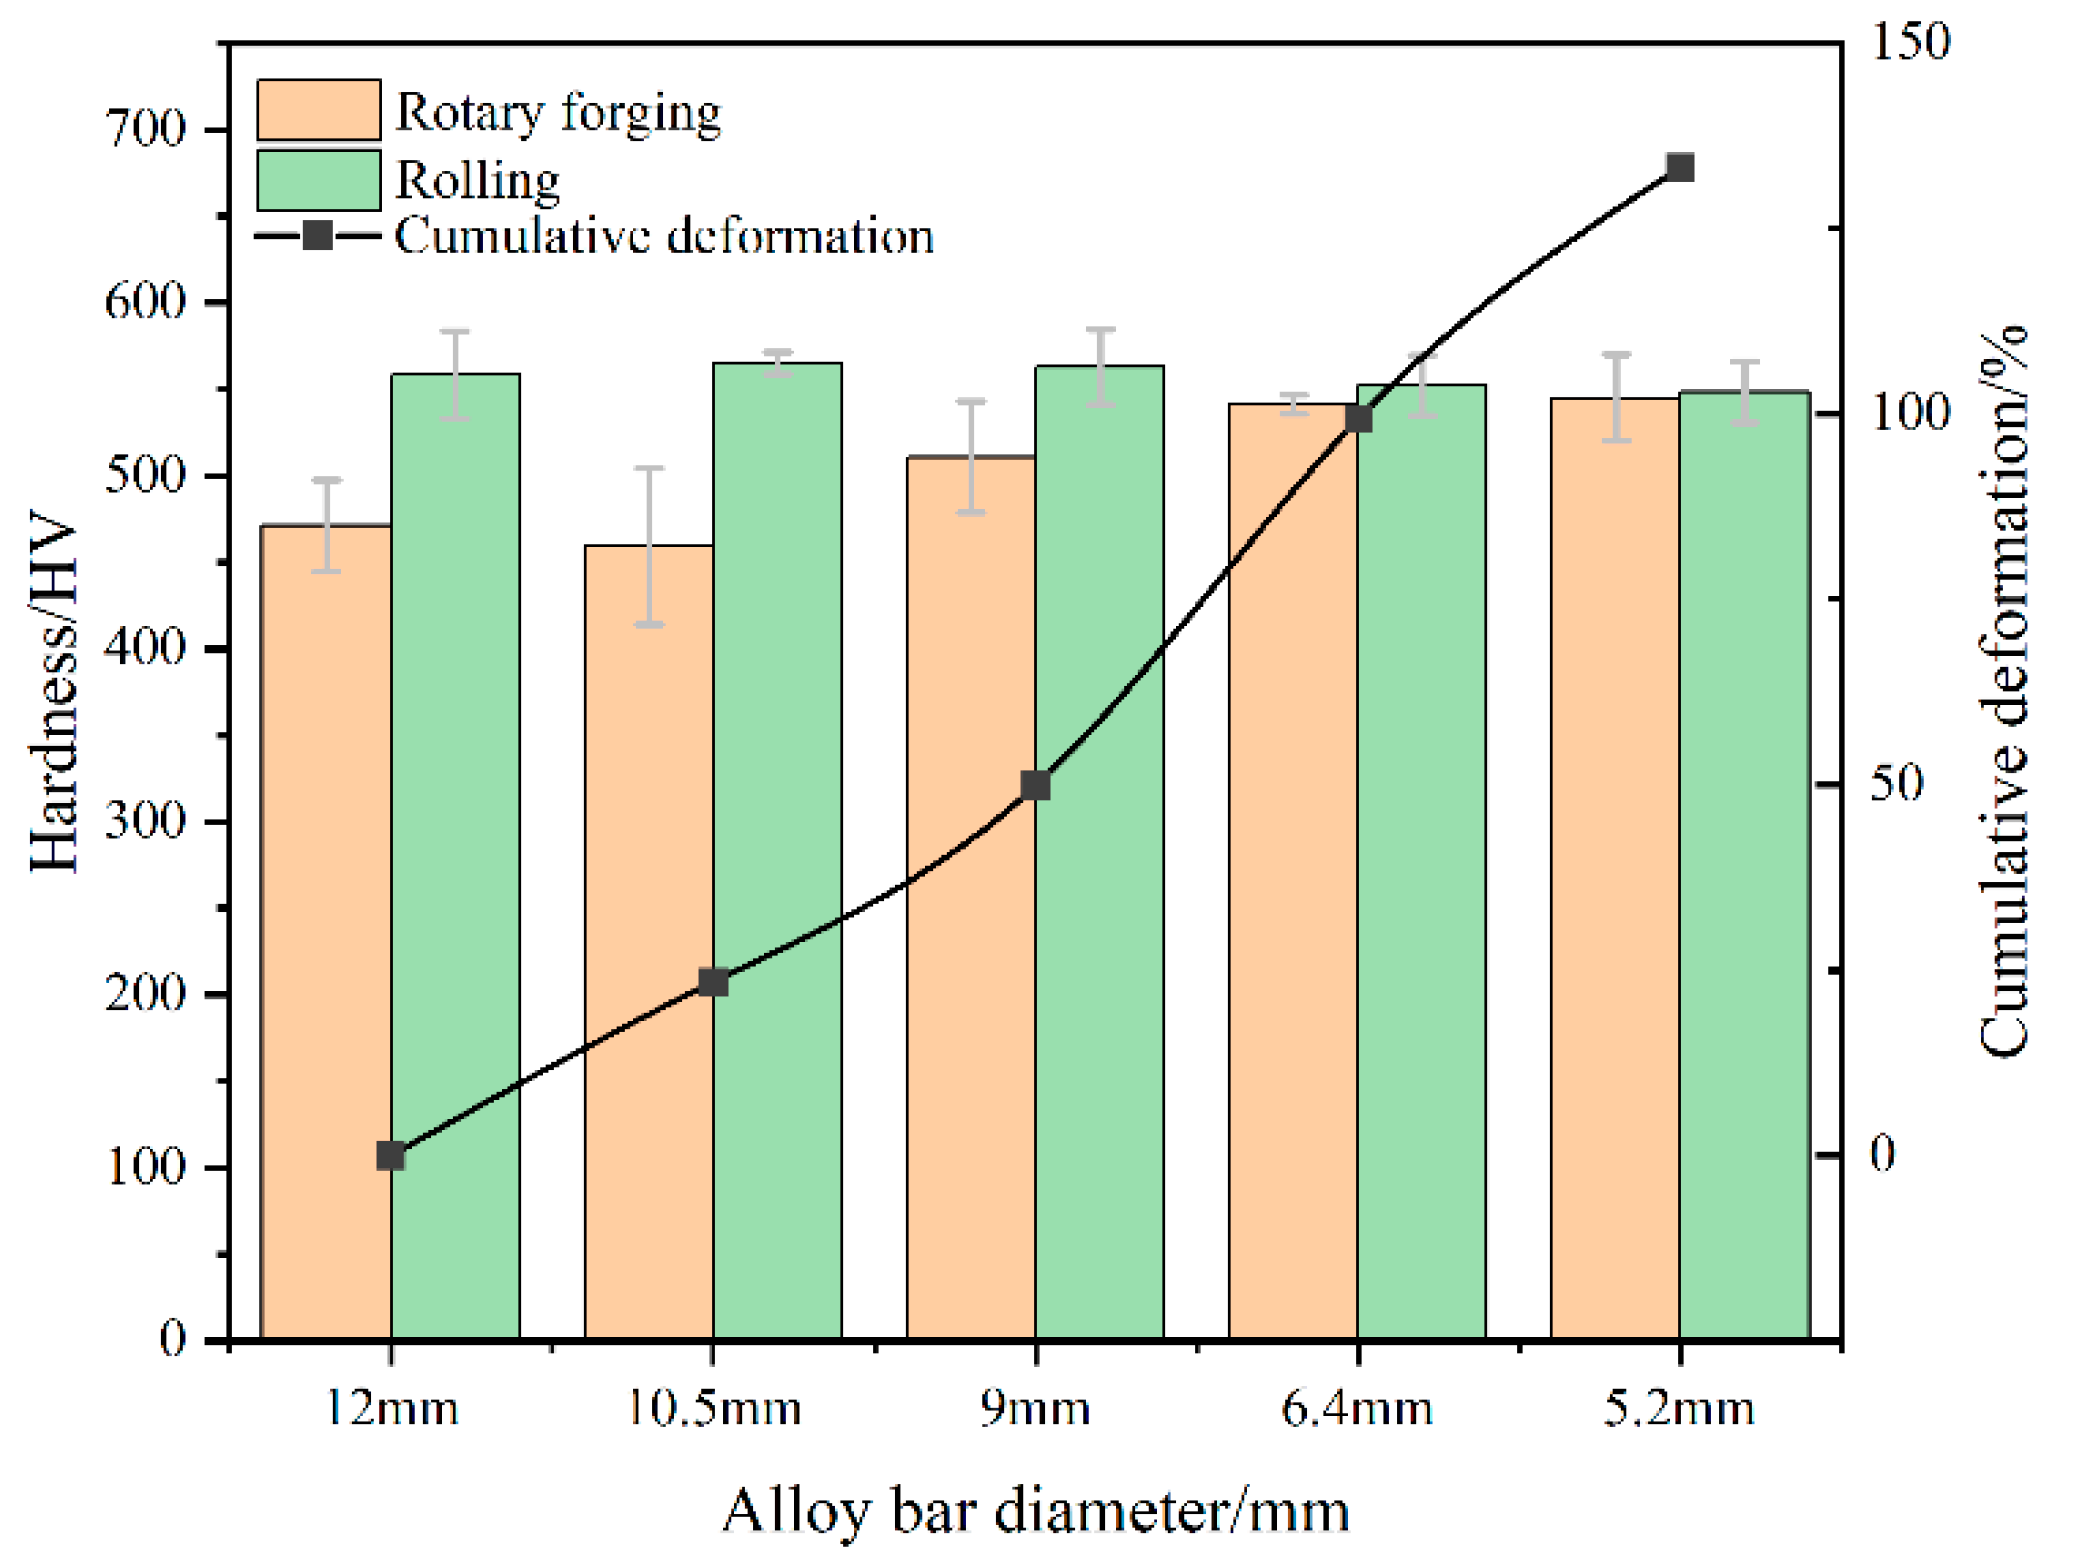
Figure 9 visually compares the hardness of tungsten-lanthanum (W-La) alloys processed by rotary forging and rolling at different bar diameters (corresponding to cumulative deformation levels). Using a combination of bar graphs to display hardness values and a line graph to indicate cumulative deformation, the figure clearly illustrates the relationship between the two processing methods and their resulting properties. Overall, across all diameter stages and their corresponding deformation levels, the rolled material generally exhibits higher hardness than the rotary-forged material. Although the difference narrows slightly at certain points, rolling consistently maintains superior performance, demonstrating its overall advantage. Detailed analysis of data trends reveals that at a bar diameter of ø12 mm, rolled hardness already surpasses rotary forging; this advantage persists as diameter decreases to ø10.5 mm and 9 mm. At a bar diameter of ø6.4 mm, rolled hardness is markedly higher than rotary forging. Even at ø5.2 mm, where the gap narrows slightly, rolling retains its superiority through higher hardness values.
In summary, rolling demonstrates a significantly superior approach to regulating the hardness properties of tungsten alloys compared to rotary forging, owing to its highly efficient dislocation-strengthening mechanism driven by uniform deformation. This provides robust experimental evidence for selecting the optimal processing technique [39].

3.4. Evolution of Grain Size of W-La Alloy at Different Annealing Temperatures

The grain sizes of tungsten rods subjected to rotary forging and rolling are shown in Table 7. The table indicates that for annealed ø9.0 mm rotary-forged bars, the bar grain sizes were 1611, 1750, and 1900 pieces/mm2, respectively; whereas for annealed ø9.0 mm rolled bars, the bar grain sizes were 1800, 1950, and 2196 pieces/mm2, respectively. Based on prior processing experience, annealed samples of this specification exhibit optimal processing quality when the grain size ranges between 1800 and 2500 pieces/mm2. For ø9.0 mm bars, the rolled grain size reached 2196 pieces/mm2 at an annealing temperature of 2300 °C, significantly exceeding the 1900 pieces/mm2 achieved by rotary forging. Higher grain size values indicate greater numbers of finer-sized pieces per unit area. This fine-grained microstructure enhances the uniformity of plastic deformation, reduces the risk of processing cracks, and facilitates subsequent wire-forming processes. The ø5.2 mm bar undergoes greater deformation than the ø9.0 mm bar during processing, increasing the stored energy within the material. This enhances the recrystallization driving force during annealing, facilitating the formation of a fine, uniform grain structure. Following annealing of the ø5.2 mm bar, the grain sizes of the rolled bars were 2050, 2180, and 2350 pieces/mm2. Based on production experience, the annealed grain size range for samples of this specification typically falls between 2000 and 2500 pieces/mm2. Evidently, the grain size distribution of the ø5.2 mm bars approaches the upper limit of the ideal range, placing them within the fine-grain advantage zone. This ensures material strength while optimizing plasticity.
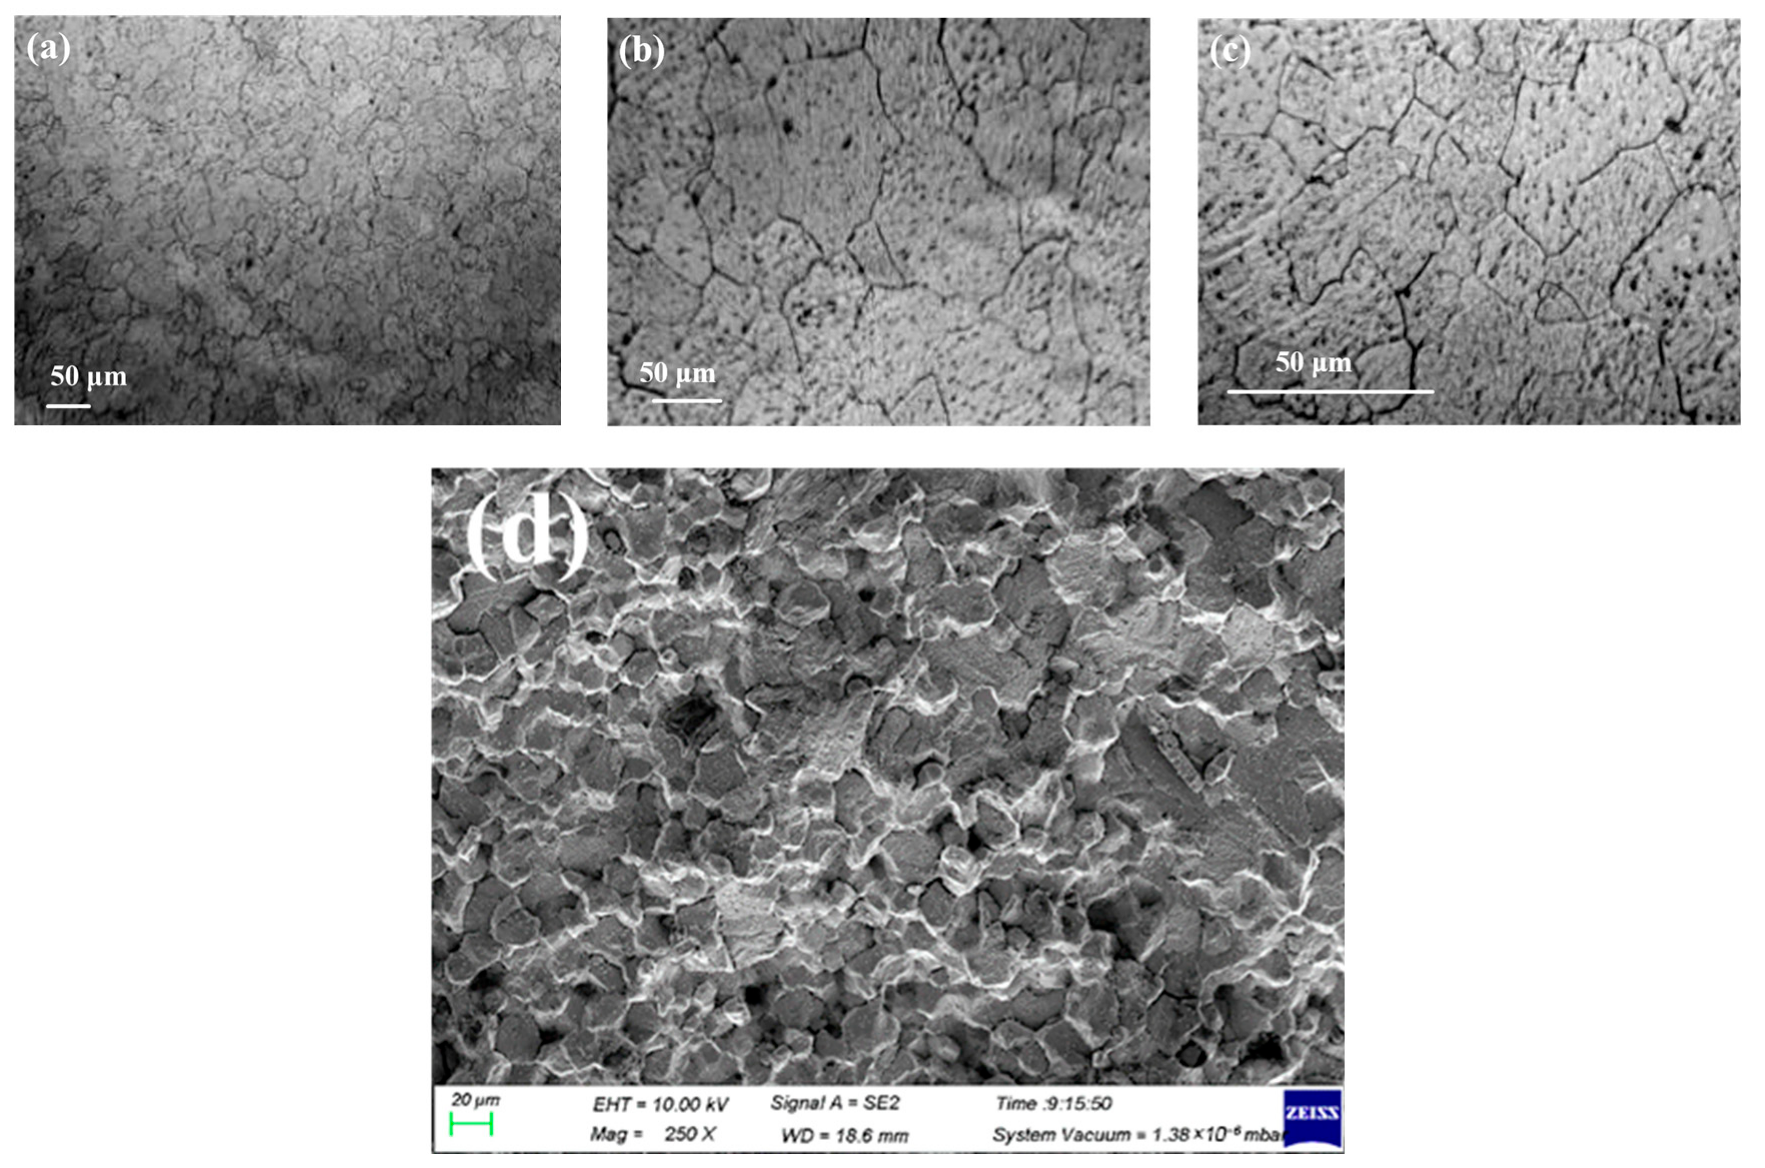
Figure 10 and Figure 11 depict the microstructural morphology of rotary-forged and rolled ø9.0 mm bars at different annealing temperatures. At 2000 °C, Figure 10a shows smaller grain sizes with slightly lower uniformity, exhibiting a few grains with significant size variations; Figure 11a displays finer grains with a more uniform size distribution. At 2100 °C, Figure 10b shows slightly enlarged grains with partially blurred boundaries, indicating room for improvement in grain uniformity. Figure 11b also exhibits grain growth, yet the overall grain size remains smaller than that of the rotary forging microstructure at the same temperature, with well-defined boundaries and a more regular size distribution. At 2300 °C, Figure 10c shows significant grain coarsening with abnormal grain growth in some regions, further widening size variations. Figure 11c exhibits grain growth but less pronounced coarsening than rotary forging, maintaining a relatively uniform distribution without conspicuous abnormal grains. Figure 10d exhibits poorer grain distribution uniformity, with blurred grain boundaries in specific regions and locally inconsistent grain sizes. The microstructure reveals minor voids or non-compact areas, reflecting how the localized point-by-point deformation inherent to rotary forging retains uneven deformation after annealing, thereby affecting grain growth consistency. Figure 11d exhibits markedly superior grain uniformity, with well-defined and regular grain boundaries, high microstructural density, and minimal porosity defects. The planar uniform deformation characteristic of the rolling process endows the material with more evenly distributed deformation energy storage prior to annealing. During annealing, grain growth is driven by uniform forces, resulting in a more regular and compact microstructure [23].
Figure 12 and Figure 13 display the microstructural morphology of tungsten alloy bars, rotary forged to ø5.2 mm after either rotary forging or rolling, at different annealing temperatures. In Figure 12a, grain size is small with insufficient uniformity, exhibiting a few irregular grains, and some areas retain deformation microstructure characteristics. Conversely, the bar in Figure 13a displays fine grains with well-defined boundaries, providing more nucleation sites for recrystallization. As indicated by the yellow selection area in Figure 12b, recrystallization has increased, yet small grains remain; the yellow selection area in Figure 13b reveals uniformly grown grains with regular boundaries, showing no abnormal coarsening. Figure 12c exhibits abnormal grain growth in some grains, with flattened boundaries and significant grain size variation, resulting in reduced microstructural uniformity. Conversely, the yellow selection area in Figure 13c demonstrates grown, equiaxed grains maintaining relatively uniform polygonal morphology, indicating superior microstructural uniformity.
The rotary forging and rolling of ø9.0 mm bars at identical annealing temperatures subjected the rolling process to six-directional compressive stress, yielding high deformation uniformity. This resulted in elevated and uniformly distributed stored energy within the material, arising from dislocation multiplication and accumulated lattice distortion. Conversely, intermittently loaded rotary forging produced non-uniform deformation, with higher stored energy confined to specific regions and an overall stored energy level inferior to that achieved by rolling. Consequently, at identical annealing temperatures, the high-energy-storage regions within rolled tungsten rods facilitate rapid nucleation of recrystallization sites, promoting preferential nucleation and growth. Only isolated high-strain zones form subgrains, resulting in fewer and scattered nucleation sites. This leads to a less uniform and less dense distribution of fine grains compared to the “rolling + rotary forging” processed bar [40].

3.5. Effect of Different Annealing Temperatures on Hardness of W-La Alloy

Two materials with diameters of ø9.0 mm and ø5.2 mm were selected for annealing. The annealing temperature was 2000~2400 °C, and the annealing time was about 32 s. The Vickers hardness of tungsten alloy samples with different annealing temperatures was measured, and the measured hardness values are shown in Table 8.
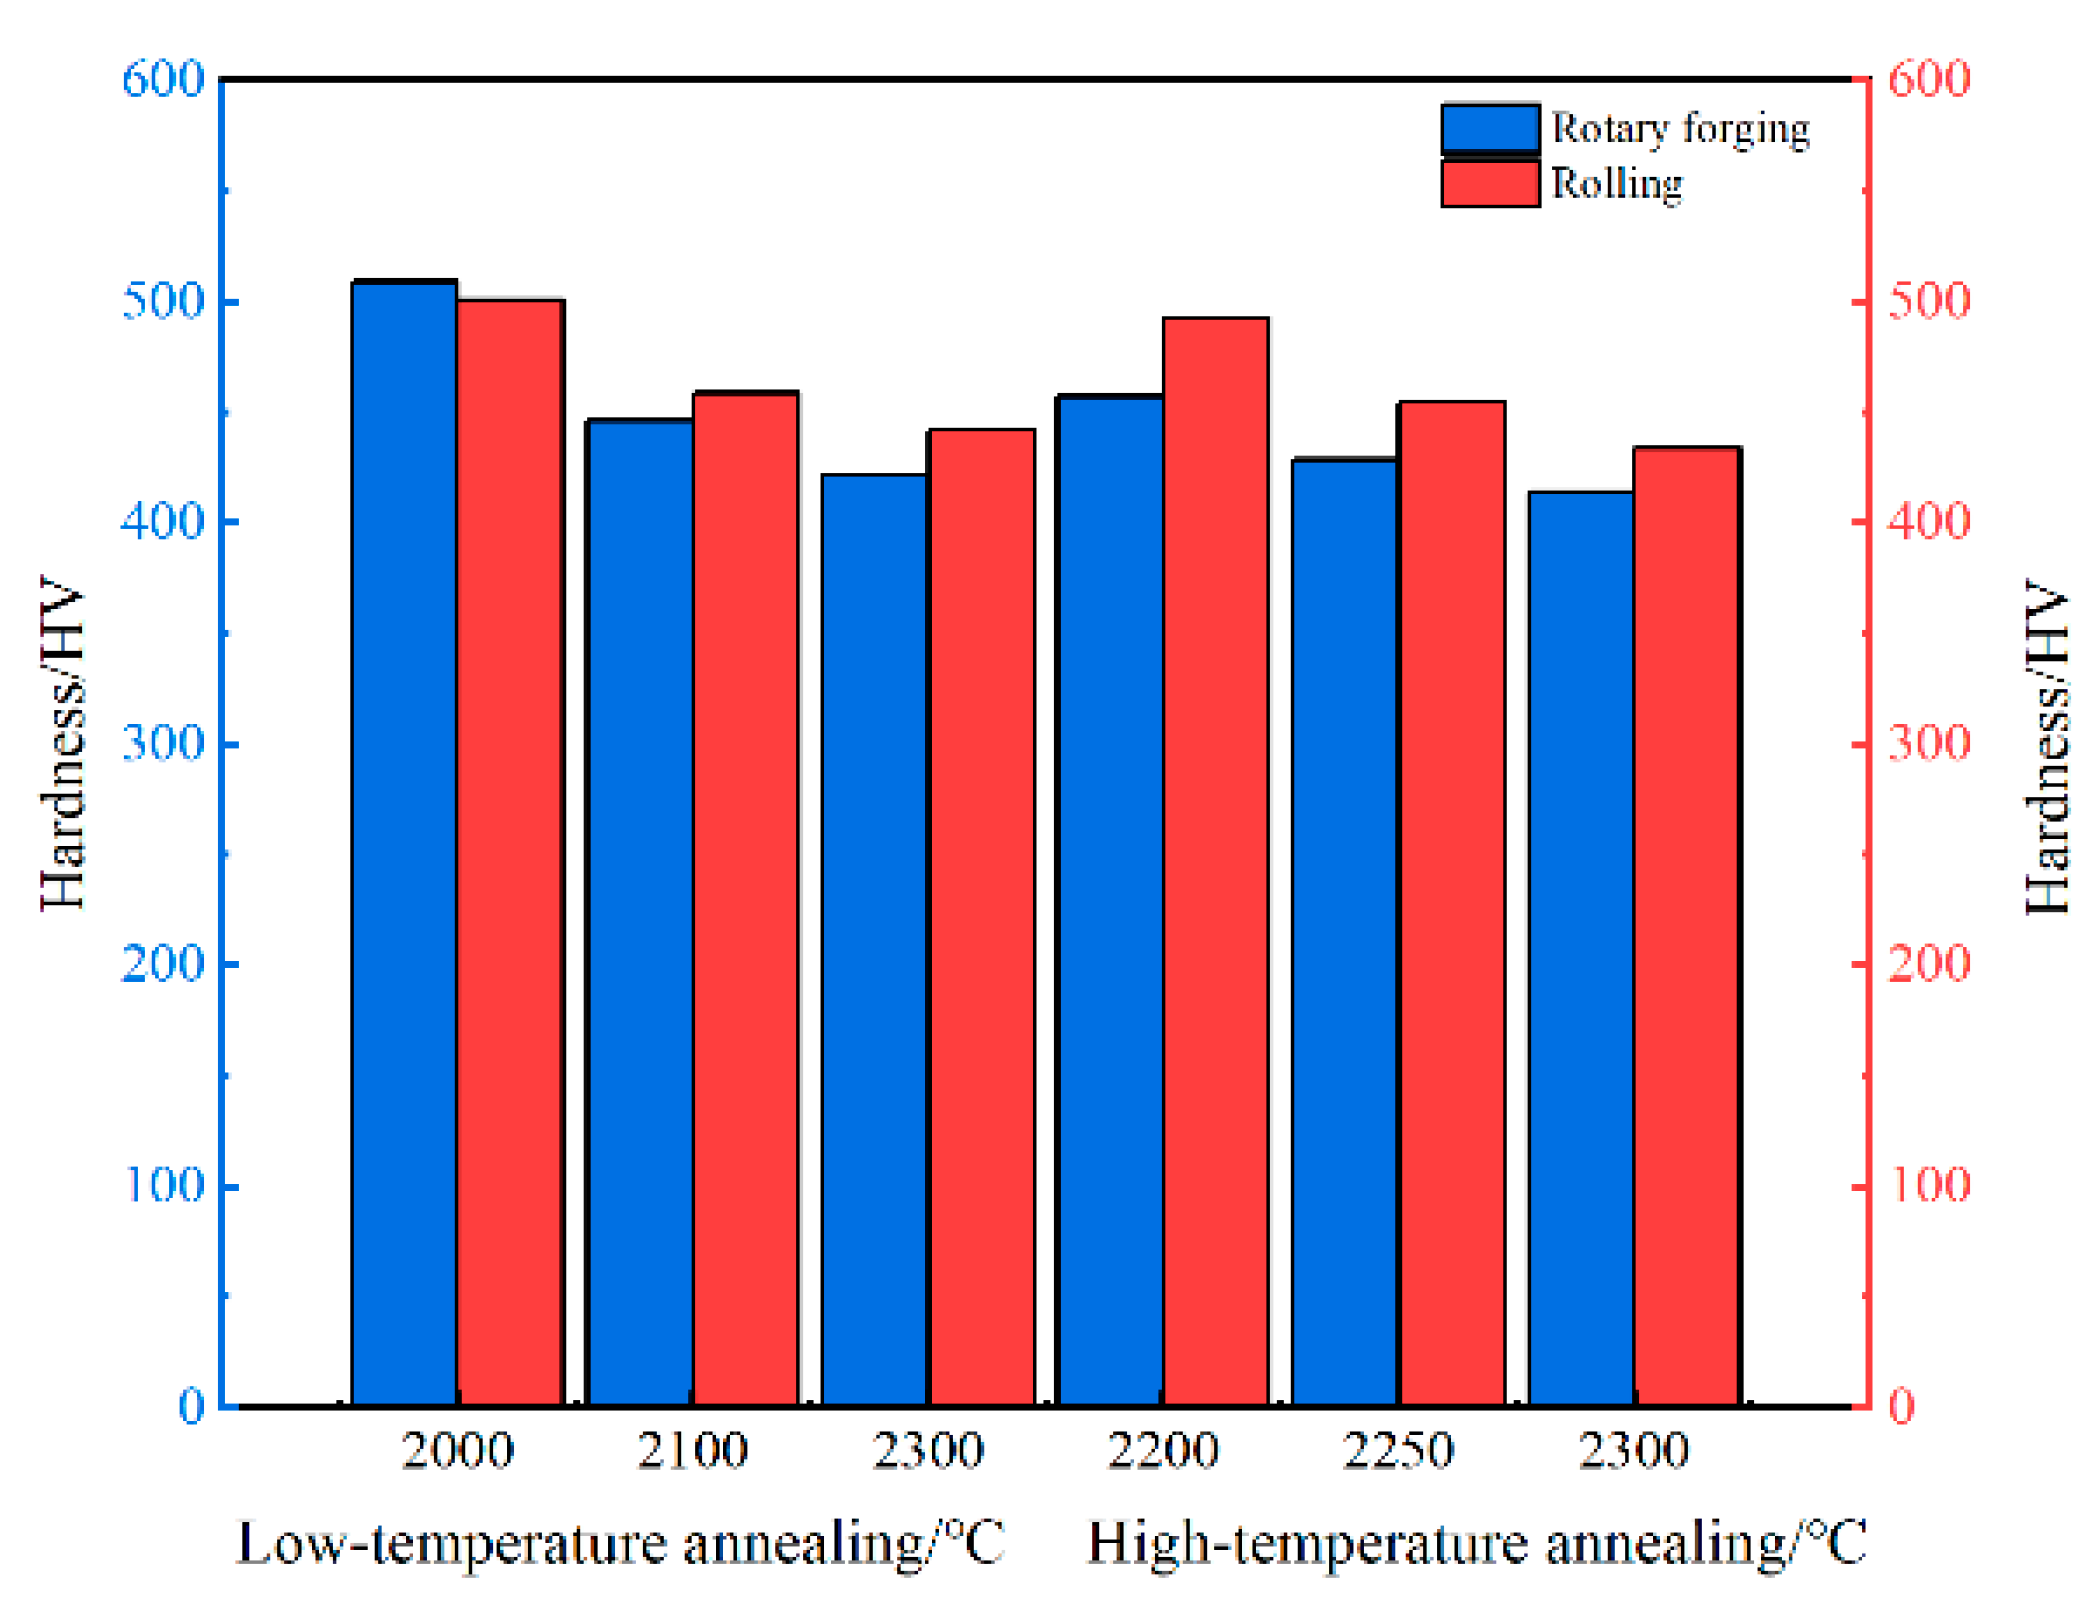
Figure 14 presents the hardness profiles of rotary-forged and rolled tungsten alloy bars under low-temperature and high-temperature annealing conditions. Overall, both rotary-forged and rolled bars exhibit a decreasing hardness trend with increasing annealing temperature, though the rate of decrease and final hardness levels show significant differences. The ø9.0 mm tungsten bar processed by rotary forging exhibited a gradual decrease in hardness with rising temperature, falling from 509.2 HV to 422.1 HV. The ø9.0 mm tungsten bar processed by rolling also showed a decreasing trend, dropping from 500.8 HV to 442.0 HV, with the rolled bar demonstrating higher thermal stability. For the ø5.2 mm bars processed via the ‘rotary forging + rotary forging’ and ‘rolling + rotary forging’ composite techniques, hardness also decreased with increasing temperature. However, at 2200 °C, hardness slightly rebounded to 457.5 HV and 492.7 HV, respectively. This phenomenon may be attributed to sub-structural strengthening induced by multiple deformation cycles. Multiple deformations can pin some grain boundaries, suppress recrystallization, and form a ‘dynamic recovery’ microstructure, leading to a slight increase in hardness within a certain temperature range. However, under high-temperature annealing conditions, the ø5.2 mm bars exhibited further hardness reduction. Notably, at 2300 °C, the ‘rotary forging + rotary forging’ process decreased to 414.5 HV, and the ‘rolling + rotary forging’ process decreased to 433.9 HV, indicating that high-temperature annealing promoted grain growth and resulted in a significant hardness decline.
This phenomenon can be well explained by the evolution theory of large-angle grain boundaries (HAGBs) and small-angle grain boundaries (LAGBs) [41]. The rotary forging process induces numerous low-angle grain boundaries due to multi-directional deformation. During low-temperature annealing, these low-angle grain boundaries retain significant work-hardening effects, resulting in higher initial hardness. However, as the annealing temperature increases, low-angle grain boundaries gradually transform into high-angle grain boundaries, promoting grain growth and causing a rapid decline in hardness. In contrast, the rolling process, dominated by uniaxial deformation, preserves more high-angle grain boundaries. These boundaries promote recrystallization during high-temperature annealing, forming finer equiaxed grains that inhibit grain growth, resulting in a smaller reduction in hardness. The ‘rolling + rotary forging’ combination integrates the recrystallization advantage of high-angle grain boundaries formed by rolling with the work-hardening characteristics introduced by rotary forging via low-angle grain boundaries.
In summary, the fundamental cause of hardness variation in tungsten alloy bars lies in the dynamic evolution patterns of low-angle and high-angle grain boundaries. Low-angle grain boundaries retain their work-hardening strengthening effect during the low-temperature phase, while high-angle grain boundaries promote recrystallization refinement during the high-temperature phase. The synergistic interaction between these two phenomena ultimately determines the material’s hardness behavior.

3.6. Density Distribution of W-La Alloy Under Rotary Forging and Rolling Processing

Density is also one of the main indices to test the quality of tungsten alloy. Theoretical density is the ultimate density that a material can achieve in an ideal dense state when other conditions are unchanged. Relative density is the ratio of object density to theoretical density, which can be expressed by the following formula:
ρ D = ρ ρ L
In the formula, ρ —the density of the object, g/cm3, ρ D —the relative density of the object, g/cm3, and ρ L —the theoretical density of the object, g/cm3.
The density was measured by using the drainage method, and the relative density of tungsten alloy samples was calculated by taking the theoretical density of tungsten (19.35 g/cm3) and the theoretical density of lanthanum oxide (6.51 g/cm3). The measured density and calculation results are shown in Table 9.
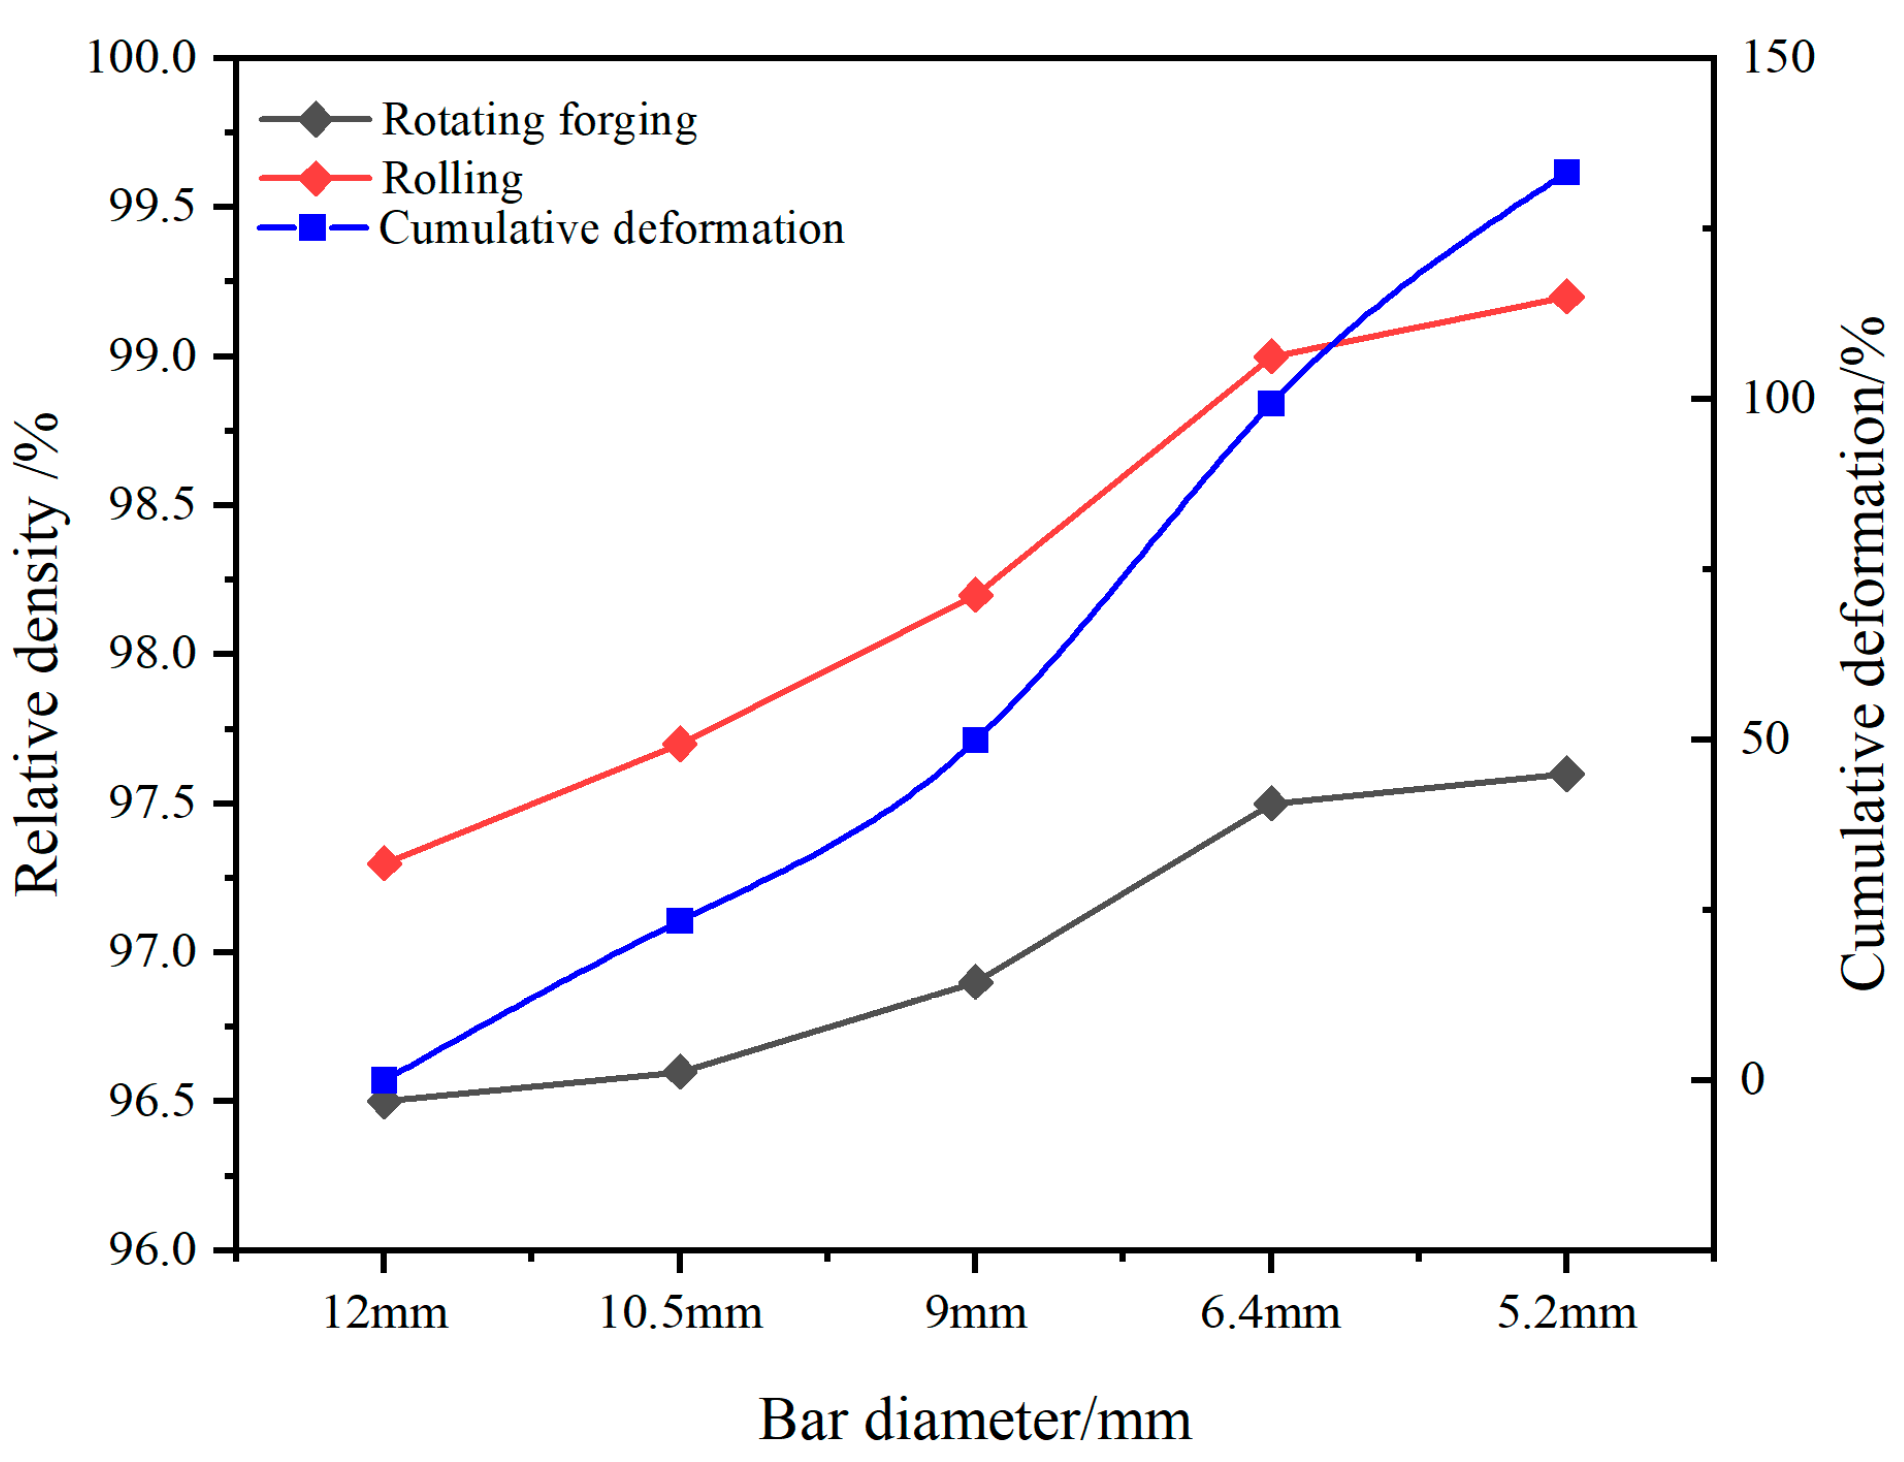
Figure 15 shows the variation of the relative density of tungsten alloy bars with cumulative deformation. With a decrease in bar diameter (increase of cumulative deformation), the relative densities of rolling and rotary forging increase, but the rolling increase is more significant. When the bar diameter is reduced from 12 mm to 5.2 mm, the rolling relative density increases from 97.3% to 99.2%, and the rotary forging only increases from 96.5% to 97.6%. Therefore, it can be seen that rolling has certain advantages in improving the relative density of tungsten alloy.

4. Conclusions

(1)
Research has demonstrated that combining hot rolling with rotary forging effectively refines the grain structure of tungsten alloys. During the processing stage from ø22 mm to ø10.5 mm, hot rolling reduced the average grain size from 36.82 μm to 21.62 μm (a refinement of 41.3%), whereas rotary forging only refined it from 36.82 μm to 28.53 μm (a refinement of 22.5%). At the ø5.2 mm diameter stage, hot rolling further refined the grain size to 9.3 μm, whereas rotary forging achieved 11.2 μm. According to the Hall–Page formula, hot rolling increased yield strength by 97.9 MPa, while rotary forging increased it by 80.5 MPa, indicating hot rolling’s superior strengthening effect.
(2)
The hardness of hot-rolled material was significantly higher than that of rotary forging. At the ø5.2 mm diameter stage, hot rolling yielded a hardness of 548.4 HV, whereas rotary forging produced 544.9 HV. Hot rolling substantially enhanced the material’s comprehensive properties through uniform deformation and dynamic recrystallization mechanisms.
(3)
The annealing response of the rolled process markedly outperformed that of rotary forging. Following annealing at 2300 °C, the rolled ø9.0 mm bar exhibited a grain count of 2196 per/mm2, surpassing the rotary forged sample’s 1900 per/mm2. After annealing, the grain size distribution became more uniform, with significantly enhanced microstructural compactness. For ø5.2 mm bars annealed at 2300 °C, the rolled grain size reached 2350 per/mm2, meeting the ideal range (2000–2500 per/mm2) for subsequent wire drawing. In contrast, the rotary forging process yielded only 2246 per/mm2, demonstrating superior microstructural controllability of the rolling process after annealing.

Author Contributions

Conceptualization, J.C.; Software, T.Z.; Validation, J.F. and T.Z.; Formal analysis, J.F. and T.Z.; Investigation, J.F. and T.Z.; Resources, J.F. and J.C.; Data curation, J.F. and J.Z.; Writing—original draft, J.F. and Y.S.; Writing—review & editing, J.C., Y.S. and J.Z.; Visualization, J.F. and Y.S.; Supervision, J.C.; Project administration, J.C.; Funding acquisition, J.C. All authors have read and agreed to the published version of the manuscript.

Funding

This research received no external funding.

Data Availability Statement

The original contributions presented in this study are included in the article. Further inquiries can be directed to the corresponding author.

Acknowledgments

Thanks to all the workers who have worked hard on this article.

Conflicts of Interest

The authors declare no conflicts of interest.

References

  1. Liu, F.; Luo, G.; Li, Q.; Wang, W. Study on the application of tungsten in nuclear fusion reactors. China Tungsten Ind. 2017, 32, 41–48+55. [Google Scholar]
  2. Ouyang, W. Advantages and applications of tungsten-based high-density alloy technology. Sci. Technol. Outlook 2016, 26, 69. [Google Scholar]
  3. Xie, K. Application of refractory metal tungsten and molybdenum pipes and research progress of their preparation technology. Cem. Carbide 2018, 35, 219–225. [Google Scholar]
  4. Miao, Z.; Wu, Z.; Wang, D. Preparation and mechanical properties of rare earth reinforced tungsten alloy for photovoltaic cutting. China Molybdenum Ind. 2023, 47, 57–60. [Google Scholar]
  5. Puyang, S.A.; Lyu, Y.M.; Nian, F.; Xu, Y.P.; Yang, Z.S.; Zhou, H.S.; Luo, G.-N. Deuterium retention and surface morphology modification in oxidized tungsten exposed to D plasma. Int. J. Hydrogen Energy 2021, 46, 31346–31352. [Google Scholar] [CrossRef]
  6. Boda, A.; Shenoy, K.T.; Mohan, S. Diffusion, permeation and solubility of hydrogen, deuterium and tritium in crystalline tungsten: First principles DFT simulations. Int. J. Hydrogen Energy 2020, 45, 29095–29109. [Google Scholar] [CrossRef]
  7. Ueda, Y.; Coenen, J.W.; De Temmerman, G.; Doerner, R.P.; Linke, J.; Philipps, V.; Tsitrone, E. Research status and issues of tungsten plasma facing materials for ITER and beyond. Fusion Eng. Des. 2014, 89, 901–906. [Google Scholar] [CrossRef]
  8. Stork, D.; Agostini, P.; Boutard, J.L.; Buckthorpe, D.; Diegele, E.; Dudarev, S.L.; Zinkle, S.J. Developing structural, high-heat flux and plasma facing materials for a near-term DEMO fusion power plant: The EU assessment. J. Nucl. Mater. 2014, 455, 277–291. [Google Scholar] [CrossRef]
  9. Gludovatz, B.; Wurster, S.; Weingärtner, T.; Hoffmann, A.; Pippan, R. Influence of impurities on the fracture behaviour of tungsten. Philos. Mag. 2011, 91, 3006–3020. [Google Scholar] [CrossRef]
  10. Gumbsch, P. Brittle fracture and the brittle-to-ductile transition of tungsten. J. Nucl. Mater. 2003, 323, 304–312. [Google Scholar] [CrossRef]
  11. Gludovatz, B.; Wurster, S.; Hoffmann, A.; Pippan, R. Fracture toughness of polycrystalline tungsten alloys. Int. J. Refract. Met. Hard Mater. 2010, 28, 674–678. [Google Scholar] [CrossRef]
  12. Cheng, G.M.; Xu, W.Z.; Jian, W.W.; Yuan, H.; Tsai, M.H.; Zhu, Y.T.; Zhang, Y.F.; Millett, P.C. Dislocations with edge components in nanocrystalline bcc Mo. J. Mater. Res. 2013, 28, 1820–1826. [Google Scholar] [CrossRef]
  13. Li, H.; Stefan, W.; Christian, M. Dislocation-core symmetry and slip planes in tungsten alloys: Ab initio calculations and microcantilever bending experiments. Acta Mater. 2012, 60, 748–758. [Google Scholar] [CrossRef]
  14. Xie, Z.; Liu, R.; Fang, Q.; Zhang, T.; Jiang, Y.; Wang, X.; Liu, C. Microstructure and Mechanical Properties of Nano-Size Zirconium Carbide Dispersion Strengthened Tungsten Alloys Fabricated by Spark Plasma Sintering Method. Plasma Sci. Technol. 2015, 17, 1066–1071. [Google Scholar] [CrossRef]
  15. Liu, R.; Xie, Z.M.; Hao, T.; Zhou, Y.; Wang, X.P.; Fang, Q.F.; Liu, C.S. Fabricating high performance tungsten alloys through zirconium micro-alloying and nano-sized yttria dispersion strengthening. J. Nucl. Mater. 2014, 451, 35–39. [Google Scholar] [CrossRef]
  16. Zhang, Y.; Ganeev, A.V.; Wang, J.T.; Jin, Q.L.; Igor, V.A. Observations on the ductile-to-brittle transition in ultrafine-grained tungsten of commercial purity. Mater. Sci. Eng. 2009, 503, 37–40. [Google Scholar] [CrossRef]
  17. Reiser, J.; Hoffmann, J.; Jäntsch, U.; Klimenkov, M.; Bonk, S.; Bonnekoh, C.; Rieth, M.; Hoffmann, A.; Mrotzek, T. Ductilisation of tungsten (W): On the shift of the brittle-to-ductile transition (BDT) to lower temperatures through cold rolling. Int. J. Refract. Met. Hard Mater. 2016, 54, 351–369. [Google Scholar] [CrossRef]
  18. Petaccia, M.G.; Gervasoni, J.L. Nano-yttria in oxide dispersion strengthened tungsten under alpha particle irradiation. Nucl. Mater. Energy 2019, 20, 100681. [Google Scholar] [CrossRef]
  19. Lukas, K.; Dirk, H. A thermodynamically consistent model for elastoplasticity, recovery, recrystallization and grain coarsening. Int. J. Solids Struct. 2018, 152–153, 185–195. [Google Scholar] [CrossRef]
  20. Wang, Y.J.; Yan, Q.Z. Grain boundary strengthened W-ZrB alloy via freeze-drying technique and spark plasma sintering. Fusion Eng. Des. 2019, 149, 111333. [Google Scholar] [CrossRef]
  21. Wang, C.J.; Zhang, L.Q.; Wei, S.Z.; Kun, M.P.; Xiao, C.W.; Qing, K.L. Preparation, microstructure, and constitutive equation of W-0.25 wt% Al2O3 alloy. Mater. Sci. Eng. A 2019, 744, 79–85. [Google Scholar] [CrossRef]
  22. Zhao, M.Y.; Zhou, Z.J.; Zhong, M.; Jun, T.; Lian, Y.Y.; Liu, X. Thermal shock behaviour of fine grained W–Y2O3 materials fabricated via two different manufacturing technologies. J. Nucl. Mater. 2016, 470, 236–243. [Google Scholar] [CrossRef]
  23. Ren, C.; Fang, Z.Z.; Xu, L.; Jonathan, P.; James, J.; Paramore, D.; Butler, B.G. An investigation of the microstructure and ductility of annealed cold-rolled tungsten. Acta Mater. 2019, 162, 202–213. [Google Scholar] [CrossRef]
  24. Bonk, S.; Hoffmann, J.; Hoffmann, A.; Reiser, J. Cold rolled tungsten (W) plates and foils: Evolution of the microstructure. Int. J. Refract. Met. Hard Mater. 2016, 60, 92–98. [Google Scholar] [CrossRef]
  25. Zhao, B.L.; Xia, Y.P.; Zhang, L.F.; Ke, J.G.; Cheng, X.; Xie, Z.M.; Liu, R.; Miao, S.; Hao, T.; Wu, X.B.; et al. Effects of rolling reduction on microstructural evolution and mechanical properties of W-0.5wt%ZrC alloys. Mater. Sci. Eng. 2022, 830, 142310. [Google Scholar] [CrossRef]
  26. Liu, R.; Xie, Z.M.; Zhang, T.; Fang, Q.F.; Wang, X.P.; Hao, T.; Liu, C.S.; Dai, Y. Mechanical properties and microstructures of W-1%YO microalloyed with Zr. Mater. Sci. Eng. 2016, 660, 19–23. [Google Scholar] [CrossRef]
  27. Shen, T.L.; Dai, Y. Microstructure and tensile properties of tungsten at elevated temperatures. J. Nucl. Mater. 2016, 468, 348–354. [Google Scholar] [CrossRef]
  28. Xue, K.; Guo, Y.S.; Shi, J.F. The brittle-to-ductile transition of pure tungsten processed by closed dual equal channel angular pressing process. Mater. Sci. Eng. 2022, 832, 142513. [Google Scholar] [CrossRef]
  29. Hao, T.; Fan, Z.Q.; Zhang, T. Strength and ductility improvement of ultrafine-grained tungsten produced by equal-channel angular pressing. J. Nucl. Mater. 2014, 455, 595–599. [Google Scholar] [CrossRef]
  30. Ren, C.; Fang, Z.Z.; Koopman, M. Methods for improving ductility of tungsten—A review. Int. J. Refract. Met. Hard Mater. 2018, 503, 28–31. [Google Scholar] [CrossRef]
  31. Wei, Q.; Jiao, T.; Ramesh, K.T. Mechanical behaviour and dynamic failure of high-strength ultrafine grained tungsten under uniaxial compression. Acta Mater. 2006, 54, 77–87. [Google Scholar]
  32. Fan, J.; Du, J.; Cao, J.; Sun, Y.; Zhang, J. Study on the Influence of Deformation and Temperature on the Properties of High-Strength Tungsten Alloy Wire. Micromachines 2025, 16, 922. [Google Scholar] [CrossRef]
  33. Wen, F.; Zheng, W.; Qiang, S. Effect of thermomechanical processing via rotary swaging on grain boundary character distribution and intergranular corrosion in 304 austenitic stainless steel. J. Mater. Res. Technol. 2022, 19, 2470–2482. [Google Scholar] [CrossRef]
  34. Kunčická, L.; Macháčková, A.; Lavery, N.P.; Kocich, R.; Cullen, J.C.T.; Hlaváč, L.M. Effect of thermomechanical processing via rotary swaging on properties and residual stress within tungsten heavy alloy. Int. J. Refract. Met. Hard Mater. 2020, 87, 105120. [Google Scholar] [CrossRef]
  35. Zan, X.; Gu, M.; Wang, K. Recrystallization kinetics of 50% hot-rolled 2% Y2O3 dispersed tungsten. Fusion Eng. Des. 2019, 144, 1–5. [Google Scholar] [CrossRef]
  36. Zhang, T.; Du, W.Y.; Zhan, C.Y. The high thermal stability induced by a synergistic effect of ZrC nanoparticles and Re solution in W matrix in hot rolled tungsten alloy. Nucl. Eng. Technol. 2022, 54, 2801–2808. [Google Scholar] [CrossRef]
  37. Yin, X. Production Principle, Technology and Properties of Tungsten Wire; Metallurgical Industry Press: Beijing, China, 1998. [Google Scholar]
  38. Luo, L.; Zhao, Z.; Yao, G. Research progress on the effect of rolling on the properties of particle reinforced tungsten alloys for fusion devices. Trans. Nonferrous Met. Soc. China 2022, 32, 76–86. [Google Scholar]
  39. Zhang, X.; Yan, Q.; Lang, S. Preparation of pure tungsten via various rolling methods and their influence on macro-texture and mechanical properties. Mater. Des. 2017, 126, 1–11. [Google Scholar] [CrossRef]
  40. Kiran, U.R.; Kumar, J.; Kumar, V.; Sankaranarayana, M.; Nageswara Rao, G.V.S.; Nandy, T.K. Effect of cyclic heat treatment and swaging on mechanical properties of the tungsten heavy alloys. Mater. Sci. Eng. A 2016, 656, 256–265. [Google Scholar] [CrossRef]
  41. He, X.; Deng, Y.; Guo, X. In-situ EBSD tensile revealing the evolution mechanism of high angle grain boundaries in Al–Zn–Mg alloy profile with heterogeneous structures. Mater. Sci. Eng. A 2024, 901, 146539. [Google Scholar] [CrossRef]
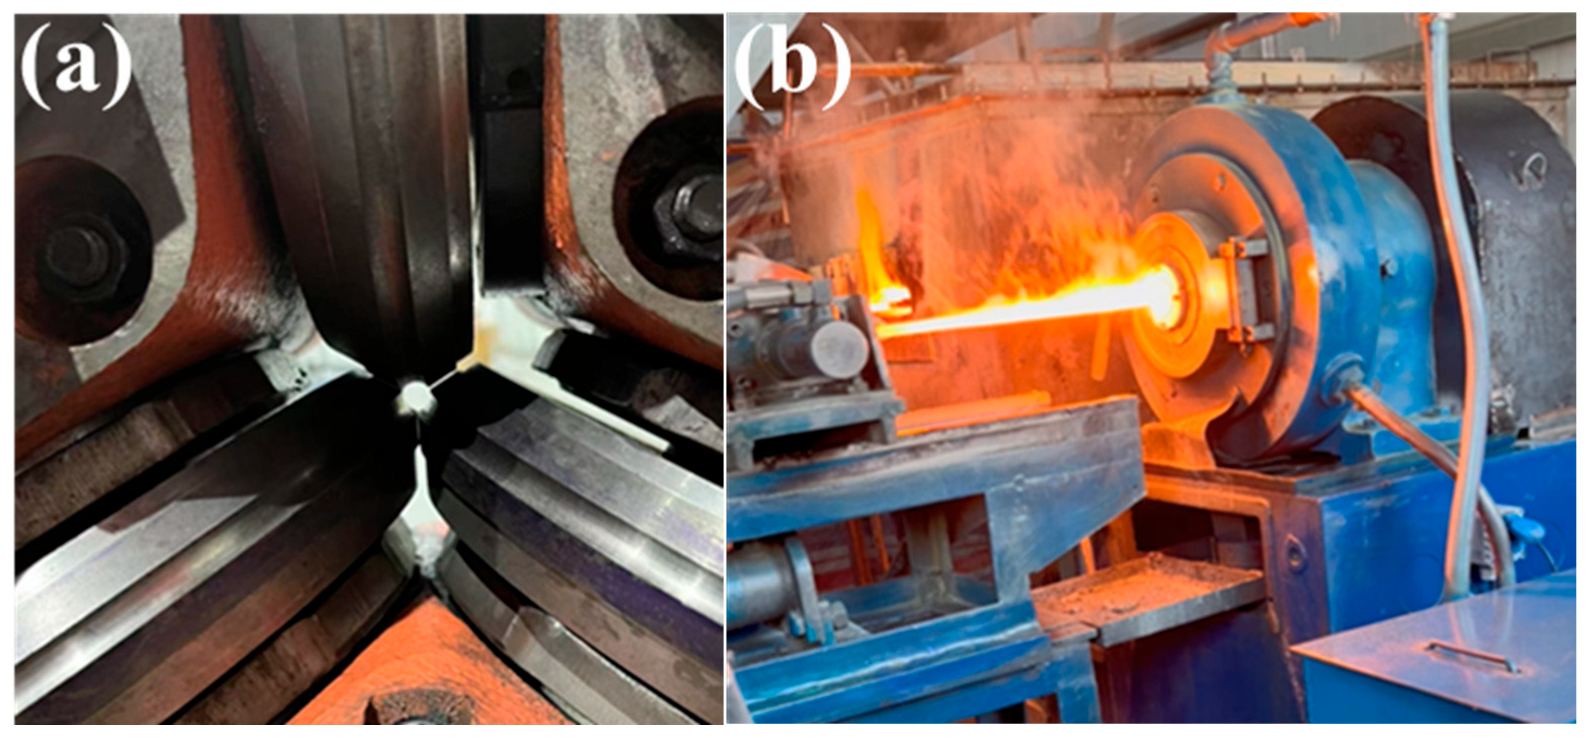
Figure 1. Processing equipment ((a) three-roll, round hole Y-type rolling mill; (b) rotary forging equipment).
Metals 15 01157 g001
Figure 2. Micro-morphology of tungsten alloy ((a) metallographic diagram of cross-section; (b) binary metallographic diagram).
Metals 15 01157 g002
Figure 3. Grain size distribution of ø22 mm tungsten alloy billet.
Metals 15 01157 g003
Figure 4. Metallographic diagram of cross-section microstructure of rotary forging tungsten alloy: (a) 26.5% 1500 °C; (a1) 12 mm tungsten alloy grain size distribution diagram; (b) 23.4% 1450 °C; (b1) 10.5 mm tungsten alloy grain size distribution diagram; (c) 26.5% 1400 °C; (c1) 9 mm tungsten alloy grain size distribution diagram; (d) 9 mm annealing microstructure diagram; (e) 49.4% 1350 °C; (f) 33.9% 1300 °C; (g) 5.2 mm annealing microstructure diagram.
Metals 15 01157 g004aMetals 15 01157 g004b
Figure 5. Metallographic diagram of cross-section microstructure of rolled tungsten alloy: (a) 70.2% 1650 °C; (a1) 12 mm tungsten alloy grain size distribution diagram; (b) 23.4% 1620 °C; (b1) 10.5 mm tungsten alloy grain size distribution diagram; (c) 26.5% 1590 °C; (c1) 9 mm tungsten alloy grain size distribution diagram; (d) 9 mm annealing microstructure diagram; (e) 49.4% 1560 °C; (f) 33.9% 1520 °C; (g) 5.2 mm annealing microstructure diagram.
Metals 15 01157 g005
Figure 6. Average grain size distribution of W-La alloy rotary forging and rolling bars under different deformation.
Metals 15 01157 g006
Figure 7. Microhardness change for tungsten alloy processed by rotary forging.
Metals 15 01157 g007
Figure 8. Microhardness change for tungsten alloy processed by rolling.
Metals 15 01157 g008
Figure 9. Hardness change diagram of W-La alloy processed by rotary forging and rolling.
Metals 15 01157 g009
Figure 10. Rotary forging annealed tungsten alloy ø9.0 mm: (a) 2000 °C; (b) 2100 °C; (c) 2300 °C; (d) 2300 °C SEM.
Metals 15 01157 g010
Figure 11. Rolling annealed tungsten alloy ø9.0 mm: (a) 2000 °C; (b) 2100 °C; (c) 2300 °C; (d) 2300 °C SEM.
Metals 15 01157 g011
Figure 12. Rotary forging annealed tungsten alloy at ø5.2 mm: (a) 2200 °C; (b) 2300 °C; (c) 2400 °C.
Metals 15 01157 g012
Figure 13. Rolling annealed tungsten alloy at ø5.2 mm: (a) 2200 °C; (b) 2300 °C; (c) 2400 °C.
Metals 15 01157 g013
Figure 14. Hardness of tungsten alloy under low-temperature and high-temperature annealing.
Metals 15 01157 g014
Figure 15. Variation of the relative density of tungsten alloy bars with cumulative deformation.
Metals 15 01157 g015
Table 1. Cold isostatic pressing process.
Process StagePressure (MPa)Holding Time (s)
Pre-pressing5030
Intermediate pressing10030
High pressing15010
Final pressing18060
Table 2. Rolling tests of W-La alloy billets at different temperatures and deformations.
ProcessProcessing StageBar Diameter (mm)Temperature (°C)Compression Ratio (%)
“Rolling + Rotary forging”Rolling four12.0165070.2
Rolling eight10.5162023.4
Rolling ten9.0159026.5
Rotary forging one6.4156049.4
Rotary forging two5.2152033.9
Table 3. Rotary forging test of W-La alloy billet at different temperatures and deformations.
ProcessProcessing StageBar Diameter (mm)Temperature (°C)Compression Ratio (%)
“Rotating forging + Rotating forging”Initial billet14.01500~
Rotary forging one12.0150026.5
Rotary forging two10.5145023.4
Rotary forging three9.0140026.5
Rotary forging four6.4135049.4
Rotary forging five5.2130033.9
Table 4. Annealing test of 9.0 mm and ø5.2 mm W-La alloy bars.
Bar DiameterProcessing MethodAnnealing Temperature (°C)
ø9.0 mmRotary forging2000
2100
2300
Rolling2000
2100
2300
ø5.2 mm“Rotating forging + Rotating forging”2200
2300
2400
“Rolling + Rotary forging”2200
2300
2400
Table 5. Microhardness of tungsten alloy processed by rotary forging.
Processing MethodBar Diameter (mm)Compression Ratio (%)Hardness (HV)
“Rotating forging + Rotating forging”12~471.0
10.523.4459.1
9.026.5510.8
Annealing 9.0~446.1
6.449.4541.3
5.233.9544.9
Annealing 5.2~433.5
Table 6. Microhardness of tungsten alloy processed by rolling.
Processing MethodProcessing StageBar Diameter (mm)Compression Ratio (%)Hardness (HV)
“Rolling + Rotary forging”Rolling four12~558.3
Rolling eight10.523.4565.0
Rolling ten9.026.5562.7
Rolling ten annealing9.0~467.2
Rotary forging one6.449.4552.2
Rotary forging two5.233.9548.4
Rotary forging two annealing5.2~460.4
Table 7. Table of grain size of W-La alloy.
Bar DiameterProcessing MethodAnnealing Temperature (°C)Grain Size (Pieces/mm2)
ø9.0 mmRotary forging20001611
21001750
23001900
Rolling20001800
21001950
23002196
ø5.2 mm“Rotating forging + Rotating forging”22001984
23002100
24002246
“Rolling + Rotary forging”22002050
23002180
24002350
Table 8. Hardness table of tungsten alloy at different annealing temperatures.
Bar DiameterProcessing MethodAnnealing Temperature (°C)Hardness (HV)
ø9.0 mmRotary forging2000509.2
2100446.1
2300422.1
Rolling2000500.8
2100458.9
2300442.0
ø5.2 mm“Rotating forging + Rotating forging”2200457.5
2300428.6
2400414.5
“Rolling + Rotary forging”2200492.7
2300454.6
2400433.9
Table 9. Density table of tungsten alloy under different processing methods.
Bar Diameter (mm)Processing MethodCompression Ratio (%)Density (g/cm3)Relative Density (%)
12.0Rotating forging~18.6796.5
Rolling18.8297.3
10.5Rotating forging23.418.7096.6
Rolling18.9097.7
9.0Rotating forging26.518.7796.9
Rolling19.0098.2
6.4Rotating forging + Rotating forging49.418.8797.5
Rolling + Rotating forging19.1599.0
5.2Rotating forging + Rotating forging33.918.8997.6
Rolling + Rotating forging19.2099.2
Disclaimer/Publisher’s Note: The statements, opinions and data contained in all publications are solely those of the individual author(s) and contributor(s) and not of MDPI and/or the editor(s). MDPI and/or the editor(s) disclaim responsibility for any injury to people or property resulting from any ideas, methods, instructions or products referred to in the content.