Article

Effects of Surface Modifications on Rotating Bending Fatigue of Ni-Al Bronze Alloy

1
Department of Optoelectronics and Materials Technology, National Taiwan Ocean University, Keelung 20224, Taiwan
2
Department of Material Research, National Atomic Research Institute, Taoyuan 32546, Taiwan
3
Department of Materials Science and Engineering, National Taiwan University, Taipei 10617, Taiwan
*
Author to whom correspondence should be addressed.
Metals 2025, 15(1), 19; https://doi.org/10.3390/met15010019
Submission received: 19 November 2024 / Revised: 24 December 2024 / Accepted: 27 December 2024 / Published: 29 December 2024
(This article belongs to the Special Issue Advances in Copper, Copper Alloys and Their Processing)

Abstract

:
Surface modifications, including laser surface melting (LSM) and micro-shot peening (MSP), were applied to improve the fatigue performance of the Ni-Al bronze (NAB) alloy. LSM could homogenize the NAB into a uniform microstructure with refined columnar grains in the laser-melted zone but introduced residual tensile stress (RTS). The bombardment and generated heat induced by MSP could not entirely remove the granular κII precipitates and lamellar κIII phase in the peened zone of the shot-peened sample (NSP sample) but introduced residual compressive stress (RCS) into the NSP sample under the peening intensity of this work. The results of fatigue tests revealed that the LSM sample had the poorest fatigue performance, but the NSP sample showed the best fatigue performance among the tested samples. The fatigue limit of the NAB alloy was about 325 MPa; meanwhile, the fatigue performance of the LSP (LSM + MSP) sample was equivalent to or a little better than that of the NAB alloy (NBM sample). The RTS and aligned columnar grains accounted for the degraded fatigue resistance of the LSM sample. By contrast, the high RCS and the refined structure were responsible for the improved fatigue strength/life of the NSP sample relative to that of the other samples. The fatigue limit of the NSP sample was as high as 450 MPa. However, the increase in fatigue strength of the NSP sample occurred in service life regions above 3 × 10⁵ cycles.

1. Introduction

Ni-Al bronze (NAB) is a Cu-based alloy with Al, Fe, and Ni as the major strengthening elements. The typical microstructure of the NAB includes α-Cu, β′ (martensite), and several forms of κ phases (κI, κII, κIII, and κIV) [1,2,3,4]. The NAB’s high strength and corrosion resistance in seawater make it widely used in marine applications, including propellers, pumps, and valves. However, the NAB is sensitive to selective corrosion [5] and stress corrosion cracking [6,7] while running in seawater. Preferential attack of the lamellar α occurs in α + κIII eutectoid structure of the NAB [8]. The results of cavitation erosion tests of the NAB show that the cumulative mass loss in seawater increases by 50% compared to the results in distilled water [9]. Furthermore, adding sulfide in 3.5% NaCl solution increases the cavitation erosion rate of the NAB [10].
The high-cycle fatigue life of the cast NAB is very sensitive to the size and location of the defects and often shows a considerable scatter in the S-N curve [11]. A noticeable decrease in the high-cycle fatigue life of the NAB occurs with increasing the defect size and surface proximity [12]. The κII, κIII, and β′ (martensite) present in the cast NAB are reported to deflect the fatigue crack growth direction, thus slowing down the fatigue crack growth rate (FCGR) [13]. In seawater, the FCGR of the NAB accelerates obviously, and the threshold stress intensity factor range decreases compared with those tested in air [14].
Distinct surface modifications are applied to change the microstructure and improve the mechanical properties of the NAB. The low surface roughness and high residual compressive stress (RCS) induced by laser shock peening account for enhancing the NAB’s high-cycle fatigue life [15]. Laser surface heat treatment (LSHT) is carried out to dissolve the lamellar κIII phase in the NAB alloy, which improves its corrosion resistance [16]. After laser surface melting (LSM), the cavitation erosion resistance of the treated NAB [17] and Mn-Ni-Al bronze [18] in 3.5% NaCl solution can be enhanced relative to the as-received one. In addition, the increased corrosion and erosion resistance of the Mn-Ni-Al bronze is attributed to the formation of a single, homogeneous microstructure [19]. With the LSM or LSHT treatments, the NAB alloy had equivalent cavitation performance [20]. However, higher surface hardness and high residual tensile stress (RTS) are obtained in the former rather than in the latter [20]. Moreover, the corrosion resistance of moderately peened NAB is superior to that of the un-peened one, owing to the induced nano-sized grains and high RCS [21] in the former. In addition, the cavitation resistance of the shot-peened NAB in a 3.5% NaCl solution is much better than that of the un-peened one [22].
The fatigue resistance of a structural component under cyclic loading can be increased by introducing the RCS, refining the surface microstructure, and decreasing the surface roughness. In this work, LSM [17,18,19,20], micro-shot peening (MSP) [23,24,25,26,27,28,29], and the combination of LSM + MSP are applied to modify the surface microstructure and residual stress distribution of the NAB alloy. The fatigue performance of the treated NAB was evaluated by rotating bending fatigue tests in laboratory air and compared with the as-received one. The surface metrology of the treated NAB was detected with a 3D contour profiler. The fracture feature of the fatigue-tested samples was examined with a scanning electron microscope (SEM). The re-melted microstructure after LSM and refined microstructure after MSP were identified by electron backscatter diffraction (EBSD).

2. Materials and Experimental Procedures

This work employed a UNS C95500 NAB bar with the chemical composition (in wt.%) of 9.56 Al, 4.92 Fe, 4.02 Ni, 0.09 Mn, 0.22 Zn, and balanced Cu. It was melted in the air, then hot-worked and drawn into a 15 mm diameter bar named the base metal (NBM sample). The as-received NBM sample was ground by sandpapers from 320 to 1000. Some of the NBM samples were subjected to MSP with fine amorphous powders [25,26,27,28] under 200% surface coverage and designated as the NSP sample. The MSP intensity measured by the height of the N-type Almen specimen was 0.18 mm. In the case of the NBM sample subjected to laser surface melting (LSM), the as-melted sample was called the LSM sample. The LSM treatment was carried out using a fiber laser with a single pulse energy of 45 joules at 16 Hz and a travel speed of 312 cm/min. A single nugget size was about 650 μm in diameter and maintained a 50% bead overlap during laser melting. MSP was applied to reverse the RTS present in the laser-melted zone of the LSM sample and named the LSP sample. The nomenclature of the samples used in this study is listed in Table 1.
An MVK-G1500 Vickers hardness tester (Mitutoyo, Kawasaki, Japan) was applied to determine the hardness of various samples under the load of 100 gf for 15 s. Moreover, a Hysitron TI 980 TriboIndenter (Bruker, Billerica, MA, USA) loaded at 2000 μN was applied to measure the hardness of the shot-peened and laser-melted zones. The surface metrology of the samples was investigated with a Contour GT-K 3D optical profiler (Bruker, Billerica, MA, USA), which provided non-contact surface investigation. Rotary bending fatigue tests were conducted on the dog-bone samples at room temperature and at a frequency of 33.3 Hz at R = −1 (fully reversed). The tested samples’ fatigue stress (S) vs. number of cycles (N) curves were presented after repeated tests. The tested samples’ microstructure and fatigue-fractured appearance were examined with a S-3400N SEM (Hitachi, Tokyo, Japan). Detailed microstructures of the tested samples were observed by a transmission electron microscope (TEM). Quantitative chemical compositions of different phases in the examined specimens were analyzed with a JXA-8200 electron probe micro-analyzer (EPMA, JEOL, Tokyo, Japan) equipped with a wavelength-dispersive spectroscope (WDS). Moreover, distinct samples were also examined with an SEM equipped with a NordlysMax2 electron backscatter diffraction (EBSD, Oxford Instruments, Abingdon, UK) detector to distinguish the grain orientations and distinct phases in the inspected samples. A µ-X360s residual stress analyzer (Pulstec, Hamamatsu, Japan) was applied to determine the distribution of residual stress in the thickness direction in the NSP, LSM, and LSP samples. The standard settings of the X-ray source used Mn target Kα radiation (wavelength 2.10306 Å) at an X-ray tube voltage of 30 kV with a 1.5 mA current. The device for measuring residual stress is based on the cos α method. The distorted lattice is related to the full width at half maximum (311)α peak. The Poisson’s ratio and modulus of elasticity of Cu used for calculating the residual stress were 0.33 and 110 GPa, respectively. The distribution of residual stress in the thickness direction was obtained by removing the surface layer of the sample using an EP-3 electrochemical polisher (Pulstec, Hamamatsu, Japan).

3. Results

3.1. Microstructural Observations

Figure 1 shows the microstructure of the LSM samples in a cross-sectional direction with indicated sites, of which the chemical compositions were subsequently determined by EPMA. The NAB consisted of granular κII with a size of less than 3 μm, the lamellar κIII, and un-resolved κIV in the α matrix. The results of EPMA analysis on distinct phases in the examined samples are listed in Table 2. Because the diameter of the yielded volume of the electron beam was about 1 μm, the composition of the examined phases with size less than 1 μm would be hard to determine accurately. According to the atomic ratio listed in Table 2, the κII (Site 1 to Site 3) could be the Fe3Al intermetallics. By contrast, the α-Cu (Site 4) was the Cu matrix alloyed with Cu-8Al-1.6Fe-1.7Ni (in approximate wt.%). As pointed out in prior studies [5,6,7,8], the complex or non-homogeneous microstructures present in the NAB alloy are reported to degrade its mechanical and corrosion properties. After LSM, the chemical composition of the laser-melted zone (Site 5) comprised Cu-10Al-5.5Fe-4.4Ni (in approximate wt.%). The dissolution of intermetallics after LSM resulted in a more homogeneous structure in composition and an increase in Fe and Ni contents in the melted zone, as compared with those in the α-Cu.
The top surface appearance and the cross-sectional view of the LSM sample examined by SEM are displayed in Figure 2. The single nugget was about 650 μm in diameter. As shown in Figure 2a, the imposed pulse laser energy caused melting and formed regularly overlapped nuggets after LSM treatments. It was expected that the surface ripples related to the overlapped nuggets would increase the LSM sample’s surface roughness. Figure 2b shows the microstructure of the LSM sample in a cross-sectional view. The results indicated that the melted zone displayed a fine needle-like structure without observable precipitates or second phase. It seemed that LSM could homogenize the NAB into a uniform microstructure, which was expected to improve the cavitation resistance of the alloy [17,18,19].
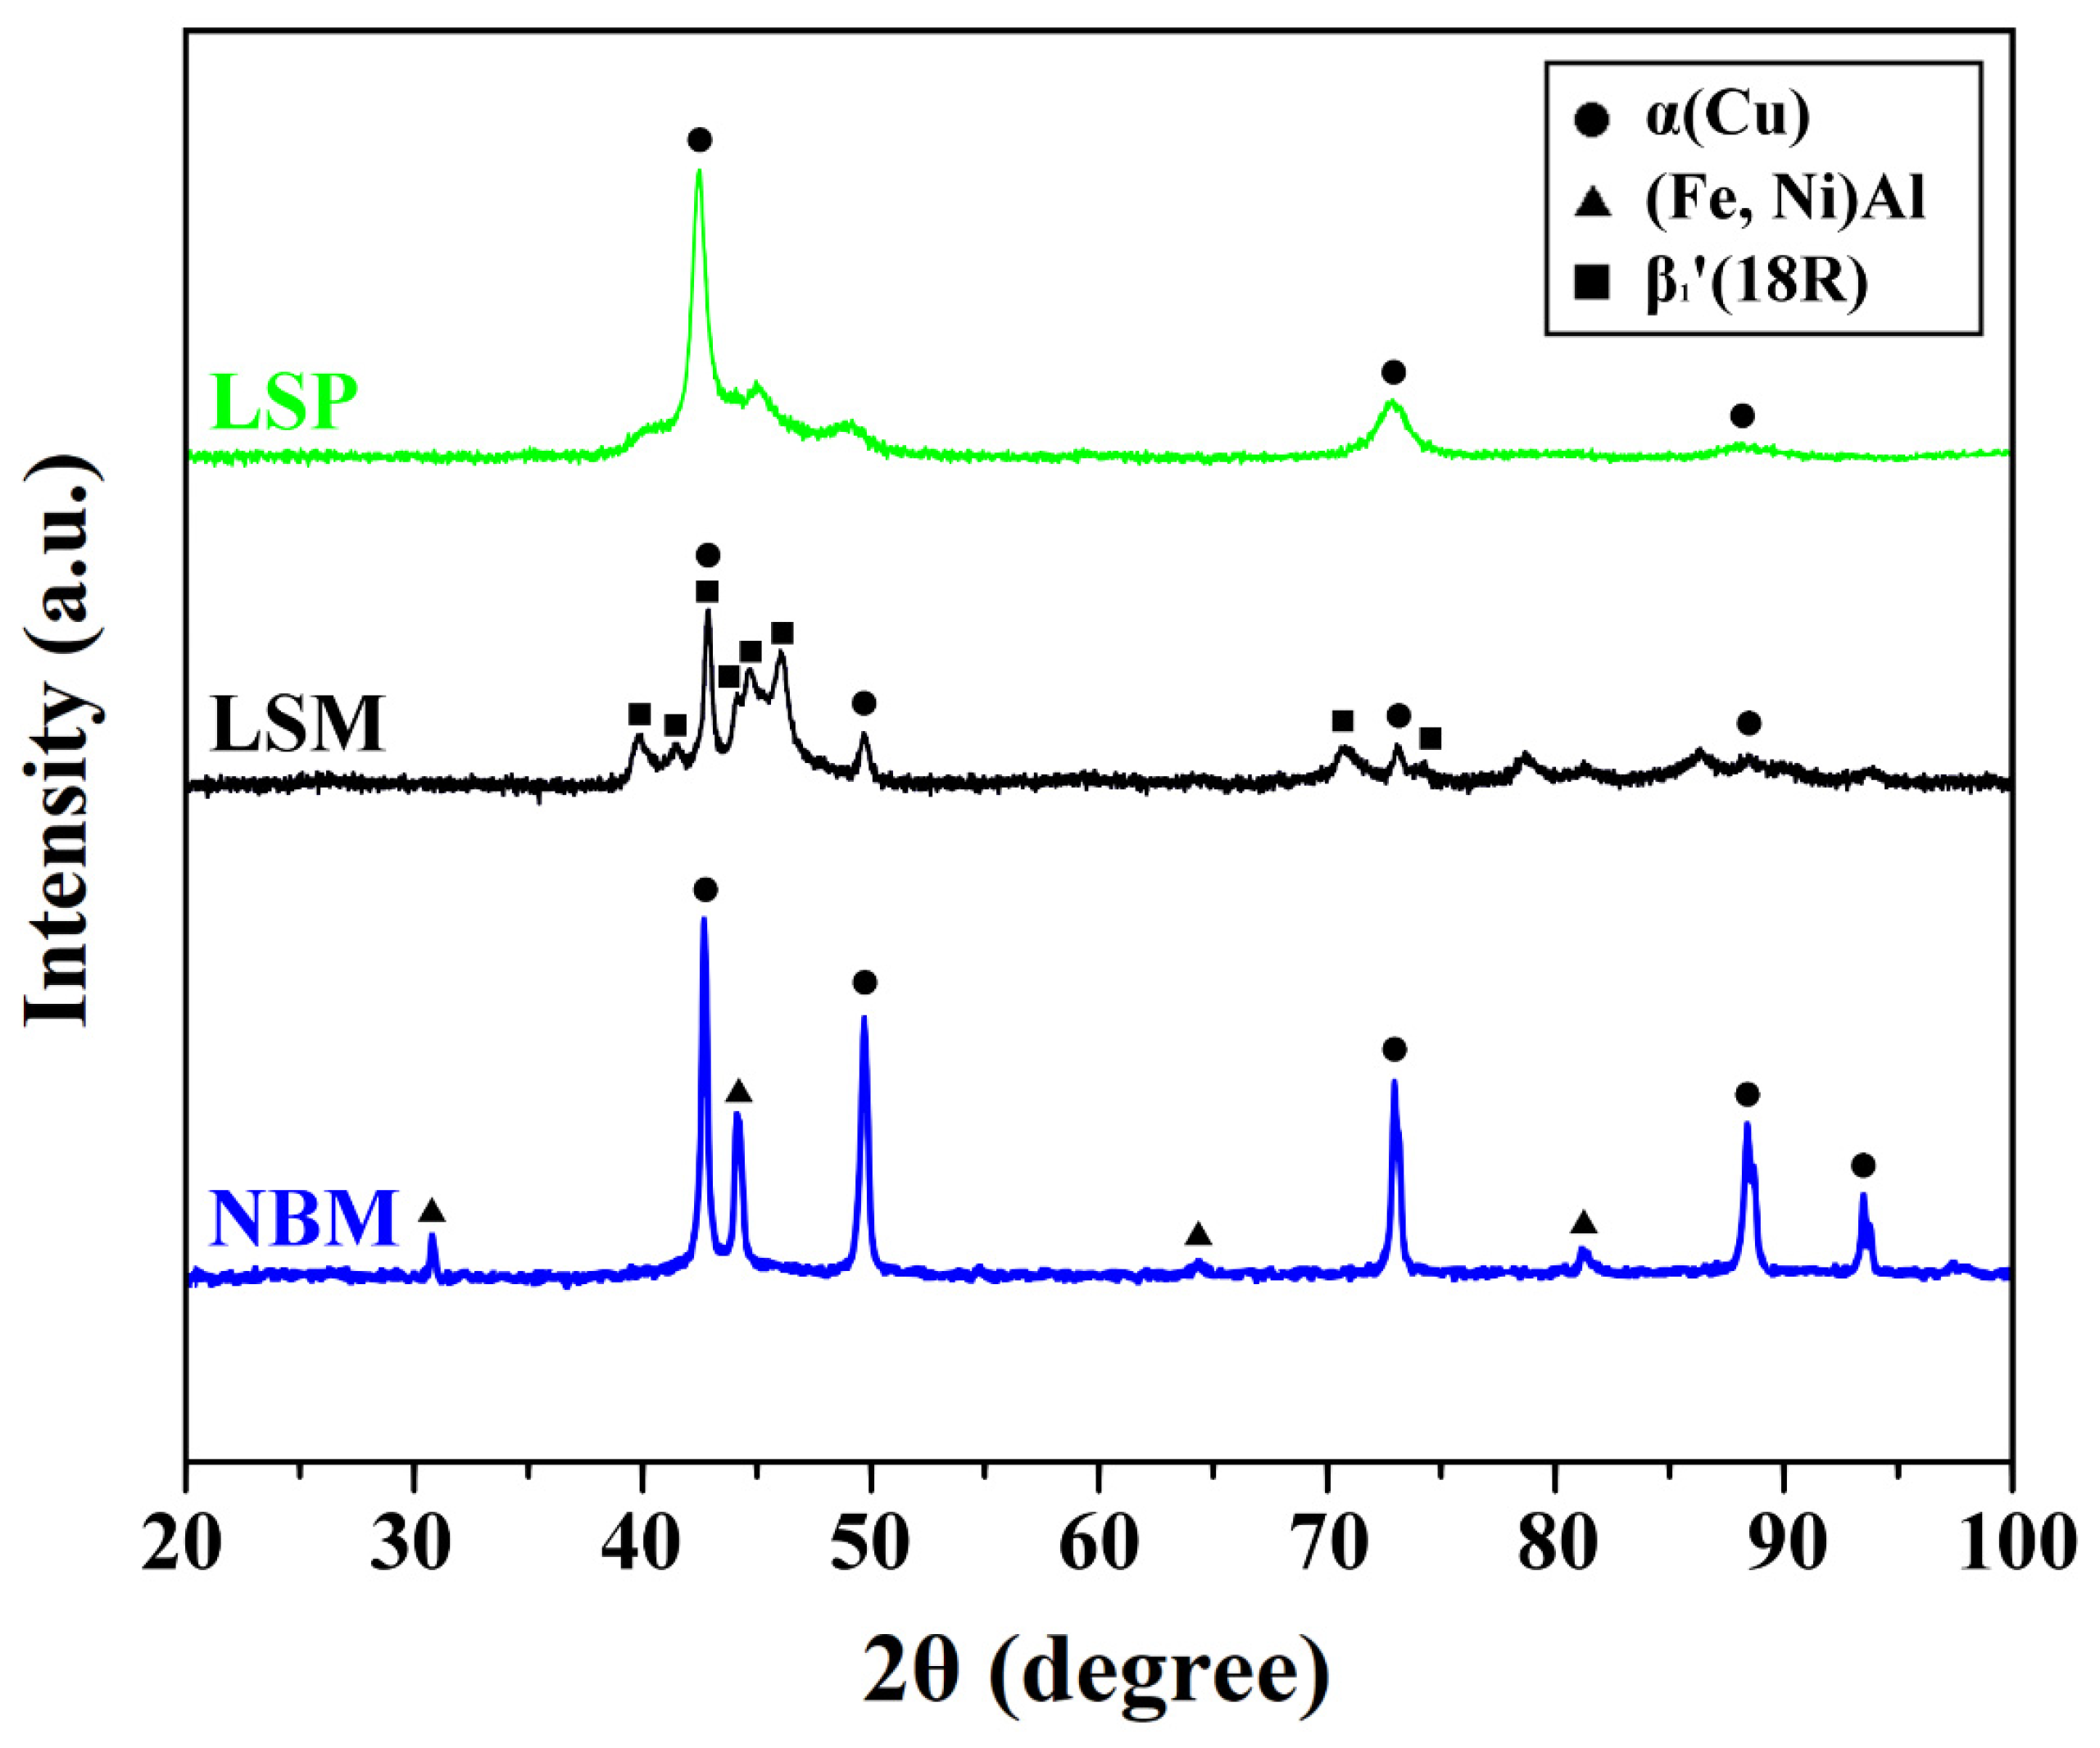
The phase constituents of the NBM, LSM, and LSP samples identified by XRD are shown in Figure 3. It was revealed that the XRD spectrum of the NBM sample comprised mainly α-Cu and (Fe, Ni)Al intermetallics, which were also inspected and shown in Figure 1. In addition, several sharp peaks were present in the XRD spectrum of the LSM sample within 2θ = 40–50°, which were similar to those of the selective-laser-melted NAB alloy in the as-built condition [30]. It is reported that complex phases, including β′, β1′, and γ1′, might present in the laser-melted zone of the LSM sample [30]. By contrast, those fine peaks present in the LSM sample became hard to distinguish in the LSP sample. It seemed that the MSP caused the partial transformation of β1′ to α-Cu.
The detailed mechanism causing such a phase transformation was not known at this moment. The detailed microstructure of the NSP, LSM, and LSP samples examined by a TEM is shown in Figure 4, and the diffraction pattern of the inspected sample is attached below the figure. The result displayed that MSP caused the formation of a nanocrystal structure in the severely shot-peened zone, which was confirmed by the ring pattern of electron diffraction (Figure 4a). The fine-grained structure was expected to enhance the rapid formation of the protective passive film and reduced the occurrence of selective dissolution [31]. In addition, refined needle-like martensite with high dislocation densities and twins was formed in the laser-melted zone (Figure 4b). The exact crystal structure of the laser-melted zone was not able to be identified by diffraction pattern in this work. Moreover, the heavily peened zone of the LSP sample also consisted of a nano-grained structure (Figure 4c). Thus, the needle-like structure in the laser-melted zone transferred to a nanocrystal structure after MSP.

3.2. Surface Feature

The surface morphology of the NSP and LSP samples is displayed in Figure 5. The peened surface of the NSP sample revealed small and shallow dents in different sizes (Figure 5a). It was noticed that micro-cracks were not formed on the surface of the peened sample. However, the remnant of the lamellar structure could still be seen under the applied peening intensity (Figure 5b). It was deduced that the intensity of MSP applied in this work was not high enough to completely remove or disperse the coarse lamellar structure. Moreover, the surface appearance of the LSP sample still exhibited the regular traces of solidified ripples (Figure 5c). At a higher magnification, the bombarded dents covered all the impacted surfaces of the LSP sample (Figure 5d).
The surface texture of various samples determined by a 3D contour profiler is shown in Figure 6. In addition, the surface roughness (Sa, Sp, and Sv) of the examined samples is listed in Table 3. The Sa values of the NSP, LSM, and LSP samples were about 0.90, 1.80, and 1.66 μm, respectively. This meant that the surface roughness of the LSM sample was higher than that of the others. With the MSP, the surface roughness (Sa) of the LSM sample could be slightly mitigated (LSP sample). The surface feature of the NSP sample showed high red spots (high peak) more or less evenly distributed in the matrix (Figure 6a). It was noticed that the uneven distribution of high peaks could be related to the original ripples in the nuggets of the LSM sample (Figure 6b). It seemed that the bombardment introduced by MSP could slightly lower the peak of the nugget ripples of the LSM sample but could not completely eliminate the ripple profiles (Figure 6c). As listed in Table 3, the LSM sample had the highest Sp and Sv among the three samples, whereas the NSP sample had the lowest ones. The high surface roughness of the LSM sample was expected to deteriorate its fatigue performance.

3.3. Hardness Measurements

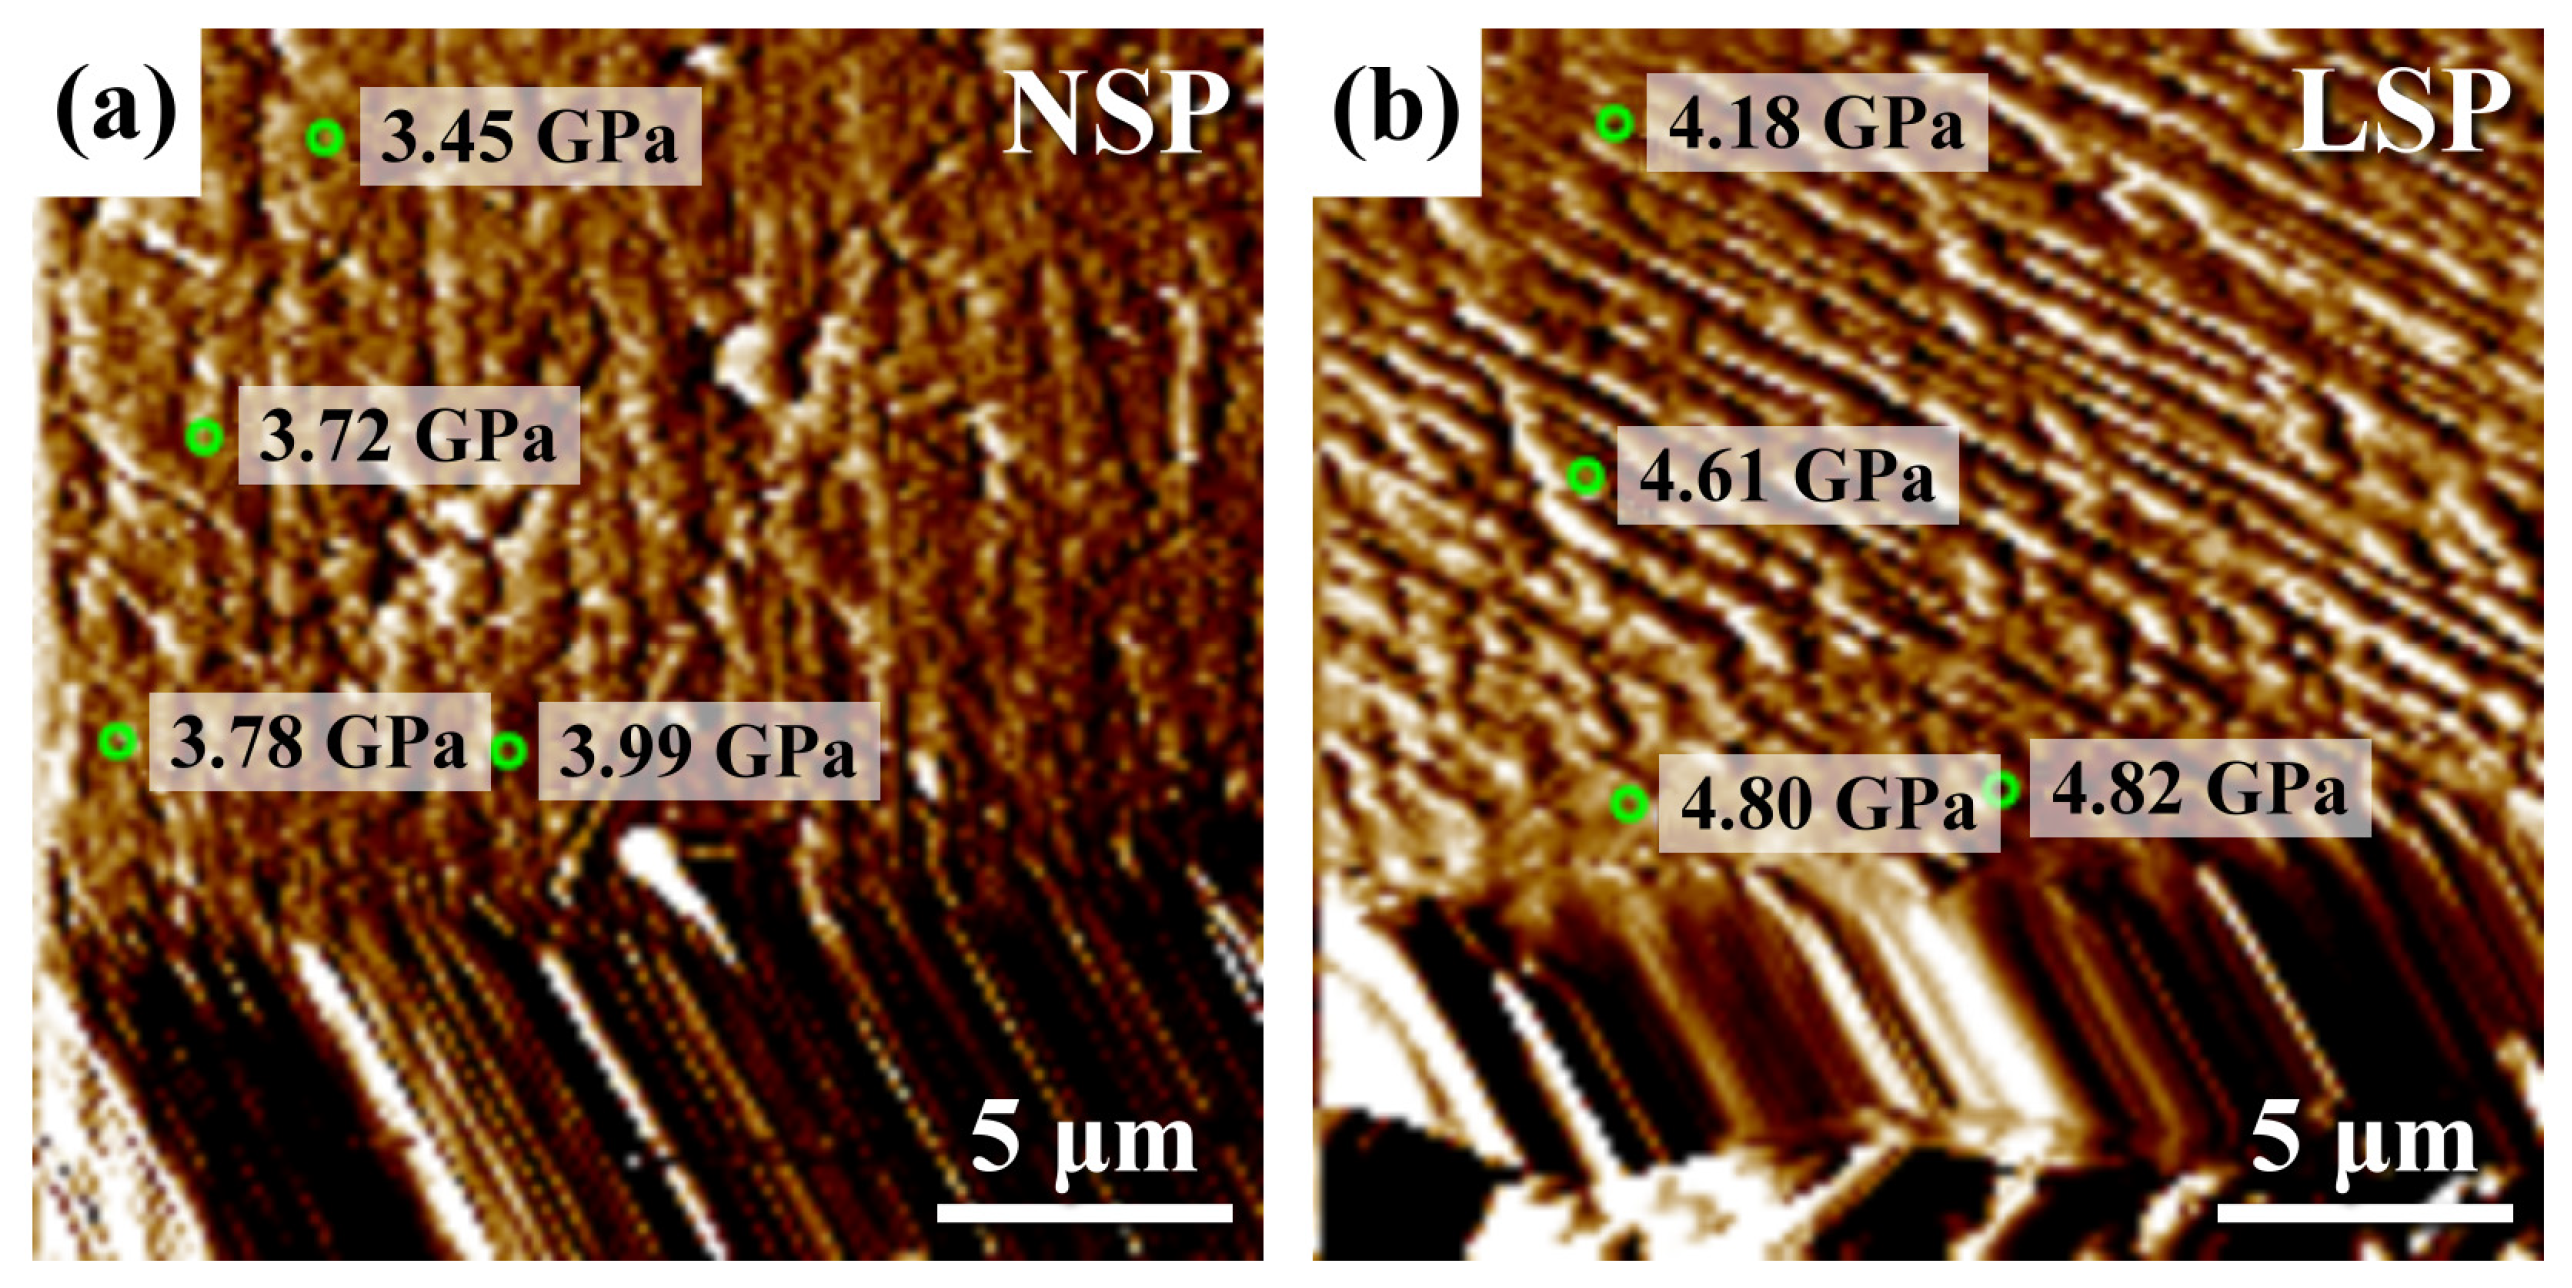
The Vickers hardness tester and triboindenter were applied to measure the hardness of the laser-melted zone of the LSM sample and the shot-peened zone of the NSP one. As shown in Figure 2b, the Vickers hardness of the laser-melted zone of the LSM sample was about 320 HV0.1, in contrast to about 185 HV0.1 of the substrate (NBM sample). Figure 7 shows the nano-hardness in the shot-peened zone of the NSP sample (Figure 7a) and in the shot-peened laser-melted zone of the LSP sample (Figure 7b). In the shot-peened zone of the NSP sample (Figure 7a), the nano-hardness fell in the range of 3.45–3.99 GPa, which was about 340–390 HV. The nano-hardness of the shot-peened laser-melted zone could be as high as 4.82 GPa, which was about 470 HV (Figure 7b). After MSP, the hardness of the shot-peened and shot-peened laser-melted zones was much higher than that of the substrate (NBM sample, about 185 HV0.1). Besides, the inherently higher hardness of the laser-melted zone also demonstrated greater hardness than the bombarded substrate after MSP.

3.4. EBSD Analysis

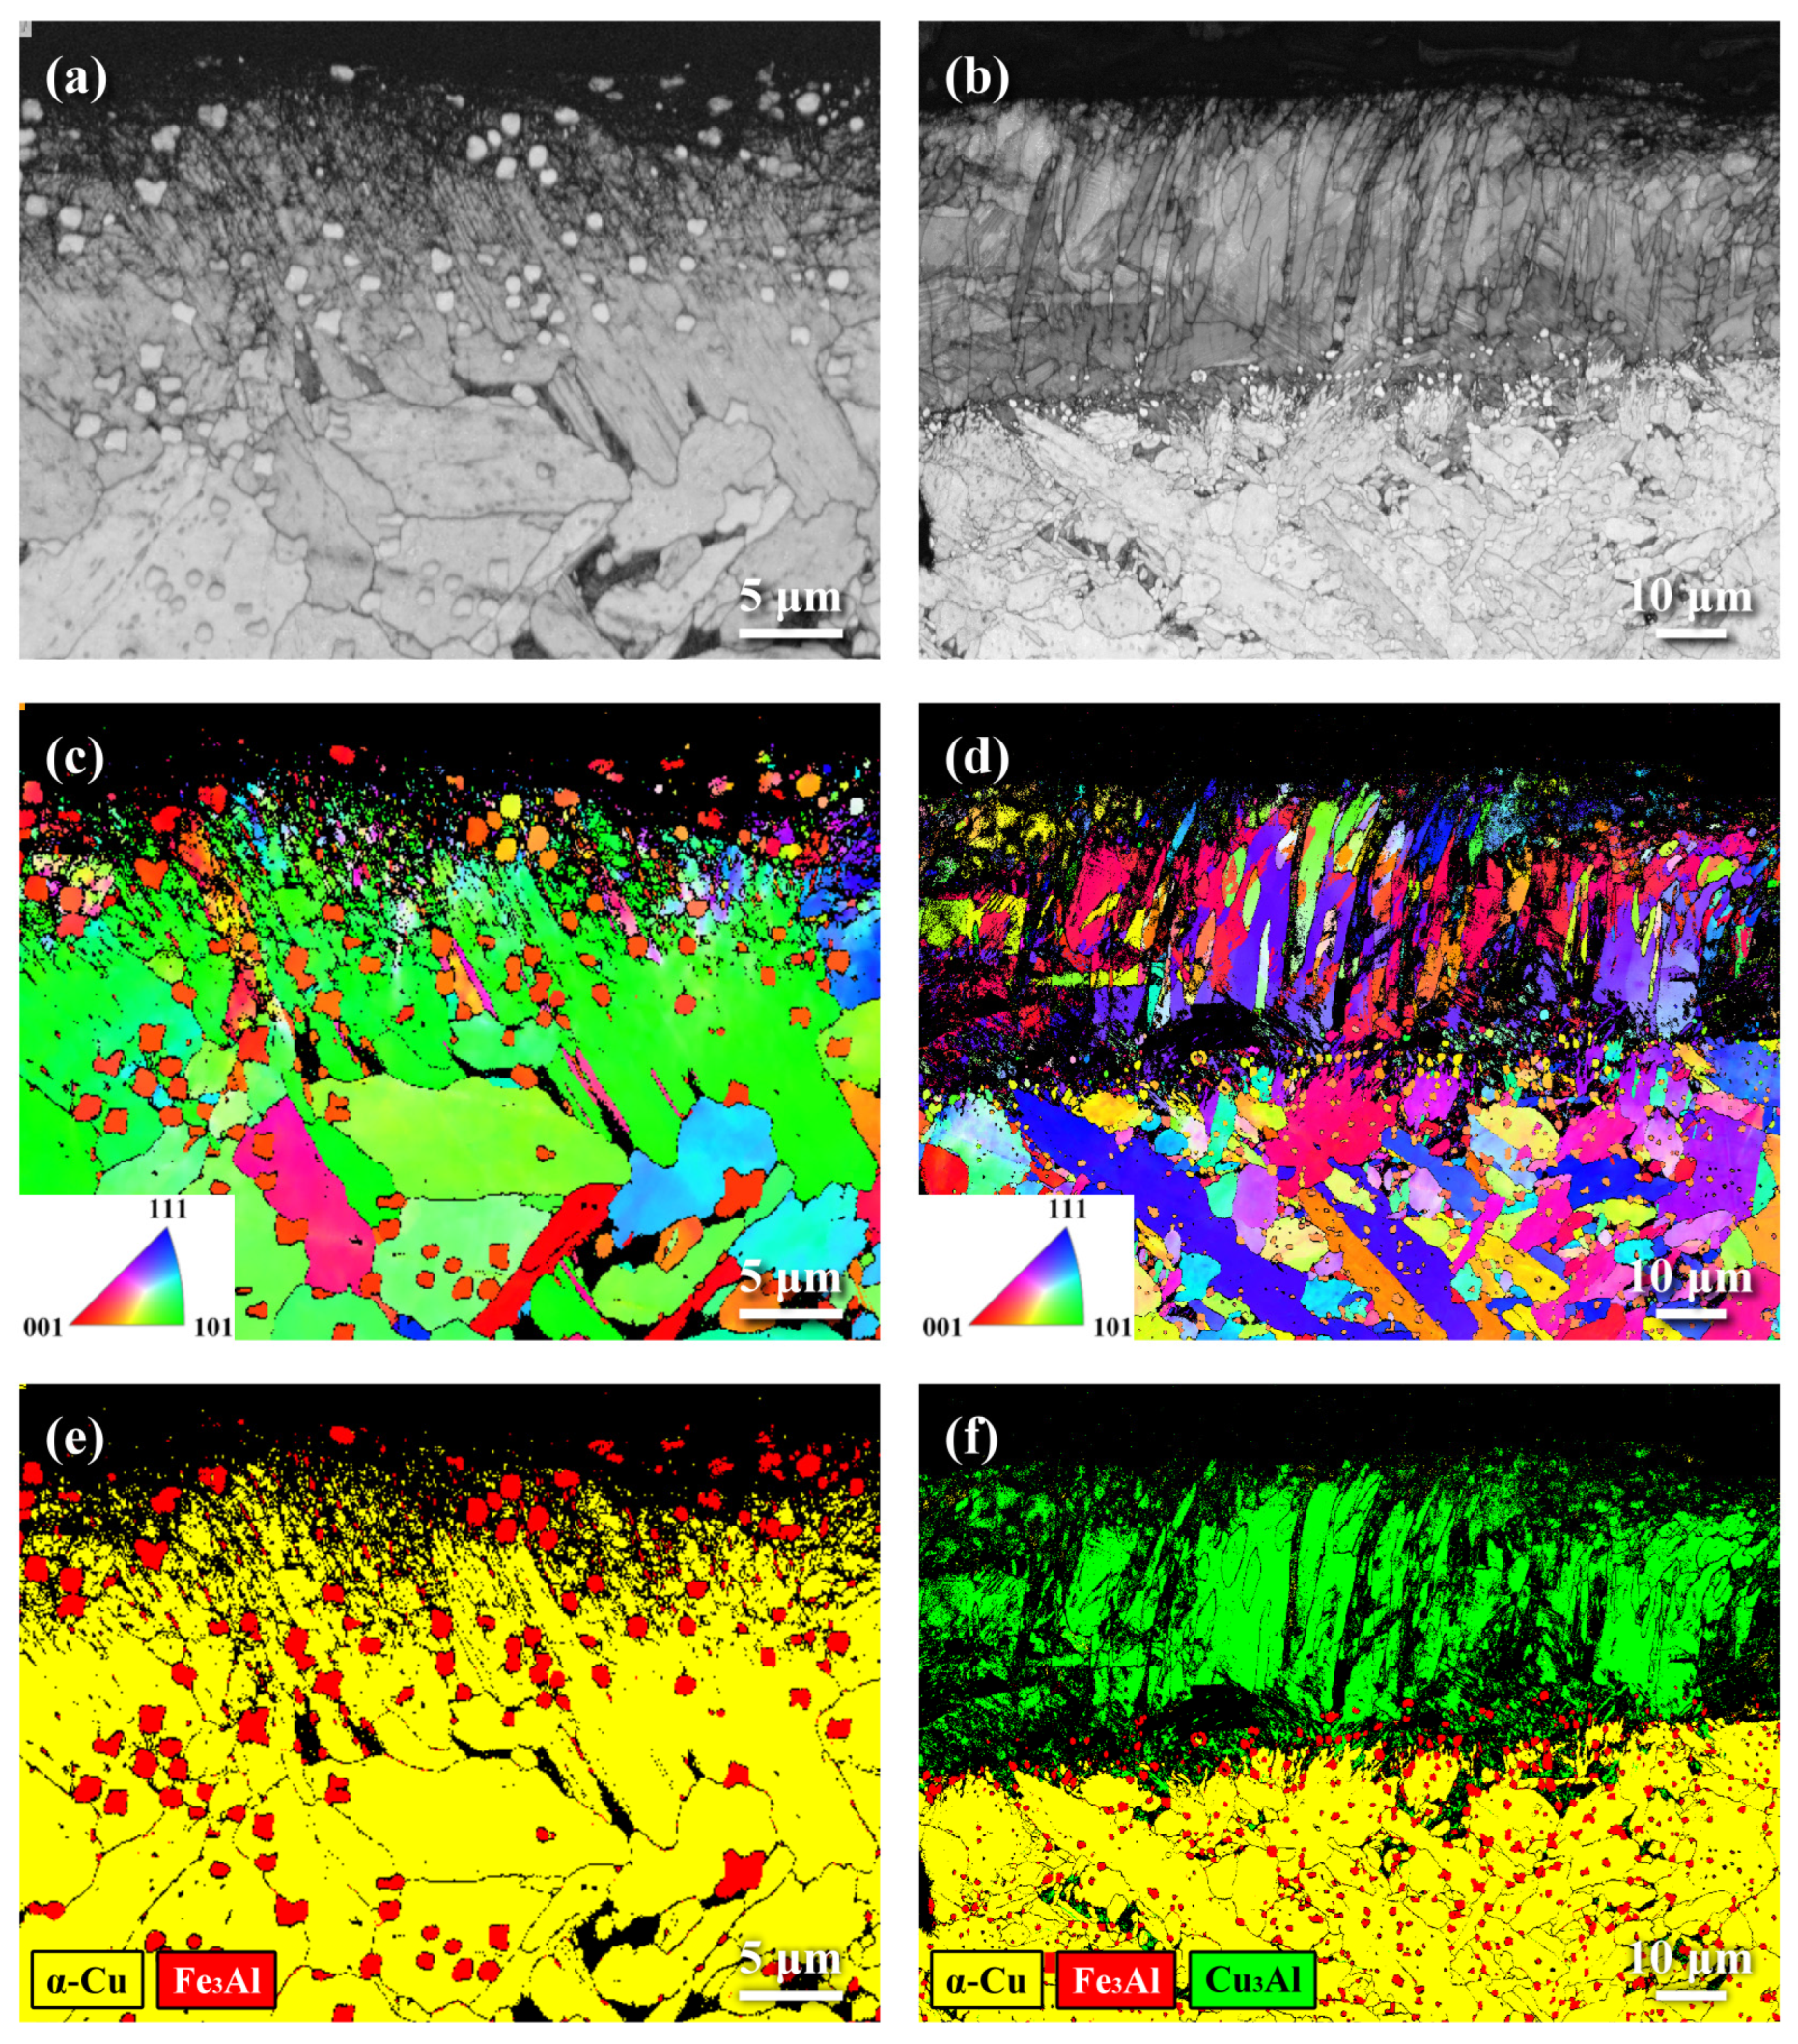
Figure 8 shows the results of the EBSD analysis, displaying the outermost microstructures of the NSP and LSP specimens in a cross-sectional view. The band contrast (BC) map displayed the shot-peened microstructures, which showed granular precipitates dispersed in the substrate with a deformed surface layer (Figure 8a). The inverse pole figure (IPF) showed the refined grains in the severely peened zone near the outmost surface, which were too fine to be revealed clearly by EBSD (Figure 8c). As shown in Figure 8c, the heat introduced by MSP could not dissolve those granular precipitates into the α-Cu matrix to form a homogeneous microstructure, but MSP caused dynamic recrystallization to form refined grains in the severely peened layer. The refined grains and deformed microstructure accounted for the higher hardness of the shot-peened layer (Figure 7) compared to the substrate. The phase map (Figure 8e) confirmed that those granular precipitates were mainly Fe3Al dispersed in the α-Cu matrix.
The LSP microstructure analyzed by EBSD is shown in Figure 8. The BC map revealed that the laser-melted zone of nearly 40 μm in thickness consisted of refined columnar grains. Due to the epitaxial growth from the un-melt substrate, the aligned columnar grains were formed in the laser-melted zone after solidification (Figure 8b). Furthermore, the external surface of the LSP also exhibited a thin layer of fine-grained structure, similar to that of the NSP sample therein (Figure 8a). As shown in Figure 8d, the IPF of the LSP sample revealed finer columnar grains in the laser-melted zone. It was seen that those columnar grains with different orientations predominantly aligned in a normal direction to the external surface (Figure 8d). Similar to the NSP sample, the refined structure in the external surface of the LSP sample was also hard for EBSD to reveal. The phase map (Figure 8f) confirmed that a single phase (Cu3Al) was formed in the laser-melted zone, whereas observable Fe3Al precipitates were distributed in the α-Cu matrix.

3.5. Residual Stress Measurements

Figure 9 shows the variation in residual stress with the depth from the top surface to the interior of the NSP, LSM, and LSP samples. For the NSP sample, the RCS field was present on the outmost surface, and the peak value could reach −640 MPa, followed by a gradual change to a low stress state. A marked RCS field appeared in the NSP sample around the peened surface. Thus, intense surface plastic deformation introduced by MSP caused a marked strain-hardening of the peened zone, resulting in showing high RCS but a narrow affected depth. With the LSM treatment, the solidification of the laser-melted zone was expected to induce high RTS in the laser-melted zone. However, no reliable stress state could be obtained around the surface of the laser-melted zone, owing to the characteristics of X-ray spectrums. The reasons for the unsolved stress state in the laser-melted zone of the LSM sample will be given in the discussion section. At a depth above 30 μm from the surface, the RTS was obtained in the LSM sample (+318 MPa). It was deduced that the RTS field would enhance the fatigue-crack initiation and growth of the LSM sample. With the application of MSP on the LSM sample (LSP sample), the RCS field was introduced around its outmost surface. The peak RCS near −800 MPa appeared in the subsurface zone of the LSP sample. It was noticed that the laser-melted zone of the LSM sample was much harder than the substrate in the as-treated condition, as shown in Figure 2. Therefore, it was expected that the strength of the laser-melted zone would be much greater than that of the substrate. Such a high RCS of the LSP sample could be attributed to the high hardness/strength of the laser-melted zone relative to the soft substrate after MSP. Thus, the presence of the RCS field on the external surface of the LSP sample was helpful to retard the fatigue crack initiation, as compared with the LSM sample.

3.6. Fatigue Tests

Figure 10 displays the stress (S) vs. cycle life (N) curves of various samples. The test would be terminated at the cycle number above 2 × 10⁶, and an arrow was attached to indicate the non-failure of the test sample. In the as-received condition, the tensile properties of the NAB bar were as follows: yield strength of 392 MPa, tensile strength of 763 MPa, and elongation of 19%. As shown in Figure 10, the LSM sample had the poorest fatigue property, but the NSP sample showed the best fatigue property among the tested samples. The NBM sample showed a gradual decrease in fatigue life with increasing fatigue stress. The results revealed that the fatigue limit of the NBM was about 300 MPa after duplicate tests. It was noticed that the fatigue performance of the LSM samples was heavily degraded compared to that of the NBM sample. Interestingly, the increase in surface hardness and homogenized surface microstructure of the LSM sample did not increase its fatigue resistance. The results indicated that the NSP sample exhibited a higher fatigue strength/life than the NBM, particularly under loading at low stress. As compared with the NBM sample, the increase in fatigue strength of the NSP sample was only demonstrated in service life regions above 3 × 10⁵ cycles. The fatigue limit of the NSP sample could be 50% greater than that of the NBM. Moreover, the fatigue performance of the LSP sample was equivalent to or a little better than that of the NBM. Undoubtedly, the application of MSP could increase the fatigue resistance of the NAB alloy, regardless of its original state.

3.7. Fractured Surface Examinations

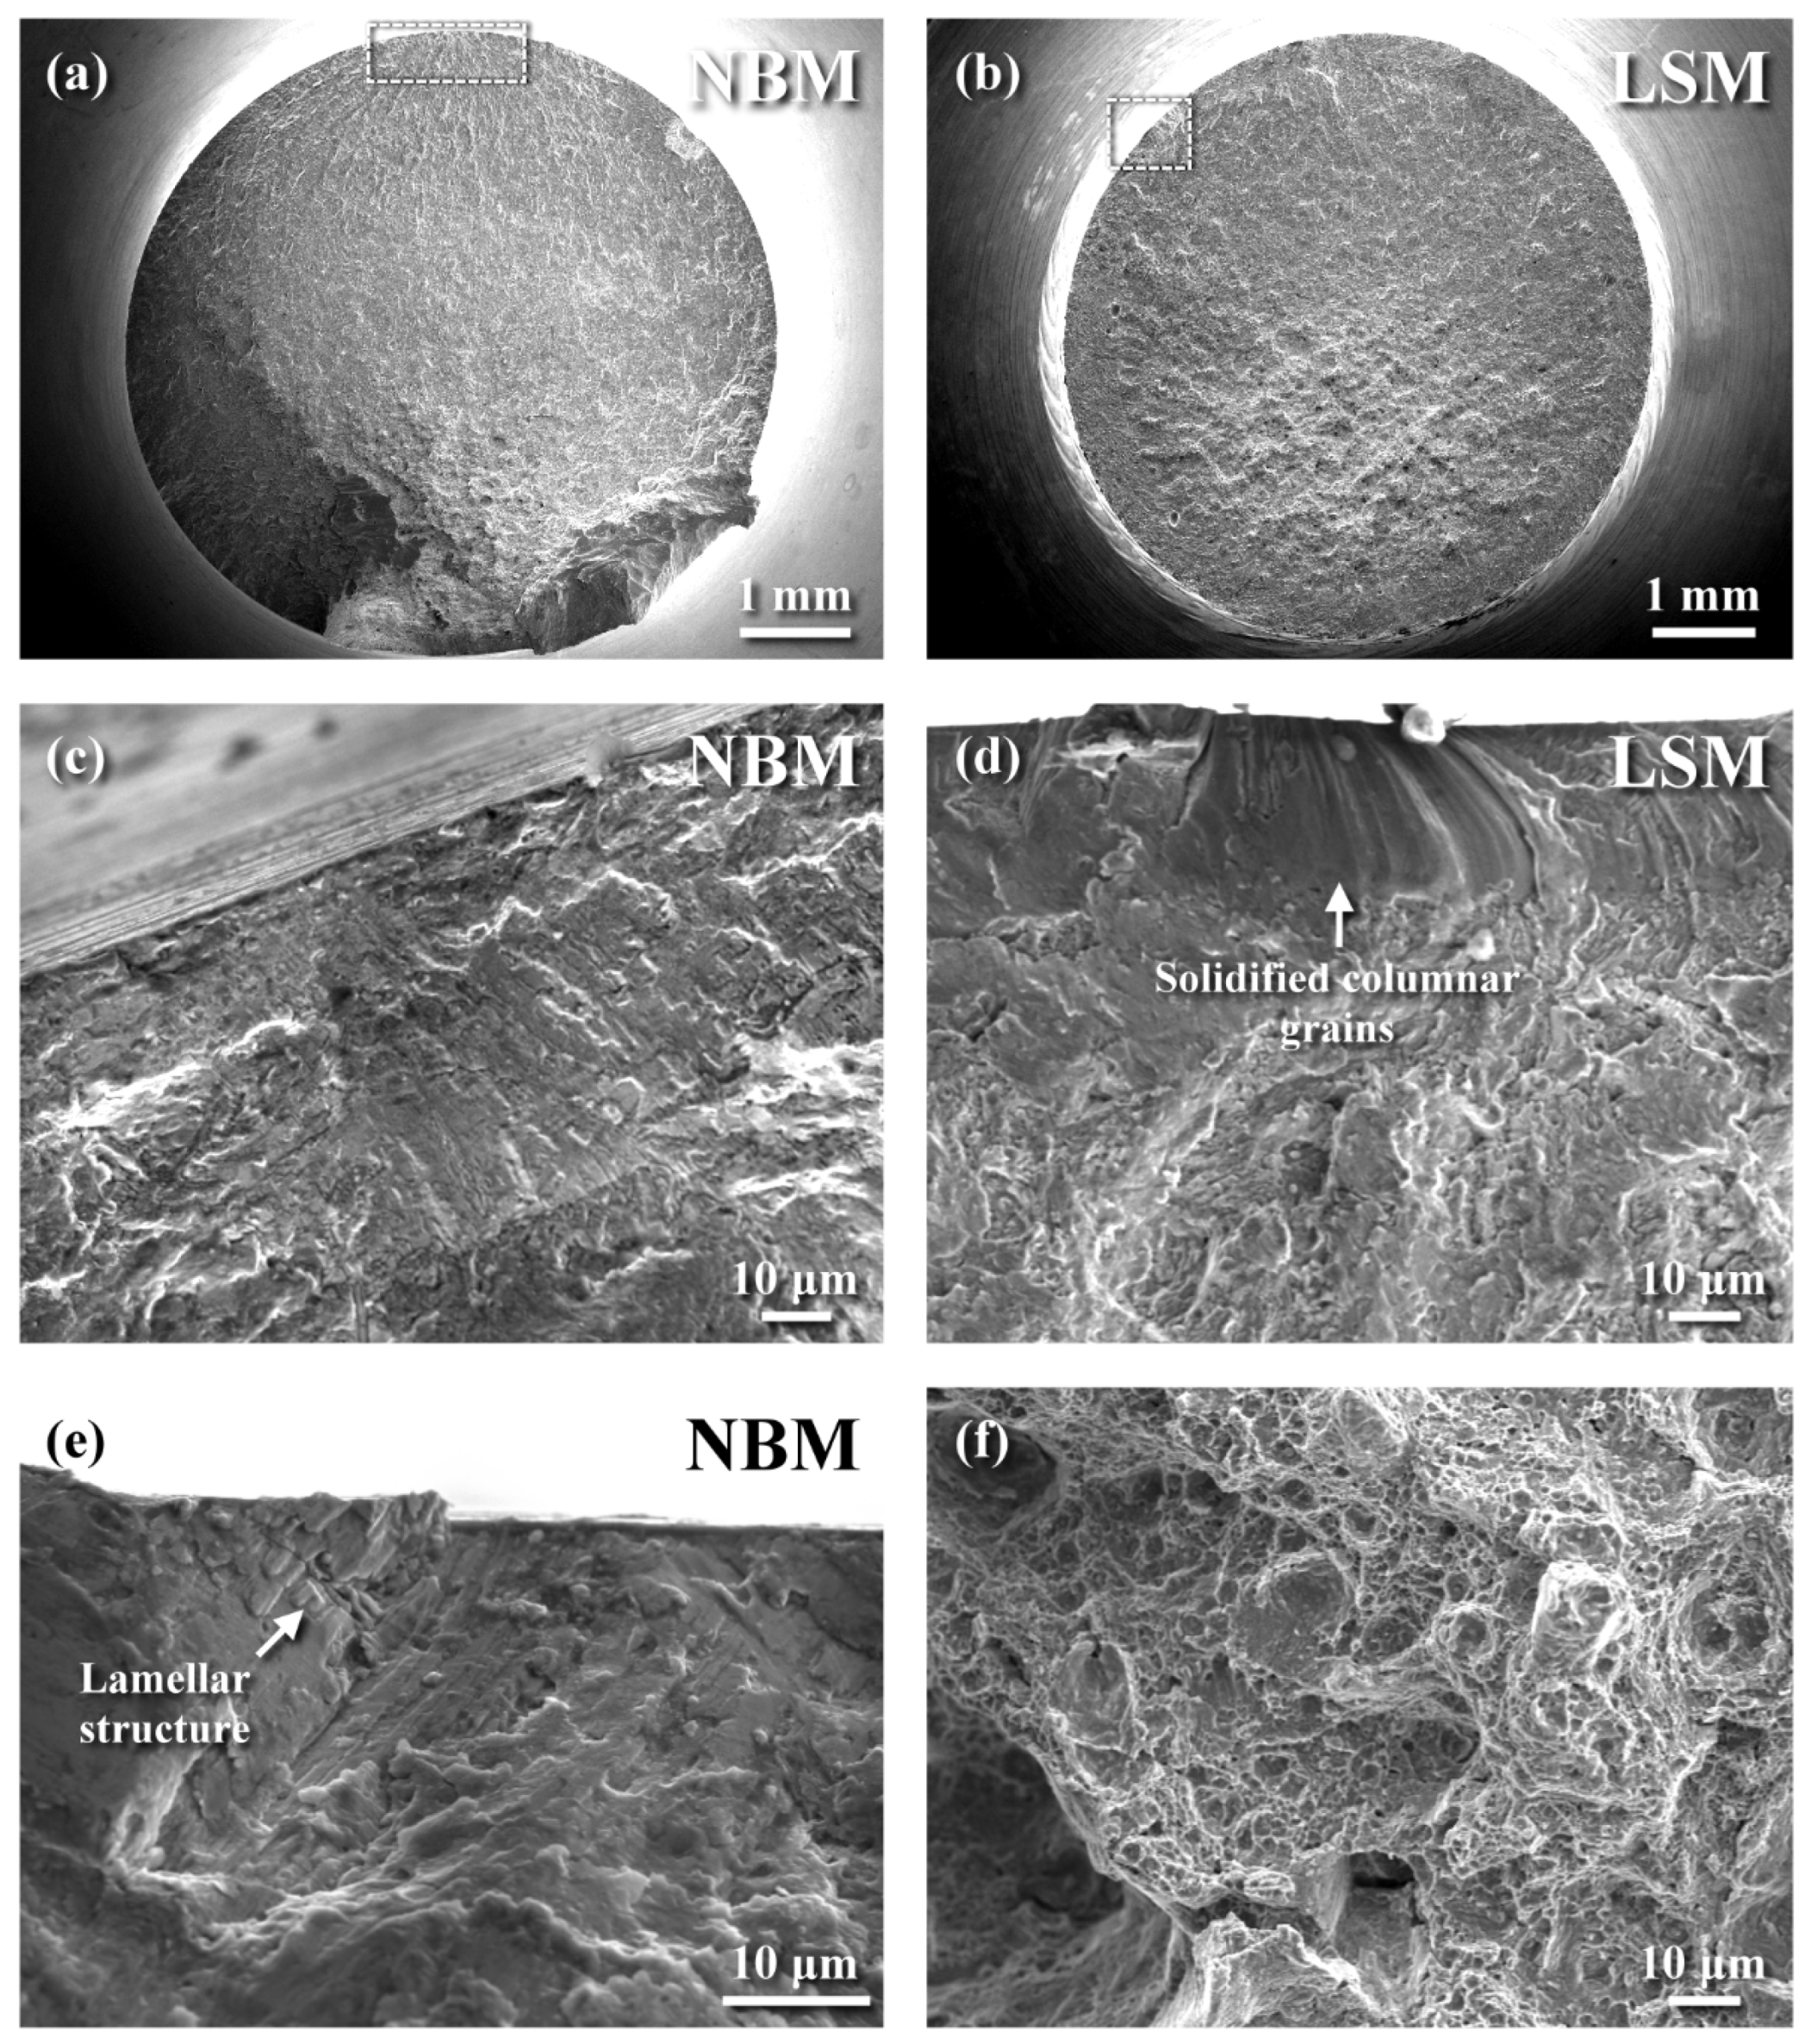
The fatigue-fractured morphologies of the NBM and LSM samples are shown in Figure 11. Because the high peak stress resulted on the external surface of the fatigued samples, the fatigue crack always initiated on the external surface. Macroscopically, the fracture appearance of the NBM and LSM samples was similar. The fatigue crack initiated at the external surface and propagated into the interior, as shown in Figure 11a,b. The periphery of the fatigue-fractured NBM and LSM samples was decorated with a thin flat layer, which indicated the multiple fatigue crack initiation around the external surface of the tested samples (Figure 11a,b). The area profiled by a dashed line (Figure 11a,b) was examined at higher magnification. Mainly, quasi-cleavage fracture was seen at the crack initiation site of the fatigue-fractured NBM (Figure 11c) and LSM (Figure 11d) samples. Around the outmost region, the fatigue-fractured laser-melted zone of the LSM sample was more likely to display the traces of solidified columnar grains (Figure 11d). In addition, a lamellar feature, which was associated with the α + κIII microstructure, was found at the crack initiation site of the NBM sample (Figure 11e). It was deduced that the α + κIII lamellar structure was the weak point that initiated fatigue cracks in the NAB alloy. In the fast fracture zone, a predominant dimple fracture was observed (Figure 11f), revealing the NAB alloy’s ductile nature. The fatigue-fractured morphologies of the NSP and LSP samples are shown in Figure 12. With the MSP, the occurrence of subsurface crack initiation of the NSP sample was more often seen (Figure 12a,b). In addition, the external profile was decorated with a thin layer of the rubbed zone (Figure 12c). Fatigue cracks tended to initiate on the outermost surface of the LSP sample (Figure 12d). A thin, flat fractured layer was found on the outer profile of the LSP sample (Figure 12d-left). Under examination at higher magnification, MSP did impose a fine-grained layer on the external surface of the fatigue-fractured LSP sample (Figure 12d-right). Overall, MSP introduced refined structure and high RCS in the shot-peened zone, thus improving the fatigue strength/life of the NAB alloy, regardless of the original state.

4. Discussion

As mentioned previously, the microstructure played an essential role in the NAB alloy’s mechanical and corrosion properties. Thus, refining and homogenizing the NAB alloy’s microstructure via various processes have attracted much attention. With the application of LSM on the NBM sample, the homogenized microstructure caused an increase in its surface hardness, as shown in Figure 2. The XRD spectrum (Figure 3) and microstructural observation (Figure 4) showed that the formation of complex phases in the refined columnar grains of the LSM sample was responsible for the increased hardness of the laser-melted zone relative to the substrate. A 3D contour profile showed that MSP could create marked deformation on the impacted zone but only caused a minor increase in surface roughness (Figure 6). By contrast, the LSM sample showed a coarse surface roughness relative to the other samples, which was expected to degrade its fatigue performance. Moreover, the EBSD analysis revealed that the bombarded surface comprised a deformed structure with about 10 μm in thickness after MSP (Figure 8). Unlike the substrate’s microstructure, the peened layer showed refined grains and was confirmed by TEM observation (Figure 4). Therefore, MSP effectively refined the surface microstructure of the NAB alloy.
Shot-peening is reported to refine the α-Cu grain through the dislocation activities in precipitate-free α-Cu and mechanical twins in high-stress concentration areas around κ phases [32]. In addition, different κ phases are also deformed during shot-peening [32]. The lamellar κIII is fragmented and may dissolve into the matrix under high peening intensity at 0.25 mmA [32]. Moreover, plastic deformation also introduces high dislocation densities into the κII phase [32]. In this work, residual lamellar κIII was fragmented but still could be found on the peened surface after MSP, which meant that the applied peening intensity of this work was not high enough to remove all the κIII phases. The existence of fragmented κIII was expected to play a reverse effect on the fatigue resistance of the peened NAB alloy.
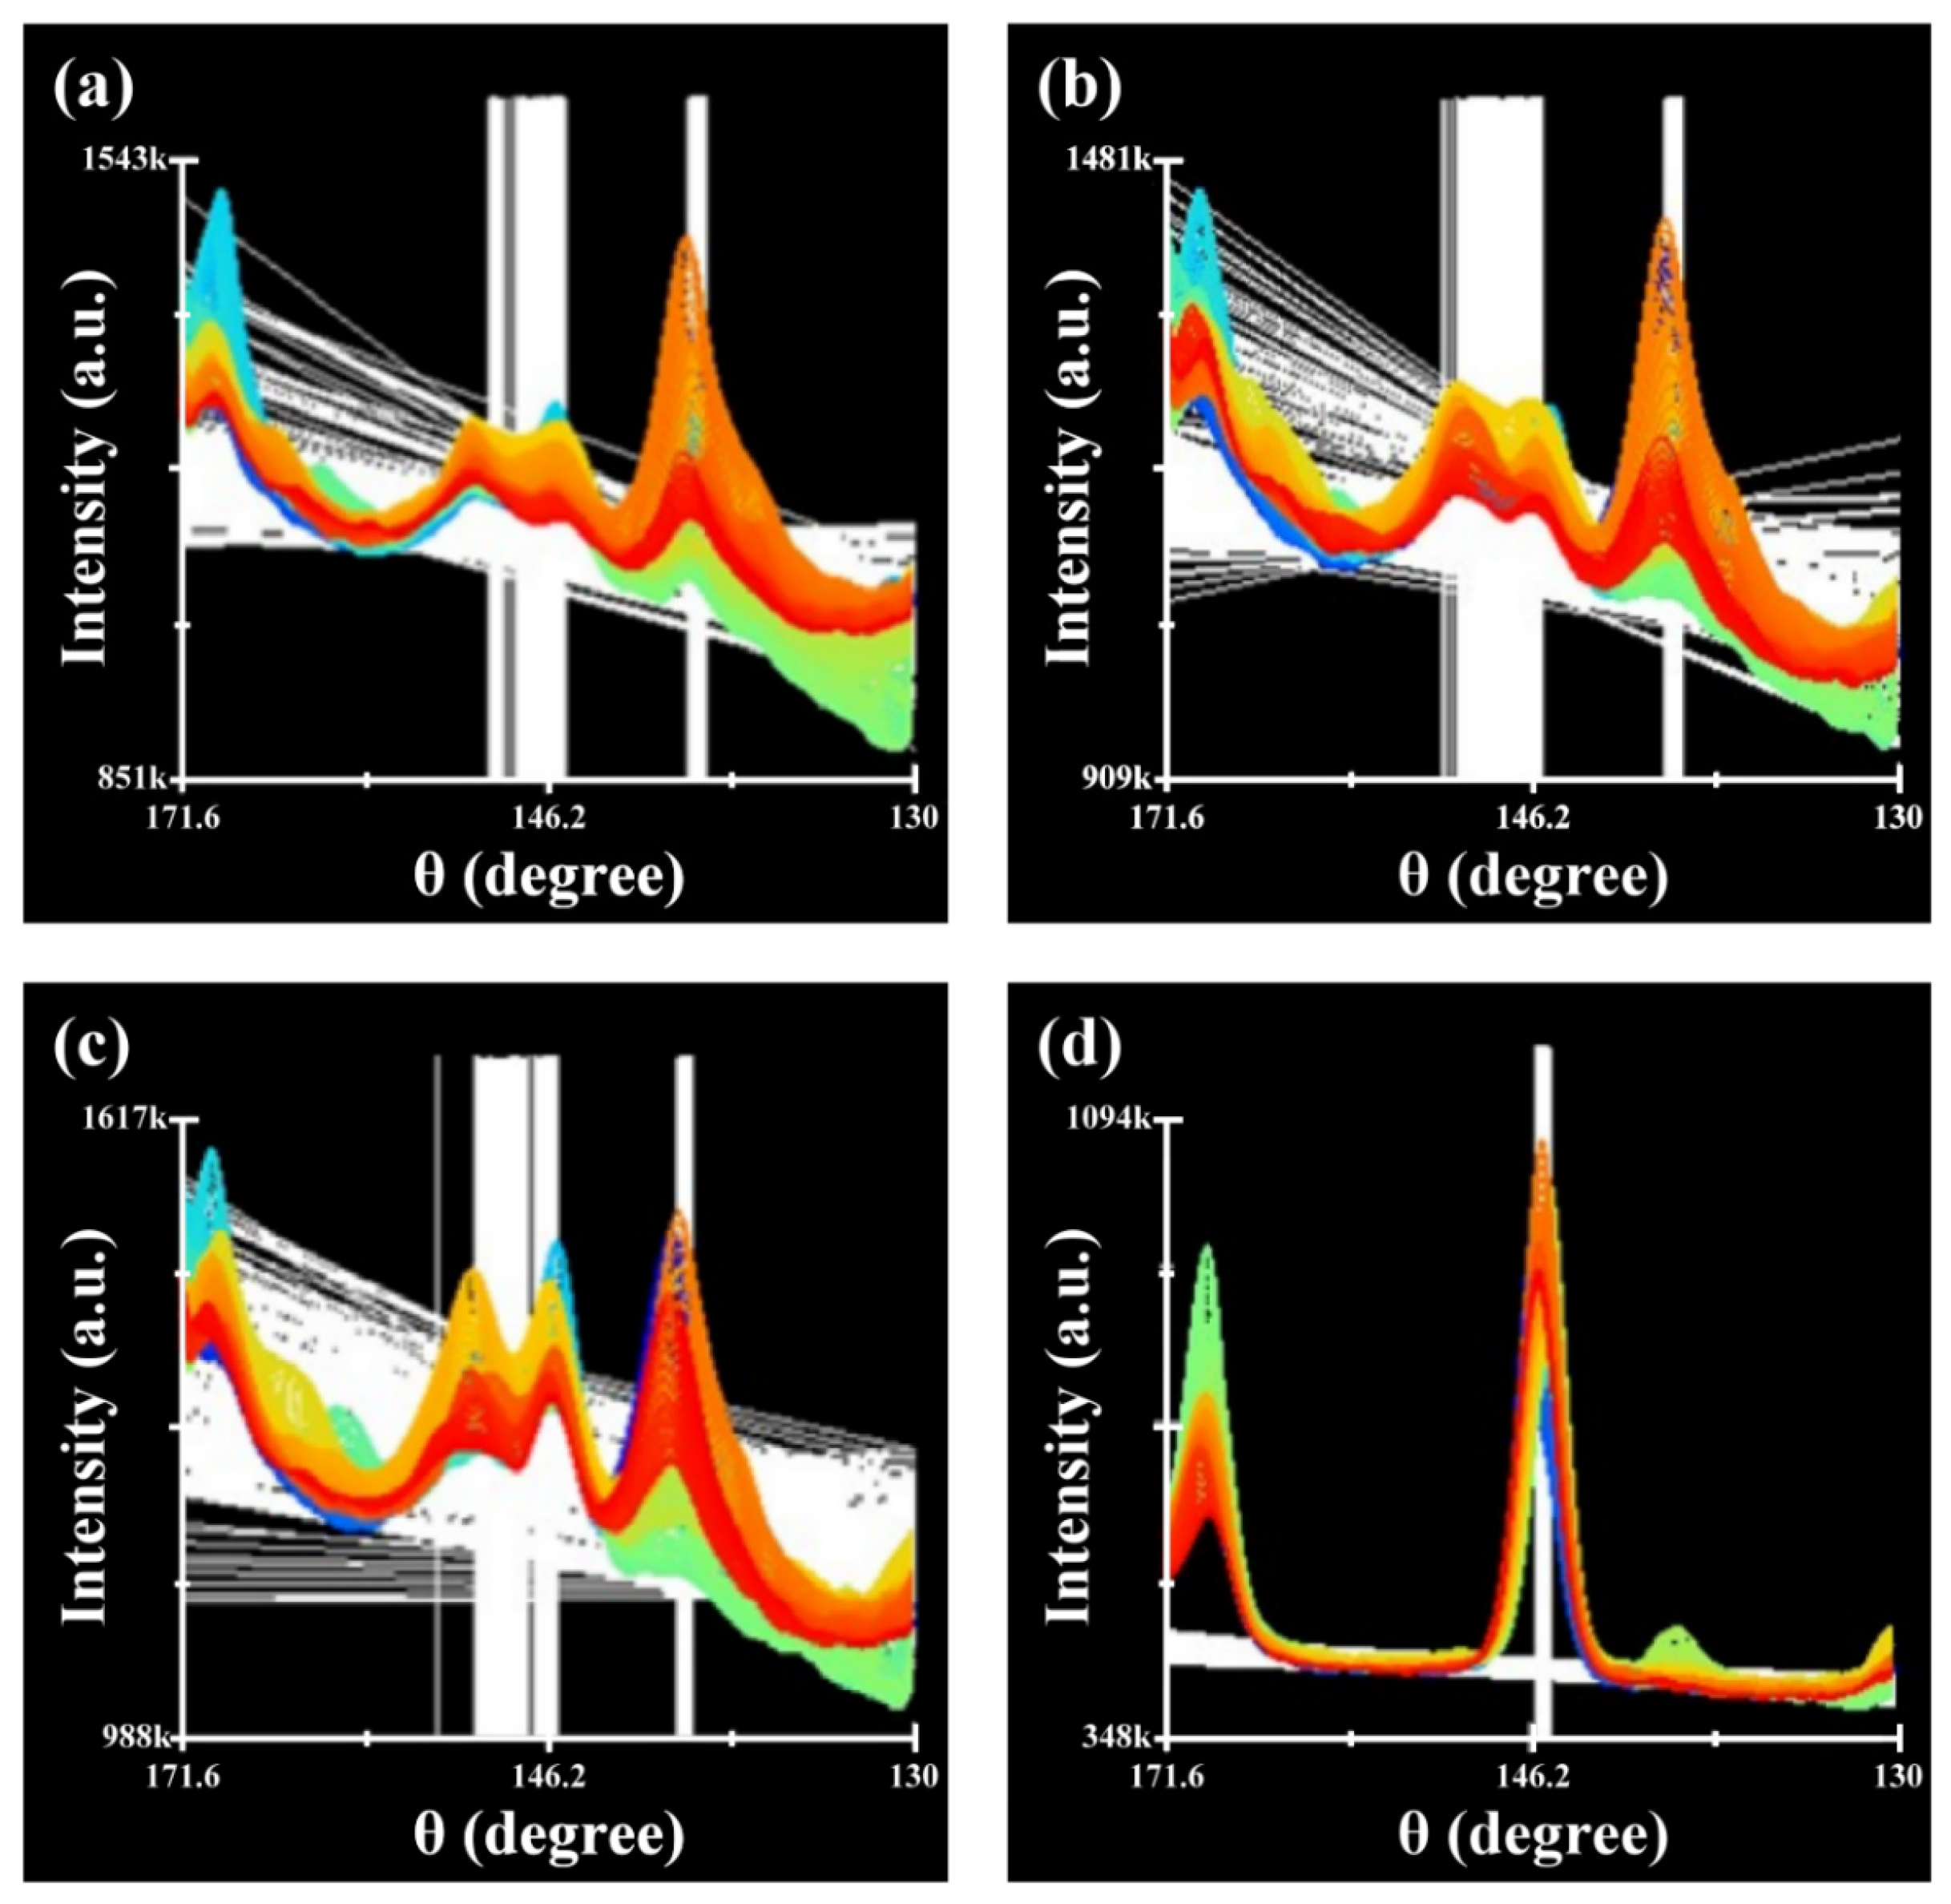
As mentioned previously, the full width at a half maximum (311)α peak of the XRD spectrum was used to measure the residual stress of the investigated sample. A plane detector installed in µ-X360s stress analyzer (Pulstec USA, Inc., Torrance, CA, USA) was applied to collect all the diffracted beams from the irradiated surface of the inspected sample with numerous grains in distinct orientations. With the internal stress, Debye ring related with the specific lattice plane of the examined sample can be distorted. With the aid of the developed software, the Debye ring was cut into 500 segments. The diffraction curves associated with distinct segments were superimposed after the diffraction test. The cumulative results would display the intensity distribution of the Debye ring. The strength of the intensity was shown in color, i.e., the highest in red and the lowest in blue. Figure 13 shows the XRD spectrum around a 2θ angle of 146.2° at different depths from the outmost surface to the interior of the LSM sample. It was seen that continuous peaks, which were hard to separate into individual peaks, appeared in the XRD spectrum of the LSM sample within the laser-melted zone (Figure 13a–c). By contrast, a single and distinguishable peak was obtained at a 2θ angle of 146.2° at a depth of about 40 μm from the surface, which could be used to calculate the residual stress value (Figure 13d). The measurement of near-surface residual stress of the LSM sample was not achieved by using the XRD. As shown in Figure 8, aligned columnar grains were present in the laser-melted zone. The continuous peaks present in the XRD pattern of the LSM sample (Figure 13a–c) could be partly attributed to the texture or epitaxial growth of refined columnar grains in distinct orientations in the laser-melted zone.
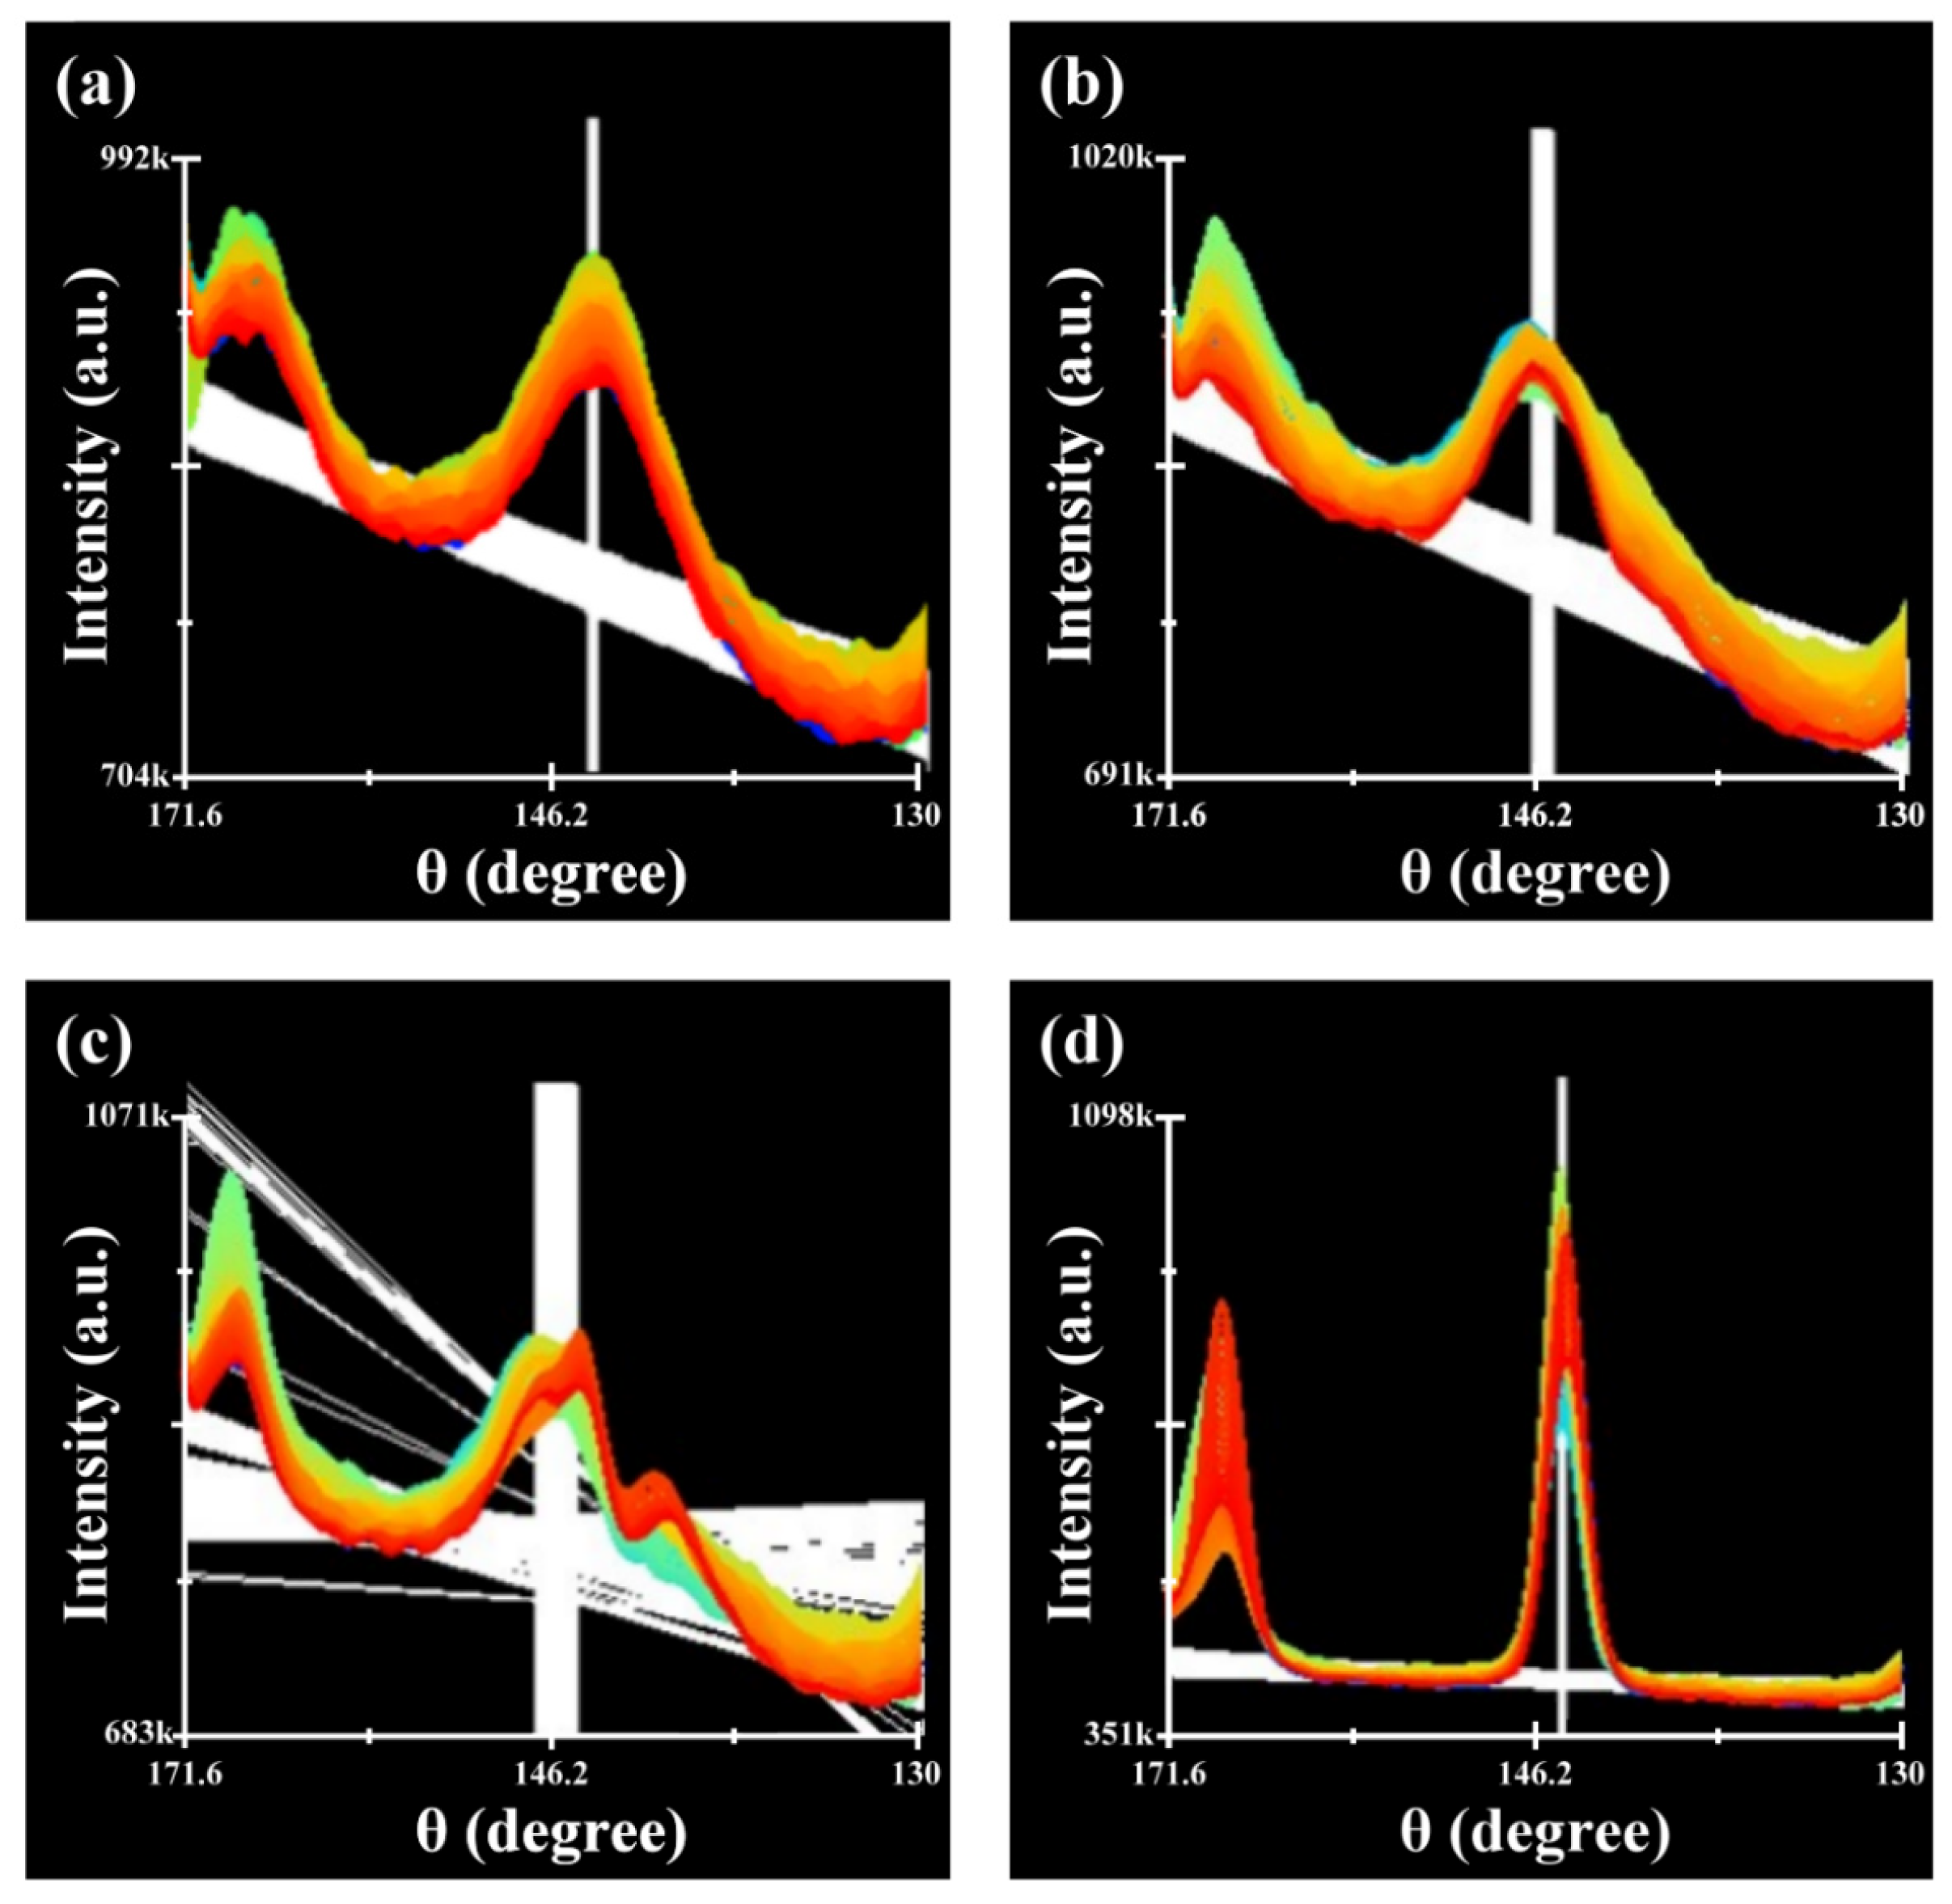
Figure 14 shows the XRD patterns around a 2θ angle of 146.2° at distinct depths from the external surface of the LSP sample. After MSP, a distinguishable single but broad peak was obtained in the XRD pattern of the LSP sample around the surface zone (Figure 14a,b). At a depth of about 20 μm (Figure 14c), another peak attached to the central peak was found. At a depth of about 40 μm, a sharp single (311)α peak related to the α-Cu was present in the XRD spectrum of the LSP sample (Figure 14d), which was associated with the NAB substrate. As mentioned previously, β′ martensite was formed in the laser-melted zone of the LSM sample. It seemed that MSP caused the phase transformation of β′ martensite to α-Cu. The exact reasons for this peening-induced phase transformation were not known. However, using the (311)α peak, the residual stress field of the LSP sample was determined and confirmed the introduction of the RCS field around the surface of the LSP sample.
The results of the fatigue tests (Figure 10) showed that the LSM treatment would degrade its fatigue performance compared to that of the NBM sample. As shown in Figure 10, the LSM sample had the worst fatigue performance among the tested samples. Thus, the homogeneous microstructure in the laser-melted zone did not improve its fatigue resistance. It was deduced that the RTS, oriented columnar grains, and high surface roughness were responsible for the degraded fatigue characteristics of the LSM sample. Such a deteriorated effect of LSM on the fatigue performance of the NAB alloy was not mentioned in open literature. Moreover, the NSP sample showed a much higher fatigue strength/life than the NBM sample. The surface-hardening, refined surface microstructure and the induced RCS in the severely peened zone after MSP accounted for the improved fatigue resistance of the NSP sample. The results indicated that the fatigue performance of the LSP sample was equivalent to or a little better than that of the NBM sample. As shown in Figure 9, the sample’s RCS field was limited to 40 μm near the surface region. It was deduced that the positive effect of the RCS field was limited to impeding the surface crack initiation. It is seen in Figure 12d that the aligned fibrous feature, which was found to incline to the outer surface of the fatigue-fractured LSP sample, was observed. Based on the fracture feature of the LSP sample shown in Figure 12d (right), it was deduced that the fatigue crack would initiate on the outer surface and propagate inward. A significant improvement in fatigue performance of the LSP sample did not occur, which could be partly attributed to several causes. It could be that the outermost residual stress of the LSP sample was not high enough to suppress or overcome the high peak stress during cyclic loading. In addition, the aligned columnar grains and brittle nature of the laser-melted zone of the LSP sample were more likely to nucleate surface cracks. Therefore, the LSP sample had a similar fatigue resistance to the NBM sample. Therefore, the application of MSP could increase the fatigue resistance of the NAB alloy.
In a prior study, the fracture feature changes from an intergranular fracture for the cast NAB alloy to a transgranular fracture for the laser-shock-peened NAB alloy in the fatigue crack initiation zone [15]. The fatigue fractured appearance displayed mainly quasi-cleavage fracture at the crack initiation site of the NBM (Figure 11c) and LSM (Figure 11d) samples. Moreover, the lamellar feature, which was associated with the α + κIII microstructure, was more likely to be the crack initiation site of the NBM sample. By contrast, the LSM sample showed a trace of solidified columnar grains (Figure 11d). With the MSP, the fatigue-fractured appearance of the NSP sample showed a rubbed and squeezed surface feature (Figure 12c), which could be attributed to the act of RCS. Moreover, a thin, fine-grained layer was present on the external surface of the fatigue-fractured LSP sample (Figure 12d), which was introduced by MSP. Therefore, the fatigue-fractured feature of the NAB alloy at the crack initiation site was sensitive to its inherent microstructures and distribution of residual stress.

5. Conclusions

  • Micro-shot peening (MSP) and laser surface melting (LSM) were applied to improve the fatigue performance of the Ni-Al bronze (NAB) alloy. The homogenized microstructure could be achieved in the laser-melted zone of the LSM sample, which consisted of refined columnar grains. However, the laser-melted zone was accompanied by residual tensile stress (RTS) after LSM treatment. MSP caused surface-hardening, refined the surface microstructure, and introduced residual compressive stress (RCS) into the severely peened zone of the treated samples. However, MSP could not completely remove the granular κII precipitates and lamellar κIII phase in the peened zone under the applied peening intensity.
  • Rotating bending fatigue tests revealed that the LSM sample had the poorest fatigue property, whereas the shot-peened sample (NSP sample) showed the best fatigue property among the tested samples. The RTS and aligned columnar grains accounted for the degraded fatigue resistance of the LSM sample. Moreover, the fatigue performance of the LSP (LSM + MSP) sample was equivalent to or a little better than that of the substrate (NBM sample). The surface-refined structure and high RCS were responsible for the improved fatigue strength/life of the NSP sample relative to the other samples. The NSP sample exhibited a higher fatigue strength/life than the NBM, particularly under loading at low stress. As compared with the NBM sample, the increase in the fatigue strength of the NSP sample was only demonstrated in service life regions above 3 × 10⁵ cycles.
  • Fatigue fractured features showed mainly quasi-cleavage fractures at the crack initiation sites of the NBM and LSM samples. The lamellar α + κIII microstructure was found to initiate the fatigue cracks of the NBM sample, whereas the solidified columnar grains were for the crack initiation of the LSM sample. With the presence of refined grains and RCS field, subsurface crack initiation might occur and is more likely to show a rubbed and squeezed fracture feature in the NSP sample. The fatigue-fractured morphology of the LSP sample exhibited a thin and fine-grained layer deposited on the outer surface of the columnar grains, which was generated during MSP. Thus, the inherent microstructures and distribution of residual stress played an important role in the fatigue fracture of the NAB alloy.

Author Contributions

Conceptualization, R.-K.S. and L.-W.T.; methodology, R.-K.S. and L.-W.T.; formal analysis, G.-X.L. and T.-C.C.; investigation, G.-X.L. and T.-C.C.; resources, T.-C.C.; data curation, G.-X.L. and T.-C.C.; writing—original draft preparation, L.-W.T.; writing—review and editing, T.-C.C. and R.-K.S.; visualization, G.-X.L. and T.-C.C.; supervision, L.-W.T.; project administration, L.-W.T.; funding acquisition, L.-W.T. All authors have read and agreed to the published version of the manuscript.

Funding

This research received no external funding.

Data Availability Statement

The data presented in this study are available on request from the corresponding author. The data are not publicly available due to privacy concerns.

Acknowledgments

The authors are grateful to the Ministry of Science and Technology (National Taiwan University) for the assistance in EPMA analysis (EPMA000300). The authors thank the Core Facility Center of National Cheng Kung University (OTHER002200) for accessing the 3D optical profiler. The authors also thank the National Taiwan Science and Technology (OTHER001900) for the assessment of nanoindentors. The authors would also like to thank Likuan Technology Corp. for the great help in determining the residual stress of the shot-peened sample and Vincent Vacuum Tech. for performing the micro-shot peening.

Conflicts of Interest

The authors declare no conflicts of interest.

References

  1. Lloyd, D.M.; Lorimer, G.W.; Ridley, N. Characterization of phases in a nickel-aluminium bronze. Met. Tech. 1980, 7, 114–119. [Google Scholar] [CrossRef]
  2. Hasan, F.; Jahanafrooz, A.; Lorimer, G.W.; Ridley, N. The morphology, crystallography, and chemistry of phases in as-cast nickel-aluminum bronze. Met. Trans A 1982, 13, 1337–1345. [Google Scholar] [CrossRef]
  3. Böhm, J.; Linhardt, P.; Strobl, S.; Haubner, R.; Biezma, M.V. Microstructure of a heat treated Nickel-Aluminum bronze and its corrosion behavior in simulated fresh and sea water. Mater. Perform. Charact. 2016, 5, 689–700. [Google Scholar] [CrossRef]
  4. Zhang, L.M.; Ma, A.L.; Yu, H.; Umoh, A.J.; Zheng, Y.G. Correlation of microstructure with cavitation erosion behaviour of a nickel-aluminum bronze in simulated seawater. Tribol. Int. 2019, 136, 250–258. [Google Scholar] [CrossRef]
  5. Al-Hashem, A.; Caceres, P.G.; Riad, W.T.; Shalaby, H.M. Cavitation corrosion behavior of cast Nickel-Aluminum bronze in seawater. Corrosion 1995, 51, 331–342. [Google Scholar] [CrossRef]
  6. Fonlupt, S.; Bayle, B.; Delafosse, D.; Heuze, J.L. Role of second phases in the stress corrosion cracking of a nickel–aluminum bronze in saline water. Corros. Sci. 2005, 47, 2792–2806. [Google Scholar] [CrossRef]
  7. Ding, Y.; Lv, Y.; Chen, K.; Zhao, B.; Han, Y.; Wang, L.; Lu, W. Effects of microstructure on the stress corrosion cracking behavior of nickel-aluminum bronze alloy in 3.5% NaCl solution. Mater. Sci. Eng. A. 2018, 733, 361–373. [Google Scholar] [CrossRef]
  8. Al-Hashem, A.; Riad, W. The role of the microstructure of nickel–aluminum–bronze alloy on its cavitation corrosion behavior in natural seawater. Mater. Charact. 2002, 48, 37–41. [Google Scholar] [CrossRef]
  9. Song, Q.N.; Zheng, Y.G.; Jiang, S.L.; Ni, D.R.; Ma, Z.Y. Comparison of corrosion and cavitation erosion behaviors between the As-Cast and Friction-Stir-Processed nickel aluminum bronze. Corrosion 2013, 69, 1111–1121. [Google Scholar] [CrossRef]
  10. Song, Q.N.; Xu, N.; Bao, Y.F.; Jiang, Y.F.; Gu, W.; Zheng, Y.G.; Qiao, Y.X. Corrosion and cavitation erosion behaviors of two marine propeller materials in clean and Sulfide-Polluted 3.5% NaCl solutions. Acta Metall. Sin.-Engl. Lett. 2017, 30, 712–720. [Google Scholar] [CrossRef]
  11. Sarkar, A.; Chakrabarti, A.; Nagesha, A.; Saravanan, T.; Arunmuthu, K.; Sandhya, R.; Philip, J.; Mathew, M.D.; Jayakumar, T. Influence of casting defects on S–N fatigue behavior of Ni-Al bronze. Metall. Mater. Trans. A. 2014, 46, 708–725. [Google Scholar] [CrossRef]
  12. Chakrabarti, A.; Sarkar, A.; Saravanan, T.; Nagesha, A.; Sandhya, R.; Jayakumar, T. Influence of mean stress and defect distribution on the high cycle fatigue behaviour of cast Ni-Al Bronze. Proc. Eng. 2014, 86, 103–110. [Google Scholar] [CrossRef]
  13. Lv, Y.; Hu, M.; Wang, L.; Xu, X.; Han, Y.; Lu, W. Influences of heat treatment on fatigue crack growth behavior of NiAl bronze (NAB) alloy. J. Mater. Res. 2015, 30, 3041–3048. [Google Scholar] [CrossRef]
  14. Ding, Y.; Lv, Y.; Zhao, B.; Han, Y.; Wang, L.; Lu, W. Response relationship between loading condition and corrosion fatigue behavior of nickel-aluminum bronze alloy and its crack tip damage mechanism. Mater. Charact. 2018, 144, 356–367. [Google Scholar] [CrossRef]
  15. Gao, Y.; Yang, W.; Huang, Z.; Lu, Z. Effects of residual stress and surface roughness on the fatigue life of nickel aluminum bronze alloy under laser shock peening. Eng. Fract. Mech. 2021, 244, 107524. [Google Scholar] [CrossRef]
  16. Cottam, R.; Barry, T.; McDonald, D.; Li, H.; Edwards, D.; Majumdar, A.; Dominguez, J.; Wang, J.; Brandt, M. Laser processing of nickel–aluminum bronze for improved surface corrosion properties. J. Laser. Appl. 2013, 25, 032009. [Google Scholar] [CrossRef]
  17. Zeng, S.; Tian, J.; Hu, S.; Xiao, M.; Peng, B. Effect of laser surface melting on microstructure evolution and cavitation behavior of nickel aluminum bronze. T. Nonferr. Metal. Soc. 2023, 33, 2090–2109. [Google Scholar] [CrossRef]
  18. Tang, C.H.; Cheng, F.T.; Man, H.C. Improvement in cavitation erosion resistance of a copper-based propeller alloy by laser surface melting. Surf. Coat. Tech. 2004, 182, 300–307. [Google Scholar] [CrossRef]
  19. Tang, C.H.; Cheng, F.T.; Man, H.C. Effect of laser surface melting on the corrosion and cavitation erosion behaviors of a manganese–nickel–aluminum bronze. Mater. Sci. Eng. A 2004, 73, 195–203. [Google Scholar] [CrossRef]
  20. Cottam, R.; Luzin, V.; Moody, H.; Edwards, D.; Majumdar, A.; Wong, Y.C.; Wang, J.; Brandt, M. The role of microstructural characteristics in the cavitation erosion behaviour of laser melted and laser processed Nickel–Aluminium Bronze. Wear 2014, 317, 56–63. [Google Scholar] [CrossRef]
  21. Wang, C.; Jiang, C.; Chai, Z.; Chen, M.; Wang, L.; Ji, V. Estimation of microstructure and corrosion properties of peened nickel aluminum bronze. Surf. Coat. Tech. 2017, 313, 136–142. [Google Scholar] [CrossRef]
  22. Zeng, S.; Hu, S.; Cheng, G. Effect of shot peening on surface characterization and cavitation resistance of nickel aluminum bronze. Mater. Comm. Today 2022, 33, 104767. [Google Scholar] [CrossRef]
  23. Morita, T.; Noda, S.; Kagaya, C. Influences of Fine-Particle bombarding and conventional shot peening on surface properties of steel. Mater. Trans. 2014, 55, 646–652. [Google Scholar] [CrossRef]
  24. Harada, Y.; Fukaura, K.; Haga, S. Influence of micro shot peening on surface layer characteristics of structural steel. J. Mater. Proc. Tech. 2007, 191, 297–301. [Google Scholar] [CrossRef]
  25. Harada, Y.; Fukauara, K.; Kohamada, S. Effects of microshot peening on surface characteristics of high-speed tool steel. J. Mater. Proc. Tech. 2008, 201, 319–324. [Google Scholar] [CrossRef]
  26. Zhang, J.W.; Lu, L.T.; Shiozawa, K.; Shen, X.L.; Yi, H.F.; Zhang, W.H. Analysis on fatigue property of microshot peened railway axle steel. Mater. Sci. Eng. A. 2011, 528, 1615–1622. [Google Scholar] [CrossRef]
  27. Su, C.; Chen, T.; Tsay, L. Improved fatigue strength of Cr-electroplated 7075-T6 Al alloy by micro-shot peening. Int. J. Fatigue. 2023, 167, 107354. [Google Scholar] [CrossRef]
  28. Su, C.; Chen, T.; Ding, Y.; Lu, G.; Tsay, L. Effects of Micro-Shot peening on the fatigue strength of anodized 7075-T6 alloy. Materials 2023, 16, 1160. [Google Scholar] [CrossRef] [PubMed]
  29. Chung, Y.; Chen, T.; Lee, H.; Tsay, L. Effect of Micro-Shot peening on the fatigue performance of AISI 304 stainless steel. Metals 2021, 11, 1408. [Google Scholar] [CrossRef]
  30. Murraya, T.; Thomasa, S.; Wua, Y.; Neilb, W.; Hutchinsona, C. Selective laser melting of nickel aluminium bronze. Add. Manuf. 2020, 33, 101122. [Google Scholar] [CrossRef]
  31. Lv, Y.; Zhao, B.; Zhang, H.; Su, C.; Nie, B.; Wang, R.; Cao, L.; Lyu, F. Improving Corrosion Resistance Properties of Nickel-Aluminium Bronze (NAB) Alloys via Shot Peening Treatment. Mater. Trans. 2019, 60, 1629–1637. [Google Scholar] [CrossRef]
  32. Zhao, B.; Lv, Y.; Ding, Y.; Wang, L.; Lu, W. The Grain Refinement Mechanisms of Various Phases in Shot-Peened Nickel-Aluminum Bronze (NAB) alloy. Mater. Charact. 2018, 144, 77–85. [Google Scholar] [CrossRef]
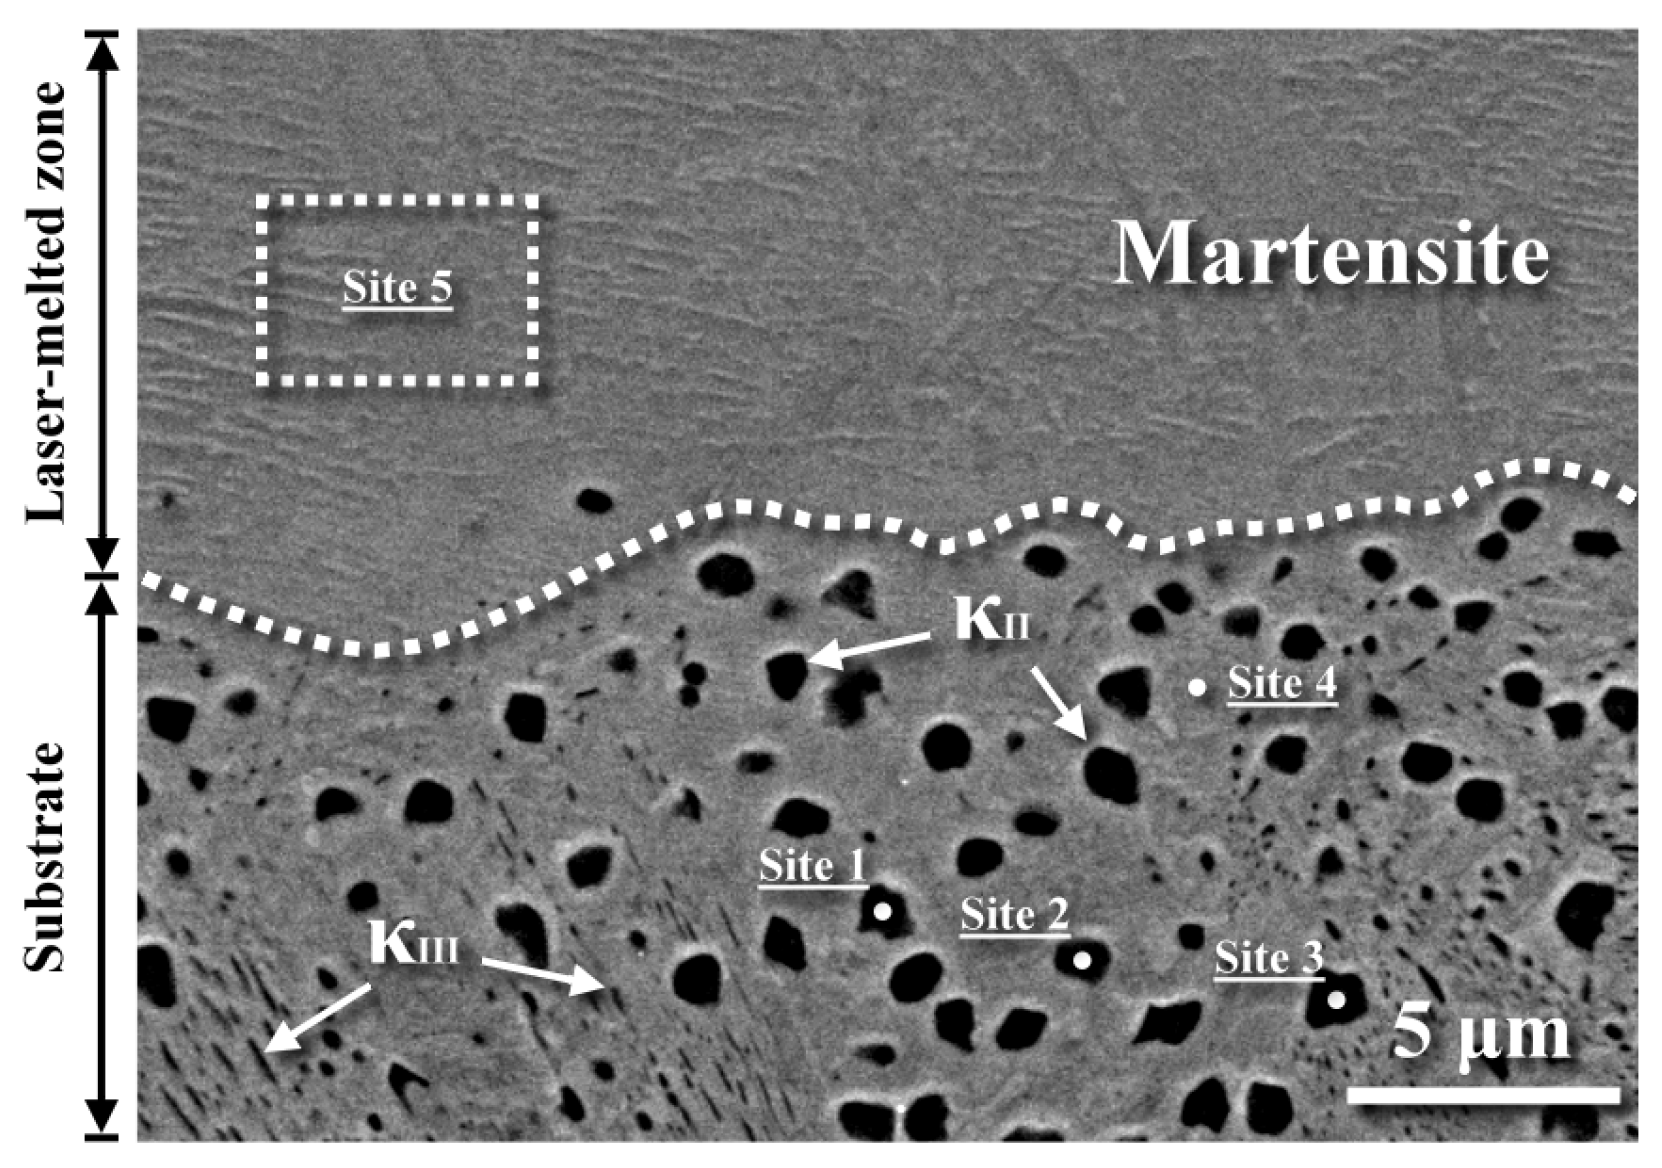
Figure 1. SEM micrograph showing the microstructure of the LSM sample in cross-sectional direction with the indicated sites analyzed by EPMA; the dashed line revealing the melting boundary.
Metals 15 00019 g001
Figure 2. (a) The top surface appearance showing the laser-melted zone of the LSM sample at (left) lower and at higher magnification (right, enlarged from the dashed zone); (b) the cross-sectional view of the LSM sample.
Metals 15 00019 g002
Figure 3. XRD spectrums showing the constituents of the NBM, LSM, and LSP samples detected from the top surface of the investigated samples.
Metals 15 00019 g003
Figure 4. TEM microstructure of the outmost surface zone of the (a) NSP, (b) LSM, and (c) LSP samples with the diffraction pattern of the inspected sites.
Metals 15 00019 g004
Figure 5. The surface morphology of the (a,b) NSP and (c,d) LSP samples: (a) the dents and (b) residual lamellar structure of the NSP sample; (c) vague ripple traces and (d) the dents of the LSP sample.
Metals 15 00019 g005
Figure 6. 3D contour profile of the (a) NSP, (b) LSM, and (c) LSP samples.
Metals 15 00019 g006
Figure 7. The determined nano-hardness near the outermost surface of the (a) NSP and (b) LSP samples.
Metals 15 00019 g007
Figure 8. Results of EBSD analysis on the (a,c,e) NSP and (b,d,f) LSP samples in cross-sectional view: (a,b) the band contrast map, (c,d) the inverse pole figure, and (e,f) the phase map.
Metals 15 00019 g008
Figure 9. The residual stress distribution in the thickness direction of the NSP, LSM, and LSP samples from the surface to the interior.
Metals 15 00019 g009
Figure 10. Fatigue stress (S) vs. cycle (N) curves of the NBM, NSP, LSM, and LSP samples.
Metals 15 00019 g010
Figure 11. The macroscopic fatigue-fractured morphologies of the (a) NBM and (b) LSM samples; (c) quasi-cleavage of the NBM sample (enlarged from the dashed zone in Figure 11a) and (d) quasi-cleavage in the laser-melted zone of the LSM sample (enlarged from the dashed zone in Figure 11b); (e) fatigue crack initiation at the lamellar structure of the NBM sample; (f) dimple fracture at the final fracture zone.
Metals 15 00019 g011
Figure 12. SEM micrographs showing (a) the macro-fractured appearance, (b) sub-surface crack initiation, (c) rubbed and squeezed feature around the outer profile of the NSP sample; (d) the macroscopic fatigue-fractured appearance (left) and microscopic fatigue-fractured feature around the external surface of the LSP sample (right, enlarged from the dashed zone in Figure 12d).
Metals 15 00019 g012
Figure 13. XRD spectrum of the LSM sample around a 2θ angle of 146.2° at distinct depths of (a) 0, (b) 10, (c) 20, and (d) 40 μm from the outmost surface.
Metals 15 00019 g013
Figure 14. XRD spectrum of the LSP sample around a 2θ angle of 146.2° at distinct depths of (a) 0, (b) 10, (c) 20, and (d) 40 μm from the outmost surface.
Metals 15 00019 g014
Table 1. The nomenclature of the samples used in the current study.
SpecimenCondition
NBMBase metal
NSPNBM + Micro shot peening
LSMNBM + Laser surface melting
LSPNBM + Laser surface melting + Micro shot peening
Table 2. The chemical composition of distinct phases determined by EPMA.
ElementCuSiAlFeNiMn
Site at.%wt.%at.%wt.%at.%wt.%at.%wt.%at.%wt.%at.%wt.%
1 (κII)6.38.21.91.123.512.963.672.34.45.30.30.3
2 (κII)5.87.42.31.321.511.766.875.33.44.10.20.2
3 (κII)7.09.03.41.921.711.963.071.44.75.60.20.2
4 (α)79.888.70.10.016.87.91.61.61.71.70.10.1
LMZ69.880.10.20.120.39.95.45.54.24.40.10.1
Note: LMZ: laser-melted zone.
Table 3. Surface roughness of different samples determined by 3D profiler.
SpecimenSurface Roughness Parameter (μm)
SaSpSv
NBM0.2651.031−2.194
NSP0.8966.045−8.318
LSM1.8077.830−9.487
LSP1.6647.167−7.648
Note: Sa: arithmetical mean height of the surface; Sp: maximum peak height of the surface; Sv: maximum pit depth of the surface.
Disclaimer/Publisher’s Note: The statements, opinions and data contained in all publications are solely those of the individual author(s) and contributor(s) and not of MDPI and/or the editor(s). MDPI and/or the editor(s) disclaim responsibility for any injury to people or property resulting from any ideas, methods, instructions or products referred to in the content.