Abstract
The wire and arc additive manufacturing (WAAM) process enables the creation and repair of complex structures based on the successive deposition of fed metal in the form of a wire that is fused with an electric arc and then solidifies. The high number of depositions required to create or repair parts increases the likelihood of defect formation. If these are reliably detected during manufacturing, timely correction is possible. However, high temperatures and surface irregularity make inspection difficult. Furthermore, depending on the size, morphology, and location of the defect, the part can be rejected. Recent studies have shown that non-destructive testing (NDT) based on different physical phenomena for the timely, reliable, and customized detection of defects can significantly reduce the rejection rate and allow in-line repair, which consequently reduces waste and rework. This paper presents the latest developments in NDT for WAAM and its limitations and potential.
1. Introduction
Wire and arc additive manufacturing (WAAM) makes use of fusion welding technologies (e.g., metal inert gas (MIG), metal active gas (MAG), tungsten inert gas (TIG), plasma, laser) and, similarly to these, consists of the successive deposition of metal fed in the form of a wire that is fused with an electric arc and then solidified. This technique excels in the production of parts with complex geometries that difficult to obtain by other means with a high deposition rate, resulting in faster product delivery with less material waste and often dispensing with post-processing of the part. All these factors lead to a more economical production line than today for a wide variety of metal products.
WAAM is gaining an important position in the 4.0 industry and, although it is a manufacturing method on which current research efforts worldwide are focused, its production potential lacks studies that bring quality assurance and structural integrity to large-scale parts produced with WAAM [1].
Non-destructive testing (NDT) has emerged as a solution to meet the need to ensure the quality of a product produced with WAAM, because it does not cause damage to the inspected part and can be performed during or after the deposition of all layers. There are a wide variety of ways to perform NDT, depending on the physical phenomenon used.
The Scopus platform [2] was used to verify how deficient the WAAM research is in guaranteeing the structural quality of parts through NDT. Initially a key term (“wire arc additive manufacturing”) was defined to identify how many papers on the WAAM topic had been published. Then, the search was limited with the expression (“non-destructive testing” AND “wire arc additive manufacturing”) in order to check how many of the WAAM papers dealt with NDT as the main topic or indirectly and even as brief citations. It was found that, in 2019, only 14 papers (3.9%) addressed NDT out of a total of 362 studies on WAAM. However, already in the year 2022, NDT was present in 62 papers (3.6%) in a group of 1707 studies on WAAM. This presented scenario points to a more accelerated evolution of this technology on other fronts, finding new applications and overcoming other challenges. However, this scenario also points to a future strong dependence on NDT studies applicable to this process, whose lack may become a hindrance to the evolution of this technology on many study fronts. Far more effective and faster ways of performing NDT will be needed to validate new research and ensure industrial-scale production.
Some studies are currently underway to enable NDT to be performed in-line during WAAM. This implementation faces great challenges, as parts with complex geometries will require the NDT system to be adapted to the region where the material is being deposited. In addition, the high temperatures involved in the process can damage equipment and prevent some NDT techniques from being used. Other factors such as the roughness, waviness, and location of defects must also be taken into consideration to achieve a successful implementation.
In-line NDT of WAAM refers to the process of inspecting and evaluating the quality of WAAM-produced parts while the parts are still being manufactured. This contrasts with off-line NDT, where parts are inspected after they have been fully manufactured. In-line NDT allows for real-time monitoring of the manufacturing process, which can help to identify and correct any issues that may arise.
In-line NDT of WAAM is important to ensure that the final product meets the required quality standards and to minimize the risk of failure in service. Additionally, WAAM is a relatively new technology and as such, NDT methods for WAAM are still being developed and refined. In-line NDT can also provide feedback to the manufacturing process, allowing for adjustments to be made in real time to improve the quality of the final product.
2. Defects in WAAM: Causes, Characteristics, and Consequences
As with welding, defects can arise during the WAAM process. These defects can bring major financial and safety complications, even calling into question the manufacturer’s ability to manufacture. As a way to solve these important issues, it is necessary to understand how these defects occur and then monitor them in real time through non-destructive testing.
These defects can result in a reduced performance of the manufacturing process, wasted material, additional repair time, increased process costs, delays in the delivery of manufactured parts, and product structural integrity. In addition, defects increase the risk of the part failing while in service, potentially causing accidents and putting lives at risk.
Therefore, it is necessary to understand the causes and consequences of these defects to improve the process, As well as, from this, make it possible to identify them from NDT performed during the additive manufacturing (AM) process. Thus, with a timely identification of the defect appearance, it makes it possible to avoid errors, propose feasible solutions for in-line correction, and deliver reliable products, speeding up production and avoiding financial complications.
Most of the possible defects in the WAAM process are somehow connected to parameters such as the power, deposition speed, wire feed rate, and correct choice of material. Other factors such as the cleanliness and maintenance of the equipment prevent the appearance of some defects, such as the inclusion of impurities, for example. These are the most recurrent causes that may lead to the appearance of defects.
The most common defects in WAAM will be discussed throughout this section.
2.1. Porosity
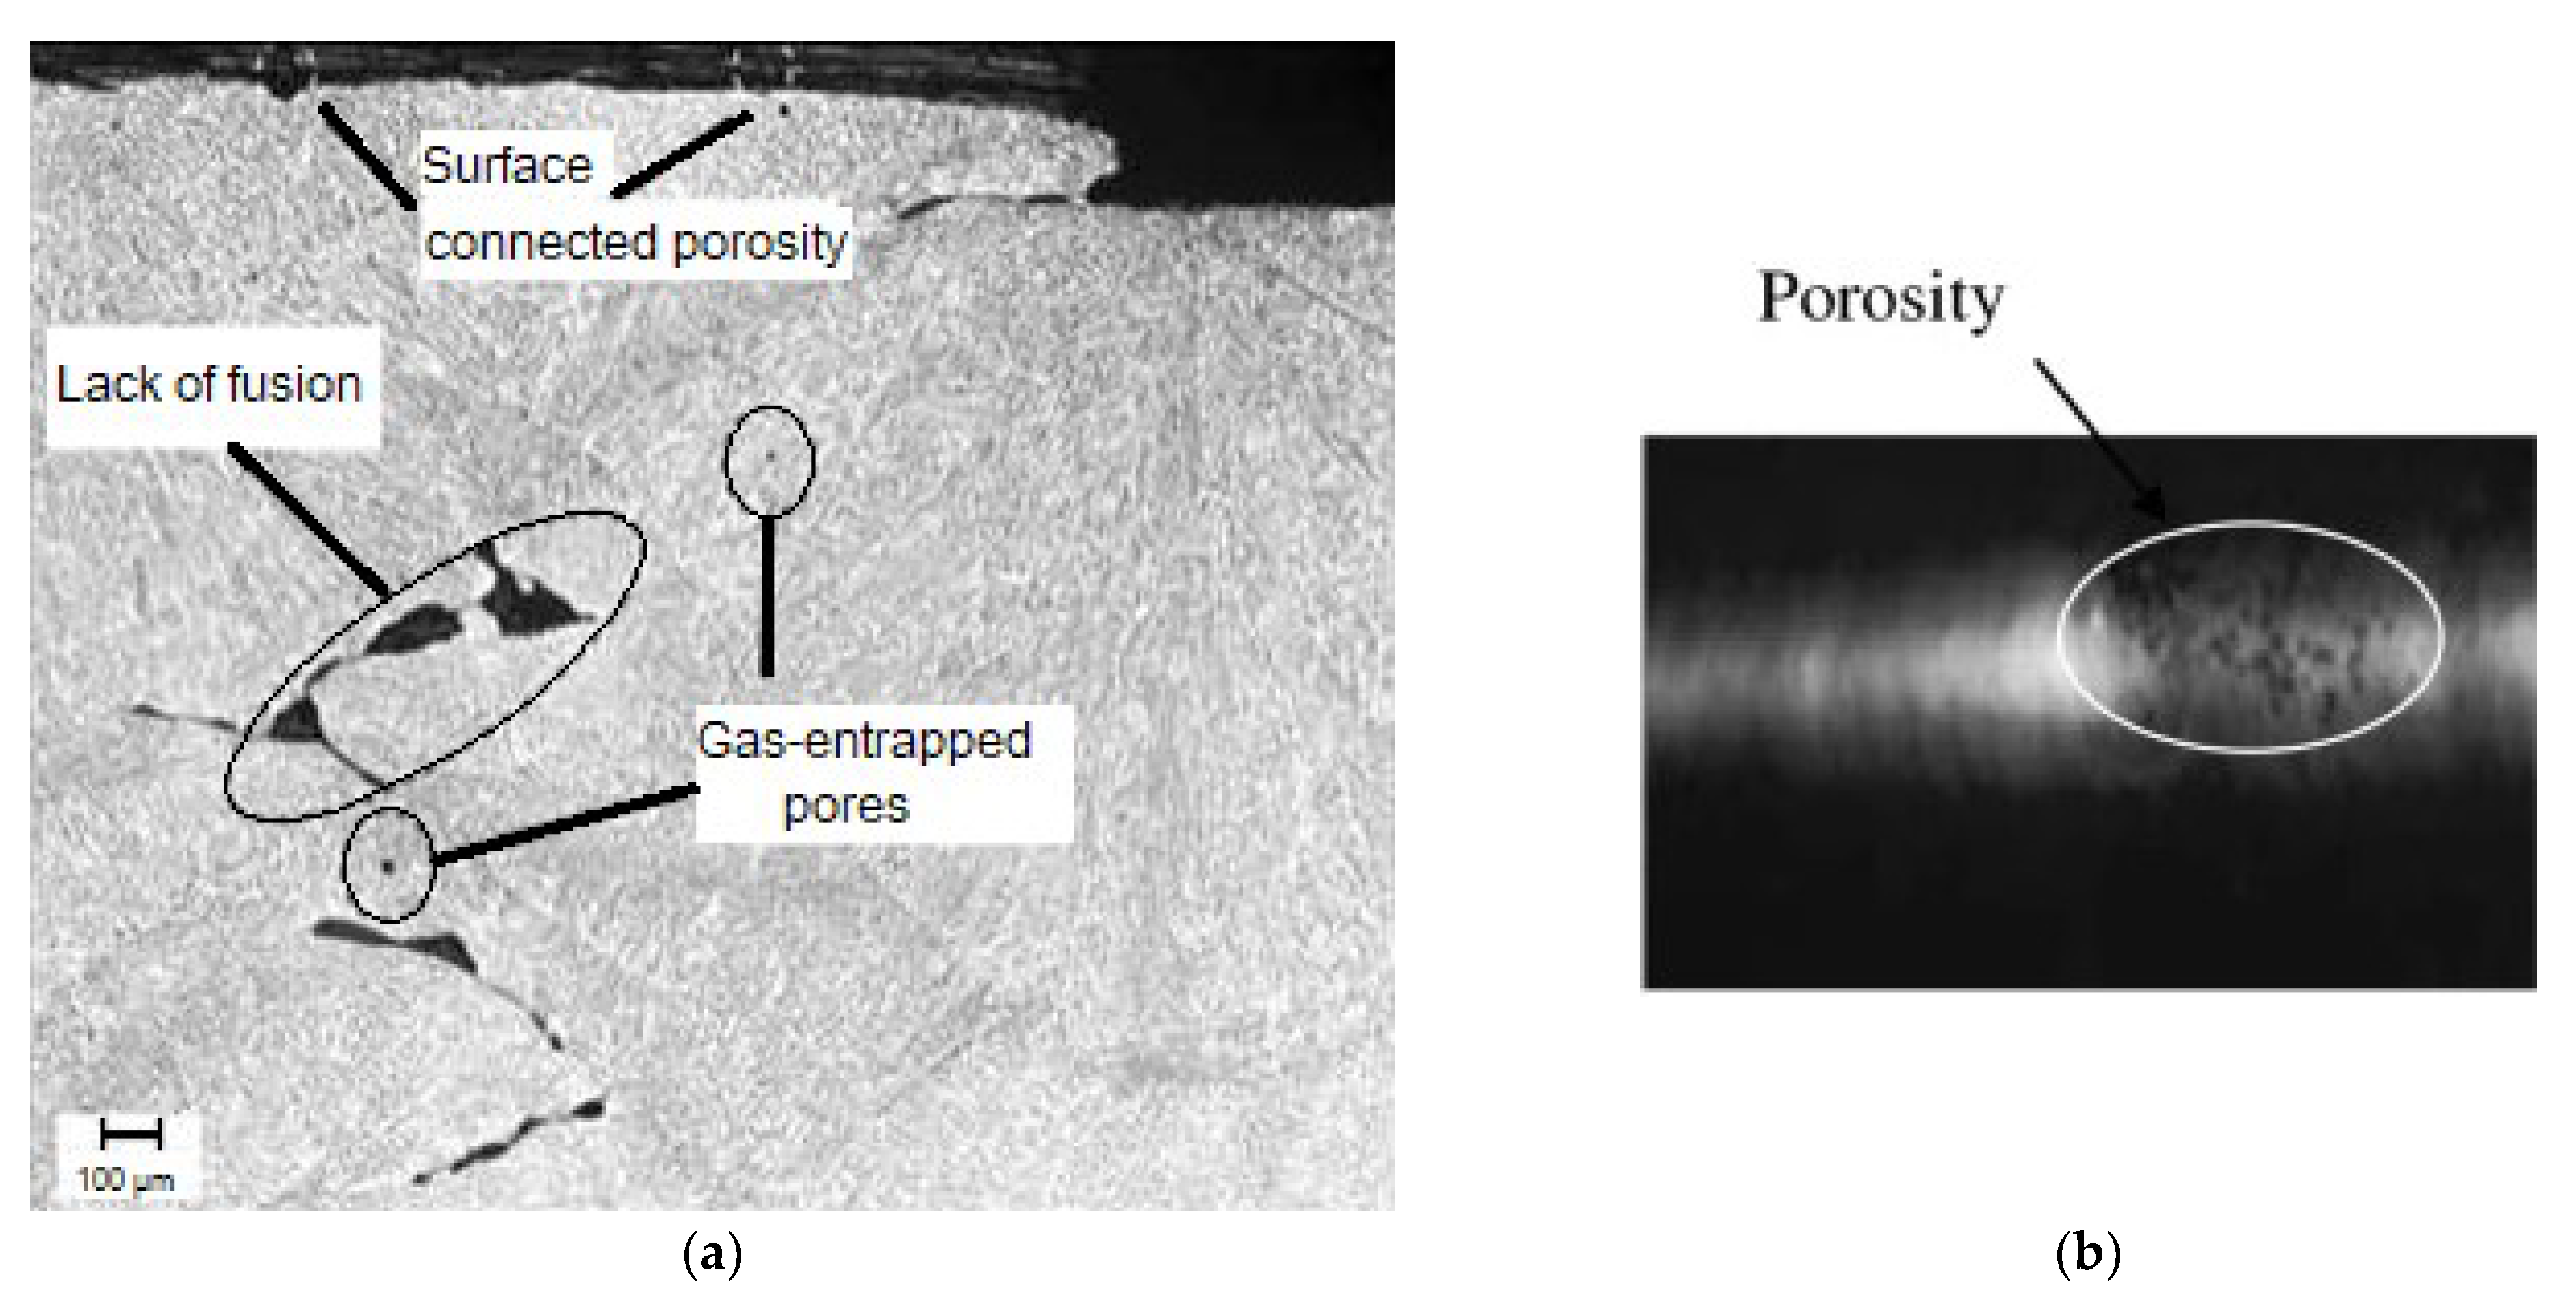
Porosity defects in WAAM are small holes, voids, or pores throughout the structure, as shown in
Figure 1.
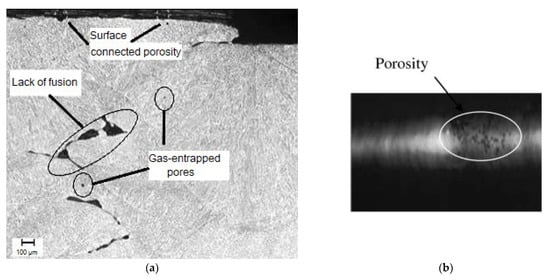
Figure 1.
Examples of porosity: (a) Stainless steel piece produced using additive manufacturing indicating the presence of pores (on surface and inside the part) and lack of fusion, adapted from [3]. (b) Pores in a weld bead identified with an X-ray test, adapted from [4].
Figure 1.
Examples of porosity: (a) Stainless steel piece produced using additive manufacturing indicating the presence of pores (on surface and inside the part) and lack of fusion, adapted from [3]. (b) Pores in a weld bead identified with an X-ray test, adapted from [4].
These defects can be caused by a variety of factors. Some of the main causes include:
- Improper process parameters [5,6]: If the deposition current or voltage is too high, the wire electrode can melt too quickly, leading to poor fusion and porosity defects. On the other hand, if the welding current or voltage is too low, the wire electrode may not melt completely, resulting in poor material deposition and porosity defects.
- Inadequate wire feeding [7]: If the wire feeder is not properly adjusted, the wire electrode may not be fed into the welding torch at the correct rate, resulting in poor material deposition and porosity defects.
- Improper cooling of the deposited material [6]: If the printed part is not cooled quickly enough, the material may not solidify properly, resulting in porosity defects.
- Inadequate shielding gas [5,8]: If the shielding gas flow is not sufficient or not properly directed, the deposited material can be exposed to the atmosphere, resulting in porosity defects.
- Contamination [9]: If the wire electrode or the workpiece is contaminated with oil, dirt, or other impurities, it can cause porosity defects.
- Poor wire quality [6]: Using a low-quality wire electrode that contains impurities or has an inconsistent diameter can cause porosity defects.
- Inadequate cleaning [9]: Lack of cleaning of the welding torch and the workpiece can cause porosity defects.
It is important to note that more than one of these causes can occur at the same time and that the specific causes of porosity defects can vary depending on the particular WAAM system and the material being used.
Porosity defects in WAAM can have significant consequences for the final printed part. Some of the main consequences include:
- Reduced strength and durability [3]: Porosity defects can weaken the structural integrity of the printed part, making it less durable and more susceptible to failure under load. This can be particularly problematic for parts that are intended to be used in high-stress or high-load applications.
- Reduced corrosion resistance [3]: Porosity defects can also make the printed part more susceptible to corrosion, as the voids and holes in the material provide a pathway for moisture and other corrosive agents to penetrate the part.
To prevent porosity defects in WAAM, it is important to ensure that the welding parameters are properly set, the wire feeder is adjusted correctly, and the printed part is cooled quickly enough. Additionally, properly maintaining the welding torch can also help to reduce the occurrence of porosity defects.
In conclusion, porosity defects are a major challenge in wire and arc additive manufacturing. Improper welding parameters, poor wire feeding, and inadequate cooling of the deposited material are the main causes of porosity defects in this process. To prevent porosity defects, proper welding parameters, wire feeding, cooling, and maintenance should be implemented and high-quality wire electrodes should be used.
2.2. Inclusion
Inclusion defects are caused by particles such as oxides or other impurities that are trapped in the weld metal. Figure 2 presents two cases of inclusions in deposited material.
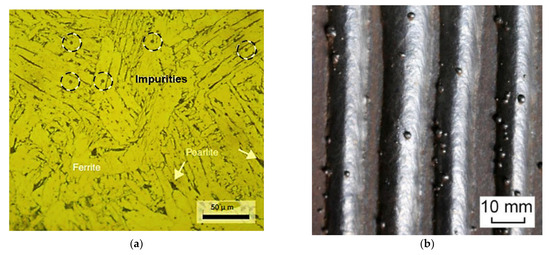
Figure 2.
Impurities inclusions (a) in an optical micrograph sample of a welded plate, adapted from [10], and (b) as slags on the surface of a weld bead, adapted from [11].
Figure 2.
Impurities inclusions (a) in an optical micrograph sample of a welded plate, adapted from [10], and (b) as slags on the surface of a weld bead, adapted from [11].

Some common factors that contribute for the presence of inclusions are:
- Contaminated wire feedstock [12]: If the wire used in WAAM contains impurities such as oils, lubricants, or other contaminants, they can be incorporated into the final product and result in inclusion defects.
- Improper cleaning of the equipment [12]: If the wire feeder or the welding torch is not properly cleaned before use, debris can accumulate and be incorporated into the final product, resulting in inclusion defects.
- Improper process control [5,13]: Incorrect combination of welding setting parameters can result in the inclusion of unwanted materials in the final product.
- Insufficient gas shielding during the welding process [5,12,13]: Gas shielding is used to protect the weld pool and the surrounding area from oxidation and other forms of contamination. If the gas shielding is not sufficient, inclusion defects can occur.
- Excessive spatter during the WAAM process [11]: Excessive spatter can result in the inclusion of unwanted materials in the final product.
- Improper layer-to-layer adhesion [12]: If the layers of the final product do not properly adhere to one another, inclusion defects can occur.
- Inadequate post-processing [13]: Insufficient cleaning or heat treatment can result in inclusion defects.
Inclusion defects in WAAM can have a significant detrimental impact on the final product’s properties and performance. Some of the consequences of inclusion defects include:
- Reduced mechanical properties [10]: Inclusion defects can result in a reduction in the product’s strength, ductility, and toughness, which can make the final product less suitable for its intended use.
- Increased risk of failure [10]: Inclusion defects can result in a higher risk of failure during use, which can lead to costly repairs or replacements.
To prevent inclusion defects, it is important to use high-quality, clean wire feedstock and to properly clean the wire feeder and the welding torch before use. Additionally, proper process control, including the use of proper welding parameters, can also help to prevent inclusion defects. These defects can have a significant impact on the final product’s properties.
2.3. Crack
Crack defects are fissures that grow along the weld bead. These linear-like defects in WAAM can occur for several reasons. The aspect of this defect is shown in Figure 3.
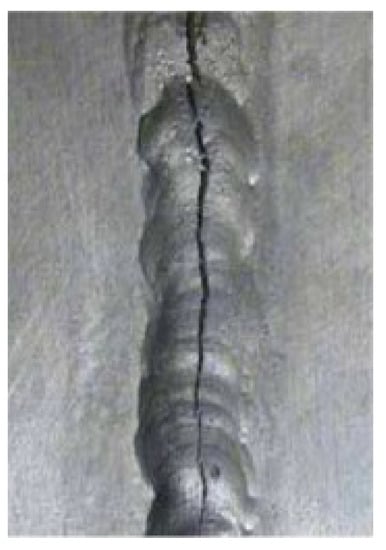
Figure 3.
Weld crack adapted from [12].
Some of the main causes of crack defects include:
- High thermal stress [3,5,12]: The welding process generates high thermal gradients as the wire melts and solidifies. These gradients can cause the material to expand and contract at different rates, leading to the formation of stress concentrations and cracking.
- Porosity [3]: Porosity is caused by trapped gases or other contaminants that are present in the weld pool. As the metal solidifies, these trapped gases can cause the material to form small voids or bubbles, which can lead to weak spots in the final product and cracks.
- Poor-quality wire surface [14,15]: A wire with a rough or uneven surface can cause the welding process to become unstable, leading to the formation of cracks.
- Inadequate process parameters [5,12,15]: Insufficient welding speed, current, or voltage can cause the wire to become unstable, leading to cracks in the final product.
- Inadequate post-processing [3,12]: Improper post-processing such as insufficient cooling or heat treatment can cause the material to cool unevenly and lead to cracking.
- Inadequate material selection [3,12]: using an inappropriate material for the WAAM process can cause cracking and other defects.
It is important to note that multiple factors can contribute to the formation of crack defects in WAAM, and it can be a combination of more than one cause. To prevent and address crack defects, it is important to understand the underlying causes and take appropriate measures to address them.
Crack defects in WAAM can have many consequences, including:
- Reduced structural integrity [3]: Cracks in the final product can weaken the structure and make it more susceptible to failure under load. This can be particularly problematic for components that are subjected to high stress or impact.
- Reduced fatigue resistance [16]: Cracks in the final product can also reduce its resistance to fatigue, which is the ability of a material to withstand repeated loading and unloading cycles. This can be a problem for components that are subjected to cyclic loading, such as gears or shafts.
- Reduced safety: if the product is used in a safety-critical application, crack defects can lead to serious safety hazards.
It is important to note that crack defects can also be difficult to detect, especially if they are located in internal regions of the component [12]. This can make it difficult to identify and address the problem, further exacerbating the consequences.
Overall, crack defects in WAAM can have a significant impact on the structural integrity, fatigue resistance, scrap rate, cost, efficiency, and safety of the final product. Therefore, it is important to take measures to prevent and address these defects in order to produce high-quality components.
To mitigate these problems, several strategies have been proposed. One approach is to use a preheat process before welding, which can help to reduce the thermal stress generated during the WAAM process [12]. Another manner to do so is through grain refinement or using a wire chemical composition that fits better with the part being built.
2.4. Burn-Through
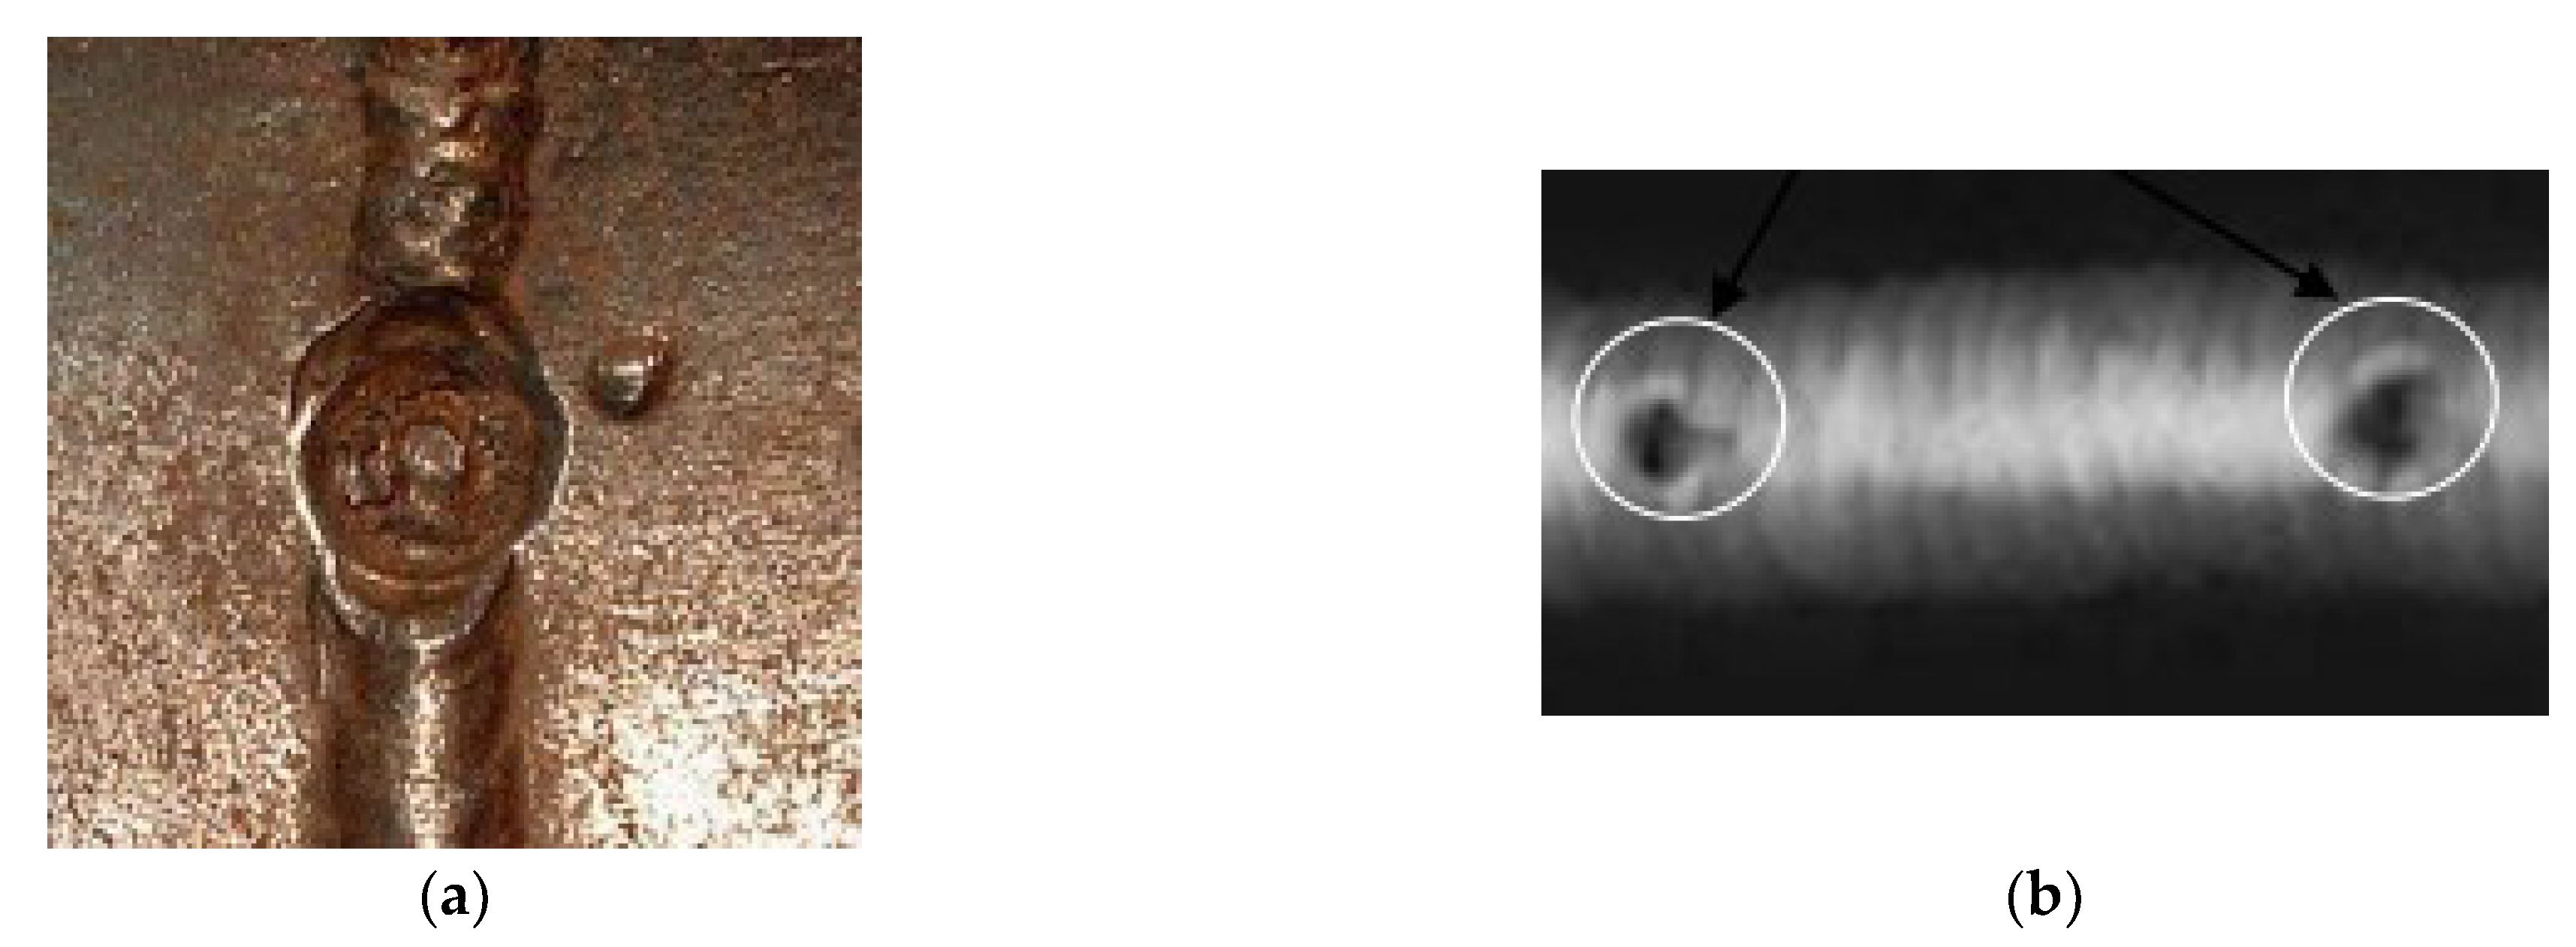
Burn-through is a type of defect that occurs when the wire electrode melts through the bottom of the part being built, resulting in a hole in the finished product. Generally, in WAAM it happens during the deposition of the first layers and the burn-through affects principally the base metal. Figure 4 presents an example of these defects.

Figure 4.
Burn-through defects (a) in a plate, adapted from [12], and (b) identified in an X-ray test of a weld bead, adapted from [4].
These defect can be caused by a number of factors, including:
- Process parameters [5,12]: A high current can cause the wire electrode to melt more quickly, which can increase the risk of burn-through. A Low wire feed speed can cause the wire electrode to be in contact with the bottom of the part for a longer period of time, which can increase the risk of burn-through. In addition, if the metal deposition is not sufficient, it can cause the part to be structurally weak, leading to burn-through. A high travel speed can cause the wire electrode to be in contact with the bottom of the part for a shorter period of time, which can increase the risk of burn-through.
- Inadequate shielding gas [12]: The shielding gas plays an important role in protecting the arc from the ambient air. If the shielding gas is inadequate, it can cause the arc to become unstable and increase the risk of burn-through.
It is important to note that burn-through can be caused by a combination of factors, and it is important to carefully monitor the process and adjust the parameters as needed to minimize the risk of burn-through. The consequences of these defects include:
- Reduced part quality: Burn-through can result in a hole in the finished product, reducing its overall quality and structural integrity.
- Increased production costs: If burn-through occurs, it may require the part to be scrapped, which can increase production costs. Additionally, if the burn-through is not noticed until later in the manufacturing process, it can result in additional costs from having to redo work that has already been completed.
- Delays in production: Burn-through can cause delays in production as the part needs to be scrapped and reworked or remade.
One way to prevent burn-through is by using a lower current and wire feed speed, which can help to reduce the heat generated by the arc [12]. Additionally, increasing the travel speed can help to reduce the amount of time that the wire electrode is in contact with the bottom of the part, which can also help to reduce the risk of burn-through [12].
By understanding the causes of burn-through defects and implementing preventative measures, it is possible to reduce the occurrence of this defect and improve the overall quality of the finished product.
It is also important to note that the consequences of burn-through can be minimized by implementing preventative measures and monitoring the process closely to minimize the occurrence of this defect and improve the overall quality of the finished product.
2.5. Undercutting
The undercutting defect occurs when the molten metal does not fully adhere to the previous layer, leaving a gap or hole. The causes of undercutting defects in WAAM can be grouped into three main categories:
- Process-related causes [5,12]: These include improper control of the electric arc, which can lead to an insufficient amount of heat being delivered to the wire, resulting in the metal not fully melting and sticking to the previous layer. In addition, improper wire feeding, such as an inconsistent wire-feeding rate or angle, can also lead to undercutting.
- Material-related causes [5,12,17]: The properties of the metal wire used in the WAAM process can also affect the likelihood of undercutting. For example, if the wire has a low melting point or poor thermal conductivity, it may not fully melt or adhere to the previous layer, leading to undercutting.
- Geometry-related causes [17]: The complex geometry of some parts can also contribute to undercutting. For example, overhangs, sharp corners or narrow features can pose a challenge for the WAAM process, as the molten metal may not fully adhere to these areas, resulting in undercutting.
It is worth noting that undercutting can also be a result of a combination of these factors. It is essential to understand the root cause of undercutting to develop appropriate mitigation strategies. Figure 5 presents examples of these defects.
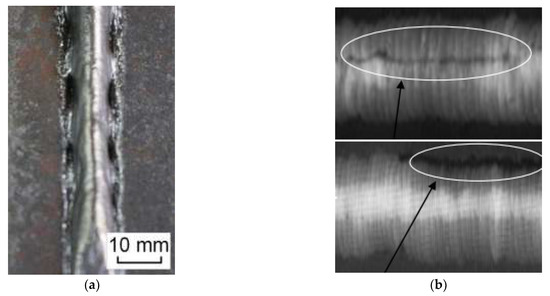
Figure 5.
Undercut defects (a) beside a weld bead, adapted from [11], and (b) internal and external identified using X-ray non-destructive testing, adapted from [4].
Undercutting defects in WAAM can have a significant impact on the quality and performance of the final component. Some of the consequences include:
- Reduced strength [17]: Undercutting can weaken the component, making it less durable and more susceptible to failure under stress.
- Decreased surface quality [12]: Undercutting can create gaps or holes in the surface of the component, which can negatively impact the overall surface finish and aesthetic appearance of the part.
- Reduced accuracy [5,12]: If undercutting occurs in certain areas of the component, it can lead to inaccuracies in the final dimensions of the part, making it difficult to meet tolerances and specifications.
There are several ways to prevent and mitigate undercutting in WAAM. One approach is to optimize the arc parameters, such as the current, voltage, and travel speed, to ensure that the wire is melted and deposited with the correct amount of heat. Additionally, proper wire-feeding techniques, such as using a wire guide, can help to prevent improper wire feeding and reduce the risk of undercutting.
Another approach is to use a filler material, such as a paste or powder, to fill in any gaps or holes that may occur as a result of undercutting. This can help to improve the overall surface finish and strength of the component.
In conclusion, undercutting is a defect that can occur in WAAM processes caused by improper control of the arc or wire feeding or insufficient heat input. However, by optimizing the arc parameters, proper wire-feeding techniques, and using filler materials, it is possible to prevent and mitigate this defect and produce high-quality components.
2.6. Spatter
Spatter are the small droplets of metal that are expelled from the welding torch during the WAAM process. These droplets can stick to the surface of the component being created and create unsightly defects. This defect is represented in Figure 6.
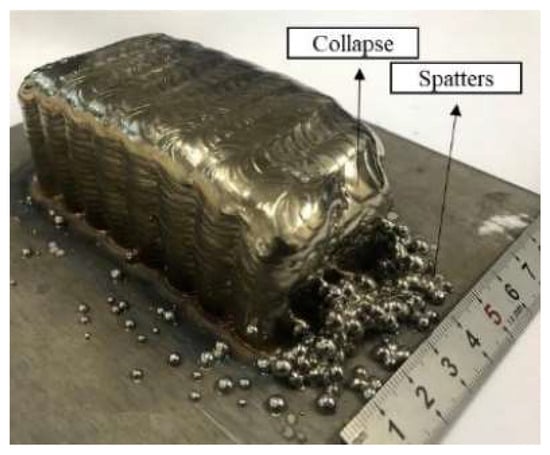
Figure 6.
Spatter and collapse defects in WAAM, adapted from [18].
Figure 6.
Spatter and collapse defects in WAAM, adapted from [18].
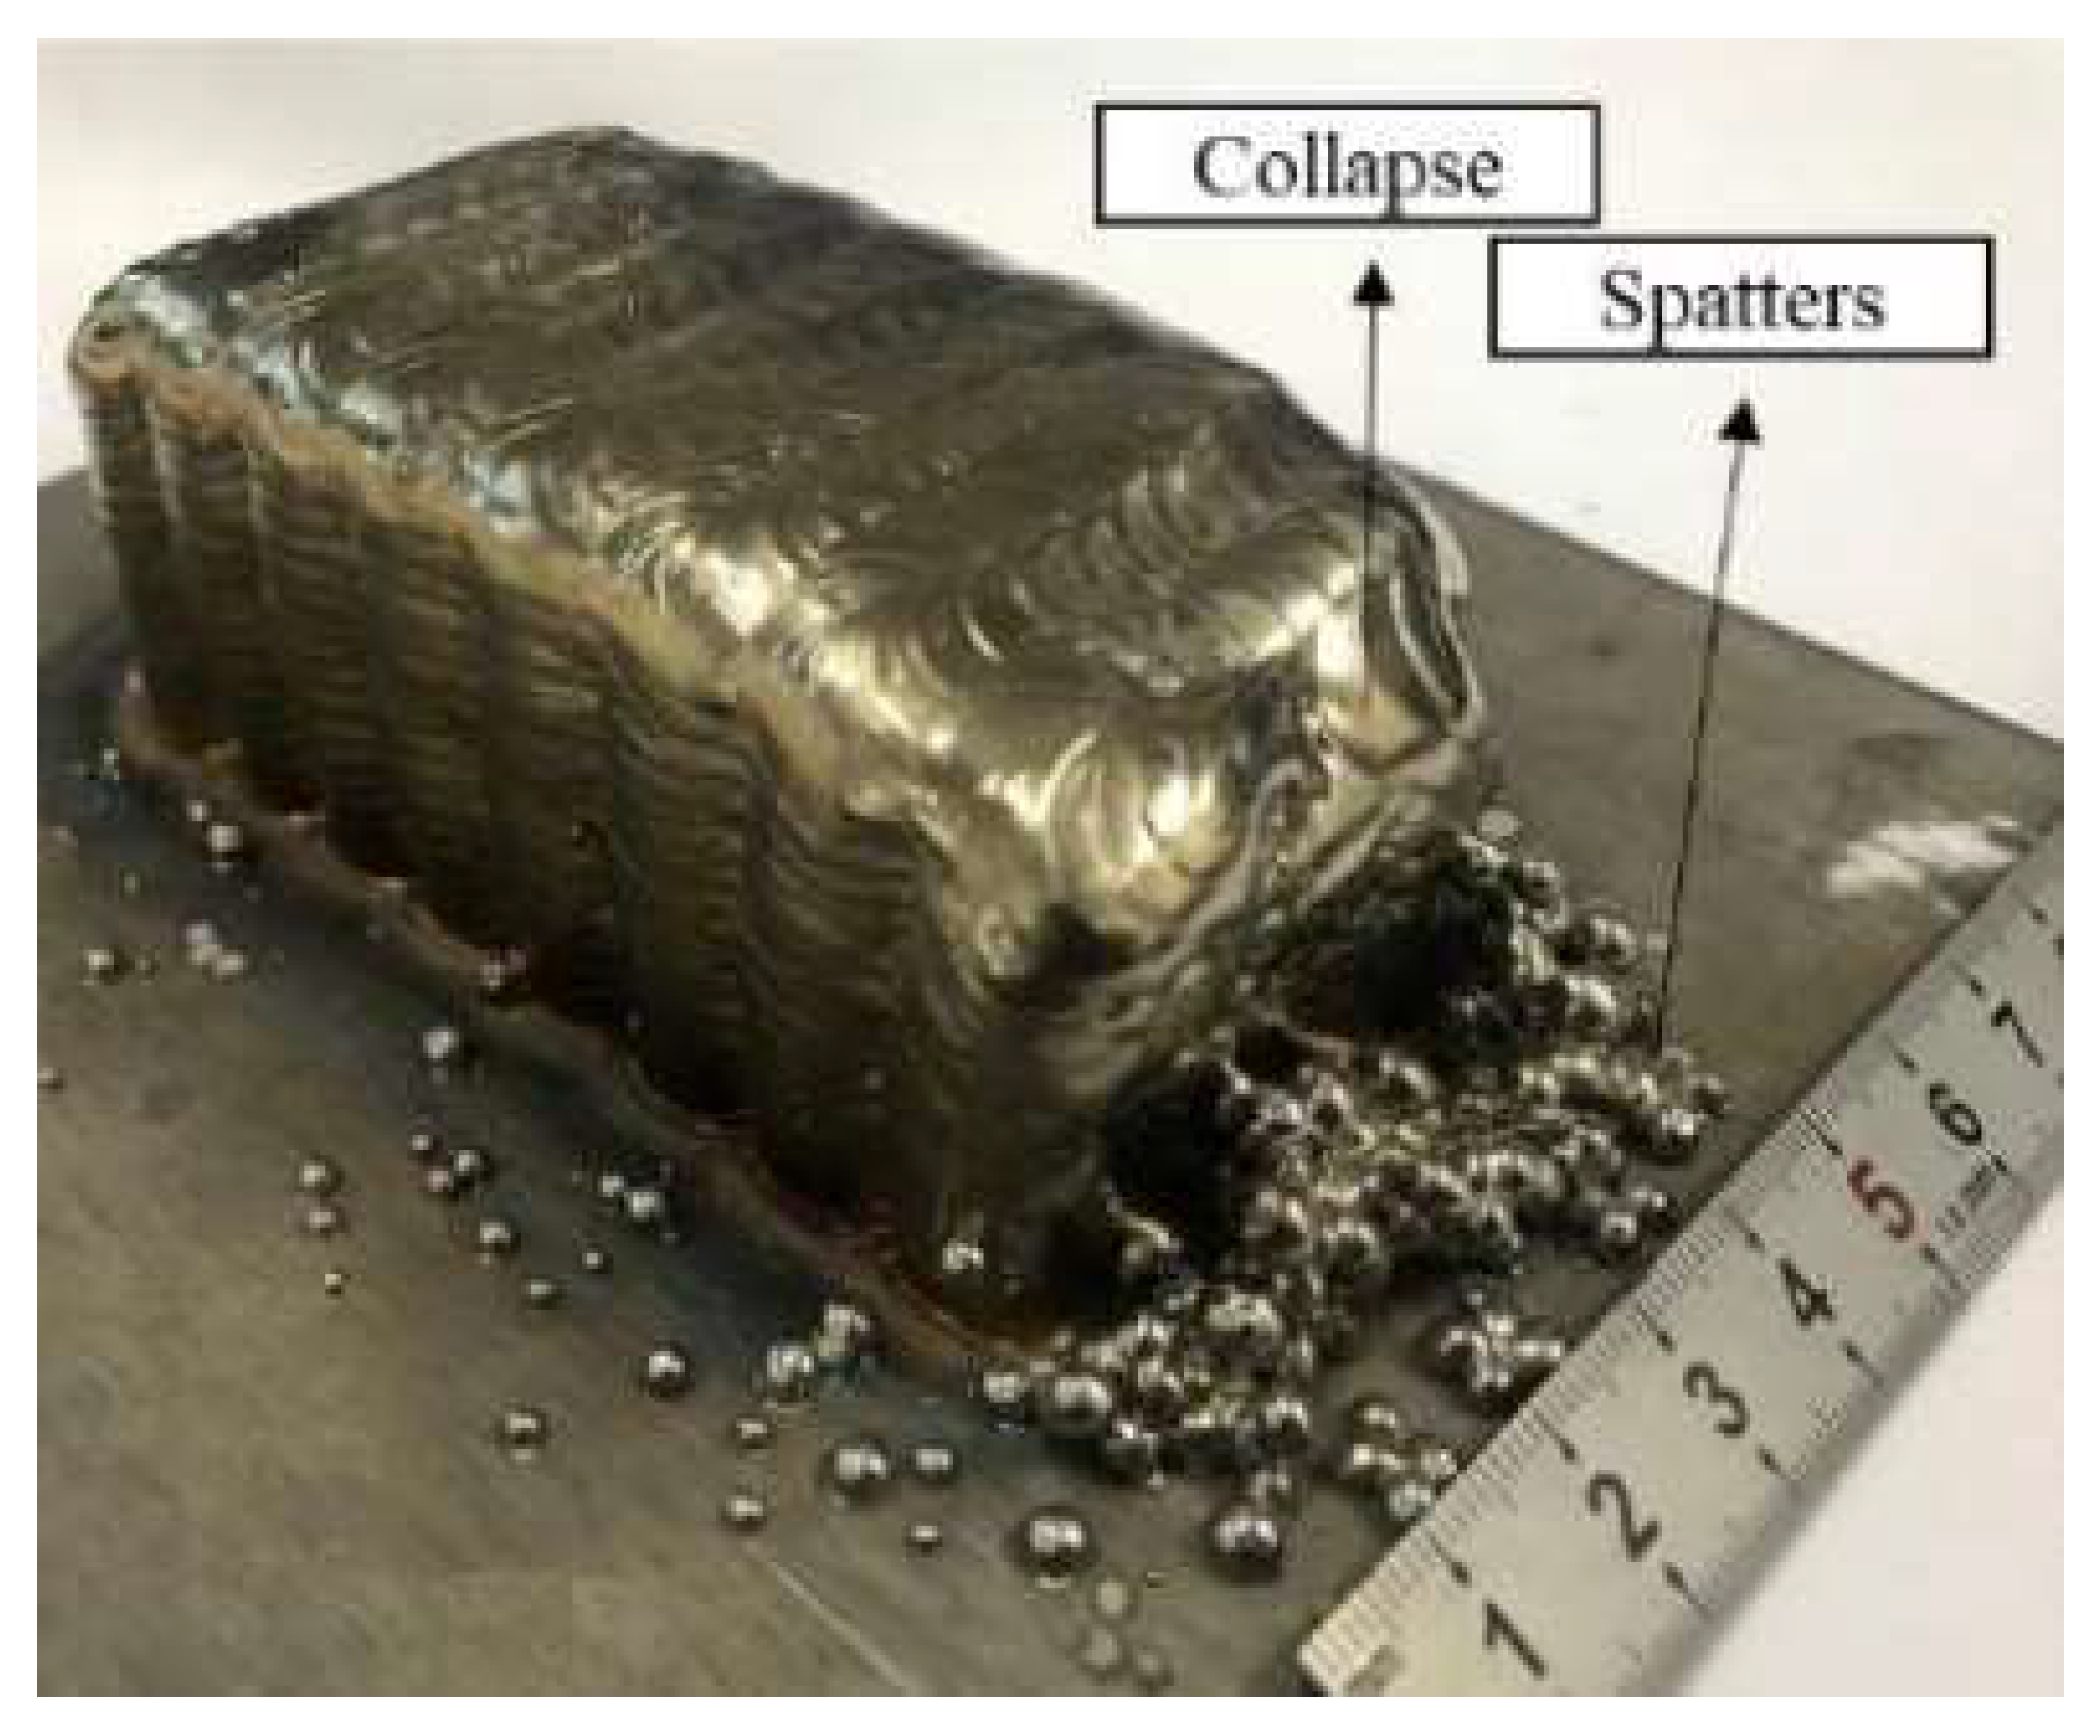
The causes of spatter defects in WAAM can be attributed to:
- Improper feedstock wire [3,18]: Using a welding wire with high levels of impurities or that is of poor quality can produce more spatter than a high-quality wire.
- Incorrect welding parameters [12,19]: The welding parameters such as the welding speed, current, and voltage can also affect the formation of spatter. If these parameters are not set correctly, it can lead to an increase in spatter formation.
- Insufficient shielding gas [19]: In WAAM processes, a shielding gas is used to protect the weld pool from the surrounding atmosphere. Insufficient or the wrong type of shielding gas can lead to the formation of spatter.
- Improper technique [20]: Improper deposition technique can also cause spatter defects. For example, if the torch is held too close to the workpiece, it can cause an increase in spatter formation.
The consequences of spatter defects in WAAM can negatively impact the quality and functionality of the finished product. Some of the consequences include:
- Reduced surface quality: Spatter can stick to the surface of the component and create unsightly defects, reducing the overall surface quality of the finished product.
- Reduced strength and durability: Spatter can also reduce the overall strength and durability of the finished product by creating weak spots or porous areas in the metal.
- Reduced functionality: Spatter defects can make the finished product less suitable for use in certain applications, such as those that require high precision and quality.
To reduce the occurrence of spatter defects, it is essential to use high-quality welding wire and to properly set the welding parameters [3,18]. Additionally, using anti-spatter agents, which are hydrophobic chemicals that are applied to the surface of the workpiece before welding to prevent spatter from sticking, can also be effective in reducing spatter defects.
In summary, it is essential for manufacturers to minimize the occurrence of spatter defects to produce high-quality and functional products and reduce production costs.
2.7. Collapse
Collapse defects occur when the molten material cools and solidifies too quickly, causing the structure to collapse in on itself. The main cause of it is the overlapping process and excessive heat input [18]. This defect is shown in Figure 6 with spatter defects. Some of the main causes of collapse defects include:
- Improper welding parameters [18]: If the welding parameters such as the welding speed, wire feed rate, and current are not set correctly, it can cause the molten material to cool and solidify too quickly, resulting in collapse.
- Poor design [18]: Certain shapes and geometries may be more prone to collapse than others. If the design of the structure is not optimized for WAAM, it can increase the likelihood of collapse defects.
- Inadequate overlap [18]: Inadequate overlap of the welding gun can also cause collapse defects.
Collapse defects can have a number of negative consequences. Some of the main consequences include:
- Reduced mechanical properties: Collapse defects can lead to a reduction in the strength and stiffness of the final product, which can make it less suitable for its intended application.
- Increased surface roughness: Collapse defects can also lead to increased surface roughness, which can make it more difficult to achieve a smooth finish and can make it more difficult to achieve good adhesion in further processing or coating.
To prevent collapse defects, it is important to carefully control the welding parameters, such as the welding speed and wire feed rate [18]. The design of the structure can also play a role, as certain shapes and geometries may be more prone to collapse than others.
Another solution is to use a technique called “overlap welding” [18], which helps to avoid collapse by moving the welding gun to an overlap area.
In conclusion, collapse defects can significantly impact the quality and strength of the final product. Careful control of the welding parameters, proper design, and material choice can help to reduce the likelihood of collapse defects.
2.8. Unmelted Wire
Unmelted wire defects in WAAM implies that the wire is not being melted totally or partially, as shown in Figure 7.
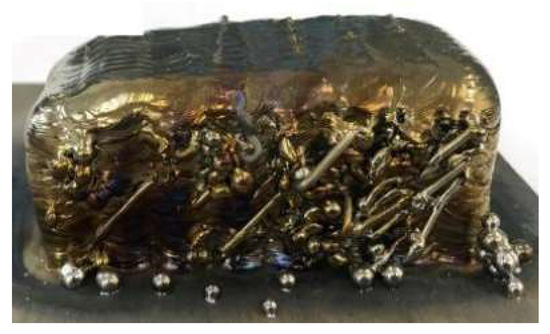
Figure 7.
Unmelted wire in WAAM, adapted from [18].
It can occur due to several different factors, including:
- Wire feed rate [21]: If the wire feed rate is too high, the arc may not have enough time to melt the wire before it is deposited on the substrate, resulting in unmelted wire segments or droplets.
- Arc power [18]: If the arc power is not sufficient, the wire may not be heated enough to melt completely, resulting in unmelted wire defects.
- Wire-to-arc distance [21]: If the distance between the wire and the arc is too much, the wire may not be heated enough to melt properly, resulting in unmelted wire defects. In addition, the composition of the wire being used can also play a role in the formation of unmelted wire defects. Some wire types may be more prone to forming unmelted wire segments or droplets due to their chemical composition, size, or shape.
- Welding conditions [18]: The welding conditions, such as the size and shape of the welding torch, the position of the torch, and the type of shielding gas used, can also affect the formation of unmelted wire defects.
It is important to note that unmelted wire defects can be caused by a combination of these factors, and that the specific cause may vary depending on the specific process and materials being used. This can results in different consequences including:
- Reduced strength and durability [18]: Unmelted wire defects can result in a weaker and less durable finished product, as the defects can act as stress concentrators that can lead to premature failure.
- Surface defects [18,21]: Unmelted wire defects can result in surface defects, such as protruding wire segments or droplets, which can affect the cosmetic appearance of the finished product and make it difficult to achieve a smooth surface finish.
- Reduced accuracy: Unmelted wire defects can affect the accuracy of the finished product, as the defects can result in variation in the thickness or shape of the deposited layers.
- Increased material consumption: Unmelted wire defects can lead to increased material consumption, as more wire may need to be used to achieve the desired thickness or shape of the finished product.
To address unmelted wire defects, one approach is to adjust the wire feed rate to a slower speed, which allows the arc to melt the wire more effectively [18]. Another approach is to increase the power of the arc, which can make it hotter and more capable of melting the wire. Additionally, reducing the distance between the wire and the arc can also help to melt the wire more effectively [18,21].
Another solution is to use a different type of wire feeder, such as one that uses a laser beam to melt the wire, which can also help to avoid unmelted wire defects.
2.9. Delamination
Delamination is a significant issue in the field of WAAM, where metal layers in a 3D printed part can separate from one another. The presence of delamination in the final product leads to significant financial and safety consequences. Figure 8 presents a delamination defect between the layers of metal deposited in the additive manufacturing process.

Figure 8.
Delamination in WAAM, adapted from [21].
The causes of delamination in WAAM can be attributed to:
- Incorrect wire-feeding speed [20]: If the wire-feeding speed is too fast or too slow, it can result in delamination.
- Low heat input [5]: Low heat input during the welding process can result in inadequate welding and a low bond strength between the metal layers, leading to delamination.
- Improper cooling [22]: Improper cooling during the WAAM process can result in residual stresses and a decreased bond strength, leading to delamination.
- Poor process control [5]: If the process parameters are not controlled and monitored correctly, it can result in delamination.
- Material properties [3]: The properties of the metal being used can also affect the likelihood of delamination, including the composition, purity, and microstructure of the metal.
The consequences of delamination can be significant, including:
- Reduced strength and durability [23]: Delamination can result in reduced strength and durability of the final product, making it more likely to fail during use.
- Increased risk of failure [3]: The presence of delamination increases the likelihood of failure during the use and life of the part, leading to significant financial and safety consequences.
The wire-feeding speed is an essential process parameter in WAAM that can have a significant impact on the final product. If the wire-feeding speed is too fast or too slow, it can result in delamination and a lower-quality final product [3]. A low heat input can also result in inadequate welding and a low bond strength between the metal layers, leading to delamination. Improper cooling during the WAAM process can also result in residual stresses and decreased bond strength, leading to delamination [5].
To minimize the occurrence of delamination in WAAM, the heat input should be controlled to prevent low bond strength and inadequate welding, and the arc voltage should be adjusted to prevent metal vaporization. Proper cooling is also essential to reduce residual stresses and increase the bond strength between the metal layers.
2.10. Uneven Bead Height
The uneven bead height defect is characterized by variation in the height of the deposited beads, resulting in a non-uniform surface finish and potentially affecting the structural integrity of the built part, as presented in Figure 9.

Figure 9.
Uneven bead height, adapted from [17].
The causes of uneven bead height defects in WAAM can be attributed to:
- Variation in welding parameters [5]: An uneven bead height can occur if the welding parameters, such as the wire feed rate and arc current, are not properly controlled. Small variations in these parameters can result in variation in the size and shape of the deposited beads, leading to an uneven surface finish.
- Wire feeder issues [5]: If the wire feeder is not working properly or is not adjusted correctly, it can cause variation in the wire feed rate, leading to an uneven bead height.
- Robot arm issues: The robotic arm used to guide the wire during the WAAM process can also cause an uneven bead height if it is not functioning properly or is not calibrated correctly.
- Improper weld-path planning [17]: If the weld path is not planned properly, it can cause unevenness in the bead height, as the robot arm may not be able to deposit the material in a consistent manner.
By identifying the root cause of the problem and implementing corrective measures, it is possible to overcome this issue and produce high-quality parts using WAAM, thus avoiding consequences such as:
- Non-uniform surface finish [17]: An uneven bead height can result in a non-uniform surface finish, which can affect the aesthetic appearance of the built part.
- Reduced accuracy: An uneven bead height can also affect the dimensional accuracy of the built part, as the variation in the bead height can result in deviations from the intended shape and size of the part.
- Increased material waste: An uneven bead height can also lead to increased material waste, as more material may be required to correct the defect or rework the part.
To address an uneven bead height defect, it is important to first identify the root cause of the problem. This can be achieved by analyzing the welding parameters and the process itself, as well as inspecting the equipment used in the process. Once the cause of the defect has been identified, steps can be taken to correct it, such as adjusting the welding parameters, maintaining or replacing equipment, or implementing process controls.
Overall, uneven bead height defects can have a significant impact on the quality and performance of the built parts, and it is important to take steps to address this issue in order to produce high-quality parts using WAAM.
2.11. Geometric
Geometric defects in WAAM can take various forms, including the most common ones such as porosity, undercuts, and uneven bead height. Some of the other types of geometric defects in WAAM, beyond these three mentioned, include:
- Overlap [13]: Overlap is a geometric defect that occurs when the deposited material builds up on top of itself, forming a thick layer that can weaken the part. This defect can occur due to incorrect process parameters or poor part design.
- Distortion [3,24]: Distortion is a geometric defect that occurs when the deposited material cools and shrinks unevenly, causing the part to change shape. This defect can occur due to poor part design or incorrect process parameters.
- Misalignment [24]: Misalignment occurs when the deposited material is not properly aligned with the part, causing the part to be out of shape or not fit properly. This defect can occur due to improper wire feeding or incorrect process parameters.
- Distortion can happen in many different forms. One of its ways is shown in Figure 10.
 Figure 10. Geometric distortion, adapted from [24].
These defects can occur due to a variety of factors and can be interrelated. Some of the causes of geometric defects are improper wire feeding, incorrect process parameters, poor part design, poor surface preparation, improper shielding, lack of process monitoring, material properties, and environmental conditions [3,13,24,25,26].
To mitigate the occurrence of geometric defects in WAAM, it is essential to carefully control the process parameters and ensure proper wire feeding. Additionally, proper part design, such as designing in larger radii and avoiding small features, can also help reduce the occurrence of defects. It is also important to regularly inspect and monitor the part during the manufacturing process to identify and address any defects that do occur.
The consequences of a geometric defect could be:
- Reduced strength and integrity of the part: Voids, porosity, and incomplete fusion can weaken the overall integrity of the part and make it more prone to failure.
- Functional failure: Undercuts, misalignment, and warping can cause the part to not fit properly or function as intended.
- Reduced accuracy: Distortion can cause the part to be out of shape [26], reducing its accuracy and making it difficult to use.
- Reduced aesthetic quality: Warping and distortion can cause the part not to have a smooth finish and can affect the overall aesthetic quality of the part.
In conclusion, geometric defects are a common issue in WAAM. These defects can have a significant impact on the structural integrity of the part and can be caused by a variety of factors. However, by properly controlling the process parameters, ensuring proper wire feeding, and designing parts with consideration for the manufacturing process, the occurrence of geometric defects can be greatly reduced.
2.12. Overview of WAAM Defects
As previously mentioned, defects in WAAM can result from various factors including incorrect process parameters, material characteristics, poor control of the feed rate, improper toolpaths, and inadequate post-processing. The presence of defects can negatively impact the mechanical properties and overall performance of the manufactured parts. It is crucial to identify and address the root cause of defects to ensure consistent and reliable output in WAAM processes. Table 1 presents an overview of the main defects in WAAM.

Table 1.
Overview of the most common WAAM defects.
It is important to keep in mind that these consequences can vary depending on the specific process and materials being used and the severity of the defects. It is important to identify and address the root causes of the defects in order to minimize their impact on the finished product and the manufacturing process.
Due to this enormous possibility of defects occurring, NDT is necessary to determine the possible failures that may occur during the process. Those tests performed in real time have the advantage of allowing the timely correction of errors during manufacturing.
3. Non-Destructive Testing Methods
Non-destructive testing (NDT) is testing methodologies for material characterization and defect detection without harming the tested material or changing its original properties. With the increasing technological transfer of the WAAM process to industry, the creation and development of customized NDT for the application in these types of components, namely in surfaces with high waviness/roughness [1] inspected at high temperature, is fundamental.
NDT is divided by physical phenomenon, these being ultrasonic, electromagnetic, radiographic, thermographic, and others (penetrating liquids and acoustic emission) [27]. Among these methods, those most widely employed are visual, ultrasonic, radiographic, infrared thermography, and liquid penetrant testing [28,29]. However, the use of some of these tests adapted specifically for WAAM is still low. In addition, there is the possibility of performing some of these NDTs during the deposition of the material, in an in-line manner, which is the goal of this paper.
There are several different techniques that can be used for in-line NDT of WAAM. One of the most common methods is X-ray imaging, which can be used to detect internal defects such as porosity, inclusions, and lack of fusion.
Another method of in-line NDT for WAAM is ultrasonic testing, which uses sound waves to detect internal defects. This can be carried out by transmitting ultrasonic waves into the part and capturing the reflections on a detector.
The constraints encountered when implementing in-line NDT in WAAM processes are due to the undulation and roughness of the surface, as well as the existence of other equipment, such as gas nozzles, material feeder, and cables, which create constraints on the arrangement of NDT probes and can cause significant interference [30]. These difficulties, combined with the characteristics of the defects generated during WAAM, such as their small size [1], heterogeneous morphology, and potential location deep in the part, can cause significant disturbances in NDT signals that must be overcome for wider adoption of WAAM technology in industry [30].
Some methods are not possible to adapt for in-line inspection of WAAM because of their dynamic operation. Some of these are liquid penetrant and magnetic particle testing [31,32], where the part must be ready for the particles, or dye-penetrant, to interact with the defects and detect them. Conventional and immersion ultrasonic methods cannot be used either, as one depends on the transducer making contact with the analyzed object, while the other depends on the part being immersed in a fluid, respectively [1,31]. Conventional radiographic inspection also cannot be used because it does not generate digital data during the penetration of the X-ray beam into the part [1,32]. Visual inspection by the naked eye is not possible [31] because it is limited to surface defects and the energy generated by the electric arc can damage eyesight, and finally, computed tomography cannot be used in-line because you need a finished part to generate a 3D model from 2D images [31,32].
Adapting NDT for WAAM is essential but it requires further research. Therefore, the main available in-line NDT techniques applicable to WAAM will be covered in the following subsections.
3.1. Phased-Array Ultrasonic Testing
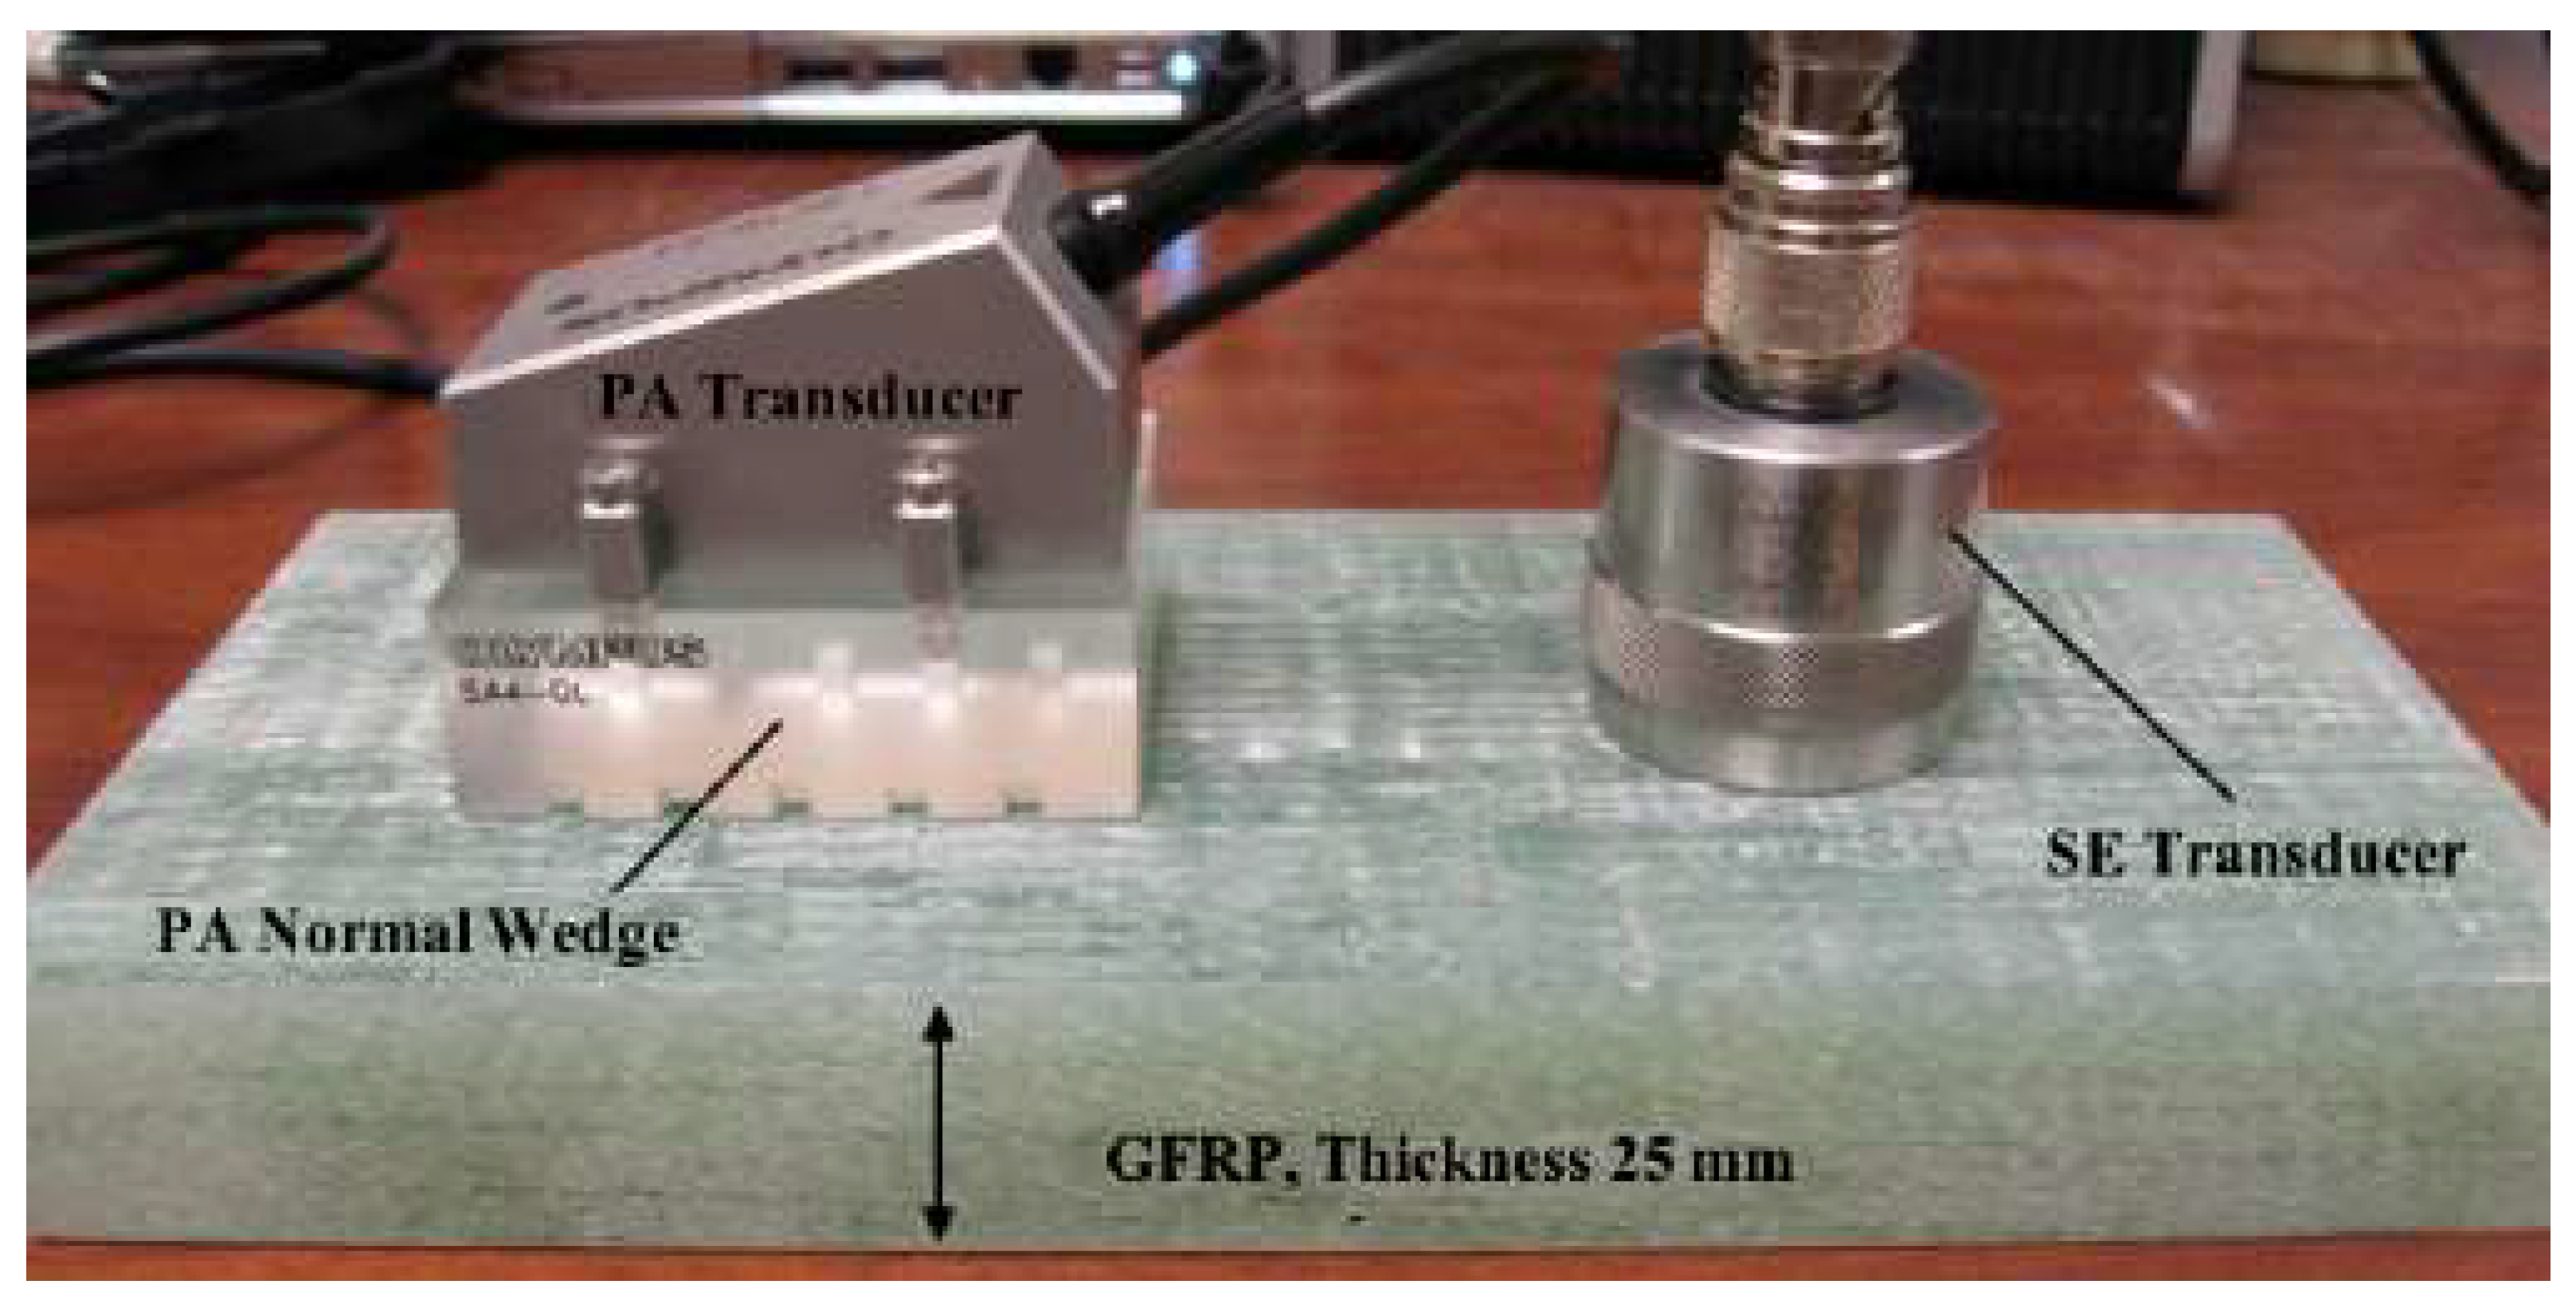
Phased-array ultrasonic testing (PAUT) uses ultrasonic waves, but instead of using a single transducer, it uses a phased array of transducers that can be electronically focused and scanned to inspect a specific area. Figure 11 presents a comparison between PAUT and conventional ultrasonic testing.
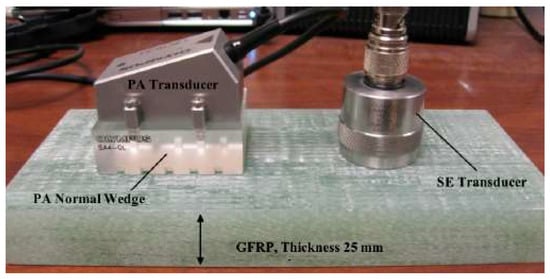
Figure 11.
Comparison between phased-array (PA) transducer used in PAUT and a single-element (SE) transducer used in conventional ultrasonic testing, adapted from [33].
Figure 11.
Comparison between phased-array (PA) transducer used in PAUT and a single-element (SE) transducer used in conventional ultrasonic testing, adapted from [33].
PAUT has several advantages over conventional ultrasonic testing, including improved resolution and the ability to change the focal point and angle of the ultrasonic beam. It also allows for the inspection of components with complex geometries and can detect a wide range of defects, including planar and volumetric defects [33].
Among the NDT methods that must be adapted to WAAM, ultrasonic is routinely used to evaluate welded structures and has proven useful even for high-dimensional structures [1]. The technique with the best use is phased-array ultrasonic testing (PAUT) [34], because it makes use of multi-element transducers that can transmit/receive independently and at different times, allowing a reduction in inspection time and increasing reliability and sensitivity, and can also be applied to high-dimensional structures [35,36]. However, the surface conditions on which the ultrasound test is performed significantly affect the detection of defects, since contact must be established between the ultrasonic and the surface of the component under analysis [37,38]. This is usually accomplished with the use of some couplant, such as gel, for example, but requires at least a surface with low roughness.
During the in-line PAUT of WAAM processes, the phased-array probe is placed in contact with the surface of the material as it is being built. The probe emits and receives ultrasonic waves, which are used to create an image of the internal structure of the material. The image is analyzed to detect any defects, such as porosity, inclusions, or lack of fusion, that may have occurred during the manufacturing process.
The in-line PAUT process can be performed in a variety of ways, including pulse–echo, through-transmission, and total focusing method (TFM). Pulse–echo is used to find surface breaking and near-surface defects, through-transmission is used to detect subsurface defects, and TFM is used to detect small, deep defects [39].
In general, the results presented in the literature [40,41] show that proper selection of the transducer frequencies should be taken into consideration when inspecting rough surfaces. Using PAUT on WAAM-manufactured parts involves two issues, the first concerning the unknown response to the internal structure of the components and the second, the morphological variation of the surface, which influences the interaction between the emitted ultrasonic beam and the component [40].
Overall, in-line phased-array ultrasonic testing of wire and arc additive manufacturing is an advanced NDT technique that provides real-time monitoring and detection of defects during the manufacturing process, allowing for adjustments to be made to improve the quality of the final product.
3.2. Electromagnetic Acoustic Transductor
An electromagnetic acoustic transducer (EMAT) is a type of non-contact transducer that is used to generate and detect ultrasonic waves in metal materials. It works by using an electromagnetic field to generate and detect the ultrasonic waves, which can be used for a variety of applications, such as metal thickness measurement, material characterization, and weld inspection [31,42,43].
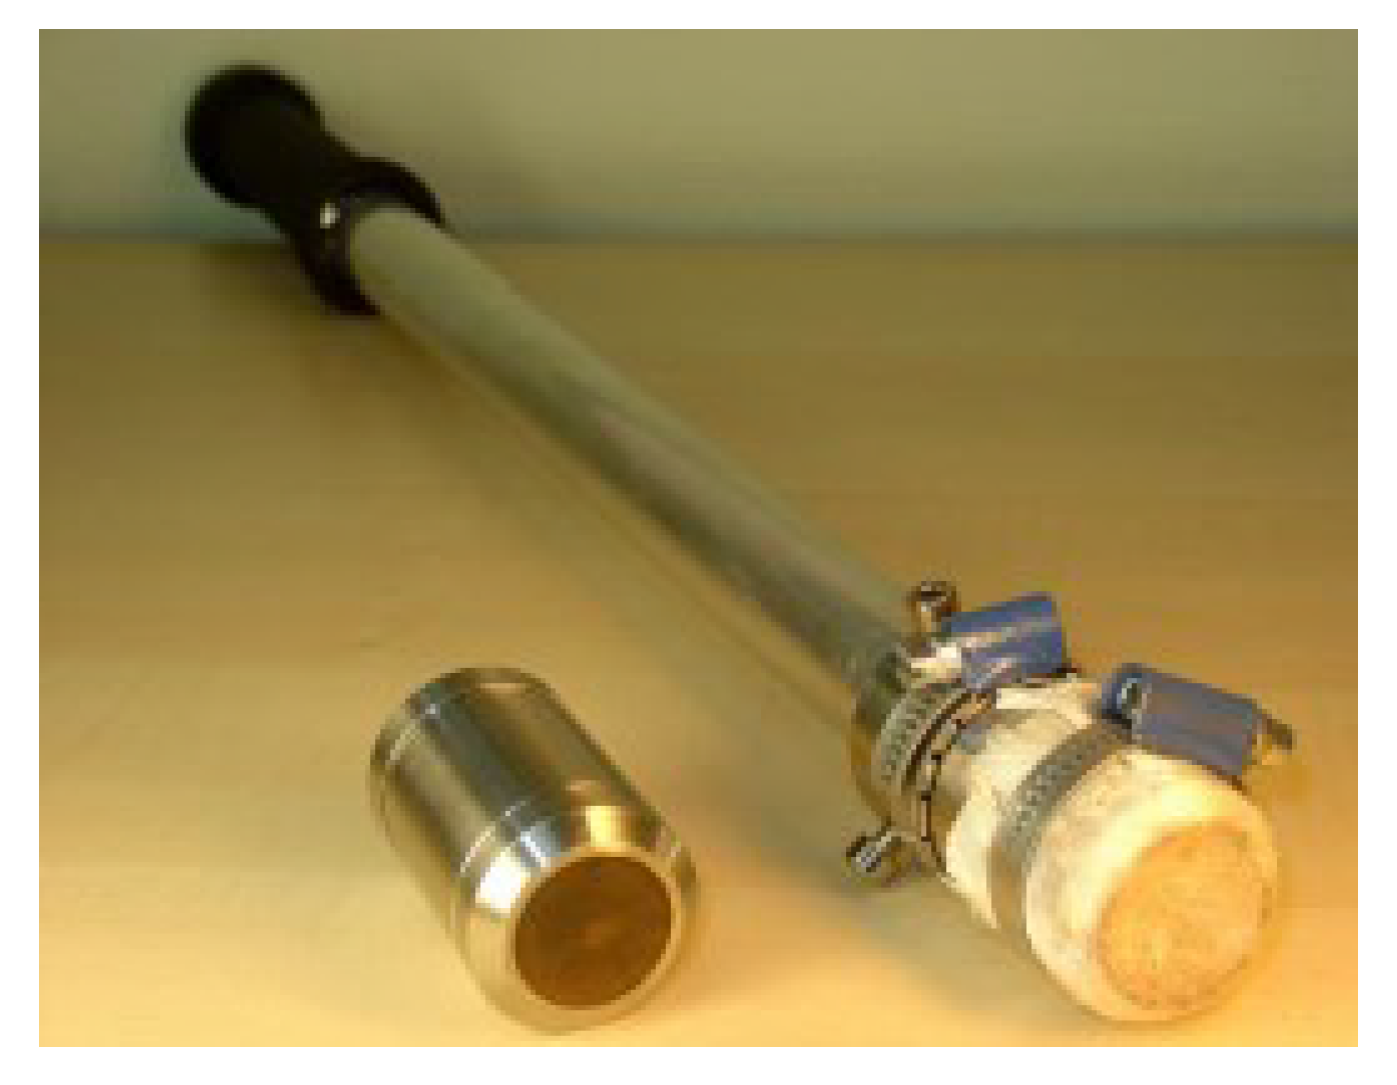
EMATs are typically composed of two main components: a coil and a permanent magnet. The coil is used to generate the electromagnetic field, while the magnet is used to focus the field onto the metal surface. When an alternating current is passed through the coil, it creates an oscillating magnetic field that induces eddy currents in the metal surface, resulting in the generation of ultrasonic waves [43] due to the Lorentz force that the material experiences. These ultrasonic waves can then be detected with the EMAT, allowing the analysis of the material. Figure 12 shows the EMAT probe and the induced eddy currents.

Figure 12.
EMAT transducer on the left as it is, and on the right with heat protection, adapted from [31].
EMAT have several advantages over other types of transducers, such as contact transducers, including:
- They do not require physical contact with the material, which makes them well-suited for use on surfaces that are difficult to access or that are sensitive to damage [1,43].
- They can be used on a wide range of metal materials, including ferromagnetic and non-ferromagnetic materials [43].
- They can be used to generate and detect both longitudinal and shear waves [42].
- They can be used in harsh environments, such as high-temperature or corrosive environments [1,31].
In WAAM, an in-line EMAT generates ultrasonic waves that are sent through the material, and the reflections of these waves are then detected by the system. The data obtained from the EMAT can be used to monitor the quality of the welds in real time, which can improve the overall quality and efficiency of the WAAM process.
The use of in-line EMATs in WAAM has some advantages over other non-destructive testing methods, such as X-ray or ultrasonic testing, including:
- It allows for real-time monitoring of the weld quality, which can improve the overall efficiency of the WAAM process [31].
- It does not require any physical contact with the material [1,43] and it can be used on a wide range of metal materials [43].
In-line EMATs can be used for various purposes in WAAM process, such as:
- Monitoring the weld pool and wire feed in order to detect and correct any issues before they become major problems [44].
- Detection of defects, such as porosity, in the welds [1,42].
- Measuring the thickness of the deposited layers in order to ensure that they meet the desired specifications [1,44].
- Detection of incomplete fusion, a common problem in WAAM processes [1,44].
EMAT also presents several limitations, namely, a high sensitivity to lift-off changes, limitations to detect sub-millimeter defects, and being limited to low frequencies compared to piezoelectric US probes.
3.3. Laser-Ultrasonic Testing
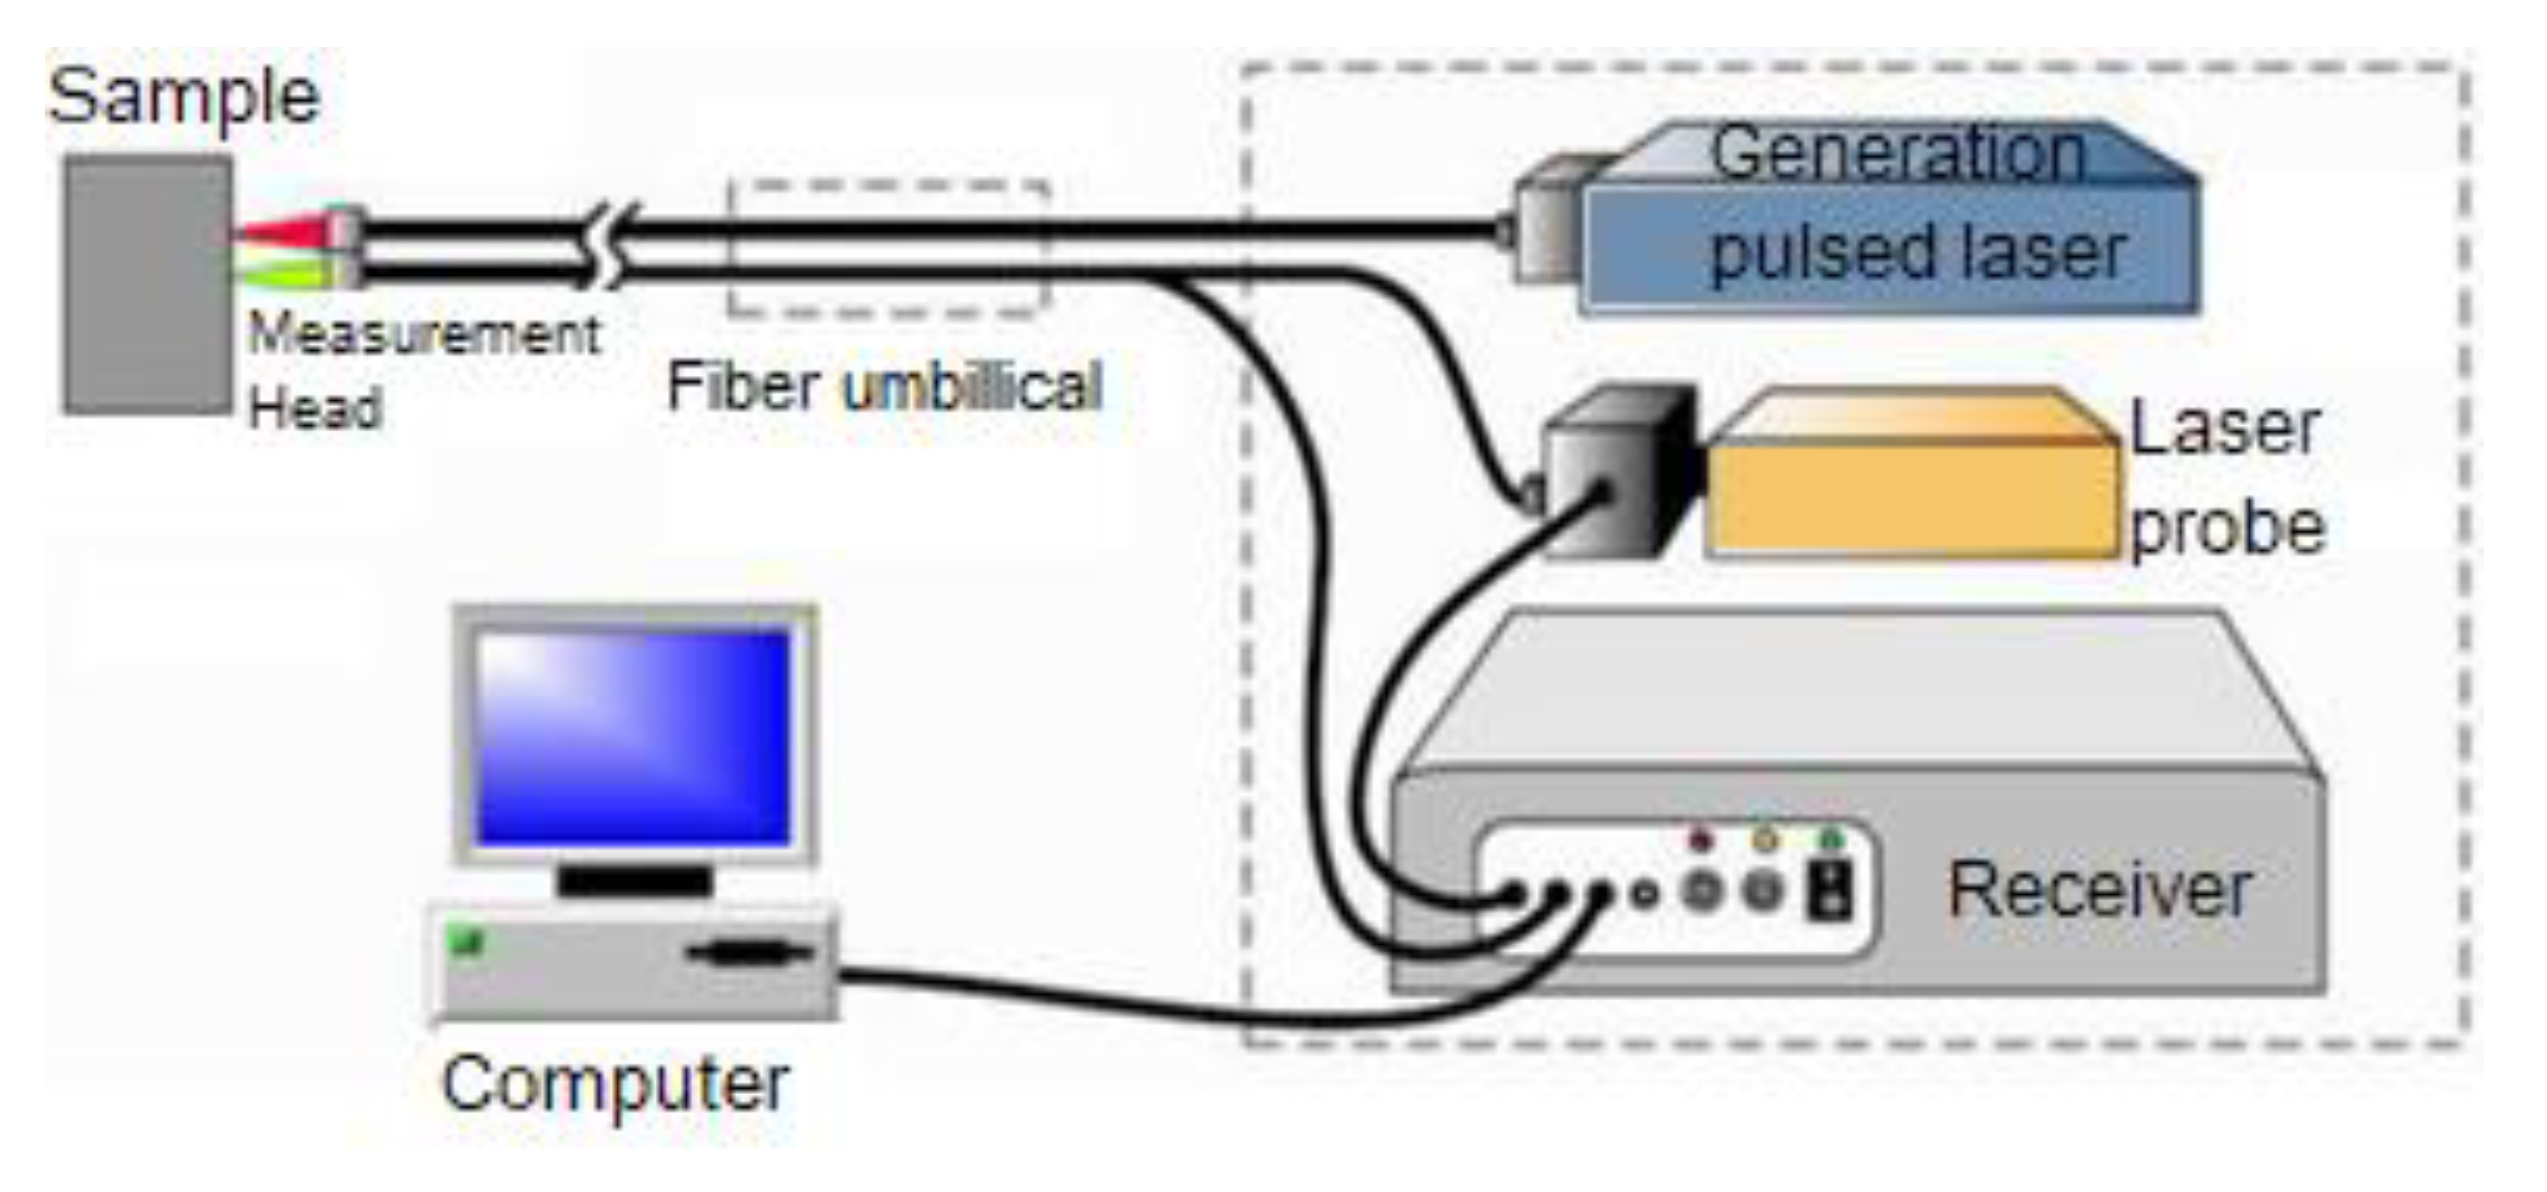
Laser-ultrasonic testing (LUT) is a NDT method that uses laser beams to generate and detect ultrasonic waves in a material. The technique is used to evaluate the properties of a material, such as the thickness, elastic modulus, and defects. The LUT setup is presented in Figure 13.
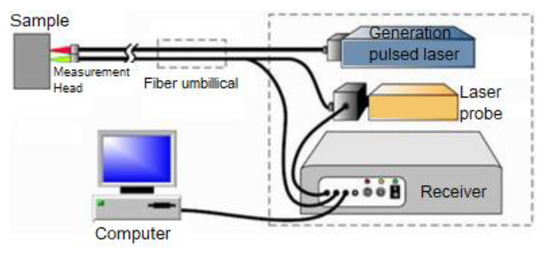
Figure 13.
LUT system, adapted from [31].
The in-line LUT system can be integrated into the WAAM equipment, and the laser beam is directed at the surface of the material being built. The laser beam heats the surface, causing thermoelastic expansion and generating ultrasonic waves. These ultrasonic waves propagate through the material and are detected using a sensor, such as a piezoelectric transducer. The sensor converts the ultrasonic waves into an electrical signal, which is then analyzed to determine the properties of the material [1,45,46].
In-line LUT of WAAM offers several advantages over other NDT methods, including high resolution, good penetration depth, and the ability to test materials in situ [1]. It can also provide information on the elastic modulus, density, and thermal diffusivity of the material, which can be used to detect subsurface defects [47].
LUT can be divided into two types: contact and non-contact LUT. Contact LUT requires direct contact between the laser and the material surface, while non-contact LUT uses a laser to generate ultrasound waves through the air. In non-contact LUT, the laser beam is focused on a small area of the material surface, and the resulting heat causes thermoelastic expansion of the material, which generates ultrasonic waves. For in-line NDT from WAAM the non-contact option of LUT should be used due to the process dynamics and high temperatures. However, the in-line LUT of WAAM systems has some limitations. It requires direct access to the surface of the material being built and is not suitable for testing materials that are opaque to laser beams or for testing buried or internally located defects [45,46,47]. Additionally, LUT requires specialized equipment and trained personnel to operate, which can be costly.
3.4. Real-Time Radiography
During a real-time radiography (RTR) inspection, the object or structure being inspected is placed between the X-ray or gamma-ray source and the detector. The radiation passes through the object and is captured using the detector, which converts it into an image. The system is positioned close to the WAAM process, and the images are taken from different angles [32,48]. The image is then displayed on a computer screen, allowing the inspector to analyze it in real time and also immediate identification and correction of any issues that may arise.
In-line RTR NDT can be used to inspect for defects such as porosity, lack of fusion, and inconsistencies in the internal structure of the part [48]. This can help to improve the overall quality and reliability of the finished product. The in-line RTR NDT system is typically integrated into the WAAM process, allowing for real-time monitoring and analysis without interrupting the manufacturing process.
In-line RTR NDT can also be used to verify the internal structure of the WAAM part against the design specifications, ensuring that it meets the required standards. This method can also be used to track the build process and monitor the quality of the finished product.
It is important to notice that this method of inspection require specific safety measures, as the radiation emitted by the X-ray or gamma-ray sources can be harmful to human health.
3.5. X-ray Backscatter
In-line X-ray backscatter testing is an NDT method that uses low-energy X-rays to inspect the internal structure of a 3D-fabricated object during the WAAM process. This method detects the radiation that reflects from the target and uses the spatial density distribution of an object to measure the intensity of the distribution of scattered X-rays [31].
The X-ray source is typically positioned at one side of the build chamber, and the X-rays pass through the object being printed and are detected with sensors that do not necessarily need to be on the opposite side [31,49,50], as presented in Figure 14. X-ray backscatter NDT uses X-rays to penetrate the material and scatter off the internal structures, creating an image that can be analyzed for defects. This method has been used to inspect the quality of welds and identify any deviations from the intended design or internal defects, such as porosity, incomplete fusion, and cracking [31,49,50].
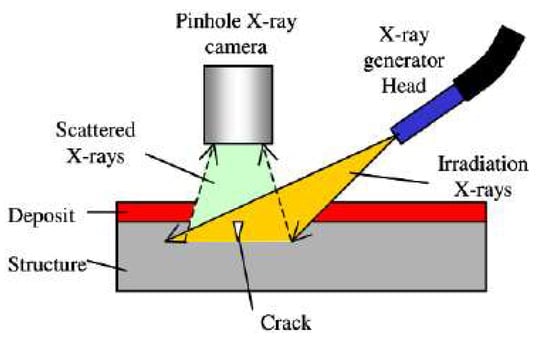
Figure 14.
X-ray backscatter testing system, adapted from [31].
In a study [51], X-ray backscatter NDT was used to detect artificial subsurface cracks in stainless steel pieces. The samples were prepared using weld-deposited cladding with the same material. The results showed that X-ray backscatter NDT was able to detect internal cracks with a 0.05 mm width. However, it could detect a defect of 0.025 mm width if the X-ray intensity was increased [32,51].
The results of this study [51] demonstrate the potential of X-ray backscatter NDT as a reliable method for inspecting the internal structure of WAAM-produced samples. Additionally, the results of this study [51] should be verified with further studies on different materials, welding conditions, and X-ray parameters.
One of the main advantages of in-line X-ray backscatter NDT is the ability to detect and correct defects in real time. This can help to improve the overall quality and reliability of the final product and can also help to reduce the manufacturing costs by reducing the need for post-manufacturing inspection and repairs. Additionally, in-line X-ray backscatter NDT can be used to optimize the manufacturing process by providing feedback on the performance of the WAAM system and identifying areas for improvement. Furthermore, X-ray backscatter NDT is capable of inspecting the entire volume of the material, rather than just a surface layer, making it possible to identify defects that may be hidden below the surface [31,52]. However, in-line X-ray backscatter NDT also has some challenges. One of the main challenges is the time consumption [51] of the process associated with the high cost. Additionally, the results of the in-line X-ray backscatter NDT may be affected by factors such as the thickness of the material, the density of the material [31], and the angle of incidence of the X-rays [49,50,51].
In conclusion, X-ray backscatter NDT is a powerful tool for evaluating the internal structure of materials and identifying defects that may not be visible to the naked eye. In the context of WAAM, X-ray backscatter NDT can be used to inspect the quality of the welds and identify any internal defects such as porosity, incomplete fusion, or cracking. However, it is important to consider the cost and complexity of the equipment required and the specific requirements of each application before deciding to use X-ray backscatter NDT.
It is important to note that, like any other X-ray technology, in-line X-ray backscatter testing uses ionizing radiation, which can be harmful to the human body in high doses. Therefore, it is important to follow safety protocols and guidelines when using this technology.
3.6. Eddy Current
Eddy current testing (ECT) is a phenomenon where an electrical current is induced within a conductor when it is exposed to a changing magnetic field. If a helicoidal cylindrical winding probe is used, the current flows in circular loops within the conductor and creates its own magnetic field that opposes the change in the external magnetic field [31,53]. Any flaws or discontinuities in the material, which can be detected and analyzed using specialized instruments, will affect the resulting eddy currents [1]. Figure 15 presents the eddy current method.
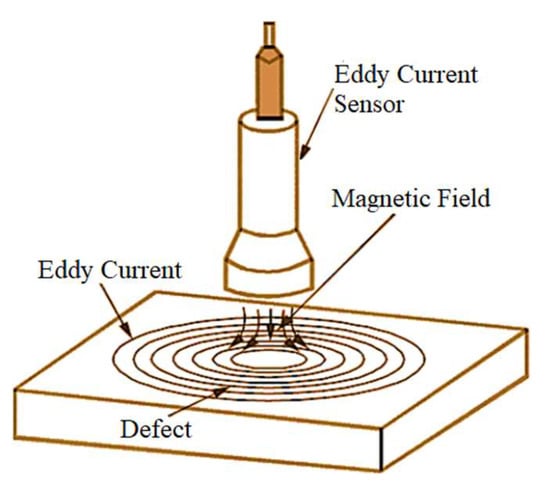
Figure 15.
Eddy current system.
The in-line ECT system is typically integrated into the WAAM process and uses a probe that is contactless, but needs proximity [1,31]. The probe generates an alternating magnetic field, which induces eddy currents in the deposited layer. These eddy currents are affected by any variation or defects in the material, and the resulting signal can be analyzed to detect these issues [1,31,53].
The in-line ECT system can detect a variety of defects, including porosity, inclusions, lack of fusion, and cracking [1].
It is advantageous to use ECT because it allows the analysis of ferromagnetic and non-ferromagnetic material during a high-speed layer deposition and it is contactless [53]. However, it presents difficulties when used as NDT for in-line WAAM due to lift-off fluctuations caused by the surface roughness, high temperatures of the process, and detection of internal flaws [53].
3.7. Infrared Thermography
Infrared thermography, also known as thermal imaging, is a technique that uses infrared radiation to create images of objects. These images show the temperature distribution of the object, allowing for the detection of temperature differences and variations [54].
The main purpose of in-line infrared thermography testing is to detect and monitor any potential thermal issues that may occur during the WAAM process. This includes detecting hot spots, which can indicate the presence of a welding defect or a problem with the wire feed [31,55].
In-line infrared thermography testing is carried out using an infrared camera that is mounted near the WAAM process. The camera captures images of the wire and metal being welded, detecting the infrared radiation emitted by objects and converting it into an electrical signal, which is then used to create an image. The temperature information is then analyzed by the machine or a human operator to detect any issues. This system is shown in Figure 16.
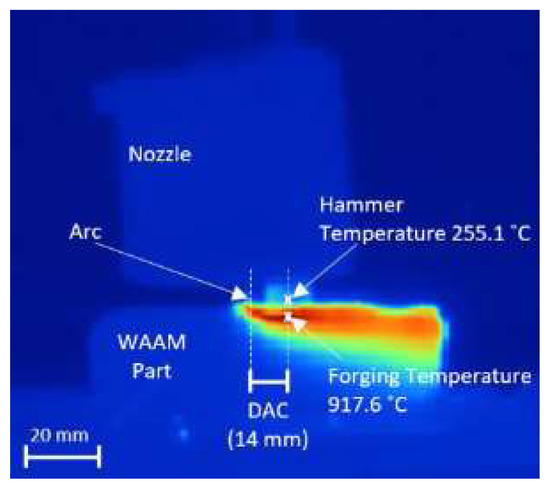
Figure 16.
Thermographic analysis of the deposited layer, adapted from [56].
Figure 16.
Thermographic analysis of the deposited layer, adapted from [56].
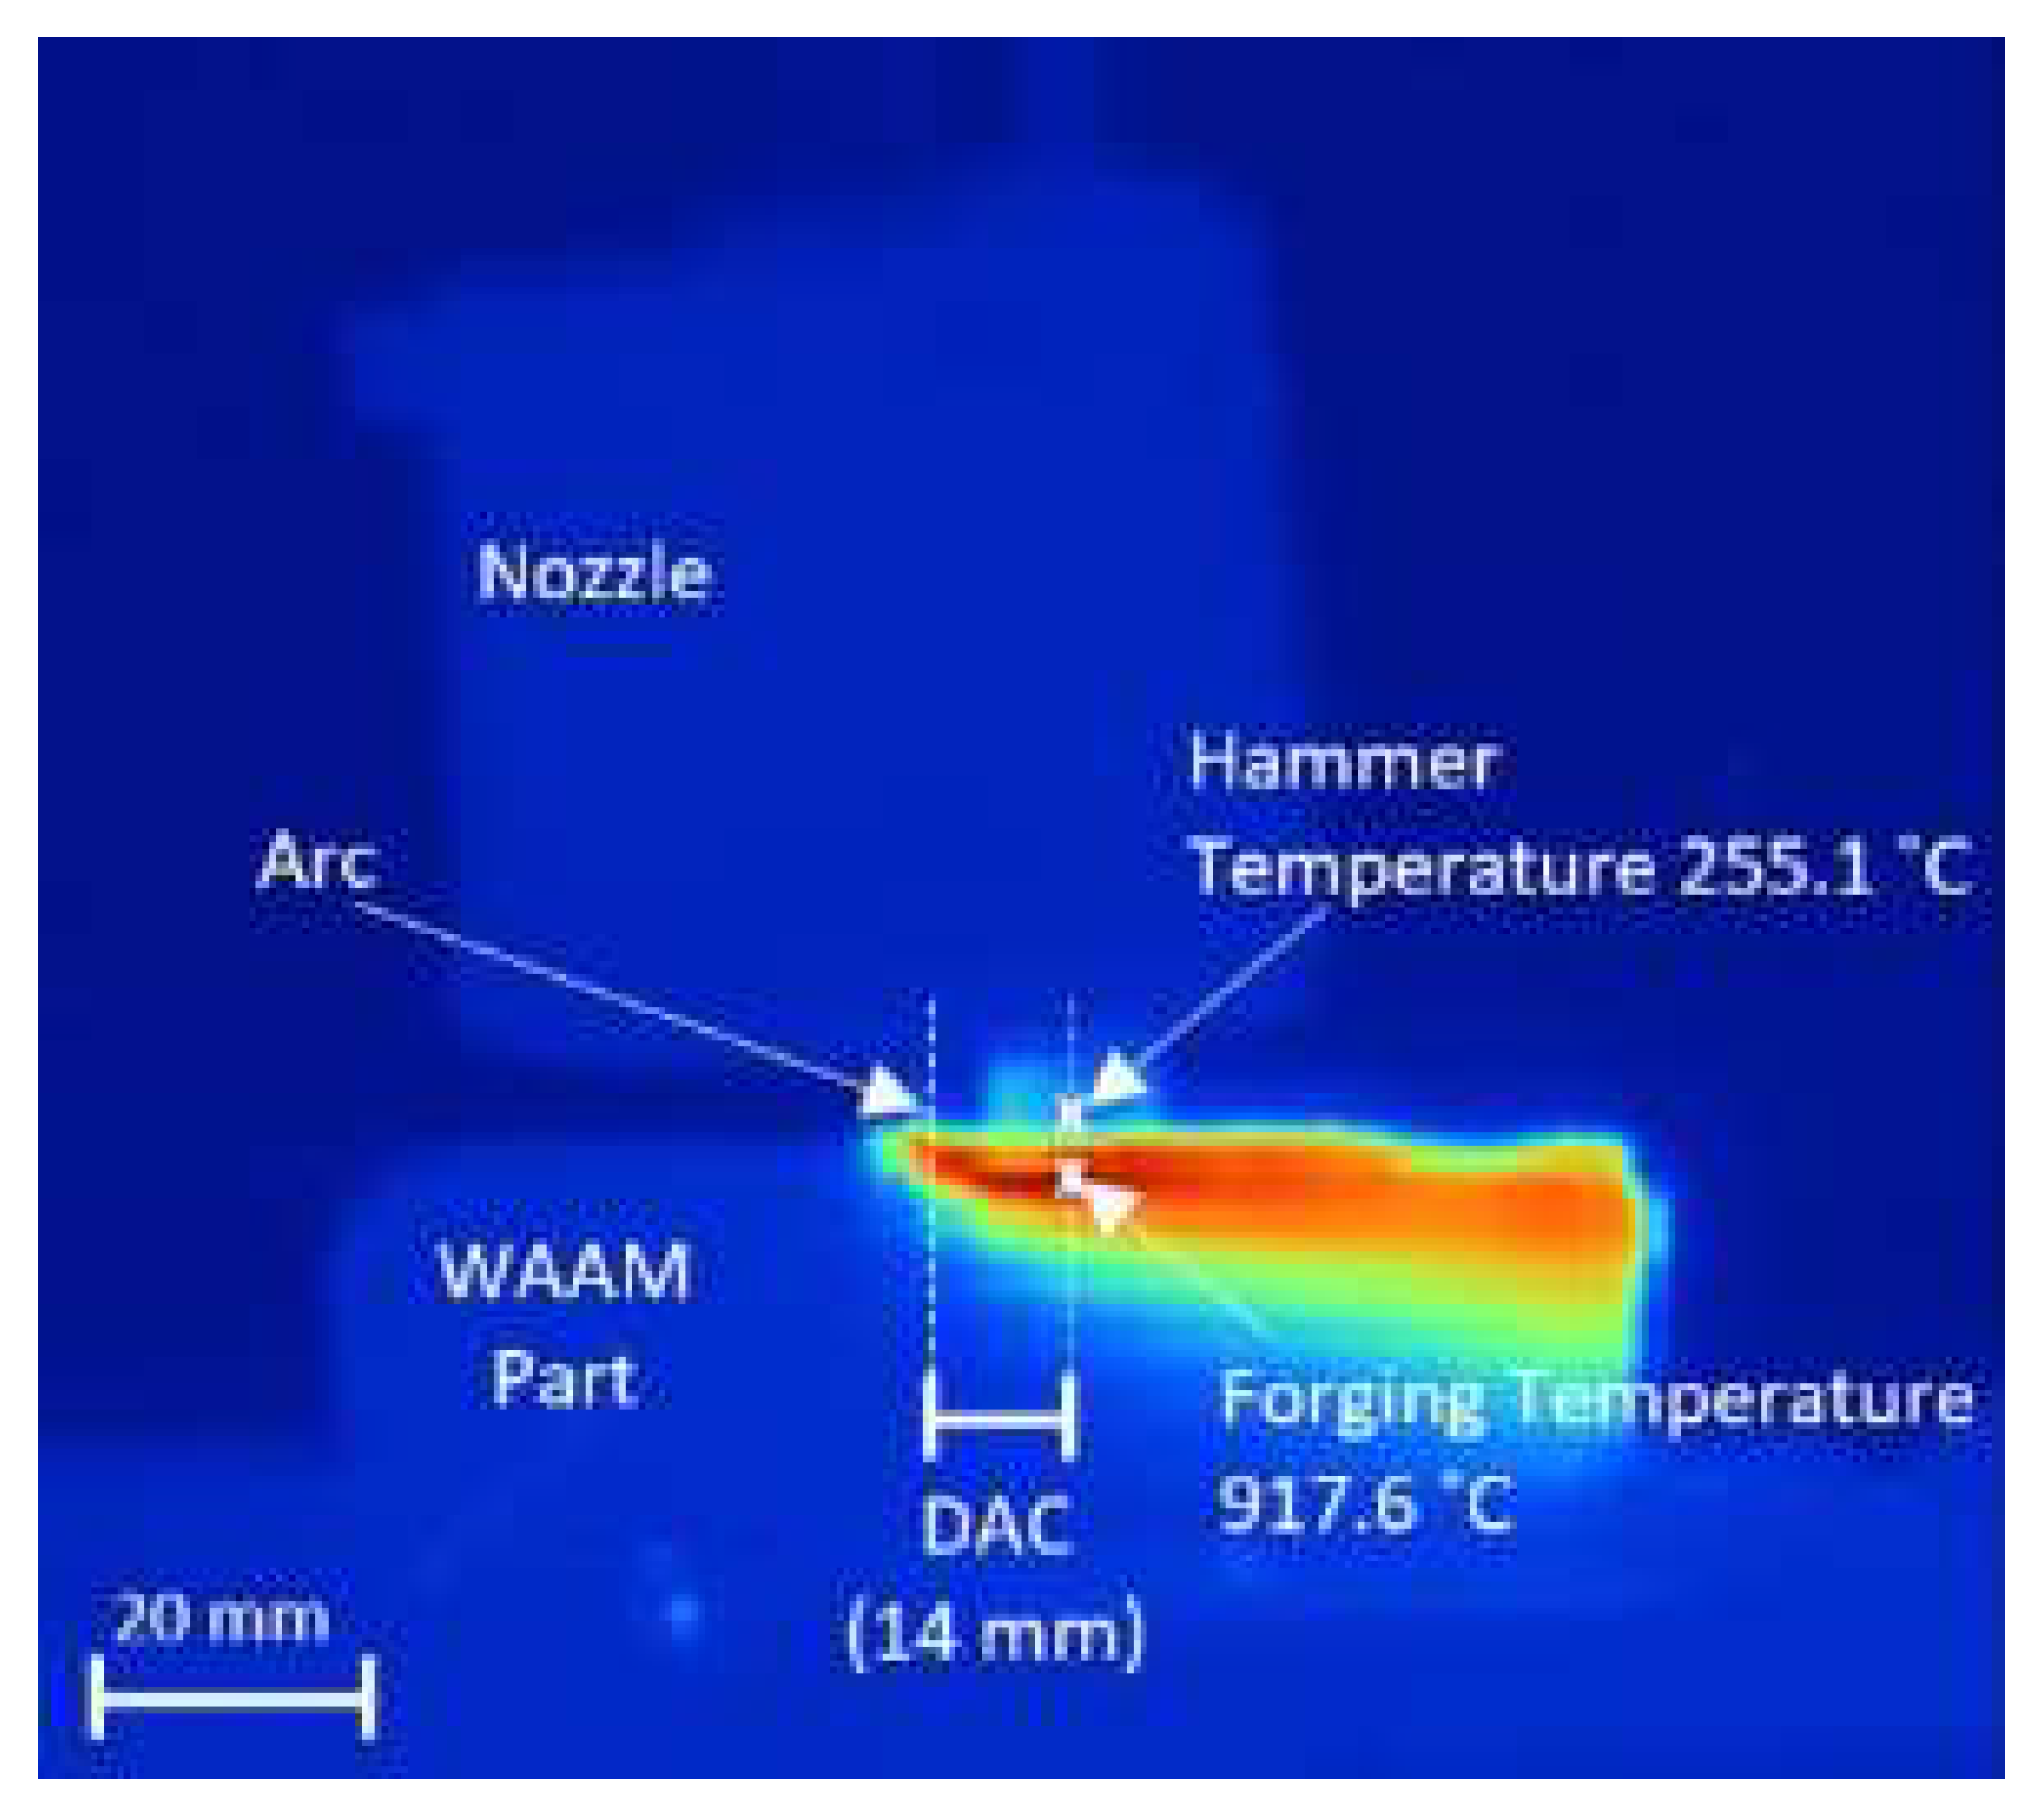
Some advantages of in-line infrared thermography testing is that it allows for real-time contactless monitoring of the WAAM process, detects subsurface defects, uses no radiation, and has a fast response, large detection range, and intuitive results [1,55].
The disadvantages of infrared thermography include qualitative results, which implicate the need of another NDT method to quantify [31]. Moreover, it needs to be used during the deposition of material, because it is necessary for the temperature differences in the material to identify possible flaws [1].
It is important to note that in-line infrared thermography testing is not a substitute for other quality control and inspection methods that are used in the WAAM process. It should be used in conjunction with other, more established NDT techniques to produce significant results for industrial application [31].
In summary, in-line infrared thermography testing is a technique used to monitor the temperature of the wire and the metal being deposited during the wire and arc additive manufacturing process. It allows for real-time monitoring of the process, detecting and correcting issues, and improving the quality and consistency of the final product.
3.8. Laser Thermography
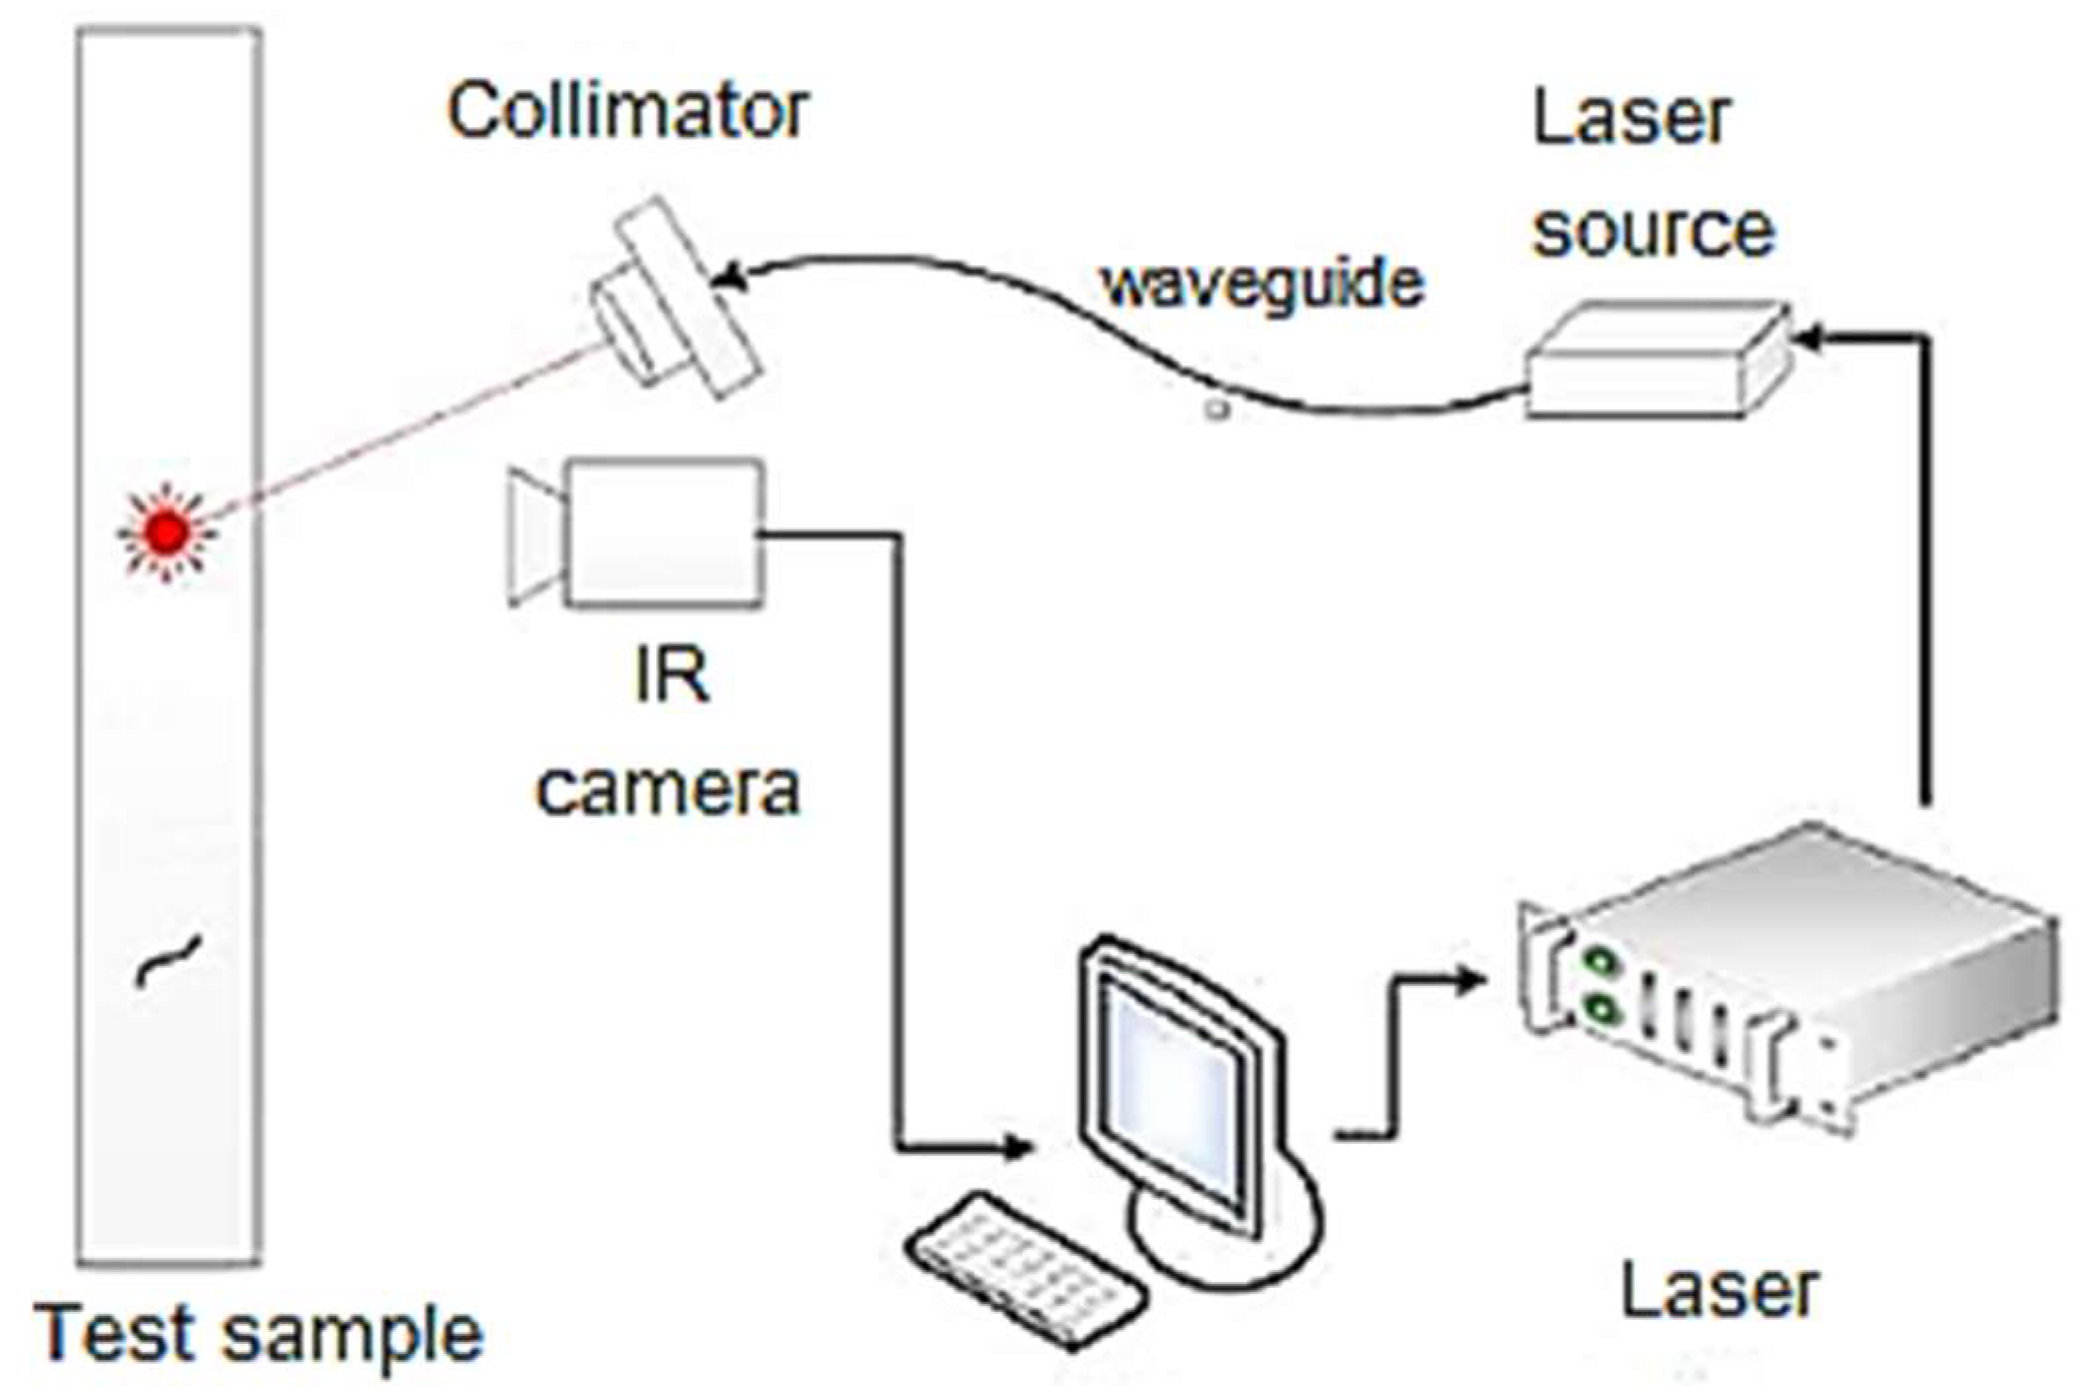
Laser thermography is an NDT method that utilizes a thermal imaging camera and a laser to measure the surface temperature of an object. The camera captures infrared radiation emitted by the object, which is then converted into a visual image that shows any variation in temperature. It is presented in Figure 17.
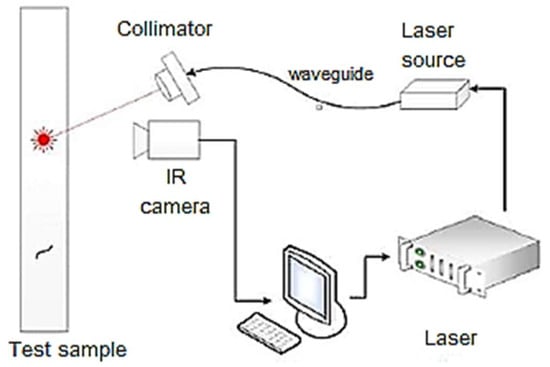
Figure 17.
Infrared thermography system, adapted from [31].
In-line laser thermography testing involves shining a laser onto the surface of the WAAM part while it is being built. The laser heats the surface, causing it to emit infrared radiation [57]. A thermal imaging camera is then used to capture the emitted radiation and create a thermal image of the object. By analyzing the thermal image, it is possible to detect areas of the object that are hotter or cooler than others, which can indicate the presence of defects or inconsistencies in the WAAM part [31,57].
The main advantage of in-line laser thermography testing is that it can detect defects in the WAAM part in real time and it can help to reduce the overall cost of manufacturing. Besides being a contactless NDT, it can detect subsurface defects and requires no surface preparation [1,31]. However, laser thermography may face some difficulties such as disturbance in the heat flow due to the presence of deep scratches or indentations [31]. In addition, surfaces with a high reflectance impede the use of this NDT technique, as only a small amount of the applied energy is absorbed and can heat up the specimen. At the same time, the low emissivity significantly reduces the amount of emitted IR radiation, which further handicaps the crack detection [58].
In-line laser thermography testing can be used to detect a variety of defects in WAAM parts, including porosity, incomplete fusion, and lack of penetration [1]. It can also be used to monitor the temperature of the wire and the arc during the manufacturing process, which can help to improve the process efficiency.
3.9. Others
There are other ways to perform in-line NDT of WAAM, but they are not as explored as those described earlier in this paper. Some of these are optical emission spectroscopy (OES) and the use of machine learning to analyze the welding parameters in real time.
OES is a technique used to analyze the composition of a sample by measuring the wavelengths and intensities of light emitted by the sample when it is excited with an external energy source. The light emitted by the sample is passed through a spectrometer, which separates the light into its individual wavelengths, creating a spectrum that can be analyzed to determine the elements present in the sample.
The in-line OES technique can be used in conjunction with other monitoring techniques, such as process-monitoring cameras, to provide a complete picture of the WAAM process and to detect any potential issues. Additionally, the OES data can be used in conjunction with other data, such as the process parameters and thermal history, to provide a comprehensive understanding of the WAAM process.
The advantages of OES include its high sensitivity, fast analysis time, ability to detect a wide range of elements, being contactless, immunity to high brightness of light, and ability to diagnose the electrical arc effectively [59,60]. The main advantage of using in-line OES testing for WAAM is that it can provide real-time feedback on the composition of the material being deposited [61]. Therefore, it can detect impurities in the sample in real time, which can help to prevent defects in the final product. However, OES also has some limitations, such as the difficulty in obtaining accurate results in a high-temperature, high-speed process such as WAAM [59]. Nevertheless, it has also been shown to be unable to detect issues such as trajectory deviation, lack of shielding gas, and lack of penetration [31]. On the other hand, it was able to detect with 86% accuracy defects such as excessive penetration, misalignment, and different thickness [31], thus showcasing its relevance as an NDT technique.
In summary, in-line OES testing is a technique used to analyze the composition of WAAM samples in real time. This technique involves using a spectrometer to measure the wavelengths and intensities of light emitted by the sample while it is being deposited during the process, which can be used to ensure that the correct alloy is being used and to detect impurities in the sample. This is important as it helps to ensure the quality of the final product. However, there are also some limitations to the in-line OES technique; for example, it can be difficult to obtain accurate results in a high-temperature and high-speed process.
Regarding the monitoring of welding parameters, in-line voltage and current evaluation is a method used to monitor the electric parameters during the wire and arc additive manufacturing process, based on machine learning. This type of evaluation is important for ensuring consistent and high-quality parts, as well as for understanding the process.
During the wire and arc additive manufacturing process, an electric arc is used to melt a wire feedstock, which is then deposited onto a substrate to form a 3D object. The voltage and current applied to the wire feedstock play a critical role in the quality and consistency of the resulting parts.
This technique is based on the statistical analysis of known electrical signals from problems such as porosity, lack of fusion, cracks, and others. These signals are used so that the computer can calculate the current and voltage variation that occurred during that previously known deposition error [62,63]. Thus, the software will analyze in real time the deposition of WAAM layers and statistically point out the probability of a certain deposition error having occurred and when [62,63]. This methodology has been shown to be able to identify or avoid more than 90% of the failures in the cases [62,63,64].
The data acquired from in-line voltage and current evaluation can be used to adjust the manufacturing process in real time to ensure consistent and high-quality parts. For example, if the current is too low, there may be a lack of fusion, resulting in poor bonding between the deposited layers. Conversely, if the current is too high, the wire feedstock may overheat and cause porosity or other defects in the final part.
Additionally, the data acquired from in-line voltage and current evaluation can be used to improve the manufacturing process for specific materials or applications. This can be achieved by analyzing the relationship between the electric parameters and the resulting microstructure, mechanical properties, and geometrical accuracy of the parts.
3.10. Overview of NDT in WAAM
In-line NDT in WAAM refers to the process of performing NDT techniques during the actual printing process to monitor the quality and integrity of the parts being produced. The aim of in-line NDT is to detect and prevent defects or anomalies in real time, thereby reducing the need for post-processing inspection and increasing the overall efficiency and productivity of the manufacturing process. In-line NDT helps ensure the quality and reliability of the final product and also enables the rapid identification and correction of issues during the manufacturing process, leading to an improved overall performance and reduced costs.
Table 2 presents the advantages and limitations between those NDT methods presented. The advantage of being used in real-time during the production of a part is common to all methods. In addition, a common limitation is that these methods require specialized equipment and trained personnel to operate, which can be a costly.

Table 2.
Overview of in-line NDT in WAAM.
4. Challenges and Solutions: Eddy Current Case Study
The authors have been undertaking developments on the application of eddy current testing (ECT) for the in-line inspection of parts produced using WAAM. There are significant difficulties and challenges associated with using this NDT technique to inspect WAAM parts. Despite the advantages of using ECT, such as its ability to detect surface and sub-surface defects in conductive materials and its non-destructive nature, there are several specificities and limitations of ECT that make it challenging to use for WAAM part inspection. These include the sensitivity of ECT to the surface roughness and waviness of the part, the morphology of WAAM parts, and the difficulty of detecting deep defects.
4.1. Why In-Line?
First, it allows for real-time monitoring of the manufacturing process, which can help to detect and correct any issues as they occur. This can help to improve the overall quality of the final product and reduce the likelihood of defects or non-conformities [65].
Second, in-line inspection allows for the early detection of defects, which can minimize the impact of those defects on the final product [66,67]. For example, if a defect is detected early in the manufacturing process, it can be corrected before it becomes more severe or affects more layers. This can help to reduce the need for rework or scrap and ultimately decrease the costs associated with those.
Third, in-line inspection allows for the collection of data on the manufacturing process, which can be used to improve the process and optimize the manufacturing parameters [68]. This can help to improve the overall efficiency of the manufacturing process and improve the production yield [65].
Finally, in-line inspection of WAAM parts layer by layer allows for the detection of internal defects such as porosity, inclusions, and voids that are not visible from the surface. These defects can be detected early and can be addressed, which can improve the mechanical properties of the part and its performance.
4.2. ECT Advantages—Suitability to In-Line WAAM Inspection
One of the main advantages of using ECT is its ability to detect surface and sub-surface defects in conductive materials [69]. This makes it an attractive option for inspecting WAAM parts, which are typically made of metals such as aluminum, steel, and titanium.
As mentioned, the layer-by-layer inspection approach allows for the detection of defects that occur deep within the material. Defects that occur deep within the material, such as internal porosity, can be difficult to detect using other methods. However, by inspecting each layer individually, it is possible to detect these defects and address them before they affect the final product, since each WAAM layer has, typically, a 2 to 5 mm thickness. Performing in-line inspection of WAAM parts layer by layer with ECT could be an effective method for detecting both surface and sub-surface defects. By inspecting each layer individually, potential defects will be located either on the surface or just below the surface of the material, depending on the layer height, which are the target defects of ECT.
Furthermore, by inspecting each layer individually, it may be possible to detect any issues that may have occurred during the manufacturing process, such as variation in the layer thickness or inconsistencies in the material composition. This can help to improve the overall quality of the final product and reduce the likelihood of defects or non-conformities.
Additionally, ECT is a relatively fast and efficient method of inspection [70], making it suitable for use in production environments where parts need to be quickly and accurately inspected before they are assembled or during short maintenance periods. This can help to reduce production downtime and increase the overall efficiency of the manufacturing process. Moreover, ECT is a versatile method of inspection, as it can be used to inspect a wide range of parts and components, including those with complex geometries and irregular shapes [71]. This makes it well-suited for inspecting WAAM parts, which often have complex shapes and geometries that can be difficult to inspect using other techniques. However, there are also several specificities and limitations of ECT that can make it challenging to use for WAAM part inspection.
4.3. ECT Disadvantages—Suitability to In-Line WAAM Inspection
One limitation is that ECT is very sensitive to the surface roughness and waviness of the part. WAAM parts often have a high degree of surface roughness and waviness, which can make it difficult to obtain accurate inspection results. Surface roughness and waviness cause variation in the lift-off, which is the distance between the ECT probe and the surface of the material. It is an important parameter in ECT as it affects the penetration depth of the eddy currents and thus, the sensitivity of the probe, which will affect the accuracy of the results [72].
Additionally, variation in the lift-off can make it difficult to interpret the ECT measurements, as variation in the lift-off can cause variation in the signal amplitude and make it difficult to distinguish between defects and variation in the surface finish [73].
Another issue concerns the edge effect, which occurs when the probe is placed close to the edge of the material. This also causes variation in the eddy currents and affects the accuracy of the results.
If the WAAM part had no waviness or roughness (e.g., after machining), the layer width would not vary, and the fact that the probe is close to the border and therefore subjected to the edge effect would not be detrimental to the inspection. This is because the edge effect would be consistent throughout the length of the part and would not vary significantly. However, due to the presence of waviness and roughness in the layer surface, the edge effect will become an issue, as it will cause variation in the eddy currents, which will affect the accuracy of the inspection results. Additionally, the edge effect can be amplified for complex geometries. In summary, the surface roughness and waviness of WAAM parts have a significant impact on the accuracy of ECT results, as they cause variation in the lift-off and contribute to the edge effect.
Another limitation of ECT is that it is not able to detect defects that are located deep within the material. As mentioned before, ECT is adequate to surface and sub-surface defects only. This is due to the eddy current (EC) skin effect. The skin effect is caused by the fact that the eddy currents generated by the ECT probe are mostly confined to the surface of the material, and as the depth increases, the intensity of the eddy currents decrease. It depends mostly on the frequency of the eddy currents and the electrical conductivity and magnetic permeability of the material. In general, the penetration depth decreases when high frequencies are used and in materials with high conductivity and high magnetic permeability. This means that the sensitivity of the probe to detect deeper defects is reduced in materials with high conductivity, such as copper, aluminum, and titanium alloys, which are commonly used in WAAM parts. In the case of steel, the low penetration depth is due to its usually higher magnetic permeability. However, it is important to take into account the height of the layer; lower heights may not present this issue.
Another challenge is that WAAM parts can have a complex microstructure, which can make it difficult to interpret the ECT results. The complex microstructure can cause variation in the electrical conductivity of the material, which can affect the accuracy of the inspection results.
The temperature can be an important factor to consider when performing an in-line ECT inspection. As the part is being manufactured, the temperature of the material can vary significantly. This can affect the electrical conductivity of the material, which can in turn affect the reliability of the ECT results.
Furthermore, the heat generated by the WAAM process can cause thermal expansion of the material, which can affect the accuracy of the ECT results by changing the distance between the probe and the surface of the part. One way to try to guarantee a consistent lift-off is by using the zero-lift-off technique, where the probe is brought into contact with the surface of the material. This approach can help to minimize the effects of thermal expansion and ensure a consistent lift-off. However, it is important to note that the waviness and roughness of the surface of the WAAM part can still affect the accuracy of the ECT results, even with the use of the zero-lift-off technique. The waviness and roughness will inevitably cause variation in the lift-off, which will affect the results.
Additionally, it is important to use ECT probes with proper thermal barriers and cooling systems to prevent overheating caused by the contact/proximity to the high-temperature part layer. This can be achieved by encapsulating the probe and using forced water cooling. However, the capsule must have insulating capabilities and must not be an electrical conductor, otherwise the ECT would not be possible. This approach can help to prevent the probe overheating. However, the lift-off will have to increase to accommodate the capsule thickness and the sensitivity of the ECT will decrease [74].
Despite these challenges, there are some ways to overcome them and obtain accurate inspection results using ECT. One approach is to use advanced signal processing techniques to filter out the effects of surface roughness and waviness on the ECT results. Another approach is to use specialized ECT probes that are designed to consider the unique properties of WAAM parts. Additionally, using ECT in combination with other non-destructive testing methods, such as ultrasonic testing or X-ray fluorescence, can also help to improve the accuracy of the inspection results.
4.4. ECT Probe Considerations for WAAM Parts
Considering the exposed advantages and disadvantages, the authors focused on the development of specialized ECT probes that are designed to take into account the unique properties of WAAM parts.
Several factors were taken into consideration: one important consideration is the probe geometry and how it relates to the top curvature of the part. The probe should be designed to closely follow the contours of the part to ensure an accurate and complete inspection. Additionally, the probe should be designed to minimize the effects of surface roughness and waviness.
Another important consideration is the size and shape of the probe’s coils. Coils with large surface areas and unique shapes can help to improve the signal-to-noise ratio and increase the accuracy of the inspection results.
It is also important to consider how the probe will be used in practice. For example, the probe should be designed to be easy to maneuver and position accurately on the part, and it should be able to withstand the demands of industrial use.
The operation mode must be taken into consideration as well. This refers to the different ways that the coils that compose the ECT probe can be configured. The most common operation modes include:
- Absolute mode: in this mode, the same coil operates as an exciter and sensor simultaneously. The probe typically consists of one or more coils, which are placed in close proximity to the part surface. It is often used for surface inspections because it is relatively simple and easy to implement, and it can provide good sensitivity for surface-breaking defects. However, absolute mode has some limitations: it is less sensitive to subsurface defects, and it is also sensitive to the surface roughness, waviness, and other external factors. Therefore, it should be avoided for the inspection of WAAM parts.
- Reflection mode: at least two coils are used, one to generate eddy currents in the part and one to measure the response. The excitation typically consists of one or more coils, which are placed in close proximity to the surface of the part. The detection coil, also known as the pick-up coil, is placed on the same side of the part as the excitation probe, but at a different location. It is used to measure the response generated. It is sensitive to surface-breaking defects, but it is less sensitive to subsurface defects. It is also less sensitive to the surface roughness, waviness, and other external factors than absolute mode. Therefore, it is often used in combination with other operation modes, such as differential mode, to improve the reliability of the inspection and increase the detection of subsurface defects.
- Differential mode: the response is measured between two or more coils while the excitation can be performed by the same coils or others. The differential mode can be used to reject unwanted signals and noise and to improve the sensitivity of the inspection. It can also help to locate subsurface defects that might be missed using absolute or reflection mode alone. Differential mode can be combined with reflection mode. It uses one or more coils exclusively for the excitation and two or more coils to measure the differential response between two points on the surface of the part. This mode can improve the accuracy and sensitivity of the inspection by rejecting unwanted signals and noise and maintaining its sensitivity to surface-breaking defects. It is important to note that, while differential mode can provide a more accurate and sensitive inspection, it may be more complex to implement than other operation modes.
Finally, it is also important to take into account the specific material properties of WAAM parts, such as the conductivity and resistivity. These properties may affect the way the probe interacts with the part and may require specific adjustments in the probe design.
4.5. Eddy Current Probe Design
Keeping in mind the previous considerations made, the performed probe design began by designing a set of five probes. The probes designed share the following features: they comprise an exciting coil and two sensitive coils with windings in opposite directions in order to act in reflection mode and work in differential mode; and the coils follow the curvature of the WAAM part layer. To understand which of the configurations could present the best potential for the application, numerical simulations were carried out for the five probe concepts using ANSYS Electronics. The geometry of the excitation and the sensitive coils were evaluated. In order to be able to make a fair and valid comparison between the probe concepts, the same parameters were used in all simulations, such as the excitation current, frequency, and number of turns of the excitation and sensing coils; a standard wall with 60 × 12 × 36 mm made of aluminum alloy, with parameters (dimensions and material properties) the same in all simulations; an inspection length to be able to obtain a reasonable and sufficient amount of data to understand and observe the behavior of the probes; the type of defects, with equal dimensions and locations for all simulations; a simulation element mesh for all probes with 1 million tetrahedral elements. Figure 18 presents the output of one of the simulations performed, which was targeting the evaluation of the excitation strength and distribution.
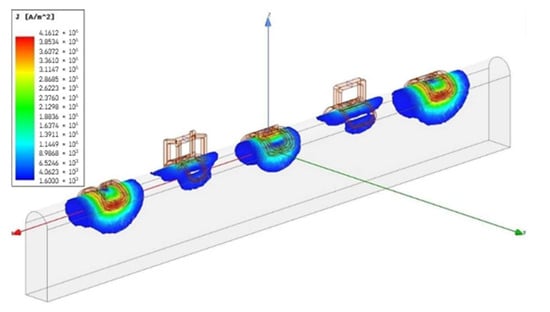
Figure 18.
Example of a numerical simulation performed to compare the performance of the five ECT probe concepts. The evaluation of the excitation strength and distribution were the target of this specific simulation.
It is also important to mention the assumptions and simplifications made, namely: only the top layer of the wall is intended to be studied and analyzed, that is, the last layer executed. For this purpose, it is assumed that the respective bead corresponds, approximately, to half a cylinder whose dimensions of radius and length are, respectively, 6 mm and 80 mm. It is therefore necessary to study and analyze the wall to a depth of approximately 6 mm. The top surface of the wall was considered smooth and circular.
The probe that demonstrated the best performance was the probe represented in Figure 19. This probe comprises a “square” exciting coil, which follows the semicircular geometry, characteristic of the top of the WAAM part, along the perimeter of the surrounding area of the sensing coils. The probe also contains two “semicircular–triangular” sensing coils that are symmetrical, but whose symmetry plane is misaligned and oblique to the symmetry plane of the wall to the travel direction of the probe. They have opposite winding directions in order to obtain a probe with differential reading.

Figure 19.
Concept probe with the best performance simulated. (a) Top view of the probe with the excitation coil represented in red and the sensing coils in green; (b) Probe modeled in Ansys Electronics used for the simulations.
4.6. Customized Probe Production and Experimental Results
With the main geometric parameters improved with the numerical simulations, a probe was assembled. To produce the probe, a structure was designed to serve as a support and mold for the coils of the probe, as they are not simple coils. The windings must follow the curvature of the top layer. The structure was produced using fused filament fabrication (FFF) in polylactic acid (PLA). The parameters of the probe were the same as those obtained in the numerical simulations in terms of the number of windings, geometry, and dimensions of each coil and lift-off. The probe was produced with 48 windings in the excitation coil and 30 windings in each of the sensing coils. The lift-off in this case corresponds to the thickness of the coil support, which is 0.5 mm. In Figure 20a, the model of the support used is presented. The windings were performed with a 0.1 mm diameter copper wire, which allowed the coils to occupy the same space as in the simulation, guaranteeing the same geometry and dimensions and at the same time having an improved number of windings. In Figure 20b, the produced and assembled probe can be found.
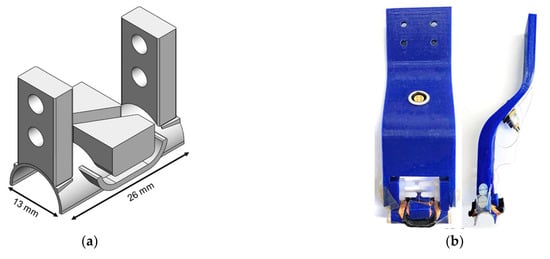
Figure 20.
Probe production; (a) Coil support CAD model; (b) Probe assembled, front and side view.
The coils were connected to a four-pin LEMO connector, which allows for connection to an impedance analyzer for differential reflection mode operation. The equipment used was a commercial Olympus impedance analyzer, the Nortec 600D. The probe was attached to an XYZ scanning table through a linear bearing that allows for free movement in the vertical direction, which allows contact between the probe and the material during the test and ensuring a lift-off as constant as possible.
Figure 21a shows the results from a scan of an aluminum WAAM sample with a drilled hole with a diameter of 1 mm that is 2 mm below the surface. The presented result was obtained with the probe operating with a frequency of 1.5 kHz. The defect causes a change in the impedance measured, but the noise generated from the waviness of the surface is significant. Other frequencies were tested but did not generate improved results.

Figure 21.
Manually wound customized ECT probe impedance output obtained from the inspection of an aluminum sample at a frequency of 1.5 kHz with: (a) a 1 mm diameter defect; (b) WEDM slot defect. The red circle and rectangle indicate the defects in the WAAM parts.
Another type of defect morphology was studied, characterized by being narrower and elongated, created using wire electrical discharge machining (WEDM). The WEDM slot, as illustrated in Figure 21b, has a thickness of approximately 350 µm and a length of 5 mm. The slot’s upper surface is located 2 mm beneath the top surface of the sample and extends across the width of the bar. The test was performed at 1.5 kHz and the defect was detected with a clear SNR, although not consistent from test to test.
Manually wound eddy current probes can have several disadvantages, including a lack of repeatability and reproducibility, as well as a lack of precision in the winding process. Additionally, manually wound probes are often less robust and can be prone to damage during use.
One solution to these issues is the use of printed circuit board (PCB) technology for the production of eddy current probes [69]. PCBs offer a number of advantages over manually wound probes, including a high degree of repeatability and reproducibility, as well as the ability to incorporate multiple layers and other advanced features.
PCB-based ECT probes often have planar coils, which can result in sensors with greater areas. Coils covering a greater area and in close proximity to the test piece have several advantages. One of the main advantages is that it improves the sensitivity of the measurement.
Flexible PCBs, in particular, offer a number of benefits for ECT applications, such as the ability to conform to the shape of the test specimen and the ability to withstand a high degree of bending and flexing without damage [75]. This solution allows it to conform to the shape of the top WAAM layer, making it possible to maintain the proximity of the coils with to part during the inspection.
One of the limitations of using PCBs for ECT probes is the lack of space to include a high number of windings in the coils. This is because the coils must be disposed in a planar manner on the PCB and increasing the number of turns will increase the area of the coil. This can be a problem as it may not be possible to fit a large number of turns on a single PCB, which can limit the sensitivity of the test.
One solution to this problem is the use of multiple-layer PCBs [70]. By using multiple layers, it is possible to increase the number of turns in the coils without increasing the overall area of the probe. This is because the additional layers can be used to stack the coils, providing more space for additional turns.
Additionally, the use of multiple-layer PCBs also allows for more compact designs, as the stackable layers can reduce the footprint of the probe.
Thus, to improve the probe reliability, reproducibility, and performance, a multi-layered flexible PCB probe was designed, produced, and tested.
Figure 22a shows the PCB produced with the respective dimensions. In order to adapt to flexible PCB technology, the previously developed probe characteristics were taken into consideration. The PCB was designed to have 48 turns in the excitation coil and 30 turns per sensing coil. The coils were distributed over six layers, each with a thickness of 25 µm, a width of 100 µm, a spacing of 100 µm between turns.
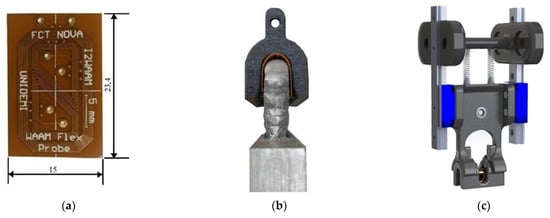
Figure 22.
Multi-layer flexible PCB probe; (a) PCB; (b) PCB assembled in the TPU chassis mounted over a WAAM wall specimen; (c) complete probe set-up system.
To take advantage of the flexible properties of the PCB, a chassis was produced using flexible filament thermoplastic polyurethane (TPU) with FFF. The TPU chassis morphology was designed considering the curvature of the WAAM part. This way, during the test, the flexible chassis will adapt to the irregular geometry of the WAAM part, keeping the flexible PCB in contact with the material to be inspected, as can be seen in Figure 22b. The flexible chassis will be supported by a rigid PLA chassis, designed to allow the implementation of a self-compensating system. Figure 22c shows the complete system.
In Figure 23a, the experimental tests are depicted regarding the inspection of an aluminum specimen with a 1 mm diameter defect at a depth of 2 mm with the developed PCB probe operating at a frequency of 1.5 kHz. The obtained result allows the detection of the defect through a peak in the impedance value represented at the location of the defect, although it contains elevated noise in the results. The performance of the same probe in an aluminum specimen with a 1.5 mm diameter defect and 2 mm depth is shown in Figure 23b. Similarly to the previous case, it is possible to observe that there is an oscillation of the impedance value with a differential characteristic when the probe passes through the defect. The detection of the defect is achieved despite the noise, due to the roughness of the specimen, since the magnitude of the signal regarding the defect is vastly superior to the noise captured.
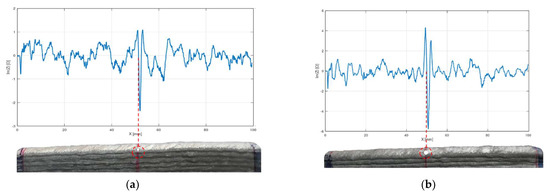
Figure 23.
Multi-layer flexible PCB probe impedance output obtained from the inspection of an aluminum sample at a frequency of 1.5 kHz with: (a) a 1 mm diameter defect; (b) a 1.5 mm diameter defect.
The results presented were selected as the best from a series of tests that were conducted on different specimens. However, it is important to note that the probes used in these tests did not consistently produce reliable results. This is due to the fact that the waviness and roughness of the specimens resulted in high amounts of noise that interfered with the defect signal.
Additionally, it is worth mentioning that these tests were performed on finished WAAM walls at room temperature. If the tests were conducted in-line, meaning during the manufacturing process at high temperatures, it would require proper insulation of the probes to prevent damage and therefore increased lift-off. The increase in lift-off would further decrease the reliability of the inspection. Therefore, it is important to consider these limitations when evaluating the results and esspecially when considering in-line ECT inspection.
4.7. Hot-Forging WAAM Variant
Hot-forging WAAM is a new variant of the WAAM process that uses a small hammer to forge the material deposited. This forging process is carried out while the material is still hot and in a viscoplastic regime immediately after the deposition process. The forging force deforms the material, refines the grain, and collapses porosities, improving the mechanical properties of the final product [56].
The layer surface in hot-forging WAAM is significantly different from that of the traditional WAAM process. The deposited layers are characterized by a near-planar surface, which is a result of the forging action on the material during the building process [76].
This near-planar surface can be beneficial for the inspection of the part using ECT as it no longer requires curved or flexible ECT probes. Additionally, the forging process also results in thinner layers, which is beneficial for the ECT inspection. Thinner layers mean shorter penetration depths required, which allow higher ECT frequencies [71]. This opens a door for in-line inspection with ECT.
To assess the apparent advantages of the variant for ECT and evaluate its applicability, several commercial and customized planar probes were used on WAAM parts produced with this variant.
For the experimental tests, an AISI 316L steel specimen with a 3 mm diameter hole defect at a depth equivalent to the thickness of the last deposited layer was used. Figure 24a shows the specimen produced with the defect. It should be noted that, despite the surface being flatter than in conventional WAAM, it still presents many irregularities. It should also be noted that the width of the planar zone varies with the length. In Figure 24b, a result obtained with an Olympus pencil probe optimized to operate at 50–100 kHz is presented. The defect causes a small disturbance in the signal, but the noise covers it. Figure 24c presents the output signal obtained with the IOnic probe developed in the scope of another work [77]. The performance is much superior; it is possible to clearly identify the typical differential signal of these probes. Again, the results presented were selected as the best from a series of tests that were conducted on different specimens.

Figure 24.
ECT inspection of hot-forging WAAM parts: (a) AISI 316L steel specimen with a 3 mm diameter hole defect, top and side view; (b) impedance output obtained at a frequency of 100 kHz with a commercial pencil probe; (c) impedance output obtained at a frequency of 100 kHz with an IOnic probe.
In conclusion, hot-forging WAAM is a variant of WAAM that has the potential to provide benefits for ECT inspection. The near-planar surface of the layers can eliminate the need for curved or flexible ECT probes, and the thinner layers can allow the use of higher frequencies. However, it is important to note that the hot-forging process still shows a lack of consistency in the WAAM parts, which affects the ECT negatively. The irregular surface of the layers and the lack of consistency in the width of the planar region can lead to high levels of noise in the ECT signal due to the edge effect, making it difficult to detect defects. Therefore, it is important to continue researching and developing new techniques to improve the consistency of the hot-forging WAAM process and to optimize the ECT probes to be used with this variant.
5. Discussion
In-line NDT is a crucial aspect of the WAAM process because it allows real-time monitoring of the quality of the parts being produced. This testing method involves the use of various techniques, such as ultrasonic testing, X-ray imaging, eddy current testing, and many others to inspect the parts during the manufacturing process without causing any damage. Implementing in-line NDT in the WAAM process has several benefits, including the early detection of defects and inconsistencies, improved quality control, and reduced post-production inspection time and costs.
In reviewing the in-line NDT methods for WAAM, it is observed that each of the techniques has different advantages and challenges to overcome in order to be implemented. Thus, it can be stated that a multi-parametric implementation of non-destructive testing is the best option for performing non-destructive testing in-line during WAAM. This guarantees greater security in the identification of flaws in the manufactured part.
A multi-parametric in-line NDT approach for WAAM involves using multiple techniques and sensors to evaluate the quality of the parts being produced in real time. This approach is more comprehensive and can provide a more accurate assessment of the parts’ quality compared to using a single NDT method.
One example of a multi-parametric in-line NDT approach is the use of a combination of ultrasonic testing and X-ray backscatter. This combination can provide a more comprehensive assessment of the parts’ quality. Ultrasonic testing can detect surface defects and subsurface defects that are located close to the surface, while X-ray backscatter can detect subsurface defects that are located deeper within the parts.
Another example is the use of a combination of eddy current testing and thermography. Eddy current testing can detect surface and subsurface defects, while thermography can provide information on the thermal history of the parts. By using a combination of these techniques, manufacturers can obtain a more complete assessment of the parts’ quality.
A multi-parametric in-line NDT approach can also be extended using sensors that can monitor the process parameters such as the current, voltage, wire feed rate, and speed of the motion. This can provide valuable information on how these parameters are affecting the quality of the parts and can help to optimize the manufacturing process.
6. Conclusions
In-line non-destructive testing (NDT) of wire and arc additive manufacturing is a vital step in ensuring the quality, safety, and reliability of parts produced using this technology. It enables real-time monitoring of the manufacturing process and the early detection of defects, which ultimately results in the production of parts that meet the required standards and specifications. It is a cost-effective and efficient method that allows manufacturers to improve the production while reducing the need for post-production inspections.
In addition, in-line NDT can also play an important role in ensuring that parts produced using WAAM are safe. WAAM is a relatively new and emerging technology, and it is important to ensure that parts produced using this method meet the required standards and specifications. In-line NDT can help identify any problems with parts early in the manufacturing process, which can prevent the production of parts that are not fit for purpose.
A multi-parametric in-line NDT approach for WAAM offers several benefits over using a single NDT method. It provides a more comprehensive assessment of the parts’ quality and can detect defects and inconsistencies that may not be identified using a single technique. Additionally, it can help to optimize the manufacturing process by providing valuable information on the process parameters. This approach can ultimately lead to the production of higher-quality parts, improved safety and reliability, and a reduction in the post-production inspection time and costs.
Author Contributions
Conceptualization and methodology, T.G.S., D.S.M.S., J.P.O. and M.A.M.; writing—original draft preparation, D.S.M.S. and M.A.M.; writing—review and editing, T.G.S., J.P.O. and M.A.M. All authors have read and agreed to the published version of the manuscript.
Funding
The authors acknowledge the Fundação para a Ciência e a Tecnologia (FCT-MCTES) for its financial support via the projects UIDB/00667/2020 and UIDP/00667/2020 (UNIDEMI). JPO acknowledges funding by national funds from FCT—Fundação para a Ciência e a Tecnologia, I.P., in the scope of the projects LA/P/0037/2020, UIDP/50025/2020 and UIDB/50025/2020 of the Associate Laboratory Institute of Nanostructures, Nanomodelling and Nanofabrication—i3N. This activity has received funding from the European Institute of Innovation and Technology (EIT)—Project Smart WAAM: Microstructural Engineering and Integrated Non-Destructive Testing. This body of the European Union receives support from the European Union’s Horizon 2020 research and innovation programme.
Data Availability Statement
No new data were created or analyzed in this study. Data sharing is not applicable to this article.
Conflicts of Interest
The authors declare no conflict of interest.
References
- Lopez, A.; Bacelar, R.; Pires, I.; Santos, T.G.; Sousa, J.; Quintino, L. Non-destructive testing application of radiography and ultrasound for wire and arc additive manufacturing. Addit. Manuf. 2018, 21, 298–306. [Google Scholar] [CrossRef]
- Scopus: Advanced Search. Available online: https://www.scopus.com/search/form.uri?display=advanced&zone=header&origin= (accessed on 6 January 2023).
- Albannai, A.I. A Brief Review on The Common Defects in Wire Arc Additive Manufacturing. Int. J. Curr. Sci. Res. Rev. 2022, 5, 4556–4576. [Google Scholar] [CrossRef]
- Ben Mhamed, I.; Abid, S.; Fnaiech, F. Weld defect detection using a modified anisotropic diffusion model. EURASIP J. Adv. Signal Process. 2012, 2012, 46. [Google Scholar] [CrossRef]
- Steel, K. Weld Imperfections and Preventive Measures; Kobelco Weld: Tokyo, Japan, 2015; pp. 9–17. [Google Scholar]
- Arana, M.; Ukar, E.; Rodriguez, I.; Iturrioz, A.; Alvarez, P. Strategies to Reduce Porosity in Al-Mg WAAM Parts and Their Impact on Mechanical Properties. Metals 2021, 11, 524. [Google Scholar] [CrossRef]
- Ryan, E.; Sabin, T.; Watts, J.; Whiting, M. The influence of build parameters and wire batch on porosity of wire and arc additive manufactured aluminium alloy 2319. J. Mater. Process. Technol. 2018, 262, 577–584. [Google Scholar] [CrossRef]
- Hauser, T.; Reisch, R.T.; Breese, P.P.; Lutz, B.S.; Pantano, M.; Nalam, Y.; Bela, K.; Kamps, T.; Volpp, J.; Kaplan, A.F. Porosity in wire arc additive manufacturing of aluminium alloys. Addit. Manuf. 2021, 41, 101993. [Google Scholar] [CrossRef]
- Gu, J.; Yang, S.; Gao, M.; Bai, J.; Zhai, Y.; Ding, J. Micropore evolution in additively manufactured aluminum alloys under heat treatment and inter-layer rolling. Mater. Des. 2019, 186, 108288. [Google Scholar] [CrossRef]
- Chen, G.; Luo, H.; Yang, H.; Han, Z.; Lin, Z.; Zhang, Z.; Su, Y. Effects of the welding inclusion and notch on the fracture behaviors of low-alloy steel. J. Mater. Res. Technol. 2018, 8, 447–456. [Google Scholar] [CrossRef]
- Li, W.; Zhang, H.; Wang, G.; Xiong, G.; Zhao, M.; Li, G.; Li, R. Deep learning based online metallic surface defect detection method for wire and arc additive manufacturing. Robot. Comput. Manuf. 2023, 80, 102470. [Google Scholar] [CrossRef]
- Madhvacharyula, A.S.; Pavan, A.V.S.; Gorthi, S.; Chitral, S.; Venkaiah, N.; Kiran, D.V. In situ detection of welding defects: A review. Weld. World 2022, 66, 611–628. [Google Scholar] [CrossRef]
- Weld Guru. Available online: https://weldguru.com/slag-inclusion/ (accessed on 1 February 2023).
- Kang, M.; Han, H.N.; Kim, C. Microstructure and Solidification Crack Susceptibility of Al 6014 Molten Alloy Subjected to a Spatially Oscillated Laser Beam. Materials 2018, 11, 648. [Google Scholar] [CrossRef]
- Albannai, A.; Aloraier, A.; Alaskari, A.; Alawadhi, M.; Joshi, S. Effects of tandem side-by-side GTAW welds on centerline solidification cracking of AA2024. Manuf. Technol. 2021, 21, 151–163. [Google Scholar] [CrossRef]
- Zhang, J.; Wang, X.; Paddea, S.; Zhang, X. Fatigue crack propagation behaviour in wire + arc additive manufactured Ti-6Al-4V: Effects of microstructure and residual stress. Mater. Des. 2016, 90, 551–561. [Google Scholar] [CrossRef]
- Jafari, D.; Vaneker, T.H.; Gibson, I. Wire and arc additive manufacturing: Opportunities and challenges to control the quality and accuracy of manufactured parts. Mater. Des. 2021, 202, 109471. [Google Scholar] [CrossRef]
- Ji, L.; Lu, J.; Tang, S.; Wu, Q.; Wang, J.; Ma, S.; Fan, H.; Liu, C. Research on Mechanisms and Controlling Methods of Macro Defects in TC4 Alloy Fabricated by Wire Additive Manufacturing. Materials 2018, 11, 1104. [Google Scholar] [CrossRef]
- Henckell, P.; Gierth, M.; Ali, Y.; Reimann, J.; Bergmann, J.P. Reduction of Energy Input in Wire Arc Additive Manufacturing (WAAM) with Gas Metal Arc Welding (GMAW). Materials 2020, 13, 2491. [Google Scholar] [CrossRef] [PubMed]
- Marinelli, G.; Martina, F.; Ganguly, S.; Williams, S. Development of Wire + Arc additive manufacture for the production of large-scale unalloyed tungsten components. Int. J. Refract. Met. Hard Mater. 2019, 82, 329–335. [Google Scholar] [CrossRef]
- Casadebaigt, A.; Hugues, J.; Monceau, D. High temperature oxidation and embrittlement at 500–600 °C of Ti-6Al-4V alloy fabricated by Laser and Electron Beam Melting. Corros. Sci. 2020, 175, 108875. [Google Scholar] [CrossRef]
- Jovanovic, M.; Grum, J.; Uran, M. Influence of lack-of-fusion defects on load capacity of MAG welded joints. In Proceedings of the 17th World Conference on Nondestructive Testing, Shanghai, China, 25–28 October 2008; pp. 25–28. [Google Scholar]
- Hu, Y.; Wu, S.; Withers, P.; Zhang, J.; Bao, H.; Fu, Y.; Kang, G. The effect of manufacturing defects on the fatigue life of selective laser melted Ti-6Al-4V structures. Mater. Des. 2020, 192, 108708. [Google Scholar] [CrossRef]
- Xu, F.; Dhokia, V.; Colegrove, P.; McAndrew, A.; Williams, S.; Henstridge, A.; Newman, S.T. Realisation of a multi-sensor framework for process monitoring of the wire arc additive manufacturing in producing Ti-6Al-4V parts. Int. J. Comput. Integr. Manuf. 2017, 31, 785–798. [Google Scholar] [CrossRef]
- Weld Guru. Available online: https://weldguru.com/overlap-in-welding/ (accessed on 1 February 2023).
- de Araújo, D.B. Study of Distortion in Welding by Using Numerical and Optimization Techniques. Ph.D. Thesis, Universidade Federal de Uberlândia, Uberlândia, Brazil, 2012. [Google Scholar] [CrossRef]
- Lopez, A.B.; Santos, J.; Sousa, J.P.; Santos, T.G.; Quintino, L. Phased Array Ultrasonic Inspection of Metal Additive Manufacturing Parts. J. Nondestruct. Eval. 2019, 38, 62. [Google Scholar] [CrossRef]
- Deepak, J.; Raja, V.B.; Srikanth, D.; Surendran, H.; Nickolas, M. Non-destructive testing (NDT) techniques for low carbon steel welded joints: A review and experimental study. Mater. Today Proc. 2021, 44, 3732–3737. [Google Scholar] [CrossRef]
- Kroworz, A.; Katunin, A. Non-destructive testing of structures using optical and other methods: A review. Struct. Durab. Health Monit. 2018, 12, 1–17. [Google Scholar]
- Rodrigues, T.A.; Duarte, V.; Miranda, R.M.; Santos, T.G.; Oliveira, J.P. Current Status and Perspectives on Wire and Arc Additive Manufacturing (WAAM). Materials 2019, 12, 1121. [Google Scholar] [CrossRef] [PubMed]
- Bacelar, R. Evaluation of WAAM Parts by NDT. Master’s Thesis, Tecnico Lisboa, Lisbon, Portugal, 2017. [Google Scholar]
- Shaloo, M.; Schnall, M.; Klein, T.; Huber, N.; Reitinger, B. A Review of Non-Destructive Testing (NDT) Techniques for Defect Detection: Application to Fusion Welding and Future Wire Arc Additive Manufacturing Processes. Materials 2022, 15, 3697. [Google Scholar] [CrossRef]
- Taheri, H.; Hassen, A.A. Nondestructive Ultrasonic Inspection of Composite Materials: A Comparative Advantage of Phased Array Ultrasonic. Appl. Sci. 2019, 9, 1628. [Google Scholar] [CrossRef]
- Drinkwater, B.W.; Wilcox, P.D. Ultrasonic arrays for non-destructive evaluation: A review. NDT E Int. 2006, 39, 525–541. [Google Scholar] [CrossRef]
- Raišutis, R.; Kažys, R.; Mažeika, L.; Žukauskas, E.; Šliteris, R.; Vladišauskas, A. Application of ultrasonic guided waves for non-destructive testing of large and complex geometry engineering structures. Vibroengineering PROCEDIA 2017, 14, 87–90. [Google Scholar] [CrossRef]
- Taheri, H.; Koester, L.; Bigelow, T.; Bond, L.J.; Braconnier, D.; Carcreff, E.; Hassen, A.A. Fast ultrasonic imaging with total focusing method (TFM) for inspection of additively manufactured polymer composite component. In Proceedings of the 27th ASNT Research Symposium, Orlando, FL, USA, 26–29 March 2018; pp. 212–220. [Google Scholar] [CrossRef]
- Holmes, C.; Drinkwater, B.W.; Wilcox, P.D. Post-processing of the full matrix of ultrasonic transmit–receive array data for non-destructive evaluation. NDT E Int. 2005, 38, 701–711. [Google Scholar] [CrossRef]
- Leleux, A.; Micheau, P.; Castaings, M. Long Range Detection of Defects in Composite Plates Using Lamb Waves Generated and Detected by Ultrasonic Phased Array Probes. J. Nondestruct. Eval. 2013, 32, 200–214. [Google Scholar] [CrossRef]
- Kumar, A.; Arnold, W. High resolution in non-destructive testing: A review. J. Appl. Phys. 2022, 132, 100901. [Google Scholar] [CrossRef]
- Palanisamy, S.; Nagarajah, C.R.; Iovenitti, P. Ultrasonic inspection of rough surface aluminium die castings. Insight-Non-Destr. Test. Cond. Monit. 2007, 49, 160–164. [Google Scholar] [CrossRef]
- Van Pamel, A.; Huthwaite, P.; Brett, C.R.; Lowe, M.J. Numerical simulations of ultrasonic array imaging of highly scattering materials. NDT E Int. 2016, 81, 9–19. [Google Scholar] [CrossRef]
- Petcher, P.; Dixon, S. Weld defect detection using PPM EMAT generated shear horizontal ultrasound. NDT E Int. 2015, 74, 58–65. [Google Scholar] [CrossRef]
- Green, R.E. Non-contact ultrasonic techniques. Ultrasonics 2004, 42, 9–16. [Google Scholar] [CrossRef]
- Mi, B. Implementation of Fiber Phased Array Ultrasound Generation System and Signal Analysis for Weld Penetration Control; Georgia Institute of Technology: Atlanta, GA, USA, 2003. [Google Scholar]
- Chauveau, D. Review of NDT and process monitoring techniques usable to produce high-quality parts by welding or additive manufacturing. Weld. World 2018, 62, 1097–1118. [Google Scholar] [CrossRef]
- Chen, X.; Kong, F.; Fu, Y.; Zhao, X.; Li, R.; Wang, G.; Zhang, H. A review on wire-arc additive manufacturing: Typical defects, detection approaches, and multisensor data fusion-based model. Int. J. Adv. Manuf. Technol. 2021, 117, 707–727. [Google Scholar] [CrossRef]
- Zeng, Y.; Wang, X.; Qin, X.; Hua, L.; Xu, M. Laser Ultrasonic inspection of a Wire + Arc Additive Manufactured (WAAM) sample with artificial defects. Ultrasonics 2021, 110, 106273. [Google Scholar] [CrossRef]
- Kah, P.; Mvola, B.; Martikainen, J.; Suoranta, R. Real Time Non-Destructive Testing Methods of Welding. Adv. Mater. Res. 2014, 933, 109–116. [Google Scholar] [CrossRef]
- Li, Y. Machine Learning Based Defect Detection in Robotic Wire Arc Additive Manufacturing. 2021. Available online: https://ro.uow.edu.au/theses1/1408/ (accessed on 17 January 2023).
- Babot, D.; Berodias, G.; Peix, G. Detection and sizing by X-ray Compton scattering of near-surface cracks under weld deposited cladding. NDT E Int. 1991, 24, 247–251. [Google Scholar] [CrossRef]
- Naito, S.; Yamamoto, S.; Yamamoto, S. Novel X-ray Backscatter Technique for Detecting Crack Below Deposit. Toshiba Corporation, Japan. 2009. Available online: http://www.ndt.net/article/jrc-nde2009/papers/110.pdf (accessed on 18 January 2023).
- Zeng, Y.; Wang, X.; Qin, X.; Hua, L.; Liu, G.; Guan, S. Laser ultrasonic inspection of defects in wire arc additive manufactured samples with different surface profiles. Measurement 2021, 188, 110597. [Google Scholar] [CrossRef]
- Bento, J.B.; Lopez, A.; Pires, I.; Quintino, L.; Santos, T.G. Non-destructive testing for wire + arc additive manufacturing of aluminium parts. Addit. Manuf. 2019, 29, 100782. [Google Scholar] [CrossRef]
- Machado, M.A.; Silva, M.I.; Martins, A.P.; Carvalho, M.S.; Santos, T.G. Double active transient thermography. NDT E Int. 2021, 125, 102566. [Google Scholar] [CrossRef]
- Chen, X.; Zhang, H.; Hu, J.; Xiao, Y. A passive on-line defect detection method for wire and arc additive manufacturing based on infrared thermography. In Proceedings of the 2019 International Solid Freeform Fabrication Symposium, Austin, TX, USA, 12–24 August 2019. [Google Scholar]
- Duarte, V.R.; Rodrigues, T.; Schell, N.; Miranda, R.; Oliveira, J.; Santos, T.G. Hot forging wire and arc additive manufacturing (HF-WAAM). Addit. Manuf. 2020, 35, 101193. [Google Scholar] [CrossRef]
- Santospirito, S.P.; Łopatka, R.; Cerniglia, D.; Słyk, K.; Luo, B.; Panggabean, D.; Rudlin, J. Defect detection in laser powder deposition components by laser thermography and laser ultrasonic inspections. In Proceedings of the Frontiers in Ultrafast Optics: Biomedical, Scientific, and Industrial Applications XIII, San Francisco, CA, USA, 3–7 February 2013; Volume 8611, pp. 202–211. [Google Scholar] [CrossRef]
- Myrach, P.; Ziegler, M.; Maierhofer, C.; Kreutzbruck, M. Influence of the acquisition parameters on the performance of laser-thermography for crack detection in metallic components. AIP Conf. Proc. 2014, 1581, 1624–1630. [Google Scholar] [CrossRef]
- Zhang, C.; Gao, M.; Chen, C.; Zeng, X. Spectral diagnosis of wire arc additive manufacturing of Al alloys. Addit. Manuf. 2019, 30, 100869. [Google Scholar] [CrossRef]
- Wittig, B.; Zinke, M.; Jüttner, S. Influence of arc energy and filler metal composition on the microstructure in wire arc additive manufacturing of duplex stainless steels. Weld. World 2020, 65, 47–56. [Google Scholar] [CrossRef]
- Xia, C.; Pan, Z.; Polden, J.; Li, H.; Xu, Y.; Chen, S.; Zhang, Y. A review on wire arc additive manufacturing: Monitoring, control and a framework of automated system. J. Manuf. Syst. 2020, 57, 31–45. [Google Scholar] [CrossRef]
- Xiao, X.; Waddell, C.; Hamilton, C.; Xiao, H. Quality Prediction and Control in Wire Arc Additive Manufacturing via Novel Machine Learning Framework. Micromachines 2022, 13, 137. [Google Scholar] [CrossRef] [PubMed]
- Li, Y.; Polden, J.; Pan, Z.; Cui, J.; Xia, C.; He, F.; Mu, H.; Li, H.; Wang, L. A defect detection system for wire arc additive manufacturing using incremental learning. J. Ind. Inf. Integr. 2021, 27, 100291. [Google Scholar] [CrossRef]
- Chabot, A.; Laroche, N.; Carcreff, E.; Rauch, M.; Hascoët, J.-Y. Towards defect monitoring for metallic additive manufacturing components using phased array ultrasonic testing. J. Intell. Manuf. 2019, 31, 1191–1201. [Google Scholar] [CrossRef]
- Ferreira, P.M.; Machado, M.A.; Carvalho, M.S.; Vidal, C. Embedded Sensors for Structural Health Monitoring: Methodologies and Applications Review. Sensors 2022, 22, 8320. [Google Scholar] [CrossRef]
- Machado, M.A.; Rosado, L.S.; Mendes, N.M.; Miranda, R.M.; Santos, T.G. Multisensor Inspection of Laser-Brazed Joints in the Automotive Industry. Sensors 2021, 21, 7335. [Google Scholar] [CrossRef]
- Machado, M.A.; Rosado, L.F.S.G.; Mendes, N.A.M.; Miranda, R.M.M.; dos Santos, T.J.G. New directions for inline inspection of automobile laser welds using non-destructive testing. Int. J. Adv. Manuf. Technol. 2021, 118, 1183–1195. [Google Scholar] [CrossRef]
- Santos, T.G.; Oliveira, J.P.; Machado, M.A.; Inácio, P.L.; Duarte, V.R.; Rodrigues, T.A.; Santos, R.A.; Simão, C.; Carvalho, M.; Martins, A.; et al. Reliability and NDT Methods. Adv. Struct. Mater. 2020, 129, 265–295. [Google Scholar] [CrossRef]
- Machado, M.A.; Rosado, L.; Pedrosa, N.; Miranda, R.M.; Piedade, M.; Santos, T.G. Customized Eddy Current Probes for Pipe Inspection. Stud. Appl. Electromagn. Mech. 2017, 42, 283–290. [Google Scholar] [CrossRef]
- Machado, M.A.; Antin, K.N.; Rosado, L.S.; Vilaça, P.; Santos, T.G. High-speed inspection of delamination defects in unidirectional CFRP by non-contact eddy current testing. Compos. Part B Eng. 2021, 224, 109167. [Google Scholar] [CrossRef]
- Machado, M.A.; Rosado, L.S.; Santos, T.G. Shaping Eddy Currents for Non-Destructive Testing Using Additive Manufactured Magnetic Substrates. J. Nondestruct. Eval. 2022, 41, 50. [Google Scholar] [CrossRef]
- Rosado, L.S.; Santos, T.G.; Ramos, P.M.; Vilaça, P.; Piedade, M. A differential planar eddy currents probe: Fundamentals, modeling and experimental evaluation. NDT E Int. 2012, 51, 85–93. [Google Scholar] [CrossRef]
- Duarte, V.R.; Rodrigues, T.A.; MacHado, M.A.; Pragana, J.P.M.; Pombinha, P.; Coutinho, L.; Silva, C.M.A.; Miranda, R.M.; Goodwin, C.; Huber, D.E.; et al. Benchmarking of Nondestructive Testing for Additive Manufacturing. 3D Print. Addit. Manuf. 2021, 8, 263–270. [Google Scholar] [CrossRef] [PubMed]
- Santos, D.; Machado, M.A.; Monteiro, J.; Sousa, J.P.; Proença, C.S.; Crivellaro, F.S.; Rosado, L.S.; Santos, T.G. Non-Destructive Inspection of High Temperature Piping Combining Ultrasound and Eddy Current Testing. Sensors 2023, 23, 3348. [Google Scholar] [CrossRef]
- Machado, M.A.; Rosado, L.; Pedrosa, N.; Vostner, A.; Miranda, R.M.; Piedade, M.; Santos, T.G. Novel eddy current probes for pipes: Application in austenitic round-in-square profiles of ITER. NDT E Int. 2017, 87, 111–118. [Google Scholar] [CrossRef]
- Duarte, V.R.; Rodrigues, T.A.; Schell, N.; Miranda, R.M.; Oliveira, J.P.; Santos, T.G. In-situ hot forging directed energy deposition-arc of CuAl8 alloy. Addit. Manuf. 2022, 55, 102847. [Google Scholar] [CrossRef]
- Rosado, L.S.; Santos, T.G.; Piedade, M.; Ramos, P.M.; Vilaça, P. Advanced technique for non-destructive testing of friction stir welding of metals. Meas. J. Int. Meas. Confed. 2010, 43, 1021–1030. [Google Scholar] [CrossRef]
Disclaimer/Publisher’s Note: The statements, opinions and data contained in all publications are solely those of the individual author(s) and contributor(s) and not of MDPI and/or the editor(s). MDPI and/or the editor(s) disclaim responsibility for any injury to people or property resulting from any ideas, methods, instructions or products referred to in the content. |
© 2023 by the authors. Licensee MDPI, Basel, Switzerland. This article is an open access article distributed under the terms and conditions of the Creative Commons Attribution (CC BY) license (https://creativecommons.org/licenses/by/4.0/).


