Article

The Corrosion Behavior of WEDM Machined Stainless Steels in a Pyrolysis Environment

1
Faculty of Mechanical Engineering, Jan Evangelista Purkyně University, 400 96 Ústí nad Labem, Czech Republic
2
Faculty of Mechanical Engineering, Brno University of Technology, 616 69 Brno, Czech Republic
3
Faculty of Environment, Jan Evangelista Purkyně University in Ústí nad Labem, Pasteurova 3632/15, 400 96 Ústí nad Labem, Czech Republic
4
ORLEN UniCRE a.s., Revoluční 1521/84, 400 01 Ústí nad Labem, Czech Republic
5
Department of Machine and Industrial Design, Technical University of Ostrava, 708 00 Ostrava, Czech Republic
6
ESAB VAMBERK, s.r.o., Smetanovo Nábřeží 334, 517 54 Vamberk, Czech Republic
*
Author to whom correspondence should be addressed.
Metals 2023, 13(1), 144; https://doi.org/10.3390/met13010144
Submission received: 25 November 2022 / Revised: 23 December 2022 / Accepted: 5 January 2023 / Published: 10 January 2023

Abstract

:
Pyrolysis represents one of the most convenient technologies for the chemical transformation of waste. The exposure to corrosion products and high temperatures does, however, require chemically resistant construction materials. This study was carried out to analyze the corrosion behavior of 1.4571 (AISI 316Ti) and 1.4305 (AISI 303) stainless steels machined with wire electric discharge machining (WEDM) in a pyrolysis environment. Different machining parameters were used for both materials tested to examine the influence of WEDM machining. The total testing time in the pyrolysis environment was 28 days, with the testing chamber being refilled 12 times. The surface topography was analyzed following the WEDM, cleaning, and corrosion test. The surface morphology and cross-section analyses were carried out using electron microscopy at all three stages of the process. An analysis of the chemical composition of the surfaces was carried out as well as of the pyrolysis environment to which the samples were exposed. It was established that the organic acids found in the pyrolysis chamber did not degrade the tested stainless steels to a meaningful degree. Minor fissures, that is, fine precipitated carbides, were observed on the surface of both the steel types and in their subsurface layer, as well as a significant presence of carbon. This presence was directly connected to the impurities found on the surface after the removal from the test furnace that were probably of a protective or passivation nature.

1. Introduction

Metal corrosion is a physical and chemical interaction between a metal and theenvironment. Corrosion provokes changes in the properties of the metal, can trigger deterioration in its functionality, and a decrease in product utility. The impact on the mechanical properties, heat transfer, and aesthetic qualities can eventually lead to a complete loss of the function and integrity of the metal [1].
Pyrolysis represents one of the most convenient technologies for the chemical transformation of waste. It is a process of thermal decomposition of materials in an inert atmosphere, producing steams comprised of condensable and non-condensable gases, and solid byproducts. A number of physical and chemical factors cause corrosion in the pyrolysis process, with the highest importance ascribed to the content of oxygen-containing substances in the pyrolysis steam and the condensed liquid combined with a high processing temperature. The exposure to corrosion products and high temperatures does, however, require chemically resistant construction materials [2].
Wire electric discharge machining (WEDM) is an unconventional machining technology that uses thermoelectrical principles to separate materials. All materials with at least a minimum conductivity can be cut, their mechanical or physical properties being of no consequence. The cutting is carried out with a wire electrode with a diameter from 0.02 to 0.3 mm which is most commonly made from brass. The workpiece and the wire electrode have to be in close contact, but never in full contact. There has to be a medium of high electric resistance, most commonly non-ionized water, between the wire and the workpiece for erosion to take place. WEDM represents a fundamental technology for many industries, such as the automotive and energy industry, and medical science [3,4].
Stainless steels are high-alloy steels, made to have a higher resistance to chemical and electrochemical corrosion. Their corrosion resistance is derived from their capacity foriron surface passivation. While the passivity of stainless steels against general corrosion has been achieved in a number of environments, some specific ones give rise to local corrosion types—crevice, pitting, and intergranular corrosion, and corrosion cracking. That is why not only chromium, but also other alloying agents, are used to increase the corrosion resistance to each corrosion type [5].
As mentioned above, corrosion causes grave processing complications which can result in serious disrepair. This means that evaluating the corrosion risk for the material and the parts which are in contact with the pyrolysis reactor environment is essential for the pyrolysis unit production and operation. Until now, not much attention has been paid to this matter, and there is a lack of data that would enable a better definition of the corrosion process for the pyrolysis of different materials. The goal of this study wasto analyze the corrosion in a pyrolysis environment of two stainless steel types, machined with an unconventional technology—WEDM. This study follows up on some extensive previous research performedon WEDM machined materials, such as Hardox steel [6], Creusabro steel [7], or aluminum alloy 7475-T7351 [8]. The findings from this study can be used in practice, for instance, when producing pyrolysis reactor chambers or whole units where the pyrolysis takes place. Pyrolysis oil causes severe corrosion on aluminum, soft steel, and nickel, even at low temperatures, while steel enhanced with cobalt and molybdenum is a lot more resistant. The corrosivity of pyrolysis oil is ascribed to the high content of organic acids, and it grows with their increasing content, temperature, and water content [9]. Keiser et al. [10] tested the corrosion parameters of the liquid from pyrolysis biomass at low temperatures (50 °C) for the purposes of its transportation and storage. The majority of the tested materials which were in contact with the pyrolysis liquid showed notable corrosion. Corrosion occurred during the steam phase as well, albeit to a lesser degree. Only two of the used materials—stainless steel types 304L and 316L—could be used for storage and transportation.

Literature Review

Aggarwal et al. [11] presented an empirical study of a Ni–27Cu–3.15Al-2Fe–1.5Mn-based superalloy using WEDM to model the cutting rate (CR) and surface roughness (SR) using a response surface methodology (RSM). The parameters selected were pulse-on and pulse-off time, spark-gap voltage, and wire-feed rate. The paper found that the optimal values of 2.48 mm/min for the CR and 2.12 µm for the SR were achieved through a multi-response optimization. Sidhom et al. [12] found the quality of the finished surface to be a strong influencing factor on the corrosion resistance of austenitic stainless steels. Experimental techniques, including roughness measurements, scanning electron microscopy (SEM), energy dispersive microanalysis (EDX), and X-ray diffraction, revealed changes leading to white and heat-affected layers as well as weakening of the resistance to pitting and intergranular corrosion in comparison to a diamond polished surface. The corrosion resistance of the AISI316L SS was restored through the removal of the white layer material. Cabrini et al. [13] studied the corrosion behavior of AISI 316L and AISI 304L stainless steel exposed to 250 °C in a batch reactor in plants for the production of bio-oil using a liquefaction process of the sorted organic fraction of municipal solid waste. Tests exposed the specimens to the water/oil phase or humid gas phase and the corrosion rate was evaluated in weight loss tests. They showed that stainless steels have low corrosion rates, which were a function of time and temperature. Marco et al. [14] studied the possible recycling of polymeric waste using the pyrolysis process. The material sources came from the automobile industry and municipal solid waste. These were pyrolyzed in a 3.5 dm3 autoclave at 500 °C for 30 min in a nitrogen atmosphere. The study concluded that pyrolysis can be a very promising recycling technique for various materials coming from the automobile industry, such as tires and municipal waste. Gleiset al. [15] studied gasification and pyrolysis as sustainable and cost-effective means to treat waste. They stated that the best results were achieved for high calorific waste and waste fuels when combined with power plants and industrial furnaces. As such, they can substitute fossil fuels and, therefore, avoid additional sources of emissions. System changes have to be made to reverse the lack of willingness and motivation on the side of waste pyrolysis and gasification providers. Viklund et al. [16] studied the corrosion of commonly used superheater materials of electricity-generating waste-fired boilers through exposure to internally cooled probes. Analyzing the deposit composition and corrosion rates of these materials revealed a predominance of CaSO4, KCl, and NaCl for the former and high corrosion rates of 13CrMo44, HCM12A, and Super 304 for the latter. The study showed how results differed for the aforementioned metals and austenitic steels and nickel-basedalloys. Karlsson et al. [17] studied how to mitigate corrosion induced by alkali chloride by adding or co-firing sewage sludge with biomass/waste in a CFB boiler. Reducing the corrosiveness of flue gases and deposits is possible using additives or co-combustion of digested sewage sludge. Three fuel mixes, including SRF, MSS1-low (SRF-Solid Recovered Fuel—with municipal sewage sludge, low dosage), and MSS2-high (SRF with municipal sewage sludge, high dosage), were used to measure stainless steel corrosion and the result was a significant decrease in corrosiveness when sewage sludge was added. Verbinnen et al. [18] studied the corrosion of heat-exchanging components in waste-to-energy plants through elemental and mineralogical analysis. The surface of these components corrodes due to devolatilization or formation of chlorides, sulfates, and their mixtures. The study explained the distribution of Cl and S in sampled ashes and confirmed the relevance of the oxygen content; boiler temperature; presence of polysulfates, Pb, and Zn; and the concentrations of HCl and SO2 in the flue gas for different types of boiler corrosion. Carlborg et al. [19] studied the resilience of refractory materials used during high-temperature gasification of biomass by exposing the materials for up to 27 h in an atmospheric oxygen-blown entrained-flow gasifier combusted with a mixture of bark and peat powder. Increased levels of Al were observed in all slags, but the fused cast materials were affected the least.

2. Experimental Setup and Material

2.1. Experimental Material

The samples for the experiment were produced from two different types of stainless steel—1.4571 (AISI 316Ti) and 1.4305 (AISI 303). Their chemical composition is shown in Table 1. The mechanical properties of the tested steels are given in Table 2. The 1.4571 (AISI 316Ti) steel is an austenitic nickel–chromium stainless steel, stabilized with titanium. It is resistant to corrosion, acids, lyes, and stillwater average-concentration chlorides. It has a very good welding property, but medium-to-low machinability. The 1.4305 (AISI 303) austenitic steel has a medium corrosion resistance but has no resistanceto intergranular corrosion. It is easy to machine, but difficult to weld. It is used in the automotive and food industries, and it is suitable for fittings production. There were 6 samples made of 100 mm × 60 mm × 5 mm size. To suspend them in the pyrolysis chamber, a slot was drilled into the upper part of a 5 mm diameter, as shown in Figure 1a on all the experiment samples.

2.2. WEDM Machine Setup

The samples for the experiment were manufactured with a Makino wire-cutting machine type EU64 (Tokyo, Japan). The machine cameequipped with a computer numerical control (CNC) of all 5 axes and a cutting bath for the dielectric liquid (deionized water), in which the material was submerged for the entire machining time. The wire electrode—a brass wire of CUT E type of 0.25 mm diameter—was made by Penta Trading (Prague, Czech Republic). The machining parameters—gap voltage (V), pulse-on time (µs), pulse-off time (µs), wire speed (m/min), and discharge current (A)—were based on extensive prior experiments and the manufacturer’s recommendations. These parameters are compiled in Table 3, alongside the cutting speed.

2.3. Pyrolysis Unit Settings

The corrosion resistance was tested in a modified batch pyrolysis unit using aCLASIC CZ (Řevnice, Czech Republic). The pyrolysis took place in a pyrolysis furnace (Figure 2A) at 500 °C with 300 g wood chips from discarded pallets used as the feedstock. The pyrolysis products were carried by a nitrogen flow (5 L/h) via heated paths to a test furnace (Figure 2B) of the same temperature where the test pieces were suspended. The furnace outlet was sealed for the filling of the test furnace with pyrolysis products until there was a light overpressure of 0.2 bar. The inlet to the test furnace was, subsequently, sealed as well and the pyrolysis was finished. A higher pressure in the test furnace served to check the apparatus’s tightness. The furnace was closed at a previously determined time when the most significant release of products occurred, according to an online CH4, CO2, and CO gas analyzer. The pyrolysis products were introduced every other day (Monday, Wednesday, and Friday) to ensure maximum possible contact between the test pieces and the corrosive agents. The total testing time was 28 days, with the test furnace refilled 12 times. The samples of the gaseous products were taken from the apparatus outlet (Figure 2C) in order to characterize the environment where the tested steals were positioned.
The samples were cleaned before being placed into and after being taken out of the pyrolysis chamber in accordance with ČSN ISO 8407 standard. The cleaning was carried out in nitric acid 65% p. a. (HNO3) and distilled water in a 1:10 ratio solution for 20 min at 60 °C temperature. The samples which were not placed in the pyrolysis chamber were cleaned with the same process in order to rule out the influence of the cleaning on the corrosion of the test pieces.

2.4. Pyrolysis Environment Analysis

The condensed gases analysis was executed with gas chromatography–mass spectrometry (GC–MS) with a simple quadrupole. Organic acids and other pyrolysis products were identified with an Agilent (Santa Clara, CA, USA) 7890-typechromatograph equipped with a 5977E mass detector and a Combi PAL (CTC Analytics AG, Zwingen, Switzerland) headspace autosampler. The sample was taken ina pre-evacuated 10 mL vial. The dosage was added using an S/SL injector (Bruker, Billerica, MA, USA) in splitless mode at 250 °C. The separation took place ona DB-WAX tripolar capillary column (Agilent Technologies, Santa Clara, CA, USA) of 30 m length, 0.25 mm inside diameter, and 0.25 µm film thickness. The furnace temperature program started at 35 °C (1 min), with a gradient of 5 °C min−1 over the span of 20 min. A helium flow at a rate of 1 mL/min was used in the mobile phase. The mass spectrometer was used in full scan mode in the range from 10 to 450 m/z and at an ion source temperature of 230 °C. Five organic acids (formic, acetic, propionic, butyric, and isobutyric) and other chosen substances were monitored to evaluate the corrosion properties. The samples were taken at 0 h, 6 h, 24 h, 48 h, 54 h, 72 h, and 78 h before the re-filling of the test furnace. The analysis of C1–C6 and the permanent gases was provided in detail earlier. Sampleswere taken into 0.6 L Tedlar gas sampling bags at 0 h and after 48 h.

2.5. Experimental Methods

All the samples machined for the experiment were blown off with compressed air, cleaned in an ultrasonic cleaner, and further analyzed. An electron microscope type Lyra3 made by Tecsan (Brno, Czech Republic) was used to analyze the morphology and chemical composition. The microscope was equipped with an energy-dispersive X-ray detector to enable the chemical composition analysis. The surfaces’ topography was analyzed with a 3D tactile profilometer type Dektak XT by Bruker (Billerica, MA, USA) and processed in Vision 64. Metallographic preparations were created to study subsurface processes and changes using the Lyra3 electron microscope. The metallographic preparations were prepared using common techniques—wet grinding and polishing with diamond pastes—using the automatic preparational system TEGRAMIN 30 by STRUERS (Westlake, Cleveland, OH, USA). The final mechanical–chemical polishing was executed with the OP-Chem suspension from STRUERS. Etching was performedwith Nital etchant.

3. Results and Discussion

3.1. Topography Analysis

The quality of the machined surface was carefully gauged and examined, as it is the driving factor for the required functionality and tool life of a machined part. It was crucial to evaluate more parameters than the arithmetical mean deviation of the profile (Ra)—the most common one—in order to provide a comprehensive assessment of the topography; hence the inclusion of the maximum height of profile (Rz) parameter used in this experiment. All the parameters were evaluated in accordance with the ISO 4287 standard. The evaluation was performed both next to the hole drilled at the top for suspending in the furnace and at the bottom at a distance of 1 mm from the edge, as well as in the center. The measurement was carried out five times and the arithmetic mean was calculated from the measured values. From this point on, the arithmetic mean refers to the analysis from the five measured spots.
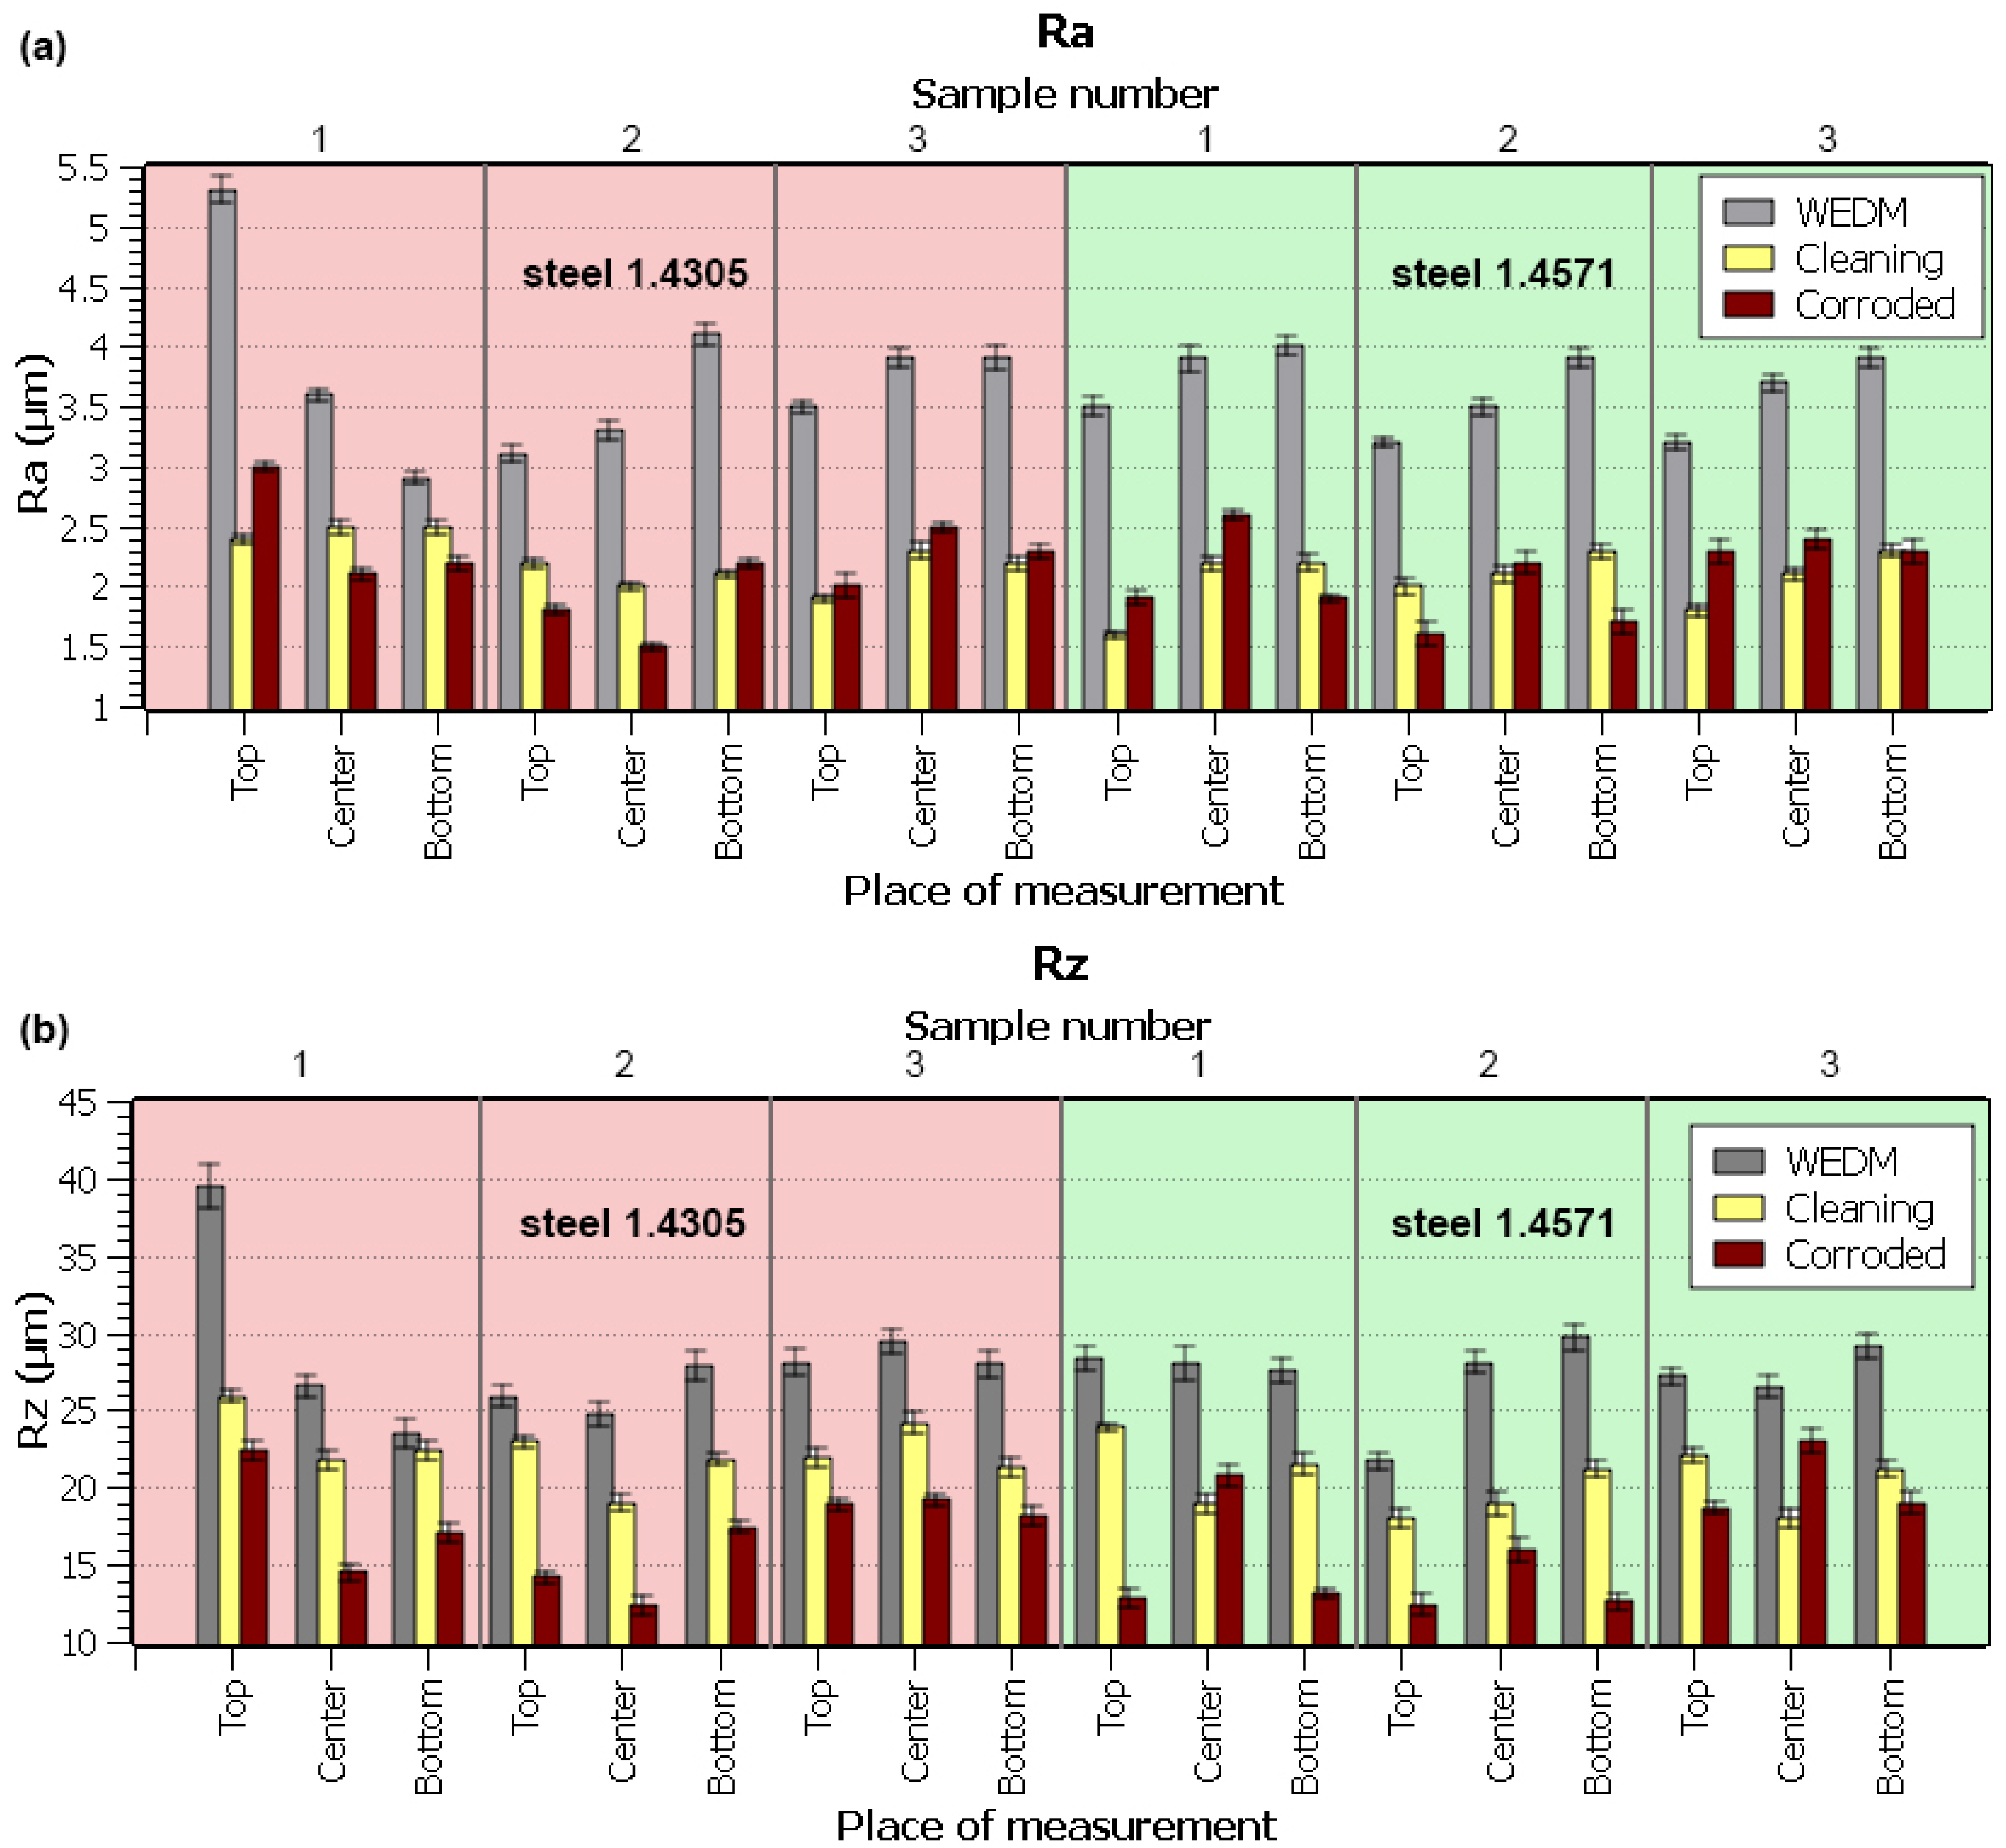
The evaluated figures of both parameters were plotted in graphs, clearly marking the difference between the topography after the WEDM, cleaning, and corrosion resistance test, as shown in Figure 3. The highest values of both topography parameters Ra and Rz were achieved immediately after WEDM. The values plummeted after the cleaning and the corrosion test. This was likely caused by the effect of nitric acid (cleaning), or more precisely, the pyrolysis environment (the test furnace exposure), that led to a smoothening of the surface unevenness, or rather a leveling of the surface topography as a whole. The overall arithmetic mean of unevenness (Ra parameter) dropped significantly compared to its value after WEDM cutting. WEDM typically shows considerable surface roughness due to the separation process of the material’s particles. Surface depressions and elevations, however, persisted, as demonstrated by the sufficiently high value of the Rz parameter. Both stainless steel types showed corrosion products, or more precisely, sediments (the so-called passive film), due to the 28-day corrosion exposure to the pyrolysis environment (matching findings from the study by Bharathiet al. [20]). These sediments filled the original uneven areas and led to the decrease in the Ra and Rz parameters, as shown in Figure 3 for both steel types studied. The results confirmed that the supposed surface integrity of the WEDM machined parts typically shows uneven particles of the molten structure and small ball fractions—craters and cavities. This has already been demonstrated for a similar 1.4301 stainless steel in studies by Lee et al. [21] and Abdulkaree et al. [22]. The difference between the individual samples was given by different machining parameters, which is a well-known fact that has been explored in many studies, such as those by Kumar et al. [23], Majumder et al. [24], and Jafari et al. [25]. The same has been observed for different materials and workpiece parts, as presented by Mouralova et al. [26]. The higher value in the top part of the first 1.4305 steel sample was potentially caused by a material defect, which only appeared during the machining, and which was responsible for the worsened topography.

3.2. Morphology Analysis and EDX

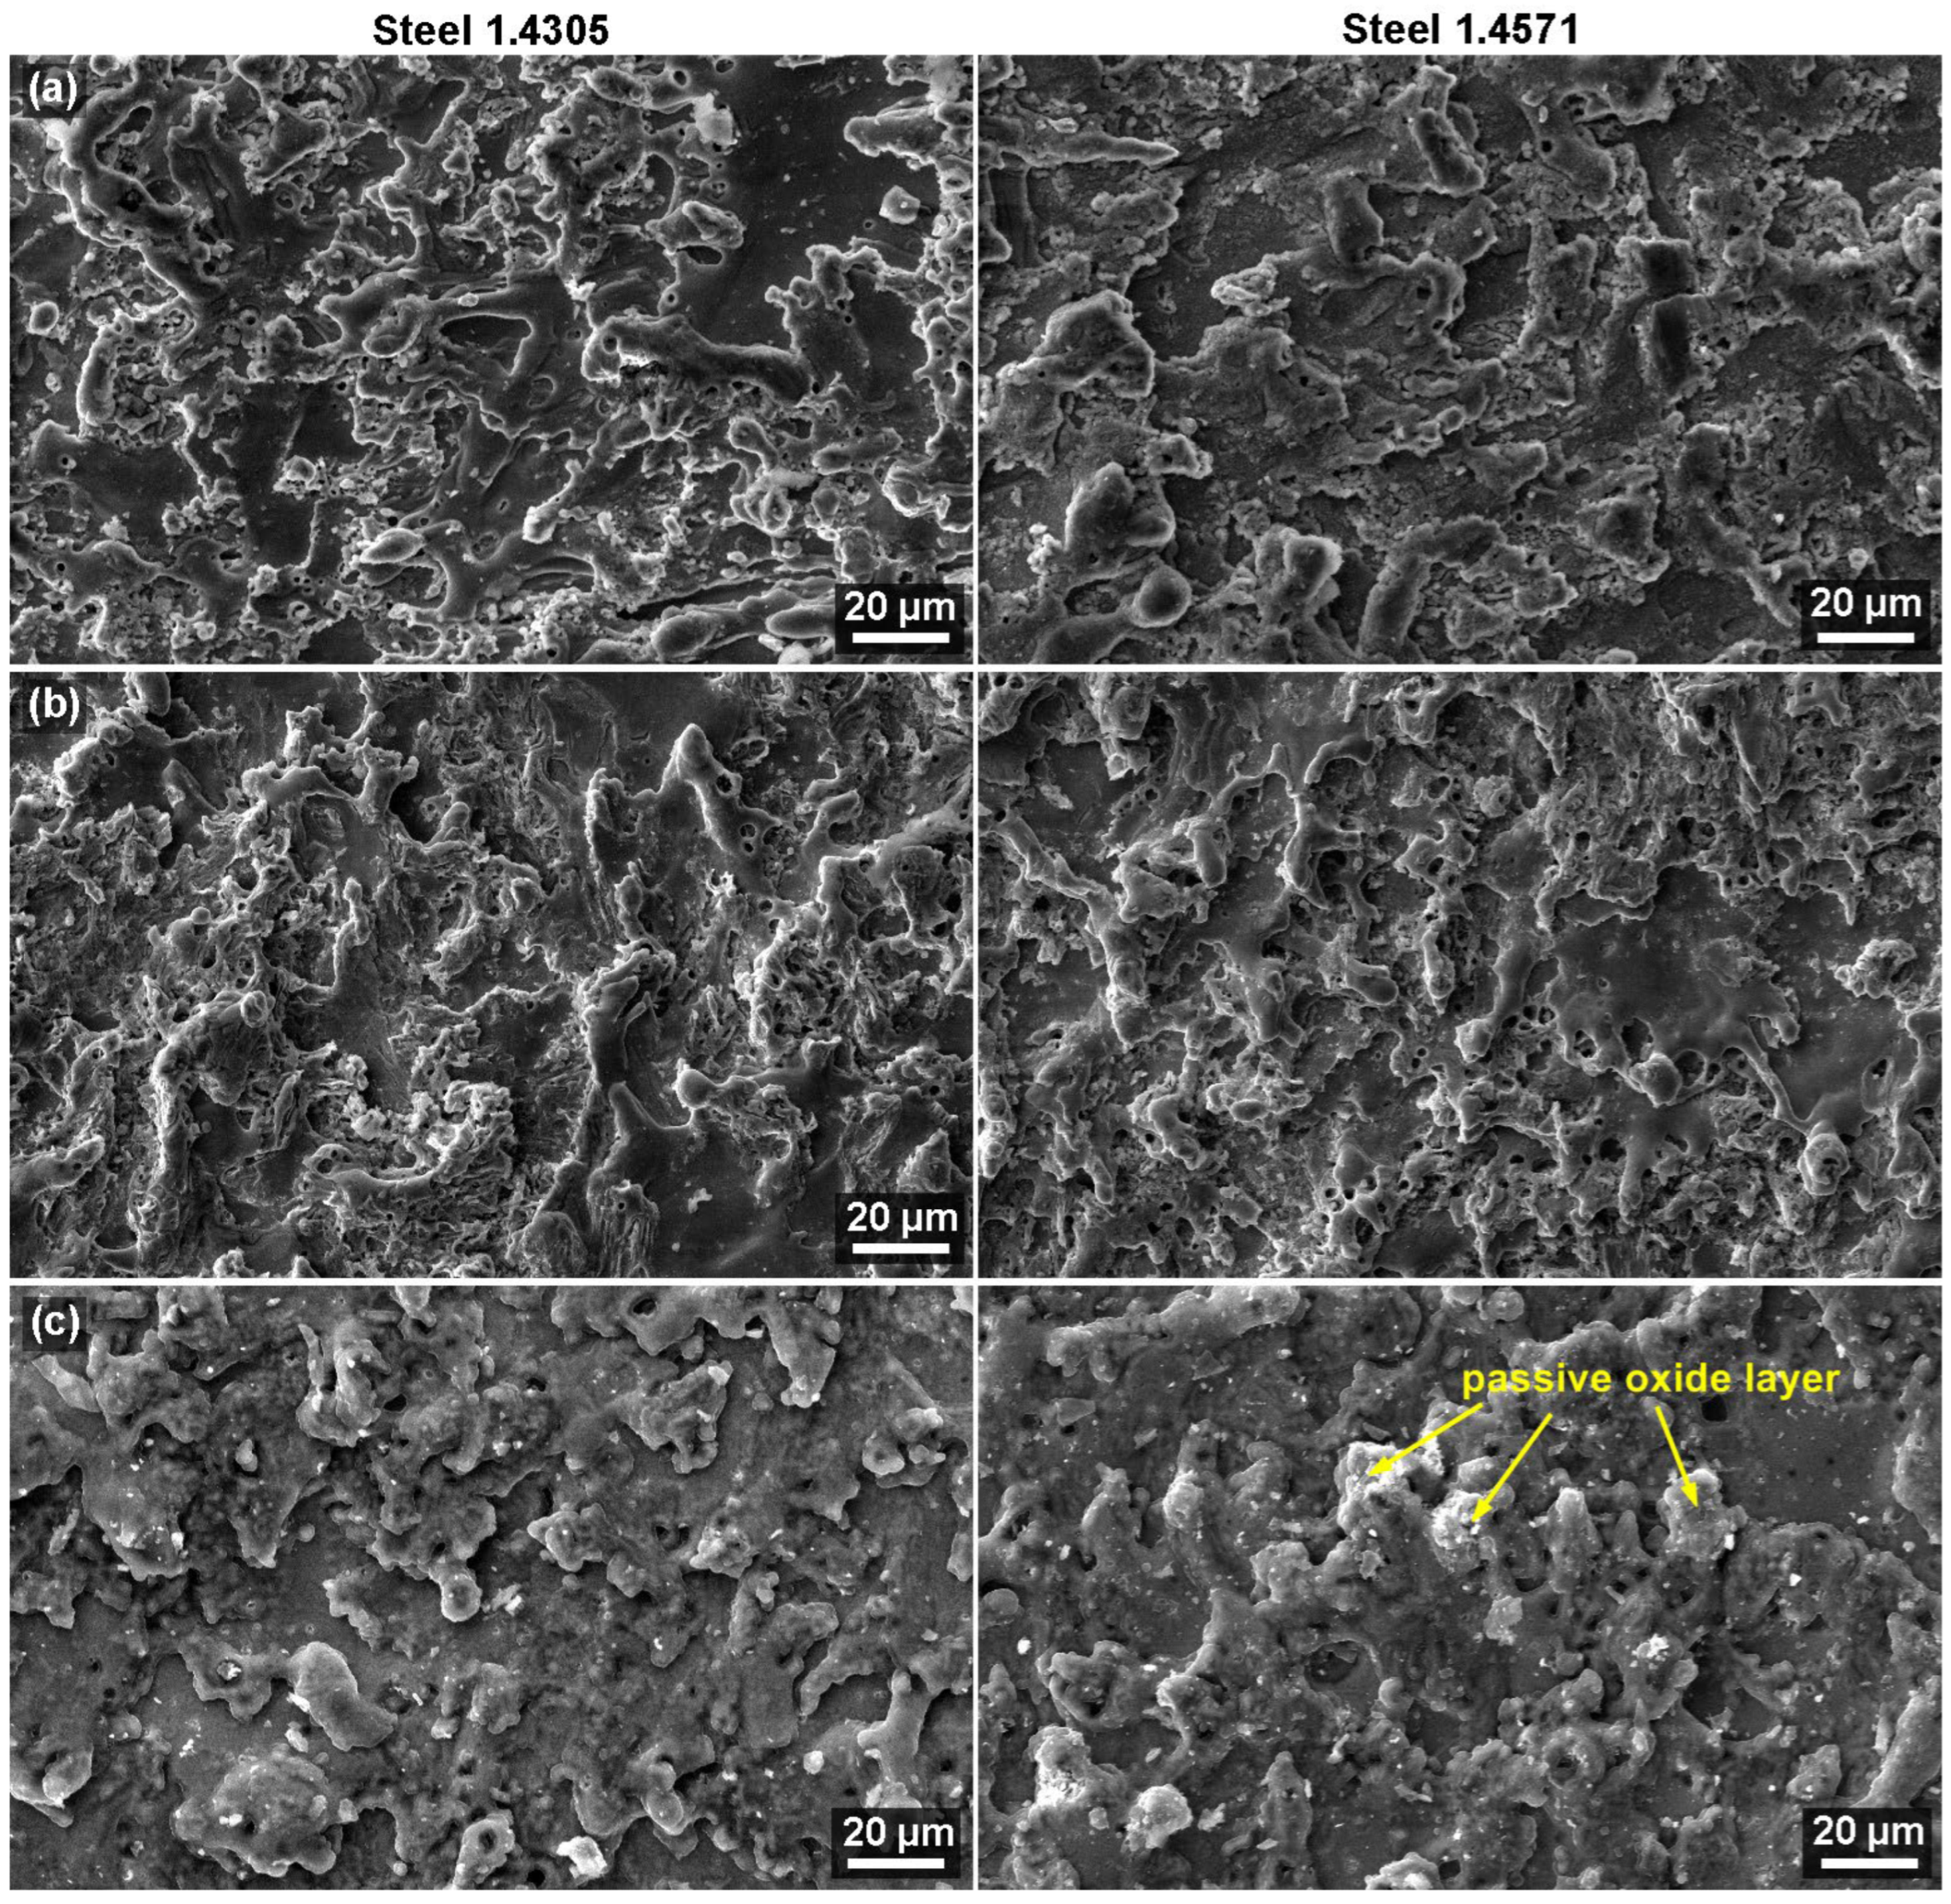
The surface morphology of an EDM machined material is very specific because there are no visible tracks left after the conventional machine, but there are craters caused by the electric discharges. These craters differ in frequency, size, and depth depending on the material and the heat treatment. The study of these craters and the overall surface morphology of the samples was carried out after WEDM machining, cleaning, and the corrosion test, using the Lyra3 electron microscope with an acceleration voltage of 20 kV and a magnification of 1000×. All the images were created by means of a secondary electron detector (SE).
Figure 4 and Figure 5 show images of the samples from the edges (1 mm from the edge) and the center of both studied materials. A slightly different morphology was, of course, observed in samples with different machining parameters, as explained in the topography analysis. There was no correlation between the machining parameters and the level of corrosion established; hence, the machining parameters did not provide any information of consequence. The differences were studied by comparing the edges and the centers of the machined sample, which is very common for WEDM and has already been shown in the study by Mouralova et al. [26]. The morphology after WEDM showed a high number of smooth sections presented by the crater bottoms and discharges. The surface after the corrosion test was covered in a passive layer, which is typical for the analyzed stainless steels, as shown in a study by Prathipati et al. [27]. These light areas that proved the presence of the passive oxide layer were mostly found on the 1.4571 steel, both at the edge and in the center of the sample, as shown in Figure 4 and Figure 5c. There were no defects on any sample. While that was very good, it did not mean that there were no defects in the subsurface layer. For this reason, cross-sections of the samples were made and analyzed, and the results are reported in the following section.
An EDX analysis was run on the samples’ surfaces on an area of 100 × 100 µm to examine the chemical composition changes. The same material samples with different machining parameters were found to be almost identical; Table 4 contains the measurement data from sample no. 1. The table shows that the diffused elements from the wire electrode—copper and zinc—were eliminated to a large degree in the cleaning process. The zinc disappeared altogether and the highest amount of copper was left on 1.4571 (AISI 316Ti). The copper had almost disappeared after the corrosion test, with only 1.1 wt% left on the material. There was 0.6 wt% copper left on 1.4305 (AISI 303) after the cleaning process as well as after corrosion, with no change recorded. Wire electrode diffusion is a well-described phenomenon (e.g., Pramanik et al. [28], Kumar et al. [29]), which happens as a consequence of exposure to a short-term but high temperature of up to 20,000 °C [30]. The explanation for this phenomenon here is that the copper reacted with the nitric acid during the cleaning, which led to the observed decrease in Cu content. Zinc has a higher evaporative capacity, so it evaporated more easily during the WEDM discharge, or rather, stayed on the surface in the form of ZnO2. The presence of carbon directly reflected the impurities which were found on the surface after being taken out of the pyrolysis chamber, that is, the products of the ongoing reactions which were of a protective nature. The oxygen found inside the passive layer was a result of the thermal decomposition of biomass to light organic acids (see Section 3.4). The difference between the two analyzed steel types lies in the difference in their chemical composition. The increased sulfur content in 1.4305 causes the binding to the copper from the wire used during WEDM machining.
A considerable occurrence of carbon on the surfaces of the samples proven by the corrosion test directly reflected the impurities, which were found on the surface after being removed from the pyrolysis chamber. It is interesting to note that the impurities were of a protective character, namely, they created a sort of barrier against the corrosion process. We can, however, assume that these organic impurities (soot) did not decompose into free carbon, which would diffuse in the austenitic structures of the tested steel types. The diffusion coefficients of both the materials were relatively low, yet there was no carbonization of the surface, nor were there undesirable chromium carbides formed at the edges of the grains, even though the samples were exposed to a temperature of 500 °C for 28 days. This was likely averted by the fast temperature drop after the end of the experiment.

3.3. Subsurface Layer Analysis

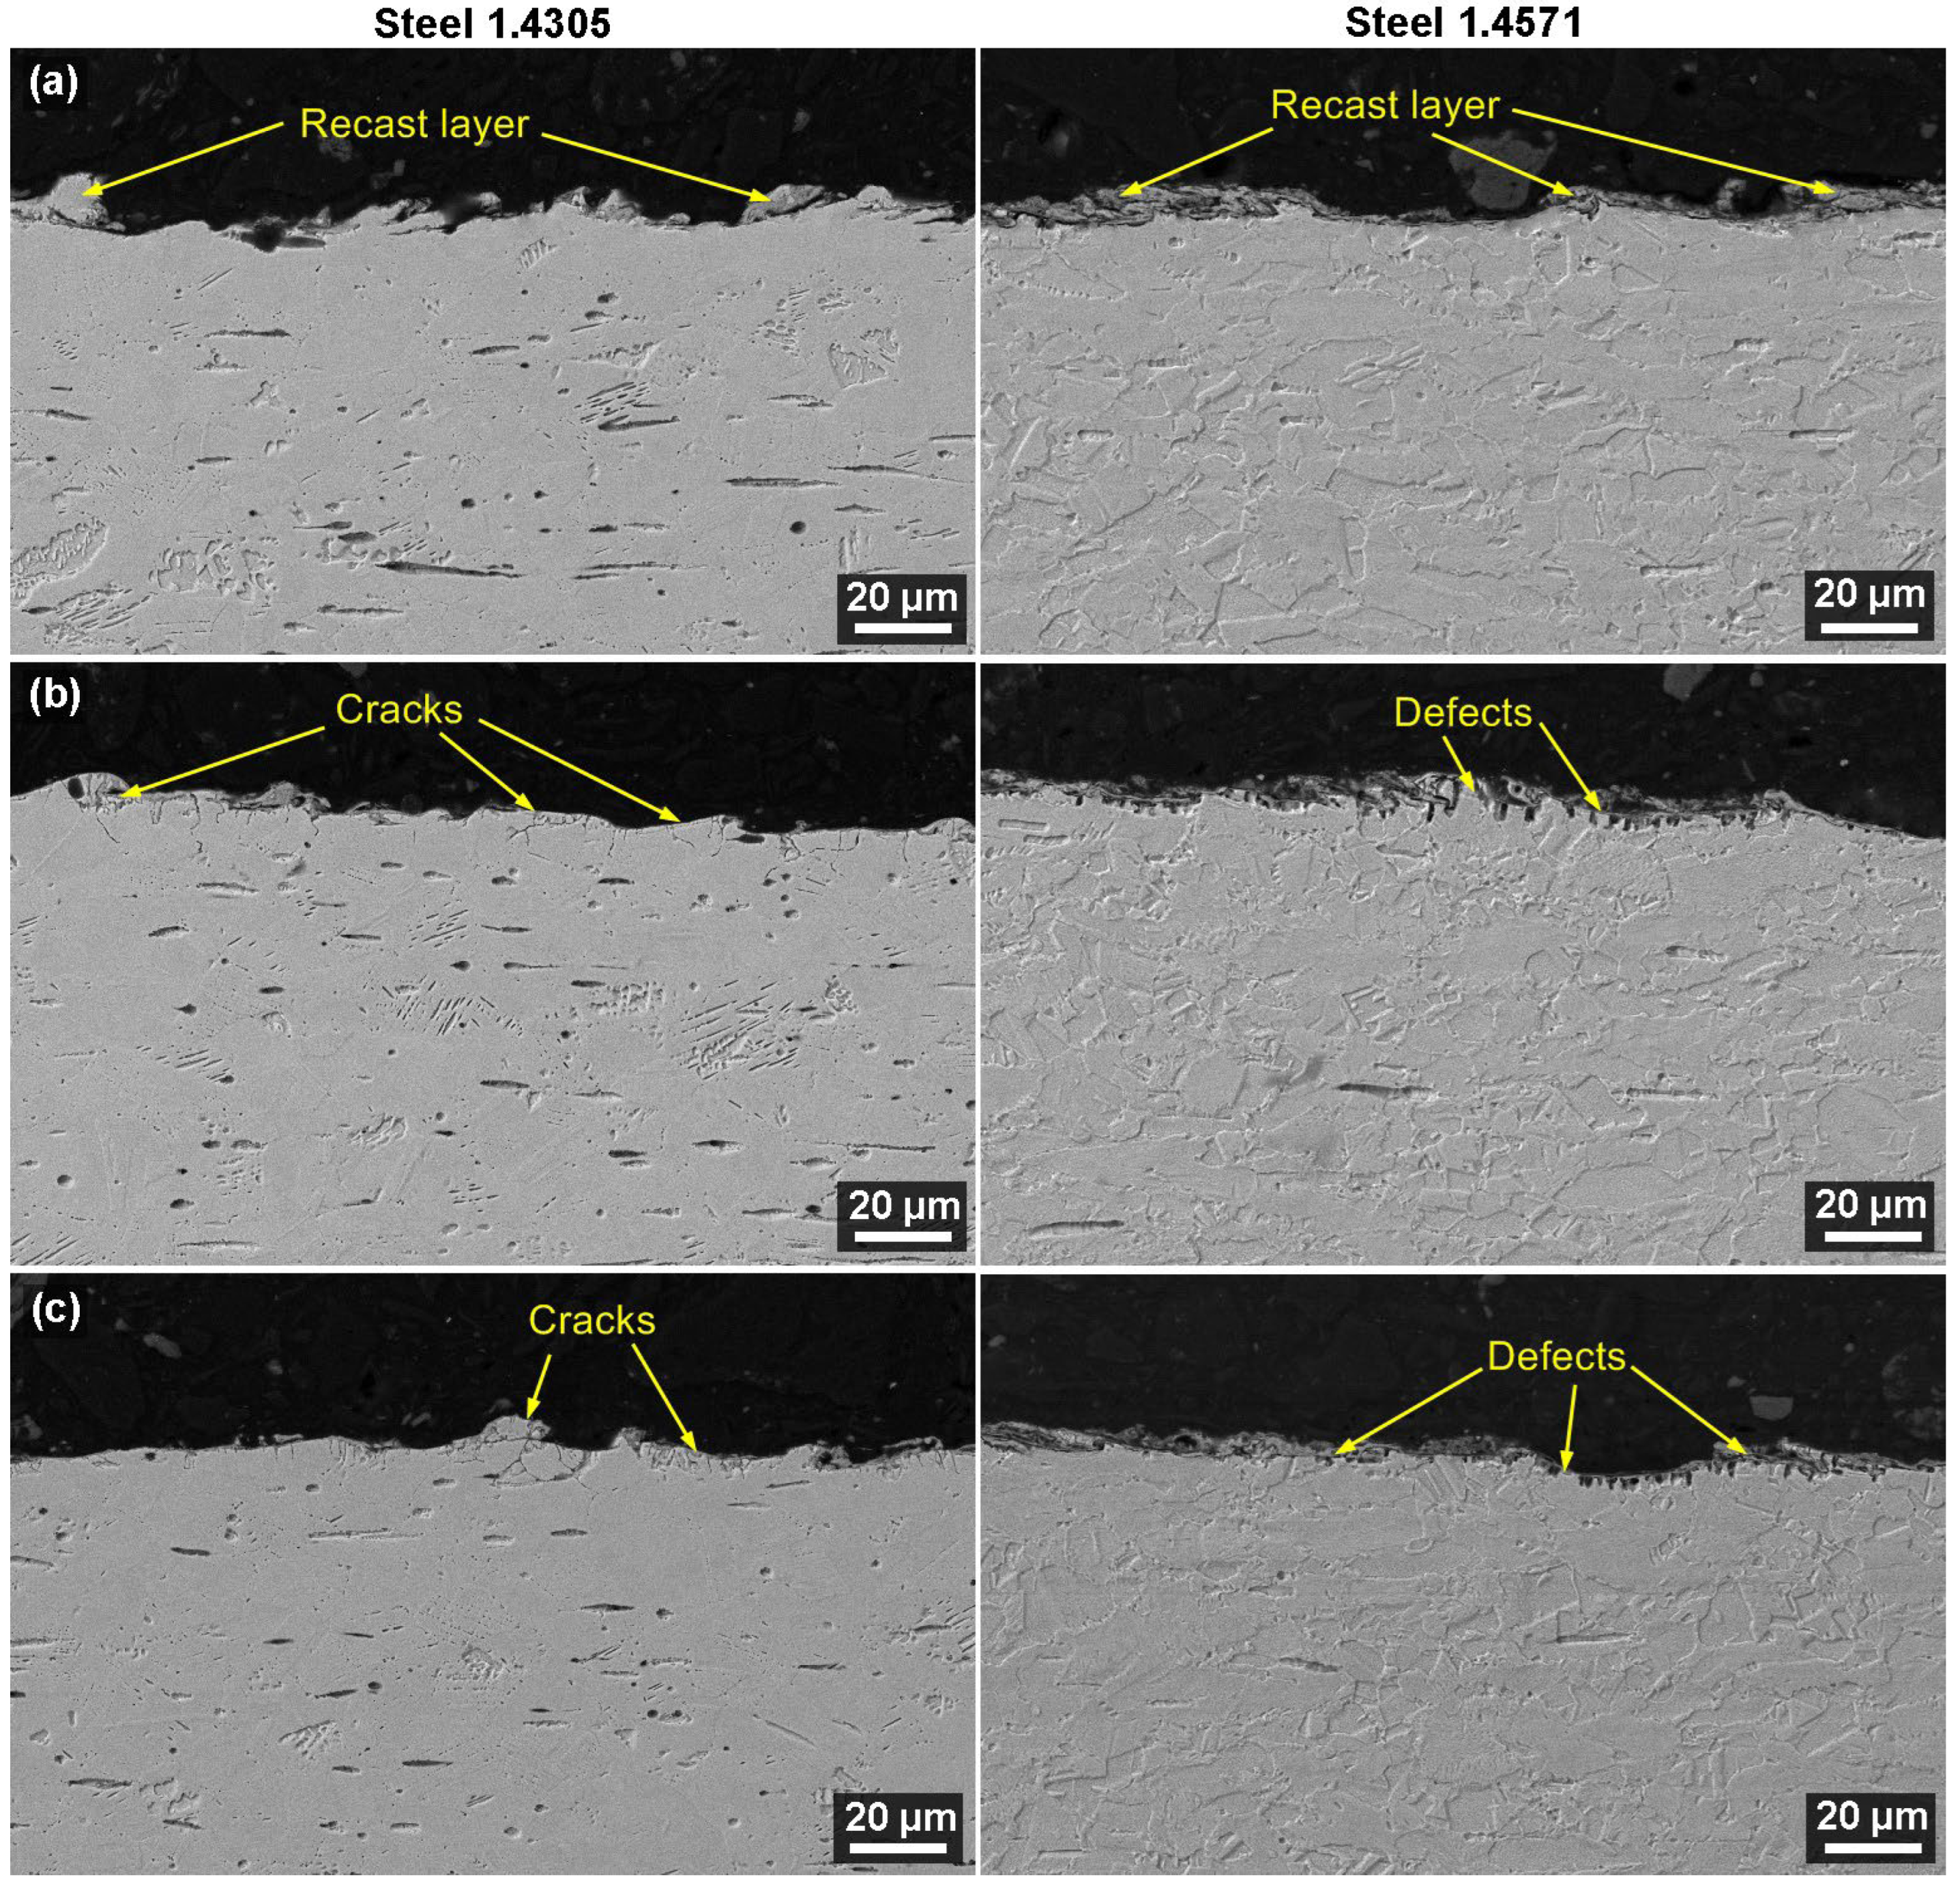
Metallographic preparations of the samples’ cross-sections were made to study the state of the subsurface layer after WEDM, cleaning, and the corrosion test. These were further examined using electron microscopy. A backscattered electron detector (BSE) was used to observe samples with a magnification of 1000× first and 2000× second. The objective was to study whether WEDM caused any subsurface defects, which is a relatively common phenomenon that has been described in many studies, such as Jadam et al. [31], Basak et al. [32], and Antar et al. [33]. The sample cross-sections of both materials studied are shown in Figure 6 and demonstrate that there were no defects in the subsurface layer due to WEDM. There was nothing but a recast layer on the surface, which is typical for WEDM. The material was melted completely and then immediately cooled again, which means the elements from the tool electrode—the wire—intermixed. Figure 6a shows that the layer was thinner on 1.4305 (AISI 303) than on 1.4571 (AISI 316Ti). The recast layer gradually receded with the cleaning and the corrosion test, which corresponded with the EDX analysis results. The surface grew smoother and was not as rugged after the cleaning and the corrosion test as it was after WEDM. This was supported by the topography analysis. The recast layer reduction was related to the formation of corrosion products—the aforementioned passive layer. This remelted and rapidly cooled surface layer was characterized by a different value of activation energy than the area which was not influenced by the WEDM process. That is why it was gradually de-etched and finally entirely disappeared over the course of the cleaning and then the exposure to corrosion, as described in a study conducted by Xu [34]. Minor fissures could be observed on the surface as a result of the voltage release, or more precisely, the corrosion products. This is apparent in Figure 6b,c for the 1.4305 steel. The second tested steel—1.4571—suffered chromium carbides precipitation at the austenite grain boundaries due to the long-term pyrolysis exposure (500 °C/28 days). This resulted in the defect occurrence which is shown in Figure 6c. While this stainless steel is stabilized with titanium (see Table 1), in the pyrolysis environment, its passive layer was breached. The aforementioned defects formed were also influenced by the cleaning process in HNO3; see Figure 6b.

3.4. PyrolysisEnvironment Characteristics

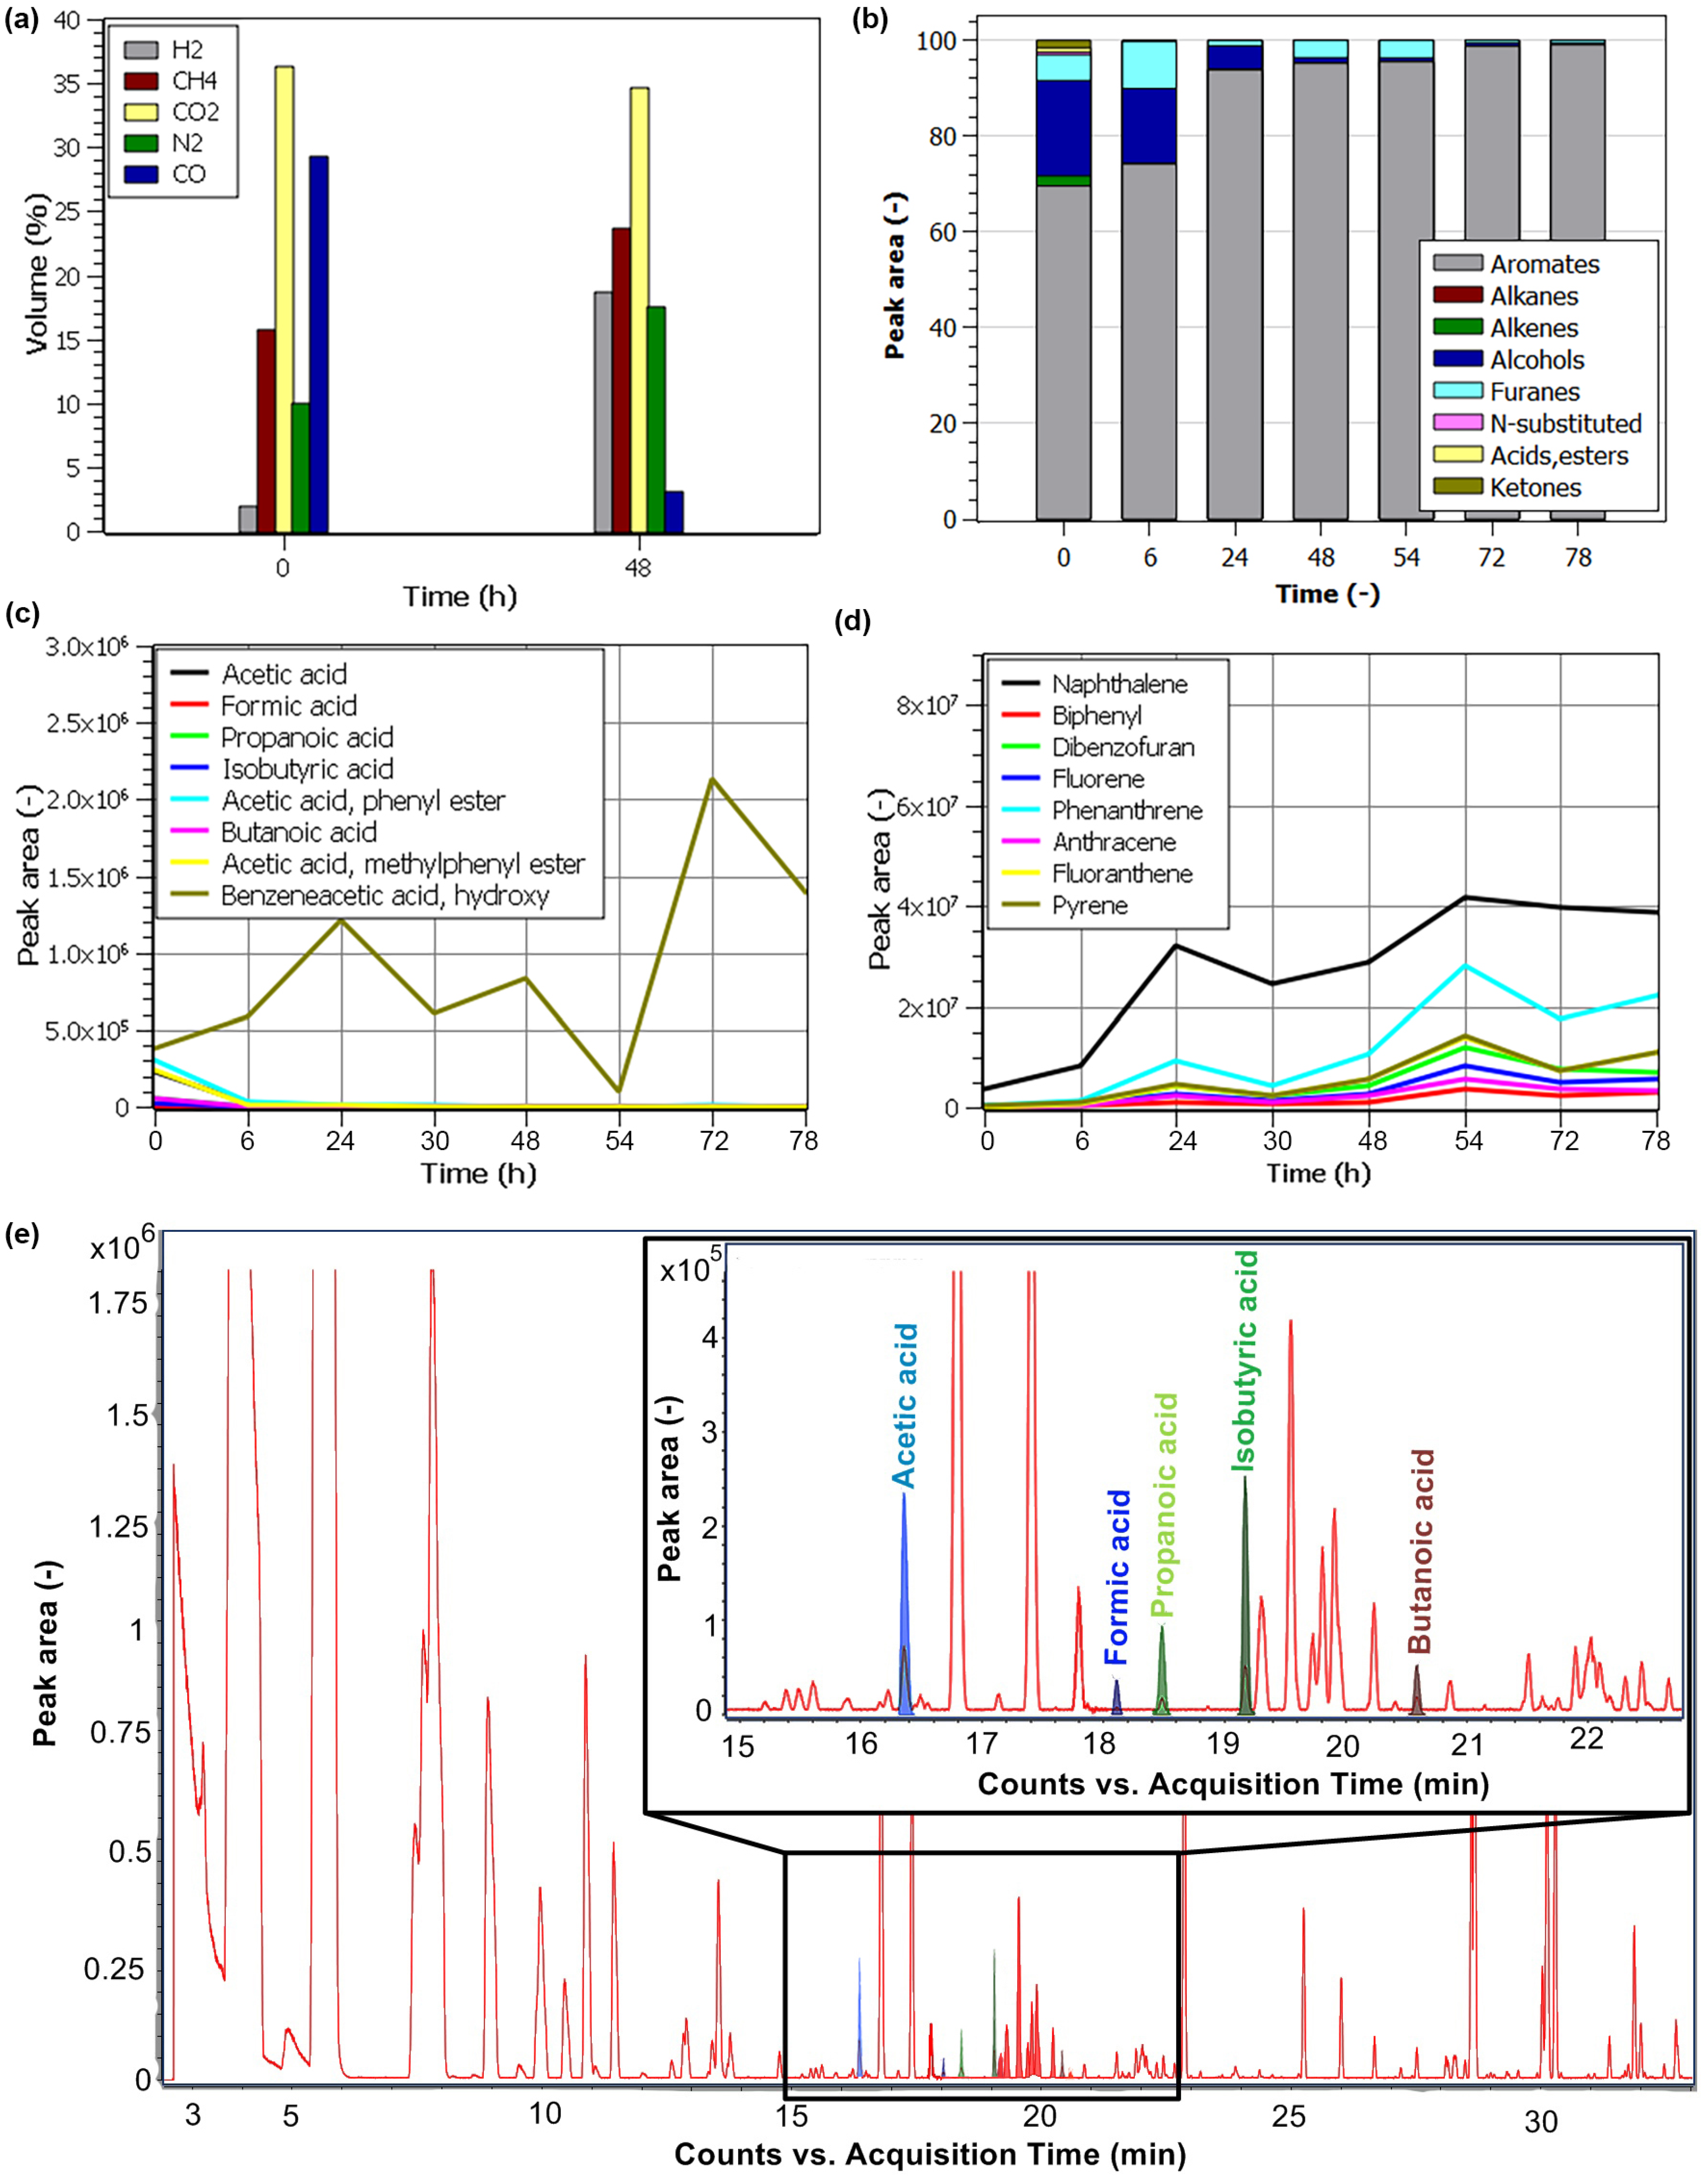
The main constituents of the pyrolysis environment after the beginning of the experiment were CO2, CO, CH4, and dose-administered N2 (Figure 7a). There was a visible decrease in CO and an increase in H2 after 48 h. This was likely caused by secondary condensation reactions, which are positively influenced by the time in the reaction zone, the temperature used, and the pressure, as outlined in a study by Newalkar et al. [35]. The change in the composition of higher hydrocarbons depicted in Figure 7b shows that they underwent significant changes already in the first 6 h from the start of the pyrolysis. During this time, the content of oxygen-containing substances (acids, alcohols, ketones) and aliphatic hydrocarbons (alkanes, alkenes) dropped considerably. The content of the aforementioned substances dropped further as the residence time of the gases in the furnace increased. Furans were the only oxygen-containing substances in the furnace to stay any longer, as their content decreased more slowly. After two days, the furans and aromatic compounds in particular, for instance, benzene, naphthalene, and its derivatives, were the only substances identified from the higher hydrocarbons. A large number of PAHs, such as phenanthrene, anthracene, fluoranthene, and others, were identified as well. Their increase is evident in Figure 7d and was correlated with the increase of H2 in Figure 7a. The chromatogram of the first sample of the pyrolysis gases taken confirmed the presence of organic acids (Figure 7e). Organic acids play the most important role in corrosion. The long-term detailed screening of the acid content shown in Figure 7c, however, demonstrates their rapid degradation. This was due to the mentioned secondary reactions that convert oxygenates into CO, CO2, and lighter hydrocarbons that, subsequently, form PAHs, as suggested by Newalkar [35]. The hydroxybenzeneaceticacid was the only exception, with a fluctuating content and its continued presence in the test furnace even after 84 h. Due to the unique concept of this experiment, the literature available was limited. There was no study found treating the stability of the gaseous pyrolysis products and other stability studies only considered liquid byproducts (Oasmaa et al. [36], Czernik et al. [37]) and, to a lesser extent, solid byproducts (Kim et al. [38], Leng et al. [39]). We can assume that the aforementioned secondary reaction mechanisms greatly influenced the content of the pyrolysis products due to their prolonged stay in this setup. This was also connected to the formation of C–C bonds and carbonaceous deposits on the surface of the test furnace and metallic samples. This phenomenon is well-described in the literature, such as by Jarvis et al. [40].

4. Conclusions

An analysis of the corrosion behavior of 1.4571 (AISI 316Ti) and 1.4305 (AISI 303) stainless steels machined with WEDM in a pyrolysis environment was carried out on six samples machined with different machining parameters. The following conclusions were drawn:
  • The highest values of the topography parameters Ra and Rz were achieved immediately after WEDM, but they plummeted after cleaning and the corrosion test;
  • Both stainless steel types showed surface corrosion products, or, more precisely, sediments, due to the 28-day corrosion exposure to the pyrolysis environment. The sediments filled up the original uneven areas, which caused the decrease in Ra and Rz topography parameters;
  • The morphology after WEDM showed a high number of smooth sections created by the crater bottoms. In contrast, the surface after the corrosion test demonstrated a so-called passive oxide layer, which was more prominent for the 1.4571 steel;
  • The diffused elements from the wire electrode—copper and zinc—were eliminated to a large degree in the cleaning process;
  • A considerable occurrence of carbon on the surfaces proven by EDX directly reflected the impurities which were found on the surface after being taken out of the pyrolysis chamber; these were of a protective nature;
  • WEDM did not lead to any surface or subsurface defects;
  • Over the course of the cleaning and after the corrosion exposure, minor fissures occurred on the surface of the 1.4305 steel as a result of the voltage release, or rather, corrosion products;
  • The 1.4571 steel suffered chromium carbides precipitation at the austenite grain boundaries due to the long-term pyrolysis exposure (500 °C/28 days), which led to defects occurring in the subsurface layer.
The analysis of the environment where the samples were placed showed that the used pyrolysis setup in the test furnace led to a fast degradation of the reactive products. The products transformed into light gases and aromatic compounds, and formed carbonaceous deposits on the tested steels due to their long stay in the reaction zone. This layer could act as a passive layer to limit the subsequent contact with the corrosion substances. The results suggested that potential follow-up studies should be carried out in a continuous pyrolysis regime so that the contact of the reaction medium with the tested materials could constantly be renewed. The influence of the carbon passive layer could be characterized via continuous cleaning and surface analysis.

Author Contributions

Conceptualization, L.B. and K.M.; methodology, K.M., J.S., T.P. and J.F.; Validation, H.B. and M.K.; formal analysis, K.M., P.M. and R.Z.; investigation, P.M. and R.Z.; resources, P.M. and T.P.; data curation, I.L., D.P. and J.F.; writing—original draft, K.M.; writing—review and editing, K.M. and P.K.; funding acquisition, L.B. All authors have read and agreed to the published version of the manuscript.

Funding

TheCzechNanoLab project LM2018110, which was funded by MEYS CR, is gratefully acknowledged for the financial support withthe measurements/sample fabrication at the CEITEC Nano Research Infrastructure. This publication is a result of project CACTU (registration no. CZ.02.1.01/0.0/0.0/17_049/0008397), which was co-financed by the European Union’s European Regional Development Fund through the Operational Programme Research, Development and Education.

Data Availability Statement

Not available.

Conflicts of Interest

The authors declare no conflict of interest.

References

  1. Figueira, R.B.; da Silva, C.J.R.; Pereira, E.V. Organic–inorganic hybrid sol–gel coatings for metal corrosion protection: A review of recent progress. J. Coat. Technol. Res. 2014, 12, 1–35. [Google Scholar] [CrossRef]
  2. Mohan, D.; Pittman, C.U., Jr.; Steele, P.H. Pyrolysis of Wood/Biomass for Bio-oil: A Critical Review. Energy Fuels 2006, 20, 848–889. [Google Scholar] [CrossRef]
  3. Kumar, N.; Kumari, S.; Abhishek, K.; Nandi, G.; Ghosh, N. Study on various parameters of WEDM using different optimization techniques: A review. Mater. Today Proc. 2022, 62, 4018–4024. [Google Scholar] [CrossRef]
  4. Asgar, M.E.; Singholi, A.K.S. Parameter Study and Optimization of WEDM Process: A Review. In Iop Conference Series: Materials Science and Engineering; IOP Publishing: Bristol, UK, 2018; Volume 404, p. 012007. [Google Scholar]
  5. Corradi, M.; Schino, D.A.; Borri, A.; Rufini, R. A review of the use of stainless steel for masonry repair and reinforcement. Constr. Build. Mater. 2018, 181, 335–346. [Google Scholar] [CrossRef]
  6. Mouralova, K.; Prokes, T.; Benes, L.; Bednar, J. The Influence of WEDM Parameters Setup on the Occurrence of Defects When Machining Hardox 400 Steel. Materials 2019, 12, 3758. [Google Scholar] [CrossRef] [Green Version]
  7. Mouralova, K.; Prokes, T.; Benes, L.; Sliwkova, P. Analysis of subsurface defects occurrence in abrasion resistant Creusabro steel after WEDM including the study of morphology and surface topography. Mach. Sci. Technol. 2020, 24, 274–290. [Google Scholar] [CrossRef]
  8. Mouralova, K.; Benes, L.; Zahradnicek, R.; Bednar, J.; Hrabec, P.; Prokes, T.; Matousek, R.; Fiala, Z. Quality of surface and subsurface layers after WEDM aluminum alloy 7475-T7351 including analysis of TEM lamella. Int. J. Adv. Manuf. Technol. 2018, 99, 2309–2326. [Google Scholar] [CrossRef]
  9. Aubin, H.; Roy, C. Study on the Corrosiveness Op Wood Pyrolysis Oils. Fuel Sci. Technol. Int. 1990, 8, 77–86. [Google Scholar] [CrossRef]
  10. Keiser, J.R.; Howell, M.; Lewis, S.A.; Connatser, R.M. Corrosion Studies of Raw and Treated Biomass-Derived Pyrolysis Oils. In CORROSION 2012; OnePetro: Richardson, TX, USA, 2012. [Google Scholar]
  11. Aggarwal, V.; Pruncu, C.I.; Singh, J.; Sharma, S.; Pimenov, D.Y. Empirical investigations during WEDM of Ni-27Cu-3.15 Al-2Fe-1.5 Mn based superalloy for high temperature corrosion resistance applications. Materials 2020, 13, 3470. [Google Scholar] [CrossRef]
  12. Sidhom, H.; Ghanem, F.; Amadou, T.; Gonzalez, G.; Braham, C. Effect of electro discharge machining (EDM) on the AISI316L SS white layer microstructure and corrosion resistance. Int. J. Adv. Manuf. Technol. 2013, 65, 141–153. [Google Scholar] [CrossRef]
  13. Cabrini, M.; Lorenzi, S.; Pastore, T.; Pellegrini, S.; Burattini, M.; Miglio, R. Study of the Corrosion Resistance of Austenitic Stainless Steels during Conversion of Waste to Biofuel. Materials 2017, 10, 325. [Google Scholar] [CrossRef] [PubMed] [Green Version]
  14. Marco, I.D.; Caballero, B.; Torres, A.; Laresgoiti, M.F.; Chomon, M.J.; Cabrero, M.A. Recycling polymeric wastes by means of pyrolysis. J. Chem. Technol. Biotechnol. Int. Res. Process Environ. Clean Technol. 2002, 77, 817–824. [Google Scholar] [CrossRef]
  15. Gleis, M. Gasification and Pyrolysis? Reliable options for waste treatment. Waste Manag. 2012, 3, 403–410. [Google Scholar]
  16. Viklund, P.; Hjörnhede, A.; Henderson, P.; Stålenheim, A.; Pettersson, R. Corrosion of superheater materials in a waste-to-energy plant. Fuel Process. Technol. 2013, 105, 106–112. [Google Scholar] [CrossRef]
  17. Karlsson, S.; Åmand, L.E.; Liske, J. Reducing high-temperature corrosion on high-alloyed stainless steel superheaters by co-combustion of municipal sewage sludge in a fluidised bed boiler. Fuel 2015, 139, 482–493. [Google Scholar] [CrossRef] [Green Version]
  18. Verbinnen, B.; DeGreef, J.; Van Caneghem, J. Theory and practice of corrosion related to ashes and deposits in a WtE boiler. Waste Manag. 2018, 73, 307–312. [Google Scholar] [CrossRef]
  19. Carlborg, M.; Weiland, F.; Ma, C.; Backman, R.; Landälv, I.; Wiinikka, H. Exposure of refractory materials during high-temperature gasification of a woody biomass and peat mixture. J. Eur. Ceram. Soc. 2018, 38, 777–787. [Google Scholar] [CrossRef]
  20. Bharathi, P.; Priyanka, T.G.L.; Rao, G.S.; Rao, B.N. Optimum WEDM process parameters of SS304 using Taguchi method. Int. J. Ind. Manuf. Syst. Eng. 2016, 1, 69–72. [Google Scholar]
  21. Lee, H.; Tai, T. Relationship between EDM parameters and surface crack formation. J. Mater. Process. Technol. 2003, 142, 676–683. [Google Scholar] [CrossRef]
  22. Abdulkaree, S.; Khan, A.A.; Zain, Z.M. Effect of machining parameters on surface roughness during wet and drywire-EDM of stainless steel. J. Appl. Sci. 2011, 11, 1867–1871. [Google Scholar] [CrossRef] [Green Version]
  23. Kumar, H.; Manna, A.; Kumar, R. Modeling of process parameters for surface roughness and analysis of machined surface in WEDM of Al/SiC-MMC. Trans. Indian Inst. Met. 2018, 71, 231–244. [Google Scholar] [CrossRef]
  24. Majumder, H.; Maity, K. Prediction and optimization of surface roughness and micro-hardness using grnn and MOORA-fuzzy-a MCDM approach for nitinol in WEDM. Measurement 2018, 118, 1–13. [Google Scholar] [CrossRef]
  25. Jafari, R.; Kahya, M.; Oliaei, S.N.B.; Ünver, H.; Özyurt, T.O. Modeling and analysis of surface roughness of microchannels produced by μ-WEDM using an ANN and Taguchi method. J. Mech. Sci. Technol. 2017, 31, 5447–5457. [Google Scholar] [CrossRef]
  26. Mouralova, K.; Kovar, J.; Zahradnicek, R.; Holub, M. Analysis of Machinability of Pure-Cobalt Disc for Magnetron Deposition Using WEDM. In International Conference Mechatronics; Springer: Cham, Switzerland, 2017; Volume 644, pp. 141–148. [Google Scholar] [CrossRef]
  27. Prathipati, R.; Ch, R.; Dora, S.P. Corrosion behavior of surface induced by wire EDM on 316L stainless steel: An experimental investigation. SN Appl. Sci. 2019, 1, 1–11. [Google Scholar] [CrossRef] [Green Version]
  28. Pramanik, A.; Basak, A.; Prakash, C. Understanding the wire electrical discharge machining of Ti6Al4V alloy. Heliyon 2019, 5, e01473. [Google Scholar] [CrossRef] [Green Version]
  29. Kumar, H.; Manna, A.; Kumar, R. Modeling and desirability approach-based multi-response optimization of WEDM parameters in machining of aluminum metal matrix composite. J. Braz. Soc. Mech. Sci. Eng. 2018, 40, 1–19. [Google Scholar] [CrossRef]
  30. McGeough, J.A. Advanced Methods of Machining; Springer Science & Business Media: Berlin/Heidelberg, Germany, 1988. [Google Scholar]
  31. Jadam, T.; Datta, S.; Masanta, M. Study of surface integrity and machining performance during main/rough cut and trim/finish cut mode of WEDM on Ti–6Al–4V: Effects of wire material. J. Braz. Soc. Mech. Sci. Eng. 2019, 41, 151. [Google Scholar] [CrossRef]
  32. Basak, A.; Pramanik, A.; Prakash, C.; Shankar, S.; Debnath, S. Understanding the Micro-Mechanical Behaviour of Recast Layer Formed during WEDM of Titanium Alloy. Metals 2022, 12, 188. [Google Scholar] [CrossRef]
  33. Antar, M.T.; Soo, S.L.; Aspinwall, D.K.; Jones, D.; Perez, R. Productivity and workpiece surface integrity when WEDM aer-ospace alloys using coated wires. Procedia Eng. 2011, 19, 3–8. [Google Scholar] [CrossRef] [Green Version]
  34. Xu, B.; Chen, S.-G.; Liang, X.; Lei, J.-G.; Shi, H.-Y.; Fu, L.-Y.; Yang, J.; Peng, T.-J.; Zhao, H.; Zhu, L.-K. Recast layer removal of 304 stainless steel by combining micro-EDM with negative polarity micro-EDM. Int. J. Adv. Manuf. Technol. 2020, 107, 4713–4723. [Google Scholar] [CrossRef]
  35. Newalkar, G.; Iisa, K.; D’Amico, A.D.; Sievers, C.; Agrawal, P. Effect of temperature, pressure, and residence time on pyrolysis of pine in an entrained flow reactor. Energy Fuels 2014, 28, 5144–5157. [Google Scholar] [CrossRef]
  36. Oasmaa, A.; Fonts, I.; Pelaez-Samaniego, M.R.; Garcia-Perez, M.E.; Garcia-Perez, M. Pyrolysis Oil Multiphase Behavior and Phase Stability: A Review. Energy Fuels 2016, 30, 6179–6200. [Google Scholar] [CrossRef]
  37. Czernik, S.; Johnson, D.K.; Black, S. Stability of wood fast pyrolysis oil. Biomass Bioenergy 1994, 7, 187–192. [Google Scholar] [CrossRef]
  38. Kim, H.-B.; Kim, J.-G.; Kim, T.; Alessi, D.S.; Baek, K. Interaction of biochar stability and abiotic aging: Influences of pyrolysis reaction medium and temperature. Chem. Eng. J. 2021, 411, 128441. [Google Scholar] [CrossRef]
  39. Leng, L.; Huang, H. An overview of the effect of pyrolysis process parameters on biochar stability. Bioresour. Technol. 2018, 270, 627–642. [Google Scholar] [CrossRef]
  40. Jarvis, M.W.; Haas, T.J.; Donohoe, B.S.; Daily, J.W.; Gaston, K.R.; Frederick, W.J.; Nimlos, M.R. Elucidation of Biomass Pyrolysis Products Using a Laminar Entrained Flow Reactor and Char Particle Imaging. Energy Fuels 2011, 25, 324–336. [Google Scholar] [CrossRef]
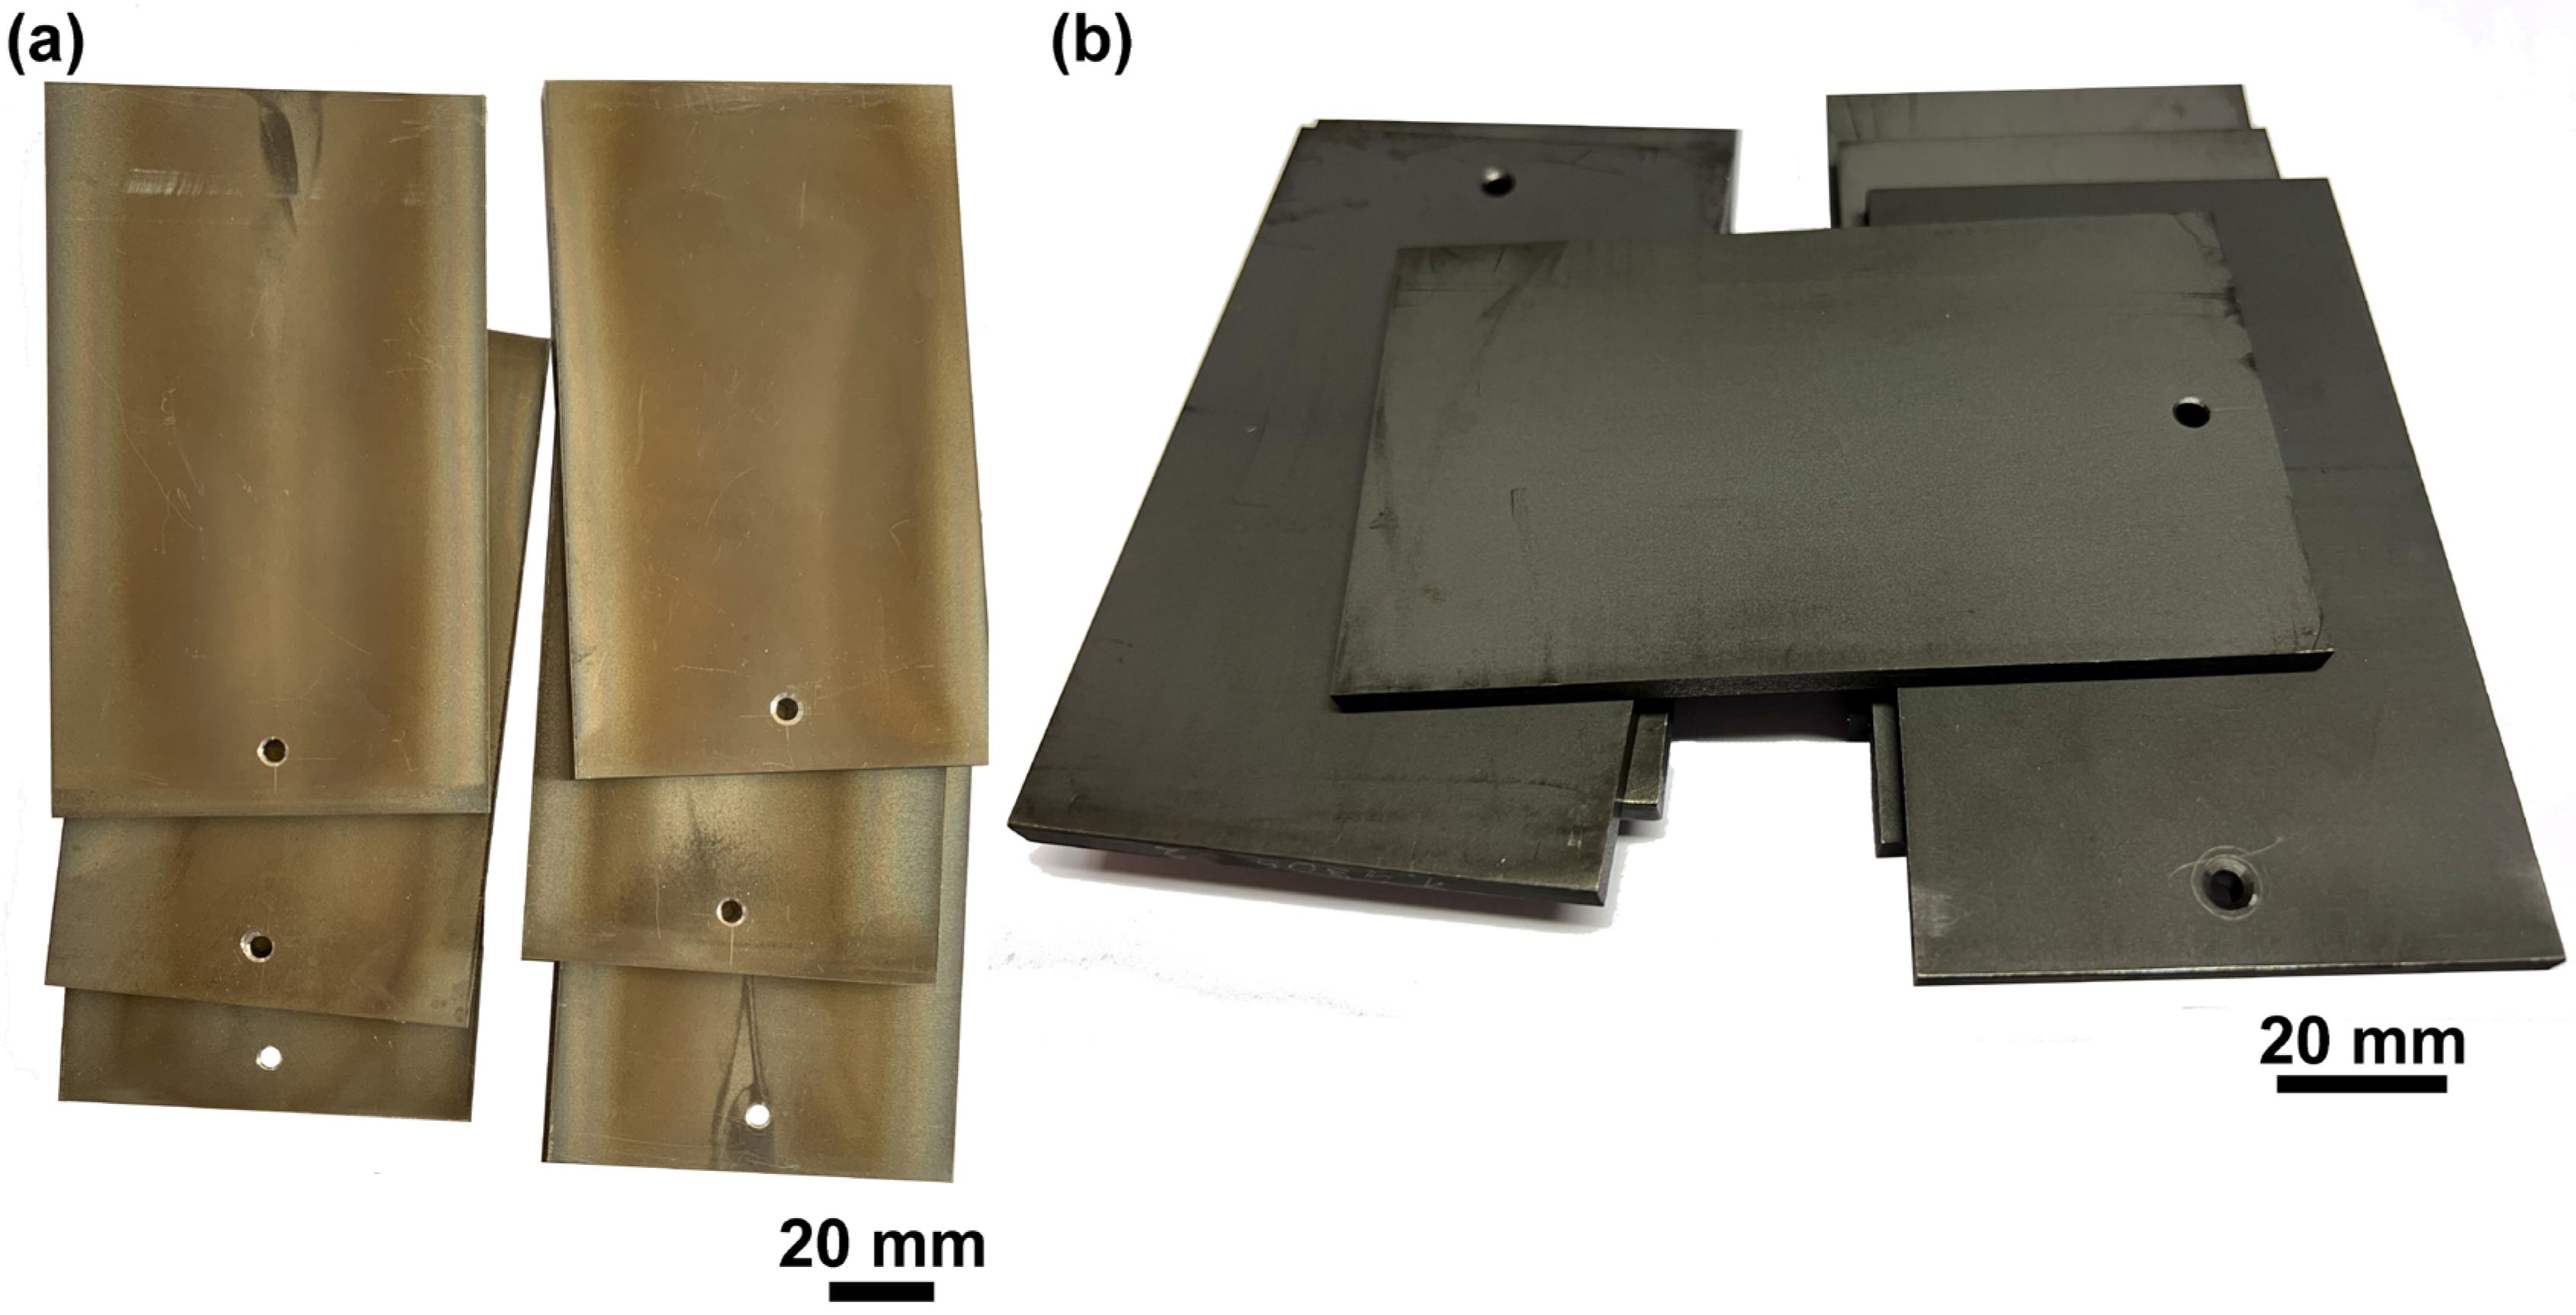
Figure 1. (a) Samples before the corrosion test, (b) samples after the corrosion test.
Metals 13 00144 g001
Figure 2. Pyrolysis unit layout, A—pyrolysis furnace, B—test furnace, C—apparatus outlet.
Metals 13 00144 g002
Figure 3. Topography analysis after WEDM, after cleaning, and after the corrosion resistance test for individual sample spots for each material: (a) topography profile parameter Ra, (b) topography profile parameter Rz.
Metals 13 00144 g003
Figure 4. Surface morphology of sample no. 1 from both materials at the edge of the samples (SEM/SE) (a) after WEDM, (b) after cleaning, and (c) after corrosion test.
Metals 13 00144 g004
Figure 5. Surface morphology of sample no. 1 from both materials at the center of the samples (SEM/SE) (a) after WEDM, (b) after cleaning, and (c) after corrosion test.
Metals 13 00144 g005
Figure 6. Cross-section of sample no. 1 from both materials (SEM/SE) (a) after WEDM, (b) after cleaning, and (c) after corrosion test.
Metals 13 00144 g006
Figure 7. (a) Permanent gases and CH4 concentration at time 0 h and after 48 h, (b) distribution of selected organic groups in the pyrolysis gas sample in time, (c) content of organic acids in time, (d) content of aromatic compounds in time, (e) GC–MS chromatogram of pyrolysis gas products with selected identified acids.
Metals 13 00144 g007
Table 1. Chemical composition of both materials in weight percentage.
1.4571 (AISI 316Ti) Stainless Steel
CTiSiMnPSCrMoNiFe
≤0.080.4–0.7≤1≤2≤0.045≤0.01516.5–18.52–2.510–13balance
1.4305 (AISI 303) Stainless Steel
CSiMnPSCrNiCuFe
≤0.1≤1≤2≤0.050.15–0.3517–198–10≤1balance
Table 2. Mechanical properties of both materials.
1.4571 (AISI 316Ti) Stainless Steel
Yield Strength Rp0.2 (N/mm2)Tensile Strength Rm (N/mm²)Hardness HB
≤200500–700≤215
1.4305 (AISI 303) Stainless Steel
Yield Strength Rp0.2 (N/mm2)Tensile Strength Rm (N/mm²)Hardness HB
≤190500–750230
Table 3. Machining parameters for the individual samples.
Sample NumberGap VoltagePulse-On TimePulse-Off TimeWire SpeedDischarge Current
(V)(µs)(µs)(m·min−1)(A)
15010301435
2708501025
3606401230
Table 4. EDX of the samples before and after the corrosion test.
Element wt%
COFeSiMnCrSNiMoCuZn
After WEDM
1.4305 (AISI 303) Stainless Steel
7.811.848.4 10.5 3.7 6.511.3
1.4571 (AISI 316Ti) Stainless Steel
810.648.80.21.111.6 4.10.37.38
After Cleaning
1.4305 (AISI 303) Stainless Steel
2 71.9 18.50.46.6 0.6
1.4571 (AISI 316Ti) Stainless Steel
1.80.965.10.4 22.3 5.5 4
After the Corrosion Test
1.4305 (AISI 303) Stainless Steel
43.32.733.20.4116.60.31.9 0.6
1.4571 (AISI 316Ti) Stainless Steel
44.9232.40.1115.6 2.30.61.1
Disclaimer/Publisher’s Note: The statements, opinions and data contained in all publications are solely those of the individual author(s) and contributor(s) and not of MDPI and/or the editor(s). MDPI and/or the editor(s) disclaim responsibility for any injury to people or property resulting from any ideas, methods, instructions or products referred to in the content.