Article

Characterization of Vapor Capillary Geometry in Laser Beam Welding of Copper with 515 nm and 1030 nm Laser Beam Sources by Means of In Situ Synchrotron X-ray Imaging

1
Bayerisches Laserzentrum GmbH (blz), Konrad-Zuse-Str. 2-6, 91052 Erlangen, Germany
2
Erlangen Graduate School in Advanced Optical Technologies (SAOT), Paul-Gordan-Str. 6, 91052 Erlangen, Germany
3
Institute of Photonic Technologies (LPT), Friedrich-Alexander Universität Erlangen-Nürnberg, Konrad Zuse-Str. 3-5, 91052 Erlangen, Germany
4
Chair for Laser Technology LLT, RWTH Aachen University, Steinbachstraße 15, 52074 Aachen, Germany
5
Fraunhofer-Institut für Lasertechnik ILT, Steinbachstr. 15, 52074 Aachen, Germany
6
Institute of Materials Physics, Helmholtz-Zentrum Hereon, Max-Planck-Str. 1, 21502 Geesthacht, Germany
*
Author to whom correspondence should be addressed.
Metals 2023, 13(1), 135; https://doi.org/10.3390/met13010135
Submission received: 2 December 2022 / Revised: 23 December 2022 / Accepted: 29 December 2022 / Published: 9 January 2023
(This article belongs to the Special Issue New Technology of Welding/Joining of Metallic Materials)

Abstract

:
Laser welding of copper is being used with increasing demand for contacting applications in electric components such as batteries, power electronics, and electric drives. With its local, non-contact energy input and high automation capability enabling reproducible weld quality, this joining technology represents a key enabler of future mobility systems. However, a major challenge in process design is the combination of energy efficiency and precise process guidance in terms of weld seam depth and defect prevention (i.e., spatter and melt ejections) due to the high electrical and thermal conductivity of copper. High-power lasers in the near infrared wavelength range (𝜆 ≈ 1 μm) and excellent beam quality provide an established joining solution for this purpose; nevertheless, the low absorptivity (≤5%) advocates novel beam sources at visible wavelengths due to altered absorptivity (40% at 515 nm) characteristics as an improved tool. In order to understand the influence of laser wavelength and process parameters on the vapor capillary geometry, in situ synchrotron investigations on Cu-ETP with 515 nm and 1030 nm laser sources with the same spot diameter are compared. The material phase contrast analysis was successfully used to distinguish keyhole and melt pool phase boundaries during the welding process. A significantly different sensitivity of the keyhole depth in relation to the feed rate was found, which is increased for the infrared laser. This behavior could be attributed to the increased effect of multiple reflections at 1030 nm.

1. Introduction

Laser beam welding is a technology with an increasing number of applications, especially in the industry sectors of aviation and automotive [1]. Additionally, its local, non-contact energy input and high automation capability enable high precision and reproducible weld quality, therefore achieving high efficiency. Solid-state lasers are widely used nowadays in welding applications for most engineering materials due to their absorptivity and applicability [2]. Ordinarily used for this task are disk lasers and fiber lasers with wavelengths between λ = 1.03 µm and 1.07 µm.
Further, emerging from the rapidly expanding e-mobility market, copper and thus the material-closed joining of copper with its excellent electrical and thermal conductivity, is becoming increasingly important [3]. Applications range from the microscale to the millimeter range for a wide variety of joint geometries, such as joints on power semiconductor modules [4] or high-current conductors (so-called “busbars”).
However, copper welding with near-infrared (IR) laser sources remains a challenging task. The absorptivity in this wavelength range is limited to single-digit values. Furthermore, process instabilities, resulting in spatter formation or porosity, as well as low reproducibility in terms of varying weld seam depth, are observed [5]. In combination with the detrimental high thermal conductivity, there is a need to further increase process reliability, as an efficient copper welding process is seen as a key enabler of future mobility systems.
As developments focused on a steady improvement of the beam sources in order to supply systems with broad applicability for various industry sectors, high-power beam sources in the visible wavelength range (λ = 515 nm) with brilliant beam quality are available nowadays [6]. Their demand arises predominantly from the processing of highly reflective materials such as copper. The absorptivity of laser radiation in the green wavelength range on copper increases to up to 40%, which is why these beam sources are considered a more suitable alternative to established IR systems [7]. Recent publications observe distinct improvements using these 515 nm (in the following “green”) beam sources. On the one hand, enhanced energy absorption during welding and, on the other hand, an increased uniformity of the seam properties were found independent of the initial surface quality of the sample in keyhole welding mode [8].
However, there is still little knowledge about the mechanisms that lead to the changed process behavior, especially in terms of defect generation. In order to better understand their formation and thus avoid these defects, an understanding of keyhole behavior and its interaction with the surrounding melt pool is required. Therefore, the aim of this work is the experimental investigation of the differences in the laser welding process of copper when using different laser wavelengths. By means of in situ synchrotron investigations with similar optical setups and process parameters for 515 nm and 1030 nm disk laser sources on Cu-ETP and visualizing the phase boundaries between different aggregate states, a deeper insight into highly dynamic temporal and local processes inside the material is provided. Thus, an analysis of the dependence of the vapor capillary geometry on the laser wavelength and the main process parameters (laser power and feed rate) is made possible.

2. Theory and State of the Art

2.1. Fundamentals of Laser Beam Welding

The joining process of laser beam welding is characterized by the heating or melting of metallic materials with energy supplied by means of laser radiation. The light-matter interaction is generally described by the absorption behavior of the material involved and the characteristics (wavelength and polarization) of the laser light. In addition, the process regime is determined by the energy balance of the workpiece, which takes into account the energy input into the material and the energy losses mainly through convection and heat conduction. Therefore, the physical properties of the material, surface characteristics (especially roughness), and temperature are further influencing factors [9].
At low power densities, the material is heated up. If a certain power density is exceeded, the melting point of the material is reached, and local melting on the material surface in the irradiated area takes place. By applying a movement to the beam or the sample, a heat-conduction weld is formed. As this process regime is characterized by single laser-matter interaction, only limited weld depths can be created that do not exceed an aspect ratio (quotient of seam width and seam depth) of 1. Thus, the heat conduction properties are primarily decisive for the weld seam characteristics.
If the power density is increased further, the deep penetration threshold is reached, i.e., the threshold at which the temperature of the melt pool on the sample is sufficient to cause evaporation on the surface. This evaporation leads to the deformation of the melt pool (induced by the recoil pressure) and multiple reflections of the laser beam. Thus, a keyhole is formed, efficiently increasing the total absorption by multiple reflections inside [10]. The authors in [11] stated that the deep penetration threshold can be characterized using an analytic description with P/d values per material.

2.2. Pressure Balance in the Keyhole

Theoretical considerations describe the keyhole formation based on a pressure balance, with the opening pressure inside the keyhole counterbalancing the closing pressure consisting of surface tension pressure pσ, hydrostatic pressure pH and hydrodynamic pressure pDdyn. Shares of the opening pressure are the recoil pressure pAbl resulting from material evaporation and the differential vapor pressure Δ(pV − p0) with atmospheric pressure p0, depicted in Equation (1) [12].
pAbl + ∆(pV − p0) = pσ + pH + pDyn
The complexity of this pressure balance is immediately apparent, as the material and laser properties as well as the environmental conditions influence the equilibrium. Among others, the energy input, the metal vapor characteristics, the melt flow, and the atmospheric pressure p0 are affecting factors. Ref. [13] Induced shear stresses on the keyhole wall by outflowing metal vapor partly cause the melt flow around the keyhole and in the melt pool. Furthermore, the varying pressure distribution along the keyhole axis influences the evaporation temperature at its wall, thus determining the energy deposition into the welded sample. Subsequently, the emerging temperature distribution defines the final weld seam geometry [14].
It has been shown that deviations from this balance can cause oscillatory deformations [15], and the keyhole is not steady in general but strongly fluctuates [16]. Investigations in [17] observed individual dominant frequencies in copper welding that could be determined by sine fits, supposing the mutual influence of radial and axial frequencies in different keyhole areas. In general, the periodic behavior is experimentally determined with higher frequencies and amplitudes compared to the aforementioned model-based approaches, which can be explained by keyhole instabilities [18]. These are described as the root causes for the formation of seam imperfections like pores and spatter formation in laser beam welding of copper [19]. A further common defect, regardless of processing laser wavelength, is melt ejection with consecutive hole formation [20].
The pores and voids are classified as spherical gas-containing inclusions, whereby the authors in [21] distinguish between gas and process pores. The former are usually formed by the precipitation of dissolved gases during solidification; the latter are inclusions of inert gas and metal vapor [22]. Holes are critical defects for seam performance (electrical as well as mechanical) and are typically observed as a result of melt ejections or particularly large spatters. These defects are predominately reported at low feed rates (v < 8 m/min for copper). Their emergence is described as starting with a bending of the keyhole tip against the welding direction and a subsequent bulge formation. Growing in size rapidly as long as the surface tension of the melt pool balances the pressure inside, parts of the surrounding melt pool (or, in an extreme case, the entire melt pool) are ejected after exceeding a critical state. Afterwards, a new formation of the keyhole and melt pool begins, as the phenomenon leaves a hole surrounded by solid material. The authors assume the cause of the defect to be the increased absorption due to a bending of the capillaries and the associated increased evaporation [23].
Furthermore, spatter formation influences the resulting process quality and can damage surrounding components, clamping devices, or optical components. The spatter is generated as a consequence of the complex melt flow conditions if a local melt volume attains enough momentum perpendicular to the melt surface to break free of the main body of the melt. The escape threshold is formulated by a combination of the local acting forces, with surface tension being the most important one (spatter release criterion, see ref. [24]). The contamination area of the droplets emerging from the interaction zone is large due to their comparatively high velocities. Further, the typical dimensions of spatter are reported to be between 50–200 µm in diameter. Researchers in [25] investigated a decreasing probability of occurrence when reducing the laser power and increasing the feed rate, accompanied by a change in the spatter formation area.
Overall, a multitude of important findings about the pressure balance in the keyhole and the associated formation mechanisms of process instabilities are available, but their appearance in copper welding has not yet been clarified conclusively.

2.3. Copper Welding Using Visible Wavelength

The basic physical mechanism for energy coupling in laser material processing is the interaction between the electromagnetic radiation and the material to be processed. When laser radiation hits a metal surface, a certain amount of the irradiated laser power is reflected. The remaining portion penetrates the material and is absorbed during propagation. Additionally, because the metals have a low optical penetration depth, which is significantly lower than the wavelength used, the transmission can be set to zero regardless of the material thickness [2]. The absorptivity (A = 1 − R − T) thus defines the portion of the irradiated laser power that is absorbed in the material and is available as heat in the interaction zone.
The absorptivity behavior of copper, aluminum, and steel is shown in Figure 1a, calculated from the reflectivity [2] with measured data for the refractive index n and the absorption index k from [26].
It becomes apparent that the absorptivity differs greatly for the metals and that, especially in welding applications with copper, the use of laser beam sources with shorter wavelengths in the range of 515 nm might be advantageous, as the absorptivity value in the case of perpendicular beam incidence at room temperature is ten times higher compared to commercially available near-infrared lasers (see green and red vertical lines). The increased absorption in the process was also experimentally confirmed by the use of calorimetric measurements [5]. According to the authors in [17], welding of copper using near-infrared beam sources can only be performed in the deep penetration regime due to the factor mentioned above, where the high power density of the laser beam vaporizes the metal.
Due to the changed state of aggregation, the absorption properties of the metal can change, which depend on the temperature and the angle of incidence, among other influencing factors [27]. The angular dependence of the absorptivity comes into play especially in the keyhole welding process when the laser beam is absorbed on the inclined, molten capillary front wall. The absorptivity of copper versus temperature at λ = 0.5 µm and λ = 1.0 µm, extracted from literature values in [28] and [29], is depicted in Figure 1b. The influence of the angle of incidence δ was calculated using the Fresnel equations for unpolarized light with values for the complex refractive index (n+i∙k) from measurements for room temperature (RT) performed in [30] and for an elevated temperature (ET) of T = 1400 K from [29], see Figure 1c.
For the near-infrared wavelength, a positive jump in the absorptivity of about 5% upon melting is followed by a further increase with rising temperature. This jump is accompanied by a reduction of the absorptivity in the case of the green wavelength. The angular dependence is observed to have a comparably small influence at both 0.5 µm and 1.0 µm wavelengths, which decreases with increasing temperature at 0.5 µm but vice versa at 1.0 µm. These circumstances, as they directly affect the energy input into the material, influence the resulting temperature field and the process conditions during copper welding, which might therefore differ depending on the laser wavelength used.
Experimental investigations confirm improvements in copper welding by changing the processing wavelength from near-infrared (IR) to green regarding the aspects of reproducibility and process stability [3]. The authors in [31] observed higher porosity when welding copper at 515 nm wavelength; nevertheless, this setup gave the most stable weld results with the fewest fluctuations. In addition, copper processing with a green laser wavelength is characterized by enabling higher penetration depths and higher feed rates compared to IR laser welding using comparable beam characteristics and laser power as well as a lowered deep penetration threshold [32]. Further, with regard to surface quality, weld seams produced on Cu-ETP with a green laser wavelength show increased roughness due to increased spatter formation and stronger cratering compared to IR [8]. The theoretical calculations in [33], based on the energy balance in combination with thermophysical material properties and taking into account the aforementioned dependence of the optical properties, support the experimental findings and confirm a higher process stability of spot welds on copper with green laser radiation.
However, a more conclusive understanding of the change in defect formation and a look at the differences in the interaction zone have not yet been given. A blue wavelength is not considered in this work since the A(λ,T) of copper is very similar to green radiation, and the beam quality of existing direct-emitting blue diode lasers is currently an order of magnitude higher than green disk-laser technology.

2.4. Process Observation Using the X-ray Phase Contrast Method

In comparison to visual and thermal imaging, in situ X-ray tomography enables a deeper investigation of laser-based processes in metals by visualizing the phase boundaries at high spatial and temporal resolution. However, since the damping of the X-ray photons penetrating a metal depends on the mass density δ of the irradiated material, which is lower in a gas-filled keyhole than in the solid sample (ρGas < ρSolid ≈ ρLiquid), conclusions regarding the geometrical conditions of the laser-matter interaction zone in the metal can be drawn from the detection of the transmitted intensity. Therefore, a scintillator for converting the attenuated X-ray into visible light and a conventional high-speed camera are typically used in the experimental setup.
This diagnostic method is an adequate tool to understand and counteract the complex processes ongoing in the keyhole and melt pool. It was applied to study the effect of keyhole behavior on spatter and pore formation in copper using a microfocus tube as an X-ray source at a 1 kHz acquisition rate [23]. The system enables a resolution of the X-rayed object of 67 pixels/mm at a frame rate of up to 5 kHz, which is suitable for the investigation of laser welding [34] and cutting [35] processes. The resolution limitations caused by edge blurring due to the X-ray source aperture and image noise originating from the low photon flux can be overcome by using a synchrotron source. Due to the high-brilliance X-ray spectrum generated, the phase contrast is greatly enhanced, and the phase boundaries between solid-liquid (melt pool) and liquid-gaseous (keyhole) become visible [36].
The improvement of the temporal and spatial resolution of the X-ray imaging enables novel process insights, as demonstrated, for example, in powder bed fusion with frame rates up to 40 kHz in [37]. In [17], it was also used to investigate the high dynamic behavior of the keyhole when welding copper with a multimode fiber laser.
In sum, the current state of the art compromises a broad knowledge of the influencing factors on the process behavior of keyhole welding of copper as well as suitable methods for more in-depth in situ process investigations. In order to extend the fundamental process understanding of laser beam welding of copper in the infrared and green wavelength ranges, in this study the capabilities of in situ high-speed synchrotron imaging in terms of the detailed visualization of the keyhole behavior and its interactions with the surrounding melt pool are used to determine the visible physical differences. Therefore, X-ray imaging was used in side- and front-view at an acquisition rate of 1000 fps with a spatial resolution of 417 pixels/mm and a radiated area of approximately 2 mm in diameter during laser beam welding of Cu-ETP with disk lasers (λ = 1030 nm) and frequency-doubled disk lasers (λ = 515 nm) in a wide parameter range of laser powers and feed rates. The phase contrast videos are used to study the geometry of vapor capillaries and the emergence of process instabilities in copper for 515 nm and 1030 nm processing wavelengths resulting from dynamic keyhole behavior.

3. Materials and Methods

In this paragraph, the synchrotron X-ray welding setup is introduced at the beginning. Afterwards, the experimental procedure is described, followed by the data processing approaches and methods for analyzing the measurement results.

3.1. Laser Beam Welding Setup

In this work, laser beam welding of copper with both a disk and a frequency-doubled disk laser was investigated in the high energy beamline P07-EH4 of Petra 3 at the Deutsches Elektronen-Synchrotron DESY in Hamburg [38]. The customized experimental setup for the investigation is based on the setup presented in Ref. [39], which was realized in cooperation with the RWTH Aachen University and the Fraunhofer Institute for Laser Technology (ILT). The installed setup at beamline P07-EH4 is shown in Figure 2.
The X-ray imaging system consisted of the DESY-synchrotron which provided the X-ray source (light yellow), a scintillator (blue), and a high-speed camera (grey). The beamline and imaging parameters are presented in Table 1.
The monochromatic X-ray beam from the electron accelerator ring DESY in operation mode “Low Beta” with an energy of 89 keV and an average beam diameter of approximately 2 mm irradiated the copper sample during the welding process. Locally varying sample topography due to the melt pool swelling and different attenuation coefficients depending on the aggregate state of the sample in the interaction zone led to locally varying attenuation of the X-ray beam. Using a ce-doped Gd3 Al2 Ga3 O12 scintillator, the attenuated X-ray projection behind the sample was converted into visible light, which was recorded from the backside by a high-speed camera. The scintillator size was 11 × 11 mm² with a thickness of 600 μm and was mounted in a tension-free clamping device at a distance of 3.5 m from the material sample. A high-speed camera (i-SPEED 727, iX Cameras) capturing at a frame rate of 1 kHz using an image size of 1536 × 2072 pixels was mounted inside the optical tower of the beamline for optimum surrounding darkness. An exposure time of 1 ms was used for all investigations. The resulting image sequence is referred to as “X-ray video” in the following.
A similar system using a microfocus tube as the X-ray source was previously used to study the welding process in ref. [39], and high-speed synchrotron X-ray imaging experiments were performed at the European Synchrotron Radiation Facility (ESRF) at Beamline ID19 using a multi-mode fiber laser on copper [17]. However, the herein presented in situ observations of the keyhole and melt pool geometry were achieved using high-speed X-ray imaging in side- and front-view at a frame rate of 1000 fps with a spatial resolution of 417 pixels/mm and a radiated area of approximately 2 mm in diameter. Since the divergence of the X-ray beam is between 0.0018 mrad and 0.027 mrad [40], the influence of the penumbra on the observed blurring is negligible.
In the investigation of the influence of absorptivity on the laser beam welding process of copper, two disk lasers from Trumpf were used within the experiments: a frequency-doubled, pulsed disk laser (TruDisk Pulse 421, Trumpf GmbH, Ditzingen, Germany) and the CW-beam source (TruDisk 6001, Trumpf GmbH, Ditzingen, Germany). The specifications of the laser sources and the optical setups used are presented in Table 2.
Additionally, in order to achieve comparable beam characteristics between the green and infrared laser beams, galvanometer scanners (Newson NV, Dendermonde, Belgium) with appropriate coatings for each laser wavelength and a collimation length of fC = 80 mm and f-theta lenses with a focusing length of fF = 163 mm were used. The variable working distances were compensated by a motorized linear stage in order to process the samples in the focal plane of the beams at z = 0 mm. The beam-delivery fibers had a core diameter of dLLK = 100 μm so the beams were focused to a spot diameter of dF = 222.5 mm for the green laser and dF = 213.2 mm for the infrared laser in top-hat intensity distribution, respectively, with a comparable divergence angle θ as measured with a Primes MicroSpotMonitor (Primes GmbH, Pfungstadt, Germany).
The copper specimens (Cu-ETP/CW004A) with a ground top surface were fixed by a motorized clamping device mounted on an electromagnetic high-speed x-y-axis stage (Jenny Science AG, Rain, Switzerland) to move the welding sample through the intersection of the laser beam and the synchrotron beam while processing. The sample was moved with welding speed v while the mirrors of the galvanometer scanner were set to zero position in order to ensure the recording of the keyhole during the whole experiment in side-view setup. A single frame taken from an X-ray video is presented in Figure 3, showing an extract of the radiated area, including the keyhole, the melt pool, and the base material.
The partial penetration welds were performed on Cu-ETP samples with a thickness of 2 mm, a length of 100 mm and a height of 30 mm. In obtaining additional information about the melt pool swelling and the formation of spatter, the area above the material surface was also recorded. Due to the reduced attenuation of the X-ray beam in the metal vapor-containing keyhole compared to copper in a solid or liquid state, an increased gray value is detected on the camera sensor in that region. Furthermore, as can be seen in Figure 3, the phase boundary of the melt pool can be distinguished, but this is not the case at the keyhole front wall. As investigations on steel (SS304) have shown a limited thickness of the molten material moving down the front wall starting from approximately 20 µm at 100 mm/s [41], the changed thermodynamic properties of copper (in particular the higher heat conductivity) would require an increased magnification in the setup for in situ identification and separation.
Furthermore, the laser beam was aligned to the center of the specimen at t/2 for all side view experiments. For individual parameter sets, additional investigations with laser beam trajectories oriented in the X-ray direction were carried out in order to analyze the lateral dimensions of the keyhole and the melt pool. As a result, the sample was stationary, and the beam movement was performed by the galvanometer scanner. In order to suppress increased beam attenuation in the case of welding with green laser radiation (see ref. [42]), nitrogen was used for process zone coverage, supplied through a lateral nozzle against the welding direction. A compressed air-fed cross jet mounted above protected the optics from spatter and metal fume.
The process parameters investigated in the experimental campaign are listed in Table 3. Note that the laser power was emitted in one single rectangular pulse over the whole weld seam at a constant feed rate up to v = 18 m/min, and not the full parameter matrix consisting of laser power PL and feed rate v was covered for both wavelengths. The investigations were planned in order to, on the one hand, achieve maximum keyhole depths that could still be fully detected by the camera sensor and, on the other hand, result in comparable weld depths or line energies for both laser beam sources. As the maximum energy per pulse of the TruDisk Pulse 421 is 40 J, the pulse duration was adjusted to the maximum possible value at a given laser power PL. This limit is not present for the infrared cw-beam source TruDisk 6001, so weld seams of length lWeld = 50 mm with pulse length tP selected respectively were performed.

3.2. Image Processing and Data Evaluation

In order to ensure that the grayscale values result from local density variations in the metal and not from the intensity profile of the X-ray beam, a post-processing procedure was used: First, a shading algorithm was applied to every single image for contrast enhancement and to reduce background noise and vignetting caused by the X-ray beam. Therefore, the grayscale values in the individual images of the welding process were normalized by dividing the brightness value pixel by pixel by the same row and column values of an averaged background image (the mean image from a recording of the synchrotron beam shape). The resulting image was multiplied by a correction factor to increase the image intensity to the level of the averaged background image. Additionally, after the subtraction of the averaged background image from the normalized X-ray videos, the phase contrast is already enhanced. Further, Kalman filtering [43] was applied to reduce the statistical noise in the processed image sequences. Finally, the color space of the images was adjusted to facilitate the recognition of the image features [44]. For algorithm implementation, the software MATLAB R2022b (MathWorks Inc, Carlsbad, CA, USA) was used.
The evaluation of the keyhole geometry was conducted using a mean value image calculated by averaging all relevant individual images of the stationary process from the X-ray video. The keyhole depth was calculated as the distance from the material surface (see Figure 3) perpendicular to the tip of the keyhole. The keyhole tip position was determined in a manually preselected image area by column-wise identification of the highest gradient in the brightness values and subsequent selection of the pixel position having the largest row distance from the material surface.

4. Results and Discussion

4.1. Observation of the Laser Welding Process of Copper with Visible and Infrared Laser Radiation

An overview of the generation and behavior of the keyhole is given by the use of an image sequence reflecting typical effects of the laser welding process on copper at these spot diameters and laser beam intensities. The process understanding is extended by discussing the effects of limiting the process window and the influence of processing parameters on keyhole behavior in more comprehensive investigations in the later sections.
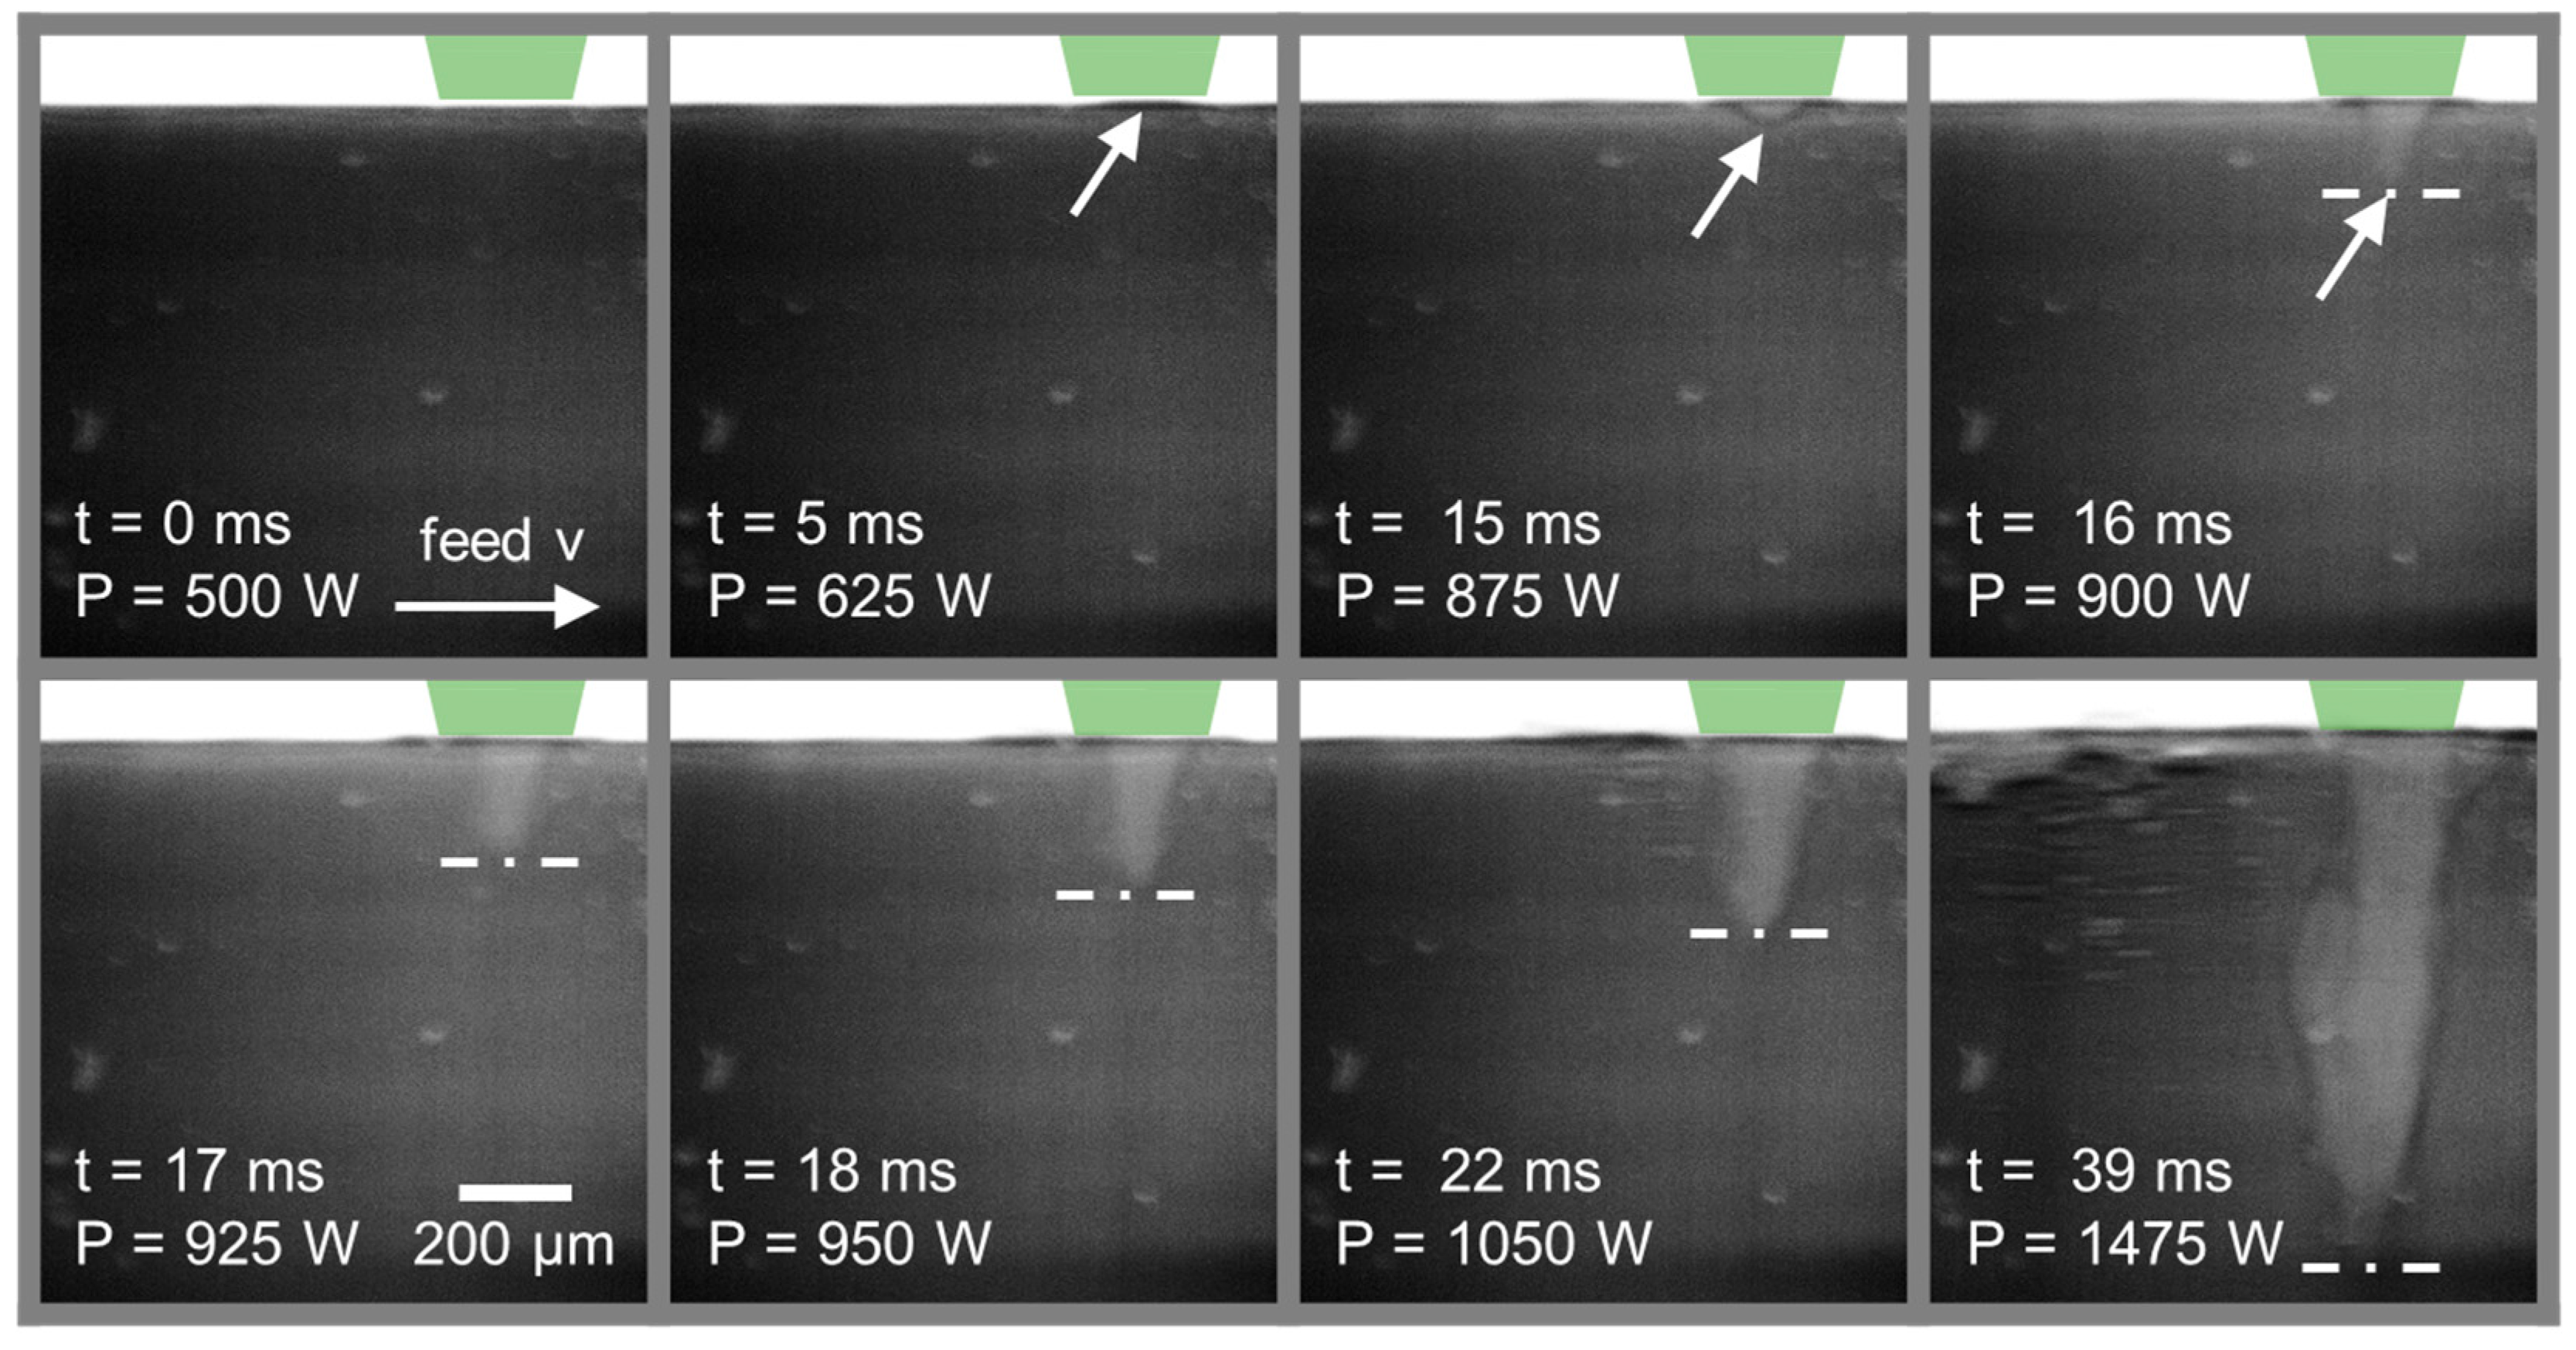
In addition, single frames of an X-ray video generated at a feed rate of v = 66.7 mm/s with a continuously linearly increased laser power starting from 500 W to 1500 W with 515 nm laser radiation are shown in Figure 4. The laser power is indicated along with the corresponding time t in the X-ray images.
The material surface and the vapor capillary can be clearly identified. Furthermore, the solidified phase is visible, which allows the inference of processes taking place in the metal to the resulting weld seam surface, and the liquid melt pool is recognizable to a limited extent. The melt film thickness on the front wall is below the spatial resolution. To ensure better visibility, the phase contrasts of interest are traced.
Further, as t = 0 ms indicates the point immediately after starting the laser emission, the copper material is heated up, and a convex melt lens can be identified at t = 5 ms. Increasing power to P = 875 W at t = 15 ms, the melt pool starts to depress (induced by the recoil pressure; see Section 2.2), and a keyhole with an aspect ratio <1 is formed. The keyhole depth progression can be subsequently observed from the time steps t = 16–39 ms, which is attributed to the efficient increase of the total absorption by multiple reflections inside [10]. The average capillary shape is nearly vertical with a small width and high aspect ratio. Since the single frames show motion blur in the keyhole area, it can be concluded that the geometry fluctuates at more than 1 kHz.
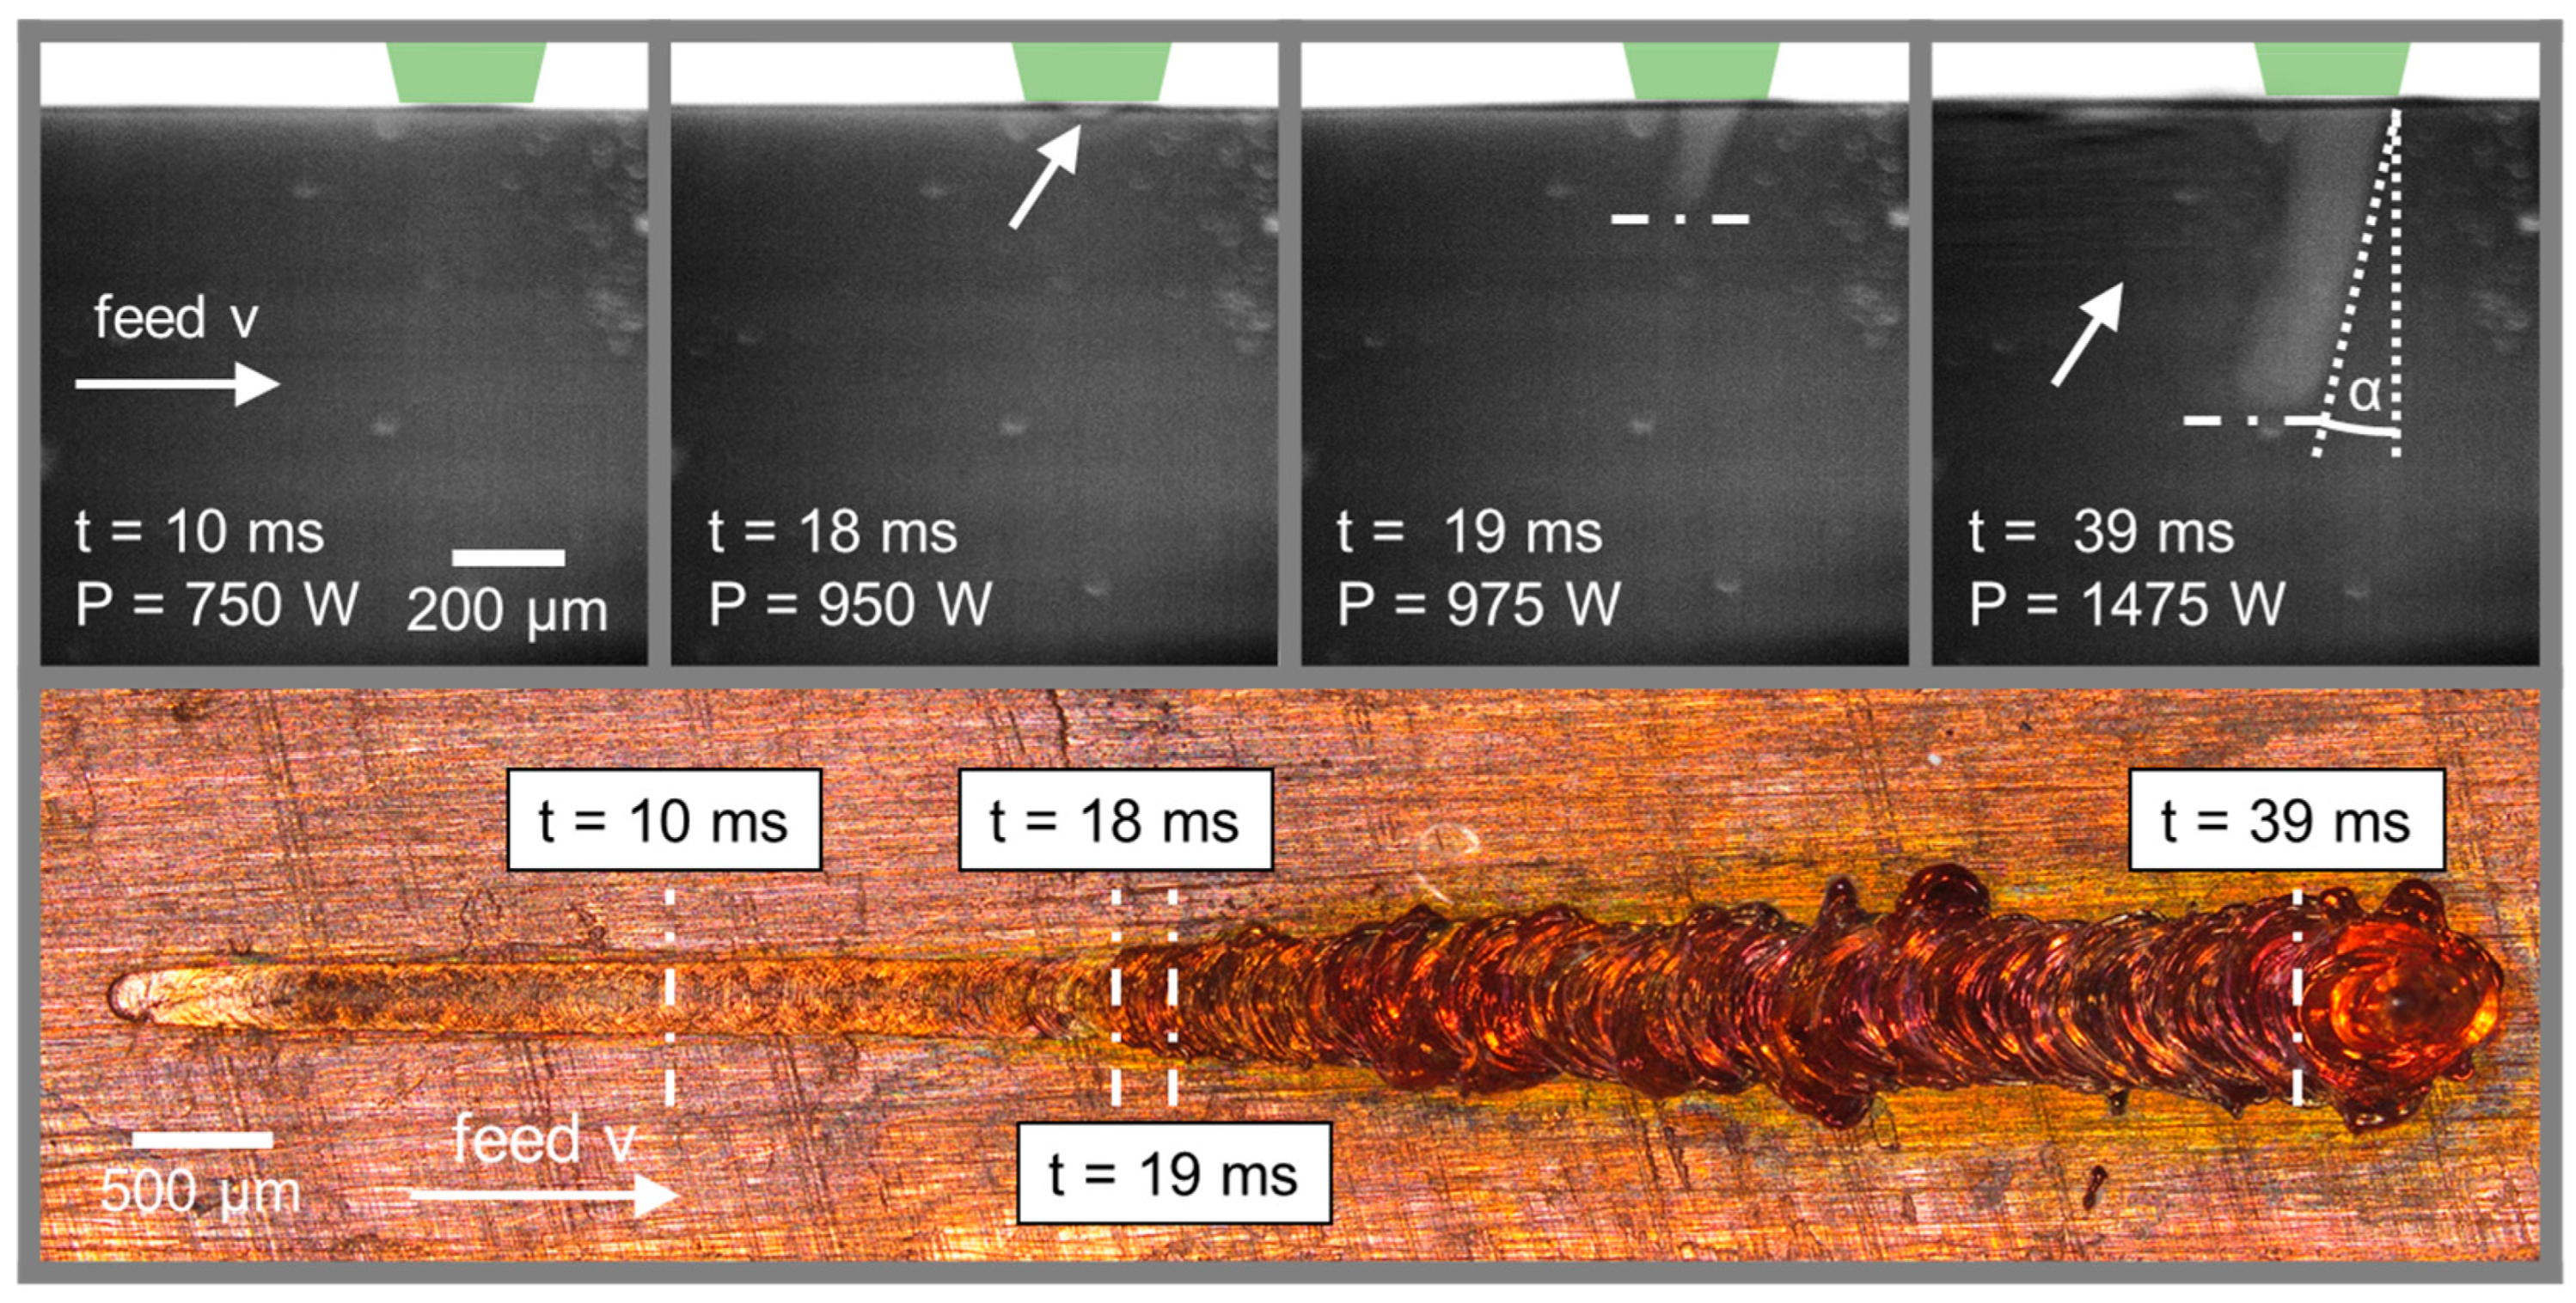
The angle of the keyhole front wall in relation to the laser axis, which is perpendicular to the workpiece top surface, is measured to be ≤3° for the image sequence. This angle α is identified as a feed-dependent parameter, as can be seen in connection with the X-ray image sequence in Figure 5. As a result, single frames of an X-ray video generated at a feed rate of v = 200 mm/s and the same laser power versus time profile (starting from 500 W to 1500 W for tP = 40 ms) using green laser radiation are shown. The corresponding top view of the weld seam is depicted in the lower part of Figure 5.
Furthermore, comparable to the findings for v = 66.7 mm/s, the formation of a melt pool depression is observed at a laser power of P = 875 W and becomes pronounced at t = 18 ms and P = 950 W. Thus, no significant influence of the feed rate on the deep penetration threshold (P/d) is stated for copper welding using green laser radiation.
The inclination angle α of the keyhole front wall is calculated to have an average value of 12.3°, which is about four times the value of the lower feed rate. The increase of the front wall inclination for higher feed rates is in good accordance with the investigations in Ref. [11] using a glass-metal sandwich setup for observation of the interaction zone. The transition from heat conduction mode to deep penetration welding can also be identified from the observation of the seam top surface, as a sudden increase in the seam width is found at the transition point between t = 18 ms and t = 19 ms (corresponding X-ray images indicated by vertical dashed lines) alongside the keyhole depth increase. Furthermore, a wavier seam surface with higher surface roughness is present in keyhole welding mode. The phase contrast between the liquid and gaseous phases becomes less visible for the higher feed rates investigated, as the fixed exposure time leads to increased dynamic noise in the X-ray videos.
In investigating copper welding with infrared laser radiation, a similar keyhole development process is observed; nevertheless, the laser power was adjusted in the range of P = 2000–3000 W, as the deep penetration threshold of Cu-ETP is 12.500 W/mm [32]. The previously discussed irregular seam surface structures observed for 515 nm wavelength are less remarkable for 1030 nm, which is consistent with the studies in [8].
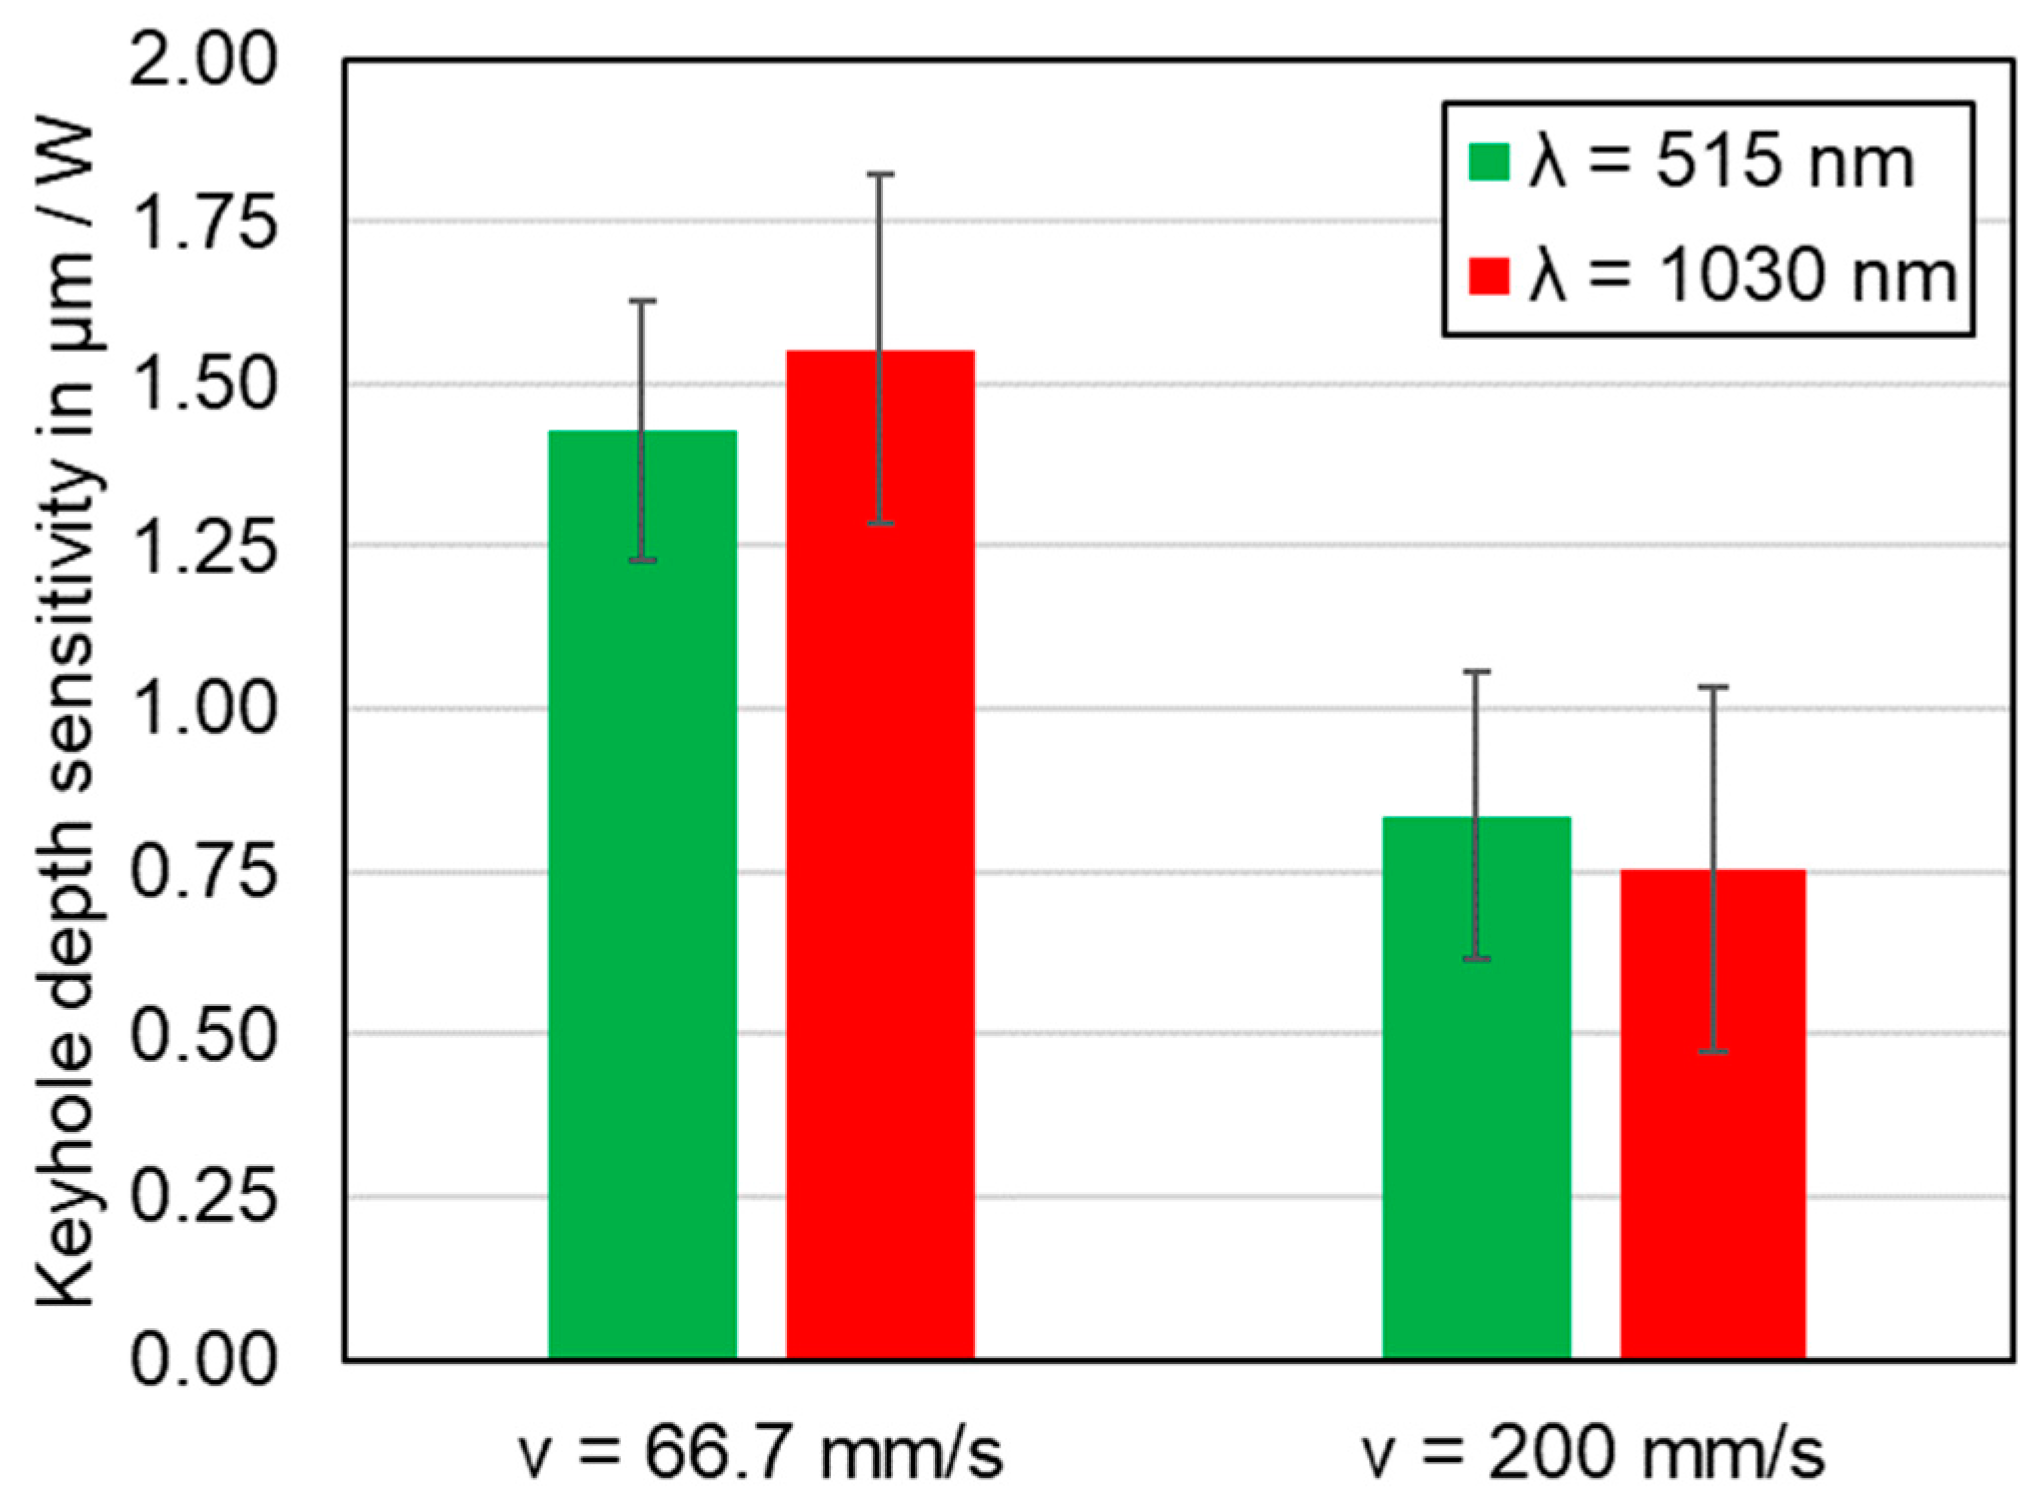
In addition, with regard to the quantification of the keyhole depth progress as a function of the feed rate and the laser wavelength, the measured depth difference (keyhole depth e(t + 1)–e(t)) was divided by the corresponding laser power difference (PL(t + 1)–PL(t)) between the single frames of the X-ray videos. Thus, the determined keyhole depth sensitivity, depicted in Figure 6, indicates the keyhole growth 2 ms after formation and was extracted from the data points by averaging. It becomes apparent (as is already evident from Figure 4 and Figure 5), that the increase in keyhole depth in relation to the laser power applied decreases with increasing feed rate for green laser radiation. The sensitivity value is found to be 58% smaller for v = 200 mm/s compared to v = 66.7 mm/s. This trend can also be observed for the investigations using near-infrared laser wavelength (sensitivity difference (v = 200 mm/s–v = 66.7 mm/s): 49%). If the sensitivity of the keyhole depth to the feed rate is compared between the laser wavelengths, a difference becomes apparent. The sensitivity value for the 1030 nm laser is higher for the lower feed rate of v = 66.7 mm/s compared to the 515 nm laser, whereas the ratio is reversed for the higher feed rate of 200 mm/s.
A reason for this behavior is assumed to be the higher laser power in the case of near-infrared laser welding (necessary to overcome the deep penetration threshold), which leads to an increased amount of energy absorbed in the sample compared to the green laser radiation. However, since the absorptivity of liquid copper at 1030 nm is lower compared to that at 515 nm (see Section 2.3), the absorbed energy is predominantly deposited in the lower keyhole region by an increased number of multiple reflections. This effect is further discussed in Section 4.3. The increased angular dependence of the absorptivity of copper for 1030 nm laser radiation in combination with the observed inclination of the keyhole front wall leads to increased reflection losses [12] for the increased feed rate. Therefore, the sensitivity of the keyhole depth is lower for 1030 nm compared to 515 nm laser radiation at v = 200 mm/s. This assumption is also supported by the results presented in [39], where an increased feed rate dependency is found for copper welding with a near-infrared beam source compared to a green one.
The lower keyhole depth sensitivity at a higher feed rate in the case of both laser wavelengths may be of particular interest for applications requiring low deviations in the weld seam depth. It should also be noted that the actual seam depth may vary less as it is affected by the heat conduction between the melt pool surrounding the keyhole and the solid metal, which is more inert than the processes in the keyhole.
Figure 7 shows the heat conduction welding of copper with near-infrared laser radiation, which is hardly feasible according to the state of the art [17]. In the X-ray image sequence, the formation of the melt lens can be followed from t = 29 ms on, whereas in the lower part of the compilation, the microscopic view of the weld seam is presented. In the generation of this seam, the identical optical setup and BrightLine functionality of the TruDisk 6001, equipped with a double core fiber, were used. Thereby, a spot diameter of 800 µm (PL(ring) = 100%) was achieved on the sample surface in the focal plane.
It becomes obvious that heat conduction welding of copper using 1030 nm laser radiation is rather difficult to control. However, 40 ms after the start of the laser emission, a convex melt pool is present that does not enlarge with further time. The initiation, starting from t = 32 ms, is attributed to locally increased surface roughness and preheating of the sample, leading to increasing absorptivity in the laser-matter interaction zone [45]. After formation, the melt pool remained dimensionally stable, and no collapse of the process was observed. Since the depth of the melt pool is measured below 100 µm, only a small amount of the irradiated laser power is absorbed in the metal at the first interaction, resulting in low process efficiency (power required to melt the volume/irradiated laser power). In addition, the smooth weld seam is narrower compared to the laser spot diameter and is symmetrically surrounded by zones in the feed direction, indicating heating effects.

4.2. Investigation of the Formation of Weld Seam Imperfections

4.2.1. Melt Ejection/Spatter Formation

Figure 8 shows the interaction zone during laser beam welding of copper at different times using 1030 nm laser radiation at a laser power of P = 2500 W at a feed rate of v = 66.7 mm/s. The X-ray image series reveals a representative section of the process, showing different effects starting at t = 12 ms.
The gaseous phase boundary appears relatively steep (small angle α), as expected for the selected process parameters and the focal diameter of approx. 200 μm. A narrow aperture at the sample surface and a high aspect ratio are visible. In the following, two expansion sequences of the keyhole, starting from the lower region—so-called keyhole bulging—can be traced for t = 35–44 ms. In general, the bulging at the keyhole bottom was found to be more pronounced compared to the middle or upper regions. It also becomes visible that several bulges occur in different areas and alter rapidly over time. The shape deviations originate from bulging on the rear wall as well as on the keyhole front wall (c.f. t = 41 ms et seq.). These dynamics are transferred to the liquid meld adjacent the keyhole, causing melt dynamics and the melt pool to swell (upward movement of the melt) at the sample surface. The liquid-solid phase boundary is exemplary indicated by the dashed line for t = 35 ms.
This bulging phenomenon may arise as a consequence of a small angle of the keyhole front wall relative to the beam axis. The irradiated laser power at the keyhole front is preferably reflected into the lower keyhole area, inducing strong fluctuations there due to the time-varying energy input. In considering the pressure balance, the lower amount of absorbed energy in the upper keyhole area leads to a changed temperature distribution, which in turn influences the recoil pressure due to the evaporation that counterbalances the closing pressures acting on the keyhole.
However, as the bulge against the feed direction grows in size rapidly and the pressure inside exceeds the surface tension of the melt pool, melt ejection (spatter formation) is observed. In the case of t = 45–51 ms, the bulge indicated by the white arrow subsequently enlarges and pushes almost the entire melt pool aside. During this time, the keyhole aperture at the sample surface was found to have significantly increased. Due to the melt ejection, a crater-shaped seam surface remains, which cannot be filled by the remaining liquid copper. The generated hole, also visible from the top view of the generated weld seam, is highlighted in the lower part of Figure 8. Afterwards, a new formation of the keyhole and the melt pool begins, as can be observed for t = 49–51 ms.
This defect formation mechanism in copper welding was predominantly observed for feed rates v ≤ 8 m/min, which is in good accordance with the literature [21]. At higher feed rates, the increased inclination of the keyhole front wall and the changed fluid dynamic conditions in the melt pool led to a widening of the keyhole aperture, especially for the 1030 nm laser radiation. Thus, the reflection losses are increased; also see Figure 11 in Section 4.3.1.

4.2.2. Pore Formation

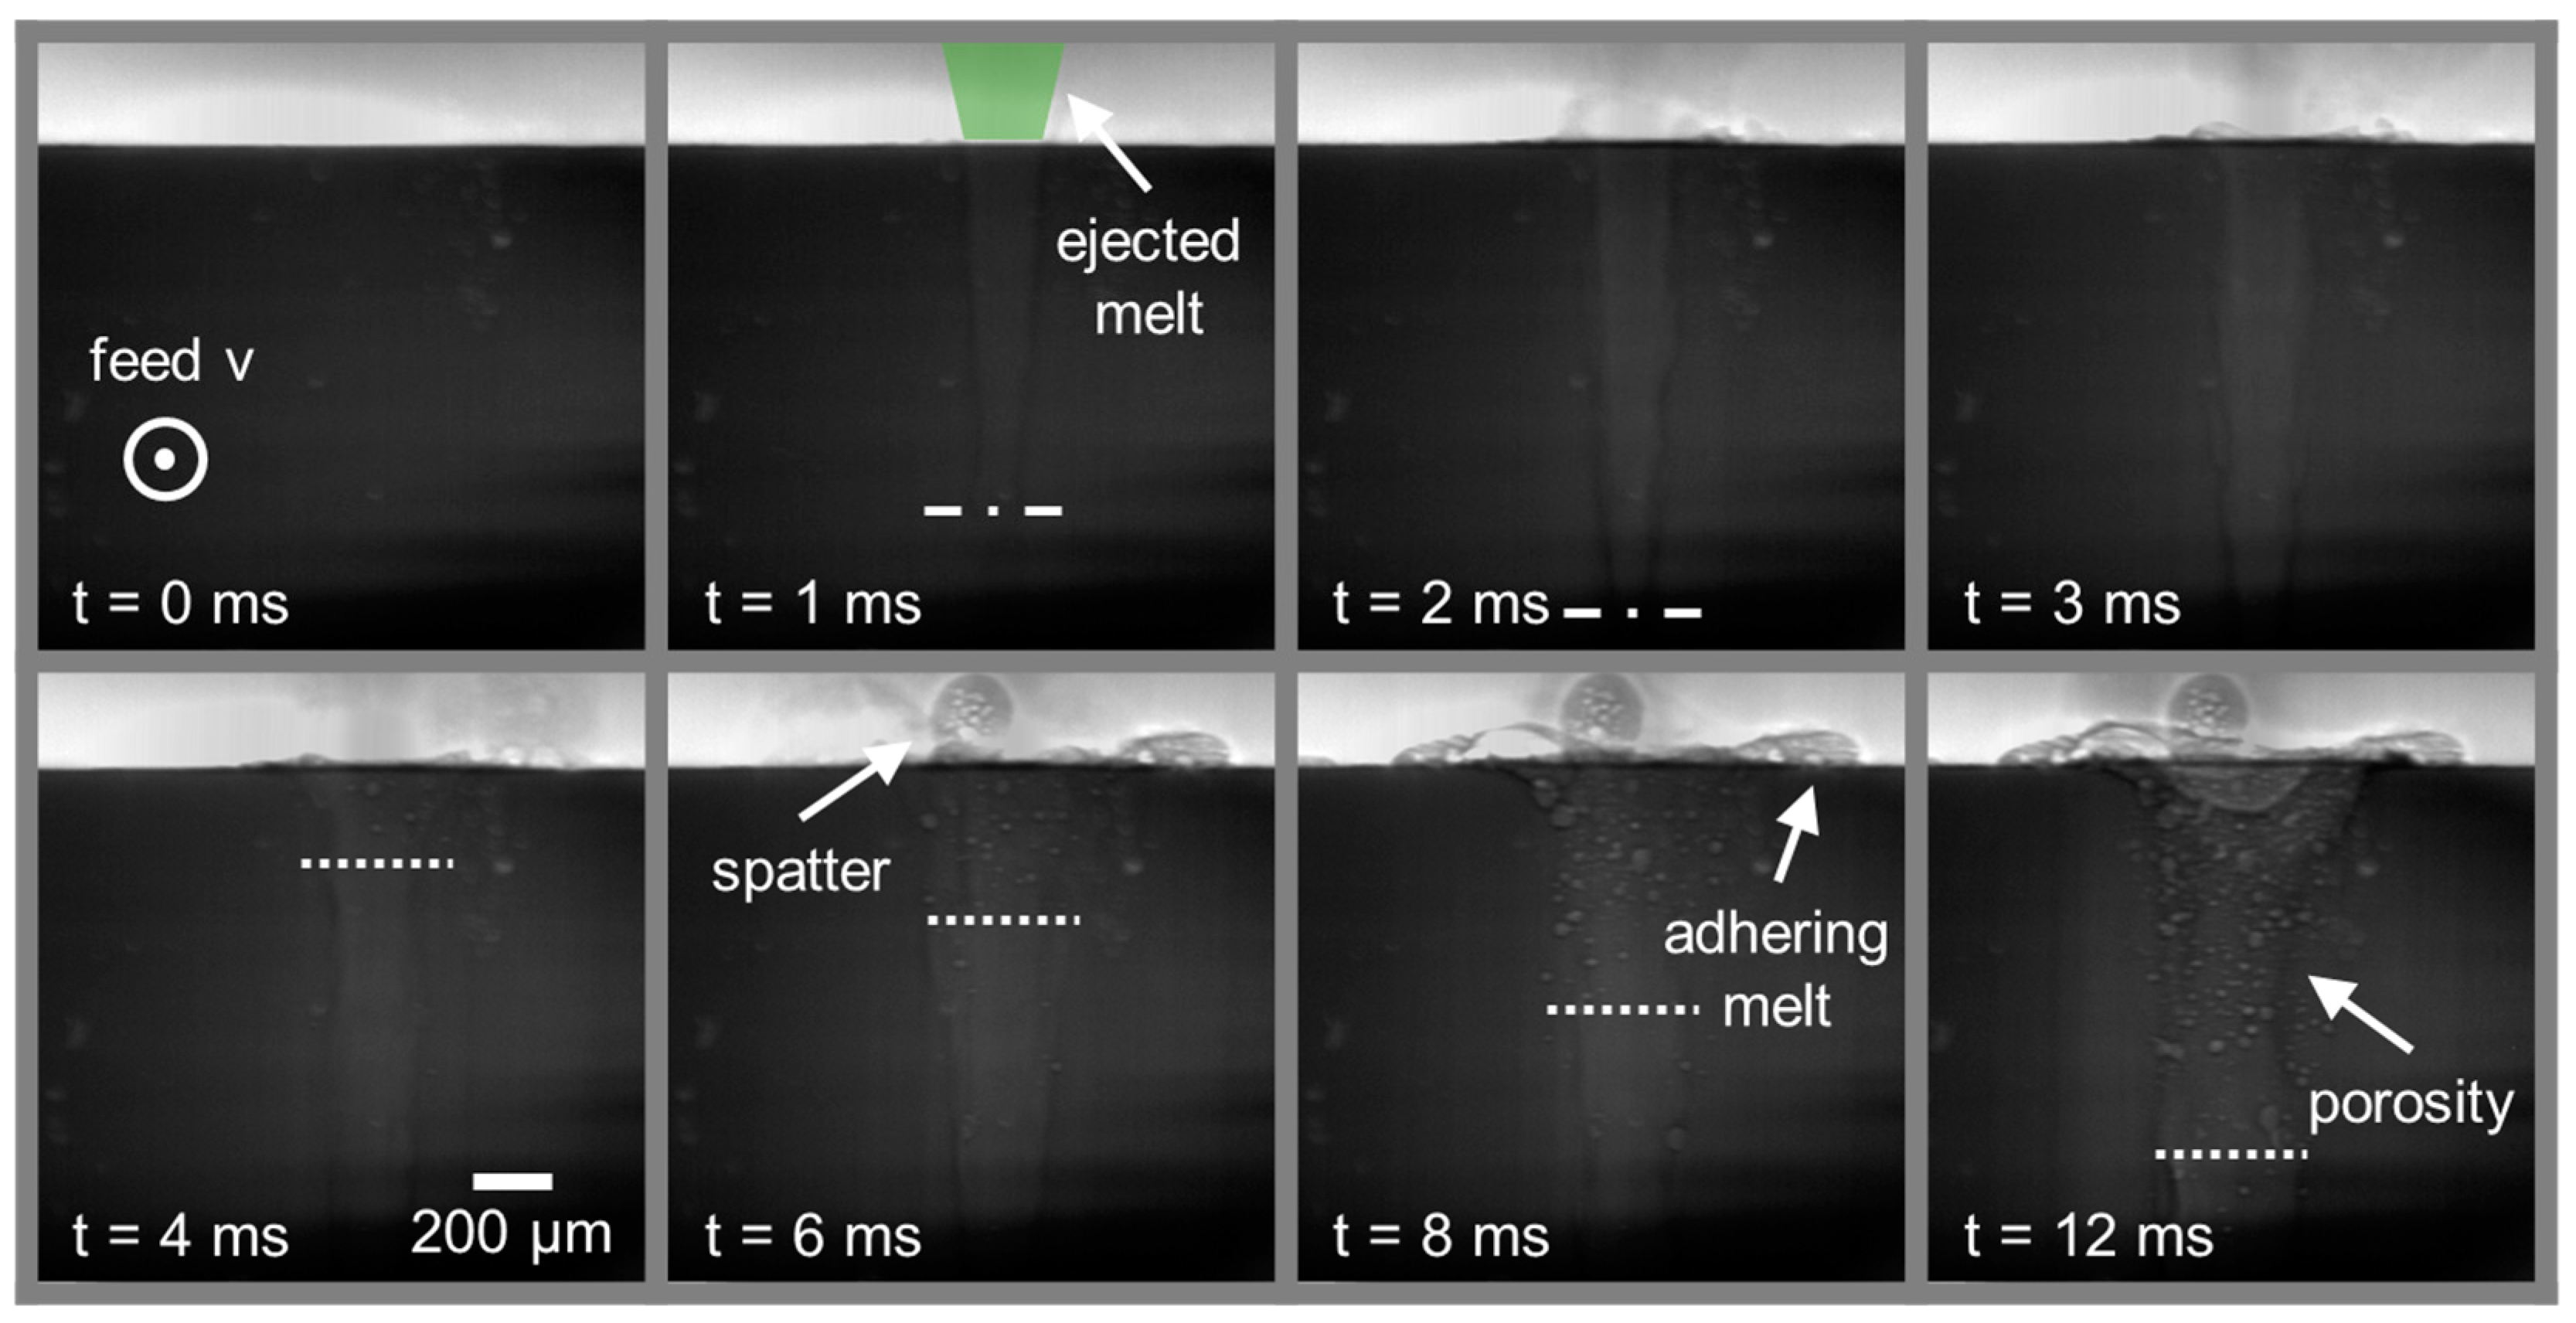
The pore formation could not be resolved from the side view experiments due to the motion blur. Therefore, the additional investigations using laser beam trajectories oriented in the X-ray direction (a stationary sample and beam movement performed by a galvanometer scanner) were used to study the processes ongoing in the melt pool. Figure 9 shows a sequence of X-ray images of the laser beam welding process of copper using green laser radiation at P = 3000 W and v = 66.7 mm/s.
The lateral dimensions of the keyhole and the melt, ejected at the top (spatter formation) and deposited on the sample surface starting at t = 1 ms, can be followed in time. The geometry is further discussed when evaluating the keyhole width in Section 4.3.2. Moreover, pore formation becomes significant at t = 4 ms. In the following X-ray images, the expansion of the porosity into the seam depth can be observed, as indicated by the dashed white line for t = 4 ms–12 ms.
This weld seam imperfection is also visible in the longitudinal section in the investigations presented in [42] for Cu-ETP welds produced with 515 nm laser radiation. A similar phenomenon with regard to the porosity was revealed for both wavelengths and parameters (P = 3000 W, v = 66.7 mm/s, λ = 1030 nm) in the in-situ synchrotron investigations. However, the effect seems to be weaker for near-infrared laser radiation, which is in accordance with the findings in [8]. Due to the consecutive propagation from the sample surface, an interaction with the ambient atmosphere is suspected. This behavior can be explained by the findings in [46], where the authors conclude that the dominant pore formation mechanism in copper is the chemical reaction of nitrogen and oxygen from the ambient gas. However, the porosity can be caused by hydrogen if the raw copper has an increased oxygen content, as in the case of Cu-ETP. The reduction of the oxygen-rich copper melt by hydrogen from the atmosphere dissolved in the melt pool liberates water vapor, as a result of which pores can be formed. Nevertheless, this effect is small compared to the former mechanism.

4.3. Influence of Process Parameters and Laser Wavelength on Keyhole Morphology

4.3.1. Evaluation of Keyhole Depth Sensitivity

The image processing methods presented in Section 3.2 were further used to evaluate the time series of the recordings by means of mean-value images of the welding processes. In Figure 10, the resulting keyhole depths and front wall angles as a function of the feed rate for the investigated parameter sets for 515 nm (left) and 1030 nm (right) laser radiation are presented. The data points represent the average of three measurements, and the length of the error bars indicates the standard deviation within the three measurements of the mean X-ray image. The dashed lines correspond to the inclination angles, whereas the solid lines indicate the keyhole depth. In this context, the feature dependence in relation to the laser power PL, feed rate v, and laser wavelength λ is of interest.
Furthermore, as shown in the graphs, it can be seen that the keyhole depth increases with increased laser power for both wavelengths. With increasing feed rate, the keyhole depth decreases, whereas the decrease is higher for welds at a wavelength of 1030 nm than for 515 nm. For the inclination angle of the keyhole front wall (short: keyhole inclination angle), an increasing trend when the feed rate is increased and a decreasing trend when the laser power is increased are visible in the cases of 515 nm and 1030 nm. The different feed sensitivity between the two lasers, earlier discussed in Section 4.1, can also be observed. In addition, starting at an equal keyhole depth of about 1.4 mm at v = 66.7 mm/s (data points: PL(515 nm) = 2 kW; PL(1030 nm) = 3 kW), the keyhole depth at 1030 nm wavelength is reduced by 1.08 mm, whereas the keyhole depth at 515 nm wavelength is only reduced by 0.72 mm if the feed rate is increased to 300 mm/s. The calculation of the average reduction of the keyhole depth with increasing feed rate for all examined parameter sets reveals a 41% reduced value for 515 nm compared to 1030 nm. In summary, the copper welding process using a 515 nm wavelength is less sensitive to feed rate variation compared to welds generated with an equal spot diameter and a 1030 nm laser wavelength. In addition, the green laser offers the opportunity to obtain small keyhole depths ≤0.6 mm in different fluid dynamic regimes. Further, the deep penetration threshold for the infrared laser is higher; as a result, an adaptation of the optical setup or a different laser source is needed when processing copper with a near-infrared wavelength at feed rates of v < 200 mm/s.
Furthermore, a similar sensitivity of the keyhole inclination angle versus feed rate is found for P = 1 kW at 515 nm and P = 2.5 kW at 1030 nm, right after exceeding the deep penetration threshold. This indicates that the shorter laser matter interaction time in the case of increasing the feed rate is the driving force for the inclination of the keyhole front wall, as a lower amount of energy is absorbed per unit time. However, the inclination leads to an increase in the average absorbed irradiance. As the laser power is increased, the aspect ratio of the keyhole also increases, and the influence of multiple reflections inside the keyhole gains importance, which is why the behavior for 515 nm and 1030 nm wavelengths is observed differently. In general, steeper keyholes were observed for 515 nm laser radiation at v = 66.7 mm/s, which persisted at the higher feed rates investigated. For example, in the case of applying equal laser power of 3 kW, α(515 nm) is found to be 6.6°, whereas α(1030 nm) is measured at 18.7° (keyhole depths e(515 nm) = 1.30 and e(1030 nm) = 0.47 mm, respectively). As discussed in [3], the different behavior for both laser wavelengths may also be caused by differing radiation attenuation in the copper vapor containing keyhole. The relationship described above is supported by the simulation conducted in [39], concluding that radiation attenuation has a significant influence when welding copper with green laser radiation and that the keyhole generation is mainly influenced by Fresnel absorption on its wall.
In comparing equal keyhole depths, predominantly the feed rates of v ≥ 133 mm/s could be assessed due to the aforementioned reasons and the X-ray beam diameter of 2 × 2 mm. The observed increased formation of seam defects at low feed rates was discussed in Section 4.2.1. Figure 11 shows the compilation of X-ray video sequences and corresponding top views of the weld seams during laser beam welding of copper using 515 nm (left) and 1030 nm (right) laser radiation at a keyhole depth of e ≈ 0.4 mm and a feed rate of v = 200 mm/s. The laser power was PL = 1000 W for the green laser, while PL = 3000 W was used for the near-infrared disk laser.
The gaseous-liquid and liquid-solid phase boundaries are traced to ensure better visibility. The changing shape of the capillary with increased feed rate is clearly visible for λ = 1030 nm in comparison to Figure 8. An enlarged keyhole aperture is present for the infrared laser. This opening of the keyhole at the sample top surface is not visible in the case of green laser welding. The keyhole front wall angle is found to be comparable (α(515 nm) = 19.2°; α(1030 nm) = 19.9°) for both investigated parameter sets.
The higher irradiated laser power during 1030 nm copper welding and the lower absorptivity lead to an increased energy distribution on the keyhole’s side and back walls by reflection. This fact is also supported by the increased spatter and melt ejection observed at 515 nm compared to 1030 nm, indicating increased process dynamics in the interaction zone at 515 nm due to the higher amount of energy absorbed in the keyhole front wall. In consequence, the melt pool is found elongated in the case of 1030 nm, and an increased melt pool swelling is detected. Moreover, the significantly narrower seam width for 515 nm wavelength than for 1030 nm can be attributed to this effect.

4.3.2. Evaluation of Keyhole Width

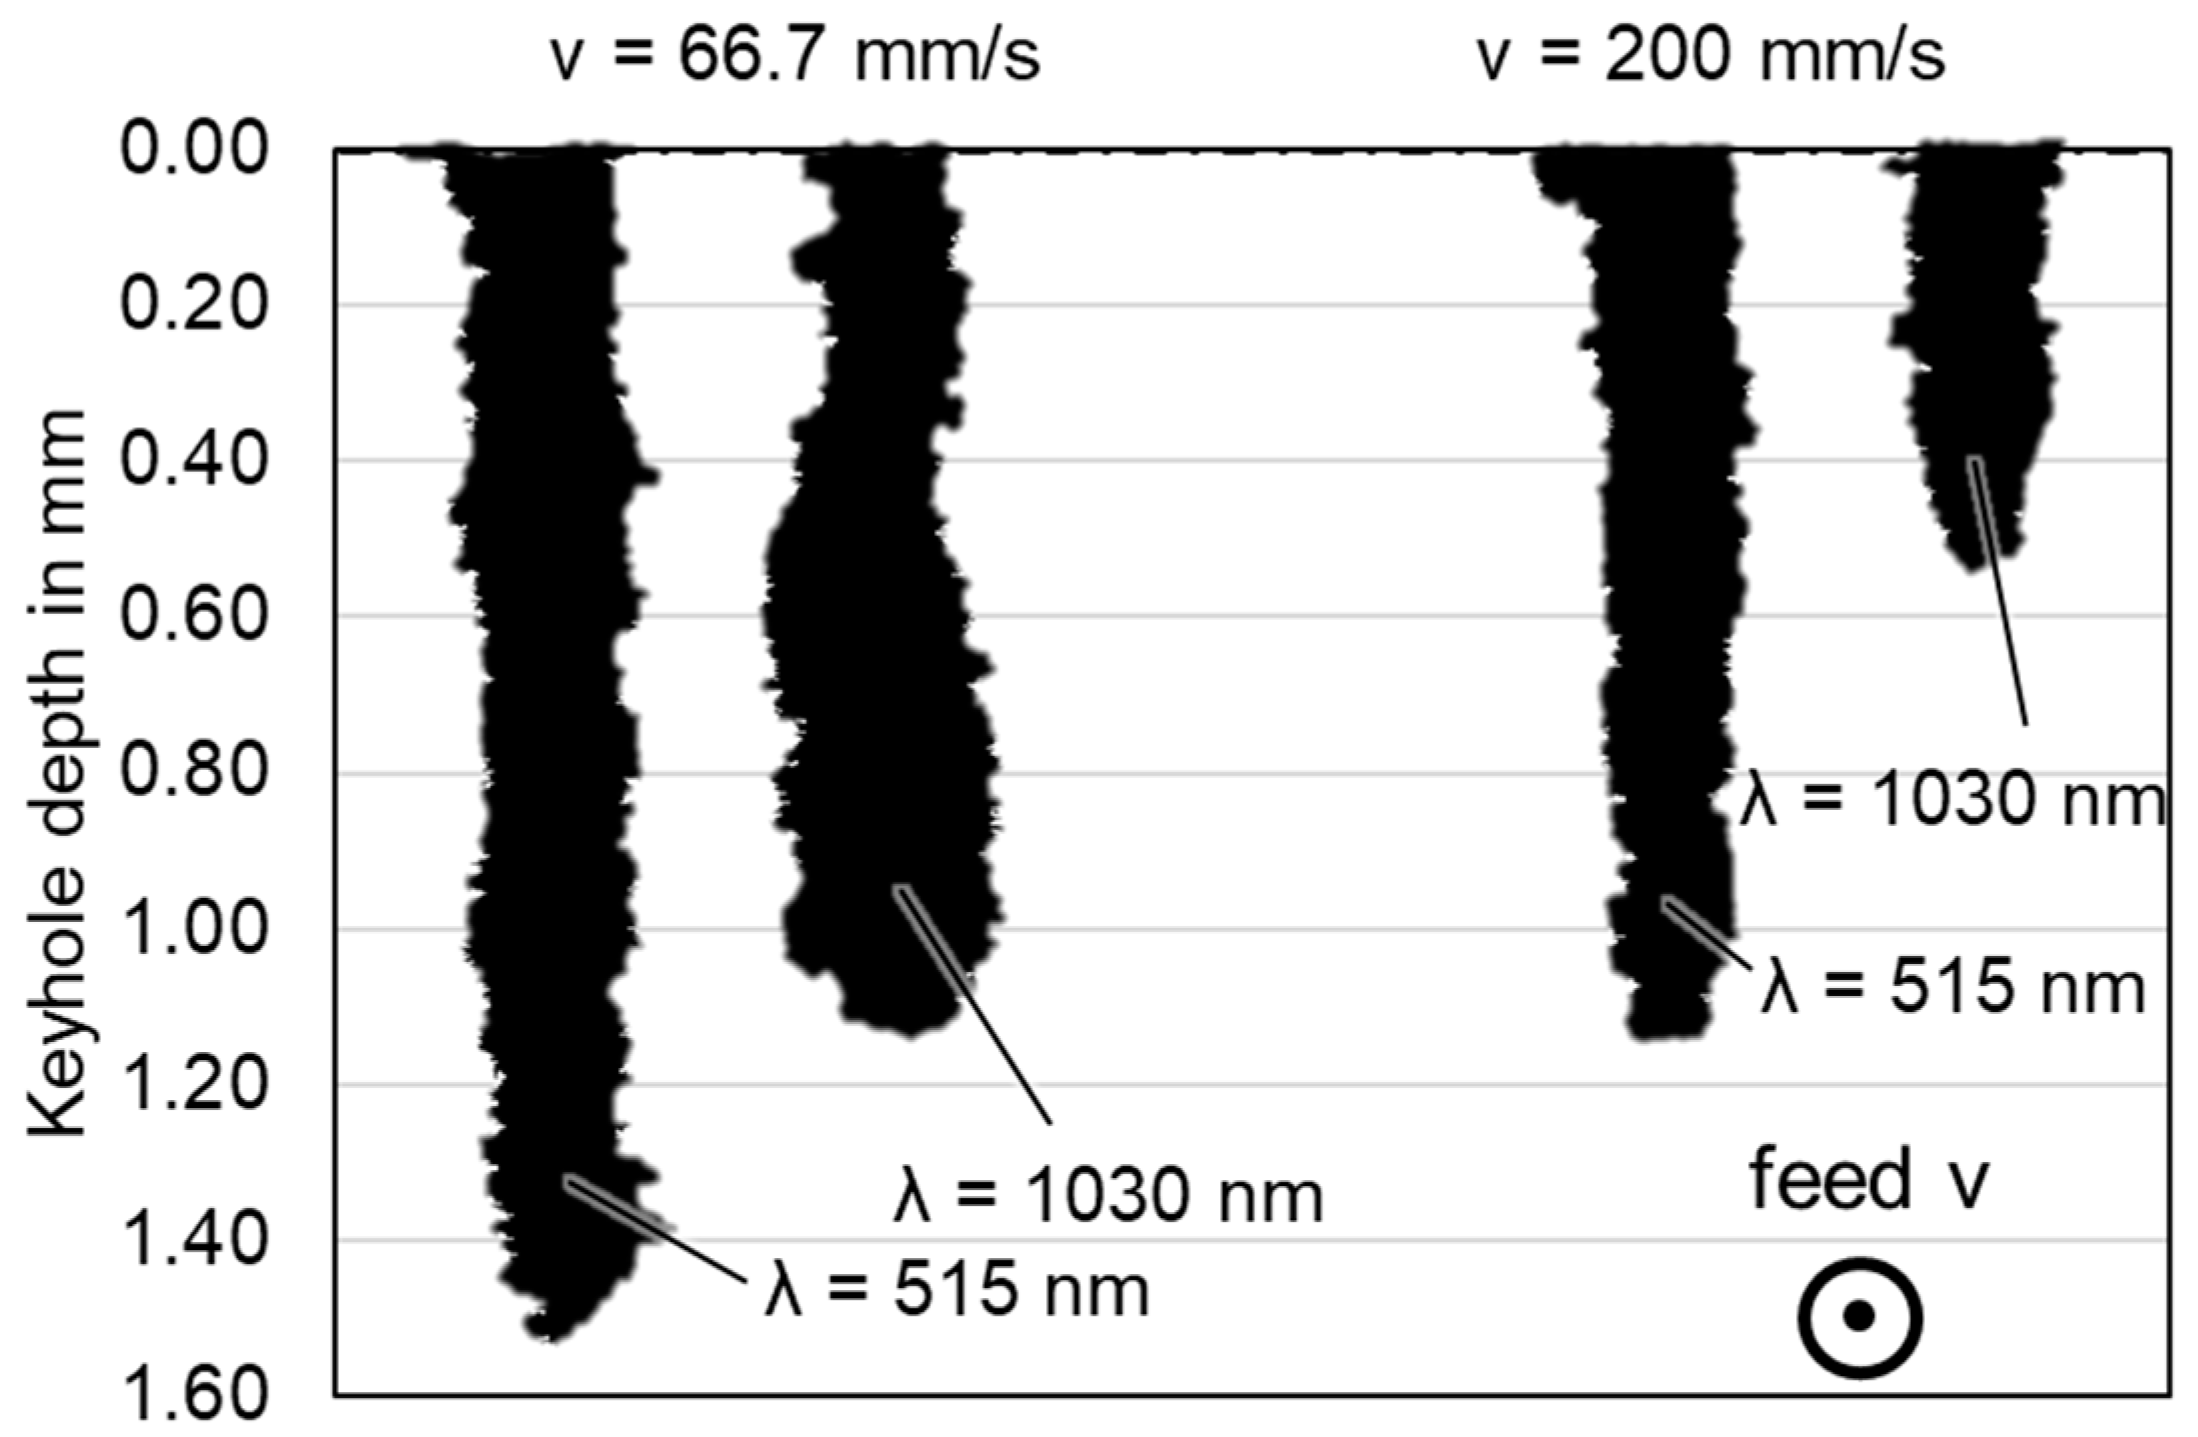
The increasing effect of multiple reflections in the case of copper welding using infrared laser radiation in particular becomes observable when evaluating the keyhole width from the X-ray videos. For an improved evaluation between the parameter sets and laser wavelengths, all images after the fast depth progress of the keyhole (see ref. [47]) were averaged using a median filter. Thereby, the contrast between the phases becomes more apparent. Further, after applying an adaptive threshold filter, the results were binarized and no further smoothing was applied.
The resulting keyhole shapes in width direction (view against feed direction) for 515 nm and 1030 nm laser radiation at a feed rate of v = 66.7 mm/s and v = 200 mm/s at a laser power of PL = 3 kW in each case are shown in Figure 12. Due to the short weld seam length of 1.5 mm, the keyhole depths are lower than the values presented in Section 4.3.1. The qualitative progression and relative behavior are, however, meaningful.
At the feed rate of v = 66.7 mm/s, a significant bulge in the lower keyhole area in the case of the infrared wavelength can be noted, whereas a comparably straight keyhole with almost parallel sidewalls is observable for 515 nm in the width direction. Furthermore, the keyhole depth is smaller for the 1030 nm wavelength for equal laser power considering both feed rate settings, as discussed earlier in this work. These findings support the increased influence of multiple reflections in the copper welding process using a 1030 nm laser wavelength. Additionally, when the feed rate is increased to 200 mm/s, the keyhole length decreases and the bulge at 1030 nm diminishes, becoming only slightly visible between 0.2 and 0.4 mm from the sample top surface. The 515 nm keyhole outline at 200 mm/s also becomes shorter; however, the reduction rate is higher for 1030 nm, confirming the experimental investigations discussed in Section 4.1 and Section 4.3.1.

5. Conclusions

In this work, X-ray phase contrast observations of the laser beam welding process of copper using visible and infrared laser radiation were conducted. Further, in order to obtain a more holistic picture of the decisive effects of the welding process and its possibilities, the analysis with a high-brilliance synchrotron beam source was used. Additionally, two laser beam sources with 515 nm and 1030 nm wavelengths, respectively, were used with optical setups achieving equal focal diameters. Finally, a wide range of process parameters (v, PL) was covered on Cu-ETP with a thickness of 2 mm to investigate the influence of the laser wavelength on the welding process.
The material phase contrast analysis was successfully applied to distinguish keyhole and melt pool phase boundaries in copper with high temporal and spatial resolution during the welding process with an acquisition rate of 1 kHz in side view. Further, apart from the X-ray video acquisition, additional image processing was used to bring the effects of the metal to light more clearly. In situ observations, both perpendicular and in the welding direction, were presented. The results were compared based on measures extracted from the post-processed X-ray video sequences. In this study, the depth progress of the keyhole and the correlation with its front wall inclination were especially investigated. A deeper insight into the keyhole formation in copper was presented at the beginning. Furthermore, the characteristic formations of weld seam imperfections, namely melt ejection, spatter formation, and pore formation, were investigated. The challenges of strong fluctuations (keyhole bulging) and highly dynamic effects were revealed. Lastly, the influence of process parameters and laser wavelength on the keyhole morphology was quantified and discussed. The investigations revealed the characteristics of the currently available beam sources for copper processing.
The following conclusions can be drawn:
  • The high-speed phase contrast imaging of laser beam welding of copper enables the detailed observation of the dynamic processes inside the metal during the interaction between the laser beam, keyhole, and melt pool.
  • The keyhole depth sensitivity for the 1030 nm laser is higher for the lower feed rate of v = 66.7 mm/s compared to the 515 nm laser, whereas the ratio is reversed for the feed rate of 200 mm/s when the laser power is continuously and linearly increased.
  • The feed rate sensitivity decreases with increasing feed rate, which is attributed to the increasing inclination of the keyhole front wall in the case of both laser wavelengths.
  • In general, the keyhole in the copper welding process using a 515 nm wavelength is observed to be less sensitive to changes in feed rate compared to the keyholes generated with an equal spot diameter and a 1030 nm laser wavelength.
  • Multiple reflections have an increased effect in the case of infrared laser radiation, as the absorptivity for 1030 nm is lower compared to the 515 nm wavelength.
  • This effect becomes particularly visible when looking at the keyhole in the width direction, where a decisive bulge is found in the lower keyhole area.
  • The weld seam imperfections limit the usable parameter space, where especially key-hole bulging in the lower region at low feed rates (v ≤ 133 mm/s) is caused by the highly dynamic energy input for low keyhole inclination angles, which in consequence can result in spatter formation or complete ejection of the melt pool.
  • The pore formation is observed as a time-progressive phenomenon in copper welding and is assumed to be caused by the chemical reaction of nitrogen and oxygen in the ambient gas.
In sum, the green laser radiation enables less sensitive keyhole behavior for welding applications with a variety of different feed rates. These findings are expected to be beneficial for further welding process optimization. It should be noted that due to the greater inert heat conduction between the melt pool surrounding the keyhole and the solid metal compared to the dynamic processes in the keyhole, the actual weld seam depth may vary less.
Therefore, future investigations will focus on an in-depth metallographic analysis of copper welding using a 3 kW CW frequency-doubled disk laser (515 nm) in comparison to a 1030 nm laser beam source. Additionally, future work will also cover potential applications in e-mobility, such as, inter-battery connections and the assessment of electrical and mechanical seam properties. Furthermore, efficiency calculations are of interest for economic and resource-efficient manufacturing.

Author Contributions

Conceptualization, F.K.; methodology, F.K.; validation, F.K. and C.F.; formal analysis, F.K.; investigation, F.K., C.F., M.H., F.B. and J.M.; resources, M.S.; data curation, F.K.; writing—original draft preparation, F.K.; writing—review and editing, F.K.; visualization, F.K.; supervision, S.R. and M.S.; project administration, M.S. and A.O.; funding acquisition, M.S. All authors have read and agreed to the published version of the manuscript.

Funding

The authors gratefully thank the German Ministry for Economic affairs and Climate action for funding part of this work in the research project “GreenPls: Laserbearbeitungseinheit für hochreflektive Werkstoffe” (Grant No. KK5004303LP0) as part of the Central Innovation Programme for SMEs. The presented investigations were carried out within the framework of Research Unit FOR-5134, “Solidification Cracks during Laser Beam Welding: High Performance Computing for High Performance Processing”, (Grant No. 434946896) and funded by the Deutsche Forschungsgemeinschaft e.V. (DFG, German Research Foundation). The sponsorship and support are gratefully acknowledged.

Institutional Review Board Statement

Not applicable.

Informed Consent Statement

Not applicable.

Data Availability Statement

Not applicable.

Acknowledgments

This research was supported by TRUMPF GmbH & Co. KG and IPG Laser GmbH. The presented investigations were carried out in cooperation with RWTH Aachen University within the framework of the Collaborative Research Centre SFB1120-236616214 “Bauteilpräzision durch Beherrschung von Schmelze und Erstarrung in Produktionsprozessen” and funded by the Deutsche Forschungsgemeinschaft e.V. (DFG, German Research Foundation). The presented investigations were carried out in cooperation with DESY in Hamburg at PETRA III, and we would like to thank F. Beckmann and J. Moosmann for their assistance in using P07 EH4. Beamtime was allocated for proposal I-20210713. The sponsorship and support are gratefully acknowledged. We would like to thank all people involved for their support.

Conflicts of Interest

The authors declare no conflict of interest. The funders had no role in the design of the study, in the collection, analysis, or interpretation of data, in the writing of the manuscript, or in the decision to publish the results.

References

  1. Schmidt, M.; Zäh, M.; Li, L.; Duflou, J.; Overmeyer, L.; Vollertsen, F. Advances in macro-scale laser processing. CIRP Ann. 2018, 67, 719–742. [Google Scholar] [CrossRef]
  2. Hügel, H.; Graf, T. Materialbearbeitung mit Laser: Grundlagen und Verfahren; 4., überarbeitete und erweiterte Auflage; Springer Vieweg: Wiesbaden, Germany, 2022; ISBN 9783658372521. [Google Scholar]
  3. Haubold, M.; Ganser, A.; Eder, T.; Zäh, M.F. Laser welding of copper using a high power disc laser at green wavelength. Procedia CIRP 2018, 74, 446–449. [Google Scholar] [CrossRef]
  4. Pavlicek, N.; Mohn, F. Laser bonding of copper ribbons and clips on SiC power MOSFETs with sintered copper bond buffers. In Proceedings of the 2020 IEEE 8th Electronics System-Integration Technology Conference (ESTC), Tønsberg, Vestfold, Norway, 15–18 September 2020; pp. 1–4, ISBN 978-1-7281-6293-5. [Google Scholar]
  5. Engler, S.; Ramsayer, R.; Poprawe, R. Process Studies on Laser Welding of Copper with Brilliant Green and Infrared Lasers. Phys. Procedia 2011, 12, 339–346. [Google Scholar] [CrossRef]
  6. Pricking, S.; Baumann, F.; Zaske, S.; Dold, E.; Kaiser, E.; Killi, A. Progress in green disk laser development for industrial high power applications. In Solid State Lasers XXX: Technology and Devices; Solid State Lasers XXX: Technology and Devices, Online Only, United States, 6–12 March 2021; Clarkson, W.A., Shori, R.K., Eds.; SPIE: Bellingham, WA, USA, 2021; p. 13. ISBN 9781510641631. [Google Scholar]
  7. Ramsayer, R.M.; Engler, S.; Schmitz, G. New approaches for highly productive laser welding of copper materials. In Proceedings of the 2011 1st International Electric Drives Production Conference, Nuremberg, Germany, 28–29 September 2011; pp. 69–73. [Google Scholar]
  8. Hummel, M.; Schöler, C.; Gillner, A. Metallographic Comparison for Laser Welding of Cu-ETP and CuSn6 with Laser Beam Sources of 515 nm and 1030 nm Wavelength. In Enhanced Material, Parts Optimization and Process Intensification: Proceedings; Reisgen, U., Drummer, D., Marschall, H., Eds.; Springer Nature: Cham, Switzerland, 2021; pp. 14–28. ISBN 978-3-030-70331-8. [Google Scholar]
  9. Schaaf, P. Laser Processing of Materials: Fundamentals, Applications and Developments; Springer: Berlin/Heidelberg, Germany; New York, NY, USA, 2010; ISBN 9783642132810. [Google Scholar]
  10. Franco, D. Wobbling Laser Beam Welding of Copper. Ph.D. Thesis, Universidade Nova de Lisboa, Lisboa, Portugal, 2017. [Google Scholar]
  11. Kaufmann, F.; Maier, A.; Schrauder, J.; Roth, S.; Schmidt, M. Influence of superimposed intensity distributions on weld seam quality and spatter behavior during laser beam welding of copper with green laser radiation. J. Laser Appl. 2022, 34, 42008. [Google Scholar] [CrossRef]
  12. Beck, M. Modellierung des Lasertiefschweißens. Doctoral Thesis, Universität Stuttgart, Stuttgart, Germany, 1996. [Google Scholar]
  13. Kroos, J.; Gratzke, U.; Simon, G. Towards a self-consistent model of the keyhole in penetration laser beam welding. J. Phys. D Appl. Phys. 1993, 26, 474–480. [Google Scholar] [CrossRef]
  14. Berger, P.; Hügel, H. Fluid Dynamic Effects in Keyhole Welding—An Attempt to Characterize Different Regimes. Phys. Procedia 2013, 41, 216–224. [Google Scholar] [CrossRef] [Green Version]
  15. Kroos, J.; Gratzke, U.; Vicanek, M.; Simon, G. Dynamic behaviour of the keyhole in laser welding. J. Phys. D Appl. Phys. 1993, 26, 481–486. [Google Scholar] [CrossRef]
  16. Arata, Y.; Mario, I.; Miyamoto, T.; Takeuchi, S. Dynamic behavior of laser welding and cutting. In Proceedings of the 7th International Conference Electron and Ion Beam Science and Technology, Washington, WA, USA, 4–7 May 1976; pp. 111–128. [Google Scholar]
  17. Schricker, K.; Schmidt, L.; Friedmann, H.; Diegel, C.; Seibold, M.; Hellwig, P.; Fröhlich, F.; Bergmann, J.P.; Nagel, F.; Kallage, P.; et al. Characterization of keyhole dynamics in laser welding of copper by means of high-speed synchrotron X-ray imaging. Procedia CIRP 2022, 111, 501–506. [Google Scholar] [CrossRef]
  18. Klein, T.; Vicanek, M.; Kroos, J.; Decker, I.; Simon, G. Oscillations of the keyhole in penetration laser beam welding. J. Phys. D Appl. Phys. 1994, 27, 2023–2030. [Google Scholar] [CrossRef]
  19. Miyagi, M.; Zhang, X. Investigation of laser welding phenomena of pure copper by x-ray observation system. J. Laser Appl. 2015, 27, 42005. [Google Scholar] [CrossRef]
  20. Katayama, S. (Ed.) Handbook of Laser Welding Technologies: Woodhead Publishing Series in Electronic and Optical Materials; Woodhead Publishing: Sawston, UK, 2013; ISBN 978-0-85709-264-9. [Google Scholar]
  21. Heider, A. Erweitern der Prozessgrenzen Beim Laserstrahlschweißen von Kupfer mit Einschweißtiefen Zwischen 1 mm und 10 mm. Ph.D. Thesis, University of Stuttgart, Stuttgart, Germany, 2018. [Google Scholar]
  22. DIN EN ISO 6520; Schweißen und Verwandte Prozesse—Einteilung von Geometrischen Unregelmäßigkeiten an Metallischen Werkstoffen—Teil 1: Schmelzschweißen. Beuth Verlag GmbH: Berlin, Germany, 2007.
  23. Heider, A.; Sollinger, J.; Abt, F.; Boley, M.; Weber, R.; Graf, T. High-Speed X-ray Analysis of Spatter Formation in Laser Welding of Copper. Phys. Procedia 2013, 41, 112–118. [Google Scholar] [CrossRef] [Green Version]
  24. Kaplan, A.F.H.; Powell, J. Spatter in laser welding. J. Laser Appl. 2011, 23, 32005. [Google Scholar] [CrossRef]
  25. Zhang, G.; Zhu, B.; Zou, J.; Wu, Q.; Xiao, R. Correlation between the spatters and evaporation vapor on the front keyhole wall during fiber laser keyhole welding. J. Mater. Res. Technol. 2020, 9, 15143–15152. [Google Scholar] [CrossRef]
  26. Weaver, J.H.; Krafka, C.; Lynch, D.W.; Koch, E.E. Optical properties of metals. Appl. Opt. 1981, 20, 1124_1–1125. [Google Scholar] [CrossRef]
  27. Pells, G.P.; Shiga, M. The optical properties of copper and gold as a function of temperature. J. Phys. C Solid State Phys. 1969, 2, 1835–1846. [Google Scholar] [CrossRef]
  28. Blom, A.; Dunias, P.; van Engen, P.; Hoving, W.; de Kramer, J. Process spread reduction of laser microspot welding of thin copper parts using real-time control. In Photon Processing in Microelectronics and Photonics II; International Society for Optics and Photonics: Bellingham, WA, USA, 2003; pp. 493–507. [Google Scholar]
  29. Krishnan, S.; Hansen, G.P.; Hauge, R.H.; Margrave, J.L. Emissivities and Optical Constants of Electromagnetically Levitated Liquid Metals as Functions of Temperature and Wavelength. In Materials Chemistry at High Temperatures; Hastie, J.W., Ed.; Humana Press: Clifton, NJ, USA, 1990; pp. 143–164. ISBN 978-1-4612-6781-2. [Google Scholar]
  30. Palik, E.D. (Ed.) Handbook of Optical Constants of Solids: Volume 2; Academic Press: San Diego, CA, USA; London, UK, 2012; ISBN 9780080556307. [Google Scholar]
  31. Punzel, E.; Hugger, F.; Dörringer, R.; Dinkelbach, T.L.; Bürger, A. Comparison of different system technologies for continuous-wave laser beam welding of copper. Procedia CIRP 2020, 94, 587–591. [Google Scholar] [CrossRef]
  32. Kaufmann, F.; Maier, A.; Ermer, J.; Roth, S.; Schmidt, M. Influence of defocusing in deep penetration welding of copper by using visible wavelength. In Proceedings of the 11th International WLT-Conference on Lasers in Manufacturing, Munich, Germany, 21–24 June 2021. [Google Scholar]
  33. Kohl, S.; Kaufmann, F.; Schmidt, M. Why Color Matters—Proposing a Quantitative Stability Criterion for Laser Beam Processing of Metals Based on Their Fundamental Optical Properties. Metals 2022, 12, 1118. [Google Scholar] [CrossRef]
  34. Fetzer, F.; Hagenlocher, C.; Weber, R.; Graf, T. Geometry and stability of the capillary during deep-penetration laser welding of AlMgSi at high feed rates. Opt. Laser Technol. 2021, 133, 106562. [Google Scholar] [CrossRef]
  35. Lind, J.; Fetzer, F.; Blazquez-Sanchez, D.; Weidensdörfer, J.; Weber, R.; Graf, T. Geometry and absorptance of the cutting fronts during laser beam cutting. J. Laser Appl. 2020, 32, 32015. [Google Scholar] [CrossRef]
  36. Kawahito, Y.; Wang, H. In-Situ Observation of Laser Manufacturing with X-ray Technique. Synchrotron Radiat. News 2019, 32, 14–19. [Google Scholar] [CrossRef]
  37. Chen, Y.; Clark, S.J.; Leung, C.L.A.; Sinclair, L.; Marussi, S.; Olbinado, M.P.; Boller, E.; Rack, A.; Todd, I.; Lee, P.D. In-situ Synchrotron imaging of keyhole mode multi-layer laser powder bed fusion additive manufacturing. Appl. Mater. Today 2020, 20, 100650. [Google Scholar] [CrossRef]
  38. Schell, N.; King, A.; Beckmann, F.; Fischer, T.; Müller, M.; Schreyer, A. The High Energy Materials Science Beamline (HEMS) at PETRA III. MSF 2013, 772, 57–61. [Google Scholar] [CrossRef] [Green Version]
  39. Hummel, M.; Külkens, M.; Schöler, C.; Schulz, W.; Gillner, A. In situ X-ray tomography investigations on laser welding of copper with 515 and 1030 nm laser beam sources. J. Manuf. Process. 2021, 67, 170–176. [Google Scholar] [CrossRef]
  40. Weckert, E.; Balewski, K.; Brefeld, W.; Decking, W.; Drube, W. PETRA III: A New High Brilliance Synchrotron Radiation Source at DESY. In AIP Conference Proceedings. Synchrotron Radiation Instrumentation: Eighth International Conference on Synchrotron Radiation Instrumentation, San Francisco, CA, USA, 25–29 August 2003; AIP: Woodbury, Long Island, NY, USA, 2003; pp. 73–76. [Google Scholar]
  41. Eriksson, I.; Powell, J.; Kaplan, A. Melt behavior on the keyhole front during high speed laser welding. Opt. Lasers Eng. 2013, 51, 735–740. [Google Scholar] [CrossRef] [Green Version]
  42. Kaufmann, F.; Ermer, J.; Maier, A.; Roth, S.; Schmidt, M. Influence of plume attenuation under high power laser welding of copper using visible wavelengths. J. Laser Appl. 2021, 33, 042006. [Google Scholar] [CrossRef]
  43. Harvey, A.C. Forecasting, Structural Time Series Model and Kalman Filter; Cambridge University Press: Cambridge, UK; New York, NY, USA, 1990; ISBN 9780521321969. [Google Scholar]
  44. Abt, F.; Boley, M.; Weber, R.; Graf, T. X-ray videography for investigation of capillary and melt pool dynamics in different materials. In Proceedings of the International Congress on Applications of Lasers & Electro-Optics. ICALEO® 2011: 30th International Congress on Laser Materials Processing, Laser Microprocessing and Nanomanufacturing, Orlando, FL, USA, 23–27 October 2011; Laser Institute of America: Woodbury, Long Island, NY, USA, 2011; pp. 179–186, ISBN 978-0-912035-94-9. [Google Scholar]
  45. Bergström, D.; Powell, J.; Kaplan, A.F.H. Absorptance of nonferrous alloys to Nd:YLF and Nd:YAG laser light at room temperature. Appl. Opt. 2007, 46, 1290–1301. [Google Scholar] [CrossRef] [Green Version]
  46. Alter, L.; Heider, A.; Bergmann, J.P. Influence of hydrogen, oxygen, nitrogen, and water vapor on the formation of pores at welding of copper using laser light at 515 nm wavelength. J. Laser Appl. 2020, 32, 022020. [Google Scholar] [CrossRef]
  47. Faure, F.; Weber, R.; Graf, T. Influence of beam parameters on the capillary formation and the depth progress in laser spot welding of copper. In Proceedings of the 11th International WLT-Conference on Lasers in Manufacturing, Munich, Germany, 21–24 June 2021. [Google Scholar]
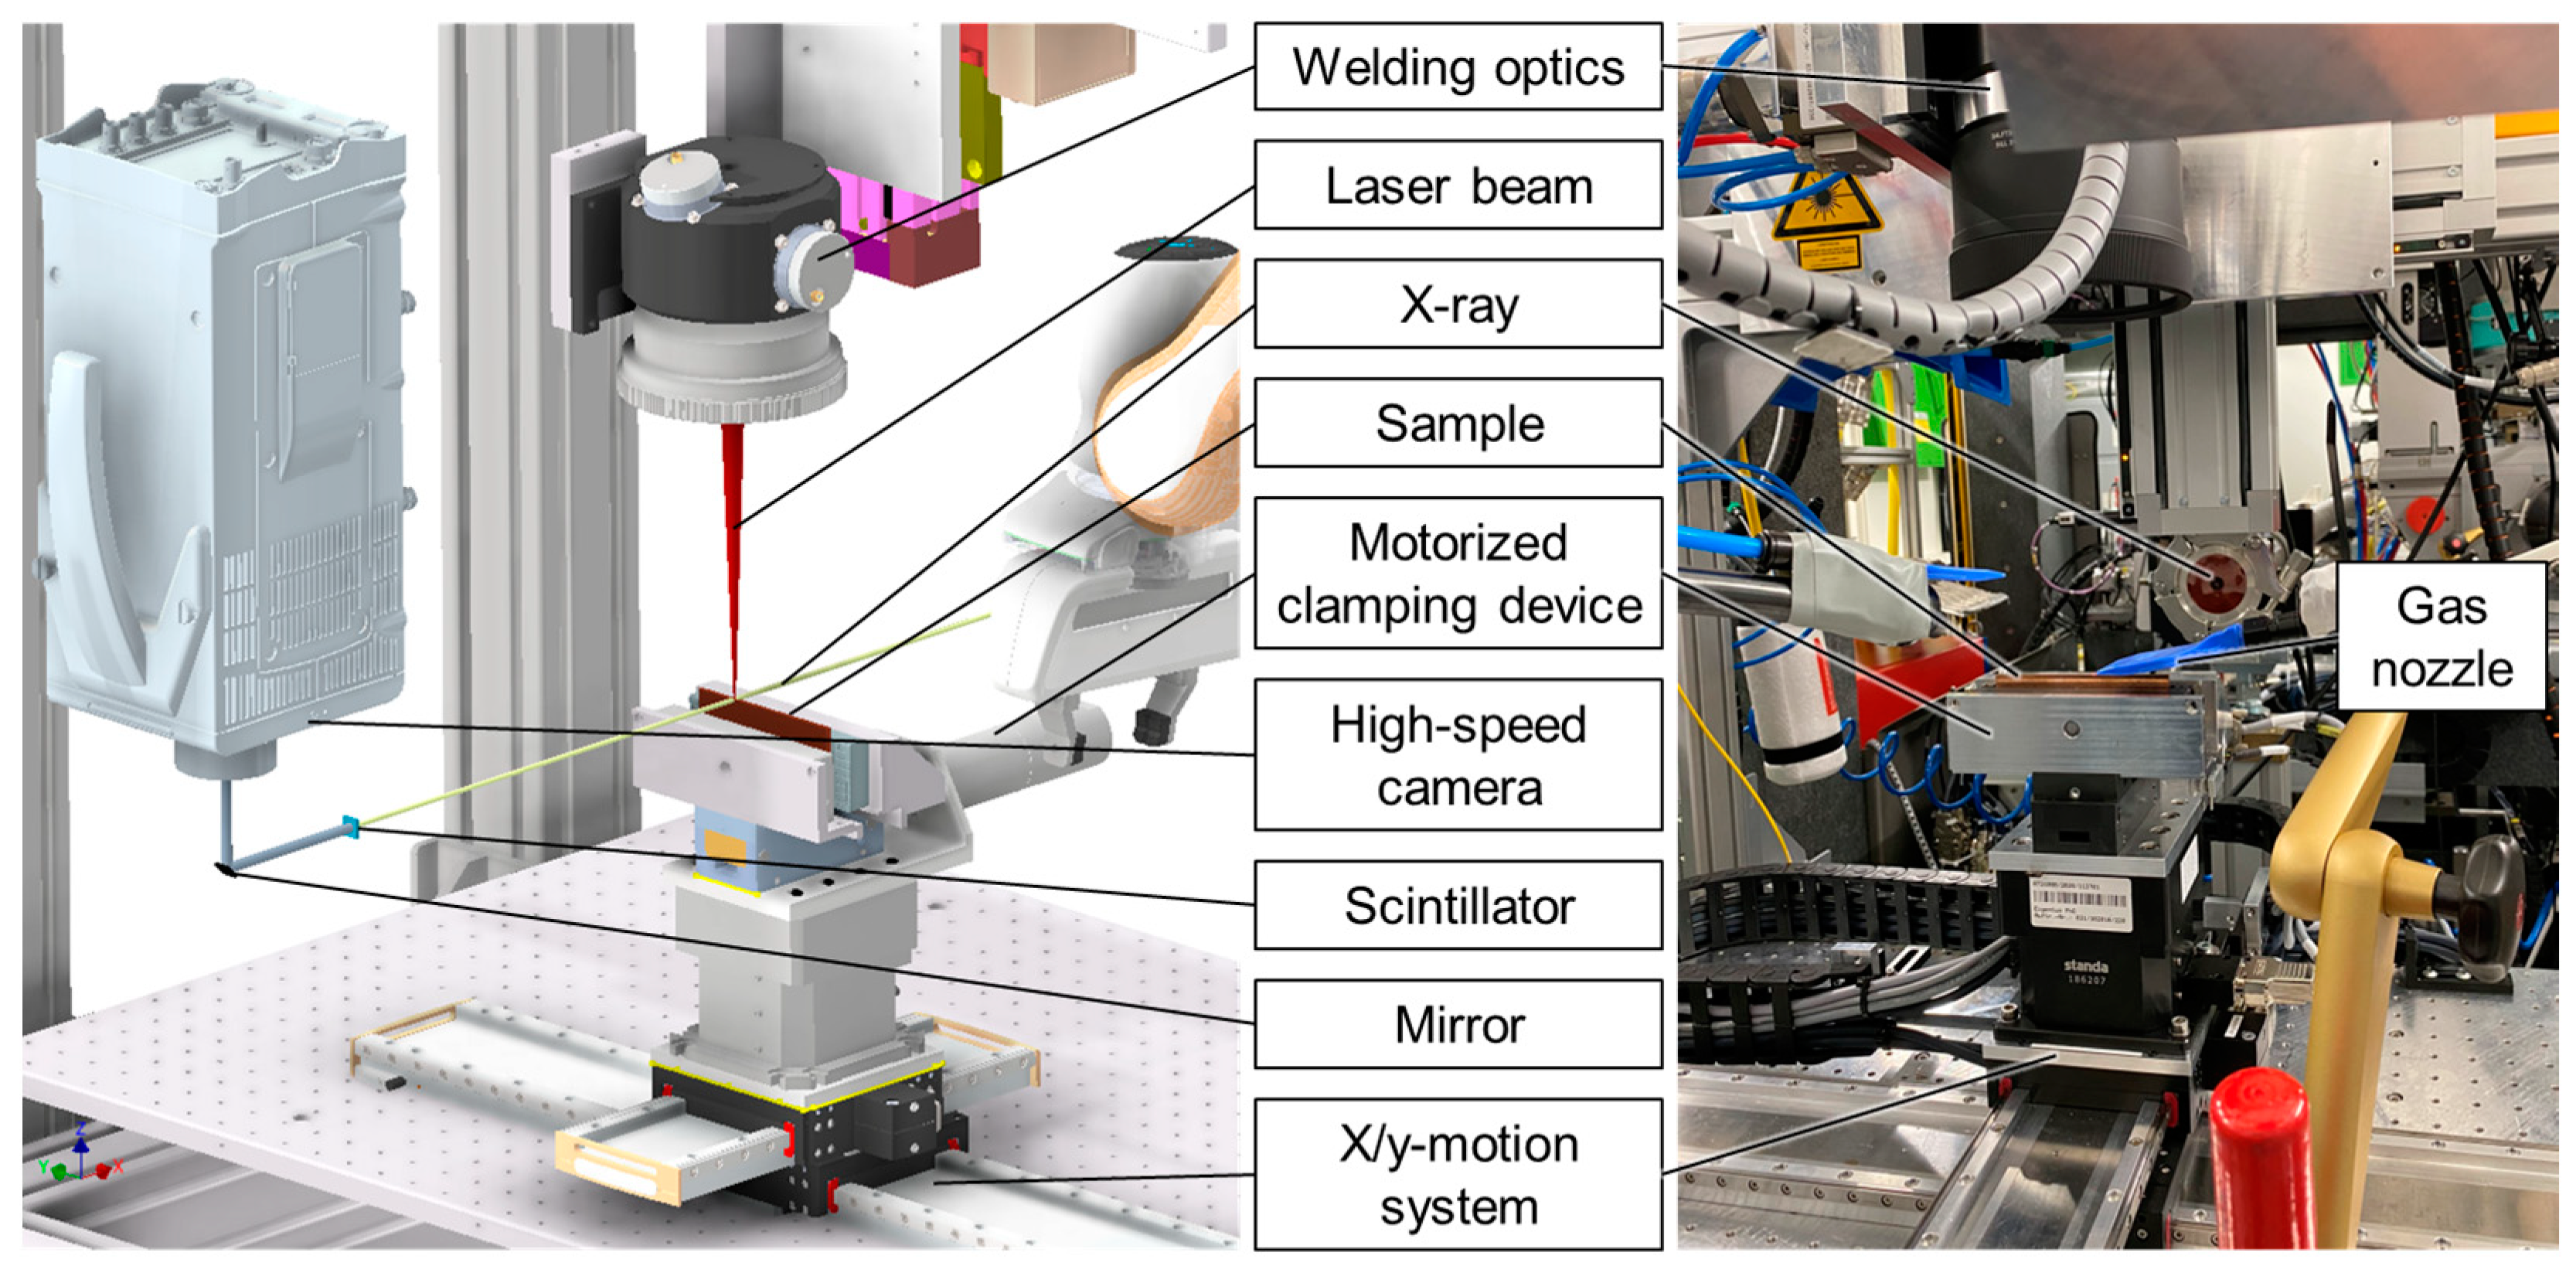
Figure 1. (a) Absorption spectra of Cu, Al, and Fe at room temperature; (b) temperature dependence of the absorptivity of copper at 0.5 µm and 1.0 µm; (c) angular dependence of the absorptivity of copper at 0.5 µm and 1.0 µm at room temperature (RT) and elevated temperature (ET = 1400 K).
Metals 13 00135 g001
Figure 2. Experimental setup for phase contrast observation of laser welding; left: CAD-model, scintillator distance not to scale (left); real setup (right).
Metals 13 00135 g002
Figure 3. High-speed synchrotron X-ray image of laser beam welding of Cu-ETP with a 515 nm-wavelength laser at a 1 kHz frame rate (PL = 4000 W, v = 200 mm/s).
Metals 13 00135 g003
Figure 4. X-ray video sequence of laser beam welding of copper using 515 nm laser radiation, P = 500 W–1500 W, v = 66.7 mm/s.
Metals 13 00135 g004
Figure 5. (Upper) X-ray video sequence of laser beam welding of copper using 515 nm laser radiation, P = 500 W–1500 W, v = 200 mm/s; (Lower) corresponding top view of the weld seam.
Metals 13 00135 g005
Figure 6. Keyhole depth sensitivity evaluated from linear welds for feed rates v = 66.7 mm/s and v = 200 mm/s for linearly increased laser power (P = 500 W–1500 W for λ = 515 nm laser radiation; P = 2000 W–3000 W for λ = 1030 nm).
Metals 13 00135 g006
Figure 7. (Upper) X-ray video sequence of laser beam welding of copper using 1030 nm laser radiation, P = 4000 W, v = 133.3 mm/s, dF = 800 µm; (lower) corresponding top view of the weld seam.
Metals 13 00135 g007
Figure 8. (Upper) X-ray video sequence of laser beam welding of copper using 1030 nm laser radiation, P = 2500 W, v = 66.7 mm/s; (lower) corresponding top view of the weld seam.
Metals 13 00135 g008
Figure 9. X-ray video sequence of laser beam welding of copper using 515 nm laser radiation, P = 3000 W, v = 66.7 mm/s.
Metals 13 00135 g009
Figure 10. Keyhole depth and front wall inclination angle versus feed rate for selected laser powers using 515 nm (left) and 1030 nm (right) laser radiation.
Metals 13 00135 g010
Figure 11. Compilation of X-ray video sequences and corresponding top views of the weld seams during laser beam welding of copper using 515 nm (left) and 1030 nm (right) laser radiation at a keyhole depth of e ≈ 0.4 mm, v = 200 mm/s; further parameters see insert.
Metals 13 00135 g011
Figure 12. Keyhole shapes in width direction (view against feed direction) for laser beam welding of copper using 515 nm and 1030 nm wavelengths for feed rates of v = 66.7 mm/s (left) and v = 200 mm/s (right), PL = 3 kW.
Metals 13 00135 g012
Table 1. Synchrotron setup and parameters for the experimental investigation.
DimensionUnitPetra 3 Beamline P07
Operation mode[-]Low Beta
Photon energy[keV]89
Beam area[mm²]2 × 2
Scintillator material[-]Ce:GAGG
Scintillator size[mm²]11 × 11
Scintillator thickness[µm]600
Distance scintillator—material sample[mm]3500
Table 2. Laser beam sources and optical setup used for the investigation.
DimensionUnitTrumpf TruDisk Pulse 421Trumpf TruDisk 6001
Wavelength (λ)[nm]5151030
Laser power (Pmax)[W]400 (cw)/4000 (pulsed)6000
Fiber diameter (dLLK)[µm]100100
Focal length collimator (fC)[mm]8080
Focal length optics (fF)[mm]163163
Focal diameter (dF, measured)[µm]222.5213.2
Diffraction factor (M2)[-]23.511.95
Divergence angle (θ)[mrad]71.575.9
Beam parameter product (BPP)[mm∙mrad]3.984.05
Table 3. Overview of the used process parameters for welding in partial penetration mode.
DimensionUnitChoice of Parameters
Material of sample[-]Cu-ETP
Feed rate (v)[mm/s]66.7; 133.3; 200; 300
Power of laser (PL)[kW]1; 1.5; 2; 2.5; 3; 4
Energy of pulse (E)[J]40 = const. @ λ = 515 nm/
var. @ λ = 1030 nm
Pulse length (tP)[ms]40∙PL[kW]−1 @ λ = 515 nm/
3∙v[m/min]−1 @ λ = 1030 nm
Frame rate X-ray (fX-ray)[kHz]1 = const.
Disclaimer/Publisher’s Note: The statements, opinions and data contained in all publications are solely those of the individual author(s) and contributor(s) and not of MDPI and/or the editor(s). MDPI and/or the editor(s) disclaim responsibility for any injury to people or property resulting from any ideas, methods, instructions or products referred to in the content.