Article

On the Microstructure Development under Cyclic Temperature Conditions during WAAM of Microalloyed Steels

1
Institute of Metallurgy, Clausthal University of Technology, 38678 Clausthal-Zellerfeld, Germany
2
Faculty of Engineering, Galala University, Galala City 43511, Egypt
3
Institute of Welding and Machining, Clausthal University of Technology, 38678 Clausthal-Zellerfeld, Germany
*
Authors to whom correspondence should be addressed.
Metals 2022, 12(11), 1913; https://doi.org/10.3390/met12111913
Submission received: 7 October 2022 / Revised: 2 November 2022 / Accepted: 2 November 2022 / Published: 8 November 2022
(This article belongs to the Special Issue Alloy and Process Design of Metallic Materials)

Abstract

:
This paper shed light on the kinetics of transformation and the developed microstructure during wire arc additive manufacturing (WAAM). Three microalloyed alloys, two of them are high strength low alloyed steel (HSLA) grades and the third is a Ni-Cr-Mo steel, from which the welding wires are being produced, were investigated. Repeated cycles around varied temperatures from a reheating temperature of 1350 °C and down to a temperature 35 °C below the Ae1 are applied using dilatometer on samples from the steels. After applying the cycles, the dilatometric-samples were investigated metallographically and their macro- and microhardness values were measured. It is shown that the WAAM using HSLA steels produce softer structure than the steel of the welding wire. Combined microalloying with Ti and Nb can present a useful strategy for producing finer structure in the WAAM components due to the effect of Ti in inhibiting the prior austenite grain-growth and that of Nb in refining the final structure. Additionally, repeated heating near Ae3 refines the prior austenite grains and produced fine ferrite-pearlite structure in case of HSLA steels and a microstructure predominated by the granular bainite in case of welding wire alloy. The former microstructure was the softest one for the case of HSLA steels, whereas the softest structure in case of the welding wire alloy was the tempered martensite structure developed by reheating below Ae1. Idealized temperature curves were chosen for the heat treatment, which could be characterized in a well-defined manner. In future work such idealized curves together with temperature histories obtained in WAAM-process will be used to set up a database to train an AI-model for predicting structure and material properties.

1. Introduction

New developments in automation and computer-aided design have led to a renaissance in welding process-based additive manufacturing, formerly known as “shape welding” [1]. This is accelerated by further developments based on control and sensor technology [2,3,4,5,6,7] and path planning algorithms [8]. Wire and Arc Additive Manufacturing WAAM has established itself as one of the main methods of welding process-based additive manufacturing. This includes all arc welding processes that use a wire-shaped filler metal, which allow a wide range of potential materials, e.g., steels [9,10,11], nickel-based [12], complex concentrated alloys [13] and many others to be manufactured. A wide-ranging overview of the research status of these processes to date is given in [1,14,15] and others.
A key advantage of this additive manufacturing process is the high deposition rate compared to laser and powder-based processes. However, this leads to a reduced surface quality of the components, which must be finished using conventional subtractive manufacturing processes such as milling. To simplify this finishing process, new materials with improved cutting properties are currently being developed for additive manufacturing (AM) [12,16,17,18]. Another advantage of WAAM is the relatively simple realization of multi-material components, also called functionally graded materials. These components have different properties based on different heat management [19,20,21] or the use of different materials [22,23,24]. However, the key point here is the knowledge of the relationships between the alloy composition of the metal used, the heat management in the additive manufacturing process and the resulting properties.
The understanding of the microstructure development during additive manufacturing is the main point for the realization of certain material properties. In case of continuous cooling or heating, the metastable microstructure formation is described by the associated CCT- or the CHT-diagram, respectively. In general, however, this data cannot be transferred directly to conditions in additive manufacturing. Repeating thermal cycles around certain temperatures lead to a different microstructure.
The influence of a cyclical temperature development on the structure formation during welding was analyzed by Samardžić et. al. [25] studied on a welding simulator. This simulator allows the application of transient, in particular cyclic, temperature profiles. The resulting dynamic transformation temperatures were determined by dilatometer measurements. Furthermore, microstructure investigations and hardness measurements were carried out. Celin et al. [26] investigated the microstructure development in different areas of the heat-affected zone during multi-path welding of a fillet weld for a high-strength fine-grain structural steel. The multi-layer welding process results in thermal cycles that correspond to those in the WAAM process. The microstructure during the real welding process was compared with that of dilatometer simulations, in which a temperature profile similar to that during the welding process was applied. From the results it was concluded that dilatometer investigations are well suited for simulating microstructure development in the heat-affected zone under cycling temperature conditions. The microstructure development in general during the WAAM process was investigated by several working groups [27,28,29,30,31].
Mathematical models for the microstructure and the resulting property are of great importance for the process design and monitoring of the WAAM process. Data-driven Artificial Intelligence (AI) based models (e.g., neural networks) are increasingly playing a major role. AI-techniques have been used to predict CCT diagrams [32,33,34]. However, it is repeatedly pointed out [35] that a direct transfer of the results of CCT diagram models to the microstructure development in additive manufacturing is not possible due to the special temperature history. Nevertheless, the modeling of CCT diagrams is a useful starting point for modeling the microstructure development in additive manufacturing.
In order to be able to predict the relation between the temperature history and the material properties for a given alloy using an artificial intelligence, AI-model, the temperature profile must be classified and quantified. For this purpose, the duration and the number of cycles when the temperature is in certain temperature ranges during heating and cooling can be considered. The corresponding temperature range selection can be based on the transformation temperatures Ae1 and Ae3. As a starting point for the development of such a classification method, it makes sense to use exemplary temperature profiles with defined cycle numbers, holding temperatures, holding times and heating/cooling speeds.
In this work, dilatometer trials have been performed. Exemplary temperature curves were chosen which could be characterized in the described manner. Critical phase transformation temperatures were determined, the microstructure was analyzed and the hardness was measured. These thermal cycle simulations were performed on two High Strength Low Alloyed (HSLA) microalloyed steels and on a steel from which welding wires are made. Such data shall serve as a starting point to build up a database for an AI microstructure and material property model for the WAAM process.

2. Experimental Procedure

2.1. Investigated Materials

The thermal-cycle simulations were applied on three microalloyed steels with chemical compositions given in Table 1. Steels A and B are high strength low alloyed (HSLA) steels. Steel A is microalloyed with Nb, while steel B is microalloyed with Ti and Nb. Steel C is alloyed with Ni, Cr and Mo and microalloyed with Ti and is used for the production of welding wires.

2.2. Dilatometry and Heat Treatment

For applying the thermal cycles and dilatometric study, a Dil 805A dilatometer was used. The simulations were performed on cylindrical samples of 4 mm diameter and 10 mm length. Sheathed type S “Pt/Pt-10% Rh” thermocouples with a nominal diameter of 0.1 mm were individually spot welded to the specimens surface in central position. Each sample was held between two Al2O3 rods, with its 10-mm side along the rods. The thermal cycles were performed under a vacuum of 0.005 Pa, and helium was used for cooling. Further details on dilatometric measurements using Dil 805A is given in [36]. After applying the thermal cycles in the dilatometer, the dilatometric samples were used for investigating the effect of the applied heat treatment on microstructure development and mechanical characteristics in terms of hardness values.
The specimens were subjected to schedules shown in Figure 1. In these schedules, the specimens were heated up to 1350 °C and held for 3 min. The main objective of this step is to allow for the metal carbides to dissolve in austenite and to obtain microstructures that are similar to that obtain when cooling from the melt-status. To investigate the effect of thermal cycles on the microstructure development, three schedules were applied. Schedules II and III simulate two and four repeated cycles of adding layers during the WAAM process, respectively by heating to temperature TB and holding for 30 s. After the last thermal cycle, the samples are cooled to room temperature. The heating rate to TA and TB was 100 Ks−1. In all cycles the holding temperature, TB is related to the equilibrium transformation temperatures Ae1 and Ae3 as given in Table 2. These temperatures of the three alloys are calculated by using the software ThermoCalc and applying the database TCFE9. The natural cooling in all schedules is simulated by applying a t8/5 time of 18 s. The t8/5 is the required time for cooling a weld bead and its heat-affected zone to pass through the temperature range from 800 °C to 500 °C. At this temperature-interval, the most important structural changes occur in the steel.

2.3. Microstructure Investigations

Light optical microscopy of the samples, after applying various processing conditions, were performed on sections cut at central position parallel to the longitudinal axes. After mounting, the specimens were prepared by mechanical grinding using abrasive grinding papers ranging from coarse, 180 grit number to fine 1000 grit number followed by polishing up to 0.05 μm alumina. The microstructure was revealed by etching with 2% Nital. After etching, the samples were rinsed with ethyl alcohol and dried under a warm air drier. The different microstructural constituents observed in the current study were classified according to the features given in [37].

2.4. Hardness Test

In this study both macro- and microhardness measurements were performed on as-received, and heat-treated samples. Macro-hardness testing was carried out at room temperature using Vickers hardness according to ASTM E384 applying a load of 30 kg (HV30). Wolpert hardness tester equipped with a digital measurement system enabling data transmission to PC was used. The hardness data are the average of at least 4 measurements. For microhardness measurements, the Mitutoyo microhardness tester with an optical microscope was used. The hardness of the phases was measured with a Vickers hardness HV0.025 (25 g load, and 15 s duration time).

3. Results and Discussions

3.1. Microstructure Charactersitics

3.1.1. As Received Microstructure

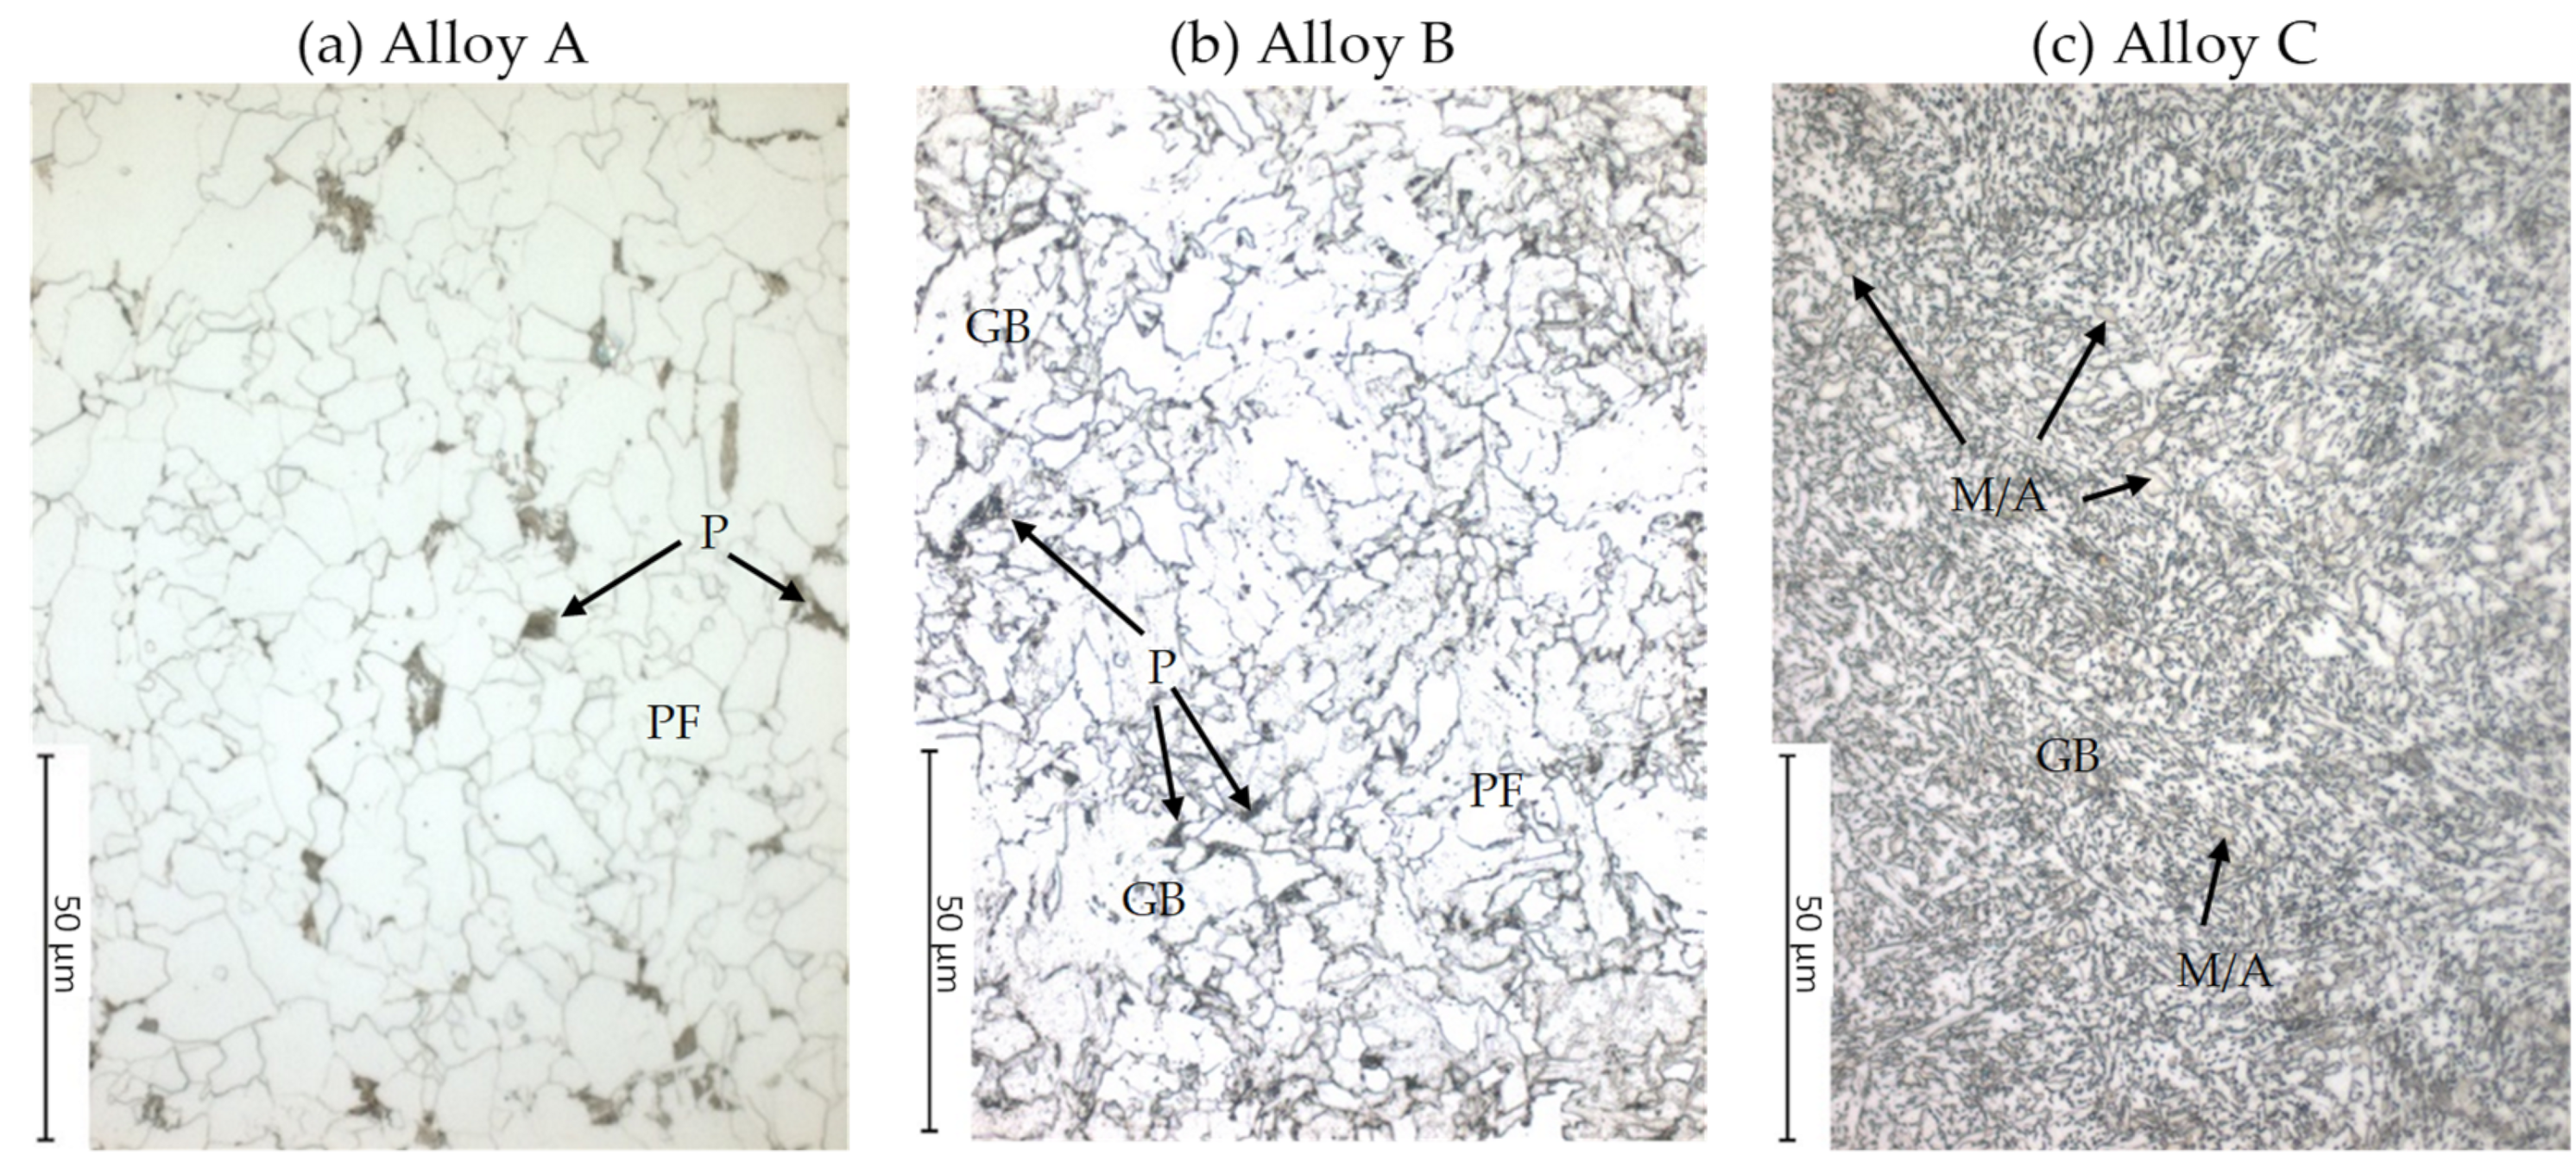
Figure 2 shows the as-received microstructure of the three alloys. The microstructure of alloy A is basically consisting of polygonal ferrite (PF) and pearlite (P), with average ferrite grain size of 5.7 µm. The as-received alloy B has a microstructure consisting of granular bainite (GB), PF and P. The GB is characterized by a non-smooth outer boundary and interior area featured with carbide phases dispersed within the grain, whereas the PF grains have smoother outer boundary and featureless interior area [37]. The term granular bainite originated from the granular appearance of the carbides within this type of bainite. The GB is essentially the main microstructure of the C alloy. Indeed, this form of bainite is reported to form habitually in alloy steel like Ni-Cr-Mo steels (refer to composition of C in Table 1), that have been cooled at slow-to-intermediate rates and to have dispersed islands of retained austenite and martensite (M/A islands) [38]. The M/A islands are correspondingly observable in the microstructure of C and marked with arrows within the GB structure in Figure 2c. These islands are formed during continuous cooling from the untransformed austenite with different austenite to martensite ratios. The abundance of the granular carbide phase in the GB of alloy C compared to alloy B is related to the higher content of carbide forming elements in the former alloy. The high level of alloying in C increased its hardenability and therefore suppressed the formation of ferrite and pearlite during cooling.

3.1.2. Microstructure Development during Reheating and Austenitization

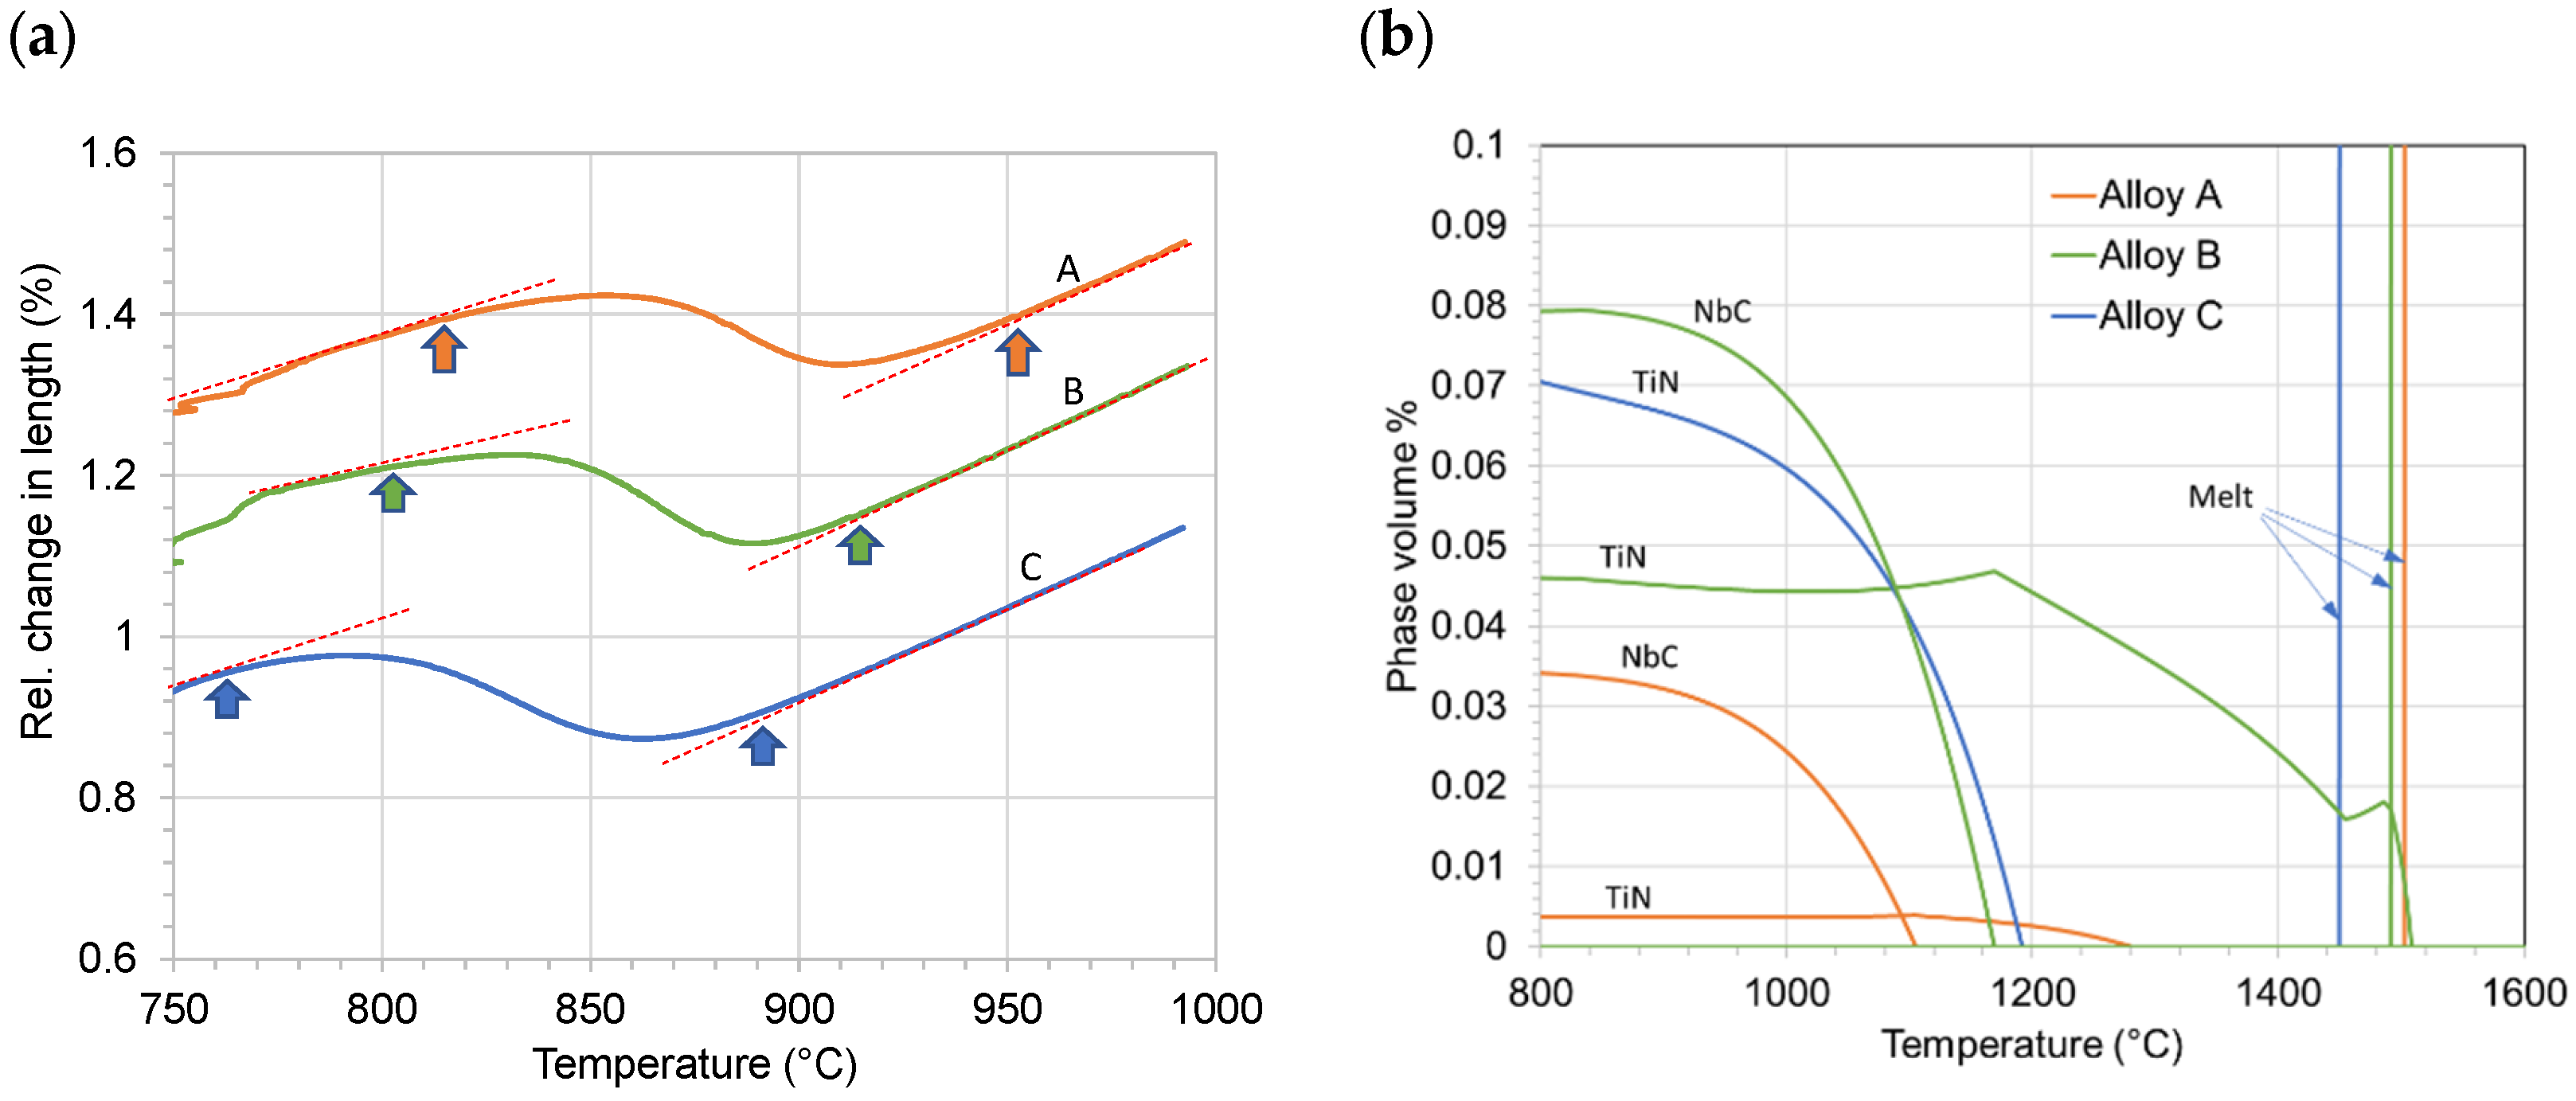
During heating, the as-received structure transforms to austenite. The very high heating rate of 100 Ks−1 simulating the heating during the WAAM process shifts the critical temperatures, Ac1 and Ac3, of the three alloys to higher temperatures compared to the corresponding equilibrium temperatures Ae1 and Ae3. The Ac1 and Ac3 of the three alloys are illustrated in Figure 3a. The increased alloying contents from alloy A to C that resulted in decreasing Ae1 and Ae3 (Table 2) has a similar effect on Ac1 and Ac3 as shown in this figure. In addition to the austenite formation, the continuous heating and holding at 1350 °C results in dissolving of the NbC precipitates in alloys A and B as shown in Figure 3b. Nevertheless, the TiN formed in the Ti microalloyed steels B and C, has a high solubility temperature; therefore, an undissolved quantity of its particles remains in the microstructure during the austenitization stage at 1350 °C. This is important for limiting the coarsening of austenite grains during austenitization via the pinning effect [39]. Conversely, NbC that is completely dissolves during austenitization, precipitates during the subsequent cooling processes and, therefore, plays an important role in refining the final structure. Accordingly, the mutual microalloying with the Ti and Nb, like in the case of alloy B, is common in low carbon steels because of the conjoint reinforcing role that they are playing in refining the microstructure [40]. The Ti forms TiN that limits the coarsening of austenite grains during austenitization and leads to finer prior austenite grains and Nb forms NbC that precipitates during the subsequent cooling processes and refines the final structure.
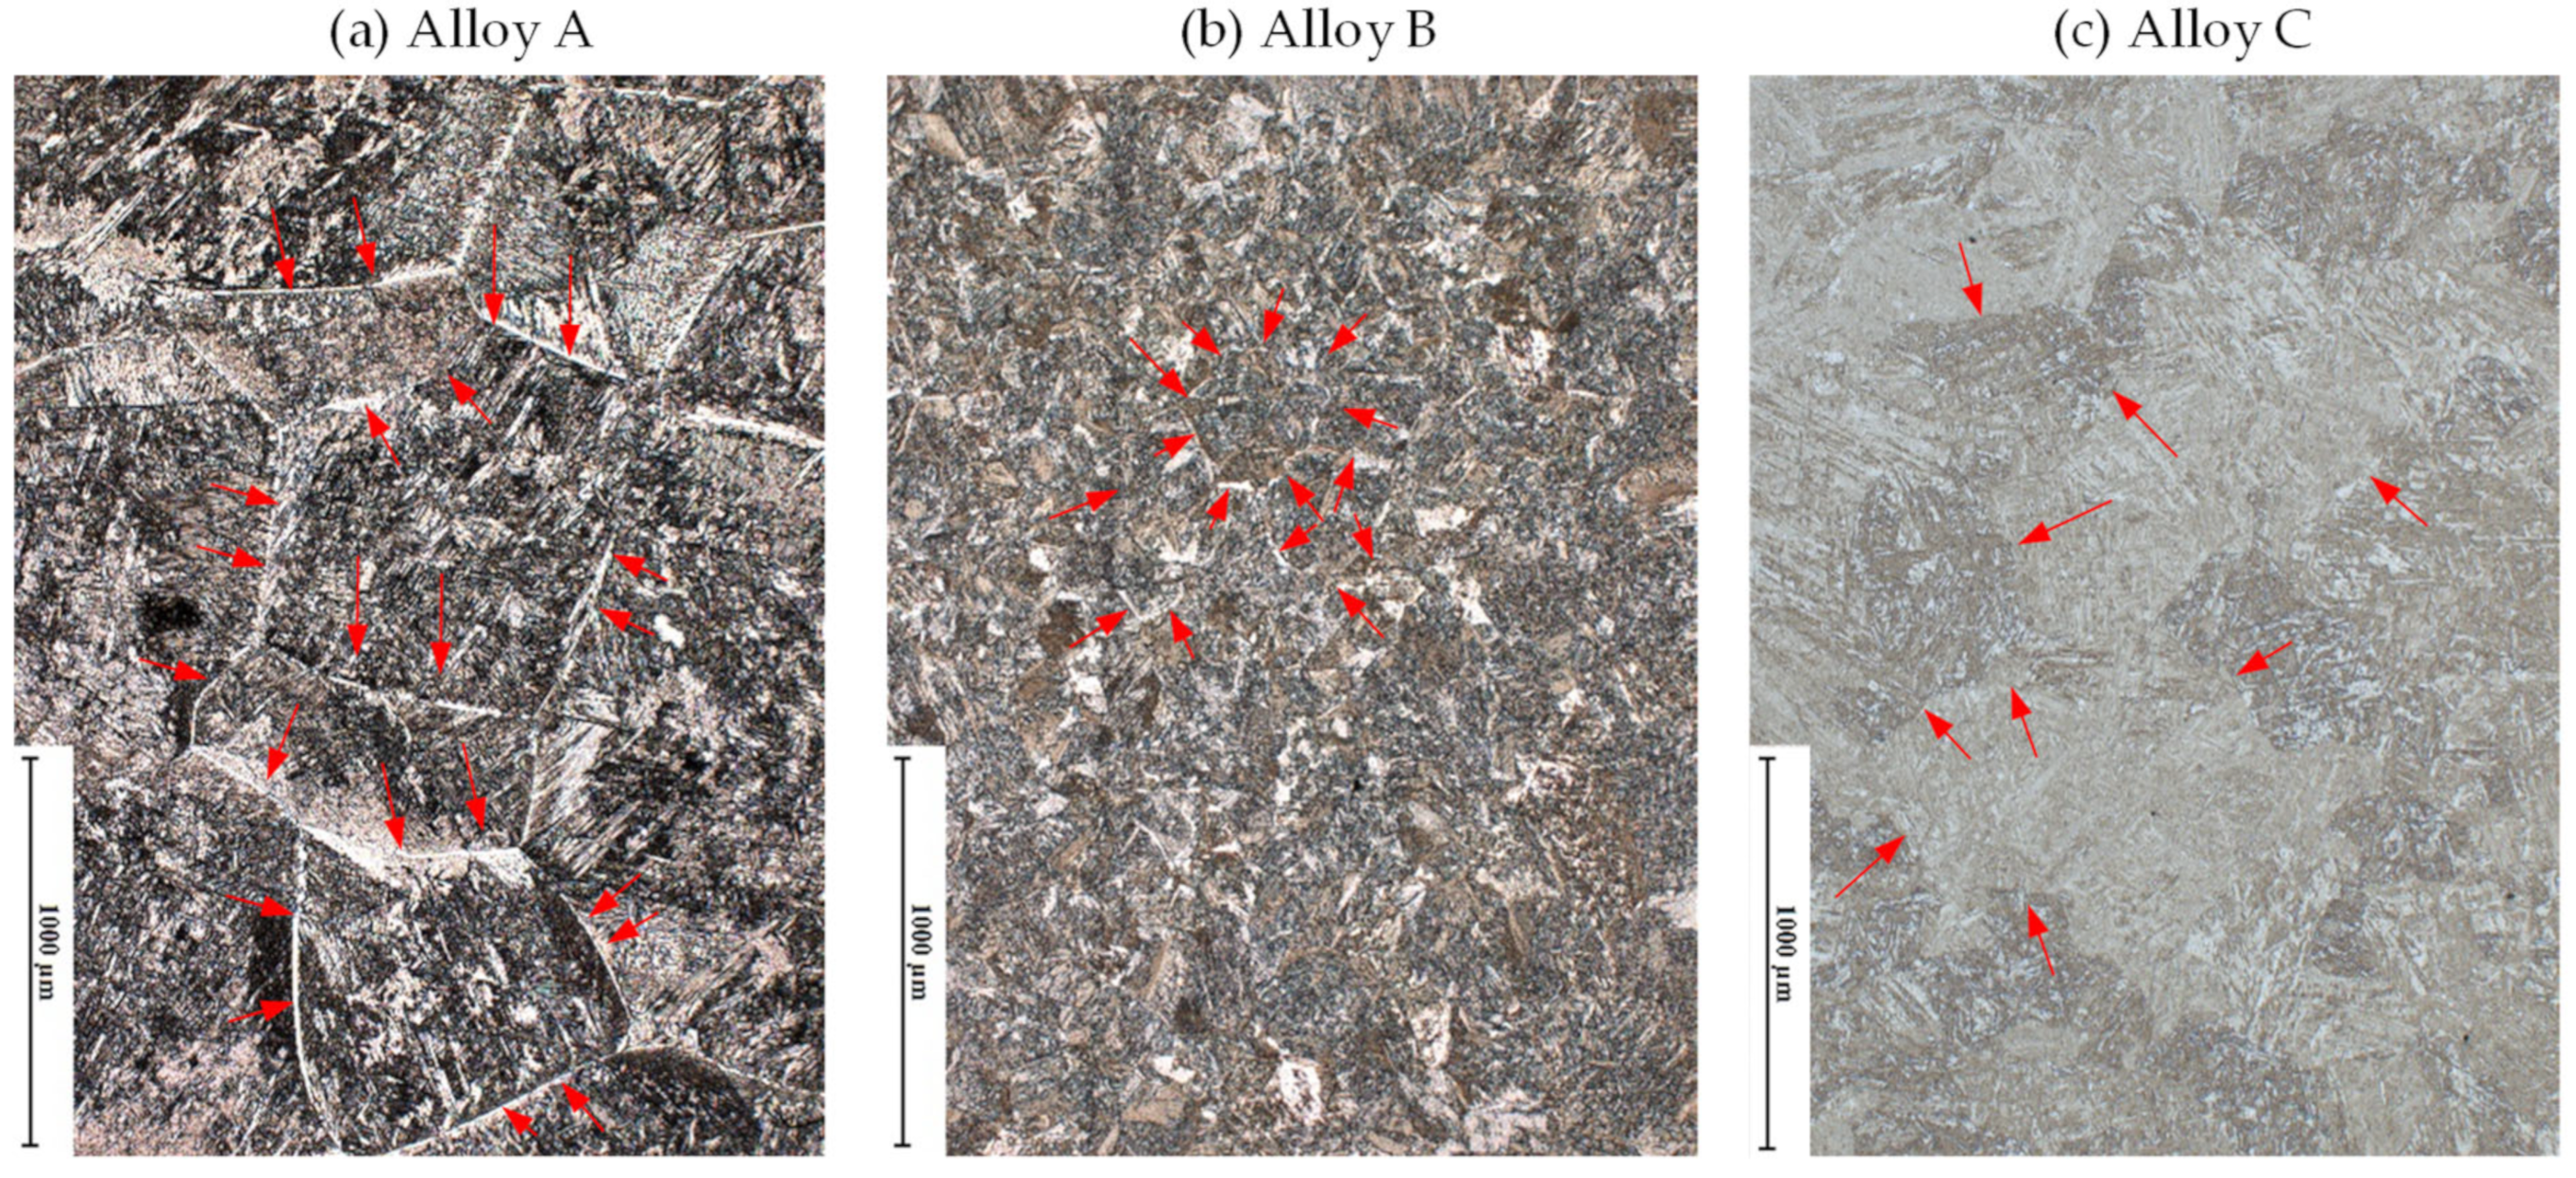
In order to reveal the prior austenite after holding at 1350 °C for 180 s, samples were quenched to room temperature applying a cooling rate of approx. −120 Ks−1 after austenitizing. During quenching the prior austenite grains transforms to martensite, with grain boundaries corresponding to the prior austenite boundaries. Figure 4 shows the quenched microstructures. The considerable large prior austenite grains of alloy A are attributed to the dissolution of the TiN and NbC and absence of pinning of the austenite boundaries during heating at 1350 °C (Figure 3b). Alloy B showed the strongest pinning of austenite and therefore the smallest grain sizes. The TiN in alloy C seems to have a partial effect in limiting the growth of the austenite grains, although its complete dissolution under equilibrium takes place at about 1200 °C. Probably, the equilibrium condition was not reached, hence, complete dissolution was delayed. On the other hand, the thermodynamic calculations showed that the Mo and Cr-carbides precipitates are predicted to dissolve below 800 °C.

3.1.3. Microstructure Development during Applying Schedule I

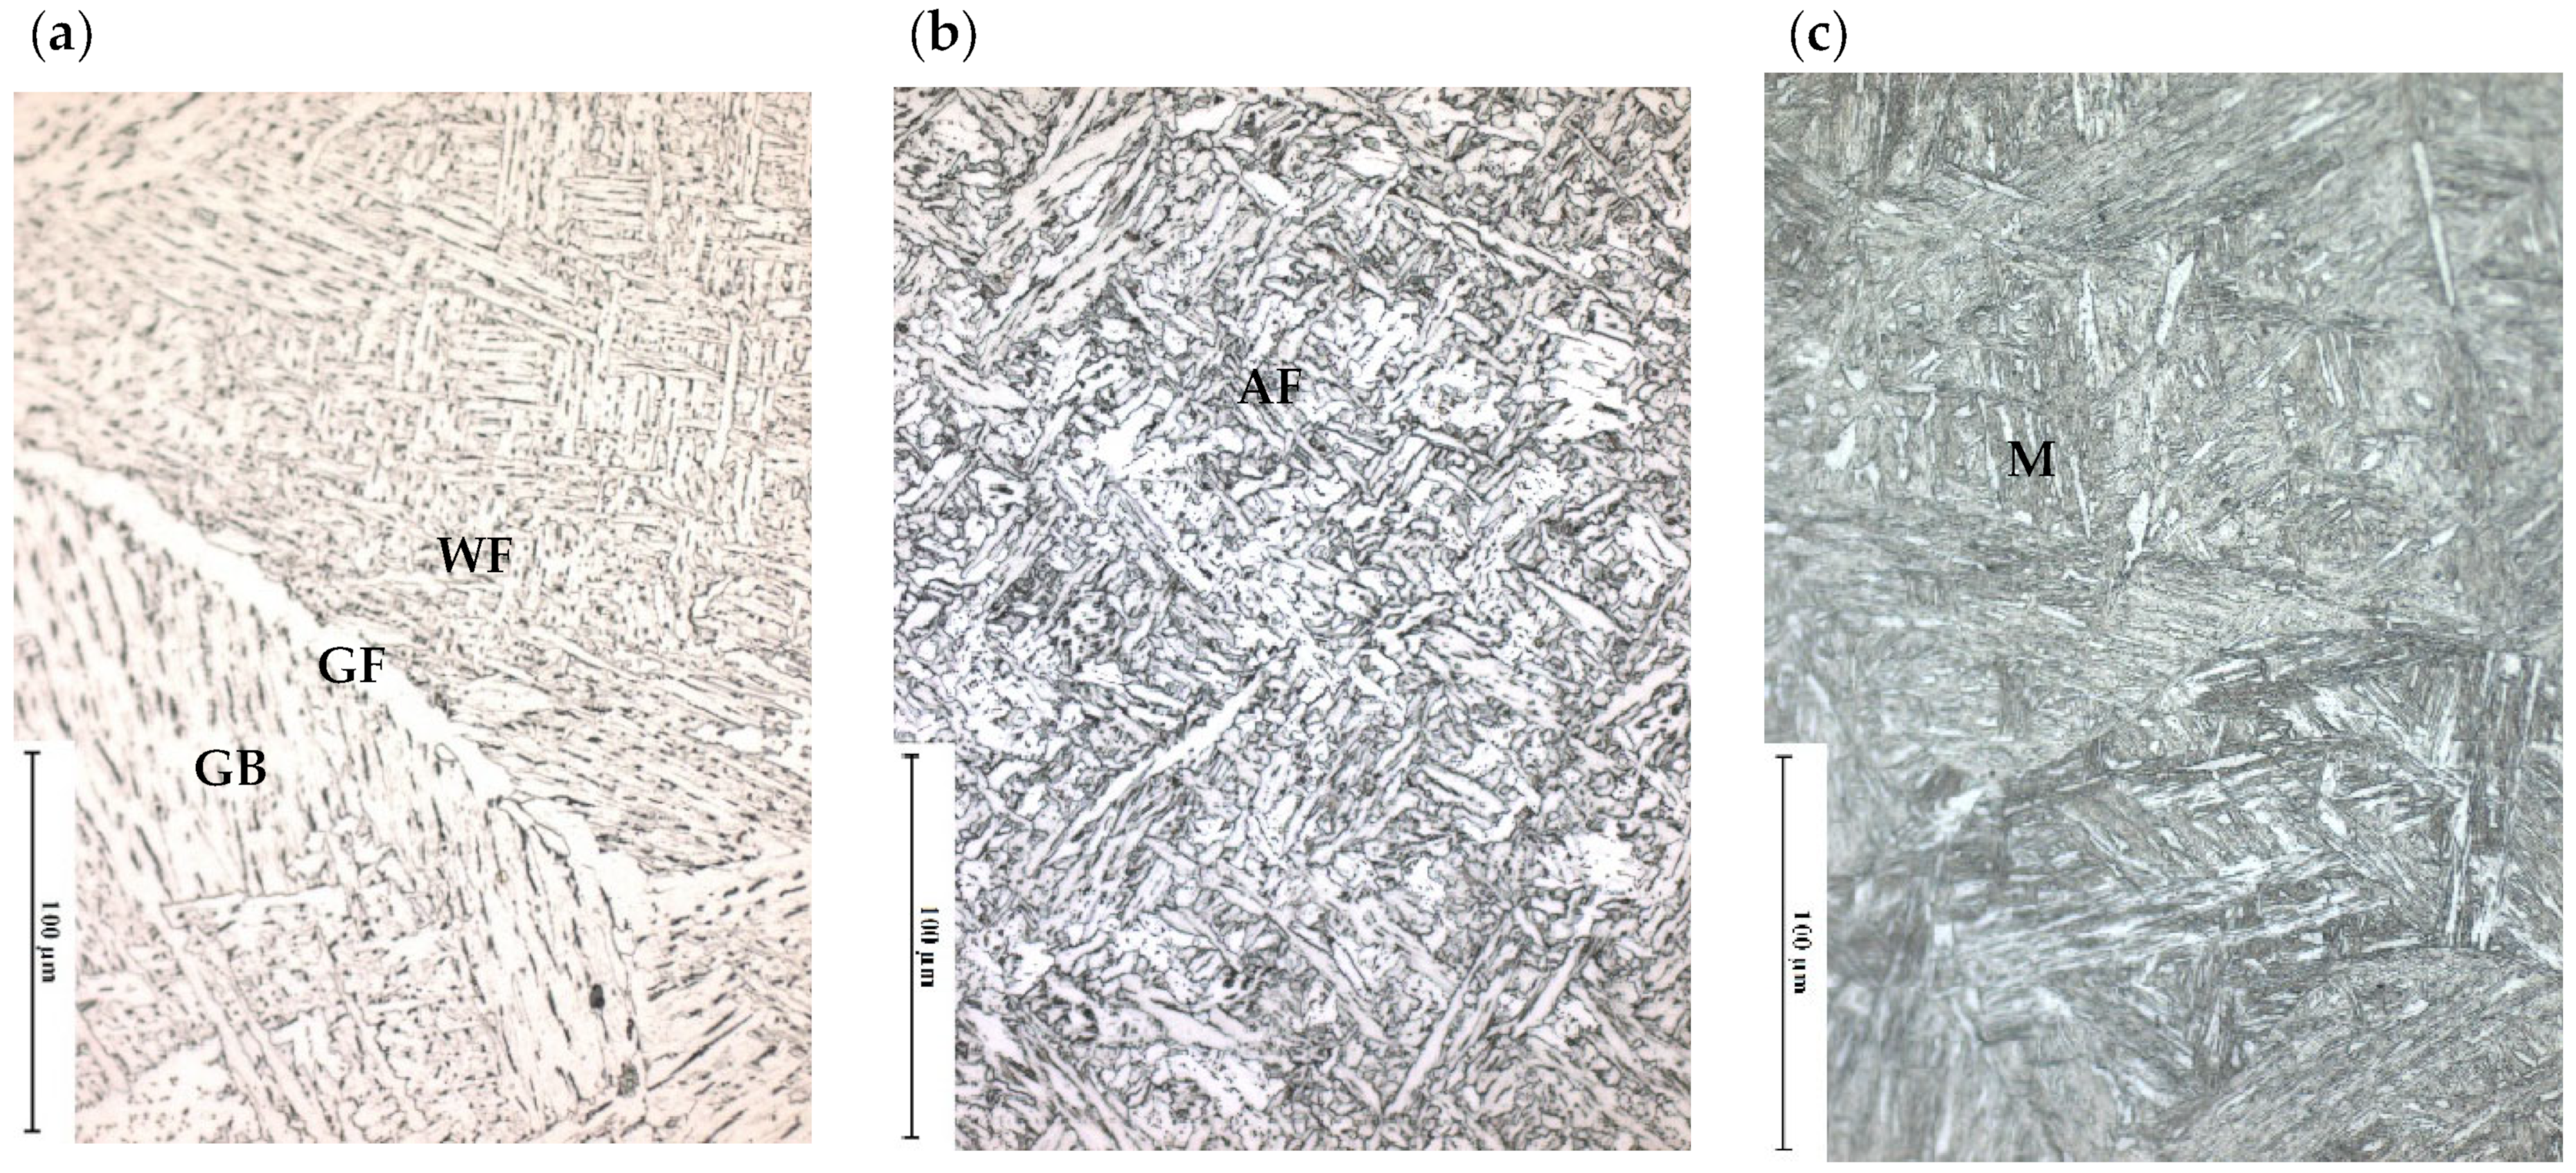
Applying schedule I (see Figure 1) on the three alloys results in the microstructures given in Figure 5. Figure 6 shows a comparison of the transformation kinetics of the three alloys in terms of length change observed during cooling in the dilatometer investigations.
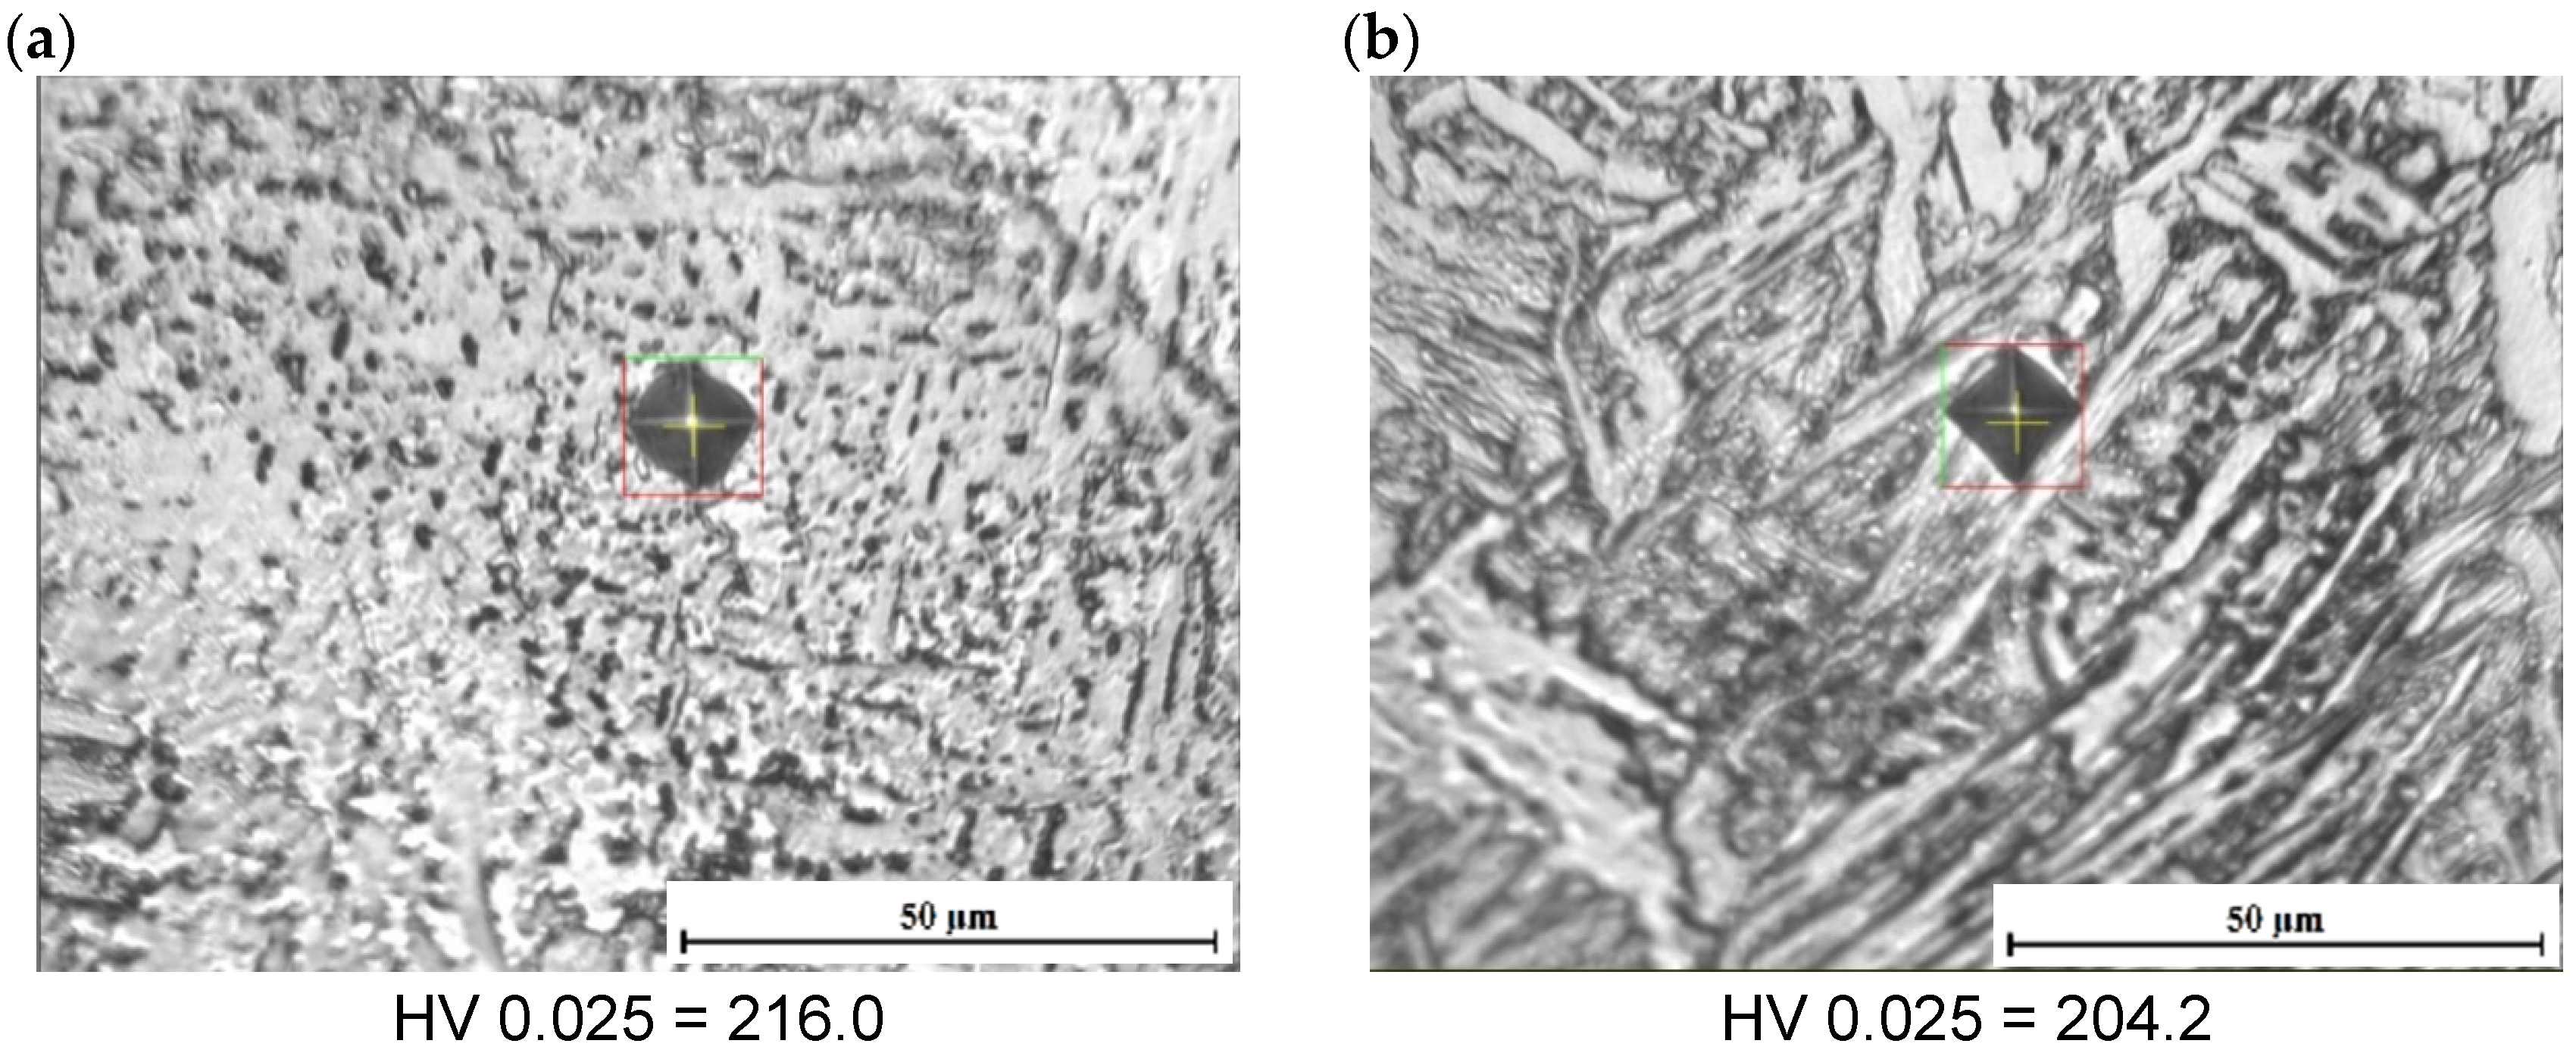
For alloy A, Widmanstätten ferrite (WF) growing from the grain boundary allotriomorphic ferrite (GF) is the major constituent of the microstructure, which also contains GB as a secondary phase. Referring to the dilatometric curve observed during cooling, it is obvious that the transformation starts at about 630 °C, which corresponds to the formation of the GF on the austenite grain boundaries. By continuous cooling the WF grows on the GF before the formation of GB. The dilatometric curve indicates the start of formation of small quantity of martensite at about 450 °C. This is a lower martensite-start temperature (Ms) of alloy A by about 41 °C, compared to that one predicted applying Andrews’ equation [41]. The enrichment of the untransformed austenite with carbon during the formation of GF, WF and GB is the reason for its lower Ms. The GB showed marginally higher microhardness than WF as shown in Figure 7. On the other hand, B and C alloys exhibited single-phase microstructure of acicular ferrite (AF) and martensite (M), respectively. The AF poses an assemblage of interwoven ferrite laths. The disorganized microstructure of the AF gives it its larger ability to deflect cracks, thus it is the most favorable structure in many steels because of its high fracture toughness [37]. Also, the high dislocation density, caused by heavy accommodated strain occurred due to the transformation of austenite into AF, contributes considerably in achieving high strength in the final product [37]. On the other hand, martensite is a hard, brittle phase of steel with a distorted tetragonal crystal lattice. It is formed by rapid cooling of austenite, a process known as quenching. The formation of AF in alloy B is observed to take place at about 565 °C and that of M in alloy C at about 396 °C. Indeed, the predicted Ms of alloy C according to Andrews’ equation [41] is 393 °C, which is in consistence with the measured temperature. The diversity of microstructures developed in the three alloys is due to the different chemistries of the alloys and Prior Austenite Grain Size (PAGS). As revealed in Figure 4 the prior austenite grains (PAG) of alloys B and C (recorded ~250 and ~450 µm, respectively) are significantly smaller compared to that of alloy A (recorded ~840 µm), thanks to the pinning effect of TiN in B and C. Indeed, increasing the grain size should decelerate the transformation kinetics. Alloy A showed, however, faster kinetics of transformation compared to B and C despite its larger austenite grains. This points out that the diluted chemistry of A dominated the kinetics of transformation.

3.1.4. Microstructure Development during Applying Schedule II

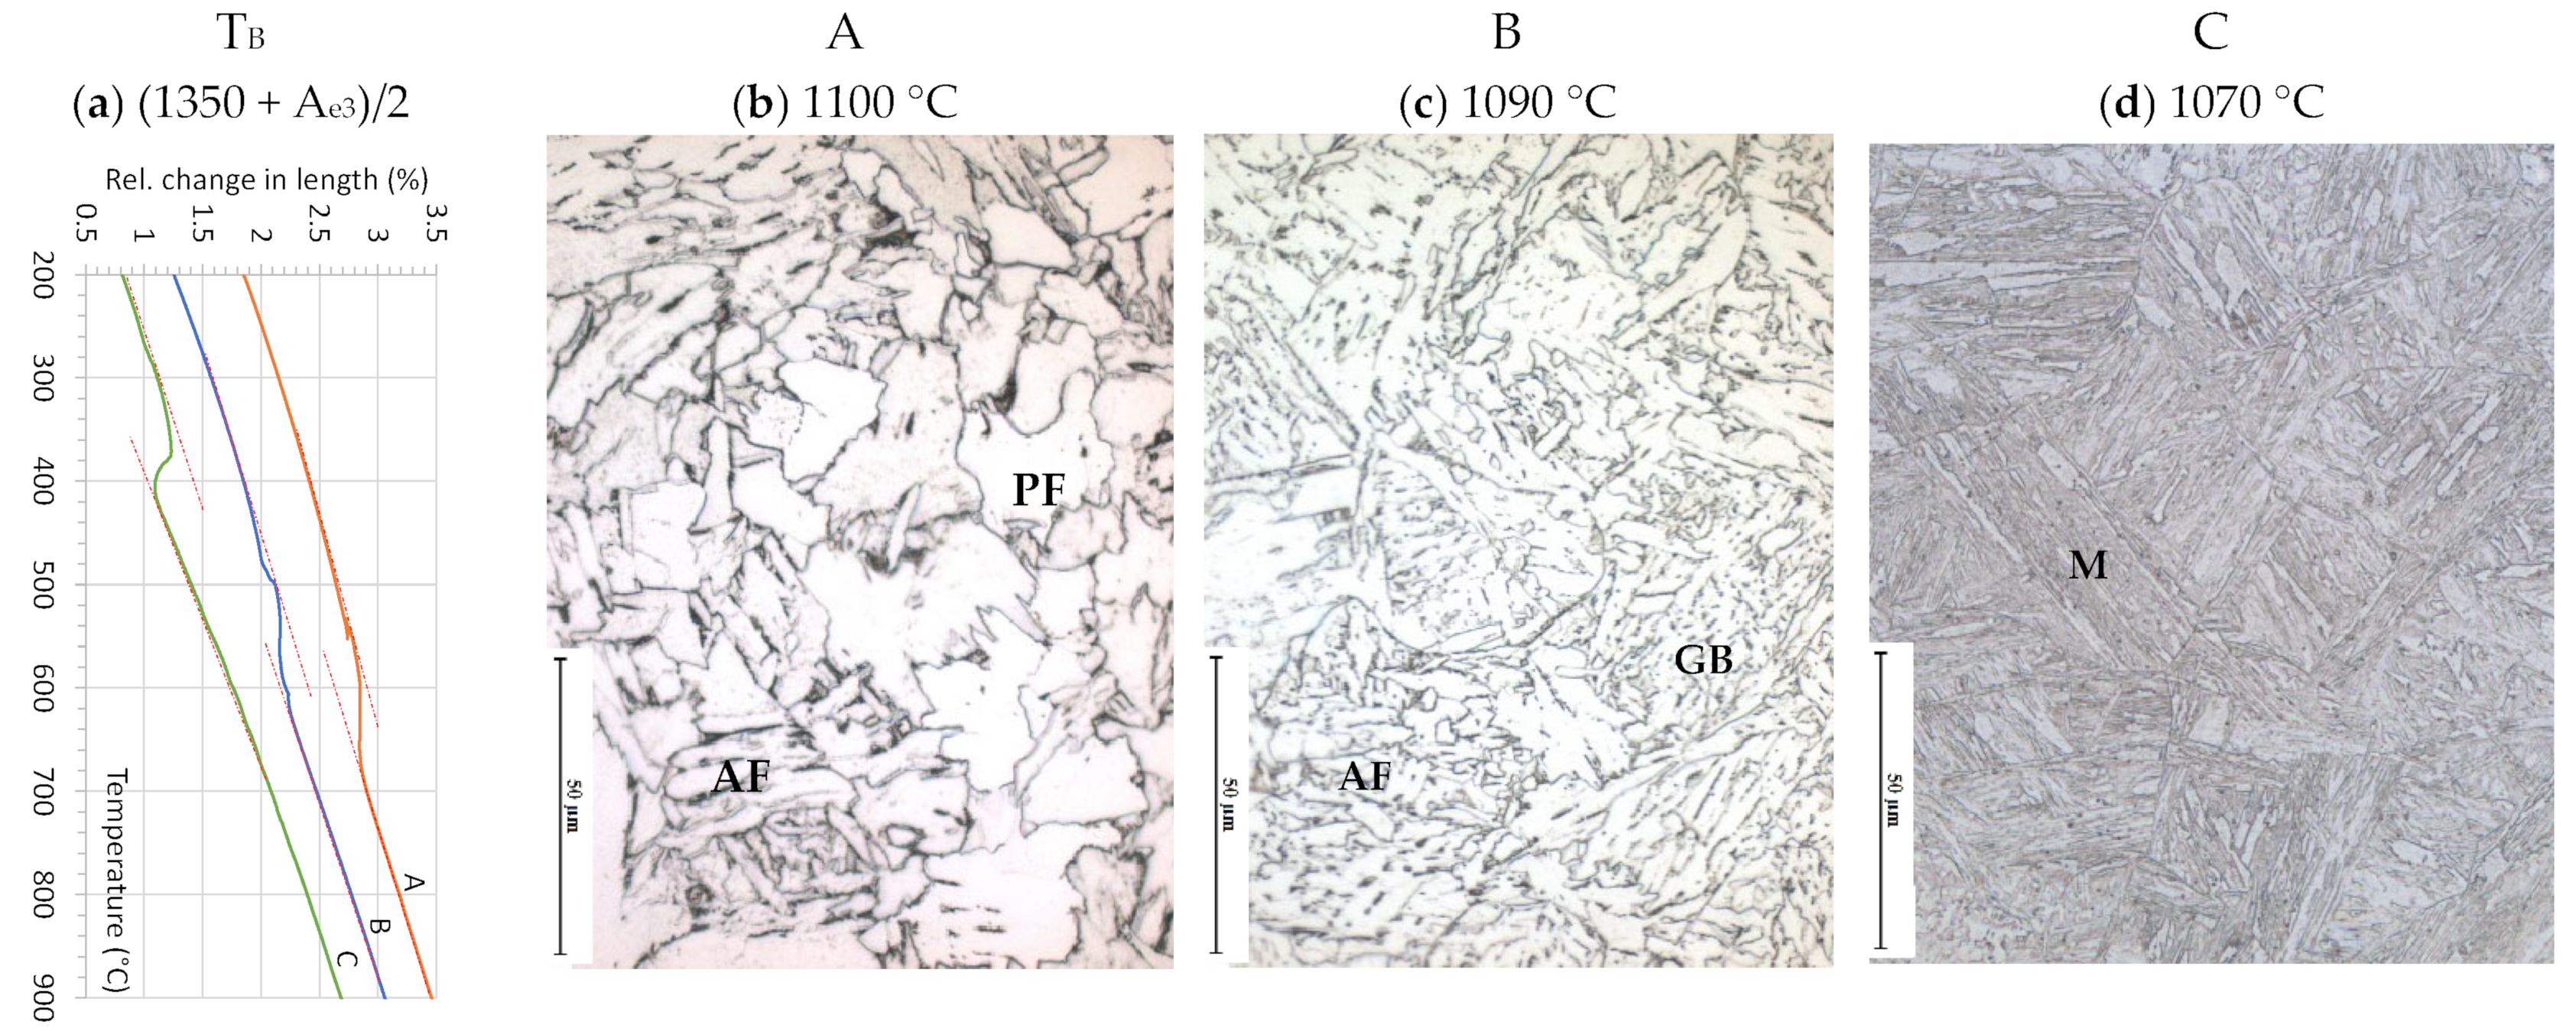
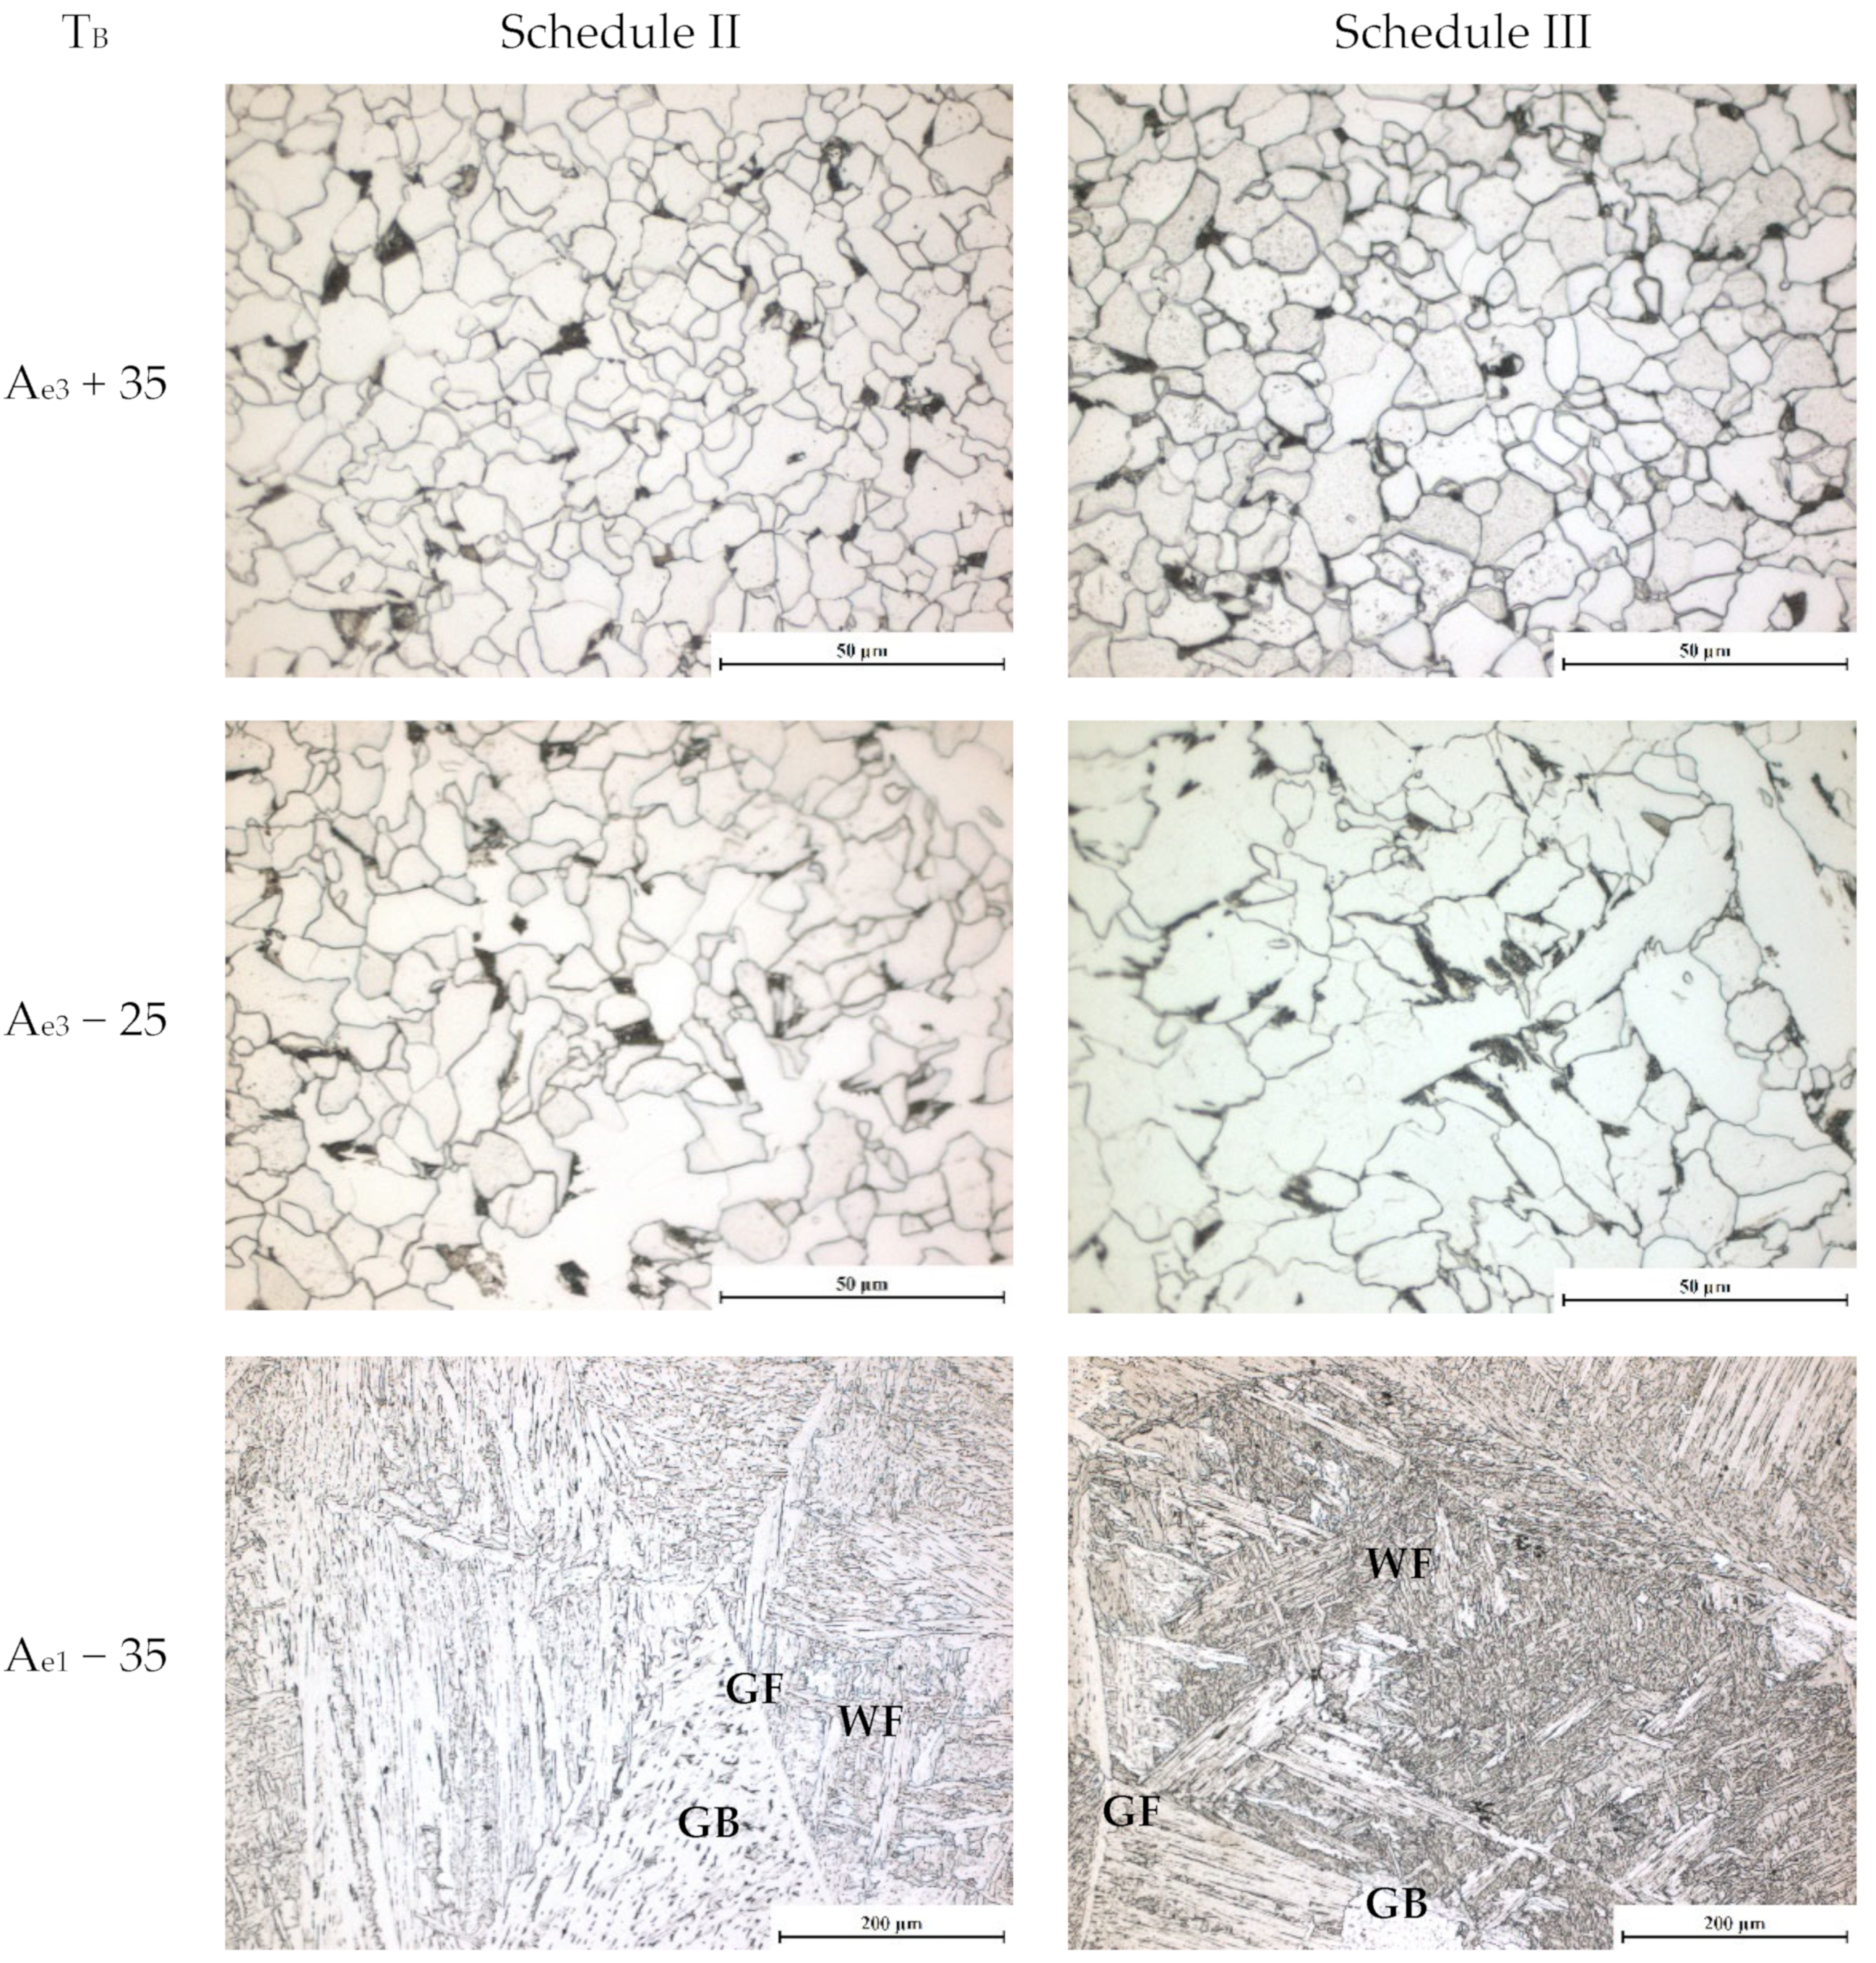
Applying two thermal-cycles at varied temperature TB (schedule II, Figure 1) has a significant influence on the formed microstructures as shown in Figure 8. The TB plays an important role in defining the resulting microstructure. The dilatometric curves observed during the last cooling after two cycles of holding at TB is shown in Figure 8 as well.
Figure 8b shows for alloy A a microstructure of large size PF grains with P and AF. Figure 8c shows for B a microstructure composed of AF and GB. Contrary to the characteristics of AF, as a desirable microconstituent with high toughness, Zhou et al. reported that GB is detrimental for toughness and best be avoided during production process [42]. Refining GB is predicted to limit this effect, an enhancement in the cleavage fracture is reported via decreasing grain size of GB [43]. Alloy C exhibits an un-tempered martensite microstructure (Figure 8d). Two cyclic heating at (1350 °C + Ae3)/2 has a significant effect in accelerating the transformation kinetics of all alloys. This is also revealed in the dilatometric curves of Figure 8a as indicated by increasing the transformation starts, this might be attributed to the improved homogeneity of distribution of alloying elements during the two cyclic austenitization.
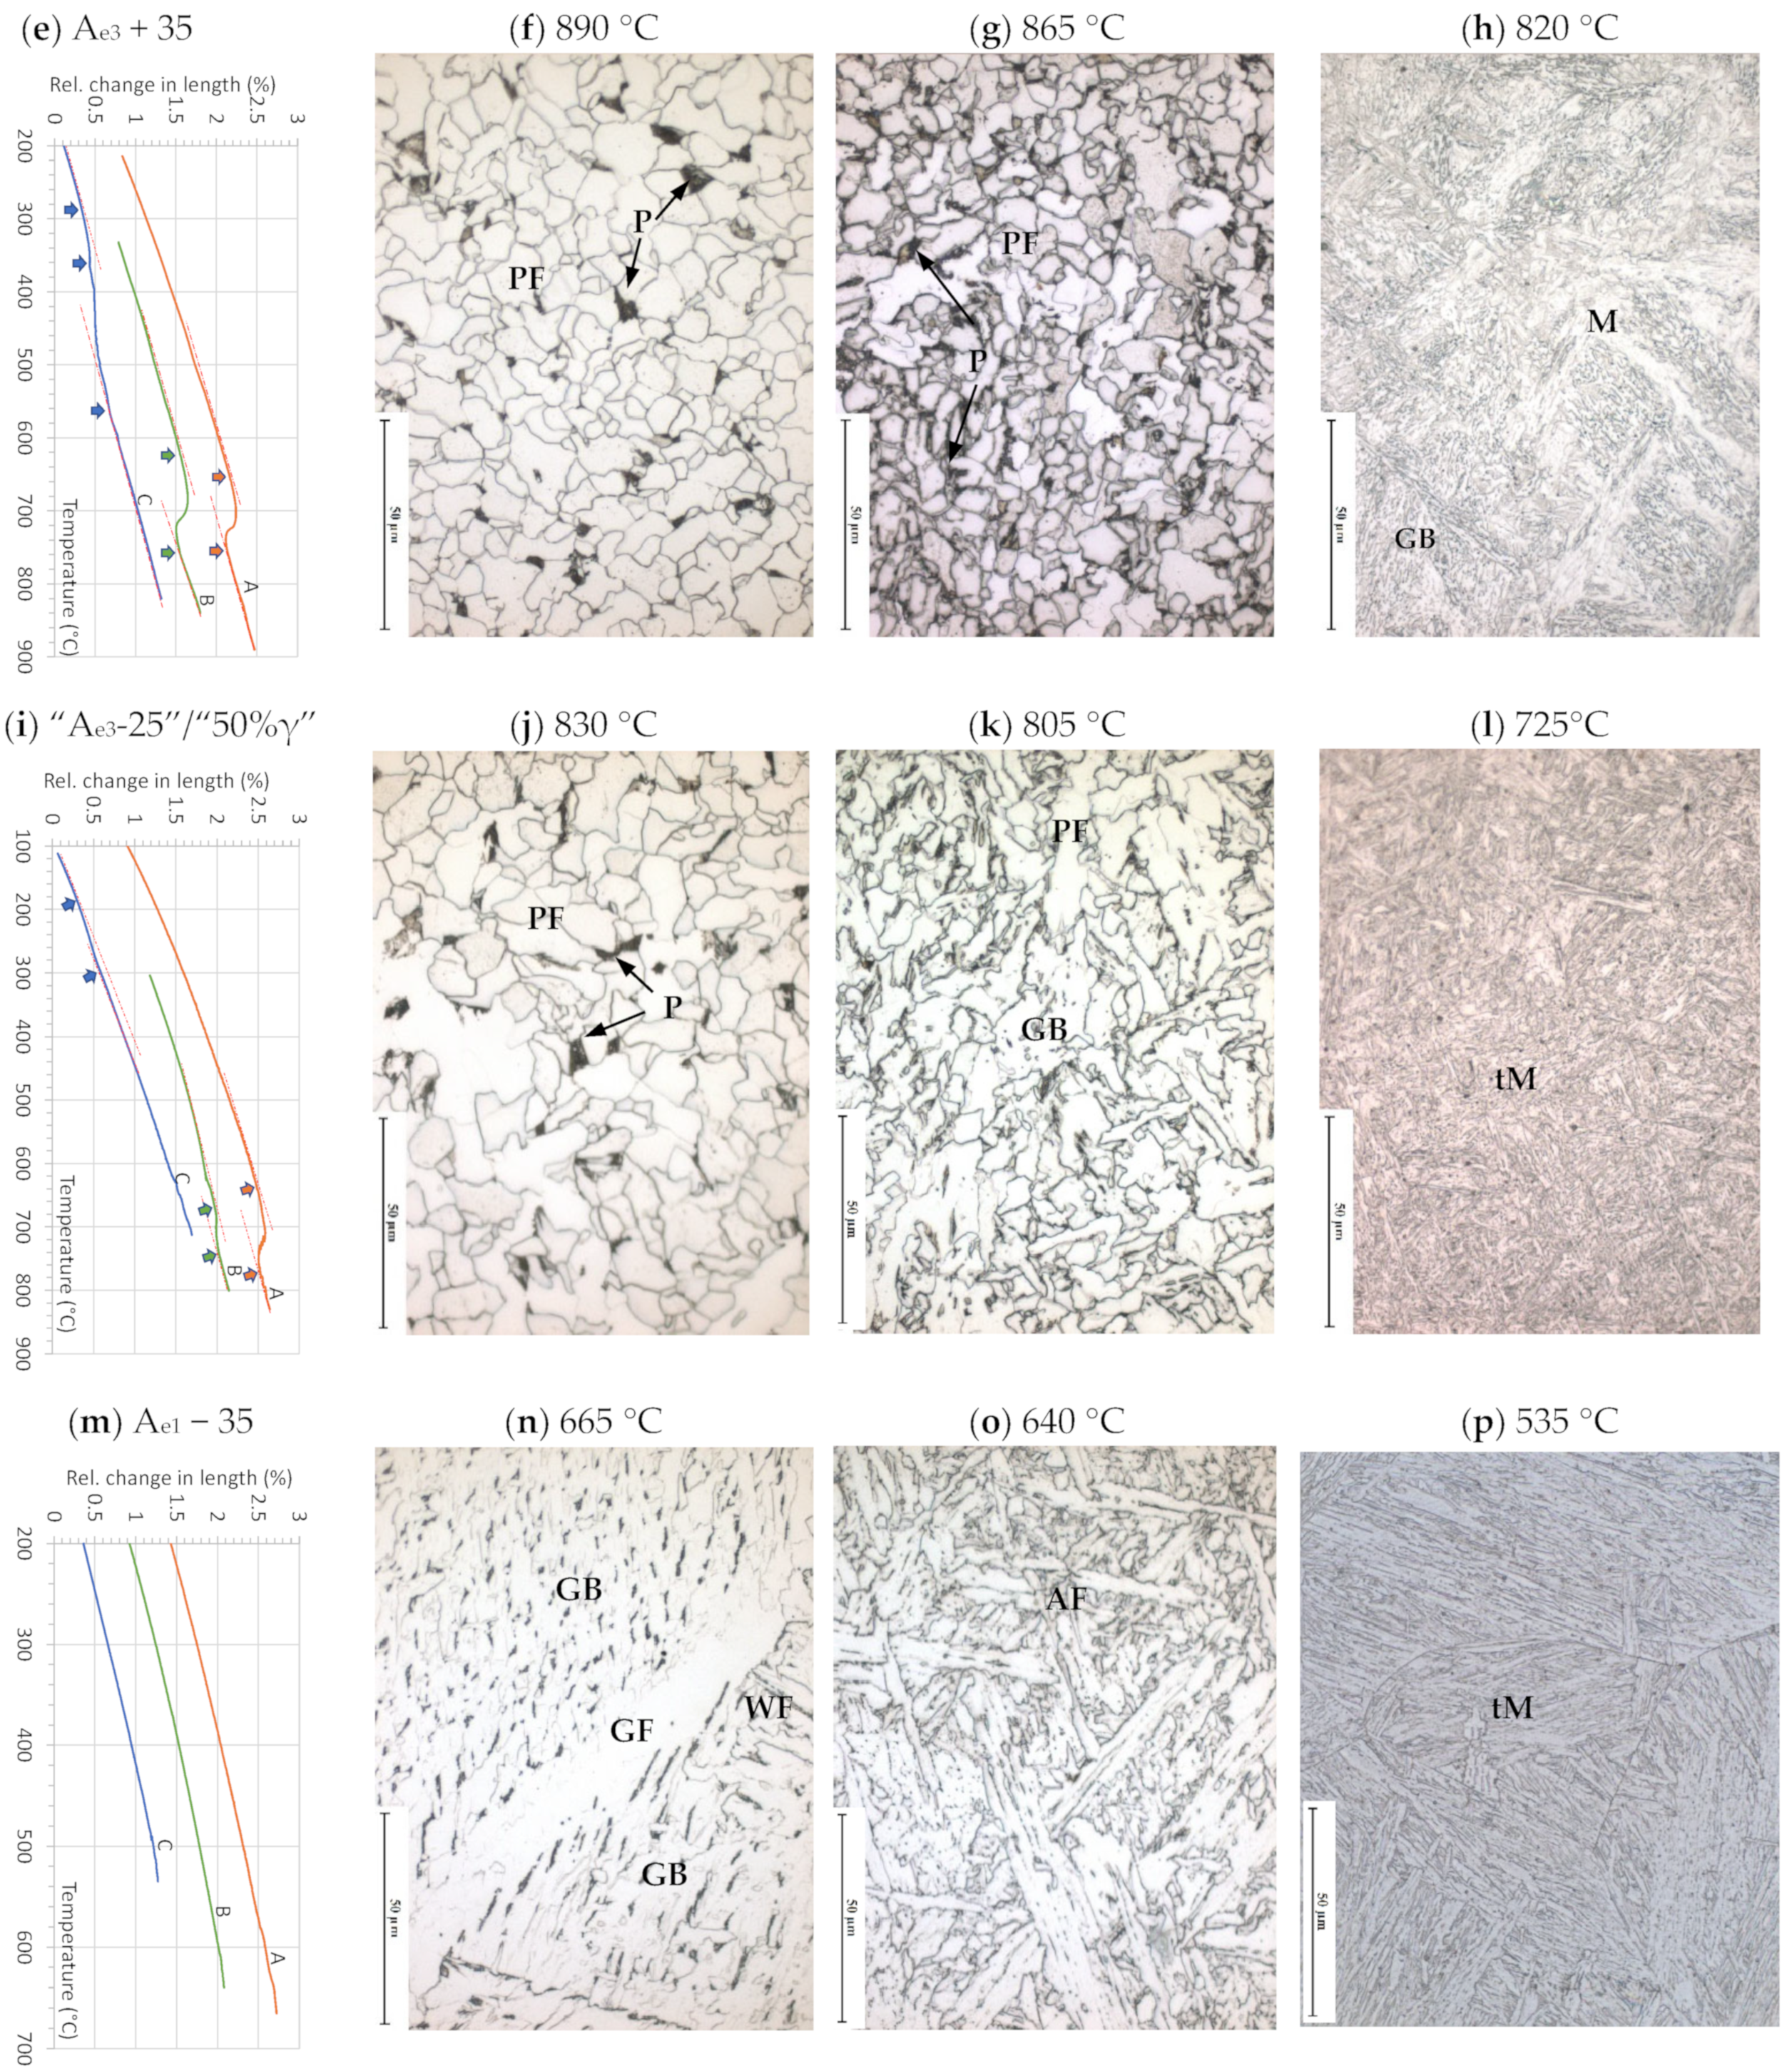
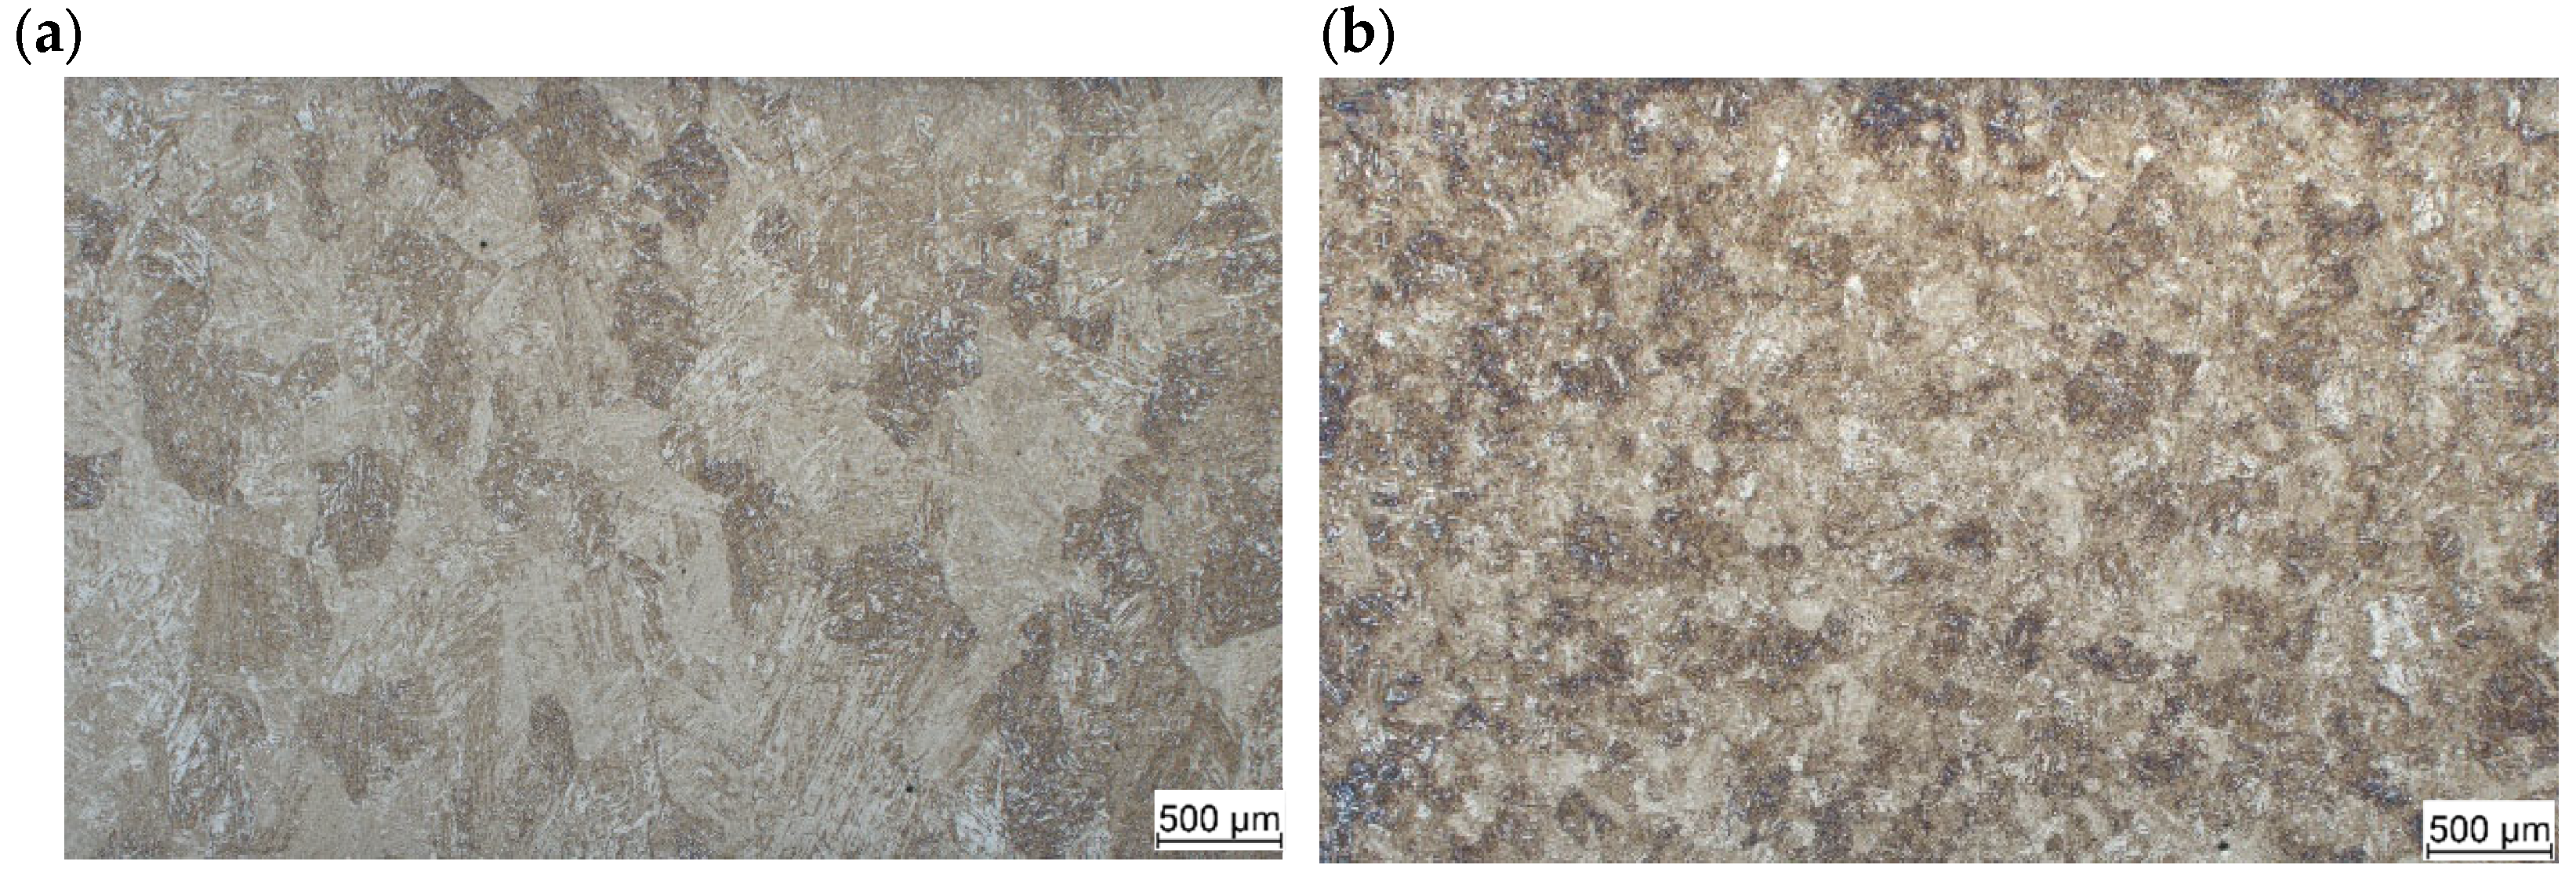
The two cyclic austenitization just above Ae3 (Figure 8e–h) and just below Ae3 (Figure 8i–l) “normalizes” the grains of the previous structure. During holding at these temperatures new grains of refined austenite are formed. The normalizing treatment also reduces the structure irregularities and produces structure with improved toughness and ductility. This is clearly observable in the microstructures of A and B, which revealed a homogeneous ferritic pearlitic fine microstructure with grain size of ferrite ranging from 5 to 10 µm. Figure 8k showed that, in addition to the ferritic-pearlitic microstructure, a second phase of GB is formed in alloy B. In alloy C, a microstructure composed of GB and M is formed during cooling after holding 35 °C above Ae3, as shown in Figure 8h. The formation of GB indicates the decrease in hardness of alloy C. The decreased hardness in this case is basically attributed to the refining of PAG during normalizing at 820 °C. Figure 9 compares the PAGS of alloy C after holding at 1350 °C and that developed after normalizing at 820 °C. The normalizing process at 820 °C has significantly refined the PAG from 450 µm to 235 µm, and therefore provided more nucleation sites for transformation during cooling, which resulted in accelerating the transformation kinetics. The dilatometric curve of alloy C in Figure 8e shows that the GB transformation begins at ~560 °C and the M starts to form at ~360 °C. The PF formation of alloys A and B begin at ~760 °C and ~750 °C, respectively. Nevertheless, fast heating and relatively short holding of alloy C at 725 °C was not sufficient for complete transformation of martensite into austenite. This is clearly revealed from the small dilatation observed during the subsequent cooling of C to room temperature (Figure 8i). Cooling from 1350 °C to room temperature results in formation of martensite (Figure 5c). Subsequent heating and holding at 725 °C in the two-phase region results mainly in tempering the martensite and in formation of marginal quantity of newly formed austenite. The main microstructure in this case is composed of tempered martensite (tM) with small quantity of freshly transformed new martensite (un-tempered formed from the newly formed austenite at 725 °C) as shown in Figure 8l. The tempered martensite has an acicular form. This acicular shape fades due to tempering, yielding a globular appearance [44]. For alloys A and B, holding 25 °C below Ae1 has no significant effect in altering the microstructure observed in Figure 5, as shown in Figure 8n,o. Regarding alloy C, holding at 535 °C has resulted in producing tM. The tempered martensite in Figure 8p is with longer and less faded acicular form compared to that of Figure 8l due to the lower tempering temperature.

3.1.5. Microstructure Developed after Applying Schedule III

Figure 10 shows representative microstructure for alloy A comparing four cycles (schedule III, Figure 1) to “two cycles (schedule II)”, reheated to the same TB temperature. It is shown that the number of cycles plays a notable role in the fineness of the developed microstructure, but it does not alter its constituents.

3.2. Hardness Characteristics

The effect of different thermal cycles on the hardness is shown in Figure 11. The lowest hardness is observed in the normalized microstructures of alloy A and B. These microstructures are expected to have improved ductility and toughness due to its regular and fine grains, of course, yield strength is expected to be reduced. The finest of these structures is that obtained by isothermal holding at Ae3 + 35 °C as disclosed by the measured ferrite grain sizes (gray curves of Figure 11a,b). The ferrite grain is indeed a key microstructural component suppressing the propagation of cracks across the grain/grain boundary. Wu et al. showed that the intracrystalline polygonal ferrite improves the fracture toughness of high strength steels [45]. Additionally, ductile fracture toughness has been found to increase with decreasing ferrite grain size [46]. Another factor strongly affecting the material toughness is the material impurities. As the impurity level is increased, the inclusion volume fraction, average inclusion radius, inclusion spacing and number of inclusion particles per unit area all increase. These increases are detrimental to the toughness and ductility of the steel [47]. Alloy C (Figure 11c) exhibits higher hardness compared to alloys A and B due to its structure that is basically composed of martensite/tempered martensite and GB. The hardness is also lower when isothermal holding at Ae3 + 35 °C is applied. The lower value in this case is, however, due to refining the prior austenite grains and therefore replacing the un-tempered M by GB. As discussed above, treating alloy C at 725 °C results in two types of martensite at room temperature, mostly tM with smaller fraction of quenched martensite, M. The absence of GB in this case is the reason for the higher hardness observed at this temperature compared to that recorded at 820 °C. Additionally, a secondary hardening occurs due to precipitation of Mo and Cr carbides during tempering. Tempering at 535 °C results in the lowest observed hardness in this alloy. The tempered martensite formed at this temperature should have higher hardness compared to that formed at 725 °C, as increasing the tempering temperature reduces the hardness of martensite. Nonetheless, there is no formed quenched martensite in this microstructure. The microstructure is a fully tempered one, therefore, it has lower hardness than the microstructures formed by quenching from 725 °C. The absence of this secondary hardening might also contribute to the inferior hardness after quenching from 535 °C. It is worth mentioning here that the hardness of steel B and C treated at (1350 °C + Ae3)/2 showed similar value to that obtained by treating at 1350 °C. This can be related to the effective pinning of austenite by microalloying in these two steels (Figure 3b). The parent austenite of the microstructures formed by quenching from 1350 °C is similar in size to that of the microstructure formed by quenching from TB = (1350 °C + Ae3)/2.

3.3. Transformation Temperatures during the Thermal Cycles

It can be inferred from Figure 6 and Figure 8 that the transformation kinetics during cooling has a significant correlation with the holding temperatures TA and TB. Table 3 sums up the measured transformation-start and -end temperatures during cooling from TA and TB together with that predicted equilibrium temperatures (i.e., Ae1 and Ae3) and that recorded during heating at 100 Ks−1 (i.e., Ac1 and Ac3). For alloys A and B, decreasing the holding temperature preceding the last cooling results in a general trend of shifting the transformation-start and -end temperatures to higher values. Generally, the microstructure formed at higher transformation temperatures are softer than that formed at lower temperatures. Therefore, the obtained microstructures are correspondingly becoming softer by decreasing the holding temperature until reaching the temperature range around Ae3, as shown in Figure 11a,b. Nevertheless, holding at TB below Ae1 does not result in phase changes and accordingly the hardness is increased compared to higher TB values. Regarding alloy C, the transformation is basically dominated by the martensite formation as previously shown under Section 3.1.4, with exception of the transformation-start temperature for TB = Ae3 + 35 °C. The transformation-start and -finish temperatures listed in Table 3 for this alloy present Ms and Mf temperatures, respectively. The refined PAGS formed by holding at Ae3 + 35 °C accelerated the transformation kinetics, therefore, this case records the highest transformation start of 560 °C, which corresponds to the GB formation. Yet, the carbon diffused from GB to the untransformed austenite, enriching it and enhancing its stability. Consequently, the Mf showed lower value compared to that recorded after holding at TA and TB = (1350 °C + Ae3)/2.

4. Summary and Conclusions

Three different microalloyed steels, two HSLA steels and the third is a welding wire one, were subjected to different exemplary thermal cycles in dilatometer. The aim is to enlighten the dependence of the microstructure development on the alloying composition and thermal-cycling parameters during WAAM. Under the present conditions, the transformation temperatures given in Table 3 were found. The following conclusions can be drawn from the current study:
Ti-Nb microalloying strategy can present a method of refining the microstructure of WAAM components. The undissolved precipitates can hinder the growth of the prior austenite during the repeated heating cycles at high temperature and therefore, results finally in a finer WAAM microstructure.
In case of the HSLA-steels, the softest microstructures are those developed by cycling heating around Ae3, where fine ferritic-pearlitic microstructure develops from normalized (fine grained) austenite.
For the wire welding steel, which has higher hardenability compared to the studied HSLA steels, martensite is formed during cooling from the reheating temperature. In the simulation of the WAAM process, cyclic thermal processing around Ae3 can also result in soft microstructure due to the formation of GB from the refine/normalized austenite. Nonetheless, the softest structure formed in this steel is that one developed by thermal cycling below Ae1. This microstructure is a soft tempered martensite one and free from any quench-martensite.
It is suggested here that the HSLA steels can be more suitable for producing softer and consequently tougher components than that produced from the conventional welding wires, where the high additions of alloying elements results in developing of martensite with lower toughness.
Steel composition, temperature history in terms of reheating temperatures and dwell time in certain temperature intervals chosen according to equilibrium transformation temperatures is a reasonable characterization and data structure candidate for prediction of microstructure by AI methods. Of course, much more work has to be done in this respect.

Author Contributions

Conceptualization, M.S., K.-H.S. and V.W.; methodology, M.S. and K.-H.S.; software, M.S.; validation, C.H. and M.S.; formal analysis, C.H and M.S.; investigation, C.H. and M.S.; resources, K.-H.S. and V.W.; data curation, C.H.; writing—original draft preparation, M.S., K.T. and K.-H.S.; writing—review and editing, M.S., K.T. and K.-H.S.; visualization, C.H. and M.S.; supervision, M.S., V.W. and K.-H.S.; project administration, M.S. and K.-H.S. All authors have read and agreed to the published version of the manuscript.

Funding

This research was funded by Open Access Publishing Fund of Clausthal University of Technology.

Data Availability Statement

The raw/processed data required to reproduce these findings cannot be shared at this time as the data also forms part of an ongoing study.

Acknowledgments

We acknowledge financial support by Open Access Publishing Fund of Clausthal University of Technology.

Conflicts of Interest

The authors declare no conflict of interest.

References

  1. Treutler, K.; Wesling, V. The Current State of Research of Wire Arc Additive Manufacturing (WAAM): A Review. Appl. Sci. 2021, 11, 8619. [Google Scholar] [CrossRef]
  2. Mbodj, N.G.; Abuabiah, M.; Plapper, P.; El Kandaoui, M.; Yaacoubi, S. Bead Geometry Prediction in Laser-Wire Additive Manufacturing Process Using Machine Learning: Case of Study. Appl. Sci. 2021, 11, 11949. [Google Scholar] [CrossRef]
  3. Richter, A.; Scheck, M.; Gehling, T.; Bohn, C.; Wesling, V.; Rembe, C. Erfassung geometrischer Daten des Schmelzbades zur Regelung eines WAAM-Prozesses. tm Tech. Mess. 2021, 88, s95–s100. [Google Scholar] [CrossRef]
  4. Richter, A.; Gehling, T.; Treutler, K.; Wesling, V.; Rembe, C. Real-time measurement of temperature and volume of the weld pool in wire-arc additive manufacturing. Meas. Sens. 2021, 17, 100060. [Google Scholar] [CrossRef]
  5. Richter, A.; Rembe, C.; Gehling, T.; Treutler, K.; Wesling, V. Echtzeittemperaturmessung bei additivem Lichtbogenschweißen/Real-time temperature measurement at wire arc additive welding. tm Tech. Mess. 2019, 86, 112–116. [Google Scholar] [CrossRef]
  6. Richter, A.; Scheck, M.; Bohn, C.; Rembe, C. Erfassung der Schmelzbadfläche mit Korrektur der Perspektive zur Prozessregelung eines Wire and Arc Additive Manufacturing. tm Tech. Mess. 2022, 89, 525–533. [Google Scholar] [CrossRef]
  7. Scheck, M.; Franz, J.; Richter, A.; Gehling, T.; Treutler, K.; Beitler, S.; Wesling, V.; Rembe, C.; Bohn, C. Identification and Modeling of Wire Arc Additive Manufacturing under consideration of Interpass Temperature. In Proceedings of the 2022 UKACC 13th International Conference on Control (CONTROL), Plymouth, UK, 20–22 April 2022; IEEE: Toulouse, France, 2022; pp. 219–225. [Google Scholar] [CrossRef]
  8. Ehlers, R.; Treutler, K.; Wesling, V. SAT Solving with Fragmented Hamiltonian Path Constraints for Wire Arc Additive Manufacturing. In Theory and Applications of Satisfiability Testing—SAT 2020; Pulina, L., Ed.; Springer International Publishing: Cham, Switzerland, 2020; pp. 492–500. [Google Scholar]
  9. Wächter, M.; Leicher, M.; Hupka, M.; Leistner, C.; Masendorf, L.; Treutler, K.; Kamper, S.; Esderts, A.; Wesling, V.; Hartmann, S. Monotonic and Fatigue Properties of Steel Material Manufactured by Wire Arc Additive Manufacturing. Appl. Sci. 2020, 10, 5238. [Google Scholar] [CrossRef]
  10. Kühne, R.; Feldmann, M.; Citarelli, S.; Reisgen, U.; Sharma, R.; Oster, L. 3D printing in steel construction with the automated Wire Arc Additive Manufacturing. Ce/Papers 2019, 3, 577–583. [Google Scholar] [CrossRef] [Green Version]
  11. Plangger, J.; Schabhüttl, P.; Vuherer, T.; Enzinger, N. CMT Additive Manufacturing of a High Strength Steel Alloy for Application in Crane Construction. Metals 2019, 9, 650. [Google Scholar] [CrossRef]
  12. Schroepfer, D.; Treutler, K.; Boerner, A.; Gustus, R.; Kannengiesser, T.; Wesling, V.; Maus-Friedrichs, W. Surface finishing of hard-to-machine cladding alloys for highly stressed components. Int. J. Adv. Manuf. Technol. 2021, 114, 1427–1442. [Google Scholar] [CrossRef]
  13. Treutler, K.; Lorenz, S.; Hamje, J.; Wesling, V. Wire and Arc Additive Manufacturing of a CoCrFeMoNiV Complex Concentrated Alloy Using Metal-Cored Wire—Process, Properties, and Wear Resistance. Appl. Sci. 2022, 12, 6308. [Google Scholar] [CrossRef]
  14. Pan, Z.; Ding, D.; Wu, B.; Cuiuri, D.; Li, H.; Norrish, J. Arc Welding Processes for Additive Manufacturing: A Review. In Transactions on Intelligent Welding Manufacturing; Springer: Singapore, 2018; pp. 3–24. [Google Scholar]
  15. Wu, B.; Pan, Z.; Ding, D.; Cuiuri, D.; Li, H.; Xu, J.; Norrish, J. A review of the wire arc additive manufacturing of metals: Properties, defects and quality improvement. J. Manuf. Process. 2018, 35, 127–139. [Google Scholar] [CrossRef]
  16. Eissel, A.; Engelking, L.; Treutler, K.; Wesling, V.; Schröpfer, D.; Kannengießer, T. Modification of Co–Cr alloys to optimize additively welded microstructures and subsequent surface finishing. Weld. World 2022, 66, 2245–2257. [Google Scholar] [CrossRef]
  17. Leicher, M.; Treutler, K.; Wesling, V. Development of an Alternative Alloying Concept for Additive Manufacturing Using PVD Coating. Appl. Sci. 2022, 12, 6619. [Google Scholar] [CrossRef]
  18. Eissel, A.; Engelking, L.; Treutler, K.; Schroepfer, D.; Wesling, V.; Kannengiesser, T. Nickel-Iron-Alloy Modification to Enhance Additively Welded Microstructure for Subsequent Milling. In Proceedings of the 2nd International Conference on Advanced Joining Processes (AJP 2021), Sintra, Portugal, 21–22 October 2021, 1st ed.; Da Silva, L.F.M., Martins, P.A.F., Reisgen, U., Eds.; Springer International Publishing: Cham, Switzerland, 2022; pp. 85–99. [Google Scholar]
  19. Reisgen, U.; Sharma, R.; Mann, S.; Oster, L. Increasing the manufacturing efficiency of WAAM by advanced cooling strategies. Weld. World 2020, 64, 1409–1416. [Google Scholar] [CrossRef]
  20. Luo, J.; You, G.; Lu, D.; Zeng, S.; Peng, L.; Liu, Q. Effect of Modified Water-Bath Method on Microstructure and Mechanical Properties of Wire Arc Additive Manufactured Low-Carbon Low-Alloy Steel. Steel Res. Int. 2021, 92, 523. [Google Scholar] [CrossRef]
  21. Panchenko, O.; Kladov, I.; Kurushkin, D.; Zhabrev, L.; Ryl’Kov, E.; Zamozdra, M. Effect of thermal history on microstructure evolution and mechanical properties in wire arc additive manufacturing of HSLA steel functionally graded components. Mater. Sci. Eng. A 2022, 851, 143569. [Google Scholar] [CrossRef]
  22. Treutler, K.; Kamper, S.; Leicher, M.; Bick, T.; Wesling, V. Multi-Material Design in Welding Arc Additive Manufacturing. Metals 2019, 9, 809. [Google Scholar] [CrossRef] [Green Version]
  23. Pütz, R.D.; Pratesa, Y.; Oster, L.; Sharma, R.; Reisgen, U.; Zander, D. Microstructure and Corrosion Behavior of Functionally Graded Wire Arc Additive Manufactured Steel Combinations. Steel Res. Int. 2021, 92, 2100387. [Google Scholar] [CrossRef]
  24. Leicher, M.; Kamper, S.; Treutler, K.; Wesling, V. Multi-material design in additive manufacturing—Feasibility validation. Weld. World 2020, 64, 1341–1347. [Google Scholar] [CrossRef]
  25. Samardžić, I.; Stoić, A.; Kozak, D.; Kladaric, I.; Dunđer, M. Application of Weld Thermal Cycle Simulator in Manufacturing Engineering. J. Manuf. Ind. Eng. 2013, 12, 2–177. [Google Scholar] [CrossRef] [Green Version]
  26. Celin, R.; Burja, J.; Kosec, G. A comparison of as-welded and simulated heat affected zone (HAZ) microstructures. Mater. Tehnol. 2016, 50, 455–460. [Google Scholar] [CrossRef]
  27. Dai, Y.; Yu, S.; Huang, A.; Shi, Y. Microstructure and mechanical properties of high-strength low alloy steel by wire and arc additive manufacturing. Int. J. Miner. Metall. Mater. 2020, 27, 933–942. [Google Scholar] [CrossRef]
  28. Rodrigues, T.A.; Duarte, V.; Avila, A.J.; Telmo, G.S.; Miranda, R.M.; Oliveira, J.P. Wire and arc additive manu-facturing of HSLA steel: Effect of thermal cycles on microstructure and mechanical properties. Addit. Manuf. 2019, 27, 440–450. [Google Scholar] [CrossRef]
  29. Sun, L.; Jiang, F.; Huang, R.; Yuan, D.; Guo, C.; Wang, J. Microstructure and mechanical properties of low-carbon high-strength steel fabricated by wire and arc additive manufacturing. Metals 2020, 10, 216. [Google Scholar] [CrossRef] [Green Version]
  30. Müller, J.; Hensel, J.; Dilger, K. Mechanical properties of wire and arc additively manufactured high-strength steel structures. Weld. World 2021, 66, 395–407. [Google Scholar] [CrossRef]
  31. Wesling, V.; Leicher, M.; Gräbner, M.; Treutler, K.; Lorenz, S.; Esderts, A.; Hupka, M.; Wächter, M.; Spitzer, K.H. Werkstoffkennwerte additiv gefertigter Strukturen. In Tagungsband 4. Niedersächsisches Symposium Materialtechnik: 25. Bis 26. Februar 2021; TU Clausthal: Clausthal-Zellerfeld, Germany, 2021. [Google Scholar]
  32. Trzaska, J.; Dobrzański, L.A. Modelling of CCT diagrams for engineering and constructional steels. J. Mater. Process. Technol. 2007, 192, 504–510. [Google Scholar] [CrossRef]
  33. Dobrzanski, L.A.; Trzaska, J. Application of neural networks for the prediction of continuous cooling transformation diagrams. Comput. Mater. Sci. 2004, 30, 251–259. [Google Scholar] [CrossRef]
  34. Wang, J.; van der Wolk, P.J.; van der Zwaag, S. Effects of carbon concentration and cooling rate on continuous cooling transformations predicted by artificial neural network. ISIJ Int. 1999, 39, 38–46. [Google Scholar] [CrossRef]
  35. Kouraytem, N.; Li, X.; Tan, W.; Kappes, B.; Spear, A.D. Modeling process–structure–property relationships in metal additive manufacturing: A review on physics-driven versus data-driven approaches. J. Phys. Mater. 2021, 4, 032002. [Google Scholar] [CrossRef]
  36. Soliman, M.; Weidenfeller, B.; Palkowski, H. Metallurgical Phenomena during Processing of TRIP Steel. Steel Res. Int. 2009, 80, 57–65. [Google Scholar]
  37. Soliman, M. Microstructural Control and Properties Optimization of Microalloyed Pipeline Steel. Metals 2020, 10, 1499. [Google Scholar] [CrossRef]
  38. Bramfitt, B.L.; Benscoter, A.O. Metallographer’s Guide: Practices and Procedures for Irons and Steels; ASM International: Materials Park, OH, USA, 2002. [Google Scholar]
  39. Gomez, M.; Valles, P.; Medina, S.F. Evolution of microstructure and precipitation state during thermomechanical processing of a X80 microalloyed steel. Mater. Sci. Eng. A 2011, 528, 4761–4773. [Google Scholar] [CrossRef] [Green Version]
  40. Bhadeshia, H.; Honeycombe, R. Steels: Microstructure and Properties, 4th ed.; Butterworth-Heinemann: Oxford, UK, 2017. [Google Scholar]
  41. Andrews, K.W. Empirical formulae for the calculation of some transformation temperatures. J. Iron Steel Inst. 1965, 203, 721. [Google Scholar]
  42. Zhou, T.; Yu, H.; Wang, S. Effect of microstructural types on toughness and microstructural optimization of ultra-heavy steel plate: EBSD analysis and microscopic fracture mechanism. Mater. Sci. Eng. A 2016, 658, 150–158. [Google Scholar] [CrossRef]
  43. Tian, D.; Karjalainen, L.; Qian, B.; Chen, X. Cleavage Fracture Model for Granular Bainite in Simulated Coarse-Grained Heat-Affected Zones of High-Strength Low-Alloyed Steels. JSME Int. J. Ser. A Mech. Mater. Eng. 1997, 40, 179–188. [Google Scholar] [CrossRef] [Green Version]
  44. Lescano, D.E.; Silvetti, S.P. Study of Microstructure and Tempered Martensite Embrittlement in AISI 15b41 Steel. Procedia Mater. Sci. 2012, 1, 134–140. [Google Scholar] [CrossRef] [Green Version]
  45. Wu, Z.; Liu, Z.; Li, X. Microstructural effects on the fracture toughness of advanced high strength steels. Mater. Lett. 2020, 271, 127761. [Google Scholar] [CrossRef]
  46. Srinivas, M.; Malakondaiah, B.; RamaRao, P. Influence of polycrystal grain size on fracture toughness of and fatigue threshold in Armco iron Author. Eng. Fract. Mech. 1987, 28, 561–576. [Google Scholar] [CrossRef]
  47. Chen, D.; Zhang, X.; Wu, H.; Lang, D.; Xiao, D.; Wang, Z.; Su, B.; Meng, D. The influence of impurities on the ductility and toughness of a low-temperature-aged U-Nb alloy. Mater. Sci. Eng. A 2018, 739, 1–16. [Google Scholar] [CrossRef]
Figure 1. Applied thermal schedules.
Metals 12 01913 g001
Figure 2. As-received microstructures of alloys A, B and C.
Metals 12 01913 g002
Figure 3. (a) Austenite formation kinetics in terms of relative change in length during heating of alloys A, B and C. The temperature on the curves marks the Ac1 and Ac3 temperatures. (b) Dependance of the precipitates volume % on the annealing temperature (predicted using ThermoCalc).
Metals 12 01913 g003
Figure 4. Comparison of the prior austenite grain sizes after austenitization at 1350 °C for 180 s. The red arrows indicate the grain boundaries in (ac). In (a,b) the grain boundaries are decorated by allotriomorphic grain boundaries ferrite.
Metals 12 01913 g004
Figure 5. Microstructure of alloys A (a), B (b) and C (c) after applying schedule I.
Metals 12 01913 g005
Figure 6. Austenite decomposition kinetics in terms of relative change in length during cooling of alloys A, B and C according to schedule I. The marked temperatures on the curves of alloys A and B designate the Ar1 and Ar3 temperatures and on the curve of alloy C designate the martensite start (MS) and martensite finish (Mf).
Metals 12 01913 g006
Figure 7. HV 0.025 values together with the micro-hardness indentations (a) in GB and (b) in WF of the microstructure developed after applying schedule I on alloy A.
Metals 12 01913 g007
Figure 8. Dilatometric curves (the left column) recorded during the final cooling after applying schedule II (two cycles) with different reheating temperatures (TB) on steels A, B and C together with the developed microstructure in the three alloys.
Metals 12 01913 g008aMetals 12 01913 g008b
Figure 9. Micrographs showing different martensite grains formed from prior austenite with different PAGS after quenching from (a) 1350 °C and (b) 820 °C for alloy C.
Metals 12 01913 g009
Figure 10. Effect of applying 2 Cycles (left) and 4 Cycles (right) on the formed microstructure of alloy A.
Metals 12 01913 g010
Figure 11. Dependence of hardness and ferrite grain size on the treatment temperature of alloys A, B and C. The developed microstructures are also designated on the diagrams at the respective treatment temperature.
Metals 12 01913 g011aMetals 12 01913 g011b
Table 1. Chemical composition (wt.%) of the steels used in this work.
AlloyCSiMnAlCrNiMoTiNbN
A0.0590.0230.7660.0390.0390.0330.0030.0020.0310.003
B0.0640.0281.4940.0490.0410.0320.0080.0300.0590.005
C0.1330.7141.360.00560.3402.240.5630.033-0.005
Balance iron.
Table 2. Predicted critical temperature and the temperature TB (°C) applied in different trials.
Temp.ABC
AeAe1700675570
Ae3855830785
TB(1350 + Ae3)/2110010901070
Ae3 + 35890865820
Ae3 − 25830805-
50% austenite780-725
Ae1 − 35665640535
Table 3. Transformation temperatures under equilibrium together with those recorded during heating and cooling applying different thermal cycles. St: start and Fi: finish. Under the present conditions no significant difference was found between 2 and 4 cycles.
Temp.ABC
AeAe1700675570
Ae3855830785
AcAc1816804763
Ac3954924890
Ar1/Ar3
MS/Mf
TA or TBStFiStFiStFi
schedule I:1350 °C630528565425396298
schedule II: (1350 + Ae3)/2680553625496427308
schedule II: Ae3+ 35757651750619560281
schedule II: Ae3 − 25/50%γ774658733657331180
schedule II: Ae1 − 35------
Publisher’s Note: MDPI stays neutral with regard to jurisdictional claims in published maps and institutional affiliations.