Article

Microstructure and Texture of 2205 Duplex Stainless Steel Additive Parts Fabricated by the Cold Metal Transfer (CMT) Wire and Arc Additive Manufacturing (WAAM)

1
School of Materials Science and Engineering, Jiangsu University of Science and Technology, Zhenjiang 212003, China
2
Marine Equipment and Technology Institute, Jiangsu University of Science and Technology, Zhenjiang 212003, China
*
Author to whom correspondence should be addressed.
Metals 2022, 12(10), 1655; https://doi.org/10.3390/met12101655
Submission received: 29 August 2022 / Revised: 27 September 2022 / Accepted: 28 September 2022 / Published: 30 September 2022
(This article belongs to the Topic Properties of the Corroding Interface)

Abstract

:
Additive parts made of 2205 duplex stainless steel were fabricated by cold metal transfer (CMT) wire and arc additive manufacturing (WAAM), and their microstructure and properties were systematically studied. The X-ray diffraction results show that austenite phase and ferrite phase were formed in the additive parts. Due to the low heat input characteristics of CMT-WAAM, no σ phase was observed. The microstructure in the additive parts was different from the bottom to the top, with the content of austenite phase gradually increasing and that of ferrite gradually decreasing. The EBSD results indicate that the ferrite phase in the bottom part grew parallel to the normal direction of {100}. However, the ferrite phase in the middle part grew parallel to the plane composed of the build direction and normal direction, and along {100} and {111}. The effect of the ferrite and austenite contents on the mechanical performance of the additive parts was simulated using the LAMMPS software. The simulation results exhibit a common characteristic in that the dislocations move mainly along the 1/6<112> crystallographic direction families. The simulated maximum tensile stress values of the bottom, middle, and top parts were 23.3 GPa, 22.3 Gpa, and 22.5 Gpa, respectively. The data from the bottom tensile strength simulation were consistent with the actual data, and the bottom tensile strength was the largest in the actual tensile process.

1. Introduction

Duplex stainless steel (DSS) is an excellent steel grade for both weight reduction and cost reduction, and it has excellent serviceability, processability, mechanical properties, and corrosion resistance. The DSS differs from coated material [1,2,3,4] and pure metal [5] in that it enables an enhancement of performance [6,7]. It is of great interest in many industries, such as pipes and vessels used for the transport and storage of chloride and hydrogen sulfide solutions [8]. Among them, the requirements for the structure of 2205 DSS used in some fields are diverse and complex, and it is difficult for the conventional method to meet its manufacturing requirements. Additive manufacturing (AM) is based on three-dimensional digital models used to create three-dimensional entities through layered manufacturing and layer-by-layer superposition [9]. With the development of AM technology and the increasing demand for complex parts for high-performance DSS, there has been a large amount of research on the AM of DSS.
Selective laser melting (SLM) [10], laser AM (LAM) [11], and wire and arc additive manufacturing (WAAM) [12,13,14] are the main methods used for DSS AM. Papula et al. [10] studied the microstructure and mechanical properties of SLM 2205 DSS. Wen et al. [11] conducted LAM tests on the surface of 2205 DSS, and the microstructure of the cladding layer was composed of ferrite and austenite phases. However, due to the low deposition rate and limited form size of SLM and LAM processes, low efficiency for the manufacturing of large-scale DSS additive parts has been demonstrated to be a significant risk factor for the production of additive parts.
Among the reasons for this is that the high deposition rate of WAAM and the low cost of equipment compared to lasers have attracted the most attention from scientists and engineers. Until now, WAAM has been used to manufacture steel [15,16], Al alloy [17,18,19], Mg alloy [20,21], nickel-based alloy [22], and other parts. However, there have been few studies on the WAAM of 2205 DSS. Therefore, it is of great significance to analyze and explore the use of arc AM technology for 2205 DSS. Zhang et al. [23] found that the pitting resistance of DSS additive parts was significantly improved after heat treatment. Yang et al. [24] observed significant changes in ferrite grain size and austenite morphology from layer 5 to layer 30 of plasma arc additive parts with different cooling rates.
Cold metal transfer (CMT) has many technical advantages such as lower heat input, less material splash, and better manipulability. It has become one of the main heat sources for arc AM [25,26]. M Lervåg et al. [27] studied the microstructure of super DSS manufactured using cold metal transfer wire and an arc additive manufacturing process (CMT-WAAM). The CMT process has the advantages of simple operation, no sputtering during stacking, smooth arc, high shape quality, uniform microstructure, fine grains, and few defects. Moreover, because of its small heat input, the wire feeding speed can be kept at a high value to improve the melting efficiency. However, the microstructure and property changes during the 2205 DSS CMT additive process are still unclear. In this paper, the microstructural evolution and variance in the mechanical performance of additive parts manufactured via CMT-WAAM are discussed in detail.

2. Experimental Method

The welding wire used in CMT-WAAM was an ER2209 DSS wire with a diameter of 1.6 mm. The chemical composition of the welding wire is shown in Table 1. The welding wire was fabricated in an incremental way on a 10 mm thickness mild steel substrate. Both the wire and the substrate were dried prior to additive manufacturing. A schematic diagram is shown in Figure 1. After rough grinding, fine grinding, and polishing of the 2205 DSS prepared by CMT-WAAM, it was rinsed and dried with deionized water and anhydrous ethanol and corroded by Beraha reagent. The structure of the samples was observed using an optical microscope (OM), and the microstructure and element composition were analyzed using a ZEISS Merlin Compact Scanning Electron Microscope (SEM, ZEISS, Jena, Germany). The texture, phase distribution, and grain size were analyzed via an EBSD. An XRD-6000 X-ray diffractometer was used to analyze the phase composition of the specimens by scanning at a speed of 4°/min in the range of 30–100°.
The 2205 duplex stainless steel additive parts have two structures at room temperature: body-centered cubic (BCC) structure and face-centered cubic (FCC) structure. In order to study the effect of the variation in BCC and FCC content on the performance, the X-direction [100], Y-direction [010], and Z-direction [001] crystallographic orientation was modeled. The sizes of blocks in the X [100], Y [010], and Z [001] directions were 50 Å, 20 Å, and 100 Å. The α-Fe and γ-Fe were modeled in the X-direction [100] and Y-direction [010], and in the Z-direction [001]. The α-Fe has a BCC structure at room temperature, and γ-Fe has an FCC structure at room temperature. The lattice constants of α-Fe and γ-Fe were 2.85 Å and 3.65 Å, respectively.

3. Results and Discussion

The effects of different process parameters (such as additive path, interlayer cooling time, and scanning speed) on the formation of CMT-WAAM products have been experimentally studied [21]. For this study, we used a 6 mm/s scanning speed and deposited 30 layers. Compared with unidirectional additives, reciprocating additives can obtain additive parts with a better form quality. When the interlayer cooling time is short (0 s and 30 s), the surface nonuniformity of the additive parts and the surface forming quality are relatively poor. However, when the scanning speed increases to 8 mm/s, the surface quality of the additive parts becomes poorer. Therefore, in order to obtain better formed parts, the following parameters should be met: reciprocating additive, interlayer cooling time controlled at about 60 s, wire feeding speed controlled at 70 mm/s or less, and scanning speed of 5 mm/s~7 mm/s.

3.1. CMT-WAAM 2205 DSS Additive Parts Microstructure Analysis

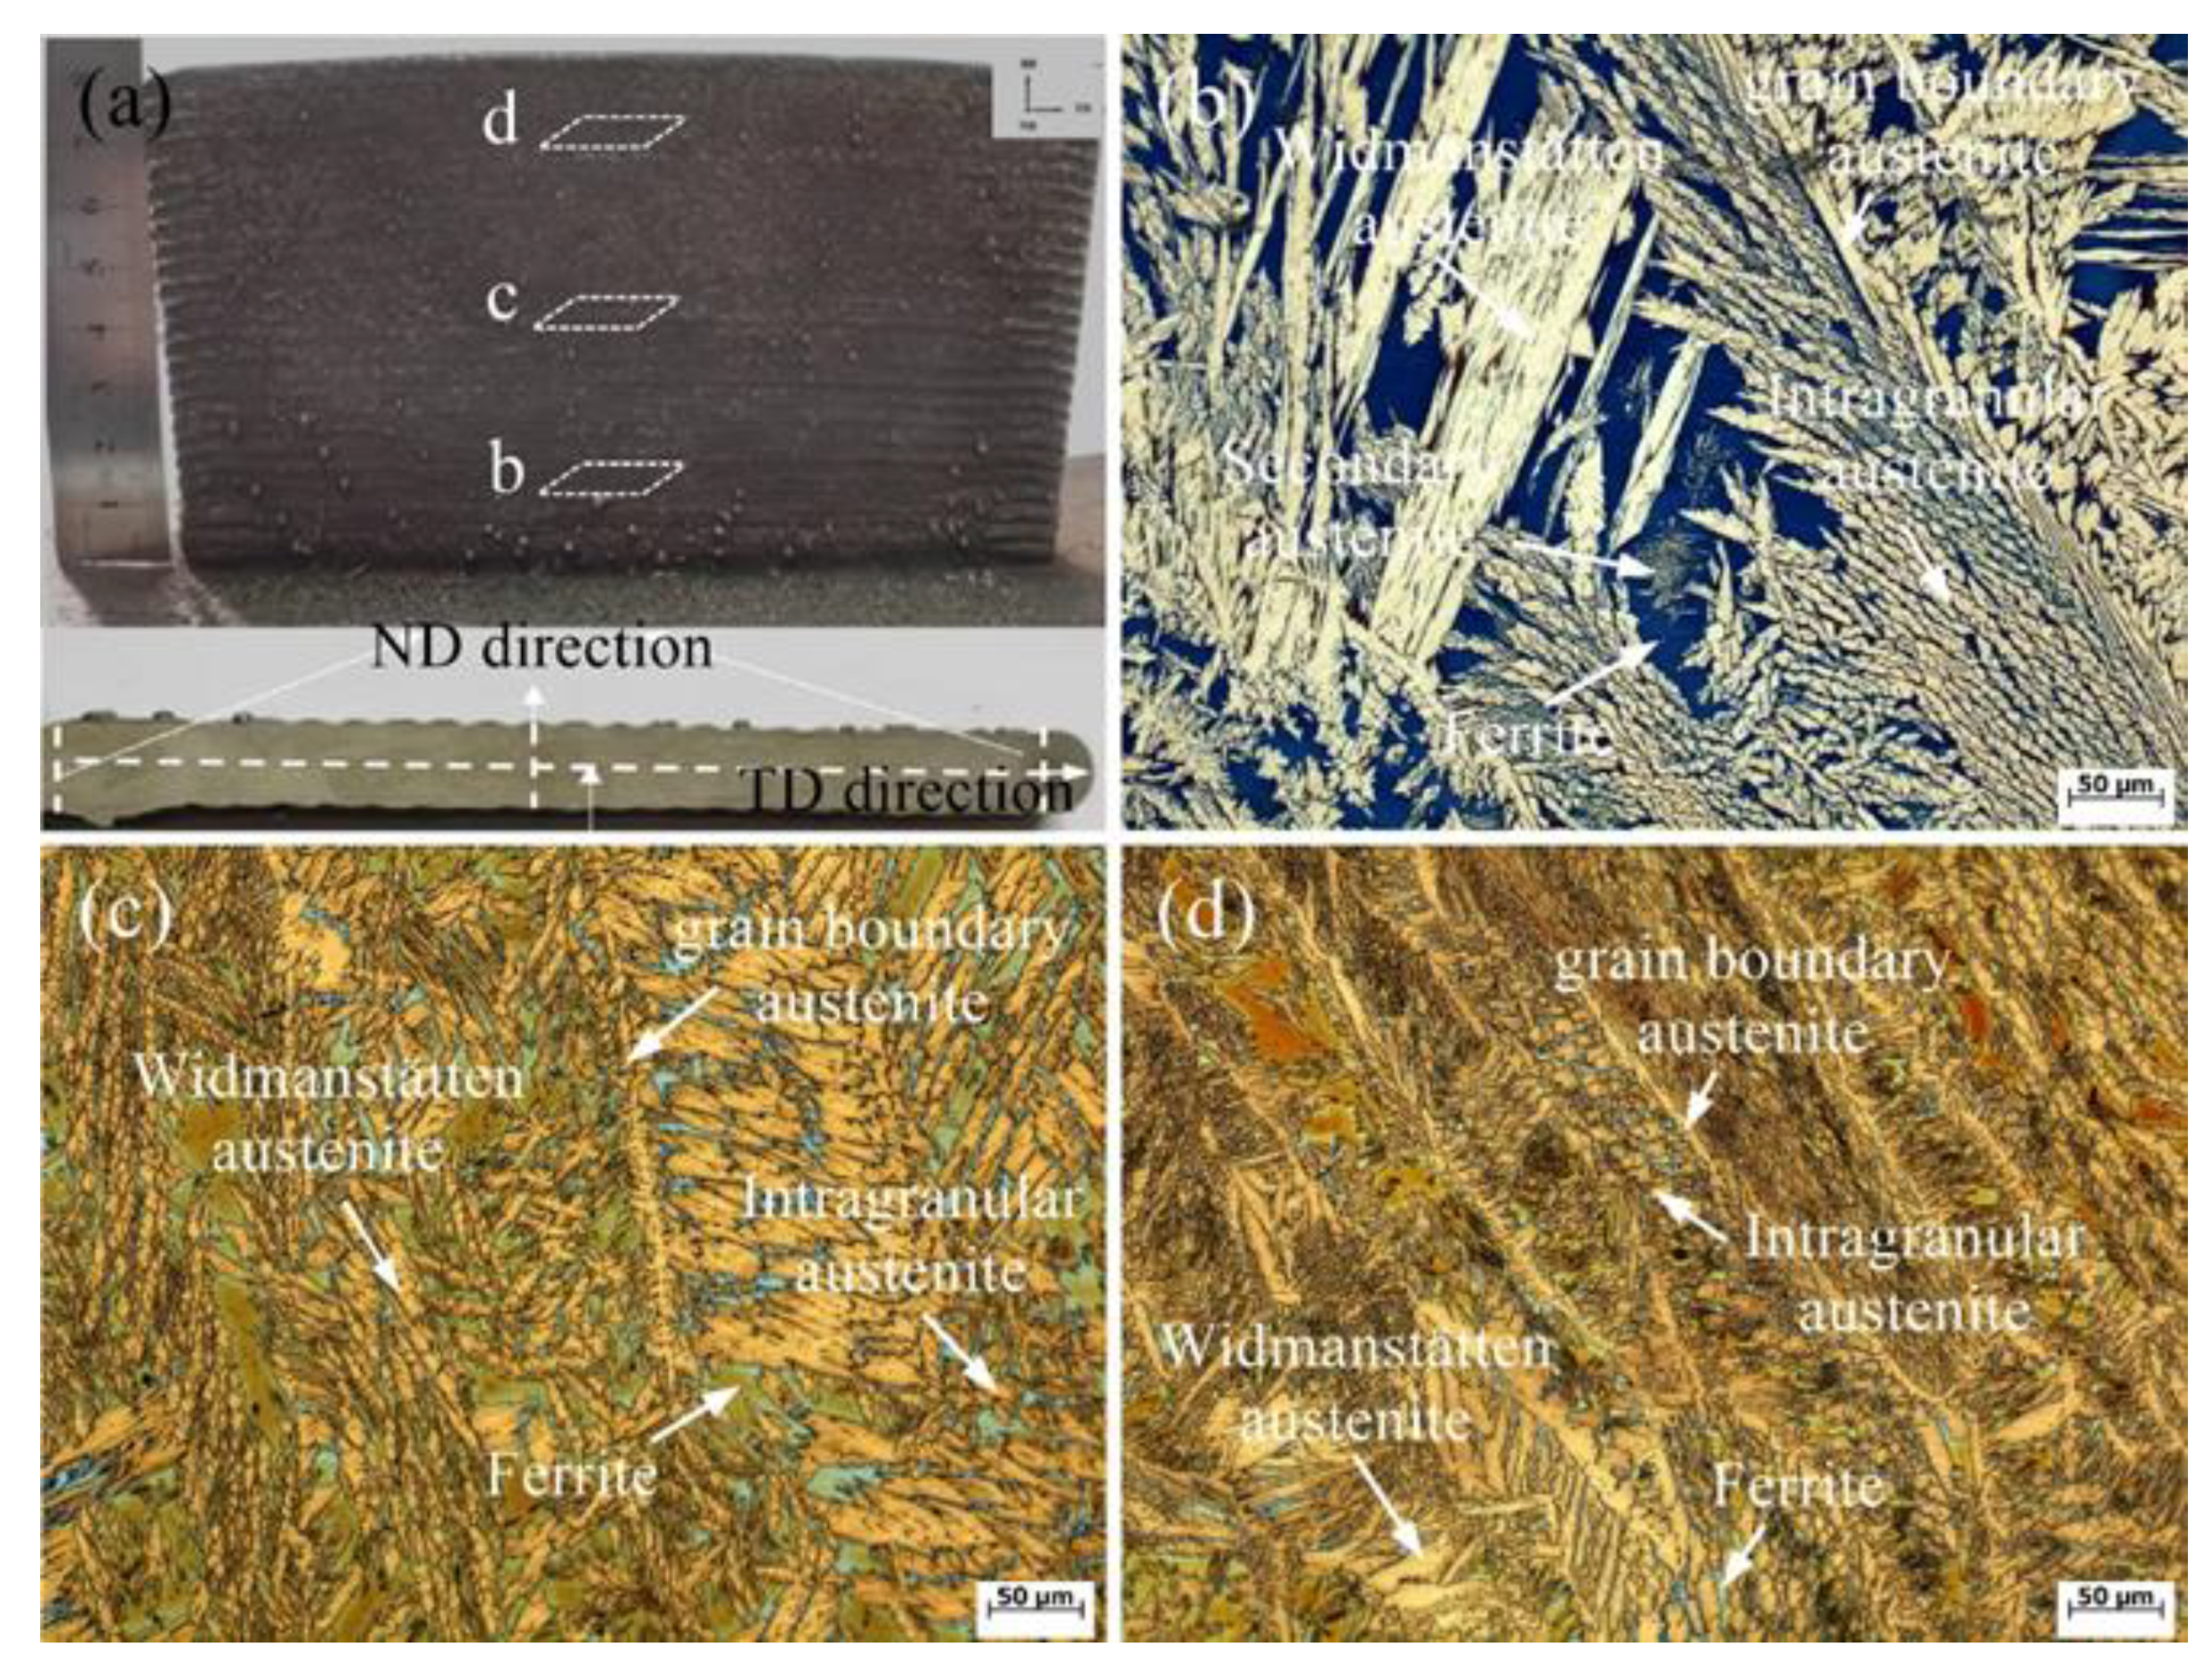
The multilayer single-pass additive parts and the microstructure of the additive parts are shown in Figure 2. The width of the additive parts was around 8.5 mm, the height was 80 mm, and the length was 200 mm. The additive parts had good verticality, smooth surface, good metallurgical bonding, and no obvious defects such as cracks or collapses after the optimization of the CMT-WAAM process parameters, as shown in Figure 2a. For the convenience of analysis, the thickness direction of the additive was set to the normal direction (ND), the additive direction was set to the building direction (BD), and the scanning direction was set to the transformation direction (TD).
In the BD, the structure in the sample presented a growth state similar to the casting structure, and there was a relatively obvious fusion of the layers into a remelting zone and non-remelting zone. The microstructure was mainly columnar dendrites and coarse widmanstatten austenite (WA) structures [28,29]. The microstructure began to change from fine dendrite to columnar dendrite as the grain size increased in the process. The microstructure of the bottom of the additive part is shown in Figure 2b. The bottom microstructure of the additive was mainly dendritic and feather-like austenite. The bottom of the additive part is closer to the substrate, and the heat dissipation conditions are better. The shorter the time for which the molten pool stays at high temperatures, the larger the temperature gradient GL is in this area. The larger the GL/R is, the smaller the component undercooling is and the easier the microstructure grows towards the dendrite shape. In addition, crystal grains grow preferentially along the opposite direction of the heat flow. Therefore, it was observed that the widmanstatten was arranged in parallel, and the amorphous grain boundary austenite content was higher. Figure 2c presents the ND–TD surface in the middle area. In the core of the sample, the microstructure grew in the form of columnar equiaxed crystal. The growth pattern of interlayer crystals is shown between the layers. The austenite content at the bottom was much greater than the ferrite content. The microstructure of the top of the additive part is shown in Figure 2d. On top of the additive part, the structure was coarse WA and columnar crystals. The heat dissipation conditions at the top are the worst, and the temperature gradient is the smallest, so columnar dendrite structures can be found at the top. At the same time, the ferrite content in this area was significantly lower than that in the middle. Therefore, the size of the austenite at the top was larger than that in the middle.
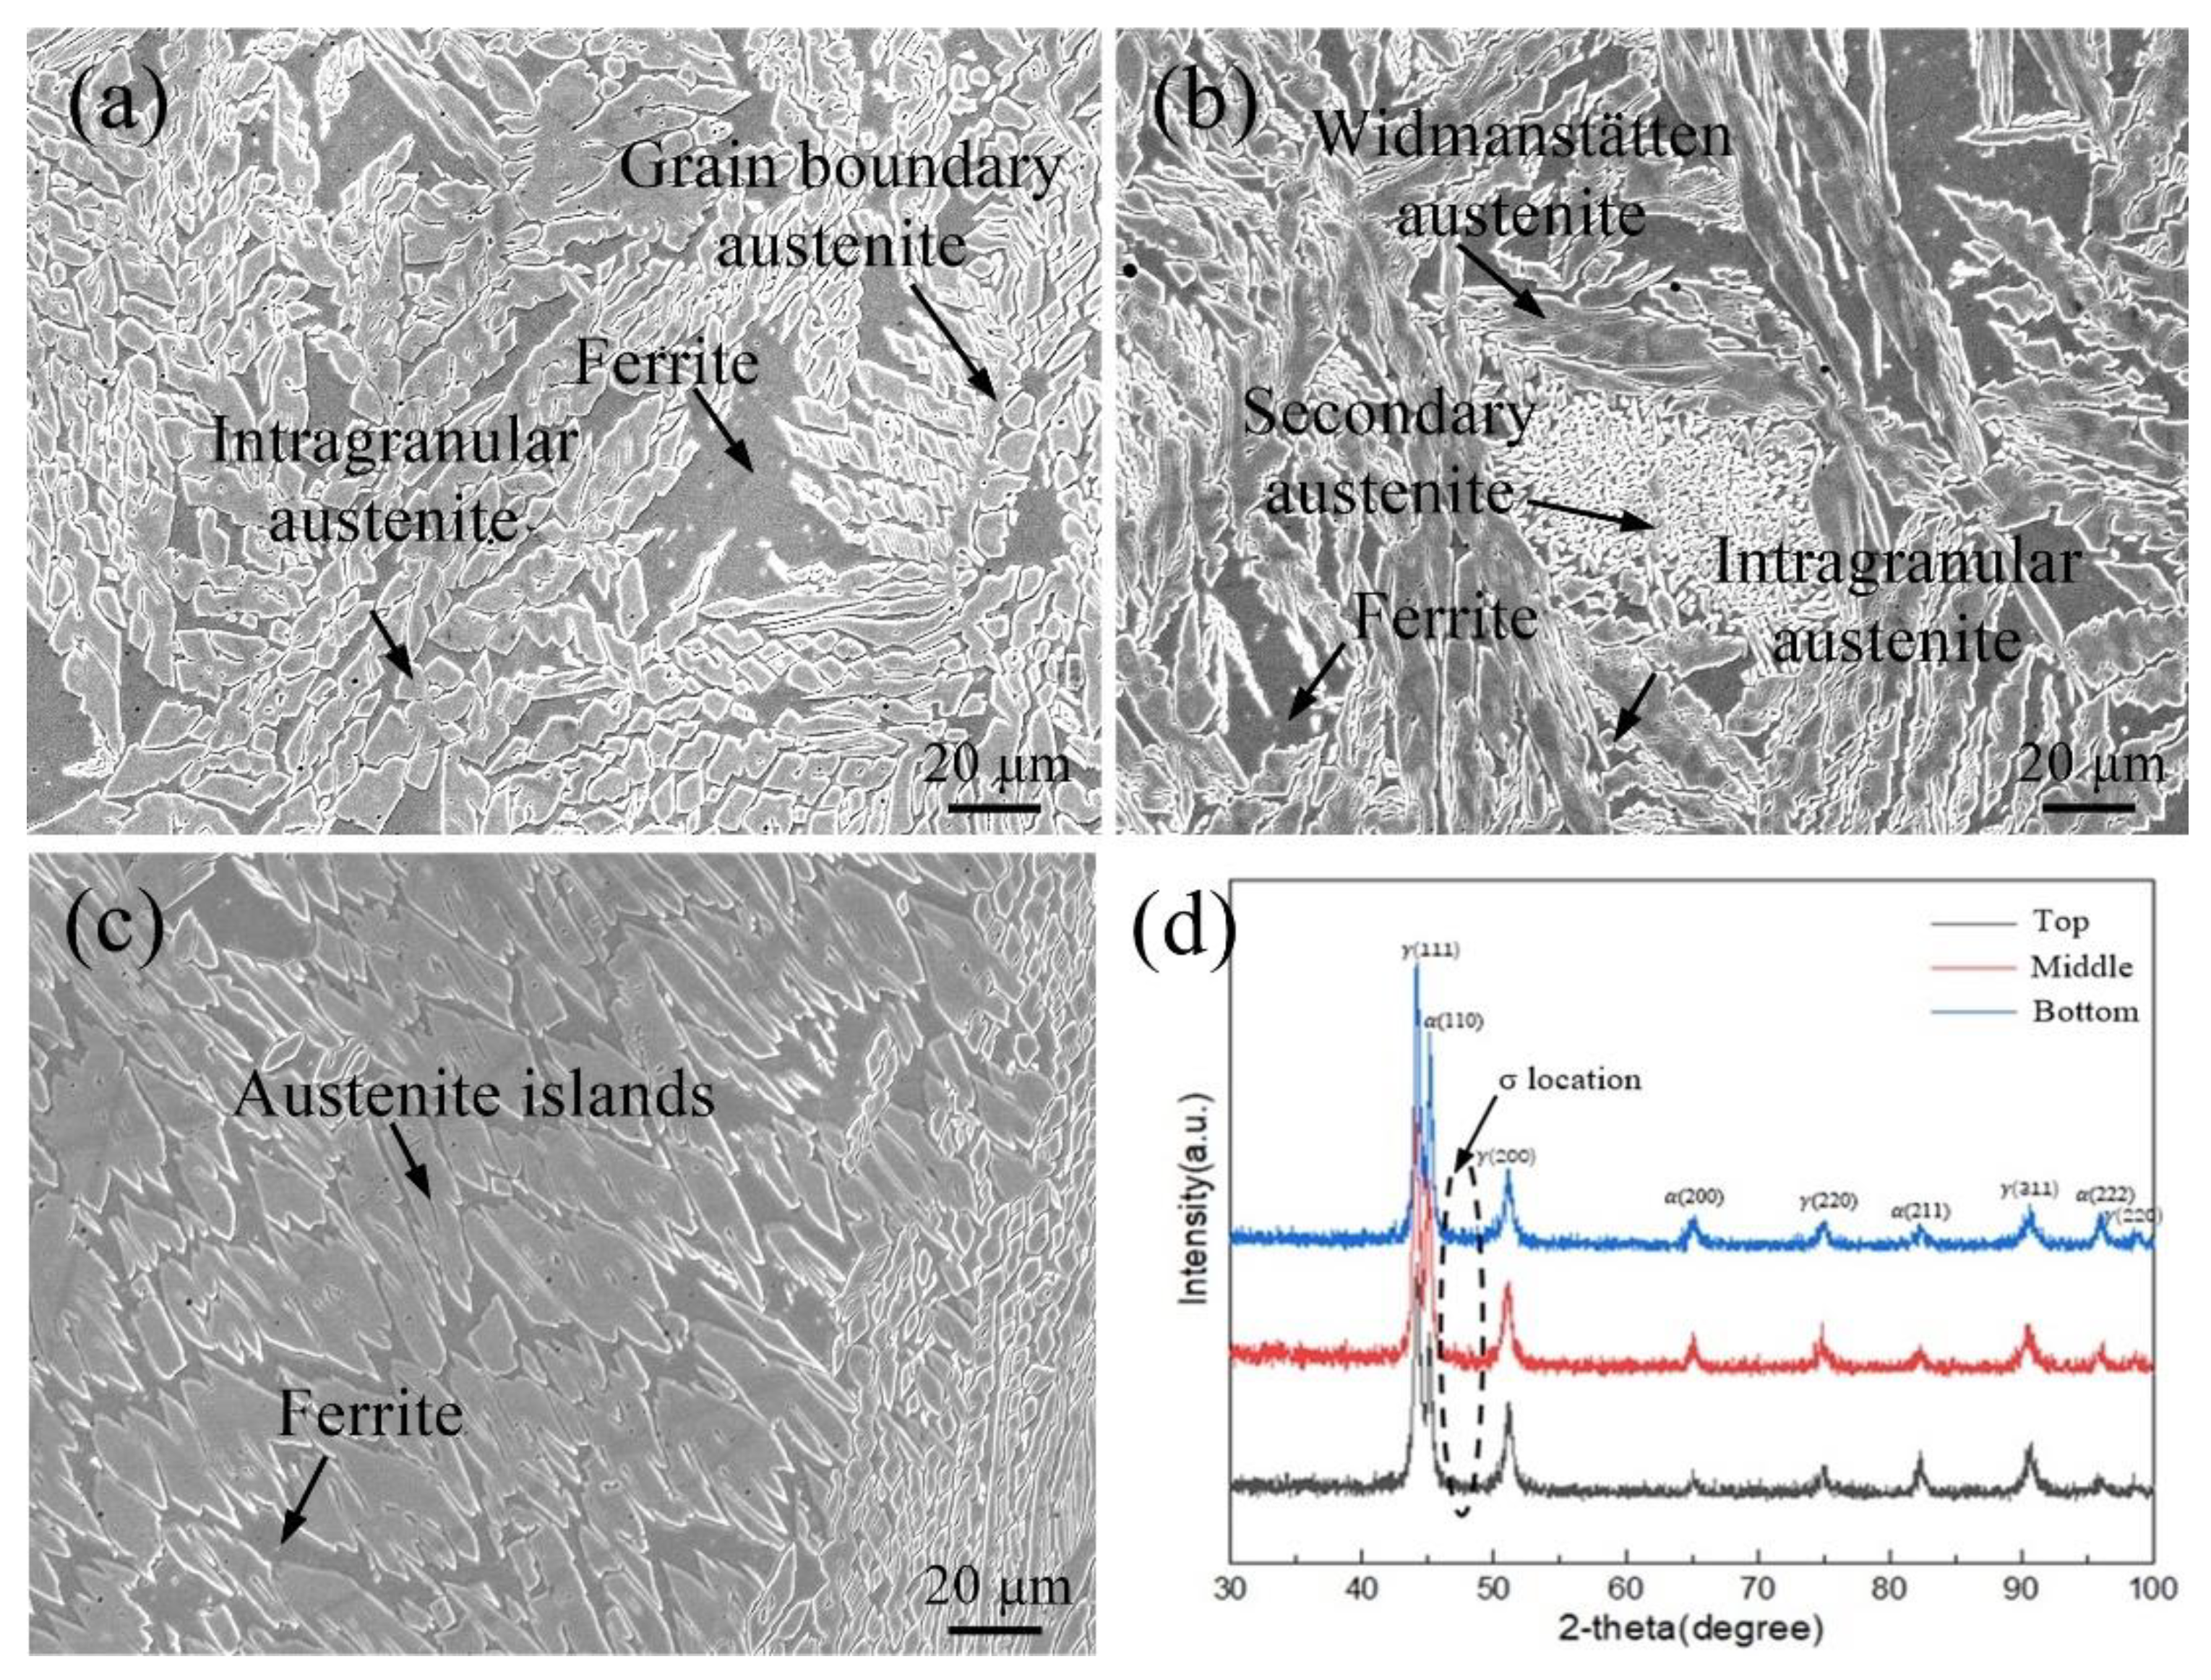
Figure 3a–c presents the SEM images of different positions of the multilayer single-pass additive parts. The protruding part is austenite, and the recessed part is ferrite. The austenite was distributed on the ferrite matrix, and some harmful phases were not found in the SEM image, such as σ phase, Cr2N, χ phase, and R phase. However, these phases are often detected in grade 2205 duplex stainless steel. The sample microstructure in the bottom area was mostly fine intragranular austenite. With the accumulation of heat and the change in heat dissipation conditions, coarse WA and secondary austenite structures appeared in the middle area, and the austenite content increased significantly compared with that at the bottom. In the top area, the austenite gradually became island-like and massive. The grain size and content of austenite increased to a certain extent compared with that in the middle area. The results of XRD phase analysis of the additive part at the bottom (5 mm away from the substrate), the middle (40 mm away from the substrate), and the top (75 mm away from the substrate) are shown in Figure 3d. There were only two phases of ferrite and austenite in different positions of the additive parts, and no diffraction peaks of the σ phase were found [30,31]. As shown, the main peaks were distributed at 40~100°. The strongest diffraction peaks of the α-Fe phase at different positions were all at (110), and the strongest diffraction peaks of the γ-Fe phase at different positions were all at (111). It can also be observed that the full width at half-maximum of the diffraction peaks of the α-Fe phase and the γ-Fe phase decreased from the bottom to the top in turn. It was thus preliminarily determined that there were only two phases—ferrite and austenite—in the additive parts. The σ phase precipitates in duplex stainless steel during heating or slow cooling in the temperature range of 600~1000 °C [32]. However, no σ phase was detected by the XRD results, which indicates that the low heat input by CMT-WAAM inhibited the formation of σ phase.

3.2. Analysis of Additive Part Textures at Different Areas

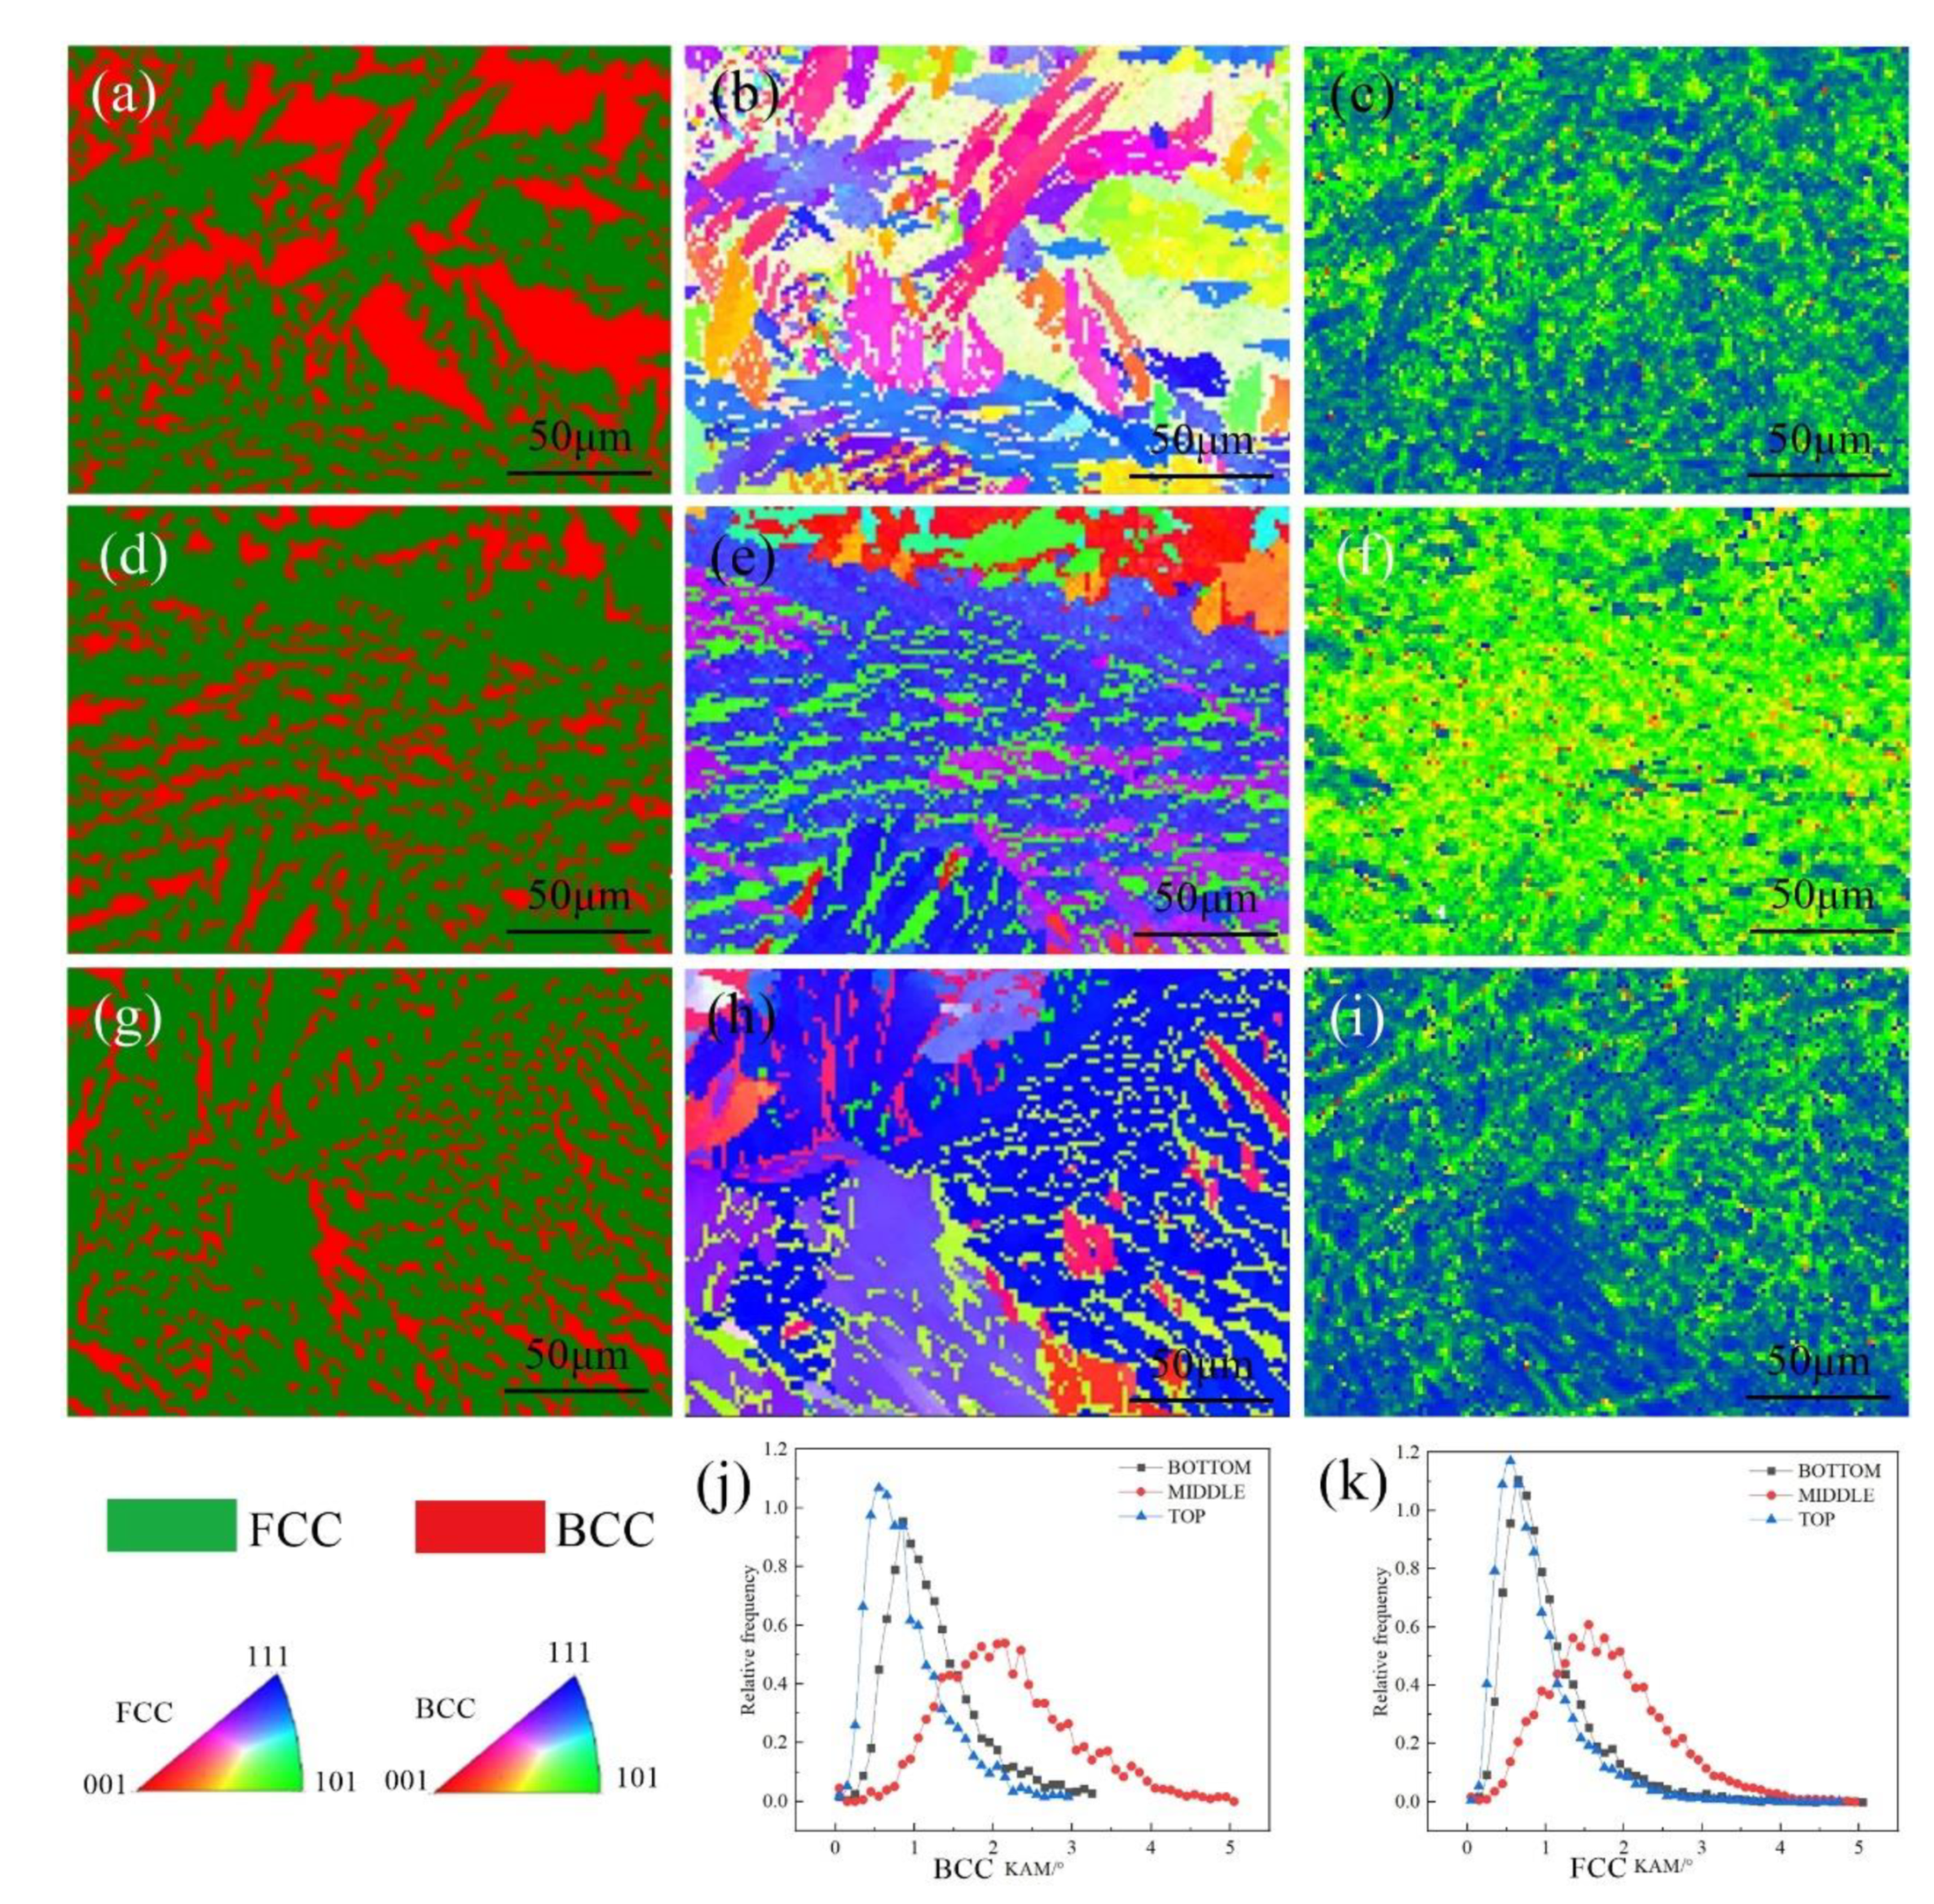
In order to accurately determine the appearance and distribution of phases and to explain the relationship between the microstructure distribution and mechanical properties, EBSD analysis was performed on the specimen at the bottom (distance from the substrate of 5 mm), the middle (distance from the substrate of 40 mm), and the top (distance from the substrate of 75 mm) of the additive parts. Figure 4a,d,g shows the phase distribution at different positions of the additive parts. Red represents ferrite structure and green represents austenite structure. It can be seen that the austenite content increased while the ferrite content decreased with increasing deposition height. No precipitation of harmful phases (Cr2N and σ phase) was found in different positions of the additive part. The distributions of grain orientations of the CMT-WAAM additive part at different positions are shown in Figure 4b,e,h. At the bottom of the additive part, the microstructure had no obvious orientation distribution, as shown in Figure 4b. However, the transition of the microstructure to the middle position of the additive part showed obvious grain orientation, presented in Figure 4e. The grains mainly present a blue color in the austenite region and a purple color in some areas, while the grains in the ferrite region mainly present a green color. According to the microstructure of the top part of the additive, the color of the austenite zone at the top did not change significantly compared to that of the middle part, still consisting of blue and purple, with the difference being that the area of the purple zone increased. The ferrite grains mainly grew along (101). At the same time, the austenite grains mainly grew along (111), and some grains grew along (112) at the middle of the additive part. As can be seen in Figure 4h, the ferrite color at the top changed significantly compared to that of the ferrite in the middle; the ferrite region at the top consisted mainly of yellow and red, which is a significant change compared to the green color in the middle. The ferrite grains mainly grew along (102) and (001). As shown by the KAM diagram in Figure 4c,f,i, it was found that the KAM at the middle of the additive part had the maximum value (Figure 4j,k), followed by the bottom and, finally, the top. This indicates that the residual stress was the smallest at the top of additive part, followed by the bottom, while the residual stress was the largest at the middle of the additive part.
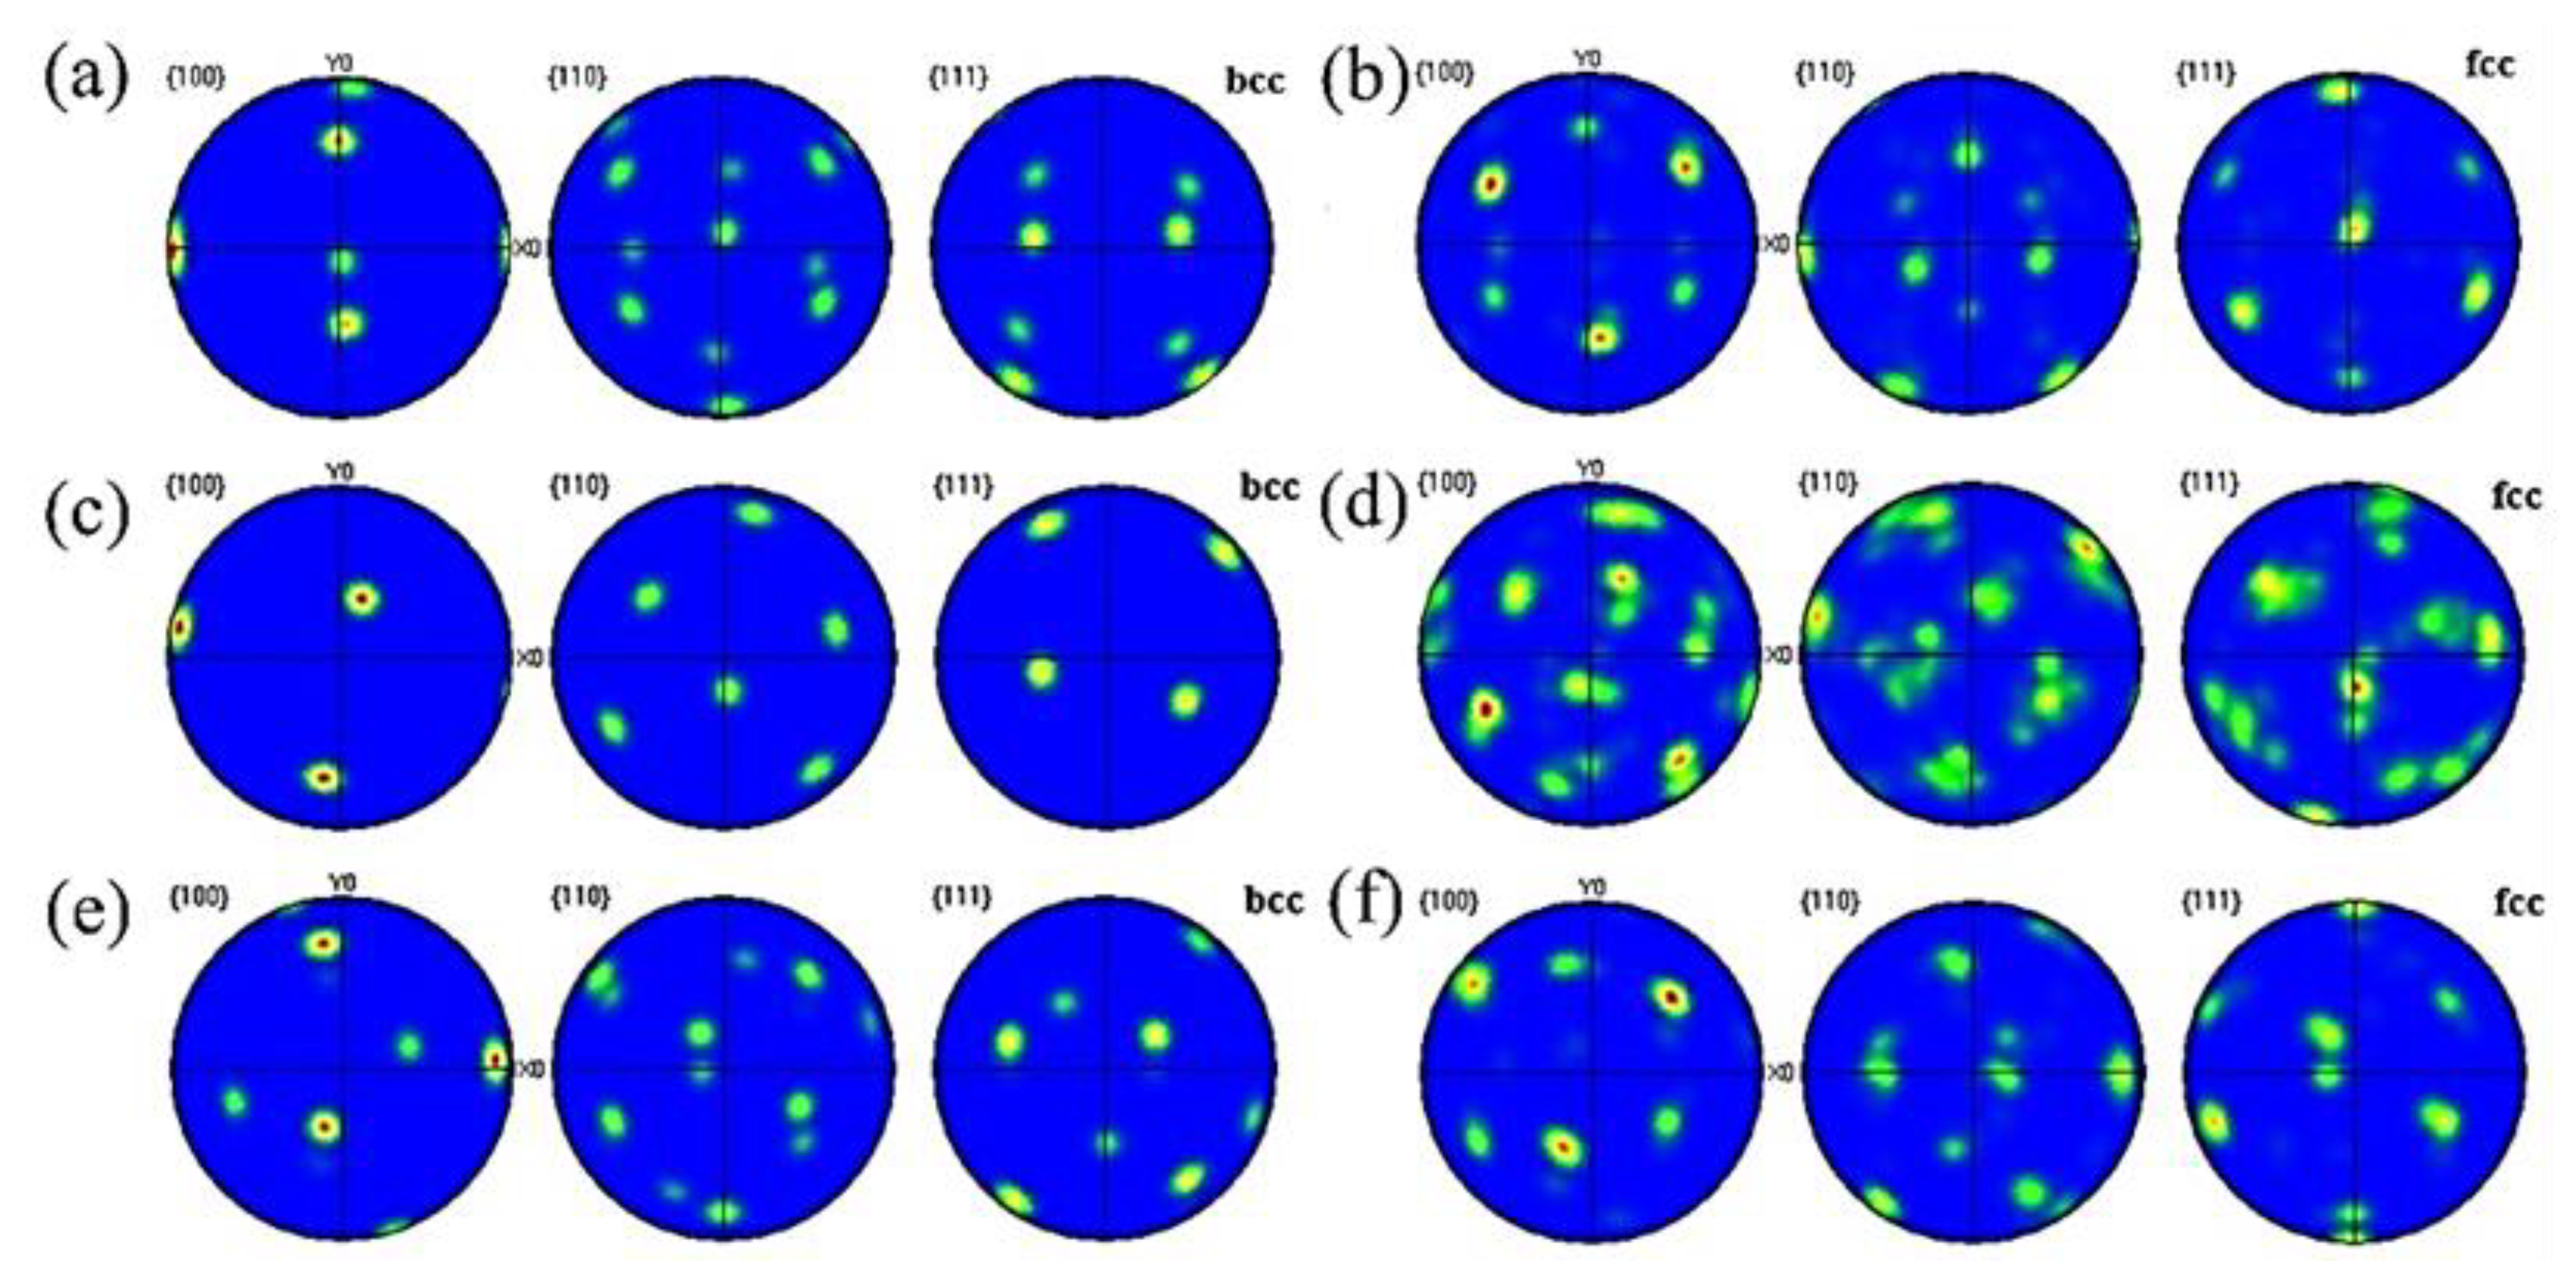
Figure 5 presents the Pole Figure corresponding to ferrite and austenite at different positions of the additive parts. y0 is parallel to the BD, and x0 is parallel to the ND. A strong texture was found in the base metal for both the austenite and ferrite phases [33]. As shown in Figure 5a,b, there was an obvious texture on the bottom of the additive part. The maximum pole density was 43.58 for the BCC ferrite grains, which grew parallel to the BD and ND along the {100} plane. At the same time, a weak texture was found growing along the {111} plane parallel to the ND. The maximum pole density was 32.3 for FCC austenite grains. These textures not only grew along the {100} plane and {111} plane parallel to the BD, but also grew along the {100} plane at an angle of 45° to the BD and ND. Therefore, there was an obvious texture orientation at the bottom of the additive part. As shown in Figure 5c,d, the maximum pole density at the center of the additive part was 56.8 for ferrite grains, which mainly grew along the {100} and {111} planes parallel to the BD and ND. The maximum pole density was 13.4 for the austenite grains in the middle of the additive part. Textures mainly grew along the {100} and {111} planes parallel to the BD, but some also grew along the {100}, {110}, {111} planes at a certain angle to the BD and ND. There was also an obvious texture orientation on top of the additive parts. As shown in Figure 5e,f, the maximum pole density on the top of the additive part was 41.1 for ferrite grains which mainly grew along the {100} plane parallel to the BD and ND, and the maximum pole density was 28.2 for the austenite grains growing along the {100}, {111} planes parallel to the BD and ND or at a certain angle. The texture’s preferred orientation along the heat dissipation direction can be found with the largest temperature gradient, which is in good agreement with the grain growth orientation observed by OM. Generally speaking, the anisotropy of the texture can determine the degree of difficulty of the slip deformation process. Therefore, the mechanical properties have a very close relationship with the crystal texture of metals and their alloys.
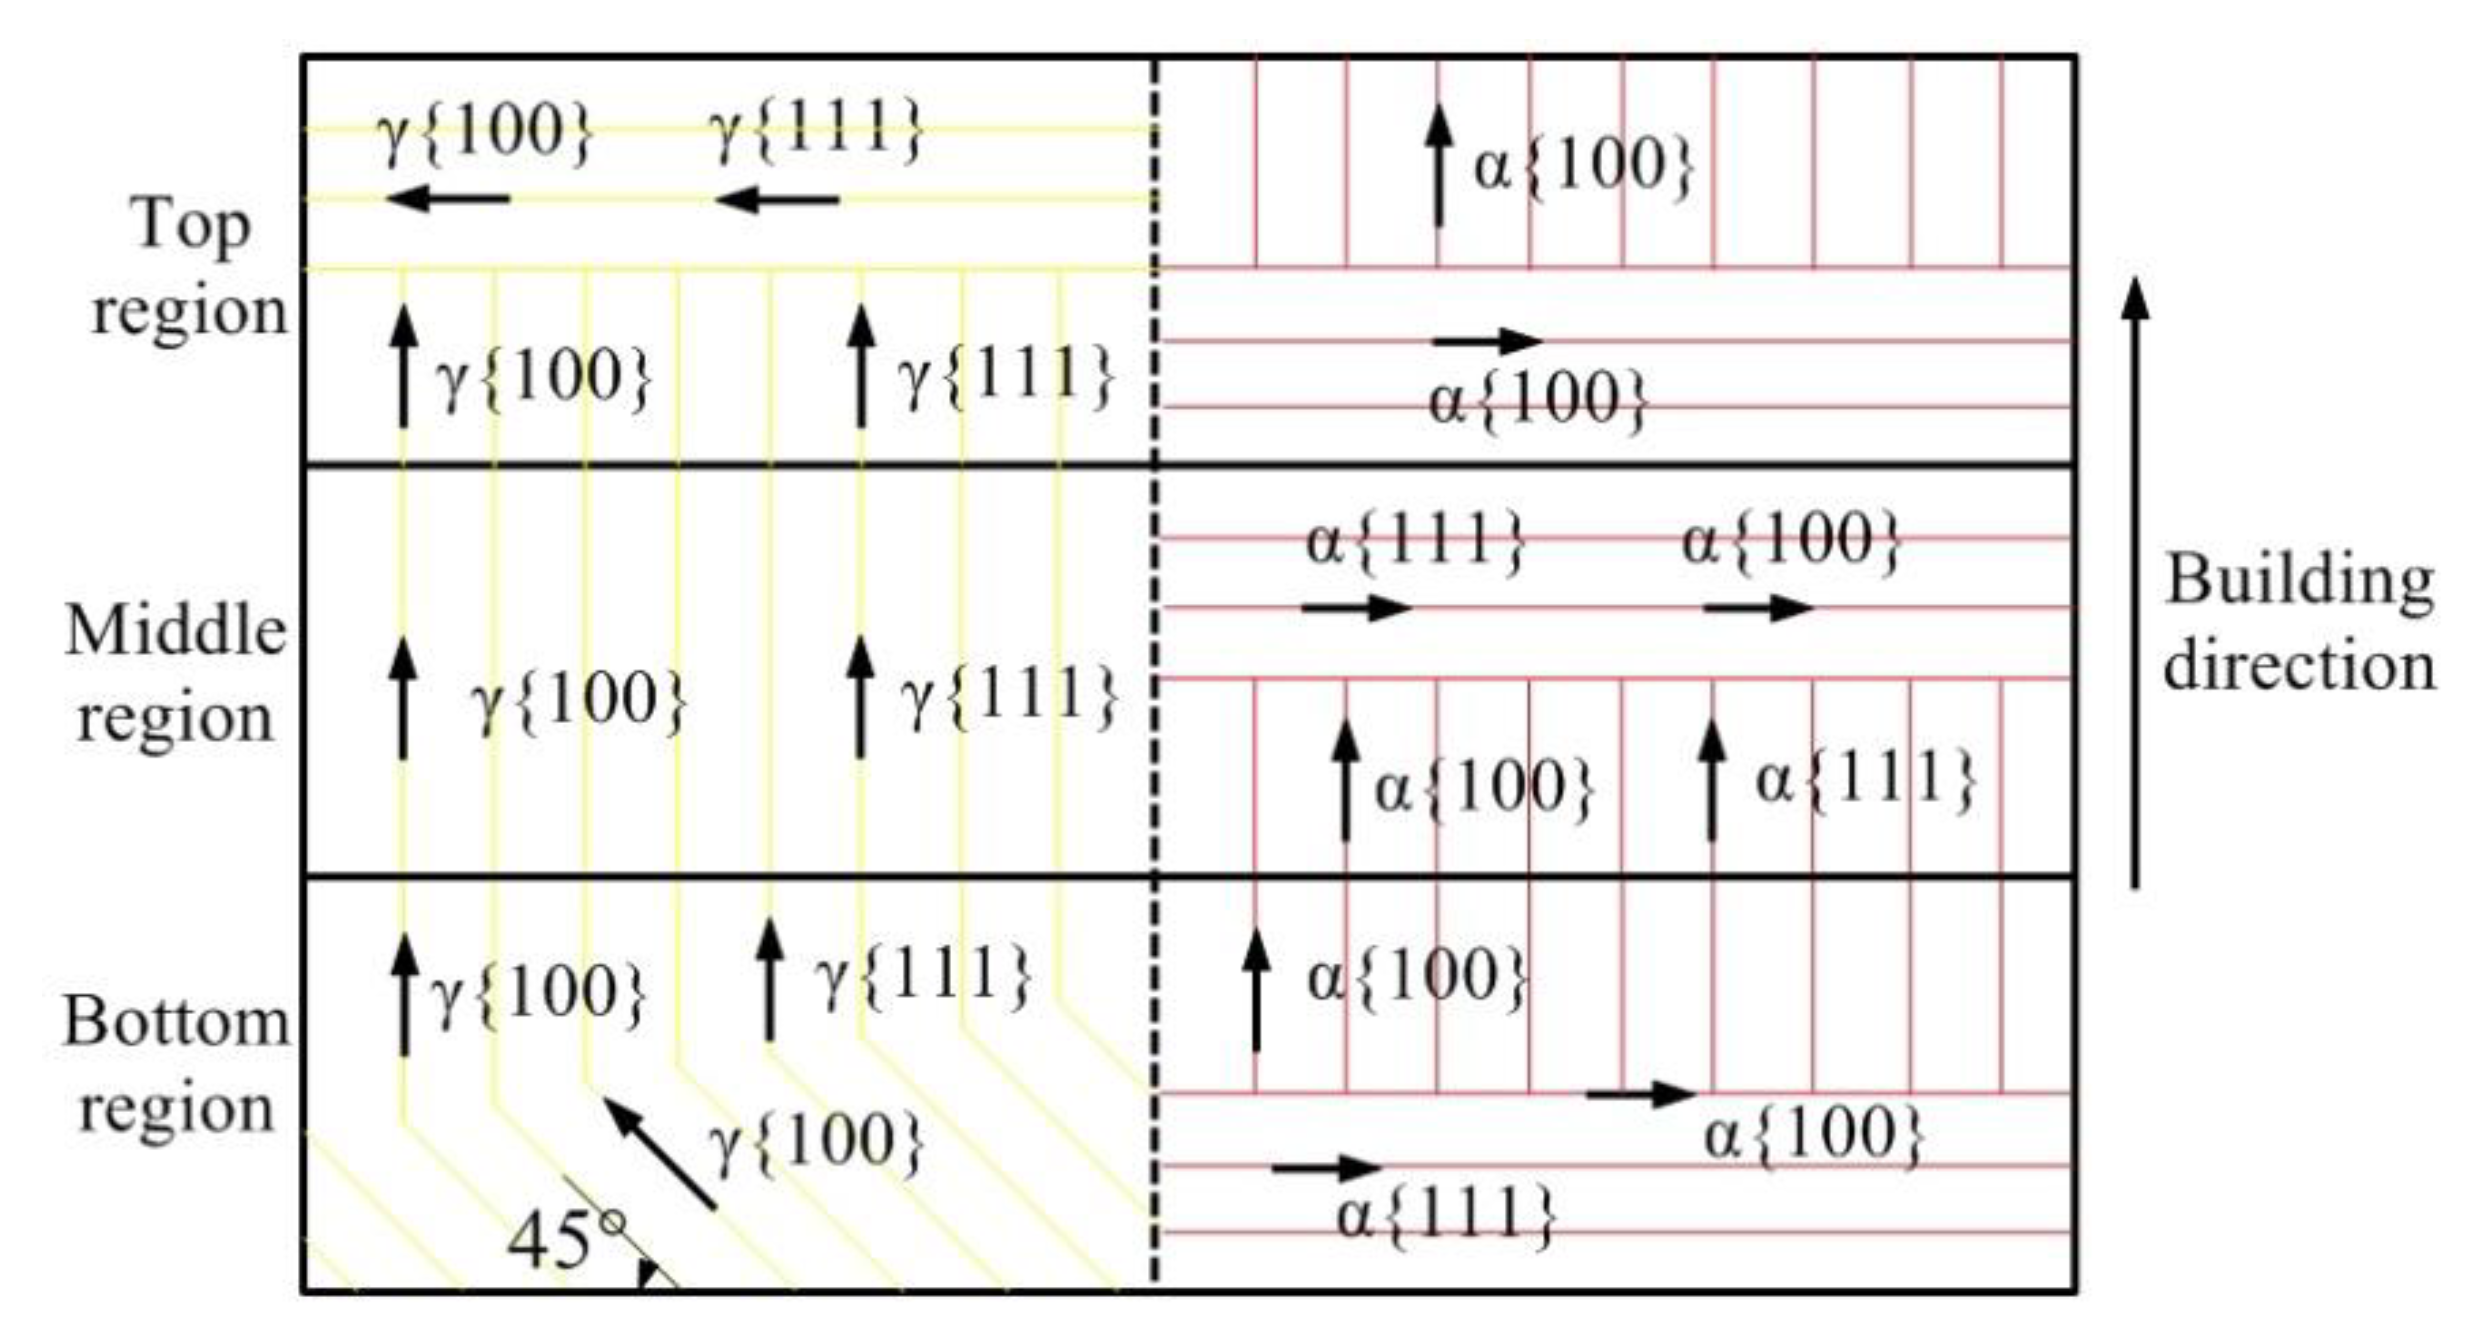
In order to observe the effect of grain orientation on the properties of additive parts during CMT-WAAM, the grain orientation change model is shown in Figure 6. A significant orientation along the build direction was observed in selective laser melting of 2205 duplex stainless steel [34]. In terms of EBSD detection, the ferrite in the top, middle, and lower regions along the TD showed strong texture, while austenite only showed strong texture in the top region. Ferrite and austenite have strong textures, growing along the BD in the three regions. It can be seen that the texture along the TD was mainly ferrite, and the texture along the BD was ferrite and austenite; the tensile properties of the material showed obvious anisotropy. The higher the ferrite content in steel, the lower the plastic toughness of the material. With too many austenite phases in the steel, the strength of the material decreases. Therefore, the tensile strength of the specimen in the BD was higher than that in the TD.

3.3. Molecular Dynamics Simulation of Ferrite and Austenite with Different Volume Ratios

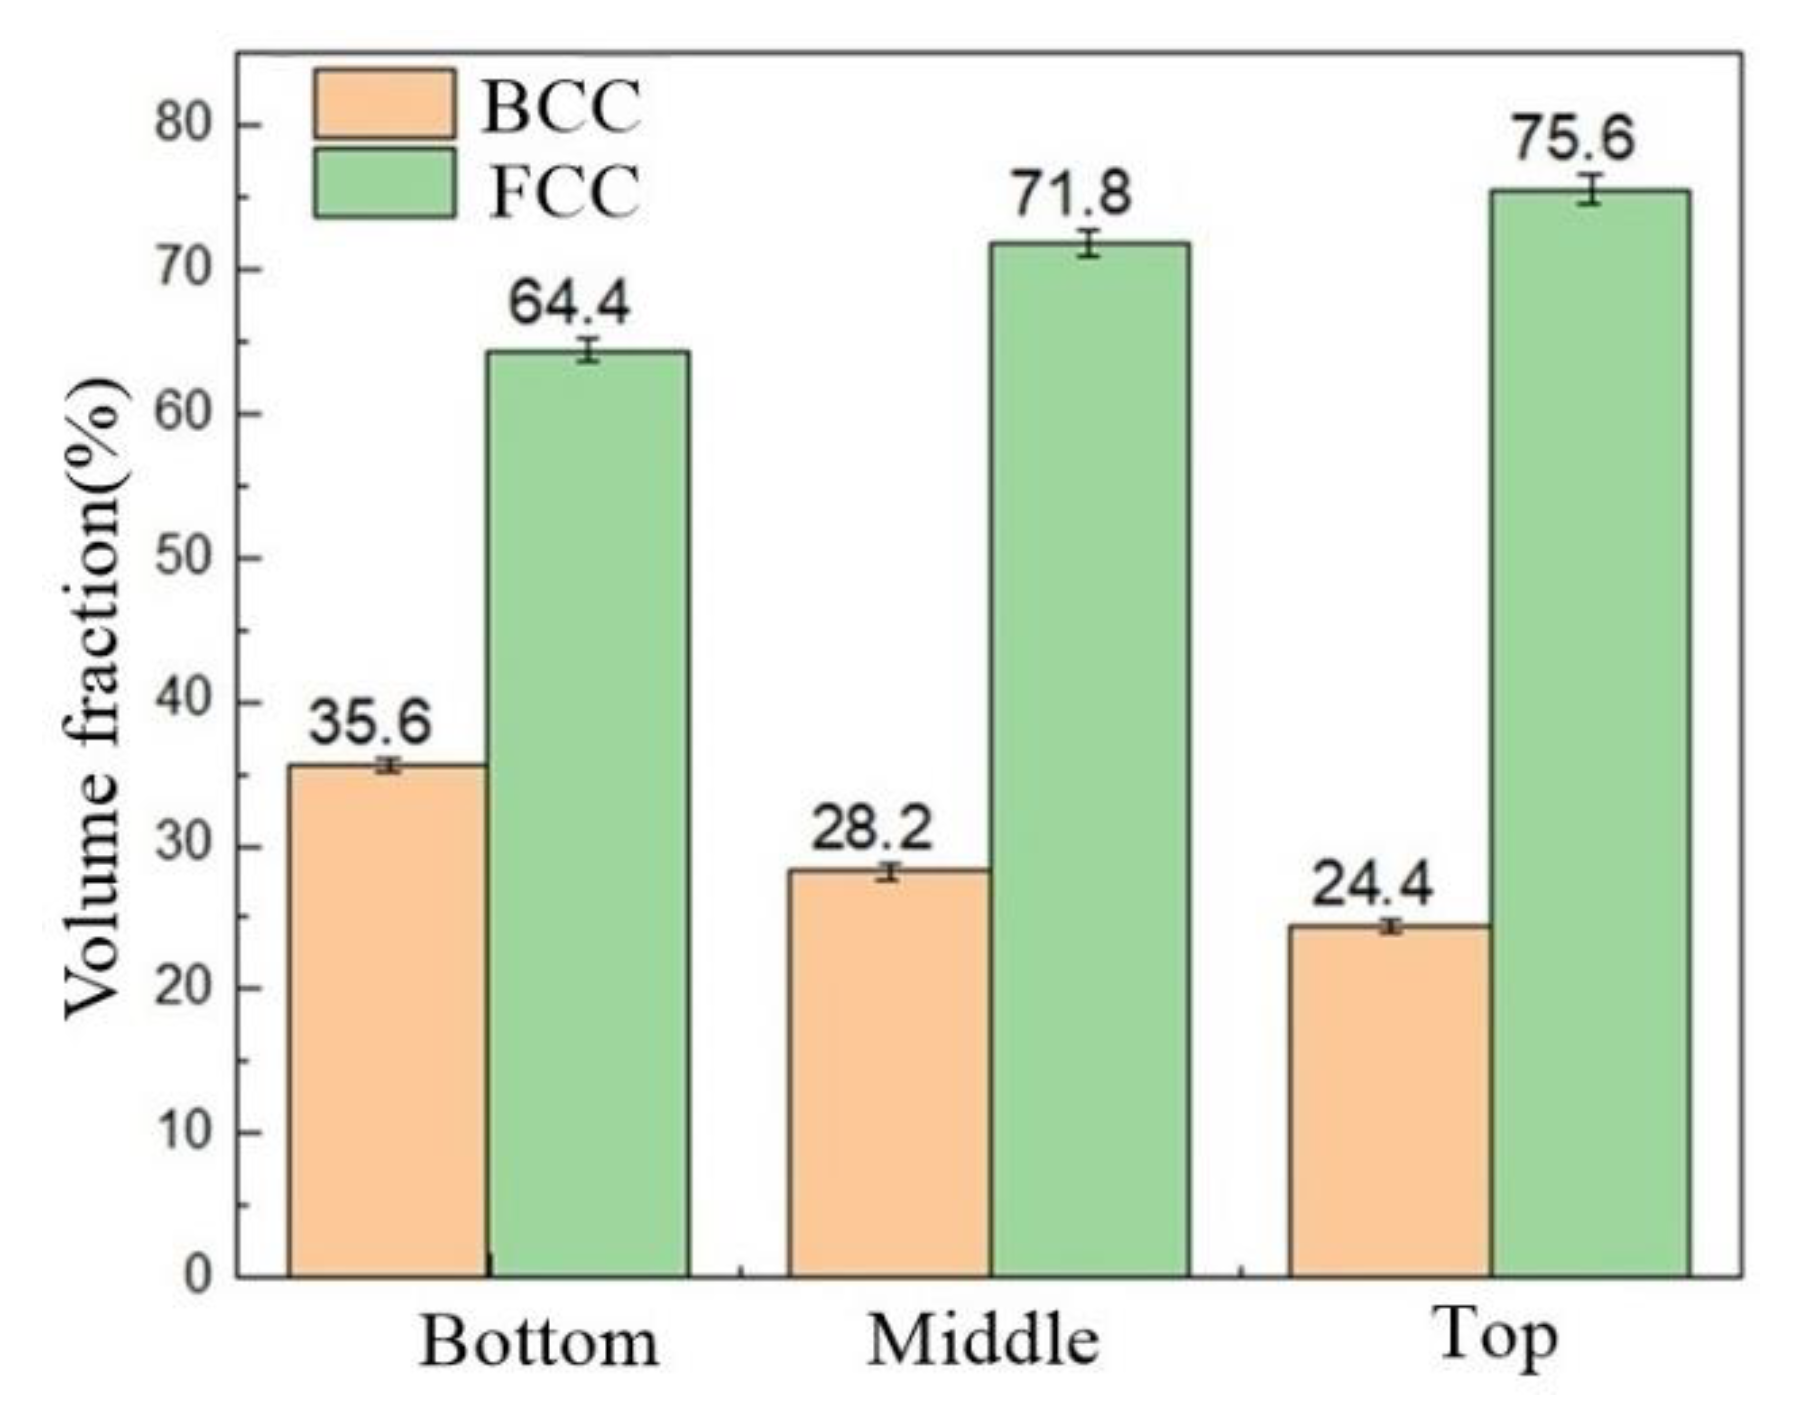
The ferrite and austenite distributions in Figure 4a,d,g revealed that the ferrite and austenite volumes changed. Hence, Figure 7 presents the results of calculating the two-phase comparison of the three positions using the IPP software. In the bottom area, the ferrite and austenite volumes at the bottom of additive parts were 35.6% and 64.4%, respectively. With an increase in the distance from the base plate, austenite gradually increased and ferrite gradually decreased. The ferrite and austenite volumes at the middle of the additive parts were 28.2% and 71.8%, respectively. Meanwhile, the ferrite and austenite volumes at the top of the additive parts were 24.4% and 75.6%, respectively. A simulation was performed in this study using LAMMPS software (lammps-4May2022.tar.gz, Sandia National Laboratories, Albuquerque, NM, USA) to study the effect of ferrite and austenite contents on the performance of the additive parts.
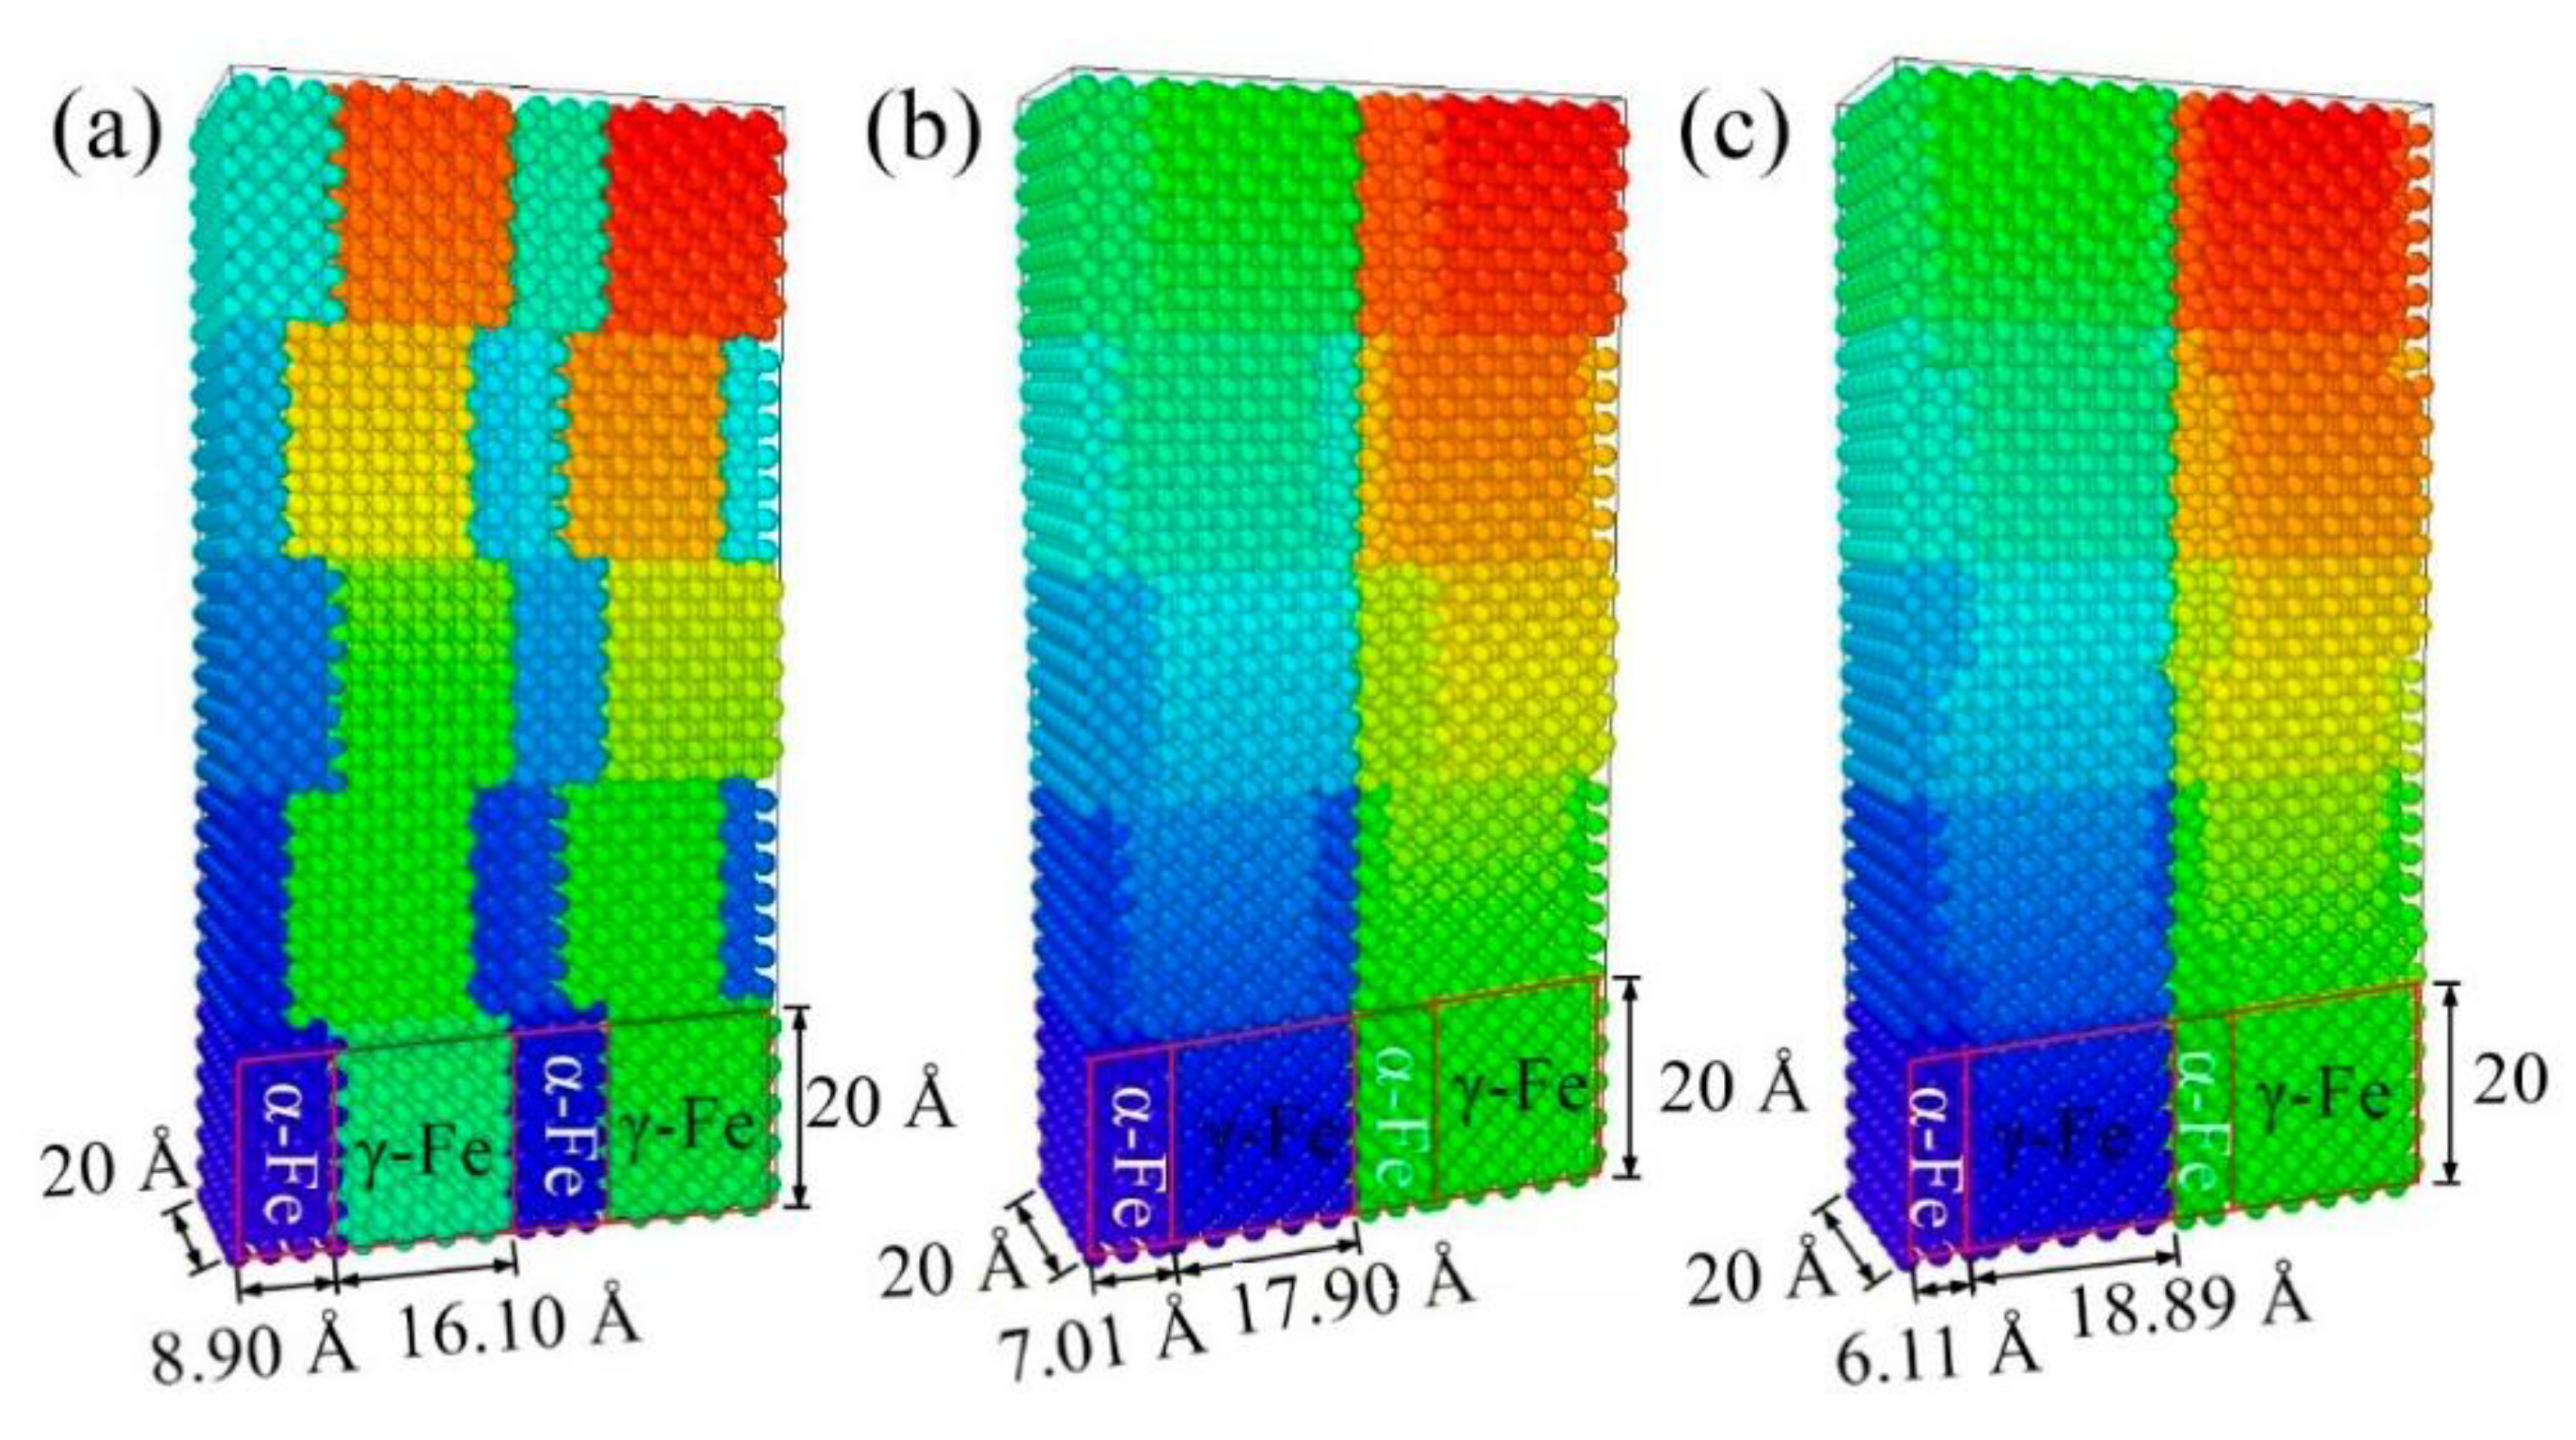
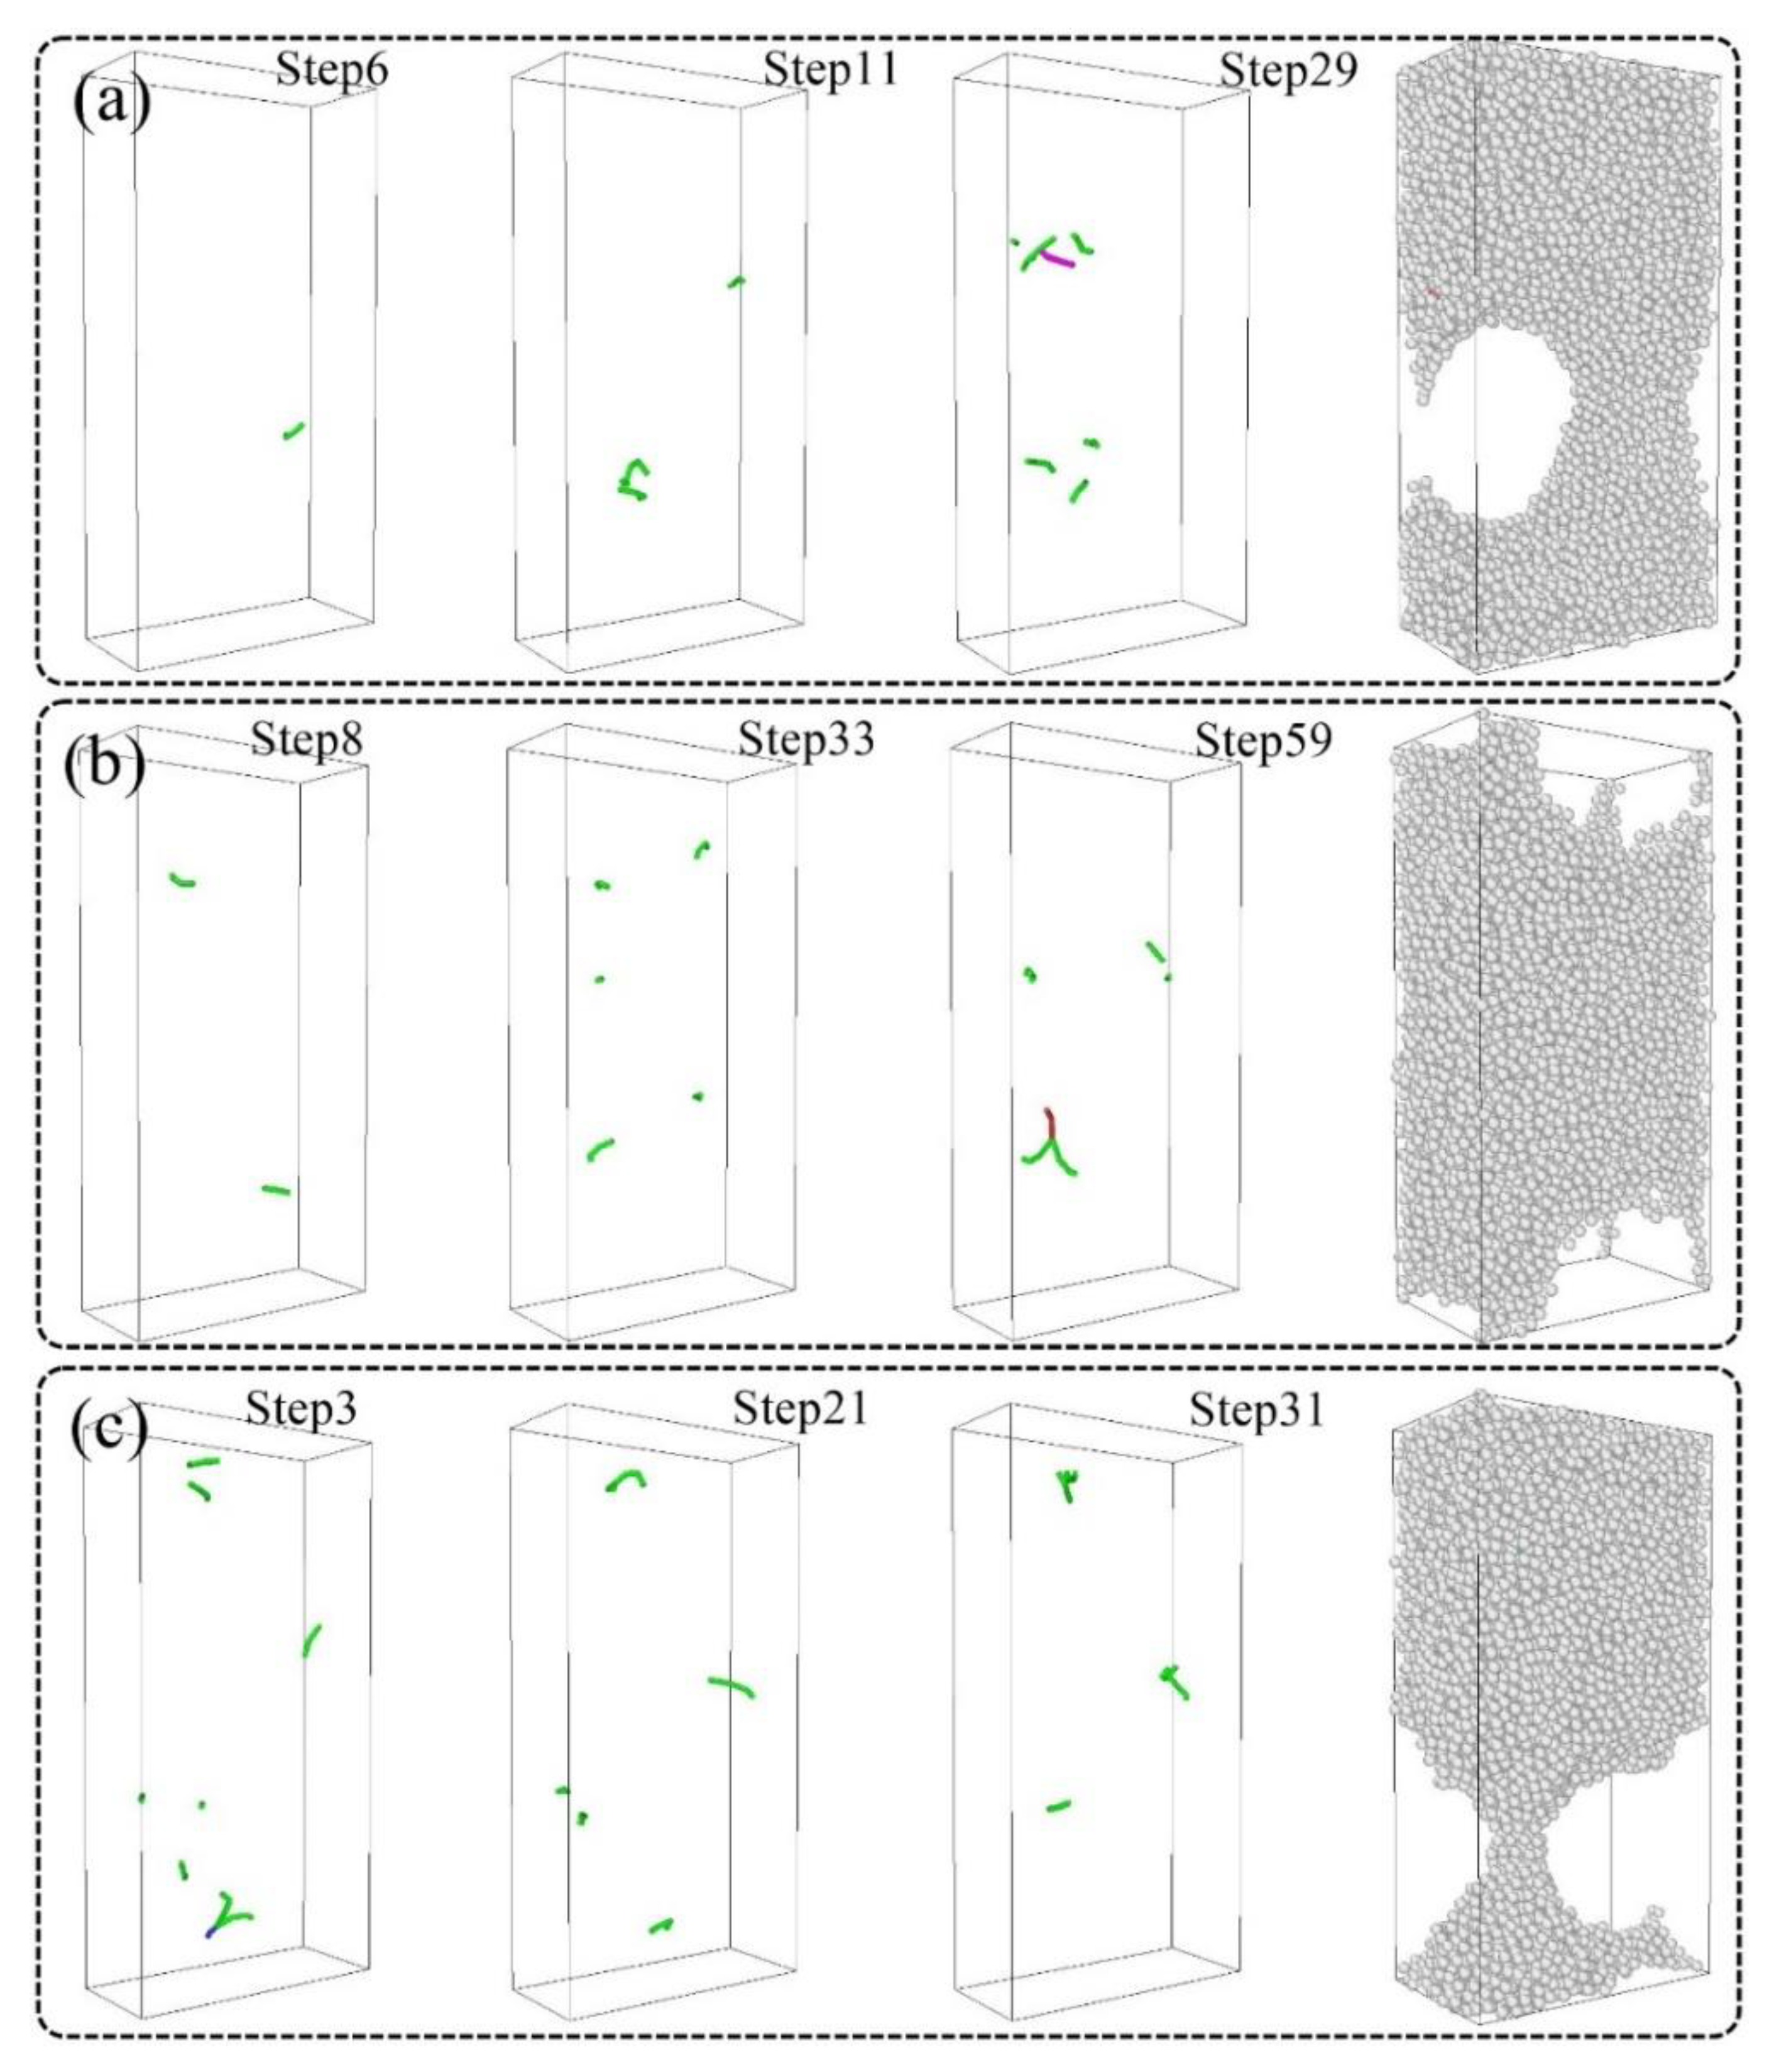
Taking into account the different contents of ferrite and austenite in different regions of the additive parts, the studied parts were modeled separately according to the volume ratio of ferrite and austenite, as shown in Figure 8. The model for the additive parts was cut into 22 pieces, of which 12 pieces were α-Fe and 10 pieces were γ-Fe. The size of the α-Fe area at the bottom was 8.90 Å × 20 Å × 20 Å, and the size of the γ-Fe area was 16.10 Å × 20 Å × 20 Å, as shown in Figure 8a. The α-Fe and γ-Fe volumes in the middle and top are shown in Figure 8b,c. The molecular dynamics simulation for axial tension processing of the different volume ratios of ferrite and austenite in additive parts at 300 K temperature is shown in Figure 9. Initially, the NPT ensemble was used to relax the system, and the strain rate was 1 × 10¹⁰/s. The timestep was kept at 1 fs, and the simulation was run up to 10,000 steps, corresponding to 0.1 nanoseconds. For the additive parts at the bottom, the dislocation change rule during deformation is shown in Figure 9a. The dislocation at the bottom of the additive parts during the initial deformation was along the 1/6[1 1 2] direction (step 6), and the dislocation length was 5.94 Å. As the strain increased, the dislocation moved along the 1/6[1 1 2], 1/6[ 1 12], 1/6[21 1 ], and 1/6[121] directions (step 11), and these dislocation lengths were 4.94 Å, 8.39 Å, 7.06 Å, and 1.90 Å, respectively. With continued increasing strain, the dislocation moved along the 1/6[2 1 1], 1/6[ 1 2 1 ], 1/6[ 1 1 2], 1/6[ 1 12], and 1/6[101] directions (step 29), and these dislocation lengths were 9.15 Å, 7.98 Å, 4.86 Å, 5.54 Å, and 6.37 Å, respectively. For the additive parts at the middle, the dislocation change rule during deformation is shown in Figure 9b. Two dislocations with the same 1/6[ 1 21] direction appeared at the initial deformation, and their lengths were 7.11 Å and 6.66 Å. As the strain increased, the dislocations were found to move mainly along the 1/6<112> crystallographic direction families and partly along 1/3[011] at the later stage of deformation. Similarly, the dislocation variation for the top of the additive part is shown in Figure 9c, and the dislocations were found to move mainly along the 1/6<112> crystallographic direction families.
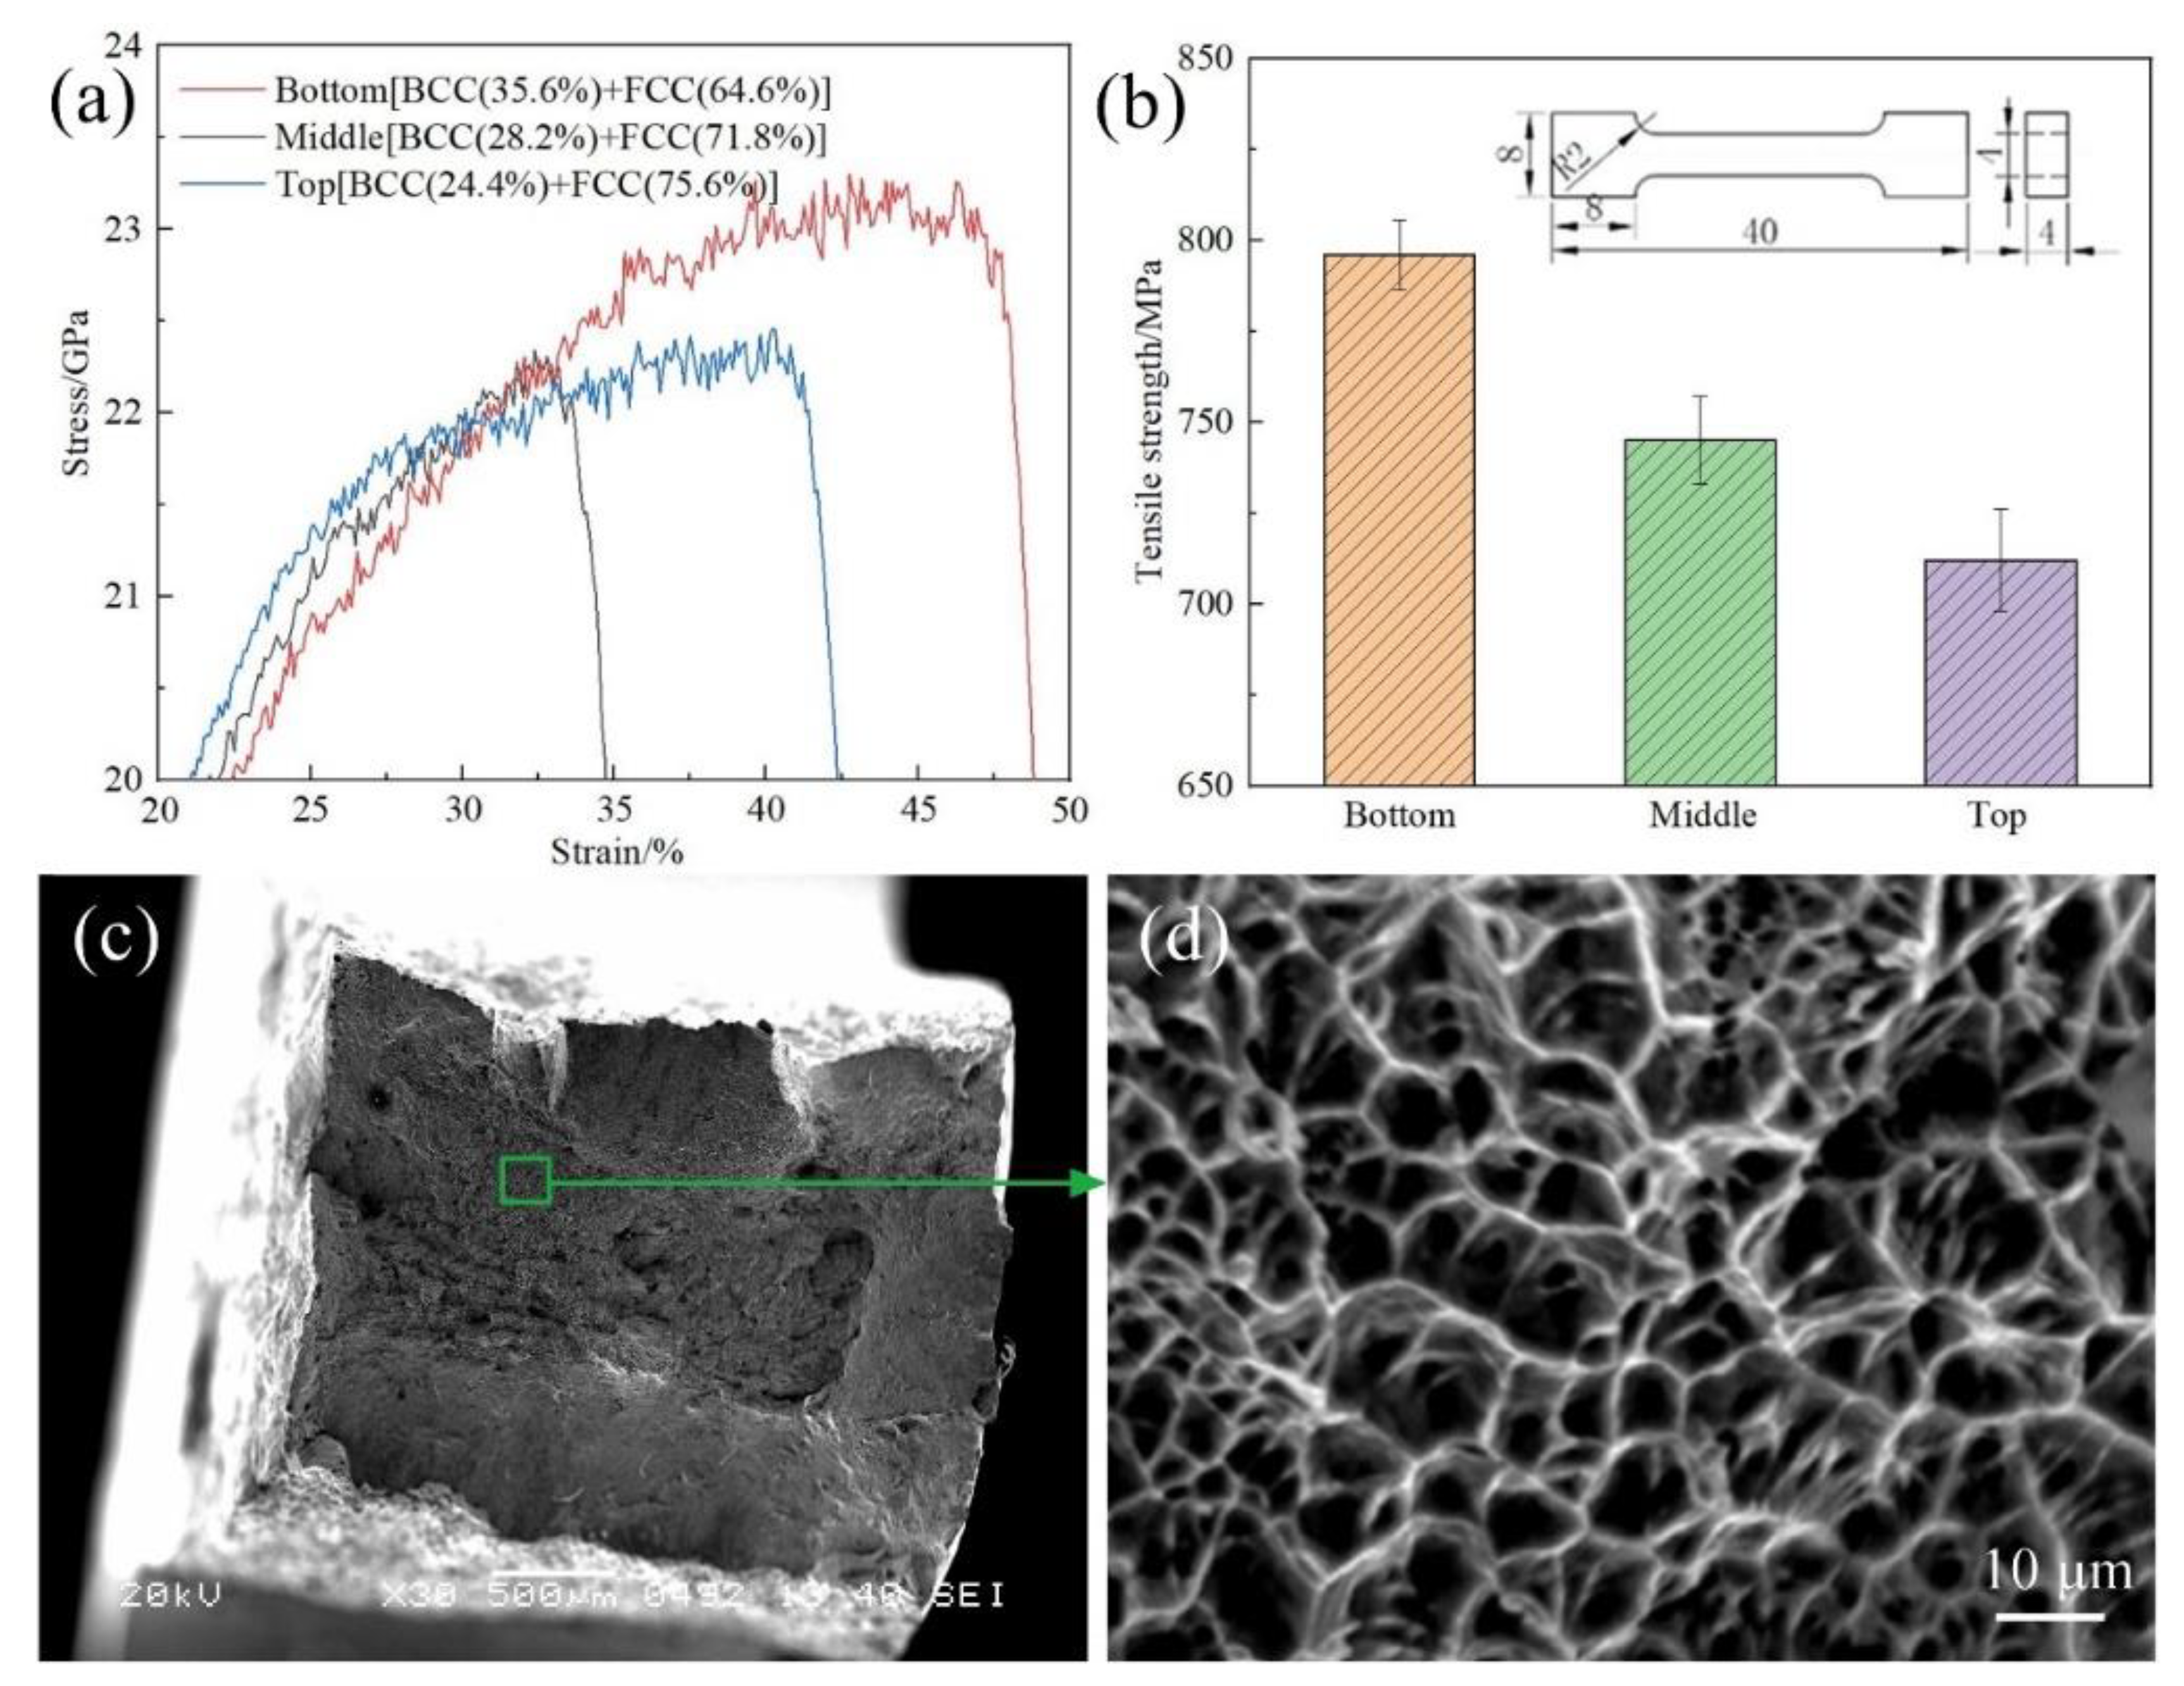
Molecular dynamics simulations were used to analyze the stresses in different regions of the additive parts, and it was found that the stresses in the bottom region were the highest; the stress values in the middle and top were closer, but the elongation in the middle was smaller compared to that in the top. The maximum stress at the bottom of the additive part was 23.3 GPa, that at the middle was 22.3 GPa, and that at the top was 22.5 GPa, as shown in Figure 10a. The tensile properties of the bottom, middle, and top regions of the additive are shown in Figure 10b. It can be seen from the tensile results that the tensile strength in the bottom region was the largest, and the tensile strength in the top region was the smallest. This partially coincides with the simulation results, which, together with the actual tests, showed the highest stress in the region at the bottom. The simulation results for the middle part differed from those for the top part considering the effect of residual stresses that occur in the additive part during the additive process on the properties. The ultimate tensile strength of the 2205 additive parts prepared by the CMT method was 811 MPa in the bottom region, with an elongation of 26%. The ferrite and austenite volumes at the bottom of additive parts were 35.6% and 64.4%, respectively. Nima et al. [35] studied the evolution of microstructure and mechanical properties during LPBF of 2205 duplex stainless steel. The microstructure after LPBF is mostly ferritic, with only ~2% austenite. The LPBF sample shows significantly ultimate tensile strength (Elongation = 18% and ultimate tensile strength = 844 MPa). Wen JH et al. [11] found out that the proportions of ferrite and austenite phases were about 37% and 47% in directed energy deposition additive parts, respectively. The tensile strengths and elongations of the claddings along the vertical direction were 795 MPa and 31%, respectively. This indicates that CMT additive manufacturing enables to obtain additive parts with performance close to that of laser additive manufacturing, and that CMT is more efficient. A typical fracture morphology is shown in Figure 10c,d, where it can be seen that the micro-morphology of the fracture was dimple-like in the SEM micrographs [36], which is typical of ductile fractures.

4. Conclusions

Microstructural regulation of 2205 duplex stainless steel additive parts was realized herein using a low-heat-input method (cold metal transfer wire and arc additive manufacturing); the additive parts were free from σ phase, and their performance was better. Molecular dynamics simulations were used to predict the effect of the phase compositions of different regions of the additive part on its performance and compare with the experimental results. The main conclusions are as follows:
(1)
The residual stress was the smallest at the top of the additive part, followed by the bottom, while the residual stress was the largest at the middle of the additive part. With an increase in the distance from the base plate, austenite gradually increased and ferrite gradually decreased.
(2)
The microstructure had no obvious orientation distribution at the bottom of the additive part. Obvious orientation distributions were detected at the bottom and top of the additive part. The ferrite grains mainly grew along (101) at the middle of the additive part, and along (102) and (001) at the top. The austenite grains mainly grew along (111) and (112) at the middle and top of the additive part.
(3)
The ferrite and austenite grains preferred orientation along the heat dissipation direction with the largest temperature gradient. Ferrite grew along the {100} and {111} planes and austenite grew along the {100} and {111} planes at the middle of the additive part.
(4)
A simulation was performed in this study using the LAMMPS software to study the effect of ferrite and austenite content on the performance of the additive parts. The dislocations were found to move mainly along the 1/6<112> crystallographic direction families.

Author Contributions

Funding acquisition, R.L.; Investigation, J.G.; Resources, C.J.; Software, Z.H.; Writing—original draft, X.B. All authors have read and agreed to the published version of the manuscript.

Funding

This work was supported by the National Natural Science Foundation of China (grant numbers 52075228).

Institutional Review Board Statement

Not applicable.

Informed Consent Statement

Not applicable.

Data Availability Statement

Not applicable.

Conflicts of Interest

The authors declare no conflict of interest.

References

  1. Yuan, W.; Li, R.; Chen, Z.; Gu, J.; Tian, Y. A comparative study on microstructure and properties of traditional laser cladding and high-speed laser cladding of Ni45 alloy coatings. Surf. Coat. Technol. 2021, 405, 126582. [Google Scholar] [CrossRef]
  2. Luo, S.; Li, R.; He, P.; Yue, H.; Gu, J. Investigation on the Microstructure and Mechanical Properties of CNTs-AlSi10Mg Composites Fabricated by Selective Laser Melting. Materials 2021, 14, 838. [Google Scholar] [CrossRef] [PubMed]
  3. Zhao, Y.; Li, R.; Wu, M.; Yue, H.; Li, T.; Chen, Y. Effect of c-BN on the microstructure and high temperature wear resistance of laser cladded Ni-based composite coating. Surf. Coat. Technol. 2021, 421, 127466. [Google Scholar] [CrossRef]
  4. Li, R.; Yuan, W.; Yue, H.; Zhu, Y. Study on microstructure and properties of Fe-based amorphous composite coating by high-speed laser cladding. Opt. Laser Technol. 2022, 146, 107574. [Google Scholar] [CrossRef]
  5. Li, T.; Li, R.; Chang, T.; Ye, X.; Wang, F. Texture evolution and properties analysis of R60702 pure zirconium joint by fiber laser welding. Mater. Charact. 2021, 182, 111581. [Google Scholar] [CrossRef]
  6. Zheng, Z.; Long, J.; Guo, Y.; Li, H.; Zheng, K.; Qiao, Y. Corrosion and impact–abrasion–corrosion behaviors of quenching–tempering martensitic Fe–Cr alloy steels. J. Iron Steel Res. Int. 2022, 21, 728. [Google Scholar] [CrossRef]
  7. Yi, X.; Ma, A.; Zhang, L.; Zheng, Y. Crystallographic anisotropy of corrosion rate and surface faceting of polycrystalline 90Cu-10Ni in acidic NaCl solution. Mater. Des. 2022, 215, 110429. [Google Scholar] [CrossRef]
  8. Karlsson, L. Welding duplex stainless steels: A review of current recommendations. Zavar. Zavarene Konstr. 2018, 63, 65. [Google Scholar] [CrossRef]
  9. Frazier, W.E. Metal Additive Manufacturing: A Review. J. Mater. Eng. Perform. 2014, 23, 1917. [Google Scholar] [CrossRef]
  10. Papula, S.; Song, M.; Pateras, A.; Chen, X.; Brandt, M.; Easton, M.; Yagodzinskyy, Y.; Virkkunen, I.; Hänninen, H. Selective laser melting of duplex stainless steel 2205: Effect of post-processing heat treatment on microstructure, mechanical properties, and corrosion resistance. Materials 2019, 12, 2468. [Google Scholar] [CrossRef] [Green Version]
  11. Wen, J.; Zhang, L.; Ning, J.; Xue, F.; Lei, X.; Zhang, J.; Na, S. Laser additively manufactured intensive dual-phase steels and their microstructures, properties and corrosion resistance. Mater. Des. 2020, 192, 108710. [Google Scholar] [CrossRef]
  12. Zhang, X.; Wang, K.; Zhou, Q.; Kong, J.; Peng, Y.; Ding, J.; Diao, C.; Yang, D.; Huang, Y.; Zhang, T. Element partitioning and electron backscatter diffraction analysis from feeding wire to as-deposited microstructure of wire and arc additive manufacturing with super duplex stainless steel. Mater. Sci. Eng. A 2020, 773, 138856. [Google Scholar] [CrossRef]
  13. Kannan, A.R.; Shanmugam, N.S.; Rajkumar, V.; Vishnukumar, M. Insight into the microstructural features and corrosion properties of wire arc additive manufactured super duplex stainless steel (ER2594). Mater. Lett. 2020, 270, 127680. [Google Scholar] [CrossRef]
  14. Hejripour, F.; Binesh, F.; Hebel, M.; Aidun, D.K. Thermal modeling and characterization of wire arc additive manufactured duplex stainless steel. J. Mater. Process. Technol. 2019, 272, 58. [Google Scholar] [CrossRef]
  15. Rodrigues, T.A.; Duarte, V.; Avila, J.A.; Santos, T.G.; Miranda, R.M.; Oliveira, J.P. Wire and arc additive manufacturing of HSLA steel: Effect of thermal cycles on microstructure and mechanical properties. Addit. Manuf. 2019, 27, 440. [Google Scholar] [CrossRef]
  16. Stützer, J.; Totzauer, T.; Wittig, B.; Zinke, M.; Jüttner, S. GMAW cold wire technology for adjusting the ferrite–austenite ratio of wire and arc additive manufactured duplex stainless steel components. Metals-Basel 2019, 9, 564. [Google Scholar] [CrossRef]
  17. Geng, H.; Li, J.; Xiong, J.; Lin, X.; Zhang, F. Geometric limitation and tensile properties of wire and arc additive manufacturing 5A06 aluminum alloy parts. J. Mater. Eng. Perform. 2017, 26, 621. [Google Scholar] [CrossRef]
  18. Köhler, M.; Fiebig, S.; Hensel, J.; Dilger, K. Wire and arc additive manufacturing of aluminum components. Metals 2019, 9, 608. [Google Scholar] [CrossRef]
  19. Li, Y.; Yu, S.; Chen, Y.; Yu, R.; Shi, Y. Wire and arc additive manufacturing of aluminum alloy lattice structure. J. Manuf. Process. 2020, 50, 510. [Google Scholar] [CrossRef]
  20. Takagi, H.; Sasahara, H.; Abe, T.; Sannomiya, H.; Nishiyama, S.; Ohta, S.; Nakamura, K. Material-property evaluation of magnesium alloys fabricated using wire-and-arc-based additive manufacturing. Addit. Manuf. 2018, 24, 498. [Google Scholar] [CrossRef]
  21. Yang, X.; Liu, J.; Wang, Z.; Lin, X.; Liu, F.; Huang, W.; Liang, E. Microstructure and mechanical properties of wire and arc additive manufactured AZ31 magnesium alloy using cold metal transfer process. Mater. Sci. Eng. A 2020, 774, 138942. [Google Scholar] [CrossRef]
  22. Abe, T.; Sasahara, H. Dissimilar metal deposition with a stainless steel and nickel-based alloy using wire and arc-based additive manufacturing. Precis. Eng. 2016, 45, 387. [Google Scholar] [CrossRef]
  23. Zhang, Y.; Cheng, F.; Wu, S. Improvement of pitting corrosion resistance of wire arc additive manufactured duplex stainless steel through post-manufacturing heat-treatment. Mater. Charact. 2021, 171, 110743. [Google Scholar] [CrossRef]
  24. Yang, L.; Lu, W.; Liu, Z.; Zhang, Y.; Xu, F.; Gao, H.; Yao, Z. Location-Dependent Microstructure and Properties for Plasma Arc Additively Manufactured Duplex Stainless Steel ER2209 Wire. J. Mater. Eng. Perform. 2021, 30, 6788–6800. [Google Scholar] [CrossRef]
  25. Selvi, S.; Vishvaksenan, A.; Rajasekar, E. Cold metal transfer (CMT) technology—An overview. Def. Technol. 2018, 14, 28. [Google Scholar] [CrossRef]
  26. Xizhang, C.; Su, C.; Wang, Y.; Siddiquee, A.N.; Sergey, K.; Jayalakshmi, S.; Singh, R.A. Cold Metal Transfer (CMT) Based Wire and Arc Additive Manufacture (WAAM) System. J. Surf. Investig. X-ray Synchrotron Neutron Tech. 2018, 12, 1278. [Google Scholar] [CrossRef]
  27. Lervåg, M.; Sørensen, C.; Robertstad, A.; Brønstad, B.M.; Nyhus, B.; Eriksson, M.; Aune, R.; Ren, X.; Akselsen, O.M.; Bunaziv, I. Additive manufacturing with superduplex stainless steel wire by cmt process. Metals 2020, 10, 272. [Google Scholar] [CrossRef]
  28. Ramkumar, K.D.; Bajpai, A.; Raghuvanshi, S.; Singh, A.; Chandrasekhar, A.; Arivarasu, M.; Arivazhagan, N. Investigations on structure-property relationships of activated flux TIG weldments of super-duplex/austenitic stainless steels. Mater. Sci. Eng. A 2015, 638, 60. [Google Scholar] [CrossRef]
  29. Khan, W.N.; Mahajan, S.; Chhibber, R. Investigations on reformed austenite in the microstructure of dissimilar super duplex/pipeline steel weld. Mater. Lett. 2021, 285, 129109. [Google Scholar] [CrossRef]
  30. Makhdoom, M.A.; Ahmad, A.; Kamran, M.; Abid, K.; Haider, W. Microstructural and electrochemical behavior of 2205 duplex stainless steel weldments. Surf. Interfaces 2017, 9, 189. [Google Scholar] [CrossRef]
  31. Ahmad, G.N.; Raza, M.S.; Singh, N.K.; Kumar, H. Experimental investigation on Ytterbium fiber laser butt welding of Inconel 625 and Duplex stainless steel 2205 thin sheets. Opt. Laser Technol. 2020, 126, 106117. [Google Scholar] [CrossRef]
  32. Hsieh, C.; Wu, W. Overview of Intermetallic Sigma (σ) Phase Precipitation in Stainless Steels. Int. Sch. Res. Not. 2012, 2012, 732471. [Google Scholar] [CrossRef]
  33. Badji, R.; Bacroix, B.; Bouabdallah, M. Texture, microstructure and anisotropic properties in annealed 2205 duplex stainless steel welds. Mater. Charact. 2011, 62, 833. [Google Scholar] [CrossRef]
  34. Nigon, G.N.; Isgor, O.B.; Pasebani, S. The effect of annealing on the selective laser melting of 2205 duplex stainless steel: Microstructure, grain orientation, and manufacturing challenges. Opt. Laser Technol. 2021, 134, 106643. [Google Scholar] [CrossRef]
  35. Haghdadi, N.; Ledermueller, C.; Chen, H.; Chen, Z.; Liu, Q.; Li, X.; Rohrer, G.; Liao, X.; Ringer, S.; Primig, S. Evolution of microstructure and mechanical properties in 2205 duplex stainless steels during additive manufacturing and heat treatment. Mater. Sci. Eng. A 2022, 835, 142695. [Google Scholar] [CrossRef]
  36. Calliari, I.; Straffelini, G.; Ramous, E. Investigation of secondary phase effect on 2205 DSS fracture toughness. Mater. Sci. Technol. 2010, 26, 81. [Google Scholar] [CrossRef]
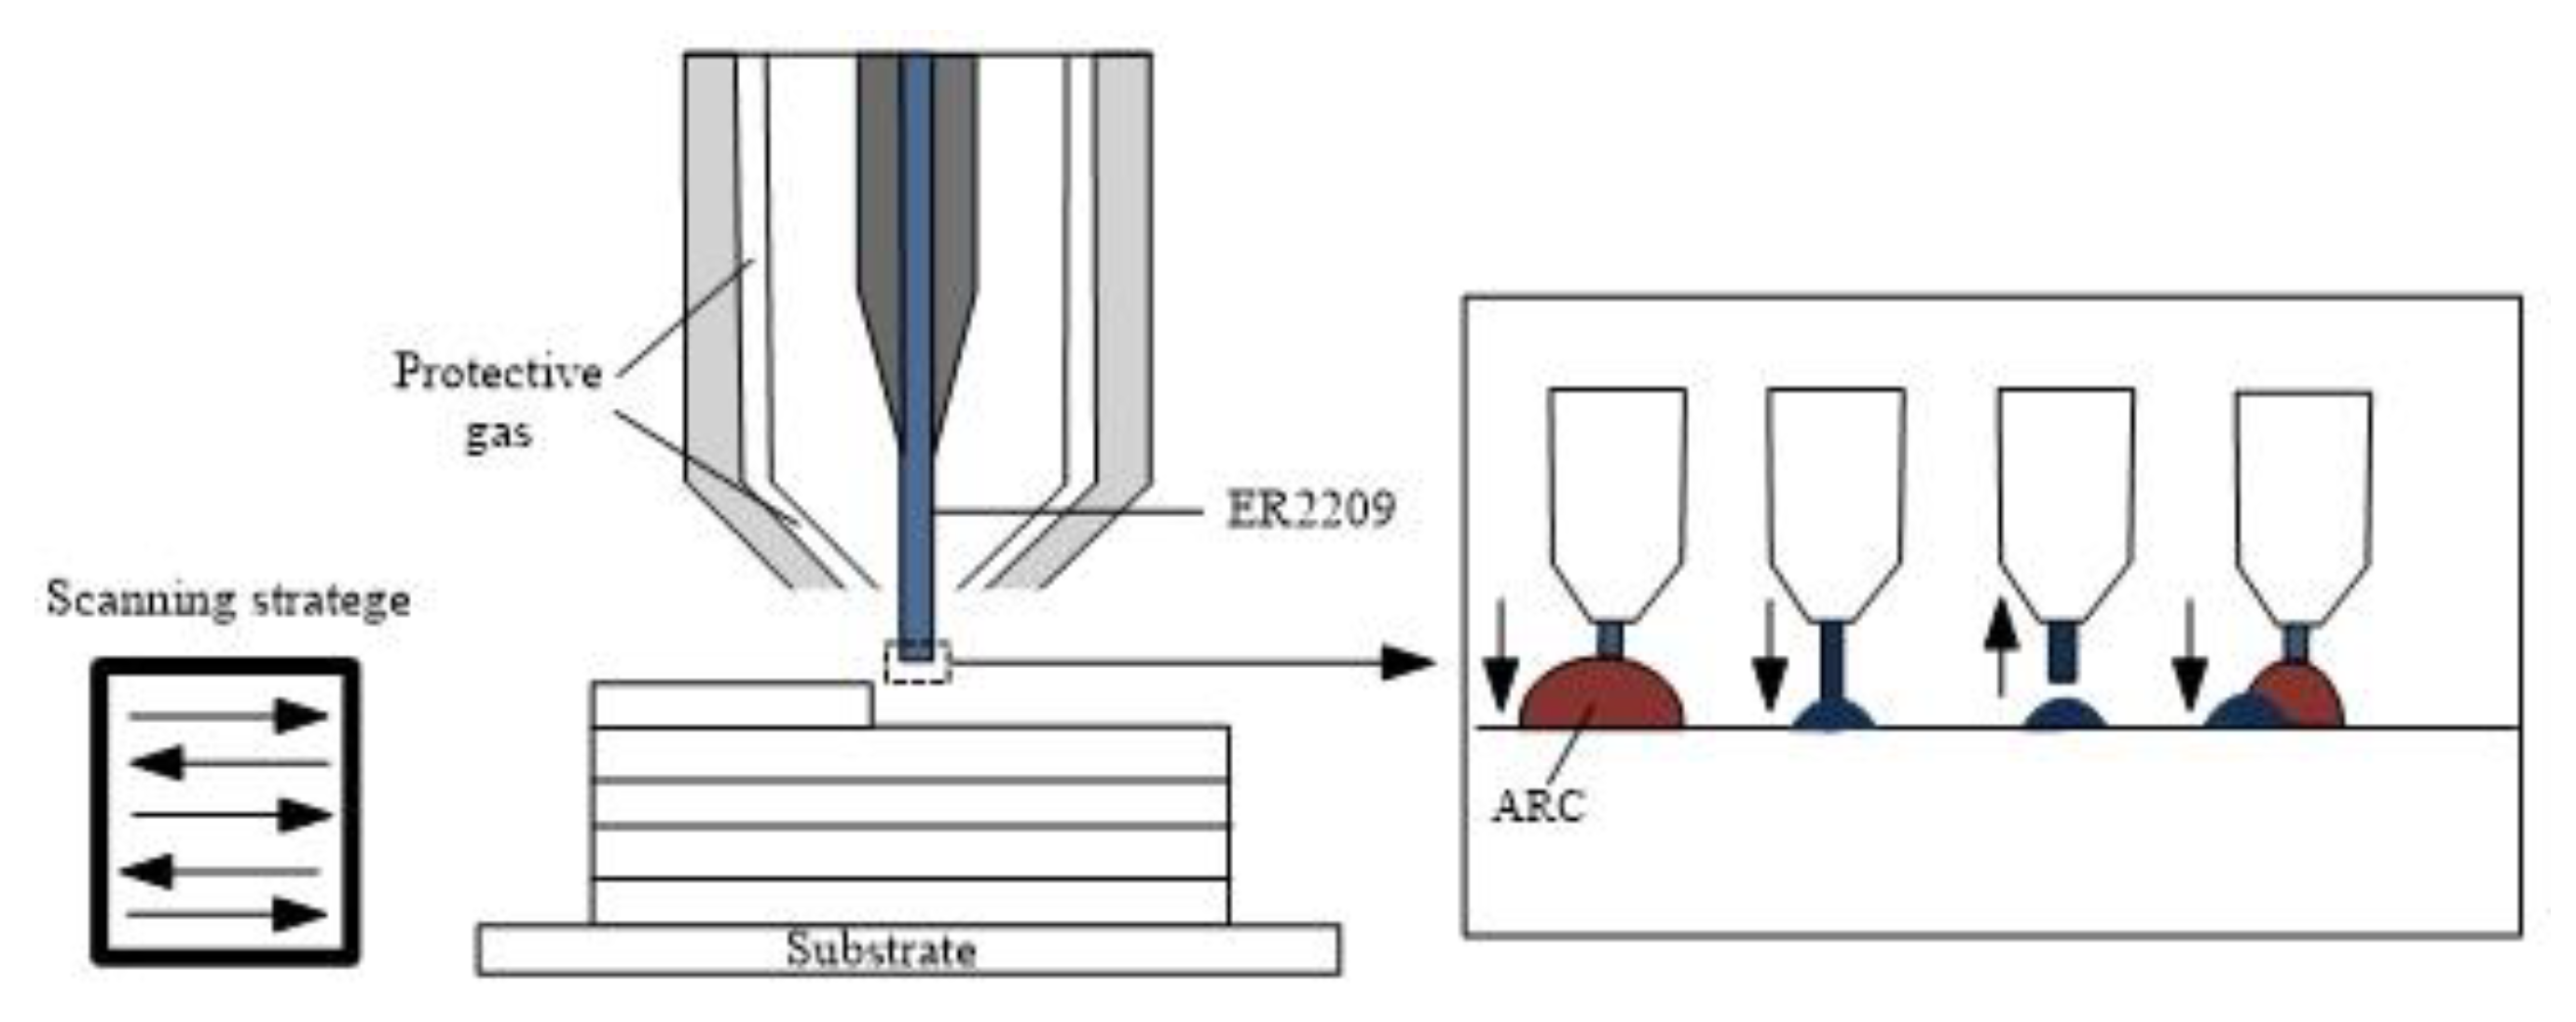
Figure 1. Schematic diagram of multi-layer single-pass CMT-WAAM.
Metals 12 01655 g001
Figure 2. The microstructure of CMT-WAAM 2205 DSS additive parts in different areas: (a) schematic diagram of sampling location; (b) bottom area; (c) top area; (d) top area.
Metals 12 01655 g002
Figure 3. SEM images of multi-layer single-pass additive parts in different areas (a) bottom area; (b) middle area; (c) top area; (d) XRD patterns of the bottom, middle and top of the additive parts.
Metals 12 01655 g003
Figure 4. EBSD analysis of additive parts (a,d,g) phases distribution at bottom, middle and top area; (b,e,h) distribution of grain orientation at bottom, middle and top area; (c,f,i) KAM at bottom, middle and top area; KAM-angle distributions for BCC (j) and FCC (k).
Metals 12 01655 g004
Figure 5. The pole figure of ferrite and austenite at different positions of the additive part: (a,b) bottom; (c,d) middle; (e,f) top.
Metals 12 01655 g005
Figure 6. Grain orientation model for CMT-WAAM additive part in different zones.
Metals 12 01655 g006
Figure 7. Phase volume ratios at different positions of the additive part.
Metals 12 01655 g007
Figure 8. The models with different volume ratios of ferrite and austenite (a) 35.6% ferrite + 64.4% austenite; (b) 28.2% ferrite + 71.8% austenite; (c) 24.4% ferrite + 75.6% austenite.
Metals 12 01655 g008
Figure 9. Molecular dynamics simulation of 2205 additive parts with different volume ratios of ferrite and austenite (ac) dislocation changes at bottom, middle and top area during tensile simulation.
Metals 12 01655 g009
Figure 10. (a) Molecular dynamics simulation strain–stress curves different volume ratios of ferrite and austenite; (b) variation value of tensile strength in different areas; (c,d) typical SEM micrographs of fracture morphology.
Metals 12 01655 g010
Table 1. Chemical composition of welding wire (wt.%).
MaterialCSiMnPSCrNiMoNFe
ER22090.0130.491.540.0180.00722.928.63.20.17Bal.
Publisher’s Note: MDPI stays neutral with regard to jurisdictional claims in published maps and institutional affiliations.