Article

Enhancing Surface Topology of Udimet®720 Superalloy through Ultrasonic Vibration-Assisted Ball Burnishing

by
Ramón Jerez-Mesa
1,
Victoria Plana-García
2,
Jordi Llumà
3 and
J. Antonio Travieso-Rodriguez
2,*
1
Department of Engineering, Faculty of Science and Technology, Universitat de Vic · Universitat Central de Catalunya, C. de la Laura 13, 08500 Vic, Spain
2
Department of Mechanical Engineering, Universitat Politècnica de Catalunya, Av. Eduard Maristany 10-14, 08019 Barcelona, Spain
3
Department of Material Science and Engineering, Universitat Politècnica de Catalunya, Av. Eduard Maristany 10-14, 08019 Barcelona, Spain
*
Author to whom correspondence should be addressed.
Metals 2020, 10(7), 915; https://doi.org/10.3390/met10070915
Submission received: 28 May 2020 / Revised: 6 July 2020 / Accepted: 7 July 2020 / Published: 8 July 2020
(This article belongs to the Special Issue Advances in Plastic Deformation Technologies)

Abstract

:
This contribution reports the effects of an ultrasonic-vibration assisted ball burnishing process on the topological descriptors of nickel-based alloy Udimet®720. This material is of high interest for the transportation industry, and specifically for the aeronautical sector. Despite the acknowledged necessity to finish this material to achieve excelling mechanical performances of parts, surface integrity enhancement by means of plastic deformation through ball burnishing has seldom been explored in previous references so far. In this paper, different surface descriptors are used to report how the topology changes after ultrasonic-assisted ball burnishing, and how burnishing conditions influence that change. The burnishing preload and the number of passes are the only influential factors on surface change, whereas the feed velocity of the tool and the strategy reveal not to be relevant on the result. Additionally, the extent to which the process successfully modifies the objective surfaces is highly divergent depending on the original scale of the treated surface. The assistance of the process with vibrations also shows that the resulting topologies are characterized by a periodical pattern of repetitive peaks and valleys that are extended on the surface with a higher frequency in comparison to the non-assisted process, which could influence in the functional deployment of workpieces treated through it, and could deliver an advantage with regard to its non-assisted homologous process.

1. Introduction

Surface finish is one of the aspects of mechanical workpieces used to define their quality, not only for the aesthetic appearance of the final piece but for the great importance it has in its in-service performance. It is a decisive factor defining the expected resistance to wear and corrosion, and the fatigue life that the part may present when subjected to dynamic stress. As described by Loh and Tam (1988) [1], the surface texture is determined by all those irregularities that are the consequence of the production process used to finish that surface. In other words, surface finish is the signature of the process used to modify the engineering surface during the last stage of manufacturing. One of the main groups of the finishing processes is made up of surface plastic deformation technologies. Ball burnishing is included in that group. It manages to correct the surface by plastic deformation by rolling a ball over the target surface while applying a preloaded force. Like this, the material located in the peaks is compressed, thereby reducing the surface texture amplitude descriptors and reproducing the curved geometry of the ball in the newly generated surface, as a kind of copy effect that characterizes the resulting surface. The mechanical state of the material that composes the surface of the workpiece is also effectively modified [2].
Researchers agree on the fact that one of the main issues related to investigations about ball burnishing is that the number of variables that define the execution of the operation are numerous. Some of the most relevant ones are the burnishing force [3], the feed, the original texture state of the target surface, the friction coefficient and the tool’s tip radius [4] or different lubrication/cooling strategies [5]. Some of them are considered as objects of study, as shall be explained below.
The process is also cited for the positive effects that are simultaneously induced in terms of residual hardening [6,7]. That is, the process is able to change the metallurgical state of the grains of the metallic material that compose the surface of the workpiece, as proven by Rodriguez et al. (2012) [8], and could also be able to enhance the surface integrity of materials subjected to severe processes, such as friction stir welding [9]. For this reason, ball burnishing is a feasible candidate to treat the workpieces of highly demanding and competitive industries, such as the aeronautical sector [10,11]. High safety requirements translate into rigorous quality controls, which take into account the finish and the compliance with the tolerances of all the parts by means of traceable processes that show high robustness and repeatability. In addition, the research and development of new materials set the pace for the evolution of the sector. In this context, the 1940s witnessed the expansion of the first nickel-based alloys for aeronautical applications [12]. Their excellent capability to maintain high resistance at very high temperatures makes them best material choice for turbine blades and other aerospace parts. One of the most extended nickel-based alloys is Udimet®720, which is evaluated and specified by the standard MSRR 7252. This metal presents one of the highest strength/temperature ratios in the field of superalloys, and is hardened both by solid solution of molybdenum and tungsten, and by precipitation of aluminium and titanium, forming intermetallic compounds [13]. On the whole, it has not only an outstanding mechanical resistance/temperature ratio, but it also has good resistance to corrosion and oxidation. It has also been cited for its resistance to crack growth at high temperatures [14].
To further improve the performance of Udimet®720 parts, this paper aims to analyze the effect of the ball burnishing process on the surface texture of a ball-end milled part, as the application of advanced surface techniques is one of the main ways to enhance the reliability of critical components [15]. To do this, the 3D texture descriptors have been measured. The influences of the following variables on the results were considered: burnishing force, number of passes, feed velocity, the initial surface texture and the strategy that determines the order and direction of the passes. We also intended to determine whether there is any significant interaction between the burnishing force, number of passes and feed.
The process used in this work to modify surface integrity was an ultrasonic vibration-assisted ball burnishing (VABB) executed through a tool developed and characterized by Jerez-Mesa et al. (2018) [16]. Vibration assistance as a means of enhancing the execution of conventional processes has already been successfully explored in numerous machining (e.g., drilling [17]) and plastic deformation processes, as it delivers different positive effects on the surface integrity. In the case of the VABB process, it has proven to be stable enough to deliver robust results and be feasible for expansion to productive contexts [18]. In terms of material modification, the effects of VABB were previously tested on AISI 1038 steel surfaces. Jerez-Mesa et al. (2018) [19] explained that VABB prevents surface scratching and microdefects that could eventually act as stress concentrators, unlike the complementary non-assisted version, thereby highlighting the positive effect of the process itself to favor ball rolling. In this contribution, the effects of VABB are explained as a combination of three effects: surface texture reduction; redistribution to a Gaussian state; and in some cases, reorientation of surface features. The improvements delivered by vibration assistance are also related to a higher degree of residual work-hardening generated in comparison to the non-vibration assisted ball burnishing (NVABB) process [20].
Regarding the nickel-based alloys such as the one on which this paper focuses, a literature review shows that the application of VABB on this type of material has seldom been reported. In this sense, Prevey et al. concluded in 2000 that the application of ball burnishing on 4-point bending fatigue specimens made of Inconel 720 resulted in a 30% increase of the cyclic load bearing [21]. The same author concluded that BB showed superior results when compared to other typical finishing processes, such as shot peening or laser shock peening, presenting deeper (to almost 1 mm) and more stable residual stress in comparison to shot peening [22]. The same material subjected to ball burnishing was studied by other authors. Lopez de la Calle et al. (2007) [23] highlighted that, due to its ductile behavior, the maximum pressure eligible to ball-burnishing Inconel 718 surfaces should not be higher than 12 MPa. Residual hardening of the superficial material on cylindrical specimens was observed by Sequera et al. (2014) [24], especially for burnishing pressures higher than 20 MPa. Klocke et al. (2009) [25] found a direct correlation of burnishing pressure with maximum residual stress achieved in depth, 250 bar being the highest successful value. Nagarajan et al. (2017) [26,27] introduced in the discussion the treatment of IN100 and RR1000 nickel-based alloys by ball burnishing. Rain refinement was obtained and residual work hardening till the depths of around 400 μ m were observed.
Despite the advantage that ball burnishing can provide for the enhancement of nickel-based alloys, previous references that deal with this topic are scarce. This work aims to characterize the surface texture modification of Udimet®720 ball-end milled surfaces by varying numerous ball-burnishing process parameters. After an analytical and statistical study, we intended to determine the best burnishing conditions in order to enhance the surface properties. The results obtained are of great importance for Udimet®720 manufacturers in order to optimize the designs of the final pieces and the manufacturing processes, and to expand the knowledge related to surface modification of this group of alloys by means of plastic deformation-based processes.
2. Materials and Methods

2.1. Sample Preparation

The raw material used was a 117-mm diameter cylindrical block of Udimet®720. Its properties and composition are listed in Table 1 and Table 2, according to the datasheet of Special Materials Corporation [28].
On one of the circular bases of the block, three different surfaces have been machined following different routines to evaluate the effect of the original topology on the process results. These surfaces were prepared through a milling process carried out by successive adjacent passes in the same direction with a 10 mm diameter hemispherical milling tool. To obtain the three different original topologies, the lateral offset between passes a e was varied. Table 3 includes the machining parameters applied for the operation.

2.2. VABB Tool

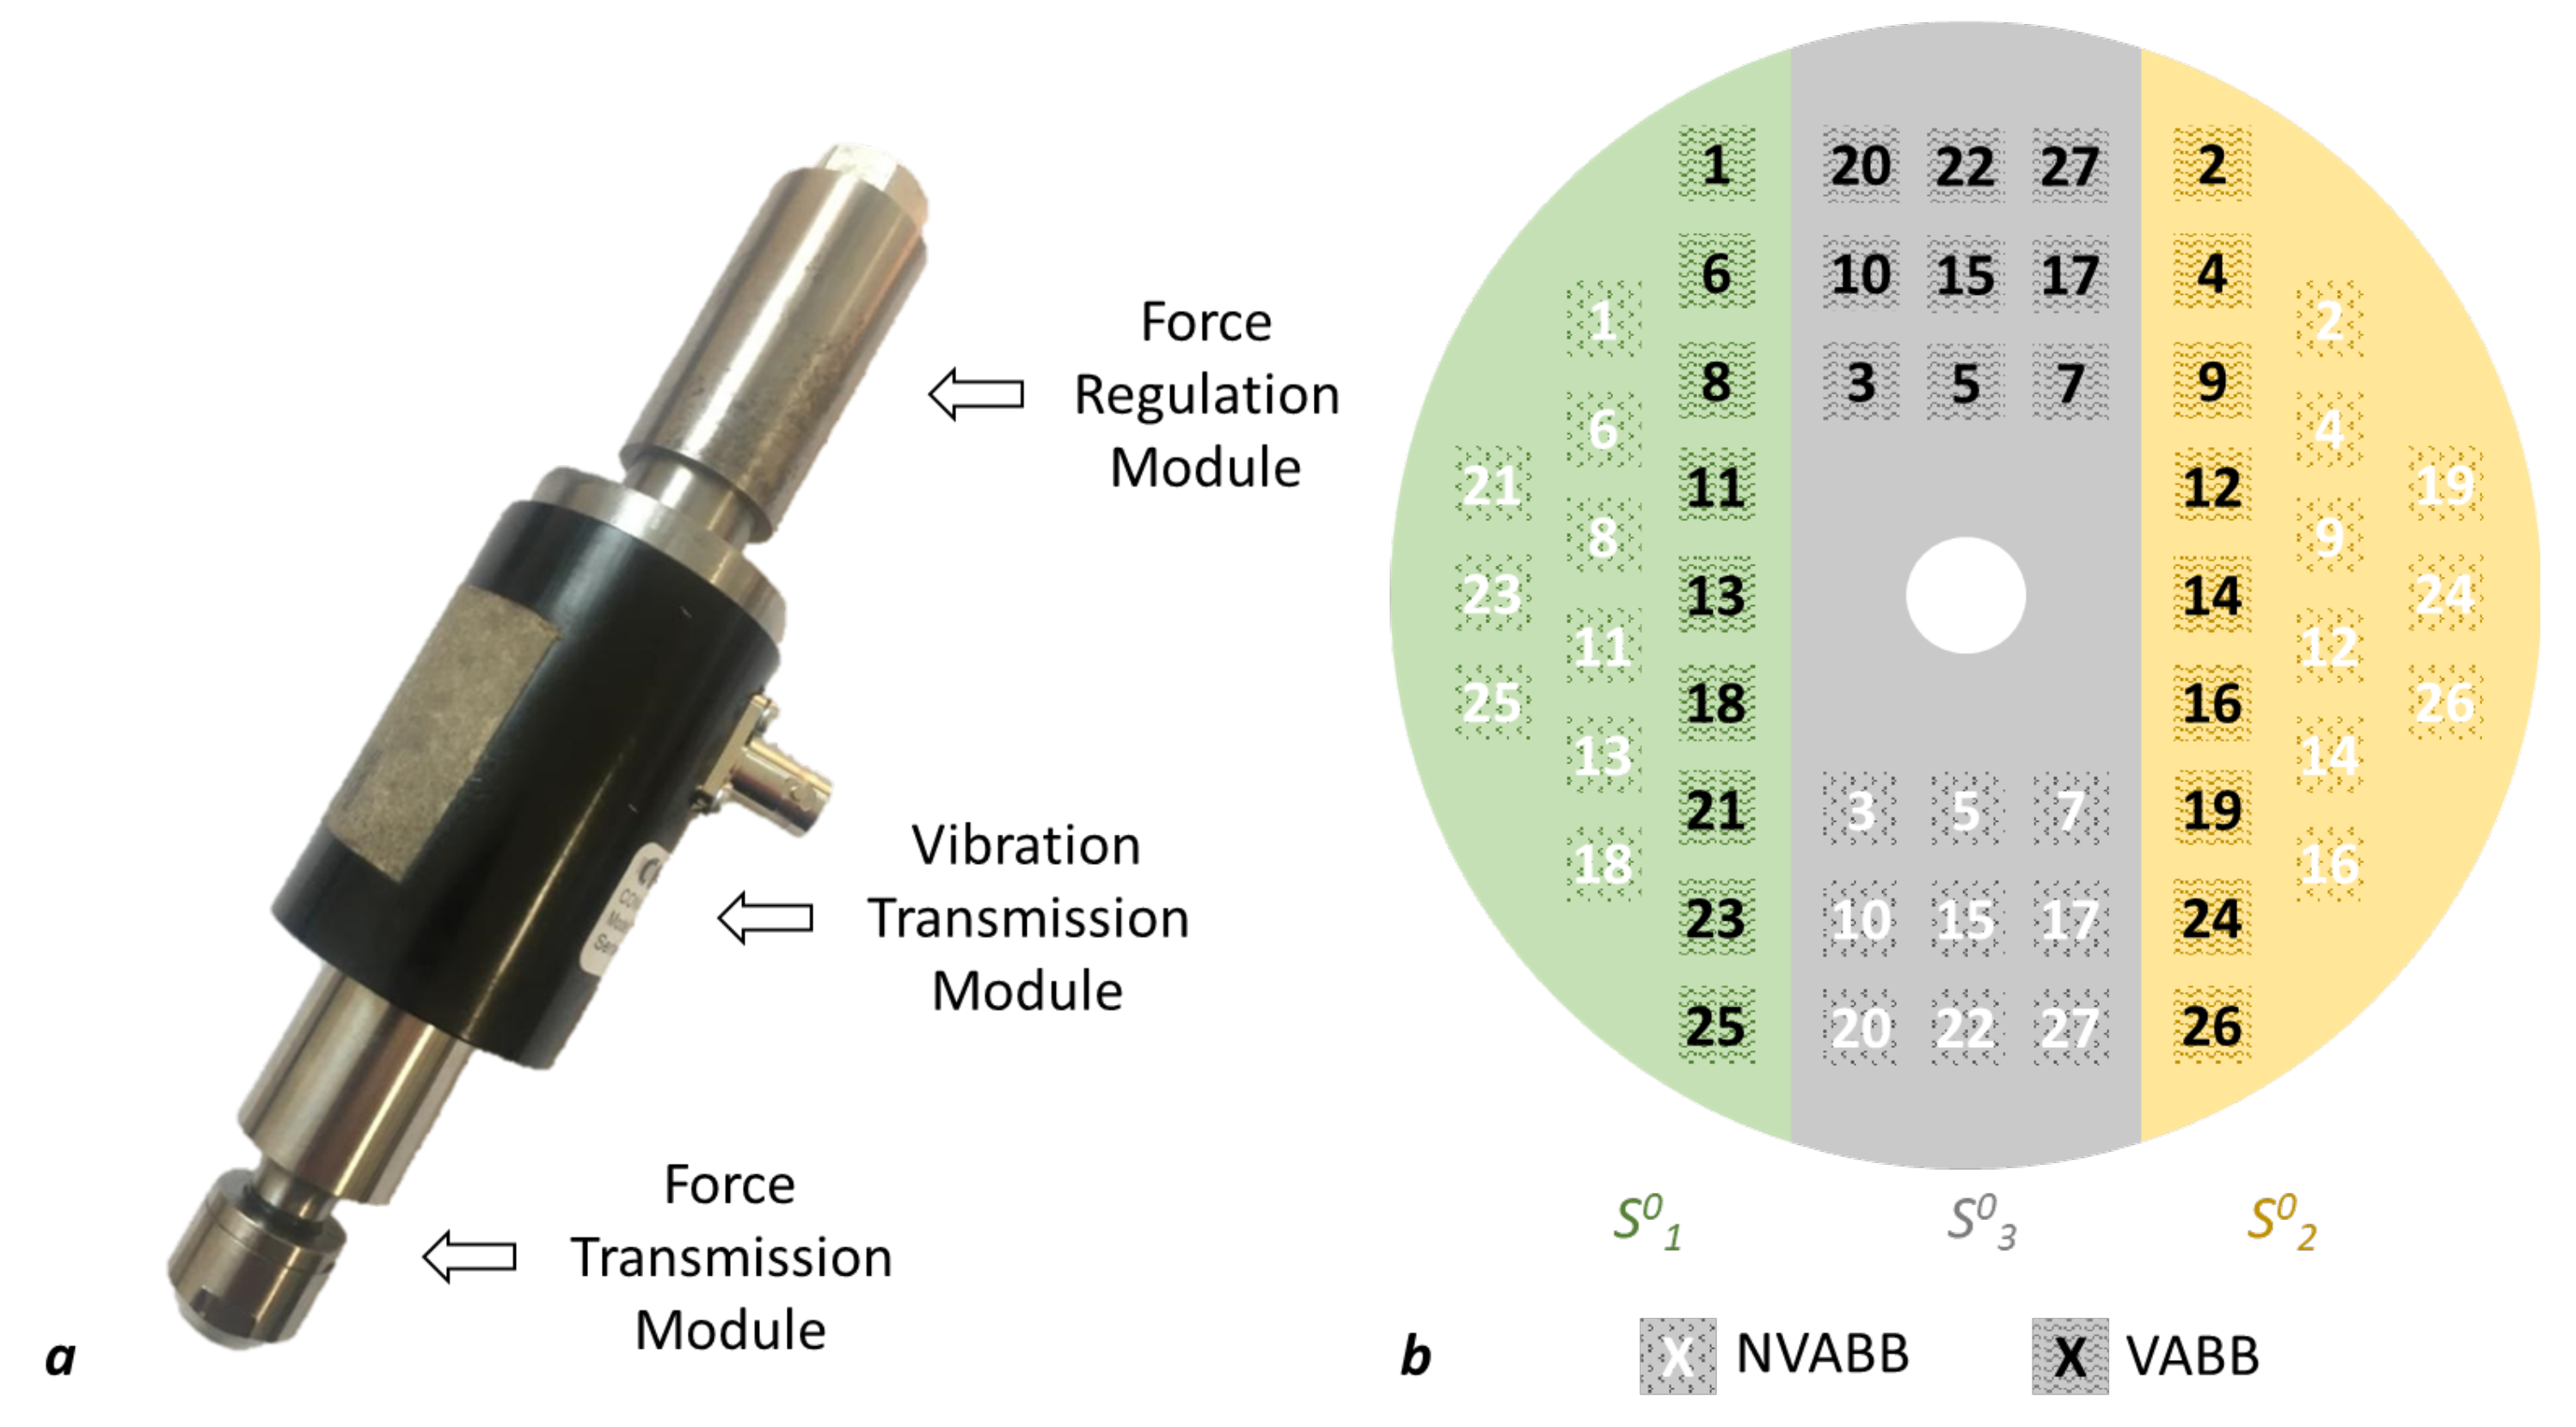
To perform the VABB operations, the tool presented in Figure 1a was used. As detailed by Jerez-Mesa (2018) [16], the tool is made up of three different modules. A spring inside the tool holder allows the regulation of the force exerted on the surface of the material proportionally to the compression length, according to Hooke’s law. The intermediate module contains four piezoelectric disks, which generate a vibration in phase with the alternate voltage that polarizes them. The last module supports the burnishing ball and allows both preload force and vibration to be transmitted to the workpiece. With this tool, it is also possible to work without vibration when the piezoelectric disks are not excited.

2.3. Design of Experiments

In this study, the influences of five factors were analyzed at three levels (Table 4). The values for the levels were decided based on a preliminary set of tests deployed to have a new approach to the issue, and so that the results obtained here could be compared to previous experiments applied on other materials [19,20].
  • Preload force ( F p ). Static compression load exerted by the tool spring on the material surface at the beginning of the process, and kept constant during the test.
  • Number of passes ( n p ). Number of iterations performed on the same study area. A greater number of passes is expected to apply a greater plastic deformation in the affected area.
  • Feed velocity ( v f ). Linear speed at which the tool moves on the surface during the burnishing process.
  • Original surface topology ( S 0 ). Surface finishing pattern obtained by different ball-end milling routines, as explained above.
  • Strategy ( S t ). It represents the path followed by the tool to cover the study area in the number of passes of each test, as represented in Figure 2. Of all three, only the bn90/0 contemplates a change in the direction of the passes. In all cases, the lateral offset between passes is 0.3 mm.
Using a traditional factorial design to plan the experiments would involve a large number of tests to evaluate the five factors at all three levels. In order to reduce them, the method described by Taguchi (2005) [29] was applied, which minimizes the number of experiments while still being demonstrative of the first order effects of all factors. Specifically, an L27 array was selected, which is capable of evaluating up to 13 factors at 3 levels, with only 27 experiments. In this case, five factors were included in the plan, and the degrees of freedom of the experimental design that were still available were used to evaluate the second order influences of the pairs F p n p , n p v f and v f F p , as is described in detail in Jerez-Mesa et al. (2018) [19]. Table A1 in Appendix A reflects the combination of parameters applied for each run. It should be noted that the fact of being burnished with or without vibration is not considered as a factor in the DOE. To compare the effects of both processes, two L27 matrices were actually used on the workpiece. Therefore, a total of 54 experiments were performed, distributed in the study surfaces as shown in Figure 1b.

2.4. 3D Texture Parameters

The surface roughness has usually been characterized with the R parameters in 2 dimensions. However, these values are biased, as they are based on roughness lines that do not represent the overall surface texture. Loh and Tam (1988) [1] pointed out that two similar values can be obtained for completely different topologies, so that a bias in result assessment is much more likely to happen with 2D parameters. In the specific case of ball burnishing, it must be considered that the roughness perpendicular to the burnishing process shall always be greater than the one calculated on a parallel profile, due to the high anisotropy of the generated surface. For all these reasons, using 2D parameters to define burnished surfaces should be avoided if possible. That is why in this work the 3D texture or S parameters are chosen to represent the surfaces resulting from the tests, with no risk of losing information by neglecting the 2D R parameters. According to Dong et al. (1993) [30], the 3D roughness analysis and visualization techniques not only allow obtaining a global analysis of the entire study surface but also help to understand the frequent variation of the 2D parameters.
The S parameters can be classified in four main groups; namely: amplitude parameters that refer to the height distribution of the surface, and it is the only parameter set with a direct correlation with the 2D parameters; spatial parameters that define the directionality of the topology; hybrid parameters, a mix of the amplitude and spatial sets; and the miscellaneous parameter that sets the angle of the main direction of the texture pattern with the y-axis. The reader can find details about all of them in the works developed by Dong et al. (1994) [31,32], and also a brief definition in Appendix B of this manuscript. The S parameters calculations in this work follow the ISO 25178 standard.
The explained parameters were calculated on height datasets acquired for all burnished patches with a CCS Prima Optical sensor for topographical measurements based on a chromatic confocal system by STIL Marposs (France). As explained in Jerez-Mesa et al. (2018) [19], the size of the patch for each kind of surface must be different so that the overall burnishing effects are sufficiently represented on all original surfaces. Consequently, a 3 mm × 3 mm patch was acquired for the tests on the S 1 0 surface, 4.5 mm × 4.5 mm for S 2 0 and 6 mm × 6 mm for S 3 0 . The datasets were processed with software SPIP 6.6.5 (Image Metrology A/S, Lyngby, Denmark) and the statistical analysis was performed through Minitab 19.

3. Results Discussion

3.1. Initial Surfaces

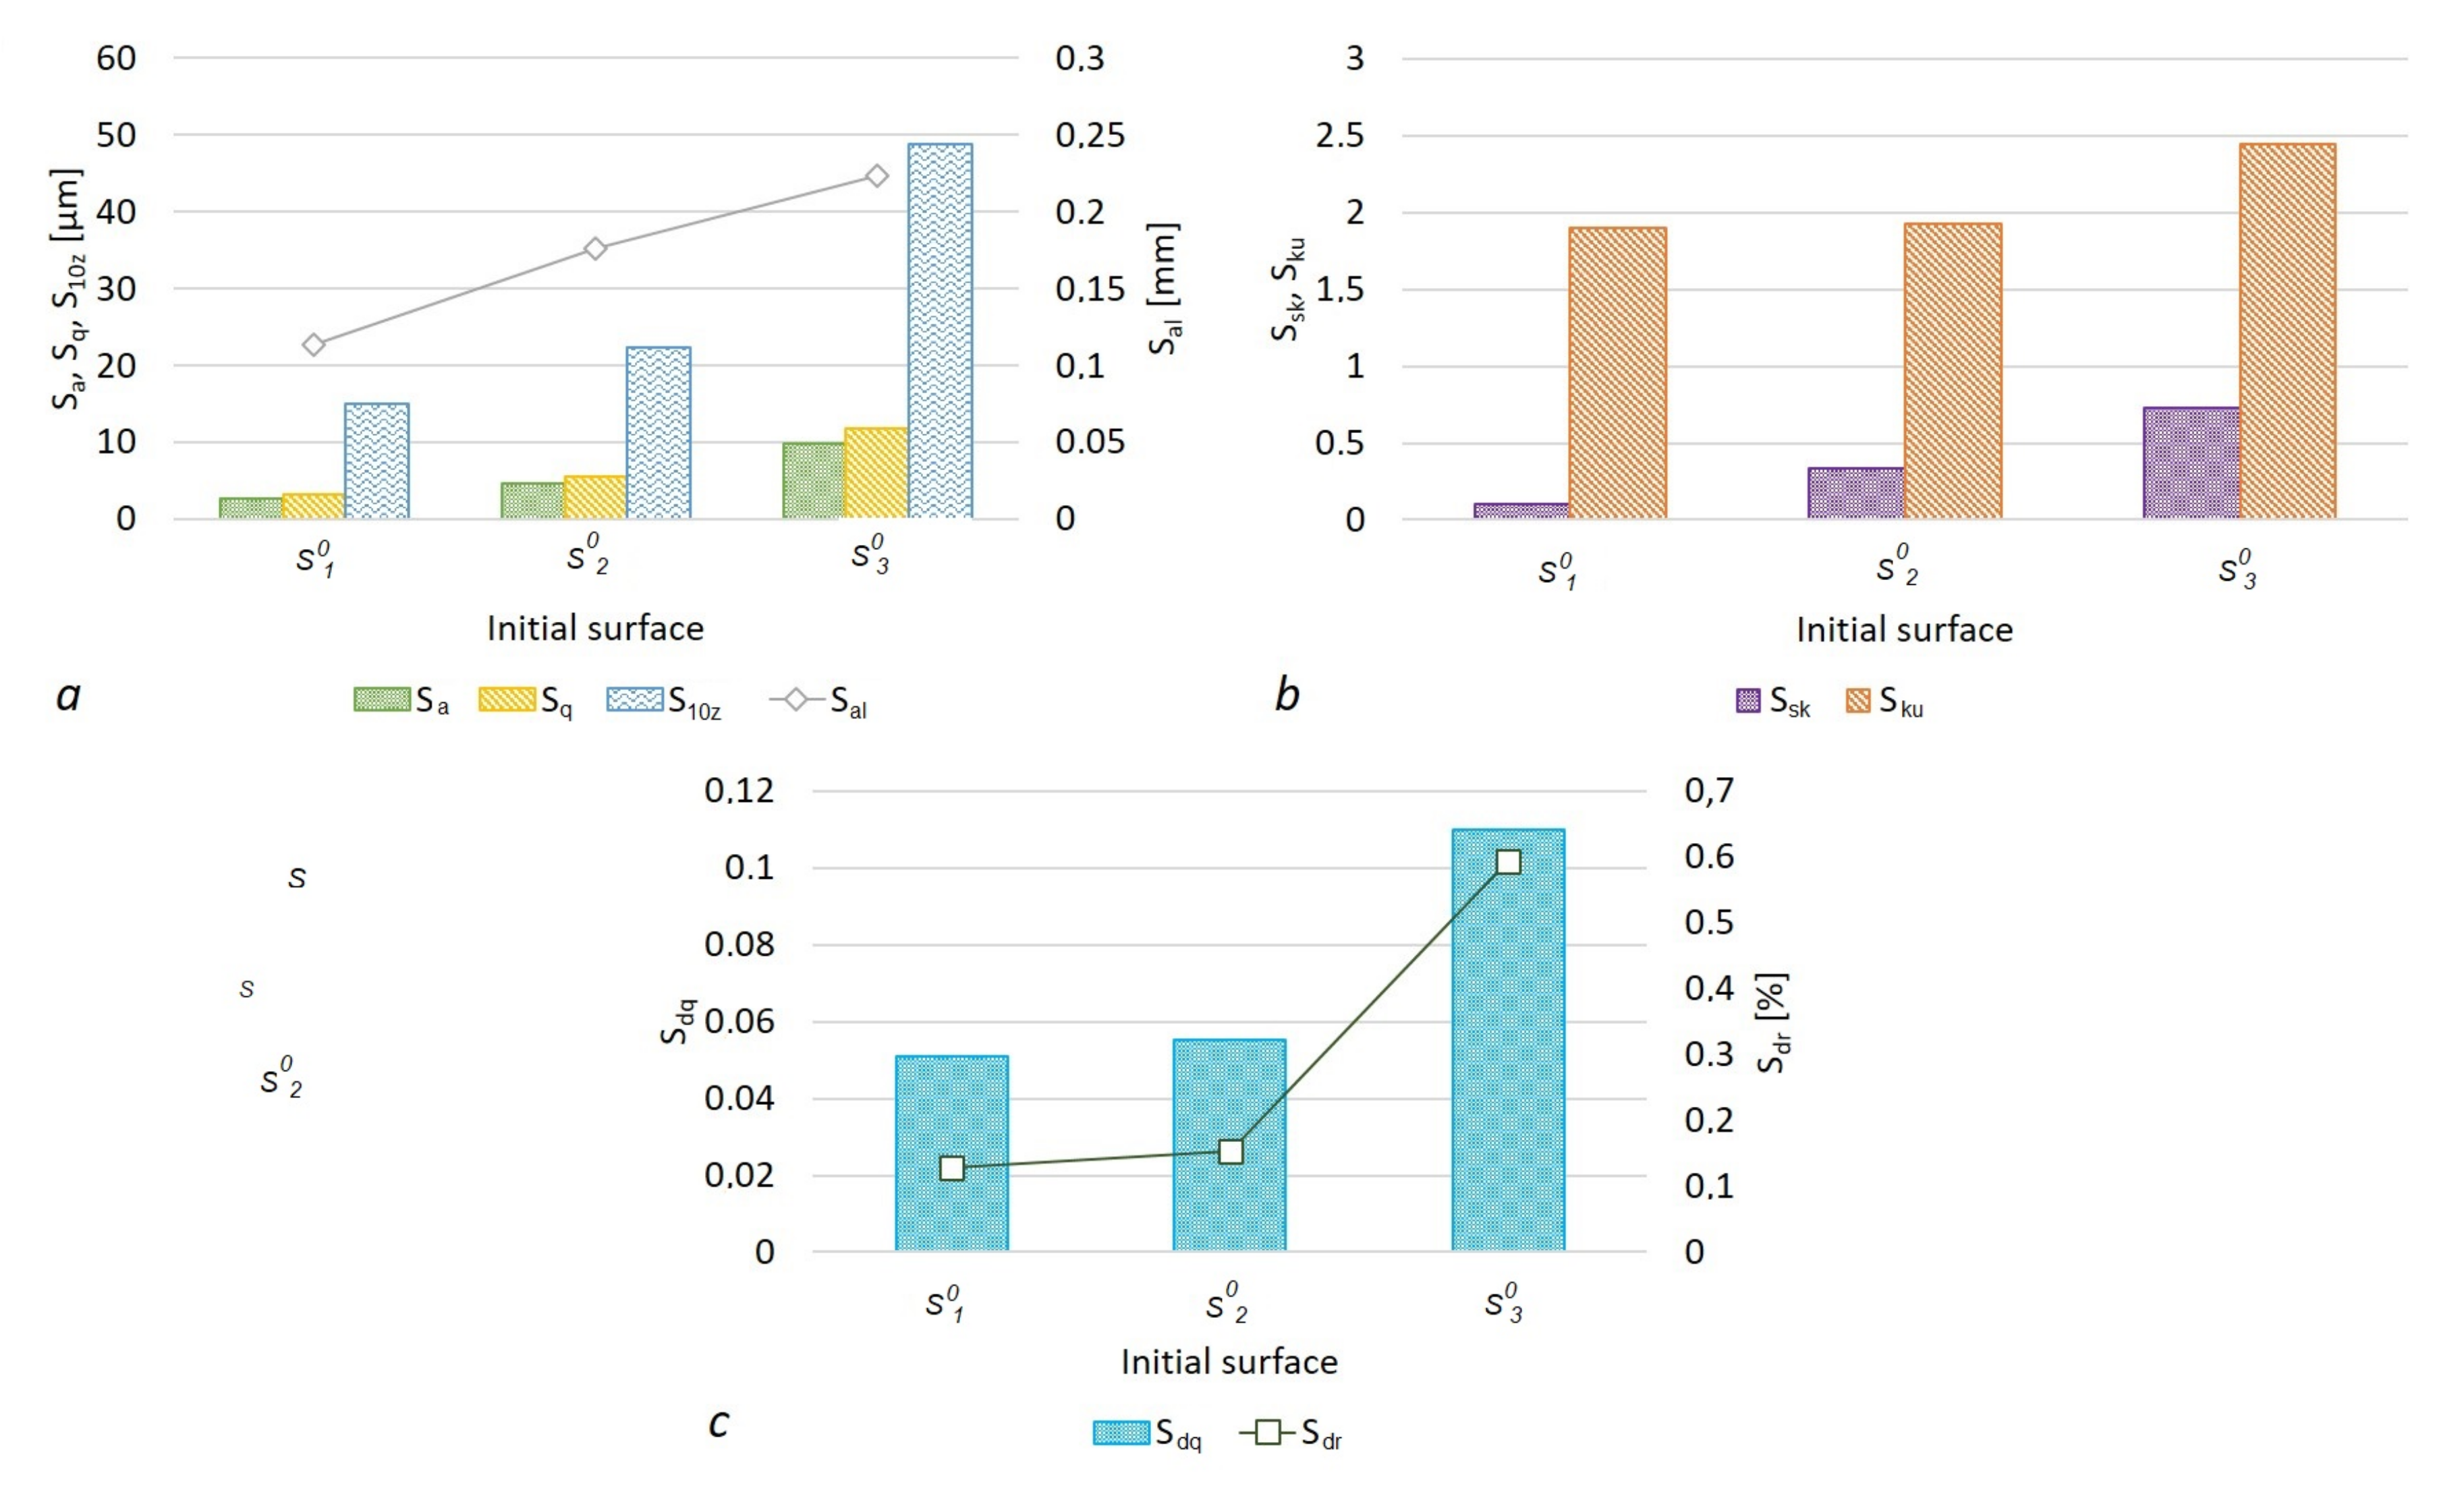
Figure 3 includes the texture values obtained for each initial surface. All the amplitude and spatial parameters grow from S 1 0 to S 3 0 . The main amplitude parameters S a and S q show that by increasing the lateral offset in the machining routine to perform the longitudinal ball-end milling passes, the scale of the surface grows (Figure 3a). Additionally, the progressive increase of the spatial parameter S a l indicates that the repetition frequency decreases; that is, the periodic peaks and valleys of the surface are typical of a bigger-in-scale surface. In addition, it presents a greater difference in height between the deepest valleys and the highest peaks ( S 10 z ). This trend confirms that S 3 0 is the most abrupt starting surface, while S 1 0 is the smoothest one, although the all three values of the S d r hybrid parameter are well below 1%, meaning that all three machining routines end up in already finished surface topologies (Figure 3b).
All three original surfaces are platykurtik but with an increasing trend of the kurtosis S k u value, that being S 3 0 the surface with S k u closer to 3 (Gaussian value) (Figure 3c). As for skewness S s k , the surface S 1 0 shows the closest value to 0 and there is also an increasing trend through positive values. As the offset set in the milling process grows, the material shifts to the peaks. It is worth mentioning that all S a and S q values are related by a 0.84–0.86 ratio, agreeing with the relationship established by King and Spedding (1982) [33] in quasi-Gaussian surfaces, as is the case. For this reason, the simultaneous analysis of both values is redundant and the results of S a shall be henceforth ignored due to its lack of statistical essence, in favor of S q , which refers to the standard deviation of the points included in the dataset.

3.2. VABB Results

In this subsection, the surfaces obtained after VABB are characterized and discussed. To that effect, comments are organized and divided based on the triple effect of VABB described by Jerez-Mesa et al. (2018) [19].

3.2.1. Surface Texture Reduction

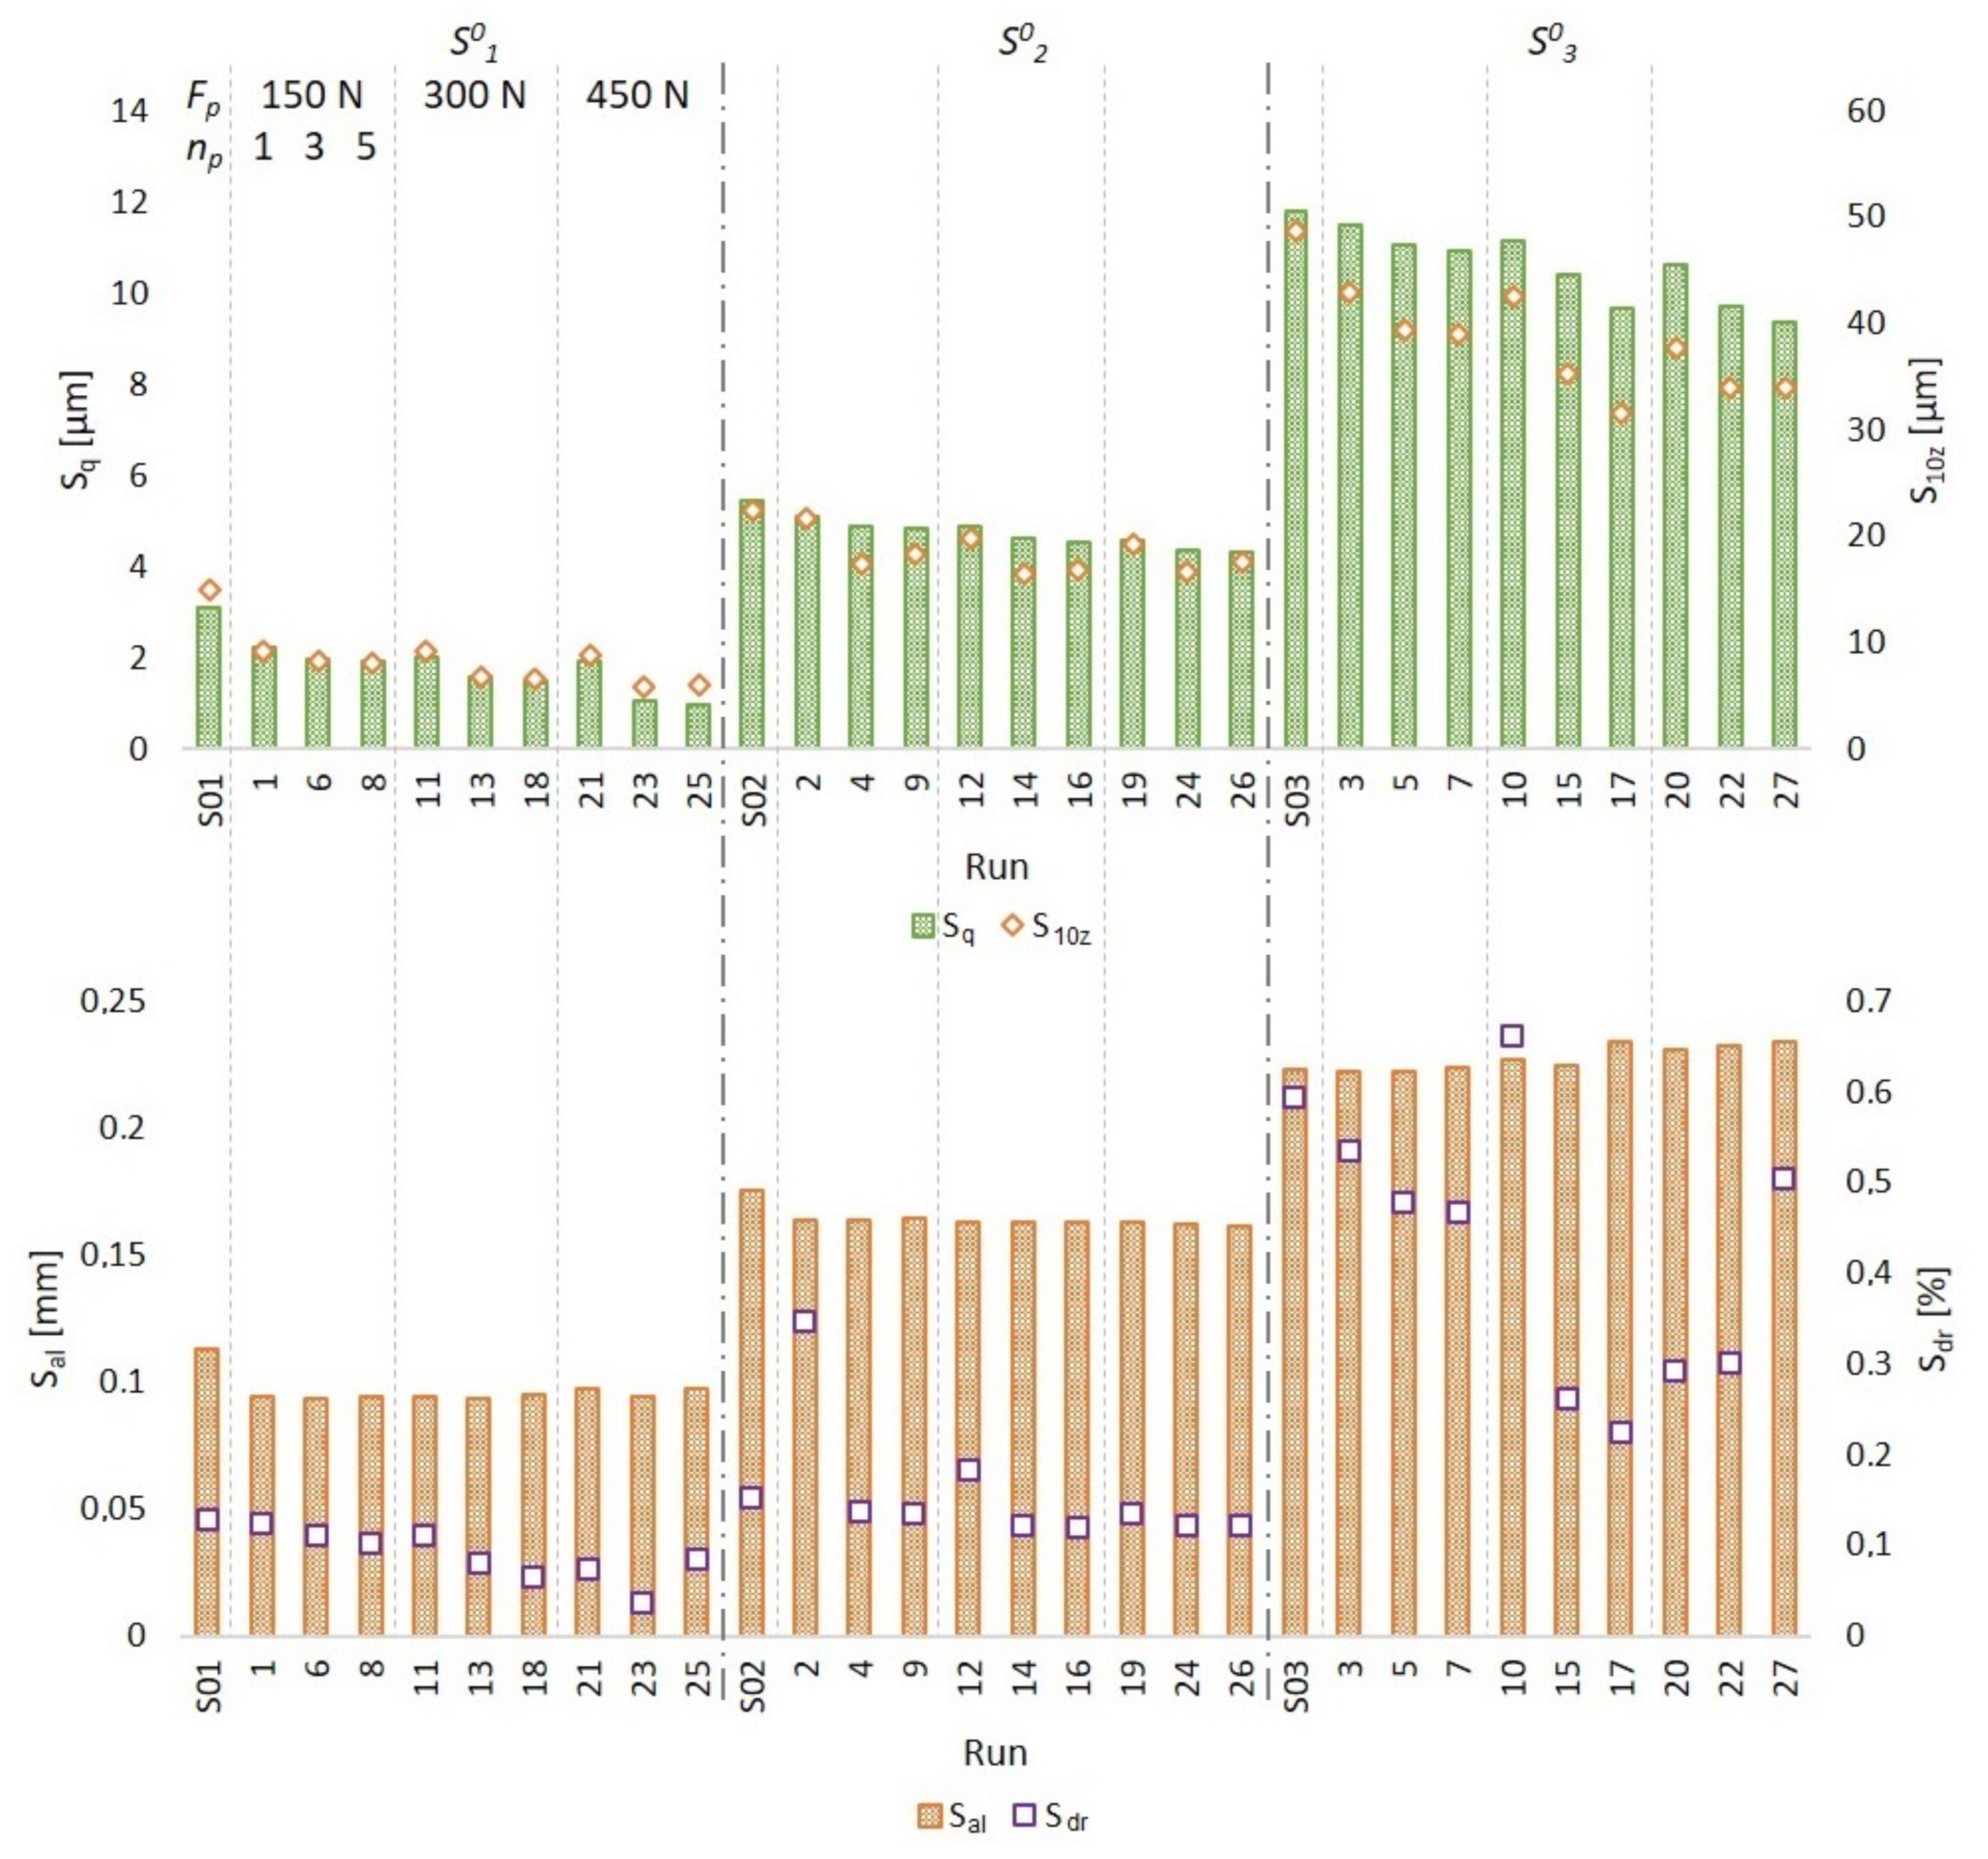
To characterize how the scale of the surface is affected after VABB, the S q , S 10 z , S a l , S d r and S t d parameters are considered. Previous results exposed by Jerez-Mesa et al. (2018) [19] indicate that these parameters are enough to define to what extent the surface is reduced. Figure 4 shows how they evolve as the number of passes and preload force are increased, that is, as more plastic deformation can be induced. The tests are shown so that results are grouped by the original surface topology. It can be seen how S q and S 10 z values gradually decrease as the plastic deformation increases. Despite that, in the same way as the results obtained by Jerez-Mesa (2018) [19], in the transition from five passes to one pass when the force increases—that is, from 150N&5p to 300N&1p and from 300N&5p to 450N&1p—there is an upturn of both of them. It is because even if the preload is higher, just one pass is not enough to increase the net plastic deformation compared to the previous run with lower preload but five passes. The same source also evidences that for the smoother initial surface S 1 0 , there was a threshold of plastic strain that leads to surface harm by increasing S q . In this analysis, this limit does not appear, and this could mean that the Udimet®720 surface texture can still be improved by applying further plastic strain.
The trend shown by hybrid parameter S d r is also decreasing, which means that with surface reduction, a more superfinished state is achieved, as was expected. However, the S a l parameter is decreased when a low force and one pass are applied, but does not evolve from that point on. The periodicity of peaks and valleys is not therefore substantially modified by the process.
The statistical influences of all described parameters can be analyzed through an ANOVA. Table 5 shows that the extent to which the surface texture is reduced does not depend on the strategy followed or the feed velocity. The original surface, preload and number of passes are the only influential parameters with which to define the final results. Increasing the preload and the number of passes allows improved surfaces in terms of amplitude, as proven by the influences on the S q and S 10 z parameters, and more finished surfaces if considering S d r . As for interactions, no influence is detected on the results. For all these considerations, a confidence level of α = 10 % has been considered. Further experiments could lead to reducing this confidence level and reach the same deductions.
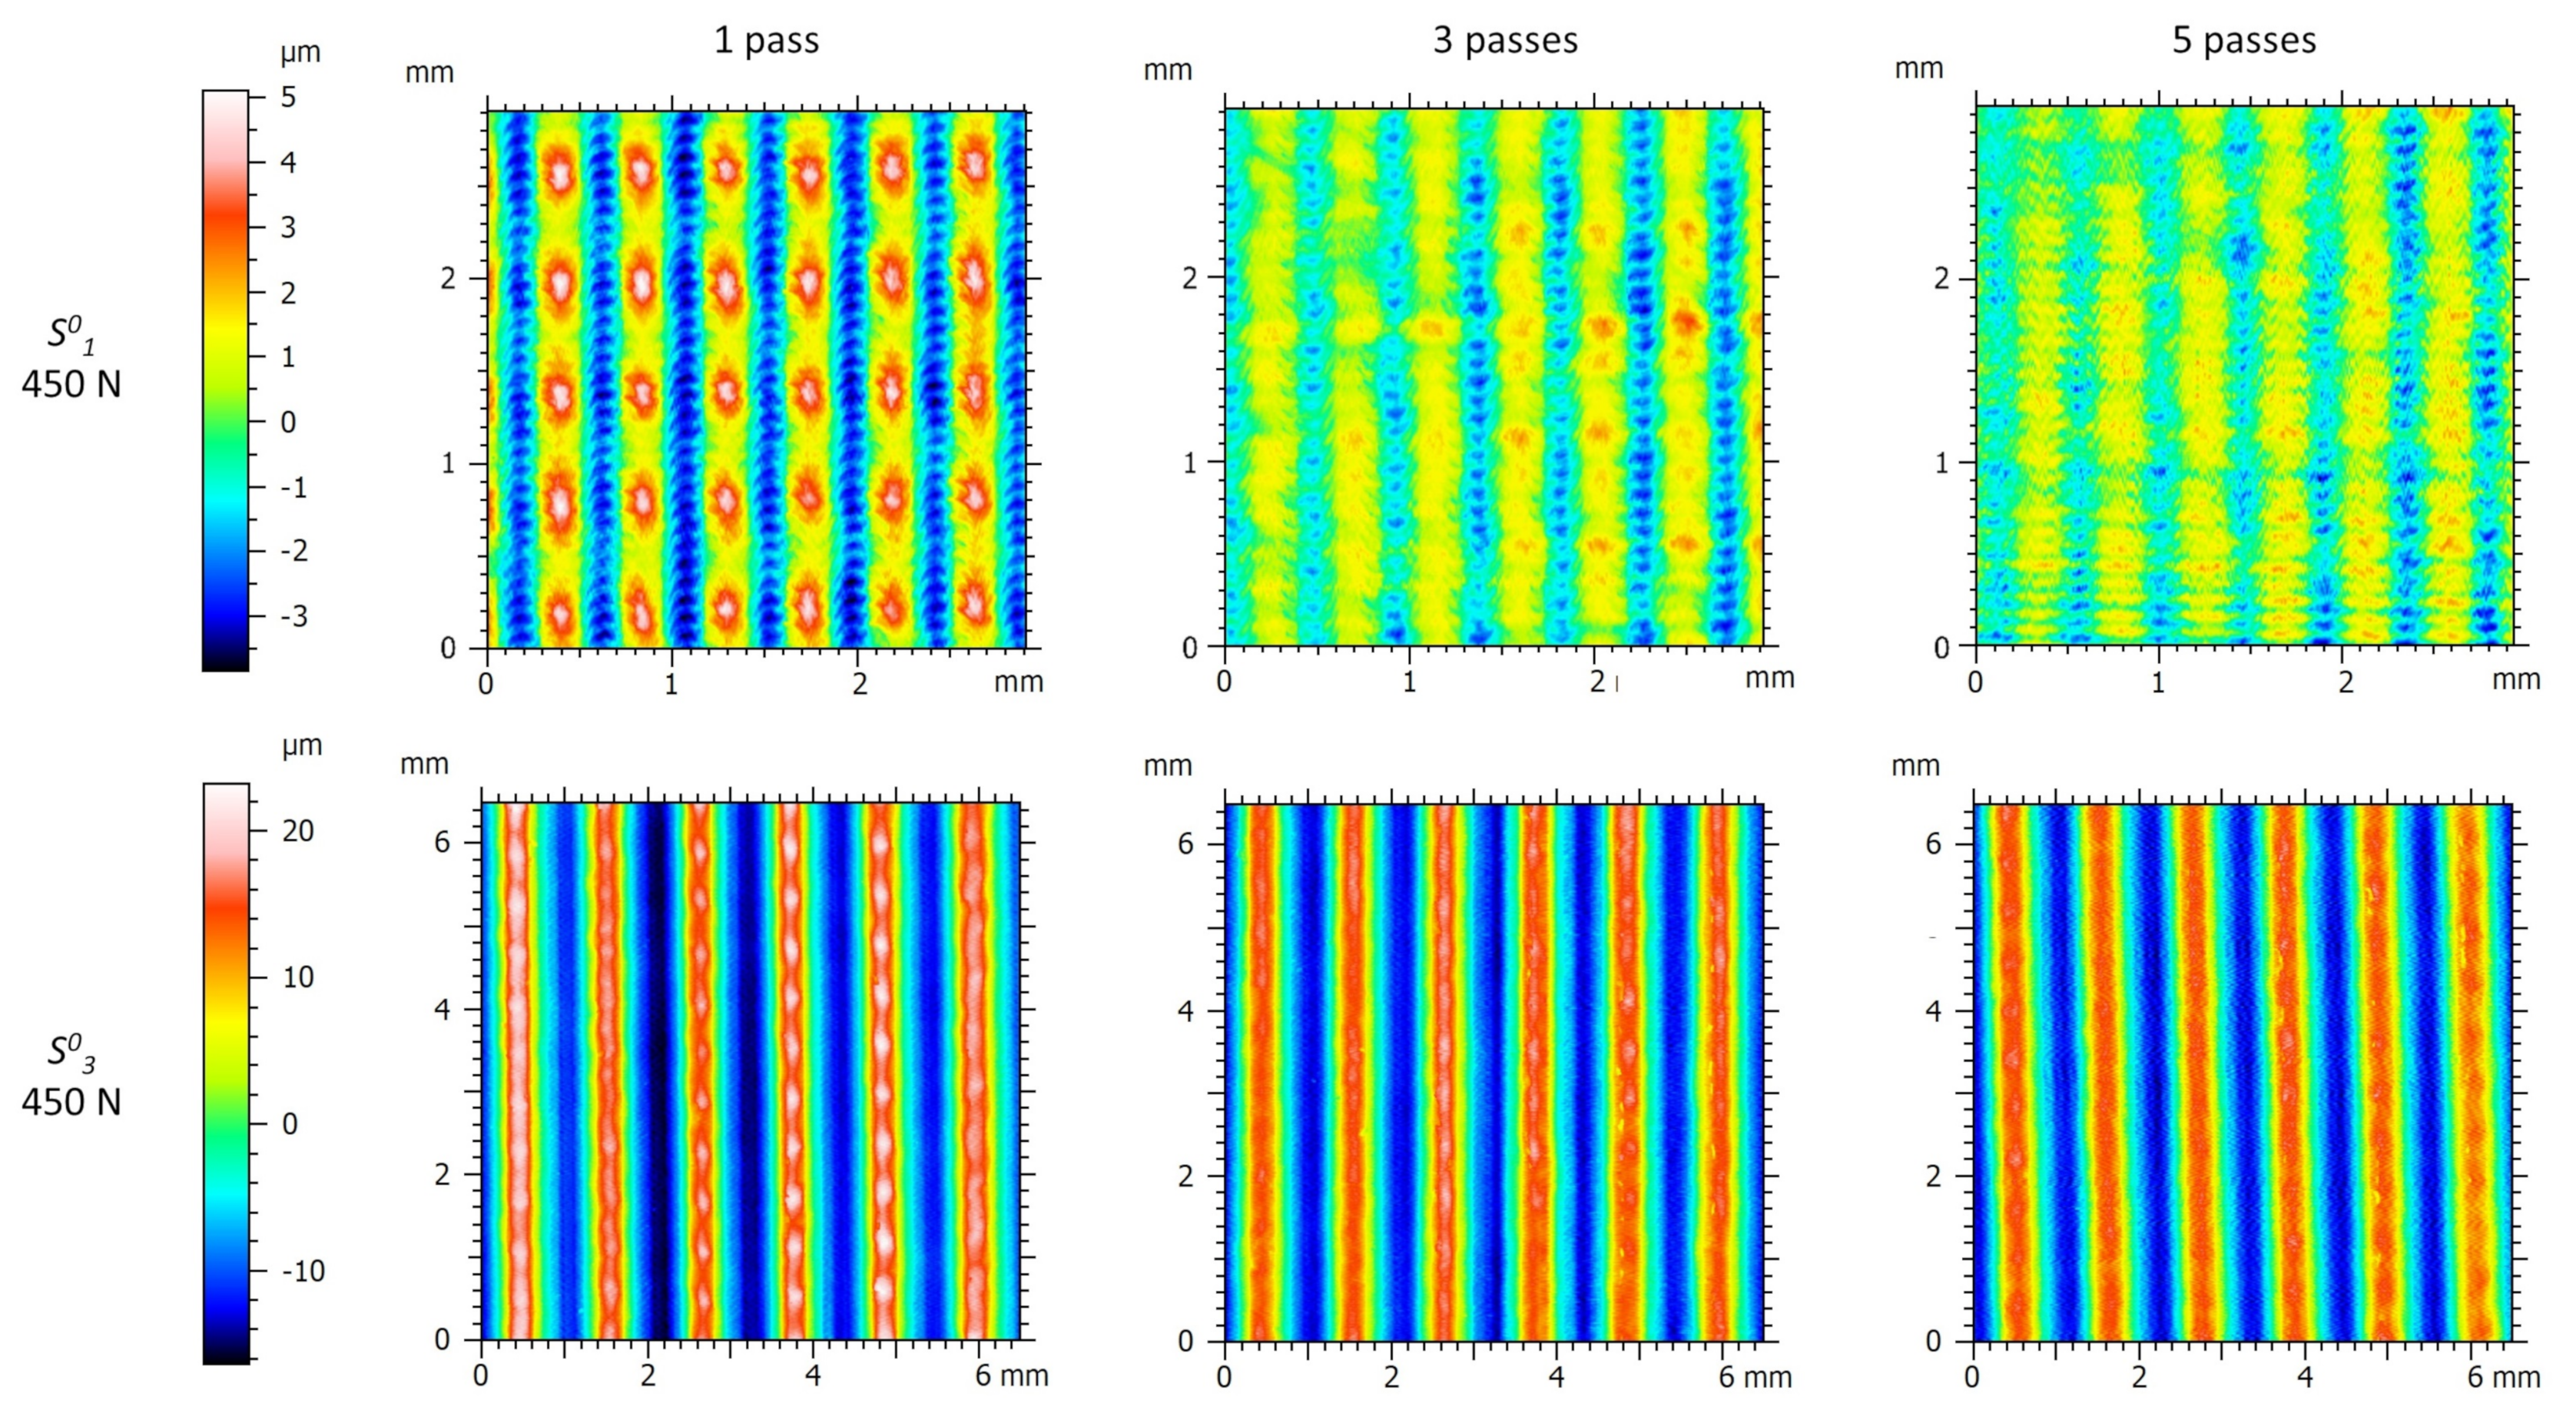
Unlike the previous three parameters, S t d remains 90 in all cases, as in the original surfaces. This texture direction is dominated on the original surfaces by the ball-end milling furrows even after VABB. S a l does not change either by the effect of factor variation, which could be expected, considering Figure 4. This in conjunction with the fact that S t d keeps being 90° after VABB means that the process is not effective enough to reorientate the surface as reported in other works [19], probably because of not enough preloading or too few passes being exerted. This means that there is still improvement capacity for VABB to modify Udimet®720. Figure 5 evidences this observation showing how S 1 0 evolves as the number of passes is increased, applying 450 N of preload. It is evident that the peaks of the surface are progressively flattened, but even after five passes, the original marks of ball-end milling are still present. However, it is also conspicuous how the traits of the surface are starting to be aligned according to the VABB direction, and it seems as if the application of a slightly higher preload or a sixth pass could have led to an effective reorientation of the machining direction. The same Figure shows in contrast how the effect is hardly conspicuous in the S 3 0 surface, whose scale is too large to be modified even by the level of force selected in this experimental design.
In summary, it is surface S 1 0 that is mostly affected by the process, whereas S 2 0 and S 3 0 are more timidly modified by the process. Indeed, if the improvement ratio 1 S q / S q 0 is considered and subjected to an ANOVA, it can be seen that surface S 1 0 has a much higher potential of improvement than the other two (Figure 6). At sight of this result, it can be said that the finer the original surface, the higher improvement potential it exhibits. Another obvious result evidenced after this analysis is that, as the preload increases and more passes are performed, the surface is improved to a higher extent, as argued above.

3.2.2. Surface Redistribution

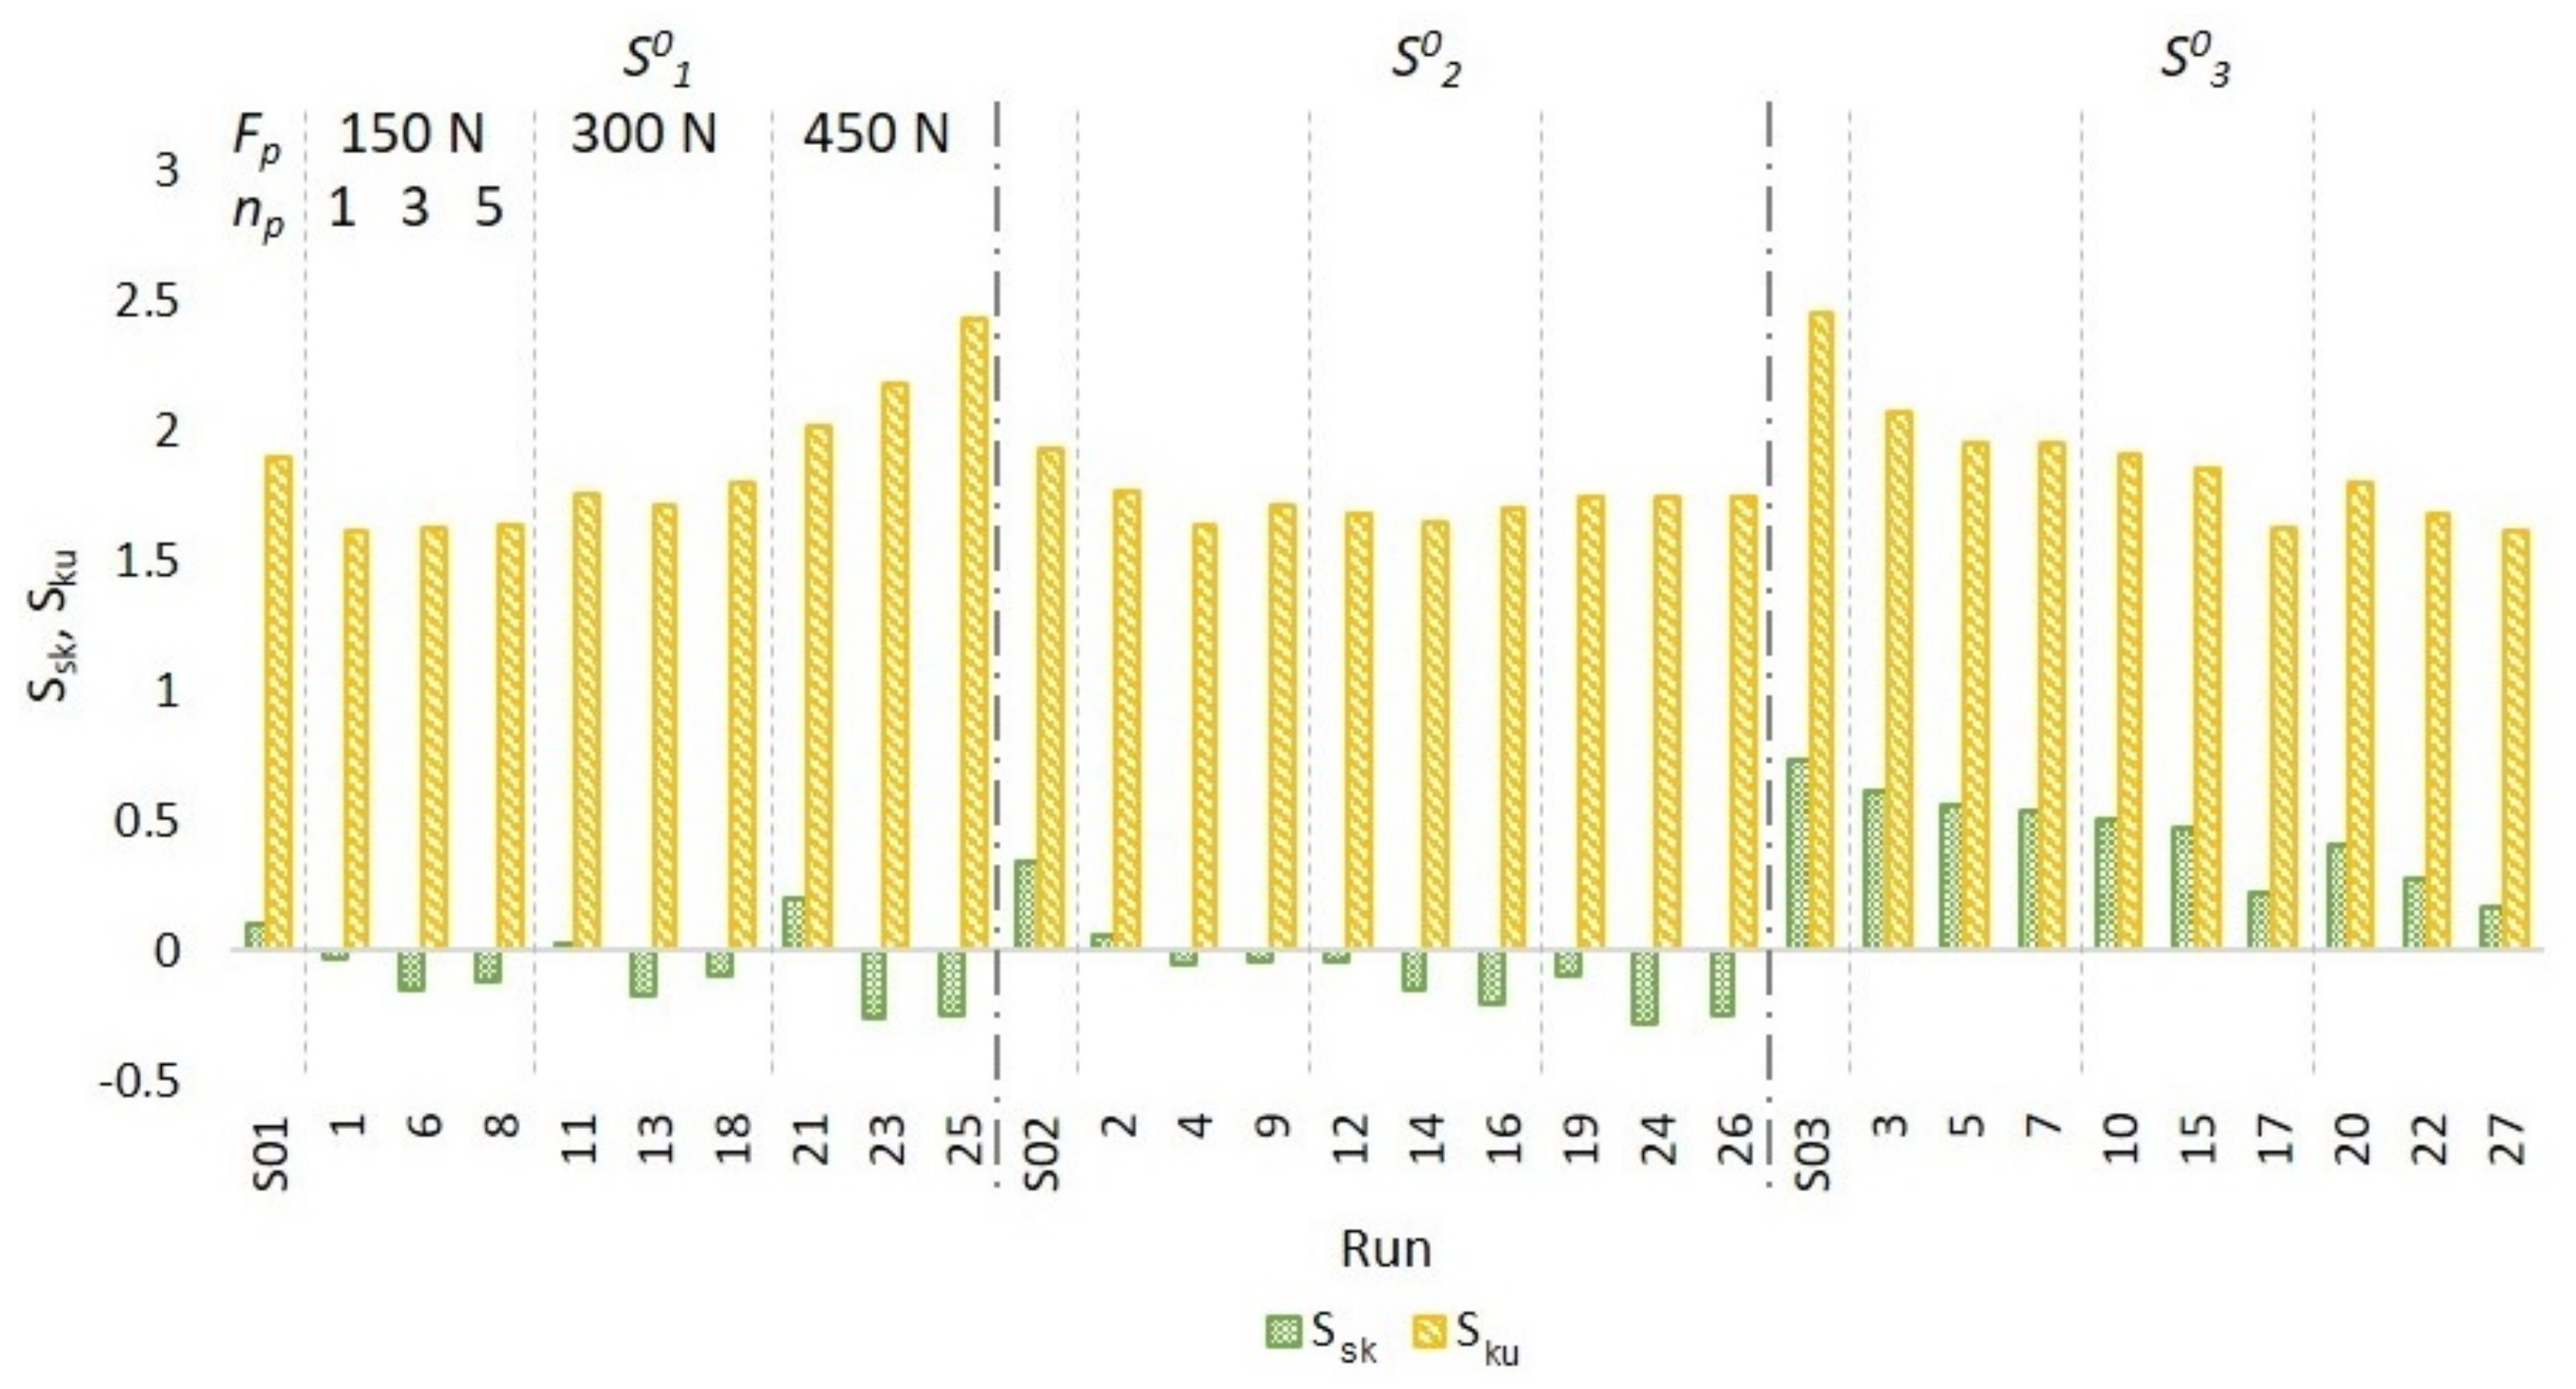
The effects of VABB in terms of surface redistribution are represented by the skewness and kurtosis values. It is assumed that the Gaussian values for these parameters (0 and 3, respectively), represent a balanced surface in terms of height and void equilibrium and average abruptness of the surface features, which ultimately guarantees a good functional performance of the surface. Taking a look at how kurtosis and skewness evolve as more plastic deformation is done in Figure 7; it can be found that the three surfaces perform differently. The effects on S 2 0 and S 3 0 skewness seem to fall from the original values, meaning that the peaks gain protagonism in the newly generated surfaces. On the contrary, all VABB tests deliver platykurtic surfaces with kurtosis kept at values around 1.5. It is S 1 0 that depicts a different behavior. Although the skewness values seem to be held at values around 0, kurtosis rises and tends to evolve towards Gaussian value 3 as more plastic deformation is performed.
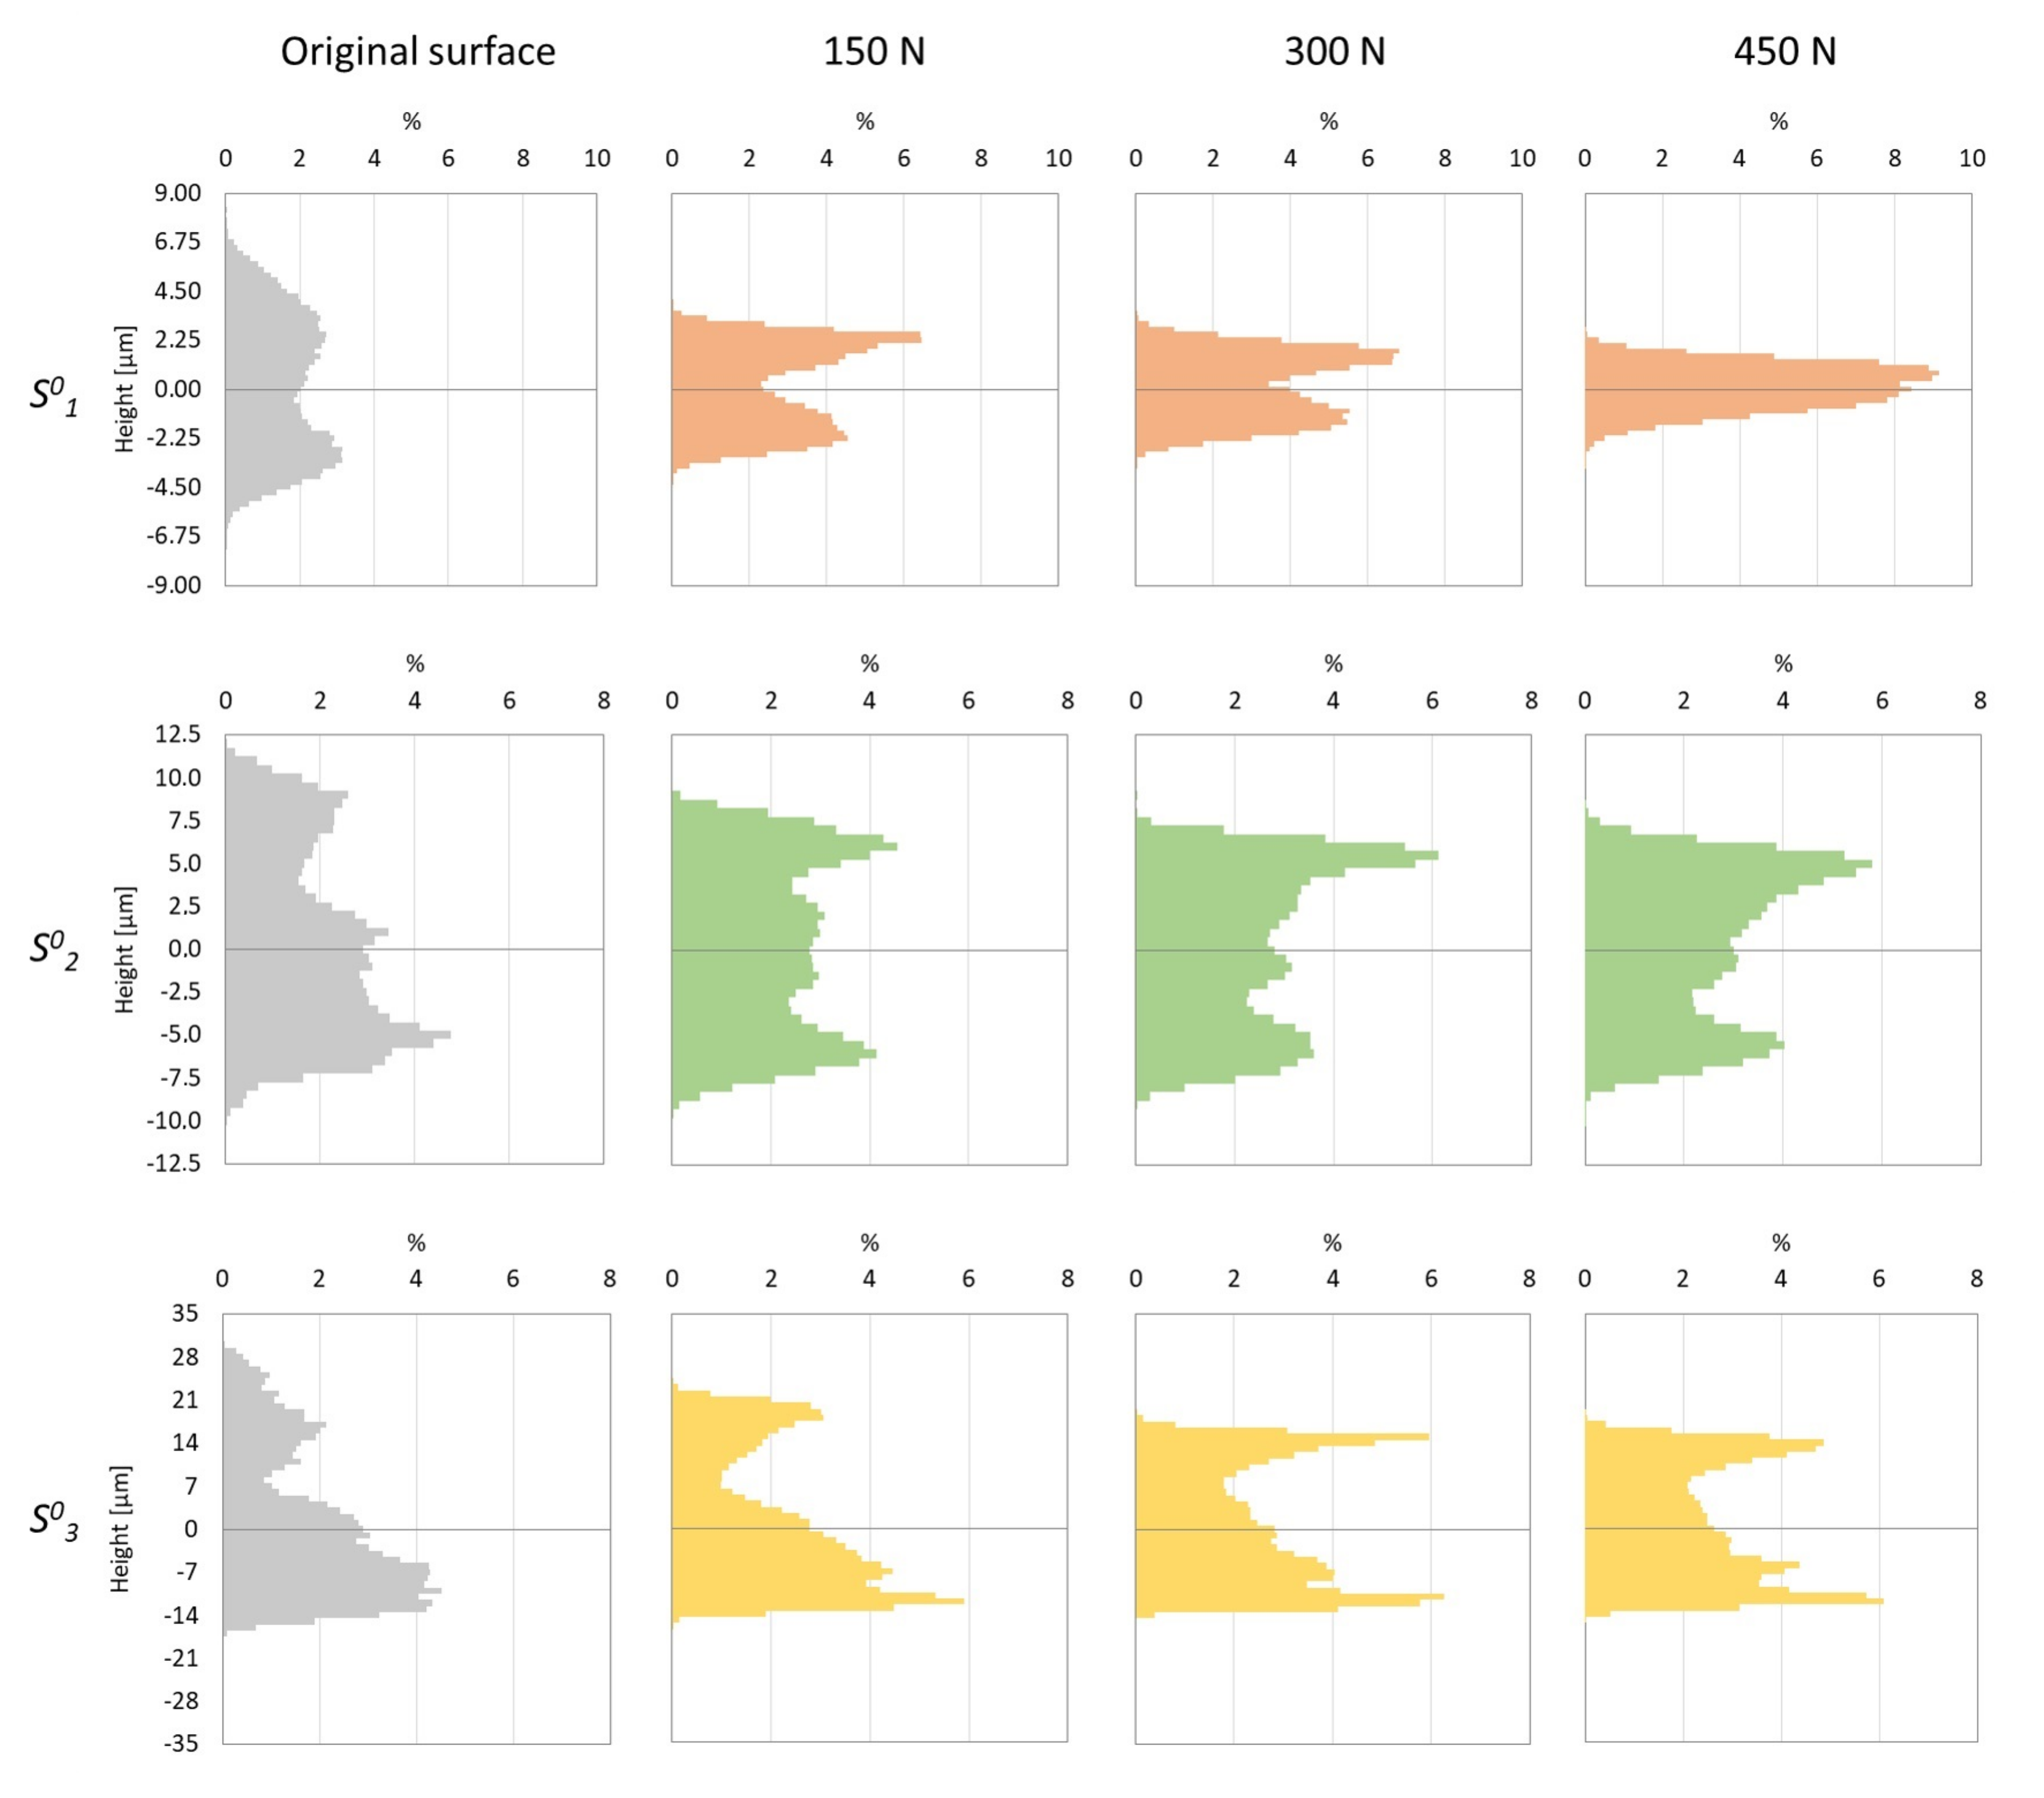
The exposed evolution of S s k and S k u agree with how the height histograms evolve (Figure 8). Platykurtic surfaces are represented by bimodal distributions in S 2 0 and S 3 0 . At these levels of preload and number of passes, VABB is not able to redistribute the surface. At sight of the amplitude results, this can be attributable to the fact the peaks of the surface are hardly deformed. On the contrary, S 1 0 evolves from a platykurtic bimodal surface to an almost unimodal distribution when 450N&5p are applied, confirming the previous results.

3.3. Comparison of VABB and NVABB

To assess what the effect is of the introduction of vibrations in the process, all the S parameters presented by VABB and NVABB surfaces are juxtaposed in Figure 9, evidencing that the surfaces obtained after both processes can be compared in all senses: amount of texture reduction and redistribution. VABB seems to deliver superior results only in some cases for surface S 1 0 , but this should be the object of a more thorough investigation in future research phases.
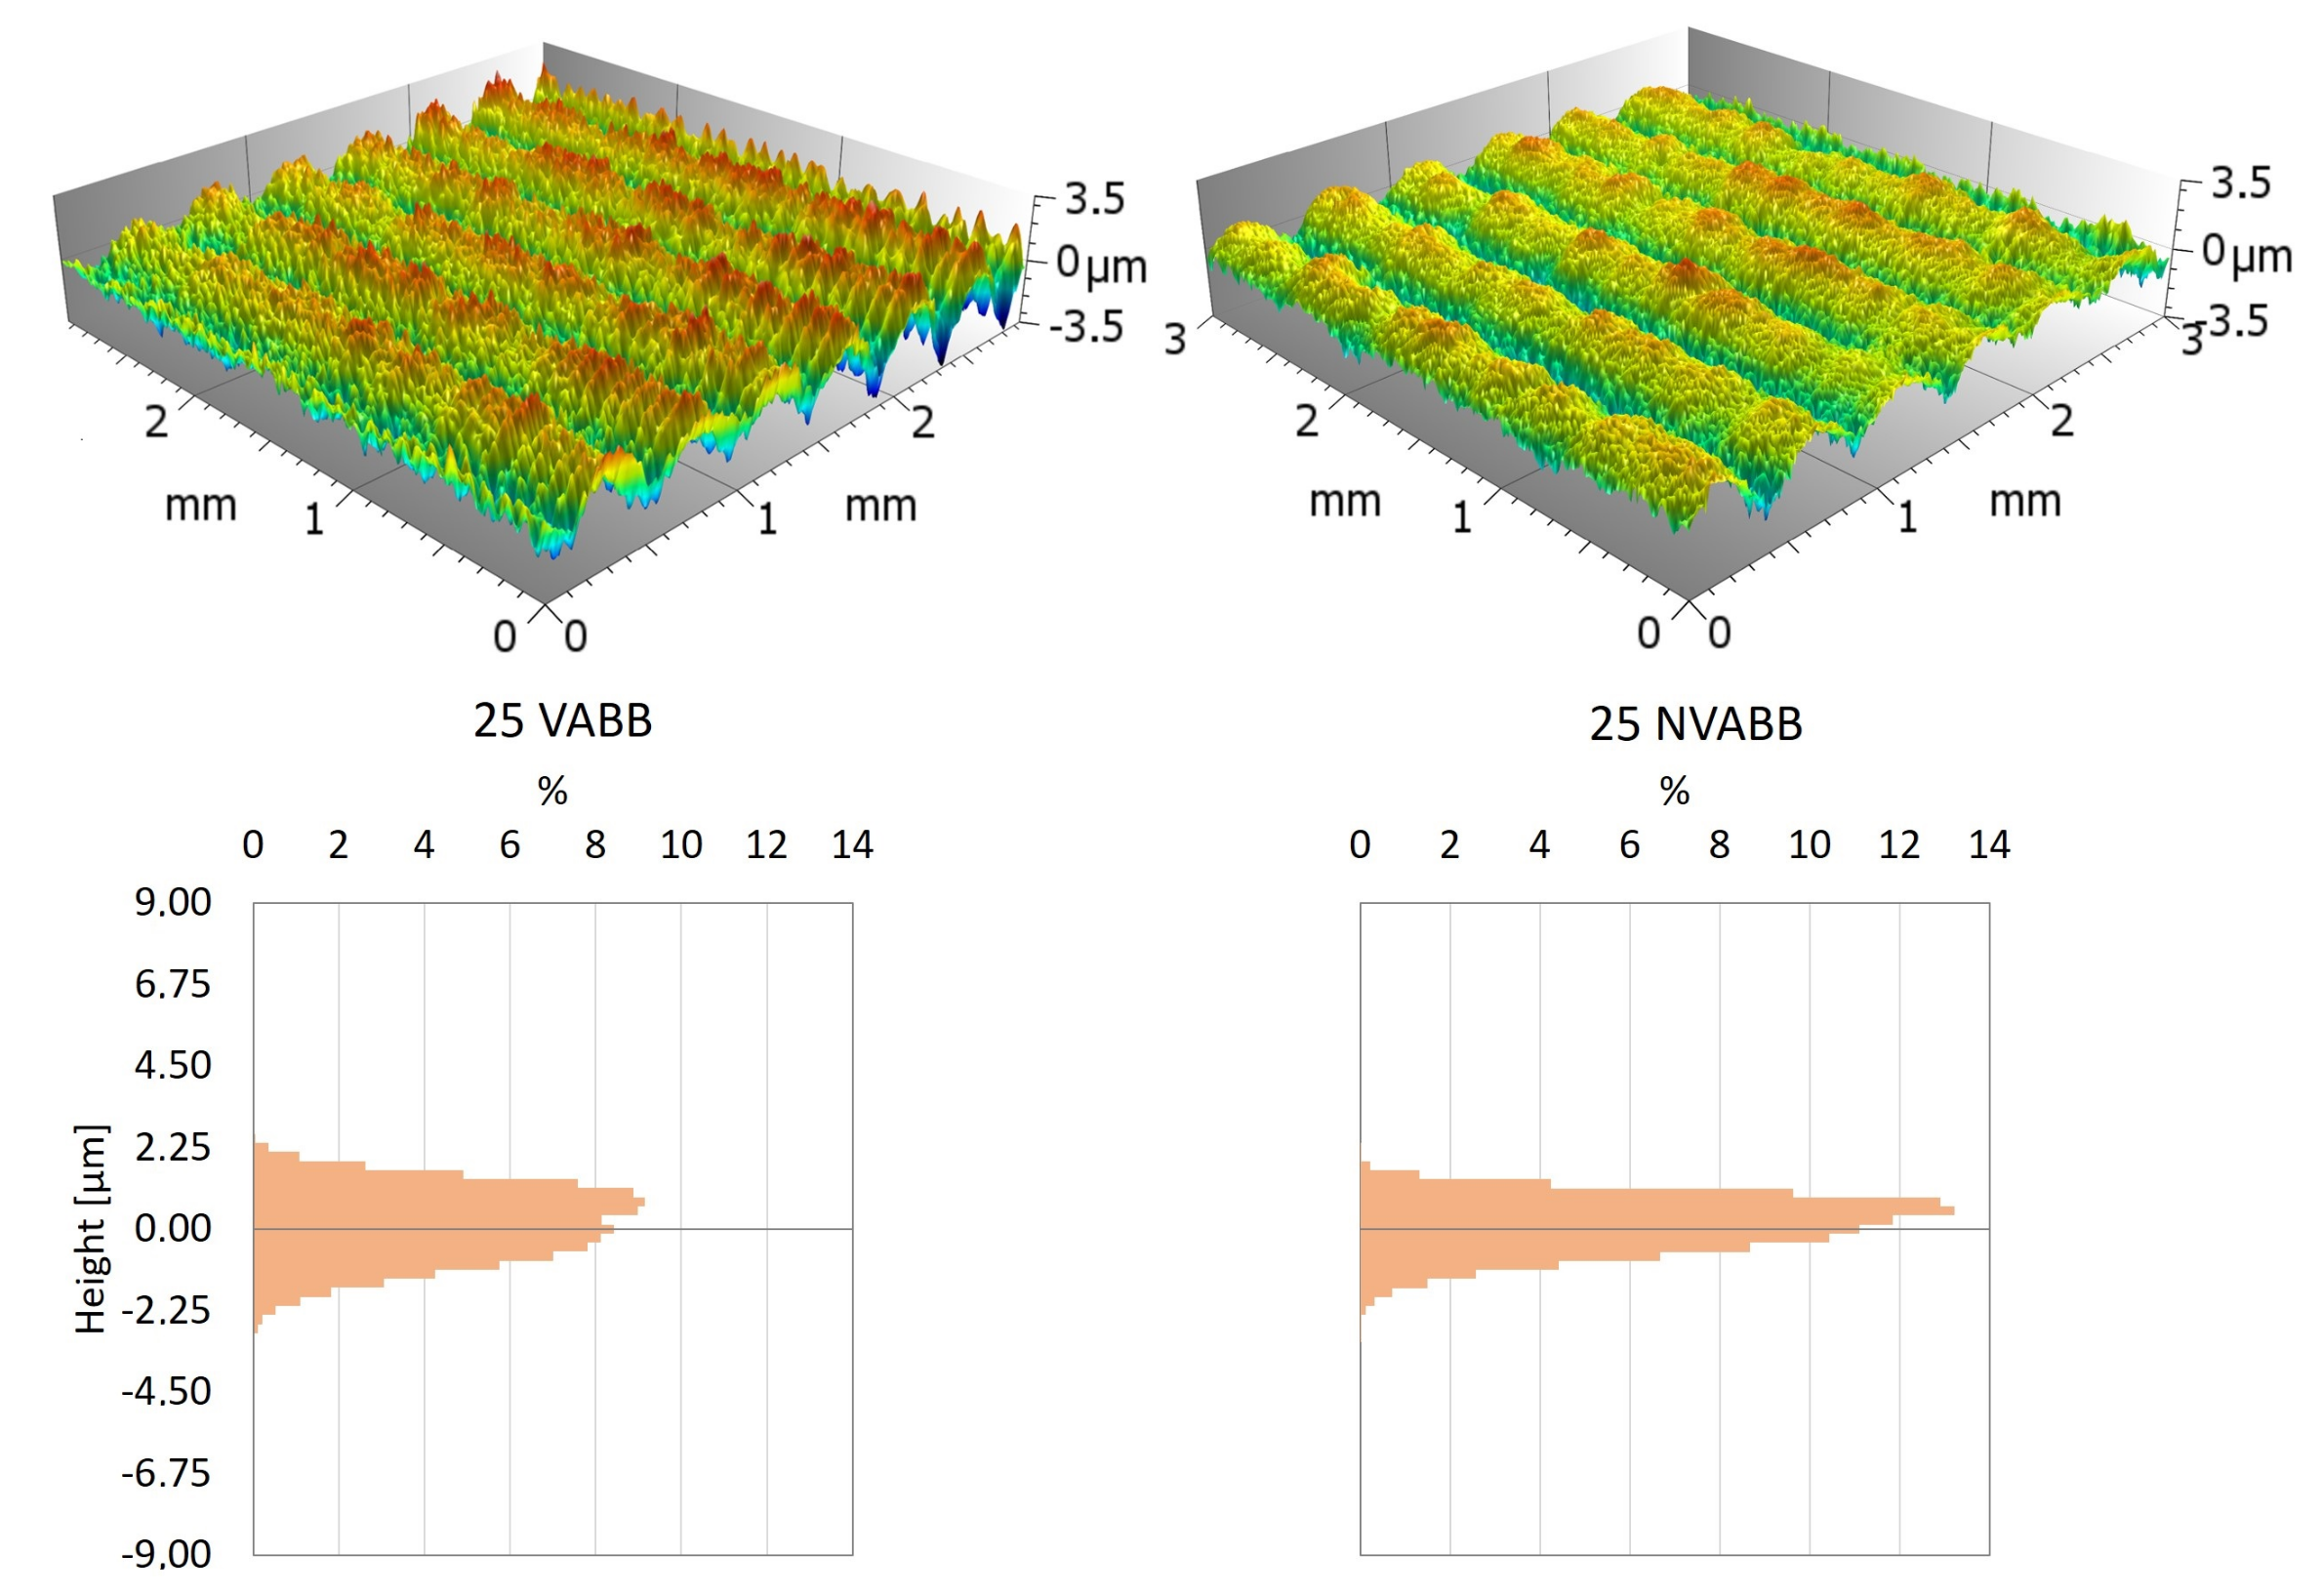
Although the numerical values seem to indicate that vibration-assistance does not introduce a significant change in the surface descriptors, a direct visual inspection evidences that both processes do not have the same actual effect on the surface. For instance, Figure 10 shows a 3D view of the topologies of the surfaces burnished on S 1 0 with 450 N and three passes. It can be observed that, although their descriptors are similar, the VABB surface presents surface features that are repeated more periodically. It would seem that the vibration movement of the burnishing ball interacts more heterogeneously with the peaks of the profile. As this difference has to do with a spatial condition of the surface, it can be indeed detected by the S a l parameter, which proves to be lower in all surfaces obtained by performing VABB on the S 1 0 surface. Again, the finer the surface, the most sensitive to vibration-assistance. The implications of this S a l being lower due to vibration assistance could have an impact in terms of functionality by reducing chatter and vibration of the surface, if it is in dynamic contact with another one. In all cases, this assertion should be confirmed with further experimental research.

4. Conclusions

In this paper, the effect of ultrasonic VABB applied on Udimet®720 has been quantified and analyzed in qualitative terms. In overall, the effects of vibration-assistance are positive, but results show that the process is more effective on surfaces that present lower texture amplitude. Given the the typologies of the surfaces studied in this paper, a quasi-Gaussian surface with S q < 4 is a good description of how previous surfaces should be prepared to be subjected to VABB and maximize its effects. In terms of material processing, 450 N and five passes are the best processing parameters found to improve texture on ball-end milled Udimet®720 surfaces. However, from the triple effect of VABB described by Jerez-Mesa et al. (2018) [19], only surface scale reduction and redistribution were observed with the processing conditions included in these works. Visual inspection revealed that the third effect of reorientation of the surface texture features could be achieved by applying higher preloads, which could also accentuate the scale reduction and redistribution effects.
The results found in this paper prove that, although the preload and number of passes have similar effects on topology reduction and redistribution, it seems that a single pass cannot succeed in delivering a fully modified surface. This observation has productive consequences that should be explored in future works, as it could be a drawback for the eventual industrial implementation of the process. Future research lines also include the assessment of residual stress and hardening caused by the process on this specific Ni-based alloy.

Author Contributions

Conceptualization, R.J.-M., J.L. and J.A.T.-R.; methodology, R.J.-M., J.L. and J.A.T.-R.; software, V.P.-G.; validation, R.J.-M., J.L. and J.A.T.-R.; formal analysis, V.P.-G. and R.J.-M.; investigation, R.J.-M.; resources, R.J.-M. and J.A.T.-R.; data curation, V.P.-G.; writing—original draft preparation, V.P.-G. and J.L.; writing—review and editing, R.J.-M., V.P.-G., J.L. and J.A.T.-R.; visualization, R.J.-M.; supervision, R.J.-M.; project administration, J.L.; funding acquisition, R.J.-M. and J.A.T.-R. All authors have read and agreed to the published version of the manuscript.

Funding

Financial support for this study was provided by the Ministry of Science, Innovation and Universities of Spain, through grant RTI2018-101653-B-I00, which is greatly appreciated; and by the regional government of Catalonia and FEDER funds for regional development through grant IU68-016744.

Conflicts of Interest

The authors declare no conflict of interest.

Abbreviations

The following abbreviations are used in this manuscript:
F p Burnishing preload
n p Number of passes
v f Feed velocity
S i 0 Original surface i
S t Burnishing strategy
ANOVAAnalysis of variance
NVABBNon-vibration-assisted ball burnishing
VABBVibration-assisted ball burnishing

Appendix A. Particular Taguchi Orthogonal Array

Table A1. L27 orthogonal array called for the design of the experiment.
Run F p (N) n p v f (mm/min) S 0 St
115013001nb0
215016002bn90/0
315019003bn0
415033002bn0
515036003nb0
615039001bn90/0
715053003bn90/0
815056001bn0
915059002nb0
1030013003bn90/0
1130016001bn0
1230019002nb0
1330033001nb0
1430036002bn90/0
1530039003bn0
1630053002bn0
1730056003nb0
1830059001bn90/0
1945013002bn0
2045016003nb0
2145019001bn90/0
2245033003bn90/0
2345036001bn0
2445039002nb0
2545053001nb0
2645056002bn90/0
2745059003bn0

Appendix B. Definition of Surface Descriptors Included in This Manuscript

The calculations of the surface parameters S used to define the topology of the surface, and included in the following list, were performed according to the ISO 25178 standard.
S a Average surface texture amplitude
S q Root mean square surface texture amplitude
S 10 z Mean 10 height-peak texture amplitude
S d r Developed surface to area ratio
S t d Surface texture direction
S a l Fastest decay correlation length
S d q Root mean square of the slopes of the surface
S s k Skewness of the surface height distribution
S k u Kurtosis of the surface height distribution

References

  1. Loh, N.; Tam, S. Effects of ball burnishing parameters on surface finish—A literature survey and discussion. Precis. Eng. 1988, 10, 215–220. [Google Scholar] [CrossRef]
  2. Murthy, R.; Kotiveerachari, B. Burnishing of metallic surfaces—A review. Precis. Eng. 1981, 3, 172–179. [Google Scholar] [CrossRef]
  3. Sachin, B.; Narendranath, S.; Chakradhar, D. Selection of optimal process parameters in sustainable diamond burnishing of 17-4 PH stainless steel. J. Braz. Soc. Mech. Sci. Eng. 2019, 41, 219. [Google Scholar] [CrossRef]
  4. Kuznetsov, V.; Smolin, I.Y.; Dmitriev, A.; Tarasov, S.Y.; Gorgots, V. Toward control of subsurface strain accumulation in nanostructuring burnishing on thermostrengthened steel. Surf. Coat. Technol. 2016, 285, 171–178. [Google Scholar] [CrossRef]
  5. Rotella, G.; Rinaldi, S.; Filice, L. Roller burnishing of Ti6Al4V under different cooling/lubrication conditions and tool design: Effects on surface integrity. Int. J. Adv. Manuf. Technol. 2020, 106, 431–440. [Google Scholar] [CrossRef]
  6. Hamadache, H.; Bourebia, M.; Taamallah, O.; Laouar, L. Surface hardening of 36 NiCrMo 6 steel by ball burnishing process. Mater. Res. Express 2019, 6, 106538. [Google Scholar] [CrossRef]
  7. Ding, Z.; Zhao, J.; Liu, H.; Dong, Y. Effects of ball burnishing on surface properties of SKD11 mold steel. Eng. Res. Express 2020, 2, 025004. [Google Scholar] [CrossRef]
  8. Rodríguez, A.; De Lacalle, L.L.; Celaya, A.; Lamikiz, A.; Albizuri, J. Surface improvement of shafts by the deep ball-burnishing technique. Surf. Coat. Technol. 2012, 206, 2817–2824. [Google Scholar] [CrossRef]
  9. Rodríguez, A.; Calleja, A.; López de Lacalle, L.N.; Pereira, O.; González, H.; Urbikain, G.; Laye, J. Burnishing of FSW Aluminum Al-Cu-Li Components. Metals 2019, 9, 260. [Google Scholar] [CrossRef] [Green Version]
  10. Bhagi, L.K.; Gupta, P.; Rastogi, V. A brief review on failure of turbine blades. In Proceedings of the STME-2013 Smart Technologies for Mechanical Engineering, Delhi, India, 26–27 October 2013; pp. 25–26. [Google Scholar]
  11. Thakur, A.; Gangopadhyay, S. State-of-the-art in surface integrity in machining of nickel-based super alloys. Int. J. Mach. Tools Manuf. 2016, 100, 25–54. [Google Scholar] [CrossRef]
  12. Smith, R.; Lewi, G.; Yates, D. Development and application of nickel alloys in aerospace engineering. Aircr. Eng. Aerosp. Technol. 2001, 73, 138–147. [Google Scholar] [CrossRef]
  13. Monajati, H.; Taheri, A.; Jahazi, M.; Yue, S. Deformation characteristics of isothermally forged UDIMET 720 nickel-base superalloy. Metall. Mater. Trans. A 2005, 36, 895–905. [Google Scholar] [CrossRef]
  14. Sadananda, K.; Shahinian, P. Creep crack growth in Udimet 700. Metall. Trans. A 1978, 9, 79–84. [Google Scholar] [CrossRef]
  15. Gill, A.; Telang, A.; Mannava, S.; Qian, D.; Pyoun, Y.S.; Soyama, H.; Vasudevan, V.K. Comparison of mechanisms of advanced mechanical surface treatments in nickel-based superalloy. Mater. Sci. Eng. A 2013, 576, 346–355. [Google Scholar] [CrossRef]
  16. Jerez-Mesa, R.; Travieso-Rodriguez, J.A.; Gomez-Gras, G.; Lluma-Fuentes, J. Development, characterization and test of an ultrasonic vibration-assisted ball burnishing tool. J. Mater. Process. Technol. 2018, 257, 203–212. [Google Scholar] [CrossRef] [Green Version]
  17. Hussein, R.; Sadek, A.; Elbestawi, M.; Attia, M. Surface and microstructure characterization of low-frequency vibration-assisted drilling of Ti6Al4V. Int. J. Adv. Manuf. Technol. 2019, 103, 1443–1457. [Google Scholar] [CrossRef]
  18. Estevez-Urra, A.; Llumà, J.; Jerez-Mesa, R.; Travieso-Rodriguez, J.A. Monitoring of Processing Conditions of an Ultrasonic Vibration-Assisted Ball-Burnishing Process. Sensors 2020, 20, 2562. [Google Scholar] [CrossRef]
  19. Jerez-Mesa, R.; Landon, Y.; Travieso-Rodriguez, J.A.; Dessein, G.; Lluma-Fuentes, J.; Wagner, V. Topological surface integrity modification of AISI 1038 alloy after vibration-assisted ball burnishing. Surf. Coat. Technol. 2018, 349, 364–377. [Google Scholar] [CrossRef] [Green Version]
  20. Jerez-Mesa, R.; Travieso-Rodríguez, J.A.; Landon, Y.; Dessein, G.; Lluma-Fuentes, J.; Wagner, V. Comprehensive analysis of surface integrity modification of ball-end milled Ti-6Al-4V surfaces through vibration-assisted ball burnishing. J. Mater. Process. Technol. 2019, 267, 230–240. [Google Scholar] [CrossRef]
  21. Prevéy, P.; Telesman, J.; Gabb, T.; Kantzos, P. FOD resistance and fatigue crack arrest in low plasticity burnished IN718. In Proceedings of the 5th National Turbine Engine HCF Conference, Chandler, AZ, USA, 7–9 March 2000. [Google Scholar]
  22. Prevéy, P.S. The Effect of Cold Work on the Thermal Stability of Residual Compression in Surface Enhanced IN718; Technical Report; Lambda Research: Cincinnati OH, USA, 2000. [Google Scholar]
  23. De Lacalle, L.L.; Lamikiz, A.; Sánchez, J.; Arana, J. The effect of ball burnishing on heat-treated steel and Inconel 718 milled surfaces. Int. J. Adv. Manuf. Technol. 2007, 32, 958–968. [Google Scholar] [CrossRef]
  24. Sequera, A.; Fu, C.; Guo, Y.; Wei, X. Surface integrity of inconel 718 by ball burnishing. J. Mater. Eng. Perform. 2014, 23, 3347–3353. [Google Scholar] [CrossRef]
  25. Klocke, F.; Bäcker, V.; Wegner, H.; Feldhaus, B.; Baron, H.U.; Hessert, R. Influence of process and geometry parameters on the surface layer state after roller burnishing of IN718. Prod. Eng. 2009, 3, 391. [Google Scholar] [CrossRef]
  26. Nagarajan, B.; Castagne, S. Microstructure study of nickel-based superalloys after deep cold rolling. In Materials Science Forum; Trans Tech Publications Ltd.: Bächau, Switzerland, 2017; Volume 879, pp. 169–174. [Google Scholar]
  27. Nagarajan, B.; Kumar, D.; Fan, Z.; Castagne, S. Effect of deep cold rolling on mechanical properties and microstructure of nickel-based superalloys. Mater. Sci. Eng. A 2018, 728, 196–207. [Google Scholar] [CrossRef]
  28. Special Metals Corporation. UDIMET Alloy 720; Technical Report; Special Metals Corporation: New York, NY, USA, 2004. [Google Scholar]
  29. Taguchi, G.; Chowdhury, S.; Wu, Y. Taguchi’s Quality Engineering Handbook; Wiley: Hoboken, NJ, USA, 2005. [Google Scholar]
  30. Dong, W.; Sullivan, P.; Stout, K. Comprehensive study of parameters for characterizing three-dimensional surface topography I: Some inherent properties of parameter variation. Wear 1992, 159, 161–171. [Google Scholar] [CrossRef]
  31. Dong, W.; Sullivan, P.; Stout, K. Comprehensive study of parameters for characterising three-dimensional surface topography: III: Parameters for characterising amplitude and some functional properties. Wear 1994, 178, 29–43. [Google Scholar] [CrossRef]
  32. Dong, W.; Sullivan, P.; Stout, K. Comprehensive study of parameters for characterising three-dimensional surface topography: IV: Parameters for characterising spatial and hybrid properties. Wear 1994, 178, 45–60. [Google Scholar] [CrossRef]
  33. King, T.; Spedding, T.A. On the relationships between surface profile height parameters. Wear 1982, 83, 91–108. [Google Scholar] [CrossRef]
Figure 1. (a) Basic structure of the VABB tool used for the experiments. (b) Overview of the distribution of the 54 runs on the workpiece.
Metals 10 00915 g001
Figure 2. Representation of the path followed for each strategy depending on the number of passes.
Metals 10 00915 g002
Figure 3. 3D texture parameters of the original surfaces. (a) Amplitude parameters S a , S q and S 10 z , and spatial parameter S a l . (b) Hybrid parameters S d q and S d r . (c) Surface skewness S s k and kurtosis S k u .
Metals 10 00915 g003
Figure 4. S q , S 10 z , S a l and S d r parameters that characterize all surfaces after VABB.
Metals 10 00915 g004
Figure 5. Pseudo view of S 0 surfaces burnished with 450 N, and one pass (#21), three passes (#23) and five passes (#25).
Metals 10 00915 g005
Figure 6. Mean effects graph derived from ANOVA considering the improvement ratio of S q with regard to the original value ( 1 S q / S q 0 ).
Metals 10 00915 g006
Figure 7. Skewness and kurtosis S parameters that characterize all surfaces after VABB.
Metals 10 00915 g007
Figure 8. Evolution of height distribution histograms for all tests with five passes.
Metals 10 00915 g008
Figure 9. Comparison of S q , S s k and S k u parameters obtained after VABB and NVABB testing.
Metals 10 00915 g009
Figure 10. 3D views and height histograms of surfaces processed with 450 N and three passes. (Left) VABB. (Right) NVABB
Metals 10 00915 g010
Table 1. Properties of Udimet®720 alloy.
PropertyUnitsValue
25 C875 C
Elongation%417
Yield strength (0.2%)MPa950540
Tensile strengthMPa1100665
Densityg cm 3 8.08
Coefficient of expansion μ m m 1 C 1 12.24
Table 2. Material composition of Udimet®720 in weight %.
NiCrCoTiMoAlWZrCB
*15.5–16.514.0–15.54.75–5.252.75–3.252.25–2.751.0–1.50.025–0.0500.01–0.020.01–0.02
Table 3. Milling parameters for the machining preparation of the three original surfaces.
Original Surface a e (mm) a p (mm) v c (m/min) f n (mm/rev)
S 1 0 0.5
S 2 0 0.70.2600.1
S 3 0 1.1
Table 4. Factors and levels considered in the DOE to generate the Taguchi orthogonal array.
FactorLevels
123
F p (N)150300450
n p 135
v f (mm/min)300600900
S 0 S 1 0 S 2 0 S 3 0
S t nb0bn90/0bn0
Table 5. The p-values obtained for all ANOVA calculations. Shaded values are lower than α = 10 % .
F p n p v f S 0 St F p n p F p v f n p v f
S q 0.024 0.0450.967 00.8320.8070.7780.840
S 10 z 0.0840.0280.89500.5540.7580.4690.786
S a l 0.2910.6160.99800.8620.9710.8130.623
S d r 0.0810.0690.6070.0010.2120.1250.1440.421