Article

Identification and Evaluation of Tool Tip Contact and Cutting State Using AE Sensing in Ultra-Precision Micro Lathes †

by
Alan Hase
1,2
1
Department of Mechanical Engineering, Saitama Institute of Technology, 1690 Fusaiji, Fukaya 369-0293, Saitama, Japan
2
Institute of Physical and Chemical Research (RIKEN), 2-1 Hirosawa, Wako 351-0198, Saitama, Japan
This paper is an extended version of the paper published in Hase, A. Acoustic Emission Signal during Cutting Process on Super-Precision Micro-Machine Tool. In Proceedings of the Global Engineering, Science and Technology Conference, Singapore, 3–4 October 2013.
Lubricants 2026, 14(1), 7; https://doi.org/10.3390/lubricants14010007 (registering DOI)
Submission received: 5 December 2025 / Revised: 14 December 2025 / Accepted: 19 December 2025 / Published: 23 December 2025

Abstract

The growing demand for miniature mechanical components has increased the importance of ultra-precision micro machine tools and real-time monitoring. This study examines acoustic emission (AE) sensing for the intelligent control of an ultra-precision micro lathe. AE signals were measured while brass and aluminum alloys were turned with cermet and diamond tools at different spindle speeds and cutting depths. Finite element simulations were performed to clarify the AE generation mechanisms. The AE waveform amplitude changed stepwise corresponding to tool–workpiece contact, elastoplastic deformation, and chip formation, enabling precise contact detection at the 0.1 μm level. The AE amplitude increased with increasing spindle speed and increasing depth of cut except during abnormal conditions (e.g., workpiece adhesion). Frequency analysis revealed a dominant peak near 0.2 MHz during normal cutting, as well as high-frequency (>1 MHz) components linked to built-up edge formation. Simulations confirmed that these AE features reflect variations in the strain rate in the shear zone and on the rake face. They also confirmed that cutting force spectra under high friction reproduce the experimentally observed high-frequency peaks. These findings demonstrate the feasibility of using AE sensing to identify the cutting state and support the development of self-optimizing micro machine tools.

1. Introduction

The evolution of electronic devices, advances in mobility equipment, and an increase in embedded machinery have led to a heightened demand for smaller mechanical components. Specifically, the trend toward higher density and lower weight in smartphones, wearable devices, and medical equipment is accelerating the miniaturization of internal parts. In addition, space-saving and weight reduction are crucial competitive factors in electric mobility devices, including electric vehicles, drones, and robots. Furthermore, demand for components installed in confined spaces, such as IoT sensors and microactuators, is increasing. Downsizing mechanical systems and components reduces material costs and power consumption while improving transportation and storage efficiency, which addresses societal demands such as carbon neutrality and the constraints of urbanization and limited space.
Advances in precision machining technology, the development of high-precision measurement and evaluation techniques, and the emergence of high-strength materials have enabled the miniaturization of micro-components. Conventional large-scale production lines are disadvantageous with respect to energy efficiency, installation space, capital investment, and flexibility when manufacturing these micro-components. Consequently, the miniaturization of production machinery systems, or microfactories and microfabrication, has been actively pursued [1,2,3]. Specifically, the demand for micro machine tools, particularly desktop computer numerical control (CNC) machine tools, is increasing year by year, and their market value is expected to increase. In 2022, the global market for desktop CNC machine tools was valued at USD 2.09 billion, and it is projected to grow from USD 2.25 billion in 2023 to USD 4.2 billion by 2032 [4]. The compound annual growth rate (CAGR) from 2024 to 2032 is projected to be 7.21%. This market growth is driven by the increasing demand for the precision machining of micro-components and the expansion of small-scale production facilities.
The desktop CNC machine tool market exhibits a relatively high CAGR and represents a core segment within the small machine tool market because of the strong demand for small-batch, high-mix production, educational applications, and use by individuals and small businesses. To enhance the sustainability of small machine tools, it is essential to introduce sensing technology for monitoring and controlling machining conditions and maintaining machine tools.
When machining is carried out using desktop machine tools or micro machine tools, precise coordinate system settings and recognition of the machining state are necessary to produce accurate, high-quality products. Setting the coordinate system for the position of a cutting tool edge on a micro-machine tool or super-precision microfabrication machine is time-consuming and labor-intensive because the space between the cutting tool and the workpiece must be repeatedly adjusted by performing trial cuts and observing them under a microscope. Identifying the cutting state on micro machine tools is complicated and has therefore only ever been performed by skilled workers.
Measurements of various parameters (e.g., vibration, sound, cutting force, and power) have conventionally been used to monitor the cutting state [5,6,7,8,9]. However, such measurements are difficult to apply to micro machine tools because of their low sensitivity when used to evaluate microscopic phenomena. Acoustic emission (AE) sensing is a nondestructive testing method that evaluates materials using elastic stress waves generated when a material is deformed. The ultimate goal of the present study is to create an intelligent, super-precision micro-machine tool that uses AE sensing. Numerous studies have examined AE signals detected during the cutting process on conventional machine tools [10,11,12,13,14,15,16,17]; however, to our knowledge, none have attempted to elucidate AE signals detected during micro-cutting on super-precision micro machine tools. The present study aims to investigate the features of AE signals (i.e., the amplitude and the frequency spectrum of AE signal waveforms) during micro-cutting on an ultra-precision micro lathe.
The findings of this study demonstrate the efficacy of AE sensing in identifying tool–workpiece contact and cutting states in an ultra-precision micro lathe, exhibiting high sensitivity. Stepwise changes in AE amplitude enabled tool contact detection with a precision of 0.1 μm, while amplitude and frequency characteristics reflected cutting conditions: a dominant peak near 0.2 MHz appeared during stable cutting, whereas additional high-frequency components above 1 MHz indicated abnormal states such as adhesion and built-up edge formation, consistent with finite element simulation results.
The strength of this work lies in its integration of high-resolution AE measurements with finite element analysis (FEA) to establish a clear physical link between AE features and micro-scale cutting phenomena. The findings underscore the considerable promise of AE sensing for real-time, in situ monitoring of ultra-precision micro machining. These results lay the groundwork for the advancement of intelligent, self-optimizing micro machine tools. These tools would possess the capability of automatic tool positioning, cutting condition optimization, and early detection of adhesion and tool degradation.

2. Materials and Methods

2.1. Cutting Experiments on an Ultra-Precision Micro Lathe

The cutting experiments were conducted using a numerically controlled ultra-precision micro lathe (MTS 3: Nano, Yokohama, Japan) [18]. Figure 1 and Figure 2 show a photograph of the experimental system and a schematic of the instrumentation used to acquire AE signals from the micro-cutting process, respectively. AE signals generated during cutting were detected by an AE sensor mounted in a sensor jig on the back of the tool’s shank. The AE sensor was a wideband AE transducer (AE-900M-WB: NF, Yokohama, Japan), which was fabricated from lead zirconate titanate (PZT) piezoelectric ceramic. The frequency response of the sensor used in this study was 0.5–4 MHz. For frequencies below 0.5 MHz, while the flatness of the frequency response is suboptimal, AE signals can still be detected without issue. The output signals from the AE sensor were amplified to 80 dB using a preamplifier (AE-912: NF) and a main amplifier. The AE signals were passed through a 100 kHz high-pass filter using a discriminator (AE9922: NF) to eliminate noise and signals caused by phenomena not directly related to the cutting process, such as collisions and twining of chips. AE signal waveforms were measured using a fast waveform digitizer with a resolution of 12 bits and a sampling frequency of 100 MHz; the measurements were conducted from the moment the cutting tool contacted the workpiece until the workpiece was cut.
The cutting conditions were chosen to produce the finish machining. In the experiments, the spindle rotating speed and cutting depth were varied, whereas the cutting feed rate remained constant. The cutting conditions used in this study are listed in Table 1. The ultra-precision micro lathe has a resolution limit of 0.1 μm. Free-cutting brass (C3604) and an aluminum alloy (A6063) were used as the workpiece materials. Their chemical compositions based on Japanese Industrial Standards (JIS) are listed in Table 2. These materials have average crystallite sizes of approximately 10 to 50 µm and 20 to 100 µm, respectively. Each workpiece was 5 mm in diameter and 20 mm in length and was supported by a collet chuck with an overhang length of 10 mm; the outer diameter of the workpieces was cut under dry cutting conditions using a disposable tip made of cermet and a single-crystal diamond with a nose radius of 0.2 mm. The tool holder was 8 mm × 8 mm and 80 mm long. Premachining was conducted under each cutting condition before each experiment to eliminate the axis eccentricity of the workpiece.

2.2. Cutting Simulations via the Finite Element Method

In this study, simulation analysis was performed using commercially available FEA software (AdvantEdge FEM Ver. 8.1: ITOCHU Techno-Solutions, Tokyo, Japan), a finite element method (FEM) simulation program dedicated to machining. This software is also being used to visualize and analyze various turning behaviors [19,20,21]. To investigate the generation of AE waves during the adhesion phenomenon mentioned earlier, we conducted a comparative analysis by varying the friction coefficient between the tool and workpiece from 0.2 (low friction) to 1.0 (high friction).
The following cutting conditions were applied: feed rate, 0.1 mm; cutting speed, 300 m/min; depth of cut, 0.5 mm; cutting distance, 3.0 mm; initial temperature, 20.0 °C; and dry cutting. The tool material was high-speed steel (HSS), and the workpiece material was A2014 aluminum alloy. The tool tip geometry had a rake angle of 45.0°, a clearance angle of 10.0°, and a cutting-edge radius of 0.005 mm. The maximum number of nodes was set to 24,000, the maximum element size to 0.1 mm, the minimum element size to 0.02 mm, and the number of output frames to 30. Although the material and cutting conditions differ in the FEA, the behavior of the shear zone due to differences in the friction state between the tool and workpiece is considered to reflect the actual phenomenon.

3. Results and Discussion

3.1. Change in the AE Signal Waveform Detected from the Contact of the Cutting Tool and the Workpiece Until the Workpiece Was Cut

Figure 3 shows the typical AE signal waveform from the moment the cutting tool contacted the workpiece until it cut through it. An insignificant fluctuation in the AE signal waveform was observed from the beginning until 50 μs. This fluctuation occurred only when the main spindle was rotated; that is, it was background noise. From 50 to 120 μs, the amplitude of the waveform increased slightly. This increase is attributable to the effect of the cutting tool contacting the workpiece. After this increase, the amplitude increased twice as much as at the beginning of contact. From 120 to 250 μs, the contact state is assumed to have changed from rubbing (between the flank and the workpiece) to cutting. More precisely, elastoplastic deformation of the workpiece and formation of the chip started as the cutting tool was fed. Finally, the fluctuation in the AE signal waveform changed drastically after 250 μs. Because the formation of chips was clearly observed here, the substantial fluctuation is speculated to have been caused mainly by cutting (i.e., shear deformation). Therefore, the amplitude of the AE signal waveform was found to change stepwise as a result of the cutting process.

3.2. Detection of the AE Signal at Contact of the Cutting Tool and the Workpiece

The results in Section 3.1 suggest that the position of the cutting tool can be precisely set by detecting the AE signal when the cutting tool makes contact before cutting. The position of the cutting tool is useful for examining the detection limit of the cutting tool’s contact with the workpiece more closely. Figure 4 shows typical AE signal waveforms (a) when only the main spindle was rotating (i.e., the background noise signal) and (b) when the cutting tool contacted the workpiece. The data were obtained using a cutting depth of 0.1 μm, a spindle rotation speed of 500 rpm, a single-crystal diamond tool, and a free-cutting brass workpiece. As evident in Figure 4a,b, a clear difference in amplitude is observed between the two. The AE frequency spectra in Figure 4a,b show no frequency peaks in the background noise. By contrast, a frequency peak appears at ~0.2 MHz in the AE signal detected when the cutting tool contacts the workpiece. Therefore, AE sensing can clearly detect contact between the cutting tool and workpiece with high precision of 0.1 μm. Because a cutting depth of 0.1 μm corresponds to the resolution of the ultra-precision micro-machine tool used in the present study, sensing contact with better than 0.1 μm accuracy may also be possible, although this cannot be confirmed with a smaller cutting depth. Using a high-speed camera, optical microscope observations confirmed that reliable contact was established at a cutting depth of 0.1 µm.

3.3. Effect of the Spindle Rotating Speed and the Cutting Depth on the AE Signals

The effects of spindle rotation speed and cutting depth on the AE signals are examined. Figure 5 shows the changes in the amplitude of the AE signal waveform when cutting was carried out at different spindle speeds and cutting depths for different combinations of tools and workpiece materials: (a) a cermet tool and a free-cutting brass workpiece, (b) a diamond tool and a free-cutting brass workpiece, and (c) a diamond tool and an aluminum alloy workpiece. The amplitude of the AE signal waveform was evaluated using the maximum amplitude value during the 200 μs period of the cutting process. The amplitudes of the AE signal waveform were plotted using the average results of five experiments. The error bars represent the maximum and minimum values, respectively.
Figure 5 shows that the amplitude of the AE signal waveform is proportional to the spindle rotation speed, except for the data corresponding to a cutting depth of 100 μm and an aluminum alloy workpiece in Figure 5c. The most likely explanation is that the strain rate changes depending on the spindle’s speed. In addition, the amplitude of the AE signal waveform increases with increasing cutting depth. One possible explanation for the effect of cutting depth is that the shear deformation zone increases with increasing cutting depth [22,23,24]. The peculiar data in Figure 5c corresponding to a cutting depth of 100 μm were obtained in an abnormal cutting state, which will be discussed in the next section. Regarding the difference in cutting tools, the slope of the straight line corresponding to the diamond tool (Figure 5b) is greater than that corresponding to the cermet tool (Figure 5a), likely because of the difference in AE propagation characteristics. Regarding the difference in workpiece materials, the slopes of the approximately straight lines corresponding to the free-cutting brass workpiece (Figure 5b) are greater than those corresponding to the aluminum alloy workpiece (Figure 5c). This difference in slopes is due to changes in the shear deformation process of the chips caused by the difference in hardness of the workpiece material. Overall, the amplitude of the AE signal waveform increases as the spindle rotation speed and cutting depth increase, except in the abnormal cutting state.

3.4. Identification of the Cutting State by the AE Frequency Spectrum

The frequency spectrum of the AE signal waveform contains important information because the velocity and scale of deformation and fracture phenomena are related to it. Thus, examining the features of the AE frequency spectrum more closely is worthwhile to identify the cutting state of an ultra-precision micro-machine tool. Figure 6 shows typical AE signal waveforms and their frequency spectra under different conditions: (a) a cermet tool, (b) a diamond tool with the spindle rotating at 500 rpm and a free-cutting brass workpiece, and (c) a diamond tool with the spindle rotating at 3000 rpm and an aluminum alloy workpiece. The position of the frequency peak of the AE signal waveform detected during cutting is basically similar, with a peak frequency of ~0.2 MHz. Although the 0.2 MHz AE frequency peak is related to the resonant frequency of the AE sensor used in this study, it is also considered to result from plastic deformation [25,26].
The AE signal waveform and the AE frequency spectrum shown in Figure 7 were partially observed in experiments corresponding to data acquired for a cutting depth of 100 μm, a spindle rotation speed of 500 rpm, and an aluminum alloy workpiece (Figure 5c). Here, frequency peaks appear not only in the low-frequency region (<0.5 MHz) but also in the high-frequency region (>1 MHz). An AE frequency peak at ~1 MHz is observed when adhesion occurs [27,28]. Figure 8a–c show micrographs of the rake face of the cutting tool (a) before the experiment, (b) after the experiment with a free-cutting brass workpiece, and (c) after the experiment with an aluminum alloy workpiece. These data corresponds to the experiments shown in Figure 6b and Figure 7. Although signs of adhesion were hardly observed on the rake face after the experiment with a free-cutting brass workpiece (Figure 8b), it was clearly observed on the rake face after the experiment with an aluminum alloy workpiece (Figure 8c). Therefore, the peculiar data in Figure 5c for a cutting depth of 100 μm are interpreted as the effects of adhesion on the rake face of the free-cutting brass workpiece in Figure 8b and adhesion of the workpiece material to the cutting tool. Identifying the adhesion of the workpiece material to the cutting tool is important because it adversely affects the machining quality and accelerates tool wear. The correlation between the frequency spectrum and tribological phenomena correspond to the trend observed in a previously reported in situ observation study performed with a scanning electron microscope [29].
The AE frequency spectrum features for each cutting process are as follows: a frequency peak occurs at ~0.2 MHz during cutting, and frequency peaks are observed at frequencies above 1 MHz during workpiece adhesion. These findings lead to the conclusion that adhesion of the workpiece material (i.e., the formation of a built-up edge) can be identified by detecting AE signals at frequencies greater than 1 MHz. On the basis of these findings, an intelligent micro-machine tool system using AE sensing will be developed in the near future, enabling the machine tool to decide appropriate cutting conditions independently.

3.5. Verification of AE Frequency Changes Using Finite Element Analysis

As mentioned in the previous section, the frequency spectrum of the AE signal waveform (referred to as the AE frequency) changes depending on the cutting conditions at the tool tip—specifically, the occurrence of adhesion. High-frequency AE signals generated by adhesion have also been found to be useful for predicting breakage during micro-hole drilling [30]. Therefore, FEA was used to examine whether high-frequency elastic stress waves are generated by adhesion (i.e., a high-friction state). Actual adhesion and built-up edge formation are dynamic processes involving stick-slip motion and material peeling. This analysis assumed an instantaneous phenomenon and used different constant friction coefficients, although the friction state is not constant.
Figure 9 shows the strain-rate contour map obtained from the FEA simulation (frame 17). The AE measurement can be viewed as capturing strain acceleration. Here, this concept is demonstrated using the strain-rate distribution. The analysis results for a low friction coefficient μ = 0.2, assuming stable cutting conditions, show high strain rates in the shear zone. The analysis results for a high friction coefficient μ = 1.0, simulating unstable cutting conditions where adhesion occurs, reveal substantially higher strain rates in the shear zone, greater chip thicknesses, and greater strain-rate variation within the shear zone. In addition, regions with high strain rates exist on the tool rake face, suggesting successful reproduction of the adhesion phenomenon. As the friction coefficient increases, the number of regions affecting the strain rate on the tool rake face increases. The strain-rate changes on the tool rake face associated with adhesion fluctuate between large and small values and influence the cutting-force changes.
Figure 10 shows the variation in the primary cutting force. These results indicate that the variation in cutting force under low-friction conditions is smaller and more stable than that under high-friction conditions. In addition, the contact shear stress under low-friction conditions is small, with no sudden increases observed. Fluctuations in cutting force were found to occur with the onset of adhesion phenomena on the tool rake face. It has been demonstrated through a series of experimental studies that the phenomenon of tool adhesion gives rise to high-frequency vibrations and fluctuations in cutting force [31,32]. In a previous study, cutting experiments using an ultra-precision machining center revealed that the amplitude of the AE signal increased when adhesion occurred on the workpiece material [33]. This result suggests that the effect is influenced not only by the shear zone but also by changes in the strain rate on the tool rake face.
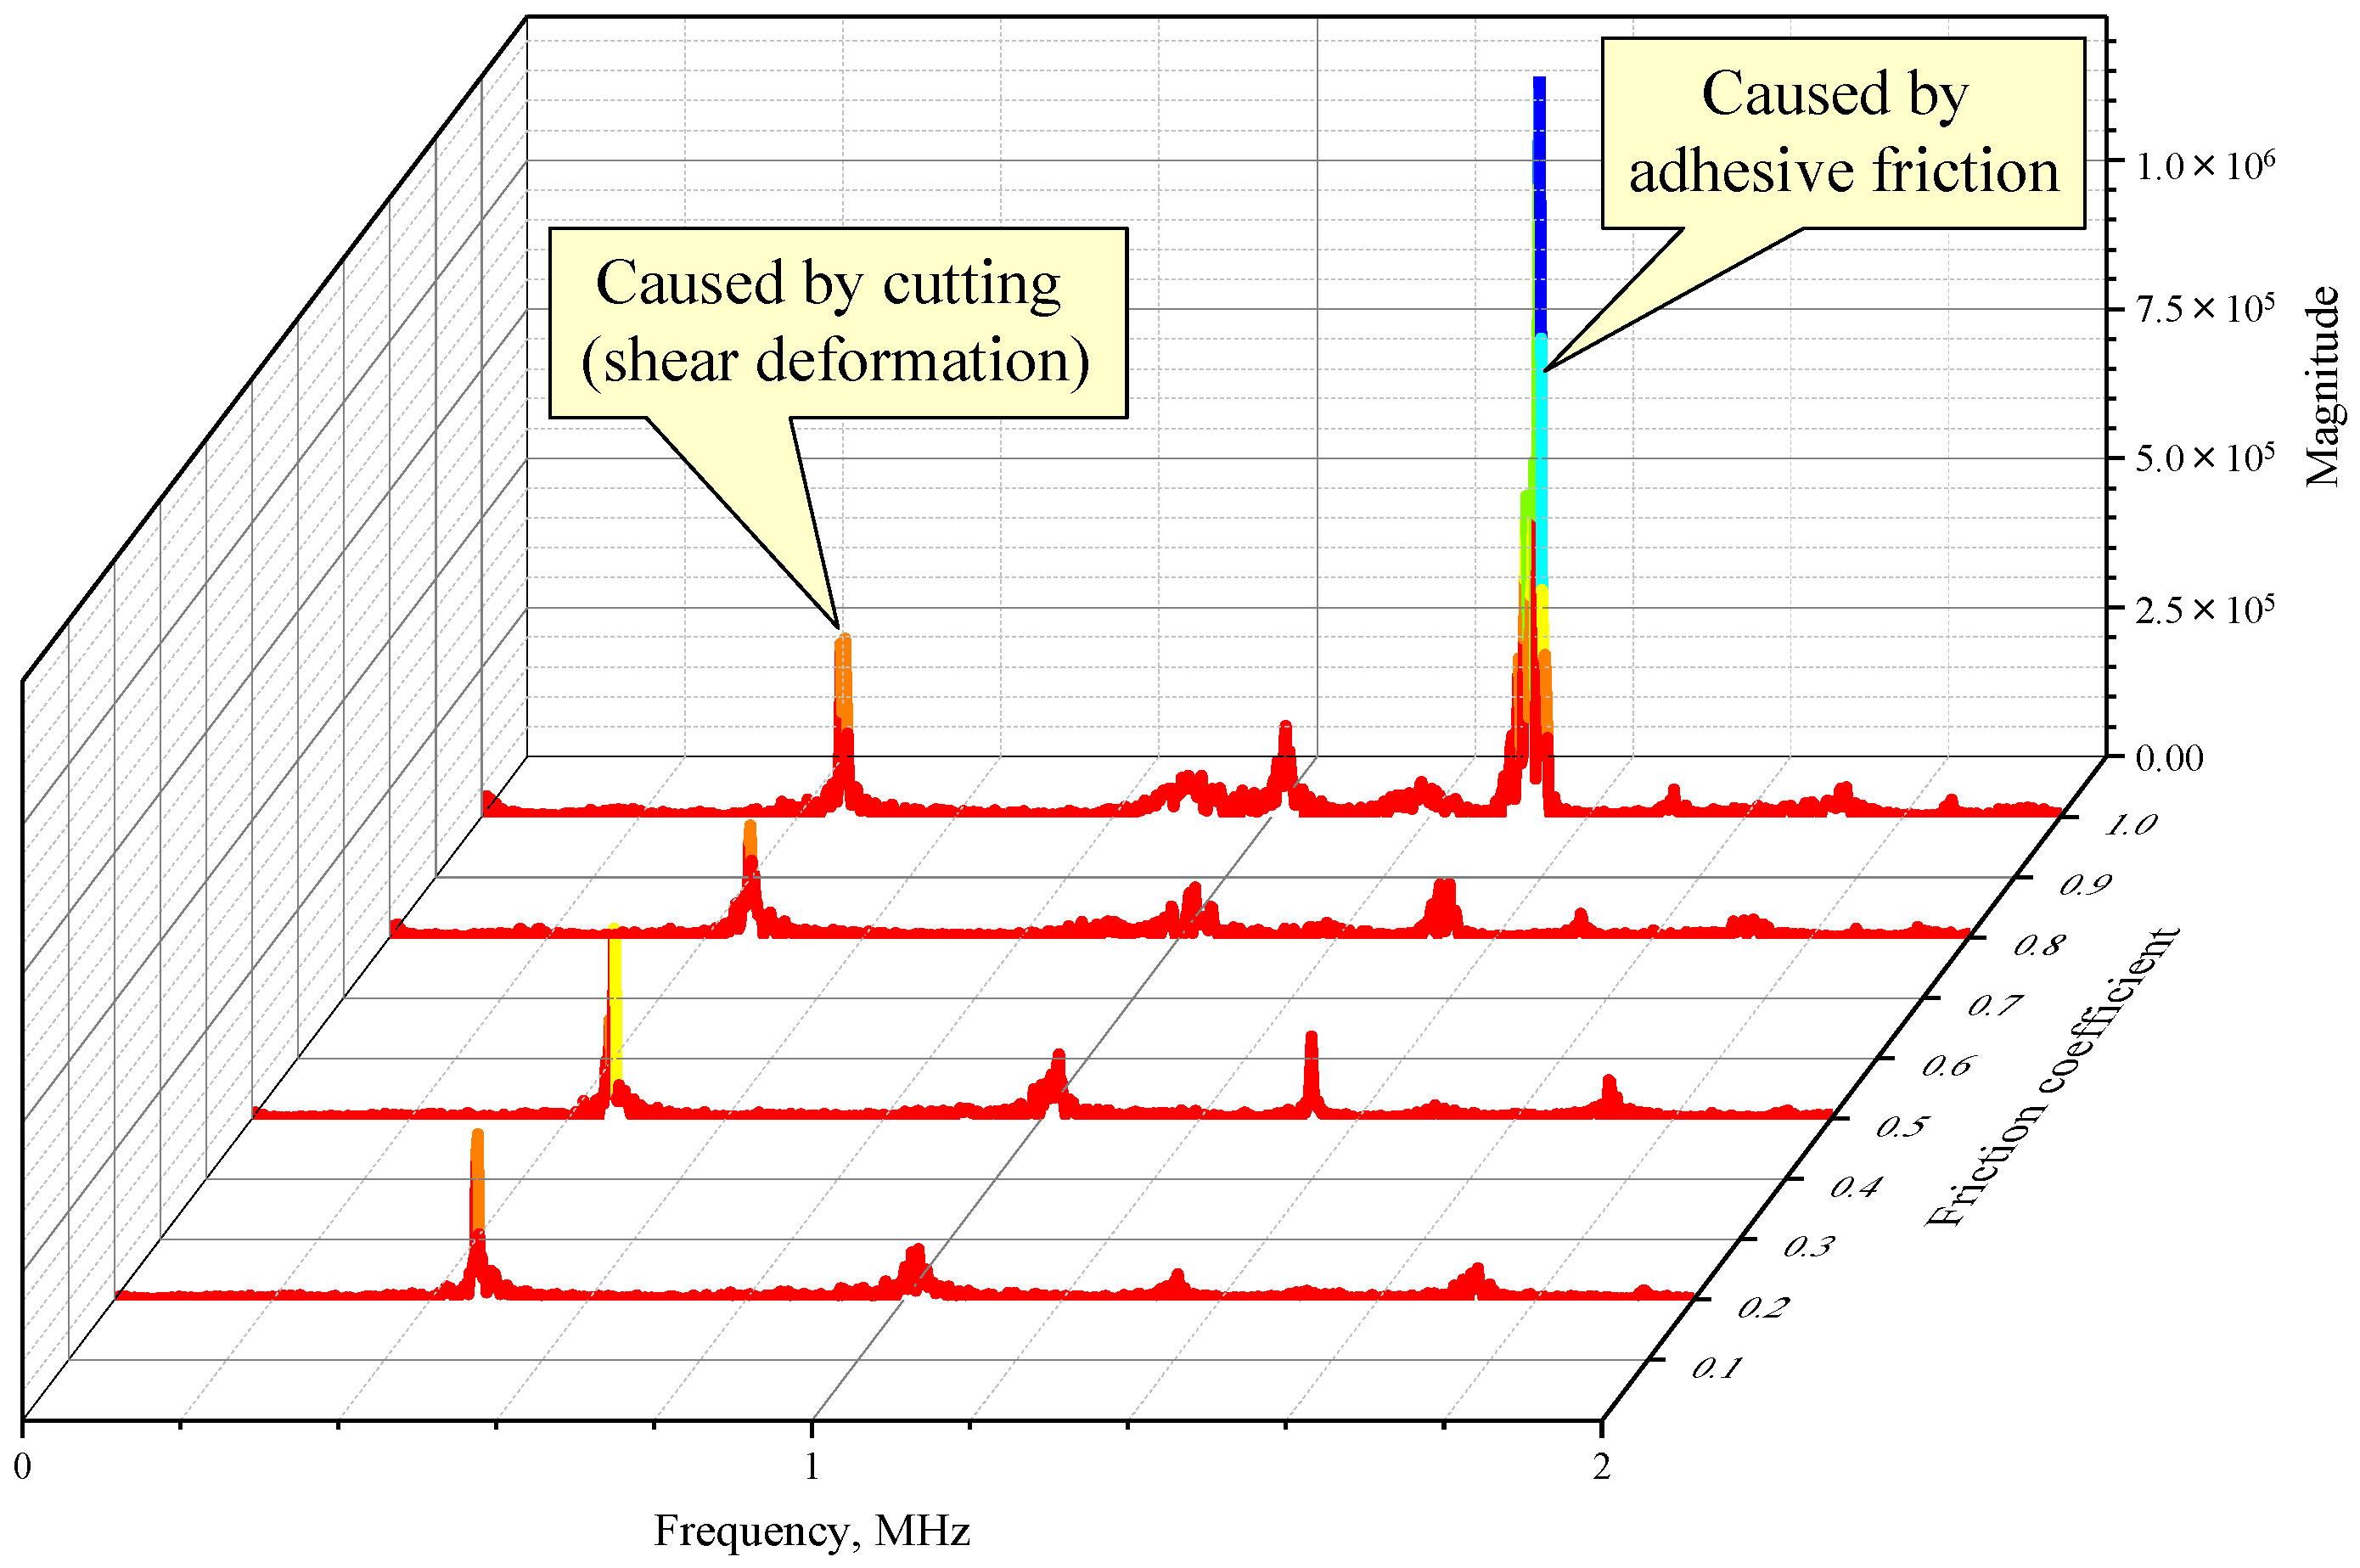
Figure 11 shows the frequency analysis results for the fluctuations in the principal cutting force depicted in Figure 10. These results indicate that, under cutting conditions with μ ≤ 0.8, the main peak appears at ~0.5 MHz. This frequency is considered to be primarily that of stress changes associated with the workpiece’s shear deformation. This frequency peak can also be observed under high-friction conditions (μ = 1.0). In addition, under high-friction conditions, high-frequency components exist between 0.8 and 1.3 MHz, with a substantial peak appearing near 1.3 MHz. These results are speculatively attributed to adhesion phenomena on the tool rake face, as evidenced by adhesion-induced pluck marks visible on the machined surface. As evident in Figure 10, this high-frequency component increases starting from μ = 0.5. Cutting experiments under lubrication confirm that adhesion phenomena produce high-frequency components with smaller amplitudes than those observed under nonlubricated conditions. This result suggests that the high-frequency component captures stress changes induced by adhesion phenomena on the tool rake face [34]. The lack of a substantial difference in the high-frequency component between μ = 0.5 and 0.8 is thought to be related to the size of the adhesion area on the tool rake face (Figure 9).
The findings of this study demonstrate the efficacy of AE sensing in identifying tool–workpiece contact and cutting states in an ultra-precision micro lathe, exhibiting high sensitivity. The AE waveform amplitude demonstrated discernible stepwise alterations corresponding to tool contact, deformation, and chip formation, thereby facilitating contact detection with a precision of 0.1 μm. The amplitude of the AE increased in proportion to variations in spindle speed and depth of cut under normal conditions. Deviations from this trend indicated abnormal cutting, such as workpiece adhesion.
Frequency analysis revealed a predominant AE peak near 0.2 MHz during stable cutting, while supplementary high-frequency components above 1 MHz emerged in instances of adhesion or built-up edge formation. These experimental observations were corroborated by finite element simulations, which revealed that high-friction conditions result in substantial strain-rate fluctuations in the shear zone and on the tool rake face, thereby yielding cutting-force spectra that are consistent with the measured high-frequency AE components.
In the future, it will be possible to build a “self-determining” ultra-precision machining system that analyzes acquired AE features in real time. This system will automatically set tool contact positions and optimize cutting conditions. In addition, the use of high-frequency components (>1 MHz) is expected to establish diagnostic algorithms that can detect early signs of adhesion, tool wear, and built-up edge formation. Furthermore, a data-driven model that combines AE waveforms, frequency spectra, and FEM results will enable more precise estimations of cutting conditions and predictions of tool life. These findings are expected to be applied to various machining processes and to be developed as foundational AE sensing technology for micro-machining in general. This research is crucial for developing intelligent, ultra-precision machine tools based on AE sensing. It has the potential to advance manufacturing sites’ automation and quality using physics-based modeling techniques [35] and other approaches.

4. Conclusions

AE signals were measured during a turning process using an ultra-precision micro lathe, and the features of the AE signals detected at the contact point between the cutting tool and the workpiece, as well as during the cutting process, were examined. The following conclusions were derived from the results:
(1)
The amplitude of the AE signal waveform changed stepwise during the following cutting processes: contact between the cutting tool and the workpiece, elastoplastic deformation of the workpiece, and formation of chips (shear deformation).
(2)
AE sensing can detect contact between the cutting tool and the workpiece with a high precision of 0.1 μm.
(3)
The amplitude of the AE signal waveform increases with increasing spindle rotation speed and increasing cutting depth, except in the case of abnormal cutting, such as when the workpiece material adheres to the cutting tool.
(4)
The AE frequency spectrum feature for each cutting process is as follows: a frequency peak occurs at ~0.2 MHz during the cutting process, and frequency peaks are observed above 1 MHz during adhesion of the workpiece material.
(5)
Adhesion of the workpiece material to the rake face of the cutting tool (i.e., the formation of a built-up edge) can be identified by detecting high-frequency (>1 MHz) AE signals.
(6)
FEA revealed that the strain-rate variations in the shear zone and on the tool rake face influence the AE waves generated during cutting.
(7)
The frequency spectrum of cutting forces obtained via FEA under high-friction conditions was found to be similar to the frequency spectrum of AE signals recorded during adhesion in cutting experiments.

Funding

This research was funded by the Mazak Foundation (FY 2012), under the research project entitled “Fundamental Study on Intelligent System of Micro Machine Tool by Acoustic Emission Technique”.

Data Availability Statement

The data that support the findings of this study are available from the corresponding author upon reasonable request.

Acknowledgments

This research was supported in part by a grant from the Mazak Foundation in 2013. Thanks are due to Kazuki Shimizu, who was an undergraduate student at the Saitama Institute of Technology at the time that experiments were performed, for their assistance.

Conflicts of Interest

The author declares no conflicts of interest.

Abbreviations

The following abbreviations are used in this manuscript:
AEAcoustic Emission
EVElectric Vehicle
IoTInternet of Things
CNCComputer Numerical Control
CAGRCompound Annual Growth Rate
PZTLead Zirconate Titanate
JISJapanese Industrial Standards
FEAFinite Element Analysis
FEMFinite Element Method

References

  1. Järvenpää, E.; Heikkilä, R.; Tuokko, R. TUT-microfactory—A small-size, modular and sustainable production system. In Proceedings of the 11th Global Conference on Sustainable Manufacturing, Berlin, Germany, 23–25 September 2013; pp. 78–83. [Google Scholar] [CrossRef]
  2. Okazaki, Y. Microfactories: A new methodology for sustainable manufacturing. Int. J. Autom. Technol. 2010, 4, 82–87. [Google Scholar] [CrossRef]
  3. Ashida, K. On-demand MEMS device production system by module-based microfactory. Int. J. Autom. Technol. 2010, 4, 110–116. [Google Scholar] [CrossRef]
  4. Gupta, S. Desktop CNC Machines Market; MRFR/IA-E/6134-HCR; Market Research Future: New York, NY, USA, 2025. [Google Scholar]
  5. Xing, Q.; Zhang, X.; Wang, S.; Yu, X.; Liu, Q.; Liu, T. Milling Tool Wear Monitoring via the Multichannel Cutting Force Coefficients. Machines 2024, 12, 249. [Google Scholar] [CrossRef]
  6. Rubio, E.; Jáuregui-Correa, J.C. Time–Frequency Approach for Cutting Tool Power Signal Separation in Face Milling Operations. Appl. Mech. 2024, 5, 180–191. [Google Scholar] [CrossRef]
  7. Silva, R.; Araújo, A. The Deterministic Nature of Sensor-Based Information for Condition Monitoring of the Cutting Process. Machines 2021, 9, 270. [Google Scholar] [CrossRef]
  8. Denkena, B.; Bergmann, B.; Stiehl, T.H. Transfer of Process References between Machine Tools for Online Tool Condition Monitoring. Machines 2021, 9, 282. [Google Scholar] [CrossRef]
  9. Scheffer, C.; Heyns, P.S. Wear monitoring in turning operations using vibration and strain measurements. Mech. Syst. Signal Process. 2001, 15, 1185–1192. [Google Scholar] [CrossRef]
  10. Lee, H.H.; Kim, H.J.; Nam, J.H.; Lee, S.H. Ductile–Brittle Mode Classification for Micro-End Milling of Nano-FTO Thin Film Using AE Monitoring and CNN. Coatings 2025, 15, 933. [Google Scholar] [CrossRef]
  11. Sender, P.; Buj-Corral, I.; Álvarez-Flórez, J. Analysis of Roughness, the Material Removal Rate, and the Acoustic Emission Signal Obtained in Flat Grinding Processes. Machines 2024, 12, 110. [Google Scholar] [CrossRef]
  12. Maia, L.H.A.; Abrão, A.M.; Vasconcelos, W.L.; Júnior, J.L.; Fernandes, G.H.N.; Machado, Á.R. Enhancing Machining Efficiency: Real-Time Monitoring of Tool Wear with Acoustic Emission and STFT Techniques. Lubricants 2024, 12, 380. [Google Scholar] [CrossRef]
  13. Dudzik, K.; Labuda, W. The Possibility of Applying Acoustic Emission and Dynamometric Methods for Monitoring the Turning Process. Materials 2020, 13, 2926. [Google Scholar] [CrossRef] [PubMed]
  14. Sio-Sever, A.; Leal-Muñoz, E.; Lopez-Navarro, J.M.; Alzugaray-Franz, R.; Vizan-Idoipe, A.; de Arcas-Castro, G. Non-Invasive Estimation of Machining Parameters during End-Milling Operations Based on Acoustic Emission. Sensors 2020, 20, 5326. [Google Scholar] [CrossRef] [PubMed]
  15. Min, S.; Lidde, J.; Raue, N.; Dornfeld, D. Acoustic emission based tool contact detection for ultra-precision machining. CIRP Ann. Manuf. Technol. 2011, 60, 141–144. [Google Scholar] [CrossRef]
  16. Lee, D.E.; Wang, I.; Valente, C.M.O.; Oliveira, J.F.G.; Dornfeld, D.A. Precision manufacturing process monitoring with acoustic emission. Int. J. Mach. Tools Manuf. 2006, 46, 176–188. [Google Scholar] [CrossRef]
  17. Guo, Y.B.; Ammula, S.C. Real-time acoustic emission monitoring for surface damage in hard machining. Int. J. Mach. Tools Manuf. 2005, 45, 1622–1627. [Google Scholar] [CrossRef]
  18. Hase, A. Acoustic Emission Signal during Cutting Process on Super-Precision Micro-Machine Tool. In Proceedings of the Global Engineering, Science and Technology Conference, Singapore, 3–4 October 2013; No. 521. [Google Scholar]
  19. Hao, G.; Tang, A.; Zhang, Z.; Xing, H.; Xu, N.; Duan, R. Finite Element Simulation of Orthogonal Cutting of H13-Hardened Steel to Evaluate the Influence of Coatings on Cutting Temperature. Coatings 2024, 14, 293. [Google Scholar] [CrossRef]
  20. Ma, J.; Ge, X.; Qiu, C.; Lei, S. FEM assessment of performance of microhole textured cutting tool in dry machining of Ti-6Al-4V. Int. J. Adv. Manuf. Technol. 2016, 84, 2609–2621. [Google Scholar] [CrossRef]
  21. Nikawa, M.; Mori, H.; Kitagawa, Y.; Okada, M. FEM simulation for orthogonal cutting of Titanium-alloy considering ductile fracture to Johnson-Cook model. Mech. Eng. J. 2016, 3, 15-00536. [Google Scholar] [CrossRef]
  22. Erturk, A.S.; Larsson, R. Subscale modeling of material flow in orthogonal metal cutting. Int. J. Mater. Form. 2025, 18, 12. [Google Scholar] [CrossRef]
  23. Hajdu, D.; Astarloa, A.; Kovacs, I.; Dombovari, Z. The curved uncut chip thickness model: A general geometric model for mechanistic cutting force predictions. Int. J. Mach. Tools Manuf. 2023, 188, 104019. [Google Scholar] [CrossRef]
  24. Schimmel, R.J.; Endres, W.J.; Stevenson, R. Application of an Internally Consistent Material Model to Determine the Effect of Tool Edge Geometry in Orthogonal Machining. J. Manuf. Sci. Eng. 2002, 124, 536–543. [Google Scholar] [CrossRef]
  25. Vinogradov, A.; Nadtochiy, M.; Hashimoto, S.; Miura, S. Correlation between Spectral Parameters of Acoustic Emission during Plastic Deformation of Cu and Cu–Al Single and Polycrystals. Mater. Trans. 1995, 36, 426–431. [Google Scholar] [CrossRef]
  26. Wada, M.; Mizuno, M.; Sasada, T. Study on friction wear utilizing acoustic emission: Wear mode and AE spectrum of copper. J. Jpn. Soc. Prec. Eng. 1990, 56, 1474–1479. [Google Scholar] [CrossRef]
  27. Iwata, T.; Fukuda, M.; Oikawa, M.; Kano, M.; Mihara, Y. Acoustic emission analysis of seizure transition process between steel journals and aluminum alloy plain bearings. Tribol. Int. 2025, 202, 110324. [Google Scholar] [CrossRef]
  28. Hase, A.; Mishina, H.; Wada, M. Correlation between features of acoustic emission signals and mechanical wear mechanisms. Wear 2012, 292–293, 144–150. [Google Scholar] [CrossRef]
  29. Hase, A.; Wada, M.; Mishina, H. Scanning electron microscope observation study for identification of wear mechanism using acoustic emission technique. Tribol. Int. 2014, 72, 51–57. [Google Scholar] [CrossRef]
  30. Hase, A. In Situ Measurement of the Machining State in Small-Diameter Drilling by Acoustic Emission Sensing. Coatings 2024, 14, 193. [Google Scholar] [CrossRef]
  31. Svenningsson, I.; Tatar, K. On the mechanism of three-body adhesive wear in turning. Int. J. Adv. Manuf. Technol. 2021, 113, 3457–3472. [Google Scholar] [CrossRef]
  32. Sousa, V.F.C.; Silva, F.J.G. Recent Advances on Coated Milling Tool Technology—A Comprehensive Review. Coatings 2020, 10, 235. [Google Scholar] [CrossRef]
  33. Koga, T.; Hase, A.; Ninomiya, K.; Okita, K. Acoustic emission technique for contact detection and cutting state monitoring in ultra-precision turning. Mech. Eng. J. 2019, 6, 19-00169. [Google Scholar] [CrossRef]
  34. Zhou, T.; Hao Cui, H.; Wang, Y.; Yang, W.; He, L. Multi-physics analytical modeling of the primary shear zone and milling force prediction. J. Mater. Process. Technol. 2023, 316, 117949. [Google Scholar] [CrossRef]
  35. Yin, C.; Li, Y.; Wang, Y.; Dong, Y. Physics-guided degradation trajectory modeling for remaining useful life prediction of rolling bearings. Mech. Syst. Signal Process. 2025, 224, 112192. [Google Scholar] [CrossRef]
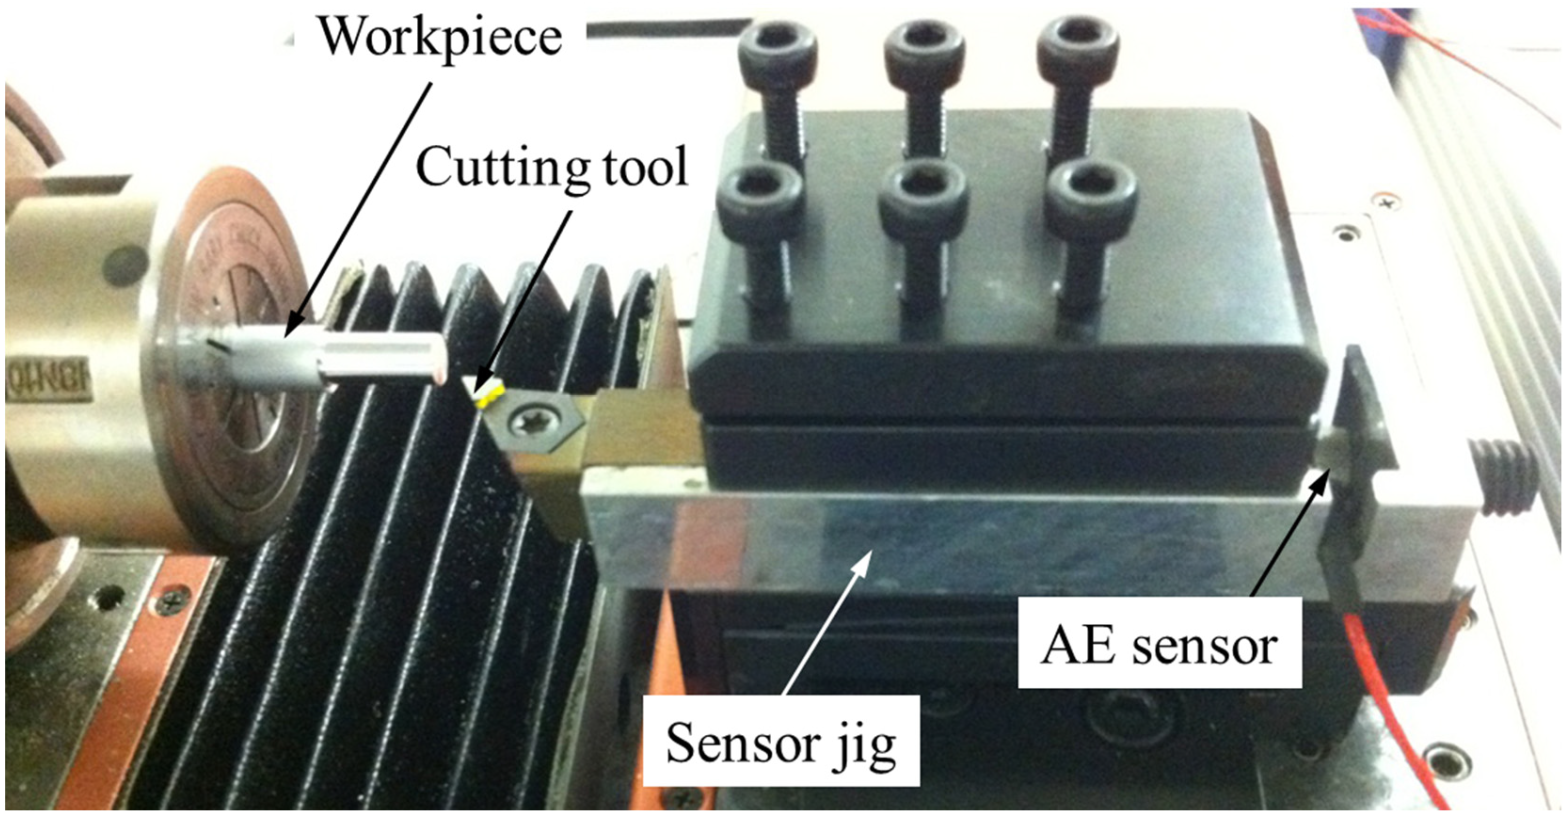
Figure 1. Setup of the experimental system with an acoustic emission (AE) sensor on the numerically controlled ultra-precision micro lathe.
Lubricants 14 00007 g001
Figure 2. Schematic of the instrumentation for acquiring the AE signal from the turning process on the ultra-precision micro lathe.
Lubricants 14 00007 g002
Figure 3. Typical AE signal waveform from immediately before contact of the cutting tool and the workpiece to cutting of the workpiece using a cermet tool and a free-cutting brass workpiece (N = 3000 rpm, d = 0.1 μm).
Lubricants 14 00007 g003
Figure 4. Typical AE signal waveforms (upper) and the AE frequency spectra (lower) (a) when only the main spindle was rotating (background noise signal) and (b) when the cutting tool contacted the workpiece in the experiment using the single-crystal diamond tool and the free-cutting brass workpiece (N = 500 rpm, d = 0.1 μm).
Lubricants 14 00007 g004
Figure 5. Changes in the amplitude of the AE signal waveform detected at cutting with different spindle rotating speeds and different cutting depths for different tool–workpiece material combinations: (a) with a cermet tool and free-cutting brass workpiece; (b) with a diamond tool and free-cutting brass workpiece; and (c) with a diamond tool and aluminum alloy workpiece. The error bars indicate the maximum and minimum values.
Lubricants 14 00007 g005
Figure 6. Typical AE signal waveforms (upper) and the AE frequency spectra (lower) for different cutting conditions: (a) using a cermet tool and a free-cutting brass workpiece (N = 500 rpm); (b) using a diamond tool and a free-cutting brass workpiece (N = 500 rpm); and (c) using a diamond tool and an aluminum alloy workpiece (N = 3000 rpm). The cutting depth was 100 μm in all cases.
Lubricants 14 00007 g006
Figure 7. Typical AE signal waveform (upper) and the AE frequency spectrum (lower) partially observed in the experiments corresponding to the data for the aluminum alloy workpiece in Figure 5c (N = 500 rpm, d = 100 μm).
Lubricants 14 00007 g007
Figure 8. Micrographs of the rake face of the cutting tool (a) before the experiment, (b) after the experiment with a free-cutting brass workpiece, and (c) after the experiment with an aluminum alloy workpiece.
Lubricants 14 00007 g008
Figure 9. Contour maps for the strain rate in finite element analysis (FEA) simulations for different coefficients of friction.
Lubricants 14 00007 g009
Figure 10. Fluctuations in the cutting force for the different cutting states in FEA.
Lubricants 14 00007 g010
Figure 11. Frequency spectra of the cutting force in FEA for the different coefficients of friction.
Lubricants 14 00007 g011
Table 1. Summary of the experimental conditions.
Cutting ToolCermet
Single-Crystal Diamond
Workpiece materialFree-cutting brass
Aluminum alloy
Spindle rotating speed N, rpm500, 1000, 1500, 2000, 3000
Cutting depth d, µm100, 10, 1, 0.1
AE amplification factor, dB80
AE band-pass filter, MHzHigh-pass filter: 0.1
Low-pass filter: THRU
Table 2. Summary of the chemical composition of the workpiece (wt%).
Free-Cutting Brass
(C3640)
57.0% to 61.0% Cu, 1.8% to 3.7% Pb, Up to 0.50% Fe, 1.0% Impurities Excluding Fe, Remainder Zn
Aluminum alloy
(A6063)
Al balance, 0.20% to 0.6% Si, up to 0.35% Fe, up to 0.10% Cu, up to 0.10% Mn, 0.45% to 0.9% Mg, up to 0.10% Cr, up to 0.10% Zn, and up to 0.10% Ti
Disclaimer/Publisher’s Note: The statements, opinions and data contained in all publications are solely those of the individual author(s) and contributor(s) and not of MDPI and/or the editor(s). MDPI and/or the editor(s) disclaim responsibility for any injury to people or property resulting from any ideas, methods, instructions or products referred to in the content.