1. Introduction
Aluminum is the most widely used metal, after iron. Its low density (2.58–2.89 g/cm3), along with its good electrical and thermal conductivity, as well as high corrosion resistance, have led to a continuous expansion of its use in fields such as the electrochemical industry, the naval industry, the aeronautical industry, etc. The low mechanical strength of aluminum in its pure state has determined the development of numerous alloys capable of ensuring better behavior under different categories of mechanical stress. In this regard, alloys of aluminum with other metallic or non-metallic materials are known and used, such as copper, magnesium, manganese, silicon, zinc, lithium, etc.
In addition to aluminum, the AW-2007 alloy contains copper (contributes to improving mechanical strength and hardness), lead (the presence of lead in the alloy contributes to improving machinability, facilitating precise machining), magnesium (ensures an improvement in the ratio between mechanical strength and weight of the part), manganese (contributes to increasing the service life of the parts and refining the grain structure). Other symbolizations of this alloy even highlight the presence of such chemical elements, such as the symbols AlCu4PbMgMn, AW-AlCu4PbMgMn, AlCuMgPb, etc. If copper, lead, magnesium, and manganese are considered key components of the alloy, the other elements are considered to have a minor role. Among the mechanical properties of the EN AW-2007 alloy, the following can be mentioned: tensile strength of 330–420 MPa, yield point of 210–270 MPa, shear strength of 220–250 MPa, elastic modulus of 71 GPa, shear modulus of 27 GPa, elongation at break of 5.6–8.0%, Poisson’s ratio of 0.33, and hardness HB = 90–100. Since it was found that the alloy has lower corrosion resistance, anodizing is used to protect the parts. The high copper content does not provide good conditions for welding workpieces from such an alloy. Workpieces can be presented in the form of bars, sheets, foils, wire, pipes, and various profiles [
1].
By taking into account its mechanical properties, the EN AW-2007 aluminum alloy is used for various machine elements in the aerospace industry, in the military industry, in the automotive industry, in electronics and electrical assemblies, etc.
Workpieces made of the EN AW 2007 aluminum alloy can be machined at high cutting speeds, leading to the formation of short chips and thus allowing processing on automatic lathes.
An improvement in certain mechanical properties of the EN AW2007 aluminum alloy has become possible by applying superficial plastic deformations. In principle, the burnishing involves the displacement and pressing of a hard body on the surface whose properties are to be improved. The main effects of burnishing include an increase in the hardness of the surface layer of the workpiece affected by the process and, respectively, a significant decrease in the roughness parameters that take into account the heights of the surface asperities [
2,
3,
4,
5,
6,
7,
8,
9,
10].
Extensive research on the application of burnishing processes to EN AW 2007 aluminum alloy specimens was carried out in collaboration with research groups from Chemnitz University of Technology and Fraunhofer Institute for Machine Tools and Forming Technology in Chemnitz (Chemnitz, Germany).
Thus, evaluating the results of an experimental study, Posdzich et al. assessed that the initial surface roughness generated by applying a plain ball burnishing process does not have a significant influence on the heights of the asperities generated by burnishing, as it is a completely new surface [
11]. In 2020, Posdzich et al. took into account the influence of the undulations generated by the milling process applied to a surface before burnishing for EN AW 2007 aluminum alloy specimens [
12]. They highlighted the existence of interdependencies between the parameters characterizing the two processes (milling and burnishing), also revealing how the effects of surface undulations generated by milling are transmitted to the surface through burnishing.
Putz et al. considered that the use of a controlled force may be difficult [
13], as some difficulties in applying a burnishing process may be generated in the case of the edges of prismatic parts. They also emphasized the importance of establishing appropriate values for the applied polishing force and polishing feed rate.
The influence of the rigidity of the tool used for burnishing on some characteristics of the surface affected by the process, such as surface features indent, bulge, and roughness, was the subject of research addressed by Stöckmann et al. [
14]. They concluded that soft tools can provide a greater degree of constant force and a reduction in the roughness of the processed surface.
The results of research conducted by Ferencsik, in connection with the simulation by the finite element method of the effect of the pressing force on the values of a surface roughness parameter resulting from burnishing, revealed the existence of possibilities for reducing the heights of the asperities thus generated [
15]. Subsequently, in another article published in 2024, the results of theoretical and experimental research were presented regarding the generation of residual stresses as a result of the application of burnishing processes in the case of the aluminum alloy used [
16].
A study of the influence exerted by some input factors in the burnishing process and, respectively, by the roughness of the surfaces generated by burnishing in the case of some aluminum alloy specimens on some properties of interest, such as wear resistance and corrosion resistance, was carried out by Thorat and Thakur [
17]. They concluded that there is a significant correlation between the roughness of the surface obtained by burnishing and, respectively, the wear resistance and corrosion resistance of the surfaces generated by burnishing.
Cai et al. proposed an analytical model capable of describing the variation in the cutting force magnitude in the case of an end-milling process using the MQL [
18]. They included coefficients in the model to highlight the effect of using of the MQL on the cutting force magnitude.
The analysis of the information identified in the accessed specialized literature showed that no research was conducted to clarify the effect exerted by the presence of cooling–lubrication media on the values of some output parameters of the diamond burnishing process of the aluminum alloy. It was considered useful to develop an experimental investigation to provide additional information on how some input factors in the diamond burnishing process could affect the values of some output parameters of the investigated process.
The research whose results have been taken into account in this article aimed to reveal the influence exerted by some input factors in the diamond burnishing process on the values of some output parameters of this process. It decided to highlight the effects exerted by the experimental conditions on the values of the parameter of surface roughness achieved by burnishing and of the pressing force, in the presence and absence of the use of a lubricant as a working medium. To this end, the available experimental conditions were briefly analyzed, the conditions for carrying out the experimental tests were described, the experimental results obtained were discussed, and how these results were processed and interpreted.
2. Materials and Methods
Although grinding is the traditional method used to improve the finishing of metal surfaces, non-ferrous materials are gaining more and more ground in the industry, due to their advantages such as light weight and good mechanical behavior. However, abrasive machining of these materials is problematic, particularly due to the heat generated during the process. As an alternative, smoothing by burnishing offers an effective solution, as it is carried out at low temperatures, below the recrystallization point, thus eliminating the risks of thermal damage to the surface.
The material selected for the experimental tests was an aluminum alloy grade EN AW 2007. The EN AW 2007 alloy was purchased commercially as laminated rods and had mechanical properties with values between the limits indicated for such a material. Aluminum alloy AW-2007 (or EN AW-2007, also called AlCuMgPb) is a hard-type aluminum–copper–magnesium–lead alloy frequently used in precision mechanical applications where high resistance to mechanical stress and excellent machinability are required. Achieving low roughness is critical to ensuring the performance, reliability, and durability of components machined from this material, especially in dynamic or precision applications. In
Table 1, the chemical composition and main mechanical properties of aluminum alloy grade EN AW 2007 are given.
The aluminum alloy bar was purchased from Amari Romania, which served as a direct importer and distributor.
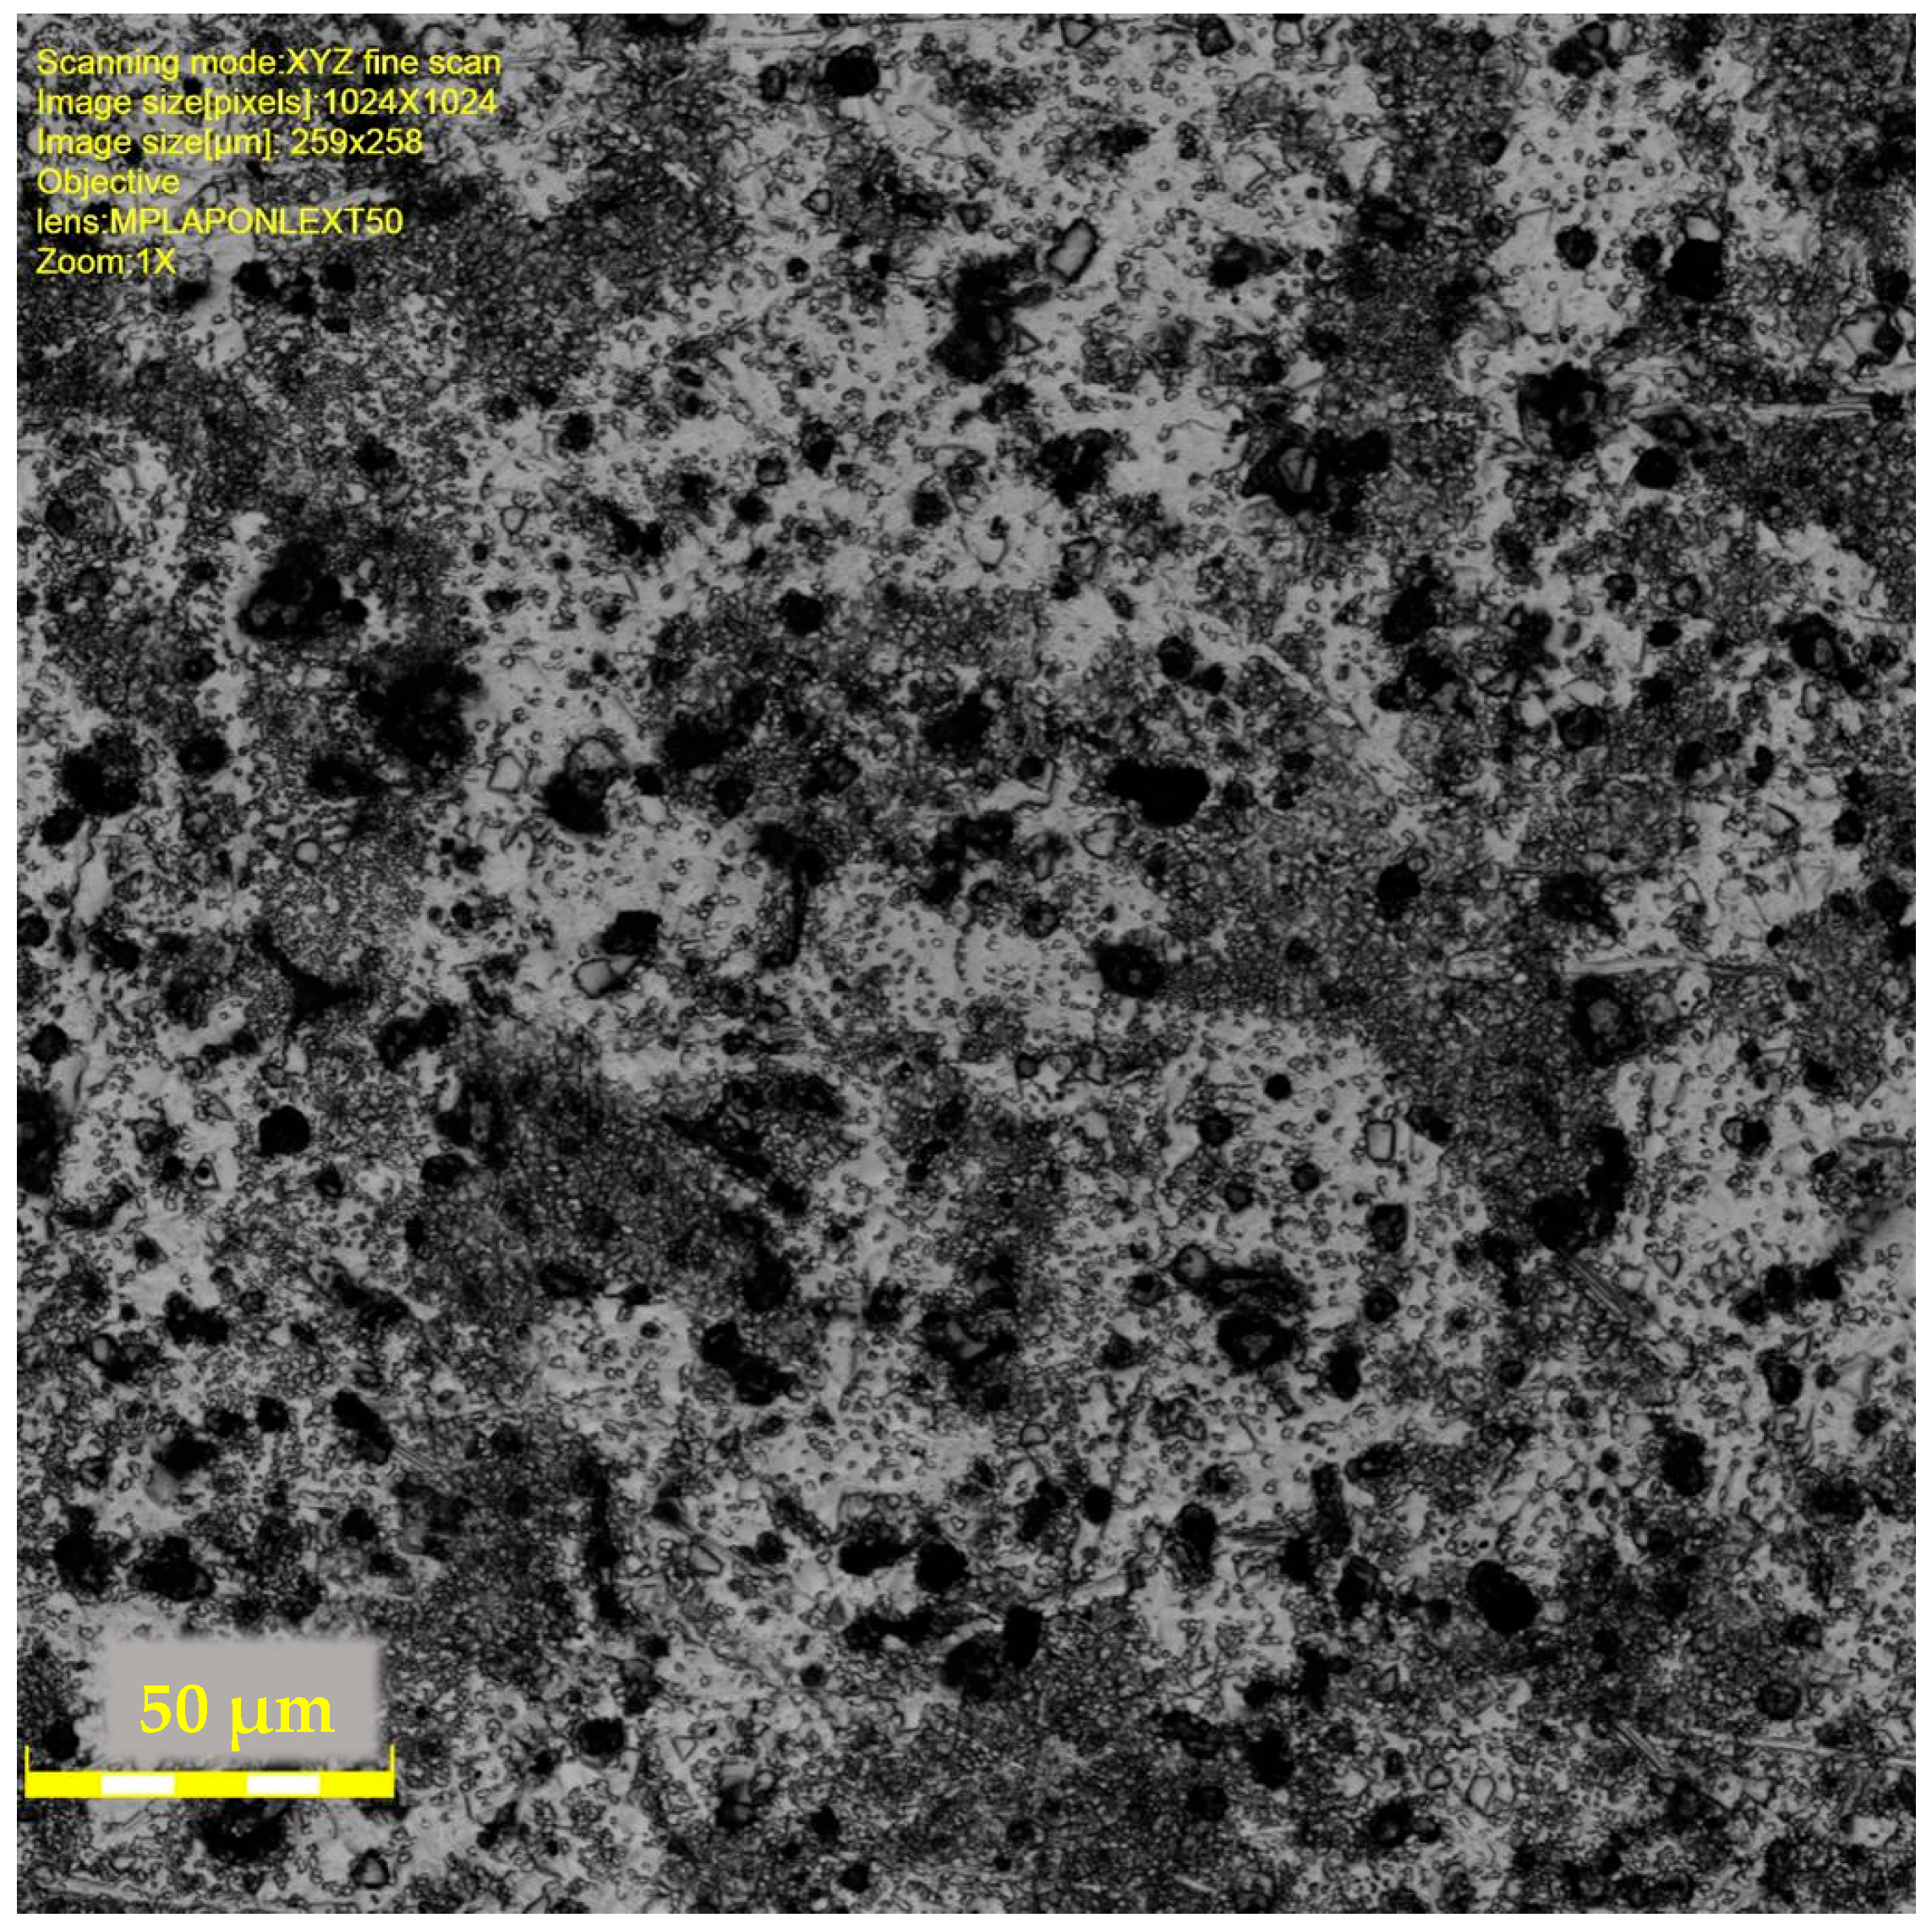
Figure 1 presents the microstructures obtained for the material sample (HF 10%) with the confocal metallographic laser microscope OLYMPUS LEXT OLS4100, produced by Olympus Corporation, with its headquarters in Tokyo, Japan.
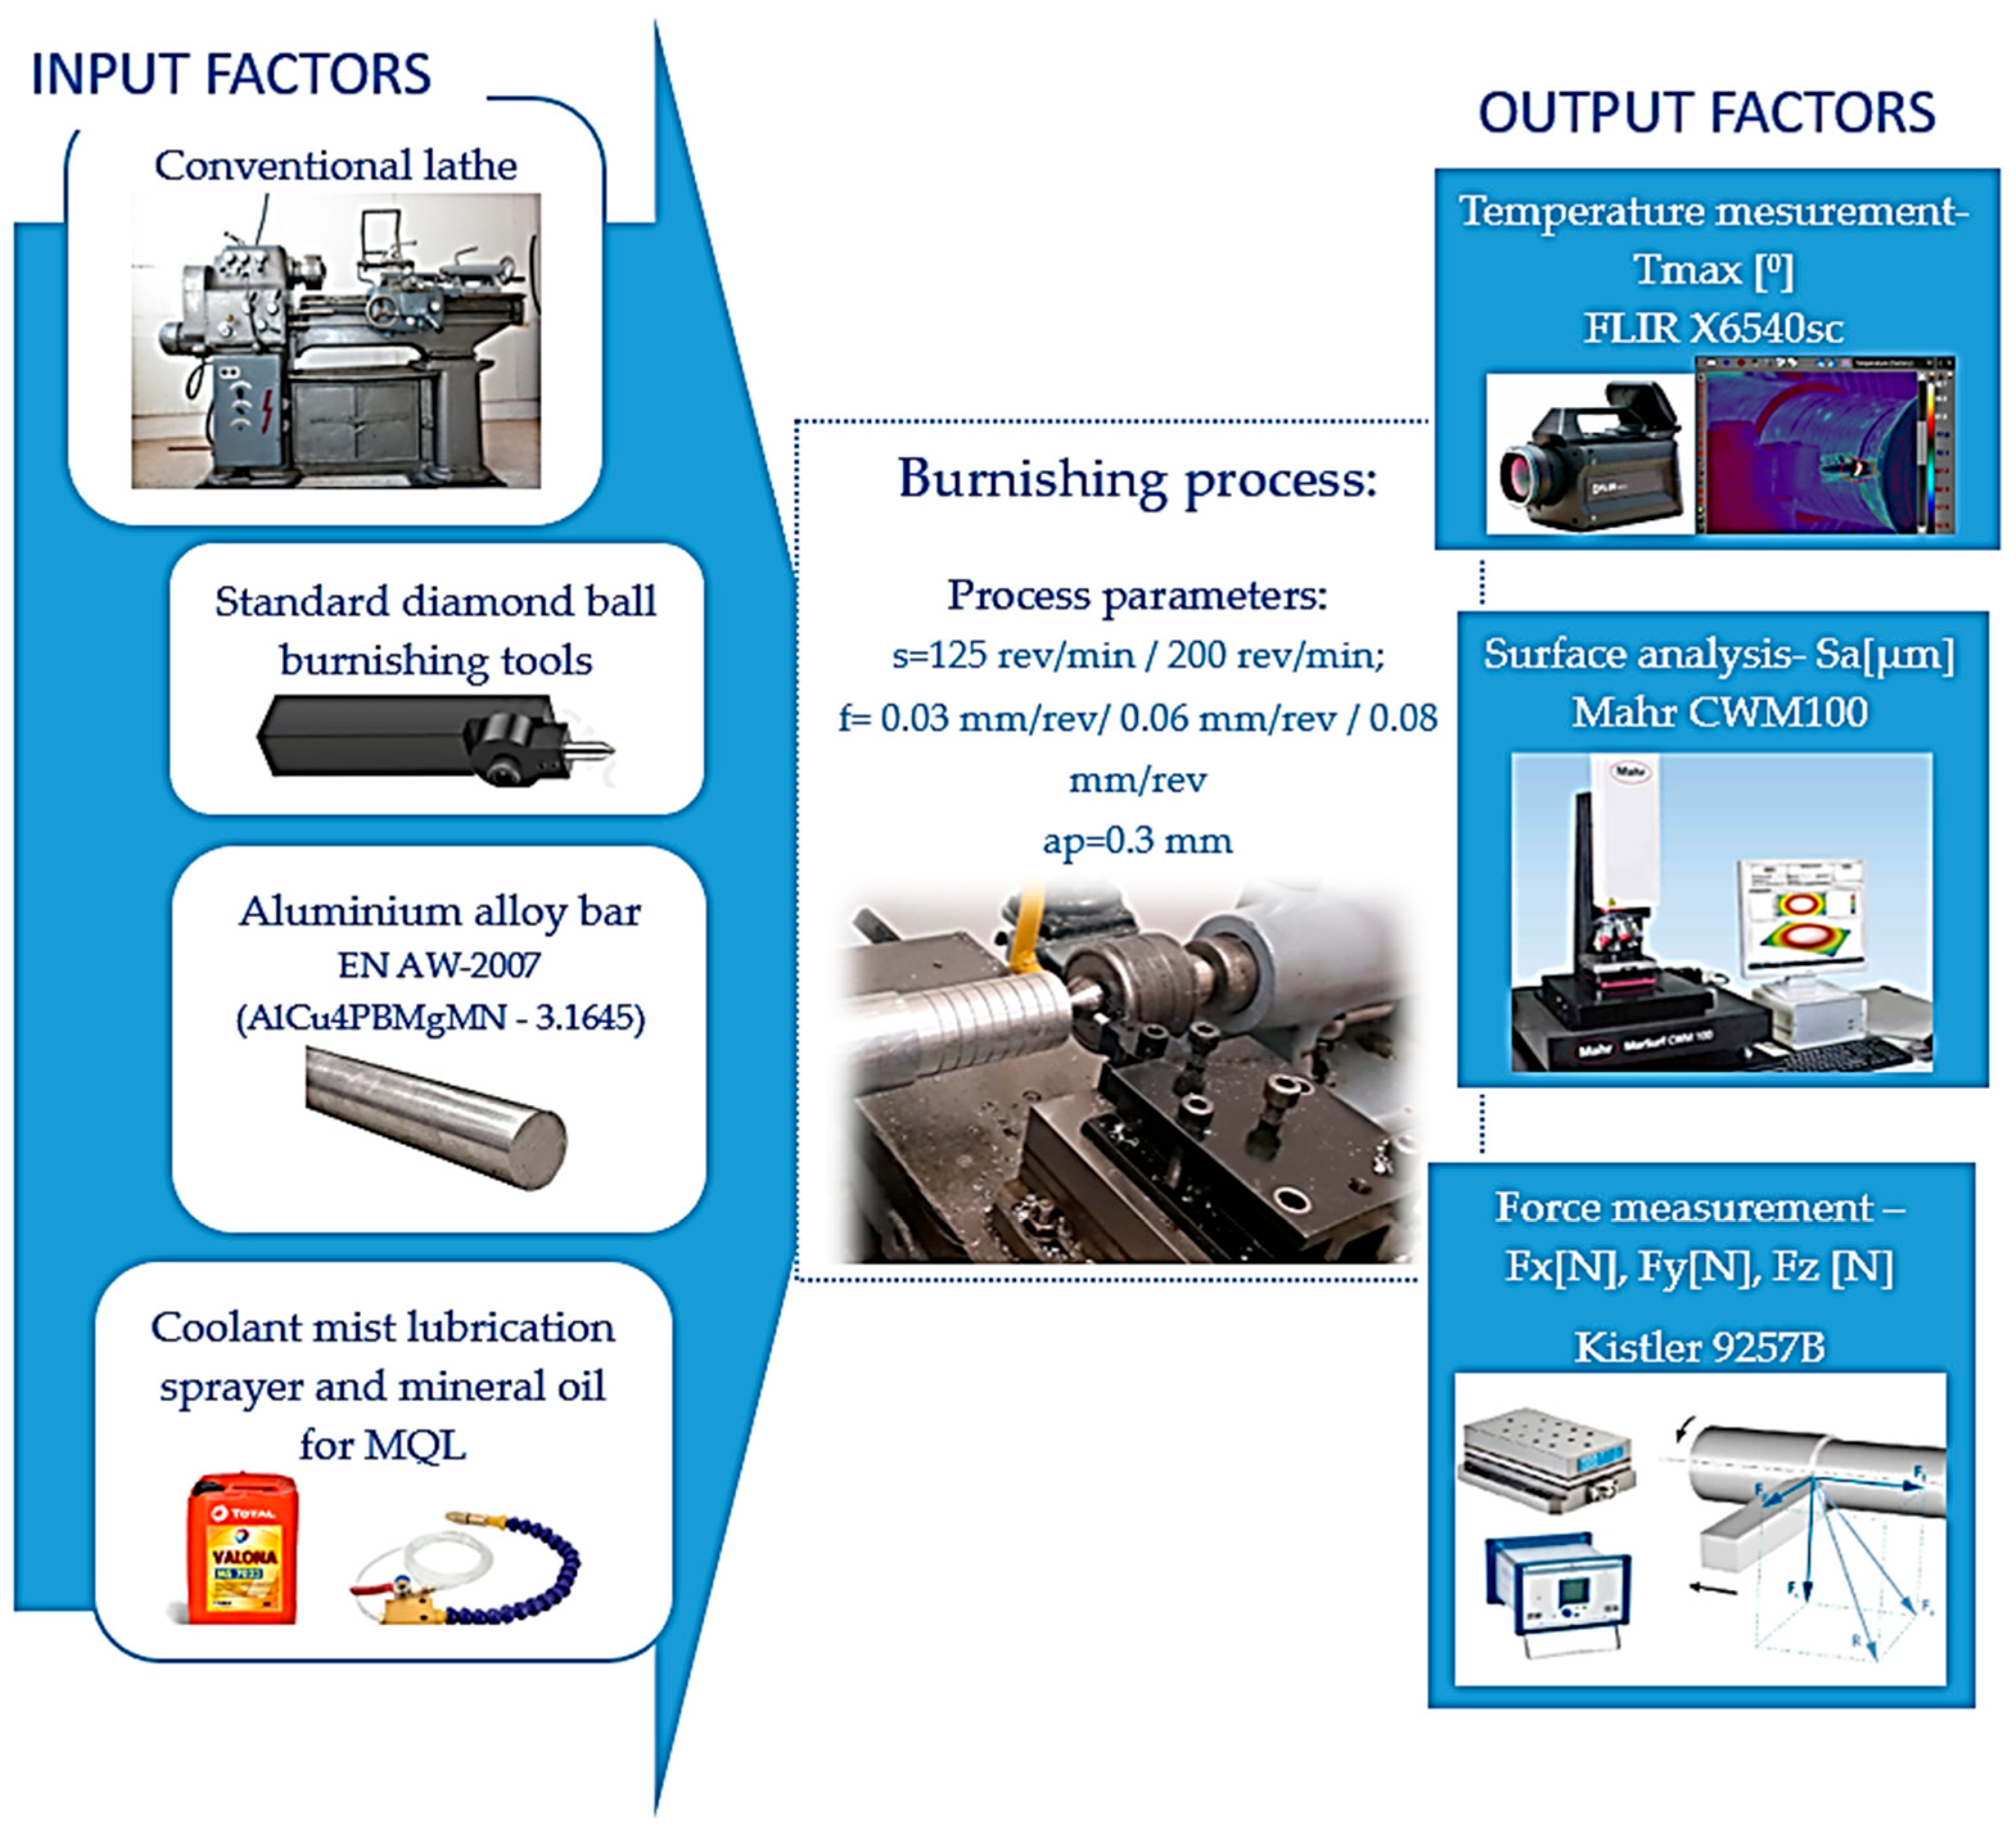
Figure 2 presents the experimental setup used for the burnishing tests. The burnishing tests were carried out on a plant lathe. The aluminum alloy bars were subjected to rough and semi-finish turning operations until a diameter of 40 mm was obtained. All machining operations, including the smoothing process by burnishing, were carried out without changing the grip of the part to avoid repositioning errors and possible geometric misalignments that could affect the accuracy of the measurements and the comparability of the machined surfaces.
A commercially available diamond ball burnishing tool, with a radius of 1 mm, was used. A full factorial design was applied by considering 3 input factors: the processing environment, the workpiece rotation speed, and the tool feed. Two different machining environments were used: dry conditions and MQL—minimum quantity of liquid.
For the MQL, a mist coolant lubrication cooling sprayer was used. The sprayer was connected to a small industrial air compressor. The air pressure was set at 1 bar. For the lubrication, a mineral oil type Valona MS7023 HC, produced by TotalEnergies Lubrifiants, Nanterre, France, was used. This is a neat cutting oil that can be used for ferrous and non-ferrous metals and has a cinematic viscosity of 23 mm
2/s at 40 °C and a density at 15 °C of about 856 kg/m
3 [
21]. The oil has been homologated by GROB-WERKE (Mindelheim, Germany), and it is considered to ensure very good antiwear and extreme pressure performance.
The lubricant flow rate and spray angle were not measured directly, but the nozzle was visually adjusted to ensure consistent coverage of the tool–workpiece interface, with an estimated angle of 30–45°. The total lubricant consumption per operation was not recorded, but based on the device specifications and working conditions, the flow rate is estimated to be within the typical range of 20–50 mL/h.
Two different rotating speeds were used, namely 125 rev/min and 200 rev/min. These speeds were selected after testing and concluding that higher rotational speeds, above 500 rev/min, cause extreme vibrations and therefore poor surface quality. Preliminary experimental trials were carried out with higher speeds (>500 rev/min). In these tests, significant vibrations were generated, which adversely affected the surface quality. Therefore, only the speeds that ensured process stability and acceptable surface finish were considered for further analysis. For the selected values of the workpiece rotational speeds, the burnishing speed values were ~16 m/min (125 rev/min) and ~26 m/min (200 rev/min). These speed levels were also reported by other authors [
22].
Table 2 contains the burnishing process parameters.
Three tool feeds were tested: 0.03 mm/rev, 0.06 mm/rev, and 0.08 mm/rev. In the burnishing process, small feeds are essential to obtain a high-quality surface. The processing depth was set at 0.03 mm. A dial gauge was used for precise control of the processing depth.
The forces were measured using a dynamometer type 9257B produced by Kistler Instruments AG, Winterthur, Switzerland. The dynamometer allows the dynamic recording of machining forces (
Fx,
Fy,
Fz) and moments (
Mx,
My,
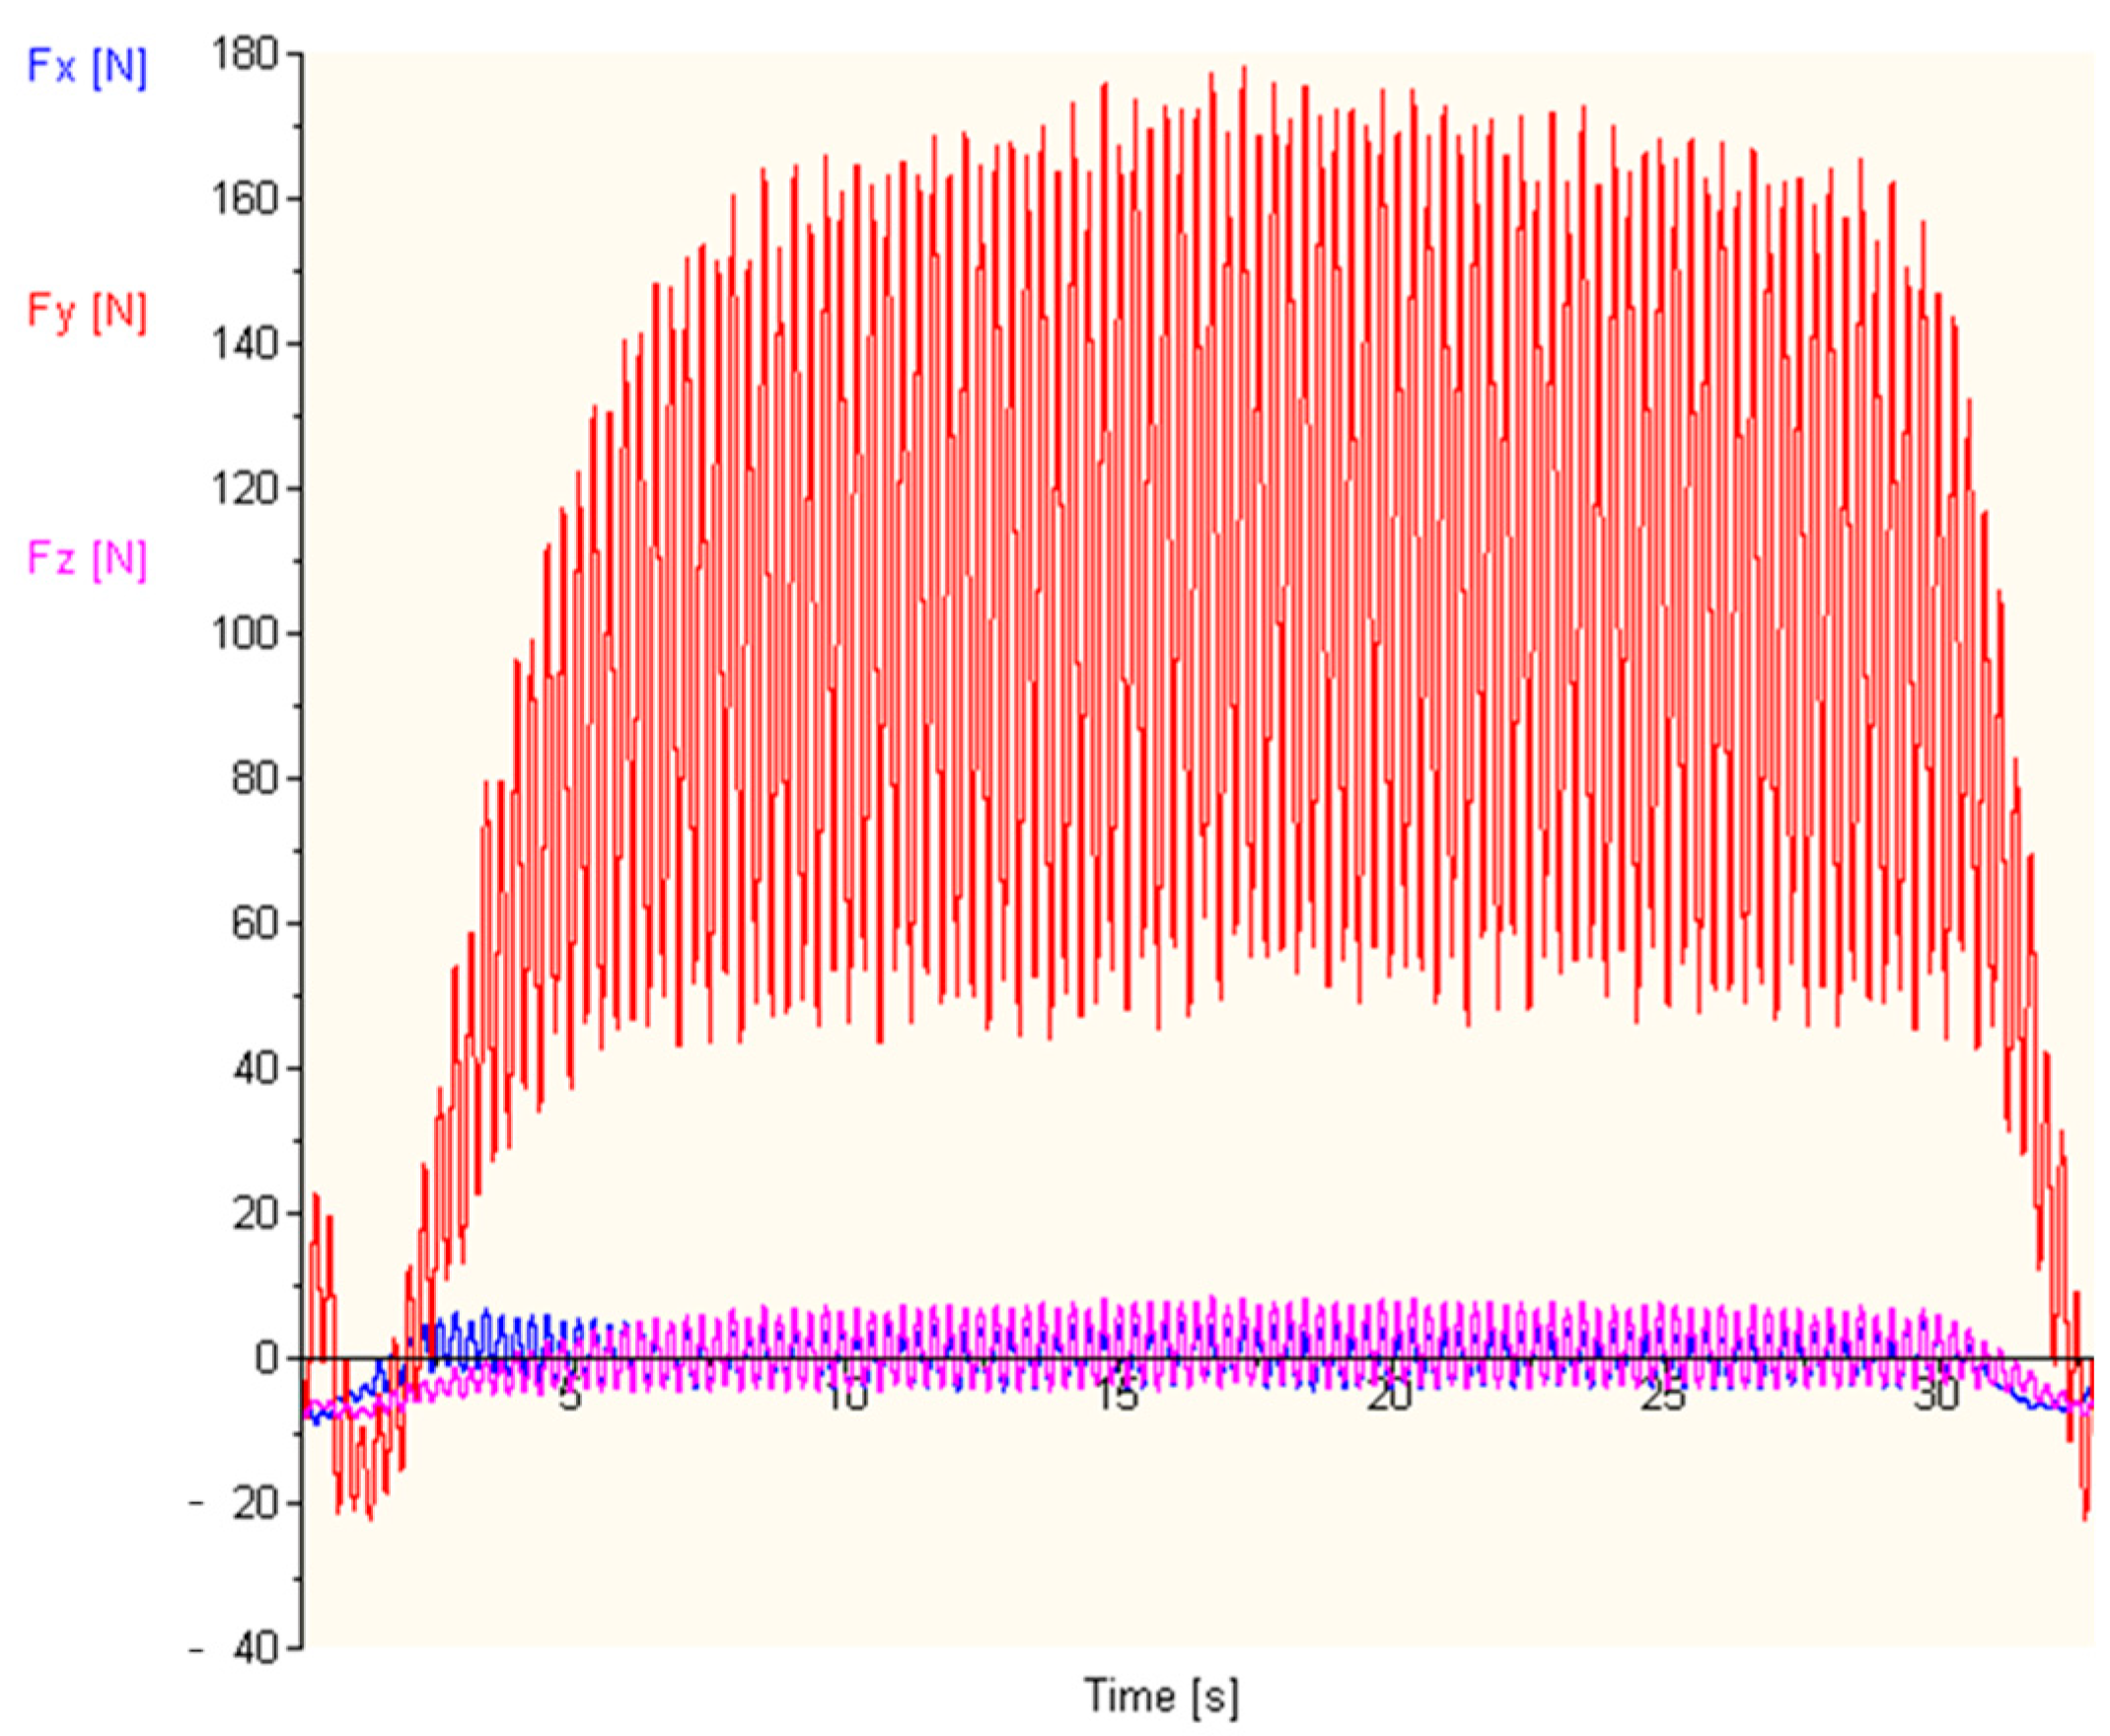
Mz) according to the three axes of a triorthogonal Cartesian coordinate system. Because it assures fast response time and high sensitivity, the Kistler dynamometer is suitable for high-precision applications. After the processing tests were performed, the data were analyzed using the associated software Dynoware v. 2.6.5.16. In
Figure 3, a sample graph obtained in the experiments is presented.
The graphs obtained for the pressing force Fy highlight a specific transient behavior at the beginning of the contact of the tool with the part. Although the plunging depth was previously set, the tool was initially retracted, then brought back into contact with the part as the feed started.
A decrease in value, followed by a sudden increase, could be observed. This can be attributed to an elastic response of the system at the moment of partial contact. In this stage, the part-tool–tool holder structure undergoes a slight elastic deformation until reaching the position of full contact, corresponding to the set depth.
Afterwards, the force increases rapidly and reaches a stationary, oscillating regime characteristic of the effective work phase. This evolution is specific to smoothing under superficial plastic deformation processes, where the mechanical contact stabilizes progressively. Oscillations of the pressing force are due to the cyclic tool–surface interaction, influenced by the initial roughness and vibrations of the system. In the comparative analysis, the average value of the force in the stable regime was used to eliminate transient influences.
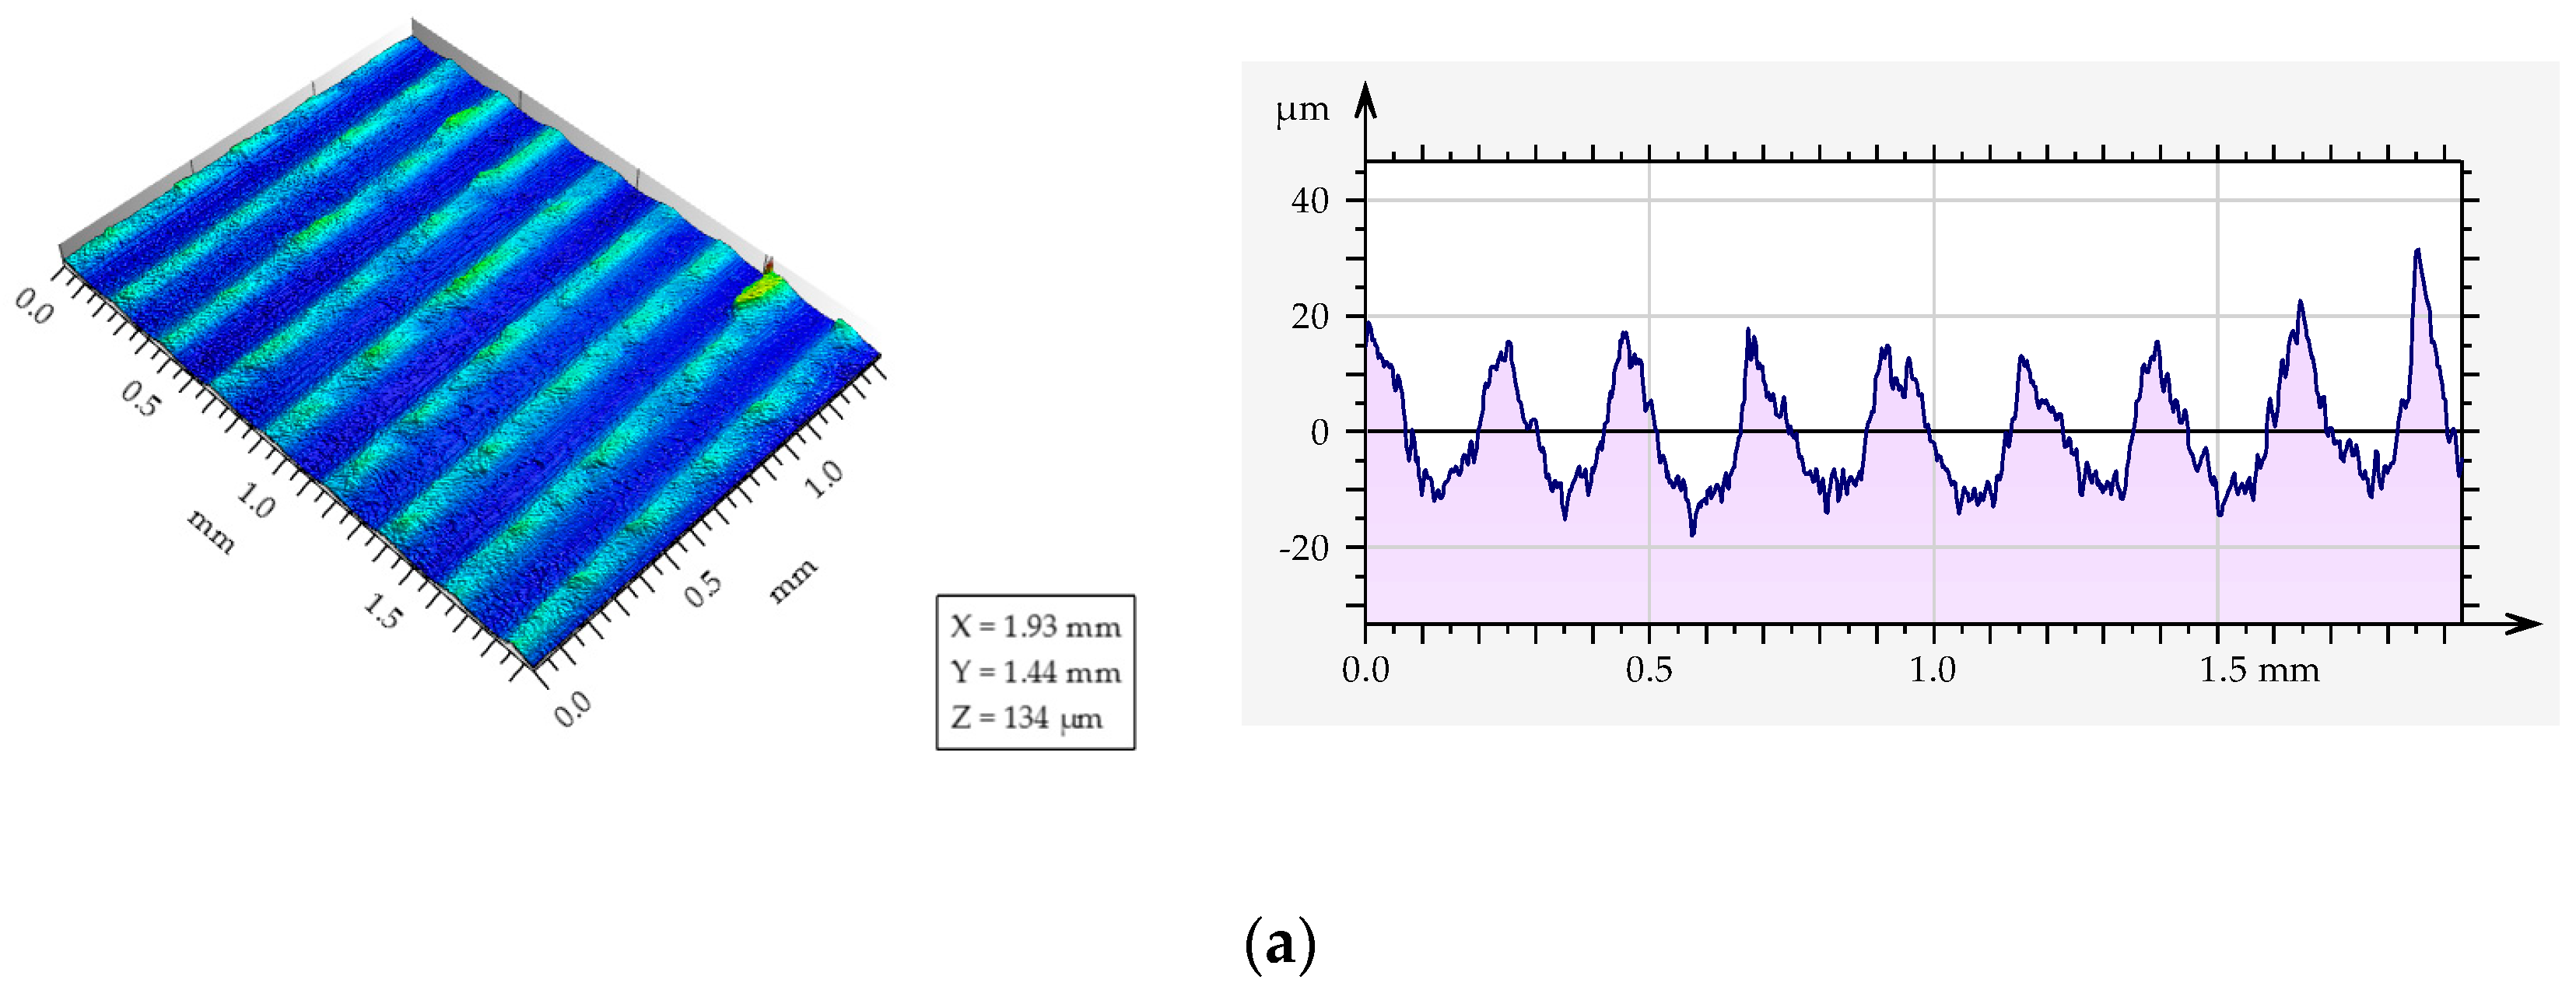
The surface quality is the main output parameter for smoothing operations as burnishing. After the burnishing tests, the processed surfaces were inspected using a confocal microscope and interferometer type CWM100, produced by Mahr, Mahr Holding GmbH, Goettingen, Germany. The analysis of the surface texture proved essential in evaluating the efficiency of the burnishing process, as the topographical characteristics directly influence the tribological behavior, fatigue resistance, and lubricant retention capacity.
Among the roughness parameters, the Sa (arithmetical mean deviation) parameter was used, which expresses the arithmetic mean of the deviations of the points on the 3D surface from the average reference plane. It provides a global picture of the degree of smoothness obtained after mechanical treatment, being a relevant indicator for comparing the efficiency of different processing regimes.
The temperature in the tool–piece contact area was also analyzed to determine the influence of the processing conditions and environment on the thermal regime during the burnishing operations. When processing aluminum alloys, high temperatures can lead to local softening of the material, which affects the way the surface is deformed. The thermal regime also influences the final roughness, the degree of gloss, and can lead to changes in the surface layer (oxidation, material adhesion). By monitoring process temperature, technological parameters (force, feed, speed) can be optimized to avoid premature damage to the part or tool. The temperature was measured using an IR thermal camera, Flir X6540sc, produced by Teledyne FLIR LLC, Wilsonville, OR, USA. The temperature during the plastic deformation process was monitored using a FLIR X6540sc infrared thermographic camera (Teledyne FLIR LLC, Wilsonville, OR, USA). The IR camera operates in the mid-wave infrared range (1.5–5 µm), having a resolution of 640 × 512 pixels, a thermal sensitivity (NETD) of less than 30 mK, and an acquisition frequency of up to 125 Hz at full resolution [
23]. The camera was placed approximately 1.5 m from the deformation zone at an angle of 45° to the surface. For the machined aluminum alloy surface, an emissivity of 0.81 was used.
By using the IR Research v. 4.40.12.38 software, the maximum temperature variation plots were obtained for the tool–part contact area as the one presented in
Figure 4.
3. Results and Discussions
The measured values of the considered output parameters for the experiments are summarized in
Table 3.
For more concise results, the roughness parameter was measured in three different areas for each machined surface, and the average value of these measurements was retained. Thus, a representative characterization of the final state of the surface was ensured, reducing the influence of possible local non-uniformities or isolated deviations caused by variable process conditions.
The initial roughness was determined in the same way. After turning, the surface of the workpiece was divided into sectors. One sector was left unburnished to determine the value of the initial roughness. The medium value of the initial roughness was
Sa = 8.44 µm. The surface roughness was significantly reduced under both processing conditions, achieving improvements of approximately 83.8% for the dry processing environment and 86.7% for the MQL processing environment compared to the initial value. On average, the process led to a roughness reduction of 85.3%, which confirms the effectiveness of the applied smoothing process. Other studies also reported significant improvements for surface roughness parameters for MQL compared to dry burnishing [
24,
25].
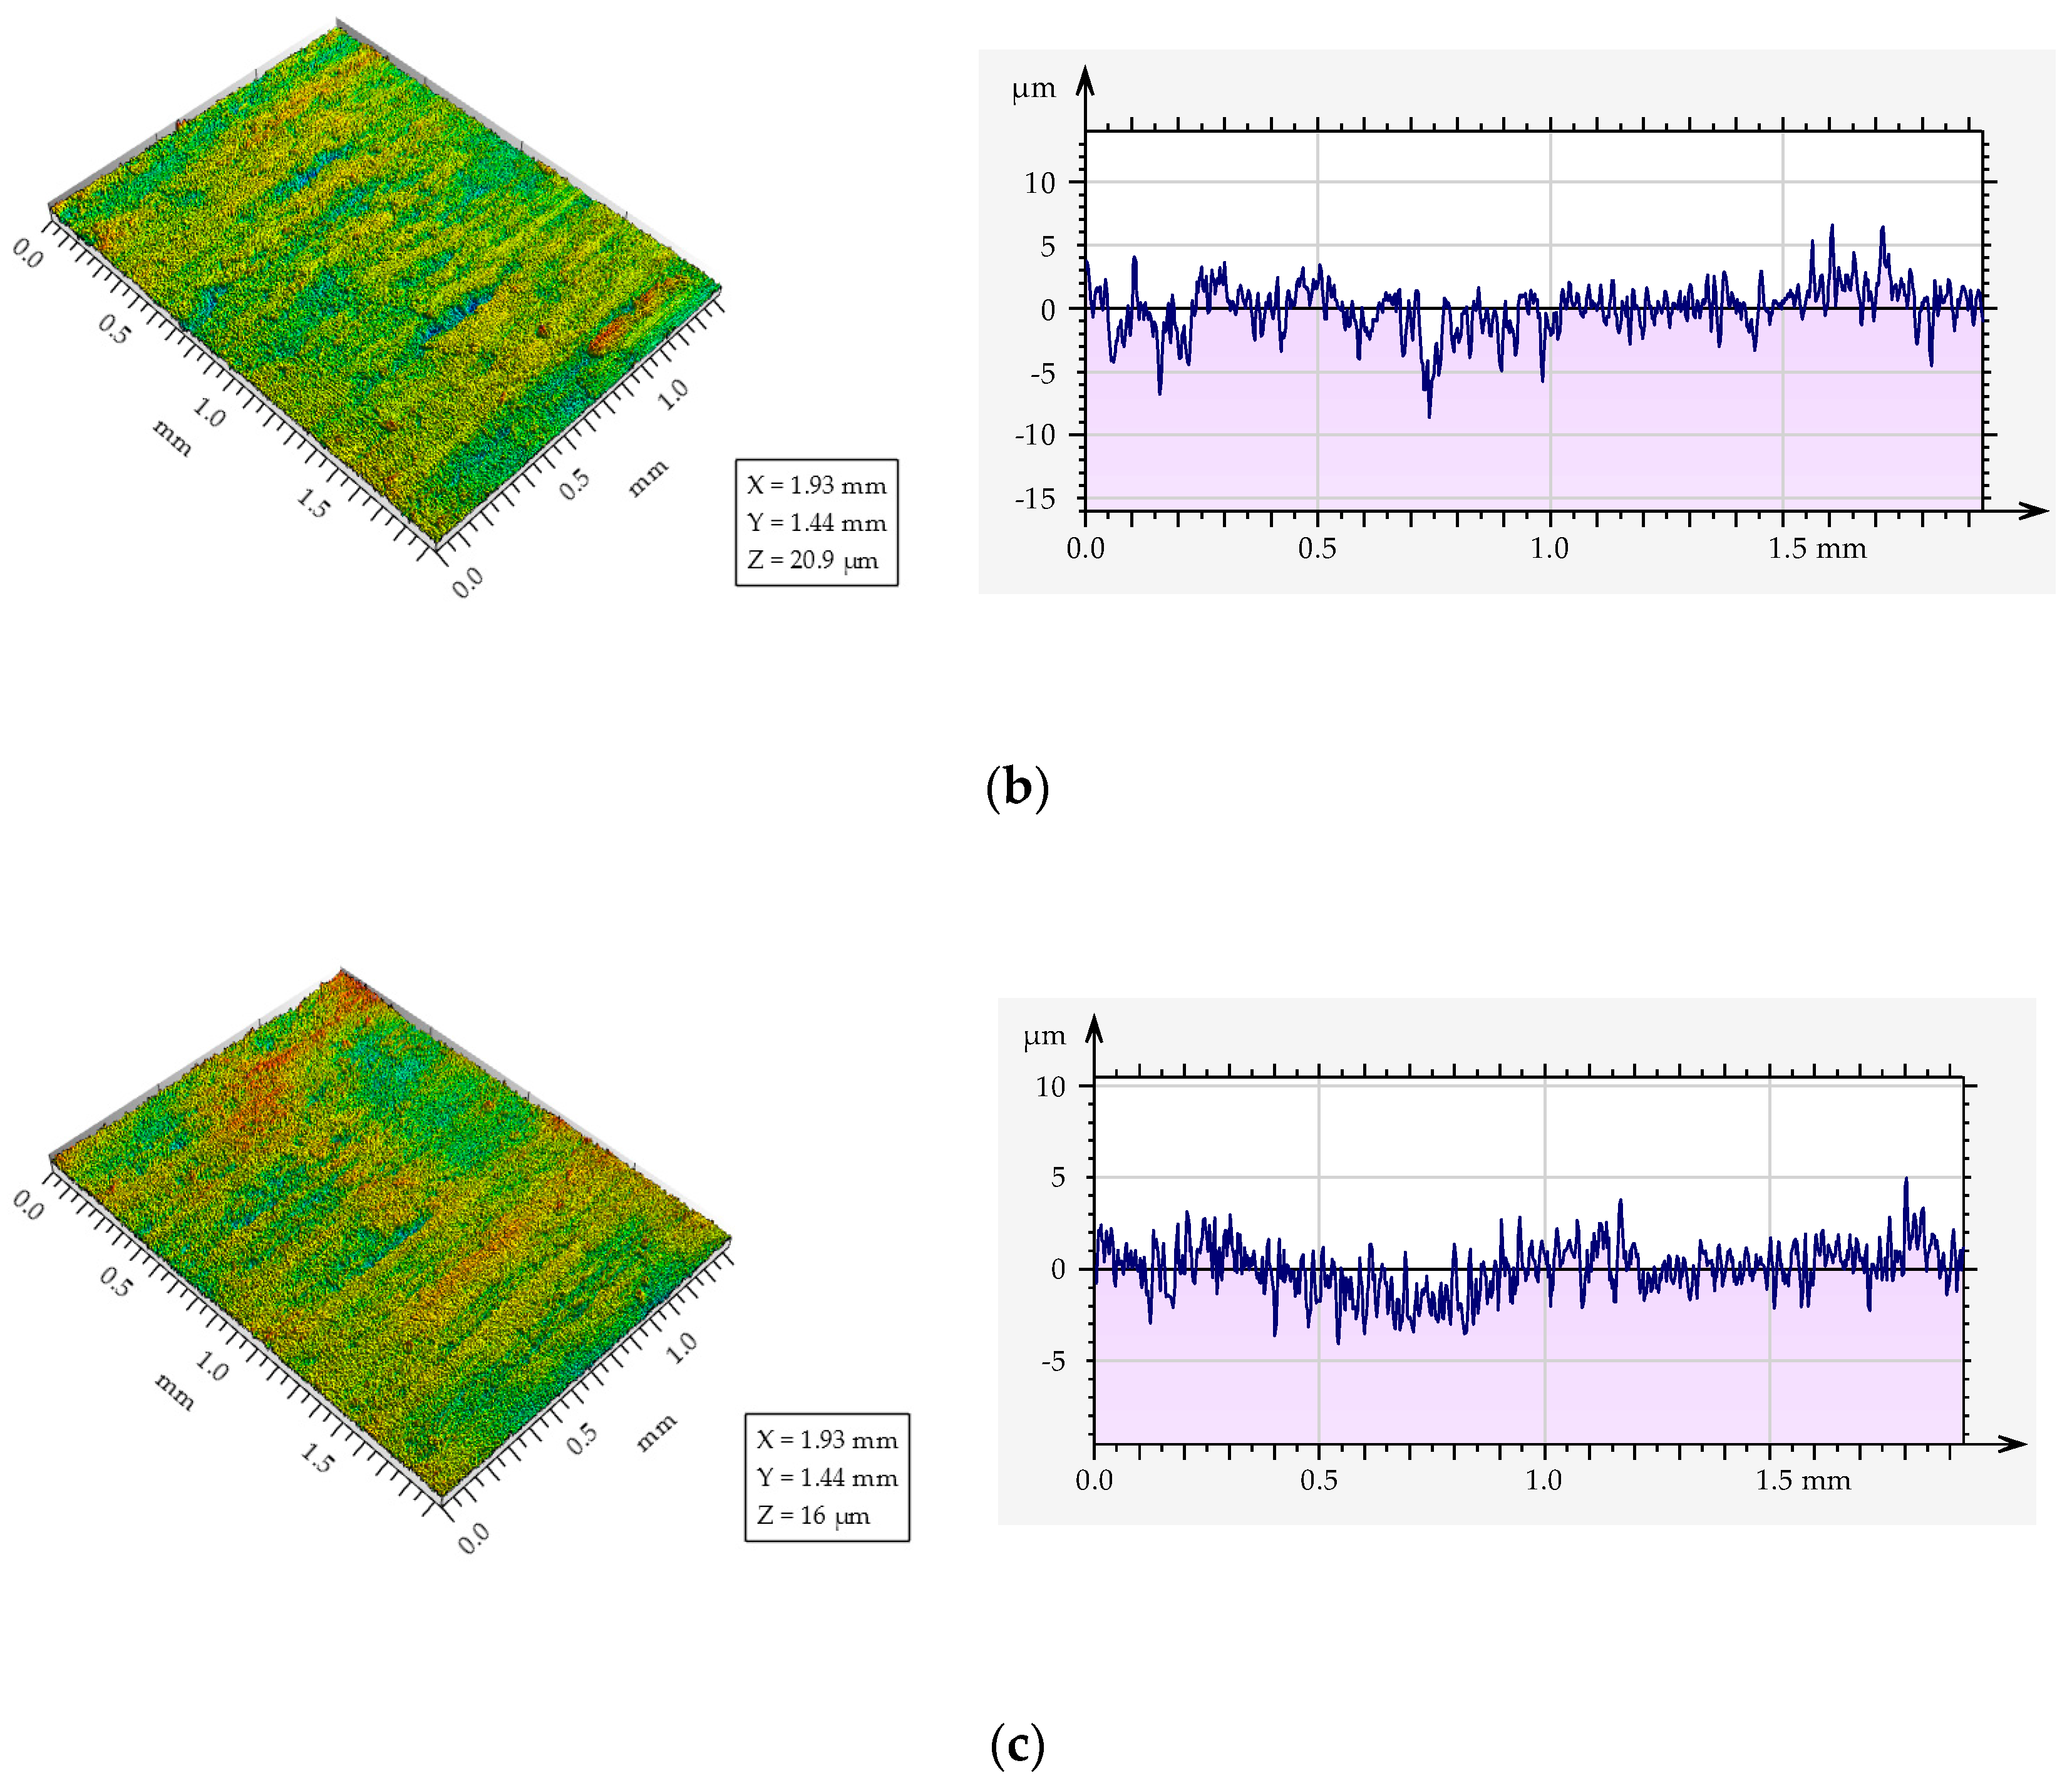
Figure 5 clearly illustrates the changes in surface texture and surface roughness resulting from the application of a burnishing process. After applying burnishing under dry conditions, the surface texture is significantly improved, and a partial leveling of the surface can be observed, but there are still slight variations. For the test carried out under MQL conditions, the surface is even smoother, and the texture is almost completely uniform, which indicates a more efficient or optimized application of the burnishing process.
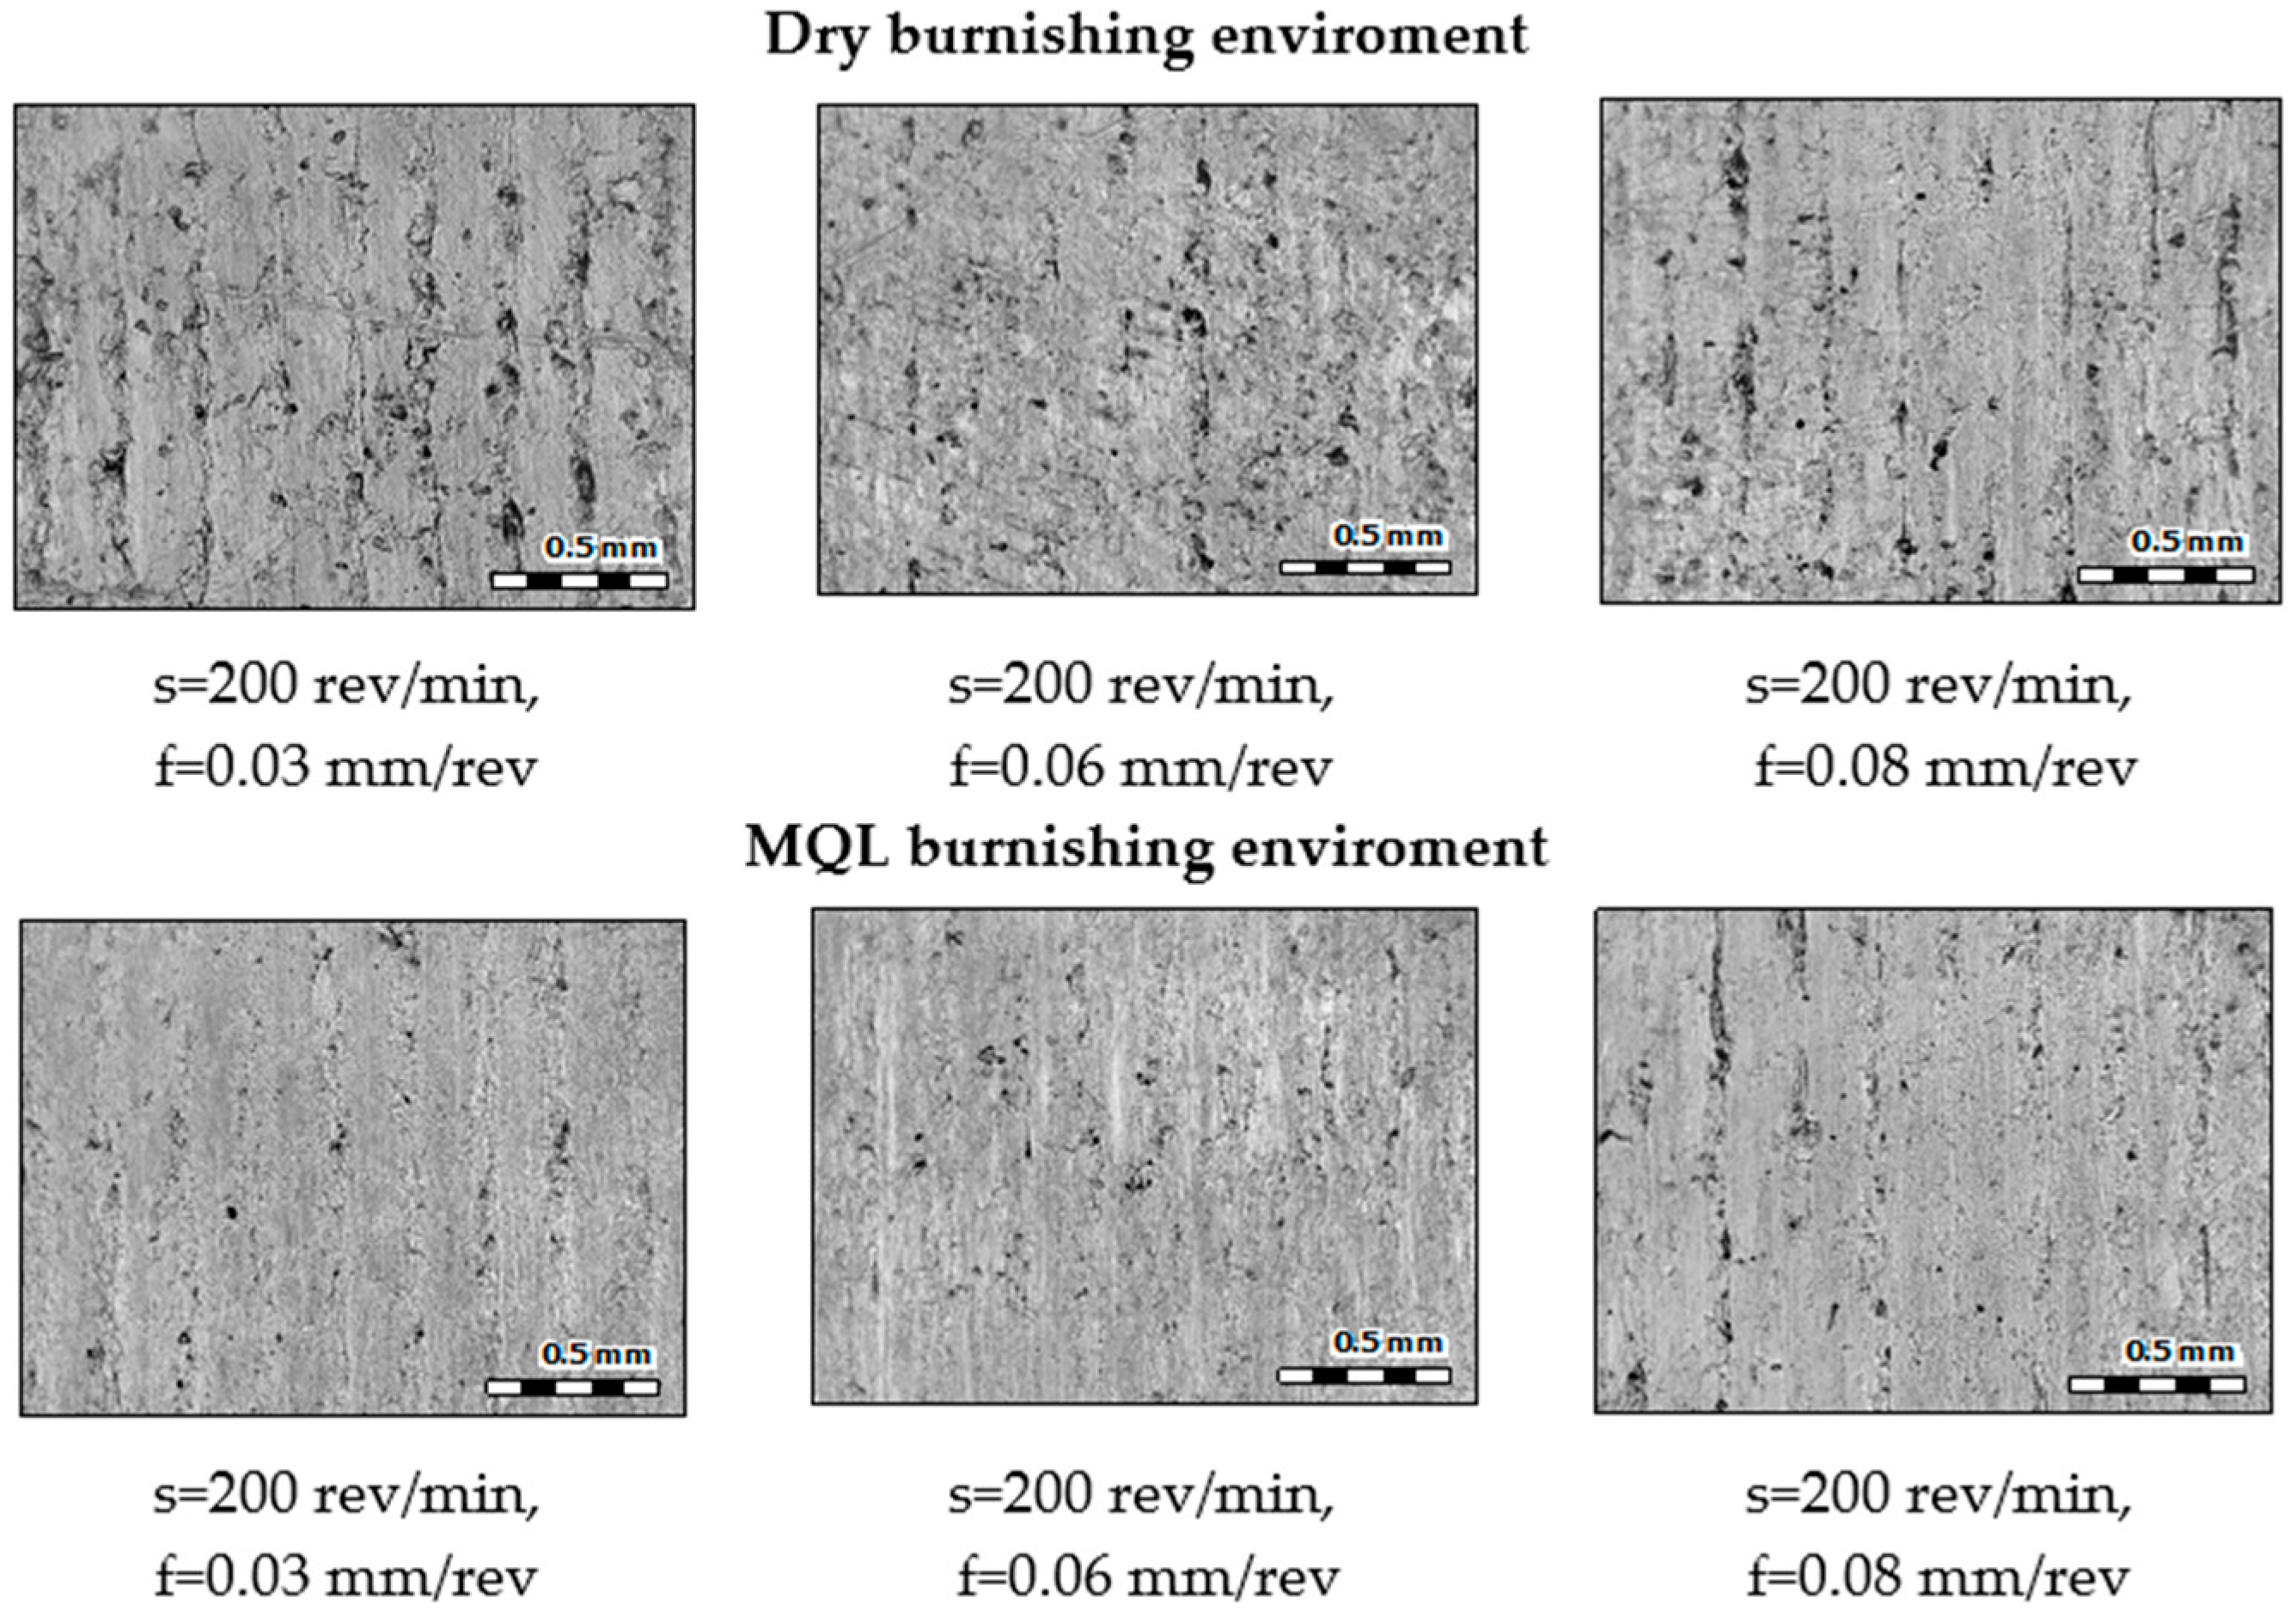
Figure 6 presents the microscopic aspect of some sample surfaces obtained by burnishing in a dry and MQL processing environment with different tool feeds. The surfaces obtained in a dry machining environment expose deeper scratches and marks, suggesting more friction between the tool and the part. These defects are considerably reduced when applying MQL, a sign that lubrication has lowered wear and improved surface quality. Also, the texture distribution is more chaotic for dry machining and appears to have a rougher and more irregular texture. The surfaces obtained under MQL conditions appear more even and smooth, with less pronounced processing marks.
These aspects are also reflected in the values obtained for the roughness investigated parameter. The Sa roughness parameter improved by 18.13% when MQL was applied compared to dry medium, indicating additional smoothing achieved by changing the process environment.
Figure 7 presents the surface roughness parameter variations for the two rotational speeds considered in the experiments. As observed, the roughness parameter
Sa does not vary significantly with changes in rotational speed for the case of the MQL environment. In the burnishing process under MQL conditions, the relatively stable roughness values observed across different rotational speeds may be attributed to the enhanced process stability and reduced friction. The MQL environment effectively lowers the temperature and friction forces between the tool and the workpiece, leading to decreased tool wear and a more consistent surface finish, even as the rotational speed varies within the tested range.
When applying a burnishing operation on a lathe,
Fy is the compressive force, the most important and the one responsible for plastic deformation. The axial force
Fx is the main friction force that is oriented to oppose the feed direction, and
Fz is the secondary friction force. It was observed that during the burnishing process, the magnitude sequence of the three force components is
Fy >
Fz >
Fx. This has also been reported in other scientific works [
22].
The reduction in friction when applying lubrication by MQL processing environment is reflected in a medium decrease of the main friction force by 60.87% compared to the
Fx forces measured for dry processing conditions. The reduction in thrust forces by application of the MQL condition in the burnishing process had previously been reported by other studies [
26].
The other two force components, Fy and Fz, are also lower by approximately 45,1%. The lubricating film not only reduces the frictional forces but also distributes the pressure more evenly, thus leading to a decrease in micro-asperities and -waviness as well as a lower roughness of the processed surfaces.
Another explanation for the lower forces obtained in the MQL burnishing environment, in addition to friction reduction, is that the lubricant film leads to a decrease in the local temperature by absorbing part of the heat generated in the process. This reduction in the local temperature was also observed after analyzing the maximum local temperatures detected with the IR thermal camera. A reduction of approximately 20% of the maximum temperature reached in the area of tool–part contact was obtained for the tests carried out in an MQL environment. The decrease in local temperature means that the material does not reach the softening threshold, maintaining a stable plastic deformation behavior, without creep phenomena or structural degradation in the superficial layer.
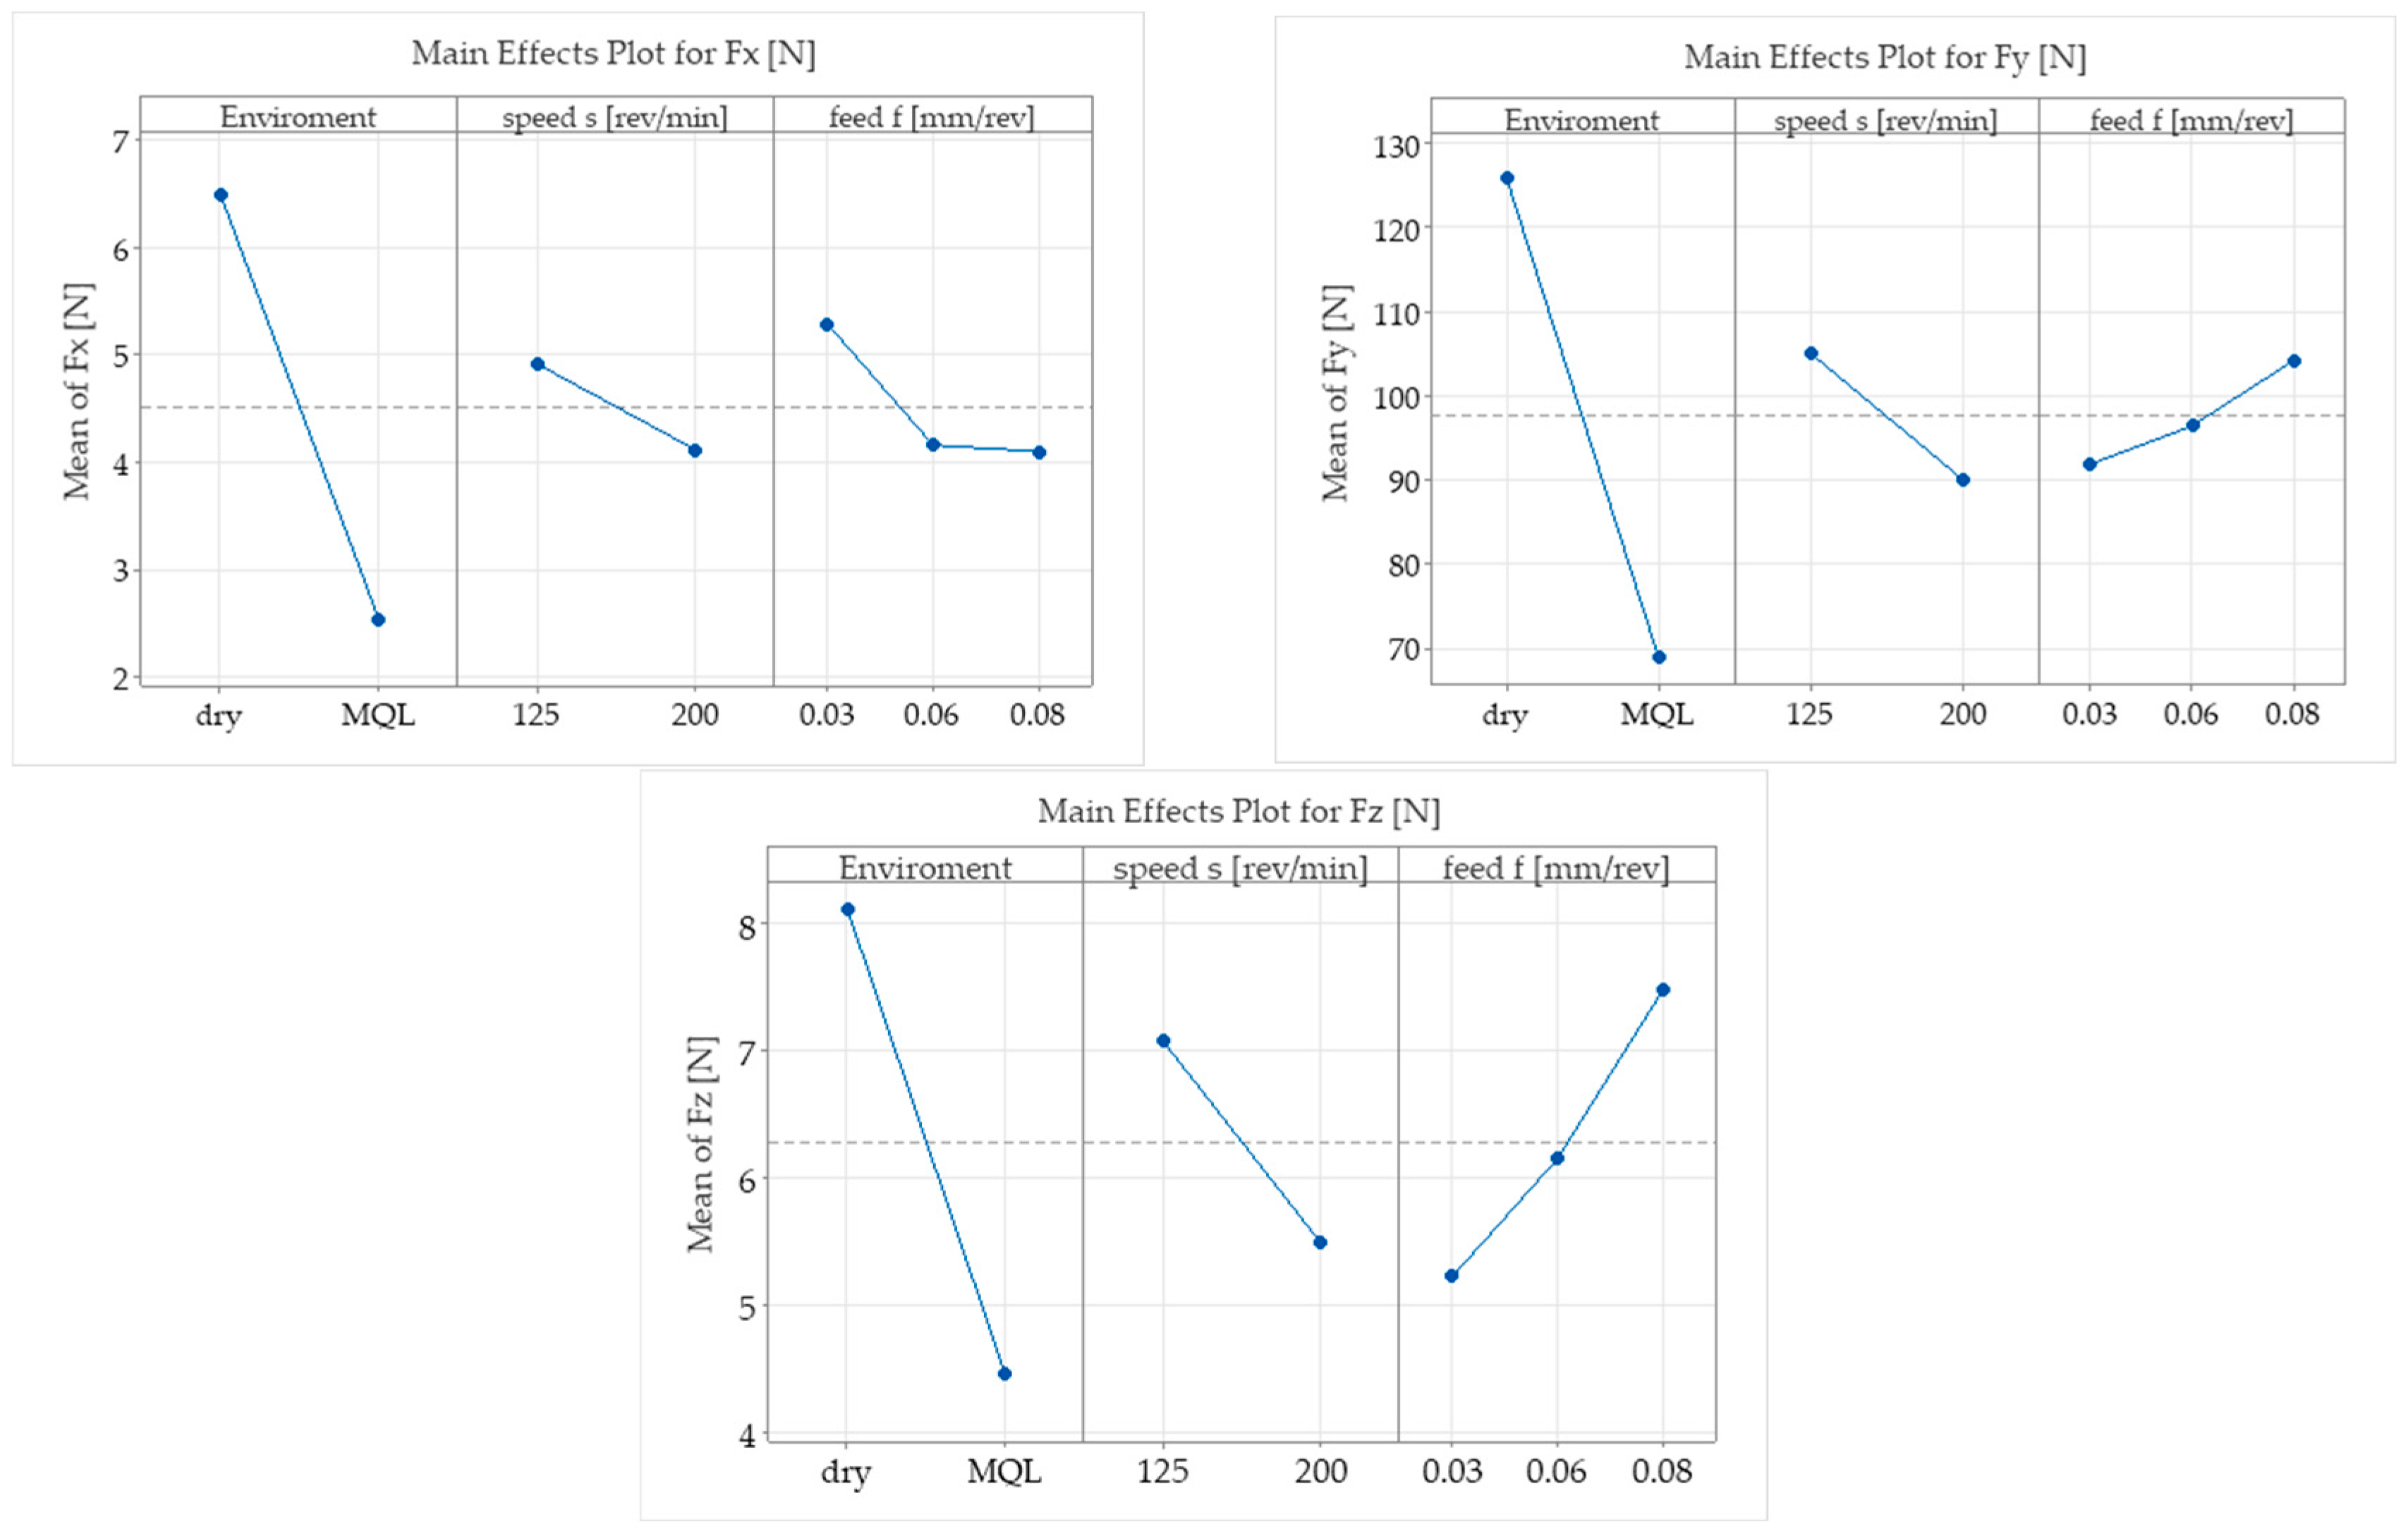
Figure 8 presents the main effects plots for the forces measured in the burnishing test. According to this graph, the machining environment plays a significant role in the force’s amplitude developed during the smoothing process by plastic deformation. The rotation speed does not lead to major force variations, such as processing environment or tool feed. The highest level considered for the rotation speed led to smaller forces.
A decrease in axial friction force (Fx) was observed with the increase in feed rate. This behavior can be explained due to the reduction in the contact time between the tool and each point on the surface, as well as by changing the mode of interaction between the tool and the asperities of the material, which causes less friction in the tool feed direction. The minimal quantity of lubricants introduced via MQL forms a thin lubricating film, which lowers the coefficient of friction. This directly reduces the tangential cutting force required for plastic deformations and sliding.
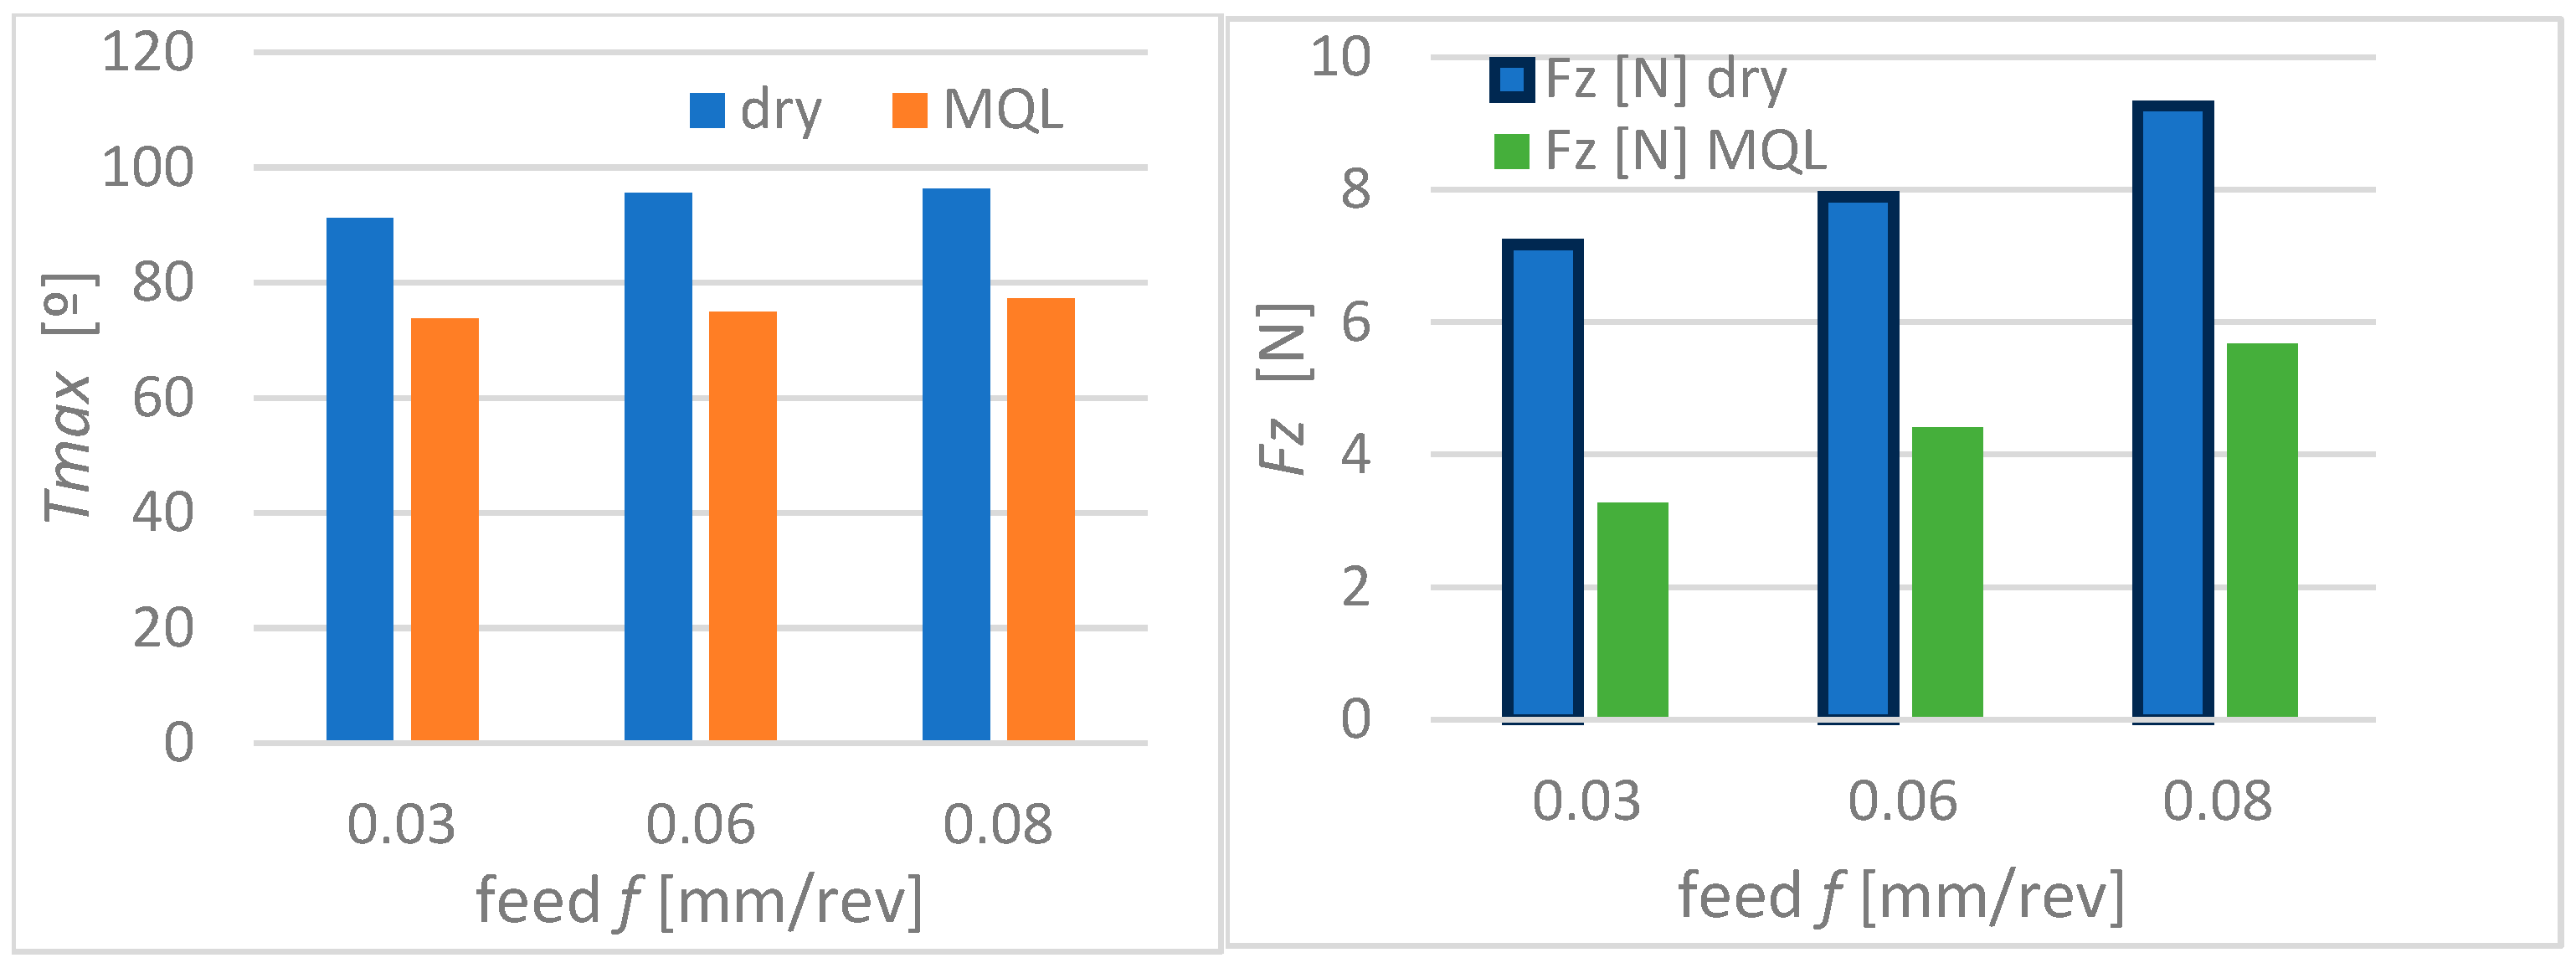
Figure 9 exposes the burnishing feed influence on the maximum temperature generated in the tool–workpiece area,
Tmax during burnishing, and the tangential forces
Fz [N]. Increasing the feed rate in the burnishing process causes an increase in friction and plastic deformation rate at the tool–part interface, which leads to a significant increase in local temperature in the contact area. The increase in temperature in the contact zone is an indicator of the intensification of friction at the tool–part interface, directly affecting the tangential (
Fz) components of the burnishing force.
The machining conditions used for the burnishing tests allowed maintaining the average temperature in the working area at 70–100 °C, below the recrystallization threshold of the aluminum alloy, thus avoiding structural damage to the surface layer. Although MQL does not cool as effectively as flood cooling, the continuous airflow combined with small amounts of oil helps carry heat away from the tool–workpiece interface. This results in a measurable temperature drop.
By processing the experimental data, a power–law relationship between burnishing parameters and surface roughness parameter
Sa [µm] was obtained as follows:
For Equation (1), the value of the exponent e will be set as 1 if the MQL burnishing environment is used and 0 if dry conditions are applied. For this equation, the coefficient of determination R2 = 86.1%, which indicates a very good fit between the model and the experimental data.
We conducted an extensive literature review and found no published model reporting explicit numeric values for the exponents in Equation (1) for burnishing processes. Most studies use polynomial RSM or other types of functions. However, the result is consistent with the results reported in the literature. RSM studies (on Al-6061 or similar alloys) [
27,
28] identify feed as a factor with a moderate impact (small positive exponent), and speed can negatively influence roughness (negative exponent for speed), as with the results from our model.
The presence of the MQL environment ensures a reduction in the frictional forces specific to the plastic deformation process, which would also mean a less intense deformation of the metal alloy crystals. Given the low weight of such an effect, it is expected that this smaller deformation of the crystals will be less visible when examining the microstructure of the surface layer.
