Article

Significant Improvement in Wear Resistance of CoCrFeNi High-Entropy Alloy via Boron Doping

1
Engineering Research Center of High Entropy Alloy Materials (Liaoning Province), School of Materials Science and Engineering, Dalian University of Technology, Dalian 116024, China
2
Key Laboratory for Light-Weight Materials, Nanjing Technology University, Nanjing 210009, China
3
Key Laboratory of Solidification Control and Digital Preparation Technology (Liaoning Province), School of Materials Science and Engineering, Dalian University of Technology, Dalian 116024, China
*
Author to whom correspondence should be addressed.
Lubricants 2023, 11(9), 386; https://doi.org/10.3390/lubricants11090386
Submission received: 10 August 2023 / Revised: 1 September 2023 / Accepted: 5 September 2023 / Published: 9 September 2023
(This article belongs to the Special Issue Laser Surface Engineering for Tribology)

Abstract

:
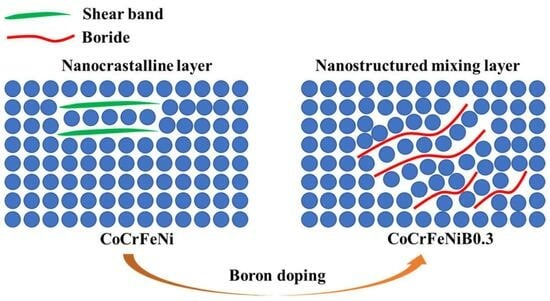
CoCrFeNi high-entropy alloy (HEA) exhibits excellent mechanical properties but relatively poor wear resistance. In particular, when the load reaches a certain level and the deformation mechanism of the CoCrFeNi HEA changes, the formation of shear bands leads to a significant increase in wear rate. Although numerous studies have been conducted on alloying strategies to improve the wear resistance of alloys, there is still limited research on the influence of deformation mechanism adjustment on wear resistance. Therefore, in order to fill this research gap, this study aims to use boron doping to regulate the deformation mechanism and successfully improve the wear resistance of CoCrFeNi HEA by 35 times. By observing the subsurface microstructure, the mechanism behind the significant improvement in wear resistance was further revealed. The results indicate that the reduction of shear bands and the formation of nanostructured mixed layers significantly improve wear resistance. The proposed strategy of boron doping to change the deformation mechanism and improve wear resistance is expected to provide new enlightenment for the development of wear-resistant HEAs.

Graphical Abstract

1. Introduction

High-entropy alloys (HEAs) with multiple principal elements have unique properties that traditional alloys cannot achieve [1,2]. For example, face-centered cubic (FCC) HEAs maintain high ductility and fracture toughness at cryogenic temperatures [3]. However, these single-phase FCC HEAs generally have low strength and poor wear resistance [4,5,6,7,8]. As the load increases, the wear of the material becomes increasingly severe [9,10]. Therefore, improving the wear resistance of materials is highly essential. Many studies have tuned the composition and microstructure of FCC HEAs to overcome these shortcomings and improve wear resistance. Wu et al. found that the addition of Al could promote the formation of the body-centered cubic (BCC) phase and increase hardness, thereby greatly improving the wear resistance of the AlxCoCrCuFeNi HEA [11]. Joseph et al. added Al to the CoCrFeNi HEA, and the formation of alumina and BCC phases also significantly improved wear resistance [12]. Many other studies found that the preparation of self-lubricating CoCrFeNi HEA could also considerably improve wear resistance. For instance, excellent wear resistance was obtained by adding solid lubricant graphite (MoS, Ag, and Cu) to the CoCrFeNi HEA [13,14,15].
In addition, preparing coatings is also an effective way to enhance the wear resistance of HEAs, and boriding is one of the most popular surface treatment methods for improving the surface performance of HEAs. Boriding is also defined as boronizing. Boronizing is a thermochemical surface treatment method that involves the transfer of active boron released from boron-producing substances onto the alloy surface through thermal diffusion between 800 and 1050 °C, with a holding time ranging from 30 min to 10 h [16]. During the thermal diffusion process, the active boron atoms diffuse into the interstitial positions in the lattice of the alloy, resulting in the formation of a metal boride layer on the workpiece [17]. Hou et al. prepared a boronized layer on the surface of Al0.25CoCrFeNi HEA using the solid-boronizing method. The Vickers hardness of the boronized sample surface is close to 1136 HV, which is 6.0 times higher than that in the unboronized condition. The wear resistance of the boronized Al0.25CoCrFeNi HEA was improved by 12 times compared to the unboronized alloy [18]. Wu et al. improved the tribological properties of single-phase FCC Al0.1CoCrFeNi HEAs by the pack-boronizing method. The surface-borided layer mainly consists of (Co, Fe)B, CrB, and NiB hard phases, which increase the surface hardness and reduce the wear rate [19].
Generally, the wear resistance of FCC HEAs is improved by alloying, which brings limitations to the design of wear-resistant HEAs. The deformation mechanism inevitably changes during friction and wear [20,21]. The effect of deformation on wear resistance has always been ignored. As a result, methods of adjusting the deformation mechanism to improve wear resistance, which may significantly affect FCC HEAs, have rarely been explored. According to a previous study, doping boron could effectively adjust the deformation mechanism of CoCrFeNi HEA [22]. Based on this, the HEAs doped with boron can provide solutions for industrial applications where the equipment deteriorates due to abrasive wear [23,24]. Therefore, exploring the deformation mechanism of materials with boron doping in the wear process may help establish the relationship between the deformation mechanism and wear resistance, thus overcoming the limitation of the wear resistance of FCC HEAs. Surface wear during sliding friction is a complex phenomenon involving many wear mechanisms [25,26]. The current research on friction and wear of HEAs mainly focuses on the wear mechanism from the perspective of surface topography analysis [27]. In fact, the basic factor determining the wear mechanism is the deformation and fragmentation of the subsurface layer, which change the structure and properties of this layer, thus determining the final wear resistance [28,29]. Consequently, the wear mechanism that affects wear resistance in the wear process remains to be further studied, especially under high loads.
The wear performance of HEAs is closely related to their microstructure, and most of them are based on composition control to improve wear resistance. However, a method to improve the wear resistance by adjusting the deformation mechanism of the alloy has not been proposed. In this study, boron doping was used to change the deformation mechanism of CoCrFeNi HEA for the first time to achieve high wear resistance. The mechanism that causes high wear resistance was revealed. The research results might provide a theoretical basis for the design and development of high-wear-resistant HEAs in the future.

2. Experimental Procedures

CoCrFeNi and CoCrFeNiB0.3 HEAs were prepared using the arc melting method in a vacuum arc melting furnace equipped with a water-cooled copper crucible. Before melting, the raw materials were placed in a water-cooled copper crucible from low to high melting point, and then the furnace chamber was closed. The furnace chamber was vacuumed to below 3 × 10⁻³ Pa, then reverse charged with protective high-purity argon to 0.05 Pa before starting the melting process. During smelting, titanium ingots need to be melted first to absorb residual oxygen in the furnace chamber, and then the alloy needs to be melted. In order to ensure the melting of all raw materials and obtain an alloy with uniform composition, all alloy samples need to be repeatedly melted 5 times, and the sample needs to be flipped once for each melting. Each smelting time is 2 min, and the smelting current is about 300 A. Electron probe microanalysis (JXA-8530F PLUS) and TEM (JSM-F200) were used to observe the microstructures of CoCrFeNi and CoCrFeNiB0.3 HEAs. The samples were cut into two parallel sides by the electric spark cutting method, and then they were polished with 80 #, 240 #, 400 #, 800 #, 1000 #, 1500 #, and 2000 # sandpapers, and the surface was cleaned with alcohol to ensure the smoothness and cleanliness of the surface. The hardness test was performed using the Vickers hardness tester model (MH-60) with loads of 1 kg and a duration of 15 s. Seven measurements for each ingot were performed to calculate the average data and ensure accuracy. The disc surfaces were ground with 4000-mesh grit papers before the wear tests.
The discs (10 mm diameter and 3 mm thick) taken from the ingot were used for wear tests. Ball-on-disc wear tests were performed using a WTM-2E controlled atmosphere at room temperature with loads of 2 N, 5 N, and 8 N for 1 h, and a sliding velocity of 0.188 m/s. The friction ball is a Si3N4 ceramic ball with a diameter of 6 mm. To ensure the accuracy of the wear tests, at least three samples were tested in the same condition. After the tests, the wear rate of all disc samples was measured by the volume loss method before ultrasonic cleaning with ethanol. The surface profile of the wear trajectory was obtained using a QLS4000 confocal laser scanning microscope to quantify the volume loss and calculate the wear rate W using the following equation:
W = V L   ×   P
where V is the wear volume loss (mm3), L is the sliding wear distance (m), and P is the applied normal load (N). Three independent wear tests were carried out for each test condition, and the average wear rate and standard deviation were obtained.
Thin foils of CoCrFeNi and CoCrFeNiB0.3 HEAs were prepared using a focused ion beam system (Helios G4 UX) for TEM observations. Firstly, the bulk sample was polished, which can be slightly corroded. It was placed under an electron microscope for observation to find the ideal position. By cutting the sample with an ion beam, a sheet of the same size was obtained and then welded to a copper column. Finally, the standard FIB program was used to further polish the sheet thickness to the nanometer level, usually less than 100 nm, and then a low-voltage electron beam was used to clean the surface of the sheet, and finally the sample was obtained. The sampling position was on the wear scar, and the directions normal to the sliding surface, along the sliding direction, and perpendicular to the sliding direction in the sliding plane were defined as ND and SD, respectively. The ND–SD cross-section under the sliding surface of the alloys was analyzed using TEM, high-resolution TEM (HRTEM), and high-angle annular dark-field scanning transmission electron microscopy (HAADF-STEM).

3. Results and Discussion

3.1. Microstructure and Wear Properties

Figure 1a,b shows the microstructure of CoCrFeNiB0.3 HEA. According to previous studies, the microstructure of CoCrFeNi HEA was only a single FCC phase. After adding boron, a large number of precipitates appeared in the CoCrFeNiB0.3 HEA [30]. As shown in the corresponding selected area electron diffraction (SAED) pattern in the inset, the matrix was still in the FCC phase, and the precipitate was Cr2B [31]. Figure 1c shows the Vickers hardness (HV) of CoCrFeNi and CoCrFeNiB0.3 HEAs. The HV of CoCrFeNiB0.3 HEA was significantly higher than that of CoCrFeNi HEA, mainly because of the formation of Cr2B precipitates. Figure 1d,e shows the 3D profiles of the worn surfaces of CoCrFeNi and CoCrFeNiB0.3 HEAs under different loads. The wear scar depth increased with the increase in loads. Under the same load, the wear scar depth of CoCrFeNi HEA was significantly larger than that of CoCrFeNiB0.3 HEA. The results indicated that Cr2B was formed after adding boron, the hardness of the alloy increased, and the resistance of the matrix against deformation improved, resulting in higher wear resistance [23]. Figure 1f shows the wear rates of CoCrFeNi and CoCrFeNiB0.3 HEAs under different loads. For the CoCrFeNi HEA, the wear rate under 2 N, 5 N, and 8 N loads was 2.6 × 10⁻⁵, 2.9 × 10⁻⁵, and 3.57 × 10⁻⁴ mm3/(N·m), respectively. On the contrary, for the CoCrFeNiB0.3 HEA, the wear rate under 2 N, 5 N, and 8 N loads was 8.3 × 10⁻⁶, 8.6 × 10⁻⁵, and 8.9 × 10⁻⁵ mm3/(N·m), respectively. Generally, the wear rate increased with the load. The wear rate of CoCrFeNiB0.3 HEA was lower than that of CoCrFeNi HEA, indicating that the wear resistance of CoCrFeNiB0.3 HEA was better. The wear rate of CoCrFeNi HEA was two to three times that of CoCrFeNiB0.3 HEA under 2 N and 5 N loads, while the wear rate of CoCrFeNi HEA was 35 times that of CoCrFeNiB0.3 HEA under the 8 N load. Obviously, the increase in wear resistance under low-load conditions could be attributed to the higher hardness. However, under higher loads, the significantly improved wear resistance of CoCrFeNiB0.3 HEA indicated an impact on some other factors besides the increase in hardness. Therefore, wear scars and subsurface structures were observed to further investigate the underlying mechanism.

3.2. Worn Morphology

Figure 2 shows the wear scars of CoCrFeNi HEA under different loads. As shown in Figure 2a,c,e, the width of the wear scar increased with the load. The wear behavior was typical of abrasive wear [13]. A large number of grooves appeared on the worn surfaces, which were caused by the hard, rough surface sliding across the softer surfaces, as shown in Figure 2b,d,f. Moreover, the number and depth of grooves increased with the increase in load, indicating an increase in the wear rate of the alloy.
Figure 3 shows the wear scar of CoCrFeNiB0.3 HEA under different loads. As shown in Figure 3a,c,e, the width of the wear scar increased with the increase in load [32]. Delamination features appeared on the worn surfaces of the alloy, demonstrating that the addition of boron transformed the wear behavior of CoCrFeNi HEA from abrasive wear to cracking and delamination. The width of the wear scar of CoCrFeNiB0.3 HEA decreased clearly, and the worn surfaces were smoother compared with CoCrFeNi HEA, indicating that the wear resistance of CoCrFeNiB0.3 HEA was better than that of CoCrFeNi HEA. Under the 2 N load, almost no plastic deformation occurred, and small grooves appeared on the worn surface. Although some grooves were observed on worn surfaces under 5 N and 8 N loads, they were not obvious.

3.3. Worn Subsurface Structure

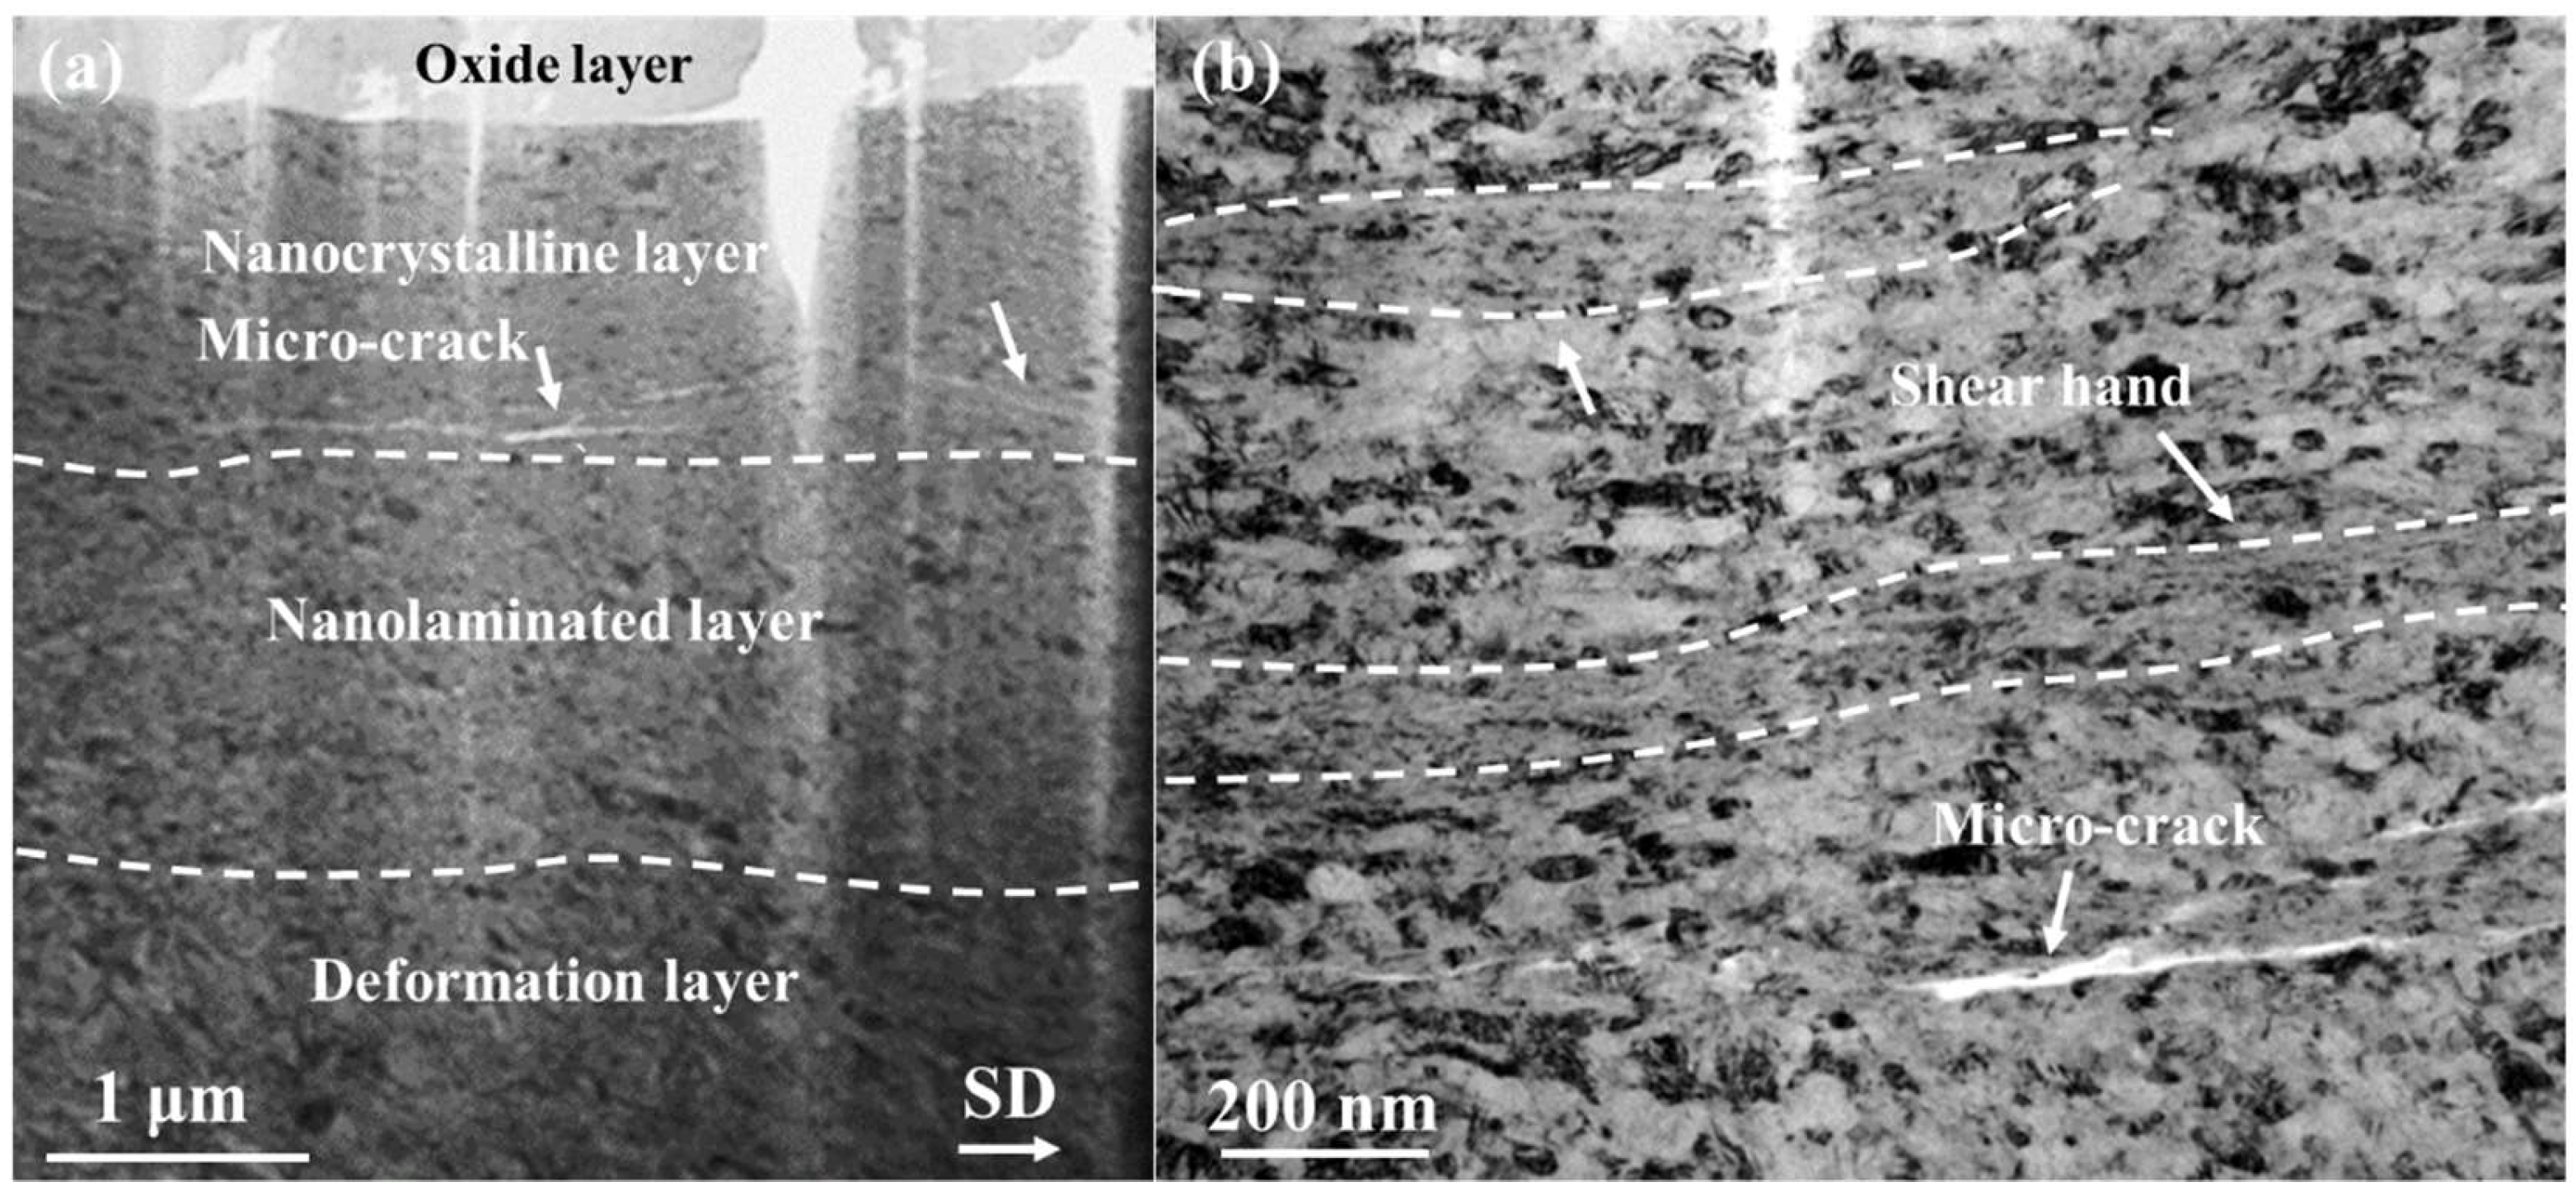
The worn subsurface structures of the alloys were further analyzed to reveal the origin of the large difference in wear rates between CoCrFeNi and CoCrFeNiB0.3 HEAs under the 8 N load. Figure 4 shows the sliding wear-induced ND–SD cross-sectional subsurface structure of the CoCrFeNi HEA under the 8 N load. The subsurface layer consisted of oxide, equiaxed nanocrystalline, nanolaminated, and deformation layers, which was consistent with previous studies [14]. Additionally, previous research results showed that the formation of shear bands was the main reason for the sharp increase in the wear rate under higher loads [33]. A large number of shear bands were also formed in the nanocrystalline layer of CoCrFeNi HEA, as shown in Figure 4b, which should be mainly caused by severe damage from deformation twins under higher loads. This indicated that localized deformation occurred in the form of shear bands during stress concentration. Nucleation and growth of cracks often occurred in the shear bands, which directly led to high wear rates.
Figure 5 shows the sliding wear-induced ND–SD cross-sectional subsurface structure of the CoCrFeNiB0.3 HEA under the 2 N load. The subsurface layer consisting of oxide, equiaxed nanocrystalline, nanolaminated, and deformation layers was formed in the CoCrFeNiB0.3 HEA. The average thickness of the nanocrystalline layer was 0.5 μm. As shown in Figure 5b and the inset, the grain size was 50 nm. The nanocrystalline layer was followed by a nanolaminated layer with a thickness of 1 μm and a grain size of ~50 to 200 nm, which was elongated along the sliding direction. The remaining part was the deformation layer, where the deformation twins were formed, as shown in Figure 5d.
Figure 6 shows the sliding wear-induced ND–SD cross-sectional subsurface structure of the CoCrFeNiB0.3 HEA under the 5 N load. The composition of the subsurface structure under the 5 N load was the same as that under the 2 N load. The increase in load had an obvious influence on the thickness of the subsurface structure. Beneath the oxide layer was the nanocrystalline layer with an average thickness of 0.5 μm. As shown in Figure 6b and the inset, the grain size was ~50 nm. The nanocrystalline layer was followed by a nanolaminated layer, with a thickness of 1 μm and a grain size of ~200 to 300 nm, which was elongated along the sliding direction. The remaining part was the deformation layer with the deformation twins, as shown in Figure 6d.
Figure 7 shows the sliding wear-induced ND–SD cross-sectional subsurface structure of the CoCrFeNiB0.3 HEA under the 8 N load. The subsurface structure was different from those under 2 N and 5 N loads. Meanwhile, the subsurface structure of CoCrFeNiB0.3 HEA was obviously different from that of CoCrFeNi HEA under the 8 N load (Figure 3). The topmost region of the subsurface structure was observed to be streamlined. The grains in CoCrFeNiB0.3 HEA were finer, about 10–20 nm, compared with those in CoCrFeNi HEA, as shown in Figure 7b, indicating that boron doping could contribute to grain refinement. However, the microstructure should be a mixed region composed of boride and matrix, referred to as the nanostructured mixing layer [34]. Next, beneath the nanostructured mixing layer was the nanolaminated layer, with a thickness of 2 μm. The grains in the nanolaminated layer were markedly elongated, with an average diameter of 50–100 nm, and the elongated direction was parallel to the sliding direction, as shown in Figure 7c. As boride was a hard and brittle phase and its deformation was inconsistent with the matrix during the deformation process, the stress trended to accumulate at the interface between the precipitates and the matrix, resulting in the fracture of the precipitates [35,36]. The layer beneath was the deformation layer, whose deformation direction was parallel to the sliding direction. The dislocation cells were found in the nanolaminated and deformation layers, and the density was much higher than that of CoCrFeNi HEA. Correspondingly, the number of nanoscale deformation twins was significantly reduced. This was mainly due to the change in the deformation mechanism caused by boron doping. According to previous studies, the formation of borides in FCC HEAs could significantly increase the stacking fault energy (SFE), thereby promoting the movement of dislocations and suppressing the formation of deformation twins [37,38,39]. Moreover, the dominant motion mode of dislocation changed from plane slip to wave slip.
Figure 8a The gray part in the nanostructured mixing layer was Cr2B and streamlined along the sliding direction. According to the SAED pattern in Figure 8b, the matrix of the nanostructured mixing layer was still in the FCC phase. During the process of friction and wear, Cr2B was fragmented and its size significantly reduced. With the crushing of Cr2B, a crack area appeared in the subsurface layer, and its strength was lower than that of the surrounding materials, which led to a huge shear instability, resulting in a turbulent plastic flow in the subsurface layer [40]. Venkataraman et al. found that for Al alloy, besides the shear instability caused by loads, the reinforcing particles were also a necessary condition for the formation of the nanostructured mixing layer. Therefore, the combination of shear instability and the hard formation of Cr2B resulted in a nanostructured mixing layer [34,41]. Moreover, the hardness of this nanostructured mixing layer was significantly higher than that of the matrix, which obviously improved the wear resistance of the material [41].
Besides the formation of the nanostructured mixing layer, the change in the deformation mechanism was another important reason for the significant improvement in wear resistance. Compared with the CoCrFeNi HEA, no shear bands were found in the nanostructured mixing layer of the CoCrFeNiB0.3 HEA, indicating that adding boron could effectively suppress the formation of shear bands. The results showed that low SFE strongly promoted the formation of shear bands [42,43,44]. It was consistent with the experimental results that the density of the shear band increased with the decrease in SFE. The relationship between SFE and the stacking fault (SF) width could be expressed as follows [45]:
γ = G b 1 · b 2 2 π d
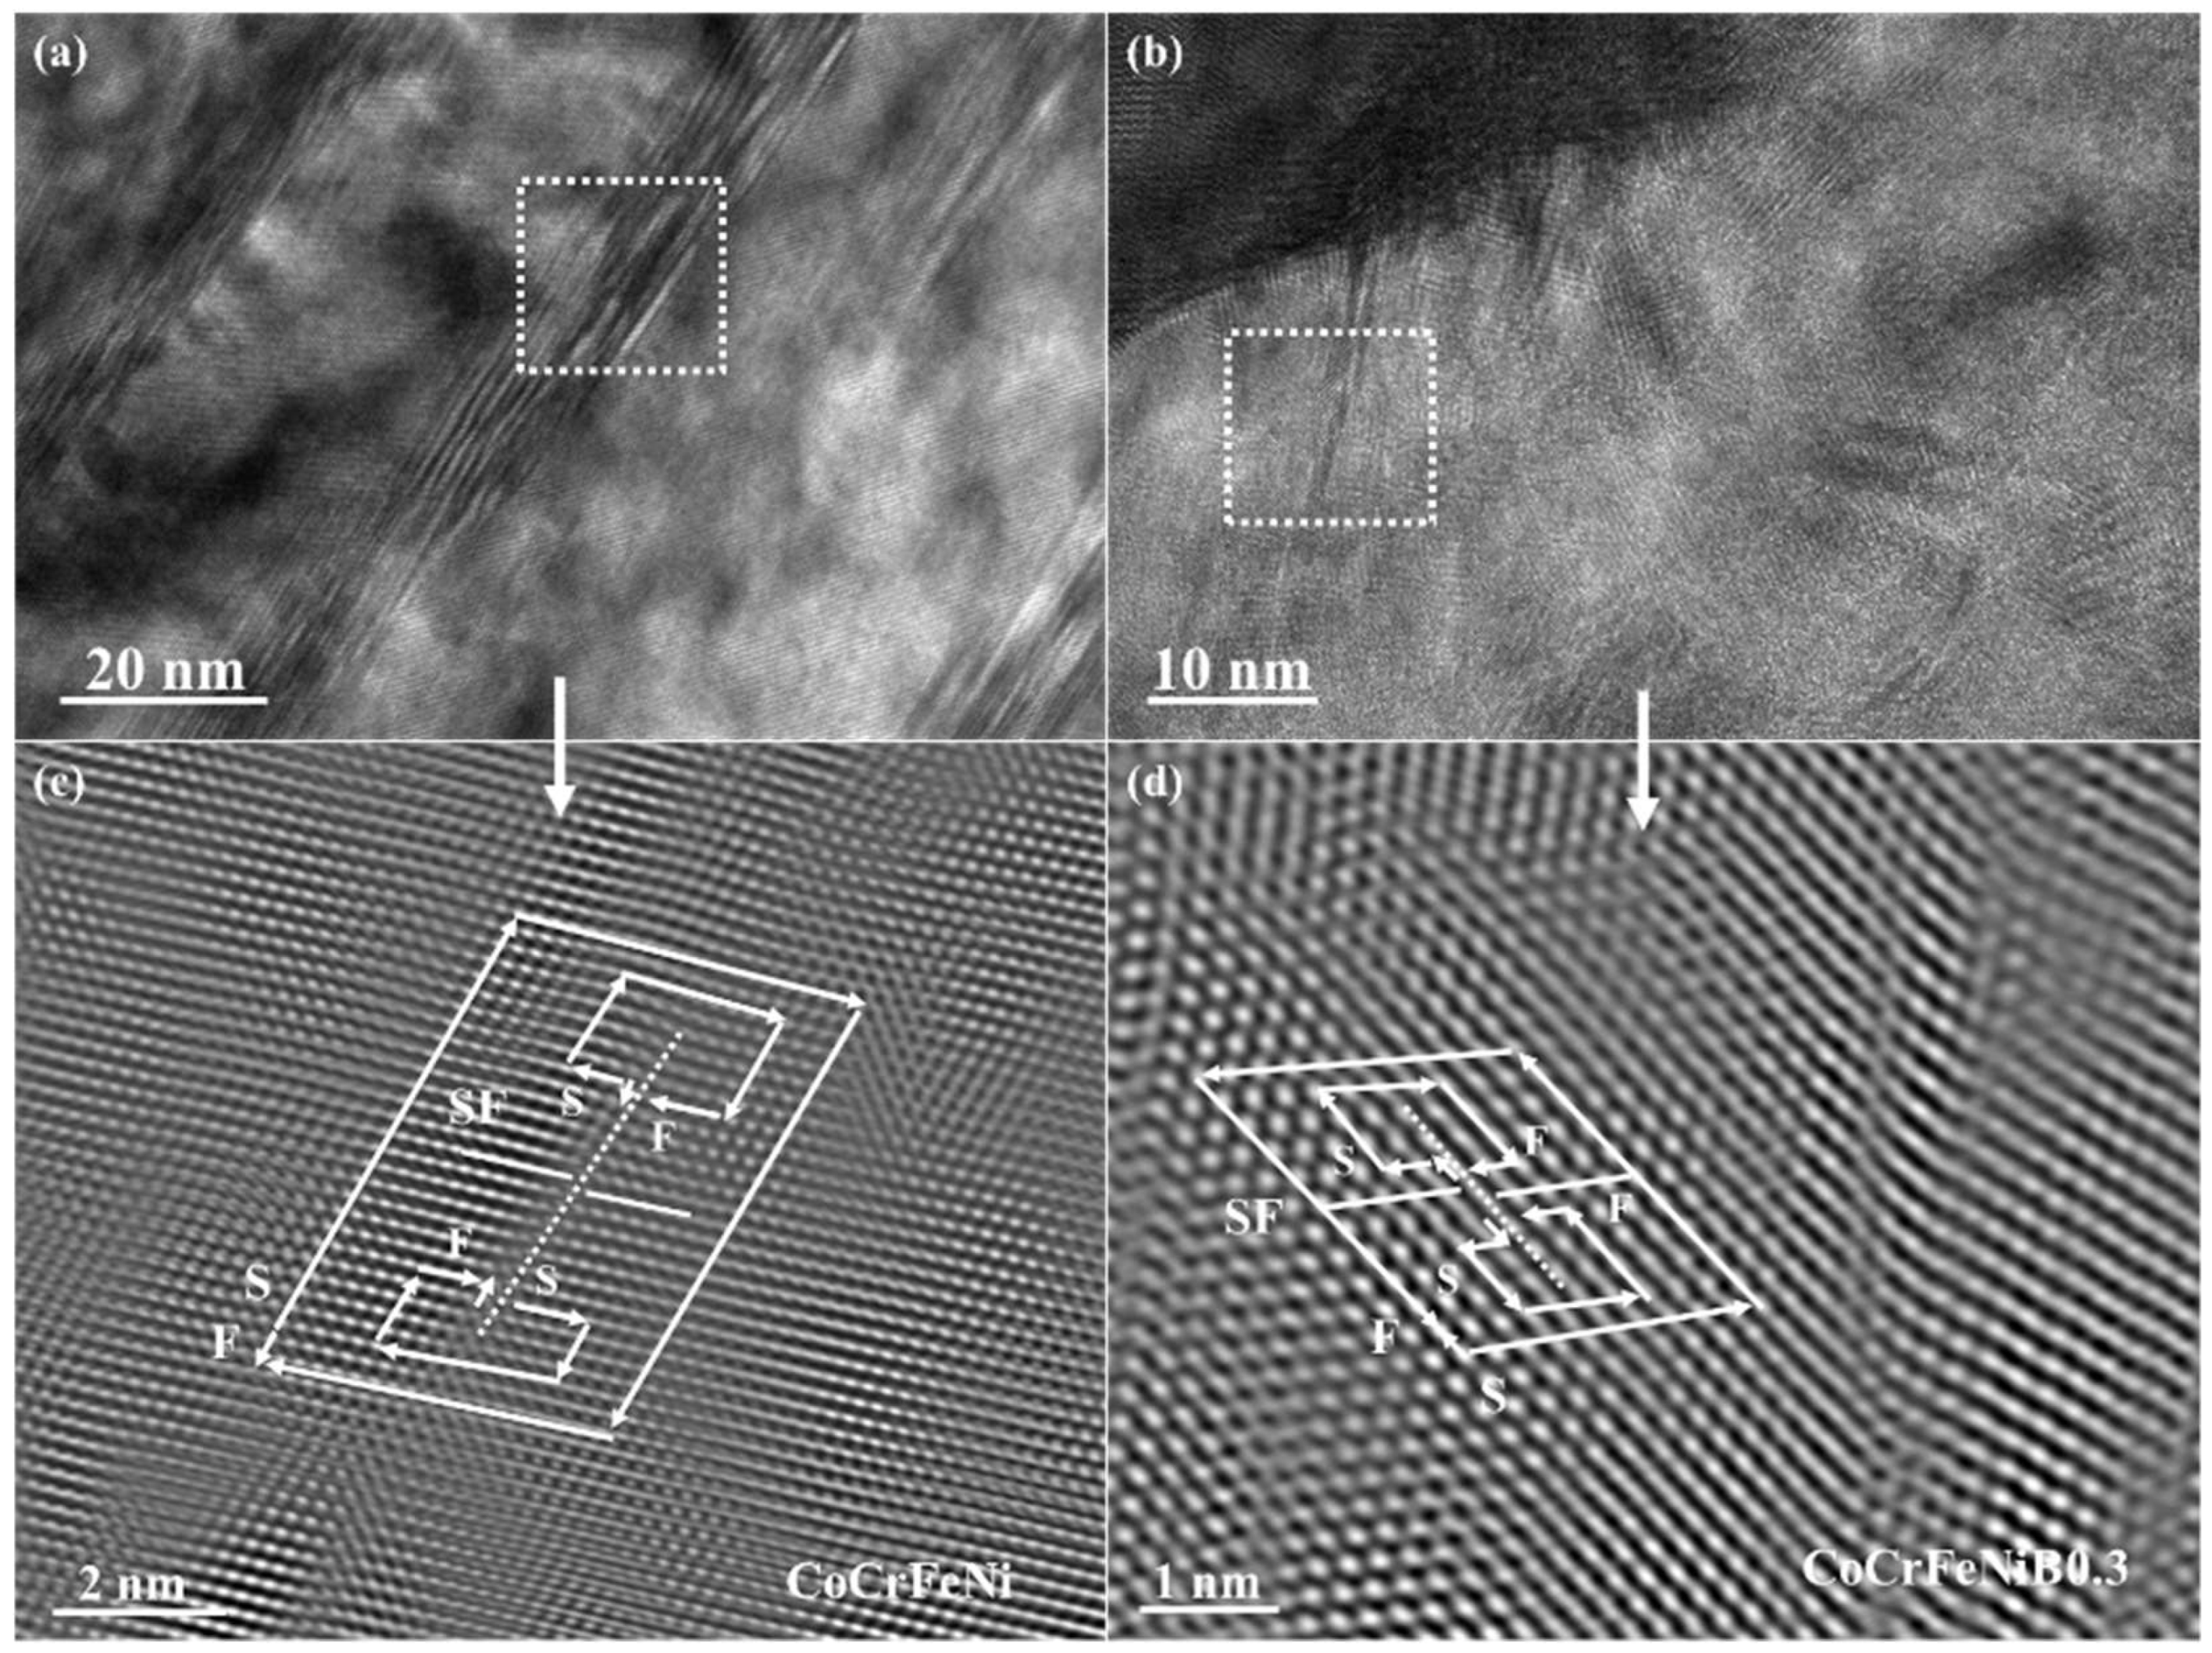
where G is the shear modulus, γ is the SFE, b1 and b2 are Burgers vectors of two partial dislocations, and d is the width of the stacking fault (SF). As shown in Figure 9, the SF width of CoCrFeNi and CoCrFeNiB0.3 HEAs was 4.3 and 1.7 nm, respectively. According to the formula, the SF width was inversely proportional to the SFE. Therefore, the SFE of CoCrFeNi HEA was significantly lower than that of CoCrFeNiB0.3 HEA. The addition of boron to the CoCrFeNi HEA led to the formation of boride, which increased the SFE, thereby suppressing the formation of shear bands and significantly improving wear resistance [22]. The aforementioned conclusion was related to the microscopic size, and the same conclusion was also obtained for the macroscopic size, indicating that it was universal. The evolution of microstructure was found to be closely related to the influence of the SFE. More importantly, the influence mechanism of the SFE on the formation of shear bands not only provided an excellent opportunity to deeply understand the deformation mechanism of FCC HEAs but also expanded the application range of interstitial elements. This finding had promising application prospects in preparing HEAs with excellent wear resistance.

4. Conclusions

In this study, wear experiments using CoCrFeNi and CoCrFeNiB0.3 HEAs were conducted under different loads. The wear resistance of CoCrFeNi HEA was significantly improved by changing the deformation mechanism via boron doping. The mechanism for enhancing wear resistance was systematically investigated using TEM. The results indicated that the formation of a nanostructured mixing layer under higher loads had a positive effect in terms of improving wear resistance. The following conclusions were obtained through the systematic study of the wear properties of CoCrFeNi and CoCrFeNiB0.3 HEAs:
  • The wear formation of CoCrFeNi HEA mixed with boron changed from abrasive wear to delamination wear.
  • The shear instability caused by the fragmentation of precipitation and the joint action of hard particles led to the formation of a nanostructured mixing layer.
  • The formation of a hard phase made only a small contribution to the improvement in wear resistance, whereas the formation of a nanostructured mixing layer and the reduction in the shear band were key to the substantial improvement in the wear resistance of materials.
  • By adding interstitial elements to change the deformation mechanism and improve wear resistance, this study may provide a new strategy for the design of wear-resistant HEAs.

Author Contributions

H.Z. contributed the central idea, analyzed most of the data, and wrote the initial draft of the paper. Y.L. contributed writing—reviewing and editing, visualization, and supervision. The remaining authors contributed to refining the ideas and finalizing this paper. All authors have read and agreed to the published version of the manuscript.

Funding

This work was supported by the National Natural Science Foundation of China (Nos. 51822402 and U20A20278), the National Key Research and Development Program of China (Nos. 2019YFA0209901 and 2018YFA0702901), the fund of the State Key Laboratory of Solidification Processing in NWPU (No. SKLSP201902).

Data Availability Statement

Not applicable.

Conflicts of Interest

The authors declare no conflict of interest.

References

  1. Cantor, B.; Chang, I.T.H.; Knight, P.; Vincent, A.J.B. Microstructural development in equiatomic multicomponent alloys. Mater. Sci. Eng. A 2004, 375–377, 213–218. [Google Scholar] [CrossRef]
  2. Yeh, J.W.; Chen, S.K.; Lin, S.J.; Gan, J.Y.; Chin, T.S.; Shun, T.T.; Tsau, C.H.; Chang, S.Y. Nanostructured high-entropy alloys with multiple principal elements: Novel alloy design concepts and outcomes. Adv. Eng. Mater. 2004, 6, 299–303. [Google Scholar] [CrossRef]
  3. Gludovatz, B.; Hohenwarter, A.; Catoor, D.; Chang, E.H.; George, E.P.; Ritchie, R.O. A fracture-resistant high-entropy alloy for cryogenic applications. Science 2014, 345, 1153–1158. [Google Scholar] [CrossRef]
  4. Jiang, H.; Jiang, L.; Qiao, D.; Lu, Y.; Wang, T.; Cao, Z.; Li, T. Effect of Niobium on Microstructure and Properties of the CoCrFeNbxNi High Entropy Alloys. J. Mater. Sci. Technol. 2017, 33, 712–717. [Google Scholar] [CrossRef]
  5. Liu, Y.; Xie, Y.; Cui, S.; Yi, Y.; Xing, X.; Wang, X.; Li, W. Effect of Mo Element on the Mechanical Properties and Tribological Responses of CoCrFeNiMox High-Entropy Alloys. Metals 2021, 11, 486. [Google Scholar] [CrossRef]
  6. Zhang, Z.; Zhang, B.; Zhu, S.; Tao, X.; Tian, H.; Wang, Z. Achieving enhanced wear resistance in CoCrNi medium-entropy alloy co-alloyed with multi-elements. Materials Letters. Mater. Lett. 2022, 313, 131650. [Google Scholar] [CrossRef]
  7. Hao, X.; Zhen, J.; Zhao, X.; Ma, J.; Chen, H.; Guo, S.; Wang, C.; Wang, C. Effect of Sn addition on the tribological behaviors of CoCrFeNi high entropy alloys. J. Alloys Compd. 2022, 909, 164657. [Google Scholar] [CrossRef]
  8. He, M.; Eizadjou, M.; Chen, H.; Liu, H.; Chang, L.; Ringer, S.P. Microstructure and properties of CoCrFeNi-based multi-principal element alloys containing C and Sc. J. Mater. Sci. 2022, 57, 9442–9453. [Google Scholar] [CrossRef]
  9. Du, Y.; Pei, X.; Tang, Z.; Zhang, F.; Zhou, Q.; Wang, H.; Liu, W. Mechanical and tribological performance of CoCrNiHfx eutectic medium-entropy alloys. J. Mater. Sci. Technol. 2021, 90, 194–204. [Google Scholar] [CrossRef]
  10. Lan, L.W.; Wang, X.J.; Guo, R.P.; Yang, H.J.; Qiao, J.W. Effect of environments and normal loads on tribological properties of nitrided Ni45(FeCoCr)40(AlTi)15 high-entropy alloys. J. Mater. Sci. Technol. 2020, 42, 85–96. [Google Scholar] [CrossRef]
  11. Wu, J.; Lin, S.; Yeh, J.; Chen, S.; Huang, Y.; Chen, H. Adhesive wear behavior of AlxCoCrCuFeNi high-entropy alloys as a function of aluminum content. Wear 2006, 261, 513–519. [Google Scholar] [CrossRef]
  12. Joseph, J.; Haghdadi, N.; Shamlaye, K.; Hodgson, P.; Barnett, M.; Fabijanic, D. The sliding wear behaviour of CoCrFeMnNi and AlxCoCrFeNi high entropy alloys at elevated temperatures. Wear 2019, 428, 32–44. [Google Scholar] [CrossRef]
  13. Zhang, A.; Han, J.; Su, B.; Li, P.; Meng, J. Microstructure, mechanical properties and tribological performance of CoCrFeNi high entropy alloy matrix self-lubricating composite. Mater. Des. 2017, 114, 253–263. [Google Scholar] [CrossRef]
  14. Yang, L.; Cheng, Z.; Zhu, W.; Zhao, C.; Ren, F. Significant reduction in friction and wear of a high-entropy alloy via the formation of self-organized nanolayered structure. J. Mater. Sci. Technol. 2021, 73, 1–8. [Google Scholar] [CrossRef]
  15. Verma, A.; Tarate, P.; Abhyankar, A.C.; Mohape, M.R.; Gowtam, D.S.; Deshmukh, V.P.; Shanmugasundaram, T. High temper- ature wear in CoCrFeNiCux high entropy alloys: The role of Cu. Scr. Mater. 2018, 161, 28–31. [Google Scholar] [CrossRef]
  16. Dong, J.; Wu, H.; Chen, Y.; Zhang, Y.; Wu, Y.; Yin, S.; Du, Y.; Hua, K.; Wang, H. Study on self-lubricating properties of AlCo CrFeNi2.1 eutectic high entropy alloy with electrochemical boronizing. Surf. Coat. Technol. 2022, 433, 128082. [Google Scholar] [CrossRef]
  17. Nakajo, H.; Nishimoto, A. Boronizing of CoCrFeMnNi high-entropy alloys using spark plasma sintering. J. Manuf. Mater. Process. 2022, 6, 29. [Google Scholar] [CrossRef]
  18. Hou, J.; Zhang, M.; Yang, H.; Qiao, J.; Wu, Y. Surface strengthening in Al0.25CoCrFeNi high-entropy alloy by boronizing. Mater. Lett. 2019, 238, 258–260. [Google Scholar]
  19. Wu, Y.H.; Yang, H.J.; Guo, R.P.; Wang, X.J.; Shi, X.H.; Liaw, P.K.; Qiao, J.W. Tribological behavior of boronized Al0.1CoCrFeNi high-entropy alloys under dry and lubricated conditions. Wear 2020, 460–461, 203452. [Google Scholar] [CrossRef]
  20. Meng, A.; Liang, F.; Gu, L.; Mao, Q.; Zhang, Y.; Chen, X.; Zhao, Y. An exceptionally wear-resistant CoFeNi2 medium entropy alloy via tribo-induced nanocrystallites with amorphous boundaries. Appl. Surf. Sci. 2023, 614, 156102. [Google Scholar] [CrossRef]
  21. Miao, J.; Liang, H.; Zhang, A.; He, J.; Meng, J.; Lu, Y. Tribological behavior of an AlCoCrFeNi2.1 eutectic high-entropy alloy sliding against different counterfaces. Tribol. Int. 2021, 153, 106599. [Google Scholar] [CrossRef]
  22. Zhang, H.; Wang, C.; Shi, S.; Li, T.; Zou, L.; Lu, Y.; Liaw, P.K. Tuning deformation mechanisms of face-centered-cubic high-entropy alloys via boron doping. J. Alloys Compd. 2022, 911, 165103. [Google Scholar] [CrossRef]
  23. Aguilar-Hurtado, J.Y.; Vargas-Uscategui, A.; Zambrano-Mera, D.; Palma-Hillerns, R. The effect of boron content on the micro structure and mechanical properties of Fe50-XMn30Co10Cr10BX (x = 0, 0.3, 0.6 and 1.7 wt%) multi-component alloys prepared by arc-melting. Mater. Sci. Eng. A 2019, 748, 244–252. [Google Scholar] [CrossRef]
  24. Aguilar-Hurtado, J.Y.; Vargas-Uscategui, A.; Paredes-Gil, K.; Palma-Hillerns, R.; Tobar, M.J.; Amado, J.M. Boron addition in a non-equiatomic Fe50Mn30Co10Cr10 alloy manufactured by laser cladding: Microstructure and wear abrasive resistance. Appl. Surf. Sci. 2020, 515, 146084. [Google Scholar] [CrossRef]
  25. Nagarjuna, C.; You, H.; Ahn, S.; Song, J.; Jeong, K.; Madavali, B.; Song, G.; Na, Y.; Won, J.W.; Kim, H.; et al. Worn surface and subsurface layer structure formation behavior on wear mechanism of CoCrFeMnNi high entropy alloy in different sliding conditions. Appl. Surf. Sci. 2021, 549, 149202. [Google Scholar] [CrossRef]
  26. Cheng, Z.; Yang, L.; Huang, Z.; Wan, T.; Zhu, M.; Ren, F. Achieving low wear in a μ-phase reinforced high-entropy alloy and associated subsurface microstructure evolution. Wear 2021, 474, 203755. [Google Scholar] [CrossRef]
  27. Zhang, X.; Tong, Y.; Hu, Y.; Liang, X.; Chen, Y.; Wang, K.; Zhang, M.; Xu, J. Microstructure and Performance of Fe50Mn30Cr10Ni10 High-Entropy Alloy Produced by High-Efficiency and Low-Cost Wire Arc Additive Manufacturing. Lubricants 2022, 10, 344. [Google Scholar] [CrossRef]
  28. Singh, J.B.; Wen, J.; Bellon, P. Nanoscale characterization of the transfer layer formed during dry sliding of Cu-15 wt.% Ni-8 wt.% Sn bronze alloy. Acta Mater. 2008, 56, 3053–3064. [Google Scholar] [CrossRef]
  29. Hughes, D.A.; Dawson, D.B.; Korellis, J.S.; Weingarten, L.I. Near surface microstructures developing under large sliding loads. J. Mater. Eng. Perform. 1994, 3, 459–475. [Google Scholar] [CrossRef]
  30. Zhang, L.J.; Yu, P.F.; Fan, J.T.; Zhang, M.D.; Zhang, C.Z.; Cui, H.Z.; Li, G. Investigating the micro and nanomechanical properties of CoCrFeNi-Cx high-entropy alloys containing eutectic carbides. Mater. Sci. Eng. A 2020, 796, 140065. [Google Scholar] [CrossRef]
  31. Tu, J.; Xu, K.; Liu, Y.; Luo, J.; Zhou, Z.; Ding, L. Characterization of deformation substructure evolution in metastable Fe49Mn30Co10Cr10B1 interstitial high entropy alloy. Intermetallics 2022, 144, 107508. [Google Scholar] [CrossRef]
  32. Günen, A.; Soylu, B.; Karakaş, Ö. Titanium carbide coating to improve surface characteristic, wear and corrosion resistance of spheroidal graphite cast irons. Surf. Coat. Technol. 2022, 437, 128280. [Google Scholar] [CrossRef]
  33. Mohseni, H.; Nandwana, P.; Tsoi, A.; Banerjee, R.; Scharf, T.W. In situ nitrided titanium alloys: Microstructural evolution during solidification and wear. Acta Mater. 2015, 83, 61–74. [Google Scholar] [CrossRef]
  34. Chen, X.; Han, Z.; Lu, K. Wear mechanism transition dominated by subsurface recrystallization structure in Cu-Al alloys. Wear 2014, 320, 41–50. [Google Scholar] [CrossRef]
  35. Wang, J.; Guo, X.; Qin, J.; Zhang, D.; Lu, W. Microstructure and mechanical properties of investment casted titanium matrix composites with B4C additions. Mater. Sci. Eng. A 2015, 628, 366–373. [Google Scholar] [CrossRef]
  36. Luan, J.H.; Jiao, Z.B.; Chen, G.; Liu, C.T. Effects of boron additions and solutionizing treatments on microstructures and ductility of forged Ti-6Al-4V alloys. J. Alloys Compd. 2015, 624, 170–178. [Google Scholar] [CrossRef]
  37. Christian, J.W.; Mahajan, S. Deformation twinning. Progress. Mater. Sci. 1995, 39, 1–157. [Google Scholar]
  38. Meyers, M.A.; Vöhringer, O.; Lubarda, V.A. The onset of twinning in metals: A constitutive description. Acta Mater. 2001, 49, 4025–4039. [Google Scholar] [CrossRef]
  39. Han, W.Z.; Zhang, Z.F.; Wu, S.D.; Li, S.X. Combined effects of crystallographic orientation, stacking fault energy and grain size on deformation twinning in fcc crystals. Philos. Mag. 2008, 88, 3011–3029. [Google Scholar] [CrossRef]
  40. Rosenfield, A.R. A shear instability model of sliding wear. Wear 1987, 116, 319–328. [Google Scholar] [CrossRef]
  41. Venkataraman, B.; Sundararajan, G. The sliding wear behaviour of Al-SiC particulate composites-II. The characterization of subsurface deformation and correlation with wear behaviour. Acta Mater. 1996, 44, 461–473. [Google Scholar] [CrossRef]
  42. An, X.H.; Wu, S.D.; Wang, Z.G.; Zhang, Z.F. Significance of stacking fault energy in bulk nanostructured materials: Insights from Cu and its binary alloys as model systems. Prog. Mater. Sci. 2019, 101, 1–45. [Google Scholar] [CrossRef]
  43. An, X.; Lin, Q.; Qu, S.; Yang, G.; Wu, S.; Zhang, Z. Influence of stacking-fault energy on the accommodation of severe shear strain in Cu-Al alloys during equal-channel angular pressing. J. Mater. Res. 2009, 24, 3636–3646. [Google Scholar] [CrossRef]
  44. Mohammed, A.A.S.; El-Danaf, E.A.; Radwan, A.A. A criterion for shear banding localization in polycrystalline FCC metals and alloys and critical working conditions for different microstructural variables. Mater. Process. Technol. 2007, 186, 14–21. [Google Scholar] [CrossRef]
  45. Cottrell, A.H. Theory of dislocations. J. Mech. Phys. Solids 1957, 5, 223. [Google Scholar] [CrossRef]
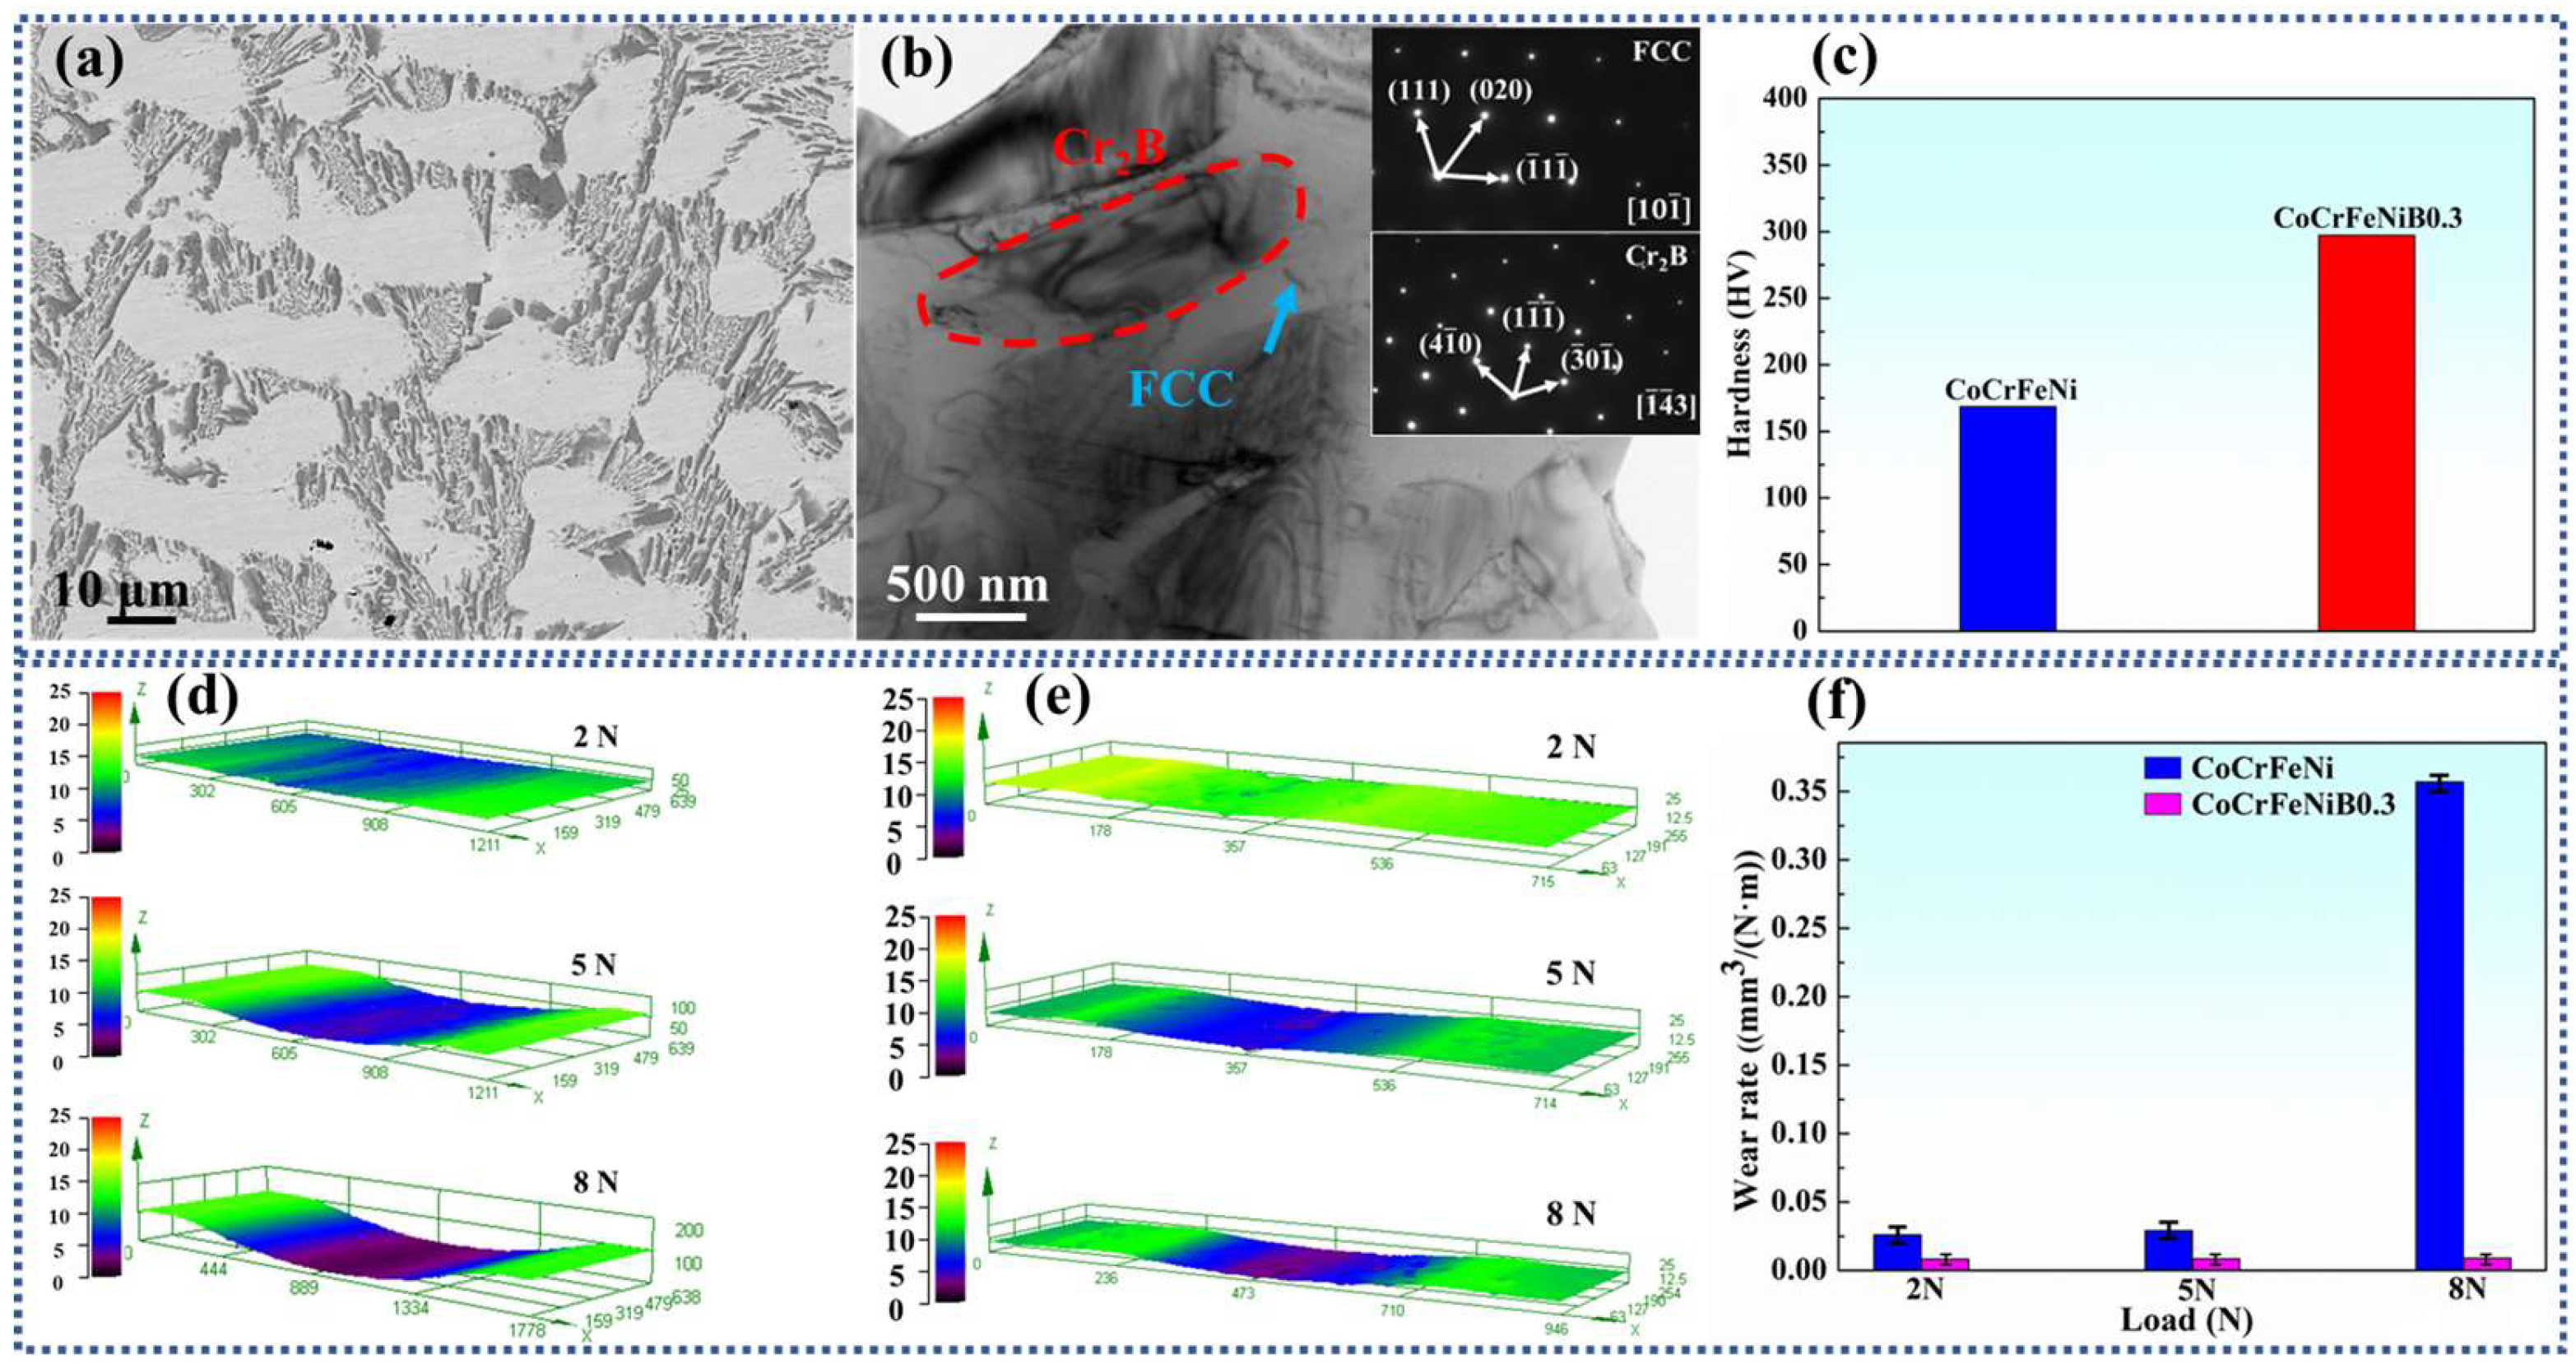
Figure 1. (a) Backscattered electron images of CoCrFeNiB0.3 HEA; (b) bright-field images of CoCrFeNiB0.3 HEA with SAED pattern; (c) Vickers hardness of CoCrFeNi and CoCrFeNiB0.3 HEAs; (d) 3D profiles of the worn surfaces of CoCrFeNi HEA under different loads; (e) 3D profiles of the worn surfaces of CoCrFeNiB0.3 HEA under different loads; (f) wear rates of CoCrFeNi and CoCrFeNiB0.3 HEAs under different loads.
Lubricants 11 00386 g001
Figure 2. Wear scars of CoCrFeNi HEA with the corresponding enlarged image under different loads: (a) and (b) 2 N; (c) and (d) 5 N; (e) and (f) 8 N.
Lubricants 11 00386 g002
Figure 3. Wear scars of CoCrFeNiB0.3 HEA with the corresponding enlarged image under different loads: (a,b) 2 N; (c,d) 5 N; (e,f) 8 N.
Lubricants 11 00386 g003
Figure 4. Sliding wear-induced ND–SD cross-sectional subsurface structure of the CoCrFeNi HEA under the 8 N load: (a) bright-field image and (b) enlarged image of the nanocrystalline layer.
Lubricants 11 00386 g004
Figure 5. Sliding wear-induced ND–SD cross-sectional subsurface structure of the CoCrFeNiB0.3 HEA under the 2 N load: (a) bright-field TEM (BFTEM) image and (bd) high-magnification images of selected regions in (a).
Lubricants 11 00386 g005
Figure 6. Sliding wear-induced ND–SD cross-sectional subsurface structure of the CoCrFeNiB0.3 HEA under the 5 N load. (a) BFTEM image and (bd) high-magnification images of selected regions in (a).
Lubricants 11 00386 g006
Figure 7. Sliding wear-induced ND–SD cross-sectional subsurface structure of the CoCrFeNiB0.3 HEA under the 8 N load. (a) Bright-field image and (bd) high-magnification BFTEM image corresponding to the selected region in (a).
Lubricants 11 00386 g007
Figure 8. (a) HAADF image of the CoCrFeNiB0.3 HEA in the nanostructured mixing layer; (b) corresponding SAED pattern of the selected area in (a).
Lubricants 11 00386 g008
Figure 9. HRTEM image and the corresponding inverse fast Fourier transform (IFFT) image with Burgers circuits surrounding the entire stacking fault (SF): (a,c) CoCrFeNi HEA; (b,d) CoCrFeNiB0.3 HEA.
Lubricants 11 00386 g009
Disclaimer/Publisher’s Note: The statements, opinions and data contained in all publications are solely those of the individual author(s) and contributor(s) and not of MDPI and/or the editor(s). MDPI and/or the editor(s) disclaim responsibility for any injury to people or property resulting from any ideas, methods, instructions or products referred to in the content.