Article

Effects of Tool Plunging Path on the Welded Joint Properties of Pinless Friction Stir Spot Welding

College of Mechanical and Electrical Engineering, Huangshan University, Huangshan 245041, China
*
Author to whom correspondence should be addressed.
Lubricants 2023, 11(3), 150; https://doi.org/10.3390/lubricants11030150
Submission received: 27 February 2023 / Revised: 15 March 2023 / Accepted: 17 March 2023 / Published: 21 March 2023
(This article belongs to the Special Issue Friction Stir Processing of Structural Metallic Materials)

Abstract

:
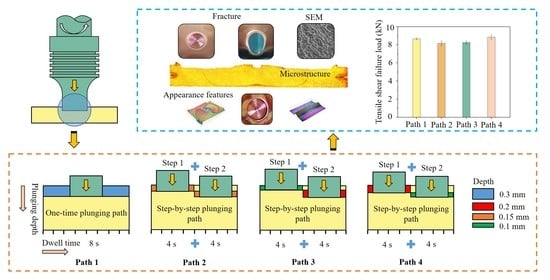
Four tool plunging paths including a one-time plunging path and three step-by-step plunging paths were designed to study the effects of the tool plunging path on the welded joint properties of pinless friction stir spot welding (PFSSW). The appearance, cross-sectional microstructure, welding temperature, microhardness, and tensile shear failure load of the PFSSW of thin copper sheets under different tool plunging paths were explored. Furthermore, the fracture modes of welded joints under different tool plunging paths were analyzed. Studies showed that path 1 (plunge total depth at one time) produced the largest range of stirring zone, but the grains in the stirring zone were larger and the width of the thermal-mechanical affected zone was smaller. Path 1 obtained the highest peak temperature during the welding process, and path 3 (plunge 1/3 total depth + plunge 2/3 total depth) gained the lowest peak temperature. The greater the initial plunging amount of the tool, the faster the temperature rise rate in the welding stage. The tensile shear failure loads for path 1, path 2 (plunge 1/2 total depth + plunge 1/2 total depth), path 3, and path 4 (plunge 2/3 total depth + plunge 1/3 total depth) were 8.65 kN, 8.15 kN, 8.25 kN, and 8.85 kN, respectively. The tensile shear failure load of path 4 was 2.3% higher than that of path 1. The fracture modes of welded joints under different tool plunging paths were all nugget pullout fractures. The fracture morphology indicated that the fracture type was ductile fracture. The step-by-step plunging path proposed in this work extends the traditional PFSSW process. The findings of this study can provide a reference for the selection and design of tool plunging paths for PFSSW.

Graphical Abstract

1. Introduction

Friction stir welding (FSW) is a solid-state joining process invented by The Welding Institute, UK in 1991 [1,2]. Compared with traditional fusion welding, FSW can produce high-strength welded joints with smaller distortion due to lower heat input [3], and has been successfully applied in the welding of aluminum alloys [4,5,6], magnesium alloys [7,8], copper alloys [9,10], etc. Furthermore, FSW also has significant advantages in the welding of dissimilar metals [11,12,13]. At present, FSW has been effectively used in the fields of automobile, aerospace, rail transportation, and so on [14]. Friction stir spot welding (FSSP) was developed by the Mazda Motor Corporation based on FSW in 1993 [3], and has been successfully used in the welding of car body structures. Affected by the structure of the tool with a pin, FSSP will inevitably leave a keyhole at the welded joint, which restricts the improvement in the welded joint performance to a certain extent, especially for the welding of thin metal sheets. Subsequently, pinless friction stir spot welding (PFSSW) has been proposed to solve the keyhole defect [15]. The welding process of PFSSW can be divided into three stages. (i) Plunging stage: The pinless tool plunges to a specified depth at a certain rotation speed and plunging speed. (ii) Dwell stage: The rotating pinless tool stays for a specified time after reaching the specified depth. (iii) Retreating stage: The pinless tool retracts at a certain rotation speed and rising speed to complete the welding process. PFSSW has attracted more and more attention due to the absence of keyhole defects and good welding performance [16]. PFSSW has the characteristics of a simple welding process, environmental protection, and low tool loss, etc. It can avoid problems such as thermal cracks, pores, and slag inclusions in traditional fusion welding, and has broad application prospects in the high-quality welding of thin metal sheets [17,18,19].
Oxygen-free copper sheets, as the basic connector for electrical and thermal conductivity, are widely used in the electrical industry, electronics industry, aerospace, and other fields due to its good electrical conductivity, thermal conductivity, and ductility [20,21,22] such as bus bars, conductive strips, radiators, etc. Welding is an important way to achieve a firm connection of oxygen-free copper sheets. Due to the high thermal conductivity and high expansion coefficient of oxygen-free copper, it is difficult to weld by fusion welding [23,24], and the PFSSW without keyhole defects is a potential option for the high-quality welding of oxygen-free copper sheets. Therefore, it is significant and valuable to carry out research on the PFSSW of oxygen-free copper sheets.
Current research on PFSSW has mainly focused on the effects of tool geometry and process parameters on welded joint performance and numerical simulation modeling. Bakavos et al. designed five shapes of pinless tools, namely, the flat tool, short flute wiper tool, long flute wiper tool, scroll tool, and proud wiper tool, and analyzed the forming mechanism and material flow behavior of PFSSW. The study found that although the structure of a pinless tool with grooves is simple, the material flow during the welding process is extremely complex, which increases the penetration between the upper sheet and the lower sheet [25]. Xu et al. investigated the PFSSW of a Mg alloy with Zn interlayer, and explored the effects of the tool plunging depth, shoulder morphology, and heat treatment on the welded joint performance. The results showed that an appropriate increase in tool plunging depth is beneficial for improving the strength of a welded joint [26]. Yazdi et al. conducted friction stir spot welding research on a 6061-T6 aluminum alloy, and analyzed the influence of a pinless tool and pin tool on the welded joint properties. The study pointed out that the pinless tool produced a larger bonding width than the pin tool, and the pinless tool with L-shaped grooves obtained the highest tensile shear strength [27]. Furthermore, Saleh et al. studied the PFSSW of DP600 steel and AA6061 aluminum alloy, and established the relationship between process parameters and the failure load of welded joints by using the design of experiments method. The microstructural features and phase evolution of the welded joint were also analyzed [28]. Li et al. proposed the method of PFSSW plus subsequent FSW to eliminate the hook defect in welded joints. It was found that the tensile shear strength of the welded joints under this method was greatly improved compared with the traditional PFSSW [29]. Özgül et al. investigated the effect of tool geometry and rotational speed on the microstructure and mechanical properties of 5754 aluminum alloy PFSSW joints. In this study, three fracture modes of shear fracture, mixed cleavage fracture, and nugget pullout fracture were obtained [30]. In addition, Suryanarayanan et al. explored the influence of the PFSSW process parameters on the welded joint properties of the 5754-6061 aluminum alloy, and optimized the PFSSW process parameters using the response surface methodology. The study pointed out that the shoulder diameter was the most important factor affecting the strength of the welded joints [31]. Abed et al. studied the effect of the PFSSW welding process on the mechanical properties of the welded joints of AA 6061-T6 aluminum alloy. The study showed that the tool plunging depth and welding time had a significant impact on the joint strength [32]. Moreover, Chu et al. studied the PFSSW of a 2198-T8 aluminum–lithium alloy and analyzed the microstructure and mechanical properties of the welded joints under different process parameters. The relationship between the mechanical properties of the welded joints and the angle between the nugget boundary and the upper surface of the welded joints were discussed [33]. Tchouaha Tankoua et al. performed PFSSW experiments on thin aluminum–copper sheets and investigated the effect of different tool shoulder diameters on the welded joint properties [34]. Additionally, Park, H. conducted a study on the PFSSW of a Ti–6Al–4V alloy and analyzed the microstructure, mechanical properties, and fracture modes of the welded joints [35]. From the aspect of numerical simulation studies, the coupled Eulerian–Lagrangian method was adopted to establish the numerical simulation model of the AA2198 Al–Li alloy by Chu et al. In this study, the material flow during the welding process was analyzed, and the reliability of the numerical simulation was verified by experiments [36]. Moreover, Jedrasiak et al. simulated the FSSW process of aluminum–aluminum and aluminum–steel, and analyzed the temperature history during FSSW. The temperature history was used to predict the growth of intermetallic phases at the welded joint interface [37]. In addition, the numerical simulation models of PFSSW for the 2198-T8 aluminum alloy and AA2024 aluminum–AISI304 stainless steel were also established to study the temperature change and material flow during the welding process [38,39].
As one of the three key stages of tool movement in PFSSW, the plunging stage has an important influence on the forming quality of the welded joint. In previous studies, the tool plunging path in the plunging stage was one-time plunging, that is, the tool plunged to the specified depth at the same plunging speed at one time, and few studies have explored the effect of a step-by-step plunging path on the properties of welded joints. The step-by-step plunging path has different welded joint properties than the one-time plunging path due to its variable tool movement. Due to the lack of relevant research, the properties of welded joints under step-by-step plunging paths are not known at present, and the difference between the properties of welded joints under step-by-step plunging paths and the one-time plunging path is not yet clear.
The main purpose of this study was to explore the effects of the one-time plunging path and the step-by-step plunging paths on the welded joint properties of PFSSW. The research content can provide insights into the relationship between different tool plunging paths and welded joint properties. The step-by-step plunging path proposed in this paper can enrich the welding process of PFSSW and can provide design ideas for more combinations of step-by-step plunging paths.
The rest of this paper is organized as follows. Section 2 presents the design ideas of the tool plunging path, the process parameter settings, and performance test methods. Section 3 discusses the welded joint properties such as appearance features, cross-sectional microstructure, welding temperature, cross-sectional microhardness, tensile shear failure load, and fracture mode under different tool plunging paths. Finally, Section 4 summarizes the main findings of this research.

2. Materials and Methods

Oxygen-free copper sheets with a thickness of 1 mm and chemical composition of (wt.%) Cu + Ag: 99.97, P: 0.002, Bi: 0.001, Sb: 0.002, As: 0.002, Fe: 0.004, Ni: 0.002, Pb: 0.003, Sn: 0.002, S: 0.004, Zn: 0.003, O: 0.002, impurities: 0.003 were provided by Wenghou Metal Materials Firm in Hefei’s Shushan District (Hefei, China) and used to carry out the PFSSW experiments. The dimensions and overlap type of oxygen-free copper sheets are shown in Figure 1.
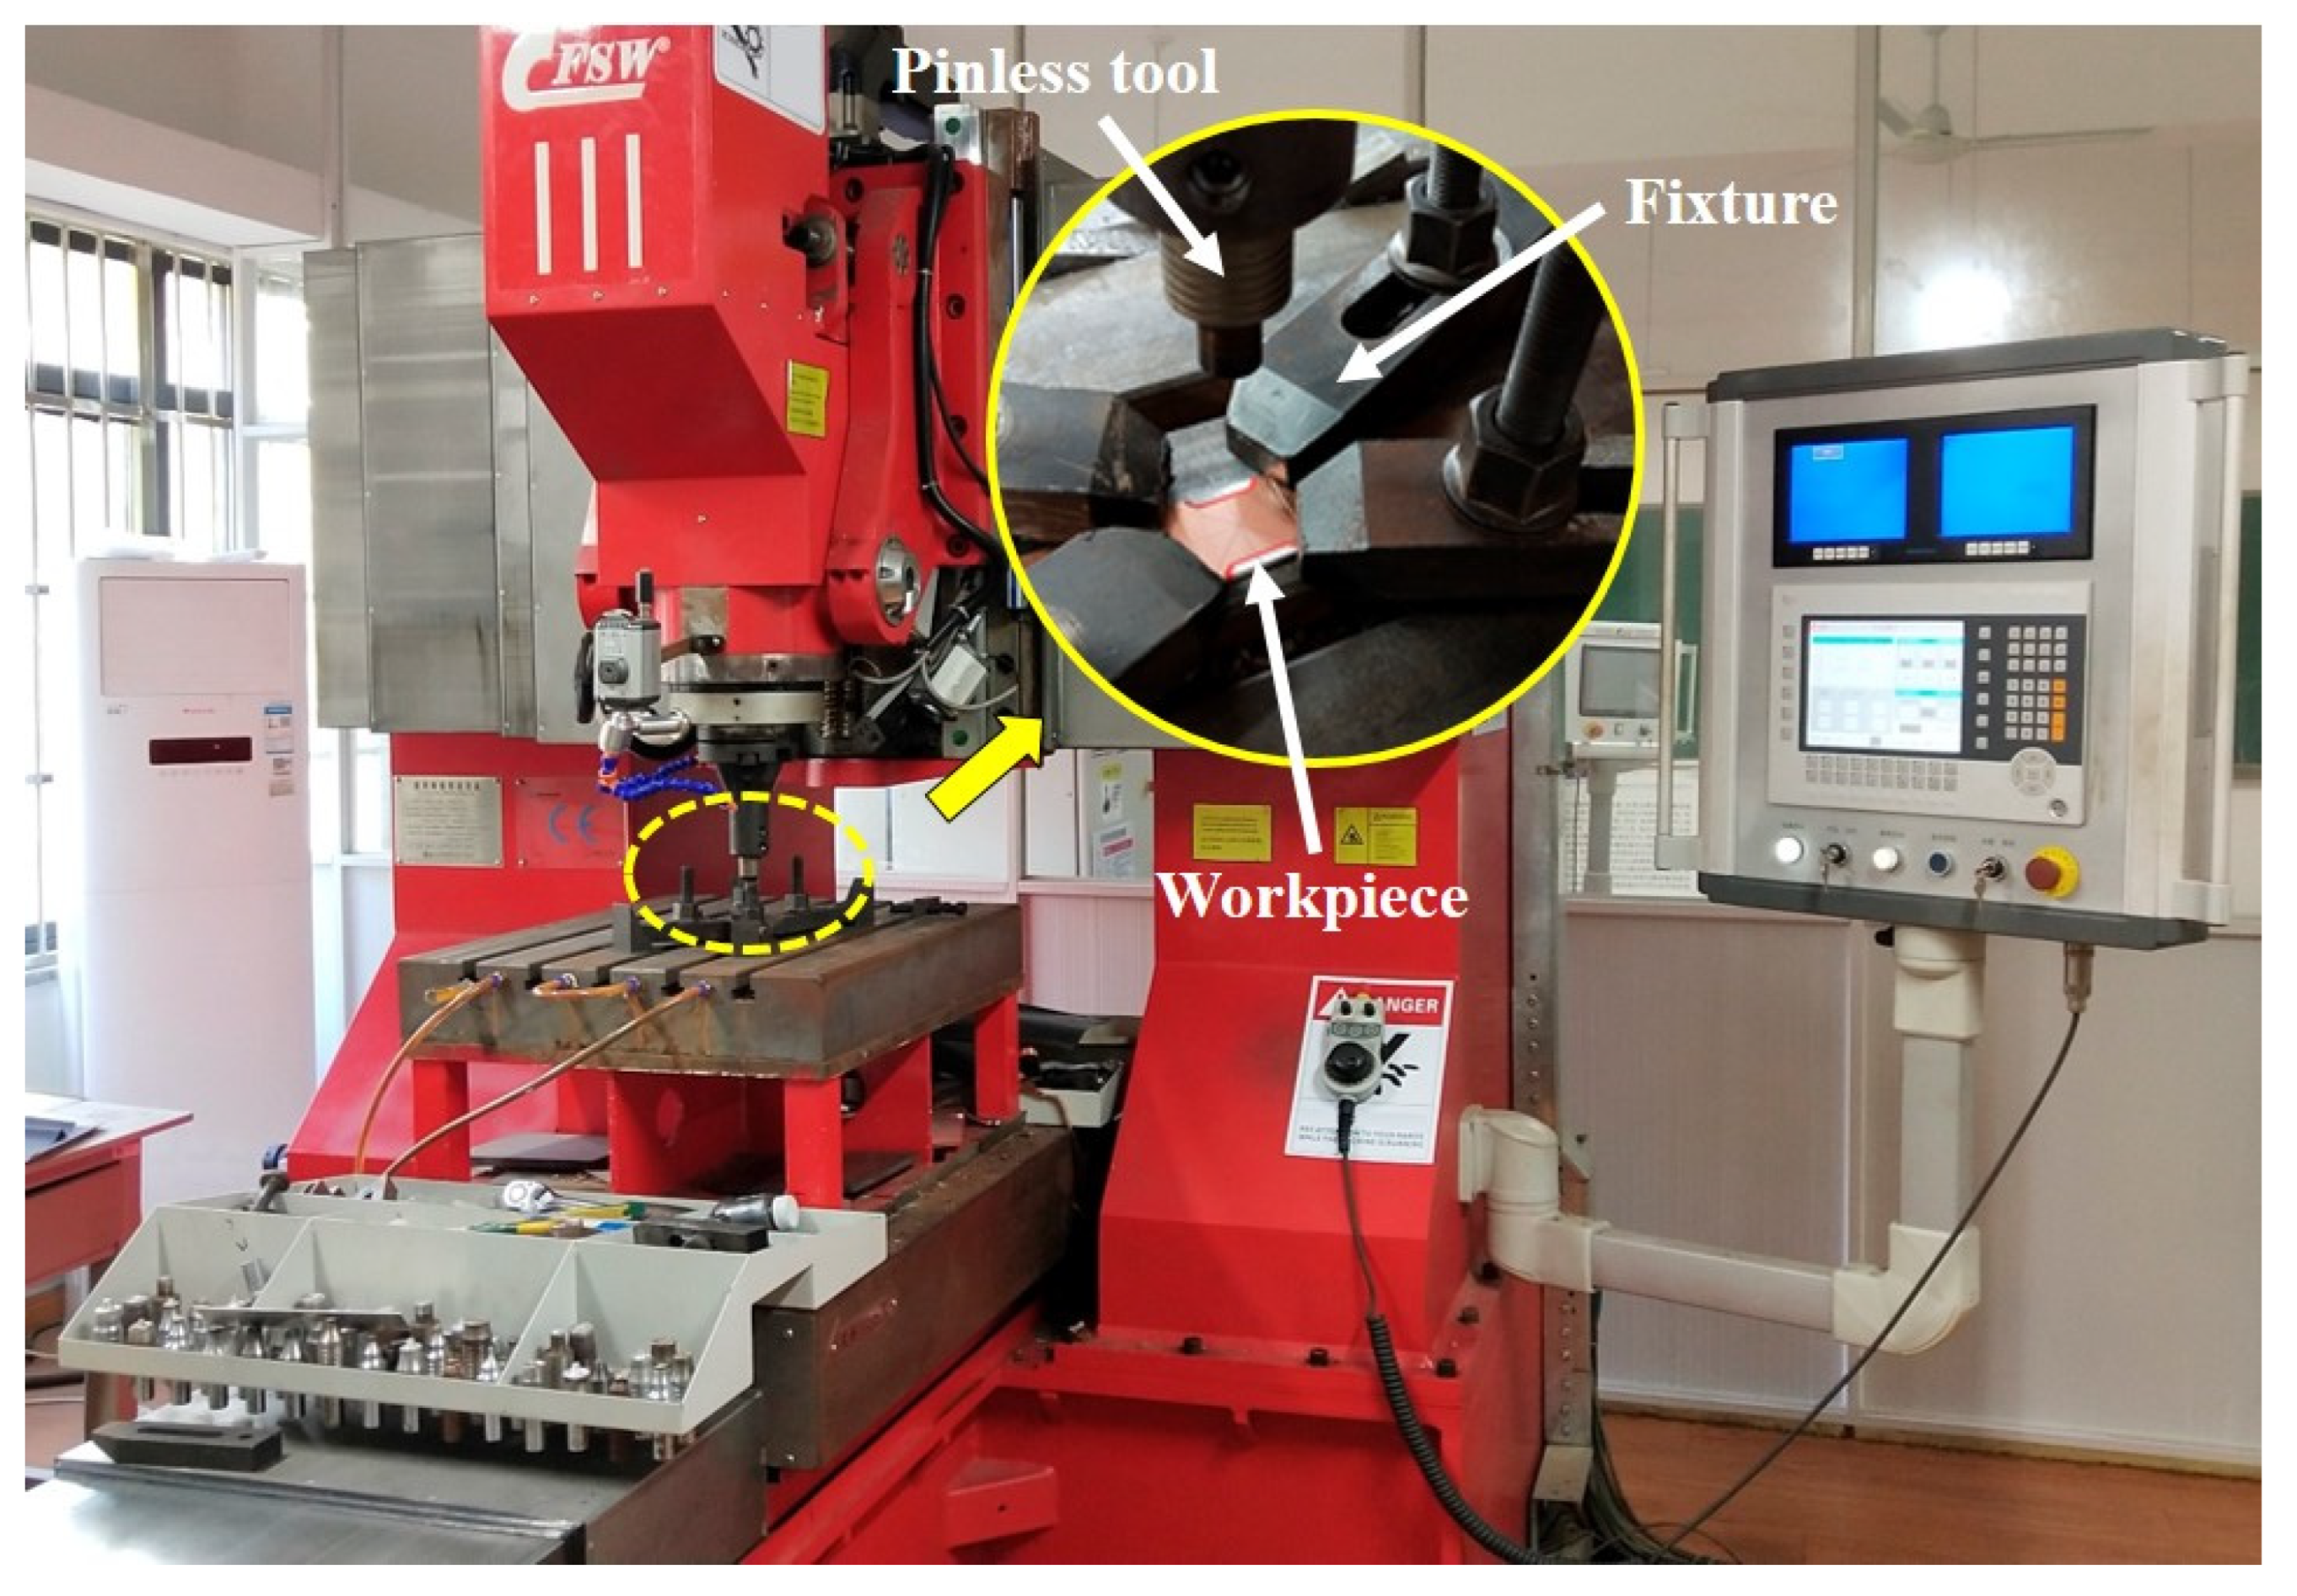
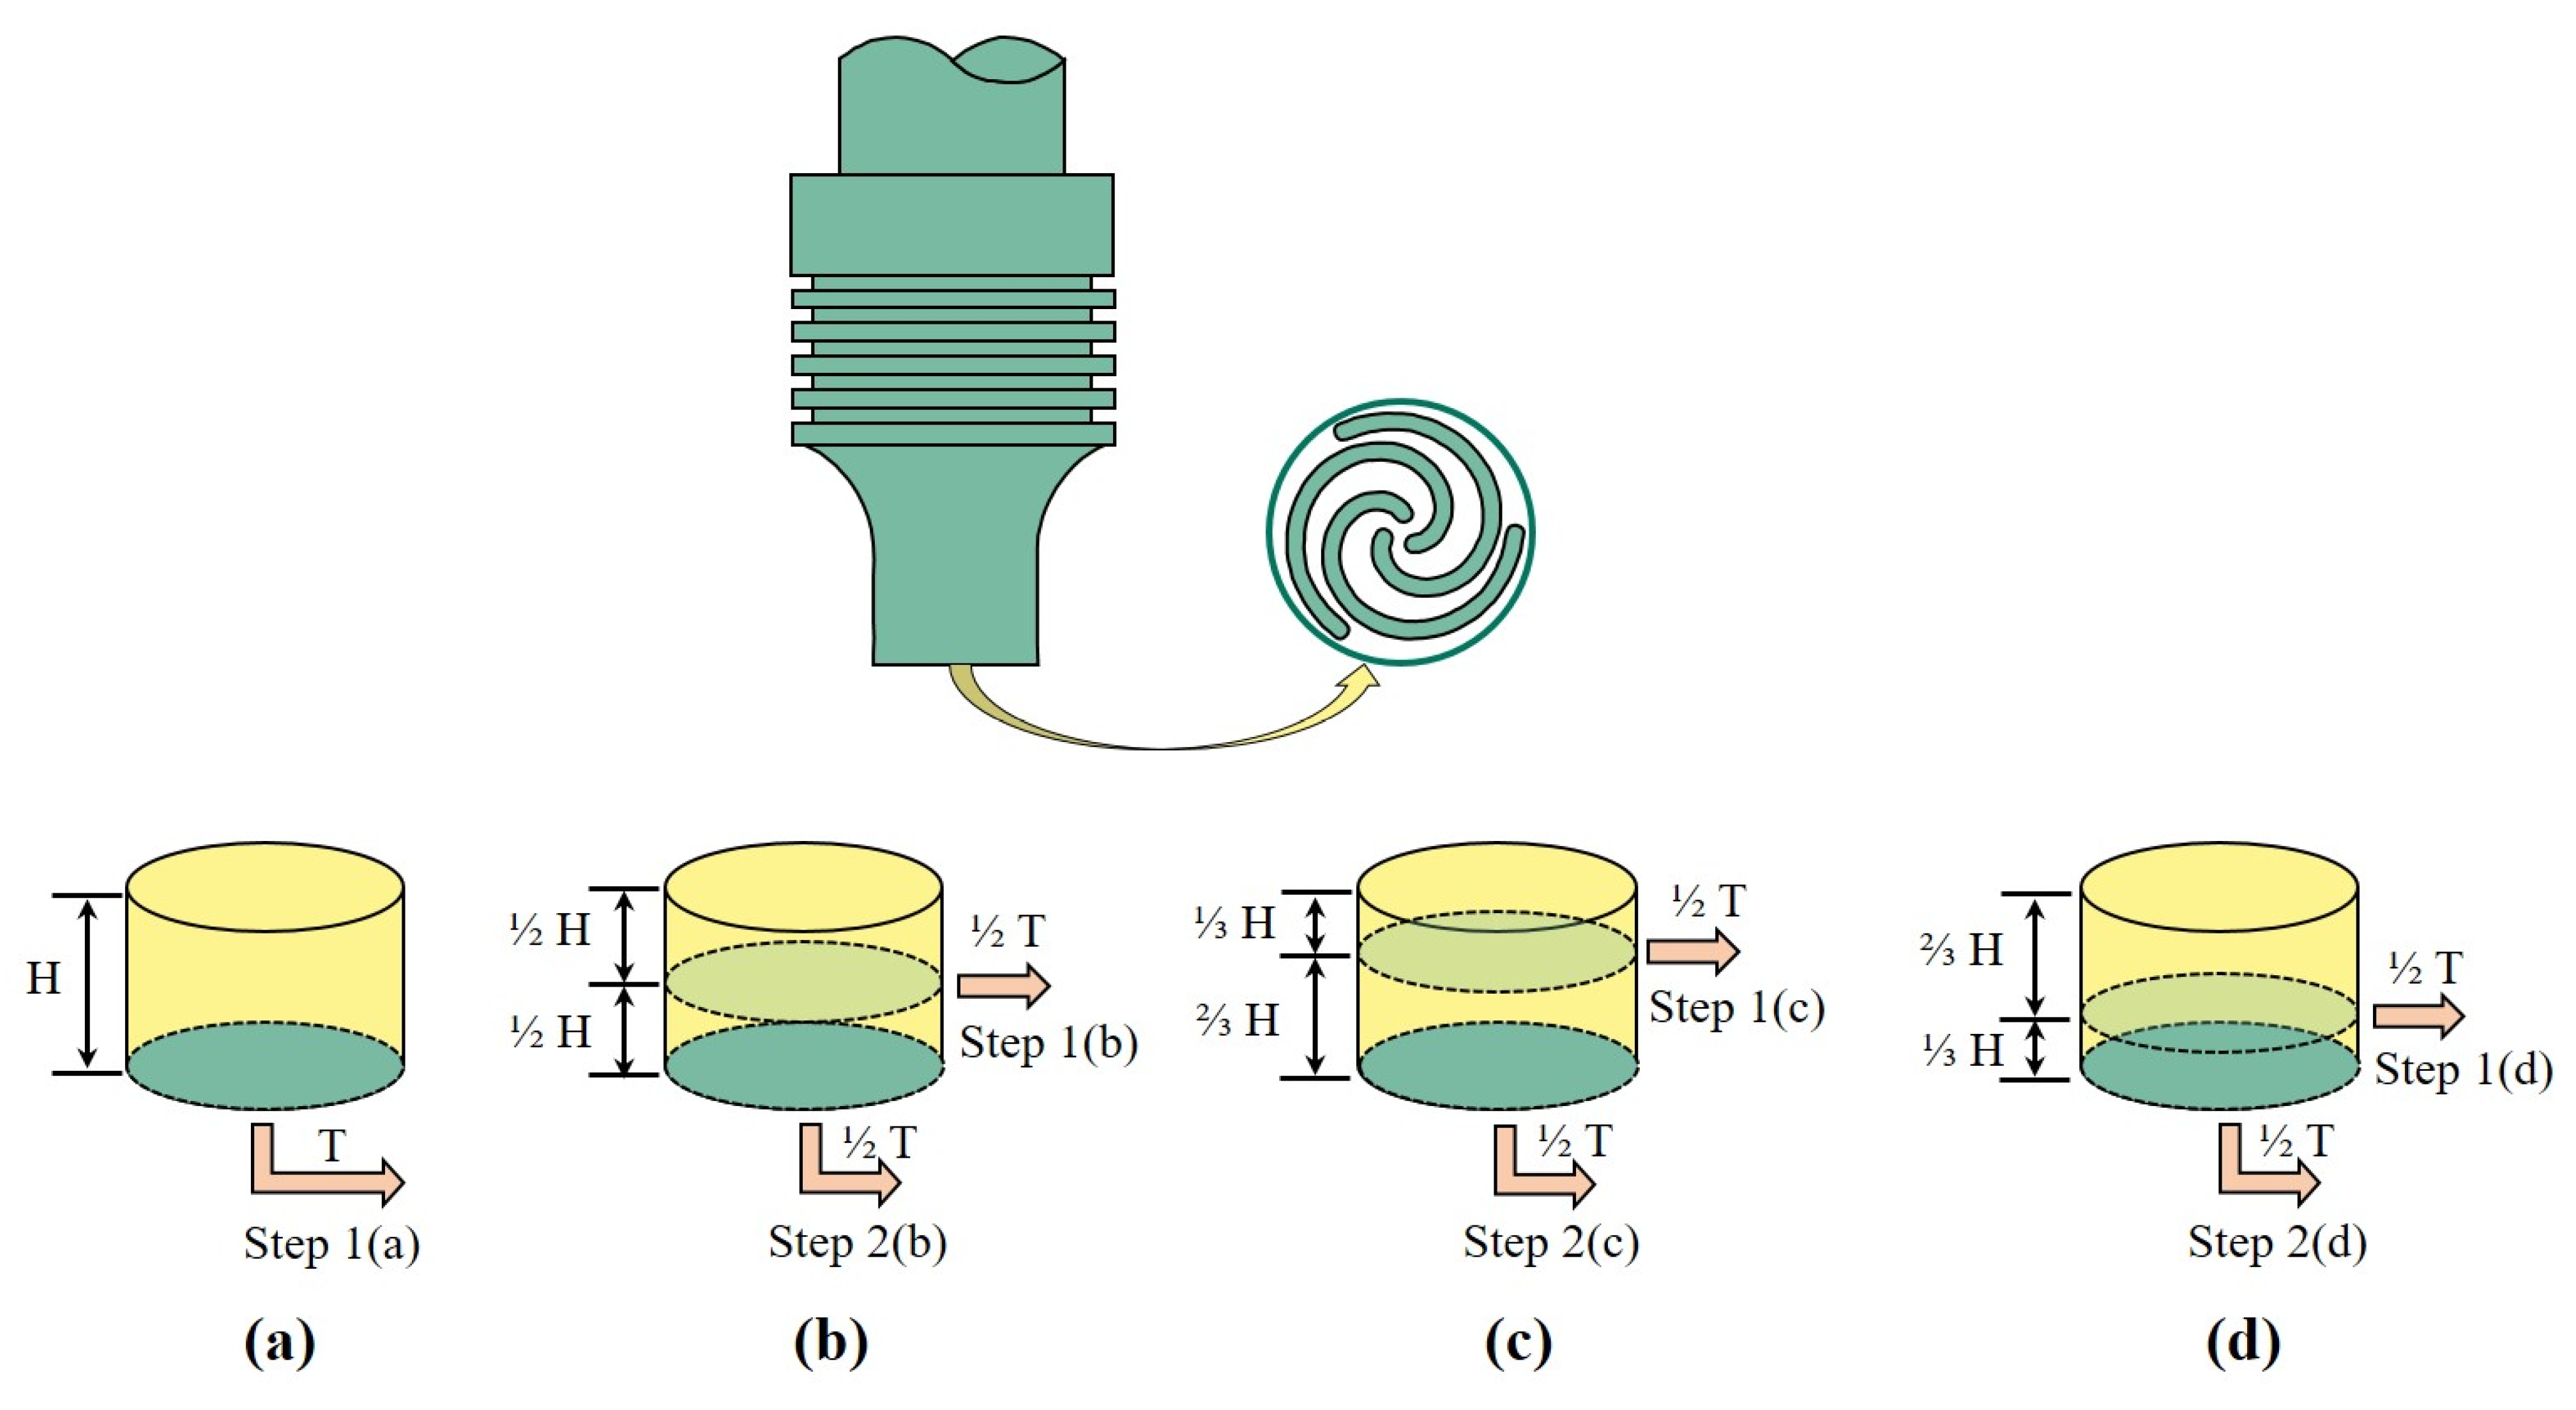
A friction stir processing machine manufactured by Beijing FSW Technology Co., Ltd. (Beijing, China) was used to perform the PFSSW experiments. The experimental platform is shown in Figure 2. A pinless tool with a shoulder diameter of 15 mm and three involute grooves was used to conduct the welding experiments. The depth of involute grooves was 0.5 mm, and the material of the pinless tool was H13 steel.
Four tool plunging paths including a one-time plunging path and three step-by-step plunging paths were designed, as shown in Figure 3. H is the total plunging depth and T is the total dwell time. The plunging process was automatically controlled by the numerical control program.
The process parameters under different tool plunging paths are shown in Table 1. In order to maintain the same experimental conditions, the total cumulative plunging depth and total cumulative dwell time of the four tool plunging paths were all 0.3 mm and 8 s. In addition, the rotation speed and the plunging speed of the tool were constant in all experiments, which were 1200 rpm and 10 mm·min−1, respectively.
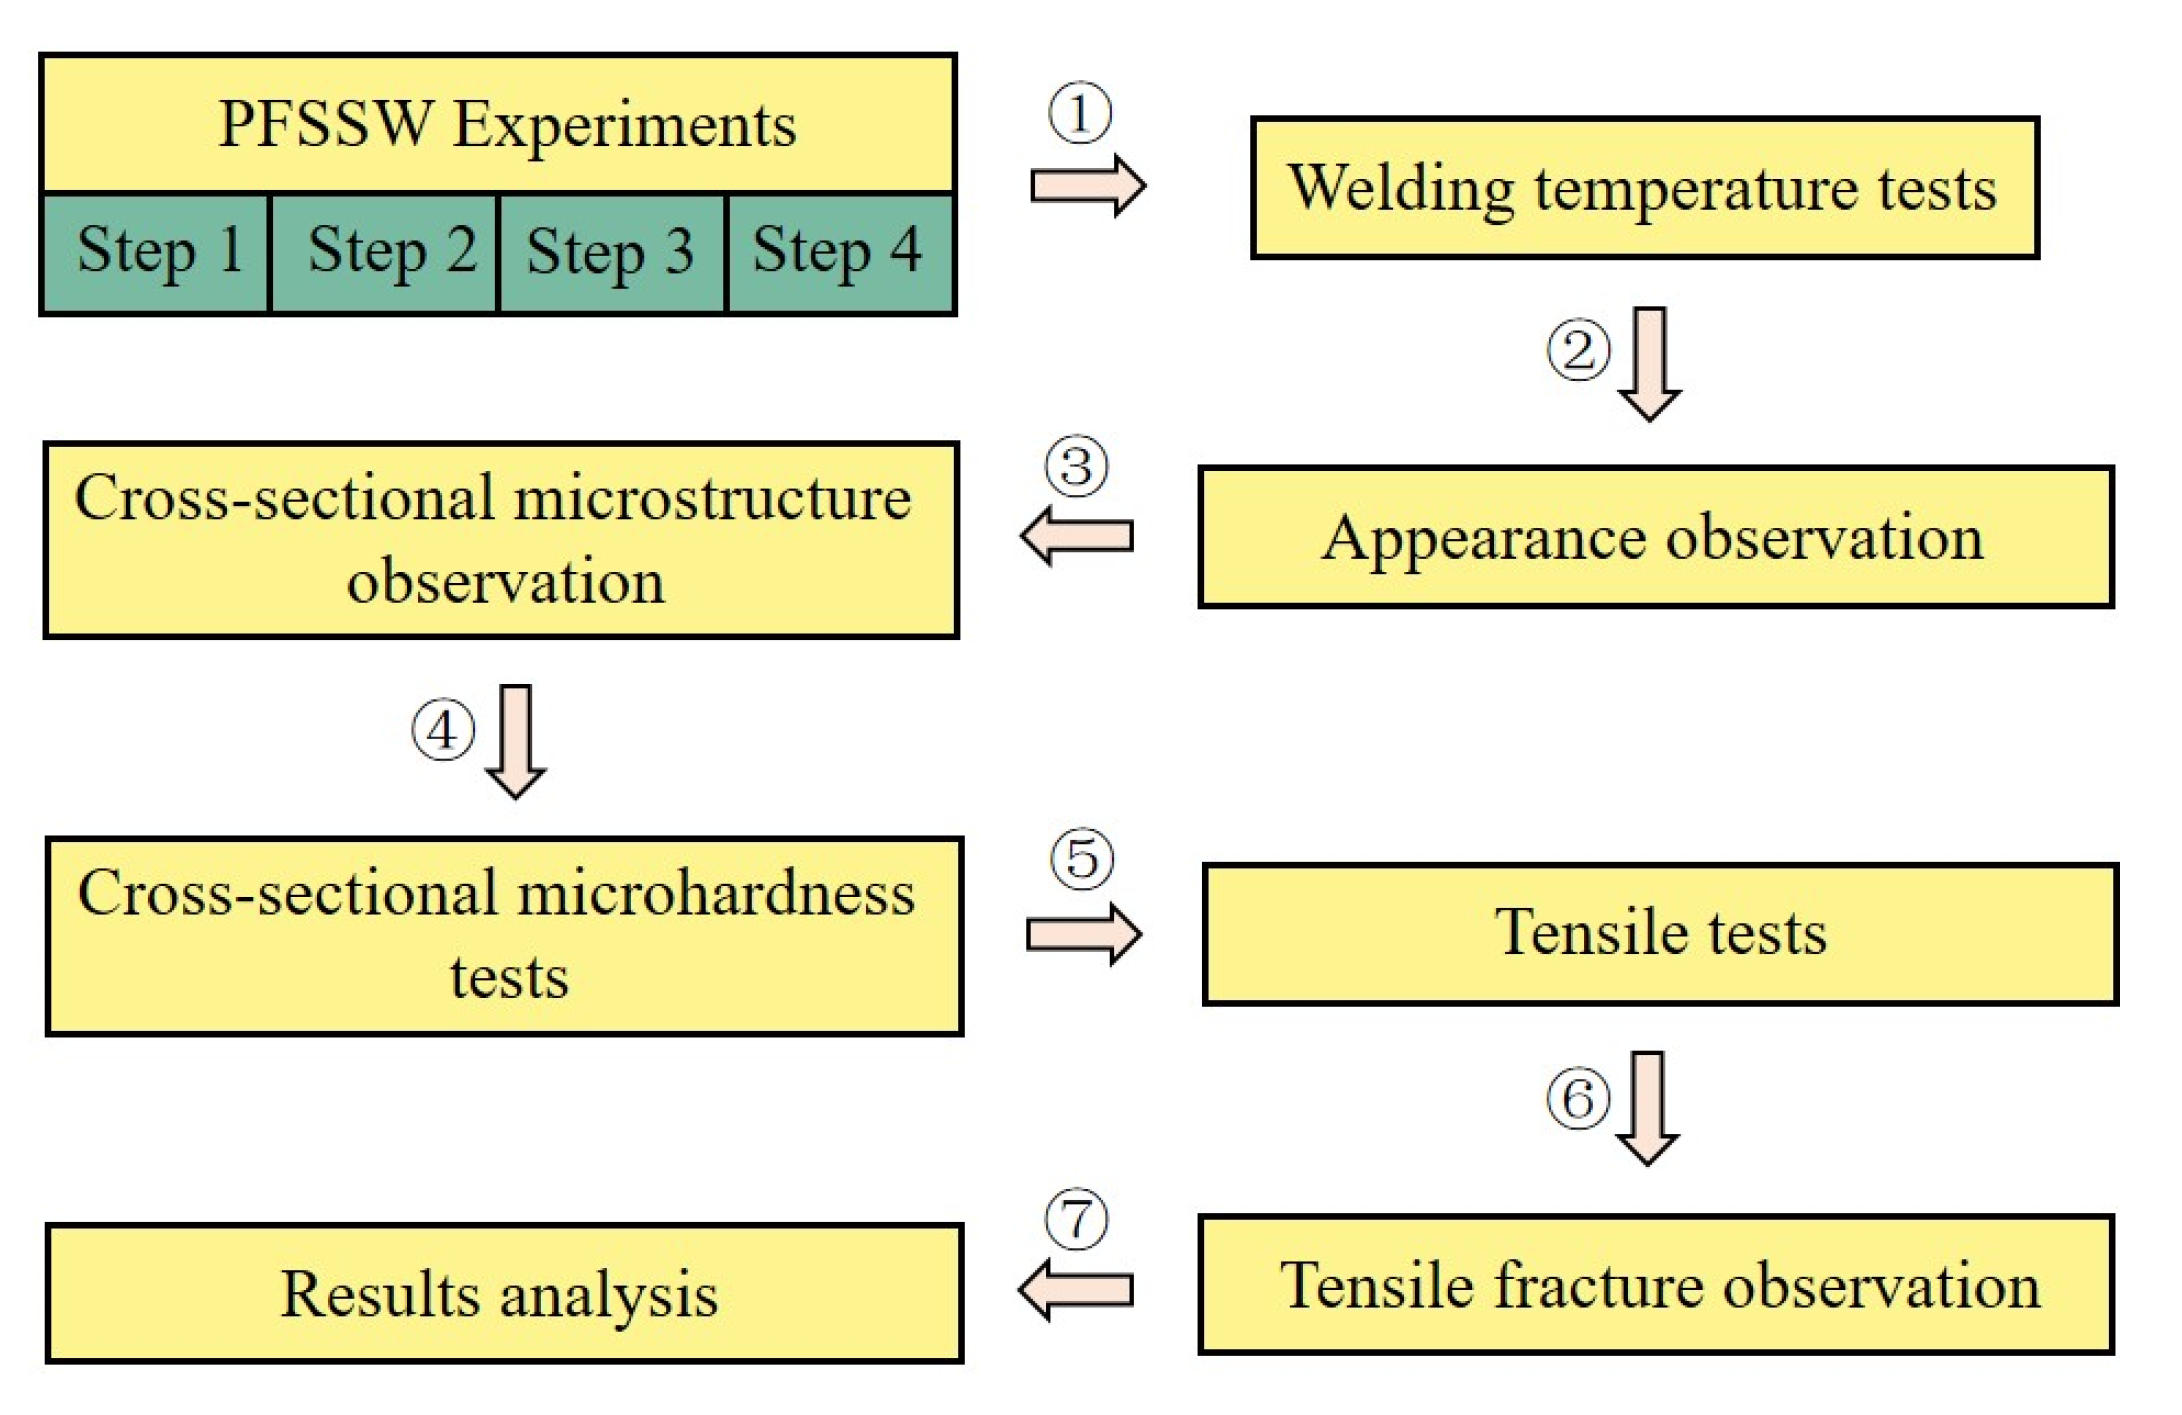
The research process of this work is shown in Figure 4. A K-type thermocouple with a diameter of 1 mm was used to measure the temperature change. The diameter and the depth of temperature measurement hole (P) were 1 mm and 0.6 mm, respectively, as shown in Figure 1. The appearance features of the center and edge of the welded joints were observed with a superdepth digital microscope produced by KEYENCE Co., Ltd. (Osaka, Japan). The welded joints were cut from the center using a wire cutting machine to observe the macroscopic morphology, microstructure, and microhardness of the cross-section. A Vickers hardness tester provided by Laizhou Weiyi Experimental Machine Manufacturing Co., Ltd. (Laizhou, China) was used to test the microhardness of the cross section. The location of the test points for microhardness was set at 0.7 mm below the upper surface of the upper sheet, and the horizontal distance between the test points was 0.3 mm. The microhardness test was performed at a pressure of 0.5 kg and a holding time of 10 s. The tensile tests were adopted to evaluate the strength of the specimens [40,41], and a universal tensile testing machine was used to perform tensile tests with a tensile rate of 1 mm·min−1. Three specimens were tested for each tool plunging path, and the average values were used as the final test results. The fracture morphologies of welded joints were observed by a scanning electron microscope produced by Hitachi Ltd. (Tokyo, Japan).

3. Results and Discussion

3.1. Appearance Features

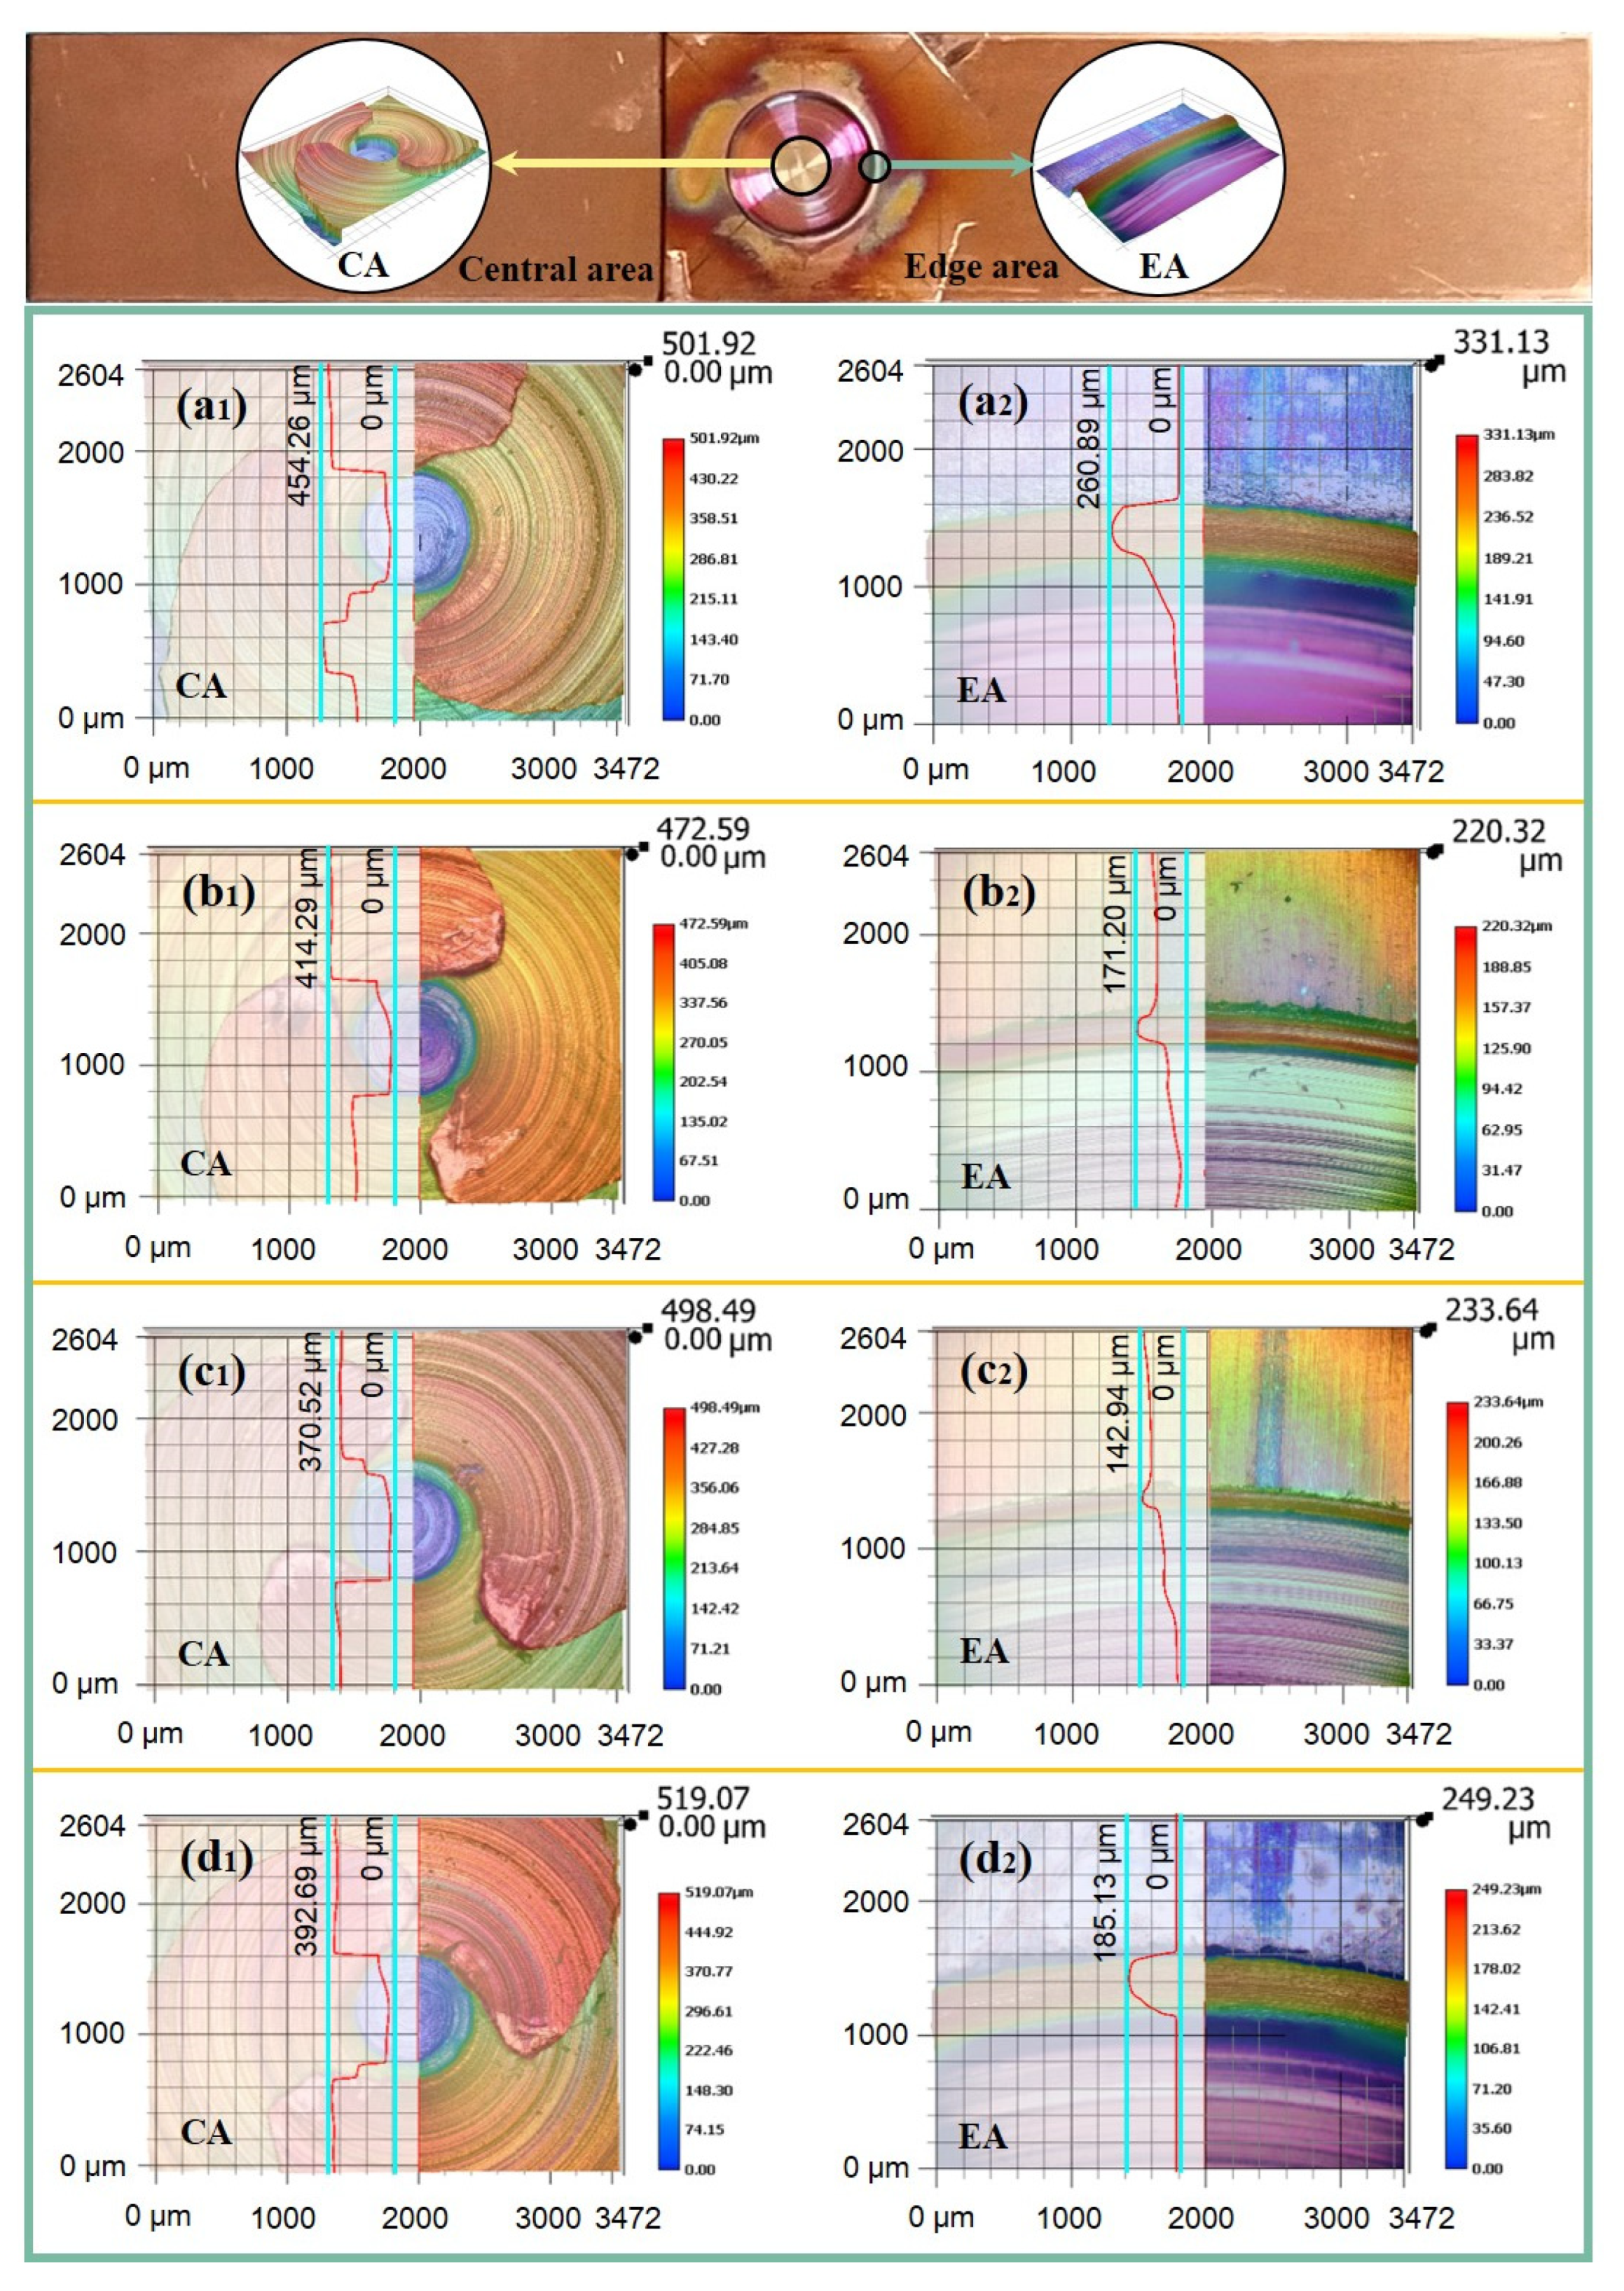
Figure 5 presents the appearance of welded joints under different tool plunging paths. As can be seen from Figure 5, three interlaced convex peaks formed in the center of the welded joints due to the stirring effect of the tool with involute grooves, and there was a circular hole between the three convex peaks, while a circular arc shape feature formed at the edge of the welded joints due to the material flow. The maximum depths of the circular hole at the center of the welded joints under path 1, path 2, path 3, and path 4 were 454.26 μm, 414.29 μm, 370.52 μm, and 392.69 μm, respectively. The maximum heights of the welded joint edges under path 1, path 2, path 3, and path 4 were 260.89 μm, 171.20 μm, 142.94 μm, and 185.13 μm, respectively. It was found that the depth of the circular hole and the height of the welded joint edge generated by path 1 were the largest, followed by path 4 and path 2, and the depth of the circular hole and the height of the welded joint edge of path 3 were the smallest. The depth of the circular hole was closely related to the material flow at the center of the welded joint. The greater the depth of circular hole, the stronger the stirring effect of the tool at the center of welded joint. Figure 5 also indicates that the greater the first plunging depth of the tool, the greater the depth of the circular hole, and the higher the height of the edge of the welded joint.

3.2. Macroscopic Morphology and Microstructure

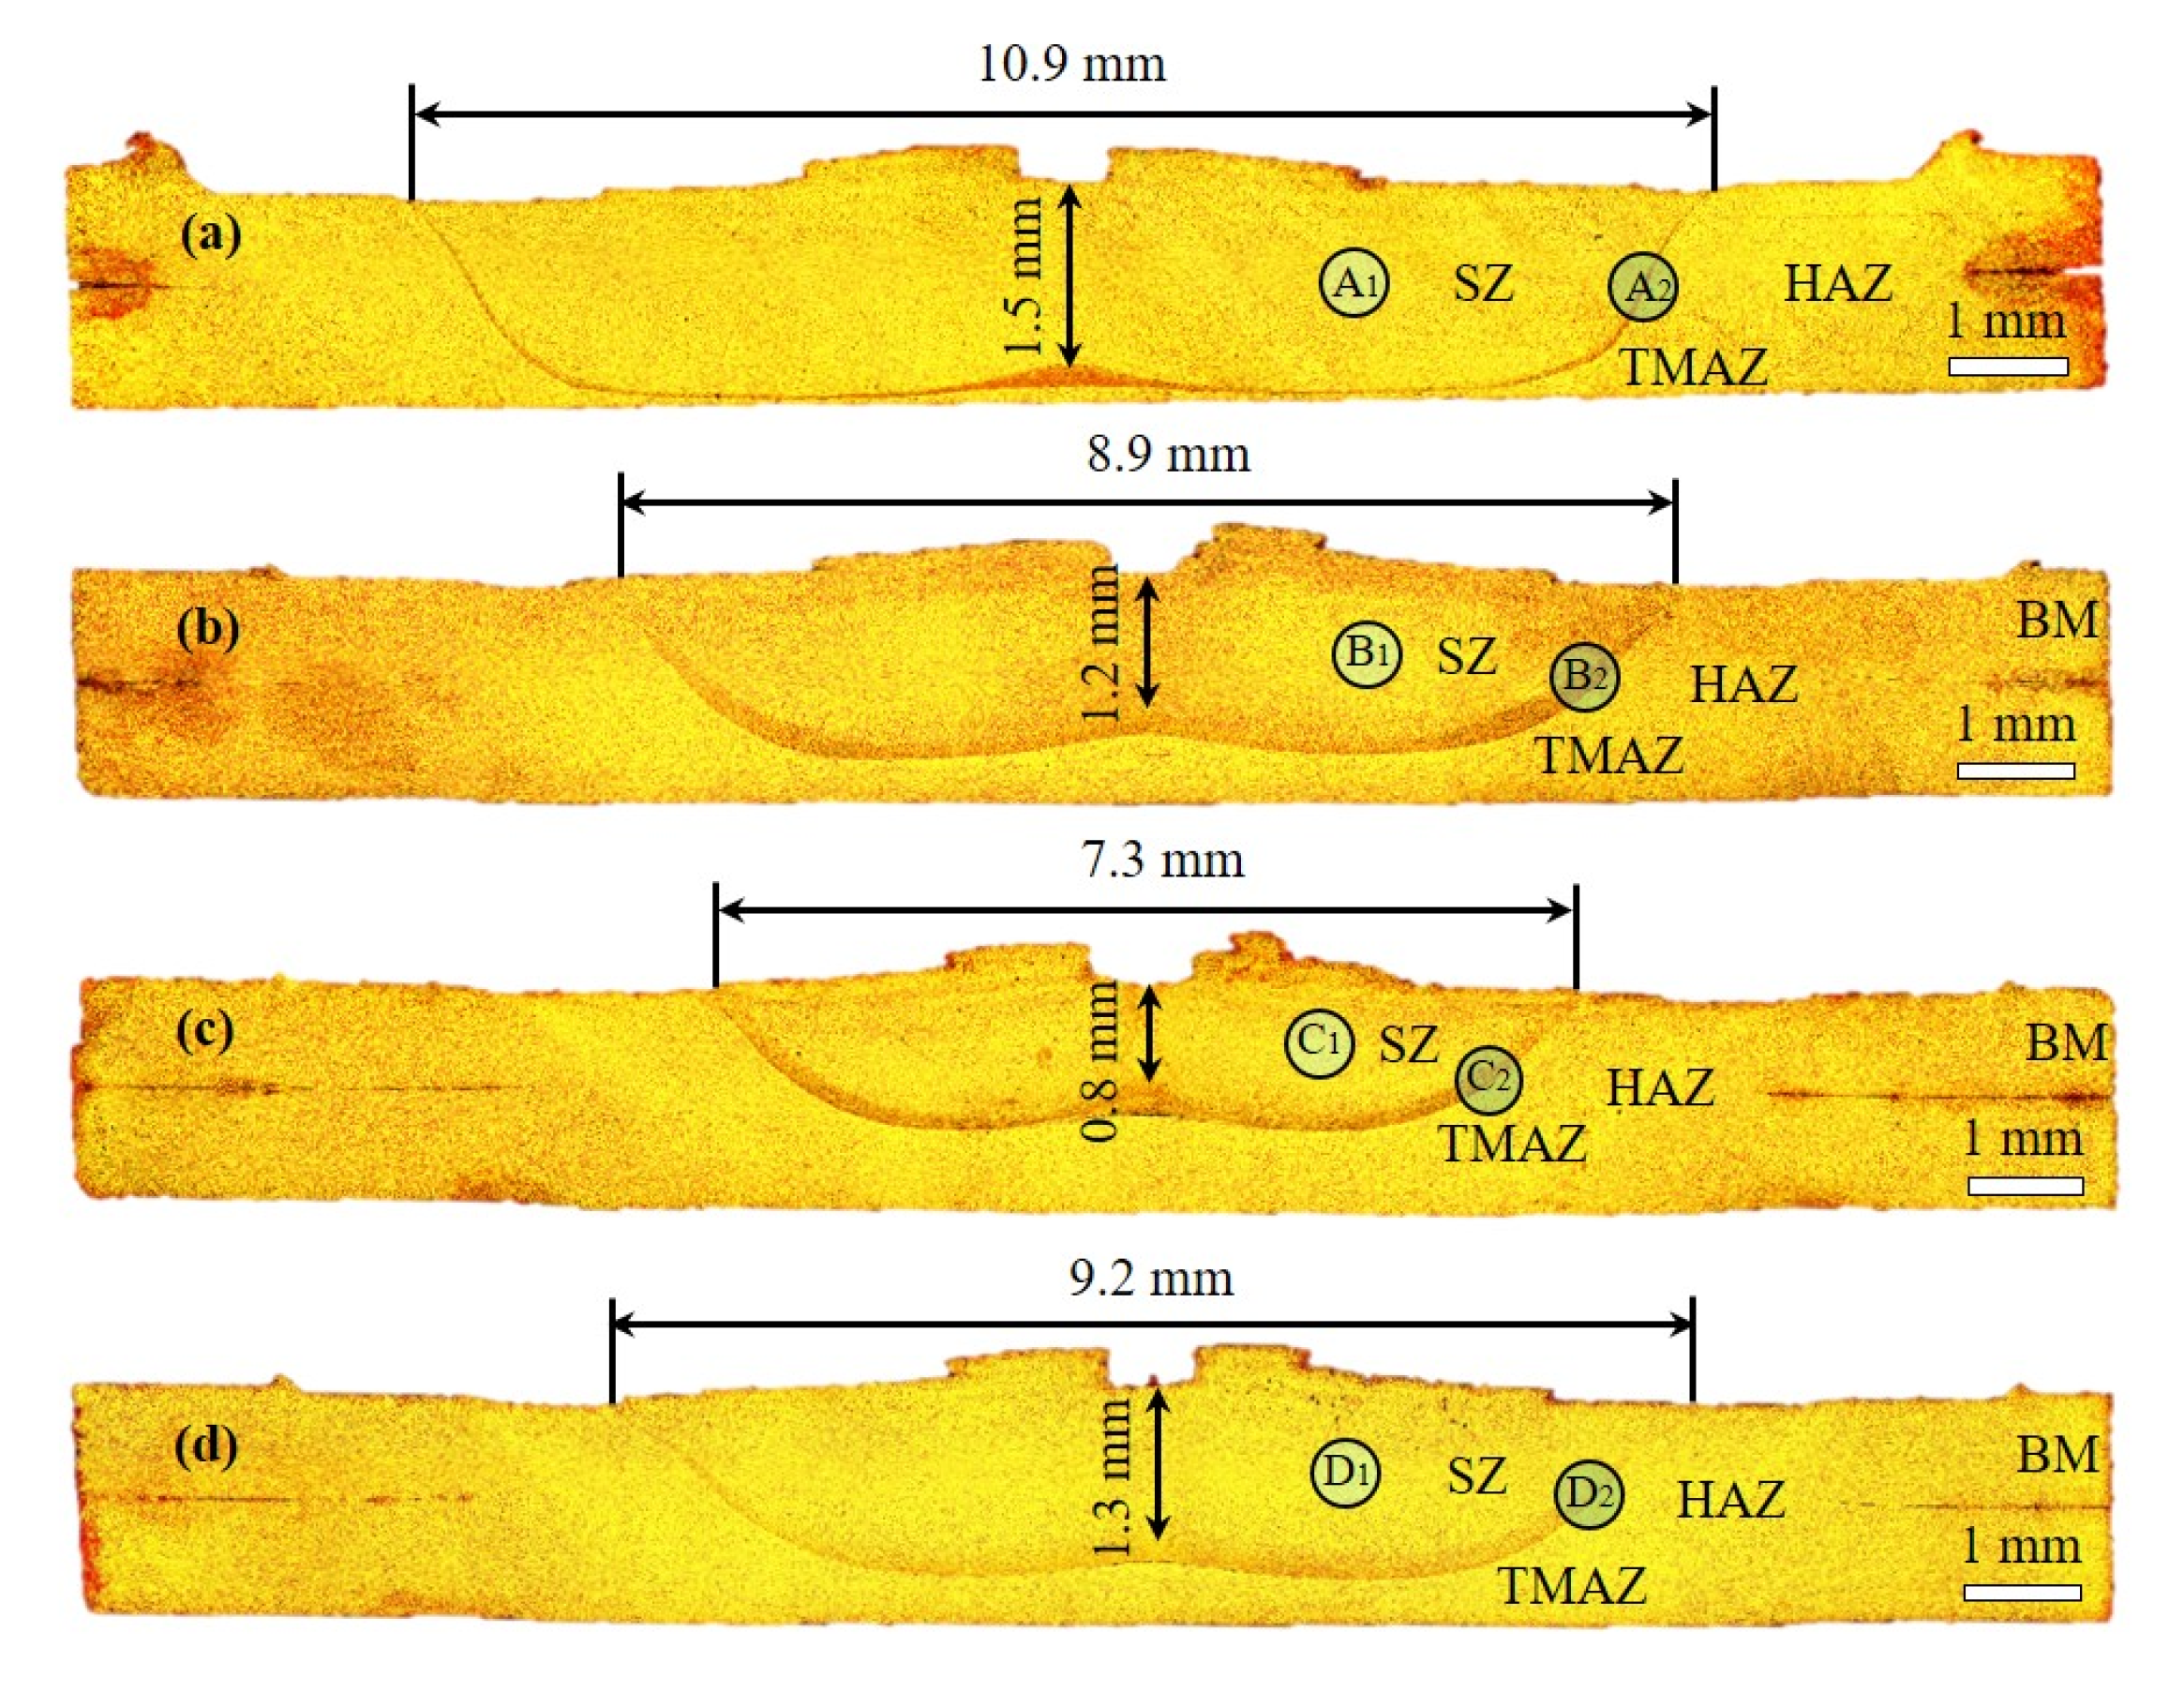
Figure 6 shows the cross-sectional macroscopic morphologies of the welded joints under different tool plunging paths. There were certain differences in the size of the cross-sectional welded joints under different tool plunging paths, but they all presented typical characteristics of the stirring zone (SZ), the thermal-mechanical affected zone (TMAZ), and the heat-affected zone (HAZ). The maximum widths of the stirring zones in path 1, path 2, path 3, and path 4 were 10.9 mm, 8.9 mm, 7.3 mm, and 9.2 mm, respectively, and the heights of the stirring zones at the centers of the welded joints under path 1, path 2, path 3, and path 4 were 1.5 mm, 1.2 mm, 0.8 mm and 1.3 mm, respectively. On the whole, the range of the stirring zone generated by path 1 was the largest, followed by path 4 and path 2, and the range of stirring zone formed by path 3 was the smallest, which indicates that the greater the first plunging depth, the greater the width and depth of the stirring zone.
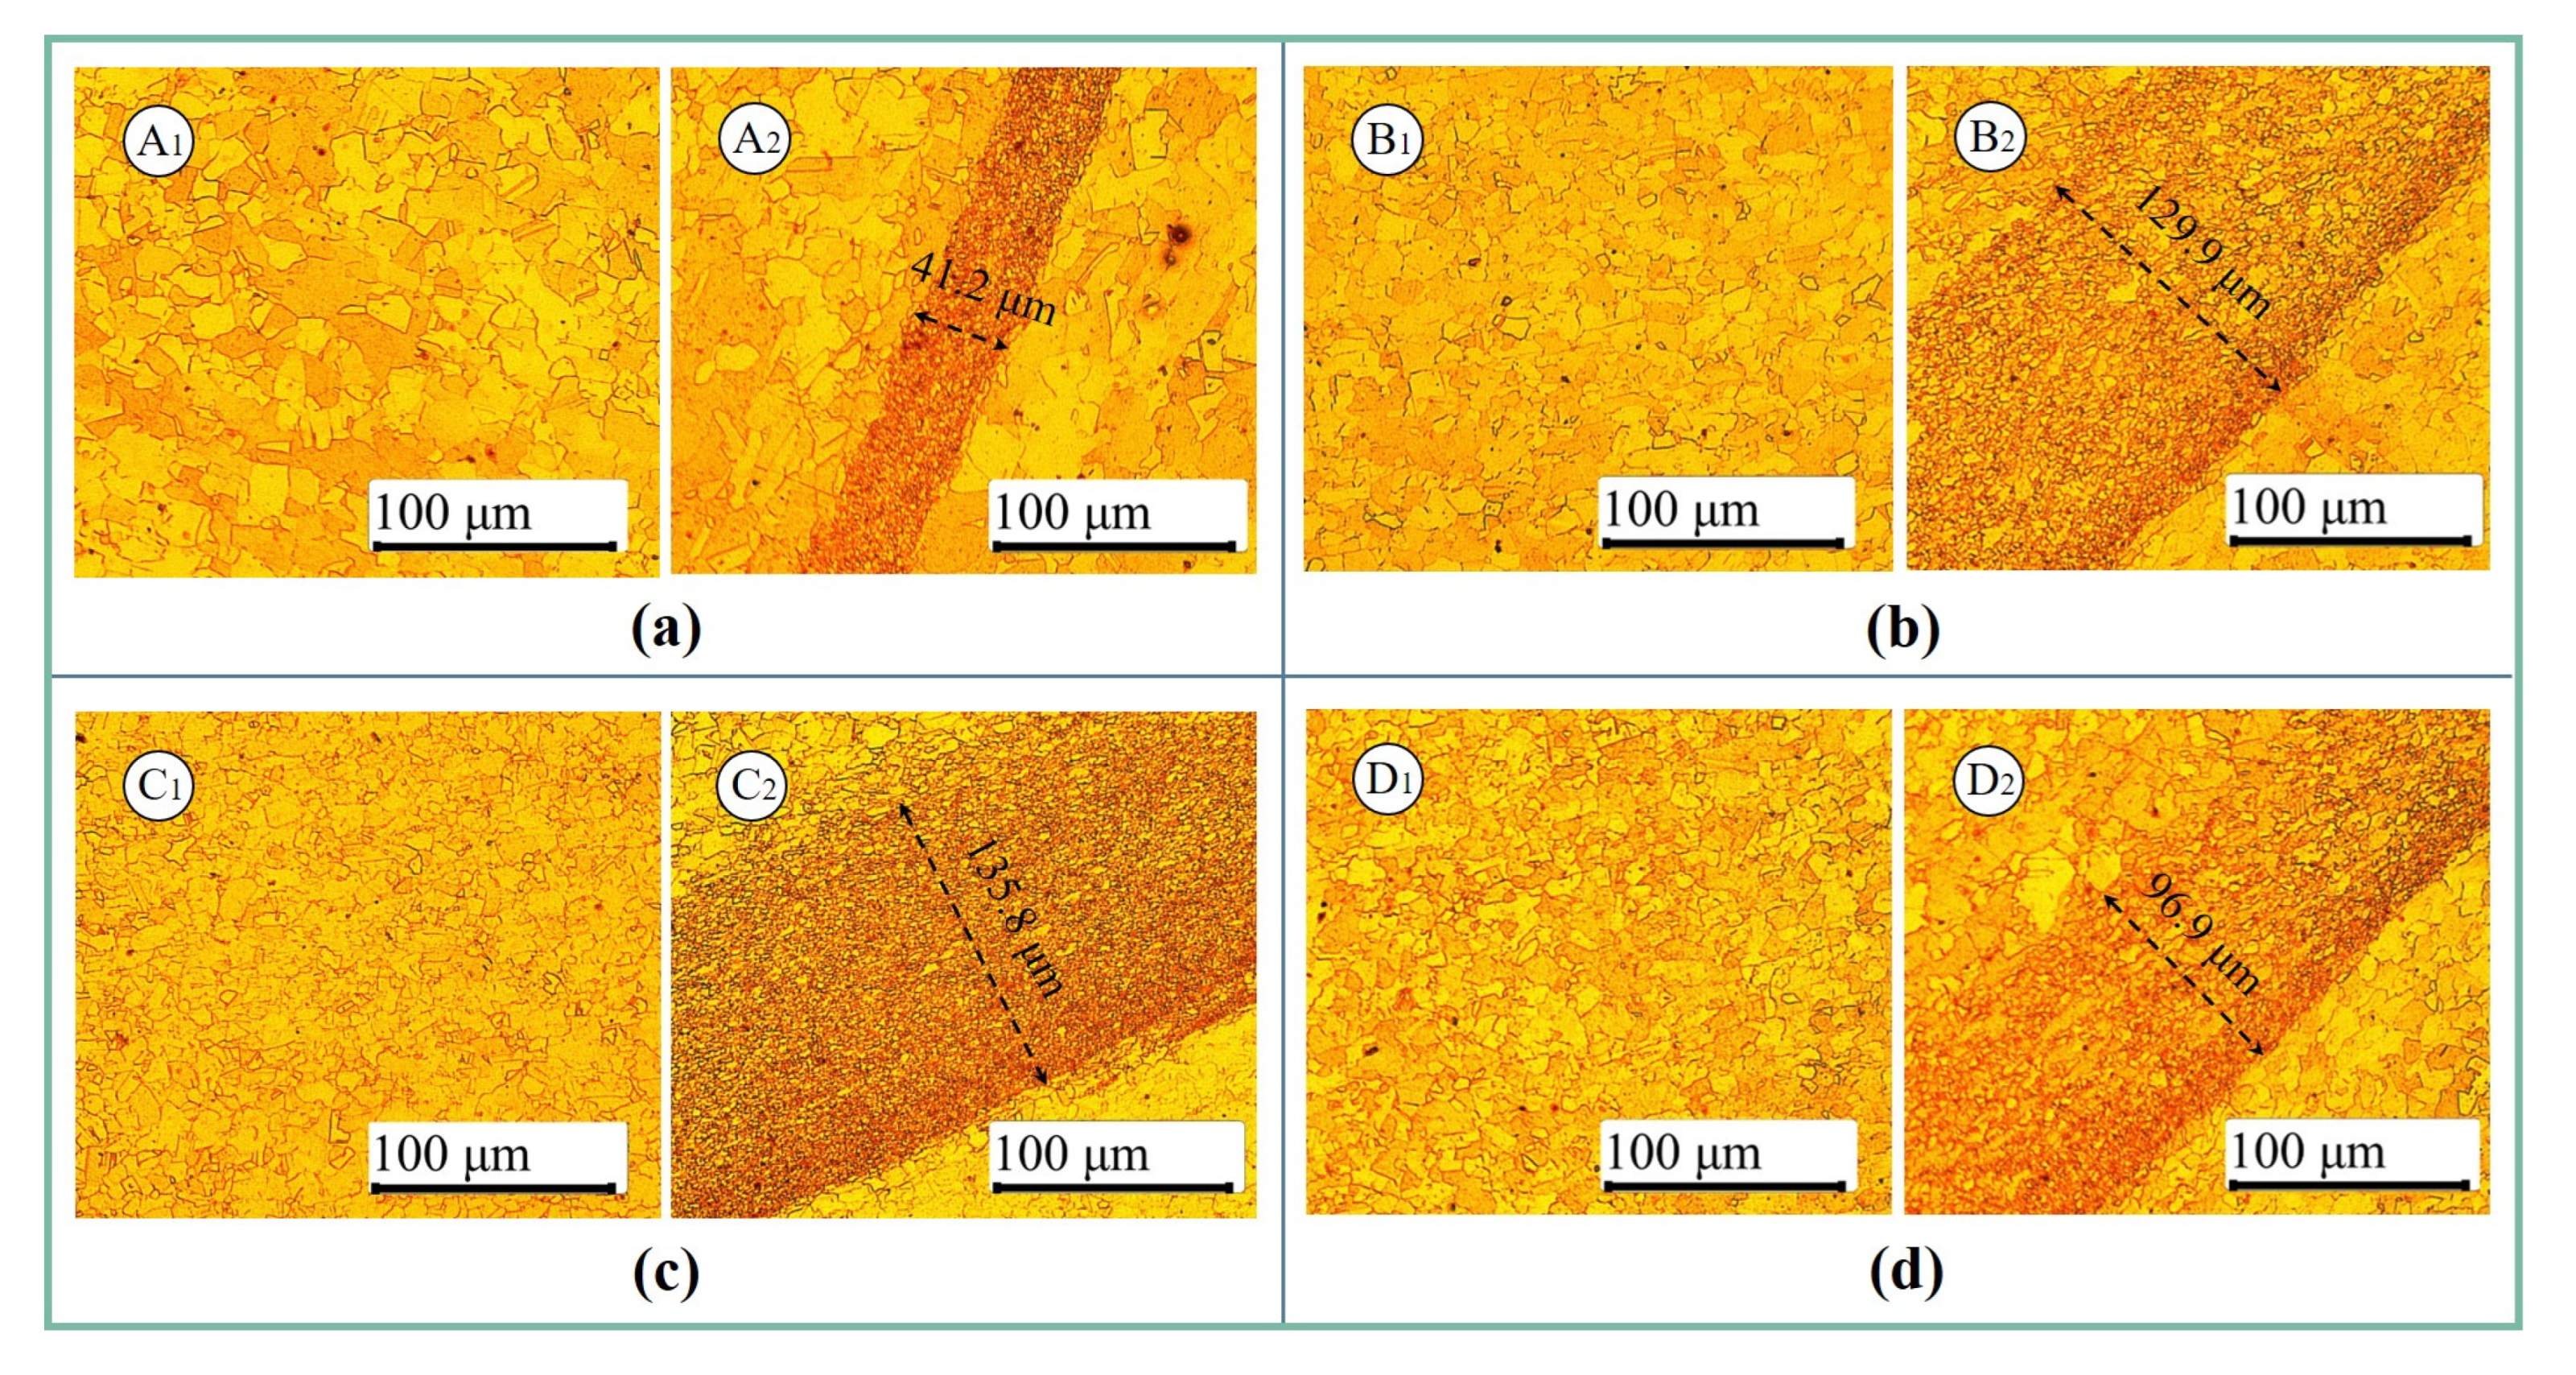
Figure 7 shows the microstructure of the stirring zone and thermal-mechanical affected zone under different tool plunging paths.
It can be seen from Figure 7 that the grains in the stirring zone under path 1 were significantly larger than those under path 2, path 3, and path 4, which may be due to the higher temperature generated under path 1, causing the grains in the stirring zone to grow under the effect of higher temperature [42,43]. Furthermore, path 1 produced the smallest thermal-mechanical affected zone width of 41.2 μm, followed by path 4, which produced a width of 96.9 μm, while path 2 and path 3 produced a larger thermal-mechanical affected zone width. This suggests that the tool plunging path has a great influence on the width of the thermal-mechanical affected zone. The reason for the larger width of the thermal-mechanical affected zone produced by the step-by-step plunging path may be related to the first dwell after the first plunging stage. The material at the bottom of the tool during the first dwell stage is preheated, and when the tool plunges for the second time, the already softened material is more sensitive to the mechanical stirring effect of the tool, resulting in a larger range of the thermal-mechanical-affected zone. Comparing Figure 6 and Figure 7, it can be found that although the stirring zone range under path 1 was the largest, the grains in the stirring zone were larger and the width of the thermal-mechanical-affected zone was the smallest.

3.3. Welding Temperature

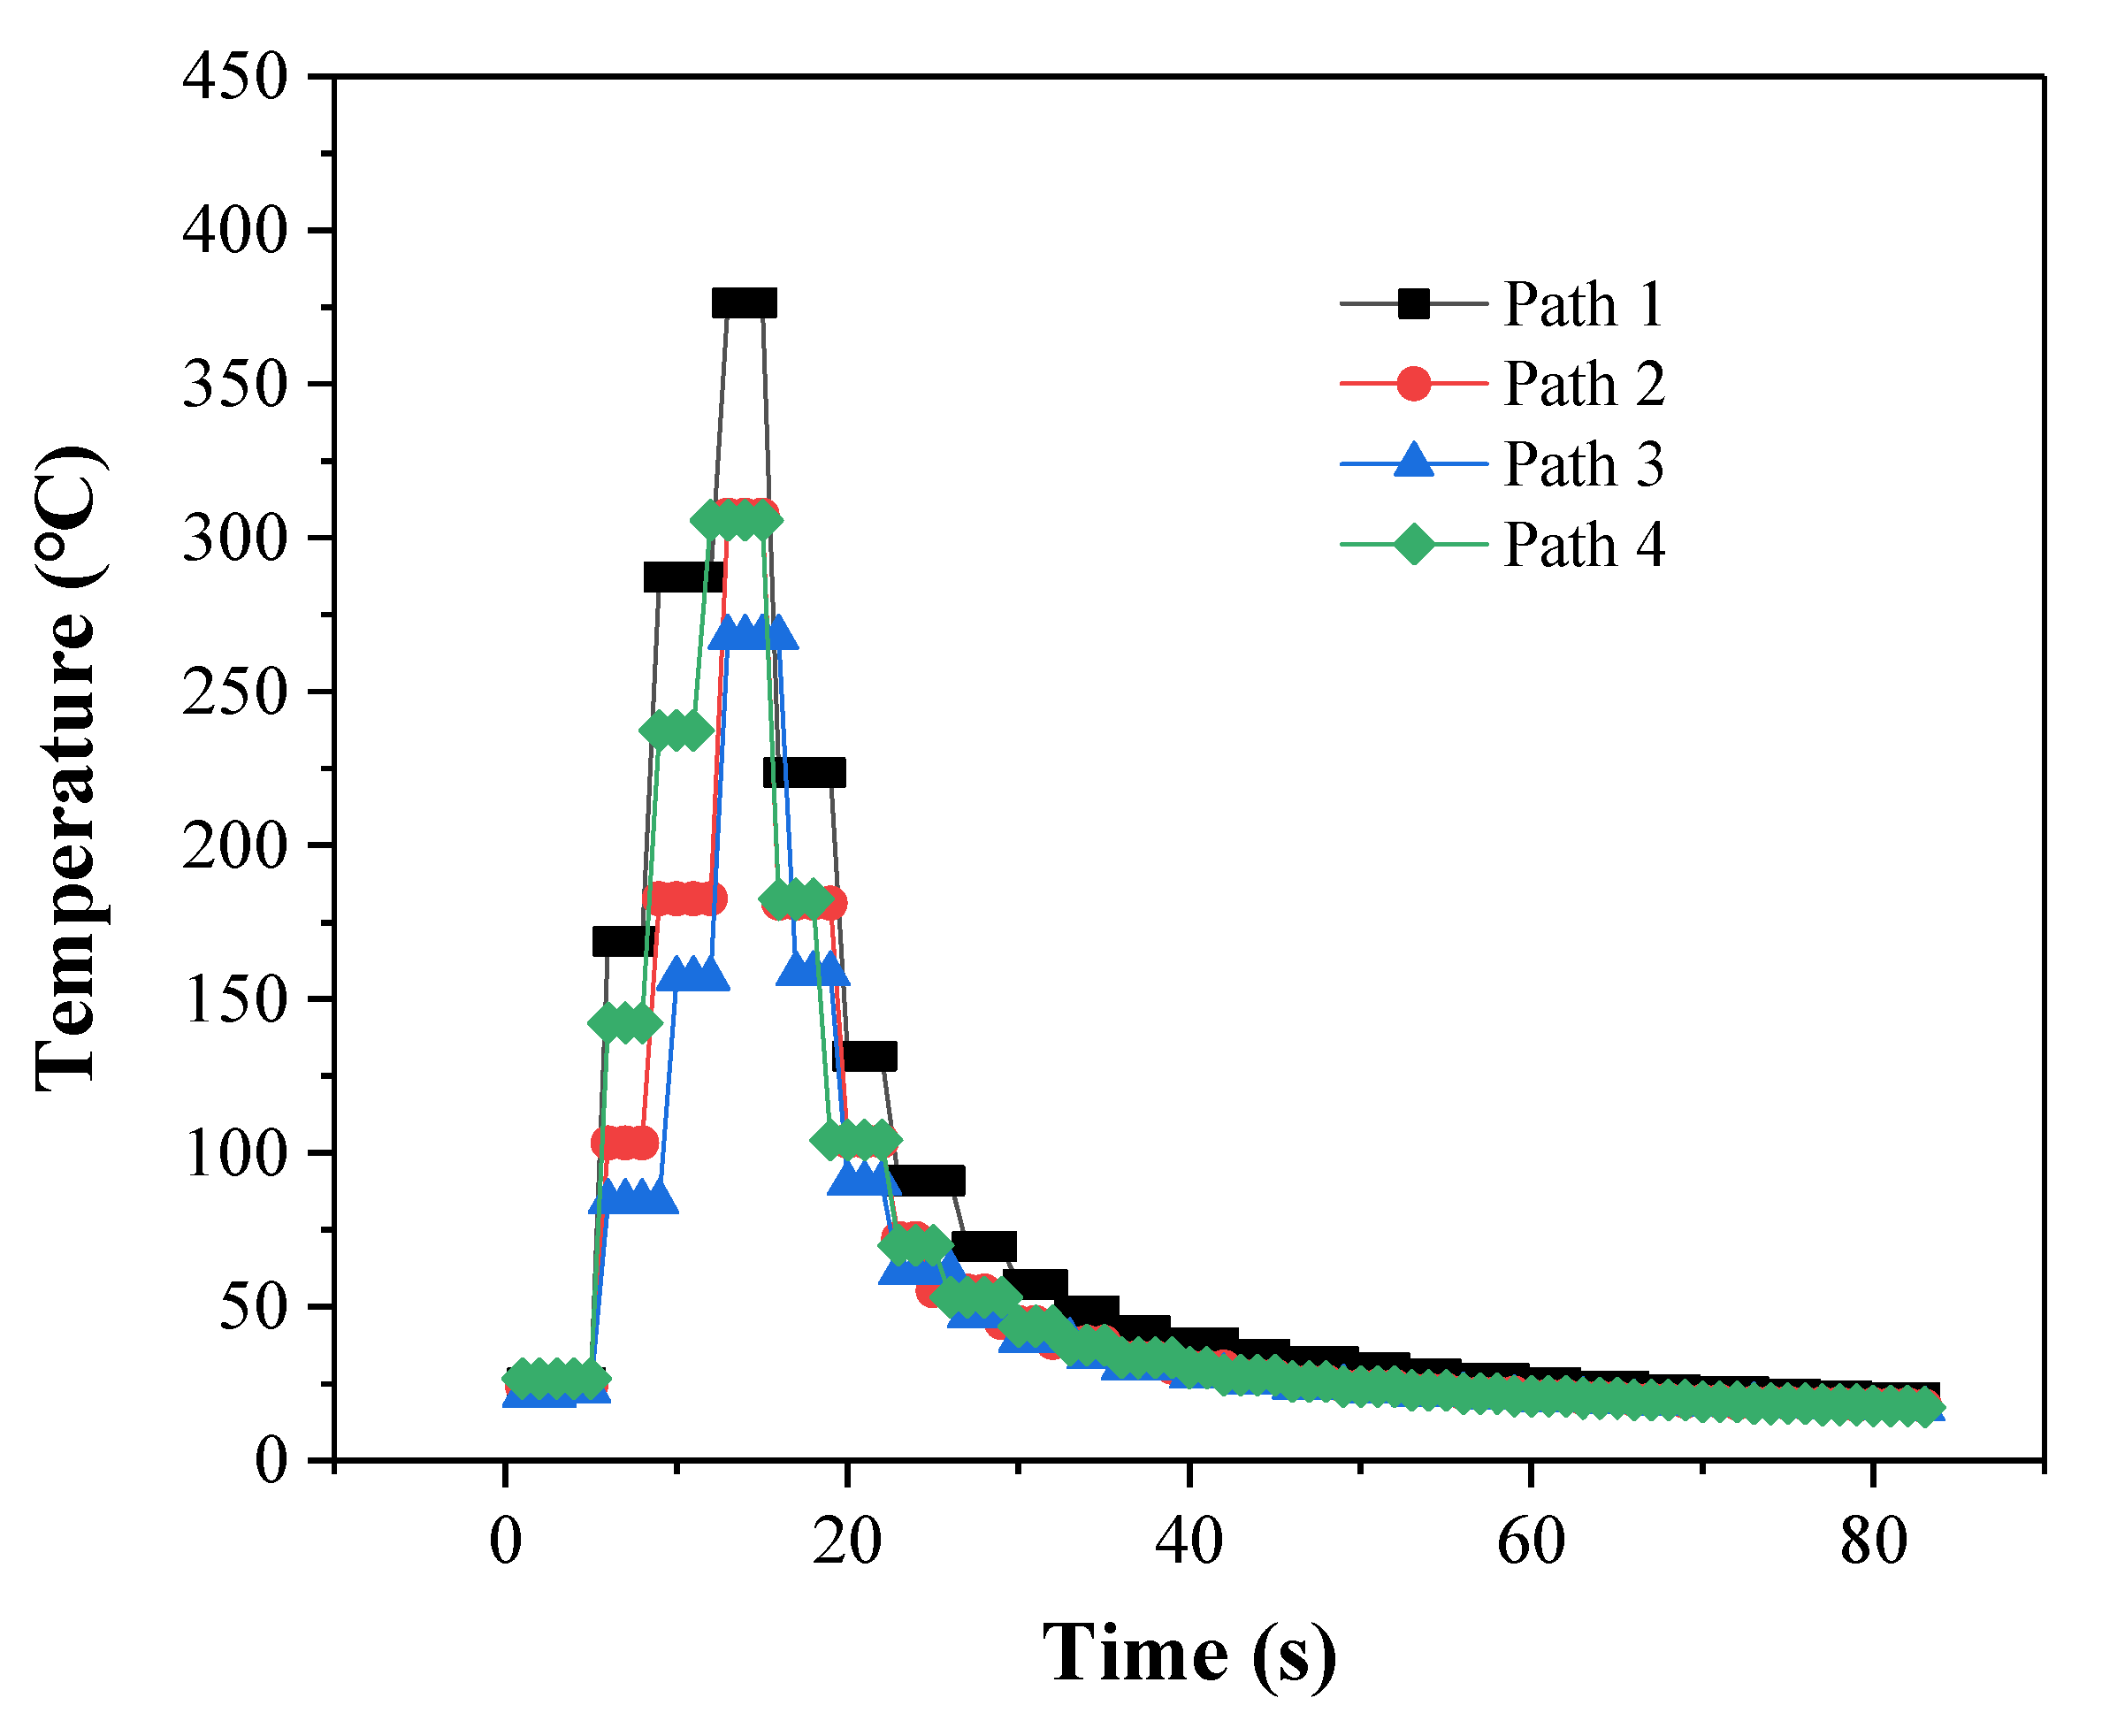
Figure 8 shows the changes in the welding temperature for different tool plunging paths. The overall temperature change during the PFSSW process showed a trend of first increasing, then decreasing, and finally stabilizing. During the plunging and dwell stage of the tool, a large amount of heat is generated in the welding area due to the friction between the tool and the material and the plastic deformation of material, resulting in a continuous increase in the welding temperature. In the stage of tool retraction, since the tool is separated from the material, no frictional heat is generated, and the welded joint dissipates heat naturally at room temperature, so the temperature continues to drop to room temperature. Path 1 obtained the highest peak temperature of 376 °C, and path 3 had the lowest peak temperature of 268 °C. The peak temperatures of path 2 and path 4 were close to each other at 307 °C and 306 °C, respectively. In path 1, due to the continuous plunging of the tool, the plastic flow of the material in the welding zone was greater, and more frictional heat was generated, which is one of the main reasons for the larger grains under this condition. Figure 8 also shows that the greater the initial plunging amount of the tool, the faster the temperature rise rate during the tool plunging and dwell stages.

3.4. Mechanical Properties

Figure 9 shows the cross-sectional microhardness of the welded joints under different tool plunging paths. In path 1, the microhardness at the edge of the welded joint was lower than that at the center of the stirring zone, and was far from reaching the microhardness of the base metal (89 HV). This was mainly due to the range of the stirring zone of path 1 being larger, and the range of the heat-affected zone formed under the influence of higher temperature was also larger, and the limited test points did not reach the base metal area. The microhardness of path 2, path 3, and path 4 gradually decreased when moving from the edge of the welded joint to the stirring zone, and rose when it reached the vicinity of the stirring zone, which is consistent with the findings of [44]. The gradual decrease in microhardness when moving from the edge of the welded joint to the stirring zone may be related to the decrease in dislocation density [45]. In addition, excessive aging can also reduce the microhardness of the heat-affected zone [46]. Two hard spots appeared around −2 mm and +4 mm of path 3, which were located near the stirring zone and the thermal-mechanical affected zone. The reason for this may be attributed to the effects of strain hardening [27]. In general, the microhardness of path 3 in the stirring zone was higher, followed by path 4 and path 2, and the microhardness of path 1 in the stirring zone was lower, which indicates that the step-by-step plunging path is favorable for increasing the microhardness in the stirring zone.
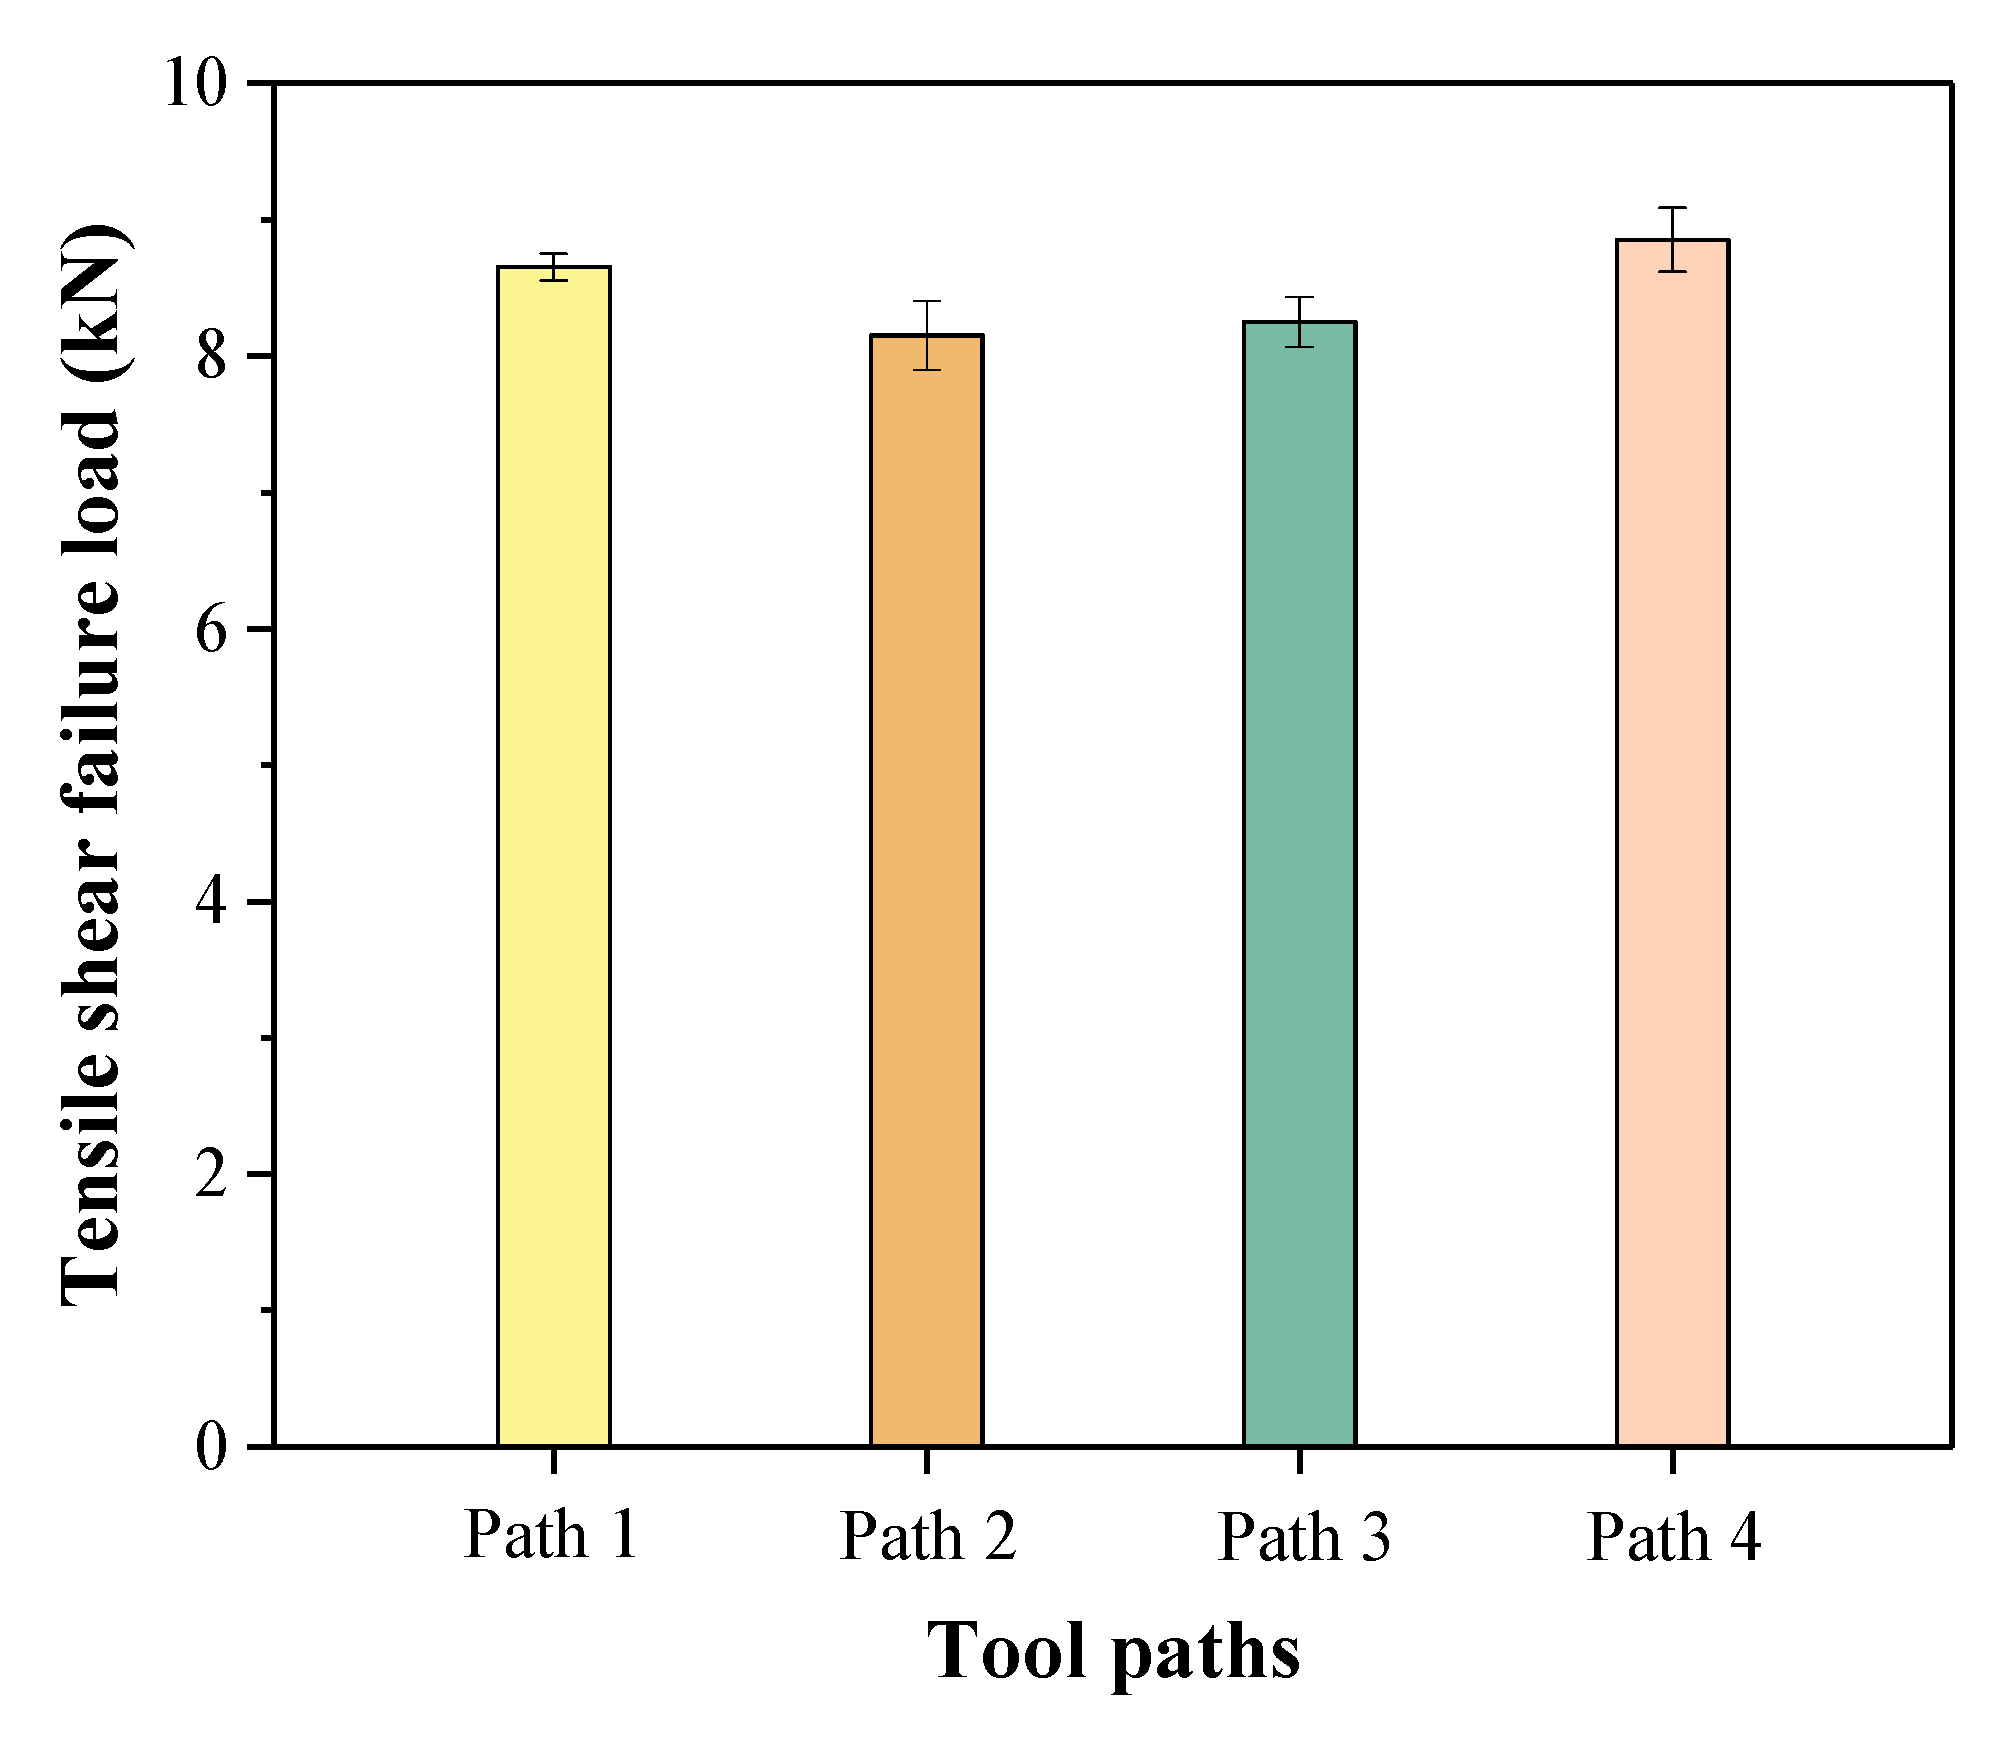
Figure 10 presents the tensile shear failure loads of the welded joints under different tool plunging paths.
It can be observed from Figure 10 that the tensile shear failure load of path 4 was the largest at 8.85 kN, and the tensile shear failure load of path 2 was the smallest at 8.15 kN. The tensile shear failure loads of path 1 and path 3 were 8.65 kN and 8.25 kN, respectively. The tensile shear failure load of path 4 was 2.3% higher than that of path 1, which shows the superiority of a reasonable step-by-step plunging path compared to a one-time plunging path in terms of the welded joint strength. The reason for this phenomenon may be that path 4 preheats the welding zone during the dwell stage after the first plunging step, and the softened material at the faying surface produces more severe plastic deformation and stronger bonding force during the second plunging step. According to the previous analysis, the maximum width and maximum height of the stirring zone of path 1 was larger than that of path 4, but the grains of the stirring zone of path 4 were smaller than that of path 1, and the width of the thermal-mechanical affected zone of path 4 was significantly higher than that of path 1, which indicates that the welded joint strength of PFSSW was not positively correlated with the range (width and height) of the stirring zone. The welded joint strength of PFSSW is related to various factors such as the range of the stirring zone, the microstructural features, and the range of the thermal-mechanical affected zone.

3.5. Fracture Mode

Figure 11 shows the fracture pictures of the welded joints under different tool plunging paths (LS means the lower sheet, US-TS means the top surface of upper sheet, and US-BS means the bottom surface of the upper sheet). It is clear that the welded joints were completely pulled out from the upper sheet and were tightly bonded to the lower sheet, which is a typical nugget pullout fracture mode of friction stir spot welding. This fracture mode was also observed in [47]. The size order of the tightly bonded welded joint on the lower sheet was path 1, path 4, path 2, and path 3, which is consistent with the variation law of the maximum width of the stirring zone. It can be concluded from the fracture mode that good metallurgical bonding formed in the welded joints under different tool plunging paths.
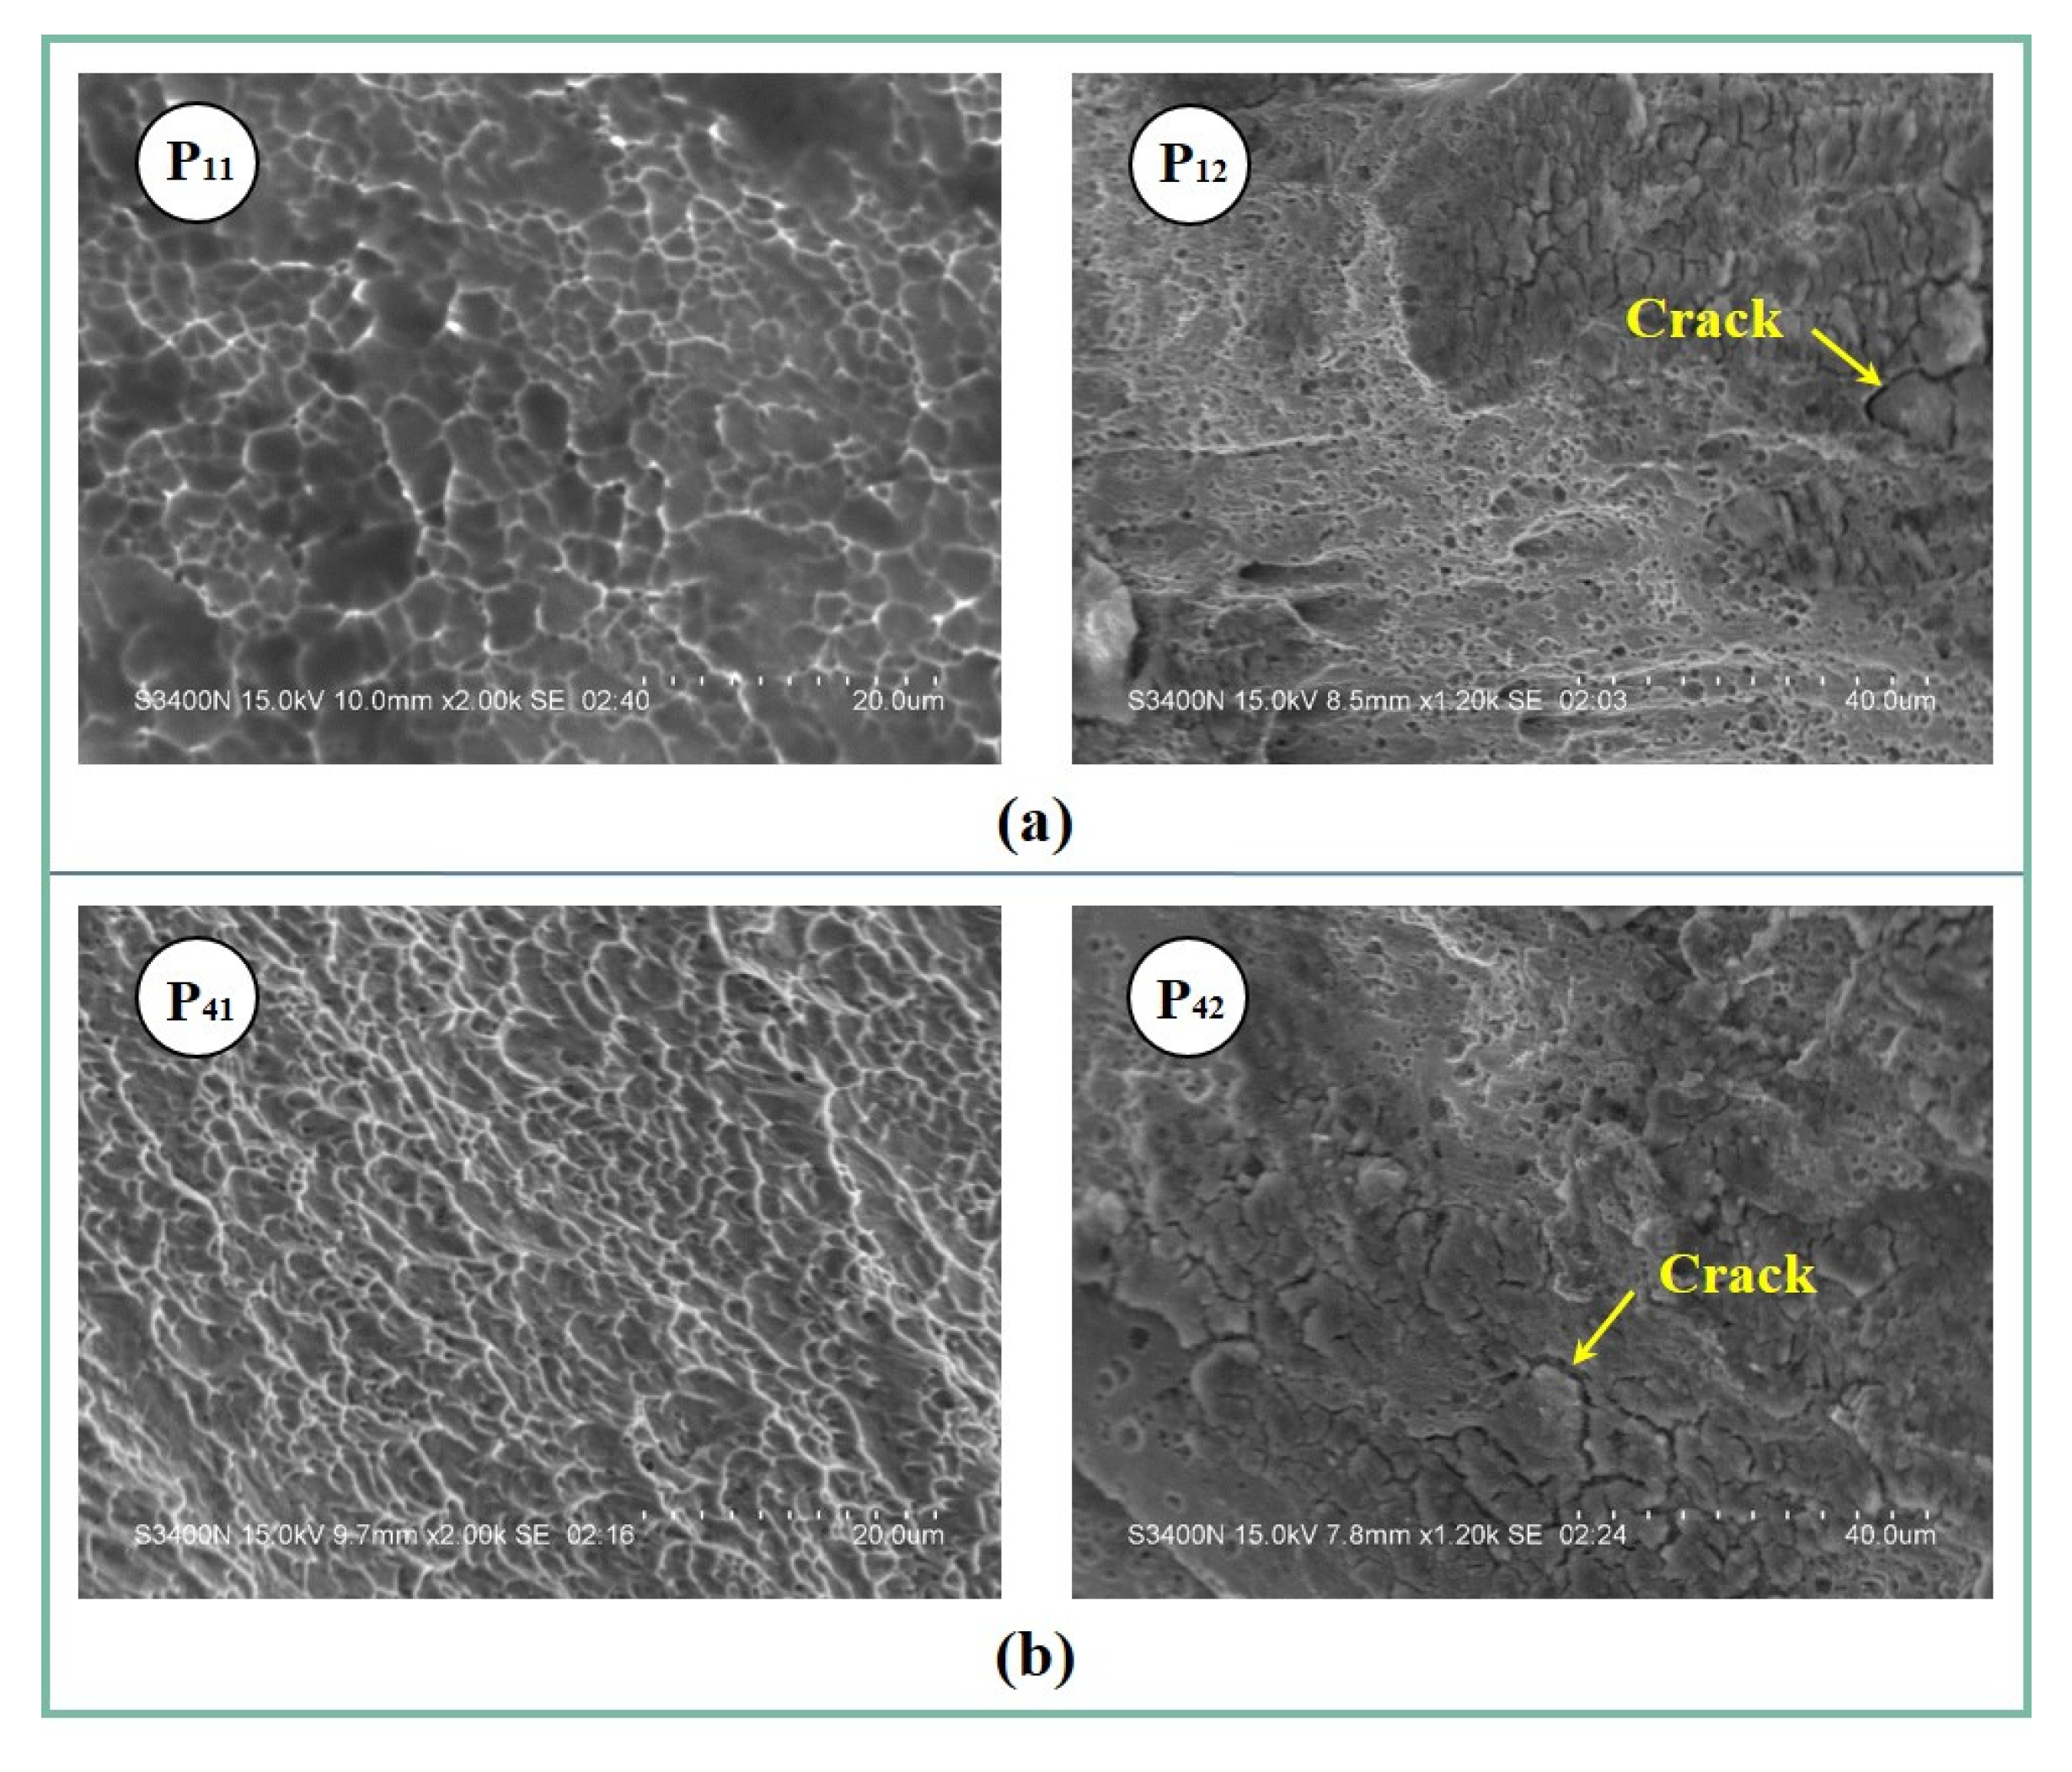
The SEM morphologies of the welded joint fractures of path 1 and path 4 in positions of P11, P12, P41, and P42 (see Figure 11) are shown in Figure 12.
It can be observed from Figure 12 that the fracture morphologies of path 1 and path 4 were composed of dimples of different sizes, which indicates that the fracture types of the welded joints in path 1 and path 4 were both ductile fracture [48]. Furthermore, the dimple size of path 4 was smaller than that of path 1, and the distribution was denser, which indicates that the joint surface of the welded joint of path 4 produced a better bonding quality. This may be attributed to the finer grain structure and wider thermal-mechanical affected zone of path 4 [49]. Cracks could be observed in the P12 and P42 areas of the upper sheet, which were caused by the continuous elongation of the material in this area during the stretching process. The cracks in path 4 were larger than that in path 1, which indicates that the welded joint of path 4 was subjected to greater tensile force during the tensile process. This is consistent with the changes in the tensile shear failure load of path 1 and path 4.

4. Conclusions

The effects of four kinds of tool plunging paths on the welded joint properties of the PFSSW of thin copper sheets were explored. The main conclusions are as follows:
  • The range of stirring zone generated by path 1 (one-time plunging: 0.3 mm) was the largest, while the range of stirring zone formed by path 3 (step-by-step plunging: 0.1 mm + 0.2 mm) was the smallest. The grains in the stirring zone of a step-by-step plunging path were smaller than those of the one-time plunging path. The width of the thermal-mechanical affected zone generated by the one-time plunging path was the smallest.
  • Path 1 obtained the highest peak temperature, and path 3 gained the lowest peak temperature. The greater the initial plunging amount of the tool, the faster the temperature rise rate during the tool plunging and dwell stages.
  • The tensile shear failure loads of path 1, path 2 (step-by-step plunging: 0.15 mm + 0.15 mm), path 3, and path 4 (step-by-step plunging: 0.2 mm + 0.1 mm) were 8.65 kN, 8.15 kN, 8.25 kN, and 8.85 kN, respectively. The tensile shear failure load of path 4, with a step-by-step plunging path, was 2.3% higher than that of the one-time plunging path 1. The step-by-step plunging path is favorable for increasing the microhardness in the stirring zone.
  • The fracture modes of the welded joints under different tool plunging paths were all nugget pullout fracture, and the fracture types of path 1 and path 4 were both ductile fracture.

Author Contributions

Conceptualization, X.G.; Methodology, X.G. and D.J.; Software, X.G.; Investigation, X.G. and W.S.; Resources, X.G. and H.W.; Writing—original draft, X.G.; Writing—review & editing, X.G. and W.S.; Visualization, X.G., D.J., W.S. and H.W.; Supervision, H.W.; Funding acquisition, X.G. All authors have read and agreed to the published version of the manuscript.

Funding

This research was funded by the Key Research Project of Natural Science in Anhui Higher Education Institutions, grant number 2022AH051947; the Key Research and Development Project in Anhui Province, grant number 202004a05020025 and 202104b11020011.

Data Availability Statement

The data presented in this study are available on request from the corresponding author.

Conflicts of Interest

The authors declare no conflict of interest.

References

  1. Hou, W.T.; Ding, Y.Q.; Huang, G.Q.; Huda, N.; Ahmad Shah, L.H.; Piao, Z.Y.; Shen, Y.F.; Shen, Z.K.; Gerlich, A. The role of pin eccentricity in friction stir welding of Al-Mg-Si alloy sheets: Microstructural evolution and mechanical properties. Int. J. Adv. Manuf. Technol. 2022, 121, 7661–7675. [Google Scholar] [CrossRef]
  2. Marzbanrad, J.; Akbari, M.; Asadi, P.; Safaee, S. Characterization of the influence of tool pin profile on microstructural and mechanical properties of friction stir welding. Metall. Mater. Trans. B-Process Metall. Mater. Process. Sci. 2014, 45, 1887–1894. [Google Scholar] [CrossRef]
  3. Paulo Davim, J. Welding Technology, 1st ed.; Springer Nature Switzerland AG: Cham, Switzerland, 2021; pp. 1–3. [Google Scholar] [CrossRef]
  4. Shao, M.H.; Wang, C.M.; Zhang, H.; Zhang, J.; Liu, D.B.; Wang, F.F.; Ji, Y.J.; Chen, G.Q. Microstructure and corrosion behavior of bobbin tool friction stir welded 2219 aluminum alloy. Mater. Charact. 2022, 192, 112178. [Google Scholar] [CrossRef]
  5. Wang, H.; Xu, W.F.; Lu, H.J.; Liu, Y.L. Effect of microstructure inhomogeneity on creep behavior of friction stir welding 7B50-T7451 aluminum alloy thick plate joint. Mater. Charact. 2022, 193, 112292. [Google Scholar] [CrossRef]
  6. Shen, Z.K.; Zhang, M.T.; Li, D.X.; Liu, X.Y.; Chen, S.L.; Hou, W.T.; Ding, Y.Q.; Sun, Z.G.; Su, Y.; Li, W.Y.; et al. Microstructural characterization and mechanical properties of AlMg alloy fabricated by additive friction stir deposition. Int. J. Adv. Manuf. Technol. 2023, 125, 2733–2741. [Google Scholar] [CrossRef]
  7. Xie, L.W.; Xiao, X.; Zhu, X.Y.; Fan, Y.X.; Jiang, C.; Song, Y.L. Influence mechanism of pin thread in friction stir welding of magnesium alloys based on the relationship between microstructure and mechanical properties. J. Mater. Process. Technol. 2023, 312, 117870. [Google Scholar] [CrossRef]
  8. Chiuzuli, F.R.; Batistão, B.F.; Bergmann, L.A.; Alcântara, N.G.D.; Santos, J.F.D.; Klusemann, B.; Gargarella, P. Effect of the gap width in AZ31 magnesium alloy joints obtained by friction stir welding. J. Mater. Res. Technol. 2021, 15, 5297–5306. [Google Scholar] [CrossRef]
  9. Liu, X.C.; Sun, Y.F.; Nagira, T.; Ushioda, K.; Fujii, H. Strain rate dependent micro-texture evolution in friction stir welding of copper. Materialia 2019, 6, 100302. [Google Scholar] [CrossRef]
  10. Pashazadeh, H.; Teimournezhad, J.; Masoumi, A. Numerical investigation on the mechanical, thermal, metallurgical and material flow characteristics in friction stir welding of copper sheets with experimental verification. Mater. Des. 2014, 55, 619–632. [Google Scholar] [CrossRef]
  11. Shi, L.; Dai, X.; Tian, C.Y.; Wu, C.S. Effect of splat cooling on microstructures and mechanical properties of friction stir welded 2195 Al-Li alloy. Mater. Sci. Eng. A 2022, 858, 144169. [Google Scholar] [CrossRef]
  12. Ghiasvand, A.; Ranjbarnodeh, E.; Mirsalehi, S.E. The microstructure and mechanical properties of single-pass and double-pass lap joint of Al 5754H-11 and Mg AZ31-O alloys by friction stir welding. J. Mater. Res. Technol. 2023, 23, 6023–6038. [Google Scholar] [CrossRef]
  13. Khajeh, R.; Jafarian, H.R.; Jabraeili, R.; Eivani, A.R.; Seyedein, S.H.; Park, N.; Heidarzadeh, A. Strength-ductility synergic enhancement in friction stir welded AA2024 alloy and copper joints: Unravelling the role of Zn interlayer’s thickness. J. Mater. Res. Technol. 2022, 16, 251–262. [Google Scholar] [CrossRef]
  14. Farhang, M.; Farahani, M. Experimental correlation between microstructure, residual stresses and mechanical properties of friction stir welded 2024-T6 aluminum alloys. Int. J. Adv. Des. Manuf. Technol. 2022, 15, 1–9. [Google Scholar] [CrossRef]
  15. Tozaki, Y.; Uematsu, Y.; Tokaji, K. A newly developed tool without probe for friction stir spot welding and its performance. J. Mater. Process. Technol. 2010, 210, 844–851. [Google Scholar] [CrossRef]
  16. Prangnell, P.B.; Bakavos, D. Novel approaches to friction spot welding thin aluminium automotive sheet. Mater. Sci. Forum 2010, 638, 1237–1242. [Google Scholar] [CrossRef]
  17. Ding, W.Z.; Zhang, Y.; Lu, T.; Wang, P.Z.; Chu, Q.; Li, W.Y. Materials flow behavior during probeless friction stir spot welding and its correlation with macroscopic morphology and grain characteristics of joints. Jixie Gongcheng Xuebao 2020, 56, 59–65. [Google Scholar] [CrossRef]
  18. Yang, X.W.; Fu, T.; Li, W.Y. Friction stir spot welding: A review on joint macro- and microstructure, property, and process modelling. Adv. Mater. Sci. Eng. 2014, 2014, 697170. [Google Scholar] [CrossRef] [Green Version]
  19. Suryanarayanan, R.; Sridhar, V.G. Studies on the influence of process parameters in friction stir spot welded joints—A review. Mater. Today Proc. 2020, 37, 2695–2702. [Google Scholar] [CrossRef]
  20. Forsström, A.; Bossuyt, S.; Yagodzinskyy, Y.; Tsuzaki, K.; Hänninen, H. Strain localization in copper canister FSW welds for spent nuclear fuel disposal. J. Nucl. Mater. 2019, 523, 347–359. [Google Scholar] [CrossRef]
  21. Ólafsson, D.; Vilaça, P.; Vesanko, J. Multiphysical characterization of FSW of aluminum electrical busbars with copper ends. Weld. World. 2020, 64, 59–71. [Google Scholar] [CrossRef] [Green Version]
  22. Zhang, H.; Jiao, K.X.; Zhang, J.L.; Liu, J.P. Experimental and numerical investigations of interface characteristics of copper/steel composite prepared by explosive welding. Mater. Des. 2018, 154, 140–152. [Google Scholar] [CrossRef]
  23. Jabbari, M. Elucidating of rotation speed in friction stir welding of pure copper: Thermal modeling. Comput. Mater. Sci. 2014, 81, 296–302. [Google Scholar] [CrossRef]
  24. Heidarzadeh, A.; Jabbari, M.; Esmaily, M. Prediction of grain size and mechanical properties in friction stir welded pure copper joints using a thermal model. Int. J. Adv. Manuf. Technol. 2015, 77, 1819–1829. [Google Scholar] [CrossRef]
  25. Bakavos, D.; Chen, Y.C.; Babout, L.; Prangnell, P. Material interactions in a novel pinless tool approach to friction stir spot welding thin aluminum sheet. Metall. Mater. Trans. A 2011, 42, 1266–1282. [Google Scholar] [CrossRef]
  26. Xu, R.Z.; Ni, D.R.; Yang, Q.; Liu, C.Z.; Ma, Z.Y. Pinless friction stir spot welding of Mg-3Al-1Zn alloy with Zn interlayer. J. Mater. Sci. Technol. 2016, 32, 76–88. [Google Scholar] [CrossRef]
  27. Yazdi, S.R.; Beidokhti, B.; Haddad-Sabzevar, M. Pinless tool for FSSW of AA 6061-T6 aluminum alloy. J. Mater. Process. Technol. 2019, 267, 44–51. [Google Scholar] [CrossRef]
  28. Saleh, A.; Seyyed Ehsan, M.; Eslam, R. Pinless FSSW of DP600/Zn/AA6061 dissimilar joints. J. Mater. Res. Technol. 2021, 15, 996–1006. [Google Scholar] [CrossRef]
  29. Li, W.Y.; Li, J.F.; Zhang, Z.H.; Gao, D.L.; Wang, W.B.; Dong, C.L. Improving mechanical properties of pinless friction stir spot welded joints by eliminating hook defect. Mater. Des. 2014, 62, 247–254. [Google Scholar] [CrossRef]
  30. Özgül, H.G.; Dedeoğlu, O. Investigations of the mechanical and microstructural effects of pinless tool geometry on friction stir spot welding process. Trans. Indian Inst. Met. 2020, 73, 2281–2289. [Google Scholar] [CrossRef]
  31. Suryanarayanan, R.; Sridhar, V.G. Effect of process parameters in pinless friction stir spot welding of Al 5754-Al 6061 alloys. Metallogr. Microstruct. Anal. 2020, 9, 261–272. [Google Scholar] [CrossRef]
  32. Abed, B.H.; Salih, O.S.; Sowoud, K.M. Pinless friction stir spot welding of aluminium alloy with copper interlayer. Open Eng. 2020, 10, 804–813. [Google Scholar] [CrossRef]
  33. Chu, Q.; Yang, X.; Li, W.; Li, Y. Microstructure and mechanical behaviour of pinless friction stir spot welded AA2198 joints. Sci. Technol. Weld. Join. 2016, 21, 164–170. [Google Scholar] [CrossRef]
  34. Tchouaha Tankoua, A.; Köhler, T.; Bergmann, J.P.; Grätzel, M.; Betz, P.; Lindenau, D. Tool downscaling effects on the friction stir spot welding process and properties of current-carrying welded aluminum-copper joints for e-mobility applications. Metals 2021, 11, 1949. [Google Scholar] [CrossRef]
  35. Park, H. Pinless Friction Stir Spot Welding of Ti-6Al-4V Alloy for Aerospace Application. Doctoral Dissertation, University of Tennessee, Knoxville, TN, USA, May 2022. [Google Scholar]
  36. Chu, Q.; Yang, X.W.; Li, W.Y.; Vairis, A.; Wang, W.B. Numerical analysis of material flow in the probeless friction stir spot welding based on Coupled Eulerian-Lagrangian approach. J. Manuf. Process. 2018, 36, 181–187. [Google Scholar] [CrossRef]
  37. Jedrasiak, P.; Shercliff, H.R.; Reilly, A.; McShane, G.J.; Chen, Y.C.; Wang, L.; Robson, J.; Prangnell, P. Thermal modeling of Al-Al and Al-Steel friction stir spot welding. J. Mater. Eng. Perform. 2016, 25, 4089–4098. [Google Scholar] [CrossRef] [Green Version]
  38. Yang, X.W.; Feng, W.Y.; Li, W.Y.; Xu, Y.X.; Chu, Q.; Ma, T.J.; Wang, W.B. Numerical modelling and experimental investigation of thermal and material flow in probeless friction stir spot welding process of Al 2198-T8. Sci. Technol. Weld. Join. 2018, 23, 704–714. [Google Scholar] [CrossRef]
  39. Mariia, R.; Nicola, C.; Giuseppe, C. Modeling of probeless friction stir spot welding of AA2024/AISI304 steel lap joint. Materials 2022, 15, 8205. [Google Scholar] [CrossRef]
  40. Minh, P.S.; Nguyen, V.-T.; Nguyen, V.T.; Uyen, T.M.T.; Do, T.T.; Nguyen, V.T.T. Study on the fatigue strength of welding line in injection molding products under different tensile conditions. Micromachines 2022, 13, 1890. [Google Scholar] [CrossRef]
  41. Nguyen, T.T.; Tran, V.T.; Pham, T.H.N.; Nguyen, V.-T.; Thanh, N.C.; Thi, H.M.N.; Duy, N.V.A.; Thanh, D.N.; Nguyen, V.T.T. Influences of material selection, infill ratio, and layer height in the 3D printing cavity process on the surface roughness of printed patterns and casted products in investment casting. Micromachines 2023, 14, 395. [Google Scholar] [CrossRef]
  42. Ciemiorek, M.; Morawiński, Ł.; Jasiński, C.; Orłowska, M.; Chmielewski, T.; Olejnik, L.; Lewandowska, M. Characterization of ultrafine-grained copper joints acquired by rotary friction welding. Arch. Civ. Mech. Eng. 2022, 22, 1–12. [Google Scholar] [CrossRef]
  43. Farhang, M.; Sam-Daliri, O.; Farahani, M.; Vatani, A. Effect of friction stir welding parameters on the residual stress distribution of Al-2024-T6 alloy. J. Mech. Eng. Sci. 2021, 15, 7684–7694. [Google Scholar] [CrossRef]
  44. Chu, Q.; Hao, S.J.; Li, W.Y.; Yang, X.W.; Zou, Y.F.; Wu, D.; Vairis, A. On the association between microhardness, corrosion resistance and microstructure of probeless friction stir spot welded Al-Li joint. J. Mater. Res. Technol. 2021, 14, 2394–2405. [Google Scholar] [CrossRef]
  45. Murr, L.E.; Liu, G.; McClure, J.C. A TEM study of precipitation and related microstructures in friction-stir-welded 6061 aluminum. J. Mater. Sci. 1998, 33, 1243–1251. [Google Scholar] [CrossRef]
  46. Heinz, B.; Skrotzki, B. Characterization of a friction-stir-welded aluminum alloy 6013. Metall. Mater. Trans B 2002, 33, 489–498. [Google Scholar] [CrossRef]
  47. Yu, G.S.; Chen, X.; Wu, Z.T.; Chen, Y.X.; Zhang, G.C. Analysis of microstructure and mechanical properties of probeless friction stir spot welding joint in AA6061-T6 aluminum alloy. Jilin Daxue Xuebao (Gongxueban), 2022; in press. [Google Scholar] [CrossRef]
  48. Sun, F.Q.; Gong, W.B.; Fan, J. Influence of needleless stir friction head welding on micro-structure and properties of aluminum alloy lapping. J. Changchun Univ. Technol. 2016, 37, 1–4. [Google Scholar] [CrossRef]
  49. Tong, L.; Xie, J.N.; Liu, L.; Chang, G.; Ojo, O.O. Microscopic appraisal and mechanical behavior of hybrid Cu/Al joints fabricated via friction stir spot welding-brazing and modified friction stir clinching-brazing. J. Mater. Res. Technol. 2020, 9, 13239–13249. [Google Scholar] [CrossRef]
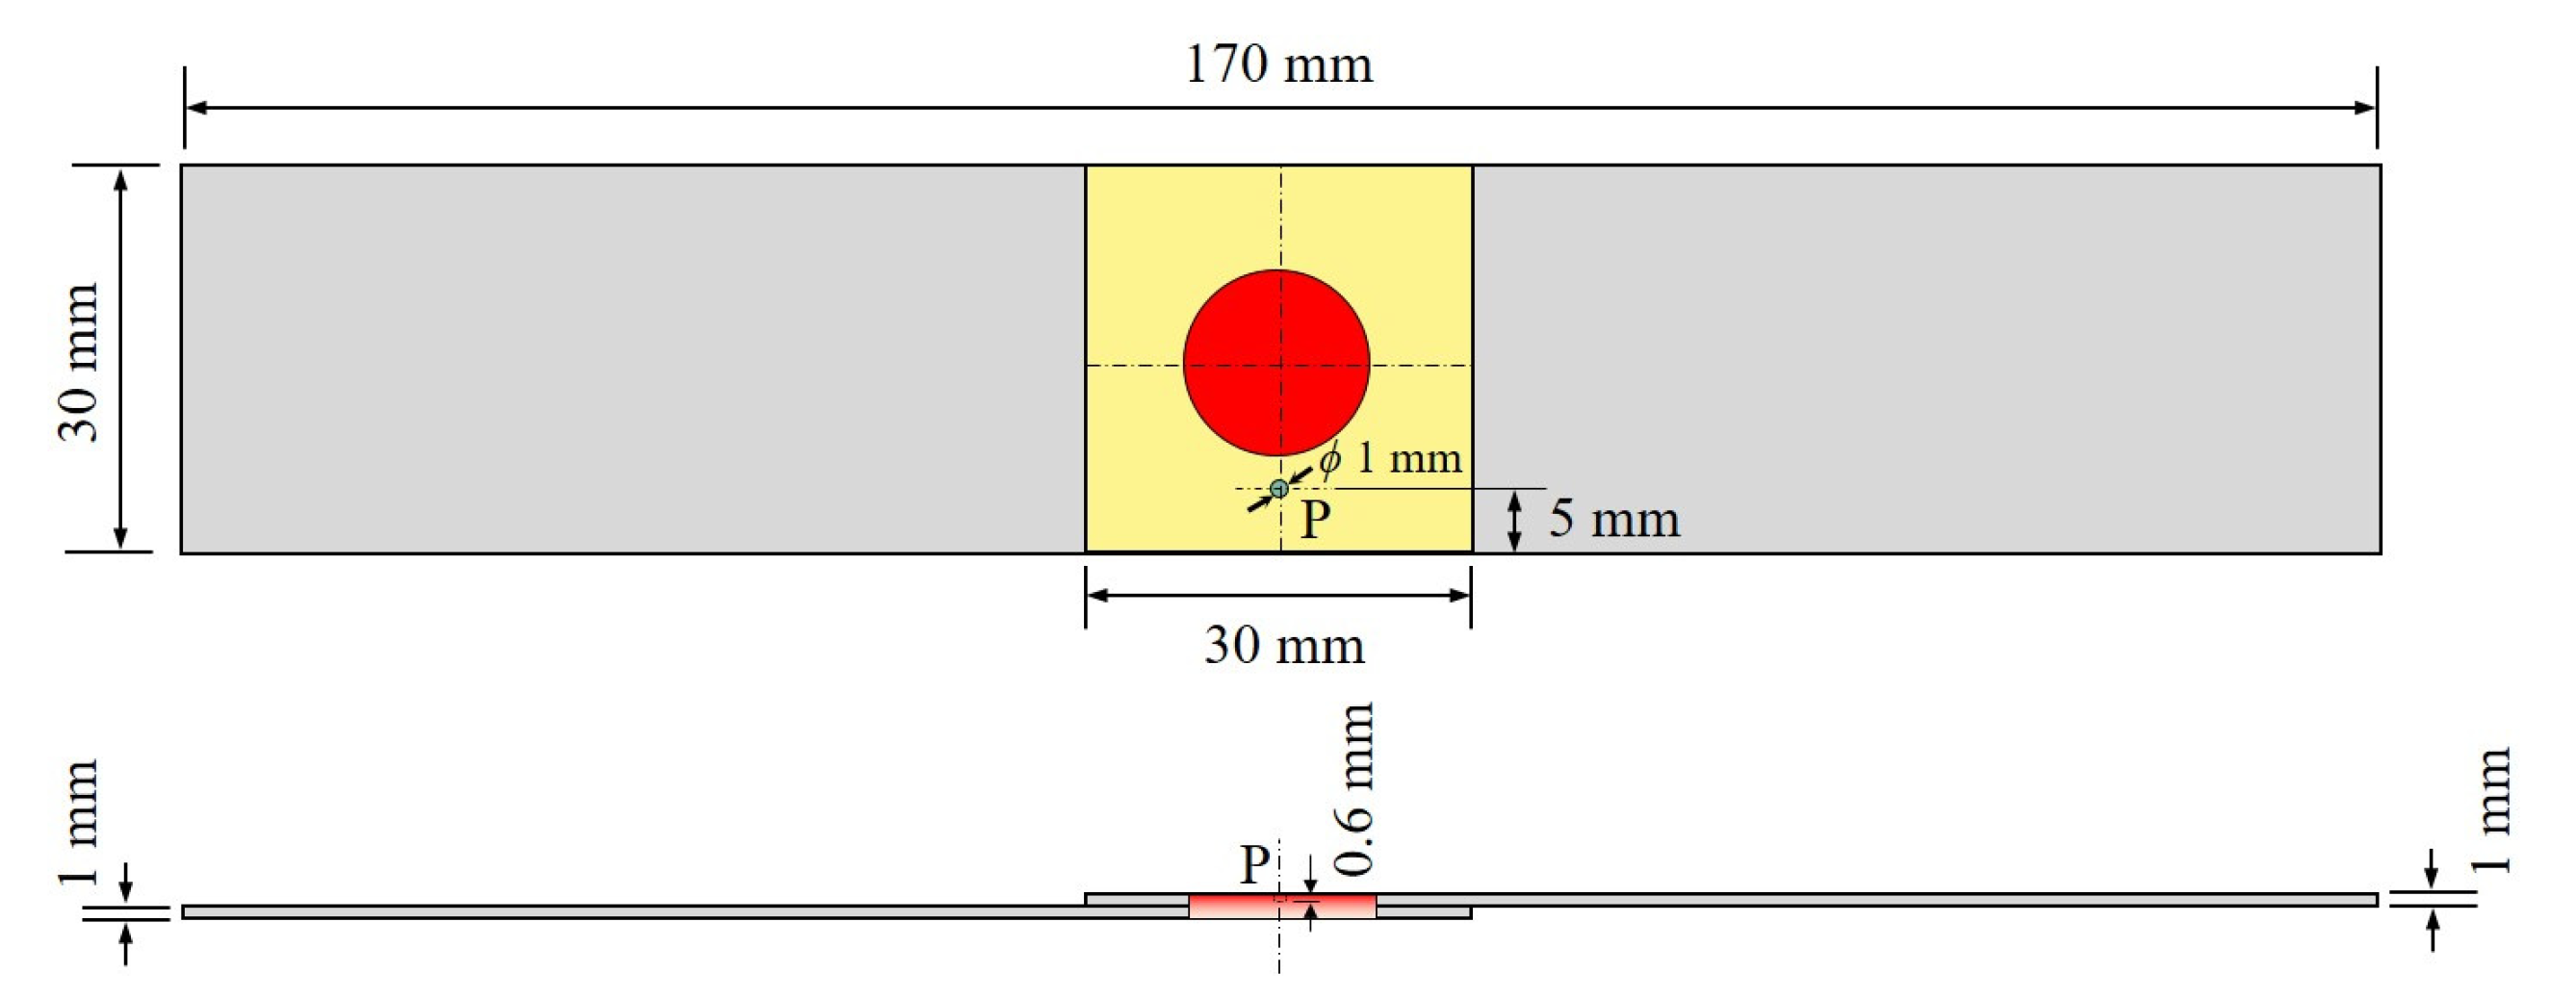
Figure 1. Dimensions and overlap type of copper sheets.
Lubricants 11 00150 g001
Figure 2. Photograph of the experimental platform.
Lubricants 11 00150 g002
Figure 3. Schematic diagram of path 1 (a), path 2 (b), path 3 (c) and path 4 (d).
Lubricants 11 00150 g003
Figure 4. Flowchart of the research process.
Lubricants 11 00150 g004
Figure 5. Appearance features of the welded joints under path 1 (a1,a2), path 2 (b1,b2), path 3 (c1,c2), and path 4 (d1,d2).
Lubricants 11 00150 g005
Figure 6. Cross-sectional morphologies of the welded joints under path 1 (a), path 2 (b), path 3 (c), and path 4 (d).
Lubricants 11 00150 g006
Figure 7. Microstructure of the stirring zone (A1,B1,C1,D1) and thermal-mechanical affected zone (A2,B2,C2,D2) under path 1 (a), path 2 (b), path 3 (c), and path 4 (d).
Lubricants 11 00150 g007
Figure 8. Welding temperature under different tool plunging paths.
Lubricants 11 00150 g008
Figure 9. Cross-sectional microhardness of the welded joints under the different tool plunging paths.
Lubricants 11 00150 g009
Figure 10. Tensile shear failure loads of the welded joints under different tool plunging paths.
Lubricants 11 00150 g010
Figure 11. Fracture pictures of welded joints under path 1 (a), path 2 (b), path 3 (c), and path 4 (d).
Lubricants 11 00150 g011
Figure 12. SEM morphologies of the welded joint fractures of path 1 (a) and path 4 (b).
Lubricants 11 00150 g012
Table 1. The process parameters under different tool plunging paths.
Plunging ProcessProcess ParametersPath 1Path 2Path 3Path 4
Step 1Plunging depth (mm)0.30.150.10.2
Dwell time (s)0.80.40.40.4
Step 2Plunging depth (mm)-0.150.20.1
Dwell time (s)-0.40.40.4
Disclaimer/Publisher’s Note: The statements, opinions and data contained in all publications are solely those of the individual author(s) and contributor(s) and not of MDPI and/or the editor(s). MDPI and/or the editor(s) disclaim responsibility for any injury to people or property resulting from any ideas, methods, instructions or products referred to in the content.