1. Introduction
Titanium alloys are light and usually well deformable alloys with high values of ductility, strength, and anti-corrosion properties [
1,
2]. Due to this, they are used in the vehicle and aerospace industries for the manufacture of large-sized welded and assembled structures of aircraft and spherical tanks for space rocket engines that withstand high internal pressures in a wide temperature range [
3,
4]. However, complex, multi-stage methods are used to produce such spherical tanks, which considerably increases the lead time and material costs of production. Recently, the additive manufacturing of products from titanium alloys has become widespread, which makes it possible to fabricate products with complex geometry. In addition, additive methods are used to produce large-sized products that do not require high detailing, for which electron beam additive manufacturing technology with wire filament feeding (WEBAM) is used [
5,
6].
Depending on the modes used during the manufacturing, the structure morphology of products may change, with the most typical for WEBAM-produced samples being a columnar structure with elongated primary β-phase grains [
7]. Because of this, the anisotropy of mechanical properties is characteristic of WEBAM-derived products, which negatively affects the final product properties [
8,
9]. In addition, spherical pores may be present in the components produced by WEBAM, the size and number of which depend on the heat dissipation rate through the substrate—the smaller it is, the larger the size and number of pores are [
10]. A competent selection of modes can allow for an increase in the values of tensile and yield strength in WEBAM-produced products, but the values of other parameters, such as fracture and fatigue strength, are, at best, comparable with those of rolled products [
11].
The properties of additive products can be significantly improved in most cases by subsequent heat treatment [
12]. However, most heat treatment methods are poorly controlled and lead to additional defects and material embrittlement [
13]. Friction stir processing (FSP), a method of local surface modification similar to friction stir welding which is used for joining dissimilar materials, can help to avoid this. The process of FSP is performed by heating and severe plastic deformation arising from the adhesive friction of the material by a tool being introduced into the surface layer and passing over the required area. The FSP process locally changes the microstructure of the alloy to achieve the desired specific properties. Severe plastic deformation and thermal impact during FSP lead to grain refinement in the matrix, the elimination of porosity, and the formation of a uniform fine grain structure [
14,
15,
16]. The material is displaced behind the tool in the process of its movement, with the material movement having an extremely complex character. The final product properties also depend on the parameters used. Because of the wide variability of both WEBAM and FSP modes, the processed additive samples are poorly studied. Thus, the purpose of this work was to study the effect of friction stir processing on changes in the structure and properties of products made of Ti6Al4V alloy and produced by wire-feed electron beam additive manufacturing using a complex 3D printing trajectory to produce bulk block-shaped samples.
2. Materials and Methods
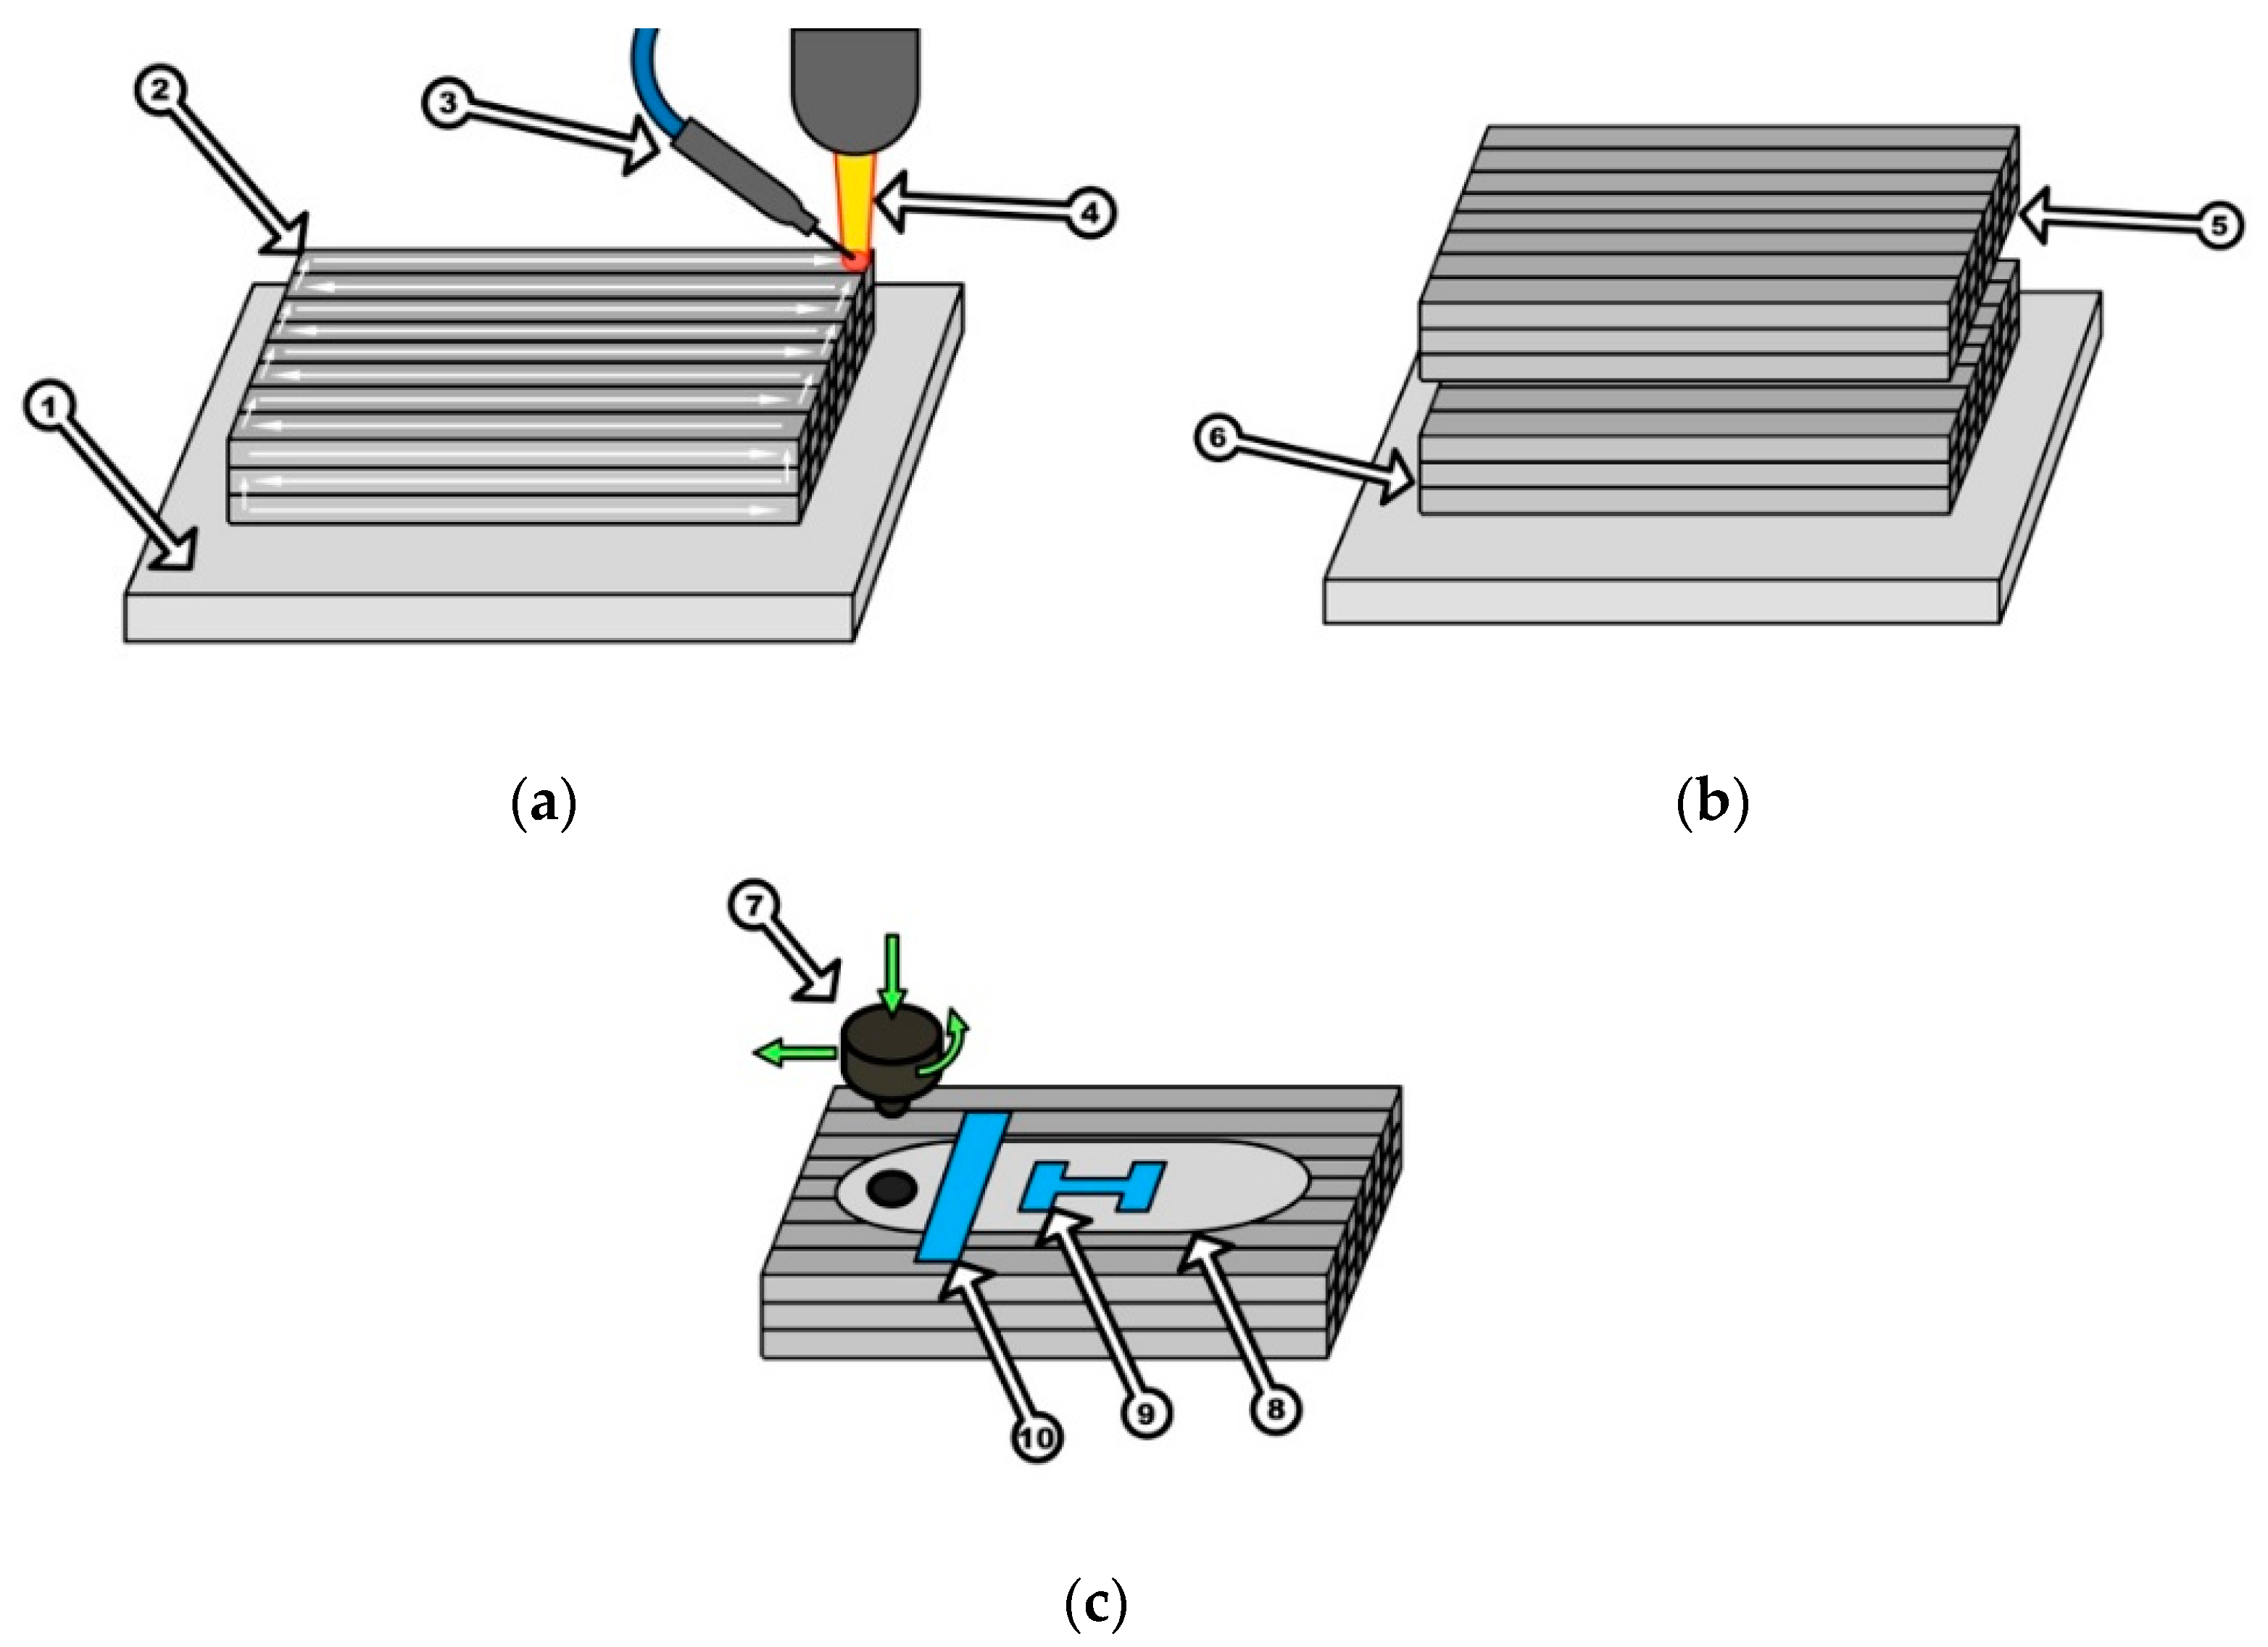
To carry out the research, samples in the shape of blocks measuring 120 mm × 60 mm × 30 mm were produced using a wire-feed electron beam additive manufacturing machine (WEBAM, Institute of Strength Physics and Materials Science, Siberian Branch of the Russian Academy of Sciences, Tomsk, Russia). The 3D printing was performed using a 2.0 mm diameter Ti6Al4V alloy welding wire. The samples were produced according to the scheme shown in
Figure 1a. The WEBAM process was implemented at a constant accelerating voltage of 30 kV, a linear printing speed of 440 mm/min, and an average electron beam current of 45 mA.
After 3D printing, the samples were sectioned into plates, which were subsequently subjected to friction stir processing (FSP), as shown in
Figure 1b,c. For the FSP, a tool made of nickel-based heat-resistant alloy ZhS6U with a pin length of 2.5 mm, a pin diameter of 5.0 mm and a shoulder diameter of 20.0 mm were used. The FSP parameters used were a loading force of 36.29 kN, a tool travel speed of 90 mm/min, and a tool rotation speed of 400 rpm for sample 1 (lower plate) and a loading force of 38.25 kN, a tool travel speed of 90 mm/min, and a tool rotation speed of 400 rpm for sample 2 (upper plate). The processing was carried out on a specially designed laboratory setup for friction stir welding (Institute of Strength Physics and Material Science, Siberian Branch of the Russian Academy of Sciences, Tomsk, Russia).
After the processing, specimens were cut out for metallographic studies and static tensile tests. The cutting of plates for the FSP and specimens for examinations was carried out by means of the EDM-machine DK7750 (Suzhou Simos CNC Technology Co., Ltd., Suzhou, China). The microstructure of the material was investigated using an Altami MET 1C optical microscope (Altami Ltd., Saint Petersburg, Russia), an Apreo 2 S LoVac scanning electron microscope (Thermo Fisher Scientific Inc., Waltham, MA, USA), and a JEOL JEM-2100 transmission electron microscope (JEOL Ltd., Akishima, Japan). Static tensile tests were performed on the UTS 110M-100 (Testsystems, Ivanovo, Russia).
3. Results
3.1. Optical Metallography
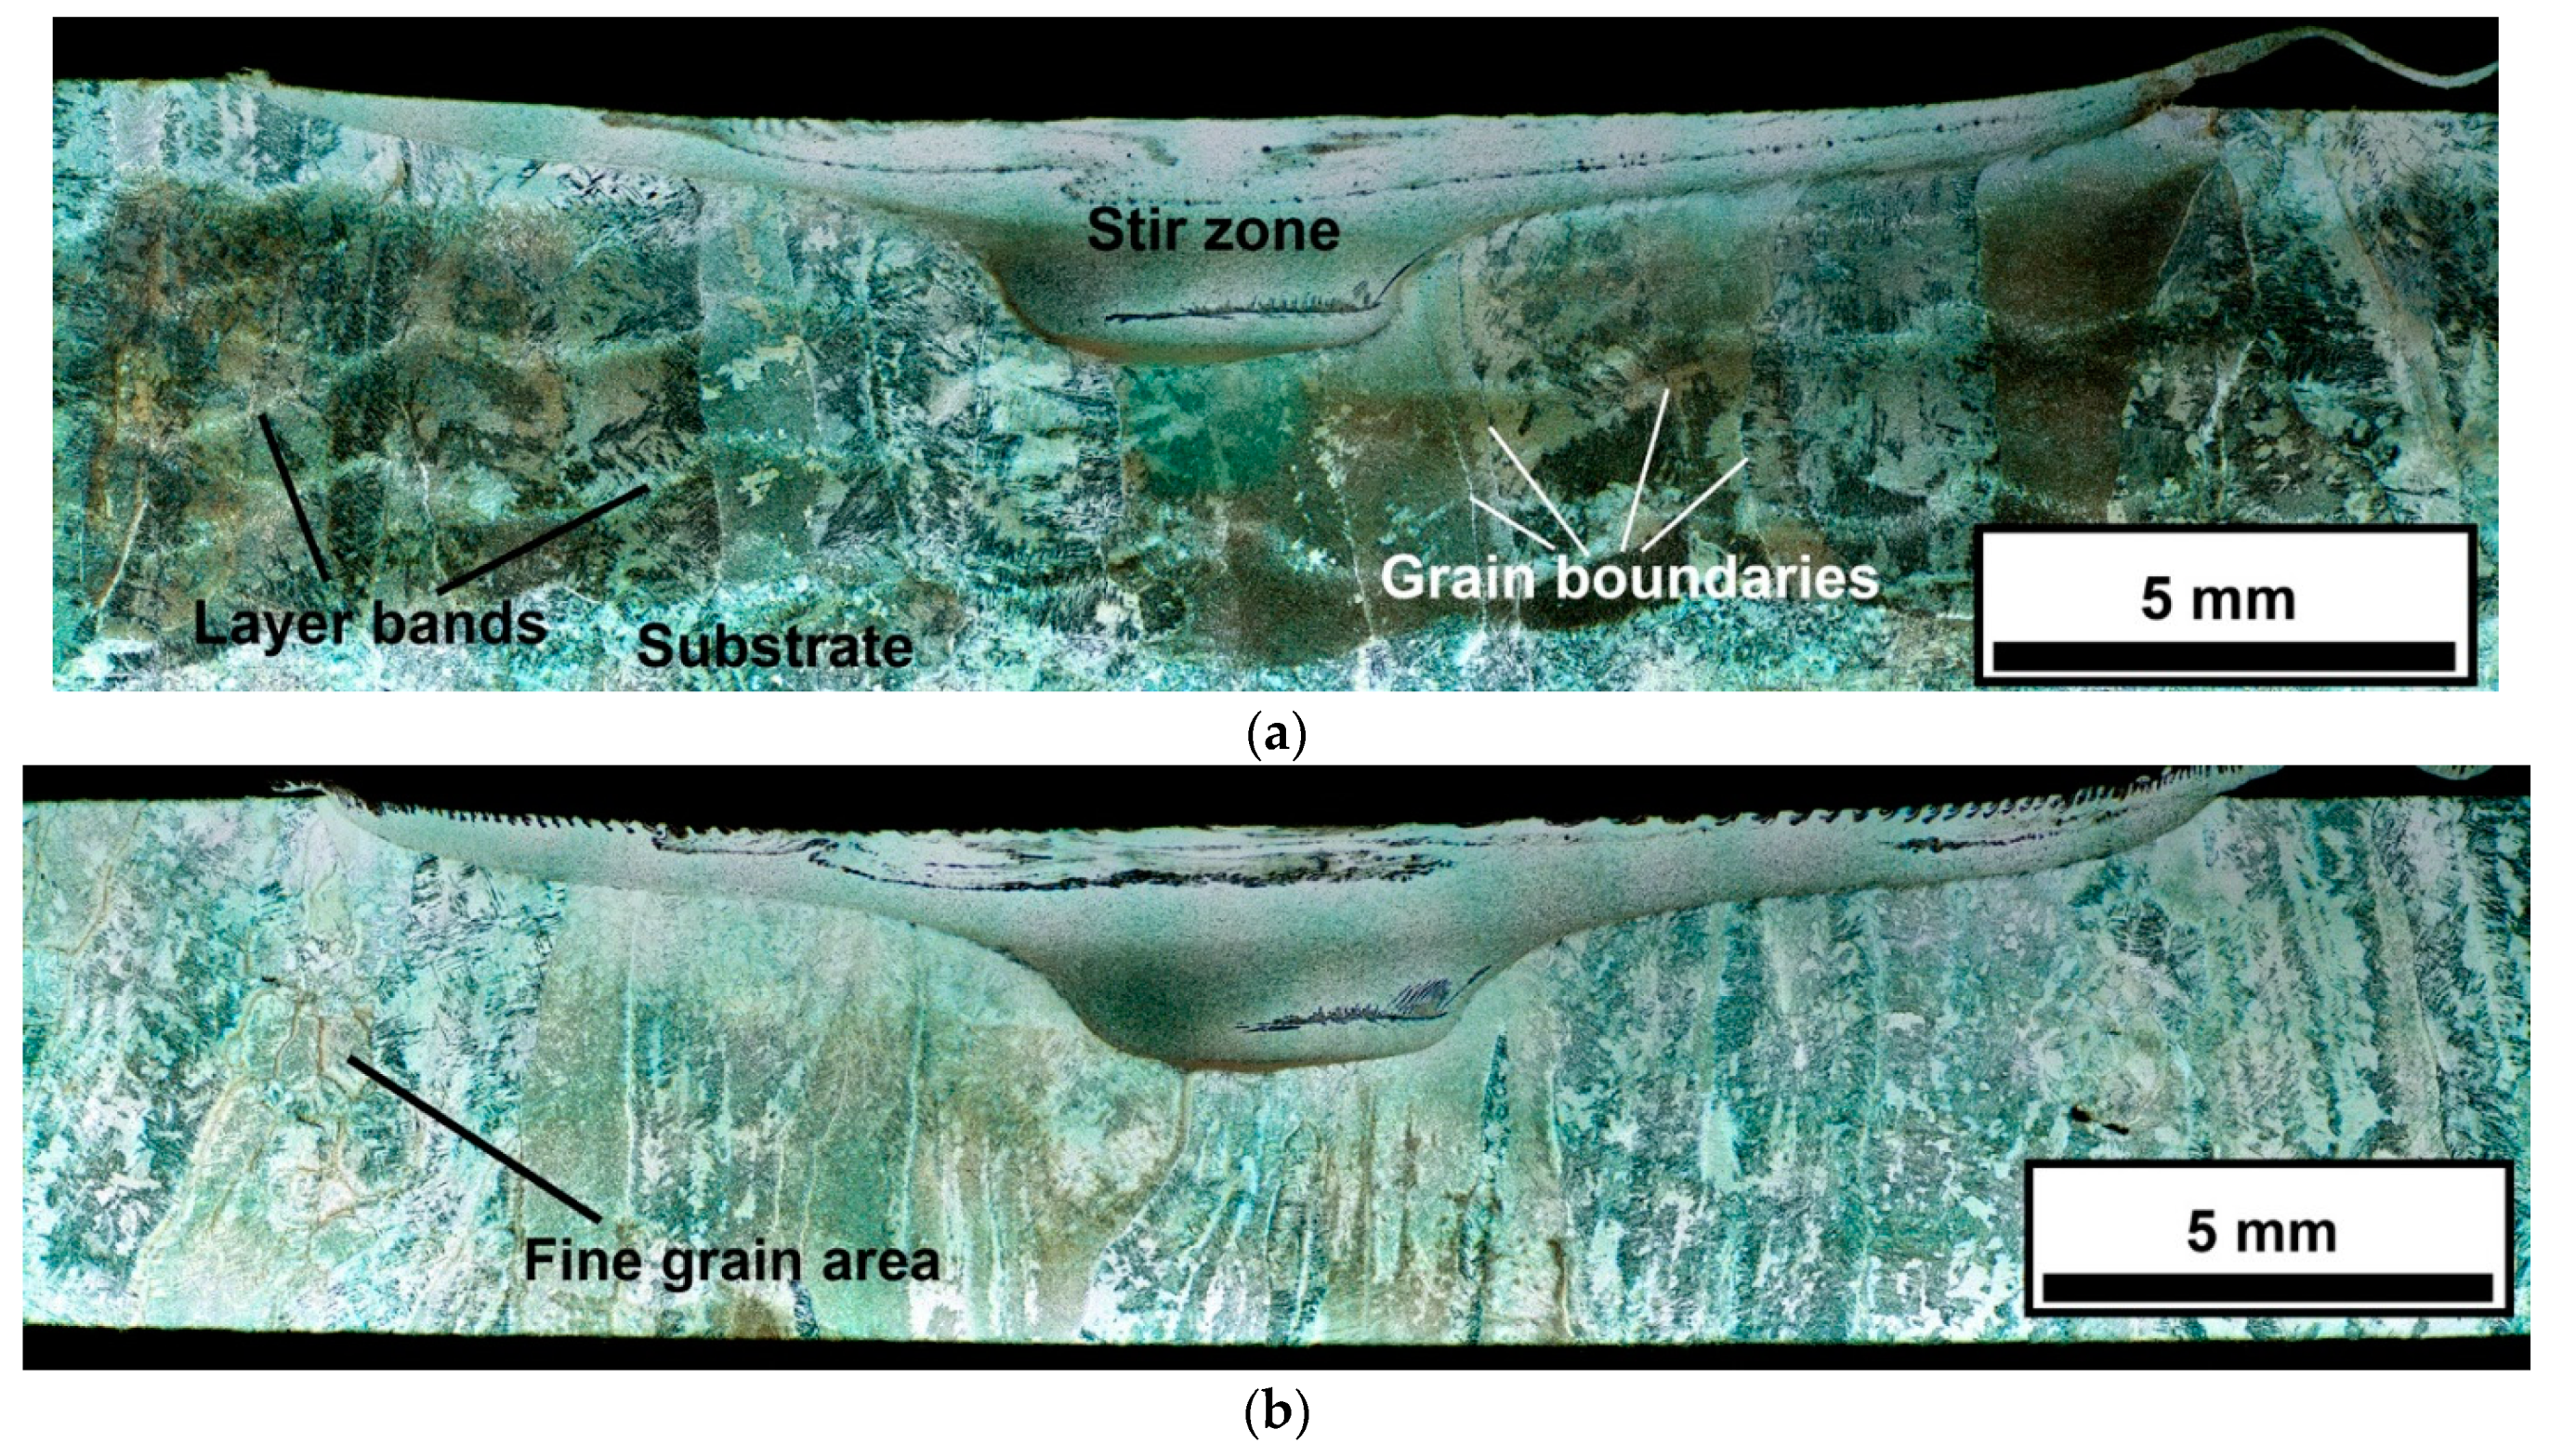
Images of the macrostructure of the samples produced, including the initial structure of the additive material and the stir zone after the FSP, are shown in
Figure 2. First, the structure of the initial material of the additive workpiece will be considered. In the cross-sections of lower and upper plates in the as-built state, typical for Ti6Al4V alloy, columnar grains of the primary β-phase can be seen. In the lower plate (Sample 1,
Figure 2a), the layer-bands (or the heat-affected zones) caused by thermal cycling in the process of 3D-printing are also evident. As for the size of these grains, their height can reach the height of the sample, i.e., the grain growth occurs epitaxially from the substrate to the upper surface of the sample. The width of the columnar grains varies depending on the studied section. Thus, in the transverse section of sample 1, the average width of the columnar grains is 1.2 mm, whereas in sample 2, it is 0.8 mm. At the same time, there are areas with small grains of an almost equiaxed shape of about 0.6 mm in size (
Figure 2b).
Inside the primary β-phase grains, the lamellar α-phase formed during the additive manufacturing process upon cooling (
Figure 3). The structure undergoes insignificant deformation near the stir zone, thus forming a very small thermos-mechanically affected zone (TMAZ,
Figure 3b).
This zone is characterized by deformed α-phase plates, which bend in the direction of the material flow moved by the tool during the friction stir processing. This allows for the determination of the boundaries of the TMAZ and its size, which is about 30 μm. The zone is observed both on the advancing and retreating sides of the stir zone. Moreover, such character of structural change in this zone is true for the processing of both sample 1 and sample 2.
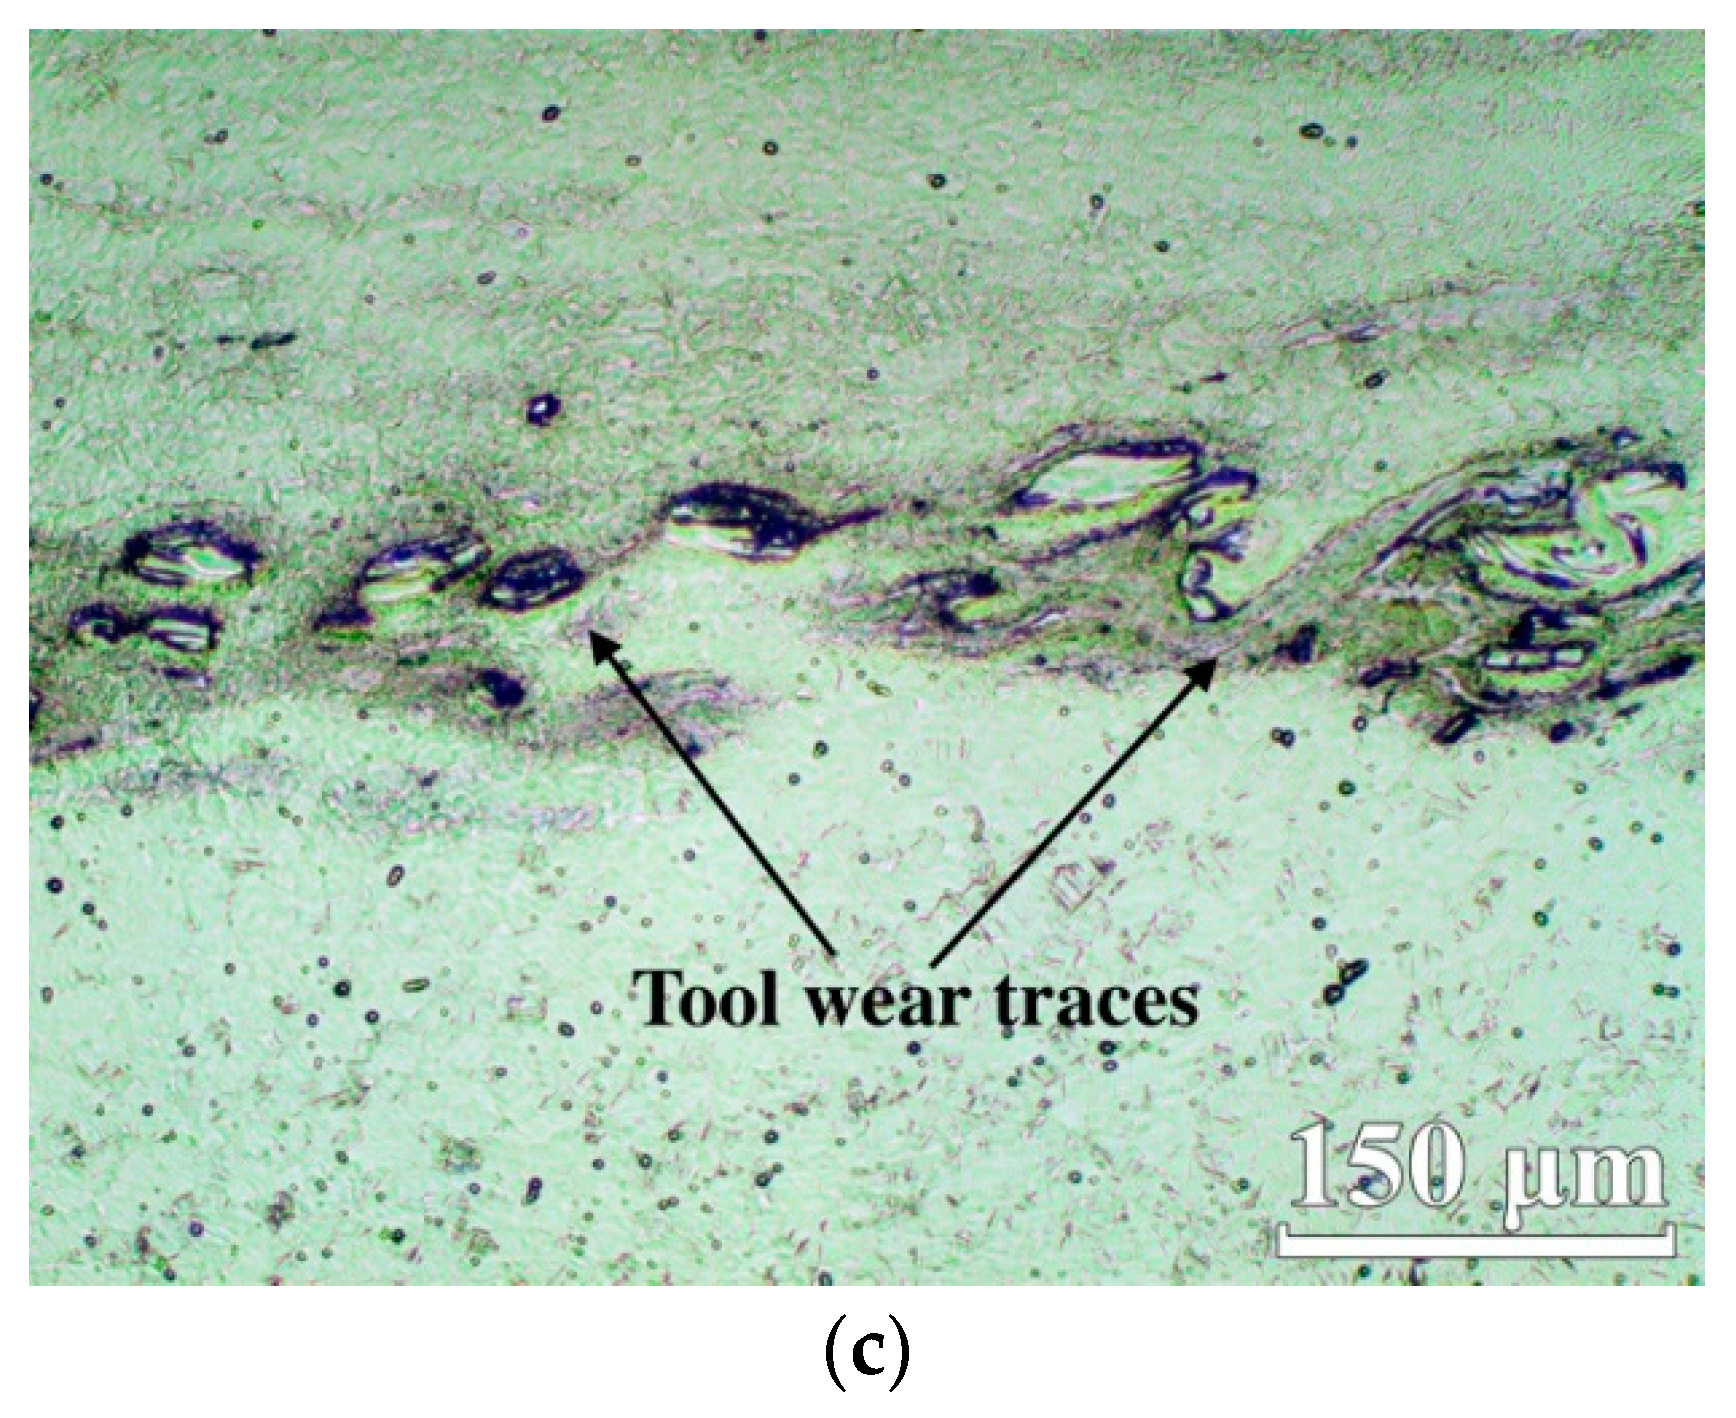
The structure of the stir zone because of severe plastic deformation was modified by dynamic recrystallization and the formation of a fine-dispersed structure (
Figure 3c). Optical metallography does not provide an indication of the grain sizes in the stir zone, but the figure shows that, predominantly, almost equiaxed grains are formed, inside of which plates of the α-phase are visible. At the same time,
Figure 2 and
Figure 3c show that inclusions in the stir zone are observed, which, in other works on the welding and processing of titanium alloy Ti6Al4V, were associated with the wear of the welding tool made of ZhS6U alloy [
17].
Apart from tool wear traces, no other inclusions and defects were detected during the processing of the lower and upper plates of the workpiece, indicating that the selected friction stir processing modes were correct.
3.2. Electron Microscopy of the Stir Zone Material
The structure of the stir zone was investigated using scanning and transmission electron microscopy methods.
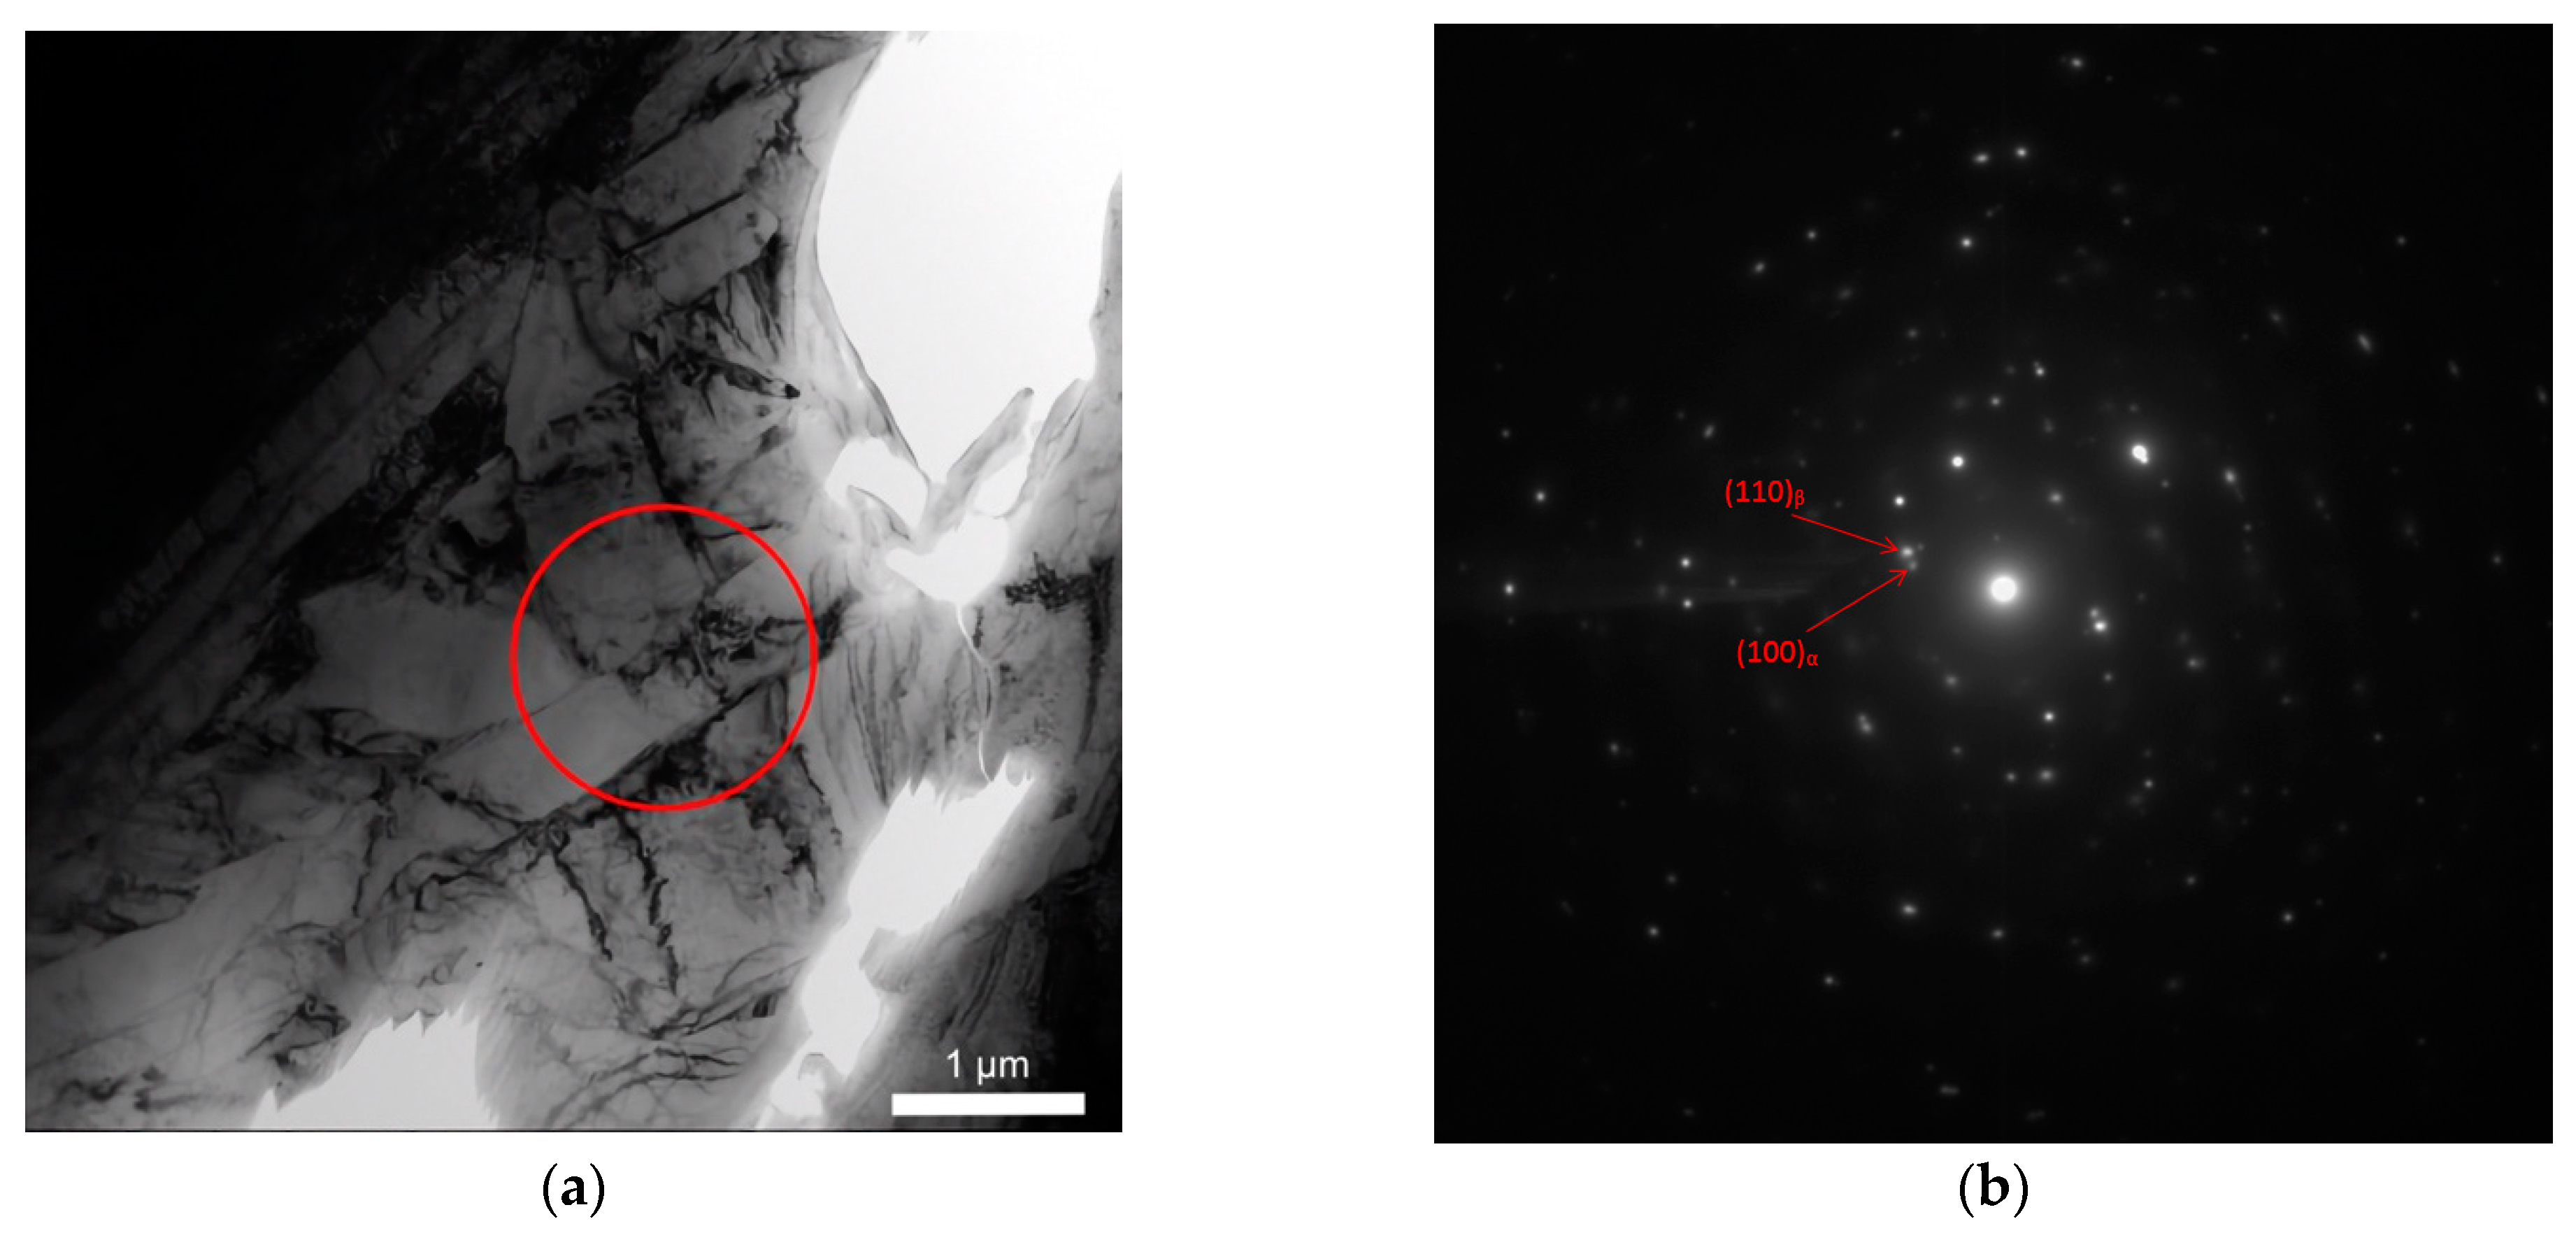
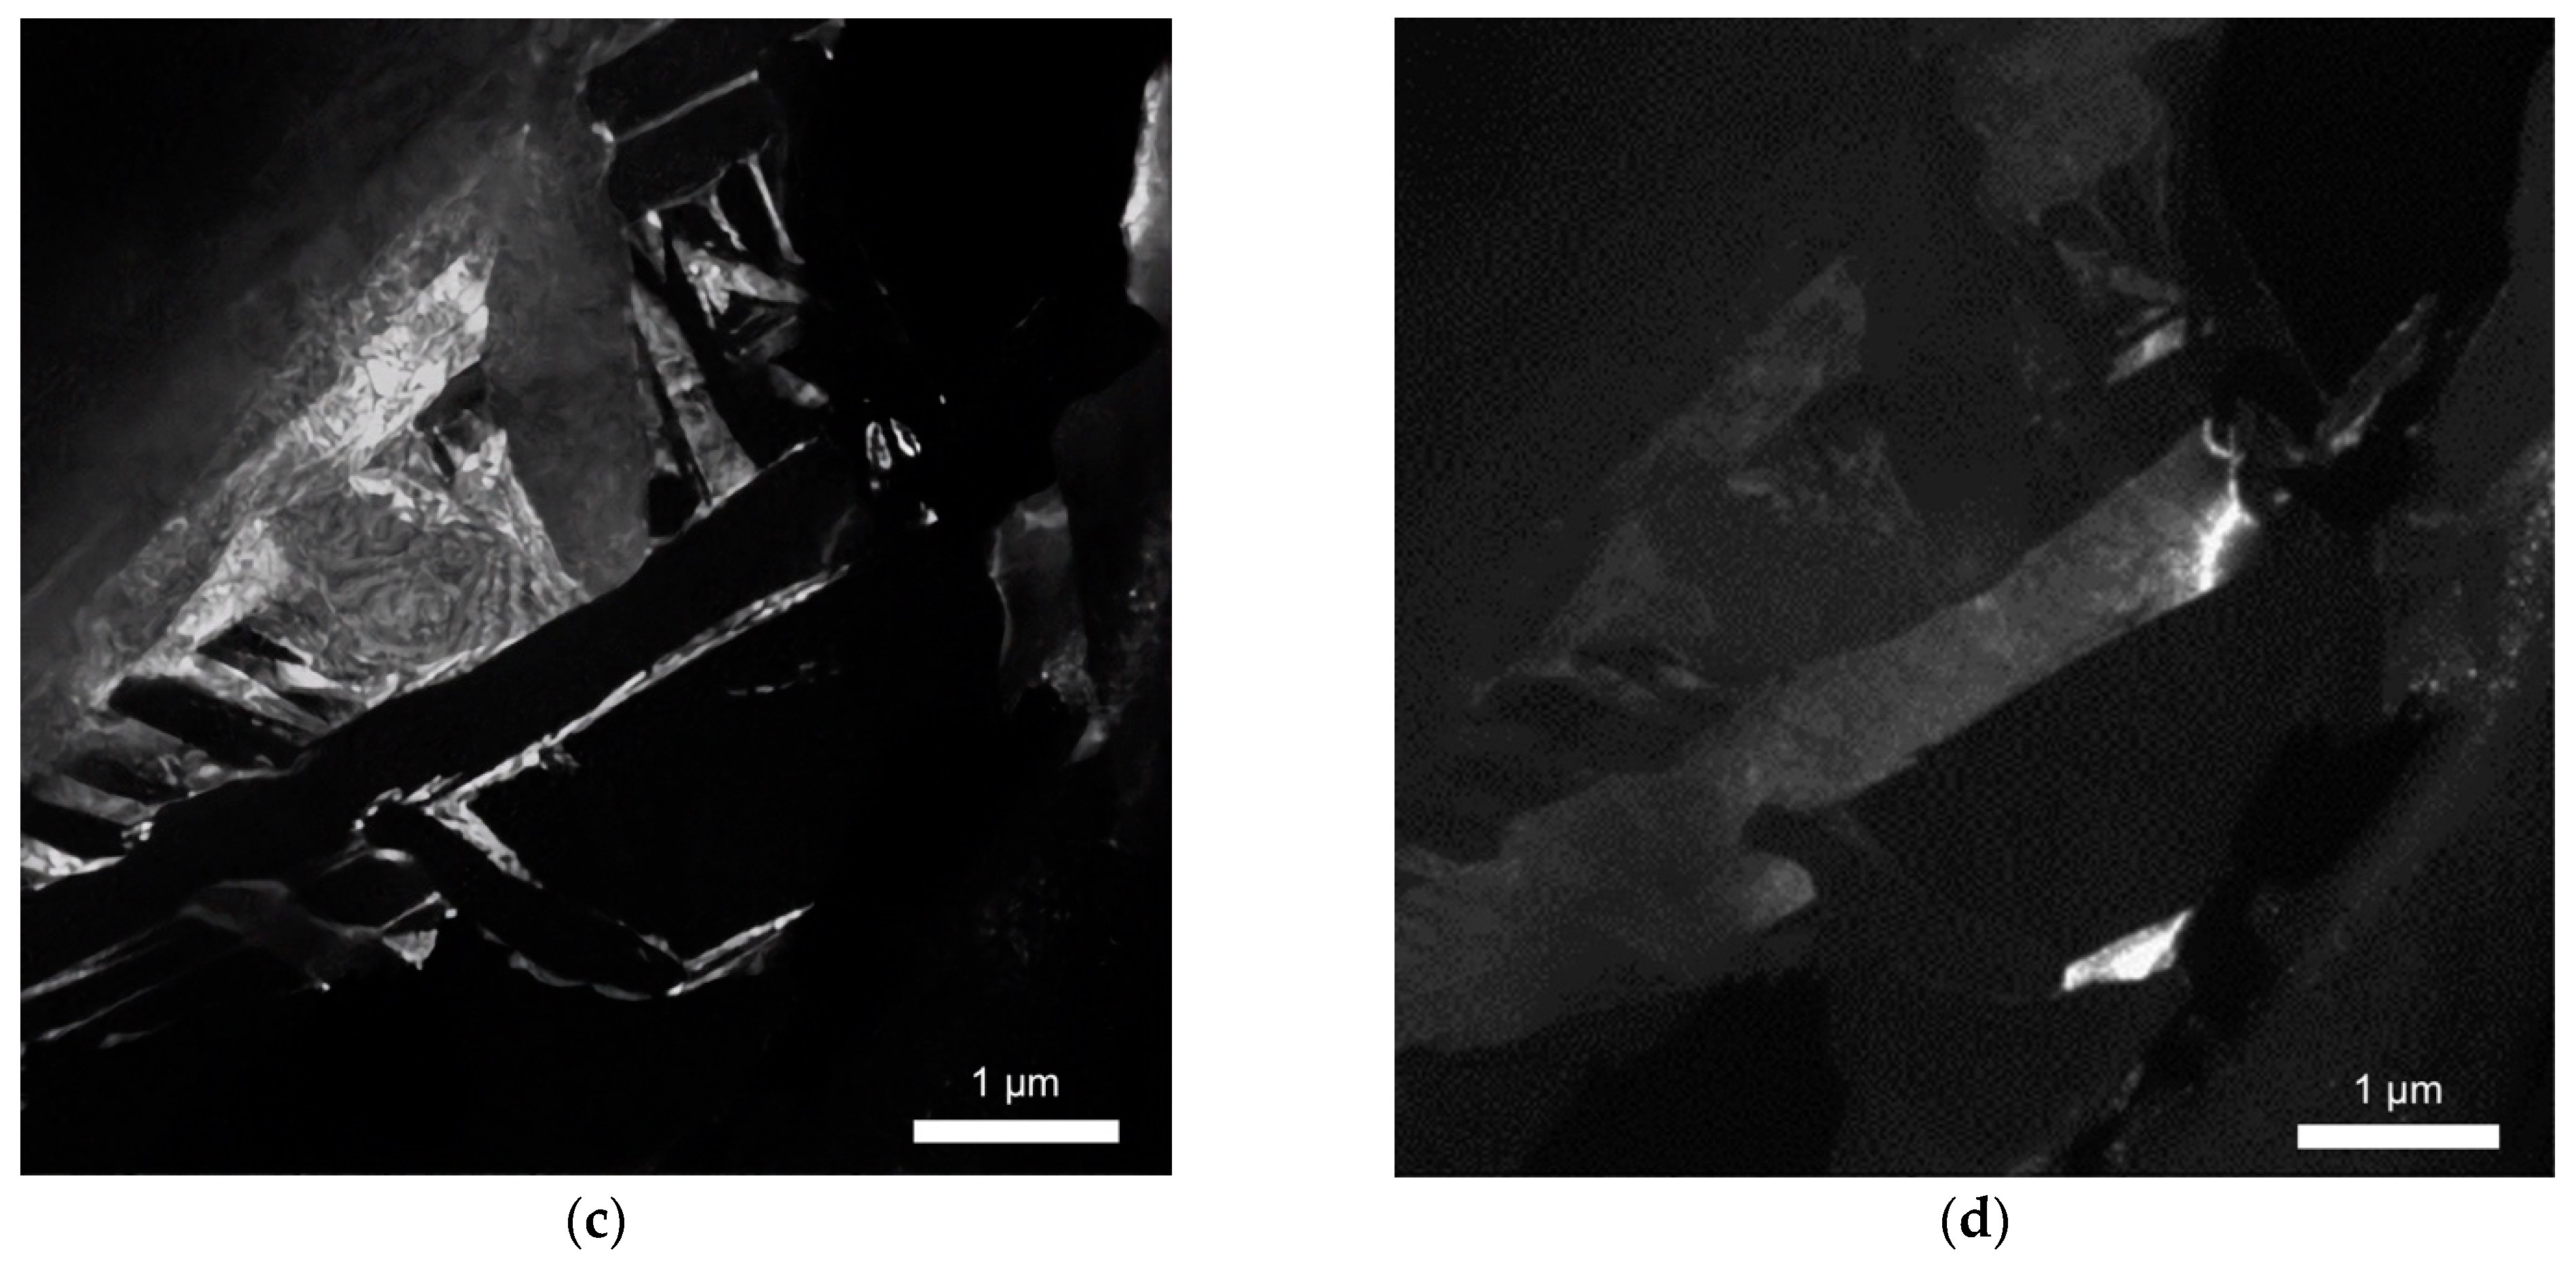
Figure 4 shows TEM images of the Ti6Al4V alloy in the stir zone of sample 1. As can be observed, the alloy microstructure in the stir zone is homogeneous and represented by two structural-phase elements: lamellar α-phase precipitations (
Figure 4d), between which the β-phase is distributed (
Figure 4c). It should be noted that, in the dark-field image (
Figure 4c), not only is the β-phase visible, but the α-phase is as well; this relates to the fact that the reflexes of these phases are located close enough (
Figure 4b), and the aperture diaphragm of the microscope does not allow for separating them. The dimensions of the α-plates in the stir zone reach approximately 5 μm in length and 0.5 μm in width. According to the results of the energy dispersive analysis (
Table 1), the β-phase contains more aluminum and vanadium in comparison with the α-phase.
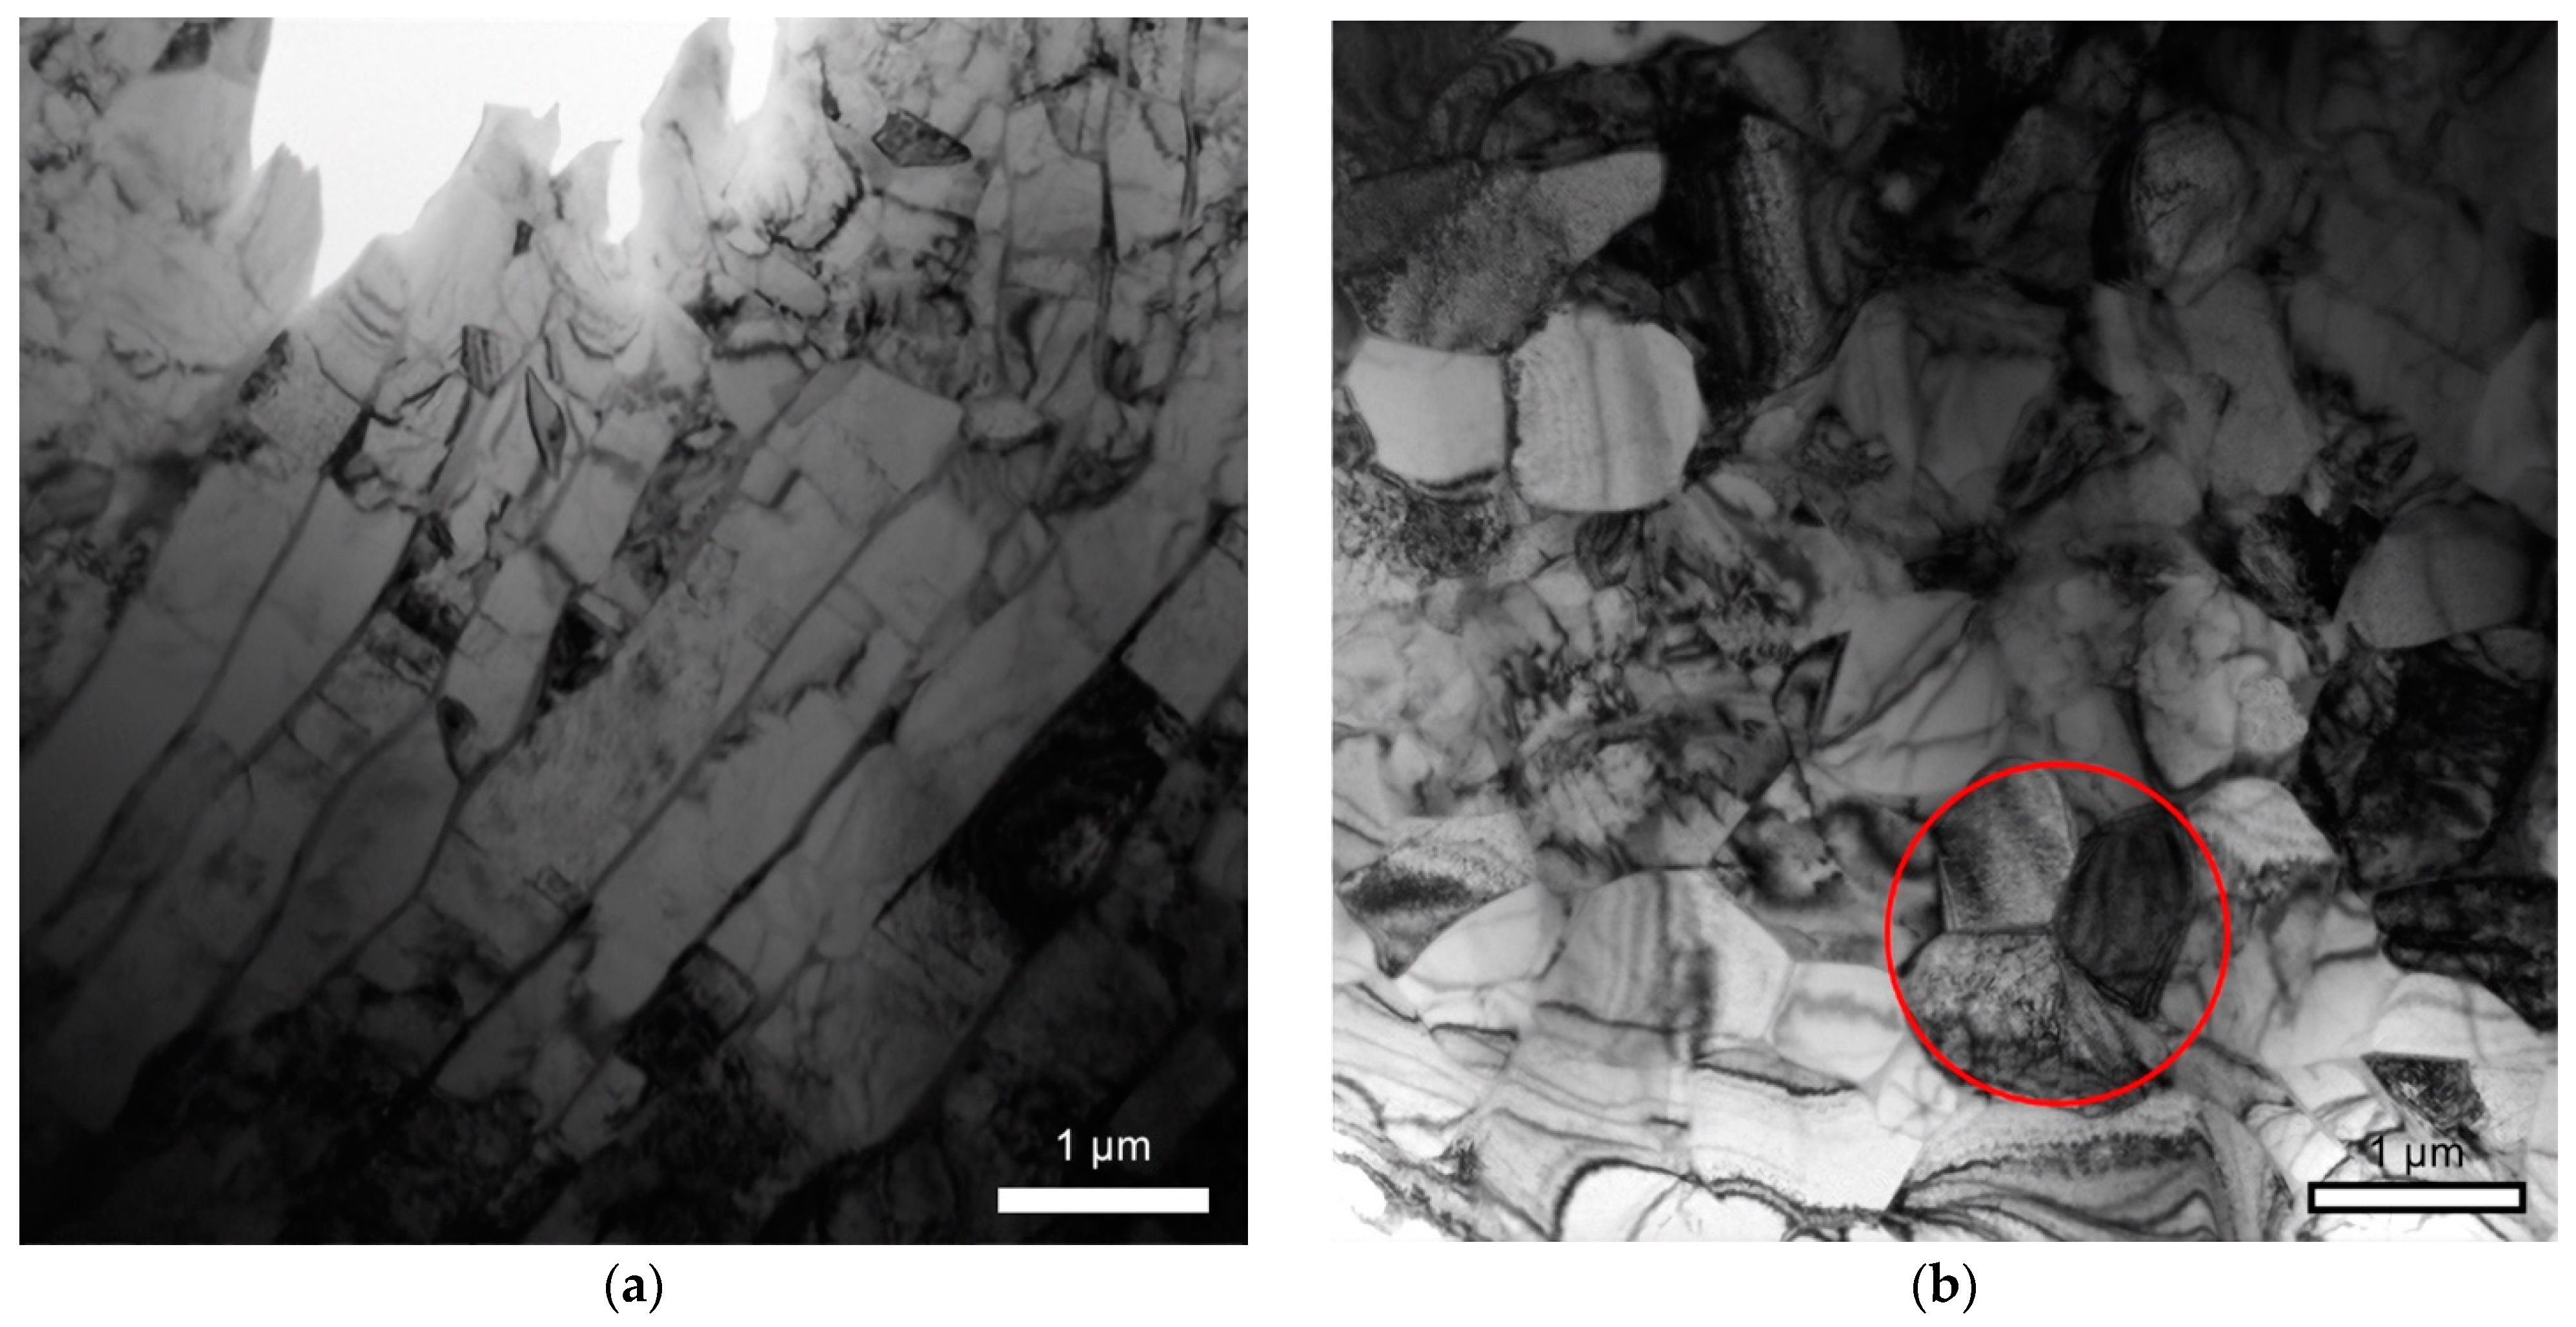
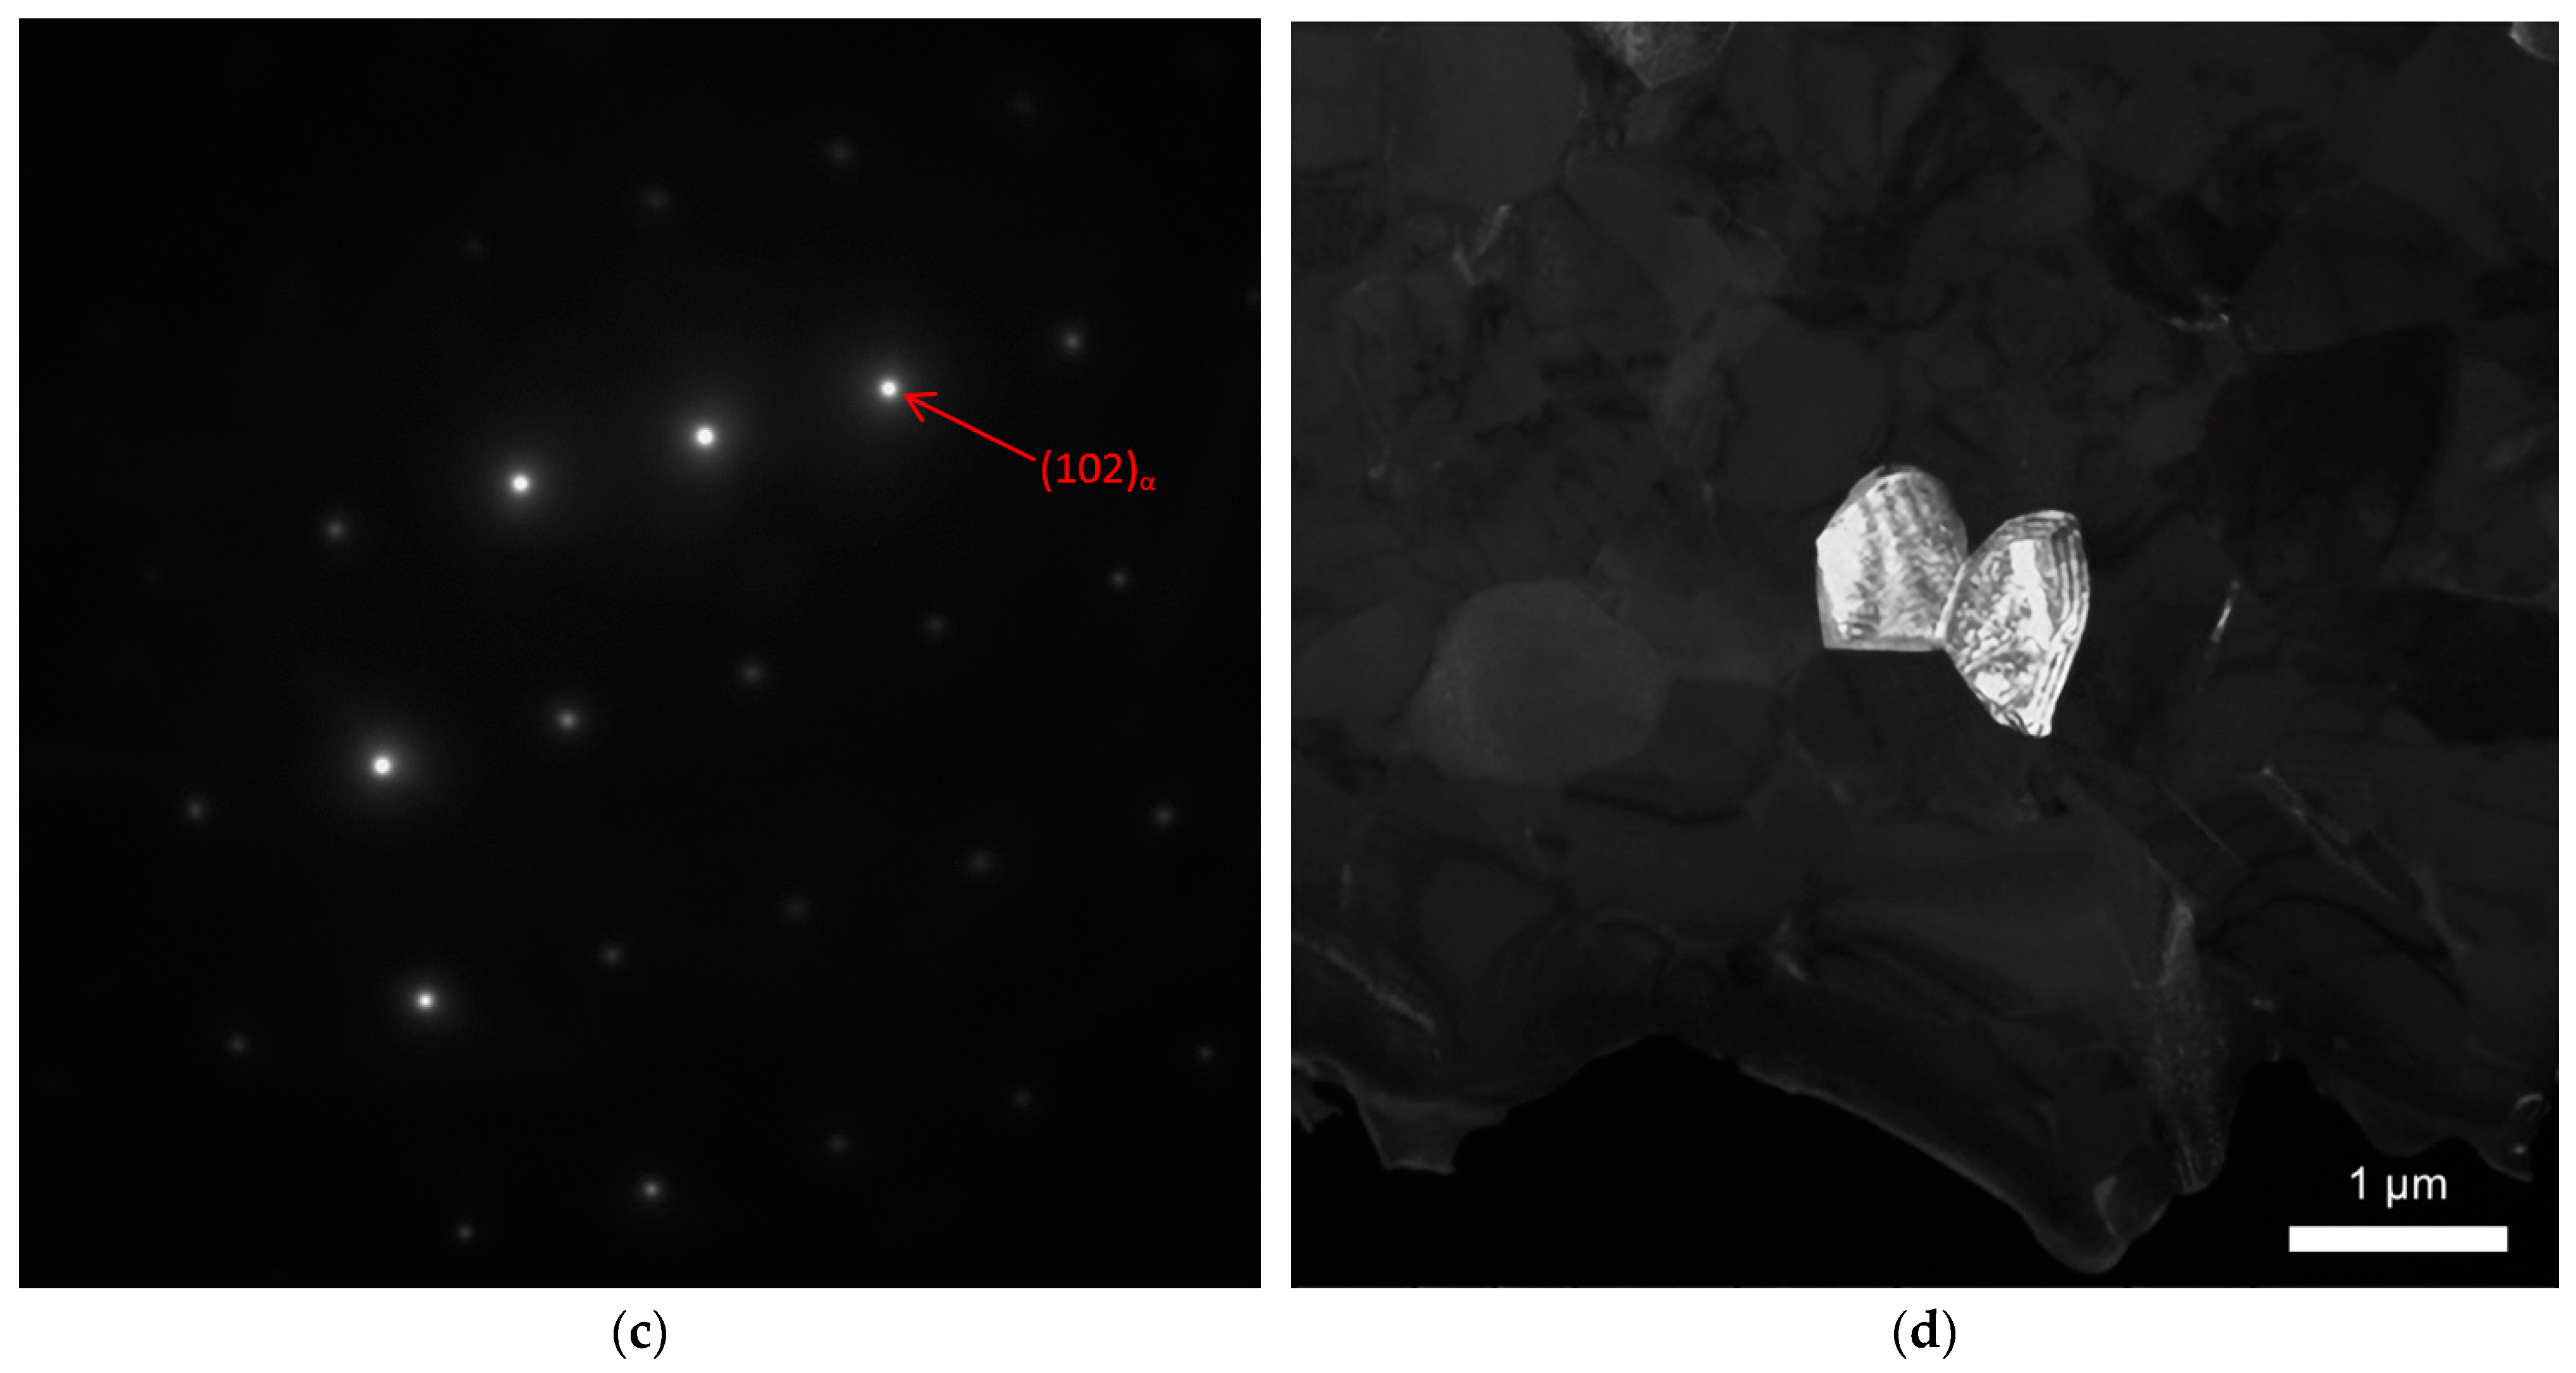
Figure 5 shows TEM images of the Ti6Al4V alloy in the stir zone of sample 2 (upper plate of the workpiece).
As seen, the microstructure of sample 2 is less homogeneous and shows a bimodal distribution of the α-phase: lamellar and close to equiaxial grains, between which the β-phase is also distributed. The dimensions of the α-plates as in the previous sample reach about 5 μm in length and 0.5 μm in width. The diameter of the equiaxial grains is 500–1000 nm. According to the results of the energy dispersive analysis (
Table 2), in the material of the sample processed across the layer deposition direction, there is a more intense segregation of vanadium into the β-phase in both the equiaxial and lamellar grains.
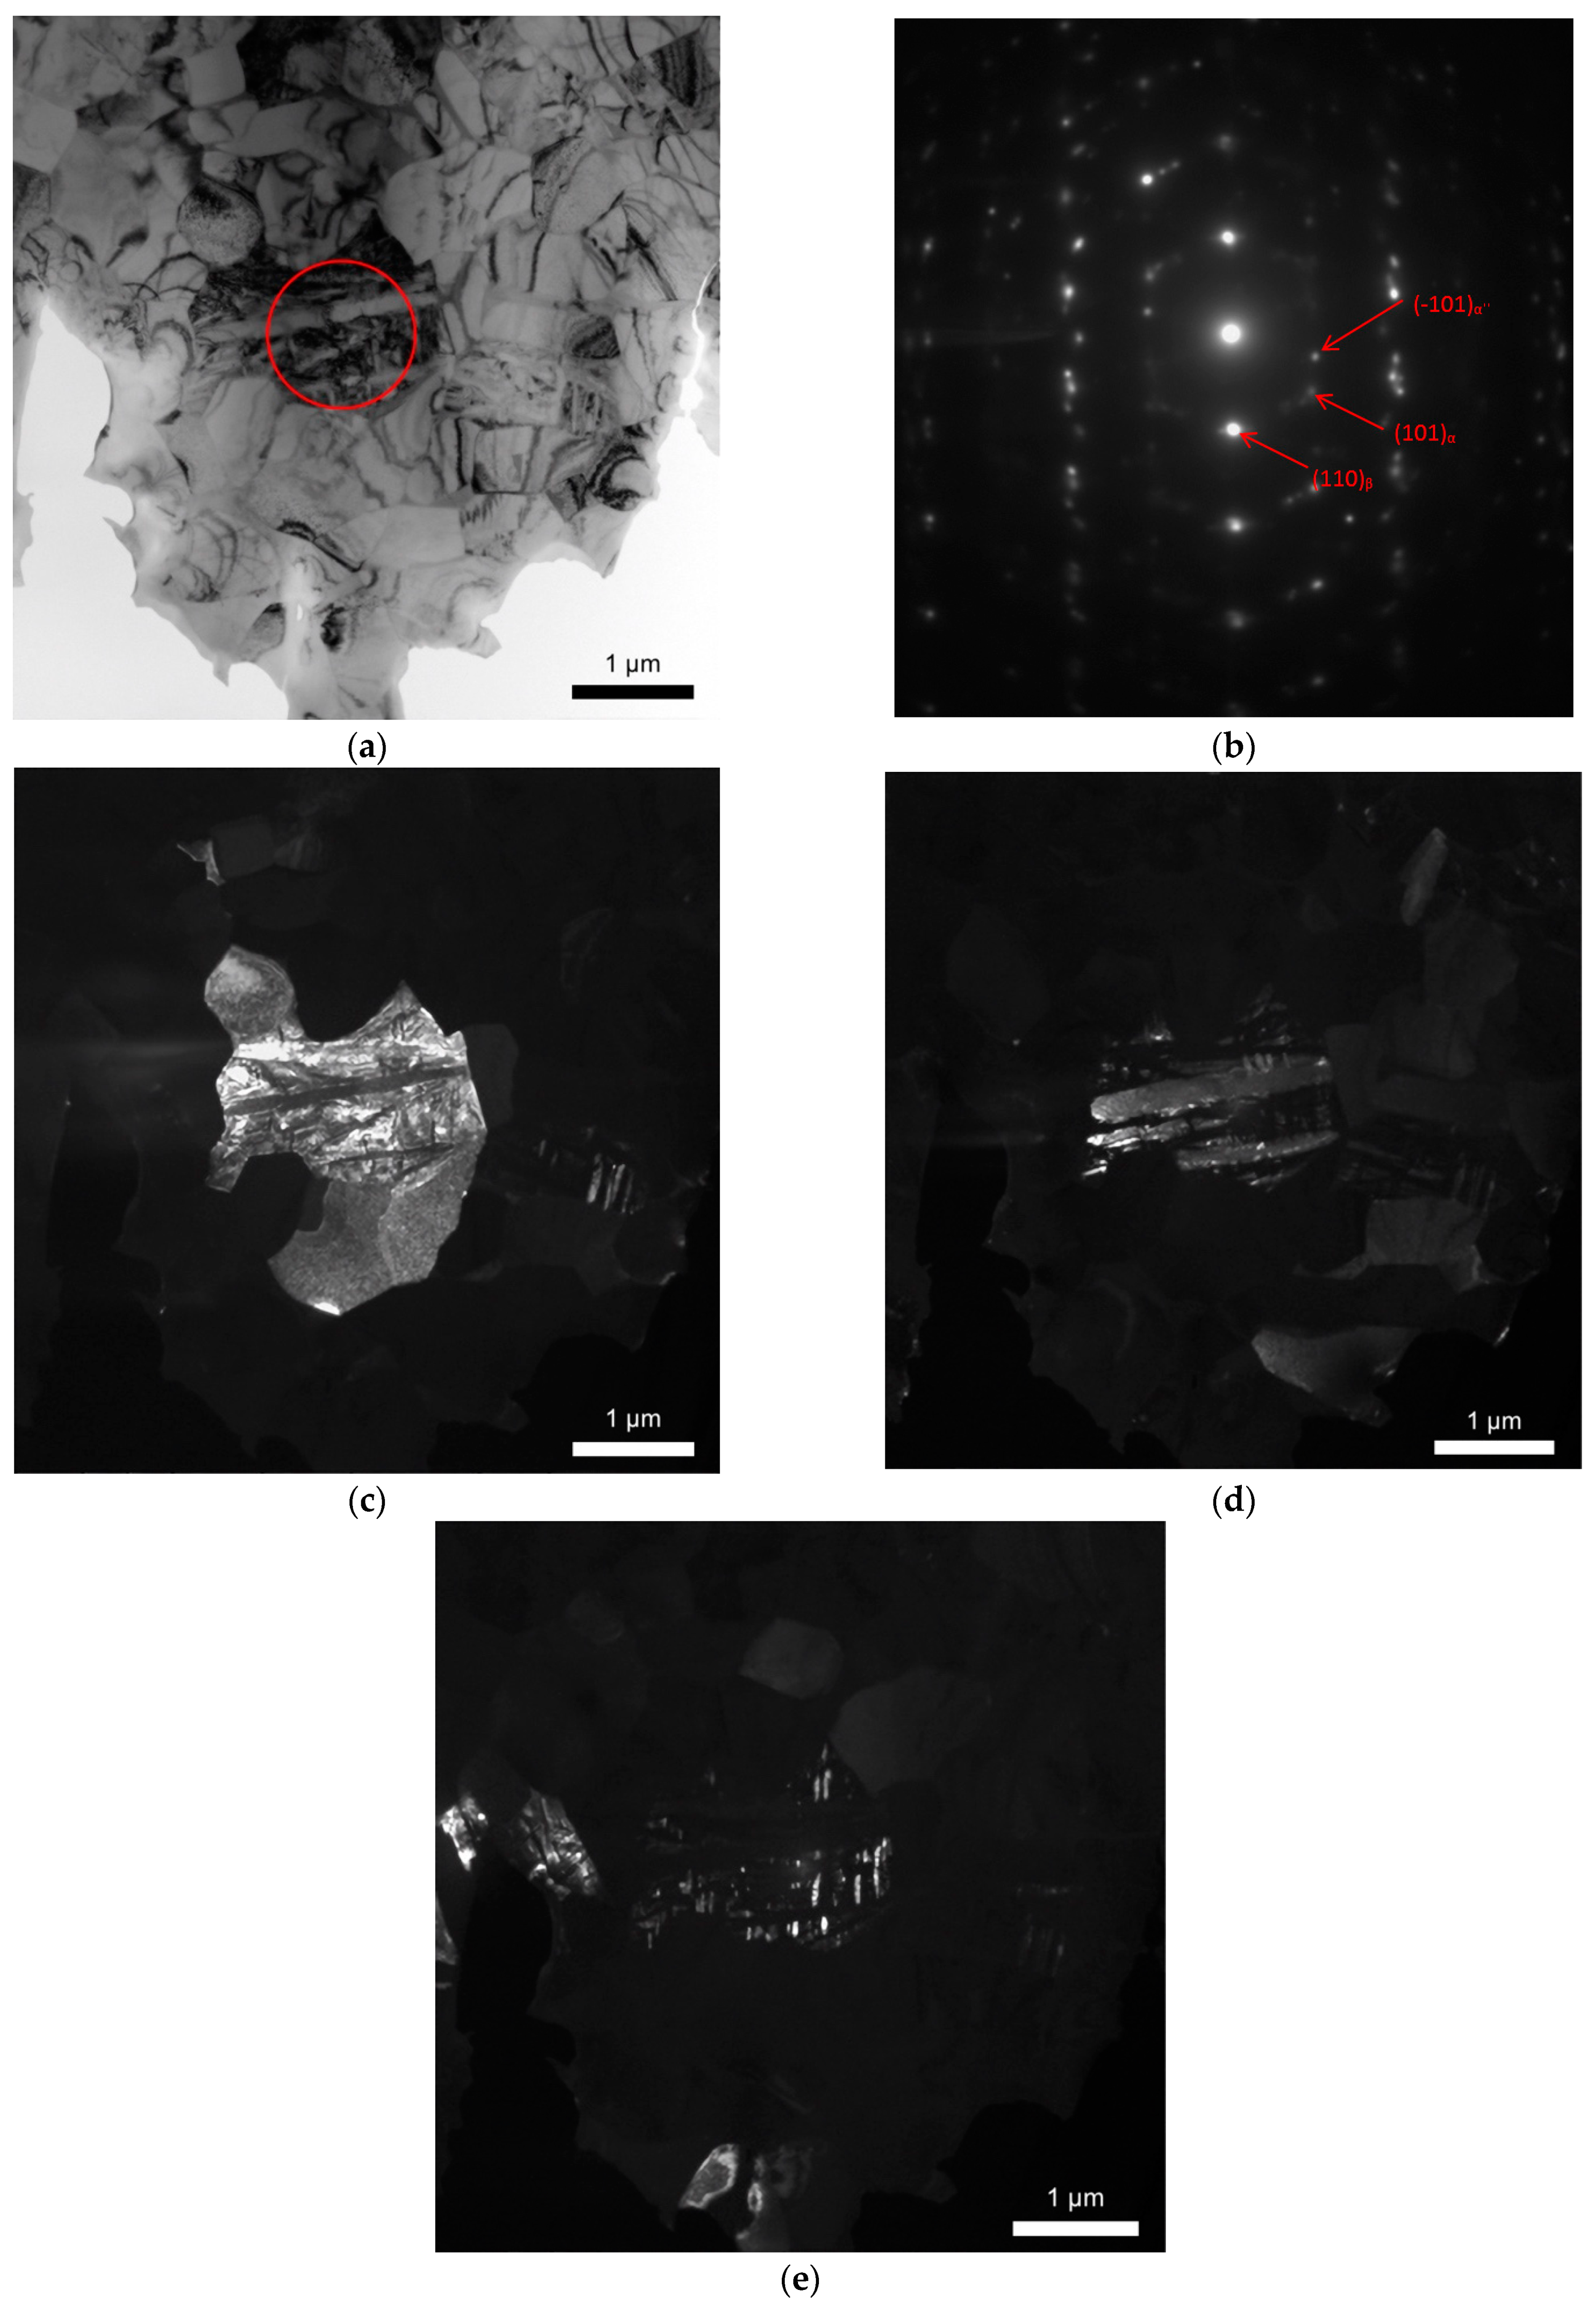
In contrast to the first sample, in this case, a martensitic mixture of α- and α″-phase plates, also surrounded by the β-phase, is formed (
Figure 6). The α″-phase plates are an order of magnitude smaller than the α-phase plates and are approximately 50–250 nm long and no more than 30 nm wide. Additionally, the α″-phase contains a greater amount of vanadium—4.3 ± 1.05 at.% (compared to the α-phase)—and therefore a smaller amount of aluminum—6.64 ± 0.22 at.%.
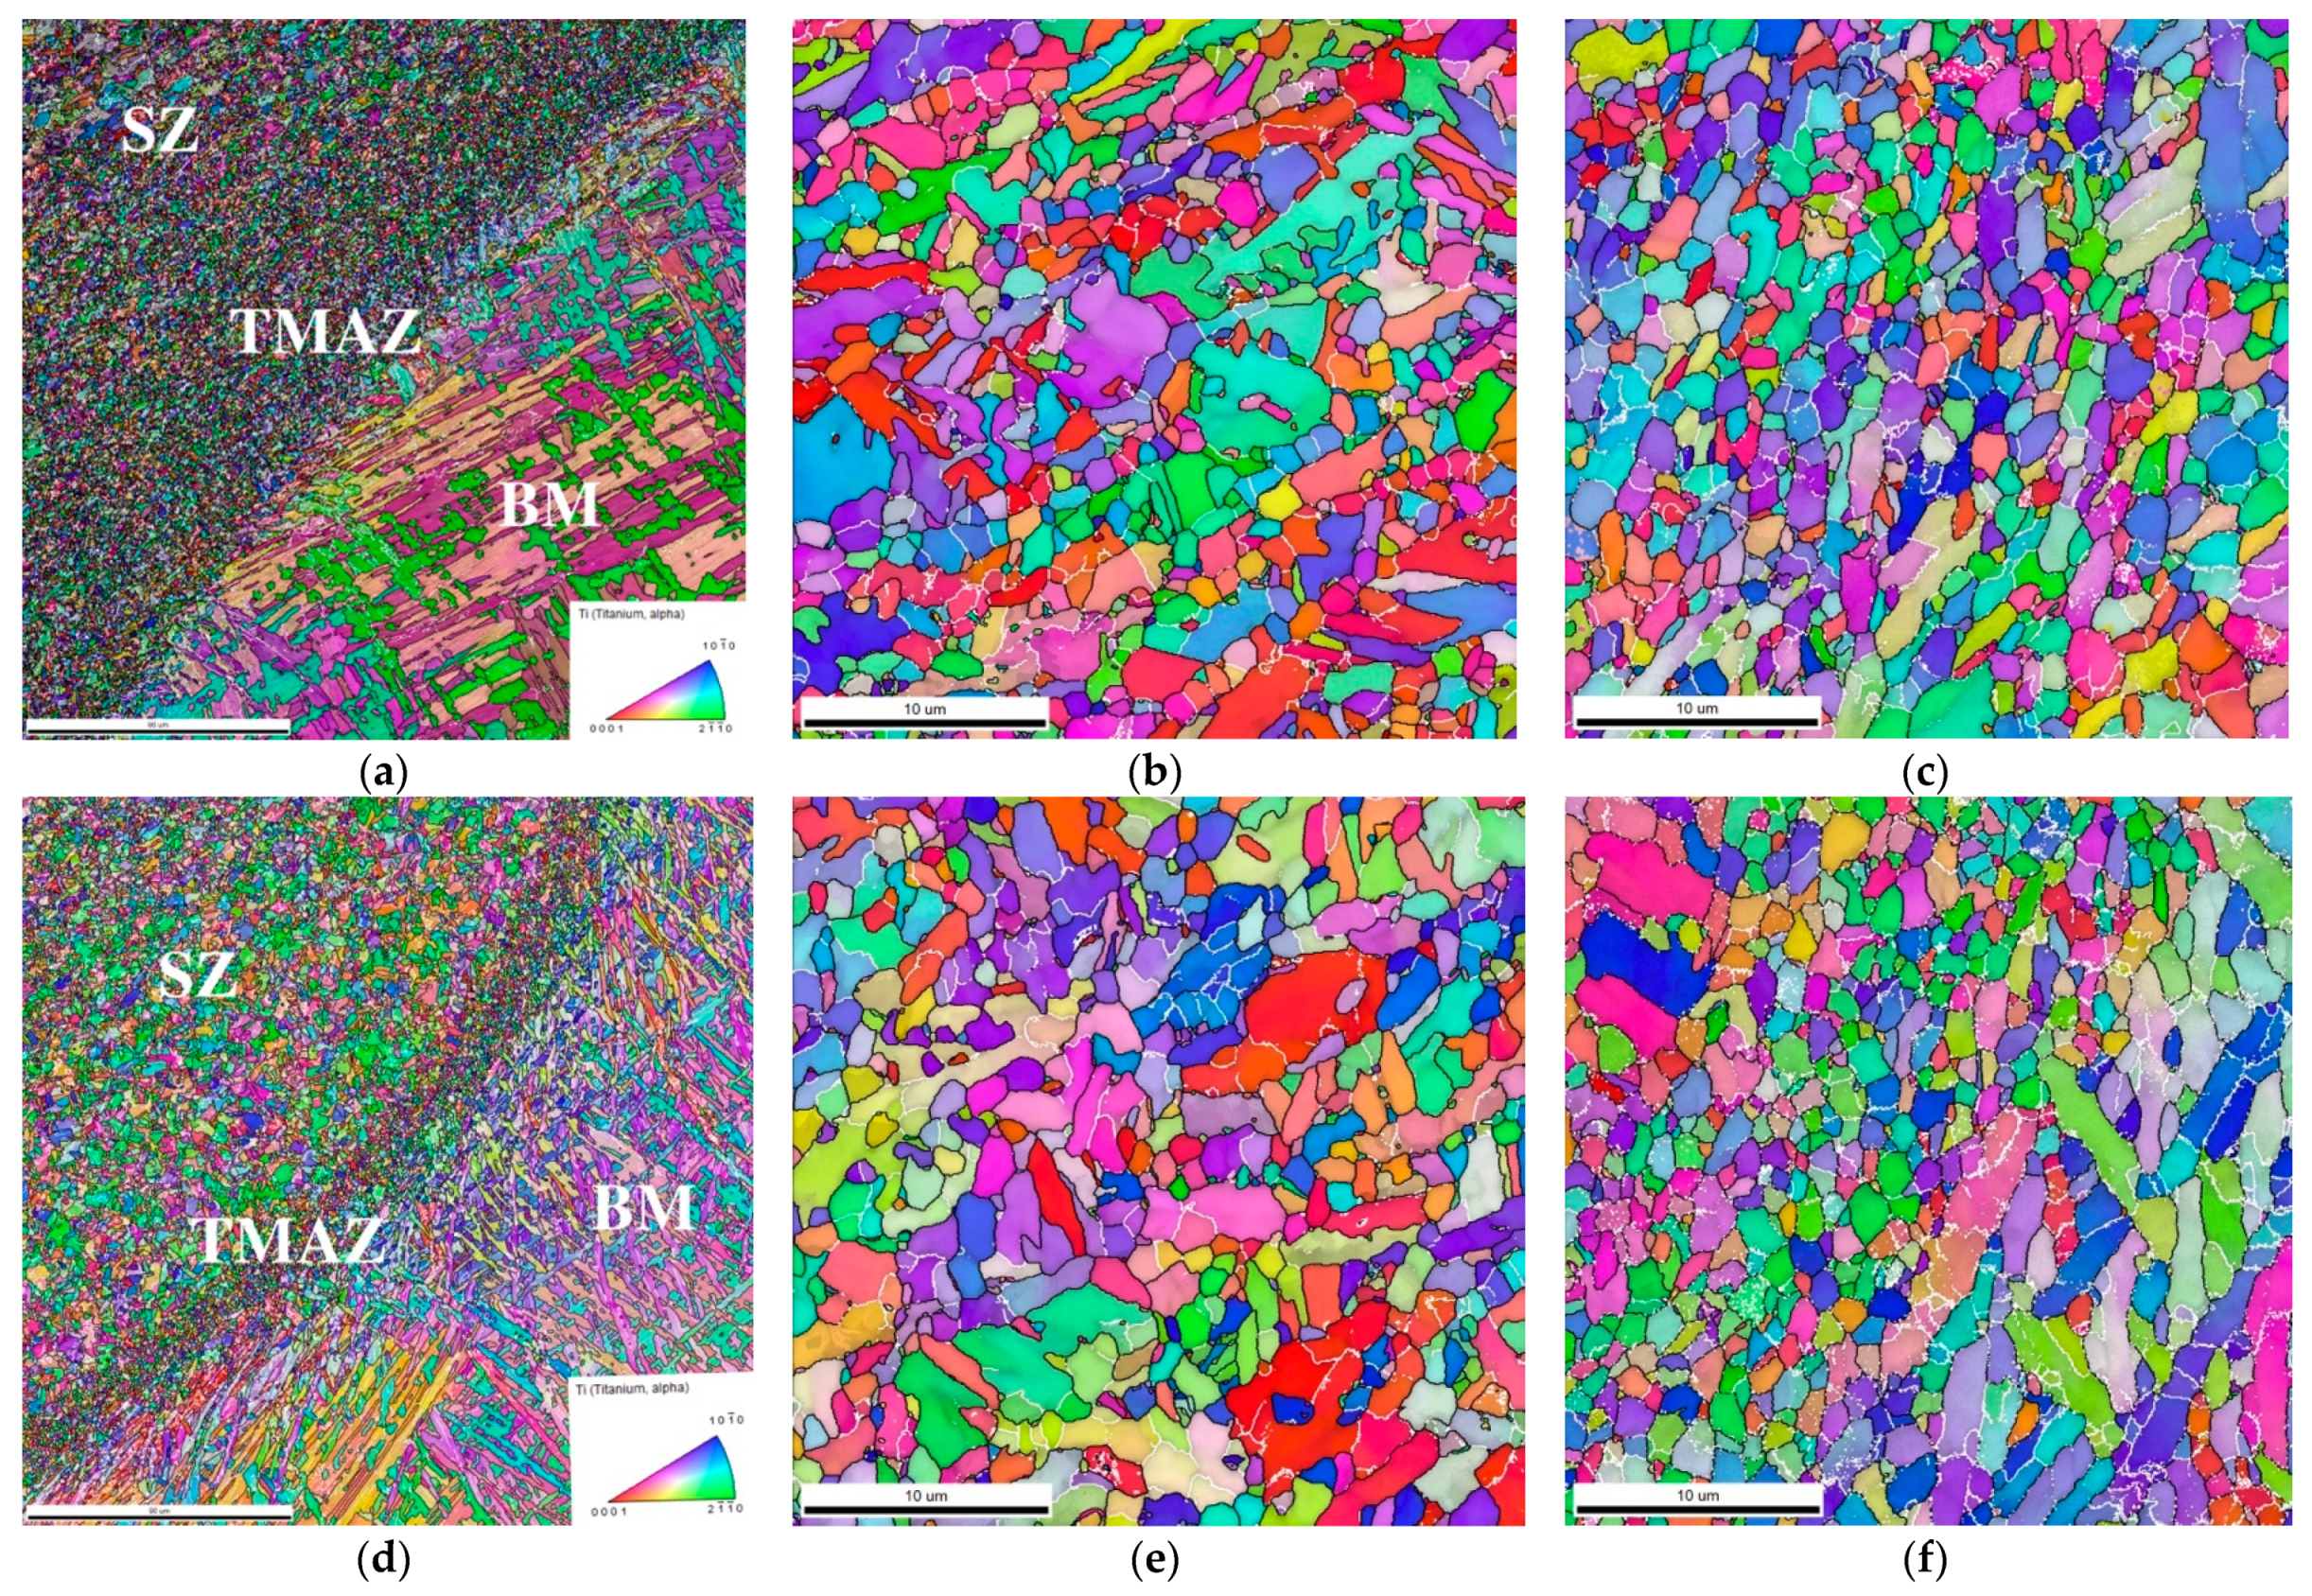
Electron backscatter diffraction analysis (EBSD) of the processed sample structure showed that the thermomechanically affected zone has a small area, which is characterized by the presence of nanosized equiaxed α-phase grains (
Figure 7). From the figure, it can be seen that during the processing of the lower plate of the workpiece (sample 1), the nanosized TMAZ area is rather wide (more than 30 µm), has a sharp boundary with the base metal, and smoothly passes into the stir zone.
During the processing of the upper plate (sample 2), the structure is formed differently.
Figure 7d shows that the nanosized TMAZ is formed as a thin band of 10–15 μm and has sufficiently sharp boundaries on both the base metal side and the stir zone.
The grain size in the stir zone is at the level of 0.5–1.0 µm, which is in accordance with the results of transmission electron microscopy. At the same time, in the thermomechanically affected zone, the grain size is predominantly of the order of 100–200 nm.
3.3. Mechanical Testing
To analyze the mechanical properties of the processed surface, dog-bone flat specimens were cut from the stir zone of the samples produced, which were subjected to static tensile tests. Additionally, the base metal specimens of the additive workpiece were tested in the as-built state.
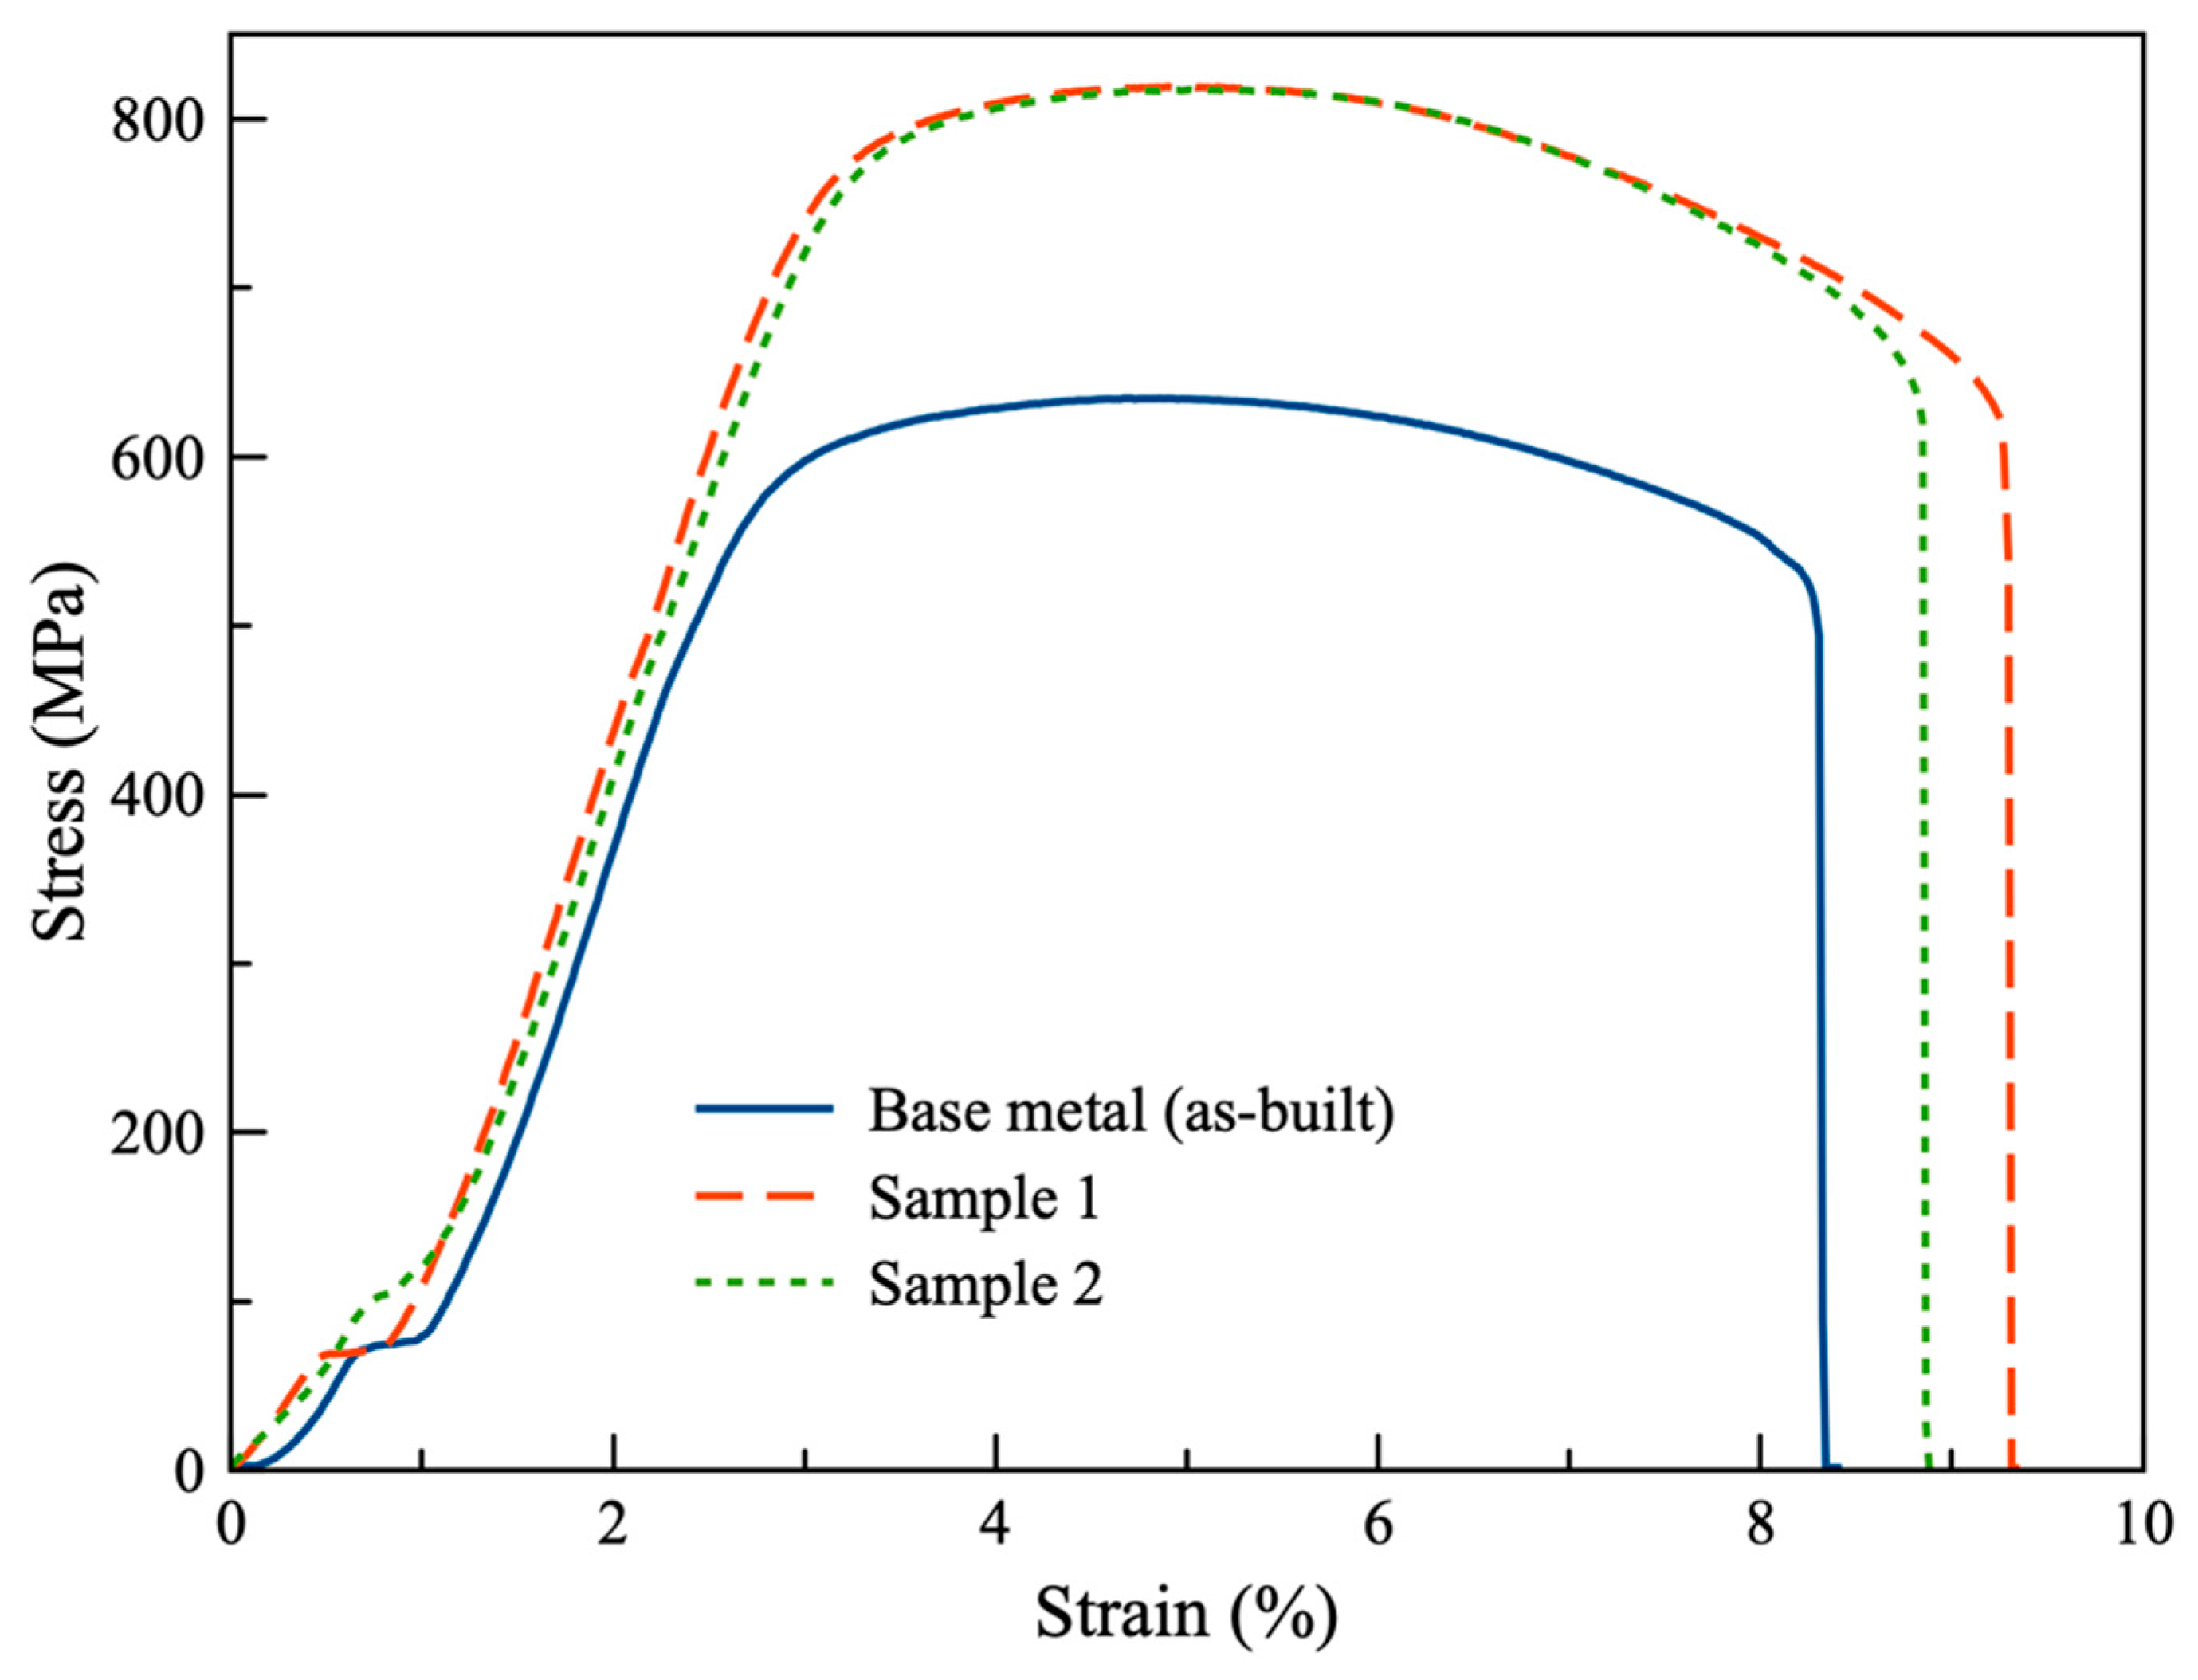
A comparative testing diagram of the samples produced is shown in
Figure 8. The base metal sample shows low characteristics for Ti6Al4V alloy: the average ultimate tensile strength is 630 ± 7 MPa at a relative elongation of 8.5 ± 0.6%. This value of the tensile strength is about 27% lower than the tensile strength of the wrought alloy Ti6Al4V ELI (Extra Low Interstitials).
Sample 1 showed ultimate tensile strength values of 827 ± 6 MPa, which are 24% higher than those of the base metal and only 4% lower than those of the wrought ELI alloy. The relative elongation before fracture is 7.0 ± 2.2%, which, firstly, is lower than that of the base metal. Secondly, the result is unstable in different parts of the stir zone due to a high value of measurement error, which can be explained by the structural heterogeneity due to the presence of tool wear inclusions.
The processing of the upper plate of the additive workpiece (sample 2) also allows for a significant increase in the strength characteristics of the alloy. So, as a result of the test, it was possible to achieve the ultimate tensile strength of the order of 823 ± 6 MPa, with a relative elongation of 8.2 ± 0.8%. The result shows that, in this case, friction stir processing provided a 23% increase in the ultimate strength, while the plasticity of the material remained at the level of the base metal.
4. Discussion
The studies have shown that the friction stir processing of additive titanium alloy Ti6Al4V leads to significant structural changes. At the same time, the initial structure of the additive workpieces in the shape of rectangular blocks being processed slightly influences the character of structure formation.
Initially, the structure of the material produced by electron beam additive manufacturing is a coarse-grained columnar structure with 0.8–1.2 mm-wide grains. After the processing, due to severe plastic deformation in the stir zone, a fine-dispersed structure is formed, represented by equiaxed α-grains of less than 1.0 µm in size and inclusions of α-phase plates of about 5.0 µm in length and about 0.5 µm in width. However, in the upper part of the workpiece processed, the α″-phase is also revealed, the size of the plates of which is from 50 to 250 nm.
The results of the EBSD analysis revealed a thermomechanically affected zone in the structure of the processed Ti6Al4V alloy, while, previously, it was believed that the TMAZ is not formed at the FSW and FSP of this alloy [
18,
19]. This zone is characterized by the formation of equiaxed nanosized α-phase grains whose size is about 100–200 nm. It should be noted that this zone is clearly distinguished (has clear boundaries with both the stir zone and the base metal) only in sample 2 (upper plate), whereas, when processing the lower plate, the TMAZ is rather blurred towards the stir zone and is more difficult to detect. This difference is probably caused by variations in the structure of the initial workpiece, which is characterized by a high anisotropy of the structure and properties of the material in different directions [
20].
The results of mechanical tests show that, despite structural differences, the processing area (in the lower or upper part) does not significantly affect the mechanical properties. Owing to FSP, it was possible to achieve an increase in the ultimate tensile strength of the material by 23–24%, with ductility not lower than that of the base coarse-grained material. Consequently, friction stir processing, due to serious structural changes connected with dynamic recrystallization in the stir zone and the formation of nano- and submicrocrystalline structures, can significantly improve the properties of additively manufactured titanium alloy Ti6Al4V.
5. Conclusions
The results obtained during the research made it possible to draw the following conclusions.
1. Additively produced workpieces of titanium alloy Ti6Al4V, which have the coarse-grained structure, are characterized by structural anisotropy, which consists in a change in the size of structural elements relative to the layer deposition direction during the 3D printing of workpieces in the shape of blocks.
2. During friction stir processing, structural changes occur due to the formation of a fine-dispersed structure in the stir zone. Equiaxial α-grains of 0.5–1.0 μm in size are formed.
3. In addition to α-grains in the stir zone, there are α-phase plates. In this case, in the lower part of the sample, only α-plates of about 5 mm in length and 0.5 mm in width are distinguished, whereas, when processing an upper plate of the workpiece, α″-plates of 50–250 nm in size are also formed.
4. The thermomechanically affected zone in the friction stir processing of Ti6Al4V alloy is characterized by a region with nanosized α-phase grains which has a clear boundary with the base metal and the stir zone. However, the boundary between TMAZ and SZ can be blurred by changing the processing area due to a structural anisotropy of additive materials.
5. The application of friction stir processing makes it possible to increase the ultimate tensile strength of the additive alloy Ti6Al4V by 23–24% while preserving the plasticity of the material.
Author Contributions
Conceptualization, T.K. and K.K.; methodology, A.C. (Andrey Chumaevskii) and A.Z.; formal analysis, K.K.; investigation, A.C. (Andrey Cheremnov), A.E., E.K. and D.G.; resources, V.B.; data curation, A.Z.; writing—original draft preparation, K.K., D.G. and A.C. (Andrey Cheremnov); writing—review and editing, T.K.; visualization, D.G., E.K., E.M. and K.K.; supervision, T.K.; project administration, T.K.; funding acquisition, T.K. All authors have read and agreed to the published version of the manuscript.
Funding
This research project was supported by the Russian Science Foundation under grant No 22-29-20172,
https://rscf.ru/en/project/22-29-20172/ (accessed on 11 November 2022) and funded by the Administration of the Tomsk Region.
Data Availability Statement
Not applicable.
Conflicts of Interest
The authors declare no conflict of interest.
References
- Furuya, Y.; Takeuchi, E. Gigacycle fatigue properties of Ti–6Al–4V alloy under tensile mean stress. Mater. Sci. Eng. A 2014, 598, 135–140. [Google Scholar] [CrossRef]
- Zhou, X.; Dake, X.; Yongqiang, F. Mechanical properties, corrosion behavior and cytotoxicity of Ti-6Al-4V alloy fabricated by laser metal deposition. Mater. Charact. 2021, 179, 111302. [Google Scholar] [CrossRef]
- Wang, X.; Chou, K. Effect of support structures on Ti-6Al-4V overhang parts fabricated by powder bed fusion electron beam additive manufacturing. J. Mater. Proc. Technol. 2018, 257, 65–78. [Google Scholar] [CrossRef]
- Veiga, C.; Davim, J.P.; Loureiro, A.J.R. Properties and applications of titanium alloys: A brief review. Rev. Adv. Mater. Sci. 2012, 32, 133–148. [Google Scholar]
- Gibson, I.; Rosen, D.; Stucker, B.; Khorasani, M. Additive Manufacturing Technolnologies, 3rd ed.; Springer: New York, NY, USA, 2021; p. 675. [Google Scholar]
- Manjunath, A.; Anandakrishnan, V.; Ramachandra, S.; Parthiban, K.; Sathish, S. Investigations on the effect of build orientation on the properties of wire electron beam additive manufactured Ti-6Al-4V alloy. Mater. Today Commun. 2022, 33, 104204. [Google Scholar] [CrossRef]
- Perevalova, O.B.; Syrtanov, M.S. In situ study of phase transformations in electron beam additive manufactured Ti-6Al-4V titanium alloy by high temperature synchrotron X-ray diffraction and TEM. J. Alloys Compd. 2022, 917, 165463. [Google Scholar] [CrossRef]
- Davis AEKennedy, J.R.; Strong, D.; Kovalchuk, D.; Porter, S.; Prangnell, P.B. Tailoring equiaxed β-grain structures in Ti-6Al-4V coaxial electron beam wire additive manufacturing. Materialia 2021, 20, 101202. [Google Scholar] [CrossRef]
- Savchenko, N.L. Modification of the column structure of wire-feed electron-beam additive manufactured Ti-6Al-4V alloy. AIP Conf. Proc. 2019, 2167, 020309. [Google Scholar] [CrossRef]
- Kalashnikov, K.N.; Chumaevskii, A.V.; Kalashnikova, T.A.; Kolubaev, E.A. A substrate material and thickness influence on the 3D-printing of Ti–6Al–4V components via wire-feed electron beam additive manufacturing. J. Mater. Res. Technol. 2022, 16, 840–852. [Google Scholar] [CrossRef]
- Edwards, P.; Ramulu, M.; O’Conner, A. Electron Beam Additive Manufacturing of Titanium Components: Properties and Performance. J. Manuf. Sci. Eng. 2013, 135, 061016. [Google Scholar] [CrossRef]
- Nguyen, H.D.; Pramanik, A.; Basak, A.K.; Dong, Y.u. A critical review on additive manufacturing of Ti-6Al-4V alloy: Microstructure and mechanical properties. J. Mater. Res. Technol. 2022, 18, 4641–4661. [Google Scholar] [CrossRef]
- Wu, C.; Zhan, M. Microstructural evolution, mechanical properties and fracture toughness of near β titanium alloy during different solution plus aging heat treatments. J. Alloys Compd. 2019, 805, 1144–1160. [Google Scholar] [CrossRef]
- Chumaevskii, A.V.; Kalashnikov, K.N.; Gusarova, A.V. The Regularities of Structure Formation during Friction Stir Processing of Bimetallic Materials Based on Copper and Aluminum Alloys. IOP Conf. Ser. Mater. Sci. Eng. 2020, 753, 052022. [Google Scholar] [CrossRef]
- Bauri, R.; Yadav, D. Introduction to Friction Stir Processing (FSP). In Metal Matrix Composites by Friction Stir Processing; Butterworth-Heinemann: Oxford, UK, 2018; pp. 17–29. [Google Scholar]
- Zykova, A.P.; Tarasov, S.Y.; Chumaevskiy, A.V.; Kolubaev, E.A. A Review of Friction Stir Processing of Structural Metallic Materials: Process, Properties, and Methods. Metals 2020, 10, 772. [Google Scholar] [CrossRef]
- Amirov, A.; Eliseev, A.; Kolubaev, E.; Filippov, A.; Rubtsov, V. Wear of ZhS6U Nickel Superalloy Tool in Friction Stir Processing on Commercially Pure Titanium. Metals 2020, 10, 799. [Google Scholar] [CrossRef]
- Gangwar, K.; Mamidala, R.; Sanders, D.G. Friction Stir Welding of near α and α + β Titanium Alloys: Metallurgical and Mechanical Characterization. Metals 2017, 7, 565. [Google Scholar] [CrossRef]
- Kalashnikov, K.; Chumaevskii, A.; Kalashnikova, T.; Cheremnov, A.; Moskvichev, E.; Amirov, A.; Krasnoveikin, V.; Kolubaev, E. Friction Stir Processing of Additively Manufactured Ti-6Al-4V Alloy: Structure Modification and Mechanical Properties. Metals 2021, 12, 55. [Google Scholar] [CrossRef]
- Carroll, B.E.; Palmer, T.A.; Beese, A.M. Anisotropic Tensile Behavior of Ti–6Al–4V Components Fabricated with Directed Energy Deposition Additive Manufacturing. Acta Mater. 2015, 87, 309–320. [Google Scholar] [CrossRef]
Figure 1.
Additive manufacturing process scheme with the printing trajectory (a), the production of plates for FSP (b), and friction stir processing (c). 1—substrate, 2—3D printed sample, 3—wire-feeder, 4—electron beam, 5, 6—plates for FSP, 7—FSW-tool, 8—stir zone, 9—tensile test specimen, 10—metallographic specimen.
Figure 2.
Macrostructure of the FSPed plates of the additively manufactured block-shaped Ti6Al4V workpiece in sample 1 (a) and sample 2 (b).
Figure 2.
Macrostructure of the FSPed plates of the additively manufactured block-shaped Ti6Al4V workpiece in sample 1 (a) and sample 2 (b).
Figure 3.
Microstructure of the initial additive metal (a), the boundary between the stir zone and the base metal (b), and the stir zone with traces of tool wear (c).
Figure 3.
Microstructure of the initial additive metal (a), the boundary between the stir zone and the base metal (b), and the stir zone with traces of tool wear (c).
Figure 4.
TEM image of the stir zone microstructure of sample 1 (a); electronogram obtained from the area highlighted in red (b); dark-field image of the β-phase obtained in reflex (110) (c); dark-field image of the α-phase obtained in reflex (100) (d).
Figure 4.
TEM image of the stir zone microstructure of sample 1 (a); electronogram obtained from the area highlighted in red (b); dark-field image of the β-phase obtained in reflex (110) (c); dark-field image of the α-phase obtained in reflex (100) (d).
Figure 5.
TEM images of the microstructure of sample 2 (a,b); the area from which the electronogram was obtained is highlighted in red (c); dark-field image of the α-phase (d) obtained in reflex (102).
Figure 5.
TEM images of the microstructure of sample 2 (a,b); the area from which the electronogram was obtained is highlighted in red (c); dark-field image of the α-phase (d) obtained in reflex (102).
Figure 6.
TEM image of the microstructure of sample 2 (a); the area from which the electronogram was obtained is marked in red (b); dark-field image of the β-phase (c) obtained in reflex (110); dark-field image of the α-phase (d) obtained in reflex (101); dark-field image of the α″-phase (e) obtained in reflex (−101).
Figure 7.
EBSD maps for sample 1 (a–c) and sample 2 (d–f). (a,d)—overview maps, (b,e)—stir zone, (c,f)—thermomechanically affected zone.
Figure 7.
EBSD maps for sample 1 (a–c) and sample 2 (d–f). (a,d)—overview maps, (b,e)—stir zone, (c,f)—thermomechanically affected zone.
Figure 8.
Stress/strain diagrams obtained during the tensile tests of the additive workpiece base metal specimens and the stir zone ones.
Figure 8.
Stress/strain diagrams obtained during the tensile tests of the additive workpiece base metal specimens and the stir zone ones.
Table 1.
Content of chemical elements in the α- and β-phases in the stir zone material structure of sample 1 (at%).
Table 1.
Content of chemical elements in the α- and β-phases in the stir zone material structure of sample 1 (at%).
| Type | Al | Ti | V |
|---|
| α-phase | 5.56 ± 0.28 | 92.09 ± 0.86 | 2.35 ± 0.89 |
| β-phase | 6.11 ± 0.84 | 89.92 ± 1.78 | 3.97 ± 0.99 |
Table 2.
Content of chemical elements in the α- and β-phases in the stir zone material structure of sample 2 (at%).
Table 2.
Content of chemical elements in the α- and β-phases in the stir zone material structure of sample 2 (at%).
| Type | Al | Ti | V |
|---|
| α-phase (equiaxial) | 8.56 ± 1.68 | 90.64 ± 2.06 | 0.83 ± 0.59 |
| β-phase (equiaxial) | 6.56 ± 2.25 | 85.55 ± 3.94 | 7.89 ± 5.90 |
| α-phase (lamellar) | 7.84 ± 0.80 | 90.82 ± 0.79 | 1.35 ± 0.01 |
| β-phase (lamellar) | 5.57 ± 0.47 | 87.99 ± 2.31 | 6.45 ± 2.78 |
| Publisher’s Note: MDPI stays neutral with regard to jurisdictional claims in published maps and institutional affiliations. |
© 2022 by the authors. Licensee MDPI, Basel, Switzerland. This article is an open access article distributed under the terms and conditions of the Creative Commons Attribution (CC BY) license (https://creativecommons.org/licenses/by/4.0/).
