1. Introduction
A big trend today is the transformation of the vehicle fleet from internal combustion engines to electric motors as the source of propulsion. This transition has sparked many new engineering challenges in a range of different fields. For the drivelines, new demands are imposed both at the system level and component level due to, e.g., higher rotational speeds of the input shaft, larger gear ratios, and lower acceptance of noise, vibration, and harshness (NVH).
The above-mentioned demands on the gears translate to their tolerances. In a series of studies [
1,
2,
3,
4], Hjelm and colleagues investigated how gear set behavior is affected by manufacturing errors and their tolerances. This investigation conducted using a loaded tooth contact analysis, or LTCA, with smooth surfaces under dry conditions.
However, the gear sets used in practice are lubricated. The pressure distribution in the lubricant film between two mating gear surfaces is governed by the Reynolds equation, which describes the hydrodynamic pressure in a thin lubricant film. Due to the high pressure experienced in gear contacts, the surfaces will deform elastically (and possibly plastically). This is the elasto-hydrodynamic lubrication (EHL) problem. Thermal EHL (TEHL) describes the EHL problem where temperature is considered.
Many studies based on EHL models can be found in the literature. Some of these address line contacts, such as between one cylinder and another cylinder or a plane [
5,
6,
7,
8,
9], or between two cones [
10].
Ren et al. [
5] studied shaved, ground, honed, and polished surfaces with assumed periodicity. Their method, which aimed to reduce computational time, showed good agreement with previous results. Almqvist and Larsson [
6] presented a model that uses a physical description based on the Navier–Stokes equation. This study contains a discussion about a singularity in the pressure gradient, which can occur when shear stress becomes too large (causing the denominator in one of the equations to become zero). This singularity, which comes from the momentum conservation equation, is not present in the Reynolds equation. They compared [
7] the model with the Reynolds equation approach. It was shown in [
7] that the Reynolds equation works well, with very similar results between the two approaches. This motivated the use of the Reynolds equation in the present study.
Chu et al. [
8] brought forth an inverse approach in which the fluid film’s thickness is measured and the temperature and pressure are calculated from those measurements. Mihailidis et al. [
9] used the Reynolds equation to address both flooded and starved regions of contact between rollers. The study includes the energy equation, a non-Newtonian fluid description, and limiting shear stress.
One advantage of these studies is that the results can easily be compared to experiments from, e.g., a twin disc setup [
11,
12]. Another advantage is their generality, as they can describe many other contacts such as between a cam and its follower or certain bearing types. However, the generality comes with the drawback that some geometrical features of gears cannot be captured, such as the tip relief, or effects such as contact outside the nominal line of action. In addition, time dependence, such as the change in the radii of the curvature with time, is not included in these models.
The importance of gear geometry, including phenomena such as tip relief, was discussed by Jamali et al. [
13] who showed how linear tip relief causes a cusp which increases contact pressure. The model included a transient Reynolds equation with non-Newtonian parameters. They also used a similar approach [
14] to show the effect of crowning. Peng et al. [
15] performed a TEHL analysis of gears subjected to modifications and misalignment. However, no manufacturing errors were assumed to be present.
Several studies include dynamics [
10,
16,
17,
18,
19,
20,
21]. While damping can be modeled for dry contacts, such as with Rayleigh damping, lubricated contacts present the possibility to model viscous damping. This was performed by Li and Kahraman [
16,
17]. Xue et al. [
18] applied their model to scuffing, and Liu et al. [
19] used a quasi-static finite element model for load calculations and combined the Reynolds equation and the energy equation. Wang et al. [
20] included the impact of spalling on dynamic behavior. Barbieri et al. [
21] stressed the importance of including dynamics together with the EHL model, even when the system is far from resonance. Yang et al. [
22], however, stated that dynamics are typically of little importance when predicting lubrication performance. Thus, it can be concluded that there are different perceptions of this matter in the literature. In the present study, dynamics will not be included.
Due to the high pressure and sliding speed found in gear contacts, heat generation can be considerable. A rise in temperature affects the lubricant, especially its viscosity. Temperature can be accounted for in different ways. To ease the computational burden, Li and Kahraman [
23] used a thermal correction factor. Dong et al. [
10] used the temperature rise equation derived from the shear stress. Several authors use the heat equation [
9,
18,
19,
24,
25,
26]. Yang et al. [
22] reported values of flash temperature of up to around 700 °C, while Wang and Gong [
20] reported half of that. Peng et al. [
15] showed cases with a temperature increase of only a few degrees. While these studies looked at different gear sets, lubricants, and operation conditions, and are therefore not directly comparable, they also show that there is a large selection of TEHL solutions.
Using a varying temperature, i.e., not making an isothermal assumption, thus enables a more realistic treatment of the lubricant. A temperature increase counteracts the immense increase in viscosity caused by the pressure in the contact. However, this also adds to the complexity and computational time. Therefore, varying temperatures, viscosities, and densities are considered in the present study.
The gears in a vehicle will always experience some degree of deviation from their intended geometry, i.e., manufacturing errors, such as pitch error and profile slope error. A change in geometry due to these errors affects lubricant film thickness, which in turn affects other lubricant properties such as pressure and temperature. Many authors have studied surface roughness, which is translated to the manufacturing error, denoted by the deviation in profile form, and its impact on the lubrication’s performance. For example, Clarke et al. [
27] brought forth the important conclusion that different profile errors within the same tolerance can give rise to different lubrication behaviors. This motivates further analysis into the link between gear set behavior and manufacturing error tolerances.
There is, however, a lack of studies in the literature that concern pitch errors and profile slope errors in lubricated contacts. The objective of this paper is, therefore, to create a TEHL method that can simulate the meshing of gears subjected to combinations of manufacturing error of different tolerances. The method takes into account the temperature dependence of viscosity and density.
2. Method
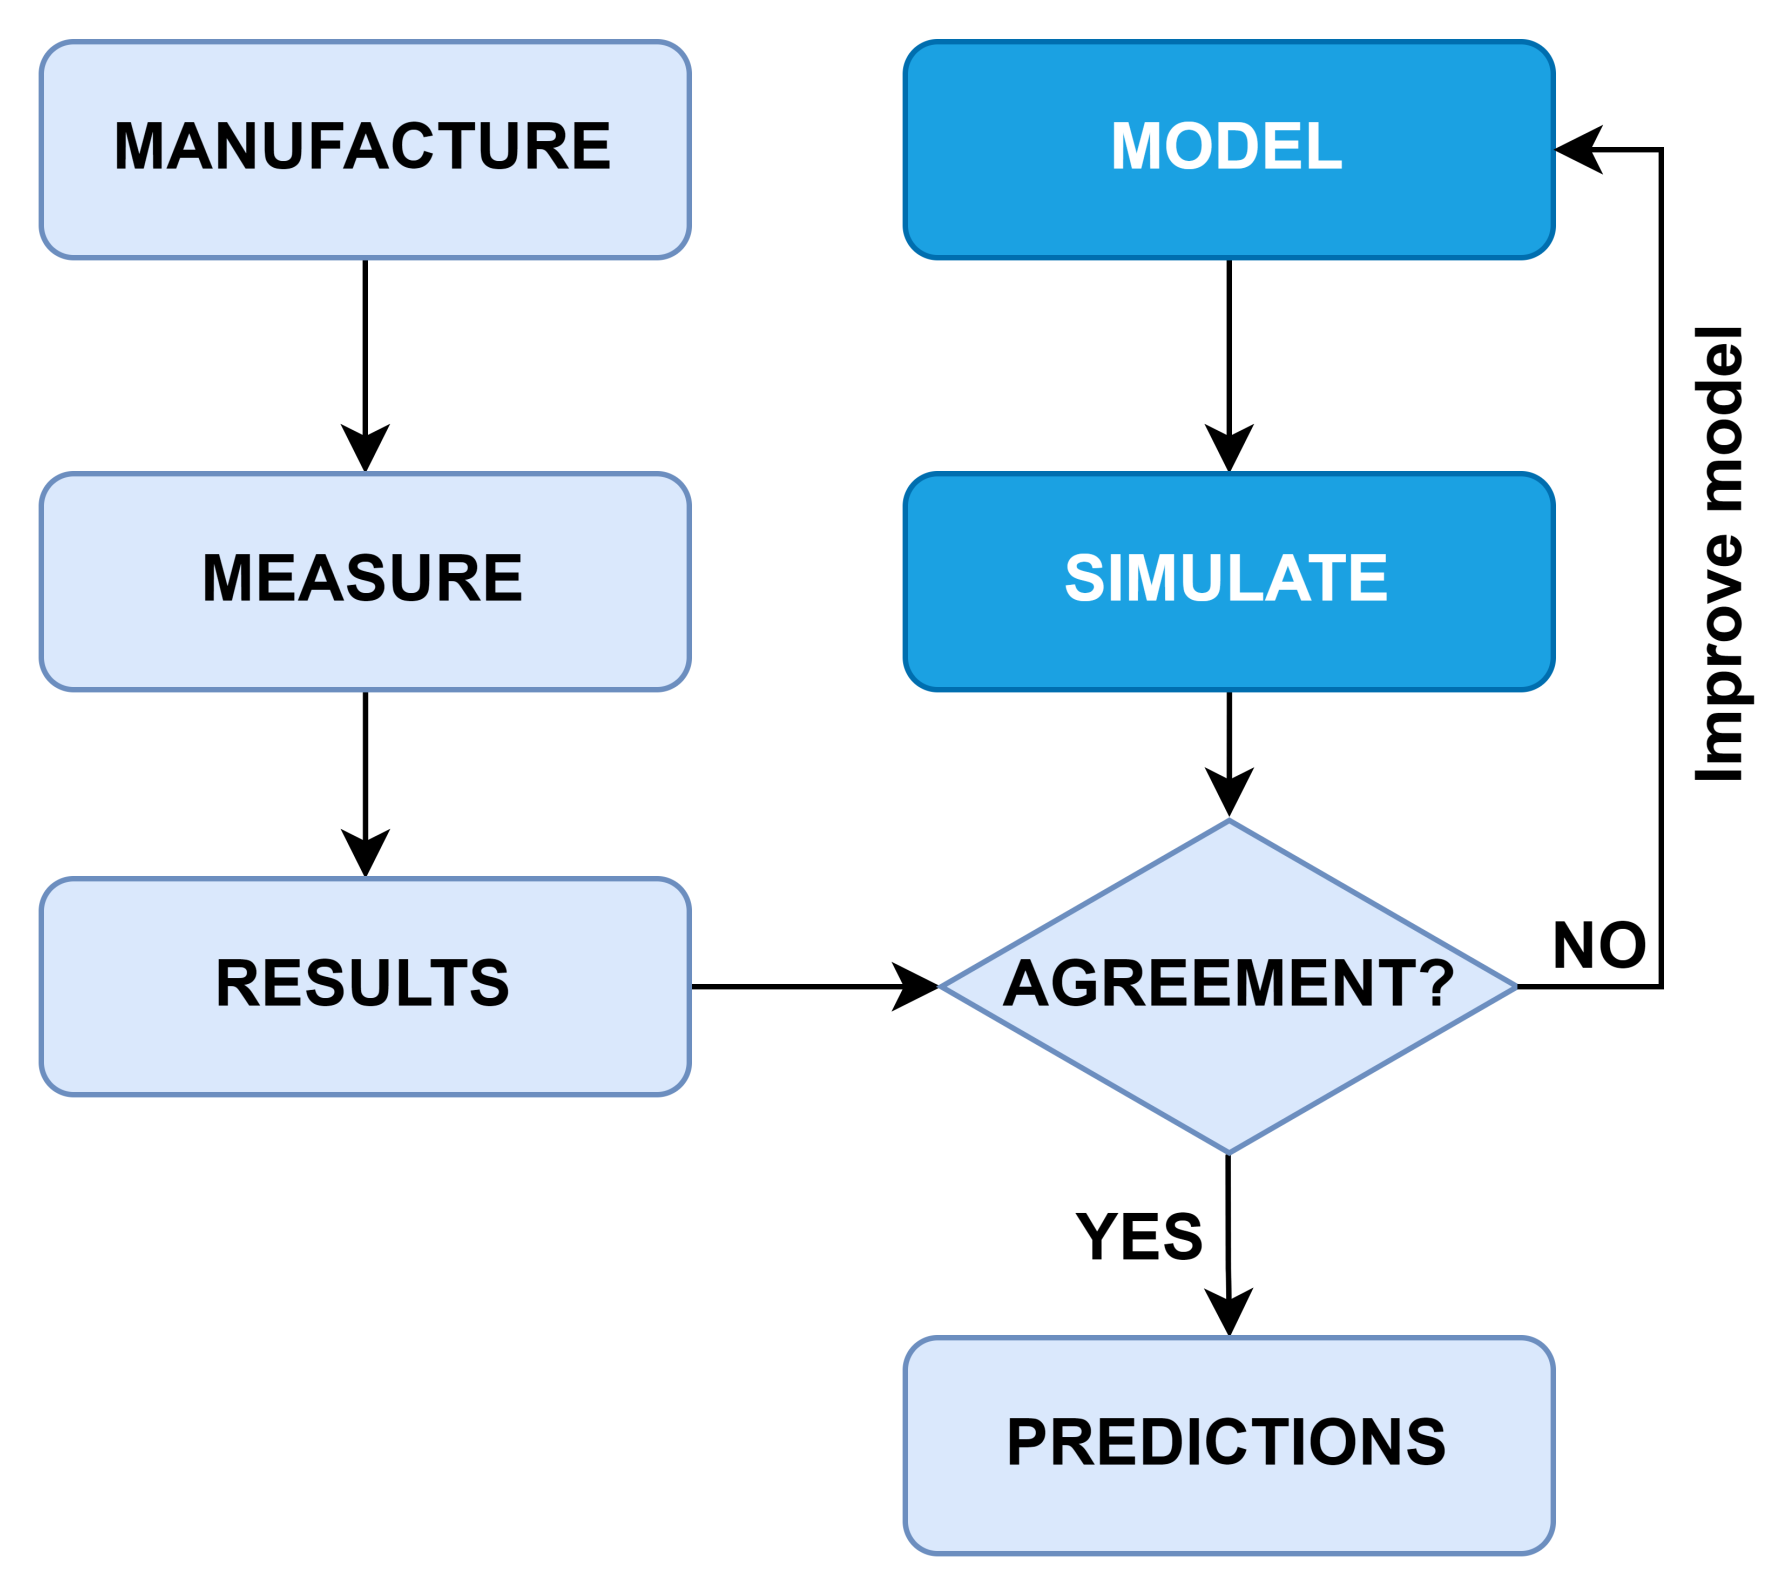
This study is the first step in an iterative process. The results from the method presented in this paper will be compared to the results of future experiments, and the method will be modified until satisfactory agreement with experiments is reached. It is only when the method can replicate experiment result with satisfactory accuracy that it can start to replace costly and time-consuming experiments. This process is shown schematically in
Figure 1.
In this paper, it will be assumed that dynamics can be neglected and that the surfaces are smooth. All symbols and indices used in this paper are defined in
Appendix B, see
Table A1.
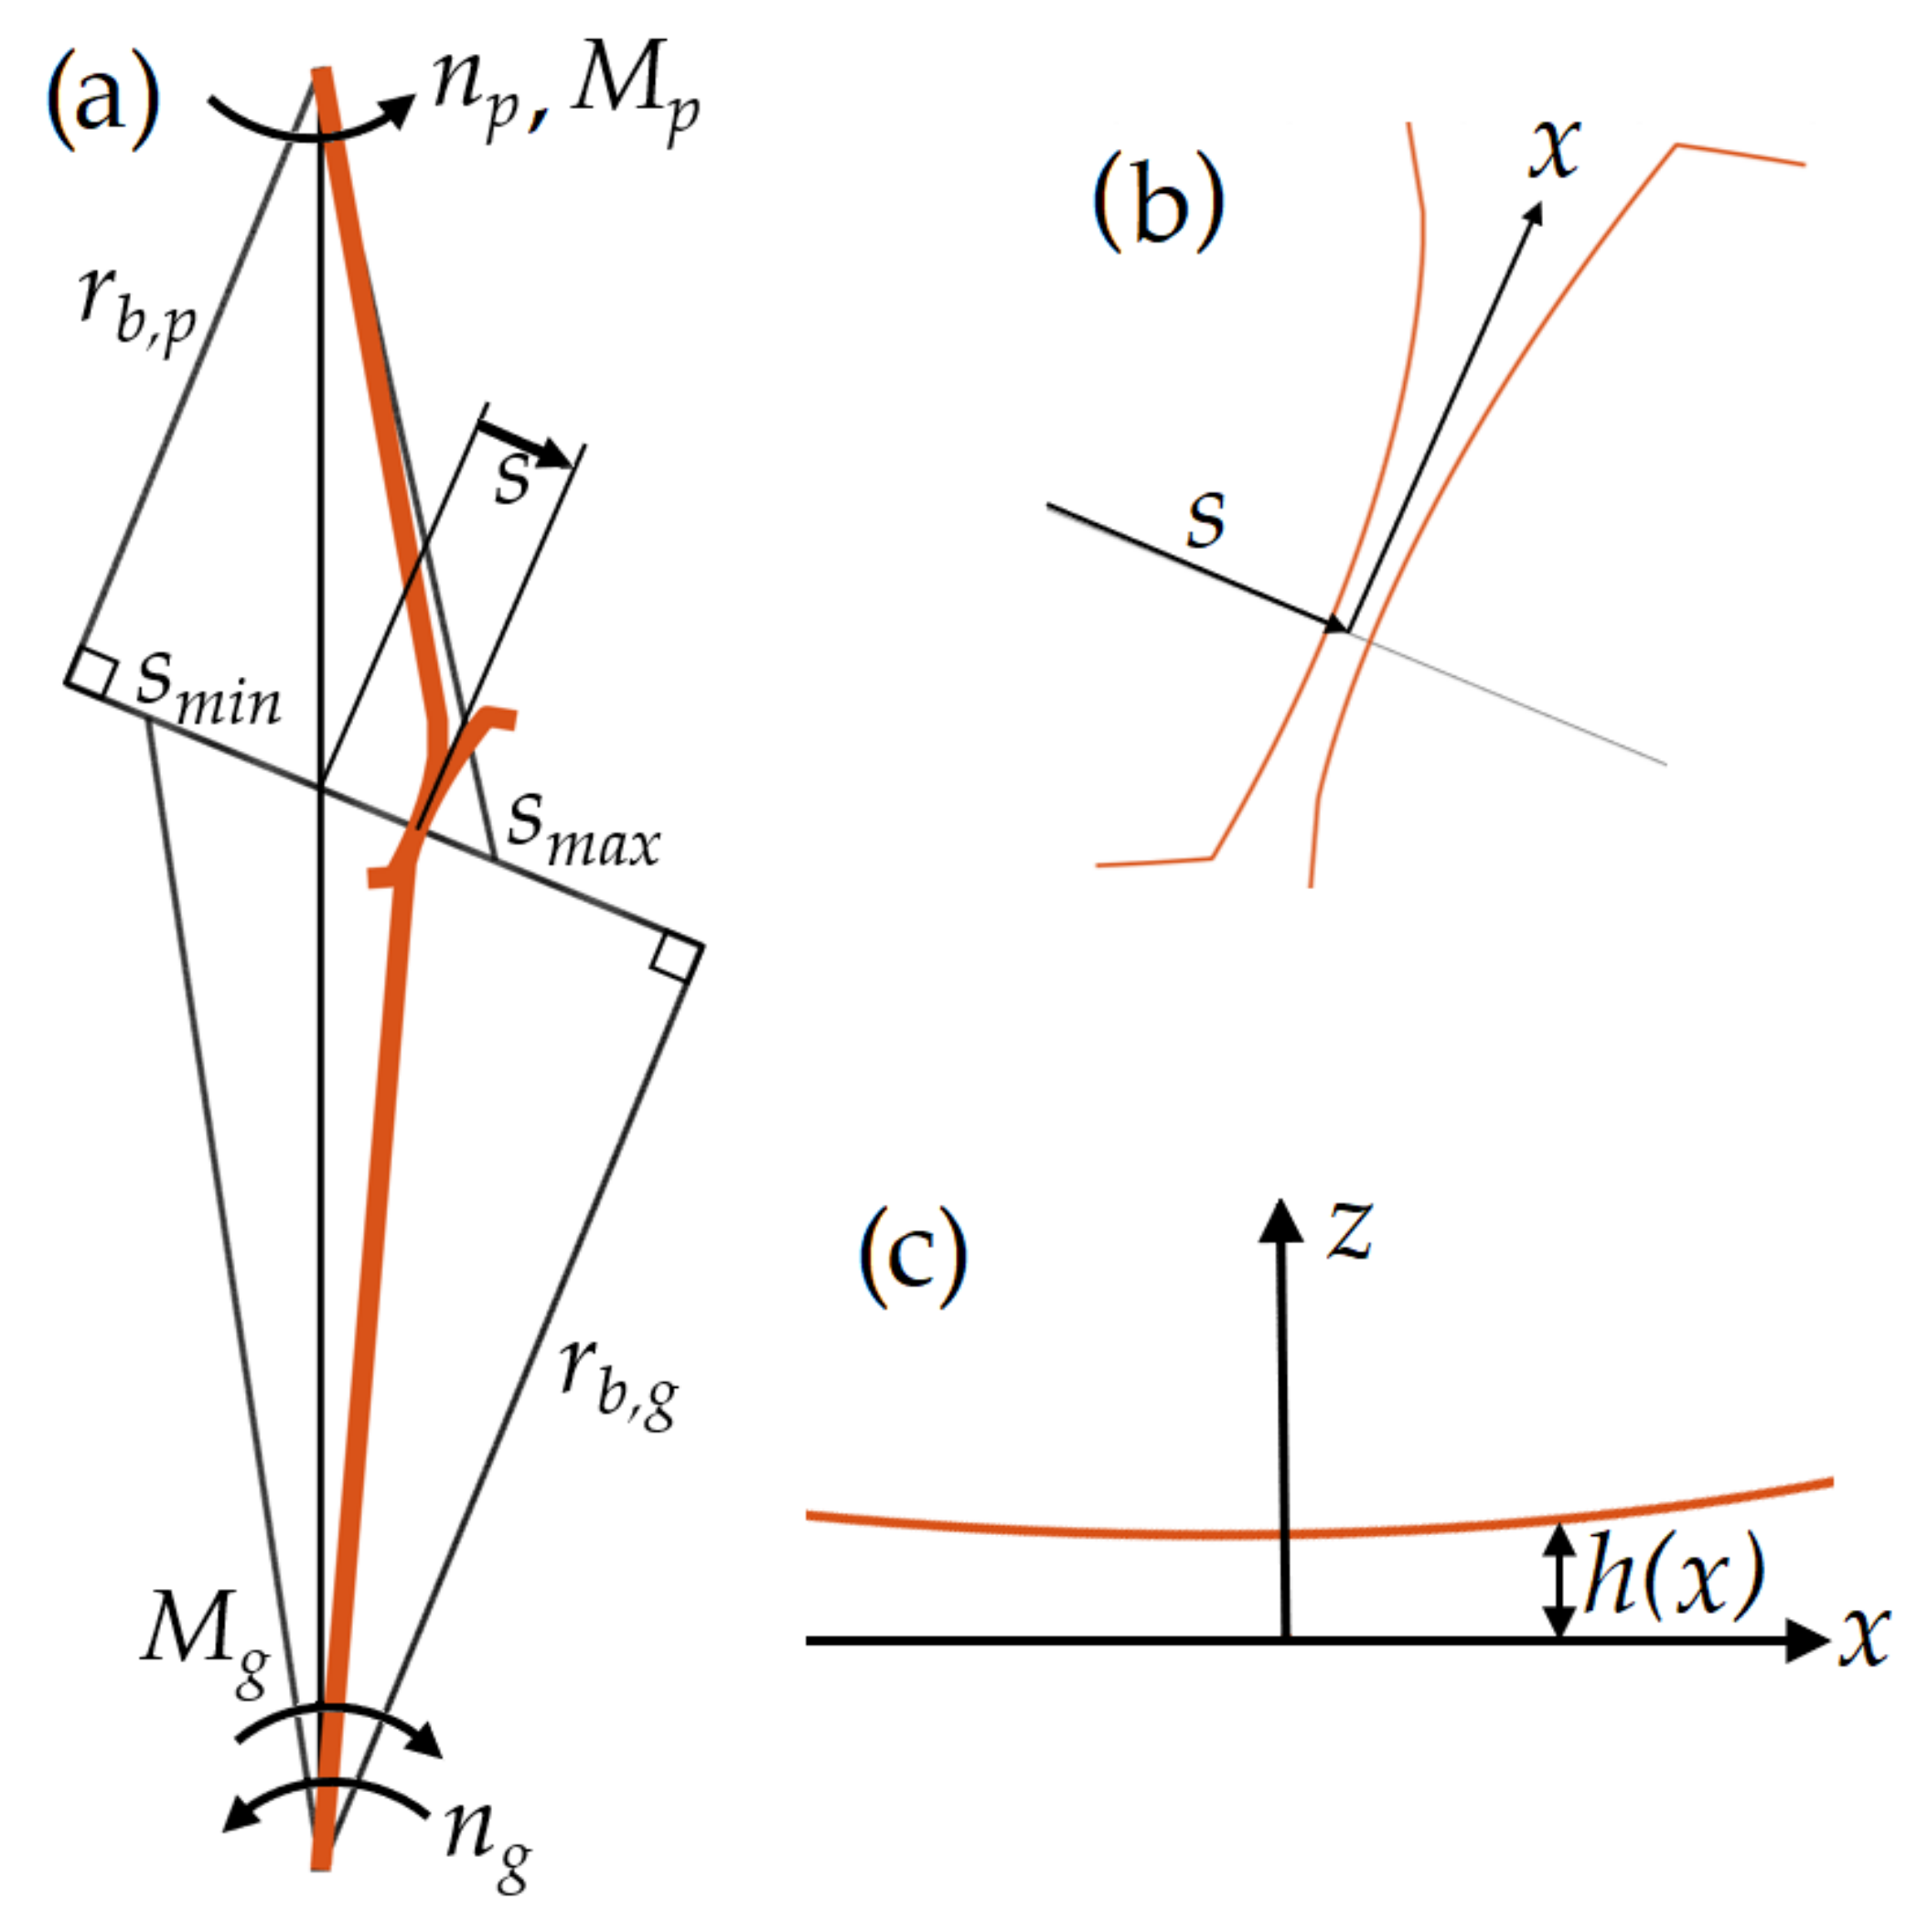
To solve the TEHL problem, a gear set according to
Figure 2a) is considered. The input shaft is connected to the pinion (index
p) and the output shaft to the gear (index
g).
Contact between the flanks of two mating teeth is found at a position along the line of action (LOA) given by the distance
s from the pitch point. At that position, which is zoomed in on in
Figure 2b), a coordinate
x is introduced along the contact.
The surfaces are separated by a thin lubricant film of height
h in the
z-direction. A coordinate system is introduced according to
Figure 2c). In this study, no variation in the
y-direction is considered.
At a position x in the contact, the lubricant experiences a pressure p, temperature T, viscosity , and density . These properties are assumed to vary along x but not along z.
The governing equations of the lubricant film are given in
Section 2.1. The discretization of the equations is mentioned in
Section 2.2, and shown in detail in
Appendix A. The LTCA is described in
Section 2.3. The implementation of the method is described in
Section 2.4.
2.1. Theory
The lubricant pressure is governed by the Reynolds equation according to:
which can be expressed as:
where
Here, the mean velocity
between surfaces of the pinion and gear is given by:
where
and
are the velocities of the pinion and gear surfaces, respectively.
By solving the Reynolds equation, the pressure is found in the entire contact zone, spanning the domain , where and denote the start and end of meshing, respectively.
This problem is highly non-linear due to its couplings. When the lubricant becomes pressurized, its density and viscosity are affected. The relation between density and pressure according to Dowson–Higginson [
28] is given by:
where
,
,
, and
are density parameters. Numerical values are defined in
Section 2.5.
It is also seen that the temperature
T affects the density. This is also the case for the viscosity, which is governed by the expression given by Rodermund [
29] as:
where
,
,
,
, and
are viscosity parameters. Numerical values are defined in
Section 2.5.
Since both density and viscosity depend on temperature, it is necessary to calculate the temperature distribution in the lubricant film. The temperature is governed by the one-dimensional differential equation:
where
is the volume expansion coefficient,
u is the lubricant velocity,
is the shear stress,
c is the specific heat, and
is the thermal conductivity.
With the pressure derivative and the velocity gradient given, Equation (
7) is an ordinary differential equation of second order, which means that two boundary conditions are needed. The inlet temperature is known at
, i.e., a Dirichlet boundary condition, and the temperature derivative is assumed to be zero at the outlet,
, i.e., a Neumann boundary condition.
In Equation (
7), the shear stress is given by:
and the lubricant velocity is given by:
This gives the velocity gradient:
Combining Equations (
8) and (
9) yields:
This implies that the shearing term in Equation (
7) evaluated at
becomes:
where
is the velocity of a point in the lubricant film and varies along
z. An average velocity
is obtained by:
Averaging the shear stress and velocity gradient over
z yields the same result as in Equation (
12).
The lubricant is thus described by the Reynolds equation (Equation (
1)) and the heat equation (Equation (
7)). As the pressure depends on the temperature and the temperature depends on the pressure, these equations have to be solved iteratively.
The height of the lubricant film is affected by the elastic deformation of the surfaces due to the pressure. The deformation of the mean surface [
30] is given by:
where the kernel
C is given by:
is the equivalent modulus of elasticity, given by:
where both the pinion and gear have the same modulus of elasticity and Poisson ratio.
When the pressure has been calculated, the total load, or contact force, is calculated according to:
where
b is the width of the gear teeth. The load can be found from the load balance equation:
where
is the base circle radius. This equation can also be modified by including friction. Alternatively, another method such as an LTCA can be used; see
Section 3.
When solving the Reynolds equation above, with an almost symmetric height function, the pressure will be almost anti-symmetric, which implies negative pressure values. As the lubricant cannot accommodate any tensile stress of considerable magnitude, the lubricant film collapses, i.e., cavitation [
31,
32] occurs.
The start of the cavitation zone is denoted by
, and is characterized by the boundary condition:
In the entire cavitation zone
, it holds that:
Thus, the pressure distribution in the cavitation zone is known. The fill factor
in the cavitation zone is given by the heights according to:
This is used in the expression for the shear stress. The equivalent of Equation (
12) in the cavitation zone becomes:
The heat equation, Equation (
7), is reduced to:
where
cancels out since it is present in all terms.
2.2. Discretization
To solve the equations established above, they need to be discretized. This is accomplished using a central difference scheme. The equations are then formulated as matrix equations, and boundary conditions are introduced. The discretization is shown in detail in
Appendix A.
2.3. LTCA
Except for the theory of the TEHL problem described above, the method also utilizes an LTCA. The LTCA is described in detail in [
1,
2] and briefly summarized here.
The geometry of the pinion and gear is found from a parametric description of the reference profile. Once the gear set geometry, with, e.g., a certain center distance, is established, the LTCA finds contacts by searching for common normal directions. If an overlap exists at the position of a common normal, it is a possible contact point. The gears are then rotated back and forth, using the bisection method, until the total torque contribution of all simultaneous contacts are in equilibrium with the applied torque. Thus, the load distribution is found from equilibrium and a compliance condition.
In the LTCA, the profile slope error is introduced by a rotation of the reference profile. The physical interpretation of this is a misaligned tool. The pitch errors are instead introduced by altering the positions of the teeth in question.
2.4. Implementation
To solve the TEHL problem in practice, a specific gear set is needed. In the algorithm, the flank coordinates can be either calculated or taken as input from a file. Thus, e.g., tip relief can be introduced to the geometry.
Once a gear set and a contact position s are chosen, the undeformed geometry at the contact is known. However, the contact domain along the x coordinate is unknown. Here it is assumed that on each tooth flank there is a lubricant film with a certain thickness denoted by supply thickness. When the films on either flank meet, the pressure starts to build up. This marks the start of the contact zone, . At the outlet of the contact, is found in the same way.
While the supply thickness is unknown, a sensitivity analysis shows that it does not influence the solution as long as it is large enough, as a too large supply thickness only gives an extended contact domain, where the film height is large at the inlet and outlet, corresponding to a near-zero pressure.
Once the computational domain is established, the governing equations of the TEHL problem are presented in
Section 2.1. The unknowns
p,
h,
T,
, and
all depend on each other. Therefore, the algorithm uses start guesses of the unknowns, followed by iterative corrections until convergence is reached.
The iterative corrections utilize the intrinsic feedback mechanism of the TEHL problem. For example, if the height suggested in a certain iteration is too small, the pressure in the subsequent iteration will be large. This results in a greater deformation, which in turn will give a greater height corresponding to a lower pressure.
If the first guess of the unknowns is sufficiently close, the consecutive values will converge. The guess is then within the (multi-dimensional) convergence radius. If the guess is outside this radius, there will be no convergent solution, and a better guess has to be made.
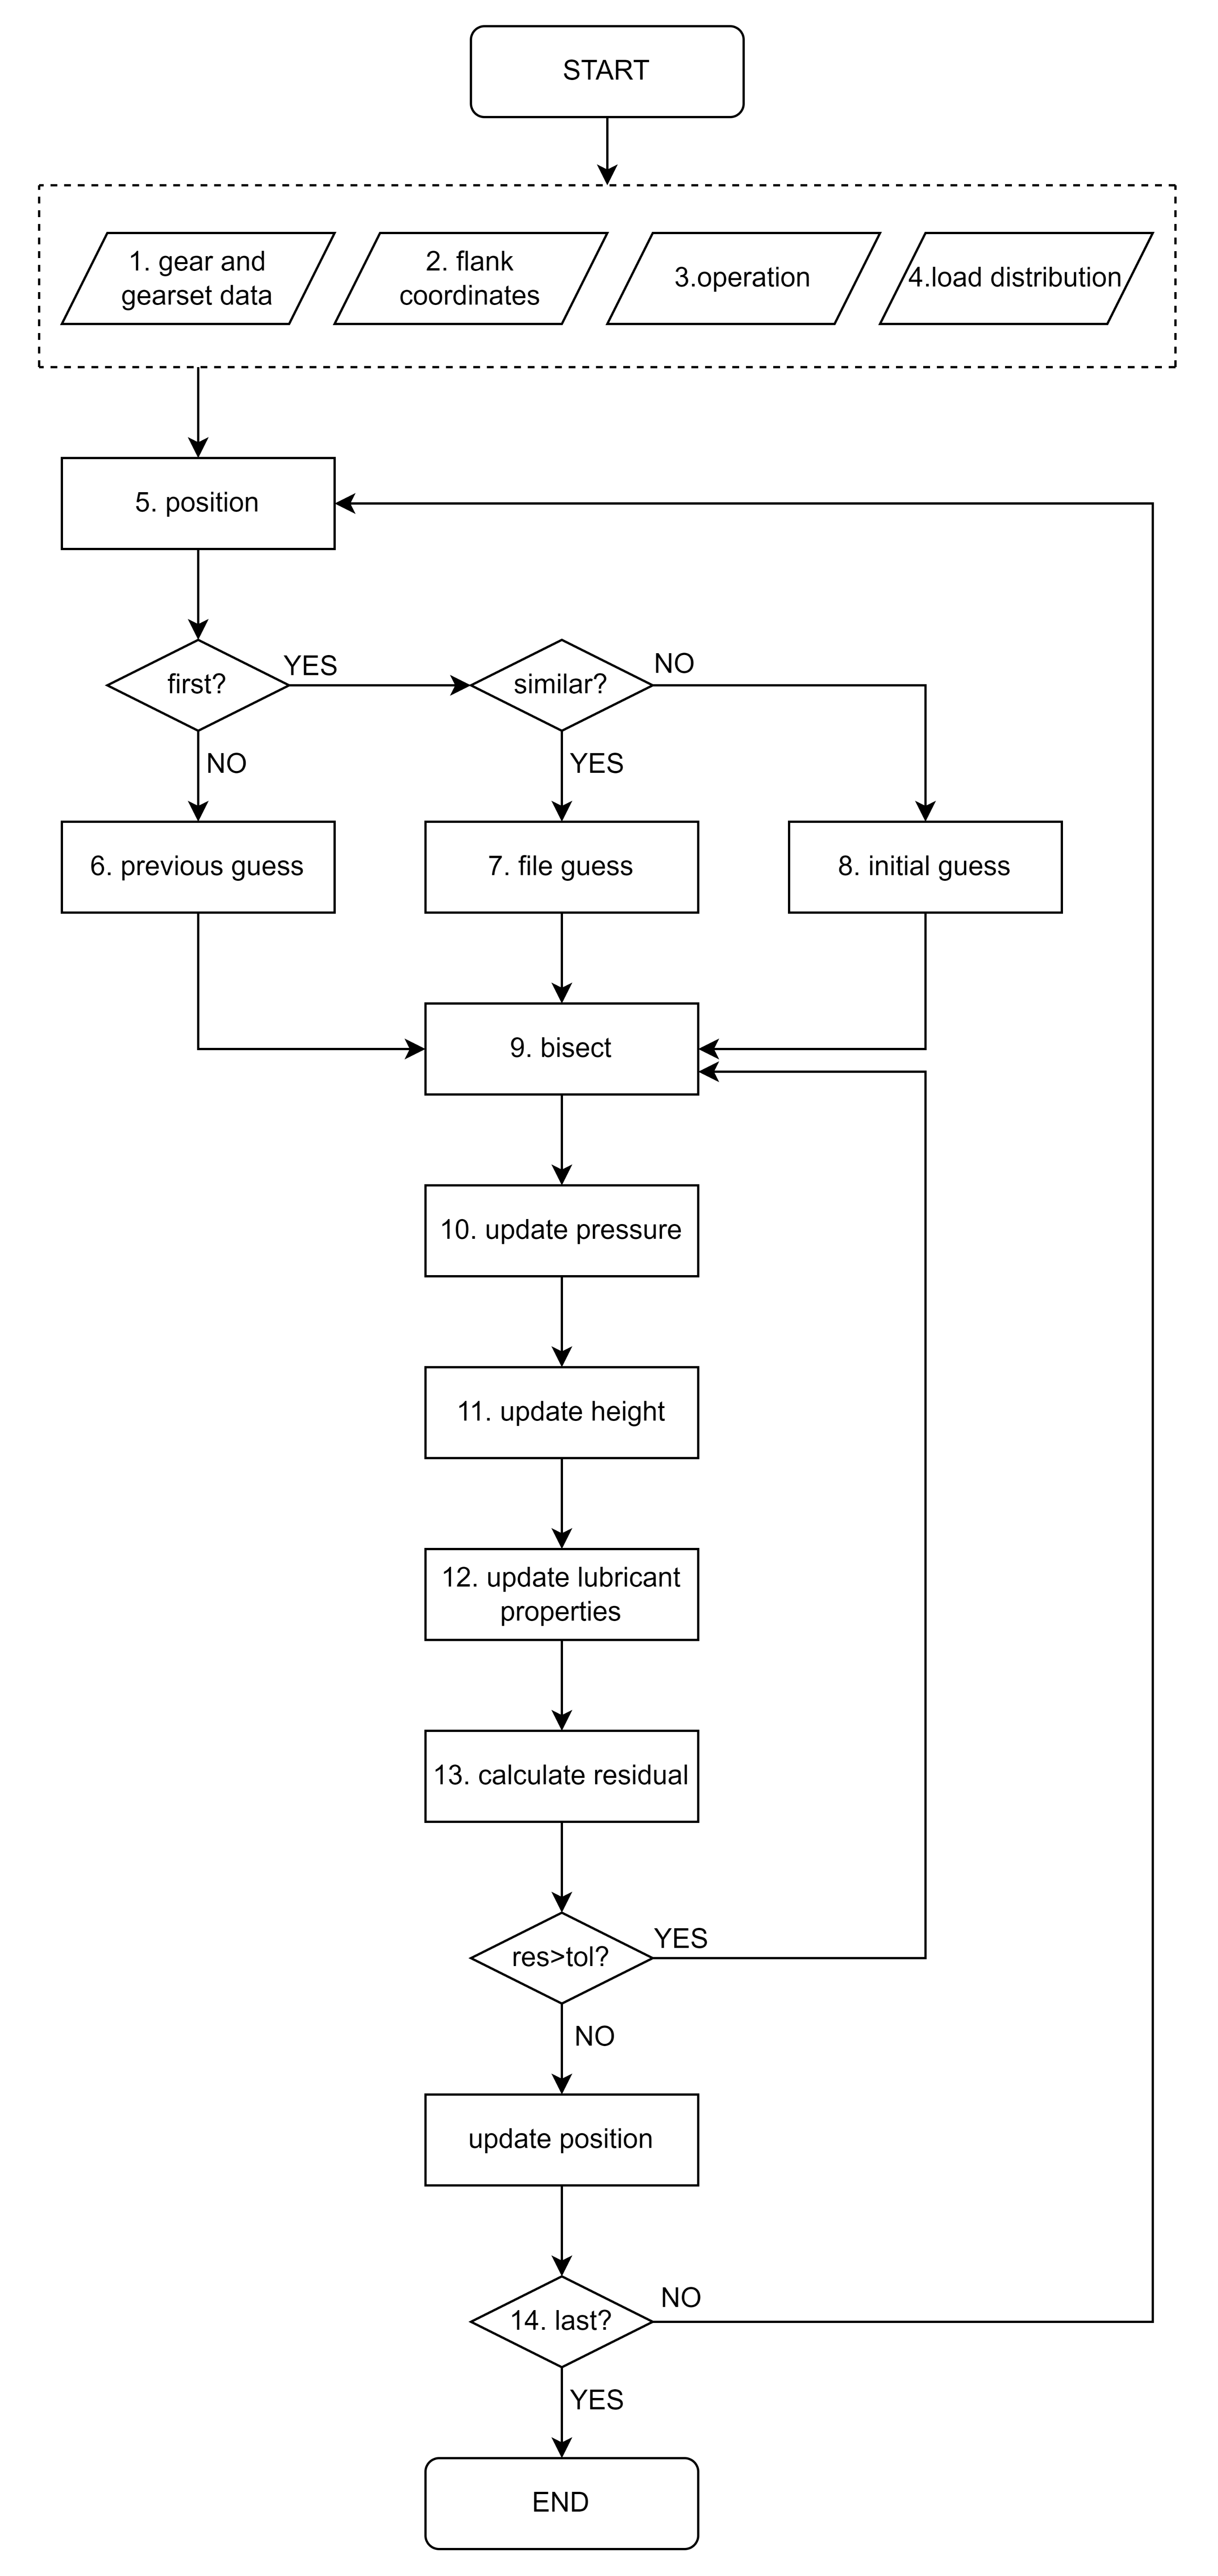
Figure 3 gives an overview of the different steps in the algorithm. The steps are then described in greater detail.
Once the program is started, it takes the following input (marked with dashed lines in
Figure 3):
After initiating these input values, the program proceeds in the following way:
- 5.
A position is chosen. If this position is not first in the simulation, the program moves on to step 6;
- 6.
The solution from the previous position is used as as a start guess to the current.
However, if there is no previous position, the program moves on to step 7 or 8:
- 7.
File guess, if a solution has been found in previous simulations for a similar case, and this solution is saved in a file;
- 8.
Initial guess, if no solution for a similar case is accessible.
All types of guesses contain a pressure distribution and a temperature distribution and the corresponding viscosity and density. The pressure guess of the first iteration corresponding to a certain position is denoted by .
The deformation caused by the pressure is used to update the undeformed height, such that its shape is known. Its offset is, however, still unknown.
- 9.
Once a guess has been made, the bisection method is used to calculate the offset. The height curve is rigidly displaced until the pressure distribution found from solving the Reynolds equation, with respect to cavitation, gives the correct equivalent contact force. This pressure is denoted by .
- 10.
The calculated pressure
will in general be different from
. The difference is given by:
The pressure is then updated according to:
where
is a damping factor, typically
. This prevents the solver from taking too large steps. Even if a step is in the right direction, it may fall outside the convergence radius, thus causing the algorithm convergence to fail. If, on the other hand, a smaller value is chosen, convergence becomes slower. With this choice, not too much effort has to be put into the initial guess of the solution.
- 11.
When the new pressure is found, the corresponding deformation is calculated. This is added to the height, and the old deformation is subtracted.
- 12.
With pressure and height established, viscosity, density, and temperature are updated.
- 13.
From the new and old pressure, the residual is calculated. This procedure is then repeated, for subsequent iterations from
to
, until
where
N is the number of points, subscript index
k denotes the point, and superscript index
i denotes the iteration number.
- 14.
When a solution is found, the program either changes the contact position and repeats the process or terminates and prints the results.
2.5. Numerical Example
To show some results from TEHL simulations, a specific numerical example is needed. All results pertain to this example.
The gear set used in this numerical example is the FZG C gear pair, with data according to
Table 1.
Apart from the geometrical and stiffness data presented in
Table 1, the gear set is assumed to operate under conditions according to
Table 2.
The gear set is subject to manufacturing errors. These errors are assumed to affect only the pinion. The pitch error tolerance (
) and profile slope error tolerance (
) can be seen in
Table 3.
Data for the parameters in the heat equation, Equation (
7), can be found in
Table 4. These values are assumed to be ‘typical’ for gear application lubricants.
The values of the coefficients in the density function (Equation (
5)) and viscosity function (Equation (
6)) are presented in
Table 5.
3. Results
Nominally, the contact takes place along the LOA between and . In reality, this might be slightly altered due to off line-of-action effects caused by deformation, modifications, manufacturing errors, etc.
One or more pairs of gear teeth are in contact. For the gear set in the numerical example, the contact ratio is between 1 and 2; thus, either one or two tooth pairs are in mesh simultaneously, i.e., single or dual engagement. In the single-engagement zone, one tooth pair carries all the load.
However, the load distribution in the dual engagement zone is unknown. The simplest assumption is that the tooth pairs in mesh divide the load equally. This is, however, not necessarily the case. Some authors, such as Bobach et al. [
34] and Zhao et al. [
35], instead modified the load distribution function with use of trapezoidal parts. Irrespective of the approach, it is only the load, i.e., the integral of the pressure distribution over the contact surface, that is used as input in the TEHL analysis. Thus, the equivalent load of the dry pressure distribution is used as input to calculate the lubricated pressure distribution.
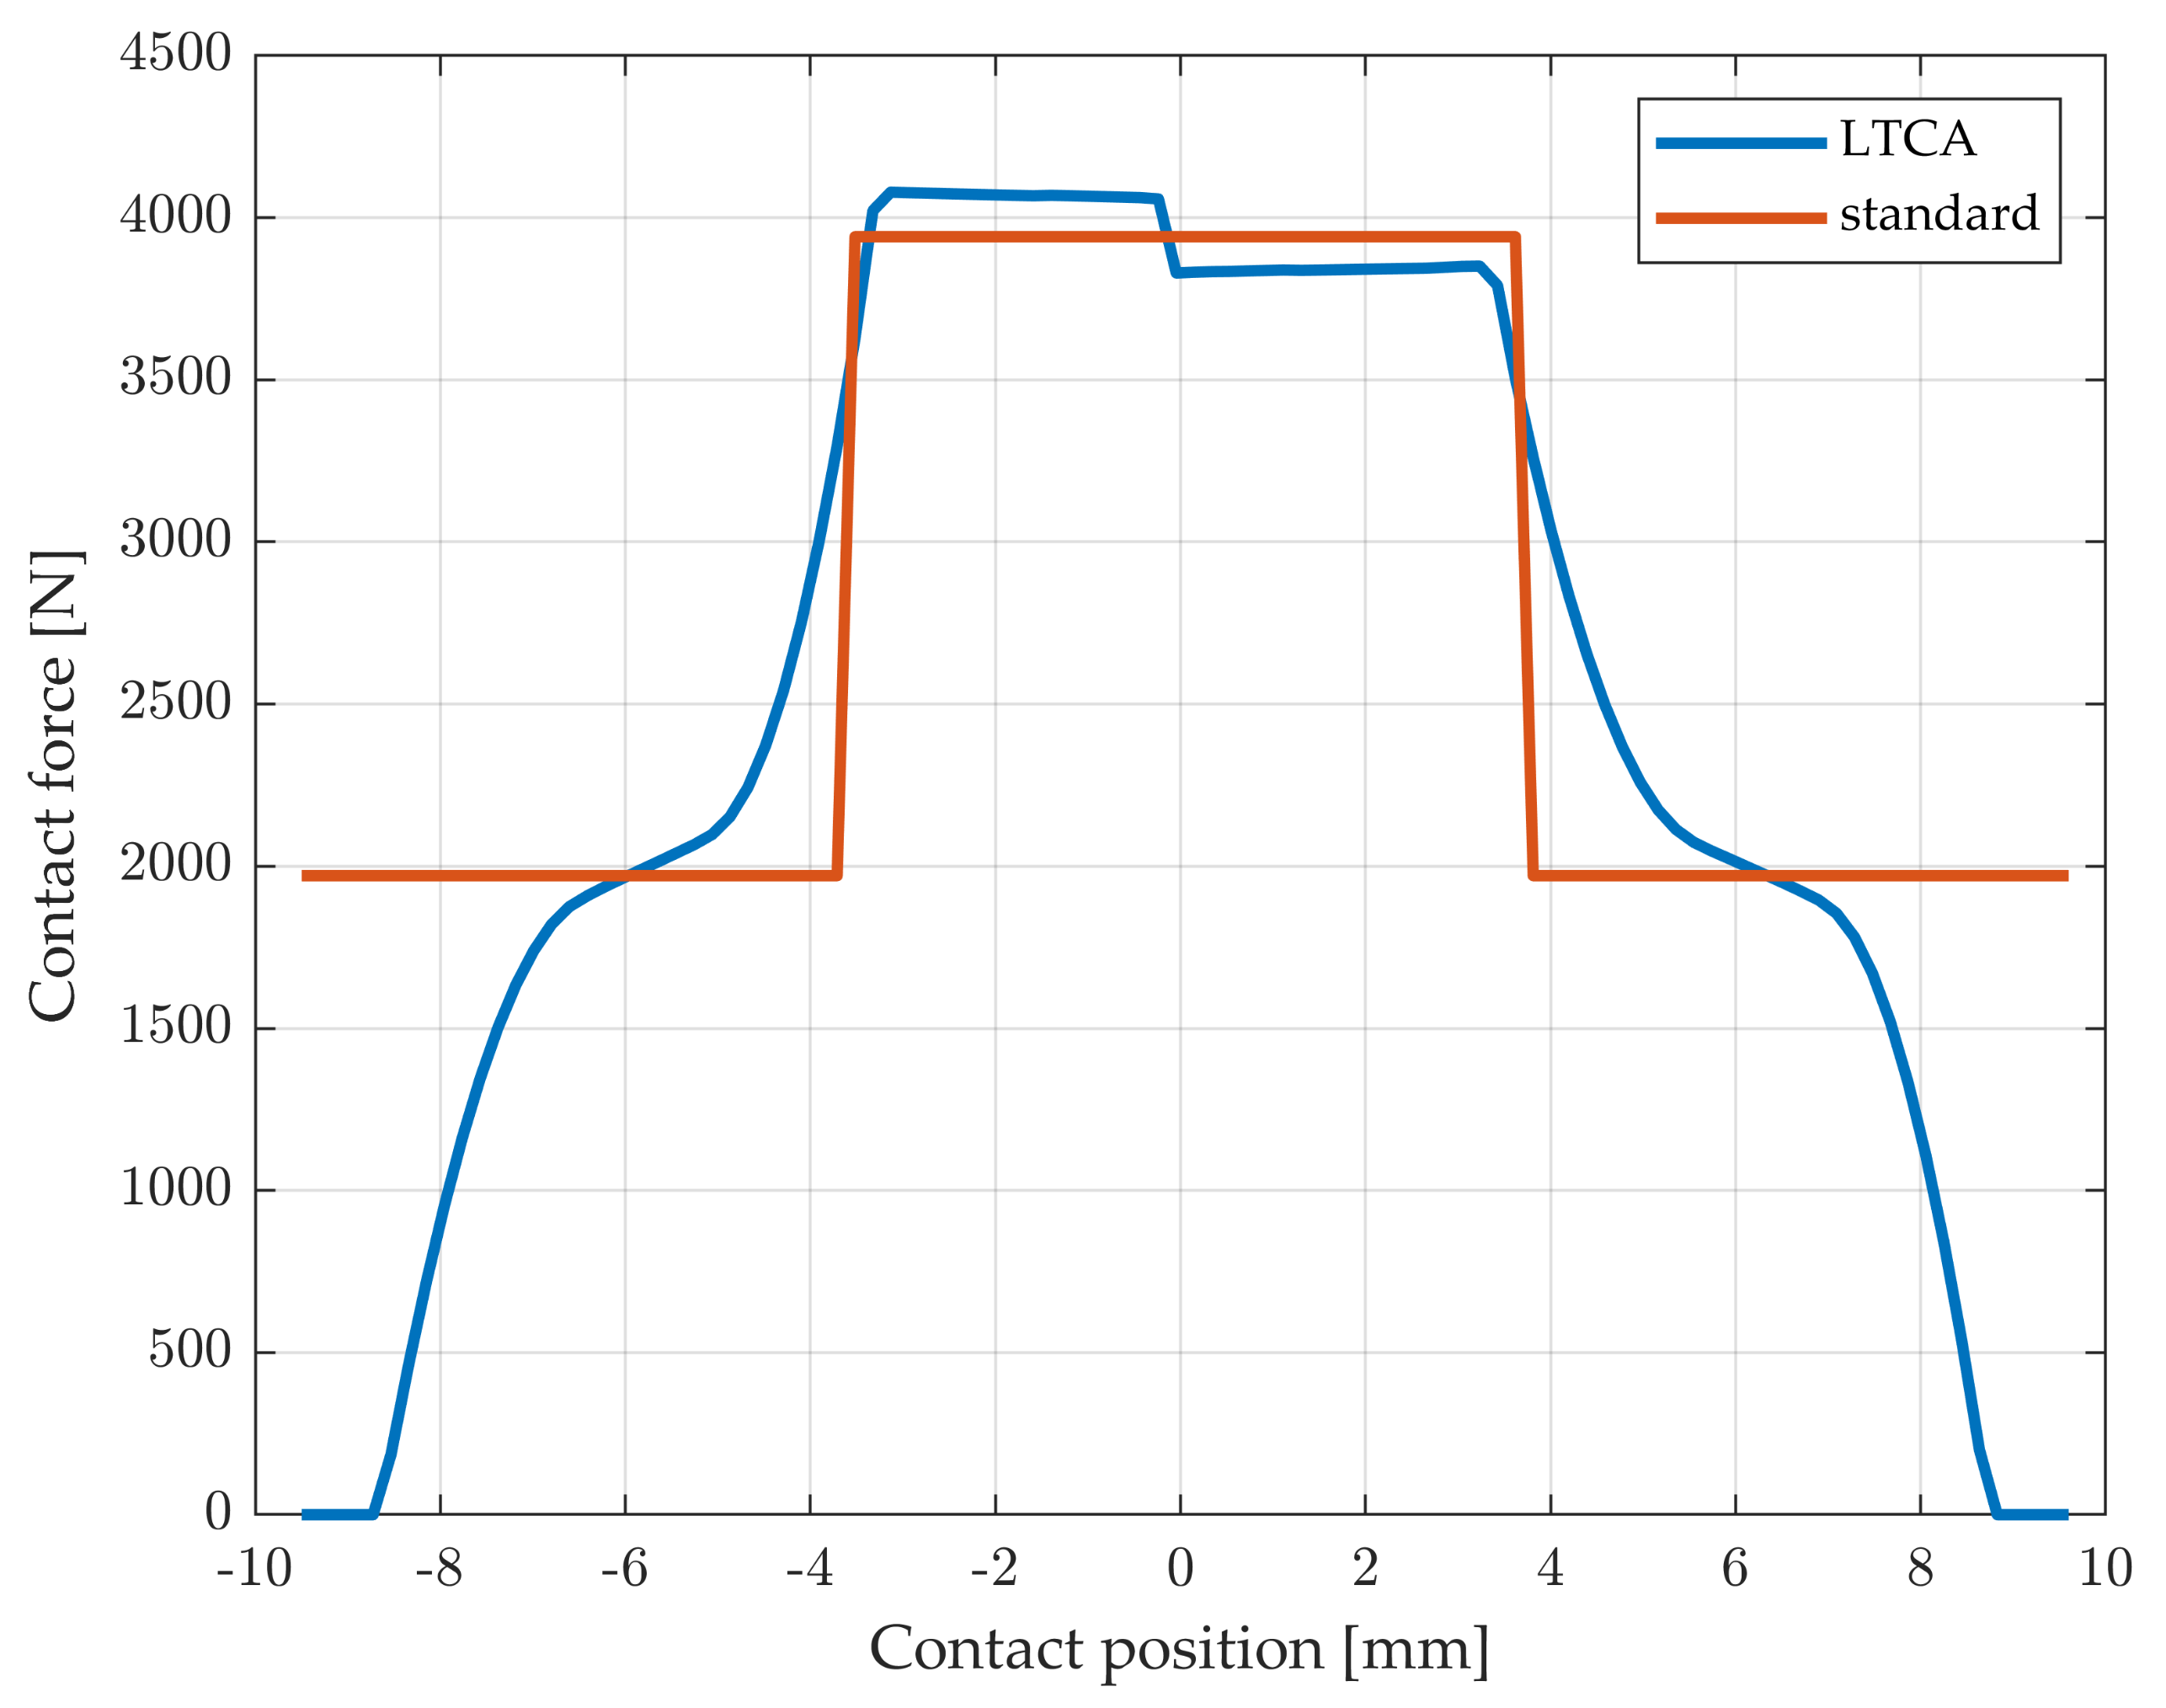
In the present study, results from an LTCA are used as input for the load distribution, see
Figure 4.
In the single-engagement zone, the standard approach and the LTCA approach give very similar results. There, the pressure distribution found from the LTCA is very close to a Hertzian pressure distribution.
The slight difference that can be seen in
Figure 4, including the sudden jump at the pitch point, is due to the LTCA taking friction into account in the moment equilibrium. As the sliding velocity changes direction at the pitch point, so does the friction. The friction force multiplied by its lever (along the line of action) contributes slightly to the transmitted torque.
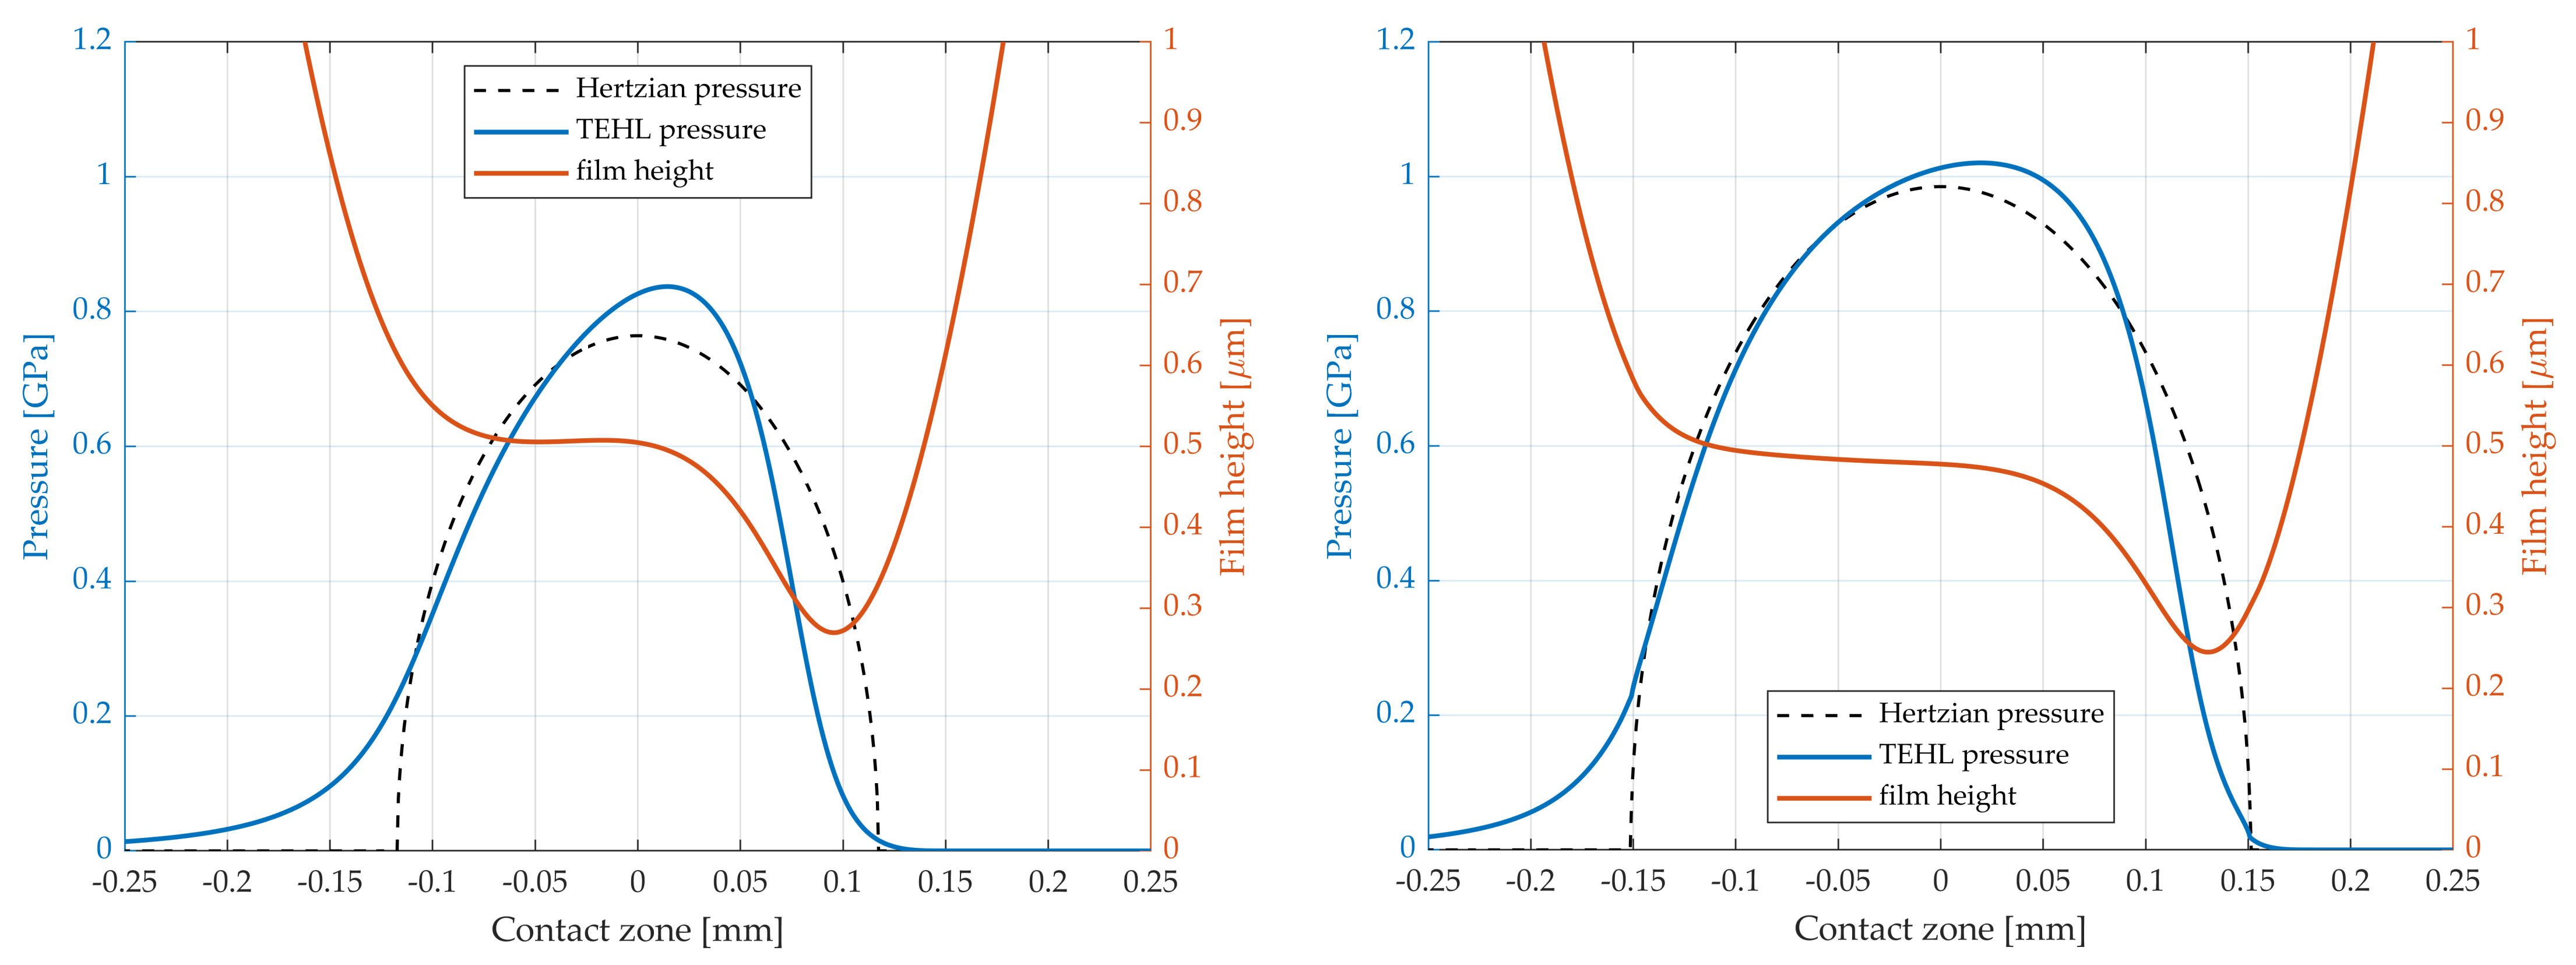
The result of the TEHL analysis at
s = 2 mm, where the standard and the LTCA give very similar loads, is shown in
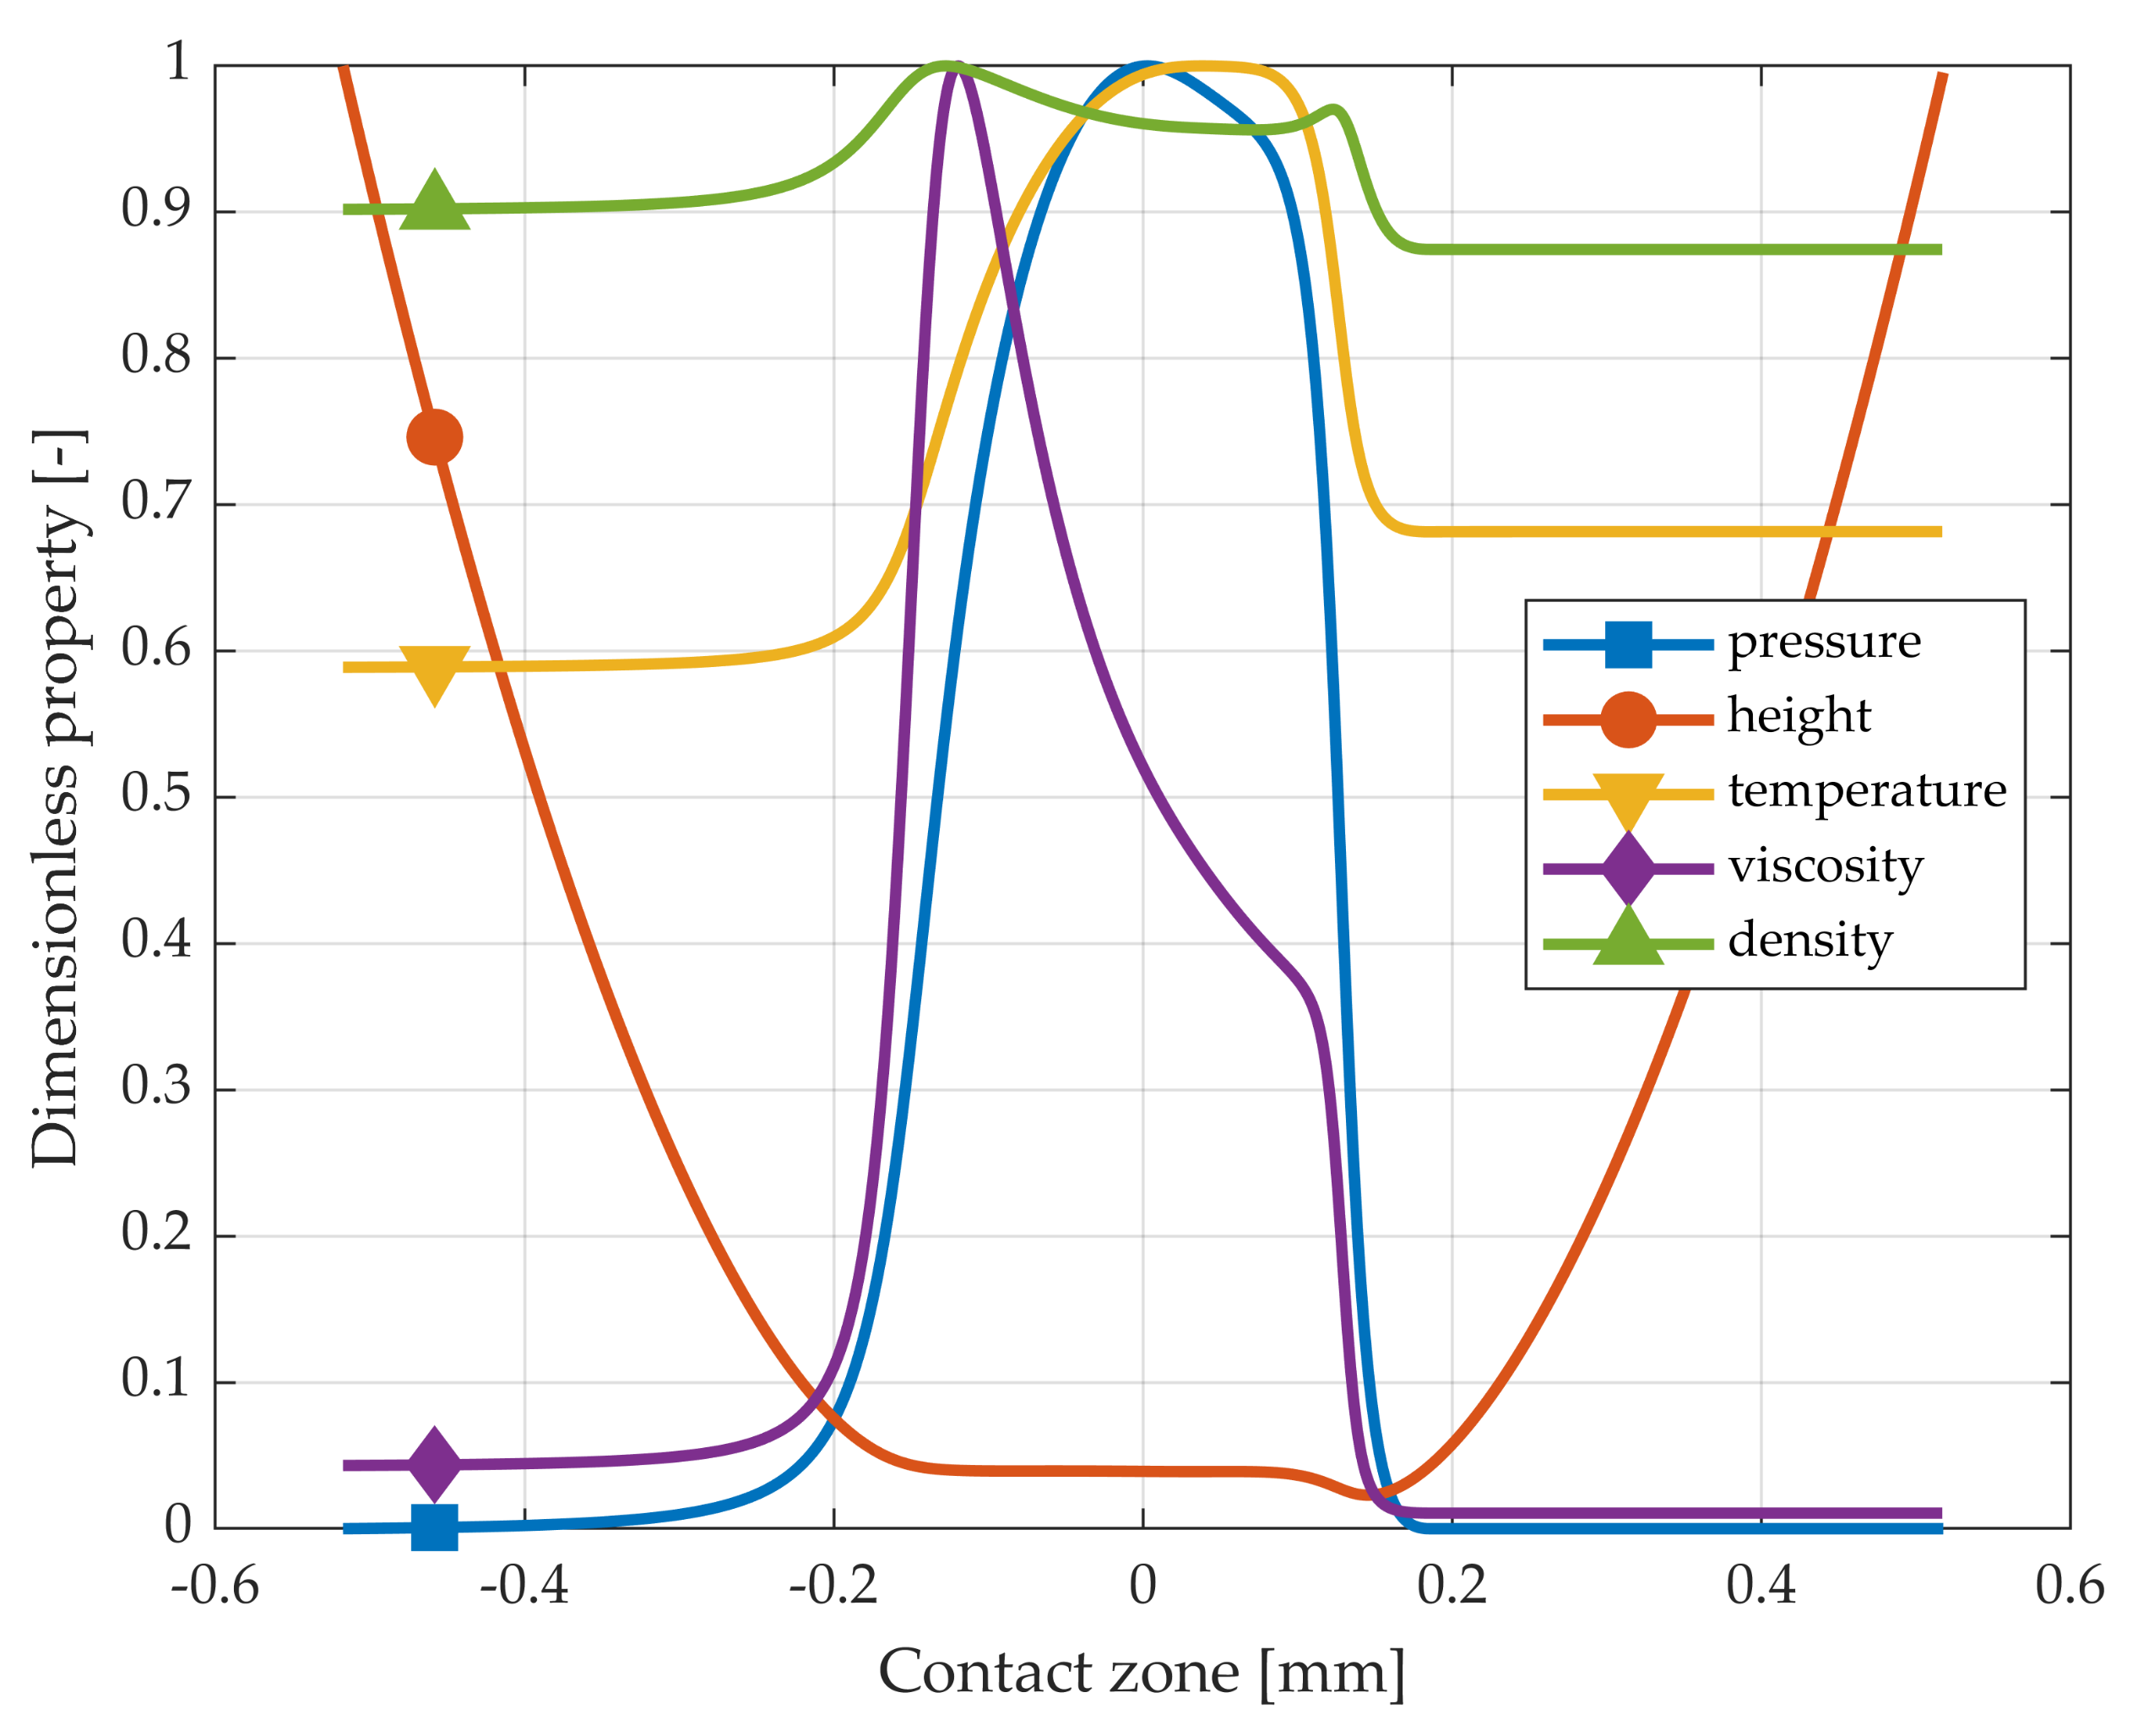
Figure 5. A few phenomena can be observed. The pressure distribution exhibits the typical lubricant pressure property of a gradual increase at the inlet, as opposed to, e.g., Hertzian pressure, which has an infinite pressure derivative at the borders of the pressure domain. The height curve shows that the surface is flattened and has a dent near the start of the cavitation zone. The temperature increases to its maximum value near the center of the contact zone, and then decreases and stabilizes at a value slightly larger than the inlet temperature. Viscosity increases rapidly as the pressure starts to build up and then decreases with temperature. Finally, density is seen to increase with pressure but decrease with temperature. These phenomena and their validation are further discussed in
Section 4.
Contrarily, there is a large difference between the standard load distribution in the dual engagement zone and the load distribution according to the LTCA. This is seen at the point
s = 3.8 mm in
Figure 4.
Figure 6 shows the result of the TEHL analysis using the load based on LTCA as well as the standard load distribution assumption at the same contact point. Note that the difference in load is reflected by difference in both pressure and film height in the contact.
The maximum temperature according to standard load distribution is 305 °C, whereas the LTCA load distribution gives a maximum temperature of 373 °C, see
Figure 7.
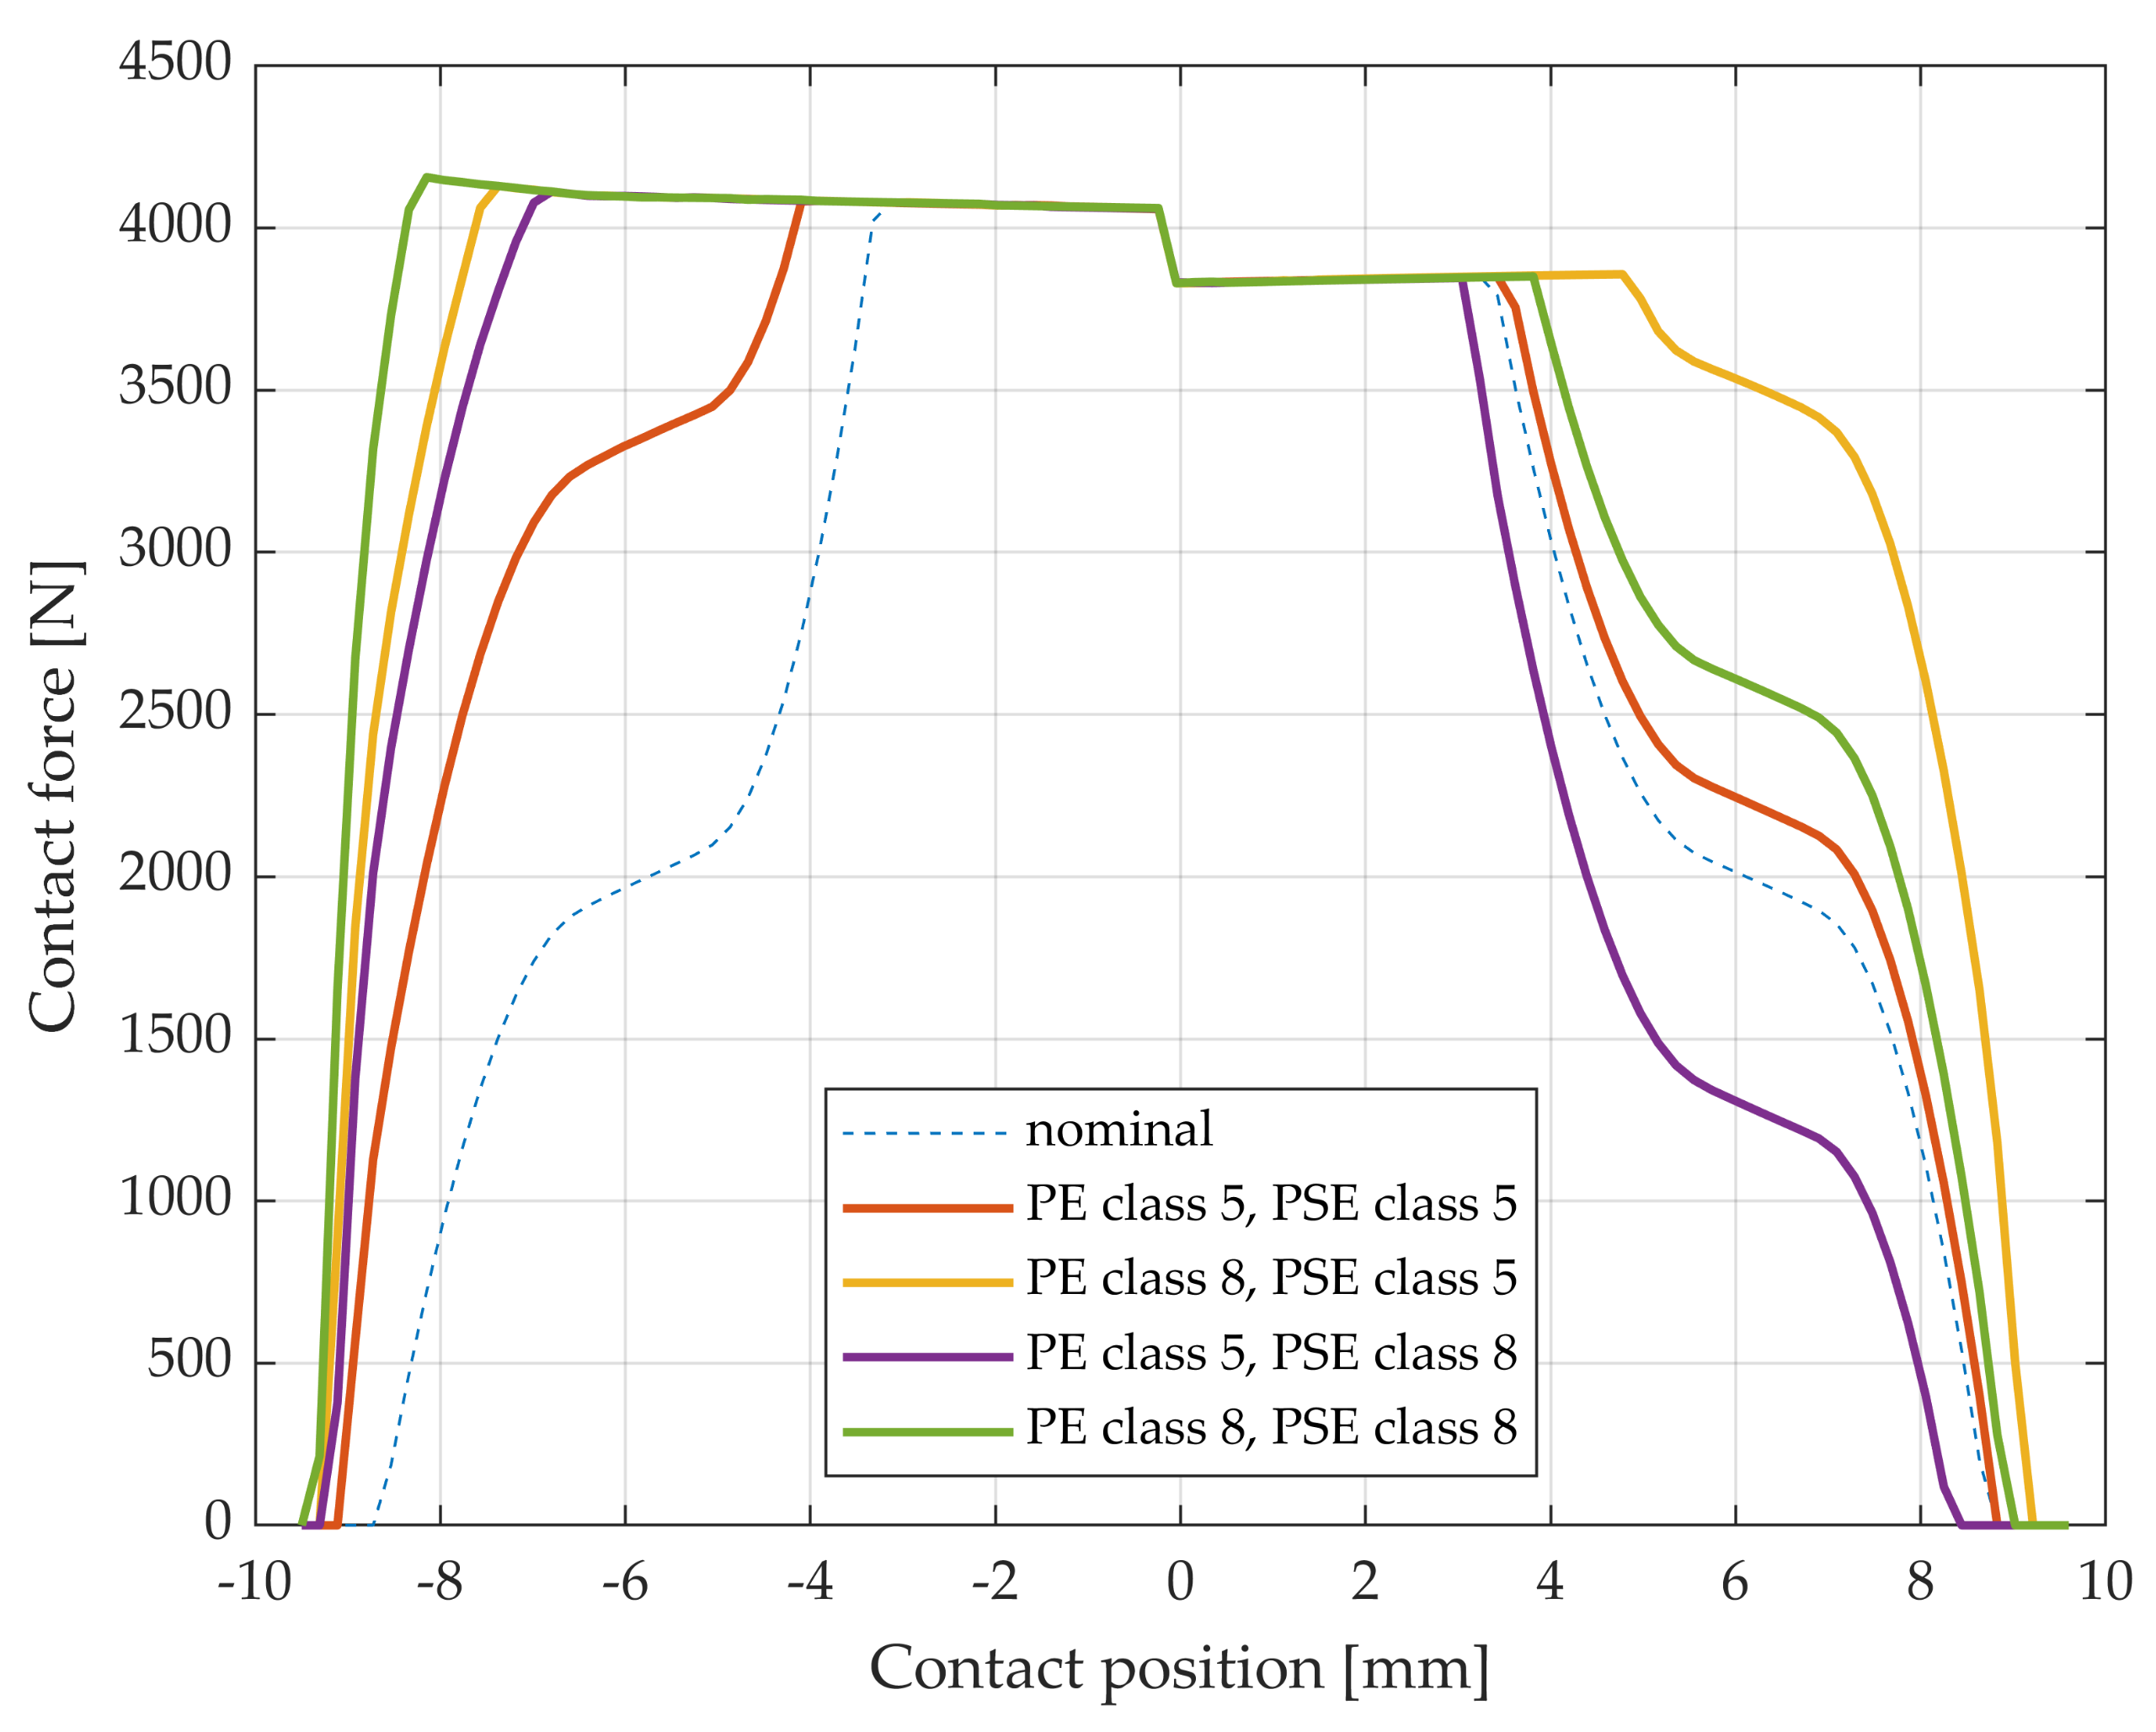
Manufacturing errors manifest themselves, among other things, as an alteration of the load distribution. Therefore, they can be included in the TEHL analysis via the LTCA load distribution. The load distribution for cases of pitch error (PE) and profile slope error (PSE) are shown in
Figure 8. For better visibility, only two cases are displayed, namely, classes 5 and 8 according to ISO 1328 [
33]. They correspond to a relatively fine and a relatively coarse quality class, typically used in the automobile industry. A nominal case is shown for reference.
It can be seen in
Figure 8 that pitch errors extend the single-engagement zone (for a specific tooth pair) while profile slope errors skew it. When they appear together, their effect is combined. In this case, the load distribution in some contact positions therefore becomes less altered, as profile slope errors tend to counteract pitch errors by ’skewing back’ the load distribution curve.
Generally, different manufacturing errors appear together.
Figure 9 displays the load distribution for four different manufacturing error combinations, as well as a nominal case for reference. Again, it is seen that the load near the pitch point is not affected, whereas a great alteration occurs near the endpoints of the LOA.
First, by including combinations of tolerance classes 5 and 8 of PE and PSE, the load for different cases at the previous point
s = 3.8 mm can be found. The resulting minimum lubricant film height, maximum pressure, and maximum temperature are presented in
Table 6. As a reference, values found for the nominal error-free case are included, using both the standard and the LTCA load distributions. Note that the two last cases show only a 2 N difference in load, which gives practically the same solution.
In
Table 6, it can be seen that there is a large difference in temperature. This is explained by difference in load. In the nominal, i.e., error-free, cases (cases I and II), the standard load distribution model and the LTCA load distribution model give different loads, as shown in column 5. The higher load in the contact results in larger pressure and heat generation and, consequently, greater temperature rises, as the lubricant volume does not differ much between the cases. When manufacturing errors are also included, this effect is either larger (cases III, V, and VI) or smaller (case IV) depending on the change in load and geometry imposed by the manufacturing error.
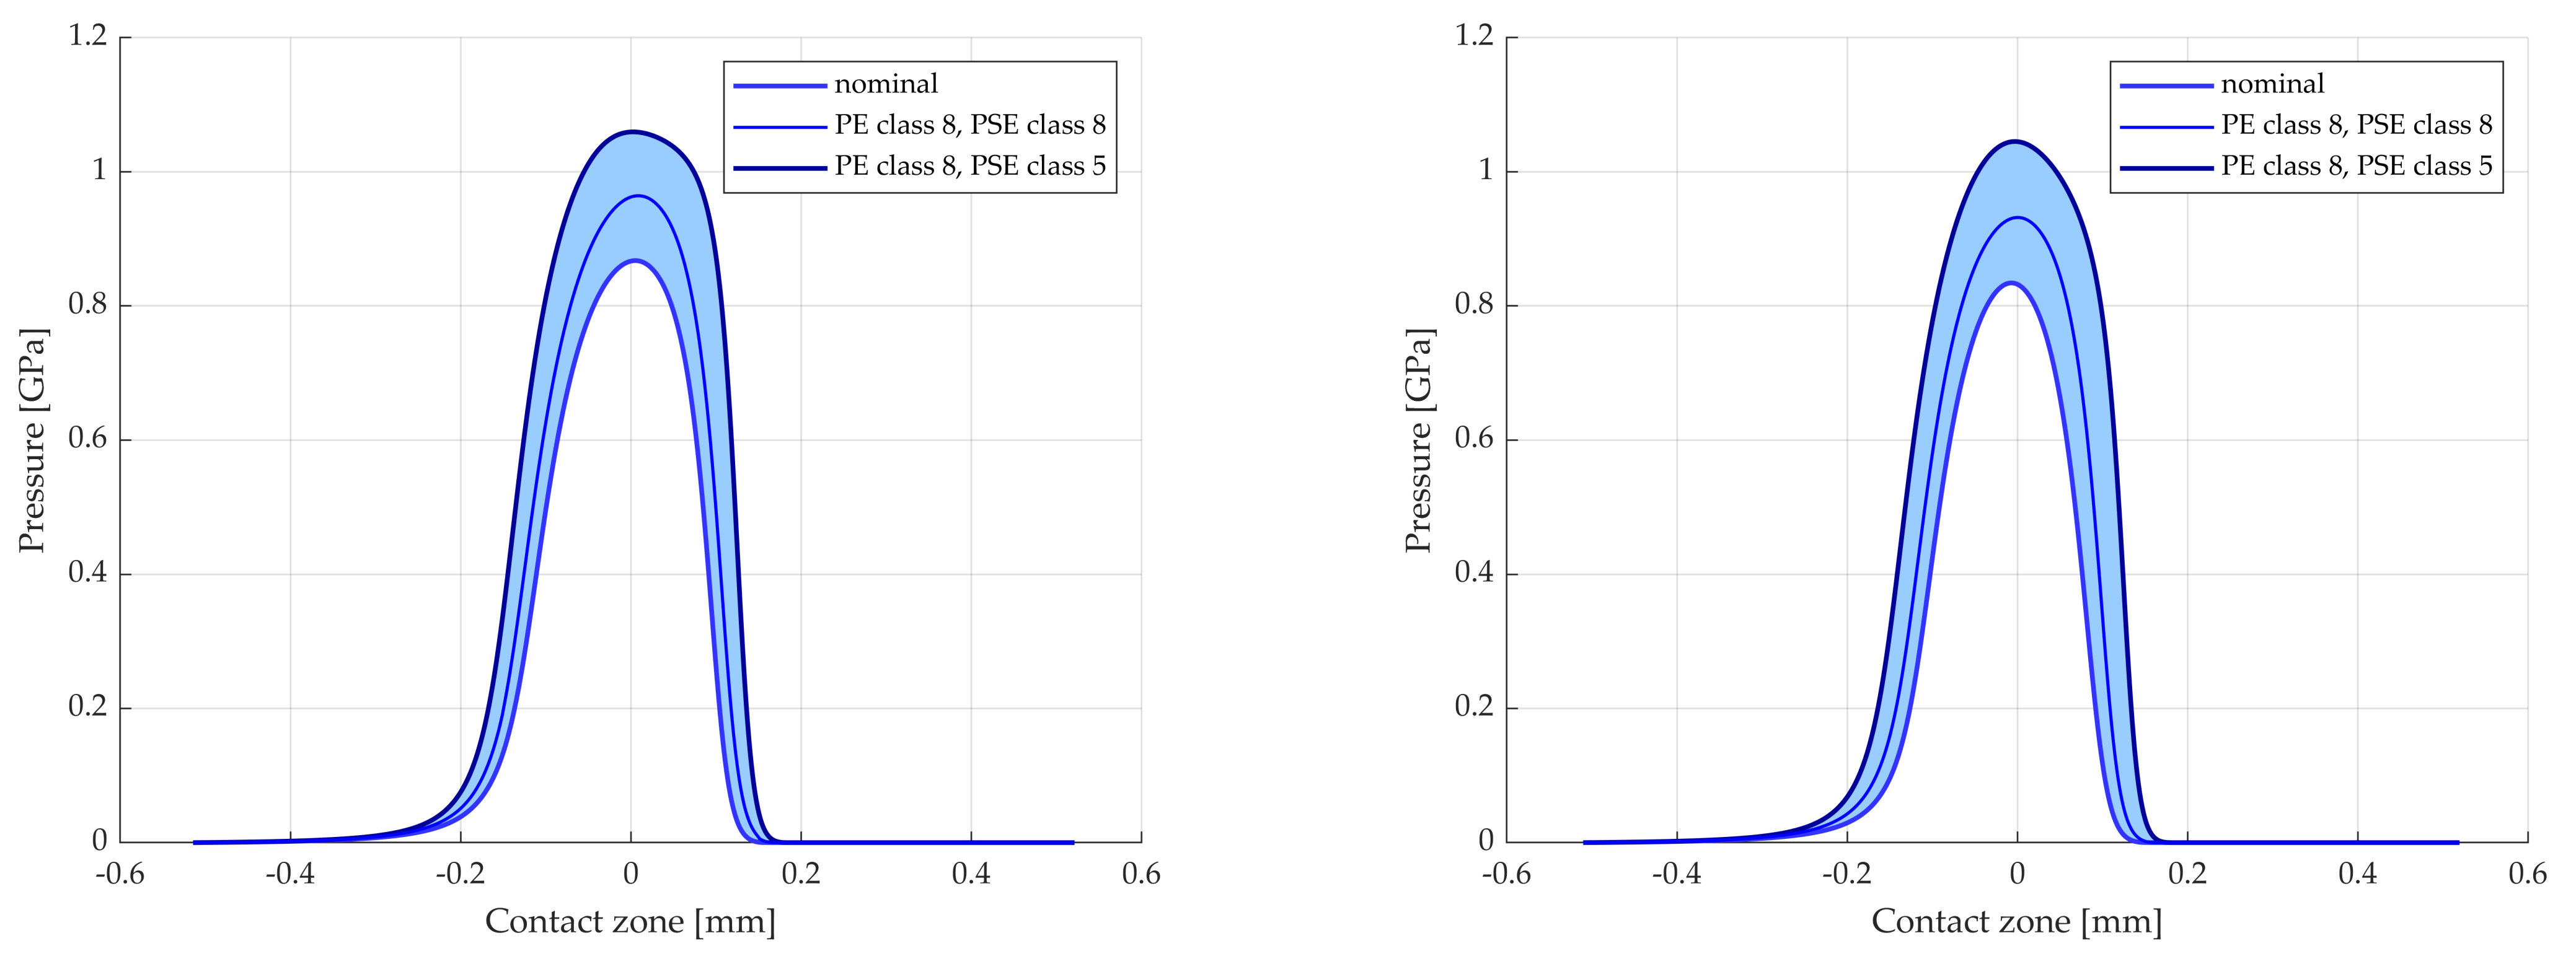
The difference in load between different manufacturing error combinations increases along the LOA. For this reason, cases V and VI, which constitute worse conditions than the nominal case, are studied further. Farther away from the pitch point along the LOA, the difference in load distribution for the cases becomes larger. This can be seen at points
s = 5 mm and
s = 6 mm in
Figure 9. The results from TEHL analysis of cases V and VI, together with the nominal, are seen in
Figure 10,
Figure 11 and
Figure 12.
Figure 10 displays the pressure for
s = 5 mm and
s = 6 mm. The filled areas correspond to the increase in pressure caused by the manufacturing errors.
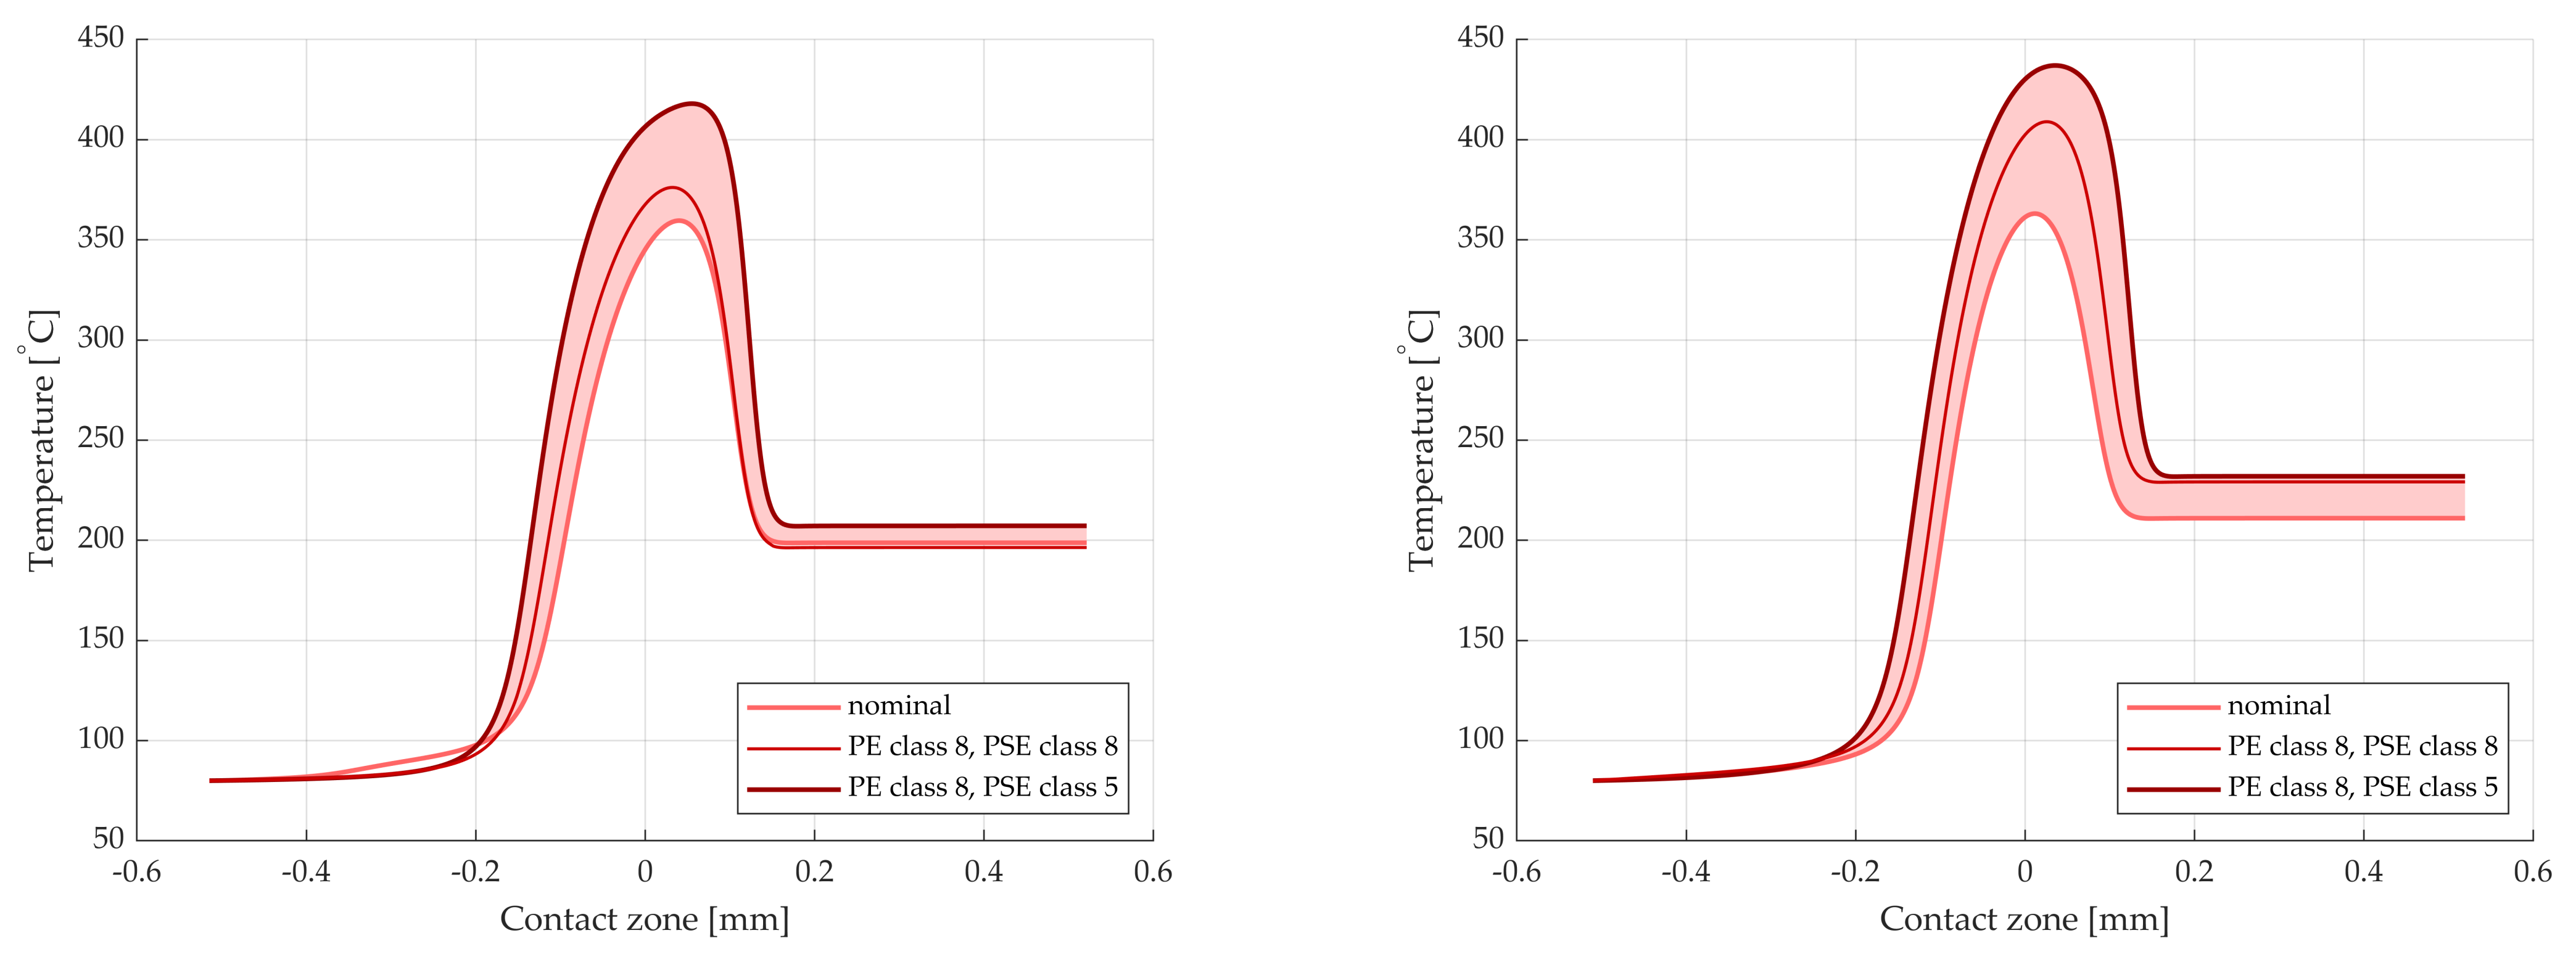
The increased load gives rise to an increased temperature. This can be seen in
Figure 11, where the same interpretation can be made for the filled area.
The increase in temperature is larger at s = 6 mm than s = 5 mm due to the increased sliding velocity.
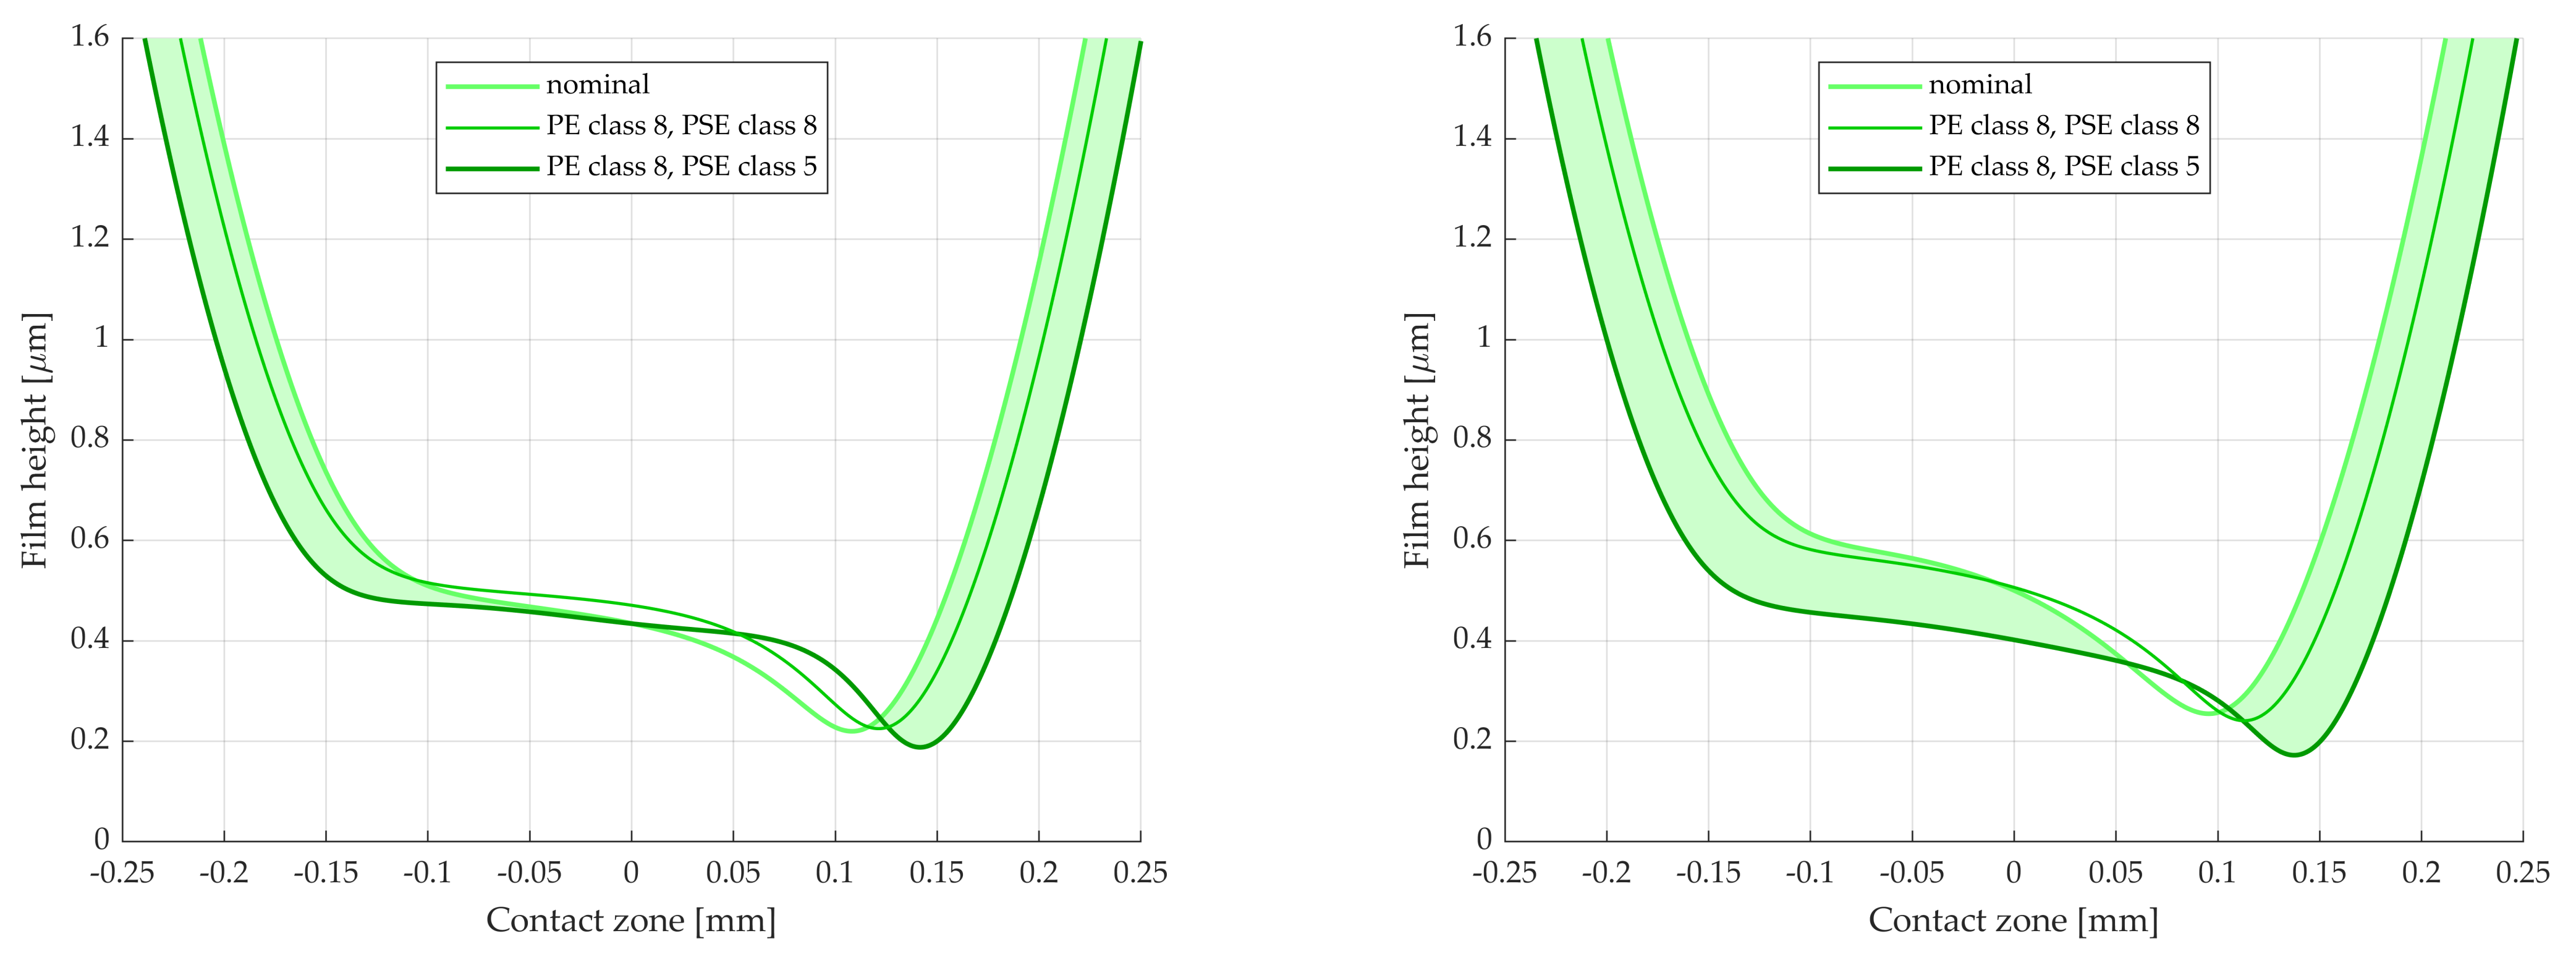
Similar to pressure and temperature, the lubricant film height is presented in
Figure 12. Here, the shaded area is instead the decrease in height caused by the manufacturing errors. Both the central and minimum film thicknesses are affected.
Even more severe cases can be found, such at positions around
s = −8 mm, cf.
Figure 9. However, the combination of large load and high sliding velocity tends to cause very high temperature, which makes results less reliable. On the other hand, if the rotational speed of the input shaft is decreased, it may become too low for hydrodynamic pressure to form. This is further discussed in
Section 4.
4. Discussion
This paper has presented a TEHL method for gear sets with manufacturing error combinations. Preliminary results are presented in form of the pressure, temperature, film height, viscosity, and density of the lubricant. The resulting lubricant pressure, see
Figure 5 and
Figure 6, as well as
Figure 10, is fairly close to Hertzian pressure, while also exhibiting typical fluid film pressure features, such as the gradual pressure build-up at the start of the mesh. The pressure derivative is also zero at the boundary of the cavitation zone.
The film height experiences the typical dent at the end of the mesh, cf.
Figure 5 and
Figure 6, as well as
Figure 12. The lubricant temperature increases with pressure, and then drops and remains constant or close to constant at the end of the mesh, as shown in
Figure 5 and
Figure 11. Similar results are presented by other authors, see, e.g., Chu et al. [
8] or Bobach et al. [
34]. These comparisons serve as a preliminary validation, as measured data are not yet available.
The model presented in this paper uses load distribution from an LTCA of gear sets with PE and PSE of different tolerance classes, see
Figure 4,
Figure 8 and
Figure 9. These figures show a dip in the load distribution at the pitch point due to the contribution of friction on the transmitted torque. This contribution is neglected by most authors, likely due to its small size. The phenomenon is discussed in detail by Reimann et al. [
36].
It is shown in
Figure 10,
Figure 11 and
Figure 12 that this altered load distribution has a large impact on lubricant behavior, especially on the temperature. This is largely due to the increased load near the start and end of the mesh, where the sliding velocity also has its greatest values. This result is a main finding of this paper. For gear sets to behave in the desired way, tolerances of PE and PSE should be chosen with lubricant and resulting lubricant temperature in mind. Apart from PE and PSE, however, the gear set is assumed to be ’perfect’, i.e., no assembly errors are present. A TEHL analysis of gear sets with assembly error remains to be performed, which can greatly affect the gear set, as shown by Kumar and Hirani [
37].
However, different load distribution models can be chosen. The easiest approach, which is also quite common [
35], is to let each tooth pair carry half the load in the dual engagement zone. While this assumption is not necessarily true, it requires very little computational effort and can easily be extended to handle, e.g., triple engagement.
While the LTCA approach is a useful way to calculate the load distribution, it is slightly flawed since the load distribution found in the LTCA comes from pressure distributions based on dry contact. Thus, dry contact pressure distributions are used to find the equivalent load that, in turn, is used to find the lubricated contact pressure distributions. The LTCA results are, however, believed to be more accurate than those obtained by the standard assumption of equal load distribution and Hertzian pressure since it accounts for both friction and deformation, as well as manufacturing errors. The use of load distribution from an LTCA instead of the standard approach is one of the major contributions of this work.
A third approach would be to use a compliance condition between all simultaneous tooth pairs in contact under lubricated conditions. This approach requires large computational effort as many iterations between simultaneous TEHL contacts are needed. It is also complicated due to the sensitivity of these TEHL contacts; there is not always a full-film solution to the problem.
Except for load distribution, the method takes flank coordinates as input. Instead of using a parabolic height function, the fluid film height is based on the real geometry of the gear flanks. This eliminates the need for correction factors due to profile modifications such as tip relief. Contrary to most studies, start and endpoints of meshing are not based on Hertzian contact width. Instead, they are found from where the lubricant films (with a certain film height, the supply thickness) of each unloaded flank meet and separate, respectively.
In the current paper, and as a first step, the authors assume that dynamics have a large influence on gear set behavior when the system is close to a resonance frequency. However, as these frequencies should be avoided, it is assumed that the system frequency is sufficiently far from resonance for the dynamics to be neglected. It remains, as future work, to investigate the validity of this assumption further.
In this study, non-Newtonian lubricant effects are neglected. Apart from giving a slight computational ease, this is because these parameters are not known for the lubricants in the tests. This is, however, a point that can be improved in a later iteration of the model should the discrepancy between simulation results and measured values be unsatisfactorily large. However, it is assumed that this has little influence on pressure distribution and lubricant height, as shown by Liu et al. [
38].
Due to the lubricant pressure, the surfaces will deform. This deformation should be elastic—if the deformation is plastic, the gears will be damaged. However, this is only true on a more macroscopic scale. The pressure spikes coincide with the asperity peaks, and these peaks may plasticize well without damaging the gears; instead, the surface is ’flattened’. Plasticity is not considered in this work. A linear elastic–ideal plastic model is presented by Bobach et al. [
34].
The singularity in the deformation formula, due to the Boussinesq formulation, makes the deformation mesh-dependent, which is undesirable. Few authors have addressed this problem. However, different methods exist to prevent the problem, such as combining a Boussinesq–Cerruti solution with a constant solution or using the more complicated Love’s solution (see Wasko et al. [
39]). Thorough treatments of singularities, Boussinesq, and contact problems were given by Lubarda [
40] and Marmo et al. [
41].
The model in this study is two dimensional, i.e., no variation along the width of the gear teeth is assumed. This assumption decreases computational burden while being physically reasonable. This is because the width is perpendicular to the contact velocity and thus the entrainment direction. In addition, for future studies including micro-geometry, the micro-geometrical variations along the width should be assumed to be smaller than along the flank due to manufacturing.
Using a two-dimensional model also means that, e.g., the helix angle cannot be included, but the method can be extended to three dimensions if this should be desired. However, Liu et al. [
24] found that the effect of varying helix angle is less pronounced than, e.g., pressure angle.
In the study, the temperature is calculated by solving the heat equation, and is used to update the viscosity and density. This equation takes into account compression, shearing, convection, and conduction in the lubricant. There is no mathematical limit to the temperature magnitude that can be found by solving this equation. In practice, however, a too high resulting temperature indicates that the equation is insufficient. A more thorough treatment of temperature would include limiting shear stress, which consequently limits the shearing term. In addition, heat conduction in the material should be considered, such as in, e.g., Li and Kahraman [
42] and Ziegltrum et al. [
43], as this plays an increasingly important role when temperature increases. Furthermore, by varying the heat parameters (see [
9]), the effect of temperature and pressure on heat parameters can be included. Finally, beyond certain temperatures, the expressions for viscosity and density are no longer valid.
It is possible to add a time-dependent term in the Reynolds equation, namely, the derivative of the lubricant height with respect to time. While this term is omitted in this study, as it is assumed to be negligible at this stage, this does not mean that time dependence is excluded in the method. Instead, time is implicit since each contact position, and thereby the instantaneous geometry of the contact, is linked to a certain time via the rotational speed of its respective gear.
In the present study, the gear surfaces are assumed to be smooth. In reality, the gear surfaces will always experience some degree of roughness, depending on manufacturing method (such as hobbing, shaving, honing, broaching, skiving, and polishing), as well as coating, damage, wear, and so on. This roughness influences lubricant film thickness, which in turn affects the pressure. Roughness peaks may also come into contact, i.e., asperity contact. The inclusion of surface roughness is believed to be the most important point for future work. It allows for both a more realistic treatment of the lubricated contact and a continued investigation of the effect of manufacturing errors on gear set behavior. Tolerances of pitch error and profile slope error can then be combined with tolerances of profile form error.
Several authors have included roughness in their studies [
5,
10,
13,
16,
18,
22,
25,
27,
34,
44,
45,
46]. Evans et al. [
44] showed cumulative damage for gears with different degrees of roughness, and concluded that areas with significant asperity contact correlate well to areas that are subject to scuffing. Clarke et al. [
27] studied roughness from Klingelnberg measurements and showed the effect of using different cut-off lengths. They showed that when the cut-off length is too large, the pressure peaks are underestimated. Indeed, the larger the cut-off length, the smoother the surfaces will appear, while noise is also filtered out. It is with this in mind that the algorithm described in this paper can take files with flank geometry as input.
Lubrication that takes place when the mating surfaces are completely separated by the lubricant film is called full-film lubrication. However, as mentioned above, asperities may come into contact. This type of lubrication is known as boundary lubrication. When a gear contact experiences both full-film and boundary lubrication, one speaks of mixed lubrication. This lubrication type is treated by, e.g., Evans et al. [
44] and Dong et al. [
10]. Li and Kahraman [
45] modeled mixed lubrication statically using a transient Reynolds equation together with an Eyring fluid. Li et al. [
46] also used a mixed lubrication model to calculate stresses in the gears to find the onset of cracks and study fatigue.
Wear, especially as a result of asperity contact, does occur in gear sets; see, e.g., Walker et al. [
47] or Wang et al. [
48]. The wear process is not modelled in this study; however, since the method can take measurements of real surfaces as input, the effect of wear can be included when a mixed lubrication TEHL method is implemented. This remains as future work. Wear also causes debris. as studied by Kumar et al. [
49]. As the lubricant film’s height is known, the effect of wear debris is also possible to include in future studies.
While cost and manufacturing aspects are not included in this study, the presented method can be a part of such analyses. When the gear meshing is simulated, the effect of additional treatments, such as surface coating, can be evaluated. The enhanced performance of the gear set can then, in a future study, be weighed against the increased time, cost, and complexity of additional manufacturing steps. Such a study can include a cost analysis, such as that conducted by, e.g., Vu et al. [
50].
Thus, many aspects should be considered when designing a gear set. This study has shown that manufacturing error tolerances should be carefully considered with respect to lubricant pressure and temperature to obtain the desired gear set behavior. This is especially important in electrified drivelines, where rotational speed is higher than in traditional drivelines with an internal combustion engine.
