Article

Optimal Design of High-Precision Focusing Mechanism Based on Flexible Hinge

1
Changchun Institute of Optics, Fine Mechanics and Physics, Chinese Academy of Sciences, Changchun 130033, China
2
University of Chinese Academy of Sciences, Beijing 100039, China
3
Chang Guang Satellite Technology Ltd., Changchun 130012, China
*
Author to whom correspondence should be addressed.
Machines 2024, 12(9), 627; https://doi.org/10.3390/machines12090627
Submission received: 17 July 2024 / Revised: 28 August 2024 / Accepted: 4 September 2024 / Published: 6 September 2024
(This article belongs to the Section Machine Design and Theory)

Abstract

:
A high-precision focusing mechanism was designed using a flexible hinge to address the demand for precise focusing in space cameras. Firstly, a finite element model of the liner guideway was created using Hertz contact theory, and the accuracy of the model was confirmed using the “flip method”. Subsequently, the flexible hinge was optimized by a mix of topological and integrated optimization. The simulation results demonstrated that the improved flexible hinge successfully eliminates interference between the liner guideway and the screw, minimizes the effects of initial assembly mistakes, and greatly reduces the tilt error of the focusing mechanism. Afterward, the focusing mechanism was subjected to a vibration test, which showed that its first-order fundamental frequency reached 163.28 Hz. This frequency is sufficiently high to minimize the risk of resonance during the launch phase. Ultimately, the tilt error of the focusing mechanism was assessed using both a rigid connector and a flexible hinge. The findings demonstrated that implementing the flexible hinge resulted in a 55.7% decrease in the range of Δθz and a 55.22% reduction in the standard deviation, effectively fulfilling the specified design requirements. This study indicates that the inclusion of a flexible hinge in the focusing mechanism leads to a substantial decrease in tilt error.

1. Introduction

Space cameras are essential instruments for obtaining ground information and are widely used in meteorology, geological exploration, agriculture, forestry, environmental monitoring, military operations, disaster relief, and other fields [1,2,3]. After launch, due to changes in environmental conditions (atmospheric pressure, temperature, gravity, etc.), impact, vibration, overload, and other factors during transportation, as well as hygroscopic expansion of carbon fiber materials, the focal plane position of the optical system will change, and the image quality will eventually decline [4]. To ensure the image quality of the space camera, it is necessary to design a focusing mechanism to fine-tune the position of the focal plane in the optical system, compensate for the defocus amount, and make the target image accurate on the detector surface. In addition, using a focusing mechanism can also relax the requirements on the installation position and change of each mirror in the optical system, which is conducive to the integration of the optical–mechanical system [5].
The sinusoidal excitation of the space camera during launch mainly comes from the thrust pulsation changes caused by the unsteady combustion of the launch vehicle engine and the unbalanced rotation of the rotating equipment. The frequency range is about 5 Hz–100 Hz. In addition, the random excitation frequency range caused by the ground transportation environment is roughly 0.5 Hz–100 Hz. If the fundamental frequency of the focusing mechanism is less than 100 Hz, it may lead to resonance under the action of vibration excitation in the ground transportation and launch flight stage, and it is faced with the risk of damage and loosening of the structural parts, stagnation of the focusing mechanism, and misalignment of the optical system. Therefore, the fundamental frequency of the focusing mechanism component is generally required to be higher than 100 Hz, and if the fundamental frequency is higher, it means that the likelihood of resonance is lower.
In recent years, the technology of space cameras has developed rapidly, and domestic and foreign researchers have conducted more and more research on focusing mechanisms. According to the driving principle of focusing mechanisms, focusing mechanisms can be roughly divided into mechanical focusing and thermal focusing. Mechanical focusing is more widely used. Jinwon Jung et al. [5] proposed a novel focusing mechanism with a flexible hinge driven by a step motor to compensate for the defocusing of the optical system by moving the secondary mirror. The scheme can achieve 2.39 × 10⁻³ mm travel, but the tilt error is 18.25″. On the other hand, Xiaozhe Ma et al. [6] proposed a new focusing mechanism for a space telescope, which uses a flexible hinge rod to adjust the position of the secondary mirror. After analysis, this scheme is expected to reach no less than 9.4 × 10⁻³ mm travel. To reduce the mass of the focusing mechanism and simplify the structure, Li et al. [7] designed a focusing mechanism driven by piezoelectrics and based on the principle of a two-stage flexure hinge lever with a travel range of up to 2 mm, but its tilt error was not studied. Lu et al. [8] designed a three-degree-of-freedom piezoelectric-driven flexible focusing mechanism whose fundamental frequency could reach 121.5 Hz. Kai W et al. [9] developed a focusing mechanism combining spiral and worm gear transmission, ensuring precise linear motion by linear guideway. The focusing range was ±3 mm, and the positioning accuracy was better than ±6 × 10⁻³ mm. Ziqing J et al. [10] designed a new high-precision focusing mechanism composed of a worm gear and cam slider. A linear guideway also ensured precision linear motion; the focusing displacement error was better than 5.86 × 10⁻³ mm, and the tilt error was less than 14″. There are relatively few studies on thermal focusing, mainly because thermal focusing tends to have minor travel and requires additional power consumption to maintain the position after focusing. In addition, thermal focusing has a slower response speed, so it is not as widely used as mechanical focusing [11,12,13].
According to the above research, we can find that the research on mechanical focusing technology at home and abroad is mainly limited to the transmission mode, the form of the flexible hinge, etc., and there are few studies on how to improve the tilt accuracy of the focusing mechanism. Even though some individual literature has tested the tilt error of the focusing mechanism, the test results reached 12″–18″. It is challenging to meet the strict tilt error requirements of optical systems. Therefore, it is worth further research and exploration to study the factors that affect the tilt error of the focusing mechanism, improve the design scheme, and reduce the tilt error of the focusing mechanism. To study the causes of the tilt error of the focusing mechanism, it is often necessary to use the finite element method to model the system. As the core component of the focusing mechanism, the accuracy of the modeling of the linear guideway directly affects the conclusion of the analysis. Pawełko P et al. [14] proposed using rod elements to model the linear guideway. Calculation efficiency is greatly improved by ensuring accuracy. This paper will also use the theory to build and verify a model.
Within focusing mechanism studies, the flexible hinge is mainly used as a “guiding element” to ensure linear motion. In the field of mirror research, the flexible hinge, as a part of the support structure of the mirror, is usually used to reduce the influence of factors such as temperature change and uneven mounting surfaces on the reflective mirror type [15,16]. The interference between the guide and drive elements directly affects the focusing mechanism’s tilt accuracy. Therefore, by combining the flexible hinge with the focusing mechanism, this paper proposes using the flexible hinge to decouple the interference between the guide element and the drive element, which can provide a new idea for improving the tilt accuracy of the focusing mechanism. In the optimization design process of flexible hinges, to efficiently find the flexible hinge size with the best performance, this paper adopts the combination of topology optimization and integration optimization to optimize, and topology optimization was used to find the optimal structural configuration that meets the requirements quickly. Based on the optimal configuration, the integrated optimization method automatically facilitates data interaction and optimization among various models to attain the global optimal design of the system [17].
The remaining sections of this paper are organized as follows: Section 2 comprehensively explains the requirements, scheme, and finite element modeling simulation of the focusing mechanism. Section 3 explicitly addresses the flexible hinge’s topology and integration optimization in the focusing mechanism. Section 4 evaluates the overall functioning of the focusing mechanism through appropriate tests and inspections.
2. Design and Analysis of the Focusing Mechanism

2.1. Design of Focusing Method

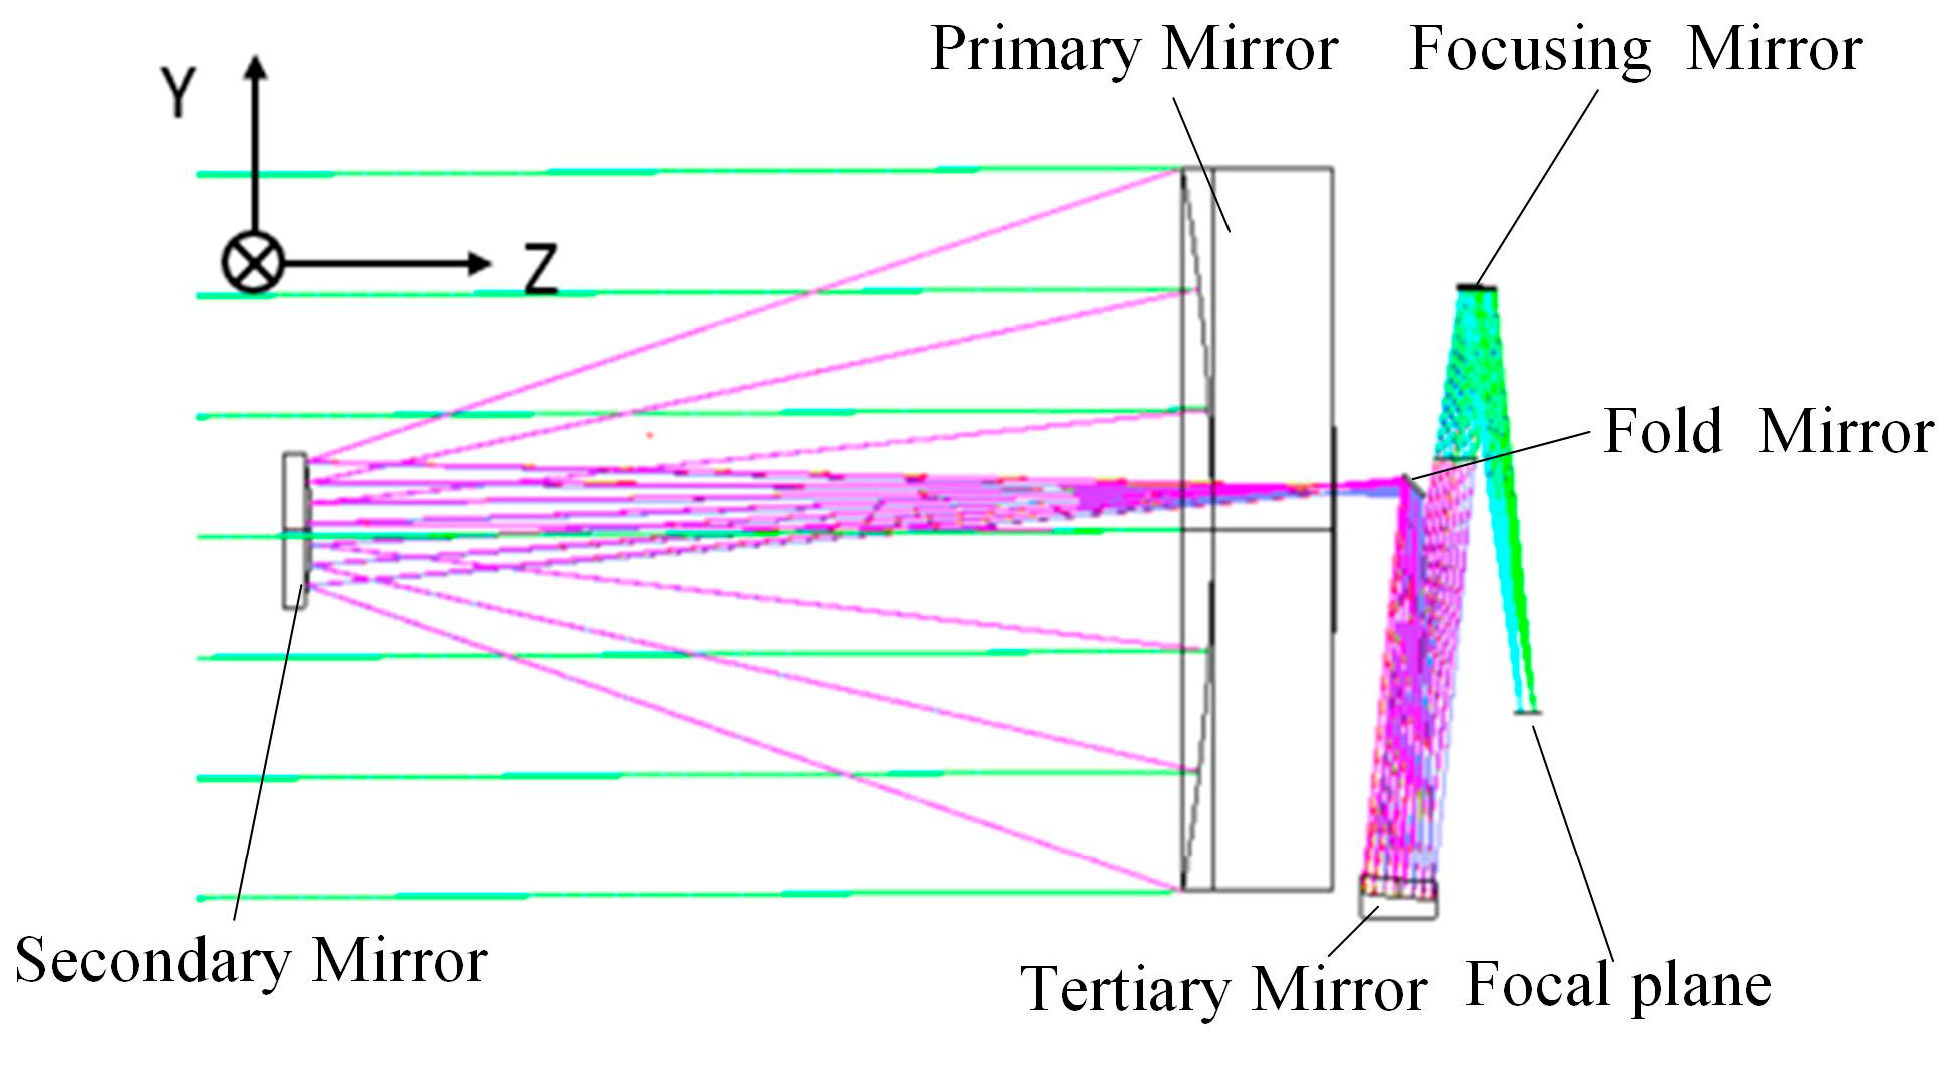
The Cassegrain optical system, composed of all mirrors, has attracted much attention in space cameras and has been used increasingly in submeter space cameras. In this paper, the focal length of the Cassegrain optical system of the space camera is 8 m, the imaging width is not less than 11 km, and the field of view angle is not less than 1° at the orbital altitude of 656 km. The optical system consists of five mirrors: the primary mirror, secondary mirror, fold mirror, tertiary mirror, and focusing mirror. The Y-axis is the focusing and flight direction; the Z-axis is the launching direction and the earth direction of the camera in remote sensing; and the X-axis is determined according to the right-hand rule, as indicated in Figure 1.
For full-reflection optical systems, according to the moving optical element, the focusing mode can be divided into the focusing mirror method and the focusing plane method [18]. The focal plane of the space camera in this paper is large in size and mass, and the focus plane method will inevitably increase the quality and volume of the focusing mechanism. Hence, the focusing method using the focusing mirror is a more reasonable scheme. The focusing mirror can fold the light path to shorten the camera length and eliminate the system field curvature due to the slight curvature, so the focusing mode of moving the mirror is finally adopted.

2.2. Design Requirements for the Focusing Mechanism

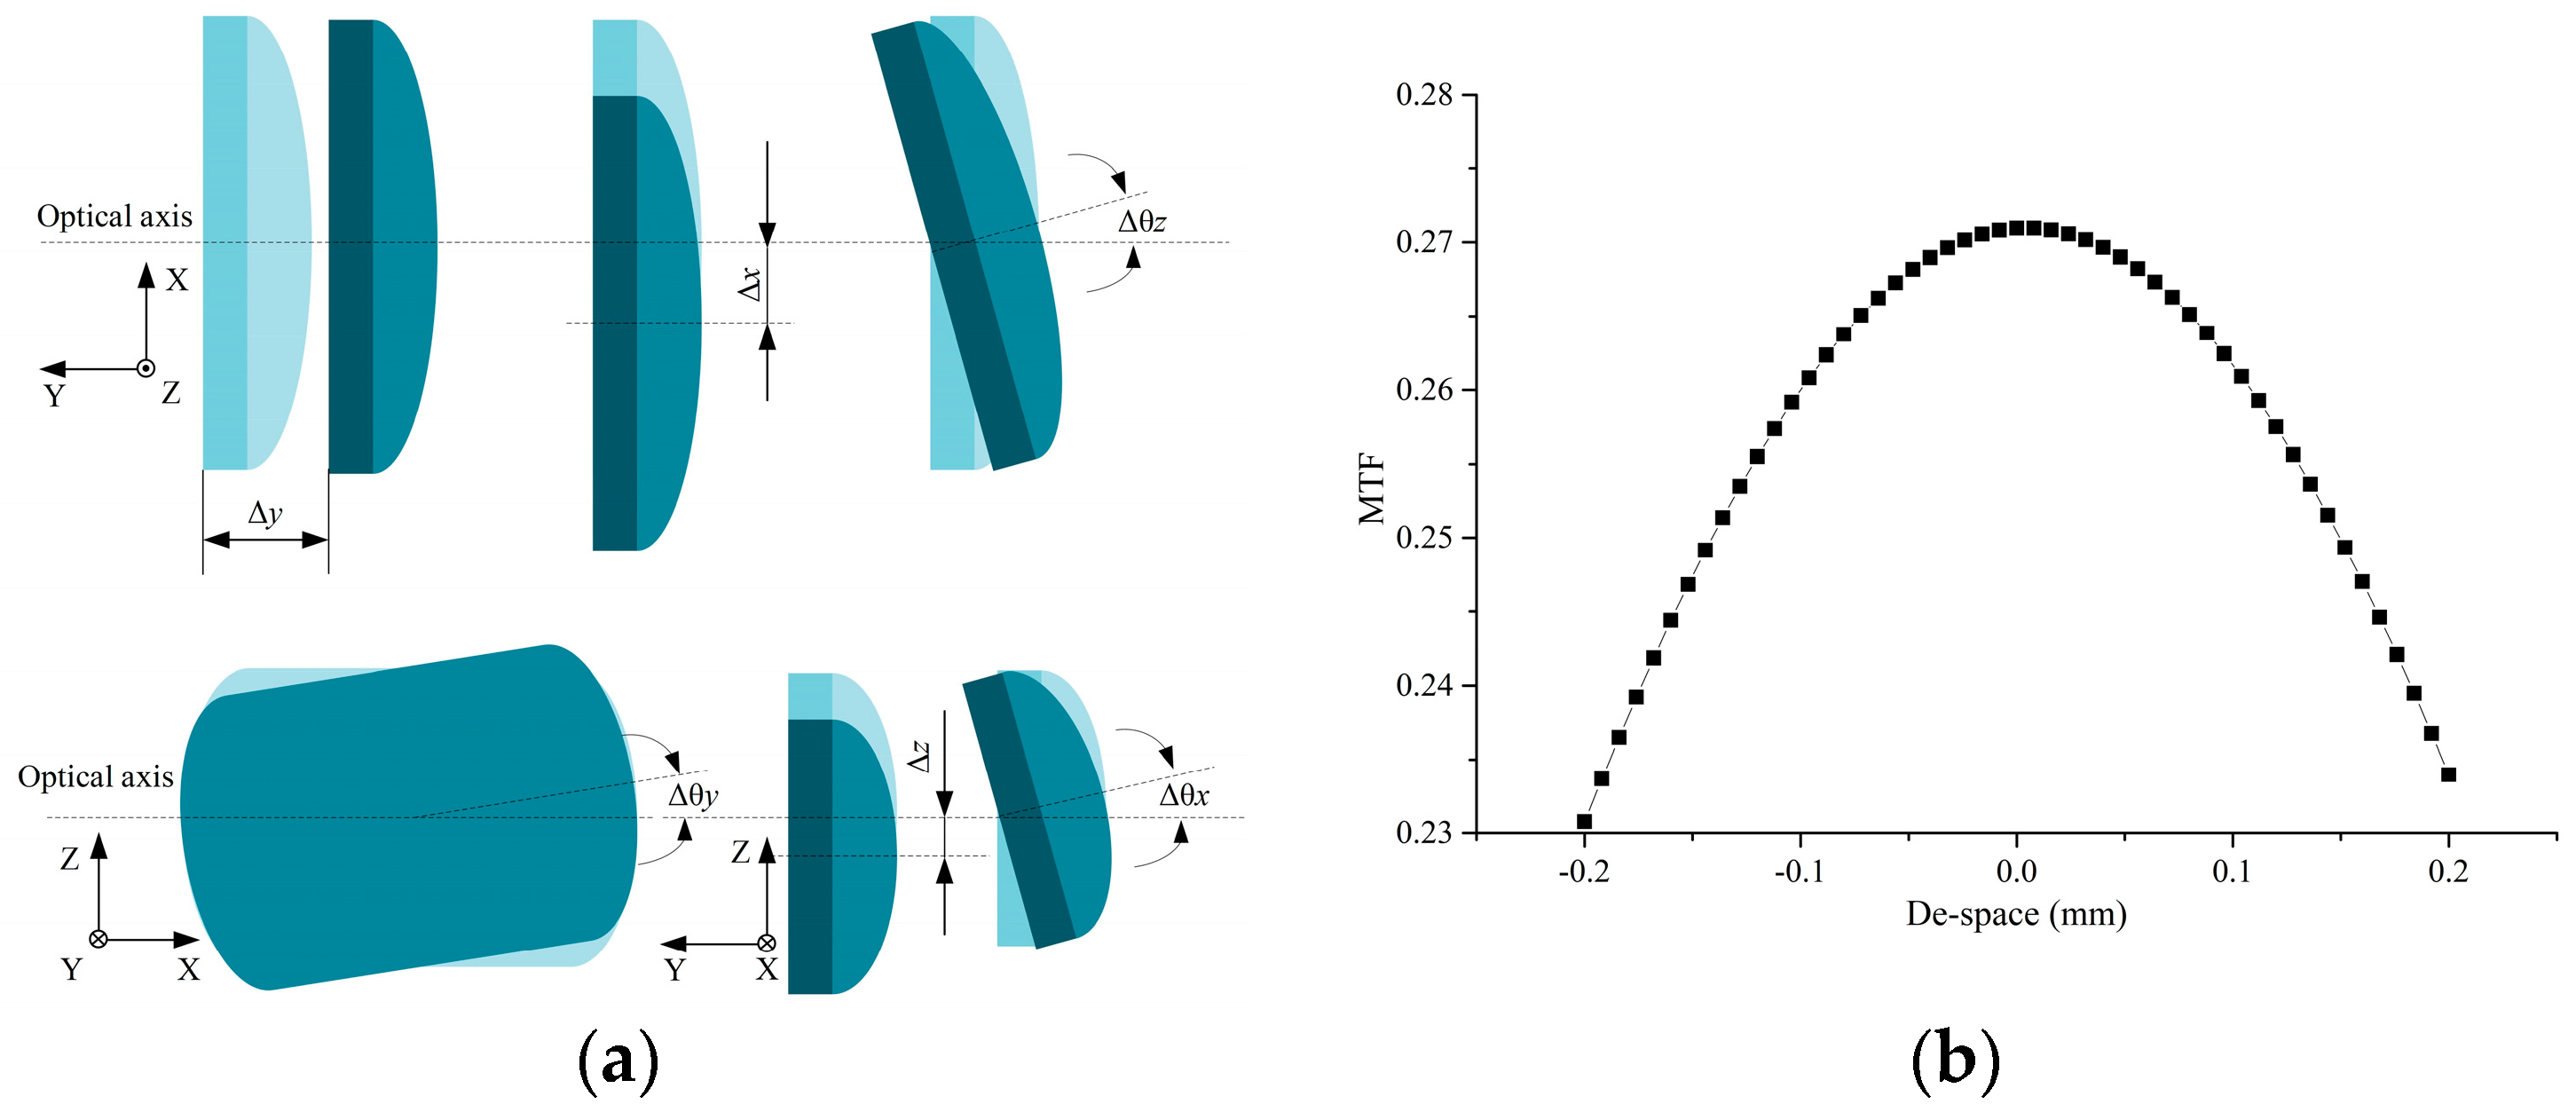
For the focusing mirror moving scheme, the primary position errors of the focusing mirror can be decomposed into the eccentricity Δx, Δy, and Δz in the X, Y, and Z directions, and the tilt Δθx, Δθy, and Δθz around the X, Y, and Z axes, as shown in Figure 2a. Δy will lead to the defocusing of the system, and the defocusing curve is shown in Figure 2b. The remaining position errors will also cause the transfer function of the optical system to decrease. Therefore, according to the tolerance analysis results of the position of the focusing mirror in the optical design, and considering the impact of multiple factors such as the processing error of the focusing mirror, assembly error, and positioning error of the focusing mechanism, the requirements of the focusing mechanism are finally obtained [5] after error distribution, as shown in Table 1. The first-order fundamental frequency and focusing stroke are also proposed, as shown in Table 1.
According to the accuracy of the current focusing mechanism’s liner guideway, encoder, and structural machining, the indicators Δx, Δy, Δz, and Δθy are relatively easy to achieve. The indicators of Δθx and Δθz are highly influenced by the effect of assembly, making them challenging to achieve, so the main research content of this paper is how to control the errors of Δθx and Δθz.

2.3. Design of the Focusing Mechanism

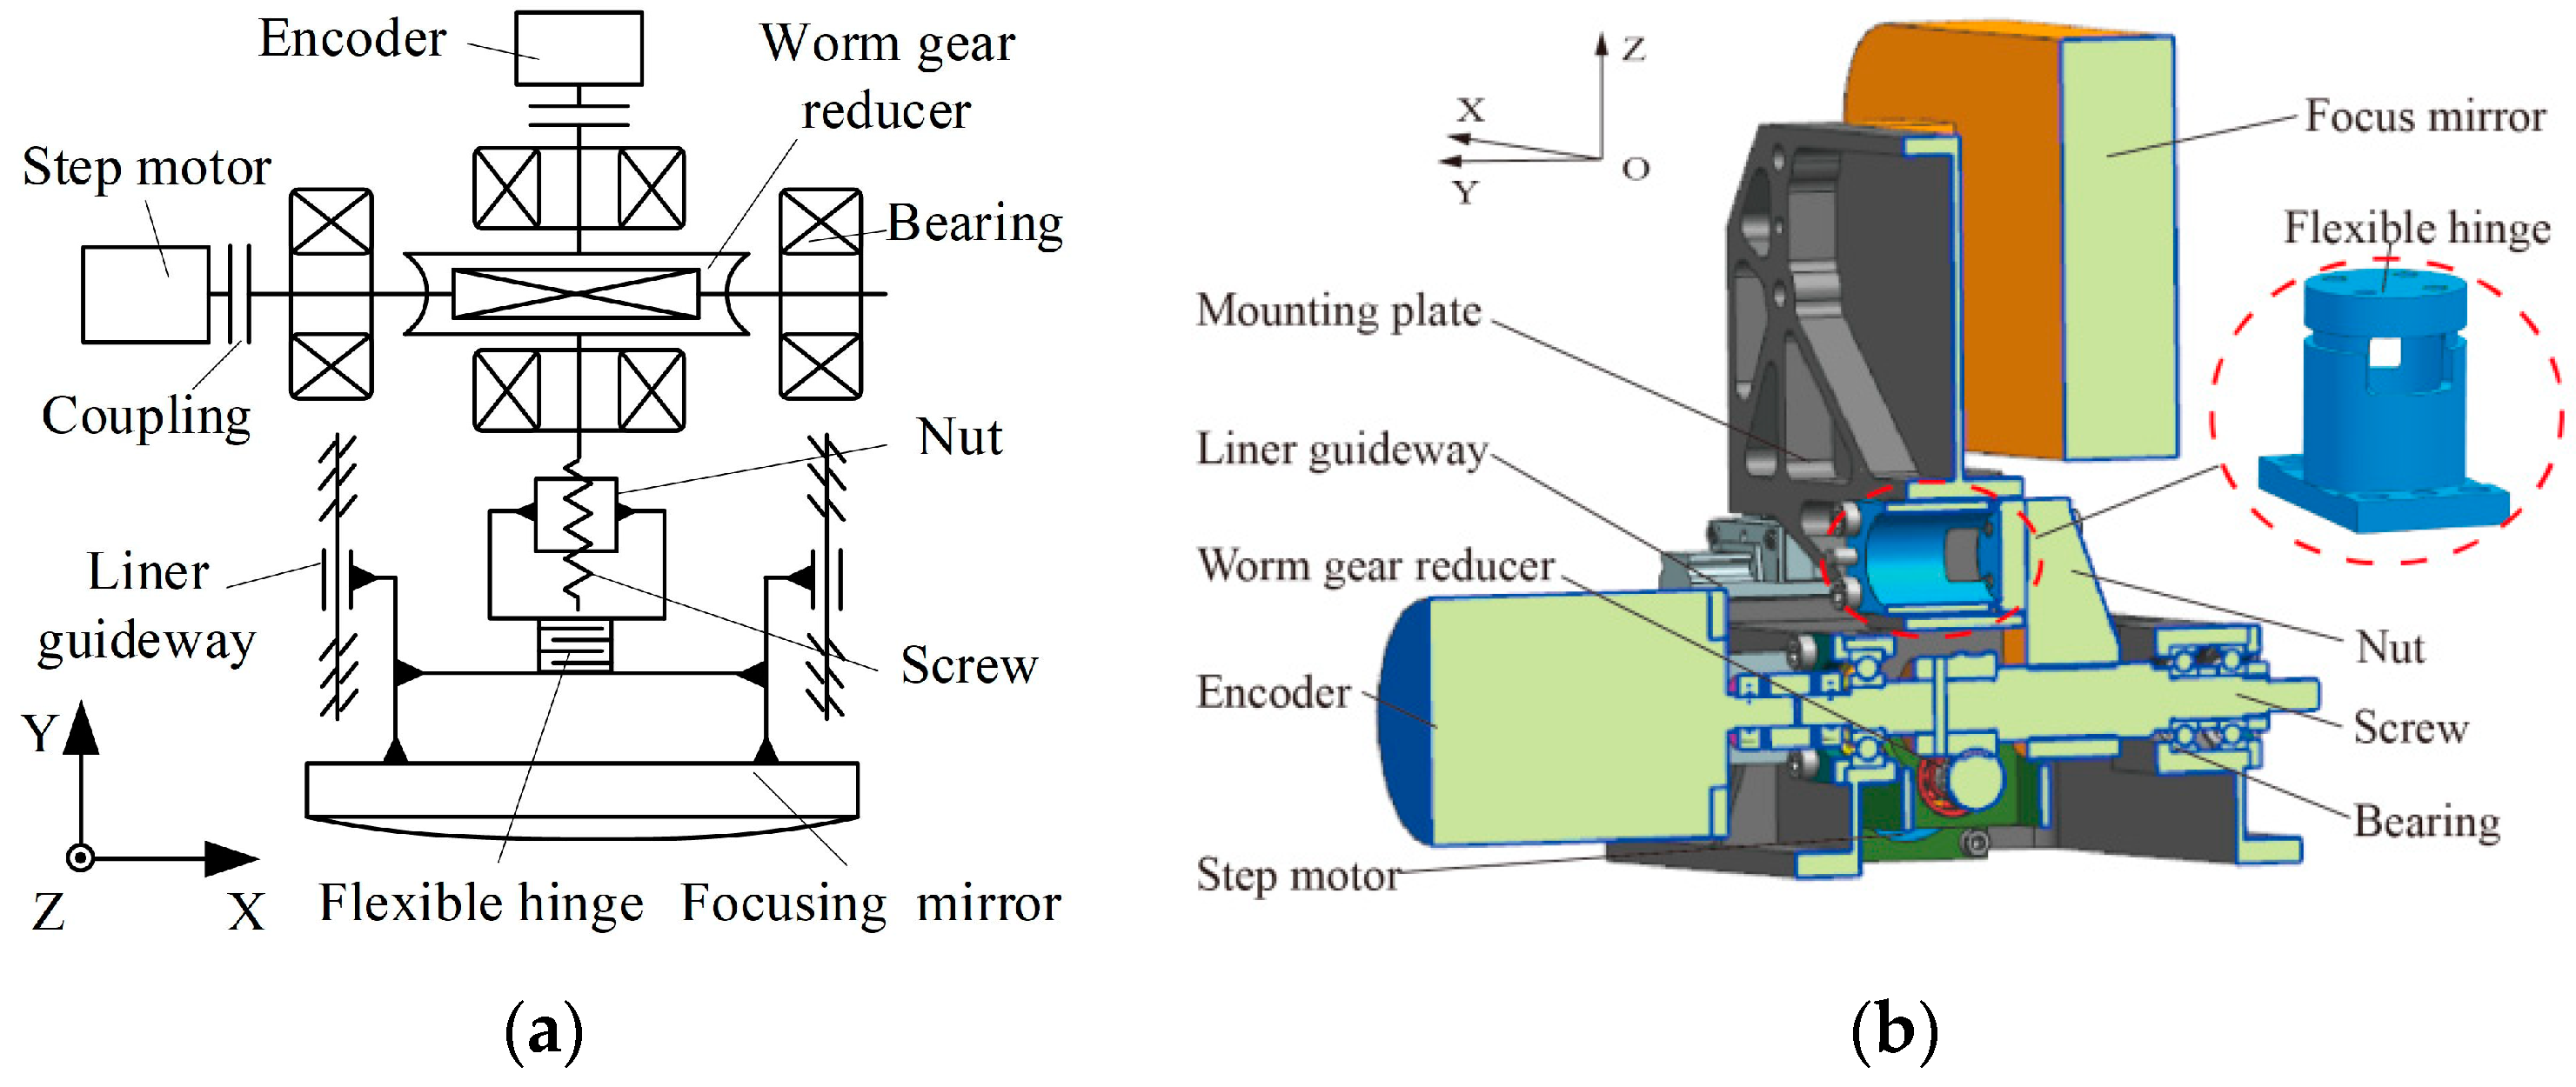
The focusing mechanism scheme is shown in Figure 3. The motor drives the worm gear to rotate through the coupling, the worm gear drives the screw to rotate, and the nut drives the mounting plate and focusing mirror assembly to move along the Y-axis in a straight line constrained by the linear guideway through the flexible hinge to realize the focusing of the space camera. The encoder indirectly measures the displacement of the focusing mirror assembly by measuring the angle of the screw, which is used for the closed-loop control of focusing.
The difference between this scheme and the traditional scheme Is that the flexible hinge is added between the nut and the mounting plate to decouple the interference motion between the linear guideway and the screw. The most significant advantage of this scheme is that it reduces the tilt error of the focusing mechanism Δθx and Δθz, so that better image quality can be obtained during the focusing process. The disadvantage of this scheme is that it will reduce the fundamental frequency of the focusing mechanism along the Y direction, which may cause resonance In the launching stage and damage the focusing mechanism. Finally, it was confirmed by a vibration test that the fundamental frequency of this scheme is much higher than 100 Hz, and the probability of resonance during launching is very low.

2.4. Finite Element Simulation Analysis

To achieve the optimal design of the flexible hinge, the primary challenges lie in constructing accurate finite element models and defining suitable working conditions. This section addresses these two critical aspects in detail. It is worth noting that in order to make the work in this section seem simpler and more straightforward, the “flexible hinge” in Figure 3b is replaced by a “rigid connector”, as shown in Figure 4.

2.4.1. Modeling of Linear Guideway

Firstly, linear guideways are critical components in finite element models, and their accuracy significantly affects the analysis results. Therefore, based on the Hertz contact theory, this paper first analyzed the contact characteristics of the ball and raceway, then constructed the finite element model according to the equivalent modeling method of the linear rolling guide proposed by Dunaj P [19], and finally verified the static accuracy by experiments.
The technical data of the RSR12M series guideway from THK include distinctive factors relating to contact modeling, which are presented in Table 2.
We used the values of the parameters from Table 2 in Equations (A1)–(A6) in Appendix A, and computed the liner guideway contact parameters as indicated in Table 3.
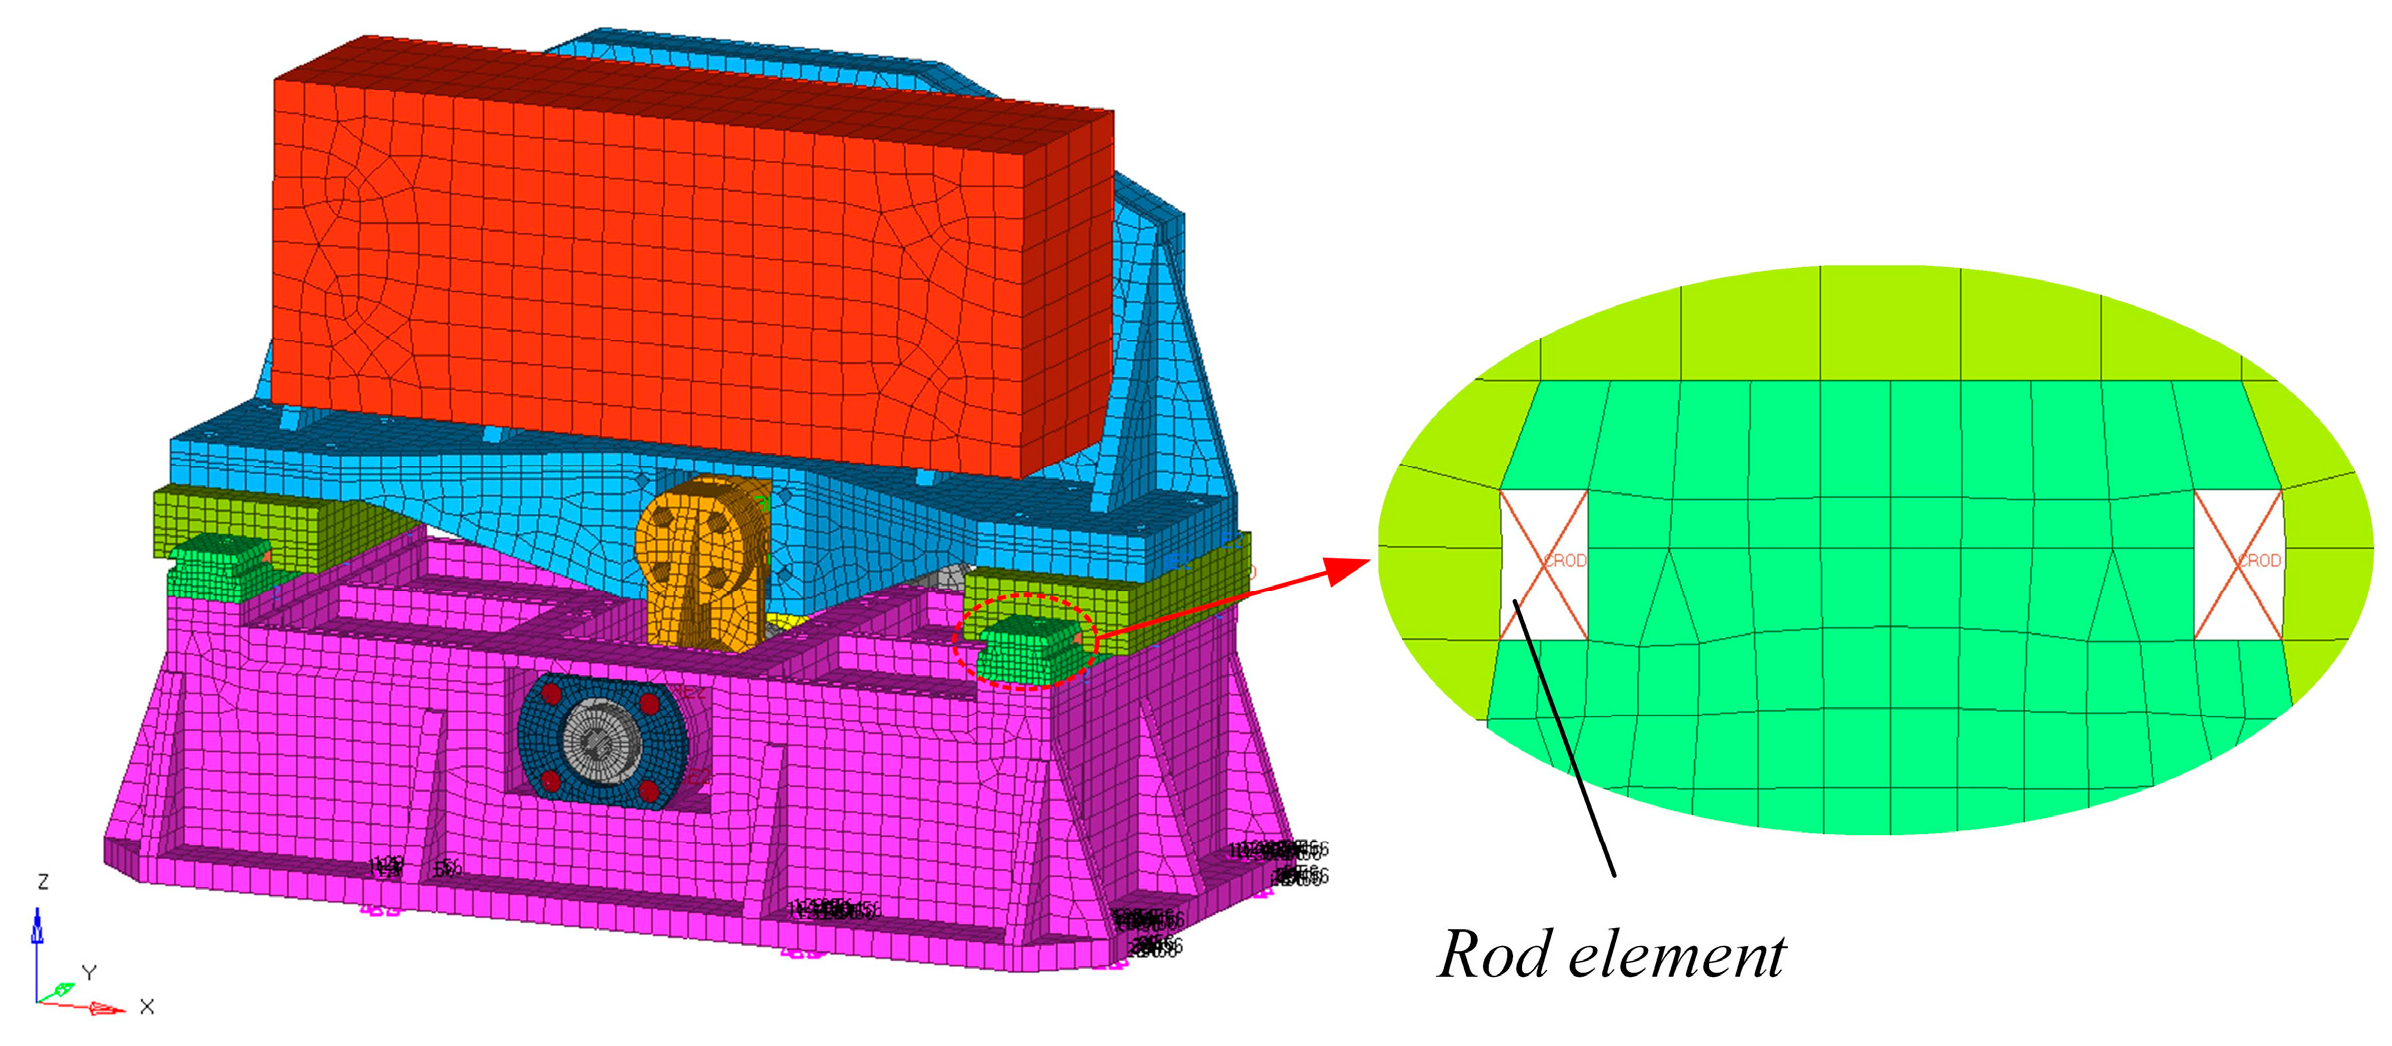
According to the equivalent modeling method of linear rolling guide proposed by Dunaj P [19], as shown in Figure 5, the finite element model of liner guideway contact, as shown in Figure 6, is constructed using rod elements. In this simulation, we used standard rod elements provided by the software. These elements allow for customization of their cross-sectional shape and size to meet our specific needs. The rectangular rod element’s cross-section dimensions are 0.5337 mm and 0.0649 mm, respectively. Additionally, 2 rod elements replace each ball, each raceway contains 13 balls, and one linear guideway contains two raceways, totaling 52 rod elements. The material parameters of the rod element are shown in Table 2.
In addition to the 52 rod elements mentioned above, the finite element model incorporates 49 RBE2 elements to simulate threaded connections and 72,971 hexahedral elements to represent the rest of the focusing mechanism’s structure. In total, the model comprises 73,072 elements, as shown in Figure 6.

2.4.2. Verification of the Finite Element Model

To verify the static precision of the finite element model of the focusing mechanism, the “flip method” was used to measure the angle between the focusing mirror and the base, comparing it with the finite element simulation results. The detection principle is shown in Figure 7. A Leica TM6100 theodolite was used to detect the angle θz1 between the test prism on the simulation part of the focusing mirror and the reference prism on the fixture before flipping. Then, the focusing mechanism was turned 180° to detect the angle θz2 after flipping. According to Formula (1), the angle α between the focusing mirror and the base caused by gravity can be calculated. By comparing the difference between the measured value of α and the simulated value, the static accuracy of the finite element model of the focusing mechanism can be analyzed. The test site is shown in Figure 8.
α = θ z 2 θ z 1 2
The simulation value of α differs from the measured value by just −0.13″, with a relative error of 6%, as indicated in Table 4. This demonstrates that the finite element model is highly accurate and fulfills the analytical requirements.

2.4.3. Simulation Analysis of Cumulative Assembly Error

There are two main reasons for the interference between the screw and the linear guideway. One is the cumulative assembly error Δ1; the other is the non-parallelism error Δ2 between the linear guideway and the screw, as shown in Figure 9.
Firstly, the cumulative error of the assembly was analyzed. The rigid connector connects the nut and mounting plate in the focusing mechanism assembly, usually installed last. Due to processing errors and assembly errors in the actual mounting plate, rigid connector, and nut, the gap between the mounting plate and nut cannot be completely consistent with the thickness and size of the rigid connector, resulting in the accumulated assembly error Δ1, as shown in Figure 9a. In the case of cumulative assembly errors, after tightening the screws of the rigid connector and the mounting plate, the mirror will produce a certain initial mirror angle θz0, as shown in Figure 9b.
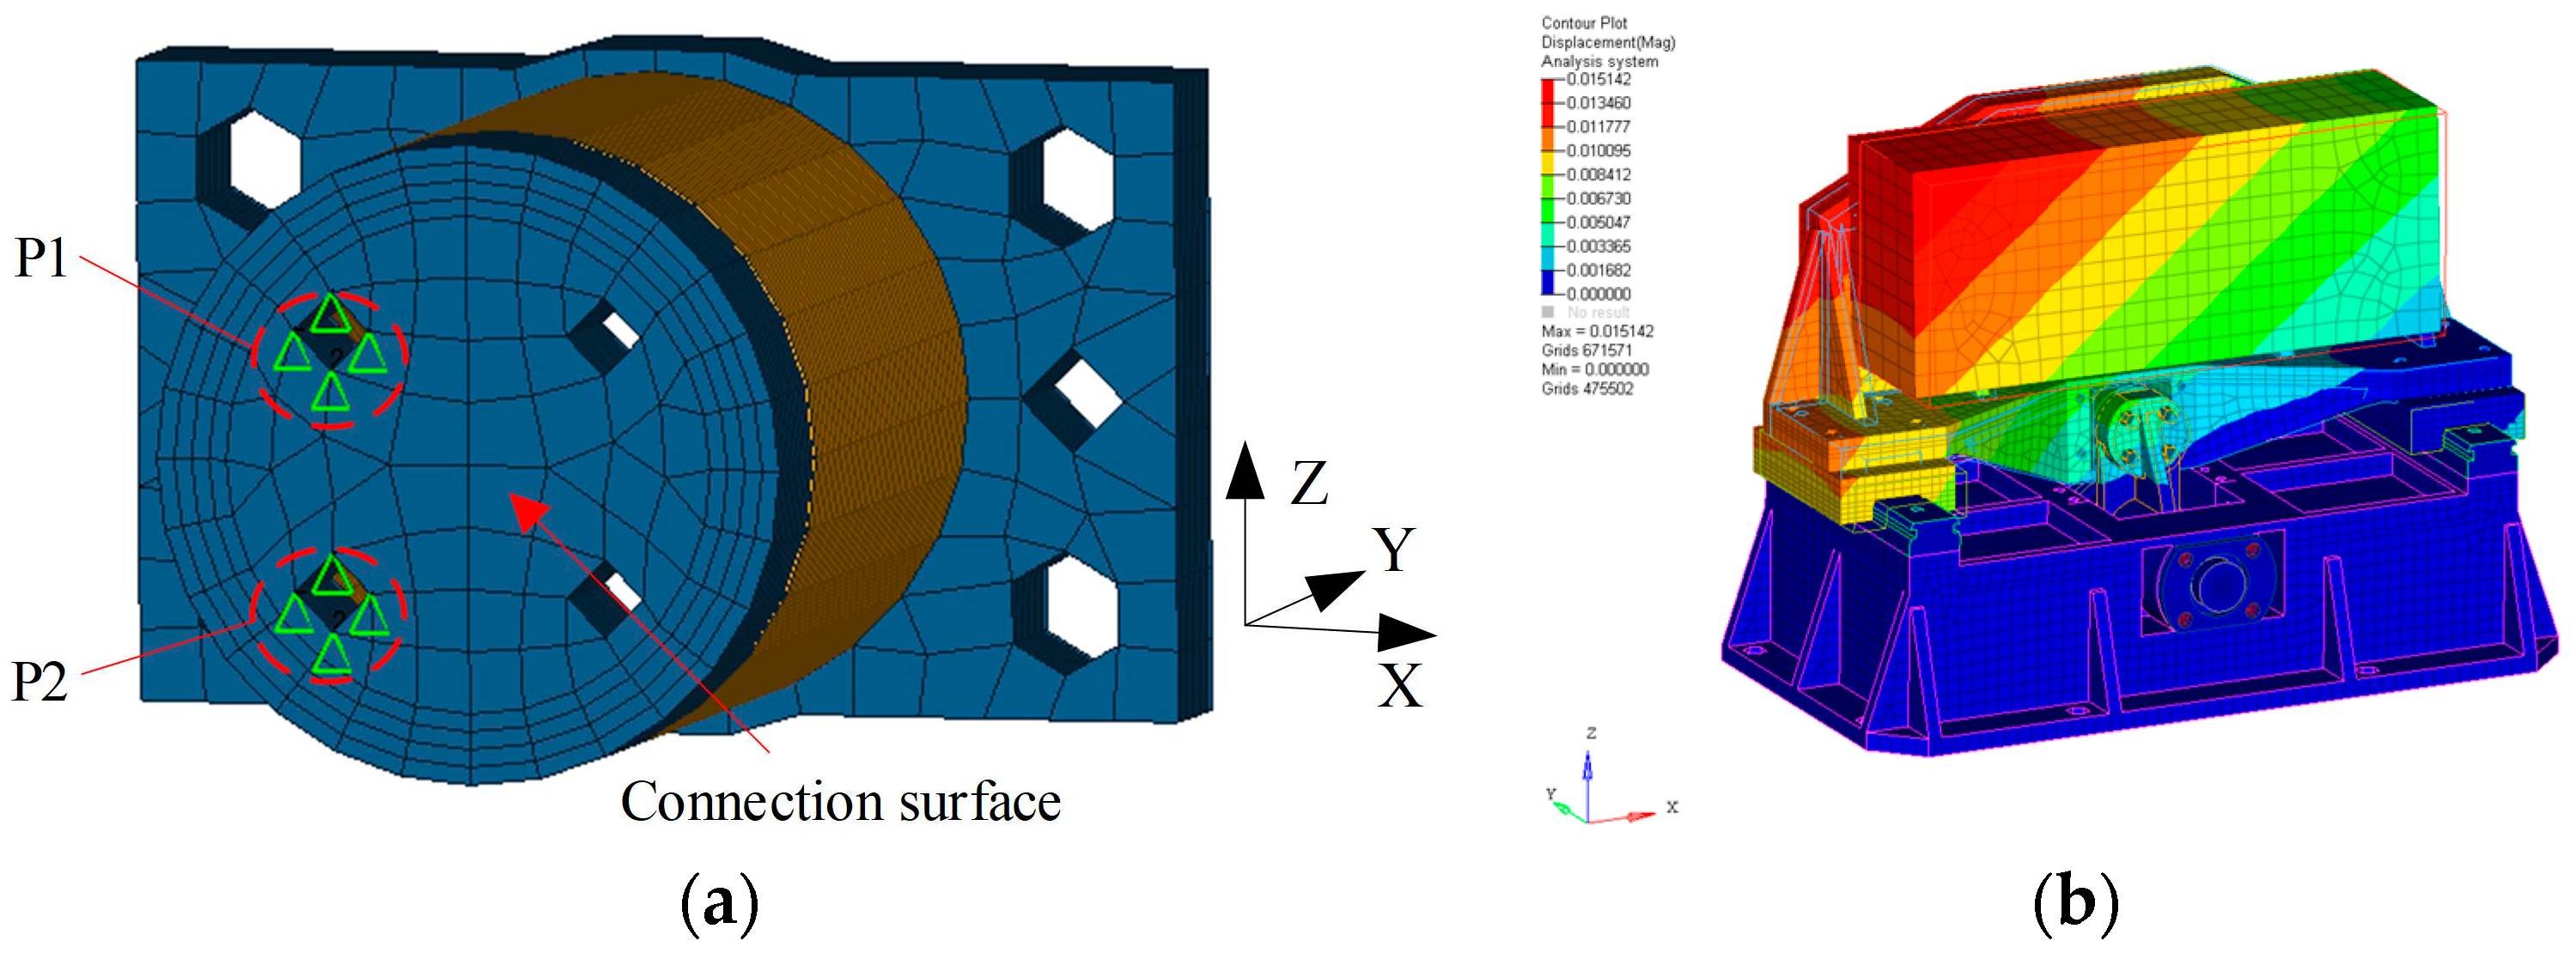
Under the existing machining and assembly accuracy conditions, the cumulative assembly error can generally be controlled within 0.005 mm. Considering the symmetry of the structure, only the two holes on the left were selected to set the cumulative assembly error, and the cumulative assembly error was simplified into the constraints of Y direction displacement at P1 and P2, respectively, as shown in Figure 10a. The cumulative assembly error of 0.005 mm was applied at the P1 position, and the deformation cloud image is shown in Figure 10b, and the mirror produces θx0 tilt 15.30″and θz0 tilt 19.00″.

2.4.4. Simulation Analysis of Non-Parallelism Between the Guideway and the Screw

Based on the cumulative assembly error, the non-parallelism error between the liner guideway and the screw was analyzed. Due to the coaxiality error of the screw-bearing seat, the straightness error of the screw shaft, the processing error of the positioning shoulder of the linear guideway, and the assembly error, there will inevitably be non-parallel error Δ2 between the screw and the guideway, as shown in Figure 9a, and such non-parallelism will inevitably lead to movement interference between the screw and the linear guideway. After focusing, the mirror angle will change from θz0 to θzi, as shown in Figure 11, and then the mirror tilt error Δθzi is the difference between the two.
Δ θ z i = θ z i θ z 0
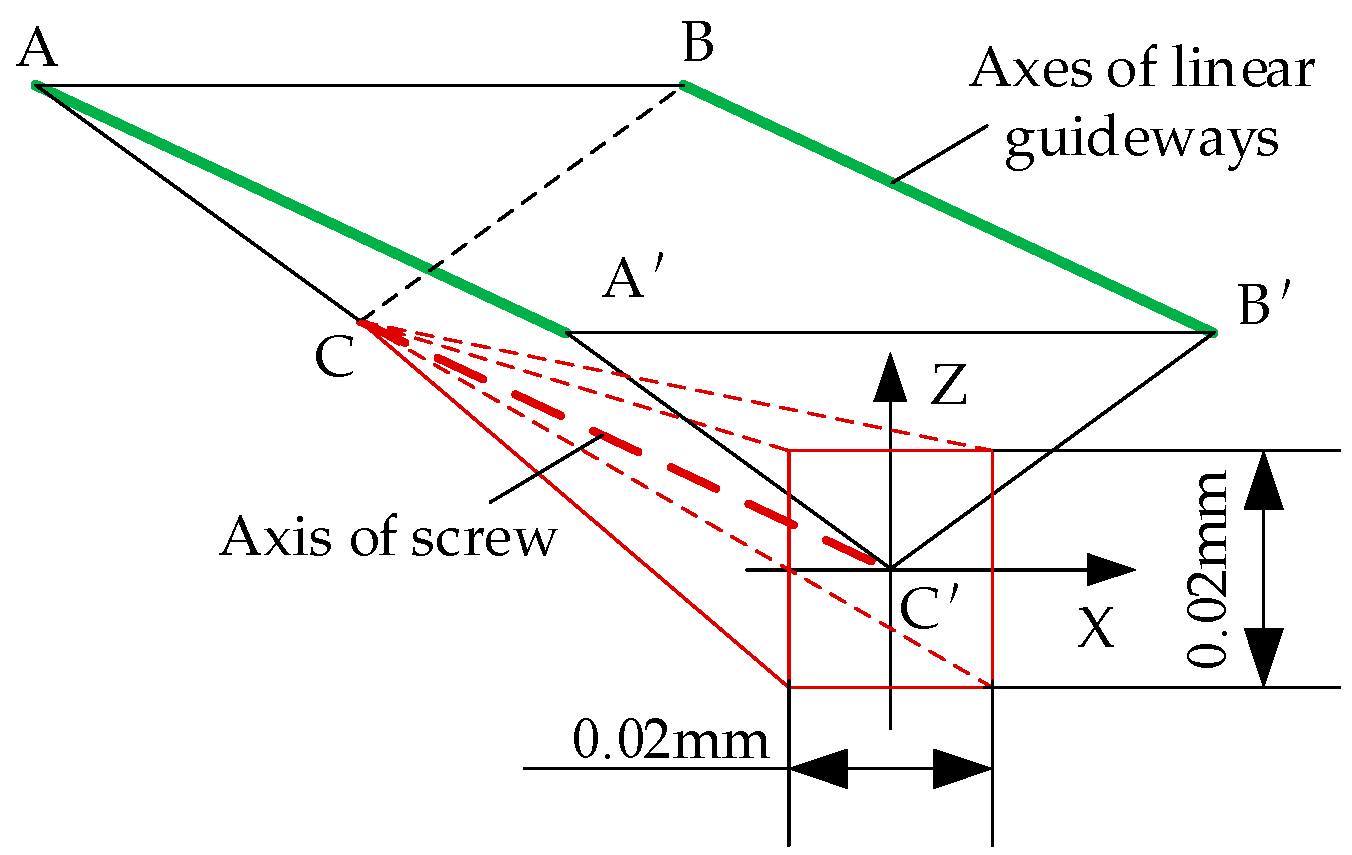
To analyze the influence of the non-parallelism between the screw and the guideway, it is imperative to set such boundary conditions in the finite element simulation. For two guideways and one screw, the three axes may present arbitrary spatial angles, and it is necessary to consider simplifying the setting of boundary conditions. The guideways are typically equipped with reference surfaces, making it simple to detect and change the parallelism between them. Consequently, it may be inferred that the two guideways are perfectly parallel. The screw usually does not have a complete and continuous cylinder as the detection datum; ensuring the parallelism of the screw and the linear guideway is challenging, so the primary consideration is that the screw and the guideway are not parallel. According to the actual processing and assembly experience, the parallelism error in the XY plane and YZ plane can generally be controlled within 0.01 mm, as shown in Figure 12, which assumes that one end of the screw is fixed C, the other end of the screw can be arbitrarily selected in a square with a side length of 0.02 mm centered on point C′.
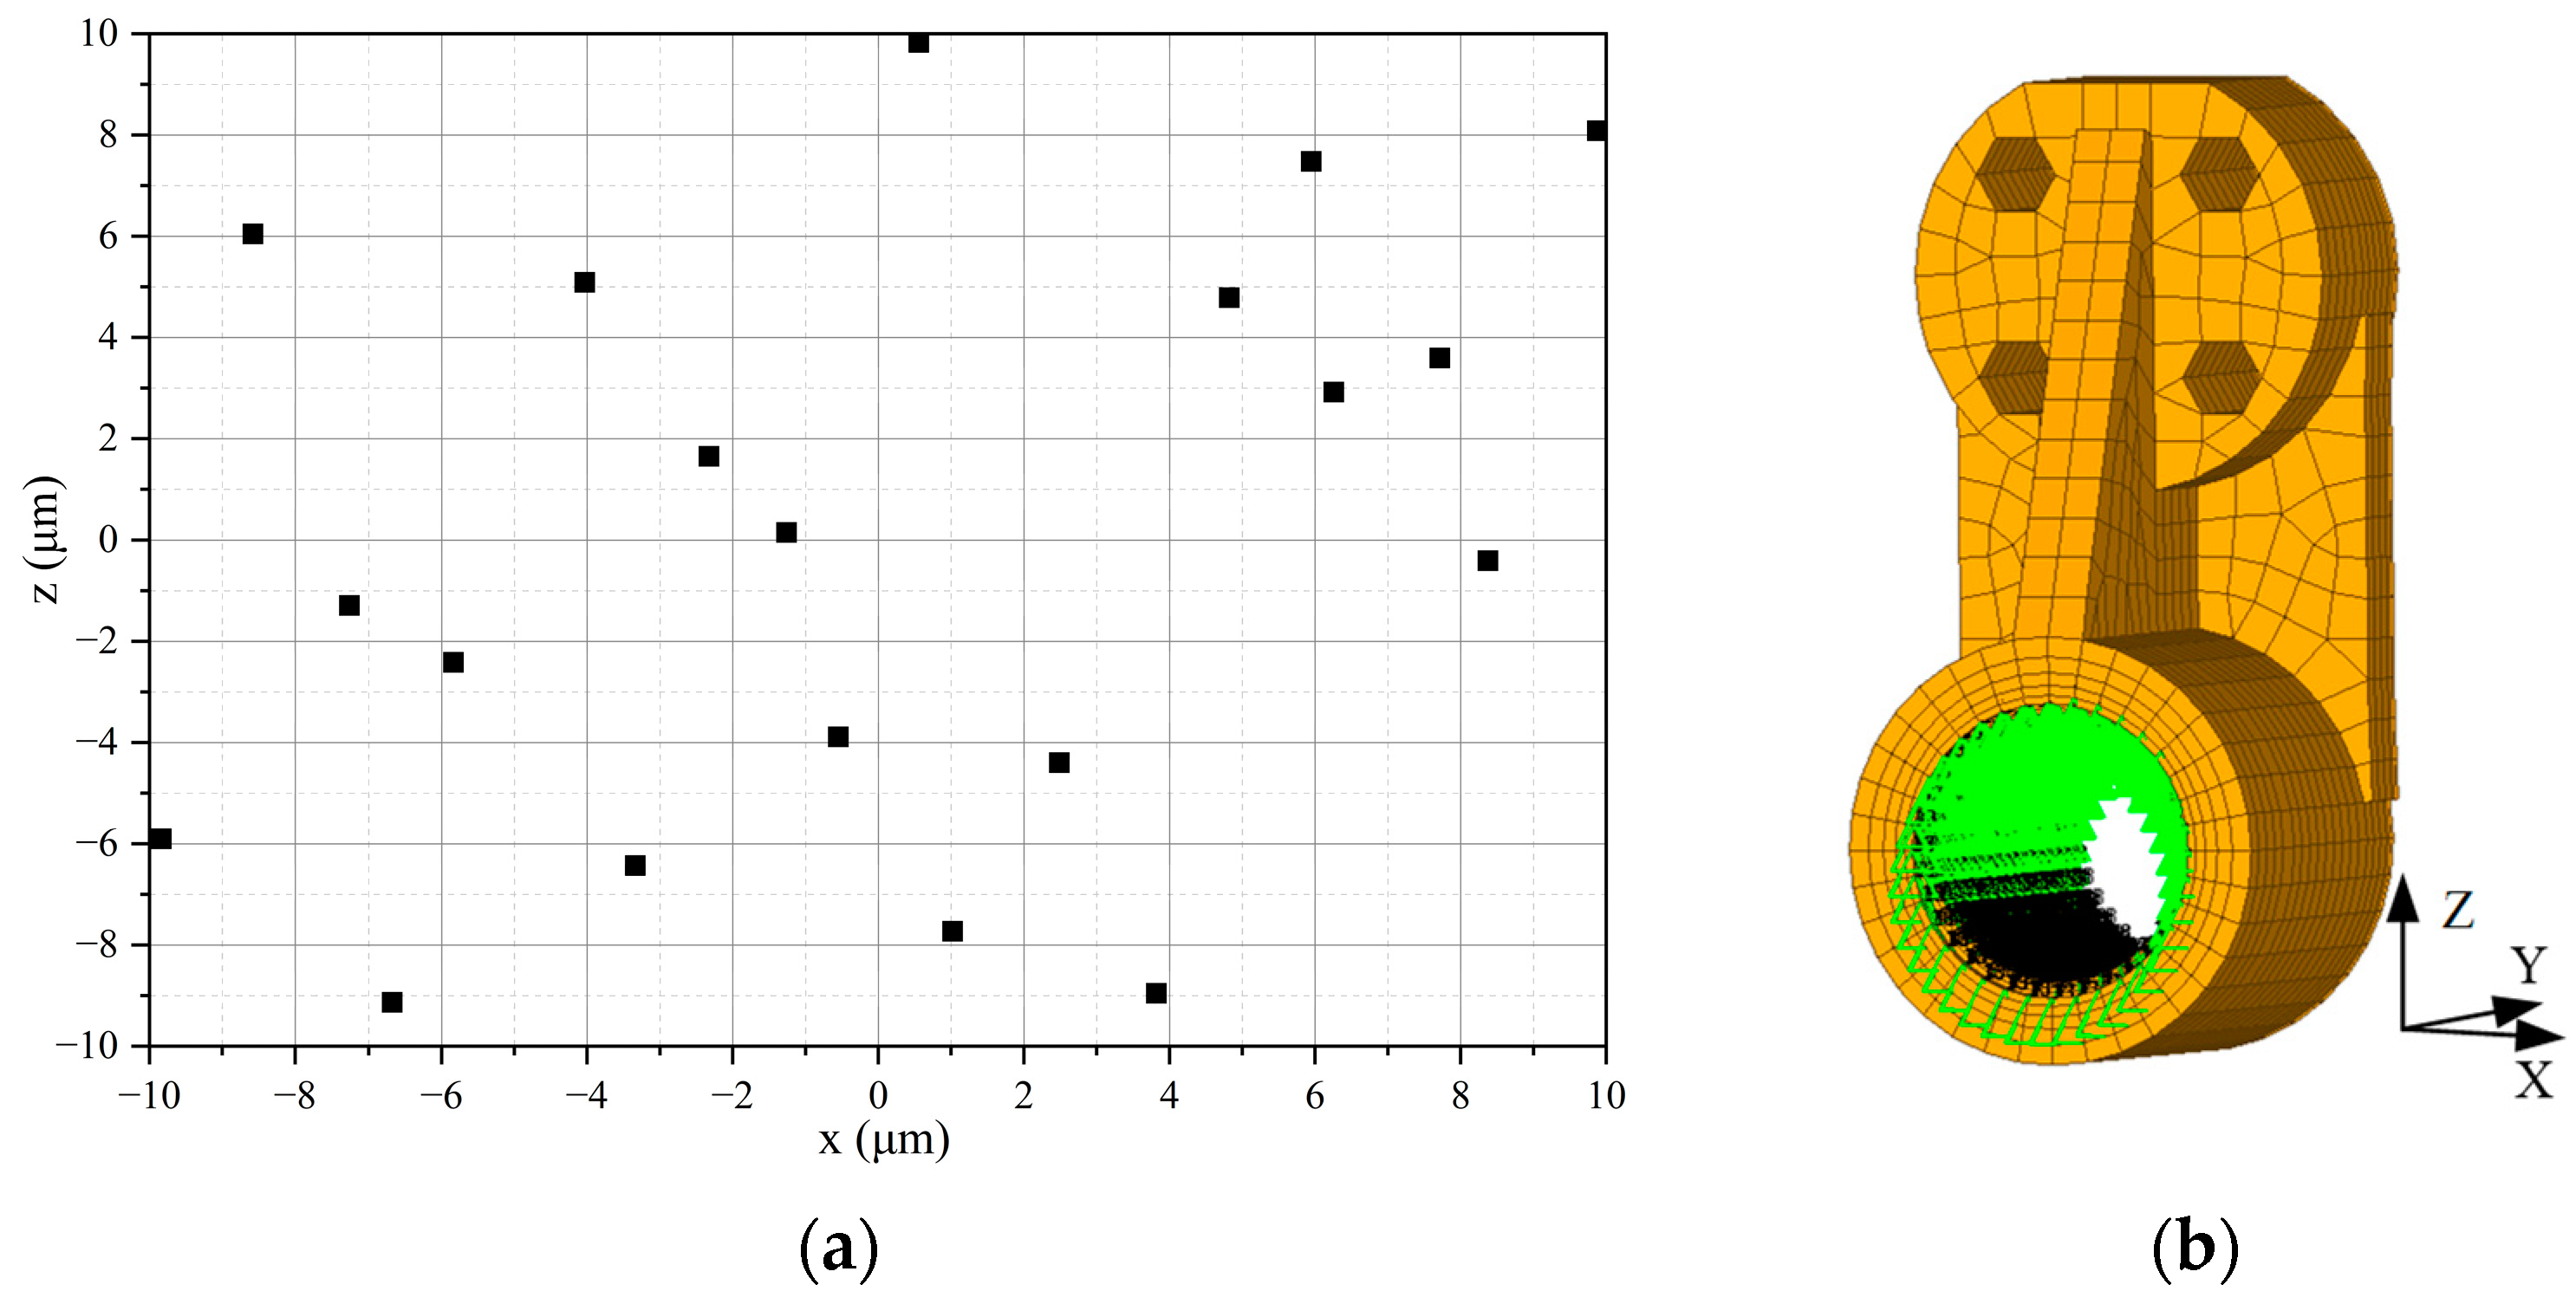
The Latin hypercube random sampling approach is employed to streamline the analysis process [16]. This method allows for acquiring a relatively small yet representative number of test samples evenly dispersed throughout the design space. The non-parallelism between the guideway and the screw was randomly sampled by a Latin hypercube. The X direction and Z direction were evenly divided into ten intervals, and 20 sampling points were obtained, as shown in Figure 13a. At the inner thread of the nut, X and Z displacement constraints are applied, as shown in Figure 13b. The non-parallelism error of the liner guideway and the screw is combined with the accumulated assembly error of the upper section, and the combined working condition is shown in Table 5. In the following paper, Δθxi and Δθzi will be used to represent the tilt error around the X-axis and the tilt error around the Y-axis, respectively, under i working conditions (i = 1, 2,…, 40).
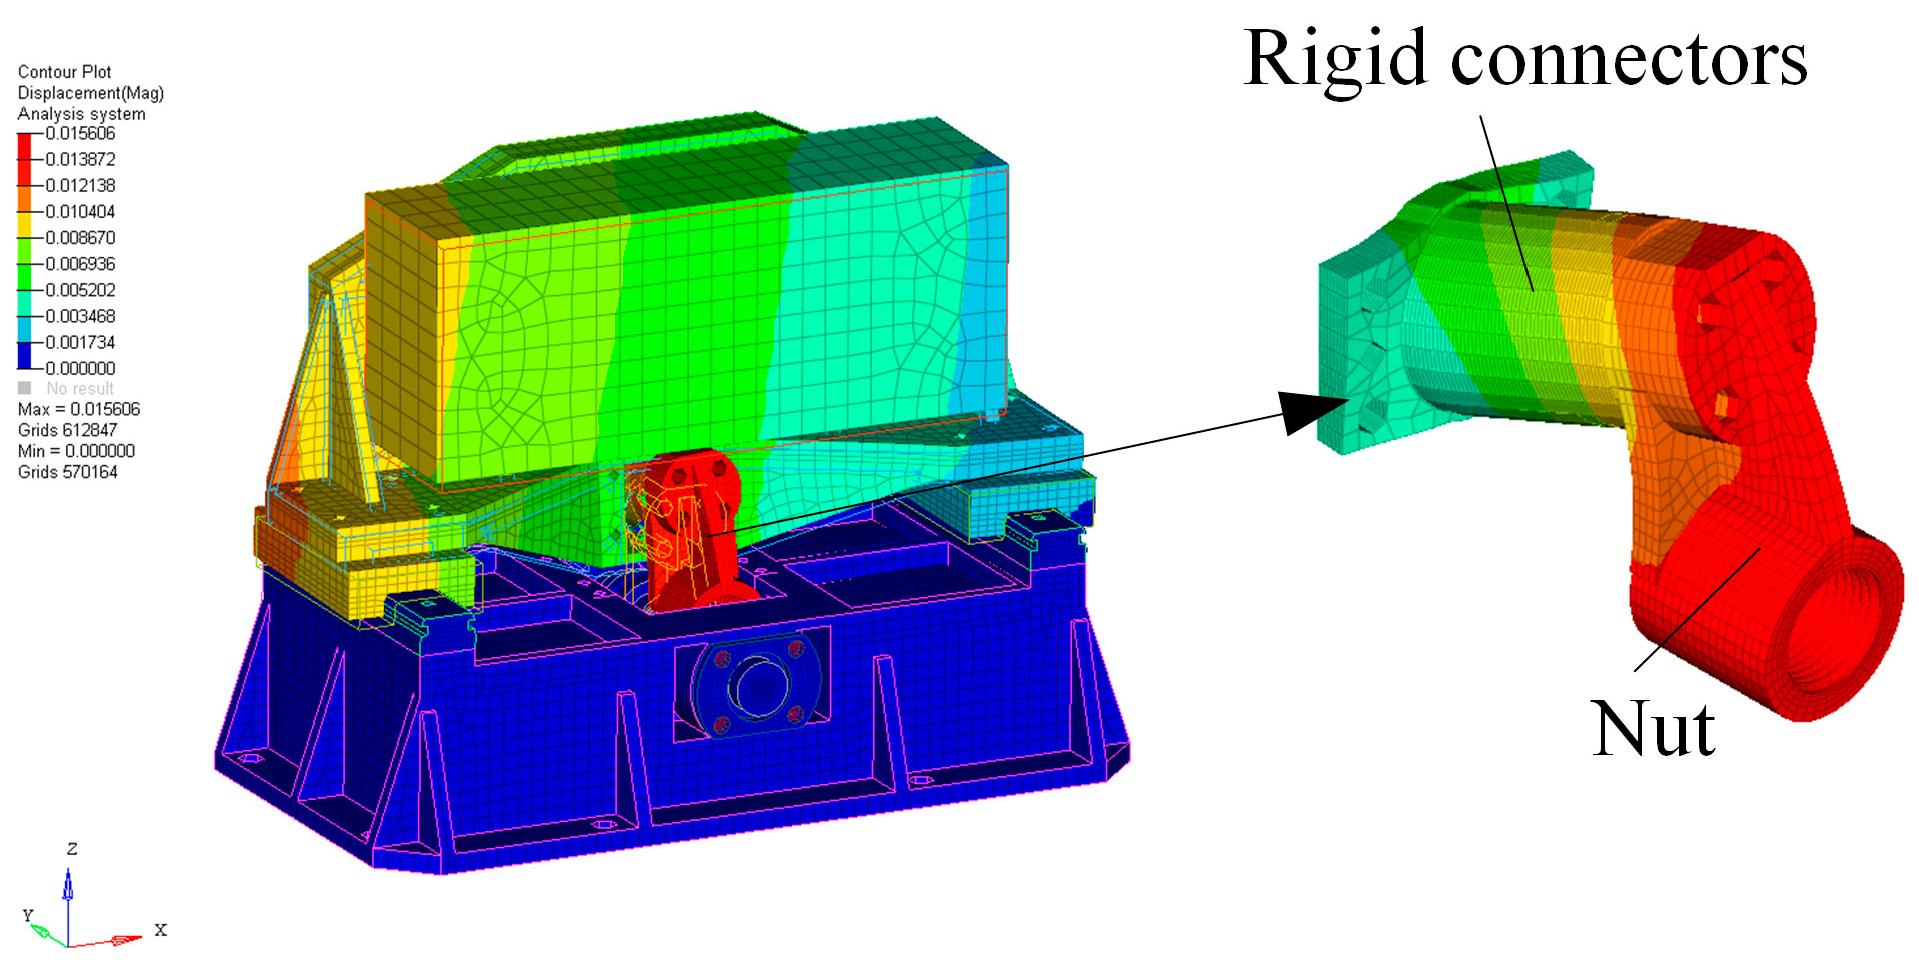
Comprehensive working condition 11 was selected for static analysis, and the deformation cloud image of the analysis results is shown in Figure 14. It is calculated that the tilt error Δθz11 is −17.13″, and the tilt error Δθx11 is −4.14″, as shown in Table 6, where Δθx11 does not meet the index requirements. At the same time, it can be found that the overall deformation of the rigid connector is small, which fully transfers the displacement of the nut but leads to a significant tilt error around the X-axis, so it can be considered to weaken the stiffness of the rigid connector and replace the rigid connector with a flexible hinge to suppress the tilt error of the focusing mirror.

3. Optimization Design of the Flexible Hinge

3.1. Topology Optimization of the Flexible Hinge

When planning the initial design for the flexible hinge, quickly finding the most reasonable scheme is difficult if only following the “build a finite model, simulation analysis, improve scheme” cycle. Topology optimization offers an effective way to identify a sensible solution [20] rapidly.
The mainstream topology optimization technique is solid isotropic material with penalization (SIMP) [21]. It uses material density as the design variable, establishes the mapping relationship between density and structural physical properties, and transforms optimization into optimal material distribution. This paper applied SIMP to the topology optimization design of the flexible hinge made of TC4 material. The optimized domain is shown in Figure 15. The topology optimization mathematical model is shown in the following Formula (3). The algorithm for the topology optimization is Dual Optimizer based on separable convex approximation (DUAL). Approximation concepts convert the basic mathematical programming statement of the structural synthesis problem into a sequence of explicit primal problems of separable form. These problems are solved by constructing explicit dual functions, which are maximized subject to non-negativity constraints on the dual variables. It is applicable to a broad class of structural optimization problems [22,23,24].
The optimization process was centered on static models of the linear guides, primarily due to the challenges and constraints of dynamic simulations. Modal analysis, essential for evaluating resonant frequencies, requires highly accurate dynamic simulations, particularly given the nonlinear interactions between the ball and raceway in the guide rails. Due to these complexities and the current limitations in modeling, we were unable to incorporate dynamic optimization within the static analysis framework. Consequently, we focused on static optimization and later validated the resonant frequency concerns through vibration tests.
M i n i m i z e : F ( θ ) = i = 1 n Δ θ x i + Δ θ z i s . t . V ρ V 0 C i ( i = 1 , 2 , , n ) C 0 D i s p force D i s p k
In the equation, F(θ) represents the objective function; Δθxi is the yaw angle error around the X-axis under the i-th working condition; Δθzi is the roll angle error around the Z-axis under the working condition; n is 40, the total comprehensive working conditions involved; V0 is the total pre-optimization volume; and V is the post-optimization volume. We explore the volume fraction constraint, denoted by ρ, where a 70% volume fraction was selected based on extensive trials. This specific value was determined to be optimal, effectively minimizing tilt error while maintaining the necessary structural stiffness; Ci is the flexibility of the i-th working condition, and C0 is the upper limit of the optimized flexibility, which is 10; Dispforce is the Y-direction displacement of the flexible hinge under the action of the unit force in the Y direction; the purpose is to ensure that while weakening the stiffness of the flexible hinge, sufficient stiffness along the Y direction is guaranteed; Dispk is 1.5 × 10⁻⁵ mm.
The initial material density was set at 0.8, and the convergence tolerance was established at 0.005. Convergence was achieved when the change in the objective function for two consecutive iterations was less than the set tolerance and constraint violations were below 1%. For manufacturability considerations, the topology results were also set to be symmetric with respect to the XY and YZ planes.
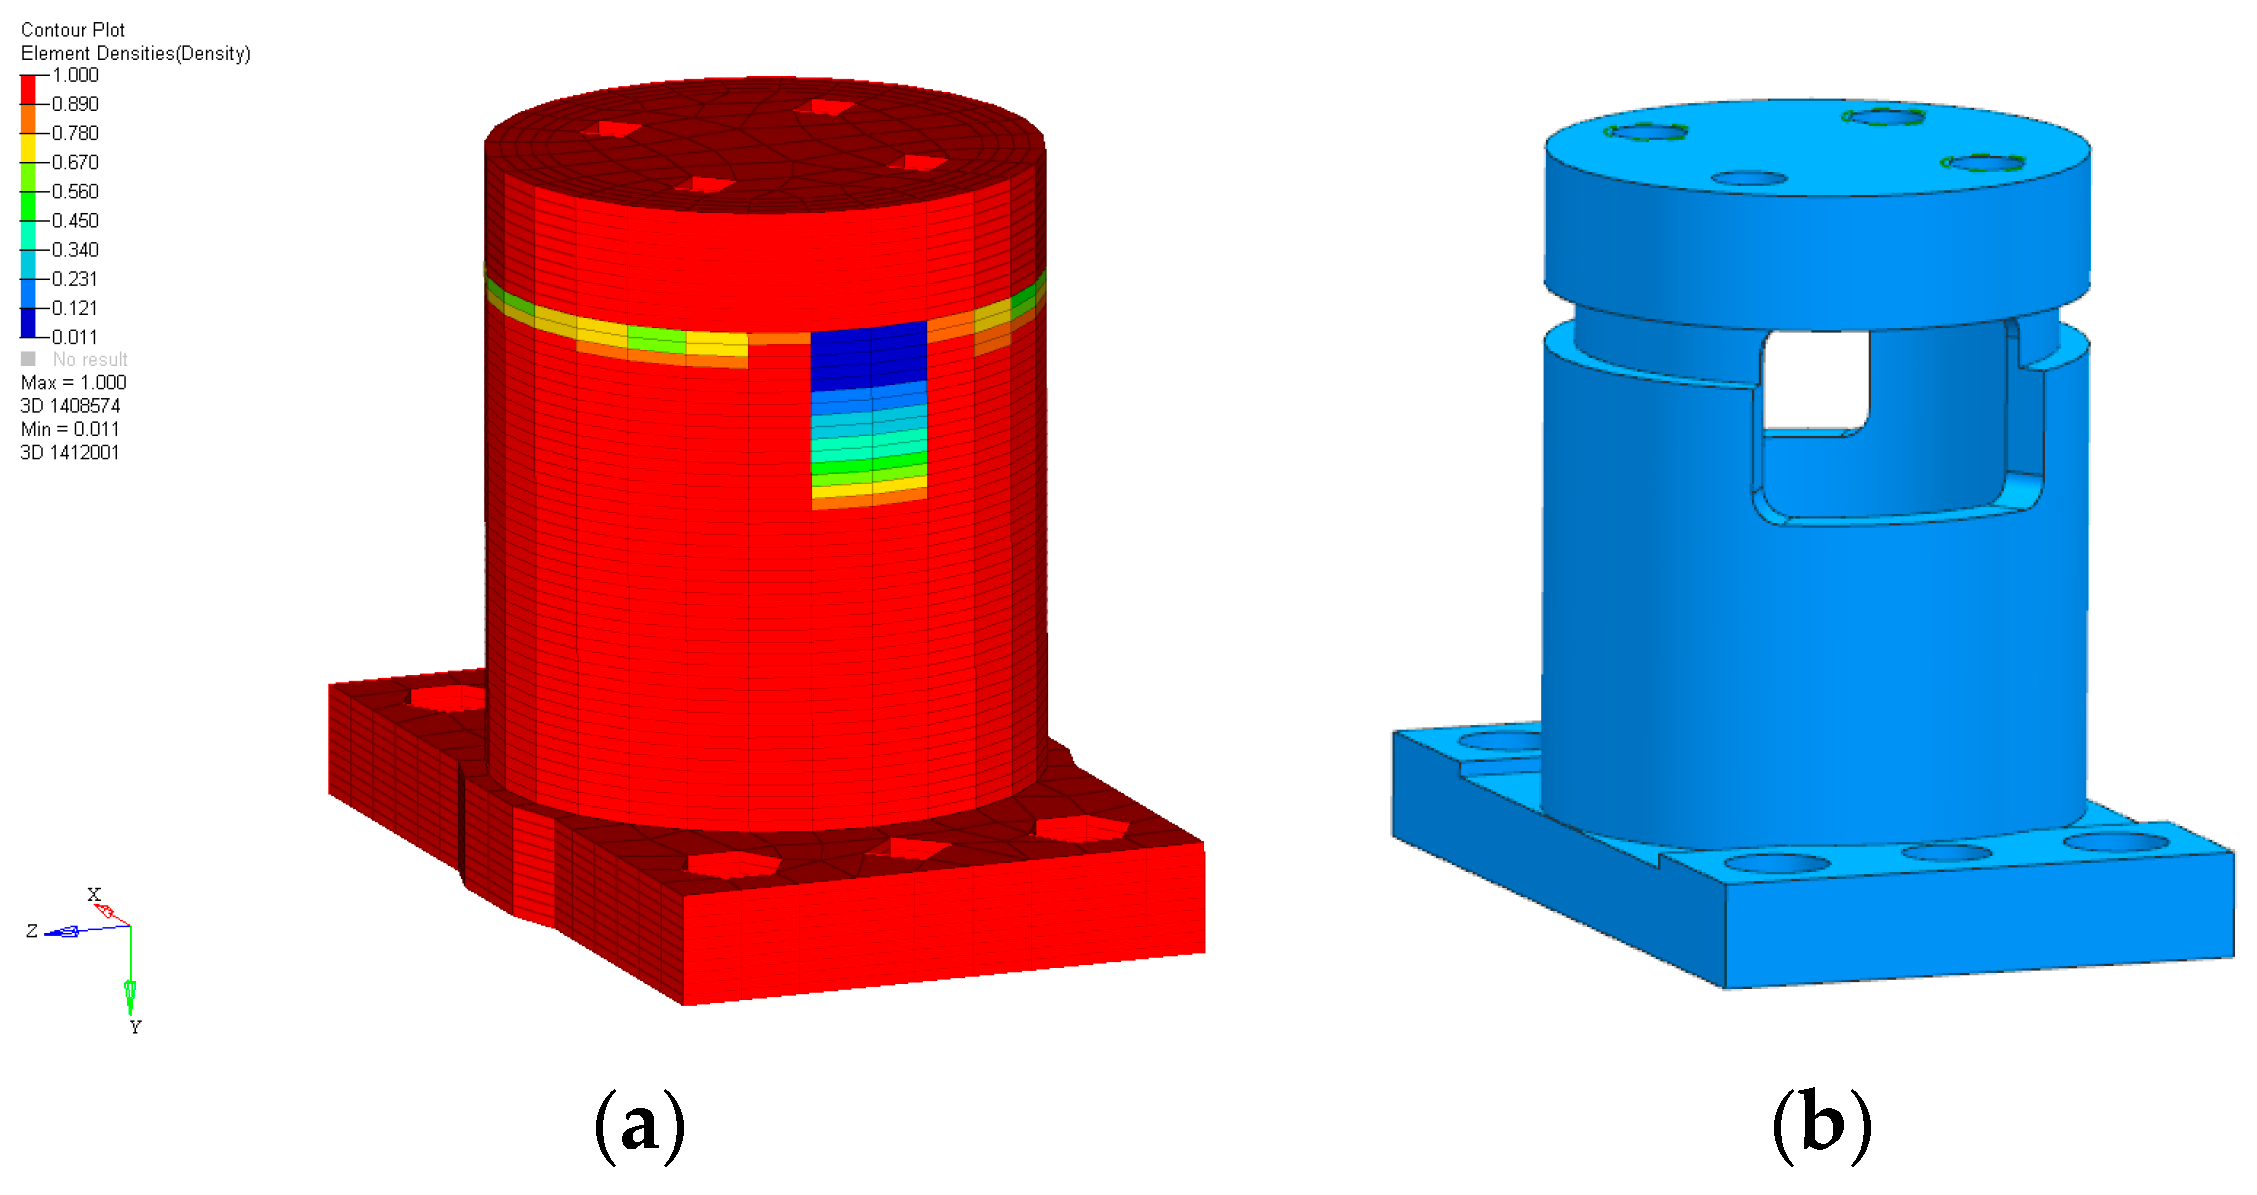
After 18 iterations, Figure 16a shows the optimized material distribution results. The presence of the ring groove, along with the two through holes, decreases the torsional stiffness of the flexible hinge around the X-axis and helps reduce the tilt error around the X-axis.
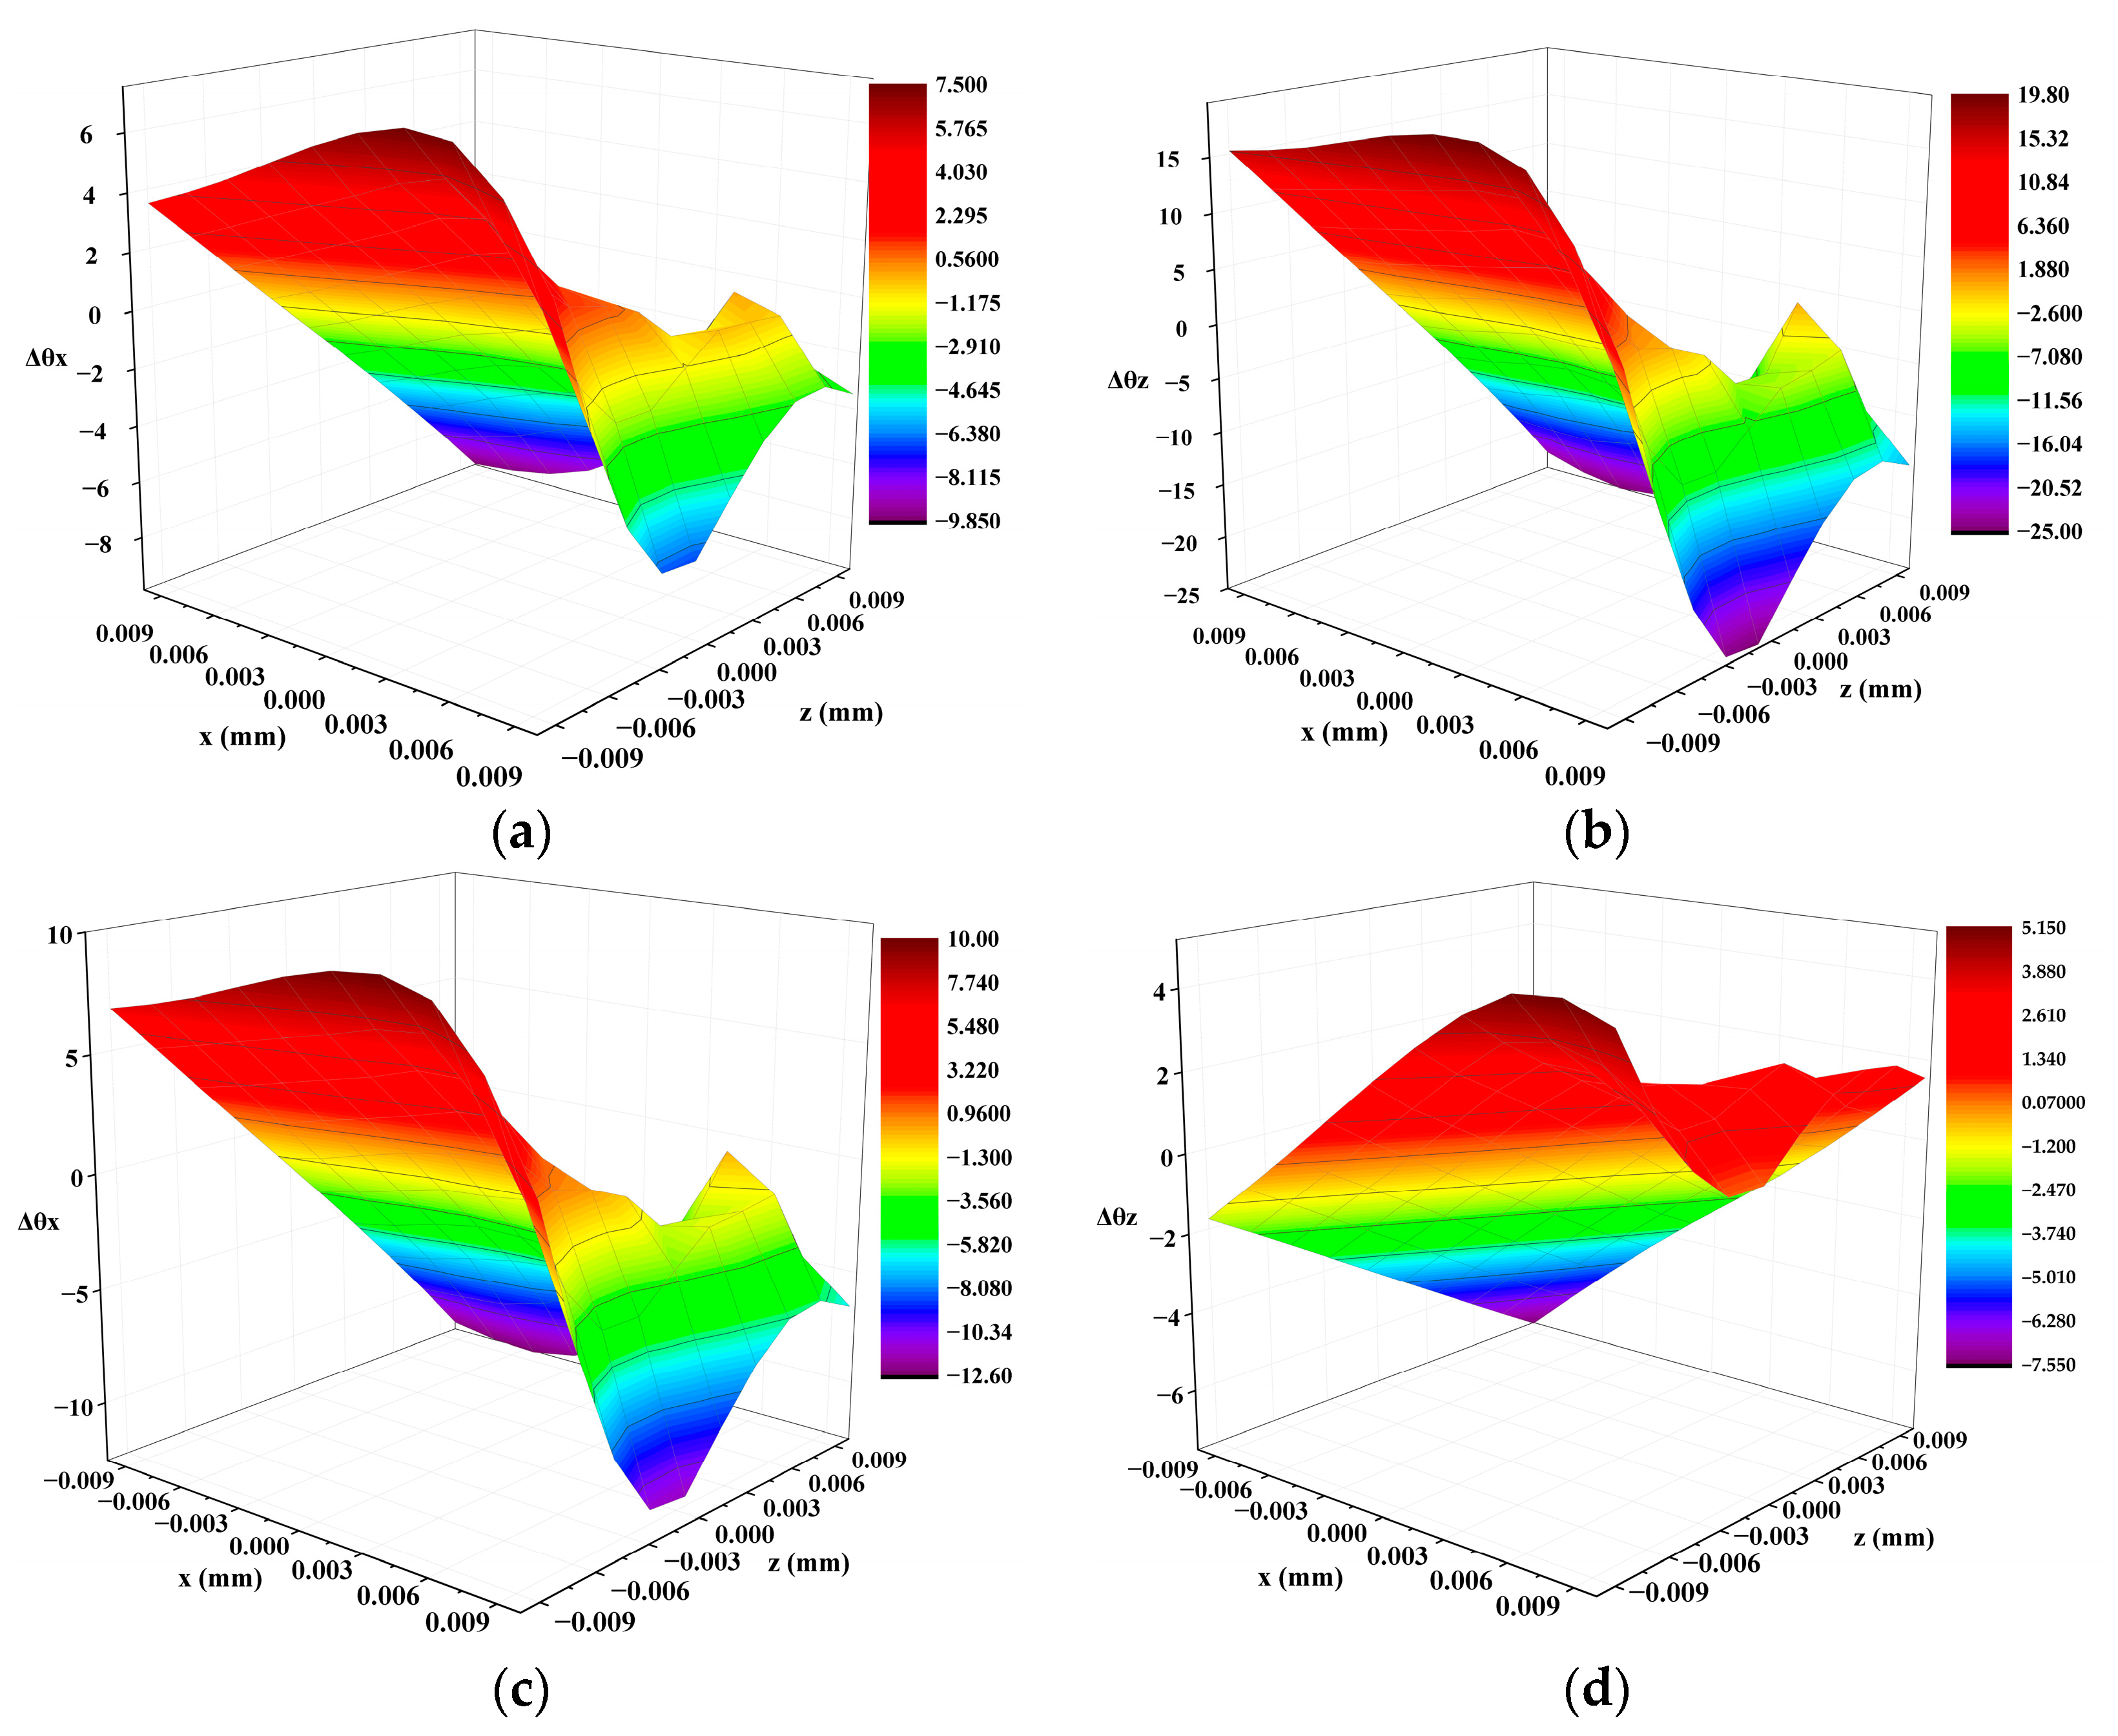
The structure shown in Figure 16b was rebuilt and analyzed based on the material distribution in Figure 16a. The 1st to 20th working conditions were analyzed. The tilt error was plotted against the non-parallelism in the X and Z directions of the screw and the liner guideway (Figure 17). As seen, the tilt error trend of the enhanced design closely matches the pre-optimization state. The Z-direction non-parallelism error mainly influences Δθx. After optimization, the overall tilt error amplitude decreases, demonstrating the flexible hinge’s excellence and validating the optimization results.

3.2. Integrated Optimization of the Flexible Hinge

After using the flexible hinge design from topological optimization, the following focus is to find the optimal dimension setting to reduce the tilt error. The traditional method is manual trial-and-error until needs are met. But this method struggles to find optima and has low efficiency. We can now use integrated optimization with parameter modeling and a multidisciplinary approach as computers and algorithms advance. The optimization algorithm can quickly identify the optimal variable values and structural performance by defining design variables and performance targets.
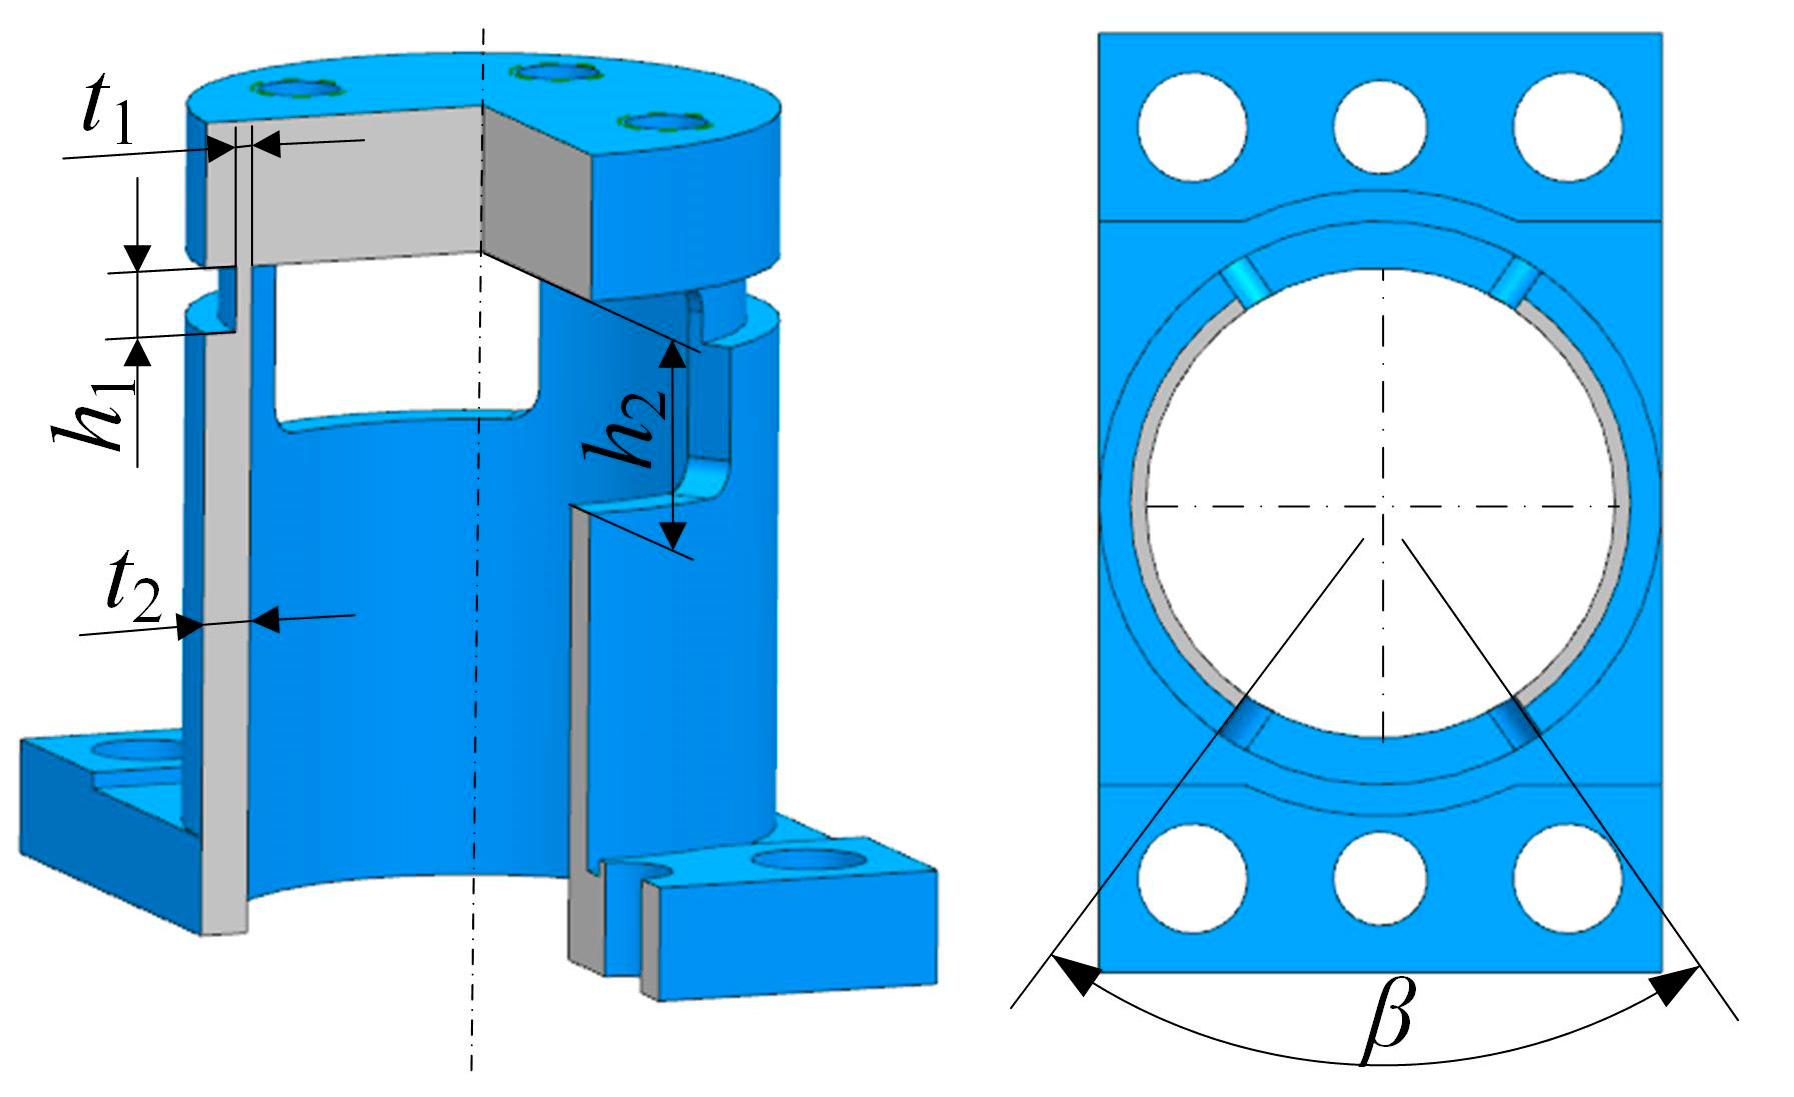
When optimizing sizes, the main goal is reducing tilt error. So, the optimization target minimizes the sum of tilt errors under all working conditions. First, we limit Δθx and Δθz out-of-tolerance ranges for conditions 1–20 and 21–40. Second, to limit tilt fluctuations, we constrain the maximum standard deviations of Δθx and Δθz for those condition sets. Then, to ensure Y-axis stiffness, we restrict the flexible hinge’s Y displacement under a unit Y-force to below 1.5 × 10⁻⁵ mm. Finally, considering size and manufacturing limits, we set variable ranges for t1, h1, t2, h2, and β, finding the optimal combination, as shown in Figure 18. The optimization problem’s mathematical expression is
f i n d X = t 1 , h 1 , t 2 , h 2 , β M i n i m i z e : F ( θ ) = i = 1 n Δ θ x i + Δ θ z i s . t . M a x ( R a n g e 1 , , R a n g e 4 ) 1 0 M a x ( σ 1 , σ 2 , σ 3 , σ 4 ) 5 D i s p f o r c e 1.5 × 10 5 mm 0.8   mm t 1 2.3   mm 1   mm h 1 3   mm 1.8   mm t 2 3   mm 4.5   mm h 2 14.5   mm 50 ° β 90 °
This paper built an integrated model to optimize the process, as shown in Figure 19a. First, the “model” module adjusts t1, h1, t2, h2, and α by moving and rotating nodes of the specific elements in the flexible hinge and updating the finite element solution file. Next, the “calculate” module runs simulations using a specified solver, which outputs results to a file and extracts displacement data of critical nodes. Finally, the “Excel” module calculates the focusing mirror’s tilt error around the X- and Z-axes from the displacement data of the nodes.
This paper used the Multi-island Integration Genetic Algorithm (MIGA) [25] for optimization. The main parameter settings of the MIGA are as follows: The sizes of each offspring, the number of islands, and the number of generations of evolution are all 6, the crossover probability is 100%, the offspring mutation probability is 3%, the migration rate between offspring is 3%, and the migration interval is 5. The iterative optimization process of using the MIGA to solve the flexible hinge optimization problem is shown in Figure 19b. After 216 optimization iterations, it gradually converged. The optimal result that met the constraints was the 197th iteration result. The final optimization results are shown in Table 7.

3.3. Optimized Simulation Comparison

Examining the simulation outcomes of the initial rigid connector, the optimized flexible hinge after topology and size optimization was found, as depicted in Figure 20. Notably, the variation range and standard deviation of the tilt error significantly decreased, validating the effectiveness of the flexible hinge and optimization strategy.
To investigate the potential correlation between tilt error and interference motion between the screw and the liner guideway, simulations analyzed the rigid connector and optimized flexible hinge after topology and size optimization. A statistical analysis is performed on the results of the 1st to 40th working conditions in Table 5. For each condition, the stress on the rod elements simulating the linear guideway ball characterized the interference motion intensity. The standard deviation of the stress across 52 rod elements on one liner guideway was statistically calculated for each condition. A higher standard deviation indicates more excellent interfering motion, as shown in Figure 21. Concurrently, the root mean square value Δθ of Δθx and Δθz represented the synthetic tilt error.
The statistical results are shown in Figure 22. After topology and size optimization, the stress variation in the flexible hinge decreases significantly compared to the rigid connector. A similar trend emerges for the synthetic tilt error. This indicates that the tilt error is related to the interference motion of the screw and the liner guideway, and more significant interference leads to a higher tilt error. Simultaneously, the flexible hinge proposed in this paper can significantly reduce the interference between the liner guideway and the screw and reduce the tilt error.

4. Experimental Verification

4.1. Vibration Test

Since the focusing mechanism will be affected by mechanical environments such as shock and vibration during launch and transportation, it is necessary to carry out a vibration test before launching. The linear guideway mainly bears the vibration in the X and Z directions. In contrast, the vibration load in the Y direction is applied to the flexible hinge (the Y direction is the focusing direction, and the linear guideway releases the freedom of movement along the Y direction). Although the stiffness along the Y direction has been ensured as far as possible through the constraint of flexible hinge displacement in the above optimization process, introducing a flexible hinge will inevitably lead to a decrease in stiffness along the Y direction. Vibration tests were conducted to verify whether the mechanism can meet the requirement of a first-order fundamental frequency greater than 100 Hz.
Sine scanning vibration tests in the X, Y, and Z directions were carried out on the focusing mechanism, and an acceleration sensor was installed on the surface of the focusing mirror. The test site and the size-optimized flexible hinge are shown in Figure 23. The frequency range of the sinusoidal scanning vibration test was 10–2000 Hz, and the vibration amplitude was 0.1 g. The response of the acceleration sensor is shown in Figure 24. The test results are shown in Table 8.
The results showed the focusing mechanism’s first-order fundamental frequency was 163.28 Hz in the Y direction. The first-order fundamental frequency in the Z direction (direction of launch) was 655.5 Hz. This exceeded the 100 Hz requirement. This proved that the first-order fundamental frequency of the focusing mechanism is sufficiently high, minimizing the risk of resonance during the launch phase. This is crucial for maintaining the imaging quality of the space camera post-launch.

4.2. Tilt Error Test

To further verify the rationality of the focusing mechanism flexure hinge design, the tilt errors of the focusing mechanism with a rigid connector and the size-optimized flexible hinge were tested. The autocollimator used was MEC300MAT (0.3″ uncertainty within a 60″ range). The test site is shown in Figure 25. The travel of the focusing mechanism is ±5 mm, and the focusing is performed with 0.033 mm as the step length during detection. Δθx and Δθz were tested at each position, and the test results are shown in Figure 26 and Table 9.
The test results indicate that the flexible hinge significantly improves the range and standard deviation of tilt error (Δθz) in the focusing mechanism compared to the rigid connector. This improvement ensures that the flexible hinge meets the required tilt error specifications. Although there is a noticeable discrepancy between the analysis and experimental results, these differences arise mainly from the challenges in accurately replicating real-world boundary conditions in our simulations. Nonetheless, the flexible hinge design remains both reasonable and feasible, as demonstrated by the test outcomes.

5. Conclusions

This paper introduced a flexible hinge into the focusing mechanism to reduce the tilt error. Then, the flexible hinge was optimized using topology and integrated optimization. Finally, the mechanism was tested and verified. The results showed that the range of tilt error Δθz of the focusing mechanism with a flexible hinge can be reduced by 55.7%. Additionally, vibration testing confirmed that the first-order fundamental frequency of the focusing mechanism with the flexible hinge reaches 163.28 Hz. This frequency is sufficiently high to minimize the risk of resonance during the launch phase. In summary, the flexible hinge focusing mechanism proposed in this paper is reasonable, and the design method is effective. It can meet the focusing requirements of long-focal-length space cameras and has specific research significance for the subsequent development of high-precision focusing mechanisms.

Author Contributions

All authors contributed to the study’s conception and design. Z.H., G.L., L.T. and T.Y. conducted material preparation, data collection, and analysis. D.T. wrote the first draft of the manuscript. D.T. and J.L. planned the entire research work and reviewed and revised the article before submission. All authors have read and agreed to the published version of the manuscript.

Funding

This research was supported by the Jilin Province Science and Technology Development Plan Project (No. 20230508140RC).

Data Availability Statement

The original contributions presented in the study are included in the article, further inquiries can be directed to the corresponding author.

Acknowledgments

The authors would like to thank the editors and anonymous referees for their valuable suggestions and comments.

Conflicts of Interest

The authors declare no conflicts of interest. Most of the authors (Huo, Z., Li, G., Tan, L., Yang, T. and Li, J.) were employed by Chang Guang Satellite Technology Ltd. Tian, D. was employed by Changchun Institute of Optics, Fine Mechanics and Physics. All authors declare that the research was conducted in the absence of any commercial or financial relationships that could be construed as a potential conflict of interest.

Appendix A

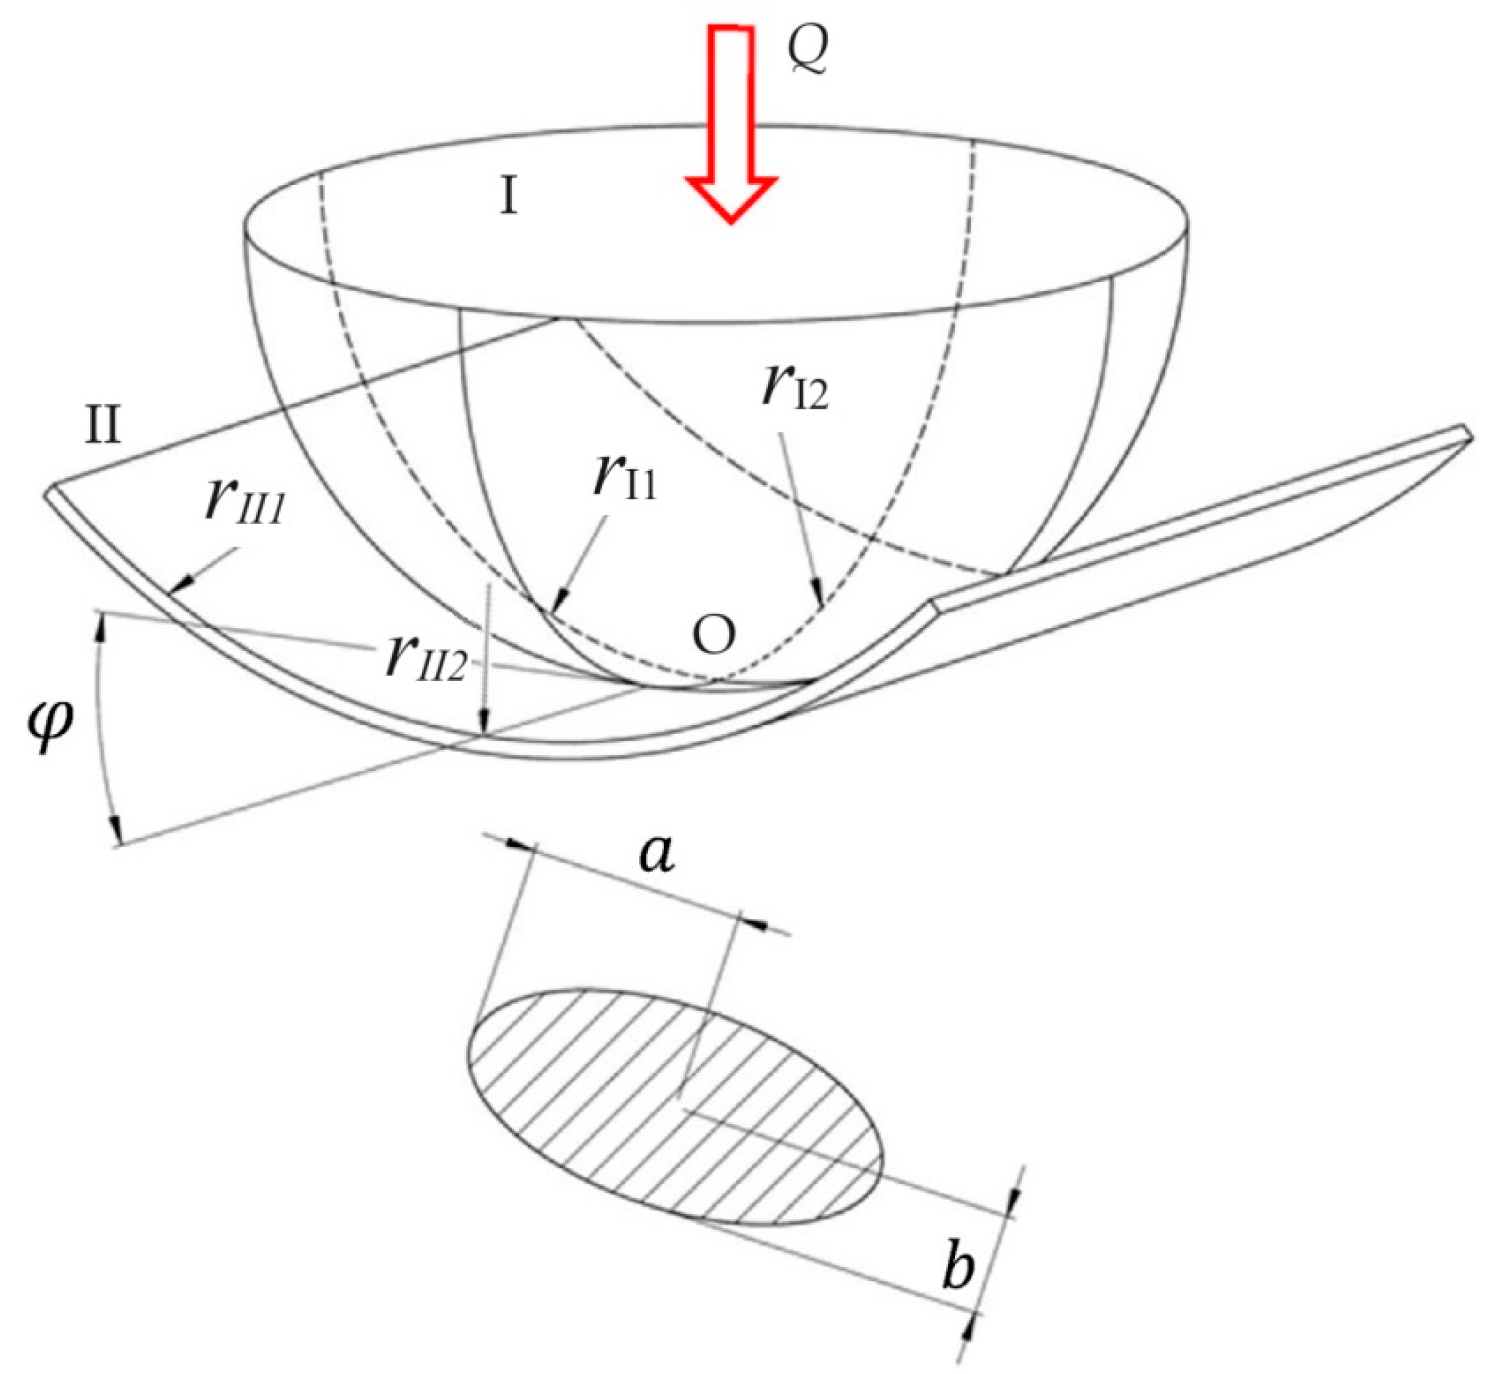
According to Hertz contact theory, it is assumed that elastic bodies I and II are only in contact at point O before the load is applied. After the load is applied, the point contact between elastic body I and elastic body II becomes a surface contact with an elliptical contact area, as shown in Figure A1. Among them, the orthogonal principal planes of the two elastic bodies are plane 1 and plane 2; the principal curvature radii of elastic body I and elastic body II at point O are rI1, rI2, rII1, rII2, and the principal curvatures are ρI1, ρI2, ρII1, ρII2, respectively; the external load borne by the elastic body is Q.
Figure A1. Schematic diagram of point contact.
Machines 12 00627 g0a1
ρ = 1 r I 1 + 1 r I 2 + 1 r II 1 + 1 r II 2
  • rI1, rI2—the radius of the ball in planes 1 and 2;
  • rII1, rII2—the radius of the groove in planes 1 and 2;
  • Σρ—the sum of the four principal curvatures of the contact point between the ball and the groove.
F ( ρ ) = ρ I 1 ρ I 2 + ρ II 1 ρ II 2 ρ
  • ρI1, ρI2—the principal curvatures of the ball in planes 1 and 2;
  • ρII1, ρII2—the principal curvatures of the groove in planes 1 and 2;
  • F(ρ)—the principal curvature difference function.
η = 1 v 1 2 E 1 + 1 v 2 2 E 2
  • v1, v2—Poisson’s ratio of the ball and the groove;
  • E1, E2—the elastic modulus of the ball and the groove;
  • η—the comprehensive elastic constant of the two objects.
Q = 4 2 δ 3 2 3 n δ 3 2 ρ 1 2 η
  • δ—the contact elastic deformation of the ball and the groove;
  • nδ—the coefficient related to the principal curvature difference function F(ρ), which can be obtained by checking Appendix A of reference [18];
  • Q—the normal contact load between the ball and the groove.
a = n a 3 η Q 2 ρ 1 3
b = n b 3 η Q 2 ρ 1 3
  • i > a—the major semi-axis of the contact ellipse between the ball and the groove;
  • b—the minor semi-axis of the contact ellipse between the ball and the groove;
  • na, nb—coefficients related to the principal curvature difference function F(ρ), which can be obtained by referring to Appendix A of reference [18].

References

  1. Zhang, B.; Wu, Y.; Zhao, B.; Chanussot, J.; Hong, D.; Yao, J.; Gao, L. Progress and Challenges in Intelligent Remote Sensing Satellite Systems. IEEE J. Sel. Top. Appl. Earth Obs. Remote Sens. 2022, 15, 1814–1822. [Google Scholar] [CrossRef]
  2. Zhang, X.; Wang, F.; Wang, W.; Huang, F.; Chen, B.; Gao, L.; Wang, S.; Yan, H.; Ye, H.; Si, F.; et al. The Development and Application of Satellite Remote Sensing for Atmospheric Compositions in China. Atmos. Res. 2020, 245, 105056. [Google Scholar] [CrossRef]
  3. Adjovu, G.E.; Stephen, H.; James, D.; Ahmad, S. Overview of the Application of Remote Sensing in Effective Monitoring of Water Quality Parameters. Remote Sens. 2023, 15, 1938. [Google Scholar] [CrossRef]
  4. Li, L.; Wang, L.; Yuan, L.; Zheng, R.; Wu, Y.; Sui, J.; Zhong, J. Micro-vibration suppression methods and key technologies for high-precision space optical instruments. Acta Astronaut. 2021, 180, 417–428. [Google Scholar] [CrossRef]
  5. Jung, J.; Sy, N.V.; Lee, D.; Joe, S.; Hwang, J.; Kim, B. A Single Motor-Driven Focusing Mechanism with Flexure Hinges for Small Satellite Optical Systems. Appl. Sci. 2020, 10, 7087. [Google Scholar] [CrossRef]
  6. Ma, X.; Li, C.; Cheng, P.; Hu, B. A focusing mechanism based on flexible hinges for space telescope. In Proceedings of the Pacific Rim Laser Damage 2019: Optical Materials for High-Power Lasers, Qingdao, China, 19–22 May 2019. [Google Scholar] [CrossRef]
  7. Li, Y.; Liu, B.; Ge, W.; Tong, X. Optimization design of compliant focusing mechanism for space optical camera with light weight. Adv. Mech. Eng. 2022, 14, 16878132221119707. [Google Scholar] [CrossRef]
  8. Lu, Y.; Chen, C.; Zhu, J. Design of a Focusing Mechanism Actuated by Piezoelectric Ceramics for TMA Telescope. Sensors 2023, 23, 4610. [Google Scholar] [CrossRef]
  9. Wang, K.; Xu, M.; Xie, P.; Xu, Z.; Tao, S. Precision Analysis and Experiment of Focusing Mechanism of Space Hyperspectral Camera. J. Mech. Eng. 2019, 55, 29–36. [Google Scholar] [CrossRef]
  10. Jiang, Z.; Jia, J. Development of focusing mechanism for space camera. Opt. Precis. Eng. 2018, 26, 2956–2962. [Google Scholar] [CrossRef]
  11. Franzoso, A.; D’Imporzano, R. A sub-micrometric thermal refocussing mechanism for High Resolution EO telescopes. In Proceedings of the 45th International Conference on Environmental Systems, Bellevue, WA, USA, 12–16 July 2015. [Google Scholar]
  12. Cong, S.; Wang, S.; Sun, M.; Xue, Z.; Yang, F.; Wang, Y.; Chen, M.; Zhang, L. Design of support structure for space optical payloads with refocusing function (Invited). Infrared Laser Eng. 2021, 50, 20210476. [Google Scholar] [CrossRef]
  13. Lee, M.; Kim, J.; Chang, J.S.; Kang, M.S. Development of in-orbit refocusing mechanism for SpaceEye-1 electro-optical payload. In Proceedings of the Earth Observing Systems XXI, San Diego, CA, USA, 30 August–1 September 2016. [Google Scholar] [CrossRef]
  14. Pawełko, P.; Berczyński, S.; Grządziel, Z. Modeling roller guides with preload. Arch. Civ. Mech. Eng. 2014, 14, 691–699. [Google Scholar] [CrossRef]
  15. Yang, F.F.; Tian, H.Y.; Yan, C.X.; Wu, C.J.; Mu, D.Q. Athermal design of the mirror support with flexure hinges for the laser communication terminal. Optoelectron. Lett. 2019, 15, 454–458. [Google Scholar] [CrossRef]
  16. Yu, F.; Xu, S. Flexible support structure based on spring principle for a high precision reflecting mirror. Optik 2020, 207, 164341. [Google Scholar] [CrossRef]
  17. Shao, M.; Zhang, L.; Jia, X. Optomechanical integrated optimization of a lightweight mirror for space cameras. Appl. Opt. 2021, 60, 539–546. [Google Scholar] [CrossRef]
  18. Ning, G. Study on the Dynamic Characteristics of Rolling Liner Guide. Master’s Thesis, Dalian University of Technology, Dalian, China, June 2016. [Google Scholar]
  19. Dunaj, P.; Berczyński, S.; Pawełko, P.; Grządziel, Z.; Chodźko, M. Static condensation in modeling roller guides with preload. Arch. Civ. Mech. Eng. 2019, 19, 1072–1082. [Google Scholar] [CrossRef]
  20. Li, G.; Huo, Z.; Yuan, J.; Tan, L.; Zhang, L.; Li, J. Topology and Size Optimized Design and Laser Welding of the U-Frame for Free-Space Laser Communication Telescopes. Machines 2023, 11, 868. [Google Scholar] [CrossRef]
  21. Liu, F.; Li, W.; Zhao, W.; Zhao, H.; Lin, G.; Wang, X. Topology Optimization Based Parametric Design of Balloon Borne Telescope’s Primary Mirror. Appl. Sci. 2021, 11, 5077. [Google Scholar] [CrossRef]
  22. Fleury, C.; Schmit, L. Dual Methods and Approximation Concepts in Structural Synthesis. Technical Reports. NASA Contactor Report 3226. 1980. Available online: http://ntrs.nasa.gov (accessed on 2 May 2024).
  23. Fleury, C.; Braibant, V. Structural optimization: A new dual method using mixed variables. Int. J. Numer. Methods Eng. 1986, 23, 409–428. [Google Scholar] [CrossRef]
  24. Fleury, C. Structural weight optimization by dual methods of convex programming. Int. J. Numer. Methods Eng. 1979, 14, 1761–1783. [Google Scholar] [CrossRef]
  25. Yuan, J. Research of Opto-Mechanical Structure Based on Carbon Fiber Honeycomb Sandwich for Space Camera. Ph.D. Dissertation, University of Chinese Academy of Sciences, Beijing, China, June 2020. Available online: https://link.cnki.net/doi/10.27522/d.cnki.gkcgs.2020.000021 (accessed on 1 May 2024).
Figure 1. Schematic design of the optical system and optical ray trace layout.
Machines 12 00627 g001
Figure 2. (a) Schematic diagram of focusing mirror position deviation; (b) defocus curve.
Machines 12 00627 g002
Figure 3. (a) Focusing mechanism scheme; (b) cross-sectional view of focusing mechanism.
Machines 12 00627 g003
Figure 4. Rigid connector.
Machines 12 00627 g004
Figure 5. An equivalent model of contact.
Machines 12 00627 g005
Figure 6. A finite element model of the focusing mechanism.
Machines 12 00627 g006
Figure 7. The scheme of flipping detection. (a) Before flipping; (b) after flipping.
Machines 12 00627 g007
Figure 8. Testing for detection. (a) Before flipping; (b) after flipping.
Machines 12 00627 g008
Figure 9. Cumulative assembly error. (a) Before installing the rigid connector; (b) after installing the rigid connector.
Machines 12 00627 g009
Figure 10. (a) Displacement constraint; (b) deformation cloud diagram after applying cumulative assembly error at P1.
Machines 12 00627 g010
Figure 11. Non-parallelism between screw and liner guideway.
Machines 12 00627 g011
Figure 12. Non-parallelism working condition between liner guideway and screw.
Machines 12 00627 g012
Figure 13. (a) Sample of non-parallelism condition; (b) displacement constraint of the nut.
Machines 12 00627 g013
Figure 14. Analysis results of the 11th comprehensive working condition.
Machines 12 00627 g014
Figure 15. Rigid connector finite element model for optimization.
Machines 12 00627 g015
Figure 16. Flexible hinge. (a) Topology optimization results; (b) structure after topology optimization.
Machines 12 00627 g016
Figure 17. Comparison of tilt error analysis results. (a) Δθx of the rigid connector; (b) Δθz of the rigid connector; (c) Δθx after topology optimization; (d) Δθz after topology optimization.
Machines 12 00627 g017
Figure 18. Dimensions of flexible hinge.
Machines 12 00627 g018
Figure 19. (a) Integrated optimization model; (b) optimization iteration process.
Machines 12 00627 g019
Figure 20. Comparison of the simulation results. (a) Range; (b) standard deviation.
Machines 12 00627 g020
Figure 21. The stress of rod elements.
Machines 12 00627 g021
Figure 22. Comparison of stress and tilt error simulation. (a) Standard deviation of stress; (b) synthetic tilt error.
Machines 12 00627 g022
Figure 23. Vibration test. (a) Test site; (b) size-optimized flexible hinge.
Machines 12 00627 g023
Figure 24. Accelerometer response curve.
Machines 12 00627 g024
Figure 25. Tilt error test.
Machines 12 00627 g025
Figure 26. Tilt error test curve. (a) Tilt error Δθx; (b) tilt error Δθz.
Machines 12 00627 g026
Table 1. Design requirements for focusing mechanism.
IndicatorValue
X-axis deviation(Δx)≤±0.01 mm
Y-axis deviation(Δy)≤±0.01 mm
Z-axis deviation(Δz)≤±0.01 mm
Pitch angle (Δθx)≤±10″
Roll angle (Δθy)≤±10″
Yaw angle (Δθz)≤±10″
First-order fundamental frequency≥100 Hz
Focusing stroke≥±5 mm
Table 2. Parameters of linear guideway.
ParameterValue
Diameter of ball (rI1, rI2)1.25 mm
Curvature radius of the slider and guide’s groove (rII2)1.30 mm
Poisson’s ratio of ball and groove (v1, v2)0.3
Elastic modulus of ball and groove (E1, E2)206 GPa
Contact elastic deformation of ball and groove (δ)1.5 × 10⁻³ mm
Number of single-row balls13
Table 3. Contact parameters of linear guideway.
ParameterValue
Sum of the four principal curvatures of the contact point (Σρ)0.8308 mm−1
Principal curvature difference function (F(ρ))0.9260
Coefficient related to the principal curvature difference function (na)3.51
Coefficient related to the principal curvature difference function (nb)0.41
Coefficient related to the principal curvature difference function (nδ)0.634
Comprehensive elastic constant of the ball and the groove (η)0.0088 GPa−1
Normal contact load between the ball and the groove (Q)27.0752 N
Major semi-axis of the contact ellipse (a)0.2668 mm
Minor semi-axis of the contact ellipse (b)0.0325 mm
Table 4. Test data.
Table 4. Test data.
ParameterTest DataSimulation AnalysisError
θz189.1295--
θz289.1302--
α/″2.162.036%
Table 5. Comprehensive working conditions.
No.Position of Cumulative Assembly ErrorNon-Parallelism between Screw and Liner Guideway
x/×10−3 mmz/×10−3 mm
1P16.262.92
2−9.84−5.90
3−1.260.15
42.49−4.40
50.559.83
6−3.34−6.43
7−5.84−2.42
81.02−7.73
98.37−0.41
103.82−8.95
119.888.09
12−8.586.05
13−2.331.65
14−7.27−1.29
15−0.55−3.89
164.824.79
17−6.68−9.13
185.947.48
19−4.035.09
207.713.60
21P26.262.92
22−9.84−5.90
23−1.260.15
242.49−4.40
250.559.83
26−3.34−6.43
27−5.84−2.42
281.02−7.73
298.37−0.41
303.82−8.95
319.888.09
32−8.586.05
33−2.331.65
34−7.27−1.29
35−0.55−3.89
364.824.79
37−6.68−9.13
385.947.48
39−4.035.09
407.713.60
Table 6. Simulation data of the 11th comprehensive working condition.
Itemθx11/″θz11/″
Tilt angle after applying the cumulative assembly error15.3019.00
Tilt angle after applying the cumulative assembly error and non-parallelism error11.161.87
Focusing mirror tilt angle error−4.14−17.13
Table 7. Optimization results.
Optimization VariableLower LimitUpper LimitInitial ValueOptimized Value
t1 (mm)0.82.311.2
h1 (mm)1321.4
t2 (mm)1.8322.1
h2 (mm)4.514.56.512.1
β (°)50907074.5
Table 8. Vibration test results.
DirectionXYZ
1st-order fundamental frequency /Hz767.62163.28655.5
DirectionXYZ
Table 9. Test results.
ItemΔθxΔθz
Range/″σ′/″Range/″σ′/″
Rigid connector5.691.4711.852.30
Flexible hinge after size optimization5.661.305.251.03
Difference−0.53%−11.56%−55.70%−55.22%
Disclaimer/Publisher’s Note: The statements, opinions and data contained in all publications are solely those of the individual author(s) and contributor(s) and not of MDPI and/or the editor(s). MDPI and/or the editor(s) disclaim responsibility for any injury to people or property resulting from any ideas, methods, instructions or products referred to in the content.