Abstract
The iron roughneck is an automated piece of equipment utilized for the connection and removal of drilling tools. This paper presents the design of an integrated iron roughneck, providing a detailed introduction to its clamp body structure, along with an analysis of its structural characteristics and performance requirements. The study delves into the integration mode and working characteristics of the clamping mechanism and spin buckle mechanism for the integrated upper clamp body structure of the iron roughneck. Additionally, this paper conducts an in-depth theoretical study on the spin buckle mechanism. Firstly, it analyzes the actual working condition of the spin buckle roller from two perspectives, namely contact theory and rolling friction theory, determining the structural form of the spin buckle roller. Secondly, it investigates the relative displacement between the spin buckle mechanism and the drilling tool, proposing a design method for the floating device mounted on the spin buckle roller and establishing the kinematic equation of the spin buckle roller under the influence of the floating device. Furthermore, the kinematic equations of the spin buckle roller under the influence of the floating device are established. Finally, a dynamics simulation experiment is performed to simulate the working process of the spin buckle mechanism under actual working conditions, analyzing the dynamics and kinematics of the spin buckle mechanism and obtaining the relevant parameter curves of the spin buckle mechanism and drilling tools. Through data comparison and analysis, the correctness of the theoretical analysis results and the rationality of the performance and structure of the spin buckle mechanism are verified.
1. Introduction
The Earth’s crust contains abundant resources that serve as the foundation and driving force for the continuous advancement of human scientific and technological civilization. To access these crustal resources, drilling technology and equipment play an indispensable role. During the drilling process, various pieces of drilling equipment must be coordinated to swiftly and efficiently complete tasks, enhancing the efficiency of resource extraction and geological exploration. As science and technology continue to progress, automation equipment is becoming increasingly prevalent in the industrial sector. Compared to traditional machinery, automated equipment offers heightened productivity, safety, and reliability, effectively reducing labor intensity and safeguarding personal well-being [1,2]. Among these advancements, the iron roughneck stands as a key piece of supporting equipment for automated drilling technology. It replaces traditional drilling tool screwing and unloading equipment, facilitating the connection and disassembly of drilling tools during the drilling process, thereby enhancing the efficiency of drilling tool thread connection and disassembly [3,4].
In order to facilitate seamless integration with other drilling equipment for the purpose of achieving automated drilling operations, the operation of the iron roughneck with drilling tools encompasses two primary elements: rotation and screwing (unloading). This entire process is executed through the collaborative functioning of the rotating mechanism, clamping mechanism, and unscrewing mechanism. The spinning buckle mechanism is tasked with swiftly rotating the drill pipe in and out via the spinning roller, the clamping mechanism secures the drilling tool in place, and the unscrewing mechanism is responsible for tightening the drilling tool once the threaded connection between the upper and lower drill pipes is essentially secured or for loosening the threaded connection during the disassembly of the drilling tool [5].
To date, a number of well-known international oil equipment manufacturers have successfully developed different models of iron roughneck products. Among them, National Oilwell Varco (NOV), a petroleum equipment production giant, produces and develops the ST-80C2 iron roughneck’s lightweight, telescopic arm structure design, which is made in the horizontal direction to achieve a greater extension distance [6]. Switzerland’s Weatherford company’s TorkWrench 10-100 iron roughneck is a fully hydraulic iron roughneck with a compact design and high overall stability [7]. The TM-100 iron roughneck developed by Nabors has a high degree of integration and a modular design, with a standard feature-rich hands-free PLC remote interface that can be equipped with a SmartROS software controller to realize the intelligent remote control of the equipment; the TM-100 seamlessly integrates into the automated workflows of top drives, overhead walkways, mud pumps, and winches, giving the TM-100 a high degree of automation capability [8]. Jiangsu Ruishi Machinery Co. has developed the new RSG216-110 iron roughneck, which is a lightweight and modular iron roughneck that can be customized with parts according to the user’s needs, which makes the replacement of parts more convenient compared to other types of iron roughnecks, and a modular driller with parts is customized to the user’s needs [9]. Although most of the iron roughnecks have been used in land and ocean drilling activities, some problems have gradually appeared with the expansion of the application range of iron roughnecks; when the clamping mechanism and the spin buckle mechanism are clamping or holding the drilling tools, if the positioning of the iron roughneck is inaccurate, the center of the clamping center and the center of the drilling tool axis will not coincide with one another, which will result in the slight bending of the drilling tools in the process of clamping. When the spin buckle mechanism works, the axial position of the upper and lower drilling tools changes, and the spin buckle mechanism should float with it to reduce the wear between the spin buckle roller and the drilling tools. However, the current iron roughneck mainly relies on the overall floating of the bulky spin buckle clamp body, which leads to problems, such as the center of the clamping center and the axis of the drilling tools not overlapping, and the floating is inflexible or the mechanism is complicated and consumes a lot of energy. These problems not only reduce the efficiency and stability of the iron roughneck but also cause damage to the drilling tool and shorten its service life [10].
In response to the aforementioned issues, a novel clamp body structure for the iron roughneck has been researched and designed. This new structure incorporates a one-piece design that integrates both the spin buckle mechanism and the clamping mechanism within the same unit. This results in a reduction in the volume and weight of the clamp body while enhancing the smoothness of movement and the centering performance. Furthermore, the structural form of the spin buckle roller has been determined in accordance with application requirements, and a new floating method that relies on the spin buckle roller to achieve self-floatation has been proposed. This innovation not only improves the flexibility of floatation but also simplifies the overall structure.
Theoretical analysis and performance research were conducted on the spin buckle mechanism of the iron roughneck. First, the theoretical analysis focused on the contact relationship between the spin buckle roller and the drilling tool. Subsequently, a motion model of the floating device of the spin buckle roller was established and subjected to theoretical analysis. Dynamics analysis experiments on the spin buckle mechanism were performed using ADAMS software, and the acquired data were analyzed to verify the reasonableness of the motion relationship of each mechanism. The main goal of this study is to enhance the operational efficiency of the spin buckle mechanism of the iron roughneck, improve the performance of the spin buckle roller, minimize drilling tool losses, reduce the frequency of part replacements, and enhance the auto-centering ability, self-adaptation degree, and operational stability of the iron roughneck.
2. Structural Design and Theoretical Analysis
2.1. The Overall Structure of the Iron Roughneck
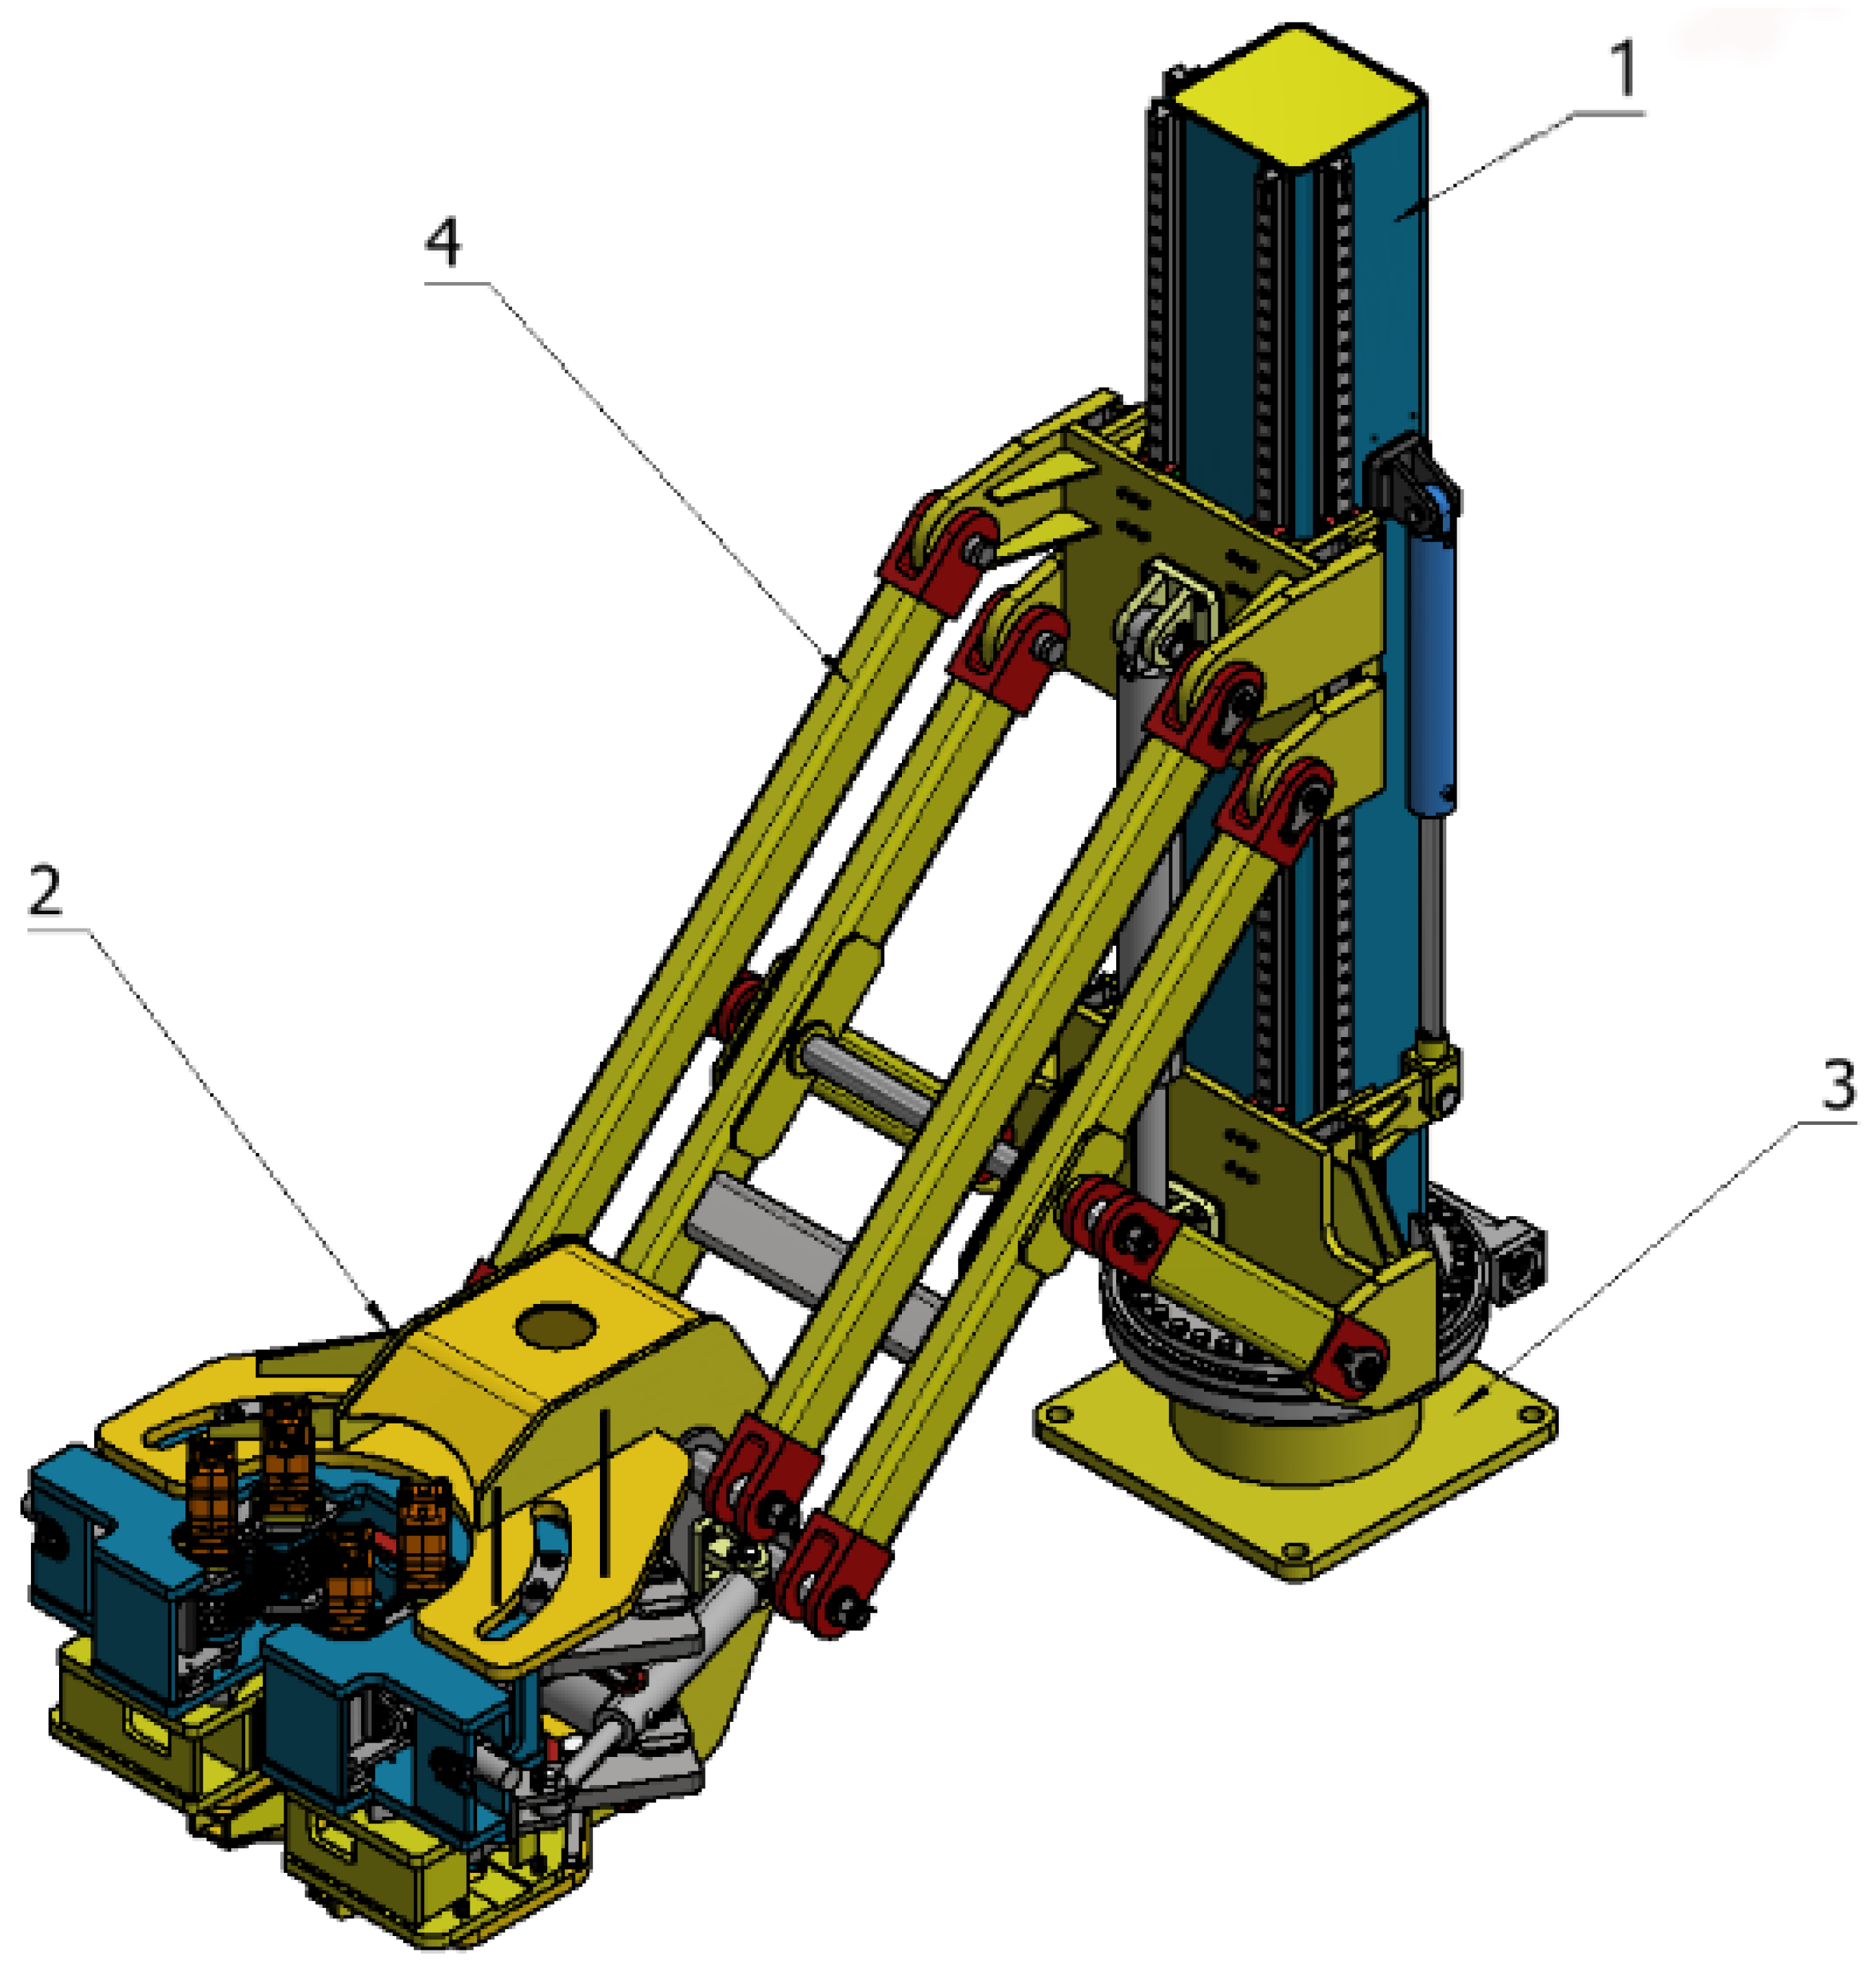
Figure 1 illustrates the configuration of the new one-piece iron roughneck, which primarily consists of a column, a base, a clamp body, and an extension mechanism. The column is installed with a guide rail, and the carriage of the extension mechanism slides along the guide rail under the control of the hydraulic cylinder. This movement drives the connecting rod assembly to extend or retract, thereby controlling the clamp body to accurately position itself for operation. A rotary mechanism is provided between the base and the column, which can realize the rotary movement of the iron roughneck and drive the extension mechanism and the clamp body for positioning. The clamp body is connected to the extension mechanism through the pin, which is responsible for the spin buckle mechanism and the upward and downward buckling work of the drilling tools.

Figure 1.
Structure of iron driller: 1. column; 2. clamp body; 3. base; 4. extension mechanism.
2.2. Main Performance Parameters of Iron Roughneck
In order to ensure the normal operation of the iron roughneck and meet the performance requirements at work, the main performance parameters of the iron roughneck are determined in conjunction with the actual situation, as shown in Table 1.

Table 1.
Main performance parameters.
2.3. Clamp Body Structure Design and Research
2.3.1. Design and Research of Spin Buckle Mechanism
The spin buckle mechanism of the iron roughneck is primarily employed to facilitate the initial spinning when the drilling tool threads are fastened, as well as the subsequent spinning action when they are unfastened. This mechanism moves quickly and does not require much torque, but it requires a high level of stability and precision. Its fundamental construction includes the clamping and spin buckling mechanisms [11].
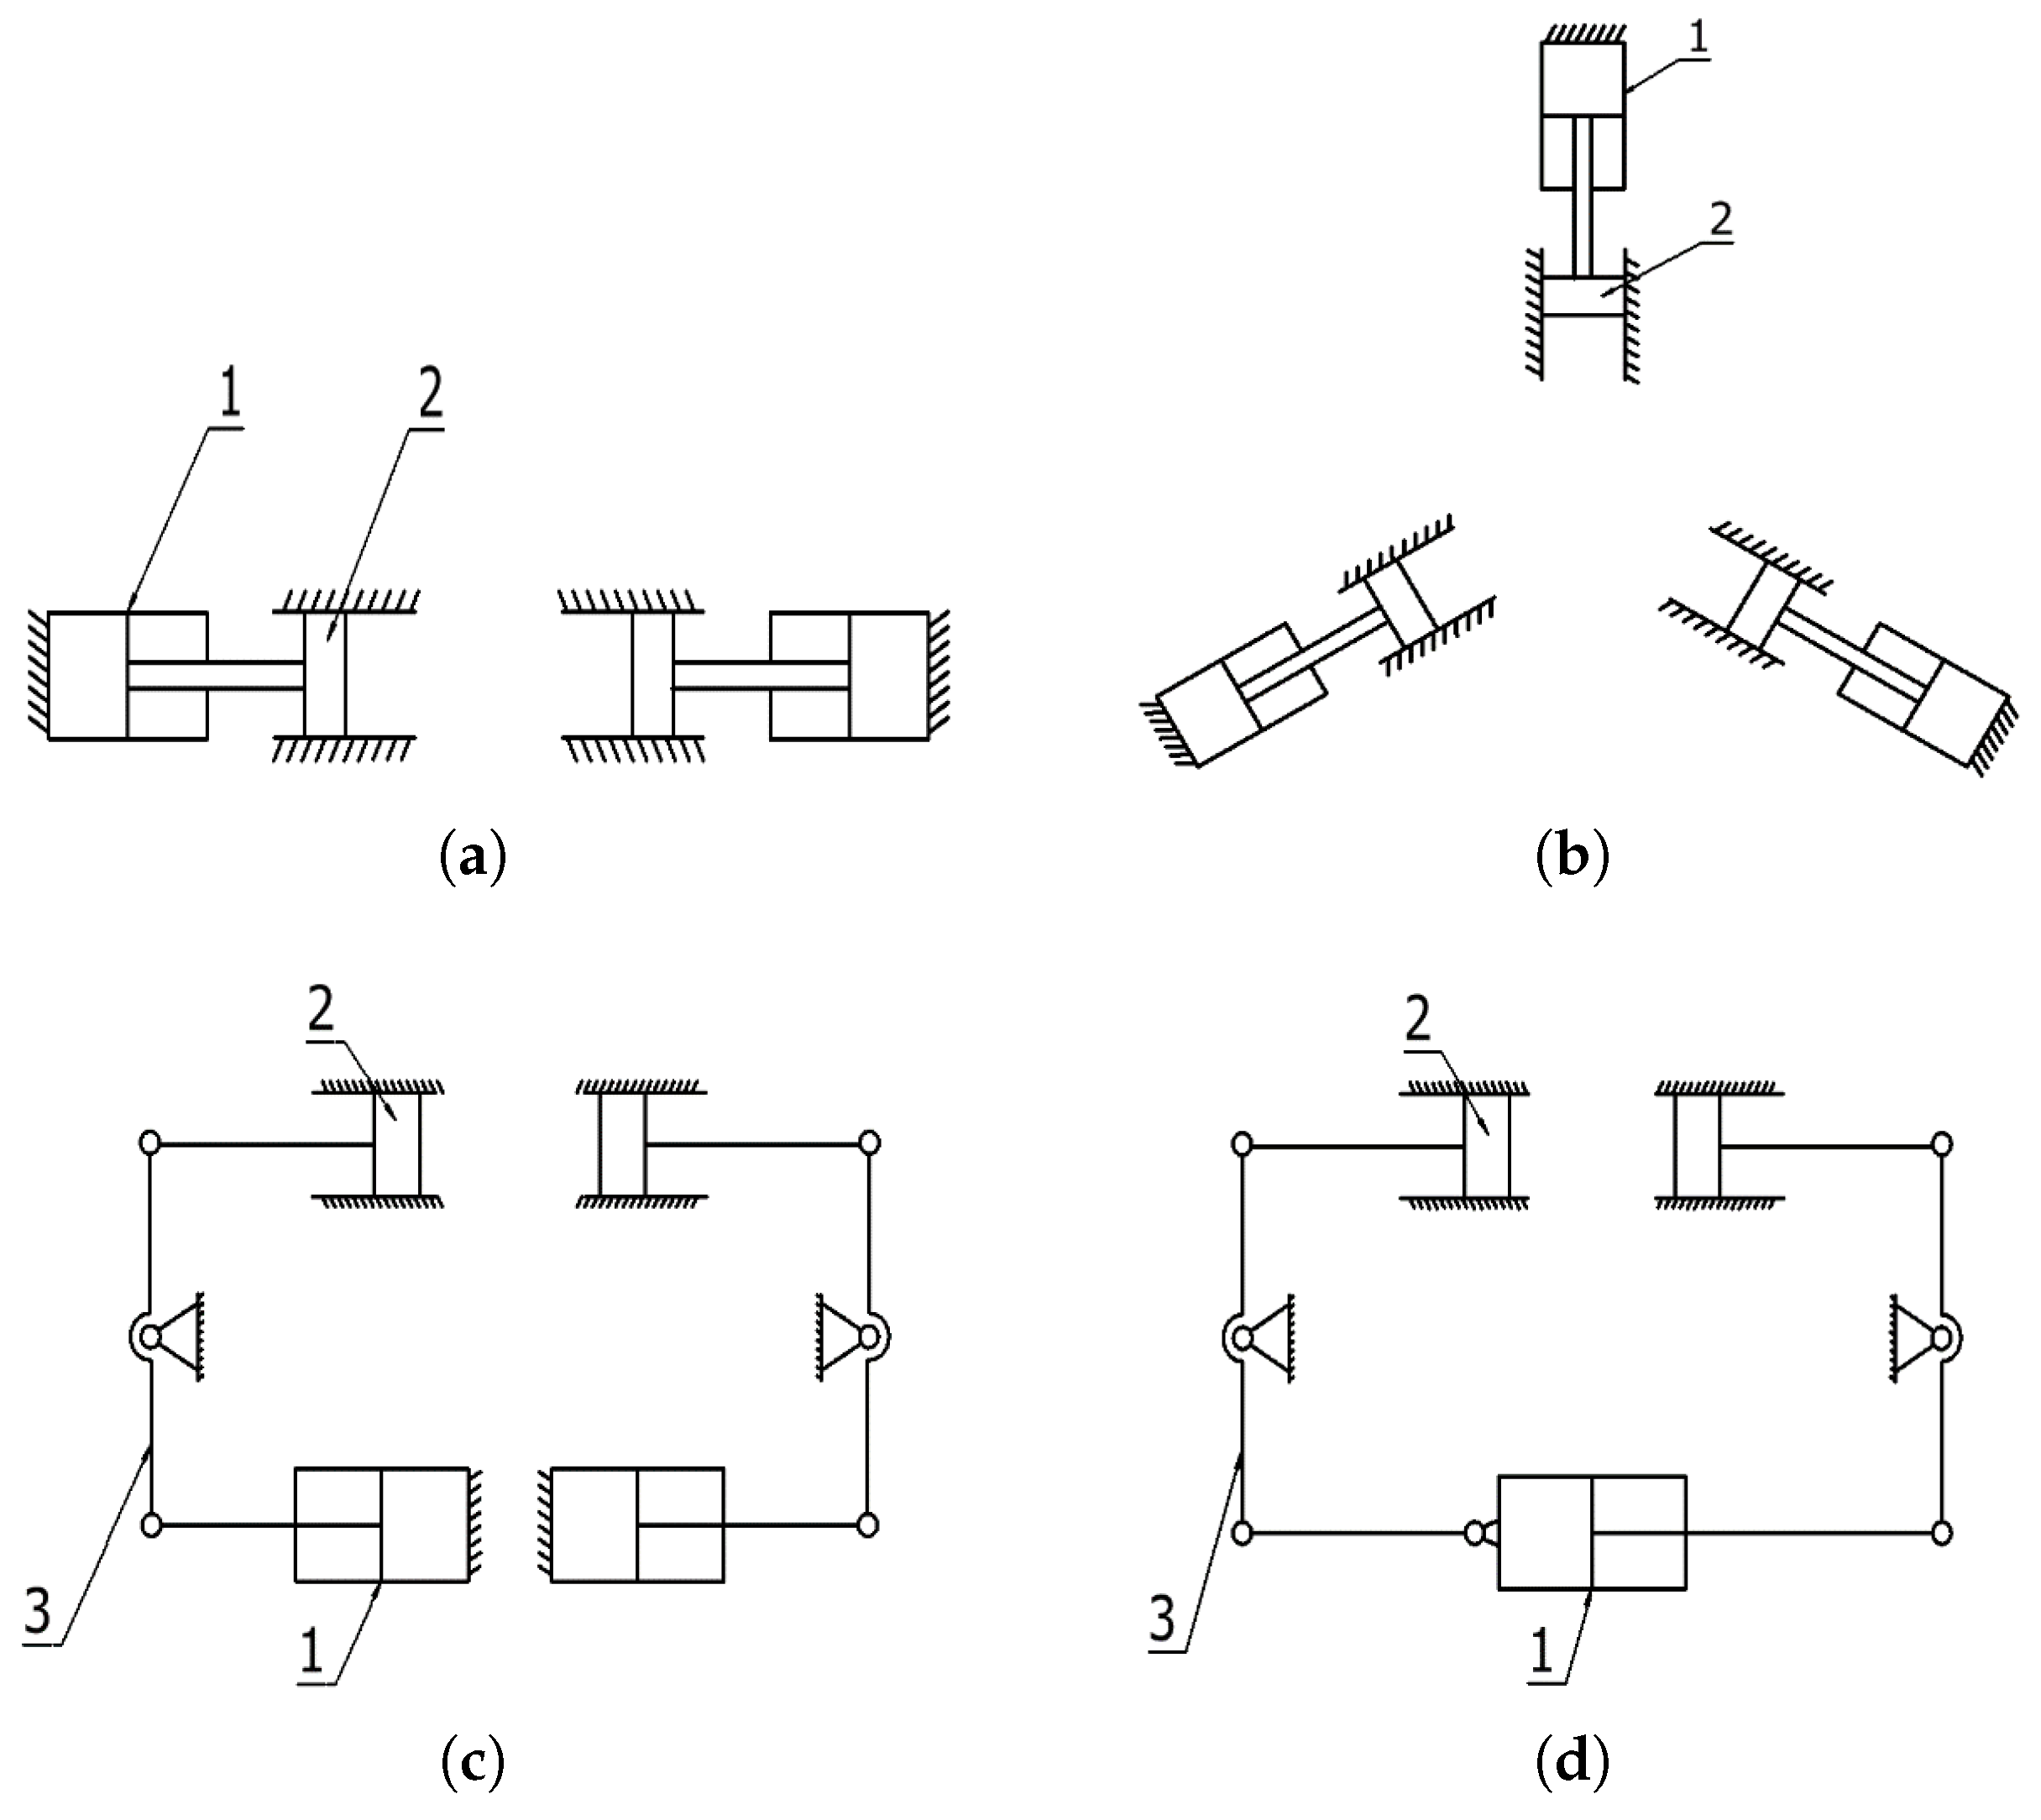
To date, the form of the iron roughneck’s clamping mechanism, according to the number of hydraulic cylinders used, can be divided into a single-cylinder drive, a double-cylinder drive, a triple-cylinder drive, and other forms. In practical applications, according to different equipment conditions or technical requirements, the structural design of the clamping mechanism may vary, but it can be roughly summarized into the four cases shown in Figure 2.
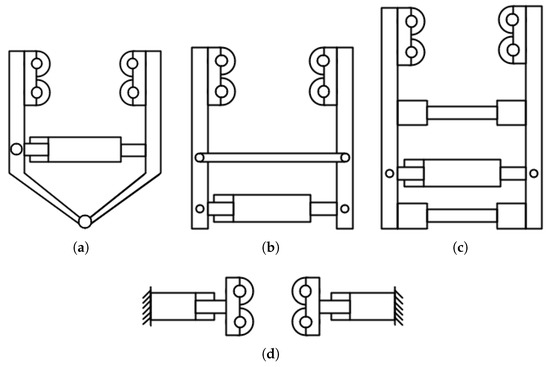
Figure 2.
Spin buckle mechanism’s holding form. (a) V-shaped clamping structure. (b) H-type clamping structure. (c) Parallel clamping structure with single hydraulic cylinder. (d) Parallel clamping structure with double hydraulic cylinders.
Figure 2a shows the V-type clamping structure. Although the structure of this form is simple and easy to control, its limited space necessitates the selection of smaller hydraulic cylinders, making it challenging to produce a larger clamping force. Furthermore, as the diameter of the clamped drilling tool changes, the clamping center position of the spinning buckle roller will vary, necessitating adjustments to the clamp body during operation to align with the drilling tool position specifications.
Figure 2b shows two forms of the H-type clamping structure. The arrangement of the hydraulic cylinder and the connecting rod in the two forms differs. Compared to the V-type structure, this form of spinning buckle roller group has a wider clamping range, resulting in a larger clamping force. However, the structure is more complex, installation is inconvenient, and the clamping center position of the spinning buckle roller will change due to the different diameters of the clamped drilling tools.
Figure 2c shows the parallel holding structure with a single hydraulic cylinder. The form with this structure has better alignment and smooth operation but will occupy a large amount of space, and the size of the hydraulic cylinder has more stringent requirements.
Figure 2d shows the parallel clamping structure with double hydraulic cylinders, which adopts the clamping form to clamp the drilling tools. This form’s clamping force is larger than those of the other structures, with good alignment.
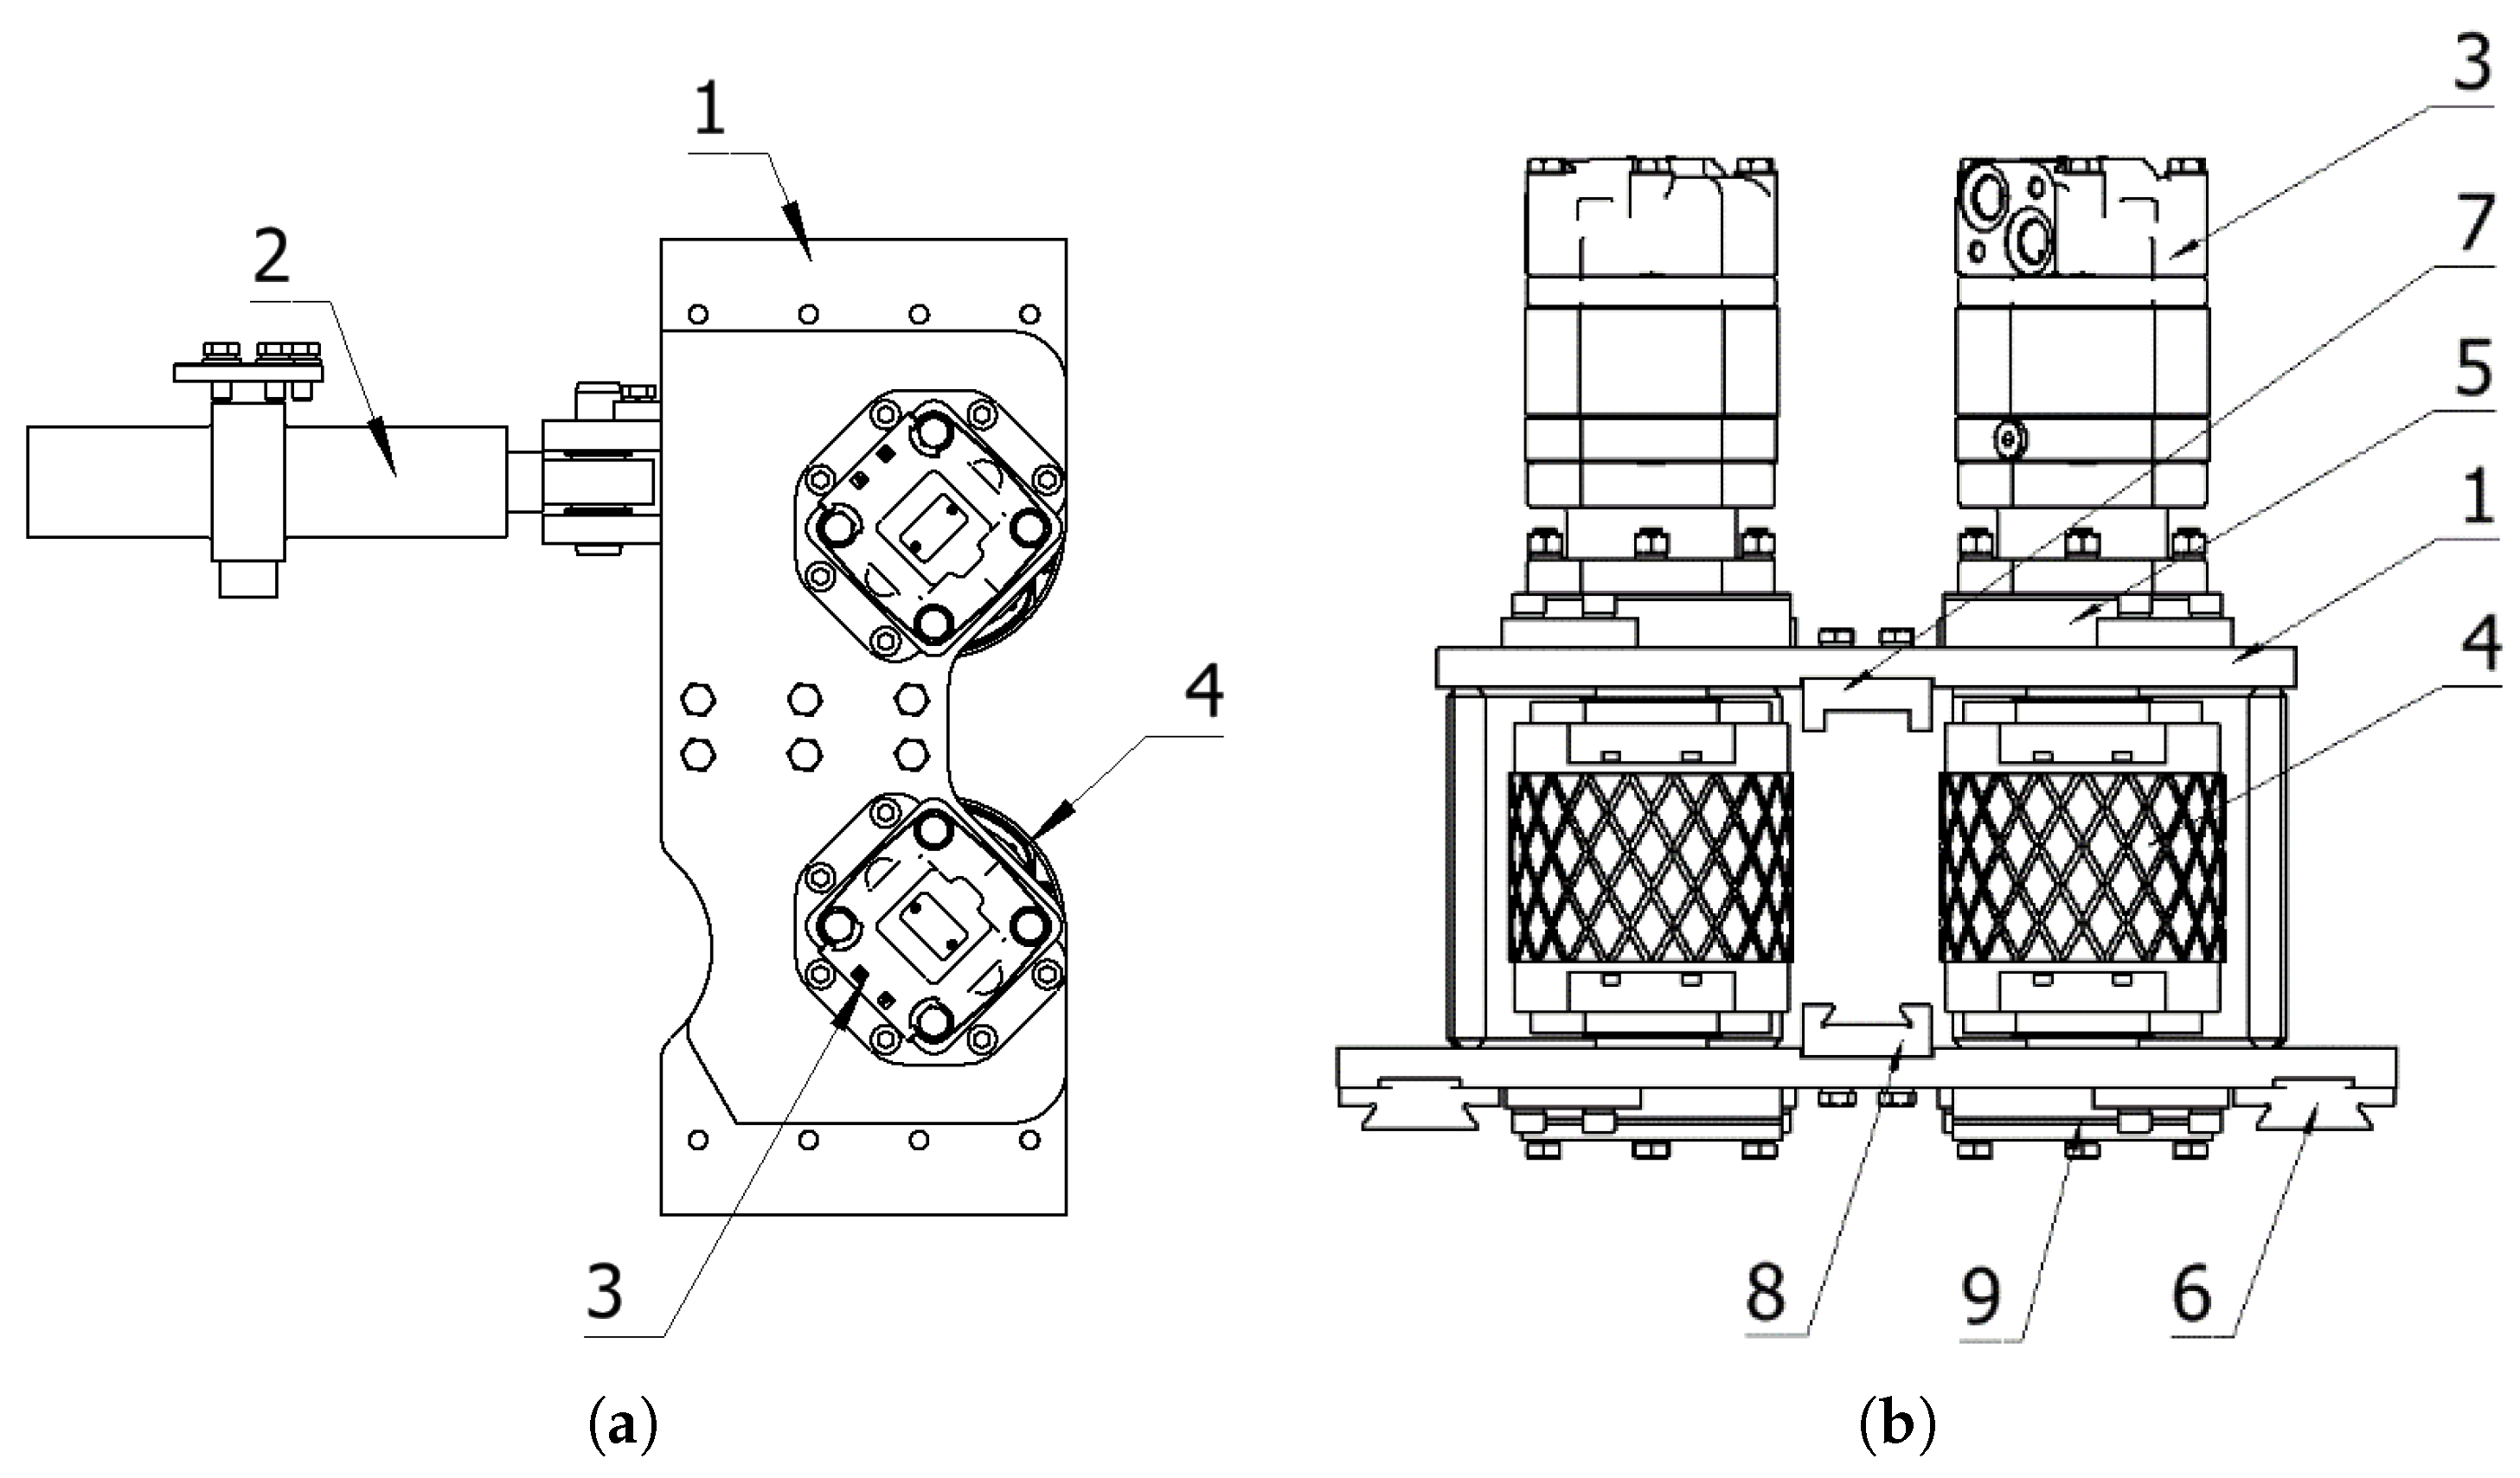
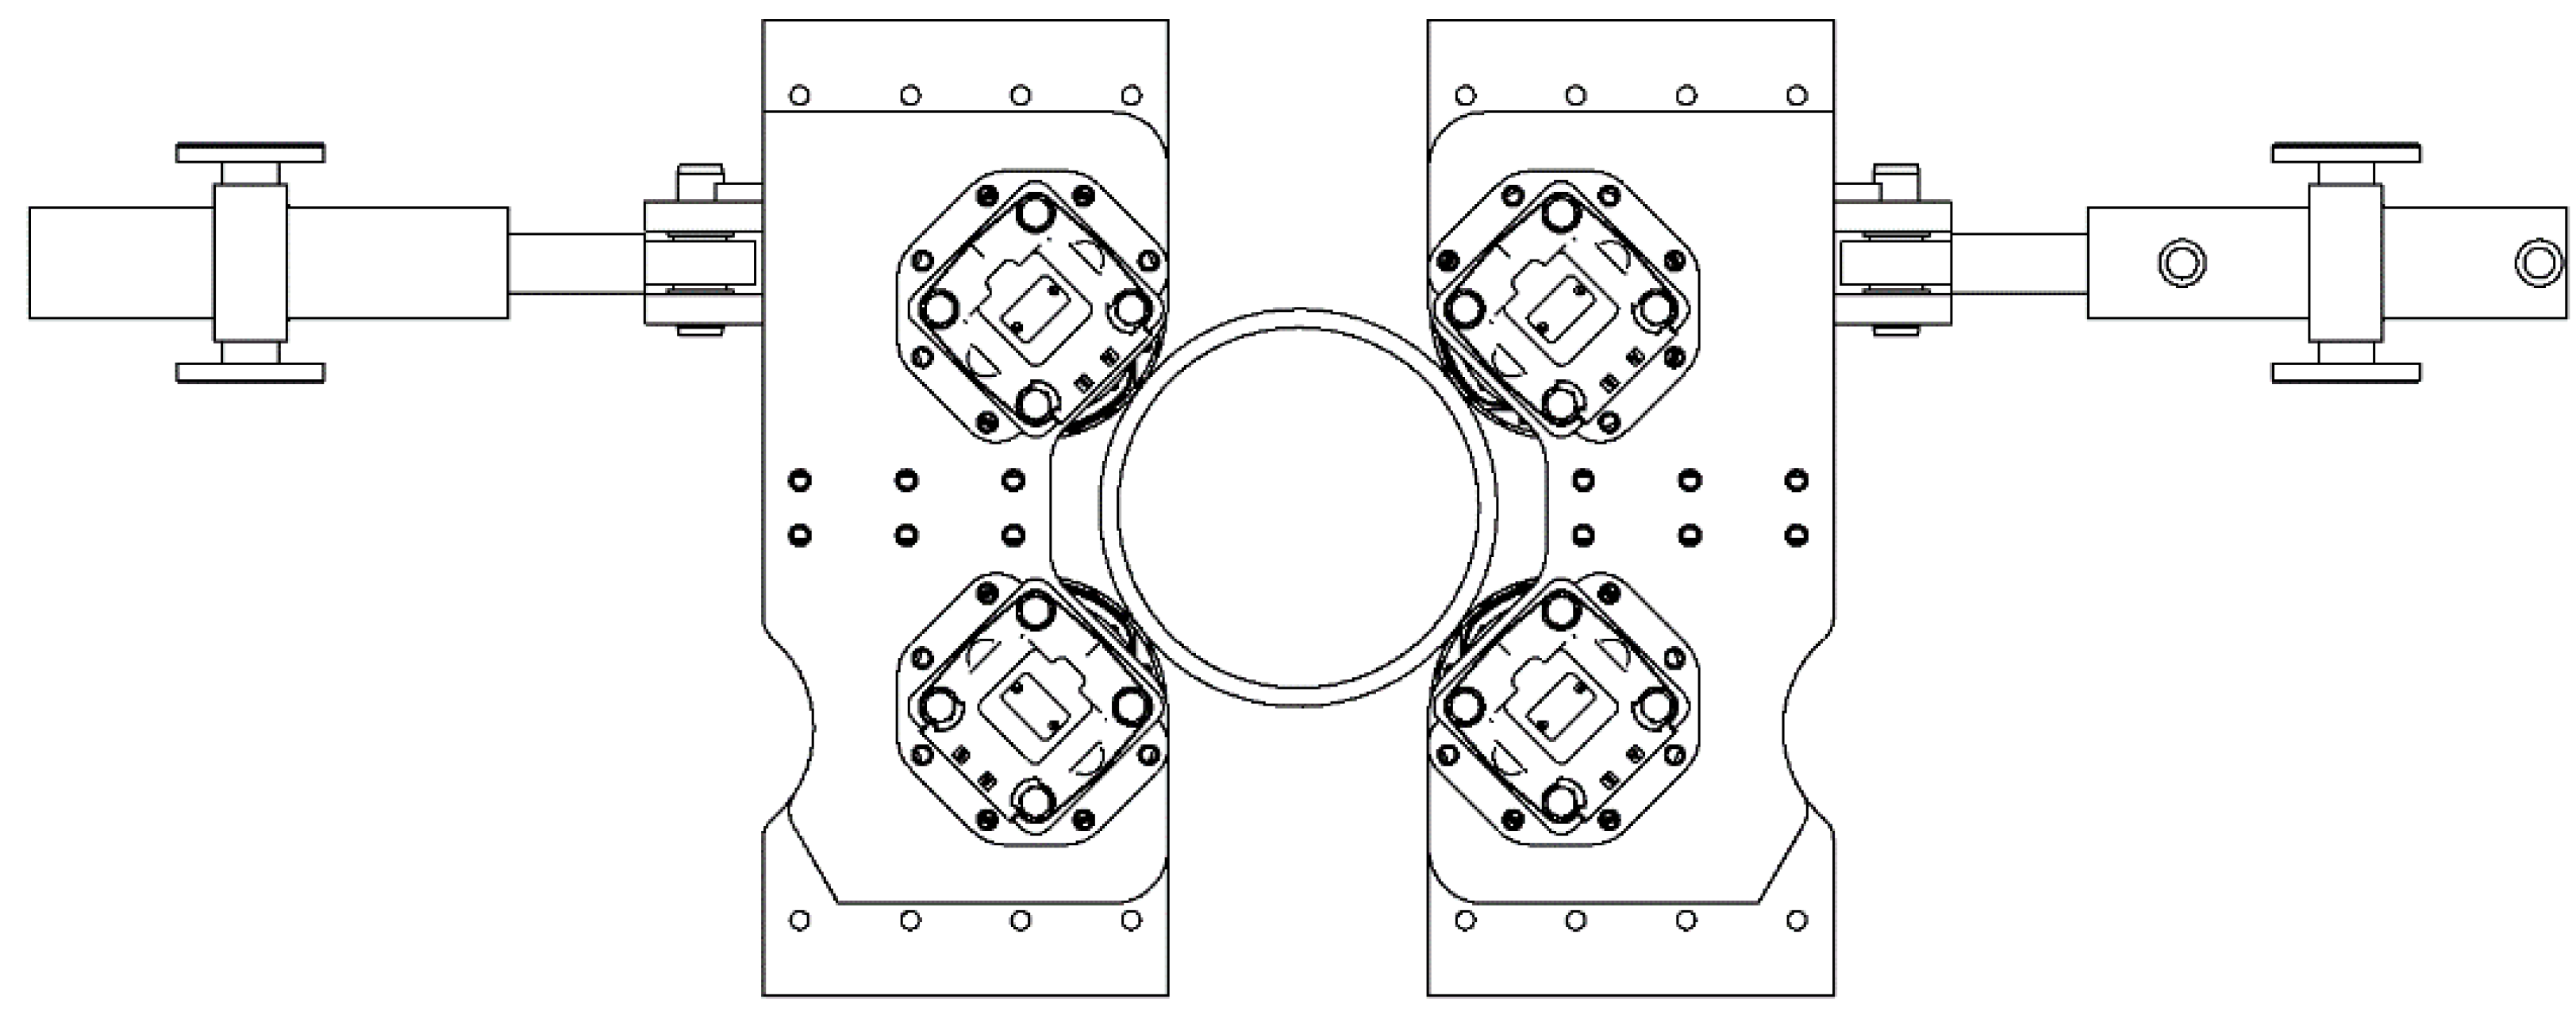
Given the comprehensive features and advantages and disadvantages of the above structures, and taking into account that the iron roughneck designed in this paper is a clamping–spin buckle body structure, the parallel clamping structure with double hydraulic cylinders is chosen as the design of the spin buckle mechanism, whose structure is shown in Figure 3, and the clamping schematic diagram of the drilling tool is shown in Figure 4.
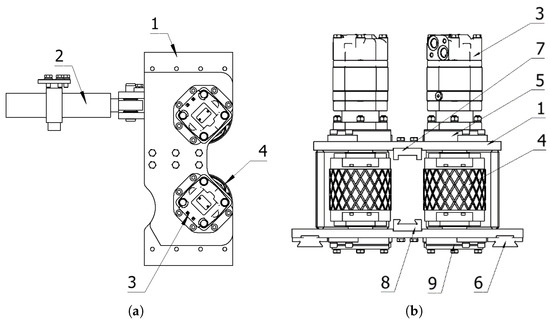
Figure 3.
Structural diagram of spin buckle mechanism: 1. support base; 2. counterclamp cylinder; 3. swinging clamp motor; 4. swinging clamp roller; 5. motor seat; 6. slider; 7. clamping clamp upper rail; 8. lower seat plate; 9. clamping clamp lower rail.
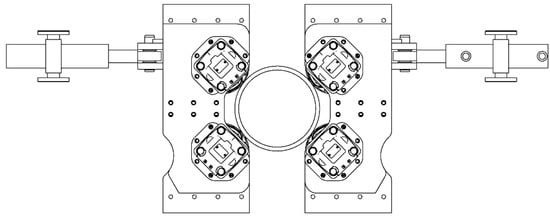
Figure 4.
Schematic diagram of drilling tool clamping by spinning mechanism.
2.3.2. Clamping Mechanism Design and Research
The iron roughneck uses the clamping mechanism, a mechanical structure, to secure the drilling tools during the fastening and unfastening process. Once the clamping mechanism secures the drill pipe, the unbuckling cylinder initiates the rotation of the upper clamp body, thereby fastening and unfastening the drilling tools. It serves as a crucial component of the iron roughneck, and the selection of a suitable structural form and the determination of reasonable structural parameters are pivotal in ensuring the efficient operation of the iron roughneck [12].
Currently, we can divide the iron driller clamping mechanism form into single-cylinder drive, double-cylinder drive, triple-cylinder drive, and other forms based on the number of hydraulic cylinders used. In practice, according to different equipment or technical requirements, the structural design of the clamping mechanism may vary, but it can be roughly summarized into the four cases, shown in Figure 5.

Figure 5.
Main forms of clamping mechanism. (a) Double hydraulic cylinder drive direct push type. (b) Three hydraulic cylinders drive direct push type. (c) Double hydraulic cylinders drive connecting rod type. (d) Single hydraulic cylinder driven connecting rod type. 1. hydraulic cylinder; 2. clamping clamp; 3. connecting rod.
Figure 5a shows the double-hydraulic-cylinder drive’s direct push type. This form of clamping mechanism structure is simple, occupies a small space, and can produce a large clamping force; the disadvantage is the need to use a larger hydraulic cylinder. In addition, the clamping process of the two clamping jaws has higher requirements for neutrality, and in the case of a large load, it is easy to damage the drill pipe.
Figure 5b shows the three-hydraulic-cylinder drive’s direct push type. The clamping effect is good, there is good alignment, and the drilling tool force is uniform; the disadvantage is that it occupies a large amount of space, and the hydraulic control system requires high synchronization.
Figure 5c illustrates the linkage of the double-hydraulic-cylinder drive, which can provide a larger clamping force through the lever structure. The structure’s various forms can be adapted to different occasions, but the disadvantage is that the structure is more complex and occupies more space.
Figure 5d shows the single-hydraulic-cylinder drive’s linkage, which, compared with the double-hydraulic-cylinder drive, occupies a relatively small space, in addition to its other advantages.
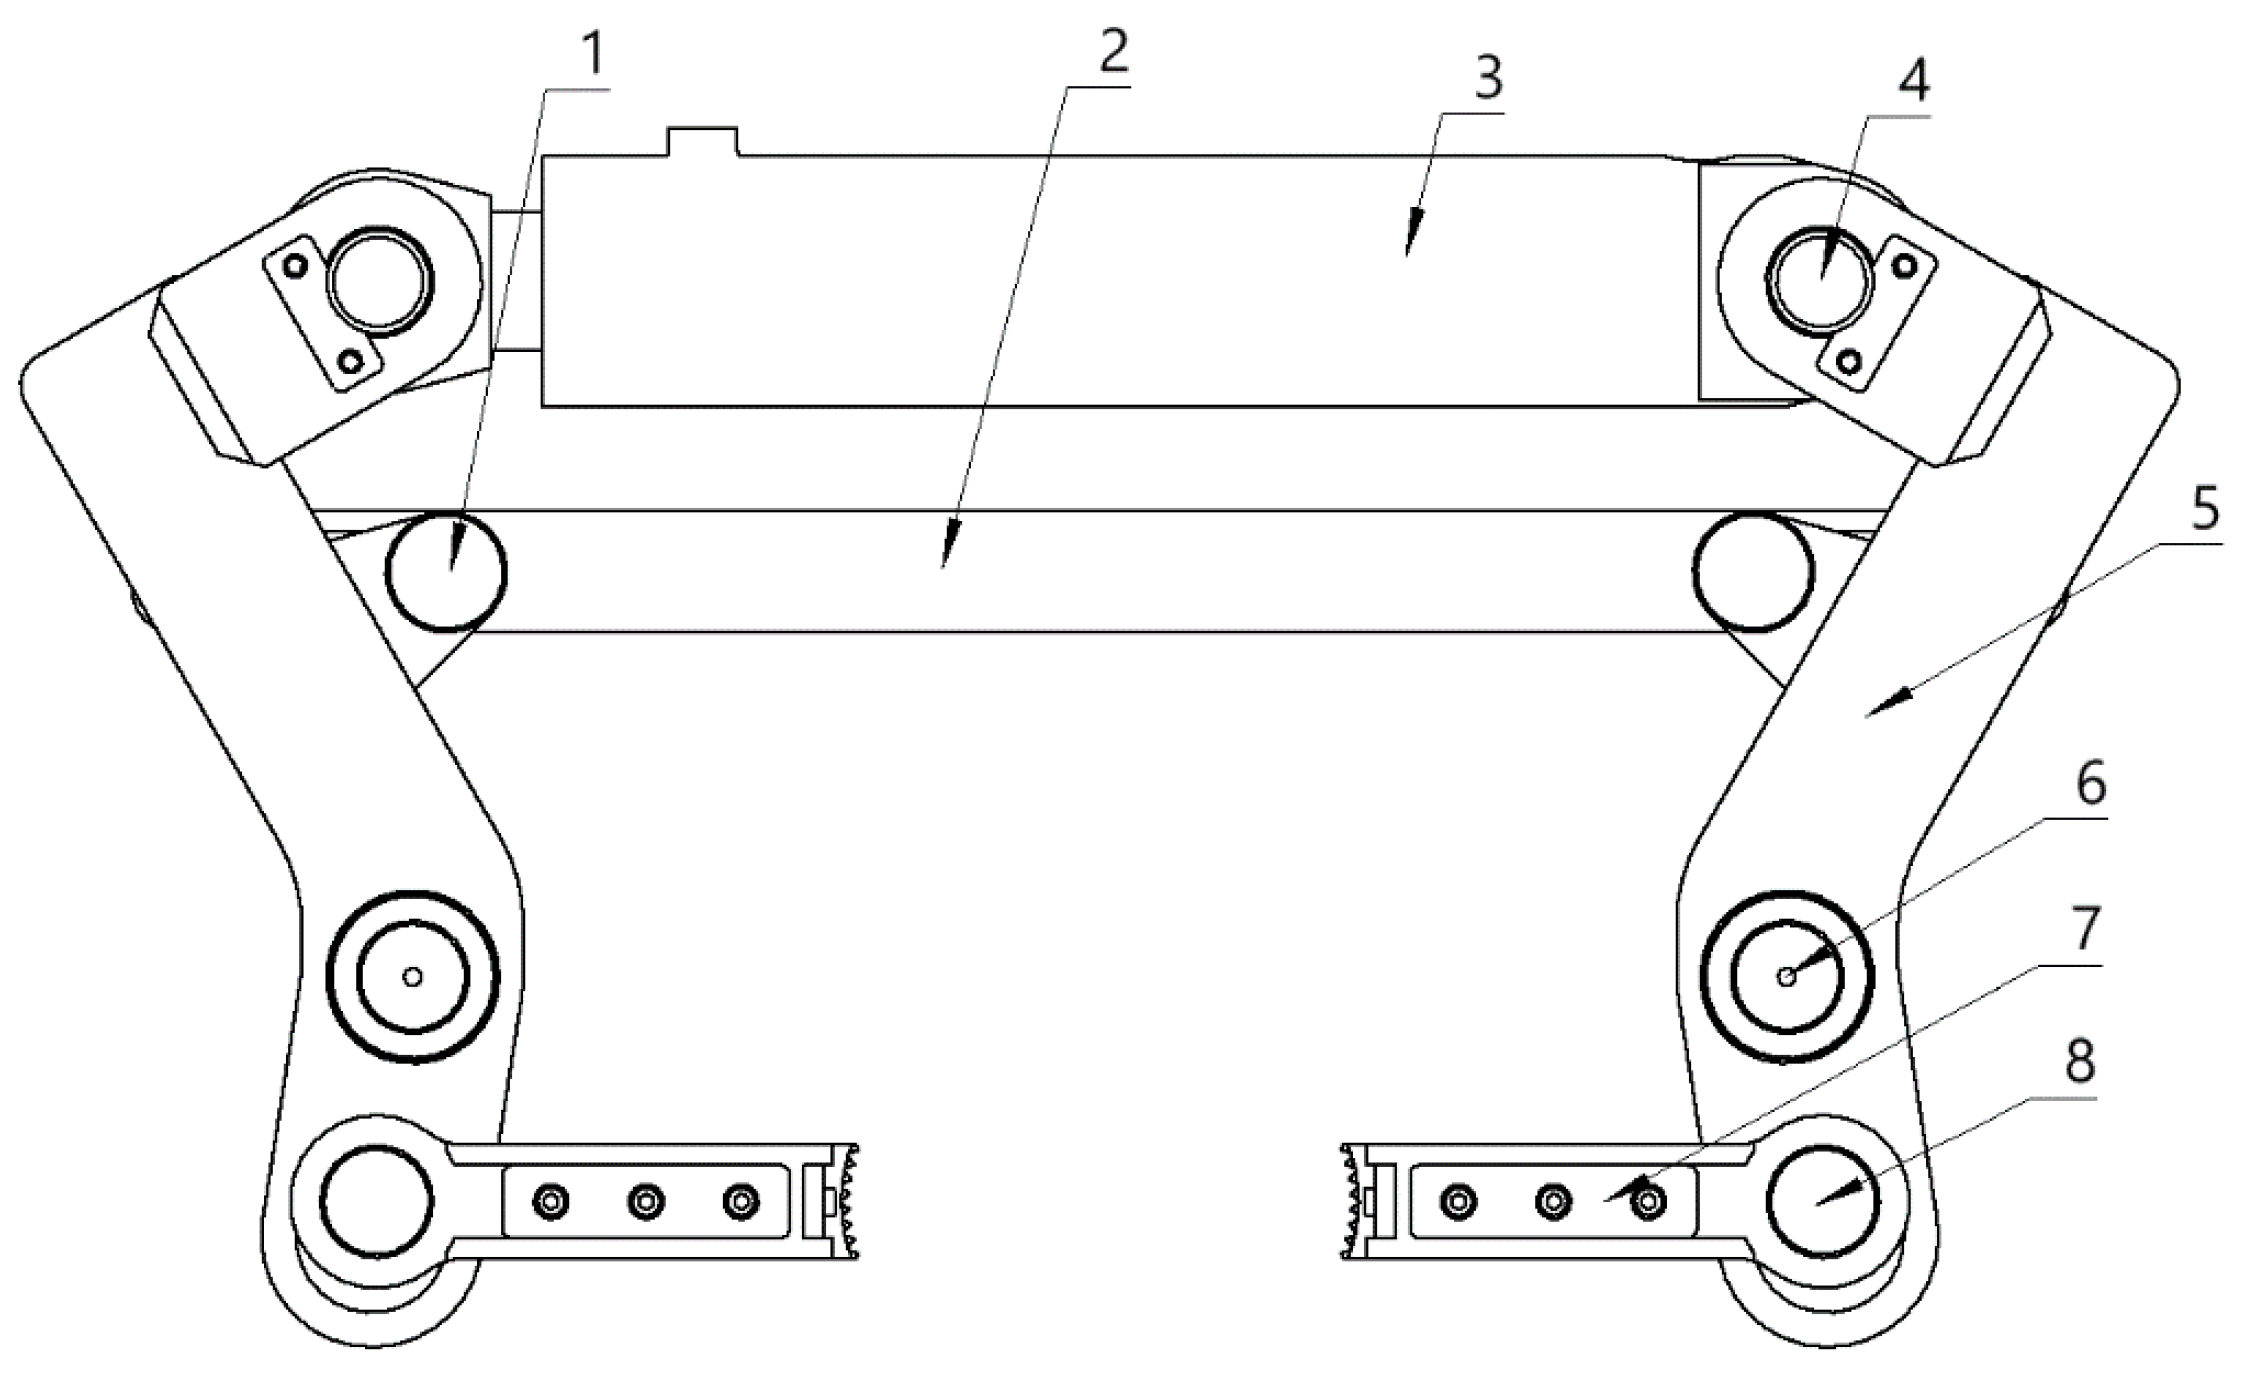
Considering the relatively limited working space of the iron roughneck and the high requirements for centering and synchronization, and after integrating the advantages and disadvantages of the different structural forms mentioned above, as well as conducting a comprehensive analysis of the working environment and performance requirements of the iron roughneck, the final design of the iron roughneck clamping mechanism adopts a synchronized centering single-hydraulic-cylinder-driven linkage type. The clamping mechanism structures of the upper and lower clamp bodies are similar, and the structure of the lower clamp body is illustrated in Figure 6.

Figure 6.
Schematic diagram of clamping mechanism: 1. limit-plate-connecting shaft; 2. limit plate; 3. clamping cylinder; 4. cylinder connecting shaft; 5. clamping arm; 6. clamp seat fixing shaft; 7. clamping clamp; 8. sliding pin.
2.3.3. Clamp Body Structure Design and Research
The clamp body structure serves as the iron roughneck’s primary structure. Currently, most iron roughnecks feature a clamp body that primarily comprises a spin buckle mechanism and unloading buckle (upper buckle) pliers. Typically, these two components employ a split structure design, which often results in misalignment during the working process. This misalignment can cause the spin buckle mechanism’s center, the unloading buckle (upper buckle) pliers’ clamping center, and the drilling tool axis to not be aligned, leading to an uneven distribution of drilling tool force and subsequent deflection, thereby impacting the efficiency of the iron roughneck and the longevity of the drilling tool. In response to this issue, the new clamp body structure incorporates a one-piece design, integrating the spin buckle mechanism and the unclamping (upper buckle) clamp within the same body. This design aims to minimize axial deviations during the iron roughneck’s operation, enhance work stability, and extend the service life of the drilling tools.
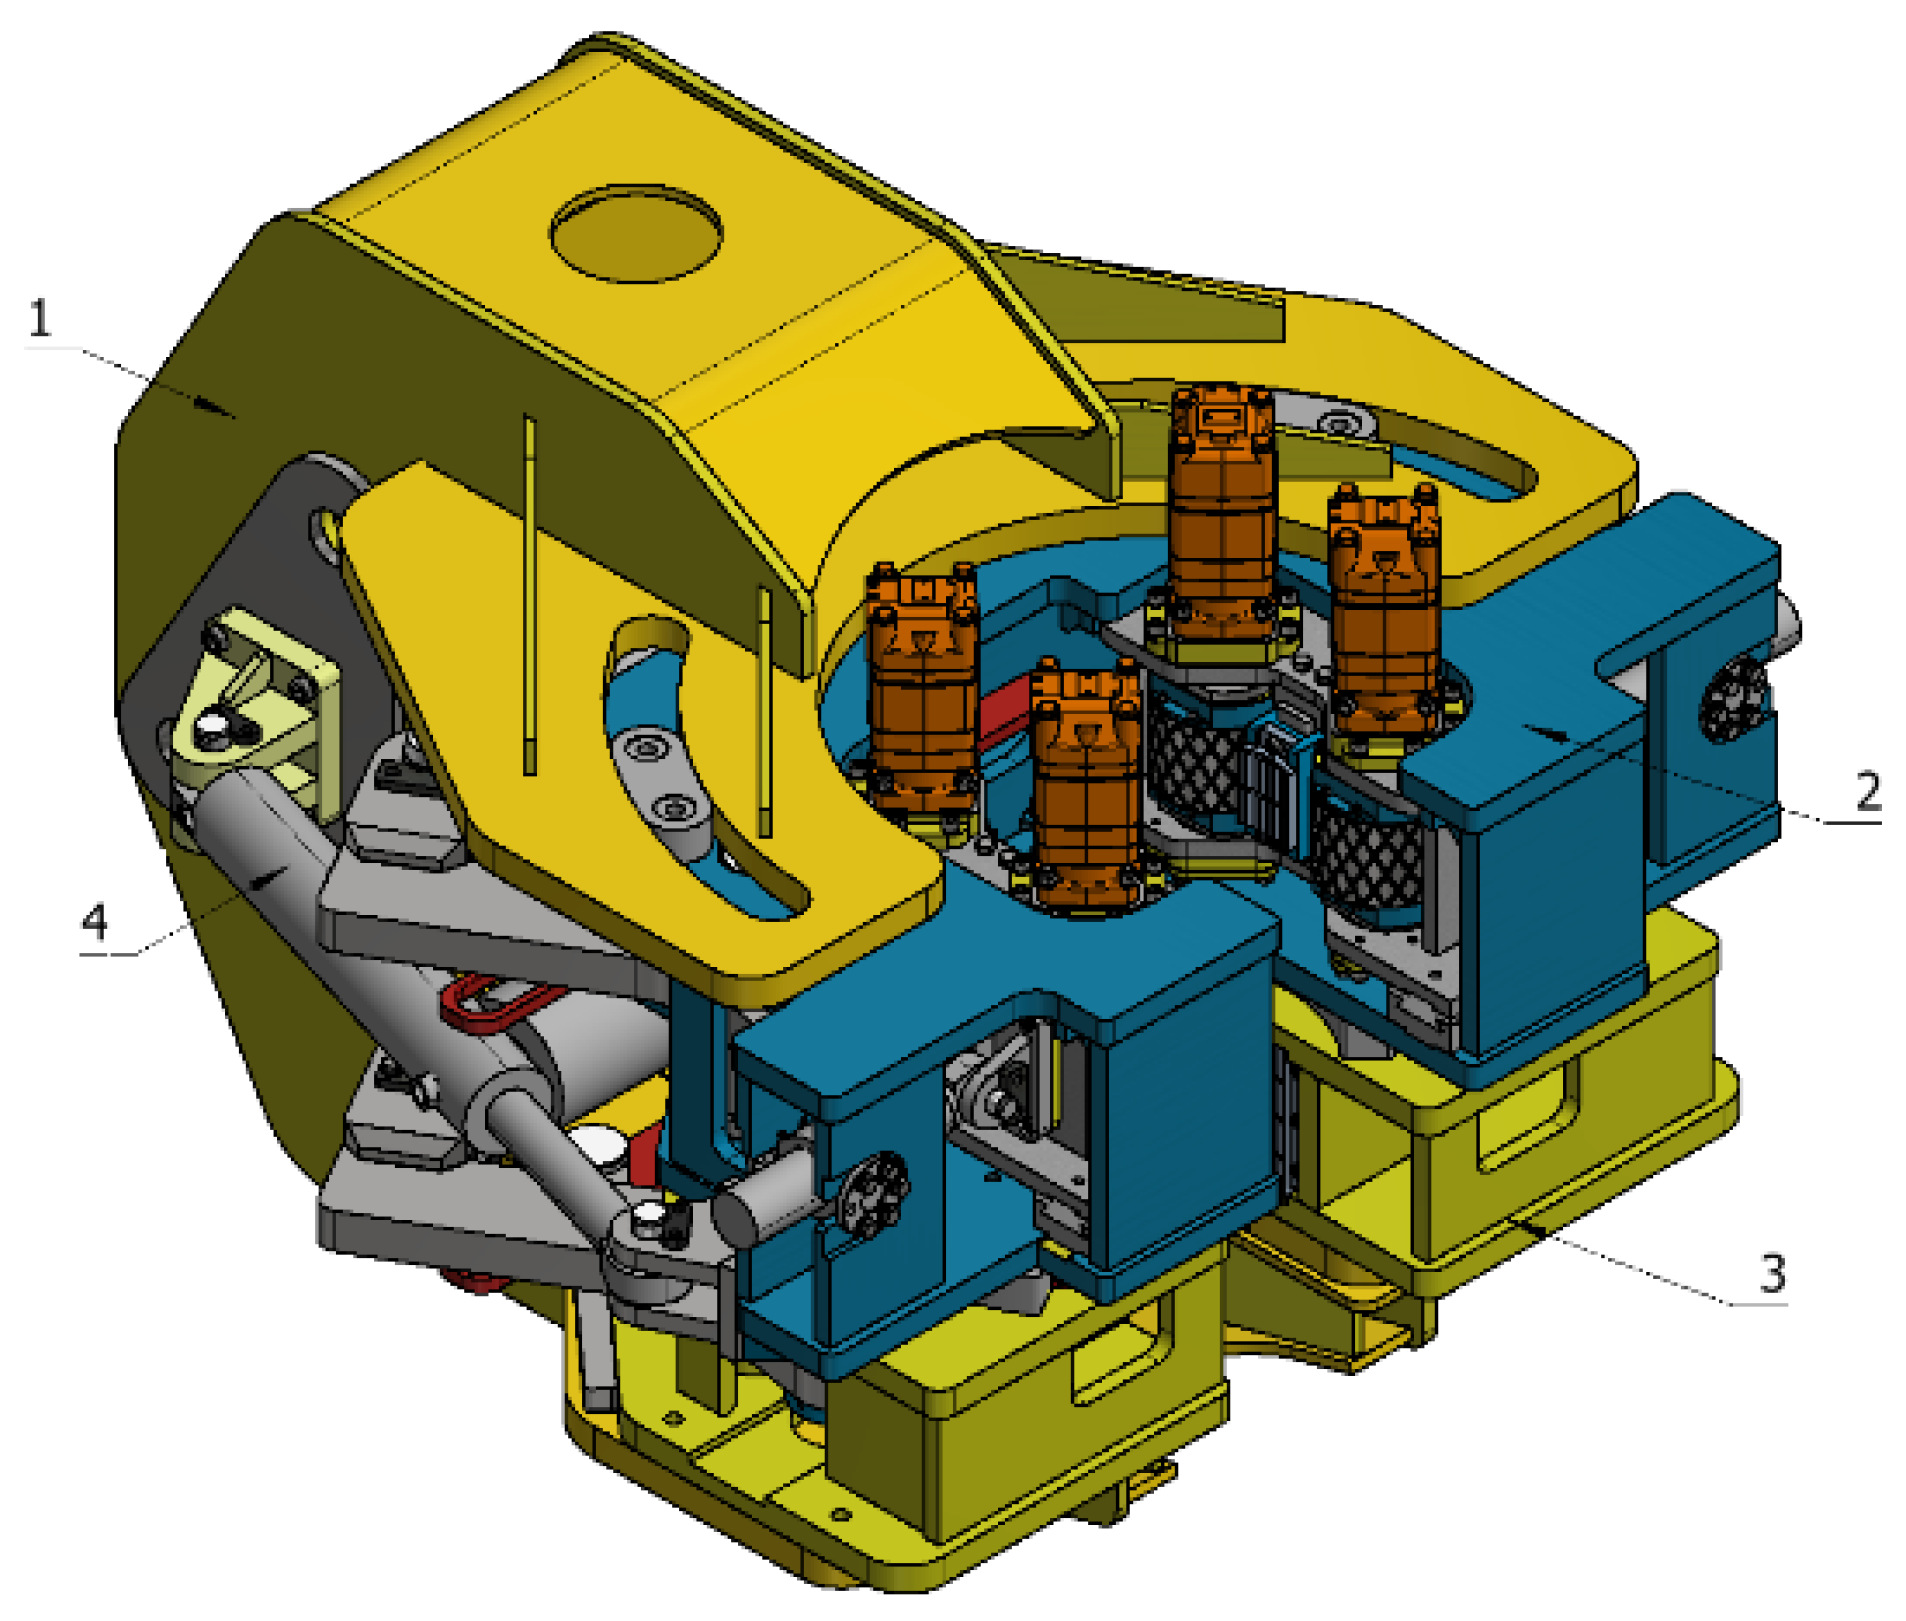
The clamp body structure is shown in Figure 7, specifically the support seat, the upper clamp body, the lower clamp body, and the unloading cylinder. The unbuckling cylinder in the upper buckle or rotary unbuckling work can cause traction on the clamp body; the upper clamp body and the support seat between the arc key connection are used in the process of unloading the (upper) buckle limit; the lower clamp body is fixed in the support seat, the upper and lower clamp bodies between the inner and outer blocking rings are formed by the arc track. The upper clamp body can be rotated along the track relative to the lower clamp body.

Figure 7.
Schematic diagram of clamp body structure: 1. support seat; 2. upper clamp body; 3. lower clamp body; 4. unloading cylinder.
The iron roughneck’s spin buckle mechanism and clamping mechanism are integrated in the upper clamp body, so the upper clamp body, as the main working clamp body, can not only perform the spin buckle action but also can perform the upper buckle and unbuckle action. The clamp body structure in Figure 8 shows two spin buckle roller seats symmetrically arranged on both sides of the upper clamp seat; the buckle roller seat can move along the guide rail, driving the spin buckle roller on the drilling tool to hold and responsible for controlling the horizontal movement of the clamping cylinder fixed in the upper clamp seat. A pair of clamping pliers are arranged in the middle of the two spin buckle rollers, controlled by the clamping arm, which can be extended from the spin buckle roller seat along the guide rail, and the clamping pliers are responsible for clamping the drilling tools during the upward and downward buckling. The clamping arm is connected to the clamp and the clamping cylinder through a pin, constituting a lever force transmission mechanism to realize the clamping action. The limit plate is arranged at the rear side of the clamp base, and its function is to limit the displacement of the clamping arm and ensure the synchronization of the two clamping arms.
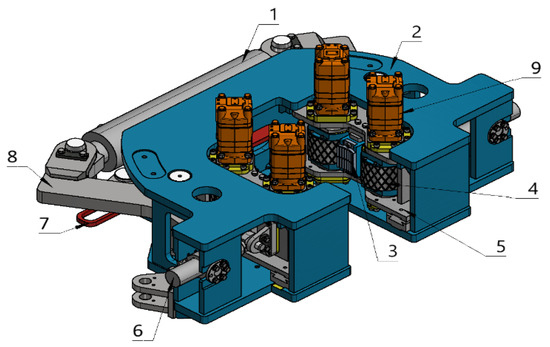
Figure 8.
Schematic diagram of the upper clamp body structure: 1. clamping cylinder; 2. upper clamp seat; 3. clamping clamp; 4. spinning buckle roller; 5. spinning buckle roller seat; 6. counterclamping cylinder; 7. limit plate; 8. clamping arm; 9. swing motor.
The lower clamp body structure is shown in Figure 9; it is mainly responsible for fixing and clamping the drilling tool below to ensure the stability of the drilling tool. The clamp body structure is relatively simple; the top of the fixed internal and external stop ring together constitute the arc-shaped track for the upper clamp body in the process of upper buckle and unbuckle rotation. The upper clamp body and the lower clamp body connect through the wear-resistant seat plate contact, and the lower clamp body in the wear-resistant seat plate and the lower clamp seat between the addition of disc springs, the role of which is to provide the upper clamp body with the axial displacement of the drilling tool in the process of the upper buckle, unloading the buckle and floating, and reduce the upper clamp body in the work of the drilling tool due to the friction generated by the axial relative motion. The lower clamp body structure and layout of the clamping clamp and the clamping method is similar to the upper clamp body and will not be repeated.
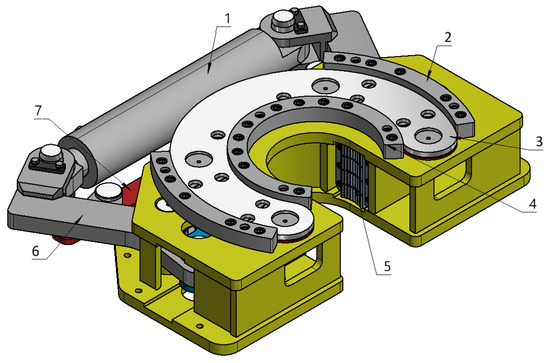
Figure 9.
Schematic diagram of the structure of the lower clamp body: 1. clamping cylinder; 2. outer retaining ring; 3. wear-resistant seat plate; 4. inner retaining ring; 5. clamping clamp; 6. clamping arm; 7. limit plate.
2.4. Theoretical Analysis of Spinning Roller
2.4.1. Force Analysis of Spin Buckle Mechanism
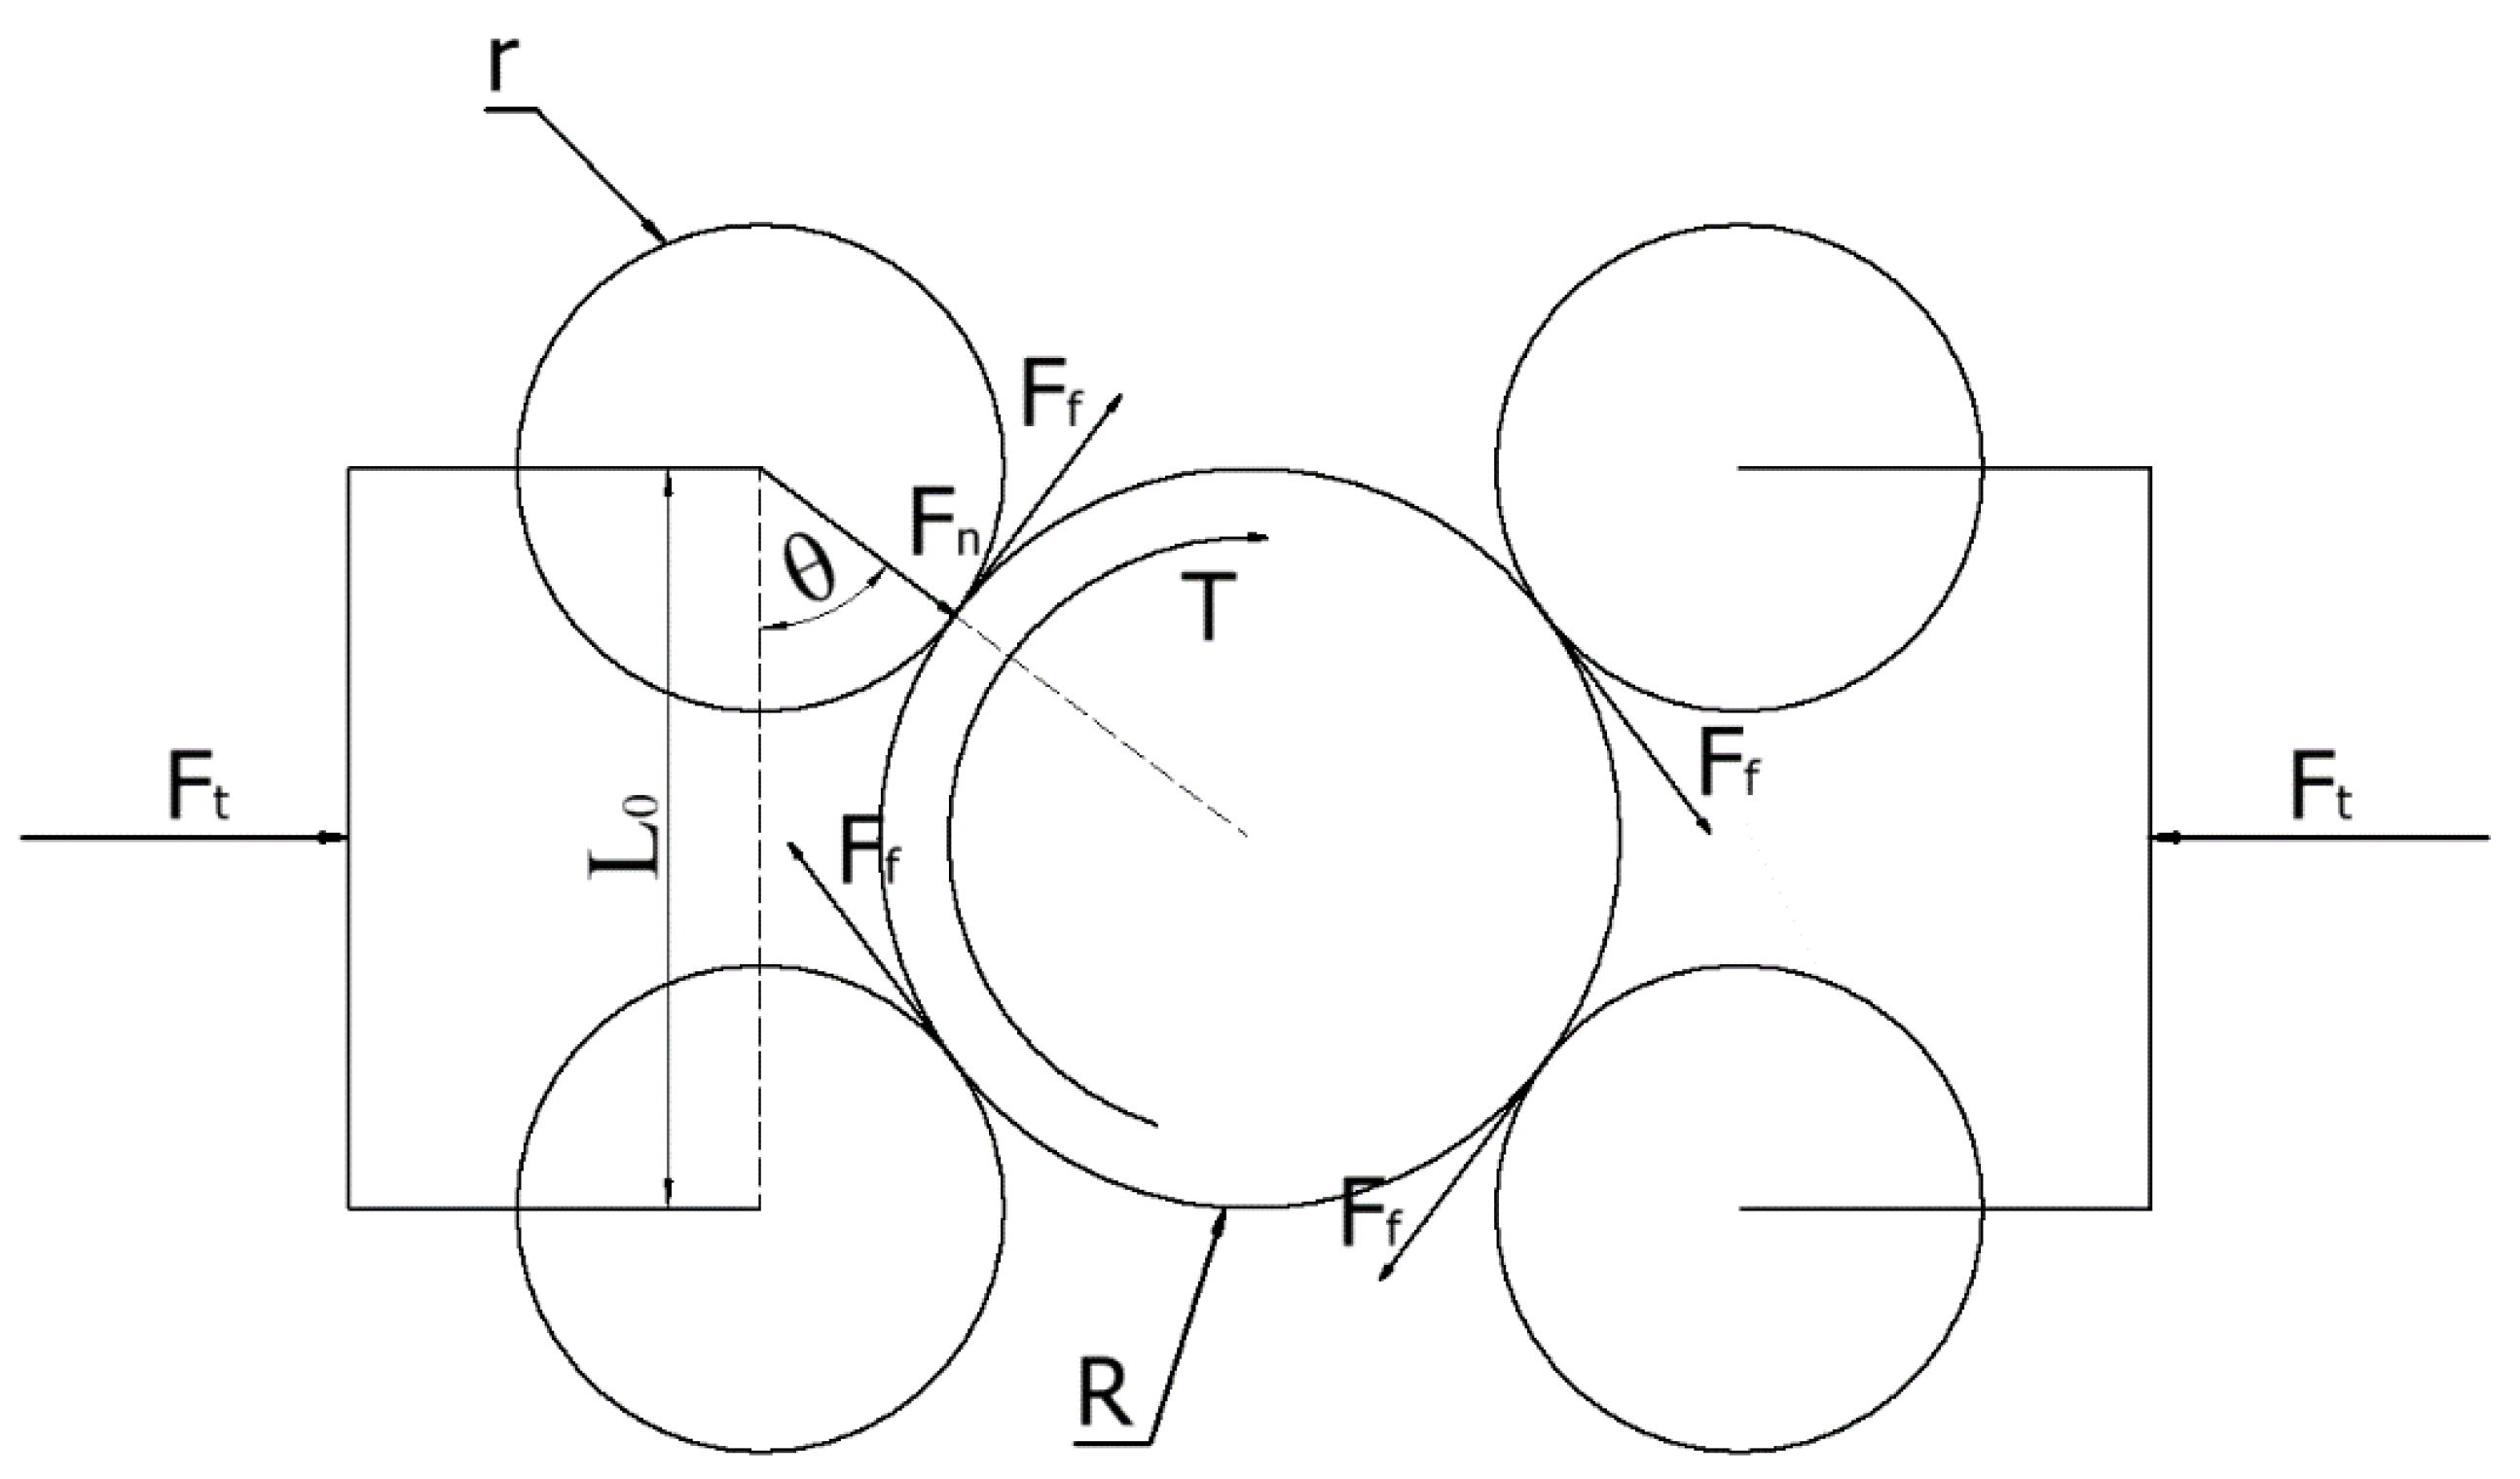
During the operation of the spin buckle mechanism, the primary means of executing the spinning action involves the torque generated by the friction between the spin buckle roller and the drilling tool, facilitating the inward and outward rotation of the upper and lower drilling tools. The total torque produced by each spin buckle roller must meet the performance criteria of the iron roughneck. Consequently, the clamping mechanism of the spin buckle mechanism must supply a specific clamping force to maintain stable contact between the drilling tool and the roller interface. The force diagram of the spin buckle mechanism is depicted in Figure 10.
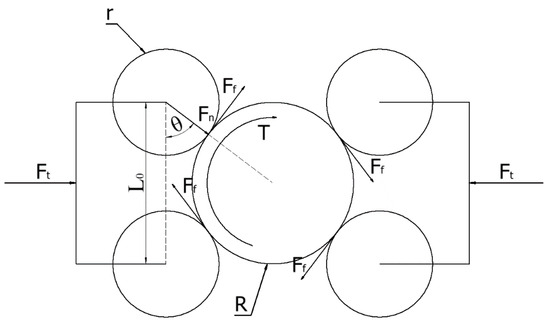
Figure 10.
Sketch of the force on the spinning mechanism.
Ideally, the symmetrical arrangement of the two sides of the spin buckle roller group of the force situation is the same [13]. As the distance between the spinning buckle rollers in the same spinning buckle roller group is fixed, r is the radius of the spinning buckle roller. Set the angle between the center line of the spinning buckle roller with the drilling tool and the center line between the two spinning buckle rollers on the same side as . R is the radius of the drilling tool, which can be seen from the geometric relationship:
Under normal operating conditions, since the specifications of each spinning buckle roller are the same, the friction between different spinning buckle rollers and drilling tools is also the same, and according to the moment balance equation, we have:
where T is the rotary buckling torque. Based on the main performance parameters, take T = 2400 Nm, R = 108 mm. The maximum friction between the drilling tool and each roller can be obtained as:
A force analysis of the spin buckle mechanism shows that:
where is the radial pressure of the rotary buckling roller on the drilling tool; is the thrust provided by the clamping cylinder of the rotary buckling mechanism; f is the friction coefficient between the roller and the drilling tool; the friction between the roller and the drilling tool in the process of rotary buckling is the rolling friction, and f = 0.2 is taken after consulting the information.
In Figure 10, = 216 mm, r = 71 mm, and the joint Equations (2)–(5) to obtain the maximum clamping cylinder thrust required by the rotary buckling mechanism to hold the drilling tool are:
2.4.2. Theoretical Analysis of Spinning Roller–Drilling Tool Contact
When two objects are in contact under the action of external forces, the contact surface will produce contact force and surface deformation or mutual surface movement [14]. The spin buckle roller and drilling tool are cylinders. Under the action of the cylinder thrust, the two contacts, at first, can be approximated as two cylinders in line contact; the contact area is a straight line. With the increasing clamping force, the two cylinders undergo elastic deformation in the clamping drilling tool, the spin buckle roller and the drilling tool between the contact area expand into a certain area of the contact surface, and the contact stress also changes. At this time, according to the Hertz formula, we calculate the area of this region and the contact stress of the two contact objects [15,16]. In order to meet the requirements of the Hertz formula for the object contact mechanics of the relevant analysis, the following assumptions are made:
- The contact body is elastic and has a uniform material distribution.
- The surface of the contact region is an ideally smooth quadratic surface without considering friction.
- The size of the contact surface is very small compared to the radius of curvature of the contacting body surface.
- The contact stress distribution is adapted to the shape of the contact area and the contact surface.
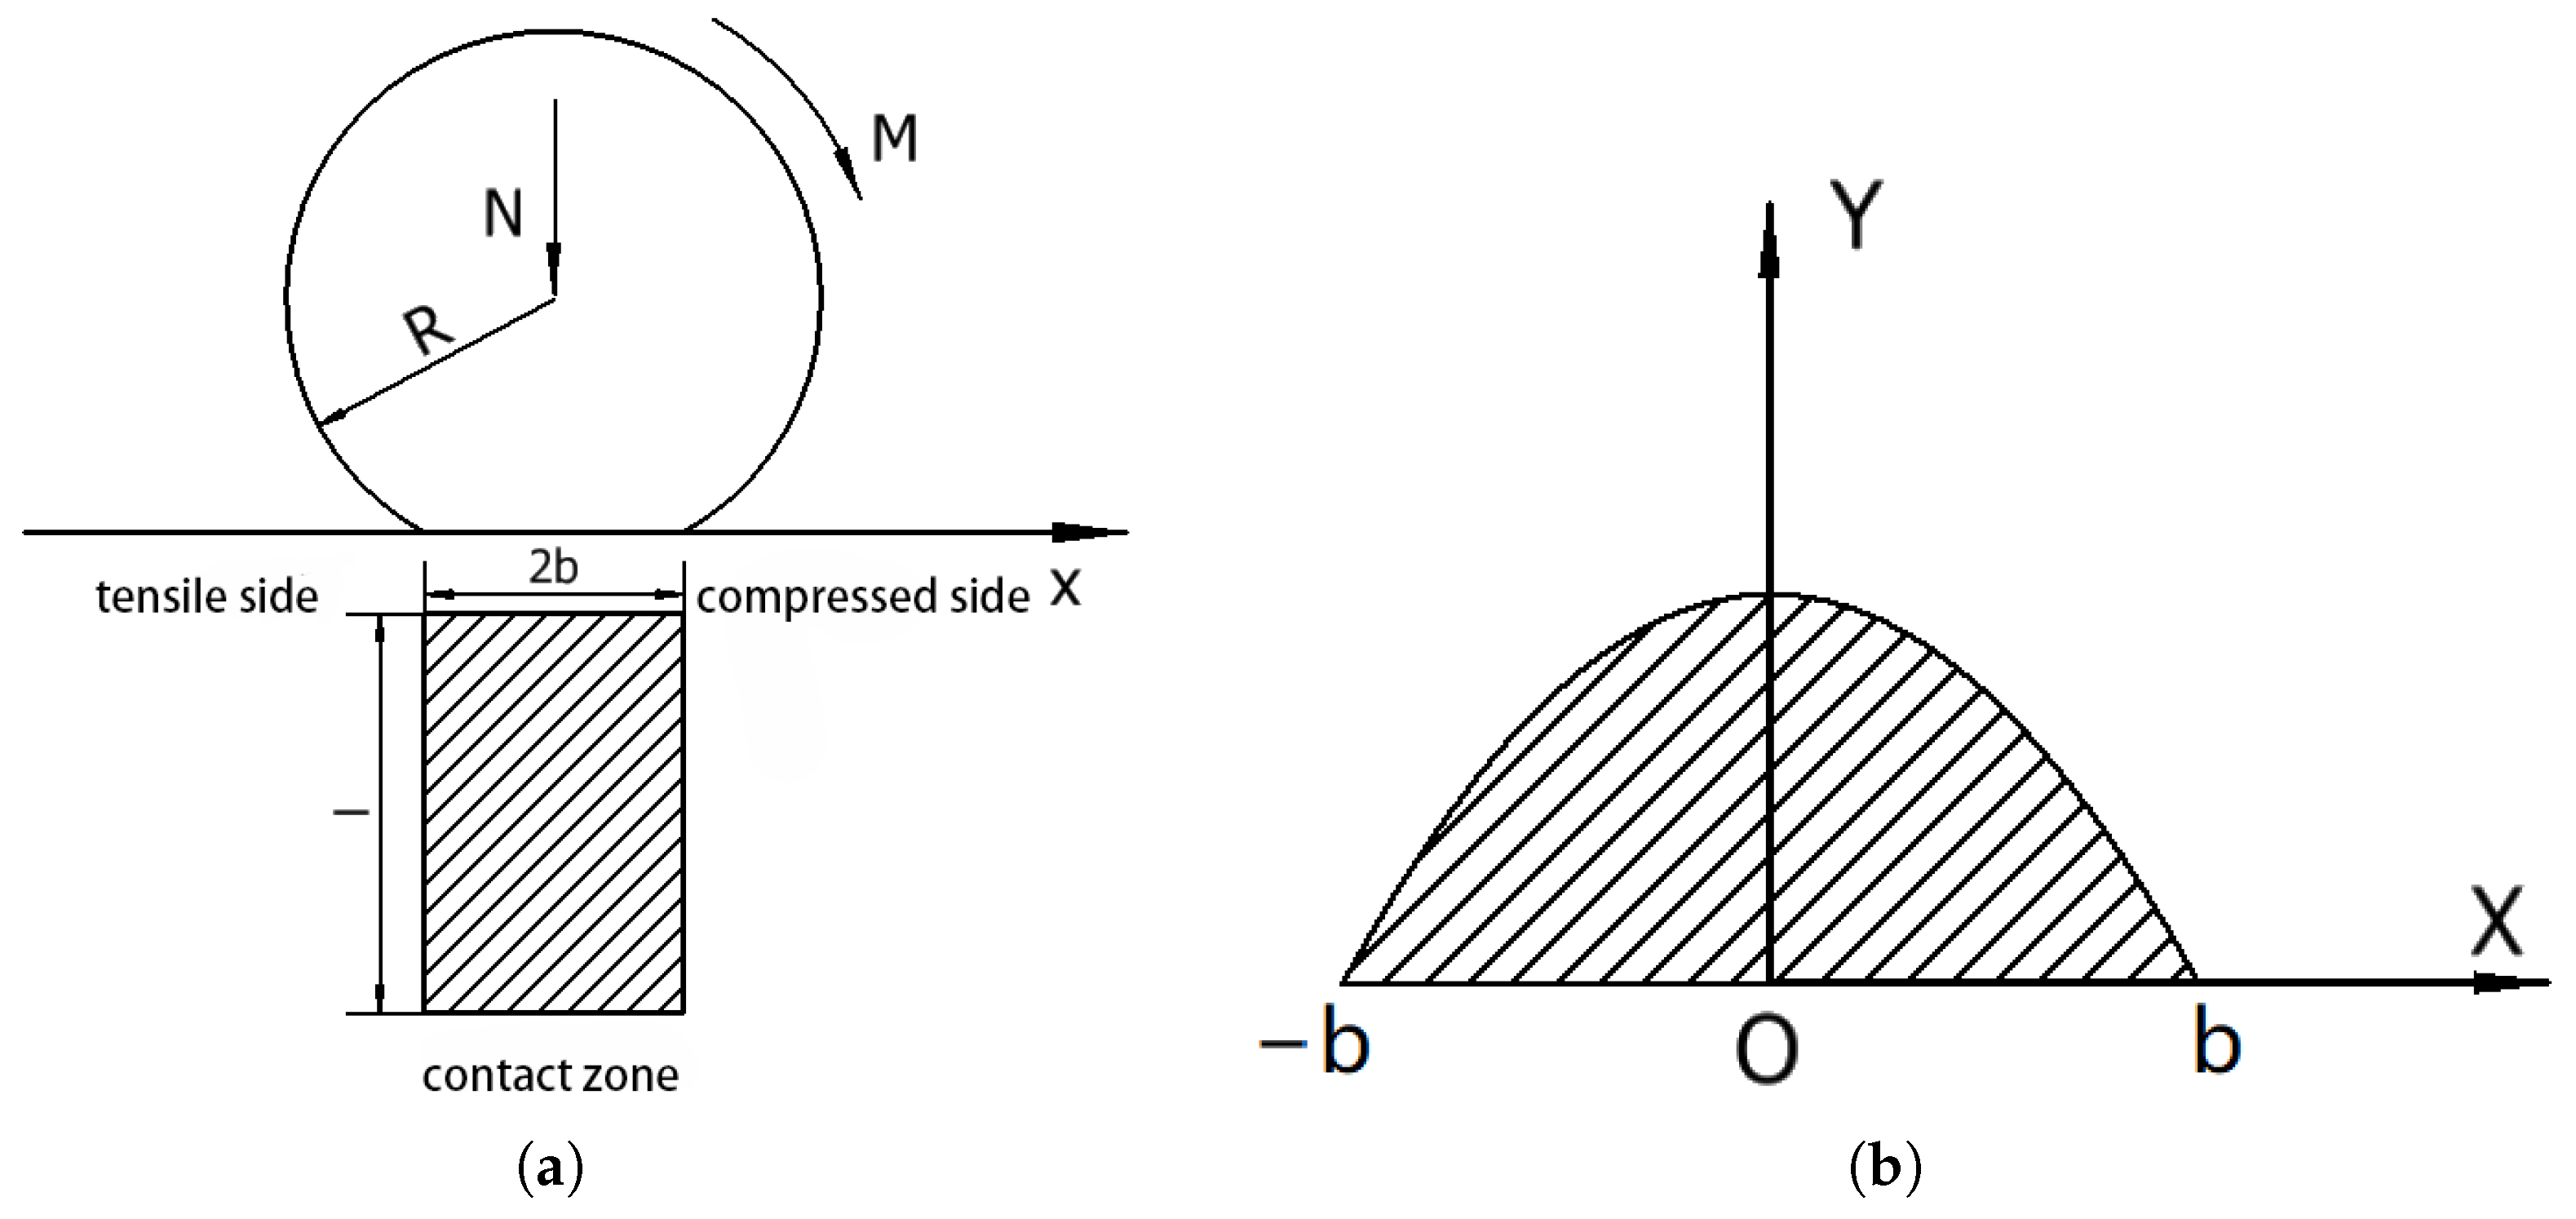
The type of contact between the iron driller’s spinning buckle roller and the drilling tool can be regarded as a two-dimensional curved body line contact, and the contact situation is shown in Figure 11. F is the external force acting in the plane where the axes of the two cylinders are located, and the contact stresses are uniformly distributed along the axes on the contact area. Figure 12 shows a magnified view of the contact stress.
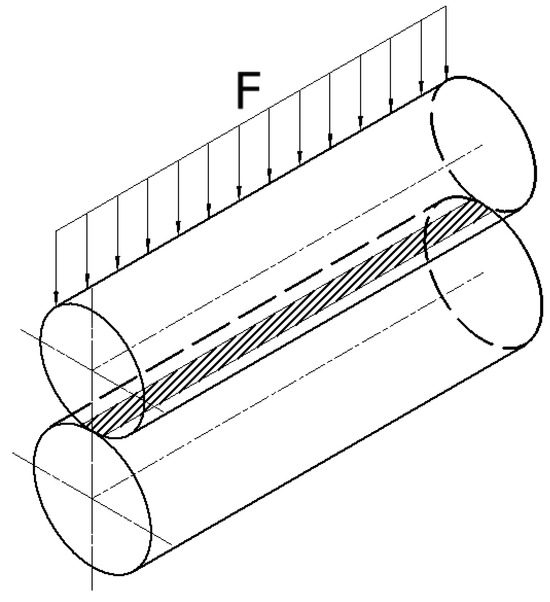
Figure 11.
Schematic diagram of elastic line contact.
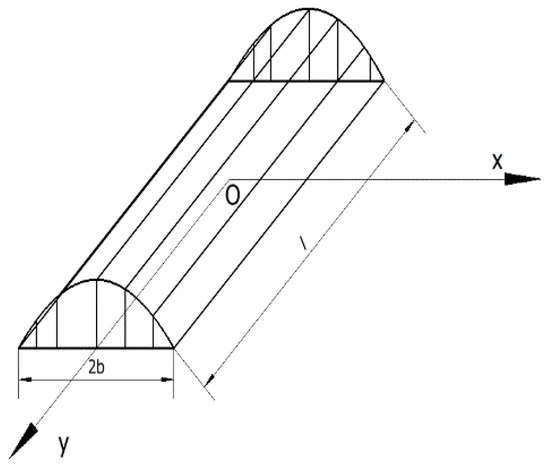
Figure 12.
Amplified view of contact stress.
In Figure 11 and Figure 12, the contact region in the xOy plane can be seen; for the l × 2b rectangular region, b is the half-width of the contact region, l is the length of the contact region, and the entire stress distribution region in the xOz plane of the projection profile can be regarded as a half-elliptic quadratic curve. The origin of O is the center of the contact region, whence we have:
where q(x) is the contact stress distribution function along the x-axis direction and is the maximum contact stress. The external force F can be abstracted as half of the ellipsoidal cylinder in the coordinate system, then by the equilibrium condition of the external force and the contact stress, it can be obtained by volume integration of the stress distribution region:
Equations (7) and (8) give the maximum contact stress as:
The radii of curvature of the two elastomers are and , respectively, and the sum of curvatures of the contact surfaces is:
The half-width b of the line contact region between the two elastomers is related to the elastic deformation convergence between the two cylinders, and the coordination condition for the contact deformation is:
where , are the deformations of the two cylinders; + is the distance between the two cylindrical surfaces and its value is . According to the Hertz formula and the Boussinesq solution, Equation (11) can be written as:
This is obtained by taking the derivative of Equation (12) and integrating:
Equations (9) and (14) give the contact region half-width b as:
In the equation, , represent Poisson’s ratio of the two elastic elements; , represent the modulus of elasticity of the two elastic elements.
In engineering calculations, for the type of line contact between two cylinders made of the same steel, the half-width b of the contact region can be approximated as:
In the process of solving the half-width b of the contact region, the contact deformation is eliminated after the derivation of Equation (12), so this method cannot directly derive the amount of elastic deformation convergence between the two cylinders. In this regard, the British scholars K.L. Johson, through the use of the planar stress and strain state integrals, derived an approximate formula for the amount of contact deformation between the two cylinders as [17]:
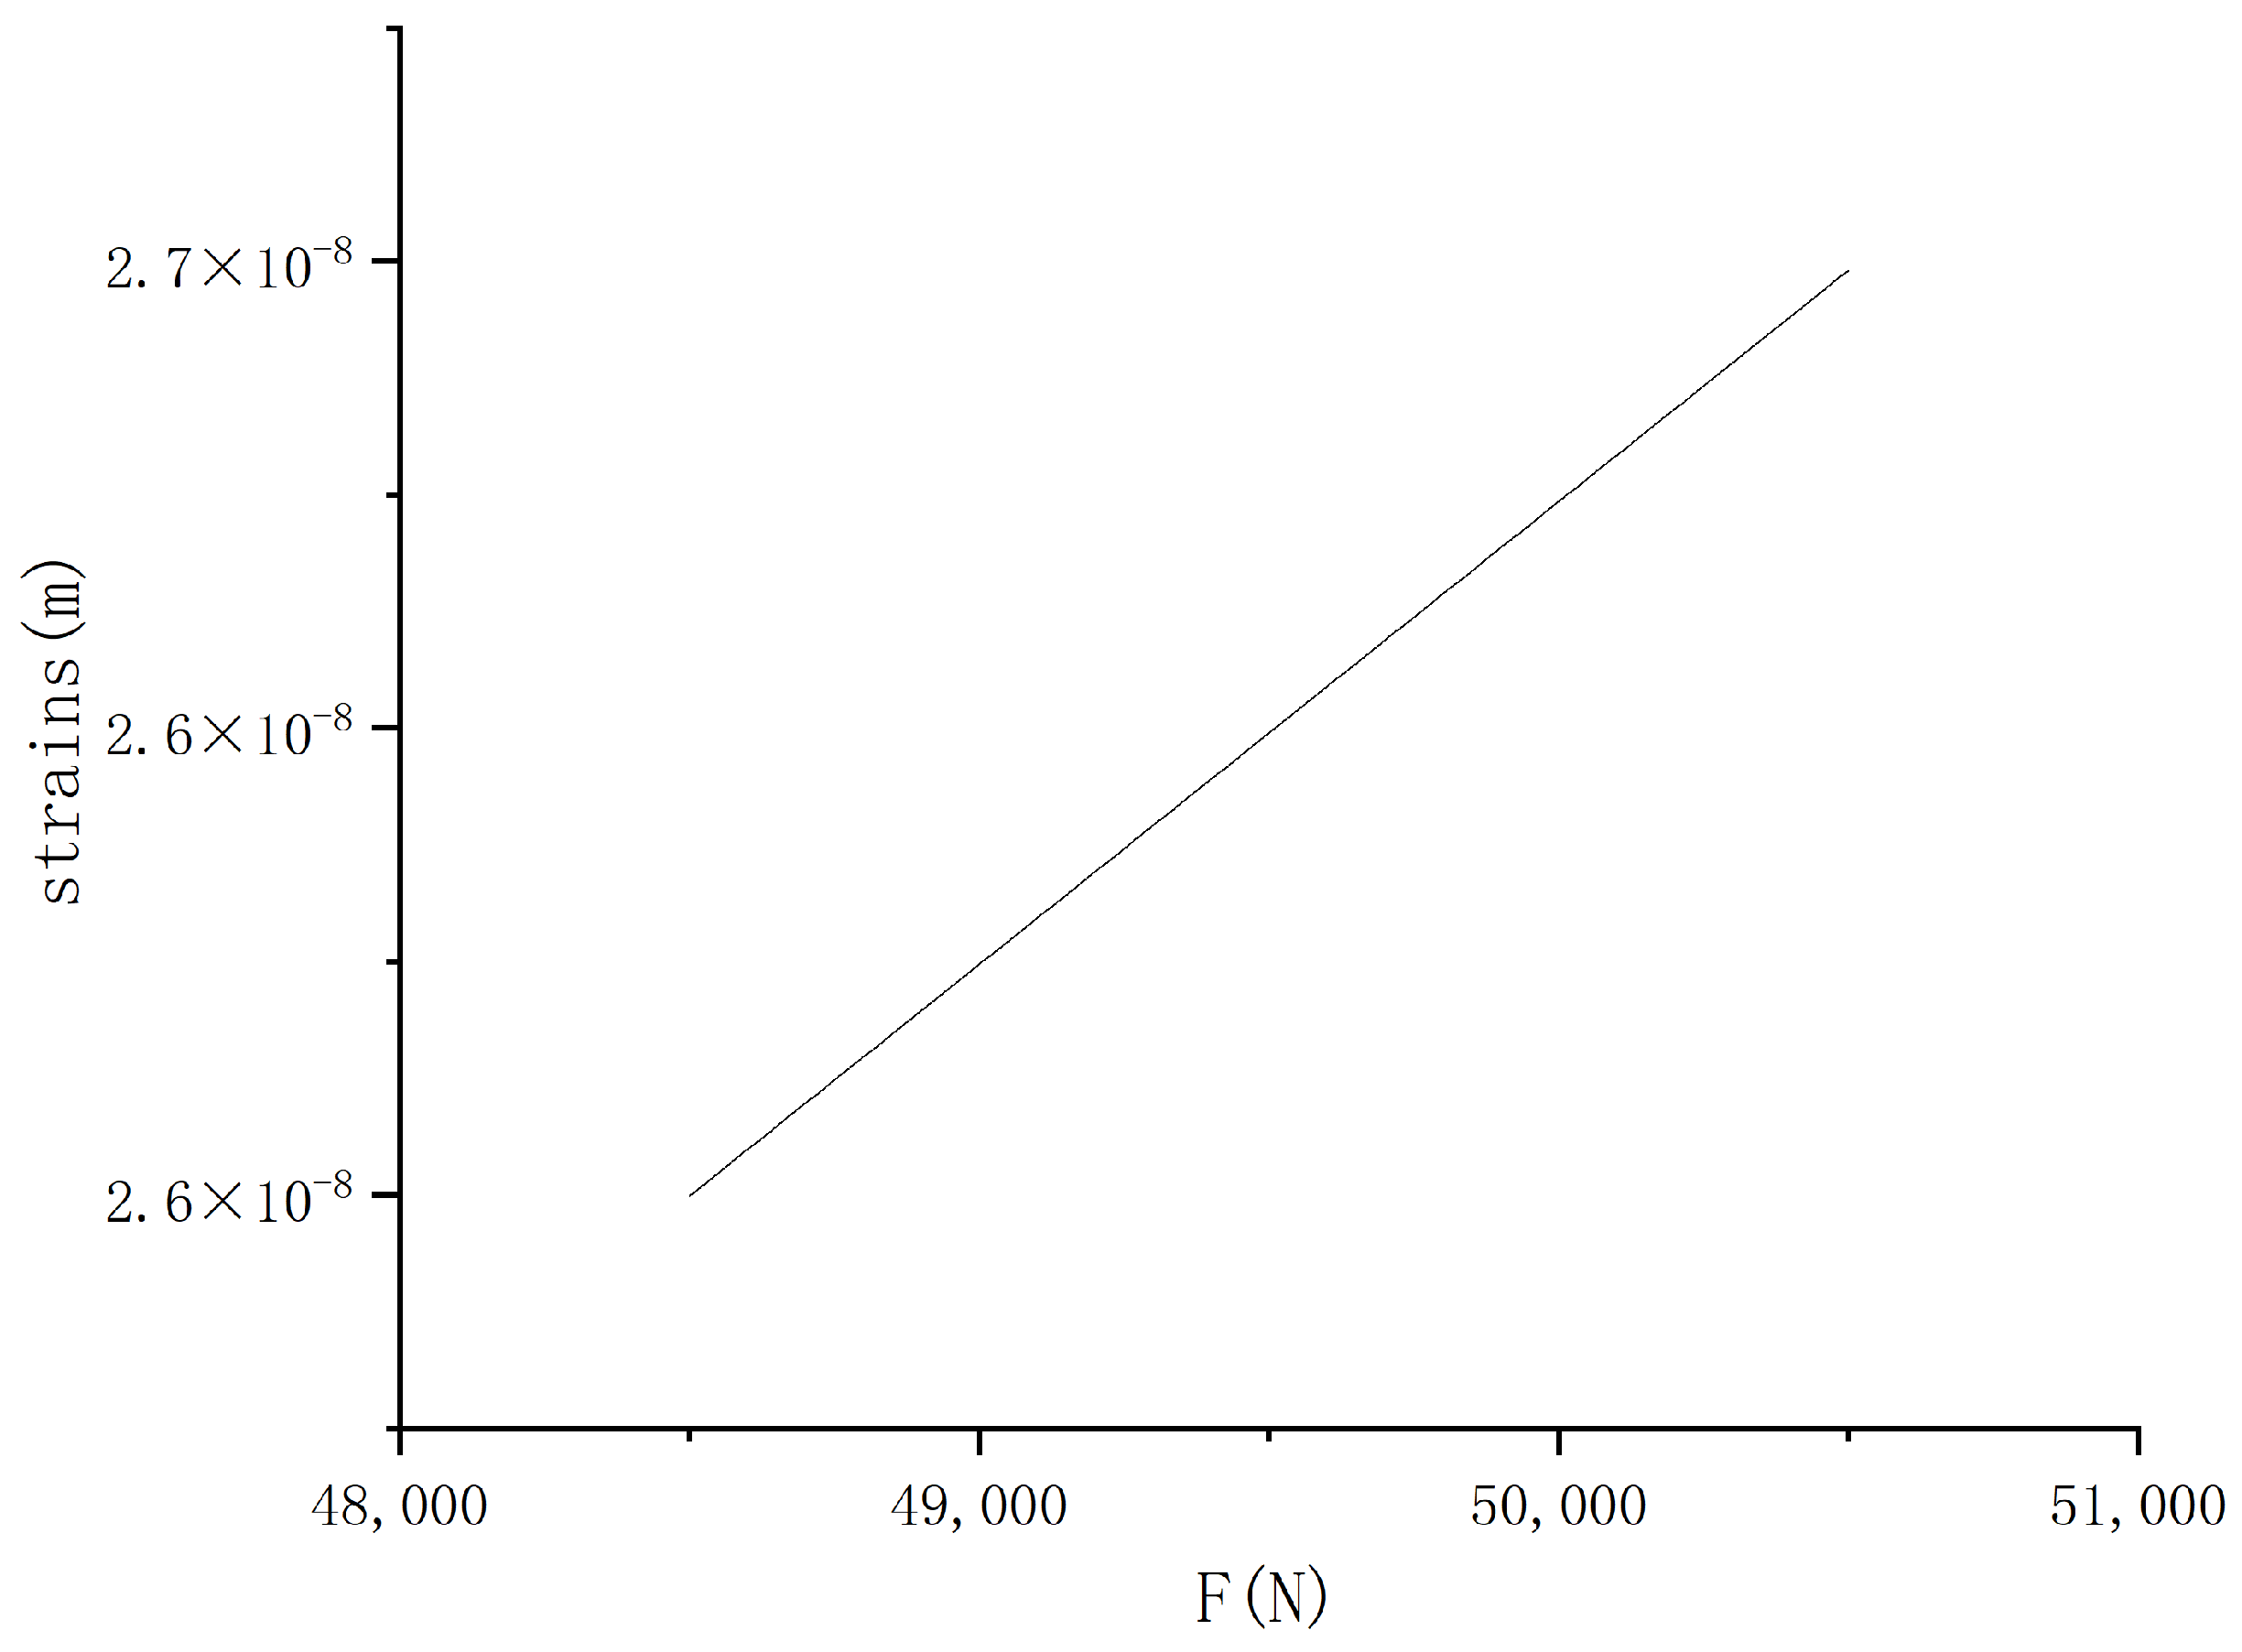
This is used to make a contact strain, as seen in Figure 13, which shows that as F increases, the strain value also becomes larger, but the overall strain value is still very small.
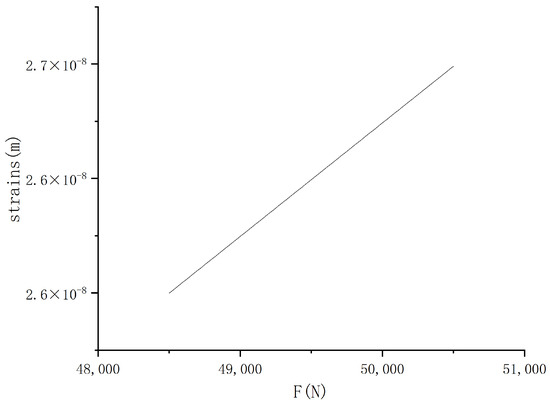
Figure 13.
Contact strain diagram.
2.4.3. Rolling Friction Analysis between Spinning Roller and Drilling Tools
The friction between the buckling roller and the drilling tool is mainly rolling friction. As the contact part of the spinning buckle roller and drilling tool is in uninterrupted motion, the contact surface is always in dynamic change; that is, just part of the object surface in contact with each other will be separated along the direction perpendicular to the contact surface at the next moment and is less affected by the adhesion effect and the plough furrow effect [18]. Rolling friction is the occurrence of relative rolling between the objects generated by the force imbalance caused by an impediment to the role of rolling; this results in an imbalance in the generation of force and the deformation of the two contact objects.
As there is no perfect rigid body in nature, any object is composed of deformable materials. When the contact between the objects is due to the action of the load, there must be deformation. For the rolling friction process of the cylinder and the calculation of the coefficient of rolling friction, Figure 14 illustrates an example [19].
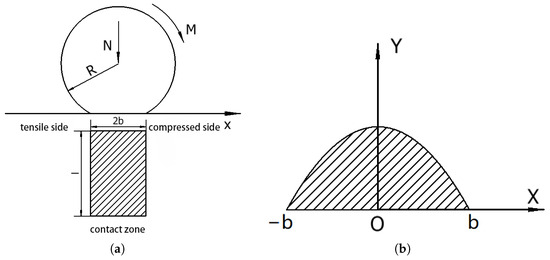
Figure 14.
(a) Rolling schematic. (b) Stress distribution diagram.
As can be seen from Figure 14, the cylinder undergoes rolling in the positive direction along the x-axis, the radius of the cylinder is R, and the material on the front side, which is in the direction of motion, is squeezed, while the material on the other side is stretched. According to Figure 14b, the pressure on the microelement at the x position in front of the contact region is p, and the resistance generated by the pressure p around the normal of the contact region should be pdx; then, the total resistance moment M in the first half of the region is:
This is obtained by combining Equation (7) and integrating the above equation:
When the cylinder rolls a distance x, the elastic deformation work resulting from compression of the first half of the material is:
Due to the elastic hysteresis effect of the material, the moment generated when the latter part of the material is stretched cannot fully compensate for the elastic work generated by the pressure in the first half, and there will be partial energy loss, which is generally expressed through the hysteresis loss coefficient . The real energy loss of the rolling body is , and then we have:
where is the rolling friction resistance. Combined with Equations (8) and (12)–(14), the rolling friction coefficient can be obtained:
With the above equation, it can be seen that the coefficient of rolling friction is not only related to the material of the elastomer and the load acting on the elastomer, but also to the dimensions of the elastomer, the size of the contact surface, and the hysteresis coefficient.
2.4.4. Spin Buckle Roller Axial Floating Device and Analysis
Spin buckle rollers are composed of several parts, including roller shaft, friction ring, limit sleeve, threaded sleeve, shroud, spring guide rod, and floating spring. The roller shaft and friction ring are the main parts of the spin buckle roller; the two are connected through the spline; the roller shaft is driven by the spin buckle motor; the axial position is fixed; the friction ring in the spring guide rod and the floating spring can float along the axial direction for a certain distance; the threaded sleeve through the threaded connection with the roller shaft is fixed, which plays a role in limiting; the shroud is directly connected to the friction ring, with the friction ring synchronized movement. Different from the existing combination roller, the program will be a combination of multiple convex rings to a larger width of a single friction ring; the friction ring surface can be processed into different structural types according to the needs of the program on the roller surface in two different directions to cut out the threaded groove so that the surface of the roller forms a number of rhombic contact surfaces, to further increase friction during spinning buckling.
The drilling tool will be displaced axially due to the threaded connection in the process of unbuckling and spinning, while the spin buckle roller is closely fitted with the drilling tool, which will cause the drilling tool to be displaced while exerting axial friction on the spin buckle roller. Due to the axial friction, the relative sliding between the spin buckle roller and the drilling tool will aggravate the friction loss and affect the service life of the drilling tool and the spin buckle roller. In order to avoid this phenomenon and reduce the wear between the spin buckle roller and the drilling tool, this loss can be reduced by installing a floating device to make the spin buckle roller move together with the drilling tool. At present, iron roughnecks usually adopt the method of floating the spin buckle mechanism as a whole, but due to the large volume and weight of the spin buckle mechanism, it will lead to problems such as insufficient flexibility of floating, uneven floating force, etc., and the floating device is relatively complicated [20].
This paper adopts a new combined structure, as shown in Figure 15, where floating springs are installed at both ends of the friction ring. When spinning the buckle roller, the friction ring can float up and down along the roller shaft and spring guide bar under the action of axial friction, so as to reduce the relative sliding between the drilling tool and reduce wear. The specific actions are as follows. When removing the drilling tools, the spin buckle roller separates the upper and lower drilling tools, and the upper drilling tool drives the roller to float upward; when connecting the drilling tools, the spin buckle roller makes the upper and lower drilling tools spin together, and the upper drilling tool drives the roller to float downward.
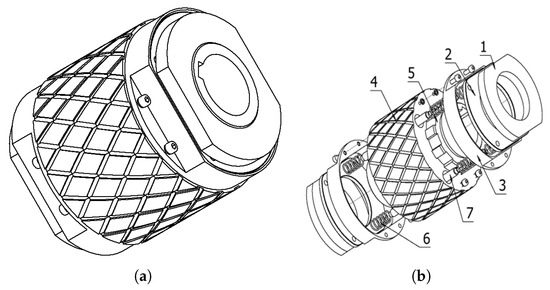
Figure 15.
Schematic diagram of spinning roller structure: (a) fabrication. (b) exploded diagram. 1. threaded sleeve; 2. limit sleeve; 3. shroud; 4. friction ring; 5. roller shaft; 6. floating spring; 7. spring guide bar.
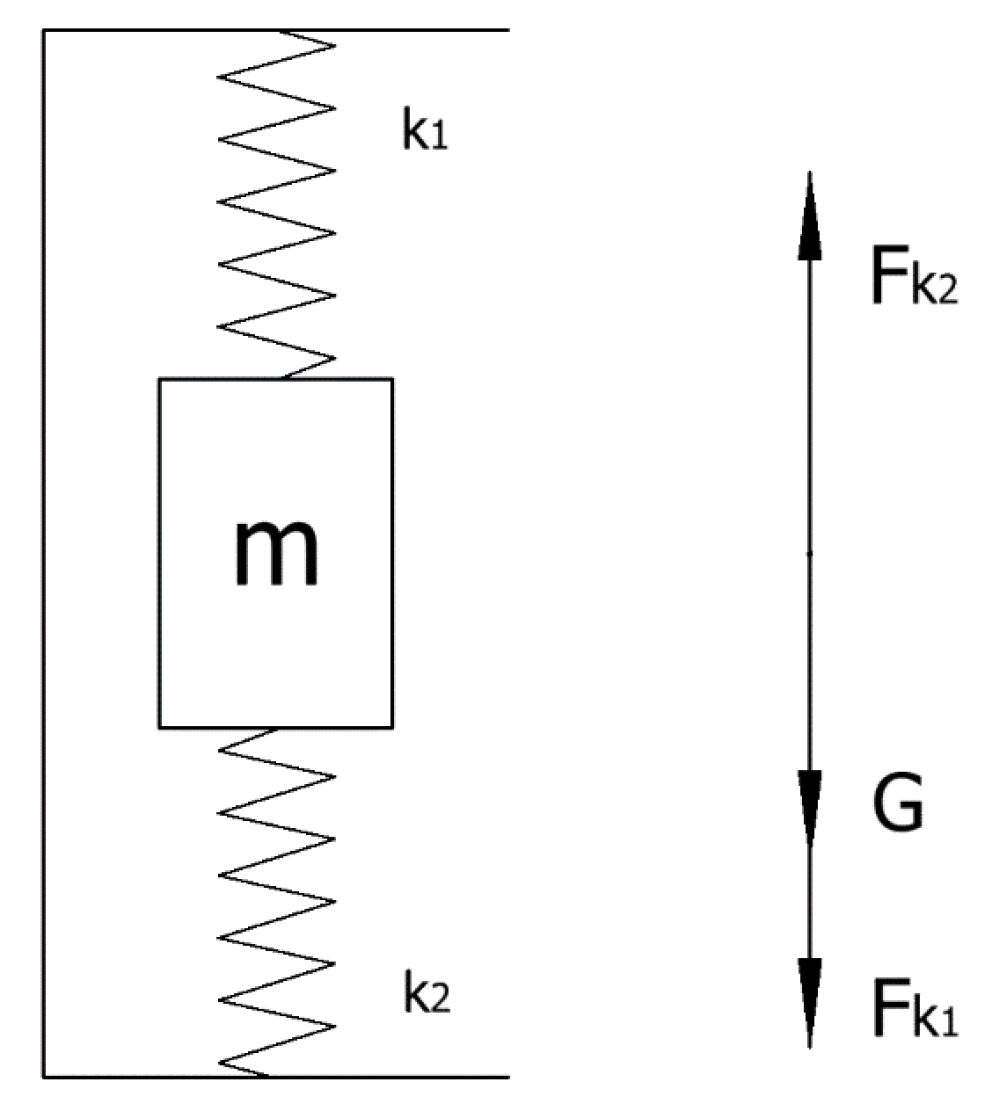
In order to analyze the floating situation of the spin buckle roller, the mechanical analysis model of the spin buckle roller spring is established, and the force sketch is shown in Figure 16:
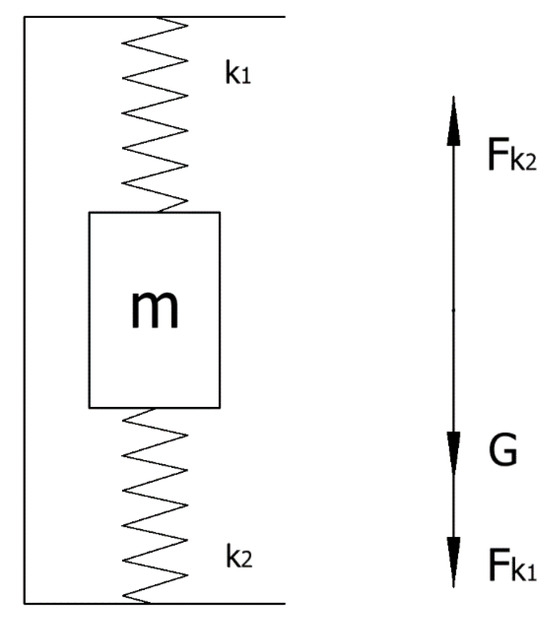
Figure 16.
Sketch of floating force on spinning buckle roller.
The floating springs of the buckling roller are set at both ends of the friction ring, and the floating of the buckling roller is the floating of the friction ring. In the absence of spin buckle work, the friction ring is at rest, and at the same time, by the upper and lower ends of the spring force, the spring is in a compressed state. Combined with Figure 16, we can obtained the force balance equation:
where , are the spring force of the spring , on the friction ring, and G is the friction ring by gravity. For ease of calculation, the spring names , are used to express the spring coefficient of each spring. Combined with the Equation (23), we have:
In the equation, , are the displacement compression of the spring , , respectively.
When the spin buckle roller starts to work, the floating spring in the normal state should always be in compression, and the displacement direction of the friction wheel is certain. Taking the center of mass of the spin buckle roller in the equilibrium state as the origin, the axial direction as the y-axis direction, and s as the axial displacement of the friction ring, the force equation of the friction ring is:
where is the axial friction force applied to the friction wheel, Equation (25) is the force on the friction ring when unbuckling, and Equation (26) is the force on the friction ring when buckling, and the spring forces of the two springs are in different working processes:
Equations (25)–(28) are obtained by joining them:
The above equation is a second-order constant coefficient non-chi-square linear differential equation, so that . Solving Equation (30), we can find the roller in the axial direction under the influence of friction displacement, and the equation is solved for:
2.5. Simulation Experiment
2.5.1. Simulation Process
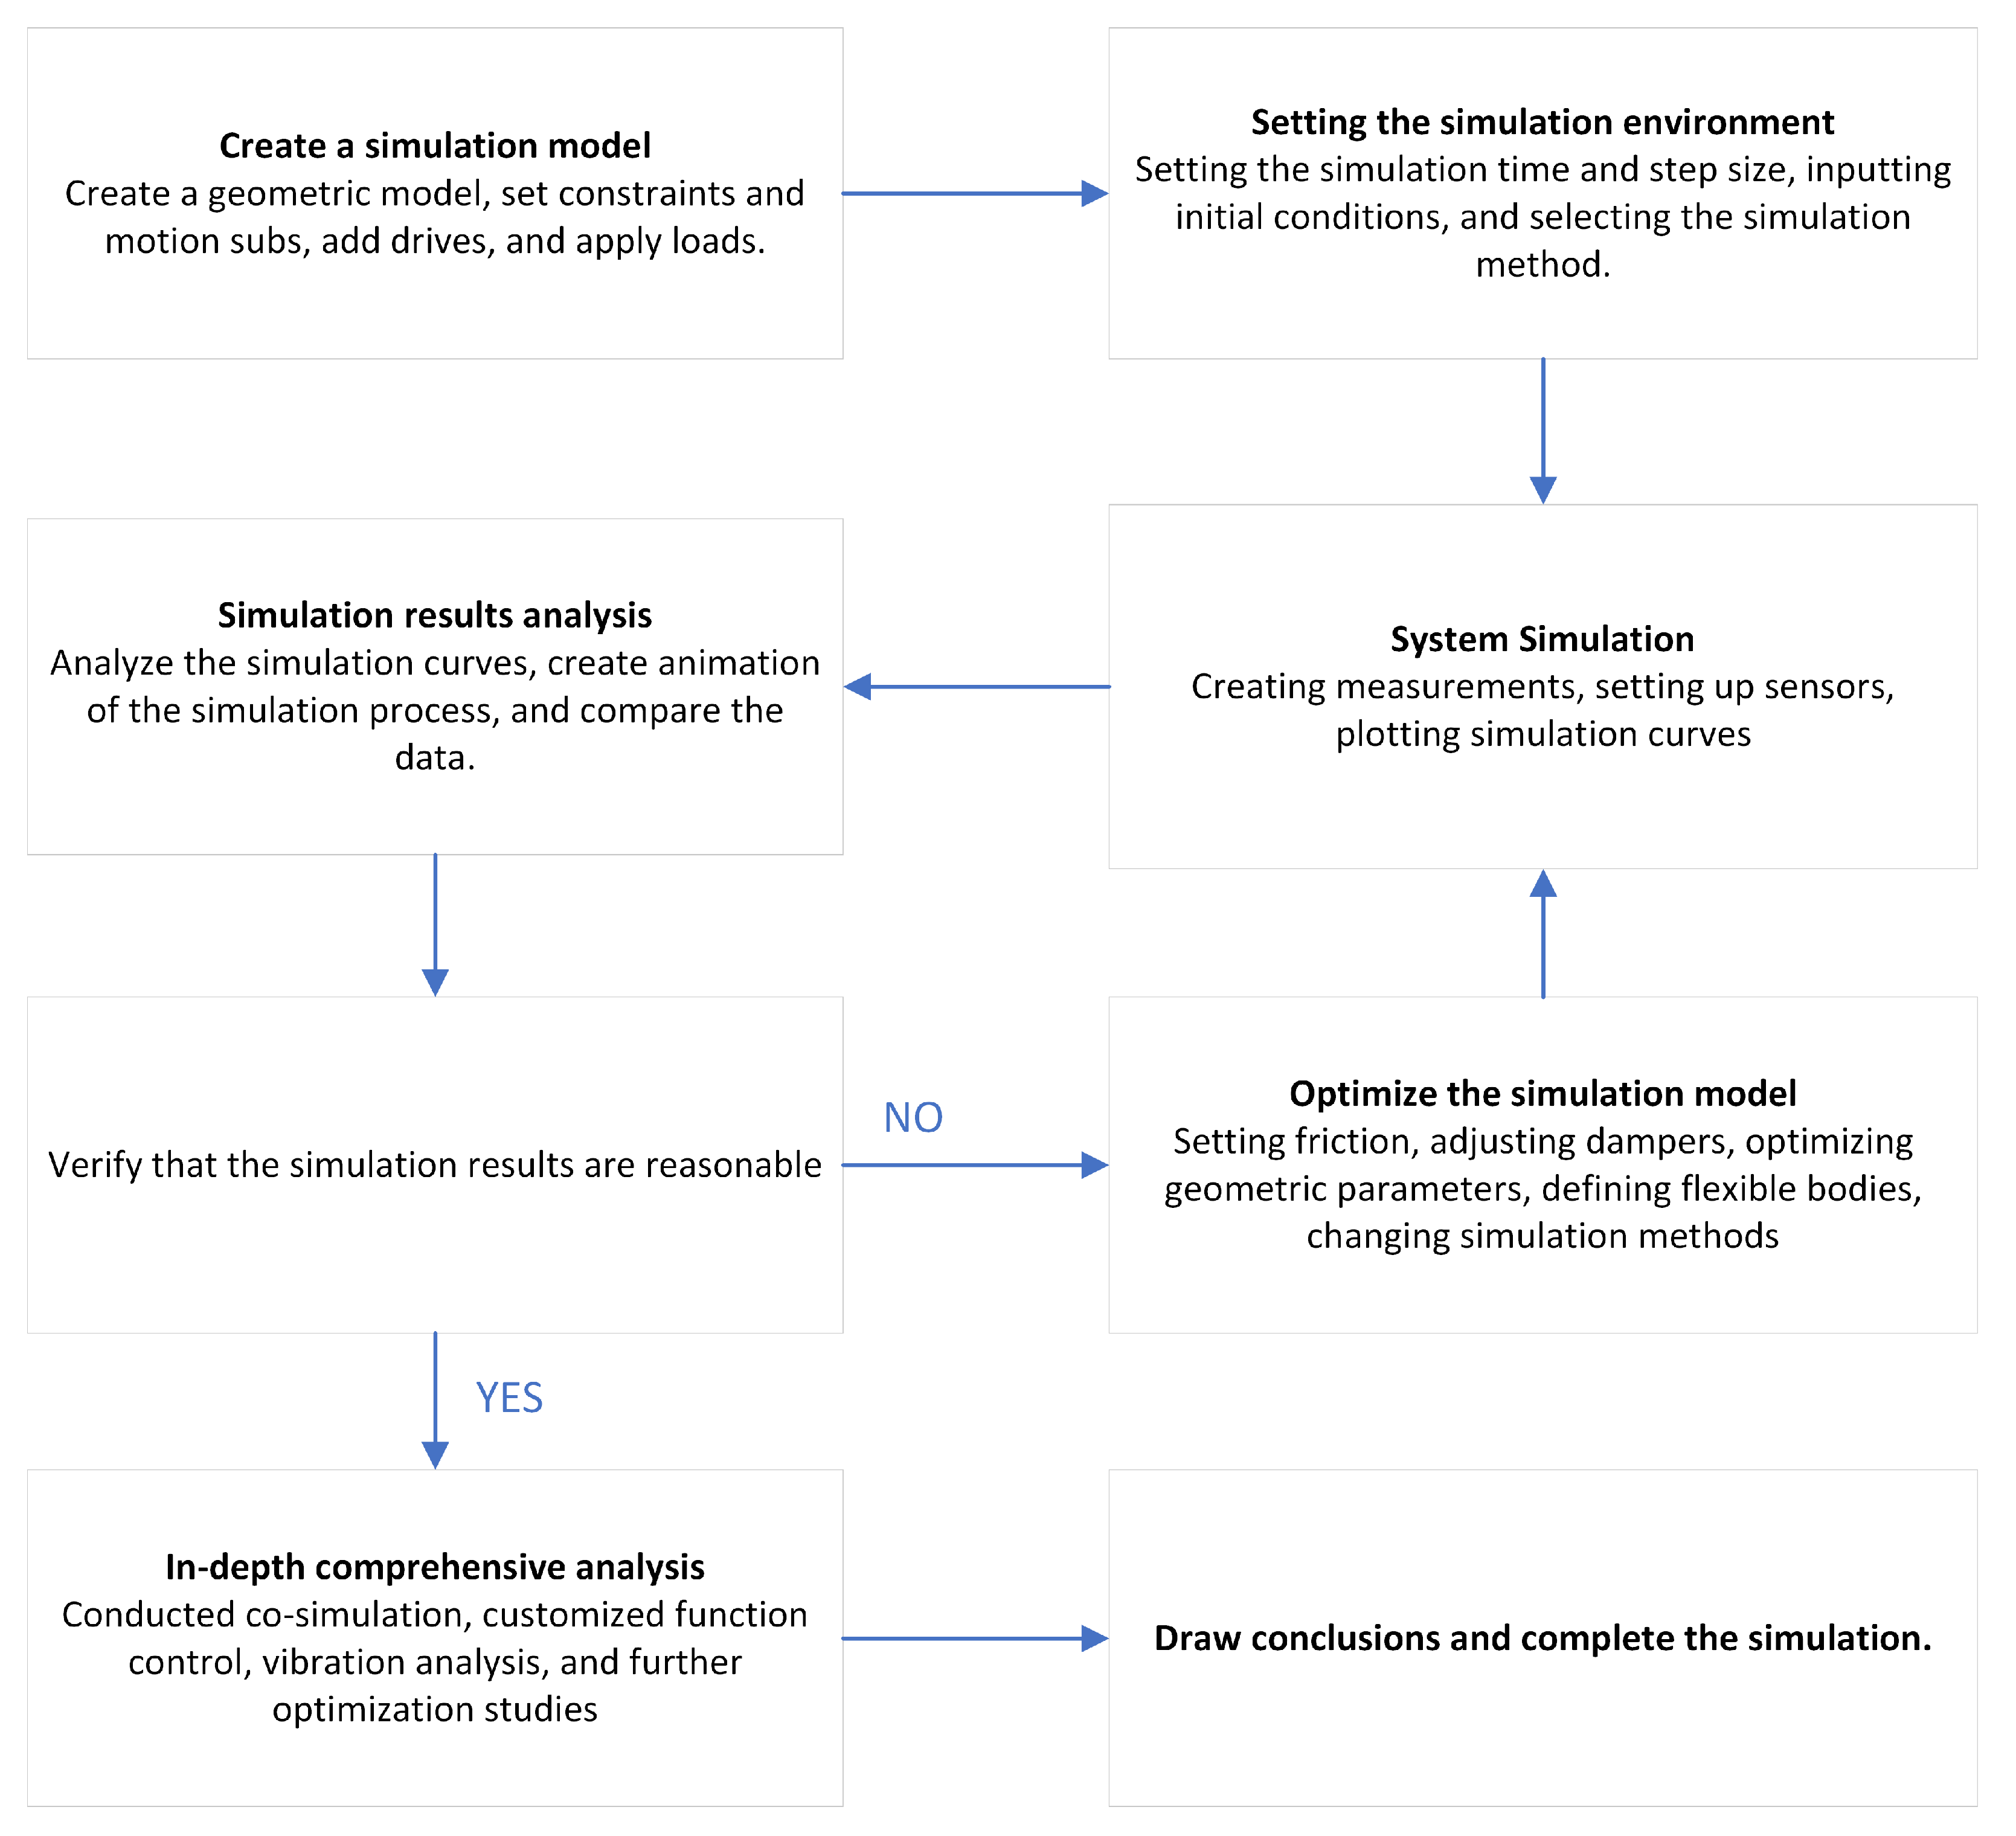
The simulation process can be summarized in two parts: modeling and solving. The modeling part includes the structural modeling of the geometric object. The physical modeling is based on the structural modeling to set the relevant physical characteristics of the object, the physical modeling of the connection relationship between the objects, or the relative motion relationship, as well as the mathematical modeling of the scalar setting of the relevant parameters or the control of the dynamic function [21,22]. The solution part is to analyze the changes in the performance parameters of the object in motion by applying different algorithms to the set the model through the integrator and solver of ADAMS. After several iterations of solving, the relevant curves and simulation animations are produced. After that, the simulation model can be further solved and analyzed by different function expansion modules [23]. The specific flow of the simulation is shown in Figure 17.
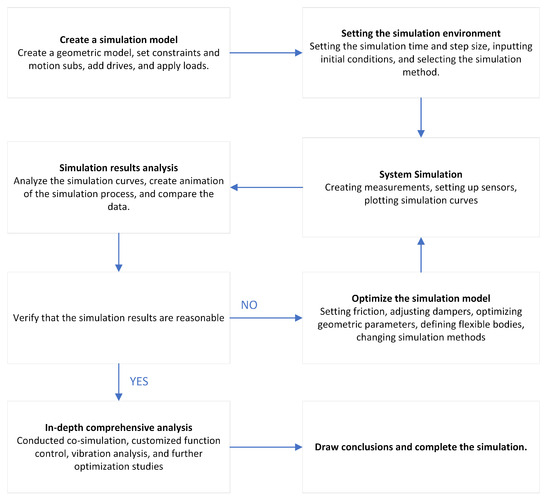
Figure 17.
Simulation flowchart.
2.5.2. Driver Addition and Simulation Environment Setup
After completing the constraint and load setting, the motion trajectory of the spin buckle mechanism is basically determined. Next, it is necessary to add the drive according to the working process of the spin buckle mechanism to make the mechanism operate. In normal operation, the spin buckle mechanism is held by the cylinder thrust on the drilling tool. Therefore, it is necessary to add a translational drive to the moving vice between the clamping cylinder barrel and the clamping cylinder piston rod so that the clamping cylinder piston rod is pushed to hold the drilling tool. After holding tight, the spin buckle roller set completes the spin buckle work, and then the piston rod pulls it back into the cylinder barrel. In order to realize the rotation of the spin buckle roller, it is necessary to add rotary drive to the rotating vice between the spin buckle roller shaft and the spin buckle motor to drive the drilling tool to rotate and complete the spin buckle work.
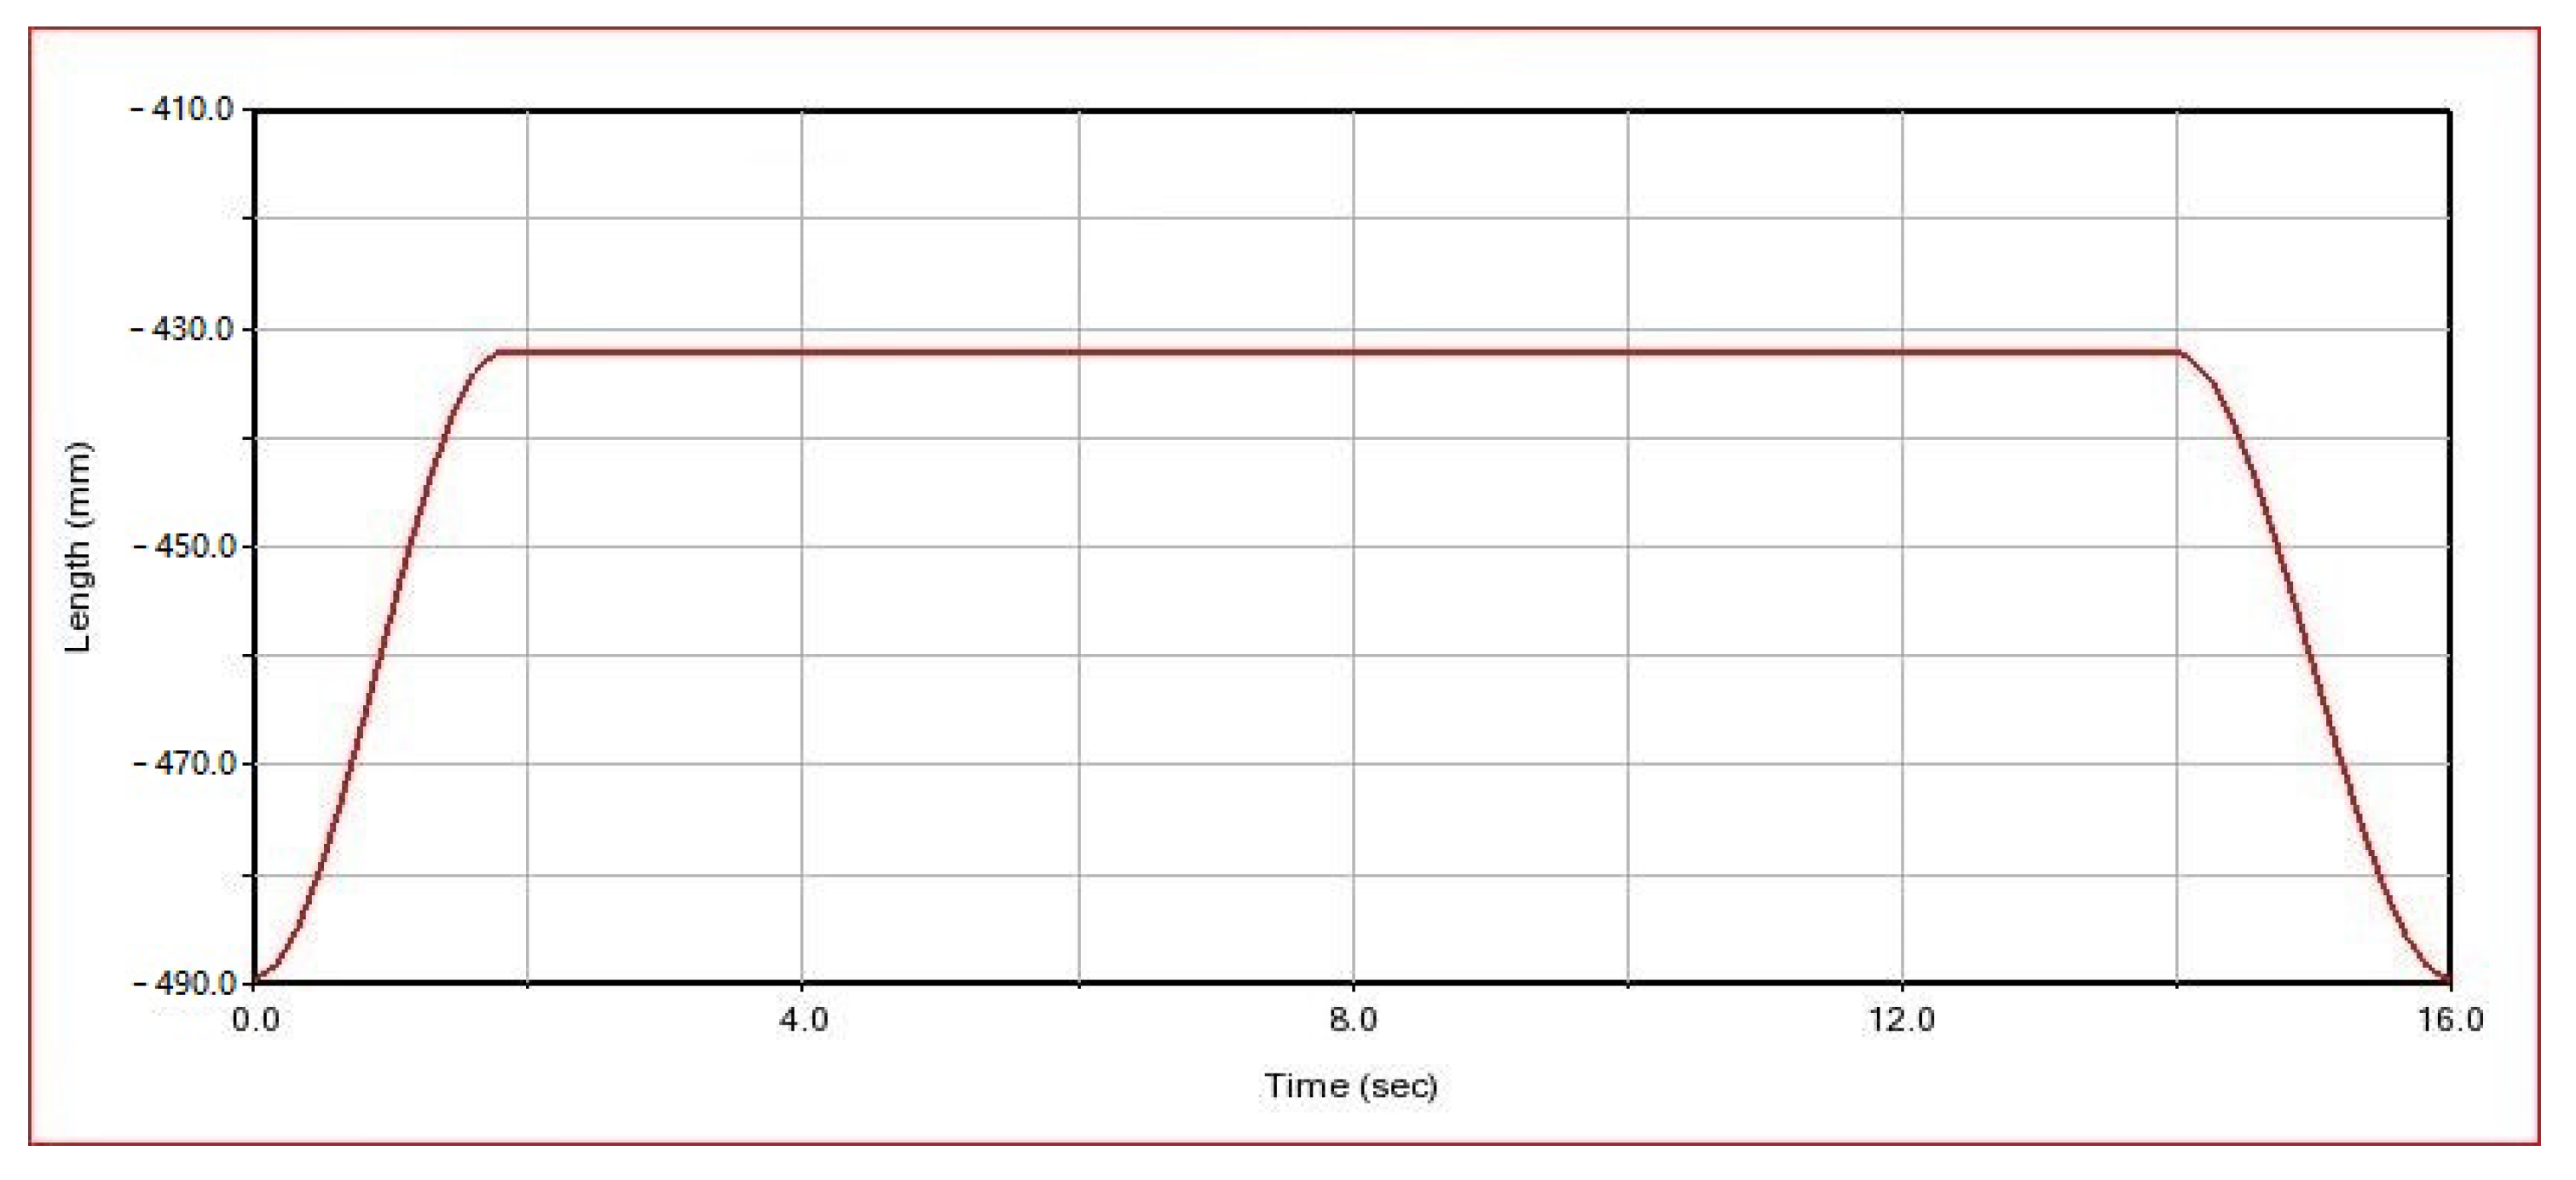
The simulation process can be realized by function control in conjunction with interactive simulation. First of all, in order to realize the holding–spin buckle–stop spin buckle–reset workflow of the spin buckle mechanism, the control of the translational drive and rotational drive can be realized by setting the STEP function and the sensor [24,25]. After that, set the simulation type, determine the simulation duration, and set the number of steps or step length as needed. Combined with the actual working conditions, the total simulation time of the working process of the spin buckle mechanism is set to 16 s, and the number of simulation experimental steps is 500. The simulation is carried out by taking the clamping of the 216 mm drilling tool as a sample [26], and the drive settings are shown in Figure 18 and Figure 19.
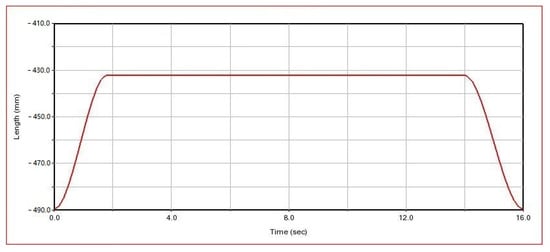
Figure 18.
Clamping cylinder piston rod displacement curve.
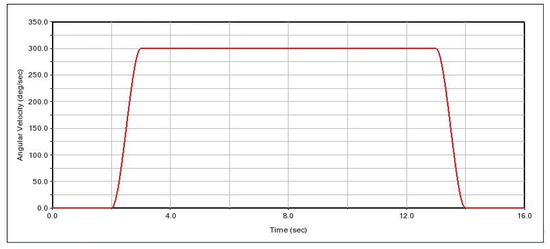
Figure 19.
Spin buckle roller speed curve.
Figure 18 shows the applied translational driving curve. From the figure, it can be seen that under the control of the STEP function, the piston rod extends and gradually approaches the drilling rod in 0∼1.8 s, and the spin buckle roller contacts the drilling tool in 1.8 s. At this time, the piston rod extends the distance of 57.5 mm; after that, the spin buckle mechanism holds the drilling tool tightly, and the force of the piston rod is gradually increased. After 0.2 s adjustment, the spinning buckle mechanism keeps holding until 14 s, during which the spinning buckle roller starts to work; the spinning buckle completes its work at 14 s, and the thrust force of the piston rod gradually decreases within 0.2 s; the piston rod is withdrawn from 14.2 to 16 s.
Figure 19 demonstrates the driving speed curves of the four spin buckle rollers. According to the figure, we can see that in 0∼2 s, the spin buckle roller waits for the spin buckle mechanism to hold the drilling tool, and the rotational speed is 0 at this time; when the roller holds the drilling tool, the roller starts to rotate, and the rotational speed grows from 0 to 300 deg/s (50/min) in 1 s; in the following 10 s, the spin buckle roller maintains this rotational speed to carry out spinning work; in 13 s, the spin buckle roller starts to slow down; in 14 s, the speed returns to zero, and the spinning action is completed, waiting for the piston rod to be retracted; in 16 s, the mechanism is reset, and the simulation experiment is finished.
3. Results and Discussion
3.1. Simulation and Experimental Analysis of the Contact Force between the Spinning Roller and Drilling Tools
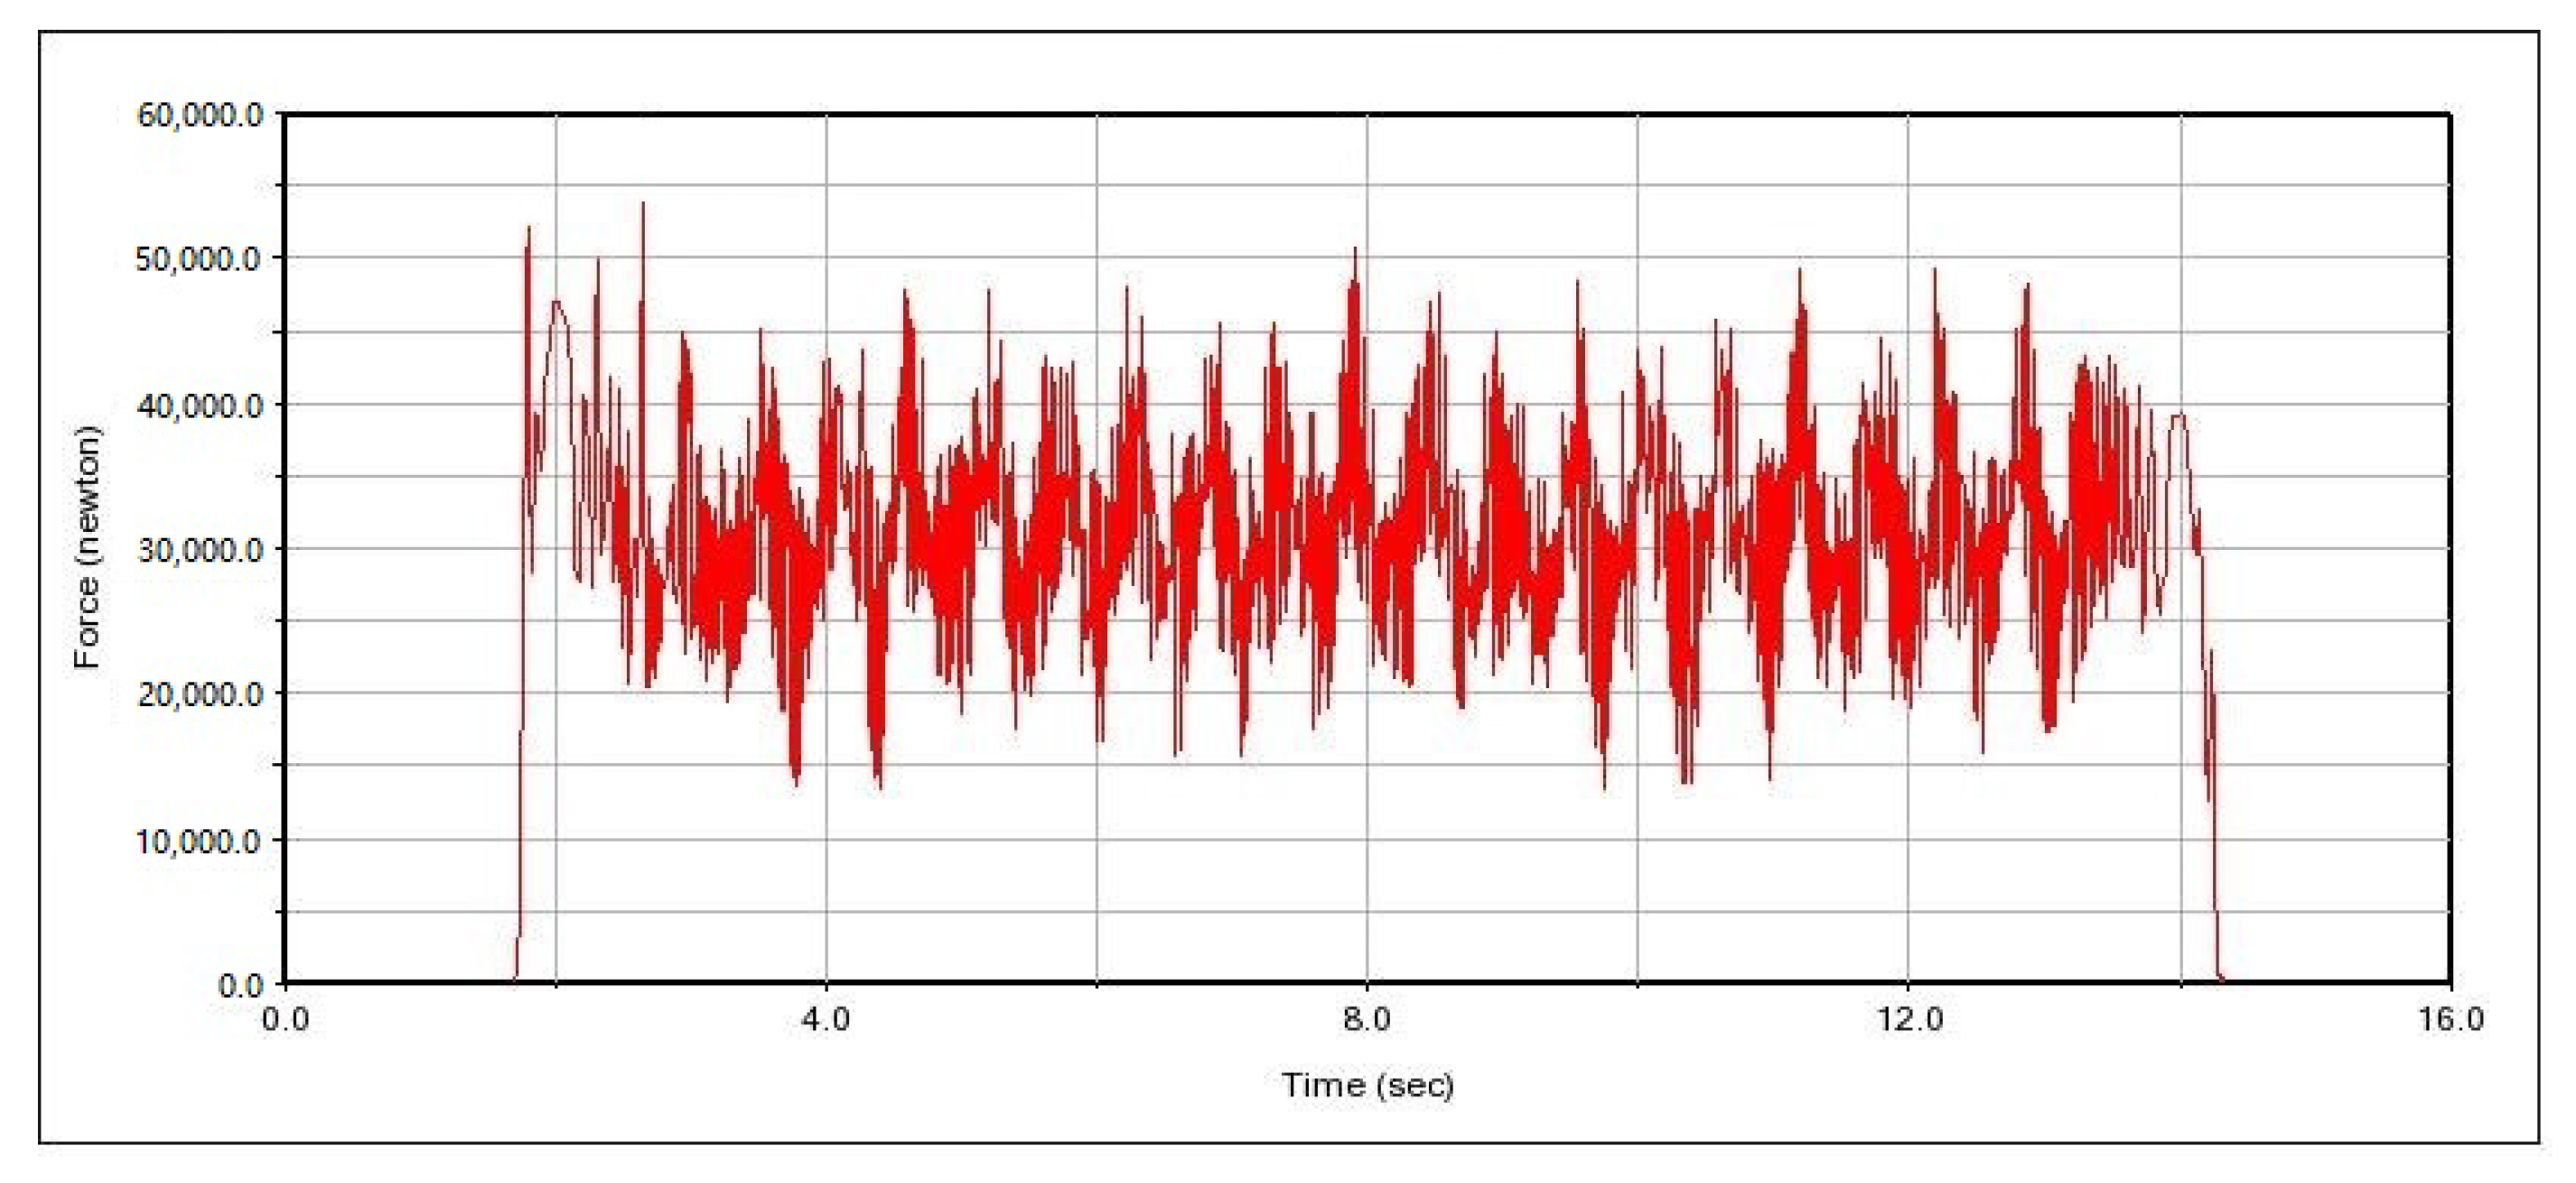
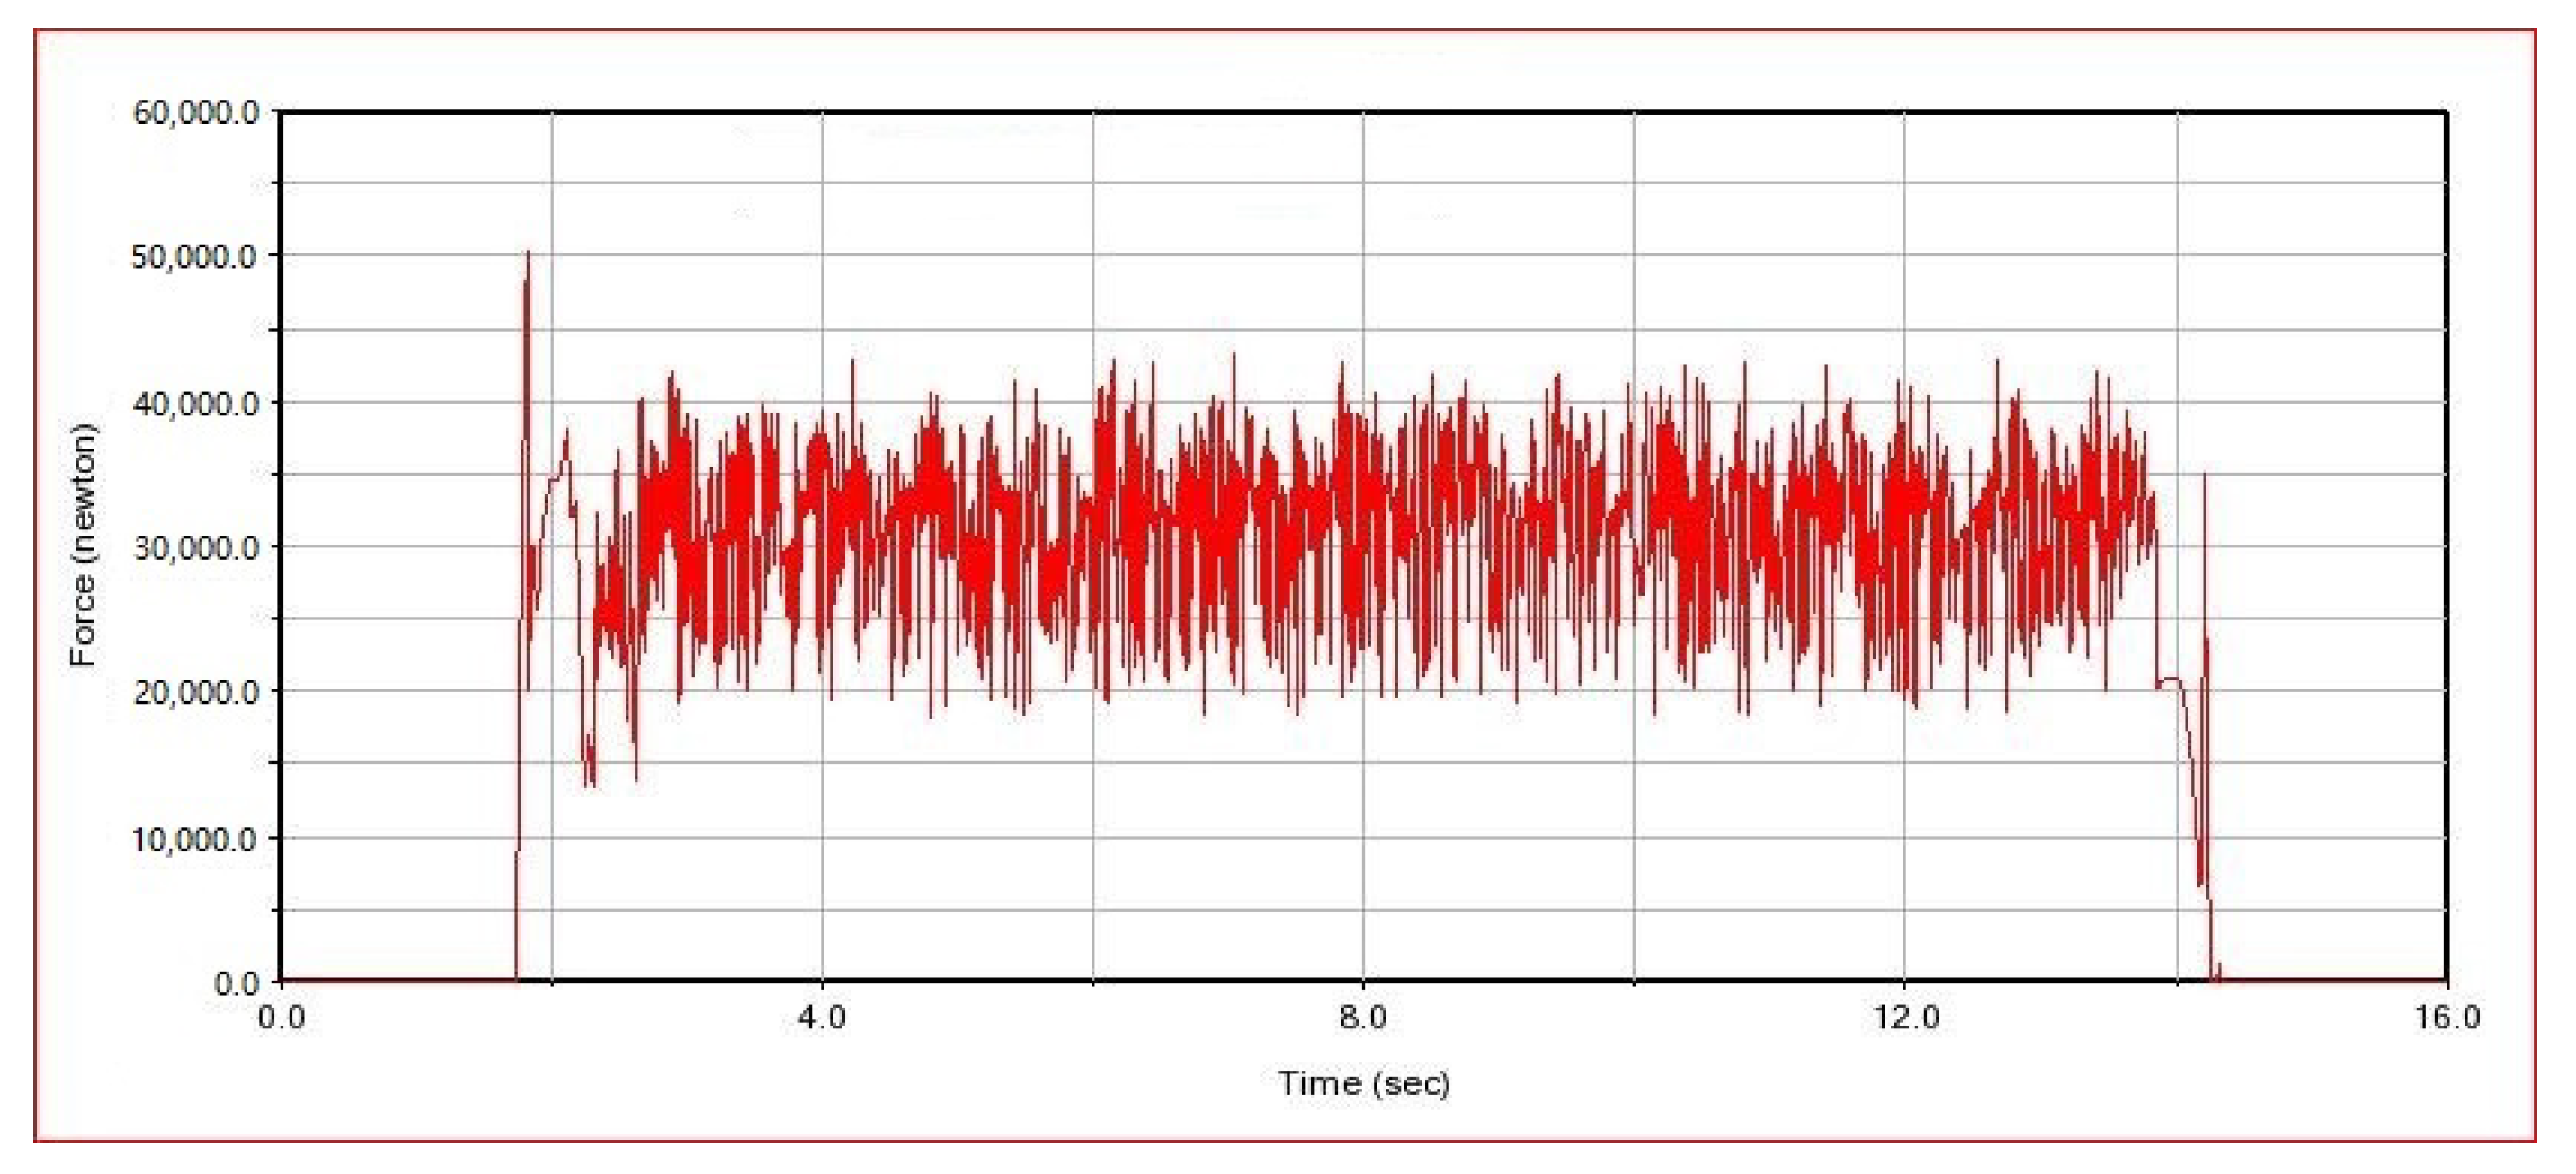
The size of the contact force between the spin buckle roller and the drilling tool directly affects the efficiency of the iron roughneck spin buckle work, which is an important factor. Rotary buckle work is a dynamic process, and the force between the dynamic rotating parts is unstable in the motion state. By analyzing the change in contact force, the vibration of the mechanism during the work can be speculated and the rationality of the design can be verified. Figure 20, Figure 21, Figure 22 and Figure 23 show the contact force curves between the four spin buckle rollers and the drilling tools obtained from the simulation experiments.

Figure 20.
Change curve of contact force between spinning roller 1 and drilling tool.

Figure 21.
Change curve of contact force between spinning roller 2 and drilling tool.
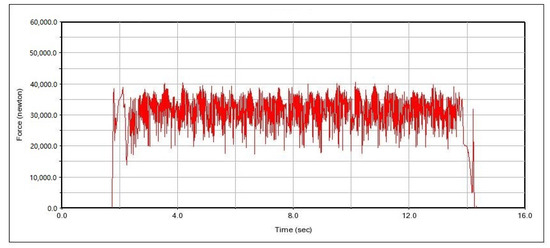
Figure 22.
Change curve of contact force between spinning roller 3 and drilling tool.
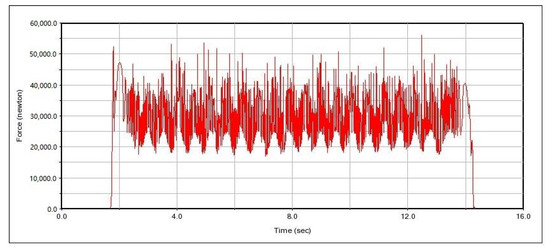
Figure 23.
Change curve of contact force between spinning roller 4 and drilling tool.
Spin buckle roller 1 and spin buckle roller 2 are two spin buckle rollers on the same spin buckle roller set, and spin buckle roller 3 and spin buckle roller 4 are fixed on another spin buckle roller set. Combined with Figure 20, Figure 21, Figure 22 and Figure 23, it can be seen that at time t = 1.8 s, the spin buckle roller is in contact with the drilling tool, and due to a certain initial speed of the spin buckle mechanism, a certain amount of collision is generated at the moment of contacting with the drill pipe, so that the force on the roller is suddenly increased. After 0.2 bs adjustment, the rotational speed of the spin buckle roller is gradually increased in 2∼3 s for the accelerating stage, and the spin buckle roller runs with a fixed rotational speed for 3 s. At the early stage of acceleration, because the rotational speed of the spin buckle roller is not high, the movement between the roller and the drilling tool is relatively smooth, and the the fluctuation frequency of the force curves of the four spin buckle rollers is not large, but there is a slight difference in amplitude due to the collision; the rotational speed of the spin buckle roller is constant within 3∼13 s, and the contact force between the spin buckle roller and the drilling tool starts to fluctuate up and down around a certain value, which is due to the fact that the spin buckle roller is in the state of relative contact with the drilling tool, and the two contacts are affected by forces of various directions. This is because the spin buckling roller and the drilling tool are in the relative contact operation state, and the contact state of both of them changes constantly under the influence of the force in each direction, which causes the instantaneous value of the contact force to fluctuate under the influence of the vibration and other factors.
It can be seen from the figure that the vibration frequency and amplitude of two spin buckle rollers (such as roller 1 and roller 2, or roller 3 and roller 4) installed on the same roller support seat are different, and the reason for analyzing the difference is due to the installation position of the clamping cylinder close to the side of the roller support seat, and the rigidity of the two ends of the support seat will have a little difference when the spin buckle roller is clamping the drilling tools, which will lead to a difference in vibration conditions of the spin buckle rollers installed on the two sides of the roller support seat. This leads to a difference in the vibration of the spinning buckle rollers mounted on both sides of the roller support. However, from the overall situation, the contact force of the four spin buckle rollers fluctuates around 30 kN, and the average force is basically the same; it is able to meet the demand of the spin buckle clamping force.
3.2. Comparative Simulation and Experimental Analysis of Force on Piston Rod of Clamping Cylinder
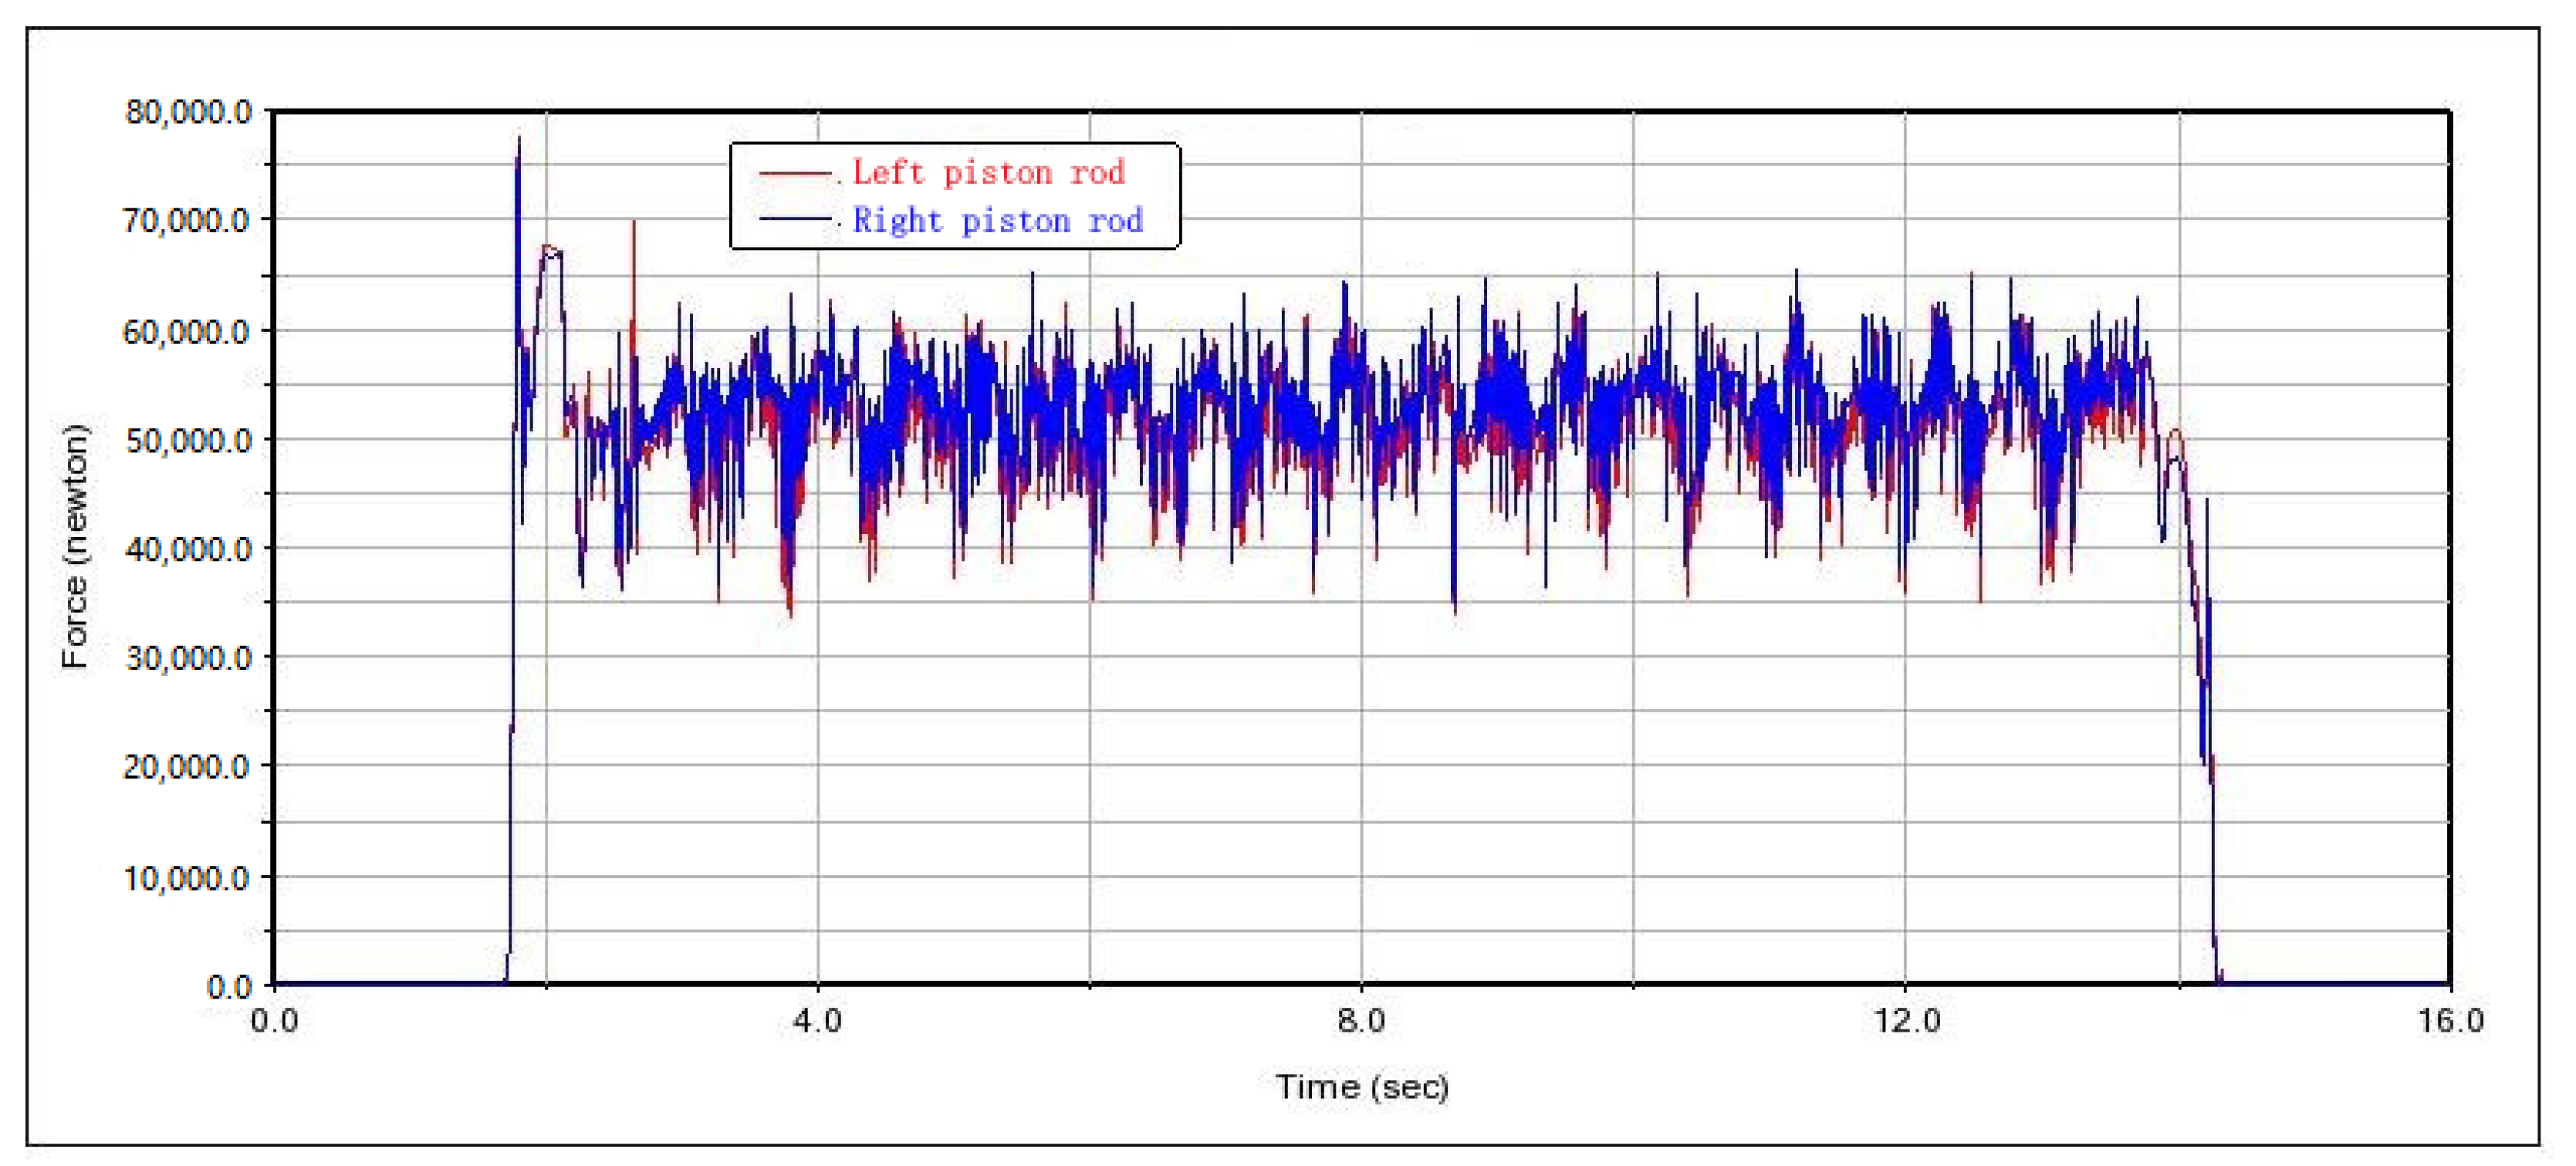
The force curve of the piston rod of the clamping cylinder is shown in Figure 24. According to the figure, we can see that the roller contacts the drilling tool at t = 1.8 s, the force of the two piston rods starts to increase at the same time, and the size of the resulting collision force and the trend of change are the same. At the beginning of the spin buckle work, the rotational speed of the roller is low, and the force curve of the two piston rods is almost the same, which indirectly proves that the synchronization of the piston rods is good. After 3∼13 s to set a fixed speed to start the spin buckle, the force curve of the two piston rods has a small difference , but the overall trend is close to the size of the force, which is around 50 kN up and floating down. Combined with Equation (4), the spin buckle mechanism force analysis, it can be deduced that when the piston rod force is 50 kN, the theoretical contact force between the spin buckle roller and drilling tool is 31.17 kN, which is similar to the simulation results, proving the correctness of the theoretical analysis and simulation analysis. At t = 13 s, the speed of the spin buckle roller began to reduce; at this time, the force changes in two piston rods began to tend to be stable, and the amplitude of the vibration decreased. At t = 14 s, the spin buckle roller speed began to decrease, and the vibration amplitude of the two piston rods began to stabilize. At t = 14 s, the spin buckle roller speed began to decrease. At t = 14 s, the spin buckle roller speed began to decrease, and the vibration amplitude of the two piston rods began to change. At t = 14 s, the spinning buckle ends, the two piston rods enter the adjustment stage, and the force decreases to 0 with a similar trend.
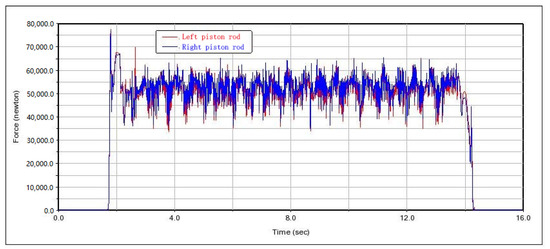
Figure 24.
Two pairs of clamp cylinder piston rod force.
Figure 25 shows the curve comparison of the force of the two spin buckle rollers on the same side as the force of the piston rod. Figure 25a shows the curve comparison of the force of the two spin buckle rollers on the left side with the force of the piston rod. Figure 25b shows the curve comparison of the force of the two spin buckle rollers on the right side with the force of the piston rod. It can be seen through the comparison in the figure that in the complete process of the piston rod extending to retracting, the trend of the force of the two spin buckle rollers on the same side and the force of the piston rod is basically the same, which indicates that the driving force applied by the clamping cylinder can effectively make the spin buckle roller hold the drilling tool and carry out the spinning buckle action.

Figure 25.
Comparison of the force on the piston rod of the spinning buckle roller–clamping cylinder. (a) Comparison of forces on the left roller set and cylinder. (b) Comparison of forces on the right roller set and cylinder.
3.3. Experimental Analysis of Axial Floating Simulation of Spinning Buckle Roller
Since the spin buckle roller is equipped with a floating spring as a floating device to reduce the relative axial displacement between the spin buckle roller and the drilling tool, it is important to analyze the actual floating effect of the spin buckle roller to verify the reliability of the floating device. In order to realize the actual effect of the floating spring, the spring effect is simulated in the simulation model by creating a flexible connection between the friction ring of the spin buckle roller and the roller shaft, and the axial displacement of the friction ring of the spin buckle roller can be regarded as the axial displacement of the spin buckle roller. The axial displacement curve of the spin buckle roller is shown in Figure 26.

Figure 26.
Axial displacement curve of each spinning buckle roller. (a) Comparison curve of axial displacement of each spinning buckle roller. (b) Localized enlargement of the axial displacement curve of each spinning buckle roller.
Curves 1∼4 in Figure 26a are the axial displacement curves of the four spin buckle rollers, from which it can be seen that no axial displacement of the spin buckle rollers occurs in 0∼2 s when the spin buckle work does not start; when the spin buckle work starts at t = 2 s, under the influence of axial friction, the rollers start to move axially along with the drilling tool, and the displacement increases linearly with a smooth change, and the trend of the axial displacement curves of each spin buckle roller is the same.
Figure 26b shows the partial enlargement of the axial displacement curve of each spin buckle roller. From the data in the figure, it can be seen that the maximum axial displacement of each spin buckle roller is in the range of 28.34∼28.73 mm, and the maximum relative axial displacement is about 0.39 mm, which indicates that the synchronization of the axial movement of each roller is better; at t = 14.2 s, the work of the spin buckle is finished, and the roller is reset by the effect of gravity, and the spring compression amount reaches 10.38 mm in a short period of time due to the effect of gravity potential energy and quickly returns to the initial value under the influence of damping.
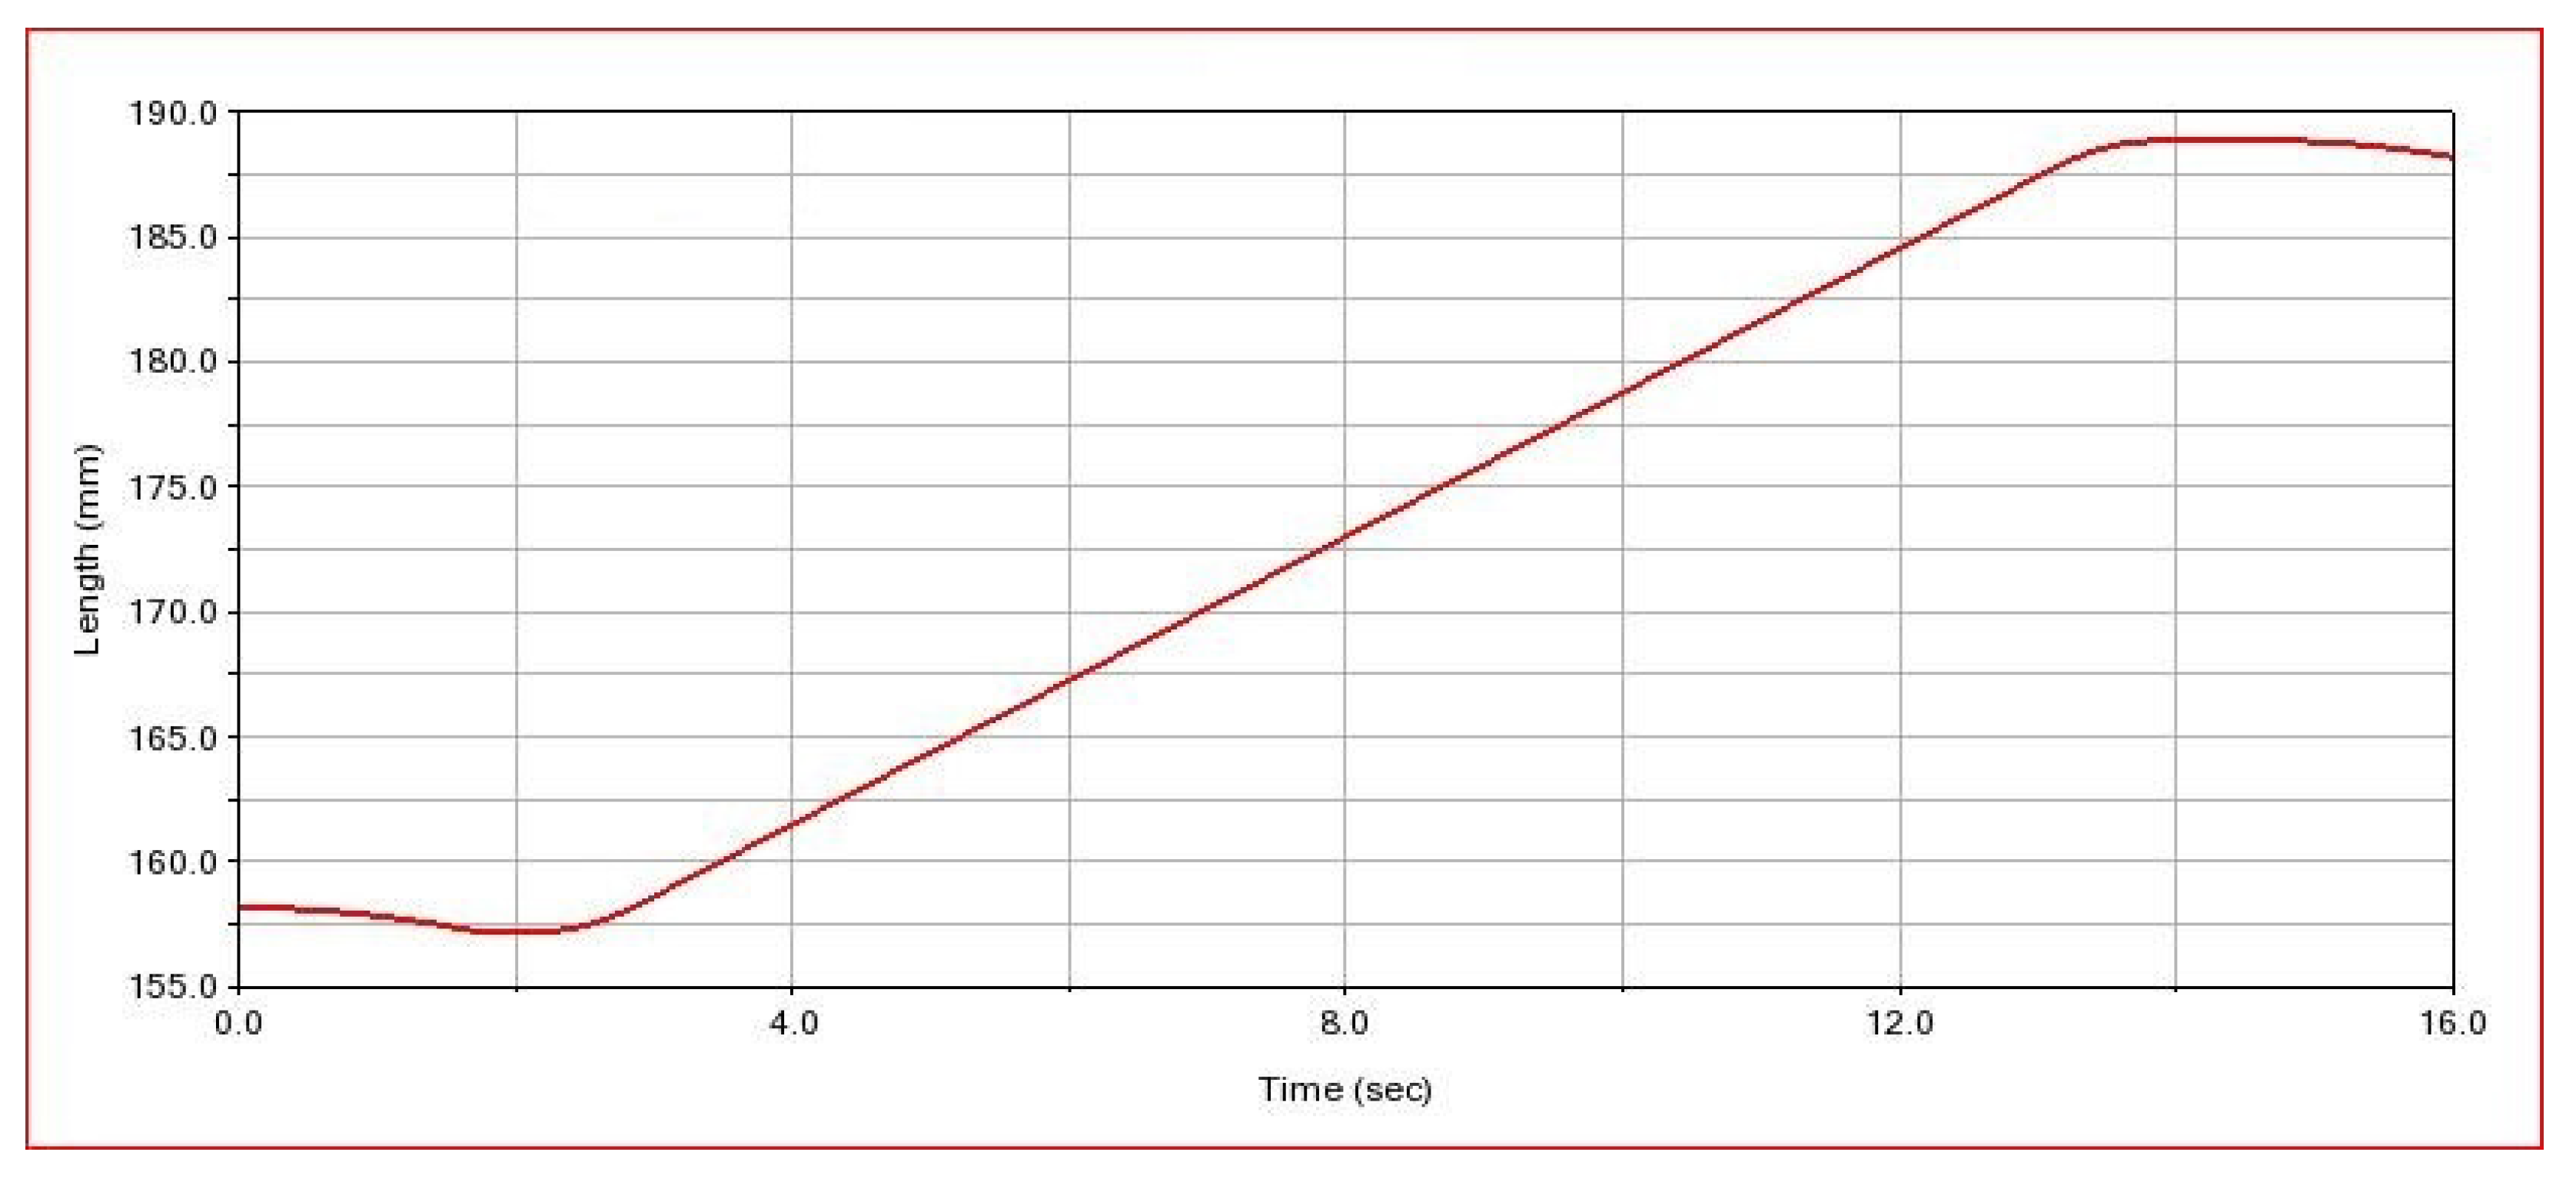
Figure 27 demonstrates the axial displacement curve of the drilling tool. From the figure, it can be observed that at the beginning of the simulation, under the influence of the gravity field, the drilling tool is displaced along the direction of gravity for a certain distance, and its axial position changes from 158.18 mm to 157.19 mm; when t = 1.8 s, the spin buckle mechanism holds the drilling tool tightly so that it stops the displacement along the direction of gravity, and it starts to move towards the opposite direction of gravity under the driving of the spin buckle roller when t = 2 s; the actual axial displacement reaches the maximum value at t = 14 s, and it is measured that the actual axial displacement is 31.68 mm. Combined with the analysis of the axial movement of the spin buckle roller, it can be seen that the drilling tool moves in the axial direction with the drilling tool in the process of displacement, and the different spin buckle roller moves in the axial direction with the drilling tool under the action of the floating spring by 28.34∼28.73 mm, and the relative displacement between the roller and the drilling tool is about 2.95∼3.34 mm.The relative displacement is small and meets the working requirements. By comparing the axial displacement between the spin buckle roller and the drilling tool, it can be proved that the floating effect of the roller floating device is good, which plays a useful role in reducing the relative displacement between the drilling tool and the roller.
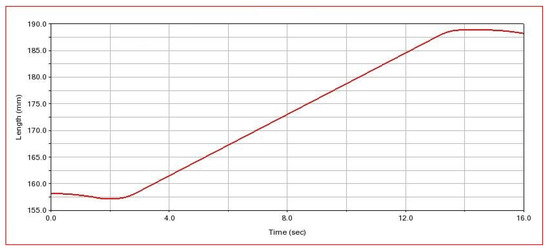
Figure 27.
Drilling tool axial displacement curve.
4. Conclusions
In this paper, a new type of iron roughneck and its spinning buckle performance are studied and analyzed. The main innovations of this work are as follows:
- Aiming at the current problems of poor centering performance of iron roughneck clamp body, low efficiency of spin buckle, complex floating mechanism, and poor floating effect, we have researched and designed a new one-piece iron roughneck.
- The contact and friction between the spin buckle roller and the drilling tool are analyzed from the contact mechanics point of view, and the spin buckle roller with axial floating adaptive function is designed, and the axial maximum floating of the spin buckle roller is made to be 31.68 mm.
- A new synchronized alignment mechanism is designed so that the four spin buckle rollers can synchronize the contact force output of about 30 kN to reduce machine damage.
- The kinematics and dynamics of the spin buckle mechanism are simulated and analyzed with the help of ADAMS simulation software. The dynamic simulation model of the spin buckle mechanism is established, the simulation analysis of the spin buckle mechanism is carried out, and the relevant parameter curves of the spin buckle mechanism are obtained. The performance of the spin buckle mechanism is analyzed by combining with the simulation results and comparing with the theoretical analysis results, which verifies the correctness of the theoretical analysis and the reasonableness of the simulation results.
In this paper, the simulation analysis of the spin buckle mechanism is based on the ideal operation of the control system, which does not take into account the operation of the control system in the actual work, and the control system of the spin buckle mechanism can be studied to carry out joint simulation analysis. In the dynamic simulation of the spin buckle mechanism, the model of the spin buckle mechanism is simplified, the model of the mechanism is regarded as a rigid body that does not undergo elastic deformation, and subsequent work can be carried out to analyze the simulation of the spin buckle mechanism in the model of a flexible body to obtain more realistic data results.
Author Contributions
Conceptualization, Y.S. and D.H.; methodology, Y.S. and D.H.; software, Y.S. and D.H.; validation, Y.S., D.H. and D.C.; formal analysis, Y.S. and C.L.; investigation, Y.S. and D.H.; resources, Y.S., D.H. and D.C.; data curation, Y.S. and D.H.; writing—original draft preparation, Y.S.; writing—review and editing, Y.S., D.H. and C.L.; visualization, D.H.; supervision, Y.S.; project administration, Y.S.; funding acquisition, Y.S. All authors have read and agreed to the published version of the manuscript.
Funding
This research was funded by Jilin Provincial Department of Science and Technology, grant number 20220201037GX.
Data Availability Statement
The data present in this study are available on request from the corresponding author.
Conflicts of Interest
The authors declare no conflicts of interest.
References
- Hongsheng, Z.; Hao, Y.; Jinfeng, Z. Current Status and Prospects of Iron Drillers. Oil Mine Mach. 2008, 37, 12–16. [Google Scholar]
- Yong, Z.; Qingyou, L.; Xiaowei, C. Development of a new type of lightweight iron driller. Oil Mine Mach. 2007, 36, 73–75. [Google Scholar]
- Mingqian, L.; Jiqing, H. Development and Application of Torque Spinning Machine for Oil Drilling Tools. Pet. Mach. 2005, 33, 27–28. [Google Scholar]
- Zhang, K.; Liu, Y.; Jia, H.; Yan, F.; Xue, G. Research on a Three-Dimensional Fuzzy Active Disturbance Rejection Controller for the Mechanical Arm of an Iron Roughneck. Processes 2023, 11, 1409. [Google Scholar] [CrossRef]
- Shuai, J.Z. A Study of Trajectory Planning for Electric Iron Roughnecks. Master’s Thesis, Xi’an Petroleum University, Xi’an, China, 2023. [Google Scholar]
- Fengqing, Z. ST-80C iron roughneck hydraulic system modification. China Pet. Chem. Stand. Qual. 2024, 44, 148–149+152. [Google Scholar]
- Tangyi, Y. Simulation and Design of Hydraulic System for TZG/G200 Rail Type Iron Roughneck. Master’s Thesis, Northeast Petroleum University, Daqing, China, 2016. [Google Scholar]
- Shengjie, H. Design and Realization of Electric Iron Roughneck Controller. Master’s Thesis, Xi’an Petroleum University, Xi’an, China, 2023. [Google Scholar]
- Bin, H.K. Mechanical Study of TZG216-110 Iron Roughneck Punching Buckle Pliers. Master’s Thesis, Lanzhou University of Science and Technology, Lanzhou, China, 2009. [Google Scholar]
- Sun, Y.; Zhang, F.; Wang, Q.; Gao, K. Application of “Crust 1” 10k ultra-deep scientific drilling rig in Songliao Basin Drilling Project (CCSD-SKII). J. Pet. Sci. Eng. 2016, 145, 222–229. [Google Scholar]
- Man, X.; Yongbai, S.; Xiaoli, L. Design of iron driller’s spinning mechanism. In Proceedings of the 18th Annual National Academic Exchange Conference on Prospecting Engineering (Geotechnical Drilling and Excavation Engineering), Harbin, China, 19–22 October 2015; China Geological Publishing House: Beijing, China, 2015; pp. 142–145. [Google Scholar]
- Xiaotong, X. Design and Analysis of New Iron Driller. Master’s Thesis, Dalian University of Technology, Dalian, China, 2018. [Google Scholar]
- Sha, Y.; Li, Q.; Zhao, X. Study on the Position Deviation between the Iron Roughneck’s Spin-Rollers and the Drilling Tool. Appl. Sci. 2022, 12, 5827. [Google Scholar] [CrossRef]
- Li, Z.; Chen, L.; Zhong, Y.; Wang, L. Study on Sinusoidal Post-Buckling Deformation of Coiled Tubing in Horizontal Wells Based on the Separation Constant Method. Machines 2023, 11, 563. [Google Scholar] [CrossRef]
- Wang, P.; Xu, H.; Ma, H.; Han, H.; Yang, Y. Effects of three types of bearing misalignments on dynamic characteristics of planetary gear set-rotor system. Mech. Syst. Signal Process. 2022, 169, 108736. [Google Scholar]
- Guo, Y.; Mi, H.; Habibi, M. Electromechanical energy absorption, resonance frequency, and low-velocity impact analysis of the piezoelectric doubly curved system. Mech. Syst. Signal Process. 2021, 157, 107723. [Google Scholar]
- Johnson, K. Contact mechanics and the wear of metals. Wear 1995, 190, 162–170. [Google Scholar]
- Sánchez, E.; Cosimo, A.; Brüls, O.; Cardona, A.; Cavalieri, F.J. Non-smooth numerical solution for Coulomb friction, rolling and spinning resistance of spheres applied to flexible multibody system dynamics. Multibody Syst. Dyn. 2023, 59, 69–103. [Google Scholar]
- Xiaojun, L. Comparative Study of Fatigue Life of Roll Materials under Frictional Wear Conditions. Master’s Thesis, Wuhan Institute of Technology, Wuhan, China, 2006. [Google Scholar]
- Ozaki, S.; Tsuda, K.; Tominaga, J. Analyses of static and dynamic behavior of coned disk springs: Effects of friction boundaries. Thin-Walled Struct. 2012, 59, 132–143. [Google Scholar]
- Tahvilzadeh, M.; Aliyari-Shoorehdeli, M.; Razi-Kazemi, A.A. Model-Aided Approach for Intelligent Fault Detection System for SF 6 High-Voltage Circuit Breaker with Spring Operating Mechanism. IEEE Trans. Power Deliv. 2023, 38, 3356–3365. [Google Scholar]
- Wang, K.; Chen, G.; Wan, S.; Tian, P. Dynamic simulation analysis of CT26 operating mechanism of high-voltage circuit breaker based on ADAMS. In Proceedings of the 2016 International Conference on Advanced Electronic Science and Technology (AEST 2016), Shenzhen, China, 19–21 August 2016; Atlantis Press: Amsterdam, The Netherlands, 2016; pp. 834–843. [Google Scholar]
- Jin, M.; Yang, H.; Xie, Z.; Sun, K.; Liu, H. Ground simulation experiment verification of space robot with ADAMS and Simulink co-simulation. In Proceedings of the 2013 IEEE International Conference on Robotics and Biomimetics (ROBIO), Shenzhen, China, 12–14 December 2013; IEEE: Shenzhen, China, 2014; pp. 2529–2534. [Google Scholar]
- Kanchwala, H.; Chatterjee, A. ADAMS model validation for an all-terrain vehicle using test track data. Adv. Mech. Eng. 2019, 11, 1687814019859784. [Google Scholar]
- Yixuan, L.; Qing, X.; Yingmou, Z.; Zhuoyu, H. The Application of ADAMS Software to Vehicle Handling Stability: A Review. In Proceedings of the IncoME-VI and TEPEN 2021: Performance Engineering and Maintenance Engineering; Mechanisms and Machine Science. Springer: Cham, Switzerland, 2022; pp. 785–795. [Google Scholar]
- Zhao, X.Y. Simulation Analyzing for Spinner Institutions of Iron Roughneck Based on ADAMS. Appl. Mech. Mater. 2014, 488, 1264–1267. [Google Scholar]
Disclaimer/Publisher’s Note: The statements, opinions and data contained in all publications are solely those of the individual author(s) and contributor(s) and not of MDPI and/or the editor(s). MDPI and/or the editor(s) disclaim responsibility for any injury to people or property resulting from any ideas, methods, instructions or products referred to in the content. |
© 2024 by the authors. Licensee MDPI, Basel, Switzerland. This article is an open access article distributed under the terms and conditions of the Creative Commons Attribution (CC BY) license (https://creativecommons.org/licenses/by/4.0/).

