Article

Double-Sided Surface Structures with Undercuts on Cold-Rolled Steel Sheets for Interlocking in Hybrid Components

Institute of Metal Forming (IBF), RWTH Aachen University, Intzestraße 10, 52072 Aachen, Germany
*
Author to whom correspondence should be addressed.
Machines 2024, 12(8), 562; https://doi.org/10.3390/machines12080562
Submission received: 15 July 2024 / Revised: 9 August 2024 / Accepted: 13 August 2024 / Published: 16 August 2024
(This article belongs to the Special Issue Advances in Design and Manufacturing in Die Casting and Metal Forming)

Abstract

:
Weight reduction strategies are essential for the transportation sector to reduce greenhouse gas emissions or extend the range of electric vehicles. In the field of lightweight assembly strategies, multi-material design offers great potential. Joining materials typically used in the automotive sector, such as aluminum and steel, brings challenges as conventional processes such as fusion welding are unsuitable. Therefore, new technologies can extend the design options. In previous studies, a mechanical interlocking between cold-rolled surface structures with undercuts on a steel sheet and die-cast aluminum was presented. This method has now been extended to double-sided structures for more complex applications with a joint on both sheet surfaces. Numerical simulations and validation experiments were performed to investigate the manufacturing of the double-sided structures. Furthermore, the influence of the alignment of the upper and lower structures in relation to each other on the resulting structural geometry and the rolling forces were analyzed. More advantageous geometric parameters, e.g., 24% larger undercuts, and approx. 24.1% lower forming forces at 20% height reduction were observed for a shifted alignment. However, significantly higher wear of the structured rollers occurred in the corresponding experiments.

1. Introduction

Lightweight transportation structures are needed to reduce greenhouse gas emissions or to increase the range of electric vehicles [1]. Apart from the drive for weight reduction, part properties such as stiffness and collision safety need to be maintained [2]. To satisfy both demands, a multi-material design with low-density aluminum and high-strength steel is attractive to produce lightweight and crash-worthy components [3]. However, common joining techniques like welding of steel and aluminum can result in brittle intermetallic phases (IMPs) due to the dissimilar thermo-physical and metallurgical properties [4]. Therefore, conventional methods have been supplemented with joining by forming processes, which can be categorized into metallurgical and mechanical joining [5]. Cold or pressure welding can create metallurgical bonds between different materials by high interfacial pressure avoiding the problems of conventional welding. Mechanical joining processes like riveting, clinching, or hemming interlock different materials through forming techniques [6]. While joining by forming involves both materials in a solid state, hybrid molding or casting offers additional possibilities with one component in a liquid state. The advantage often includes the possibility for more complex parts with a higher design freedom, while still facilitating mass production. This process is on the one hand possible for molding with polymers [7] but also casting with metals [8]. In the case of hybrid casting, a metallurgical bonding with up to 7.7 MPa shear strength was achieved between steel and aluminum by different coatings of the steel insert [9]. Mechanically interlocking connections are attainable for both casting and molding, typically involving two steps: surface structuring and assembly [7]. Various processes can be employed for surface structuring. Subtractive processes such as micromachining [10], stamping [11], or electron and laser beam sculpturing [12] are one set of options. Conversely, there are additive processes to create ball-head pins [13] or nano-spikes [14] on the insert surface.
Few processes efficiently utilize forming processes for interlocking large areas. Channel structures with undercuts can be produced in a multi-pass cold rolling process along a continuous line, making it an efficient method to prepare expansive surface areas [15]. In the initial pass, a structural roller with machined channels imprints a rectangular structure of channels and ribs into the surface of a steel sheet (Figure 1). Previous studies used sheets of h 0 = 2.0   mm initial height and created Δ h s = 0.5   mm deep channels [15]. The sheet height at the channels h s- c is determined by the height reduction and the rib w s- r and channel w s- c width by the roller geometry. In the subsequent pass, the structure is flattened via flat rolling to a depth Δ h f . The tips of the ribs spread horizontally and form an undercut of up to w f-uc = 50   µ m width [16]. As the undercut develops, the vertical side of the rib can fold over the channel bottom, creating an inner notch of length w f-no [17]. This notch can be prone to cracking and is therefore unwanted, but not always avoidable. The structured sheet material is then inserted in a hybrid casting or molding process. The liquid material, e.g., aluminum melt, fills the undercut channels and interlocks once solidified [18]. In previous studies, a high-pressure die casting (HPDC) process was developed by the Foundry Institute (GI) of RWTH Aachen University [19]. Shear tests on flat, hybrid-casted samples have shown a maximum joint strength of 45 MPa. This strength depends on the geometry, especially the undercut width, of the structure [16].
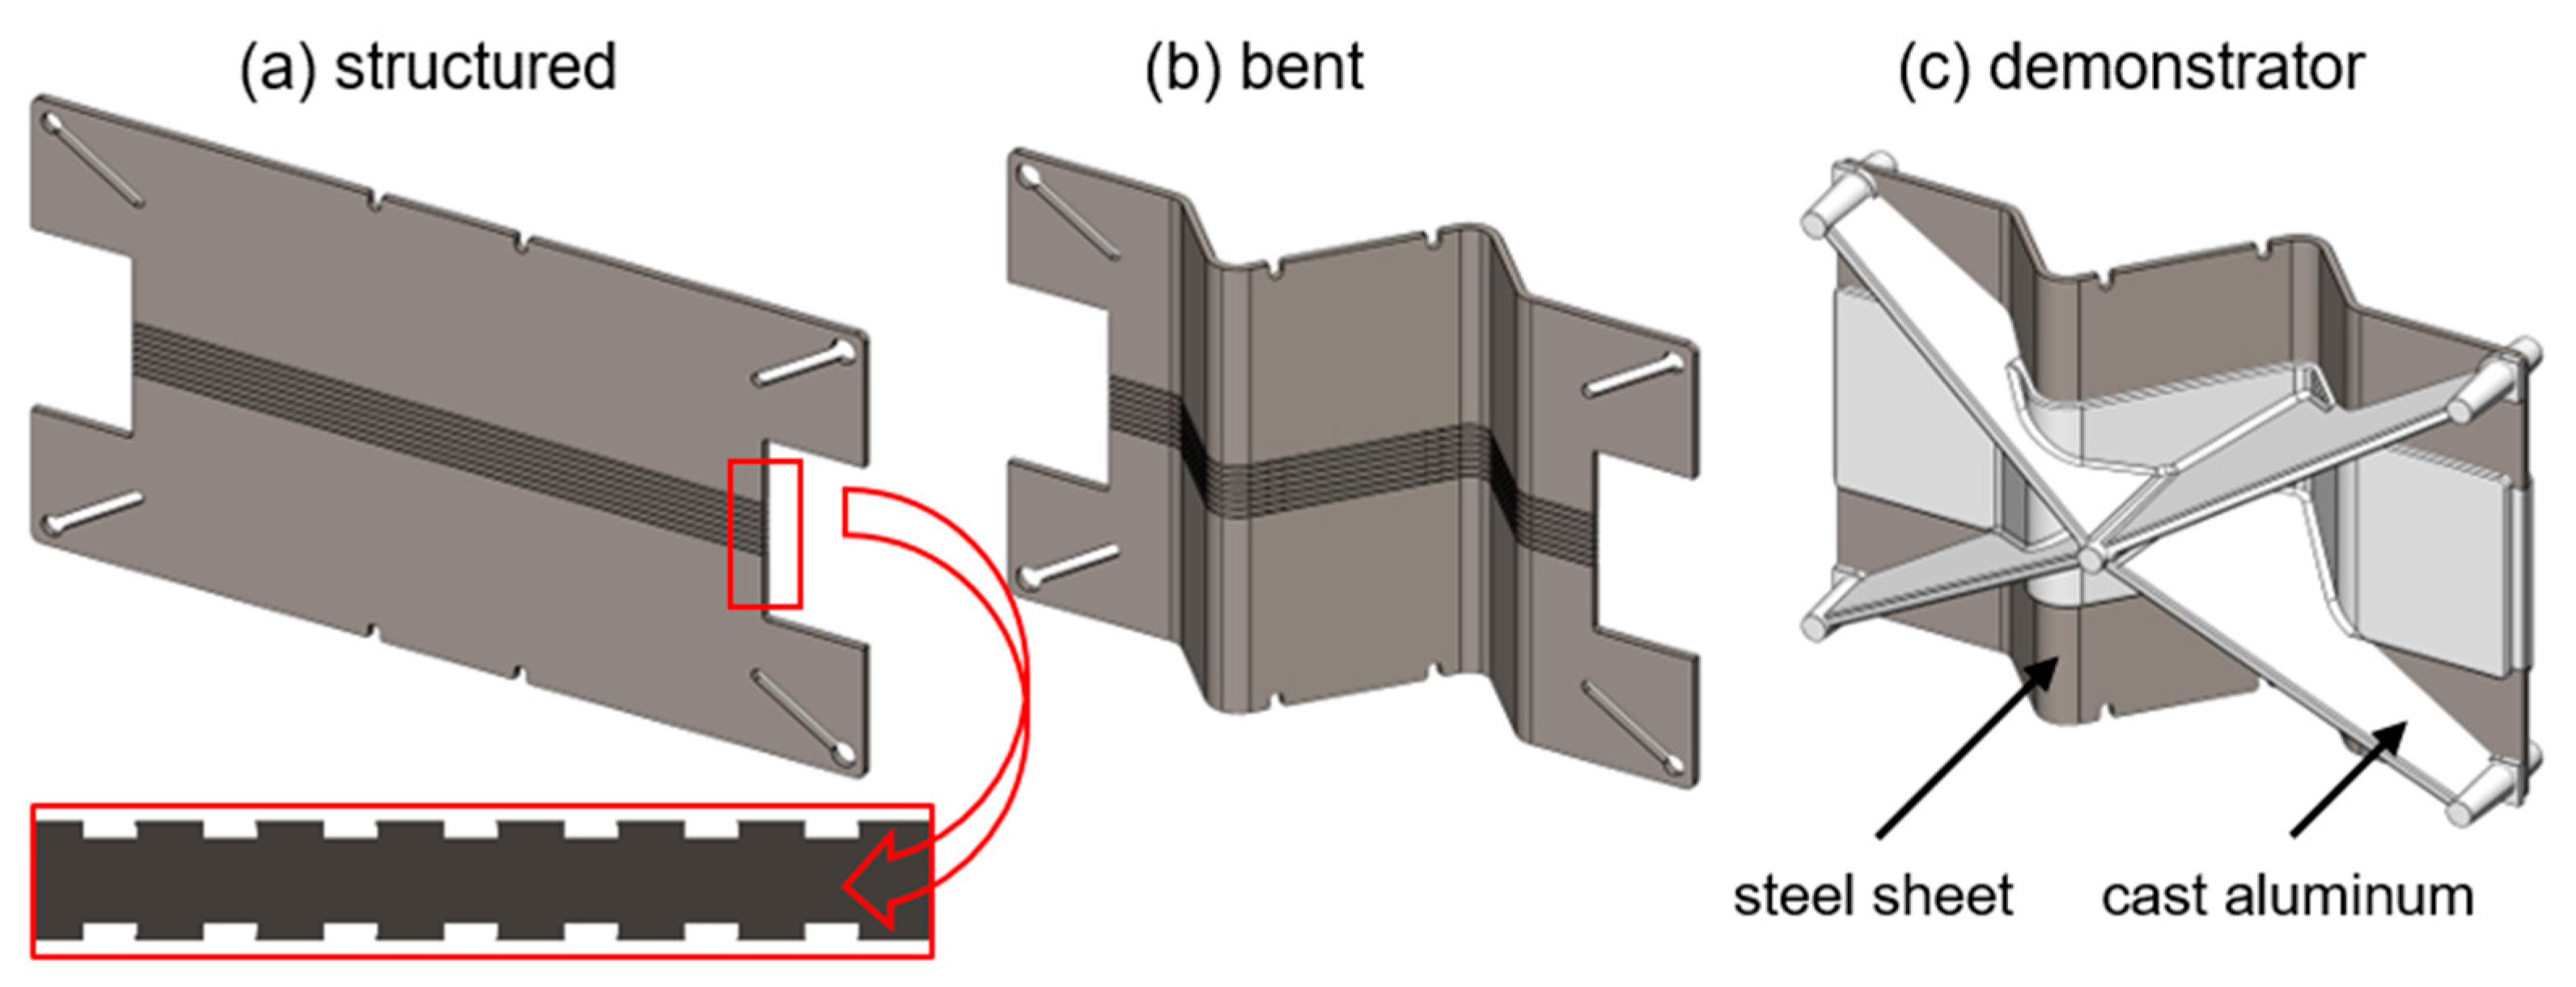
To investigate the concept close to the automotive industry level, a more complicated geometry of the multi-material component was designed based on a section of a roof cross beam (Figure 2c). This demonstrator part, with aluminum surrounding the steel insert, requires interlocking surface structures on both sides of the insert (Figure 2a) and a bending of the surface structure (Figure 2b). The effects of bending were investigated in a prior study and are not expected to have a critical influence on the orientation used in this investigation [20].
The concept of a demonstrator part with double-sided structures has been previously proven and the compound strength was analyzed with a focus on the casting parameters [21]. Tensile strengths of up to 7.4 MPa were reached for the structures in those parts.
However, the analysis of the forming process for the surface structure has thus far been limited to single-sided structures. Therefore, it remains unknown how the simultaneous imprinting from both sides affects the formation of channels and undercuts. Previous simulations indicate that for single-sided structuring, the occurring strains penetrate more than 1.0 mm inside the material, thus reaching over half the sheet thickness [17]. This leads to the hypothesis that strain hardening might reciprocally influence the structures on the upper and lower sides. The aim of this study is to understand the material flow during the formation of the double-sided surface structures. This knowledge will be used in the next stage to further optimize the process in regard to undercut width and, thus, joint strength.
When the same structure of 1.0 mm wide channels and ribs is imprinted on both sides of the sheet simultaneously, two alignments appear reasonable: a mirrored alignment of the ribs and channels and a shifted alignment where the channel on one side aligns with the rib on the other side (Figure 3).

2. Materials and Methods

To investigate the mechanisms of the two different alignments, a finite element (FE) simulation was built using the software Abaqus 2017 (Providence, Rhode Island, USA) and validated by experimental trials. Similar to previous studies, DC04 (1.0338) steel sheets with an initial thickness of h 0 = 2.0   mm and a width between 160 mm and 200 mm were used. The material properties at room temperature and the measured flow curve were presented previously [17].

2.1. FE-Simulation of the Structural Rolling Process

The 2D FE models were based on previous models from one-sided structures [17]. The rolling process and the derived 2D model with the used assumptions are schematically displayed in Figure 4.
In the first pass, the channel structure is rolled from both sides into the sheet material. The channels are imprinted in the rolling direction (RD) and the middle of the sheet. In contrast to conventional flat rolling processes, the aim is not to obtain elongation of the sheet. Rather, the process is designed to create the surface structure by allowing material flow in the normal direction (ND). It is assumed that non-deformed sheet material next to the structure in the middle prevents the material flow in the rolling direction. Therefore, the model is oriented in the transverse and normal directions, and the material flow is approximated by a 2D plane strain assumption. For simplicity, only half a channel and half a rib are modeled, and the width is kept constant by symmetry constraints at the sides. The rigid rollers then deform the sheet material by a vertical movement. This means that the kinetics of the simulation resemble rather an upsetting than a rolling process and the rollers are acting like punches. After deformation, the punches open to relieve elastic deformation. A surface-to-surface contact was defined between the rollers and the sheet with a typical cold-rolling friction coefficient of μ = 0.07 [22]. An explicit solver was used because heavy local deformations occurred and it allowed the use of Arbitrary Lagrangian–Eulerian (ALE) concepts to improve the mesh quality. The explicit solver together with the assumption of strain rate independent material properties enabled a speed scaling to reduce the computational time. In the experiments, the material needs approx. 0.1 s to pass through the roll gap for a height reduction of 0.5 mm at 92.5 mm roller radius and 6.0 s for one period of roller circulation. In the simulations, the time for the upsetting was decreased by a factor of 100 to 0.001 s.
The simulation of the flattening pass uses the same definitions for contact, kinetics, and boundary conditions as the first pass. The ribs of the surface structure are flattened by flat punches. Despite the use of the explicit solver with ALE, the mesh is strongly distorted, and remeshing is needed. To consider the strain hardening from the channel rolling, the inhomogeneous field variables, i.e., stresses and strains are mapped onto the new surface. The mapping is done via predefined fields and a Python script developed earlier, which is discussed in Clausmeyer et al. [23]. The evaluation of the geometric features, e.g., channel depth Δ h f , undercut width w f-uc , and inner notch length w f-no of the final geometry was performed by a Python script.
Convergence studies regarding the mesh size and the friction coefficient were performed. An analysis of the mesh size sensitivity was conducted for the channel rolling pass. The deformable sheet was meshed with quadratic elements of type CPE4R with side lengths between 0.1 mm and 0.0075 mm. A relatively fine mesh size of 0.01 mm was selected to receive a convergence regarding the strain distribution and to display the formation of rib and channel with the needed accuracy while maintaining reasonable computational times. The chosen mesh size was used for the flattening pass as well.
To test the influence of the friction coefficient, it was changed between μ = 0.02 and μ = 0.15 . When increasing the friction coefficient from 0.02 to 0.15 for the structural rolling, the channel depth is not influenced but the rolling force increases by 16% at 24.5% height reduction. For the flattening pass, a minor effect for the undercut width (−8.25%) and the inner notch length (−13.65%) was observed for the increase of the friction coefficient from 0.02 to 0.15 at 39.5% height reduction. The rolling force during flattening increased by 25% for the same case. As the used friction coefficient of μ = 0.07 lies in this range, especially the values of the rolling force need to be critically analyzed.

2.2. Experimental Validation of Structural Cold-Rolling

The rolling was conducted on a roll-forming machine P3.160 by the company Dreistern GmbH & Co. KG (Schopfheim, Germany). Sheets of 200 mm width and 245 mm length were used for the validation of the structuring pass. For the flattening pass sheets of 160 mm width and 500 mm length were used. To achieve a straight channel structure and transfer the material in between the rolling stands, lateral guide rails were installed. Profiled rollers with 92.5 mm radius and 13 mm width were used for the first pass. The profiles consisted of seven ribs and six channels, each 1.0 mm wide and 0.5 mm deep. A fillet radius was milled at the rib edges with a size of 0.1 mm for the upper and 0.05 mm for the lower roller. A flat roller pair with a 93.0 mm radius and a 50 mm width was used for the consecutive flattening pass. The rolling speed was set to 5.8 m/min. The rolling force was measured by load cells. Despite the guide rails, a light curvature was observed and removed by roller leveling. Two samples of each sheet were extracted for cross-section preparation by water jet cutting. The resulting structure geometry was measured by a Keyence VHX-7000 digital microscope (Osaka, Japan). To make the inner notch and material flow visible, a 3% Nital etching was used for approx. 60 s. Exemplary cross-section pictures of the structural rolling and flattening pass as well as of the mirrored and shifted alignments are shown in Figure 5. Since the channels at the sides (nos. 1, 2, 6, 7) show significant deviations in shape, only the middle channels (no. 3 to 5) were used for evaluation and validation of the simulations.
For the structuring pass, the height reduction was calculated regarding Equation (1). To maintain comparability to the single-sided structures, the sum of the channel depths was used, Equation (2).
ε h , 1 = h 0     h s c h 0
Δ h s = Δ h s , up + Δ h s , low
The height reduction of the flattening pass was calculated with Equation (3) to receive an average from the upper and lower structures. In the same way, the averages from the upper and lower structures were calculated for the undercut width and inner notch length by Equation (4) and Equation (5), respectively.
ε h , 2 = 1 2 i = [ up ,   low ] Δ h s , i     Δ h f , i Δ h s , i
w f-uc = 1 2 ( w f-uc , up + w f-uc , low )
w f-no = 1 2 ( w f-no , up + w f-no , low )

3. Results and Discussion

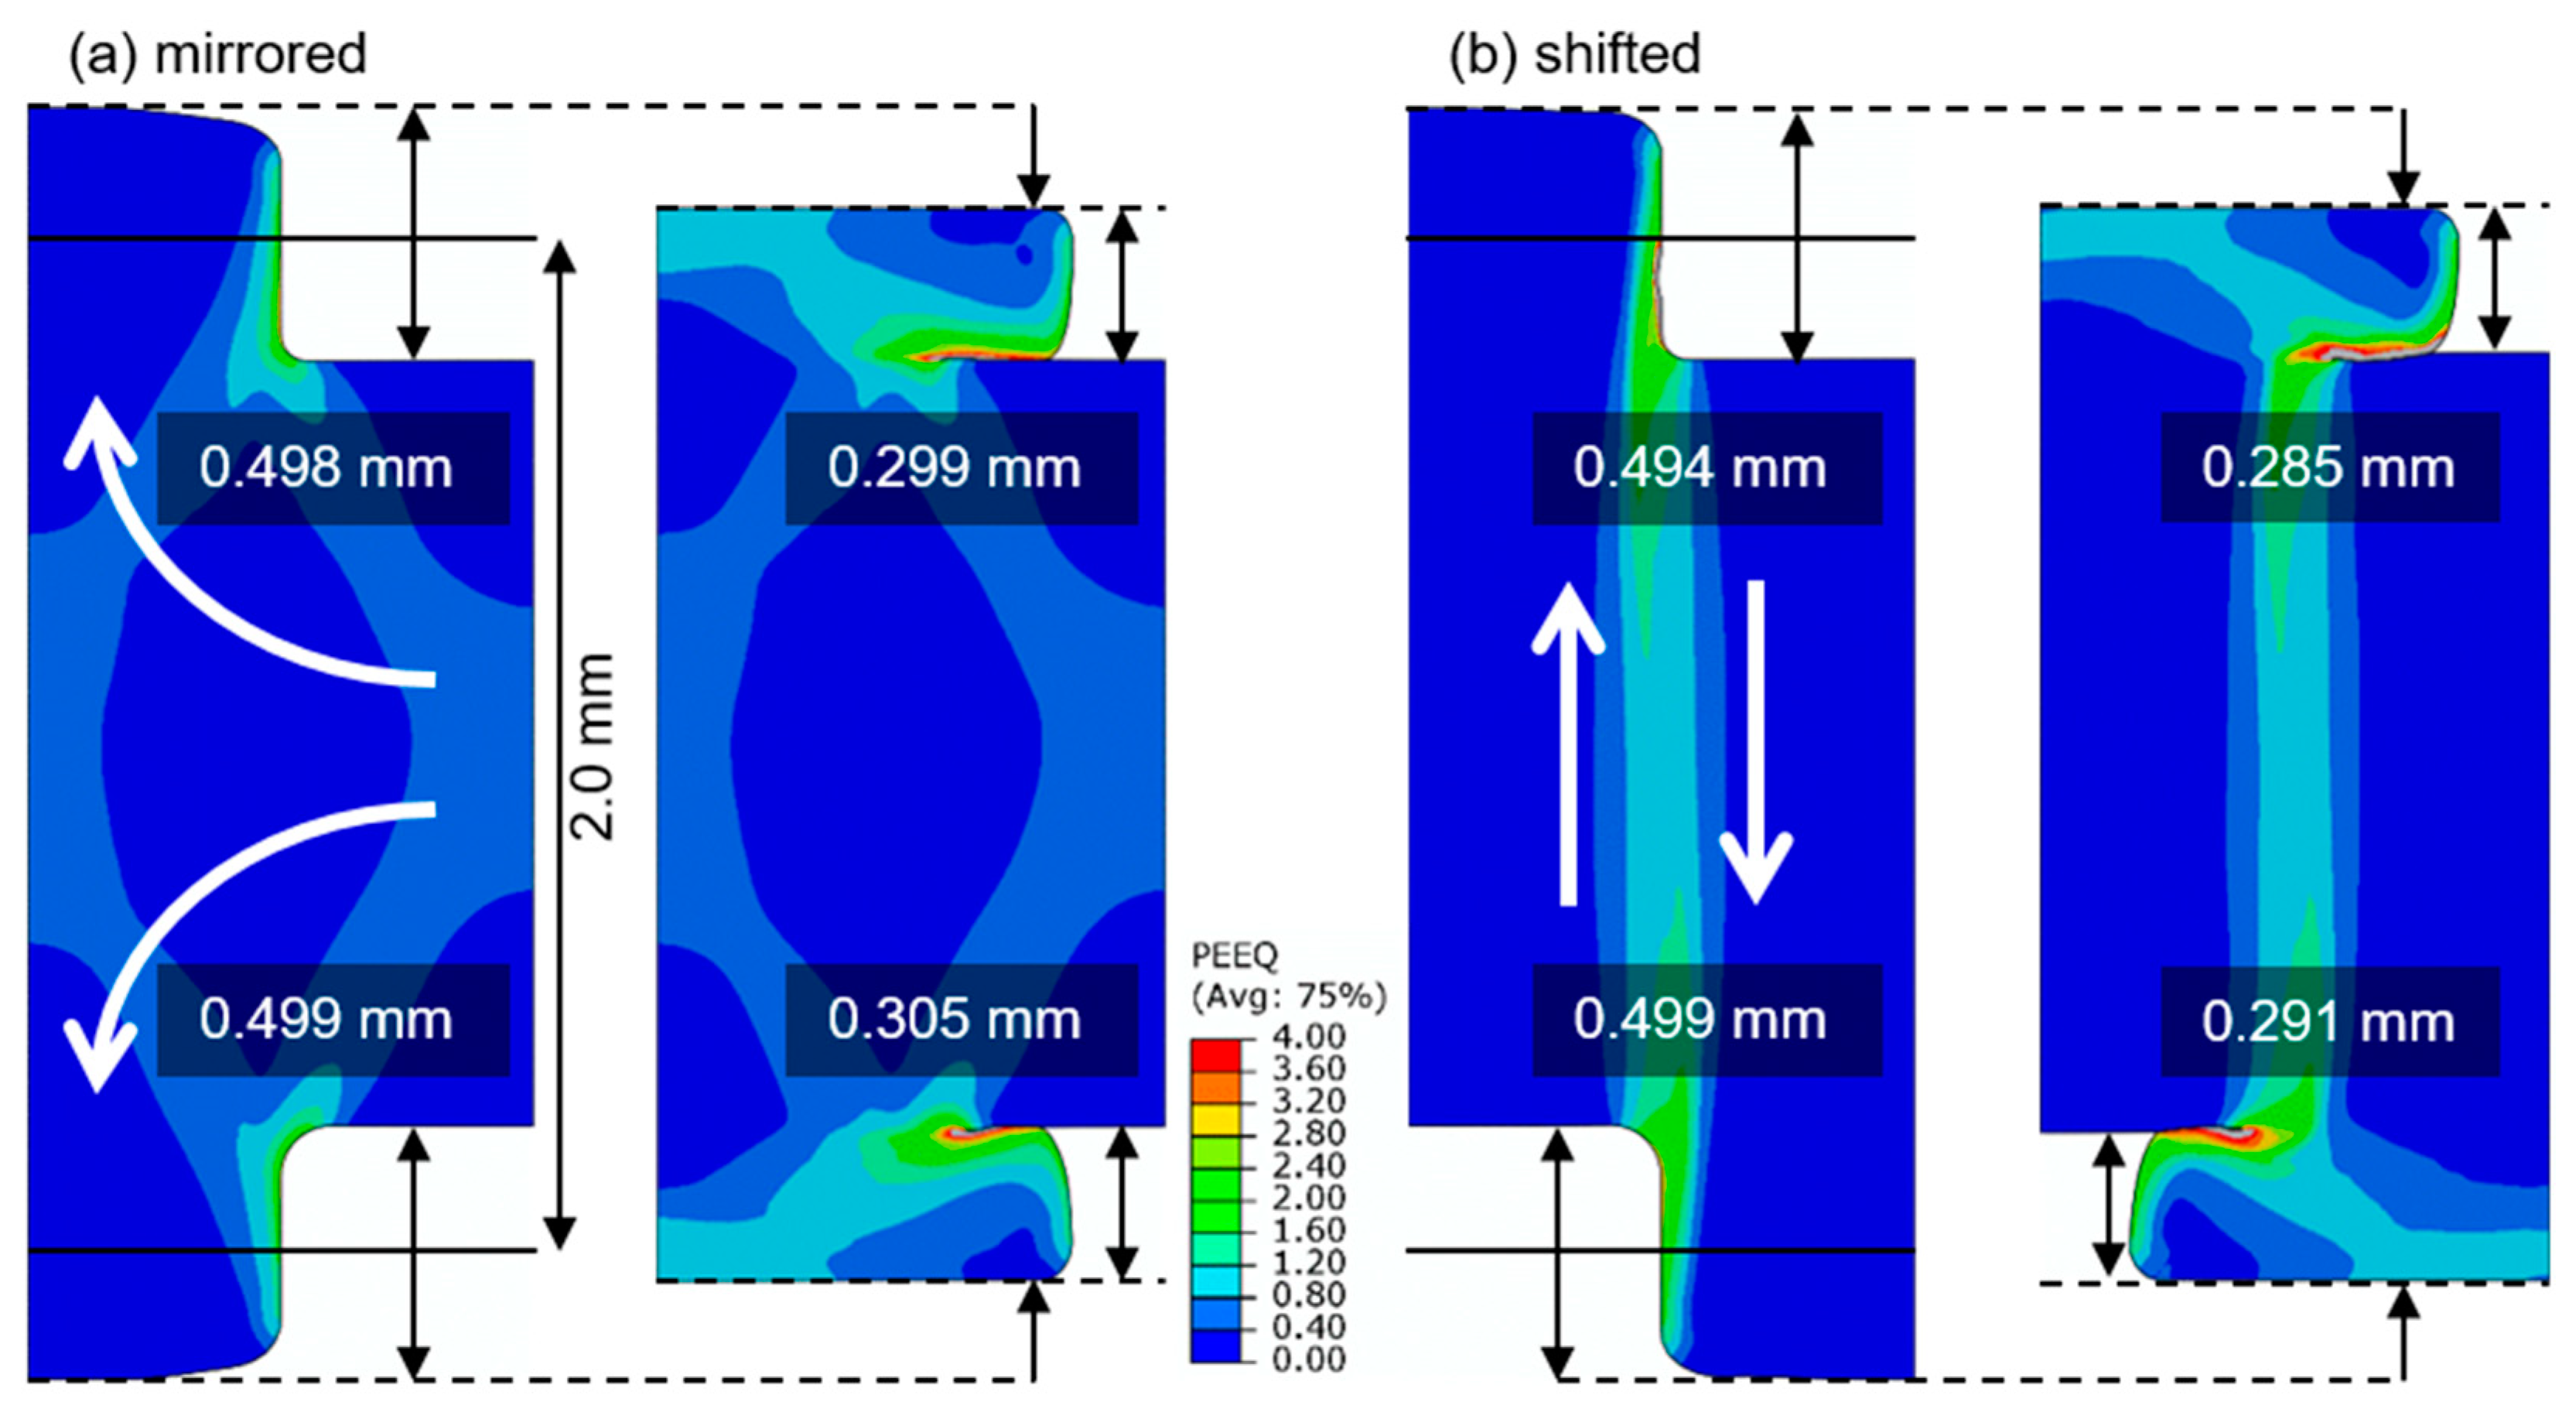
Figure 6 shows the exemplary material flow in the simulations for the structural rolling and flattening. Both alignments show channel depths of approx. 0.5 mm after the channel rolling. During the flattening, the channel depths are reduced to approx. 0.3 mm and the undercut and inner notch are clearly visible. However, the strain distribution in the two setups is very different, suggesting different material flow. It seems likely that the material flow in the mirrored alignment comes from the channel section and flows laterally and then vertically into the ribs (see white arrows). The shifted alignment shows a vertical high-strain area at the intersection between the channels and ribs. This indicates that the material is sheared in this region (see white arrows).
The material flow, which was suggested by the simulations, was also found in the experiments. Figure 7 shows close-ups of the cross-sections after structural rolling and flattening. The Nital etching makes the material flow direction visible.
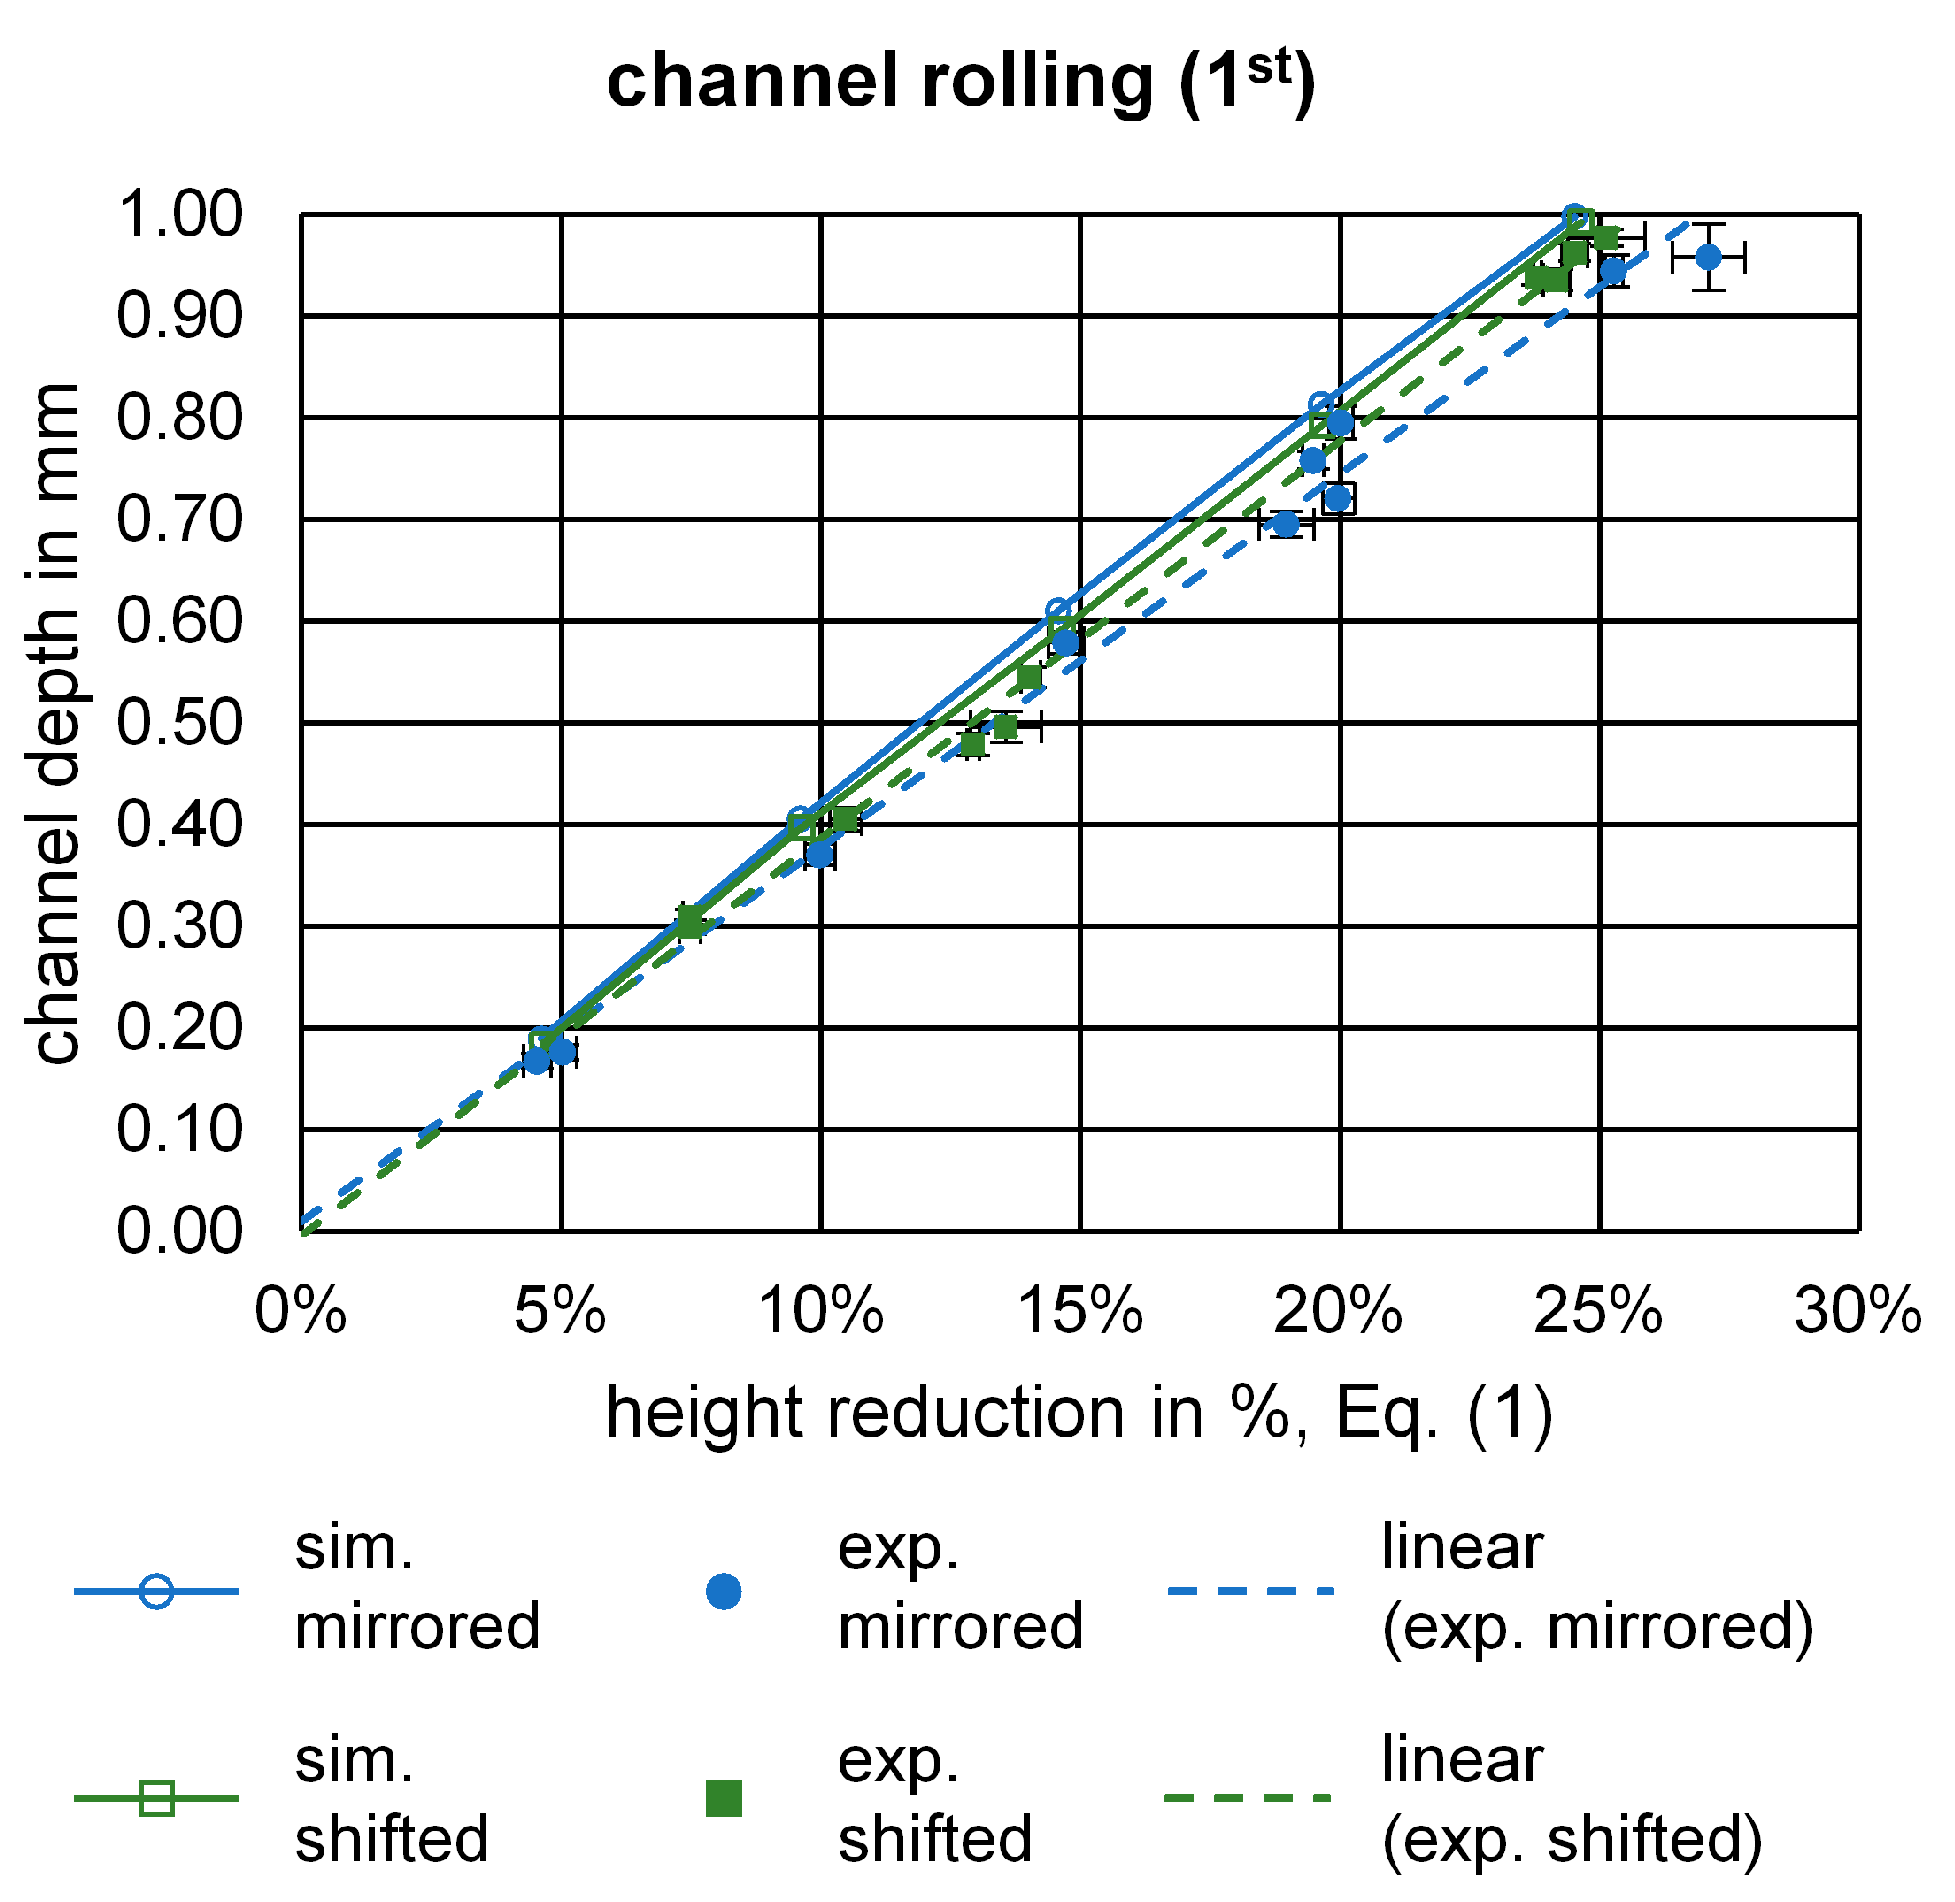
For the channel rolling, the channel depth is displayed over the height reduction for simulations and experiments in Figure 8. The plane strain simulations reach a channel depth of 1.0 mm, thus 0.5 mm for both the upper and lower channel, at a height reduction of approx. 25%, as expected. Previous studies for single-sided structures showed that the slope of the experimentally measured channel depth was only 65% as big [17]. Surprisingly, for the double-sided structures, the slope of the experimental values is much closer to the simulations. Here, a channel depth of 1.0 mm is possible with approx. a 27% height reduction for the mirrored alignment and 26% height reduction for the shifted alignment.
To compare this phenomenon, Table 1 shows the needed height reduction ε h , 1 for a channel depth Δ h s of 0.5 mm. In an ideal case without any fillets of the rib, ε h , 1 ( Δ h s = 0.5   mm ) would equal 12.5%. The simulations for all three cases show a height reduction slightly below that, as the top of the rib is curved and not ideally rectangular. For the experiments with a single-sided structure, ε h , 1 ( Δ h s = 0.5 ) is 57.3% bigger compared to the ideal case. In comparison, the double-sided structures are close to the ideal case. One reason might be the different forming kinetics, as the deformation comes from both sides. This might promote material flow in a normal direction instead of a rolling direction. Another reason might be the use of guide rails and observably less curvature of the sheets after rolling.
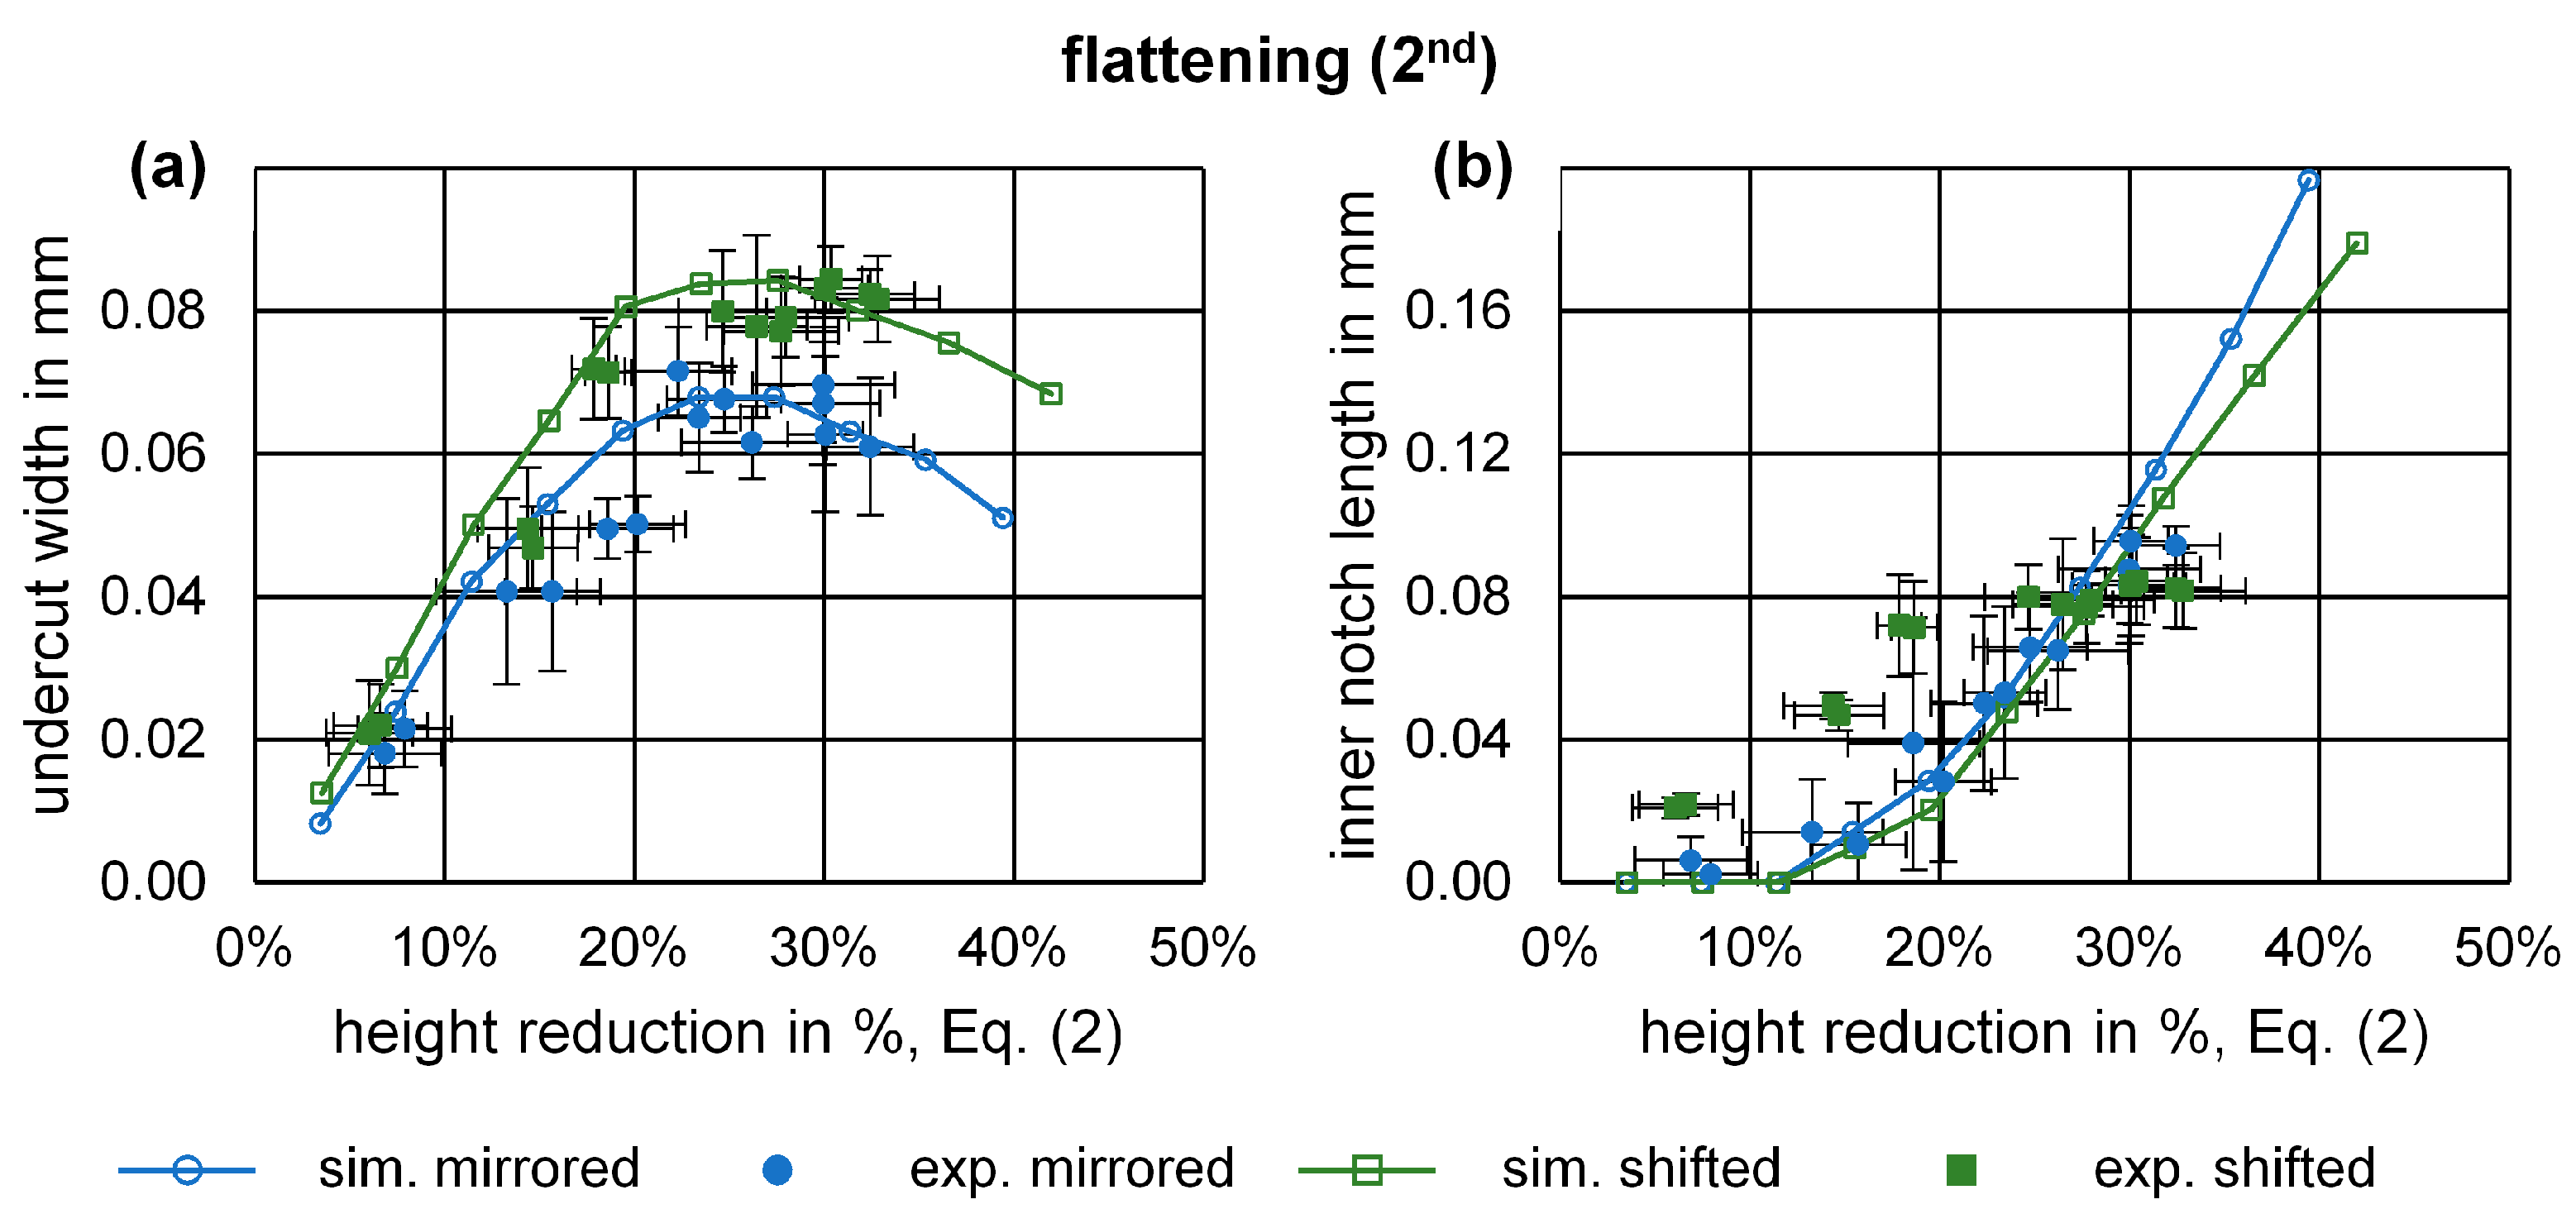
For the flattening pass, the values of the undercut width from simulations and experiments fit well (Figure 9a). The undercut maximum is reached at around 25% height reduction and is decreasing thereafter. The shifted alignment results in increased undercut widths. The maximum undercut width of the shifted alignment is in the simulations approx. 24% bigger compared to the mirrored alignment. The inner notch (Figure 9b) starts to form at approx. 12% height reduction in the simulations and is then steadily increasing. The development of the inner notch for the shifted alignment seems to be slightly smaller. The experimental values for the mirrored alignment align well with the simulation, while the simulations of the shifted alignment underestimate the inner notch for smaller height reductions.
Apart from the geometry, the rolling force was also analyzed. In the channel rolling experiments, increasing rolling forces with increasing height reductions were observed (Figure 10a). To be able to compare the rolling forces from the 2D simulation, a transformation is necessary. The maximum force from the simulation is multiplied by the contact length l c and the contact width w c (Equation (6)).
l c = ( h 0 h s c ) Δ r
r : roller   radius
w c = 7   mm   ribs   of   roller
The simulations show a similar trend for the development of the forces. At 20% height reduction, the simulations overestimate the mirrored alignment by approx. 3.5% and the shifted alignment by approx. 14.7%. When comparing both alignments, a reduced force for the shifted alignment is observed in general. As an example, the experimental force at 20% height reduction is 24.1% smaller for the shifted alignment. One reason might be the material flow as shown in Figure 7. For the mirrored alignment, the material needs to flow laterally first and then vertically into the ribs. The shearing of the material in the shifted alignment might require less rolling force.
The simulations predict an increasing trend of the rolling force with height reduction for the flattening pass (Figure 10b). The experimental values show an overall larger rolling force, which is constant at approx. 48 kN for all height reductions and no significant difference is visible for the two alignments. The reason for the mismatch of simulation and experiment is that 50 mm wide rollers were used in the experiments which are in contact with the 13 mm wide rib structure and additionally the undeformed sheet material on the sides. Therefore, an overall higher and constant force was measured.
As the experiments were performed on a roll-forming machine with comparably elastic roller stands, the roll gap had to be preloaded. Thus, the roll gap increased elastically during rolling to the desired height. Since the plate material was rolled, the roll gap was running empty before and after each plate. In this case, the rollers showed strong wear. Especially for the shifted alignment a shearing of the roller rib edges from the upper and lower roller was observed and the rollers had to be replaced after a few plates. For industrial production, this problem might be solved by either using stiffer roller stands to avoid preloading or coiled material only.

4. Conclusions and Outlook

In this study, a double-sided structural rolling process was simulated and validated by experiments. Good alignment of the experimental and simulated geometry was achieved for the structural rolling pass. The experiments showed worse channel formation for the channels at the sides. In total, a channel depth of 1.0 mm is possible with approx. 27% height reduction for the mirrored alignment and 26% height reduction for the shifted alignment. The mirrored structure also showed higher rolling forces compared to the shifted structure. Nevertheless, when rolling plate material, strong wear of rollers was observed for the shifted alignment. In the flattening pass, the alignment of the experimental and simulated undercut width was good. The shifted alignment provided larger undercuts (84 µm) compared to the mirrored alignment (68 µm). The inner notch tendency for both alignments was predicted very similar. However, in the experiments, the shifted alignment showed larger inner notches. The advantages and disadvantages of the two alignments must be carefully considered.
In future work, the differences between the channel depth for the single and double-sided structures will be analyzed in regard to the effect of the kinetics and the guide rails. The compound strength in combination with HPDC aluminum was tested for the mirrored structure [21]. Testing of the shifted alignment is planned.

Author Contributions

Conceptualization, A.R.; methodology, A.R. and D.B.; software, S.S. and A.R.; validation, S.S. and A.R.; formal analysis, A.R. and S.S.; investigation, S.S.; resources, D.B.; data curation, S.S. and A.R.; writing—original draft preparation, A.R.; writing—review and editing, S.S. and D.B.; visualization, A.R.; supervision, D.B.; project administration, A.R.; funding acquisition, D.B. All authors have read and agreed to the published version of the manuscript.

Funding

Funded by the Deutsche Forschungsgemeinschaft (DFG, German Research Foundation)—Project-ID 245566034.

Data Availability Statement

The original contributions presented in the study are included in the article, further inquiries can be directed to the corresponding author.

Conflicts of Interest

The authors declare no conflicts of interest.

References

  1. Kim, H.C.; Wallington, T.J. Life-cycle energy and greenhouse gas emission benefits of lightweighting in automobiles: Review and harmonization. Environ. Sci. Technol. 2013, 47, 6089–6097. [Google Scholar] [CrossRef] [PubMed]
  2. Cecchel, S. Materials and Technologies for Lightweighting of Structural Parts for Automotive Applications: A Review. SAE Int. J. Mater. Manf. 2021, 14, 81–97. [Google Scholar] [CrossRef]
  3. Mori, K.; Abe, Y. A review on mechanical joining of aluminium and high strength steel sheets by plastic deformation. Int. J. Lightweight Mater. Manuf. 2018, 1, 1–11. [Google Scholar] [CrossRef]
  4. Meschut, G.; Janzen, V.; Olfermann, T. Innovative and Highly Productive Joining Technologies for Multi-Material Lightweight Car Body Structures. J. Mater. Eng. Perform. 2014, 23, 1515–1523. [Google Scholar] [CrossRef]
  5. Mori, K.; Bay, N.; Fratini, L.; Micari, F.; Tekkaya, A.E. Joining by plastic deformation. CIRP Ann. Manuf. Technol. 2013, 62, 673–694. [Google Scholar] [CrossRef]
  6. Salamati, M.; Soltanpour, M.; Fazli, A.; Zajkani, A. Processing and tooling considerations in joining by forming technologies; part A—Mechanical joining. Int. J. Adv. Manuf. Technol. 2019, 101, 261–315. [Google Scholar] [CrossRef]
  7. Feistauer, E.E.; dos Santos, J.F.; Amancio-Filho, S.T. A review on direct assembly of through-the-thickness reinforced metal–polymer composite hybrid structures. Polym. Eng. Sci. 2019, 59, 661–674. [Google Scholar] [CrossRef]
  8. Noguchi, T.; Asano, K.; Hiratsuka, S.; Miyahara, H. Trends of composite casting technology and joining technology for castings in Japan. Int. J. Cast Met. Res. 2008, 21, 219–225. [Google Scholar] [CrossRef]
  9. Fang, X.; Gundlach, J.; Schipperges, J.-J.; Jiang, X. On the Steel–Aluminum Hybrid Casting by Sand Casting. J. Mater. Eng. Perform. 2018, 27, 6415–6425. [Google Scholar] [CrossRef]
  10. Ma, Y.; Zhang, G.; Cao, S.; Huo, Z.; Han, J.; Ma, S.; Huang, Z. A Review of Advances in Fabrication Methods and Assistive Technologies of Micro-Structured Surfaces. Processes 2023, 11, 1337. [Google Scholar] [CrossRef]
  11. Müller, S.; Brand, M.; Dröder, K.; Meiners, D. Increasing the Structural Integrity of Hybrid Plastics-Metal Parts by an Innovative Mechanical Interlocking Effect. Mater. Sci. Forum 2015, 825–826, 417–424. [Google Scholar] [CrossRef]
  12. Buxton, A.L.; Ferhati, A.; Glen, R.J.; Dance, B.G.I.; Mullen, D.; Karayiiannis, T. EB Surface Engineering for High Performance Heat Exchangers. In Proceedings of the First International Electron Beam Welding Conference, Chicago, Illinois, USA, 17–18 November 2009. [Google Scholar]
  13. Ucsnik, S.; Gradinger, R.; Becirovic, A.; Waldhör, A. Enhanced Performance of Steel-Aluminium Cast Nodes through Cold Metal Transfer. Mater. Sci. Forum 2013, 765, 736–740. [Google Scholar] [CrossRef]
  14. Abe, H.; Chung, J.C.; Mori, T.; Hosoi, A.; Jespersen, K.M.; Kawada, H. The effect of nanospike structures on direct bonding strength properties between aluminum and carbon fiber reinforced thermoplastics. Compos. Part B Eng. 2019, 172, 26–32. [Google Scholar] [CrossRef]
  15. Senge, S.; Brachmann, J.; Hirt, G.; Bührig-Polaczek, A. Interlocking Multi-Material Components made of Structured Steel Sheets and High-Pressure Die Cast Aluminium. In Proceedings of the 20th International ESAFORM Conference on Material Forming, Dublin, Ireland, 26–28 April 2017; p. 190007. [Google Scholar]
  16. Senge, S.; Brachmann, J.; Hirt, G.; Bührig-Polaczek, A. Evaluation of interlocking bond strength between structured 1.0338 steel sheets and high pressure die cast AlMg5Si2. In Proceedings of the 21st International ESAFORM Conference on Material Forming, Palermo, Italy, 23–25 April 2018; p. 40019. [Google Scholar]
  17. Ringel, A.; Lohmar, J. Optimization of the Surface Geometry in Structured Cold Rolling for Interlocking of Formed and Die-Cast Metal Components. Defect Diffus. Forum 2022, 414, 89–94. [Google Scholar] [CrossRef]
  18. Jakumeit, J.; Behnken, H.; Laqua, R.; Eiken, J.; Brachmann, J. Multi-scale simulation of hybrid light metal structures produced by high pressure die casting. IOP Conf. Ser. Mater. Sci. Eng. 2020, 861, 12035. [Google Scholar] [CrossRef]
  19. Joop, D. Präzisionsbestimmende Faktoren bei der Herstellung blechverstärkter Hybridstrukturen im Druckguss: Grenzflächenanalyse und Verzugsoptimierung. Doctoral Thesis, Gießerei-Institut, RWTH Aachen University, Aachen, Germany, 2018. [Google Scholar]
  20. Ringel, A.; Hirt, G. Bending behavior of structured steel sheets with undercuts for interlocking with Al die-cast metal. Int. J. Mater. Form. 2024, 17, 2. [Google Scholar] [CrossRef]
  21. Bruckmeier, L.; Ringel, A.; Vroomen, U.; Bailly, D.; Bührig-Polaczek, A. Influence of High-Pressure Die Casting Process Parameters on the Compound Strength of Hybrid Components with Undercut Sheet Metal. Metals 2023, 13, 1717. [Google Scholar] [CrossRef]
  22. Tieu, A.; Liu, Y. Friction variation in the cold-rolling process. Tribol. Int. 2004, 37, 177–183. [Google Scholar] [CrossRef]
  23. Clausmeyer, T.; Schowtjak, A.; Wang, S.; Gitschel, R.; Hering, O.; Pavliuchenko, P.; Lohmar, J.; Ostwald, R.; Hirt, G.; Tekkaya, A.E. Prediction of Ductile Damage in the Process Chain of Caliber Rolling and Forward Rod Extrusion. Procedia Manuf. 2020, 47, 649–655. [Google Scholar] [CrossRef]
Figure 1. Scheme of the rolling process for surface structures (as proposed by Senge et al. [15]); view in the normal direction (ND) and transverse direction (TD).
Machines 12 00562 g001
Figure 2. Examples of surface structures on steel sheets after (a) rolling and cutting, (b) bending, and (c) casting of the demonstrator part.
Machines 12 00562 g002
Figure 3. Investigated alignments of the double-sided surface structure.
Machines 12 00562 g003
Figure 4. 3D scheme of the rolling process and 2D simplification in the FE simulation.
Machines 12 00562 g004
Figure 5. Cross-section preparations of (a) structural rolling, mirrored, (b) flattening, mirrored, (c) structural rolling, shifted, (d) flattening, shifted.
Machines 12 00562 g005
Figure 6. Exemplary material flow in FE simulations by equivalent plastic strain (PEEQ) after structural rolling and flattening.
Machines 12 00562 g006
Figure 7. Close-up cross-section measurement examples of (a) structural rolling, mirrored, (b) flattening, mirrored, (c) structural rolling, shifted, (d) flattening, shifted.
Machines 12 00562 g007
Figure 8. Channel depth after structural rolling for simulations vs. experiments of both alignments.
Machines 12 00562 g008
Figure 9. (a) Undercut width and (b) inner notch length after flattening for simulations vs. experiments of both alignments.
Machines 12 00562 g009
Figure 10. Max. rolling forces for (a) channel rolling and (b) flattening for simulations vs. experiments of both alignments.
Machines 12 00562 g010
Table 1. Height reduction to reach a 0.5 mm channel depth for different cases.
ε h , 1 ( Δ h s = 0.5 ) in %Single [17]MirroredShifted
Ideal case12.50
Simulation12.04 (−3.7% *)12.05 (−3.6% *)12.37 (−1.0% *)
Experiment19.66 (+57.3% *)14.18 (+13.4% *)13.01 (+4.1% *)
* Deviations from the ideal case.
Disclaimer/Publisher’s Note: The statements, opinions and data contained in all publications are solely those of the individual author(s) and contributor(s) and not of MDPI and/or the editor(s). MDPI and/or the editor(s) disclaim responsibility for any injury to people or property resulting from any ideas, methods, instructions or products referred to in the content.