Article

The Grinding and Correction of Face Gears Based on an Internal Gear Grinding Machine

School of Mechatronics Engineering, Henan University of Science and Technology, 48 Xiyuan Rd., Luoyang 471003, China
*
Author to whom correspondence should be addressed.
Machines 2024, 12(8), 496; https://doi.org/10.3390/machines12080496
Submission received: 11 June 2024 / Revised: 21 July 2024 / Accepted: 22 July 2024 / Published: 23 July 2024

Abstract

:
This paper presents a method of calculating and correcting grinding face gears on an internal gear grinding machine. The generating principle of face gears is studied, and the feasibility of grinding motion on an internal gear grinding machine is analyzed. Then, the motions that need to be followed for grinding are analyzed based on the gear machine tool structure. Four main error sources causing tooth surface deviation in the grinding movements are proposed. The mathematical modeling of the grinding of face gears containing proposed error sources on an internal gear grinding machine is accurately established. The influence of the error sources on the topological deviations of the tooth surface is explored. A sensitivity matrix is established for the influence of various error factors on the tooth surface deviations. The correction values of each error factor are obtained in the case of existing tooth surface deviations. Finally, a virtual machining experiment is conducted, which proves the accuracy of the proposed method for characterizing grinding and realizing corrections.

1. Introduction

Face gear transmissions are bevel gear transmissions that mesh with cylindrical gears. They offer superior features over other gear assemblies, such as smooth transmission, low noise, a large transmission ratio, insensitive installation, and good power splitting [1]. Face gear transmissions can be used in the aviation, navigation, automobile, radar, and fishing tackle industries [2]. Due to the maturity of the paired pinion manufacturing technology, which involves involute cylindrical gears, face gear transmissions have good interchangeability in industrial applications.
There are several processing methods for face gears, such as shaping, hobbing, milling on a machining center, power skiving [3], forging, and powder metallurgy. Face gears need to be finished when high transmission quality is needed, such as for aircraft gears. The commonly used method of finishing is hard tooth surface grinding. At present, there are two main grinding methods for face gears. The first is the grinding process using a spherical worm wheel, proposed by Litvin et al. [4,5], and the second is the grinding process using a dish wheel.
For grinding using a spherical worm wheel, the surface of the grinding wheel is dressed into a spherical worm. The continuous grinding process of the tooth surface of the face gear is realized by simulating the continuous meshing between the generating gear and the face gear. Li et al. [6] studied the design and modification method of worm wheels, established a mathematical model of face gears and worm wheels, and obtained the tooth surface of face gears by using the envelope theory. Tang et al. [7] considered the modeling and compensation of the geometric error of the rotation angle of a worm grinding wheel and selected the instantaneous ideal contact point as the reference point of the compensation algorithm. The effectiveness of the method was verified through theoretical calculations and practical machining examples. Zhou et al. [8] reported that the original surface of face gears may not be covered by a worm wheel. They studied the singularity of the tooth surface contact line and the worm thread surface and proposed a multistep grinding method for the complete grinding of the whole working part. Shi et al. [9,10] and Zhou et al. [11] analyzed the geometry of a worm surface and described it as the sweep of the lateral contour section. The contour was designated as the contour of the dressing wheel to accurately manufacture the spherical worm and the face gear. The above method requires the use of multiple dress paths to dress the worm wheel. Then, they proposed a method to dress the worm grinding wheel with only one motion trajectory and compensated for the machining error in closed-loop manufacturing. The rough machining method corresponding to the worm grinding wheel is face gear hobbing; that is, the hob is designed to be a similar spherical worm to realize rough machining. For example, Wang et al. [12] designed the spherical hob by using the assembled structure and developed the face gear hobbing machine tool to complete the hobbing experiment of face gears. Grinding face gears via worm wheels is an efficient technique to grind face gears. However, due to the limitations of the size of the worm wheel and the movement mode of the continuous grinding process, the flexibility of the tooth surface modification is limited to a certain extent, which is usually suitable for mass production and product finalization.
For grinding using a dish wheel, the profile of the grinding wheel is usually trimmed to the shape of a tooth of the generating gear (i.e., the involute cylindrical gear). According to the relative motion of the generating gear and the workpiece, the tooth surface of the face gear is enveloped by the tooth surface of the generating gear. Tang et al. [13] analyzed the principle of grinding face gears using a dish wheel and obtained the profile of the face gear with a modified rack. The virtual simulation platform of the PHOENIX800G bevel gear grinding machine was established on virtual processing software, and a virtual simulation experiment was conducted. Shen et al. [14] obtained the geometry of the double-crown tooth surface of face gears by using a modified dish wheel and longitudinal topography design and realized processing of the tooth surface on a six-axis CNC machine tool. Zhou et al. [15] proposed a conical wheel as the generating gear of a face gear tooth surface. They used a dish wheel to perform an enveloping motion on the designed tooth surface and established a simulation platform for virtual grinding. Guo et al. [16,17] introduced a face gear milling method without considering the feed of the dish wheel to improve the milling efficiency of the face gear. The tooth surface of the face gear obtained by this method was different from the tooth surface in [4,5], but the deviation could be reduced by increasing the diameter of the dish wheel. Wang et al. [18] built a special face gear grinding machine tool for the dish wheel grinding method. They optimized the grinding compensation and position of the grinding wheel and carried out grinding and dressing experiments on the face gear. Wang et al. [19] proposed a mathematical model of tooth surface roughness by means of a dish wheel, which considered the removal of material by grinding wheel wear and the motion between the grinding wheel and the workpiece. Ma et al. [20] studied the factors affecting the roughness of a tooth surface and optimized the roughness through numerical simulation and experiments. In addition, a non-involute dish grinding wheel can also be used for grinding face gears. For example, the Gleason Company proposed the CONDIFACE [21] method for cutting and grinding face gears. A standard cutting tool was used on the bevel gear processing machine, and the face gear tooth surface was obtained and paired with the pinion by optimizing the radial feed path and meshing parameters. Peng et al. [22] studied the principle of the straight profile milling cutter in the processing of face gears. This processing method is also suitable for accessing straight profile dish wheels to grind face gears. However, the face gear tooth surface obtained by this grinding method results in a severe contact angle and a small instantaneous contact area. It is usually necessary to modify the paired pinion to obtain a more ideal contact quality. The grinding method using a dish wheel is inefficient because the dish wheel grinds the grooves of the face gear one by one. Since the contour of the grinding wheel is simple to trim and the grinding movement mode is easy to control, it is easier to manufacture the equipment and modify the tooth surface. In the product design and development stage, a dish wheel for the grinding face gear will be more suitable.
At present, cylindrical gear-forming grinding machines all use dish wheels. Implementing the grinding face gear on a cylindrical gear grinding machine will greatly shorten the product development cycle. The simulation of the generating motion between the generating gear and the face gear is also necessary. A change in the meshing angle of the dish wheel requires the use of the rotating motion of the grinding wheel holder on the cylindrical gear-forming grinding machine. However, for external gear grinding machines, there is usually a motor on one side of the grinding wheel that drives the grinding wheel directly. When the grinding wheel holder rotates, interference easily occurs between the motor and the top of the face gear teeth. For this reason, it is possible to consider using an internal gear grinding machine for the grinding of face gears. The degrees of freedom associated with the motions of the internal and the external gear grinding machines are the same, but the grinding wheel holder adopts a design scheme of a grinding head. Moreover, the driving motor is usually located above the grinding wheel, and synchronous belt transmission is used to drive the grinding wheel to rotate at high speed. This structure with a grinding wheel can effectively avoid collision and interference between the grinding wheel holder and the face gear teeth.
This study begins from the perspective of involute dish grinding wheels, and the implementation of this method is studied. The error factors that cause tooth surface deviations on the gear-forming grinding machine are analyzed. The influence of various error factors on the tooth surface is discussed. A reverse adjustment and correction method is developed. This research provides technical support for the use of gear grinding machines in industrial applications to obtain high-precision face gears. Under the condition that interference can be avoided, the computational modeling of this method is also applicable to external gear grinding equipment.

2. The Mechanism of Face Gear Formation

2.1. Generating Gear

The driving gear of the face gear transmission is an involute cylindrical gear. The tooth surface of the face gear is formed by an involute cylindrical gear (see Figure 1) with 1–3 more teeth than the driving gear, and the face gear transmission can achieve point contact without changing the transmission error. When generating the tooth surface of the face gear, the following motion relationship should be satisfied:
z g ω g = z f ω f
where zg is the tooth number of the generating gear, zf is the tooth number of the face gear, ωg is the rotational speed of the generating gear, and ωf is the rotational speed of the face gear.
The relative motion between the generating gear and the face gear can be considered a meshing process, and a meshing line will be created when the gears make instantaneous contact.

2.2. Motion of the Dish Wheel

In the manufacturing process of face gears, a slotting cutter with the same profile as the tooth of the generating gear can be used for cyclic machining along the tooth length of the face gear to access the tooth surface of the face gear.
Similarly, when using a dish-shaped grinding wheel to grind surface gears, the profile of the dish-shaped grinding wheel should be consistent with the section profile of the tooth of the generating gear. The grinding wheel material can be ordinary or cubic boron nitride (CBN). CBN grinding wheels increase the precision and quality of tooth surfaces. Usually, the diameter of the grinding wheel is not consistent with the diameter of the generating gear (see Figure 2). As a result, the rotation center, Og, of the grinding wheel does not coincide with the rotation center, O, of the generating gear. The same spatial motion relationship between the grinding wheel profile and the generating gear profile can be achieved when the rotation center, Og, of the grinding wheel rotates around point O. In addition, the tooth length of the generating gear can be replaced equivalently by the movement of the grinding wheel along the tooth length direction. The envelope motion is equivalently simulated based on the swing and stroke motions of the grinding head.

3. Grinding Strategy of the Gear Grinding Machine

3.1. Motion Analysis of the Gear Grinding Machine

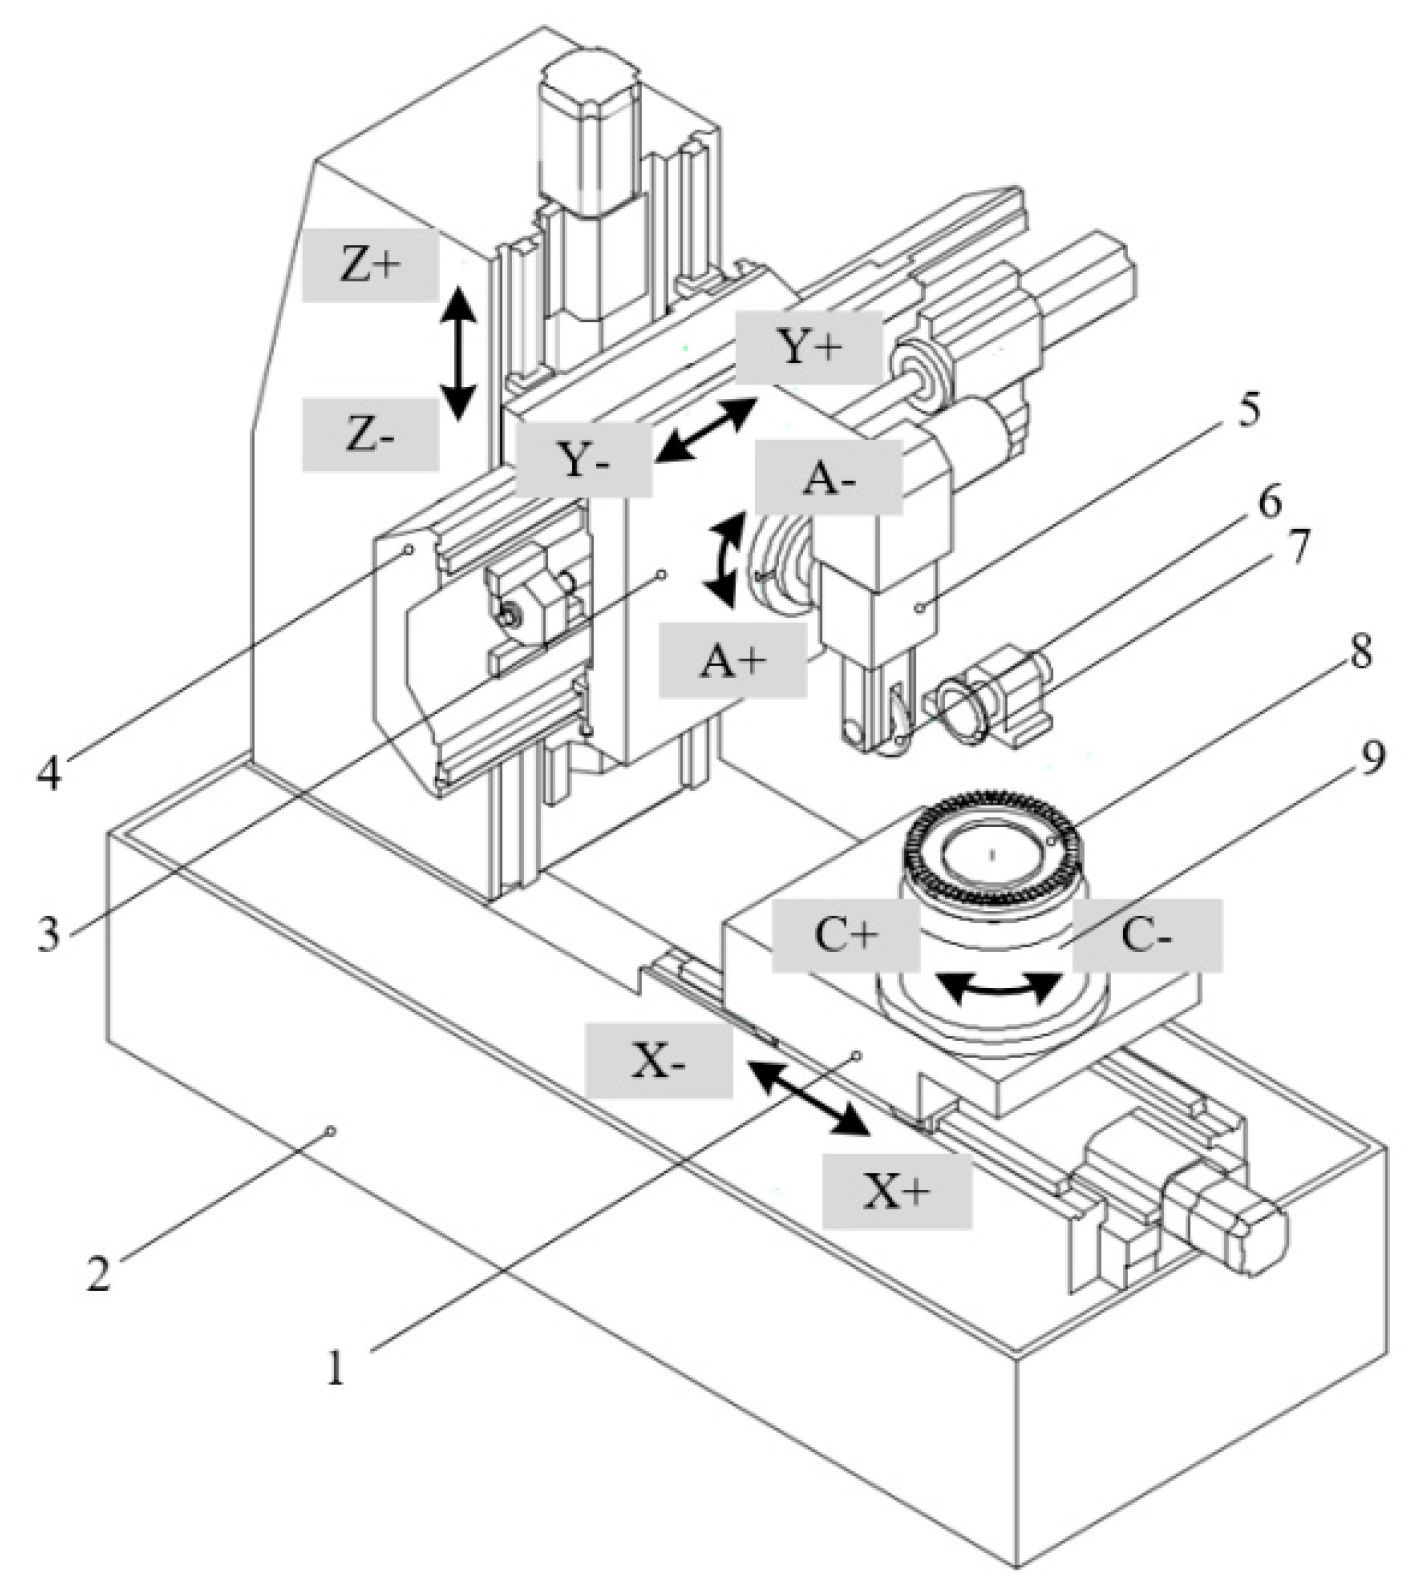
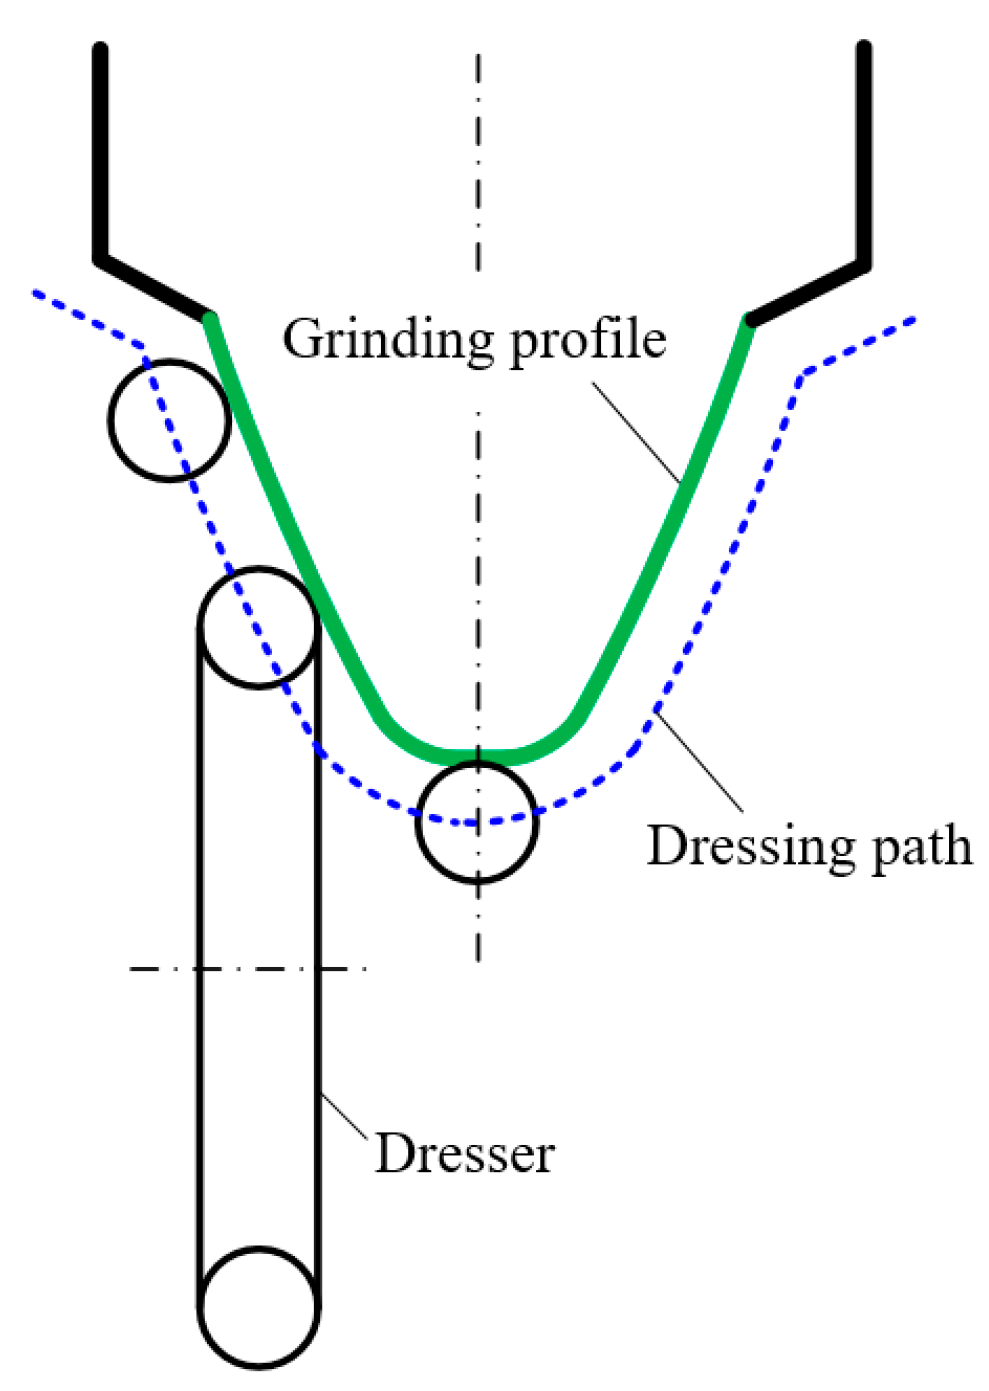
The structure of the gear grinding machine is different from that of the external gear grinding machine. The grinding process of an internal gear requires the grinding wheel to be placed inside the internal gear, and the structure of the grinding head needs to be designed as a cantilever. Considering a specific type of internal gear grinding machine as an example, a basic structure is shown in Figure 3. The machine tool consists of three linear motions (X, Y, and Z) and two rotary motions (A and C), as well as grinding wheel spindle 1 and dressing spindle 2. For each motion axis, a closed-loop control system is adopted, and the system is equipped with a circular encoder or linear encoder. The absolute coordinate error of each axis can be considered to be extremely small. The dresser usually uses a diamond roller with a circular arc profile, and the dressing process of the grinding wheel requires interpolation motion only with Axis-Y and Axis-Z. The dressing path uses the principle of equidistant curves, as shown in Figure 4. The grinding process of face gears requires the coordination of multiple motion axes.
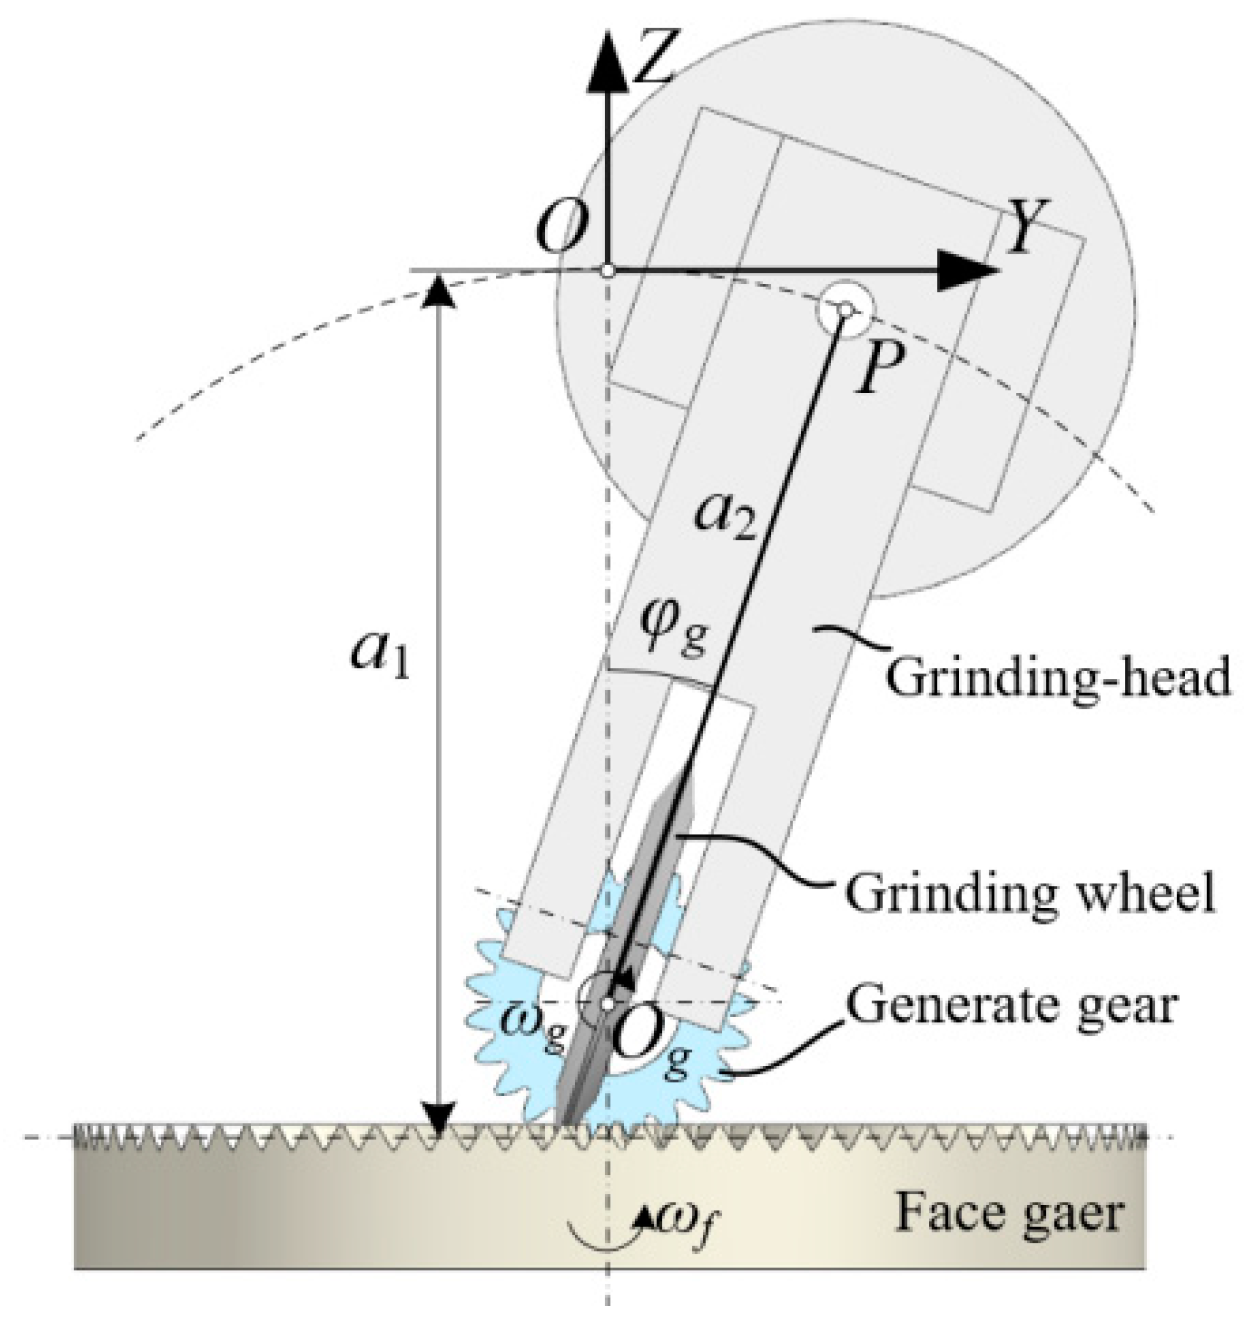
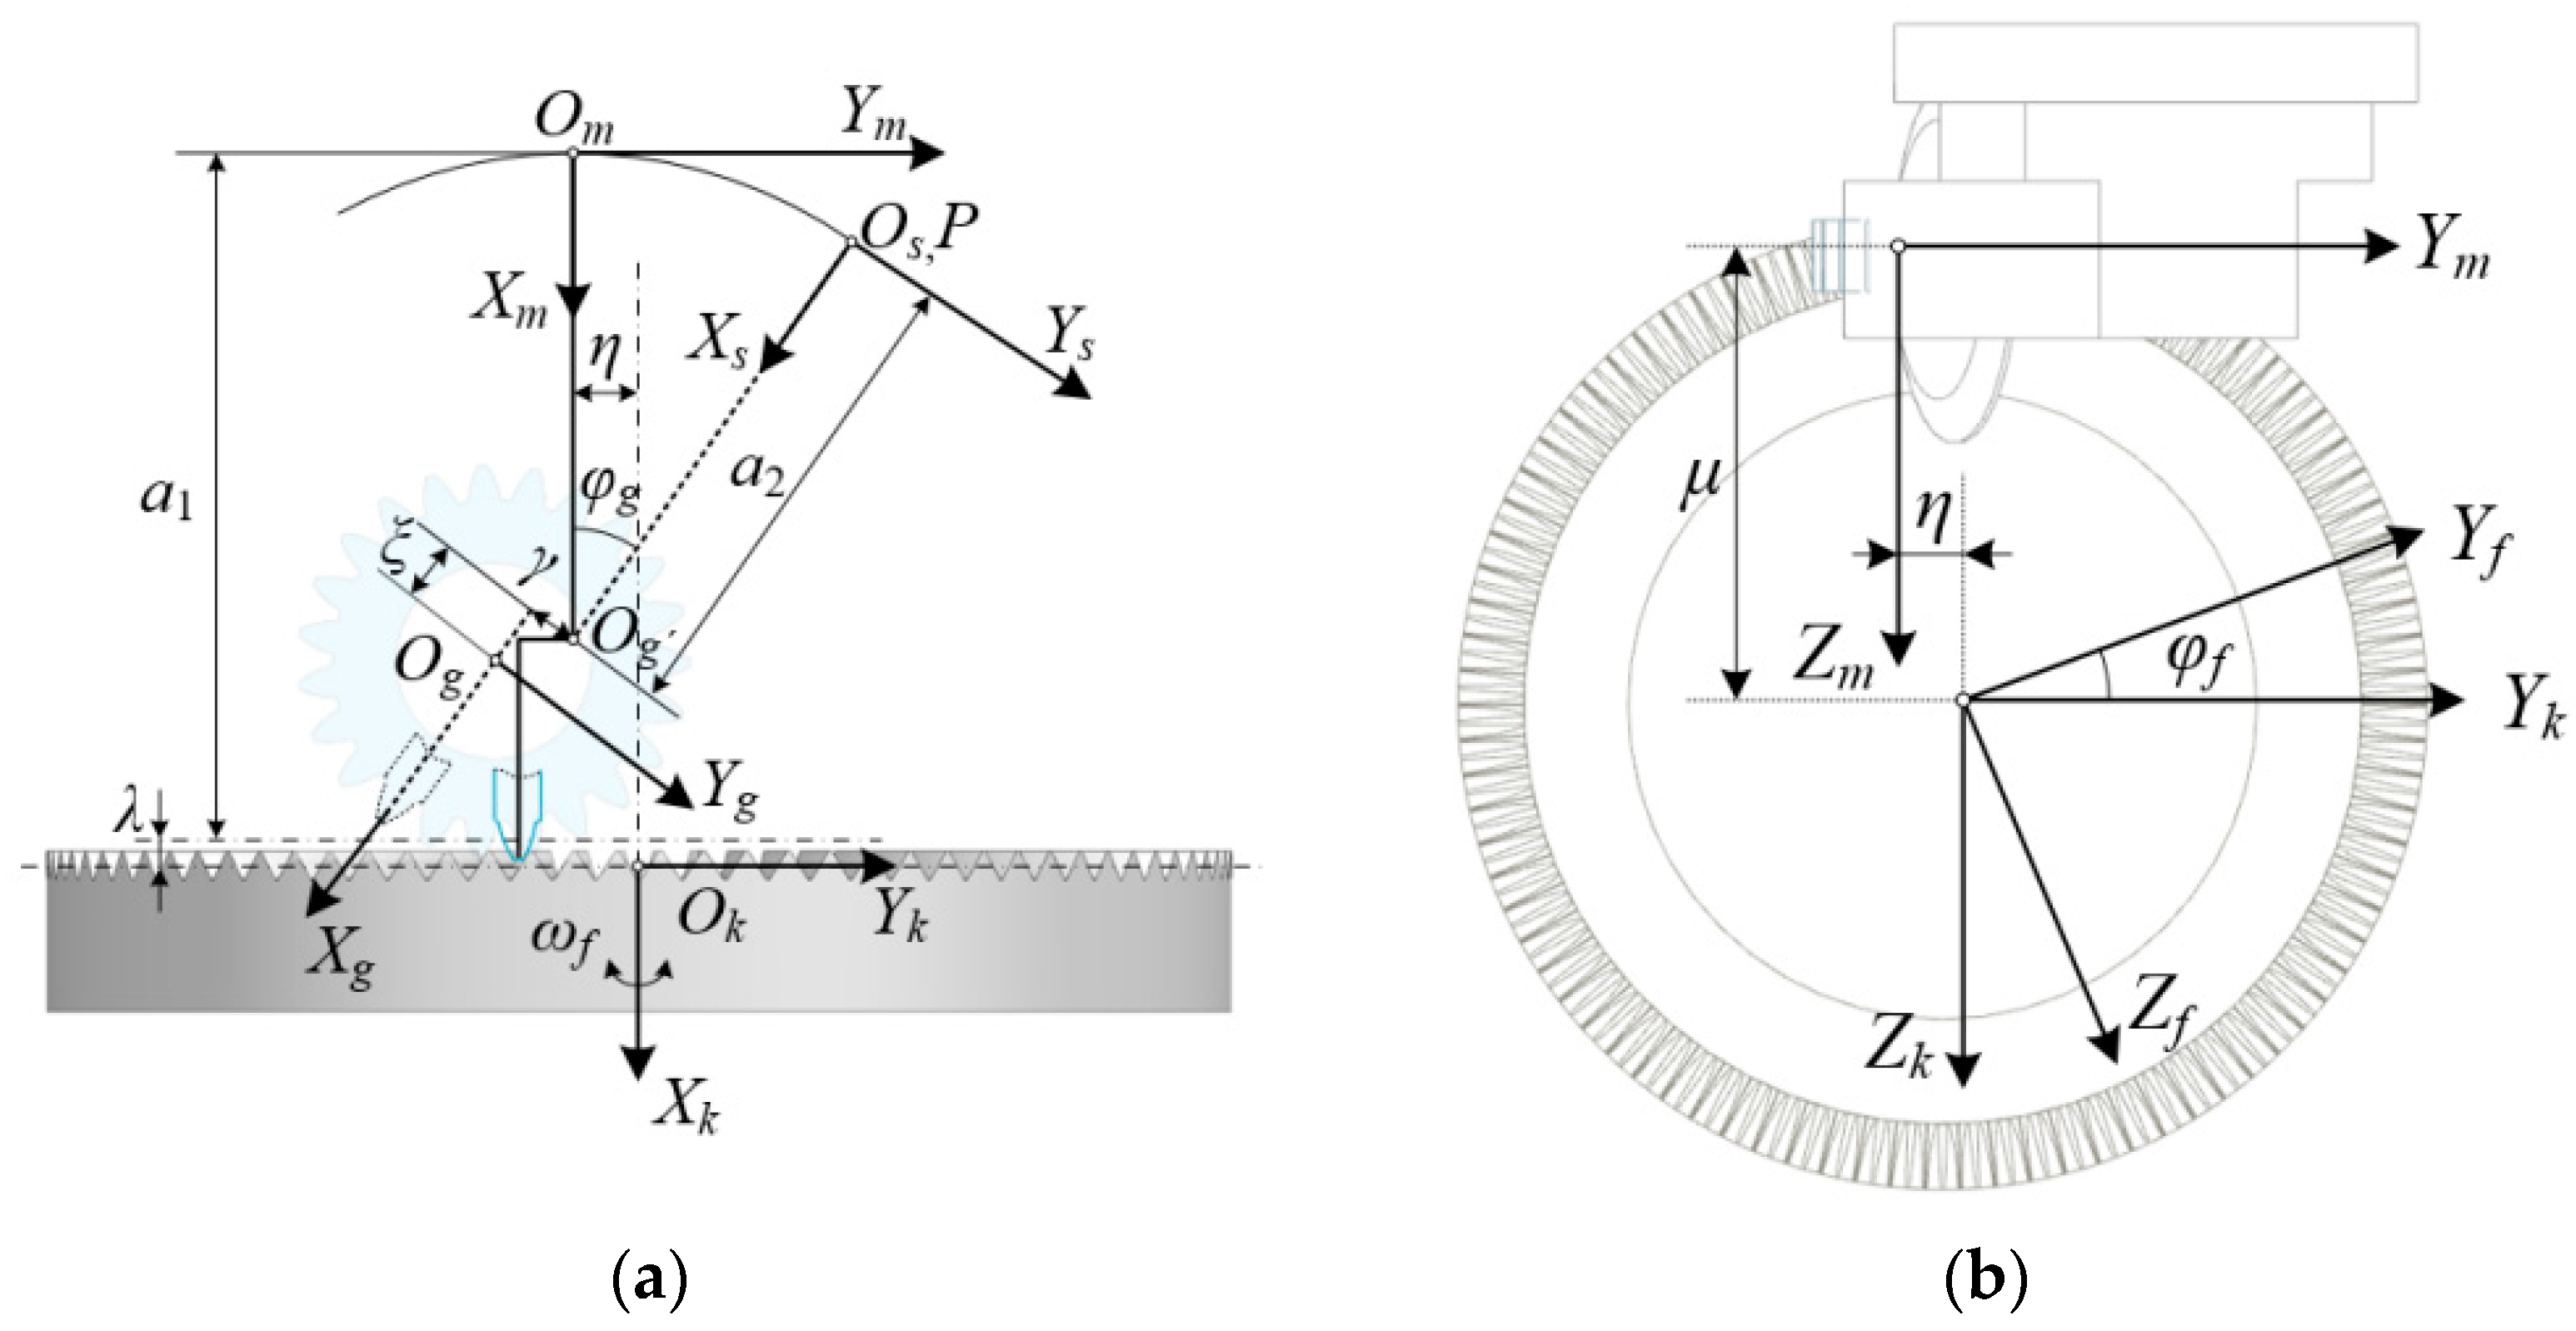
The motion scheme of the gear grinding machine used for grinding face gears is shown in Figure 5. The axis of the grinding wheel does not intersect with the axis of the generating gear. The distance between the axis of the grinding wheel and the rotation center of Axis-A is constant and is determined at the stage of designing the machine tool. Point P is located on the rotation axis of Axis-A. To achieve meshing motion between the generating gear and the face gear, point P should rotate around the center, Og, of the generating gear. Here, φg is the meshing angle of the generating gear, a1 is the distance from the reference plane of the face gear to point O, and a2 represents the distance between the center of the generating gear and point P. Both a1 and a2 are related to the diameter of the grinding wheel. The coordinate system SXYZ is the reference coordinate system of the machine tool. The motion trajectory of point P in the YZ plane is represented as:
y P = a 2 s i n φ g z p = a 2 c o s φ g a 2
The grinding motion in the tooth length direction (Axis-X) is independent of the circular arc motion at point P.

3.2. Error Source Analysis

When the machine tool moves following the theoretical position and the profile of the grinding wheel is dressed as a standard involute, there is no deviation in the tooth surface. However, due to the machining environment and manufacturing errors of the machine tool itself, as well as the influence of replacing grinding wheels, trimers, and fixtures, the grinding wheel may not be able to move accurately according to the designed grinding trajectory.
Due to the use of closed-loop control for each motion axis, the inaccuracy of the motion mainly comes from the deviation in the relative position of each moving part. When grinding the face gear on the gear grinding machine, the main error sources are mainly divided into the following four aspects:
  • The positional error caused by the lack of intersection between the rotational center of the grinding wheel head (Axis-A) and the face gear axis (Axis-C) can be recorded as η. This factor can be compensated by adjusting the position of Axis-Y during the grinding process.
  • The positional error caused by the lack of positional coincidence between the center plane of the grinding wheel profile and the axis of the grinding wheel head (Axis-A) can be recorded as γ. This factor can be compensated by adjusting the coordinate offset of Axis-Y when dressing the grinding wheel.
  • When the generating gear meshes with the face gear, the generating gear and the face gear are not in the theoretical position. The deviation between the theoretical mounting distance of the face gear and the actual installation distance can be recorded as λ. Because the reference cone angle of the face gear is 90°, this error factor can be compensated by adjusting the offset of Axis-Z.
  • The designed rotation center of the generating gear does not coincide with the virtual rotation center of the generating gear generated by the motion axes of the grinding machine. The difference can be recorded as ξ. This results in the profile of the grinding wheel not rotating around the designed rotation center. This factor mainly comes from the manufacturing errors associated with the length of the grinding wheel head and the error of the diameter of the grinding wheel. This factor can be compensated by adjusting the setting value of a2 in the NC code.
To determine the distance between the grinding wheel and the face gear before grinding, the top of the grinding wheel is contacted with the mounting plane of the fixture by calibrating the grinding wheel head to the vertical. Then, the reference coordinate at Axis-Z is thus determined. Here, a1 is a constant, represented as:
a 1 = L + r G h f
where L is the design length of the grinding wheel head from Axis-A to the rotational center of the grinding wheel, rG is the outer radius of the grinding wheel, and hf is the addendum of the generating gear, corresponding to the dedendum of the face gear.
The setting value of a2 in the NC code can be represented as:
a 2 = a 1 m z g 2 ξ
where m is the module of the generating gear.

4. Mathematical Modeling

4.1. Profile of the Grinding Wheel

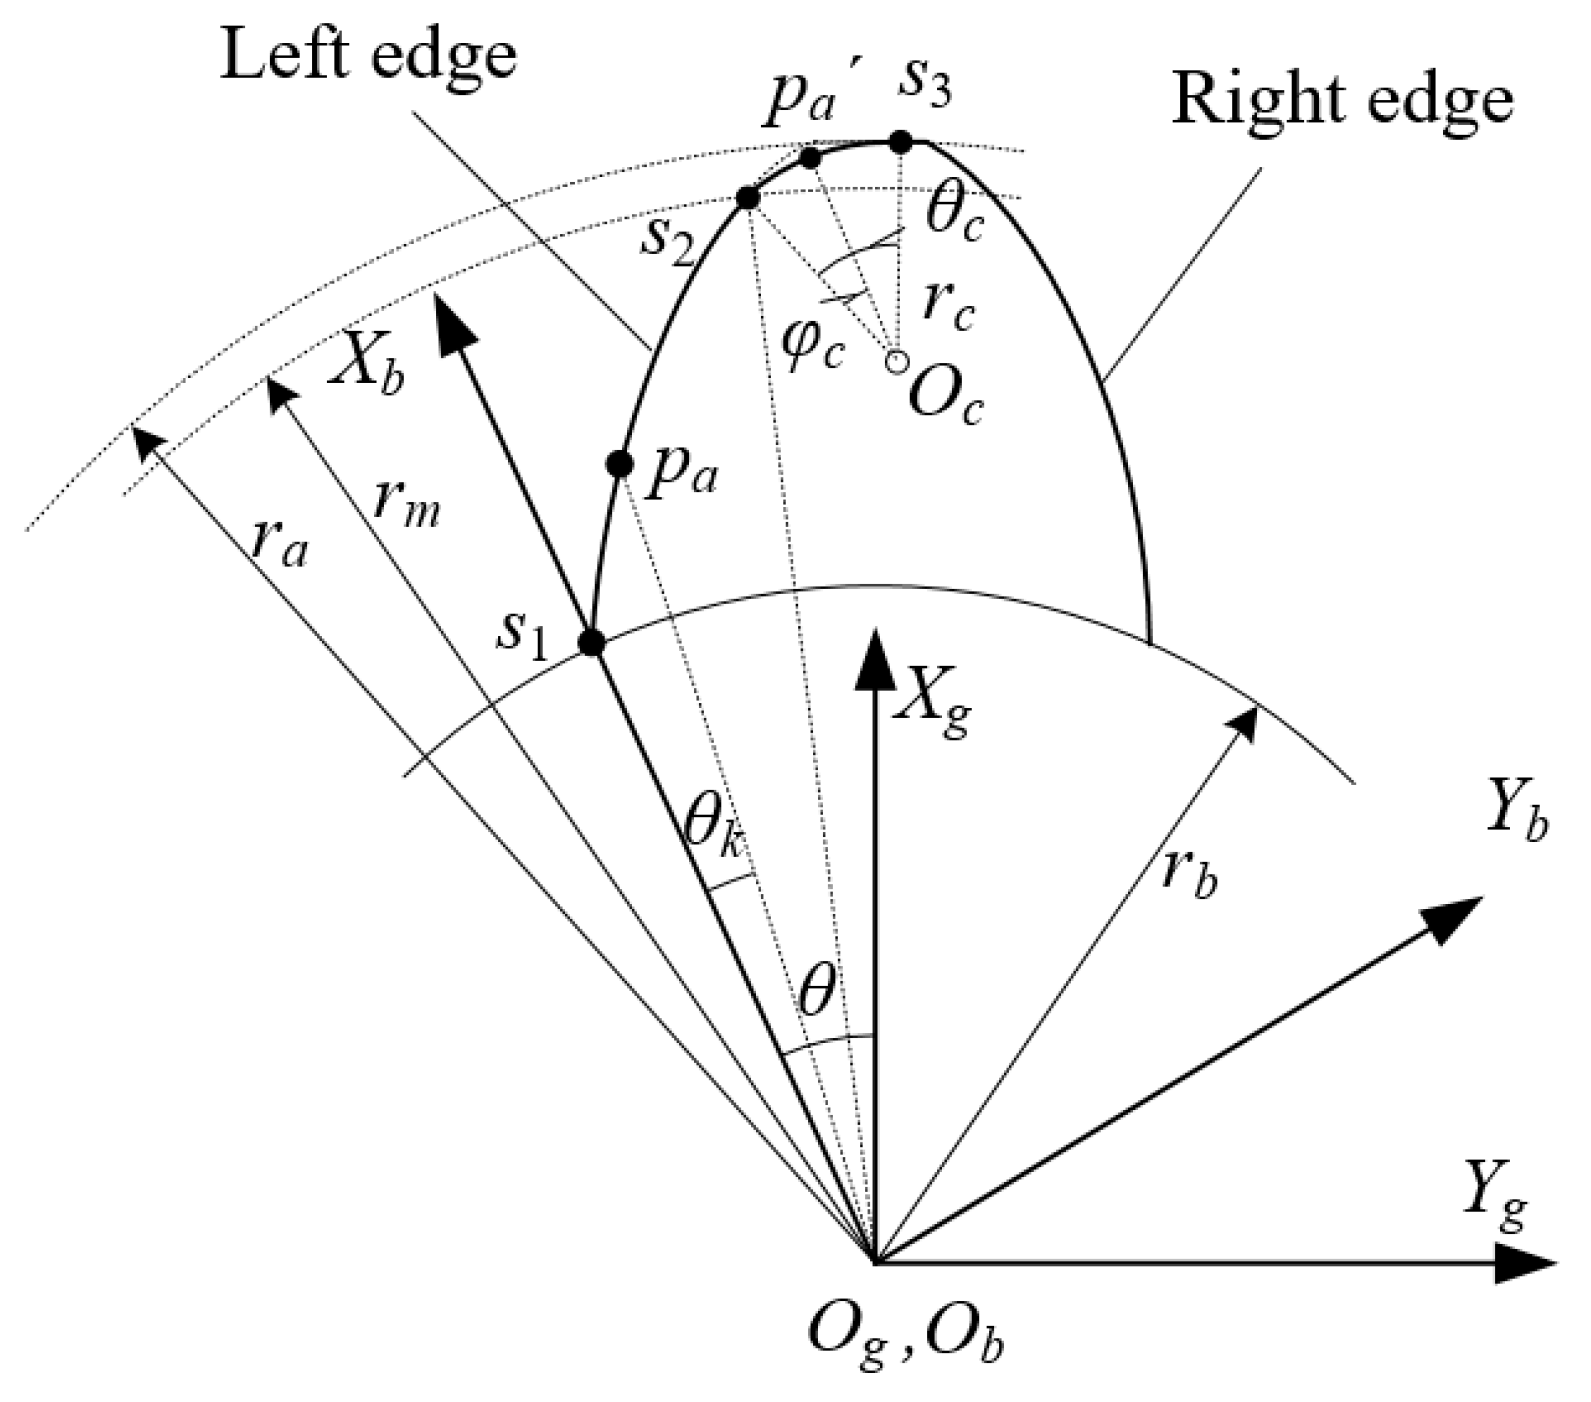
The sectional profile of the grinding wheel is the end profile of the generating gear and is composed of involutes and transitional arcs. The generating gear considered here is a spur gear. Its profile is shown in Figure 6. Therein, section s1s2 is the involute part, rb is the radius of the base circle, section s2s3 is the transitional arc part, rc is the radius of the transitional arc, ra is the radius of the tip circle of the generating gear, and Oc is the center of the transitional arc. Point Pa is on the involute and point Pa’ is on the transitional arc. The transitional arc and involute are tangent at point s2, where rm is the radius corresponding to the tangent point. φ is the profile parameter of the involute part, and φc is the profile parameter of the transitional arc part. The coordinate axes Zb and Zg both overlap the axis of the generating gear. The coordinate axis Xb passes through the starting point s1 of the involute. The left and right tooth surfaces of the grinding wheel are symmetrical with respect to the coordinate axis Xg. The left edge of the grinding wheel will grind the right flank of the face gear, and the right edge will grind the left flank of the face gear.
In the coordinate system Sb, the involute and transition arcs can be represented as:
r b e = [ r b c o s φ + r b φ s i n φ S a r b s i n φ S a r b φ c o s φ 0 1 ] T
n b e = [ S a s i n φ c o s φ 0 ] T
r b c = [ x o c + r c c o s ( θ 0 + φ c ) S a y o c + S a r c s i n ( θ 0 + φ c ) 0 1 ] T
n b c = [ S a c o s ( θ 0 + φ c ) s i n ( θ 0 + φ c ) 0 ] T
where the superscript e represents the involute part, and the superscript c represents the transition arc part. Sa = 1 represents the profile of the left tooth surface of the grinding wheel and the right tooth surface of the grinding face gear. Sa = −1 represents the profile of the right tooth surface of the grinding wheel and the left tooth surface of the grinding face gear. θ0 represents the angle between the normal direction and the coordinate axis Xb at point s2. Oc(xoc, yoc) are the coordinates of the center of the transition arc in the coordinate system Sb.
The profile equations are denoted as rb and nb. The profile parameters are all expressed by φ. Equations (5)–(8) are expressed in the coordinate system Sg as:
r g ( φ ) = M g b r b n g ( φ ) = T g b n b
where Mgb is the transformation matrix from the coordinate system Sb to the coordinate system Sg. Tgb is the three-dimensional matrix after removing the last row and last column of Mgb.
M g b = c o s θ S a s i n θ 0 0 S a s i n θ c o s θ 0 0 0 0 1 0 0 0 0 1
where θ = π/zg/2 + tanα − α, and α is the pressure angle of the generating gear at the pitch circle.
It is clear that the third components of rg and ng are 0.
The dressing path between the diamond roller and grinding wheel should satisfy:
Z d = r g x + n g x ρ d Y d = r g y + n g y ρ d
where ρd is the circular arc radius of the dresser.

4.2. Kinematic Model

The kinematic model of the grinding process containing position errors is shown in Figure 7. Sg is the coordinate system of the generating gear. The coordinate system Ss is fixedly connected to the grinding wheel head. The origin Os coincides with the rotation center of Axis-A of the machine tool. The coordinate system Sm is the initial position of Ss. The coordinate axis Xm is parallel to the axis of the face gear. The coordinate axis Ym is parallel to Axis-Y of the machine tool. The coordinate system Sk is an auxiliary coordinate system that is parallel to the coordinate system Sm. The origin of Sk is located on the reference plane of the face gear. The coordinate axis Xk coincides with the axis of the face gear. The coordinate system Sf is fixedly connected to the face gear and rotates around the axis of the face gear by the angle φf. The distance from Os to Og along the Xs direction is a2. The distance from Om to Ok in the Xm direction is a1. Here, μ is the distance from point Om to the axis of the face gear.
The signs of the error factors are defined as follows: when η is positive, the center of rotation of the grinding wheel head is located on the left side of the face gear axis. When γ is positive, the center plane of the profile of the grinding wheel is located on the left side of the rotation center of the grinding wheel head. A positive λ indicates that the grinding wheel exits along the tooth depth direction. When ξ is positive, the length of the grinding wheel head set in the NC code is longer than the actual value.
The motion relationship between the generating gear and the face gear should be satisfied as:
φ f = φ g z g z f
According to the coordinate transformation, the tooth surface equation of the face gear is expressed as:
r f ( φ , φ g , μ ) = M f g r g n f ( φ , φ g , μ ) = T f g n g
where Mfg = MfkMkmMmsMsg, and each transformation matrix is expressed as:
M s g = 1 0 0 a 2 + ξ 0 1 0 γ 0 0 1 0 0 0 0 1
M m s = c o s φ g s i n φ g 0 a 2 a 2 c o s φ g s i n φ g c o s φ g 0 a 2 s i n φ g 0 0 1 0 0 0 0 1
M k m = 1 0 0 a 1 λ 0 1 0 η 0 0 1 μ 0 0 0 1
M f k = 1 0 0 0 0 c o s φ f s i n φ f 0 0 s i n φ f c o s φ f 0 0 0 0 1
According to the gear meshing theory [23], the meshing equation should be satisfied as:
f 1 ( φ , φ g , μ ) = d r f d φ d r f d μ × d r f d φ g = 0
When the radial position, Rp, and axial position, Ap, of a point on the tooth surface of the face gear in the coordinate system Sf are provided, the boundary conditions for the tooth surface equation are thus established as:
f 2 ( φ , φ g , μ ) = r f x A p = 0
f 3 ( φ , φ g , μ ) = r f y 2 + r f z 2 R p 2 = 0
The parameters Rp and Ap can be obtained by the discretized rotating projection plane of the gear tooth. The discretized method can be found in [3].
Equations (18)–(20) form a set of nonlinear equations with three unknown parameters (φ, φg, and μ). A convergence method (such as Newton’s method) can be used to obtain the tooth surface parameters at a certain point by providing appropriate initial values. Then, the three-dimensional coordinates of any point on the tooth surface of the face gear can be obtained by bringing the solution into Equation (13).

5. Analysis of the Tooth Surface Deviation

5.1. Distribution of the Deviation

The tooth surface deviation refers to the normal deviation between the actual machined tooth surface and the designed tooth surface. If the positional errors of the machine tool analyzed in this article are not zero, then the calculated tooth surface of the face gear will be inconsistent with the theoretical tooth surface. The position vector and the unit normal vector of the designed face gear tooth surface at radial position Rp and axial position Ap are represented as rf0 and nf0, respectively. When the positional errors of the machine tool are not equal to zero, the calculated position vector of the tooth surface at the same radial and axial positions is represented as rf. The tooth surface deviation is thus calculated using the following formula:
e = n f 0 ( r f r f 0 )
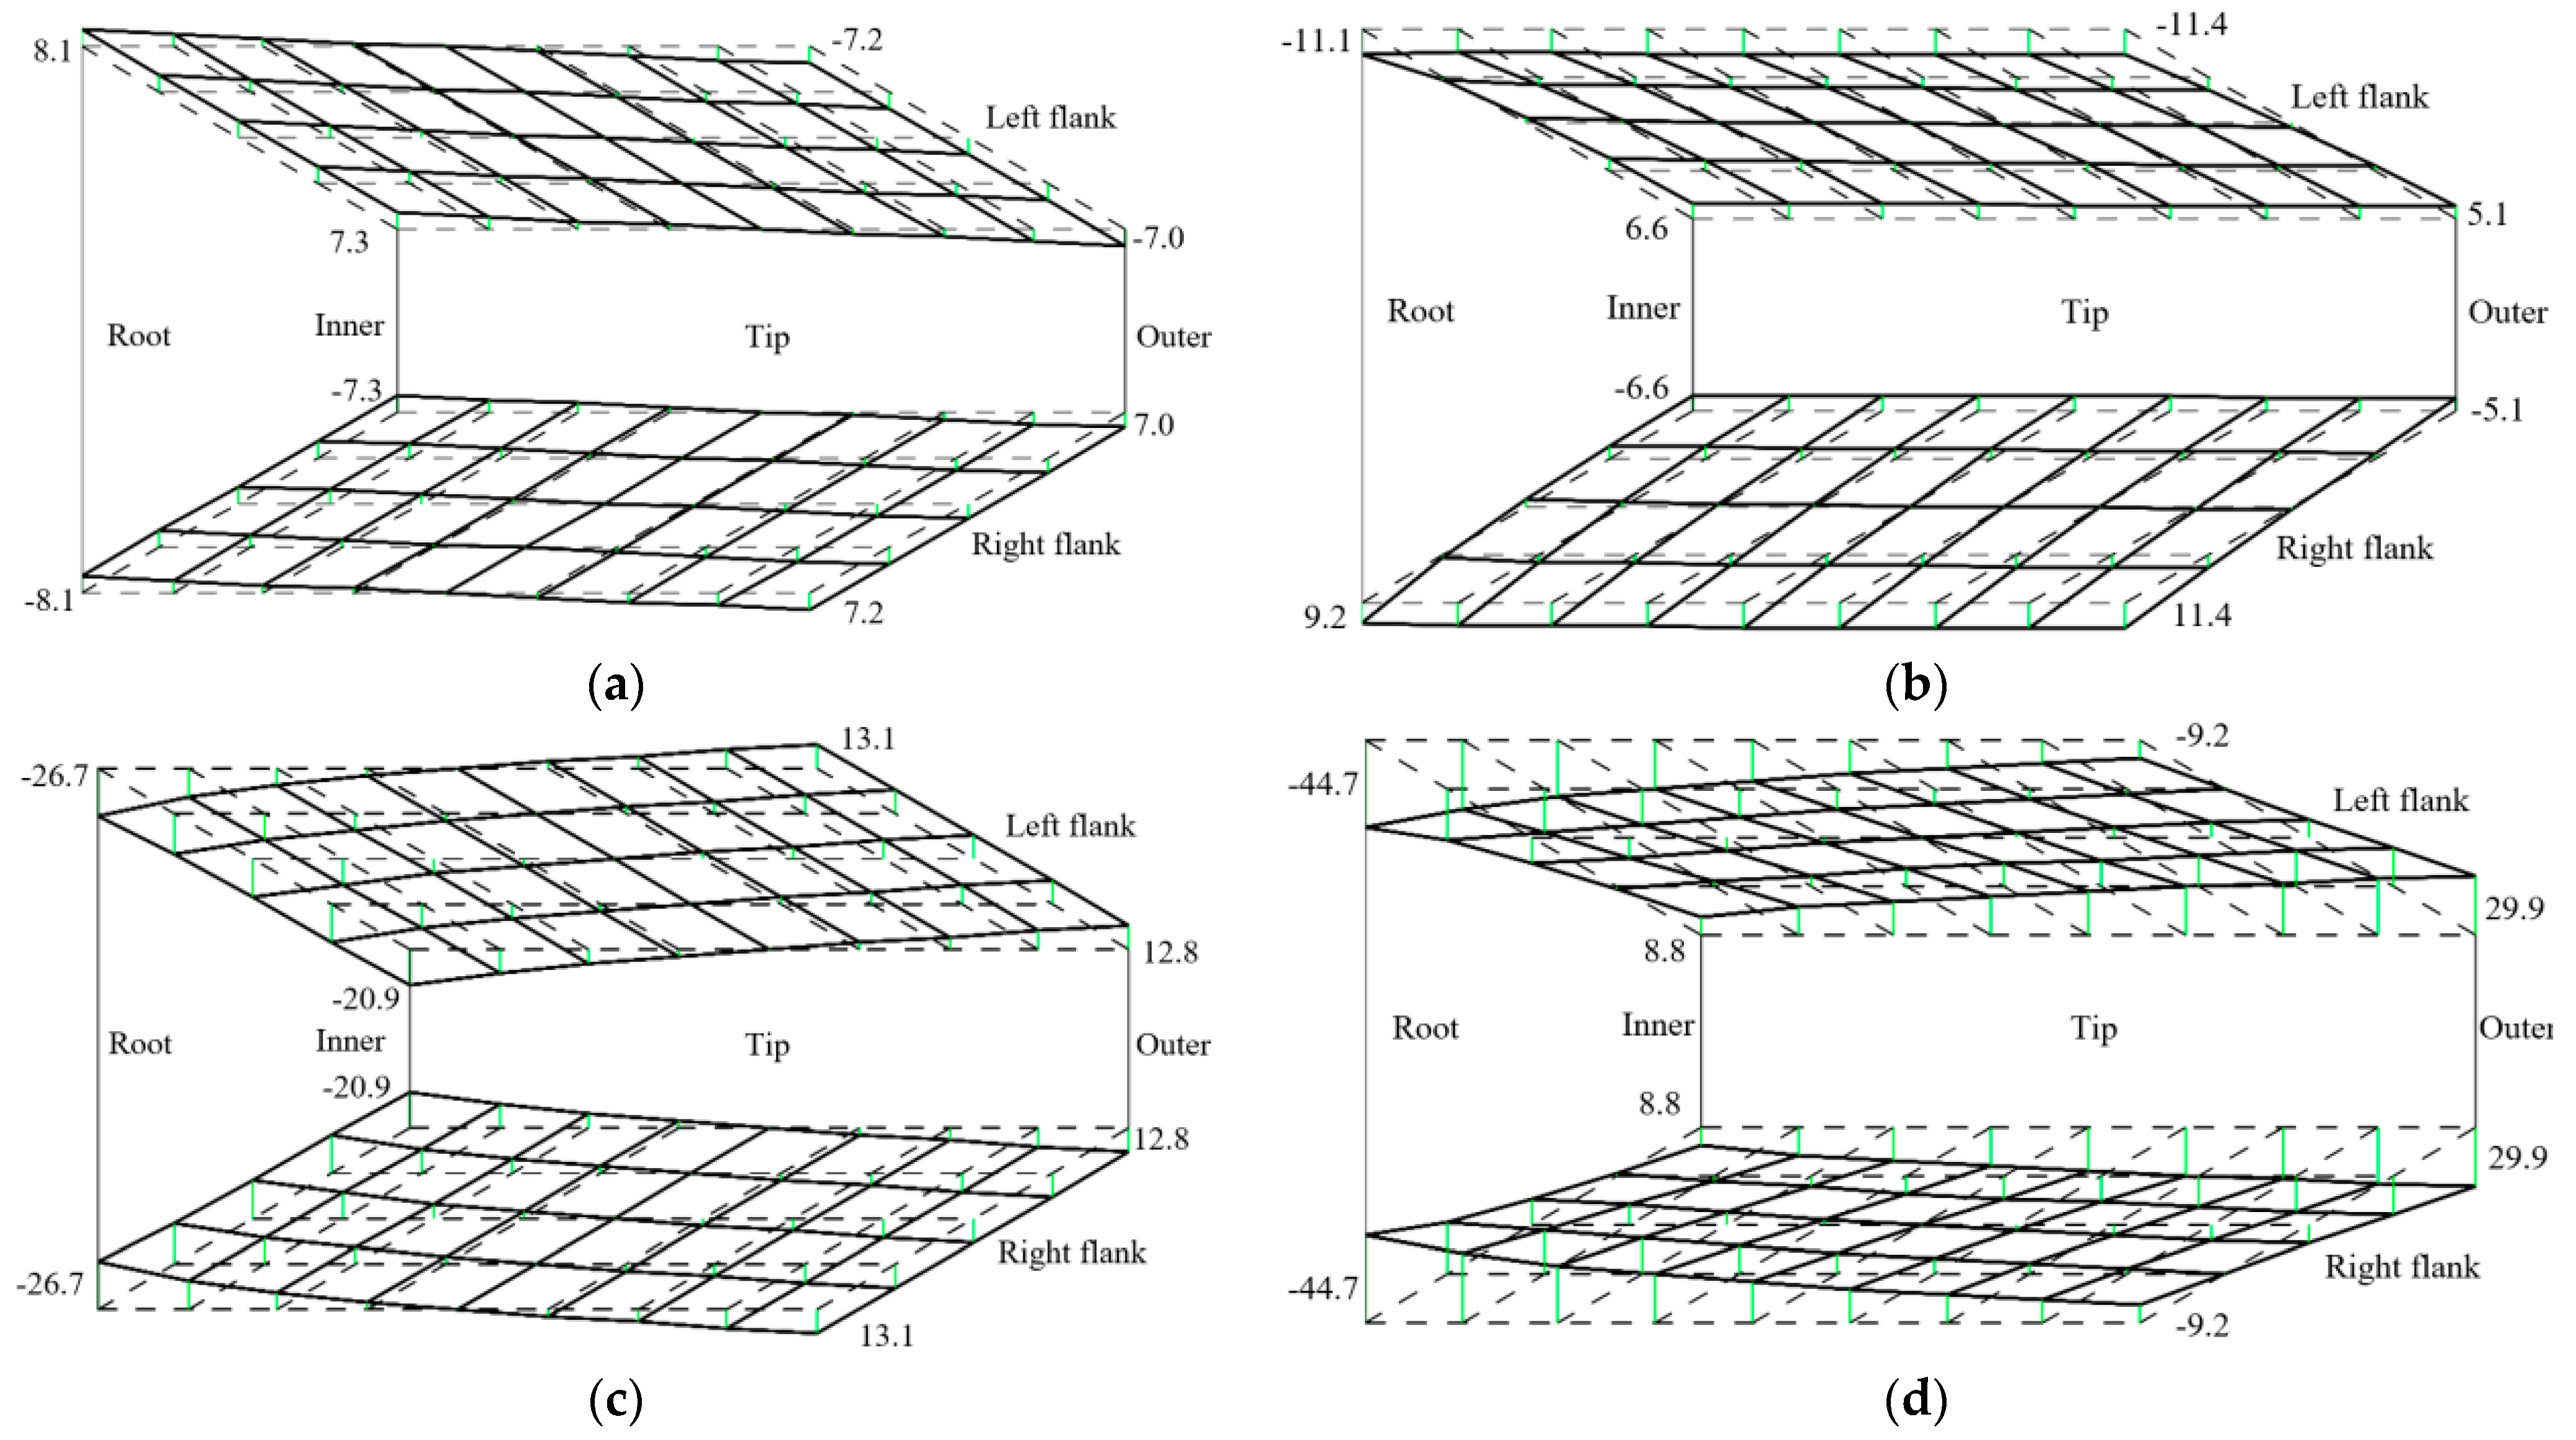
Taking the data in Table 1 as an example, Figure 8 shows the topological deviations of the designed tooth surface with a positional error of 0.1 mm for each factor.
Figure 8a shows that when the axis of the grinding wheel head did not intersect with the axis of the face gear, that is, when the grinding wheel head was offset to the left of the designed position (Figure 7), the tooth length direction of the face gear was significantly skewed. This resulted in negative deviations near the outer end and positive deviations near the inner end on the left tooth flank, and positive deviations near the outer end and negative deviations near the inner end on the right tooth flank. The variation in deviations along the tooth height direction was not significant.
Figure 8b shows that when the center plane of the profile of the grinding wheel was located on the left side of the rotation center of the grinding wheel head, the change in the pressure angle of the two flanks was different. The deviations near the top of the left flank were positive, while those near the root were negative, which indicates that the pressure angle decreased. The opposite was true for the right flank. The variation in the deviations along the tooth length direction was not significant.
Figure 8c shows that when the grinding wheel exited along the tooth height direction, the main manifestation was the change in the thickness at the outer and the inner ends. Both tooth flanks exhibited positive deviations at the outer end and negative deviations at the inner end. The variation in the deviations between the two tooth flanks was strictly symmetrical. These topology deviations caused the contact area of the face gear pair to move outward.
Figure 8d shows that when the setting value of the length of the grinding wheel head in the NC code was smaller than the actual value, deviations existed in the directions of tooth length and tooth height. The distributions of the deviations on the two tooth flanks were strictly symmetrical. For example, at the top and root of a tooth, the increase in thickness at the outer end was greater than that at the inner end. At both the inner and outer ends, the increase in thickness at the tooth tip was greater than that at the tooth root. The difference between the root of the inner tooth and the tip of the outer tooth was the largest, at 74.4 μm. Furthermore, Figure 7 shows that for different values of ξ, the geometric meaning was that the actual rotation center of the grinding wheel profile deviated from the rotation center of the generating gear along the length direction of the grinding head. The initial designed length of the grinding head did not affect the variation law of the tooth surface deviations caused by ξ.
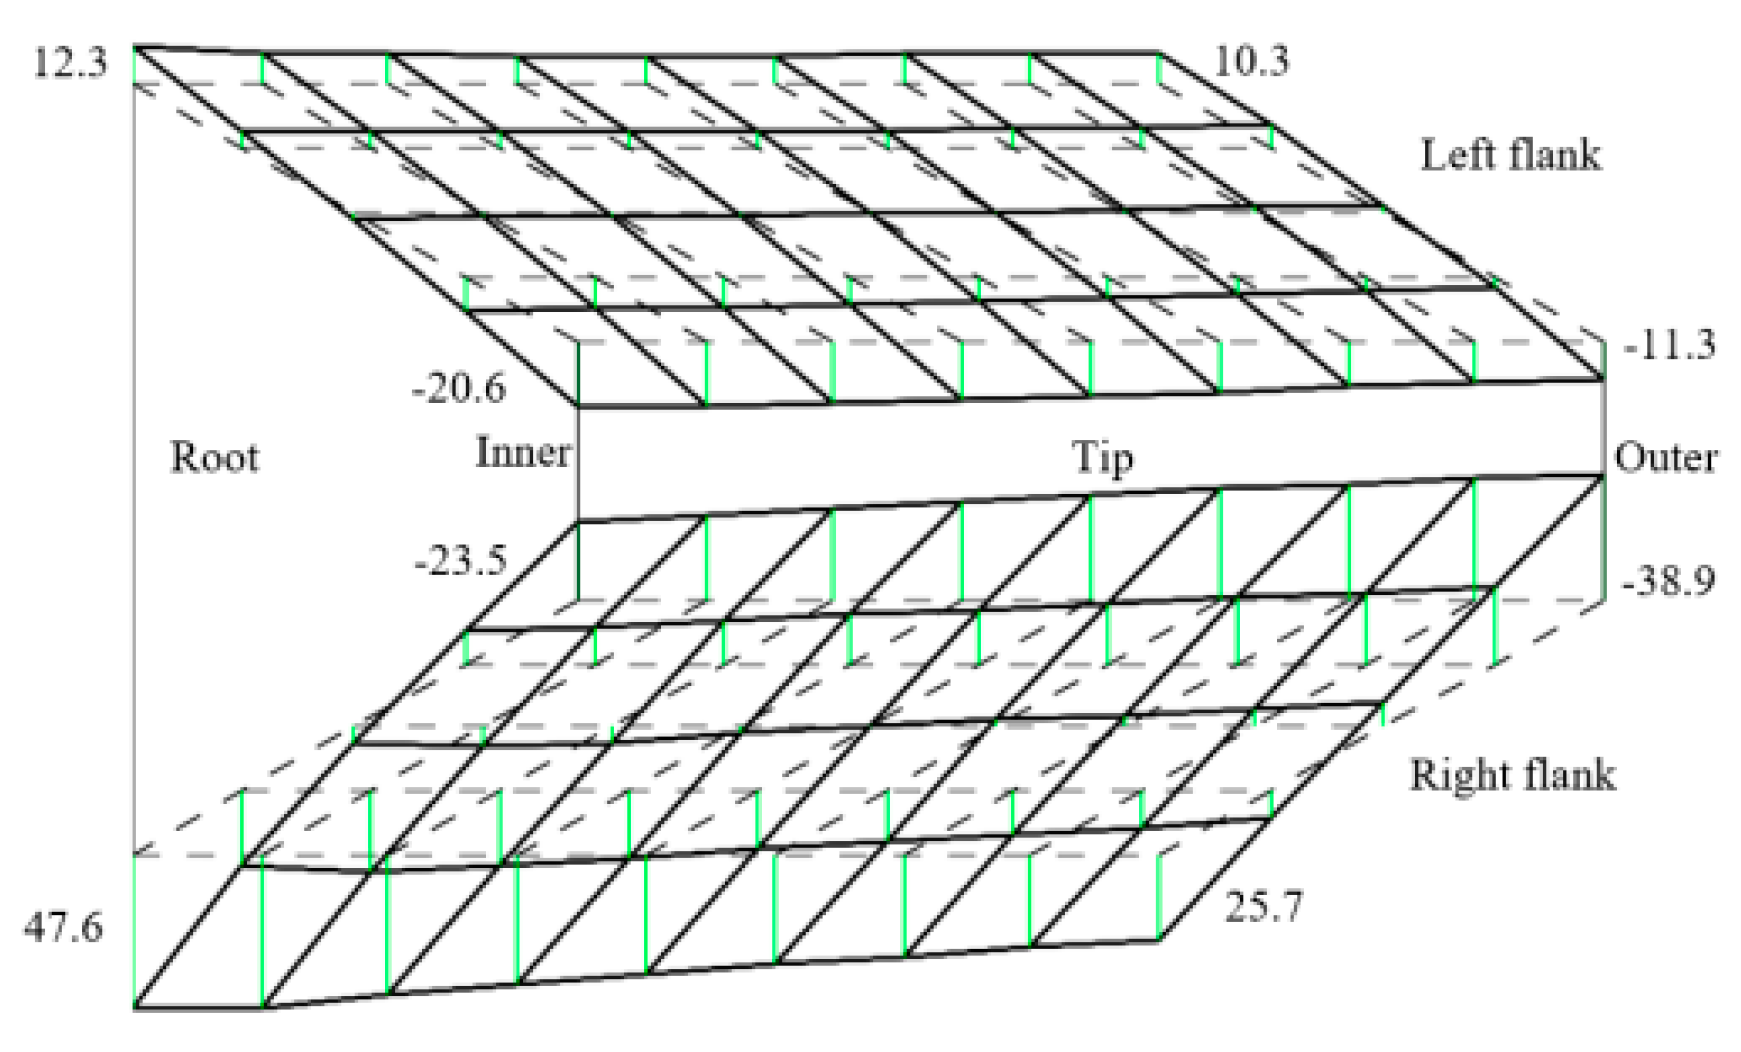
In conclusion, the influences of each error factor on the tooth length direction and tooth height direction were different. The distribution of tooth surface deviations was extremely complex. The deviations in Figure 8 were obtained under ideal conditions. In a true grinding process, tooth surface deviations are usually generated by various factors overlapping and influencing each other (Figure 9). To manufacture high-quality gears, it is necessary to solve the adjustment values of each error factor based on the detected deviations in the tooth surface.

5.2. Tooth Surface Correction Strategy

To calculate the correction values of various error factors that cause tooth surface deviations, a sensitivity matrix can be constructed via the least squares method. First, n points were selected on the left and right tooth flanks to describe the distribution of the tooth surface deviations. The prerequisite of this step is to ensure that the calculation points and the detection points correspond one-to-one on the rotating projection plane.
When the error factors were assigned a small but nonzero numerical variation, κ, the tooth surface deviations generated by the corresponding calculation points were expressed as:
e η = [ e η 1 , e η 2 , e η 3 , , e η 2 n ] T
e γ = [ e γ 1 , e γ 2 , e γ 3 , , e γ 2 n ] T
e λ = [ e λ 1 , e λ 2 , e λ 3 , , e λ 2 n ] T
e ξ = [ e ξ 1 , e ξ 2 , e ξ 3 , , e ξ 2 n ] T
The gradient change matrix of the tooth surface topological deviations, that is, the sensitivity matrix, was represented as:
G = 1 κ e η e γ e λ e ξ
The matrix G contained 2n rows and 4 columns.
The equation for the relationship between the error factors and the variation in tooth surface deviations was set as:
G X = E
where X = [η γ λ ξ]T is the solution of the four error factors. E is the detected deviation vector of the tooth surface, in which the order of the elements is the same as in Equations (22)–(25).
Equation (27) represents the comprehensive tooth surface deviation generated by various error factors under the influence of the sensitivity matrix G. The equation system contained 2n linear equations and 4 unknowns. Normally, 9 × 5 points on the left and right tooth surfaces are taken as the measuring points and are evenly distributed on the tooth surface of the face gear. There were 90 inspection points in total on the left and right tooth surfaces as input samples. Due to 2n > 4, Equation (27) is an overdetermined system of equations; therefore, there is no exact solution. We can set the least squares solution of the system of equations as the optimal solution:
X = G T G 1 G T E
The error factors that need to be adjusted for grinding parameters were derived as:
η γ λ ξ = X T
The maximum total deviations was 32.9 μm on the left tooth flank and 86.5 μm on the right tooth flank. After calculation using the method in Section 5.2, in which κ = 0.1, the adjustment of the error factors of the machine tool obtained is shown in Table 2. After adjusting the error factors, the deviation data of Case 2 could be obtained, as shown in Figure 10a. The maximum total deviation of the left flank was reduced to 1.2 μm, which was a reduction of 96.4%. The maximum total deviation in the right flank was reduced to 3.3 μm, which was a reduction of 96.2%. The constructed sensitivity matrix had a very significant effect on reducing tooth surface deviations. The deviation data of Case 3 (Figure 10b) were reduced to 0 by performing inverse correction based on the deviation data of Case 2, indicating that the actual position of the machine tool was adjusted back to the theoretical position.
This correction method can be applied not only to the inverse correction of tooth surface deviations but also to the active design of tooth surfaces. For example, we want to obtain the tooth surface shape Ω1 of the face gear, which is designed by artificially yielding some equations. Based on the face gear tooth surface, Ω2 (rf0), established in this article, a comparison can be made between Ω1 and Ω2 to obtain the deviation values at each point on the two tooth flanks. By using the deviation values of two types of tooth surfaces as the inspected deviations for the correctional calculation, the adjustment amount of the error factors can be obtained. Furthermore, if the tooth surface shape Ω1 is extremely complex, such as if the tooth height and tooth length are crowned designs, the four error factors mentioned in this article may not be sufficient to correct the tooth surface to approach the designed tooth surface Ω1 well. Under these circumstances, it is necessary to implement the nonlinear motion trajectory of the machine tool and construct more complex designs for the nonlinear modification of the grinding wheel profile. This approach provides ideas for the complex tooth surface design of face gears.

5.3. Contact Analysis

To verify the meshing quality of the face gear tooth surface machined by the presented grinding method, a loaded tooth contact analysis (LTCA) is carried out on the face gear pair in this section. Aiming at the study of LTCA, H. Ding [24,25] and V. Simon [26] conducted a series of studies on simulated loaded tooth contact analysis (SLTCA) and numerical loaded tooth contact analysis (NLTCA). The real tooth meshing quality of the presented grinding method could be obtained through the method of simulated loaded tooth contact analysis. The simulation analysis was conducted in ABAQUS 9.1.1 software. ABAQUS is a powerful suite of finite element software for engineering simulation. This software can analyze complex solid mechanics and structural mechanics systems, process and simulate large and complex models, and deal with highly nonlinear problems. Within this software, by importing the 3D model of the part, defining the material characteristics, boundary conditions, and other parameters, the force situation and motion state of the part can be simulated and analyzed.
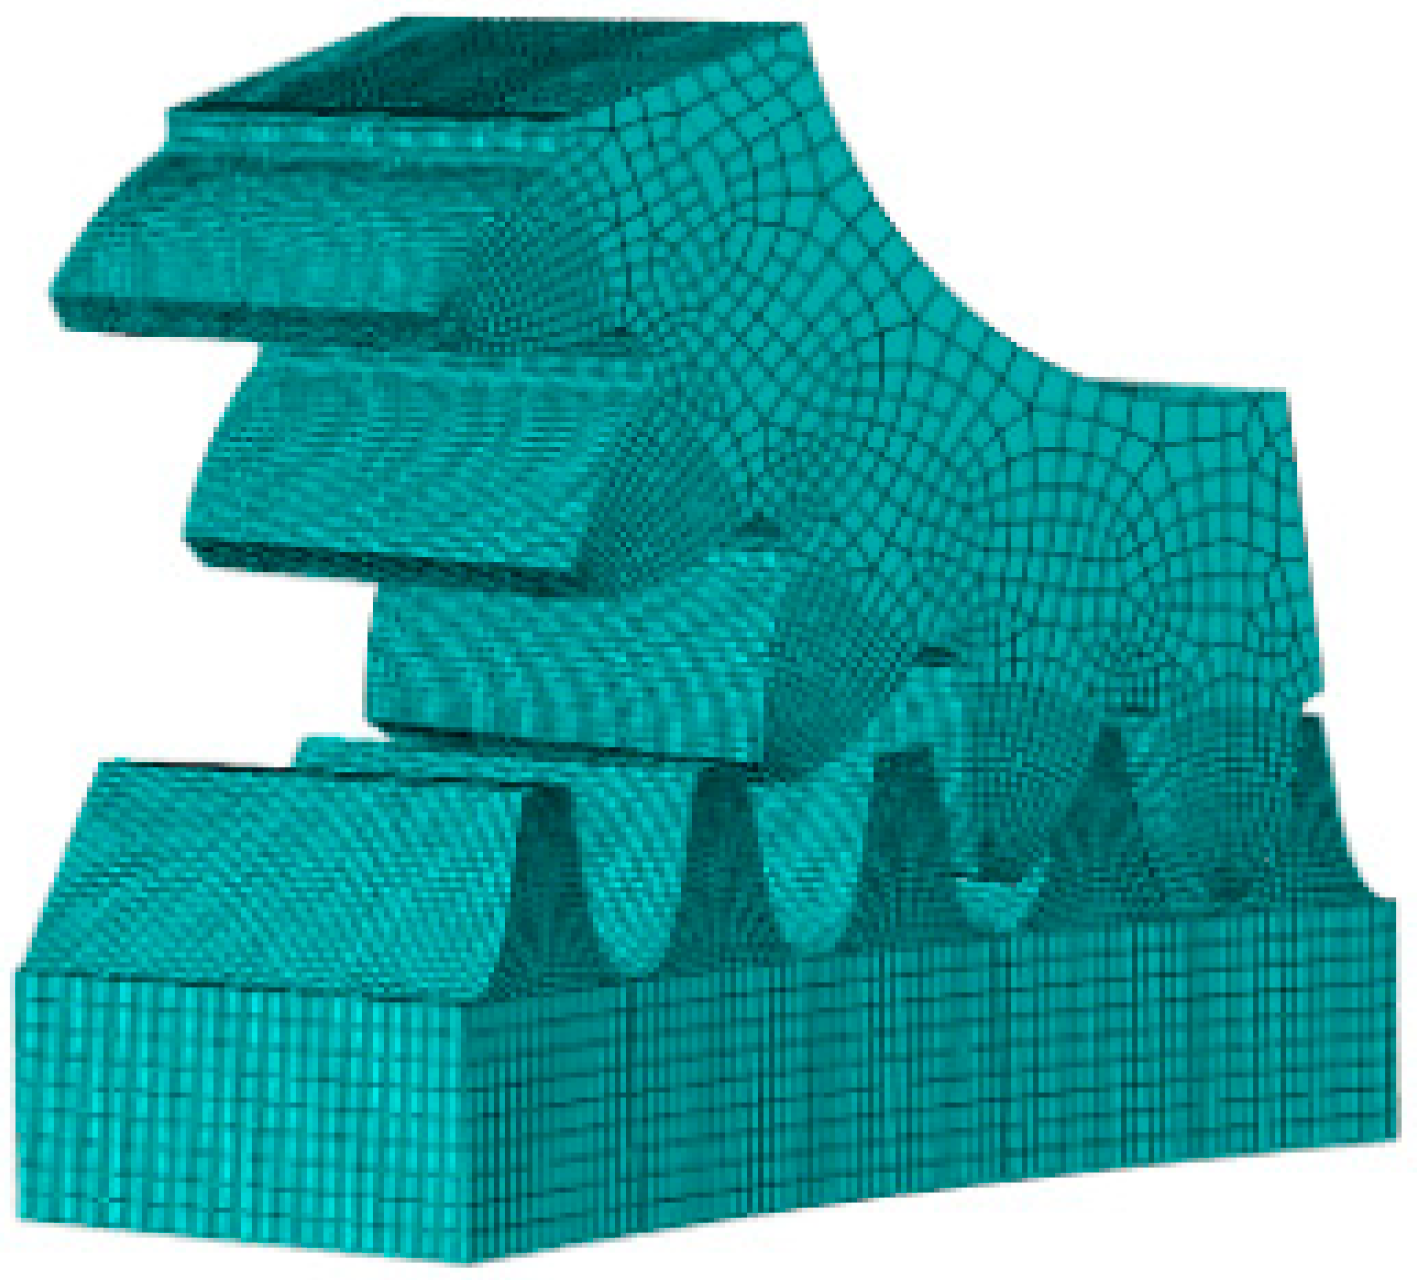
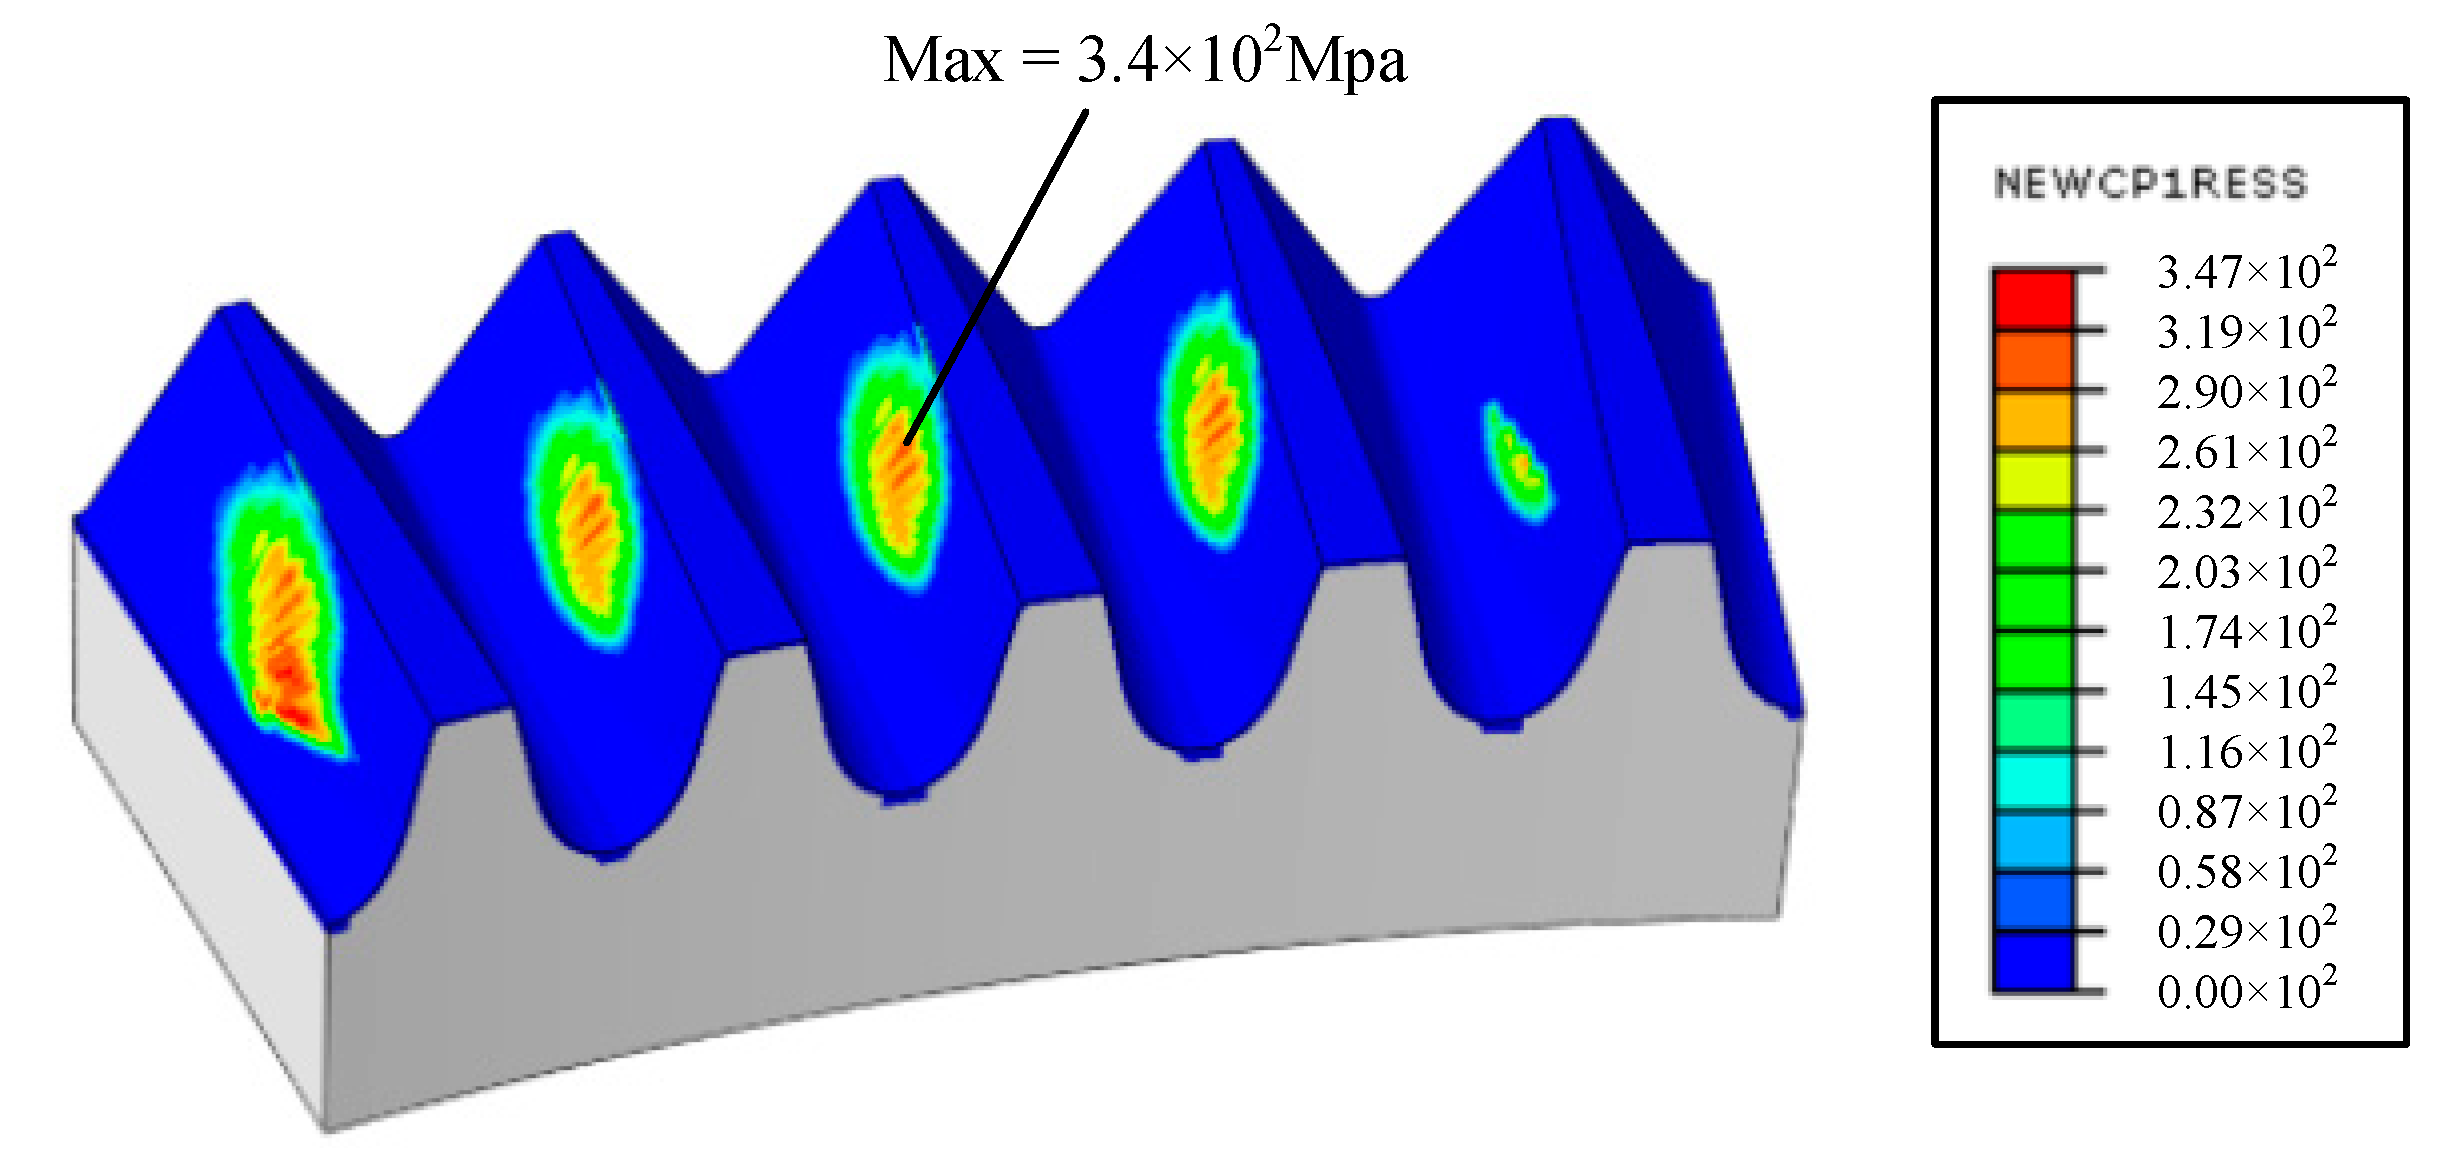
The pinion paired with the face gear is a cylindrical gear with 22 teeth, which is 2 teeth fewer than the number of teeth of the generating gear. The teeth were divided into hexahedral grids (see Figure 11). The calculation step was set to 0.01, meaning that 100 steps were required to complete the analysis. The material properties were as follows: the Young’s modulus was set as E = 2.09 × 10⁵ Mpa, Poisson’s ratio was v = 0.3, the coefficient of friction in tangential contact was set as 0.05, and the load on the face gear was defined as 200 Nm. The simulation results are shown in Figure 12 and Figure 13.
Figure 12 shows the contact stress distribution of the tooth surface during the entire meshing process. The stress nephograms of each instantaneous contact state were extracted and superimposed to form Figure 12. The high stress caused by the initial contact of the first tooth was unreasonable and was ignored. The maximum contact stress on the tooth surface was located in the middle of the tooth, and its value was 3.4 × 10² Mpa. There was no stress concentration in the entire contact area. The stress distribution on the tooth surface indicated that the face gear tooth was in a reasonable contact state.
Figure 13 shows the loading contact transmission error of the gear pair. The maximum transmission error of the tooth surface was 8.7 × 10⁻⁶ rad, and it exhibited a fluctuating pattern. This type of transmission error will be beneficial to the smooth transmission of the face gear pair. According to the LTCA results, the face gear tooth surface obtained by the proposed grinding method in this paper can mesh well with the cylindrical gear.

6. Experiment

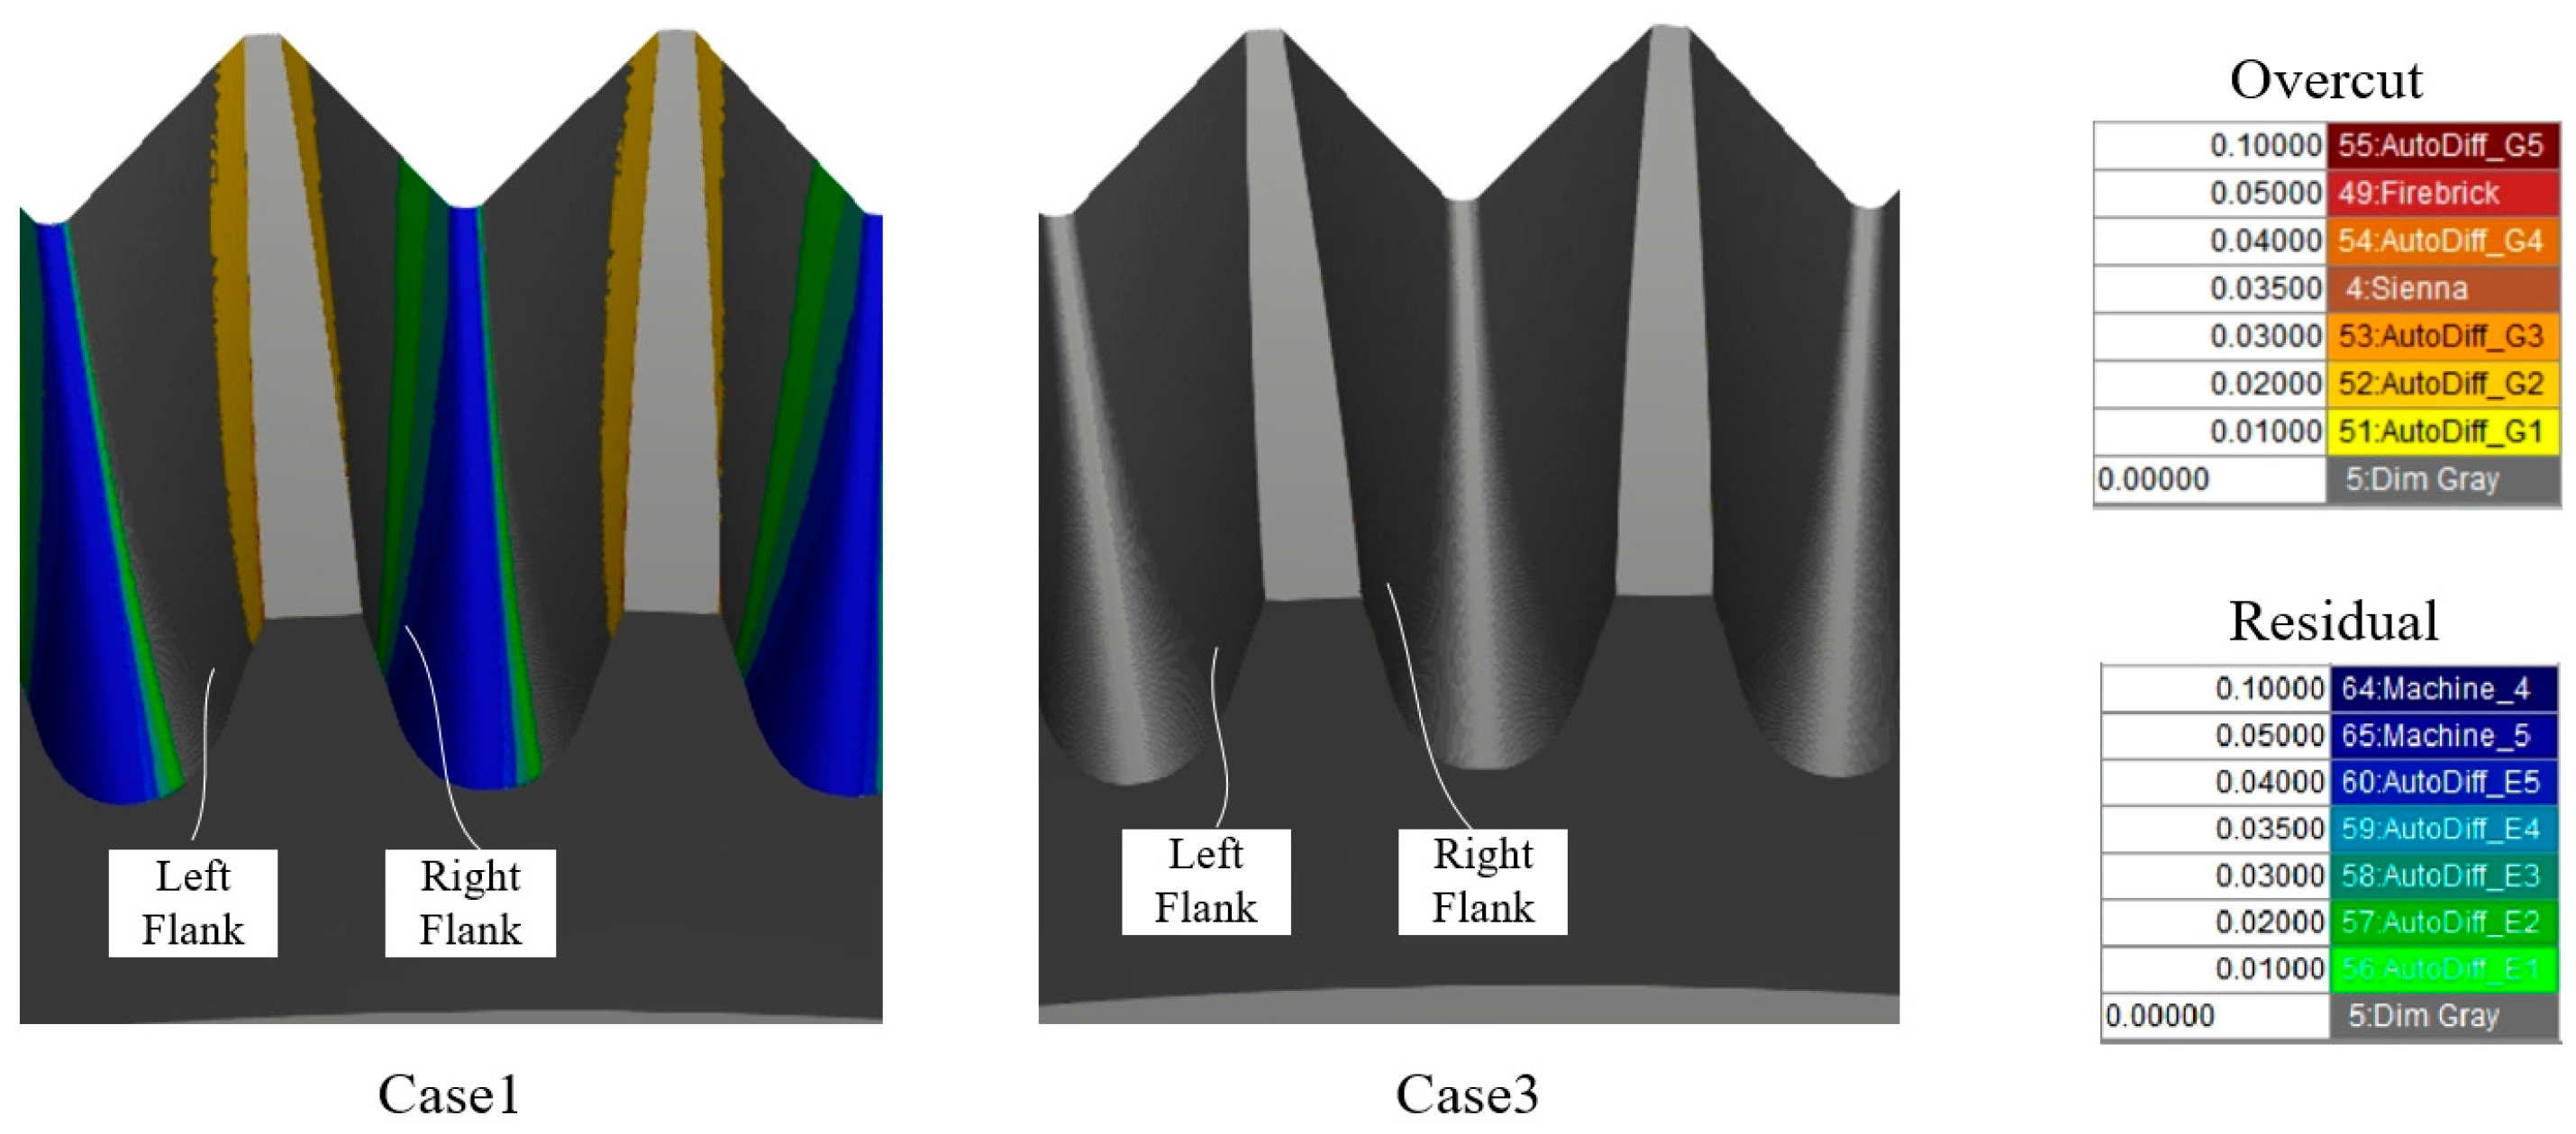
Based on the structure of the gear grinding machine mentioned in this paper, three-dimensional models of various components of the machine tool were created, and a corresponding machine tool was built in VERICUT 9.1.1 software. The NC macro-codes corresponding to the grinding process were designed, in which the motion relationship of the Y-axis and Z-axis satisfied Equation (2). The virtual machining process is shown in Figure 14. The maximum meshing angle used was φgmax = 24°. The discrete meshing angle step was 0.1°. To verify the accuracy of the proposed algorithm, the tooth surface of the virtual machined face gear was compared with that of the theoretically calculated face gear. The comparison results are shown in Figure 15.
In Figure 15, the left figure shows the distribution of deviations between the two tooth flanks compared using the setting values of various factors in Case 1. On the left tooth flank, the virtual machined face gear had a maximum positive deviation at the inner root of the work area, and the minimum negative deviation was at the inner tip of the work area. On the right tooth flank, the maximum positive deviation was at the inner root of the work area, and the minimum negative error was at the outer tip. The distributional characteristic of the deviations was consistent with the calculation results in Figure 9. When the values of the four error factors were all set to 0 in NC codes, the error-free tooth surface (Case 3) was obtained, as shown in the right figure, which is consistent with the results shown in Figure 10b. The virtual experiment, therefore, proved that the impact rule of the error factors on the tooth surface of the face gear analyzed in this paper was correct and that the correction data obtained through calculation were accurate.
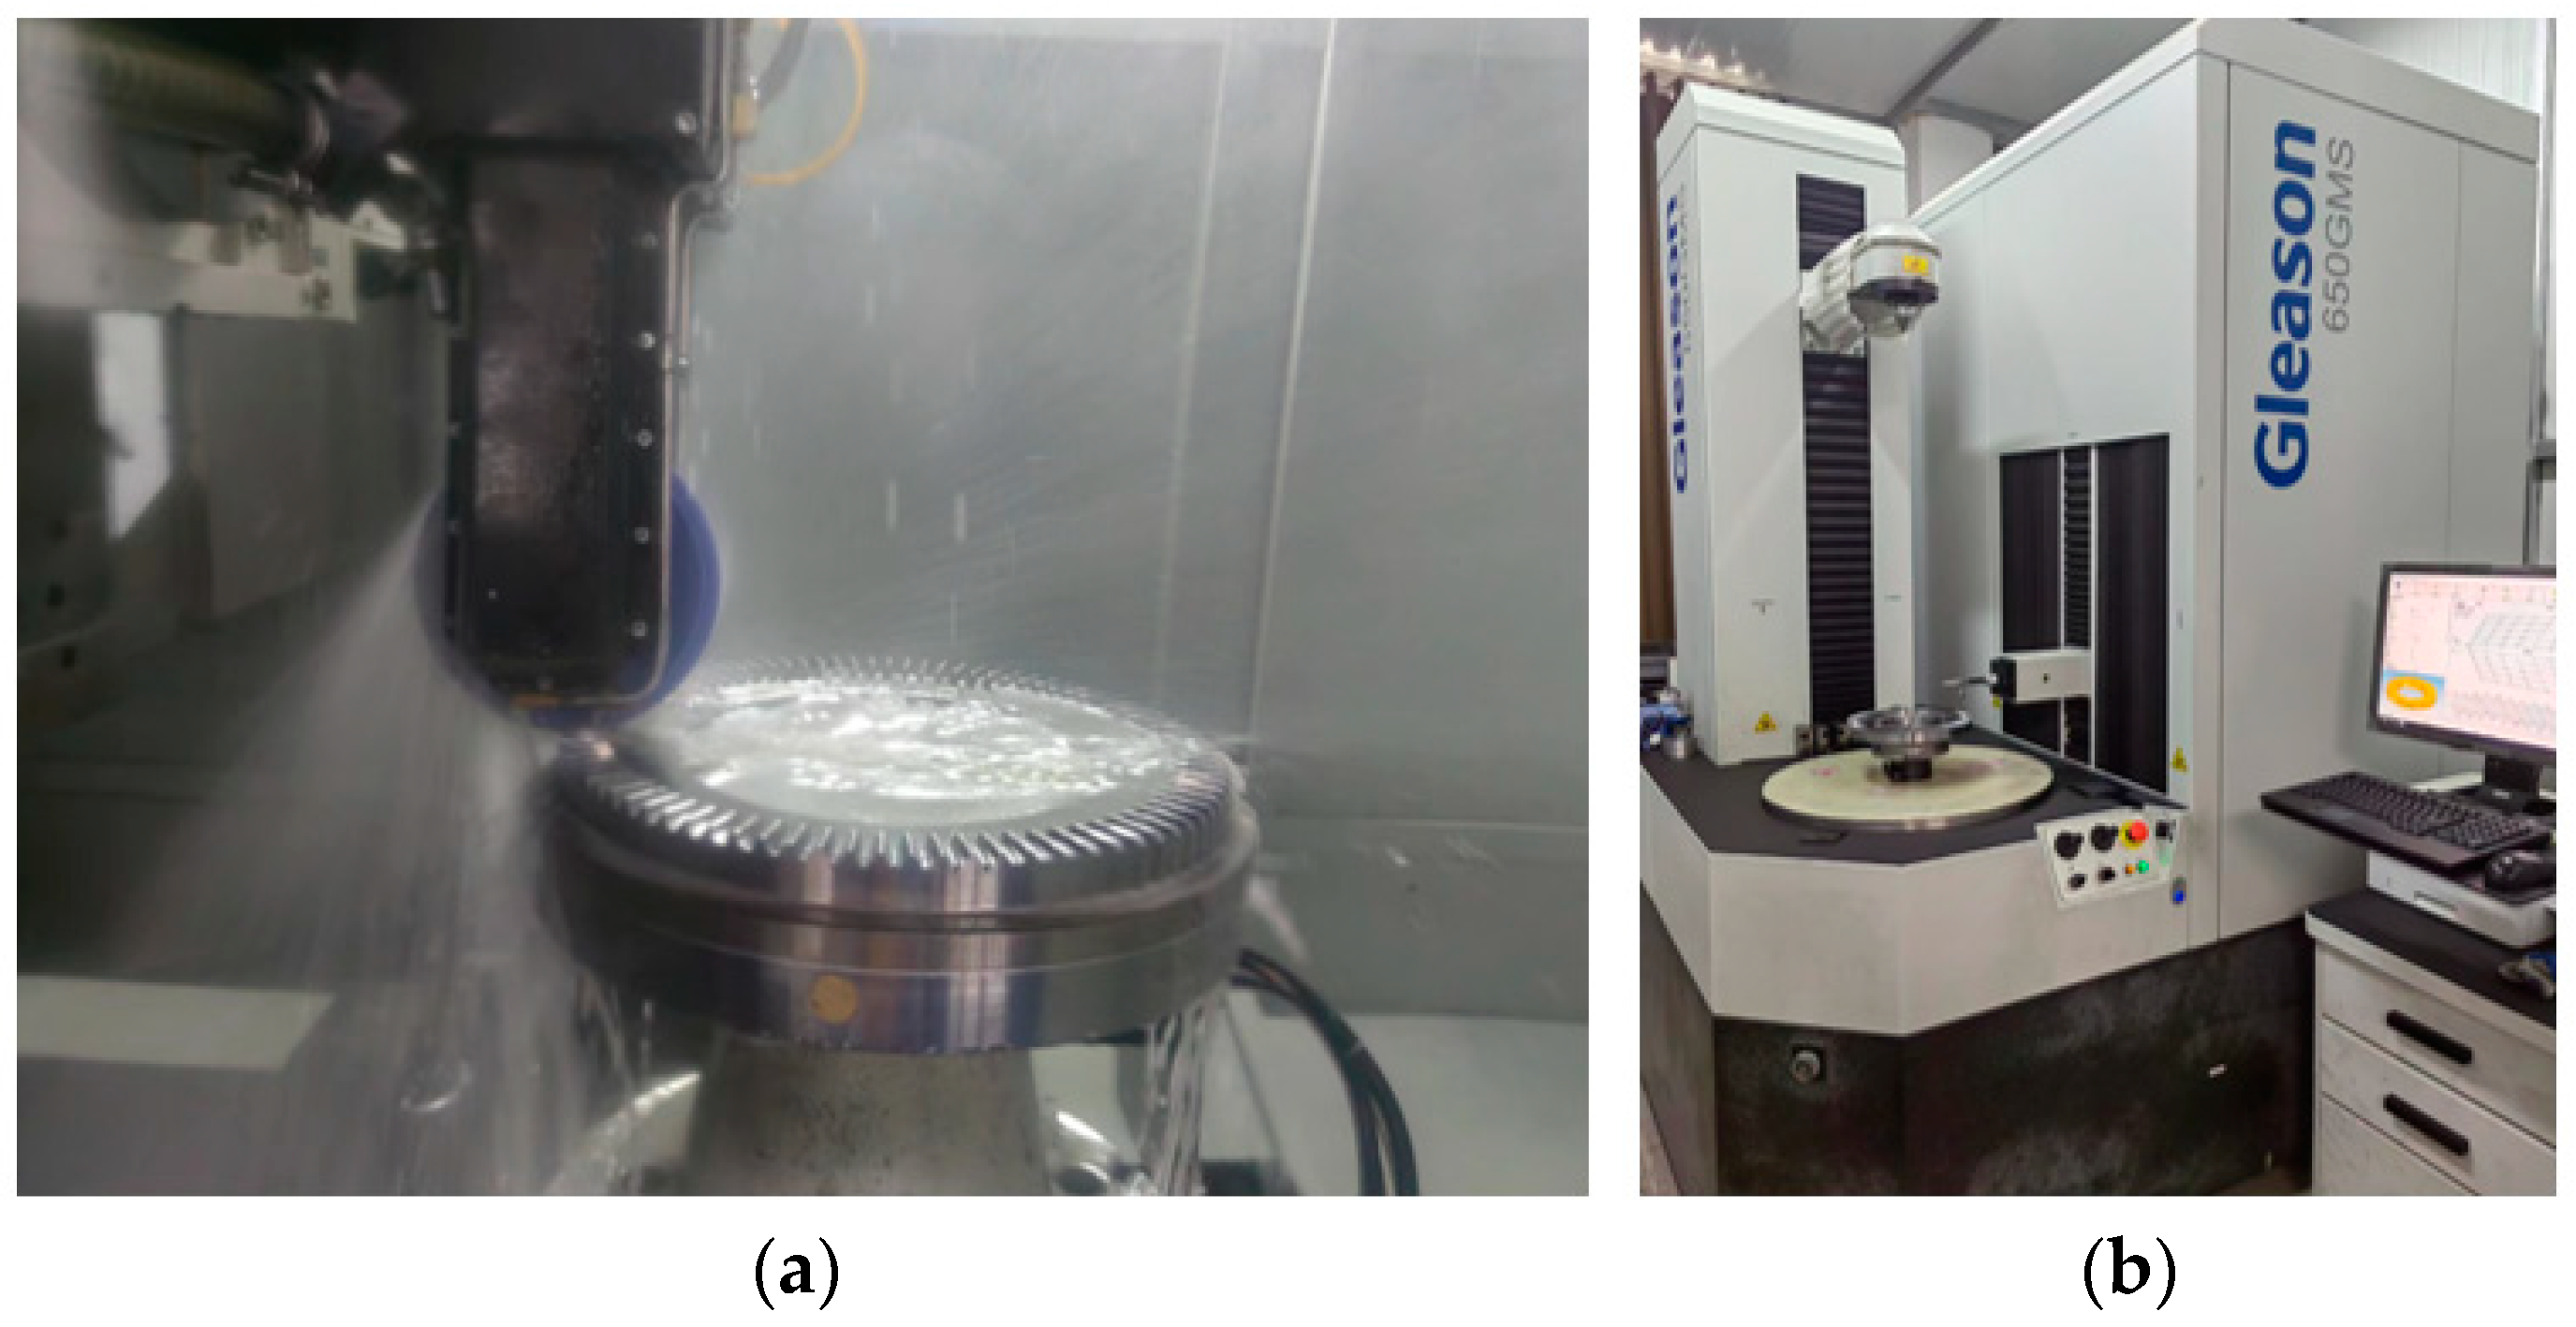
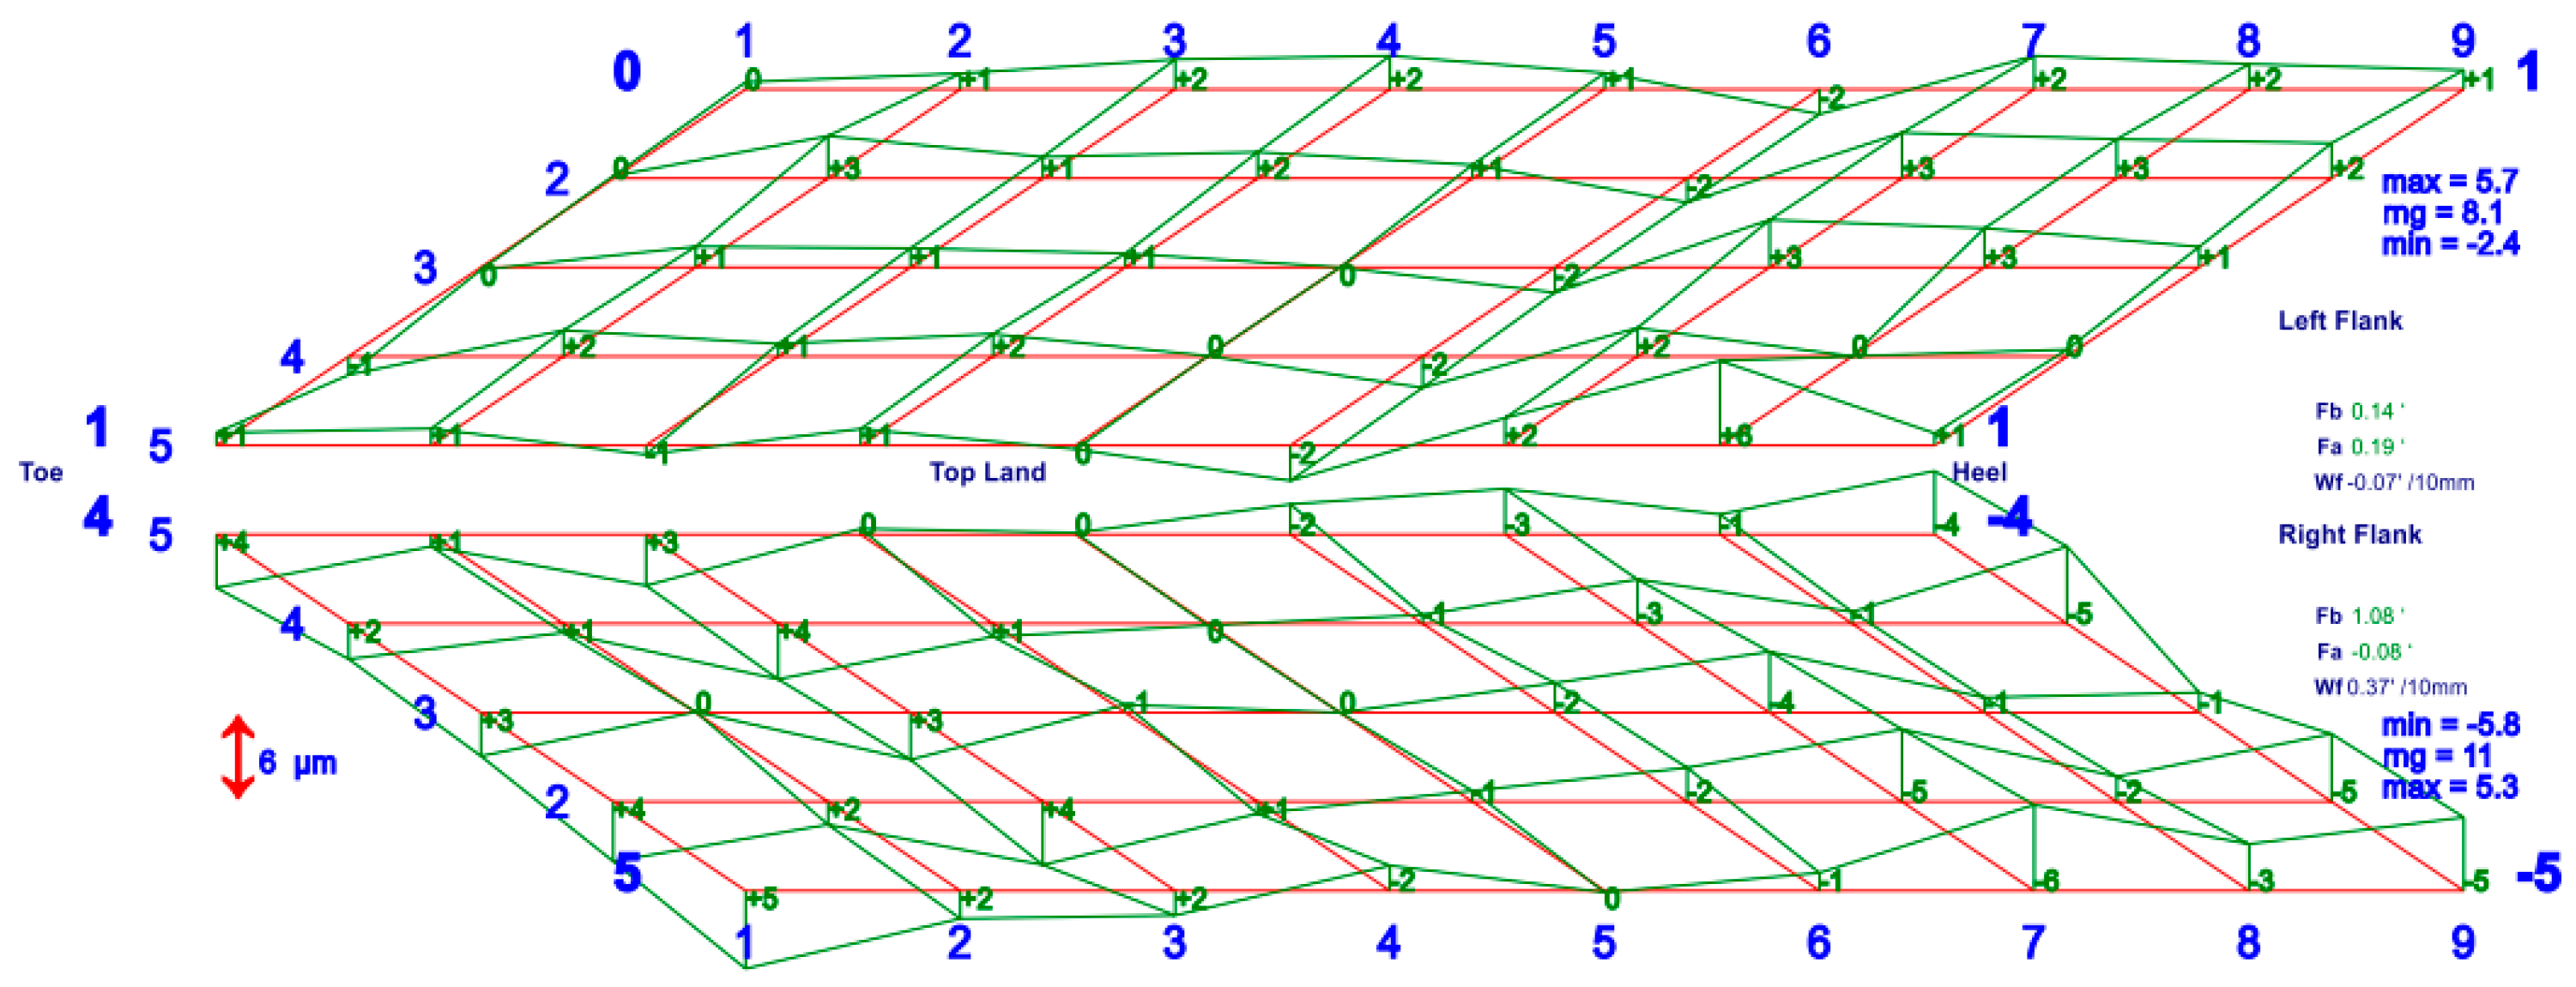
Furthermore, a grinding verification test was conducted on an internal gear grinding machine, utilizing the same NC code following the virtual machining process. The grinding process is shown in Figure 16. The linear speed of the grinding wheel was set at 40 m/s, while the grinding feed speed along the tooth length direction was 7000 mm/min. The material of the face gear was 20CrMnTi. To improve the grinding efficiency, the step size of the discrete meshing angle was reduced to 0.5°. The total grinding time amounted to approximately 96 min. The finished face gear was measured on a Gleason 650 GMS gear measuring machine. The position vector and the normal vector in Equation (13) provided the measuring path for the measuring machine. The measurement results are shown in Figure 17. In Figure 17, the maximum error of the two flanks was 11 μm, located on the right flank. Meanwhile, the maximum error of the left flank was 8.1 μm. The measurement result conclusively demonstrated that the internal gear grinding machine is capable of accurately grinding face gears.

7. Conclusions

The following conclusions were drawn from the research results obtained in this study:
  • The grinding methods for face gears on an internal gear grinding machine were analyzed.
  • A mathematical model containing positional errors of the machine tool was established, and this model can accurately predict the variation law of tooth surface deviations of face gears.
  • A method in which a sensitivity matrix was used to adjust the grinding deviation of the tooth surface was developed. This method easily converged and could accurately calculate the adjustment parameters of the machine tool based on the distribution of the deviations in the tooth surface. The deviations in the tooth surface of the face gear were significantly reduced.

Author Contributions

Conceptualization, L.G. and Y.F.; methodology, Z.H.; software, Z.H.; validation, X.D. and C.Z.; formal analysis, Z.H.; investigation, L.G.; resources, C.J.; writing—original draft preparation, Z.H.; writing—review and editing, Z.H. and C.J.; supervision, X.D. All authors have read and agreed to the published version of the manuscript.

Funding

This research was funded by the National Natural Science Foundation of China, grant number 52005157; the National Science and Technology Major Project of China, grant number HT-J2019-VII-0017-0159; the Henan Provincial Science and Technology Research Project, China, grant number 242102220084, and the Longmen Laboratory Frontier Exploration Project, grant number LMQYTSKT024.

Data Availability Statement

All relevant data are within the paper.

Conflicts of Interest

The authors declare no conflicts of interest.

References

  1. Heath, G.F.; Filler, R.; Tan, J. Development of Face Gear Technology for Industrial and Aerospace Power Transmission; Glenn Research Center: Cleveland, OH, USA, 2002; NASA/CR-2002-211320. [Google Scholar]
  2. Inoue, T.; Kurokawa, S. Influence of waveform components derived from the transmission error of a face gear pair on a fishing reel based on tactile sensibility. Precis. Eng. 2018, 51, 232–243. [Google Scholar] [CrossRef]
  3. Han, Z.; Jiang, C.; Deng, X. Machining and meshing analysis of face gears by power skiving. J. Adv. Mech. Des. Syst. Manuf. 2022, 16, JAMDSM0002. [Google Scholar] [CrossRef]
  4. Litvin, F.L.; Fuentes, A.; Zanzi, C.; Pontiggia, M.; Handschuh, R.F. Face-gear drive with spur involute pinion: Geometry, generation by a worm, stress analysis. Comput. Methods Appl. Mech. Eng. 2002, 191, 2785–2813. [Google Scholar] [CrossRef]
  5. Litvin, F.; Chen, Y.; Heath, G.; Sheth, V.; Chen, N. Apparatus and Method for Precision Grinding Face Gear. Patent number 6,146,253, 14 November 2000. Available online: https://www.freepatentsonline.com/6146253.html (accessed on 14 November 2000).
  6. Li, X.Z.; Zhu, R.P.; Li, Z.M.Q.; Li, F.J. Study on designing and dressing of worm for grinding process of face gear. Appl. Mech. Mater. 2011, 86, 475–478. [Google Scholar] [CrossRef]
  7. Tang, Z.; Zhou, Y.; Wang, S.; Zhu, J.; Tang, J. An innovative geometric error compensation of the multi-axis CNC machine tools with non-rotary cutters to the accurate worm grinding of spur face gears. Mech. Mach. Theory 2022, 169, 104664. [Google Scholar] [CrossRef]
  8. Zhou, Y.; Tang, J.; Zhou, H.; Yin, F. Multistep method for grinding face-gear by worm. J. Manuf. Sci. Eng. 2016, 138, 071013. [Google Scholar] [CrossRef]
  9. Shi, X.; Zhou, Y.; Tang, J.; Li, Z. An innovative generated approach to dressing the worm for grinding spur face gears. Manuf. Lett. 2020, 25, 26–29. [Google Scholar] [CrossRef]
  10. Shi, X.; Zhou, Y.; Zhang, W.; Tang, J. A new worm grinding method of face gears based on the optimization of dressing wheel profile. Forsch. Im Ingenieurwesen 2019, 83, 751–757. [Google Scholar] [CrossRef]
  11. Zhou, Y.S.; Tang, Z.W.; Shi, X.L.; Tang, J.Y.; Li, Z.-M.Q. Efficient and accurate worm grinding of spur face gears according to an advanced geometrical analysis and a closed-loop manufacturing process. J. Cent. South Univ. 2022, 29, 1–13. [Google Scholar] [CrossRef]
  12. Wang, Y.Z.; Chu, X.M.; Zhao, W.J.; Wang, Z.; Su, G.Y.; Huang, Y.Z. A precision generating hobbing method for face gear with assembly spherical hob. J. Cent. South Univ. 2019, 26, 2704–2716. [Google Scholar] [CrossRef]
  13. Tang, J.Y.; Yin, F.; Chen, X.M. The principle of profile modified face-gear grinding based on disk wheel. Mech. Mach. Theory 2013, 70, 1–15. [Google Scholar] [CrossRef]
  14. Shen, Y.; Liu, X.; Li, D.; Li, Z. A method for grinding face gear of double crowned tooth geometry on a multi-axis CNC machine. Mech. Mach. Theory 2018, 121, 460–474. [Google Scholar] [CrossRef]
  15. Zhou, R.; Zhao, N.; Li, W.; Li, R.; Guo, G.; Guo, H. A grinding method of face gear mating with a conical spur involute pinion. Mech. Mach. Theory 2019, 141, 226–244. [Google Scholar] [CrossRef]
  16. Guo, H.; Peng, X.; Zhao, N.; Zhang, S. A CNC grinding method and envelope residual model for face gear. Int. J. Adv. Manuf. Technol. 2015, 79, 1689–1698. [Google Scholar] [CrossRef]
  17. Guo, H.; Gonzalez-Perez, I.; Fuentes-Aznar, A. Computerized generation and meshing simulation of face gear drives manufactured by circular cutters. Mech. Mach. Theory 2019, 133, 44–63. [Google Scholar] [CrossRef]
  18. Wang, Y.; Hou, L.; Lan, Z.; Zhang, G. Precision grinding technology for complex surface of aero face-gear. Int. J. Adv. Manuf. Technol. 2016, 86, 1263–1272. [Google Scholar] [CrossRef]
  19. Wang, Y.; Liu, Y.; Chu, X.; He, Y.; Zhang, W. Calculation model for surface roughness of face gears by disc wheel grinding. Int. J. Mach. Tools Manuf. 2017, 123, 76–88. [Google Scholar] [CrossRef]
  20. Ma, X.; Cai, Z.; Yao, B.; Chen, G.; Cai, S.; Liu, W. Prediction model for surface generation mechanism and roughness in face gear grinding. Int. J. Adv. Manuf. Technol. 2022, 120, 4423–4442. [Google Scholar] [CrossRef]
  21. Hermann, J. CONIFACE face gear cutting and grinding. Int. J. Gear Solut. 2010, 18, 39–47. [Google Scholar]
  22. Peng, X.L.; Niu, Q.Y.; Guo, W.; Fang, Z.D. A new method of motion rule synthesis for face gear manufacturing by plane-cutter. J. Mech. Des. 2017, 140, 023302. [Google Scholar] [CrossRef]
  23. Litvin, F.; Fuentes, A. Gear Geometry and Applied Theory; Cambridge University Press: Cambridge, UK, 2004. [Google Scholar]
  24. Ding, H.; Zhou, Y.; Tang, J.; Zhong, J.; Zhou, Z.; Wan, G. A novel operation approach to determine initial contact point for tooth contact analysis with errors of spiral bevel and hypoid gears. Mech. Mach. Theory 2017, 109, 155–170. [Google Scholar] [CrossRef]
  25. Peng, S.; Ding, H.; Tang, J. Accurate numerical computation of loaded tooth surface contact pressure and stress distributions for spiral bevel gears by considering time-varying meshing characteristics. Adv. Eng. Softw. 2019, 135, 102683. [Google Scholar] [CrossRef]
  26. Simon, V.V. Optimization of face-hobbed hypoid gears. Mech. Mach. Theory 2014, 77, 164–181. [Google Scholar] [CrossRef]
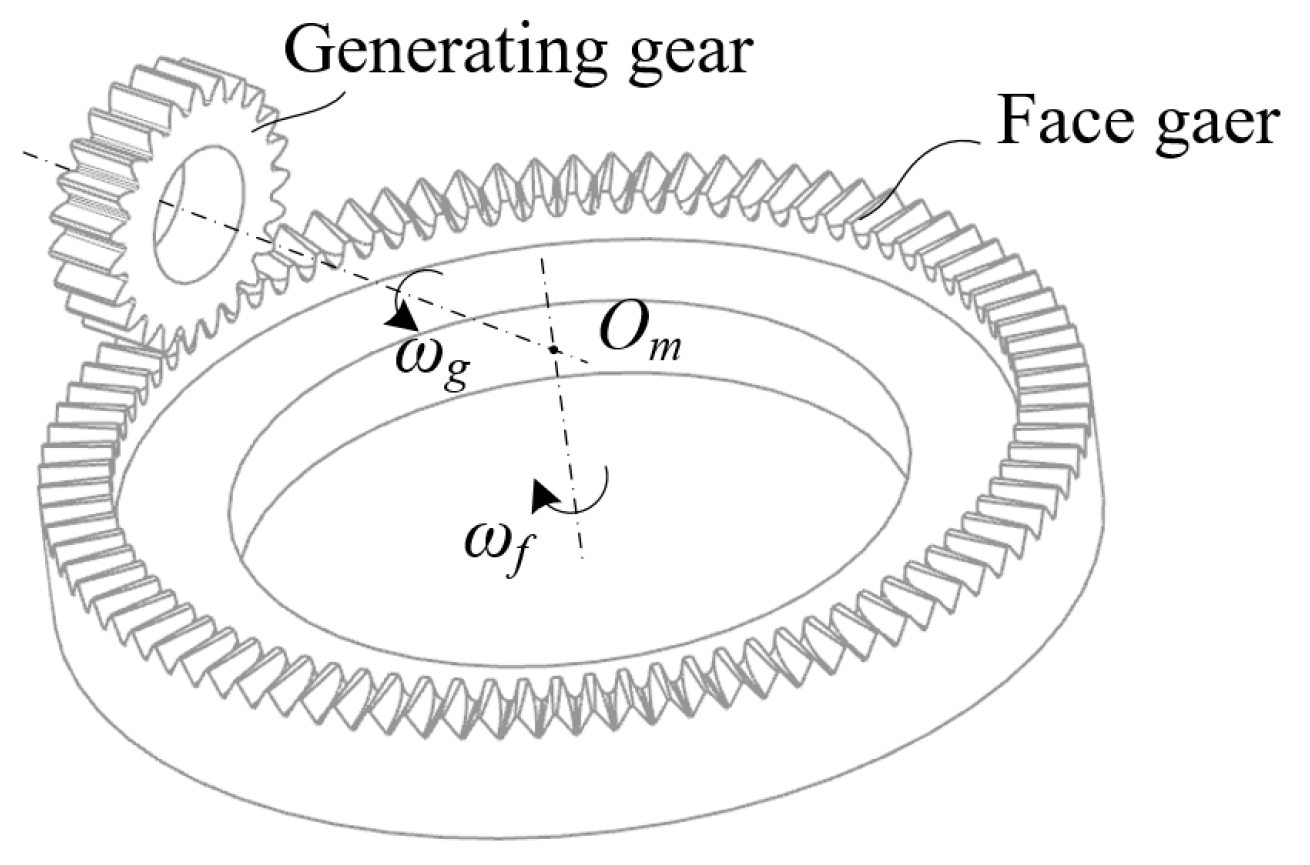
Figure 1. Relative location between the generating gear and face gear.
Machines 12 00496 g001
Figure 2. Grinding motion.
Machines 12 00496 g002
Figure 3. Structure of the gear grinding machine: 1-X slide, 2-machine base, 3-Y slide, 4-Z slide, 5-grinding wheel head, 6-grinding wheel, 7-dresser, 8-face gear, and 9-workpiece turntable.
Machines 12 00496 g003
Figure 4. Dressing scheme.
Machines 12 00496 g004
Figure 5. Grinding scheme.
Machines 12 00496 g005
Figure 6. Sectional profile of the grinding wheel.
Machines 12 00496 g006
Figure 7. Kinematic model of the grinding process: (a) front view and (b) top view.
Machines 12 00496 g007
Figure 8. Tooth surface topology deviations (unit: μm): (a) η = 0.1 mm, (b) γ = 0.1 mm, (c) λ = 0.1 mm, and (d) ξ = 0.1 mm.
Machines 12 00496 g008
Figure 9. Synthetical deviation of the tooth surface (unit: μm). Case 1: η = −0.1 mm, γ = 0.13 mm, λ = 0.06 mm, and ξ = −0.11 mm.
Machines 12 00496 g009
Figure 10. Correction results (unit: μm): (a) Case 2 and (b) Case 3.
Machines 12 00496 g010
Figure 11. Divided grids.
Machines 12 00496 g011
Figure 12. Stress distribution during the entire meshing process.
Machines 12 00496 g012
Figure 13. Transmission error.
Machines 12 00496 g013
Figure 14. Virtual machining process.
Machines 12 00496 g014
Figure 15. Comparison of tooth surface deviation (unit: mm).
Machines 12 00496 g015
Figure 16. Machining test: (a) gear grinding and (b) gear measurement.
Machines 12 00496 g016
Figure 17. Measuring result (unit: μm).
Machines 12 00496 g017
Table 1. Basic parameters of the face gear.
ParametersValues
Teeth number of the generating gearzg = 24
Modulem = 4
Pressure angleα = 25°
Teeth number of the face gearzf = 86
Inner diameter of the face geardi = 320 mm
Outer diameter of the face geardo = 370 mm
Radius of the grinding wheelrG = 100 mm
Length of the grinding headL = 350 mm
Dedendum of the face gearhf = 5 mm
Table 2. Calculated data (unit: mm).
FactorsCase 1−X1Case 2−X2Case 3
η−0.10.095−0.0050.0050
γ0.13−0.1280.002−0.0020
λ0.06−0.062−0.0020.0020
ξ−0.110.108−0.0020.0020
Disclaimer/Publisher’s Note: The statements, opinions and data contained in all publications are solely those of the individual author(s) and contributor(s) and not of MDPI and/or the editor(s). MDPI and/or the editor(s) disclaim responsibility for any injury to people or property resulting from any ideas, methods, instructions or products referred to in the content.