Abstract
Modern electric motors developed for the automotive industry have an ever higher power density with a relatively compact size. Among the various existing solutions to improve torque and power density, a reduction in the dimensions of the end-windings has been explored, aiming to decrease volume, weight, and losses. However, more compact end-windings often lead to complex shapes of the conductors, especially when preformed hairpin windings are considered. The rectangular cross-section of hairpin conductors makes them prone to deviating out of the bending plane during the forming process. This phenomenon, known as torsional–flexural instability, is influenced by the specific aspect ratio of the cross-section dimensions and the bending direction. This study focuses on understanding this instability phenomenon, aiming to identify a potential threshold of the cross-section aspect ratio. The instability makes it difficult to predict the final geometry, potentially compromising the compliance with the geometric tolerances. A finite element model is developed to analyse a single planar bend in a hairpin conductor. Various cross-section dimensions with different aspect ratios are simulated identifying those that experience instability. Moreover, an experimental campaign is conducted to confirm the occurrence of instability by testing the same single planar bending. The experimental data obtained are used to validate the finite element model for the tested dimensions. The aim is to provide designers with a useful tool to select hairpin geometries that are more suitable for the folding process, contributing to successful assembly and improving the overall design process of preformed hairpin conductors.
1. Introduction
The need for more sustainable mobility has driven developments in electric machines in recent years. In particular, the automotive sector demands increasingly higher power and torque density to meet performance targets, especially concerning the power-to-weight ratio of an entire vehicle. For instance, in-wheel motors, a common example, necessitate low weight to minimise unsprung masses, thereby influencing the dynamic behaviour of the vehicle [1]. Similarly, the aerospace field requires ever lighter electric machines without compromising performance, efficiency, or, above all, reliability [2].
The aim of reducing the mass of the components drives research toward new materials and improvements in manufacturing technologies. Hairpin conductors play a vital role in the manufacturing of modern electric motors, offering numerous advantages, including improved efficiency, increased power density, and enhanced thermal performance [3,4].
Moreover, aluminium hairpins represent an innovative proposal to reduce mass and emissions. The density of aluminium is lower than that of copper, but it presents different electric properties, currently limiting widespread adoption on a large scale [5].
The particular type of winding technique influences not only the performance but also the manufacturing process. Preformed hairpin conductors have emerged as a popular choice for high-performance electric motor designs. The rectangular cross-section of the hairpin better fits with the shape of the stator slot (Figure 1b) with respect to the common round wires (Figure 1a). This results in a higher copper fill factor, which refers to the ratio of the copper area to the total slot area. A greater copper fill factor enhances a better utilisation of the available space, potentially resulting in improved motor efficiency and performance. All these aspects are well discussed in [6], which also analyses the possibility of adopting a variable cross-section of conductors to reduce the AC losses (Figure 1c).

Figure 1.
Examples of slot fill factor considering round (a), uniform rectangular (b), and varying rectangular (c) cross-sections of the wires.
In particular, due to their large cross-section, hairpins suffer high AC losses at high frequencies, primarily due to skin and proximity effects. These parasitic effects, occurring at high frequencies, result in the current preferentially flowing through the areas farthest from the centre of the conductor. This phenomenon reduces the effective cross-section of the conductor, consequently increasing winding resistance and losses. A potential solution to mitigate these issues is the adoption of segmented hairpins, where one or more conductors near the air gap are divided into two or more subconductors [7]. Consequently, the radial thickness of the rectangular cross-section is actually scaled along the radial direction of the stator slot (Figure 1c) to optimise the current distribution within the conductor section [8,9].
However, the segmented solution leads to flatter pins (highlighted in Figure 1c), potentially introducing instability problems during the forming process of the hairpin due to the occurrence of torsional–flexural instability [10]. In particular, as the hairpin cross-section becomes flatter, the conductor becomes more susceptible to torsional–flexural instability, making the pin more prone to buckling or undesired deformation during the bending process [11].
In fact, even a simple in-plane bending of a flat section could lead to an out-of-plane motion. This means that when a flat section is bent, it may experience a distortion that causes it to deviate from its expected bending plane (Figure 2). In addition, the overall final shape of the hairpin conductor results in it being even more compromised when multiple folds are involved due to cumulative out-of-plane distortions. Unlike the well-known spring-back phenomenon [12], which can be estimated and accounted for, the entity of this distortion in hairpin conductors cannot be accurately predicted. Additionally, hairpins manufactured using the same bending process may exhibit different shapes due to the inherent random nature of this instability phenomenon.
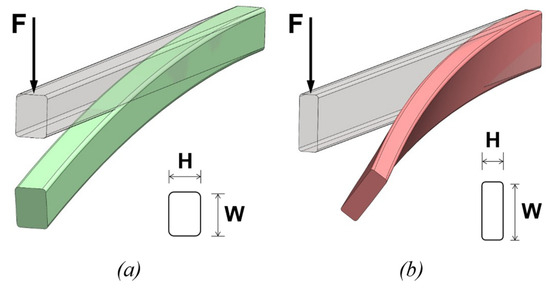
Figure 2.
Examples of the bending process of rectangular pins: (a) well-executed bending process in green; (b) evident instability occurrence with noticeable out-of-plane distortion in red.
Therefore, suitable investigations have to be performed to find a geometric limit of the hairpin cross-section that ensures the manufacturing process is predictable and compliant with the geometric tolerances. Optimising the dimensions of the hairpin conductor cross-section is crucial. By balancing the width and the thickness of the conductor (W and H in Figure 2), manufacturers can avoid excessive slender sections that are prone to instability.
Several numerical techniques exist to model the forming process considering the manufacturing constraints in an early stage of product development [13]. The approach proposed by the authors involves the development of a finite element (FE) model that aims at simulating the bending process of a hairpin wire and capturing potential instabilities that may arise. In particular, a single planar bend was examined, taking into account various parameters such as the dimensions of the cross-section and the point where the bending force is applied. The aim of this analysis is to identify the critical cross-section aspect ratio above which the instability occurs.
In order to validate the results of the FE model, an experimental campaign was then conducted. In particular, some specimens were selected with significantly different aspect ratios to compare the numerical results of a reliably stable bend, a definitely unstable bend, and an intermediate aspect ratio that could potentially identify a transition zone between stable and unstable geometries. This knowledge allows electric machine designers to make informed decisions and avoid dimensions that are prone to instability, thus preventing the use of cross-sections in electromagnetic optimisation that are challenging from a manufacturing perspective.
The paper is structured as follows: The initial section provides a comprehensive overview of the standard hairpin manufacturing process, clarifying the torsional–flexural instability issues associated with it; a dedicated section introduces the finite element model and the analysis of the hairpin bending process; the experimental test setup and the tools employed for the data collection are then described; subsequently, the obtained experimental data are presented and compared to the finite element analysis results; finally, some conclusions end the manuscript.
2. Hairpin Manufacturing Process
Hairpin conductors consist of straight sections connected by U-shaped bends, resembling a hairpin shape (Figure 3).
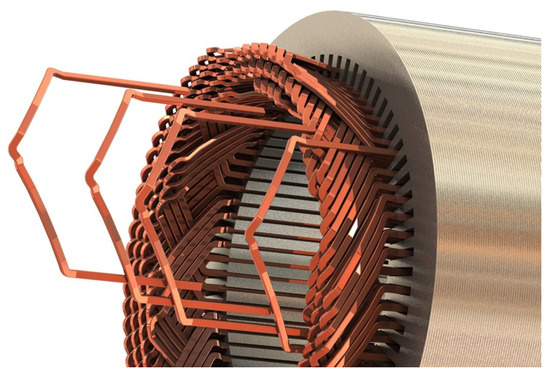
Figure 3.
Wound stator assembly and hairpin insertion detail.
The design offers several advantages, including an increased copper fill factor and improved heat dissipation. However, this technology proves to be highly challenging, considering the manufacturing process [14].
The manufacturing process of hairpin conductors involves several key steps, including wire preparation, bending, forming, insulation, and final assembly. Each step contributes to the overall quality and performance of the conductor. This section mainly focuses on the bending process and its influence on the final assembly.
2.1. Bending Process
Bending the wire into the hairpin shape is a critical step in the manufacturing process. Advanced bending machines equipped with precision tools are used to achieve accurate and consistent bends. The machine applies controlled force to the wire, forming the U-shaped bends and the straight portions. The bending process may be organised in multiple stages to achieve complex hairpin geometries [15].
However, it is important to note that during the bending process, hairpin conductors can be susceptible to bending issues caused by torsional–flexural instability phenomena. Under certain conditions, these forces can lead to instability and undesirable deformations in the hairpin conductor shape. The torsional–flexural instability phenomenon in hairpin conductors depends on several factors, including:
- Geometric Parameters: The dimensions and geometry of the hairpin conductor cross-section, such as the width and thickness, can influence the occurrence of torsional–flexural instability. The aspect ratio of the cross-section, which refers to the width-to-thickness ratio (W/H, see Figure 2), influences the sensitivity to instability and buckling. Hairpin conductors with slender cross-sections, characterised by higher aspect ratios, are more prone to experiencing torsional–flexural instability under flexural loads.
- Material Properties: The mechanical properties of the material used for the hairpin conductor, such as its modulus of elasticity and yield strength [16,17], can affect the onset and the severity of torsional–flexural instability. Materials with a lower modulus of elasticity and higher yield stress may be more prone to instability [18]. In this study, copper is considered the material of interest since the experimental tests were conducted on standard copper wires.
- Loading Conditions: The magnitude and direction of applied loads play a crucial role in the occurrence of torsional–flexural instability. In fact, high aspect ratios of the section can promote instability only when bending occurs in the plane aligned with the largest section dimension. Moreover, the weight of the hairpin conductor itself can induce additional bending moments, potentially exasperating the flexural instability phenomenon.
- Manufacturing Process: The bending and forming process used to create the hairpin conductor can also impact its stability. Factors such as bending force, tooling geometry, and process parameters can influence the integrity of the hairpin shape and its susceptibility to instability. Figure 4 depicts a typical layout of the equipment employed for hairpin bending. The pin exit tool serves as the nozzle through which the wire passes. The dimensions of the nozzle are tailored to the specific cross-section of the chosen hairpin. The gripper seizes the pin, enabling its movement through the nozzle and securing it in place during the bending process. For instance, the distance between the nozzle and the tool is a process parameter playing a crucial role in determining the success of the folding process. Defining a minimum distance between the nozzle and the tool is essential to prevent excessive deformation or irregularities in the hairpin shape [10]. Furthermore, the shape of the nozzle itself can have a substantial impact on the bending characteristics, representing the constraint on the wire during bending. The minimum clearance between the nozzle and the wire ensures controlled and precise folding, minimising the risk of undesired distortions that can compromise the hairpin stability.
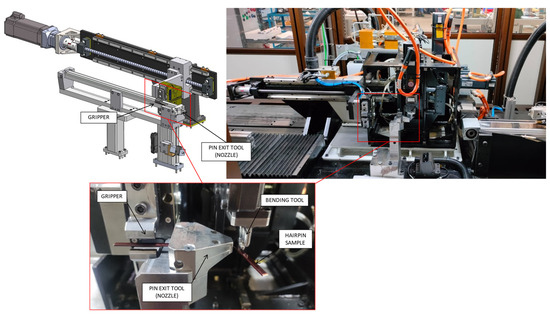 Figure 4. Typical machine and tooling used for the hairpin manufacturing process.
It is important to consider all these factors in the design and manufacturing processes of hairpin conductors to minimise the occurrence of torsional–flexural instability and to avoid problems during the final assembly.
2.2. Final Assembly Process
During the process of assembling hairpin conductors within the stator slots, assembly issues can occur due to variations in the geometry of the conductors caused by the instability phenomena during the bending process. In fact, the bending process involved in shaping hairpin conductors can lead to undesired shape variations that can negatively impact the final assembly within the stator slots. These dimensional inconsistencies may lead to challenges in fitting the conductors properly within the slots, resulting in interference or contact between neighbouring conductors or between the conductors and the stator core. Such interference can have detrimental effects, including mechanical residual stress and damage to the protective coatings applied on the hairpin conductors, compromising their corrosion resistance and electrical insulation properties [19,20].
3. Finite Element Model
The finite element model discussed below has already been extensively covered in [10], which analyses the influence of several processes and geometric parameters on the occurrence of the mentioned instability. The results of this preliminary analysis revealed that the most influential parameter is the W/H aspect ratio of the pin cross-section (see Figure 2). The main aspects necessary for appreciating the details of the model are reported here for the sake of completeness. The purpose of the FE analysis conducted here was to identify ranges of the W/H ratio that could lead to instability in order to guide and streamline the experimental procedure to avoid tests lacking significant evidence.
Figure 5 displays the FE model utilised in these analyses. The commercial software MSC Marc-Mentat was employed for both the pre-processing and solving phases. The model includes the nozzle, the bending tool, and the hairpin. The nozzle and the tool are made of steel, while the hairpin is made of copper.
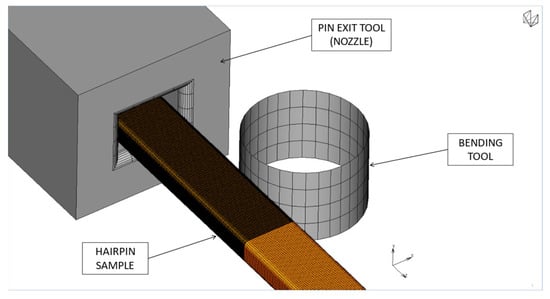
Figure 5.
Finite element model: detail of the contact between the wire, the nozzle, and the tool.
Only the hairpin was discretised as a deformable component, while the nozzle and the tool were treated as rigid bodies. This simplification accelerated the calculations without compromising the accuracy of the simulations. In fact, a sensitivity analysis conducted during the initial stages of the research demonstrated that the steel nozzle and tool were significantly stiffer than the copper hairpin, allowing for a simplified approach treating them as rigid bodies, which yielded comparable results.
The mechanical properties of copper were obtained via a dedicated experimental campaign. Specifically, a stress–strain curve was derived using samples directly obtained from the hairpin wire. The material non-linear behaviour was considered in the simulations, fitting the experimental results by adopting the Ramberg–Osgood theory and activating a kinematic hardening rule.
Contact interactions between the different bodies (hairpin–nozzle, hairpin–tool) were considered. In fact, non-linear behaviour of the contact interfaces was expected due to the presence of rounded edges in both nozzle and tool that determines the onset of locally progressive contact during the bending phase. In addition, the presence of the clearance between the nozzle and the pin also makes the contact patch between the nozzle inner walls and the pin uncertain and leaves a (limited) degree of rotational freedom of the pin around its axis.
A suitable sensitivity analysis was then carried out on the parameters used for the hairpin discretisation. As a result, an element size equal to 0.2 mm within the cross-section was adopted for each pin analysed. Along the pin axis, the element size varied from 0.5 mm in less critical areas to 0.1 mm in the central part interacting with the nozzle and the tool to better capture deformations in the contact zones (see Figure 5). Consequently, the aspect ratio of the resulting hexahedral elements varied from 2.5 to 0.5.
Additionally, a 0.0725 mm-thick insulating layer of PAI-200 with perfect adhesion to copper was introduced. The overall number of elements depends on the dimensions of the specific hairpin analysed. In particular, cross-sections with different W/H aspect ratios were analysed (namely, W/H = 1.5, 1.8, 2.0, 2.2, 2.4, 2.7, 3.0, 3.3, 3.6, 4.0), while a fixed length of the hairpin was considered. This length was chosen as the minimum length between the gripper and the tool plus an additional part protruding from the tool to ensure correct contact during the entire bending process. In general, the mesh incorporated a range of about 50,000 ÷ 175,000 hexahedral elements for the copper hairpin and 26,000 ÷ 57,000 quadrilateral shell elements for the insulator.
Figure 6 provides a detailed depiction of the cross-section of a discretised hairpin. Note that ideally a doubly symmetric mesh could be employed. Nevertheless, actual manufactured components always exhibit imperfections due to processing, geometry, and material, which can trigger instability phenomena that cannot be predicted using a perfectly symmetric mesh. Consequently, to reflect this, one node of each discretised hairpin section of was shifted by 0.00001 mm along the W direction (see Figure 6, referring, for example, to W/H = 2.0). This mesh modification only introduces a numerical asymmetry without altering the cross-section geometry. This minimal perturbation was introduced in all the models. When an aspect ratio that revealed itself to be stable is considered, that perturbation is not amplified by the applied external loading and a perfect in-plane bending is obtained. On the other hand, this very small perturbation is enough to trigger the occurrence of instability when a critical value of the cross-section aspect ratio is reached. A sensitivity analysis confirmed that this behaviour is independent of the actual magnitude of this perturbation.
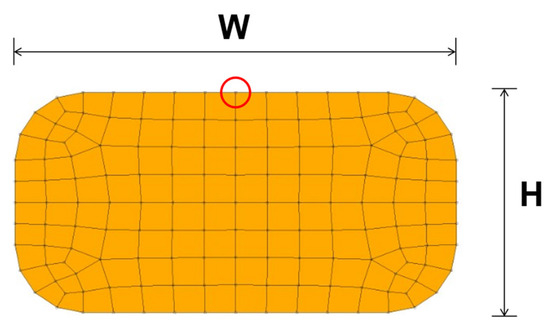
Figure 6.
Discretised hairpin cross-section related to W = 2.6 mm, H = 1.3 mm, and W/H = 2.0. The red circle identifies the shifted nodes.
Bending is generated by imposing a fixed displacement on the tool such as to reach a predefined bending angle of the pin.
Figure 7 compares two typical outputs of these simulations. The deformed hairpin is shown from the perspective of an observer positioned exactly in front of the nozzle. In Figure 7a, no instability phenomenon was triggered, and the hairpin maintains its symmetry while bending. In Figure 7b, an instability phenomenon can be noticed, and the resulting deformation was strongly asymmetrical, with an evident torsional–flexural deformation.
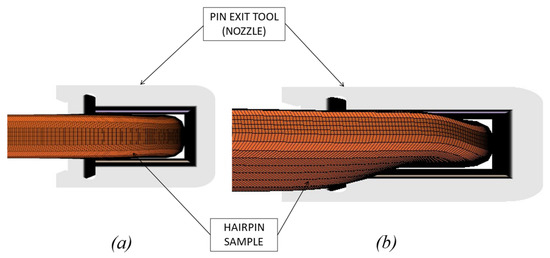
Figure 7.
Typical output of the simulations, detailed view of the area near the nozzle: no instability detected, W/H = 2.0 (a); evident instability, W/H = 3.6 (b).
Results of the numerical analysis are collected in Table 1, which reports on the stable and unstable behaviours of the simulated hairpins as a function of the considered W/H ratios, with W/H = 2.7 identified as the boundary aspect ratio value (dashed line of Table 1).

Table 1.
Results of the finite lement analysis catalogued according to whether instability occurred (YES) or not (NO).
4. Experimental Campaign
A series of experimental tests was performed on different hairpin conductors. The experimental campaign was carried out considering some of the process parameters previously mentioned, aiming to provide additional insights into the bending process. The results were used to validate the findings of the finite element model analysis and gain greater confidence in the torsional–flexural instability phenomenon.
4.1. Test Setup and Methodology
The experimental tests aimed to replicate the basic single-bend configuration analysed in the finite element model. The test specimens consisted of standard copper wires commonly used for hairpin conductors. The dimensions of the hairpin conductors were selected to be representative of typical industry standards. Three different types of hairpins were identified based on the pin sections commercially employed and provided by the company that hosted the experimental tests. The tested dimensions are listed in Table 2 for each specimen type. The selection of the specimens was made according to the outcomes of FE analysis. In particular, Type I specimens refer to a stable W/H ratio, Type II presents a W/H ratio close to the possible instability threshold, and finally, Type III corresponds to an unstable W/H ratio.

Table 2.
Process parameters employed during the bending tests for each specimen type.
Each bending test was performed with the tool positioned at the minimum distance d for each pin type. The distance d was identified as equal to the wire width (W) increased by a constant length of 0.5 mm to take into account the thickness of the coating and an adequate gap. The bending angle for each specimen was approximately 80 degrees (see Figure 8).
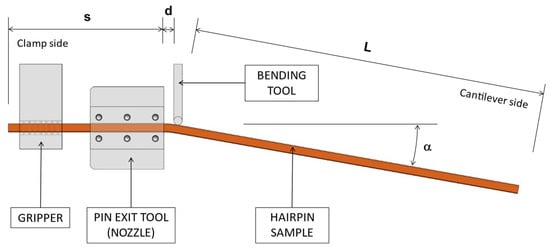
Figure 8.
Bending test setup and process parameters.
The tests were designed to capture the behaviour of the hairpin conductors under realistic loading conditions related to the manufacturing process and to evaluate the occurrence of torsional–flexural instability.
Since the pins are usually wound on a spool, they need to be straightened before the forming process in order to remove any bends or curves. The straightening process is carried out by the passage of the pins through specific roller sets. This preparation step ensures that the pins present a consistent geometry, thus minimising any pre-existing deformations that could affect the results. However, this procedure can still leave a slight rectilinearity error, typically of around 0.5 mm [21]. The straightened wire is then cut to the desired length.
During the process of shaping hairpin conductors, the portion of the pin outside the nozzle may vary (L in Figure 8). In general, the maximum value depends on the stator length plus an additional length necessary for the twisting process outside the stator (on the welding side). Each specimen type was created with a length L varying in a range from 15 mm to 400 mm in order to investigate the influence of the weight of the pin portion protruding from the nozzle.
The tests were conducted on the actual bending machine of a real production line, adding a practical and real-world dimension to the research (see Figure 4). This ensured that the experimental conditions closely mimicked those encountered in an industrial setting, enhancing the relevance and the applicability of the findings.
4.2. Tooling Design and Implementation
A dedicated tooling system was developed for the experimental campaign to test each specimen type considering the hairpin dimensions and the desired bending configurations. In fact, multiple nozzles were produced to accommodate the different specimen types tested, considering both vertical and horizontal wire orientation options (Figure 9a,b). Note that all the bends were performed on the plane aligned with the W dimension, which is the most critical concerning the instability phenomenon. The dedicated tooling employed ensured controlled and repeatable bending, allowing for easy replacement of the specimens during the tests. The slot dimensions (W* and H* in Figure 9) took into account a suitable clearance of about 0.1 mm with respect to the hairpin cross-section dimensions (W and H in Figure 2) for all the specimens tested. This clearance mimicked a real production line, where it is necessary to account for the tolerances of the pin cross-section dimensions.
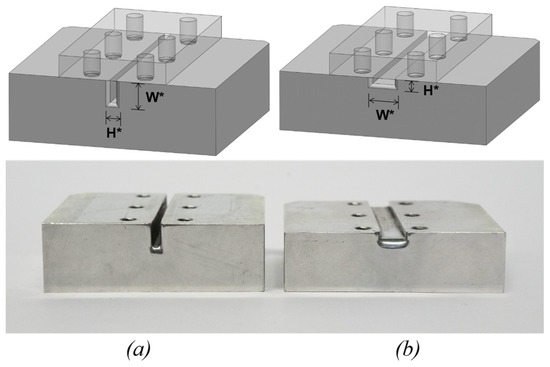
Figure 9.
Custom pin exit tools (nozzle) used for the experimental tests: vertical bends (a); horizontal bends (b).
The horizontal wire orientation tests considered the influence of gravity loads on the instability phenomenon. This enabled the investigation of realistic loading conditions and the evaluation of possible deformations and shape irregularities related to additional gravity-induced bending moments.
On the other hand, the tests with vertical wire orientation provided insights into the inherent flexural instability of the hairpin conductors, independently of gravity body forces.
5. Results and FEM Model Validation
Through the experimental tests, the finite element model predictions were compared to the actual behaviour observed in the physical tests. The experimental results were analysed to verify the accuracy of the model in capturing the torsional–flexural instability occurring and to identify any discrepancies between the predicted and observed behaviours.
5.1. Evaluation of Instability Occurrence
To assess the occurrence of instability during the experimental tests, an accurate inspection of the specimens after the test was conducted. The objective was to determine whether instability, characterised by out-of-plane deformations, occurred in the hairpin conductors subjected to bending.
Hairpin samples subjected to bending experiencing stable and unstable behaviours were analysed. Figure 10a compares a case in which noticeable instability occurred with another in which it did not. In particular, Sample A identified a hairpin conductor referring to the highest aspect ratio of the cross-section (W/H = 3.6). A clear instance of instability was observed after the bending process. The wire exhibited a significant out-of-plane deflection, resulting in a noticeable deviation from the desired shape. In this case, a single bending was considered, but it is possible to understand the detrimental effects of the torsional–flexural instability on the final geometry of a hairpin conductor consisting of multiple bends.
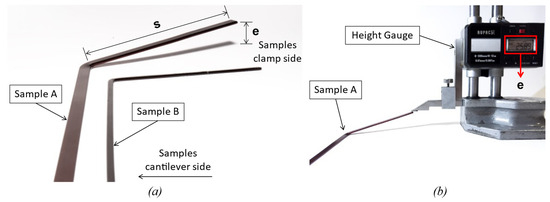
Figure 10.
Comparison between specimens after the bending tests: (a) examples of hairpins where the instability occurred and did not (Sample A: Type III, W/H = 3.6; Sample B: Type I, W/H = 2.0); (b) measurements setup.
In contrast, Sample B consisted of to a hairpin with a cross-section exhibiting the lowest aspect ratio tested (W/H = 2.0). After the bending process, no apparent instability was observed: The deformed wire remained in the plane of the bend.
Quantification of the instability was challenging due to its unpredictable nature and the lack of established metrics for measuring its severity. Nevertheless, instead of relying only on a qualitative assessment, measurements were taken to quantify the out-of-plane deflection resulting from the bending process. Given the challenge of directly measuring the out-of-plane angle, the focus shifted to measuring the displacement of the wires in the out-of-plane direction (e in Figure 10), and the angle could subsequently be determined. The measurement procedure is shown in Figure 10b, where the displacement e was measured using a height gauge. The measurement e was taken at a fixed distance from the bend for each specimen (s in Figure 8 and Figure 10a) in order to directly compare each test. In fact, that measurement e was always taken from the specimen’s clamp side, so it was not affected by the specific cantilever length L of each specimen.
The direct measurement of the out-of-plane distortion offered valuable insights into the mechanical behaviour of hairpin conductors during the bending process. It provided a tangible parameter to evaluate the occurrence of torsional–flexural instability, facilitating the identification of critical conditions and informing the design process.
By presenting these visual examples side by side, the contrast between hairpin bends with and without instability was emphasised. This visual evidence underlines the importance of considering and mitigating torsional–flexural instability during the process of manufacturing hairpin conductors.
5.2. Validation of the Finite Element Model
The tests with the vertically oriented pin served the purpose of validating the finite element (FE) model, which did not consider the influence of gravity loads. By comparing the experimental results of the vertical bending tests to the FE model predictions, the accuracy and reliability of the model could be assessed and validated.
The presented experimental results are organised into groups corresponding to the tested specimens: Type I, Type II, and Type III. These groups are referenced in Figure 11, Figure 12, and Figure 13, respectively. In particular, the graphs show the out-of-plane displacement e as a function of the cantilever length L for each specimen.

Figure 11.
Experimental tests results related to Type I specimens. The grey band represents the range of rectilinearity tolerance of the raw wire (±0.5 mm).
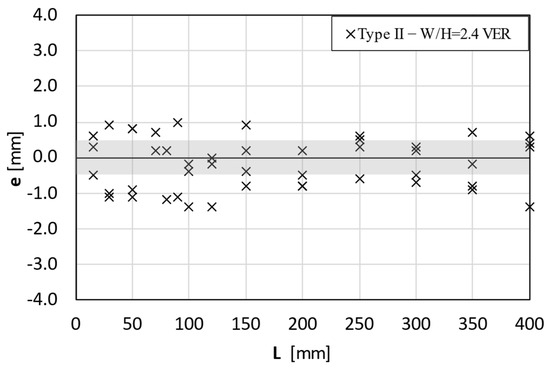
Figure 12.
Experimental tests results related to Type II specimens. The grey band represents the range of rectilinear tolerance of the raw wire (±0.5 mm).
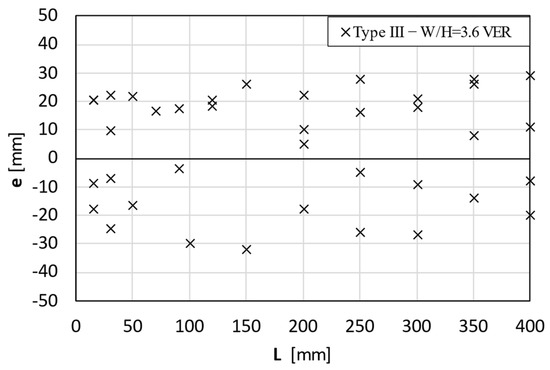
Figure 13.
Experimental tests results related to Type III specimens.
Looking at the results referring to the Type I specimens (Figure 11), a notable observation is the absence of instability phenomena. In fact, all these specimens exhibited almost perfectly in-plane deformations with negligible out-of-plane deviations. The maximum values of deformation, in this case, were comparable with the rectilinearity tolerances of the raw wire (grey band in Figure 11 and Figure 12) and with the possible measurement errors. The structural integrity remained intact during the bending process, indicating a robust resistance to instability.
Conversely, the set related to Type II specimens (Figure 12) presented a different scenario. The displacement e generally increased compared to the Type I case, although apparently not compromising the overall shape of the bend. Some specimens still remained within the tolerance band, while others exhibited displacement values that slightly exceeded the initial wire rectilinearity tolerance. These limited but not negligible out-of-plane displacements suggest that this aspect ratio represents the beginning of a potential transition zone, where the onset of a possible instability appears.
Finally, the Type III specimen group (Figure 13) provided a clear example of instability arising during the bending process. Out-of-plane displacements were relevant and exhibited higher deviations (more than one order of magnitude) compared to the Type I and Type II cases, compromising the stability of the process and the final geometry of the pin. Moreover, although some values indicated apparently lower deformations, they were still several millimetres higher than those observed in the previously presented pin types. Note that the tests related to some length L presented few experimental data because they showed immediate instability with significant values; therefore, further testing was deemed unnecessary.
These comparative findings underscore the influence of geometric parameters on the instability behaviour of the hairpin specimens. In particular, the W/H ratio was confirmed to be the driving parameter and not the single absolute dimensions of the pin cross-section. In fact, although Type I specimens had the smallest cross-section dimensions, they never presented instability issues because they referred to a low W/H ratio. On the other hand, the results seem to be almost independent of the specific cantilever length of the specimens, L, and consequently, they can be summarised as a function of the W/H ratio and directly compared to the FE results in Table 1.
In particular, Table 3 presents a summary of the results, indicating whether instability occurred (YES) or not (NO) for each hairpin configuration analysed. Both experimental tests and numerical results are presented. For completeness, the hairpins previously shown in Figure 10 are also highlighted in red in Table 3. The simulation results were not compared with the experimental results in terms of out-of-plane displacement due to the intrinsic random nature of the phenomenon. Furthermore, evaluating the exact value of this deformation was not the aim of this activity, so when instability occurred, that specific W/H ratio was simply marked with YES. The important factor was to determine whether a specific W/H aspect ratio provided stability during bending or not.

Table 3.
Comparison between FEM results and experimental tests in terms of instability occurring. Red data identify the specimens previously highlighted in Figure 10.
The simulation results previously shown in Table 2 identified a discontinuity in the instability behaviour, delineating a specific critical aspect ratio W/H = 2.7 (dashed line) above which instability numerically appeared. Conversely, it was not possible to also derive a specific threshold from the experimental tests. Experimental evidence suggests that the instability gradually arose with a certain level of dispersion (see Figure 12). Consequently, a band of transition could be identified considering these experimental results related to W/H = 2.4 and the numerical threshold of W/H = 2.7 (yellow band in Table 3).
Although the comparison between the results of the simulations and the experimental tests involved only three types of specimens, it was possible to validate the FE model, which therefore provides information about the suitability of the desired W/H chosen for the electric motor design. Obviously, it is advisable not to choose a value close to that threshold, given the uncertain transition zone noted in the experimental tests. Once validated, the model can be used to perform further simulations to test the influence of other parameters (e.g., distance between the nozzle and the tool d [10], material properties, tool shape, etc.). Numerical simulations are more cost-effective than experimental tests, allowing for a greater number of configurations to be tested.
5.3. Influence of the Gravity Load
While the primary objective of the tests was to validate the finite element model, also performing wire bending in a horizontal direction allowed us to verify the possible influence of gravity on the bending process and, in particular, on the occurrence and/or on the direction of the out-of-plane distortion. The gravity load depends on the portion of the conductor extending beyond the nozzle during the bending process (namely, L in Figure 8). This portion determines the actual mass that contributes to the generation of an additional bending moment.
The results of the horizontal bends were compared to the vertical ones. In particular, Figure 14 and Figure 15 refer to Type II and Type III specimens, respectively, corresponding to scenarios where out-of-plane deflections were observed.
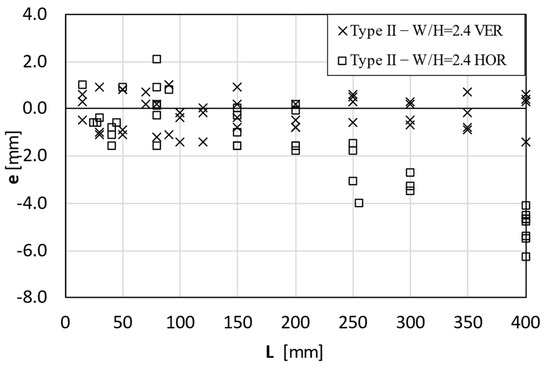
Figure 14.
Experimental tests comparing vertical and horizontal bending of Type II specimens.
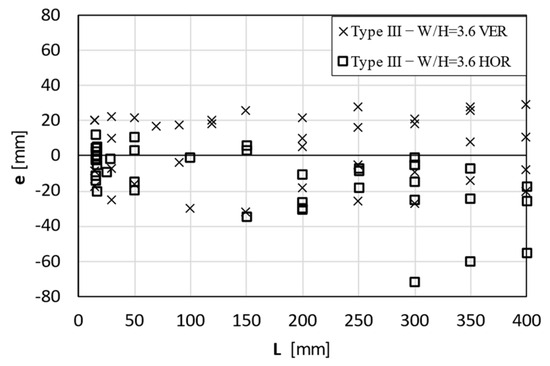
Figure 15.
Experimental tests comparing vertical and horizontal bending of Type III specimens.
When vertical tests were addressed, the direction of the out-of-plane motion resulting from the instability phenomenon was random. However, when considering horizontal bending, which is influenced by the gravity load, the direction of the out-of-plane motion was more aligned with the downward direction of the gravity load. In fact, increasing the overhang L instability consistently occurred in the same direction. Conversely, for lower overhangs, the results were still random and comparable to the vertical tests, as the impact of the gravity load became negligible.
Figure 16 depicts the results of tests on wires with a cross-section aspect ratio W/H = 2.0 (Type I) where instability did not occur, even for great values of L and for both vertical and horizontal bending. This means that the sole gravity load cannot trigger the occurrence of instability and possibly only affects the direction of the out-of-plane deflection for pins referring to aspect ratios already prone to instability. In fact, the magnitude of the bending moment induced by the gravity load is generally negligible compared to the moments necessary for bending the wire itself. In conclusion, according to these results, the finding of the critical W/H ratio does not depend on the gravity load, and for this reason, it was not considered in the numerical simulations.
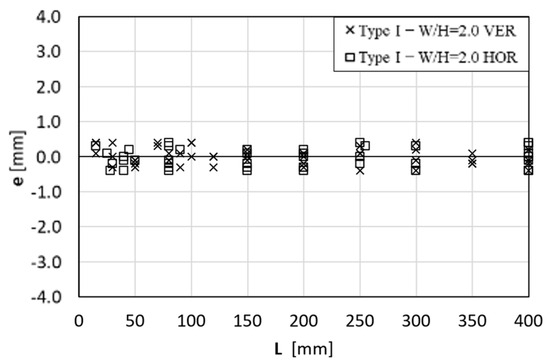
Figure 16.
Experimental tests comparing vertical and horizontal bending of Type I specimens.
6. Conclusions and Future Works
In this manuscript, an investigation into the torsional–flexural instability phenomenon during the manufacturing process of hairpin conductors has been presented. The main objective was to further investigate this instability and to provide additional insights to guide the design process of hairpin conductors.
The influence of various parameters on the occurrence of the instability was examined through the development and the validation of a finite element (FE) model. The FE model demonstrated its effectiveness in predicting the behaviour of hairpin conductors during bending. The numerical results revealed that the occurrence of instability strongly depends on the aspect ratio (W/H) of the hairpin cross-section and that a threshold of its value emerges above which instability consistently occurs.
Experimental tests were conducted to validate the FE model and to further investigate the torsional–flexural instability phenomenon. While the FE model considered various hairpin section geometries, the experimental tests were confined to the available pins found and commercially employed. Three types of hairpins were selected to be tested, the results of which were compared to the outcomes of the FE model.
The validated FE model provides a cost-effective means to explore various W/H ratios and different bending parameters, informing the design process and potentially reducing the need for extensive experimental tests. It represents a valuable tool for preliminary assessments and guides the designer in the selection of the pin section.
The influence of gravity loads was also observed during the experimental tests with horizontal bending, showing a clear downward out-of-plane motion due to the gravitational force when referring to pins with critical aspect ratios W/H. However, when a section with a lower aspect ratio was considered, the gravity load alone was not able to induce instability phenomena. The gravity load did not trigger the occurrence of instability phenomena but only influenced the direction in which the out-of-plane deflection occurred.
In conclusion, the results of this analysis successfully validated the FE model in predicting the stability of the forming process of hairpins. While the sizing of hairpins often involves electromagnetic considerations, it is important to verify that the chosen sections are suitable for the technological production process. This tool provides helpful guidelines aligned with the ongoing efforts to optimise the manufacturing process. This contributes to enhancing the mechanical stability of hairpin conductors, leading to more reliable and efficient electric motors in various applications.
In the future, the validated numerical model will be used to investigate other process parameters, such as the influence of geometrical details of the tools employed and multiple subsequent folds. In addition, aluminium hairpins will be studied using the same approach presented in this contribution.
Author Contributions
Conceptualization, V.M. and S.G.B.; methodology, V.M., S.G.B. and M.G.; software, V.M. and S.G.B.; validation, V.M. and S.G.B.; formal analysis, V.M. and S.G.B.; investigation, V.M., S.G.B. and M.G.; resources, P.V. and F.G.; data curation, V.M.; writing—original draft preparation, V.M. and S.G.B.; writing—review and editing, V.M., S.G.B. and M.G.; visualization, V.M. and S.G.B.; supervision, M.G.; project administration, M.G. and C.G.; funding acquisition, C.G. All authors have read and agreed to the published version of the manuscript.
Funding
This project has received funding from the Clean Sky 2 Joint Undertaking under the European Union’s Horizon 2020 research and innovation programme under project AUTOMEA, grant agreement No. 865354.
Data Availability Statement
The raw data supporting the conclusions of this article will be made available by the authors on request.
Acknowledgments
We extend our profound gratitude to CopperING (part of SCHMID E-MOTIVE Technologies S.r.l. group) for their instrumental support in facilitating the experimental phase of this research. The generous provision of access to the bending machine and the supply of hairpin samples significantly contributed to the successful execution of the study.
Conflicts of Interest
The authors declare no conflict of interest.
References
- Luo, Y.; Tan, D. Study on the Dynamics of the In-Wheel Motor System. IEEE Trans. Veh. Technol. 2012, 61, 3510–3518. [Google Scholar] [CrossRef]
- Arzillo, A.; Braglia, P.; Nuzzo, S.; Barater, D.; Franceschini, G.; Gerada, D.; Gerada, C. Challenges and Future Opportunities of Hairpin Technologies. In Proceedings of the 2020 IEEE 29th International Symposium on Industrial Electronics (ISIE), Delft, The Netherlands, 17–19 June 2020. [Google Scholar]
- Berardi, G.; Nategh, S.; Bianchi, N.; Thioliere, Y. A Comparison between Random and Hairpin Winding in E-Mobility Applications. In Proceedings of the IECON 2020 The 46th Annual Conference of the IEEE Industrial Electronics Society, Singapore, 18–21 October 2020; IEEE Computer Society: Washington, DC, USA, 2020; pp. 815–820. [Google Scholar]
- Venturini, G.; Volpe, G.; Villani, M.; Popescu, M. Investigation of Cooling Solutions for Hairpin Winding in Traction Application. In Proceedings of the 2020 International Conference on Electrical Machines, ICEM 2020, Gothenburg, Sweden, 23–26 August 2020; Institute of Electrical and Electronics Engineers Inc.: Piscataway, NJ, USA, 2020; pp. 1573–1578. [Google Scholar]
- Cutuli, G.; Barater, D.; Nategh, S.; Raghuraman, B. Aluminum Hairpin Solution for Electrical Machines in E-Mobility Applications: Part I: Electromagnetic Aspects. In Proceedings of the 2022 International Conference on Electrical Machines (ICEM), Valencia, Spain, 5–8 September 2022; pp. 1770–1776. [Google Scholar] [CrossRef]
- Notari, R.; Devito, G.; Bernardi, F.; Pastura, M.; Barater, D.; Nuzzo, S. Optimal Sizing of Hairpin Conductors in Highway Operation with PWM Power Supply. In Proceedings of the 2023 IEEE Workshop on Electrical Machines Design, Control and Diagnosis (WEMDCD), Newcastle upon Tyne, UK, 13–14 April 2023; pp. 1–6. [Google Scholar] [CrossRef]
- Preci, E.; Nuzzo, S.; Valente, G.; Gerada, D.; Barater, D.; Degano, M.; Buticchi, G.; Gerada, C. Segmented Hairpin Topology for Reduced Losses at High-Frequency Operations. IEEE Trans. Transp. Electrif. 2022, 8, 688–698. [Google Scholar] [CrossRef]
- Pastura, M.; Notari, R.; Nuzzo, S.; Barater, D.; Franceschini, G. On the AC Losses in the End Conductors of Hairpin Windings. In Proceedings of the 2022 International Conference on Electrical Machines (ICEM), Valencia, Spain, 5–8 September 2022; pp. 1150–1155. [Google Scholar] [CrossRef]
- Pastura, M.; Notari, R.; Nuzzo, S.; Barater, D.; Franceschini, G. AC Losses Analysis and Design Guidelines for Hairpin Windings with Segmented Conductors. IEEE Trans. Transp. Electrif. 2024, 10, 33–41. [Google Scholar] [CrossRef]
- Barbieri, S.G.; Mangeruga, V.; Giacopini, M.; Mantovani, S. Structural Analysis of the Forming Process for Hairpin Windings for Electric Motor Applications: Torsional-Flexural Instability Issues. In Proceedings of the 2022 International Conference on Electrical Machines (ICEM), Valencia, Spain, 5–8 September 2022; pp. 1137–1143. [Google Scholar] [CrossRef]
- Zhou, Y.; Fei, Q. Evaluating Deformation Modes of Sandwich Serpentine Structures for High Stretchability. Thin-Walled Struct. 2020, 157, 107087. [Google Scholar] [CrossRef]
- Wirth, F.; Kirgor, T.; Hofmann, J.; Fleischer, J. FE-Based Simulation of Hairpin Shaping Processes for Traction Drives. In Proceedings of the 2018 8th International Electric Drives Production Conference (EDPC), Schweinfurt, Germany, 4–5 December 2018; pp. 3–7. [Google Scholar] [CrossRef]
- Fleischer, J.; Hausmann, L.; Wirth, F. Production-Oriented Design of Electric Traction Drives with Hairpin Winding. Procedia CIRP 2021, 100, 169–174. [Google Scholar] [CrossRef]
- Glaessel, T.; Pinhal, D.B.; Masuch, M.; Gerling, D.; Franke, J. Manufacturing Influences on the Motor Performance of Traction Drives with Hairpin Winding. In Proceedings of the 2019 9th International Electric Drives Production Conference (EDPC), Esslingen, Germany, 3–4 December 2019; pp. 1–8. [Google Scholar] [CrossRef]
- Riedel, A.; Kühl, A. Challenges of the Hairpin Technology for Production Techniques. In Proceedings of the 2018 21st International Conference on Electrical Machines and Systems (ICEMS), Jeju, Republic of Korea, 7–10 October 2018. [Google Scholar]
- Wirth, F.; Fleischer, J. Influence of Wire Tolerances on Hairpin Shaping Processes. In Proceedings of the 2019 9th International Electric Drives Production Conference (EDPC), Esslingen, Germany, 3–4 December 2019. [Google Scholar] [CrossRef]
- Wirth, F.; Nguyen, C.; Hofmann, J.; Fleischer, J. Characterization of Rectangular Copper Wire Forming Properties and Derivation of Control Concepts for the Kinematic Bending of Hairpin Coils. Procedia Manuf. 2020, 47, 678–685. [Google Scholar] [CrossRef]
- Belluzzi, O. Scienza Delle Costruzioni; Zanichelli: Bologna, Italy, 1989; Volume 4, pp. 176–181. [Google Scholar]
- Mancinelli, P.; Stagnitta, S.; Cavallini, A. Qualification of Hairpin Motors Insulation for Automotive Applications. IEEE Trans. Ind. Appl. 2017, 53, 3110–3118. [Google Scholar] [CrossRef]
- Glaessel, T.; Seefried, J.; Franke, J. Challenges in the Manufacturing of Hairpin Windings and Application Opportunities of Infrared Lasers for the Contacting Process. In Proceedings of the 2017 7th International Electric Drives Production Conference (EDPC), Würzburg, Germany, 5–6 December 2017; pp. 1–7. [Google Scholar] [CrossRef]
- Chen, X.; Yan, N.; Wang, C.; Ding, P. Study on Straightening Quality Control for Slender Rod Based on Digital Twin. J. Phys. Conf. Ser. 2020, 1633, 012160. [Google Scholar] [CrossRef]
Disclaimer/Publisher’s Note: The statements, opinions and data contained in all publications are solely those of the individual author(s) and contributor(s) and not of MDPI and/or the editor(s). MDPI and/or the editor(s) disclaim responsibility for any injury to people or property resulting from any ideas, methods, instructions or products referred to in the content. |
© 2024 by the authors. Licensee MDPI, Basel, Switzerland. This article is an open access article distributed under the terms and conditions of the Creative Commons Attribution (CC BY) license (https://creativecommons.org/licenses/by/4.0/).